

Page 1

Bluetooth Headset (GHSBTC)
Quick Start Guide
Page 2
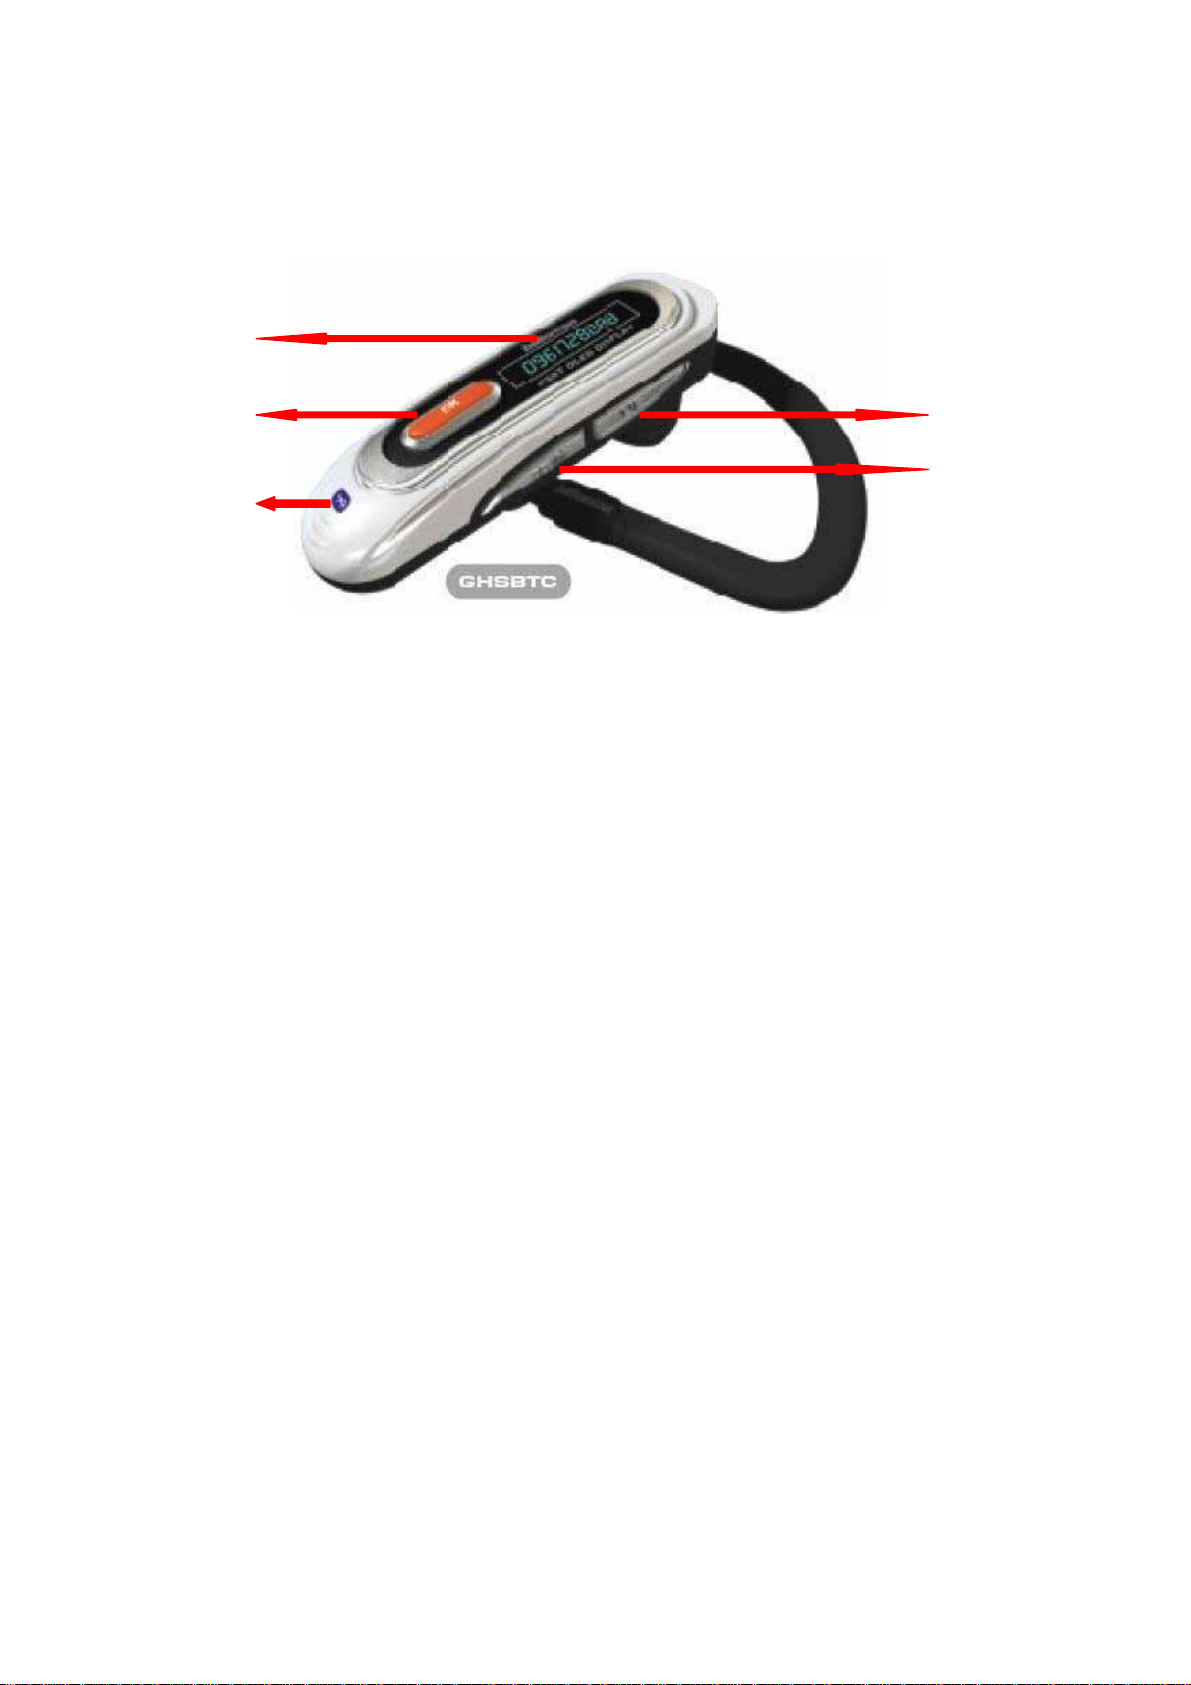
Product Parts
4
1 2
5
1. Talk button (Power/MFB)
3
2. Volume up button
3. Volume down button
4. OLED Display
5. LED indicator
Page 3
Man Machine Interface
1. Button Function
Button Action Function
1. Talk
Short Click Answer an incoming call
Short Click Voice recognition dial
Short Click To establish an RFCOMM with a paired AG if the
headset is in standby mode.
Short Click Hang up an active call
Press and hold for
longer than 2
seconds
Press and hold for
longer than 2
seconds
Press and hold for
longer than 2
seconds
Press and hold for
longer than 5
seconds
Audio Transfer from AG to Headset or from
Headset to AG
To send “Last Number Redial” request to AG if
RFCOMM is established and the running mode is
Handsfree.
To Reject the incoming call if the headset is running
in Handsfree mode and there is an incoming call
Power on the headset if it is currently OFF.
Press and hold for
longer than 5
seconds
2. Volume UP
3. Volume Down
4. Talk and
Short Click To increase the volume
Short Click To decrease the volume
Short Click Show Bluetooth status in OLED display
Volume UP
Power off the headset if it is currently ON.
2
Page 4

Button Action Function
Press and hold for
Show battery status in OLED display
longer than 2
seconds
5.Volume UP and
Press and hold for
Enter pairing mode if the headset is in standby mode
longer than 2
Volume Down
seconds
2. OLED Display
# Display Icon Function COMMENT
1
2
3
4
Caller ID
Standby mode
Connection established 7 sec display time and rolling
Connecting As Master Soon disappear if connecting
If exceed 10 digits, display each 3 sec
7 sec display time and rolling.
fail/Success or 30 sec display time if
AG no authorization , and rolling
5
6
7
Ring or SCO connection
established
If no caller ID, 7sec display time and
rolling
Pairing mode 30 sec display time and rolling
Adjusting volume 5 sec display time
7
Battery Status 5 sec display time and rolling for
each battery status
8
Charging Motion Icons, and fix if full-charged
3. Sound Indicator
# Action Sound played
1 Power ON Ascending melodic; (Do-Fa-Si)
2 Power OFF Descending melodic; (Si-Fa-Do)
3
Page 5

# Action Sound played
3 Press Talk button for 2 seconds 2 beeps. (Do Do).
4. Press Talk and V+ button for 2 second 2 beeps. (Do Do).
5. Press V+ and V- button for 2 seconds 2 beeps. (Do Do).
6 Volume level reaches the max/Min 2 beeps
7 Active Connect to AG Fail 1 beep (Do)
8 Ring tone (Out-of-Band Ring) Ascending melodic; (Do-Ra-Mi-Fa-So-La-Si-Do)
9 Low Battery Indicator 1 beep(Do) every 5 sec
10 Pair Operation Fail 1 beep (Do)
4. LED Indicator
# Event Flashing Pattern COMMENT
1 Power on Flash 6 times
Only applied when user power on the system.
ON (250ms)
OFF (250ms)
2 Pairing ON(300ms)
If any mobile devices paired exists, headset will
do auto connection first. After auto
OFF(300ms)
connection, then pairing function will be
workable
3 Standby ON(100ms)
N/a
OFF(4900ms)
4 Connecting as
N/a N/a
Master
5 RFCOMM
ON(100ms)
N/a
connected
OFF(1900ms)
6 SCO
Connected
ON(1900ms)
OFF(100ms)
N/a
4
Page 6

T
# Event Flashing Pattern COMMENT
7 Press and hold for
longer than 2
seconds
Flash 2 times
ON (250ms)
To indicate user to release button, and then long
press function will be workable
OFF (250ms)
8 Press and hold V+
and V- for longer
than 2 seconds
Flash 2 times
ON (250ms)
o indicate user to release button, and then
Pair operation will be executable
OFF (250ms)
Operation
. Charging the battery
Before using the Bluetooth headset, you will have to charge the battery.
1. Plug the USB cable into the mini USB port situated at the back of the headset and plug the other end
into your computer’s USB port.
2. When charging, the headset will automatically POWER ON, and BLUE LED will always ON, and
OLED display will show the , and OLED display will show the charging motion icon.
3. The LED will turn off after the battery is fully charged and OLED display also show the full-charged
icon.
4. After the battery is fully charged, it will perform best.
NOTE:
a. The headset will work while it is charging
b.Please charge approximately 2.5 hours before initial use.
. System Power ON / OFF
To POWER ON:
Press and hold the Talk button for at least 5 seconds when the Headset is in power OFF mode. Once the
Headset is powered on, the OLED display will show
ascending melodic tone (Do-Fa-Si) will be played. If users first use the Headset, it will enter the Pairing
mode automatically. If Users have more than one paired AG already, After power on, the Headset will
connect to the last paired AG automatically.
and the BLUE LED will flash 6 times and an
5
Page 7

To POWER OFF:
Press and hold the Talk button for at least 5 seconds when the Headset is in power ON mode. The OLED
display will show and a descending melodic tone (Si-Fa-Do) will be played before the Headset is
powered off.
NOTE: if there is a charger plugged in, the system won’t be able to be powered off.
. Pair with a Mobile phone AG
To Enter Pairing mode:
1. Make sure the Headset is in Standby Mode, it means the Headset didn’t connect with any AG
2. Please make sure the Headset finish Active Connect to AG after POWER ON if the Headset has
more than one paired AG already
3. Press and hold V+ and V- button for 2 seconds to enter pairing mode.
4. Operate the Mobile phone AG to perform the pairing process. The PIN code is 0000.
The Headset will go into pairing mode when user press and hold V+ and V- button for 2 seconds. User can
then operate the Mobile phone to search available Bluetooth device, and the device name will be
“GHSBTC” ,and then do the bonding process. The fixed PIN code for the HS/HF is 0000.
. OLED Display Information
1. Press and hold Talk and V+ button to indicate the Bluetooth status, as standby, connected , or
ring SCO connection.
2. Press and hold Talk and V+ button for 2 seconds to indicate the battery status
. Establish a RFCOMM Connection with a Paired AG
1. Make sure the Headset is in Standby Mode.
2. Press the TALK button.
NOTE: if there is RFCOMM Connected, we didn’t support normal disconnection from the
Headset
. Answer an incoming voice call
1. The Headset plays a RING tone whenever there is an incoming call. Press the TALK button will
answer the incoming call.
. Hang up an ongoing voice call
1. The Headset has an active call.
2. Press Talk button will hang up the call.
6
Page 8

. Voice recognition Dial
1. Make sure the Headset has a RFCOMM connection with an AG.
2. Press the Talk button for will activate the voice dial functionality in AG -if it is supported in the
Mobile phone, and any voice record will be prepared in the Mobile phone in advance.
3. Speak the name on headset.
.Adjust the Volume
1. Make sure the Headset has an RFCOMM connection with an AG (in HandsFree mode) OR there is
an SCO connection with an AG (in Headset mode).
2. Press the VolumeUP/VolumeDown Button to adjust the volume.
.Audio Transfer from Headset to AG
1. Make sure the Headset is on an active call.
2. Press and hold Talk button for 2 seconds of the Headset.
.Audio Transfer from AG to Headset
1. Make sure the Mobile phone AG is on an active call.
2. Press and hold Talk button for 2 seconds of the Headset.
. Last Number Redial in HF mode
1. Make sure the Headset has an RFCOMM connection with an AG (in HandsFree mode) OR there is
an SCO connection with an AG (in Headset mode).
2. Press and hold the TALK button for 2 seconds will request the Mobile phone AG to perform the last
number redial functionality. The feature is only supported in HF mode.
.Reject Incoming Call in HF mode
1. The Headset plays a RING tone whenever there is an incoming call.
2. Press and hold the TALK button for 2 seconds will Reject the incoming call.
7
Page 9

Federal Communications Commission (FCC) Statement
15.21
You are cautioned that changes or modifications not expressly approved by the part responsible for
compliance could void the user’s authority to operate the equipment.
15.105(b)
This equipment has been tested and found to comply with the limits for a Class B digital device, pursuant to
part 15 of the FCC rules. These limits are designed to provide reasonable protection against harmful
interference in a residential installation. This equipment generates, uses and can radiate radio frequency
energy and, if not installed and used in accordance with the instructions, may cause harmful interference to
radio communications. However, there is no guarantee that interference will not occur in a particular
installation. If this equipment does cause harmful interference to radio or television reception, which can be
determined by turning the equipment off and on, the user is encouraged to try to correct the interference by
one or more of the following measures:
-Reorient or relocate the receiving antenna.
-Increase the separation between the equipment and receiver.
-Connect the equipment into an outlet on a circuit different from that to which the receiver is connected.
-Consult the dealer or an experienced radio/TV technician for help.
Operation is subject to the following two conditions:
1) this device may not cause interference and
2) this device must accept any interference, including interference that may cause undesired operation of the
device.
FCC RF Radiation Exposure Statement:
This equipment complies with FCC radiation exposure limits set forth for an uncontrolled environment.
End users must follow the specific operating instructions for satisfying RF exposure compliance. This
transmitter must not be co-located or operating in conjunction with any other antenna or transmitter.
8
 Loading...