

Page 1

Bluetooth Access Point with
Broadband Router
User's Guide
FCC Interference Statement
FEDERAL COMMUNICATIONS COMMISSION
This device complies with Part 15 of the FCC Rules. Operation is subject
to the following two conditions:(1) this device may not cause harmful
interference, and (2) this device must accept any interference received,
including interference that may cause undesired operation.
NOTE
This equipment has been tested and found to comply with the limits for a
Class B digital device, pursuant to Part 15 of the FCC Rules. These limits
are designed to provide reasonable protection. This equipment generates,
uses and can radiated radio frequency energy and, if not installed and
used in accordance with the instructions, may cause harmful interference
to radio communications. However, there is no guarantee that interference
will not occur in a particular installation If this equipment does cause
harmful interference to radio or television reception, which can be
determined by turning the equipment off and on, the user is encouraged to
try to correct the interference by one or more of the following measures:
-Reorient or relocate the receiving antenna.
-Increase the separation between the equipment and receiver.
-Connect the equipment into an outlet on a circuit different from that to
which the receiver is connected.
-Consult the dealer or an experienced radio/TV technician for help.
Changes or modifications not expressly approved by the party responsible
for compliance could void the user‘s authority to operate the equipment.
FCC Radiation Exposure Statement
This equipment complies with FCC radiation exposure limits set forth for
an uncontrolled environment. In order to avoid the possibility of exceeding
the FCC radio frequency exposure limits, human proximity to the antenna
shall not be less than 20cm (8 inches) during normal operation.
Page 2

CE Declaration of Conformity
This equipment complies with the requirements relating to electromagnetic
compatibility, EN 55022/A1 Class B, and EN 50082-1. This meets the
essential protection requirements of the European Council Directive
89/336/EEC on the approximation of the laws of the member states relation to
electromagnetic compatibility.
Chapter 1 Introduction
Chapter 2 Function and Features
Chapter 3 Specifications
Chapter 4 Package Contents
Chapter 5 Install the Router
Chapter 6 Configuring the PC
Chapter 7Configuring Router
Chapter 8 Troubleshooting
Chapter 1 Introduction
Congratulations on your purchase of the Bluetooth access point wtih
broadband router. This Bluetooth access point wtih broadband router
provides the ideal solution for connecting your wireless network to a highspeed broadband Internet connection or a 10/100 Fast Ethernet backbone.
Configurable as a DHCP server for your existing network, the access point
wtih broadband router acts as the only externally recognized Internet gateway
on your local area network (LAN) and serves as an Internet NAT firewall to
unwanted outside intruders.
This cutting-edge Bluetooth access point wtih broadband router eliminates the
need to buy an additional hub or switch and extends the range of your
wireless network. Now your entire wireless network can enjoy blazing
broadband internet connections supported by a robust switched
backbone. With the dual-function speed and power of the Bluetooth access
point wtih broadband router, your network will take off at speeds faster than
you ever imagined.
Devices of all types, from phones and handhelds to printers and even home
electronics, such as TVs and stereos, are perfectly suited for PANs. They are
spontaneous, or “ad hoc”. Unlike the other types of wireless networks, PANs
Page 3

need NO infrastructure to giving an entirely new meaning to the term
“universal remote”. PANs offer a myriad of possibilities for connecting to the
internet, communicating with other Bluetooth devices, and collaborating peerto-peer networking. Additionally it is easy to configure and operate for even
non-technical users. Instructions for installing and configuring this product can
be found in this manual. Before you install and use this product please read
this manual carefully to fully utilize all the available features.
Chapter 2 Functions And Features
• Broadband modem supported
connects multiple computers to a broadband (cable or xDSL) modem
or an Ethernet router to surf the Internet.
• DHCP server supported
all of the networked computers can retrieve TCP/IP settings
automatically from this product.
• Piconet enabled. Up to 7 Bluetooth devices can simultaneously
connect to the built in access point and connect to other LAN devices
through a 10/100 Base-Ethernet at speed of up 723 kbps.
Web-based configuration provides a Friendly web-based management
and interface. A built-in web server and java applet support easier
configuration, allows remote management, and shows a status report.
• Access Control supported
allows you to assign different access right for different users.
• Virtual Server supported
enables you to expose WWW, FTP and other services on your LAN in
order to be accessible to Internet users.
• User-Definable Application Sensing Tunnel
user can define the attributes needed to support the special
applications requiring multiple connections, like Internet gaming, video
conferencing, Internet telephony and so on. After these settings have
been configured this product will sense the application type and open a
multi-port tunnel for it.
• Extended wireless range. Low power and more sensitivity cover a
distance up to 100 meters (power class 1)
• Compliant with Bluetooth Specification v1.1.
• Compliant with PAN/BNEP Specification version 1.0.
• Supports Bluetooth link level security.
• Supports Bluetooth authentication and access rights management.
• DHCP or Static IP-address support.
• User authentication using CHAP or PAP.
Page 4

Chapter 3 Specification
Bluetooth
Wireless Interface Compliant with Bluetooth Spec. Version 1.1
Bluetooth Protocol Stack
Supported L2CAP, BNEP, RFCOMM, SDP
Bluetooth Profiles Supported GAP, PAN
Bluetooth security mode 1, 2, 3 and PAN service-level
Security Mode
security
Frequency 2.4 GHz license-free ISM band
Range(open environment) Up to 100 meters range (300ft)
Radio Receiver Sensitivity < -84 dBm at 1e-3 BER
Maximum Clients per PicoNet Up to 7 simultaneous active PAN users
Antenna attached 2.4 GHz external antenna x 1
Interface/Connectors
Power, Link/ACT(LAN 10Mps), Speed (100Mbps), Air
LED Indicators (3)
(Bluetooth Activity)
Push Button (1) Default factory settings
WAN Port (1) RJ-45 connector with UTP/STP Category 5
External antenna (1) Dipole antenna
Networking
LAN Interface 10/100 Mbps Ethernet,RJ-45 socket
LAN Protocol Compliant with IEEE802.3 and IEEE802.3u
Automatic Configuration NAT, DHCP Server, DHCP Client, PPPOE
Remote Configuration Built-in Web Server
Supported Tools Remote gateway IP discovery
Electronic
90V-240VAC, 50/60Hz, DC Adaptor, to 5 VDC
Power Requirements
at1000mA
Typical: 170 mA/5V Maximum: 260 mA/5V Idle: 140
Power Consumption
mA/5V
Certifications FCC Class B, Part 15.247, Part 15.109, BQB,CE
Operating Temperature
0 ゚ C to 55 ゚ C
Humidity (non-condensing) 5% to 95% RH
Dimensions
Size 94 mm x 62 x 21 mm (WxDXH)
Weight 180 g
Chapter 4 Package contents
One Bluetooth PAN Router unit
One installation CD-ROM
One quick start guide
One power cord and power adapter
One CAT-5 UTP Fast Ethernet cable (Straight Through Cable)
Page 5

Chapter 5 Install the router
5.1. Panel Layout
5.1.1. Rear Panel
Rear Panel
The LAN port is the segment connected to your xDSL or Cable modem and is
linked to the Internet.
The LAN port section consists of 2 ports, X and LAN (only one port can be
used at one time).
Page 6

Depending on your Modem’s port type (regular or uplink), the table shows you
what WAN port to use with which cable.
Port Straight Through Cable Crossover Cable
X
LAN Modem port is an Uplink port Modem port is a regular port
Power inlet. This is where you connect the included power adapter. Please
note that the included power adapter is DC 6V/1A.
Using wrong type of power adapter may damage to this product.
5.1.2. Front Panel
Modem port is a regular port Modem port is an Uplink port
Page 7

5.1.3. LED indicators
PWR LED indicators: Green. This LED indicates that the Router’s power is
on.
LAN indicators: Green This LED indicates that the Router’s WAN Interface
has been enabled.
AIR LED indicator: Green. This LED indicates Bluetooth wireless activity.
5.2. Installation Requirements
Hardware requirements
This product can be positioned at any convenient place in your office or house.
No special wiring or cooling requirements are needed. However, you should
comply with the following guidelines for optimal installation:
• Place this product on a flat horizontal plane.
• Keep this product away from any heating devices.
• Do not place this product in a dusty or wet environment.
• The recommended operational specifications of this product are:
Voltage/Current AC 100V ~ 230V
Temperature: 5℃ ~ 55℃
Humidity: 10 % ~ 90 %
Page 8

In addition, remember to turn off the power, remove the power cord from the
outlet, and keep your hands dry when you install this product.
Software requirements
• One Windows 98 SE, Millennium, 2000, or XP PC equipped with
TCP/IP Protocol, Internet Explorer 4.0 or Netscape Navigator 4.7 with
Java VM included for web-based configuration, a CD-ROM Drive and
an Ethernet Adapter with a UTP CAT 5 Network Cable
• Cable or DSL Modem with Ethernet Connection and Internet Access
• For Windows XP users, it is necessary to download JRE from Sun
Microsystems (http://www.sun.com) or run windows update.
• Bluetooth application software must be compliant with PAN/BNEP
Specification version 1.0.
Chapter 6 Configuring The PC
6.1. Overview
These instructions will help you configure each of your computers to
communicate with the Bluetooth PAN Router. To do this, you will need to
configure your PC’s network settings to obtain an IP (or TCP/IP) address
automatically. Computers use IP addresses to communicate with each other
across a network or the Internet. You will need to know which operating
system your computer is running, such as Windows 98, 2000, or XP. You can
find out by clicking the Start button and then selecting the Settings option (If
your Start menu does not have a Settings option, you’re running Windows
XP. You can select the Control Panel directly from the Start Menu). Then,
click Control Panel and double-click the System icon. Click the Cancel
button when done. Once you know which Windows operating system you are
running, follow the directions below for your computer’s operating system. If
your PC is not configured with the TCP/IP protocol, you will need to do this for
each computer you are connecting to the Router.
The only Bluetooth PAN profile in PC side provided is from IVT Inc. and
Widcomm, so you need to follow the instructions of IVT BlueSoleil or BTW
and BTWCE product to setup the BT Network Adapter for later configuration.
The next few pages will tell you, step by step, how to configure your TCP/IP
settings based on the type of Windows operating system you are using. Once
you've configured your computers, continue to “Chapter 6: Configuring The
Router.”
6.2. Configuring Windows 95, 98, and Millennium PCs
Page 9

1.Click the Start button, click Settings and open the Control Panel. From
there, find the BT Network Adapter connection and double-click the icon
to open the Network screen.
2.Select the Configuration tab and highlight the TCP/IP line for the
applicable Ethernet adapter. If the word TCP/IP appears by itself, select
that line. (Note: If there is no TCP/IP line listed, refer to your Ethernet
adapter’s documentation to install TCP/IP.) Then click the Properties
button.
3.Click the IP Address tab and select Obtain an IP address automatically.
4.Click the tab and verify that the Installed Gateway field is blank. Click the
OK button.
5.Click the OK button again. Windows may ask you for the original Windows
installation disk or additional files. Supply them by pointing to the correct
file location, e.g., D:\Win98 (This assumes that “D” is the letter of your CDROM drive).
6.If Windows asks you to restart your PC, click the Yes button. If Windows
does not ask you to restart, restart your computer anyway.
Repeat steps 1 - 5 for each PC on your network.
6.3. Configuring Windows 2000 PCs
1.Click the Start button, click Settings and open the Control Panel. From
there, double-click the Network and Dial-up Connections icon. This will
display the Network screen.
2.Select the Local Area Connection icon for the applicable Bluetooth
Network adapter (usually it is the second Local Area Connection listed
instead of the default adapter after you installed the BT driver). Doubleclick Local Area Connection and click the Properties button.
3.When the Local Area Connection Status screen appears, click the
Properties button.
4.Select Internet Protocol (TCP/IP) and click the Properties button.
5.Select Obtain an IP address automatically and verify that Obtain DNS
server address automatically is selected. Then, click the OK button and
click the OK button on the subsequent screens to complete the PC’s
configuration.
Repeat steps 1-5 for each PC on your network.
6.4. Configuring Windows XP PCs
The following instructions assume you are running Windows XP’s default
interface. If you are using the Classic interface (where the icons and menus
Page 10

look like previous Windows versions), please follow the instructions for
Windows 2000.
1.Click the Start button, open the Control Panel. Click the Network and
Internet Connections icon. Then click the Network Connections icon to
display the Network screen.
2.Select the Local Area Connection icon for the applicable Bluetooth
Network adapter (usually it is the second Local Area Connection listed
instead of the default adapter after you installed the BT driver). Doubleclick Local Area Connection and click the Properties button.
3.When the Local Area Connection Status screen appears, click the
Properties button.
4.Select Internet Protocol (TCP/IP) and click the Properties button.
5.Select Obtain an IP address automatically and verify that Obtain DNS
server address automatically is selected. Then, click the OK button and
click the OK button on the subsequent screens to complete the PC’s
configuration.
Repeat steps 1 - 5 for each PC on your network.
6.5. Configure Widcomm BTW
The Bluetooth Software makes it easy to join an existing personal network,
hosted by another Bluetooth device (PocketPC, desktop, etc.). From the My
Bluetooth Places, choose Entire Bluetooth Neighborhood, and select the
Bluetooth device that you want to establish a PAN connection and double
click the device icon.
Page 11
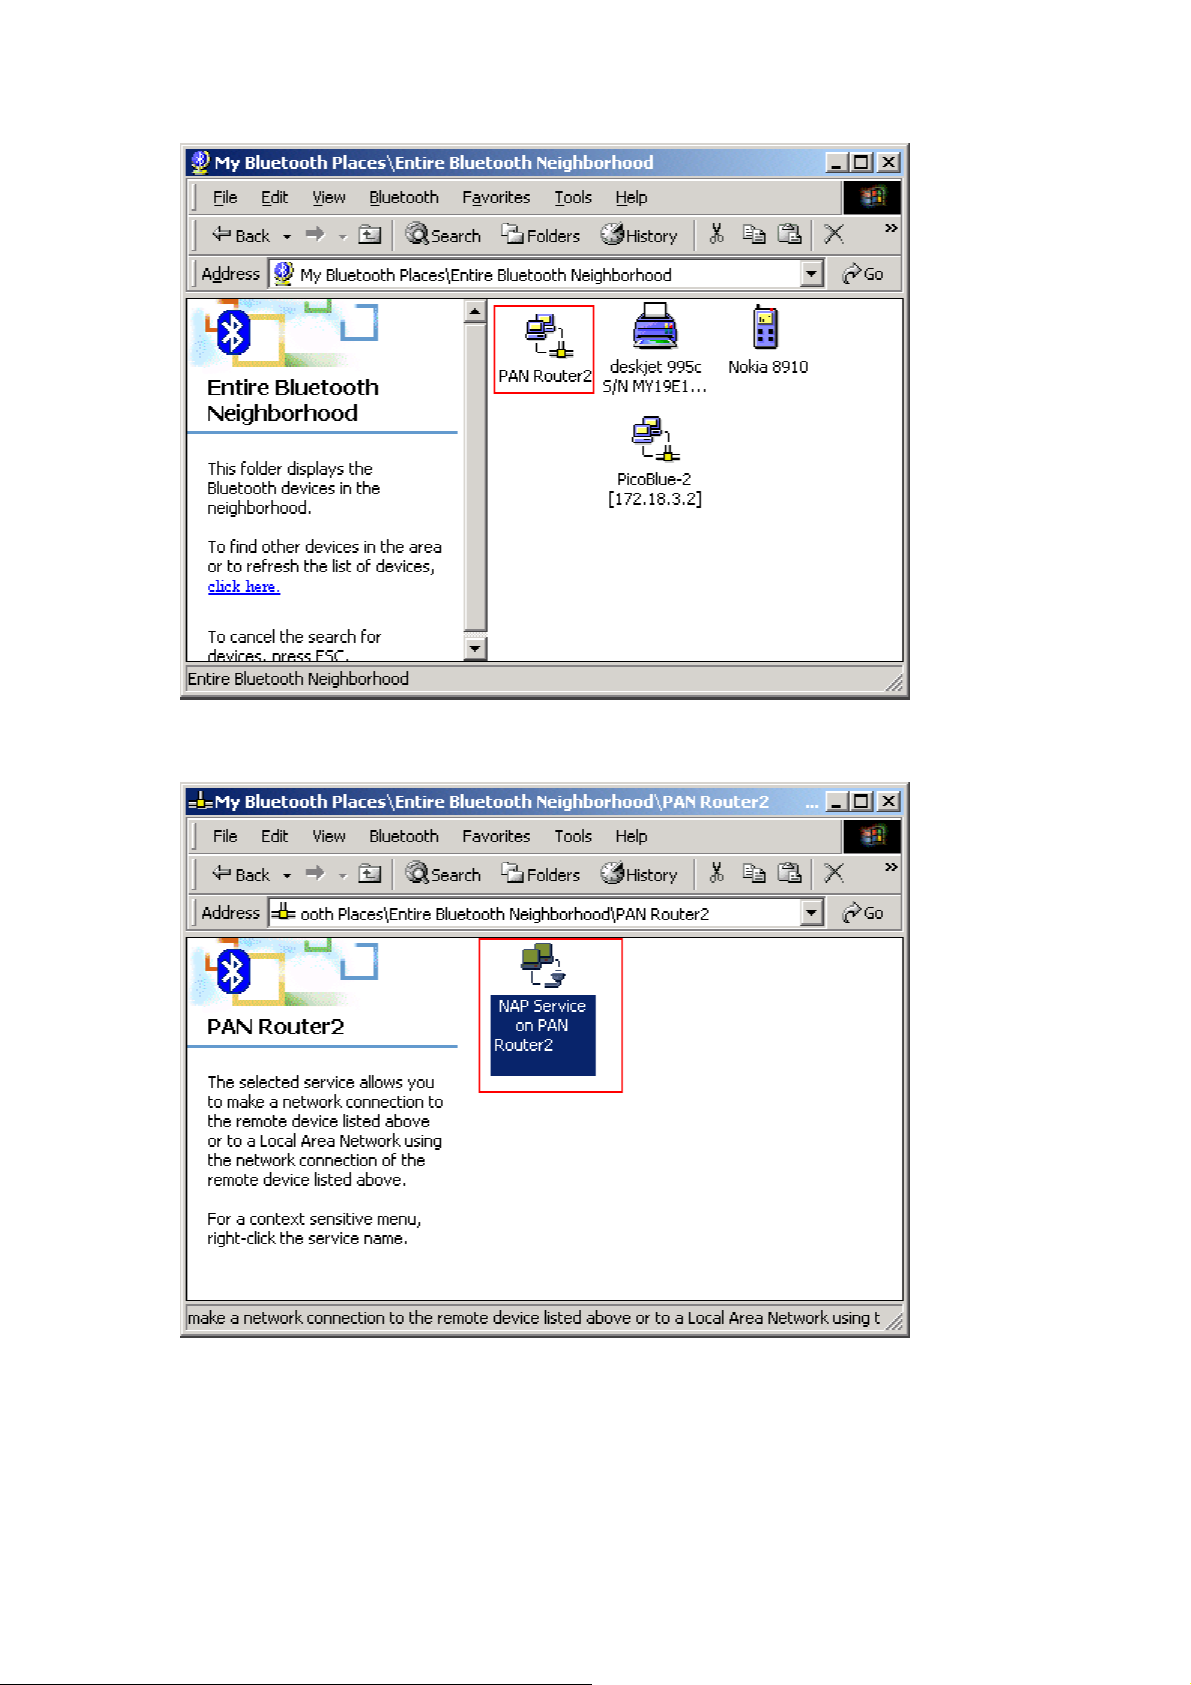
It will list out all the available services of this device. Select the NAP Service.
Right click the NAP Service and select "Connect to Network Access Point"
and your PC will get an IP address from the Network Access Point.
At this moment, you might be prompted to enter the IP network settings. If this
is the case, choose "Obtain an IP address automatically" from your
Bluetooth Network TCP/IP setting.
Page 12

After the host is selected, a connection will then be established between your
PC and the host over the personal network.
6.6. Configure Widcomm BTWCE
Hosting a Personal Area Network
To host a personal network, go to the Bluetooth Manager, choose New >
Connect > Join a personal network > Next. The following screen will be
shown:
Page 13

Choose Host a personal network and tap Next. Then the following screen
be shown, which allows you to "bring in" one or more guests, if desired. This
step is optional, since guests can join later on as long as the personal network
is active (more details in the following section).
Adding devices to a personal network.
Joining a Personal Area Network
BTW-CE makes it easy to join an existing personal network, hosted by
another Bluetooth device (PocketPC, desktop, etc.). From the Bluetooth
Manager, choose New -> Connect -> Join a personal network -> Next, but
choose Join a personal network this time. The Bluetooth Browser will be
shown for you to select the device that is hosting the personal network. After
selecting the host, choose Next. A connection will then be established
between your PocketPC and the host over the personal network.
At this moment, you might be prompted to enter IP network settings. If this is
the case, choose "Use server-assigned IP address" and tap OK.
The following warning may also be shown. As instructed, change the name of
your device and tap OK.
Page 14

Since the network is established via Bluetooth, the network host's service
availability, authorization and/or authentication security settings are in effect
and may prevent you from joining the network.
PAN network settings.
After joining the personal network, you can use any application that requires
an underlying network connection. For instance, you can view a remote folder
via the File Explorer by choosing Open and entering a remote, accessible
device path.
Browsing files on a remote device (via the PocketPC File Explorer) after
joining a personal network.
Page 15

6.7. Configure IVT BlueSoleil
By now, the PCs (PAN Clients) can access LAN as if they are attached to
LAN directly. Before you actually connect to the Bluetooth access point wtih
broadband router, you have to change the security setting on IVT BlueSoleil
product. Click on My Bluetooth -> Security, and panel will pop up. Select
the Low Security Level option to cooperate the default no-security setting on
Bluetooth PAN Router as shown in figure as blow.
Page 16

Now you can get access to PAN service in two steps:
1. In the BlueSoleil’s Main Windows, click the center ball, and wait for a few
seconds. After all device icons appear as shown in figure, click on the
Bluetooth device name which indicates your Bluetooth access point wtih
broadband router and point to PAN service icon.
Page 17

2. Right click the PAN Service icon. Choose Connect then the color of the
PAN Service icon will turn red, meaning that the connection is
established successfully. By default, you will get the LAN IP
192.168.2.100 after the connection is complete.
Page 18

6.8. Configure IVT BlueSoleil CE
1. Click "Start". 2. Select "Programs".
Page 19

3. Click "BlueSoleil" icon.
4. Then you get a message as below, asking you to Soft
reset your PDA.
5. After reset your PDA you will find a
"BlueSoleil" icon in list then click it.
6. Then you will find this icon in status bar. Click on
this icon.
Page 20

7. Select "Bluetooth Manager" item. 8. Now it automatically searches for devices...
9. After search is finished, then you'll see a
"Bluetooth Router" icon. Click it.
10. One service of "Bluetooth Router" will be
discovered, click the light icon.
Page 21

11. Connection to PAN service is
successful.
Chapter 7 Configuring Router
7.1. Network Settings and Software Installation
This chapter will show you how to configure the Bluetooth PAN to function in your network
and gain access to the Internet through your Internet Service provider (ISP). Your ISP may
require the use of a Host Name and Domain Name. Furthermore, you will need to set the
WAN Configuration Type on the Router’s Setup tab from the information given by your
Page 22

ISP. You will need this setup information from your ISP. If you do not have this
information, please contact your ISP before proceeding. The instructions from your ISP tell
you how to set up your PC for Internet access. Since you are now using this Bluetooth PAN
to share Internet access among several computers, you will use this setup information for
detailed configuration.
*Please plug the LAN cable into the PAN bridge and power it on.
*Please make sure your Bluetooth client is connected to this access point, and your
browser proxy setting is disabled.
7.1.1 Start-up and Log in
Activate your browser, and disable the proxy or add the IP address of this
product into the exceptions. Then, type this product’s IP address in the
Location (for Netscape) or Address (for IE) field and press ENTER. For
example: http://192.168.2.1. After the connection is established, you will see
the web user interface of this product. There are two appearances of web
user interface: for general users and for system administrator. Before you
make any changes to the access information. Leave the Password field
empty with “root” in the User field, and click the Logon button (you can
configure the user/password later in the “Change User/Pwd Page”).
Open your web browser, and enter 192.168.2.1 into the web browser’s
Address bar, then press the Enter key.
This product provides a Web based configuration scheme that is configurable
by Netscape Communicator or Internet Explorer. This approach can be
adopted in any MS Windows or Macintosh platform.
7.1.2 Login and Index page
The Login page will appear. Before you make any changes to the access information, leave
the Password field empty with “root” in the User field, and click the Logon button (you can
configure the user/password later in the “Change User/Pwd Page”).
Page 23

In the Index Page, there are five hyper links for diverse configurations. This
Bluetooth PAN provides software-reset function which enables users to restart
the device through wireless web configuration. You can click Restart to reset
the device in any configuration pages which shows the Restart button.
If you’d like to logout of the web configuration (for security reasons), click the Logout button
and the browser returns to the Login Page. In case you forget to leave the web configuration,
the system will automatically cancel the logon process after 3-minutes. You will have to login
again to finish uncompleted tasks.
7.1.3. General Information shows the real-time status for the Bluetooth
wireless network.
Page 24

7.1.4. General Configuration enables you to change the network settings
and configure the Bluetooth connection.
Below is the network settings page.
Page 25

Below is the Bluetooth settings page.
Page 26

7.1.5. Utility provides four virtual servers and a firmware upgrade.
Page 27

7.1.6. Change User/Pwd is where you can modify the web authentication
password.
Page 28

7.1.7. About provides product information and custom support
7.1.8. Change User &Password
Page 29

In order to access the web configuration and prevent others from changing
the import information, we strongly recommend you to change the
user/password.
1.In the Index Page, click the Change User/Pwd link.
2.According to the leftmost User List, you can add 4 users at most who are
able to access the web configuration by selecting Add option. Enter User
(up to 32 characters), and Password (up to 16 characters).
3.If you would like to delete a specific user, enter the User, select Delete, and
click Submit.
The system will indicate whether or not you entered the right settings for the page.
7.1.9. Routing Mode
By default, the Bluetooth access point wtih broadband router is set to the
Routing mode (PPPoE) that enables NAT (Net Address Translation Protocol)
function and performs a wireless portal for a secure sub-network. The
following settings are required for basic routing network:
1.Click the General Configuration in the Index Page. By default, it shows
the Networking Page.
Page 30

7.2.0. Bridging Mode
If you are connecting to a local network and the device performs simply a
wireless AP (Access Point), you can select the Bridging Mode as shown in
figure as blow, At this moment, the device becomes one of other existing LAN
devices. All routing functions are disabled except the Enable DHCP Client
option.
Be sure to enable DHCP client, or the system can NOT work as you did not properly set the
LAN IP for the Bluetooth PAN Router in Bridging Mode
1. LAN IP Address:
Page 31

This product’s IP address - The default address is 192.168.2.1 You can
change it when needed.
2. WAN Type:
WAN connection type of your ISP - You can click Change to choose the
correct type from the following four options:
A. Static IP Address: ISP assigns you a static IP address.
B. Dynamic IP Address: Obtain an IP address from ISP automatically.
C. PPP over Ethernet: Some ISPs require the use of PPPoE to connect to
their services.
Static IP Address
When connecting through a Static IP connection, be sure to have
1) Your broadband - configured PC’s fixed Internet IP Address,
2) Your broadband configured PC’s Computer Name and Workgroup Name,
3) Your Subnet Mask,
4) Your Default Gateway, and
5) Your Primary DNS IP address.
Page 32

Dynamic IP Address
When connecting through a Dynamic IP connection, be sure to have
1. Host Name – optional, required by some ISPs, for example, @Home.
PPP over Ethernet
1. When connecting through a PPPoE connection, be sure to have Your
PPPoE User Name, and Your PPPoE Password.
1) PPPoE Account and Password: the account and password your ISP
assigned to you. If you don't want to change the password, keep it empty.
2) PPPoE Service Name: optional. Input the service name if your ISP
requires it.
3) Maximum Idle Time: the time of no activity to disconnect your PPPoE
session. Set it to 0 will disable this feature.
2. On the fourth block, enter the Local IP and Subnet Mask. This is the
Router’s IP Address and Subnet Mask as seen on the internal LAN. The
default value is 192.168.2.1 for IP Address and 255.255.255.0 for Subnet
Mask.
Page 33

3. Enter the Default Gateway which is the same as Local IP in this device.
4. Click the Apply button to save the settings if you wish to configure other
settings before restarting the system. The system will store all parameters
and show the proper information to see whether it successfully writes into the
registry memory. If you have finished all the settings, directly click the
Restart button to re-boot the device.
Be sure to enable DHCP client, or the system can NOT work as you did not
properly set the LAN IP for the Bluetooth PAN Router in Bridging Mode.
Chapter 8 Troubleshooting
Q.1: So far, which versions of Bluetooth software are supported by this access point?
A.1: So far, we know this access point can support
IVT BlueSoleil 1.08
IVT BlueSoleil for WinCE1.0
Widcomm BTW1.3.2.7
Widcomm BTW-CE1.3.1.46
Page 34

Q.2: I'm using Windows XP. Why can’t I log in web management page?
A.2: For Windows XP users, it is necessary to download JRE from Sun Microsystems
(http://www.sun.com) or run windows update.
Q.3: Why can’t I connect to Bluetooth AP?
A.3: Bluetooth AP are always displayed in My Bluetooth Places once they have been
discovered, even if the remote device is out of range or not powered up. Verify that the
remote member of the pair is within radio range and powered up, and then attempt the
connection again.
Q.4 :Why can I connect to the access point, but not the internet?
A.4:
1.Connect to access point web manager page and check if the IP address you get from ISP
server is correct or not, if the access point did not get correct IP from your ISP please plug the
LAN cable into the PAN bridge and power it on. Try to get it again.
 Loading...