

Page 1

BIPAC-221
USB ISDN TA with 2 Analog Ports
Quick Start Guide
This product is designed for the ISDN with Basic Rate Interface.
Page 2
Quick Start Guide
1
Package Contents
• One external USB ISDN TA with 2 analog ports
•
One installation CD with drivers and utility software
• One CD with bundled application software programs (optional)
• One RJ-45 ISDN cable
•
One USB cable
• One power adapter
•
This Quick Start Guide
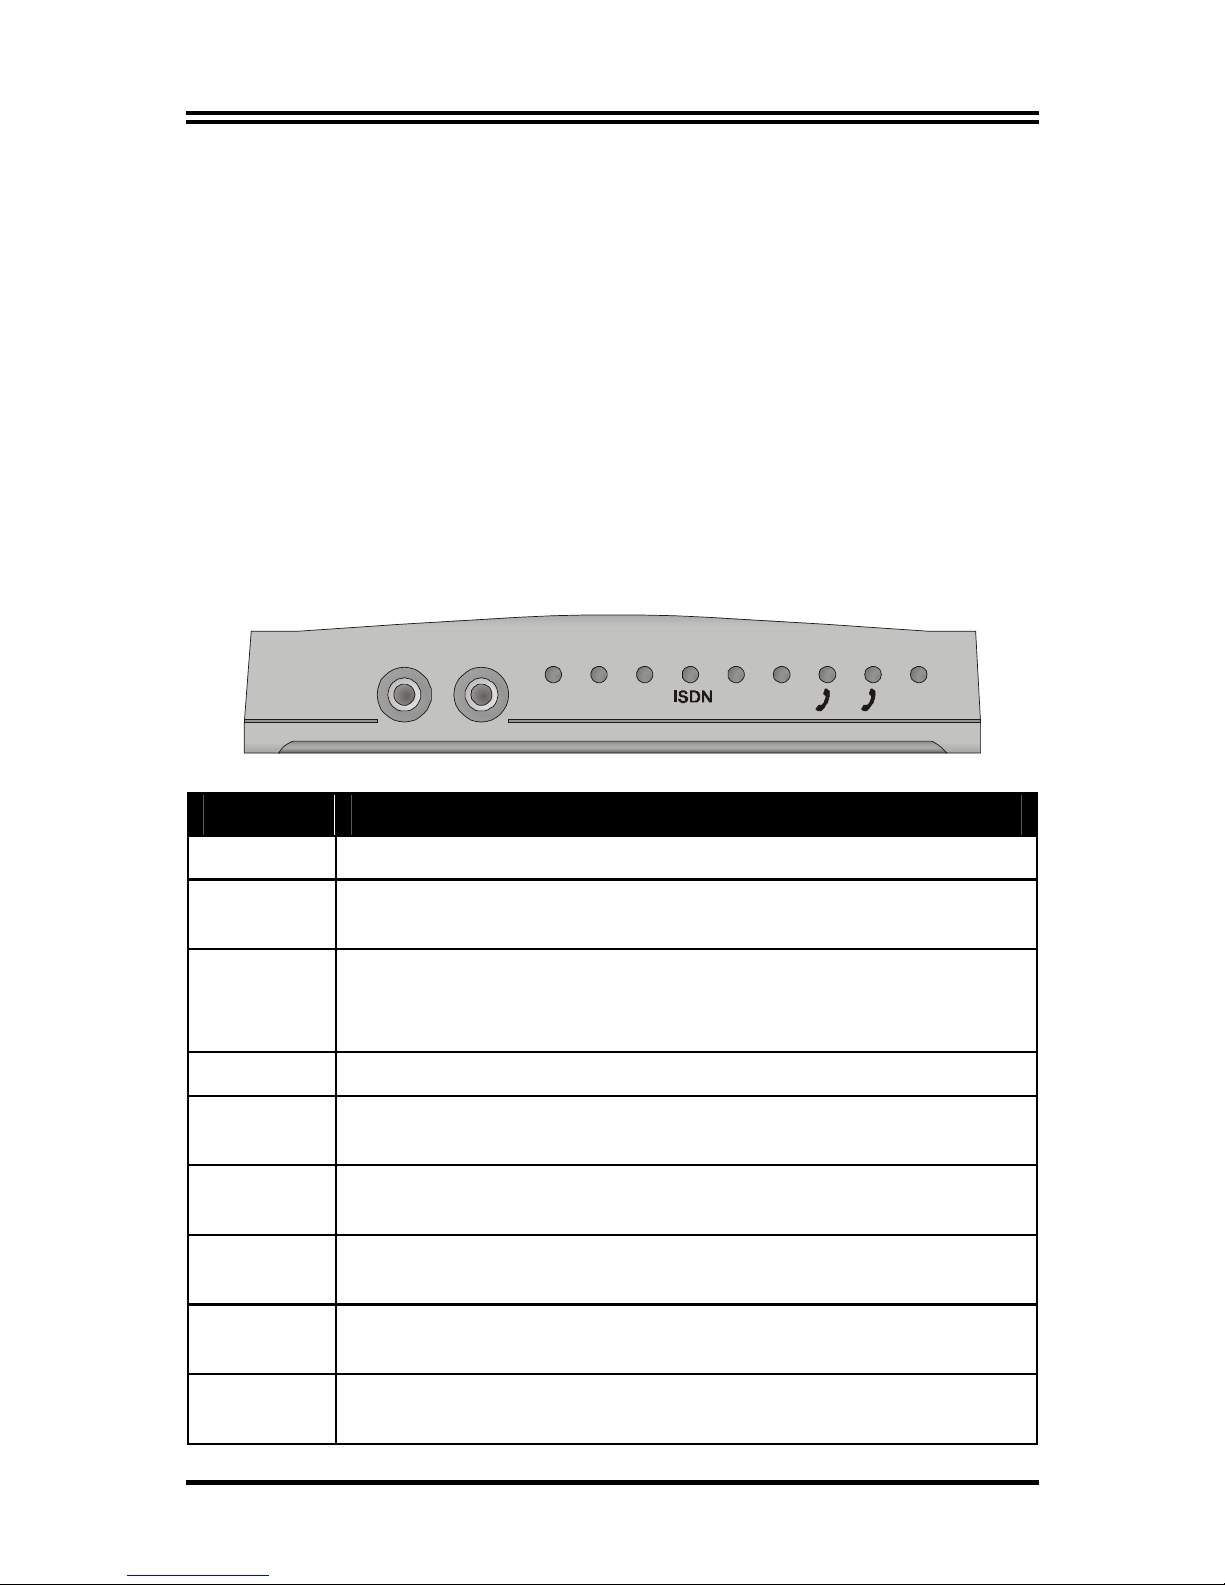
The Front Panel LEDs
MIC SPK
PWR B1 B2
PCRUN USB
1 2
LED Meaning
PWR When lit, it indicates the power adapter is connected.
RUN
Flashes periodically to indicate that the USB ISDN TA
is working properly.
USB
When lit, it indicates the USB port is connected to the
PC. When flashing, it indicat es the USB is on download
status.
ISDN When lit, it indicates that the ISDN S0 bus is activated.
B1
When lit, it indicates that the ISDN “B1” channel is
being accessed. It will flash during data transfer.
B2
When lit, it indicates that the ISDN “B2” channel is
being accessed. It will flash during data transfer.
Phone 1
When lit, it indicates that the analog device connected to
the Phone 1 port is in use.
Phone 2
When lit, it indicates that the analog device connected to
the Phone 2 port is in use.
PC
When lit, it indicates that at least one application
program running on the PC is using the USB ISDN TA.
Page 3
Billion BIPAC-221
2
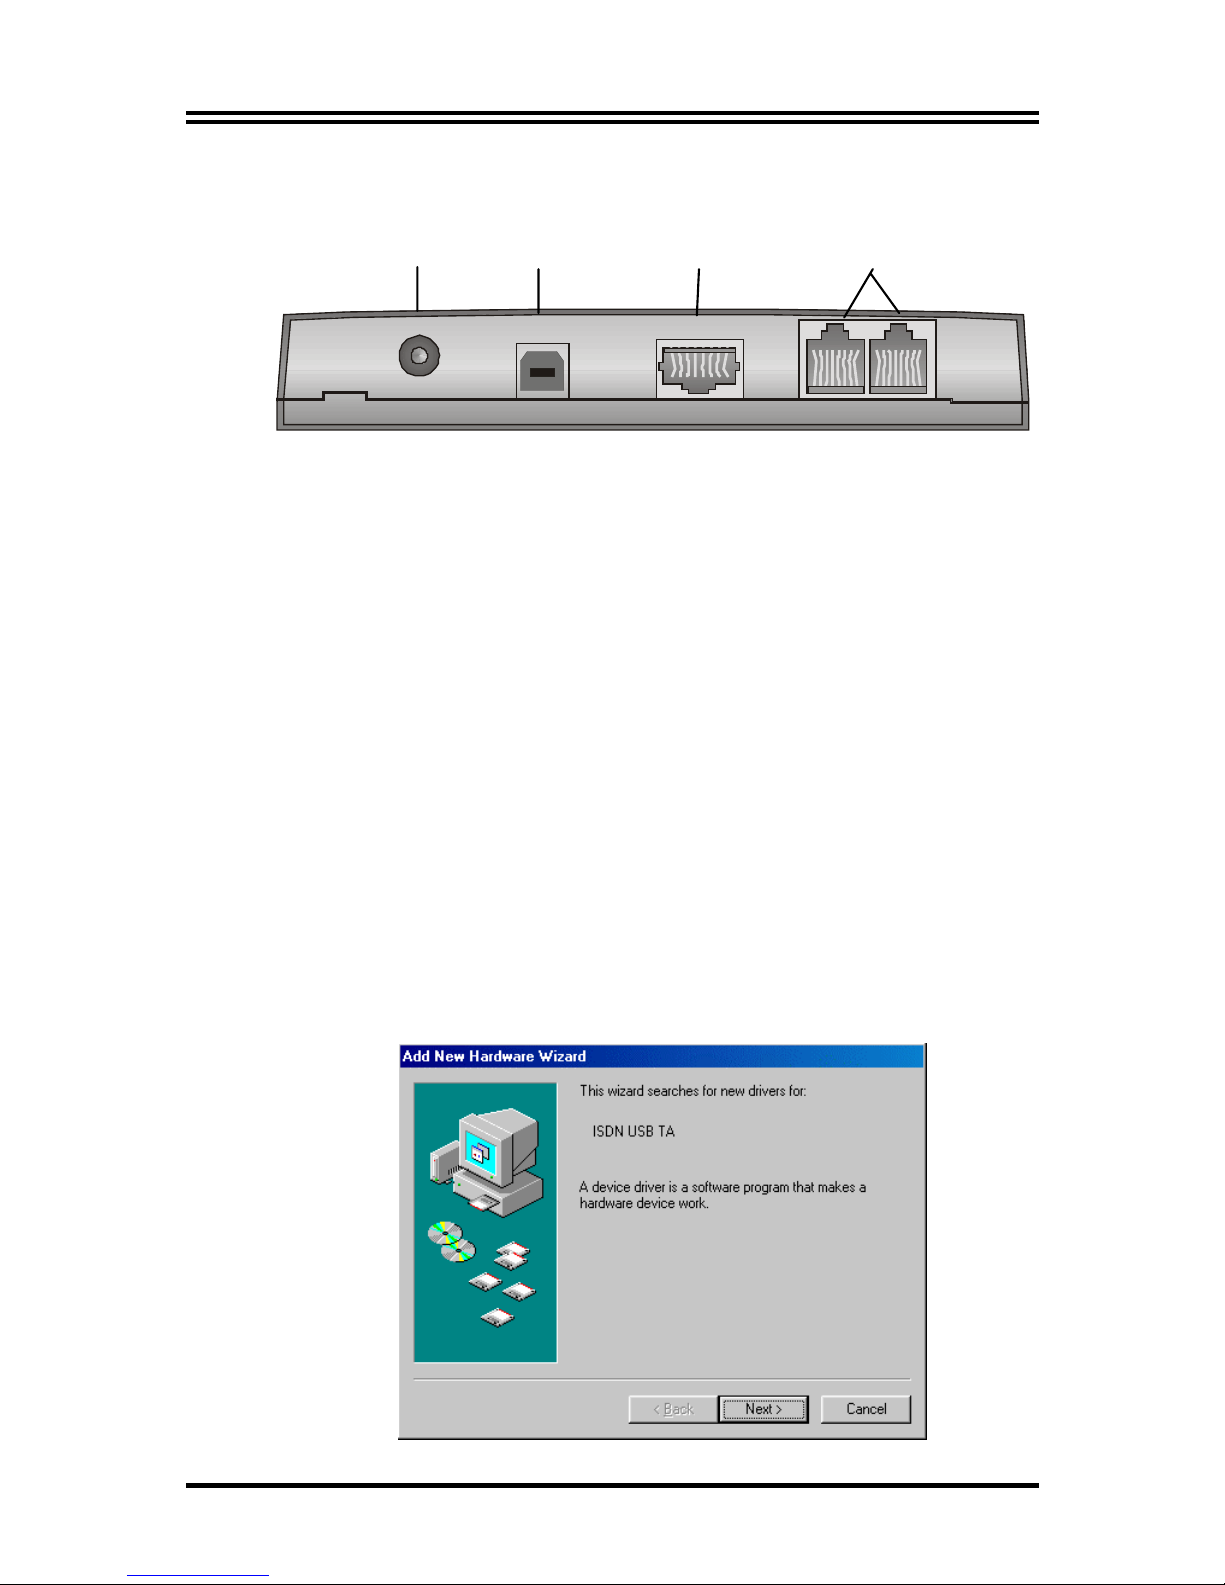
Installing the BIPAC-221
POWER
USB
IS DN S.
1. Connect the external power adapter to the power jack. All
the LEDs light and then go off one by one, except that the
PWR LED will still light.
2. Connect your ISDN line to the ISDN S
0
RJ-45 jack.
3. Connect your analog telephone and/or G3 fax machine to
the phone ports.
4. Connect a headset to the “MIC/SPK” jacks.
5. Connect the USB cable to the USB port and connect the
other end to the PC.
For Windows 98:
1. Start Windows. After the opening banner, Windows will
tell you that the new device has been detected. You will
then see the following screen. Click “
Next >
”.
Power jack USB port Phone ports
ISDN S0
RJ-45 jack
Page 4
Quick Start Guide
3
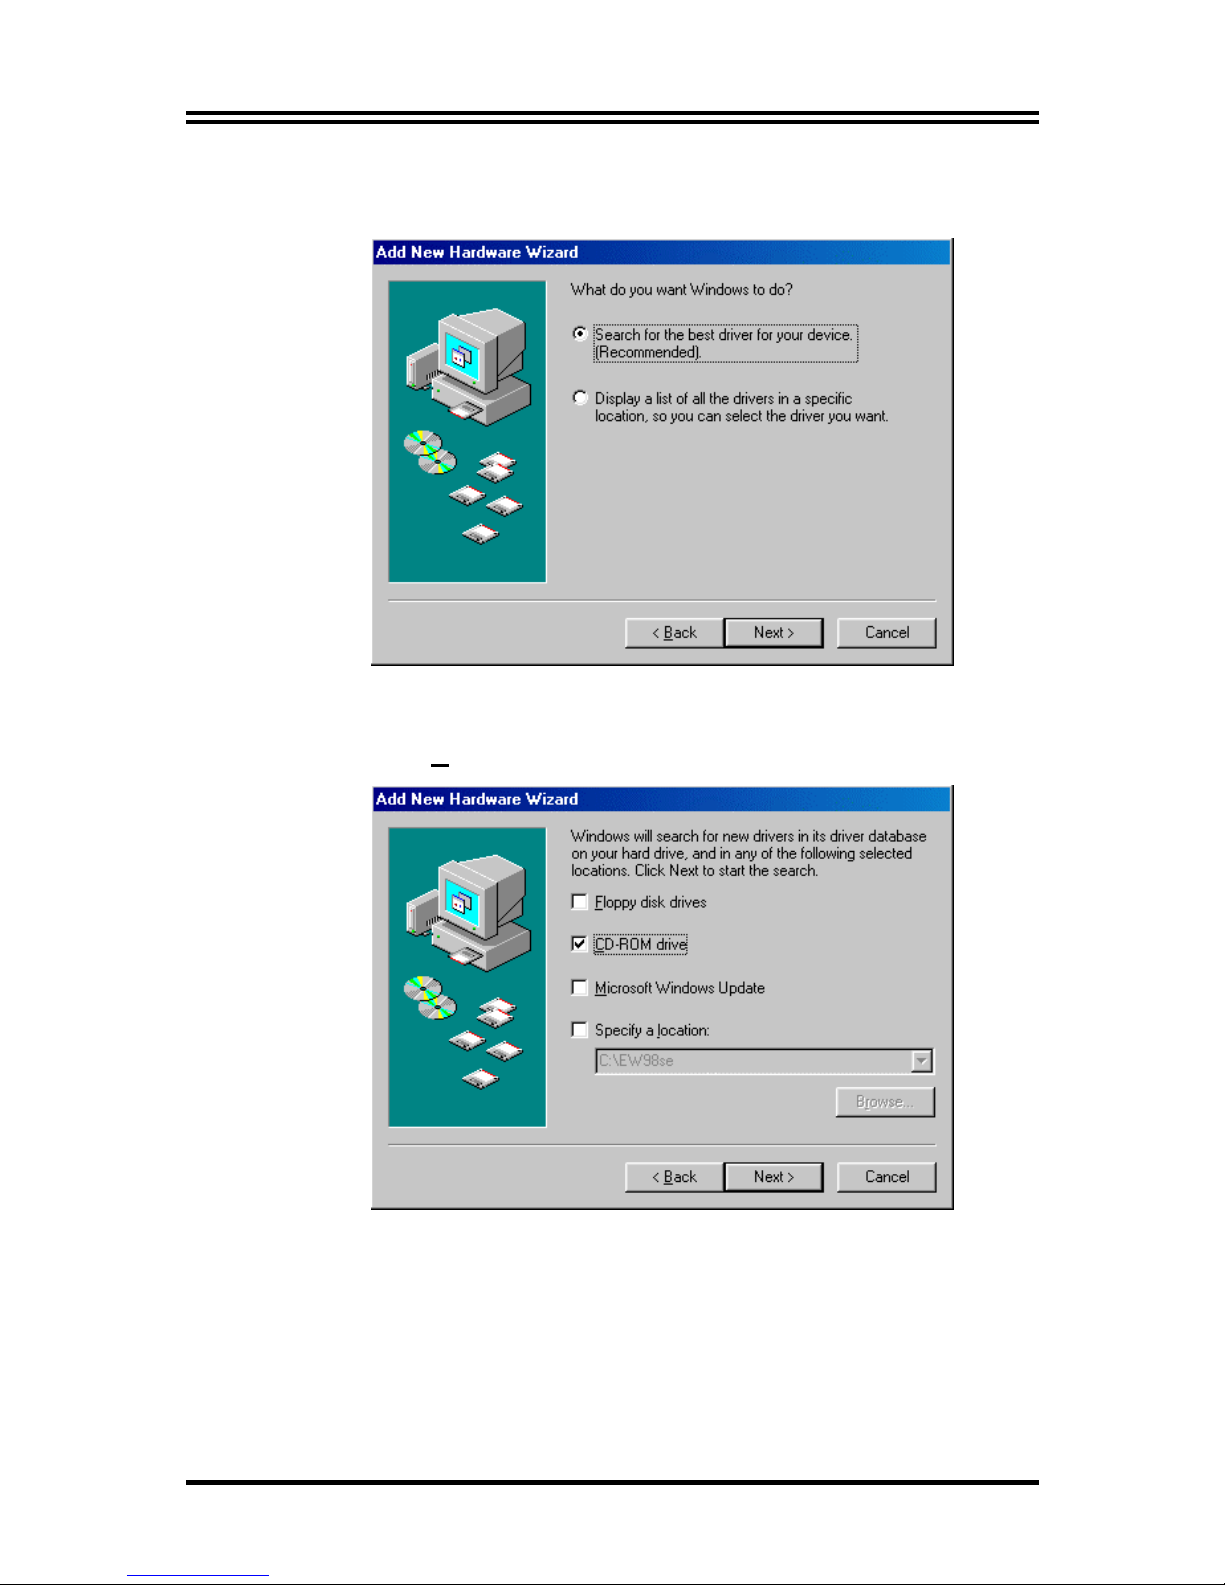
2. In the next window, select “Search for the best driver for your
device” and click “Next >”.
3. Insert the installation CD into the CD-ROM drive and
check “C
D-ROM drive” in the next window.
4. Continue through the Wizard, clicking the “
Next >
”
buttons. Windows will start copying files to your system.
You will see the following screen prompting for the path
of the Windows source files. Please specify a location.
Click “OK”. Then, click “Finish” in the next window to end
the installation.
Page 5

Billion BIPAC-221
4
5. If you are prompted to restart the com puter af ter Windows
finishes installing the driver, press “Y
es”.
For Windows Me:
1. Start Windows. After the opening banner, Windows will
tell you that the new device has been detected. Select
“S
pecify the location of the driver” and click “Next >”.
Page 6

Quick Start Guide
5
2. In next window, select “Search for the best driver for your
device”. Insert the installation CD into the CD-ROM drive
and check “Removable M
edia”. Click the “Next >” button.
3. Continue through the Wizard, clicking “
Next >
” at the
following screens. Windows will start copying files to
your system. Then, click “Finish” in the following window.
4. If you are prompted to restart the com puter af ter Windows
finishes installing the drivers, press “
Y
es
”.
Page 7

Billion BIPAC-221
6
For Windows 2000:
1. Start Windows. After the opening banner, Windows will
tell you that the new device has been detected. Click
“Next>”.
2. In next window, select “Search for a suitable driver for my
device”. Click “Next>”.
3. Insert the installation CD into the CD-ROM drive, then in
the next window check “
CD-ROM drives
” and click “
Next>
”.
Page 8

Quick Start Guide
7
4. Click “Next>” to install the driver. When the following
windows titled “Digital Signature Not Found” appear, press
“
Yes
” to continue the installation.
Page 9

Billion BIPAC-221
8
5. Press “Finish” to end the installation.
For Windows XP:
1. Start Windows. After the opening banner, Windows will
tell you that the new device has been detected. Select
“Install the software automatically”. Insert the installation CD
into the CD-ROM drive and click “Next >”.
2. When next window appears, press “Next >” to continue
the installation.
Page 10

Quick Start Guide
9
3. Click “Continue Anyway” when the following “Hardware
Installation” windows appear.
Page 11

Billion BIPAC-221
10
4. Press “Finish” to end the installation.
ISDN Utility and Diagnostic Program
The ISDN Utility includes helpful programs for the USB ISDN
TA, such as a diagnostic program, an uninstallation program,
and an on-line manual.
After Windows installs the driver of your ISDN TA, the ISDN
Utility may be installed automatically. If the ISDN Utility is not
installed, you may install it from the installation CD.
You are highly recommended to run the diagnostic program to
make sure the USB ISDN TA, its drivers and the ISDN line are
all properly installed and connected. Please follow these
instructions:
1. Open the “P
rograms” folder on the “Start” menu and click
on the “ISDN Utility” program folder.
2. Click on the “
Diagnostic Program
” item to start the program.
3. In the “Own ISDN Numb er” box, type in the subscriber
number of your ISDN line.
Page 12

Quick Start Guide
11
4. Press “Loopback Test” to begin the diagnostic procedure. It
will make a call from the B1 channel that returns through
the B2 channel. The D and B channels will be tested for
line integrity.
Uninstalling BIPAC-221
If you decide to permanently remove the driver and utility of the
USB ISDN TA from your system, you must run the
uninstallation program from the ISDN Utility program group as
follows:
1. Click “Start”, “P
rograms” and click the “ISDN Utility” item.
2. Click the “Uninstall DRV & UTL” item. The following ISDN
Uninstallation Program window opens.
3. Check the items that you want to completely remove from
the Windows system and click “OK”.
Page 13

Billion BIPAC-221
12
Product Support
If you have any problem with the USB ISDN TA, please contact
the dealer where you bought this product. If you have any other
question, you can contact Billion Electric Co., Ltd. directly at
the following email address: support@billion.com.tw
You can also download upgraded driver or software utilities for
free from Billion’s web site at http://www.billion.com.tw/
For more detailed instructions on configuring and
using the device, please refer to the on-line manual
in the installation CD.
 Loading...