

Page 1

ISDN PCI Card
Quick Start Guide
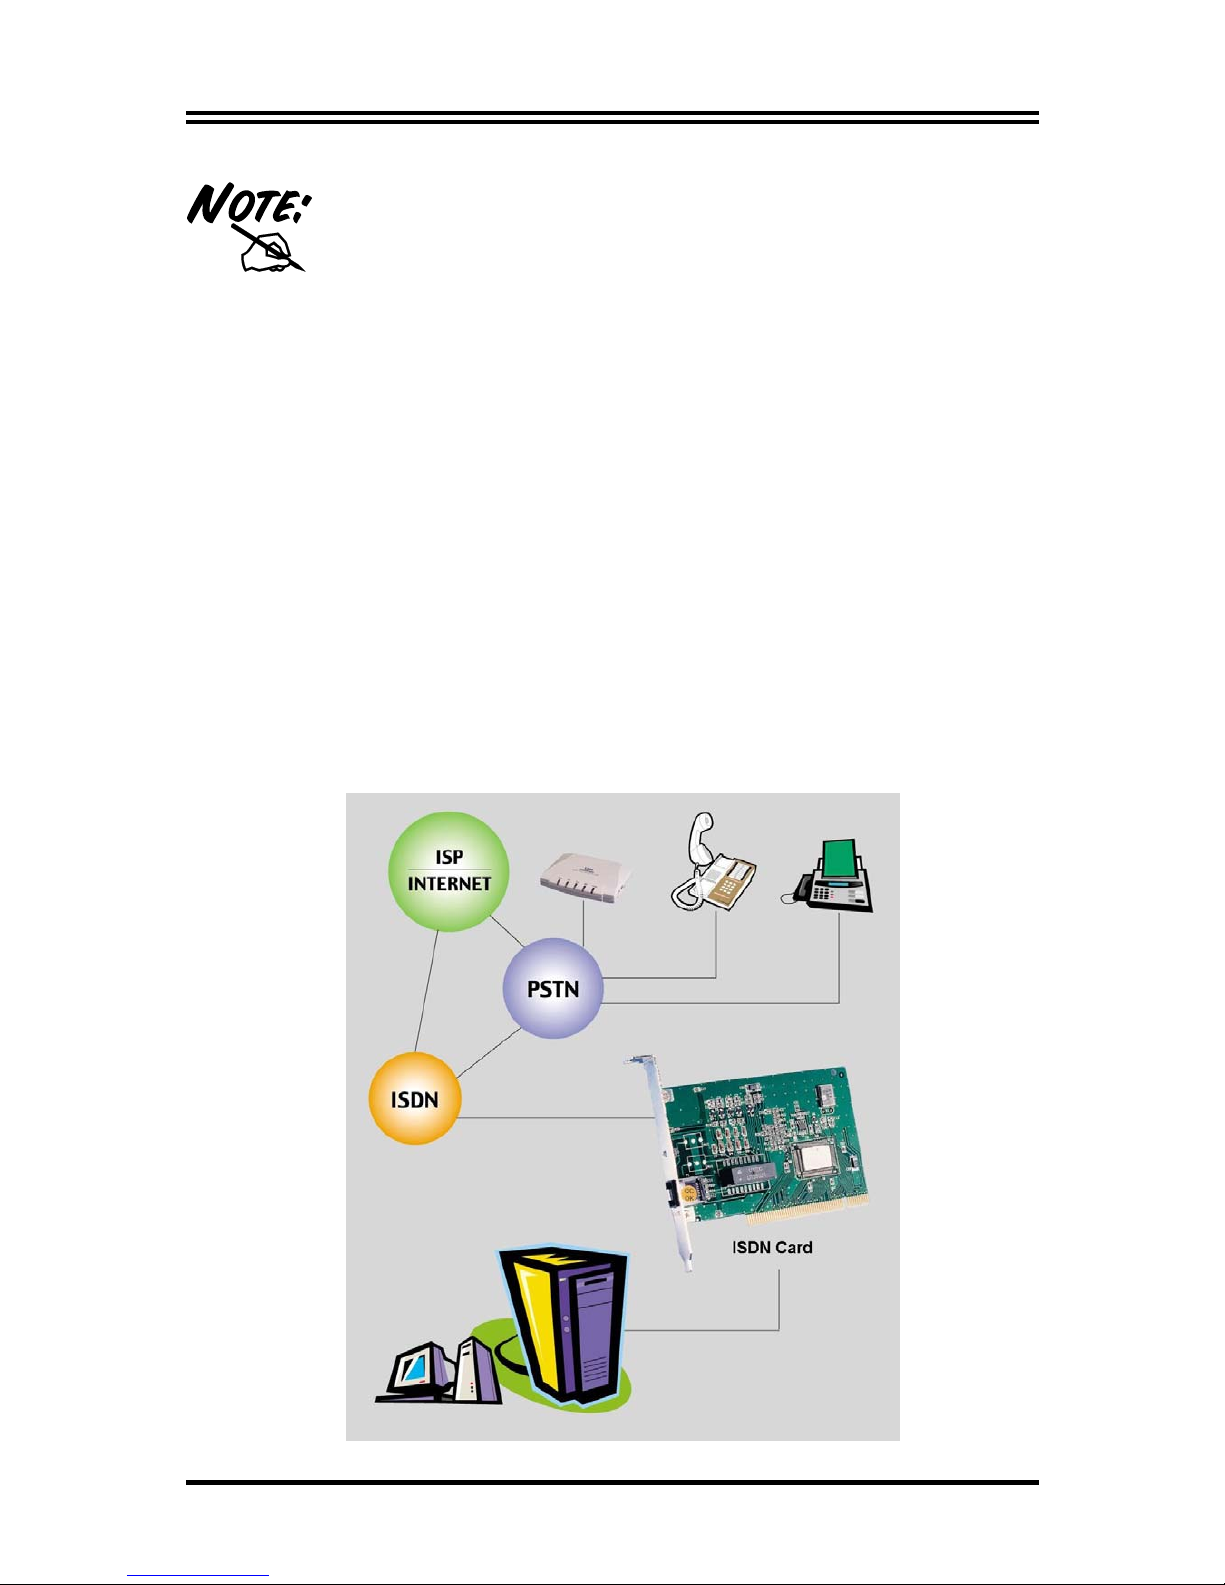
This product is designed for the ISDN with Basic Rate Interface.
Page 2
Quick Start Guide
1
For more detailed instructions on configuring and
using the ISDN card, please refer to the on-line
manual.
Package Contents
•
One ISDN card
•
One ISDN card installation CD with drivers, utility and bundled
application software programs
•
One RJ-45 ISDN cable
• This Quick Start Guide
Installing the ISDN card
Connect your ISDN line to the ISDN S0 RJ-45 jack.
Page 3
ISDN PCI card
2
For Windows 95, OEM Service Release 2 (OSR2)
or Windows 98:
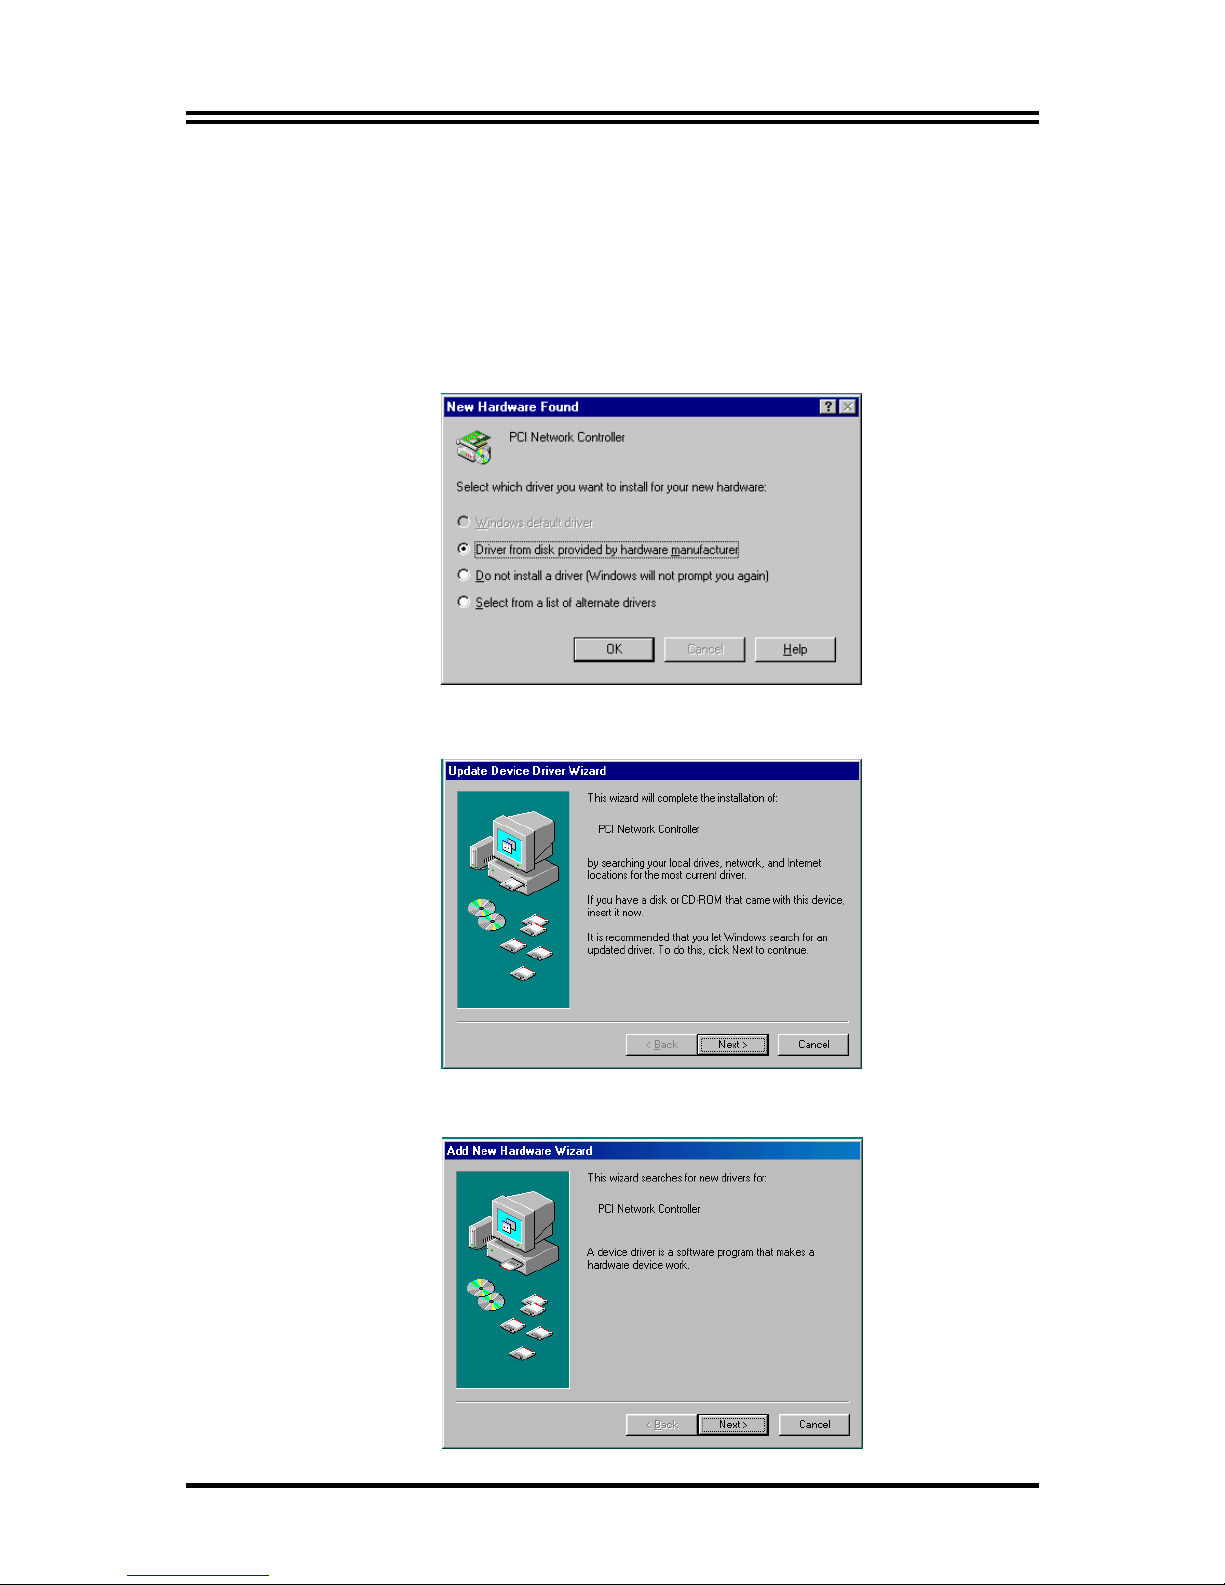
1. Start Windows. After the opening banner, Windows
will tell you that your ISDN card has been detected.
You will then see the following screen for Windows 95:
Or you will see the following screen for OSR2:
Or you will see the following screen for Windows 98:
Page 4
Quick Start Guide
3
2. Insert the installation CD into the CD-ROM drive (D:
or E: , etc.).
3. For Windows95, select “Driver from disk provided by
hardware m
anufacturer”. For OSR2, click “Next >” to go
on. For Windows 98, click “
Next >
”. Then, check
“Specify a l
ocation:” and browse for “D:\Driver\Win98” (D:
represents your CD-ROM drive).
4. Follow the instructions on the screen. Windows will
copy the driver files to Windows sub-directories.
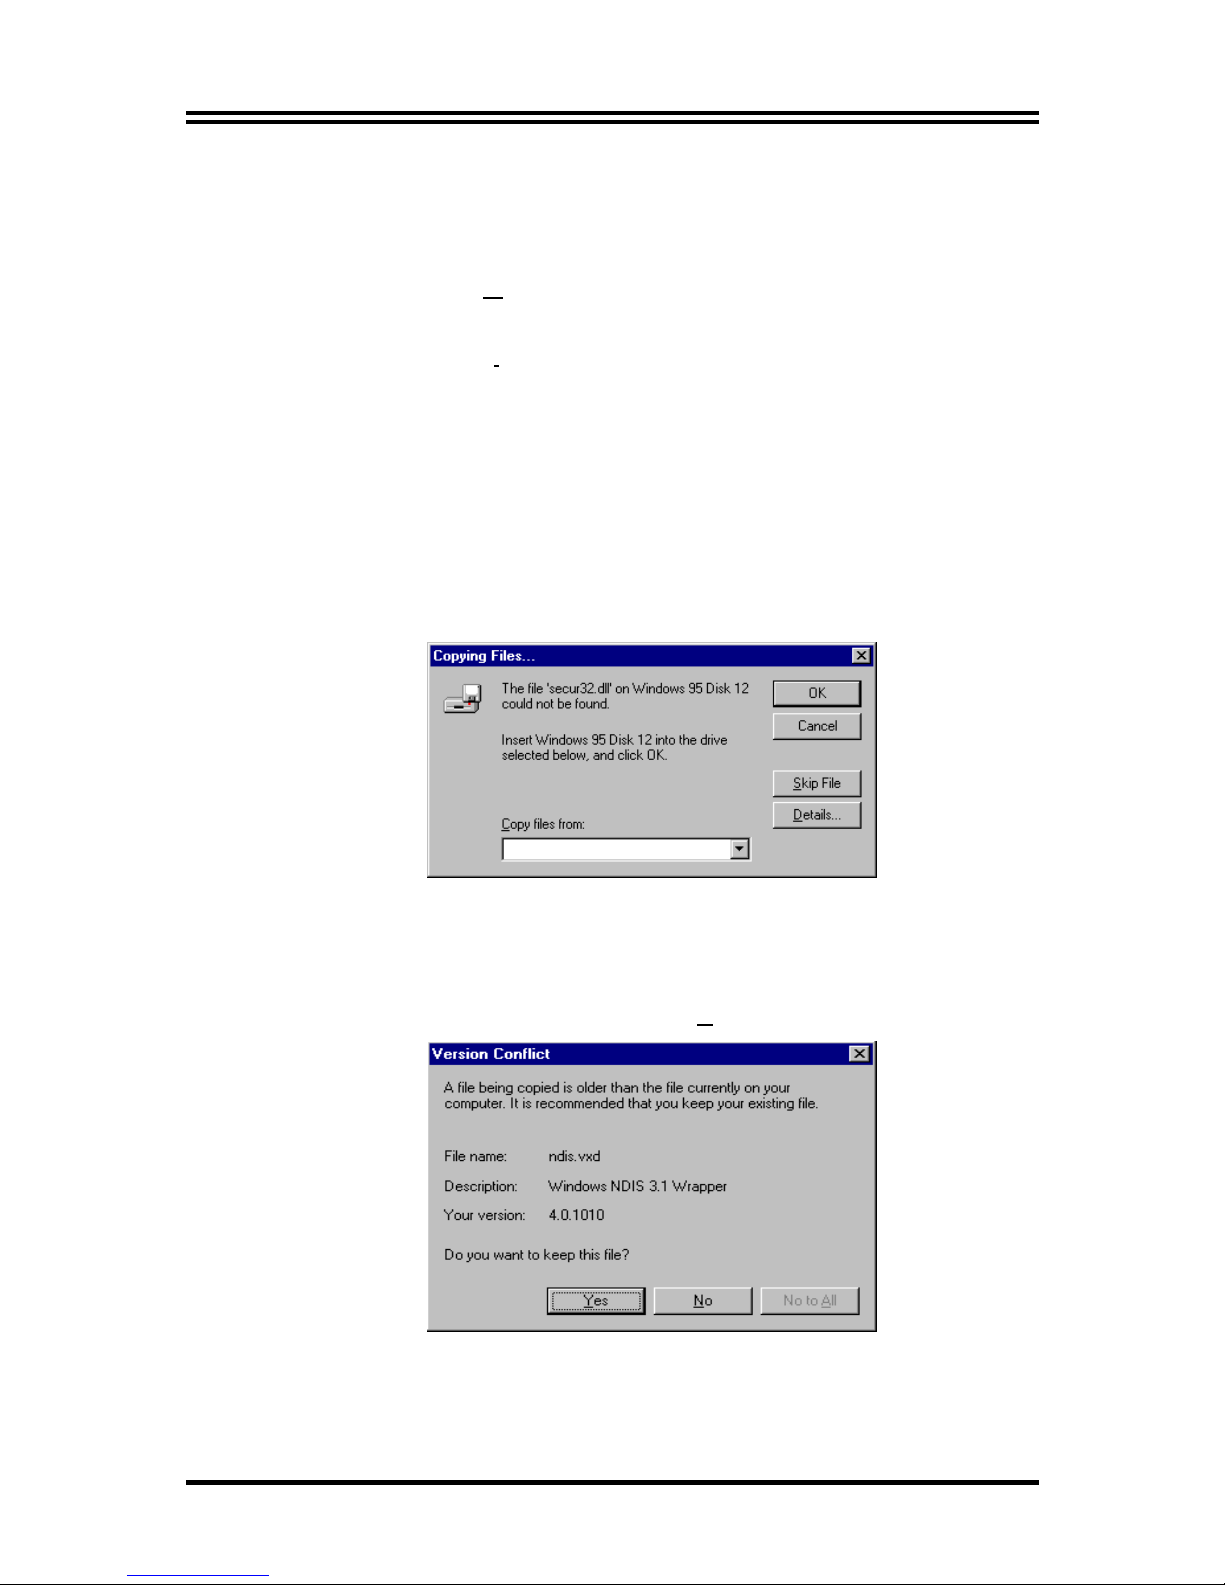
5. Then, Windows will start copying system files and you
might see the following screen prompting for the path
of the Windows source files. Please specify the location
of your Windows source files and click “OK”.
6. For Windows 95 or OSR2, if the Microsoft ISDN
Accelerator Pack 1.1 or Dial-Up Networking 1.3 has
been installed before, Windows will detect some files
with newer version. Press “Y
es” to keep the newer files.
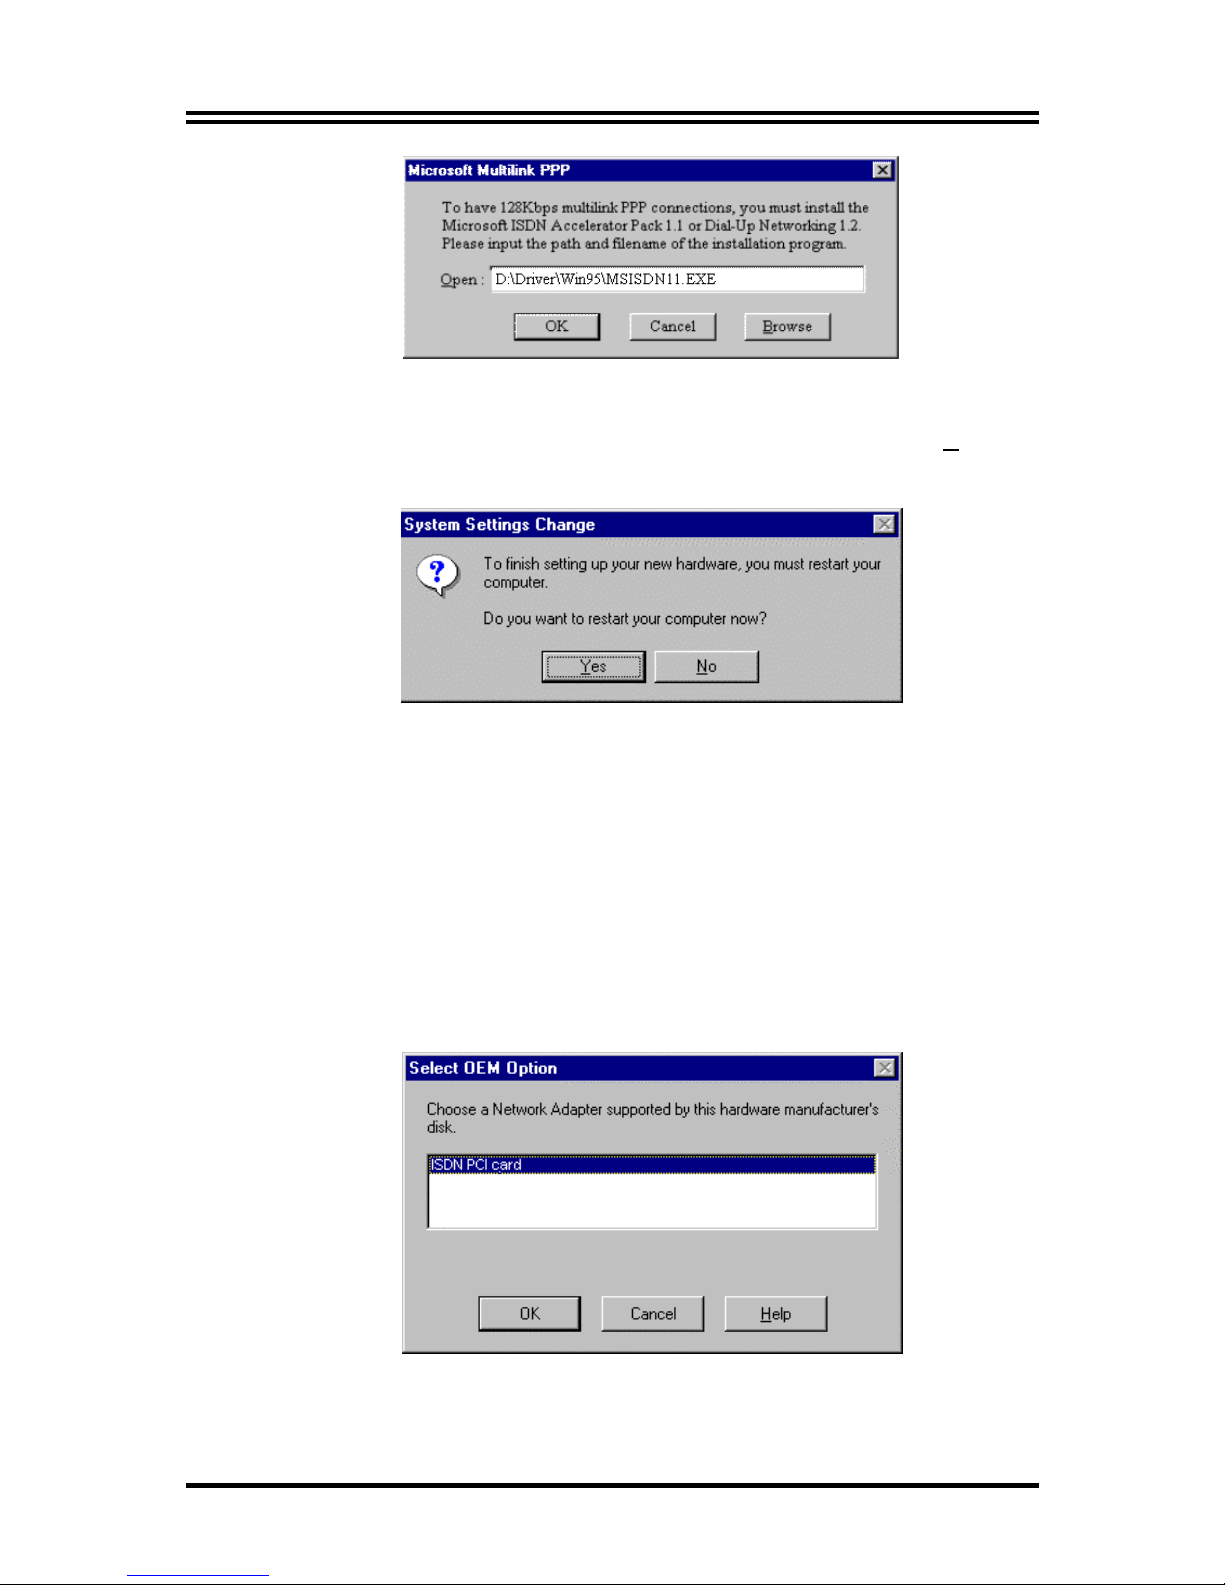
7. For Windows 95 or OSR2, if the Microsoft ISDN
Accelerator Pack 1.1 or Dial-Up Netw orking 1.3 is not
installed before, you should see the following screen.
Page 5
ISDN PCI card
4
8. After complete installing the ISDN card driver, you will
be prompted to restart the computer. Press “Y
es” to
restart your computer.
For Windows NT 4.0:
1. Start Windows. Insert the installation CD into the CD-
ROM drive (D: or E: , etc.).
2. Run “Setup.exe” in the root directory of installation CD.
3. Press “Windows NT Driver” button. Then, the following
window appears.
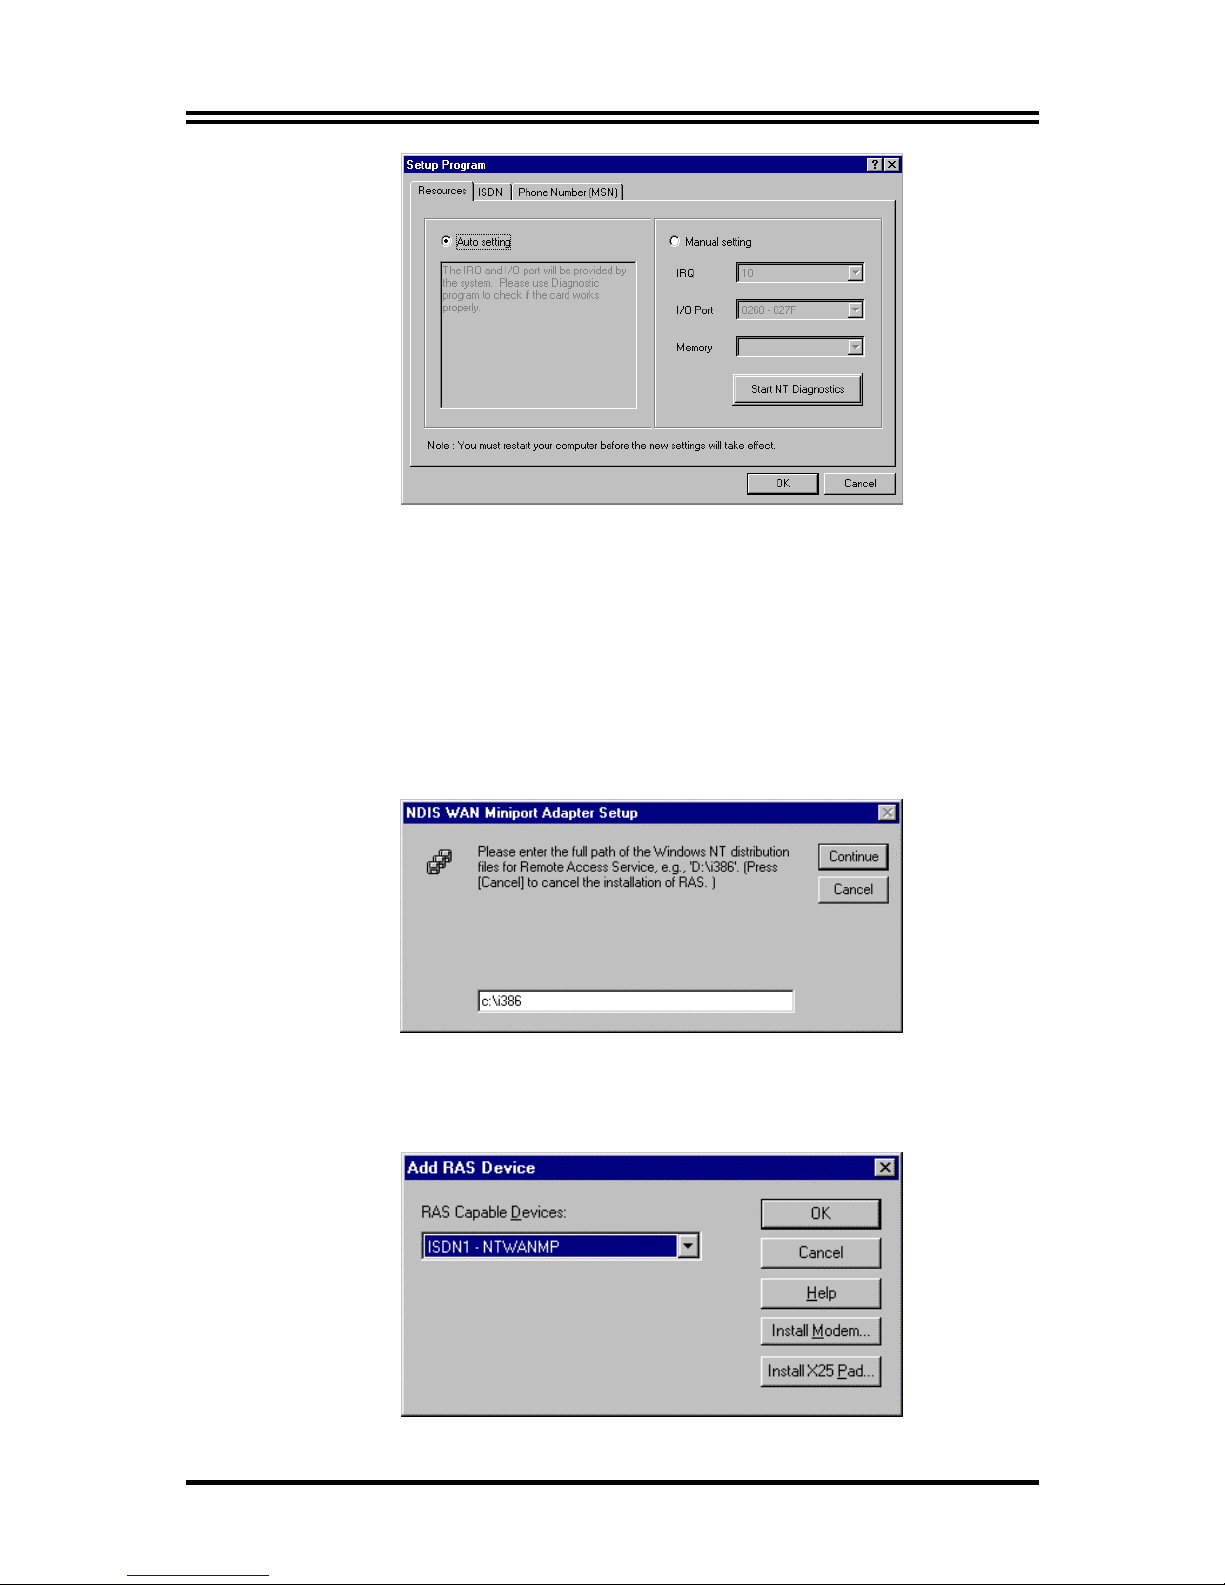
4. Click “OK” to begin copying files. After that, the
“Setup Program” will start.
Page 6
Quick Start Guide
5
5. If your PC has PnP BIOS, you c an choose “Auto setting”.
Then the IRQ and I/O Port of the ISDN card will be
configured by the system.
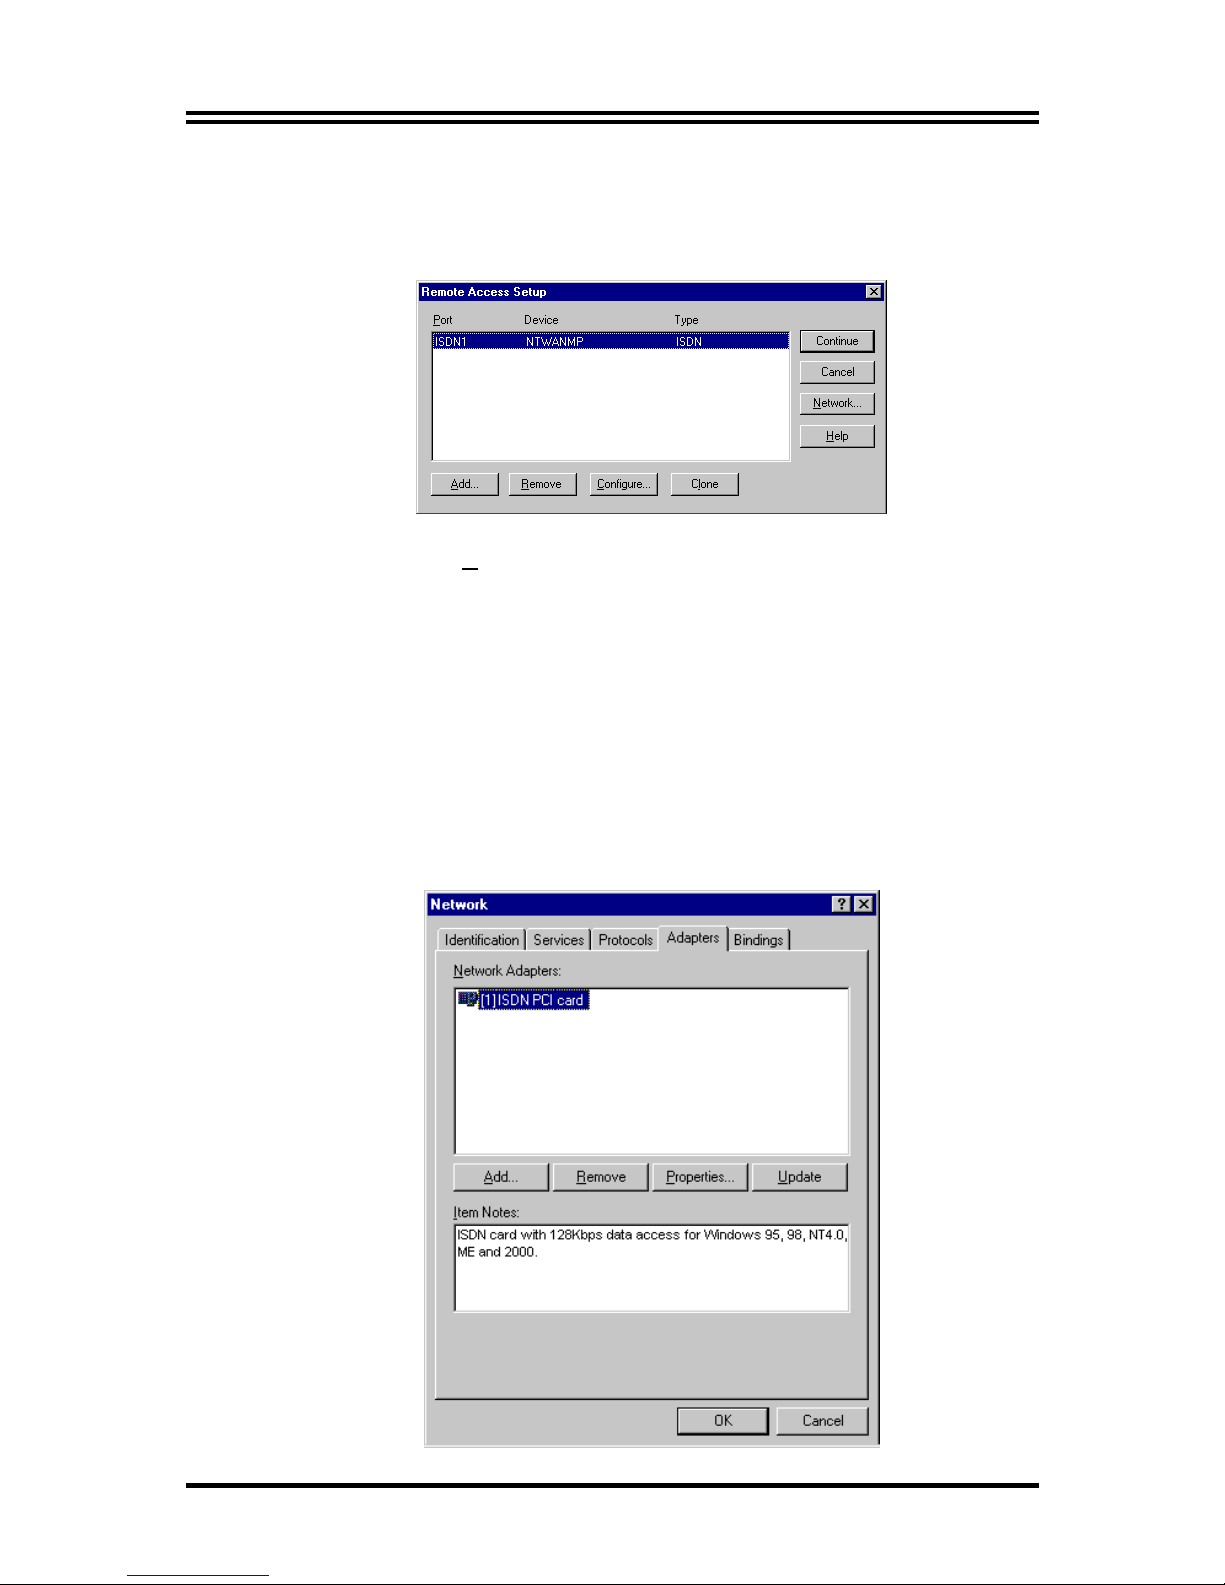
6. After setting the properties of the ISDN card, you might
see the following screen prompting for the path of the
Windows NT source files to installing the Remote
Access Service (RAS).
7. When the RAS is installed, you will see the following
screen for configuring ISDN ports as RAS devices.
Page 7
ISDN PCI card
6
8. Press “OK” to select “ISDN1-NTWANMP” as one of the
“RAS Capable Devices”, you should then see the
following screen.
9. Click “A
dd...” for adding “ISDN2-NTWANMP” to the
list of RAS communication ports. The “ISDN1” and
“ISDN2” ports make the ISDN card be capable of
dialing or receiving multilink calls. For more details
about configuring the multili nk s upport in Wind ow s NT
4.0, please refer to the on-line help of RAS.
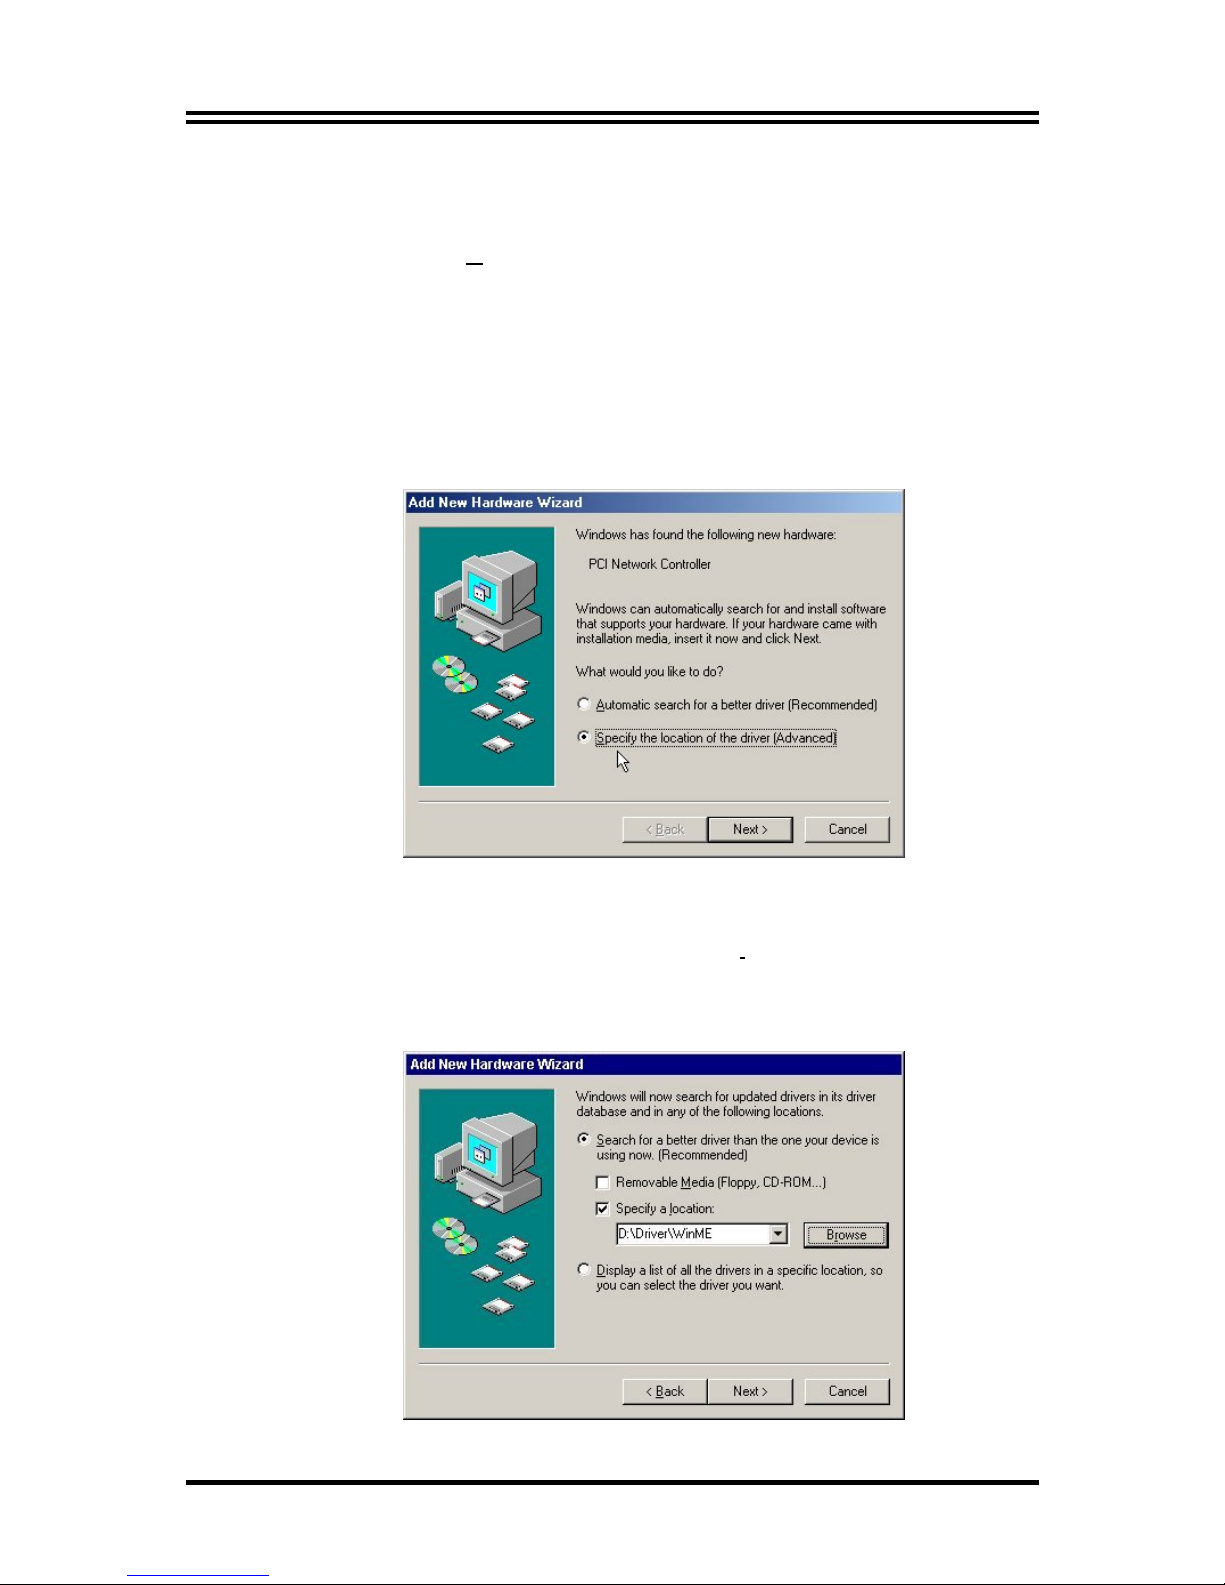
10. Click “
Continue
” to complete RAS setup, and you
should see the ISDN card has been installed as a
network adapter.
Page 8
Quick Start Guide
7
11. Click “Close”. Then, you will be prompted to restart the
computer.
12. Press “Y
es” to restart your computer and finish the
driver installation.
For Windows ME:
1. Start Windows. After the opening banner, Windows
will tell you that your ISDN card has been detected.
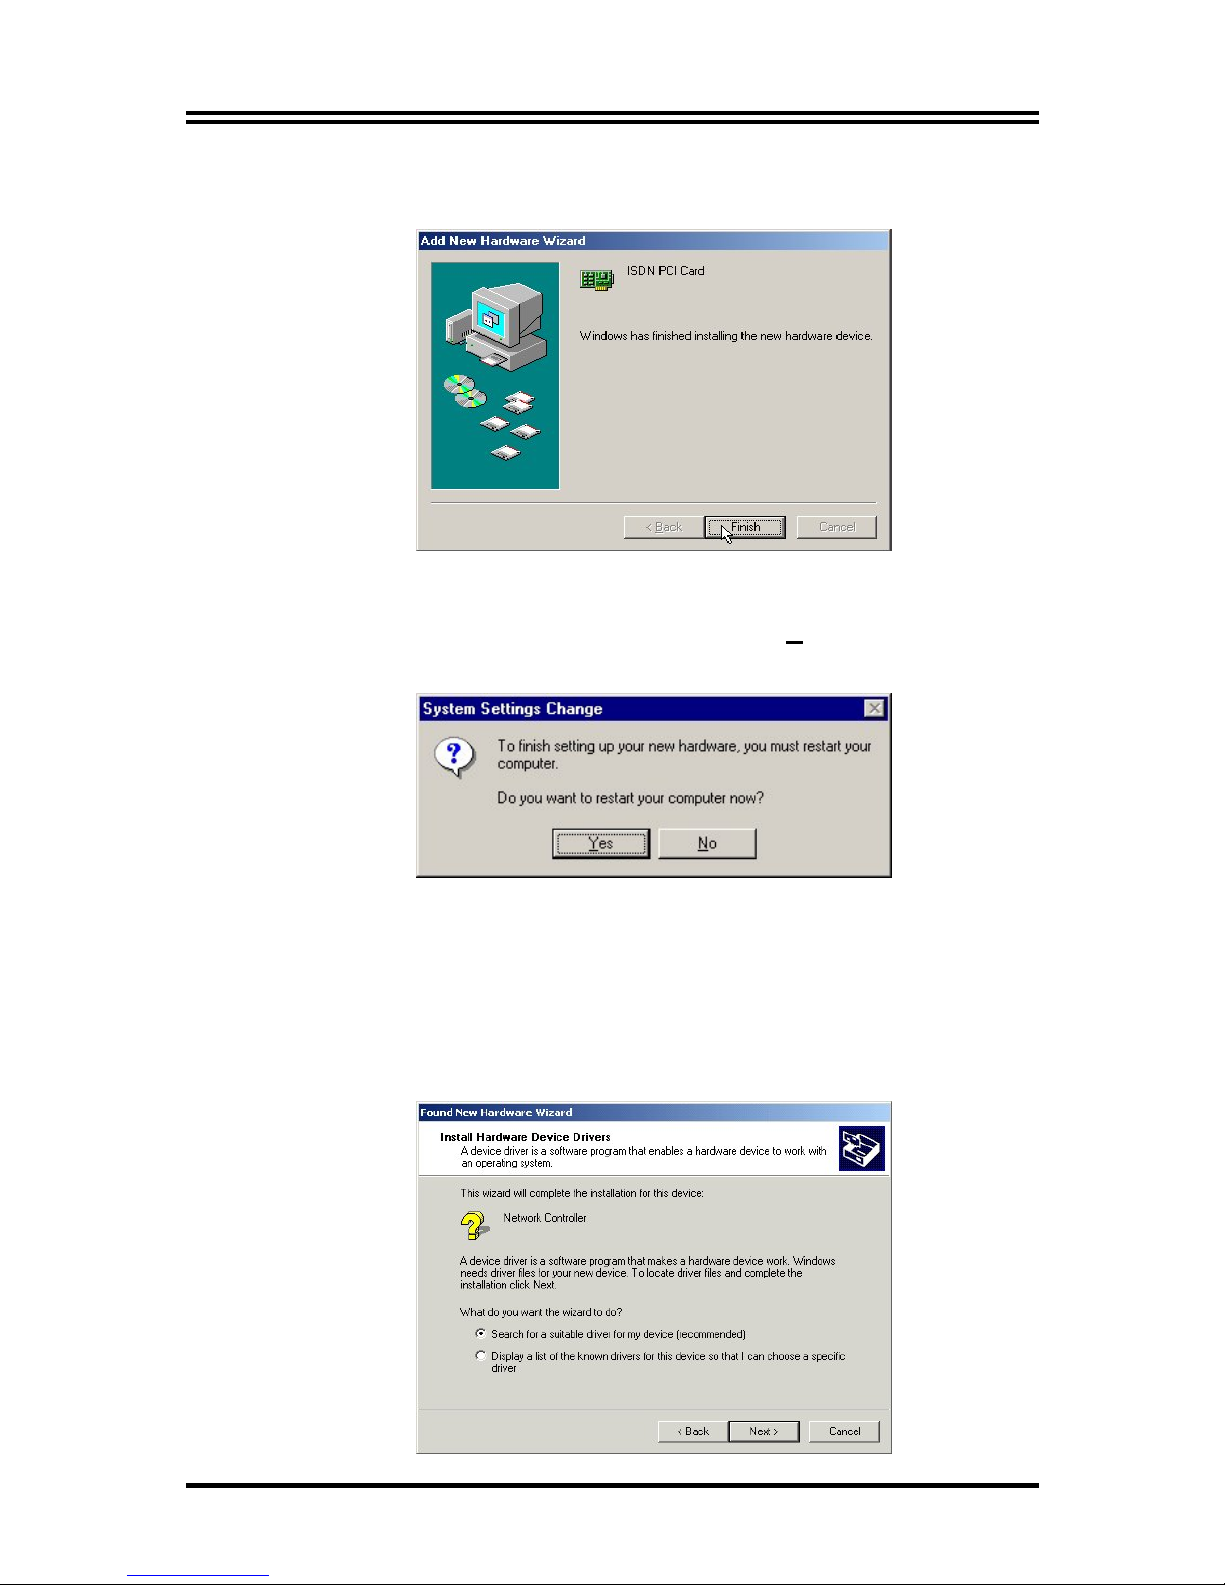
2. Insert the installation CD into the CD-ROM drive (D:,
or E:, etc.). Select “Specify a l
ocation:” and browse for
“
D:\Driver\WinME
” (D: represents your CD-ROM drive).
Click “Next >”.
Page 9
ISDN PCI card
8
3. After pressing “Next >” button for the next screen, then
press “Finish”.
4. If the next screen appears when Windows finishes
installing the drivers, press “Y
es” to restart the
computer.
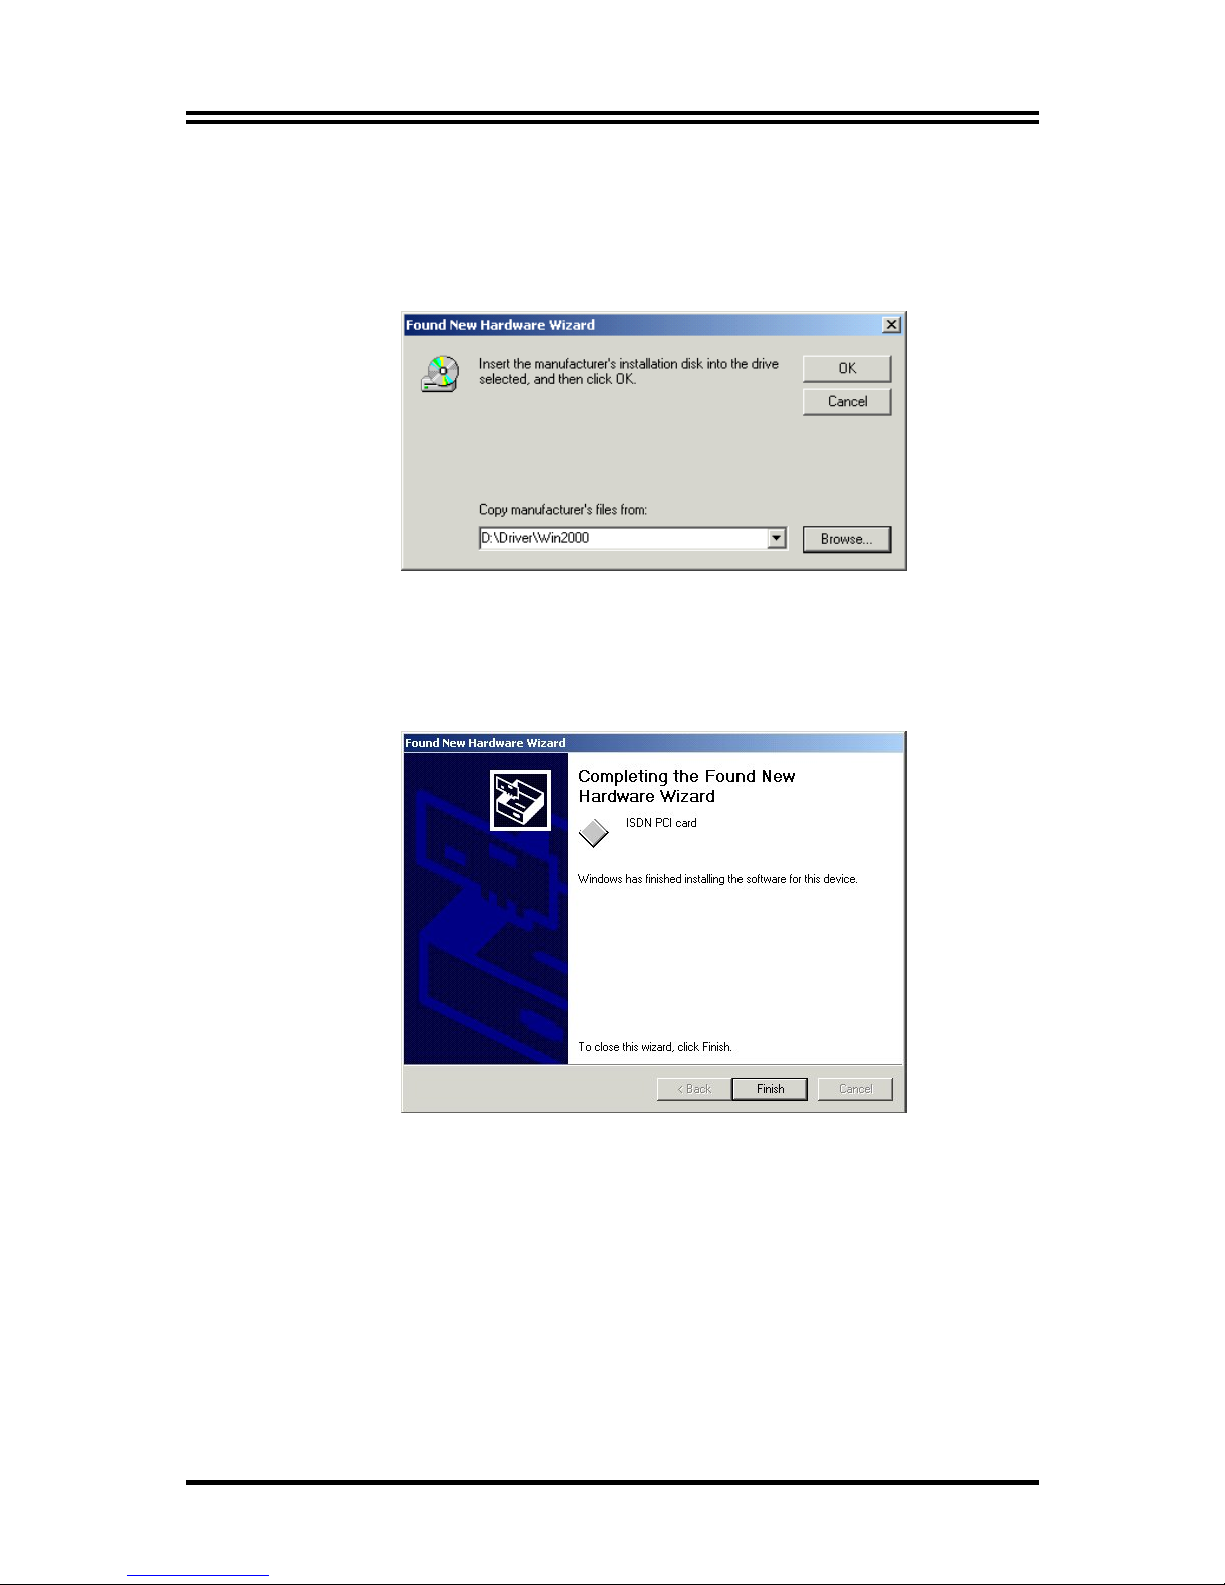
For Windows 2000:
1. Start Windows. After the opening banner, Windows
will tell you that your ISDN card has been detected.
Press “Next>”
Page 10
Quick Start Guide
9
2. Insert the installation CD into the CD-ROM drive (D:,
or E:, etc.). Select “
Specify a location
” and browse for
“D:\Driver\Win2000” (D: represents your CD-ROM
drive). Click “OK”.
3. After pressing “Next >” for the next screen, click
“Yes” if windows titled “Digital Signature Not Found”
appear. Then, press “Finish” to end the installation.
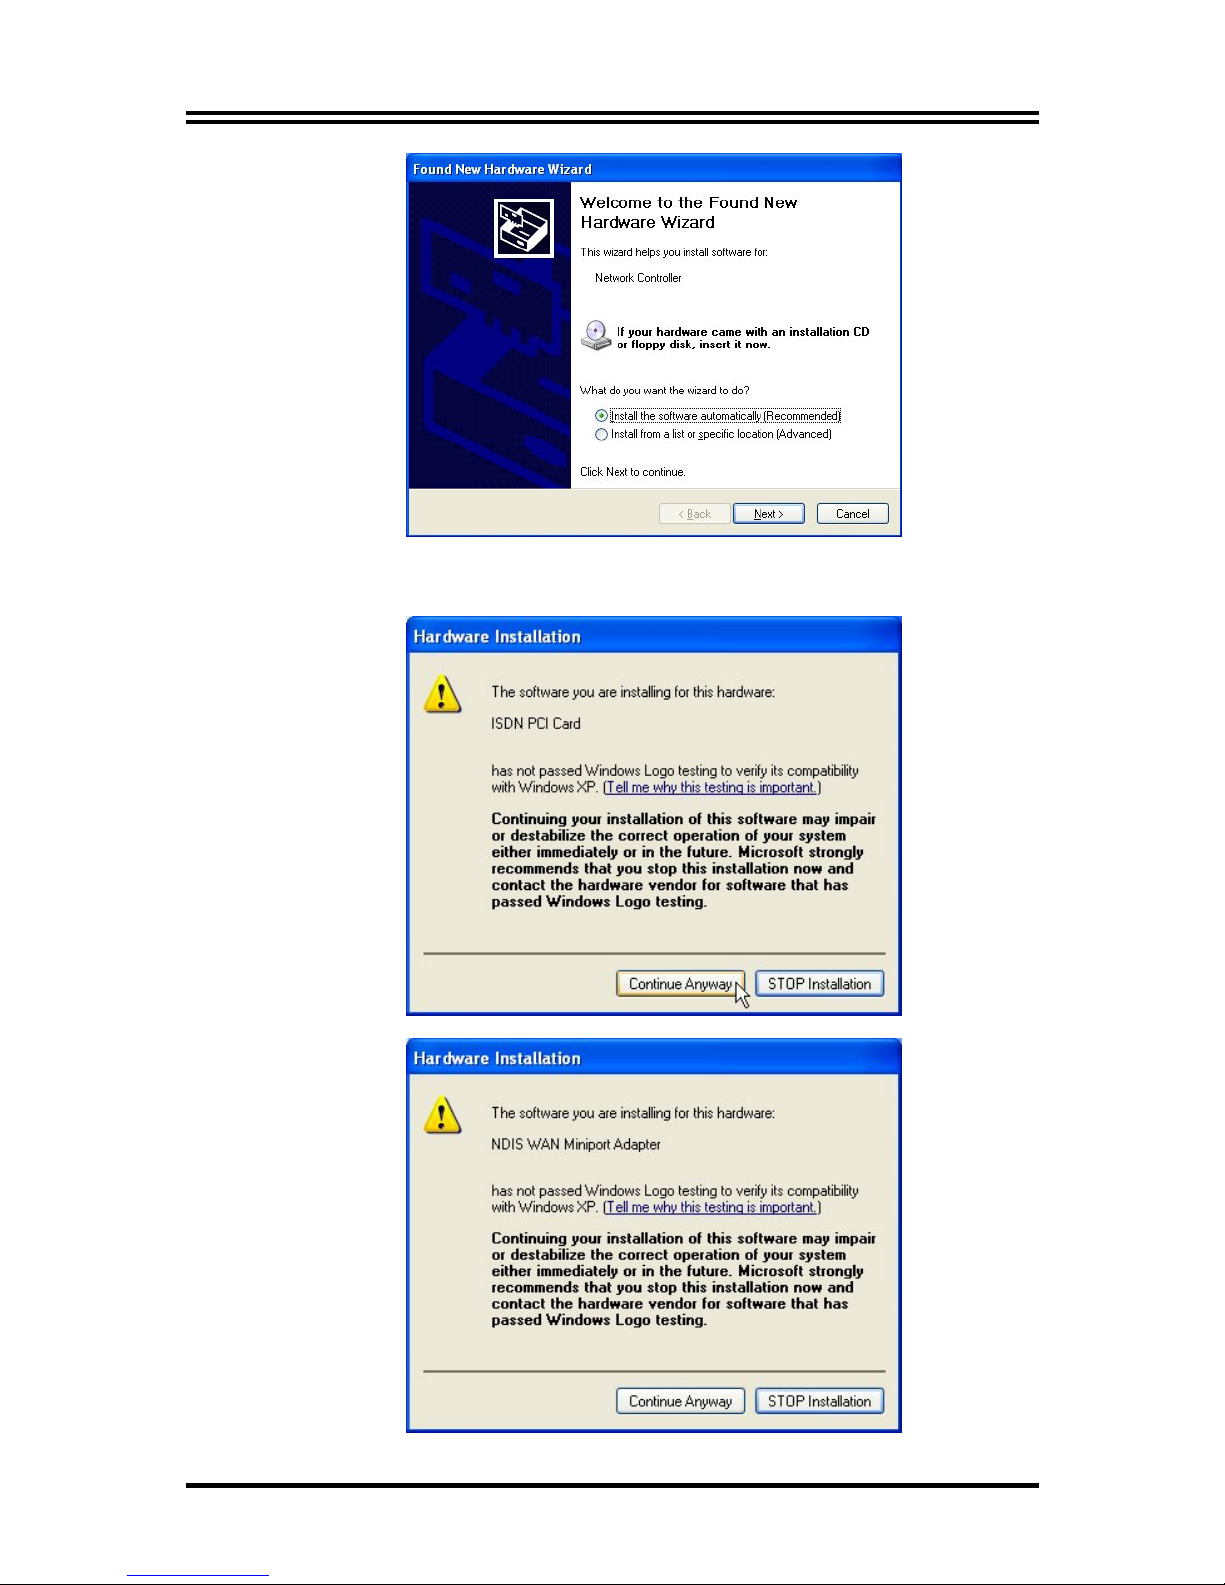
For Windows XP:
1. Start Windows. After the opening banner, Windows
will tell you that your ISDN card has been detected.
Press “Next>”
Page 11
ISDN PCI card
10
2. Click “Continue Anyway” to continue the installation.
Page 12
Quick Start Guide
11
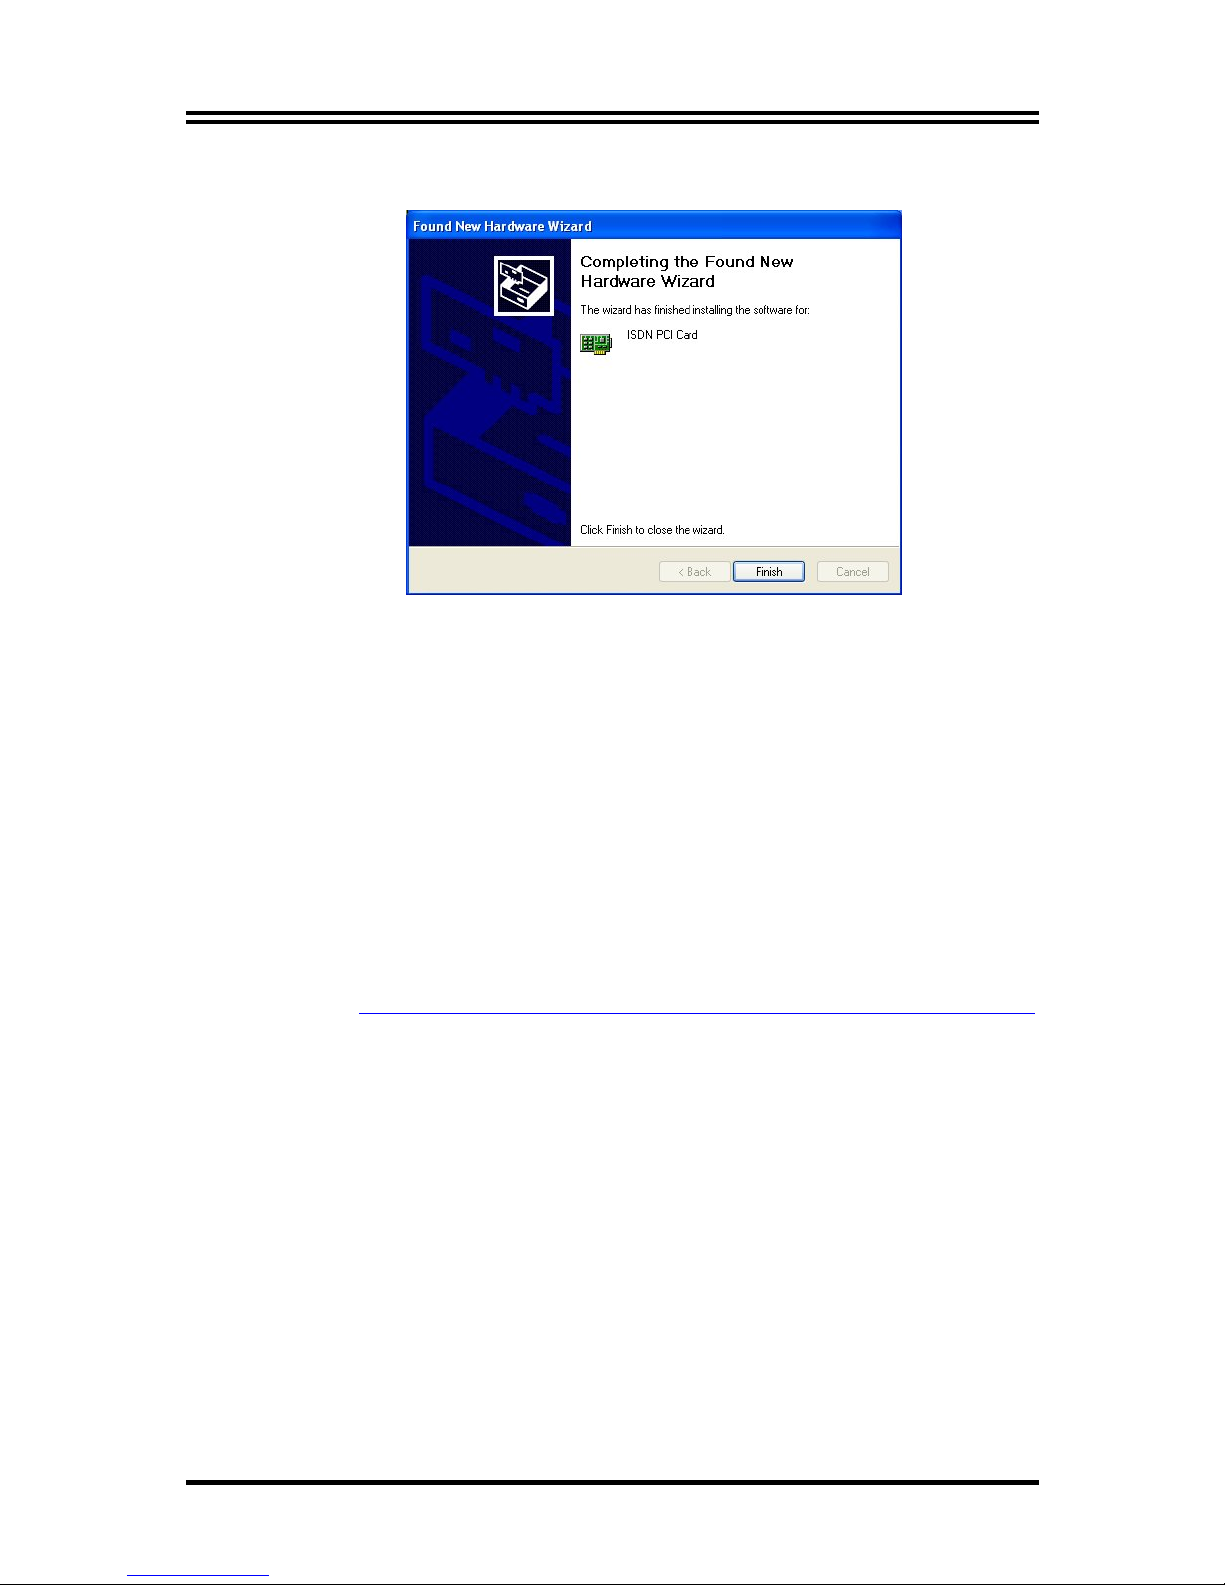
3. Press “Finish”.
For Linux:
1. The Linux support for the ISDN PCI card comes with
the Isdn4Linux package. First, you have to
reconfigure the kernel to make the HiSax module be
compiled with “Support for HFC PCI-BUS cards”.
2. You can patch your kernel with the latest ISDN
kernel tree using the current CVS sources. Please
refer to
http://www.linuxdoc.org/HOWTO/Kernel-HOWTO.html
if you are not familiar with configuring and
compiling the Linux kernel.
3. If you compiled the HiSax driver as kernel module,
you have to load it with the following commands:
/sbin/insmod/lib/modules/2.2.10/misc/isdn.o
/sbin/insmod/lib/modules/2.2.10/misc/hisax.o
id=HiSax type=35 protocol=2
4. If the kernel loads the HiSax driver, output in the
message file will show up. Then, the hardware is
installed.
Page 13
ISDN PCI card
12
ISDN Utility and Diagnostic Program
The ISDN Utility includes helpful programs for the ISDN card,
such as a diagnostic program, a s tatus progr am, an uninstall ation
program, and an on-line manual.
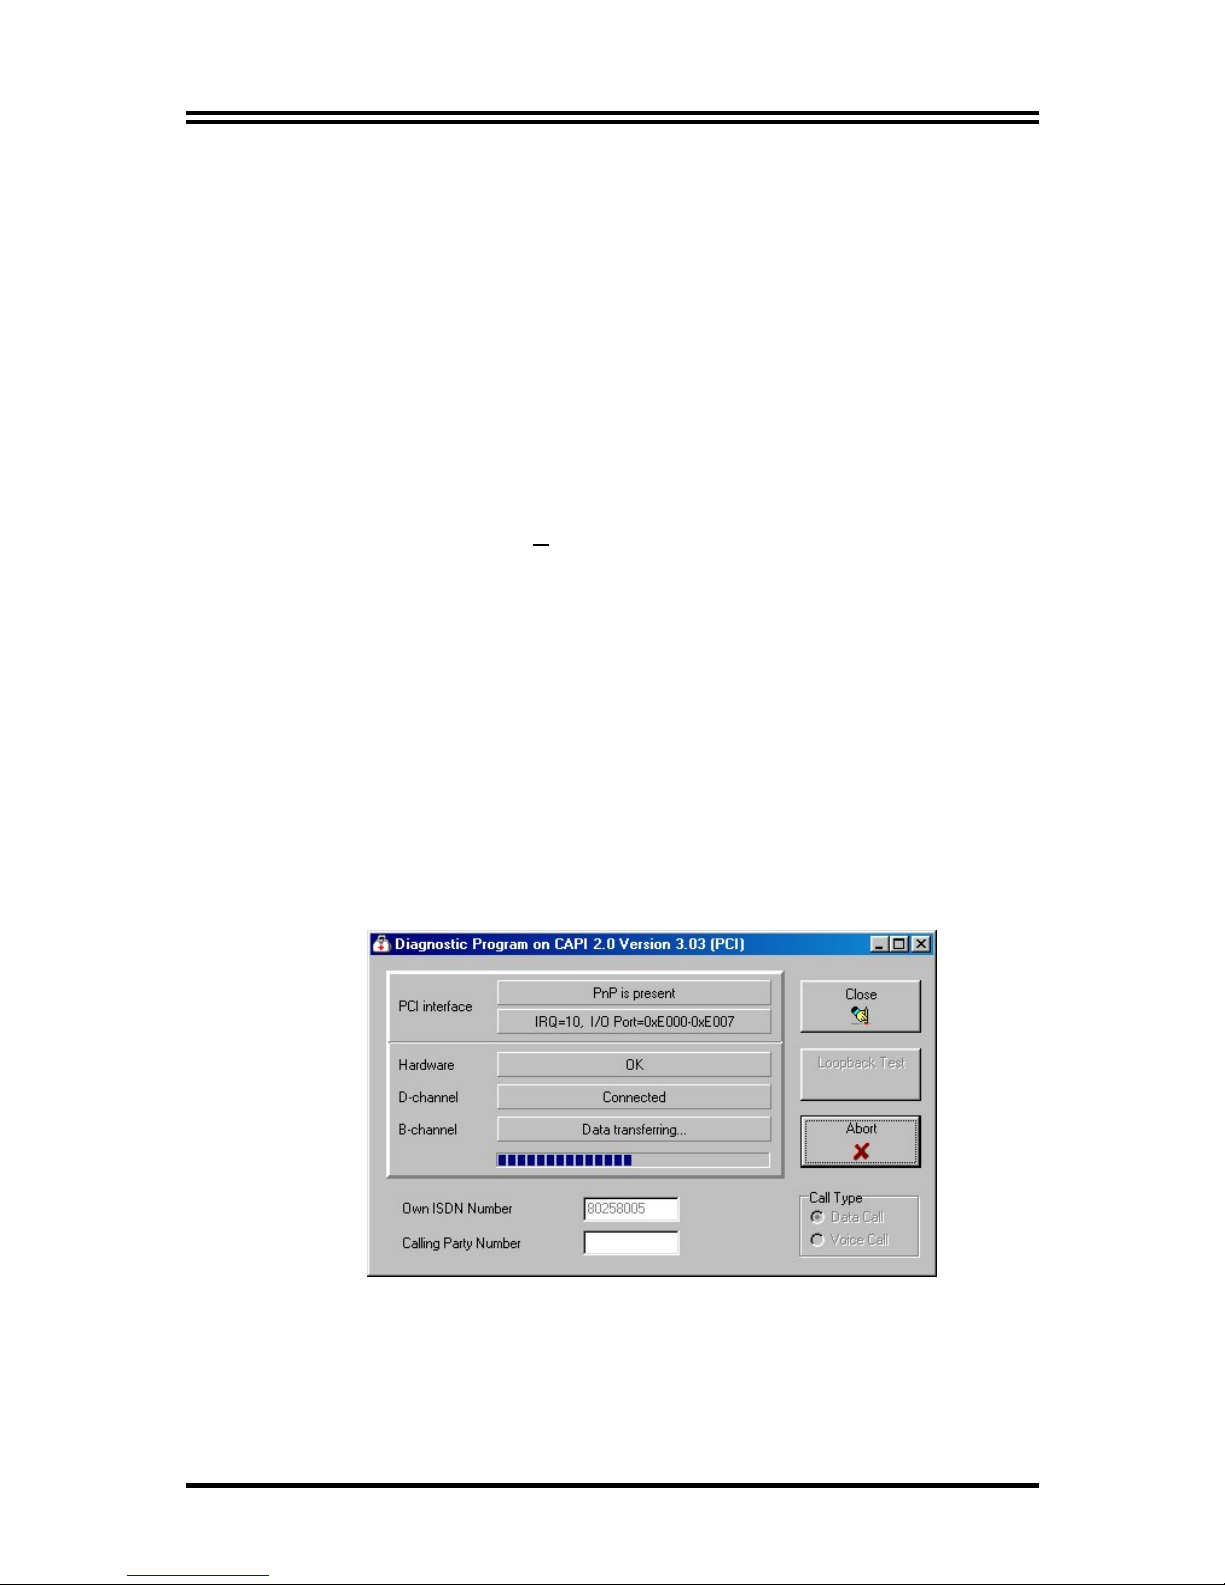
You are highly recommended to run the diagnostic program to
make sure the ISDN card, its drivers and the ISDN line are all
properly installed and connected. Please follow these
instructions:
1. Open the “P
rograms” folder on the “Start” menu and
click on the “ISDN Utility” program folder.
2. Click on the “Diagnostic Program” item to start the
program.
3. In the “Own ISDN Number” box, type in the subscriber
number of your ISDN line.
4. Press “Loopback Test” to begin the diagnostic
procedure. It will make a call from the B1 channel
that returns through the B2 channel. The D and B
channels will be tested for line integrity.
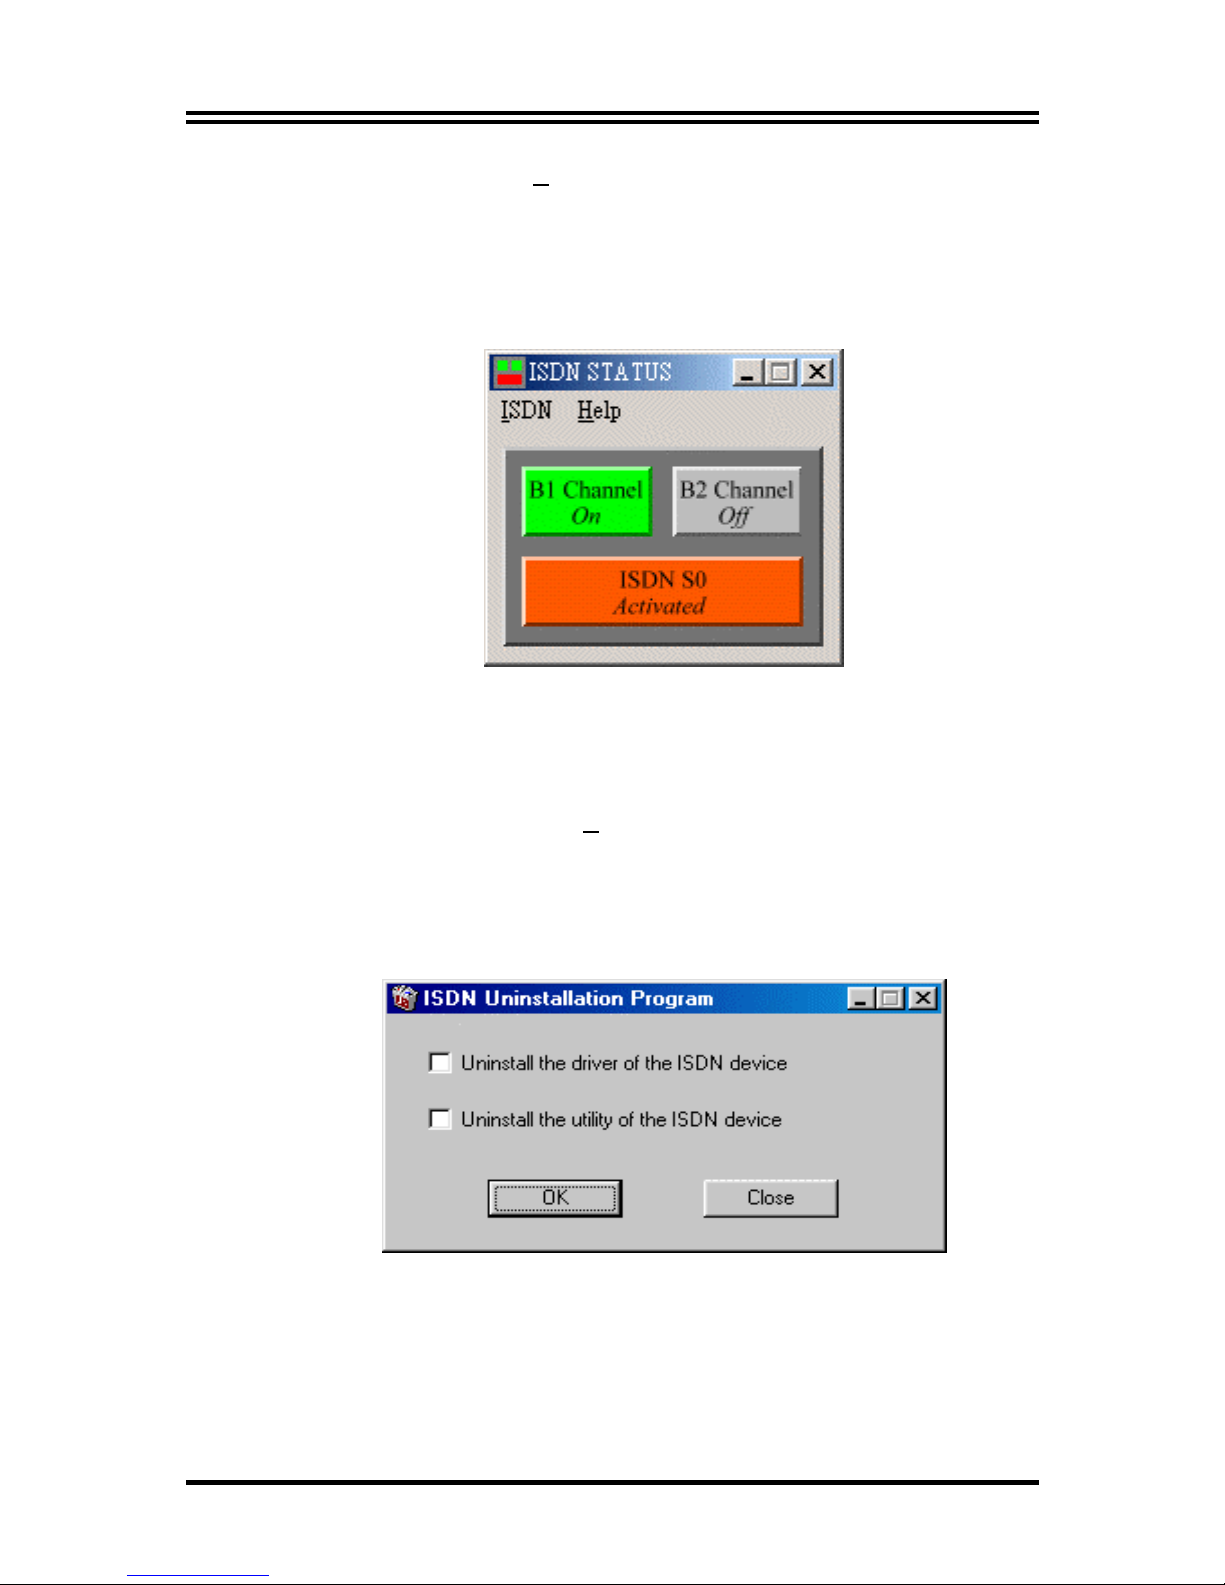
You can also run the ISDN Status program to check the status of
ISDN S0 line, B1 channel and B2 channel. Please follow these
instructions:
Page 14
Quick Start Guide
13
1. Open the “Programs” folder on the “Start” menu and
click on the “ISDN Utility” program folder.
2. Click on the “ISDN Status” item to start the program.
3. You should see the status like below.
Uninstalling the ISDN card
1. Click “
Start
”, “
P
rograms
” and click the “
ISDN Utility
”
item.
2. Click the “Uninstall DRV & UTL” item. The following
ISDN Uninstallation Program window opens.
3. Check the items that you want to completely uninstall
the driver and/or utility from the Windows system
and click “OK”.
Page 15

ISDN PCI card
14
Troubleshooting
If your ISDN card is not functioning properly, run the Diagnostic
Program to help you identify the problem.
Here are some basic faults that are often overlooked by users.
Follow these procedures for troubleshooting the ISDN card.
Error
Indication
Possible
Cause
Remedy
You are not
allowed to run
this program.
The CAPI2032.DLL
is not from the ISDN
package.
Uninstall and then
reinstall the ISDN
device.
A required DLL
file,
CAPI2032.DLL,
was not found.
The CAPI2032.DLL
is missing.
Uninstall and then
reinstall the ISDN
device.
CAPI driver is
not loaded.
The Registration key
has been destroyed.
Uninstall and then
reinstall the ISDN
device.
Please input
your own
number.
The subscriber
number of your own
ISDN line has not
been entered.
Key in the subscriber
number of your ISDN
line in the Own ISDN
Number box.
Cannot activate
S0 interface
The ISDN line is not
connected.
Ensure that the ISDN S0
line is securely
connected to the RJ-45
jack.
Cannot establish
LAPD link.
The ISDN line may
be malfunctioning.
Ensure that the ISDN S0
line is in good condition.
Page 16

Quick Start Guide
15
Error
Indication
Possible
Cause
Remedy
1. Own ISDN Number
is incorrect.
1. Ensure that your
ISDN number is
correct.
2. Other devices on
the same S
0
line are
occupying the B
channel.
2. Be sure no other
device is on the same
S
0
line and occupying
the B channel.
Connecting fail.
(error code =
xxxx)
3. The I S DN protocol
is wrong.
3. Check to see if the
ISDN protocol
configuration is
correct.
Data transfer
error.
The ISDN line is not
in good condition
Check the ISDN line.
 Loading...