

Bike Friday Pocket Rocket Pro, Pocket 8, Pocket Companion, Pocket Llama, New World Tourist User Manual
...Page 1
Using Your Bike Friday®:
• Pocket Rocket™ • Pocket Llama
™
• Pocket Rocket Pro™ • Pocket Gnu
™
• Pocket Crusoe™ • New World Tourist
™
• Pocket Companion™, Sport™ , Expedition™ , Pocket 8
™
Green Gear Cycling, Inc.
3364 W 11th Ave. Eugene, OR 97402
800-777-0258 USA & Canada
+1-541-687-0487 Int’l
+1-541-687-0403 Fax
www.bikefriday.com • [email protected]
7/16/10
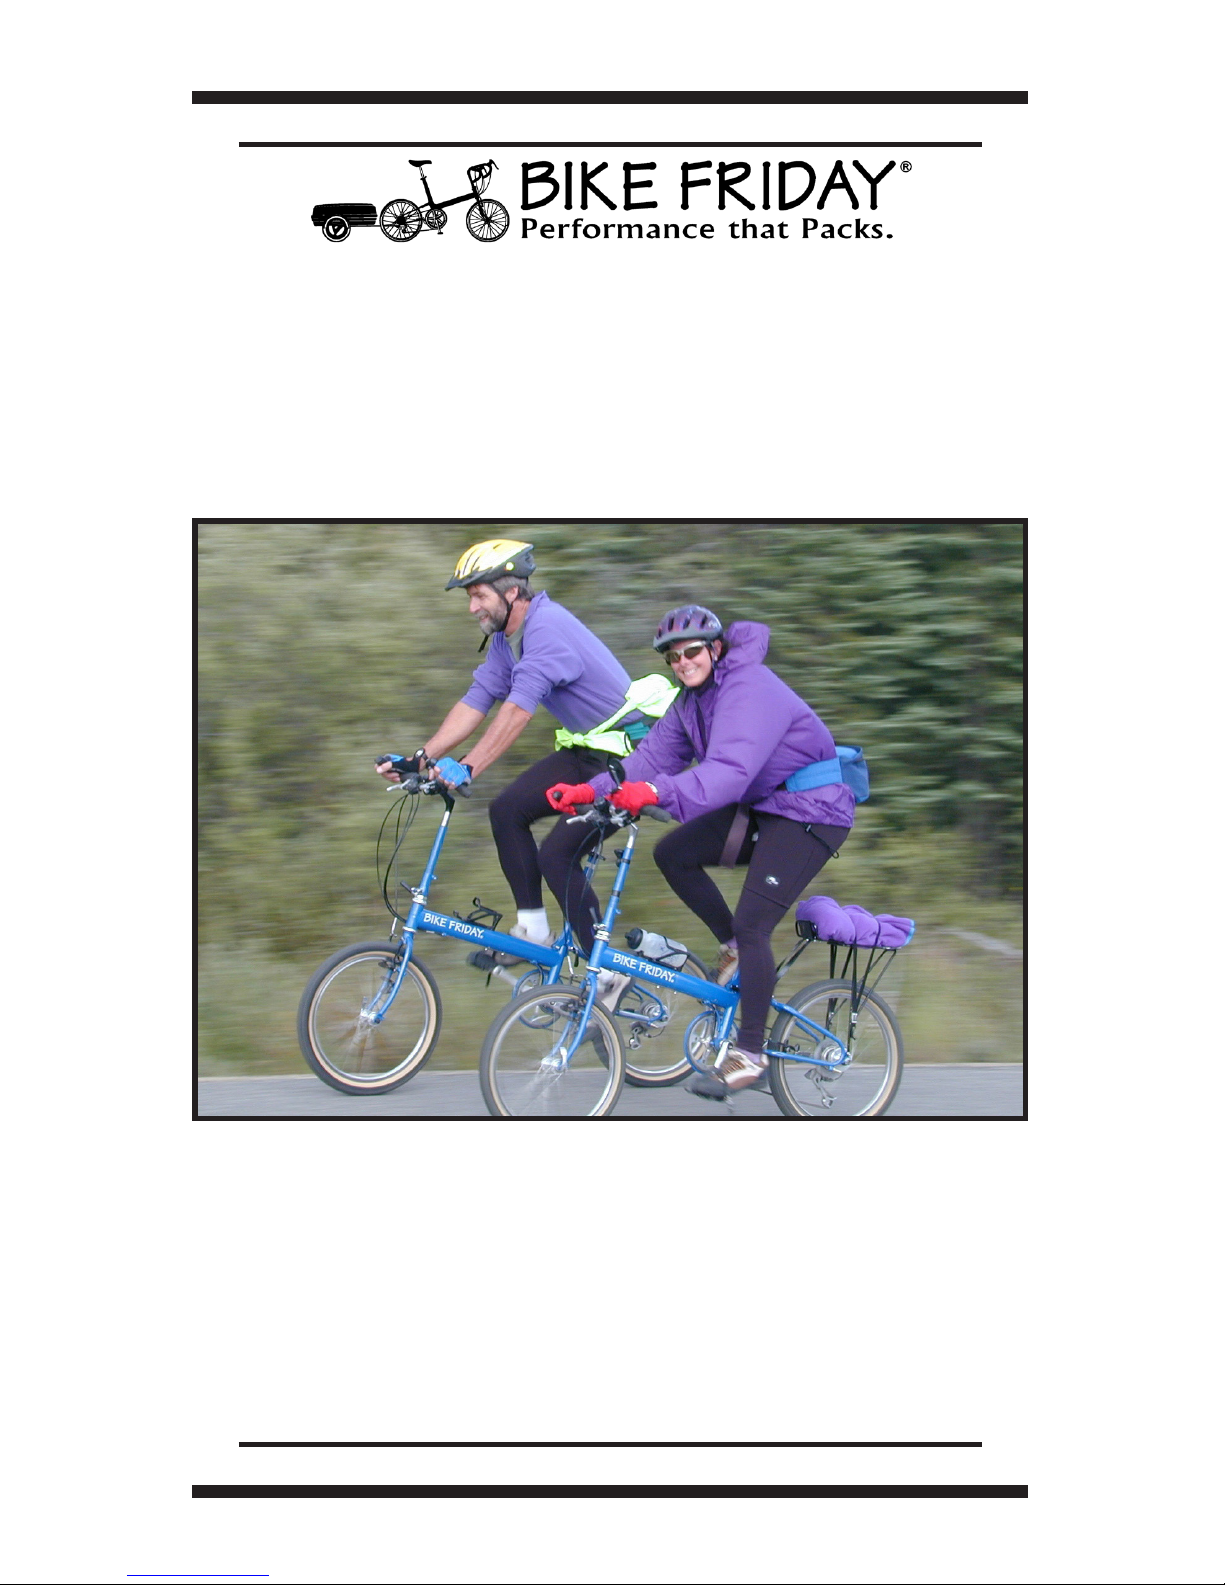
Pocket Llama owners Nina Tartako & Richard Kemnitz escape the winter freeze of
hometown Fairbanks, AK and head for Mexico.
Page 2
2
www.bikefriday.com 800-777-0258 • +1-541-687-0487
Extra Accessories
We also sell an extensive (and growing!) line of bicycle and travel
accessories. Whether you are riding the local back roads or venturing into foreign lands we have the gear you need. Call us for info on
spare tires & tubes, replacement parts, fenders, racks, bags, or other
items to complete your Travel System.
Congratulations!
You have just purchased the nest travel bicycle available today.
Your bike has been carefully designed and constructed for your
personal travel needs. All of our bikes are manufactured in our
Eugene, Oregon factory by real cyclists who care about our customers and our products.
Please take your time reviewing this manual and, if possible, watch
the video before you assemble your new Bike Friday travel bicycle.
You will nd your new bicycle simple and reliable anywhere you
go!
More Information
To check out our products, nd other useful information, discover
Bike Friday events and Yak with other Bike Friday owners on the
bulletin board, go to our main web site at www.bikefriday.com. Or
just call us at 800-777-0258.
Blue skies and happy trails from the gang at Green Gear Cycling.
If You Need Help . . .
If you need technical assistance with any Green Gear® Cycling
product, or are unclear on the proper operation of your Bike Friday
travel bicycle, please call us and a Service Technician will help you
get back on the road. Our toll-free number in the US and Canada
is 800-777-0258, international is +1-541-687-0487. Normal business
hours are 8 a.m. to 5 p.m. Monday through Friday, and 9 a.m. to 4
p.m. Saturdays, Pacic Standard Time. You can also email service
questions to [email protected].
Because we understand the needs of world travelers, we oer
24-hour technical support in emergencies. If necessary, please call
our regular number and our answering service can forward you to
a Service Technician on call.
Page 3
3
www.bikefriday.com800-777-0258 • +1-541-687-0487
Table of Contents
A Word on Safety 4
Anatomy of a Bike Friday Bicycle 5
Using a Quick Release 6
Getting Started 8
Assembly: Unpacking 9
Unfolding 11
Easy pack Seat Masts 12
Pocket Gnu Fork 13
Open Front Brake 15
Install Front Wheel 16
Install Stem 17
Handlebars 19
Seat Post & Saddle 20
Install Pedals 21
Packing: Pedals & Seat Post 22
Remove Front Wheel 23
Remove Handlebars 24
Remove Stem 25
Fold Frame 26
Place Bike in Case 27
Handlebars 28
Wheels 29
Accessories 30
Quick Fold 32
Accessories: TravelTrailer 36
Rear Rack 40
Front Rack 42
Fenders 44
Fit Stem 45
DualDrive™ Hub 46
Trouble Shooting 51
Bike Friday Service 52
Travel Tips 53
Warranty Information 54
Page 4
4
www.bikefriday.com 800-777-0258 • +1-541-687-0487
A Word on Safety
Bicycles are a lot of fun, but not free of hazards. Please
always ride safely!
• Always wear a helmet.
• Follow the rules of the road, and be courteous.
• Use front and rear lights after dark.
• Dress appropriately for the weather and the season, and
visiability.
• Always carry a spare tube, patch kit, pump and a tool kit.
• Keep your bicycle in good shape.
• Check your tire pressure before every ride.
• Make sure all quick releases are secure!
• Have your bicycle routinely serviced for trouble-free travels.
Your Tools
All Bike Friday travel bicycles are delivered with a combination 5/6mm S-wrench that is attached to your water
bottle cage. This wrench should get your new bike on
the road (along with your own pedal wrench). Leave it
in your bottle cage so that you always have it handy.
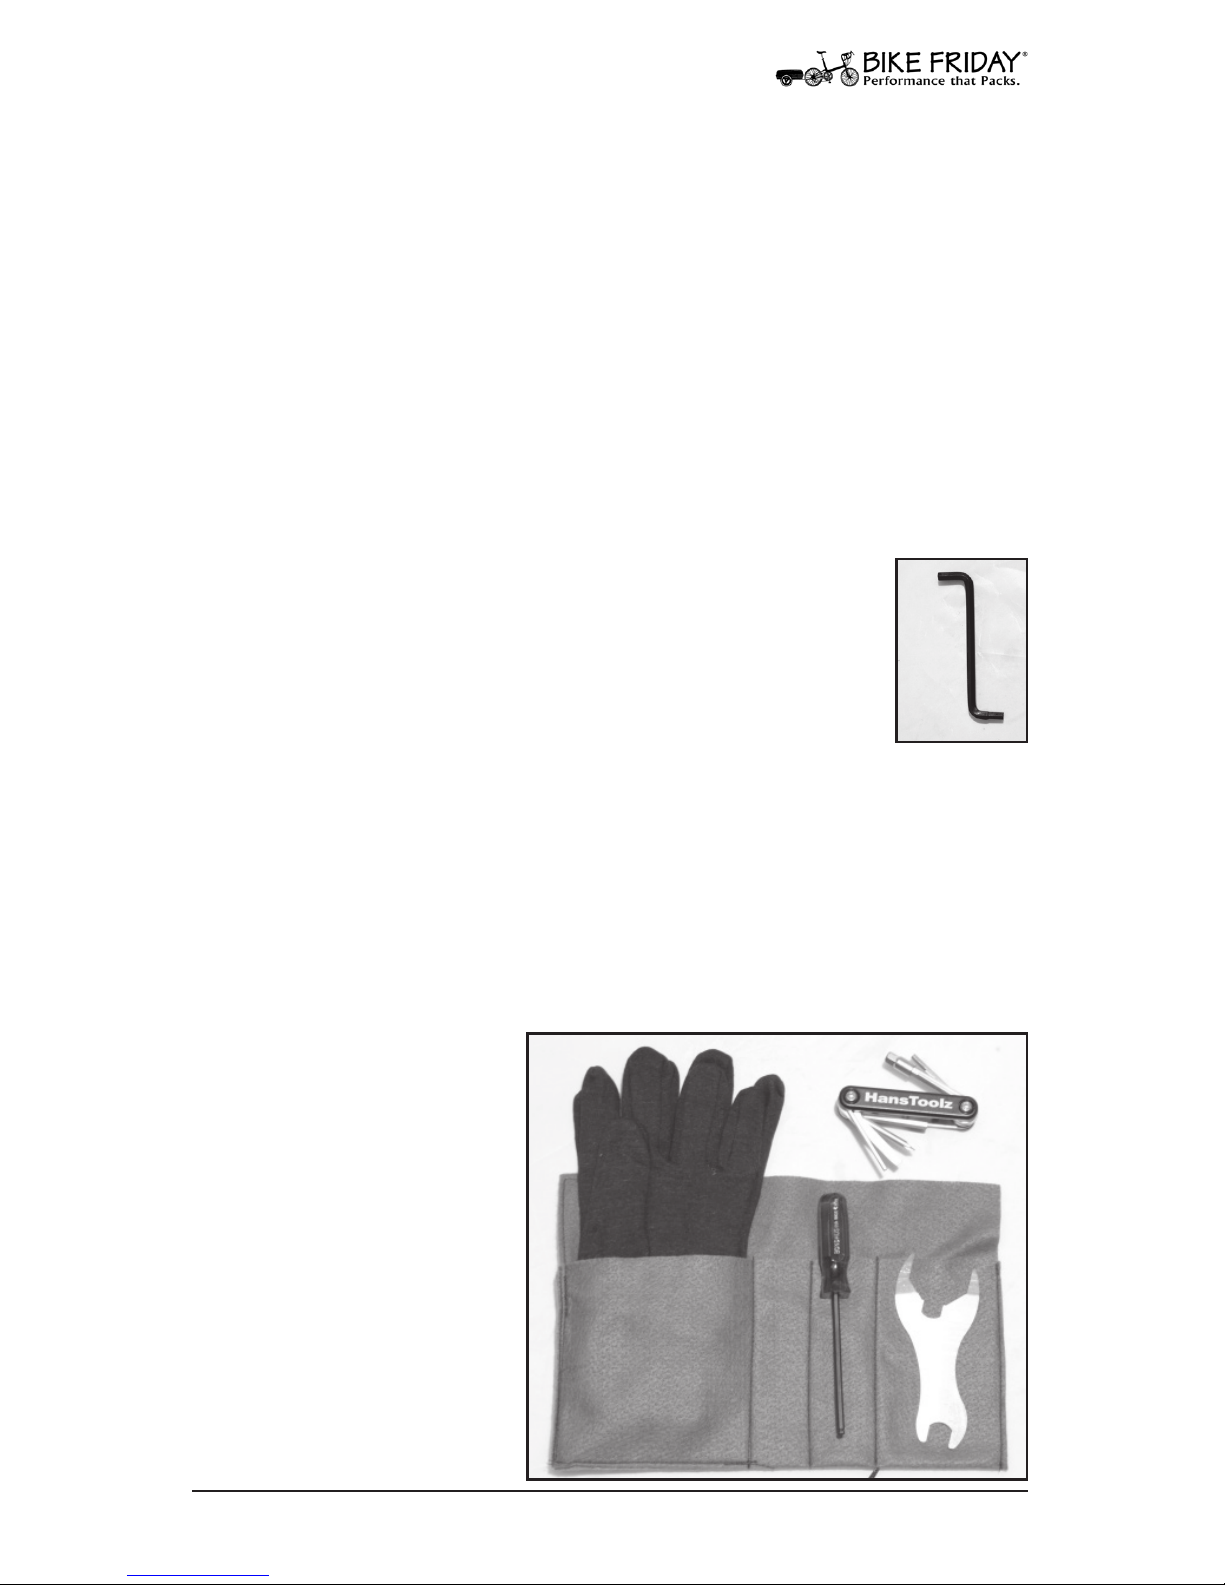
All bikes ordered with a TravelCase™ suitcase also come with a
tool pouch. In the tool pouch you will nd some cotton gloves to
keep your hands clean, a folding tool set, a combination headset
and pedal/axle nut wrench (15mm), and a 4mm ball-end driver.
The ball-end driver is perfect for mounting bottle cages, racks, and
other accessories.
We also sell more extensive tool kits for home
repair work. We encourage you to learn how to
work on your own bike. If
you are not familiar with
bicycle maintenance, consider taking a local class.
It will improve your condence and self-suciency
as you venture across the
globe.
Page 5
5
www.bikefriday.com800-777-0258 • +1-541-687-0487
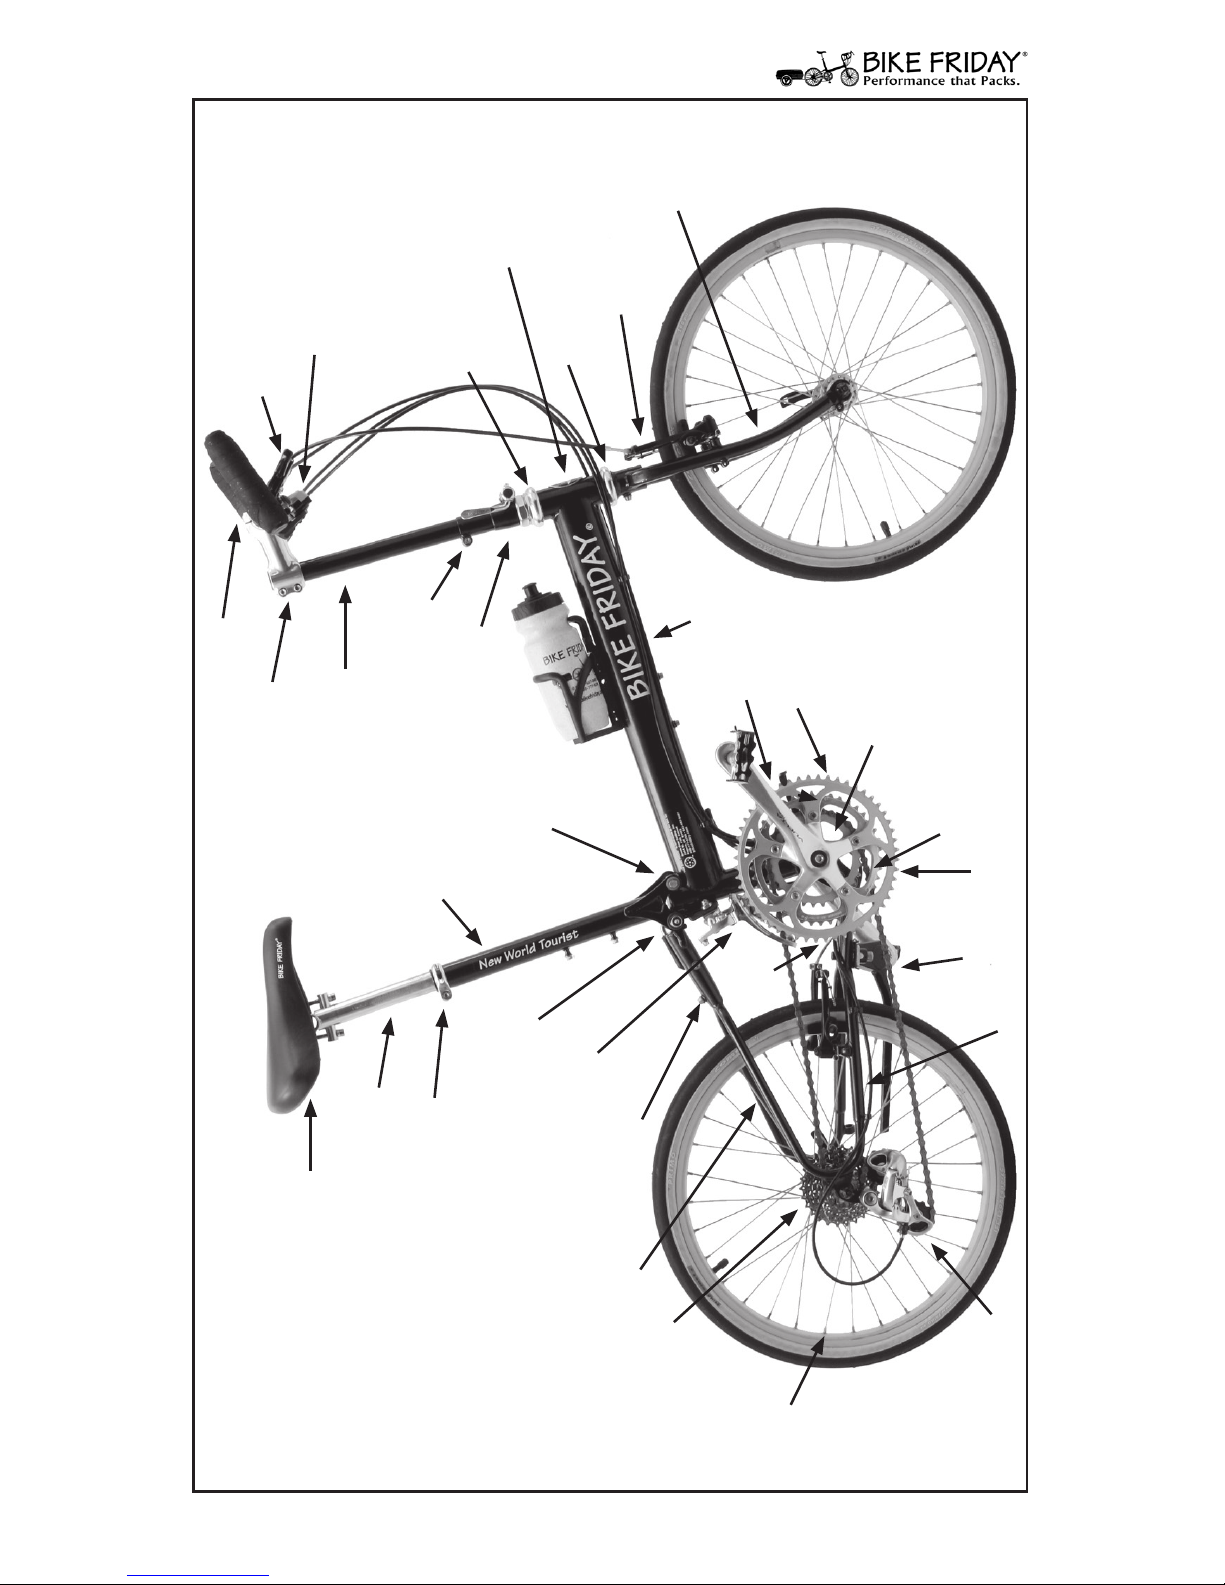
Anatomy of a Bike Friday Bicycle
Saddle
Seat Post
Seat Mast Clamp
Frame Quick Release
WishboneSeat Stays
Seat Mast
Seat Mast Hinge
Cassette (Cogs)
Rim
Rear Derailleur
Chain Stays
Mono
Stay
Bottom Bracket
Mono-Tube
Stem Riser
Stem Collar (Clamp)
Handlebars
Stem
Brake Levers
Shift Levers
Head Set
(upper)
Head Tube
Fork
Bottom Bracket Hinge
Crank Arm
Chain Ring
Kick Stand
Front Derailleur
Adjustable Stem
Clamp (optional)
Head Set
(lower)
Front Brake
Frame # between cranks on
bottom bracket shell
Page 6
6
www.bikefriday.com 800-777-0258 • +1-541-687-0487
Using Those Nifty Quick Releases
On a cold and snowy day in the 1927 Gran Premio della Vittoria, a
tired and numb Tullio Campagnolo struggled with the frozen wing
nuts on his rear wheel while trying to change gears. In a moment
of frustration and inspiration Campagnolo envisioned the modern
quick release, and the bicycle world was transformed.
The quick release is one of those simple but great inventions that
really makes life better. However, if used incorrectly you can
potentially endanger yourself. Although a reliable and safe product, some people have been injured because they didn’t know how
to properly use this elegant device. Your Bike Friday travel bike
has several of them. If you are not familiar with their operation,
PLEASE study these directions carefully. If you are still unclear
on their operation, call us or contact your favorite local bike shop
before you ride!
Using a Quick Release
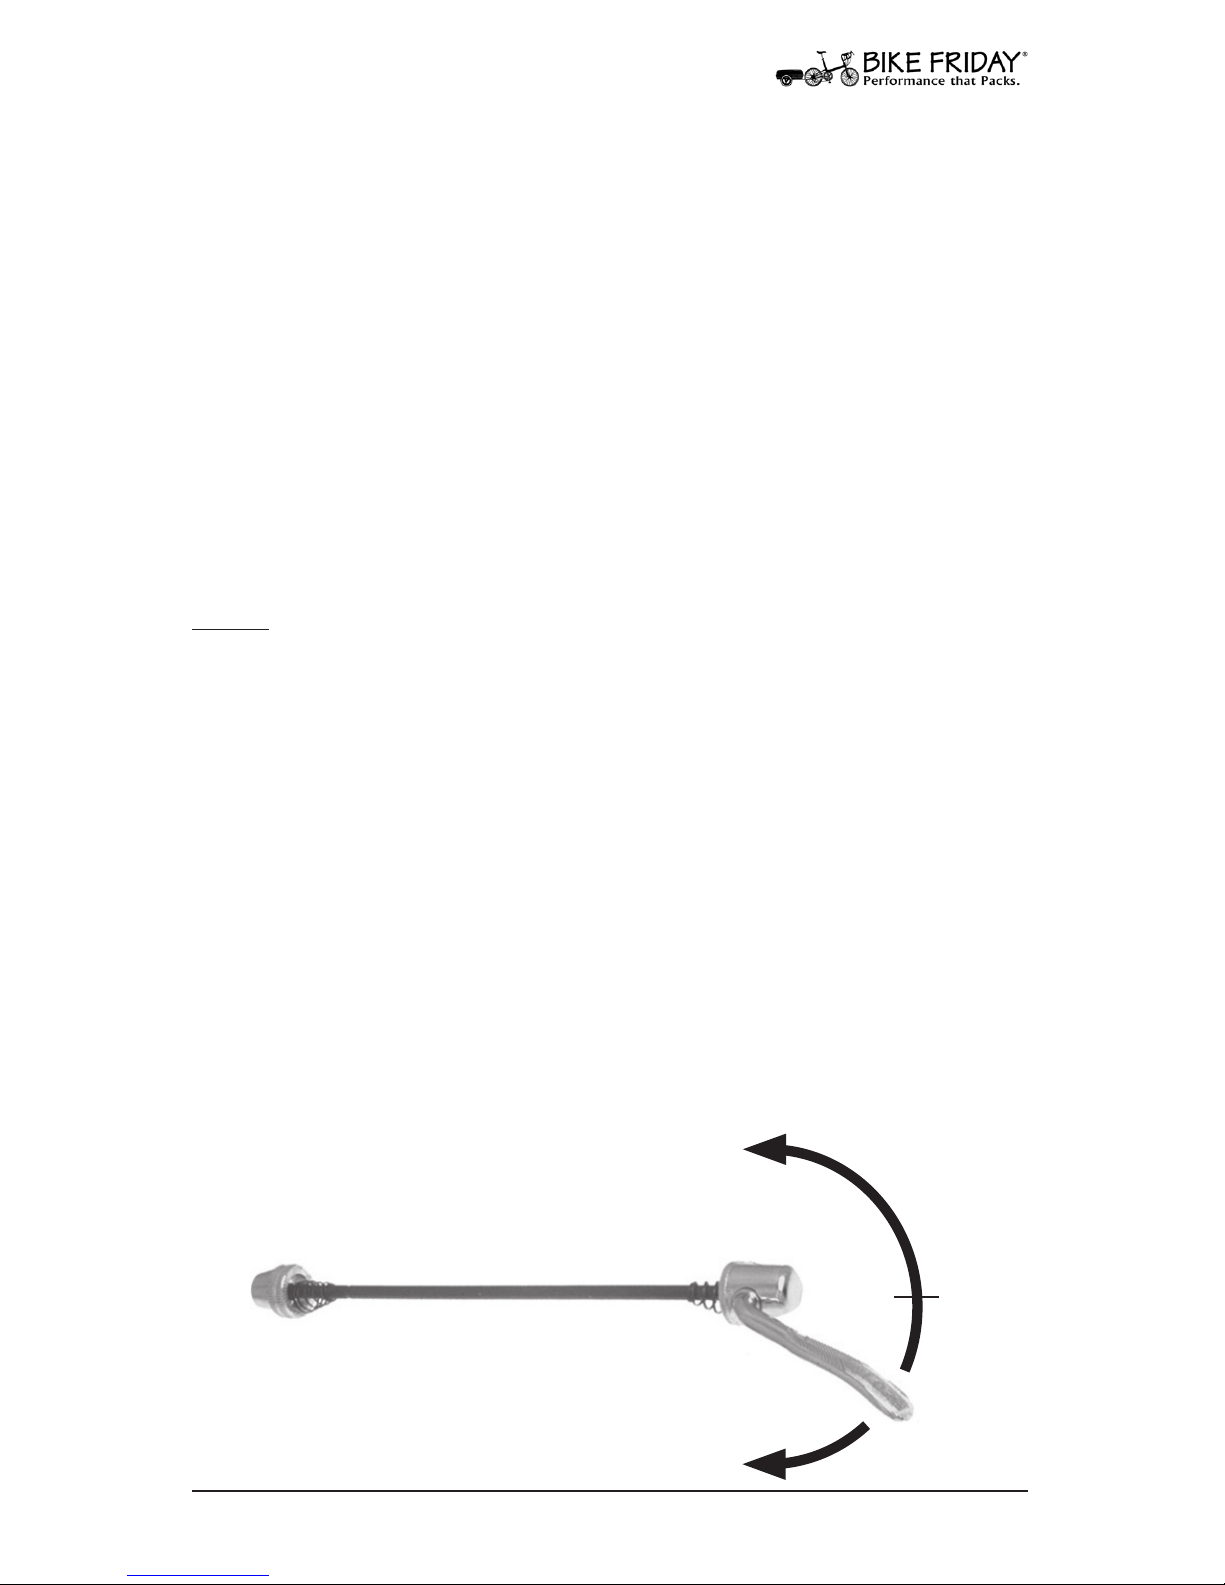
Quick Release Operation
A quick release is a simple cam with a lever that swings through an
arc that is square to the axle. As the lever moves the cam clamps the
wheel to the frame, or secures the frame joint. It is not a wing nut to
be rotated about the axle.
The tension on the quick release is controlled by how tight the
knurled nut on the other end is set. Only wheel quick releases have
the small cone-shaped springs. Note that the small ends of the
springs face toward the center of the hub.
Quick Release Maintenance
We recommend adding a few drops of light oil to the lever where
it enters the cap several times per year. This will keep your quick
release working smoothly for years to come.
Open
Closed
Knurled Nut
(adjust tightness here)
QR Lever
(Loose)
(Starts
getting
tight
here)
(Sti)
Page 7
7
www.bikefriday.com800-777-0258 • +1-541-687-0487
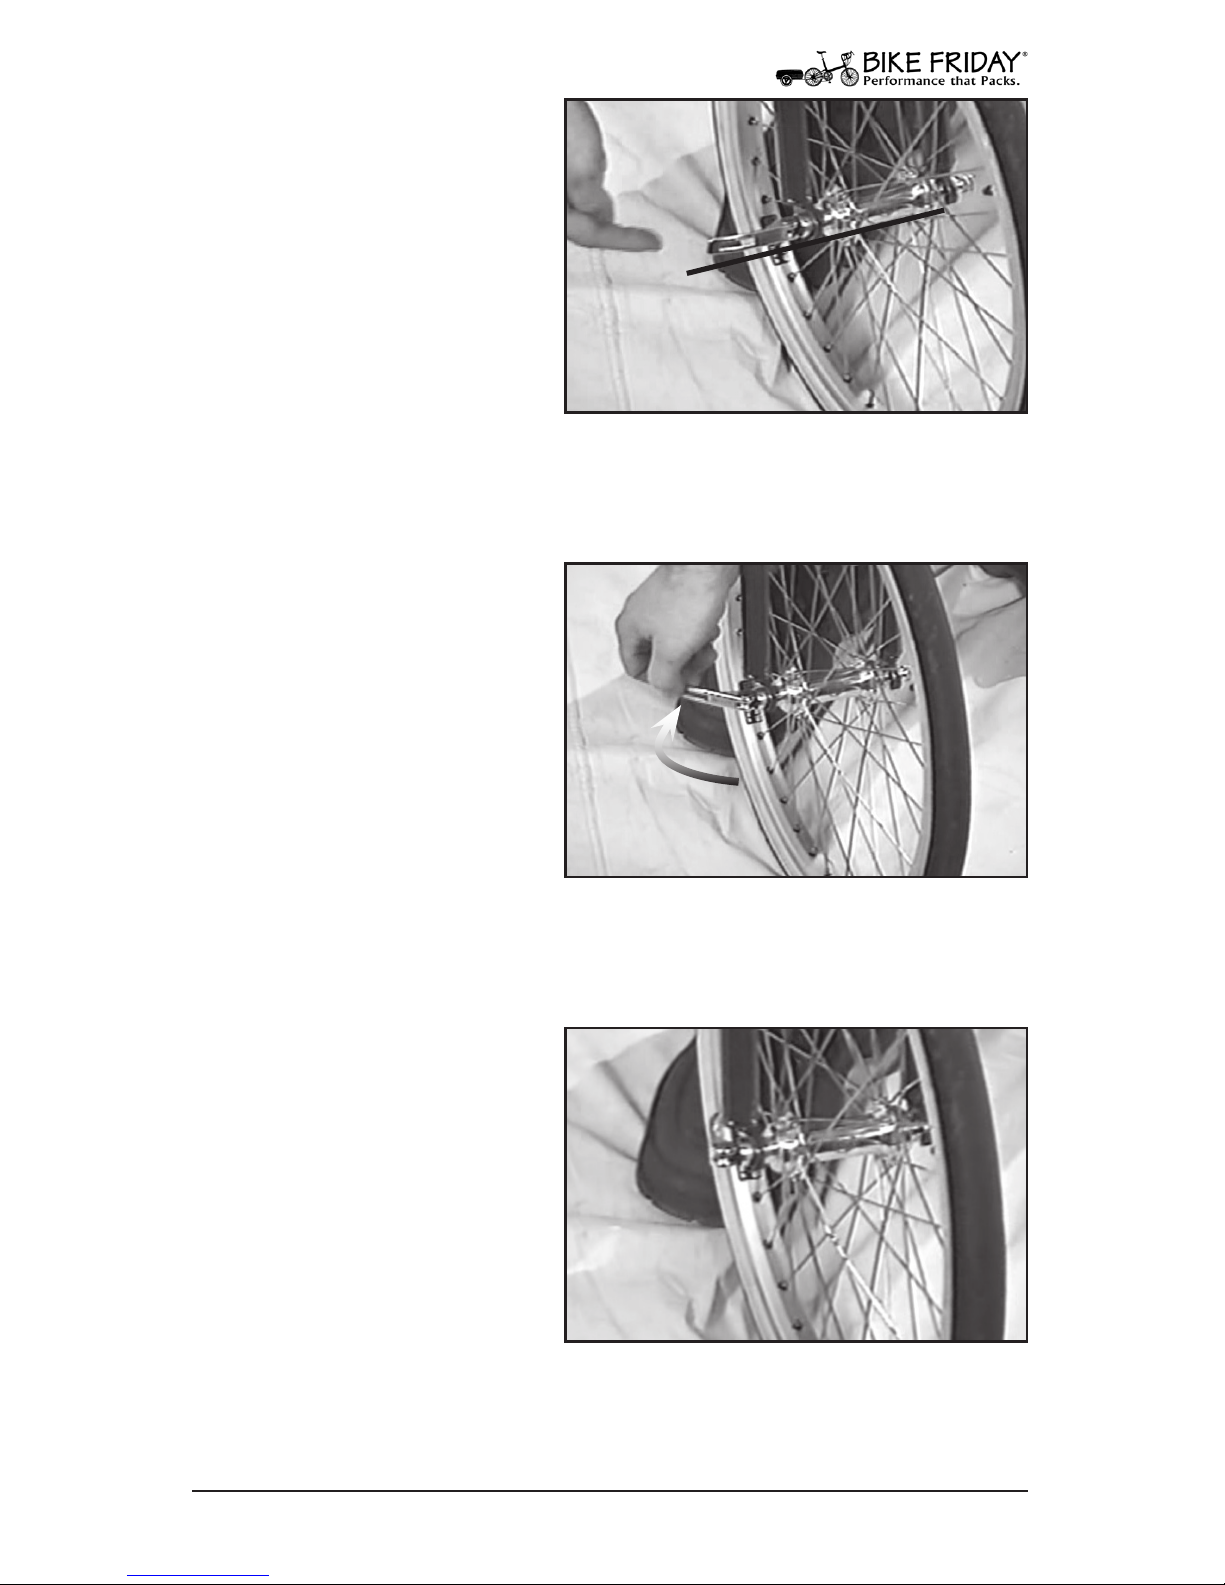
3. Double-Check!
Ideally, the QR lever should
be facing rearward, or
upward. Levers which are
facing forward can catch on
any number of things and be
accidentally opened.
Convention usually has the
front wheel quick release
lever on the left side of the
bike, although this is not critical.
Fig. 3 Closed QR pointing rearward.
Using a Quick Release
1. Adjust Knurled Nut
With the wheel installed and
the axle properly seated in
the frame (or the frame joint
closed), position the QR lever
so that it is in line with the
axle. Then turn the knurled
nut on the other side clockwise until it is snug. When
the QR is properly adjusted,
you should be able to freely swing the QR lever for the rst half of
its arc, at which point the lever should oer resistance.
Fig. 1 Quick release operation.
2. Continue Closing QR
Using the palm of your hand
press the QR lever through
the rest of its arc until the
lever is closed and parallel
to the wheel. You should feel
very rm resistance when
the QR is properly adjusted
(the lever may even leave a
light imprint in the palm of
your hand).
Fig. 2 Setting quick release tightness.
Page 8
8
www.bikefriday.com 800-777-0258 • +1-541-687-0487
Getting Started
Where to Begin
Opening your case for the rst time may present an intimidating
sight, particularly if you ordered many extra travel accessories with
your Bike Friday travel bicycle. Don’t worry, we work hard to keep
our products simple, and with a little practice you will nd that
using your new bicycle will become second nature to you.
We recommend nding a quiet area with access to the video,
these instructions, and some room to spread out. This manual
will address the fundamentals: packing and assembly tips and
techniques that are common to all of our travel bikes. However,
because this bike has been custom made for you, you may discover
that your bike was packed at the factory slightly dierent than
the one in this manual. Wherever possible, we mark any packing
materials unique to your bike.
Furthermore, you do not have to repack your bike in exactly the
same fashion. You may nd a better way of stowing your accessories, and we encourage you to experiment. If you discover a
particularly good way doing things, let us know. Some of our best
ideas have come from members of the Bike Friday family.
If you encounter diculties assembling your bike, and the manual
and video do not help, please call us. Our goal is to get you on the
road so that you can enjoy your custom made Bike Friday bicycle.
Illustrated Accessories
In order to illustrate the assembly and use of all of our travel accessories, the bike on the following pages has nearly everything we
could think of for a fully loaded tour. Your own bike may have only
a few or none of these accessories. If you ever choose to purchase
some of these accessories, this manual should help you pack the
extra items.
Bike Friday travel bicycles do not normally come with saddle or
pedals, unless you specically ordered them from us. However,
this manual shows them both to illustrate packing details.
Whether your own bike has drop handlebars or H-bars, V-brakes
or side-pull brakes, the assembly and packing steps are generally
the same. Because of component dierences, wrench sizes and the
number of bolts per clamp may vary from the illustrations.
Page 9
9
www.bikefriday.com800-777-0258 • +1-541-687-0487
Assembly: Unpacking
1. Open The TravelCase
Start by removing some of
the obviously loose items
from the case including
water bottles, accessible colored felt bags, trailer wheels,
the plastic pouch with extra
materials, and so on. Put the
accessories such as racks and
trailers out of the way for
now.
NOTE: If you did not purchase a TravelCase™ these instructions
will still help you unpack your Bike Friday from the box.
Fig. 1 The fully equipped travel bicycle.
2. Crush Protector
The crush protector is a PVC
dowel with a couple of at
caps on the ends. This piece
is a critical bit of packing
material: it spans the case so
that luggage dropped on top
of your bike is supported by
the dowel and not your bike.
The caps are lightly pressed
on—just pull the top cap o. Don’t worry if the dowel comes out
and the bottom cap is still in the case.
Fig. 2 Remove crush protector.
3. Remove Wheel & Bars
With the crush protector
removed, put the front wheel
nearby. The handlebars will
be in the left side of the case.
Pull them out, and let them
drape by the attached cables
over the left side of the case.
Fig. 3 Remove front wheel and bars.
Page 10
10
www.bikefriday.com 800-777-0258 • +1-541-687-0487
4. The Goodie Bag
There might be a better name
for this pouch, but we’ve
always called it the Goodie
Bag. This bag holds a variety
of miscellaneous loose items
for your new bike. This may
include the technical literature that came with your
components, spare spokes,
some labels and decals, The component literature is not required
reading, but we supply it for those who are technically inclined.
Fig. 4 The goodie bag.
5. Remove Tool Pouch
The tool pouch that comes
with the case is a light blue
colored felt bag with a cord
around it. Inside you should
nd a folding tool set with
all of the Allen wrenches and
screwdrivers you will need
to assemble your bike, a pair
of cotton gloves to keep your
hands clean, and a 4mm ball-end driver. Note: You will also nd a
combination 5/6mm S-wrench attached to your water bottle cage
for quick road-side adjustments.
Fig. 5 The tool pouch.
6. Stand Up Bike Frame
At this point you should be
able to stand the bike up,
still folded, in the case. If
you ordered a TravelTrailer
the long yellow felt bag with
the S-bend in it is the trailer
tongue. It was inserted
between the frame and rear
wheel when the bike was
packed. Remove the yellow trailer tongue bag and set it aside for
now.
Fig. 6 Stand up bike frame.
Assembly: Unpacking
Page 11
11
www.bikefriday.com800-777-0258 • +1-541-687-0487
7. Unfold Your Bike
Lift out your bike and unfold
it. The rear end of the bike
will swing around until the
rear end hinge tips engage
the quick release on the
frame (make certain the
frame quick release is open).
As you unfold your bike,
make certain the cable housing that goes around the bottom bracket does not get hung up on
the left crank arm or hinge.
Fig. 7 Unfold your bicycle.
Assembly: Unfolding
9. Secure Seat Mast
With the seat mast upright,
close the quick release. You
may be concerned about having a folding bicycle secured
with one quick release; however your Bike Friday bicycle
has been carefully designed
so that your weight tightens
this joint. The quick release
simply makes the bike easier to carry.
Remove packing materials from frame.
Fig. 9 Secure seat mast.
8. Unfold Seat Mast
With the rear end engaged,
lift the seat mast from its
stowed position along the
mono-tube and pull it fully
upright. The small fork tips
on the seat mast hinge will
overlap the rear end hinge
tips.
Fig. 8 Engage rear end hinge tips.
A
B
Page 12
12
www.bikefriday.com 800-777-0258 • +1-541-687-0487
12. Remove Fork Spreader
The PVC tube between your
fork legs is intended to help
prevent frame damage when
traveling. It is held in place
by the wheel’s quick release.
Open the quick release, unthread the knurled nut, and
put the fork spreader in the
tool pouch for future use.
Fig. 12 Remove fork spreader.
10. Easy Pack Seat Mast
Supplement
Rather than a hinged seat
mast like on the original Bike
Friday bicycle, the Easy Pack
Seat Mast bicycle models
have a sleeved seat mast that
telescopes out of the lower
seat tube.
If you bought a case with
your bike, the seat mast will be the painted tube (except for titanium
which is unpainted) in a grey felt bag. This conguration allows a
great deal of adjustment in saddle height for dierent sized riders
with the same bike. However, there is a minimum insertion mark
on the seat mast; at least the bottom four inches of the seat mast
should always be inside the seat tube.
Fig. 10 Pocket Bikes.
Assembly: Easy Pack Seat Mast
11.Easy Pack Style Seat Mast
For the Easy Pack Seat Mast
bicycles, the lower quick release
only clamps the rear end. A separate seat post collar on the seat
tube secures the seat mast. Both
quick releases must be closed
for safe riding.
Seat Mast
QR
Frame QR
Fig. 11 Secured seat mast.
Page 13
13
www.bikefriday.com800-777-0258 • +1-541-687-0487
Assembly: Pocket Gnu Fork
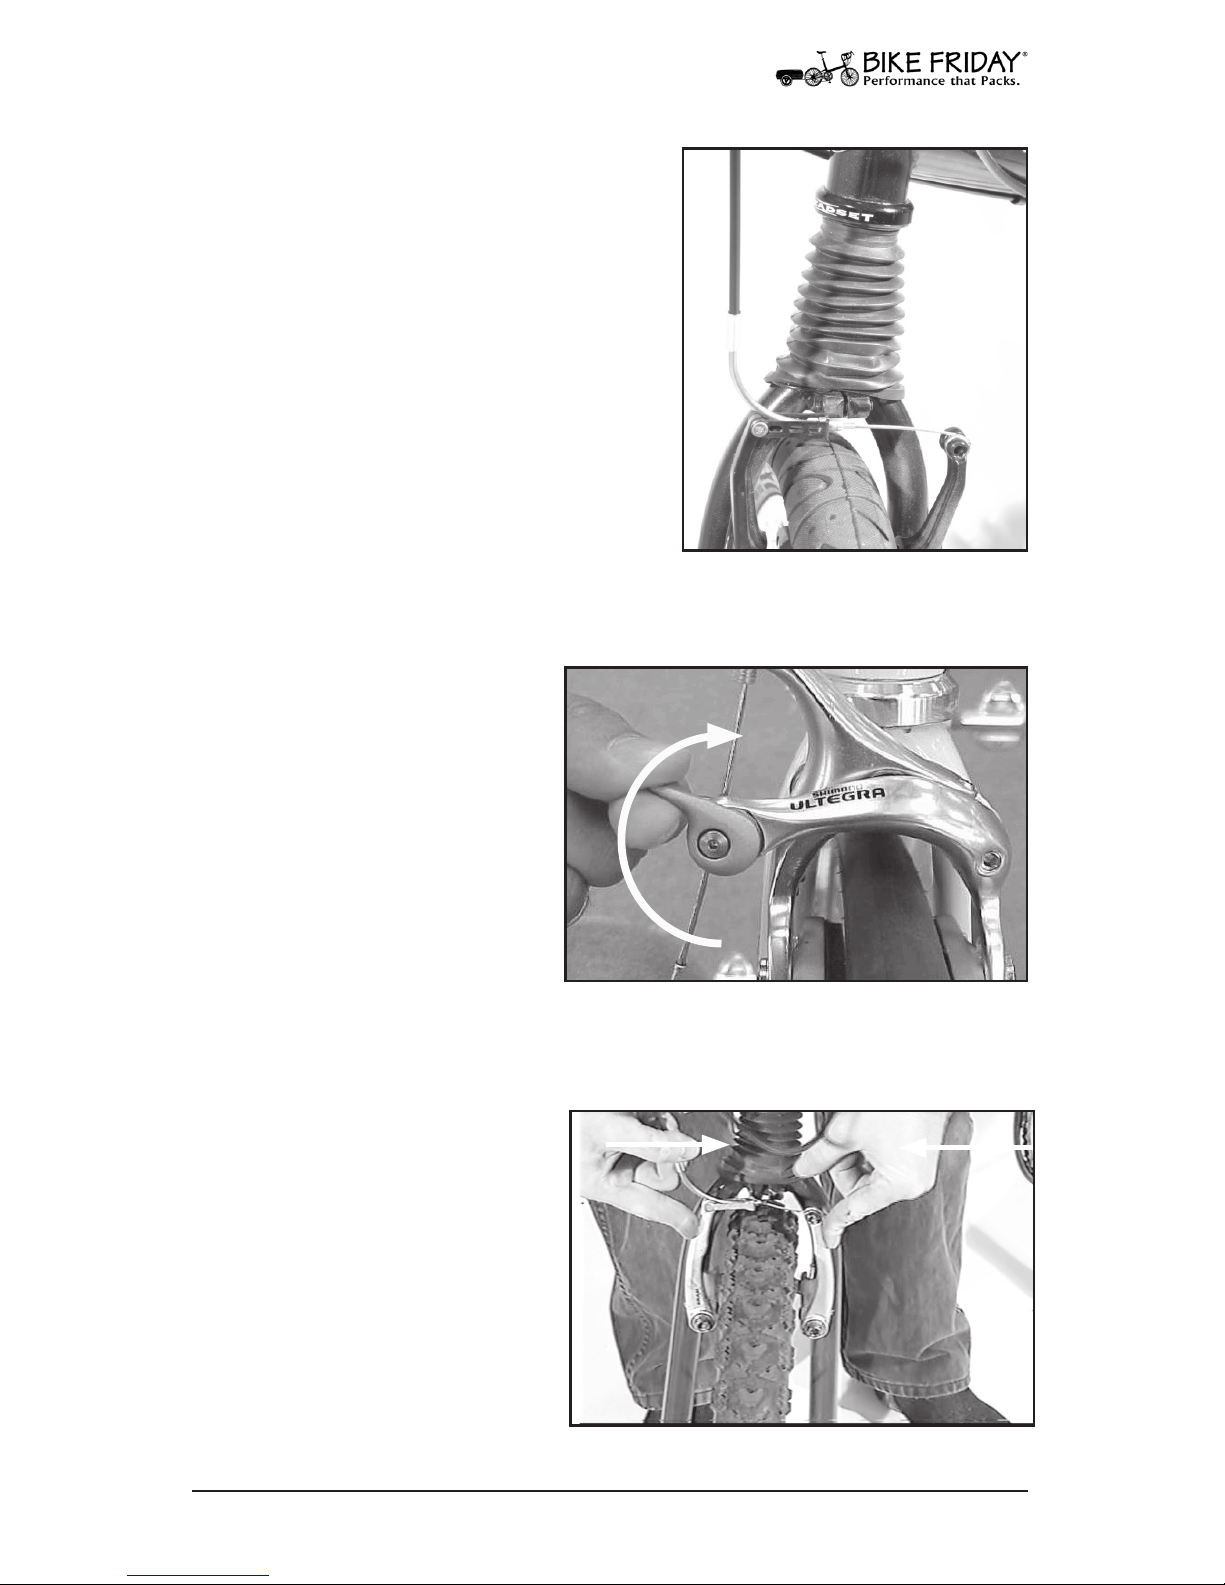
15. Tighten Fork Legs
With the fork legs properly on the
steerer, tighten both clamp bolts
securely.
Fig. 15 Tighten fork clamp bolts.
14. Pocket Gnu Suspension Fork
If you ordered a Pocket Gnu bicycle,
the fork legs were packed in a grey
felt bag and removed from the suspension steerer tube (the part that
goes through the headset bearings).
The fork legs slide up the grooved
steerer until the steerer is ush with
the bottom of the fork leg clamping
collar. Keep the fork legs roughly
aligned with the wide part of the
rubber dust sleeve.
Fig. 14 Suspension fork.
Insert end
of steerer to
bottom of
clamp.
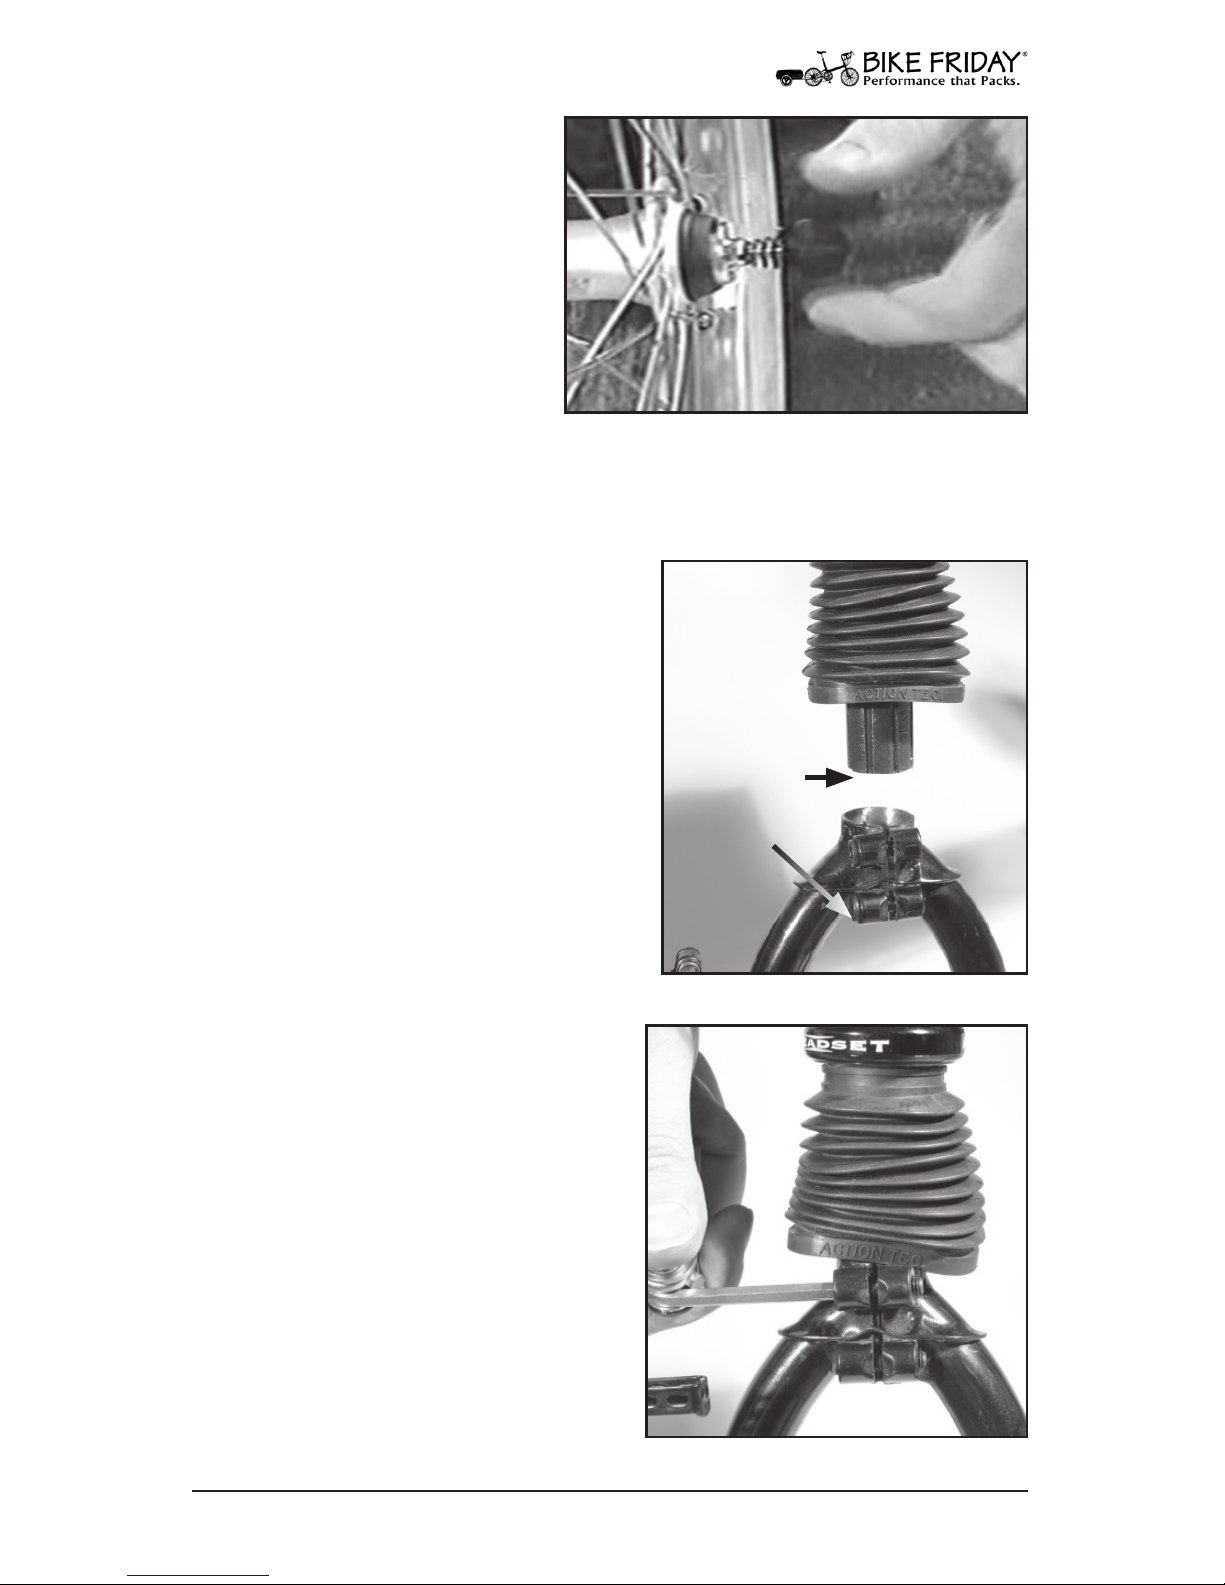
13. Install Wheel QR
Now install the quick release
from the fork spreader on the
front wheel. Make certain
that there is only one spring
per side and that the small
end of the spring is pointing
to the center of the hub on
each side. Loosely thread on
the knurled nut for now. Put
the wheel aside again.
Fig. 13 Quick release spring and nut.
Page 14
14
www.bikefriday.com 800-777-0258 • +1-541-687-0487
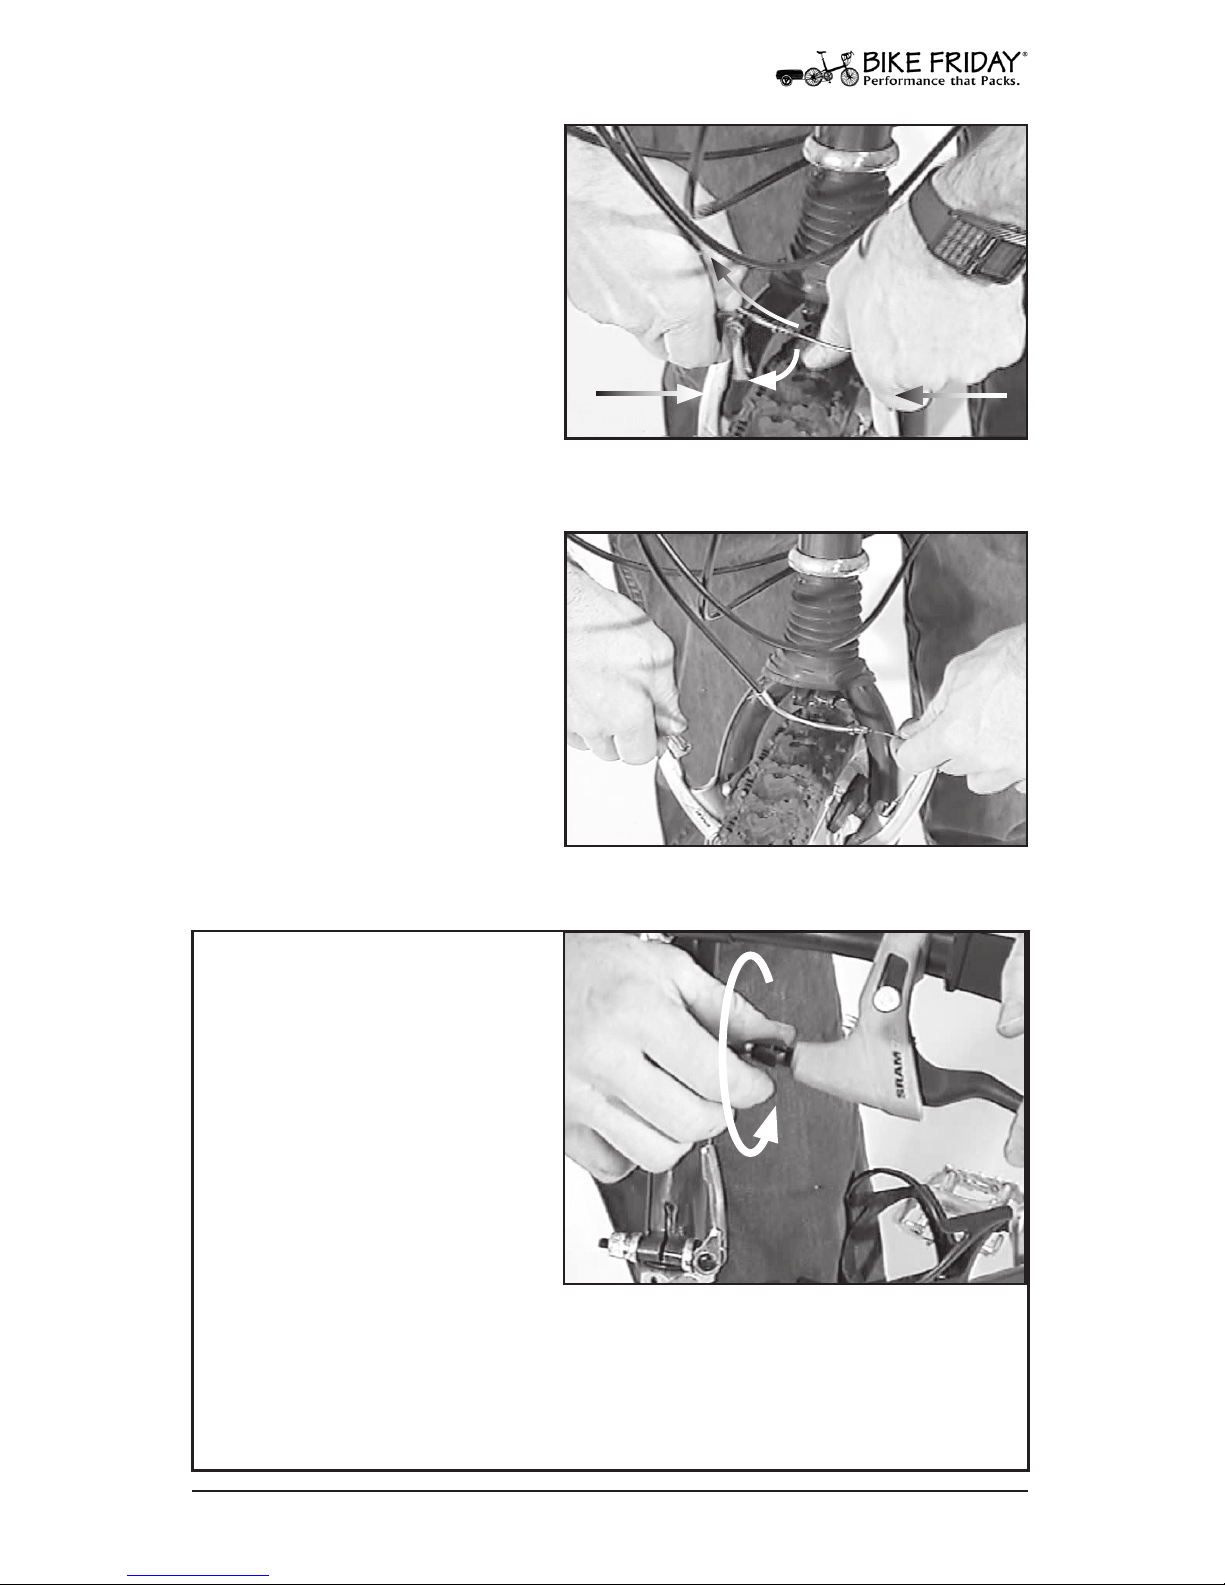
Fig. 18 V-brake
17. Open Front Brake
To install your front wheel,
you will need to open the
front brake to allow the tire
to pass by the brake shoes. If
your bike is equipped with
a side-pull brake, simply
move the small lever to the
up position.
Fig. 17 Opening side-pull brake.
18. Operating V- Brakes
If your bike is equipped with
V-brakes, start by pressing
the brake arms together.
16. Attach Dust Cover
Once the fork clamp bolts are tight,
pull the rubber dust cover down and
snap over the oval ring on the fork legs.
After the rst ride, check the tightness
of these bolts.
Fig. 16 Attach dust cover.
Page 15
15
www.bikefriday.com800-777-0258 • +1-541-687-0487
Assembly: Open Front Brake
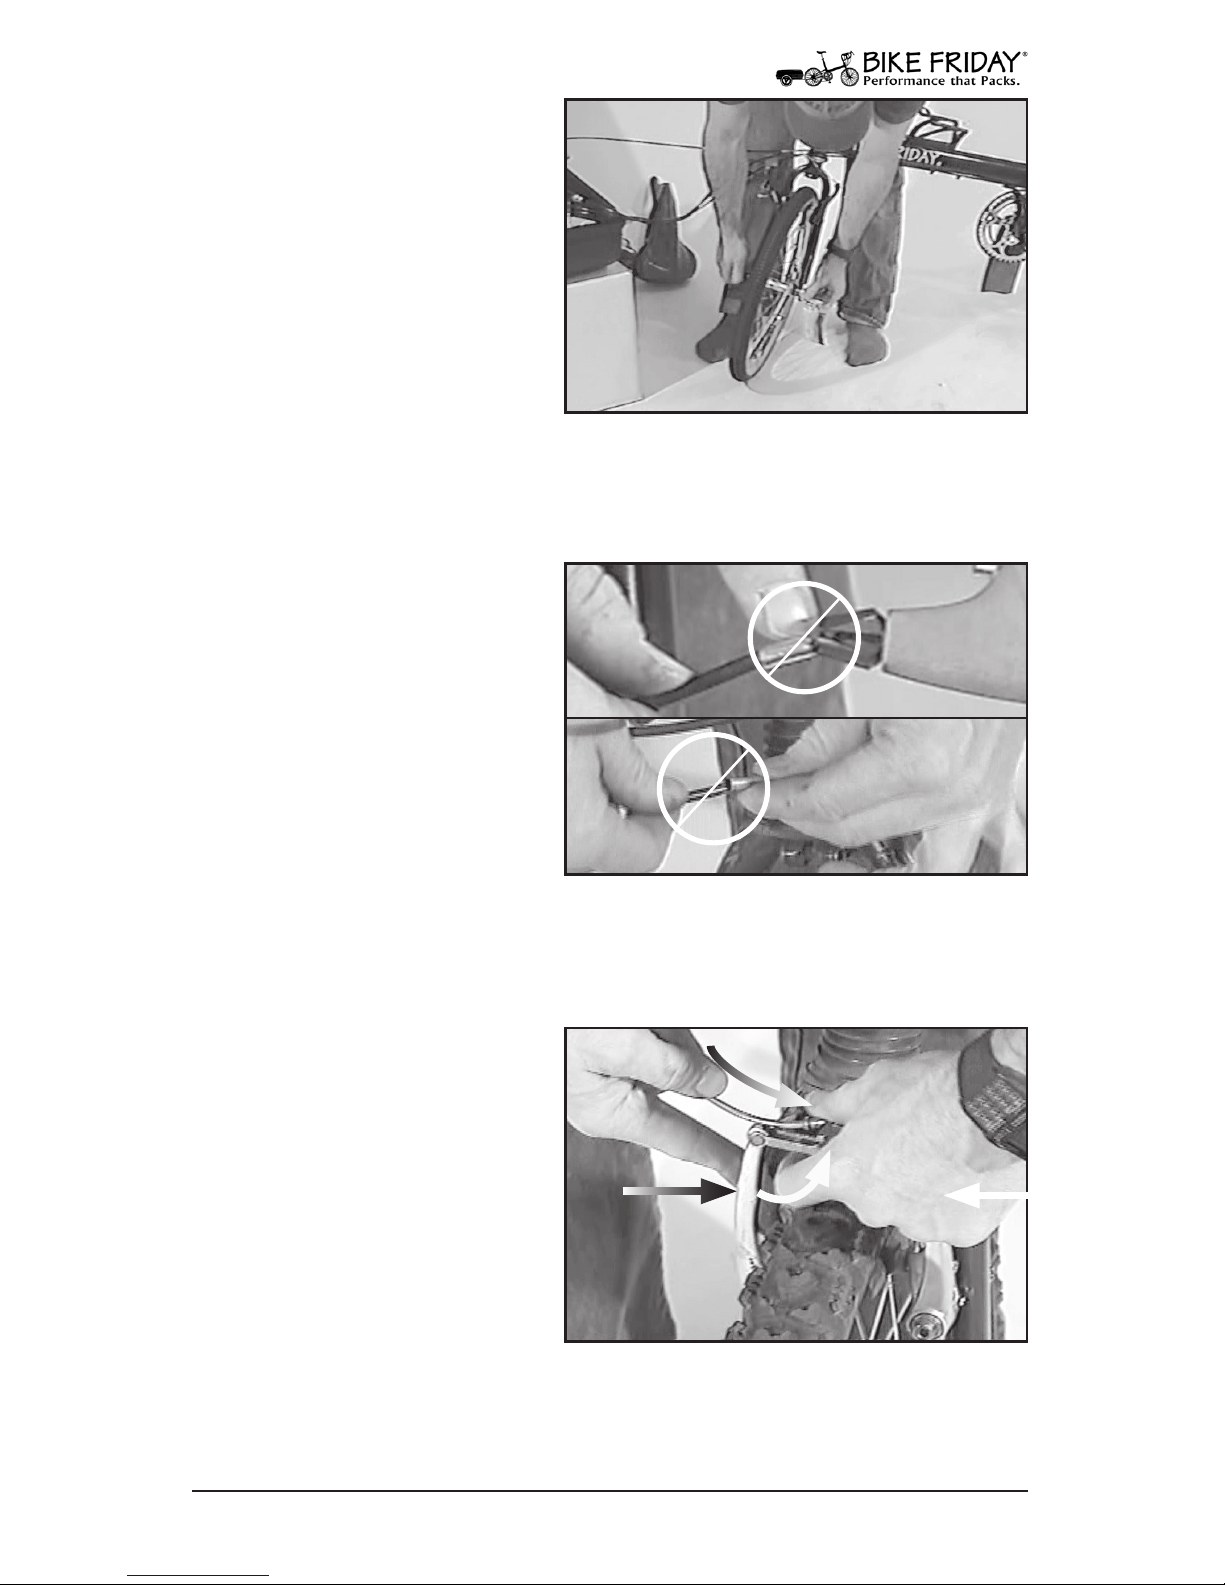
20. Open Front Brake
At this point you should be
able to open the brake arms.
If you cannot release the
noodle from the noodle
holder, then the brake cable
may need to be loosened
a bit. See the next step for
instructions to add some
slack to the cable.
Fig. 20 Open brake arms.
19. Release V-Brake
While continuing to press
the arms together (A), pull
the elbow-shaped noodle
out and up (B) and then push
the noodle holder down (C).
There is a slot in the end of
the noodle holder for the
brake cable to slip out.
Fig. 19 Pull out noodle from holder.
A
A
B
C
21.Brake Barrel Adjuster
To add some more brake
cable slack, you can turn the
barrel adjuster on the brake
lever. The barrel adjuster
is the knurled bolt that the
cable housing goes through
as it enters the brake lever.
Turn this adjuster clockwise
to loosen the cable. Note:
Some models may have a
lock nut on the adjuster,
which will need to be loosened rst. (Your own bike will not have
the stem installed at this point as shown in the illustration.)
Fig. 21 V-brake barrel adjuster.
To Add
Cable Slack
Page 16
16
www.bikefriday.com 800-777-0258 • +1-541-687-0487
Assembly: Install Front Wheel
22. Install Front Wheel
Now install the front wheel.
Make certain the wheel is
fully seated in the fork drop
outs, and securely close the
quick release as illustrated in
the quick release safety section. If you have a side-pull
brake, close the small lever
on the brake caliper at this
point.
Fig. 22 Install front wheel.
24. Close LV-Brake
Close the linear pull brake in
the reverse order of opening
it. Press both arms together
(A), and insert the noodle (B)
into the noodle holder (C).
The end of the noodle has a
bullet shaped tip that should
be inside the holder, but just
sticking through the cable
keyhole.
Fig. 24 Close V-brake.
A
A
C
B
23. Reconnect Linear Pull
Brake
If you have a linear pull
brake, before closing it check
to make certain that the housing is properly seated into its
ferrules at both ends. With
the brake open, the housing
can slip to the side and keep
the brake from closing properly. Common places to check are the brake lever barrel adjuster
(top), and where the housing enters the noodle (bottom).
Fig. 23 Check housing for seating.
Page 17
17
www.bikefriday.com800-777-0258 • +1-541-687-0487
Assembly: Install Stem
25. Double-Check Brake!
Regardless of which model
of brake you have, make
certain your brake is properly set up. Test squeeze the
brake levers; you may have
to adjust the barrel adjuster
to remove any excess cable
slack. A nal check can be
done after the rest of the bike
is assembled.
Fig. 25 Proper noodle tip position.
27. Mount Stem
Slide bottom of stem into the fork steerer
tube, keeping the stem’s quick release
assembly facing forward so that the hidden
stem pin will engage the slot in the fork.
Gently press the stem all the way down.
Fig. 27 Insert stem.
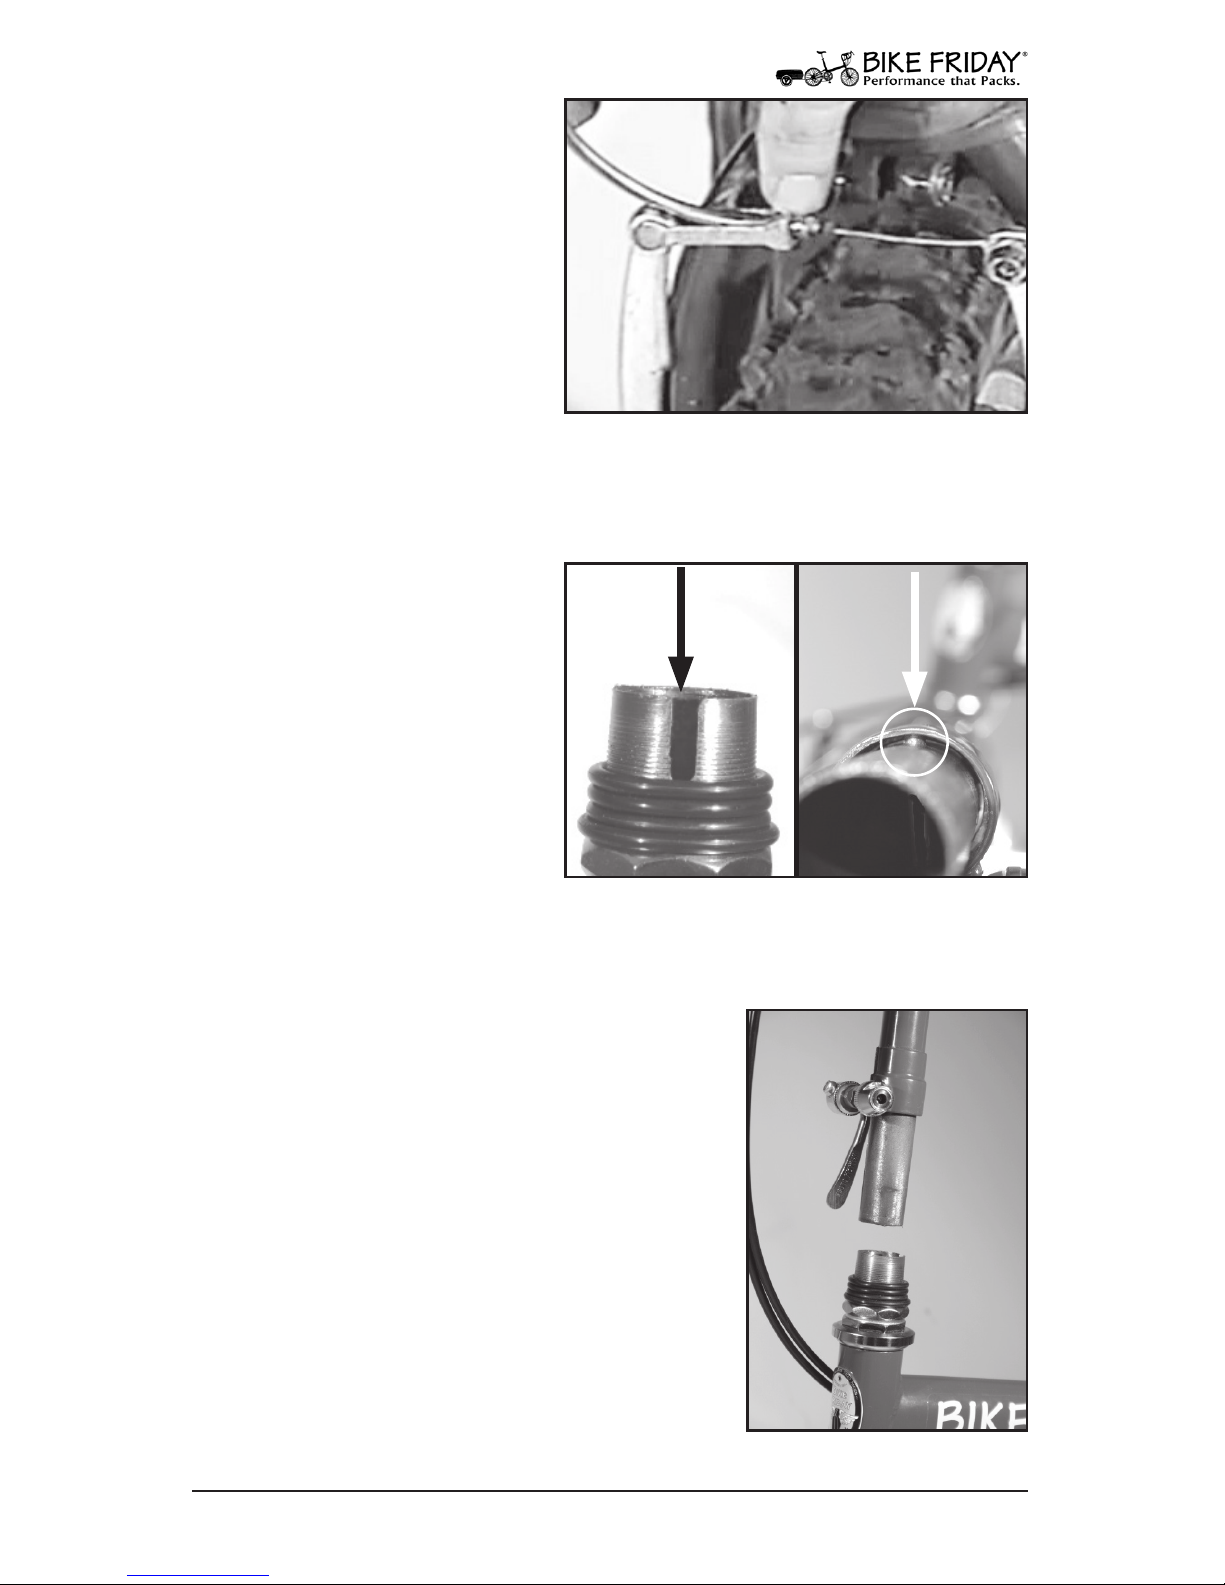
26. Stem Safety
If you look carefully at the
base of your stem, you will
see a pin hidden under the
clamping collar. This pin
must engage the slot in the
back of the fork’s steerer tube
(the threaded part sticking
up).
IF YOU DO NOT ENGAGE
THE STEM PROPERLY YOU MAY COMPROMISE SAFETY!
Fig. 26 Stem pin & fork slot.
Page 18
18
www.bikefriday.com 800-777-0258 • +1-541-687-0487
Assembly: Install Stem
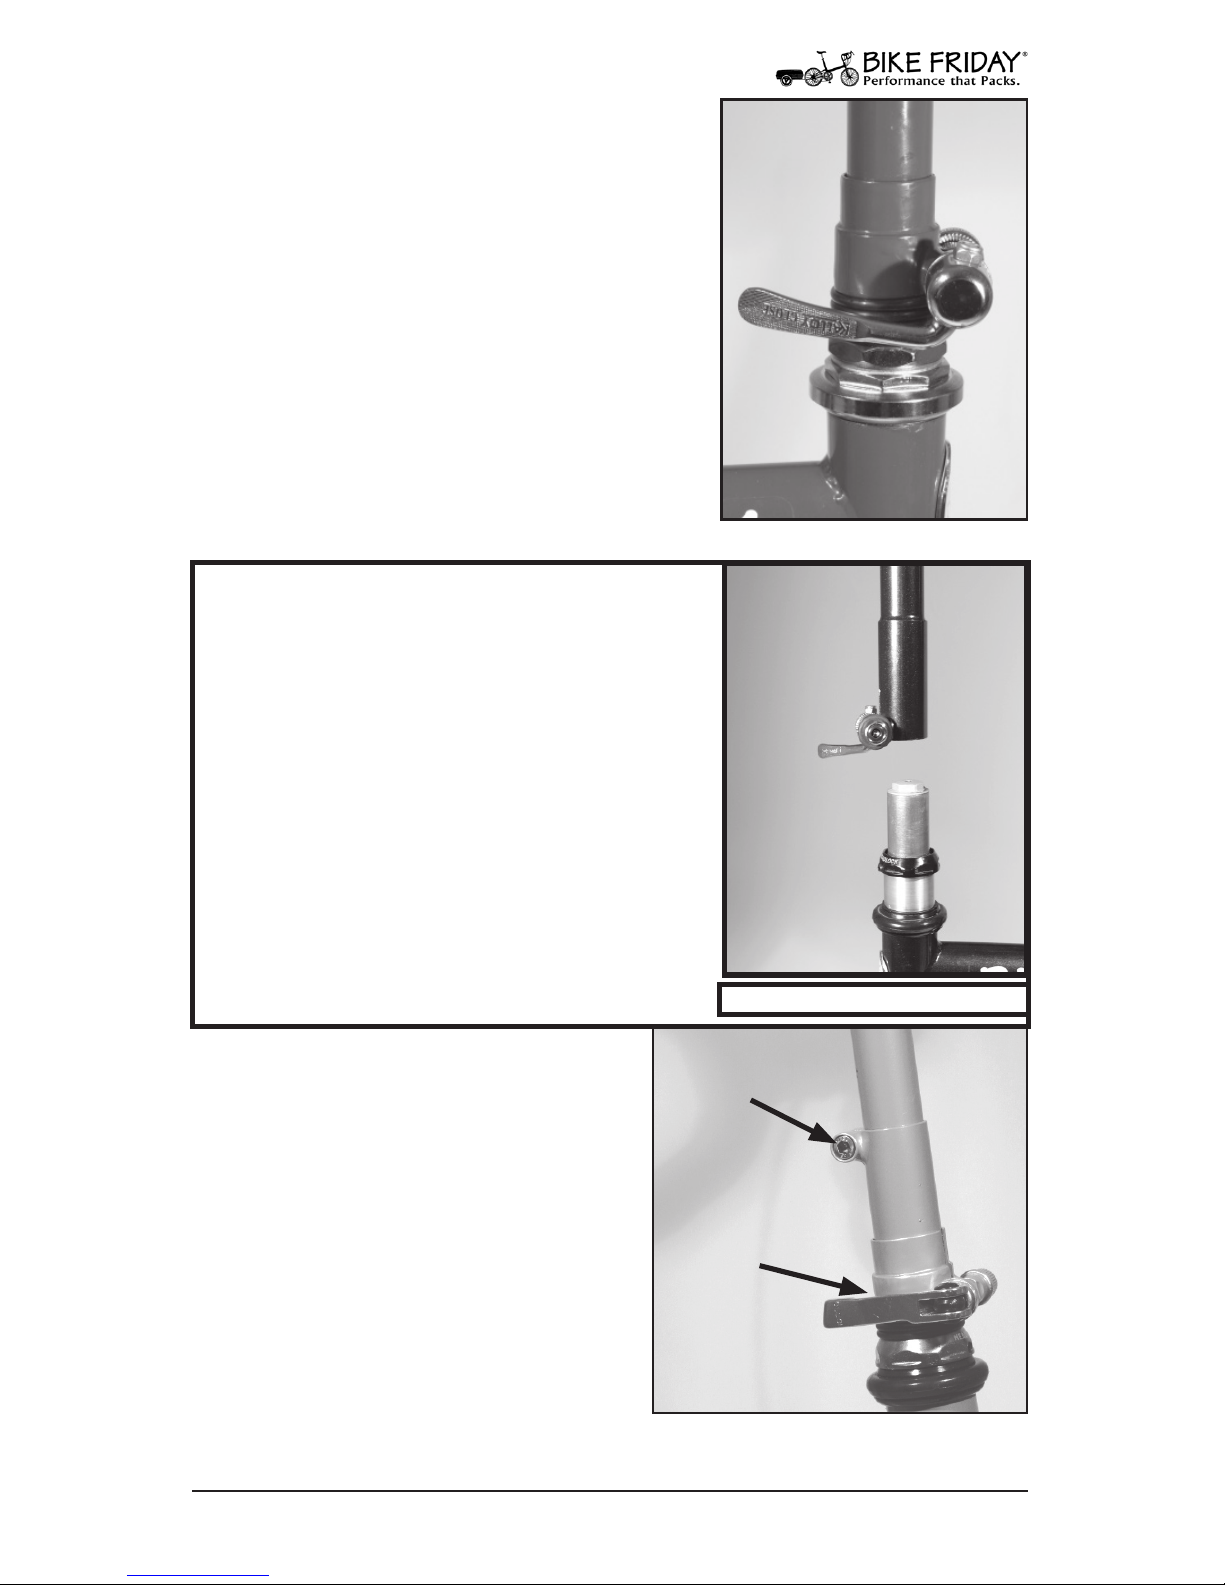
28. Tighten Stem
Tighten the quick release securely. It is
normally irrelevant whether the lever is
on the left or right side of the stem; however, a few stem collars only accept the
quick release from one direction. Also,
some stem models (i.e. Pocket Rocket Pro
bikes) will have a bolt instead of a quick
release to save weight.
Fig. 28 Stem clamp collar.
30. Adjustable Stem (Optional)
If you have purchased one of our
adjustable stems, set your desired
handlebar height using the clamp
directly above the stem collar. You
may choose to precisely set the
height once, or vary it according to
your riding needs; in either case be
certain this bolt is tight before riding
your bike. For t stem instructions,
see the section on “Accessories.”
Fig. 30 Adjustable stem.
Set bar height
here.
Release stem for
packing here.
29. Pocket Gnu Stem
If you purchased a Pocket Gnu bicycle,
your stem will be slightly dierent
because of the suspension fork. On this
bike the stem is a sleeve that ts over the
steerer tube (rather than into the steerer
tube). Furthermore, there is no alignment
pin as on the other stems. With the stem
all the way down over the steerer tube,
align the handlebars perpendicular to
the front wheel, and tighten the quick
release.
29. Pocket Gnu stem.
Page 19
19
www.bikefriday.com800-777-0258 • +1-541-687-0487
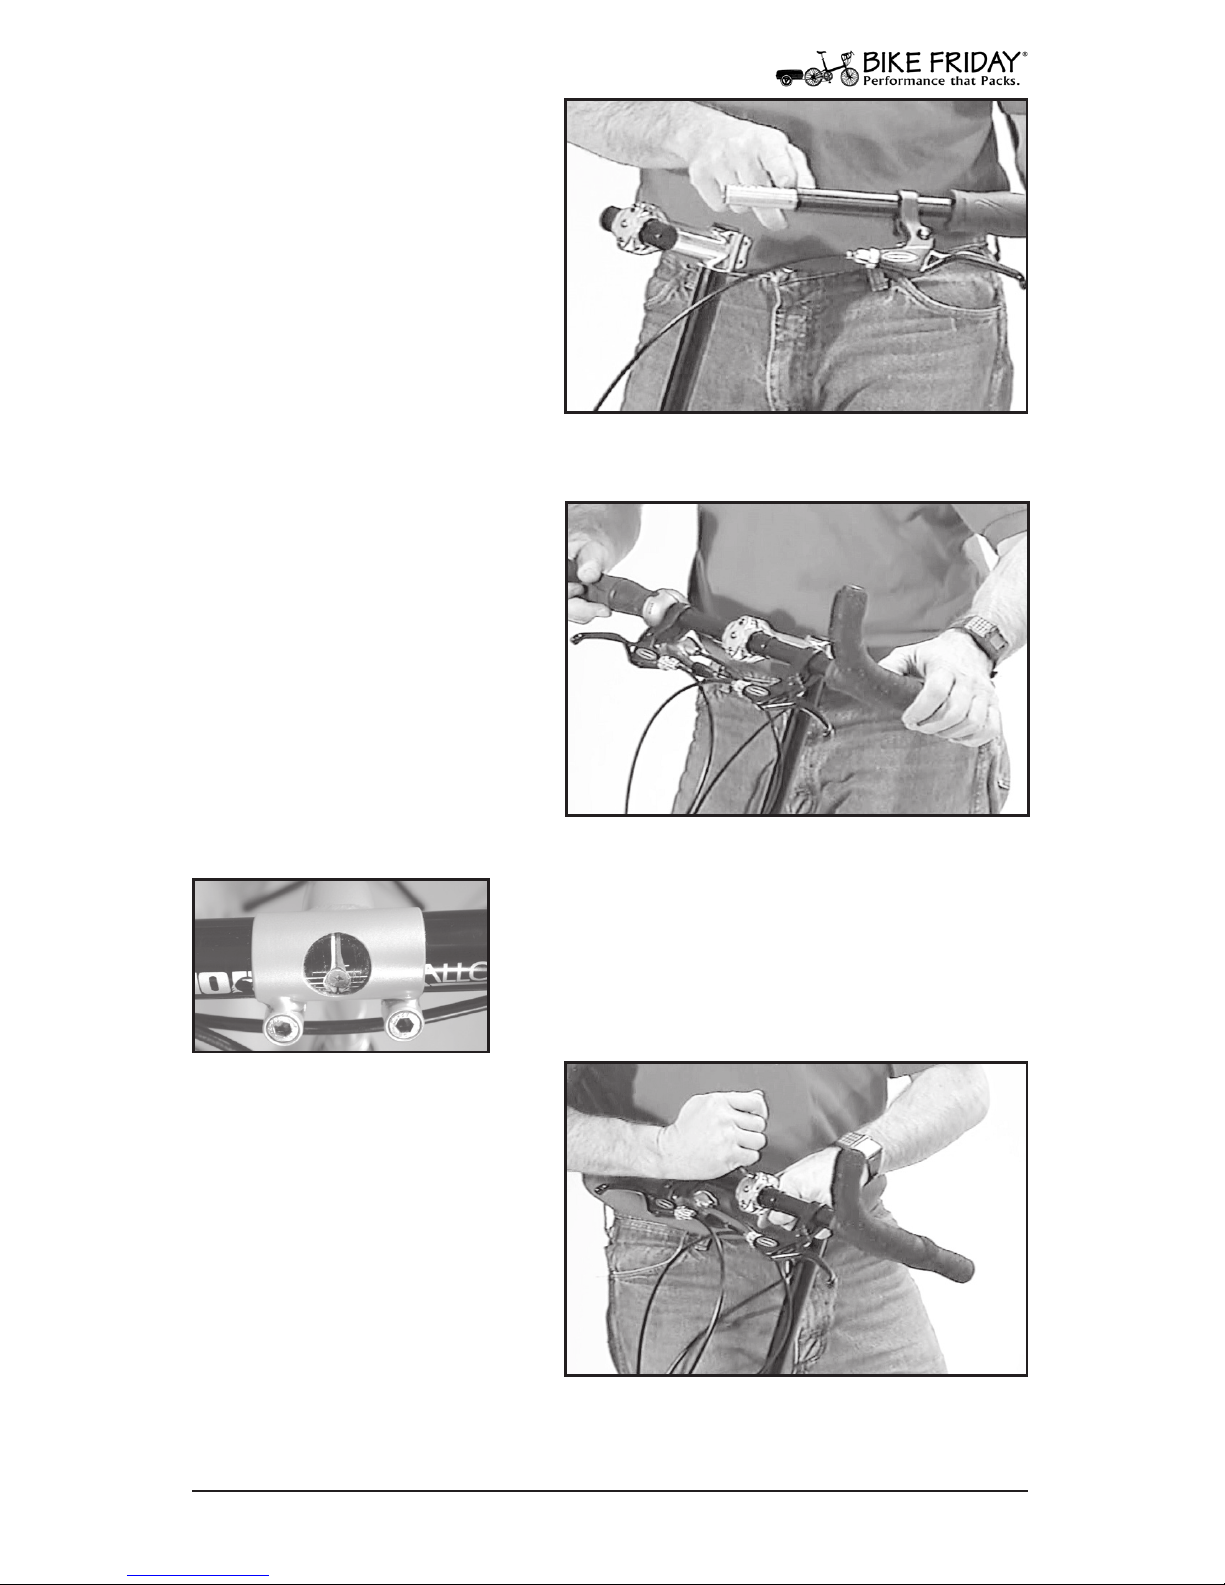
31. Insert Handlebars
To facilitate packing, most
but not all Bike Friday
bicycles have two-part handlebars with a reinforcing
sleeve in the left handlebar.
Make certain the attached
cables are not tangled or
wrapped around the frame
or fork. Insert left handlebar
into stem clamp, then right bar.
Fig. 31 Handlebar sleeve.
Assembly: Handlebars
33. Tighten Handlebars
Using the appropriate Allen
wrench (5 or 6mm), tighten
the handlebar clamp bolts
securely. If your bar clamp
has two bolts, tighten both
alternately. Now is a good
time to double-check your
steering system. Try standing in front of your bike with
the front wheel between your legs, and then push, pull, and twist
the bars and stem to make certain everything is secure.
Fig. 33 Tighten handlebar clamp.
32. Set Handlebars
With the handlebars in the
stem, press them rmly
together to ensure they are
fully seated. Custom stems
for drop bars have a round
window to allow you to center the bar split in the stem.
All other handlebar types
have a small button screw on the stem
clamp to keep the bars centered. (Do not
remove.) For the angle of the bars, experiment with what feels appropriate.
Fig. 32 Set handlebars.
Fig.32a Custom stem.
Page 20
20
www.bikefriday.com 800-777-0258 • +1-541-687-0487
34. Install Seat Post
Remove the packing materials from your seat post and
then insert the seat post into
frame. Once you have your
saddle height set, try adding
a piece of electrical tape to the
seat post or use a permanent
marker to mark your saddle
height for quick re-assembly.
If you did not purchase a saddle with your bike now would be a
good time to install your own saddle. Add a light dab of grease to
the saddle rails and seat carriage clamp.
Fig. 34 Install seat post.
Assembly: Seat Post & Saddle
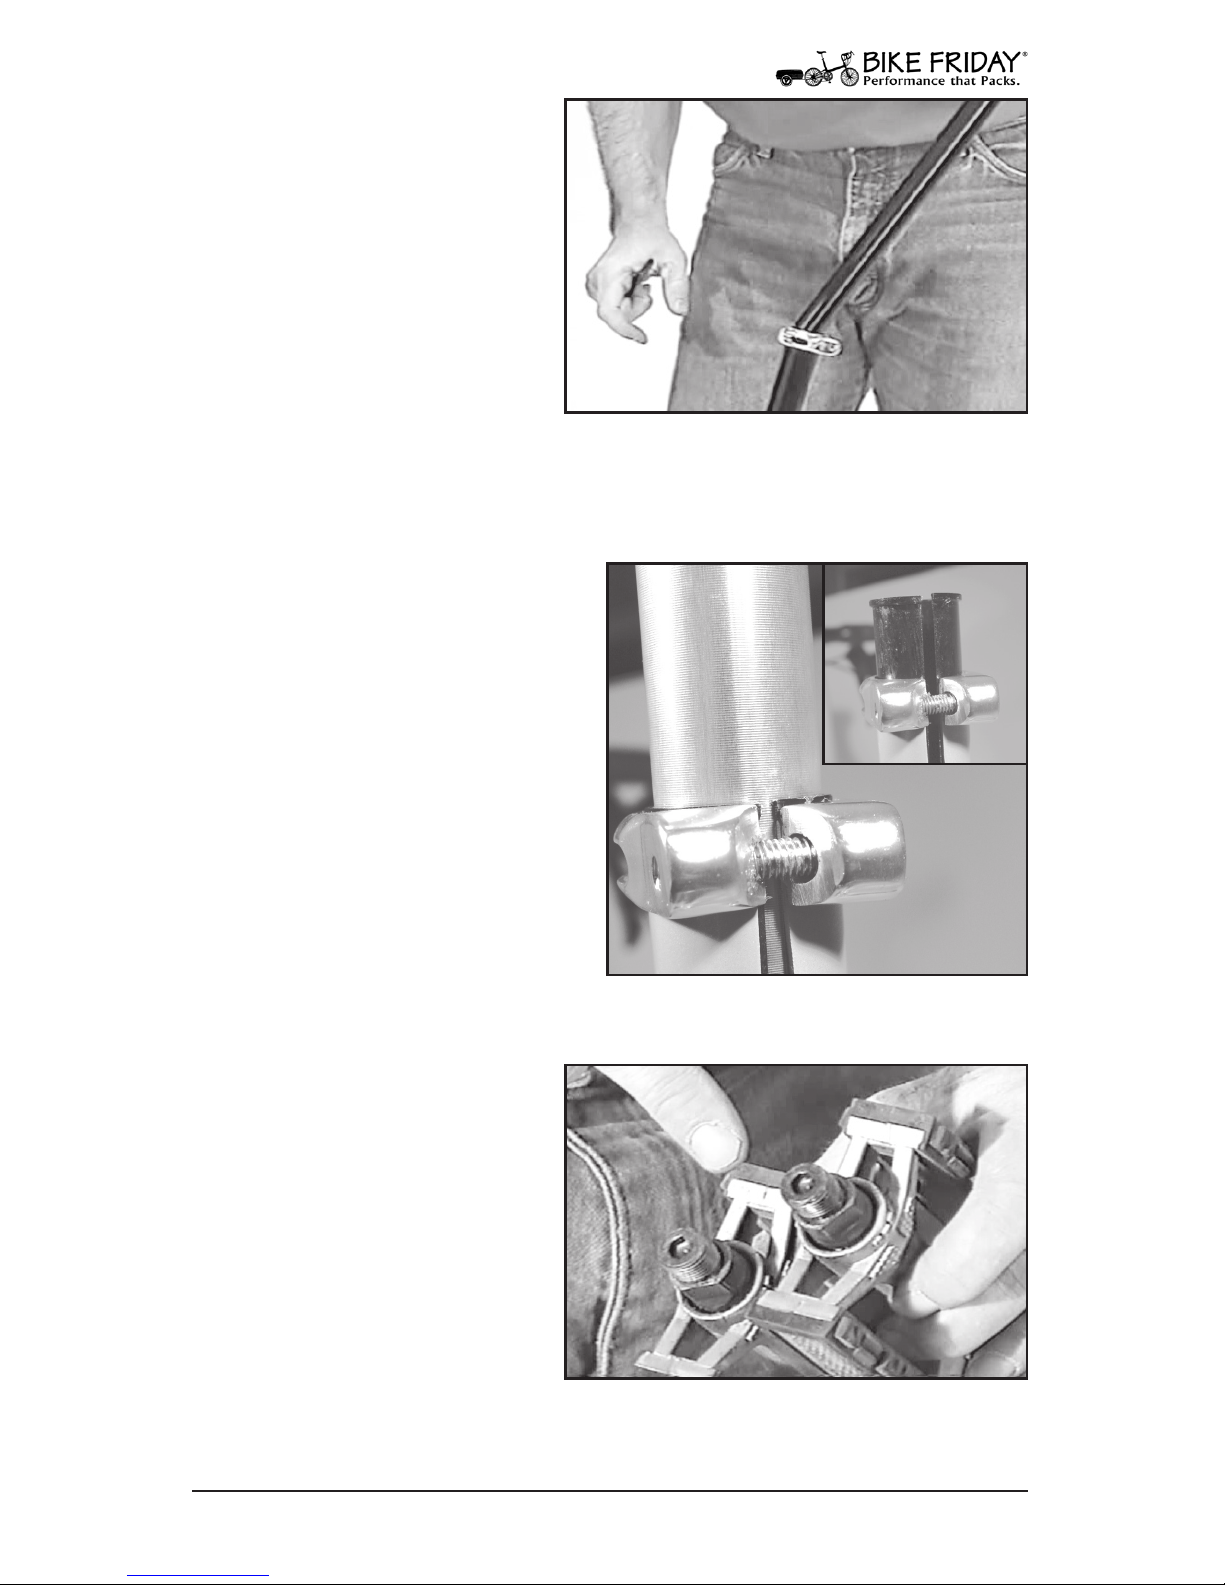
36. Install The Pedals
Bike pedals have two dierent thread directions. The
right pedal has a right-hand
thread, and the left pedal has
a left-hand thread. Thread
the right pedal in a clockwise direction; thread the left
pedal in a counter-clockwise
direction. Pedals are usually
stamped with a R or L on the pedal axle near the threads. A little
grease is always a good idea on pedal threads.
Fig. 36 Check pedals for threading.
35. Tighten Seat Post
Whenever you install the seat
post, make certain the seat
post shim (the split aluminum
sleeve inside the seat mast) has
its slot aligned with the slot in
the seat mast. (Some frames for
larger riders may not have a seat
post shim). Also make certain
the seat mast collar has its slot
aligned with the slot in the seat
mast. Tighten the seat post. (Be
careful not to overtighten, as the
bolt can break).
Fig. 35 Seat post shim.
Page 21
21
www.bikefriday.com800-777-0258 • +1-541-687-0487
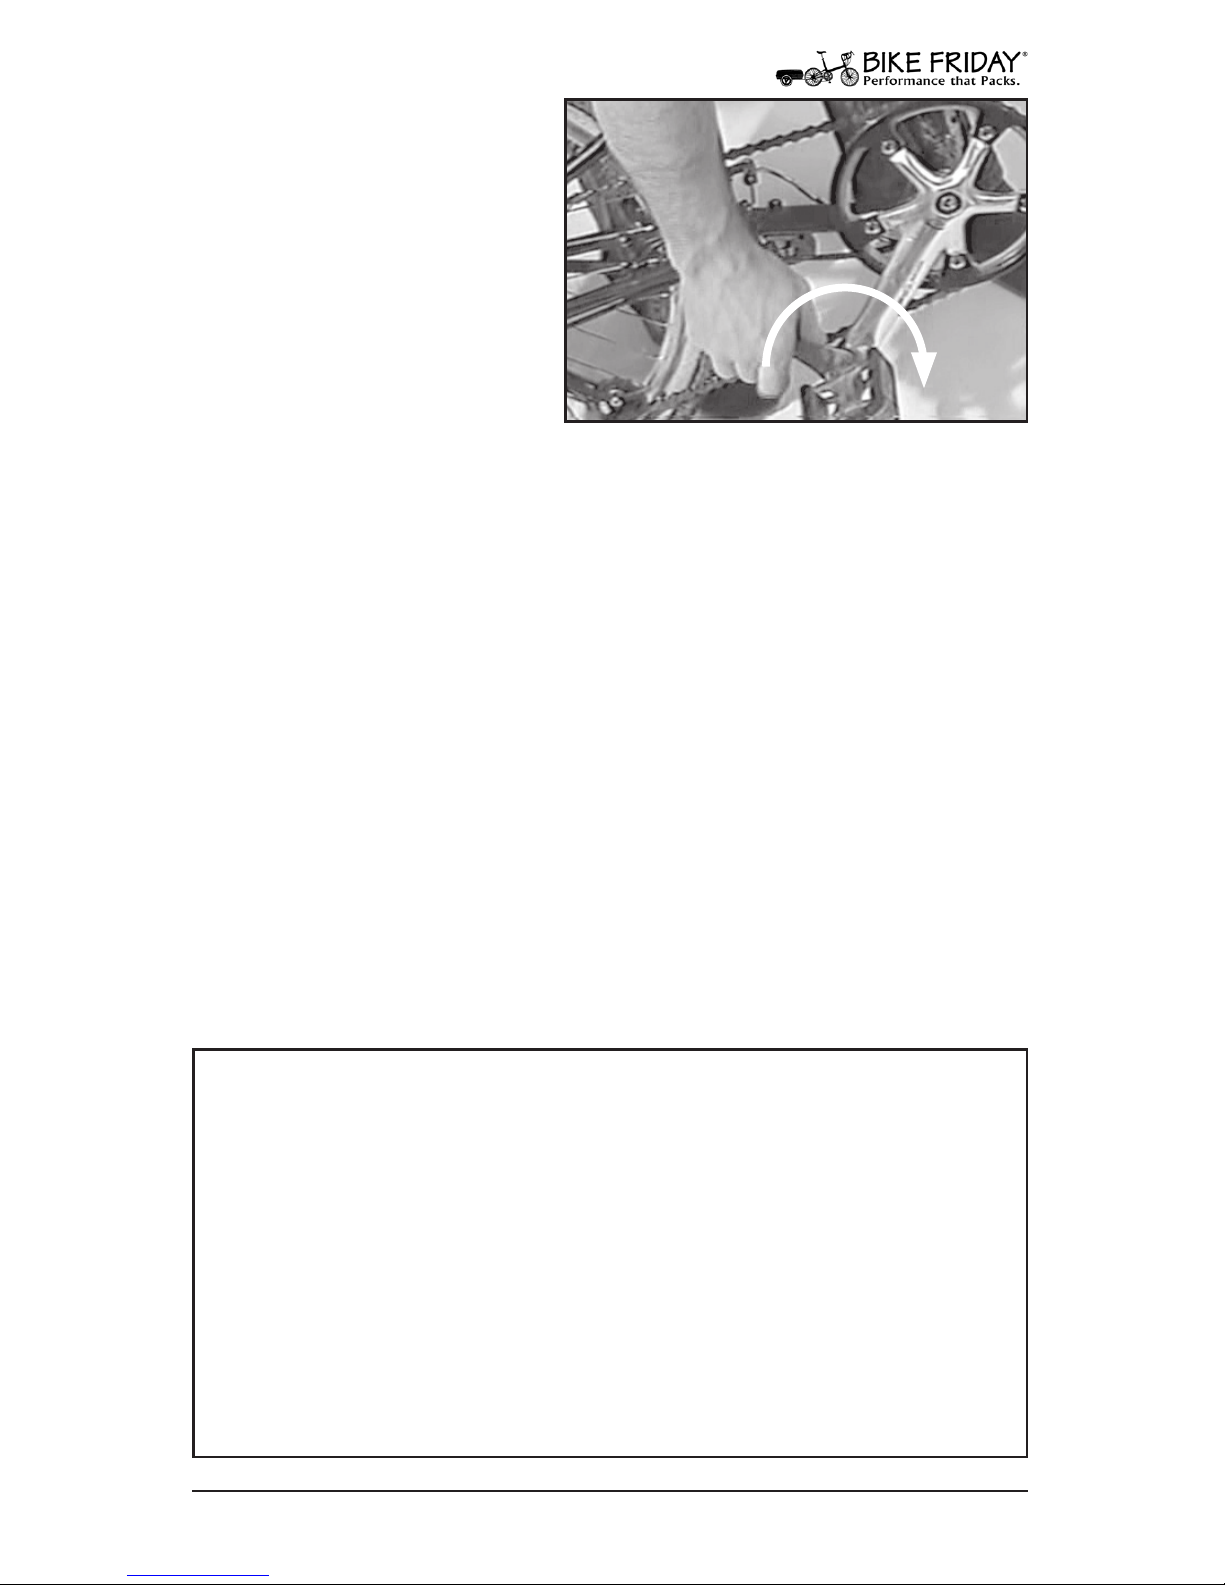
37. Thread In Pedals
Using your ngers, start
the pedal threads into the
proper crank arm. Be careful
not to cross-thread the pedals! Once the pedal threads
are started, you may use a
wrench to nish threading
them in, and then tighten
securely.
Tip: Remember to tighten
your pedals by turning both toward the front of the bike.
Fig. 37 Tighten pedals (tighten in
opposite direction for left pedal).
Assembly: Install Pedals
38. Double-Check Your Bike!
At this point your bike should be ready to ride. However, before
you ride away, be sure to double-check your assembly. Are the
handlebars tight? How about the stem and pedals? Are the quick
releases all secure?
Although we always inate the tires at the factory, check your tire
pressure for proper ination. Under-inated tires not only wear
faster and are more prone to ats, but they also add drag.
Be sure to have at least the 5/6mm S-wrench in the mono-tube
bottle cage for quick road-side adjustments. If you have the folding
tool, take it with you. You will probably want to stop and adjust
saddle height and perhaps a few other items during your rst ride
or two.
•Tip
Be sure to keep a light lm of grease on any intersecting bike
parts. This will help to prevent corrosion, facilitate disassembly,
and eliminate annoying noises. Areas include seat posts, saddle
rails, handlebars, stems, seat masts and frame fork tips. Doing this
a couple of times per year during routine maintenance should be
enough. Wipe o any excess or visible grease.
Also be sure to lightly grease all bolt threads on your bicycle as
you repair or upgrade components. Lubricating your bolts will
allow you to adequately tighten the fasteners and keep them
from seizing in the future.
Page 22
22
www.bikefriday.com 800-777-0258 • +1-541-687-0487
Packing: Pedals & Seat Post
1. Remove Accessories
Before disassembling and
packing your Bike Friday
travel bicycle, remove all
extra accessories including racks. Items which may
remain on the bike include
your cycle computer mount,
pump and mono-tube
mounted bottle cage. (The
seat mast bottle cage needs to be removed).
Fig. 1 Remove accessories.
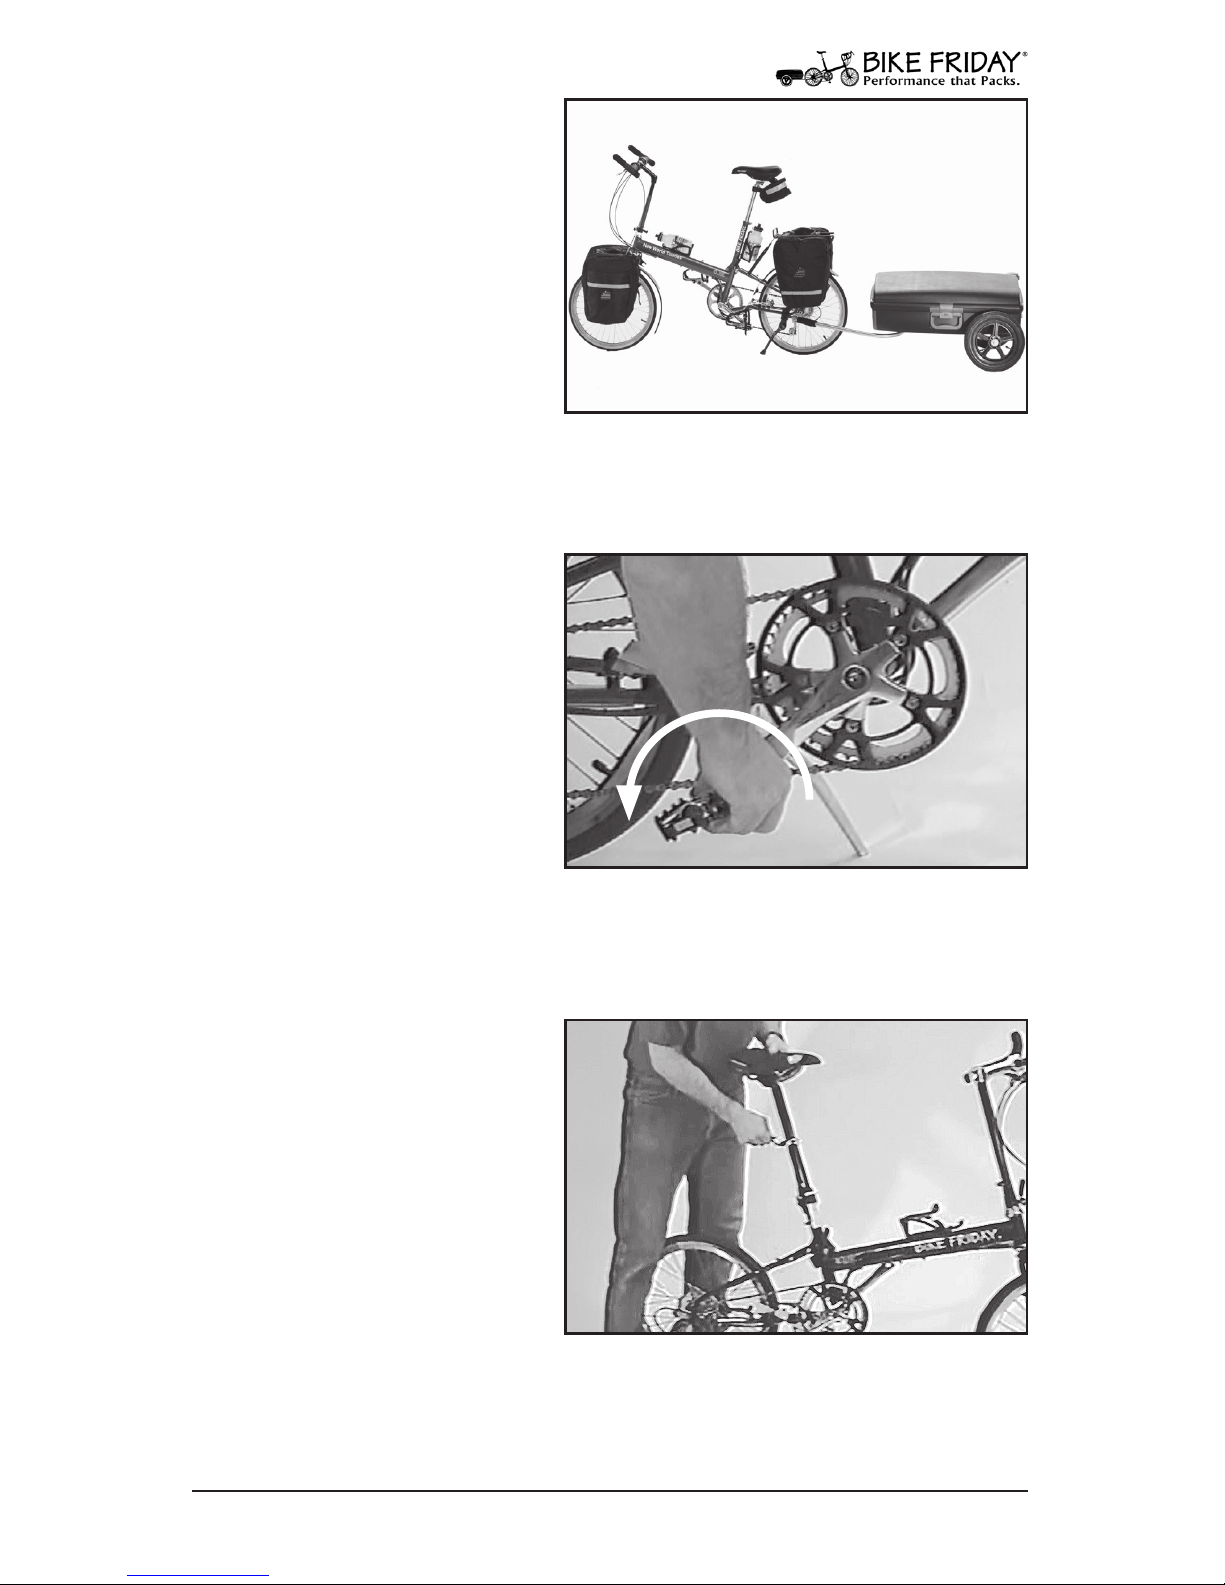
2. Remove Pedals
Loosen your pedals with
the supplied headset/pedal
wrench (TravelCase suitcase
only). The right pedal unthreads in a counter-clockwise direction and the left
pedal un-threads in a clockwise direction. (Remember
that both pedals turn toward
the rear of the bike.)
Place both pedals in the light blue felt bag and set aside.
Fig. 2 Remove pedals (loosen in opposite
direction for left pedal).
3. Remove Seat Post
Loosen the seat mast clamping collar and remove the
seat post. (The saddle can
remain attached to the seat
post). The seat post shim
should remain in the seat
mast.
Cover the seat post in the
clear vinyl sleeve labeled
“Seat Post.” Cover the saddle in a blue vinyl sleeve labeled “Saddle;” the slot in the sleeve goes over the nose of the saddle. Set the
saddle aside.
Fig. 3 Remove saddle and seat post.
Page 23
23
www.bikefriday.com800-777-0258 • +1-541-687-0487
5. Remove Front Wheel
After removing the front
wheel, close the brake again.
Remove the quick release
from the axle by undoing the
knurled nut. Be careful not to
lose the small cone-shaped
springs.
Put the quick release through
the fork spreader (the short
PVC dowel), and thread on the knurled nut again. Both small coneshaped springs should be on the quick release shaft.
Fig. 5 Remove front wheel.
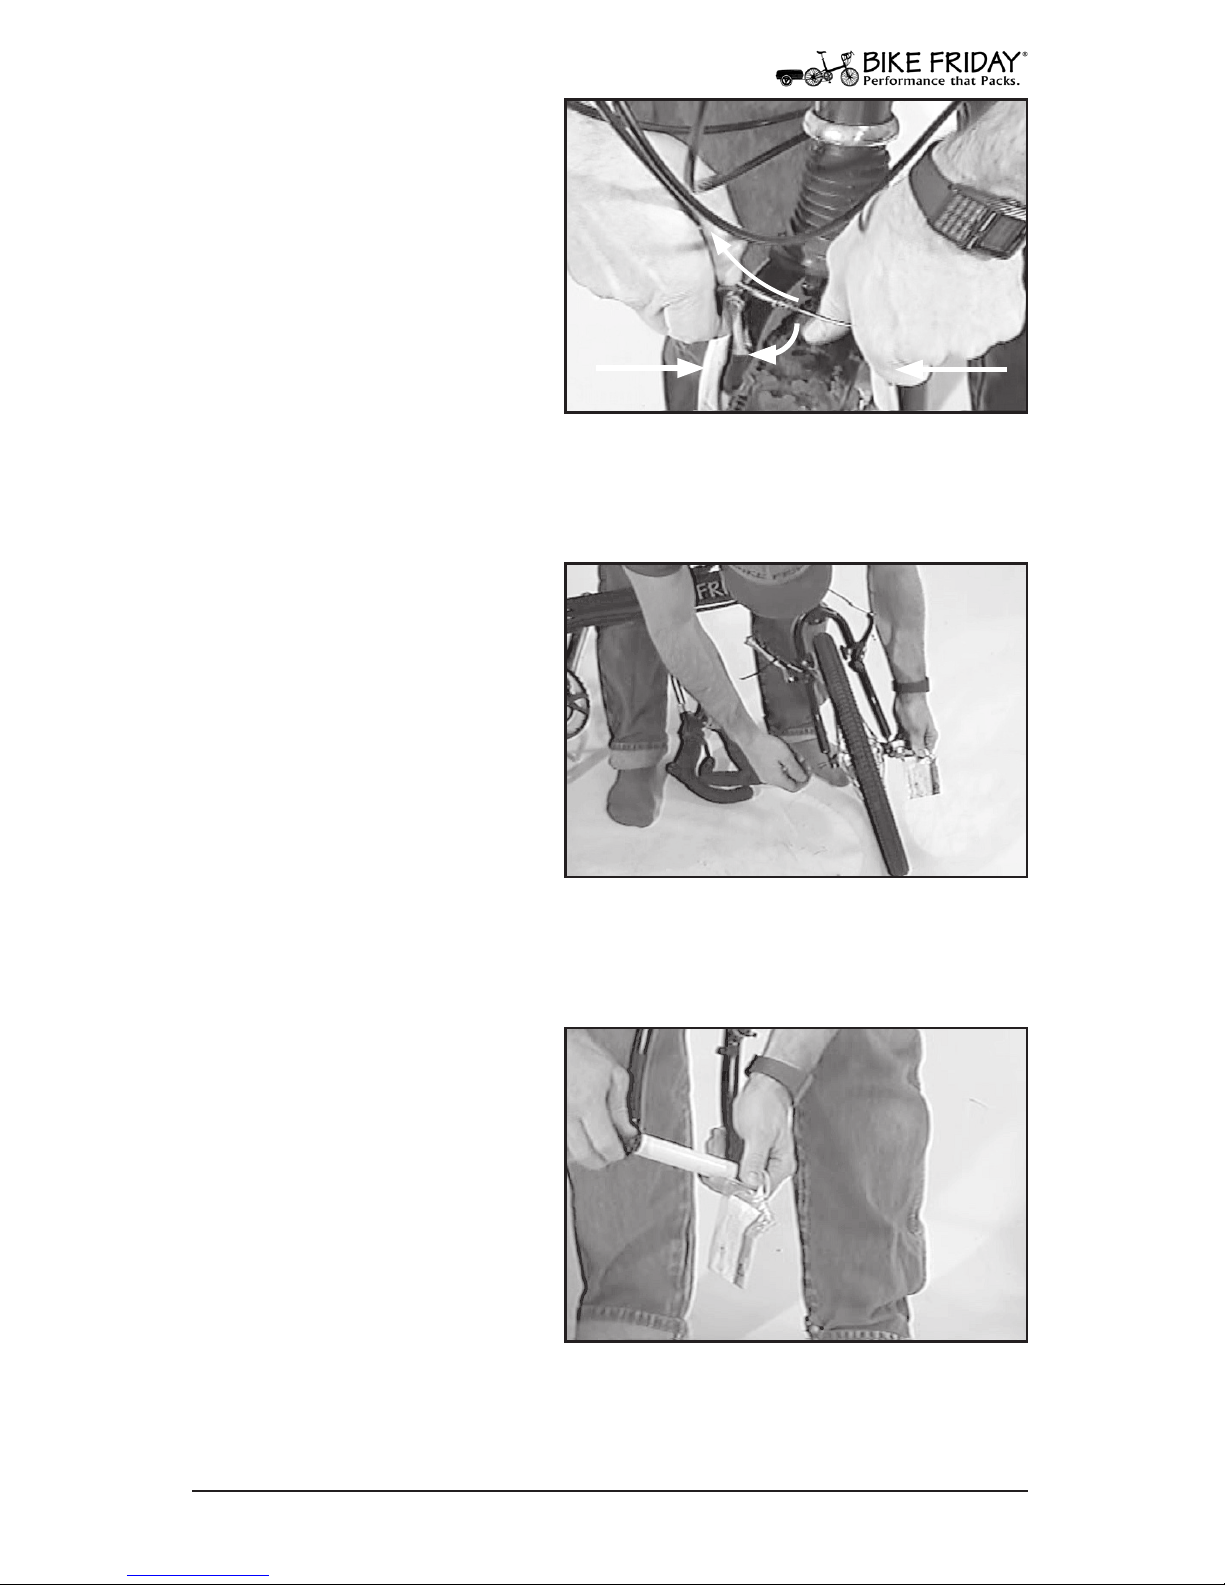
4. Open Front Brake
If you have a side-pull brake,
simply ip up the small lever
on the side of the brake.
If you have V-brakes, press
the arms together (A), and
then pull the elbow-shaped
noodle out and up (B) while
pushing the noodle holder
down (C). There is a slot in
the end of the noodle holder for the brake cable to slip out.
Fig. 4 Open brake arms (V-brake).
A
A
B
C
Packing: Remove Front Wheel
6. Install Fork Spreader
Slip the fork spreader
between the drop outs on the
fork, and lightly tighten the
quick release.
The fork spreader will help
prevent damage to your
frame when traveling.
Fig. 6 Fork spreader.
Page 24
24
www.bikefriday.com 800-777-0258 • +1-541-687-0487
9. Remove Stem
Open the stem quick release
at the bottom of the stem (or
loosen the clamp bolt), and
remove the stem.
Put the stem into the red felt
bag and set aside.
Fig. 9 Remove stem from frame.
Packing: Remove Handlebars
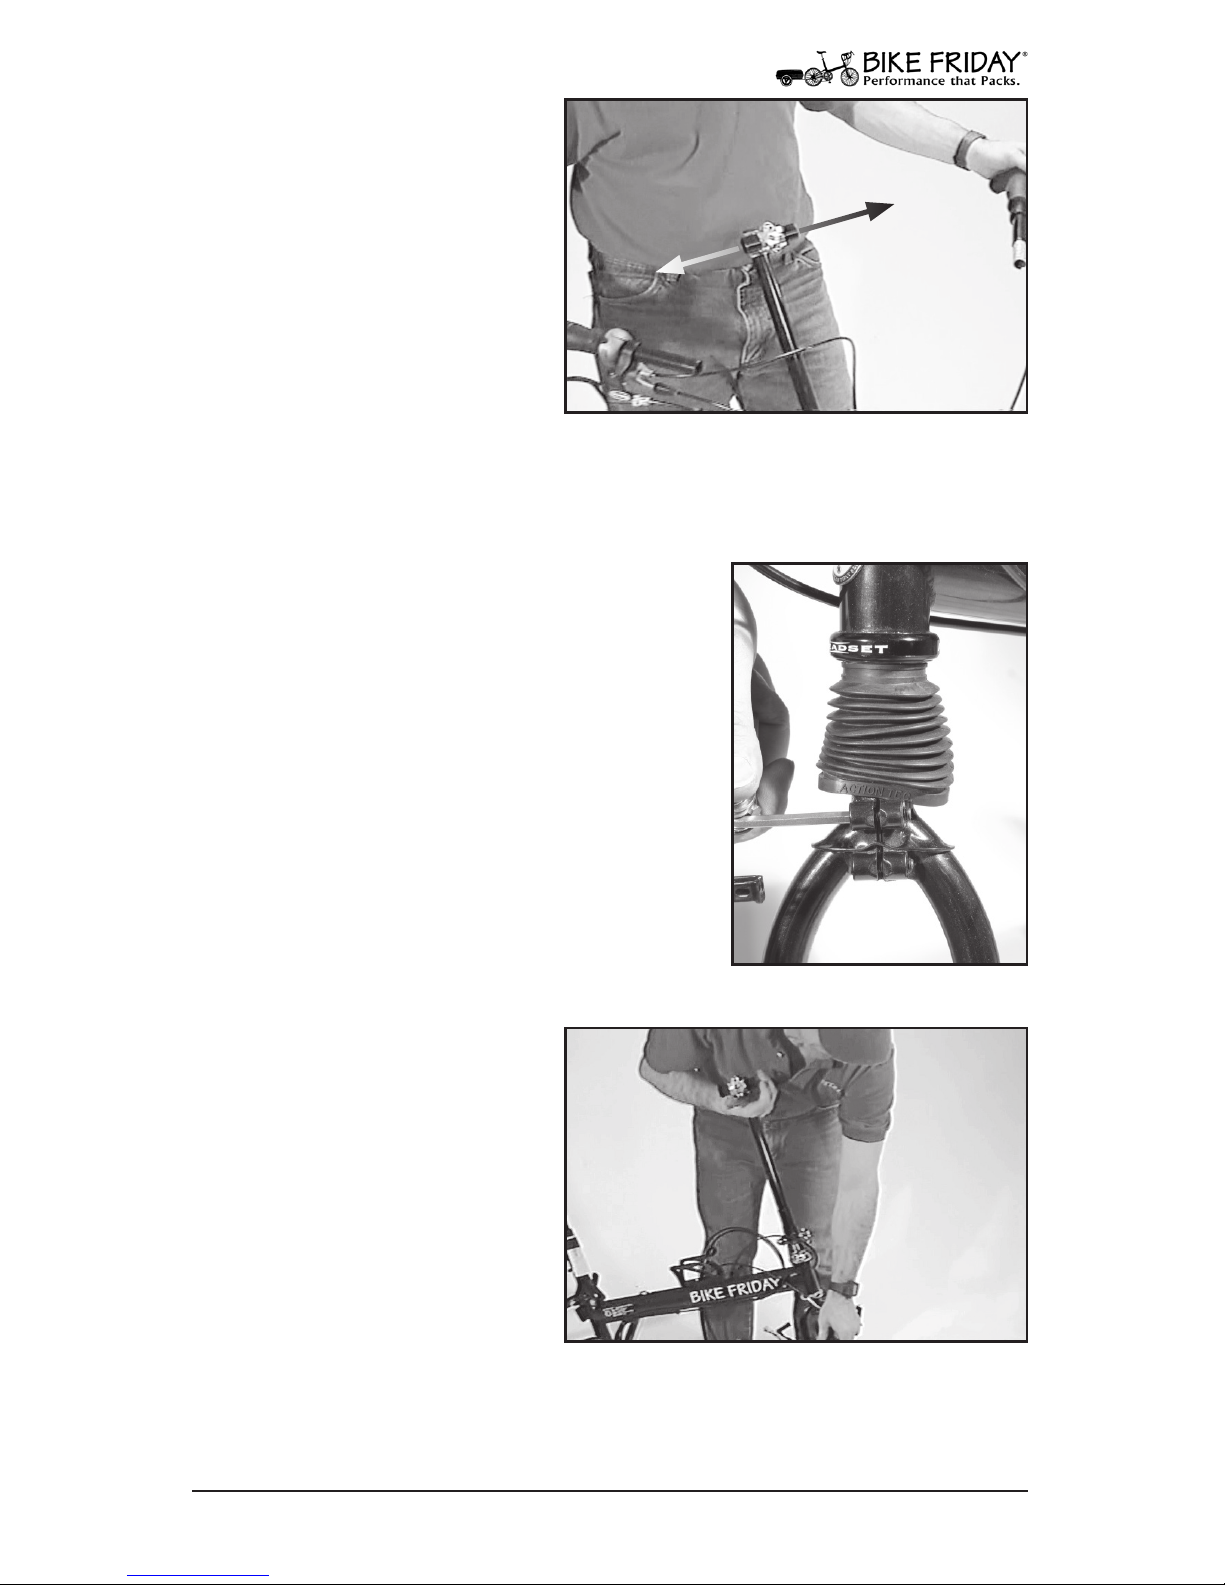
7. Remove Handlebars
Loosen the handlebar clamp
bolts on the stem, and pull
the bars apart. Depending on
the model of stem, there may
be either one clamp bolt or
two bolts. Let the bars hang
to the side for now.
On bicycles equipped with
at or H-bars, there will be a
small button-head screw in the center of the clamp. Do not loosen
or remove this screw. It holds the black sleeve in the stem.
Fig. 7 Remove handlebars.
8. Pocket Gnu Bike: Remove Fork
If you own a Pocket Gnu bicycle, you will
need to remove the fork legs. Lift the dust
sleeve to expose the two fork clamp bolts.
Loosen both bolts, and the fork legs should
slide o of the steerer tube. Put the fork
into the grey felt bag.
The fork will remain connected to the
handlebar by the brake cable.
Fig. 8 Pocket Gnu fork.
Page 25
25
www.bikefriday.com800-777-0258 • +1-541-687-0487
11. Packing Materials
At this point you should add
the packing protection pieces
to the frame. The various
covers and sleeves will be
labeled. Because each bike is
custom made and outtted,
there is some variation in the
selection of packing materials. Common pieces include:
• Seat mast cover (blue vinyl sleeve).
• Crankarm cover (blue vinyl sleeve).
• Chainstay cover (striped vinyl tube).
• Steerer tube cover (short striped vinyl tube).
• Handlebar end covers (long and short striped vinyl tube).
Your own bike may have other pieces. These will be labeled according to where they go. Generally, there is extra room in the case to
accommodate some accessories such as shoes, clothing, and perhaps a helmet. As you travel with your bike and gain experience
in your own customized packing process, you may discover that
some of the original pieces are unnecessary. You may also feel that
you may need some extra protection with new accessories. Feel free
to experiment, and let us know if you have a great idea.
Fig. 11 Add frame packing material.
Packing: Remove Stem
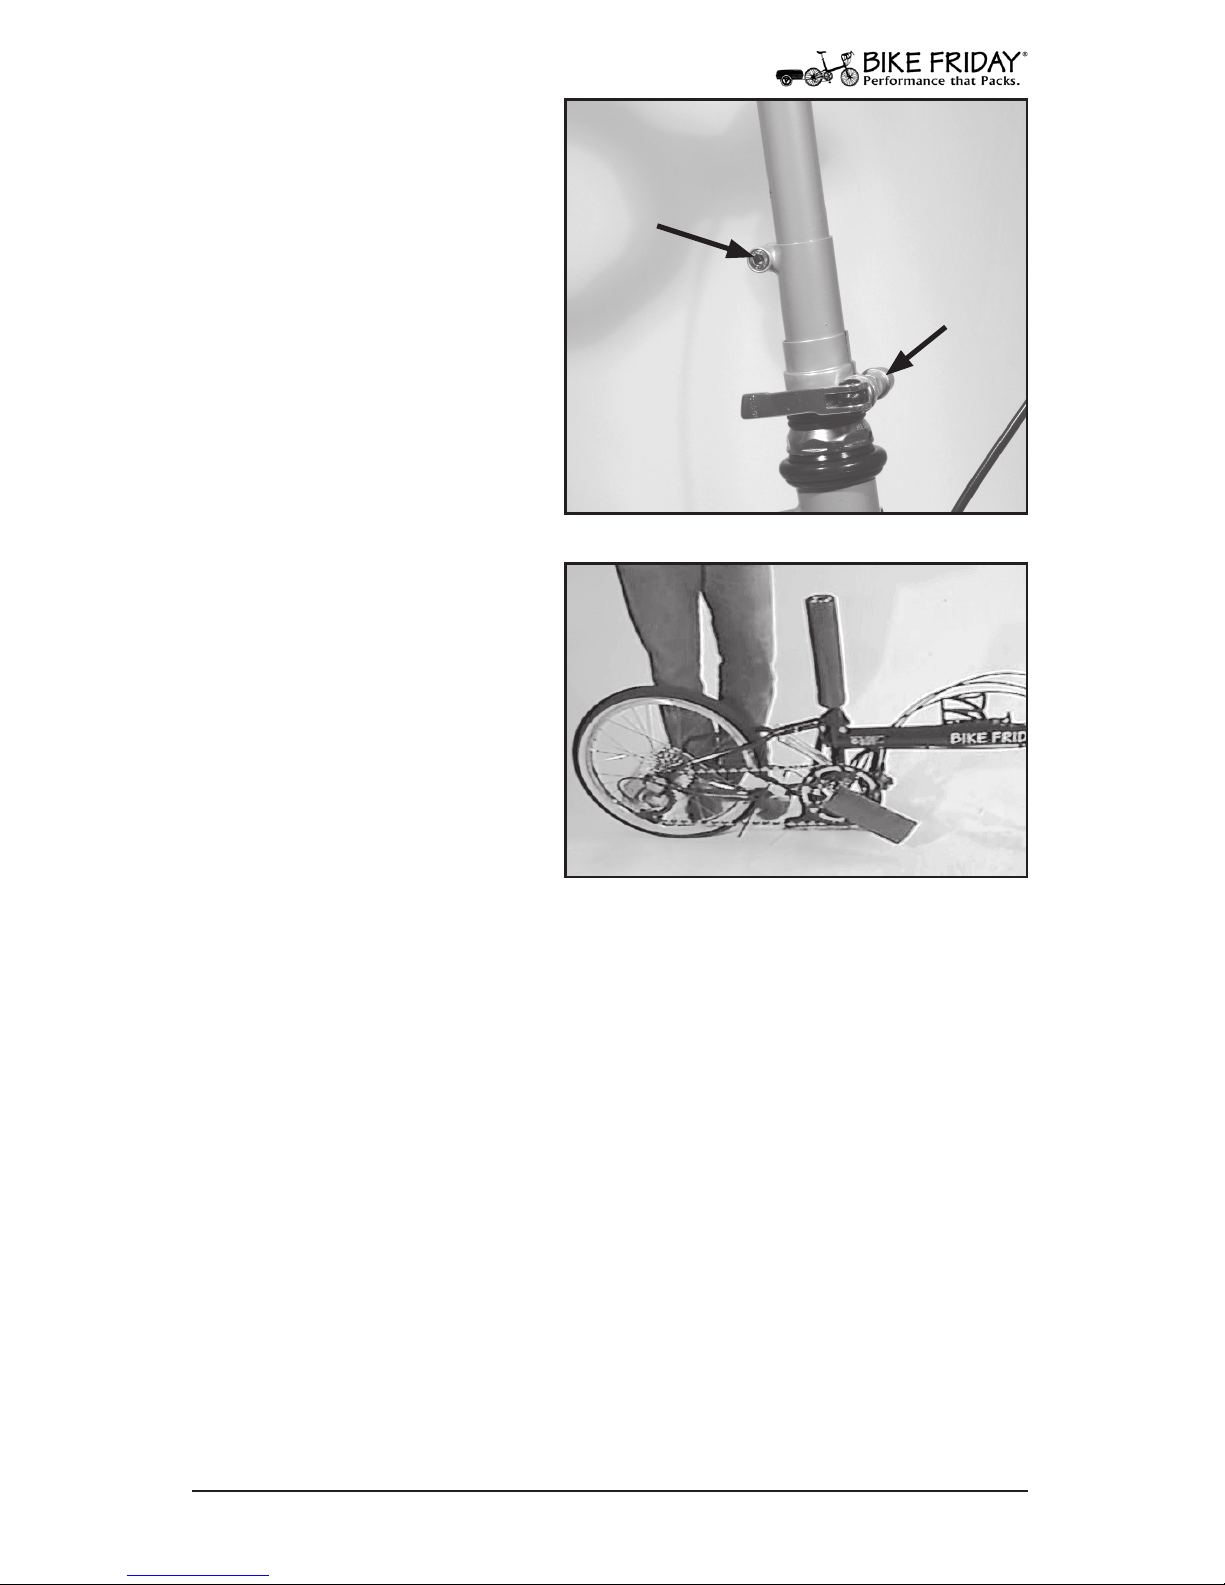
10. Adjustable Stem
If you have an adjustable
stem or a t stem, leave the
middle bolt tight to keep
your stem height set properly. Only loosen the lower
clamp or quick release for
packing purposes.
Fig. 10 Adjustable stem removal.
Leave tight for
stem height.
Loosen to
remove stem.
Page 26
26
www.bikefriday.com 800-777-0258 • +1-541-687-0487
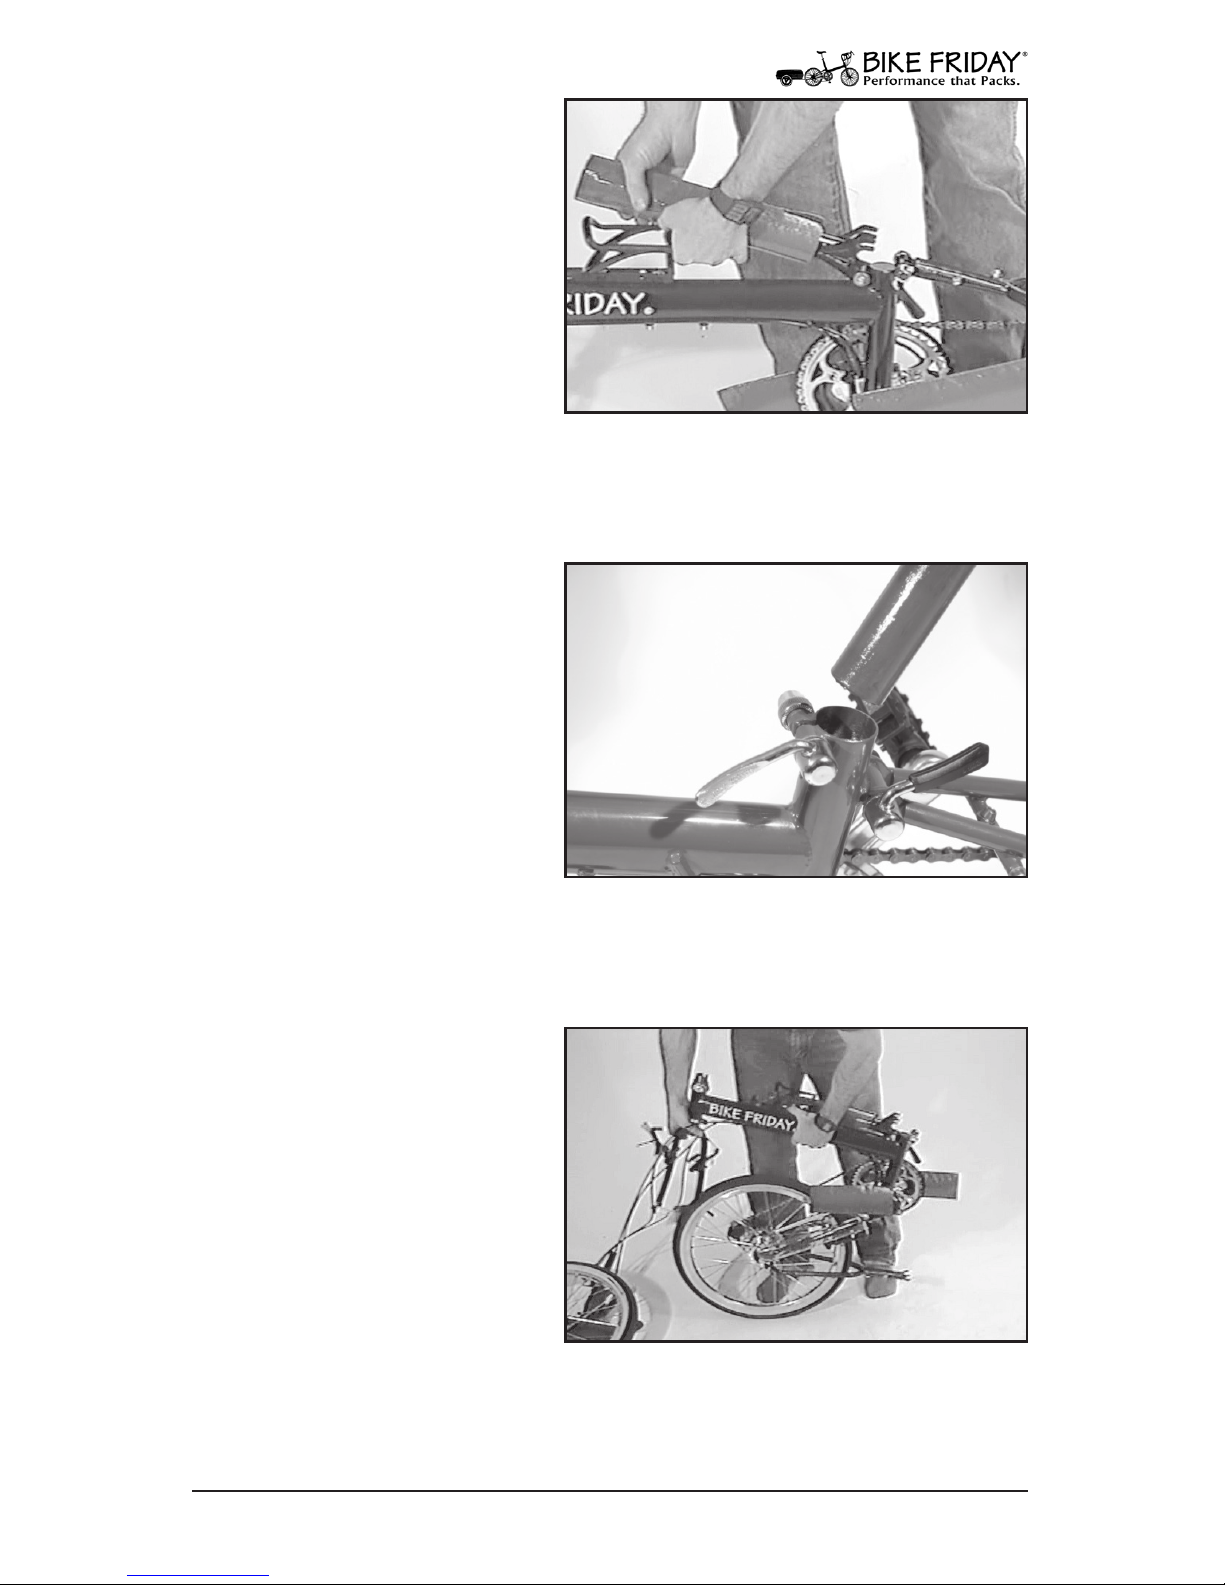
12. Fold Seat Mast
Open your frame quick
release and fold the seat mast
down to the mono-tube.
We always use nylon bottle
cages to allow you to gently
bend the cage to the side as
the seat mast folds past it.
Fig. 12 Fold seat mast forward.
13. Easy pack Seat Mast
If you own a Pocket bicycle,
then your seat mast will pull
out of the frame rather than
fold forward. Loosen the
quick release, remove seat
mast, and place the mast in
the supplied grey felt bag
and set aside.
Fig. 13 Easy pack seat mast removal.
Packing: Fold Frame
14. Fold Your Bike
To fold your bike, turn your
fork to the left 90 degrees
while picking up the bike
by the mono-tube. With new
bikes the rear end hinge
may be a bit sti and require
either a light shaking of the
bike or a push down on the
rear wheel to make it fold.
Fold the bike as far as it will go, with the rear wheel swinging past
the fork.
Fig. 14 Turn fork left and fold rear end.
Page 27
27
www.bikefriday.com800-777-0258 • +1-541-687-0487
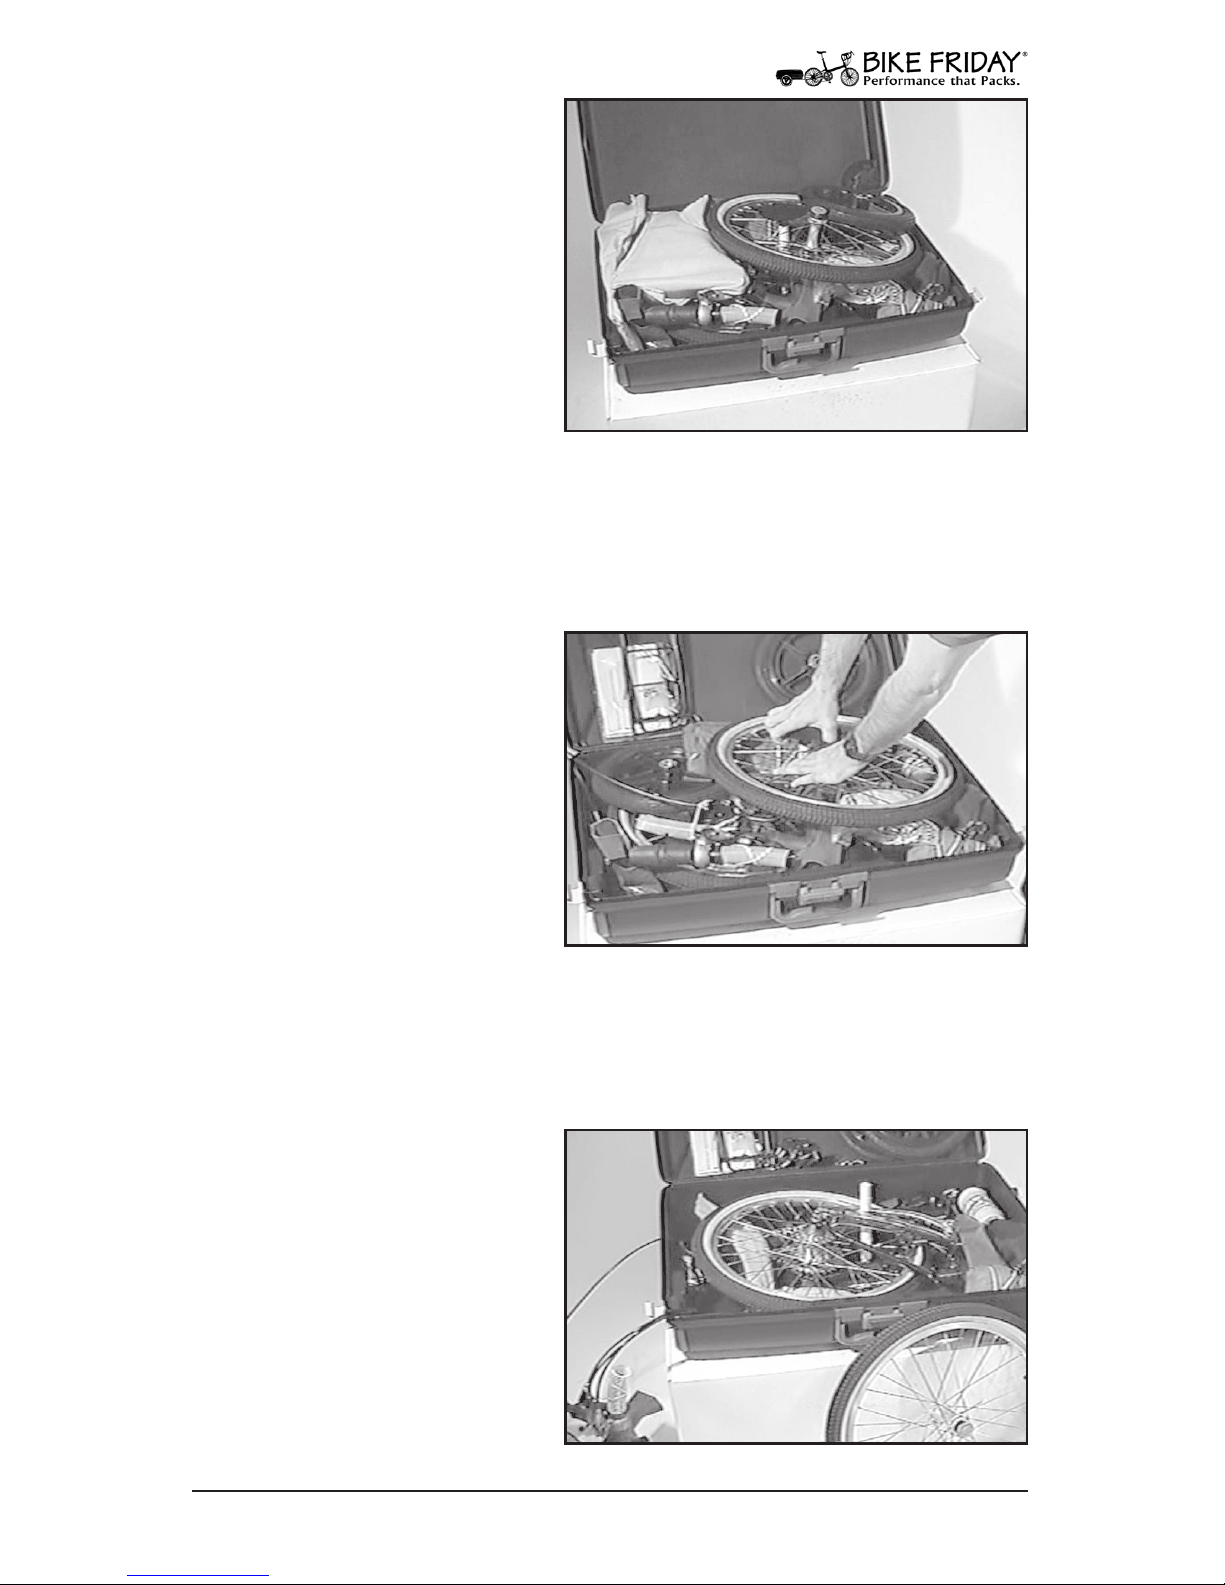
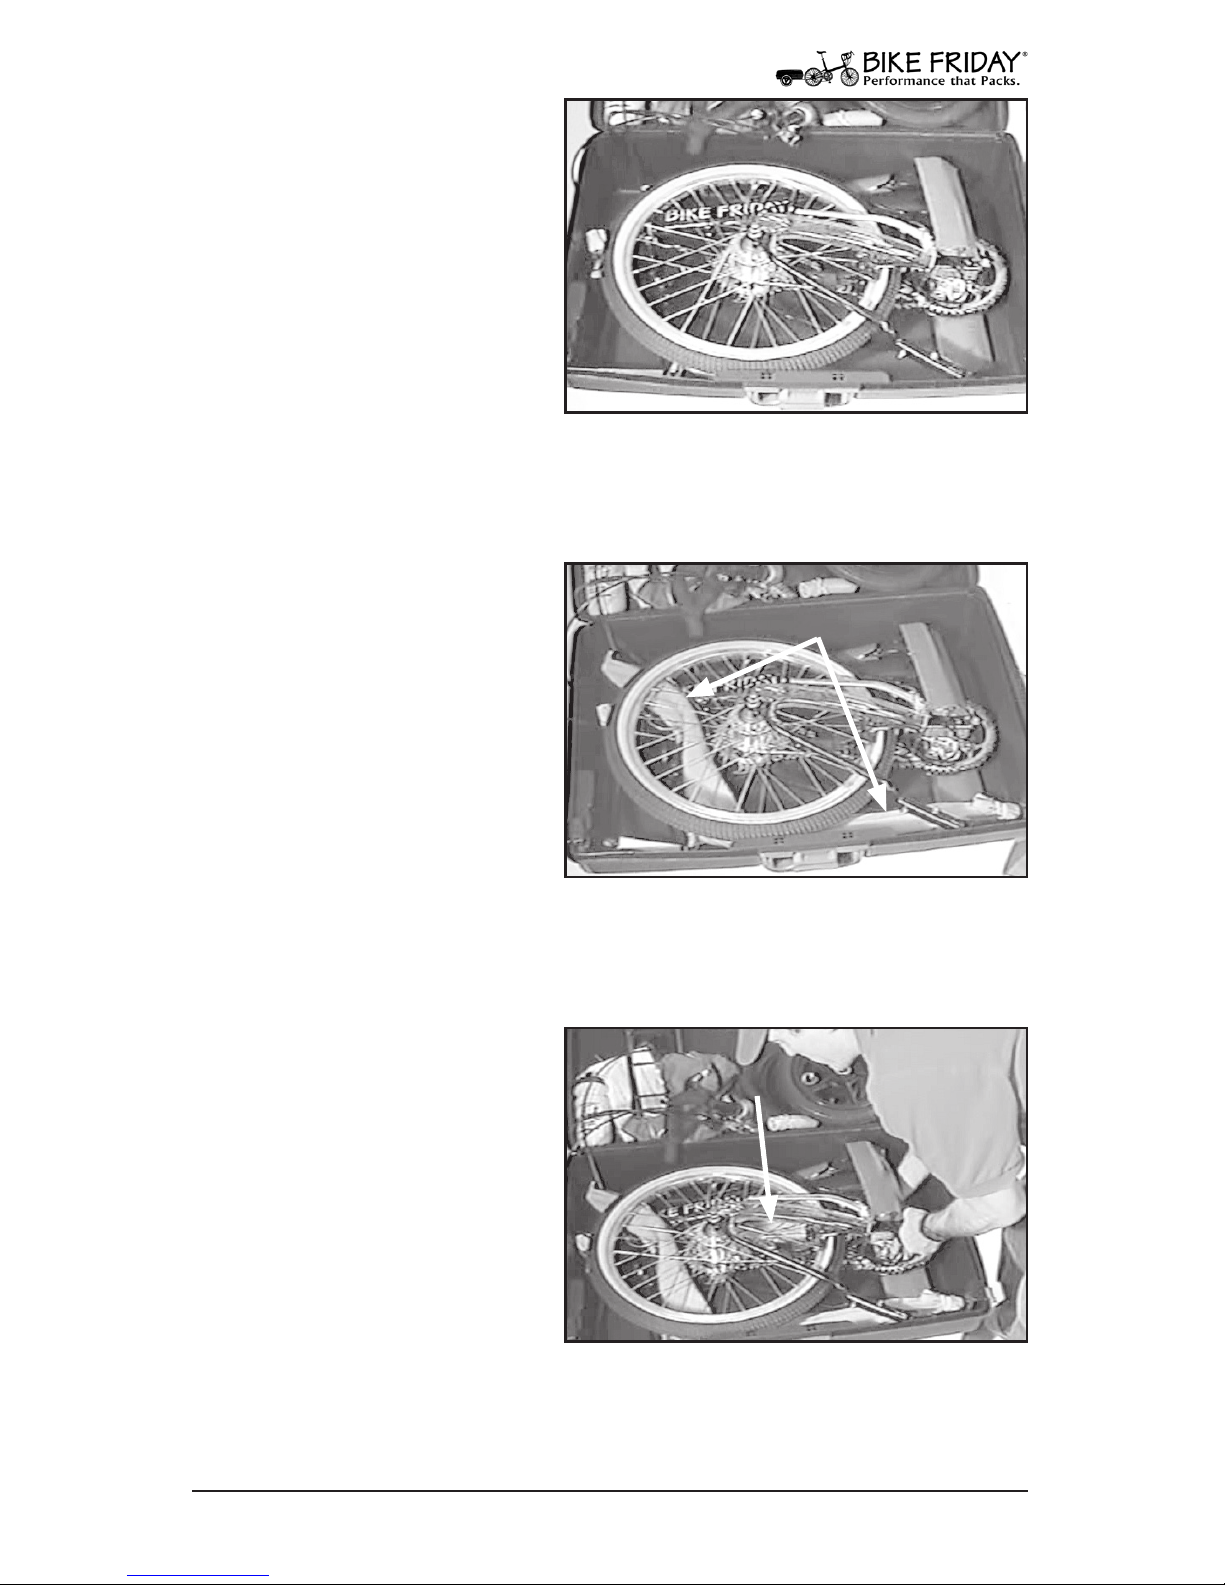
15. Lay Bike In Case
With the bike folded, place
the bike into the case, letting
the handlebars hang out of
the case. Note the orientation: the mono-tube and seat
mast are along the rear of the
case, fork on the left side, rear
wheel on top, drive train facing down and the left crank
arm pointing up in the 12 o’clock position. Place a crush protector
cap in the bottom middle of the case at this point.
Fig. 15 Bike orientation in case.
17. Trailer Axle Bag
Place the shorter yellow
trailer axle bag behind the
mono-tube in the bottom
of the case. You will have
to partially lift out the bike
again as you slip in the trailer
bag.
Fig. 17 Add trailer axle bag.
Packing: Place Bike in Case
16. Insert Trailer Tongue
If you purchased a
TravelTrailer with your bicycle, thread the trailer tongue
in the long yellow felt sleeve
into the case. You will have
to partially lift out the bike
to accomplish this. Note that
the long section is in the bottom front of the case, under
the rear wheel. The S-bend part of the trailer is pointing toward the
left rear corner of the case, and is placed on top of the mono-tube,
but under the rear wheel.
Fig. 16 Trailer tongue placement.
Trailer Tongue
Page 28
28
www.bikefriday.com 800-777-0258 • +1-541-687-0487
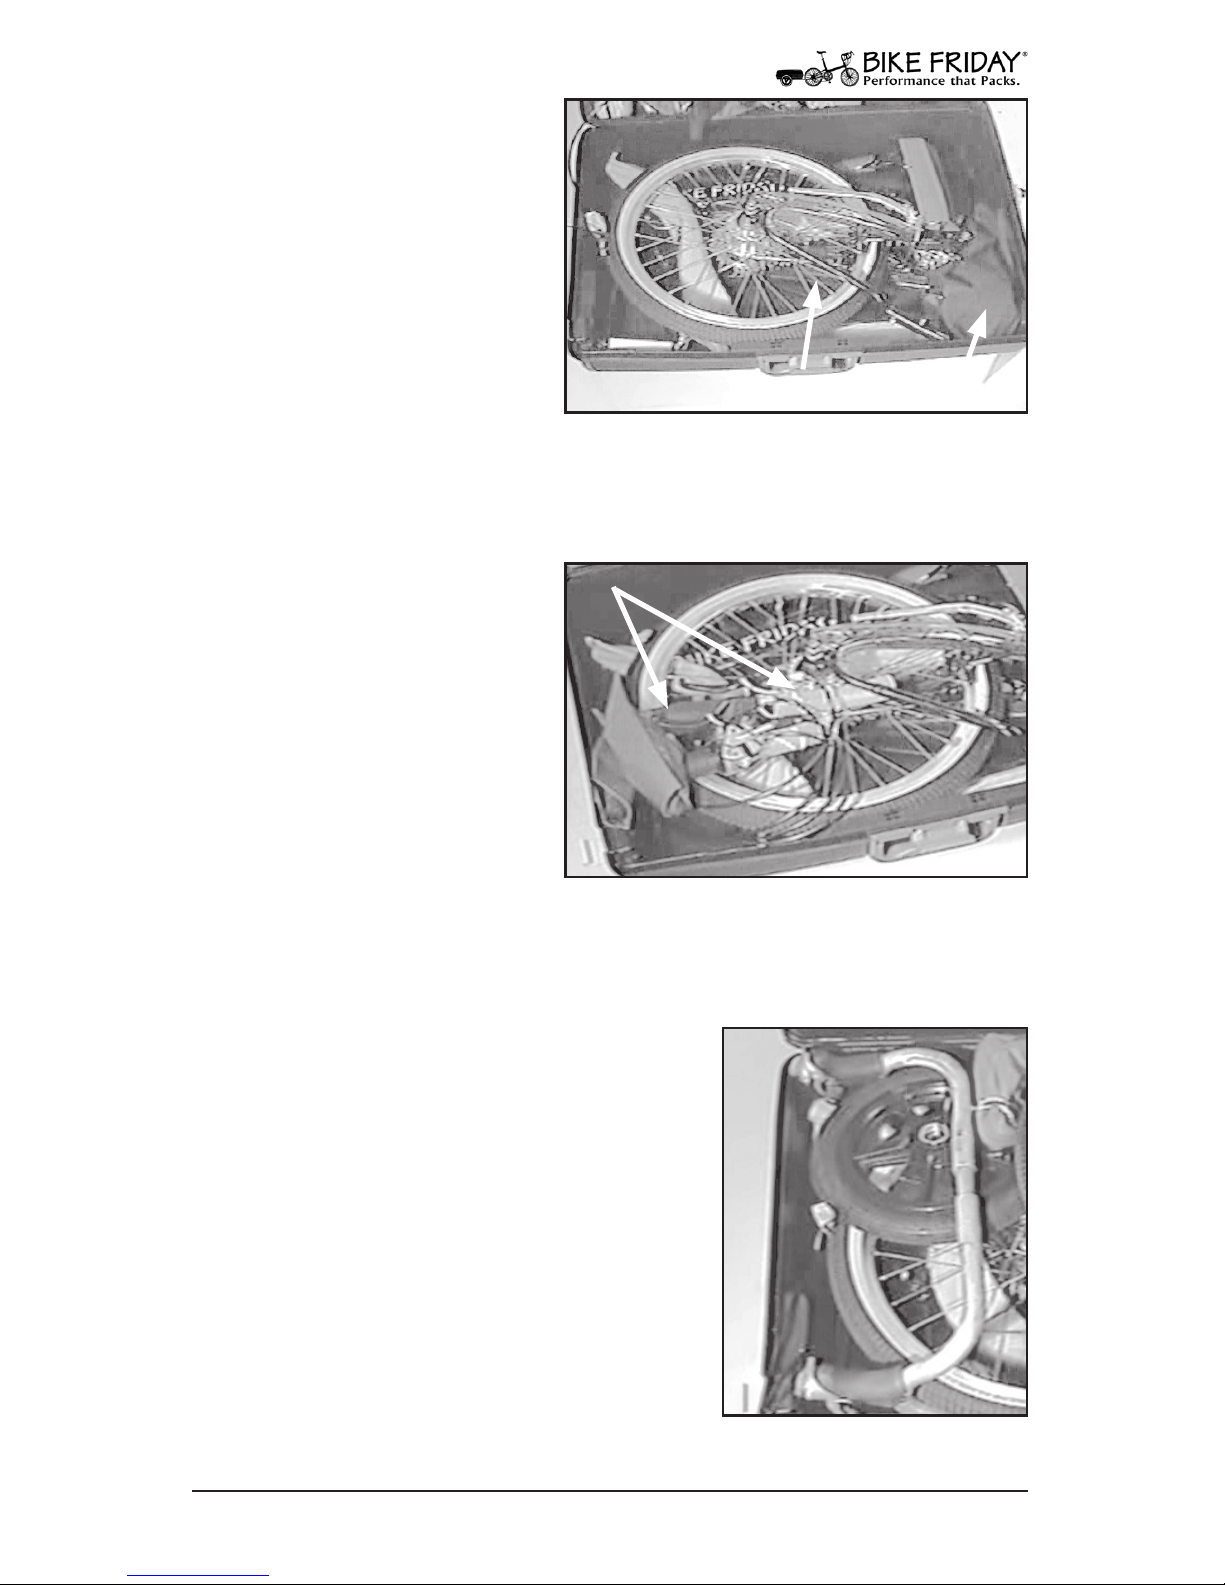
20. Drop Bar Position
If you have drop bars, set them into the
case with the right brake lever at the rear
of the case and the left brake lever at the
front of the case. The drop bar ends will
need to be hooked under the rear wheel
(left bar), and under/behind the monotube (right bar). It is not necessary to have
the bars partially connected as shown.
Figure 20 also shows the future placement of one of the trailer wheels.
Fig. 20 Drop bar position
(ignore trailer wheel).
Packing: Handlebars
18. Place Saddle
Put the saddle in the front
right corner of the case, with
the nose pointing up to 12
o’clock and the large end of
the saddle against the front
of the case. The seat post
should slide under the rear
wheel, pointing at the cassette cogs. Check that the
seat post is not “lifting” the frame.
Fig. 18 Saddle and seat post position.
Saddle
Seat Post
19. Place Handlebars
If you have at bars or Hbars, nest the bars next to
each other (with the reinforcing sleeve pointing in
the same direction) on top of
the rear wheel towards the
front left corner of the case.
If you have not already done
so, add the striped vinyl covers to the end of the bars.
Fig. 19 Handlebar placement.
Page 29
29
www.bikefriday.com800-777-0258 • +1-541-687-0487
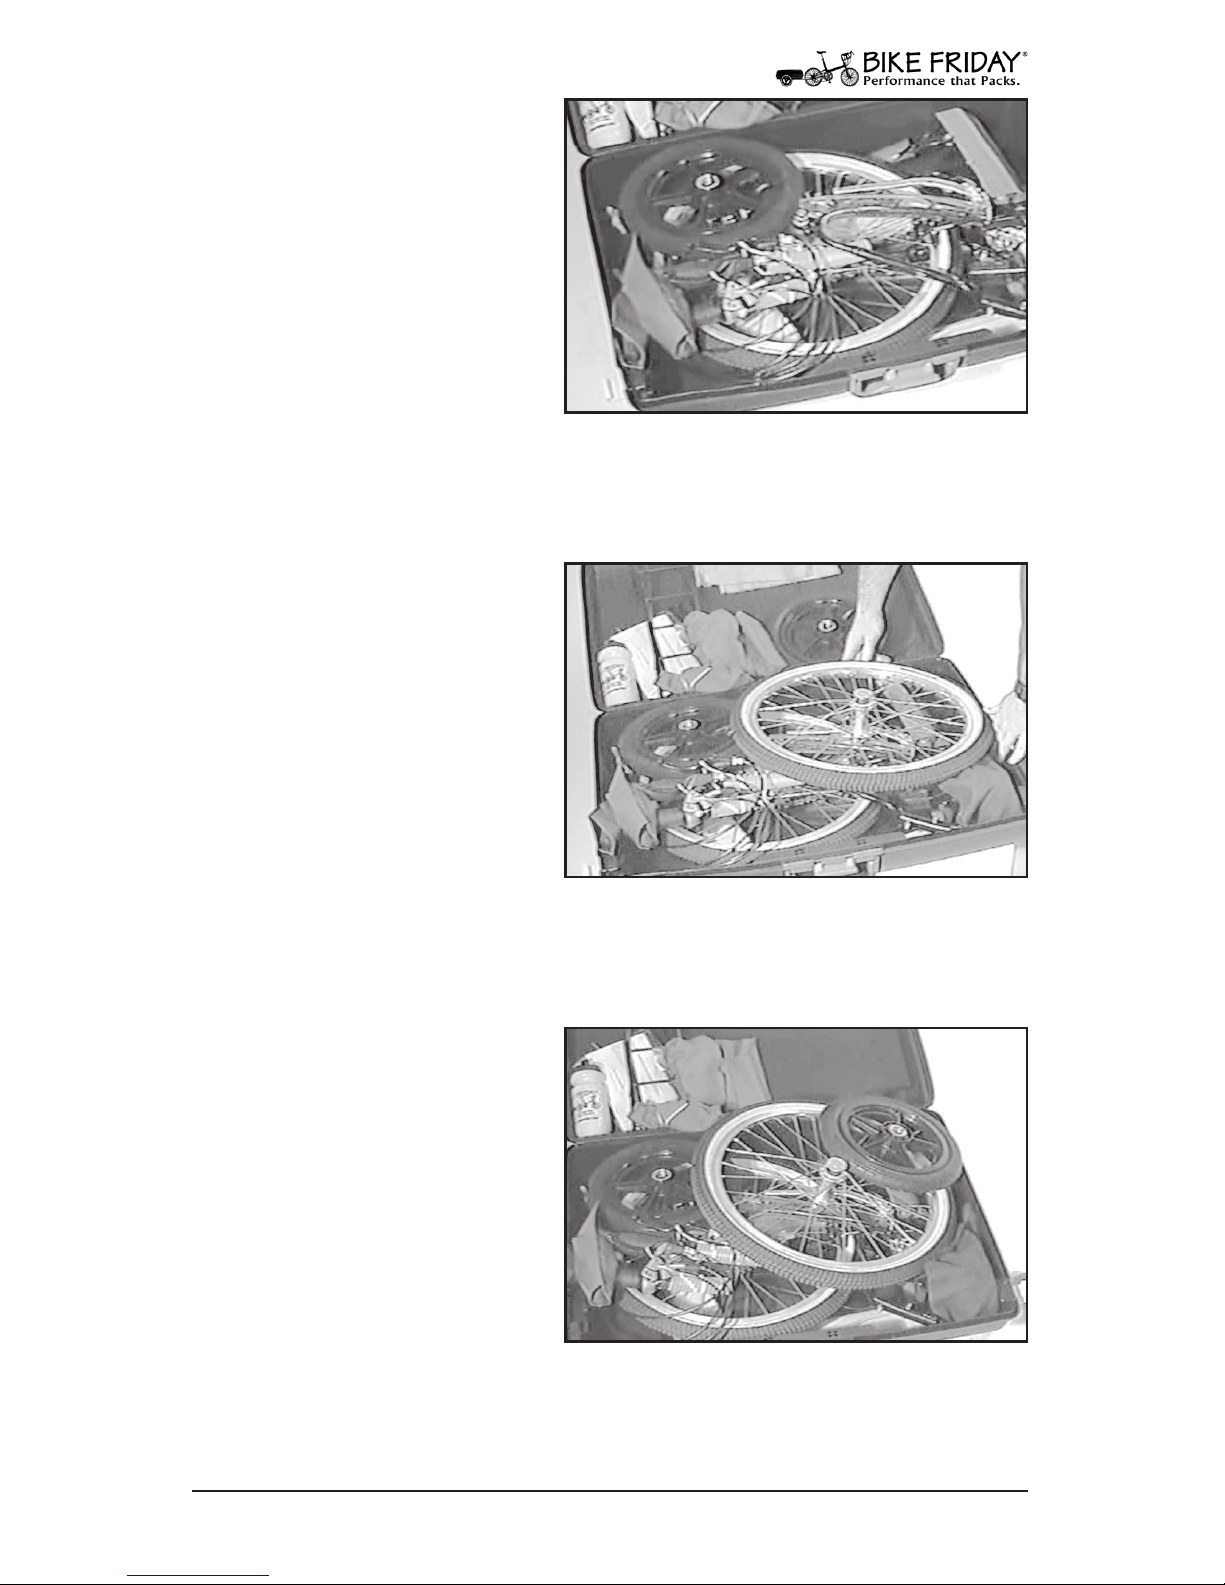
21. First Trailer Wheel
If you have a TravelTrailer
system, place one of the
trailer wheels on top of the
rear wheel in the left rear
corner of the case. If you
have drop bars, the trailer
wheel will slip between the
drop bar and the rear wheel.
Fig. 21 First trailer wheel.
22. Pack Front Wheel
Lay your front wheel on top
of everything so that the tire
rests against the rear and
right sides of the case. Watch
that the hub’s axle does not
rub against part of the rear
end of your frame, reposition if necessary. Also make
certain that the large end of
the saddle does not push the wheel up too much. Note: Although
it is not necessary to deate tires prior to air travel, large MTB tires
may need to have some air let out for easier packing.
Fig. 22 Front wheel placement.
23. Second Trailer Wheel
Now place the other trailer
wheel on top of the front
wheel, in the right rear corner of your case. The trailer
wheel should not be resting
on top of the front wheel’s
axle, but just to the side of it.
Fig. 23 Second trailer wheel placement.
Packing: Wheels
Page 30
30
www.bikefriday.com 800-777-0258 • +1-541-687-0487
Packing: Accessories
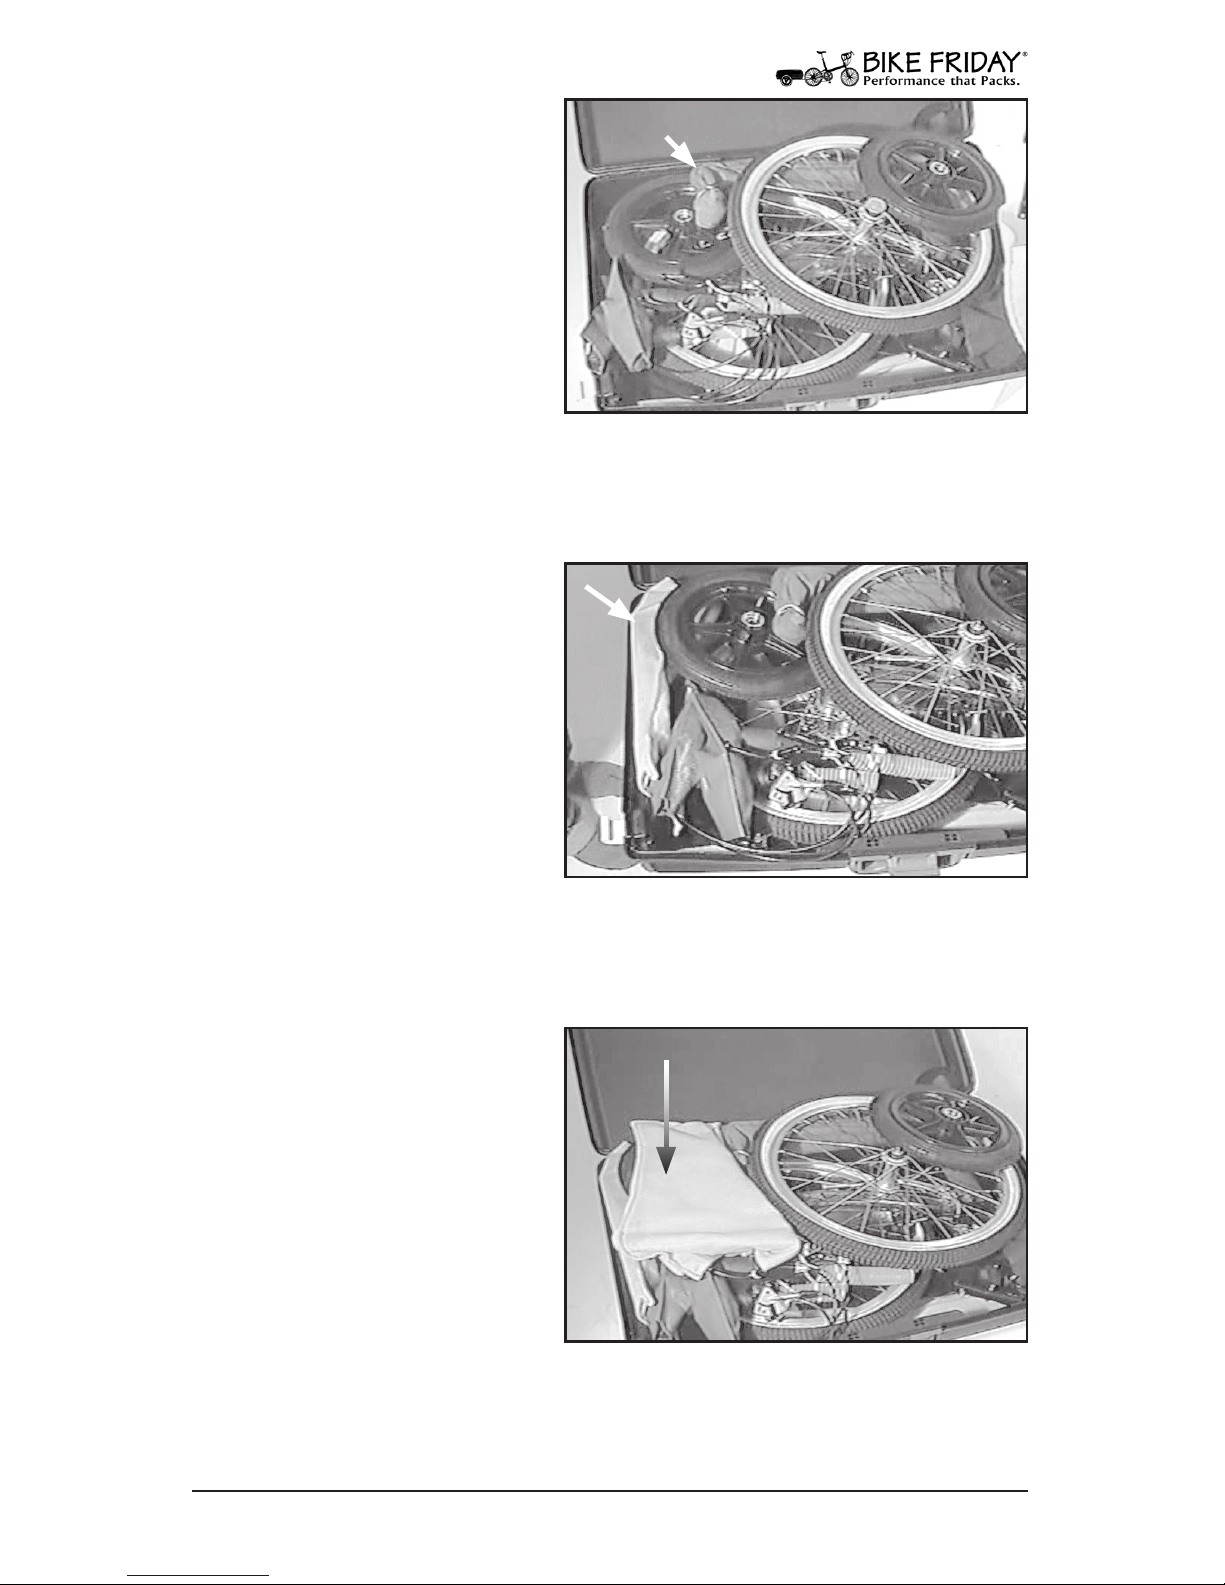
24. Pack Stem
Place your stem along the
rear of the case, under the
front wheel (it should be in
a red felt bag). Although this
position generally works
well, feel free to put the stem
in any open spot in the case.
Fig. 24 Stem position.
Stem
25. GD Folding Rear Rack
If you have a Bike Friday GD
Folding Rear Rack, fold the
rack and put it in the yellow
felt bag. The rack should t
on edge along the left side of
the case.
Fig. 25 GD Folding Rear Rack.
26. Front Rack
If you have a front rack, disassemble the rack and put it
in the yellow felt bag. The
front rack should lay at on
top of the bike, to the left of
the front wheel and on top of
the handlebars.
Fig. 26 Front rack position.
Page 31
31
www.bikefriday.com800-777-0258 • +1-541-687-0487
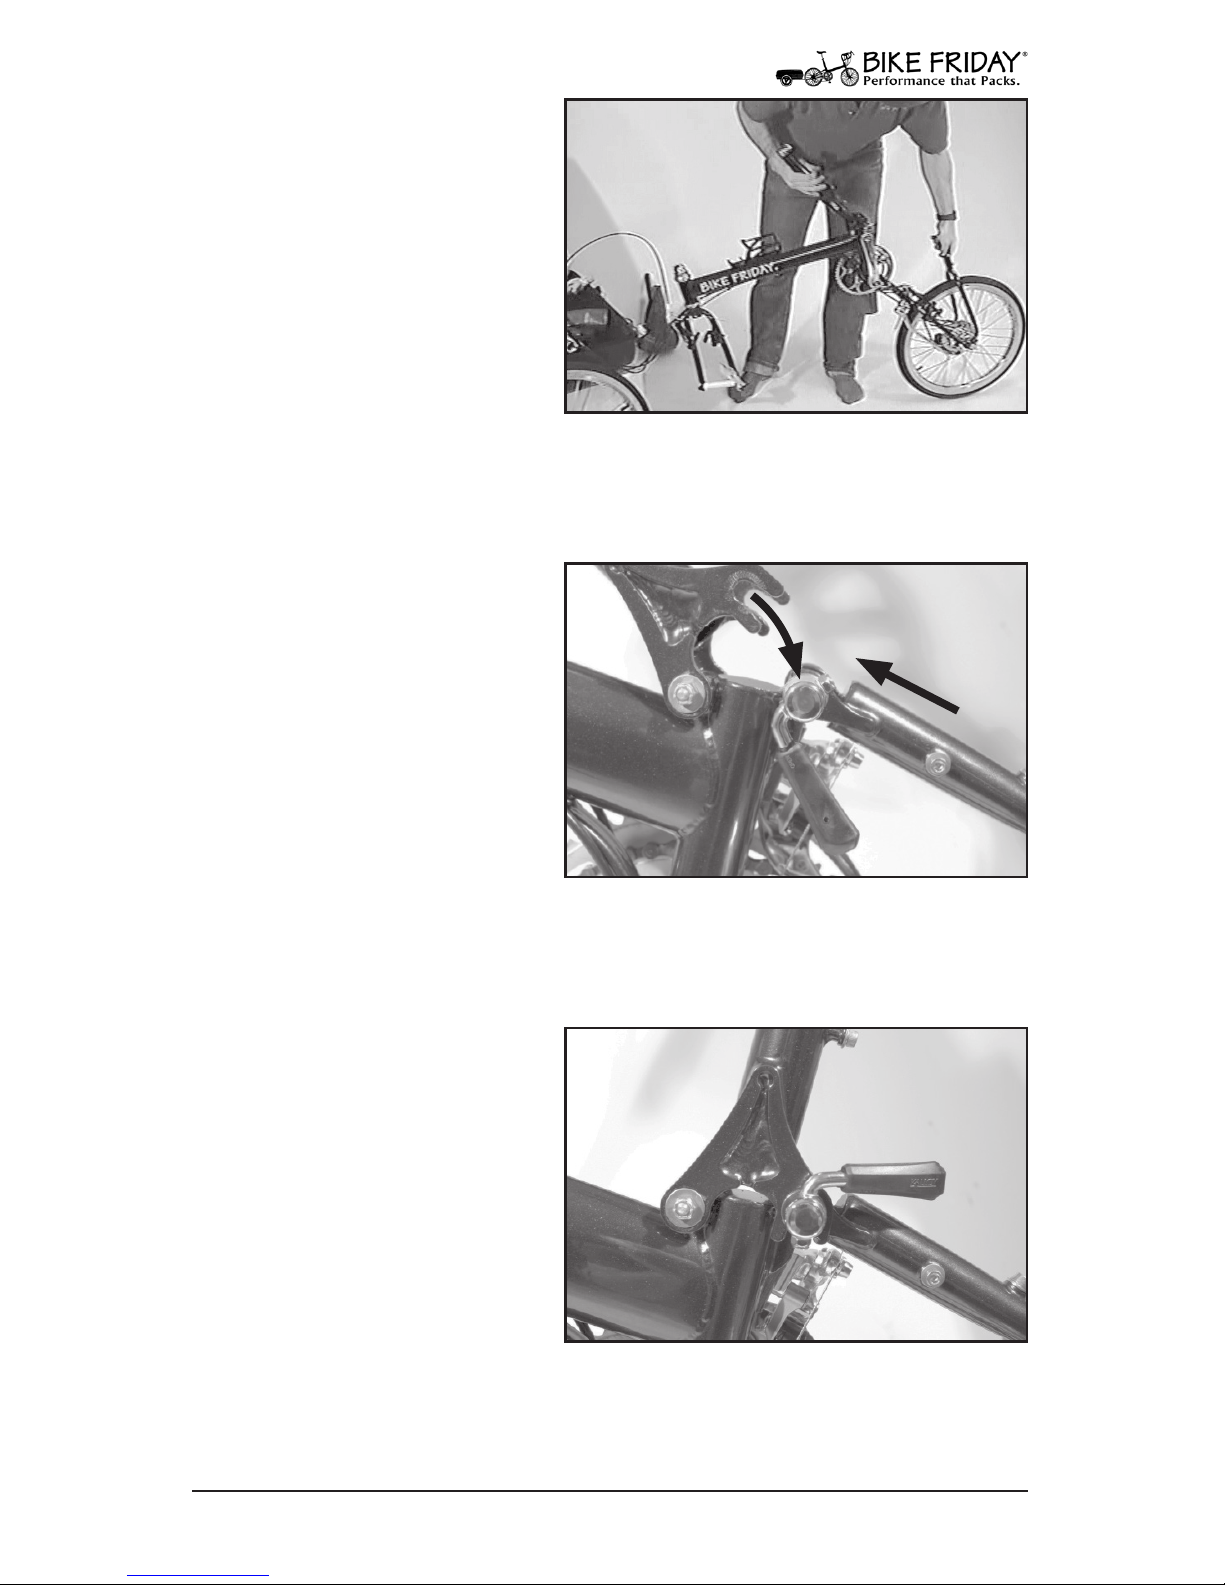
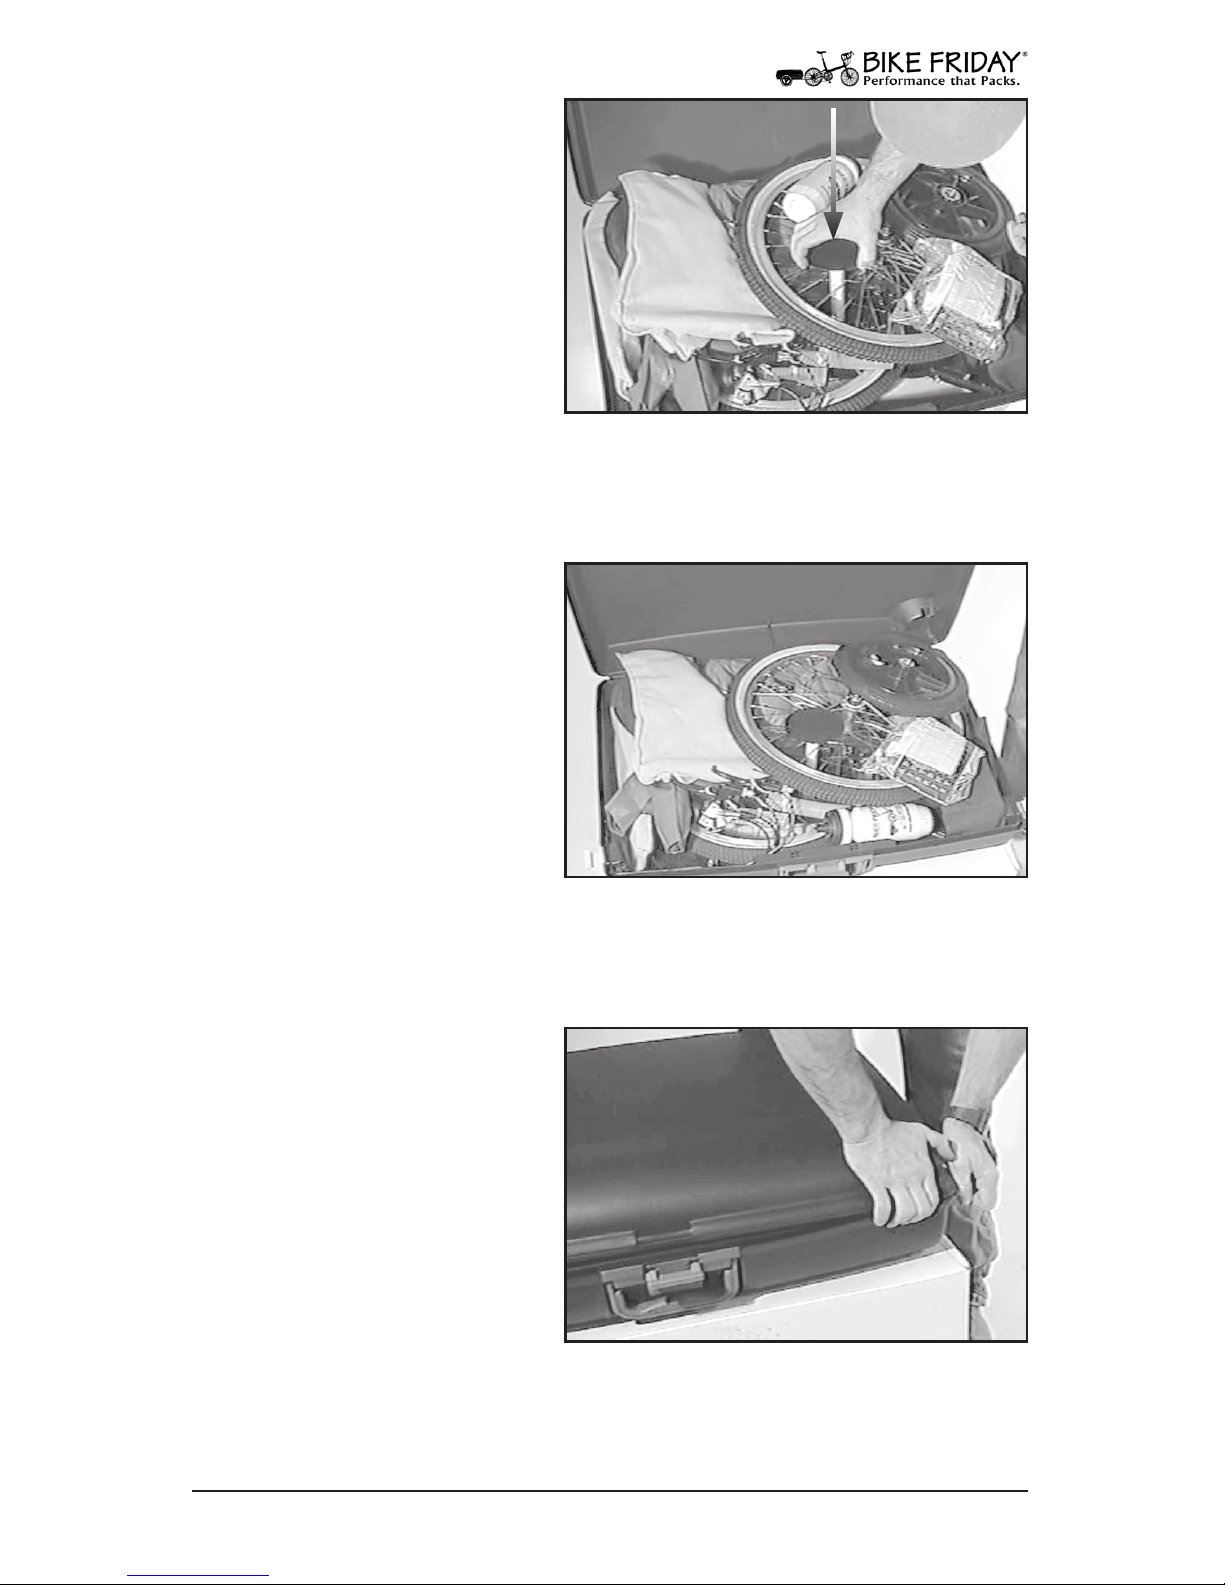
28. Miscellaneous Items
At this point the bike is
nearly packed. Any remaining loose items such as the
pedal bag, tool pouch, water
bottles, any clothing, shoes
etc. should be set into any
remaining openings. Fenders can be nested together
and wrapped around the
front wheel.
Fig. 28 Odds and ends.
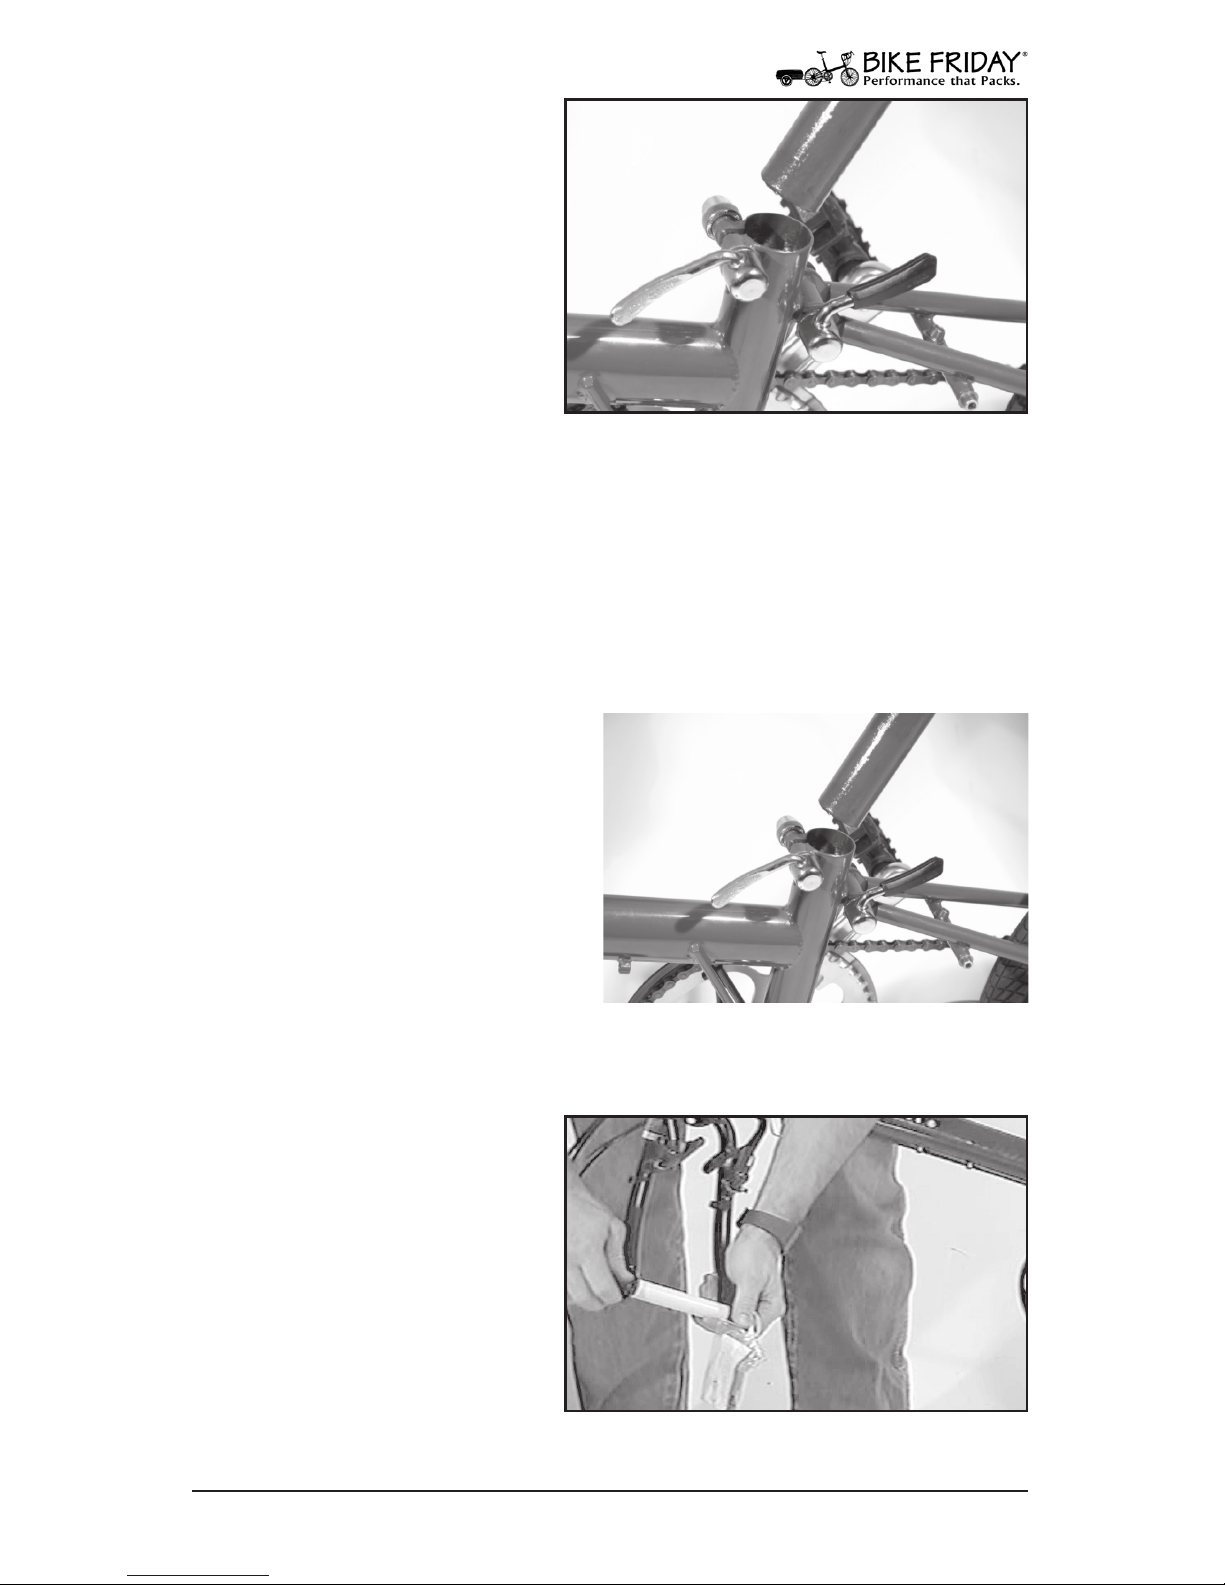
29. Close TravelCase Lid
Close the case lid, tucking
any loose cables and felt
bags into the case. Then
starting with a side buckle,
latch the lid closed. It is ok if
the lid is tight, this will help
keep the bike from bouncing
around. If you cannot close
the lid, check that the front
wheel and trailer tires are properly positioned and are not too high.
Finally, you should be able to feel that the crush protector is the
highest point of the case.
Fig. 29 Close TravelCase.
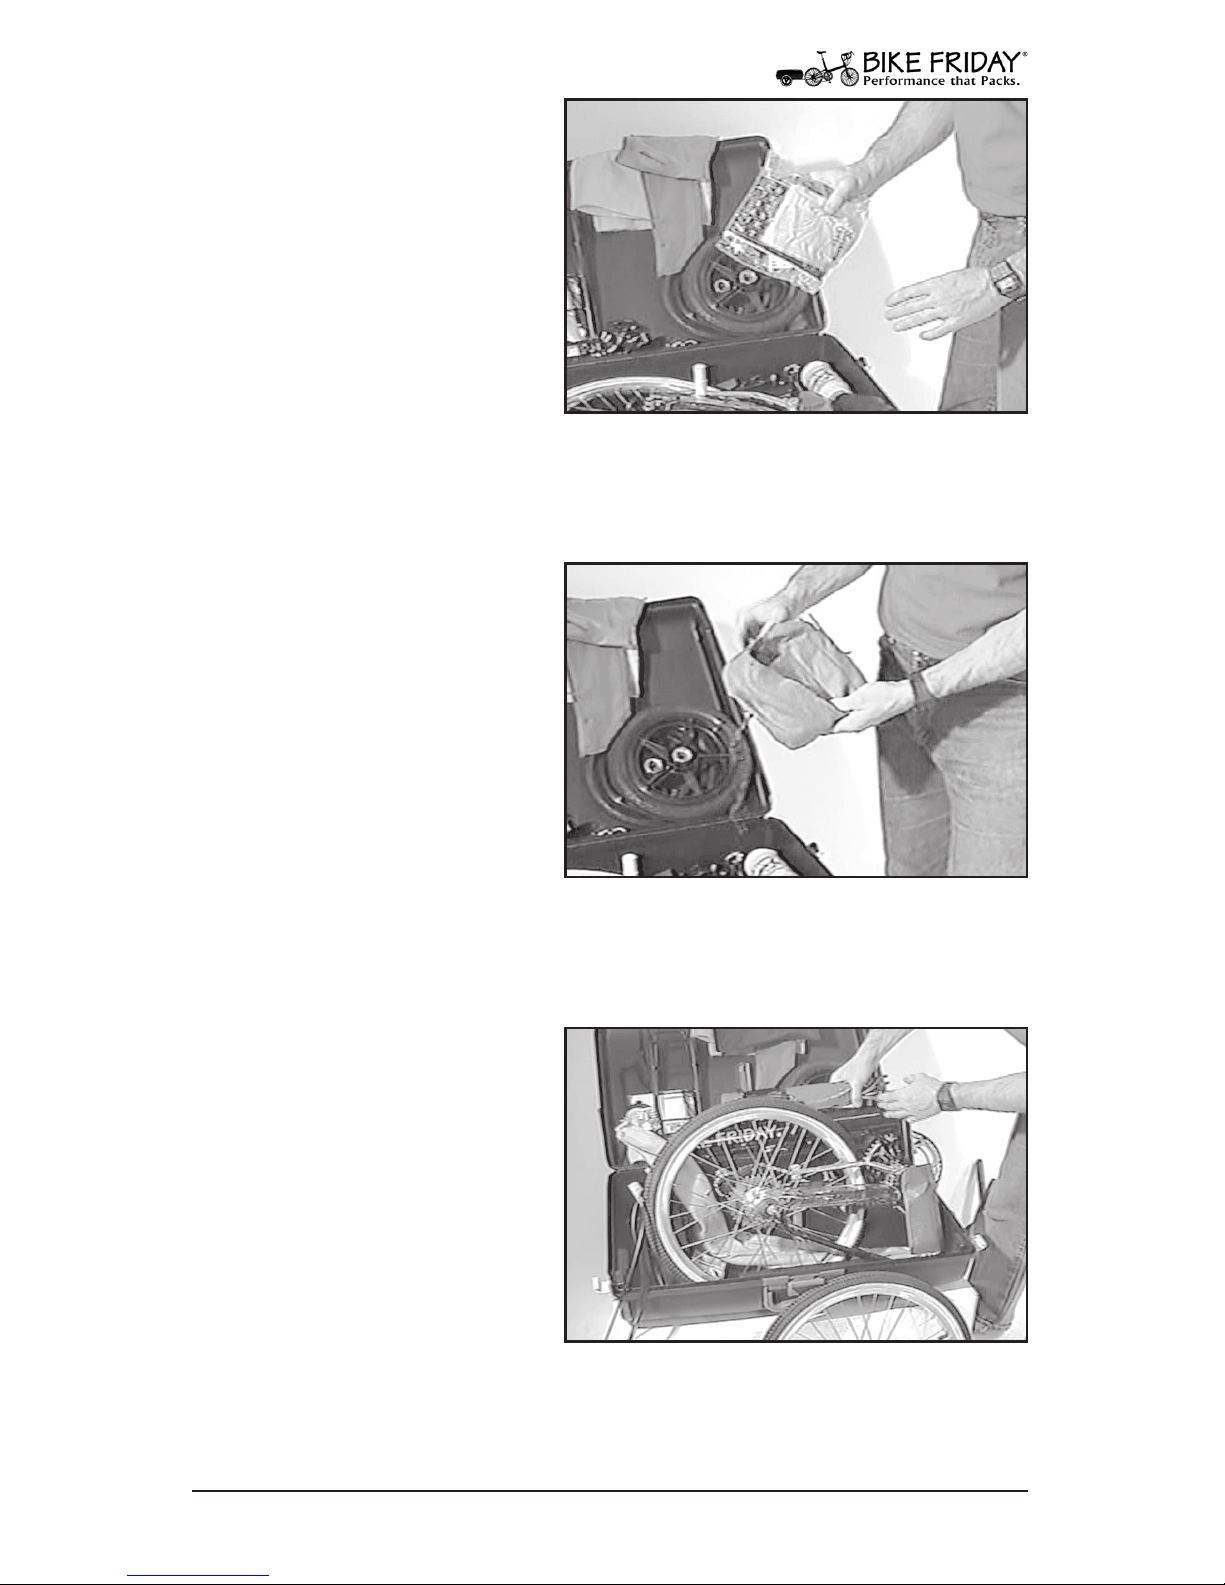
27. Insert Crush Protector
You should have placed
one of the crush protector
anges into the bottom of
the case soon after the bike
was set in place. If not, do it
now by slipping the disk into
the case. Thread the crush
protector dowel through
the front wheel, rear wheel,
frame and into the socket on the lower ange. The exact position is
not critical, as long as it is about the middle of the case, and the top
ange is close to the highest point of the bike.
Fig. 27 Crush protector.
Packing: Accessories
Page 32
32
www.bikefriday.com 800-777-0258 • +1-541-687-0487
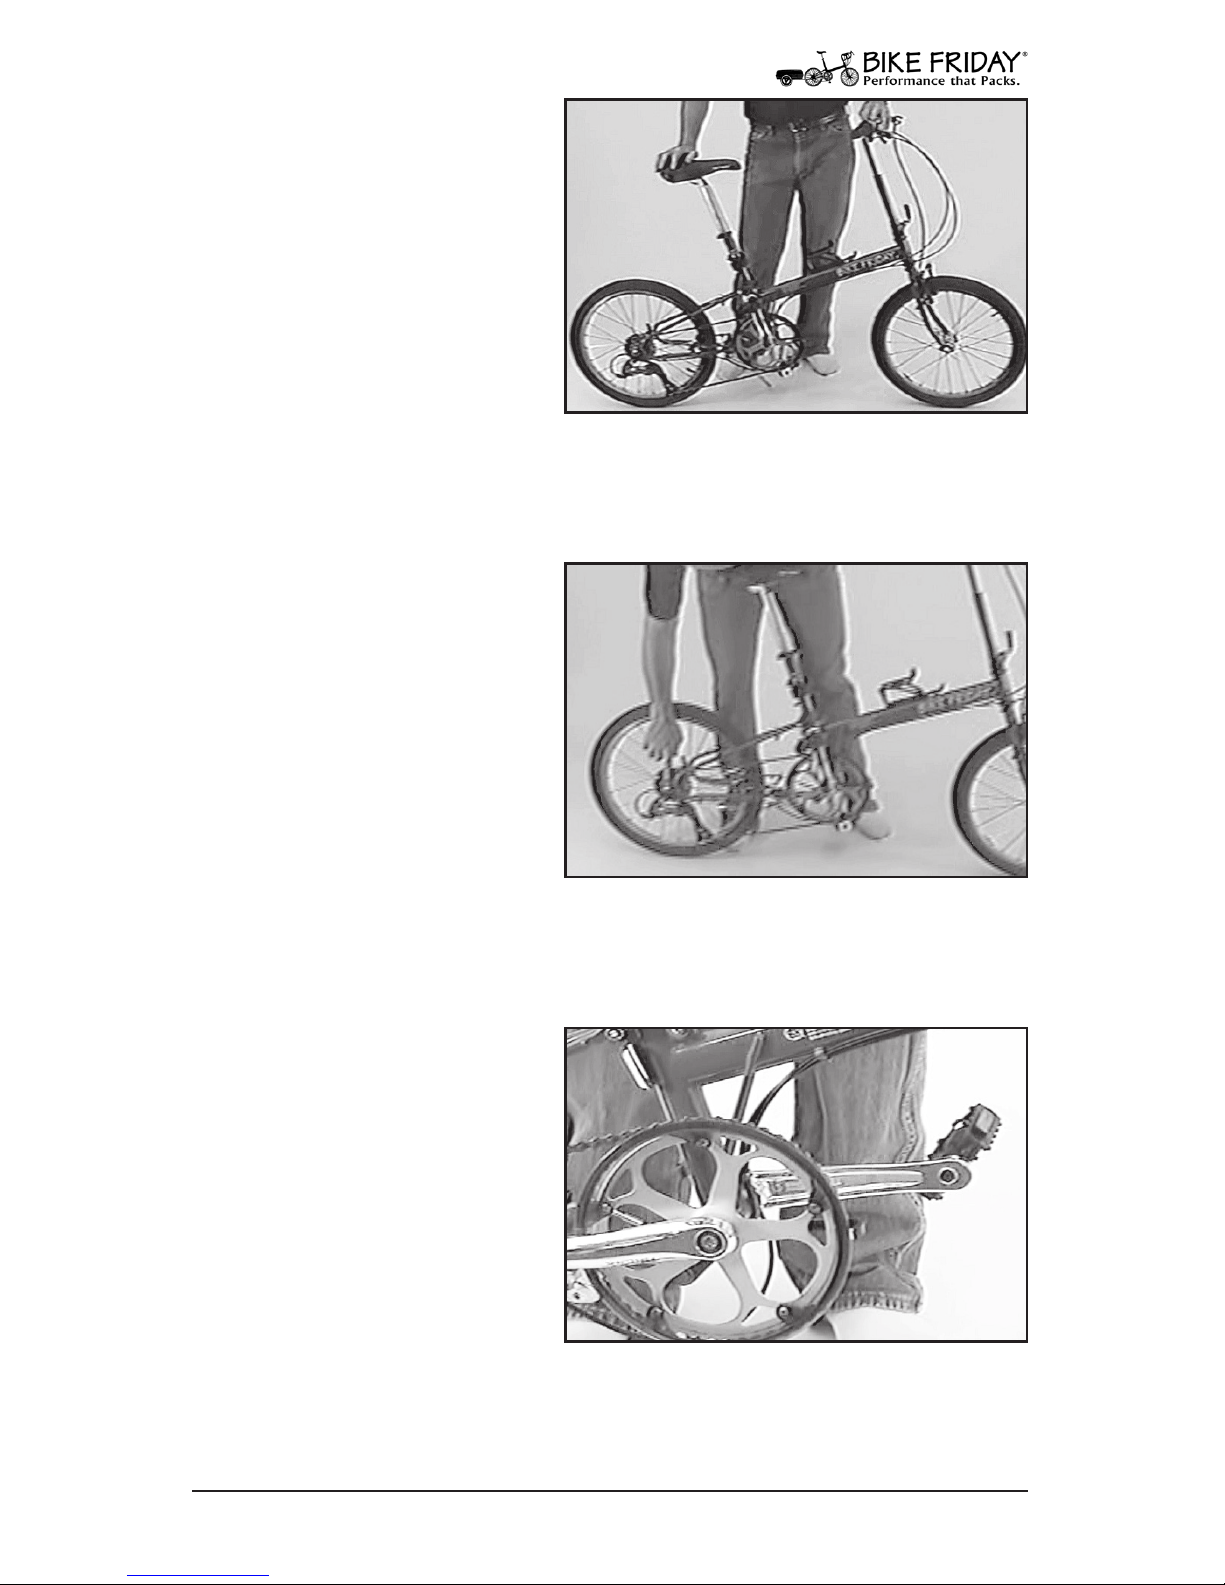
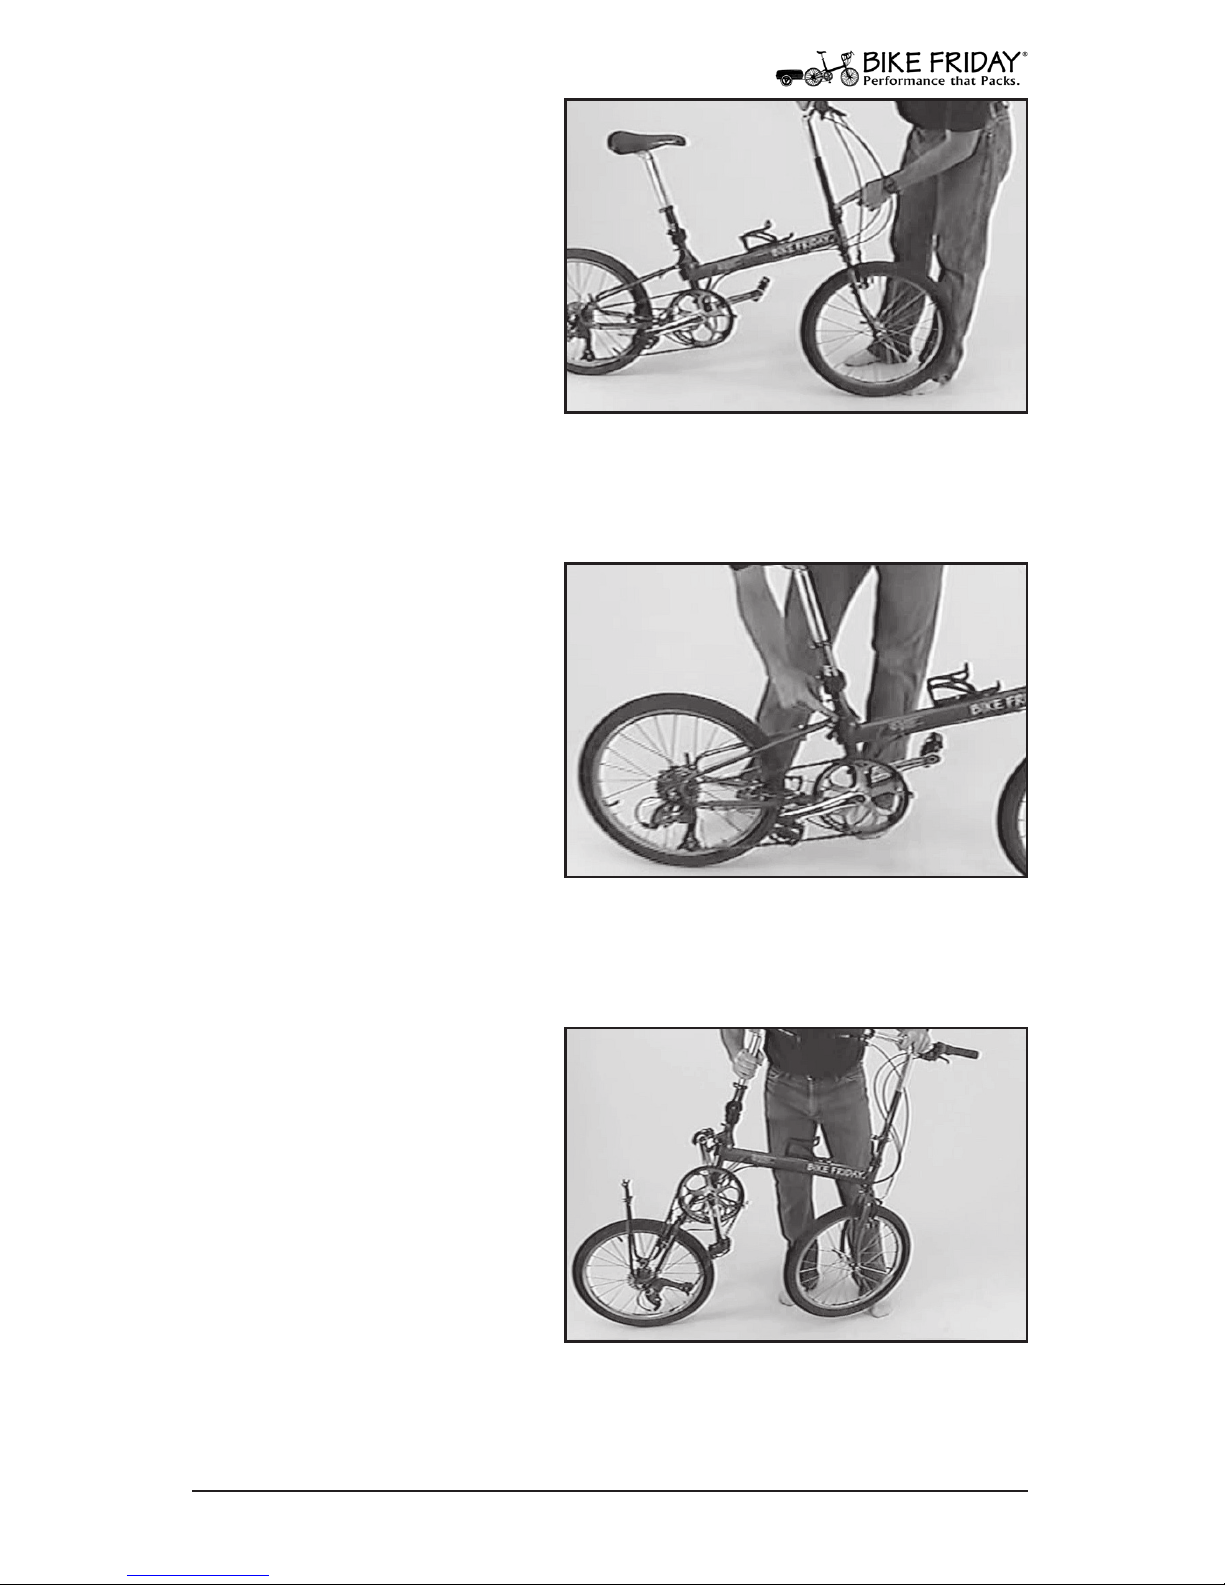
1. Raise Kick Stand
If your bike has a kickstand,
raise it at this point.
Fig. 1 Getting ready for the quick fold.
2. Shift Into Small Cog
This is best accomplished
when you are still riding and
coming to a stop, anticipating a quick fold. You will
want the chain in the small
cog in the rear. If you have
a front derailleur with two
or more chain rings in front,
shift the chain into the small
chain ring.
Fig. 2 Shift into small cog.
3. Set Crank Arms Level
Turn your crank arms until
the left crank arm is pointing
forward and the cranks are
level.
Fig. 3 Left crank arm pointing forward.
Quick Fold
Page 33
33
www.bikefriday.com800-777-0258 • +1-541-687-0487
4. Loosen Stem
Loosen the stem’s quick
release or bolt, but leave the
stem in the frame for now. If
your stem tends to be a bit
sticky on removal, you might
partially remove the stem so
that it’s loose but not out.
Fig. 4 Loosen stem quick release.
5. Open Frame QR
Open the quick release on
your frame.
Fig. 5 Loosen frame quick release.
6. Lift Bike
Pick up your bike by the seat
mast so that the rear end
swings around and under
the bike. New bikes may be
a bit sti to fold. You might
have to lightly shake the bike
or push the rear wheel down
to start the fold.
Fig. 6 Lift your Bike Friday.
Quick Fold
Page 34
34
www.bikefriday.com 800-777-0258 • +1-541-687-0487
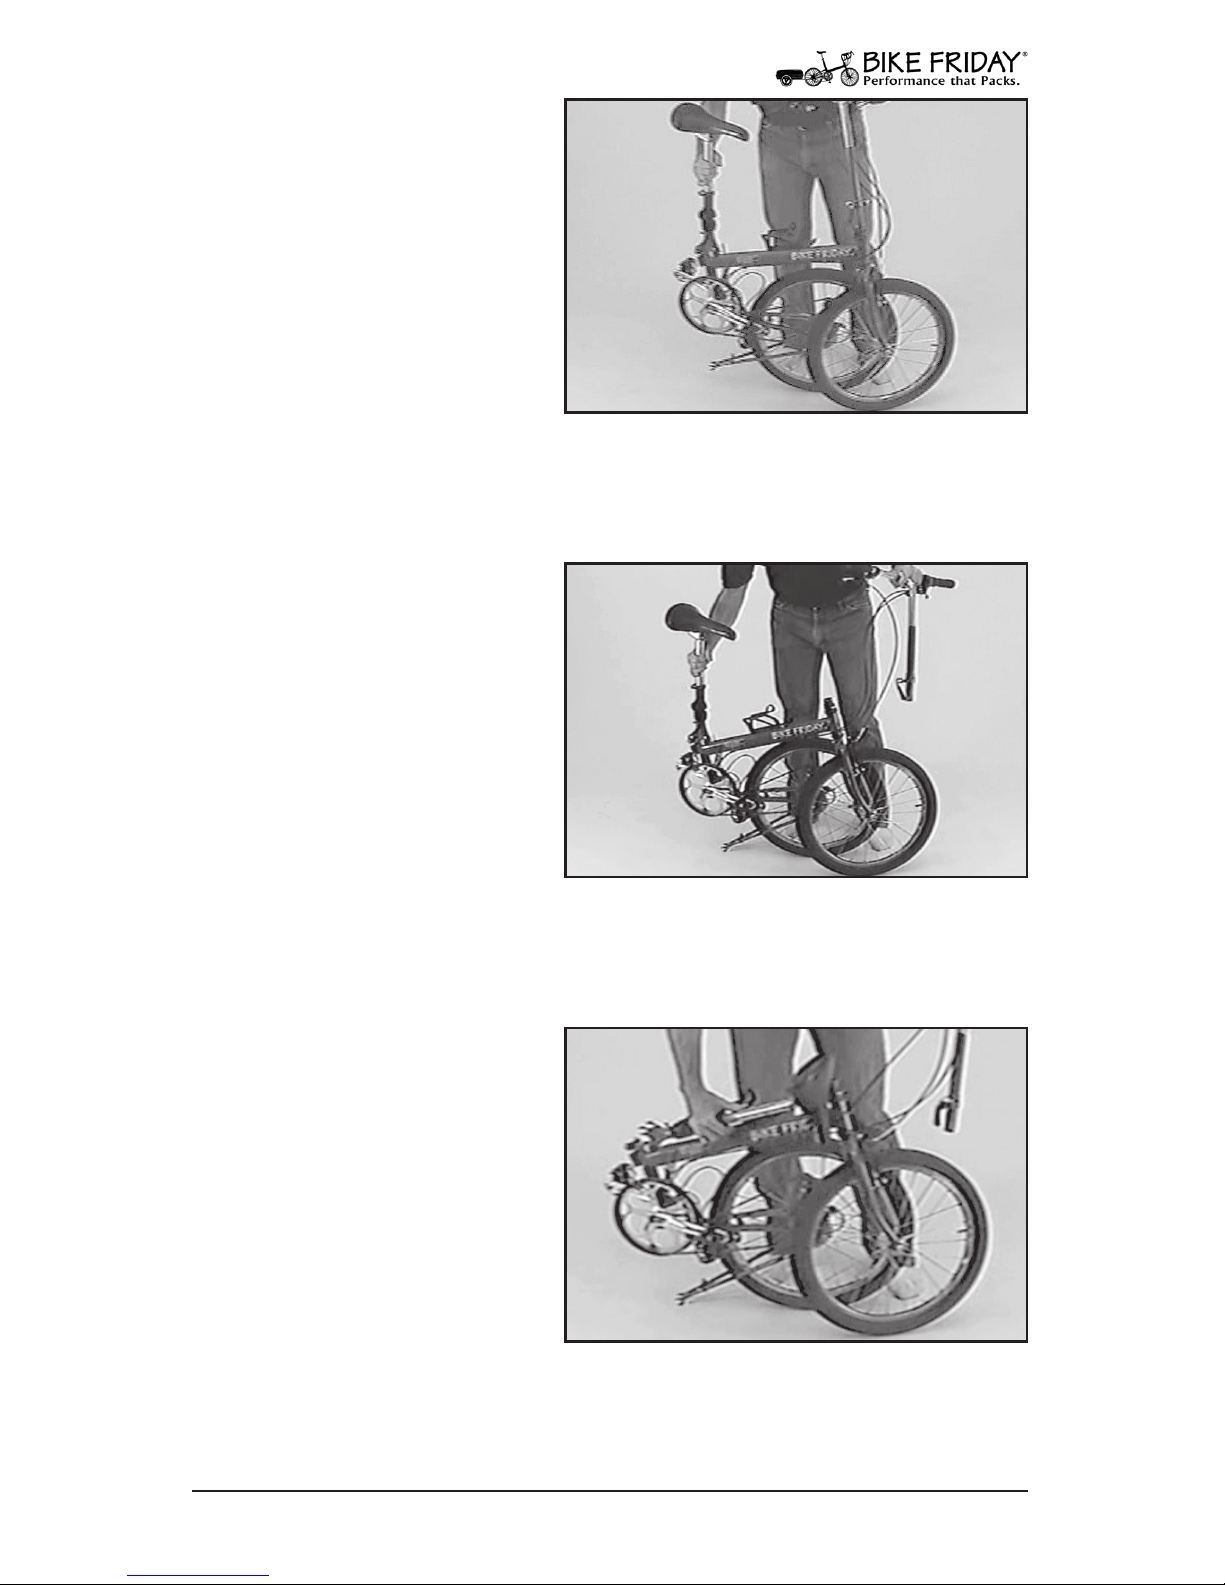
7. Continue Fold
Fold rear end all the way
around until the rear wheel
is resting next to the front
wheel.
Fig. 7 Fold frame.
8. Remove Stem
Your stem should just lift out
of your frame with the quick
release open.
Fig. 8 Remove stem.
9. Fold Seat Mast
Fold the seat mast forward
until it is next to the monotube. We use nylon water
bottle cages so that you can
gently bend the cage to the
side to accommodate the
seat mast.
Fig. 9 Fold seat mast past bottle cage.
Quick Fold
Page 35
35
www.bikefriday.com800-777-0258 • +1-541-687-0487
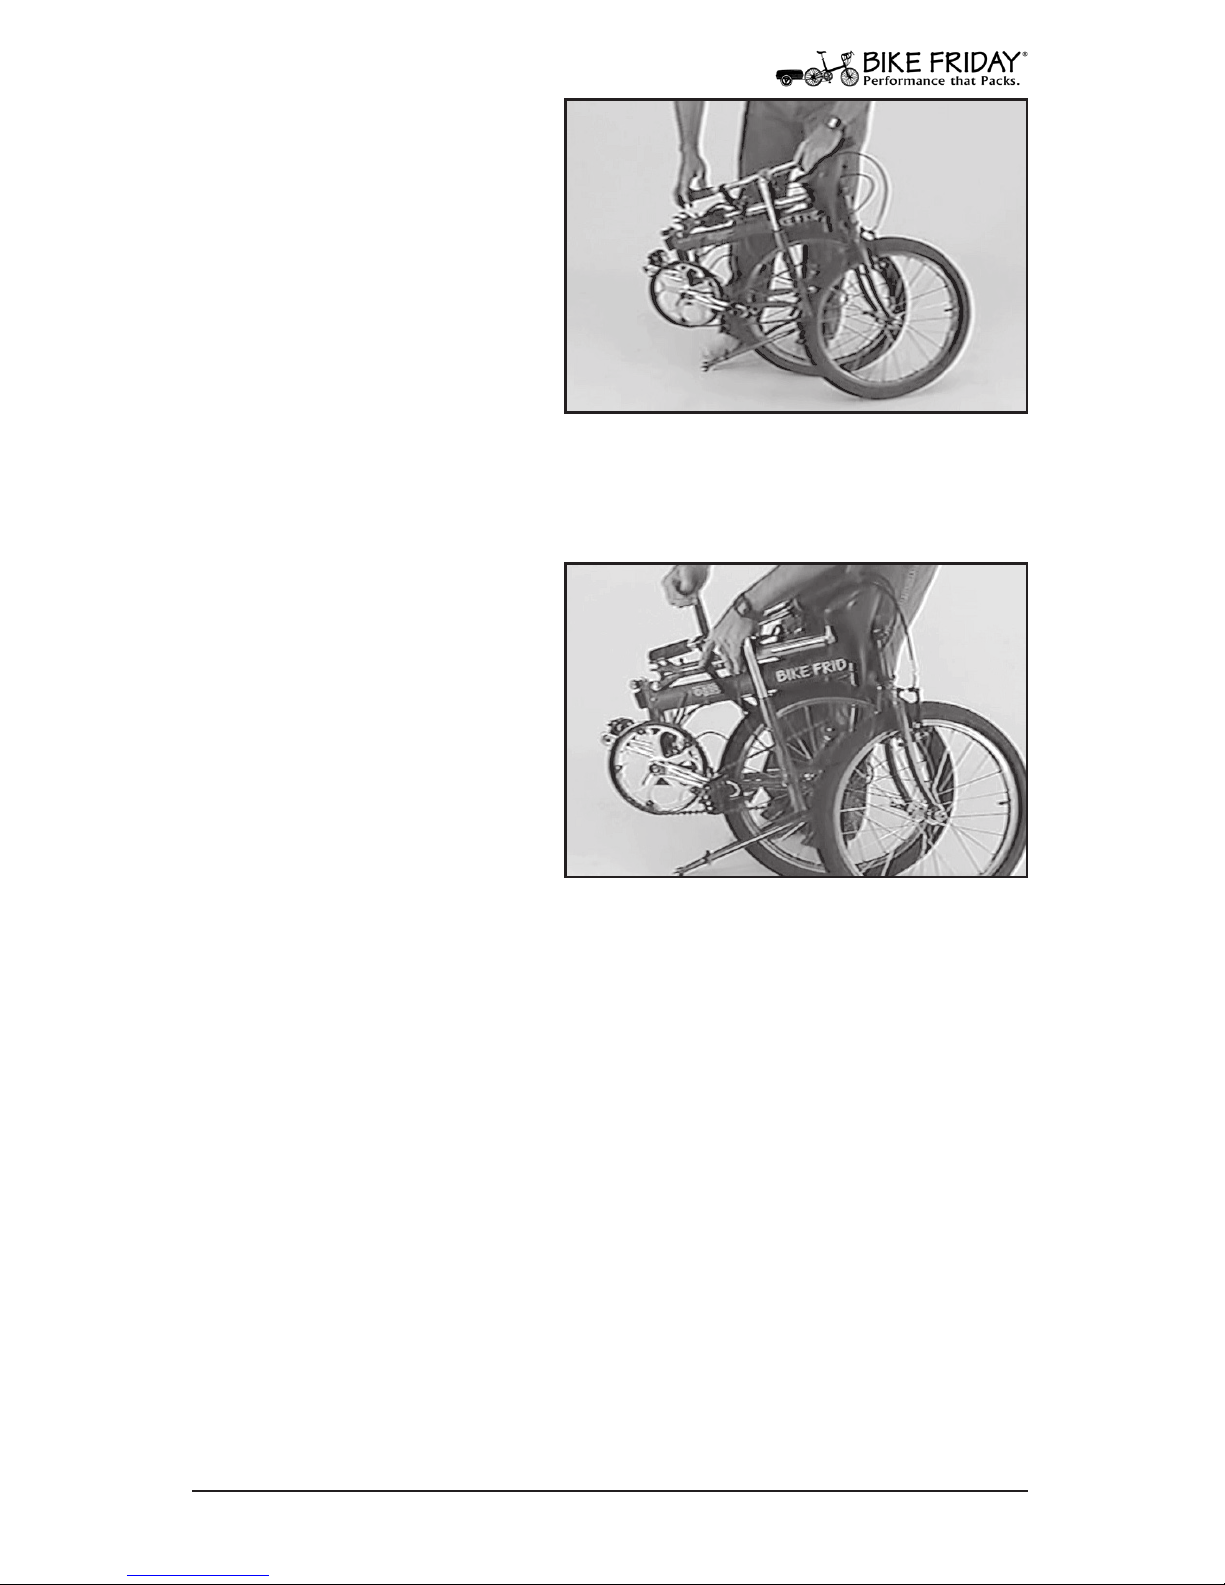
10. Nest Handlebar
Place the handlebar across
the top of the mono-tube and
seat mast, with the stem portion on the right side of the
bike.
Fig. 10 Nest handlebar on frame.
11. Strap Bike Together
Most Bike Friday bicycles
have a Velcro strap attached
to the seat mast for use during the quick fold. Unwrap
the strap and then thread it
over the handlebar, around
the mono-tube, through the
rear wheel, and back up
again to the buckle. This
will keep the bike from unfolding as you carry it. If you have a
TravelBag, place the bike in it now and zip it shut.
Fig. 11 Seat mast strap.
Quick Fold
12. Unfolding Your Bike Friday Bicycle
Unfolding your bike into riding condition is just the reverse of these
steps. Before you ride your bike again, double-check to make certain that all of the quick releases are secure, and that the alignment
pin in the stem is properly engaged to the fork.
If you are a bicycle commuter who frequently folds your bicycle,
you might consider ordering a chain retainer. Sometimes when
folding and unfolding your bicycle the chain can fall o of the front
chain ring. The chain retainer attaches to your frame and serves as
a chain catcher to keep the chain in place.
Page 36
36
www.bikefriday.com 800-777-0258 • +1-541-687-0487
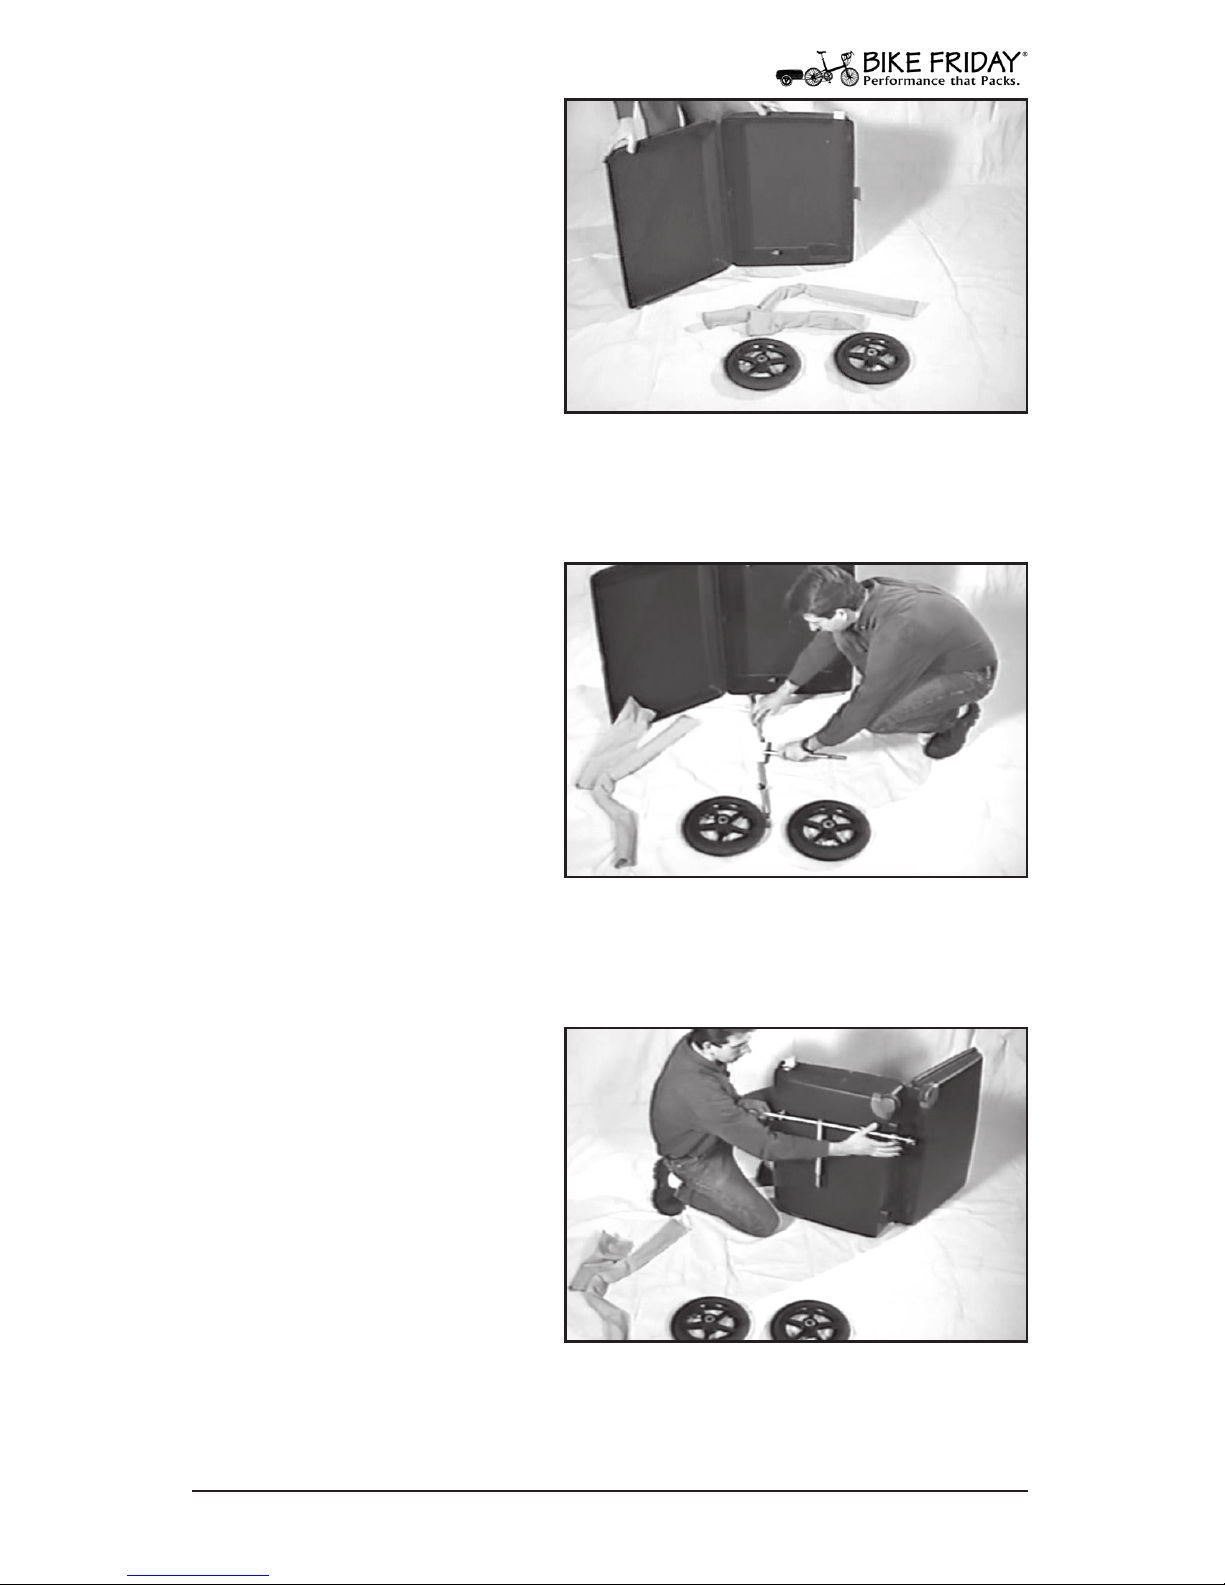
1. Trailer Parts
If you purchased a TravelTrailer with your bike, you
should have two trailer
wheels and two yellow felt
bags with the tongue and
axle. The bottom of your
TravelCase should have
three holes drilled in it if you
ordered the trailer with your
bike. If you ordered the TravelTrailer system separately, you will
need to nd the three dimple marks in the bottom of your case and
drill them through with a ¼” drill.
Fig. 1 Travel Trailer parts.
2. Connect Axles
In the smaller yellow felt bag
there should be two axles and
a T-bar. Slip the open ends of
the axles over the “T” of the
T-bar. Each axle will have a
threaded stud with a thumb
nut and two at washers.
Remove the thumb nuts and
one of the washers from each
stud (leaving one washer over each stud post).
Fig. 2 Assemble trailer axle.
3. Attach Trailer Axle
With the case open and
standing on its left side,
attach the axle assembly by
slipping the two threaded
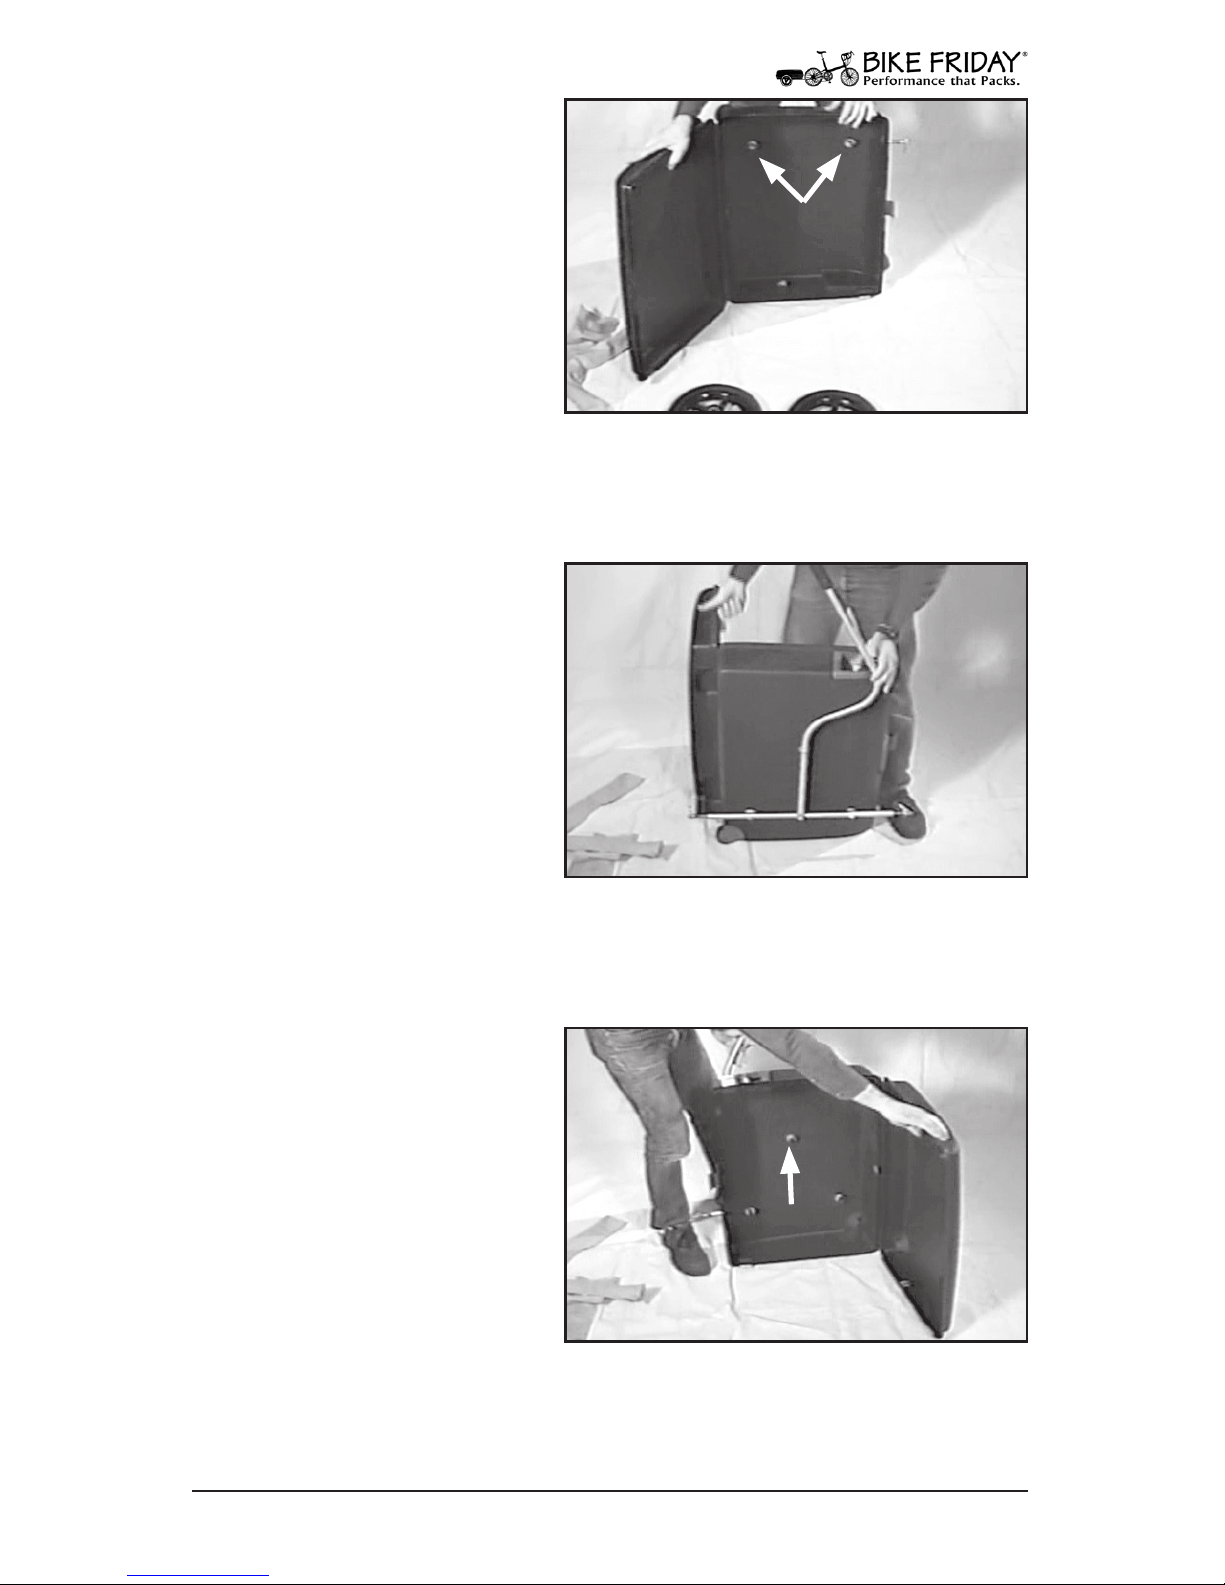
studs through the two holes
in the right side of the case.
The end of the T-bar should
be pointing at the third hole
in the case.
Fig. 3 Attach trailer axle.
Accessories: TravelTrailer
Page 37
37
www.bikefriday.com800-777-0258 • +1-541-687-0487
5. Attach Trailer Tongue
Take the long trailer tongue
and remove the thumb nut
and one washer from the
threaded stud. Slip the hollow end of the tongue over
the end the of the T-bar so
that the threaded stud in the
tongue ts into the remaining hole in the case.
Fig. 5 Trailer tongue over T-bar.
Accessories: TravelTrailer
4. Add Thumb Nuts
Place one of the at washers
over each threaded stud, and
then loosely thread on the
thumb nuts—do not tighten
them yet.
Fig. 4 Attach washers & thumb nuts.
6. Add Last Thumb Nut
Place one at washer over the
threaded stud inside the case
and add the last thumb nut.
Now securely nger tighten
all three thumb nuts inside
the case. Each attachment
point should be a sandwich
consisting of trailer frame,
at washer, nylon case, at
washer and then thumb nut.
Fig. 6 Tongue thumb nut.
Page 38
38
www.bikefriday.com 800-777-0258 • +1-541-687-0487
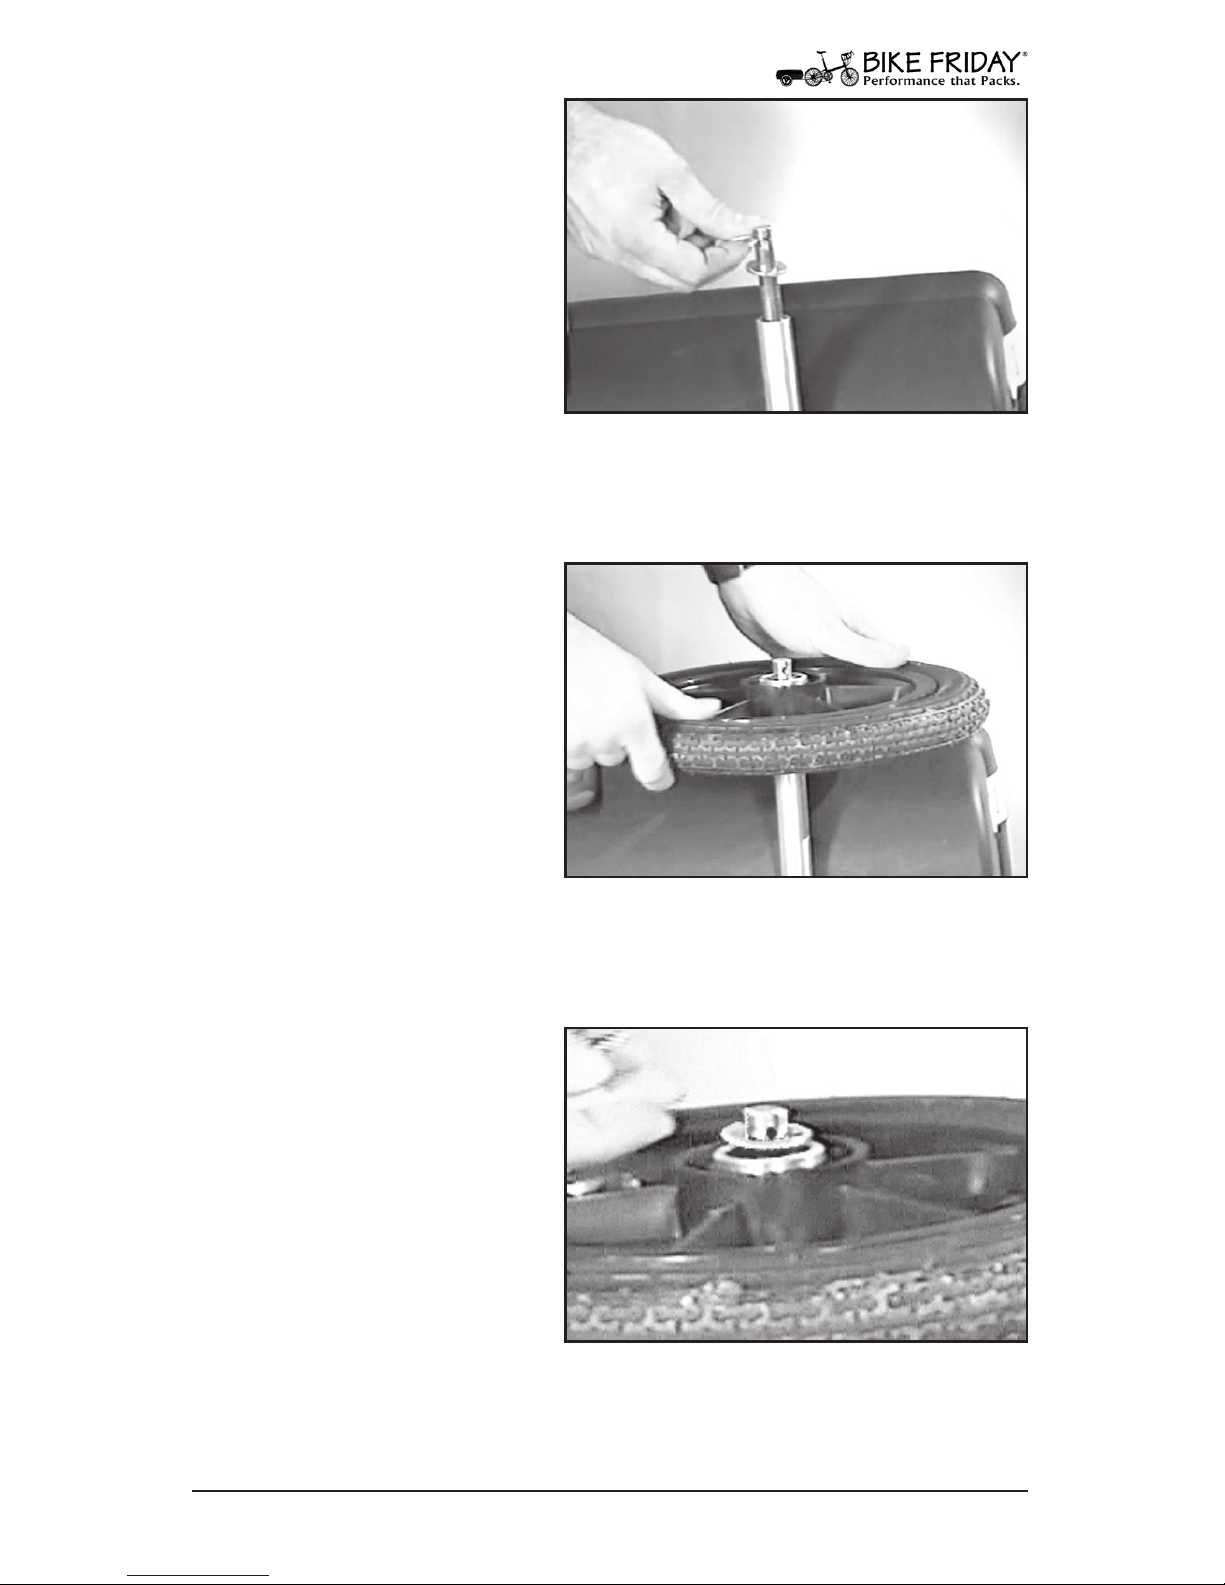
7. Wheel Axles
From one axle end remove
the clevis pin, the at washer
and the rubber O-ring. Note
the order of these parts when
installing the trailer wheel.
Fig. 7 Axle washers.
8. Install Trailer Wheel
Each trailer wheel has two
bearings; one is ush with
the outside of the wheel, and
the other is recessed. Slide
the trailer wheel over the
axle end with the recessed
side down and the ush side
up (away from the trailer).
Fig. 8 Mount trailer wheel.
Accessories: TravelTrailer
9. Add Axle End Washers
First install the rubber Oring so that it sits next to the
wheel bearing. Then install
the at washer over the Oring.
Fig. 9 First add O-ring, then at washer.
Page 39
39
www.bikefriday.com800-777-0258 • +1-541-687-0487
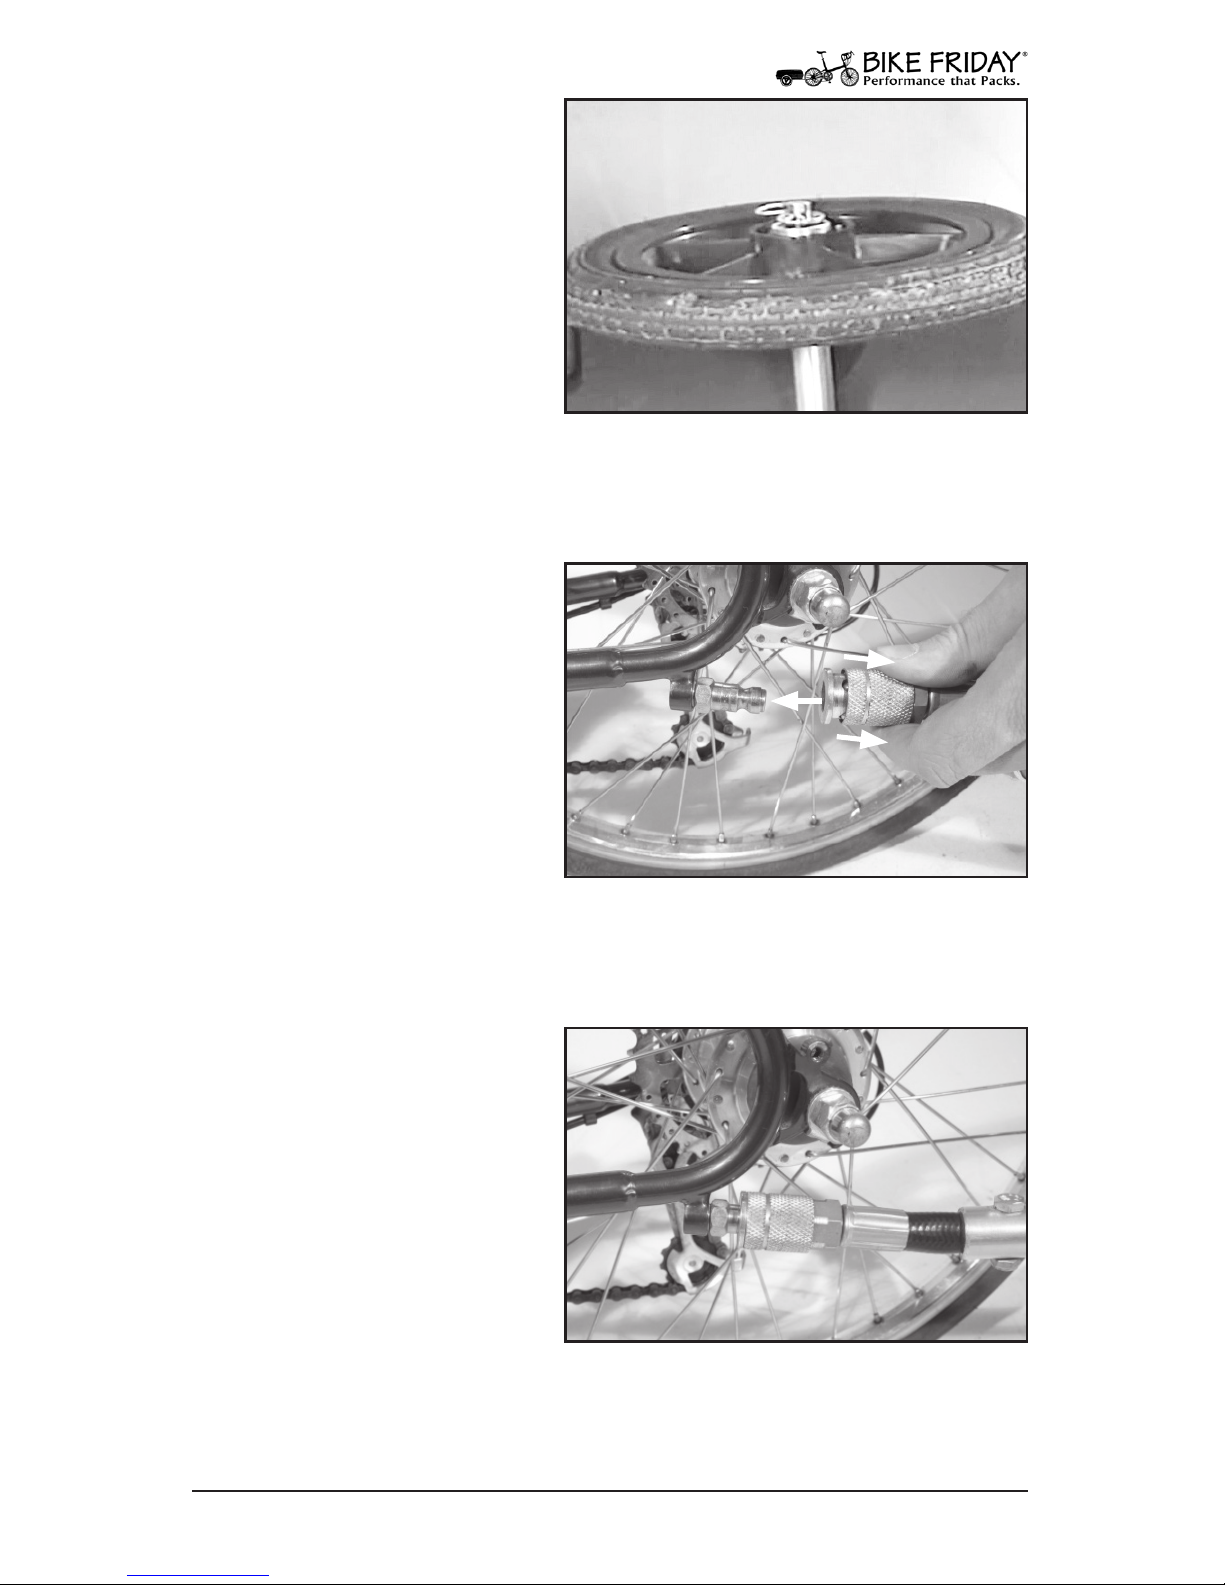
10. Insert Clevis Pin
Insert the clevis pin through
the hole in the axle end to
secure the wheel. The at
washer should be lightly
pressing against the clevis
pin from the inside, with
the O-ring acting as a sort
of spring to keep the wheel
from rattling on the axle.
Fig. 10 Insert clevis pin.
Accessories: TravelTrailer
12. Ready To Go!
When you release the knurled
collar, the coupler should be
secure and ready to go. If the
knurled collar becomes sti
and does not spring closed,
add some light lubricant
such as TriFlow™ or WD40® to the coupler.
Fig. 12 Trailer hitch connected.
11. Connect Trailer Hitch
To attach the trailer hitch to
your frame, simply pull the
knurled collar on the coupler back while you push the
coupler over the nipple on
the frame.
Fig. 11 Using your trailer hitch.
Page 40
40
www.bikefriday.com 800-777-0258 • +1-541-687-0487
Accessories: Rear Rack
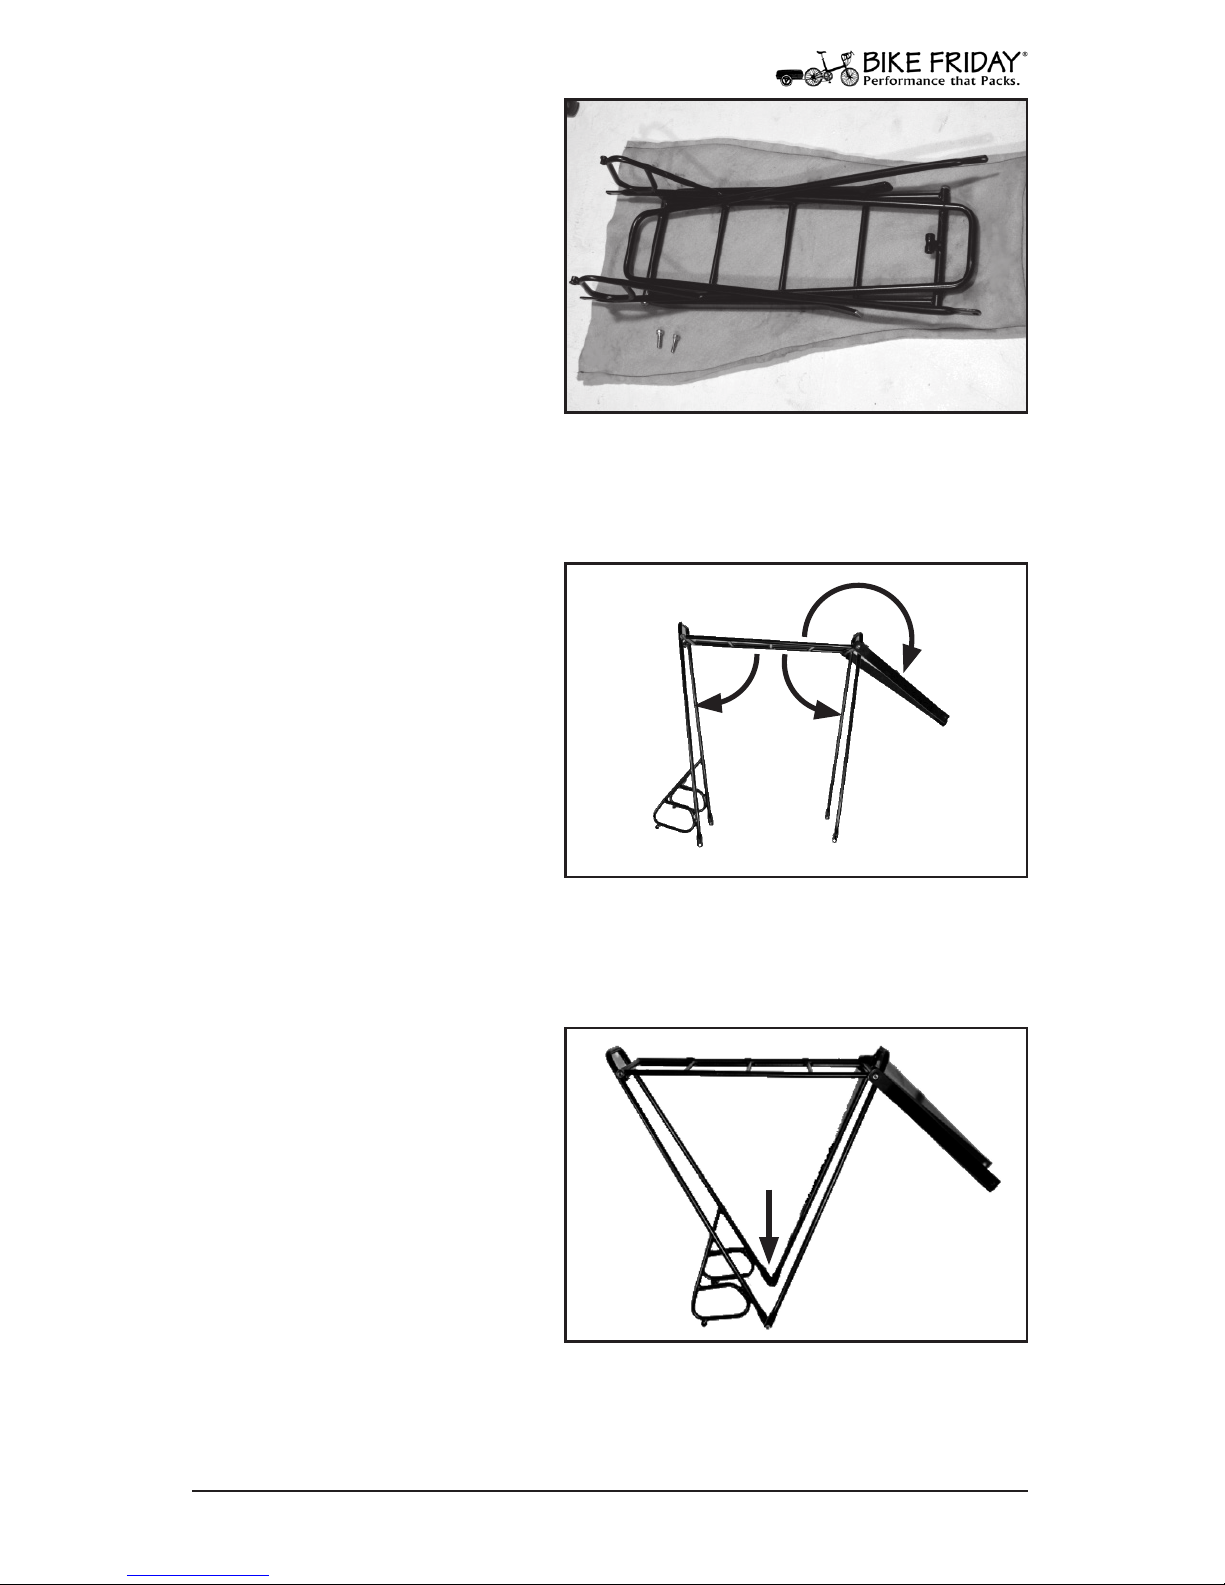
1. GD Folding Rear Rack
This handmade folding cromoly rear rack will securely
carry your travel gear anywhere in the world. Plus, it
folds quickly and compactly
for easy packing in your
TravelCase suitcase. The GD
rack is packed in a yellow felt
bag, and has two extra 5mm
bolts for mounting it to your bike. (The other two required bolts are
already in your frame.)
Fig. 1 GD Folding Rear Rack.
2. Unfold Rack
The two sets of main legs
unfold down, while the two
black aluminum stays unfold
over the top.
Fig. 2 Unfold GD rack.
3. Insert 5mm Bolts
Let the holes in the main legs
overlap at the bottom and
then insert a supplied 5mm
bolt through each pair of
legs.
Fig. 3 Place bolts through leg holes.
Page 41
41
www.bikefriday.com800-777-0258 • +1-541-687-0487
4. Mount Legs To Frame
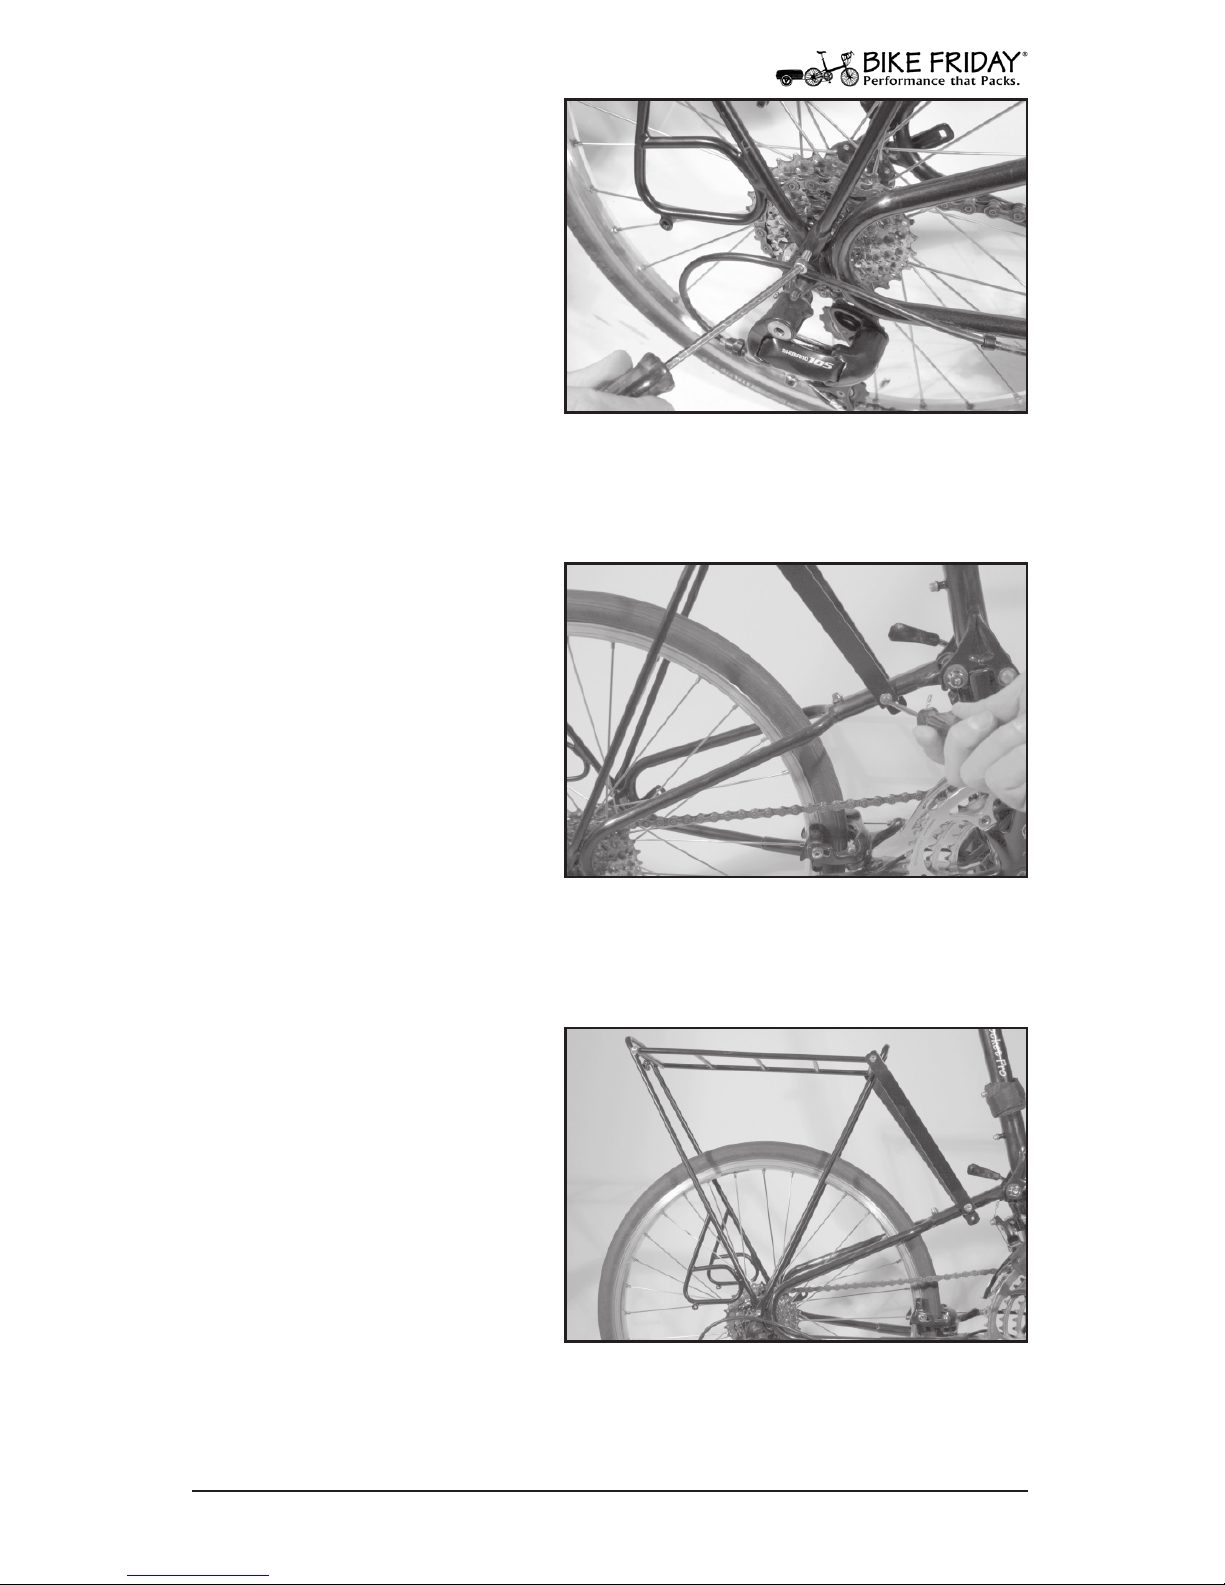
Thread the bolts into the eyelets on the drop outs on each
side of the bike. The rack
legs should have their ends
on the outside of the drop
outs. Leave the bolts loose
for now.
Fig. 4 Mount rack legs to drop outs.
5. Attach Stays To Frame
Remove the two bolts on the
sides of the wishbone. (The
wishbone is the part of the
frame that engages the frame
quick release.) Reattach the
two bolts through one of the
two holes in the rack stays.
Experiment with which rack
stay hole provides the most
level rack position.
Fig. 5 Attach rack stays to wish bone.
Accessories: Rear Rack
6. Tighten Bolts
Tighten all four mounting
bolts securely. If you would
like to attach a rear reector
or a rear tail light, there is a
threaded mount on the rear
of the rack.
Fig. 6 Tighten all bolts securely.
Page 42
42
www.bikefriday.com 800-777-0258 • +1-541-687-0487
Accessories: Front Rack
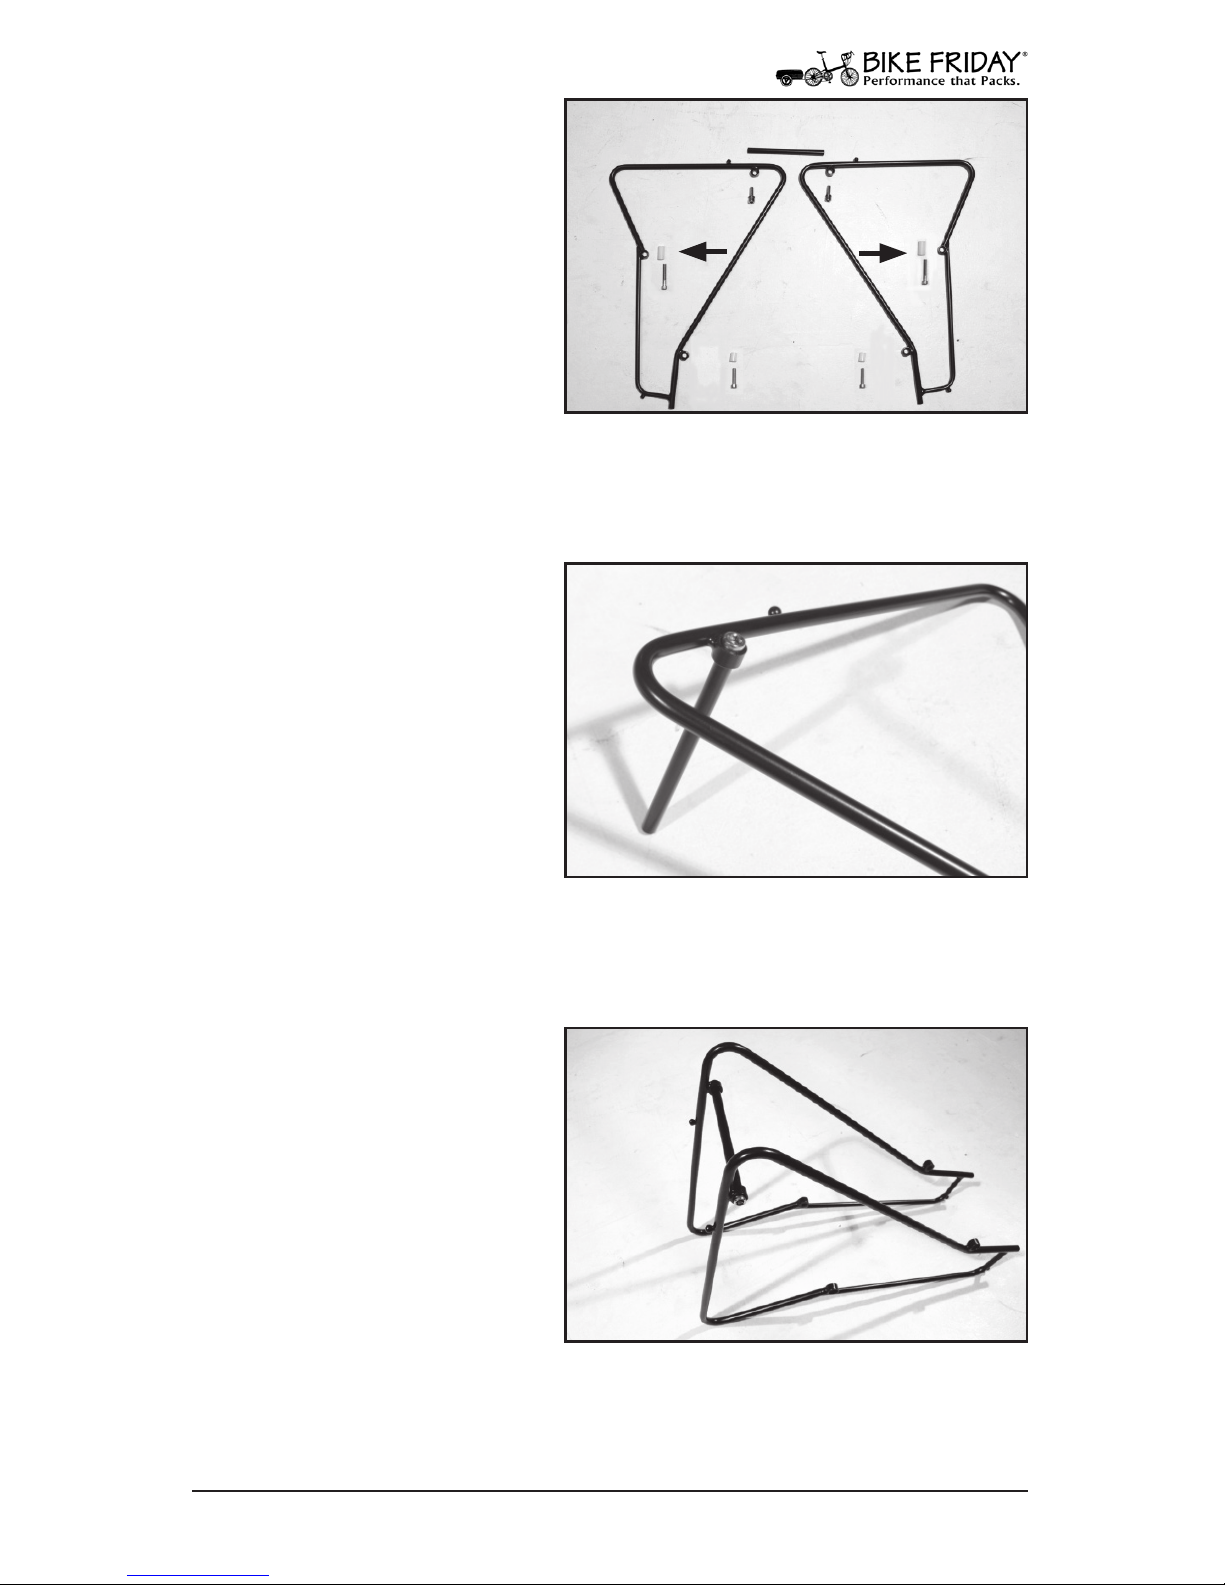
2. Mount Cross Bar
Select either side of the rack,
the cross bar and one 6mm
bolt. Insert the bolt through
the recessed side of the eyelet near the ball-stop on top
of the rack. Screw the bolt
loosely into the cross bar.
Fig. 2 Mount cross bar.
3. Mount Other Rack Side
Insert the remaining 6mm
bolt through the other rack
side and loosely thread into
the cross bar. The rack should
now resemble Figure 3.
Fig. 3 Attach other side of rack.
1. Front Rack
The front rack consists of
two mirror image sides, a
long cross bar, and assorted
bolts and spacers. The cross
bar uses two 6mm bolts. The
lower mount uses two short
5mm bolts and spacers; the
upper mount uses two long
5mm bolts and spacers. Look
at the mounting eyelets on the rack. The recessed side of the eyelets
face out and are for the bolt heads. The ush side faces in.
Fig. 1 Front rack parts.
Cross Bar
Long
Spacers
& Bolts
Short
Spacers
& Bolts
Right Side
Left Side
Page 43
43
www.bikefriday.com800-777-0258 • +1-541-687-0487
Accessories: Front Rack
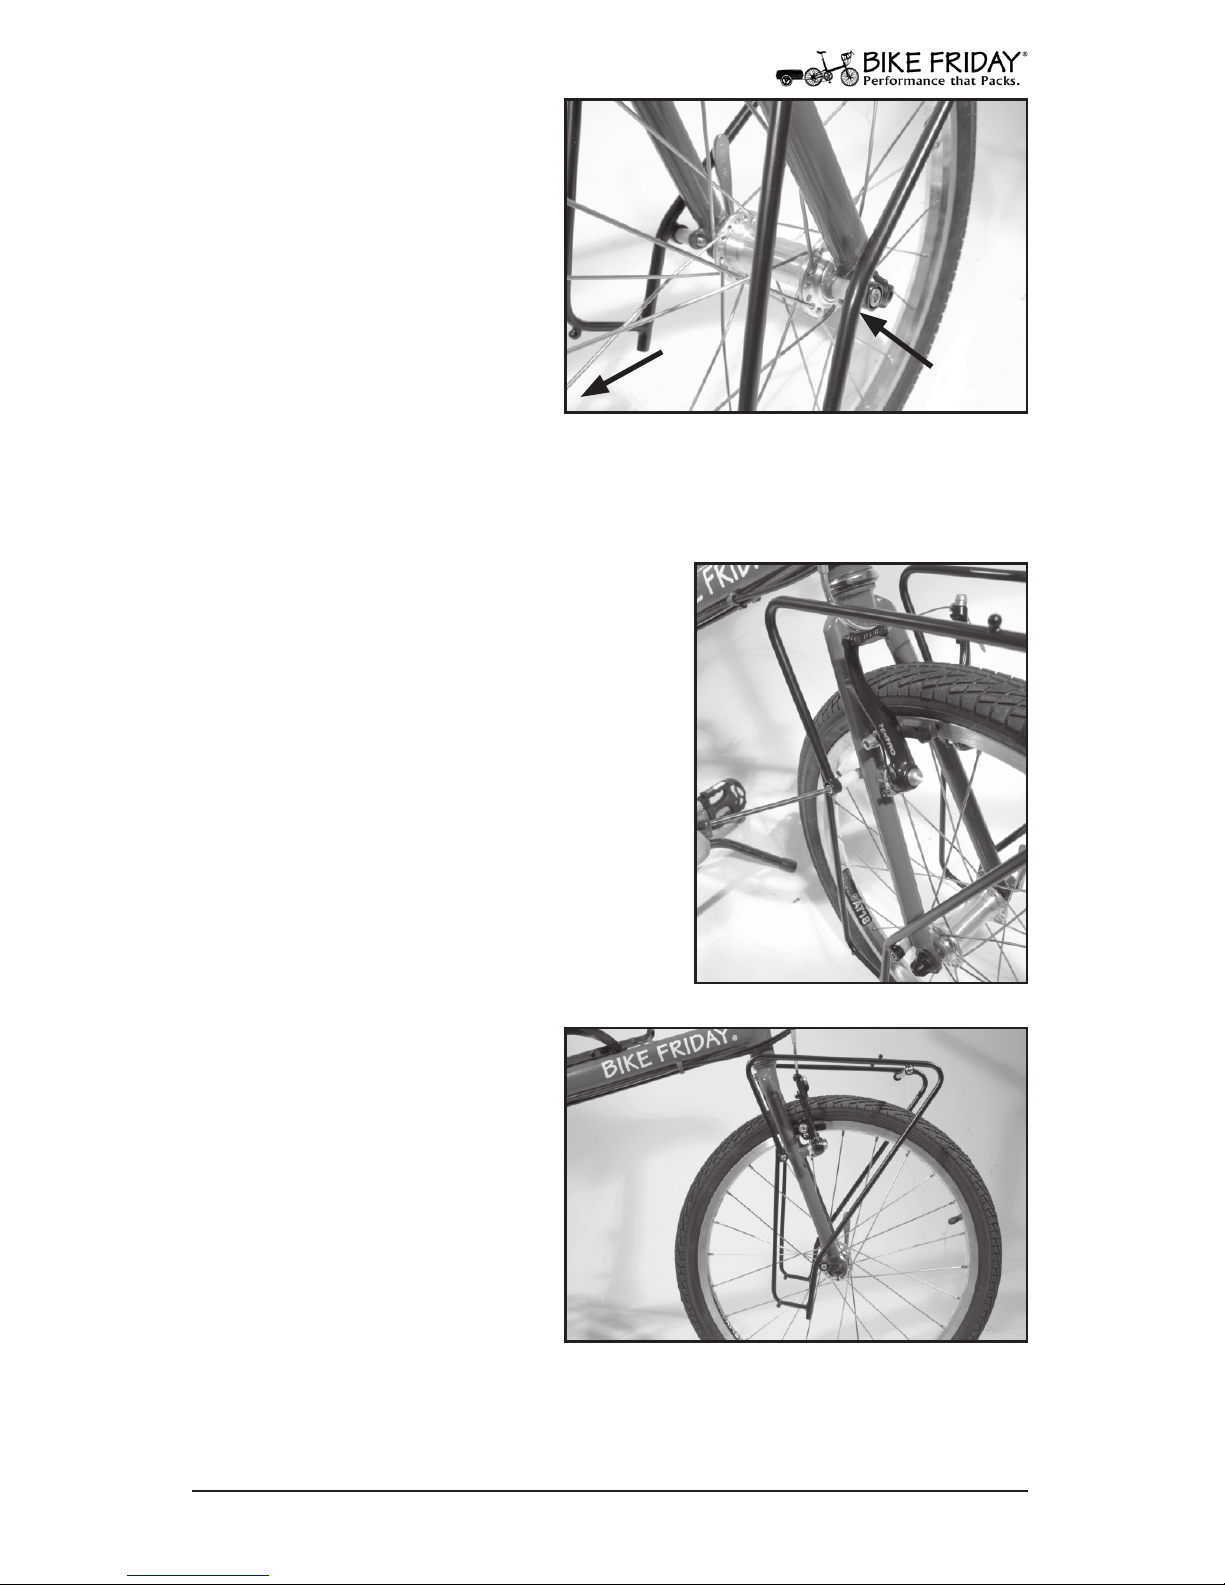
5. Mount Upper Eyelets
Using the remaining long 5mm bolts,
slip the bolts through the upper eyelets,
and then slide the long spacers over the
bolts on the inside. Thread the bolts
into the braze-ons on the fork legs.
Fig. 5 Upper mount.
6. Tighten All Bolts
Now tighten all six bolts
carefully. Your front V-brake
noodle might touch the right
rack side. This is generally not
an issue. If the interference is
signicant, it is acceptable to
lightly bend the noodle a bit
tighter to help clear the rack.
Fig. 6 Completed front rack.
4. Mount Lower Eyelets
Insert one of the short 5mm
bolts through the recessed
eyelet at the bottom of the
rack. Place one of the short
spacers over the bolt on the
inside of the rack. Repeat
with the other side. Place
the assembly over the front
wheel, and then loosely
thread the bolts into the eyelets on the fork drop outs. The part of
the rack hanging below the drop out is on the rear side of the drop
out.
Fig. 4 Right side view of rack.
Rear
Short
Spacer
Page 44
44
www.bikefriday.com 800-777-0258 • +1-541-687-0487
Accessories: Fenders
2. Rear Fender
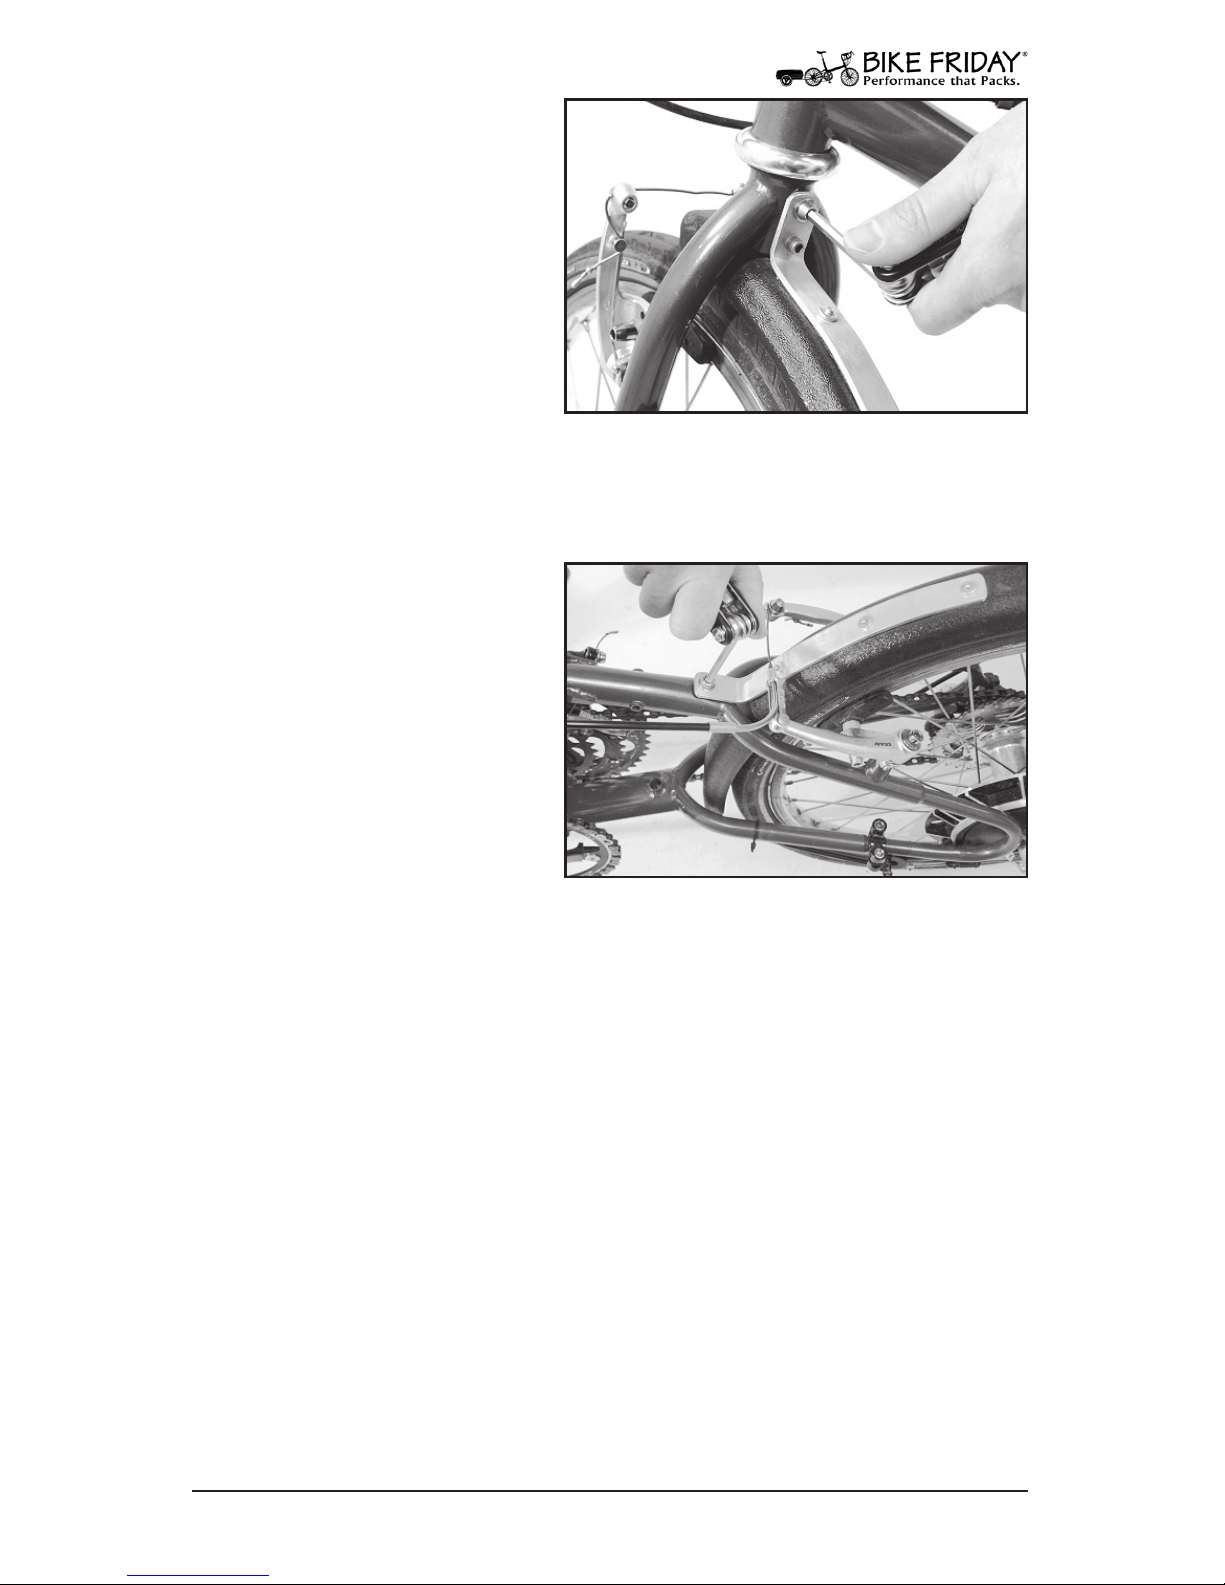
Your rear fender has one
hole in the aluminum tab,
and the fender extends farther forward of the tab than
the front fender. The fender
is attached to the rear end by
the bolt in the wish bone.
Fig. 2 Rear fender.
1. Front Fender
Your front fender has an
alignment pin (a small bolt)
through the aluminum tab
beneath the mounting hole.
The fender is attached to the
fork by the upper hole, while
the alignment pin keeps the
fender from rotating.
Fig. 1 Front fender.
Page 45
45
www.bikefriday.com800-777-0258 • +1-541-687-0487
Accessories: Fit Stem
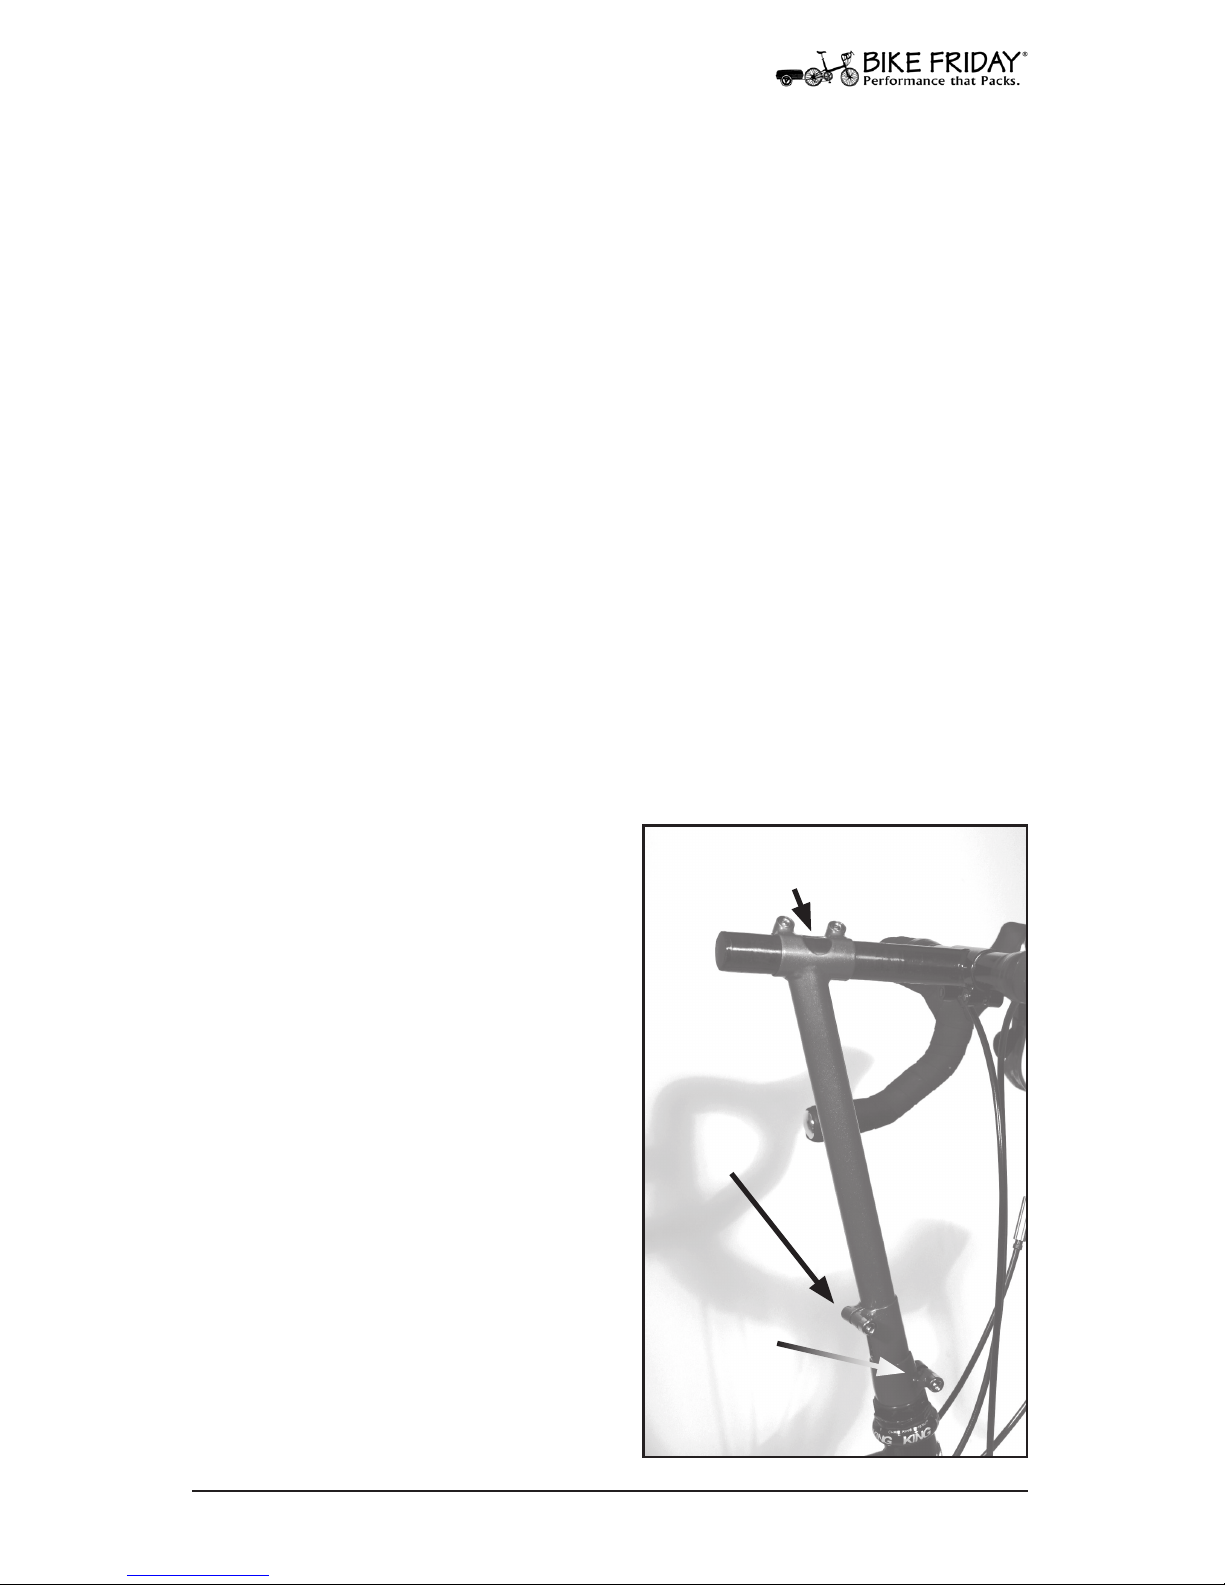
Fit Stem (Optional)
If your bike was designed to receive a Custom Ultra-light Stem, then
most likely the bike you just received has a Fit Stem installed. The
Fit Stem process is designed to ensure the highest level of accuracy
and satisfaction in producing a truly custom t for your new bike.
The Fit Stem is a temporary, but fully usable stem which can be
adjusted to any height and projection. Ride with the Fit Stem as
you would normally ride and tour. Either take a wrench with you,
or use your 5/6mm S-wrench in the bottle cage, and stop to adjust
your t as necessary. We encourage you to put 125 miles or more on
the stem, until you are satised with the overall t of your bike.
When you have nished the tting process, remove the stem and
send it back to us in the supplied FedEx box along with the information card. The only essential details are your name, address and
bike color. Once you have the stem boxed up and the card lled out,
call FedEx at 800-463-3339 to arrange a pick up. It normally takes
about two weeks to complete your new Custom Ultra-light Stem.
If you need a quicker turnaround for a trip or event, let us know
on the card or call us to arrange for expedited service. We have
completed stems in as short as two working days. (There is a fee for
this service.)
Fit Stem Adjustment
Set the stem projection by loosening the two bolts at the top of the
stem and moving the bars horizontally. Set the stem height by loosening the single bolt at the top of the
lower stem sleeve and moving the
bars vertically.
Returning Fit Stem
When you are ready to send the
stem back to us (or to pack the bike),
leave the two adjusting clamps
tight. Only remove the handlebars
and loosen the lowest stem collar.
Horizontal Adjustment
(Leave Tight)
Vertical
Adjustment
(Leave Tight)
Stem Clamp
(Remove
Here)
Page 46
46
www.bikefriday.com 800-777-0258 • +1-541-687-0487
DualDrive™ Hub
Maintenance
Your DualDrive hub requires little maintenance. The shielded
bearings are very durable, and the internal mechanism is highly
reliable. Periodically applying a little oil to the shifting rod is all
that is required. If you ride casually, then once a year is sucient. If
you ride a lot more or in poor weather, then every six months will
suce.
To lubricate the rod, remove the click box and the shifting rod (see
the following directions). Lay the bike on its left side, or remove the
wheel and then lay the wheel on its left side. Dip or coat the shifting
rod in a good quality synthetic oil such as Phil Wood Tenacious Oil.
Do not over lubricate!
Let the bike or wheel lay on its side overnight. Then re-attach the
shifting rod (do not over tighten) and the click box.
Using Your Optional DualDrive Hub
For many bike travelers, the DualDrive hub oers the perfect combination of wide gear ratios, simplicity, and durability.
As with a standard drive train, there is no single best shifting order
on a DualDrive equipped bicycle. Experiment and nd what works
well for you. A cyclist with a standard drive train must be conscious
to avoid cross-chaining, which occurs when you shift into a small
gear in front and a small one in back, or a vice versa. Cross-chaining
can cause excessive wear on your components. Since cross-chaining
is not an issue with the DualDrive hub, any gear combination is
acceptable.
Other benets include being able to shift the hub when standing
still at a stop light or the bottom of a hill. Simply shift the internal
hub to a lower gear (without even pedaling) and o you go.
The DualDrive single-sided shifter has an icon depicting uphill,
at, and downhill terrain to identify low, middle, and high gears.
If your Bike Friday travel bicycle is equipped with dierent shift
levers, the left hand lever controls the internal hub. Pulling the
cable in shifts the hub to a higher gear for descending hills. For
those who are curious about the gear ratios, adjust your gear inches
for low gear by 73%, mid-range 100% (1:1), and high gear 136%.
Page 47
47
www.bikefriday.com800-777-0258 • +1-541-687-0487
DualDrive Hub
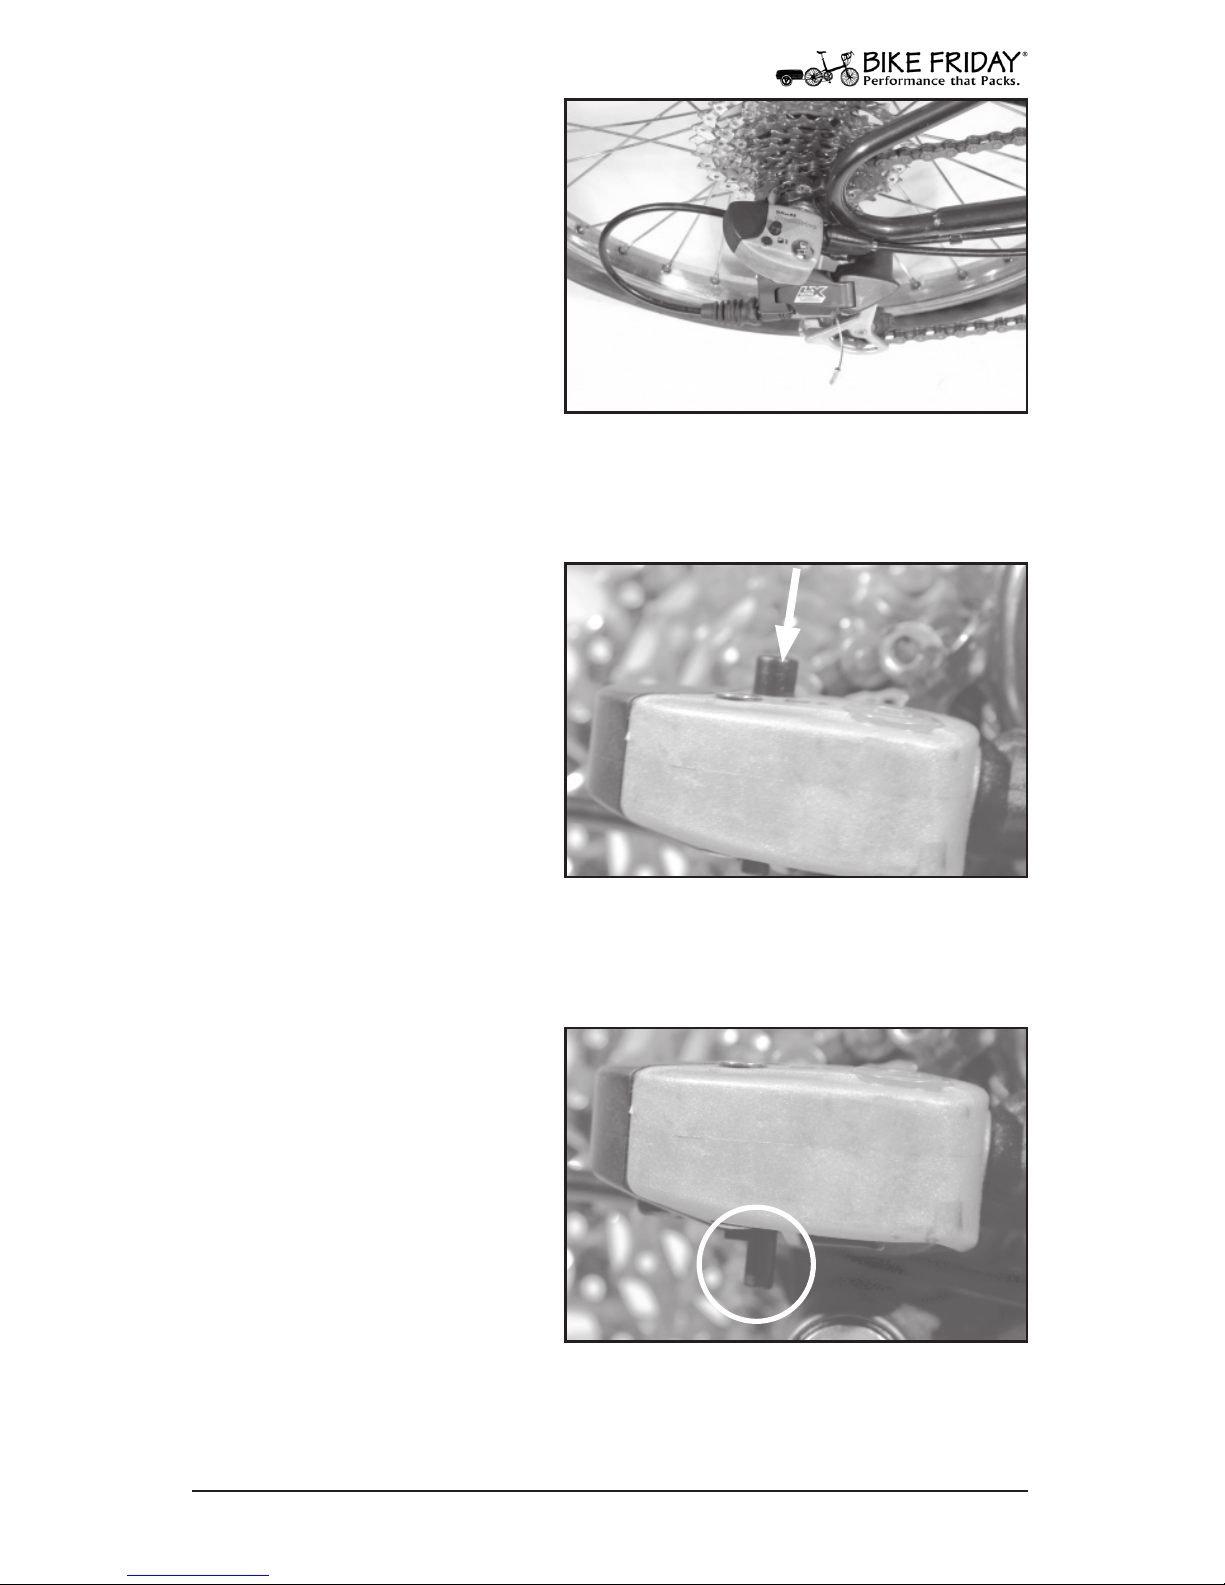
1. The Click Box
The DualDrive shift cable
connects to a grey and/or
black box attached to your
rear hub axle above the
rear derailleur. To install
and remove the rear wheel
you will need to detach and
reconnect this click box to the
axle in a few simple steps.
Start by shifting the DualDrive hub into the lowest gear (uphill
icon, or repeatedly press the small lever on STI shifters).
Fig. 1 The click box.
2. Attachment Button
The small black button on
the click box is used to attach
the box to the axle. In the
up position the box is connected.
To remove the click box,
press this button down until
it is ush with the top of the
box.
Fig. 2 Click box button up (connected).
3. Remove Click Box
With the black button down,
the click box should just slide
o of the axle end. The click
box will remain connected to
the shift cable.
Fig. 3 Click box button down (detach).
Page 48
48
www.bikefriday.com 800-777-0258 • +1-541-687-0487
DualDrive Hub
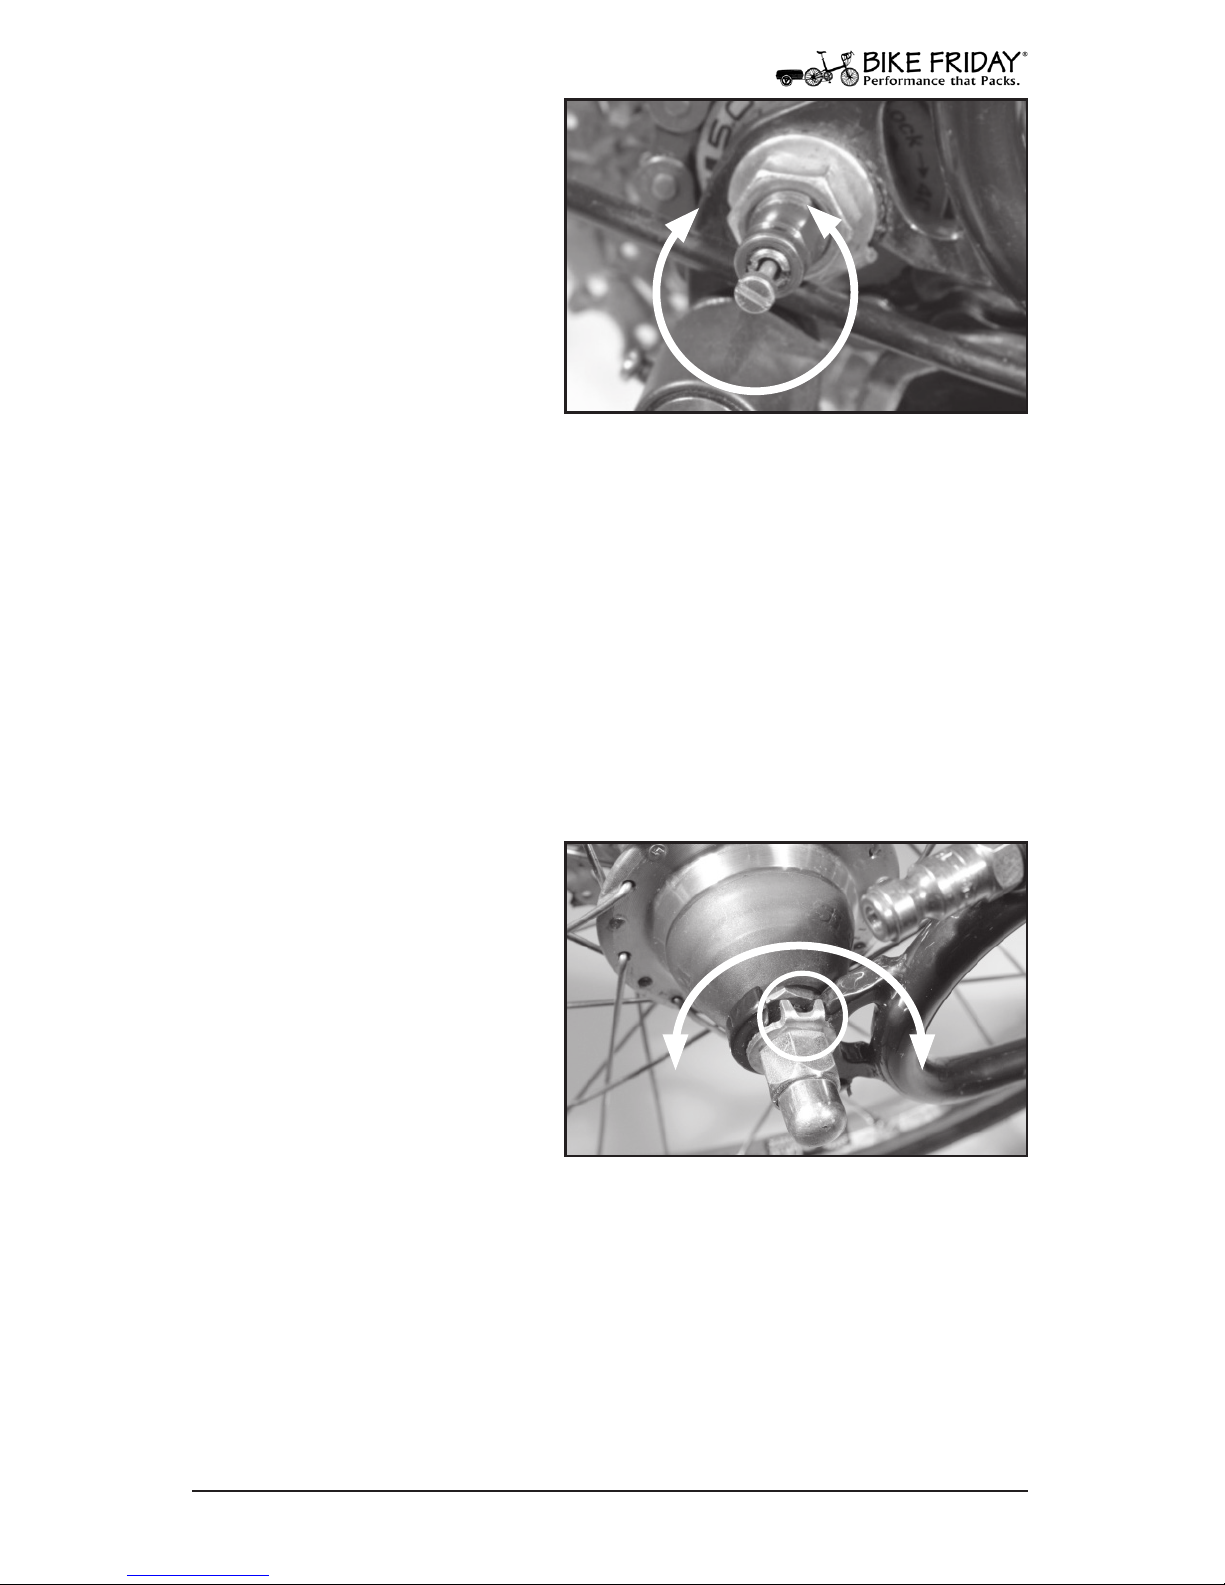
4. Shifting Rod
Underneath the click box is a
small screw head called the
shifting rod. The click box
pulls or pushes this rod in
and out to shift gears. Normally you do not need to
remove this rod to remove
the wheel.
However, be careful not to
bend the rod head. If you need to remove the rear wheel to pack
your bike, either remove the rod and keep it in a safe location or
put the protector sleeve (required for only a few bike models) over
the axle and pin head.
If you wish to add some oil to the hub, remove the shifting rod and
dip or coat the rod with good quality oil. See the paragraph on hub
maintenance for more information.
When screwing the shifting rod back into the hub, be careful not to
over-tighten. Just lightly tighten the shifting rod with a at screwdriver, until snug.
Fig. 4 Shifting Rod.
Loosen
Tighten
5. Removing Rear Wheel
With the click box removed,
loosen the two axle nuts with
a 15mm wrench, a crescent
wrench, or your pedal/headset wrench in the tool pouch.
The wheel should slide out.
The axle washers have a tab
on one side. When reinstalling the rear wheel, place the
washers on the outside of the drop outs (the part of the frame which
holds the wheels), with the tab pointed down and facing toward
the wheel. With the axle properly seated in the drop outs, tighten
the axle nuts securely.
Do not forget to reconnect the brake after installing the wheel!
Fig. 5 Axle washer, bottom view.
Tighten
Loosen
Page 49
49
www.bikefriday.com800-777-0258 • +1-541-687-0487
DualDrive Hub
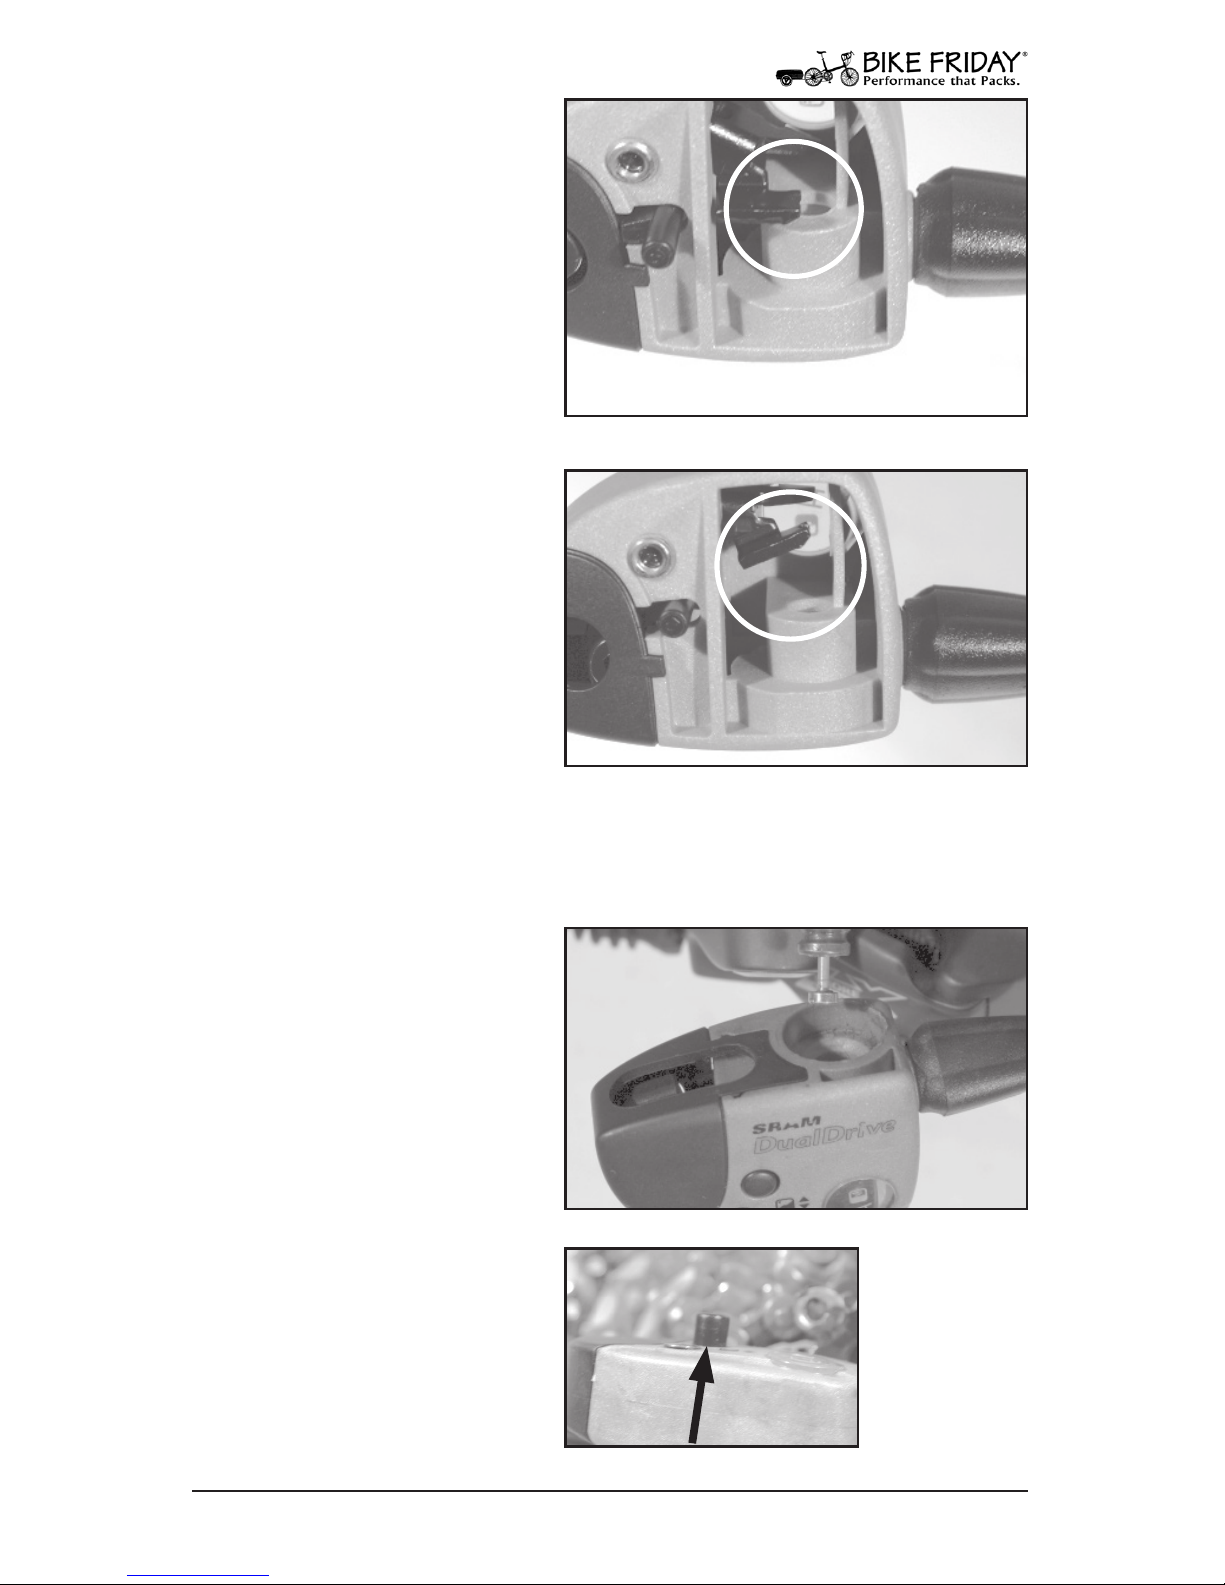
6. Reattaching Click Box
To reattach your click box
to the axle, rst ensure the
black button is all the way
down, ush with the top as
in Figure 3. If you cannot
get the button down, it is
because the shift cable pulled
the small black shifting fork
(circled in Figure 6 and 6a)
out of its proper position.
This can happen when the
click box hangs by the shift
cable. First, make certain the
shift cable housing is properly seated at the shift lever,
any cable stops, and in the
click box barrel adjuster.
Next, to get the button down,
push the fork tip down
toward the hole in the box with your nger while applying pressure to the black button. You may need to keep your nger on this
button to keep it from popping up from cable movement.
Fig. 6 Shifting fork down, button down.
Fig. 6a Shifting fork up, button stuck.
7. Mount Click Box
With the button down, place
the click box over the axle
as far as it will go, and then
press the black button up.
Your click box is now properly connected. With very
gentle tugging, you should
only feel slight spring-like
resistance.
Fig. 7 Place over axle end.
Fig. 7a Button up (connected again).
Page 50
50
www.bikefriday.com 800-777-0258 • +1-541-687-0487
DualDrive Hub
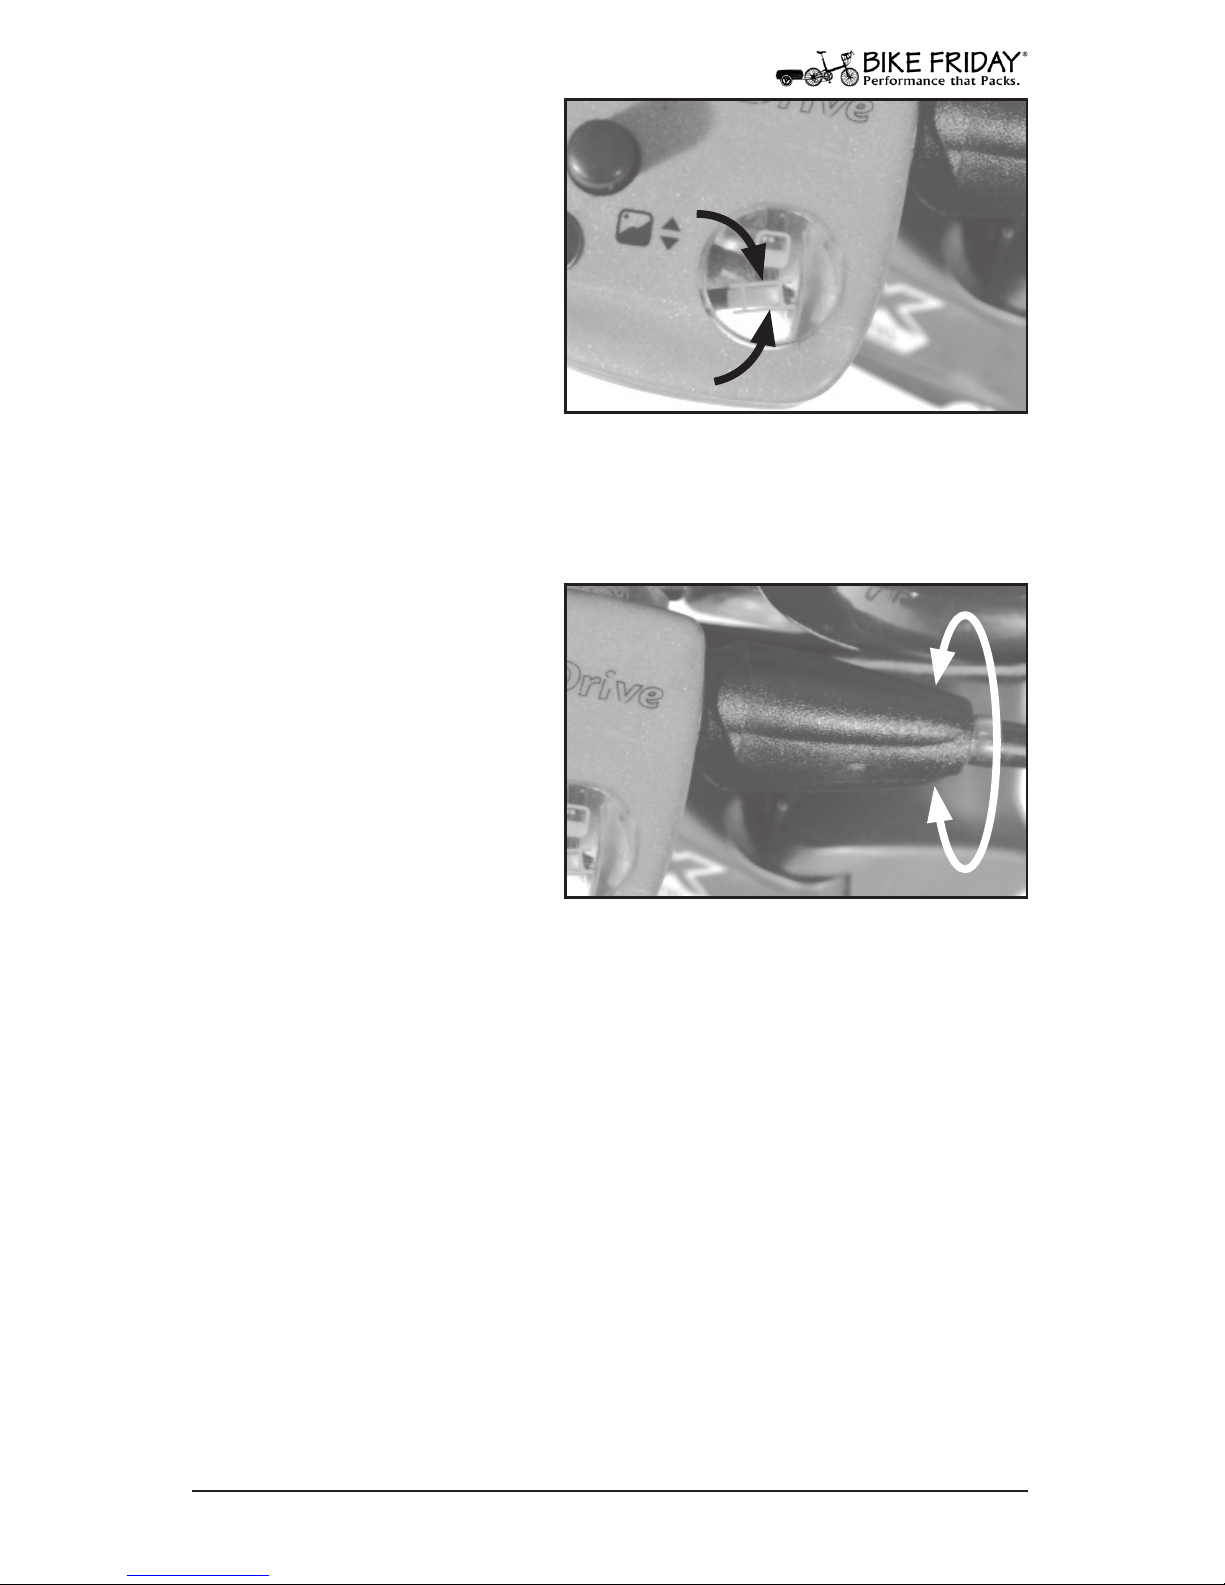
8. Adjusting DualDrive
The DualDrive hub adjustment is very simple. First
shift the DualDrive into the
middle gear (at terrain, or
middle STI position). On
top of the click box is a small
clear window showing a
couple of ladder-like bars
over a brightly colored indicator needle.
Turn the tapered barrel adjuster, where the housing enters the click
box (Figure 8a), until the needle is centered between the bars in
the clear window. It’s that
simple. When you move the
shift lever you can see the
needle move to the dierent
positions.
All new bikes will need some
initial adjustment as parts
wear in, housing compresses
and the cables stretch. If
your bike does not shift
properly, take it to your local
bike shop for adjustment. Before long, however, your bike should
be functioning trouble free.
Fig. 8 Adjusting window.
Fig. 8a Barrel adjuster.
Needle In
Needle Out
Page 51
51
www.bikefriday.com800-777-0258 • +1-541-687-0487
Trouble Shooting
V-Brake Centering And Spring Adjustment
V-brake arms are held o of the rim by a spring in each arm. To
center the brake (allowing both arms to retract an equal amount),
you need to adjust the respective spring tensions. At the base of
each V-brake arm near the pivot is a small screw pointing to the
side. Turning this screw will change the centering of the brake.
On the side which needs to retract farther, tighten this screw in
half-turn increments. You may also consider loosening the side
which retracts too far.
Thread Sizes
The stainless steel bolts that attach your rack to your bicycle use one
of the most common thread sizes available today. If you loose one
of these small bolts you will most likely nd replacement hardware
locally.
The thread size for the rack, water bottle cage, derailleur and brake
cable clamp bolts is a metric 5mm x 0.8mm. A US standard thread
of 10-32 can also be used. The thread size for many of the frame
parts and the front rack cross bar is a slightly larger 6mm x 1.0mm.
Every bike shop and virtually any hardware store world-wide will
stock these bolts in a variety of lengths.
If you are unable to nd replacements while on tour give us a call
or send us an email and we can ship to you what you need to get
back on the road.
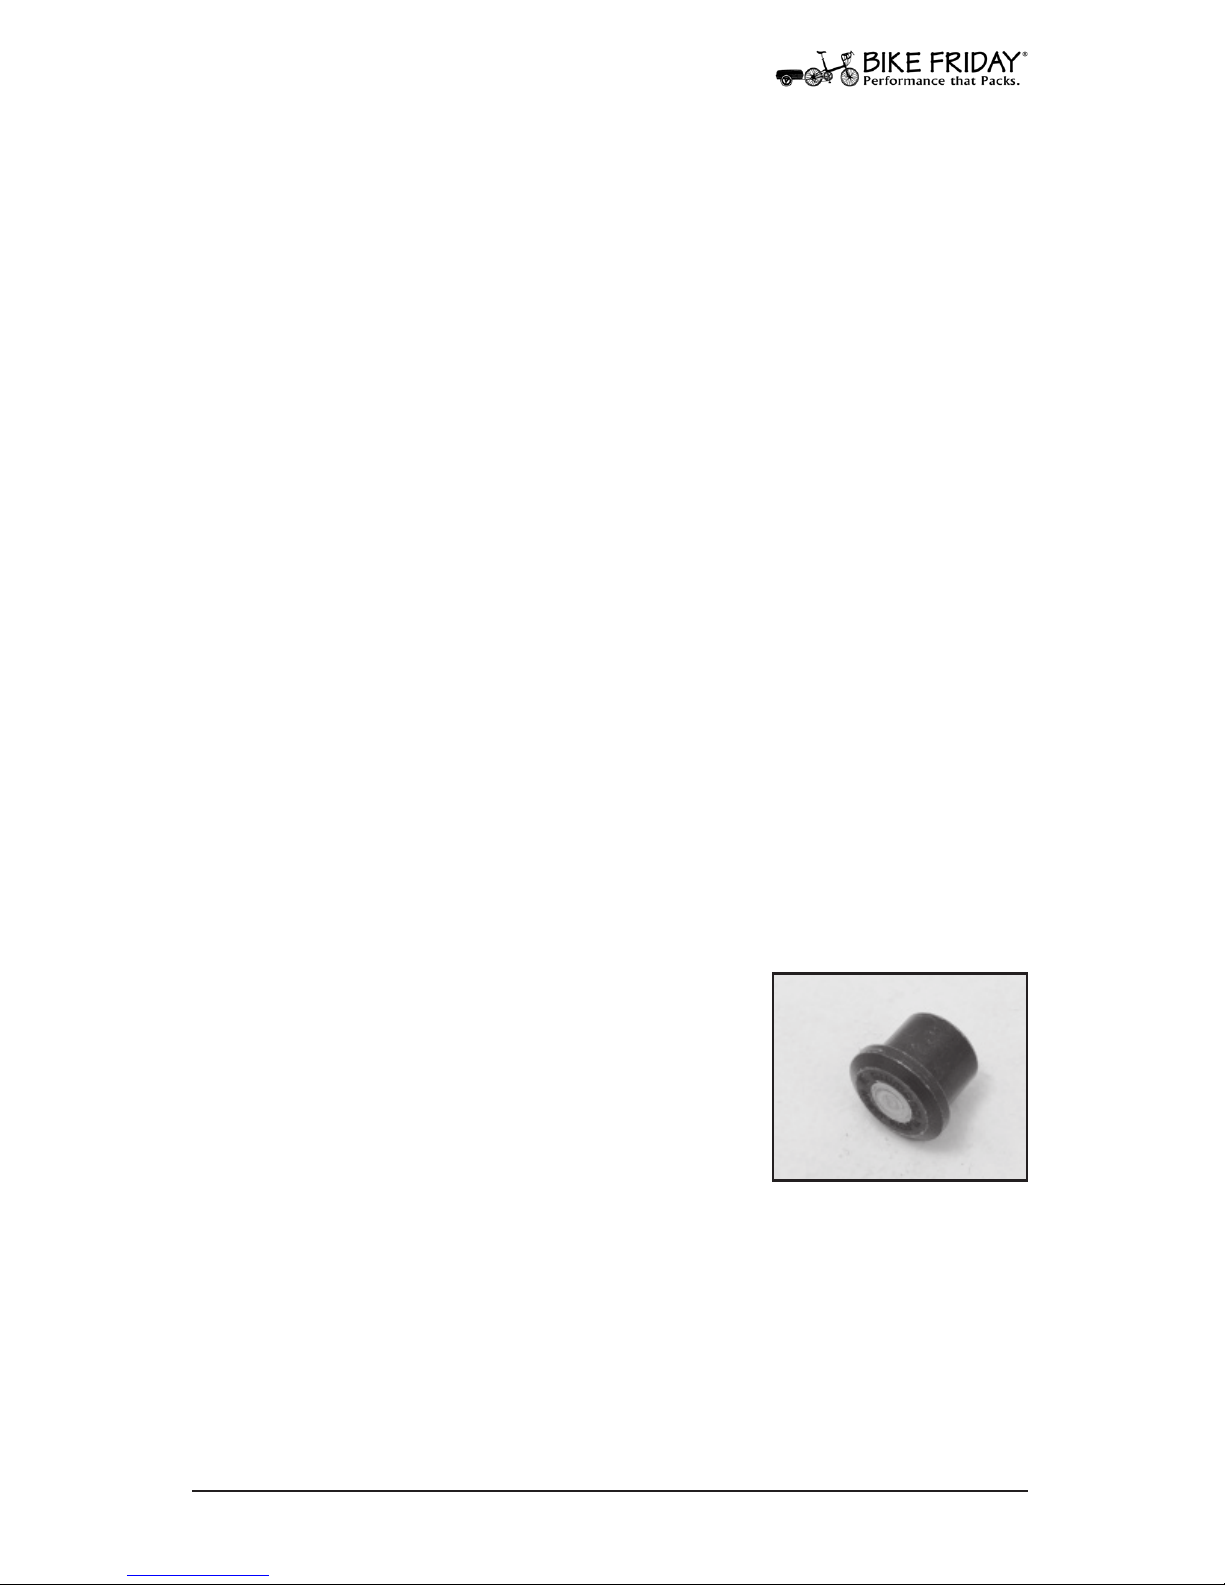
What is it?
This little mysterious tool is supplied with
Shimano crank arms. To remove the new
generation of Shimano crank arms with the
over-size bottom bracket spindles you need to
use this temporary plug with your crank arm
removal tool.
Page 52
52
www.bikefriday.com 800-777-0258 • +1-541-687-0487
New Bike Maintenance
Like all bikes, your Bike Friday travel bike will go through a breakin period. After the rst few weeks of riding you may nd that your
drive train doesn’t shift as crisply as it did when new, or perhaps
the brakes are slightly loose. This happens as new cables stretch,
housing compresses and parts wear in.
After the initial break-in period, but before a signicant tour, it is
important to have your Bike Friday bicycle professionally serviced
at your local favorite bike shop. A new bike tune up takes very
little time and the small cost for the work is minor considering the
improved performance and reliability it provides. Then at least
once a year and before any major tour, take your bike back to your
local shop for another tune-up to be sure that it runs smoothly.
After a few years of use and a few thousand miles of riding, you
may notice that the decals on your bike are starting to look worn
and the paint has some scratches. Perhaps your bike doesn’t ride as
smoothly as it used to, and the local bike shop can’t get it to function as well as you would like. We oer factory service programs
including tune-ups, overhauls, and other repair work by our expert
mechanics. A month or two before your next big ride, you may
wish to send the bike back for a complete overhaul.
Visit our web site for repair packages, costs, and details at
www.bikefriday.com/ServiceCenterInfo.cfm. For those who plan
ahead, we can generally oer the quickest repair turn-around during the winter months.
Bike Friday Service
Page 53
53
www.bikefriday.com800-777-0258 • +1-541-687-0487
Travel Tips
Airport Security
Traveling with your Bike Friday travel bike on the airlines today
will, for the most part, be as convenient as it was just a few years
ago in the good old days. However, because of the need for extensive inspections required by the TSA, there are a few points to be
aware of.
• Do not lock your TravelCase when traveling by air. All luggage
must be inspected by TSA agents when checking in your luggage.
TSA agents can, and have, broken open locked TravelCases. Even
after the initial inspection do not lock your case, we have had
reports of subsequent inspections where the TravelCase lock was
broken open.
• You may ask to be present during the inspection, however you
may not touch your bike or TravelCase once you have handed it
over to the TSA. By asking to be present, you may be able to give
some repacking tips to a very busy agent.
• When traveling by air, you might consider not over packing
your TravelCase. With some practice it is quite possible to get a
tremendous amount of gear into your TravelCase; however this
only obscures the inspectors view and they will deconstruct your
carefully packed case.
• Consider using extra straps, bungee cords, or toe straps to bundle
the packed bike. This way an inspector can remove the bike as
once piece, look it over, and replace it into the case quickly and
accurately.
• Observe airline luggage weight limitations. For domestic ights
(including domestic legs of international ights), the checked luggage needs to weigh less than 50 pounds. For international ights,
the checked luggage limit is 70 pounds. Luggage which exceeds
these limitations may be charged an excess baggage fee.
Bike Friday®, the Bike Friday® logo, Green Gear® CyClinG,
PoCket roCket™, PoCket roCket Pro™, PoCket Pilot™, air Friday™,
triday™, PoCket Crusoe™, PoCket tourist™, new world tourist™,
air Glide™, PoCket llama™, PoCket Gnu™, air llama™, Family
tandem traveler™, tandem traveler™, ti lite Xl traveler™,
tandem two’sday™, twin air™, Q tandem™, sat r day™, douBle
Page 54
54
www.bikefriday.com 800-777-0258 • +1-541-687-0487
Warranty Information
Bike Friday® Guarantee
We at Green Gear Cycling, Inc. (Bike Friday) want you, the customer, to
be happy with your new bicycle. For direct orders shipped from the
factory if your bike does not meet your expectations, you may return
the bicycle to us for a full refund, less all shipping charges and a 15%
restocking fee (as of 06-01-18). For bikes ordered through a dealer we
allow the dealer to use their own return policy. This applies to the purchase of new Custom and Stock bicycles. In all cases, the return shipping charges are your responsibility. To take advantage of this guarantee, you must notify our service department (800.777.0258 / service@
bikefriday.com) within 30 calendar days of your receipt of your bike of
your intent to return the bike, and we must receive it in our possession
within 35 calendar days of you taking delivery of the bike. We also accept returns on parts within 30 days as long as the part is unused and
undamaged. Processing your refund usually takes 2-6 weeks from the
time that we receive back your returned item(s).
We want your bicycle to work for you, and in order for your bicycle to
work well, it should t. We’ll need some help from you to ensure that
your new Bike Friday ts you well, specically by providing us with the
measurements of your best tting bike (if you own a bike that ts well)
and a description of how you feel on this bike. Additionally, you will be
asked for some personal measurements with a required accuracy within 1/4″ (5mm) and 3 pounds (1.35kg) – yes of your current weight and
not your ideal weight – as well as a description of your riding style and
the places you most likely envision riding your new Friday. Our Consultants can guide you through the process of obtaining and interpreting
this information. This guarantee does not apply to Stock Bikes, which
are not custom built to your specications, but come in standard small,
medium and large sizing.
Armed with this data, we can guarantee the t of your new Friday if
(1) we are matching exactly the dimensions from your current, best
tting bicycle, or (2) we build a Friday from your body measurements
that includes our optional “t stem” program. If you choose to have us
build a bike for you that is sized in any other way, the bike will be sized
per that method and built in a manner that allows for later ne-tuning
of the sizing should you choose, at your expense, to pursue a more
exacting t.
Page 55
55
www.bikefriday.com800-777-0258 • +1-541-687-0487
BIKE FRIDAY WARRANTY
As part of the consideration for buyer’s purchase, buyer understands
and agrees to the following: Green Gear Cycling warrants your bicycle
frame set, including fork purchased from Green Gear Cycling or an
authorized Green Gear dealer against defects in workmanship and
materials for 10 years. This does not cover paint or powder coat nishes. Green Gear Cycling honors the original manufacturer’s warranty on
parts and components against defects in manufacturing. Tubes and
tires are sold as-is.
This warranty is expressly limited to the repair or replacement of the
defective frame, fork, or defective part at the discretion of Green Gear
Cycling. This is the sole remedy of the warranty. This warranty applies
only to the original owner and is not transferable.
Claims must be made through Green Gear Cycling or an authorized
dealer. Proof of purchase is required. This warranty covers bicycles and
components purchased outside of the United States only if purchased
through an authorized Green Gear Cycling dealer.
This warranty does not cover normal wear and tear, improper assembly
or maintenance, or installation of parts or accessories not originally intended or compatible with the bicycle as sold. Under no circumstance
shall Green Gear Cycling be responsible for incidental or consequential
damages.
This warranty gives you specic rights, and those rights may vary from
place to place. This warranty does not aect the statutory rights of
the consumer. The warranty applies to bicycles and parts purchased
directly from Green Gear Cycling, Inc., or from its authorized dealers.
Except as provided herein, this product is provided “as is” without
any additional WARRANTY of any kind, including the WARRANTY OF
MERCHANTABILITY and the WARRANTY of FITNESS FOR A PARTICULAR
PURPOSE, whether EXPRESSED or IMPLIED.
Page 56
56
www.bikefriday.com 800-777-0258 • +1-541-687-0487
Pre-Owned Bike Guarantee
We at Green Gear Cycling, Inc. (Bike Friday) want you, the customer,
to be happy with your pre-owned bicycle. If for any reason you are
dissatised, you may return the bicycle to us for a full refund, less all
shipping charges. This applies to the purchase of pre-owned bicycles
purchased direct from Green Gear Cycling Inc.. In all cases, the return
shipping charges are your responsibility. To take advantage of this
guarantee, you must receive a Return Authorization Number from
the Service Department (800.777.0258 / [email protected])
within 30 calendar days of your intent to return the bike, and we must
receive it within 35 calendar days of you taking delivery of the bike.
The sizing of the pre-owned bicycles are limited by their current
construction. Bike Friday will, as part of the purchase price, replace
the stem if necessary or allow for an upgrade to the “t stem” program
for a more exacting t. No other modications to a pre-owned frame
(including SatRday boom) is allowed. Any future corrections to the
sizing will be borne by the purchaser.
Page 57
57
www.bikefriday.com800-777-0258 • +1-541-687-0487
 Loading...