

Page 1
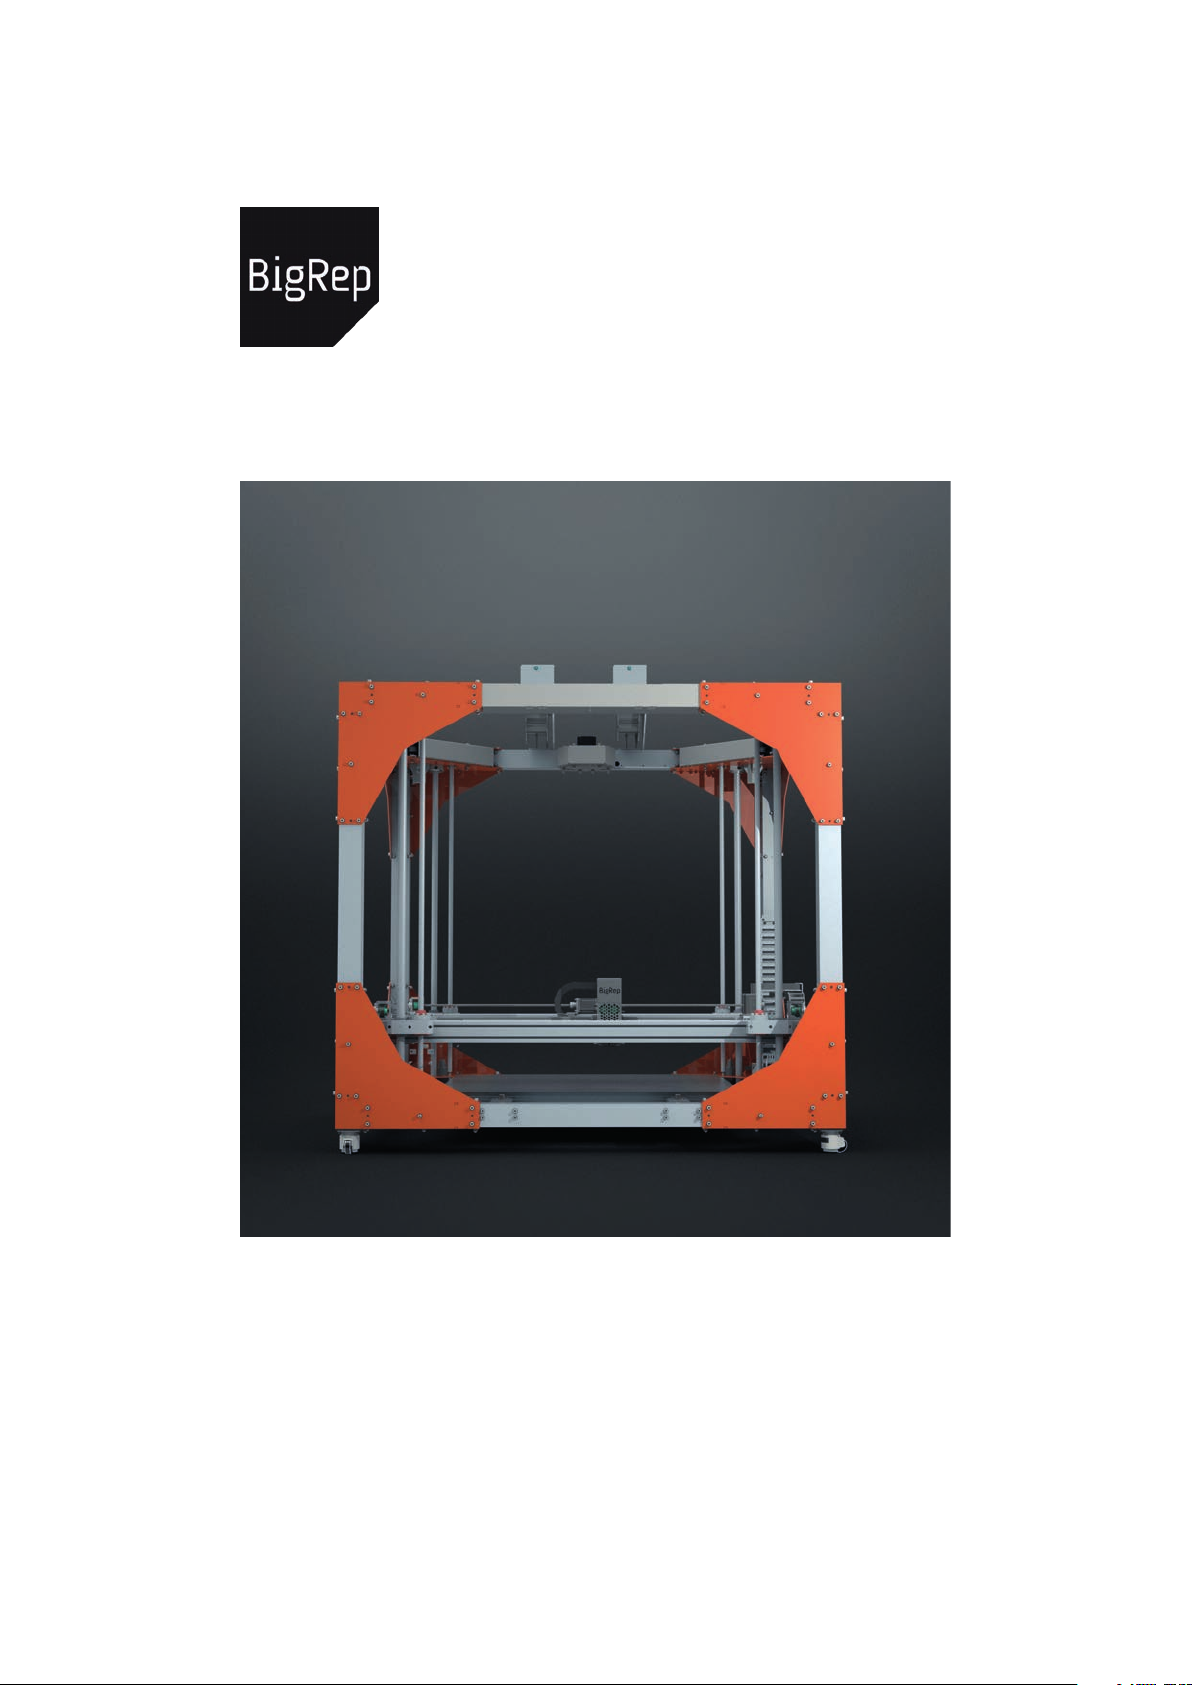
BigRep ONE.2
Full Scale 3D Printer
OPERATING INSTRUCTIONS
Translation of the original operating instructions.
1.02.02
2015/04/09
Page 2

Page 3

Table of contents
1. Introduction ........................................................................4
1.1. Information ...................................................................... 4
1.2. Technical specifications .................................................. 5
1.3 Ships ................................................................................. 5
1.4 Disposal ........................................................................... 5
2. Safety ..................................................................................6
2.1. Explanation of safety symbols ........................................ 6
2.2. Safety ............................................................................... 6
3. Assembly and function ........................................................9
3.1. Short description ............................................................. 9
3.2. Included in the delivery ................................................... 9
3.3. Overview ........................................................................ 10
3.4. The BigRep ONE.2 in detail ........................................... 11
3.5. Soware ......................................................................... 12
3.6. Interface ......................................................................... 12
4. Installation and commissioning .........................................13
4.1. Transport ....................................................................... 13
4.2. Set-up site / Requirements ............................................14
4.3. First use, connecting the printer ....................................14
4.4. Align frames and table ...................................................14
4.5. Disassembly ....................................................................16
5. Service and operations ...................................................... 17
5.1. Safety ..............................................................................17
5.2. Using the BigRep ONE.2 .................................................17
6. Changeover ....................................................................... 19
6.1. Changing the filament ................................................... 19
6.2. Changing the hot end .....................................................17
7. Maintenance and Care .......................................................23
8. Appendix ...........................................................................24
A. Drawings ...........................................................................26
Page 4

1. Introduction BigRep ONE.2
1. Introduction
Please carefully read this manual before use. Save this manual in an
accessible location for future reference.
If you have any further questions please contact Customer Care at
[email protected]
1.1. Information
Copyright/Masthead
© BigRep GmbH, 2015, Berlin
BigRep GmbH
Gneisenaustraße 66
10961 Berlin
Germany
Managing Directors: Lukas Oehmigen, René Gurka
Contact: [email protected]
Distribution and copying of this manual is prohibited without approval.
Guarantee and Warranty
The manufacturer provides a warranty of 12 months from the date of
delivery.
Liability Limitation
The manufacturer assumes no liability for damages arising by
› Non-observance of this manual
› Use of the machine which is not according to specifications
› Use of unauthorized spare parts
› Own conversion of the machine
Status of manual / Version
2015/04/01
EN-US / Translation of the original operating instructions.
4
Page 5

BigRep ONE.2 1. Introduction
1.2. Technical specifications
Manufacturer BigRep GmbH Model BigRep ONE.2
Berlin / Germany Version
1.02.02
Dimensions [mm] 1800 x 1850 x 2000
Weight control unit appx. 70 kg Weight printer appx. 410 kg
Layer thickness
≥ 300 µm
(3)
Tool heads Dual Nozzle
resolution (Z)
Fabrication
methods
Build volume [mm]
(X:Y:Z)
Positioning
accuracy (X:Y)
Positioning
accuracy (X:Y)(Z)
Application range
(ambient temp.)
Supported printing
materials
(*experimentel)
Supported filament
diameters
(1)
Only specified versions. See identification plate.
(2)
Higher temperatures lead to damage.
(3)
Depends on extruder head type and nozzle size.
FFF 3D Printing Print surface Heated build
surface
980 x 1050 x 1100
(in CE version Z:950)
50 µm Temperature
table
< 20 µm Temperature
extruder head
+10°C – +40°C
Power supply 230V, 16A, 50Hz
+50°F – +104°F
PLA, CoPolymer,
Laywood, Laybrick,
Support
material
Max. 100°C
Max. 212°F
Max. 260°C
Max. 500°F
110V, 32A, 60Hz
PVA, PS
ABS*, PC*, PA*, TPE*
2,75 mm - 3 mm Supported
0,5 mm / 1 mm
nozzle sizes
(2)
(2)
(2)
(2)
(1)
1.3. Shipping
Completely assembled in Wooden Box (1,95 m X 1,95 m X 1,95 m).
1.4. Disposal
Disposal by a specialist disposal company is recommended. The disposal
regulations at the time of disposal of the country in which the equipment
is operated do apply. The operator is obliged to comply with these guidelines when disposing.
5
Page 6
2. Safety BigRep ONE.2
2. Safety
2.1. Explanation of safety symbols
DANGER
This warning indicates an imminent danger. Non-compliance leads
to serious injury or death.
WARNING
This warning indicates a potential hazard. Non-compliance can lead
to serious injury or death.
CAUTION
This warning indicates a potentially hazardous situation that may result in minor or moderate injury.
Pay particular attention to this important information.
(damages could result if relevant precautions are not taken)
2.2. Safety
Compliant Use
The BigRep ONE.2 is used to create 3D-printed objects from suitable filament. The instruction for the machine is created in a computer and then
transferred to the machine via an USB-port.
A 3D-printed object is created layer by layer from melted filament (extrudate) from the transmitted data. (Additive manufacturing process – FFF
–Fused Filament Fabrication).
The use of non-approved filament may lead to negative printing results, contamination, damage and failure.
The printer should be used only for additive printing processes (FFF).
A list of tested and approved filaments can be found on our website at
www.bigrep.com
6
Page 7

BigRep ONE.2 2. Safety
Hazards
Hazard from electrical current
HAZARD – HIGH VOLTAGE
In case of contact with live parts, an immediate danger of death by
electrocution is possible. If the insulation of live parts is damaged,
immediately unplug the machine from electrical power and carry
out repairs by qualified personnel.
Never bridge fuses or take them out of service. Keep moisture away from
live parts.
Unplug the machine if there is water damage.
Completely unplug the system and separate from electrical power before
all work on electrical devices, as well as maintenance and repair work.
Work must be performed only by qualified personnel.
Hazard from chemicals
No hazardous fumes arise when authorized filament is properly used.
Never clean the table surface with solvent-containing cleaner. This
can produce toxic fumes when heated.
The use of non-approved filament may release fumes hazardous to
health.
Hazard from turning parts
There is a risk of being caught in turning machine parts. Wear close fitting
clothing. Protect long hair with appropriate covering.
Hazard due to barriers in the head region
CAUTION
Warning against shock injuries. Wear a helmet when working in the
machine.
7
Page 8
2. Safety BigRep ONE.2
Operator obligation
The operator is that person who operates the machine for commercial
or business purposes himself, or allows third parties to do so, and who,
during operation, carries legal product responsibility to protect the user,
sta or third parties.
Operator‘s obligations:
› Know and comply to valid work protection conditions
› Provide necessary protective equipment
› Make operator‘s manual available and ensure that all operators of
the unit read the manual
› Regularly check protective equipment on the machine (for examp-
le, the emergency stop button)
› Check the printer regularly for defects
› Ensure before every printing job that the machine is free of
objects and cannot be accessed by unauthorized persons
Protection
A helmet should be worn during operation on the machine.
Protective equipment
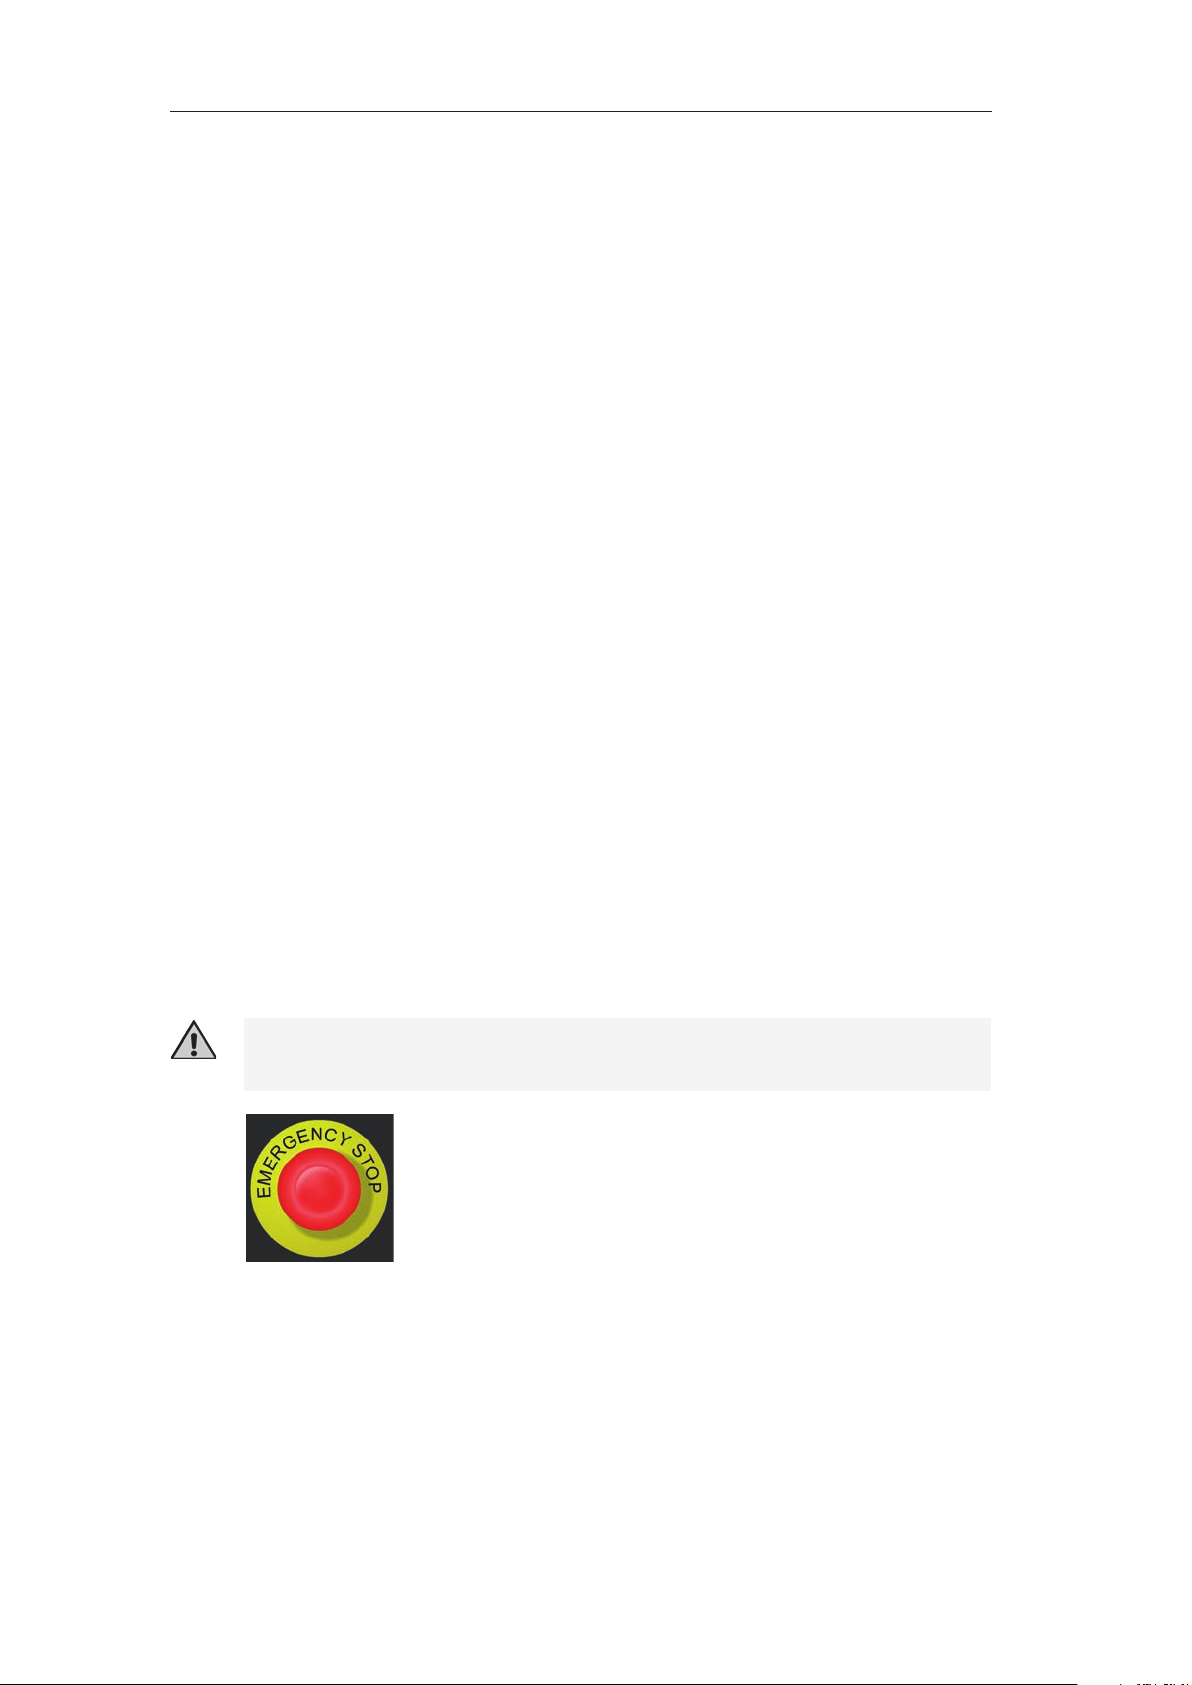
The BigRep ONE.2 is equipped with an emergency stop switch (f):
All moving parts are stopped by pressing on the emergency stop switch;
the table heat is switched o, and the printing process is interrupted!
The emergency stop switch does not shut o the power.
For this purpose, always turn the main switch (e) to O.
In order to allow the unit to restart aer an emergency
stop, turn the emergency stop switch to the right to
unlock. Then press reset (g) to activate the machine
again. The printing process has to be restarted from
Fig. 2-1:
Emergency stop switch
the beginning.
Environmental protection
Observe the manufacturer‘s instructions for disposal of filament.
8
Page 9

BigRep ONE.2 3. Assembly and function
3. Assembly and function
3.1. Short description
The BigRep ONE.2 is a full-scale FFF 3D-Printer for studio and professional
with an
volume of over 1m
1:1, or to create final products, such as designer furniture, directly with the
3D printing method.
BigRep ONE.2 is constructed with an uncompromising full aluminum
frame, incorporating professional CNC components to provide strength
and robustness for thousands of successful printing hours.
3.2. Included in the delivery (depending upon model)
980 mm x 1050 mm x 1100 mm (ca. 1.3m3) working volume. A printing
3
makes it possible to produce prototypes and models
› BigRep ONE.2 (including extruder head)
› 2 hot ends (pre-assembled), 1 mm and 0.5 mm nozzle diameters
› 2 separate hot ends (1 mm + 0,5 mm nozzle diameter)
› Control panel unit
› Hex key to change the extruder head (M2, M3, M10)
› Scraper
› Feeler gauge for calibrating nozzle height
9
Page 10
3. Assembly and function BigRep ONE.2
3.3. Overview BigRep ONE.2
F
E
A
D
H
z
y
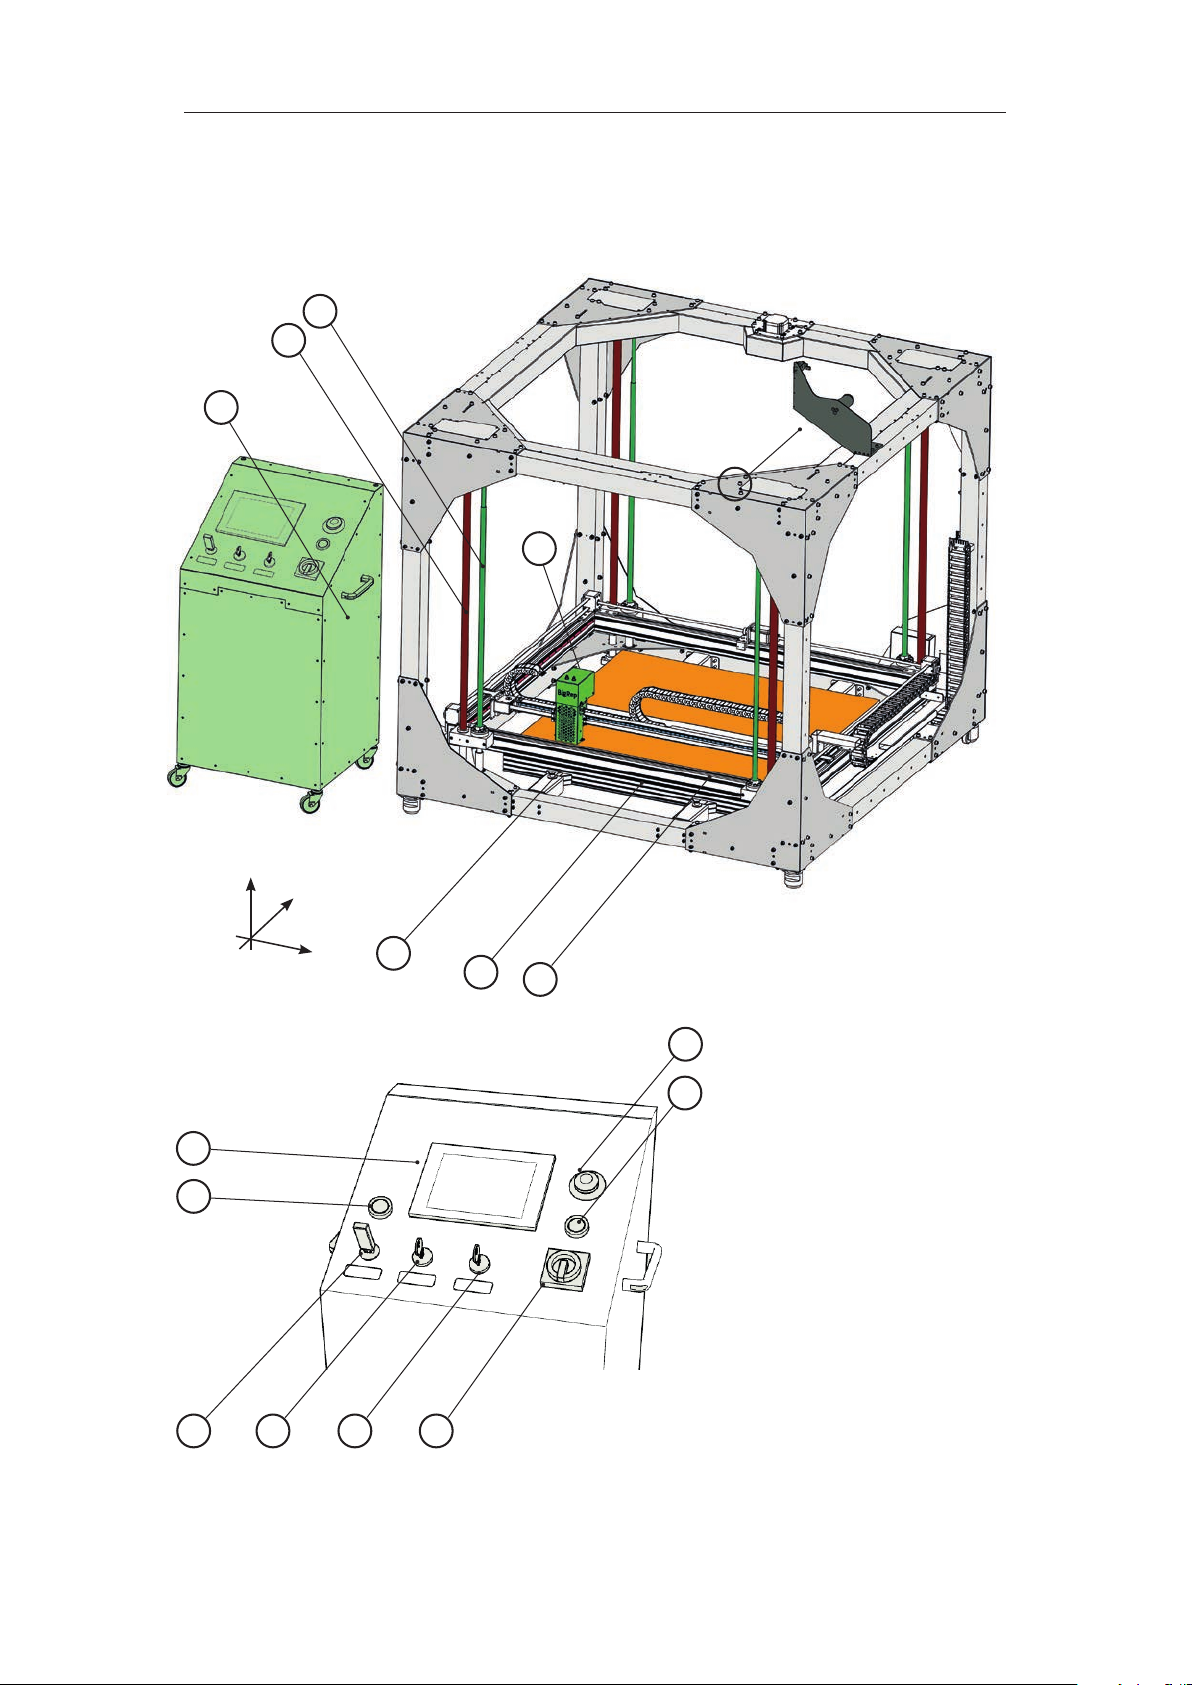
A Control panel unit
x
B
C
G
B Extruder head
C Print table
Fig. 3-1: BigRep ONE.2 with control panel
f
D Filament roll holder
E Z-guide sha s
g
F Z-lead spindles
a
G X-guide rails
H Y-guide rails
h
a Display
b USB port
c Display switch
d Table heater switch
e Main switch
b
c d e
f Emergency stop
switch
Fig. 3-2: Control panel
g Reset button
h Z-unblock
10
Page 11

BigRep ONE.2 3. Assembly and function
3.4. The BigRep ONE.2 in detail
Description of modules (& Fig. 3.1)
(A) Control panel unit
Control of the printer, display of information
(B) Extruder head with hot ends
Melting of the filament, printing
(C) Print table
Heated, covered with glued table protection layer (orange film)
(D) Filament roll holder (2 rolls)
(E) Z-guide shas (4 pieces)
(F) Z-lead spindles (4 pieces)
(G) X-guide rails (2 pieces, one above the other)
(H) Y-guide rails (2 pieces, opposite sides)
Control panel (A) (Fig. 3.2)
(a) Display with touchscreen
Operation of BigRep ONE.2 (Graphic User Interface)
(b) USB port
For loading the print instructions (G-code) from USB media
(c) Display switch
Key switch, turns the display on/o
(d) Table heater switch
Key switch, turns the table heater on/o
(e) Main switch
Turns power on/o, starts BigRep ONE.2
(f) Emergency stop switch
Shutdown of all moving parts and the heating table
(g) Reset button
For restart aer pressing the emergency stop switch
(h)
Z-unblock
Enables homing of Z-axis
11
Page 12

3. Assembly and function BigRep ONE.2
3.5. Soware
We recommend KISSlicer as slicing soware [http://www.kisslicer.com]
Use the delivered KISSlicer configuration file. This file contains all necessary settings. You can request the latest version of the configuration file
from customer care.
Note: Set the correct print table size when using slicing soware dierent
to KISSlicer. The Z-Oset must be set to zero. Wrong settings can lead to
damages.
3.6. Interface
The BigRep ONE.2 is operated via the touchscreen interface (a) on the
control panel.
Note the separate manual for the interface.
12
Page 13
BigRep ONE.2 4. Installation and commissioning
4. Installation and commissioning
The separately included transport manual must be observed before
delivery without a service setup.
4.1. Transport
The equipment must be unplugged from the power supply before
every transport operation, and the cable connection from the control
panel (A) and the equipment must be pulled out.
The BigRep ONE.2 can be moved by utilising the four transport wheels
mounted under the frame. Immediately aer transport, the transport
wheels must be locked again to prevent accidental rolling of the machinery. Turn the levelling spindles counterclockwise to loosen the transport
wheels.
The table must be aligned again aer transport.
4.2. Set-up site / Requirements
Make sure that the floor is level.
Ensure suicient ceiling clearance (minimum 1 m from unit to ceiling).
Ensure that the floor can bear the weight!
The device may only be operated in a safe environment (special room safety cage or the like), may be entered only be done by
trained operators and only be entered when the machine is switched o. The operator shall bear the responsibility.
The machine may not be accessible to unauthorized persons especially
aer the start of the print program.
Ensure for a good printing process:
› Avoid high humidity
› The temperature in the operating environment may not exceed
40°C / 104°F
& Chap. 4.4.
› Avoid strong dras during the printing process
› Avoid direct sunlight on the machine
› Do not install the machine on a floor that could be subject to
vibrations
› Avoid dusty operating environments (e.g. cutting dust)
13
Page 14
4. Installation and commissioning BigRep ONE.2
4.3. First use, connecting the printer
If you have chosen to purchase the BigRep ONE.2 without a service setup,
you will receive a separate manual for first use.
Connect the unit only to the mains aer you have aligned frames and
table.
& Chap. 4.4. Align frames and table
4.4. Align frames and table
Alignment of the frame
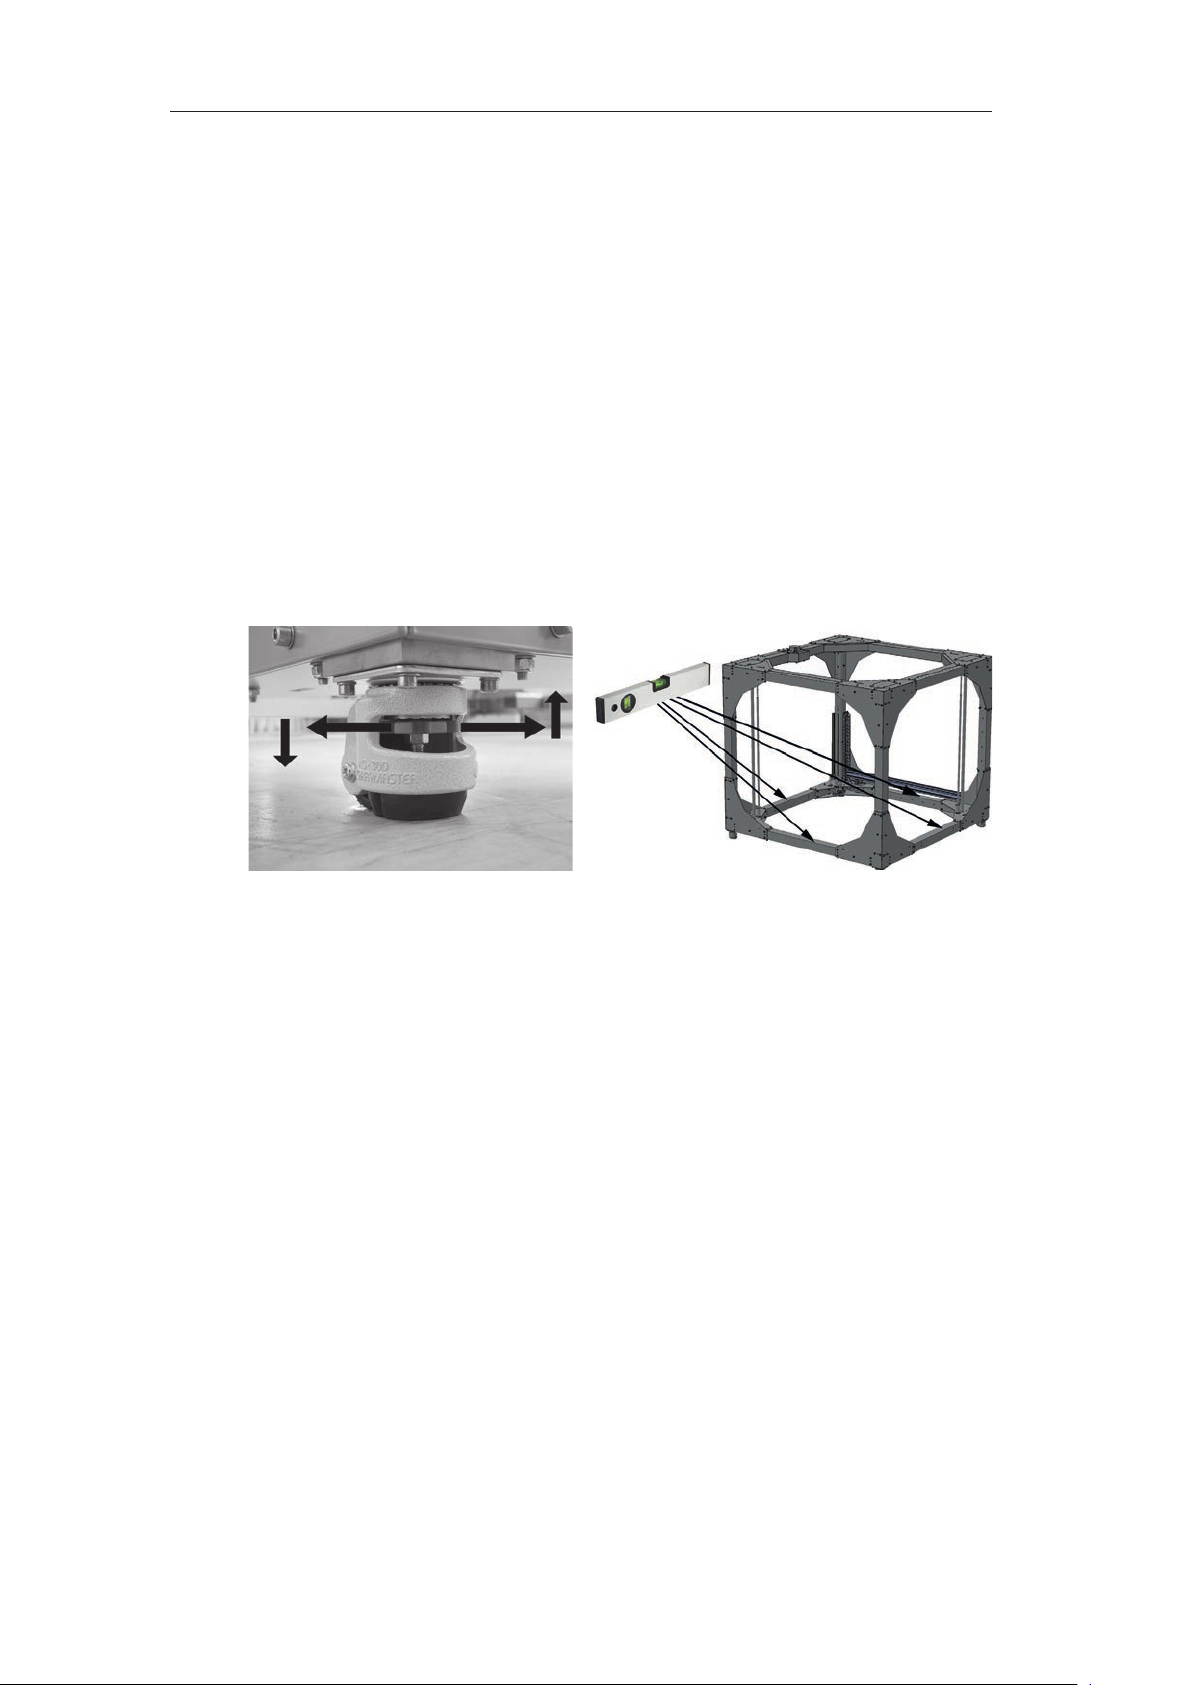
Aer each transport, the machine must be aligned horizontally using the
adjustable feet with the aid of a spirit level.
Fig. 4-3: Height adjustment
Fig. 4-4: Alignment of the frame with spirit level
In order to set the height and the horizontal alignment of the machine,
the height adjustment (levelling spindles) should be turned accordingly
to Fig. 4-3, and the horizontal alignment must be checked with a water
level (Fig. 4-4).
Also the table must be checked monthly, aer each transport and regular
use.
14
Page 15
BigRep ONE.2 4. Installation and commissioning
FRONT
P1
P2
P3
S1 S4
S3 S2
P4
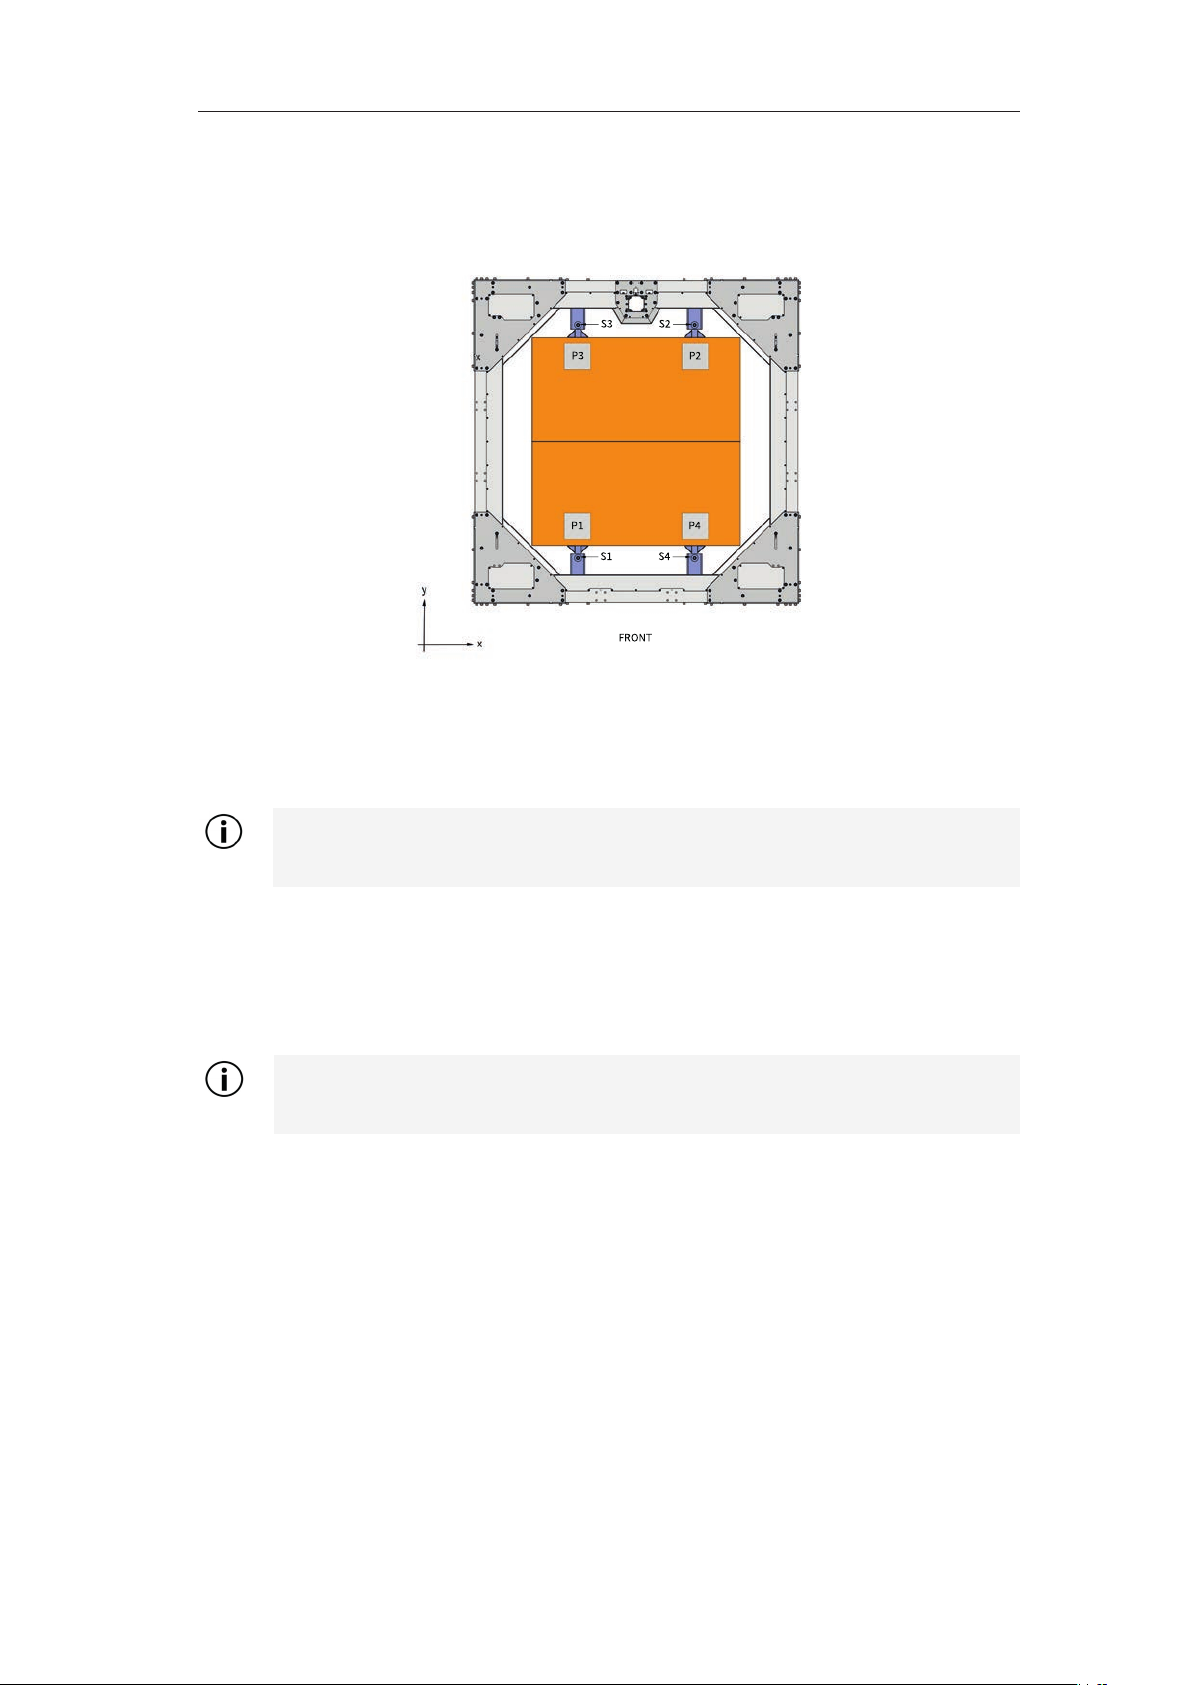
Alignment of the print table (leveling)
Fig. 4-5: Alignment of the table
› Move the table up/down by turning screws S1-S4 (Fig. 4-5)
Clockwise moves table up, counterclockwise moves the table
down.
Never completely unscrew the screws, otherwise the table will separate from the suspension.
› Move the extruder head to the home position using the interface.
& Interface-Manual | Homing
› Switch o the BigRep ONE.2 using the main switch (e)!
› Move the extruder head (B) manually by hand to P1 area (Fig. 4-5).
Never move the extruder head manually by hand while machine is
connected to power source! Induced voltage leads to damage.
› Put the fitting blade of the feeler gauge (delivered with the ma-
chine) between the table and the nozzles. (The reference value is
0,35 mm. This is about the thickness of a sheet of paper).
› Turn screw S1 in a clockwise direction until the nozzle and the
gauge blade nearly touch without clamping.
› Remove the gauge blade. (Never leave the blade on the table
when manually moving the extruder!)
› Set the extruder head manually by hand to P2, and set the
distance between the table and nozzle in the same way
› Proceed in the same way for P3 and P4.
15
Page 16

4. Installation and commissioning BigRep ONE.2
› Then run through all four points P1-P4 again. Double check all 4
points until the correct distance between the table and the nozzle
at all four points is the thickness of the gauge blade.
Move the extruder head slowly across the table. The table may not touch
any point, as the table protection layer or the nozzle could be damaged.
Turn on the main switch (e) again when the distance is set correctly. The
machine is ready for use again.
4.5. Disassembly
The machine must be disconnected from the mains before disassembly.
Please contact Customer Care if you have questions:
[email protected]
16
Page 17

BigRep ONE.2 5. Service and operations
5. Service and operations
5.1. Safety
Wear a helmet when working with the machine as well as taking things
out of the machine!
CAUTION
Do not reach into the machine during the printing process. There is
an injury hazard from moving parts!
CAUTION
The machine has both hot and rotating components. Aer ending
the printing process, components and the printed object may be
hot. Danger of burns!
Seek a doctor immediately in case of burns!
The machine may only be operated when completely assembled. Otherwise, the safety of man and machine is not guaranteed and the operating
license expires.
5.2. Using the BigRep ONE.2
Note in the following steps the separate Interface Manual as well as
the on-screen assistance of the interface.
The current corresponding interface manual for your specific firmware
can be found on our website [www.bigrep.com].
Print a component
Preparation
› Check and verify that the machine operates normaly
Before any print operation ensure that the machine is free of objects
and cannot be accessed by unauthorized persons
› Clean the print surface
› Turn on the main switch (e)
› Turn on the display (c), switch on the table heating (d)
› Home the extruder head
› Check the filament. If necessary, change the filament.
& Chap. 6.1. Changing the filament
& Chap. 7. Maintenance and Care
& Interface Manual | Homing
17
Page 18

5. Service and operations BigRep ONE.2
› Control the hot end. If necessary, clean the nozzle (Fig. 6-1, (iv)).
Mount the correct nozzle if there is a new hot end filament diameter
& Chap. 6.2. Change the hot end
Preheat device
› Set the extruder temperature in accordance with the filament in
use
› Set the temperature of the table in accordance with selected
filament
› Press Pre-Heat in the interface
Load the print file (G-code)
› The G-code which has been generated with your slicing soware
is transfered via USB medium (b)
› Select the G-code from the USB media using file explorer
› Check that the printing speed is set to that given in the G-code
The machine must be homed position before each print job!
& Interface Manual | Homing
Start printing
› Only start the print aer the extruder and the table are heated
correctly.
› Check that the printing process has begun properly
Stop / pause printing
› You can see on the display when the print is finished
› The printing is paused or stopped by pressing on Pause or
Resume
Remove component
› Move the extruder head manually with the interface so that the
printed part is freely accessible
› Let the table cool to under 40°C / 104 °F
If the printed part taken before the table is cooled there is a risk of
irreversible change in shape!
› Carefully remove the print object from the table by providing the
plastic scraper
18
Page 19

BigRep ONE.2 6. Changeover / Retooling
6. Changover / Retooling
Read the following instructions completely before you begin replacing
any components.
6.1. Changing the filament
The filament change can be done before or during printing process.
Please note the dierent procedure.
Store filament rolls in a dry and cool place. Avoid knotting of the roll
by securing the loose filament end into the roll.
Filament change before printing
Move the extruder to home position via the interface.
Remove the filament strand next to the filament guide (3).
With the interface function Retract remove the remaining filament from
the extruder head.
Extrude remaining filament in the nozzle manually via interface. Clean
the nozzle if necessary.
CAUTION
Hot nozzle can cause burns. Do not touch hot nozzle.
If the filament is changed before the filament roll currently being used is
used up, roll up the remaining filament and remove the roll.
Load the filament roll holder (D) with the new filament roll. Load the filament end into the extruders heads filament guide (Fig A-2 (5)). Adjust the
temperature on the interface if using a new filament material.
Filament change during printing process
Press Pause in the interface to pause the printing process.
Never use the homing function during an ongoing print process.
Never move extruder head manually in Z-direction. Do not quit the
printing process. Otherwise the print object will be unusable.
Aer pausing, the extruder can be moved in X- and Y-direction via the interface in order to change the filament. Take care that the extruder head
never touches the print object while moving.
Remove the filament strand next to the filament guide (3).
19
Page 20
6. Changeover / Retooling BigRep ONE.2
With the interface function Retract remove the filament from the extruder head.
Extrude remaining filament in the nozzle manually via interface. Clean
the nozzle if necessary.
CAUTION
Hot nozzle can cause burns. Do not touch hot nozzle.
Load the filament roll holder (D) with the new filament roll. Load the filament end into the extruders heads filament guide (Fig A-2 (5)). Adjust the
temperature on the interface if using a new filament material.
Manually extrude a small amount of the new filament to check whether
print process works proper.
Press Resume in the interface to continue the print process. The extruder head will automatically move to the position were the machine was
paused.
Advanced Tipp
You can change the filament during an ongoing print process without
pausing the process. Therefore cut the filament strand next to filament
guide (3), load the new filament roll and insert the new filament strand
to the filament guide directly aer the old one.
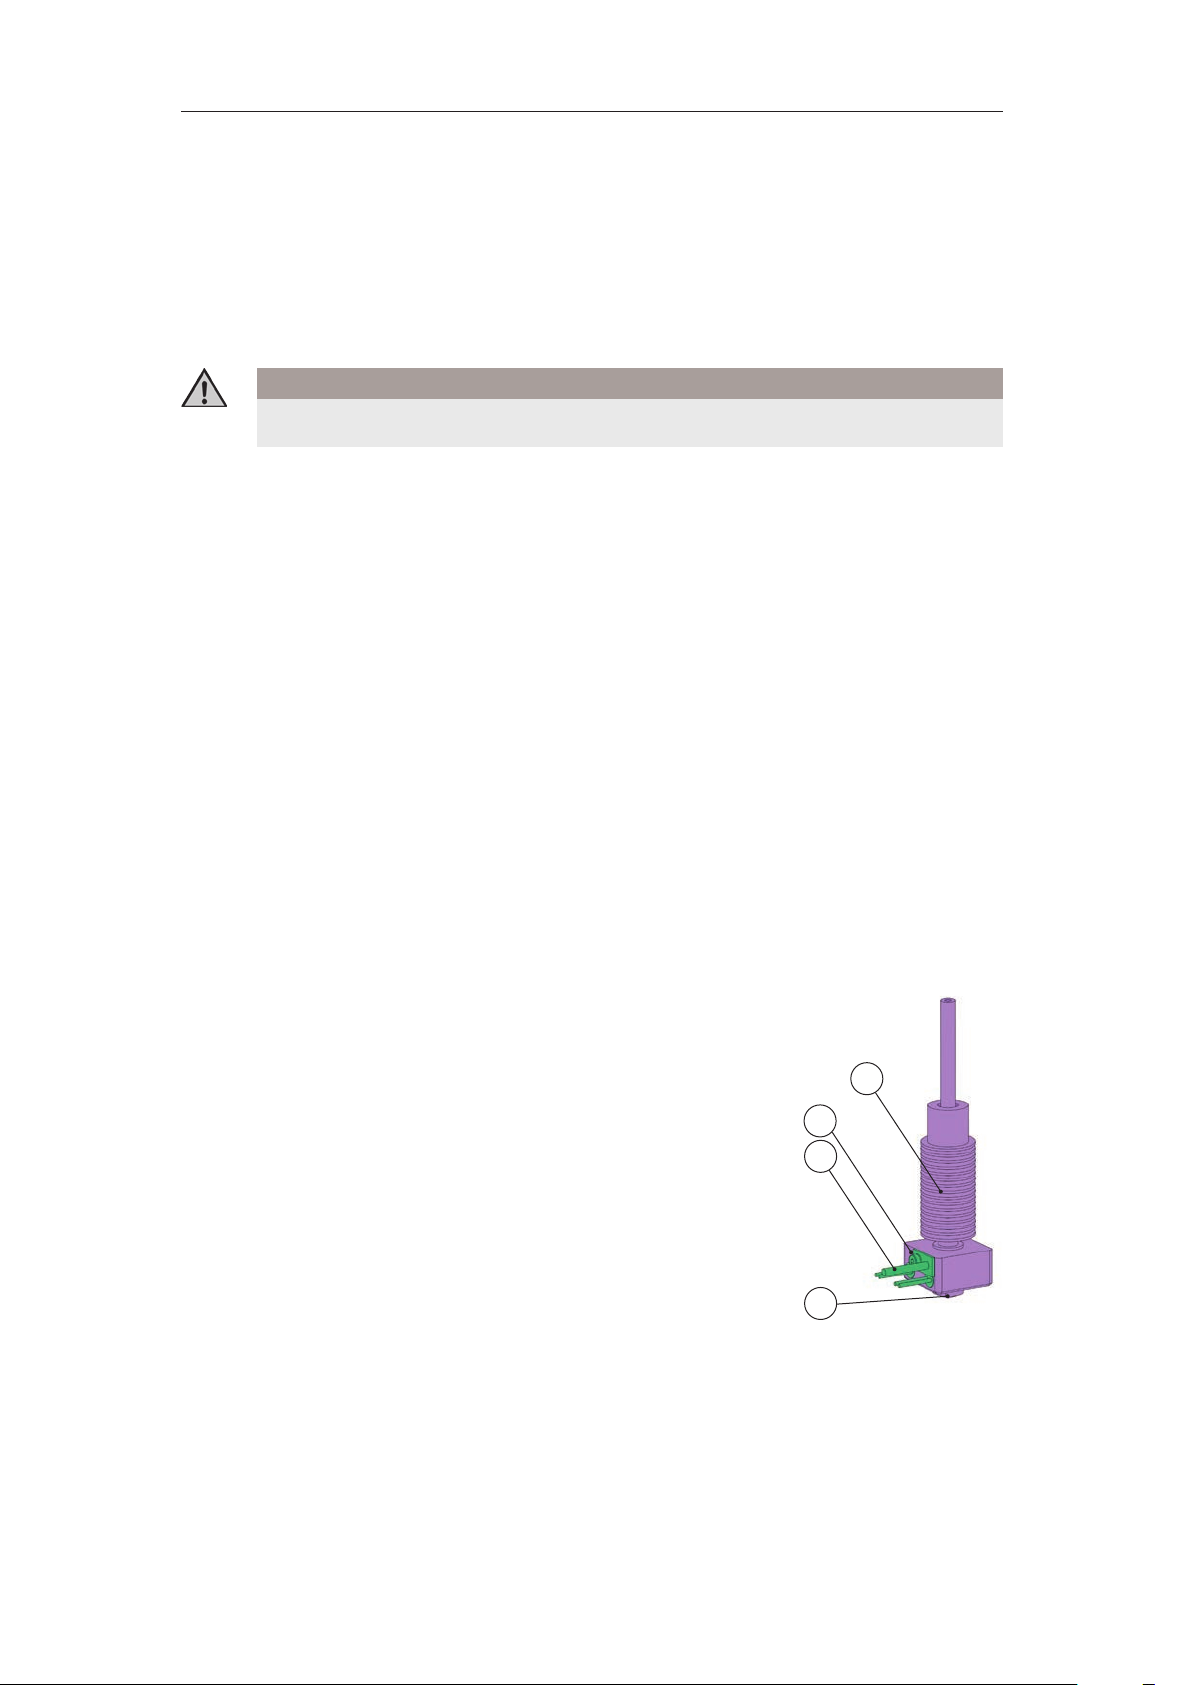
6.2. Changing the hot end (Fig. A-1a / A-1b / 6-1)
The filament is heated in the hot end (8) and guided through the nozzle (iv) with pressure. The
extruder head of BigRep ONE.2 is equipped with
two separate hot ends that can be replaced individually, for example, to use other nozzle diameters. There is a dierence between replacing the
hot end mechanicals (i) and a complete hot end
exchange including the electrical parts (iii).
The hot end mechanics are exchanged in order
to use another nozzle diameter. When changing the hot end mechanics, the electrics (cartridge heaters and sensors) are taken from the
removed hot end and mounted in the hot end which will be installed.
& Changing the hot end mechanics
ii
iii
iv
Fig. 6-1: Hot end
i
20
Page 21

BigRep ONE.2 6. Changeover / Retooling
Should you need a new hot end, ask Customer Care:
[email protected]
The hot end mechanics may only be replaced as a whole. Opening
the hot end leads to damage/loss of warranty. In particular, the nozzles found on the hot end may not be replaced individually.
Changing the hot end mechanics
Tool needed
› Allen wrench/hex: 2 mm + 3.0 mm
Procedure
1. Move the extruder head manually with the interface to a position
which makes it possible to replace the hot end without problems.
Ensure that you have suicient distance from the table (at least
50 cm).
2. Remove the filament strand out of the filament guide while the
nozzle ist hot (Fig A-1 (3)) (
& Interface Manual | Manual Extrusion)
Pull out the loose filament end when the motor no longer advances the filament.
You can only remove the filament in the hot end when the nozzle is
hot. Wait aer removal of the filament with the following steps until
the nozzle is cooled.
3. Ensure that no impurities have found their way into the filament
guide (3). Protect the opening if necessary.
4. Remove the front extrusion head cover by loosening the four
screws (4) and remove the cover by sliding it forward.
5. Identify the hot end to be replaced (should both be changed,
carry out steps 6. to 8. for both parts in the same way).
6. Loosen the hot end electrics (iii) with the screw (ii) and carefully
pull it out of the hot end.
Do not attempt to remove the electric parts by pulling the cables.
Use a small wire nail to press out the electric parts from the rear side
of the hot-end.
7. Hold the hot end to be changed with one hand, lightly loosen its
clamping screw (7) without completely removing it.
21
Page 22

7. Maintenance and Care BigRep ONE.2
8. Carefully pull out the hot end (8) downward.
Ensure that the hot end does not fall out when the clamping screw
(ii) is loosened in order to avoid damage to the hot end and the table
surface.
Installation of the new hot end mechanics
Put the new hot end mechanics back into the extruder head. Ensure that
the removed hot end mechanics are protected in order to prevent impurities or damage.
1. Move the new hot end mechanics high enough that the shaded
areas (9) are flat in one plane
2. Tighten the clamp screw (7)
3. Reinstall the hot end electronics
4. Install the front extrusion head cover
Before you start printing, always move the extruder head to the home
position.
Complete hot end exchange
Please contact to Customer Care at [email protected]
22
Page 23

BigRep ONE.2 8. Appendix
7. Maintenance and Care
Cleaning
Clean the surface with industrial alcohol (e.g isopropyl alcohol) and a so
cloth before use. This is to ensure that the print stricks to the bed. Do not
use solvent-based cleaners!
Do not use abrasive tools/materials for cleaning. Damaged surfaces
lead to faulty prints.
During the print process small filament threads can appear which can
be caught in the moving fan. Regularly check the fans and clean them if
necessar y.
Lubrication (Components & Fig. 3-1)
X-guide rail (G), Y-guide rail (H) , Z-lead screw (F) and Z-guide axis (E):
clean and lubricate regularly.
Use industrially approved grease for lubrication. Lubricating greases for
plain and roller bearings with mineral oil as the base oil are recommended.
Do not use grease with solid lubricant such as graphite or MoS2
(molybdenum disulfide ) for lubrication!
Regularly check the lubrication condition of the individual components.
Ensure that there always is a light film of lubricant.
Tighten the belts
If you have problems with tension of the belts please turn to Customer
Care: [email protected]
Change of the protection film
Please contact Customer Care at [email protected]
Firmware update
Please contact Customer Care at [email protected]
23
Page 24

8. Appendix BigRep ONE.2
8. Appendix
8.1. FAQ / Troubleshooting
You can find the current FAQ list at our home page [www.bigrep.com]
8.2. Glossary
Term Explanation
Extrusion Curable materials pressed from a nozzle.
Filament Fiber string rolled up on a roll. Available in dierent mate-
rials and sizes.
G-code Provides instructions for the printer (e.g. the moving path
of the printer in order to create the desired part). G-code is
created with slicing soware.
Slicing-Soware Soware to translate objects into printer instructions, in
form of G-Code.
Home position Zero position. Starting point for the print.
24
Page 25

BigRep ONE.2 8. Appendix
Notes
25
Page 26
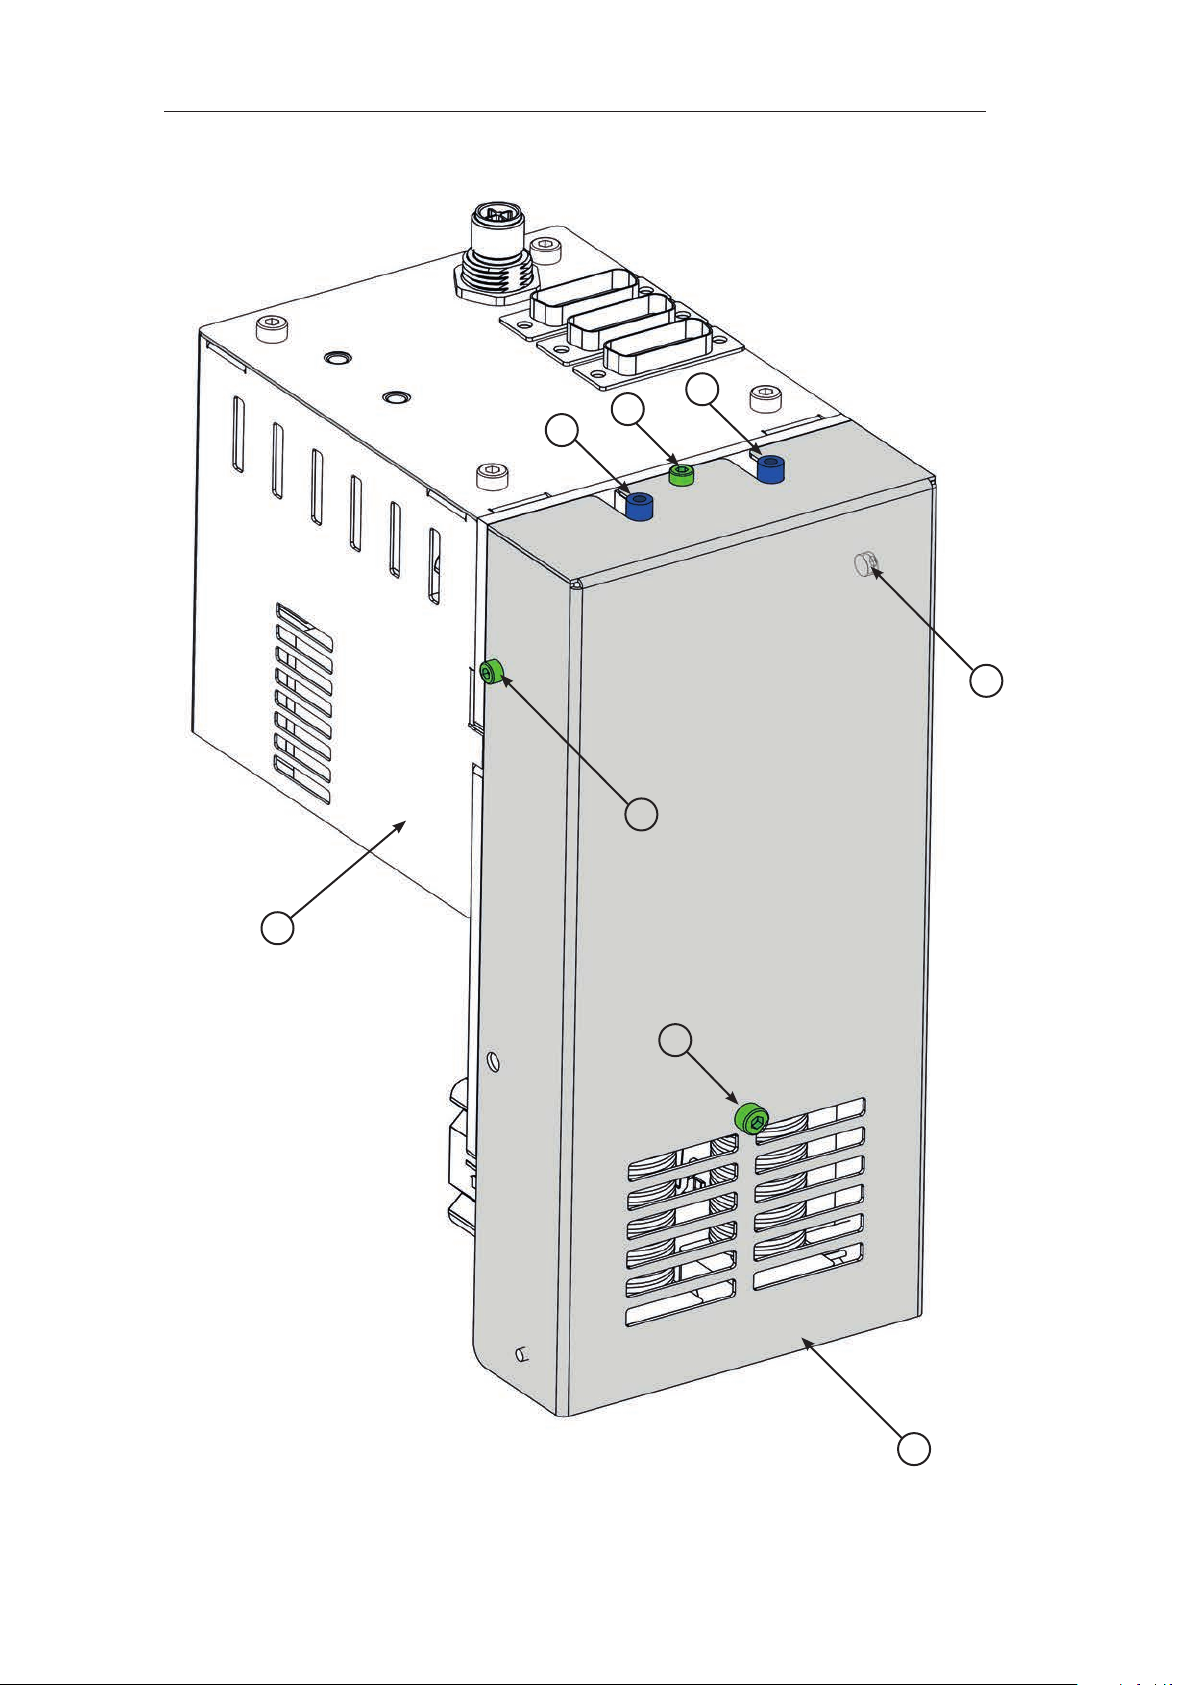
A. Drawings BigRep ONE.2
4
3
4
2
3
4
Front cover
1
Rear cover
2
filament guide
3
Screws
4
4
1
Fig. A-1: Extruder head with front cover
26
Page 27
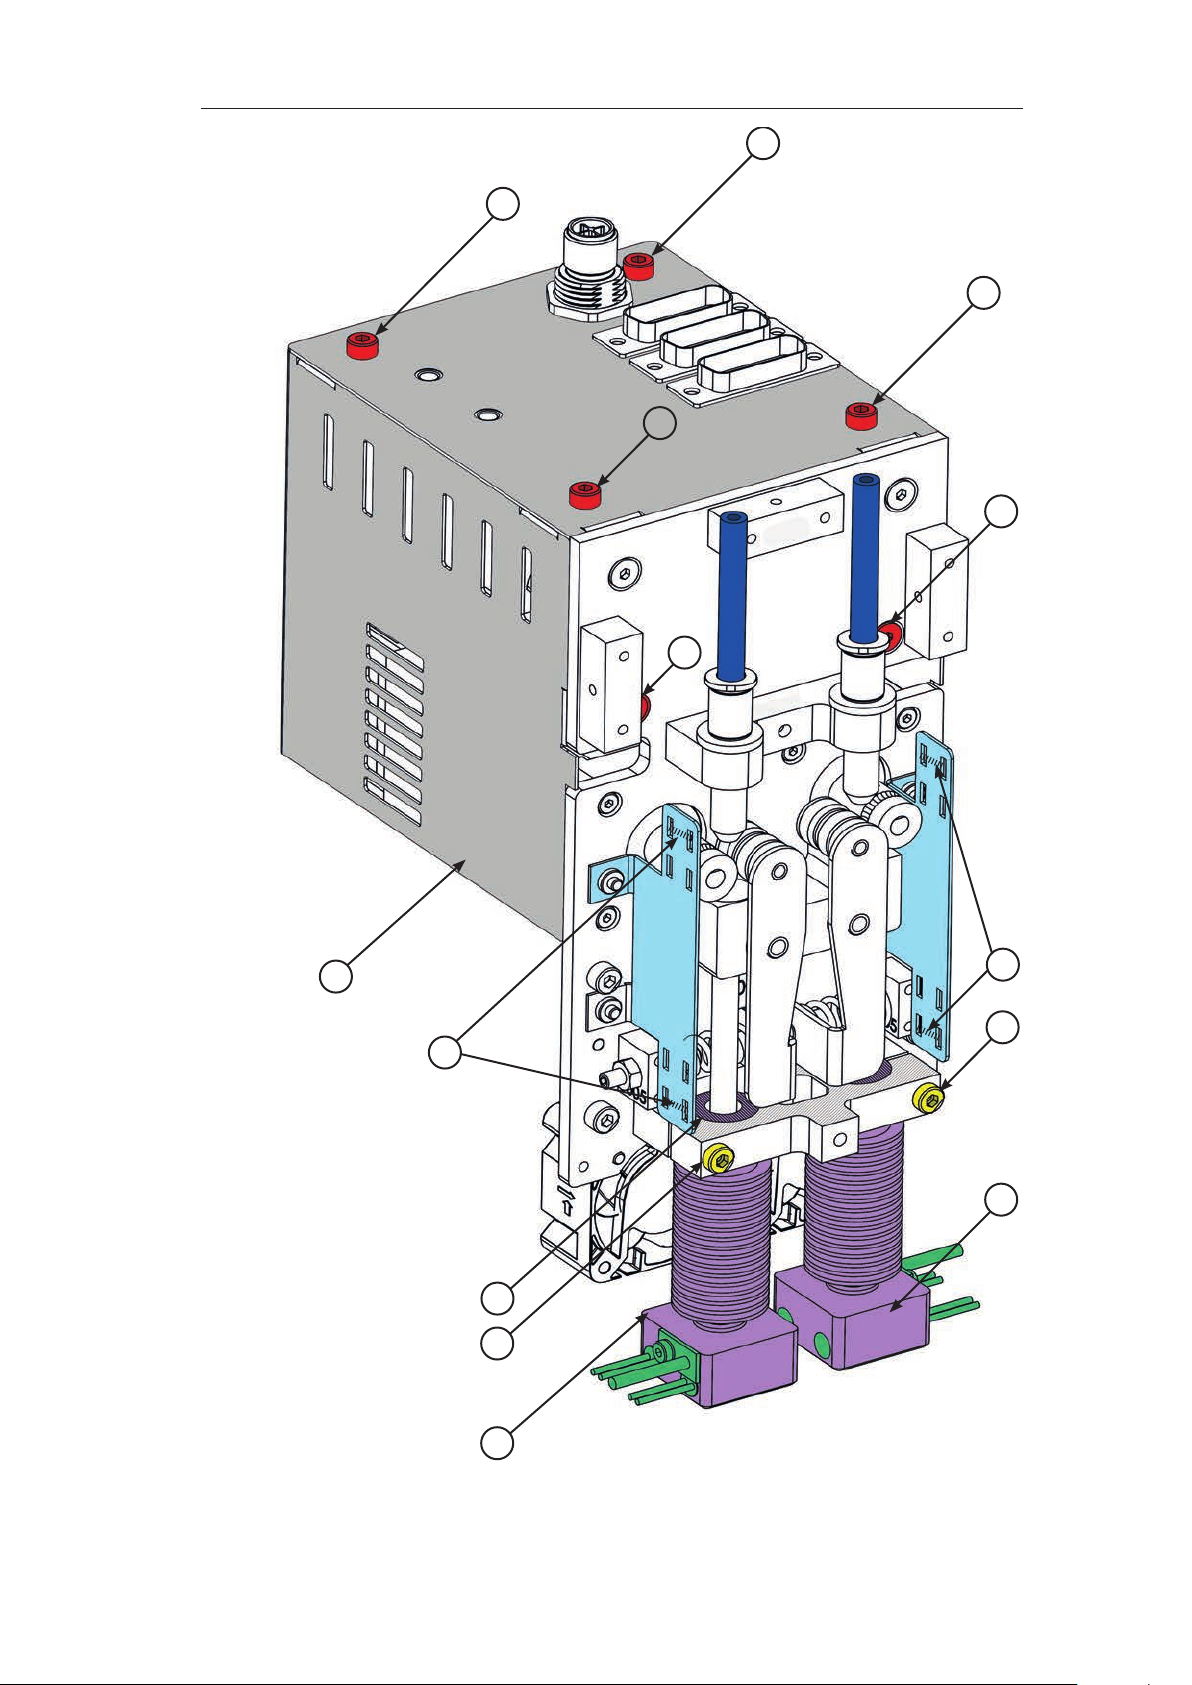
BigRep ONE.2 A. Drawings
5
5
5
5
5
5
2
Rear Cover
2
Screws
5
Releasable cable tie
6
(black)
7 Clamp screw
8 Hot end
6
7
6
8
9
7
8
Fig. A-2: Extruder head without front cover
27
Page 28

 Loading...