

Page 1
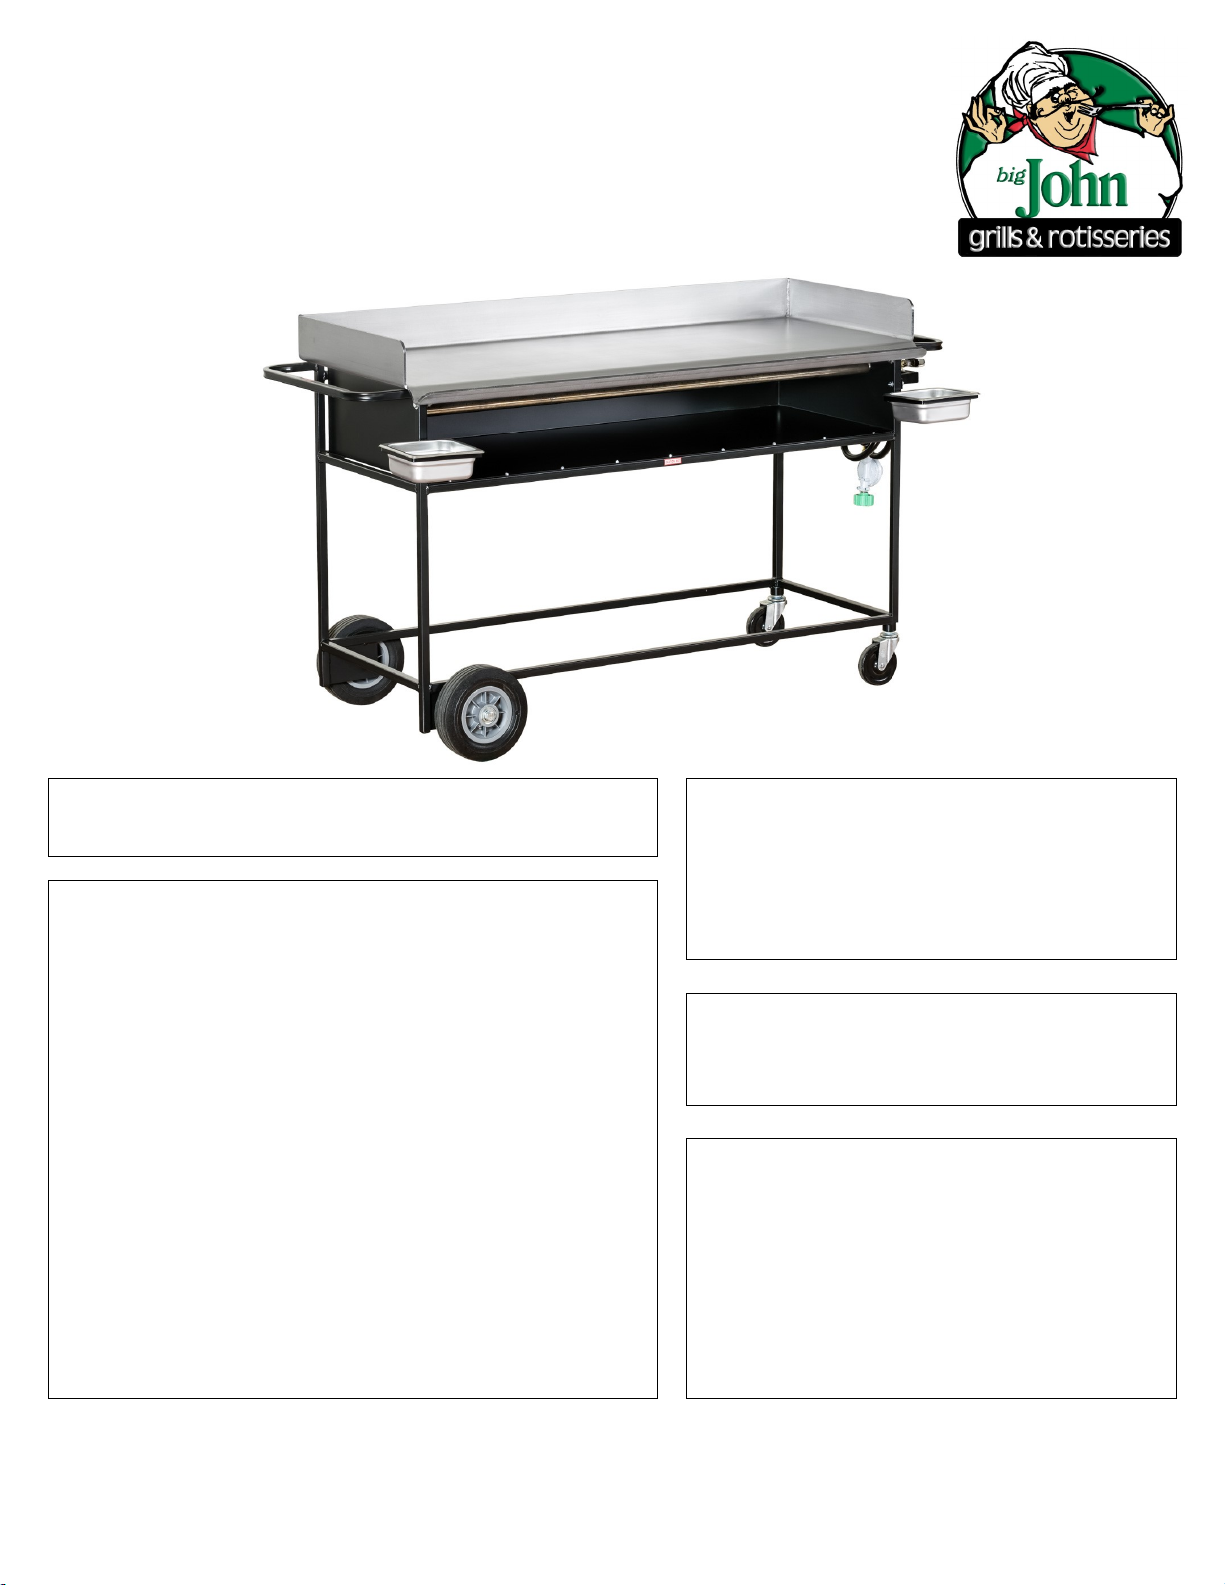
Owner’s Manual
for Assembly, Operating & Maintenance of
Model PG-52S Fixed Base Gas Griddle
www.bigjohngrills.c
YOU MUST READ THIS OWNER’S MANUAL
BEFORE OPERATING YOUR GAS GRIDDLE.
DANGER
IF YOU SMELL GAS:
1. SHUT OFF GAS TO APPLIANCE
2. EXTINGUISH OPEN FLAMES
3. IF ODOR CONTINUES, KEEP AWAY FROM THE
APPLIANCE AND IMMEDIATELY CALL YOUR
GAS SUPPLIER OR FIRE DEPARTMENT.
LEAKING GAS MAY CAUSE FIRE, EXPLOSION,
PERSONAL INJURY, DAMAGE TO PROPERTY, AND
DEATH.
WARNING: Follow all leak-check
procedures listed in this manual carefully
prior to operation of this unit. Do this
even if the griddle was assembled by a
professional.
WARNING: Do not ignite this griddle
without reading the LIGHTING INSTRUCTIONS first.
WARNING: DO NOT store or use
gasoline or other flammable liquids/
vapors in the vicinity of this griddle.
An LP Cylinder not connected for use
should not be stored in the vicinity of this
unit.
THIS GAS GRIDDLE IS DESIGNED FOR OUTDOOR USE ONLY.
526 EAST ROLLING RIDGE DRIVE, BELLEFONTE, PA 16823
P: 814-359-2755 F: 814-359-2621 [email protected]
1
Page 2

TABLE OF CONTENTS
1. PROPANE SAFETY - GENERAL Page 3
2. PROPANE SAFETY - CYLINDER Page 4 & 5
3. PROPANE SAFETY - QCC Page 6
4. GENERAL INFORMATION Page 7
5. ASSEMBLY INSTRUCTIONS Page 8
6. SET-UP INSTRUCTIONS Page 9
7. OPERATING INSTRUCTIONS Page 10
8. CLEANING & CARE INSTRUCTIONS Page 11
9. PARTS LIST Page 12
10. ACCESSORY LIST Page 13
11. TROUBLESHOOTING GUIDE Page 14
12. WARRANTY Page 15
13. WARNINGS Page 16
2
Page 3

PROPANE SAFETY - GENERAL
Liquid propane (LP) gas is a petroleum product as are gasoline and natural gas. In normal tempera-
tures and pressures, LP gas is a gas. When moderate pressure is applied, inside a cylinder, LP gas
becomes a liquid. As the pressure is released the liquid readily vaporizes and boils off as a gas.
LP gas has no odor, but rather an odor additive so you can smell it.
Propane gas is denser than air, if a propane tank purges to relieve pressure build-up, the propane
will collect in low lying areas. These areas can be easily ignited and are highly flammable. Use caution when dealing with a propane tank that may have recently self-purged.
DO NOT paint propane tanks any color other than white. Any alteration to tank color will result in
tank purging, fire, personal injury, or death.
Big John Grills & Rotisseries uses high quality Worthington Cylinders in 30 lb. and 40 lb. sizes.
These tanks are protected with a rust-resistant white powder coat finish.
Always keep the cylinder valve closed when not in use.
Cylinders are designed to function with the valve completely open or completely closed, there is no
in-between. Never open the valve just a “crack” or “half way”.
Always position the propane cylinder so that the connection between the valve and the regulator will
not cause any sharp bends in the hose.
NEVER store or use propane cylinders indoors.
Make sure the POL or QCC Connector is free from scratches or nicks which can cause gas leaks.
DO NOT store or use gasoline or other flammable liquids or vapors in the vicinity of a gas appliance.
DO NOT store extra liquid propane cylinders within the vicinity of a gas appliance.
DO NOT store a liquid propane cylinder in/on any part of an appliance not intended for such use.
Improper storage of a cylinder could lead an explosion, fire, personal injury, or death.
DO NOT store or lean items against unit surface or fuel cylinders while operating.
Shut off unit and all gas sources if the odor of unburned gas is detected. Make no attempt to use the
unit until gas leaks are fixed and/or the odor is accounted for.
Do NOT use a damaged, dented, or rusty LP cylinder or a cylinder with a damaged valve - replace
with a new one immediately.
Replacement LP tanks must match the regulator connection supplied with this grill and be a mini-
mum of 30 lb. capacity.
LIQUID PROPANE TANK REQUIREMENTS
For tanks not purchased from Big John Grills & Rotisseries: check to be sure cylinders have been
tested within the past 5 years and have a D.O.T. certification. Your LP gas supplier can do this for
you.
All LP tank supply systems must have a collar to protect the cylinder valve.
All tanks used on Big John Grills equipment must be a minimum of 30 lb. size.
Tanks larger than 100 lbs. in size may require a POL for connection. Please call a Big John Cus-
tomer Service Representative if you are using a 100 lb. propane tank.
3
Page 4

PROPANE SAFETY - CYLINDER
DISCONNECTING AND TRANSPORTING PROPANE CYLINDERS FOR REFILLING
Turn off all control knobs and close the main cylinder valve. Disconnect regulator with QCC.
Place cylinder valve plug snugly in the main cylinder valve outlet. Only use the cylinder valve plug
that is provided with the cylinder. Other types of caps or plugs may result in leakage of propane.
Treat “empty” LP cylinders with the same care as full ones. Even when the tank is empty, there is
still some gas pressure left in the cylinder.
Always transport and store propane cylinders in a secure, upright position. Never store these pro-
pane tanks on their side, handle them roughly, or drop them.
Never keep propane cylinders (full or empty) in a hot vehicle. Heat can cause the relief valve to
purge propane creating a very dangerous situation.
To fill, take the LP cylinder to a propane gas dealer WARNING: We strongly recommend that your
LP cylinder be filled by an authorized propane dealer, by a qualified attendant, who fills the
tank by weight. IMPROPER FILLING IS DANGEROUS.
Air must be purged from a new LP cylinder before the initial filling. Your LP dealer will do this.
STORING PROPANE CYLINDERS
Turn off all control knobs and close the main cylinder valve.
Place cylinder valve plug or cap snugly in main cylinder valve outlet.
Always store propane cylinders in a secure, cool/dry place in the upright position.
Never store propane cylinders in a vehicle of any kind and or anywhere the temperatures can reach
125° F.
4
Page 5
PROPANE SAFETY - CYLINDER
CONNECTING A FILLED 30 LB. CYLINDER
Remove the main cylinder plug.
Make sure that all gas valves on the grill are in the “OFF” position.
Thread the QCC Connector or POL Connection snugly into main cylinder.
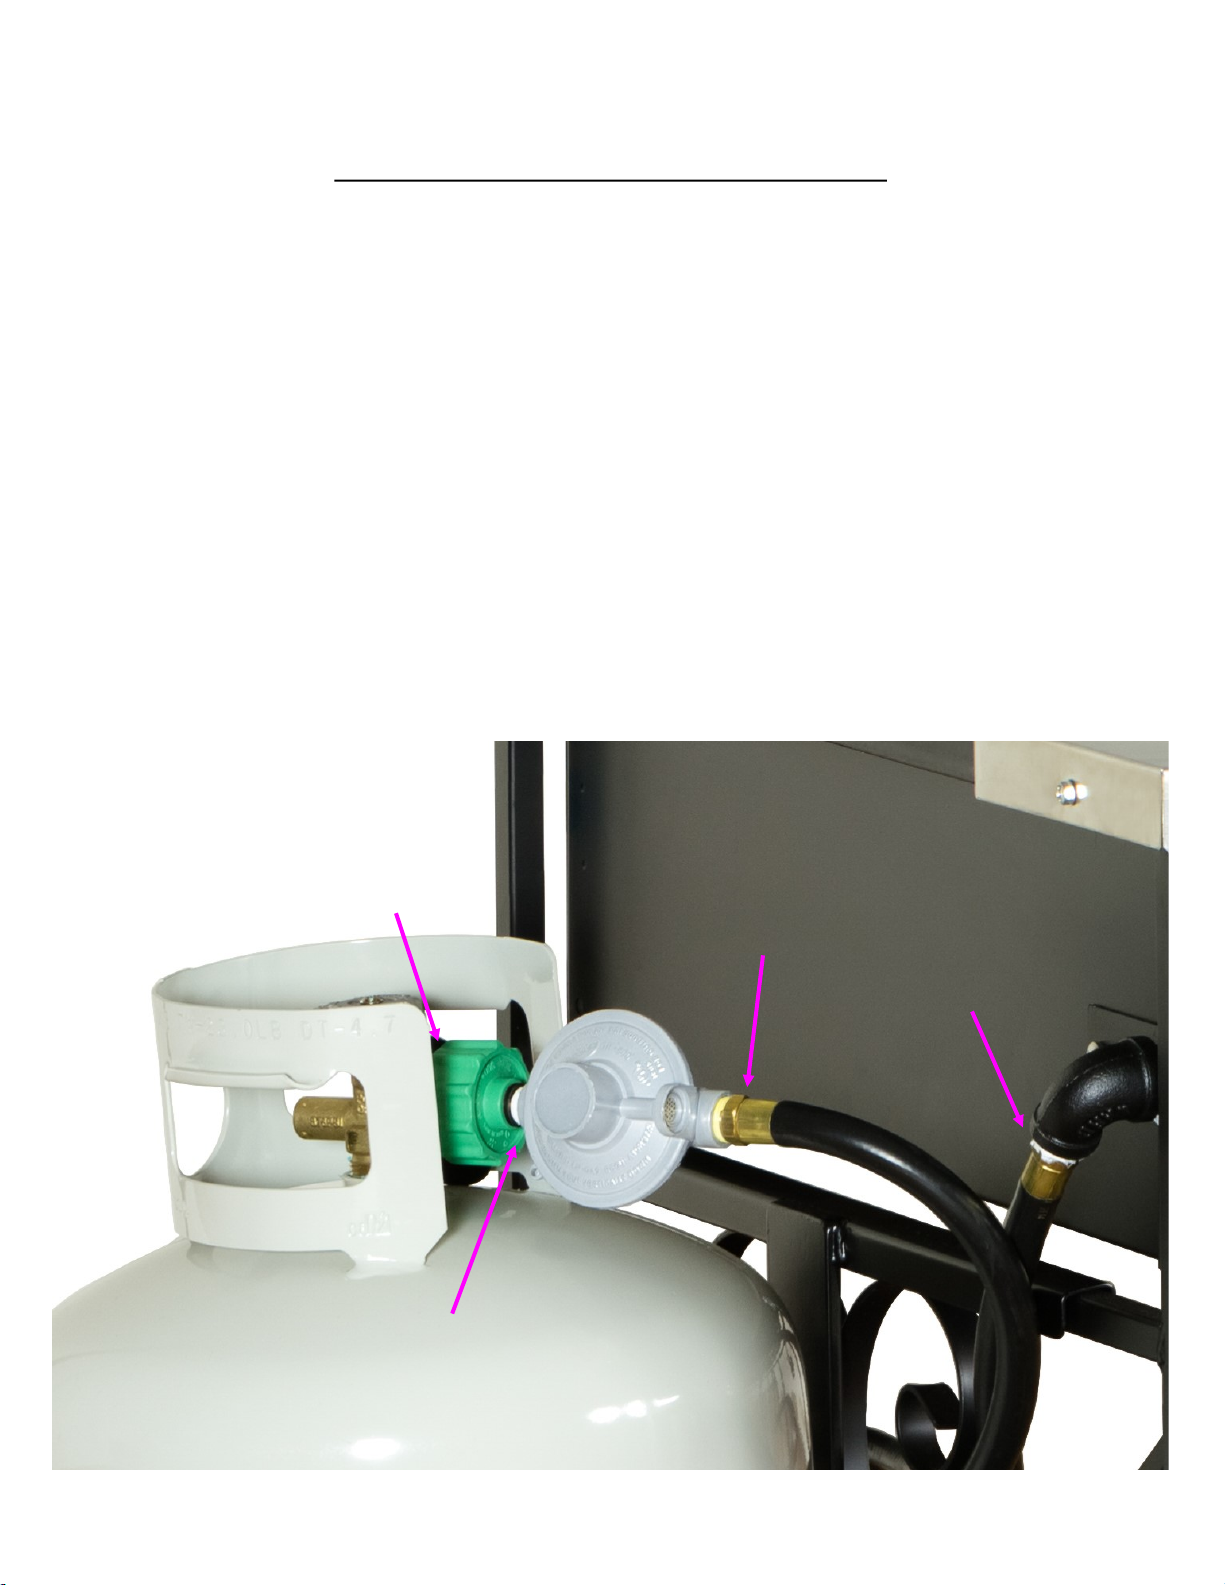
ALWAYS check for leaks. Apply soapy water with a brush or spray bottle to areas where the QCC
(or POL) screw into tank, where the QCC (or POL) attach to regulator, where the hose screws into
the regulator, and where the hose screws into the appliance.
Open the cylinder valve and watch for bubbles.
If bubbles appear, tighten the connections further. If this does not remedy the problem, call your
propane dealer.
If the system is free of leaks, light the burners and proceed to cook.
In the event of a QCC failure, your grill will not light or stay lit, see page 14 for troubleshooting.
If you suspect any problems, have your grill and tank serviced by a qualified professional.
Spray Soapy Water on All Propane
Connections between Cylinder Valve
and Unit to Test for Leaks
Cylinder Valve to
QCC Connection
Hose to Regulator
Connection
Hose to Unit
Connection
Lime Green QCC
to Regulator
Connection
5
Page 6

PROPANE SAFETY - QCC
HOW A QCC VALVE WORKS
There is a safety check valve inside our bright green QCC-1 fitting. Once the regulator is connected to the
propane tank and the main cylinder is “OPEN”, a minimal amount of gas is allowed to flow through the
check valve. If there are no downstream leaks, the pressure on both sides of the check valve will equalize
and the spring loaded stopper will open allowing maximum gas to flow. This only takes a few seconds to
complete and then you can start the lighting procedure.
IF THE QCC INDICATES FAILURE
If there is a downstream leak, or if you have started with a control valve “OPEN”, the pressure will not
equalize on both sides of the QCC check valve and it will fail. The only gas flow you will have is a small
amount that is designed to flow around the check-valve, the equivalent of 5,000 BTU’s. This may allow
you to light part of a burner, but not much more. When you open a control valve to light another burner,
you will not get any additional flame and may experience a blow out where none of the burners will light.
In case of a QCC failure, follow procedure below:
TO TROUBLESHOOT THE PROBLEM
CHECK: 1. Check that all of the control valves are in the “CLOSED” position.
2. Check that you are using at least a 30# propane tank
3. Check that you have lava rock in the grill
4. Check that the QCC is lime green - black or dark green will cause lighting problems.
If everything is correct, reset the system.
SOLUTION: To reset: Close all of the control val ves on the grill & close propane tank valve.
Then start the lighting procedure from the beginning. If the problem persists, Check for
If you experience a QCC Failure, first check your system for leaks:
Leaks:
1. Turn off all control valves and turn off propane tank
2. Extinguish any remaining open flames
3. Let gas dissipate until odor is no longer detected
4. Make sure all control valves are closed and gas tank valve is off
5. In a spray bottle, mix together dish soap and water
6. Spray the following with soapy water mixture
a. Tank Valve to QCC (part that screws into tank from regulator)
b. QCC to Regulator
c. Regulator to Hose
d. Entire hose
e. Hose to Grill
f. Each Control Valve where it Connects to Manifold
g. Manifold end cap (opposite side from hose connection)
7. Turn on propane tank
8. Inspect each connection and length of hose for any bubbles being produced
9. If bubbles are detected (bubbles indicate gas is escaping), turn off propane tank
and call Big John Grills to order replacement parts. Do not go to your local hardware store.
10. If no bubbles are detected, check to see if propane tank is empty.
11. If tank is not empty, please call Big John Grills for further assistance
If you need assistance at any time please call
Big John’s Customer Service at 1-800-326-9575 or 814-359-2755
6
Page 7

GENERAL INFORMATION
Thank you for purchasing a Big John Gas Griddle! We take pride in producing and selling equipment
made right here in America and are pleased that you recognized the quality and durability of our products. Your new Big John griddle is a commercial grade, outdoor piece of cooking equipment. With this
griddle, you will be able to cook a variety of foods quickly and easily. This griddle is portable meaning
you can take it and use it anywhere. Big John griddles are used at offsite catering events & festivals,
restaurants, hotels & resorts, golf courses, personal homes and many more. Please read the information provided below before using your griddle for the first time.
Big John products are designed for OUTDOOR USE ONLY! Only operate this equipment in a well-
ventilated area. Do not use in garage, building, or other enclosed area. Operation of this equipment
indoors or in a poorly ventilated area may cause an explosion, fire, personal injury, or death.
ONLY use the hose and regulator supplied with this griddle from the manufacturer. Any attempt to
use parts found in a hardware store may result in the grill not functioning properly which could lead
to an explosion, fire, personal injury, or death.
Do not retrofit any equipment or accessories to the unit that are not part of the original equipment
provided by Big John Grills & Rotisseries. Replacement parts must be obtained from the manufacturer. Any attempt to change or modify this unit could result in an explosion, fire, personal injury to
yourself or someone else, or death and will void your warranty.
Do not touch or allow any contact with the sides, back, or top of griddle after lighting. The unit is
EXTREMELY HOT! Allow the griddle to cool completely before touching any metal surface.
DO not operate griddle within 12” of a combustible or non-combustible surface. Provide adequate
clearance and ventilation at all times.
WARNING! Use of this griddle in high wind conditions may result in poor burner operation (low
flame, blowing out, flaring up, etc.). Avoid these conditions if possible by repositioning griddle. If repositioning does not improve operation, discontinue use and turn off grill until conditions improve.
DO NOT perform any maintenance until griddle is completely cooled down.
7
Page 8
ASSEMBLY INSTRUCTIONS
This unit ships 90% assembled and we make sure the instructions for the rest are easy to follow and
perform. Please follow the instructions below to ensure your griddle is properly assembled for safe operation. Please remember this is a commercial piece of equipment and therefore the materials used to
build it are of the best quality. Because of this, the grill weight is considerable and will require 2 people
to un-package, assemble, and set-up the unit.
1. Your Gas Griddle is shipped upside down for protection.
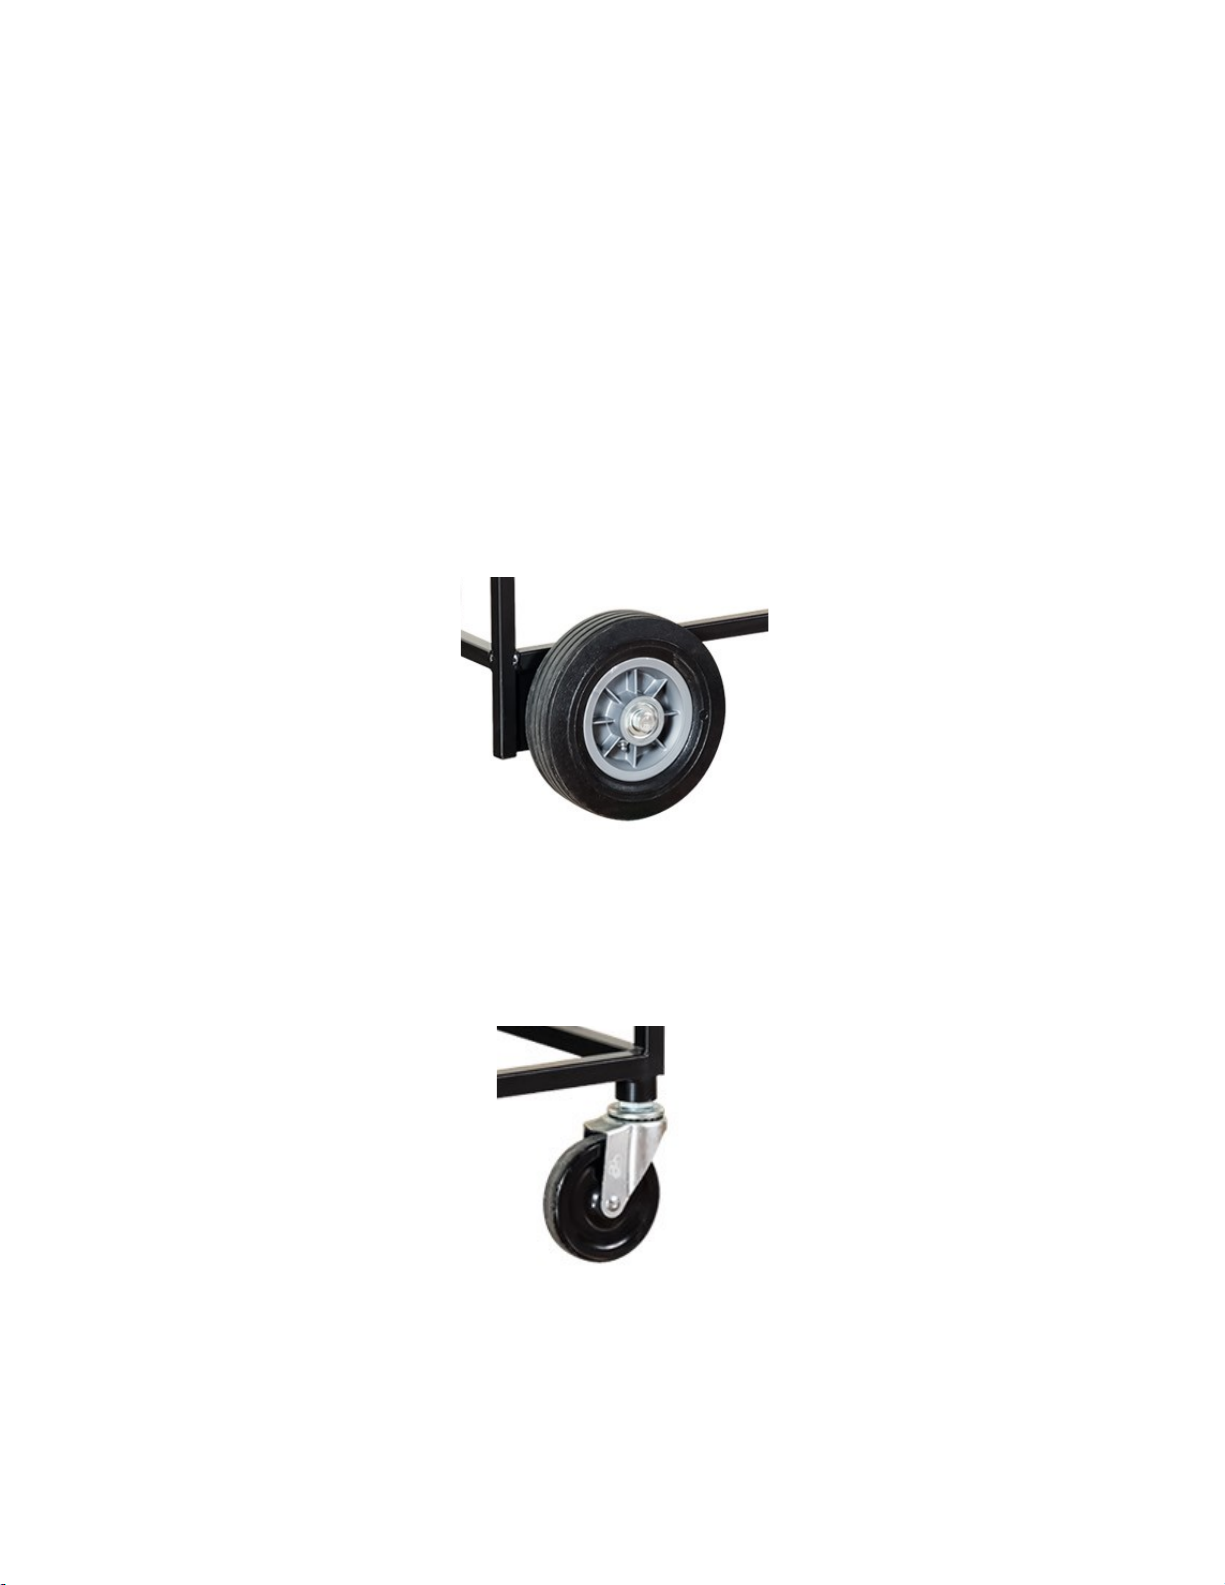
2. Unbox the unit and, while upside down, attach the wheels.
A. Attaching the 8” Wheels:
i. Adjust nut to have a 1/4” clearance between the wheel bearing and the nut
ii. Thread wheel assembly into lower threaded hole and lock nut against frame
B. Attaching the 4” Caster Wheels
i. Locate coupler on opposite side of cart.
ii. Screw threaded stem of caster into coupler
iii. Tighten using thin wrench of caster wrench purchased from Big John Grills
3. Remove all packing materials, tape, protective laser paper (can be white, gray, or clear in color) from
stainless, and plastic coverings.
4. Bolt drip pan holders to each side of the frame.
5. Place 1/6 size stainless steel drip trays into holders and check that they are level.
8
Page 9
SET-UP INSTRUCTIONS
1. Place griddle on a level area clear of any combustible materials. THIS UNIT IS BUILT FOR OUT-
DOOR USE ONLY and should be operated in a well ventilated area.
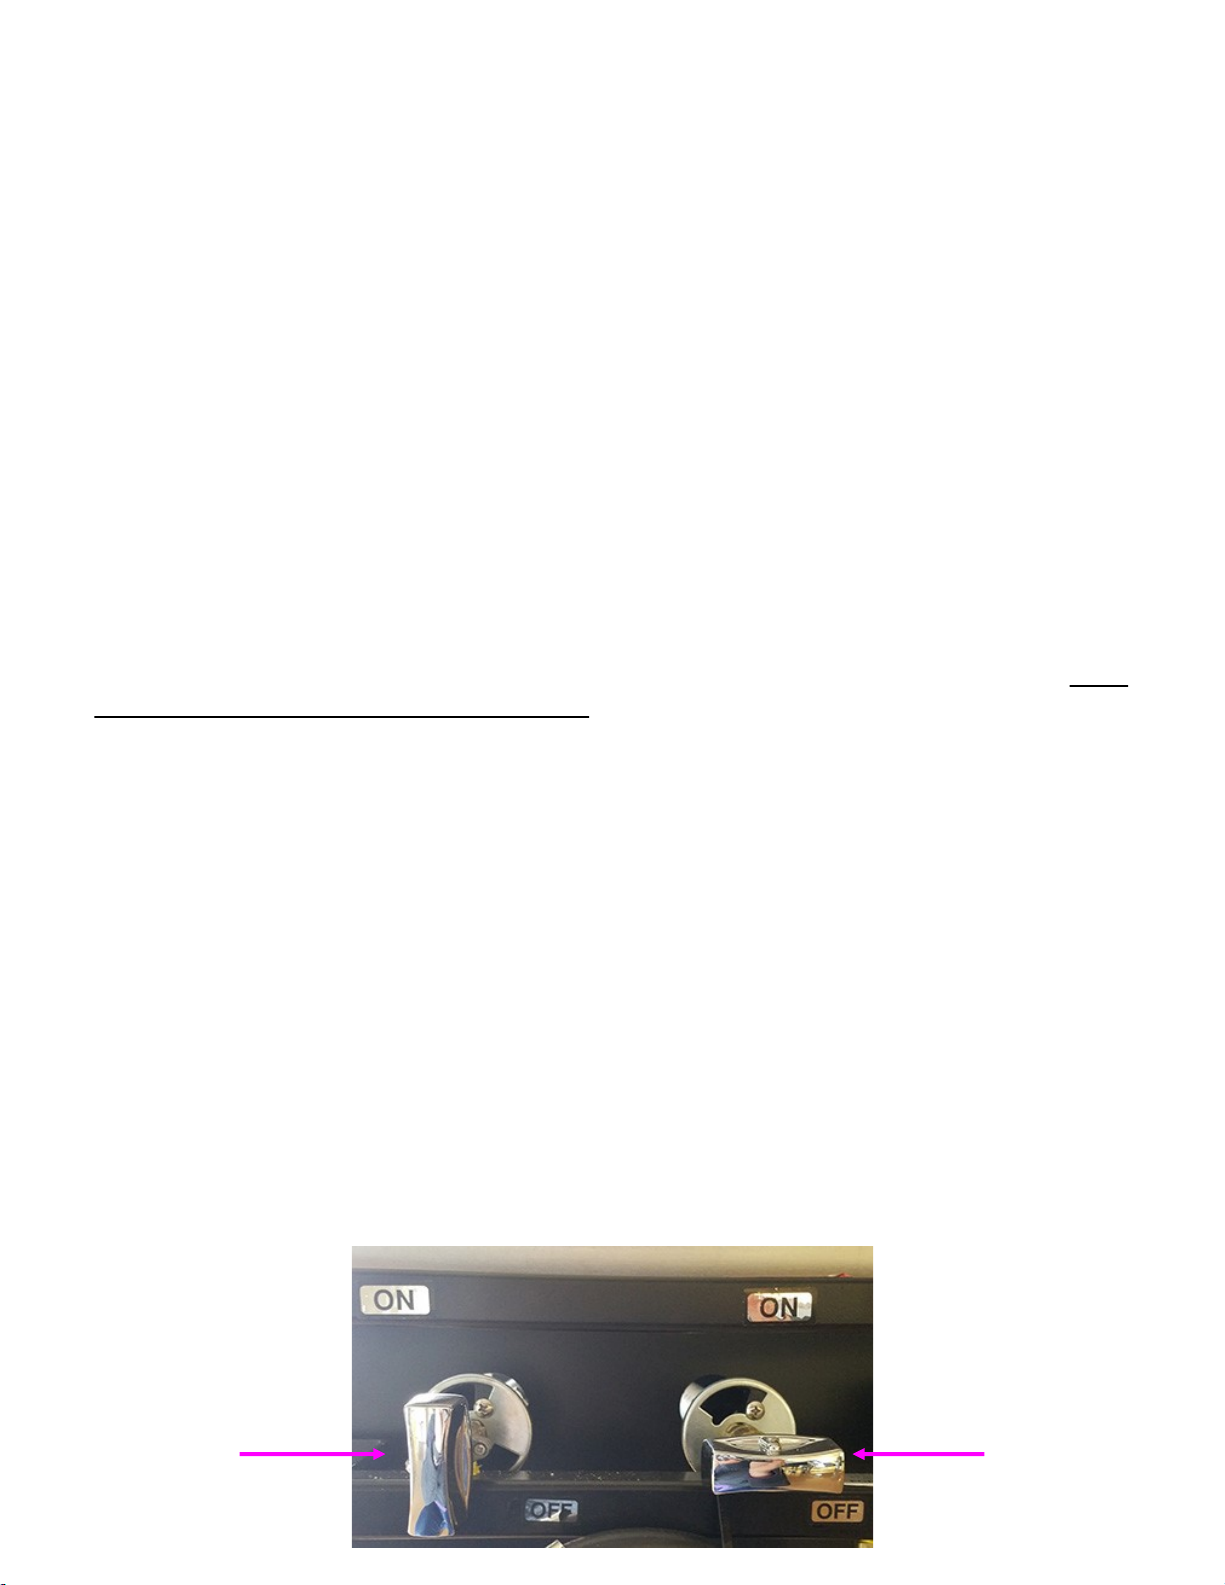
2. Ensure all control valves are in the CLOSED position (parallel to the manifold).
3. Securely connect the regulator to the propane cylinder and test for leaks according to the instruc-
tions found on PAGE 6 of this manual.
A. QCC Connection: The bright green QCC connector on a regulator threads snuggly and easily
onto the external threads of the propane cylinder valve by turning the QCC clockwise (to the
right) only.
B. POL Connection: The POL connector on a regulator is inserted into the propane cylinder
valve and screws in by turning counter clockwise (to the left) only using the black plastic hand
wheel or wrench.
4. Your griddle comes cured with a layer of vegetable oil. We recommend burning the griddle for approximately 20 minutes prior to using them for the 1st time. This will burn off any dust that accumulated during transportation. Simply wipe griddle plate down with a damp cloth and then follow lighting
instructions below. Bacon is a great first meal to break in your griddle. You will build up a black carbon seasoning which provides a non-stick cooking surface that should not be scrubbed off. CAUTION: GRIDDLE WILL BE EXTREMELY HOT.
6. Open cylinder valve completely and allow system to pressurize - takes about 1 minute.
7. TO LIGHT THE GRIDDLE: Make sure all control knobs are CLOSED - knobs are parallel to manifold. Open propane cylinder control valve and let system pressurize for 1 minute. Hold a lit long
handled butane lighter gun next to the front burner and open the control valve (push in turn the knob
to OPEN - so it is straight up and down - perpendicular to the manifold). The front burner will ignite
instantly with a *POOF* sound. Remove lighter and open 2nd control valve - it will light instantly
from the 1st. Repeat for back burner until all are lit. If for some reason the first burner does not light,
turn off gas source, wait 5 minutes for gas to dissipate, and restart lighting instructions. CAUTION:
GRIDDLE WILL BE EXTREMELY HOT.
8. Your griddle is designed to provide a large warming area under the burners. Standard food pans
(not included) can be placed in this warming area. Cover the food pans with aluminum foil to prevent
drying out/changing texture or presentation.
9. TO TURN OFF GRIDDLE: Simpl y turn all of the control knobs to the CLOSED position
(parallel to the manifold), close main cylinder valve, and disconnect the propane cylinder. CAUTION:
GRIDDLE WILL BE EXTREMELY HOT! LET COOL COMPLETELY BEFORE STORING OR
TRANSPORTING.
OFF ON
9
Page 10

OPERATING INSTRUCTIONS
1. Place griddle on a level area clear of any combustible materials. THIS UNIT IS BUILT FOR OUT-
DOOR USE ONLY and should be operated in a well ventilated area.
2. Ensure all control valves are in the CLOSED position (parallel to the manifold).
3. Securely connect the regulator to the propane cylinder and test for leaks according to the instruc-
tions found on PAGE 6 of this manual.
4. Generously coat grates with vegetable oil or oil-based cooking spray.
5. Open cylinder valve completely and allow system to pressurize - takes about 1 minute.
6. TO LIGHT THE GRIDDLE: Hold a lit long handled butane lighter gun or fireplace match next
to the front burner and open the control valve (push in turn the knob to OPEN - so it is straight up
and down - perpendicular to the manifold). The front burner will ignite instantly with a *POOF* sound.
7. Remove lighter or match and open 2nd control valve - it will light instantly from the 1st.
8. If for some reason the first burner does not light, turn off gas source, wait 5 minutes for gas to dissi-
pate, and restart lighting instructions.
9. Once burners are lit, adjust the control knobs to set desired temperature.
10. Your griddle is designed to provide a large warming area under the burners. Standard food pans
(not included) can be placed in this warming area. Cover the food pans with aluminum foil to prevent
drying out/changing texture or presentation.
11. TO TURN OFF GRIDDLE: Simply turn all of the control knobs to the CLOSED position
(parallel to the manifold), close main cylinder valve, and disconnect the propane cylinder. CAUTION:
GRIDDLE WILL BE EXTREMELY HOT! LET COOL COMPLETELY BEFORE STORING OR
TRANSPORTING.
12. Wait approximately 10 minutes before attempting to clean or coat the griddle plate with vegetable oil.
10
Page 11

CLEANING & CARE
Remember, open flame cooking can cause significant splatter that can bake onto surfaces . Unlike ov-
en or top burner cooking, the meat is not in a pot or pan and grease laden smoke will reach all surfaces.
TO CLEAN GRIDDLE PLATE
1. Turn off the griddle and wait approximately 10-15 minutes before attempting to clean. Griddle sur-
face will still be warm to touch so wear protective gloves if necessary.
2. Using a good griddle scraper, remove any food material left behind.
3. Wipe griddle plate down with a paper towel and vegetable oil to prevent rusting. Since the griddle
surface is steel, it will not rust if properly protected from moisture.
4. DO NOT HEAT THE GRILL TO EXTREME TEMPERATURES IN AN ATTEMPT TO CLEAN. YOU
WILL SCORTCH YOUR COOKING SURFACE AND POSSIBLY RUIN YOUR GRIDDLE.
5. Periodically, clean your unit with a griddle brick or by scrubbing with a paper towel and 1/4 cup of table salt. Do not scrub off the black carbon build-up - this is your non-stick surface.
6. Store griddle outside or inside. We recommend you invest in one of our high-quality vinyl covers.
SPIDER & INSECT ALERT
All outdoor appliances should be inspected thoroughly for spiders and insects if unit is sitting for a period
of time between uses. Propane and natural gas contain an odorant that insects and spiders are attracted to. This leads them to build webs and nests in burner tubes and around control valves. Nests can
form very quickly and are prevalent in areas with wet and humid conditions. We recommend the regular
cleaning and inspection of the burners and control valves as a form of normal maintenance.
1. Warning Signs of a nest or web:
a. The smell of gas
b. Burners are hard to light or will not light at all
2. How to clean the burner tubes:
a. Turn off gas and completely disconnect grill from gas source. (let cool completely if previously
lit)
b. Carefully unbolt and remove manifold with control valves from griddle.
c. Unbolt and remove each air mixer from burner assembly.
d. Unbolt burner tube assembly from griddle and remove.
e. Visually inspect inside tubes looking for a cotton-like substance that could be a web or nest.
f. If a mud-like substance is found, this is a sign of wasps and should be cleaned immediately
g. Use a pipe cleaner to remove any signs of web, nest, or other debris
h. Wipe off outside and each hole along burner to ensure nothing is clogging holes
i. Rinse with water if necessary
j. Dry burner thoroughly before replacing into griddle.
k. Then re-attach air mixers and manifold with control valves.
11
Page 12

PARTS LIST
Item # Description
302110B Low Pressure Regulator with Brass POL (for use with 100 lb. propane tanks)
302110LL Low Pressure Regulator with 200K Lime Green QCC-1 (propane tanks less than 100 lbs.)
302107 Brass POL with Black Hand Wheel Connector Only
302102LL 200K Lime Green QCC-1 Connector Only
302120A 6’ Low Pressure Hose
302123A 10’ Low Pressure Hose
302124A 12’ Low Pressure Hose
302127A 15’ Low Pressure Hose
302767 120-CB Adapter for Hose
302763 Cast Iron Air Mixer (Threaded Style - Pre 2013)
302763A Cast Iron Air Mixer (Press-On Style - 2013 to Present)
302761 Control Valve with Orifice
302762 Chrome Control Knob
307552 52” Triple Burner Assembly - Stainless Steel, Press-On Style
302764 1/6 Stainless Steel Drip Tray (7” x 6.25” x 2.5”)
302758L Bolt on Drip Tray Holder - Left Side
302758R Bolt on Drip Tray Holder - Right Side
302754 PG-36 & PG-52 Manifold
102334 4” Swivel Caster
102344 Caster Wrench
302267 8” Wheel 1/2”, No Bolt Included
800172 Bolt for 8” Wheel
800173 Nut for 8” Wheel
12
Page 13
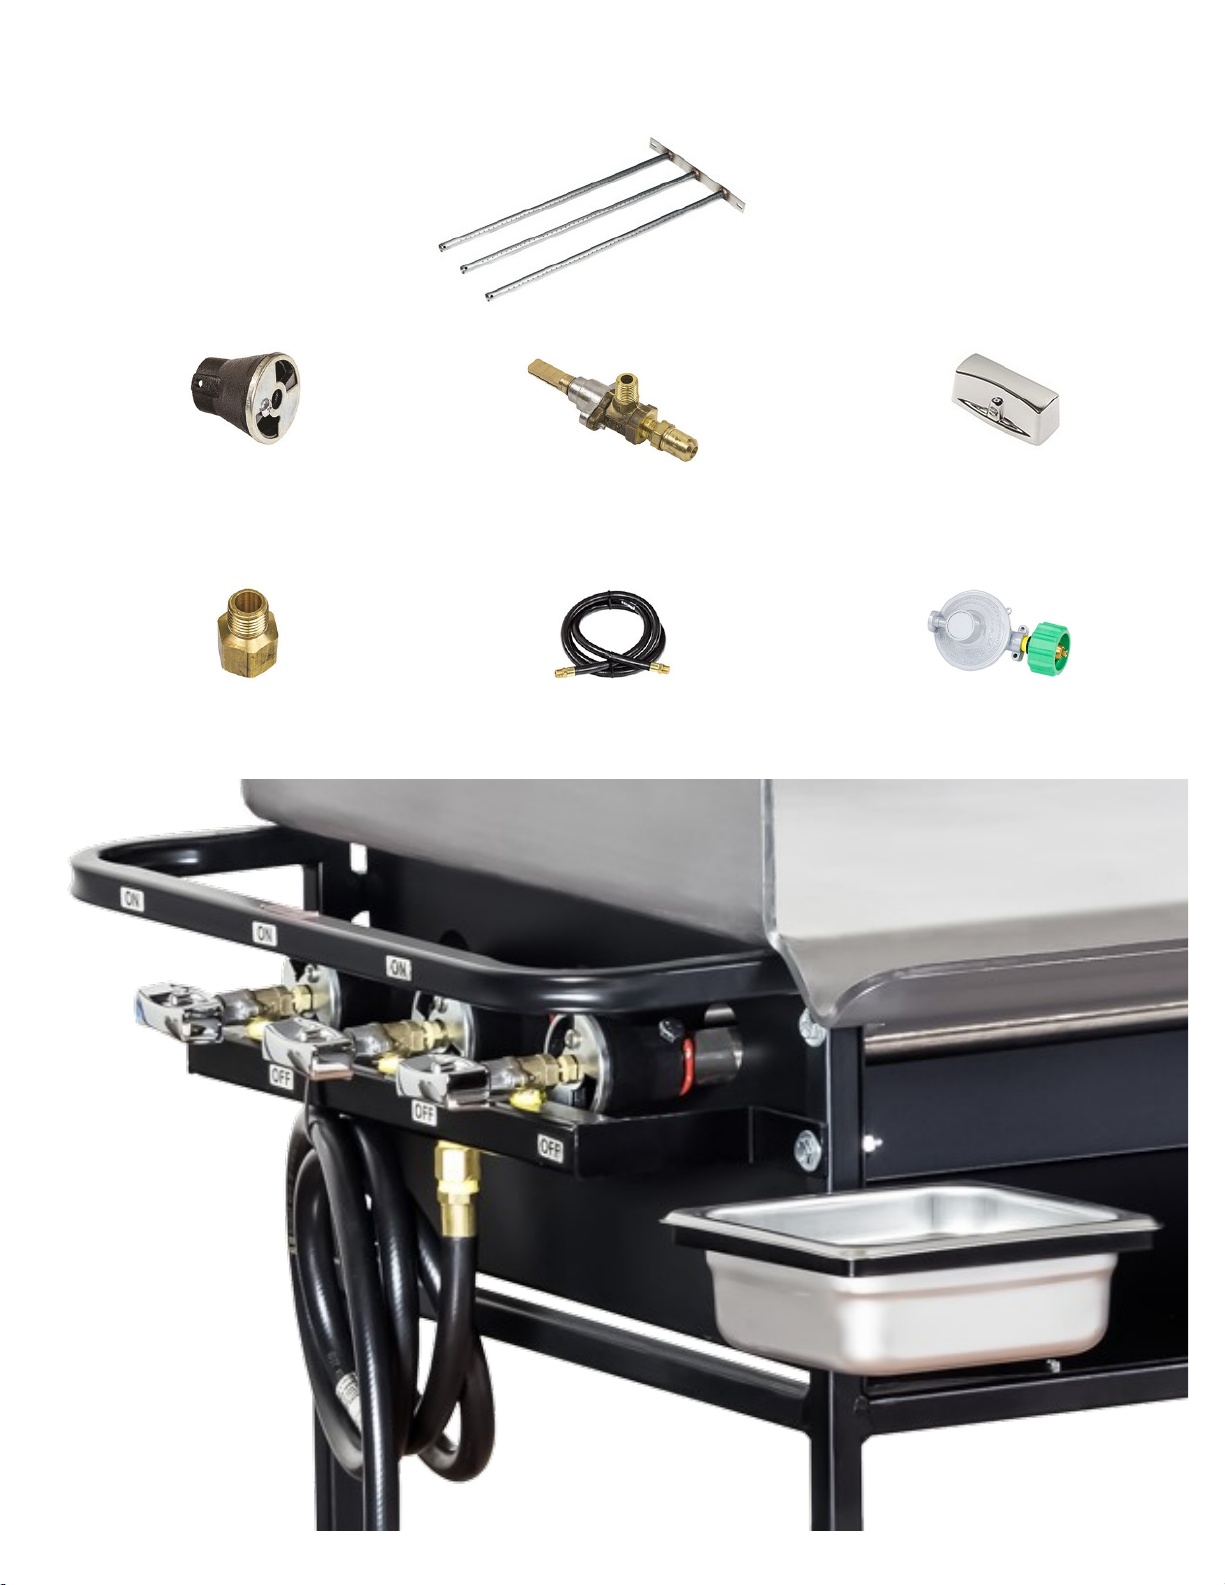
PARTS DIAGRAM
Burner Tube Assembly
Press-On Air Mixer Control Valve with Orice Control Knob
120-CB Hose Adapter Low Pressure Hose Regulator with QCC
13
Page 14

ACCESSORIES
Item # Description
301016 30# Propane Cylinder
301017 40# Propane Cylinder
301169 VC-62; 62” Green Vinyl Cover for PG-52S
14
Page 15
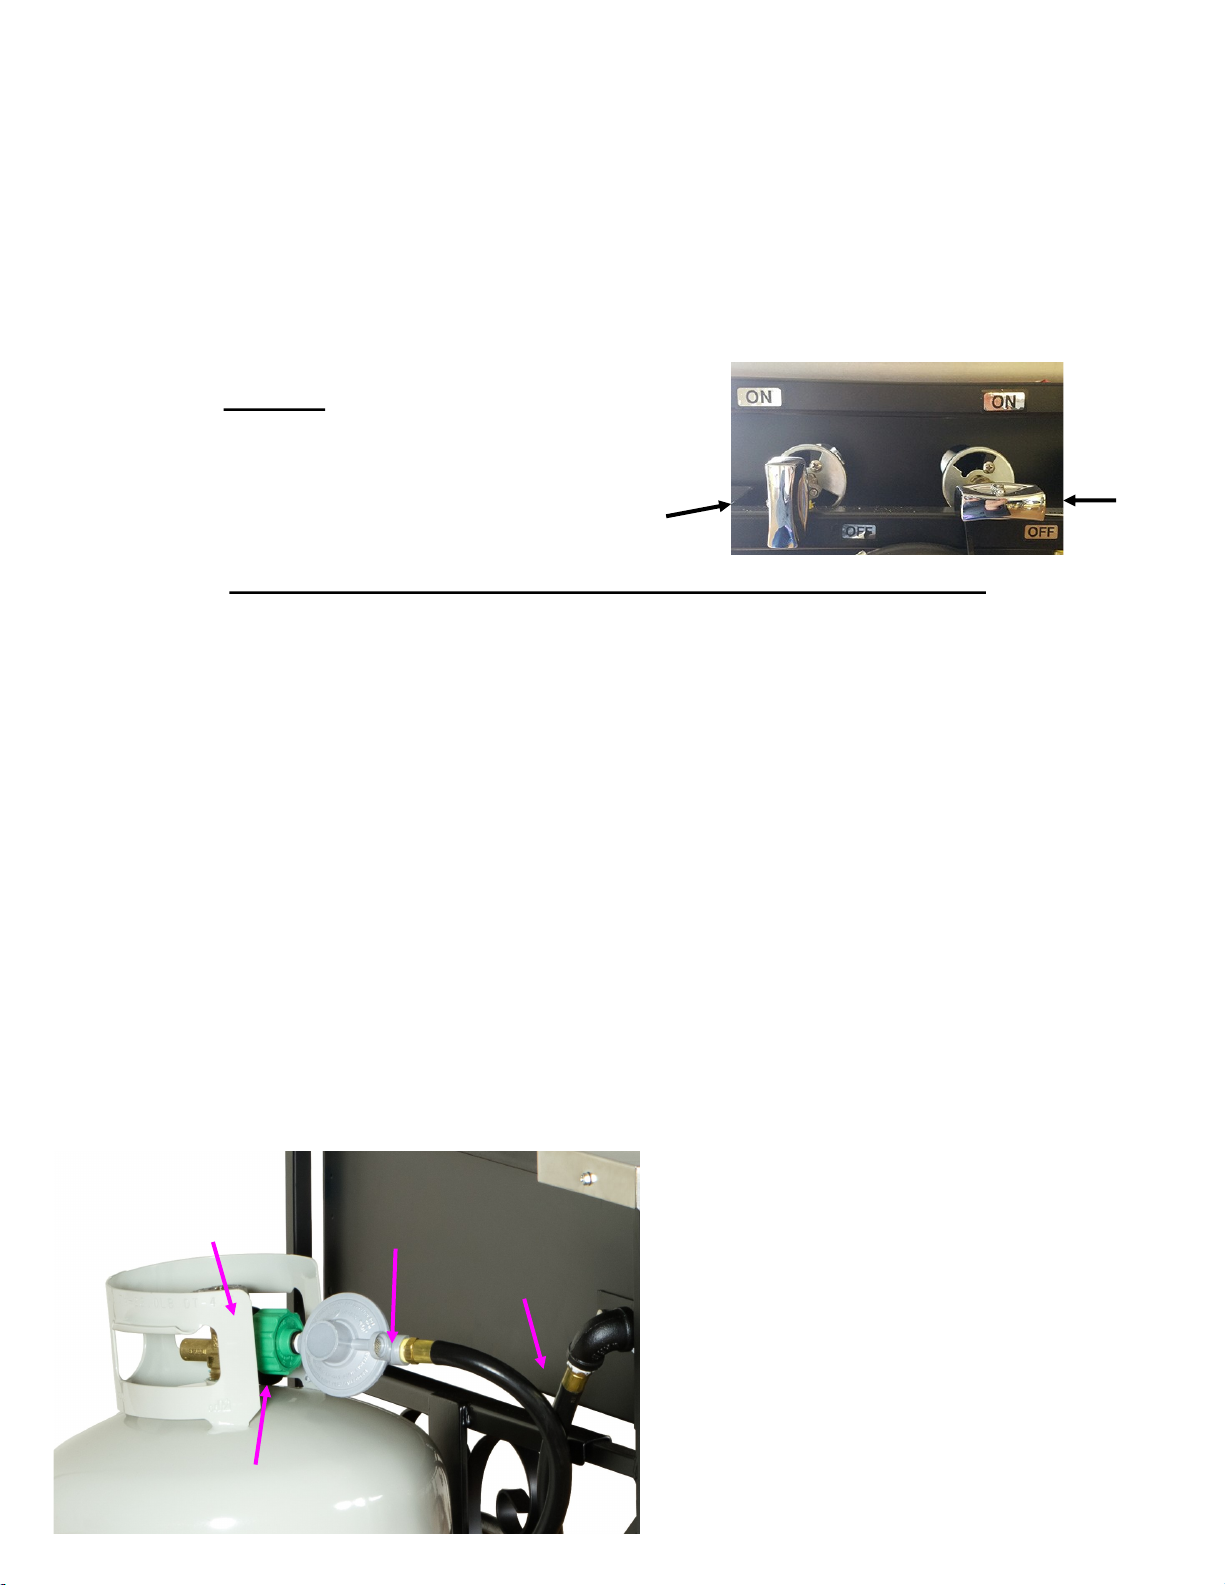
TROUBLESHOOTING GUIDE
PROBLEM(s): - Griddle will not light completely - only 1-2 burners will light before the whole griddle
turns off.
- Griddle will light, but then turn off shortly after.
- Griddle will not light
CHECK: 1. Check that all of the control valves are in the “CLOSED” position.
2. Check that you are using at least a 30# propane tank
3. Check that the QCC is lime green - black or dark green will cause lighting problems.
If everything is correct, reset the system.
SOLUTION: To reset: Close all of the control val ves on
the griddle & close propane tank valve.
Then start the lighting procedure from the
beginning. If the problem persists,
Check for Leaks:
ON
If you experience a QCC Failure, first check your system for leaks:
1. Turn off all control valves and turn off propane tank
2. Extinguish any remaining open flames
3. Let gas dissipate until odor is no longer detected
4. Make sure all control valves are closed and gas tank valve is off
5. In a spray bottle, mix together dish soap and water
6. Spray the following with soapy water mixture
a. Tank Valve to QCC (part that screws into tank from regulator)
b. QCC to Regulator
c. Regulator to Hose
d. Entire hose
e. Hose to Griddle connection
f. Each Control Valve where it Connects to Manifold
g. Manifold end cap (opposite side from hose connection)
7. Turn on propane tank
8. Inspect each connection and length of hose for any bubbles being produced
9. If bubbles are detected (bubbles indicate gas is escaping), turn off propane tank
and call Big John Grills to order replacement parts. Do not go to your local hardware store.
10. If no bubbles are detected, check to see if propane tank is empty.
11. If tank is not empty, please call Big John Grills for further assistance
OFF
Cylinder Valve to
QCC Connection
Lime Green QCC to
Regulator Connection
Hose to Regulator
Connection
Hose to Unit
Connection
Spray Soapy Water on All Propane
Connections between Cylinder Valve
and Unit to Test for Leaks
15
Page 16

TROUBLESHOOTING GUIDE
PROBLEM: Frozen Regulator
CAUSE: Water in fuel or use of under-sized propane cylinder
SOLUTION: Make sure your propane tank is standing up vertically. Horizontal tanks cannot be used
on Big John appliances. The two models of gas regulators that Big John has used over
the years are the Marshall Brass model 230 and now the Gas-Flo model GR-800. Anything other than these two models of regulator is “after-market” and is not approved by
If you are using one of the two regulators listed above, please see below for possible so-
1. Check that you are using at least a 30 lb. propane tank as most Big John equipment
Big John Corporation.
lutions. If you are not, please call Big John Grills to purchase a replacement regulator.
requires a minimum of a 30# propane tank due to the BTU draw. Use of 20 lb. cylinders
is only acceptable for an appliance with a BTU draw of 60,000 BTU’s or less. The more
volume of LP fuel you are drawing from, the less likely you are to experience a freeze-up.
Once a freeze-up occurs you can ether switch tanks or pour warm water over the tank
valve and QCC connector. Make sure the vent hole in the regulator is pointed downward
so no water gets in the regulator. Freeze-ups are most likely to occur in high humidity or
extremely cold situations.
2. If you continue to have freeze-up issues, there is a possibility that condensation in the
fuel is the cause of the problem. Condensation can accumulate in the propane tank if it
was not purged correctly when it was put into service. Take the tank to your professional
filling station and ask them to purge the tank before re-filling.
16
Page 17

WARRANTY INFORMATION
Big John Corporation provides a warranty, to the original purchaser, for all Big John finished units for a
period of 1 year from the date of sale. Any unit, or part thereof returned, freight prepaid, to our Sales &
Logistics facility, will be repaired or replaced to our commercial standard, free of charge, and returned to
the purchaser. Labor and transportation costs are NOT covered by this warranty. Misuse, neglect, or
alteration of the product is not covered by this warranty. This warranty is established automatically upon
receipt of the goods. No warranty card or registration procedures are required.
Outgoing warranty shipments must be F.O.B. factory (Bellefonte, PA). All items requested for return
must be received within 30 days of the return authorization being granted to the customer or no warranty credit will be considered.
17
Page 18

WARNINGS
FAILURE TO FOLLOW THE DANGERS, WARNINGS, CAUTIONS, AND INSTRUCTIONS OUTLINED IN THIS
MANUAL MAY RESULT IN SERIOUS BODILY INJURY OR DEATH, OR CAUSE DAMAGE TO PROPERTY BY
FIRE OR EXPLOSION.
Do not use this griddle unless all parts are in place. This unit
must be assembled properly according to the assembly &
set-up instructions listed in this manual. Failure to do so is
dangerous.
Always check your griddle for gas leaks and burner obstruc-
tions before use. See instructions in this manual for correct
procedures.
Do not store or use gasoline or other flammable liquids or
vapors in the vicinity of this product.
Do not store a liquid propane cylinder not connected for use
within the vicinity of this product.
Always position the propane cylinder so that the connection
between the valve and the regulator will not cause any sharp
bends in the hose.
Do not operate any equipment, including this griddle, if there
is a gas leak present.
Do not use a flame to check for gas leaks.
Combustible materials should never be within 12 inches of
this griddle in any direction.
Do not put anything flammable in the area under the griddle.
No Big John Grills & Rotisseries equipment should used by
children.
Accessible parts of the griddle may be very hot. Keep chil-
dren away when in use.
Big John equipment should never be left unattended or
moved while in operation.
You should exercise reasonable care when operating your
griddle and remember it will be hot during cooking and cleaning.
Should the burners go out while in operation, turn off all gas
valves and turn off gas source. Let stand for 5-10 minutes
before attempting to relight using the lighting instructions
found in this manual.
Never lean over an open griddle or place hands or fingers on
or under griddle - surfaces and burners are very hot.
Should a grease fire occur, turn off all burners and propane
tank and wait until fire is out.
Clean your Big John griddle thoroughly on a regular basis.
Keep any electrical cords or fuel supply hose away from
heated surfaces at all times, especially when in use.
Use heat-resistant barbecue gloves or mitts when operating
griddle.
Do not enlarge burner holes when cleaning.
Do not attempt to disconnect any gas fittings while your grid-
dle is in operation.
DO NOT store or lean items against griddle surface or fuel
cylinders while operating.
Liquid propane is NOT natural gas. The attempted use of
natural gas in a liquid propane unit or liquid propane gas in
a natural gas unit is dangerous and will voice your warranty.
If you wish to change your unit from LP to NG or vice versa,
please call a Big John Customer Service Agent to obtain
instructions.
Only use the supplied hose and regulator for this griddle.
Do not use one purchased from a gas company or hardware
store.
Do not attempt to disconnect the gas regulator or hose
assembly while unit is in operation.
Make sure the POL or QCC Connector is free from
scratches or nicks which can cause gas leaks.
Do not paint propane tanks any color other than white. Any
alteration to tank color may result in an explosion, fire, personal injury, or death.
NEVER store or use propane cylinders indoors.
Always keep a propane cylinder in a secure, upright position
while transporting or storing. Do not lay tanks on their side.
Never keep propane cylinders (full or empty) in a hot
vehicle. Heat could cause the relief valve to purge propane
creating a very dangerous situation.
Always keep the cylinder valve closed when not in use.
Do not store a liquid propane cylinder in/on any part of the
appliance not intended for such use. Improper storage of a
cylinder could lead an explosion, fire, personal injury, or
death.
Propane gas is more dense than air and will collect in low
areas. These areas are easily ignited and highly flammable.
Use caution when dealing with any such fuels.
Do not use a dented or rusted liquid propane cylinder as it
may be hazardous and should be checked by your propane
dealer.
Do not use a propane cylinder with a damaged valve.
Although your propane cylinder may appear empty, there
may still be gas present. The cylinder should be stored and
transported accordingly.
If you see, smell, or hear the hiss of gas escaping from the
liquid propane cylinder:
1. Move away from the cylinder
2. Do not attempt to correct the problem yourself.
3. Call your fire department.
18
 Loading...