


INSTALLATION INSTRUCTIONS AND USER GUIDE
Select 90ec
ISSUE C

2
Important:
This appliance is designed and manufactured solely for the cooking of domestic
(household) food and is not suitable for any non domestic application and therefore
should not be used in a commercial environment.
The appliance guarantee will be void if the appliance is used within a non domestic
environment i.e. a semi commercial, commercial or communal environment.
Dear Customer,
Thank you for having purchased and given your preference to our product.
The safety precautions and recommendations reported below are for your own safety
and that of others. They will also provide a means by which to make full use of the
features offered by your appliance.
Please preserve this booklet carefully. It may be useful in future, either to yourself or
to others in the event that doubts should arise relating to its operation.
This appliance must be used only for the task it has explicitly been designed for,
that is for cooking foodstuffs. Any other form of usage is to be considered as
inappropriate and therefore dangerous.
The manufacturer declines all responsibility in the event of damage caused by
improper, incorrect or illogical use of the appliance.
Introduction
3
IMPORTANT INFORMATION FOR CORRECT DISPOSAL OF THE PRODUCT IN
ACCORDANCE WITH EC DIRECTIVE 2002/96/EC.
At the end of its working life, the product must not be disposed of as
urban waste. It must be taken to a special local authority differentiated
waste collection centre or to a dealer providing this service.
Disposing of a household appliance separately avoids possible negative consequences for the environment and health deriving from inappropriate disposal and enables the constituent materials to be recovered to obtain significant savings in energy and resources. As a
reminder of the need to dispose of household appliances separately,
the product is marked with a crossed-out wheeled dustbin.
IMPORTANT INSTRUCTIONS AND ADVICE FOR THE USE OF ELECTRICAL
APPLIANCES
The use of any electrical appliance requires the compliance with some basic rules,
namely:
– do not touch the appliance with wet or damp hands (or feet)
– do not use the appliance whilst in bare feet
– do not allow the appliance to be operated by children or unqualified persons without
supervision.
The manufacturer cannot be deemed responsible for damages caused by wrong or
incorrect use.
DECLARATION OF CE CONFORMITY
•
This cooker has been designed, constructed and marketed in compliance with:
- Safety requirements of EU Directive "Low Voltage" 2006/95/EC;
- Protection requirements of EU Directive "EMC" 2004/108/EC;
- Requirements of EU Directive 93/68/EEC.

4
IMPORTANT SAFEGUARDS AND RECOMMENDATIONS
After having unpacked the appliance, check to ensure that it is not damaged.
In case of doubt, do not use it and consult your supplier or a professionally qualified
technician.
Packing elements (i.e. plastic bags, polystyrene foam, nails, packing straps, etc.) should
not be left around within easy reach of children, as these may cause serious injuries.
• ATTENTION: please peel plastic cover off both sides and front of the cooker before
use.
• Do not attempt to modify the technical characteristics of the appliance as this may
cause danger to users.
• Do not carry out any cleaning or maintenance operations on the appliance without first
disconnecting it from the electric power supply.
• If you should decide not to use this appliance any longer (or decide to substitute an
older model), before disposing of it, it is recommended that it is made inoperative in an
appropriate manner in accordance to health and environmental protection regulations,
ensuring in particular that all potentially hazardous parts be made harmless, especially
in relation to children who could play with unused appliances.
• After use, always ensure that the control knobs are in the off position.
• Household appliances are not intended to be played with by children.
• Keep children away from the appliance during use.
• Children, or persons with a disability which limits their ability to use the appliance,
should have a responsible person to instruct them in its use. The instructor should be
satisfied that they can use the appliance without danger to themselves or their surroundings.
• During and after use of the cooker, certain parts will become very hot. Do not touch hot
parts.
• Some appliances are supplied with a protective film on steel and aluminium parts.
This film must be removed before using the appliance.
• WARNING
When correctly installed, your product meets all safety requirements laid down for
this type of product category. However special care should be taken around the
rear or the underneath of the appliance as these areas are not designed or
intended to be touched and may contain sharp or rough edges, that may cause
injury.
• Fire risk! Do not store flammable material in the ovens or in the storage compartment.
• Make sure that electrical cords connecting other appliances in the proximity of
the cooker cannot come into contact with the hob or become entrapped in the
oven door.
• Do not line the oven walls with aluminium foil. Do not place baking trays or the
drip tray on the base of the oven chamber.

5
• The manufacturer declines all liability for injury to persons or damage to property
caused by incorrect or improper use of the appliance.
• The various components of the appliance are recyclable. Dispose of them in
accordance with the regulations in force in your country. If the appliance is to be
scrapped, remove the power cord.
• Always use oven gloves when removing the shelves and food trays from the oven
whilst hot.
• Do not hang towels, dishcloths or other items on the cooker or its handle – as
this could be a fire hazard.
• Clean the oven regularly and do not allow fat or oils to build up in the oven base
or trays. Remove spillages as soon as they occur.
• Do not stand on the cooker or on the open oven door.
• Always stand back from the cooker when opening the oven door to allow steam
and hot air to escape before removing the food.
• Do not allow heavy or sharp objects to drop on the glass ceramic hob. If the hob
is cracked or otherwise damaged by falling objects etc., isolate the cooker from
the power at the fuse / circuit breaker and call Customer Service.
• Do not scratch the hob with sharp objects. Don't use the hob as a work surface.
• This appliance is for domestic use only.
• WARNING: Taking care NOT to lift the cooker by the door handles.
• Safe food handling: leave food in the oven for as short a time as possible before
and after cooking. This is to avoid contamination by organisms which may cause
food poisoning. Take particular care during warmer weather.
• Do not operate your appliance by means of an external timer or separate remotecontrol system.
6
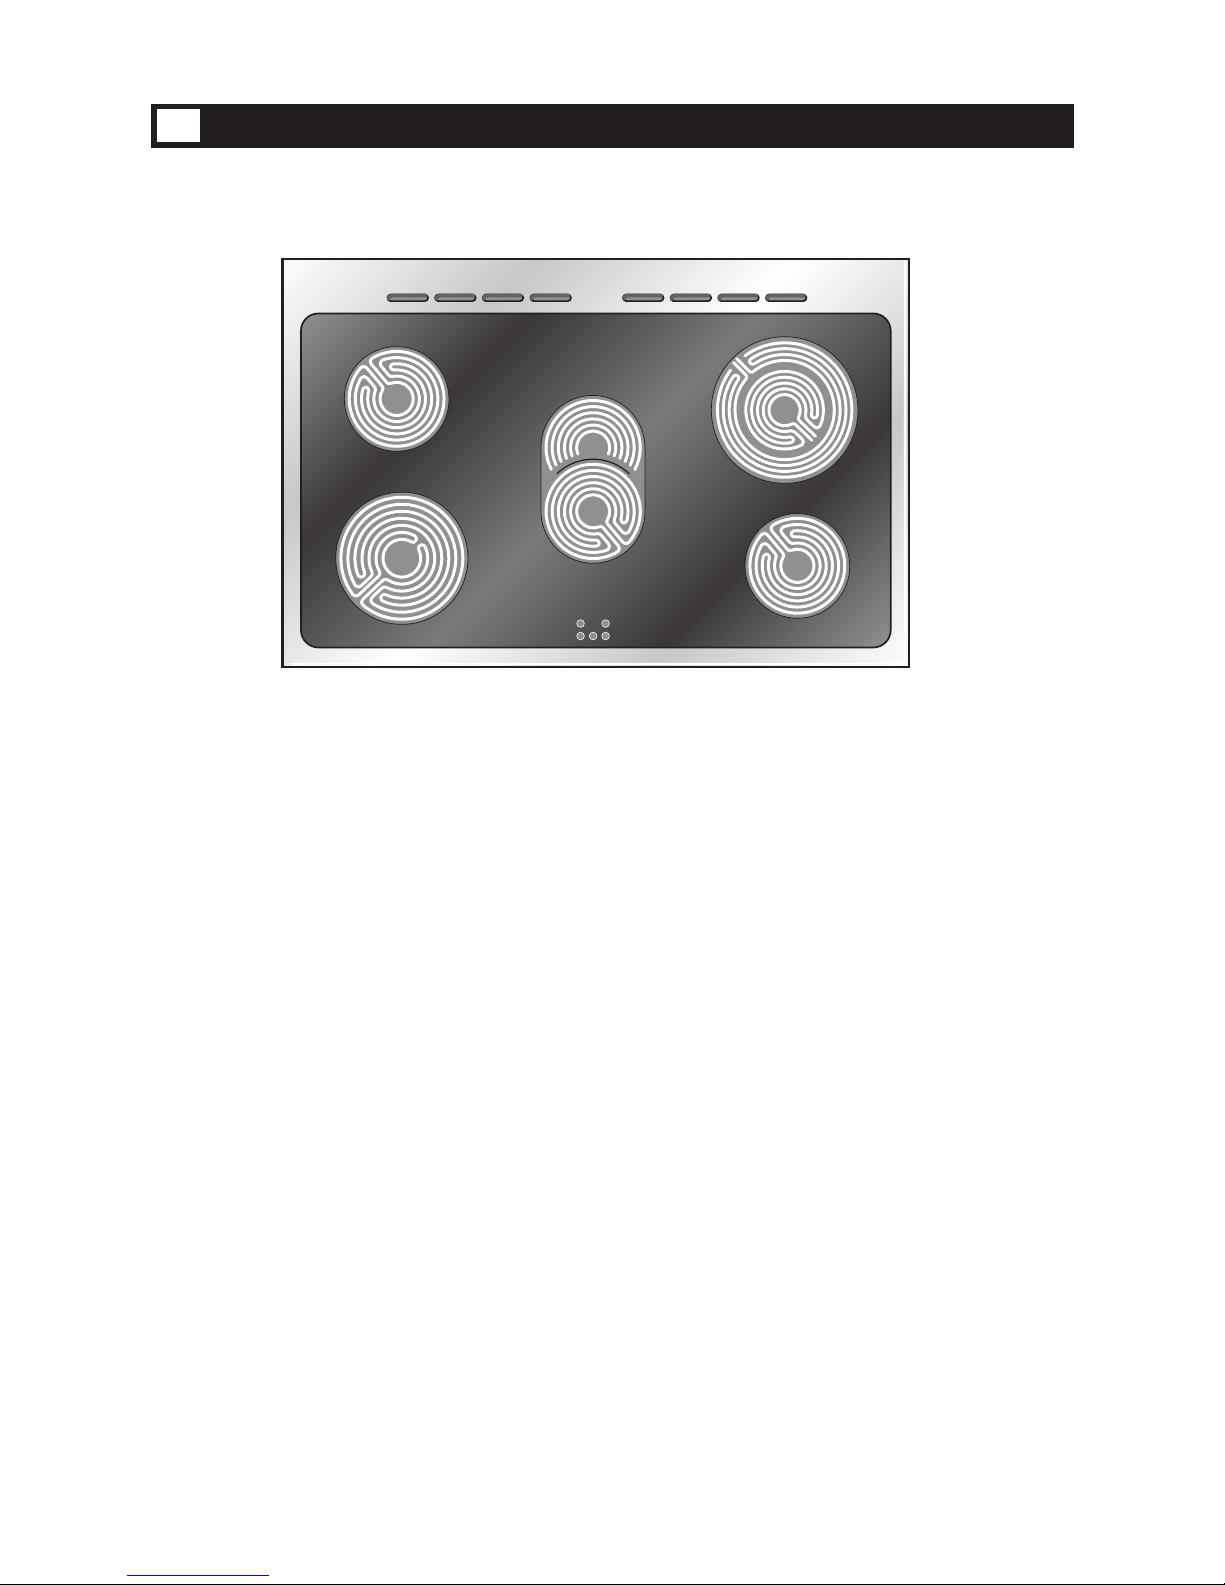
Cooking Hob
1
2
1
3
4
6
5
VITROCERAMIC COOKING HOB
1. 3 circuits cooking zone Ø 180 1700 W
2. 3 circuits cooking zone Ø 145 1200 W
3. Oval cooking zone Ø 145 x 250 1800/1000 W
4. Double cooking zone Ø 210/120 2100/700 W
5. 3 circuits cooking zone Ø 145 1200 W
6. Cooking zones residual heat indicators
Attention! Electrical Shock Hazard.
If the hob is cracked or otherwise damaged by falling objects etc., isolate the cooker
from the power at the fuse / circuit breaker and call Customer Service.
Fig. 1.1
7
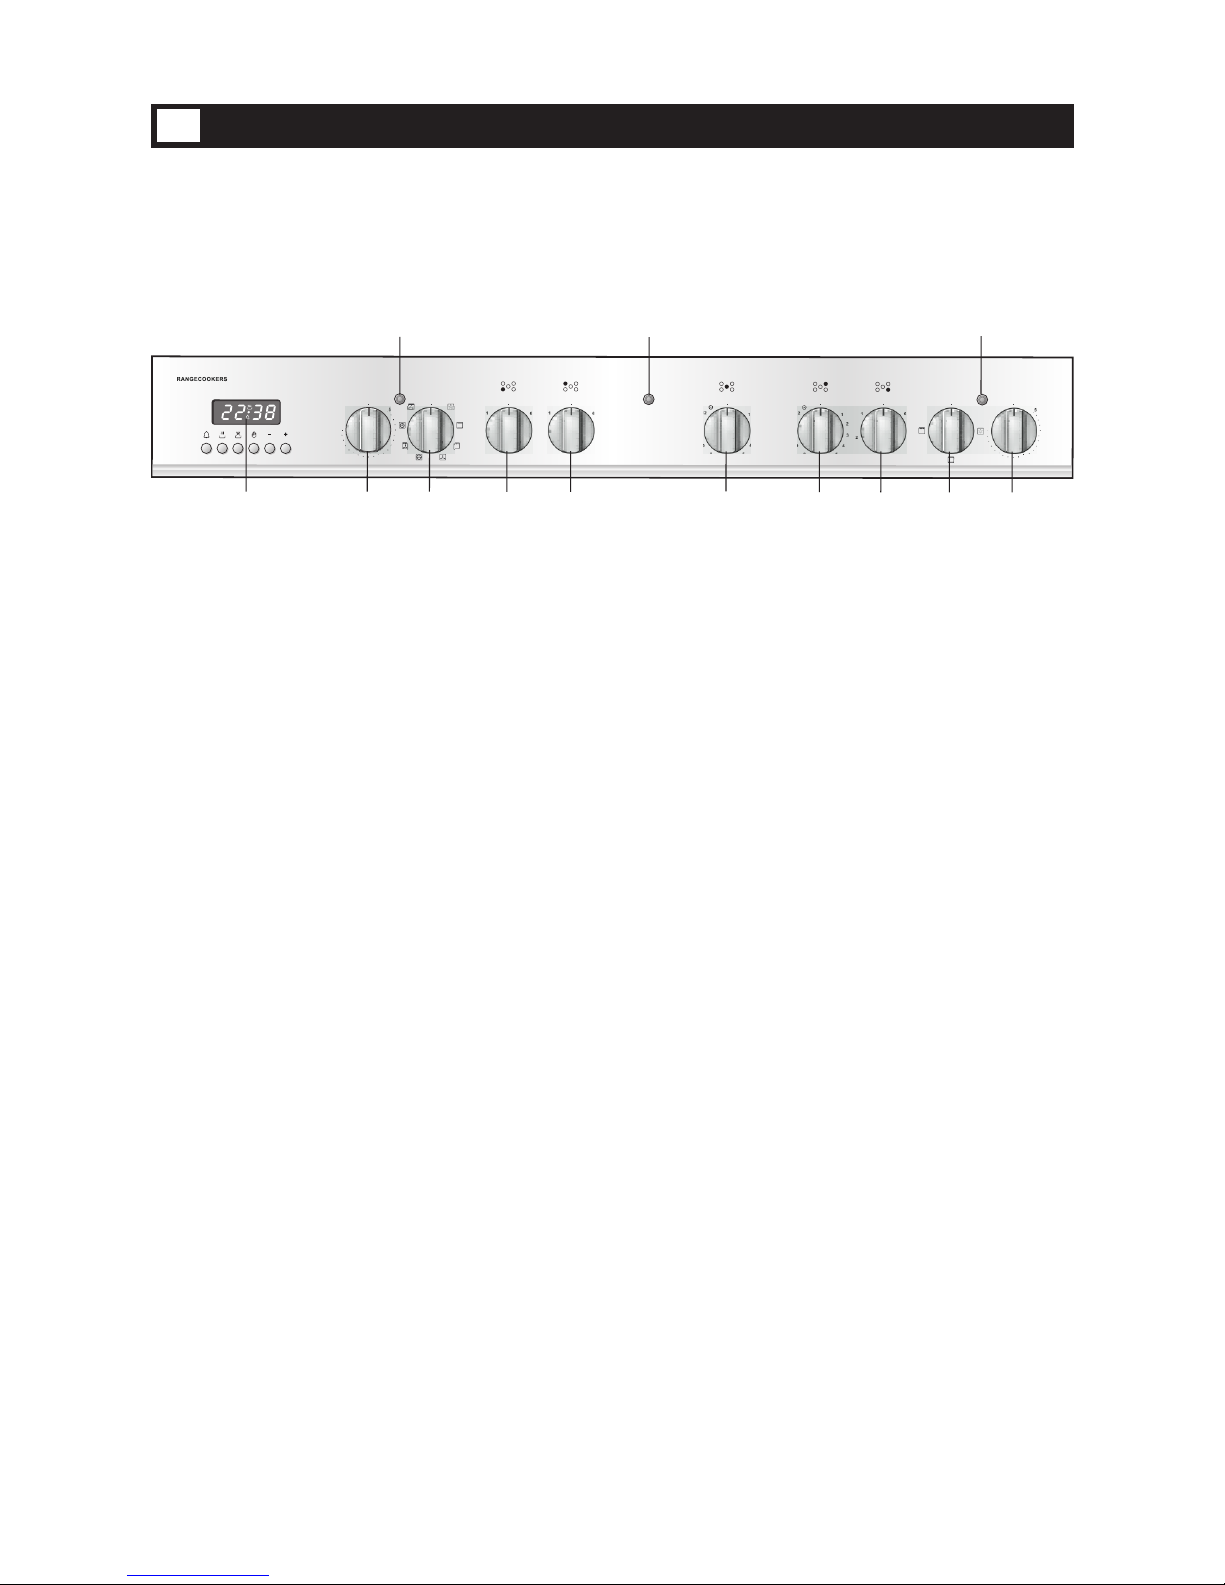
CONTROL PANEL - Controls description
1. Electronic programmer (main left oven only)
2. Multifunction main oven thermostat knob (left oven)
3. Multifunction main oven switch knob (left oven)
4. Front left cooking zone control knob
5. Rear left cooking zone control knob
6. Central cooking zone control knob
7. Rear right cooking zone control knob
8. Front right cooking zone control knob
9. Conventional oven switch knob (right oven)
10. Conventional oven thermostat knob (right oven)
Pilot lamps:
11. Main oven thermostat indicator light (left oven)
12. Conventional oven thermostat indicator light (right oven)
13. Ceramic hob ON indicator light
Please note: This appliance incorporates a safety cooling fan which you will hear
operating whenever the oven or grill are in use. This fan is to reduce the external
temperature of the appliance and cool the internal components.
250
200
150
100
50
0
0
MULTIFUNC TION
TEMPERAT URE
0
1
2
3
4
5
6
0
1
2
3
4
5
6
0
1
2
3
4
5
6
0
1
2
3
4
5
6
7
8
9
10
11
12
0
1
2
3
4
5
6
7
8
9
10
11
12
0
FUNCTIO N
200
150
100
50
0
TEMPERAT URE
Se l e c t 9 0 e c
A
U
T
O
P
1 2 4 5 7 8 9 10
3
11
12
Fig. 2.1
6
Control Panel
2
13

8
The electronic programmer is a device that groups together the following functions:
– 24 hour clock with illuminated display
– Timer (up to 23 hours and 59 minutes)
– Programme for automatic oven cooking
– Programme for semi-automatic oven cooking.
A
U
T
O
Description of the lighted symbols:
AUTO - flashing - Programmer in auto-
mat ic po sit io n b ut no t p rogrammed
AUTO - always lighted - Programmer in
automatic posi tion with programme inserted.
Automatic cooking taking place
Timer in operation
and AUTO - flashing - Programme
error.
(The time of day lies between the
calculated cooking start and end
time).
Note: Select a function by the respective
but ton and, in 5 sec ond s, se t the
required time with the / buttons
(“one-hand” operation).
A power cut zeroes the clock and cancels the set programmes.
Description of the buttons:
Timer
Cooking time
End of cooking time
Manual position and cancellation of
the inserted cooking programme
Advancement of the numbers of all
programmes
Turning back of the numbers of all
programmes and changing the frequency of the audible signal.
Fig. 3.2
Fig. 3.1
(main left oven only)
Electronic Programmer
3

9
ELECTRONIC CLOCK (fig. 3.2)
The programmer is equipped with an
electronic clock with lighted numbers
which indicate hours and minutes.
Upon immediate connection of the oven
or after a blackout, three zeroes will
flash on the programmer panel.
To set the hour it is necessary to push
the button and then the or
button until you have set the exact hour
(fig. 3.2).
Alternatively, simultaneously push the
two buttons and at the same
time push the or button.
Note: Setting the clock deletes any
programme.
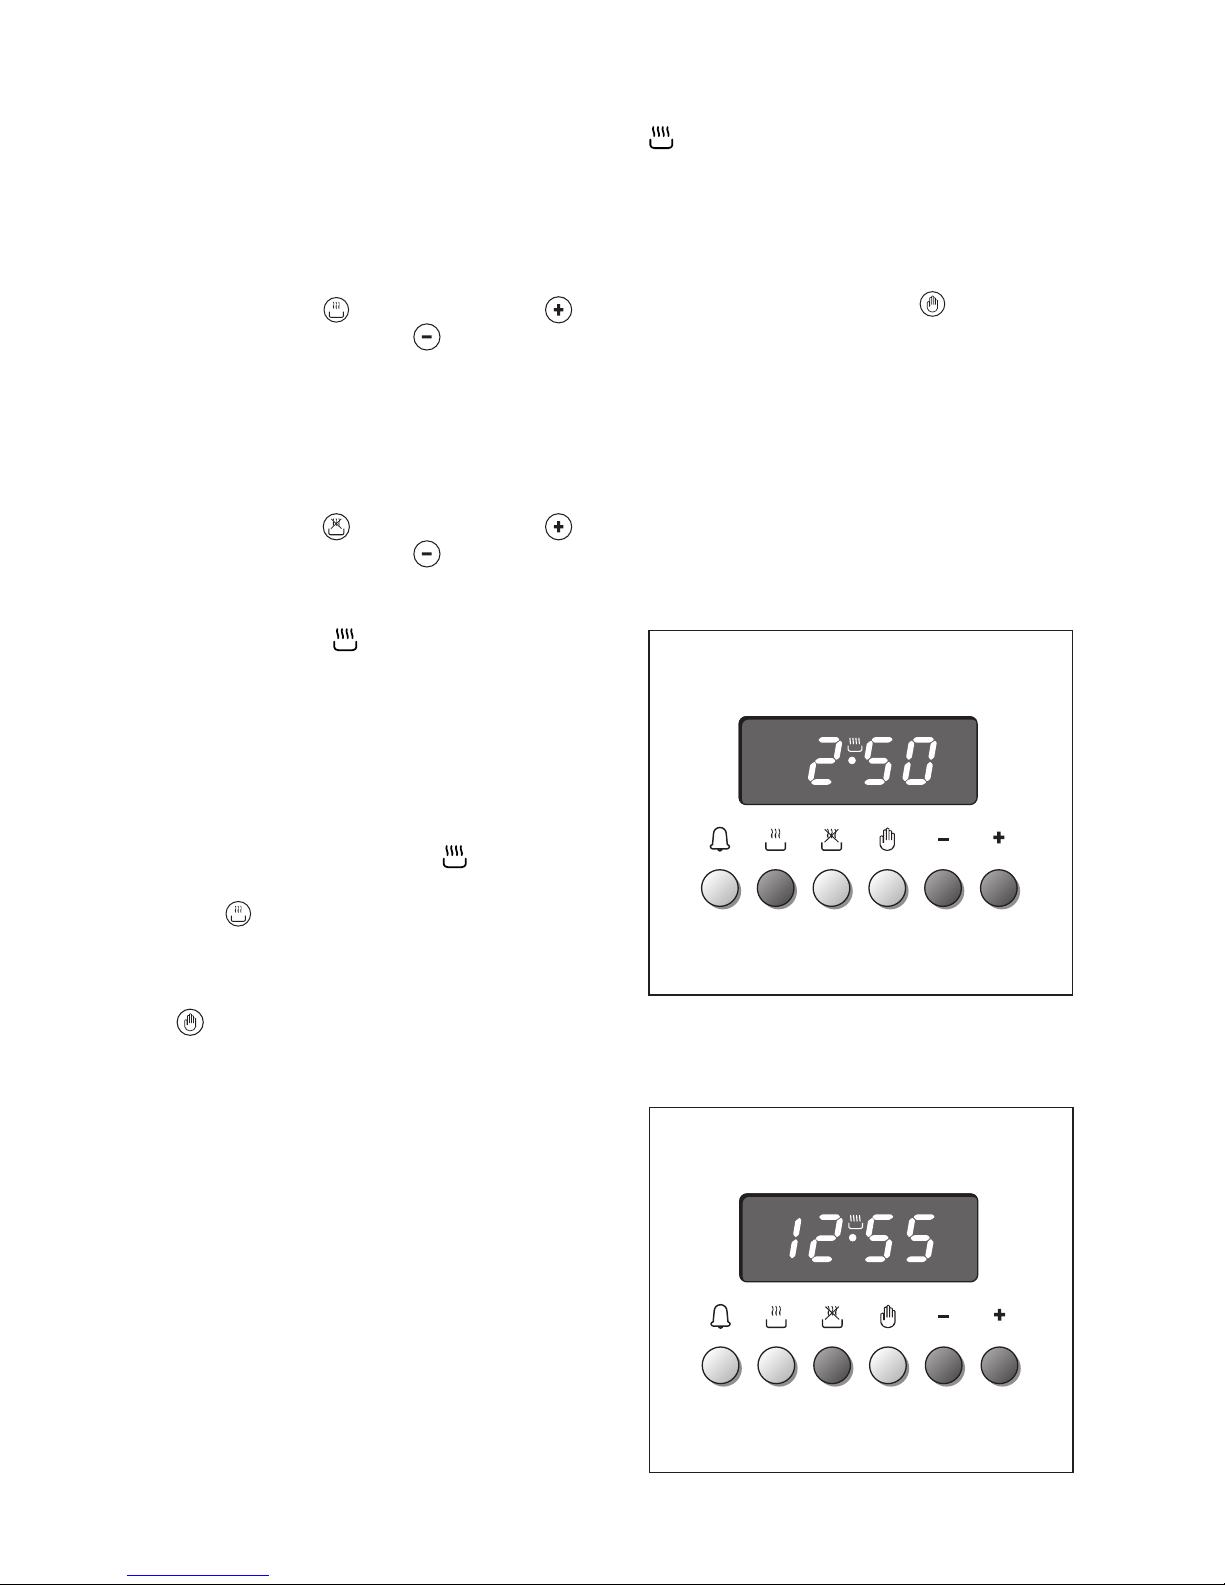
ELECTRONIC TIMER
The timer programme consists only of a
buzzer which may be set for a maximum
period of 23 hours and 59 minutes.
If the AUTO is flashing push the
button.
To set the time, push the button and
the or until you obtain the
desired time (fig. 3.4).
Having finished the setting, the normal
time will appear on the panel and the
symbol will appear.
The countdown will start immediately and
may be seen at any moment on the panel
by simply pressing the button .
At the end of the time, the symbol
will be switched off and an intermittent
buzzer will go off; this can be stopped
by pressing any one of the buttons.
ALTERING THE AUDIBLE SIGNAL
By pressing the button you can
choose from three variations.
NORMAL COOKING WITHOUT THE
USE OF THE PROGRAMMER
To manually use the oven, that is, without
the aid of the programmer, it is necessary
to cancel the flashing AUTO by pushing
the button (AUTO will be switched off
and the symbol will go on - Fig. 3.3).
Attention: If the
AUTO
is not flashing
(which means a cooking programme has
already been inserted), by pushing the button you have cancelled the programme
and switched to manual
.
Fig. 3.4
Fig. 3.3

10
A
U
T
O
A
U
T
O
AUTOMATIC OVEN COOKING
To cook food automatically in the oven,
it is necessary to:
1.Set the length of the cooking time
2.Set the end of the cooking time
3.Set the temperature and the oven
cooking programme.
These operations are done in the following way:
1. Set the length of the cooking time by
pushing the button and the button to
advance, or to go back if
you have passed the desired time (fig.
3.5). The AUTO and the symbol
will be on.
2.Set the end of the cooking time by
pressing the button (the cooking
time already added to the clock time
will appear), and the button (fig.
3.6); if you pass the desired time you
may get back by pushing the button.
After this setting, the symbol will
go off. If after this setting, the AUTO
flashes on the panel and a buzzer
goes off, it means there was an error
in the programming.
In this case, modify the end of cooking time or the cooking time itself by
fol low in g th e ab ove i nst ru cti on s
again.
3.Set the temperature and the cooking
programme by using the switch and
thermostat knobs of the oven (see
specific chapters).
Now th e ov en is pro gra mm ed and
every thing will work automatically, that
is the oven will tu rn o n at the rig ht
mom ent t o e nd th e coo ki ng at th e
established time.
During cooking, the symbol remains
on.
By pushing the button you can see
the time that remains until the end of
cooking.
The cooking programme may be cancelled in any moment by pushing .
At the end of the cooking time the oven
will turn off automatically, the symbol will turn off, AUTO will flash and a
buz zer will sound, which can be turned
off by pushing any of the but tons.
Turn the switch and thermostat knobs to
zero and pu t t he progr amm er onto
“manual” by pressing the button.
Attention: A power cut makes the clock
go to zero and cancels the set programmes.
After a power cut three zeroes will flash
on the panel.
Fig. 3.6
Fig. 3.5
11
A
U
T
O
A
U
T
O
SEMI-AUTOMATIC COOKING
This is used to automatically switch off
the oven after the desired cooking time
has elapsed.
There are two ways to set your oven:
1. Set the length of the cooking time by
pushing the button and the
button to advance, or to go backwards if you have passed the desired
time (Fig. 3.7).
or
2. Set the end of the cooking time by
pushing the button and the
button to advance, or to go backwards if you have passed the desired
time (Fig. 3.8).
AUTO and the symbol will be on.
Then set the temperature and the
cooking programme using the oven
switch and thermostat knobs (see
specific chapters).
The oven is switched on and it will be
switched off automatically at the end
of the desired time.
Dur ing coo ki ng, the sym bol
remains on and by pressing the button you can s ee th e tim e that
remains till the end of the cooking.
The cooking programme can be cancelled at any moment by pushing the
button.
At the end of cooking, the oven and the
symbol will turn off, the AUTO will
flash and a buzzer will sound; that can
be stopped by pushing any of the buttons.
Turn the switch and thermostat knobs to
zero a nd p ut th e pro gra mm er on to
“manual” by pressing the button.
Fig. 3.8
Fig. 3.7

12
How to use the Vitroceramic Hob
4
The ceramic surface of the hob allows a
fast transmission of heat in the vertical
direction, from the heating elements
underneath the ceramic glass to the
pans set on it.
The heat does not spread in the horizontal direction, so that the glass stays
“cool” at only a few centimeters from the
cooking plate.
The 5 c ook ing zo nes are sh own by
painted disks on the ceramic surface.
Check that the cooker top is clean.
WARNING:
If the surface is cracked, switch off the
appliance to avoid the possibility of electric shock.
IMPORTANT NOTE:
The heating elements incorporate a
thermolimiter that switches ON/OFF the
element in all settings to protect any
overheating of the ceramic glass.
The use of incorrect pans and/or wrong
pan positioning will cause the temperature limiter to operate more frequently,
resulting in a reduction of cooking performance.
3 CIRCUITS RADIANT ZONES
Incorporating 3 heating elements (fig.
4.2) you can control and light up all
together or separately by a 6 position
switch (fig. 4.1).
The working temperature required is
reached in a very short time.
Fig. 4.1 Fig. 4.2

13
DOUBLE AND OVAL RADIANT
ZONES
The heating element is formed of a coil
of resistant material which reaches the
working temperature quickly.
Operation of the cooking zone is controlled by a continuous energy regulator
from 1 to 12 (maximum temperature) (fig.
4.3).
To turn on both zones of the double
element, turn the double element knob
fully clockwise to the position .
To reduce the heat of the full double element, turn its knob anticlockwise to setting 12 or lower. Adjust the heat during
cooking as necessary.
Note: if you leave the knob at the
position, the full double element will
remain at the highest heat setting.
To return to using only the inner zone of
the double element, first turn the knob
to the 0 (off) position (you should feel a
click) and then clockwise to a setting
from 1 to 12.
Fig. 4.3
Fig. 4.5
Fig. 4.4
Second element
Second element

14
TYPE OF COOKING
Switched OFF
For melting operations
(butter, chocolate).
To maintain food hot and to
heat small quantities of
liquid (sauces, eggs).
To heat bigger quantities; to
whip creams and sauces.
(vegetables, fruits, soups).
Slow boiling, i.e.: boiled
meats, spaghetti, soups,
continuations of steam
cooking of roasts, stews,
potatoes.
For every kind of frying,
cutlets, uncovered cooking,
i.e.: risotto.
Browning of meats, roasted
potatoes, fried fish,
omelettes, and for boiling
large quantities of water.
Fast frying, grilled steaks,
etc.
Switching on the second
element (Double and oval
radiant plates only)
0
Knob
setting
1
2
3
4
5
6
2
0
1
2
2
3
4
3
4
6
7
4
7
8
4
5
8
9
10
6
11
12
After a short period of use, experience
will teach you which setting is the right
one for your needs.
COOKING HINTS
Cooking plate
controlled by a 7
position switch
Cooking plate
controlled by a 12
position energy
regulator
1
2
3
4
5
6
Fig. 4.6
Heating
Cooking
Roasting-frying
1
2
3
4
5
6
7
8
9
10
11
12
15
RESIDUAL HEAT INDICATOR
The hob also features 5 warning lights
which are connected to the corresponding plates.
When the temperature of a cooking
plate is above 60°C, the relevant warning light will also light up to warn of
heat on the surface of the hob.
This light also stay on after the cooking
plate has been switched off to show
that the hob surface is still hot.
This residual heat will lasts for a long
time after the cooking plate has been
switched off.
During this time you should avoid
touching the hob surface over the
cooking area.
Please pay special attention to
ensu re t ha t c hildre n a re n ot
allowed near the hob.
The light will switch off automatically as
soon as the surface temperature of the
cooking plate falls below 60°C.
Fig. 4.7
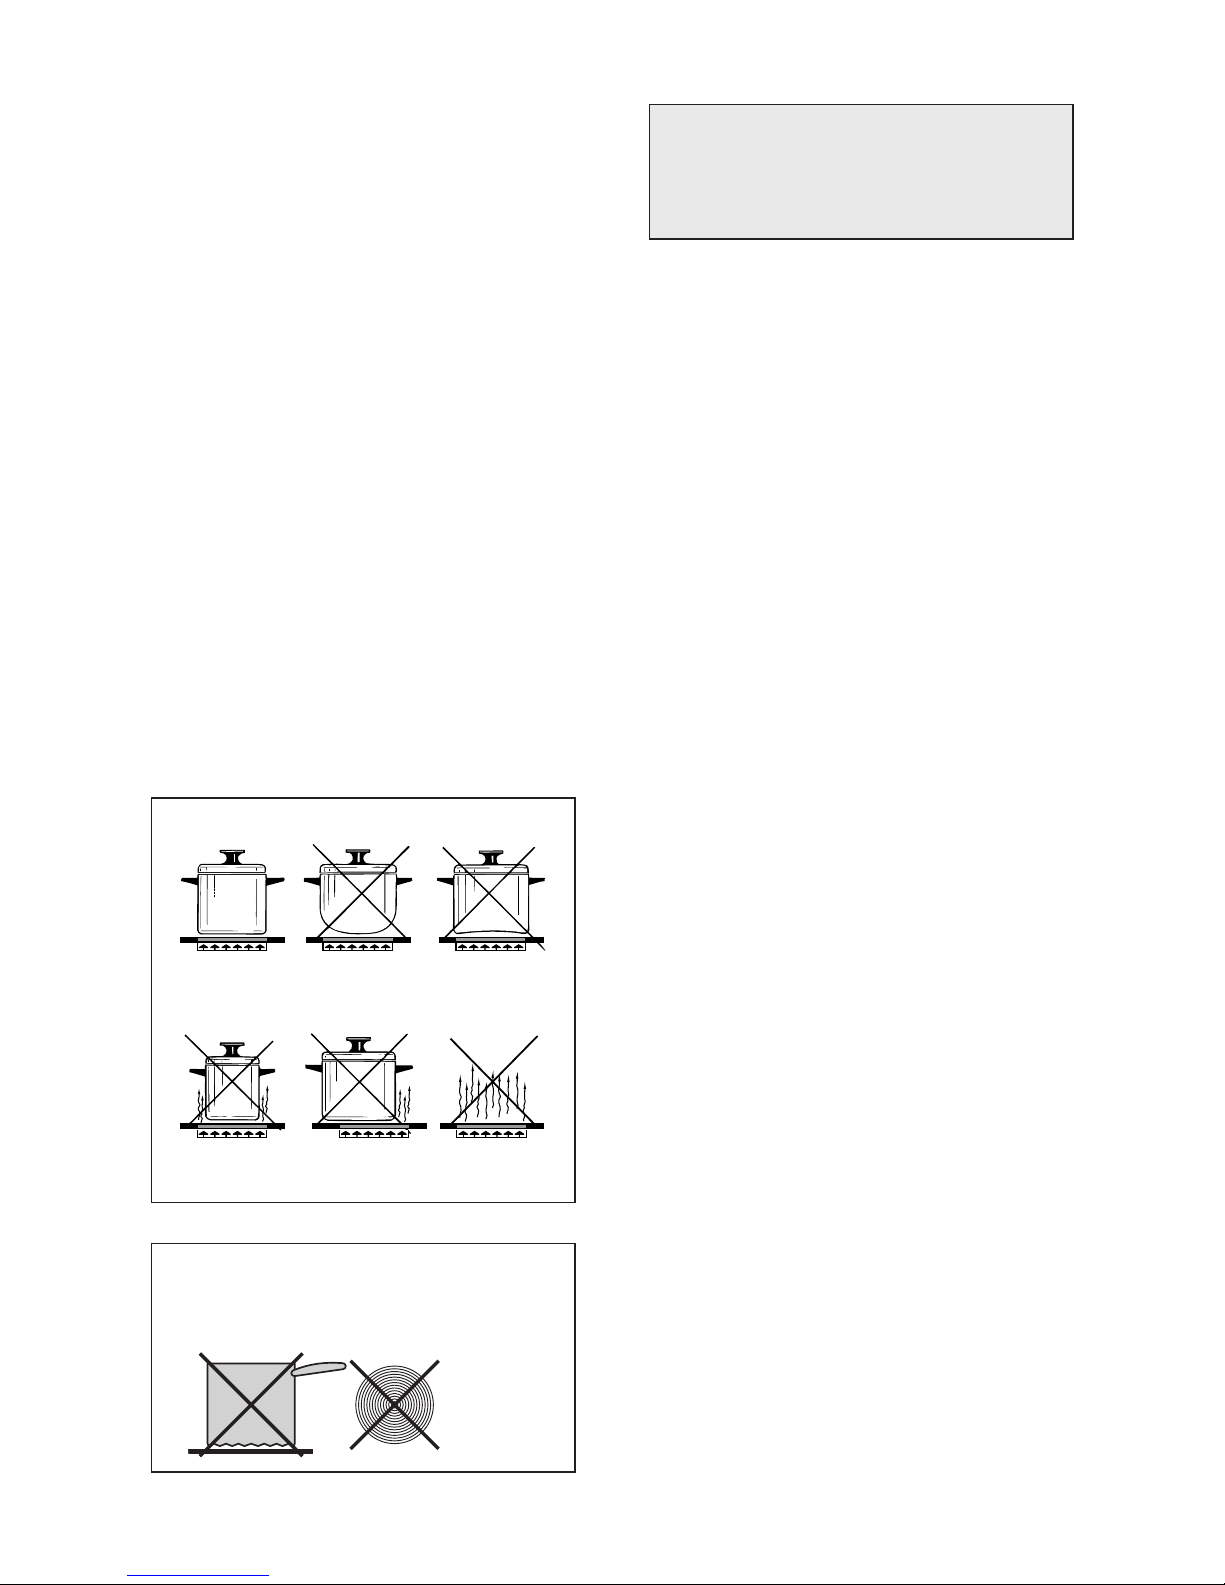
DO NOT U S E G L A S S W A R E O N C E R AMIC HOB S .
DO NOT U S E PANS WI T H R O U G H C IRCULAR
MACHINED BASE.
Fig. 4.8
COOKING HINTS:
– To reduce the cooking time, you can
turn the control knob to t he ma x
when you switch the plate on.
After a short time you can set the
control knob to the position required
for cooking.
– You should only use pots and pans
with flat bases (pans with the test
mark for gl ass- cera mic hob s are
available from specialist shops).
The d iam et er of t he pa n sh ou ld
match that of the cooking plate (or be
slightly bigger) to make the most of
the energy.
– Since the cooking surface will stays
hot for a certain time after the plate
has b een swi tc hed off , yo u ca n
switch it off 5 or 10 minutes before
the end of the cooking.
The residual heat of the hob will complete the cooking.
– To save electricity, use pan lids when-
ever possible.
– Never cook the food directly on the
glass ceramic cooktop.
DEEP FAT FRYING
For safety purposes when deep fat frying, do not fill the pan more than one
third full of oil.
DO NOT cover the pan with a lid and
DO NOT leave the pan unattended.
In the unfortunate event of a fire, leave
the pan where it is and turn off the control knobs.
Place a damp cloth or lid over the pan to
smother the flames. Leave the pan to
cool for at least 30minutes before moving the pan.
DO NOT USE WATER ON THE FIRE.
Caution!
the cooking hob becomes very hot
during operation.
Keep children well out of reach.
Do not scratch the cooktop with cutting or sharp objects.
Do not use the glass ceramic surface as a work surface.
16
Fig. 4.9
CLEANING
Before you begin cleaning make sure
that the appliance is switched off.
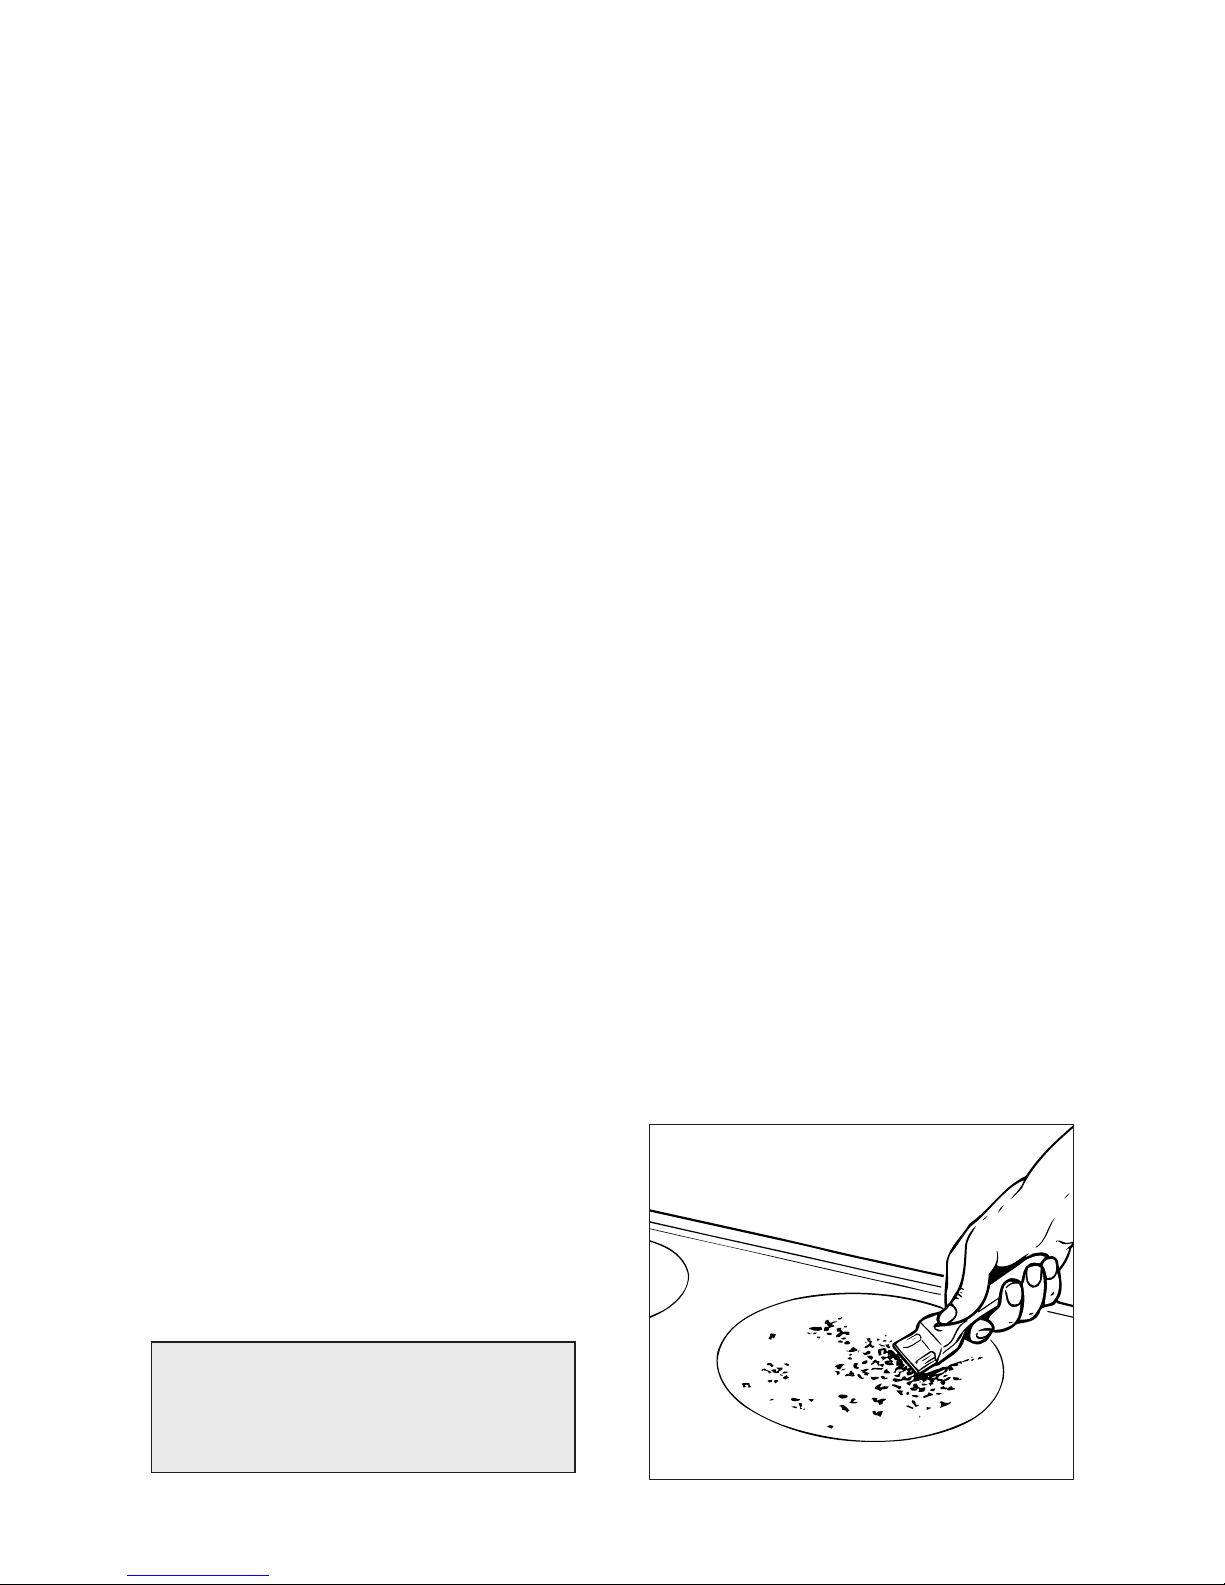
Rem ove a ny en cr ust at ion u sin g a
scraper specific for glass ceramic surfaces.
Dust or food particles can be removed
with a damp cloth.
If you use a detergent, please make sure
tha t it i s no t abr as ive or sc ou rin g.
Abrasive or scouring powders can damage the glass surface of the hob.
All traces of th e cleaner have t o be
removed with a damp cloth.
It is highly recommended to keep off the
hob any article which can melt: plastic,
aluminium foil, sugar, sugar syrup mixtures etc.
If any of these products has melted on
the ceramic surface, you should remove
it immediately (when the surface is still
hot) by using a scraper to avoid any permanent damage to the surface of the
hob (Available under part No. 103138).
Avoid using any knife or sharp utensil
since these can damage the ceramic.
Do not use steel wool or an abrasive
sponge which could scratch the surface
permanently.
ATTENTION: MOST IMPORTANT!
If c lean ing the gl ass cera mic hob
using a special tool (i.e. scraper) take
extra care to avoid damage to the seal
at the edges of the glass ceramic surface.
ADVICE FOR SAFE USE OF THE
COOKTOP
• Before switching on make sure that you
have the correct knob for the hotplate
chosen. It is advisable to put the pan on
the hotplate before switching on and to
take it away after switching off.
• Use cookware with flat and even bottoms (be careful when using cast iron
vessels). Uneven bottoms can scratch
the glass ceramic surfaces. Be careful
that the bottom is clean and dry.
• Pots with aluminium bottoms may leave
silver streaks or spots on the bob.
• Do not leave wet or damp lids on the
bob.
• The glass-ceramic surface and pans
must be clean. Carefully eliminate any
food rema ins (es pecially conta ining
sugar), dirt etc. with the aid of a cleansing agent.
• Make sure that the handles of cookware
do not stick out over the edge of the
cooker, to avoid them being knocked
over by accident. This also makes it
more difficult for children to reach the
cooking vessels.
• Do not lean over the cooking zones
when they are switched on.
• Do not drop heavy or sharp objects on
the glass ceramic cooktop. If the sur-
face is broken or damaged unplug the
appliance and contact the after-sales
service.
• Do not put alumini um foil o r plastic
objects on the cooking zones when they
are hot.
• Rem em ber tha t th e co oki ng z one s
remain hot for some time after they are
switched off (about 30 mm.).
• Follow the cleaning instructions carefully.
• If you note a crack in the cooktop,
switch the appliance off immediately
and call the After-Sales Service.
17
Attention: the oven door becomes
very hot during operation. Keep children away.
OPERATING PRINCIPLES
Heating and cooking in the MULTI FUNCTION oven are obtained in the fol-
lowing ways:
a. by normal convection
The heat is produced by the upper
and lower heating elements.
b. by forced convection
The fan draws in air contained within
the oven housing at the rear of the
oven and forces it over the circular
heating element. The hot air envelops
the food in the oven giving faster and
more even cooking before it is drawn
back into the housing to repeat the
cycle. It is possible to cook several
dishes simultaneously due to the
even distribution of heat within the
oven.
c. by forced semi-convection
The heat produced by the top and
bottom heating elements is distributed throughout the oven by the fan.
d. by radiant heat
The food is grilled by the infra red
grill element.
e. by radiant heat and ventilation
The food is grilled by the grill element, heat is distributed throughout
the oven.
f. by ventilation
The food is defrosted by using the
fan only function without heat.
GENERAL FEATURES
As its name indicates, this is an oven
that presents particular features from an
operational point of view.
In fact, it is possible to insert 7 different
programs to satisfy every cooking need.
The 7 positions, thermostatically controlled, are obtained by 4 heating elements which are:
– Bottom element 1200 W
– Top element 1000 W
– Grill element 2000 W
– Circular element 2200 W
NOTE: Upon first use, it is advisable to
operate the oven for 30 minutes in the
position and for another 30 minutes
at the maximum temperature (thermostat knob on position 250) in the positions and , to eliminate possible
traces of grease on the heating elements.
Clean the oven and accessories with
warm water and washing-up liquid.
WARNING:
The door is hot, use the handle.
ATTENTION - MOST IMPORTANT
Pay special attention not to touch the
hot heating element inside the oven
cavity.
Left Main Multifunction Oven
5
18
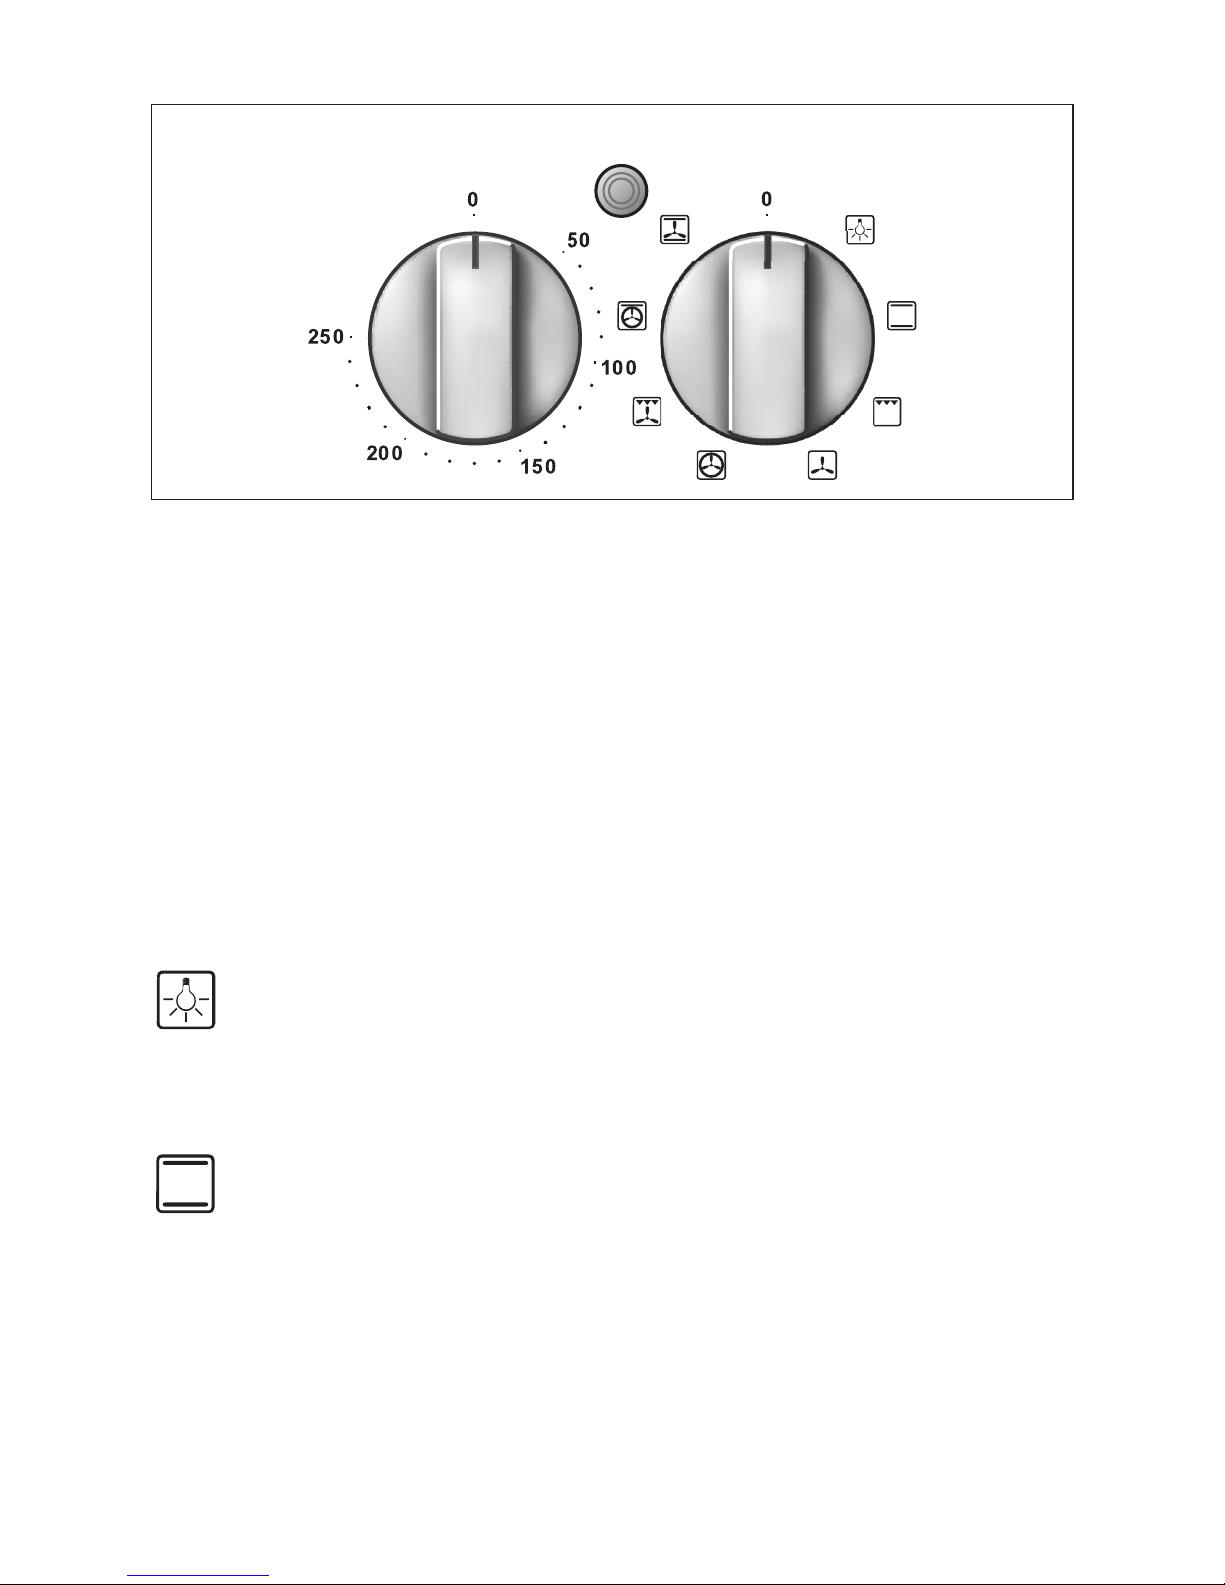
TE MPER ATU RE MU LTI FUNC TION
Fig. 5.1
Fig. 5.2
FUNCTION SELECTOR KNOB (Fig. 5.1)
Rotate the knob clockwise to set the oven for one of the following functions.
THERMOSTAT KNOB (Fig. 5.2)
This only sets the cooking temperature and does not switch the oven on. Rotate clockwise until the required temperature is reached (from 50 to 250 °C).
The light above the knobs will illuminate when the oven is swiched on and turns off when
the oven reaches the correct temperature.
The light will cycle on and off during cooking in line with the oven temperature.
OVEN LIGHT
By setting the knob to this position, only the oven light comes on.
It remains on in all the cooking modes.
TRADITIONAL CONVECTION COOKING
The upper and lower heating elements come on. The heat being dispersed by natural convection. The temperature range must be set between 50 °C and 250 °C
using the thermostat.
The oven must be preheated before cooking.
Recommended for:
Food that requires the same degree of cooking both inside and out, for
example roasts, spare pork ribs, meringues etc.

19
DEFROST
Only the oven fan comes on. Use with the thermostat knob set to “ ” - other temperature have no effect. The food is thawed by ventilation without heating.
Recommended for:
Quick thawing of frozen foods; one kg requires approximately 1 hour.
Thawing times vary according to the quantity and type of food to be thawed.
GRILLING
The infrared grill element comes on. The heat is dispersed by radiation.
Set the thermostat knob to between 50 °C and 200 °C.
Always grill with the oven door closed.
For cooking hints, see the chapter “USE OF THE GRILL”.
Recommended for:
Intense grilling, browning, cooking au gratin and toasting etc.
Do not grill for longer than 30 minutes at any one time on full heat (200 °C).
Caution: the oven door becomes very hot during operation.
Keep children well out of reach.
FAN GRILL
Both the grill and the fan come on. Most of the cooking is done by grilling and then the
hot air circulated around the oven. The oven door should be kept closed.
The temperature can be set between 50 °C and 175 °C.
The oven should be preheated for 5 minutes before cooking. For further cooking hints
see “GRILLING AND COOKING AU GRATIN”.
Recommended for:
Quick sealing in of food juices for example such as hamburger, chicken pieces, chops.
Do not grill for longer than 30 minutes at any one time on full heat (175 °C).
Caution: the oven door becomes very hot during operation.
Keep children well out of reach.
FAN FORCED
The circular element and fan come on. The heat is dispersed by forced convection and
the temperature can be varied to between 50 °C and 250 °C via the thermostat knob.
The oven does not require preheating.
Recommended for:
Food which has to be well-cooked outside and soft or rosy inside, for example lasagne,
lamb, roast beef, whole fish etc.

20
MAINTAINING TEMPERATURE AFTER COOKING OR
SLOWLY HEATING FOODS
The upper element, the circular element and the fan come on.
The heat is circulated by forced convection with greater intensity in the upper part.
The temperature can be set to between 50 °C and 140 °C via the thermostat knob.
Recommended for:
Keeping food warm after any type of cooking. Slow heating of cooked food.
MULTI-FUNCTION
The upper and lower heating elements come on and the fan come on - the heat from the
element being circulated by the fan.
The temperature range can be set to between 50 °C and 250 °C using the thermostat.
Recommended for:
Large bulky quantities of food that require even cooking throughout for example large
roasts, turkey, roast turkey, cakes etc.
COOKING ADVICE
Remember to keep children away from the appliance when you use the grill or oven,
since these parts become very hot.
STERILIZATION
Sterilization of foods to be preserved, in full and hermetically sealed jars, is done in the
following way:
a. Set the switch to position .
b. Set the thermostat knob to position 185 °C and preheat the oven.
c. Fill the dripping pan with hot water.
d. Set the jars onto the dripping pan making sure they do not touch each other and the
door and set the thermostat knob to position 135 °C.
When sterilization has begun, that is, when the contents of the jars start to bubble, turn
off the oven and let cool.
Check your recipe book for full instructions.

21
WARMING BREAD
Set the switch to position and the thermostat knob to position 150 °C.
Bread becomes fragrant again if wet with a few drops of water and put into the oven for
about 10 minutes at the highest temperature.
ROASTING
To obtain classical roasting, it is necessary to remember:
- that it is advisable to maintain a temperature between 180 °C and 200 °C.
- that the cooking time depends on the quantity and the type of foods.
SIMULTANEOUS COOKING OF DIFFERENT FOODS
The oven set on position can cook several different foods together. Foods as
diverse as fish and cakes can be cooked together without the cross transference of
flavours. This is because the fats and cooking smell that would normally be
deposited on the different foods are oxidised and are not absorbed by the foods.
The cooking temperature of the foods, however must be within 20 - 25 °C of each
other. The food with the longest cooking time will be put into the oven first and the
other foods are added as necessary according to their cooking times.
USE OF THE GRILL
Preheat the oven for about 5 minutes with the door closed.
Introduce the food to be cooked, positioning the rack as close to the grill as possible.
The dripping pan should be placed under the rack to catch the cooking juices and fats.
GRILLING AND COOKING AU GRATIN
As the hot air completely covers the food to be cooked, grilling may be done with
the food on the rack in the oven. The knob should be switched to position .
The thermostat should be set to 50 °C and 175 °C max and the oven pre-heated.
The food should be placed on a rack in the oven for the required cooking time.
Adding a few dabs of butter before the end of the cooking time gives the golden “au
gratin” effect.
WARNING: Accessible parts may become hot when the grill is used. Children
should be kept away.

22
THERMOSTAT KNOB (Fig. 6.2)
This only sets the cooking temperature
and does not switch the oven on. Rotate
clockwise until the required temperature
is reached (from 50 to maximum position).
The light above the knobs will illuminate
when the oven is swiched on and turns
off when the oven reaches the correct
temperature.
The light will cycle on and off during
cooking in line with the oven temperature
.
GENERAL FEATURES
The conventional oven is provided with
3 heating elements which are:
– Bottom element 800 W
– Top element 700 W
– Grill element 1450 W
Note:
Upon first use, it is advisable to operate
the oven at the maximum temperature
(thermostat knob on maximum position)
for 60 minutes in the position and for
another 15 minutes in the position
(thermostat knob on position 200°C), to
eliminate possible traces of grease on
the heating elements.
WARNING:
The door is hot, use the handle.
ATTENTION - MOST IMPORTANT
Pay special attention not to touch the
hot heating element inside the oven
cavity.
TE MPER ATU REFUNCTION
Fig. 6.1
Fig. 6.2
Attention: the oven door becomes
very hot during operation. Keep children away.
OPERATING PRINCIPLES
Heating and cooking in the CONVENTIONAL oven are obtained in the follow-
ing ways:
a. by natural convection
The heat is produced by the upper
and lower heating elements.
b. by radiation
The heat is radiated by the infra red
grill element.
Right Conventional Small Oven
6

23
TRADITIONAL CONVECTION COOKING
The upper and lower heating elements come on.
The heat is dispersed by natural convection and the temperature must be set to
between 50° and the maximum position via the thermostat knob. The oven must be
preheated before cooking.
Recommended for:
Food that requires the same degree of cooking both inside and out, for example roasts,
spare pork ribs, meringues etc.
FUNCTION SELECTOR KNOB
(Fig. 6.1)
Rotate the knob clockwise to set the oven for one of the following functions.
OVEN LIGHT
By setting the knob to this position, only the oven light comes on.
It remains on in all the cooking modes
.
GRILLING
The infrared grill element comes on. The heat is dispersed by radiation.
Set the thermostat knob to between 50° and 200°C.
Always grill with the oven door closed.
For cooking hints, see the chapter “USE OF THE GRILL”.
Recommended for:
Intense grilling, browning, cooking au gratin and toasting etc.
Do not grill for longer than 30 minutes at any one time on full heat (200°C).
Caution: the oven door becomes very hot during operation.
Keep children well out of reach.
USE OF THE GRILL
Preheat the oven for about 5 minutes.
Introduce the food to be cooked, positioning the rack as close to the grill as possible.
The dripping pan should be placed under the rack to catch the cooking juices and fats.
Grilling with the oven door closed.
Do not grill for longer than 30 minutes at any one time on full heat (200°C).
Caution: the oven door becomes very hot during operation.
Keep children well out of reach.

24
APPROX. HEAT OF TYPE OF DISH TO COOK
TEMPERATURE OVEN
125°C Very cool Meringue,
(257°F) oven slow cooking foods.
135°C - 140°C Cool or Milk puddings, very rich fruit
(275°F - 285°F) slow oven cakes, eg., Christmas.
150°C Cool or Stews, casseroles, braising,
(300°F) slow oven rich fruit cakes, eg., Dundee.
160°C - 170°C Warm oven Biscuits, Low temperature roasting,
(320°F - 338°F) rich plain cakes eg., Madeira cake.
180°C Moderate Plain cakes, eg., Victoria
(356°F) oven sandwich, meat pies.
190°C Fairly hot Small cakes, savoury flans,
(374°F) oven fish.
200°C Hot oven Plain cakes and buns, swiss rolls,
(392°F) fruit pies. High temp. roasting.
215°C Moderately Bread and bread rolls etc., scones,
(419°F) hot oven flaky and rough puff pastry,
Yorkshire pudding.
225°C Very hot Sausage rolls, mince pies, puff
(437°F) oven pastry.
Browning ready cooked dishes.
Temperature and times given are approximate, as they will vary depending on the
quality and amount of food being cooked.
Remember to use ovenproof dishes and to adjust the oven temperature during cooking
if necessary.
Cooking Guide
7

25
Installation, and any demonstration, information or adjustments are not included in the
warranty.
The cooker must be installed by a suitably qualified and registered person in accordance with the relevant Standards.
Attention
The appliance gets very hot, mainly around the cooking areas. It is very important
that children are not left alone in the kitchen when you are cooking.
Important Notes

26
- Do always grill with the ovens door closed.
- Do read the user instructions carefully before using the cooker for first time.
- Do allow the oven to heat for one and a half hours, before using for the first time, in
order to expel any smell from the new oven insulation, without the introduction of
food.
- Do clean your oven regularly.
- Do remove spills as soon as they occur.
- Do always use oven gloves when removing food shelves and trays from the ovens.
- Do not allow children near the cooker when in use.
- Do not allow fat or oils to build up in the ovens trays, or oven base.
- Do not place cooking utensils or plates directly onto the oven base.
- Do not grill food containing fat without using the grid.
- Do not cover the grilling grid with aluminium-foil.
- Do not use the oven tray for roasting.
- Do not place hot enamel parts in water. Leave them to cool first.
- Do not allow vinegar, coffee, milk, saltwater, lemon or tomato juice to remain in contact
with enamel parts (inside the oven and on the oven tray).
- Do not use abrasive cleaners or powders that will scratch the surface of the stainless
steel and the enamel.
- Do not attempt to repair the internal workings of your cooker.
- Do remove the protective film before the first use.
- Fire risk! Do not store flammable material in the ovens and in the storage compart-
ment.
FOR YOUR SAFETY
The product should only be used for its intended purpose which is for the cooking of
domestic foodstuffs.
Under no circumstances should any external covers be removed for servicing or maintenance except by suitably qualified personnel.
Do’s and do not’s

27
Warning
When correctly installed, your product meets all safety requirements laid down for
this type of product category. However special care should be taken around the rear
or the underneath of the appliance as these areas are not designed or intended to be
touched and may contain sharp or rough edges, that may cause injury.
GENERAL ADVICE
- Important:
the use of suitable protective clothing/gloves is recommended when handling or
cleaning of this appliance.
Important:
Before cleaning or carrying out any maintenance disconnect the appliance from
the electrical supply and wait for it to cool down.
Attention
The appliance gets very hot, mainly around the cooking areas. It is very important
that children are not left alone in the kitchen when you are cooking.
Do not use a steam cleaner because the moisture can get into the appliance thus
make it unsafe.
Cleaning and Maintenance
8
ENAMELLED PARTS
All the enamelled parts must be cleaned with a sponge and soapy water or other nonabrasive products.
Dry preferably with a microfibre or soft cloth.
Acidic substances like lemon juice, tomato sauce, vinegar etc. can damage the enamel
if left in contact for too long.
REPLACING THE OVEN LIGHT BULB
Switch the cooker off at the mains. When the oven is cool, unscrew and replace the
bulb with another one resistant to high temperatures (300°C), voltage 230 V (50 Hz),
E14 and same power (check watt power as stamped in the bulb itself) of the replaced
bulb. Note: Oven bulb replacement is not covered by your guarantee.
STAINLESS STEEL, ALUMINIUM PARTS, PAINTED AND SILK-SCREEN
PRINTED SURFACES
Clean using an appropriate product. Always dry thoroughly.
Important: these parts must be cleaned very carefully to avoid scratching and abrasion.
You are advised to use a soft cloth and neutral soap.
CAUTION: Do not use abrasive substances or non-neutral detergents as these will
irreparably damage the surface.

28
STORAGE COMPARTMENT
The storage compartment is accessible
through the pivoting panel (fig. 8.2).
Fig. 8.2
Fig. 8.1
OVEN DOORS
The internal glass panel can be easily
removed for cleaning by unscrewing the
2 retaining screws (Fig. 8.1).
Do not store flammable material in
the ovens or in the storage compartment.
Do not use harsh abrasive cleaners
or sharp metal scrapers to clean the
ove n do or gl as s sin ce th ey ca n
scratch the surface, which may result
in shattering of the glass.

29
ASSEMBLY AND DISMANTLING
OF THE SIDE RUNNER FRAMES
– Fit the side runner frames into the
holes on the side walls inside the
oven (Fig. 8.3).
– Slide the tray and rack into the run-
ners (Fig. 8.4).
The shelf must be fitted so that the
safety catch, which stops it sliding
out, faces the inside of the oven.
– To d ism ant le , o per ate in rev er se
order.
Fig. 8.3
Fig. 8.4
INSIDE OF OVEN
The oven should always be cleaned
after use when it has cooled down.
The cavity should be cleaned using a
mild detergent solution and warm water.
Suitable proprietary chemical cleaners
may be used after first consulting with
the manufacturers recommendations
and testing a small sample of the oven
cavity.
Abrasive cleaning agents or scouring
pads/cloths should not be used on the
cavity surface.
• Note: The manufacturers of this appliance will accept no responsibility for
damage caused by chemical or abrasive cleaning.
Attention: Do not store flammable
material in the ovens.
Let the oven coo l down and pay
special attention no to touch the hot
heating elements inside the oven
cavity.
30
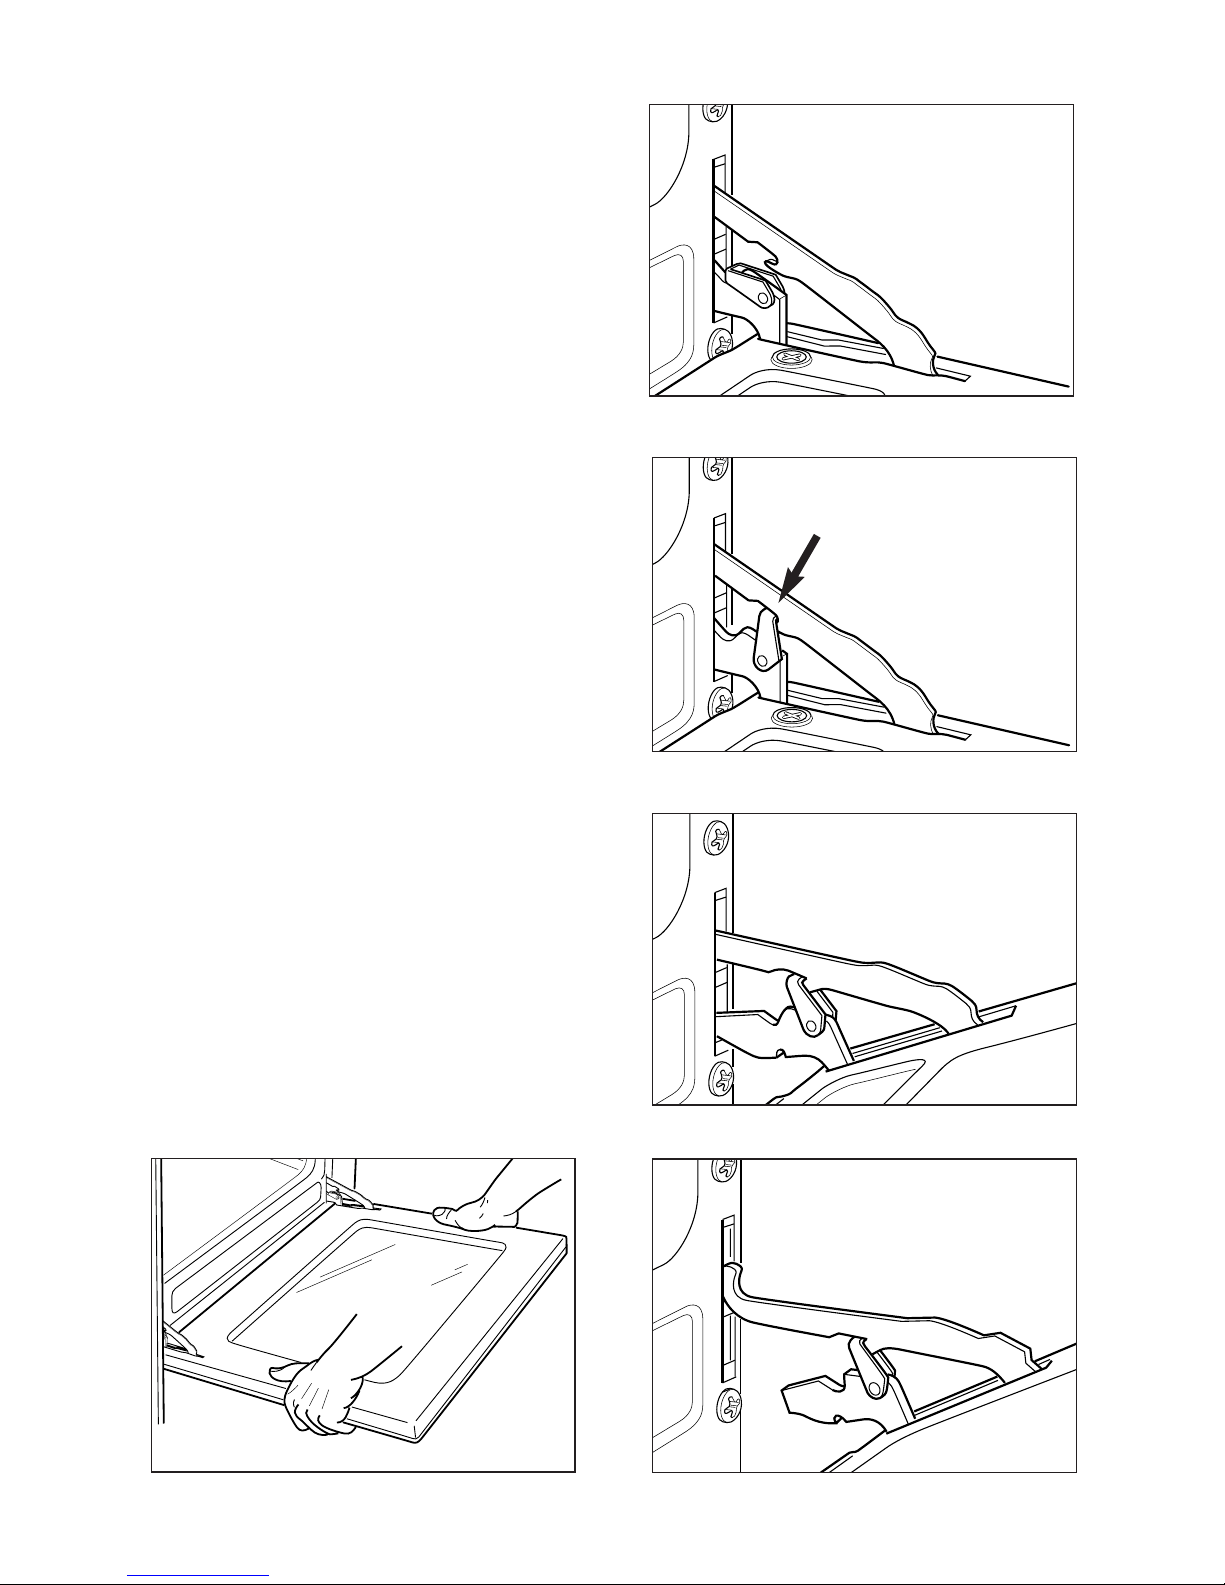
REMOVING THE OVEN DOORS
The oven doors can easily be removed
as follows:
– Open the door to the full extent (fig.
8.5A).
– Attach the retaining rings to the hooks
on the left and right hinges (fig. 8.5B).
– Hold the door as shown in fig. 8.5.
– Gently close the door and withdraw
the lower hinge pins from their location
(fig. 8.5C).
– Withdraw the upper hinge pins from
their location (fig. 8.5D).
– Rest the door on a soft surface.
– To replace the door, repeat the above
steps in reverse order.
Fig. 8.5D
Fig. 8.5C
Fig. 8.5B
Fig. 8.5A
Fig. 8.5

31
Advice for the installer
IMPORTANT
– Cooker installation must only be carried out by QUALIFIED TECHNICIANS and in com-
pliance with local safety standards. Failure to observe this rule will invalidate the war-
ranty.
– The appliance must be installed in compliance with regulations in force in your country
and in observation of the manufacturer's instructions.
– Always disconnect the appliance from the electrical supply before carrying out any
maintenance operations or repairs.
– Some appliances are supplied with a protective film on steel and aluminium parts.
This film must be removed before using the cooker.
– Important: the use of suitable protective clothing/gloves is recommended when
handling or installing of this appliance.

32
IMPORTANT
The cooker must be installed by a qualified technician and in compliance with the
local safety standards.
The appliance must be kept no less than 50 mm away from any side wall which exceed
the height of the hob surface (fig. 9.1).
The appliance must be housed in heat resistant units.
The walls of the units must be capable of resisting temperatures of 75 °C above room
temperature.
Do not install the appliance near inflammable materials (eg. curtains).
If the cooker is located on a pedestal it is necessary to provide safety measures to prevent falling out.
It is essential that the cooker is positioned as stated below.
50 mm
650 mm
500 mm
450 mm
Fig. 9.1
Installation
9

33
Fig. 9.2
FITTING THE ADJUSTABLE
FEET
The adjustable feet must be fitted to
the base of the cooker before use.
Rest the rear of the cooker on a
piece of the polystyrene packaging
exposing the base for the fitting of
the feet.
Fit the 4 legs by screwing them
tig ht into the su ppo rt ba se a s
shown in picture 9.3.
Fig. 9.3
LEVELLING THE COOKER
The co oke r m ay be le vel led by
screwing the lower ends of the feet
IN or OUT (fig. 9.4).
Fig. 9.4

34
Fig. 9.5
MOVING THE COOKER
WARNING
When raising cooker to upright position always ensure two people carry
out this manoeuvre to prevent damage
to the adjustable feet (fig. 9.5).
Fig. 9.6
Fig. 9.7
WARNING
Be careful: do not lift the cooker by the
doo r ha nd le w he n ra isi ng to t he
upright position (fig. 9.6).
WARNING
When moving cooker to its final position
DO NOT DRAG (fig. 9.7).
Lift feet clear of floor (fig. 9.5).

35
We recommend a stability bracket is fitted to the cooker.
The type shown in fig. 9.8 can be purchased from most plumbers merchants and do
it yourself (D.I.Y.) shops.
Wall fixing
Floor fixing
Bracket
Existing slot in
rear of cooker
Dotted line showing the
position of cooker when fixed
Dimension is in millimetres
3
Outline of cooker
backplate at the
engagement slot
Fig. 9.8
Stabilty Bracket

36
ELECTRICAL INSTALLATION
WARNING! Electricity can be extremely dangerous.
This appliance must be earthed.
The appliance must be connected to the electrical network verifying above all that the
voltage corresponds to the value indicated on the specifications plate and that the
cables section of the electrical plant can bear the load which is also indicated on the
plate.
It is recommended that the appliance is connected directly to the mains by fixed wiring,
placing a double pole switch with minimum opening between the contacts of 3 mm.
The power supply cable must not touch the hot parts and must be positioned so that it
does not exceed 75°C at any point.
Once the cooker has been installed, the switch must always be accessible.
Before effecting any intervention on the electrical parts the appliance must be disconnected from the network.
Electrical Section
10

37
D
B
Fig. 10.1
ELECTRICAL FEEDER CABLE CONNECTION
To connect the feeder cable to the cooker it is necessary to:
– Remove the screw that hold shield “A” behind the cooker (fig. 10.1).
– Open completely the cable clamp “D”.
– Insert the feeder cable of the suitable section (as described in the next chapter) into
the cable clamp “D”.
– Connect the phase, neutral and earth cables to
the terminal block “B” according to the diagram
in figure 10.2.
– Pull the feeder cable and block it with cable
clamp “D”.
– Re-mount shield “A”.
Connecting the power cord must be entrusted to skilled personnel in accordance
with the instructions supplied by the manufacturer and in compliance with
established safety standards.
FEEDER CABLE SECTION
“TYPE H05RR-F OR H05VV-F”
230 V 3 x 6 mm2(**)
(**)
– Connection with wall box connection.
– Diversity factor applied.
– A diversity factor may be applied to the total
loading of the cooker only by a suitable
qualified person.
PE
1 2 3 4 5
N (L2)L
1
230 V
2 3 4 51
230 V ~
N(L2)
PE
L1
Red
or
Brown
(Live)
Black
or
Blue
(Neutral)
Green
and
Yellow
(Earth)
PE Earth
N Neutral
L Live
Fig. 10.2
Fig. 10.3
A

38
Fig. 10.4
CONNECTION TO FIXED WIRING
A double pole switch must be provided no further than 2 metres from the appliance
to the electrical supply.
The appliance should be connected to a DOUBLE POLE SWITCHED FUSED SPUR
OUTLET, similar to that shown in Fig. 10.4.
We recommend that the appliance is connected by a suitably qualified person who will
comply with the IEE and local regulation.
FUSE
ON
Use a suitable FUSE in accordance
with the appliance power rating.
DOUBLE POLE SWITCHED
FUSED SPUR OUTLET

39
Descriptions and illustrations in this booklet are given as simply indicative. The manufacturer reserves the right,
considering the characteristics of the models described here, at any time and without notice, to make eventual
necessary modifications for their construction or for commercial needs.

The product specifications in this booklet apply to the specific
products and models described at the date of issue. Under
our policy of continues product improvement, these
specifications may change at anytime. You should therefore
check with your dealer to ensure this booklet correctly
describes the product currently available.
Main dealer: www.rangecookers.co.uk
Service and Helpline Information:
tel: 01244 402 976
www.rangecookersappliances.co.uk
Rangecookers Select 90ec User Guide
Product No: RCS90RCECSS/RCS90RCECBK
Booklet No: 1103684-ß2
Rangecookers and Rangecookers Appliances are a trading name of Bigblue Product Design Ltd.
 Loading...