

Page 1
Page 2
BIGBIG WON ELITE APP
CustomizethebuttonfunctionsofyourARMORXProbackbuttonwithBIGBIG
WONELITEAPP,anda seriesfunctionscanbesetsuchasMacro,on-board
configuration,mappingbackbuttons,motioncontrolandmore.
www.bigbigwon.com/support
BIGBIG WON ELITE APP REQUIREMENTS APP
iOS 13(or higher) / Android 11(or higher)
The ELITE APP needs internet, Bluetooth permission and location permission.
Please APP get these permission when install. If there is no prompt please open it in
your mobile phone’s system or the APP can not connect to your device.
CONNECT BIGBIG WON ELITE APP
EnsurethattheARMORXProisconnectedwith yourcontrollersuccessfully.
1.
TTurnonthe mobiledevice'sBluetoothfunction.
2.
Press “ARMORX Pro” to connect your ARMORX Pro.
3.
After the connection is successful, you can set many custom functions for your
4.
device.
PACKAGE
CONTENTS
SUPPORTED
CONTROLLER
SUPPORTED
PLATFORM
BIGBIGWONARMORX ProWirelessBackButton/USB Wireless Adapter
TYPE-C Data Cable/User Manual/Qualified Certification
Xbox Series Controller
Xbox Series X | S / Xbox One / Switch / Win 10/11
Page 3
NAME OF EACH PART
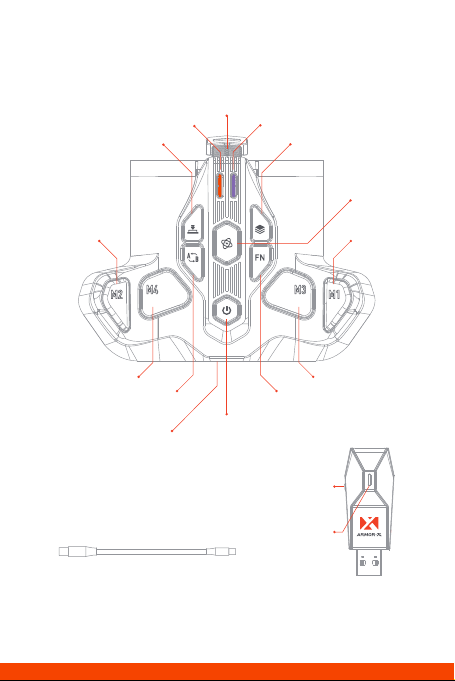
LED1
Turbo button
USB-C flexible cable
LED2
Profile switch button
MotionAim control button
M1 Back buttonM2 Back button
M4 Back button M3 Back button
Mapping button
USB-C port
TYPE-C data cable
Power on/off button
FN button
Pair button
Indicator
USB wireless adapter
Page 4
ATTACHTHEARMORX PRO
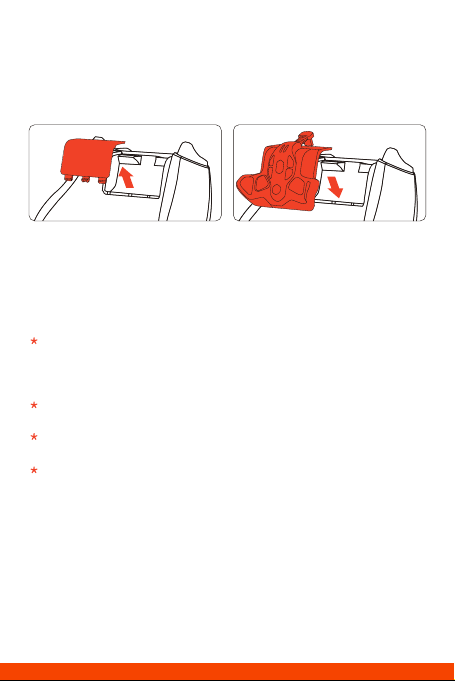
1. Removethebatterycompartmentcoveroffthe Controller and attachthe
ARMORX Protothebatterycompartment.
2. PlugtheUSB-CflexiblecableofARMORX ProintotheUSBportofthe Xbox
SeriesController.
NOTICE:Forbestperformance,pleasefullychargetheARMORX Probeforeusingitforthefirsttime.
Ittakesabout2.5hourstofullychargeadepletedbattery.
WIRELESS CONNECTION
The Xbox Series controller with ARMORX Pro can support Xbox/ PC/ Switch originally.
Hold the power button to turn on the ARMORX Pro and plug the USBwirelessadapter
into the console’s USB port. The ARMORX Pro will detect the platform automatically.
LED1 slowly flashes mean that the ARMORX Pro is connecting with the adapter.
And the fast flashes mean that the ARMORX Pro is paring with the adapter. After
the connection is successful the LED1 will become always on (The adapter
indicator is same).
After the connection is successful the LED1 and adapter indicator will become
always on and switch to the corresponding platform color.
LED2 flashes mean the connection between ARMORX Pro and controller is
unsuccessful and always on means connection success.
Connect with Switch console need to set: System Settings> Controllers and
Sensors> Pro Controller Wired Communication On.
WIRED CONNECTION
1. After attaching the ARMORX Pro to the Xbox Series controller, hold the power
button to turn it on.
2. Connect the Type-C port of ARMORX Pro to the console with a Type-C cable.
3. Check the indicator lights of the ARMORX Pro until both indicators are always on,
which means the wired connection is successful.
Note: 3.5mm audio jack is only available under wired connection, wireless connection
does not support 3.5mm audio.
Page 5

RE-PAIR
ARMORX Pro is already paired with the adapter in the factory. The only situation you
need to pair it with is that the connection of ARMORX Pro and adapter is failed.
The steps of re-pair:
1. After the ARMORX Pro is on, hold the + until the LED1 fast flashes, the
ARMORX Pro enters pairing mode.
2. Plug the adapter into the console and hold the pair button on the adapter until
the indicator fast flashes, the adapter enters the pairing mode.
3. When the LED1 and adapter indicator fast flashing means it is pairing. Please
wait for it until the LED1 and adapter indicator become always on, the re-pair is
successful.
MOTION CONTROL
The ARMORX Pro has motion control function that allows you to use the gyroscope
to simulate the action of left/right joysticks in games that do not support motion
control originally.
1. Turn on: Click once the MotionAim control button . The LED2 will be purple.
2. Turn off: Click the MotionAim control button once again to turn off the motion
control. The LED2 will flash twice and turn off.
THE MODES OF MOTION CONTROL
There are three modes of motion control:
Global right joystick simulation, Response right joystick simulation, Global left
joystick simulation.
The open methods of three modes:
1. Global joysitck simulation:
Hold + LS to open the global left joystick simulation.
Hold + RS to open the global right joystick simulation.
2. Response joystick simulation:
Hold + response button and press RS to open the response right
joystick simulation.
Open the motion control by click once MotionAimcontrolbutton will open the last
mode you have used.
SUPPORT SWITCH ORIGINAL MOTION CONTROL
ARMORX Pro has a built-in 6-axis gyroscope, and the game of Switch console
supports native motion control by default. There is no need to turn on Simulated
motion control, please make sure Simulated motion control is turned off.
Page 6

THE CALIBRATION OF GYROSCOPE
Put the Xbox Series controller that is already attached to the ARMORX Pro on the
horizontal desk and press the + of the Xbox Series controller. The LED2 will
slowly flash in purple. The LED2 flashes twice and turns off means the calibration is
successful.
MAPPING BUTTON
1. MAPPING SETTING:
Press + (M1/M2/M3/M4) to enter the mapping mode. The LED2 will breathe in
green. Then press the target button, the LED2 will flash twice. The mapping is
success.
2. THE BUTTONS SUPPORT MAPPING:
ABXY,D-pad, LT/RT/LB/RB, M1-M4, RS/LS, menu, view, share.
3. CANCEL MAPPING:
Hold the button that needs to be canceled ( M1-M4 ) and double click the ,
LED2 will flash twice in green means cancel success.
4. CANCEL ALL MAPPING:
Double click the , LED2 will flash twice in green means cancel success.
TURBO BUTTON
1. TURBO SETTING:
Hold + the button needs TURBO to open the TURBO function. The controller
will shake for 0.2 seconds and LED2 will flash twice in orange.
2. THE BUTTONS SUPPORT TURBO:
ABXY,D-pad, LT/RT/LB/RB, M1-M4, RS/LS.
3. CANCEL TURBO:
Hold the button that needs to be canceled + double click the ; the LED2 will
flash twice in orange..
4. CANCEL ALL BUTTONS’ TURBO:
Double click the , LED2 will flash twice in orange and all TURBO will be
canceled.
5. CHANGE THE FREQUENCY OF TURBO:
Hold + ↑ to change the frequency in 5/s, 10/s, 20/s
(The TURBO frequency won’t be changed by on-board profiles).
Page 7

MACRO RECORDINGN
1. MACRO RECORDING:
Press + (M1/M2/M3/M4), the LED2 will breathe in red the ARMORX Pro enters
recording mode. Press the buttons on the controller after the recording is finished
click once LED2 will flash twice means end recording. The LED2 will slowly
flash during the MACRO is being executed.
2. THE BUTTONS SUPPORT RECORDING:
ABXY,D-pad, LT/RT/LB/RB, M1-M4, RS/LS, joystick.
3. CANCEL MACRO:
Hold the button need to be canceled (M1-M4) and double click the , LED2 will
flash twice in red means cancel success.
4. CANCEL ALL MACRO:
Double click the , LED2 will flash twice in red means cancel success.
ADJUSTMENT OF RUMBLE MOTOR
1. Press + ← to change the vibration intensity of trigger motor. 4 gears vibration
intensity can be changed cyclically: strong, medium, weak, off.
2. Press + → to change the vibration intensity of handle motor. 4 gears vibration
intensity can be changed cyclically: strong, medium, weak, off.
ON-BOARD PROFILE
ARMORX Pro has 3 on-board profiles can be cycle switched by click the .
The color of LED1 on the left side shows different profiles.
1. Orange is the first profile.
2. Green is the second profile.
3. Blue is the third profile.
Page 8

BATTERY
The ARMORX has 1300mAh to satisfy 10 hours using. The biggest factor affecting
battery life is the vibration intensity of motor. The high-frequency vibration will greatly
reduce battery life.
The charging power is 5V/1A, and it will take 2 hours to fully charge.
1. Low battery: When the battery is too low, the controller will vibrate 3 times and
the LED1 will flash quickly in red. It will cycle every 5 minutes.
2. Charging: When the ARMORX Pro is charging LED1 will be always on in red. And
it will be always on in green after fully charged.
DETAILED FUNCTIONAL OPERATION INSTRUCTIONS
Please access ”BIGBIG WON Official Website>Support” to check the instruction
https://www.bigbigwon.com/support/
Page 9
Scan the QR code to
watch video tutorial
Visit the official support page for a detailed video tutorial:
If you have any questions or issues, please submit a support request
www.bigbigwon.com/support
AMAZON Product page> Seller profile> "Ask a question"
through the ways below:
Customer Service Address: [email protected]
BIGBIG WON SUPPORT
WELCOME TO THE
BIGBIGWON COMMUNITY
The BIGBIG WON community is built to connect those who seek the winning edge.
Join us Discord and Follow our social channels for the latest offerings, exclusive event
coverage, and opportunities to score BIGBIG WON hardware.
BIGBIG WON DISCORD
@BIGBIG WON
Page 10

© 2022 BIGBIG WON Inc. All rights reserved.
Product may vary slightly from pictures.
 Loading...