


EZ-M3R

Must Read Before Use
Certification
General Information
Introduction
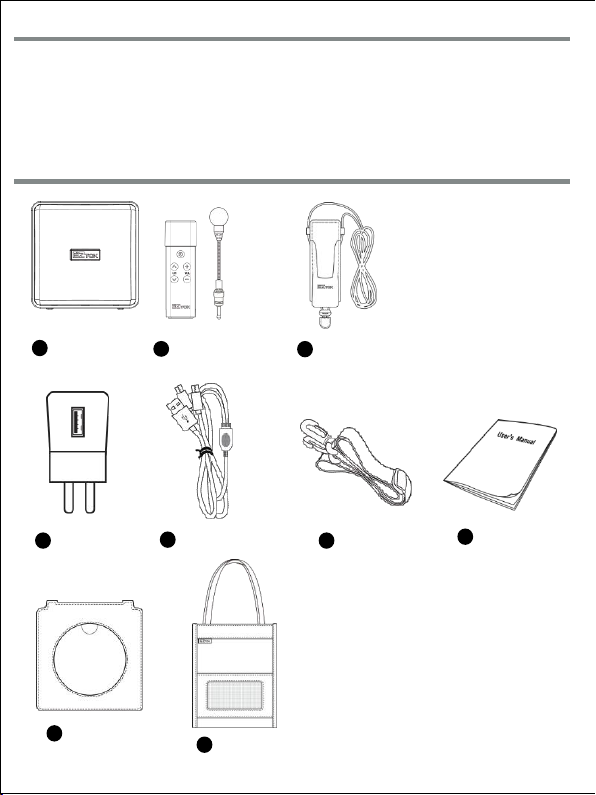
Product Components (Accessories)
Product Overview
Speaker
Microphone
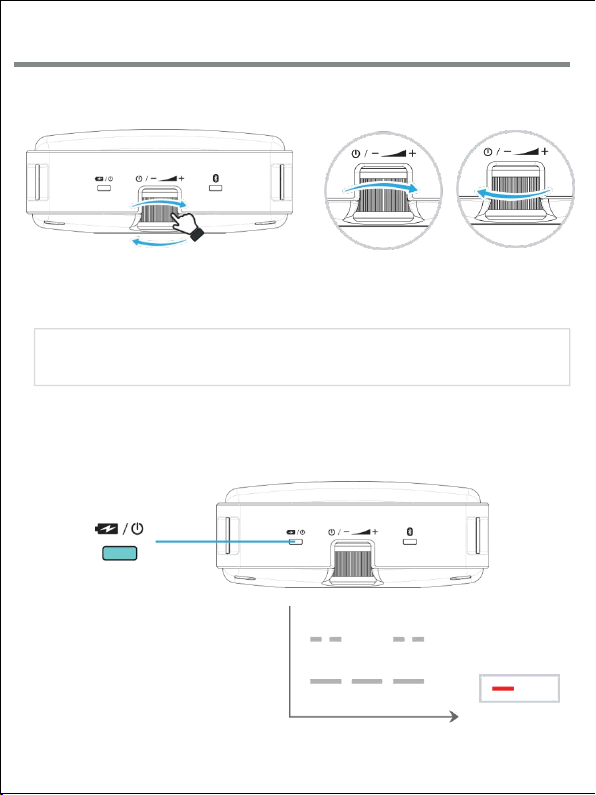
Speaker ON / OFF
Microphone ON / OFF
Battery Level
Volume Setting
Bluetooth
Bluetooth Music file Control
Microphone Number Setting (For using two mics)
How to pair two Mics with one speaker (For using two mics)
Channel Setting
How to use a head-microphone
Re-Booting (When SPREK R is not responsive)
How to charge
Specification
Warranty
Warranty Coverage
Memo
------------------------------------------------------ 2
------------------------------------------------------------------ 2
--------------------------------------------------------- 3
------------------------------------------------------------------ 3
----------------------------------------- 3
---------------------------------------------------------------- 5
------------------------------------------------------------ 6
----------------------------------------------------------- 6
------------------------------------------------------ 7
----------------------------------------------------------------- 8
---------------------------------------------------------------9
------------------------------------------------------------------- 10
----------------------------------------------- 12
---------------------- 13
----------- 14
------------------------------------------------------------- 16
------------------------------------------ 17
--------------------------------- 18
-------------------------------------------------------------- 20
---------------------------------------------------------------- 21
-------------------------------------------------------------------- 22
-------------------------------------------------------- 23
----------------------------------------------------------------------- 24
Table of Contents
-01-

-02-
Must Read before Use
I Note I
* Do not put metallic or sharp material like a pin or a needle into the speaker when using SPREK R.
* Do not try to put apart this product or fix it yourself
* Do not leave SPREK R inside a vehicle in hot summer or cold winter.
* If you leave SPREK R inside a closed car for long time, it could result in deformation, malfunction
or product damage.
* Please use only Bicom’s charger or cable when using or charging SPREK R. If you use a third party’s
charger or cable, it could result in explosion, burning or product damage.
* Stop using SPREK R immediately if you find smoke out of it or smell burning.
* Please do not use any third party components other than the included components.
* Using a third party component may cause breakdown or technical issues.
* Try not to put strong physical shock to SPREK R. It may cause breakdown or malfunction of the produ
ct.
* If dust gets in SPREK R, the quality of the product will decline. So clean the product with soft cloth
regularly .
* If SPREK R is submerged in water, try not to put it apart or fix it yourself. Call our service center.

-03-
General Information
Wireless Mic
rophone
* Check there are all product components before using it.
* Read through this manual to learn how to use it
* If the microphone is facing the speaker, feedback could occur, so try not to face it
toward the speaker.
* If you set volume high at a narrow space, feedback could occur, so please check if you
set the volume right before using it.
* Check the battery level often when using it. We recommend charging it when battery
level bar level is below “ 2 “.
* When the battery level is low, re-charge it using the included charger and cable.
* We recommend keeping your microphone within 5cm away from your mouth. Otherwis
e,
the voice may sound weak.
* When using a wired microphone by directly putting it to the speaker, make sure to
turn off the wireless microphone.
Wired Head
Microphone
* Before using it, try to fit it around your head.
* Put your mouth a little closer or further from it until you find the best vocal tone
* Firmly insert the earphone jack (3.5 pi) into the wireless microphone or the speaker.
Wireless
Speaker
* Check there are all components before using it.
* Read through this manual to learn how to use it
* Check the battery level often when using it. We recommend charging it when battery
level bar level is below “ 2 “.
* If the distance between the microphone and the speaker is close, feedback may occur.
* Try to adjust the distance between the microphone and the speaker, volume and
direction for best performance.
Input and o
utput Termi
nals
* Use only the Bicom-provided charger and cable for charging.
* You can connect the Bicom-provided microphone to ‘AUX IN’ for use.
* If you connect a third party audio product to AUX IN‘, check if it works normally.
* If you use a third party product with ‘AUX IN’, try not to turn up the volume to the
point where it may damage the speaker.
* “AUX IN” doesn't support a regular smartphone earphone or a headset.
* For the information on a AMP speaker or power that can be used with ‘AUX OUT’,
please check with us first before using them.
Bluetooth
* Read through this manual to learn how to use it
* Keep the distance between a mobile phone and an wireless speaker within 10m when
trying to pair them with Bluetooth.
* If a mobile phone is longer than 8~10m apart from the speaker, or Bluetooth pairing
gets disconnected, then try to re-pair them by Bluetooth.
Introduction
SPREK R is a wireless speaker & microphone.
SPREK R is designed to amplify your voice so crowd can hear your voice clearly from distance.
SPREK R works the best as a teacher’s portable amplifier.
Also, using 902~928MHz which is usually not overcrowded, SPREK R has no risk of 2.4GHz interfere
nce.
It offers remarkably good sound performance with a compact and light body.
So, it helps distribute your voice evenly across broad area.
-04-
Product Components (Accessories)
Speaker
(SPREK R)
1
4
Microphone
Holder
3
Pouch
9
Charger
5
User Manual
8
Y Type Charging Cable
6
Wireless Microphone
(M3 T)
2
3
Shoulder Strap
7
Pouch Case
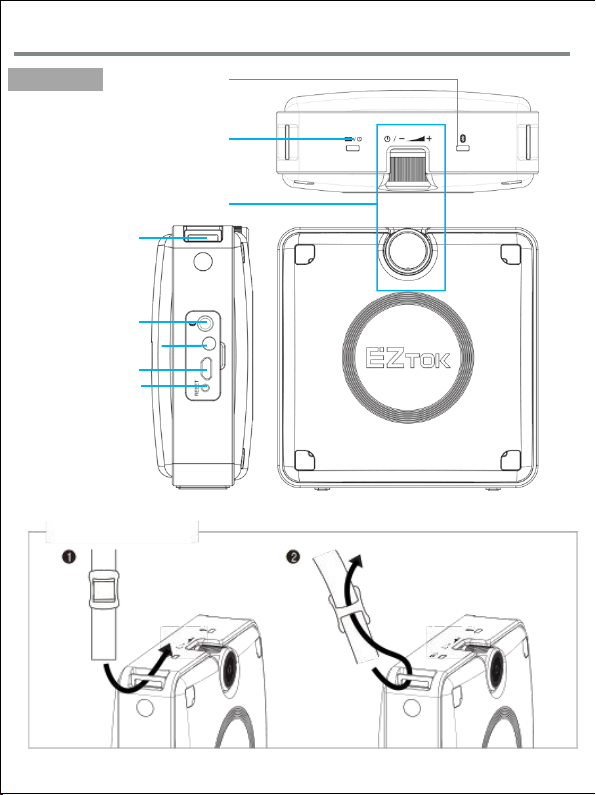
Bluetooth/
Pairing Button
AUX/Wired MIC Terminal
Charging Terminal
RESET Button
Power / Battery Level
Power On.Off / Volume Level
Bluetooth LED
Image
-05-
Main Device
Shoulder Strap
How to Use Shoulder Strap
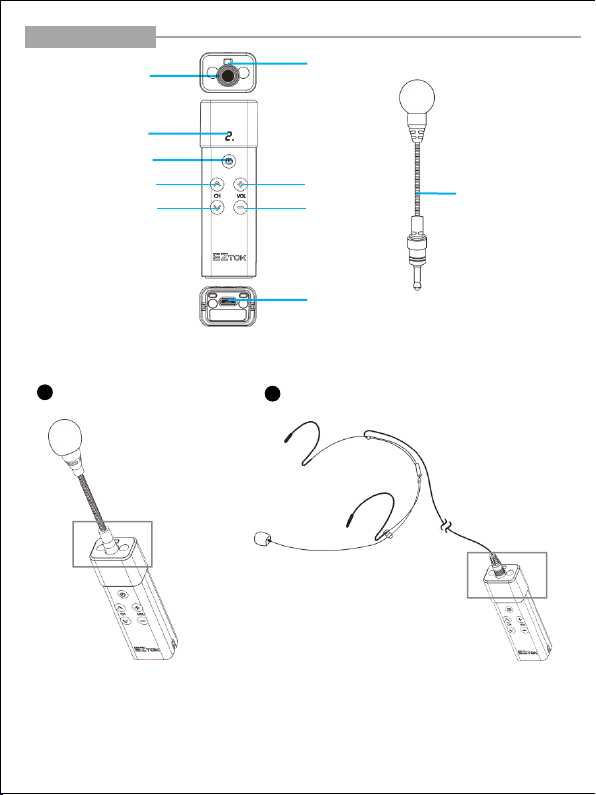
Wireless Microphone
Strap Hanger
Input Terminal
Power
Channel Up
Channel Down
Status Display
Volume Up
Volume Down
Charging Terminal
Boom MIC
I How to Use Boom MIC I
Insert the Boom MIC into the termi
nal
1
Insert a head-microphone into the terminal
2
-06-
-07-
Speaker Power ON / OFF
- Power is on if you turn the switch to the "+" direction
- Power is off if you turn the switch to the "-" direction
Power on
Power off
Turn as shown below until you hear
sound
※ Note
If left not used for an half hour, the speaker automatically goes to power-saving mode.
I Speaker LED I
When a microphone is connected, LED blinks
twice quick.
LED on
Time
When a microphone is not connected, LED bli
nks slowly..
LED blinks differently depending on wireless microphone connection

Microphone ON / OFF
2Sec
Microphone is turned on, if you press & hold the power button for two seconds.
Microphone is turned off, if you press & hold the power button for two seconds again.
-08-

Remaining Battery Level
-09-
Battery LED below indicates the current remaining battery level.
When battery is running low, battery low audio comes out apart from the battery LED.
Recharge the battery when battery is running low.
LED blinks three times with 80% of battery
LED blinks twice with 50% of battery
Time
LED blinks one time with 20% of battery
LED On
I Microphone Battery Level (Three levels) I
20% Left 50% Left More than 80% Left

-10-
Volume
I How to Set Volume I
Volume Up
Volume Down
Total Volume = Speaker Volume x MIC Volume
I Microphone Volume I
Mute on / off
0.5 Sec
Volume Up or Down
0.5 Sec
How to Set Volume from Microphone

-11-
Bluetooth
You can play music or audio file from M3 R via Bluetooth.
Bluetooth pairing has to be done first between M3 R and Bluetooth-support device
Bluetooth Pairing with Smart Phone
1
2 Sec
Press & hold Bluetooth button for tw
o seconds to go to pairing mode.
I Pairing with iOS Phone I

-12-
I Pairing with Android Phone I
You can play your smartphone music from M3 R once pairing is done.
Bluetooth Mode
2
0.5 Sec
You can make pairing simply by pressing Bluetooth button short if you
r smartphone was paired with M3 once before.

LED is constantly on with Bluetooth connec
tion
Time
LED on
I Bluetooth LED I
Upon Bluetooth connection, b
lue light is on.
LED blinks with no Bluetooth connection
I How to Run Bluetooth Music (Audio File) I
-13-
0.5 Sec
0.5 Sec
Skip to next file
Pause or Play
Volume Up / Volume Down
2 Sec

Microphone Number Setting [ for Two MICs ]
There is no need to do microphone number setting when using one microphone.
However, to use two wireless microphones, each microphone needs to be given its own number t
o prevent interference with one another.
I Set the second microphone to number 2 for two microphone use I
2 Sec
Together
Set to number 2 by pressing c
hannel up button short.
I Microphone Number Display I
U (User)
Number
Press power button short to complete
※ Note
Of two microphones set only one microphone to number “2”.
If two microphones are all set to number “1” or “2”, microphone transmission
doesn’t work normally with interference..
-14-

Pairing between Speaker and Microphone [ for two MICs ]
For two microphone transmission, two microphones need to be paired with a speaker.
2 Sec
Together
You can go to pairing mode by pressing & hold
power button for 10 seconds as well.
I First MIC I
I Second MIC I
U (User)
MIC Number
U (User)
MIC Number
-15-
1 Go to Microphone Pairing Mode

2
Go to Speaker Pairing Mode
Turn on the speaker while pressing&hold pairing button.
Press&hold the pairing button until the sound of “Pairing” comes out.
Power On
3
Once pairing is done, the red LED below is slowly turned off.
-16-

I Microphone Channel Setting I
2 Sec
0.5 Sec
2 Sec
Go to Channel setting mode
1
Choose between 0 and 9
2
Channel Setting completed
or
3
Channel Setting
You can change channel number between 0 and 9 to avoid frequency interference.
When using two microphones, you need to set them to same channel number.
-17-

Reset
(in case the speaker is unresponsive or malfunctions)
* Press “RESET” button when power is on.
Then speaker re-boots.
“RESET” button stays inside so use
something sharp to press it.
-18-

Microphone Reset
1
Press Channel down and Volume Up together
0.5 Sec
Together
2
Press&hold “Power” button for two seconds.
※ Note
Be careful not to press Channel down and Volume up t
ogether when a microphone works normally.
2 Sec
-19-

How to Charge Speaker and MIC Together
Speaker: Battery LED turns orange while being charged and turns green once charging is complete.
Microphone : Blue and red appears together while being charged and turns blue once charging is comple
te
Charging
Charged
Charging
Charged
※ Note
• Please use only the included-charging adapter.
• When using a smartphone’s charger, make sure to use a 5V/2A charger
• We do not recommend charging it with the power on.
If charged with the power on for more than a day, the product may
self-discharge. In this case, please re-charge the product. To get it fully
charged, please make sure to turn it off before starting charging it.
.
-20-

-21-
Specifications
Frequency
902 MHz~928 MHz
Transmission Method
TDMA
Modulation System
FSK
Battery
Rechargeable Li-ion 3.7V /3,400mAh Battery for Speaker
Rechargeable Li-ion 3.7V / 650mAh Battery for Microphone
Battery Life Time
24 hours for speaker at stand-by or 10 hours at constant use
9 hours for microphone at constant use
Charging Time
6 Hours for Speaker / 2 hours for microphone
Working Temperature
-10/+50℃
Size
Speaker : 105mm(W) / 105mm(H) / 40.7mm(D)
Microphone : 28.0mm(W) / 93mm(H) / 20.0mm(D)
Weight
Speaker : 340 g
Microphone : 60 g
Frequency Response
100 Hz ~ 20 kHz
Speaker Output
30W
Bluetooth
Bluetooth 4.1
Bluetooth Function
A2DP, AVRCP
※ The function may change without any notice for product improvement purpose.
※ The life time of battery may differ depending on product age.
※ The battery life time for speaker above is measured at volume 2.
About After Service
Please let us know the model name, description of technical issue, and co
ntact number for service matter.
Number to Call : 82 - 70 - 7725 - 1103
Website : www.ez-tok.co.kr

Product Warranty
Thank you for purchasing our product.
Product Name
Wireless Speaker
Model Name
SPREK R
Serial Number
Warranty Period
2 Year
Purchase Date
Make sure you fill in all the blanks. This product has passed the strict quality test and in case of b
reakdown, the warranty will cover product repair as stated in the Product Warranty. You may requ
est product repair to agency or headquarters from which you purchased this device. This Product
Warranty is not reissued, so make sure you do not lose it.
Warranty Details
- Free repair is guaranteed in case of failure by the Manufacturer or natural
defect during the warranty period.
- Free repair is NOT guaranteed in case of the following cases.
1. Failure due to your carelessness in operating the device
2. Failure due to repair or remodeling by an unauthorized person
3. Failure due to natural disasters such as fire, earthquake and flood
4. Failure due to user’s intended or accident mistakes.
5. Failure due to use of non-genuine components and accessories
BiCom Corp.
-35-
US-Ver01

www.ez-tok.com
SIMPLIFIED EU DECLARATION OF CONFORMITY
The simplified EU declaration of conformity referred to in Article 10(9) shall
be
provided as follows:Hereby, BICOM INC.declares that radio equipment EZ-M
3R is in compliance with Directive 2014/53/EU, and this product
is allowed to be used in all EU member states.
The full text of the EU declaration of conformity is available at following
company website: http://www.ez-tok.com
Eg:This product can be used across EU member states.

FCC STATEMENT :
This device complies with Part 15 of the FCC Rules. Operation is subject
to the following two conditions:
(1) This device may not cause harmful interference, and
(2) This device must accept any interference received, including
interference that may cause undesired operation.
Warning: Changes or modifications not expressly approved by the party
responsible for compliance could void the user's authority to operate the
equipment.
NOTE: This equipment has been tested and found to comply with the
limits for a Class B digital device, pursuant to Part 15 of the FCC Rules.
These limits are designed to provide reasonable protection against
harmful interference in a residential installation. This equipment
generates uses and can radiate radio frequency energy and, if not
installed and used in accordance with the instructions, may cause harmful
interference to radio communications. However, there is no guarantee
that interference will not occur in a particular installation. If this equipment
does cause harmful interference to radio or television reception, which
can be determined by turning the equipment off and on, the user is
encouraged to try to correct the interference by one or more of the
following measures:
Reorient or relocate the receiving antenna.
Increase the separation between the equipment and receiver.
Connect the equipment into an outlet on a circuit different from that to
which the receiver is connected.
Consult the dealer or an experienced radio/TV technician for help.
RF warning statement:
The device has been evaluated to meet general RF exposure
requirement. The device can be used in portable exposure condition
without restriction.

- English: "
This device complies with Industry Canada licence-exempt RSS standard(
s). Operation is subject to the following two conditions:
(1) this device may not cause interference, and
(2) this device must accept any interference, including interference that
may cause undesired operation of the device."
- French:"
Le présent appareil est conforme aux CNR d'Industrie Canada applicables
aux appareils radio exempts de licence. L'exploitation est autorisée
aux deux conditions suivantes :
(1) l'appareil nedoit pas produire de brouillage, et
(2) l'utilisateur de l'appareil doit accepter tout brouillage radioélectrique
subi, même si le brouillage est susceptible d'en compromettre le
fonctionnement."
 Loading...