

Page 1
1
USER MANUAL
Evobi Automations Pvt Ltd www.firepen3d.bibox.in
Page 2

Evobi Automations Pvt Ltd www.firepen3d.bibox.in
2
TABLE OF CONTENTS
A. SETTING UP YOUR Firepen 3D PRINTER
1. Attaching Power Supply and Powering On
B.Firepen 3D printer AT A GLANCE
1. 3D printer Diagram
2. Specifications
3. Touch Screen panel
C.FIRST USE
1. Installing Spool Holder and Mounting the Filament Spool
2. Preheating the Extruder
3. Loading Filament
4. Leveling the Build Platform
D.MAKING AN OBJECT WITH 3D printer
1. Making a Test Object from the SD Card
Appendix
Using Slicer Software Cura(一)
1. Installing Software
2. Software Settings
3. Tutorial of parameter setting
4. Software operation
Display and Controller(二)
Page 3
3
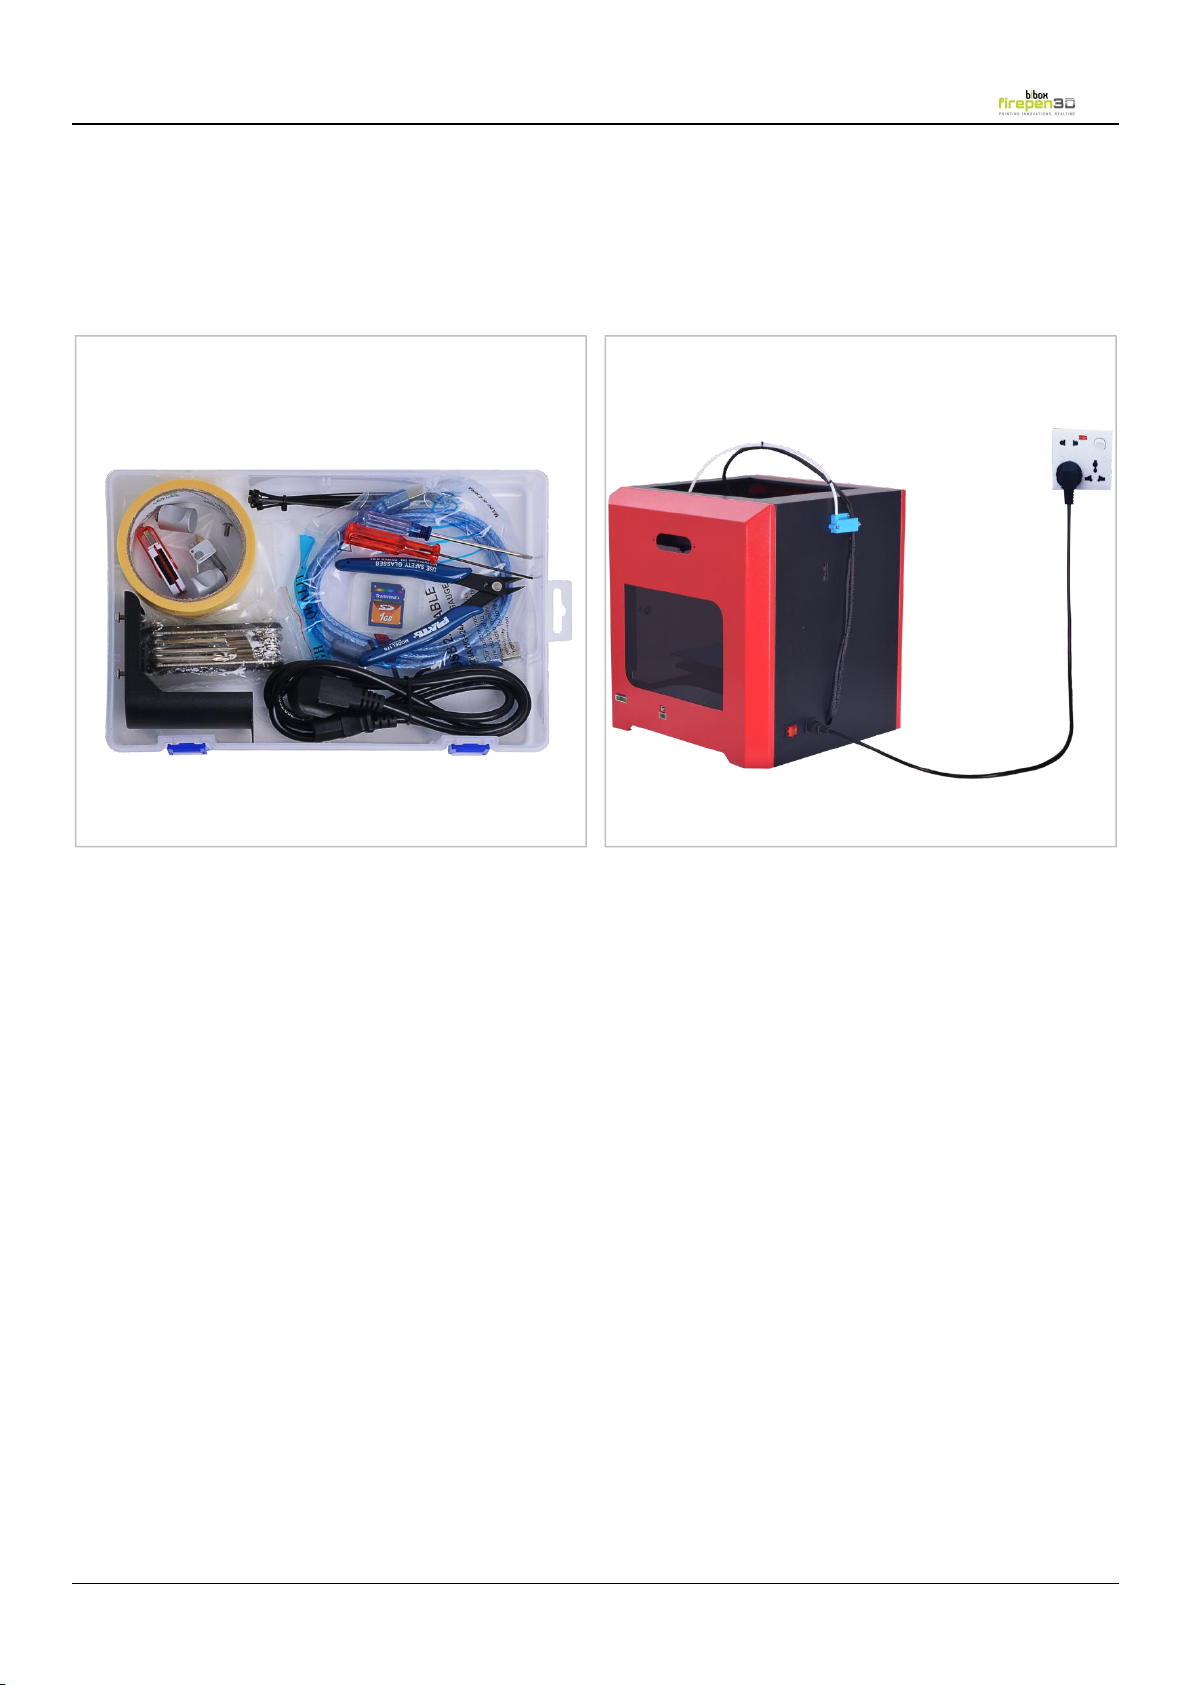
* Its very important to see to that, the Power socket that the Firepen 3D printer connects to, can source
A. SETTING UP YOUR Firepen 3D PRINTER.
1.Attaching Power Supply and Powering On
atleast upto 15A current and 220V AC supply. Also, see to that, this power socket isn’t sharing with other
electrical appliances. Under supply of current can cause malfunction of the Firepen 3D printer unit.
Evobi Automations Pvt Ltd www.firepen3d.bibox.in
Page 4
Evobi Automations Pvt Ltd www.firepen3d.bibox.in
4
B.Firepen 3D printer AT A GLANCE
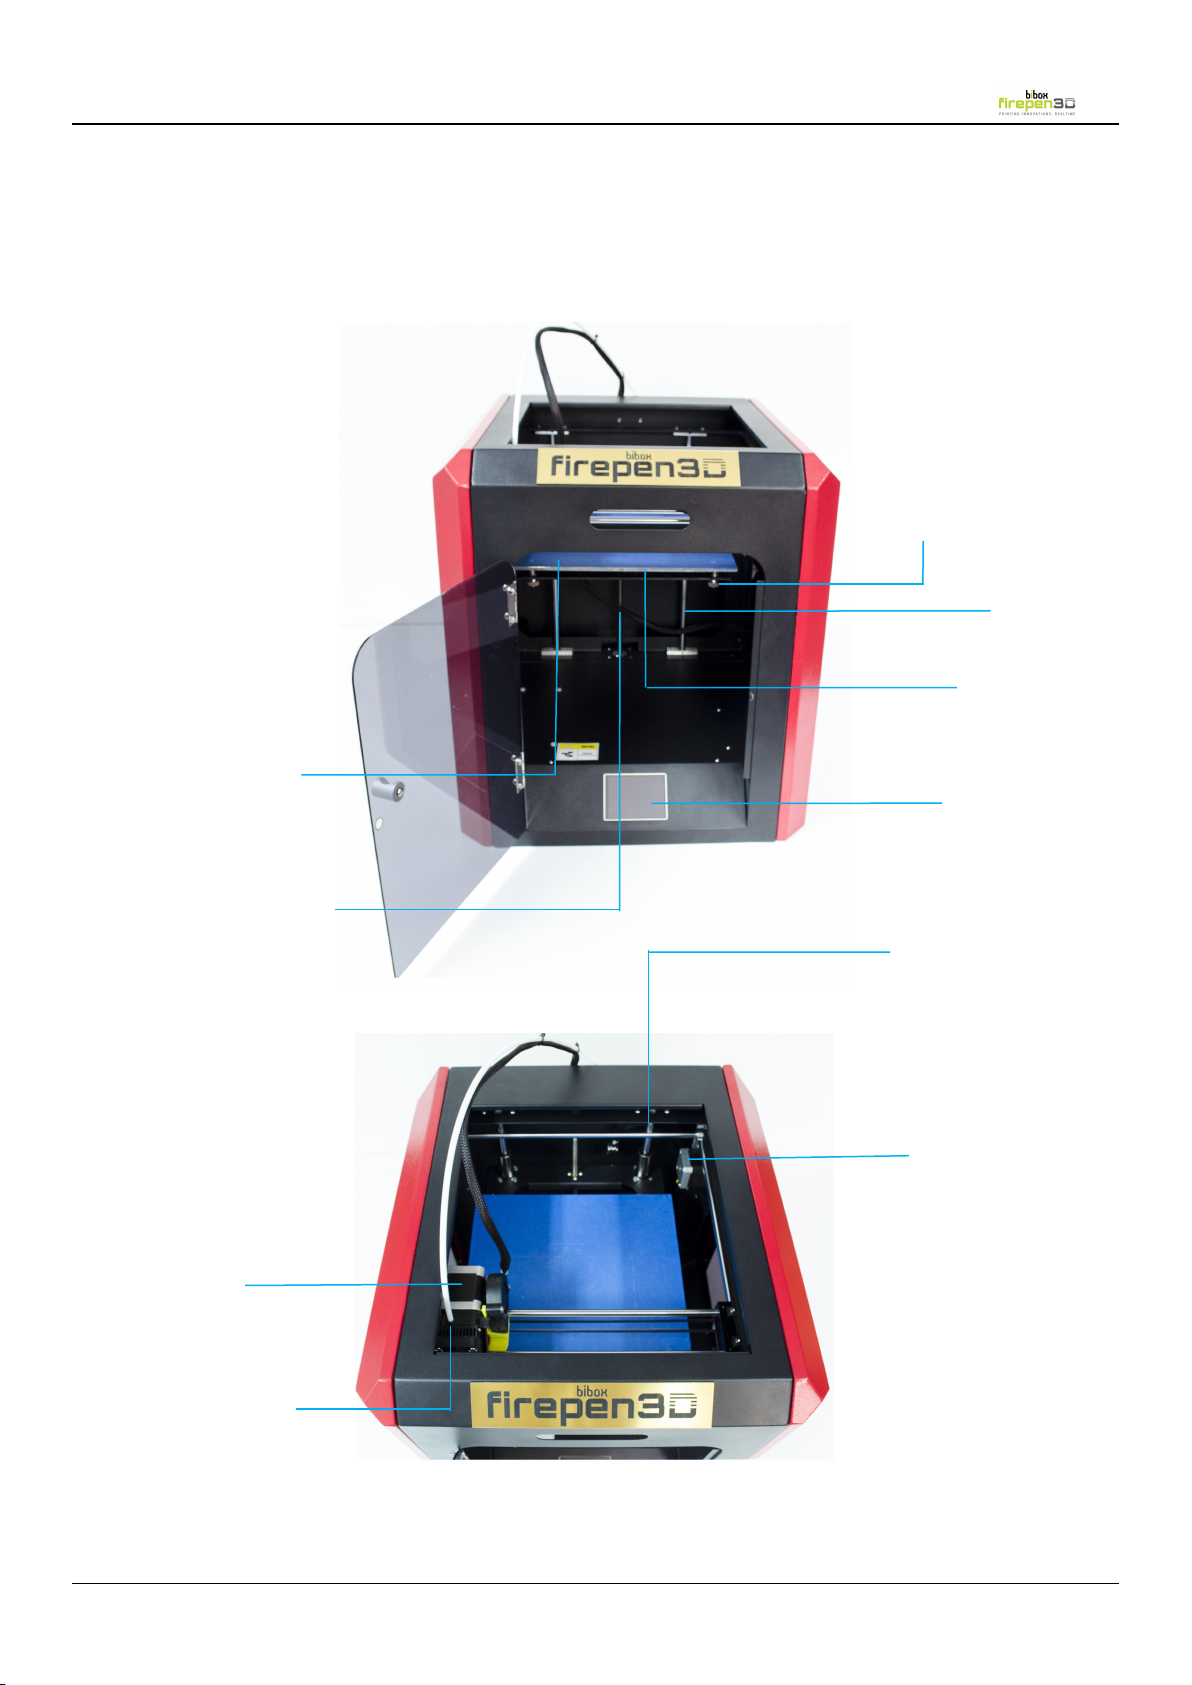
1. 3D printer Diagram
Extruder
Gantry rod
Drive bearing
Y axis motor
Build plate screws
Build plate
Build platform
Threaded rod
X axis motor
Touch Screen
Page 5
Evobi Automations Pvt Ltd www.firepen3d.bibox.in
5
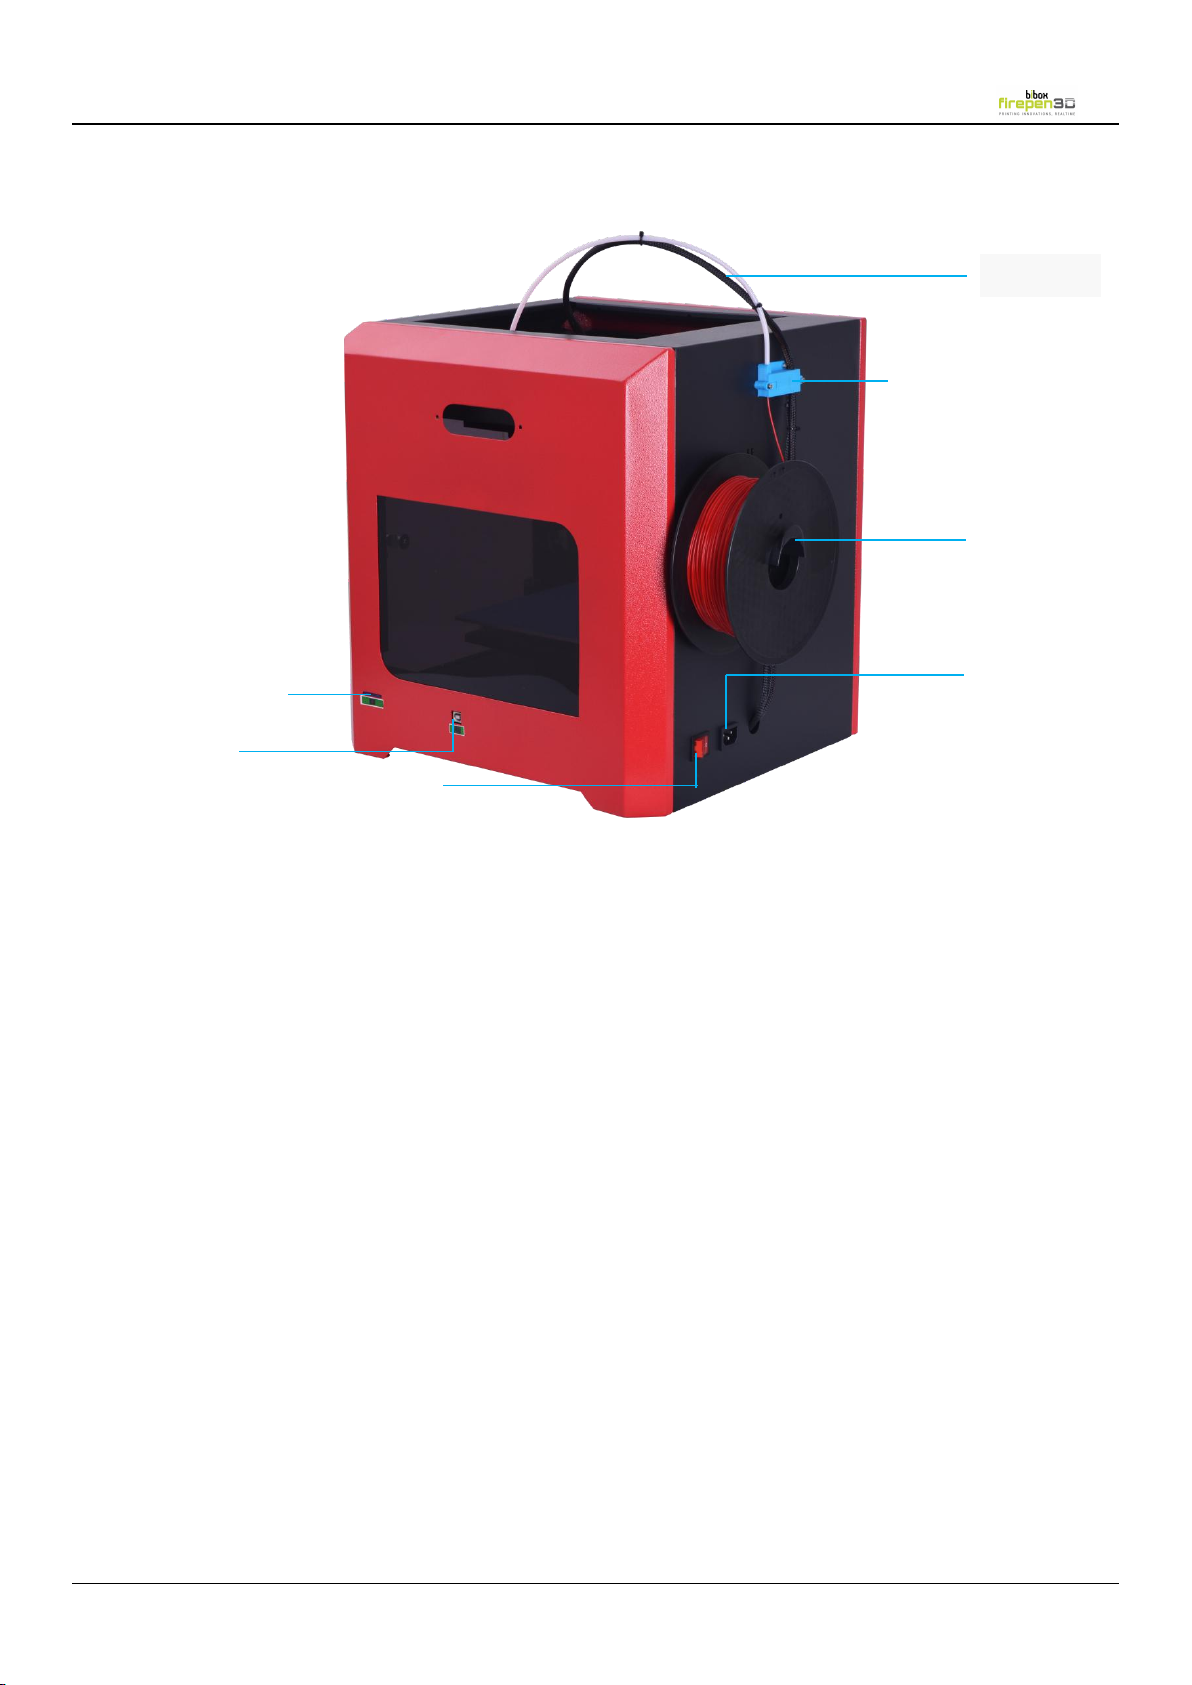
Feed tube
Filament Out
Detector
Spool holder
Power input
SD card slot
USB port
Power switch
Page 6
Evobi Automations Pvt Ltd www.firepen3d.bibox.in
6
2. Specifications
Machine model
Firepen 3D P220 printer
Machine Color
Black & Red
Display
Full color Touch screen
Language
English
Print Technology
Fused Filament Fabrication (FDM/FFF)
Layer resolution
0.05-0.4mm
Nozzle diameter
0.4mm
Positioning Precision
Z: 2.5 microns X Y: 11 microns
Print speed
20-180mm/s
Filament diameter
1.75mm
Filament
PLA/ABS/TPU/HIPS/PETG/Wood/Carbon Fiber/Z-Marble/Twinkling/Silky
AC Input
220V-110V
Supplied software
Repetier-Host
File types
.stl/.obj/.dae/.amf
Save fomat
g code
Connectivity
USB, SD card
Print dimensions
200*200*200mm
Weight
21kg
Desktop space
420*420*460mm
Nozzle quantity
One
Page 7
Evobi Automations Pvt Ltd www.firepen3d.bibox.in
7
3. Touch Screen panel
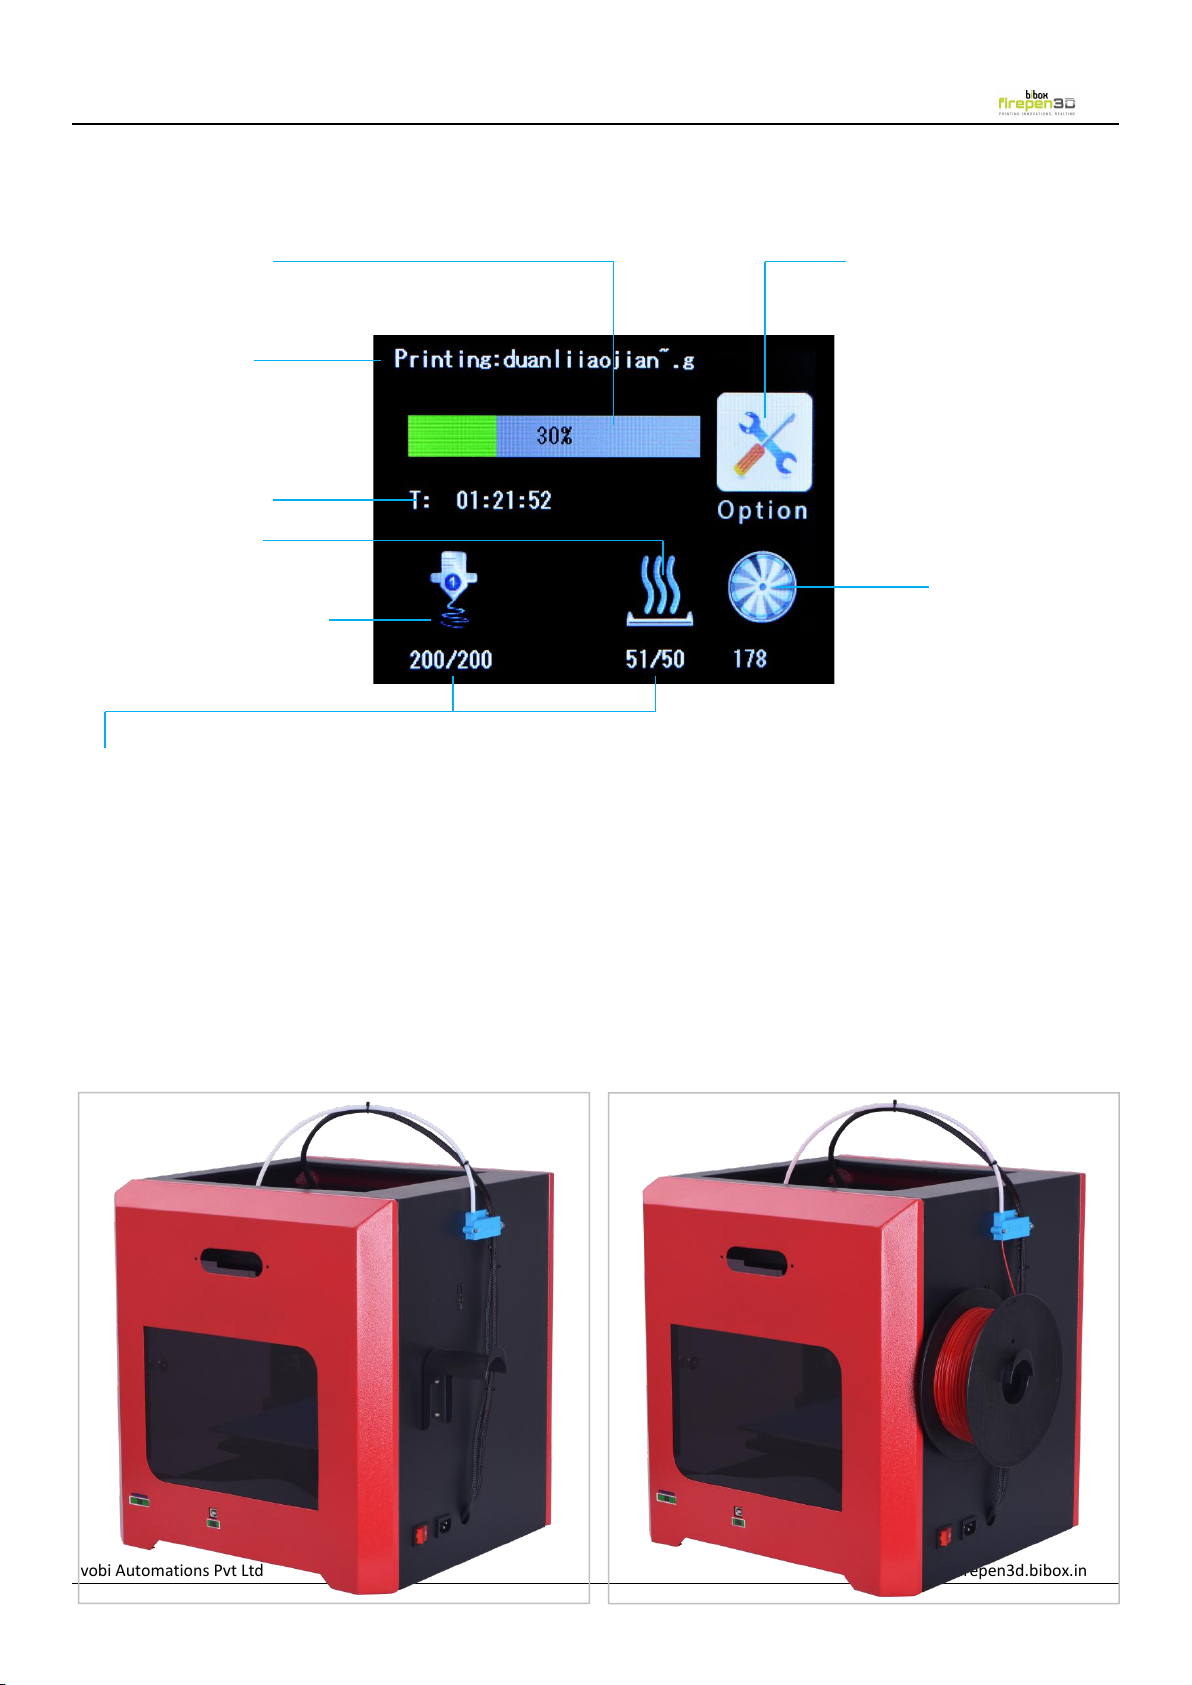
Progress bar
Model name
Runtime stats
Heated bed
temperature
Nozzle temperature
Tools (Allows you to
change the temperature
setting for the extruder
or heated bed, fan speed,
and pause or stop printing)
Fan speed
Current temperature/ Set temperature
Tips: Go to Appendix for Display and Controller
C.FIRST USE
1. Installing Spool Holder and Mounting the Filament Spool:- Take out the spool
holder from the accessory box, Attach the spool holder at the back side of the
machine.
Page 8
Evobi Automations Pvt Ltd www.firepen3d.bibox.in
8
2.Preheating the Extruder
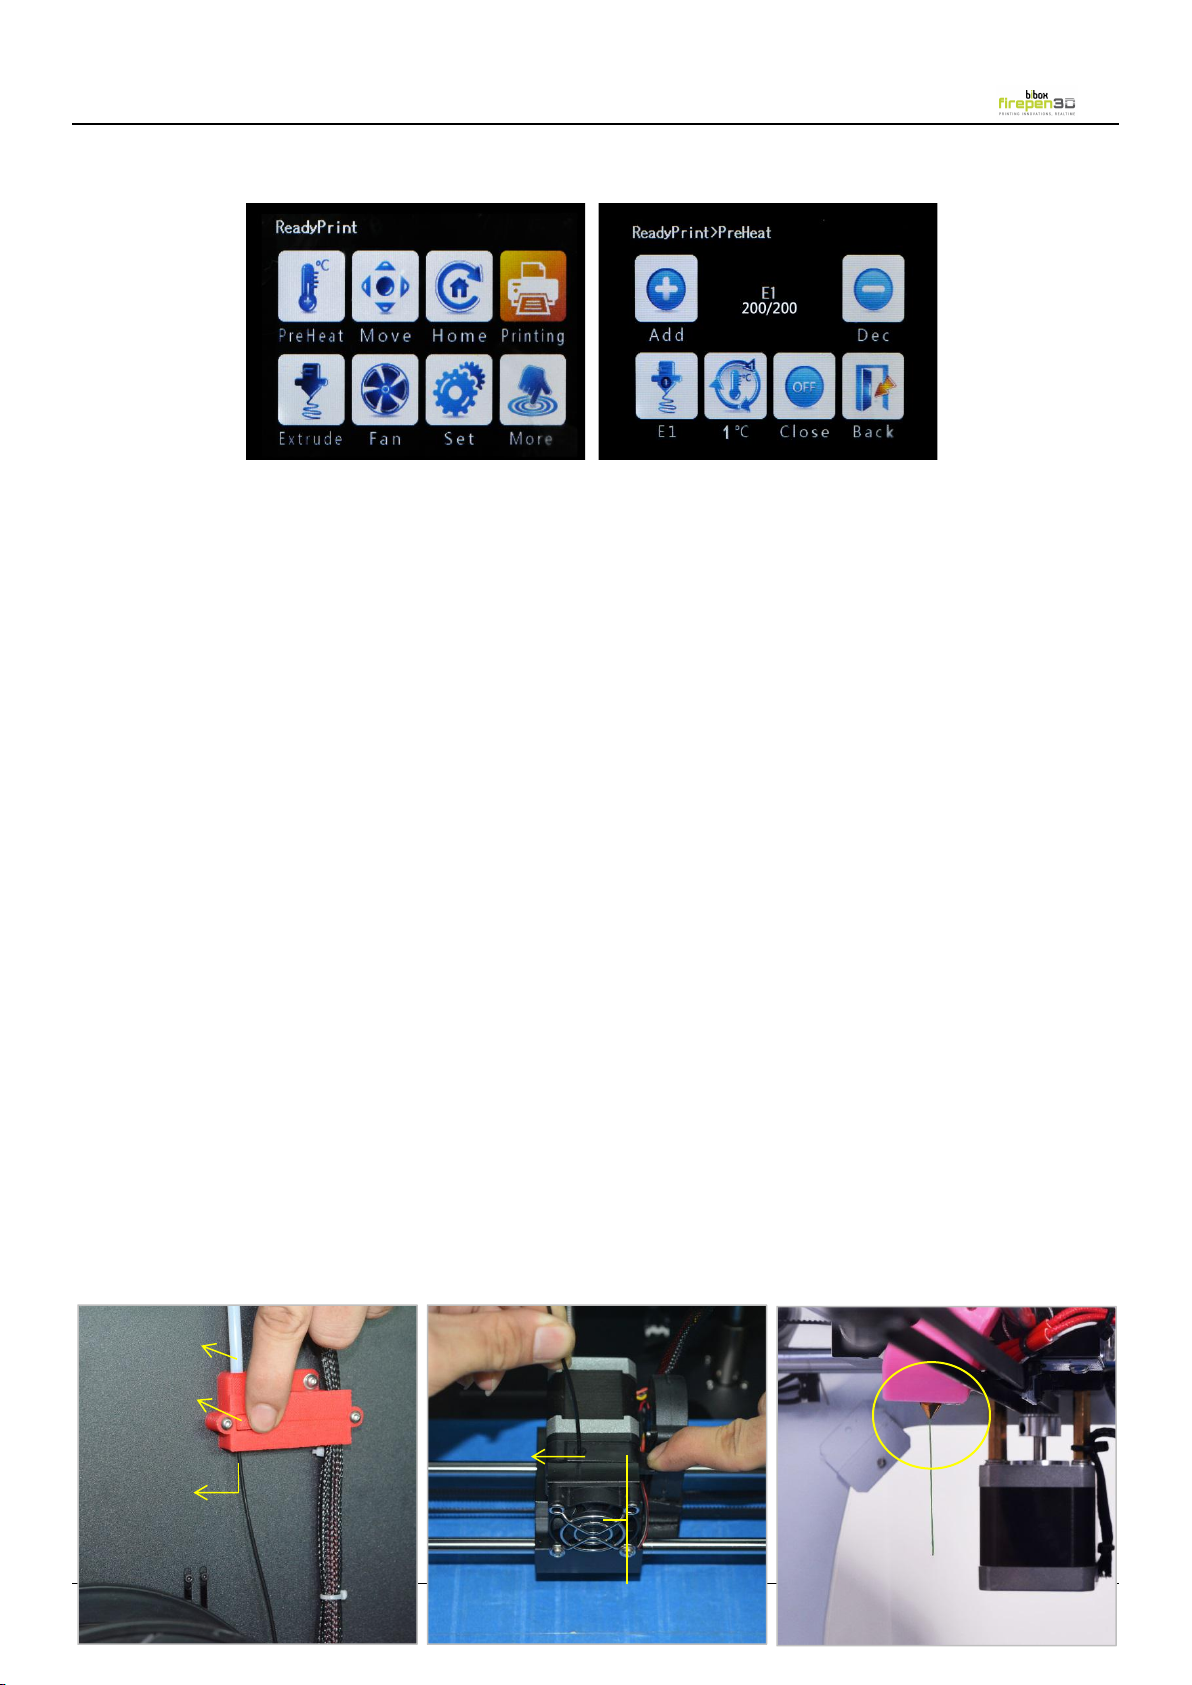
Go to the Touch screen panel and select Preheat > Add.
Add the extruder to 200℃. Wait for the extruder to heat to the set temperature.
Please press Add or Dec button to heat the extruder before start printing, or the
extruder won’t be heated.
( Nozzle 1 - 200/200 shows the current temperature and the set temperature of
nozzles. Press E1 button, the display will show for the temperature of heated bed.
Press 1 ℃ button to choose the increase rate 1℃/5℃/10℃ of heat temperature for
each press.)
3. Loading Filament:-
After the extruder reaches 200° C, press the knob on Filament Out Device to the
left, Take and straighten the end of the filament, insert it through the device into the
extruder. The machine will alarm all the time if the knob is not pressed to the left
while inserting the filament, in such a scenario, please load filament again.
Push down on the Extruder Arm, Continue to hold it down as you insert the free
end of the filament into the hole in the top of the extruder. Push the filament in as
far as it will go. You will see plastic start to emerge from the extruder nozzle.
Release the extruder arm.
Feeding pipe
Filament out device knob
Feed port
Feed port
Extruder button /arm
4. Leveling the Build Platform
Page 9
Evobi Automations Pvt Ltd www.firepen3d.bibox.in
9
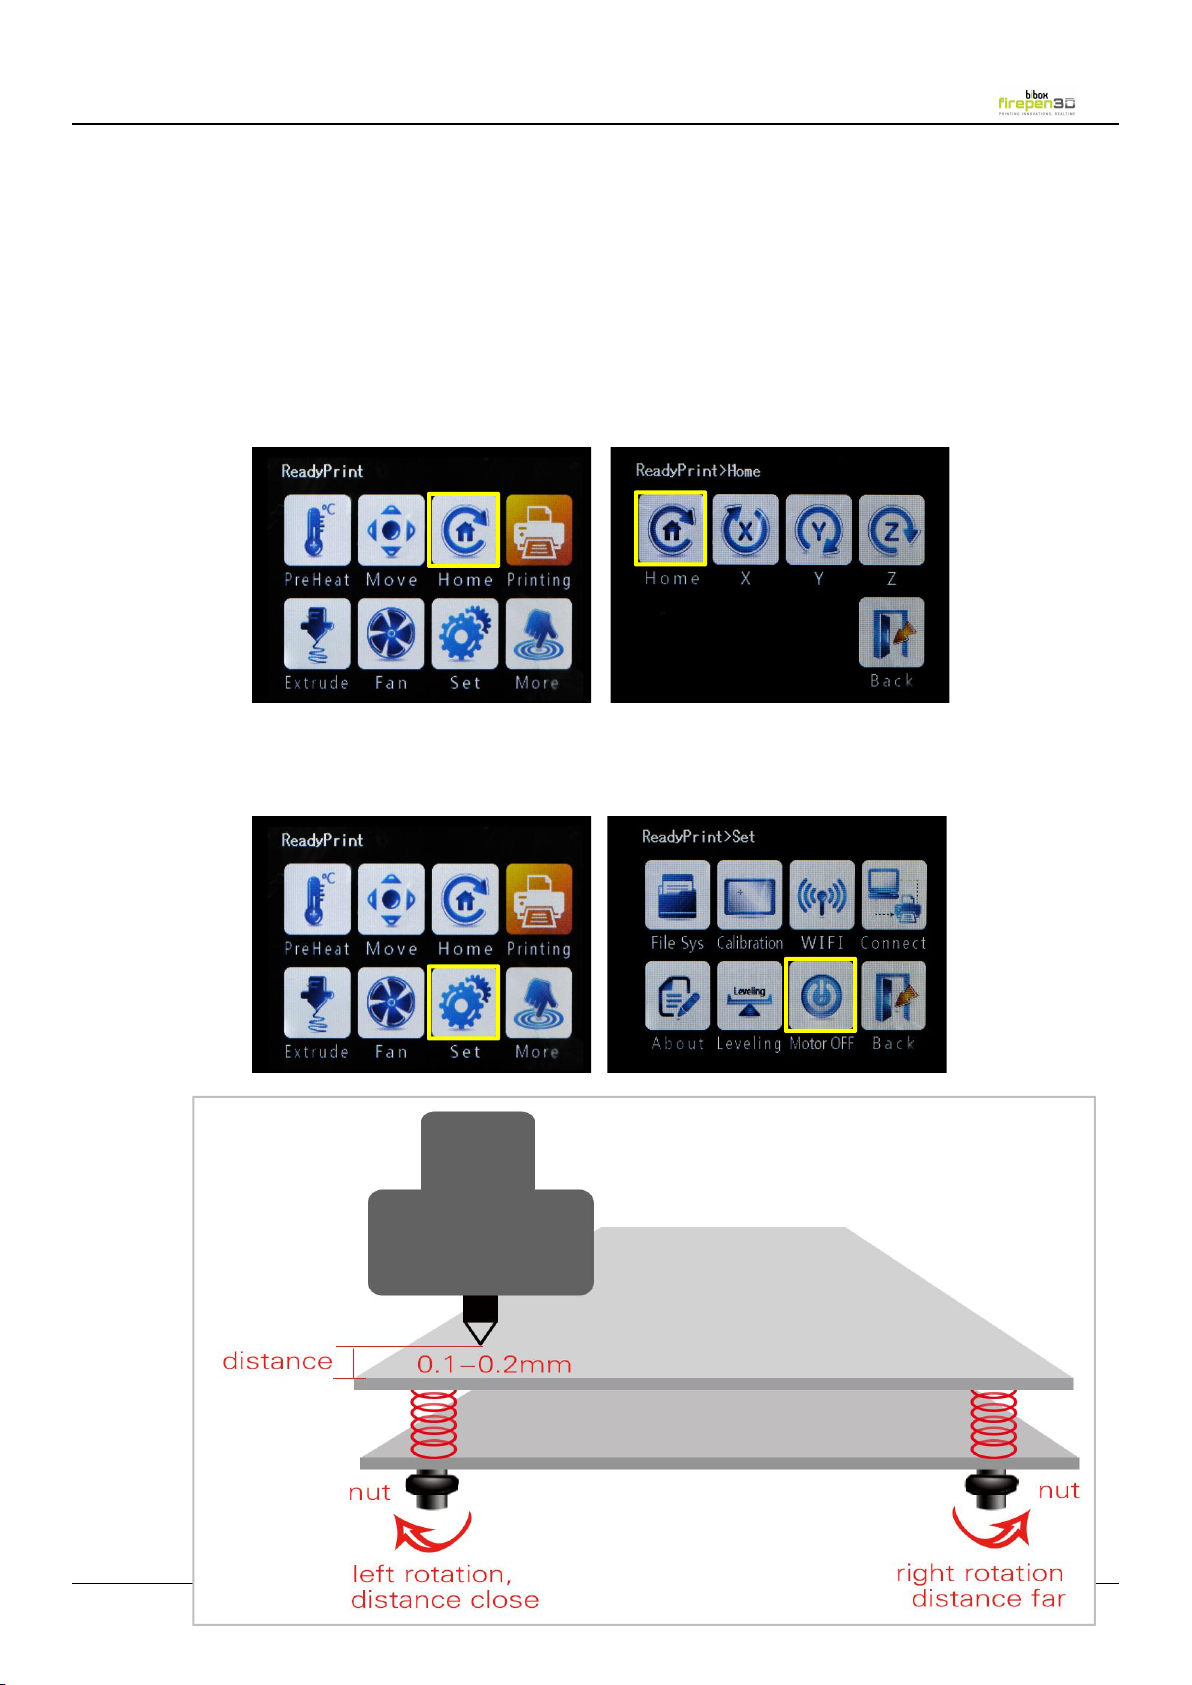
principle:rotate the below four nuts, the spring shrink or spread, and further control the
platform down or up.
method:move the extruder to anywhere on the platform, make sure the nozzle is close to the
platform, move normal and do not scratch the masking paper(the preminum distance
is 0.1-0.2mm)
○1click<Home>——<Home>
○2click<Set>
——
<Motor off>
Page 10
Evobi Automations Pvt Ltd www.firepen3d.bibox.in
10
D
.MAKING AN OBJECT WITH 3D printer
1.Making a Test Object from the SD Card
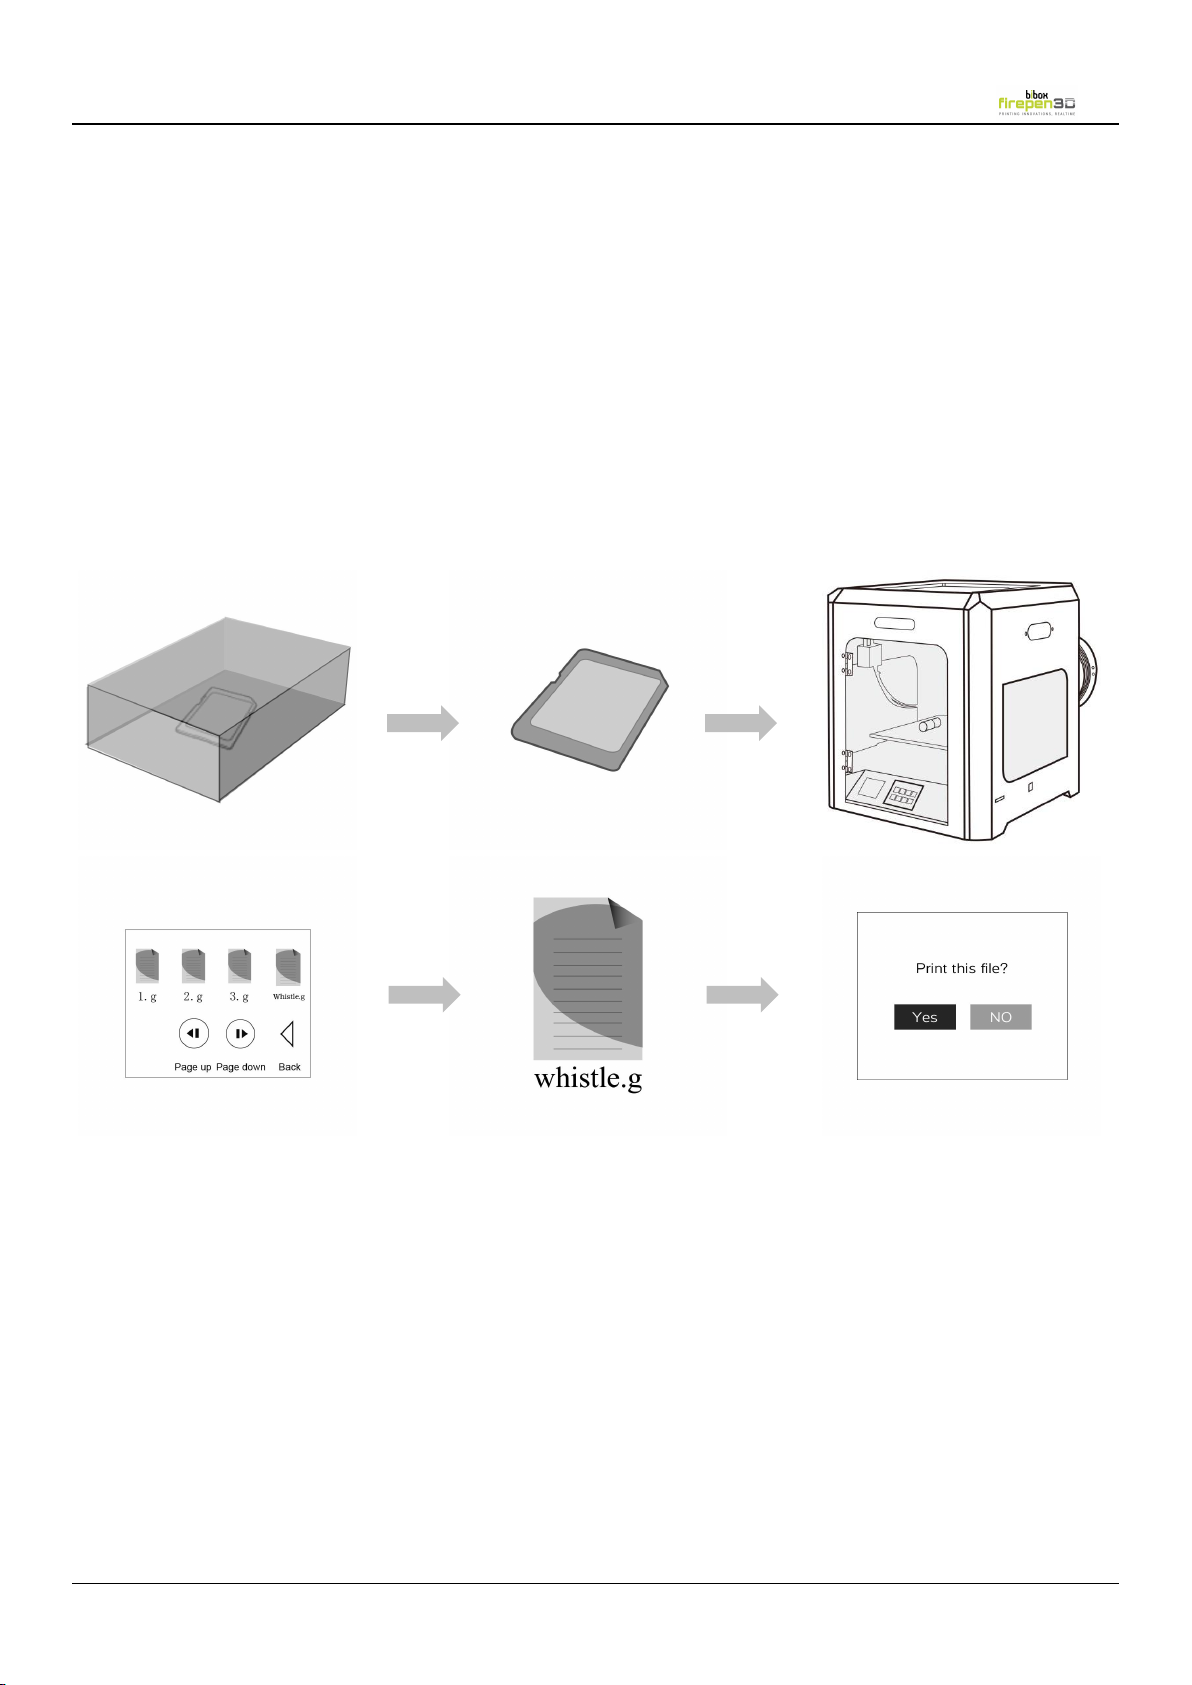
The Firepen 3D printer package includes an SD card pre-loaded with a file for
making a test object.
The SD Card is located in the accessory box. Insert the SD card into the SD
card slot. Go to the Touch screen panel and select Print and choose
“whistle.g” to start printing.
Tips: Stl is a widely used file format for 3D models. (Others: obj,amf,dae)
Thingiverse is a website where 3D printer users can share design files and
download it for free.
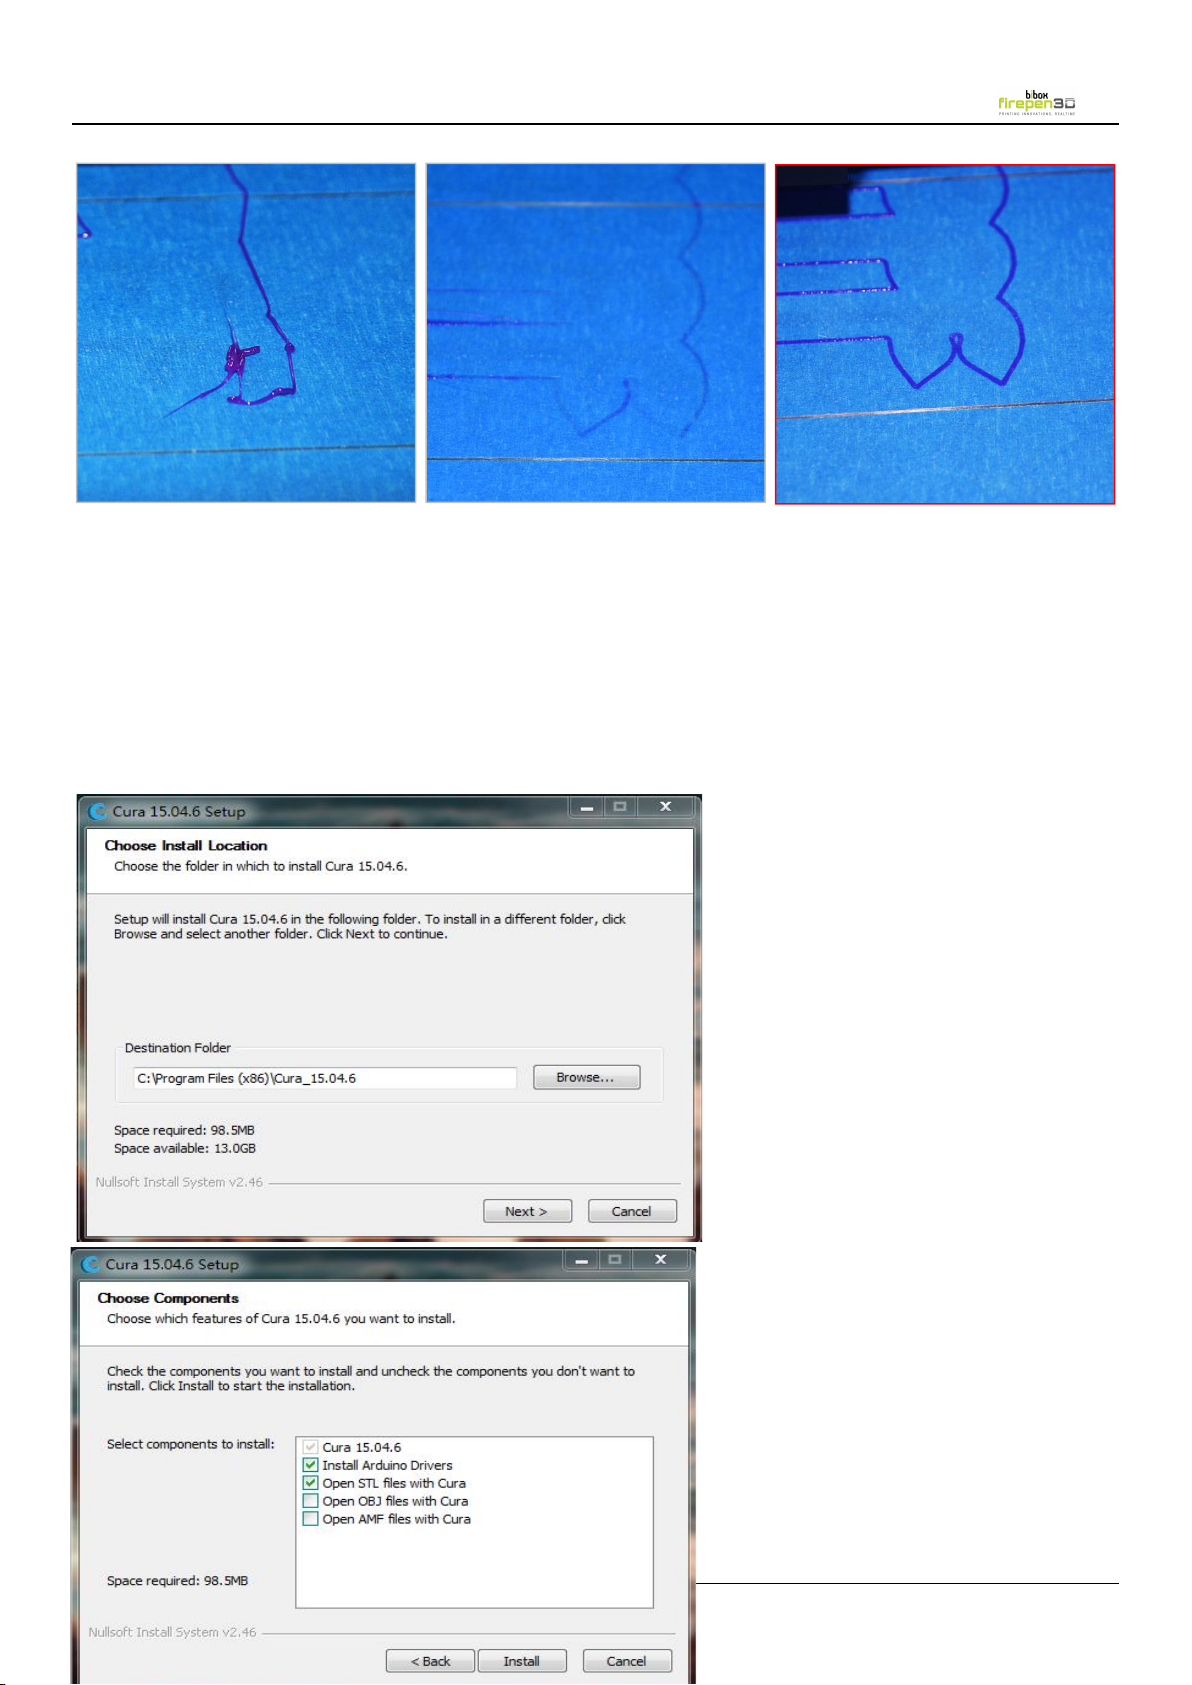
For printing it is very important that the first layer is nicely squished into the build
plate and sticks well to it.
1. If the distance between the nozzle and build plate is too big, your print won’t
stick properly to the glass plate.
Please loose the knobs [turn them to the left] moves the build plate closer to the
extruder nozzle
2. If the nozzle is too close to the build plate it can prevent the filament
from extruding from the nozzle. This can also scratch the build plate.
Please tighten the knobs [turn them to the right] moves the build plate away from
the extruder nozzle.
3. The 3rdimage below, shows the Perfect first layer, with correct setting of the
extruder nozzle distance from the build plate.
Page 11
Evobi Automations Pvt Ltd www.firepen3d.bibox.in
11
1
2
3
Appendix
Using Slicer Software Cura(一)
1. Installing Software
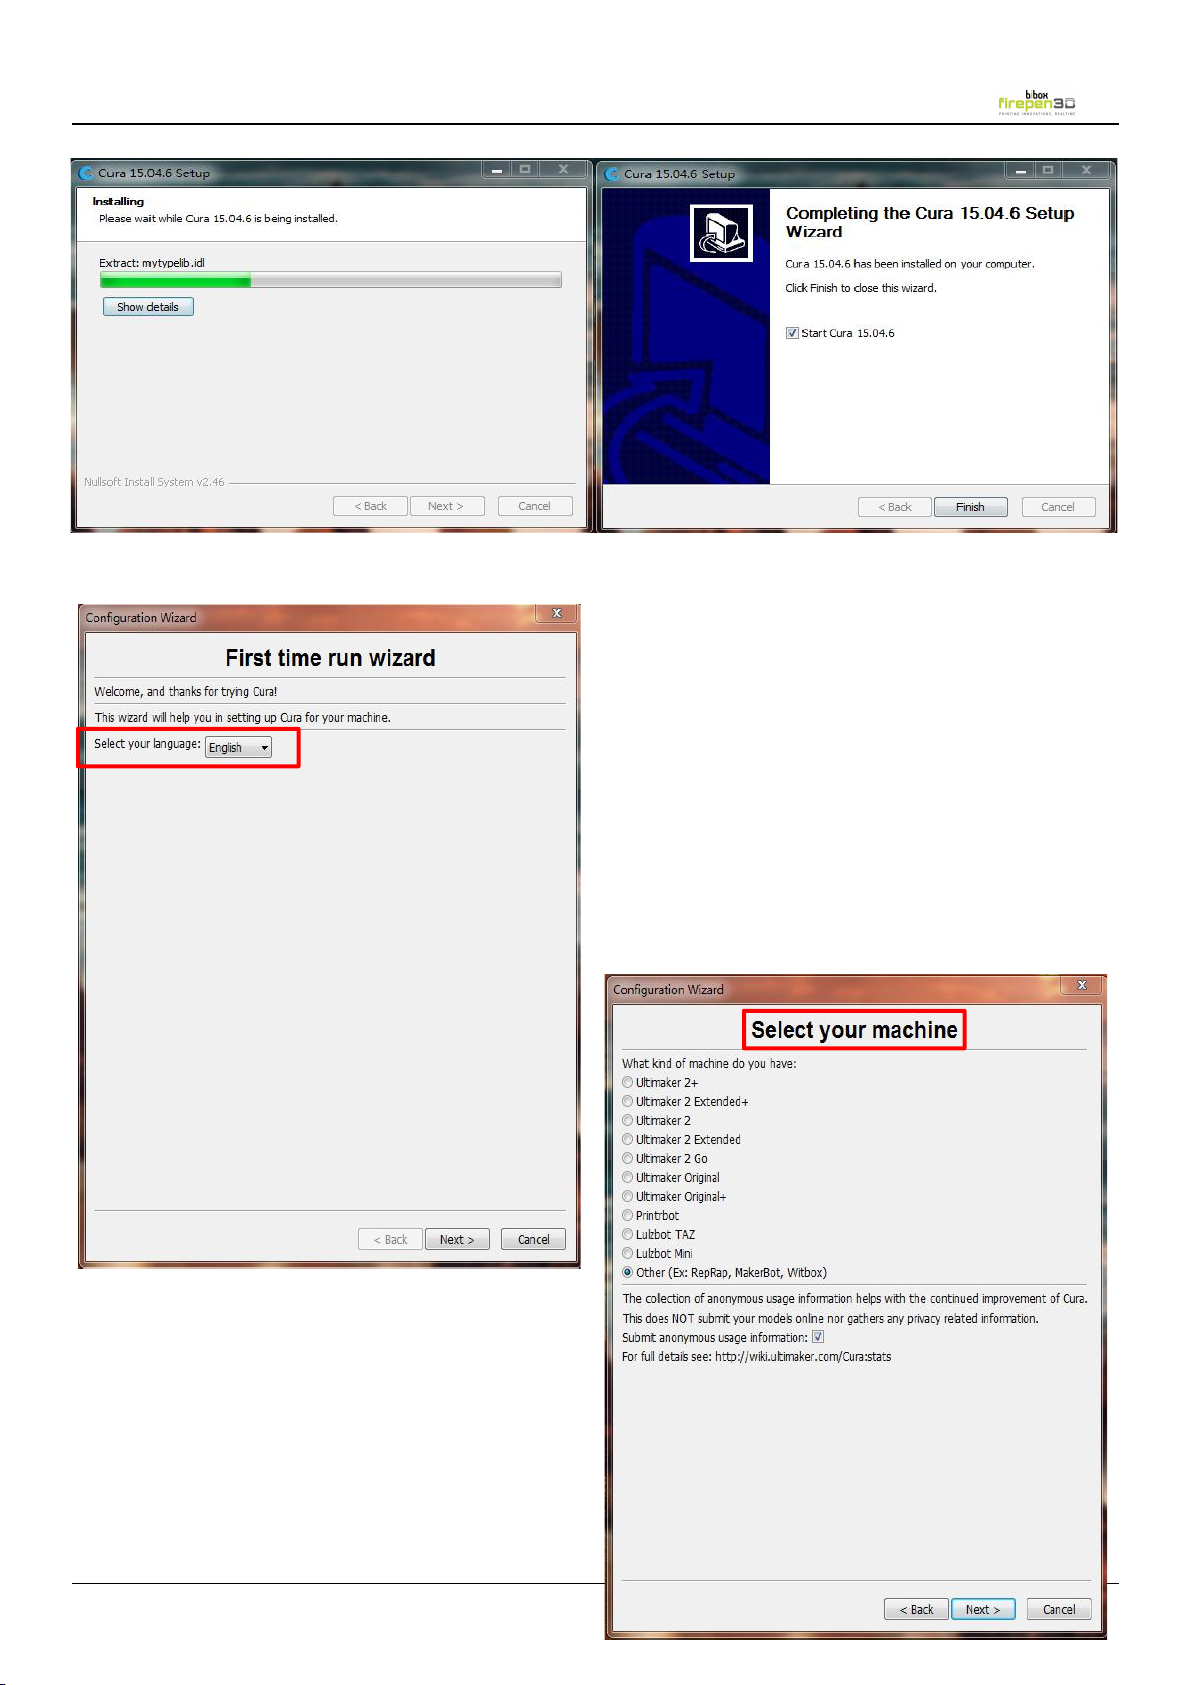
Insert the SD card reader with SD card on your computer, copy the Cura
installer to your computer.
Open the installer and run
the installation wizard to
complete the installation.
Select Next and tick all the
options.
Page 12
Evobi Automations Pvt Ltd www.firepen3d.bibox.in
12
Install > Next > Finish
Select your language > English >
Next
Select your machine > Other > Next
Page 13
Evobi Automations Pvt Ltd www.firepen3d.bibox.in
13
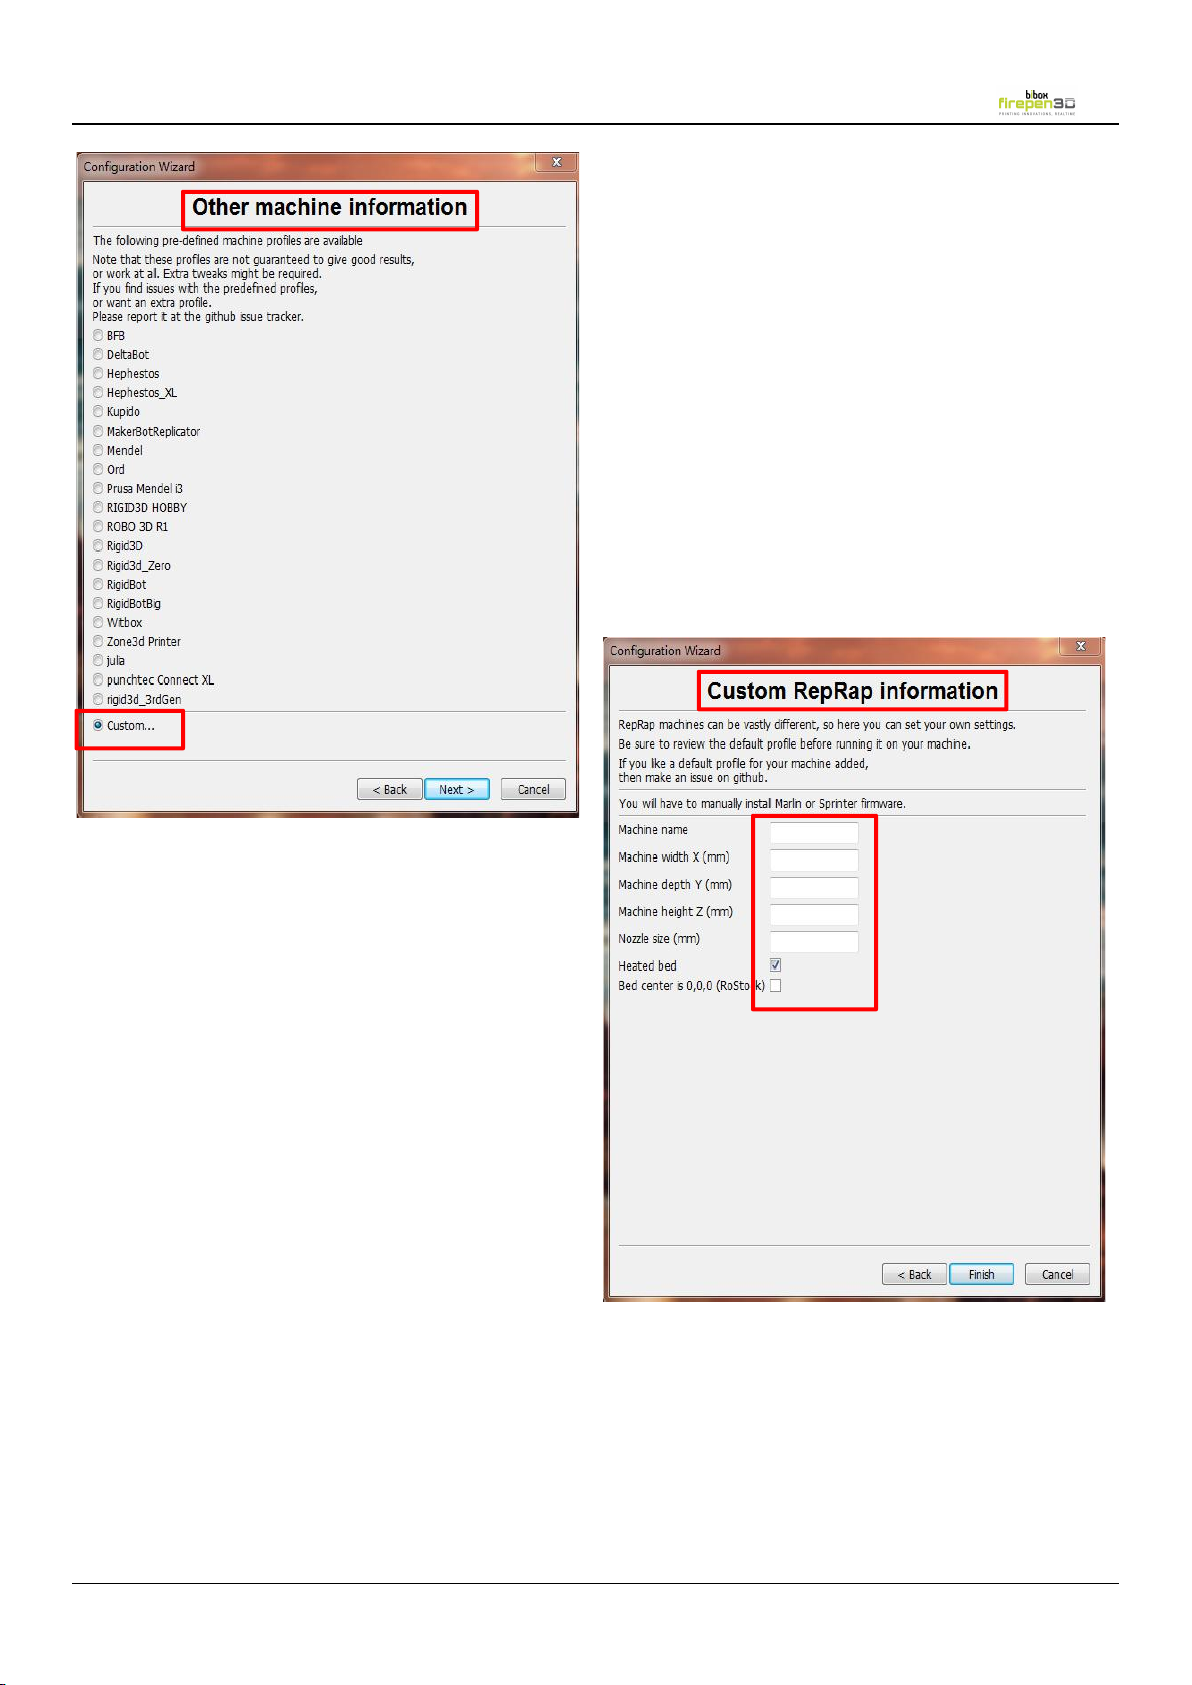
Other machine information >
Custom > Next
Finish the blank with the specs of
your 3D printer in Custom RepRap
information > Finish
ET-K1
200
200
200
0.4
Page 14
Evobi Automations Pvt Ltd www.firepen3d.bibox.in
14
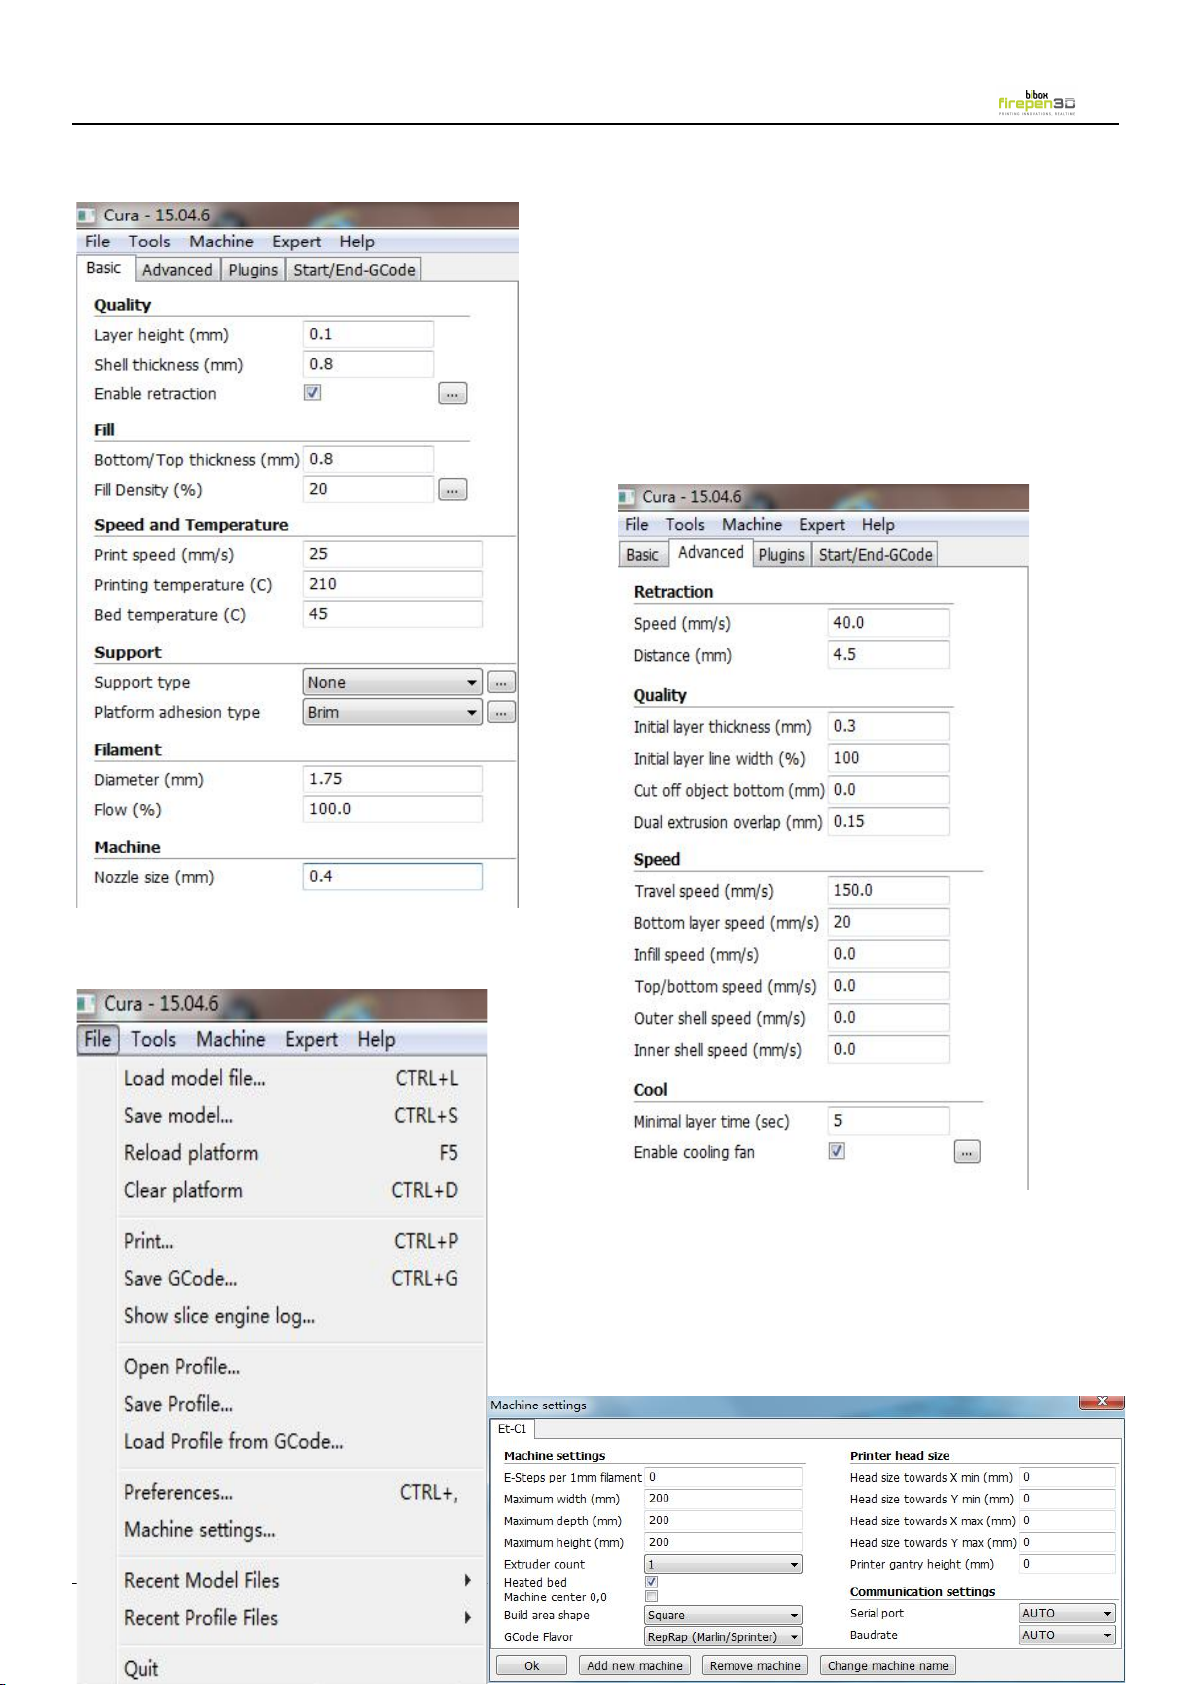
2. Software Settings
Page 15

Evobi Automations Pvt Ltd www.firepen3d.bibox.in
15
3. Tutorial of parameter setting
1. The layer height of general settings for the 0.1,0.2,0.3mm.if 0.3 mm, the model has
obvious sense of hierarchy, but it can reduce the time of printing;0.2mm,it is usually
be used; the fine print is set to 0.1mm, the printing surface is smooth, the print time
will be longer
2. The shell thickness is set to a multiple of 0.4mm, such as 0.8, 1.2, 1.6., and so on.
3.
Enable retraction, it can avoid printing residue silk filament, the detail is in advanced
settings.
4. For the general model. The bottom / top thickness is set to 1mm. If you print a
thinner object, the upper surface has an unfilled surface. This value can be increased
appropriately.
5. The fill density is generally set to 5%--20%, and smaller objects or single wall models
can be set to 100% fill, and larger seal models can also be set to 0 fill.
6. Print speed is set to 30mm/s--80mm/s range
7. The print temperature is only the nozzle temperature of the extruder, the PLA print is
set to 200-210 centigrade, and the ABS is set to 240 centigrade.
8. The heating bed temperature for PLA is usually set to 45-50 centigrade, and ABS need
more then 80 .
9.
Support is divided into: no support for the None, Touching buildplate, everywhere,
full support for Everywhere. Print model has vacated part or larger slope need to
open the support function, Touching buildplate refers to the generation of support
between the platform and the supporting model. everywhere refers to in addition to
support generation between the platform and the model can also generate support in
the inner of the hang model, the specific choice depends on the display of model.
10.
The platform adhesion type is generally selected as None, the contact surface
between print model and platform is smaller, and when the printing model height is
higher, the adhesion can be opened, and the attachment type is divided into two
kinds, brim and raft ,and the specific difference reference software is introduced.
11.filament diameter defaults to 1.75mm
12. flow default 100%, if diameter less than 1.75mm and lead to print model surface
filling unevenly, can increase this value appropriately, but seldom happened.
Page 16
Evobi Automations Pvt Ltd www.firepen3d.bibox.in
16
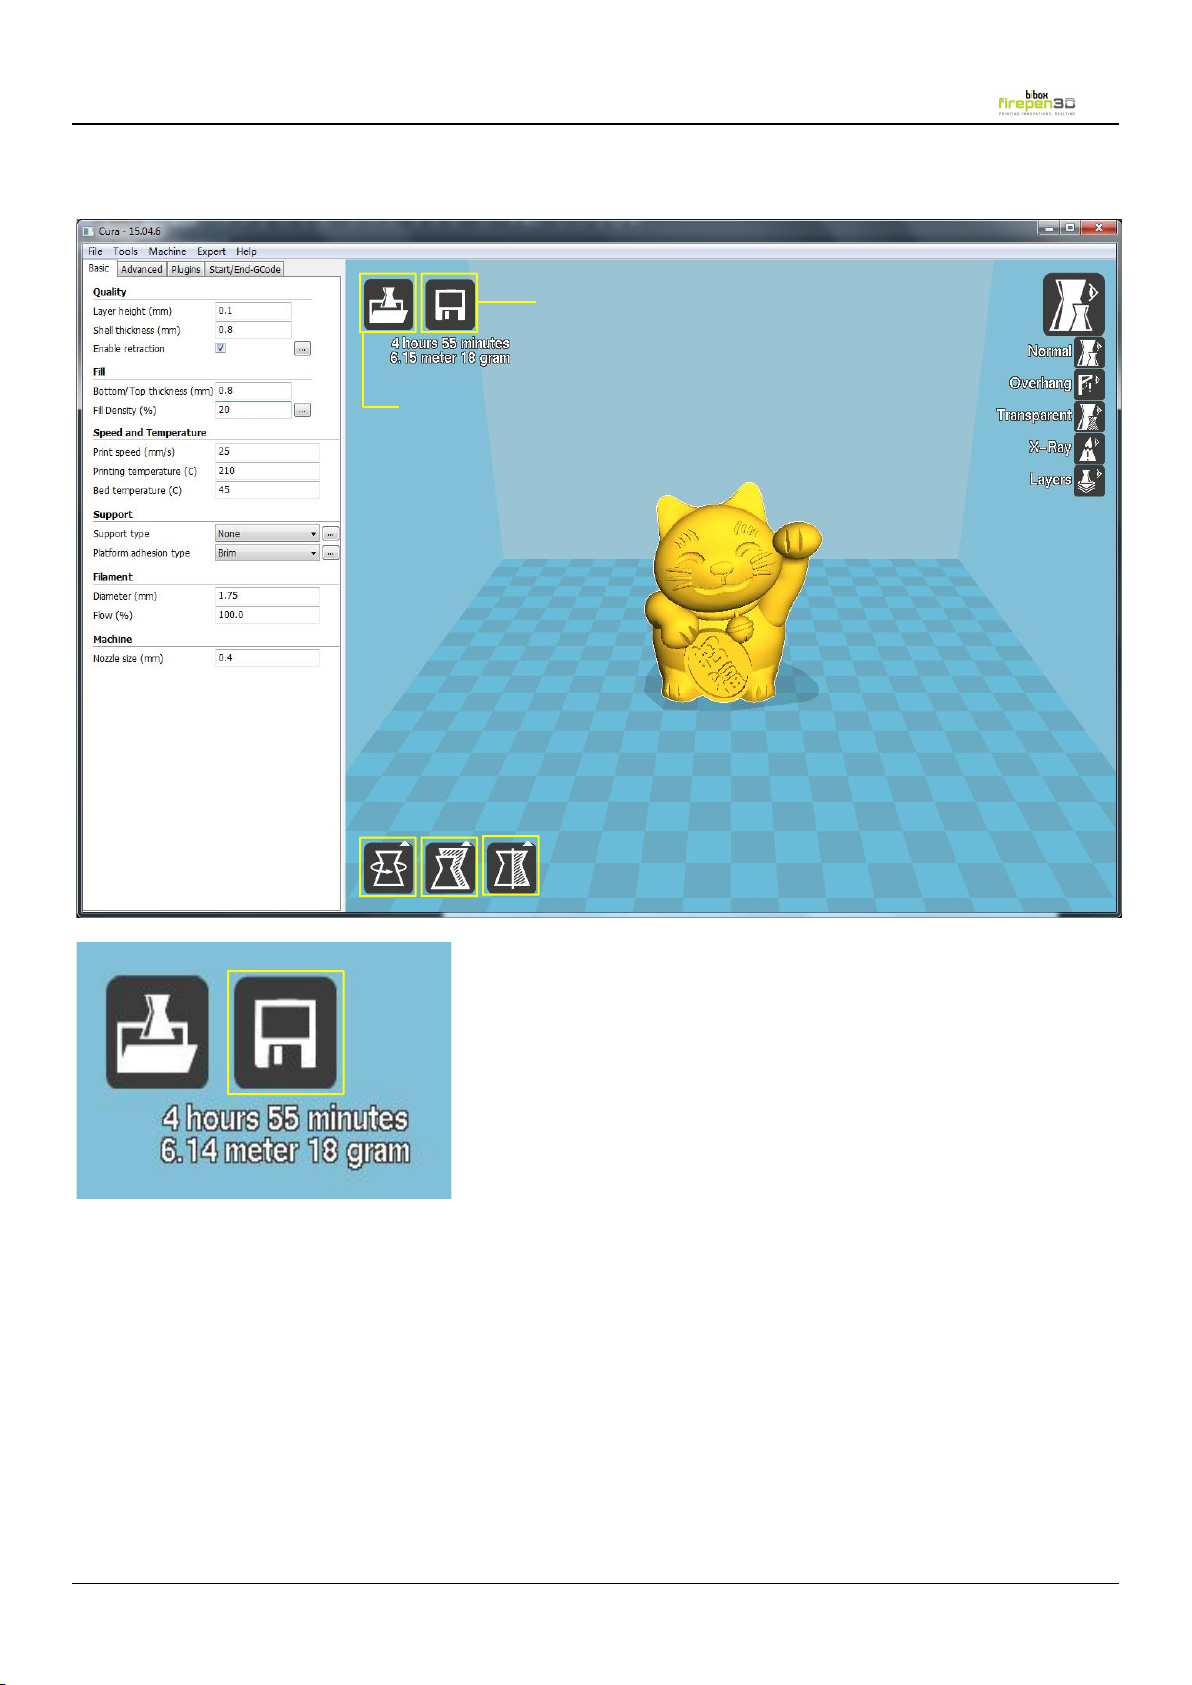
Save the model in
SD card
Load a 3D model
save the file
Choose your desired settings and wait for Cura to
slice the model.
When Cura has converted the file you can save the
print file
(G code) via the “Save” button. Save the file to the
SD card.
1. Software operation
Page 17
Evobi Automations Pvt Ltd www.firepen3d.bibox.in
17
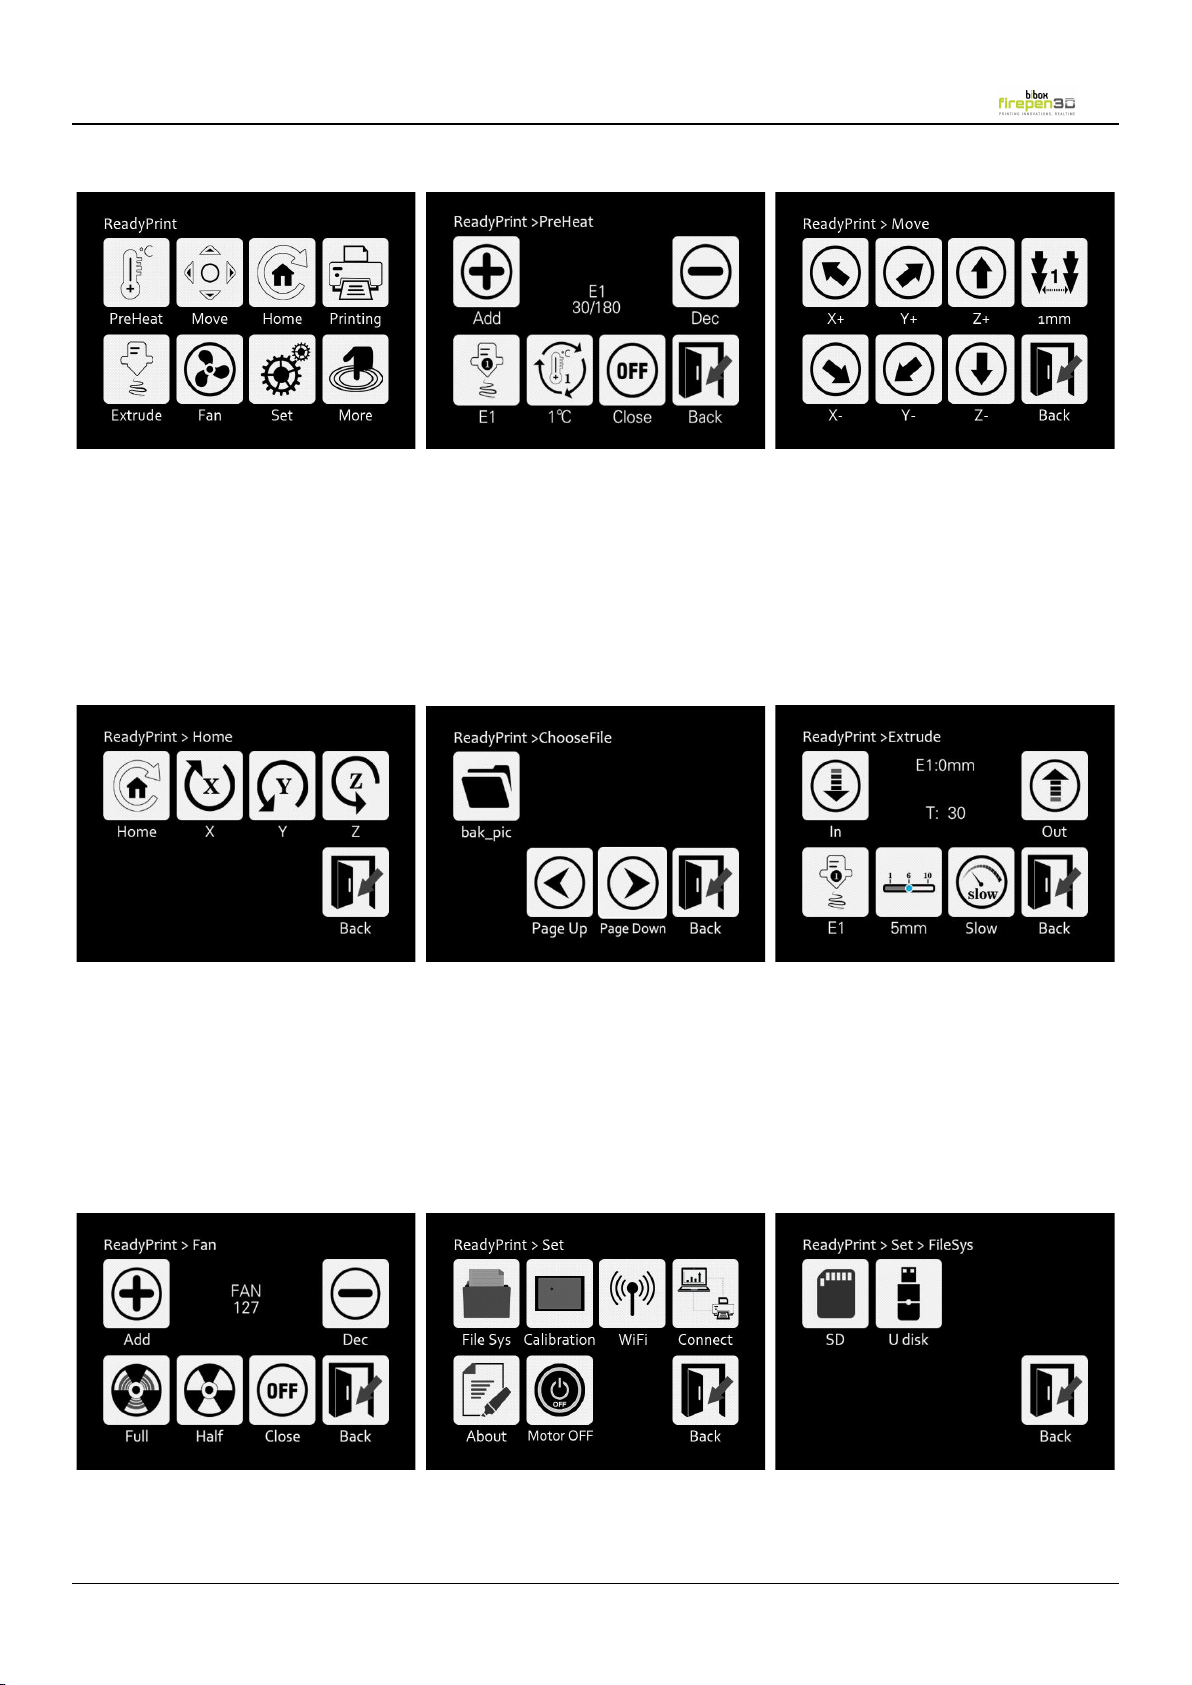
Display and Controller(二)
Main menu
Set
Preheat
1.
E1 Change the display from
nozzle temp
into heated bed
2.
1℃ Choose the increase rate
1/5/10℃ of
the nozzle or heated bed.
3.
OFF Turn off nozzle or heated
bed.
Extrude
1. E1 Change the display from
nozzle 1
into nozzle 2.(only works on
dual nozzle)
2. 1mm Choose the length of
extruded
filament 1/5/10mm
3. Slow Choose the speed of
load or unload filament.
Move
Move the extruder
1.
0.1mm Choose extruder move
distance
0.1/0.5/1mm
File Sys
Fan
Printing
1. model file will display in the print
options interface, when models
files too much,
click<Page Up>,<Page Down>to
search the file you need
Home
1.
<Home> X/Y/Z axis move
towards to limit switch
direction.
2.
<X> X axis moves left
3.
<Y> Y axis moves back
4. <Z> Z axis moves up
Page 18
18
Any further Questions / support related queries
Contact:-
Email:- [email protected] / [email protected]
Mobile:- +917760676606 / +919008333233
Tel:- +91-80-25743579
Evobi Automations Pvt Ltd
1stFloor, Pixel Park ‘A’,
PESIT South Campus,
Electronics City, Hosur Road,
Bangalore - 560100
www.firepen3d.bibox.in
www.bibox.in
Evobi Automations Pvt Ltd www.firepen3d.bibox.in
 Loading...