

Page 1
User’s manual
Page 2

User’s manual
2
Page 3

BIBO Brighter Water
Congratulations!
Congratulations and thank you for buying a BIBO. You are moments away from enjoying pure,
filtered water – boiling and chilled – at the touch of a button.
We want you to get the most from your BIBO, so before you use it please read this manual
carefully.
If you have any queries once your BIBO is up and running, please first refer to this manual, it will
provide you with helpful and practical advice. There are also a number of videos on our website
to guide you through using the BIBO www.bibowater.co.uk
Please feel free to contact us if you have any further queries or to give any feedback on your
BIBO or our service. Whatever you need, our Support team is just an email or a phone call away
Visit www.bibowater.co.uk/contact email [email protected] or call 0800 678 5969
Please note
The pictures and diagrams in this manual are for reference only, please refer to your BIBO.
We reserve the right to make corrections or changes to the information provided in this manual
without prior notice being given.
The products, functions, structures and designs described in this manual have been patented by
our company and are thus protected by the UK & EU patent offices.
Version number 110501
© Copyright BIBO 2011, All Rights Reserved
Page 4

User’s manual
4
Contents
Meet your BIBO page 4
• BIBO overview
• The touch screen panel
Using your BIBO page 6
• Important: before using your BIBO for the first time
• Main features
• Menu options & personal settings
BIBO information & maintenance page 13
• How to replace the filters
• How to clean your BIBO
• Technical information
• Safety notes
Installation page 17
• Overview
• Connection to a water source
• Troubleshooting
Page 5
BIBO Brighter Water
Meet your BIBO
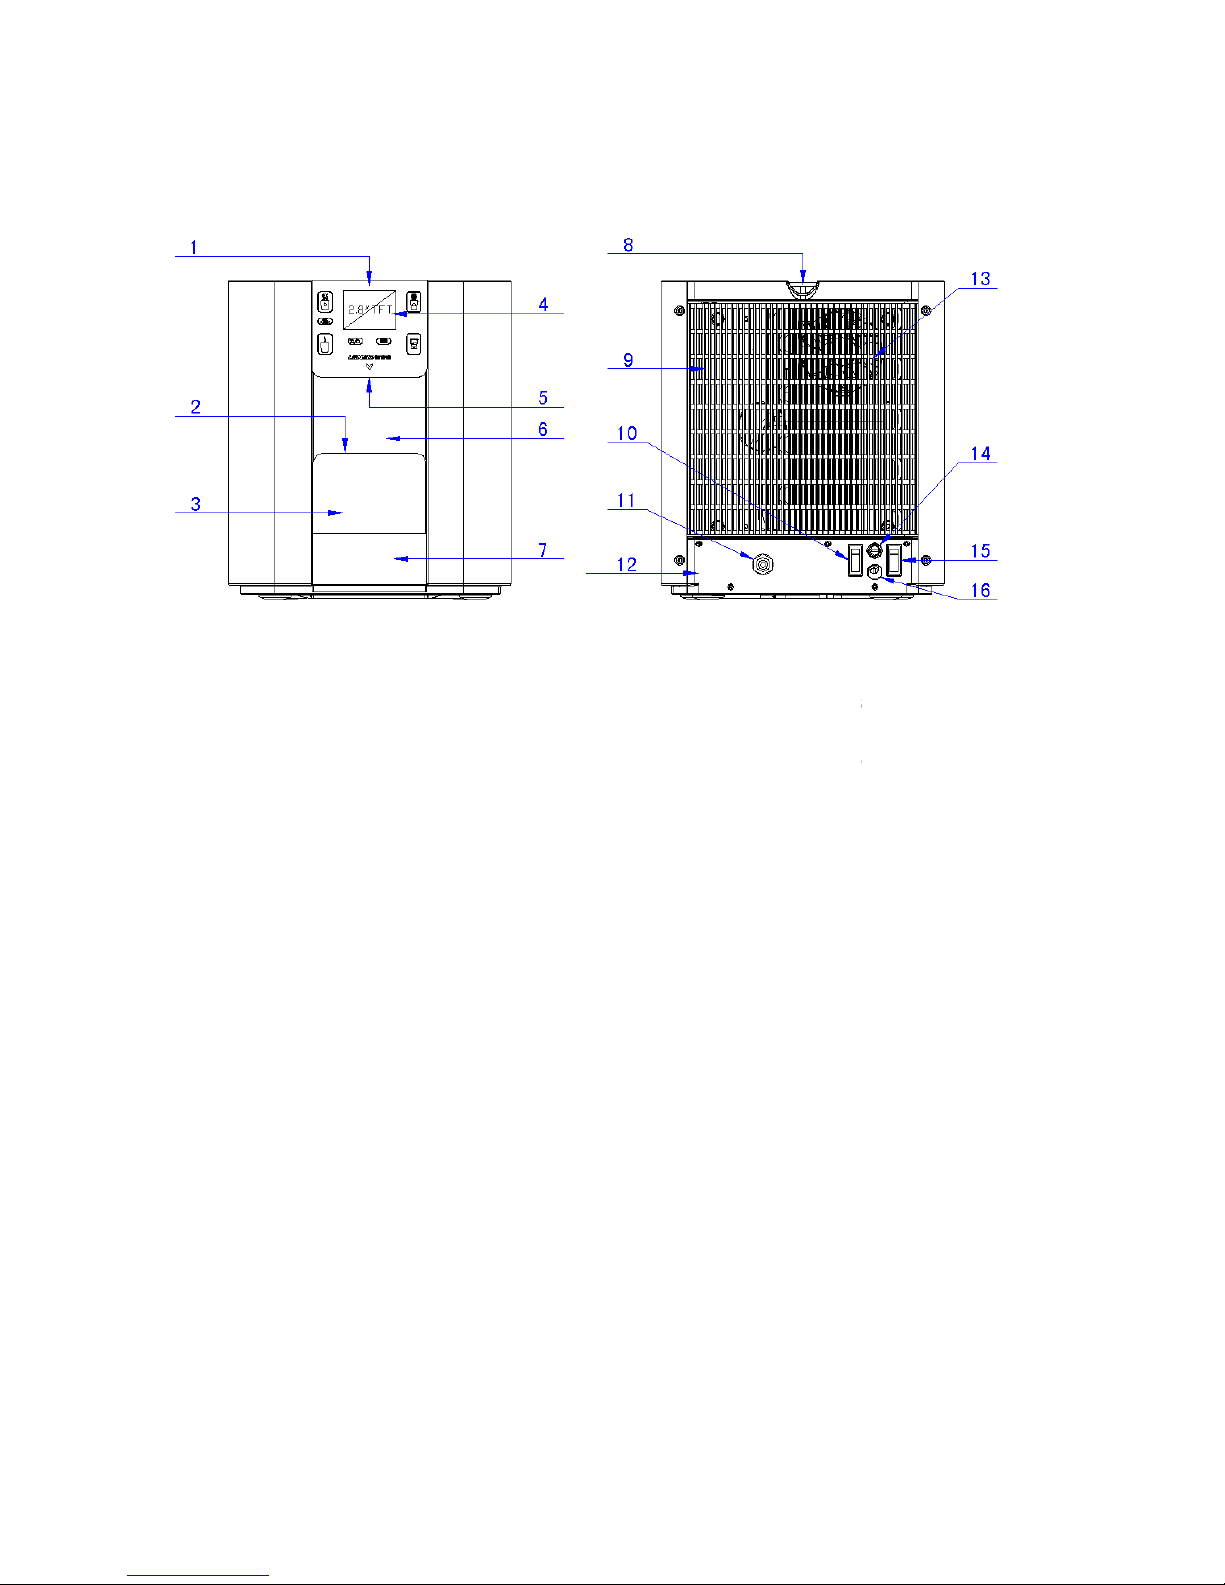
BIBO overview
1. To
uch panel
2. Drip tray cover
3. Removable dr
ip tray
4. 2.8”TFT LCD screen
5. Water outlets
6. Front p
anel
7. Overflow
reservoir
8. Lid
9. Refrigeration c
10. Hot tank
switch
11. Water i
nlet
12. Rear
panel
13. Cooling f
an
14. Mains f
use
15. Power switch
16.
Mains power cable
ondenser
Page 6
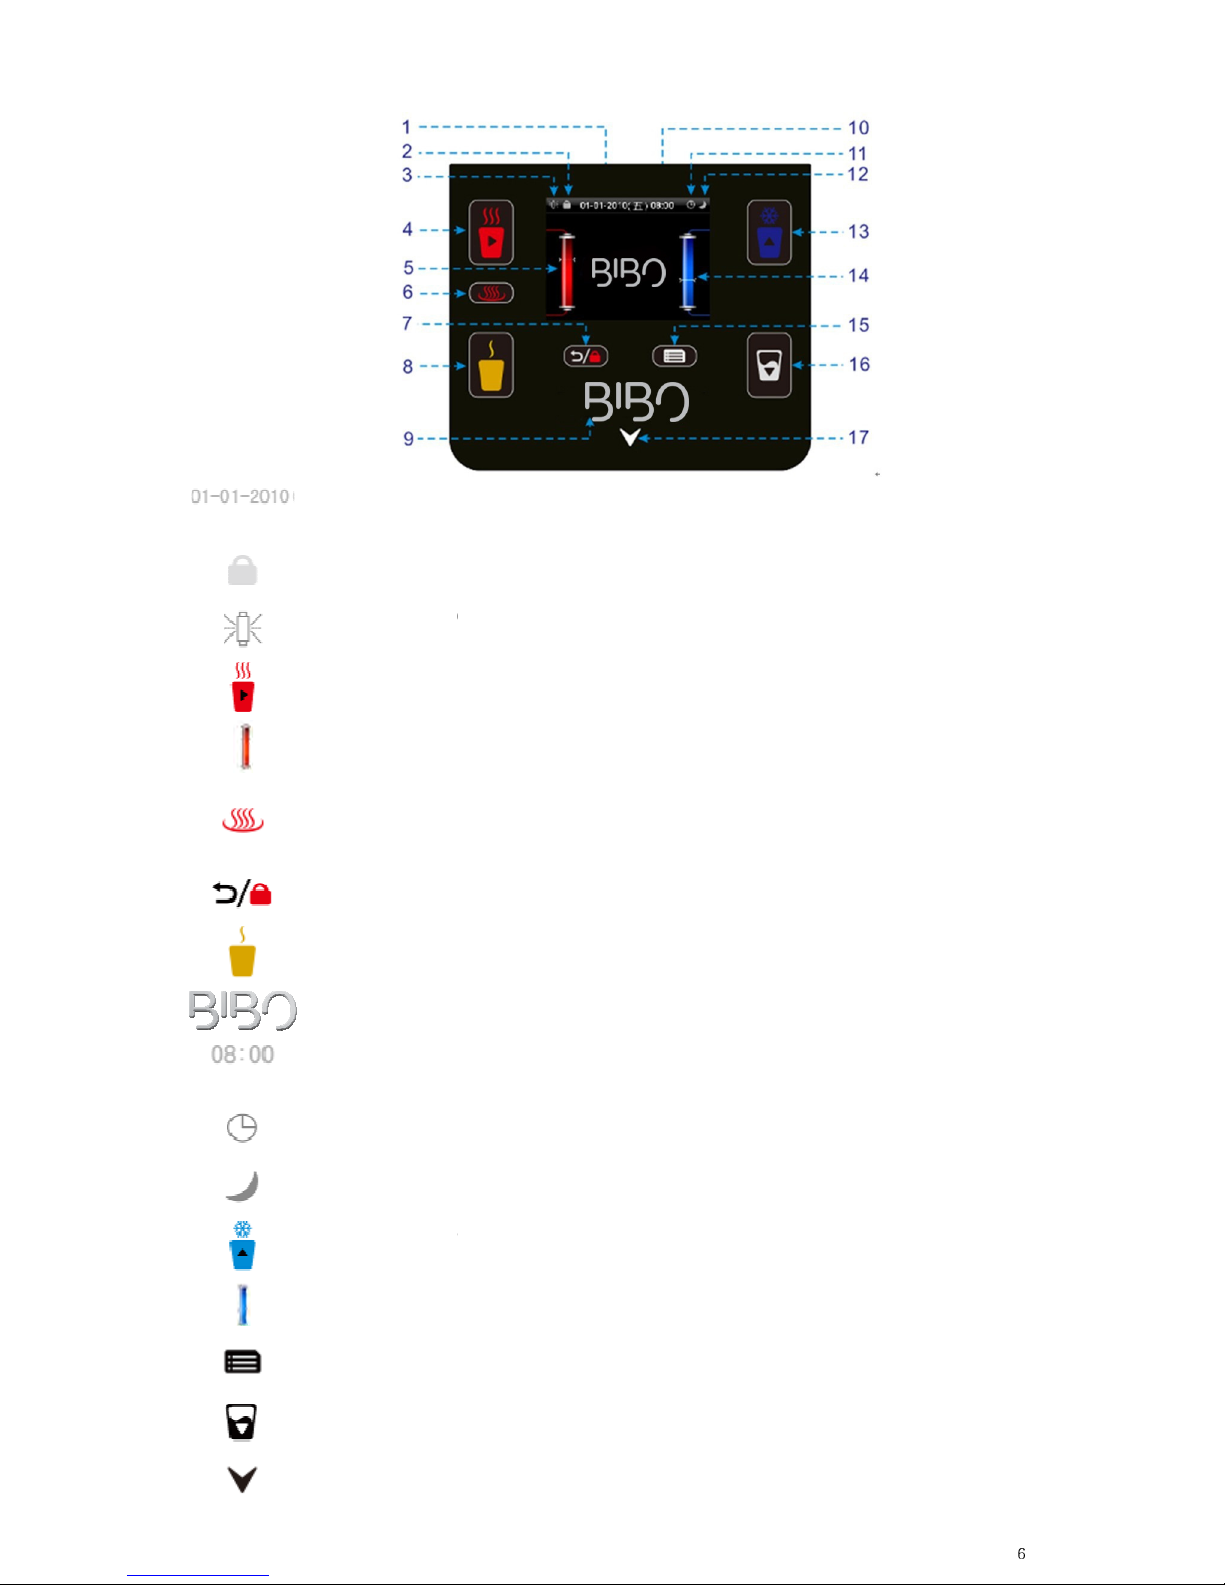
The touch screen panel
1
Calendar (Day -
Month
2
Child lock status icon
3
UV filter status icon
4
Hot water key (also acts as “select” key in menu mode
5
Heating & hot water temperature
6
Boiling water boost key
7
Child lock (also acts as “return” key in menu mode)
8
Ambient (mixed hot & cold) water key
9
BIBO logo
10
Clock (24 hour)
11
Automatic on/off icon
12
Power saving mode icon
13
Cold water key (also acts as “select” key in menu mode)
14
Chilling & cold water temperature
15
Menu & set key
16
A cup of water key (also acts as “select” key in menu
17
Water outlet indicator light (red for hot, blue for cold)
- Year)
)
bar
bar
mode)
User’s manual
6
Page 7
BIBO Brighter Water
Using your BIBO
Initial connection to an electrical supply
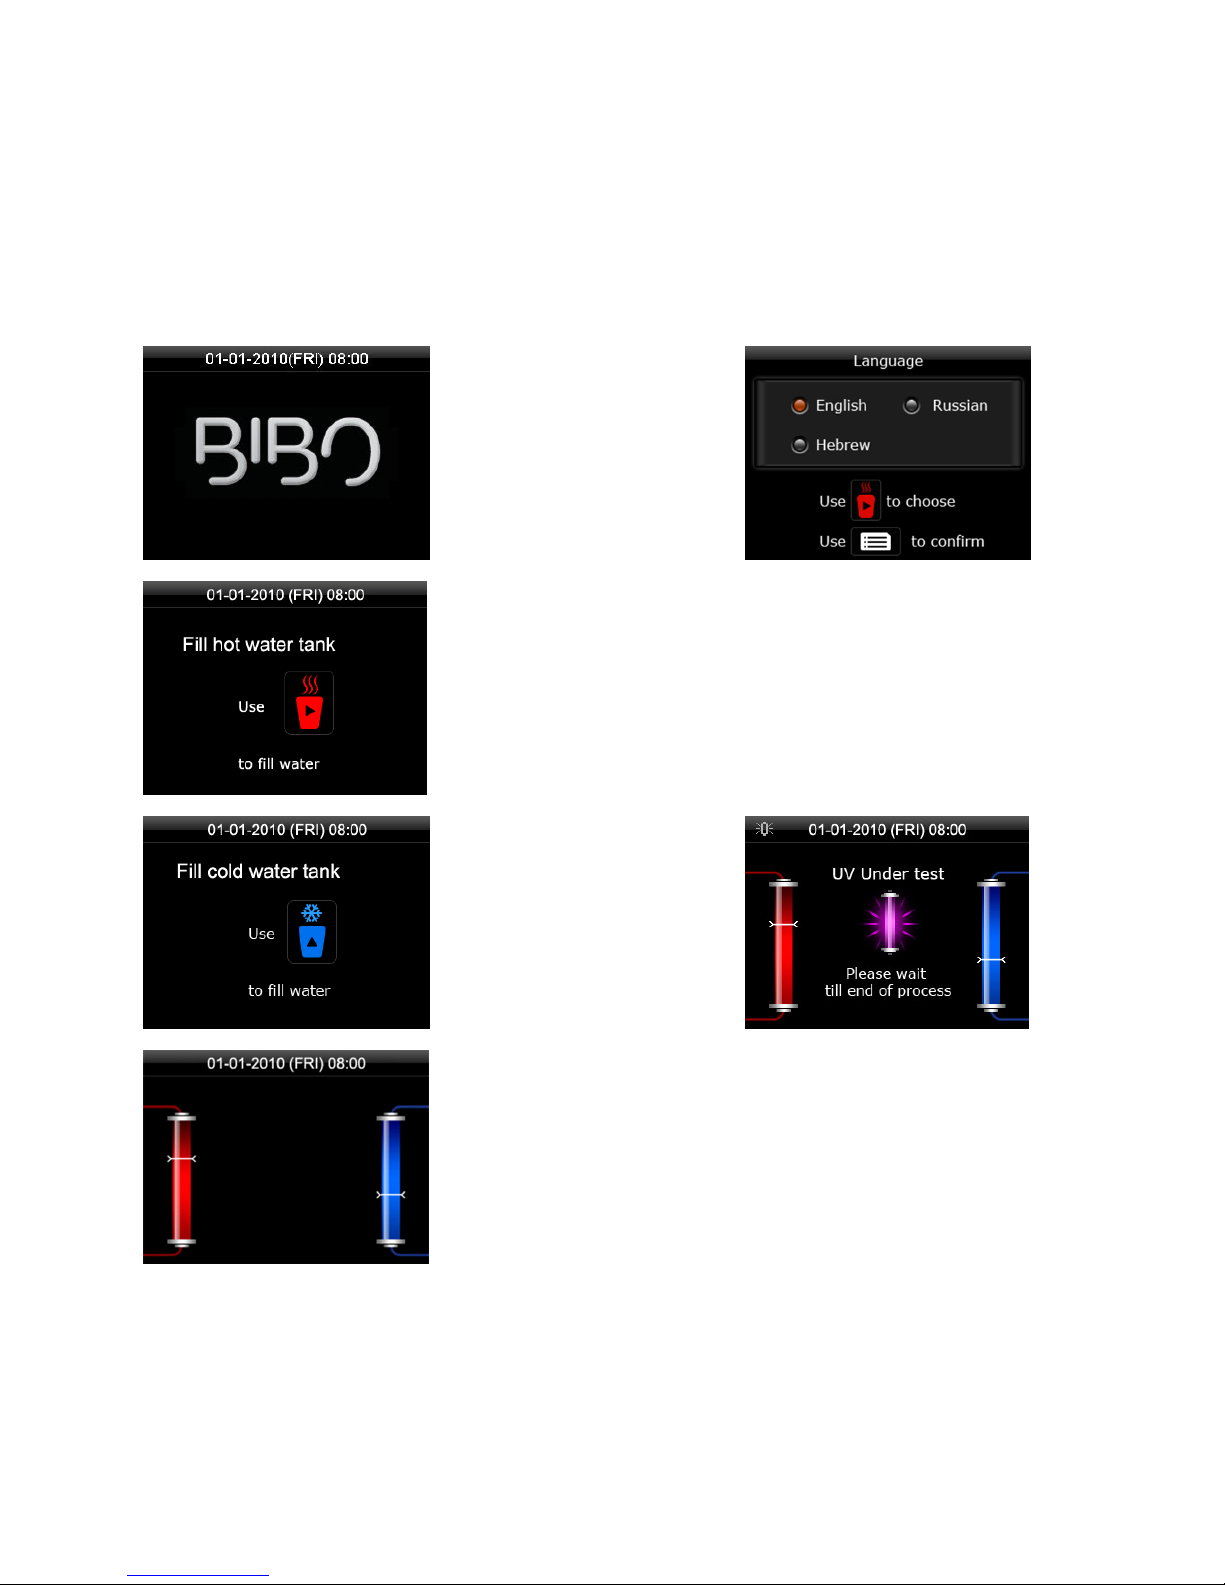
Once your BIBO has been plugged in to a power supply, the screen will display the BIBO logo;
this means it is operating correctly. Select your preferred language and then follow the
instructions on the screen, adding hot and cold water to the respective tanks. (Once the tanks
are full, water will flow from the outlet at the front of the dispenser.)
Before using your BIBO for the first time
After turning your BIBO on for the first time we suggest you dispense at least 15 litres of water
using both the hot & cold keys.
Important: When using a new or freshly cleaned BIBO for the first time, it’s important that water
is flowing from both the hot and cold keys when they are touched, before you switch on the hot
water tank.
Page 8
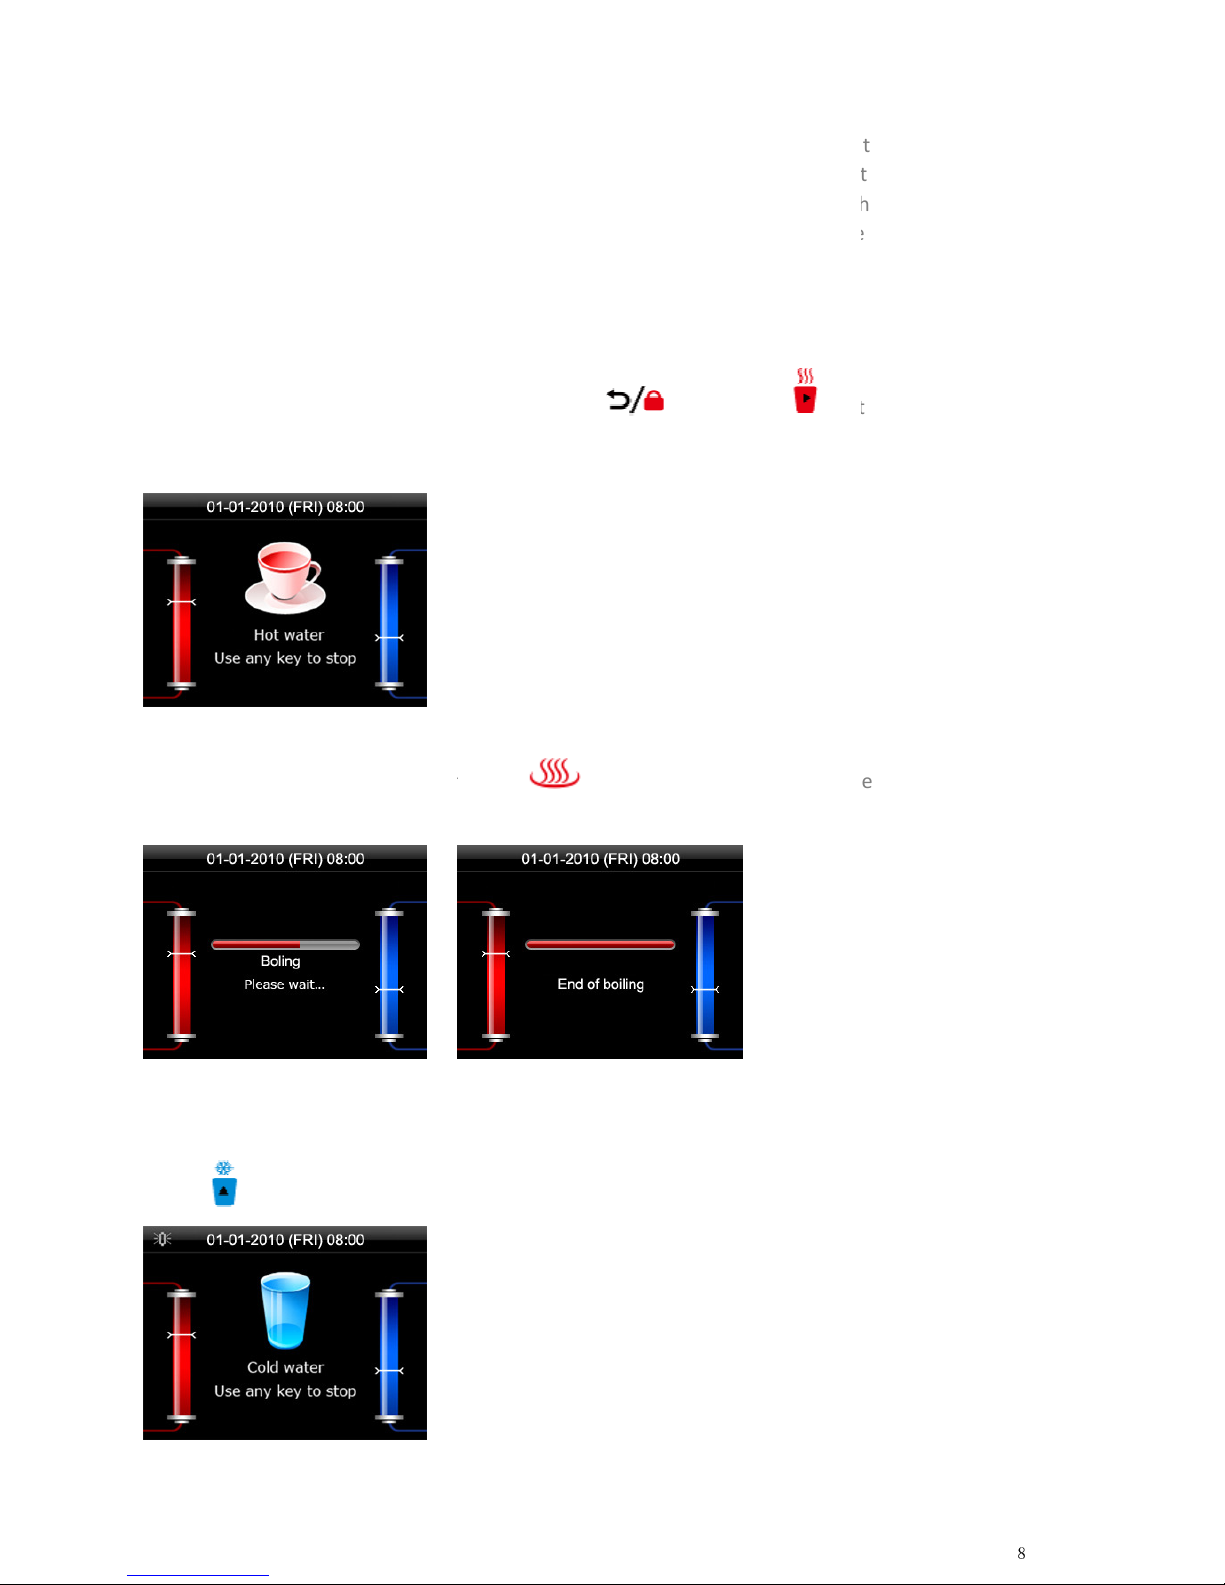
Once you have flushed 15 litres of water through the system, turn t
switch at back of the machine
(see page 4 of this guid
heat up and the hot water
temperature
hot tank will take approximately 5 minutes to get up to maximum temperature
Main features
To dispense hot water:
The BIBO
has a safety lock so you must
until you t
ouch any key to stop the water
If you require near boiling water t
following:
Once boiling ha
s completed you can dispense water from the BIBO.
To dispense cold water
Touch then cold water
will flow
To dispense ambient (mixed)
water
he hot tank
e for its location)
. The hot tank will begin to
icon will be active on the screen.
When first used
first touch
then touch
H
ot water will
.
ouch
for 0.5 seconds, the
dispenser will display the
. Touch any key to stop the water.
User’s manual
8
on using the
, the
.
flow
Page 9
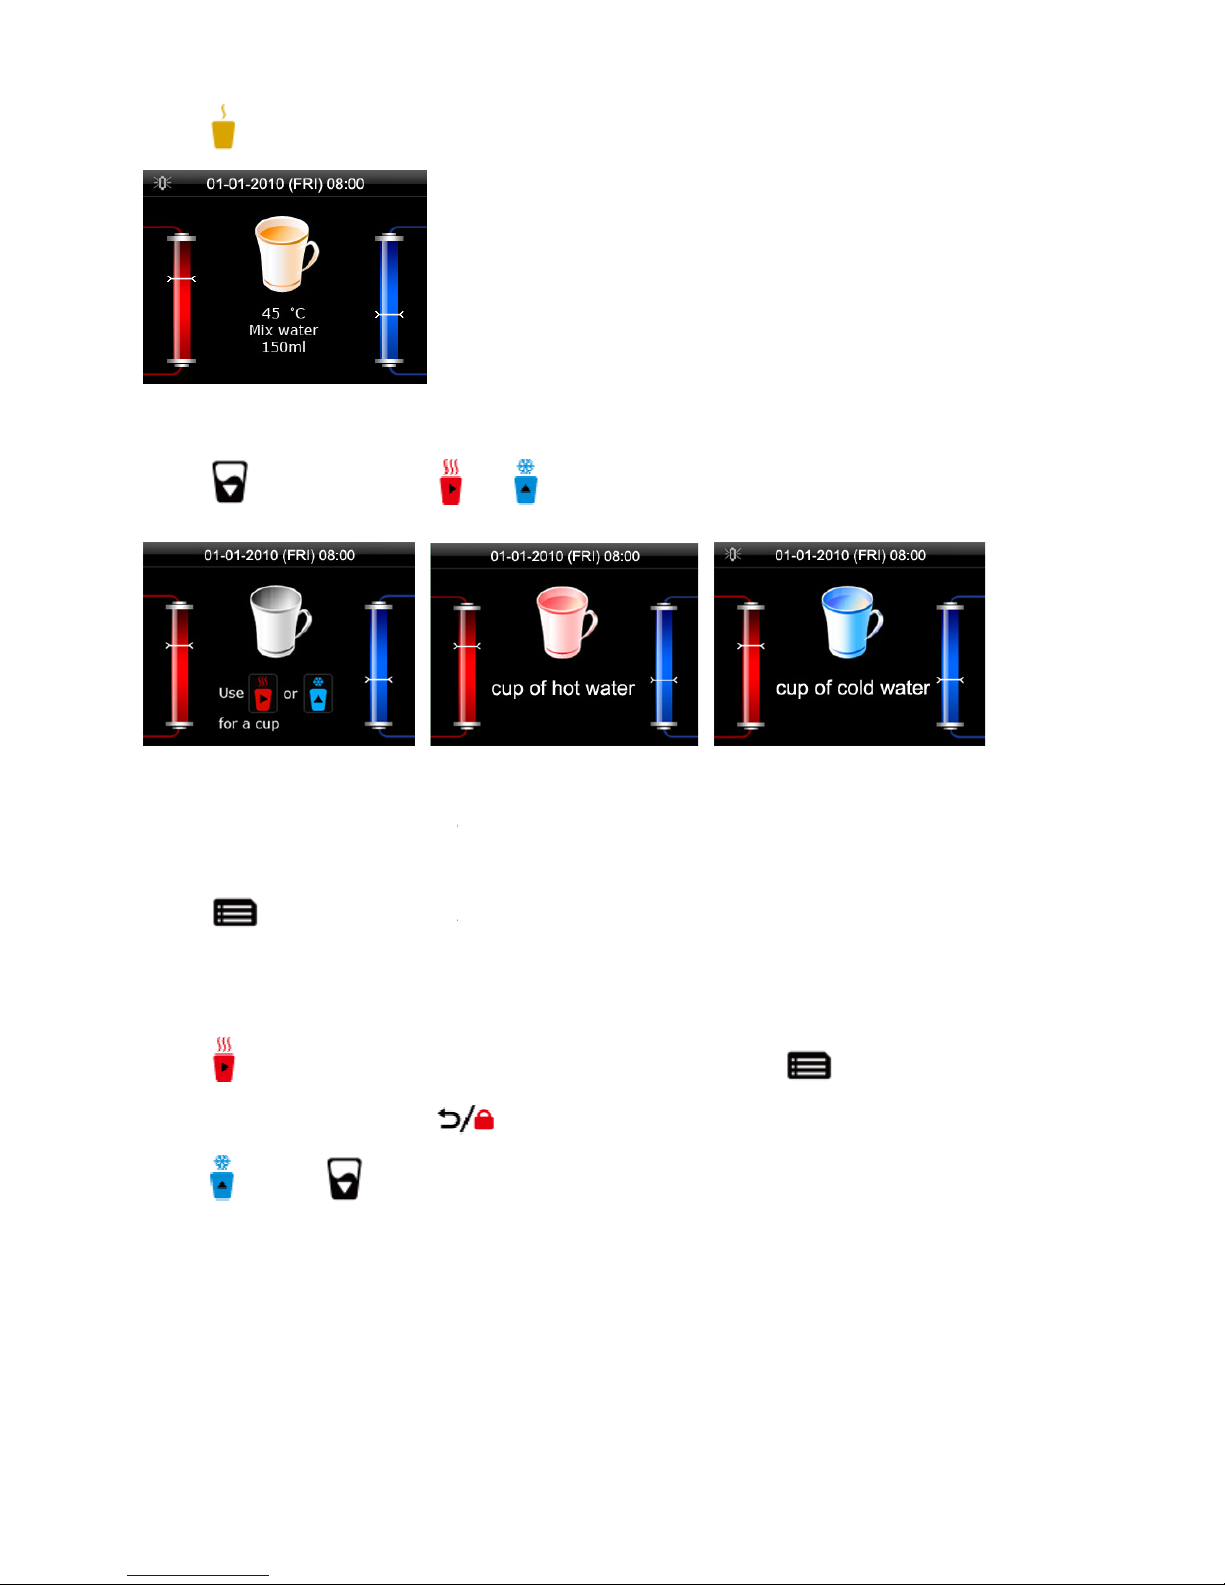
BIBO Brighter Water
Touch then ambient water
will flow. Touch any key to
To dispense a measured cup of
hot or cold
Touch then touch either
Menu options & personal settings
To enter the menu
Touch on the screen,
then follow the
The menu allows you to control
temperature settings, water
settings, energy saving mode, child lock settings, filters and UV change settings, lang
settings, ring tone settings and
there’s also an
Touch to
choose the setting that requires changing
you wish to change. Touching
Touch and/or
to adjust specific settings
Water temperature settings
Select the temperature
(Temp) setting in the menu the
cold & ambient (mix)
water temperatures as foll
stop the water.
water
or
for a measured cup of hot or cold water
on-screen prompts.
quantity
settings, time and date
option to restore BIBO’s
factory settings
, then touch
to select the setting
at any time will take you back to
the previous setting.
.
n follow the screen
prompts to set the
ows:
.
uage
.
hot,
Page 10
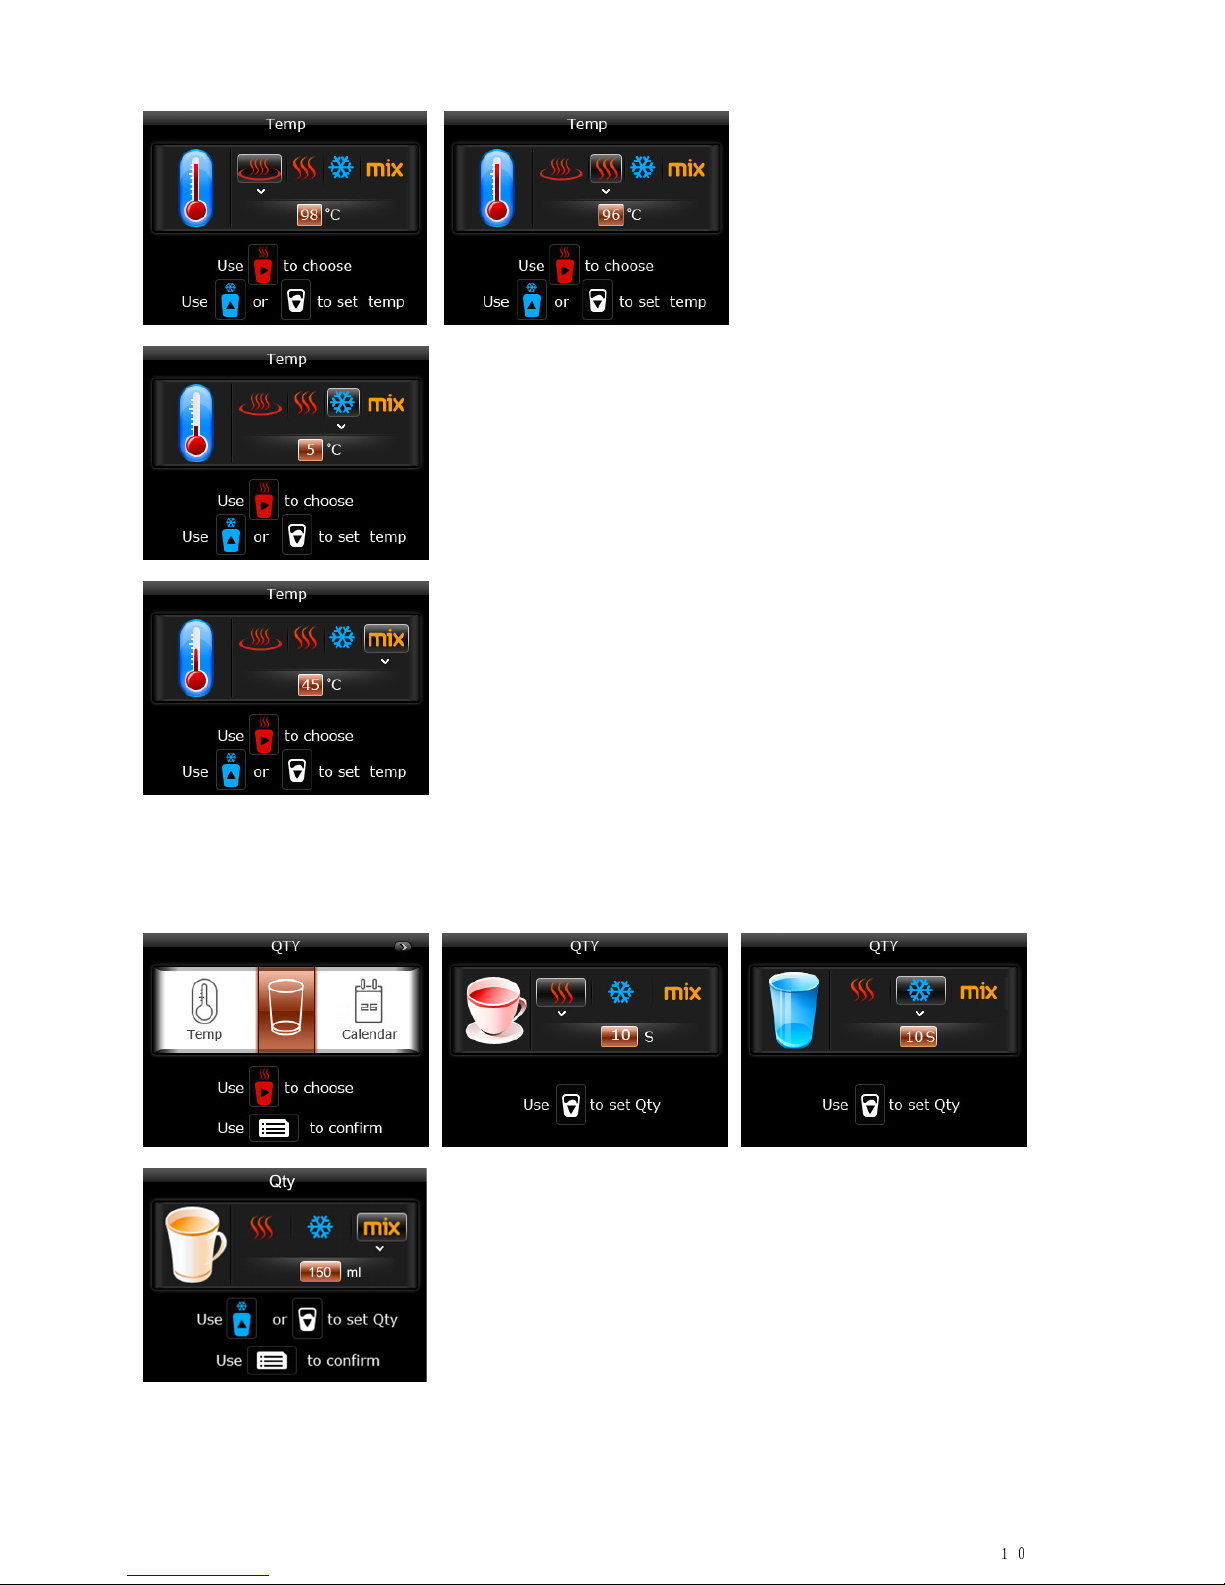
User’s manual
10
Water quantity settings
Select the water quantity (QTY) setting in the menu then follow the screen prompts to set the
hot, cold & warm (mix) water quantities as follows:
Time setting (day - month - year)
Select Calendar settings and enter the time adjustment screen. Follow the prompts to set the
date, time and your preferred time format, as follows:
Page 11
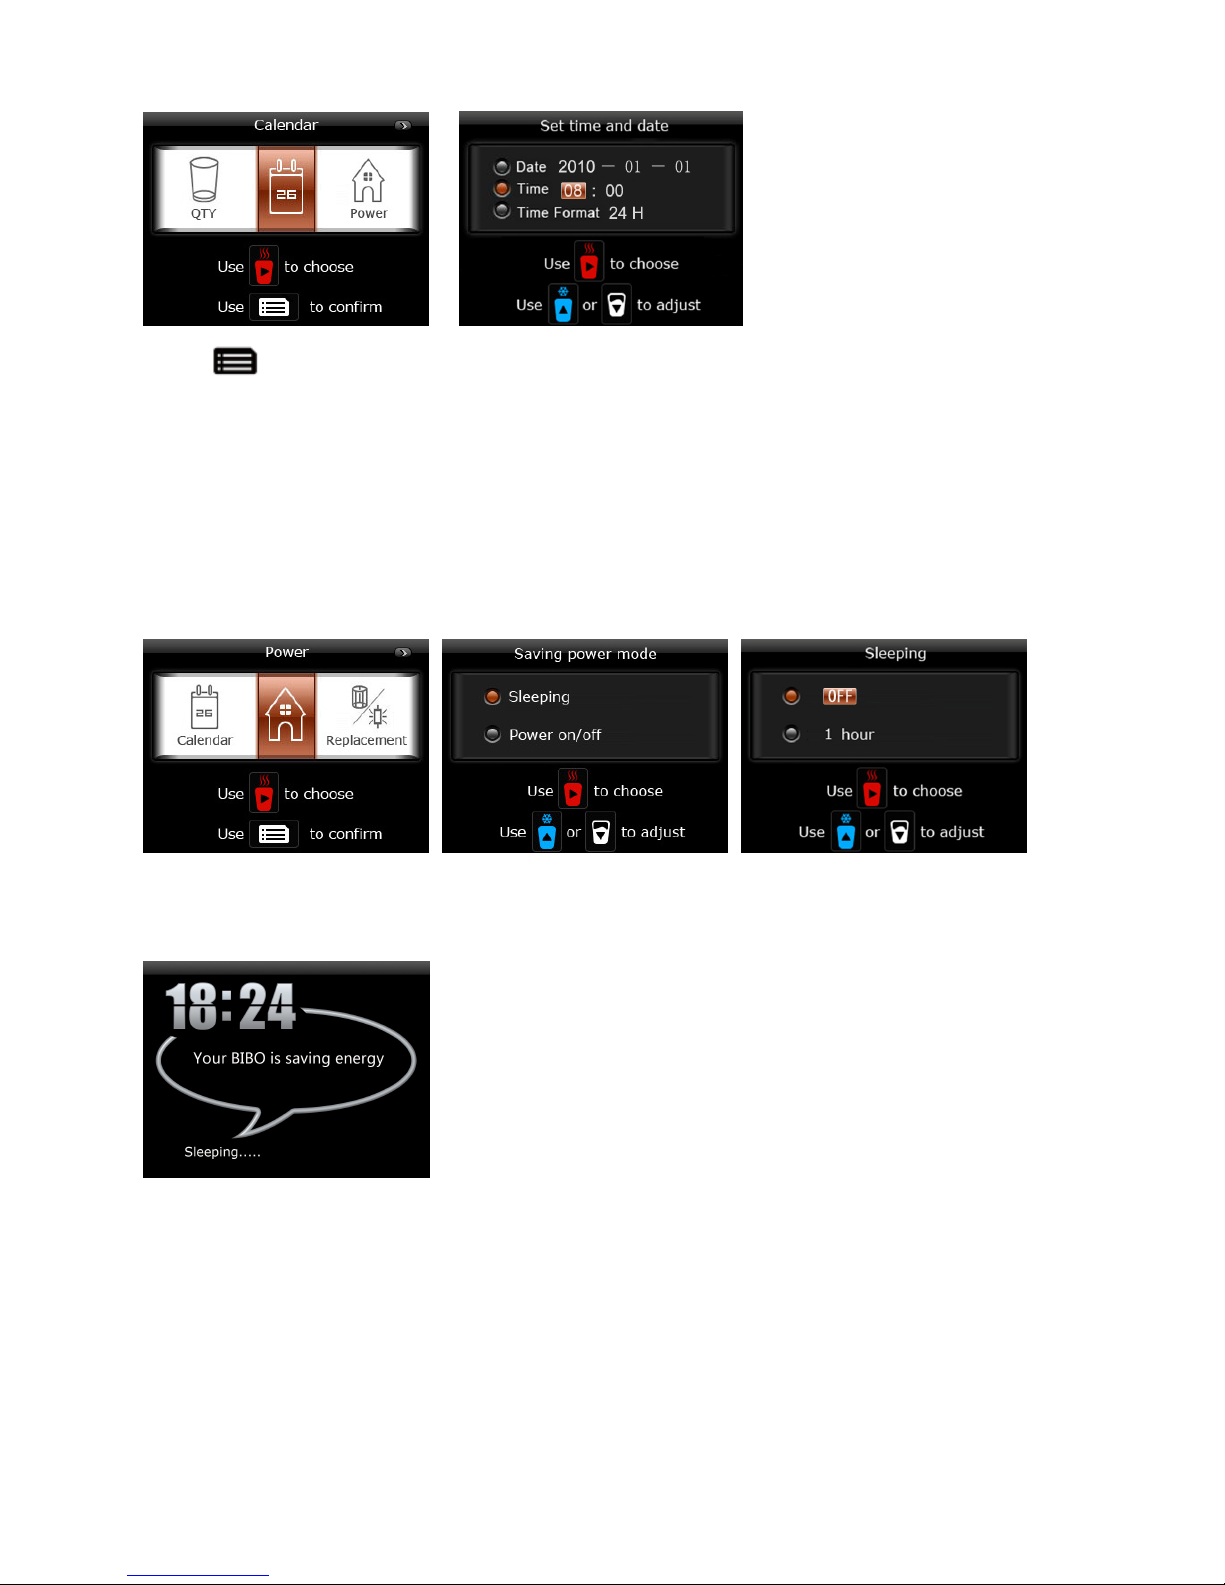
BIBO Brighter Water
Touch to save your selections
Energy -saving mode
To select which energy-saving mode you require select “power” from the menu and follow the
on-screen prompts to choose between the “sleeping” option or the timed “on/off” option.
Sleep Mode
Sleep mode allows you to tell your BIBO to go to sleep after a certain number of hours of
non-use. You can choose anything between 1 hour and 4 hours of inactivity.
When the machine goes into sleep mode, it will display the following screen. Simply press any
key to wake it up again.
Power on/off mode
Power on/off mode allows you to set your BIBO to come on and go off at different times of day –
exactly like your central heating. Choose “power” from the main menu and then choose the
“power on/off” option. Then use the power on/off screen to choose the times of day you want
the BIBO to be on, and when you want it to be on standby.
Page 12
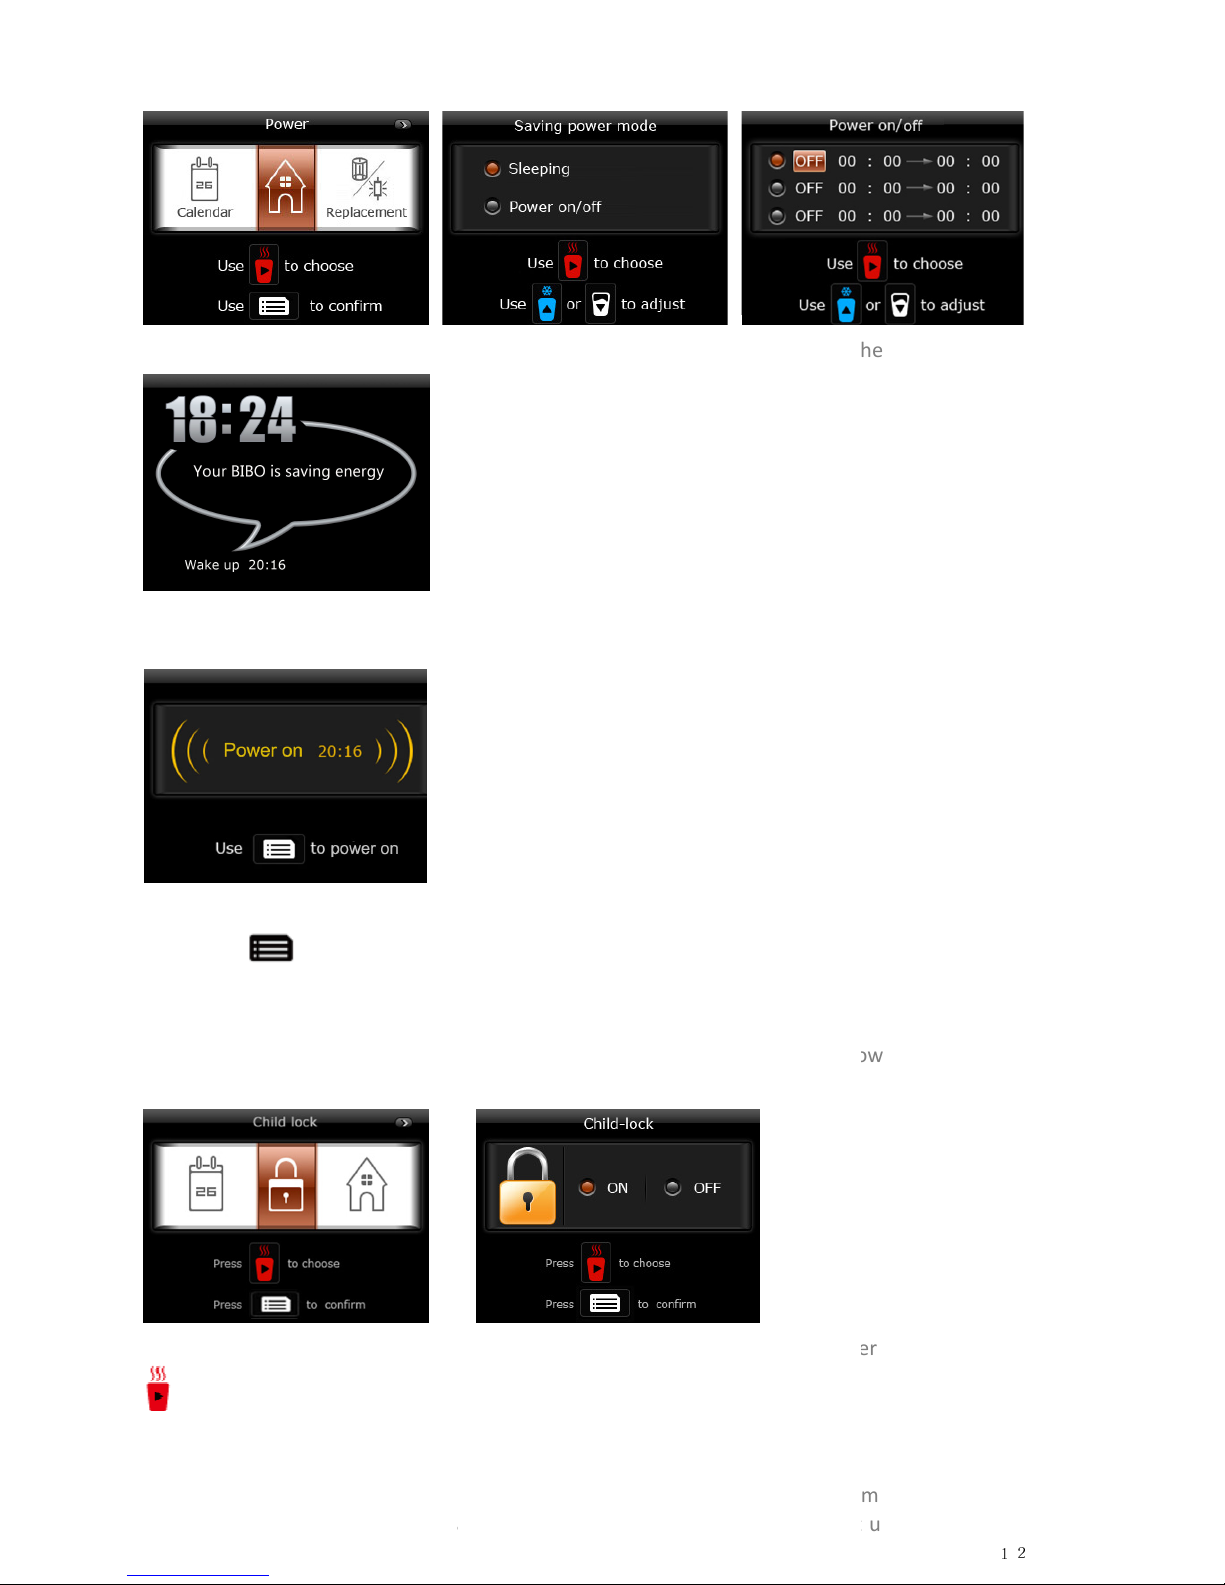
When the BIBO
goes into standby mode
If you want to wake yo
ur BIBO up before the programmed time, p
display this:
Touch the
key to confirm you want it to wake up.
4.6 Child lock setting
To set the extra child lock, select the “Child
turn the child lock on or off:
Once the child l
ock has been set, it will only be possible to dispense hot water by
key for more than 3 seconds.
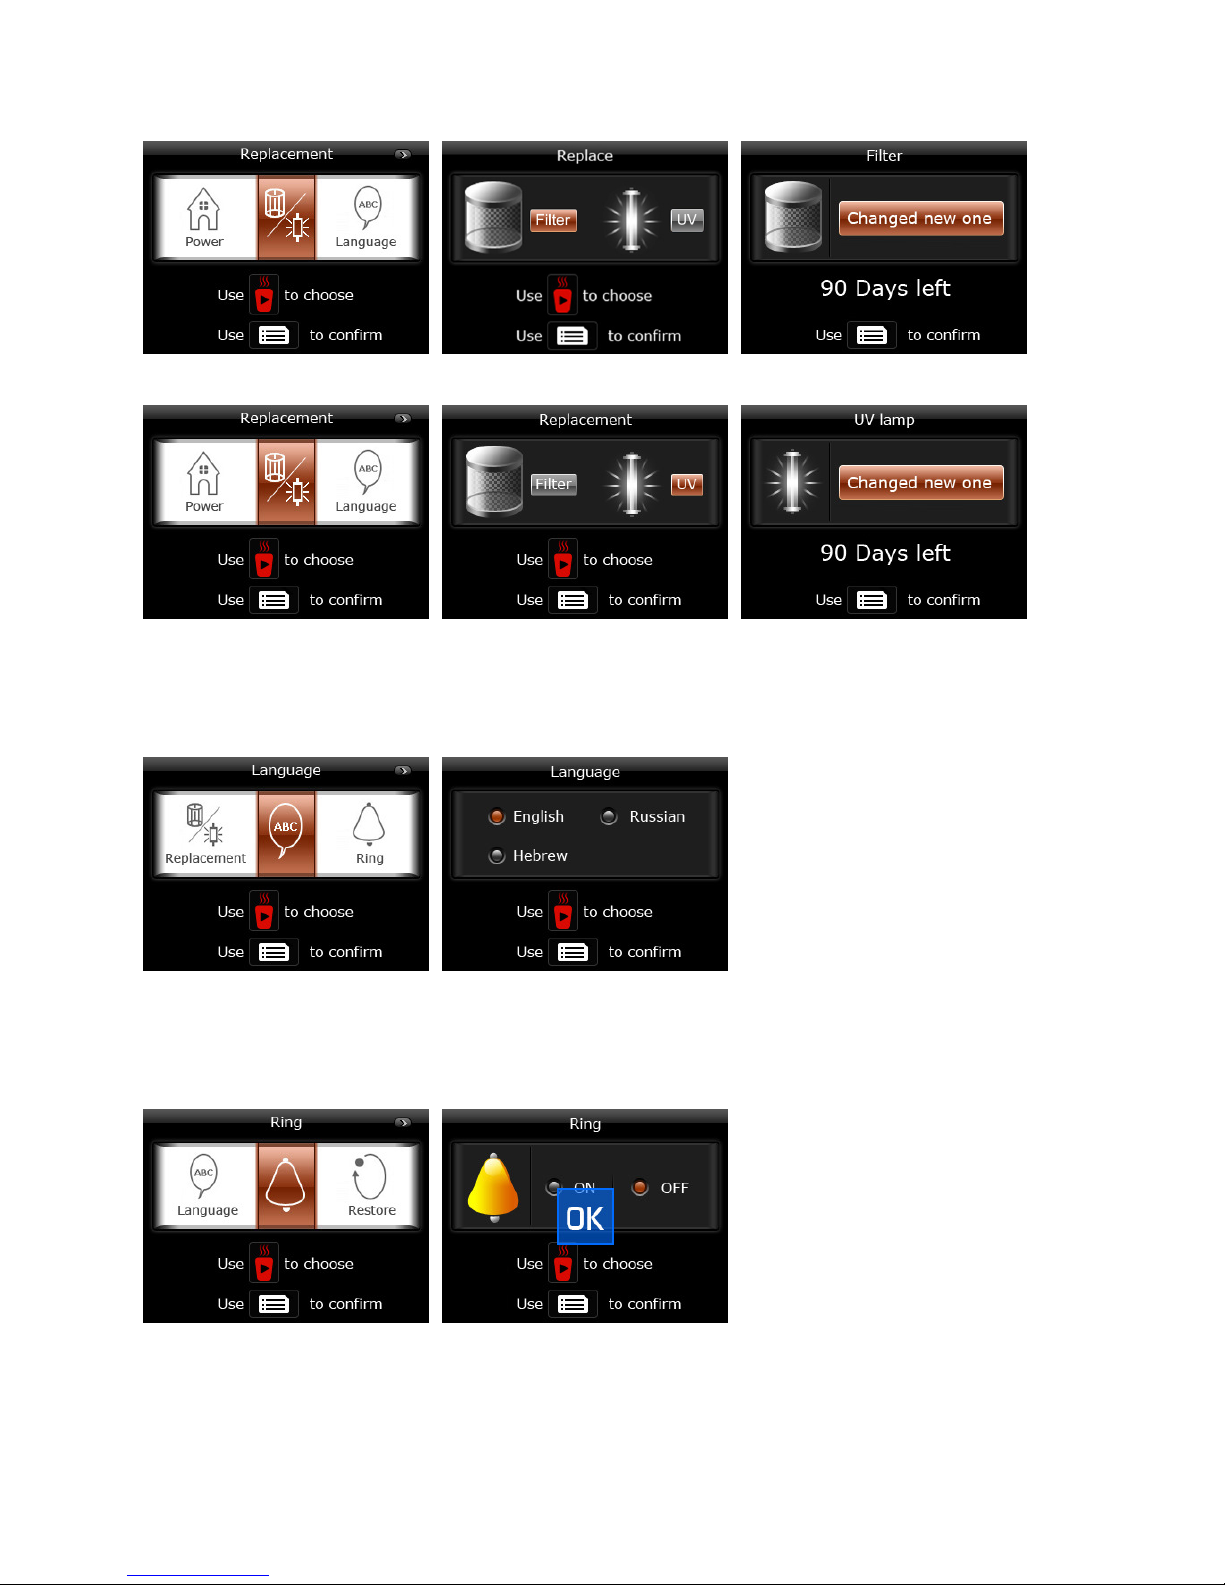
MAXI filter & UV filter
maintenance settings
To see how long is left on the lives
For the MAXI filter, select
“filter” an
, it will display the following screen in the display
ress any key
and the screen will
lock” option from the menu.
Follow the promp
of your two filters, select
“replacement” from the main menu.
User’s manual
12
:
ts to
touching the
Page 13
BIBO Brighter Water
change it for a new one.
Repeat for the UV filter, choosing “UV” instead of “filter” from the menu.
Language settings
You can change the operating language of BIBO at any time by choosing “language” from the
main menu and selecting your preferred language from the options available.
Ring/beep setting
You can tell your BIBO to beep every time a key is pressed by choosing “ring” from the main
menu, and selecting whether you want it on or off.
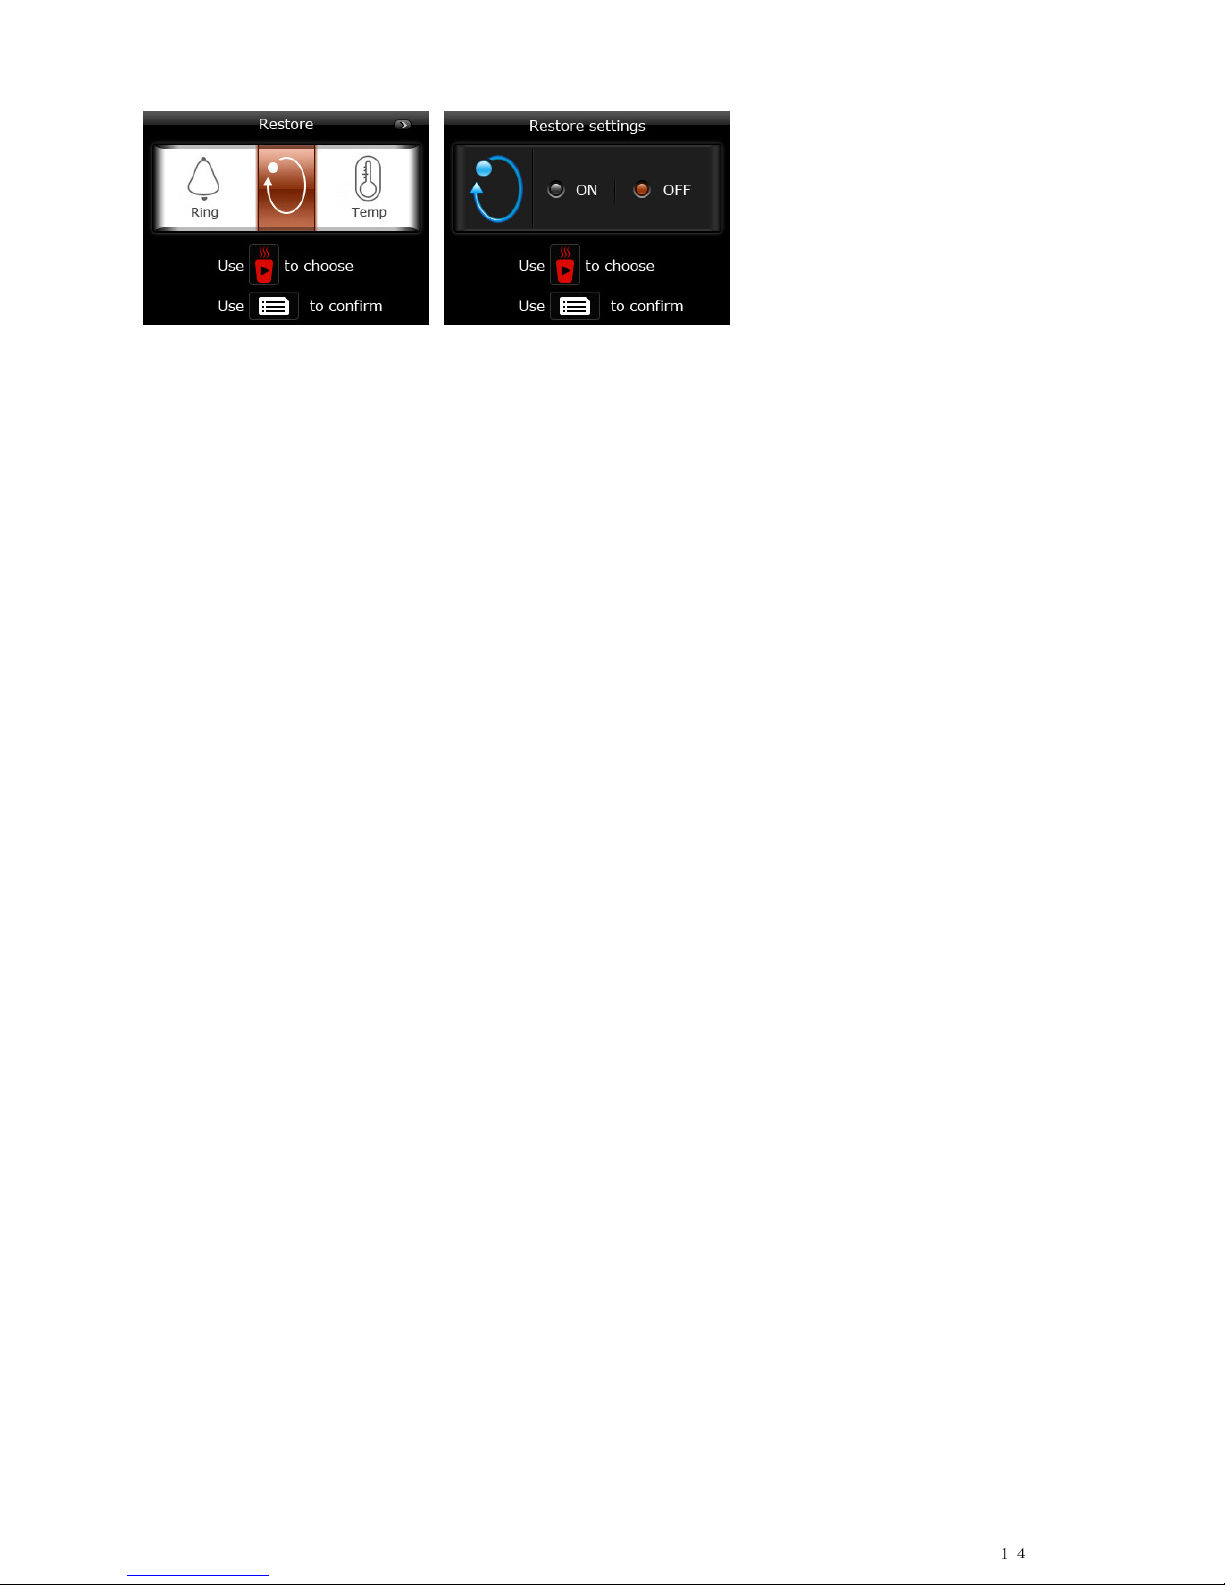
Restore factory settings
To restore all settings to factory settings, choose “restore” from the main menu and then choose
“on”.
Page 14
User’s manual
14
Page 15
BIBO Brighter Water
BIBO information & maintenance
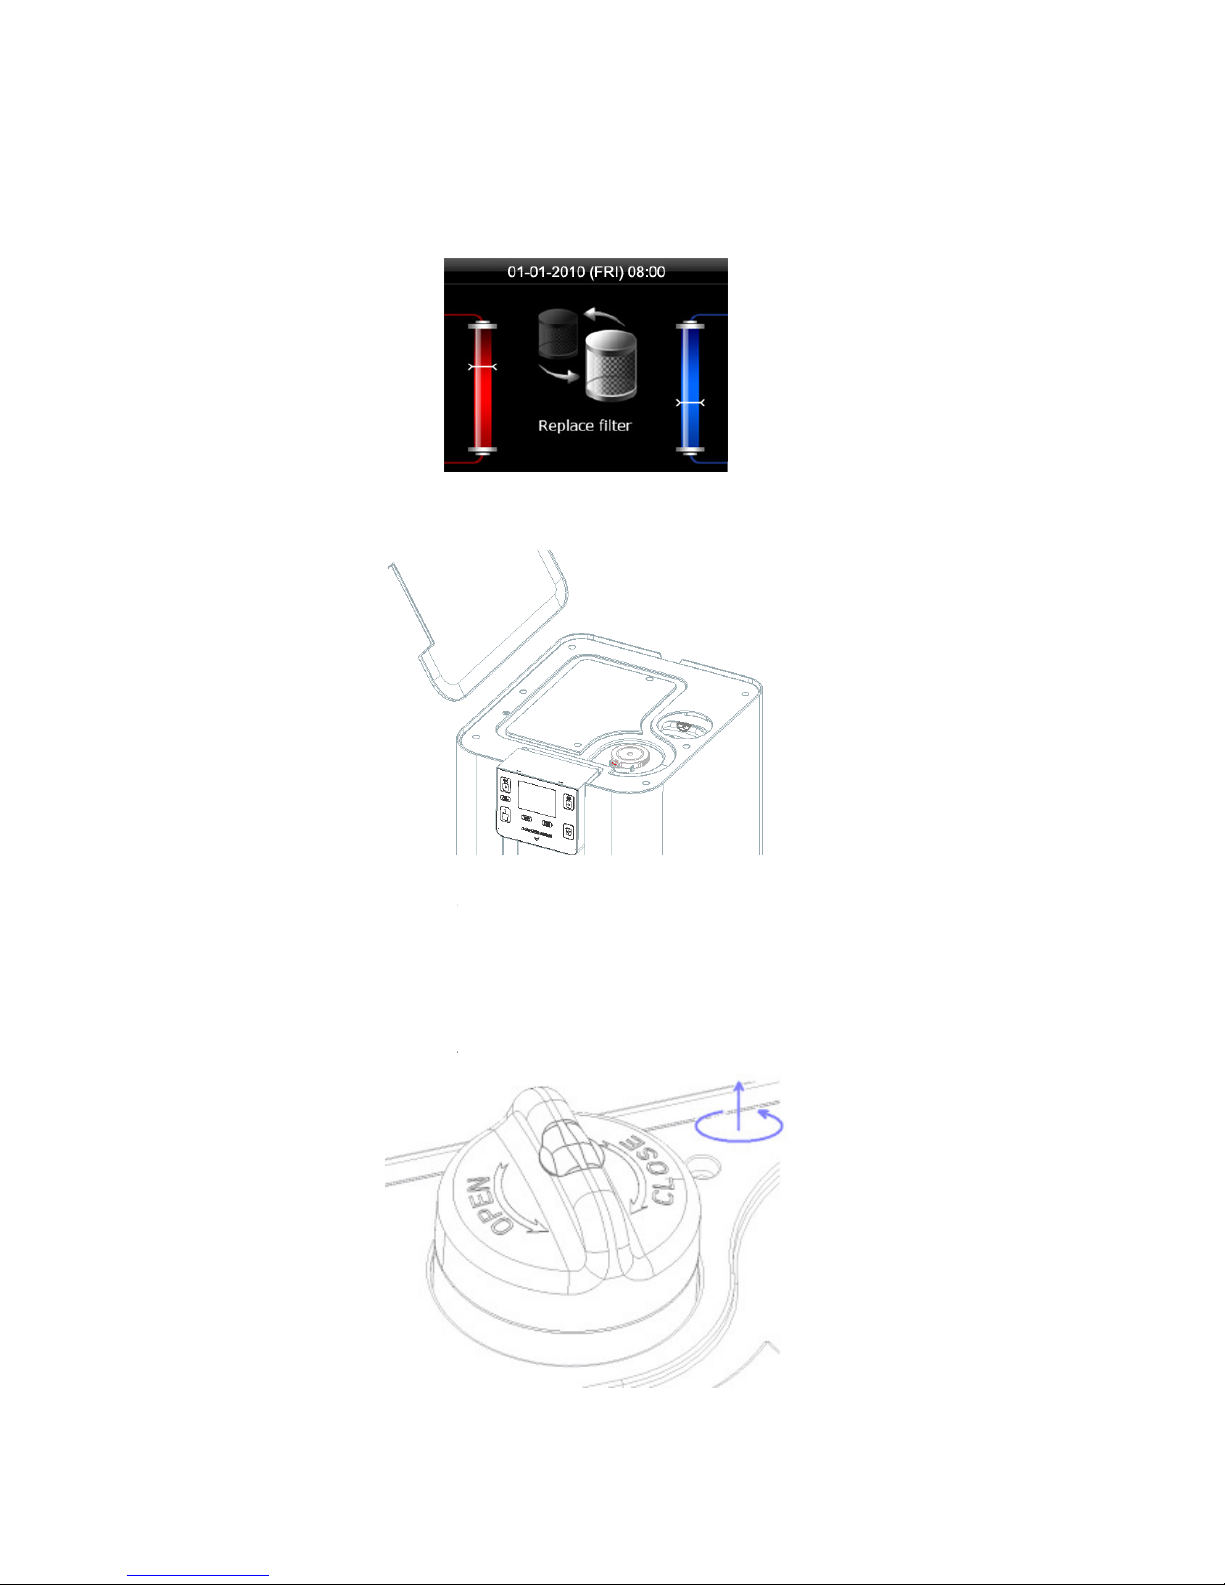
Replacing the MAXI filter
BIBO’s MAXI filter
should be replaced
filter needs replacing, the BIBO’s
display will alert you
Remove the lid on the top of BIBO
You will see the tops of two white filters on the right hand side. The MAXI filter is the one
towards the back of your BIBO which a handle protruding from the top. Turn the handle
anti-
clockwise and pull the filter upwards and
OPEN - Rotate anti-
clockwise to remove the used filter.
CLOSE -
Rotate clockwise to install the new
Remove the new MAXI filter from its packaging and insert it. Then turn clockwise to install.
Once the filter has been replaced, go into th
maintenance” option, select
“filter” and c
every 6 months (about 2,000 litre
s of water). When the
as follows:
by simply lifting it off.
out.
filter
e BIBO menu,
from the screen, select the “
onfirm the MAXI filter replacement.
filter / UV
Page 16
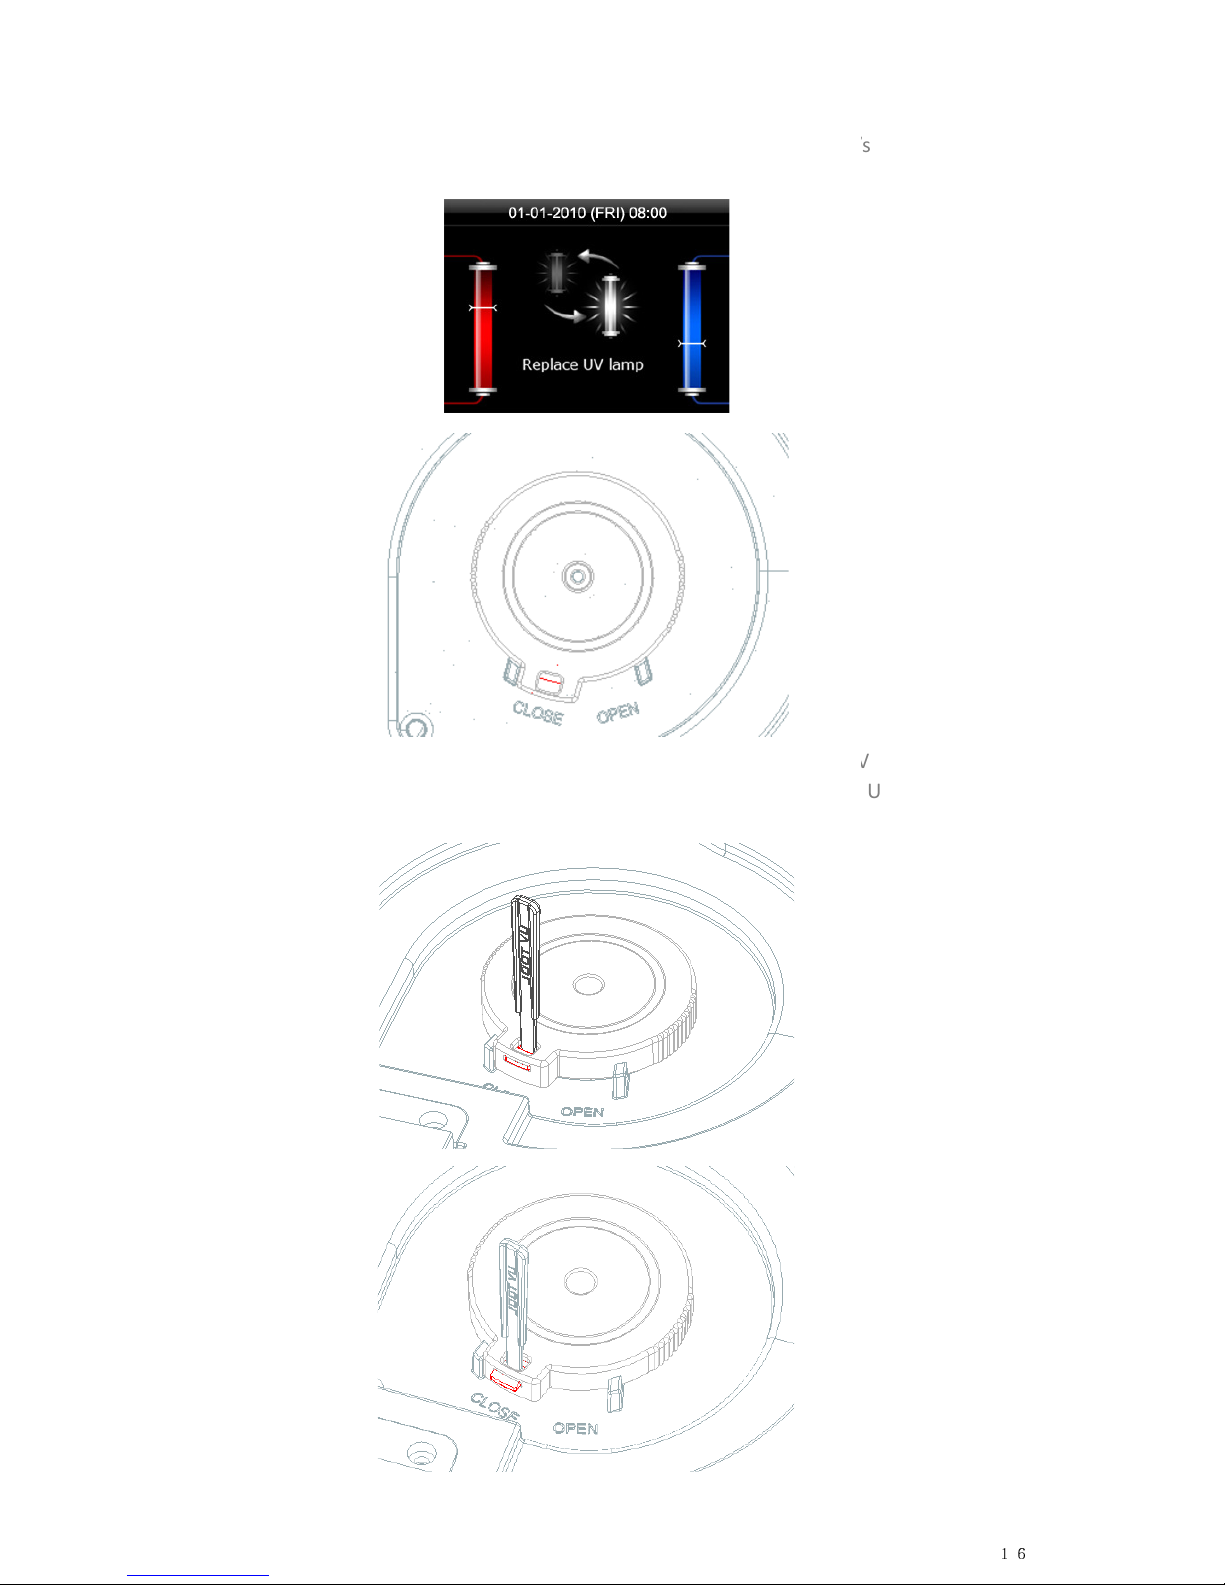
Replacing the UV filter
The UV filter
should be replaced once a year. When
you as follows:
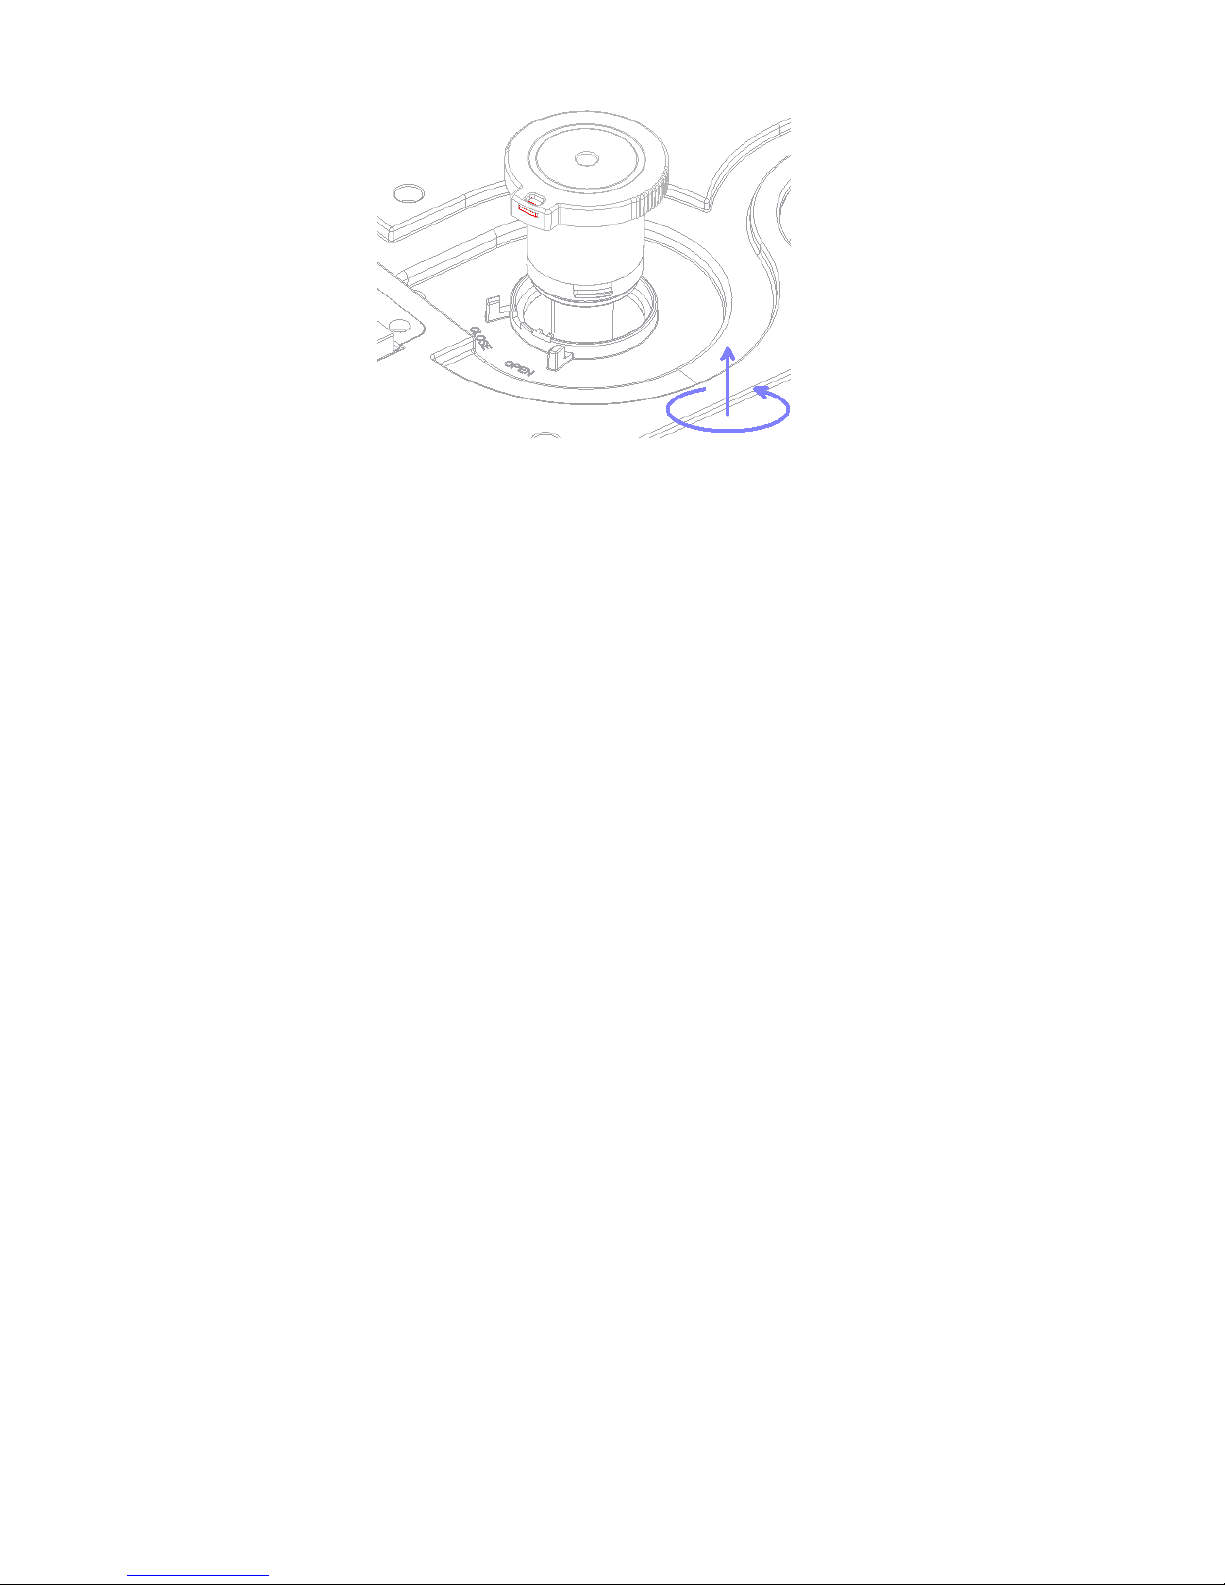
You will have been given a key when your BIBO was installed to release the UV filter. Put the key
into the slot indicated above
, release the latch
clockwise. Pull the UV filter
up and out of the BI
it needs replacing,
BIBO’s
to “open”
and rotate the UV lamp counter
BO.
User’s manual
16
display will alert
Page 17
BIBO Brighter Water
Once the filter has been replaced, go into the BIBO menu from the screen, select the “filter/UV
maintenance” option, select “UV” and confirm the UV filter replacement.
If you need more help or information on changing your filters, there’s a video demonstrating how
to replace them both on our website at www.bibowater.co.uk/filterchange
Cle aning yo ur BIBO
Clean your BIBO by simply wiping it down with a damp cloth. Soap or any other gentle detergent
can also be used if you wish. The drip tray can be removed and cleaned in your dishwasher.
Please don’t use harsh detergents, concentrated washing up liquid or solvents to clean your BIBO.
Avoid using anything abrasive (such as steel brushes, scourers etc) to clean the body as it will
scratch.
It’s very important that you don’t wet the back of the machine whilst cleaning – remember it is
connected to an electrical supply.
Page 18
User’s manual
18
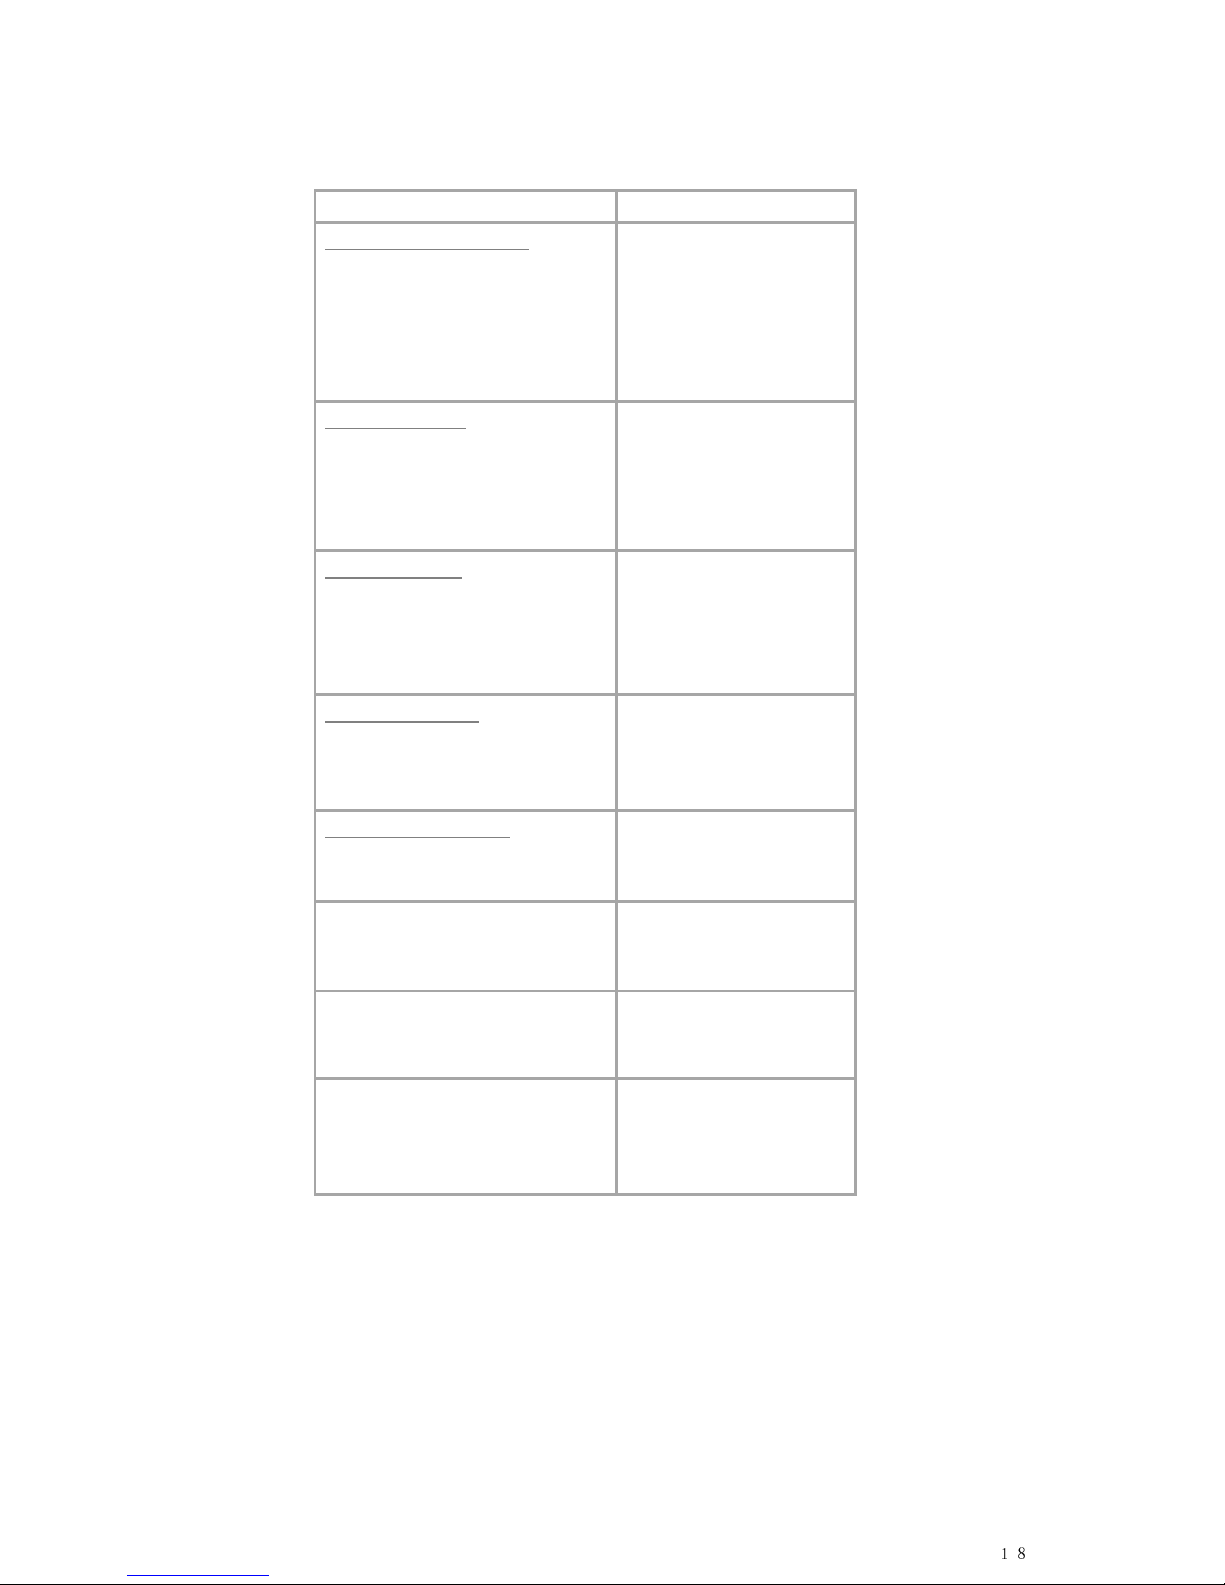
Technical information
The maximum ambient working temperature is +38℃
*The dispense capacity is calculated at an ambient and inlet water temperature of +25℃
Safety notes
• This machine is for indoor use only. Avoid placing it in direct sunlight or next to flammable
materials. Avoid placing the machine near other appliances that could get damaged if wet.
Do not immerse the machine in water.
• The machine uses 230VAC voltage and should be used with a 10A fuse in the plug top
• Important: when using a new or freshly cleaned BIBO for the first time, it’s important that
water is flowing when both the hot and cold water keys are touched, before you switch on
Specification Parameter
Electrical specification
Voltage
Frequency
Power rating
Current rating
230 Volts
50 Hertz
1,700 Watts
10 Amps
Heating system
Power rating
Heating capacity
Hot water temperature
1,500 Watts
15 Litres/hour*
70-96℃(Adjustable)
Chilling system
Power rating
Cooling capacity
Cold water temperature
138 Watts
5 Litres/hour*
4-16℃(Adjustable)
Filtration system
Activated carbon filter
UV filter
0.5 Micron
11 Watts
Inlet water pressure
Minimum-Maximum
0.1MPa—0.6MPa
Dimensions (mm)
300W x 370D x 340H
Weight
14 Kgs
Operating standards
GB4706.1-2005
GB4706.13-2008
GB4706.19-2008
GB/T22090
-
2008
Page 19
BIBO Brighter Water
the hot water tank
•
The machine dispenses safe and
the hot tank is directly connected to the hot water outlet
therefore
for a small amount of excess water to be released once water has been dispensed.
• BIBO
can produce high temperature hot water.
of producing hot
water please use caution.
•
When your BIBO is turned on for the first time, please run
before drinking any, to
ensure the water
• Warning: The machine must b
e used with
For further notes or detailed explanations on the operation of the machine, please contact
via email at [email protected]
Installation
Your BIBO will be installed by one of our profes
please note the following
concerning the
Overview
• Install the BIBO in a c
ool, dry place where it is well
any heat source
• Keep the rear of the BIBO
a minimum of 10cm (4") away from the wall and ensure that
the dispenser is well ventilated
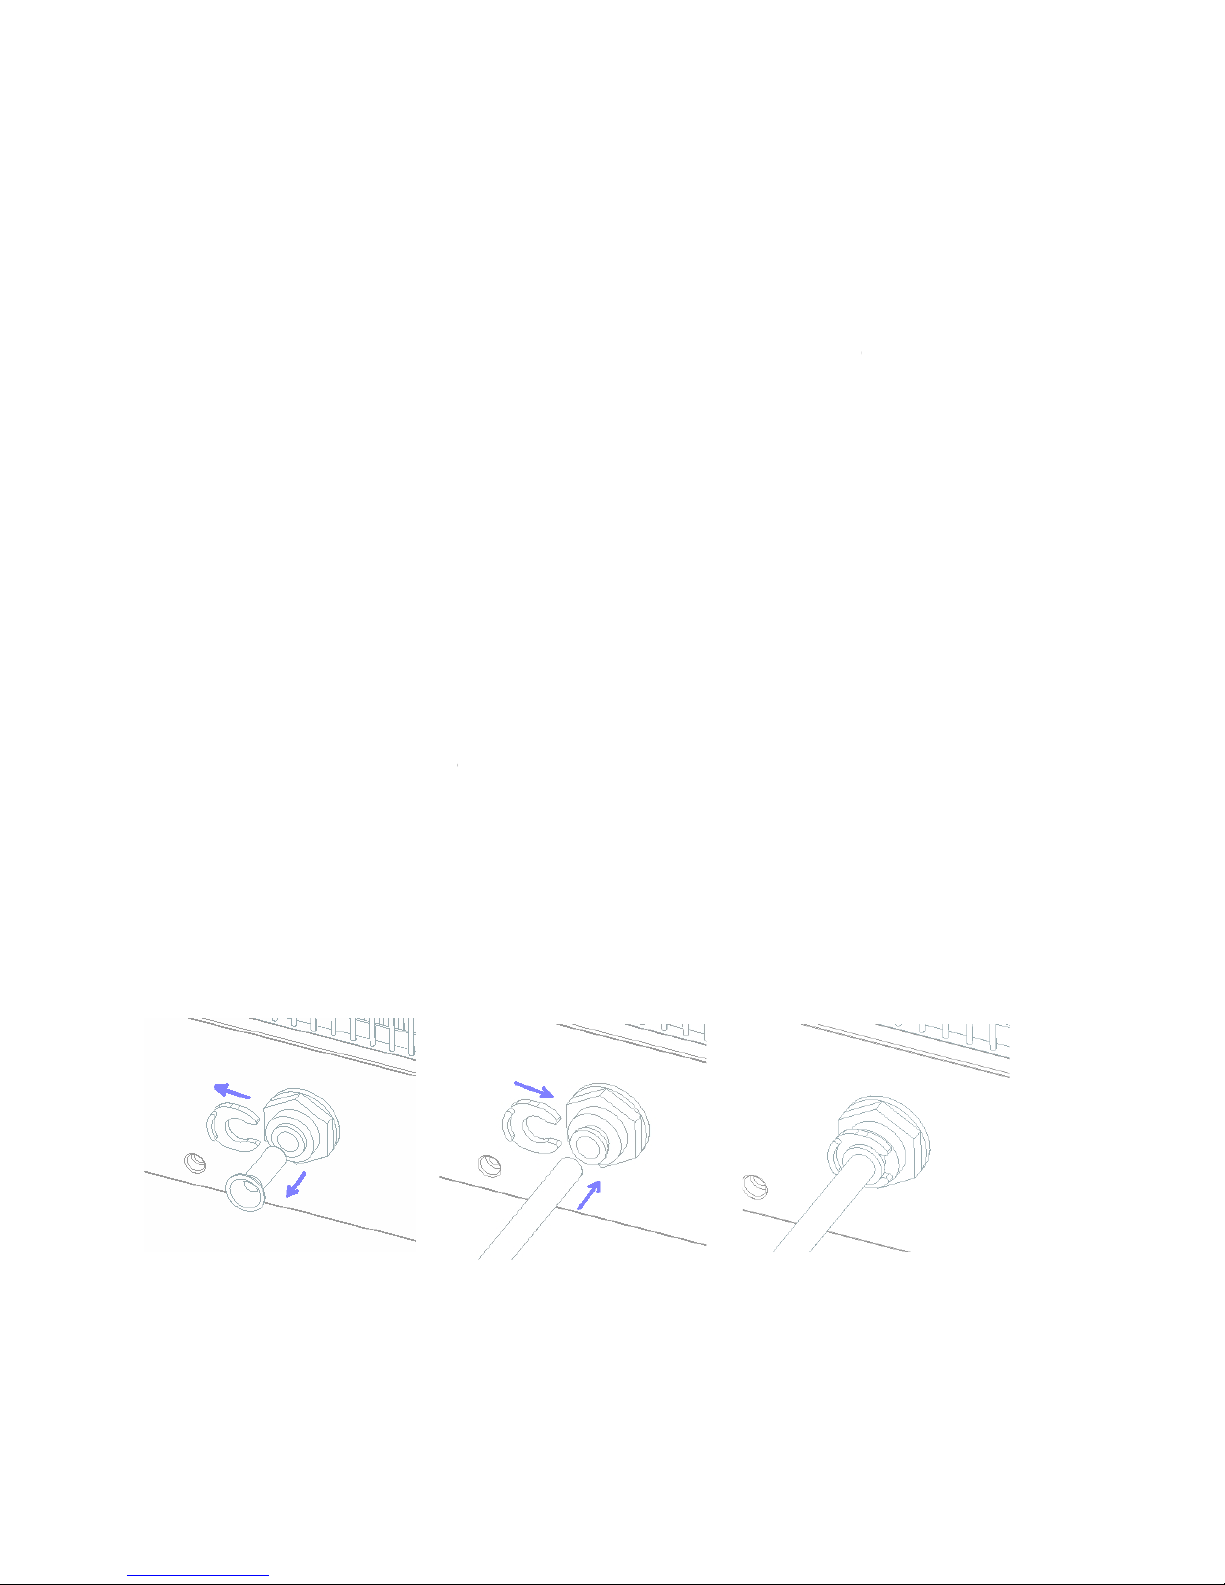
Water supply connection
•
The water pressure should be between 1bar (14.5psi) & 6bar (87psi)
•
Remove the locking clip from the inlet water fitting
• Remove the bla
nking plug (Picture
• Insert the water pipe (
Picture
•
Replace the locking clip (Picture
(Picture 1
) (
great-tasting drinking water. The tank i
s not pressurized and
. N
o valves are used
As
with any kettle, pan or appliance capable
10-15
litres of water through it
is fresh.
a reliable earth in the
mains power supply
sional, experienced installation team. However,
installation of your BIBO.
ventilated. It must be kept away from
1)
2)
3)
Picture 2) (
Picture
so it is normal
socket.
BIBO
3)
Page 20

User’s manual
20
Troubleshooting
If a fault should occur, please first use the troubleshooting guide below to determine the fault
type, then follow the steps listed to resolve the issue. This should help you resolve the fault with
the minimum effort.
If you find that the BIBO is not working properly, or if the problem persists, the machine may
need to be professionally repaired. Please contact us at [email protected] or call 0800 678
5969 to speak to one of our team.
Fault Possible cause Solution
No water flow
1. Machine power is not
connected
2. Power socket failure
3. Inlet valve closed
4. Water tap blockage or low
water pressure
1. Unplug the machine and then plug it
back in again, check switch is on
2. Check the socket and fuse
3. Check that the water inlet valve is open
4. Check your water supply system
No hot water
1. Heating system is not turned on
2. Excessive water use
3. The machine is in power saving
mode
1. Turn on the heating switch at the back
2. Test again after 10 minutes
3. Follow the prompts to wake the
machine back up
No cold water
1. Chilled water temperature set
too high
2. Excessive cold water use
3. If left unused for extended
period, ice can build up in the,
cold water tank
1. Check the water temperature settings
2. Test again after 30 minutes
3. Turn off the power and wait 2 hours
before turning it back on
Machine
leakage
1. Drip tray is full
2. Leakage inside the machine
1. Empty water drip tray and dry
thoroughly before replacing
2. Turn off the power and water, please
contact BIBO
Odour from
water
1. New machine
2. The machine has not been used
for a long time
3. The filter has not been replaced
when necessary
1. Drain 10-15L of water
2. Replace the filters
3. Replace the filters
Page 21

BIBO Brighter Water
Your warranty
If problems occur with the machine, please contact BIBO directly via email on
[email protected] or call us on 0800 678 5969. Do not attempt to disassemble the machine
by yourself, doing so will invalidate the product warranty and the BIBO takes no responsibility for
any resulting issues.
If the machine develops any technical problems within the one year warranty period, we will
repair your BIBO for free. You can extend the warranty beyond the first year by visiting our
website at www.bibowater.co.uk Appropriate maintenance costs will be charged for any damage
that is caused by the misuse of the machine or that is incurred once the warranty period has
ended.
BIBO USER MANUAL VERSION 2011/11
 Loading...