

Page 1
BIBO bar
user manual
Maximize your BIBO experience
Page 2
Welcome!
Congratulations on your new BIBO bar. You are just
moments away from enjoying endless pure, boiling
and ice-cold water, at the touch of a button.
As we want you to get the best from your BIBO bar,
we ask that you read through this manual before
getting things started.
This manual is your go-to-guide for your BIBO
bar and includes practical advice and technical
information to answer any questions you may have.
However please remember that our team is just
an email or phone call away should you have any
further queries.
Visit www.bibo.co.za/contact, email
[email protected] or call 0800 00 BIBO (2426).
So let’s clink glasses and say ‘cheers!’ to many
happy and healthy drinks with BIBO.
PLEASE NOTE
The pictures and diagrams in this manual are for reference only,
please refer to your BIBO bar.
We reserve the right to make corrections or changes to the
information provided in this manual without prior notice being given.
The products, functions, structures and designs described in this
manual have been patented by our company and are thus protected
by the UK, EU, South Africa and Australia patent oces.
Version number 190901
© Copyright BIBO 2019, All Rights Reserved
Page 3
X
Contents
CONTENTS
MEET YOUR BIBO bar
BIBO bar overview
BIBO bar’s touch screen interface
INSTALLING YOUR BIBO bar
Before getting started
p. 4 p. 22
p. 6
MAINTAINING YOUR BIBO bar
Replacing your BIBO bar maxi filter
Replacing your BIBO bar zapper
Cleaning your BIBO bar
TECHNICAL INFORMATION
Product specifications
p. 26
BIBO bar - User Manual
Step-by-step guide to self installation
USING YOUR BIBO bar
Menu options and personal settings
Dispensing water
p. 11
Safety notes
TROUBLESHOOTING
WARRANTY
p. 28
p. 29
3
Page 4
X
Meet your BIBO bar
1
6
7
2
3
4
5
8
9
10
11
12
13
14
6
7
8
9
10
11
12
13
14
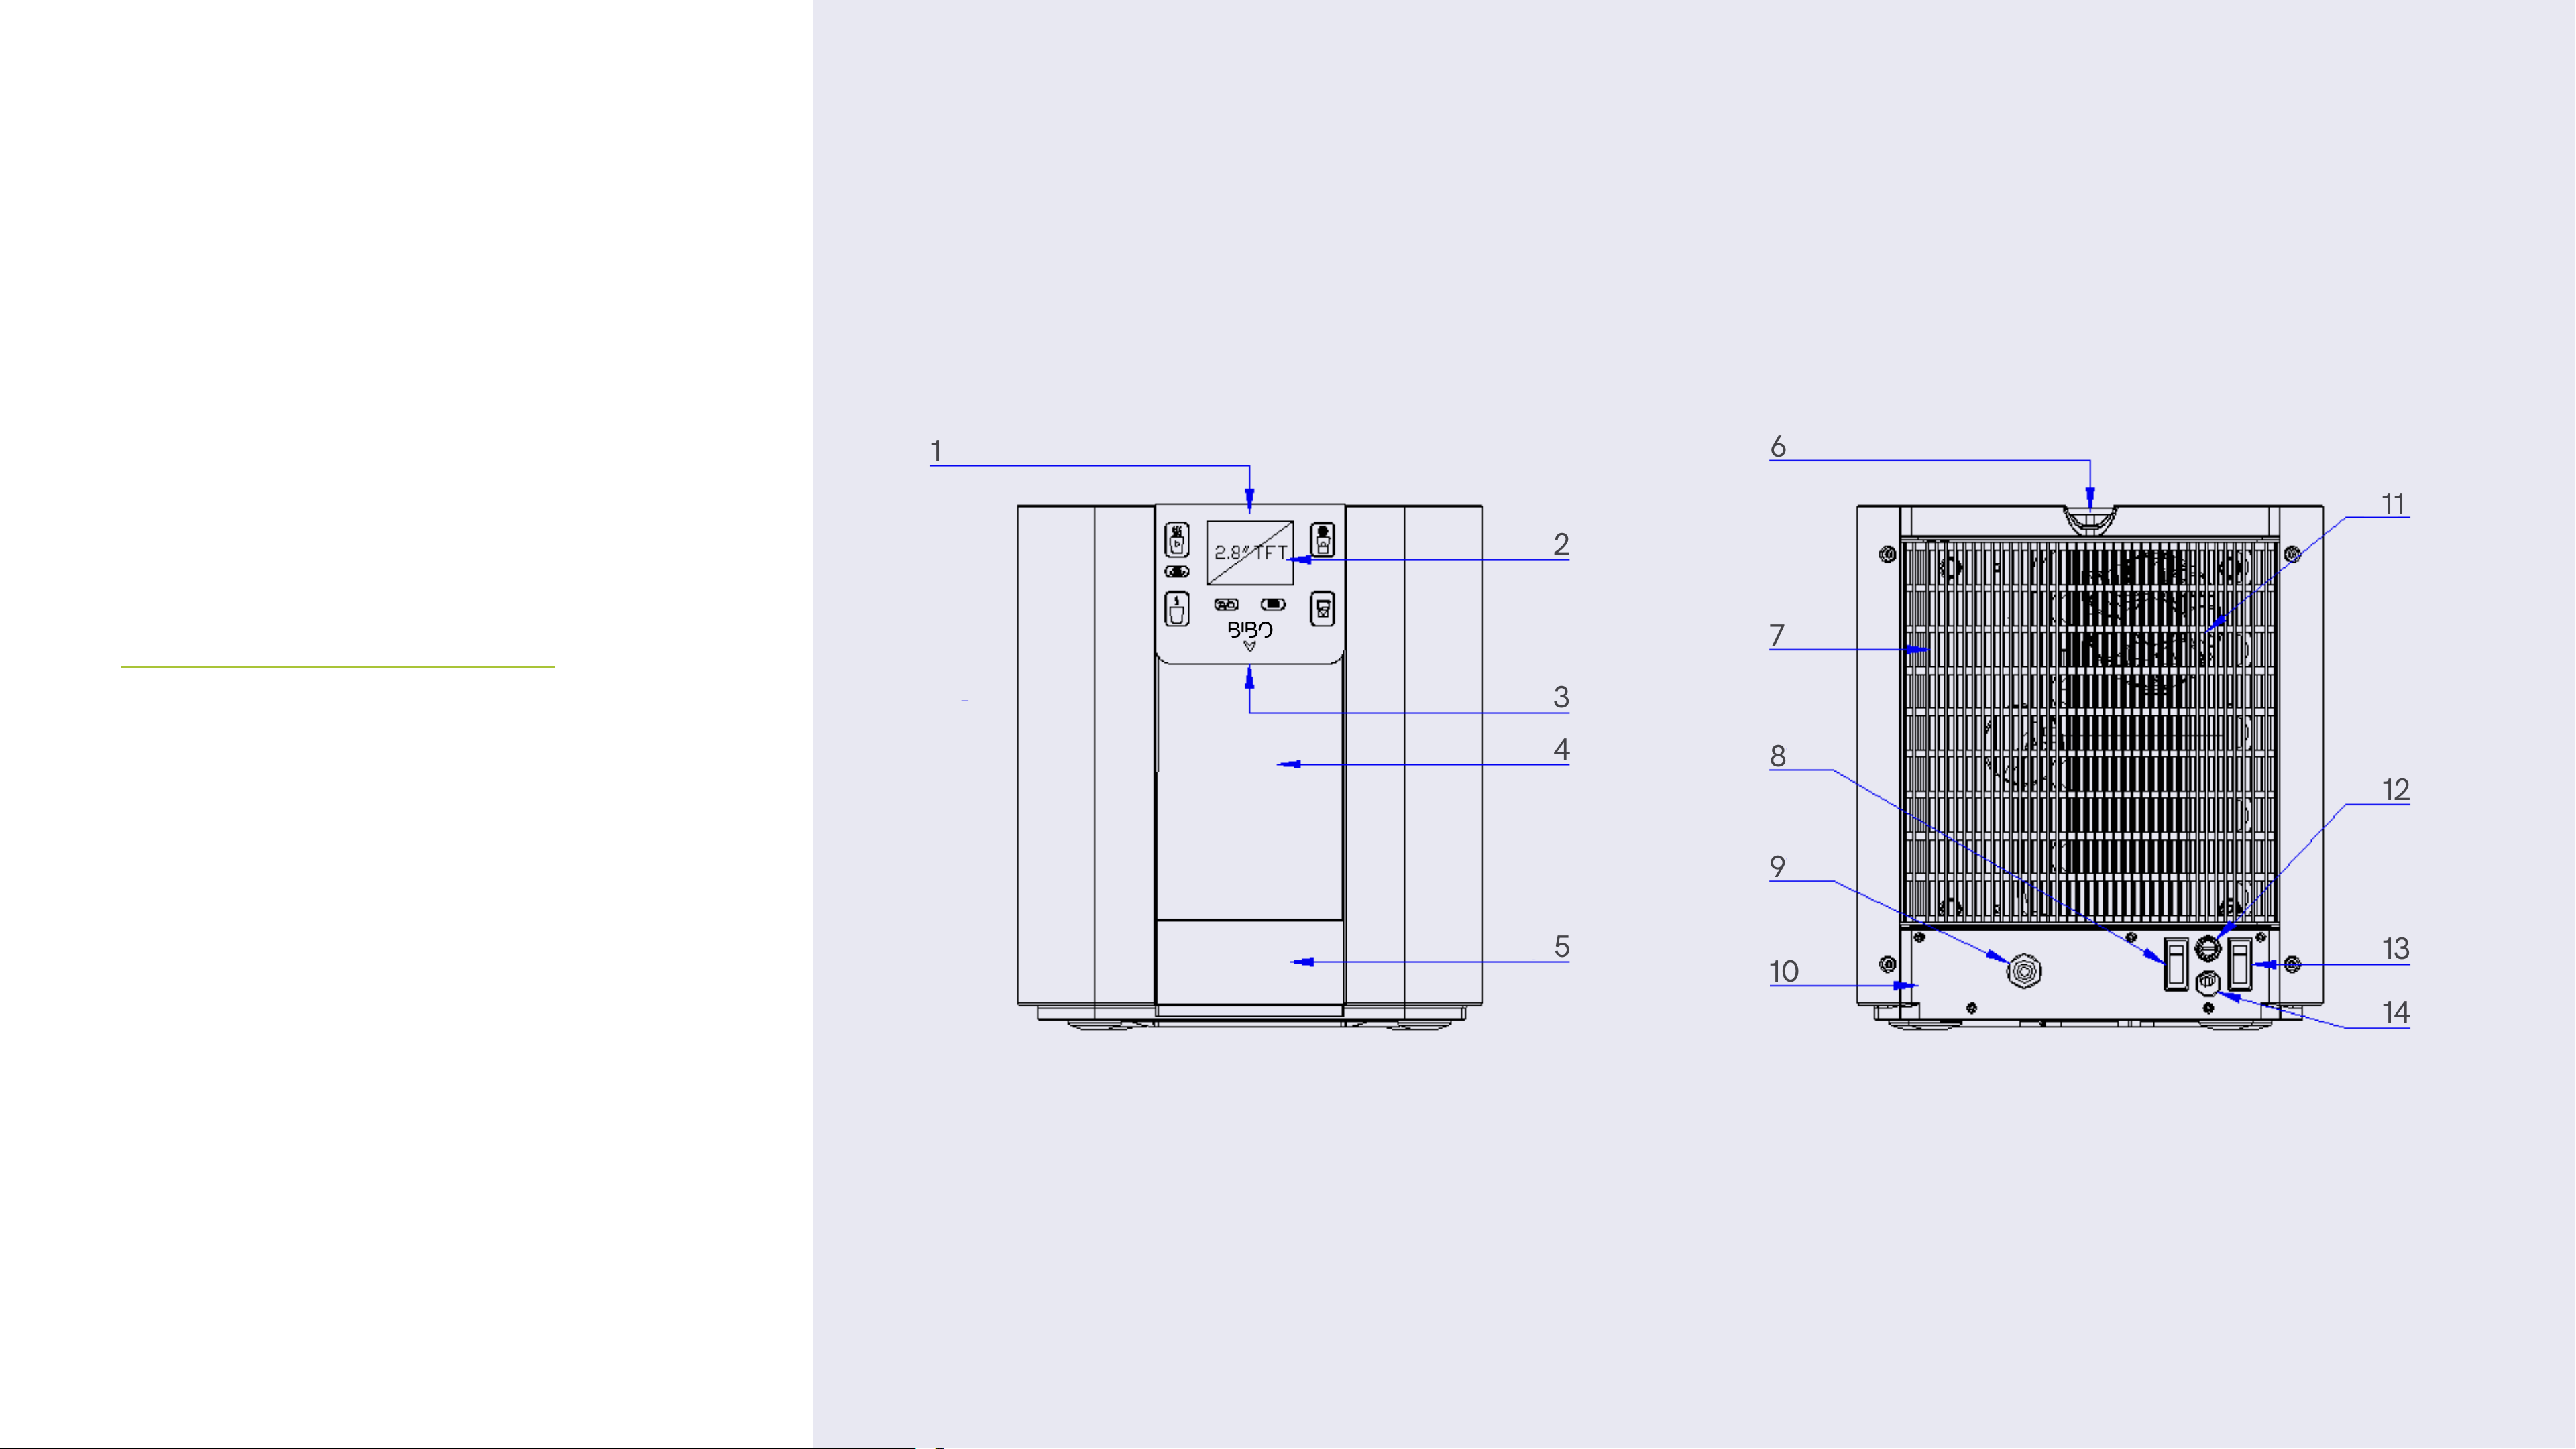
BIBO OVERVIEW
1. Touch screen interface
2. 2.8”TFT LCD screen
3. Water outlets
4. Front panel
CONTENTS
5. Removable Drip Tray
6. Lid
7. Refrigeration condenser
BIBO bar - User Manual
8. Hot tank switch
9. Water inlet
10. Rear panel
11. Cooling fan
12. Mains fuse
13. Power switch
14. Mains power cable
4
Page 5
X
Meet your BIBO bar
13 149
12 16 1115
Watch Video
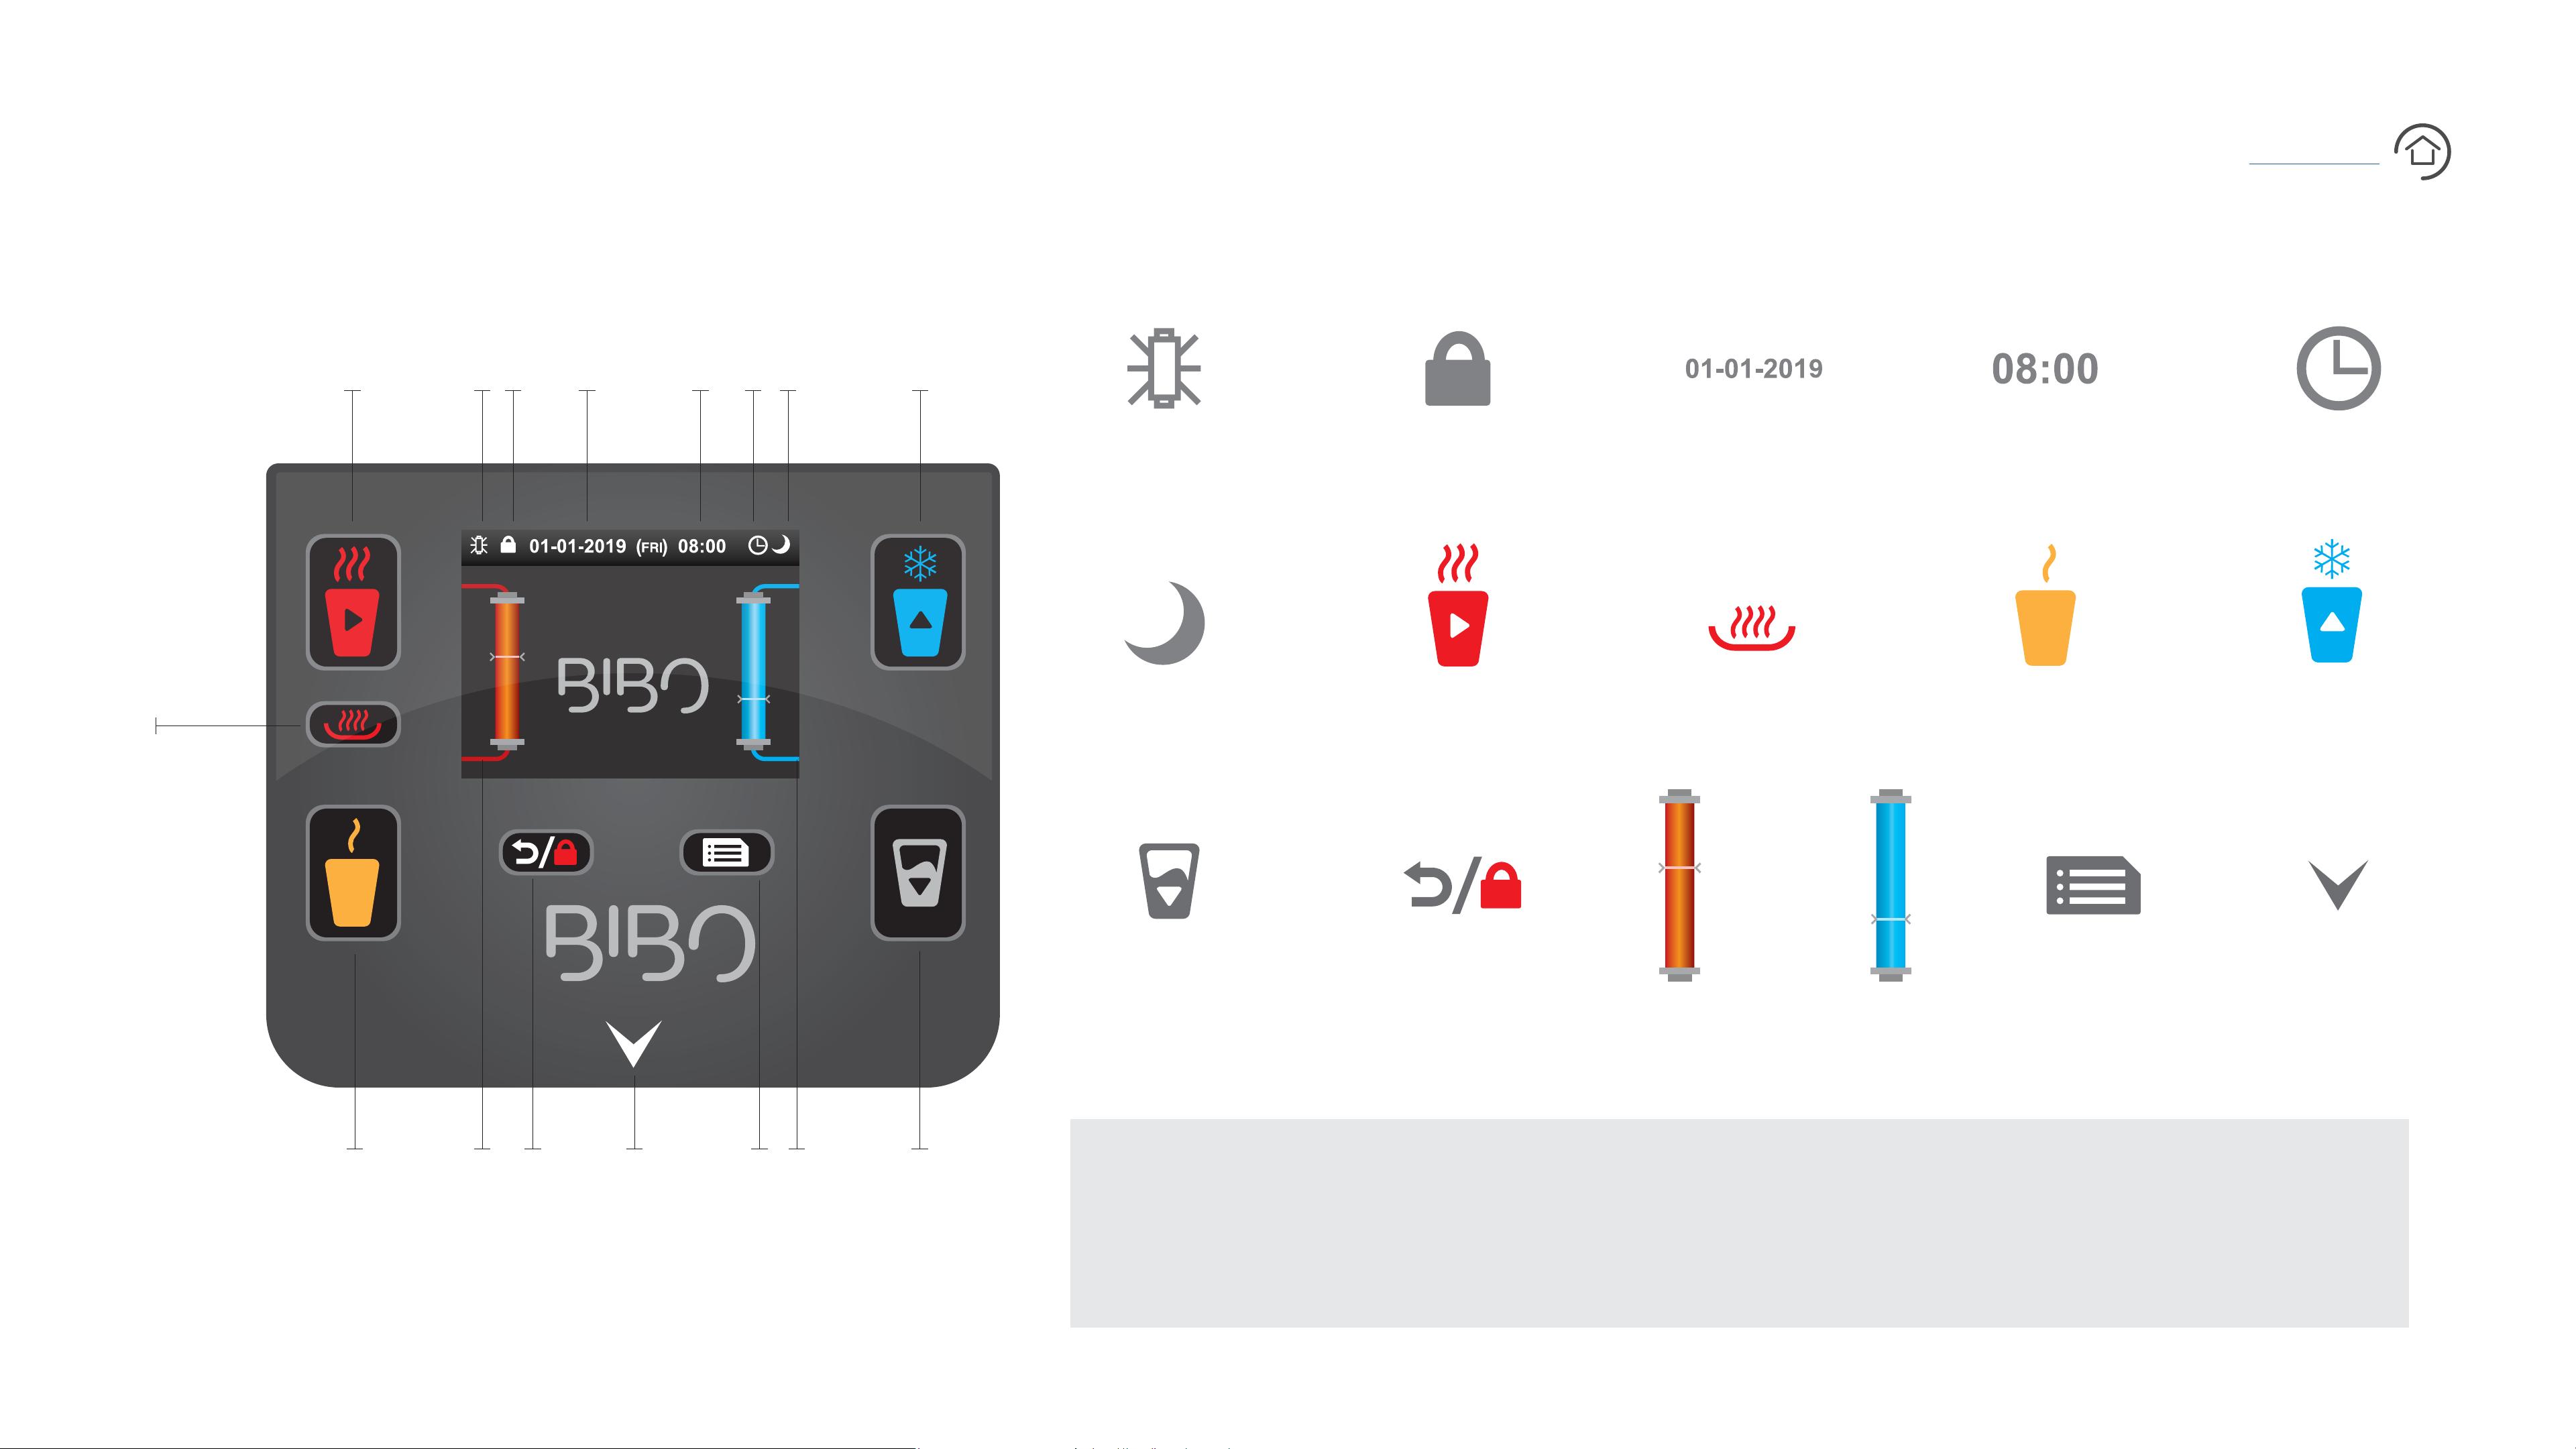
THE TOUCH SCREEN INTERFACE
CONTENTS
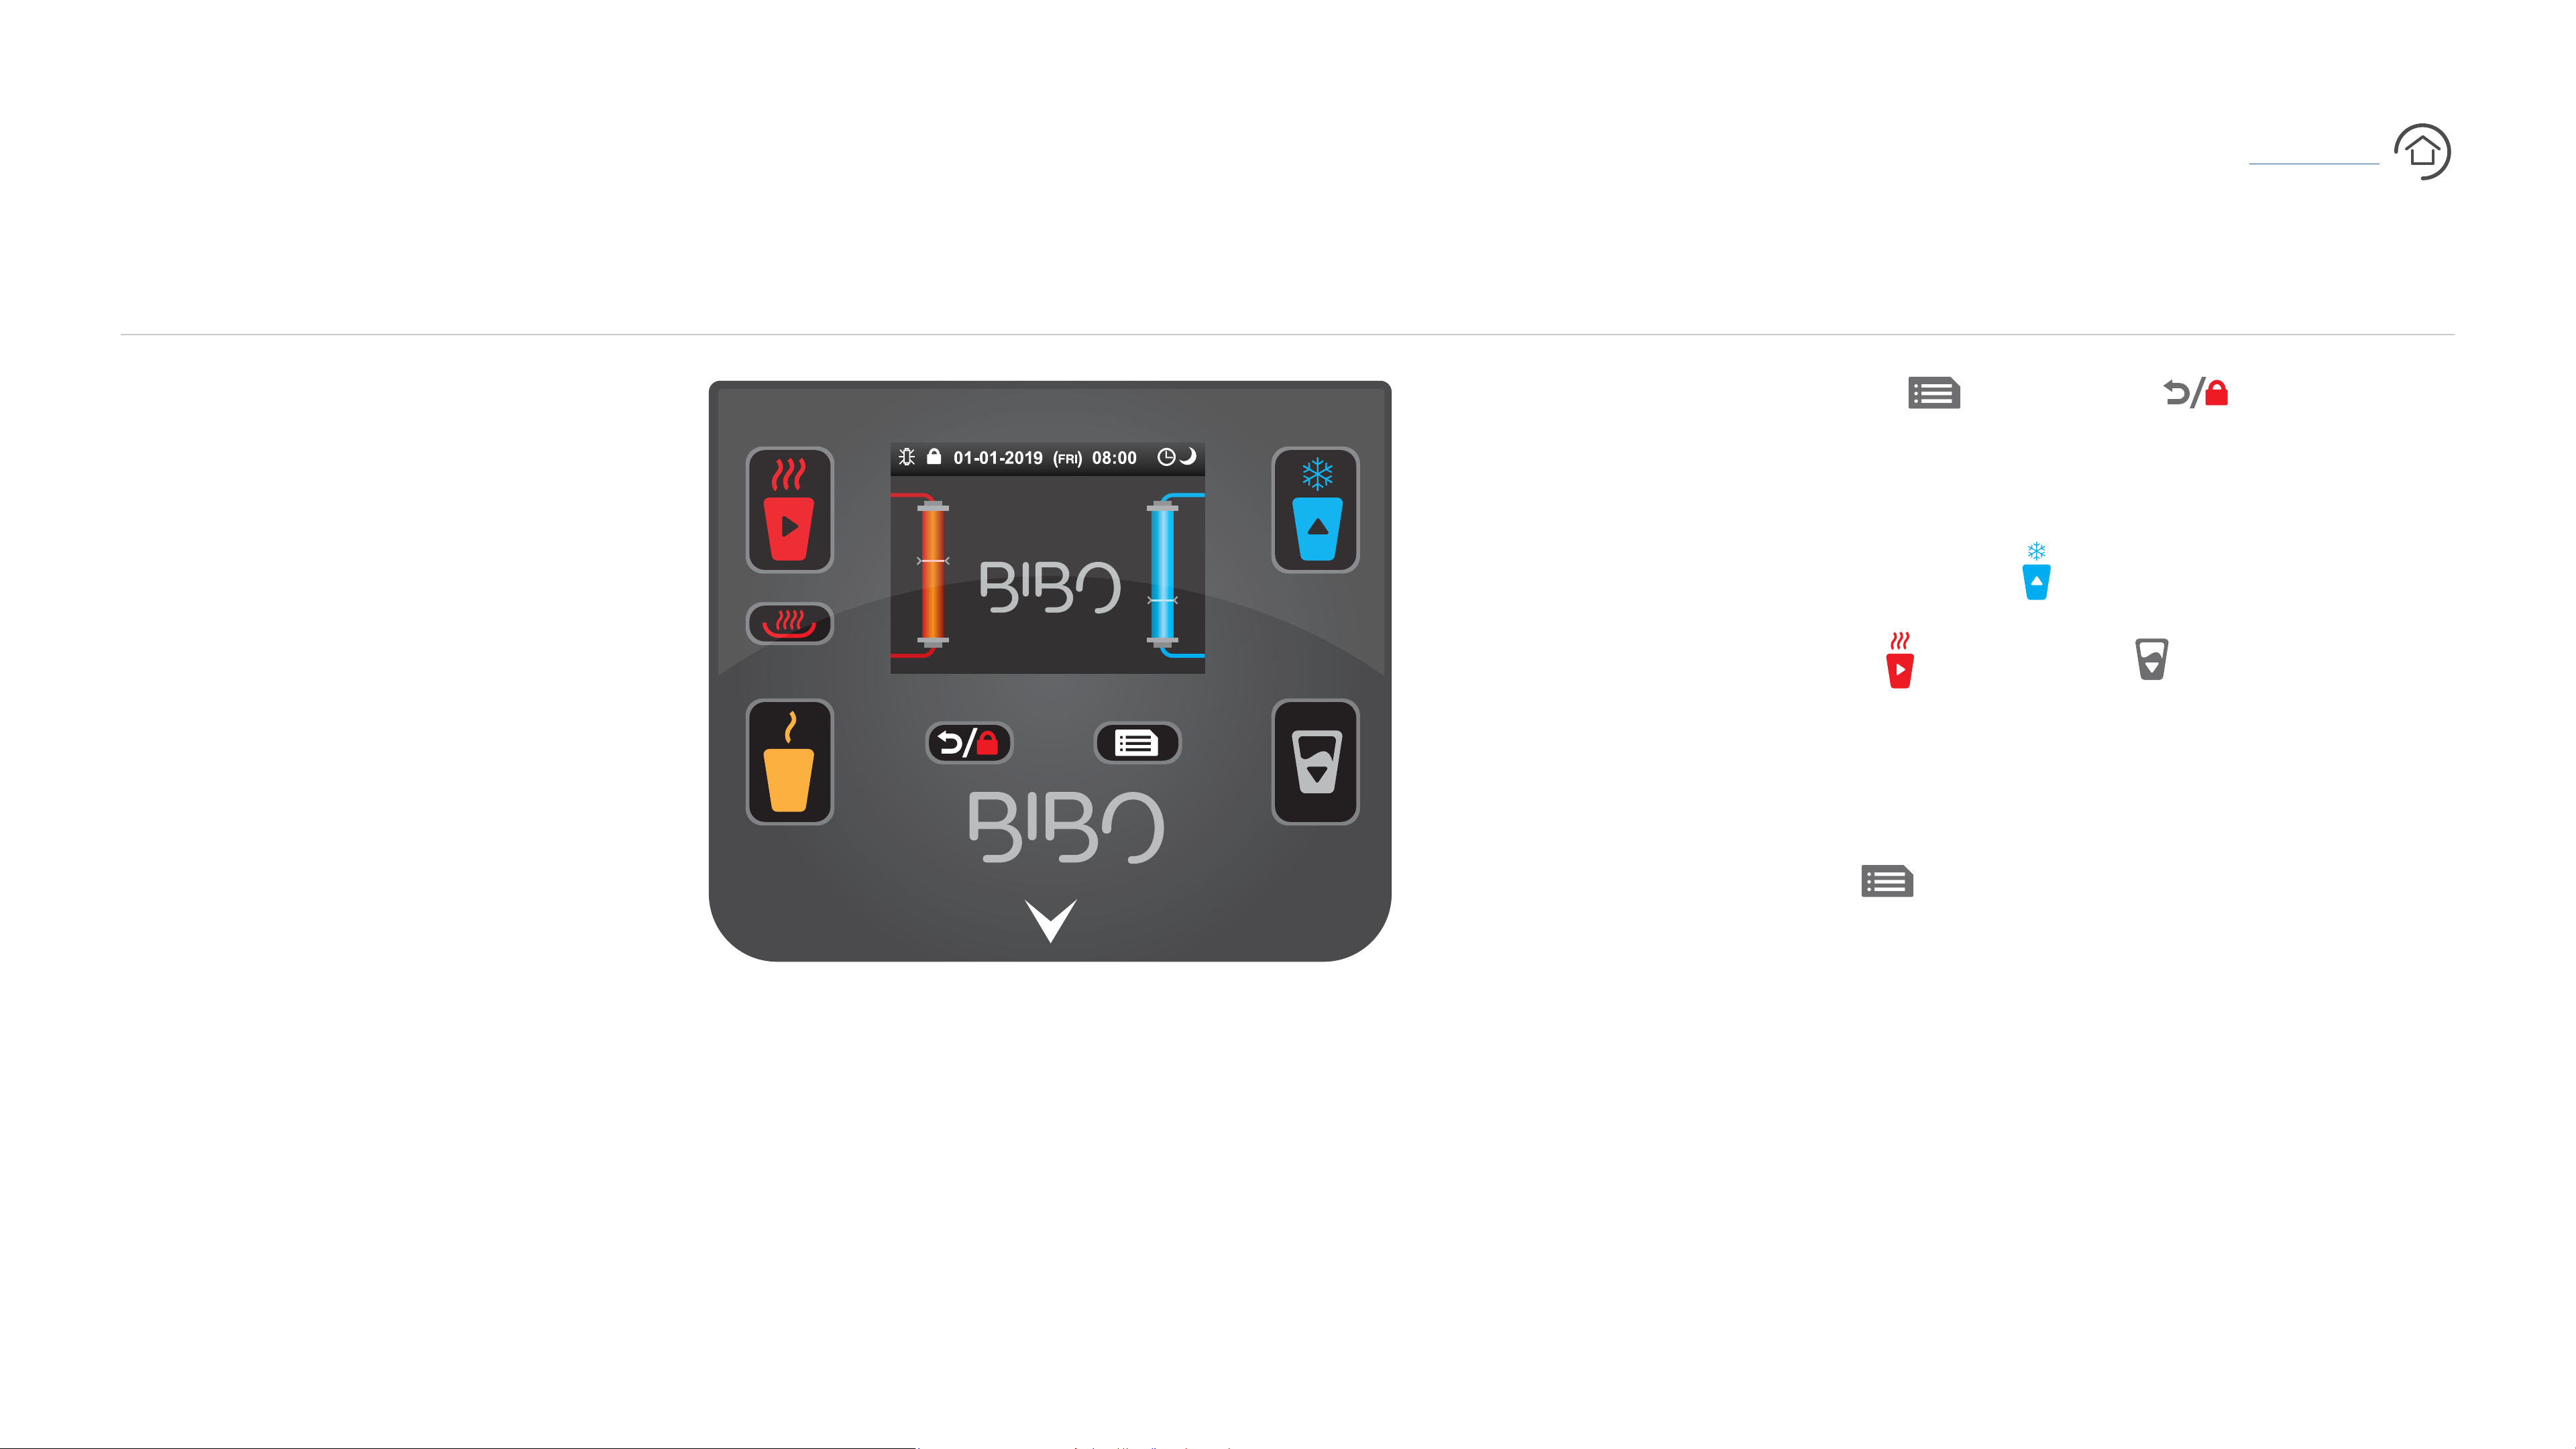
1 2 3 4 5
8
7 2 3 4 5 6 10
1
Zapper status
icon
6 7 8 9 10
Power saving
mode icon
Boiling water button
(also acts as a navigation
button in the menu mode)
Child lock
status icon
(Day - Month - Year)
Calendar
Super boil button
Ambient (mixed hot
& cold) water button
Clock
(24 hour)
Chilled water button
(also acts as a navigation
button in the menu mode)
Automatic
on/off icon
BIBO bar - User Manual
11 12 13 14 15 16
Measured cup button
(also acts as a
navigation button
in the menu mode)
Lock button (also acts
as the “return” button
in menu mode)
Heating
& boiling water
temperature bar
Chilling
& cold water
temperature bar
Menu button (also
acts as the save button
in menu mode)
indicator light (red for
Please note that your BIBO bar’s red Boiling Water Button (7), blue Chilled Water Button (10)
Water outlet
hot, blue for cold)
and white Measured Cup Button (11) all have arrows inside. This is because they act as scroll
buttons when navigating through the BIBO bar menu. Similarly, the Menu Button (15) and
Lock Button (12) act as a confirmation and back buttons respectively when in menu mode.
5
Page 6
X
Installing your BIBO bar
Watch Video
BEFORE GETTING STARTED
CONTENTS
Our experienced installation
teams are here to make sure
that your BIBO bar is correctly
installed. If you are installing
your own BIBO bar, then please
read through all the instructions
carefully, familiarising yourself
with and understanding all
the steps completely before
beginning.
CAUTIONARY NOTES
Your BIBO bar weighs 17kg, so
please take care when lifting it
from its box.
The hot tank switch is clearly
labeled at the back of your BIBO
bar (See page 4, number 8).
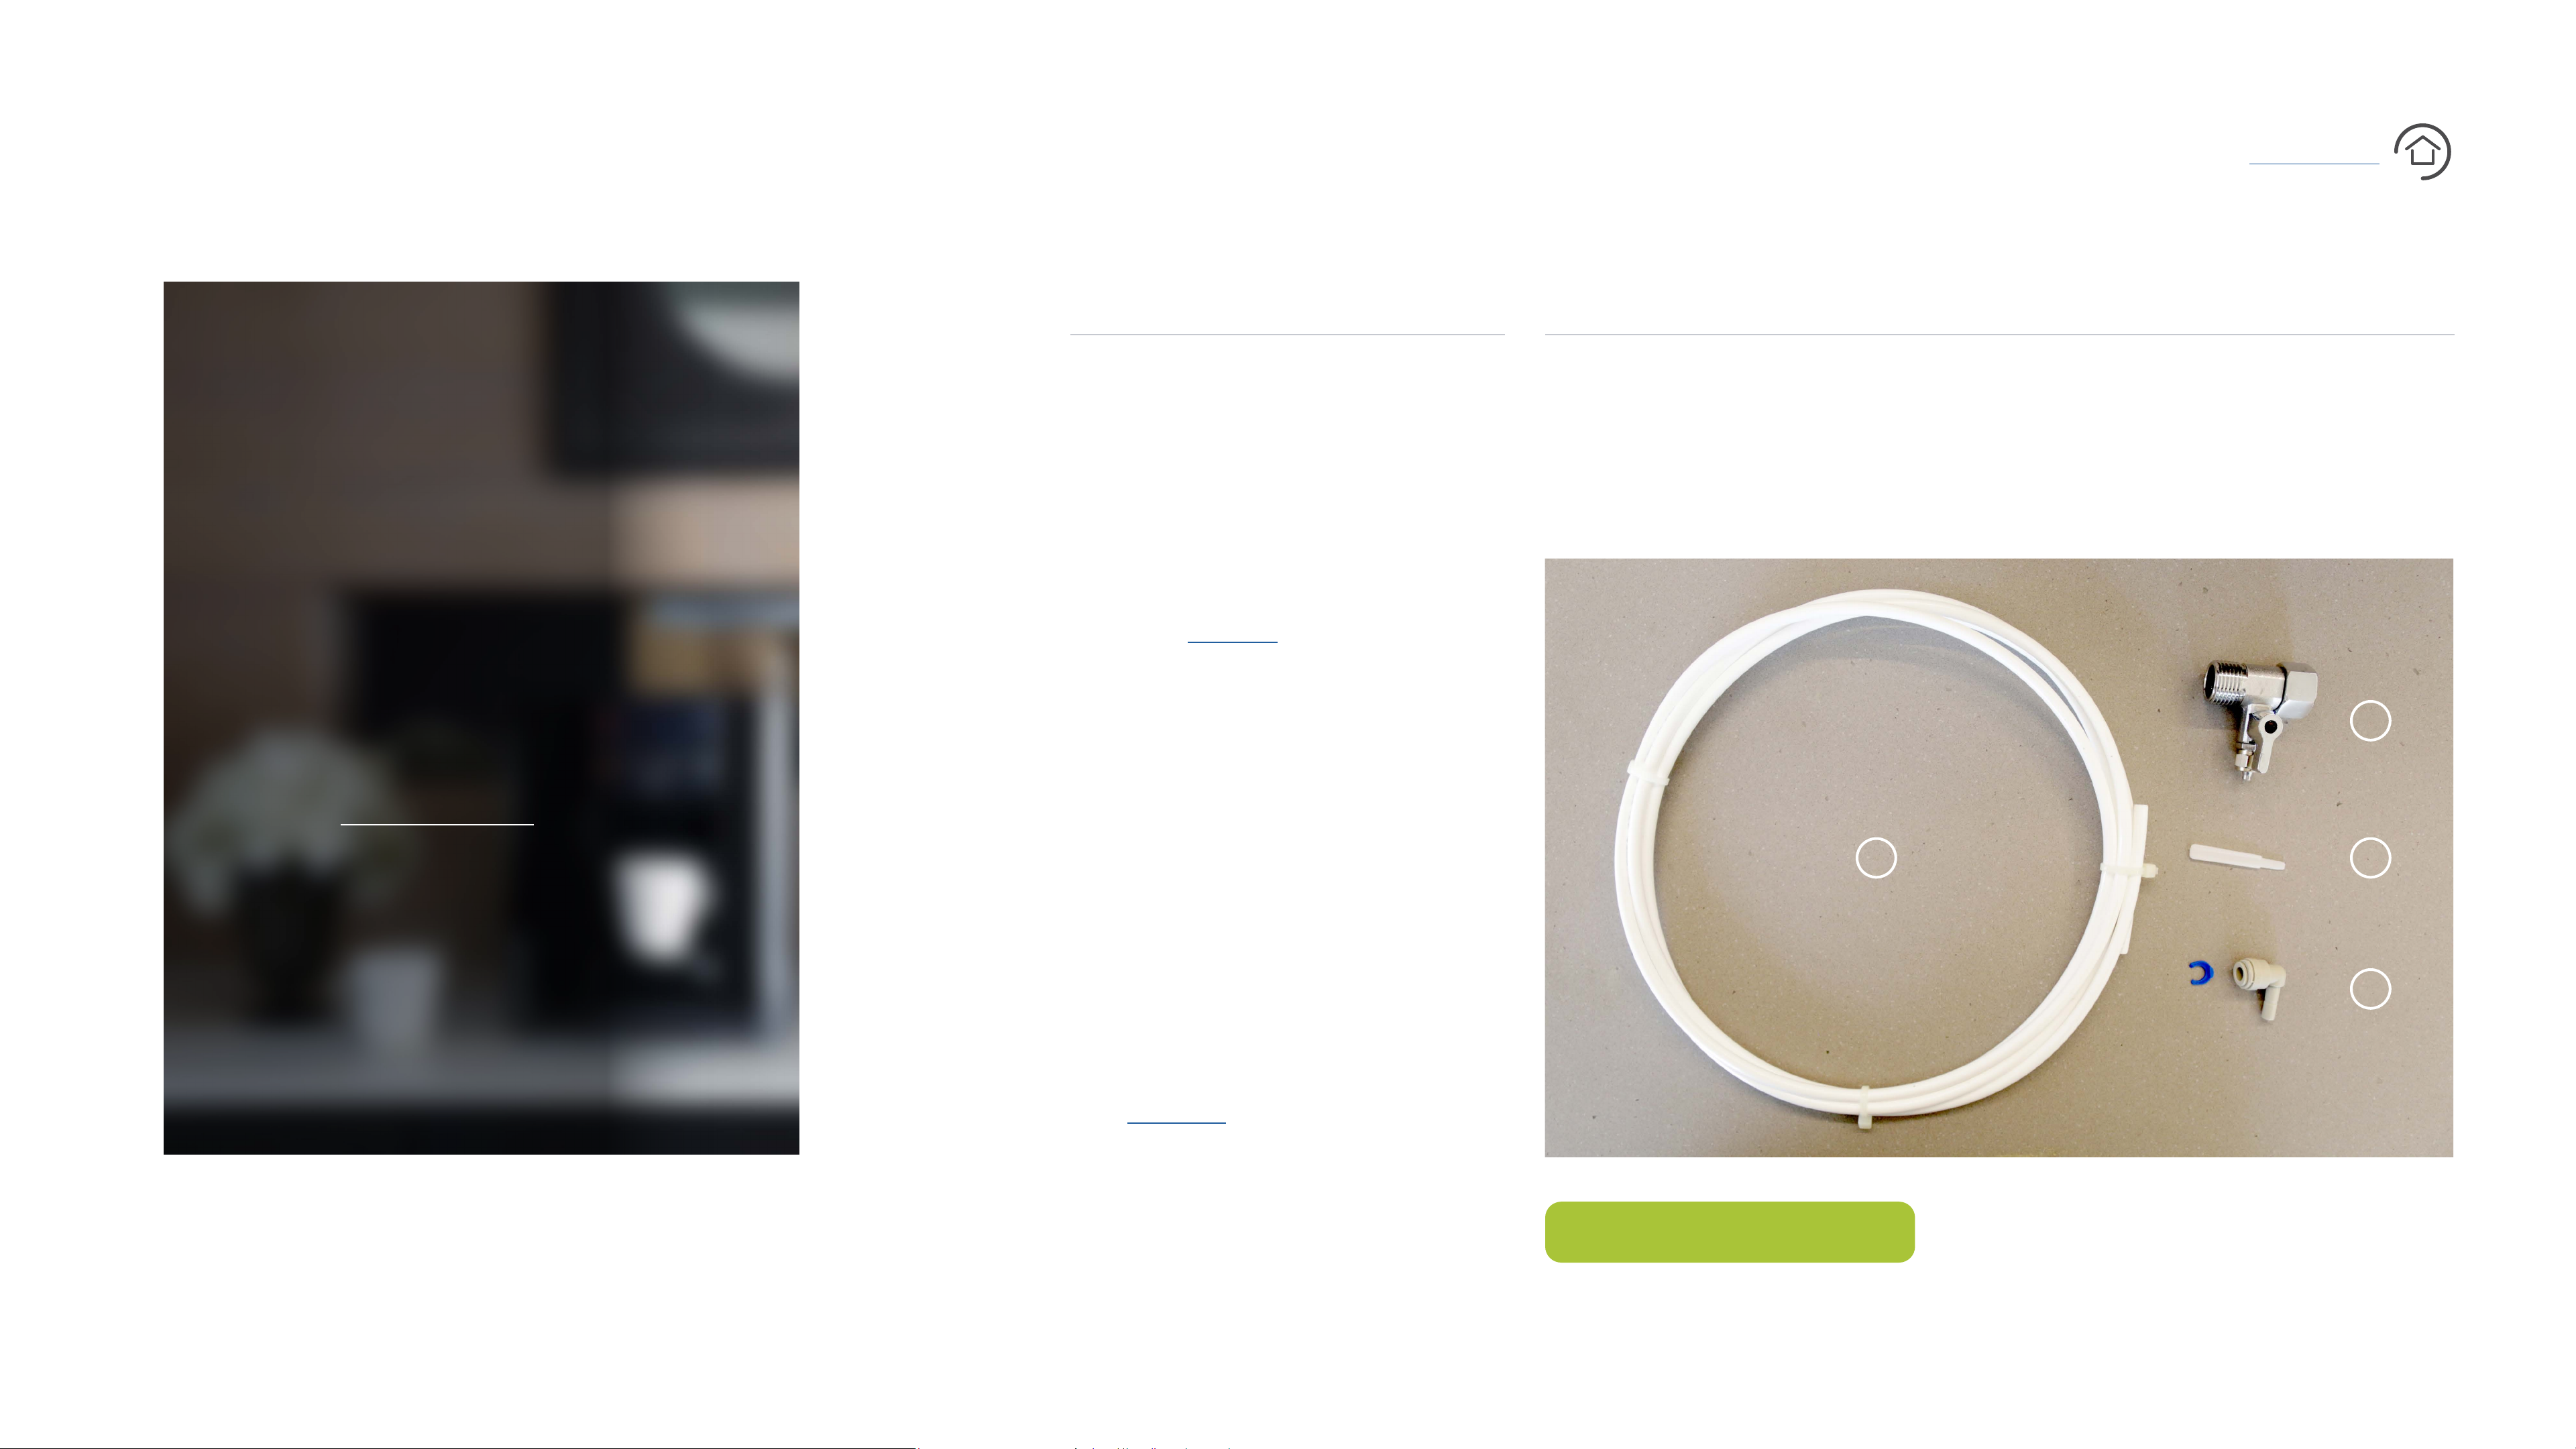
YOUR BIBO BAR TOOLKIT
Your BIBO bar comes with a self installation kit consisting of
a 3m length of 6mm white water supply pipe (1), a BIBO ½” “T”
connector with a ball valve (2), an easy to fit right angled stem
fitting (3) and a zapper key (4).
If you are at all uncertain
about any of the steps, please
call us on 0800 00 BIBO (2426)
and ask to speak to one of
BIBO bar - User Manual
our experienced technical
team members.
On average, a BIBO bar
installation should take between
one hour to an hour and a half.
Please ensure that you do NOT
turn the hot tank switch on
until the BIBO bar has filled
itself with water.
Switching the hot tank switch
on before your BIBO bar has
filled with water will require
a call out from our technical
team (this comes with a fee).
1
2
4
3
See page 9, point i, for more
details on this.
Printable Guide
6
Page 7
X
Installing your BIBO bar
Watch Video
BEFORE GETTING STARTED
WHERE TO PLACE YOUR BIBO bar WATER SUPPLY
CONTENTS
The BIBO bar often takes centre
stage in the kitchen and fast
becomes the most loved and
used appliance. It is for this
reason that the choice of where
to place and display your BIBO
bar needs to be one that offers
both convenience and style.
However a few considerations
need to be taken into account
Your BIBO bar needs to be
installed in a cool, dry place
and kept away from any heat
source.
There will need to be a suitable
mains cold water supply nearby
(more often than not, this will
be located under your kitchen
sink or behind your dishwasher
The water pressure should be
between 4bar (58psi) and 6bar
(87psi).
Before beginning the
installation, you will need to
identify a mains cold water
supply nearby. To identify the
cold water supply, turn on
the hot tap and wait for the
flowing water to get hot. Feel
oce. Please identify where the
tap/isolation valve is located
before beginning.
Ensure that your water feed/
supply is flushed out thoroughly
into a bucket until clear water
is visible with no sediment or
dirt particles in the water.
This is to ensure your BIBO
bar does not block up. Be sure
before choosing where to place
your BIBO bar.
BIBO bar - User Manual
10cm
Your BIBO bar needs to be well
ventilated. In order to ensure
this, please keep the rear of the
and/or washing machine).
You will need an electrical
power supply. Your BIBO bar
comes with a standard 3-pin
both pipes under the sink. The
one hot to the touch is the hot
water supply. WARNING: the
pipe can get extremely hot and
cause burns. Please take care!
The mains cold water supply
will need to be turned
off before beginning the
installation. Often there is an
angle stop valve which will
to do so especially in newly
renovated homes and oces.
BIBO bar a minimum of 10cm
away from the wall. Don’t install
your BIBO bar in a cupboard or
closed off space.
(16amp) plug.
enable you to isolate the cold
water pipe. If not, then it will be
necessary to turn off the mains
water supply to your home/
7
Page 8
X
Installing your BIBO bar
Watch Video
STEP BY STEP GUIDE FOR SELF-INSTALLATION
CONTENTS
1. PREPARATIONS
a. Decide where you will place
your BIBO bar.
b. Carefully remove your BIBO
bar from its packaging and
place it in its preferred spot on
the work surface.
c. Remove the plastic bag and
protective covering from the
cable and plug.
angle stop valve or turning off
the mains water supply to your
home/oce.
b. Drain as much water
as possible from the pipe
connected to the angle stop
valve before disconnecting it.
It’s useful to have a cloth close
by to dry up any spills.
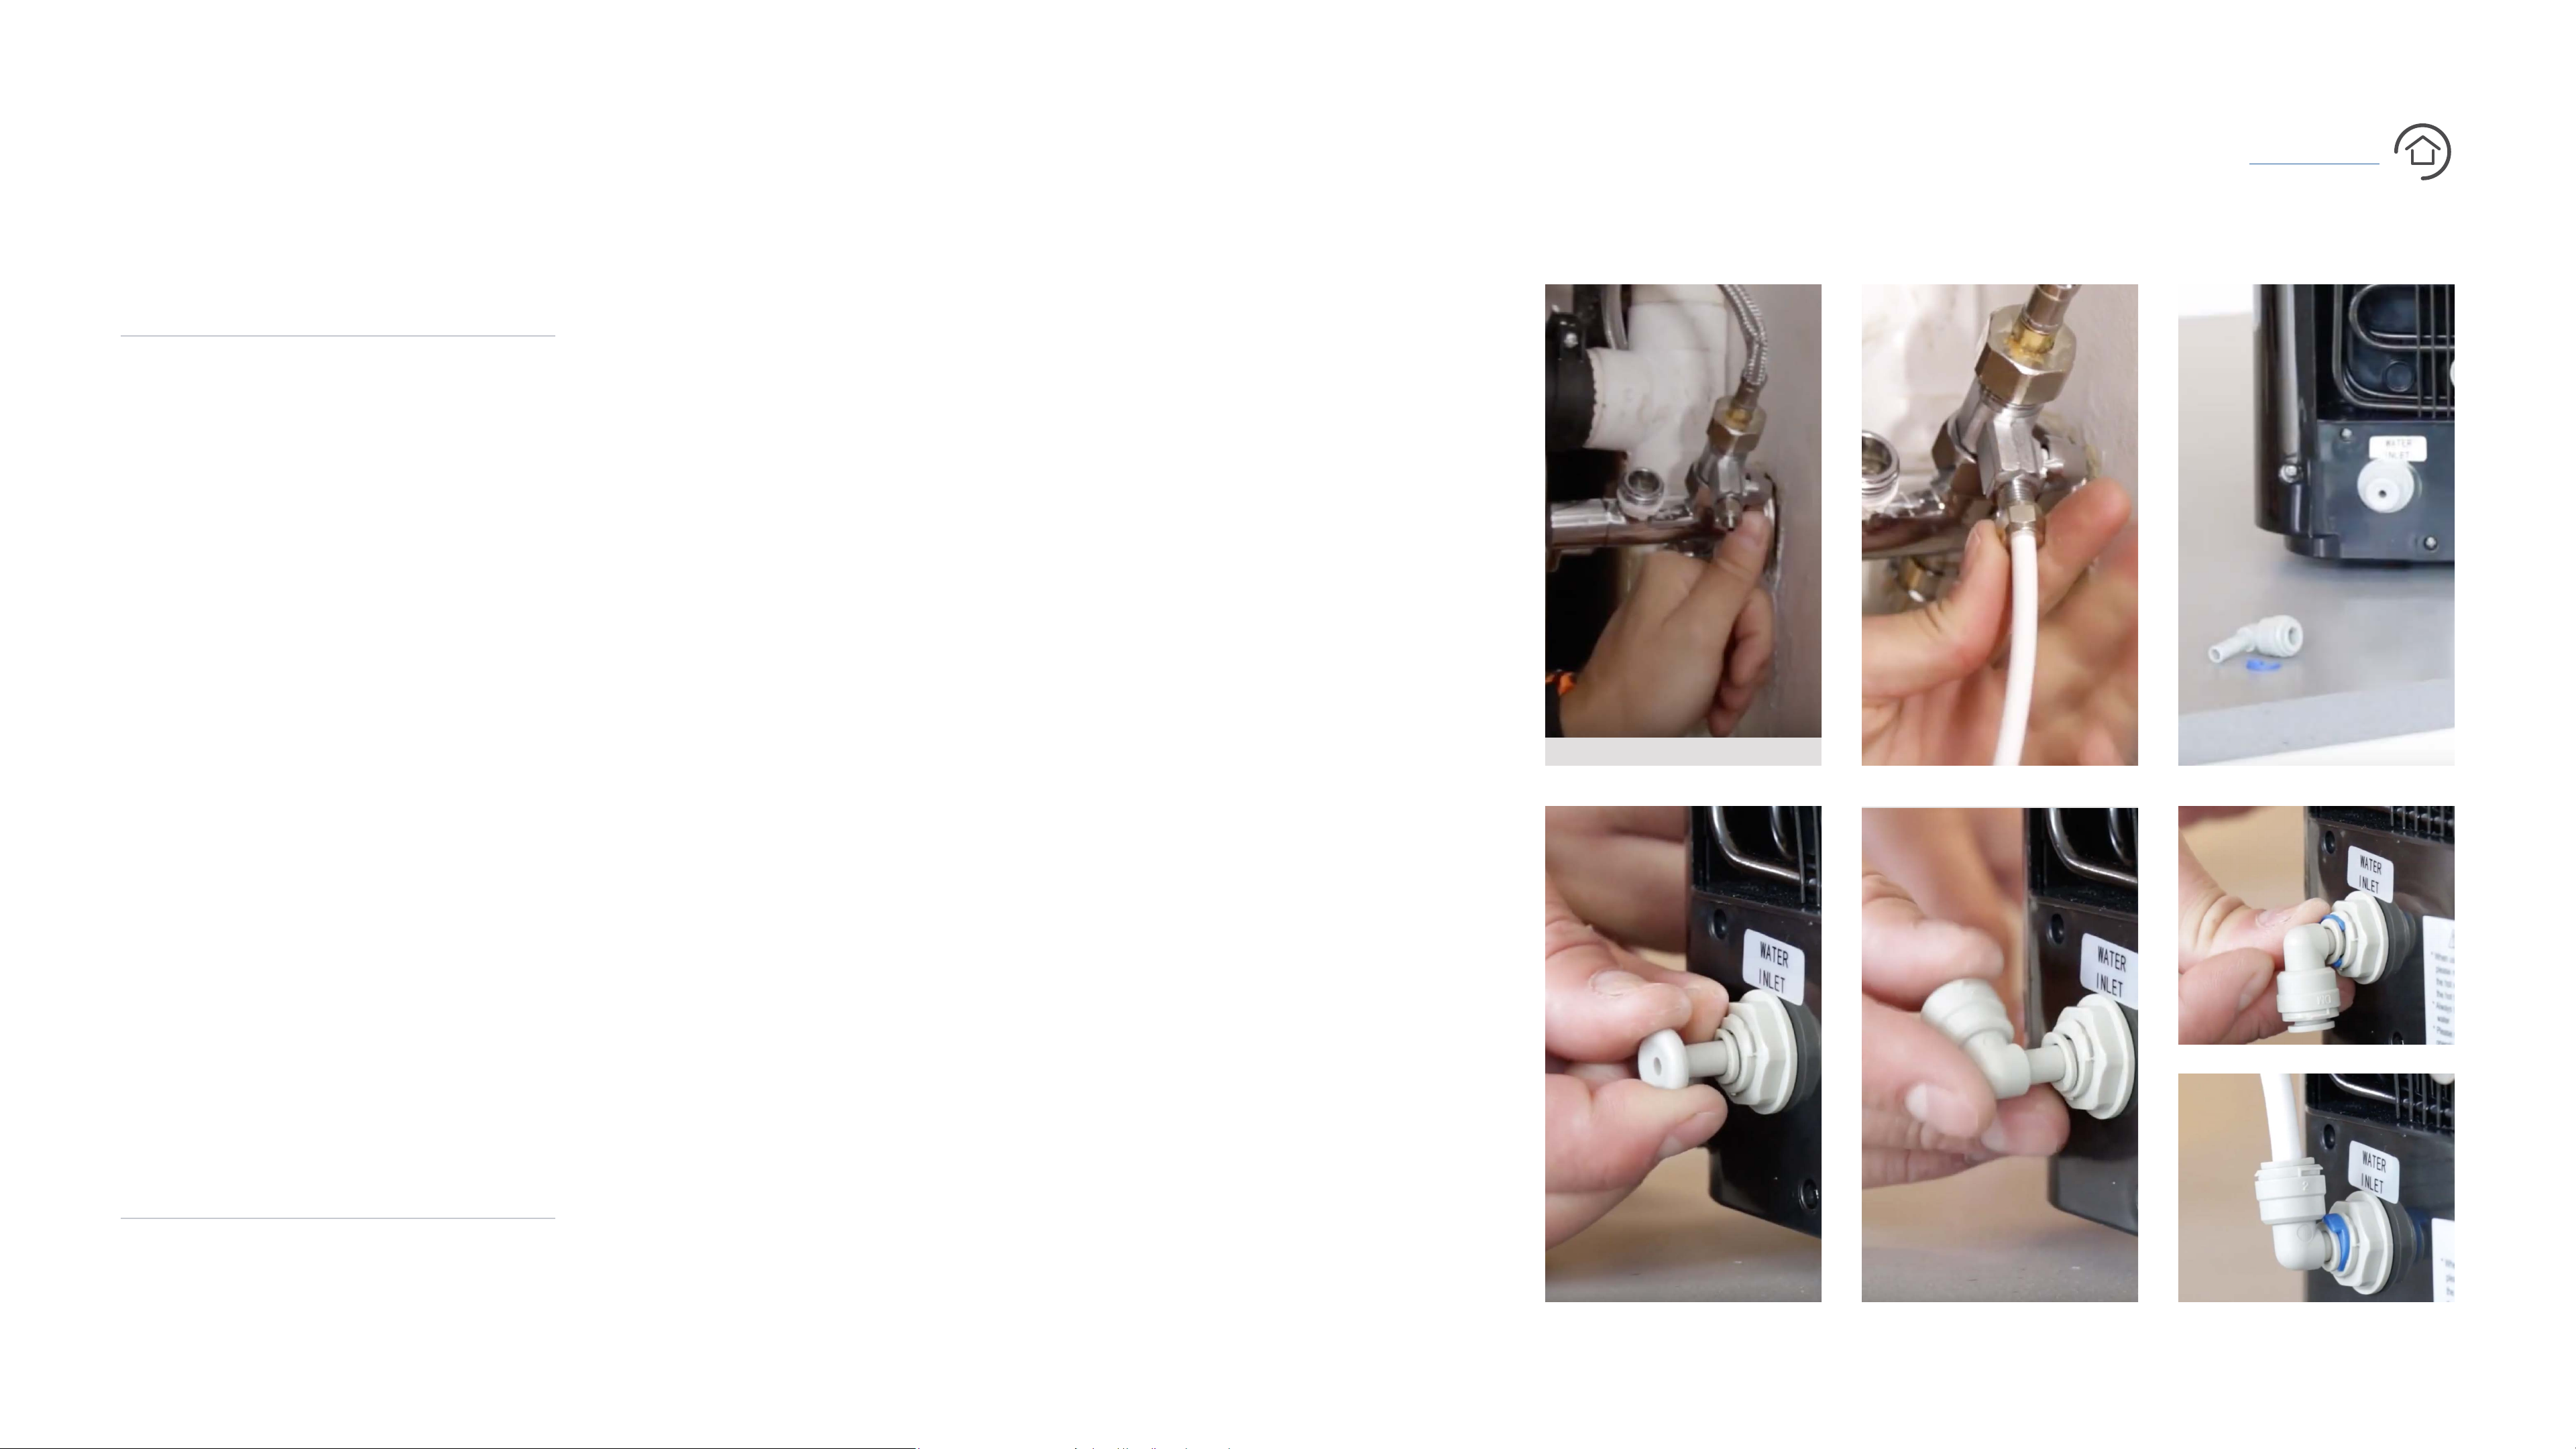
c. Install the BIBO ½” “T”
connector into the mains water
supply pipe. Make sure that the
your BIBO bar. (Picture 3)
f. Remove the blanking plug
from the inlet water fitting,
by depressing the ring. While
depressing the ring, pull
blanking plug out. (Picture 4)
g. Insert the right angled stem
elbow (provided with your BIBO
bar) into the water inlet. (Picture 5)
h. Refit the locking clip. (Picture 6)
1.
2.
3.
d. Remove the drip tray
wrapping and take out the
BIBO bar - User Manual
zapper ‘key’ from inside the
drip tray (keep this somewhere
safe - you’ll need it down
the line when replacing your
zapper).
e. Remove the protective cover
from the touch screen.
BIBO ½” “T” connector is in the
closed position. (Picture 1)
d. Connect the 6mm white
water supply pipe to the BIBO
½” “T” connector and run it to
the BIBO bar (Picture 2). You’ll
need to flush the water feed out
completely into a bucket, until
the water is clear and free from
sediments or dirt particles.
i. Push the 6mm white water
supply pipe into the elbow at the
back of your BIBO bar. (Picture 7)
j. Open the ball valve on the
BIBO ½” “T” connector (Picture 1)
k. Turn on the angle stop valve
or your mains water supply.
4.
5.
6.
7.
2. WATER SUPPLY CONNECTION
a. Isolate the mains water
supply by either turning off the
e. Remove the locking clip from
the inlet water fitting (blue or
white in colour) at the back of
8
Page 9
X
Installing your BIBO bar
Watch Video
STEP BY STEP GUIDE FOR SELF-INSTALLATION
3. SETTING UP YOUR BIBO bar
CONTENTS
a. Plug the BIBO bar’s plug into
a 3 pin socket.
b. Ensure that the hot tank
switch (see page 4, number 8)
is off at the back of your BIBO
bar.
c. Turn on the power switch (see
page 4, number 13) at the back
of your BIBO bar. Please take
f. Once you see the home
screen, turn on the hot tank
switch at the back of the BIBO
bar (see page 4, number 8).
g. A message will appear on
your screen to fill the hot water
tank (Image iv).
i
h. Place a mug under the water
outlets. (See page 4, number 3)
when water starts to flow from
the outlet nozzle situated under
iv
caution to not confuse this with
the hot tank switch.
BIBO bar - User Manual
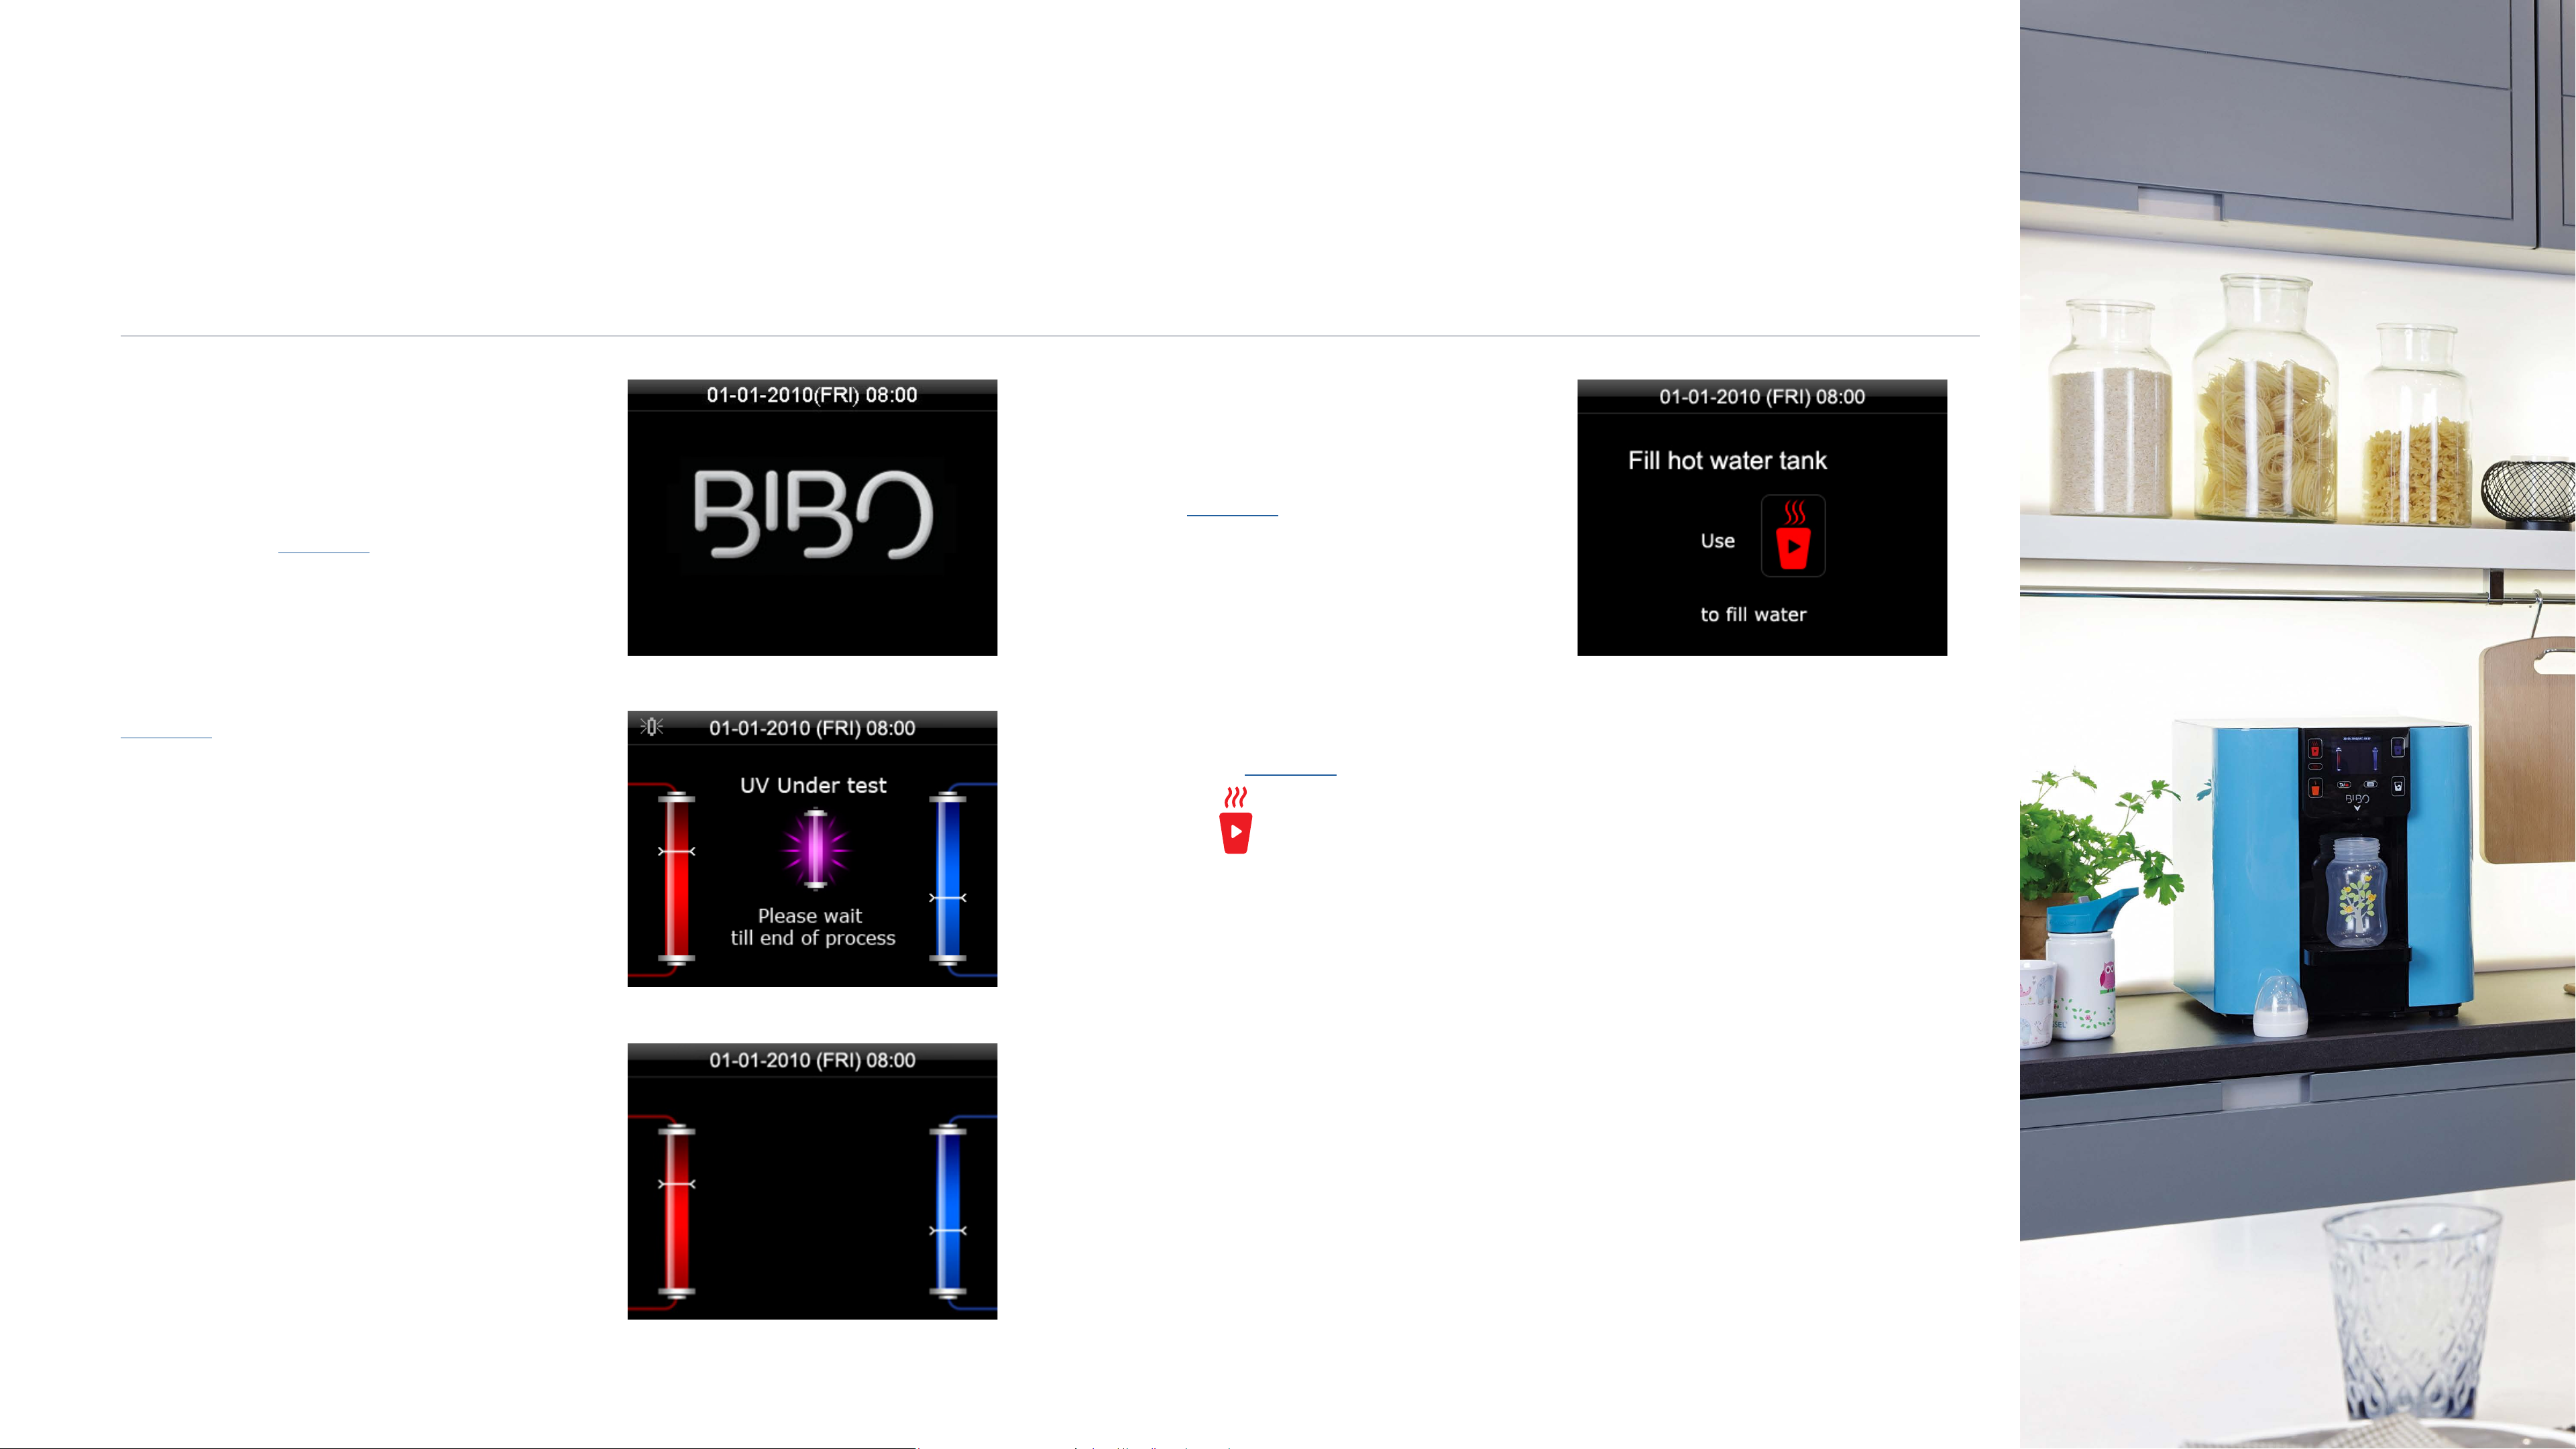
d. Once turned on, your BIBO
bar will display the BIBO logo
(Image i) followed by a zapper
test (Image ii); this means that
your BIBO bar is operating
correctly.
e. Now you should see the
ii
i. Push the button ONLY
ONCE to start the boiling filling
process.
DO NOT PUSH ANY BUTTON
INCLUDING THE RED CUP
BUTTON UNTIL THIS PROCESS
HAS BEEN COMPLETED.
(If by mistake you did push a
button before seeing water flow
from the nozzle switch off the
the screen. This usually takes
about 1 minute from pushing
the red cup button to water
flow from the nozzle.
j. Once water starts flowing
from the nozzle push any
button to end the boiling filling
setup process.
k. The hot tank will begin to
home screen. There should be a
red bar on the left of the screen
and a blue bar on the right of
the screen (Image iii).
iii
heating switch immediately and
start from step f again). You
will know that the boiling filling
process has been completed
heat up and the hot water
temperature bar icon will
be active on the screen as
streaming upwards.
9
Page 10
X
Installing your BIBO bar
STEP BY STEP GUIDE FOR SELF-INSTALLATION
3. SETTING UP YOUR BIBO bar CONTINUED
CONTENTS
When first used, the hot
tank will take approximately
5 minutes to get up to the
maximum temperature.
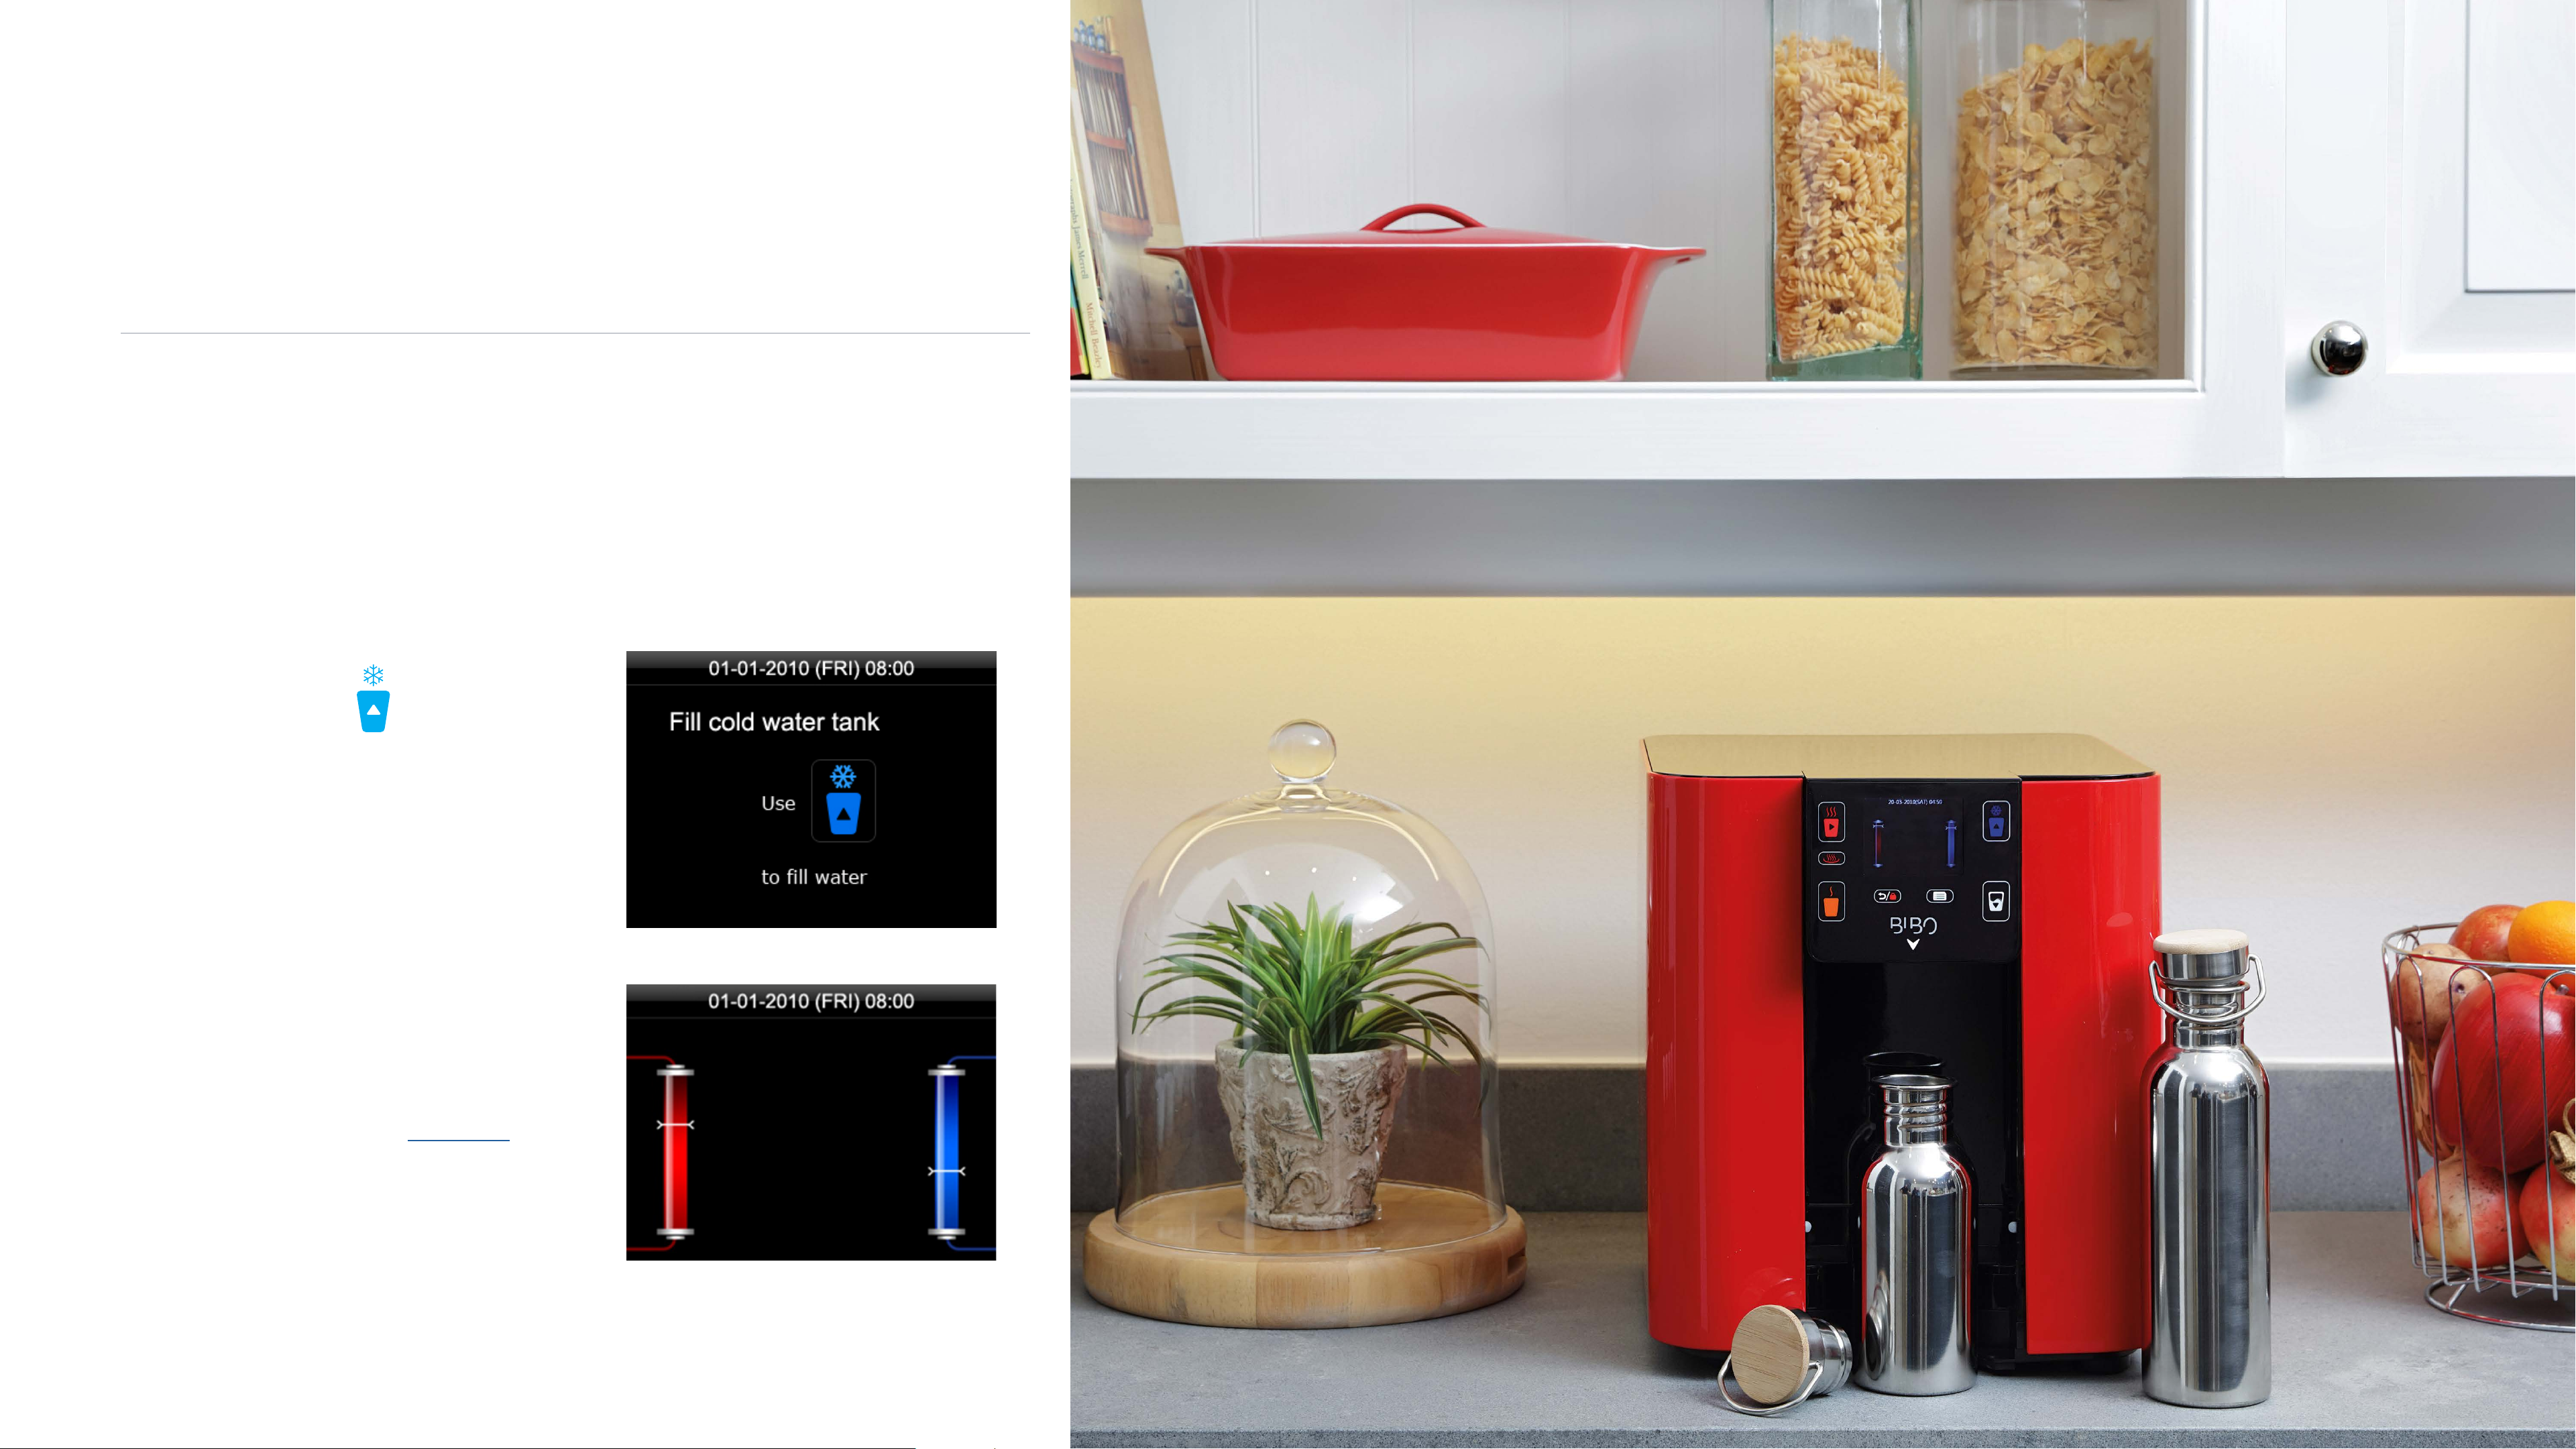
l. Similarly, fill the cold water
tank by dispensing water from
the cold water outlet (Image v).
To do this, touch and wait
until water starts dispensing.
once 1,5 litres has been
drained.
n. Your installation is now
complete and your BIBO bar
will be ready to be used and
enjoyed (Image vi).
Then touch any button to stop
the water flow.
BIBO bar - User Manual
m. It is recommended that you
drain 1,5 litres from the cold
tank and 1,5 litres from the
hot tank before drinking from
your BIBO bar. This is done by
simply dispensing water as
per the instructions on page 20
for chilled and boiling hot
v
water. Note: The BIBO bar will
automatically stop dispensing
vi
10
Page 11
X
Using your BIBO bar
Watch Video
MENU OPTIONS AND PERSONAL SETTING
CONTENTS
The menu is the place to
customise your BIBO bar
according to your personal
preferences, making it the
perfect fit for your family, home
and/or oce.
In the menu you will be able to
control the temperature settings,
To enter the menu, touch
and follow the on-screen
prompts. Navigating the menu
settings is easy.
To choose and enter into a
particular setting touch
(you will notice a right arrow in
the hot cup) until the correct
Touching will take you
back to the previous screen.
To adjust certain settings, touch
(you will notice an up
arrow in the chilled water cup)
and/or (you will notice a
down arrow in the white cup)
according to the on-screen
water dispensing quantity
settings, time and date settings,
BIBO bar - User Manual
language settings, energy saving
settings, safety settings and
ringtone settings.
Additionally the menu contains
your MAXI filter and zapper
settings. There is also an option
setting is selected (this will
be highlighted with a bronze
shade) and then touch
again to select the setting.
prompts. If no selection is
made within 10 seconds, your
BIBO bar will default back to
the home screen.
to restore your BIBO bar to its
original factory settings (but
please don’t ever restore your
BIBO bar without consulting our
BIBO technical team first).
11
Page 12
X
Using your BIBO bar
Watch Video
MENU OPTIONS AND PERSONAL SETTING
WATER TEMPERATURE SETTING
CONTENTS
Your BIBO bar allows you to set
your preferred water temperatures
for boiling, hot, cold and ambient
dispensing.
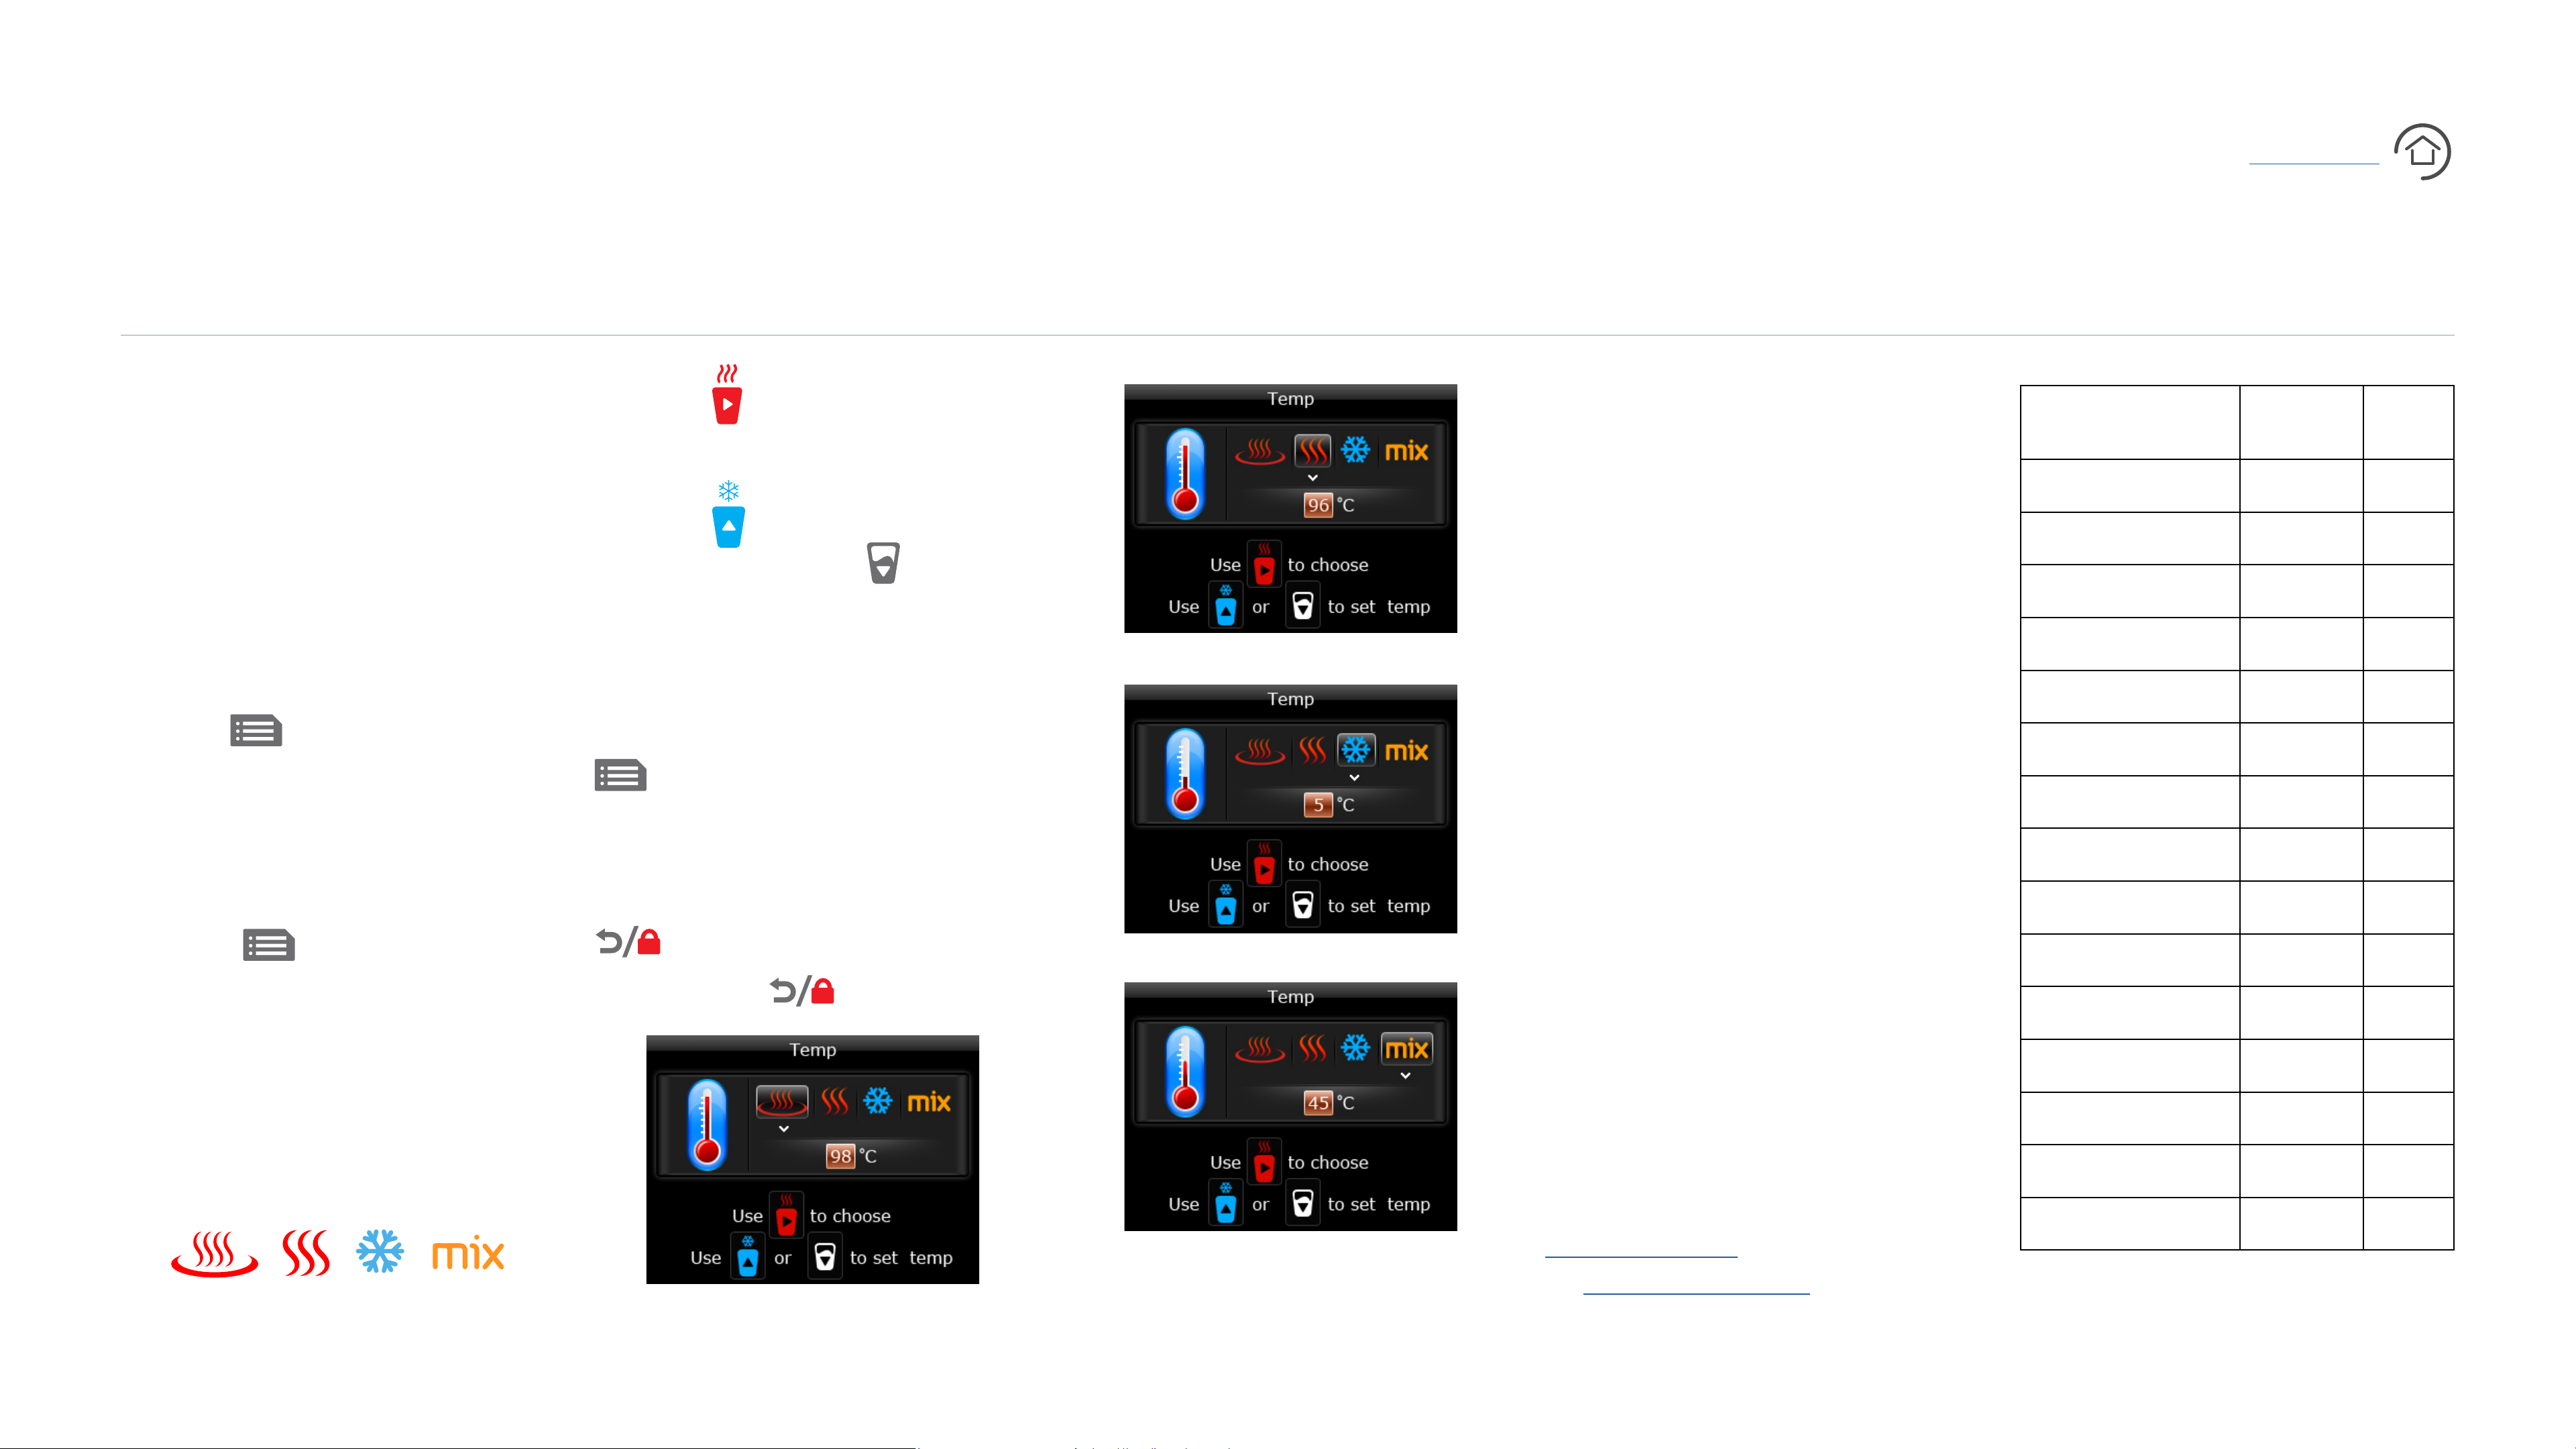
To adjust your temperature
settings:
1. Touch
on your BIBO
bar’s screen. You will see the
3. Touch to navigate between the
temperature settings (Image i - iv).
4. Touch to increase the
temperature and the to
decrease the temperature.
5. Once you are happy with the
temperature you have chosen, touch
to save the temperature
ii
TEMPERATURE TIP
When setting your boiling water
temperature remember that
the higher the altitude of your
location, the lower the degree at
which water reaches boiling point.
For example, if you’re by the
coast, your boiling water will be
much hotter than if you up in
Elevation
City
(m)
Bloemfontein 1400 94
Cape Town 0 98
Durban 0 98
East London 0 98
Johannesburg 1753 93
Kimberly 1120 95
Temp
(C)
temperature (Temp) setting
BIBO bar - User Manual
selected.
2. Touch
again to select and
enter into the Temp settings.
You will see the following icons at
the top of your screen
Super boil, boiling, chilled and
ambient/mix.
setting. Save after any change.
6. To return to the menu touch
and to return to the home
screen touch again.
iii
the mountains.
In order to make sure that your
BIBO bar dispenses boiling
water and does not turn the
water to steam, select a boiling
temperature according to the
table to the right.
If you’re still not sure what is
the best temperature for your
Nelspruit 676 97
Paarl 120 98
Pietermaritzburg 600 97
Polokwane 1600 93
Port Elizabeth 0 98
Potchefstroom 1340 94
Pretoria 1339 94
Upington 838 96
location, please reach us on
Welkom 1365 94
iv
0800 00 BIBO(2426)
i
12
Page 13
X
Using your BIBO bar
Watch Video
MENU OPTIONS AND PERSONAL SETTING
WATER QUANTITY SETTING
CONTENTS
Your BIBO bar allows you to
preset your cup size for boiling,
chilled and ambient (mix)
water. Setting this up will allow
your BIBO bar to automatically
dispense the right amount of
water for your cup. Please get
your favourite glass and mug
ready to set the water quantity.
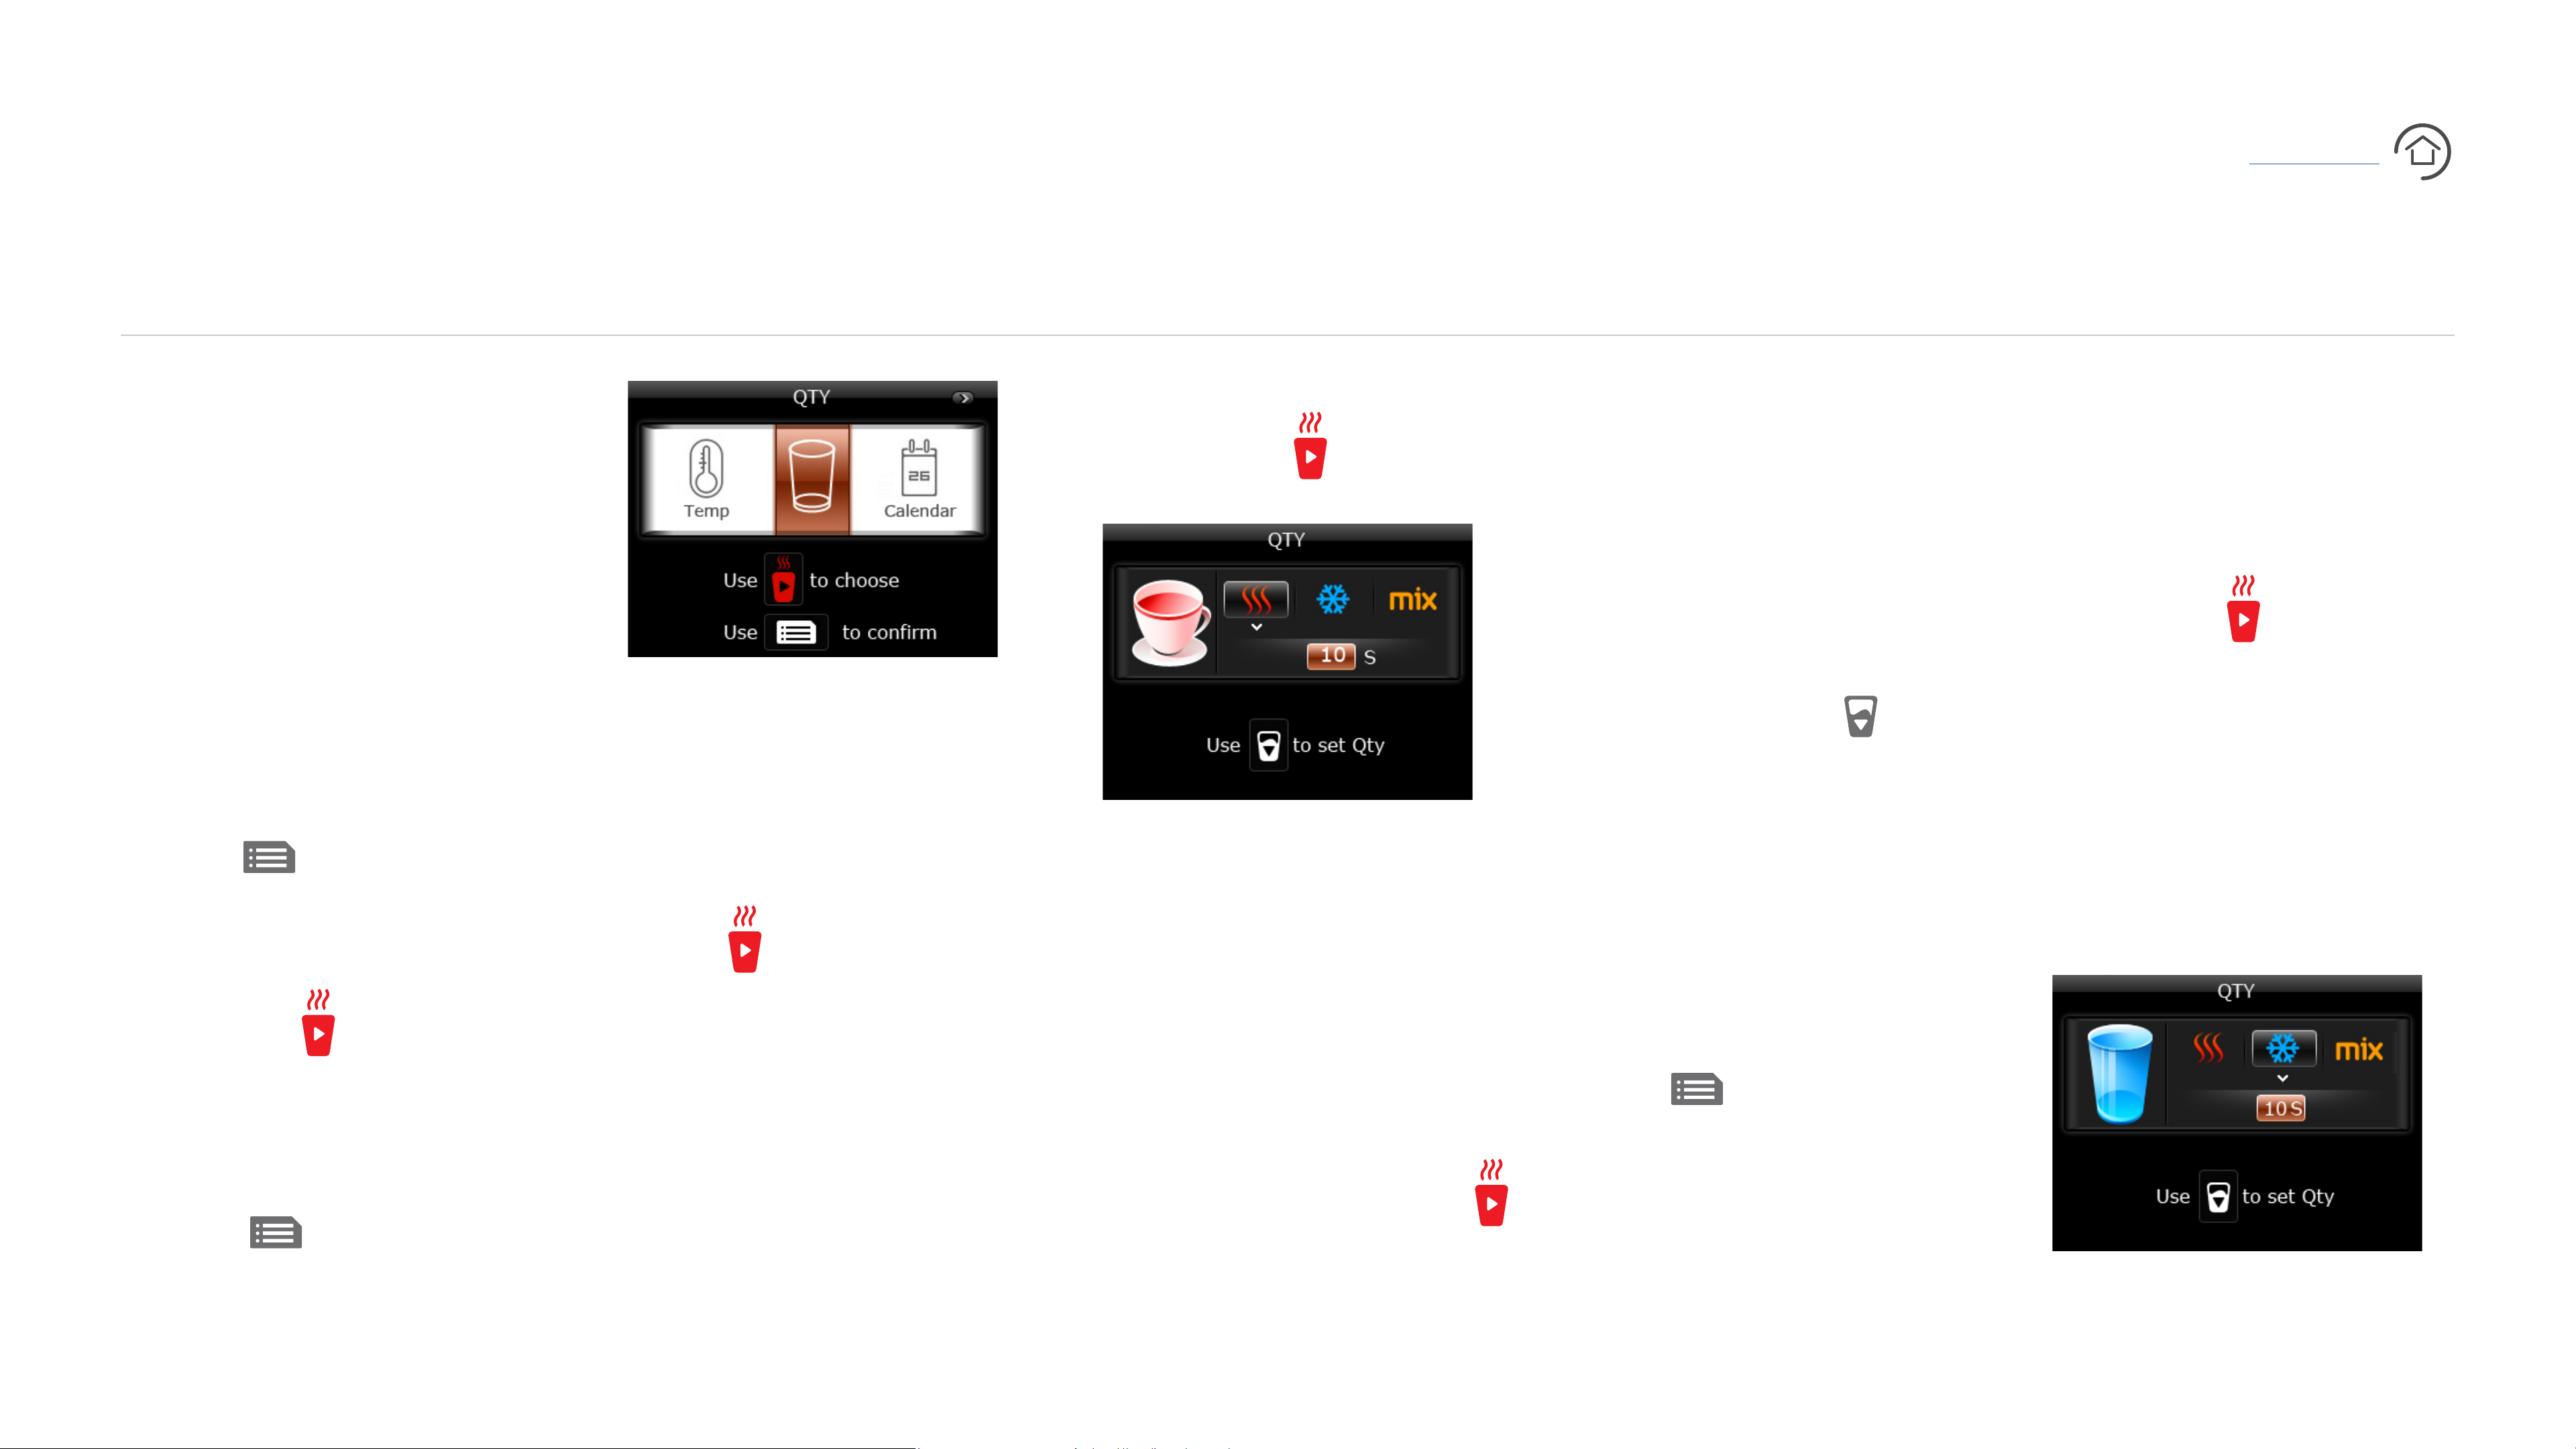
To enter into your water
i
3. You will see the following
icons at the top of your screen
• Navigate to the boiling water
settings using .
that boiling water will be
dispensed immediately once
touched.)
• Once your preferred amount
of boiling water has been
dispensed into your mug or
thermal cup, touch to
stop the water from
• Place your preferred cup on
the drip tray below the water
outlet.
• Navigate to the chilled water
setting using . You will see
a default time set up of 10
seconds (Image iii).
This is a time based quantity
quantity settings:
BIBO bar - User Manual
1. Touch on your BIBO
bar’s screen. And navigate
to the quantity (QTY) setting
by touching once. You
will then see the QTY setting
selected (Image i).
boiling, chilled and ambient/mix
(Image ii).
4. Touch to navigate
between the quantity settings.
5. To set the quantity for
boiling hot water dispensing:
ii
You will see a default time
set up of 10 seconds. This is
a time based quantity setting,
which means that the water
will dispense for the duration
of that time.
dispensing. You will notice
your BIBO bar counting up
the seconds measuring the
amount of time it takes to fill
your mug or thermal cup.
• Touch to save the
setting.
setting, which means that the
water will dispense for the
duration of that time.
2. Touch again to select
and enter into the QTY settings.
• Place your preferred mug or
thermal cup on the drip tray
below the water outlet.
• To customise the time, touch
to start dispensing boiling hot
water. (Please take caution
6. To set the quantity for
chilled water dispensing:
iii
13
Page 14
X
Using your BIBO bar
Watch Video
MENU OPTIONS AND PERSONAL SETTING
WATER QUANTITY SETTING CONTINUED
CONTENTS
• To customise the time, touch
to start dispensing chilled
water.
• Once your preferred amount
of chilled water has been
dispensed into your cup,
touch to stop the water
from dispensing.
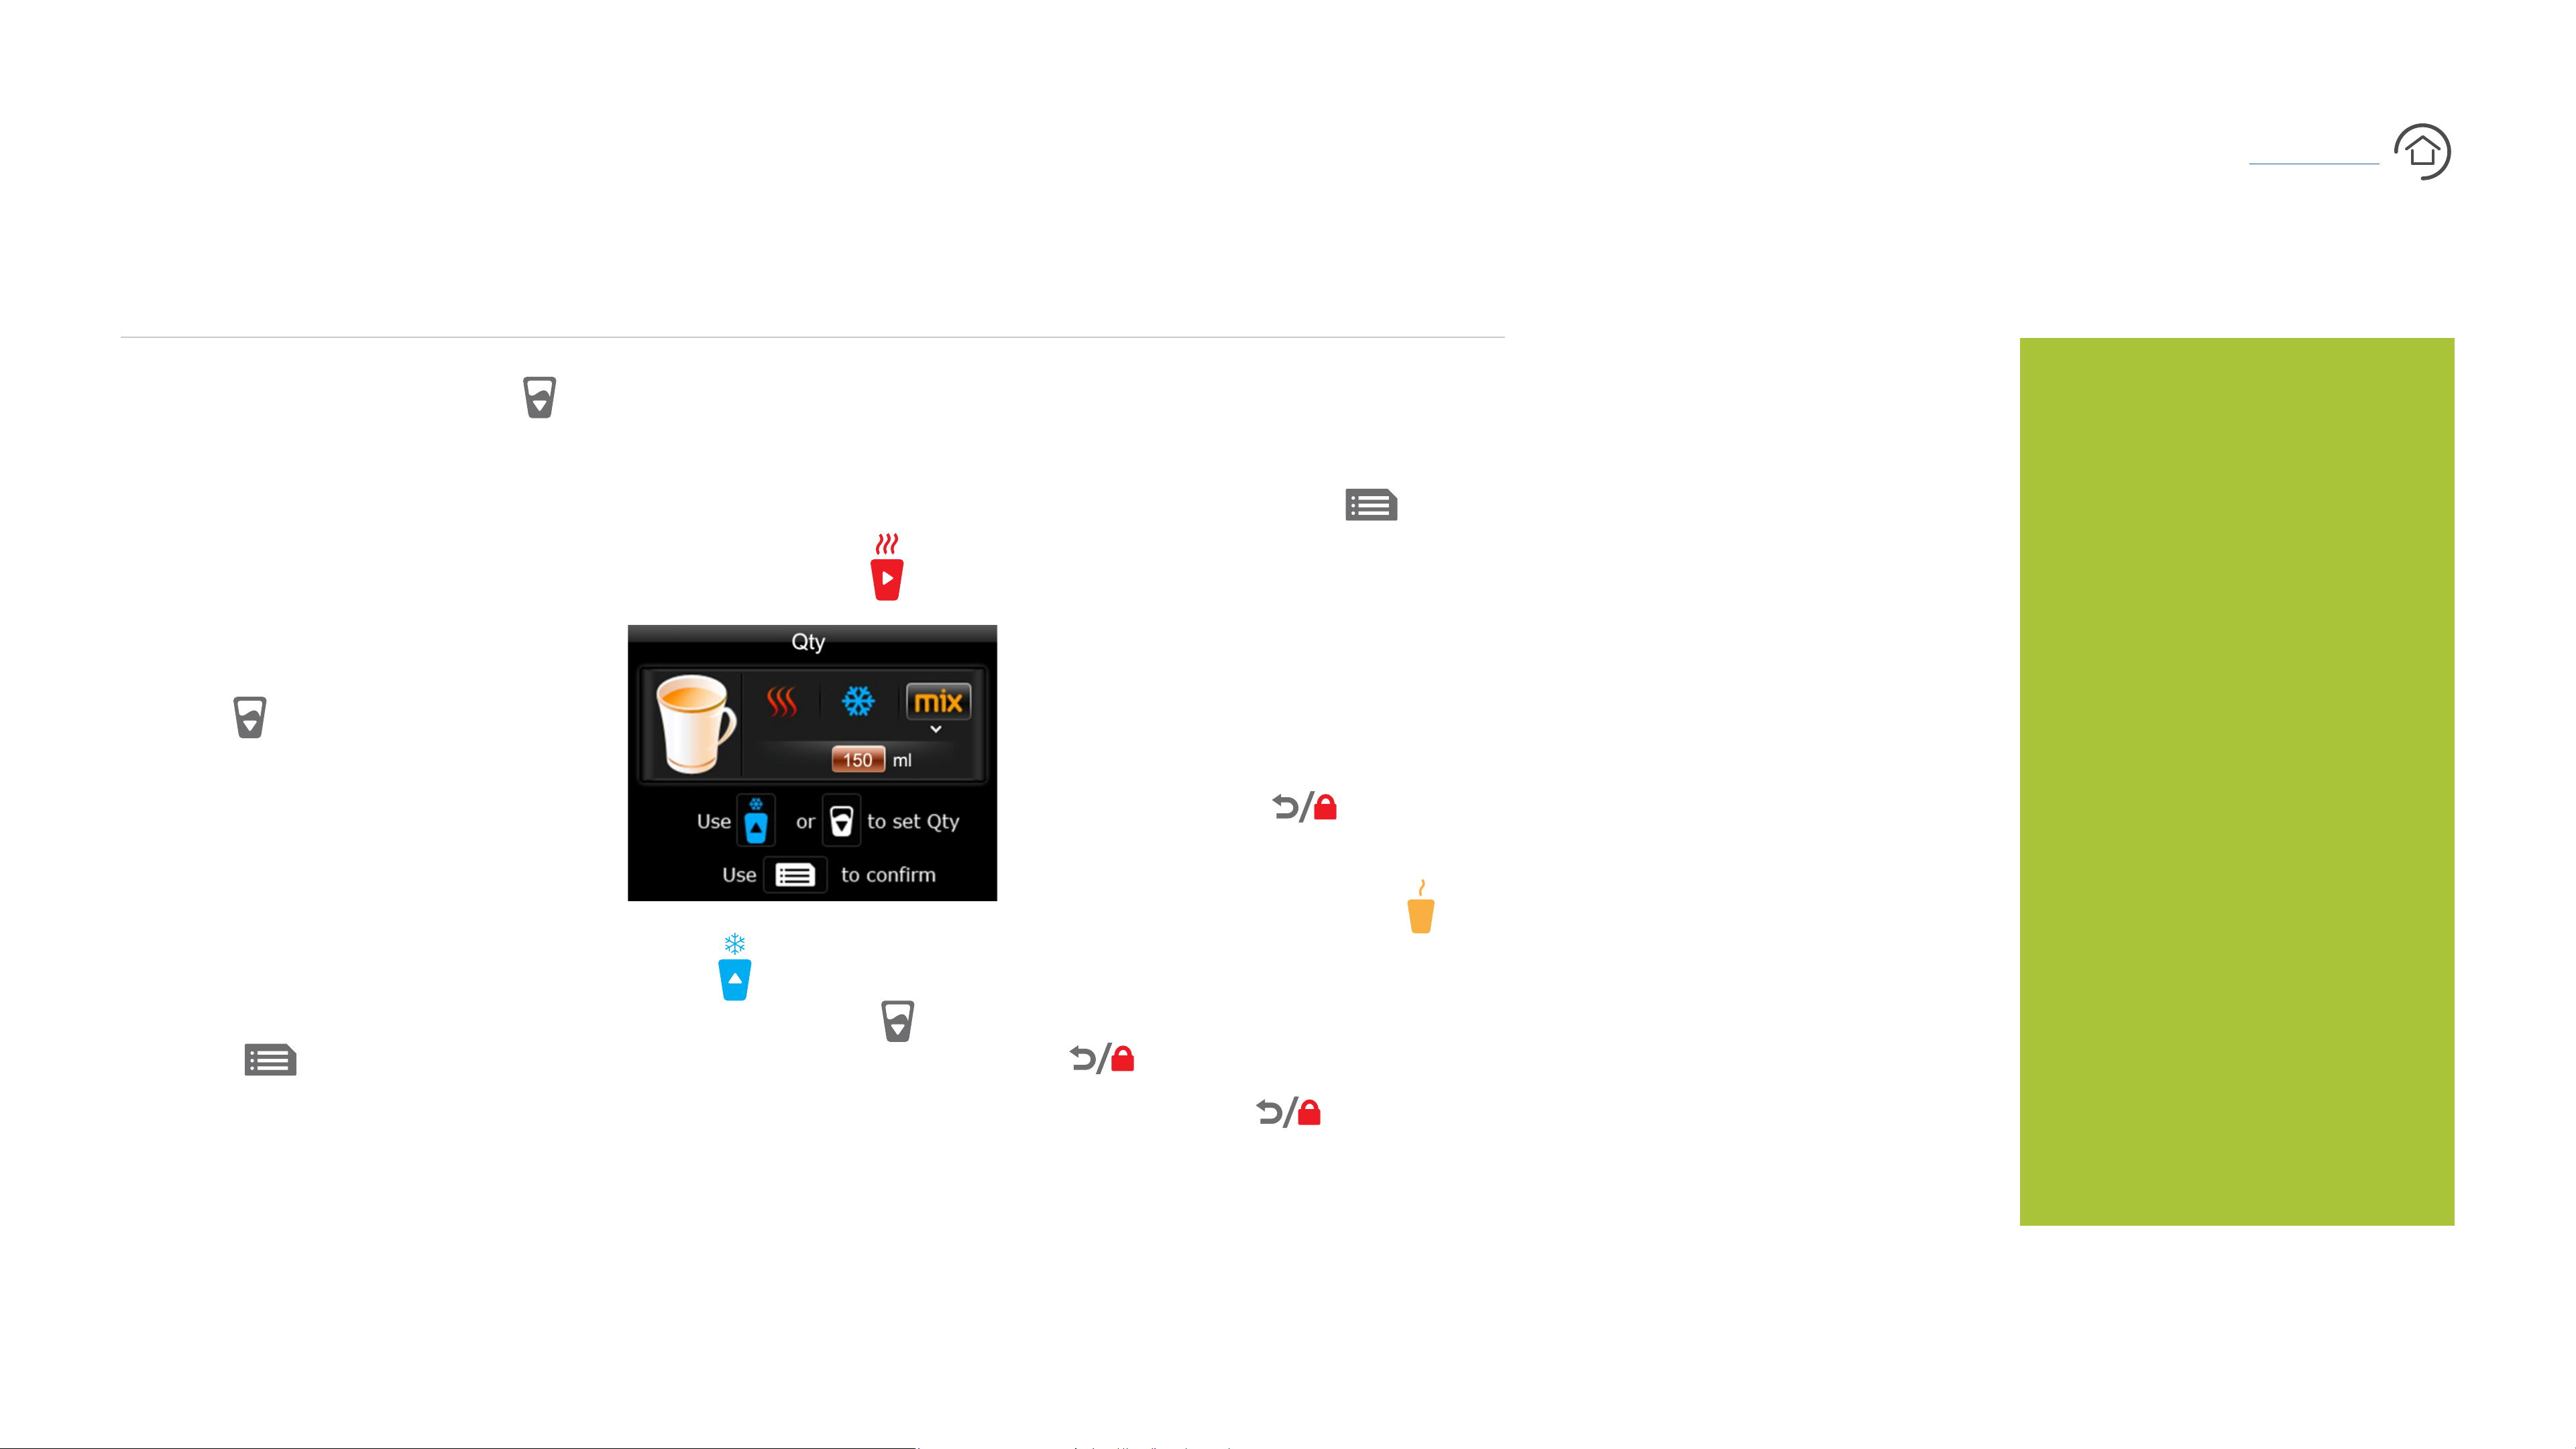
7. To set the quantity for
ambient/mix water dispensing:
• Navigate to the ambient/mix
water setting using (Image i).
• Once you are happy with
the milliliters for ambient
dispensing, touch to
save the quantity setting.
• To test the preset measured
amount of ambient water,
return to the home screen
DID YOU KNOW that
changes in location,
season, temperature,
atmosphere and municipal
water pressure have an
impact on the flow rate of
water and the way water
You will notice your BIBO
BIBO bar - User Manual
bar counting up the seconds
measuring the amount of
time it takes to fill your cup.
• Touch to save the
setting.
i
• Touch to increase the
milliletres and the to
decrease the milliliters of
your ambient water mix.
by touching two times,
place a cup under the water
outlets and then touch .
8. To return to the menu touch
and to return to the home
screen touch again.
is dispensed from your
BIBO bar? It is for this
reason that the preset
measure is an approximate
amount. Please do not
leave dispensing water
unattended.
14
Page 15
X
Using your BIBO bar
Watch Video
MENU OPTIONS AND PERSONAL SETTING
TIME AND DATE SETTINGS
CONTENTS
Your BIBO bar displays the time
and date. Setting the correct
time is needed to ensure that
your BIBO bar’s energy saving
features can function correctly.
To adjust your time settings:
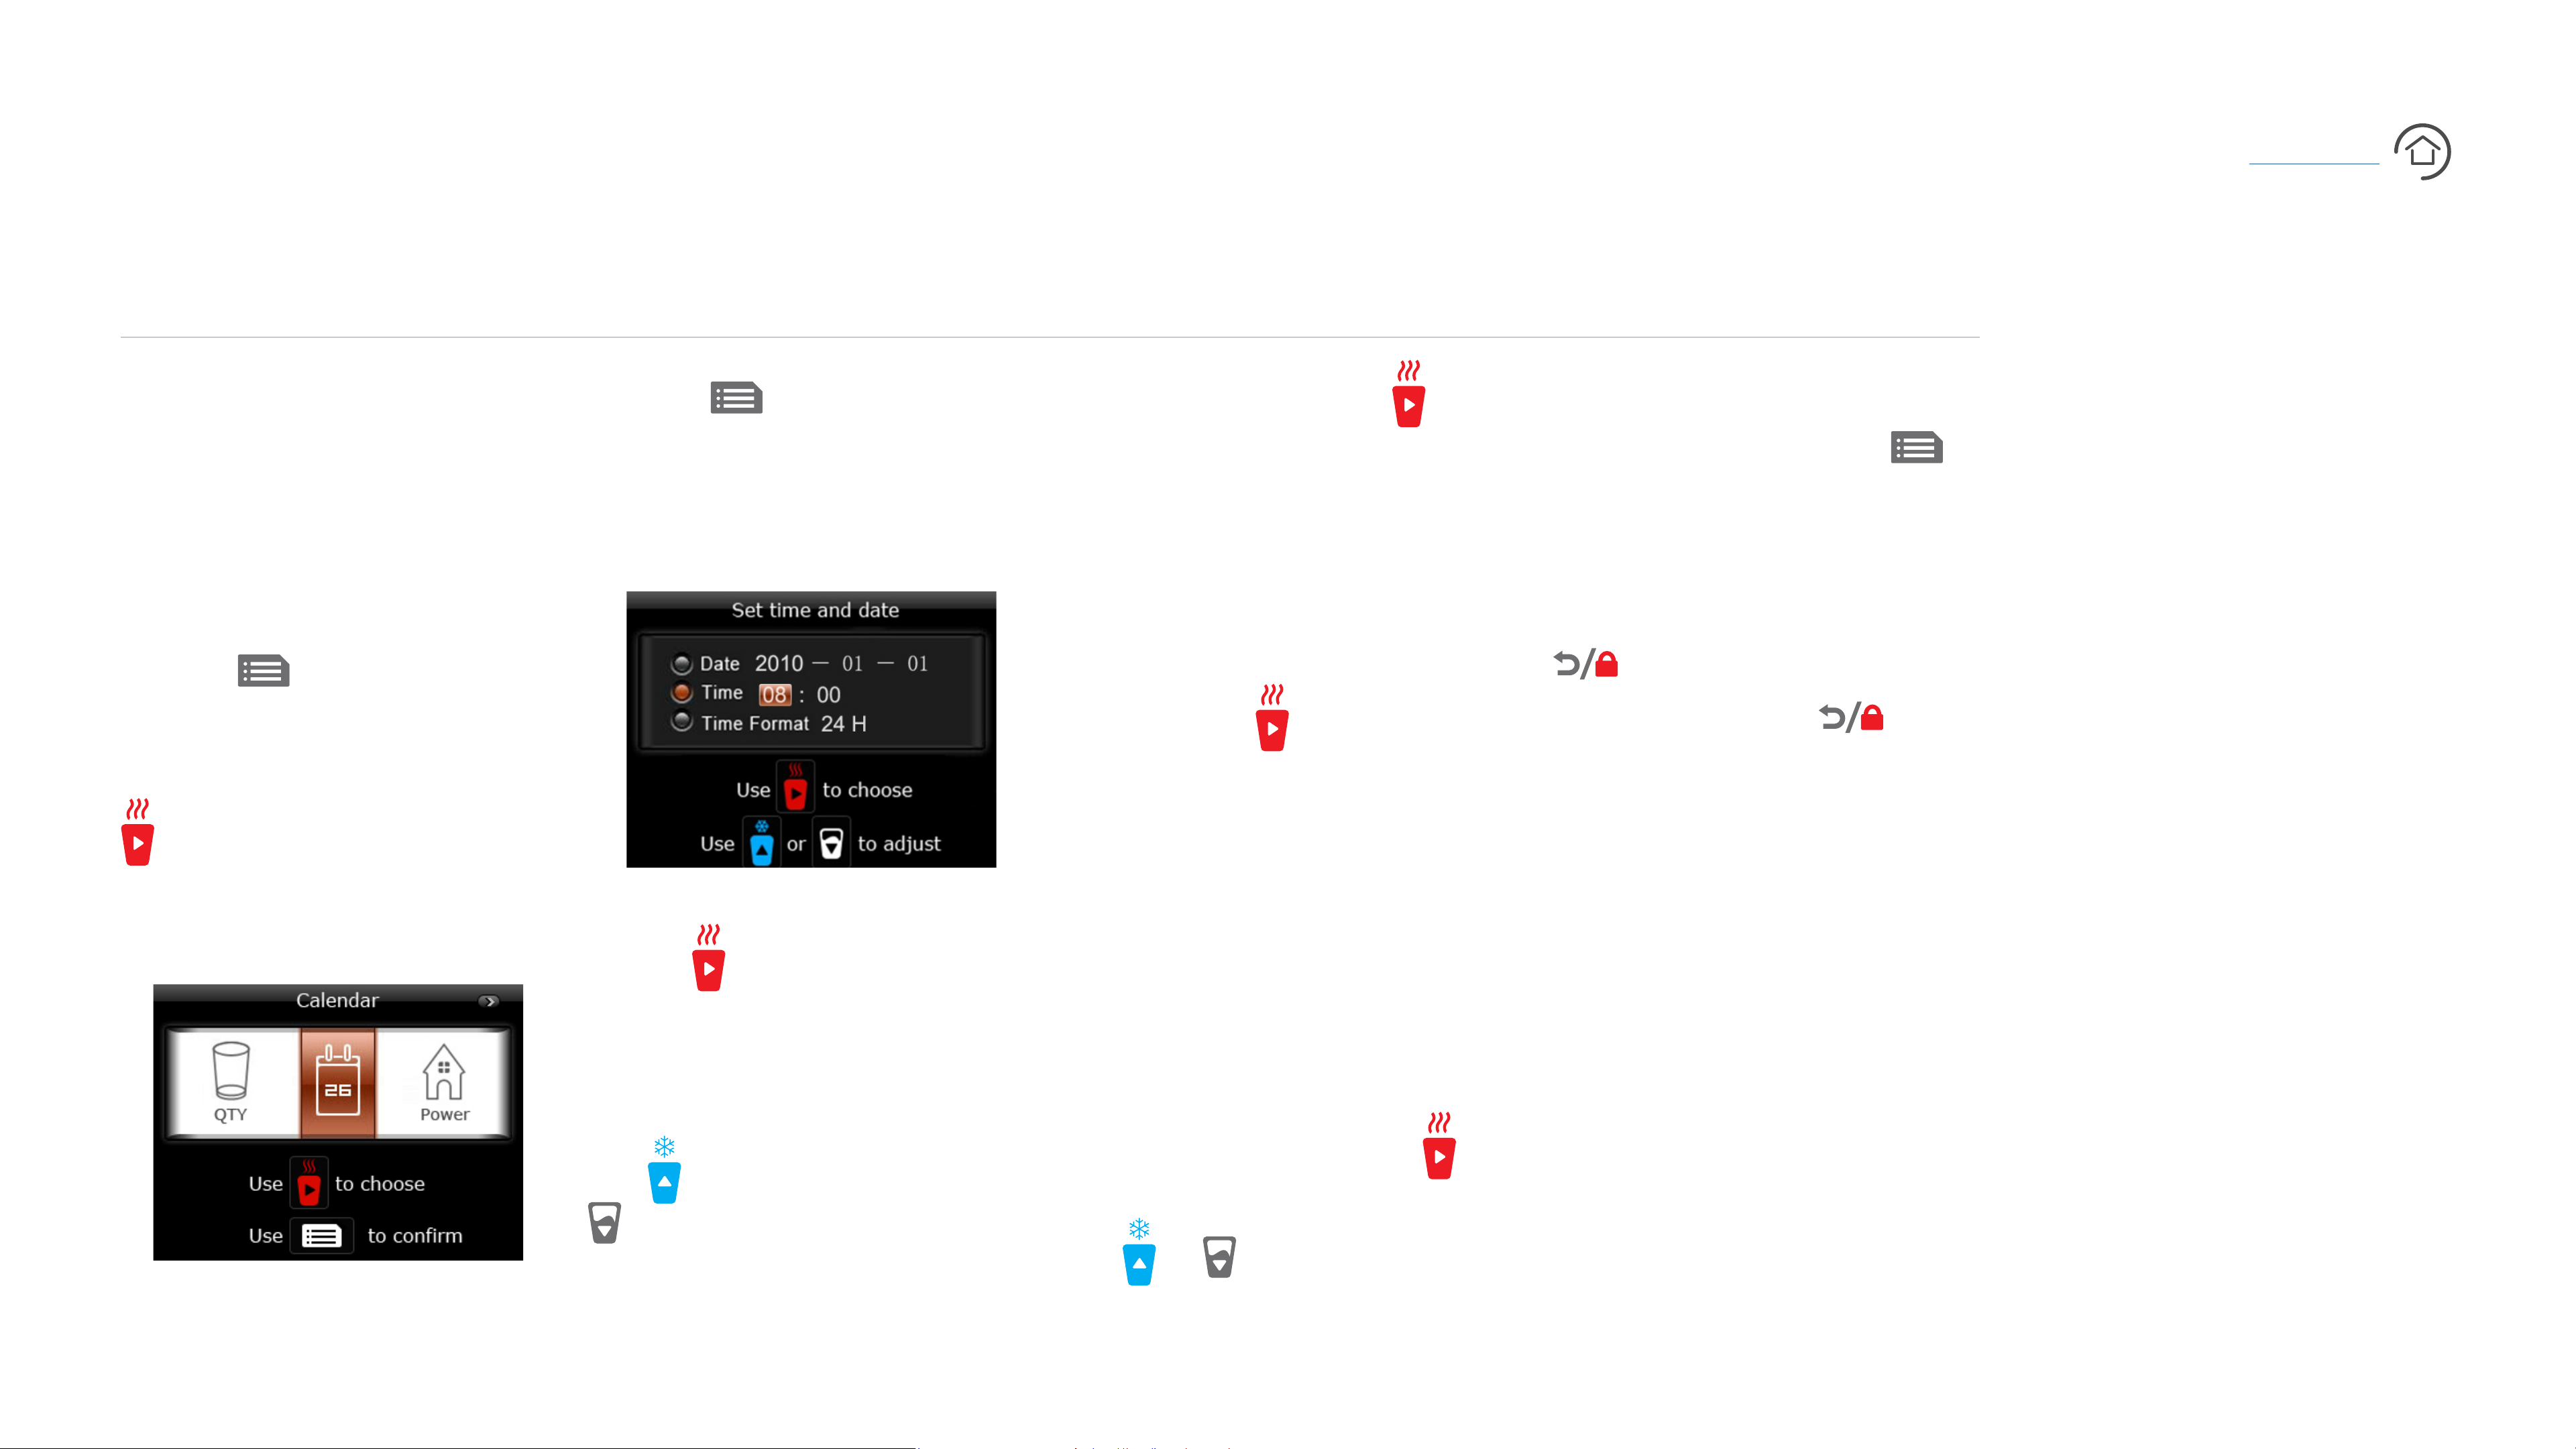
1. Touch on your BIBO bar’s
screen. And navigate to the
Calendar setting by touching
2. Touch again to select and
enter into the Calendar settings.
You will see date, time and
time format settings (Image ii)
correct year is set, use to
navigate to the month and day,
following the same routine.
5. Similarly, to change the
time, navigate to the time
setting using and adjust
the hour and minute settings.
7. Once your date and time have
been set correctly, touch to
save the Calendar settings.
8. To return to the menu touch
and to return to the
home screen touch again.
two times. You will then see
BIBO bar - User Manual
the Calendar setting selected
(Image i).
Furthermore you can select
your preferred time format and
ii
choose between a 12-hour or
3. Use to navigate between
24-hour clock.
the date and time settings.
6. To do this, navigate to the
4. To change the date, touch
time format setting using
the to advance the year and
and change the format using
to regress the year. Once the
the or .
i
15
Page 16
X
Using your BIBO bar
Watch Video
MENU OPTIONS AND PERSONAL SETTING
POWER AND ENERGY-SAVING SETTINGS
CONTENTS
Your BIBO bar is designed to
save energy based on your
usage behaviour and lifestyle.
The first energy saving technique
is Sleep Mode which allows your
BIBO bar to go to sleep and save
energy after a certain amount
of time of non-use. The second
energy saving setting is Power
On/Off Mode, which puts your
BIBO bar on standby over a
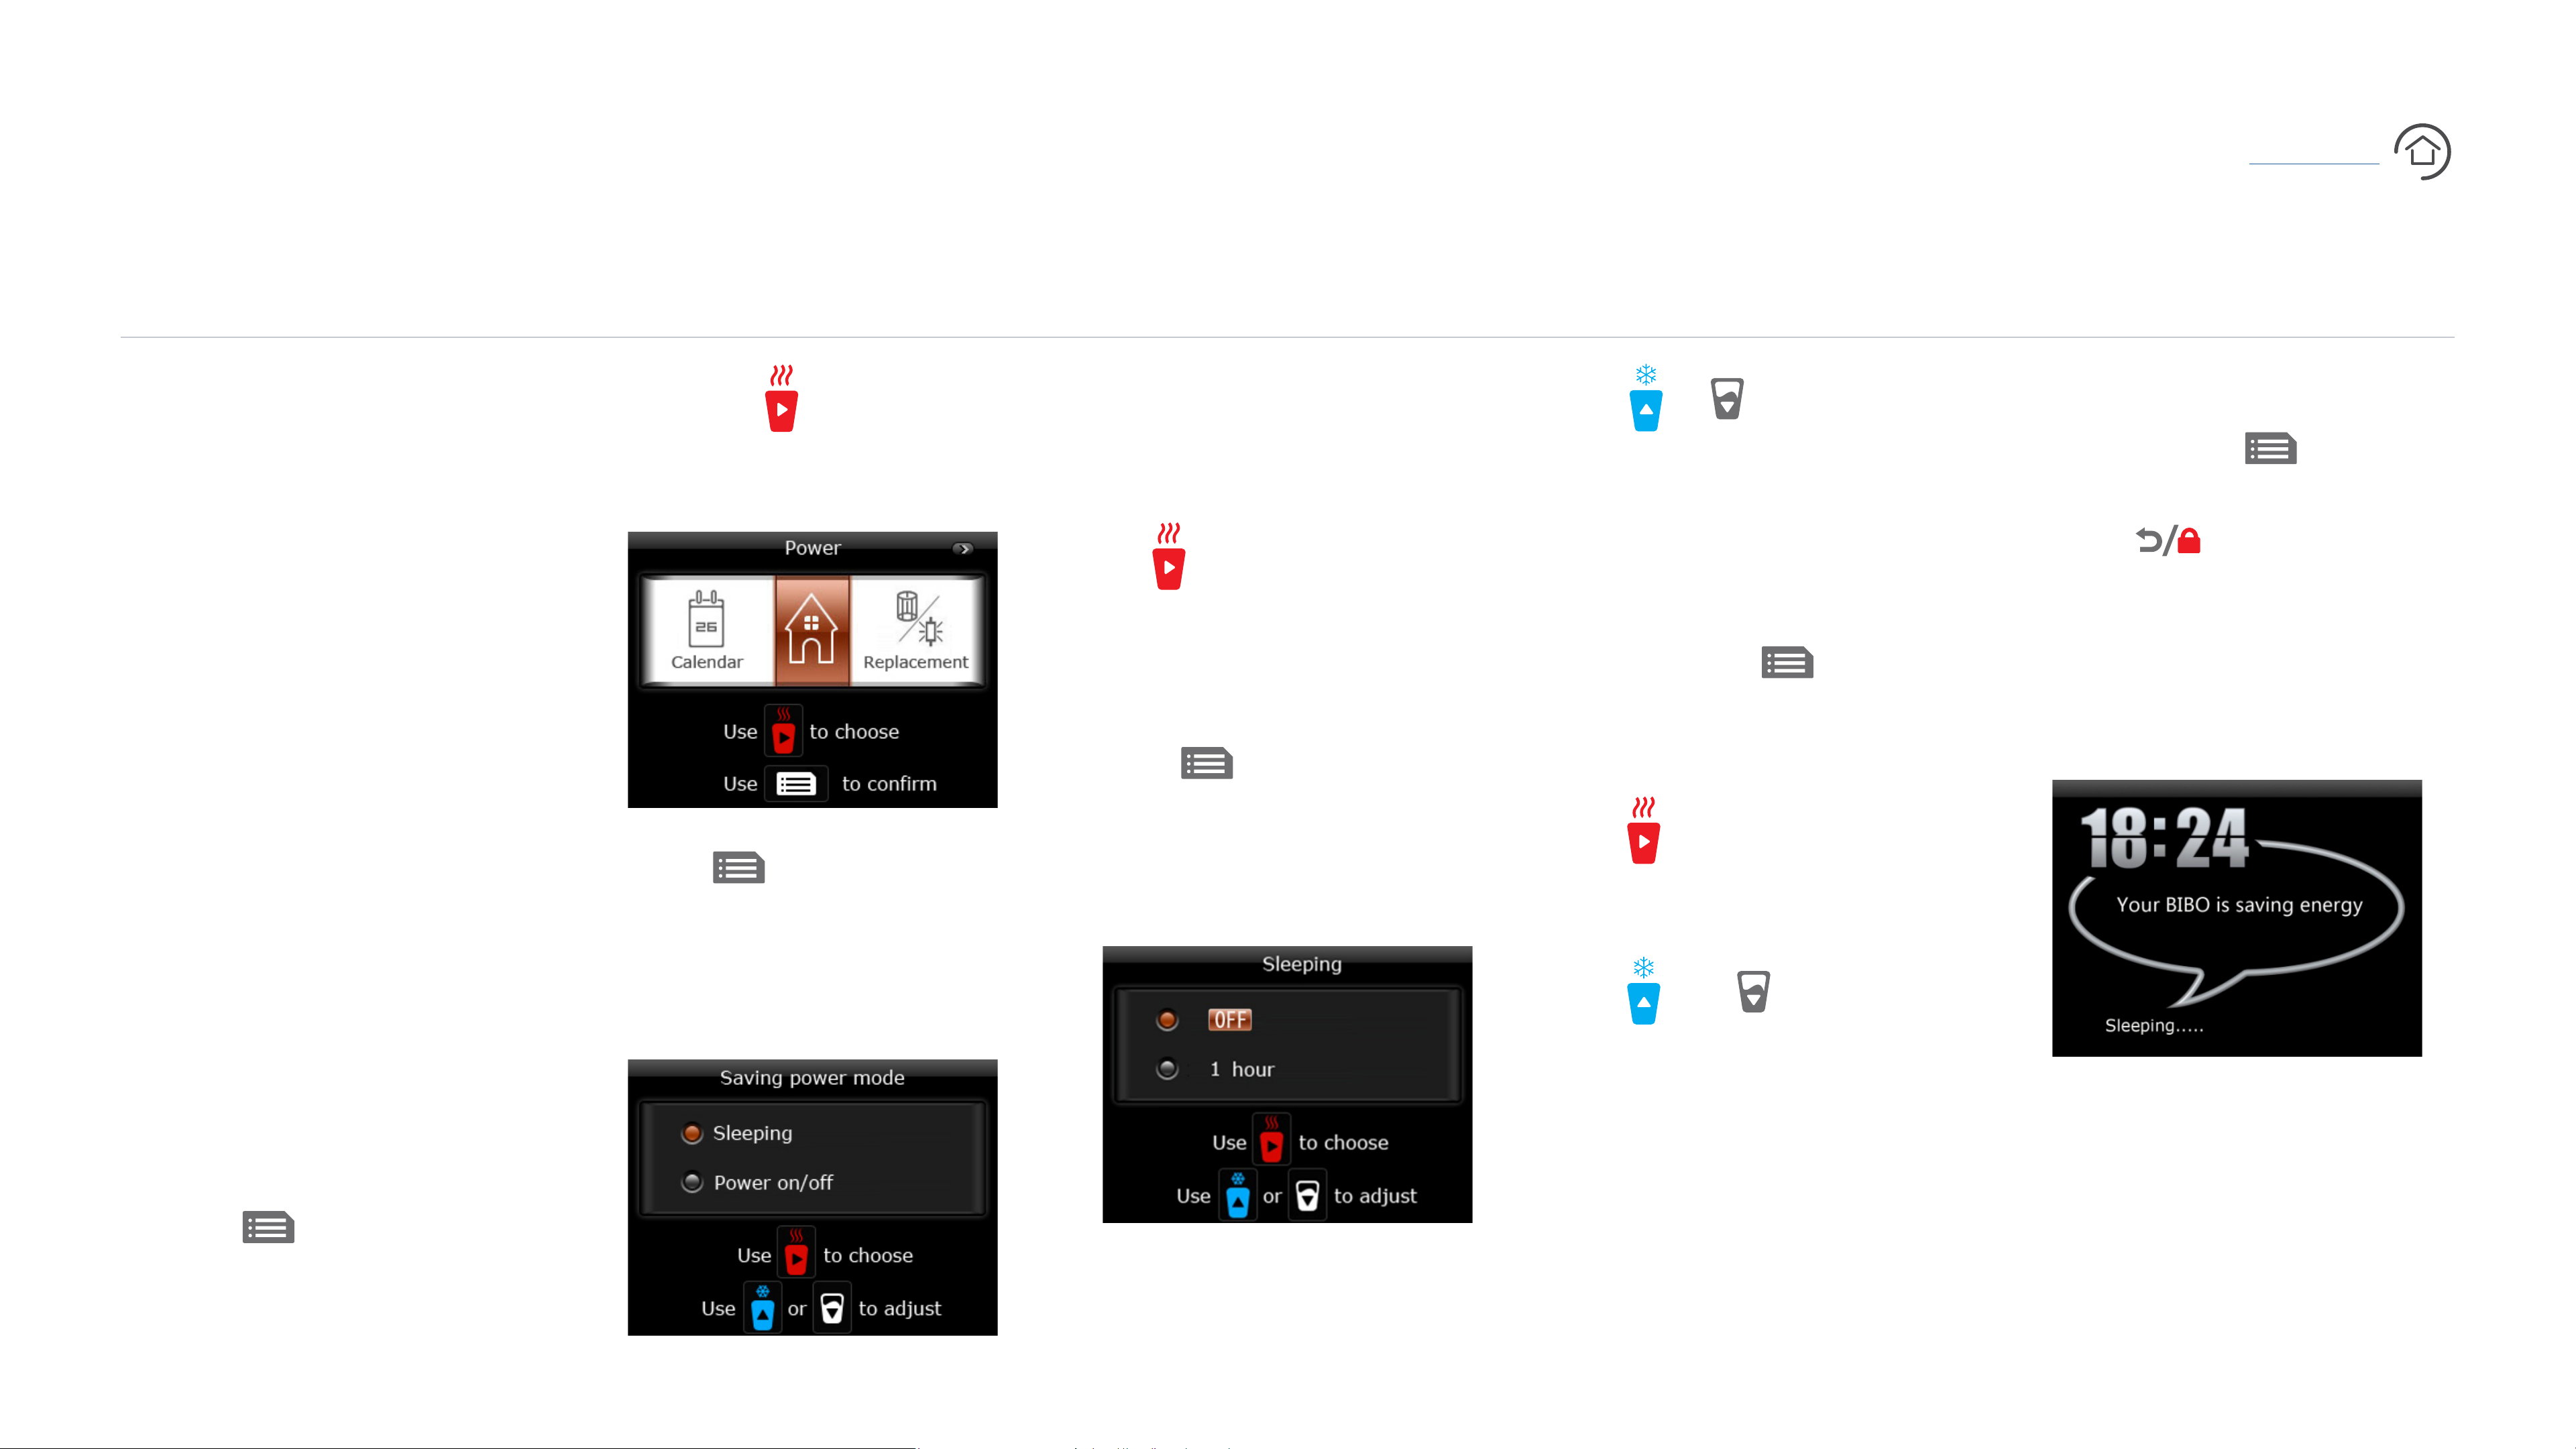
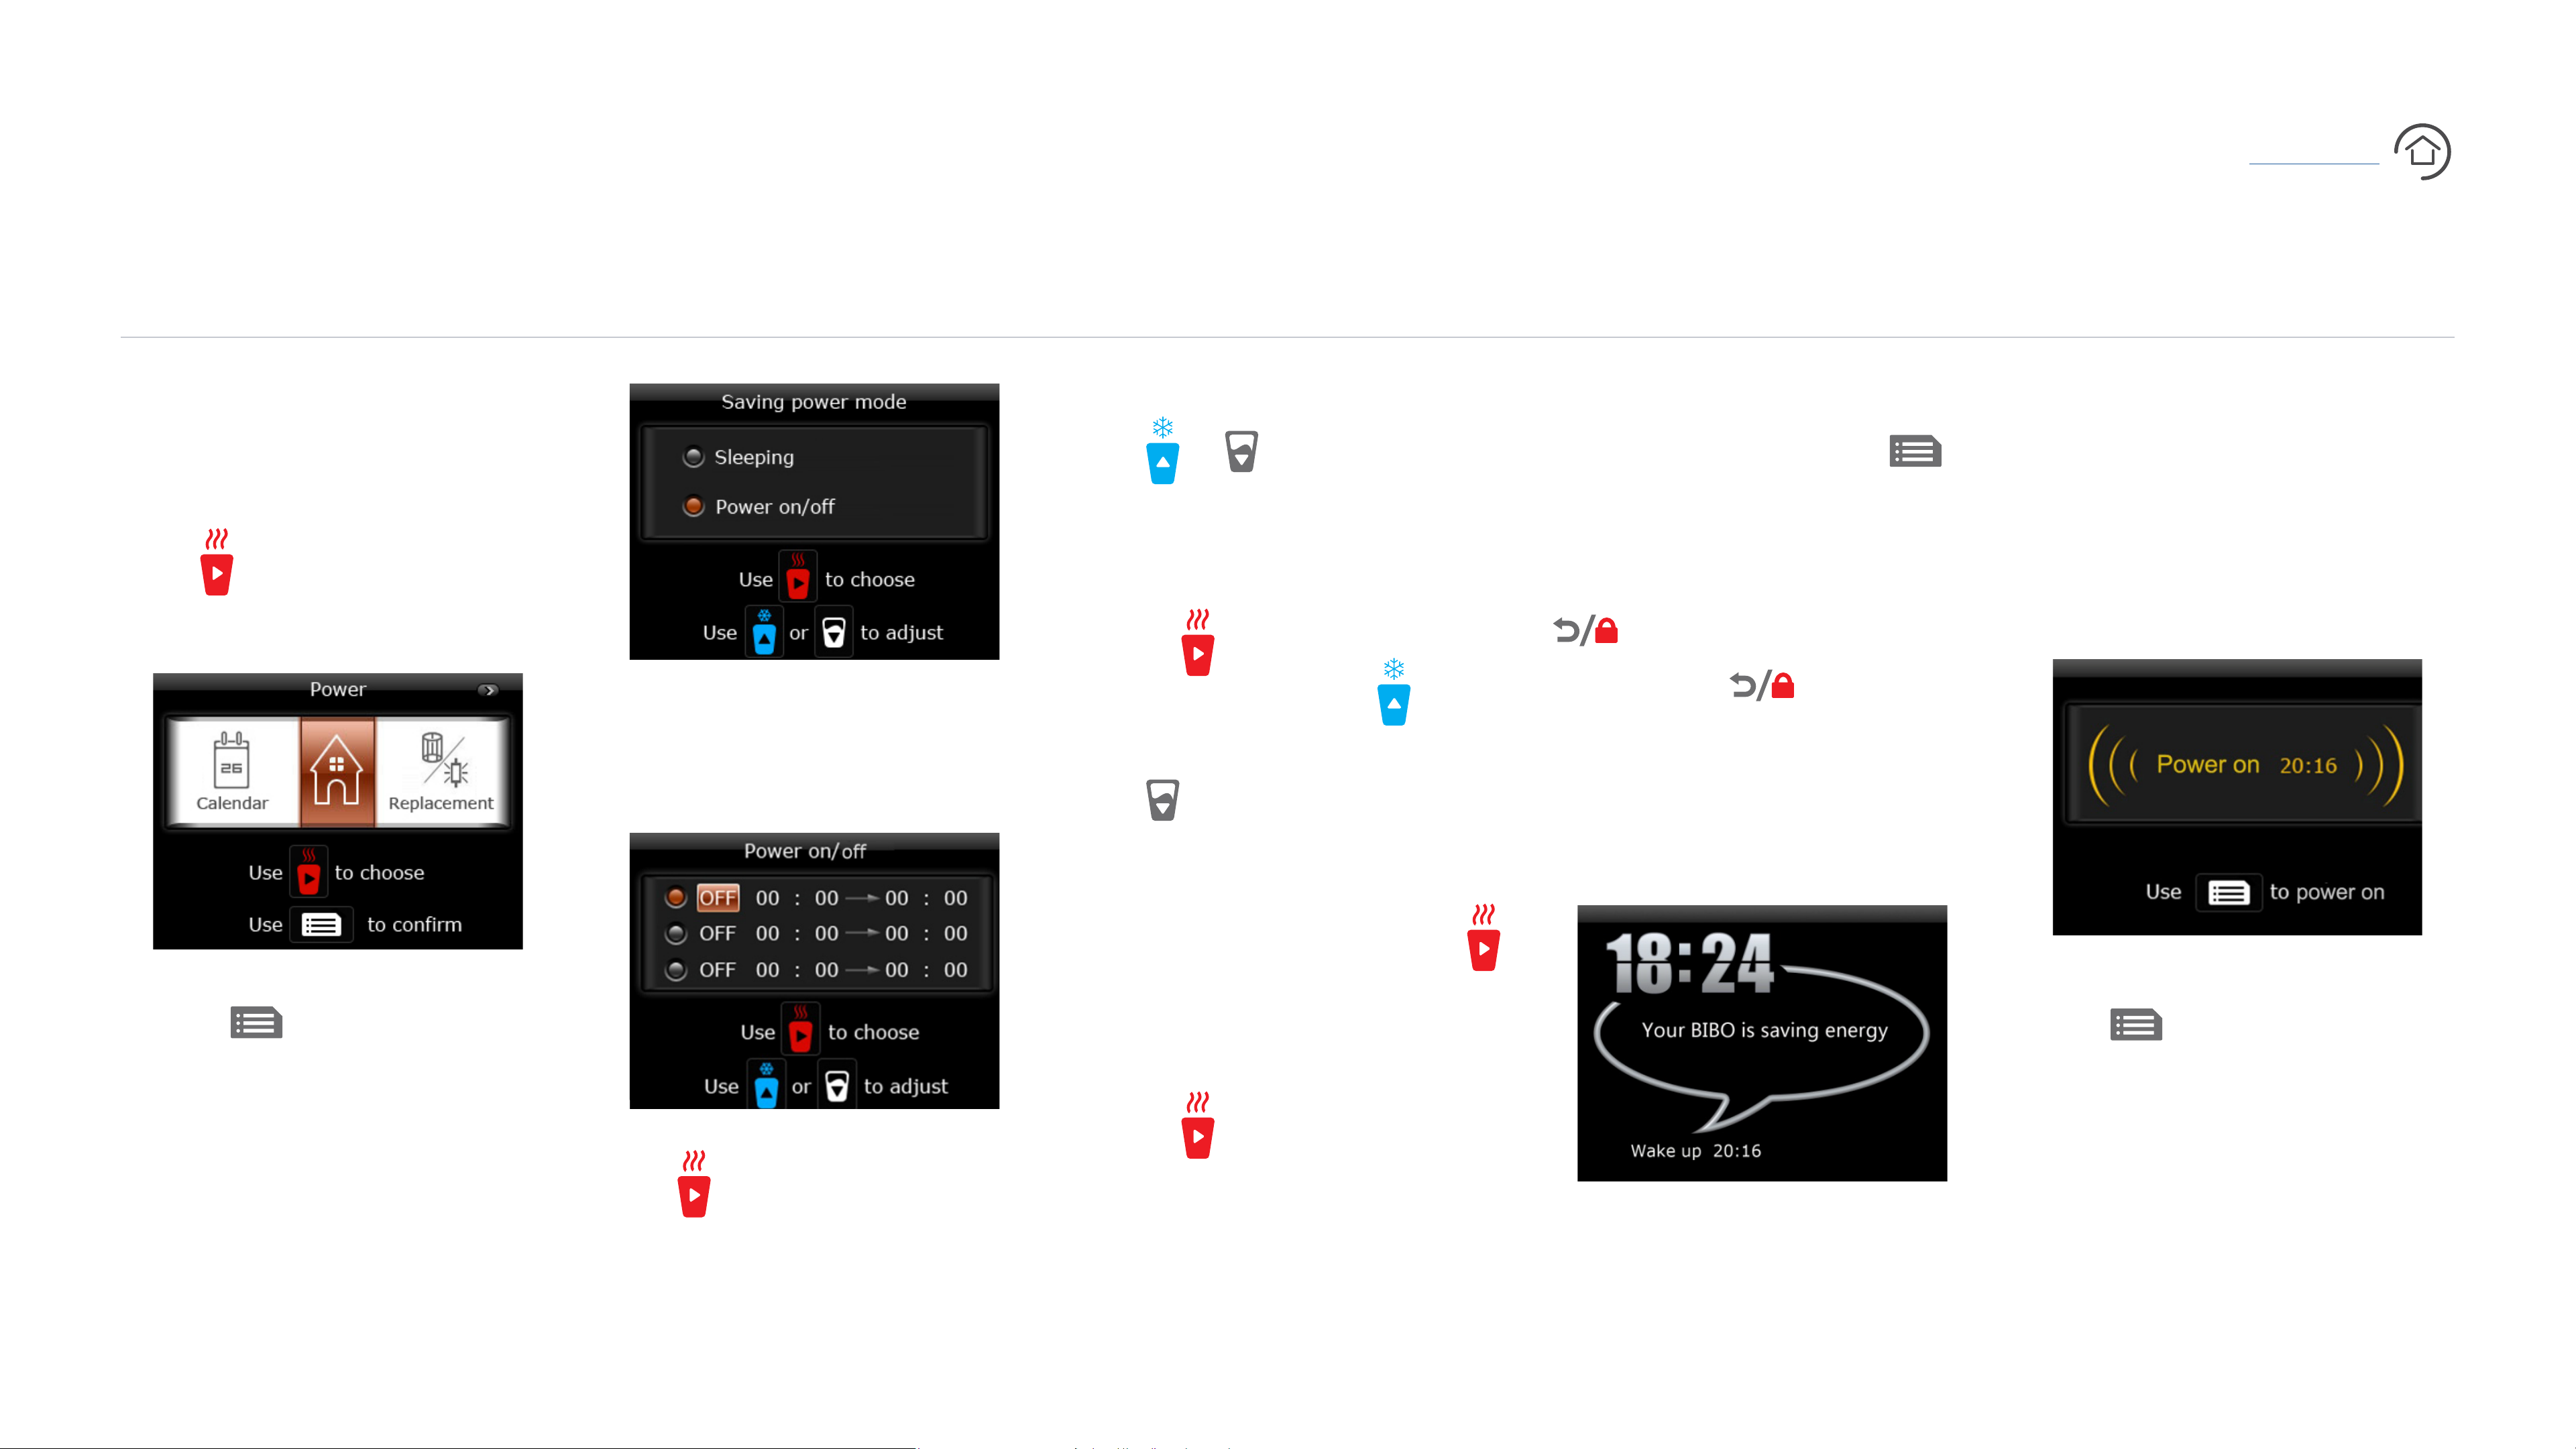
by touching
will then see the Power setting
selected (Image i).
three times. You
4. To set your BIBO bar’s sleep
mode:
• Use
Sleep settings (this should be
selected by default).
• Touch
to navigate to the
to enter into the
• Use
whether you would like your
Sleep Mode on or off.
• Once you are happy with your
choice, touch
your choice.
or to choose
to save
• Once you are happy with your
choice, touch
• Touch
Power settings.
When your BIBO bar goes into
Sleep Mode, it will display the
following screen (Image iv).
to return to the
to save.
preselected time and duration,
enabling your BIBO bar to turn
BIBO bar - User Manual
on and off at different times
of the day according to when
you will be using it. We highly
recommend enabling both your
power settings to save as much
energy as possible and the
environment.
To adjust your power settings:
i
3. Touch
enter into the Power settings. You
will see Sleeping and Power on/
off settings (Image ii).
again to select and
Sleep settings. You will see an
on/off setting and an hourly
setting (Image iii).
• Use
hourly setting.
• Use
amount of inactive hours
after which you would like
your BIBO bar to enter into
to navigate to the
and to set the
iv
Simply press any button to
wake it up again. It can take
1. Touch on your BIBO
bar’s screen.
2. Navigate to the Power setting
ii
iii
Sleep Mode.
This is between 1 and 4 hours.
up to a minute for your BIBO’s
temperature to normalise.
16
Page 17
X
Using your BIBO bar
Watch Video
MENU OPTIONS AND PERSONAL SETTING
POWER AND ENERGY-SAVING SETTINGS
CONTENTS
5. To set your BIBO bar’s Power
on/off mode:
• Use
on/off settings (Image i).
to navigate to the Power
ii
• You will see an option for
three on/off times (Image iii).
• To set an on/off time, touch
the
• Once you have chosen
between the on/off option,
touch
hour setting using the
advance the hourly time and
or .
to navigate to the
to
• Once you are happy with your
set on/off times, touch
save.
6. To return to the menu touch
screen touch
When your BIBO bar goes into
and to return to the home
again.
to
If you’d like to wake your BIBO
bar up from Standby Mode
before the scheduled time,
press any button. The screen
will then display the following:
BIBO bar - User Manual
i
• Touch
Power on/off settings (Image ii).
to enter into the
• Use
iii
to navigate between
the
• Similarly navigate to the
minute setting by touching
and follow the same routine.
• To set another on/off time,
touch
next setting and follow the
to regress the hour.
to navigate to the
Standby Mode, it will display
the following screen:
Touch
to wake your BIBO bar up.
iv
to confirm you’d like
v
the on/off time settings.
same routine as above.
17
Page 18
X
Using your BIBO bar
Watch Video
MENU OPTIONS AND PERSONAL SETTING
SAFETY SETTINGS
CONTENTS
The BIBO bar dispenses
boiling water. Accordingly it is
necessary to take precautions
when dispensing boiling hot
water. While your BIBO bar has
an inherent safety feature for
boiling hot water dispensing,
it is recommended that for
children, the child lock setting
be further enabled. While
the child lock setting ensures
i
3. Touch again to select
and enter into the child lock
5. Once your preferred child
lock mode has been selected,
touch to save the setting.
6. To return to the menu touch
and to return to the home
screen touch again.
further safety measures,
children should always be
BIBO bar - User Manual
supervised around the BIBO
bar.
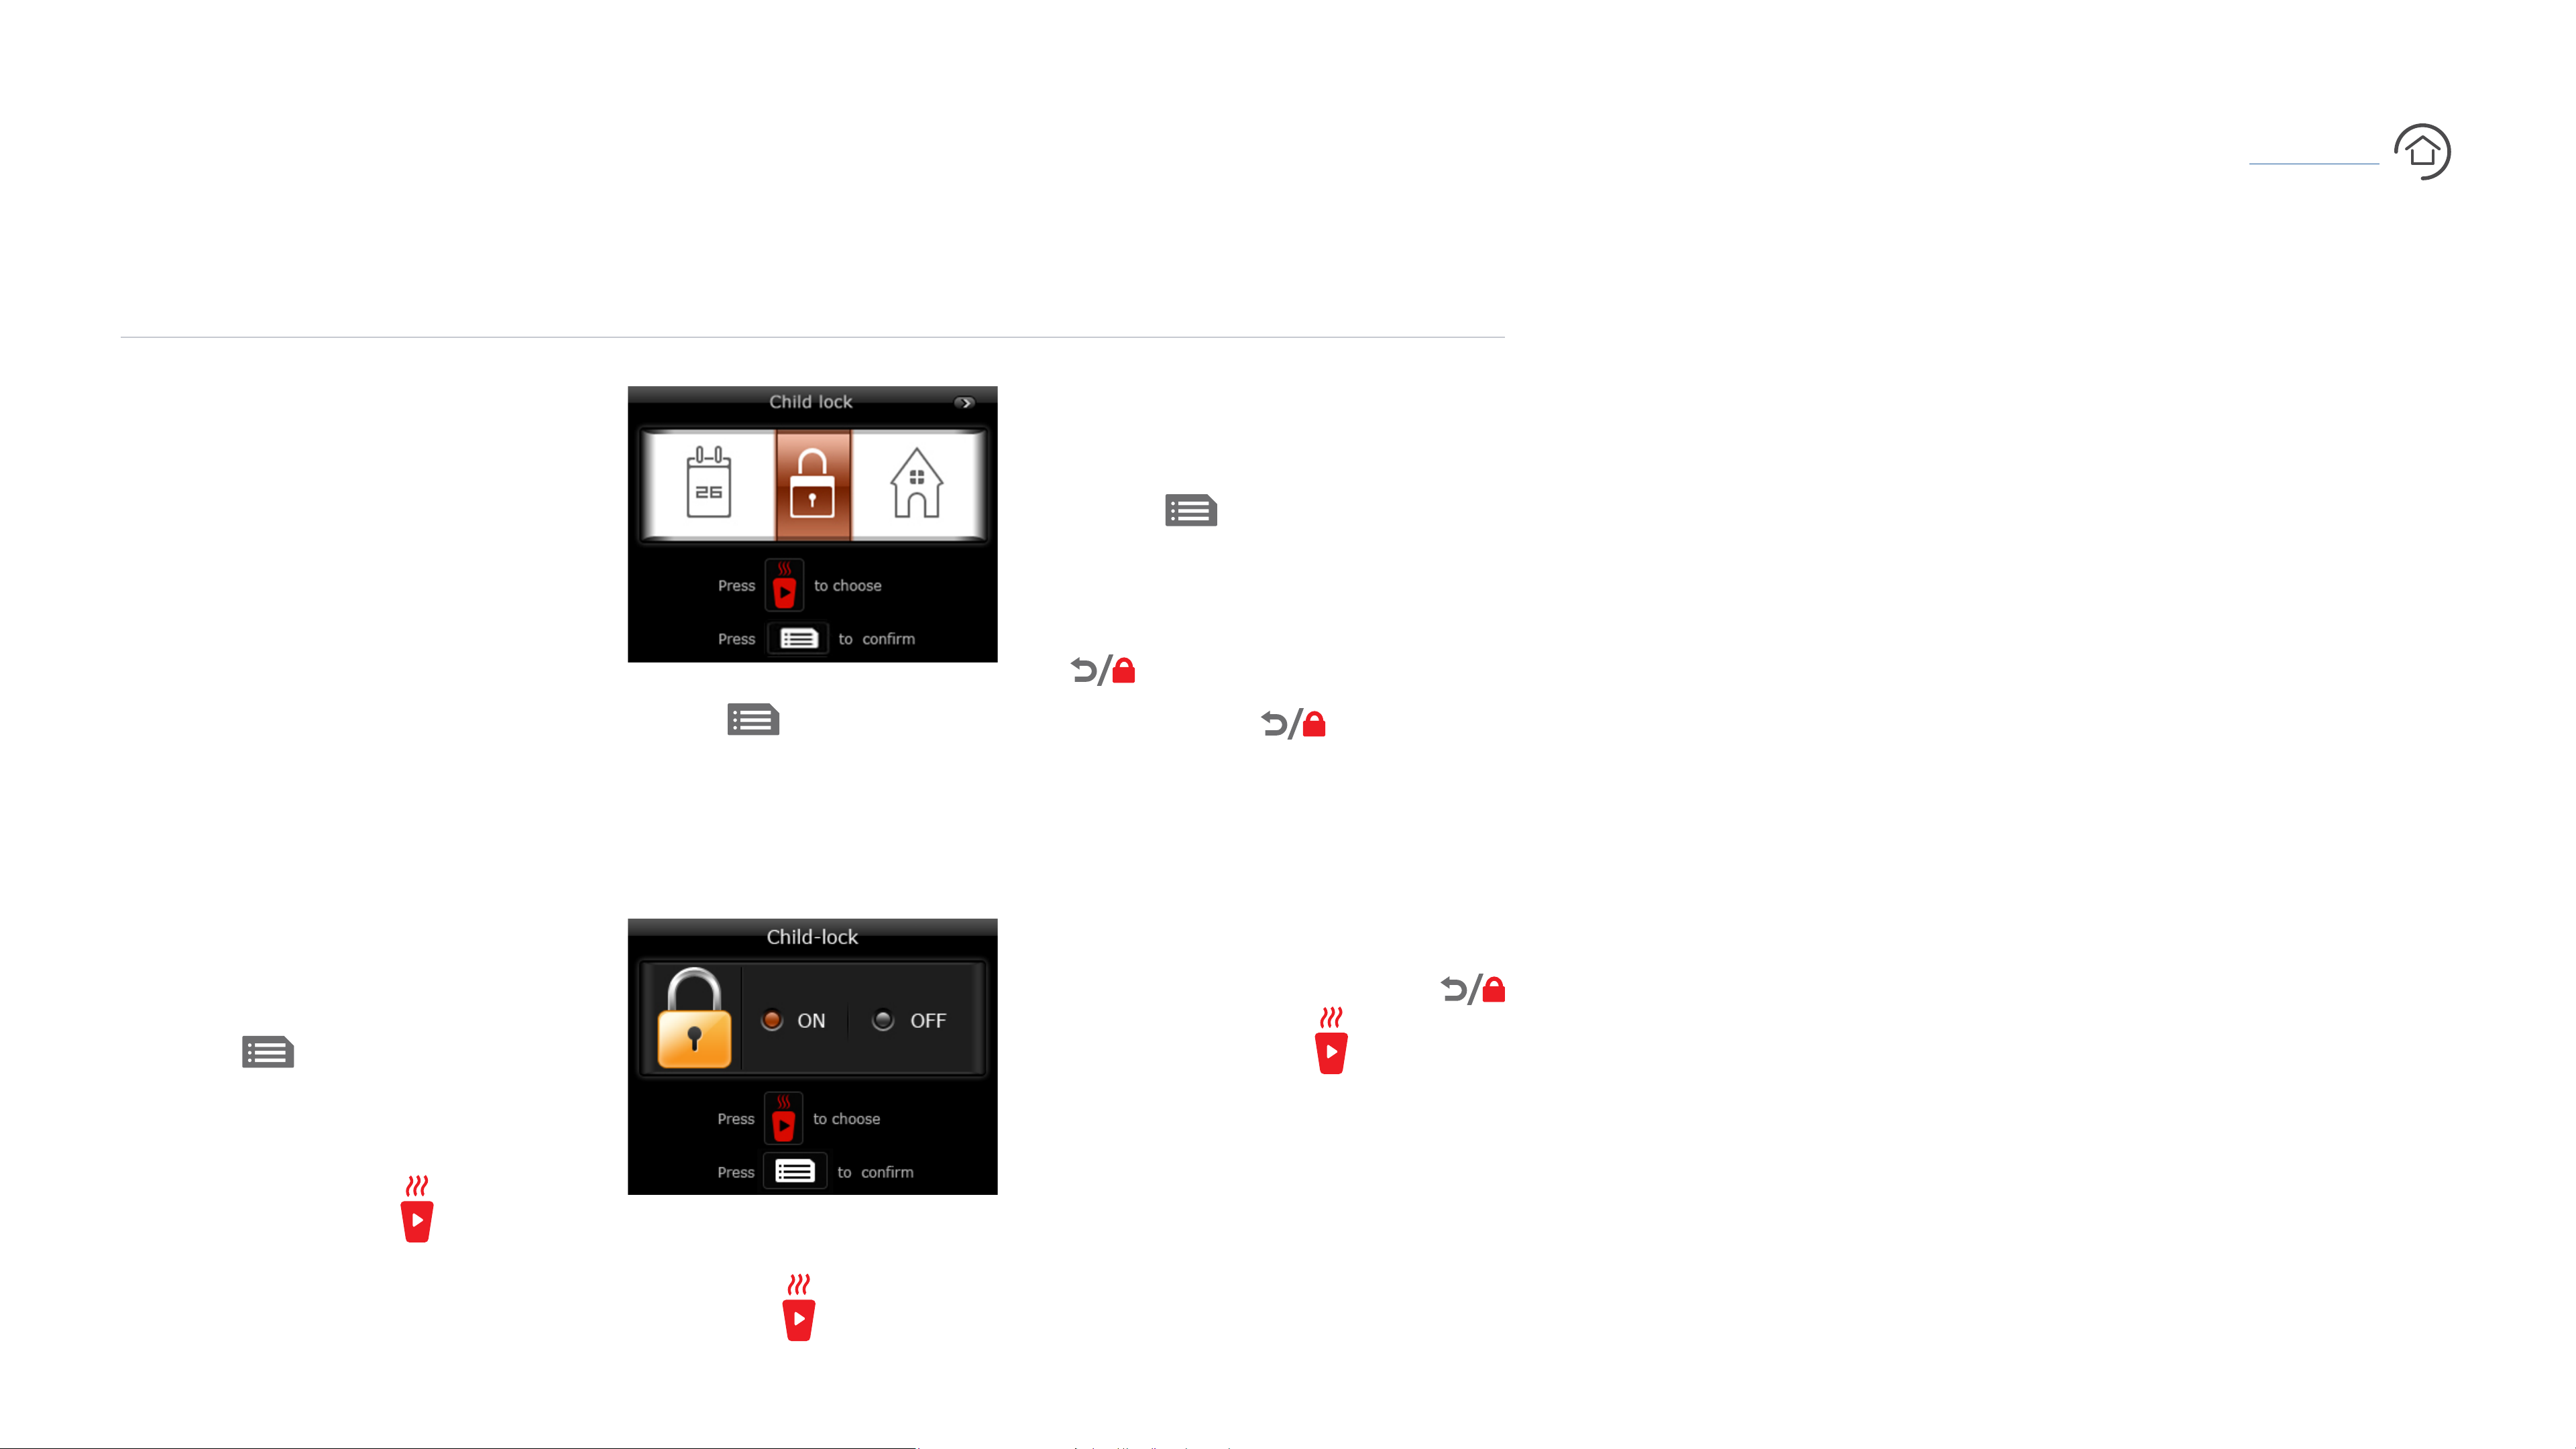
To enter the child lock setting:
1. Touch on your BIBO
bar’s screen.
2. Navigate to the child lock
settings. You will see an on and
Once the child lock setting has
off child lock option (Image ii).
been enabled, you will only
be able to dispense boiling
hot water by first touching
and then holding for
3 seconds.
setting by touching four
times. You will then see the child
lock setting selected (Image i).
ii
4. Navigate to your preferred
option using .
18
Page 19
X
Using your BIBO bar
Watch Video
Watch Video
MENU OPTIONS AND PERSONAL SETTING
RING SETTING RESTORE FACTORY SETTING
CONTENTS
Your BIBO bar gives you the
option for it to beep every
time a button is touched or to
rather operate in silent mode.
As a default setting your BIBO’s
sound feedback is turned off.
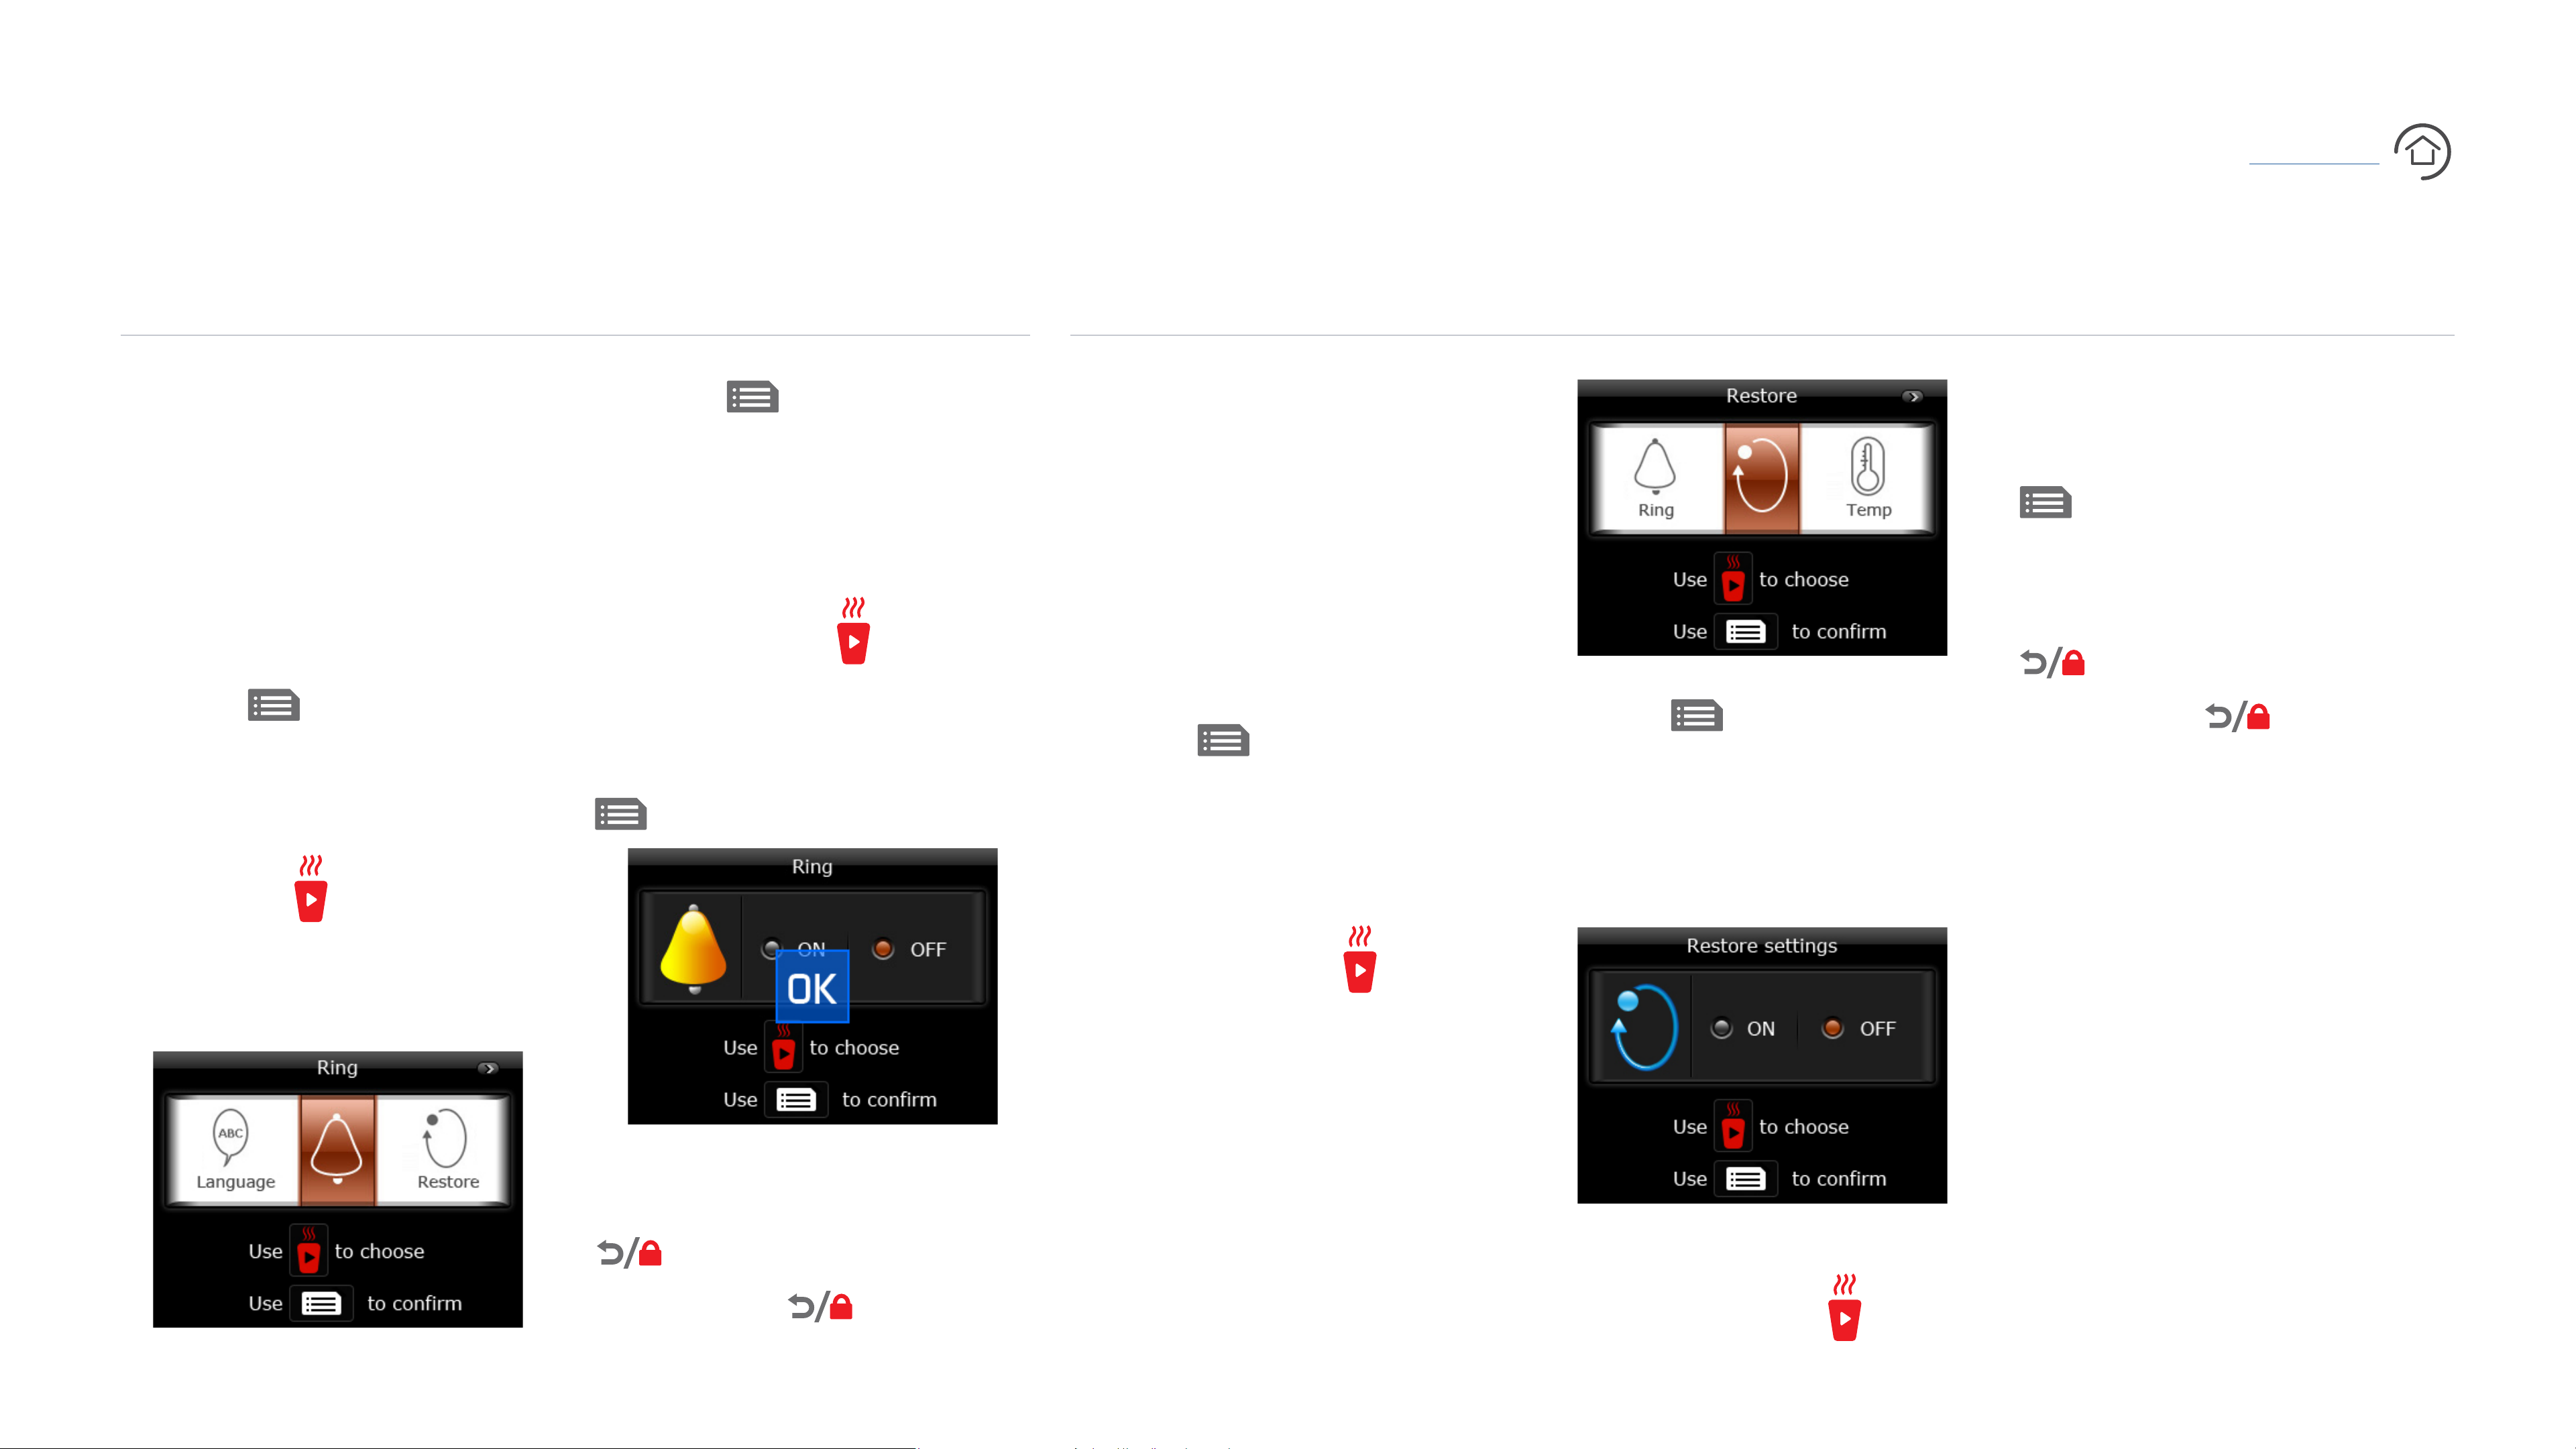
To adjust the ring setting:
1. Touch on your BIBO
bar’s screen.
3. Touch again to select
and enter into the ring settings.
You will see an on and off option.
4. Navigate to your preferred
ring setting using .
5. Once your preferred ring
setting has been selected, touch
The option to restore your
BIBO bar to its factory settings,
should only be done upon the
advice and guidance of our
BIBO technical team. Please do
not select the restore option
without speaking to us first.
To enter into the restore setting:
1. Touch on your BIBO
iii
3. Touch again to select
and enter into the restore
5. Once your preferred restore
option has been selected, touch
to save the setting.
6. To return to the menu touch
and to return to the home
screen touch again.
2. Navigate to the ring setting
BIBO bar - User Manual
by touching seven times.
You will then see the ring
setting selected (Image i).
to save the setting (Image ii).
ii
bar’s screen.
settings. You will see an on and
off option (Image iv).
2. Navigate to the restore
setting by touching eight
times. You will then see the
restore setting selected
(Image iii).
6. To return to the menu touch
iv
and to return to the home
screen touch again.
i
4. Navigate to your preferred
restore option using .
19
Page 20
X
Using your BIBO bar
Watch Video
Watch Video
Watch Video
DISPENSING WATER
DISPENSING BOILING WATER DISPENSING CHILLED WATER DISPENSING AMBIENT/MIXED WATER
CONTENTS
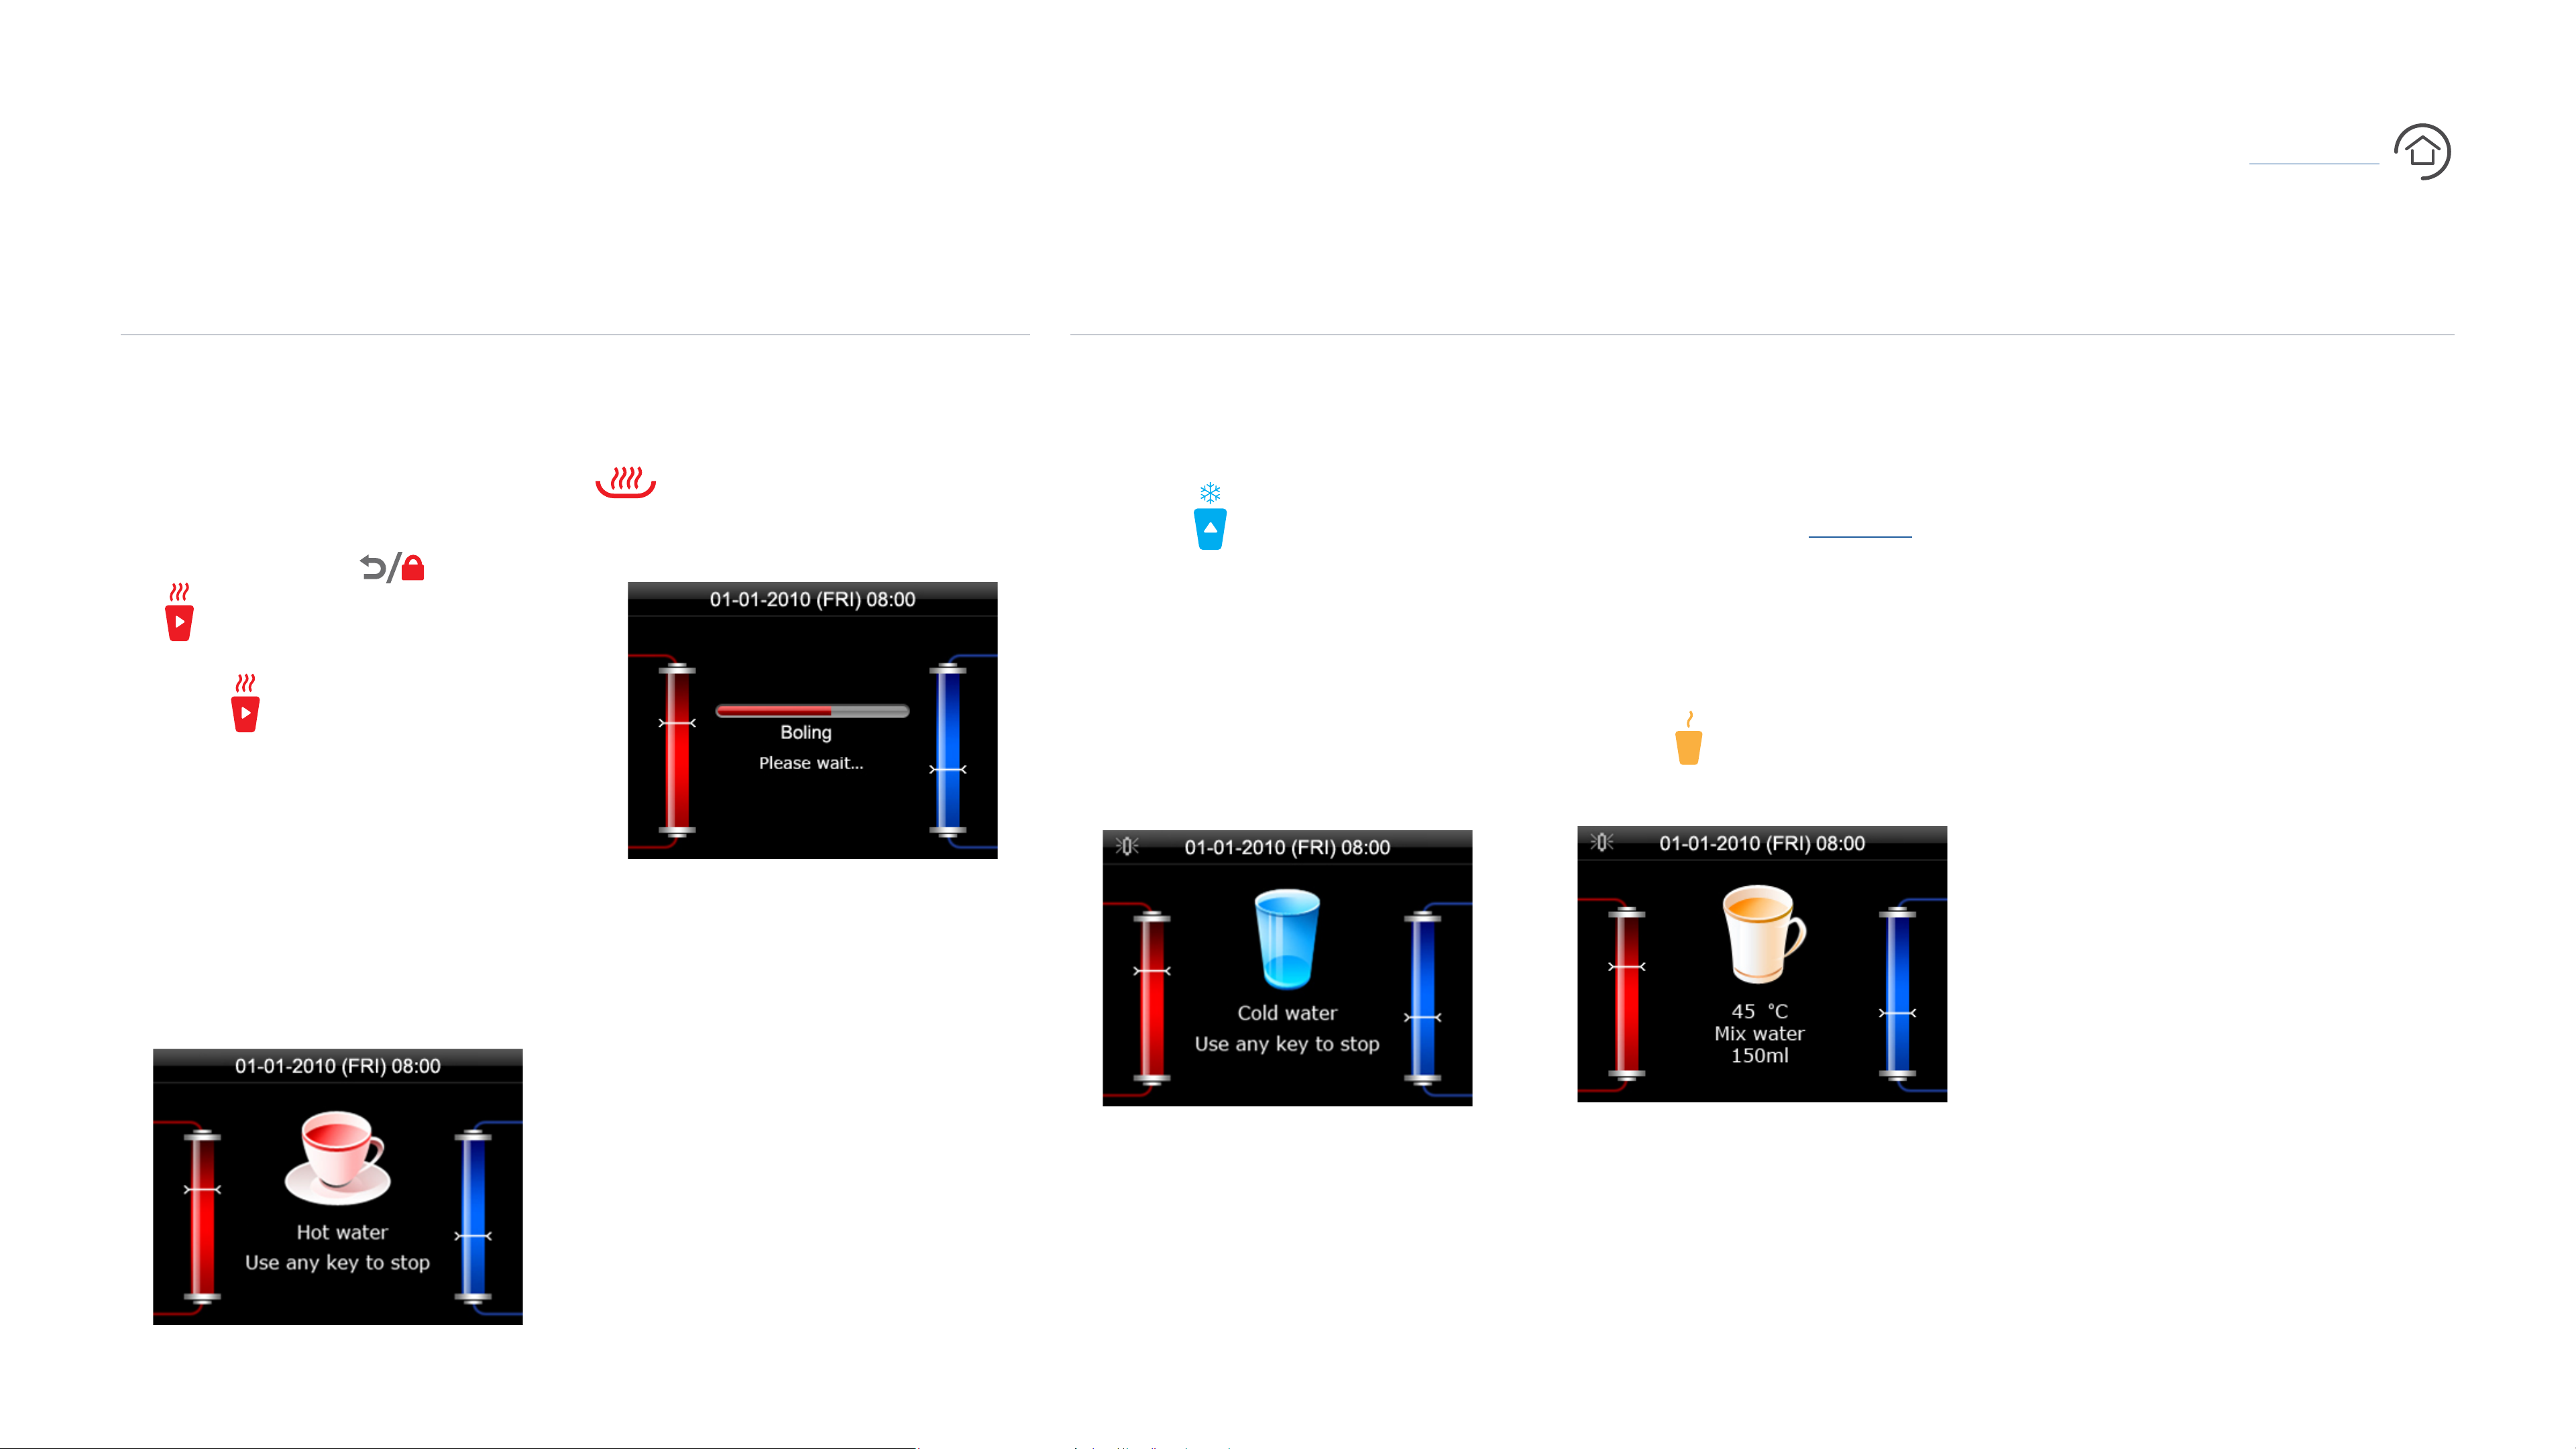
1. Place your mug, thermal cup
or pot under the water outlet.
2. Unlock the boiling hot water
flow by touching followed
by . If you have activated the
child lock feature you will need
to hold down for 3 seconds.
5. If you would like to boost the
boiling water temperature, touch
. The screen will then
display a boiling bar (Image ii).
1. Place your cup or bottle
under the water outlet.
2. Touch to start dispensing
chilled water.
3. Once your vessel has filled,
touch any button to stop the
water flow (Image iii).
To use this feature, you will
need to ensure the correct
settings are saved, according to
the instructions on page 14.
1. Place your cup, mug or bottle
under the water outlet.
2. Touch to start dispensing
measured amount of boiling
water (take caution).
4. Once your vessel has filled
according to the amount set
in the menu preferences,
the water flow will stop
automatically. To stop the water
flow at any point before, touch
3. Boiling hot water will then
begin to dispense.
BIBO bar - User Manual
4. Once your vessel has filled,
touch any button to stop the
water flow (Image i).
ii
6. Once boost has completed,
you can dispense the boiling
water as per the above
instructions.
iii
water (Image iv).
iv
3. Your BIBO bar will first
any button on the screen.
NOTE: A ratio of hot and cold
water will be dispensed. If the
water flow is manually stopped
before completed,
the temperature of the dispensed
water will be impacted.
dispense a measured amount
of cold water, followed by a
20
i
Page 21
X
Using your BIBO bar
Watch Video
DISPENSING WATER
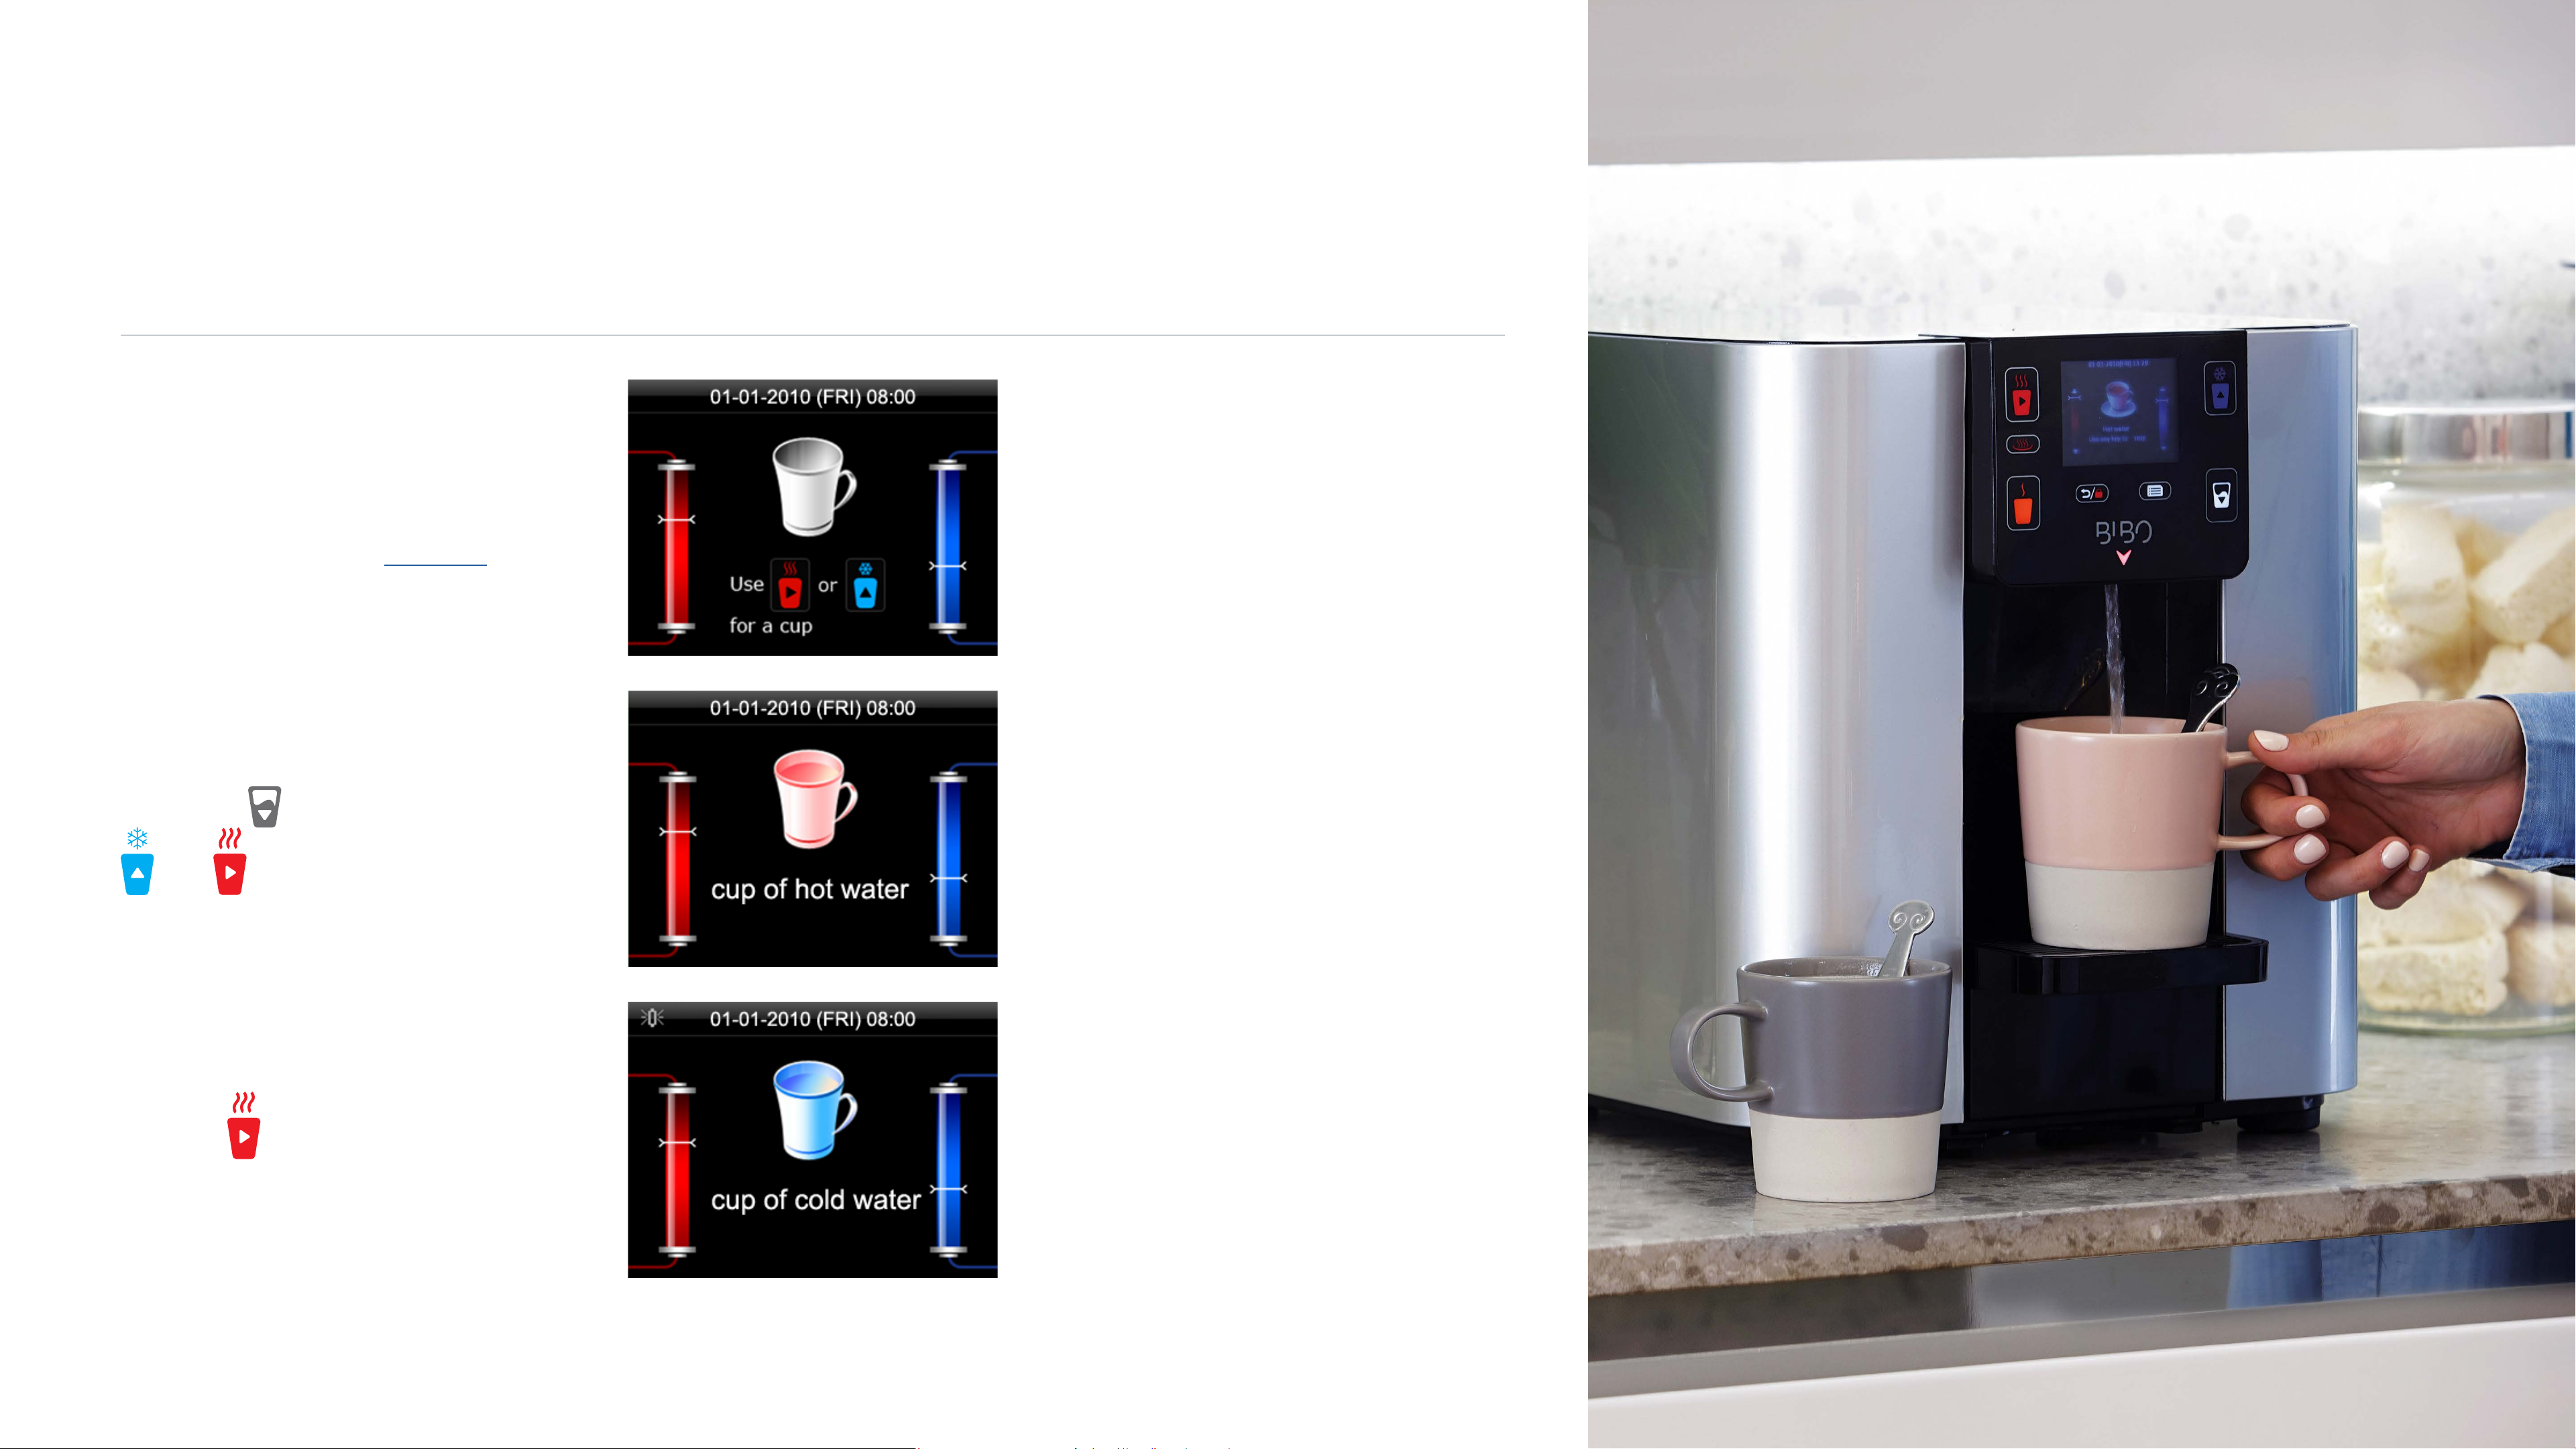
DISPENSING A MEASURED CUP OF BOILING OR CHILLED WATER
CONTENTS
To use this feature, you will
need to ensure the correct
settings are saved, according to
the instructions on page 13.
1. Place your cup, mug or bottle
under the water outlet.
3. Once your vessel has filled
according to the amount set
in the menu preferences,
the water flow will stop
automatically. To stop the water
flow at any point before, touch
i
any button on the screen.
2. Touch followed by either
BIBO bar - User Manual
or to start dispensing
your preferred water (Image i).
NOTE for dispensing boiling
water: If you have activated the
child lock feature, you will need
to hold down for 3 seconds.
ii
iii
21
Page 22
X
Maintaining your BIBO bar
FILTER AND ZAPPER REPLACEMENT
CONTENTS
Maintaining your BIBO bar
is necessary to ensure its
optimum operation and that
all the ‘bad guys’ are removed
eciently from your drinking
water. Maintenance is simple
and involves the replacement
of the BIBO maxi filter every
By signing up to the
filters@home package, we
will track, over the lifetime of
your BIBO bar, exactly when
your BIBO bar requires filter
replacements - sending you
your filters on time and to your
door before you know it. Simple
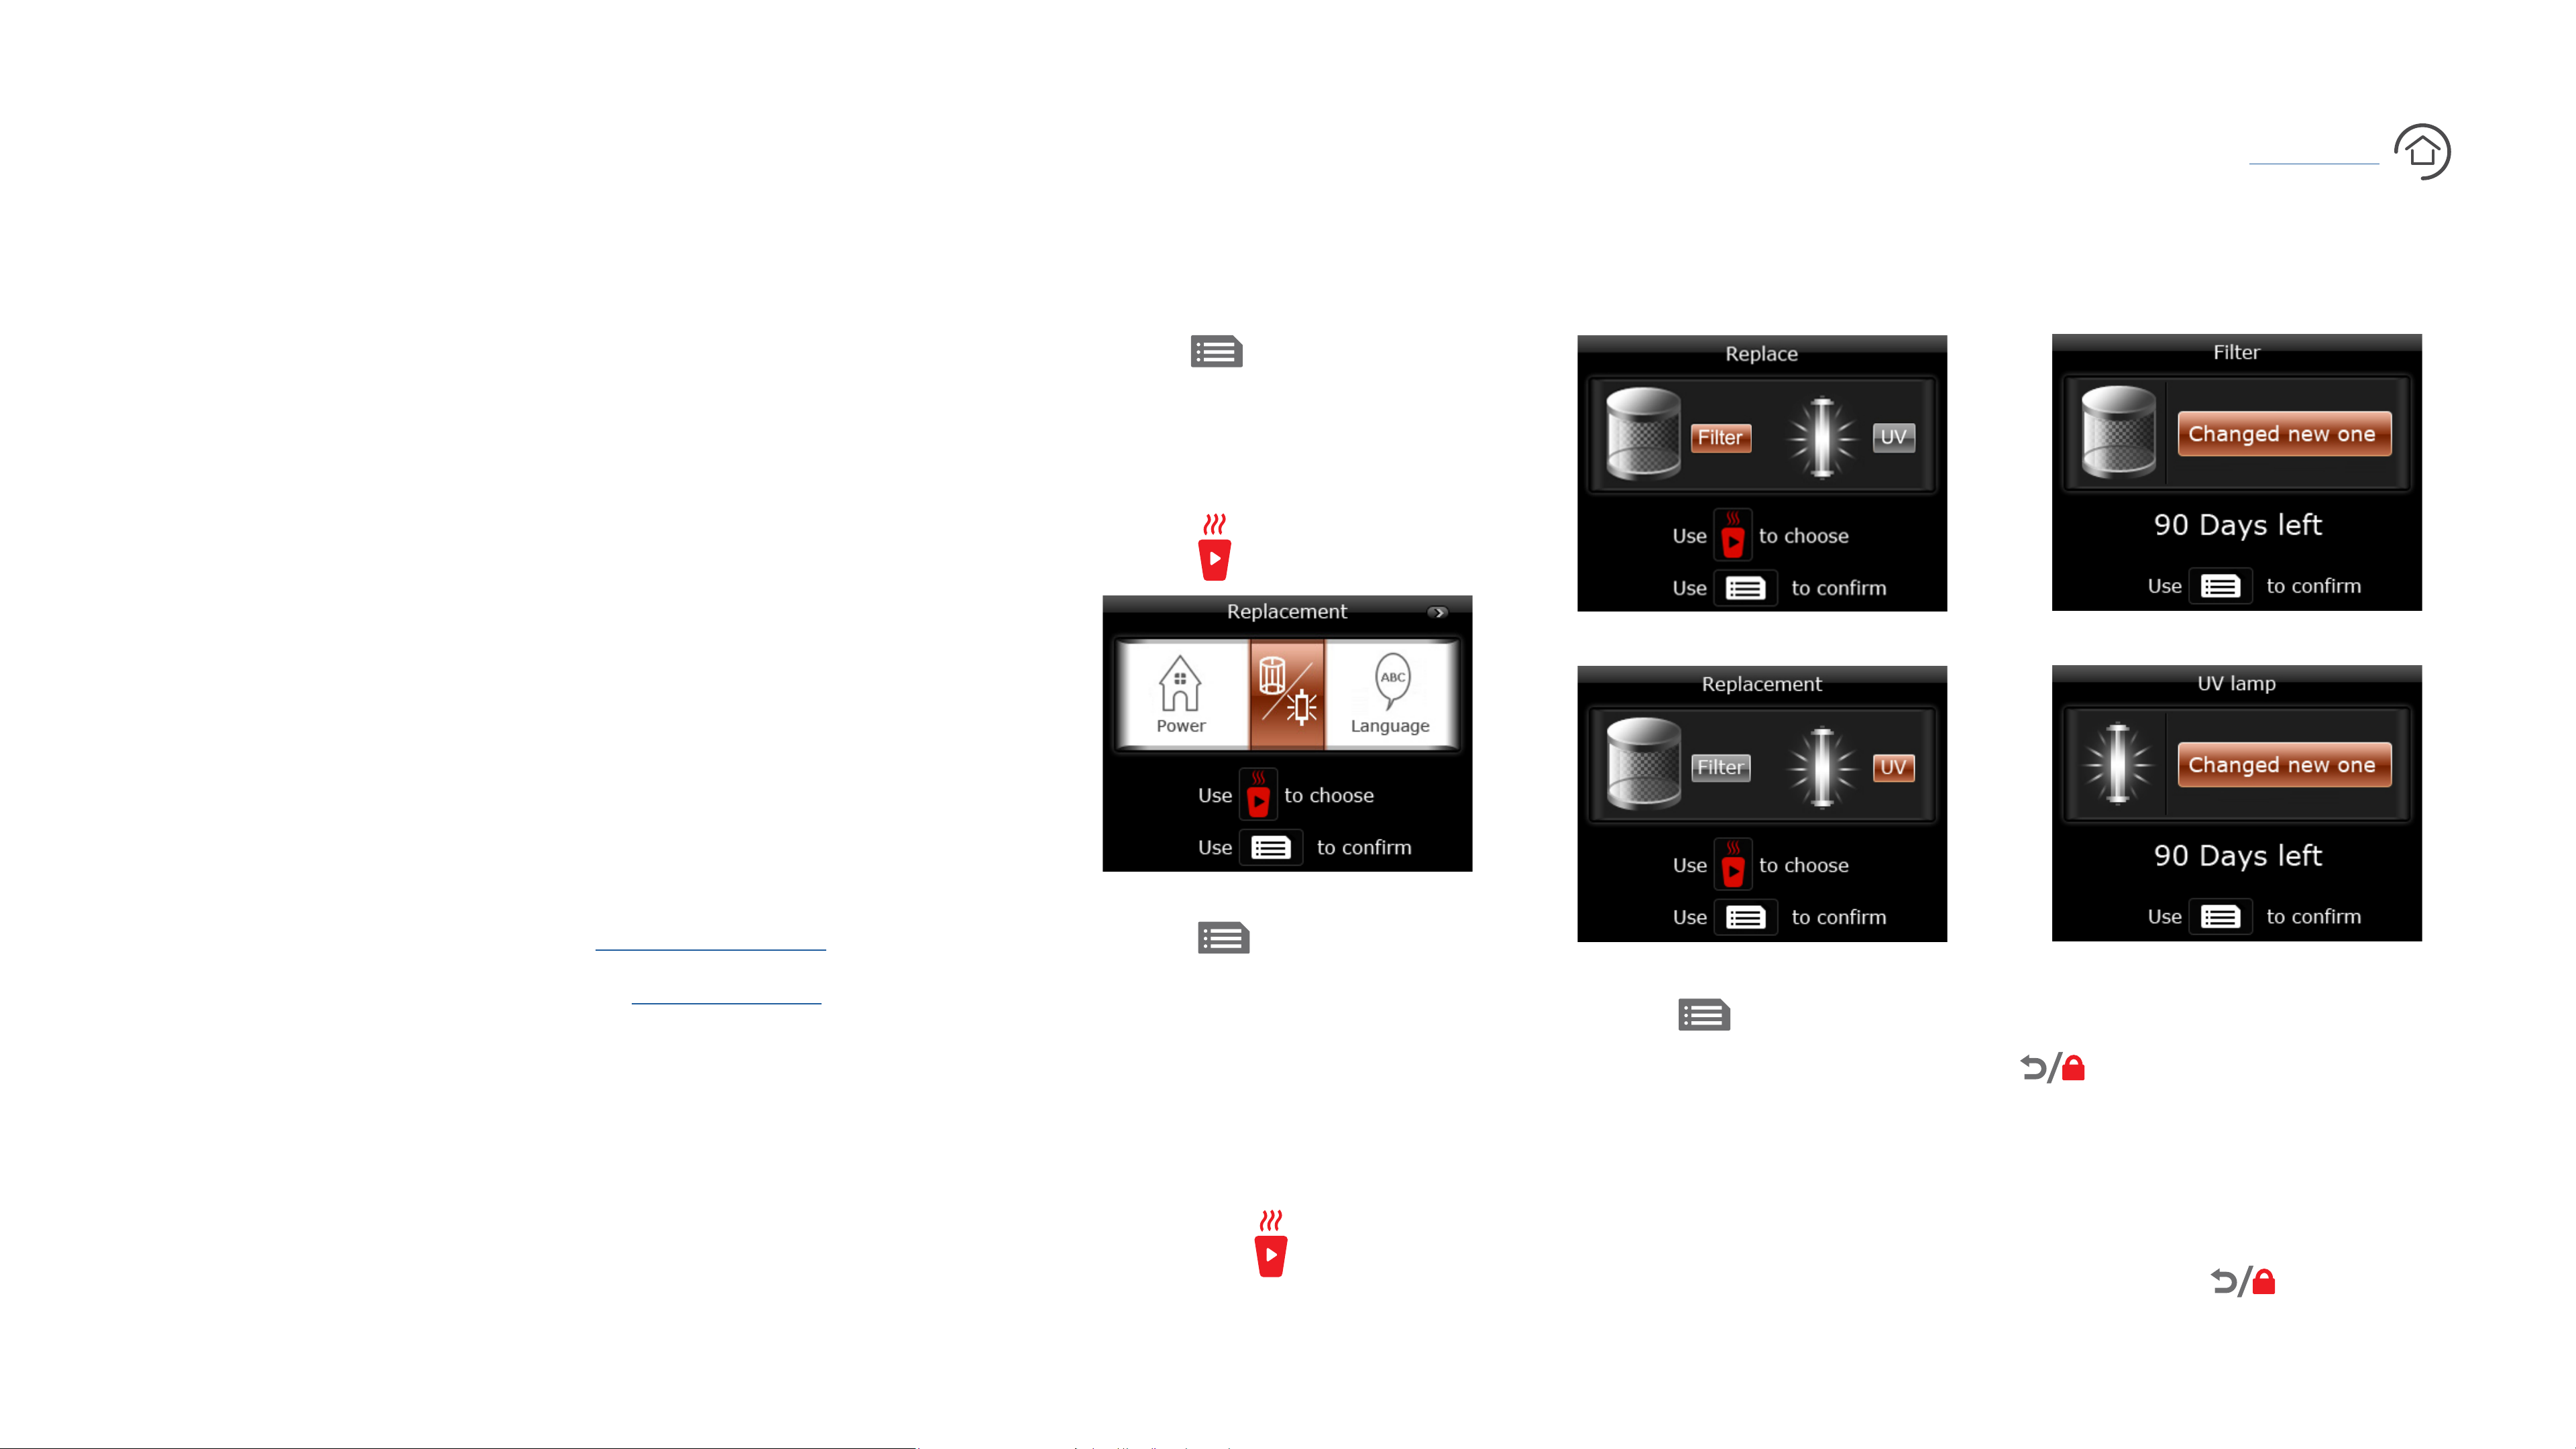
1. Touch on your BIBO
bar’s screen.
2. Navigate to the filter settings by
touching five times (Image i).
ii
iv
6 months and the replacement
of the BIBO zapper once a year.
BIBO bar - User Manual
Although your BIBO bar will
alert you when your BIBO maxi
filter and BIBO zapper require
replacement, the simplest way
to stay on top of your filter
requirements is by signing up to
our filters@home debit order.
as that! If you’d like to find out
more about our filters@home
package, please get in touch on
or 0800 00 BIBO (2426).
To see how many days are left
on your filters, enter the filter
settings as follows:
i
3. Touch to select and
enter into the filter settings.
You will see the maxi filter and
zapper options.
4. Navigate to your preferred
option using , either entering
into your maxi filter or BIBO
zapper settings (Image ii and iii).
iii
5. Touch to enter into
your preferred settings. You will
then see how many days are
left on either your BIBO maxi
filter or BIBO zapper depending
on which option you selected
(Images iv and v).
v
6. To return to the menu touch
and repeat the
instructions above to enter into
the other filter/replacement
setting or to return to the home
screen touch again.
22
Page 23
X
Maintaining your BIBO bar
Watch Video
FILTER AND ZAPPER REPLACEMENT
REPLACING YOUR BIBO MAXI FILTER
CONTENTS
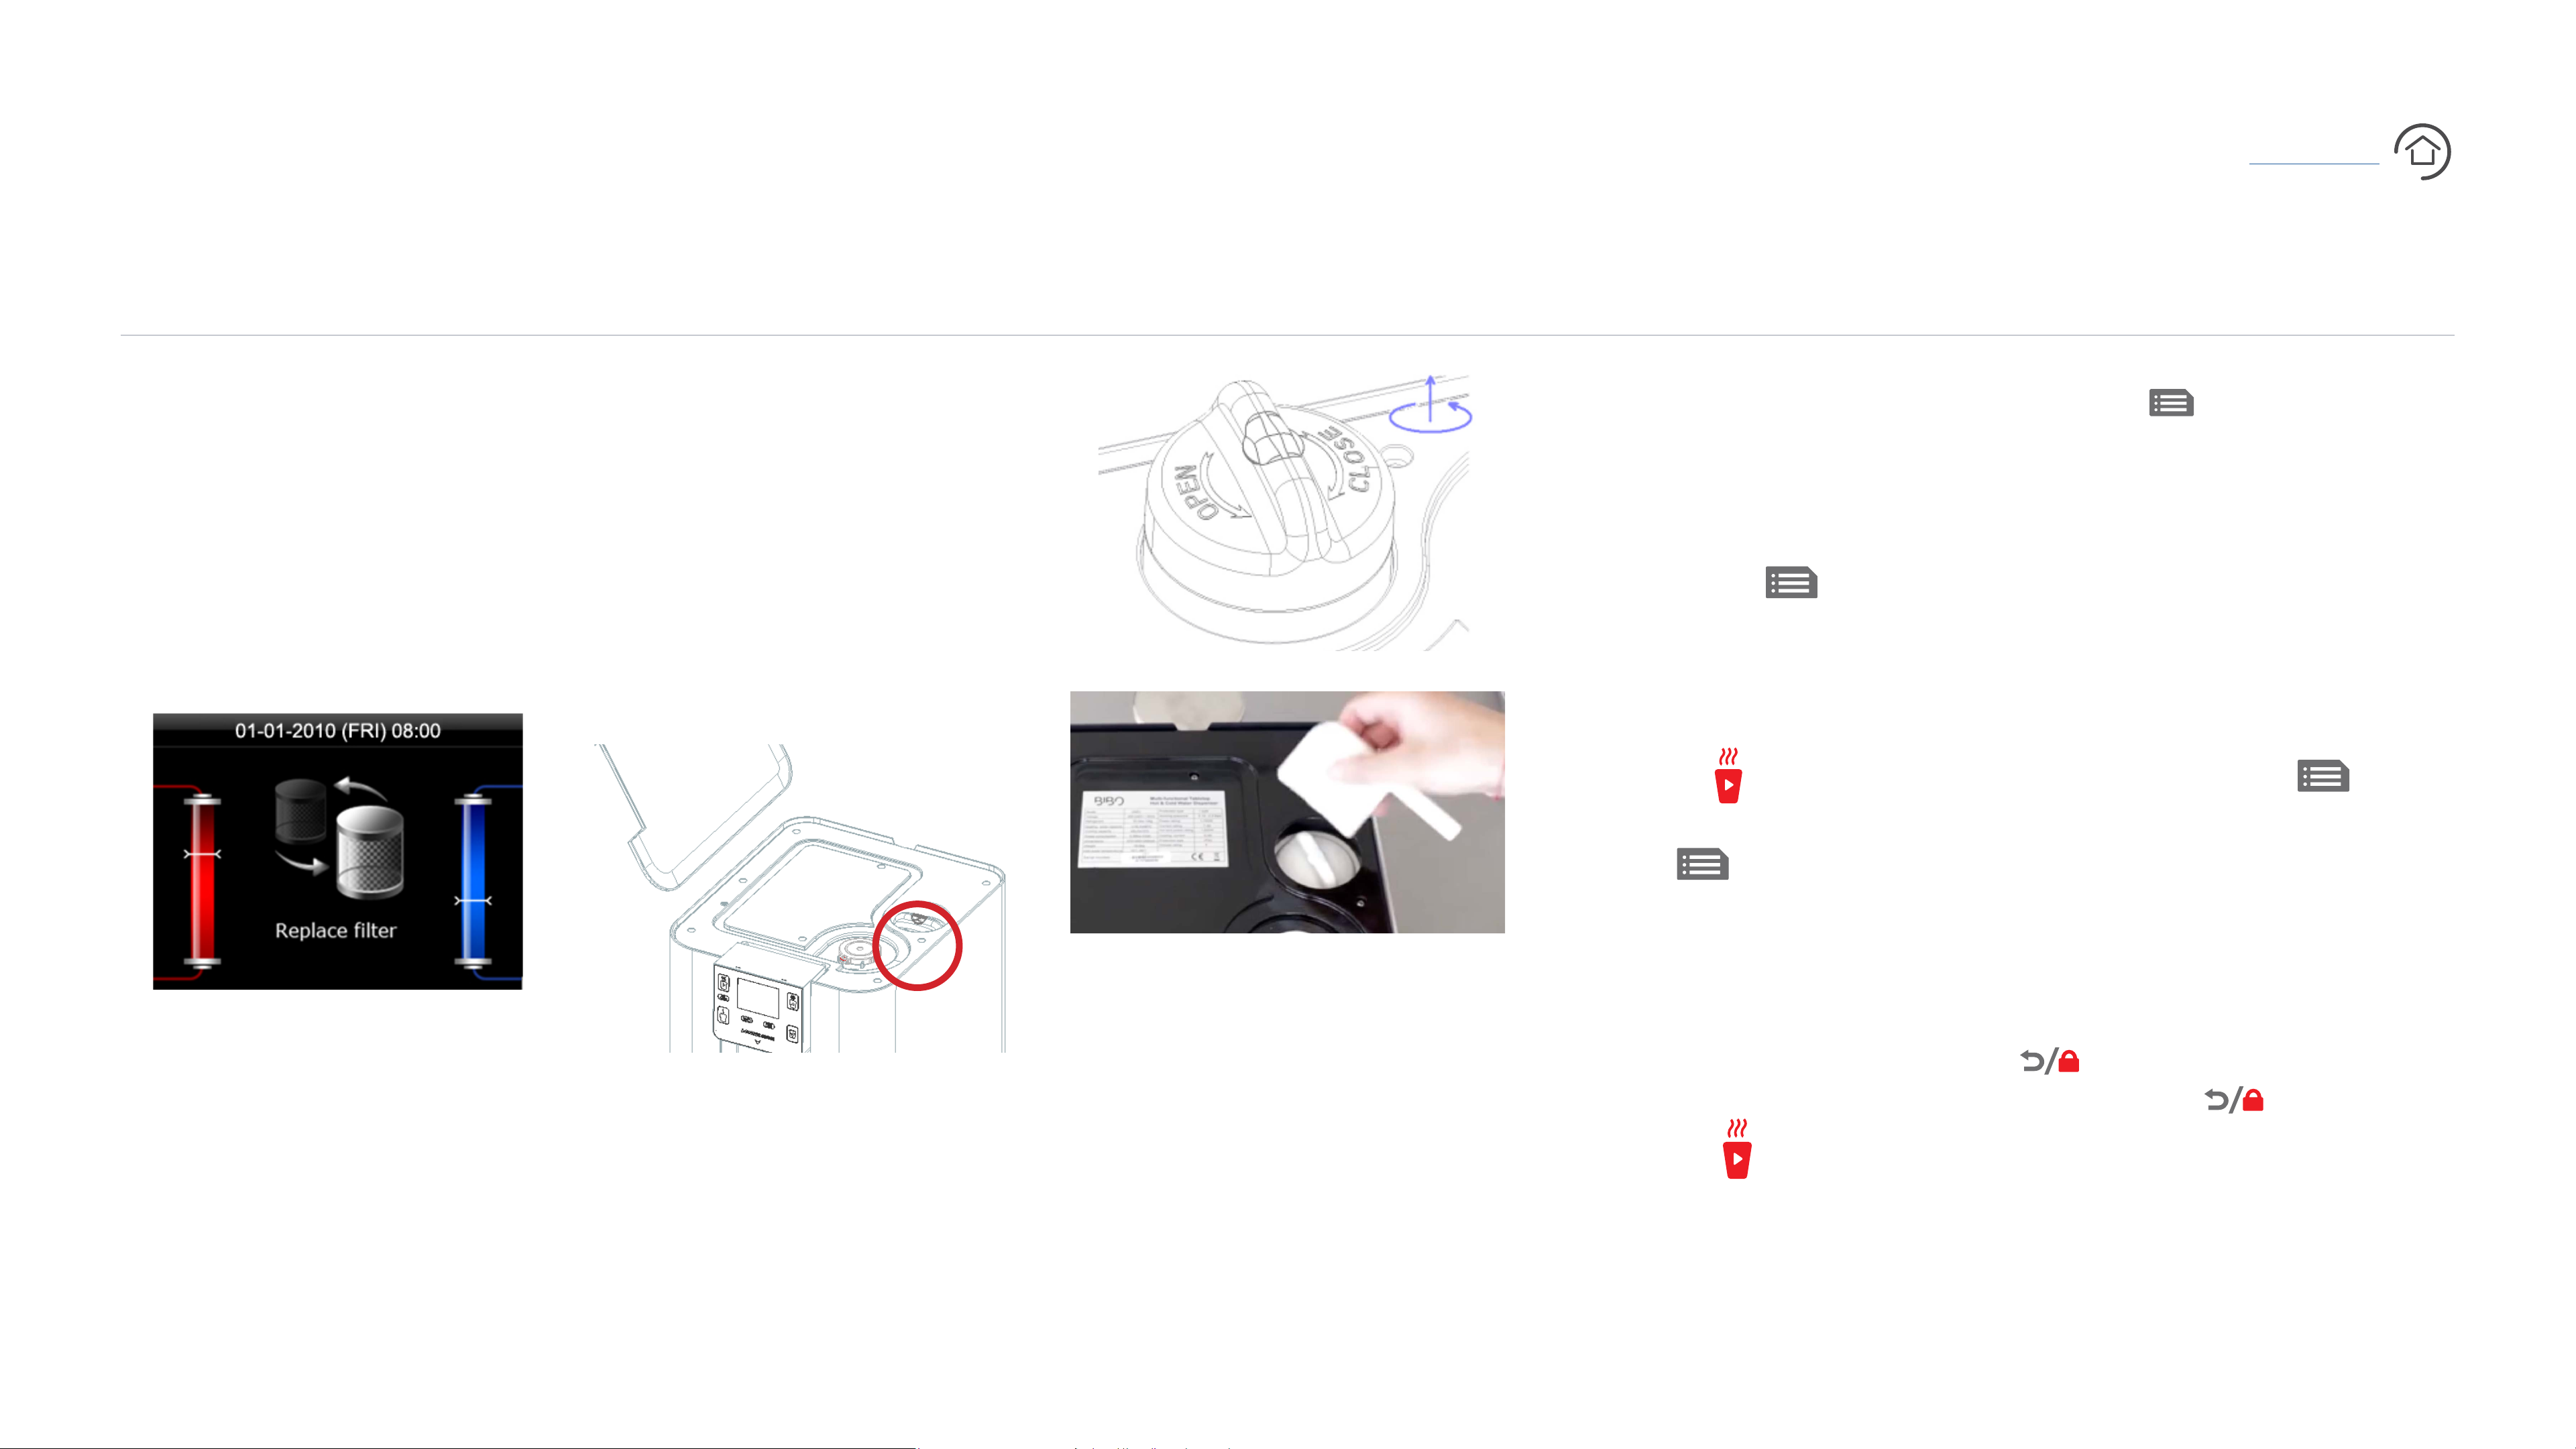
Your BIBO bar will alert you
when your BIBO maxi filter needs
to be replaced by first displaying
a countdown to the expiration
day and then with a replace
filter message (Image i) once the
expiration date has come.
white filters on the right hand
side of your BIBO bar.
The maxi filter is the one
towards the back of your BIBO
bar and can be recognised by
its wider shape and a protruding
handle from the top (Image ii).
2. Turn the handle anti-clockwise
iii
6. Replace the lid of your BIBO
bar.
7. Once the filter has been
replaced, touch
BIBO bar’s screen.
8. Navigate to the filter setting
by touching
five times.
on your
11. Touch
maxi filter settings. You will
then see how many days are
left on your BIBO maxi filter
along with the option to change
the current maxi filter.
12. To activate and reset your
filter counter touch
to enter into the
again.
BIBO bar - User Manual
Changing the BIBO maxi filter
is simple and involves the
following:
i
ii
to unlock the used maxi filter
(Image iii). You can either do
this by hand or using the white
iv
3. Pull the filter upwards and out.
4. Remove your new BIBO maxi
filter from it’s packaging and
insert it.
9. Touch
enter into the filter settings. You
will then see the maxi filter and
zapper options.
10. Navigate to your preferred
option using
the maxi filter options should
to select and
. In this instance
You will then see the counter
updated to 180 days left on
your BIBO maxi filter.
13. To return to the menu touch
and to return to the home
screen touch
again.
1. Remove the lid on the top of
your BIBO bar by simply lifting it
off. You will see the tops of two
grip tool supplied with your filter
pack (Image iv).
5. Turn the new maxi filter
clockwise to lock and install
the new filter.
already be selected.
23
Page 24
X
Maintaining your BIBO bar
Watch Video
FILTER AND ZAPPER REPLACEMENT
REPLACING YOUR BIBO ZAPPER
CONTENTS
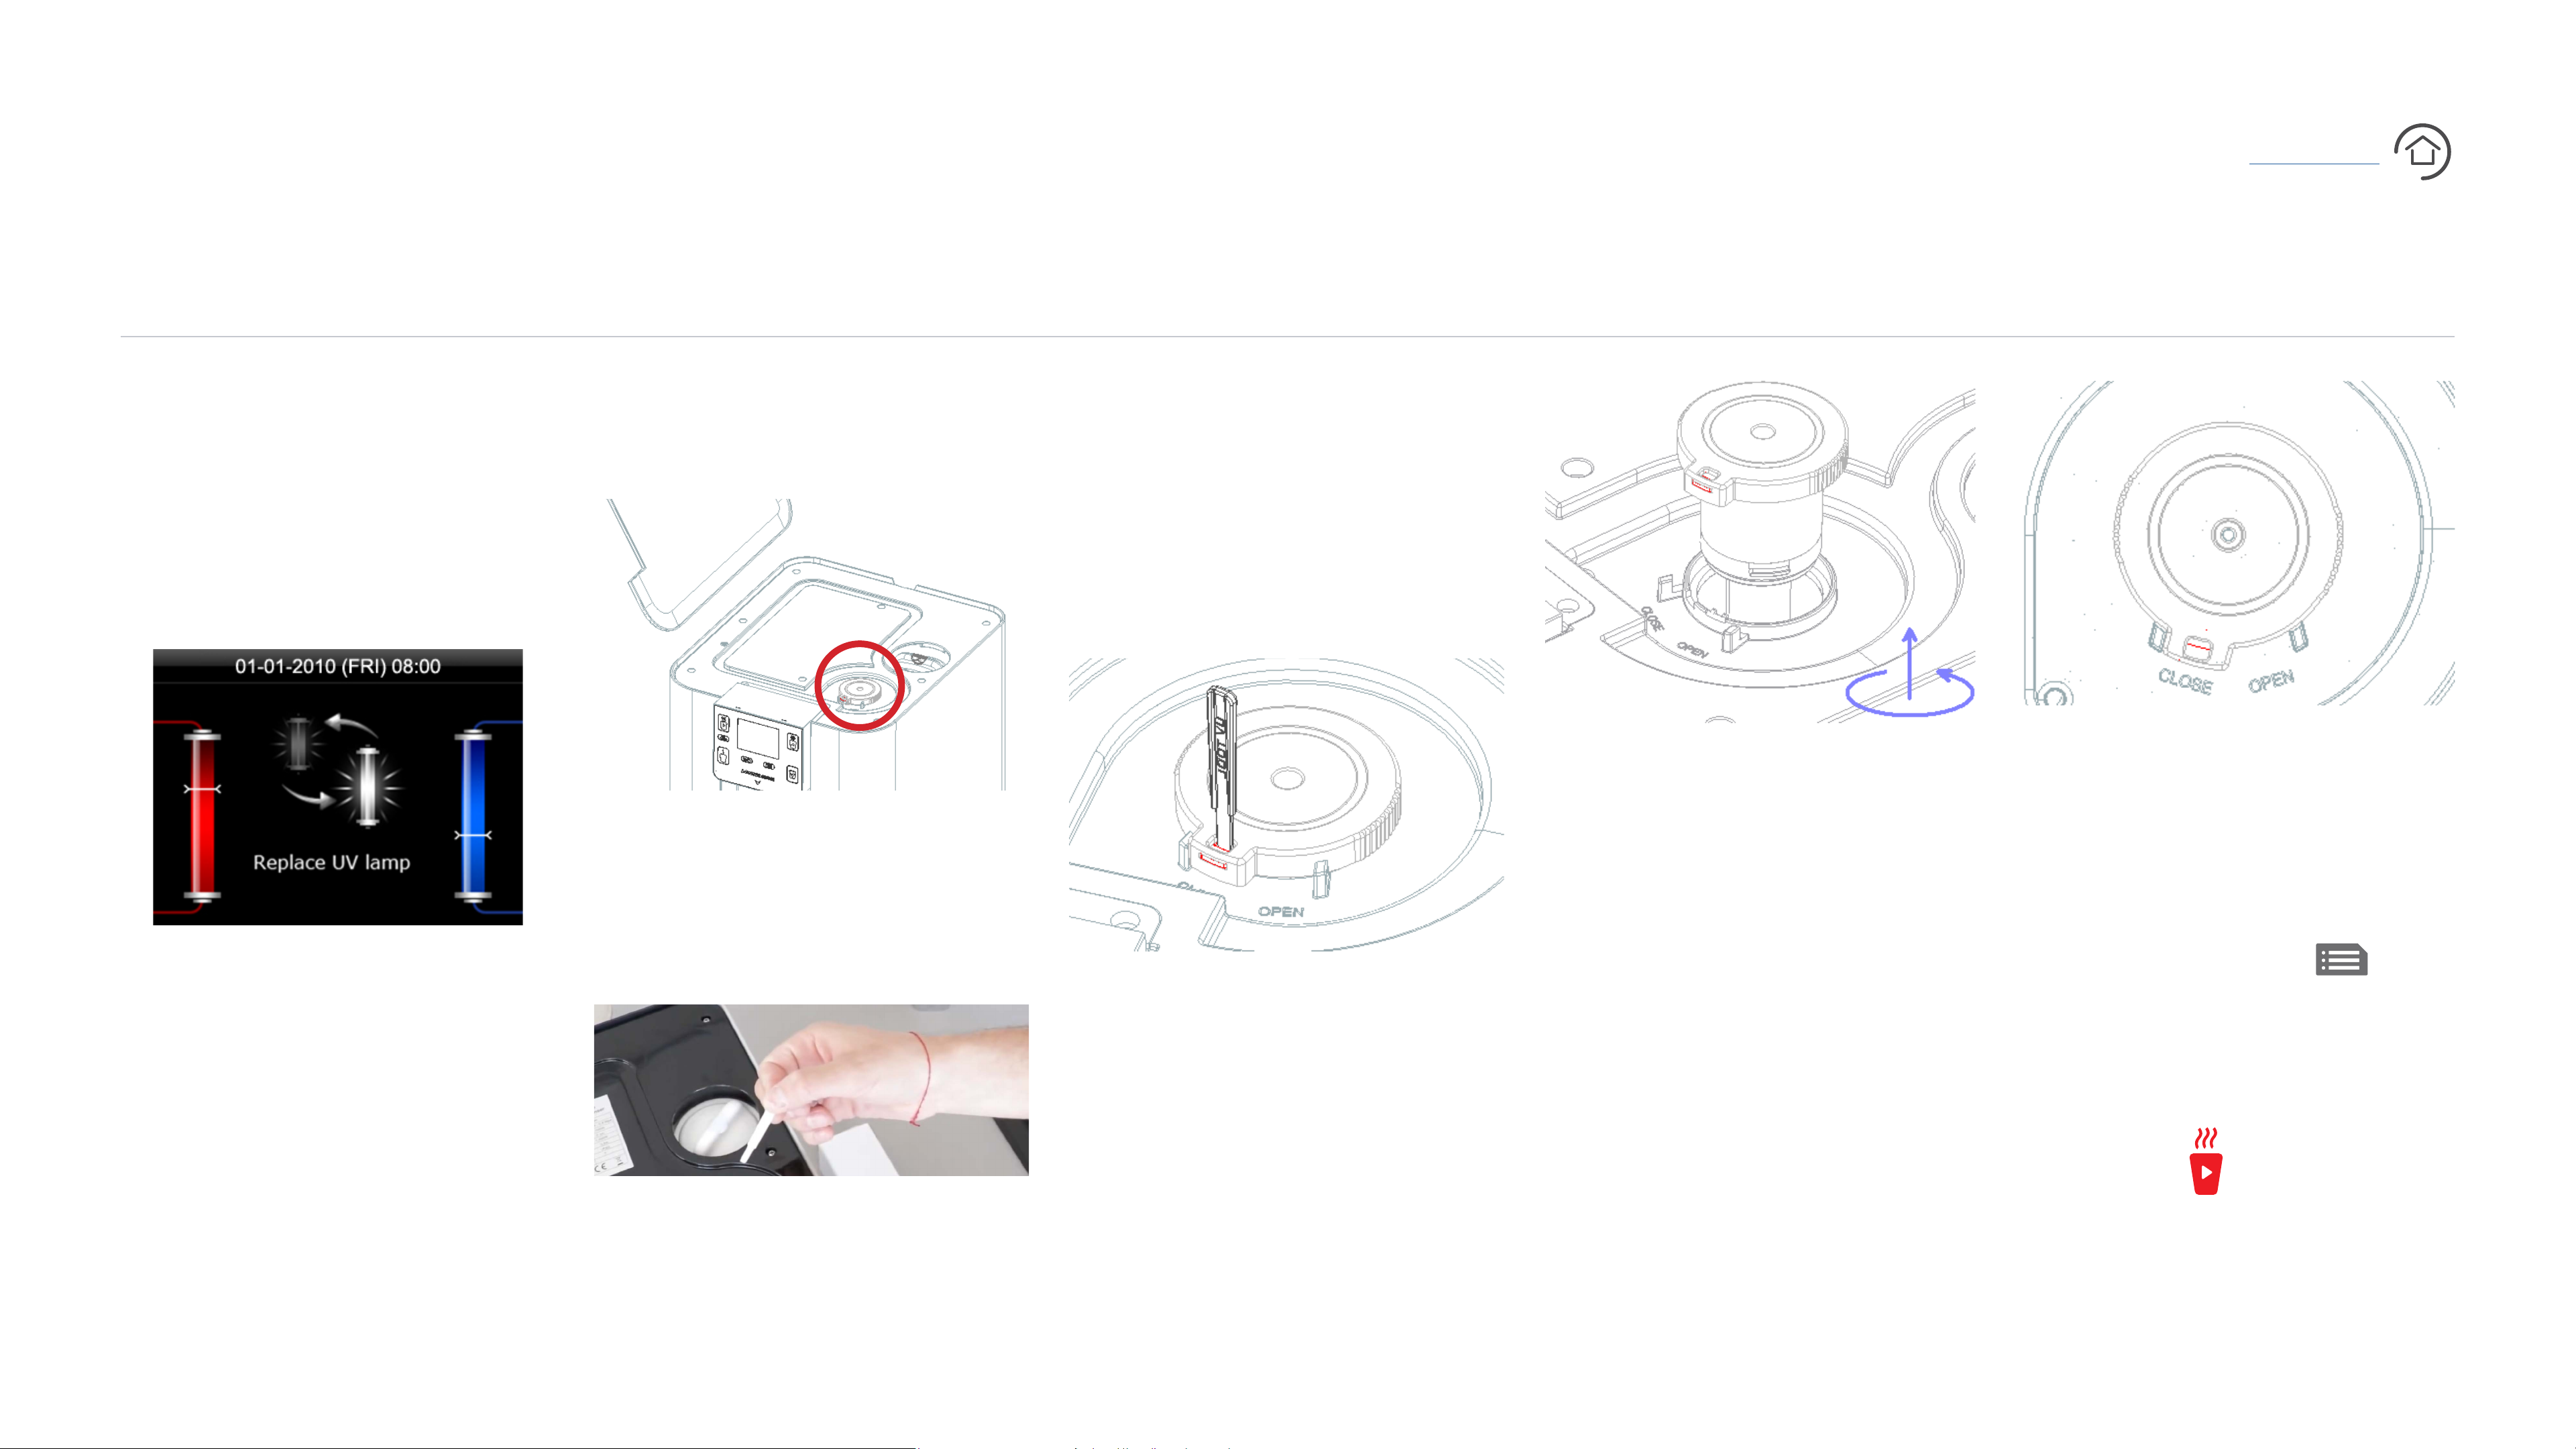
Your BIBO bar will alert you
when your BIBO zapper needs to
be replaced, by first displaying a
countdown to the expiration day
and then with a replace zapper
message (Image i) once the
expiration date has come.
front of your BIBO bar and can
be recognised by its slimmer
shape and flat top (Image ii).
Alternatively use anything small
to release the latch as indicated
below.
3. Put the key into the red slot
on the top of the BIBO zapper
(Image iv).
v
7. Remove your new BIBO
vi
10. Replace the lid of your
BIBO bar - User Manual
i
Changing the BIBO zapper is
simple and involves the following:
1. Remove the lid on the top of
your BIBO bar by simply lifting it
off. You will see the tops of two
white filters on the right hand
ii
2. To release the BIBO zapper, you
will need the key supplied with
the delivery and/or installation
of your BIBO bar (Image iii).
iii
iv
4. Push the key down to release
the latch.
5. Turn the BIBO zapper anticlockwise to “open” .
zapper from its packaging
(please handle it with care as it
is delicate) and insert it into the
top of your BIBO bar.
8. Push down so the red tongue
is out and then twist.
9. Turn the new BIBO zapper
clockwise to “close” and install
the new zapper (Image vi).
BIBO bar.
11. Once the BIBO zapper has
been replaced, touch
your BIBO bar’s screen.
12. Navigate to the filter setting
by touching
five times.
on
side of your BIBO bar. The BIBO
zapper is the one towards the
If you cannot locate it, do not
worry! You should find a key
in your filter replacement box.
6. Pull the BIBO zapper
upwards and out (Image v).
24
Page 25
X
Maintaining your BIBO bar
CONTENTS
FILTER AND ZAPPER REPLACEMENT
REPLACING YOUR BIBO ZAPPER CLEANING YOUR BIBO bar
13. Touch
enter into the filter settings. You
will then see the maxi filter and
zapper options.
14. Navigate to your preferred
option using
to select and
. In this instance
16. To activate and reset the
BIBO zapper counter touch
The days remaining will change
from 0 to 360 days left.
17. To return to the menu touch
and to return to the home
screen touch
again.
.
The BIBO bar is connected to
an electrical supply. Please take
caution to not wet the back of
the BIBO bar whilst cleaning it.
To keep your BIBO bar looking
sparkly and fresh, clean it by
simply wiping it down with a
damp cloth. If you wish, you are
also able to use mild soap or
any other gentle detergent.
touch
BIBO zapper option.
BIBO bar - User Manual
15. Touch
BIBO zapper settings. You will
then see how many days are
left on your BIBO zapper filter
along with the option to change
once to select the
to enter into the
Please don’t use harsh
detergents, concentrated
washing liquids or solvents to
clean your BIBO bar.
Additionally, please avoid
anything abrasive (such as steel
brushes, scourers and the like)
to clean the body of your BIBO
bar as it will scratch.
the current BIBO zapper.
The BIBO bar drip tray can be
removed and cleaned by hand
or in your dishwasher.
25
Page 26
X
Technical Information
PRODUCT SPECIFICATIONS
There’s a lots that goes on inside your BIBO bar. If you’re looking for the
technical ins and outs, please find the BIBO bar specifications below:
SPECIFICATION PARAMETER
Electrical specification
CONTENTS
Voltage
Frequency
Power rating
Current rating
Heating system
Power rating
Heating capacity
Hot water temperature
Chilling system
Power rating
Cooling capacity
230 Volts
50 Hertz
1 700 Watts
10 Amps
1 500 Watts
15 Litres/hour*
70-98℃ (adjustable)
138 Watts
5 Litres/hour*
BIBO bar - User Manual
Cold water temperature
Filtration system
Activated carbon filter
BIBO Zapper
Inlet water pressure
Minimum-Maximum
Dimensions (mm) 300W x 370D x 340H
Weight 15.5kg
Operating standards
4-16℃ (adjustable)
0.5 Micron
11 Watts
0.1MPa-0.6MPa
GB4706.1-2005
GB4706.13-2008
GB4706.19-2008
GB/T22090-200
26
*The dispense capacity is calculated at an ambient and inlet water temperature of +25℃.
The maximum ambient working temperature is +38℃.
Page 27

X
Safety Notes
CONTENTS
Please remember that this
new member of your home/
oce is an electrical appliance.
Accordingly, to keep both
you and your BIBO bar
working together in harmony,
some safety stuff need to be
followed. Please remember:
Your BIBO bar is for indoor use
only.
Warning: the BIBO bar must be
used with a reliable earth in the
mains power supply socket.
Ensure that your water feed/
supply is flushed out thoroughly
into a bucket until clear water
is visible with no sediments or
dirt particles in the water. This
is to ensure your BIBO bar does
not block up. Be sure to do so
When your BIBO bar is
turned on for the first time,
we recommend running 1-1,5
litres of water through it before
drinking the water. This makes
sure that the water is at its
freshest.
Your BIBO bar can produce
high temperature boiling water.
As with any kettle, pan or
If you’re looking for a little
more technical information
or explanations regarding
your trusty BIBO bar, please
don’t hesitate to get in
touch with us via email at
Avoid placing your BIBO bar
in direct sunlight or next to
flammable materials.
BIBO bar - User Manual
Avoid placing your BIBO bar
near other appliances that
could get damaged if wet.
Do not immerse your BIBO bar
in water.
especially on newly renovated
homes and oces.
Ensure that your water feed/
supply is a cold water feed
only.
It is important that, when using
a new or freshly cleaned BIBO
bar for the first time, the water
is flowing freely through both
appliance capable of producing
boiling water, please exercise
caution.
Your BIBO bar’s hot tank is
directly connected to the hot
water outlet with no valves
between the tank and the hot
water outlet. This it to prevent
the valves from being damaged
by the boiling water. As such,
Your BIBO bar uses 230VAC
voltage and should be used
with a 3-pin plug.
the hot and cold water outlets
before switching the hot water
tank on.
it is normal for a small amount
of excess water to be released
after the boiling water has been
dispensed. Please take caution.
27
Page 28

X
Troubleshooting
In the unlikely event that you find yourself in a bit of a pickle with your BIBO bar, please refer to the troubleshooting
guide below to determine the possible fault types and suggested steps to get your BIBO bar up and running again.
FAULTY TYPE POSSIBLE CAUSE SOLUTION
CONTENTS
No water flow
No hot water
1. Machine power is not connected
2. Power socket failure
3. ½” T connector closed
4. Main line blockage or water has been shut off
5. Low water pressure
1. Heating system is not turned on
2. Hot water temperature set too low
3. Excessive hot water use
4. Your BIBO bar has entered into power saving mode
5. Hot tank disabled, after an extended period of
non use
1. Unplug your BIBO bar and then plug it back in again. Check the switch is on
2. Check the socket and fuse
3. Check the water inlet valve is open
4. Check your water supply system
5. Check your water supply system
1. Turn on the hot tank switch at the back of your BIBO bar (remember to make sure that water is
flowing freely from the hot water outlet before switching it on)
2. Check the water temperature settings
3. Look at red bar guide on screen
4. Wake your BIBO bar up by following the prompts
5. Call us on 0800 00 BIBO (2426). Your hot tank will need to be reset.
p.s. Please remember to switch off and unplug your BIBO bar if you are going away or it will be left
BIBO bar - User Manual
No cold water
Leakage
Odour from water
1. Chilled water temperature is set too high
2. Excessive cold water use
3. Ice build up in the cold water tank, after an extended
period of non use
1. Drip tray is full
2. A leak inside your BIBO bar
1. New BIBO bar
2. A long period of non use
unused for an extended period of time to avoid this from happening
1. Check the water temperature settings
2. Look at blue bar guide on screen
3. Turn off the power and wait 2 hours before turning it back on. If it happens again, call us!
p.s. Please remember to switch off and unplug your BIBO bar if you are going away or it will be left
unused for an extended period of time to avoid this happening
1. Empty the water from the drip tray and dry thoroughly before replacing
2. Turn off power and water and please contact us on 0800 00 BIBO (2426) straight away
1. Drain 10-15 litres of water through your BIBO bar
2. Replace your BIBO maxi filter
3. Filter replacements have not taken place when required
3. Replace the expired filters
If you’re still a little stuck and find that your BIBO bar is still not operating as it should, or if a problem persists,
please contact us via email at [email protected] or call us on 0800 00 BIBO (2426).
Your BIBO bar may require some professional TLC.
28
Page 29
X
Warranty
Your BIBO bar comes with a
free one year warranty, which
means that in the unlikely event
that there is any problem or
fault, which our team cannot
repair on site, we will replace
your BIBO bar with a new one
for free while your warranty is
valid. Appropriate maintenance
CONTENTS
costs will be charged for any
damage that is caused by the
misuse of your BIBO bar or
incurred once your warranty
has expired. You can extend
your 1 year warranty for another
year on www.bibo.co.za.
BIBO bar - User Manual
Please remember that if you
experience any problems with
your BIBO bar, do not attempt
to disassemble your BIBO bar
by yourself, this will invalidate
your product warranty. BIBO
will take no responsibility for
any resulting issues. So rather
keep it simple and contact us
directly via email at
- let us do all the work!
29
Page 30
CONTENTS
X
Please remember to let us
know how you’re enjoying
your BIBO bar by emailing us
at [email protected] with your
feedback or reviewing us on
Facebook here.
Wishing you many happy,
BIBO bar - User Manual
healthy and hydrating hours
with your BIBO bar.
Cheers!
30
 Loading...