


Desono™
DX-S U-Bracket (SPA-UBDXxxx)
Installation Guide
The U-Bracket is a low profile powder-coated marine grade
aluminum design that allows the unit to be connected to a
center suspension post or against the wall, ceiling, or other
flat surface. It can also be mounted to a variety of third party
stand and pole adapters.
A hole drilling template is included in each box to make
installation easier.
Bolts
U-Bracket
Spacers
ClickPlug
SPA-UBDX100 - ts DX-S5
SPA-UBDX200 - ts DX-S8
Installation
1. Mount the U-Bracket prior to loudspeaker installation.
If mounting it horizontally on a wall, the slots should
face up - see image at right. Route cable through the
channel. Sucient cable should be pulled through
an unused bracket hole to create a drip loop (damp/
wet applications) with enough extra to connect to the
ClickPlug.
NOTE: If the wall is not nished before the loudspeaker is
mounted, the U-Bracket and cable should be masked with
painter's tape or other masking material.
2. Wire the ClickPlug as shown leaving enough for the
likely mounting angle and a drip loop if necessary. Do
this before mounting the loudspeaker.
2
1
Structure Mounting Points
(Hardware not provided)
Cable channel
Cable / Wire Size
ClickPlug Cable gland nut will accept a 4-8mm (0.15-.3 in)
diameter cable or 2 pairs 1.5mm² (16 ga) or 1 pair 2.5mm²
(14 ga). For outside or moisture-rich environments - round
SJOW cable or equivalent is advised to provide a weatherresistant seal in the tightened gland nut.
Tools Needed
• 5.5mm (or 7/32") Hex wrench
• Thin blade or flat screwdriver
Thread cable through the gland nut
and barrel into ClickPlug
(2 conductor cable shown)
A: 9300 S.W. Gemini Drive Beaverton, OR 97008 USA W: www.biamp.com
ClickPlug wired with 2 pairs for
daisy-chained applications
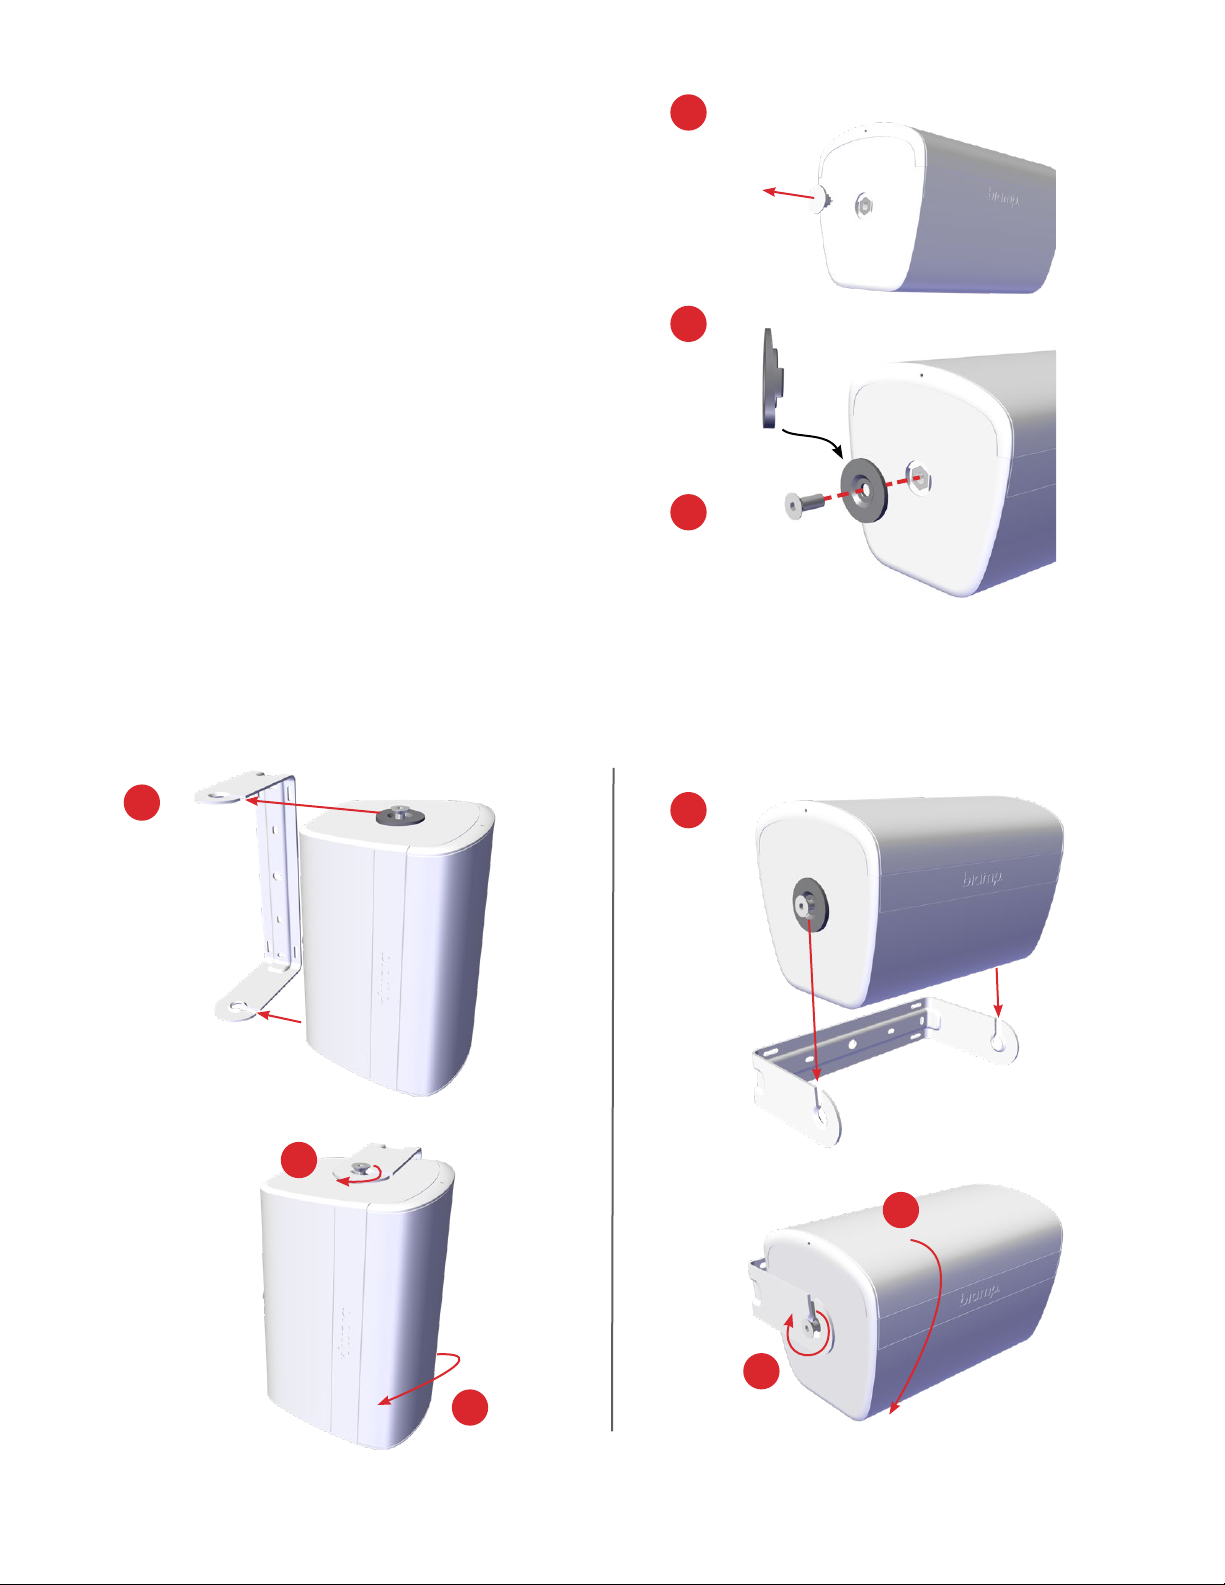
Attach the Loudspeaker to the U-Bracket
3. Remove the round caps covering the center mounting
holes. Insert a thin blade into the front or rear of each
end cap and pry them up. Pinch the side supports, and
remove the caps. They can be discarded.
4. Insert a spacer into the recess. The thicker edge should
be toward the rear of the loudspeaker, and the tabs
should t into the recess slots.
5. Thread a at head bolt into the center hole on each end,
leaving about 1/4" (6mm) of thread exposed.
6. Slide the loudspeaker onto the U-Bracket with the
bolts tting in the slots. It is easier if the back of the
loudspeaker is facing the bracket.
7. Rotate to the approximate aiming position and tighten
the bolts to hold the unit in place, but still allow it to
rotate slightly.
8. Set aiming angle and tighten the bolts to prevent any
movement. Once the angle is nal, fully tighten bolts by
using a 5.5mm (7/32") hex wrench. The loudspeaker will
rotate 200° on the bracket.
IMPORTANT: The cabinet is nished with a light coat of paint.
Take care to avoid scratching or marring the nish when sliding the
loudspeaker onto the U-Bracket.
3
4
5
Vertical Orientation Horizontal Orientation
6
6
8
7
7
SPA-UBDX Installation Guide
8

Adjust the Tap Switch
9. Rotate the tap switch knob to the
desired setting before you attach
the ClickPlug to the loudspeaker.
9
Attach the ClickPlug
10. Insert the wired ClickPlug into the opening with the plug
top (or side) into the indent under the safety cable loop
rst, then "click" it into place by pushing it against the
latch until it is fully seated, and the latch returns to the
"up" position. The general orientation of the ClickPlug
should be with the gland nut pointed down (exception
noted on the next page). It cannot be mounted with the
gland nut pointed toward the safety loop.
IMPORTANT: The t is very tight; press on the raised
portion of the ClickPlug rather than the gland nut when
inserting it.
10 10
CLICK
CAUTION: The ClickPlug t is very tight and is dicult to
remove, especially if it is oriented toward the side of the
unit. Avoid attaching the ClickPlug until the speaker is fully
installed. If the unit is installed outdoors or in a damp location
make sure a cable drip loop is utilized to prevent any moisture
from migrating into the gland nut.
CLICK
SPA-UBDX Installation Guide
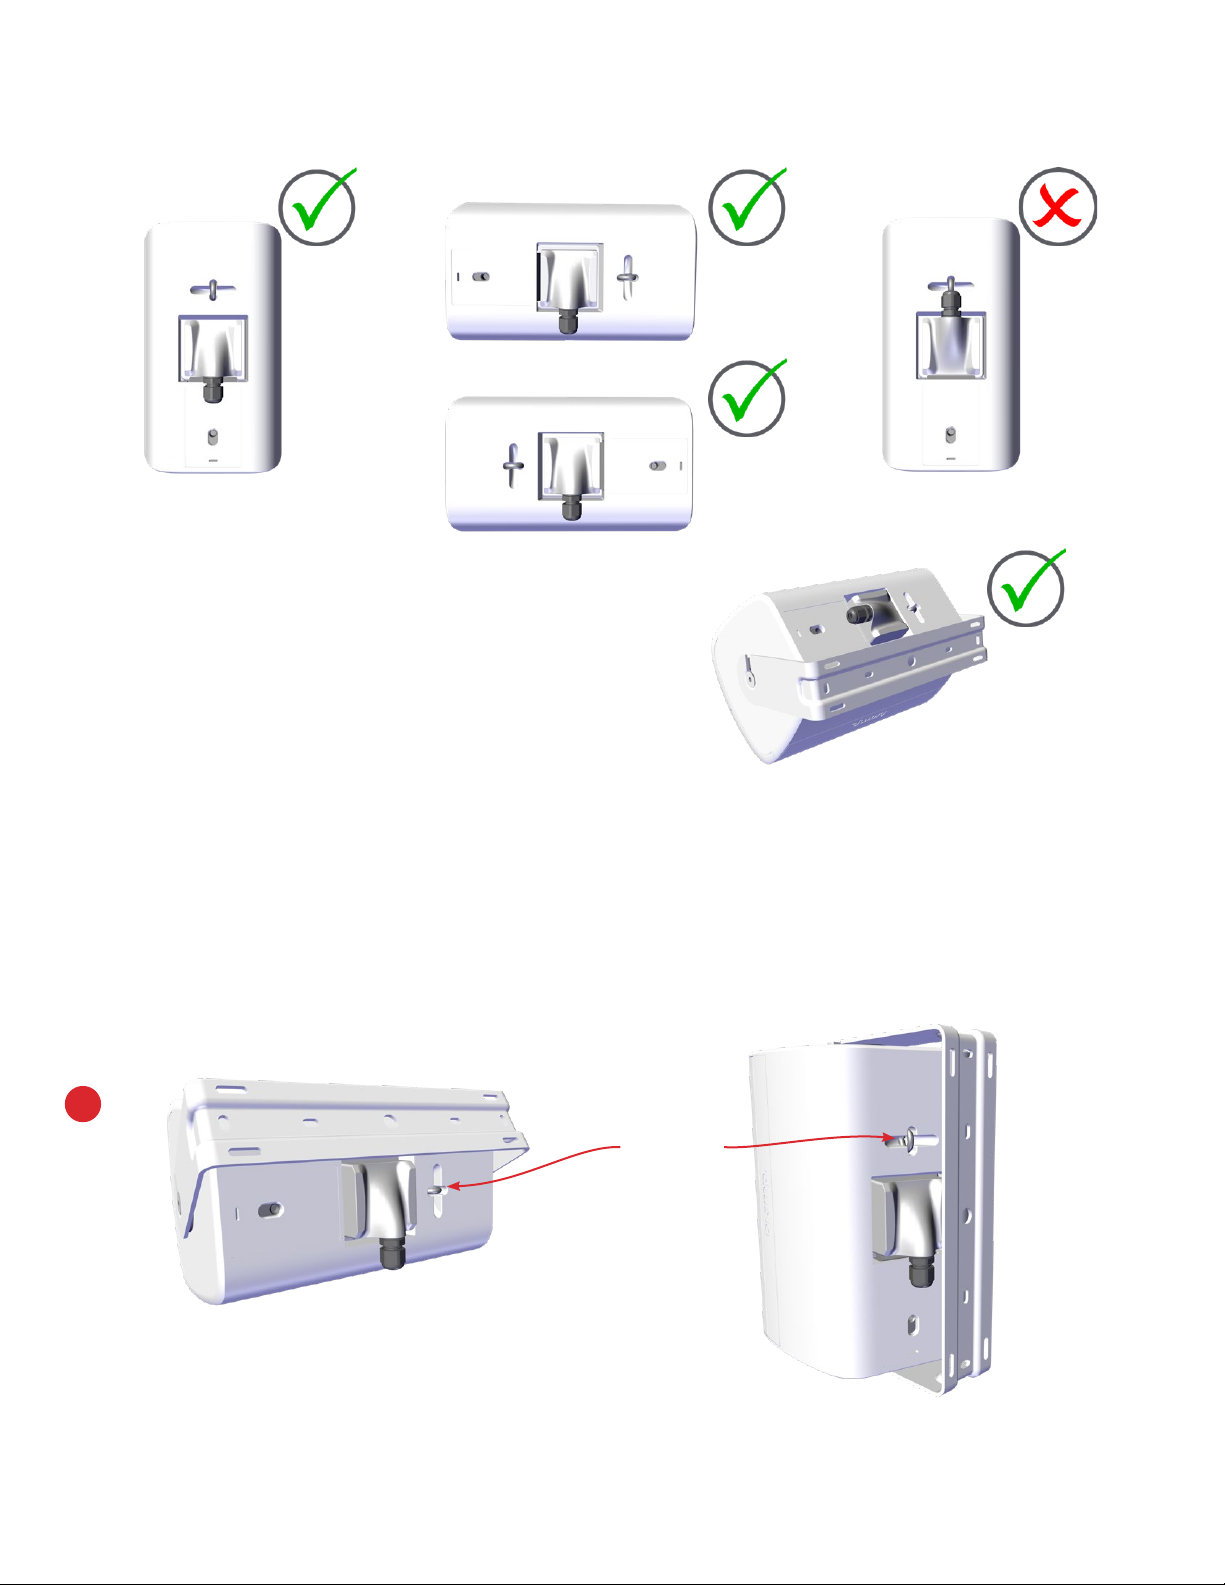
ClickPlug Orientation
The ClickPlug should be oriented as shown below. It can not
be installed upside-down.
NOTE: When mounted horizontally, the ClickPlug gland nut and
U-Bracket may interfere with each other. In this instance, the
ClickPlug needs to be rotated 90° to provide clearance for the
U-Bracket rotation. See image at right. In damp/wet applications
you must use a drip loop to prevent the chance of water traveling
into the gland nut.
Attach Safety Cable
11. Secure the loudspeaker with a safety cable attached to
the loop on the rear. The cable should be mounted to a
secondary structural mounting point close to, and above
the U-Bracket to avoid any kinetic force if the mount
should fail.
NOTE: The installer is responsible for sourcing the proper safety
cable to meet all applicable local building codes and standards.
11
Attach safety
cable here
SPA-UBDX Installation Guide
Desono™
DX-S U-Bracket (SPA-UBDXxxx)
SPECIFICATIONS
Material / Finish:Powder-coated Marine Grade
aluminum. Black (RAL 9017) or White (RAL 9016)
Color matched ABS spacer
Unit Weight
SPA-UBDX100: xx lbs (xx kg)
SPA-UBDX100: xx lbs (xx kg)
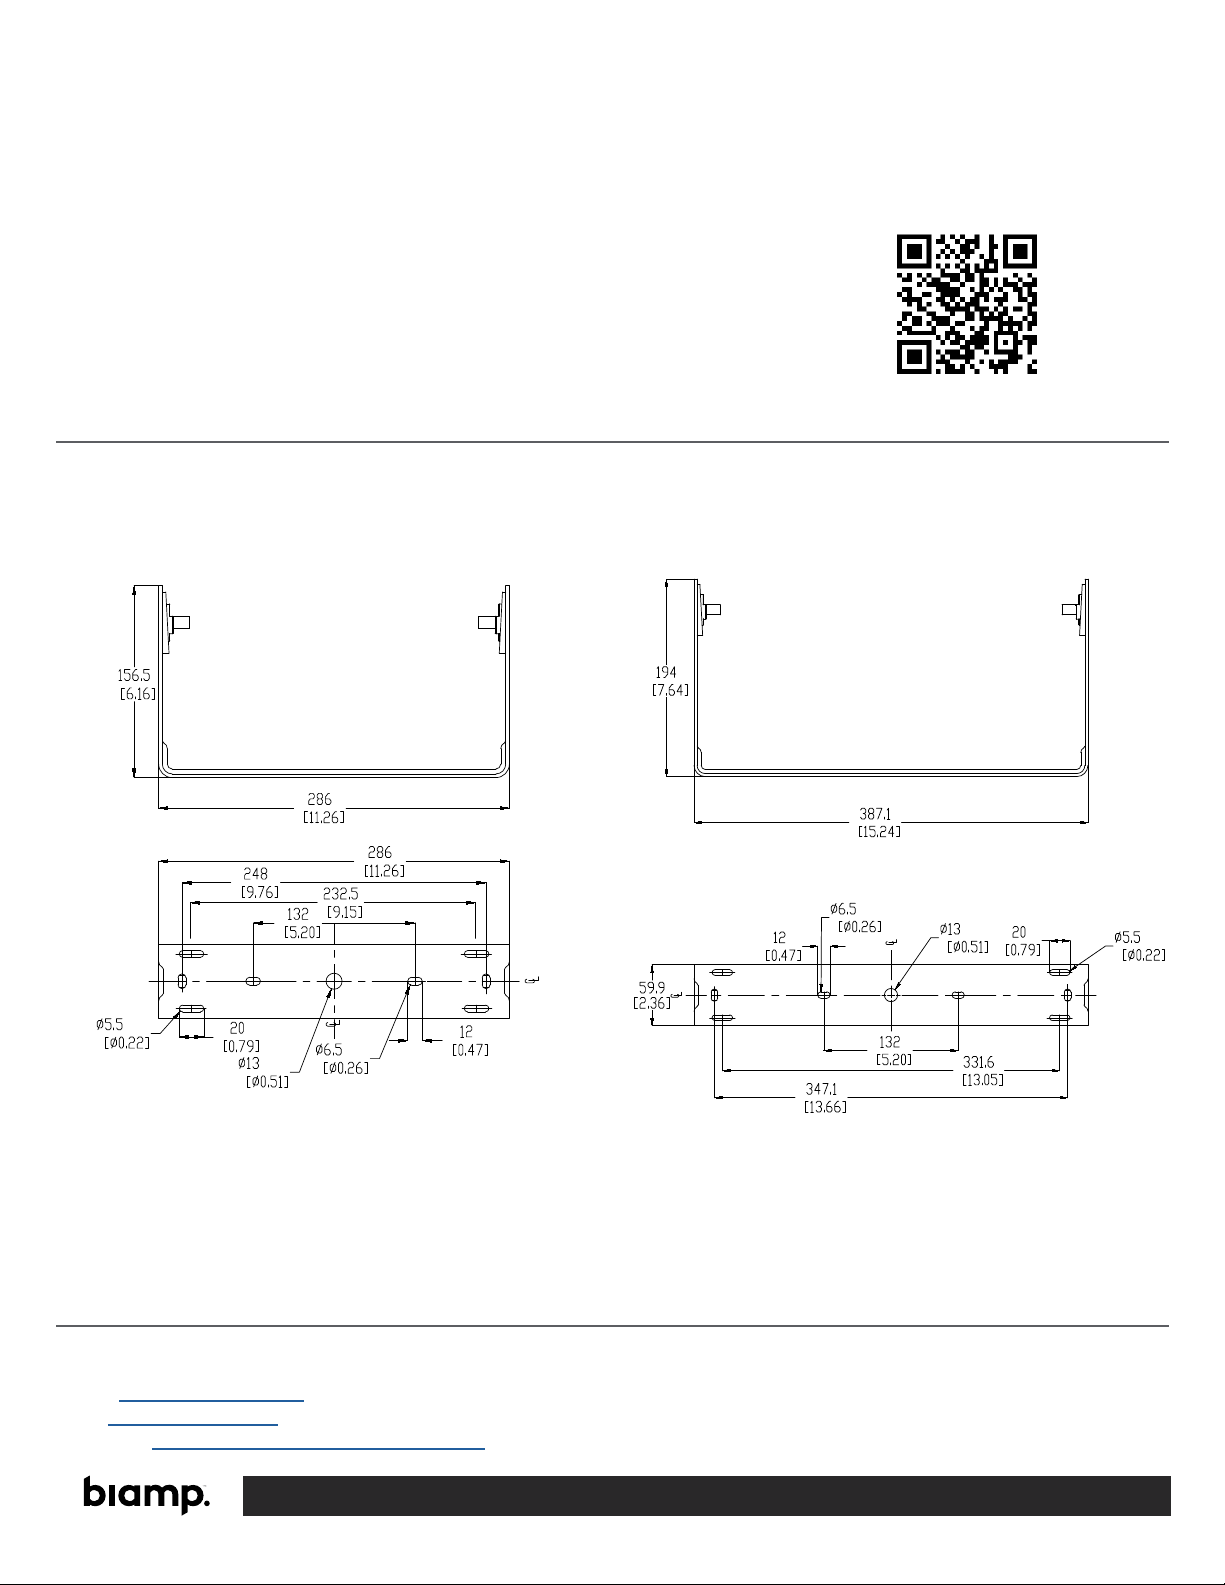
TECHNICAL DRAWINGS
SPA-UBDX100 SPA-UBDX200
Scan this QR-code to download the
full DX-S Installation guide
bia.mp/DX-S_pubs
CONTACT US
Email: support@biamp.com
Web: support.biamp.com
Warranty: biamp.com/legal/warranty-information
A: 9300 S.W. Gemini Drive Beaverton, OR 97008 USA W: www.biamp.com
08NOV2022
 Loading...