

Page 1

BIAMP SYSTEMS • 9300 SW GEMINI DRIVE • BEAVERTON, OREGON 97008 • USA
503.641.7287 • BIAMP.COM
1
Devio
CR-1T
Quick Start Guide
January 2016
585.0396.900
Page 2

BIAMP SYSTEMS • 9300 SW GEMINI DRIVE • BEAVERTON, OREGON 97008 • USA
503.641.7287 • BIAMP.COM
2
TABLE OF CONTENTS
WHAT’S IN THE BOX 3
FRONT AND REAR PANEL DIAGRAMS 3
BASIC INSTALLATION SCENARIOS 5
BASIC INSTALLATION PROCESS 6
WARRANTY 8
FCC COMPLIANCE 10
EC DECLARATION OF CONFORMITY 11
SAFETY INSTRUCTIONS 12
Page 3
BIAMP SYSTEMS • 9300 SW GEMINI DRIVE • BEAVERTON, OREGON 97008 • USA
503.641.7287 • BIAMP.COM
3
WHAT’S IN THE BOX
Devio CR-1T Package Includes:
Devio CR-1 Small room conferencing appliance
Devio DTM-1 Beamforming microphone
Power supply: 24V / 2.5 A with country specific connector
6-foot USB 3.0 Type-A to Type-B connection cable
Bracket and mounting screws
2- and 4-pin PHOENIX connectors
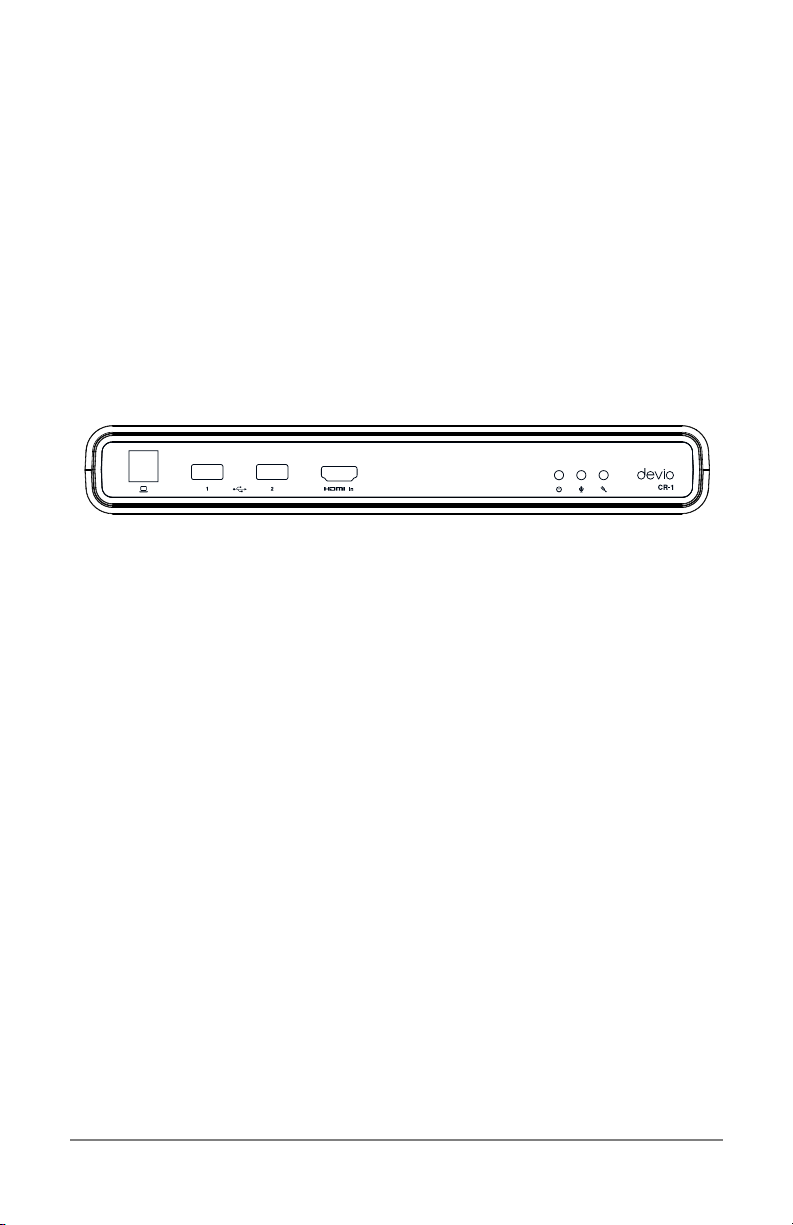
FRONT AND REAR PANEL DIAGRAMS
Figure'1.'DEVIO'CR-1'Front'Panel'
Figure 1 Legend (left to right):
USB 3.0 Type B port – connection from Devio CR-1 to computer
§ 2 USB 3.0 Type A ports – USB dock capability allows for additional
device connections to computer
§ HDMI In port – for driverless video connection from computer to
one
in-room display
§ LED Power Indicator
§ LED Microphone Status Indicator
§ LED Auto Setup Status Indicator
Page 4
BIAMP SYSTEMS • 9300 SW GEMINI DRIVE • BEAVERTON, OREGON 97008 • USA
503.641.7287 • BIAMP.COM
4
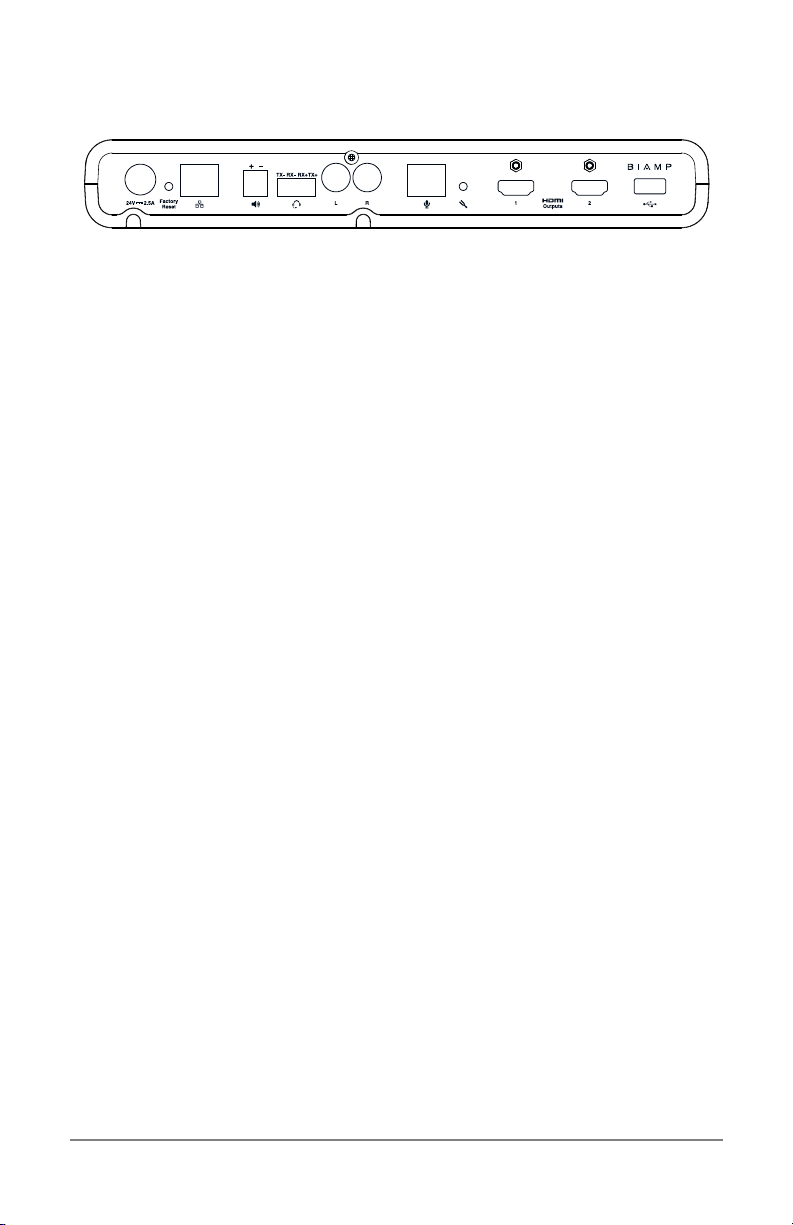
Figure'2.'DEVIO'CR-1'Rear'Panel'
Figure 2 Legend (left to right):
Power Port with locking connection
§ Factory Reset button – resets Devio CR-1 to factory settings
§ RJ-45 port – Ethernet network connection enables remote setup
and management
§ Speaker port – 20W powered 2-pin Phoenix connector
§ Headset jack – for bridging in-room telephone into voice conference
§ RCA jack – alternative connection to speaker via amplifier
§ Microphone port – Cat-5 cable connection to DEVIO DTM-1 microphone
§ Auto Setup button – for initiating the Auto Setup process for tuning
speaker and microphone
§ 2 HDMI ports – for outputting video to in-room HDM-equipped displays
§ USB 2.0 port – for connecting to USB Camera
Page 5
BIAMP SYSTEMS • 9300 SW GEMINI DRIVE • BEAVERTON, OREGON 97008 • USA
503.641.7287 • BIAMP.COM
5
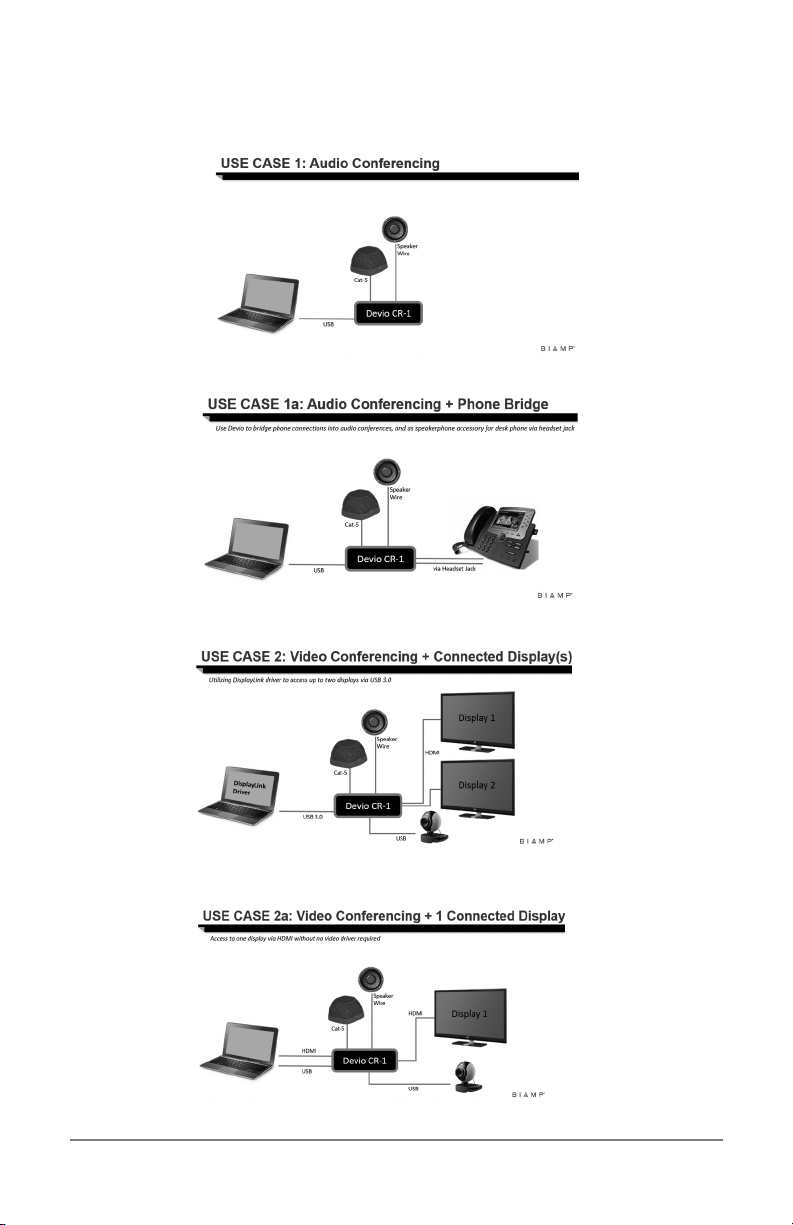
BASIC INSTALLATION SCENARIOS
Page 6

BIAMP SYSTEMS • 9300 SW GEMINI DRIVE • BEAVERTON, OREGON 97008 • USA
503.641.7287 • BIAMP.COM
6
BASIC INSTALLATION PROCESS
1. Unpack all components.
2. Connect components.
a. Select a location for the Devio CR-1 that will minimize the
space it utilizes on work surfaces while making it accessible for
connection to laptops via USB 3.0 cable. Secure the CR-1 in
this location by mounting the included bracket.
b. Select a location for the Devio DTM-1 that puts it in the center
of where conversation will occur. Place the DTM-1 in this
location or secure it by mounting the bottom cover onto the
work surface.
c. Connect Devio CR-1 to Devio DTM-1 beamforming
microphone using CAT-5 cable with RJ-45 field terminated
connectors (supports cable length up to 49.2 feet / 15 meters).
i. If installing a 2nd DTM-1, connect it to the 1st DTM-1
(same cable length supported).
d. Connect Devio CR-1 to user supplied speaker using 18awg
speaker cable or RCA cable.
e. Connect Devio CR-1 to one or two HDMI-equipped displays,
with the following considerations:
i. By default, Devio CR-1 can connect to one HDMI-
equipped display, supported via HDMI connection
from computer to the Devio CR-1
ii. Optionally, the “Enable USB Video” option allows the
Devio CR-1 to connect to up to two HDMI-equipped
displays, supported via USB 3.0 connection from
computer to the Devio CR-1. This option is enabled in
the Devio System Administration Utility (SAU),
requires DisplayLink USB Graphics Software drivers,
which can be installed automatically or manually from
http://www.displaylink.com/downloads.
f. If connecting to a camera for video conferencing, connect
Devio CR-1 via back panel USB port (or alternatively a front
panel USB port).
g. Optionally, connect the Devio CR-1 to the network via CAT-5
cable to enable remote monitoring and management.
h. Connect power supply to Devio CR-1.
i. Connect power supply to power source.
3. When front panel Auto Setup LED indicator lights red, press the Auto
Setup button on the rear of Devio CR-1.
a. Please be quiet during Auto Setup
b. A series of announcements and sounds will be generated to
optimize input and output levels for room acoustics and
placement of speaker and microphone.
Page 7

BIAMP SYSTEMS • 9300 SW GEMINI DRIVE • BEAVERTON, OREGON 97008 • USA
503.641.7287 • BIAMP.COM
7
c. The LED Auto Setup Status Indicator will illuminate green
when successfully completed, or red if an issue is
encountered.
Note
The LED Microphone Status Indicator will remain off until a computer
is connected to the Devio CR-1 via the USB 3.0 cable, in which case
it will turn green. If the LED Microphone Status Indicator is red the
microphone is not fully connected.
4. The Devio system is now ready for use.
a. Using the provided USB 3.0 Type-A to Type-B cable, connect
the CR-1 to a computer.
i. For video, connect CR-1 to computer via user-
supplied HDMI cable, or alternatively enable USB
Video to allow for video over USB 3.0 connection
b. The first connection may take a few minutes as the USB
enumeration process discovers and/or installs the required
drivers.
c. Devio will appear as an Echo Cancelling Speakerphone for
selection as speaker and microphone in computer audio and
web conferencing settings, the computer’s desktop can be
mirrored or extended onto HDMI displays, and other USBconnected accessories (like a camera) will be discovered and
available to your computer.
5. Visit devio-help.biamp.com for online assistance and documentation,
and to download the System Administration Utility (SAU).
6. Connect to the Devio CR-1 using the SAU via network connection to
manage or change settings, including:
a. Enable USB Video – check this setting to enable HDMI output
over USB 3.0. This option requires DisplayLink USB Graphics
Software drivers, which can be installed automatically or
manually from http://www.displaylink.com/downloads.
b. Enable Headset Interface – check this setting to enable Devio
CR-1 as a speakerphone for a desk phone via headset port
connection and to bridge callers directly into soft codec audio
conferences. Sidetone should be disabled on the connected
desk phone to avoid the introduction of echo to the call –
sidetone cannot be disabled on all desk phones, please work
with telephone service administrators to verify this capability.
c. Note, “devio” is the default Device Password.
Technical support is available from Biamp online at devio-help.biamp.com, via
email at DevioSupport@biamp.com, or via phone at 1-800-826-1457.
WARRANTY
Page 8

BIAMP SYSTEMS • 9300 SW GEMINI DRIVE • BEAVERTON, OREGON 97008 • USA
503.641.7287 • BIAMP.COM
8
Biamp’s Limited Warranty
BIAMP SYSTEMS IS PLEASED TO EXTEND THE FOLLOWING 2-YEAR
LIMITED WARRANTY TO THE ORIGINAL END USER CUSTOMER OF THE
PRODUCTS DESCRIBED IN THIS MANUAL
1. This limited warranty is being offered by Biamp Systems Corporation.
Biamp Systems warrants to the original end user customer of new Biamp
Systems products from an authorized Biamp Systems dealer that the product will
be free from defects in materials and workmanship for a specified period (the
“Warranty Period”), subject to the terms and conditions set forth below. The
Warranty Period for the products described in this manual shall be two (2) years.
The Warranty Period begins (a) the date of the original end user’s purchase from
an authorized Biamp Systems dealer or (b) six months after the product is first
shipped from Biamp Systems’ factory to an authorized Biamp Systems dealer or
distributor, whichever occurs earlier. This warranty extends only to the original
end user customer and is not assignable or transferrable.
2. Within the Warranty Period, Biamp Systems will repair or replace, at Biamp
Systems' option, nonconforming product, provided that Biamp Systems is notified
within 30 days of the identification of such defect or failure. Replacement
Products may be new or reconditioned. If the repair or replacement of your
nonconforming product is not reasonably available, at Biamp Systems’ discretion,
Biamp Systems will refund you the purchase price. As a condition to receiving
the benefits of this warranty, you must provide Biamp Systems with
documentation that establishes that you were the original end user purchaser of
the product from an authorized Biamp Systems dealer. Such evidence may
consist of your sales receipt.
3. Upon notice, Biamp Systems will provide instructions on the warranty claim
procedures to be followed and issue a Return Authorization (RA) number if
required. Any export/import authorizations or duties, transportation and
insurance charges to the Biamp Systems factory, or other service facility
designated by Biamp Systems, for warranty service shall be your responsibility.
Transportation and insurance charges from the Biamp Systems’ factory or
service facility after a warranty repair or for a warranty replacement will be paid
by Biamp Systems. Biamp Systems is not responsible for any damage to the
product during transit to the Biamp Systems’ factory or service facility. Biamp
Systems, at its sole discretion, will determine warrantable failures upon receipt of
your product or upon inspection of your product by an authorized Biamp Systems
dealer. All products that are returned by you and replaced by Biamp Systems
will become the property of Biamp Systems.
4. This warranty will be VOID if the serial number has been removed or
defaced; or if the product has been altered, subjected to damage, abuse or rental
usage, repaired by any person not authorized by Biamp Systems to make
repairs; damaged due to improper or inadequate maintenance; operated outside
the normal environmental specifications for the product; or installed in any
Page 9

BIAMP SYSTEMS • 9300 SW GEMINI DRIVE • BEAVERTON, OREGON 97008 • USA
503.641.7287 • BIAMP.COM
9
WARRANTY CONTINUED
manner that does not comply with Biamp Systems' recommendations. This
warranty does not apply to damage caused by an accident, power surge,
flooding, fire, earthquake, or other external causes. This warranty does not apply
to damage caused by abuse or misuse of the product.
5. Electro-mechanical fans, electrolytic capacitors, gooseneck microphones,
cords connecting handheld microphones, hard-drives, displays, consumable
parts (i.e. batteries), and normal wear and tear of items such as paint, knobs,
handles, keypads and covers are not covered under this warranty. All software
or firmware distributed by Biamp Systems is provided AS IS and without any
warranty of any kind, except as expressly provided in any documentation or
license agreement furnished with the software or firmware. This warranty does
not apply to third party products resold by Biamp Systems.
6. THIS WARRANTY IS IN LIEU OF ALL OTHER WARRANTIES,
EXPRESSED OR IMPLIED. BIAMP SYSTEMS DISCLAIMS ALL OTHER
WARRANTIES, EXPRESSED OR IMPLIED, INCLUDING, BUT NOT LIMITED
TO, IMPLIED WARRANTIES OF NON-INFRINGEMENT, MERCHANTABILITY
AND FITNESS FOR A PARTICULAR PURPOSE.
7. The remedies set forth herein shall be the purchaser's sole and exclusive
remedies with respect to any defective product. No repair or replacement of any
product or part thereof will extend the applicable warranty period for the entire
product. The specific warranty for any repair will extend for a period of 90 days
following the repair or the remainder of the warranty period for the product,
whichever is longer.
8. No agent, employee, distributor or dealer of Biamp Systems is authorized to
modify this warranty or to make additional warranties on behalf of Biamp
Systems. Statements, representations or warranties made by any dealer do not
constitute warranties by Biamp Systems. Biamp Systems shall not be
responsible or liable for any statement, representation or warranty made by any
dealer or other person. Biamp Systems makes no other warranty beyond what is
contained in this writing.
9. No action for breach of this warranty may be commenced more than one
year after the expiration of this warranty.
10. BIAMP SYSTEMS SHALL NOT BE LIABLE FOR SPECIAL, INDIRECT,
INCIDENTAL, OR CONSEQUENTIAL DAMAGES, INCLUDING LOST
PROFITS OR LOSS OF USE ARISING OUT OF THE PURCHASE, SALE, OR
USE OF THE PRODUCTS, EVEN IF BIAMP SYSTEMS WAS ADVISED OF
THE POSSIBILITY OF SUCH DAMAGES.
Revision effective as of October 27, 2015
Page 10

BIAMP SYSTEMS • 9300 SW GEMINI DRIVE • BEAVERTON, OREGON 97008 • USA
503.641.7287 • BIAMP.COM
10
FCC COMPLIANCE
FCC Notice - Class A digital device - This equipment has been tested and
found to comply with the limits for a Class A digital device, pursuant to Part 15
of the FCC Rules. These limits are designed to provide reasonable protection
against harmful interference when the equipment is operated in a commercial
environment. This equipment generates, uses, and can radiate radio frequency
energy and, if not installed and used in accordance with the instruction manual,
may cause harmful interference to radio communications. Operation of this
equipment in a residential area is likely to cause harmful interference in which
case the user will be required to correct the interference at own expense.
Page 11

BIAMP SYSTEMS • 9300 SW GEMINI DRIVE • BEAVERTON, OREGON 97008 • USA
503.641.7287 • BIAMP.COM
11
EC DECLARATION OF CONFORMITY
DoC Devio CR-1-201510
EC Declaration of Conformity
Biamp Systems Co rporation, as manu facturer having sole responsibility, hereby declares
that our delivered version the following described product complies with the applicable
provisions of the DIRECTIVES below except as noted herein. Any alterations to the product
not agreed upon and directed by Biamp Systems Corporation will invalidate this declaration.
Brand Name: Devio
TM
Product Description: Devio CR-1: confer ence room dock
Devio DTM-1: table top beamforming microph one
Devio CR-1T : conference room dock syste m (includes Devio CR-1
and Devio DTM-1)
Product Model: Devio CR-1*, Devio DTM-1 where * can be any
alphanumeric character or none.
Applicable EC Directives: Applicable Harmonized Standards:
LVD Directive (2006/95/EC) Safety EN 60950-1:2006,
+ A11:2009, + A1:2010, +
A12:2011+A2:2013
EMC Directive (200 4/108/EC) Emissions EN 55032: 2012, Class A
Immunity EN 55024: 2010, Class A
RoHS Directive (2011/65/EU) RoHS Recast
Special Considerations for Product Environment or Compliance: None
Technical Documentation File, Locati on and Contact:
Biamp Systems Corporation phone: +503.641.7287
9300 S.W. Gemini Drive fax: +503.626.0281
Beaverton, OR USA 97008 e-mail: compliance@biamp.com
Authorized Representative: Vijay Kohli, Compliance Engineer
Authorized Signature:
Date and Place Issued: October 23, 2015, Beaverton, Oreg on USA
Revised:
Page 12

BIAMP SYSTEMS • 9300 SW GEMINI DRIVE • BEAVERTON, OREGON 97008 • USA
503.641.7287 • BIAMP.COM
12
SAFETY INSTRUCTIONS
IMPORTANT SAFETY INSTRUCTIONS
Lightning Bolt: Hazardous Live voltages present when this unit is in operation. Do not touch terminals marked with
this symbol while the unit is connected to live power.
Exclamation Point: Replace components (i.e. fuses) only with the values specied by the manufacturer. Failure to
do so will compromise safe operation of this unit
Hazardous Moving Fan Blades: Remove power before servicing and keep away from moving fan blades.
WARNING - To reduce the risk of re or electric shock, do not expose these products to rain or moisture. These products must not be
exposed to dripping or splashing and no objects lled with liquids, such as vases, shall be placed on these products.
WARNING – 100 Volt Speaker terminals marked with the symbol are Hazardous Live. External wiring connected to these terminals
requires installation by a Skilled or Instructed Person.
WARNING – MAINS Powered Products employ Safety Grounding and must be connected to a MAINS socket that is properly grounded to
provide a protective earthing connection.
Disconnect Device - The MAINS plug is used to disconnect MAINS power and must remain readily operable.
CAUTION – When POTS Telephone Interface options are provided, connections to the telecom circuits of this device must be made by
qualied, trained personnel. To reduce the risk of re, use only No. 26 AWG solid copper wire for telecom circuit connections.
Intended for Installation and Service by Skilled Personnel Only:
CAUTION – To reduce the Risk of Electric Shock, Installation and Service of Biamp Products should be conducted only by Skilled Persons
who are Biamp Qualied Audio Installation Professionals.
Do not perform any servicing other than that contained in the Operating Instructions unless you are a Skilled Person qualied to do so.
Skilled Persons must disconnect AC MAINS Power before opening product.
CAUTION - The Installation steps for ‘Auxiliary Power’ are for use by Skilled Personnel only and must comply with all local codes.
• National Electrical Code, ANSI/NFPA 70 for United States.
• Canadian Electrical Code, Part 1, CSA C22.1, Sections 2-128, 12-010(3) and 12-100 for Canada.
Wall Mounting Instructions – Wall mounted products must be securely fastened to drywall or similar surface using a minimum of 4 wood
screws (2 screws for product with only two mounting holes). Alternate fasteners which may be used include drywall anchors, self-tapping
sheet metal screws located in metal studs or wood screws extending a minimum of ½ inch into wood studs.
Explanation of Graphical Symbols:
1) Read these instructions.
2) Keep these instructions.
3) Heed all warnings.
4) Follow all instructions.
5) Do not use this product near water.
6) Clean only with dry cloth.
7) Do not block ventilation openings. Install in accordance with
the manufacturer’s instructions.
8) Do not install near any heat sources such as radiators, heat
registers, stoves, or other products (including ampliers) that
produce heat.
9) Do not defeat the safety purpose of the grounding-type plug.
A grounding type plug has two blades and a third grounding
prong.
The third prong is provided for your safety. If the provided
plug does not t into your outlet, consult an electrician for
replacement of the obsolete outlet.
10) Protect the power cord from being walked on or pinched,
particularly at plugs, convenience receptacles and the point
where they exit from the product.
11) Only use attachments/accessories specied by the
manufacturer.
12) Use only with equipment rack, cart, stand or
table designed to provide adequate mechanical
strength, heat dissipation and securement to the
building structure.
When a cart is used, use caution when moving
the cart and product combination to avoid injury from tip-over.
13) Unplug this product during lightning storms or when
unused for long periods of time.
14) Refer all servicing to qualied service personnel. Servicing
is required when the product has been damaged in any way,
such as power-supply cord or plug is damaged, liquid has been
spilled or objects have fallen into the product, the product has
been exposed to rain or moisture, does not operate normally, or
has been dropped.
Page 13

BIAMP SYSTEMS • 9300 SW GEMINI DRIVE • BEAVERTON, OREGON 97008 • USA
503.641.7287 • BIAMP.COM
13
INSTRUCCIONES DE SEGURIDAD IMPORTANTES
Rayo: Voltajes activos peligrosos mientras la unidad está en funcionamiento. No toque las terminales marcadas con este
símbolo mientras la unidad se encuentre conectada a una salida activa de energía.
Signo de exclamación: Reemplace los componentes (es decir, los fusibles) solo de acuerdo con los valores indicados por
el fabricante. De no hacerlo, se pondrá en riesgo el funcionamiento seguro de esta unidad.
Aspas de ventilador en movimiento peligrosas Desenchufe el producto antes de realizar reparaciones y aléjelo de las
aspas en movimiento de los ventiladores.
Explicación de los símbolos grácos:
1) Lea estas instrucciones.
2) Guarde estas instrucciones.
3) Preste atención a todas las advertencias.
4) Siga todas las instrucciones.
5) No utilice este producto cerca del agua.
6) Limpie solo con un paño seco.
7) No obstruya los oricios de ventilación. Instale el producto
según las instrucciones del fabricante.
8) No lo instale cerca de ninguna fuente de calor como radiadores,
rejillas de calefacción, estufas u otros productos (incluidos
amplicadores) que produzcan calor.
9) No anule el propósito de seguridad del enchufe con conexión a
tierra. Un enchufe con conexión a tierra tiene dos clavijas y una
tercera punta con conexión a tierra.
La tercera punta se provee para su seguridad. Si el enchufe
suministrado no se adapta a su tomacorriente, recurra a un
electricista para reemplazar la toma obsoleta.
10) Proteja el cable de alimentación eléctrica para evitar que sea
pisado o aplastado, en especial en los enchufes, receptáculos
convenientes y el punto donde salen del producto.
11) Solo utilice complementos/accesorios indicados por el
fabricante.
12) Utilice solo con el soporte, carro,
base o mesa diseñados para proporcionar
fuerza mecánica adecuada, disipación del calor y
seguridad a la estructura del edicio.
Cuando se utiliza un carro, tenga cuidado al mover
la combinación del carro con el producto para evitar
lesiones en caso de una caída.
13) Desenchufe este producto durante tormentas eléctricas o si no
va a utilizarlo por largos períodos de tiempo.
14) Todas las reparaciones deben ser realizadas por personal
calicado. La reparación es necesaria cuando el producto
presenta cualquier tipo de daño como, por ejemplo, si se deteriora
el cable de alimentación eléctrica o enchufe, si se derraman
líquidos o caen objetos dentro del producto, si se expone el
producto a la lluvia o humedad, si no funciona normalmente o si se
ha caído.
ADVERTENCIA – Para reducir el riesgo de incendio o descarga eléctrica, no exponga estos productos a la lluvia o humedad. Estos productos
no deben exponerse a goteos o salpicaduras ni deben posarse sobre ellos objetos que contengan líquidos como, por ejemplo, jarrones.
ADVERTENCIA – Las terminales de altavoces de 100 voltios que aparecen marcadas con el símbolo están activas y son peligrosas.
La conexión externa de cables a estas terminales requiere la instalación a cargo de una persona calicada o debidamente instruida.
ADVERTENCIA – Los productos con alimentación eléctrica utilizan conexión a tierra de seguridad y deben conectarse a tomacorrientes que
funcionen correctamente para brindar una conexión a tierra de protección.
Desconexión del dispositivo – El enchufe de alimentación eléctrica se utiliza para desconectar esta alimentación y deberá poder accionarse
fácilmente.
PRECAUCIÓN – Cuando se proporcionan las opciones de interfaz telefónica POTS, las conexiones a los circuitos de telecomunicaciones de este
dispositivo deber ser realizadas por personal calicado y entrenado. Para reducir el riesgo de incendio, use solo cables de cobre sólido N.° 26 AWG
para las conexiones de los circuitos de telecomunicaciones.
Para la instalación y mantenimiento solo por parte de personal calicado:
PRECAUCIÓN – Para reducir el riesgo de descarga eléctrica, la instalación y el mantenimiento de los productos Biamp deben ser realizados por
personas calicados que formen parte de los Profesionales capacitados en la instalación de audio de Biamp.
No realice ninguna reparación que no se encuentre en las Instrucciones de uso, a menos que sea una persona calicada para hacerlo.
Las personas calicadas deben desenchufar la alimentación eléctrica de CA antes de abrir el producto.
PRECAUCIÓN – Los pasos para la instalación de una “energía auxiliar” están dirigidos solo al personal calicado y deben cumplir con todos los
códigos locales.
• Código eléctrico nacional: ANSI/NFPA 70 para los Estados Unidos.
• Código eléctrico canadiense: parte 1, CSA C22.1, secciones 2-128, 12-010(3) y 12-100 para Canadá.
Instrucciones para el montaje sobre la pared – Los productos que sean montados sobre la pared deben estar bien ajustados al yeso u otra
supercie con el uso de, al menos, 4 tornillos para madera (2 tornillos para los productos con solo dos oricios de montaje). Los enganches
alternativos que pueden utilizarse incluyen pernos de anclaje para paredes de yeso, tornillos de metal laminado con rosca cortante los cuales se
ubican en montantes de metal o tornillos para madera que se prolongan poco más de 1,5 cm dentro de los montantes de madera.
Page 14

BIAMP SYSTEMS • 9300 SW GEMINI DRIVE • BEAVERTON, OREGON 97008 • USA
503.641.7287 • BIAMP.COM
14
IMPORTANT SAFETY INSTRUCTIONS
Lightning Bolt: Hazardous Live voltages present when this unit is in operation. Do not touch terminals marked with
this symbol while the unit is connected to live power.
Exclamation Point: Replace components (i.e. fuses) only with the values specied by the manufacturer. Failure to
do so will compromise safe operation of this unit
Hazardous Moving Fan Blades: Remove power before servicing and keep away from moving fan blades.
WARNING - To reduce the risk of re or electric shock, do not expose these products to rain or moisture. These products must not be
exposed to dripping or splashing and no objects lled with liquids, such as vases, shall be placed on these products.
WARNING – 100 Volt Speaker terminals marked with the symbol are Hazardous Live. External wiring connected to these terminals
requires installation by a Skilled or Instructed Person.
WARNING – MAINS Powered Products employ Safety Grounding and must be connected to a MAINS socket that is properly grounded to
provide a protective earthing connection.
Disconnect Device - The MAINS plug is used to disconnect MAINS power and must remain readily operable.
CAUTION – When POTS Telephone Interface options are provided, connections to the telecom circuits of this device must be made by
qualied, trained personnel. To reduce the risk of re, use only No. 26 AWG solid copper wire for telecom circuit connections.
Intended for Installation and Service by Skilled Personnel Only:
CAUTION – To reduce the Risk of Electric Shock, Installation and Service of Biamp Products should be conducted only by Skilled Persons
who are Biamp Qualied Audio Installation Professionals.
Do not perform any servicing other than that contained in the Operating Instructions unless you are a Skilled Person qualied to do so.
Skilled Persons must disconnect AC MAINS Power before opening product.
CAUTION - The Installation steps for ‘Auxiliary Power’ are for use by Skilled Personnel only and must comply with all local codes.
• National Electrical Code, ANSI/NFPA 70 for United States.
• Canadian Electrical Code, Part 1, CSA C22.1, Sections 2-128, 12-010(3) and 12-100 for Canada.
Wall Mounting Instructions – Wall mounted products must be securely fastened to drywall or similar surface using a minimum of 4 wood
screws (2 screws for product with only two mounting holes). Alternate fasteners which may be used include drywall anchors, self-tapping
sheet metal screws located in metal studs or wood screws extending a minimum of ½ inch into wood studs.
Explanation of Graphical Symbols:
1) Read these instructions.
2) Keep these instructions.
3) Heed all warnings.
4) Follow all instructions.
5) Do not use this product near water.
6) Clean only with dry cloth.
7) Do not block ventilation openings. Install in accordance with
the manufacturer’s instructions.
8) Do not install near any heat sources such as radiators, heat
registers, stoves, or other products (including ampliers) that
produce heat.
9) Do not defeat the safety purpose of the grounding-type plug.
A grounding type plug has two blades and a third grounding
prong.
The third prong is provided for your safety. If the provided
plug does not t into your outlet, consult an electrician for
replacement of the obsolete outlet.
10) Protect the power cord from being walked on or pinched,
particularly at plugs, convenience receptacles and the point
where they exit from the product.
11) Only use attachments/accessories specied by the
manufacturer.
12) Use only with equipment rack, cart, stand or
table designed to provide adequate mechanical
strength, heat dissipation and securement to the
building structure.
When a cart is used, use caution when moving
the cart and product combination to avoid injury from tip-over.
13) Unplug this product during lightning storms or when
unused for long periods of time.
14) Refer all servicing to qualied service personnel. Servicing
is required when the product has been damaged in any way,
such as power-supply cord or plug is damaged, liquid has been
spilled or objects have fallen into the product, the product has
been exposed to rain or moisture, does not operate normally, or
has been dropped.
Page 15

BIAMP SYSTEMS • 9300 SW GEMINI DRIVE • BEAVERTON, OREGON 97008 • USA
503.641.7287 • BIAMP.COM
15
WICHTIGE SICHERHEITSHINWEISE
Blitz: Beim Betrieb dieses Geräts entstehen lebensgefährliche Spannungen. Berühren Sie keine Anschlüsse mit
diesem Symbol, während das Gerät an ein Netzteil mit eingeschalteter Spannungsversorgung angeschlossen ist.
Ausrufezeichen: Ersetzen Sie Bauteile (z. B. Sicherungen) nur entsprechend den vom Hersteller angegebenen
Werten. Bei Missachtung ist die Sicherheit dieses Geräts nicht mehr gewährleistet.
Rotierende Lüfterügel: Vor Wartungsarbeiten Stromversorgung unterbrechen und von beweglichen Lüfterügeln
fernhalten.
Erklärung grascher Symbole:
1) Lesen Sie diese Hinweise.
2) Bewahren Sie diese Hinweise auf.
3) Beachten Sie die Warnhinweise.
4) Befolgen Sie die Hinweise.
5) Verwenden Sie dieses Produkt nicht in der Nähe von Wasser.
6) Nur mit einem trockenen Tuch reinigen.
7) Ventil- und Lüftungsöffnungen nicht abdecken. Produkte
gemäß den Hinweisen des Herstellers installieren.
8) Nicht in der Nähe von Wärmequellen wie Radiatoren,
Wärmespeichern, Kochächen oder sonstigen Produkten
(einschließlich Verstärker), die Wärme produzieren, installieren.
9) Sicherheitsfunktion des geerdeten Steckers nicht umgehen.
Ein geerdeter Stecker hat zwei Stromkontakte und einen dritten
Erdungskontakt.
Der dritte Erdungskontakt dient Ihrer Sicherheit. Passt der
mitgelieferte Stecker nicht in die Steckdose, lassen Sie diese von
einem Elektriker austauschen.
10) Schützen Sie das Netzkabel vor Beschädigungen, besonders
am Stecker, an Mehrfachsteckdosen und am Ausgang vom Gerät.
11) Verwenden Sie ausschließlich die vom Hersteller angegebenen
Befestigungen/Zubehörteile.
12) Nur mit Geräteträger, Rollwagen, Ständer
oder Tisch verwenden, wobei eine ausreichende
mechanische Festigkeit, Wärmeableitung und
Absicherung mit der Gebäudestruktur geboten ist.
Wenn ein Rollwagen verwendet wird, beim Bewegen
der Rollwagen-Gerät-Kombination vorsichtig vorgehen, um
Verletzungen durch Umkippen zu vermeiden.
13) Trennen Sie das Gerät während eines Gewitters oder bei
längerer Nichtbenutzung vom Stromnetz.
14) Überlassen Sie jegliche Wartung qualiziertem Personal.
Wartungsarbeiten oder Reparaturen sind erforderlich, wenn das
Netzkabel oder der Stecker beschädigt ist, wenn Flüssigkeit oder
Gegenstände in das Geräteinnere eingedrungen sind, wenn das
Gerät im Regen oder in feuchter Umgebung gestanden ist, sich
nicht erwartungsgemäß verhält oder wenn es gefallen ist.
ACHTUNG – Um das Risiko eines Brandes oder eines elektrischen Schlages zu vermeiden, das Gerät vor Regen und Feuchtigkeit schützen. Das
Gerät vor Tropfen oder Wasserspritzern schützen. Keine mit Flüssigkeit befüllten Behälter, wie Blumenvasen oder ähnliche Gegenstände, auf das
Gerät stellen.
ACHTUNG – 100-Volt-Lautsprecherklemmen mit dem Symbol bedeuten Lebensgefahr. Die externe Verkabelung an diesen Anschlüssen darf
nur von geschulten oder beaufsichtigten Personen vorgenommen werden.
ACHTUNG – An das Netzteil angeschlossene Geräte verfügen über eine Sicherheitserdung und müssen an eine ordnungsgemäß geerdete Buchse
angeschlossen werden, um eine sichere Erdverbindung zu gewährleisten.
Trennen des Geräts – Der Netzstecker wird verwendet, um das Gerät von der Netzsteckdose zu trennen und muss jederzeit betriebsbereit sein.
VORSICHT – Wenn Telefonschnittstellenoptionen angeboten werden, sind die Verbindungen zum Netz des Telefonanbieters von einer qualizierten
und geschulten Person vorzunehmen. Verwenden Sie für Telekomverbindungen ausschließlich 26 AWG feste Kupferdrahtanschlüsse, um das
Brandrisiko zu reduzieren.
Ausschließlich für Einbau und Wartung durch geschultes Personal vorgesehen:
VORSICHT – Zur Verringerung der Stromschlaggefahr sind Einbau und Wartung von Biamp-Geräten ausschließlich durch geschulte Personen, bei
denen es sich um von Biamp geschulte Audio-Fachleute handelt, vorzunehmen.
Führen Sie keine anderen als die in der Betriebsanleitung angegebenen Wartungsarbeiten aus, vorausgesetzt, Sie wurden hierfür geschult.
Vor dem Öffnen des Geräts ist das Gerät von einer geschulten Person von der AC-Netzspannung zu trennen.
VORSICHT – Die Installationsschritte für die Hilfsspannungsversorgung sind nur zur Verwendung durch geschulte Personen vorgesehen und
müssen mit den örtlichen Bestimmungen übereinstimmen.
• National Electrical Code, ANSI/NFPA 70 für die USA.
• Canadian Electrical Code, Part 1, CSA C22.1, Kapitel 2-128, 12-010(3) und 12-100 für Kanada.
Anweisungen zur Wandmontage – Geräte zur Wandmontage sind mit mindestens 4 Holzschrauben sicher an einer Trockenbauwand oder an
einer ähnlichen Oberäche zu befestigen (2 Schrauben für Geräte mit nur zwei Befestigungsösen). Alternativ verwendete Befestigungselemente
umfassen Dübel für Trockenwände, selbstschneidende Schrauben in Metallrohlingen oder Holzschrauben, die mindestens 1,5 cm in die
Holzrohlinge eingedreht werden können.
Page 16

BIAMP SYSTEMS • 9300 SW GEMINI DRIVE • BEAVERTON, OREGON 97008 • USA
503.641.7287 • BIAMP.COM
16
重要安全说明
闪电:此设备运行时会伴随有危险的实时电压。当设备与电源连接时,不要触碰带有此符号的端子。
惊叹号:只能按照厂商指定的技术参数更换组件(例如:保险丝)。 否则,将会降低本设备的运行安全性。
危险的移动风扇叶片:请在提供服务之前切断电源,并与移动风扇叶片保持距离。
图形符号解释:
1) 阅读这些说明。
2) 妥善保管这些说明。
3) 留意所有警告。
4) 遵守所有说明。
5) 不得在靠近水源处使用本产品。
6) 只能用干布进行清洁。
7) 不要堵塞通风口。按照厂商说明进行安装。
8) 不要在靠近任何热源处,如散热器、热调节器、火炉或其他
释放热量的产品(包括扩音器)附近进行安装。
9) 不要损坏用于安全目的的接地插头。 接地插头有两个插片
和第三端接地管脚。
第三端管脚是为了确保您的安全而提供。如果附带的插头不适
用于您的插座,请让电工更换插座。
10) 防止电源线被踩踏或挤压,尤其是在插头、电源插座以及
产品周围进出的位置。
11) 只使用厂商指定的附属装置/附件。
12) 只配合专为建筑结构提供足够的机械强度、
热消散性和稳固性的机柜、手推车、支架或设备
桌使用。
在用手推车时应小心移动,避免因翻倒而带来伤
害。
13) 在室外出现闪电或长期未使用的情况下应拔掉本产品的电
源线。
14) 请与有资历的服务人员联系,获得所有维修服务。 当产品
以任何方式受到损害时有必要进行维修,如电源线或插头被损
坏、沾染上液体或有异物落入产品中、产品暴露在雨水或潮湿
的环境中、无法正常运行或已掉落在地上损坏了。
警告 – 为减少火灾或雷电冲击带来的风险,不要将这些产品暴露在雨水或潮湿的环境中。这些产品不得暴露在有液体滴落或飞溅的环境
中,也不应在这些产品上放置装有液体的物品(如花瓶)。
警告 – 标有符号 的 100 伏特扬声器端子是危险的带电线路。与这些端子相连的外部布线需要由专业技术人员或经过培训的人员来安
装。
警告 – 由市电供电的产品采用了安全接地技术,必须与正确接地的市电插座连接,才能提供接地防护。
断开设备连接 – 市电插头可用于断开 市电电源且必须保持时刻可运行状态。
小心 – 在提供了 POTS 电话接口选项时,必须由训练有素的人员将电话接口与本设备的电信回路进行连接。为减少火灾风险,只能使用 26
号 AWG 实心铜线连接电话端口。
只适用于专业技术人员来执行的安装和服务:
小心 – 为减少电击带来的风险,Biamp 产品的安装和服务应该只能由 Biamp 音频安装专业技术人员来执行。
除非您是专业技术人员,否则不能执行未包含在操作说明中的任何服务。
在打开产品之前,专业人员必须先断开交流市电电源。
小心 – “辅助电源”的安装步骤只适用于专业技术人员,而且必须遵循所有的本地法规。
• 对于美国,国家电气法规 ANSI/NFPA 70。
• 对于加拿大,加拿大电气法规第 1 部 CSA C22.1 第 2-128、12-010(3) 和 12-100 节。
壁挂安装说明 – 壁挂安装产品必须至少使用 4 个木螺丝(只有两个安装孔的产品则用 2 个螺丝)安全地固定在石膏板/隔断墙或类似表面
上。可能会用到的其他紧固件包括胀管、用于金属支撑架中的自攻钢板金属螺丝或是用于木制支撑架上的 ½ 英寸木螺丝。
Page 17

BIAMP SYSTEMS • 9300 SW GEMINI DRIVE • BEAVERTON, OREGON 97008 • USA
503.641.7287 • BIAMP.COM
17
중요 안전성 지침
번개 표시: 본 장비가 작동 중일 때는 위험한 전압이 발생합니다. 본 장비가 전원에 연결되어 있는 동안에는 이
기호가 표시된 터미널에 손을 대지 마십시오.
느낌표: 구성 부품(예:퓨즈)은 제조업체에 의해 지정된 사양으로만 교환합니다. 그렇지 않으면 본 장비의 안전한
작동에 문제가 생길 수 있습니다.
위험한 이동식 송풍기 블레이드: 전원을 끄고 나서 서비스를 제공하고, 이동식 송풍기 블레이드를 가까이 두지
마십시오.
그래픽 기호 설명:
1) 이 지침서를 읽으십시오.
2) 이 지침 내용을 지키십시오.
3) 모든 경고에 주의를 기울이십시오.
4) 모든 지침을 따르십시오.
5) 이 제품을 물 가까이에서 사용하지 마십시오.
6) 마른 헝겊으로만 닦으십시오.
7) 환풍구를 막지 마십시오. 제조업체의 지침에 따라
설치하십시오.
8) 라디에이터, 온풍기, 스토브 또는 열을 내는 다른 제품(
증폭기 포함)과 같은 열원 근처에 설치하지 마십시오.
9) 접지형 플러그의 안전 목적에 어긋나지 않도록 하십시오.
접지형 플러그에는 두 개의 날과 접지 단자가 있습니다.
세 번째 접지 단자는 안전을 위해 제공되는 것입니다. 제공된
플러그가 콘센트에 맞지 않는다면, 해당 콘센트의 교체를 위해
전기 기술자와 상의하십시오.
10) 전원 코드가 밟히거나 집히지 않도록 보호하십시오. 특히
플러그, 콘센트, 제품과 연결된 부분에 주의해 주십시오.
11) 제조업체가 명시한 부가 장비 및 부속품만 사용하십시오.
12) 적합한 기계적 내구성, 열 방산, 건물 구조에 대한 적절한
보호를 제공할 수 있게 설계된 장비 랙, 카트, 스탠드 또는
테이블과만 함께 사용하십시오.
카트를 이용할 때에는 카트와 제품을 함께 옮길
때 넘어뜨림으로 인한 부상을 입지 않도록 주의해
주십시오.
13) 천둥 번개가 치거나 오랜 기간 사용하지 않을
경우에는 제품의 플러그를 뽑아 주십시오.
14) 모든 서비스는 자격을 갖춘 서비스 기술자에게
문의하십시오. 제품이 어떤 방식으로든 파손되었을 경우, 예를
들어 전원 공급 코드나 플러그가 파손되었을 때, 제품에 액체
또는 물체가 쏟아졌거나 제품이 비나 습기 등에 노출되었을
때, 정상적으로 작동하지 않을 때, 제품을 떨어뜨렸을 때 등의
경우에는 서비스를 받아야 합니다.
경고 – 화재 또는 전기 충격의 위험을 낮추려면, 이 제품을 비 또는 수분에 노출시키지 마십시오. 이 제품에 물이 떨어지거나 튀기면
안되며, 꽃병같이 액체로 가득 찬 물건이 있을 경우 이 제품 가까이에 놓지 마십시오.
경고 – 이 기호가 표시된 100 V 확성기 단자 는 Hazardous Live 입니다. 이 단자에 연결된 외부 배선은 숙련되거나 전문 교육을 받은
인력이 설치해야 합니다.
경고 – MAINS로 구동되는 제품들은 접지 안정성이 있어야 하고, MAINS 소켓에 연결하여 보호 접지 연결을 제공하도록 정확하게
접지되어야 합니다.
장치 연결 해제 – MAINS 플러그는 MAINS 전원을 차단하는 데 사용되며 즉시 작동할 수 있는 상태로 유지해야 합니다.
주의 – POTS 전화 인터페이스 옵션을 제공할 경우, 이 장비의 전화 회로망 연결은 전문 교육을 받은 인력이 담당해야 합니다. 화재의
위험을 줄이기 위해서는 전기 통신 회로 연결은 26번 AWG 솔리드 동선만 이용하십시오.
공인 전문가의 설치 및 서비스:
주의 – 전기 충격의 위험을 줄이기 위해, Biamp 제품의 설치 및 서비스는 Biamp 공인 오디오 설치 전문가에게 의뢰해야 합니다.
전문 인력이 아닌 경우, 작업 지침에 담긴 내용 이외의 사항에 대해 서비스를 제공하면 안됩니다.
전문 인력은 AC MAINS 전원을 차단하고 나서 제품을 열어야 합니다.
주의 – ’보조 전원’의 설치 단계는 전문 인력에게만 해당되며, 현지의 코드를 모두 준수해야 합니다.
• 국제 전기 코드, ANSI/NFPA 70 (미국)
• 캐나다 전기 코드, Part 1, CSA C22.1, Sections 2-128, 12-010(3) 및 12-100 (캐나다)
벽면 설치 지침 – 벽걸이 제품은 최소 4개의 나무못을 사용하여 건식벽체 또는 이와 유사한 표면에 확실하게 조여야 합니다(설치 구멍은 2
개이며, 2개 나사는 제품용임). 교대용 패스너로는 건식벽체 앵커, 메탈 스터드에 조이는 셀프 태핑 판금 나사 또는 나무 스터드 안에 ½
인치 이상 들어가는 나무못이 있습니다.
Page 18

BIAMP SYSTEMS • 9300 SW GEMINI DRIVE • BEAVERTON, OREGON 97008 • USA
503.641.7287 • BIAMP.COM
18
IMPORTANT SAFETY INSTRUCTIONS
Lightning Bolt: Hazardous Live voltages present when this unit is in operation. Do not touch terminals marked with
this symbol while the unit is connected to live power.
Exclamation Point: Replace components (i.e. fuses) only with the values specied by the manufacturer. Failure to
do so will compromise safe operation of this unit
Hazardous Moving Fan Blades: Remove power before servicing and keep away from moving fan blades.
WARNING - To reduce the risk of re or electric shock, do not expose these products to rain or moisture. These products must not be
exposed to dripping or splashing and no objects lled with liquids, such as vases, shall be placed on these products.
WARNING – 100 Volt Speaker terminals marked with the symbol are Hazardous Live. External wiring connected to these terminals
requires installation by a Skilled or Instructed Person.
WARNING – MAINS Powered Products employ Safety Grounding and must be connected to a MAINS socket that is properly grounded to
provide a protective earthing connection.
Disconnect Device - The MAINS plug is used to disconnect MAINS power and must remain readily operable.
CAUTION – When POTS Telephone Interface options are provided, connections to the telecom circuits of this device must be made by
qualied, trained personnel. To reduce the risk of re, use only No. 26 AWG solid copper wire for telecom circuit connections.
Intended for Installation and Service by Skilled Personnel Only:
CAUTION – To reduce the Risk of Electric Shock, Installation and Service of Biamp Products should be conducted only by Skilled Persons
who are Biamp Qualied Audio Installation Professionals.
Do not perform any servicing other than that contained in the Operating Instructions unless you are a Skilled Person qualied to do so.
Skilled Persons must disconnect AC MAINS Power before opening product.
CAUTION - The Installation steps for ‘Auxiliary Power’ are for use by Skilled Personnel only and must comply with all local codes.
• National Electrical Code, ANSI/NFPA 70 for United States.
• Canadian Electrical Code, Part 1, CSA C22.1, Sections 2-128, 12-010(3) and 12-100 for Canada.
Wall Mounting Instructions – Wall mounted products must be securely fastened to drywall or similar surface using a minimum of 4 wood
screws (2 screws for product with only two mounting holes). Alternate fasteners which may be used include drywall anchors, self-tapping
sheet metal screws located in metal studs or wood screws extending a minimum of ½ inch into wood studs.
Explanation of Graphical Symbols:
1) Read these instructions.
2) Keep these instructions.
3) Heed all warnings.
4) Follow all instructions.
5) Do not use this product near water.
6) Clean only with dry cloth.
7) Do not block ventilation openings. Install in accordance with
the manufacturer’s instructions.
8) Do not install near any heat sources such as radiators, heat
registers, stoves, or other products (including ampliers) that
produce heat.
9) Do not defeat the safety purpose of the grounding-type plug.
A grounding type plug has two blades and a third grounding
prong.
The third prong is provided for your safety. If the provided
plug does not t into your outlet, consult an electrician for
replacement of the obsolete outlet.
10) Protect the power cord from being walked on or pinched,
particularly at plugs, convenience receptacles and the point
where they exit from the product.
11) Only use attachments/accessories specied by the
manufacturer.
12) Use only with equipment rack, cart, stand or
table designed to provide adequate mechanical
strength, heat dissipation and securement to the
building structure.
When a cart is used, use caution when moving
the cart and product combination to avoid injury from tip-over.
13) Unplug this product during lightning storms or when
unused for long periods of time.
14) Refer all servicing to qualied service personnel. Servicing
is required when the product has been damaged in any way,
such as power-supply cord or plug is damaged, liquid has been
spilled or objects have fallen into the product, the product has
been exposed to rain or moisture, does not operate normally, or
has been dropped.
Page 19

BIAMP SYSTEMS • 9300 SW GEMINI DRIVE • BEAVERTON, OREGON 97008 • USA
503.641.7287 • BIAMP.COM
19
IMPORTANT SAFETY INSTRUCTIONS
Lightning Bolt: Hazardous Live voltages present when this unit is in operation. Do not touch terminals marked with
this symbol while the unit is connected to live power.
Exclamation Point: Replace components (i.e. fuses) only with the values specied by the manufacturer. Failure to
do so will compromise safe operation of this unit
Hazardous Moving Fan Blades: Remove power before servicing and keep away from moving fan blades.
WARNING - To reduce the risk of re or electric shock, do not expose these products to rain or moisture. These products must not be
exposed to dripping or splashing and no objects lled with liquids, such as vases, shall be placed on these products.
WARNING – 100 Volt Speaker terminals marked with the symbol are Hazardous Live. External wiring connected to these terminals
requires installation by a Skilled or Instructed Person.
WARNING – MAINS Powered Products employ Safety Grounding and must be connected to a MAINS socket that is properly grounded to
provide a protective earthing connection.
Disconnect Device - The MAINS plug is used to disconnect MAINS power and must remain readily operable.
CAUTION – When POTS Telephone Interface options are provided, connections to the telecom circuits of this device must be made by
qualied, trained personnel. To reduce the risk of re, use only No. 26 AWG solid copper wire for telecom circuit connections.
Intended for Installation and Service by Skilled Personnel Only:
CAUTION – To reduce the Risk of Electric Shock, Installation and Service of Biamp Products should be conducted only by Skilled Persons
who are Biamp Qualied Audio Installation Professionals.
Do not perform any servicing other than that contained in the Operating Instructions unless you are a Skilled Person qualied to do so.
Skilled Persons must disconnect AC MAINS Power before opening product.
CAUTION - The Installation steps for ‘Auxiliary Power’ are for use by Skilled Personnel only and must comply with all local codes.
• National Electrical Code, ANSI/NFPA 70 for United States.
• Canadian Electrical Code, Part 1, CSA C22.1, Sections 2-128, 12-010(3) and 12-100 for Canada.
Wall Mounting Instructions – Wall mounted products must be securely fastened to drywall or similar surface using a minimum of 4 wood
screws (2 screws for product with only two mounting holes). Alternate fasteners which may be used include drywall anchors, self-tapping
sheet metal screws located in metal studs or wood screws extending a minimum of ½ inch into wood studs.
Explanation of Graphical Symbols:
1) Read these instructions.
2) Keep these instructions.
3) Heed all warnings.
4) Follow all instructions.
5) Do not use this product near water.
6) Clean only with dry cloth.
7) Do not block ventilation openings. Install in accordance with
the manufacturer’s instructions.
8) Do not install near any heat sources such as radiators, heat
registers, stoves, or other products (including ampliers) that
produce heat.
9) Do not defeat the safety purpose of the grounding-type plug.
A grounding type plug has two blades and a third grounding
prong.
The third prong is provided for your safety. If the provided
plug does not t into your outlet, consult an electrician for
replacement of the obsolete outlet.
10) Protect the power cord from being walked on or pinched,
particularly at plugs, convenience receptacles and the point
where they exit from the product.
11) Only use attachments/accessories specied by the
manufacturer.
12) Use only with equipment rack, cart, stand or
table designed to provide adequate mechanical
strength, heat dissipation and securement to the
building structure.
When a cart is used, use caution when moving
the cart and product combination to avoid injury from tip-over.
13) Unplug this product during lightning storms or when
unused for long periods of time.
14) Refer all servicing to qualied service personnel. Servicing
is required when the product has been damaged in any way,
such as power-supply cord or plug is damaged, liquid has been
spilled or objects have fallen into the product, the product has
been exposed to rain or moisture, does not operate normally, or
has been dropped.
Page 20

BIAMP SYSTEMS • 9300 SW GEMINI DRIVE • BEAVERTON, OREGON 97008 • USA
503.641.7287 • BIAMP.COM
20
IMPORTANT SAFETY INSTRUCTIONS
Lightning Bolt: Hazardous Live voltages present when this unit is in operation. Do not touch terminals marked with
this symbol while the unit is connected to live power.
Exclamation Point: Replace components (i.e. fuses) only with the values specied by the manufacturer. Failure to
do so will compromise safe operation of this unit
Hazardous Moving Fan Blades: Remove power before servicing and keep away from moving fan blades.
WARNING - To reduce the risk of re or electric shock, do not expose these products to rain or moisture. These products must not be
exposed to dripping or splashing and no objects lled with liquids, such as vases, shall be placed on these products.
WARNING – 100 Volt Speaker terminals marked with the symbol are Hazardous Live. External wiring connected to these terminals
requires installation by a Skilled or Instructed Person.
WARNING – MAINS Powered Products employ Safety Grounding and must be connected to a MAINS socket that is properly grounded to
provide a protective earthing connection.
Disconnect Device - The MAINS plug is used to disconnect MAINS power and must remain readily operable.
CAUTION – When POTS Telephone Interface options are provided, connections to the telecom circuits of this device must be made by
qualied, trained personnel. To reduce the risk of re, use only No. 26 AWG solid copper wire for telecom circuit connections.
Intended for Installation and Service by Skilled Personnel Only:
CAUTION – To reduce the Risk of Electric Shock, Installation and Service of Biamp Products should be conducted only by Skilled Persons
who are Biamp Qualied Audio Installation Professionals.
Do not perform any servicing other than that contained in the Operating Instructions unless you are a Skilled Person qualied to do so.
Skilled Persons must disconnect AC MAINS Power before opening product.
CAUTION - The Installation steps for ‘Auxiliary Power’ are for use by Skilled Personnel only and must comply with all local codes.
• National Electrical Code, ANSI/NFPA 70 for United States.
• Canadian Electrical Code, Part 1, CSA C22.1, Sections 2-128, 12-010(3) and 12-100 for Canada.
Wall Mounting Instructions – Wall mounted products must be securely fastened to drywall or similar surface using a minimum of 4 wood
screws (2 screws for product with only two mounting holes). Alternate fasteners which may be used include drywall anchors, self-tapping
sheet metal screws located in metal studs or wood screws extending a minimum of ½ inch into wood studs.
Explanation of Graphical Symbols:
1) Read these instructions.
2) Keep these instructions.
3) Heed all warnings.
4) Follow all instructions.
5) Do not use this product near water.
6) Clean only with dry cloth.
7) Do not block ventilation openings. Install in accordance with
the manufacturer’s instructions.
8) Do not install near any heat sources such as radiators, heat
registers, stoves, or other products (including ampliers) that
produce heat.
9) Do not defeat the safety purpose of the grounding-type plug.
A grounding type plug has two blades and a third grounding
prong.
The third prong is provided for your safety. If the provided
plug does not t into your outlet, consult an electrician for
replacement of the obsolete outlet.
10) Protect the power cord from being walked on or pinched,
particularly at plugs, convenience receptacles and the point
where they exit from the product.
11) Only use attachments/accessories specied by the
manufacturer.
12) Use only with equipment rack, cart, stand or
table designed to provide adequate mechanical
strength, heat dissipation and securement to the
building structure.
When a cart is used, use caution when moving
the cart and product combination to avoid injury from tip-over.
13) Unplug this product during lightning storms or when
unused for long periods of time.
14) Refer all servicing to qualied service personnel. Servicing
is required when the product has been damaged in any way,
such as power-supply cord or plug is damaged, liquid has been
spilled or objects have fallen into the product, the product has
been exposed to rain or moisture, does not operate normally, or
has been dropped.
 Loading...