

Page 1
I SERIES
BalancePoint™ Flyware
For Point Source and
Subwoofer loudspeakers
models IP8, IP6, IS8, and IS6
BFR22V
22" BalancePoint™ Vertical Fly Rails
The BalancePoint™ Flyware Accessory Guide (a complete set of instructions for all
of the BalancePoint™ Flyware Kits) is available on the Community website.
Community Professional Loudspeakers
333 East Fifth Street, Chester, PA 19013-4511 USA
Phone (610) 876-3400 • Fax (610) 874-0190
communitypro.com • info@communitypro.com
CAUTION: Installation of loudspeakers should only be
performed by trained and qualified personnel. It is strongly
recommended that a licensed and certified professional
structural engineer approve the mounting design.
Page 2

IMPORTANT SAFETY INSTRUCTIONS
Always follow these basic safety precautions when using or installing I SERIES loudspeakers and
accessories:
• Read these instructions prior to assembly.
• Keep these instructions for reference.
• Heed all warnings.
• Follow all instructions, particularly those pertaining to rigging, mounting, hanging and electrical
connections.
• Do not use this apparatus near water.
• Clean only with dry cloth.
• Do not block any ventilation openings. Install in accordance with the manufacturer’s instruction.
• Do not install near any heat sources such as radiators, heat registers, stoves,light fixtures, or
other apparatus (including amplifiers) that produce heat.
• Only use attachments and accessories that are specified and approved by the manufacturer.
Refer all servicing to qualified service personnel. Servicing is required when the apparatus has been
damaged in any way, such as liquid has been spilled or objects have fallen into the apparatus, the
apparatus has been exposed to rain or moisture, does not operate normally, or has been dropped.
The terms CAUTION, WARNING, and DANGER may be used in this manual to alert the reader to
important safety considerations. If you have any questions or do not understand the meaning
of these terms, do not proceed with installation. Contact your local dealer, distributor, or call
Community directly for assistance. These terms are defined as:
CAUTION: describes an operating condition or user action that may expose the
equipment or user to potential damage or danger.
WARNING: describes an operating condition or user action that will likely cause damage
to the equipment or injury to the user or to others in the vicinity.
DANGER: describes an operating condition or user action that will immediately damage
the equipment and/or be extremely dangerous or life threatening to the user or to others
in the vicinity.
These installation instructions are for use by qualified personnel only. To reduce the risk of fire or
electric shock do not perform any servicing other than that contained in the operating instructions
unless you are qualified to do so.
UNPACKING / INSPECTION
Community I SERIES loudspeakers are
engineered and manufactured to be rugged
and they are carefully packed in sturdy cartons.
However, it is recommended to thoroughly
inspect each unit after it has been removed from
the packaging, as damage could occur during
shipping.
Please note that once the shipment has left
your dealer or the Community factory, the
responsibility for damage is always borne by
the freight company. If damage has occurred
during shipping, you must file a claim directly
with the freight company. It’s very important to
contact the freight company as soon as possible
after receiving your shipment, as most freight
companies have a short time limit within which
they will investigate claims. Make sure to save
the carton and the packing material, as most
claims will be denied if these materials are
not retained. Your Community dealer and the
factory will try to help in any way they can, but
it is the responsibility of the party receiving the
shipment to file the damage claim.
It is always a good idea to retain the carton and
packing materials, if possible, in the event that
the unit may need to be returned to your dealer
or distributor for repair in the future.
CAUTION: Installation of
I SERIES loudspeakers should
only be performed by trained
and qualified personnel. It is strongly
recommended that a licensed and
certified professional structural
engineer approve the mounting. Severe
injury and/or loss of life may occur if
this product is improperly installed.
RIGGING SAFETY / IMPORTANT NOTES
There are three primary areas of responsibility
for rigging loudspeakers. The first is the
building structure. Always consult with the
building architect or structural engineer to
assure the ability of the structure to support
the loudspeaker system. The second area
of responsibility is the loudspeaker itself.
Community certifies its loudspeaker systems
and rigging accessories for suspension
when they are properly installed according
to our published guidelines. The third area
of responsibility is everything between the
loudspeaker and the building structure and the
actual process of installation. The installing
contractor assumes this responsibility.
Loudspeaker rigging should be performed only
by certified rigging professionals using certified
rigging hardware chosen for the specific
application. Prior to installation, the contractor
should present a rigging plan, with drawing
and detailed parts list, to a licensed structural
engineer (P.E.) or architect for written approval.
Page 2 BalancePoint™ Flyware I SERIES
IMPORTANT: I SERIES loudspeakers are designed and intended to be mounted to
diering building surfaces using a variety of rigging hardware, means and methods.
Installation of loudspeakers should only be performed by trained and qualified
personnel. All electrical connections must conform to applicable city, county, state, and
national (NEC) electrical codes.
DANGER: All rigging fittings must be fully tightened and secured. Any missing fasteners
or parts will compromise the structural integrity of the enclosure and constitute a safety
hazard. Over-tightening (crushing the wood) should be avoided as well. Do not suspend
the loudspeaker unless all fasteners are securely in place!
IMPORTANT: The flat head bolts that come installed in each enclosure must remain in
place or be replaced by a threaded fastener from an array bracket. The bolts attach to
internal metal brackets that are critical to the structural integrity and rated Safe Working
Load (SWL) of each point and each array assembly. Failure to include a fastener in every
location could lead to serious injury, or even death.
DANGER: I SERIES rigging fittings are rated at a Working Load Limit (WLL) of 150 lbs
(68 kg) with a 10:1 safety margin. No single rigging fitting should ever be subjected to a
load that is greater than this stated limit. Failure to heed this warning could result in
injury or death!
Page 3

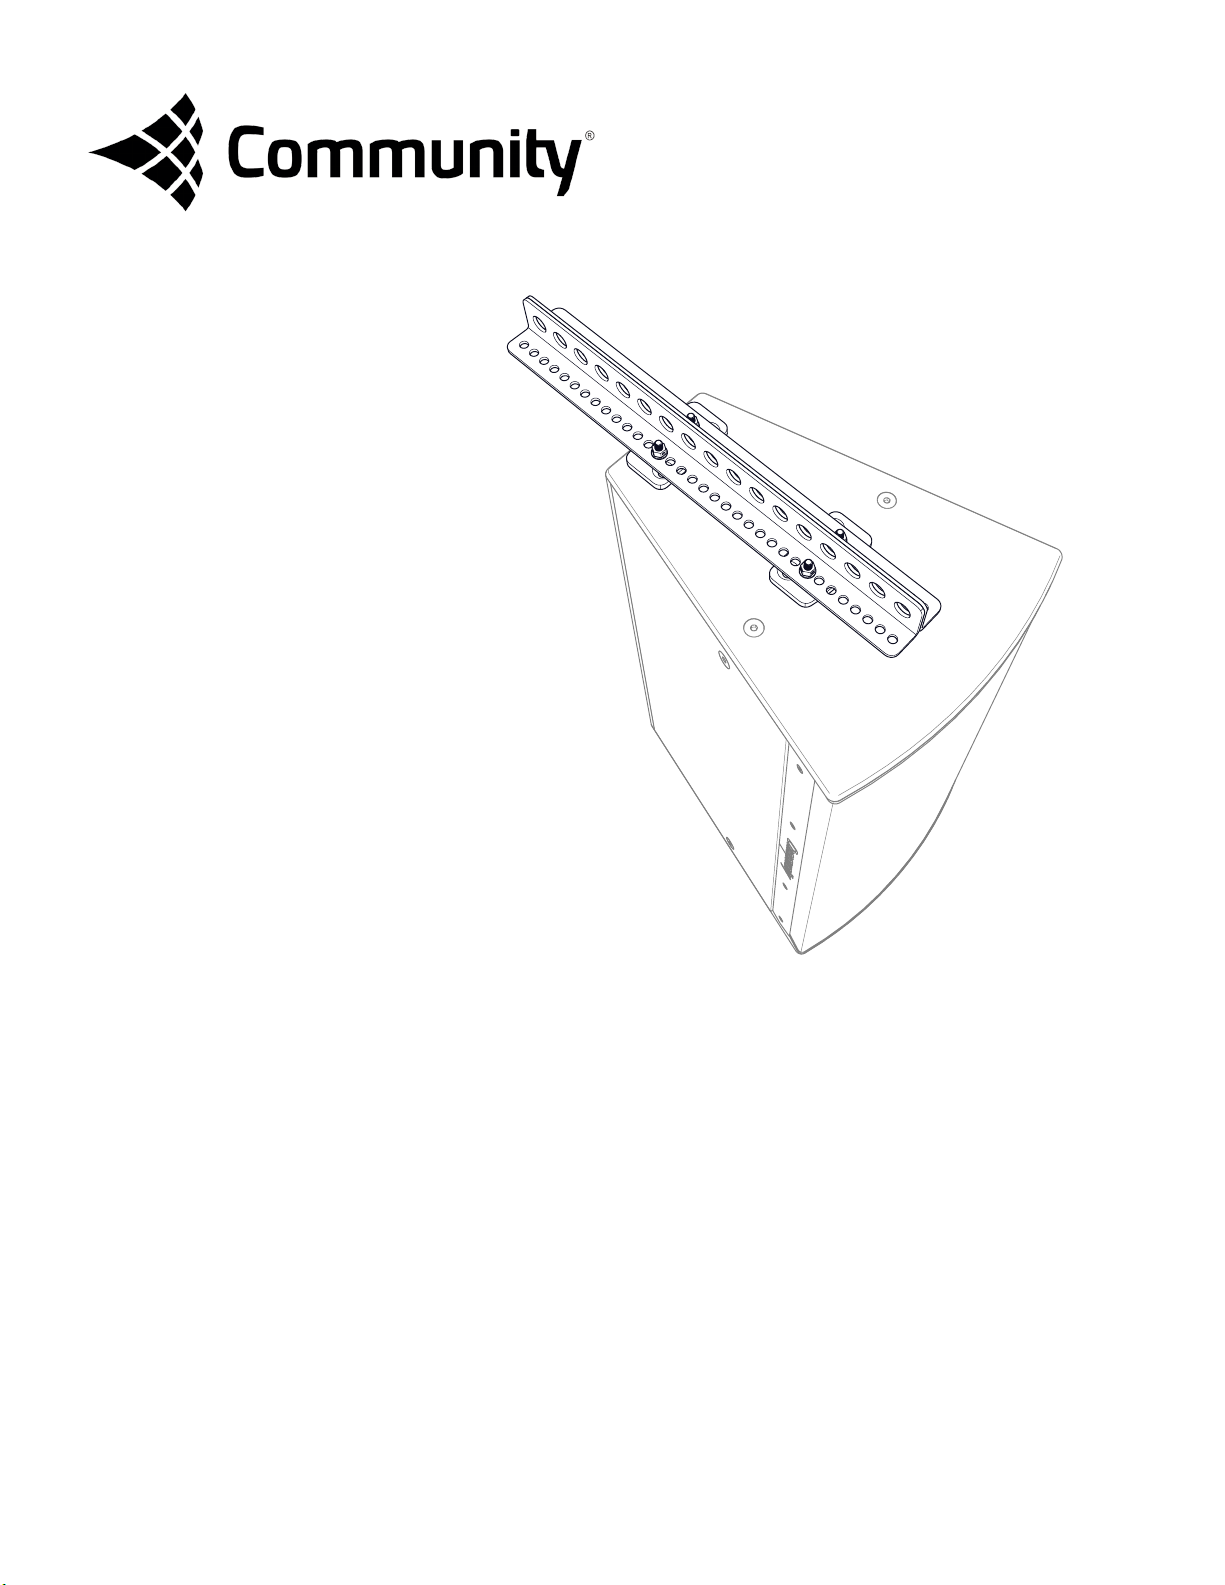
BALANCEPOINT™ FLY RAILS
BFR22V - 22" BalancePoint™ Vertical Fly Rails
APPLICATION: Suspend and aim a single full-range loudspeaker (shown) or
subwoofer from ceilings, walls, trusses, etc in portrait (vertical) orientation.
Parts:
PR-1
1
PP-1
PR-1: 22" BalancePoint™ Fly Rails (2)
PP-1: Universal Fly Rail Plates (2)
Hardware:
Qty
Code
12
HW8 8mm Flat Washers
8 HN8 M8 Locknuts
4 HF8-3 8 x 30 mm Flat Hd Bolts
4 HH8-2 8 x 25 mm Hex Hd Bolts
2 HF1-3 10 x 35 mm Flat Hd Bolts
Some 8mm hardware listed above may be
included in plate preassemblies.
Kit Weight: 9.0 lb (4.1 kg)
Description
2
HN8
HW8
HF1-3
PP-1
Figure 1. Attach PP-1 to enclosure
ADVANCED CONFIGURATIONS
The Fly Rails can be connect ed to Isometric Array
frames , U-B r acke t s and Ver t ica l Yokes. Connec t t he
rails using 8mm hard ware incl uded in this kit . Fully
tighten hardware before suspending the assembly.
The assembly should hang level and multiple lift
PR-1
points should be utilized. Lift points at the COG
of each frame, yoke or u-bracket assembly or
subwoofer cabinet.
Loudspeaker
4
Figure 2. Attach rails to PP-1
HH8-2
HW8
3
HN8
Figure 3. Fully tighten all connections
I SERIES BalancePoint™ Flyware Page 3
Figure 4. Typical connection of rails to the IAF40
(shown) or IAF55 isometric array frame
Page 4

TECHNICAL DRAWINGS
4.20" [106.8]
2.38" [60.4]
.31" [8.0]
2.10" [53.4]
.95" [24.0]
1.38" [35.0]
.55" [13.9]
1.18" [30.0]
CL
DRILL & C'SK FOR
DRILL, TAP & C'SK FOR
M8 FLAT HEAD SCREW
(2 PLACES FAR SIDE)
HORIZONTAL BRACKET SINGLE-2PCS
1.14" [29.0]
.16" [4.0]
.87" [22.0]
1.26" [32.0] (TYP)
1.61" [40.9]
1.02" [25.9]
.55" [14.0]
.63" [16.0](TYP)
Ø.39" [Ø10.0](TYP)
.66" [16.9]
2.08" [52.8]
UNIVERSAL MOUNTING PLATE [PP-1]
Tapped / countersunk for
8mm at head bolt
(far side) 2 places
Drilled / countersunk for
10mm at head bolt
(near side) 3 places
22" BALANCEPOINT™ FLY RAILS [PR-1]
Ø.79" [Ø20.0] (TYP)
21.89" [556.1]
LOUDSPEAKER WEIGHTS
FULL-RANGE 600 Level [lbs (kg)] 800 Level [lbs (kg)] SUBWOOFER 600 Level [lbs (kg)] 800 Level [lbs (kg)]
IP6/8-1122 65.0 (29.5) 55.0 (24.9) IP6/8-112 64.0 (29.0) 58.0 (26.3)
IP6/8-1152 79.0 (35.8) 68.0 (30.8) IP6/8-115 78.0 (35.4) 72.0 (32.7)
IP8-1153 - 105.0 (47.6) IP6/8-118 97.0 (44.0) 98.0 (44.5)
IP8-0002 - 63.0 (28.6) IP6/8-212 101.0 (45.8) 89.0 (40.4)
IP8-1151 - 54.0 (24.5) IP6/8-215 126.0 (57.2) 14.0 (51.7)
IP6/8-218 170.0 (77.1) 172.0 (78.0)
Page 4 BalancePoint™ Flyware I SERIES
Page 5

HELPFUL INSTALLATION TIPS
• Assemble the horizontal arrays on the ground (or lifting surface) and then lift the entire assembly into
place. Large vertical arrays should be assembled top down - lifting each component and attaching it in
order. Smaller vertical arrays can be assembled on the ground and then flown.
• Many brackets and plates come preassembled with the 8mm flat head hardware installed. Some of the
corner brackets have diering bolt patterns and we preinstall them in the most common configuration for
that kit. Refer to the diagrams on install pages to confirm that the bolts are in the correct position for your
cabinet size.
• Assemble the array with the diering models (horn/coverage patterns) in the correct configuration.
• If the cabinets are horizontal, keep the input panels all on the same side for wiring ease, whenever
possible.
• To determine the approximate splay or array angles prior to installation, use simulation software such as
EASE®. Document those values, and set the angles on the hinges and splay brackets as they are attached
to the cabinets.
• When attaching corner brackets, thread both bolts in finger tight first, then continue to tighten equally with
hex wrenches (helps avoid misalignment issues).
• Fully tighten the connections as each assembly is finished without crushing the wood fibers.
• The U-Brackets, Vertical Yokes and Isometric Frames have hole patterns compatible with third party
manufacturers' adapter plates for 1-1/2" NPT rigid pole mounting systems (such as Chief CMA105 UL listed
Ceiling mounting systems, with a SWL rating of 500 lbs [226.7 kg]). See manufacturer's website for details.
• Contact our Technical Assistance Group (TAG) for additional guidance by phone: (610) 876-3400 or email:
tagteam@communitypro.com.
GENERAL ASSEMBLY INFORMATION
The BalancePoint™ Flyware kits for the I SERIES loudspeakers are modular
and can be combined in a number of ways. The most comm on co n figuration of
each kit is shown along with instructions for assembly.
Hardware and Parts: There is a key at the beginning of each instruction that
shows the parts, their quantity and abbreviation. We also use a shortened
code for the hardware that oers an easy reference to the type, diameter and
approximate length.
ex: HW6 = Hardware Washer 6mm;
HF1-2 = Hardware, Flat head bolt, 10 x 25mm
Several par ts have underside coun tersunk holes that are t hreaded for 8mm
flat head bolt s. They should be fully sea ted (at or below the surface of the
piece) before attaching the plate/bracket to the enclosure. Bolt placement
diagrams are show n f o r the cabinet brackets t h a t ha ve m ult iple holes. S everal
of the bracke ts are shippe d with th e 8mm flat hea d bolts alr eady inst alled in
the most common configuration for that kit.
IMPO R TAN T: The flat head bolt s that come inst alled in each enclo sure
must remain in place or be replaced by a threaded fastener from an array
bracket . The bolts at tach to int ernal metal br ackets that ar e critical to
the str uctur al integrit y and ra ted Safe Work ing Load (SWL) of each point and
each array ass embly. Failure to include a fast ener in ever y lo cation co uld lead
to serious injury, or even death.
TOOLS NEEDED FOR ASSEMBLY:
• Metric socket and ratchet set
• Metric wrench set
• Metric hex key set
Typical bolt placement
diagram for 2-way Cabinet
(angle) Bracket (PB-3)
The loudspeaker enclosure must
have fasteners in all threaded holes
I SERIES BalancePoint™ Flyware Page 5
Page 6

GENERAL ASSEMBLY INFORMATION (continued)
SAFETY CABLES
IMPO R TAN T: Attach a safe ty cable to one of t he unused mounting points on t he
loudspeaker (and/or the bracket assembly). Safety cables must be secured to a
suitable load-bearing point separate from the loudspeaker mounting point, with as
lit tle slack as possib le, oriented to minimize dy namic swinging of the l oad, so as not to
develop undue sho ck or kin et ic force i f the l oudsp eaker mount wer e to fail . S af ety cabl es
and hardware ar e not included. Pl ease consult a str uctural eng ineer for the appr opriate
cables, hardware, and location(s) for the load and application.
BALANCEPOINT™ FLY RAILS
Positioning:
• The fly rails may be mounted in any position required as long as all
attachment points are used.
• For the best aesthetics, the fly rails should not extend beyond the front edge
of the front cabinet.
• The fly rails can extend beyond the back of the cabinet.
• The rails should be attached to the cabinets using all of the connections
shown in the instructions for each assembly. This will ensure that the
cabinets don't rotate on the rigging and that the rigging is securely attached
to the cabinets.
• In "Subwoofer Behind" configurations, the general rule of thumb is that there
shouldn't be less than 6" (152mm) between the face of the subwoofer and
the rear of the cabinet in front of it (allows sucient air movement from the
subwoofer cones and parts).
Flying:
• Optimally, each array should be lifted from the hole(s) on the fly rails that
produce the desired tilt angle using gravity alone (the "Balance Point").
• A second cable may be used to fine-tune the exact aiming angle and/or
stabilize the array from rotation as necessary.
Typical placement for safety
cable and hardware (eyebolt
not included)
1
2
1) Rails do not extend behind
subwoofer (best aesthetics)
2) Ample distance between the
subwoofer and full-range cabinets
3) Fly rails well behind cabinet face
Community Professional Loudspeakers
communitypro.com
I SERIES
3
1) Not enough distance
between cabinets
2) Poor aesthetic choice
1 2
BFR22V Manual 14SEP2015
 Loading...