

Page 1

RS-232 Control Document
Page 2

Table Of Contents
Overview..............................................................................................................................................................3
RS-232 Control....................................................................................................................................................4
Telnet Control......................................................................................................................................................5
Command............................................................................................................................................................6
Device Number....................................................................................................................................................8
Attribute ...............................................................................................................................................................9
Input/Output Blocks ...........................................................................................................................................10
VoIP Blocks .......................................................................................................................................................15
Mixer Blocks ......................................................................................................................................................18
Equalizer Blocks................................................................................................................................................20
Filter Blocks.......................................................................................................................................................21
Crossover Blocks...............................................................................................................................................22
Dynamics Blocks ...............................................................................................................................................23
Router Blocks ....................................................................................................................................................24
Delay Blocks......................................................................................................................................................25
Control Blocks....................................................................................................................................................26
Meter Blocks......................................................................................................................................................27
Generator Blocks...............................................................................................................................................28
Instance ID.........................................................................................................................................................29
Instance ID Tag .................................................................................................................................................29
Index..................................................................................................................................................................30
Value..................................................................................................................................................................31
Responses.........................................................................................................................................................32
HyperTerminal...................................................................................................................................................33
IP Address Commands......................................................................................................................................35
CobraNet IP Address.........................................................................................................................................37
Index..................................................................................................................................................................38
Page 3

Index
RS-232 and Telnet Protocol
Overview
Audia can be controlled via the control dialogs in the Audia software, or via third-party controllers using RS-232 or
Telnet
.
For control of Audia, Biamp created ATP (Audia Text Protocol). This simply means that Audia will accept strings
of ASCII characters to control and read settings of gain, mute, logic state, frequency, audio levels, and other
parameters of DSP Blocks in Audia products.
ATP strings can be sent via third-party controllers using RS-232 (see RS-232 Control
Telnet Control). A line feed needs to be sent after each command string sent.
The ATP string is structured in the following order:
Command DeviceNumber Attribute InstanceID Index1 Index2 Value <LF>
ATP strings require a space between each parameter; the last character in the string needs to be a line feed
<LF>. A space is not required before a line feed, but is acceptable and is used in examples shown in this manual
(for legibility only). A space normally proceeds the carriage return/line feed <CR><LF> in a response to a GET
command (see Command and Responses).
For each control string a few components will need to be derived from the Audia software: Device Number
InstanceID
used to specify what the DSP block attribute is to be set to. In an increment or decrement (INC or DEC) command
Value is used to specify how much the DSP block attribute is to be changed by.
**Note** Audia software will assign an Instance ID number to each DSP block on the initial Compile
system. Subsequent Compiles will not change the Instance ID numbers unless the "Reassign Instance IDs" check
box is selected in the ‘Compile'
software. Custom names (Instance ID Tags) may be assigned to DSP blocks, and used in lieu of Instance ID
numbers within ATP command strings.
Example: A string to control a Fader Level might look like this: SET 1 FDRLVL 2 1 9 <LF>.
The individual components for this string are:
Command Dev # Attribute Inst ID Index 1 Index 2 Value Line Feed
Notice that Index2 is not used since there is nothing entered in this parameter.
Example: A string to Mute a Standard Mixer Output: SET 3 SMMUTEOUT 5 5 1 <LF>
The individual components for this string are:
Command Dev # Attribute Inst ID Index 1 Index 2 Value Line Feed
Notice that Index1 is not used since there is nothing entered in this parameter.
Example: A string to turn up (increment) a Crosspoint on a Matrix Mixer: INC 2 MMLVLXP 4 3 2 1 <LF>
The individual components for this string are:
Command Dev # Attribute Inst ID Index 1 Index 2 Value Line Feed
In this example Index1 and Index2 are both used, together they specify which Crosspoint to change.
, and Index. Command and Attribute are derived from this document. In a SET command, Value is
tab of the ‘Options' screen (located on the Tools pull-down menu) in the Audia
SET 1 FDRLVL 2 1 None 9 <LF>
SET 3 SMMUTEOUT 5 None 5 1 <LF>
INC 2 MMLVLXP 4 3 2 1 <LF>
) or Telnet via TCP/IP (see
,
of the
Page 4
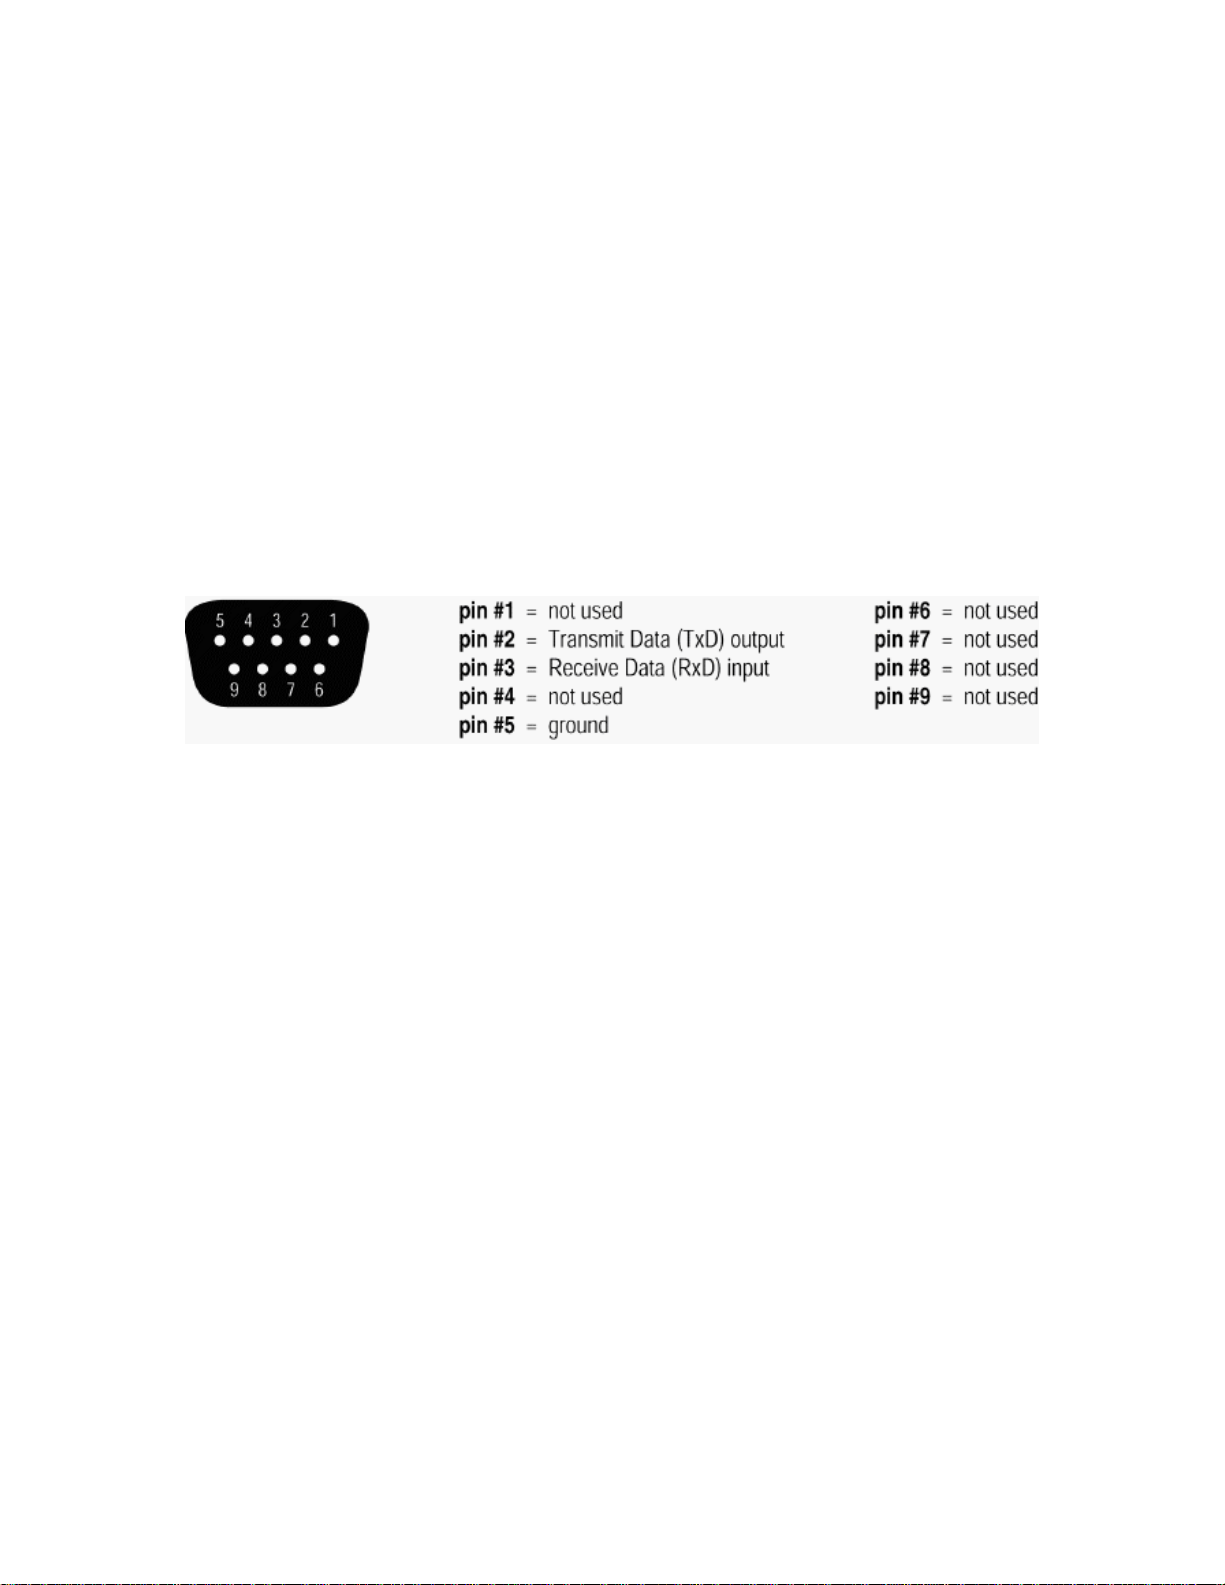
RS-232 Control
The RS-232 port on the back of an Audia unit is set to a default baud rate of 38400, 8 data bits, no parity, 1 stop
bit, and no flow control. (38400:8:None:1). If multiple Audias are connected together in a system then only one
RS-232 port needs to be connected to a third-party control system; communicati on data is shared via Ethernet
through a switch.
When controlling multiple Audia units that are not part of the same DAP file, each Audia unit will need to be
addressed via its own RS-232 port from a control system or PC. Audia units cannot be linked together via RS232, like some other BIAMP products can.
(The RS-232 baud rate can be set to 9600, 19200, 38400, 57600, or 115200 – default is 38400)
A straight through PC Serial Cable is used to communicate from an RS-232 port on a third-party controller (or
PC*) to the RS-232 port located on the back of an Audia unit.
Since the Audia's serial port does not implement flow control, waiting for a response from the Audia is essential
prior to sending the next command. After receiving the +OK response, the next command can be sent. By
waiting for the +OK response, the serial buffer will not be overloaded.
(* A PC can send/receive ATP Strings, using a terminal emulator program such as HyperTerminal.)
Page 5

Index
Telnet Control
Audia can be controlled using Telnet via TCP/IP. The same command strings that are used for RS-232 Control
are used for Telnet.
When controlling multiple Audias that are not a part of the same DAP file, each Audia device will need to be
addressed via its own Telnet session from a control system or PC.
Audia supports standard Telnet Echo Negotiation. By default, the Telnet server will echo characters sent to it, one
by one.
To turn echo OFF during a session
Send byte sequence 0xFF 0xFE 0x01.
Receive 3 byte response from server (0xFF 0xFC 0x01 = echo OFF).
Send desired commands.
To turn echo back ON during a session
Send byte sequence 0xFF 0xFD 0x01.
Receive 3 byte response from server (0xFF 0xFB 0x01 = echo ON).
Send desired commands.
:
:
Page 6

Command
SET – Tells Audia that a DSP attribute is to be set to a specific value – may contain negative numbers and/or
decimal points
GET - Tells Audia that a DSP attribute is to be read – the response may contain a decimal point and/or a negative
number (see Responses
INC - Tells Audia that a DSP attribute is to be incremented by a specific amount
DEC- Tells Audia that a DSP attribute is to be decremented by a specific amount
RECALL – Tells Audia that a preset is to be recalled.
DIAL – Tells the Audia that a dial command is being sent
SETL and GETL can be used if negative numbers and/or decimals are not supported by a control system.
SETL – Tells Audia that a DSP attribute is to be set to a specific value, no decimal places or negative numbers –
To convert a dB number: add 100 to the desired level and then multiply by 10.
Example: To set a level to –60.5dB, add 100 (-60.5 +100 = 39.5). Then multiply by 10 (39.5 X 10 = 395). Instead
of Value being –60.5, Value after this SETL command will equal 395.
GETL - Tells Audia that a DSP attribute is to be read without negative numbers or decimals. To convert this
number to dB: divide the number by 10, then subtract 100.
Example: With a returned GETL response of 405, divide by 10 (405 / 10 = 40.5), and then subtract 100 (40.5 –
100 = -59.5dB)
For your reference, the SETL/GETL Table on the following page shows .5dB increments converted into the
SETL/GETL format.
Some Attributes do not support all commands. The Attribute
GET/GETL, INC, or DEC functions. RECALL is only used on preset commands. DIAL is only used on telephone
dialing commands.
*When GET or GETL is used, a Value
Value must be specified in order for strings with SET/SETL, INC, DEC, and RECALL to work.
Note: SETD, GETD, INCD, DECD, SETLD, and GETLD commands may be used when a ‘full path’ serial
response to the command is desired (see Responses
target object, the original command, and the resulting value or state.
).
section defines which commands support SET/SETL,
will not need to be specified since GET/GETL is a request command. A
). A ‘full path’ serial response will provide identification of the
Page 7

Index
Level Value Level Value Level Value Level Value Level Value
12 1120 -10.5 895 -33 670 -55.5 445 -78 220
11.5 1115 -11 890 -33.5 665 -56 440 -78.5 215
11 1110 -12 885 -34 660 -56.5 435 -79 210
10.5 1105 -12.5 880 -34.5 655 -57 430 -79.5 205
10 1100 -13 875 -35 650 -57.5 425 -80 200
9.5 1095 -13.5 870 -35.5 645 -58 420 -80.5 195
9 1090 -14 865 -36 640 -58.5 415 -81 190
8.5 1085 -14.5 860 -36.5 635 -59 410 -81.5 185
8 1080 -15 855 -37 630 -59.5 405 -82 180
7.5 1075 -15.5 850 -37.5 625 -60 400 -82.5 175
7 1070 -16 845 -38 620 -60.5 395 -83 170
6.5 1065 -16.5 840 -38.5 615 -61 390 -83.5 165
6 1060 -17 835 -39 610 -61.5 385 -84 160
5.5 1055 -17.5 830 -39.5 605 -62 380 -84.5 155
5 1050 -18 825 -40 600 -62.5 375 -85 150
4.5 1045 -18.5 820 -40.5 595 -63 370 -85.5 145
4 1040 -19 815 -41 590 -63.5 365 -86 140
3.5 1035 -19.5 810 -41.5 585 -64 360 -86.5 135
3 1030 -20 805 -42 580 -64.5 355 -87 130
2.5 1025 -20.5 800 -42.5 575 -65 350 -87.5 125
2 1020 -21 795 -43 570 -65.5 345 -88 120
1.5 1015 -21.5 790 -43.5 565 -66 340 -88.5 115
1 1010 -22 785 -44 560 -66.5 335 -89 110
.5 1005 -22.5 780 -44.5 555 -67 330 -89.5 105
0 1000 -23 775 -45 550 -67.5 325 -90 100
-.5 995 -23.5 770 -45.5 545 -68 320 -90.5 95
-1 990 -24 765 -46 540 -68.5 315 -91 90
-1.5 985 -24.5 760 -46.5 535 -69 310 -91.5 85
-2 980 -25 755 -47 530 -69.5 305 -92 80
-2.5 975 -25.5 750 -47.5 525 -70 300 -92.5 75
-3 970 -26 745 -48 520 -70.5 295 -93 70
-3.5 965 -26.5 740 -48.5 515 -71 290 -93.5 65
-4 960 -27 735 -49 510 -71.5 285 -94 60
-4.5 955 -27.5 730 -49.5 505 -72 280 -94.5 55
-5 950 -28 725 -50 500 -72.5 275 -95 50
-5.5 945 -28.5 720 -50.5 495 -73 270 -95.5 45
-6 940 -29 715 -51 490 -73.5 265 -96 40
-6.5 935 -29.5 710 -51.5 485 -74 260 -96.5 35
-7 930 -30 705 -52 480 -74.5 255 -97 30
-7.5 925 -30.5 700 -52.5 475 -75 250 -97.5 25
-8 920 -31 695 -53 470 -75.5 245 -98 20
-8.5 915 -31.5 690 -53.5 465 -76 240 -98.5 15
-9 910 -32 685 -54 460 -76.5 235 -99 10
-9.5 905 -32.5 680 -54.5 455 -77 230 -99.5 5
-10 900 -33 675 -55 450 -77.5 225 -100 0
Page 8
Device Number
An Audia Device Number represents the physical Audia box’s defined address. The Audia software automatically
sets this number when a system is Compiled and loaded.
The Device number that a DSP block has been assigned to can be determined in 3 ways:
First Way
1. Right click on the DSP block and select ‘Properties
2. Click on DSP 1 attributes tab and scroll down. The device that the block is assigned to will be displayed
in the ‘Allocated To Unit’ field.
*Note: Each DSP block can be assigned to a device by changing ‘Fixed In to Unit" to ‘Yes’ (this is defaulted to
no).
:
’.
Second Way
1. In the Display tab of the Options screen select "Display Device Assignment in DSP Block info field".
This will display the device that each DSP block is assigned to on the main screen.
Third Way
1) While connected an Audia’s RS-232 port, type the string; GET 0 DEVID
Audia will return the Device Number of the unit you are connected to.
:
:
Page 9

Index
Attribute
The Attribute defines the portion of the DSP block to be controlled (fader level, crosspoint mute etc). The following
tables show whether each ATP Attribute supports SET/SETL, GET/GETL, INC, and DEC Commands, as well as
the Value range that the Attribute will accept. Index1/Index2 determines whether Index1, Index2 or BOTH are
needed for a ATP String to be complete.
ATP Strings can address: (click on the links to view the tables in each topic)
Input/Output Blocks
Mixer Blocks
Equalizer Blocks
Filter Blocks
Crossover Blocks
Dynamics Blocks
Router Blocks
Delay Blocks
Control Blocks
Meter Blocks
Generator Blocks
Page 10
Input/Output Blocks
Analog Inputs Attribute Commands Index Value Range
Input Gain MICGAIN SET, SETL, GET, GETL, INC,
DEC
Input Level INPLVL SET, SETL, GET, GETL, INC,
DEC
Phantom Power PHPWR SET, GET 1 0 = off
Input Mute INPMUTE SET, GET 1 0 = unmuted
Invert Polarity INPINVRT SET, GET 1 0 =normal
Example: Set Device 1 Input Level at Instance ID 6, Input 3 to –10dB.
Command Dev # Attribute Inst ID Index 1 Index 2 Value Line Feed
SET 1 INPLVL 6 3 None -10 <LF>
Result: SET 1 INPLVL 6 3 –10 <LF>
AEC Inputs Attribute Commands Index Value Range
Input Gain AECMICGAIN SET, SETL, GET, GETL, INC,
DEC
Input Level AECINPLVL SET, SETL, GET, GETL, INC,
DEC
Phantom Power AECPHPWR SET, GET 1 0 = off
Input Mute AECINPMUTE SET, GET 1 0 = unmuted
Invert Polarity AECINPINVRT SET, GET 1 0 =normal
Enable AEC AECENABLE SET, GET 1 0 = off
NLP Strength AECNLP SET, GET 1 0 = off
Noise Reduction AECNR SET, SETL, GET, GETL 1 0, and 6 ~ 15
Example: Set Device 1 AEC NLP Strength at Instance ID 24, Input 3 to aggressive.
Command Dev # Attribute Inst ID Index 1 Index 2 Value Line Feed
SET 1 AECNLP 24 3 None 3 <LF>
Result: SET 1 AECNLP 24 3 3 <LF>
1 0, 6, 12, 18, 24, 30, 36,
42, 48, 54, 60, 66
1 -100 ~ 12 *
1 = on
1 = muted
1 = inverted
* Can contain a decimal number.
1 0, 6, 12, 18, 24, 30, 36,
42, 48, 54, 60, 66
1 -100 ~ 12 *
1 = on
1 = muted
1 = inverted
1 = on
1 = soft
2 = medium
3 = aggressive
* Can contain a decimal number.
Page 11
Index
Analog Outputs Attribute Commands Index Value Range
Output
Level
OUTLVL SET, SETL, GET, GETL, INC,
DEC
2 -100 ~ 0 *
Output OUTMUTE SET, GET 2 0 = unmuted
1 = muted
Output Full
OUTFS SET, SETL, GET, GETL 2 -31, 0, 6, 12, 18, 24
Scale Level **
Invert
Polarity
Mic Level
Pad ***
OUTINVRT SET, GET 2 0 = normal
1 = inverted
OUTPAD SET, GET 2 0 = off
1 = on
* Can contain a decimal number.
** Supported only on FLEX OP-2e cards (-31 & 24 values supported on SOLO 4x12 outputs 1~4).
*** Supported on all FLEX output cards (and SOLO 4x12 outputs 1~4).
Example: Set Device 2 Output Mute at Instance ID 3, Output 4 to muted.
Command Dev # Attribute Inst ID Index 1 Index 2 Value Line Feed
SET 2 OUTMUTE 2 None 4 1 <LF>
Result: SET 2 OUTMUTE 3 4 1 <LF>
Power Amp Attribute Commands Index Value Range
Mute AMPMUTE SET, GET 2 0 = unmuted
1 = muted
Invert
Polarity
Gain AMPGAIN SET, SETL, GET, GETL, INC,
AMPINVRT SET, GET 1 0 = normal
1 = inverted
2 0 ~ 24
DEC
Clip Limiter AMPCLIPLIM SET, GET 2 0 = disabled
1 = enabled
Impedance AMPIMPED SET, GET 2 1 = 4 ohm
2 = 6 ohm
3 = 8 ohm
4 = auto
Networked
Attribute Commands Index Value Range
Paging Station-1
Level NPSLVL SET, SETL, GET, GETL, INC,
None -100 ~ 12 *
DEC
Mute NPSMUTE SET, GET None 0 = unmuted
1 = muted
* Can contain a decimal number.
Page 12

TI-2 Dialer Attribute Commands Index Value Range
Caller ID TICID GET None None
Full User Caller ID TICIDUSER GET None None
Hook-Flash TILINE FLASH None None
Hook-Switch
State
Speed Dial
Tel. Number
Speed Dial
Name
Last Number
Dialed
Speed Dial
Entry to Dial
Phone Number
to Dial
Redial TILASTDIALED DIAL None none
Note: The TI-2 can insert delay while dialing a phone number by inserting commas where desired (each comma
provides 1 second of delay). Most PBX systems require delay after acquiring an outside line. Also, multiple
TIPHONENUM commands can be used to dial the individual digits of a phone number. The TIPHONENUM
command has a character limit of 32 characters for the "value" field.
Example: Get Device 1 TI-2 Caller ID Information at Instance 23
Command Dev # Attribute Inst ID Index 1 Index 2 Value Line Feed
GET 1 TICID 23 None None None <LF>
Result: GET 1 TICIDUSER 23 <LF>
Note: GET 1 TICID 23 will return: "" if there is no caller ID information available. If there is CID information
available, it will return in the format "MMDDHHmmXXXXXXXXXX" where the "X's" represent the ten digit phone
number. For example "040211235035551212".
Example: Get Device 1 TI-2 Full User Caller ID Information at Instance 23
Command Dev # Attribute Inst ID Index 1 Index 2 Value Line Feed
GET 1 TICIDUSER 23 None None None <LF>
Result: GET 1 TICIDUSER 23 <LF>
Note: GET 1 TICIDUSER 23 will return: "" "" "" if there is no caller ID information available. The first set of
quotes contains the date and time in the format MMDDHHmm. The second set of quotes represents the
incoming phone number in the format 5036417287. The third set of quotes contains the name of the caller. If
there are quotes contained within the name, there will be a backslash preceding the quotes within the name, i.e.
"David \"Dawg\" Grisman".
Example: Set Device 1 TI-2 Speed Dial Entry at Instance 23 Speed Dial 16 to 1-800-826-1457.
Command Dev # Attribute Inst ID Index 1 Index 2 Value Line Feed
FLASH 1 TILINE 23 None None None <LF>
Result: FLASH 1 TILINE 23 <LF> (dashes in phone number are optional)
TIHOOKSTATE SET, GET None 0 = off-hook
1 = on-hook
TISDENTRY SET, GET 1 enter the phone
number
TISDLABEL SET, GET 1 enter the name
TILASTNUM GET None None
TISPEEDDIAL DIAL None 1 ~ 16
TIPHONENUM DIAL None enter the phone
number
Page 13

Index
Example: Set Device 1 TI-2 Speed Dial Entry at Instance 23 Speed Dial 16 to 1-800-826-1457.
Command Dev # Attribute Inst ID Index 1 Index 2 Value Line Feed
SET 1 TISDENTRY 23 16 None 18008261457 <LF>
Result: SET 1 TISDENTRY 23 16 18008261457<LF> (dashes in phone number are optional)
Example: Dial Device 1 TI-2 Phone Number To Dial at Instance 23 of 1-800-826-1457.
Command Dev # Attribute Inst ID Index 1 Index 2 Value Line Feed
DIAL 1 TIPHONENUM 23 None None 18008261457 <LF>
Result: DIAL 1 TIPHONENUM 23 18008261457<LF> (use DIAL instead of SET/GET commands)
TI-2 Receive Attribute Commands Index Value Range
Receive Level TIRXLVL SET, SETL, GET, GETL, INC,
DEC
Receive Mute TIRXMUTE SET, GET None 0 = unmuted
Number of
Rings Before
Auto-Answer
Line Echo
Cancellation
Noise
Suppresion
TIAUTOANSWER SET, GET None 0 = off
TIRXLEC SET, GET None 0 = off
TIRXNS SET, GET None 0 = off
None -100 ~ 12 *
1 = muted
1, 2, 3, 4, or 5
1 = on
1 = on
* Can contain a decimal number.
TI-2 Transmit Attribute Commands Index Value Range
Transmit Level TITXLVL SET, SETL, GET, GETL, INC,
DEC
Transmit Mute TITXMUTE
Example: Mute the TI-2 Transmit Block at Instance ID 21
Command Dev # Attribute Inst ID Index 1 Index 2 Value Line Feed
SET 1 TITXMUTE 21 None None 1 <LF>
Result: SET 1 TITXMUTE 21 1 <LF>
CobraNet
Input
CobraNet
RX Bundle
CobraNet
Input Level
CobraNet
Input Mute
CobraNet
Input Invert
Attribute Commands Index Value Range
CNINBNDL SET, GET None 1-65279
CNINLVL SET, SETL, GET, GETL, INC,
CNINMUTE SET, GET 1 0 = unmuted
CNININVRT SET, GET 1 0 = off
SET, GET
DEC
None -100 ~ 0 *
None 0 = unmuted
1 = muted
* Can contain a decimal number.
1 -100 ~ 12 *
1 = muted
1 = on
* Can contain a decimal number.
Page 14

CobraNet
Output
CobraNet
TX Bundle
CobraNet
Output Level
CobraNet
Output Mute
CobraNet
Output Invert
EXPI Attribute Commands Index Value Range
EXPI
RX Bundle
EXPI
Input Level
EXPI
Input Mute
EXPI
Input Invert
EXPO Attribute Commands Index Value Range
EXPO
TX Bundle
EXPO
Output Level
EXPO
Output Mute
EXPO
Output Invert
AudiaFUSION Attribute Commands Index Value Range
FUSION
Output Mute
FUSION
Amp Invert
FUSION
Clip/Limiter
FUSION
Amp Gain
FUSION
Amp Imped
Attribute Commands Index Value Range
CNOUTBNDL SET, GET None 1-65279
CNOUTLVL SET, SETL, GET, GETL, INC,
2 -100 ~ 0 *
DEC
CNOUTMUTE SET, GET 2 0 = unmuted
1 = muted
CNOUTINVRT SET, GET 2 0 = off
1 = on
* Can contain a decimal number.
EXPIBNDL SET, GET None 1-65279
EXPILVL SET, SETL, GET, GETL, INC,
1 -100 ~ 12 *
DEC
EXPIMUTE SET, GET 1 0 = unmuted
1 = muted
EXPIINVRT SET, GET 1 0 = off
1 = on
* Can contain a decimal number.
EXPOBNDL SET, GET None 1-65279
EXPOLVL SET, SETL, GET, GETL, INC,
1 -100 ~ 0 *
DEC
EXPOMUTE SET, GET 1 0 = unmuted
1 = muted
EXPOINVRT SET, GET 1 0 = off
1 = on
* Can contain a decimal number.
FUSAMPMUTE SET, GET
2
0 = unmuted
1 = muted
FUSAMPINVRT SET, GET 2 0 = off
1 = on
FUSAMPCLIPLIM SET, GET 2 0 = disabled
1 = enabled
FUSAMPGAIN SET, GET 2 0 ~ 24
FUSAMPIMPED SET, GET 2 1 = 4 Ohm
2 = 6 Ohm
3 = 8 Ohm
4 = autodetect
Page 15

Index
VoIP Blocks
VoIP Console Attribute Commands
Hookstate VOIPHOOKSTATE SET, GET
Digit(s) to Dial VOIPPHONENUM DIAL
Last Number Dialed VOIPLASTNUM GET
Redial VOIPLASTDIALED DIAL
Speed Dial
VOIPSDENTRY SET, GET 1 & 2 enter the phone
Tel. Number
Speed Dial
VOIPSDLABEL SET, GET 1 & 2 enter the name
Name
Speed Dial
VOIPSPEEDDIAL DIAL 1 1 ~ 16
Entry to Dial
Answer Call VOIPCALL ANS 1 None
Reject or End Call VOIPCALL END 1 None
Auto-Answer VOIPAAENABLE SET, GET 1 0 = enabled
Number of Rings
VOIPAACOUNT SET, GET 1 0, 1, 2, 3, 4, 5
Before Auto-Answer
Place a Call on Hold VOIPCALL HOLD 1 None
Resume a Call on
VOIPCALL RESUME 1 None
Hold
Line In Use State VOIPLIUSTATE GET 1 0 = not in use
Line Ready State VOIPLRSTATE GET 1 0 = not ready
Ring Indicator State VOIPRISTATE GET 1 0 = not ringing
CallerID VOIPCIDUSER GET 1 "date""phnenum'"name"
Note: Index 1 is the line number [1,2] and index 2 is the speed dial entry [1,16].
Multiple VOIPPHONENUM commands can be used to dial the individual digits of a phone number, but the VoIP
dialer must store the complete dial string and send it in a single request to the VoIP Proxy. To accomplish this
task, it must be aware of the end of the dial string. To indicate the end of a dial string, include a # symbol in the
dial command (DIAL 1 VOIPPHONENUM 104 1 5551234#) or (DIAL 1 VOIPPHONENUM 104 1 #).
A dialing timeout also signals the end of a dial string. If the phone is on hook, the first DIAL command will
automatically set the hook state of the line to off hook. Once off hook, the dialing sequence will time out if a new
digit is not received within 3 seconds (configurable). Once this timeout occurs, the call will be placed using the
existing digits.
DIAL commands received after the call is connected are sent immediately (as DTMF tones). The dialer can inse rt
delay while sending DTMF tones by inserting commas where desired (each comma provides ½ second of delay).
Redial and Speed Dial numbers are assumed to be complete dial strings and do not require # (or wait for a dialing
timeout) to be sent. Redial includes only the dial string used to connect the previous call and does not include
DTMF tones sent during the connection.
Index
Value Range
1
0 = off-hook
1 = on-hook
1
enter the phone
number
1
None
1
None
number
1 = disabled
1 = in use
1 = ready
1 = ringing
Page 16

Both ANS 1 VOIPCALL 104 1 and SET 1 VOIPHOOKSTATE 104 1 0 will answer an incoming call. Both END 1
VOIPCALL 104 1 and SET 1 VOIPHOOKSTATE 104 1 1 will end a call in progress.
VoIP Receive Attribute Commands
Receive Level VOIPRXLVL SET, SETL, GET, GETL, INC,
Index
1
Value Range
-100 ~ 12 *
DEC
CPT Level VOIPRXCPTLVL SET, SETL, GET, GETL, INC,
1
-100 ~ 0 *
DEC
Mute VOIPRXMUTE SET, GET
1
0 = unmuted
1 = muted
* Can contain a decimal number.
VoIP Transmit Attribute Commands
Transmit Level VOIPTXLVL SET, SETL, GET, GETL, INC,
Index
1
Value Range
-100 ~ 0 *
DEC
Mute VOIPTXMUTE SET, GET
1
0 = unmuted
1 = muted
* Can contain a decimal number.
Device Attribute Commands
VoIP FW Ver VOIPFWVER GET
Device FQ Ver DEVFWVER GET
Index
None
None
Value Range
Major.Minor (ex: 1.90)
(ex: 3.307-2.3-4.510)
Below are some examples of possible string usage:
1. Basic Dialing with timeout to send, talk, and then end call locally with end command
SET 0 VOIPHOOKSTATE 104 1 0 // go off hook
DIAL 1 VOIPPHONENUM 104 1 1 // dial the digit 1
DIAL 1 VOIPPHONENUM 104 1 2 // dial the digit 2
DIAL 1 VOIPPHONENUM 104 1 3 // dial the digit 3
// … 3 seconds pass (from last DIAL) and request is sent
// … Talking...
END 1 VOIPCALL 104 1
2. Basic Dialing with explicit send and end call locally with end command
DIAL 1 VOIPPHONENUM 104 1 1 // go off hook and dial the digit 1
DIAL 1 VOIPPHONENUM 104 1 2 // dial the digit 2
DIAL 1 VOIPPHONENUM 104 1 3 // dial the digit 3
DIAL 1 VOIPPHONENUM 104 1 # // send the dial request to the VoIP Proxy
// … Talking...
END 1 VOIPCALL 104 1
3. Incoming call & answer and end locally
// incoming call (ringing…)
ANS 1 VOIPCALL 104 1 // answer call
Page 17

// … Talking...
END 1 VOIPCALL 104 1
4. Incoming call & answer and end locally
// incoming call (ringing…)
SET 1 VOIPHOOKSTATE 104 1 0 // answer call
// … Talking...
END 1 VOIPCALL 104 1
5. Incoming call & reject
// incoming call (ringing…)
END 1 VOIPCALL 104 1 // reject call
6. Incoming call & answer, Place call on hold, resume call, and end locally
// incoming call (ringing…)
ANS 1 VOIPCALL 104 1 // answer call
// … Talking...
HOLD 1 VOIPCALL 104 1 // place call on hold
RESUME 1 VOIPCALL 104 1 // resume call
// … Talking...
END 1 VOIPCALL 104 1
Index
Page 18

Mixer Blocks
Automixer Attribute Commands Index Value Range
Input Level AMLVLIN SET, SETL, GET, GETL, INC,
DEC
Output Level AMLVLOUT SET, SETL, GET, GETL, INC,
DEC
Input Mute AMMUTEIN SET, GET 1 0 = unmuted
Output Mute AMM UTEOUT SET, GET None 0 = unmuted
Crosspoint Mute AMMUTEXP SET, GET 1 1 =unmuted
Logic Output AMLOGOUT GET 2 0 = off
Note: Typically, Index1 represents the input/row, and Index2 represents the output/column. However, Automixers
have only a single output and, therefore, Index2 is not used to specify an output/column.
Example: Set Device 1 Automixer Crosspoint Mute at Instance 3 Crosspoint 1 to muted.
Command Dev # Attribute Inst ID Index 1 Index 2 Value Line Feed
SET 1 AMMUTEXP 3 1 None 0 <LF>
Result: SET 1 AMMUTEXP 3 1 0 <LF> (Automixers have only 1 output, so Index2 is not required)
Matrix Mixer Attribute Commands Index Value Range
Input Level MMLVLIN SET, SETL, GET, GETL, INC,
DEC
Output Level MMLVLOUT SET, SETL, GET, GETL, INC,
DEC
Input Mute MMMUTEIN SET, GET 1 0 = unmuted
Output Mute MMMUTEOUT SET, GET 2 0 = unmuted
Crosspoint Level MMLVLXP SET, SETL, GET, GETL, INC,
DEC
Crosspoint Mute MMMUTEXP SET, GET 1 & 2 1 = unmuted
Note: For attributes with 2 Index fields, Index1 is the input/row, and Index2 is the output/column.
1 -100 ~ 12 *
2 -100 ~ 12 *
1 = muted
1 = muted
0 = muted
1 = on
* Can contain a decimal number.
1 -100 ~ 12 *
2 -100 ~ 12 *
1 = muted
1 = muted
1 & 2 -100 ~ 0 *
0 = muted
* Can contain a decimal number.
Page 19

Index
Standard Mixer Attribute Commands Index Value Range
Input Level SMLVLIN SET, SETL, GET, GETL, INC,
DEC
Output Level SMLVLOUT SET, SETL, GET, GETL, INC,
DEC
Input Mute SMMUTEIN SET, GET 1 0 = unmuted
Output Mute SMMUTEOUT SET, GET 2 0 = unmuted
Crosspoint Mute SMMUTEXP SET, GET 1 & 2 1 = unmuted
Note: For attributes with 2 Index fields, Index1 is the input/row, and Index2 is the output/column.
Room Combiner Attribute Commands Index Value Range
Wall State RMCMBWALL SET, GET 1 0 = down
Output Level RMCMBLVL SET, SETL, GET, GETL, INC,
DEC
Output Mute RMCMBM UTE SET, GET 2 0 = unmuted
Group State RMCMBGROUP SET, GET 1 0 ~ 16
+ Note: The behavior of RMCMBGROUP is the same as that of the "Set Selected Group" commands in the right-
click-context menus of the Room Combiner dialog screen in Audia Software: the specified room is either separate
(group 0) or combined with other rooms of the selected group (1~16). All other rooms maintain their previous
group assignments. Index1 represents the room being addressed. As rooms are combined, room levels become
ganged, so only one output level needs to be addressed.
Note: For Wall State, Index1 indicates the wall to be affected and Value indicates the actual wall state
(down=open=combined; up=closed=separated).
Example: Set Device 1 Room Combiner Wall State at Instance 4 Wall 2 to up (close/separate).
Command Dev # Attribute Inst ID Index 1 Index 2 Value Line Feed
SET 1 RMCMBWALL 4 2 None 1 <LF>
Result: SET 1 RMCMBWALL 4 2 1 <LF>
Auto-Mixer
Combiner
Group State MCMBGROUP SET, GET 1 0 ~ 32
Attribute Commands Index Value Range
1 -100 ~ 12 *
2 -100 ~ 12 *
1 = muted
1 = muted
0 = muted
* Can contain a decimal number.
1 = up
2 -100 ~ 12 *
1 = muted
* Can contain a decimal number.
Note: Index1 is the input being addressed. Value is the group; this is represented by a letter in Audia software,
but addressed as a number in ATP commands. (Example: ungroup=0, A=1, B=2, C=3….)
Note: The Auto-Mixer Combiner was previously the Mix-Minus Combiner. The above command will continue to
work with a Mix-Minus Combiner block in a previously created Audia file with a Mix-Minus Combiner.
Page 20

Equalizer Blocks
Graphic EQ Attribute Commands Index Value Range
EQ Band Level GEQLVLBND SET, SETL, GET, GETL, INC,
DEC
Bypass All Bands GEQBYPALL SET, GET None 0 = active
Note: Index1 represents the filter to be controlled. Graphic EQ filters are numbered from left to right, and the
selected band is displayed in the upper left hand corner of the Graphic EQ dialog screen in Audia software. Use
this number as Index1 for Graphic EQ strings.
Example: Set Device 2 Graphic EQ Bypass All Bands at Instance 9 to bypass.
Command Dev # Attribute Inst ID Index 1 Index 2 Value Line Feed
SET 2 GEQBYPALL 9 None None 1 <LF>
Result: SET 2 GEQBYPALL 9 1 <LF>
Parametric EQ Attribute Commands Index Value Range
EQ Bandwidth PEQBWBND SET, SETL, GET, GETL 1 0.010 ~ 4.000 *
Bypass EQ Band PEQBYPBND SET, GET 1 0 = active
Center Freq. PEQFCBND SET, SETL, GET, GETL, INC,
DEC
EQ Band Level PEQLVLBND SET, SETL, GET, GETL, INC,
DEC
Bypass All Bands PEQBYPALL SET, GET None 0 =active
Note: Index1 represents the filter to be controlled. Parametric EQ filters are initially numbered from left to right,
and the selected band is displayed in the upper left hand corner of the Parametric EQ dialog screen in Audia
software. Use this number as Index1 for Parametric EQ strings.
Example: Increment Device 1 Parametric EQ Band Level at Instance 11 Band 2 by 2dB.
Command Dev # Attribute Inst ID Index 1 Index 2 Value Line Feed
INC 1 PEQLVLBND 11 2 None 2 <LF>
Result: INC 1 PEQLVLBND 11 2 2 <LF>
Feedback
Suppressor
Reset All Filters FBSRESET SET None None
Fix All Filters FBFIXALL SET, GET None 0 = not fixed
Example: Set Device 1 Feedback Suppressor Reset All Filters at Instance 4.
Command Dev # Attribute Inst ID Index 1 Index 2 Value Line Feed
SET 1 FBSRESET 4 None None None <LF>
Result: SET 1 FBSRESET 4 <LF>
Attribute Commands Index Value Range
1 -30 ~ 15 *
1 = bypassed
* Can contain a decimal number.
1 = bypassed
1 20 ~ 20000
1 -30 ~ 15 *
1 = bypassed
* Can contain a decimal number.
1 = fix all
Page 21

Index
Filter Blocks
HPF Attribute Commands Index Value Range
Cut-Off Freq. HPFLTFC SET, SETL, GET, GETL None 20 ~ 20000 *
Filter Bypass HPFLTBYP SET, GET None 0 = active
1 = bypassed
* Can contain a decimal number.
LPF Attribute Commands Index Value Range
Cut-Off Freq. LPFLTFC SET, SETL, GET, GETL None 20 ~ 20000 *
Filter Bypass LPFLTBYP SET, GET None 0 = active
1 = bypassed
* Can contain a decimal number.
High Shelf Attribute Commands Index Value Range
Cut-Off Freq. HSFLTFC SET, SETL, GET, GETL None 20 ~ 20000 *
Gain HSFLTGAIN SET, SETL, GET, GETL, INC,
DEC
Filter Bypass HSFLTBYP SET, GET None 0 = active
Low Shelf Attribute Commands Index Value Range
Cut-Off Freq. LSFLTFC SET, SETL, GET, GETL None 20 ~ 20000 *
Gain LSFLTGAIN SET, SETL, GET, GETL, INC,
DEC
Filter Bypass LSFLTBYP SET, GET None 0 = active
Example: Set Device 1 High Shelf Filter Gain at Instance 100 to -10dB.
Command Dev # Attribute Inst ID Index 1 Index 2 Value Line Feed
SET 1 HSFLTGAIN 100 None None -10 <LF>
Result: SET 1 HSFLTGAIN 100 –10 <LF>
All-Pass Filter Attribute Commands Index Value Range
Bandwidth APFLTBWBND SET, SETL, GET, GETL 1 0.01 ~ 4.0 *
Center Freq. APFLTFCBND SET, SETL, GET, GETL 1 20 ~ 20000 *
Filter Bypass APFLTBYPBND SET, GET 1 0 = active
Filter Bypass APFLTBYPBND SET, GET 1 0 = active
Bypass All APFLTBYPALL SET, GET None 0 =active
Note: Index1 represents the filter band to be controlled. All-Pass Filter bands are initially numbered from left to
right, and the selected band is displayed in the upper left hand corner of the All-Pass Filter dialog screen in Audia
software. Use this number as Index1 for All-Pass Filter strings.
None -27 ~ 9 *
1 = bypassed
* Can contain a decimal number.
None -27 ~ 9 *
1 = bypassed
* Can contain a decimal number.
1 = bypassed
1 = bypassed
1 = bypassed
* Can contain a decimal number.
Page 22

Crossover Blocks
2-Way Attribute Commands Index Value Range
Cut-Off Freq. XOVR2FC SET, SETL, GET, GETL 1 20 ~ 20000
* Can contain a decimal number.
3-Way Attribute Commands Index Value Range
Cut-Off Freq. XOVR3FC SET, SETL, GET, GETL 1 20 ~ 20000
* Can contain a decimal number.
4-Way Attribute Commands Index Value Range
Cut-Off Freq. XOVR4FC SET, SETL, GET, GETL 1 20 ~ 20000
* Can contain a decimal number.
Notes:
2-way crossover
Index1 = 1 is the low-pass filter cut-off frequency
Index1 = 2 is the high-pass filter cut-off frequency
3-Way crossover
Index1 = 1 is low-pass filter cut-off frequency
Index1 = 2 is the lower slope of the mid filter cut-off frequency
Index1 = 3 is the higher slope of the mid filter cut-off frequency
Index1 = 4 is the high-pass filter cut-off frequency
4-way crossover
Index1 = 1 is the low-pass filter cut-off frequency
Index1 = 2 is the lower slope of the low-mid filter cut-off frequency
Index1 = 3 is the higher slope of the low-mid filter cut-off frequency
Index1 = 4 is the lower slope of the mid-high filter cut-off frequency
Index1 = 5 is the higher slope of the mid-high filter cut-off frequency
Index1 = 6 is the high-pass filter cut-off frequency
Example: Get Device 2 Crossover 3-Way Cut-Off Frequency at Instance 40 Low-Pass filter.
Command Dev # Attribute Inst ID Index 1 Index 2 Value Line Feed
GET 2 XOVR3FC 40 1 None None <LF>
Result: GET 2 XOVR3FC 40 1 <LF>
:
:
:
Page 23

Index
Dynamics Blocks
Leveler Attribute Commands Index Value Range
Bypass LVLRBYP SET, GET None 0 = active
1 = bypassed
Comp/Limiter Attribute Commands Index Value Range
Bypass CLIMBYP SET, GET None 0 = active
1 = bypassed
Ducker Attribute Commands Index Value Range
Input Level DKRLVLIN SET, SETL, GET, GETL None -100 ~ 12 *
Level Sense DKRLVLSENSE SET, SETL, GET, GETL None -100 ~ 12 *
Bypass Ducker DKRBYP SET, GET None 0 = active
1 = bypassed
Mute Sense DKRMUTESENSE SET, GET None 0 = unmuted
1 = muted
Input Mute DKRMUTEIN SET, GET None 0 = unmuted
1 = muted
Logic In Enable DKRENLOGIN SET, GET None 0 = disabled
1 = enabled
Logic Out Enable DKRENLOGOUT SET, GET None 0 = disabled
1 = enabled
Logic Input Invert DKRINVLOGIN SET, GET None 0 = normal
1 = inverted
Logic Output Invert DKRINVLOGOUT SET, GET None 0 = normal
1 = inverted
* Can contain a decimal number.
Noise Gate Attribute Commands Index Value Range
Bypass NGBYP SET, GET None 0 = active
1 = bypassed
Output Gain ANCGAIN GET None None
Example: Set Device 3 Noise Gate Bypass at Instance 55 to active.
Command Dev # Attribute Inst ID Index 1 Index 2 Value Line Feed
SET 3 NGBYP 55 None None 0 <LF>
Result: SET 3 NGBYP 55 0 <LF>
ANC Attribute Commands Index Value Range
Output Gain ANCGAIN GET None None
Page 24

Router Blocks
Router Attribute Commands Index Value Range
Crosspoint RTRMUTEXP SET, GET, SETD, GETD 1 & 2 1 = unmuted
0 = muted
Note: For attributes with 2 Index fields, Index1 is the input/row, and Index2 is the output/column.
Example: Set Device 1 Router Crosspoint at Instance 98 Row 4 Column 5 to muted.
Command Dev # Attribute Inst ID Index 1 Index 2 Value Line Feed
SET 1 RTRMUTEXP 98 4 5 0 <LF>
Result: SET 1 RTRMUTEXP 98 4 5 0 <LF>
Source Selection Attribute Commands Index Value Range
Source SRCSELSRC SET, GET, SETD, GETD 2 0 = No Source/muted
1 = Source 1
2 = Source 2
3 = Source 3
Level SRCSELLVL SET, GET, SETL, GETL, SETD,
GETD
Example: Set Device 1 Source Selection Source at Instance 99 Source 2 selected.
Command Dev # Attribute Inst ID Index 1 Index 2 Value Line Feed
SET 1 SRCSELSRC 99 None 1 2 <LF>
Result: SET 1 SRCSELSRC 99 1 2 <LF>
Example: Set Device 1 Source Selection Volume at Instance 99 to -54 dB for source input 3.
Command Dev # Attribute Inst ID Index 1 Index 2 Value Line Feed
SET 1 SRCSELLVL 99 3 None -54 <LF>
Result: SET 1 SRCSELLVL 99 3 -54<LF>
In this example, Index 1 represents the input source, where in the previous example, Index 1 represents the
output channel.
1 -100 ~ 12
Page 25

Index
Delay Blocks
Delay Attribute Commands Index Value Range
Delay in Milliseconds DLYMSEC SET, SETL, GET, GETL None 0 ~ block maximum *
Delay in Centimeters DLYCM SET, SETL, GET, GETL None 0 ~ block maximum *
Delay in Meters DLYM SET, SETL, GET, GETL None 0 ~ block maximum *
Delay in Inches DLYIN SET, SETL, GET, GETL None 0 ~ block maximum *
Delay in Feet DLYFT SET, SETL, GET, GETL None 0 ~ block maximum *
Delay Bypass DLYBYP SET, GET None 0 ~ block maximum *
* Can contain a decimal number.
Note: Value Range is from 0 to the maximum value for the specific delay block. For example, a 50mSec delay
has a maximum setting of 1717 centimeters, 17 meters, 676 inches, or 56 feet.
Example: Set Device 1 Delay In Centimeters at Instance 24 to 40 centimeters.
Command Dev # Attribute Inst ID Index 1 Index 2 Value Line Feed
SET 1 DLYCM 24 None None 40 <LF>
Result: SET 1 DLYCM 24 40 <LF>
Page 26

Control Blocks
Level Faders Attribute Commands Index Value Range
Fader Level FDRLVL SET, SETL, GET, GETL, INC,
DEC
Fader Mute FDRMUTE SET, GET 1 0 = unmuted
Mute Button Attribute Commands Index Value Range
Mute MBMUTE SET, GET 1 0 = unmuted
Logic State Attribute Commands Index Value Range
Logic State LGSTATE SET, GET 1 0 = off
Presets Attribute Commands Index Value Range
Preset PRESET RECALL None 1001 ~ maximum
Note: Instead of SET, SETL, GET, GETL, INC, or DEC; the Preset attribute uses RECALL as the command.
Preset numbers begin at 1001. Regardless of preset name, the first preset defined is 1001, the second is 1002,
and so forth. However, the numbers of any deleted Presets will not be available. Since Presets apply to entire
systems, the Device Number will always be 0 for Preset strings.
Example: Recall Device 0 Preset number 1001.
Command Dev # Attribute Inst ID Index 1 Index 2 Value Line Feed
RECALL 0 PRESET None None None 1001 <LF>
Result: RECALL 0 PRESET 1001 <LF> (use RECALL instead of SET/GET commands)
1 -100 ~ 12 *
1 = muted
* Can contain a decimal number.
1 = muted
1 = on
number of presets
Page 27

Index
Meter Blocks
Meters Attribute Commands Index Value Range
Signal Present Meter SPMTRSTATE GET 1 0 = no signal present
1 = signal present
Peak Meter PKMTRLVL GET, GETL 1 -100 ~ 36 *
RMS Meter RMSMTRLVL GET, GETL 1 -100 ~ 36 *
Logic Meter LGCMTRSTATE GET 1 0 = no signal present
1 = signal present
* Can contain a decimal number.
Note: Meters only use GET and GETL commands, which do not include a Value. Instead, Audia will respond to
these GET/GETL commands with the requested value (current level).
Example: Get Device 1 RMS Meter Level at Instance 48 Meter 1.
Command Dev # Attribute Inst ID Index 1 Index 2 Value Line Feed
GET 1 RMSMTRLVL 48 1 None None <LF>
Result: GET 1 RMSMTRLVL 48 1 <LF> (use GET/GETL commands only)
Page 28

Generator Blocks
No Attributes are specified at this time
Page 29

Index
Instance ID
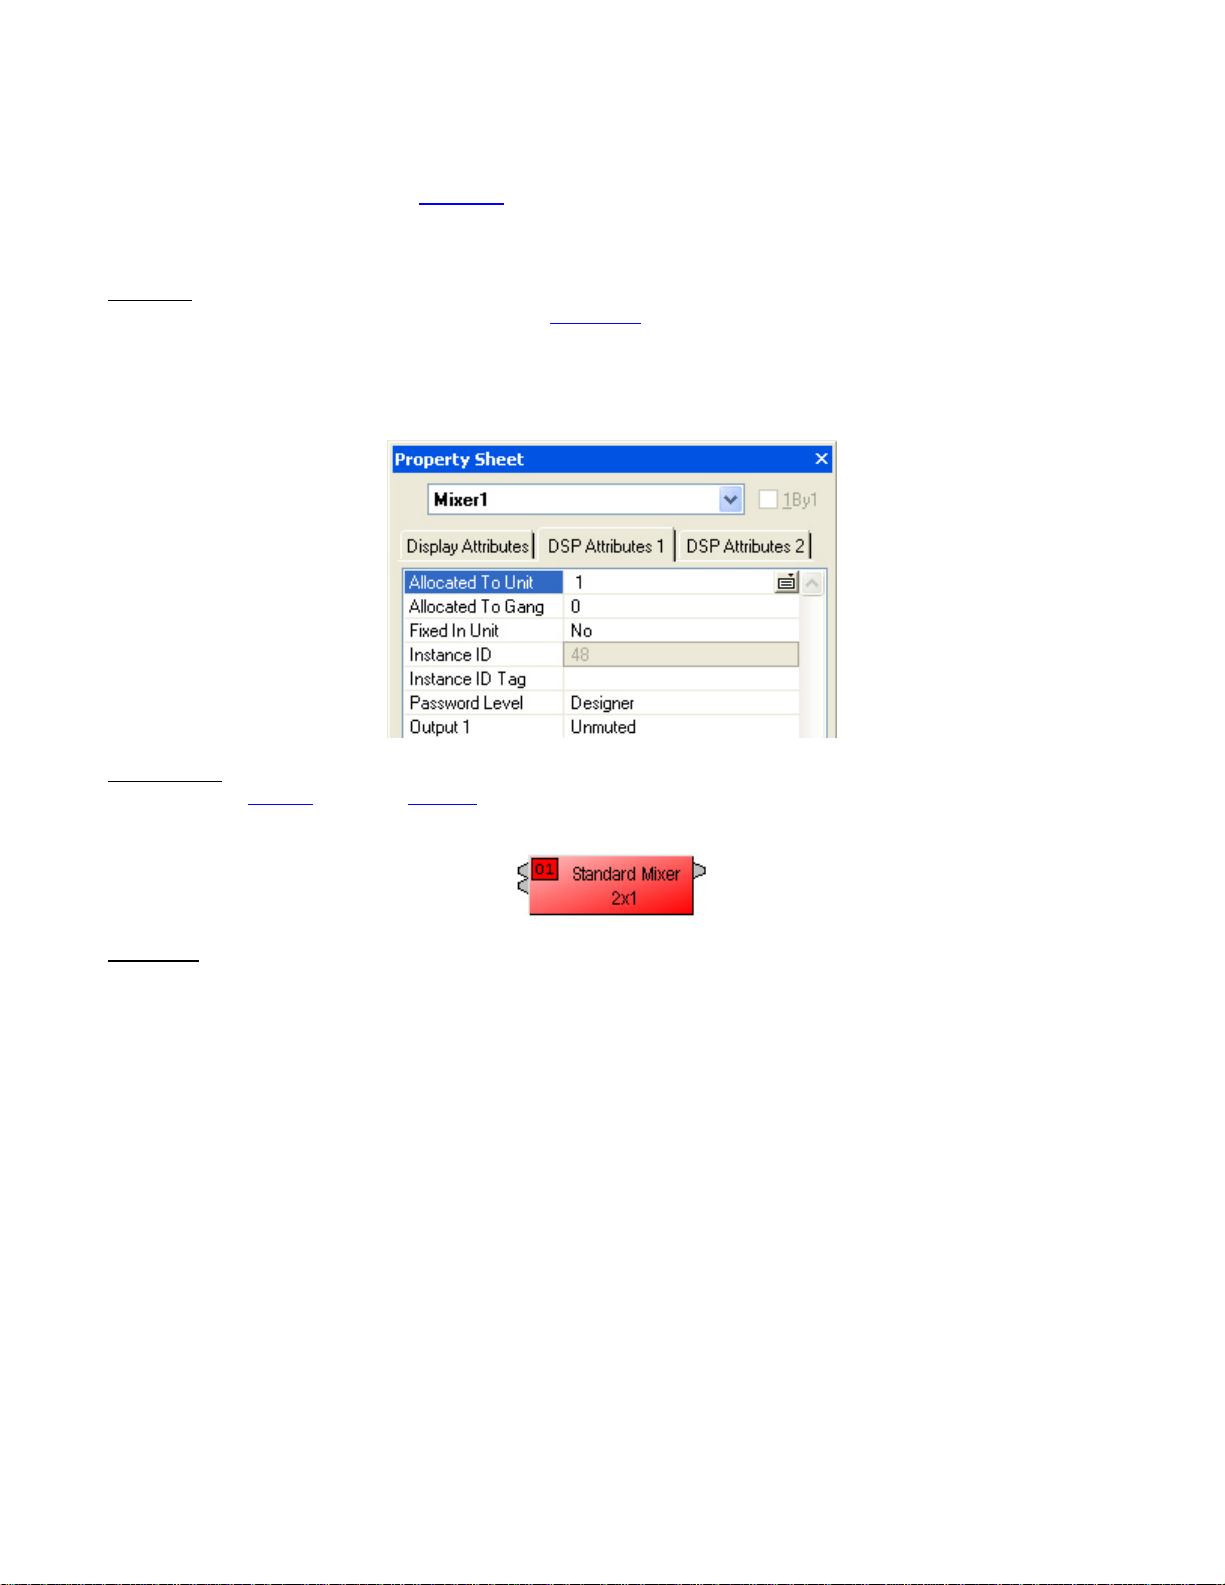
Audia uses an Instance ID number to specify the exact DSP block to be controlled. Custom names (Instance ID
Tags) may be assigned to DSP blocks, and used in lieu of Instance ID numbers within ATP command strings.
Instance ID Tags may be up to 32 characters, but may not start with a number. If the Instance ID Tag includes
spaces, it must be double-quote delimited ("Instance ID Tag") when used in a command string. The Instance ID
number (and Instance ID Tag) can be found by right-clicking the DSP block and selecting "Properties". Both
identifiers are available on the DSP Attributes 1 tab.
Instance ID Tag
Instance ID Tags are used as an alphanumeric substitution for the Instance ID when sending ATP control strings.
If the Instance ID Tag field is left blank, it is necessary to use the Instance ID. The Instance ID Tag can not start
with a numerical digit, and the tag can not contain the ampersand (&), less than (<), greater than (>), single quote
('), and double quote (") symbols.
The property sheet can only be accessed in an off-line screen.
**Note** Audia software will assign an Instance ID number to each DSP block on the initial Compile
system. Subsequent compiles will not change the Instance ID numbers unless the "Reassign Instance IDs" check
box is selected in the "Compile
If one or more DSP block is disconnected from the audio path (when connections are not made to at least one
input or output) the Instance ID numbers will be unassigned. Instance ID numbers will be reassigned once the
DSP block(s) are properly connected again. The use of Instance ID Tags (in lieu of Instance ID numbers) may
help prevent command string conflicts caused by reassignment of Instance ID numbers.
" tab of the "Options" screen (located on the Tools menu) in Audia software.
of the
Page 30

Index
Index refers to inputs, outputs, or cross points of an Attribute. Some Attributes will need an Index1 (Input or Row)
and/or an Index2 (Output or Column). The tables in the Attribute section will define which, if any, indexes are
required for the string.
Example: INC 1 AMLVLIN 4 1 1 <LF>
In an Auto Mixer on Device 1 we are increasing the level of input 1 on instance ID 4 by 1dB. Index1 is used to
represent the input number.
Example: DEC 2 AMLVLOUT 6 1 2 <LF>
In an Auto Mixer on Device 2 we are decreasing the level of output 1 on instance ID 6 by 2dB. Index2 is used to
represent the output number.
Example: SET 1 MMLXP 5 1 2 –5 <LF>
In a Matrix Mixer on Device 1 we are setting crosspoint 1:2 (Input/Row 1, Output/Column 2) level to –5dB on
instance ID 5.
Note: For commands with 2 Index fields, Index1 is the Input/Row, and Index2 is the Output/Column.
Page 31

Index
Value
Value determines what a DSP block is being set to, incremented by, or decremented by. The Attribute section will
define which type of value the string will need in order to execute the ATP string.
Example: INC 1 AMLVLIN 4 1 1 <LF>
In an Automatic mixer input level string, the Value equal to 1 states that the fader is to be incremented by 1 dB.
Example: SET 2 MMLVLIN 5 2 –100 <LF>
In a matrix mixer input level string, the value is set to –100dB.
Example: RECALL 1 PRESET 1004 <LF>
For a preset recall we are telling device 1 to recall the fourth preset.
*When GET is used, a Value will not need to be specified since GET is a request command. A Value must be set
in order for SET, INC, DEC, and RECALL command strings to work.
Example: GET 4 MMLVLOUT 5 <LF>
We are asking the level of a matrix mixer’s output. There is no Value required for this string.
Page 32

Responses
When a successful SET, SETL, INC, DEC, or RECALL command is sent to an Audia device via RS-232 or Telnet,
Audia will respond with: ‘+OK’ followed by a carriage return and line feed.
Example: Sending the string: SET 2 AMLVLIN 4 2 1 <LF> will result in an: +OK<CR><LF> response.
A successful GET or GETL command will result in a numerical response to the command string followed by
<CR><LF>.
The response from an ATP string with a GET command may contain a decimal point (with 4 numbers after the
decimal) and/or negative numbers, depending on type of Attribute addressed. If the control system does not
support negative numbers or decimal places a GETL command may be used instead (see Command).
Example: After sending the above example to an Audia device the string:
GET 2 AMLVLIN 4 2 <LF> would result in the response: 1.0000 <CR><LF> this tells us that the level is currently
set to 1dB.
If an incorrect command string is sent, an Audia will respond with: -ERR<CR><LF>
A space normally proceeds the carriage return/line feed <CR><LF> in a response to a GET command, but this
space is not present in the standard ‘+OK’ or ‘-ERR’ responses.
Note: SETD, GETD, INCD, DECD, SETLD, and GETLD commands may be used when a "full path" serial
response to the command is desired. A ‘full path’ serial response will provide identification of the target object, the
original command, and the resulting Value. A "full path" response to a valid command will always begin with a
pound sign (#) and end normally (as described above).
Examples:
Command
Response = #SETD 1 IPADDR 192.168.1.197 +OK
Command
Response = #GETD 1 IPADDR 192.168.1.197
Command
Response
Command
Response
It should be noted that, unlike SETD commands/responses, INCD or DECD commands and responses will most
often contain different Values. This is because SETD commands specify an exact Value (which will be the same
in the response), whereas, INCD and DECD commands specify a ‘change’ in Value.
= SETD 1 IPADDR 192.168.1.197
= GETD 1 IPADDR
= SETD 1 MMLVLXP 38 1 1 -1.1
= #SETD 1 MMLVLXP 38 1 1 -1.1 +OK
= INCD 1 MMLVLXP 38 1 1 1.0
= #INCD 1 MMLVLXP 38 1 1 -0.1000 +OK
Page 33

Index
HyperTerminal
HyperTerminal is a useful tool that comes with Windows® and can be used for RS-232 purposes. Simply open a
HyperTerminal session by going to: Start> Programs> Accessories> Communications> HyperTerminal. Enter a
name for your connection and click ‘OK’. Under the pull-down menu labeled ‘Connect Using’ select the location of
your RS-232 Comm. port.
Under the Comm. port properties set it to 38400, 8, None, 1, and None as shown below. Now HyperTerminal is
ready to use. Audia does not echo characters typed, so if you want to view what is being typed into Audia, click on
"echo typed characters locally" in the ASCII setup screen.
Page 34

Windows® is a registered trademark of Microsoft Corporation.
Page 35

Index
IP Address Commands
Audia has some useful IP and reset tools that may be useful when returning to older systems for service work.
Audia will automatically output its IP Address through the RS-232 port when it is powered up and functioning.
Simply have a straight through RS-232 cable connected to Audia and a PC with HyperTerminal running. When
Audia is powered up it will print the data in the HyperTerminal screen.
Get Device ID
By typing "GET 0 DEVID <LF>" in HyperTerminal, Audia will reveal the device number that is assigned to that
particular device within the system. If an Audia does not have a system loaded into it, the device ID will always be
"0". Device ID "0" is always used for network related ATP commands and reset related commands.
Get/Set IP Address
By typing "GET 0 IPADDR <LF>" in HyperTerminal Audia will reveal the IP Address it is set to. Substituting the
"0" for a 1, 2, 3, etc will tell Audia to reveal the IP Address for the device who’s number is 1, 2, 3 etc. A "0" asks
for the IP Address of the Audia you are currently connected to. Note: You can only use a 1, 2, 3 etc if there is a
system loaded into the Audia's. If it is a single device system, the only device number will be 1.
If an Audia does not have a system loaded into it, you can set the IP Address via the RS-232 port. Example:
"SET 0 IPADDR 192.168.1.101 <LF>". If there is no DAP file in the Audia, and the command is typed correctly,
Audia will send back a "+OK" response. You will need to power cycle the Audia for the new IP Address to take
effect. As stated above, Audia will output the IP Address when powered up, or you can use the GET IPADDR
command mentioned above.
Get/Set Subnet Mask
By typing "GET 0 SUBNETMASK <LF>" in HyperTerminal, Audia will reveal the Subnet Mask it is set to use.
Substituting the "0" for a 1, 2, 3, etc will tell Audia to reveal the IP Address for the device who's number is 1, 2, 3
etc. A "0" asks for the IP Address of the Audia you are currently connected to. Note: You can only use a 1, 2, 3
etc if there is a system loaded into the Audia's. If it is a single device system, the only device number will be 1. By
default, the subnet mask is set to 255.255.255.0
If an Audia does not have a system loaded into it, you can set the Subnet Mask via the RS-232 port. Example:
"SET 0 SUBNETMASK 255.255.255.0 <LF>". If there is no DAP file in the Audia, and the command is typed
correctly, Audia will send back a "+OK" response. You will need to power cycle the Audia for the new subnet
mask to take effect. As stated above, Audia will output the default gateway IP Address when powered up, or you
can use the GET SUBNETMASK command mentioned above.
Get/Set Default Gateway Address
By typing "GET 0 DEFAULTGW <LF>" in HyperTerminal Audia will reveal the Default Gateway IP Address it is
set to use. Substituting the "0" for a 1, 2, 3, etc will tell Audia to reveal the IP Address for the device who's number
is 1, 2, 3 etc. A "0" asks for the IP Address of the Audia you are currently connected to. Note: You can only use a
1, 2, 3 etc if there is a system loaded into the Audia’s. If it is a single device system, the only device number will
be 1.
If an Audia does not have a system loaded into it, you can set the Default Gateway IP Address via the RS-232
port. Example: "SET 0 DEFAULTGW 192.168.1.1 <LF>". If there is no DAP file in the Audia, and the command is
typed correctly, Audia will send back a +OK response. You will need to power cycle the Audia for the new default
Page 36

gateway IP Address to take effect. As stated above, Audia will output the default gateway IP Address when
powered up, or you can use the GET DEFAULTGW command mentioned above.
Get MAC Address
By typing "GET 0 MACADDRESS <LF>" in HyperTerminal Audia will reveal the MAC Address of the Audia’s
network interface. Substituting the ‘0’ for a 1, 2, 3, etc will tell Audia to reveal the MAC Address for the device
who's number is 1, 2, 3 etc. A "0" asks for the MAC Address of the Audia you are currentl y connected to. Note:
You can only use a 1, 2, 3 etc if there is a system loaded into the Audia's. If it is a single device system, the only
device number will be 1.
Reset
In rare instances it may become necessary to reset the Audia device. A reset can be accomplished through the
device maintenance screen, and this is the desired method for a reset. However, there is a reset command
available via the RS-232 port. Simply type: "CLEAR 0 DEVCONFIG <LF>" and the device will be reset.
Reboot Device
When needed, the Audia can be restarted without suspending audio. Simply type: "REBOOT 0 DEVICE". This
will restart a single Audia device without suspending audio.
Page 37

Index
CobraNet IP Address
These attributes and resulting commands affect the Audia CobraNet IP Configuration. Use the default setting
(Obtain an IP address automatically) in all cases, except when adding CobraNet to an existing Ethernet network
(not recommended).
CobraNet Attribute Commands Index Value Range
IP Address Config
Type
IP Address CNIPADDR SET, GET None xxx.xxx.xxx.xxx
Subnet Mask CNSUBNETMASK SET, GET None xxx.xxx.xxx.xxx
Default Gateway CNDEFAULTGW SET, GET None xxx.xxx.xxx.xxx
CNIPCONFTYPE SET, GET None 0 = Auto Obtain
1 = User Specified
Page 38

A
Attribute ....................................................................9
C
CobraNet IP Address............................................38
Command.................................................................6
Control Blocks.........................................................27
Control Dialog.........................................................33
Control Dialog - Overview.......................................33
Controls ....................................................4, 5, 27, 33
Crossover Blocks....................................................23
Crossovers..............................................................23
D
Delay Blocks...........................................................26
Delays.....................................................................26
Device Number.........................................................8
Dynamics................................................................24
Dynamics Blocks ....................................................24
E
Equalizer Blocks.....................................................20
Equalizers...............................................................20
F
Filter Blocks............................................................21
Filters......................................................................21
G
Generator Blocks....................................................29
Generators..............................................................29
H
HyperTerminal........................................................34
Index
I
ID ........................................................................... 30
Index...................................................................... 31
Input....................................................................... 10
Input/Output Blocks ............................................... 10
Instance ID............................................................. 30
Instance ID Number............................................... 30
Instance ID Tag...................................................... 30
IP Address Commands.......................................... 36
M
Meter Blocks.......................................................... 28
Meters.................................................................... 28
Mixer Blocks........................................................... 18
Mixers .................................................................... 18
O
Overview.................................................................. 3
R
Responses............................................................. 33
Router Blocks......................................................... 25
Routers .................................................................. 25
RS-232..................................................................... 4
RS-232 and Ethernet Telnet Control ....................... 3
RS-232 Parameters................................................. 4
T
Tag......................................................................... 30
Telnet Control .......................................................... 5
V
Value...................................................................... 32
VoIP ATP Commands............................................ 15
 Loading...