

Page 1
www.bhsouthafrica.co.za
Page 2

INTRODUCTION 3
GENERAL VIEW OF THE BH EMOTION 4
PEDAL ASSISTANCE SYSTEM 5
How does it work? 5
Without pedal assistance 6
Start pedaling 6
DISPLAY PANEL 6
General View of Display Panel 6
Display panel operation 7
1.
Removable display panel 7
2.
Start and stop of the pedal assistance system 7
3.
Selection of pedal assistance level 8
4.
Switch on and off the lights of the bicycle and the backlight of the display panel8
5.
Selection of display information 8
6.
Battery level indicator 8
7.
Adjustments 9
8.
Throttle function up to 6 km/h 10
9.
System error indicator 10
10.
Exclusive functions Nitro models 10
BATTERY 11
Technology 11
Autonomy 11
Charge of the battery 12
Checking the charge level of the battery in the rear carrier 13
Safety precautions 13
1.
Battery 13
2.
Charger 13
MOTOR 14
BASIC REPAIRS 14
Replacement of the rear wheel with the RDS system / disconnection of the motor
cable 14
WARRANTY PROGRAMME 15
Warranty 15
Exceptions 15
Liabilities 15
TECHNICAL CHARACTERISTICS 16
QUESTIONS AND ANSWERS 16
TABLE DESCRIBING OPERATION ERRORS 18
2
Page 3

INTRODUCTION
Congratulations on your purchase of your BH EMOTION.
This user manual has been designed to assist you with the functions and maintenance of your
pedal assisted BH
EMOTION bicycle. We recommend that you read this manual in detail before you
use your e-Bike in order to make the most of your
new BH EMOTION.
You’ll find complete and detailed information regarding all the electronic components of your bicycle in
this manual.
For consultations on conventional mechanical aspects, refer to the supplementary user
manual attached.
Should you have any doubt after consulting this manual, please go to your closest BH dealer.
Enjoy your B H -
BH has been for over a century a synonym of bicycles, cycling, sportsmanship and selfimprovement. Many children have given their first and hesitant turn of the pedals with a BH
bicycle, and legendary cyclists have also been created on many of these bikes. The journey of
BH (Beistegui Hermanos) in the industry initiated in Eibar (Guipuzkoa, Spain), a city of arms
manufacturers, in 1909 as a result of the genius and enterprising spirit of three brothers:
Cosme, Domingo and Juan Beistegui Albistegui.
The company, which was founded as an arms manufacturer, gave a radical 180-degree turn
following the First World War, and it set out to provide a fast, comfortable and economic
means of transport for the citizens of Eibar. The result was the development of very light, agile
and reliable bicycles.
This is how one of the current cycling icons and one of the most successful and consolidated
brands was born. From that point onwards and as a result of its technological advances and
abiding commitment to sport, BH has achieved a series of sporting triumphs and has
contributed with several innovations to the world of cycling.
By 1935, BH was firmly settled in the Spanish cycling scene. The BH team had one of the best
cyclists of the day in its ranks, the Belgian Gustave Deloor (1913 - 2002), who won the first two
editions of the Vuelta a España in 1935 and 1936. Up to this date, BH has won seven Vueltas a
España, the last one in 1986 with Alvaro Pino. In that edition, the team Zor-BH also came first
in the team classification.
100 years later, the Beistegui family are still at the head of BH and continue to maintain the
essence of a company that remains true to the values it was founded upon: innovation,
research and technological development; social and environmental responsibility; dynamism,
commitment, reliability and trustworthiness; and, above all, its passion for bicycles. We aim to
continue to offer sport and health products to the entire world.
3
Page 4
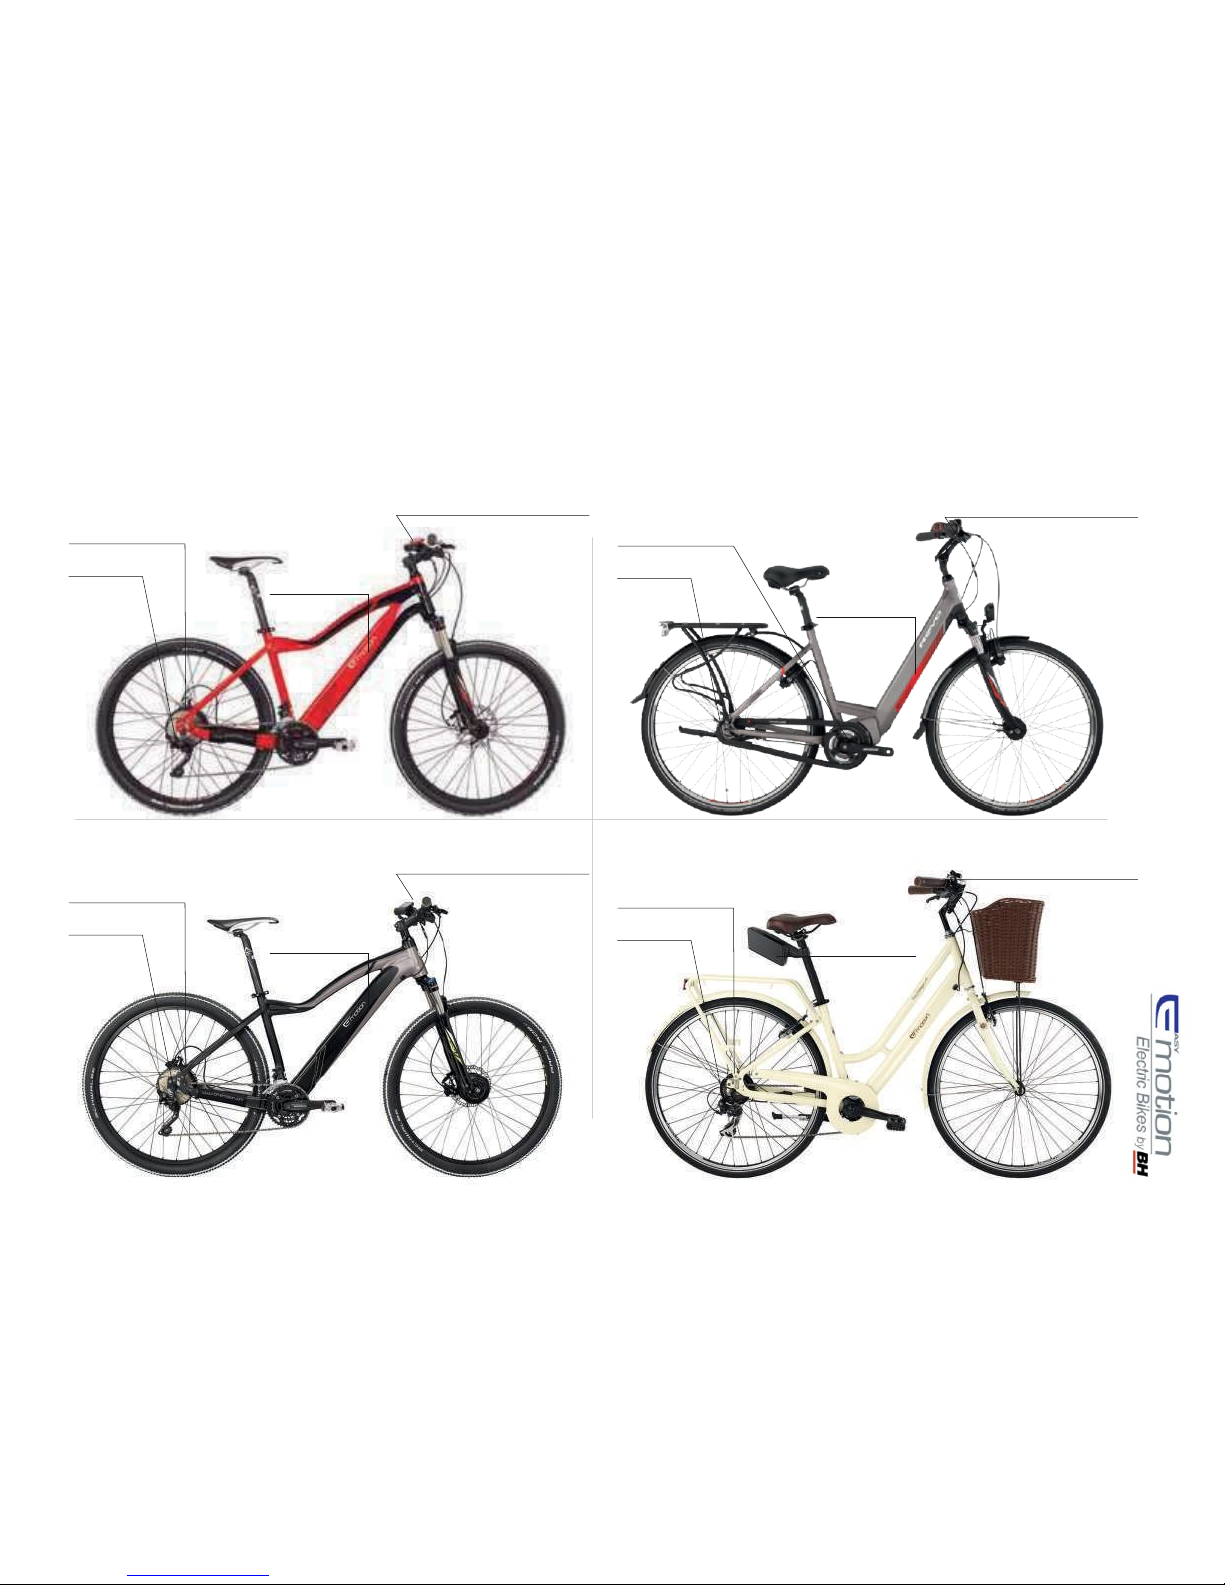
Motor
Torque sensor
Ion Lithium battery
GENERAL VIEW OF THE BH EMOTION
Motor
Torque sensor
EVO/NITRO
Rear motor
Ion Lithium battery
EMOTION Display Panel
Motor
Torque sensor
REVO
Central motor
Ion Lithium battery
EMOTION Display Panel
Motor
Torque sensor
EVO AWD
AWD in two motors
Ion Lithium battery
EMOTION Display Panel
EASY GO
Rear motor
EMOTION Display Panel
4
Page 5
PEDAL ASSISTANCE SYSTEM
How does it work?
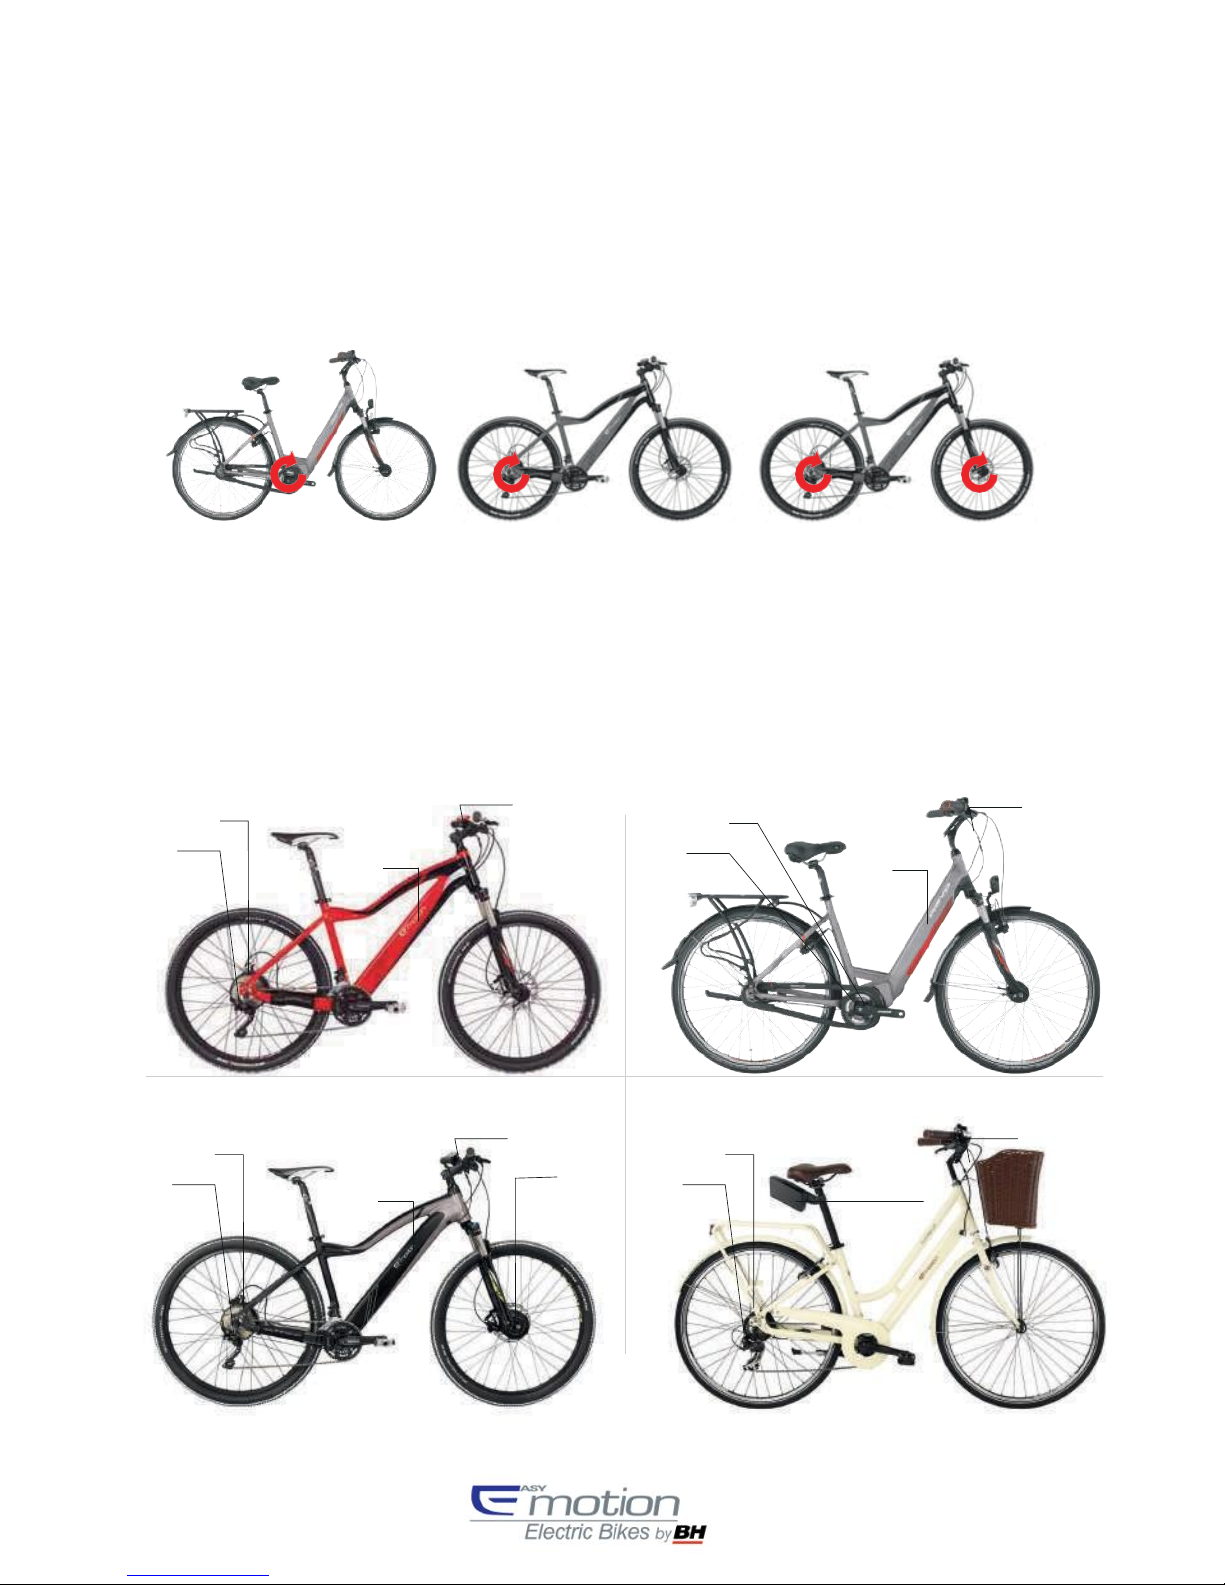
The BH EMOTION pedal assistance system comprises the following elements:
A. A motor
, which drives the bike. The location of the motor describes the system of
the e-bike:
FDS
(Front Drive System). Motor located in the front hub.
o
IBS
(Integrated Bottom bracket System). Motor integrated in the bottom bracket.
o
AWD
(All wheel Drive System). Two motors located in the front and rear hubs.
IBS
RDS
AWD
B. A display panel
, which allows, amongst other things, the selection of assistance levels.
C. A battery
, which provides power for the motor’s operation. It can be located in different places.
D. A torque sensor
, which reads the force applied on the pedal by the user.
E. A control unit
, which performs as the system’s brain by receiving and sending signals to other
elements.
A
EVO/NITRO
B
D
REVO
B D
C A
C A
EVO AWD
B
A
EASY GO
B
D A C D C
5
Page 6
TOTAL SNOW TRIP
KM/H
KM/H
TO GO
ASSISTANC E LEVEL
BOOST
o
NO ASSISTANCE SPORT
%
ECO NORMAL
After the user starts the system by means of the display panel, the control unit activates all the system
elements. From then onwards, the force applied on the pedal is read by the torque sensor, which sends
a signal to the control unit. The
control unit processes this signal and activates the motor, which is
powered by the battery. This process is immediate, in
such a way that the motor responds to the force
applied to the pedals instantaneously. When the system is connected, the motor remains inactive if no
force is applied.
Without pedal assistance
BH EMOTION may be used as a conventional bicycle. It comes equipped with a direct current
electrical motor
featuring Brushless technology. The magnetic type torque sensor also uses brushless
technology. Therefore, pedaling without assistance is carried out with no additional resistance.
The BH EMOTION’s use without pedal assistance was considered when its design was carried out and
therefore, it has been manufactured with high quality lightweight materials and components. It is
amongst the lightest bicycles in the market, weighing between 14.20 kg and 24.4 kg, including the motor
and Ion-Lithium battery. The lack of friction in combination with its light weight provides a pleasant
gliding sensation when pedaling.
Start pedaling
Before resting your feet on the pedals you must sit on the saddle and hold the handlebar firmly. Special
attention must be paid if you start pedaling when using the mode that provides the most assistance
(100% or 70% Mode), as the motor will react with maximum drive and losing control is possible. For
the purpose of easing acceleration, the motor offers an additional initial drive when starting to pedal.
Therefore, the force needed to put the bicycle in motion
is minimal, helping in a swift and safe entering
into traffic.
DISPLAY PANEL
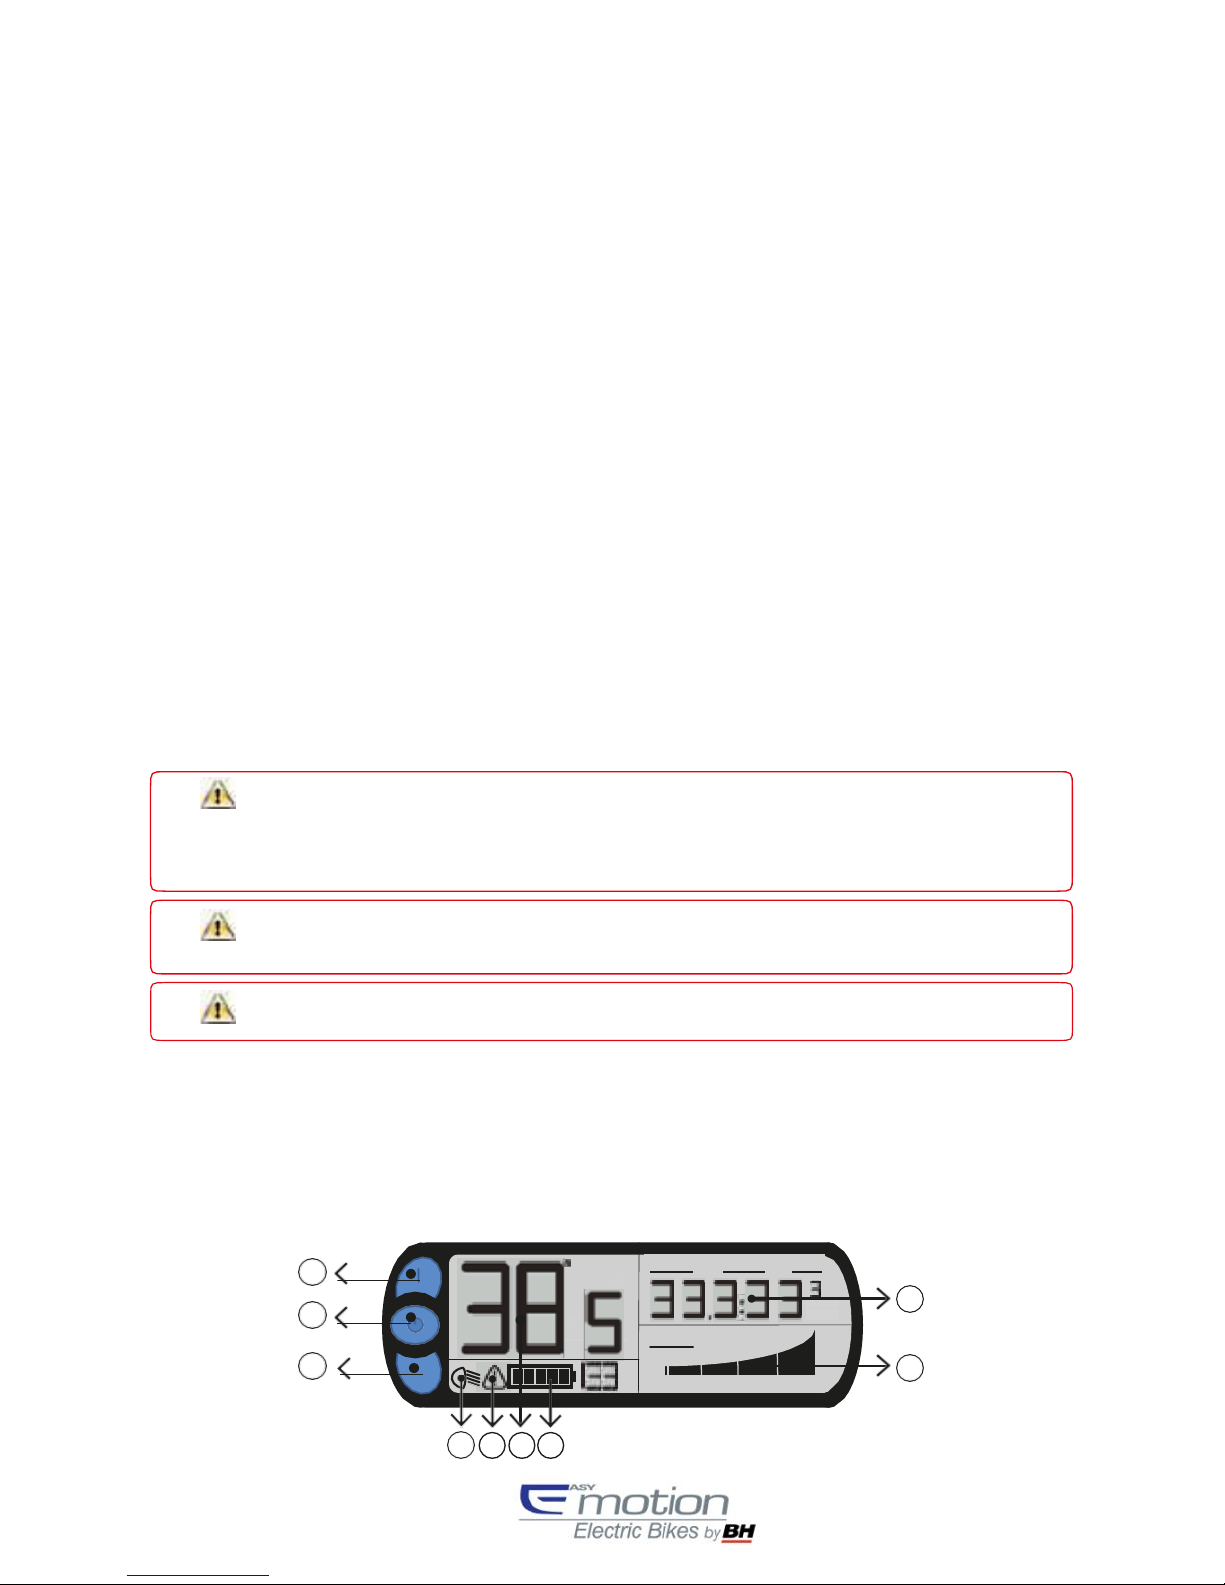
General View of Display Panel
The display panel of the pedal assistance system is on the left of the handlebar and it features the
following functions:
When the user pushes a bicycle as he walks to the side, must ensure that the system is disconnected.
EMOTION bicycles have been designed for urban use. A use for jumping or on mountain roads must
be avoided.
Start pedalling using a small development (large cogs) and a low assistance mode (30 %mode).
In
addition to providing greater control and safety on the bicycle, it requires less energy consumption and,
therefore, provides higher autonomy. Starting with a greater assistance mode (Levels 50%, 70% or
100%) may suppose a safety risk for the user.
2
TOTAL SNOW TRIP
KM/H
1
KM/H
TO GO
9
LEVEL
o
3
%
7
0% 30% 50% 70% 100%
4 6 5 8
6
Page 7
1.
POWER button for starting or stopping the system.
2.
Button (+).
3.
Button (-).
4.
Bicycle lights and display panel backlight indicator.
5.
Bicycle instant speed indicator.
6.
System error indicator.
7.
Pedal assistance level indicator.
8.
Battery level indicator.
9.
Bicycle information indicator.
Display panel operation
1. Removable display panel
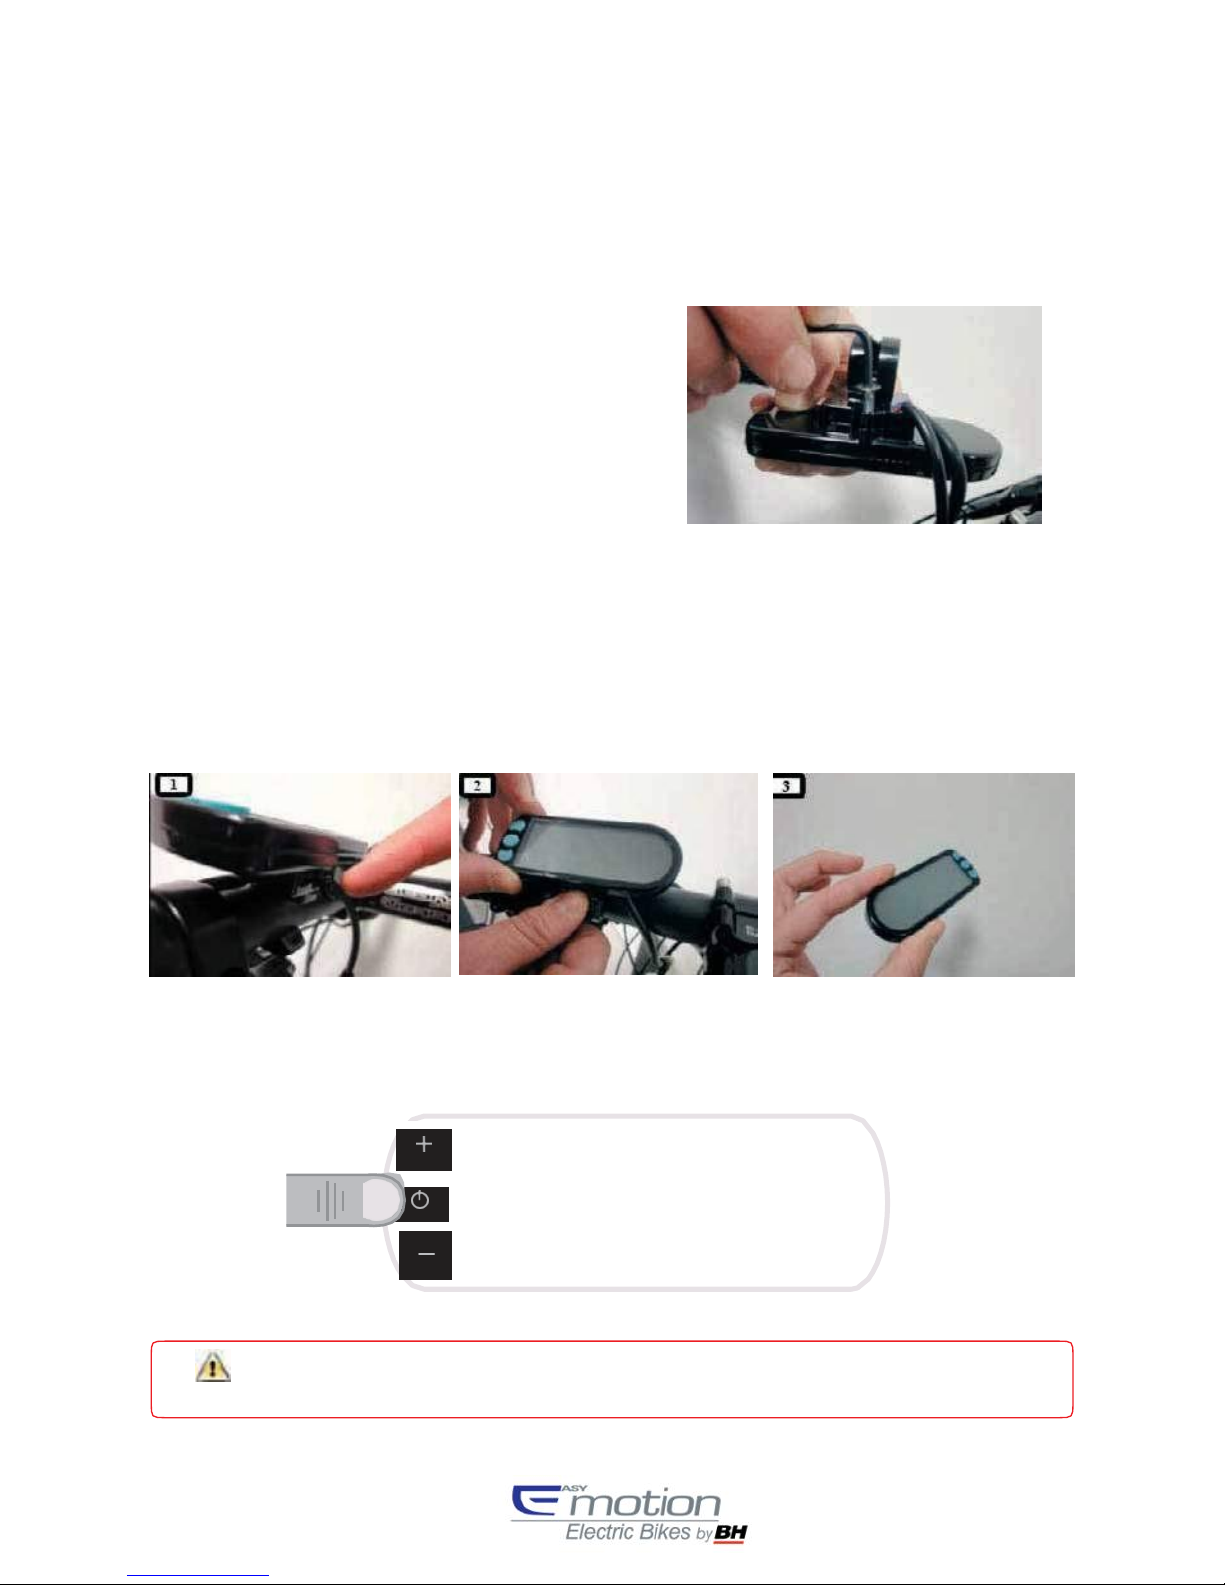
The user can make the display panel be removable or not,
as easily as inserting or removing a M3 screw, as it is
shown in the image below:
By default, the display panel will be removable. Following next steps, user can remove the display panel with no
effort:
1. User will push the flap located in the down side of the display panel.
2. While pushing the flap, the user will slide the display panel towards upside.
3. The display panel will be removed from the bracket.
2. Start and stop of the pedal assistance system
The pedal assistance system is activated or deactivated by pressing the SET button for 3 seconds. The bicycle can be
used normally with no assistance like a conventional bicycle.
3 sec
Wait for 3 seconds after switching on the system before start pedaling. During these 3 seconds,
the
system is starting the torque sensor.
7
Page 8
3. Selection of pedal assistance level
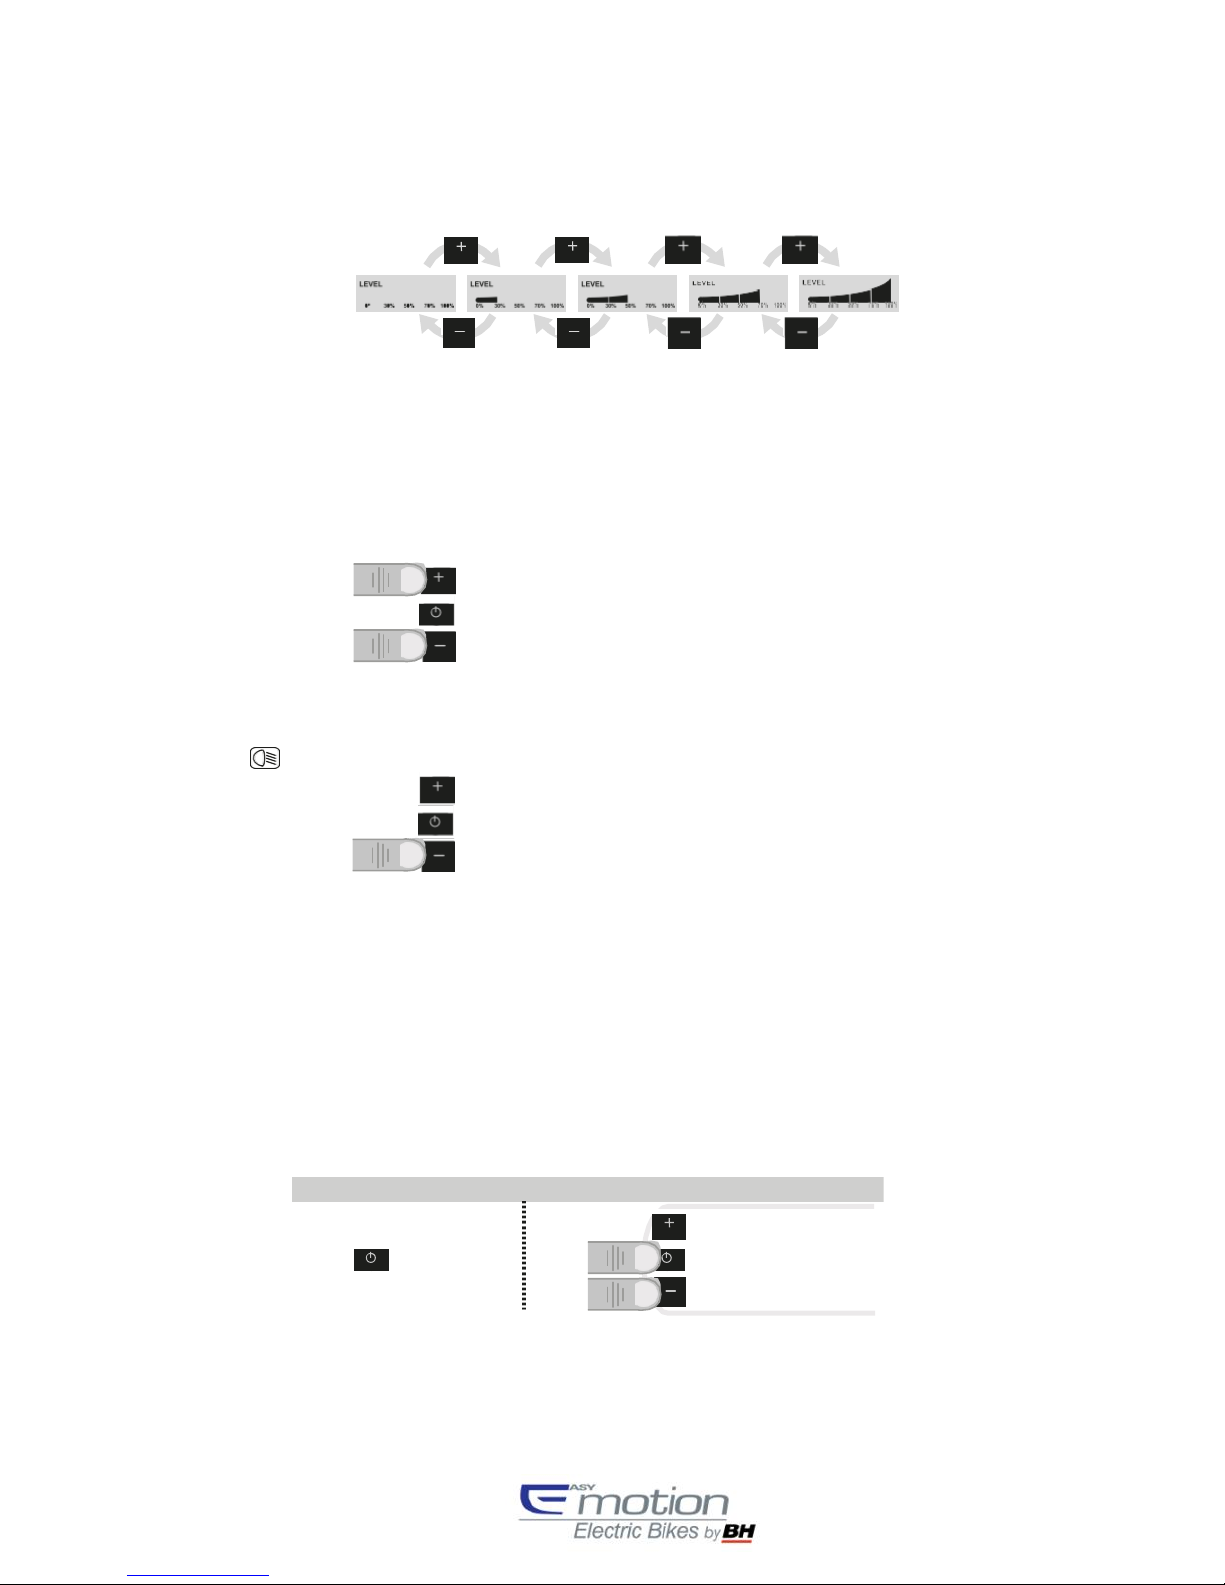
The system has 5 levels of pedaling assistance (including the without assistance mode) To move through the
assistance modes, the user should press the (+) button to increase the level of assistance and the (-) button to reduce
the level of assistance.
By default, when starting the system, the assistance level will be the same level set before the system was last switched
off.
In 30% mode, the energy supplied is minimal. It provides higher autonomy with a lower assistance ratio. In 70% mode, pedal assistance
is maximum, and as a result the action ratio will be significantly reduced.
During a trip, a suitable selection of assistance modes considering the surface or pedaling conditions encountered will
provide you an
optimum ratio between battery economy and pedalling c o mfor t .
increase
decrease
4. Switch on and off the lights of the bicycle and the backlight of the display panel
Press the (-) for 3 seconds, will switch on the retro illumination of the control panel. At this moment the lights on indicator
will light up:
3 sec
5. Selection of display information
The display panel allows the user to see different information. The user may switch among the next options by pushing
the POWER button:
-
Total distance (km).
-
Total time (hh:mm).
-
Average Total Speed (km/h).
-
Trip distance (km).
-
Trip time (hh:mm).
-
Average Trip Speed (km/h).
-
Range (TO GO km).
For resetting the trip information to zero, the user will push ON/OFF and (-) buttons for 3 seconds.
Change information
Reset trip information
push
3 sec
6. Battery level indicator
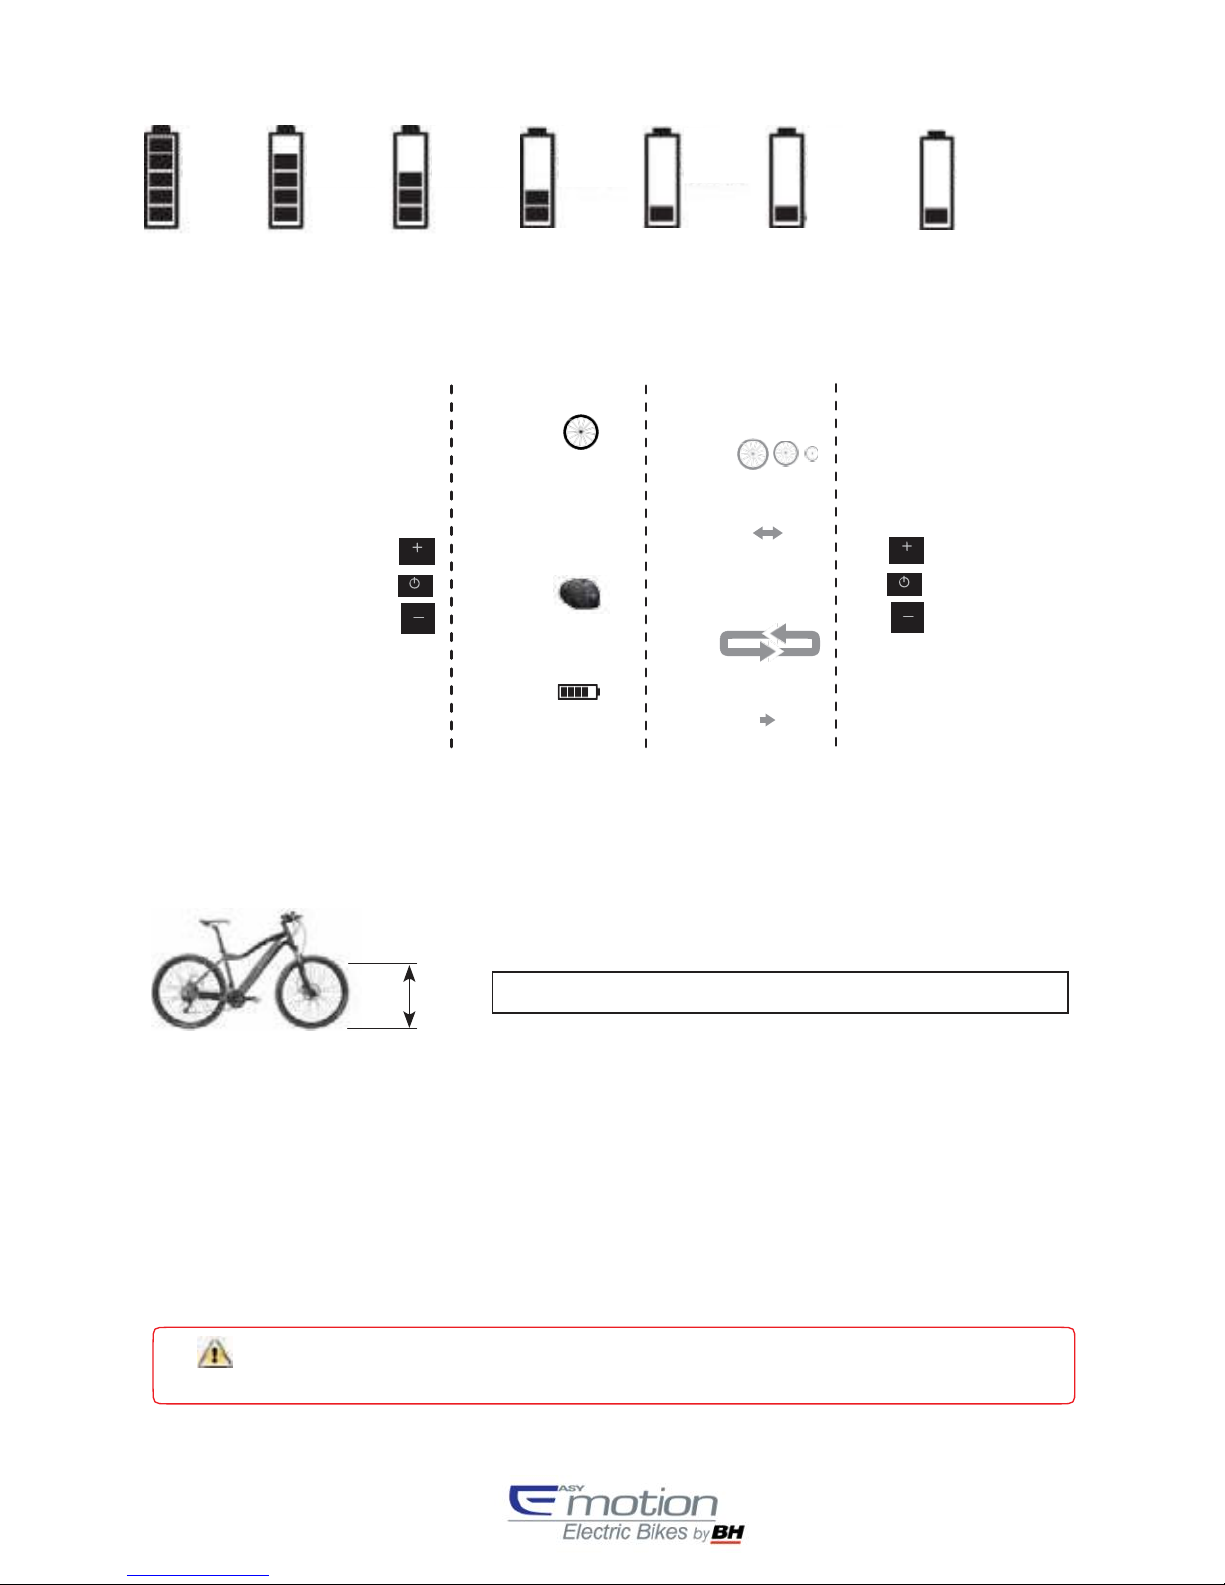
The battery level presents the following states:
8
Page 9
0-5%
CAPACITY
blinking
only MODE 0%
lights
7. Adjustments
The user can access the adjustments menu by pressing buttons (+) and (-) for 3 seconds. Press the POWER button to
scroll through the adjustments options:
The system will exit the “Adjustments” menu when the user presses the POWER button for 3 seconds.
1º 2º 3º
4º
Enter
1 1
Wheel size
2 2
Km
Miles
Km / Miles
Exit
3 sec
3 sec
3
3
AWD Mode
AWD motor
4
4
Battery type
Battery
(+) Ah
(-) Ah
Selection of wheel dimension
At any time, the user can change the dimension of the wheel. To do that, the perimeter dimension of the wheel is
viewed in millimeters and its equivalence in inches (16, 20, 24, 26, 27’5, 28 or 29). These dimensions can be modified
using
the (+) and (-) buttons. The perimeter measuring of the wheel is done as follows:
D (mm)
Change between metric system (km) and imperial (miles), pressing (+) or (-).
Exclusive functions AWD models.
The AWD models have 2 motors, one in the front hub and one in the rear hub. Pressing the (+) and (-) buttons allows
choosing the monitoring mode, form among the following:
-
ALL. The two motors work in parallel with the activated traction control.
-
ECO. The two motors are coordinated and complemented to obtain energy efficiency.
-
FRONT. Only the front motor works.
-
REAR. Only the rear motor works.
-
OFF. Select this option in the e-bikes that are not AWD.
Select battery capacity (12 Ah) for correct range calculation.
The AWD models are not homologated under the regulation EN 15194 and therefore are
designed for exclusive off-road use.
OFF REAR
ALL ECO FRONT
80 - 10%
CAPACITY
60 - 80%
CAPACITY
40 - 60%
CAPACITY
20 - 40%
CAPACITY
10 - 20%
CAPACITY
5-10%
CAPACITY
NO
MODE 100%
only
MODE 30%
Perimeter of the wheel (mm) = Diameter of the wheel (D in mm) x 3,14
9
Page 10
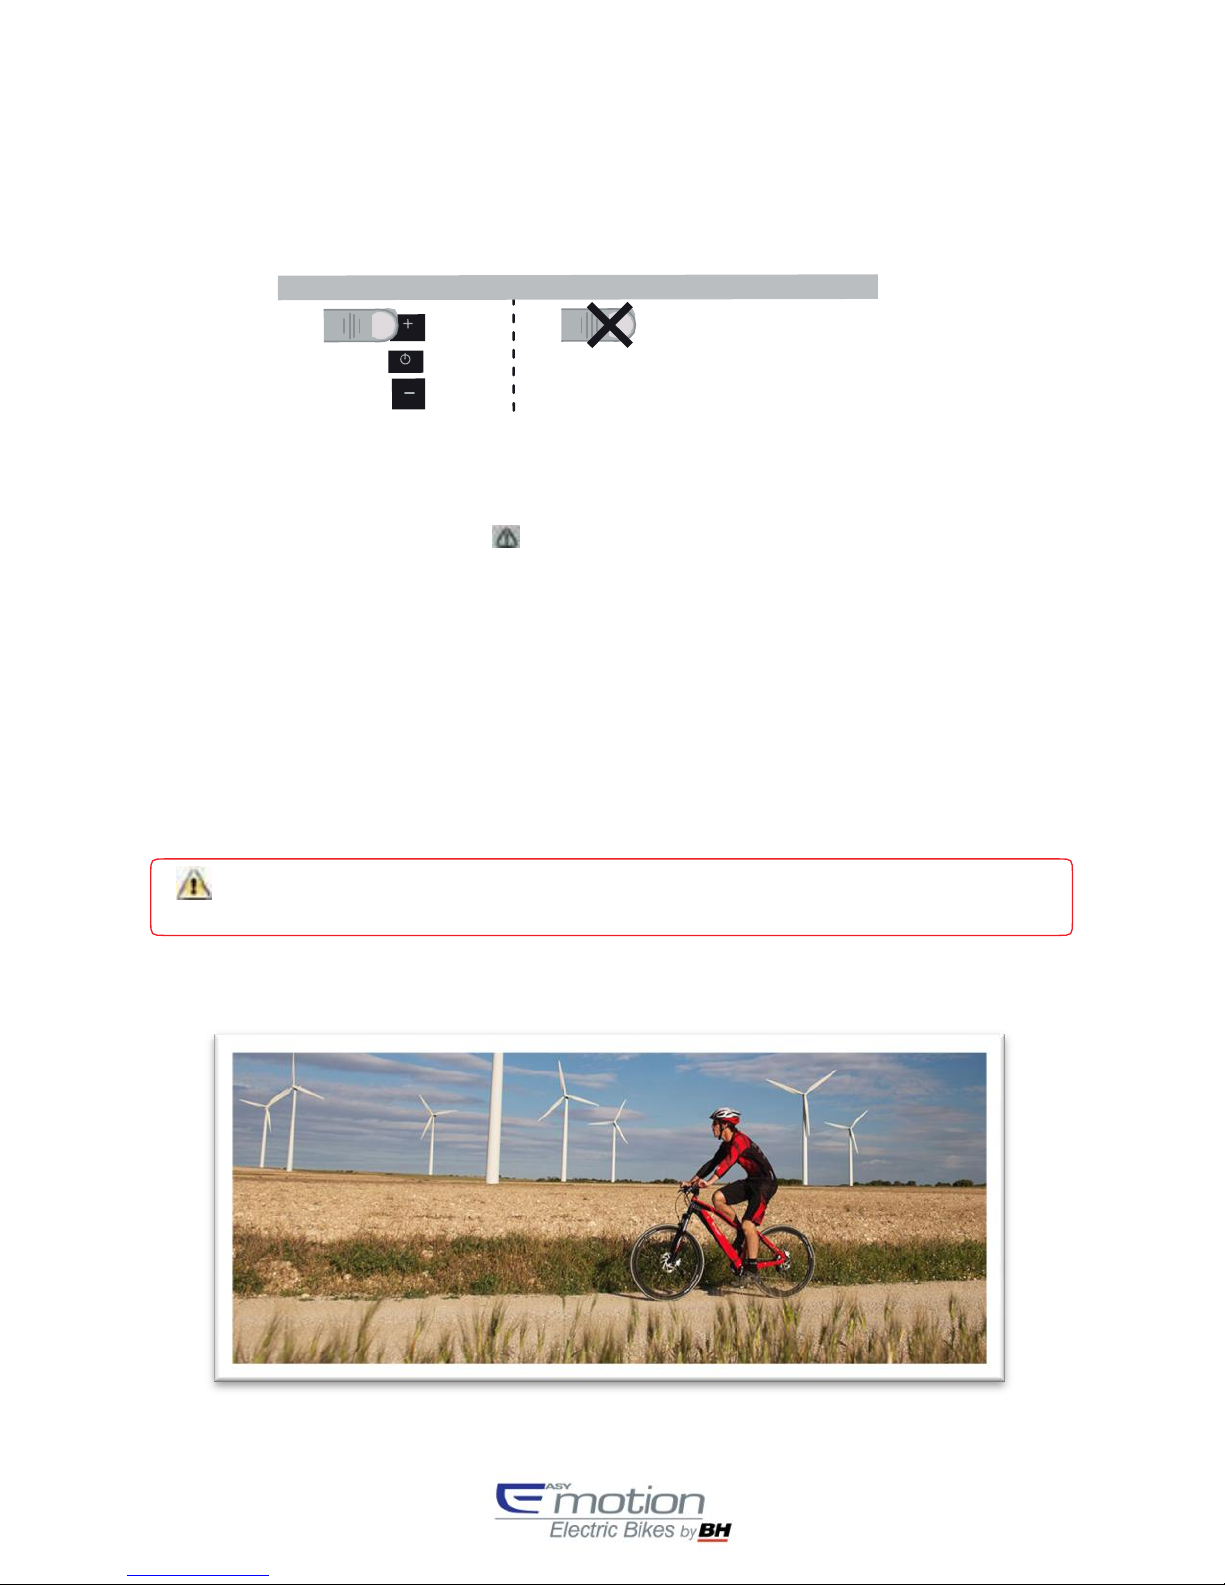
8. Throttle function up to 6 km/h
The BH EMOTION system has a throttle function integrated into control limited to a maximum
speed of 6 km/h, according to the EN 15194 standard. To activate the throttle, the user should
press and maintain pressed the (+) button for 3 seconds, and give an initial impulse to the bike.
To cancel the throttle function, all the user has to do is stop pressing the (+) button.
9. System error indicator
The BH EMOTION system continuously tests its condition. This intelligent system is continuously
checking the
situation of its different elements.
The error indicator of the control pad is activated when there is a malfunction of the system.
When this
happens, make sure the battery is charged, switch off the system and reconnect it,
making sure you do not put any effort on the pedal. If the problem persists, disconnect the motor
and contact a BH sales point.
The table on page 19 contains the possible operational errors.
10. Exclusive functions NITRO models
The NITRO models include a throttle in the right hand grip of the handlebar with a maximum speed
of 20 km/h.
The throttle is only active when the selected assistance mode is “0%”.
On
Off
3 sec
automatic
The NITRO models have been homologated as motorcycles, and for road usage, they require
a CR insurance and registration plate.
10
Page 11
BATTERY
Technology
The battery which comes equipped with your BH EMOTION is Ion-Lithium type and is the highest
technology available regarding energy density (energy stored per kilogram of weight and per cm3 of
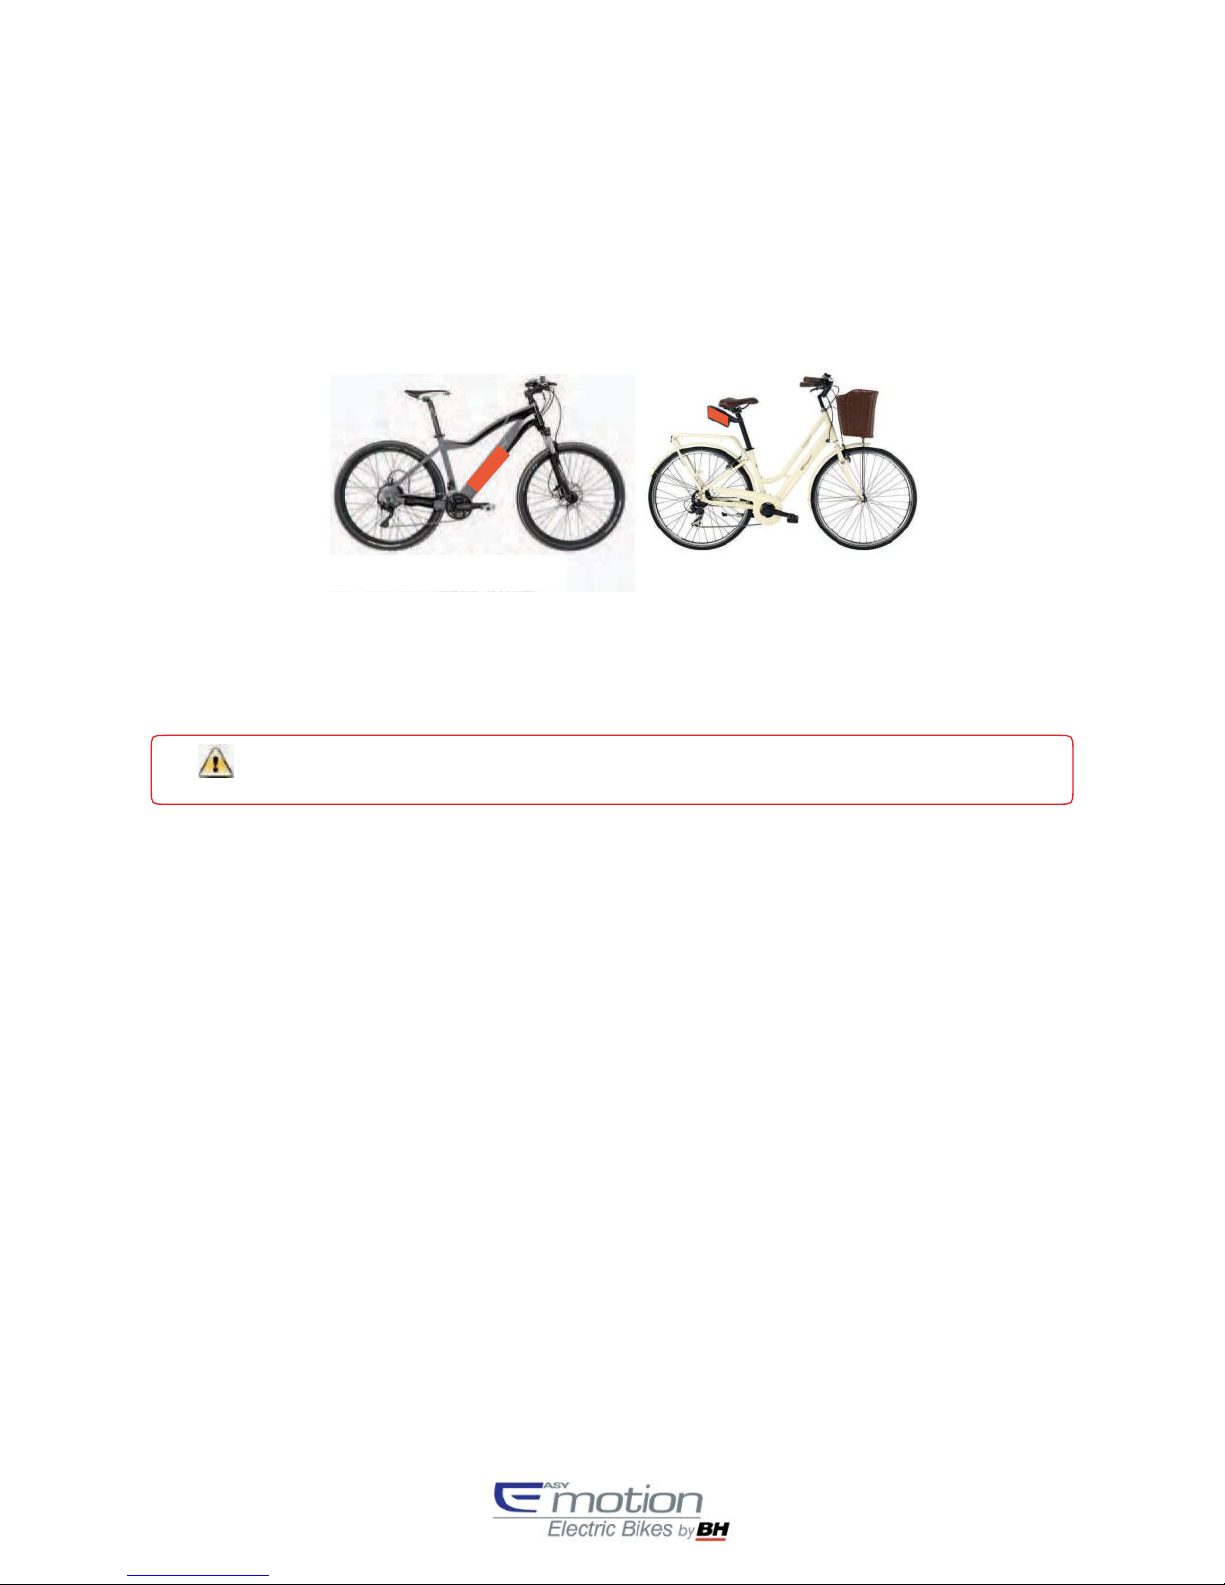
volume). There are several different battery options depending on their location in the bicycle:
BH EMOTION batteries have different capacities, depending on the acquired version.
An additional characteristic of BH EMOTION Ion-Lithium batteries is that they do not present “memory
effect” and they
are not affected by incomplete discharges. The BH EMOTION battery may be fully
discharged (100%) approximately 500 times, with a maximum battery deterioration of 20%. In the
event of partial discharges, only the discharged part is considered. For example, if we charge the
battery each time the charge level is reduced in 25% we may charge the battery to its initial capacity of
100% up to 2,000 times.
In conclusion, the guaranteed durability of the battery with a maximum degradation of 20 % is 20,000 km.
Autonomy
The maximum distance which may be travelled with a fully charged battery depends on the assistance
mode selected and the development used. A long development (small clog) demands more energy
from the battery than a short development (large clog). Other factors
which influence the dur
ation of the
battery are:
1. riding in sloped land
2. ambient temperature
3. brake friction
4. tire pressure and rolling resistance
5. wind direction
6. riding style, starting and stopping
7. weight of the rider
Use exclusively the battery model supplied by BH EMOTION.
11
Page 12
Charge of the battery
Due to its advanced Ion-Lithium technology, reaching a full discharge of the battery before connecting it
to the charger is not necessary. Likewise, fully charging the battery to its 100% capacity before use is
not necessary. But take into consideration that in order to obtain a maximum operation range a full
charge is recommended.
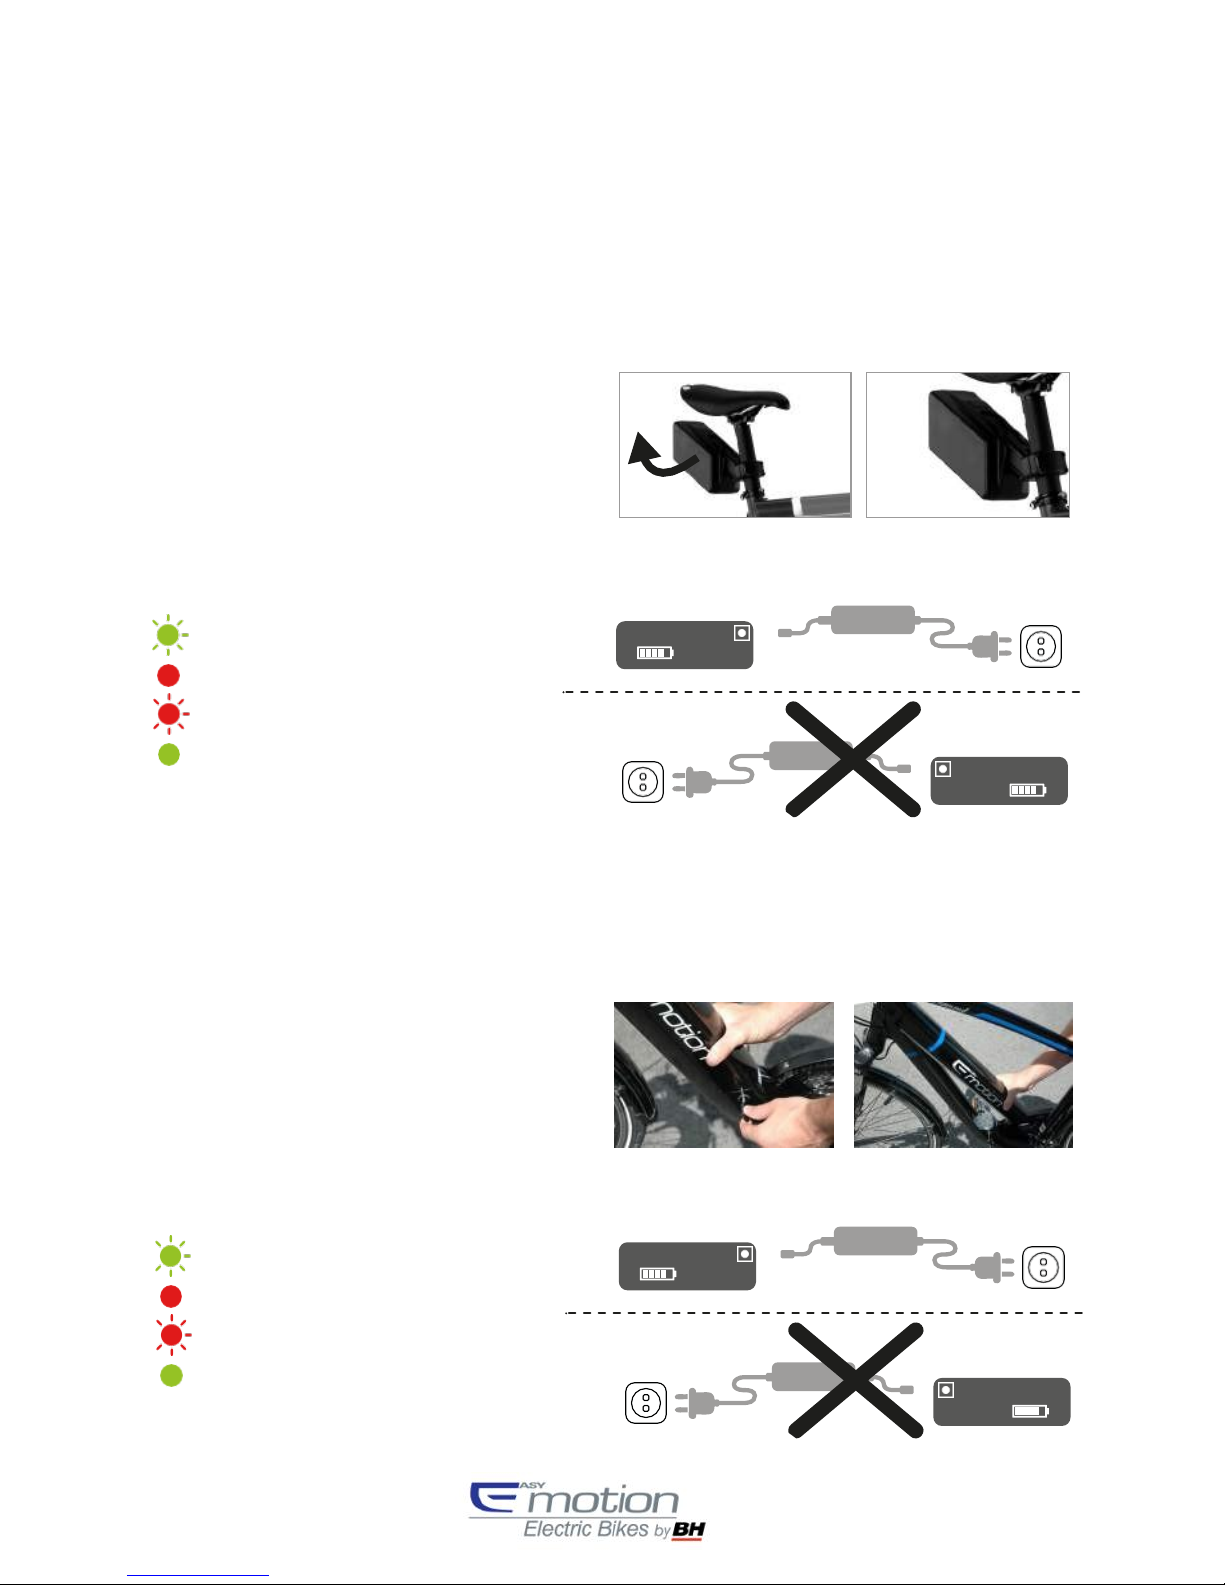
To charge the battery of the EASY GO models, follow these indications:
1.
The user can charge the battery by
removing the saddlebag.
2.
The user must turn off the charger
before proceeding the charging.
GREEN LIGHT: STANDBY
RED LIGHT: CHARGING
RED LIGHT: ABNORMAL CHARGING
GREEN LIGHT: FULLY CHARGED
1º 2º
External port
The following indications shall be carried out when charging the battery integrated in the
frame:
1.
The user must open the lock located
in the frame.
2.
The user will turn and slide the battery
out of
the frame.
GREEN LIGHT: STANDBY
RED LIGHT: CHARGING
RED LIGHT: ABNORMAL CHARGING
GREEN LIGHT: FULLY CHARGED
1º 2º
External port
1º 2º
External port
Charger
Battery port
Battery port
Charger
1º 2º
External port
Charger
Battery port
Battery port
Charger
12
Page 13
Checking the charge level of the battery
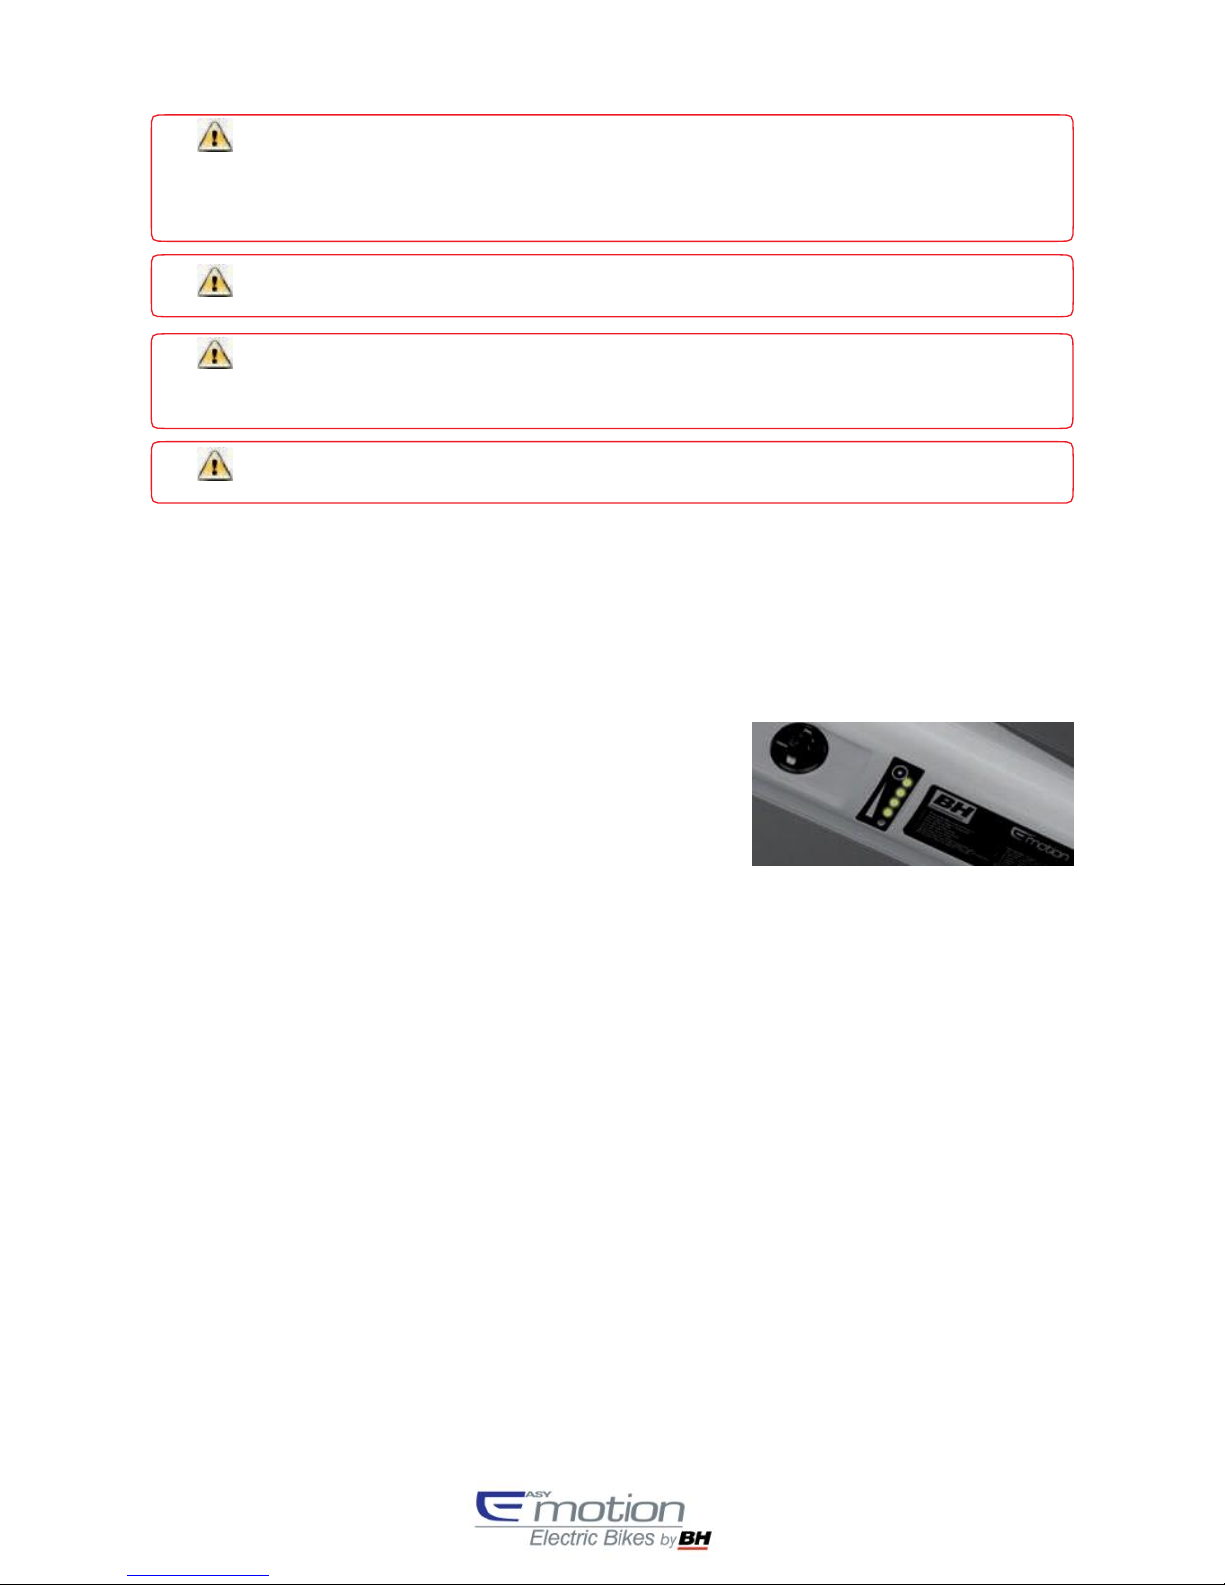
The battery includes a scale with 5 blue LEDs next to the rear light which indicate the charging state.
By pressing the top button for a short time period, the LEDs will give you a precise reading of the current
charge level.
This information supplements the reading obtained from the control console.
1.
5 blue LEDs lit
Charge is between 80-100% of the capacity
2.
4 blue LEDs lit
Charge is between 60-80% of the capacity
3.
3 blue LEDs lit
Charge is between 40-60% of the capacity
4.
2 blue LEDs lit
Charge is between 20-40% of the capacity
5.
1 blue LED lit
Charge is between 10-20% of the capacity
6.
0 blue LED lit
Charge is between 0-10% of the capacity
Safety precautions
Please read and follow these instructions carefully in order to avoid accidents, or damaging the
product or other
properties.
1.
Battery
-
Do not throw the battery into fire.
-
Do not use the battery with other devices.
-
Use the specified charger provided with the battery.
-
Do not disassemble or modify the battery.
-
Do not connect (+) and (-) terminals by using metallic objects.
-
Maintain the battery away from water. If an excess of water falls on the battery this may cause
the battery to
short-circuit and overheat.
-
Do not place the battery under water.
-
Keep out of animal and children’s reach
2.
Charger
-
Do not disassemble or modify the charger.
-
Do not use the charger with other batteries.
-
Do not submit the charger to impact (i.e.: falls.)
-
Do not place the charger under water.
-
Do not cover the charger or place objects on top.
When battery is completely discharged, charge the battery within three days.
Only use the charger provided with the battery. Do not place any object on the charger.
Charging the battery shall always be carried out in a dry environment with temperature conditions
between 5 and 40ºC. Below 5ºC, the charging time will be longer and over 40ºC the battery may be
damaged. Avoid charging the battery for long periods of time, such as over 48 hours, so as not to reduce its
useful life.
Charging the BH EMOTION battery at 70-80% is mandatory if not used or stored for a long time
period. Additionally, control the level of the battery charger every 3 months and keep it always above 20%
charge.
13
Page 14
-
Keep out of animal and children’s reach.
-
When unplugging the cable from the outlet, do not pull the cable, pull the plug. Always pull the
charger’s cable smoothly.
-
Do not use outlets, connectors or other electrical systems with different voltages than the standard.
-
Do not use damaged components, such as the chargers casing, cable or pin; if the cable is
damaged it must be
replaced by the manufacturer or your distributor.
MOTOR
The motor meets the most strict quality requirements and is guaranteed for years of reliability. It is a direct
current motor
which is incorporated to the front wheel’s bushing and is capable of developing
250 W (500 W in the Nitro
Models) with a tested energy efficiency higher than 80%. It is a very
compact unit featuring a weight of only 2.5 kg.
It operates without any friction thanks to its Brushless
technology.
As any other part of your bicycle, the useful life of the motor depends on its use. In normal conditions,
the motor may
be useful for 10 or 20 years, or 100,000 km.
The motor emits a certain level of noise during its use. This is normal and it depends on the
demand
BASIC REPAIRS
Replacement of the rear wheel with the RDS system / disconnection of the motor cable
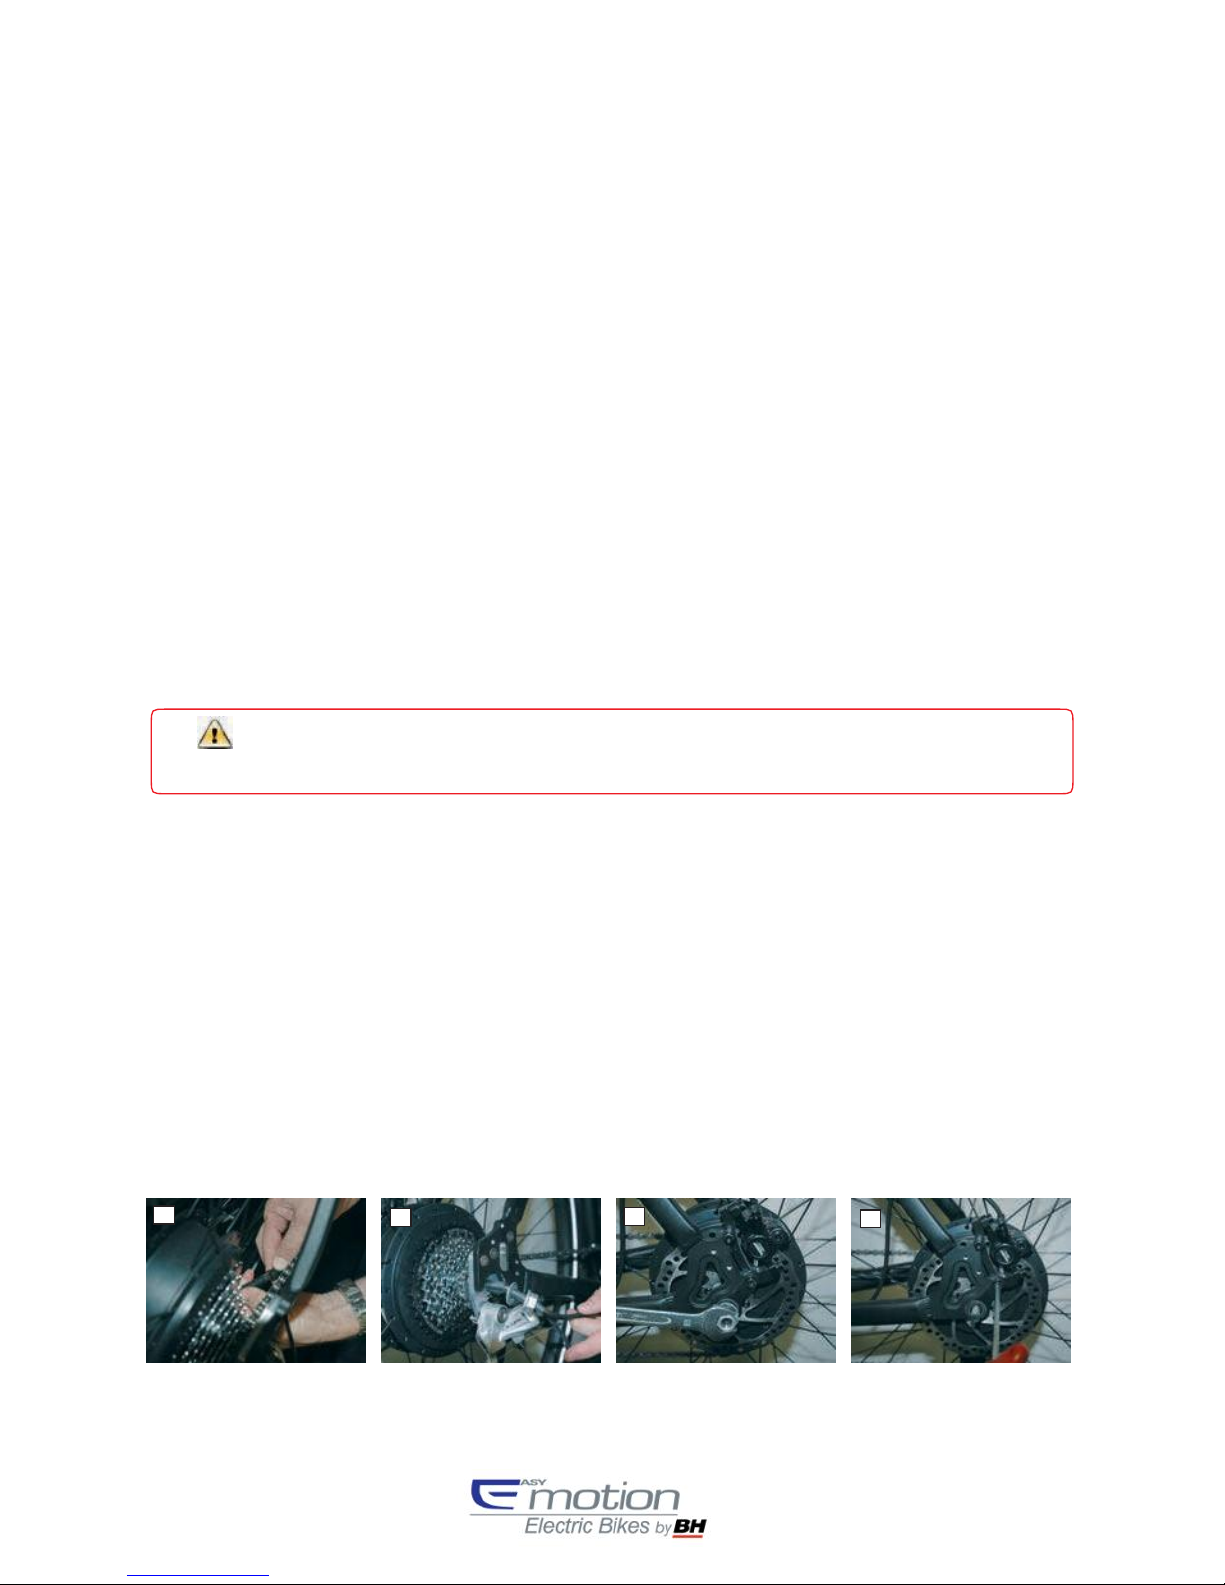
To replace the back wheel you must disconnect the cable from the joint located behind the rear chain
stay (1). Unscrew the nut and also remove the rear washer, taking care to leave the opening of the
black tube facing downwards (2). Unscrew the nut on the left side (3), as well as the safety clamp, to be
able to remove it (4). You can now take off the wheel, replace it with a new one, and then repeat the
process in reverse.
Usage when raining: Both the motor and the electrical connections are duly protected for a normal
use under rain. However, the motor unit is not prepared for jet wash or immersion.
1 2 3 4
14
Page 15
WARRANTY PROGRAMME
Warranty
o In normal conditions of use, conservation and maintenance, BH offers a 2 year warranty
for material and
manufacturing defects in the entire bicycle and electrical components.
o
Regarding batteries, the warranty is valid for 2 years from the delivery date.
o
This warranty only applies to the main owner and in no case and under no circumstance are
the rights given by
the Warranty Programme transferable.
o
Consult the Terms and Conditions of the Warranty in the warranty card which is provided
separately with your
BH EMOTION.
Exceptions
-
The warranty does not apply to parts which are subject to wear and tear, such as tyres, chains,
brakes, cables,
chain rings, direction, crank set and sprockets, providing that they do not present
material or assembly defects.
-
The warranty shall be invalidated in the following cases:
1.
The bicycle has been damaged due to its use in competitions, jumps, descents, events or
as a result of being exposed - or ridden - in extreme conditions or climate.
2.
The bicycle has been in an accident.
3.
The bicycle has been used in an unsuitable way or any other way which is uncommon
considering the type of bicycle.
4.
The bicycle has not been repaired in accordance with the maintenance instructions manual.
5.
The bicycle has been repaired or maintenance has been carried out by a non-authorized BH
distributor.
6.
Non-original bicycle parts have been assembled.
7.
The original owner has transferred the bicycle to a third party.
Liabilities
o
BH assumes no responsibilities regarding damages to (parts of) the bicycle produced by
an incorrect adjustment of mobile bicycle parts, the unsuitable use and/or
maintenance of the bicycle (including a late replacement of parts subject to wear and
tear).
o
In the event that BH accepts a warranty claim, this does not imply, in any case, the
acceptance of responsibilities due to the possible damages incurred. In the event of a
dispute regarding damages suffered (subsequent), BH shall be exempt of any
responsibility to that effect, as it is not legally bound to compensation.
Any non-authorized manipulation of the electrical system’s components may be dangerous and shall
be considered a reason for annulment of the warranty.
15
Page 16

TECHNICAL SPECIFICATIONS
Motor BH EMOTION with Continuous Current brushless
Power 250W (500W in the Nitro
models)
System voltage 36 V (48 V in the Nitro models)
Battery BH EMOTION Ion-Litio
Maximum assistance speed 25 km/h (45 km/h in the Neo Nitro model)
QUESTIONS AND ANSWERS
What is this bicycle’s the maximum speed?
Depends on the user. There isn’t a maximum limit. However, in speeds over 25 km/h, the pedal
assistance is deactivated. This assistance limitation is a legal requirement for pedal assisted
bicycles, according to the EN 15194 European Regulation. The Nitro models are an exception and
they are homologated as motorcycles. The maximum assistance speed is limited to 45 km/h.
Isn’t the BH EMOTION bicycle too heavy?
No, considering that the weight of BH EMOTION bicycles is between 16.75 kg and 24.40 kg,
depending
on different models, they are the lightest electrical bicycles in the market. The pedal
assistance provides the BH
EMOTION an additional weight of 5-6 kg when comparing a standard
bicycle with the same characteristics,
which is the sum of the battery and the motor.
Should I take any additional precautions when riding a BH EMOTION instead of a
standard bicycle?
No, but we recommended paying special attention when starting the BH EMOTION due to the
additional drive provided by the motor. In this sense, we recommend starting in Eco mode and
using a short development (large
cogs).
Should I stop every time I want to activate the pedal assistance?
No, the pedal assistance may be activated while riding the bicycle, although we do not
recommend it due to
the distraction it may produce. The only condition established for a correct
activation of the assistance is to stop pedaling for two seconds after pressing the POWER button,
thus allowing a correct activation of all the electrical
system elements.
May I remain standing, stopped or on the bicycle when at traffic lights?
Yes. The motor will stay inactive providing that you don’t apply pressure on the pedal. The greater
force applied on the pedal, a greater forward drive shall be result from the bicycle. This is a result of
the continuous reading that the magnetic torque sensor carries out on the force applied on the
pedal.
How frequently should I take my bicycle to a BH store for maintenance?
None of the electrical components of the BH EMOTION pedal assistance system needs a periodic
maintenance. The rest of components require a similar service than the components of a standard
bicycle, which depends on the frequency of the bicycle’s use and its care.
16
Page 17

What happens if I puncture? May I repair it myself?
Despite incorporating the motor to the front bushing, repairing a tyre on your own is very simple. It
only requires disconnecting the motor’s output capable, as described in the user manual.
Must I charge the battery when not in use?
It’s not necessary. The battery may be stored in a dry place or left on the BH EMOTION
bicycle.
What should I do when I am not going to use the bicycle for a long period of time?
A charge equivalent to 70-80% of the full capacity is recommended before storing for a long
time period.
Likewise, its charge level shall be supervised every three months and shall be
maintained above 20% of its full
capacity.
Why when it’s frosty or very cold the autonomy is reduced?
Below -5ºC the battery’s performance is lower. This factor doesn’t result in any problems or a
damaged battery; it just doesn’t allow for a full discharge of the battery thus the autonomy is
reduced.
May I purchase additional batteries?
Yes, additional batteries are available at BH stores. In the event that a higher autonomy is required
or there isn’t the possibility of charging the battery between two journeys, the purchase of an
additional battery in accordance with the characteristics of the purchased BH EMOTION bicycle is
recommended.
May I use my wife’s bicycle battery?
Yes, providing that the battery is from a BH EMOTION bicycle which is compatible with the
model you have
purchased. If the battery is from a non-compatible electrical bicycle, you must
not use it with the BH EMOTION.
This would damage the assistance system beyond repair and would
result in the annulment of the warranty.
May I make copies of the battery lock?
Yes, it is a standard flat key. .
Must I use a helmet?
The use of helmets depends on the law of each country, however, its use is recommended due to
safety reasons, apart from the Neo Nitro model.
Should I have third party insurance?
No, insurance is not compulsory, except in the Nitro models.
Is there a required minimum age for using a BH EMOTION?
No, any user may ride a BH EMOTION, apart from the Neo Nitro model.
17
Page 18
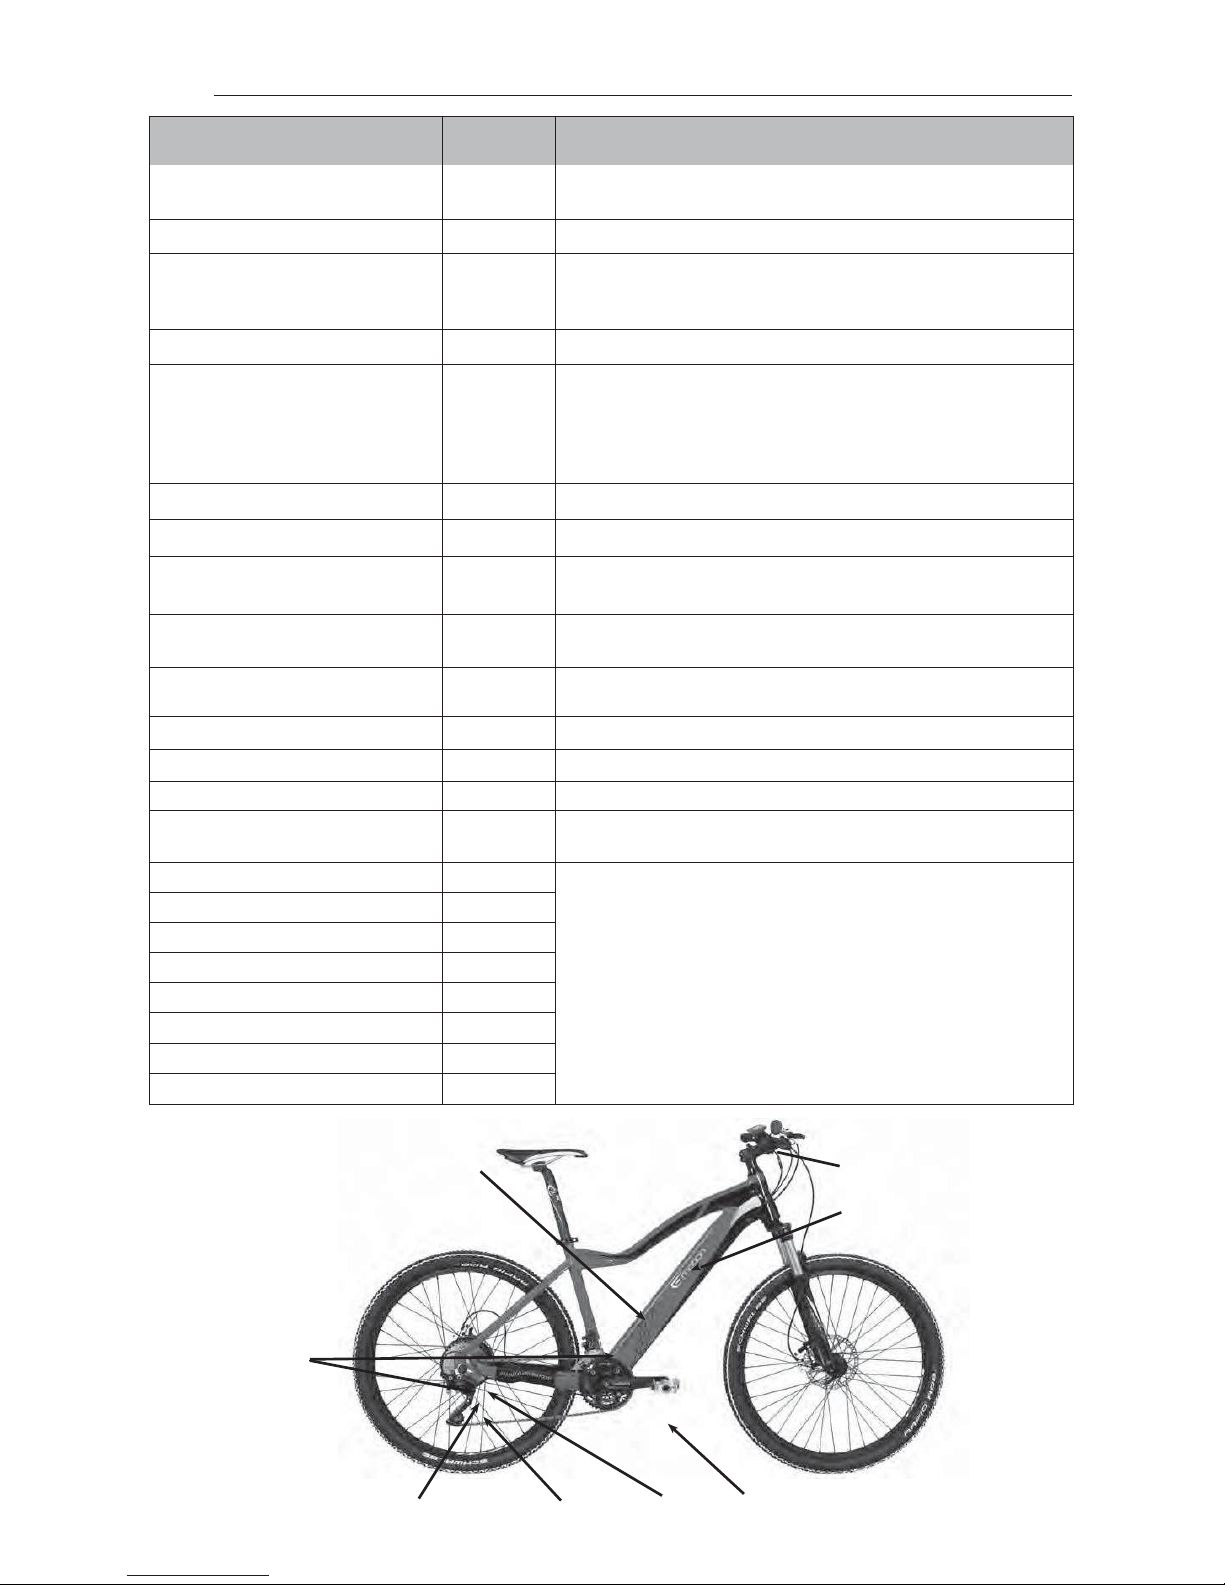
Description
Error
Observations
System over current
01
Check that the connection between the motor and the
con
troller is correct. If not, replace the controller.
System over current
02
Replace the controller.
TMM Sensor
03
Check that the connection between the TMM sensor and the
controller is correct. Check to see if the output of the TMM
sensor exceeds the normal range, it must be 0.1V-3.5V.
Motor error
04
Check the motor or controller connector.
Motor sensor error
05
Check that the connection between the motor and the
controller is correct. If the sensor inside the motor is broken,
replace the sensor or motor with a new one. Check that the
connection between the motor cable and the controller is
correct. If not, replace the controller.
Battery low
08
Check the battery level or replace it with a new one.
Motor blocked
09
Motor stopped due to accident. Motor off.
System over current
10
If there is a bad contact bad between the controller and the
motor connector, replace it with a new one.
Overheating
11
If the temperature exceeds the set value, the current gradually
weakens.
Protection against overheating
12
Enters into temperature protection mode and the controller
stops.
Communication error
13
Check the cable and the connector.
Pedal error
14
Take your foot off the pedal and switch on again.
Sensor error
15
Readjust the sensor.
Can Communication
16
Check connection motor and can converter. If error does not
disappear, contact a BH dealer.
System overvoltage
21
Restart the system. If error does not disappear, contact a BH dealer.
Torque sensor out of range
22
Over temperature
23
Below temperature
24
Current out of range
25
Torque sensor out of range
26
Speed sensor signal
27
Temperature discharging error
28
1/ 2 / 10 / 21 13 / 16 / 27 / 28
8
22 / 23 / 24
25 / 26
4 / 5 / 9 / 11 / 12 15 3
14
18
 Loading...