

Page 1
WIFIIL/H
Wiring Accessories
Wi-Fi Socket Range Extender, N300
Safety Warning
For your safety, this product must be installed in accordance with local Building Regulations. If in any doubt,
or where required by the law, consult a competent person who is registered with an electrical
self-certification scheme. Further information is available online or from your Local Authority. INDOOR USE
ONLY.
Please read carefully and use in accordance with these safety wiring instructions. Before commencing any
electrical work ensure the supply is switched off at the mains. Either by switching off the consumer unit or
by removing the appropriate fuse. Wiring should be in accordance with the latest edition of IET regulations
(BS 7671). To prevent a fire hazard always use a cable of the correct rating, size & type for the application.
Any bare earth wires must becovered with the appropriate green/yellow sleeving. Any decorative products MUST
have an earth connection between the front-plate andback box.
Warning do not exceed the load rating of this device as stated on rear of the product.
If in doubt always consult a competent electrician.
MAINTENANCE
To keep the finish of this product, wipe over with a soft dry cloth periodically.
Environmental Protection
This symbol is known as the “Crossed-out Wheelie Bin Symbol”. When this symbol is marked
on a product or battery, it means that it should not be disposed of with your general household
waste. Some chemicals contained within electrical/electronic products or batteries can be
harmful to health and the environment. Only dispose of electrical/electronic/battery items in
separate collection schemes, which cater for the recovery and recycling of materials contained
within. Your co-operation is vital to ensure the success of these schemes and for the
protection of the environment.
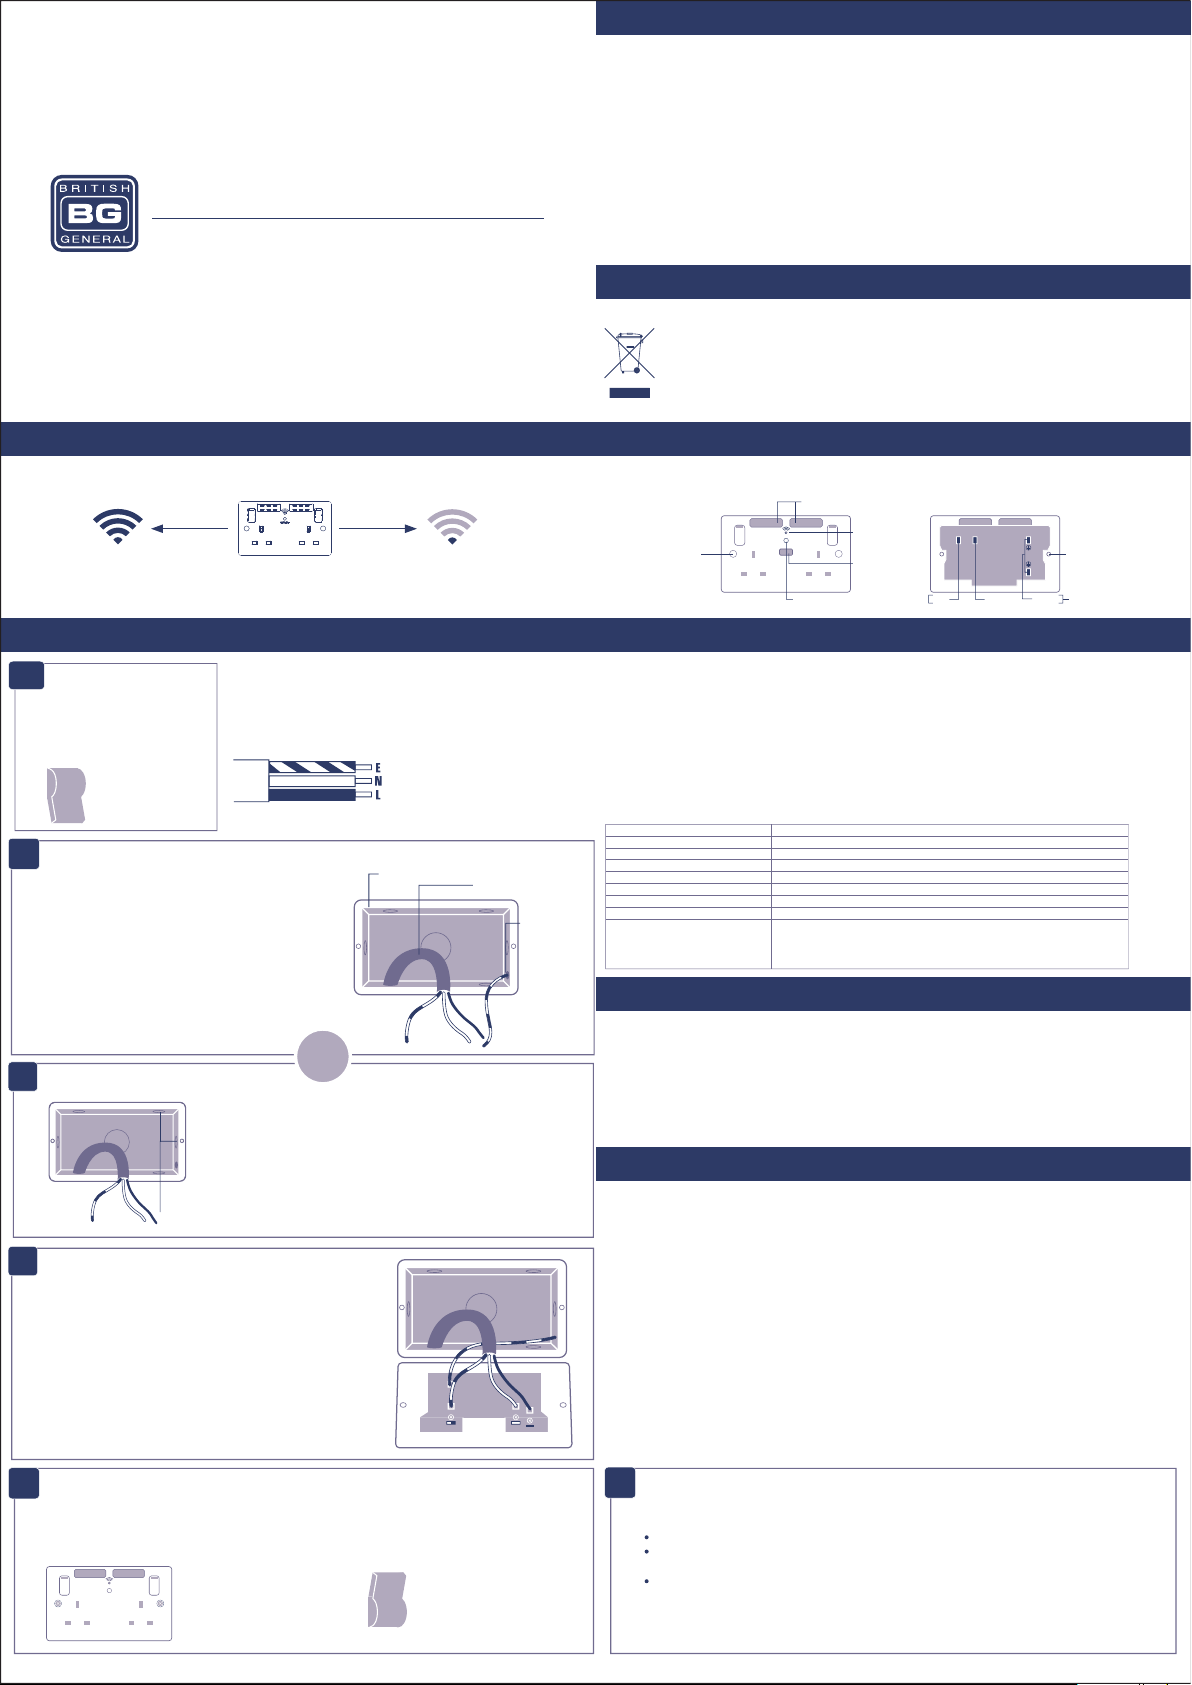
Positioning Your Wi-Fi Socket
Your Wi-Fi socket should be positioned half way between your router and the Wi-Fi dead-zone use the signal
strength indicator on your mobile device to determine the mid-signal point.
Choose a location away from Bluetooth devices and other household electronics (cordless phone,
microwave oven, baby monitor, etc.) to minimise signal interference.
Wiring Instructions
1
Power off
BEFORE COMMENCING
WORK ALWAYS ISOLATE
THE POWER AT THE
CONSUMER UNIT / FUSE BOX.
OFF
2a
Replacing an existing socket (removal)
1. Unscrew the socket from the wall/mounting box.
2. Note the cable connections: There will generally be
three different wiring configurations, this illustration
shows a single wire of each colour connected to each
terminal (there could be two or three wires of each
colour connected to each terminal) + an additional
connection between the mounting box earth terminal
and the socket earth terminal.
3. Unscrew each terminal to release the wires.
2b
New installation
KNOCK-OUTS
3
Wire up your socket
1. Line up the new socket to the mounting box and take note of
where each terminal is located.
2. Connect each wire to the matching terminal. (refer to key in
step 2)
An earth connection should always be made between the
mounting box earth terminal and the socket earth terminal.
Make sure no copper wire is exposed & that only the bare end
enters the terminal.
3. Tighten terminal screws securely. (do not over tighten)
Wire Identification – Twin & Earth Cable
Note - As from 1st April 2004 new colour codes for hard wire
installations were introduced.
EARTH = Green/Yellow Sleeving
NEUTRAL = Black (pre Apr 04) / Blue (after Apr 04)
LIVE = Red (pre Apr 04) / Brown (after Apr 04)
MOUNTING BOX
FROM SUPPLY
MOUNTING
BOX
EARTH
TERMINAL
OR
1. Install the mounting box (metal or patress) for either flush or
surface mounting, ensuring appropriate size of product. (mounting box
to be purchased separately)
2. Select the most suitable entry point of the mounting box (knock-out)
and route the supply cable through.
3. Cables should be prepared so a sufficient conductor length reaches
the terminals. Strip the ends of the individual conductors leaving an
adequate length bare to enter terminals.
EARTH LIVENEUTRAL
Product Overview
Wi-Fi Socket Range Extender
WI-FI SIGNAL ANTENNAS
SCREW
COVER
WPS/RST BUTTON
LEDWI-FI
INDICATOR
2.1A
USB CHARGING
SOCKET
Rear of Socket
NN
L
NEUTRAL EARTH TERMINALSLIVE
SCREW
HOLES
USB Charger Information
2.1 A USB port for charging mobile devices such as mobile phones, MP3 players and tablets.
2.1A 5V output fromthe USB output
• 2.1 A is sufficient power output to charge the majority of USB products.
• The total output current achieved is dictated by specific device being charged and other external factors,
such as the quality of charging cable being used.
• Overload protection for connected devices.
Low energy stand-by mode
• When not in use the USB socket is in a low energy stand-by mode.
The USB circuits on this socket are designed to withstand insulation resistance tests at 500V.A reading of
0.4Ω +/-0.05 is typically caused by the USB socket
Note - The front surface ofthis product may become warm in use. This is normal and notcause for concern.
USB Output
Input
Average active efficiency
Efficiency at low load(10%)
No load power consumption
USB Port number
USB PCBA Model name
Manufacturers model identifier
Note
y = PCD/PC finish ‘WH’,‘CL’,‘BS’,‘PC’,‘BC’,‘AB’,‘SB’,‘MB’,‘MG’,‘CH’,‘BN’;
5.0V DC 2.1A, 10.5W MAX
220-250V~ 50/60Hz
>79.04%
>70.08%
<0.10W
1 Port
CH-Wi-Fi-Power-U
x = range, 4,8, 9,Ez,Fz,PCDy,Sz,Tz,Nz,Cz,MC5z
z=Metal finish ‘BS’, ‘PC’, ‘BN’,‘AB’,‘PR’, ‘SL’.
x22UWR*
* = insert colour, ‘W’, ‘B’ or ‘G’;
Additional Advice for Decorative Products
Fixing method varies depending on which product range is supplied. Always ensure wall surface is
reasonably flat and smooth, with no bumps or projections. Metal frontplates WITH screw fixing holes, fix the
unit to the back box using two fixing screws supplied. All Decorative products MUST have an earth
connection between the frontplate and back box. Frontplates WITHOUT screw fixing holes. These products
comprise main unit with integral gasket, and frontplate as separate item. Fix unit to back box using two
fixing screws supplied. Clip frontplate onto main assembly, ensuring screwdriver notch is located bottom
right hand corner.
To remove plate, place medium size flat bladed screwdriver in notch and lever off against gasket.
Care
To maintain the high quality appearance of decorative finish switches and sockets, BG Electrical recommend
the use of a soft cloth periodically to clean the front face. When installing a decorative product please ensure
that the wall is decorated, finished and free of moisture prior to installation.
BG Electrical recommends avoiding using, but not restricted to, these substances from becoming in contact
with the decorative metal front-plates when cleaning or decorating:
• Adhesive tape, including low tack masking tape
• Solvents
• White spirit
• Multi surface cleaners
• Industrial multipurpose cleaning wipes
• Wet wipes
Using items like those listed above may cause a degrading effect to the front-plates lacquer/plated finish,
although the function will remain unaffected.
4
Complete the installation
1. C
arefully position the accessory into the mounting box,
ensuring that no wires are trapped between the plate and
the wall, and secure with screws (do not over tighten).
Then set screw covers in place (optional).
2. Once installation has been completed
correctly, replace the fuse for the
circuit, switch the power back on at the
consumer unit and test.
ON
Insulation testing
5
This socket outlet is designed to withstand insulation resistance testing at 500V as defined by
BS1363-2.
Perform insulation test between Line & Neutral at 250V.
500V test may be performed between Line & Earth, Neutral & Earth.
Or,
Disconnect all Neutral connection in the socket and connect into terminal block before
replacing the socket prior to test.
Page 2
Wi-Fi Socket Setup Instructions
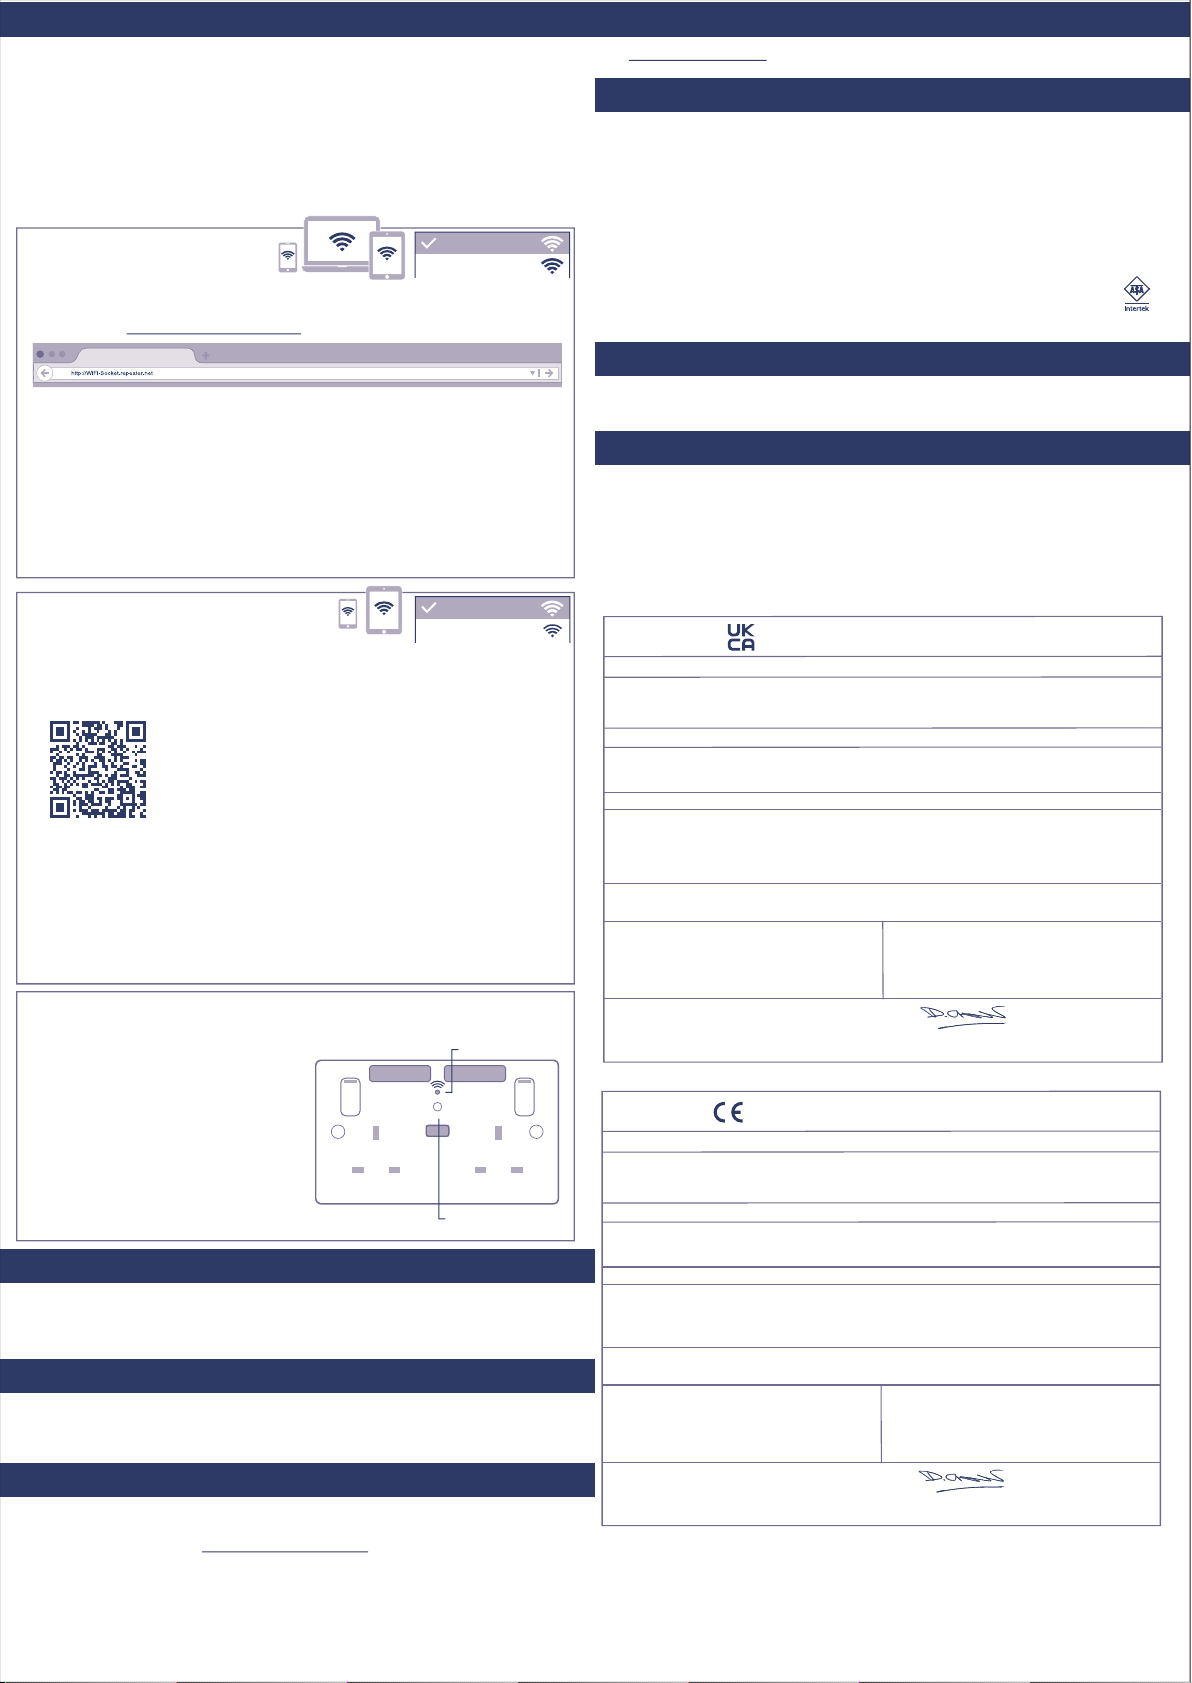
Ensure that your Wi-Fi socket is connected to the power supply as per ‘Wiring instructions’.
After the initial power up the LED indicator will illuminate with a solid blue light. After a short period of time
the indicator will then start to blink and the product will then be ready for set-up Proceed with your
preferred method of connection:
Wireless Setup
There are three installation methods to connect to the Wi-Fi socket:
• Web browser – Using your computer, smart phone or tablet’s internet browser (Safari, Chrome, Firefox,
Edge, Internet Explorer).
• QR code – Scan the QR code to take you directly to the setup page.
• WPS (Wi-Fi Protected Setup) – One touch setup, no configuration needed.
Web browser setup
• Connect to a new Wi-Fi network called “Wi-Fi Socket” (no password is required).
*Note: if the “Wi-Fi Socket” network is not showing, please reset the Wi-Fi socket.
• Enter the URL http://WiFi-Socket.repeater.net into your browser search bar.
• Select the Wi-Fi network to be extended.
• Enter your Wi-Fi router password.
• Ensure the tick-box “Set the same SSID & Password ” is ticked. This will change the “Wi-Fi
Socket” network name to match your current router network name.
• Click ‘Next’.
*Note: Should you need to change the network encryption mode, choose from the drop-down menu.
Default is WPA2-PSK. Refer to your router handbook for further details.
• Click ‘Apply’.
• The Wi-Fi socket will show a solid blue LED, and is now ready to use.
• Your devices will connect using your existing Wi-Fi network name.
Please note - this is a set-up website only that is hosted by the Wi-Fi socket. For more information
or support please visit www.bgelectrical.uk
QR code setup
• On your smartphone or tablet, connect to a new Wi-Fi network called “Wi-Fi Socket” (no
password is required).
*Note: if the “Wi-Fi Socket” network is not showing, please reset the Wi-Fi socket.
• Scan the QR code.
• Select the Wi-Fi network to be extended.
• Enter your Wi-Fi router password.
• Ensure the tick-box “Set the same SSID & Password” is ticked.
• This will change the “Wi-Fi Socket” network name to match your current router network name.
• Click ‘Next’.
*Note: Should you need to change the network encryption mode, choose from the drop-down menu.
Default is WPA2-PSK. Refer to your router handbook for further details.
• Click ‘Apply’.
• The Wi-Fi socket should show a solid blue LED, and is now ready to use.
• Your devices will connect using your existing Wi-Fi network name.
Wi-Fi Socket
My Network
Wi-Fi Socket
My Network
WPS (Wi-Fi protected) setup
• Press and hold the WPS button on your router
for 5 seconds.
*Note: WPS connection may differ for each
manufacturer, please refer to your router
handbook for your specific WPS connectio
method.
• Press the WPS/RST button once on the Wi-Fi
socket.
• The LED will blink orange whilst connecting to
your router.
• Once connected, the LED will light solid blue.
• Your devices will connect using your existing
Wi-Fi network name.
LED WI-FI INDICATOR
WPS/RST BUTTON
Resetting Your Wi-Fi Socket
• Press and hold the WPS/RST button on the front of the Wi-Fi socket for 5 seconds
• The LED will blink amber/blue and then extinguish.
• Wait for a blue blinking LED to return.
• Your Wi-Fi socket is now ready to setup
Turning Off the Wi-Fi Function (Holiday Mode)
• Press the WPS/RST button 3 times to turn off the RF (Wi-Fi) signal. The LED will extinguish.
• To turn the functionality back on, press the WPS/RST button 3 times.
The LED will show solid blue and Wi-Fi connectivity will be restored.
*Note: The 13A socket outlets work independently and are unaffected by holiday mode.
FAQ’s
The “Wi-Fi Socket” network is not showing in my list of networks?
A: Please reset your Wi-Fi socket (Refer to the ‘Resetting your Wi-Fi socket’ section) then try again.
I can’t see the login page after typing http://WiFi-Socket.repeater.net in the browser, or by scanning the QR
code?
A1: Make sure your computer/phone/tablet is connected to the “Wi-Fi Socket” Wi-Fi network.
A2: Ensure your Wi-Fi socket is connected to the power and the blue LED indicator is lit. Once connected,
reset the socket.
How do I reset the Wi-Fi socket?
A: Refer to the ‘Resetting your Wi-Fi socket’ section.
My router doesn’t have a WPS button, what do I do?
A: Please use the ‘Web browser’ method to setup your Wi-Fi socket.
Setup Advice & How-to Guides
Visit www.bgelectrical.uk/wifi for additional support.
Technical
Voltage : 220-240V ac
Frequency : 50/60Hz
Rating : 13A
Terminal capacity : 3 x 2.5mm² 3 x 4mm² 2 x 6.0mm²
Min box depth (profiled plates) : 25mm
Min box depth (flat plates) : 35mm or 25mm with spacer provided.
WiFi Specification : N300 MBPS, 2.4GHz
Network Standards : 802.11 b/g/n
Note - The front surface of this product may become warm in use. This is normal and not cause for
concern.
ASTA Approved
The ASTA quality mark is evidence that the product has been independently tested to
comply with the relevant clauses of the applicable standards.
Batch Code Explanation
yyWxx Manufacturing date code, year of manufacture (yy) and week of manufacture (Wxx)
Address/Helpline
Luceco PLC
Stafford Park 1
Telford TF3 3BD
ENGLAND
If you have further technical assistance you can get in touch with our
Technical Helpline on:
+44 (0)3300 249 279
[email protected]
Product
• Product name –Wi-Fi Socket Range Extender, N300(x22UWR)
• Type / batch or serial number range 21W25 to 23W25
Name and address of the manufacturer or his authorised representative:
The object of the declaration described above is in conformity with the relevant legislation:
Radio Equipment Regulations 2017 as amended
The Restriction of the use of Certain Hazardous Substances in Electrical and Electronic
Equipment Regulations 2012 as amended
The Ecodesign for Energy-Related Products and Energy Information (Amendment)
(EU Exit) Regulations 2019
References to the relevant designated standards used or references to the other technical
specifications in relation to which conformity is declared:
BS 1363-2:2016+A1:2018
EN 62368-1:2014+A11:2017
EN 62680-1-1:2015
EN 62311:2020
ETSI EN 301 489-1 V2.2.3
Signed for and on behalf of Luceco UK Ltd
Name: David Cleaver
Position: Senior Product Manager
Product
• Product name –Wi-Fi Socket Range Extender, N300(x22UWR)
• Type / batch or serial number range 21W25 to 23W25
Name and address of the manufacturer or his authorised representative:
The object of the declaration described above is in conformity with the relevant legislation:
2014/53/EU as amended Radio Equipment Directive
2011/65/EU as amended Directive Restriction of the use of certain hazardous substances in
2009/125/EC as amended Directive on Ecodesign Requirements for Energy-Related Products
References to the relevant harmonised standards used or references to the other technical
specifications in relation to which conformity is declared:
BS 1363-2:2016+A1:2018
EN 62368-1:2014+A11:2017
EN 62680-1-1:2015
EN 62311:2020
ETSI EN 301 489-1 V2.2.3
Signed for and on behalf of Luceco SE S.L
Name: David Cleaver
Position: Senior Product Manager
(EU) Luceco SE
C/ Bobinadora 1-5
08302 Mataró
SPAIN
(UK) DECLARATION OF CONFORMITY
Luceco plc Luceco UK Ltd:
Building E, Stafford Park 1
Telford, Shropshire
TF3 3BD, UK
ETSI EN 301 489-17 V3.2.4
EN IEC 61000-6-1:2019
EN 61000-6-3:2007+A1:2011
ETSI EN 300 328 V2.2.2
EN50563: 2011+A1:2013 + 2019/1782
Signature:
On [18/06/2021]
(EN) EU DECLARATION OF CONFORMITY
Luceco plc, Luceco Southern Europe, S.L.
C/ Bobinadora 1-5
08302 Mataró
Barcelona (SPAIN)
electrical and electronic equipment
ETSI EN 301 489-17 V3.2.4
EN IEC 61000-6-1:2019
EN 61000-6-3:2007+A1:2011
ETSI EN 300 328 V2.2.2
EN50563: 2011+A1:2013 + 2019/1782
Signature:
On: [18/06/2021]
Lic No.1182
 Loading...