


UVM Appliance
User Guide

Revision/Update Information: January 2018
Software Version: UVM Appliance 2.4
Revision Number: 0
CORPORATE HEADQ UARTERS
5090 N. 40th Street
Phoenix, AZ 85018
Phone: 1 818-575-4000
COPYRIGHT NOTICE
Copyright © 2018 BeyondTrust Software, Inc. All rights reserved.
The information contained in this document is subject to change without notice.
No part of this document may be photocopied, reproduced or copied or translated in any manner to another
language without the prior written consent of BeyondTrust Software.
BeyondTrust Software is not liable for errors contained herein or for any direct, indirect, special, incidental or
consequential damages, including lost profit or lost data, whether based on warranty, contract, tort, or any other
legal theory in connection with the furnishing, performance, or use of this material.
All brand names and product names used in this document are trademarks, registered trademarks, or trade names
of their respective holders. BeyondTrust Software is not associated with any other vendors or products mentioned
in this document.

Contents
Contents
Contents 3
Introduction 6
Contacting Support 7
Access BeyondInsight 8
Managing Your UVM 9
Accessing the UVM Web Site 9
Session Timeout 9
Activating Windows 9
Requesting Product Updates 9
Apply Security Updates 10
Setting the Update Method 11
Appliance General Settings 12
Adjusting Date and Time Settings 12
LCD Panel Settings 12
Clearing the BeyondInsight Cache 13
Export Settings 13
Pre-Logon Banner Settings 13
Managing Security Settings 14
Downloading a Crypto Key 14
Uploading a Crypto Key 14
FIPS Compliance Checking 14
Managing the UVM API Key 15
Turning off SSL Authentication 15
Analytics and Reporting Endpoints 15
Generating and Exporting Certificates 16
Setting a Security Protocol 16
Turning On HSTS 17
Accounts and Licensing Settings 18
Updating Product Serial Numbers 18
Purging Appliance Data 19
Resetting Administrator Passwords 19
Network and RDP Settings 21
Configuring RDP 21
Setting an IP Address for the Appliance 21
Entering SMTP Server Settings 22
Proxy Settings 22
BITS Throttle 23
Using Two Factor Authentication 24
UVM Appliance User Guide 3 © 2018. BeyondTrust Software, Inc.

Contents
Appliance Health 25
Health Dashboard 25
Monitoring Services and Hardware 26
Checking Services 26
Configuring Counters for Performance Metrics 27
Configuring Notifications 29
Sending Alerts to BeyondInsight 30
Viewing Notifications 32
Configuring Roles 33
Using Role Templates 33
Saving Role Configuration 33
Vulnerability Scanner Role Settings 33
Event Collector Role 33
SQL Server Database Roles 34
Database Access 34
Patch Management Role 34
PowerBroker Endpoint Protection Role 34
BeyondInsight Omniworker Service Role 34
PowerBroker Password Safe Web Portal Role 34
High Availability Role 34
On the Primary Server 34
On the Secondary Server 35
BeyondInsight Analytics and Reporting Roles 35
Analysis Services Role Settings 35
Reporting Services Role 35
Turning on Auto Update 35
Enterprise Update Server Role Settings 36
BeyondTrust Updater Role Settings 36
Configuring PowerBroker Password Safe 37
Uploading SSL Certificate 37
Archiving Password Safe Session Monitoring Events 37
Setting up the Repository Host 38
Running the Repository Configuration Tool 39
Setting up the Appliance 39
Synchronizing Session Monitoring Archive Files 40
Using High Availability 42
Active–Passive High Availability 42
Setting up High Availability 42
Turning on High Availability (HA) Pairing 42
Configuring High Availability 43
Using a Load Balancer in an Active-Passive Configuration 45
Testing HA Failover 46
Using Medium Failover Mode 46
Resuming and Suspending SQL Mirroring 46
Discarding HA Configuration Settings 47
UVM Appliance User Guide 4 © 2018. BeyondTrust Software, Inc.

Contents
Recognizing a Failover 47
Disaster Recovery 47
Verifying Connectivity Between Servers 48
Database Status After a Failover 48
Restoring Roles After a Failover 48
Reviewing Database Metrics 48
Checking the Database Connection Status 49
Configuring Backup and Restore 50
Scheduling a Backup 50
Restoring the Appliance 50
UVM Recovery 52
Appendix A: Configuring VLAN 54
Tagged VLAN configuration on Physical UVM20/50 54
Virtual Guest Tagging (VGT) VLAN configuration on Virtual UVM20 55
Appendix B: Optional Appliance Configuration 57
Configuring iDRAC 57
iDRAC Commands 57
Configuring NIC Teaming or Link Aggregation 58
Appendix C: Setting up a Cold Spare Appliance 59
Requirements 59
UVM Appliance User Guide 5 © 2018. BeyondTrust Software, Inc.

Introduction
Introduction
This guide provides information on UVM20 and UVM50 appliances, virtual appliances, and diagnostics information.
This guide is intended for network security administrators responsible for protecting their organization's computing
assets. A familiarity with networking and security concepts is needed.
FCC Certification
This equipment has been tested and found to comply with the limits for a Class A digital device pursuant to Part 15
of the FCC Rules. These limits are designed to provide reasonable protection against harmful interference when
the equipment is operated in a commercial environment. This equipment generates, uses, and can radiate radio
frequency energy and, if not installed and used in accordance with the manufacturer’s instruction manual, may
cause harmful interference with radio communications.
Operation of this equipment in a residential area is likely to cause harmful interference, in which case you will be
required to correct the interference at your own expense.
Standards Compliance
UVM has been tested and verified to comply with the applicable sections of the following standards:
• FCC Emissions
• Binational standard, UL-1950/CSA-C22.2 No. 950-95: Safety of Information Technology Equipment
Limited Hardware Appliance Warranty
This hardware appliance is accompanied by a 3-year manufacturer’s warranty based on the invoice date. (Extended
warranties available on request.) The warranty covers all hardware, including internal components supplied in this
shipment. The warranty does not cover additional items, such as keyboards, monitors and mice, not included in this
shipment. During the warranty period, the appliance will be repaired or replaced at no cost under the warranty
terms.
Due to continuing changes in the computer industry, if a replacement is necessary the appliance manufacturer
reserves the right to make product substitutions of equal or greater value.
Do not ship any appliance without first contacting BeyondTrust Technical Support to coordinate any repairs or
replacements. Do not try to repair the appliance yourself.
Please back up all data before having the appliance serviced or repaired. Neither BeyondTrust nor the appliance
manufacturer warrants that operation of the appliance will be uninterrupted or error-free. In no event will
BeyondTrust or the appliance manufacturer be responsible or liable for loss or integrity of any data on the
appliance and/or any storage media.
Warranty Invalidation
This warranty is void in the event that:
• the appliance is damaged due to accident, abuse, misuse, problems with electrical power, modifications or
servicing not authorized by BeyondTrust and/or the appliance manufacturer, or failure to operate in
accordance with the appliance instructions;
• serial tags, receiving numbers, product stickers or manufacturer seals have been removed, altered or
tampered with;
• the appliance is opened for any reason;
UVM Appliance User Guide 6 © 2018. BeyondTrust Software, Inc.

Introduction
• the appliance is damaged due to improper or inadequate packaging when returned for repair or replacement;
• the appliance has been tampered with, such as overclocking.
Labor and services performed on items or systems that are found not to be defective may be subject to a separate
charge. In addition, the appliance manufacturer reserves the right to charge a 10 percent restocking fee for items
returned which are found not to be defective.
Contacting Support
For support, go to our Customer Portal then follow the link to the product you need assistance with.
The Customer Portal contains information regarding contacting Technical Support by telephone and chat, along
with product downloads, product installers, license management, account, latest product releases, product
documentation, webcasts and product demos.
Telephone
Privileged Account Management Support
Within Continental United States: 800.234.9072
Outside Continental United States: 818.575.4040
Vulnerability Management Support
North/South America: 866.529.2201 | 949.333.1997
+ enter access code
All other Regions
Standard Support: 949.333.1995
+ enter access code
Platinum Support: 949.333.1996
+ enter access code
Online
http://www.beyondtrust.com/Resources/Support/
UVM Appliance User Guide 7 © 2018. BeyondTrust Software, Inc.

Access BeyondInsight
Access BeyondInsight
For more information about using BeyondInsight, refer to the BeyondInsight product documentation.
To log on to BeyondInsight:
1. Open a web browser, and then enter the URL to access BeyondInsight.
https://[BeyondInsight server name]/eEye.RetinaCS.Server
The SSL certificate warning window displays. The SSL certificate automatically created for the UVM ensures
encrypted communications.
To avoid the warnings, install the SSL certificate through the web browser or obtain a valid certificate from a
certificate authority. Or, select the check box to not display the information page again.
The Internet Explorer warnings will be displayed until the SSL certificate is installed or a valid certificate is
obtained.
The BeyondInsight Login page displays.
2. Enter your user name (btadmin) and the password you created in the configuration wizard, then click Login.
The BeyondInsight console displays.
UVM Appliance User Guide 8 © 2018. BeyondTrust Software, Inc.

Managing Your UVM
Managing Your UVM
You can access appliance diagnostics to verify version information, request updates and configure other options.
Accessing the UVM Web Site
To log on to the UVM web site:
1. Using your web browser, enter:
https://[your IP Address]/Maintenance
2. For the initial login, enter the following information.
– User Name - Enter the Administrator user name created using the Configuration wizard.
– Password - Enter the Administrator password created using the Configuration wizard.
Session Timeout
A user can be logged on to an appliance web site for 14 minutes. After 12 minutes a message is displayed indicating
the session will expire in 2 minutes. The user must log on to the web site after the session expires.
Session timeout applies to all appliance web sites: Roles Editor, Maintenance, Diagnostics, and High Availability.
The session timeout value cannot be configured.
Activating Windows
If the Windows environment is currently not activated, you can activate on the Maintenance web site.
To activate Windows:
1. Select Maintenance from the menu.
1. Select Accounts and Licensing.
2. Click one of the following:
– Activate Online – Select when you have an Internet connection.
– Activate By Phone – Select if there is no Internet connection (for example, in an air-gap environment).
Requesting Product Updates
You can request product updates for the UVM. You can view the version number for the BeyondTrust products that
you are licensed to use.
To request updates:
1. On the BeyondTrust Updates page, click Request Update.
The update of the UVM and BeyondInsight database starts.
UVM Appliance User Guide 9 © 2018. BeyondTrust Software, Inc.

Managing Your UVM
Apply Security Updates
BeyondTrust provides a bundle of Microsoft patches in a security update package. All updates are tested and
approved by BeyondTrust to ensure that updates do not interfere with the proper operation of your UVM.
The packages are updated when new patches are available from Microsoft. For more information about the
updates included in the package, contact BeyondTrust Technical Support.
In UVM versions 1.3 or later, there is a security update package installer that ships with your appliance. When a
new package is copied to the update server, then those updates can be received by your appliance.
Note: If you are working in an air-gap environment, you can manually download the update packages. You must
work with the BeyondTrust Technical Support team to download packages manually.
To apply the updates:
1. Log on to the appliance web site.
The default page displayed is the BeyondTrust Updates page.
2. If it is not displayed, select Maintenance from the menu, then select BeyondTrust Updates.
Details about any updates currently available are provided.
UVM Appliance User Guide 10 © 2018. BeyondTrust Software, Inc.

Managing Your UVM
3. Click Apply Security Updates.
The update can take time depending on the packages being applied. Click Refresh at any time to update the
status.
Note: If a restart is required (depending on the patch), then the appliance will restart automatically. No
action is required on your part.
Note: Applying Security Updates For UVM Versions Earlier Than 1.3
If your UVM version is earlier than 1.3, then BeyondTrust Technical Support can send you the update package
installer to deploy on your appliance. After you run the installer package, the appliance web page is updated. The
Security Updates section will be available for you to track and manage your security updates.
Setting the Update Method
1. Log on to the appliance web site.
2. Select Maintenance from the menu, then select BeyondInsight Updates.
3. Select an update method.
– Connect to the Internet for licensing and updates. No proxy required - Select if there is an Internet
connection and no proxy server.
– Connect to the Internet for licensing and updates through a proxy server - Select if you are using a proxy
server.
– No Internet connection. (Requires performing manual updates.) - Select if the appliance does not have
an Internet connection.
4. After you select an update method, click Apply Changes.
UVM Appliance User Guide 11 © 2018. BeyondTrust Software, Inc.

Managing Your UVM
Appliance General Settings
Adjusting Date and Time Settings
1. Select General Settings from the Maintenance menu.
2. Select a time zone and adjust the time.
3. Click Set the Date and Time Now.
LCD Panel Settings
To turn on settings for the LCD panel on the appliance:
1. Select General Settings from the Maintenance menu.
2. You can turn on the following settings:
UVM Appliance User Guide 12 © 2018. BeyondTrust Software, Inc.

Managing Your UVM
– Allow LCD Panel to Reset Administrator Password – Turn on to be able to reset the administrator
password to a random password from the LCD panel. If needed, go to the appliance to reset the
administrator password. Select the Show IP option to view the IP address. Hold the and arrows
simultaneously on the UVM LCD panel. A random password is generated. Press to accept the changed
password.
– Buttons on LCD Panel – Turn off to disable all the LCD panel buttons.
3. Click Update LCD Panel Settings.
Clearing the BeyondInsight Cache
The Clear BI Cache button clears the license key in the BeyondInsight database cache. If a new license key has been
recently applied, then clearing the cache ensures that the new key is saved to the BeyondInsight database.
Clearing the cache and applying the new key ensures all features are available and work properly. You can verify
licensed features on the Product Activation Keys tab.
Export Settings
To allow appliance settings such as IP address and administrator password to be set by inserting a USB drive into the
appliance.
To turn on settings for the LCD Panel on the appliance:
1. Select General Settings from the Maintenance menu.
2. Click to turn on Appliance settings to be imported and exported onto removable storage.
3. Click Update Export Settings.
Pre-Logon Banner Settings
You can configure a pre-logon message before the logon credentials page is displayed to the user.
To configure a pre-logon banner:
1. Select General Settings from the Maintenance menu.
2. Enter a title and message.
UVM Appliance User Guide 13 © 2018. BeyondTrust Software, Inc.

Managing Security Settings
Managing Security Settings
Downloading a Crypto Key
1. Select Security Settings from the Maintenance menu.
2. Enter a password, and then click Submit.
Uploading a Crypto Key
1. Select Security Settings from the Maintenance menu.
2. Enter password.
3. Drop the zip file.
4. Click Generate the Uploaded Key.
FIPS Compliance Checking
To turn on FIPS compliance checking:
1. Select Security Settings from the Maintenance menu.
UVM Appliance User Guide 14 © 2018. BeyondTrust Software, Inc.

Managing Security Settings
Managing the UVM API Key
The UVM API manages the communication between appliances when high availability is used in your environment.
The API key is automatically generated and is available to copy on the High Availability page. You can regenerate the
key on this page. You might want to regenerate the key regularly for security reasons.
You can also apply limitations on incoming messages.
To set the API:
1. Select Security Settings from the Maintenance menu.
2. Set the maximum age for messages, and then click Update Maximum Age. The default value is 600 minutes.
3. Click Generate API Key.
When configuring high availablity between appliances, copy the key to the High Availablity page for the partner
appliance.
Turning off SSL Authentication
You can turn off SSL authentication. When you select SSL/Certificate Required (No), SSL certificates are ignored.
To ignore SSL certificate authentication:
1. Select Security Settings from the Maintenance menu.
2. Click Event Service SSL/Certificate Required (No).
3. Click Submit.
Analytics and Reporting Endpoints
If the BeyondInsight Analytics and Reporting web site is not reachable, you can refresh the settings to establish the
connection.
1. Select Security Settings from the Maintenance menu.
2. Click Refresh.
UVM Appliance User Guide 15 © 2018. BeyondTrust Software, Inc.

Managing Security Settings
Generating and Exporting Certificates
1. Select Security Settings from the Maintenance menu.
2. To regenerate the SSL certificate to match the appliance network name, click Generate Certificate. The
certificate will not be trusted by the client browser.
3. To export the client certificate, enter the password for the certificate and then click Export Certificate.
Setting a Security Protocol
Select the security protocol that applies to your environment: SSL or TLS.
To use TLS 1.2, ensure the following patches have been applied to your appliance.
KB2979597 - https://support.microsoft.com/en-us/kb/2979597
KB3144114 – This is a hotfix. You can request it from here: https://support.microsoft.com/en-
us/hotfix/kbhotfix?kbnum=3144114&kbln=en-us
KB3144517 - https://support.microsoft.com/en-us/kb/3144517
1. Select Security Settings from the Maintenance menu.
2. Select the protocol type, and then click Update Security Protocols.
UVM Appliance User Guide 16 © 2018. BeyondTrust Software, Inc.

Managing Security Settings
Turning On HSTS
You can apply extra security to the appliance web site that will use strict transport security (HSTS) technology.
To turn on HSTS:
1. Select Security Settings from the Maintenance menu.
2. Turn on the setting, and then click Update HSTS Setting.
UVM Appliance User Guide 17 © 2018. BeyondTrust Software, Inc.

Accounts and Licensing Settings
Accounts and Licensing Settings
Updating Product Serial Numbers
You can review your licensed BeyondTrust components. If components are not showing as licensed you might
need to refresh the BeyondInsight database cache to ensure the most recent license is applied. See Clearing the
BeyondInsight Cache.
To update the appliance serial number:
1. Select Accounts and Licensing from the Maintenance menu.
2. You can either retrieve the serial numbers and validate the license key automatically using your Internet
connection or enter this information manually:
– Using the Customer Portal - Enter your email address and Client Portal password and click Retrieve Keys.
Select the appropriate serial numbers from the list when populated and click Update Serial.
– Using Online Appliance - Enter the serial numbers and then click Update Keys.
– Using Client Browser - Manually enter the serial number provided when you purchased the product. To
access your serial number, log on to the Client Portal, and select Product Licensing > Managing Your
Serial Numbers. Click Get Offline License and follow instructions on obtaining the license key offline.
Manually enter the license key once it is received.
– Using Email Validation - Enter the serial numbers and click Retrieve Offline Validation Keys. An email is
sent to request and validate the keys.
– Manually - Manually enter the serial numbers.
3. Click Update Keys.
UVM Appliance User Guide 18 © 2018. BeyondTrust Software, Inc.

Accounts and Licensing Settings
Purging Appliance Data
1. Select Accounts and Licensing from the Maintenance menu.
2. Scroll to the purge data area.
3. To erase the database and user configuration data from the appliance, click Wipe Appliance. The configuration
data and events are purged.
Resetting Administrator Passwords
You can reset the UVM administrator password, BeyondInsight administrator password, and Central Policy
password.
Ensure that you review the complexity requirements.
To reset a password:
1. Select Accounts and Licensing from the Maintenance menu.
2. Select the check box for the password that you want to change.
UVM Appliance User Guide 19 © 2018. BeyondTrust Software, Inc.

Accounts and Licensing Settings
3. Change the password.
4. Click Update Credentials.
UVM Appliance User Guide 20 © 2018. BeyondTrust Software, Inc.

Network and RDP Settings
Network and RDP Settings
Configuring RDP
RDP access is turned off by default. RDP access is not required for daily use regardless of licensing or roles.
BeyondTrust Technical Support can turn on RDP access for troubleshooting.
To track RDP and 2-Factor activities, there are audit log entries in the Security Event logs.
1. Select Network and RDP Settings from the Maintenance menu.
2. Select the Enable Remote Desktop box.
3. Select 2-Factor required to turn on the settings to use two-factor authentication when using remote desktop.
Note that if you want to disable the 2-Factor authentication the temporary password from BeyondTrust is
required. After you enter the password, the 2-Factor Required box is cleared.
You need a password to access the UVM remotely. BeyondTrust Technical Support will generate a time-limited
password for you.
4. Click Save RDP Settings.
Setting an IP Address for the Appliance
You can get an IP address automatically using DHCP or manually configure the IP address.
1. Select Network and RDP Settings from the Maintenance menu.
2. Select a network card from the list.
3. Click the button to use DHCP to get the IP address. Otherwise, set the IP address information manually.
UVM Appliance User Guide 21 © 2018. BeyondTrust Software, Inc.

Network and RDP Settings
4. Click Update IP Settings.
Entering SMTP Server Settings
1. Select Network and RDP Settings from the Maintenance menu.
2. Enter the following SMTP settings:
– Address - The IP address of the server.
– Port - The port number of the server.
– User - The user name used to access the server.
– Password/Confirm Password - The server password.
3. Click Update SMTP.
Proxy Settings
Configure a proxy server if access to the Internet is required.
To use a proxy server:
UVM Appliance User Guide 22 © 2018. BeyondTrust Software, Inc.

Network and RDP Settings
1. Select Network and RDP Settings from the Maintenance menu.
2. Select the Use proxy server for external communication box.
3. Enter the address and port for the server.
– Address - The IP address of the server.
– Port - The port number of the server.
4. If the proxy server requires authentication, enter the credentials:
– User - The user name used to access the server.
– Password/Confirm Password - The server password.
5. Click Update Proxy Settings.
BITS Throttle
1. Select Network & RDP Settings from the Maintenance menu.
2. Drag the slider to the level of throttling.
3. Click Update BITS Throttling Setting.
UVM Appliance User Guide 23 © 2018. BeyondTrust Software, Inc.

Using Two Factor Authentication
Using Two Factor Authentication
You can configure two factor authentication using a RADIUS server.
You must configure the RADIUS server settings in BeyondInsight.
After you set up two-factor authentication, your users must log on to the appliance using the two-factor
authentication method.
To configure a RADIUS Server:
1. From the Maintenance menu, select Accounts and Licensing.
2. Scroll to the Configure RADIUS Authentication section.
3. Click RADIUS Authentication Enabled to turn on the setting.
4. From the Alias list, select one of the available RADIUS servers.
The appliance uses the settings configured in BeyondInsight. After you select the server, the following fields
are populated:host name, authentication port, timeout, authentication mechanism, and initial password.
5. Enter the user name. This is the user account that is used to log on to the RADIUS server.
Note: The RADIUS user account password must match the appliance Administrator password.
6. Click Update Settings.
UVM Appliance User Guide 24 © 2018. BeyondTrust Software, Inc.

Appliance Health
Appliance Health
On the Diagnostics pages, you can keep track of appliance services, hardware faults, and performance metrics.
Note: If you are using your SQL Server deployment (not the SQL Server version that ships with the appliance),
then the SQL Server metrics are not displayed on the Health dashboard.
Health Dashboard
View dynamic, live appliance metrics including:
• CPU usage
• SQL Server CPU usage
• SQL Server memory
• Used disk space on the C: drive. Note that on a UVM50 additional drives are displayed (O, N, and M).
• Services running and stopped
• Analyzer reporting - Download BeyondTrust's BTAnalyzer reports. View health metrics on BeyondTrust
components and services running in your environment.
UVM Appliance User Guide 25 © 2018. BeyondTrust Software, Inc.

Appliance Health
Monitoring Services and Hardware
Appliance services and hardware are monitored:
• Services – Periodically checks the running state of the services to make sure that they are in the expected
state, considering the current roles that are set. Additionally, alerts are indicated when the service control
manager raises errors. Errors reported are typical error messages on services such as, services failing to start
or services terminating unexpectedly.
• Hardware events – Any of the alerts that are raised by Dell OpenManage monitoring software.
To turn on alerts for services or hardware:
1. Select Diagnostics from the menu.
2. Select Appliance Health from the menu.
3. Click the box to turn on the setting.
4. Click Apply Updated Settings.
Checking Services
You can view, start, and stop appliance services.
To view appliance services:
1. Select Diagnostics from the menu.
2. Select Appliance Health from the menu.
The icons indicate the following:
Click to refresh the service.
Click to start the service.
Click to stop the service.
UVM Appliance User Guide 26 © 2018. BeyondTrust Software, Inc.

Appliance Health
Configuring Counters for Performance Metrics
You can configure the threshold values for the performance metrics. When the threshold is exceeded, email alerts
can be sent to the email account configured on the notifications page.
For example, you might not want CPU usage over 50% for too long. Consider setting the thresholds to the
following:
– Low: 50
– Medium: 65
– High: 70
– Threshold Duration: 10 minutes
If there is a running average reading of 52%, then a low level alert is sent.
After a counter alerts at a certain level it will not generate further alerts for that level (or below) until it is reset. An
alert is considered in a reset state when the average is below the reset threshold for the specified time span.
If a metric is in an alerted state, but then that metric goes below a configurable Reset threshold for the specified
amount of time, then the alert is cleared, and a Reset alert is generated. At this point, the performance counter will
again receive alerts if it exceeds the threshold again.
To configure counters view performance and alert settings:
1. Select Diagnostics from the menu.
2. Select Selectable Counters from the menu.
3. Select notifications settings:
– Generate Alerts For Monitored Performance Data – Turns on email notification for alerts.
– Generate Daily Summaries of Performance Data – Performance metrics are collected every 2 hours and
emailed on a daily basis.
UVM Appliance User Guide 27 © 2018. BeyondTrust Software, Inc.

Appliance Health
4. By default, there are four base counters listed: SQL Server Memory Percentage, CPU Overall Usage, SQL
Server CPU Usage, and Disk Free. Select additional counters from the list, and then click Add to List.
5. Adjust the performance and reset thresholds.
6. Click Apply Updated Settings.
UVM Appliance User Guide 28 © 2018. BeyondTrust Software, Inc.

Appliance Health
Configuring Notifications
Notifications can be set for the following types of events:
• Health monitoring – Includes performance thresholds, service alerts, hardware alerts, and daily performance
summaries.
• High availability monitoring – Includes failover, connections, no partner alerts, and off state.
• High availability mirror change – Includes suspend and resume activities on SQL mirroring.
• Backup monitoring – Includes back up success and failure alerts, and restore success.
To configure email notification:
1. Select Diagnostics from the menu.
2. Select Configure Notifications from the menu.
3. Click the box to turn on email notification.
4. Click in the Email These Users box, and then select the check boxes for the email addresses that will receive
the notifications.
5. Click Apply Updated Settings.
UVM Appliance User Guide 29 © 2018. BeyondTrust Software, Inc.

Appliance Health
Sending Alerts to BeyondInsight
Note: BeyondInsight V6.0 is required to use this feature.
You can send alerts from the appliance to your BeyondInsight management console for further analysis.
To configure event forwarding for the appliance alerts:
1. Select Diagnostics from the menu.
2. Select Configure Notifications from the menu.
3. Select one of the following:
– None - The default value. No events are forwarded by default.
– Local - Uses the local installation of BeyondInsight.
– Remote server - Enter the IP address or DNS name for the remote BeyondInsight server.
You must export a certificate from the remote BeyondInsight server and import the certificate to the local
UVM. Select a certificate from the list, and then click Apply Updated Settings.
a. If the remote server is another UVM appliance, log on to the appliance web site for that appliance.
b. Select Security Settings from the Maintenance menu.
c. Enter a password and click Export.
d. Import the certificate on the local UVM. See Uploading SSL Certificate.
e. On the Health tab, select the certificate from the list.
If the remote server is a software install of BeyondInsight, use the BeyondInsight Configuration Tool to
create and export the certificate.
4. Click Apply Updated Settings.
You must also create a connector from the BeyondInsight management console.
UVM Appliance User Guide 30 © 2018. BeyondTrust Software, Inc.

Appliance Health
To create the connector:
1. Log on to BeyondInsight.
2. Select Configuration from the menu, and then select Connectors.
3. Click + and select Syslog Event Forwarding.
4. Enter the details for the UVM appliance, including IP address, protocol, and facility.
5. Select the Appliance Health check box.
By default all severity levels are included. Select an alternate level if needed.
UVM Appliance User Guide 31 © 2018. BeyondTrust Software, Inc.

Appliance Health
Viewing Notifications
A notifications icon is displayed on the Diagnostics page.
After notifications are received, a number is displayed that indicates the number of notifications. Click the icon to
view more information about the notifications, as shown:
The bar next to the notification indicates severity. See the following table for descriptions.
Color Legend
Info
Low
Medium
High
UVM Appliance User Guide 32 © 2018. BeyondTrust Software, Inc.

Configuring Roles
Configuring Roles
Select Appliance Roles if you are deploying more than one UVM to scale BeyondInsight in larger networks.
Roles must be selected for at least one of the UVM appliances.
When you are selecting roles, any dependencies or conflicts that might exist between roles will be displayed. The
Apply Roles button is only available after dependencies or conflicts are resolved.
Using Role Templates
There are predefined role templates that you can choose. When you choose one, all dependent roles that need to
be activated will be. Any roles that are not required for the template will be turned off.
When you select a predefined template, you must enter information for some fields before the Apply Roles button
is available. The role is indicated in orange.
For example, if you select the Standalone Database role, then you must go to the SQL Server Role and enter the
database password.
Saving Role Configuration
You can configure the roles that you need and save the settings to a configuration file. You can then upload the
template to the UVM.
Vulnerability Scanner Role Settings
Turn on the role to activate the Retina scanner agent.
Event Collector Role
On the Event Collector page, select the BeyondTrust service that will be responsible for sending events between
components (for example, Retina scanner agent, Retina Protection agent, and PowerBroker Endpoint Protection
Platform).
BeyondInsight AppBus Service and Event Server can be used for this communication. Event Server is preferred for
enterprises and can manage a greater load of data than AppBus.
The default port for the Event Server is 21690.
UVM Appliance User Guide 33 © 2018. BeyondTrust Software, Inc.

Configuring Roles
1. Select one of the following:
– Incoming Events Processed by the BeyondInsight AppBus Service
– Incoming Events Processed by the BeyondInsight Event Server Service
2. Click Apply Changes.
SQL Server Database Roles
Provides access to the SQL Server database. Select the box to allow database access from remote computers.
If you are using your SQL Server deployment, there is no action required on your part here.
Database Access
Provides access to the BeyondInsight database. You can set either a local SQL Server database or configure settings
for a remote database.
Patch Management Role
Turn on the role to activate the LanMan service on the appliance to host Third-Party patches.
PowerBroker Endpoint Protection Role
PowerBroker Endpoint Protection Platform (PB EPP) is installed on all appliances. If you do not want PB EPP
running on your appliance, click the role to turn off the PB EPP services.
BeyondInsight Omniworker Service Role
The BeyondInsight Omniworker service manages task queues. Turn on the service when your environment is using
more than one appliance.
PowerBroker Password Safe Web Portal Role
Turn on the Password Safe role to activate services needed to run the Password Safe web portal.
Note that the Password Safe role is only displayed on the Roles page when a Password Safe license is applied.
High Availability Role
Turn on the High Availability role to activate services needed to run Password Safe in high availability mode.
On the Primary Server
If you are using Password Safe High Availability, you must configure the following settings on the primary server.
To turn on the Password Safe role:
1. Log on to appliance web site.
2. Select Roles Editor from the menu.
3. Click High Availability, then and select a mirroring option:
– HA will mirror both Server and Database
– HA mirroring for services only
UVM Appliance User Guide 34 © 2018. BeyondTrust Software, Inc.

Configuring Roles
4. To save resources, you can turn off services that will not be required to run on any secondary appliances.
Select the Standalone Password Safe Worker Node check box. Select the corresponding check boxes to turn
off services: Disable BeyondInsight UI or Disable Password Safe UI.
5. Click Apply Changes.
6. On the main Roles Editor page, click Apply Pending Changes.
On the Secondary Server
If you are using Password Safe High Availability, you must turn on the role, and then select a mirroring option.
BeyondInsight Analytics and Reporting Roles
There are two roles that you can configure if you are using BeyondInsight Analytics and Reporting.
Analysis Services Role Settings
Turn on the role to turn on the SQL Server Analysis service.
You can click the link to run BeyondInsight Analytics and Reporting.
Reporting Services Role
If you are using BeyondInsight Analytics and Reporting to render reports, the service must run locally. Turn on the
Reporting Services role to run the service locally when using a remote database.
Turning on Auto Update
To use the auto update feature, where product updates will automatically download when available, turn on the
auto update role.
To turn auto update:
UVM Appliance User Guide 35 © 2018. BeyondTrust Software, Inc.

Configuring Roles
1. On the appliance web site, select Roles Editor from the menu.
2. Click Auto Update.
3. You can configure one server for all updates or configure servers based on functional area.
If you configured different update servers, click Load Default Settings to reset the default BeyondTrust server.
4. Scroll on the page, and click Apply Changes.
5. On the main Roles Editor page, click Apply Pending Changes.
Enterprise Update Server Role Settings
Turn on the role to use the Enterprise Update server to update your appliances.
BeyondTrust Updater Role Settings
Turn on the role to use the Azure web based update tool.
UVM Appliance User Guide 36 © 2018. BeyondTrust Software, Inc.

Configuring PowerBroker Password Safe
Configuring PowerBroker Password Safe
To set up Password Safe on the appliance, you need to turn on the Password Safe role.
Note on Encryption
If you are using Password Safe, all credentials are stored in the database using AES 256 using RijndaelManaged
crypto provider. When FIPS is used, all UVM credentials stored in the database are encrypted using Triple DES
crypto provider.
Uploading SSL Certificate
To upload an SSL certificate:
1. Select Security Settings from the Maintenance menu.
2. Go to Upload Certificate section.
3. Drop a file to upload.
4. Enter the password.
5. Select the following:
– Bind to HTTPS on update - Updates the bindings in IIS.
– Use for High Availability
6. Click Upload Certificate.
To generate an SSL certificate to match the appliance name:
1. Select Security Settings from the Maintenance menu.
2. Click Generate Certificate. The certificate will not be trusted by the client browser.
3. To export the client certificate, enter the password for the certificate and then click Export Certificate.
Archiving Password Safe Session Monitoring Events
You can transfer old session monitoring files off the appliance to another server for storage. Archive old files to
free up disk space on the appliance. You can view the archive files in Password Safe. For more information, refer to
the Password Safe Administration Guide.
Session monitoring files are archived in one of two ways:
UVM Appliance User Guide 37 © 2018. BeyondTrust Software, Inc.

Configuring PowerBroker Password Safe
• Automatically by the UVM. Automatic archives occur in the following cases:
– When the file reaches the configured age.
– When free space on the UVM hard drive is below the configured threshold. See Setting up the Appliance
to configure these settings.
• Manually through Password Safe. Refer to the Password Safe Administration Guide. Archive files are never
deleted.
There are two parts to configuring archiving:
• Set up the computer that will be the repository host
• Set options on the web site for the appliance
Setting up the Repository Host
Repository Host Requirements
• The minimum operating system requirement for the host computer is Microsoft Windows 2008.
• Port 443 must be open.
• IIS 7.5 or later.
In Server Manager, install and enable the following feature: Background Intelligent Transfer Service (BITS).
Activating BITS ensures prerequisites are installed regardless of OS or IIS version installed.
• ASP.NET 4.5
• You need a copy of the Setup Session Monitoring Repository tool, located here:
C:\Appliance\Tools\ConfigureRepository.exe.
Note on IIS 7.5:
If you are using IIS 7.5 and the ASP.NET 4.5 role did not install automatically:
1. Install the ASP.NET role.
2. Run the command:
C:\Windows\Microsoft.NET\Framework\v4.0.30319\aspnet_regiis.exe -i
3. Log on to Server Manager and select the IIS instance. Double-click ISAPI and CGI Restrictions.
4. Ensure that ASP.NET v.4.0 is set to Allowed.
UVM Appliance User Guide 38 © 2018. BeyondTrust Software, Inc.

Configuring PowerBroker Password Safe
Running the Repository Configuration Tool
The repository configuration tool creates a certificate on the host computer.
To run the repository configuration tool:
1. Run the repository configuration tool.
2. Click the Create Certificate button.
3. Enter a password for the exported certificate.
4. Click Export Certificate and choose a location for the file with the exported certificate.
5. Copy the exported certificate to a location that can be accessed by the appliance. You need to import the
certificate using the Diagnostics web site. See the following section.
Setting up the Appliance
You must set up the repository host before proceeding here.
On the appliance you must register the certificate that you created on the repository computer. Optionally, you can
change the archive settings such as how many days pass before the files are archived.
To configure archiving on the appliance:
1. Log on to the appliance Maintenance web site.
2. Select Security Settings from the menu.
3. Upload the certificate that you created on the host, and then click Upload Certificate.
4. Select Roles Editor from the menu.
5. Click PowerBroker Password Safe Web Portal.
6. Select the Enable Session Monitoring Archiving box.
7. Select the way to store the archive files:
– BITS – Enter the name of the repository computer.
Enter the name of the certificate. The certificate name is the same name as the repository computer.
– Windows File Sharing – Enter the name of the share and credentials to access the share. Windows file
sharing is the preferred method.
UVM Appliance User Guide 39 © 2018. BeyondTrust Software, Inc.

Configuring PowerBroker Password Safe
8. Optionally, change the archiving settings:
– Maximum Age (in Days) – Enter the number of days that pass before the files are archived. The default
value is 90 days.
– Archive when available storage becomes less than – This value applies to the storage available on the
appliance. Enter the amount of storage remaining on the appliance before the file transfer occurs. The
transfer of files will free up the disk space when the value is reached.
– Max File Transfer Time – This value is the maximum time to wait for a file transfer to occur before the
transfer times out.
9. Click Test Session Monitoring Settings to ensure the repository computer is set up correctly and can
communicate with the appliance computer.
10. Click Apply Changes to save the settings.
Synchronizing Session Monitoring Archive Files
On the High Availability Settings page, you can determine if the session monitoring archive files are up to date on
the repository host.
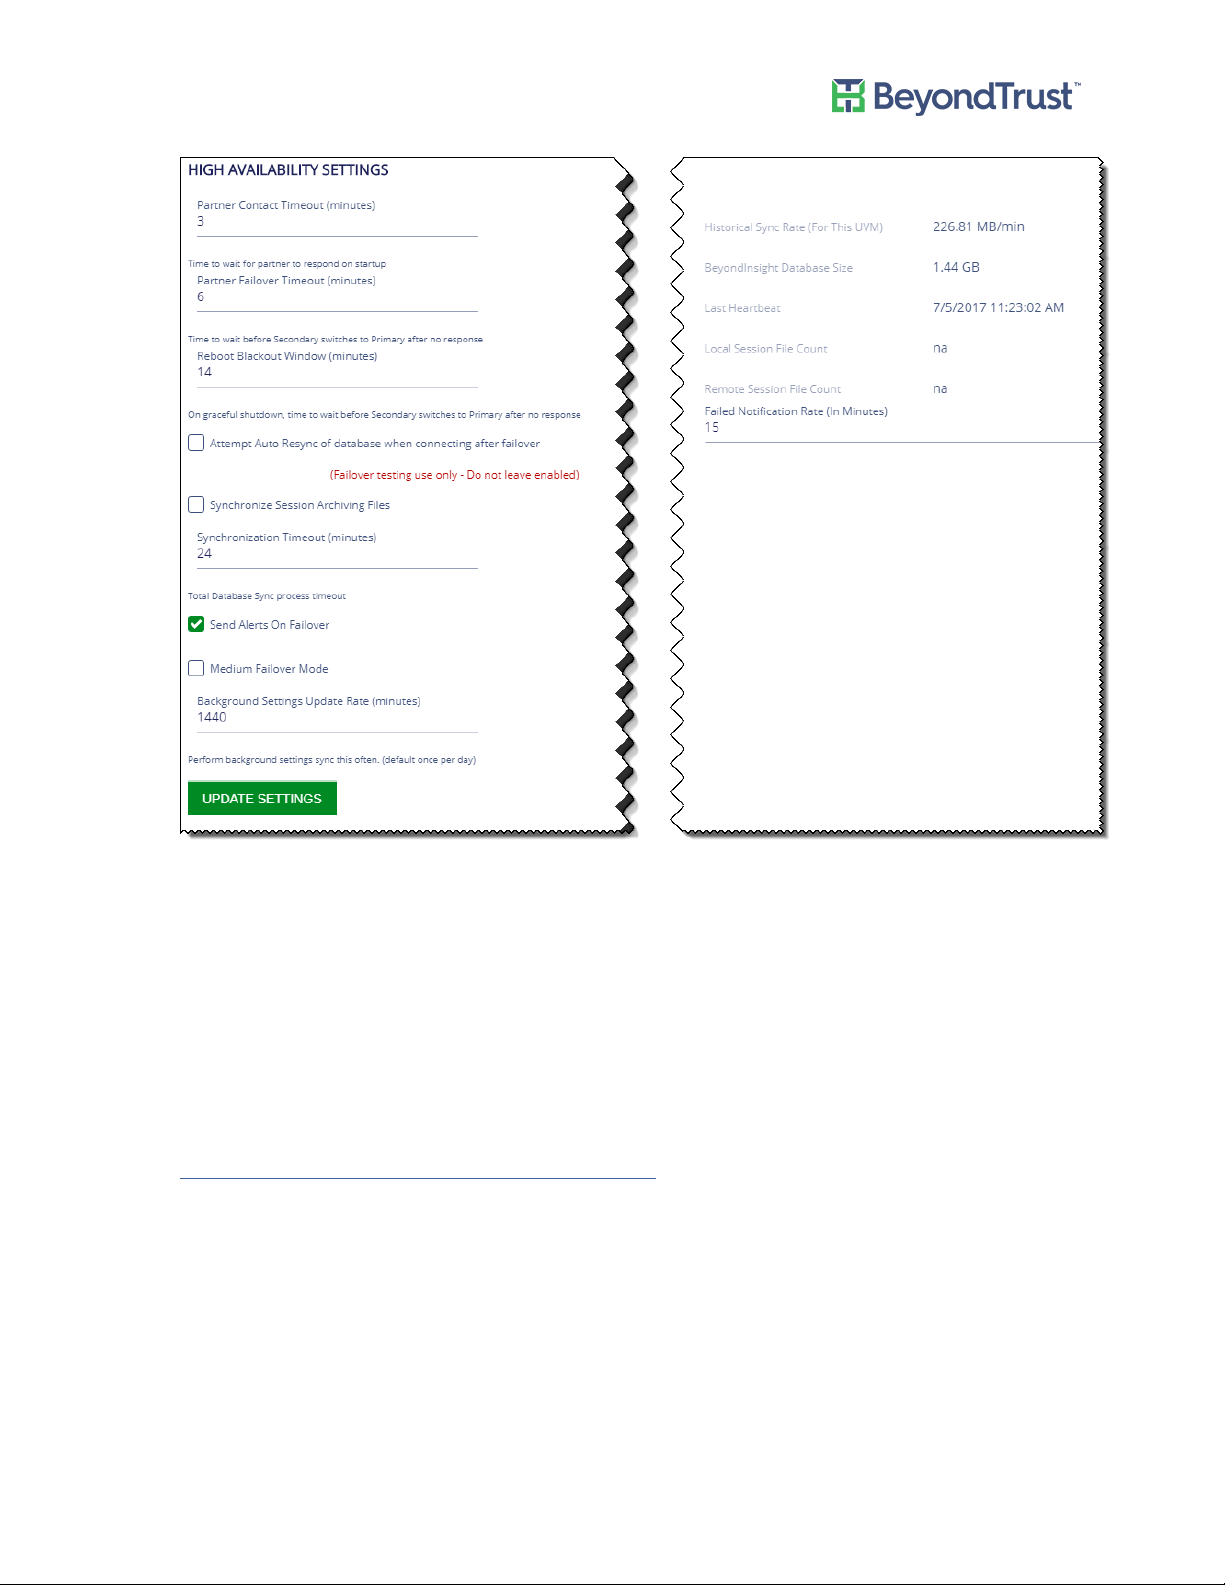
Compare the values in the Local Session File Count box (archive files on the appliance) and Remote Session File
Count box (archive files on the repository host).
If the numbers are different, select the Synchronize Session Archiving Files check box. Archive files on the
appliance will be copied to the repository host.
UVM Appliance User Guide 40 © 2018. BeyondTrust Software, Inc.

Configuring PowerBroker Password Safe
UVM Appliance User Guide 41 © 2018. BeyondTrust Software, Inc.

Using High Availability
Using High Availability
Note: High Availability is only available with a PowerBroker Password Safe license.
Active–Passive High Availability
High availability is designed to be a highly available system in an Active-Passive configuration. At any time, one of
your two servers has the role of the Active node, while the other is the Passive node.
When the Passive server detects the Active server has failed, then the Passive is promoted to Active and the Active
is demoted.
After the Active server fails and all issues are resolved, the server takes on the Passive role.
Setting up High Availability
Setting up High Availability is optional.
Turning on High Availability (HA) Pairing
You must turn on the High Availability role in the Roles Editor before setting up high availability. The role must be
turned on for the active and passive appliance.
To turn on the Password Safe HA pairing:
1. Select Roles Editor from the menu.
2. Click High Availability.
3. Turn on the high availability role.
4. Select a mirroring option.
5. Enter the password that will be used on the HA pairs.
6. Click Apply Changes.
7. On the main page, click Apply Pending Changes.
UVM Appliance User Guide 42 © 2018. BeyondTrust Software, Inc.

Using High Availability
Configuring High Availability
To set up high availability:
1. Select High Availability from the menu.
For first time configuration, the Initial Setup page is displayed. Certificates need to be set up between the
appliances for secure communication.
2. Copy the API registration keys between the partner appliances.
Registering the API keys with the partner appliance permits secure communication between the appliances.
3. Enter the IP address or the name of the passive UVM appliance, and then click Apply.
A message is displayed that the exchange is in progress.
If an error occurs during the certificate exchange a Show/Hide Results button is displayed.
Exchanging certificates can take up to approximately 5 minutes.
After the certificates are exchanged with no errors the configuration settings are displayed.
4. Click High Availability to turn on the feature.
5. Enter the mirroring port number. The default port is 5022.
6. Click Set High Availability.
UVM Appliance User Guide 43 © 2018. BeyondTrust Software, Inc.

Using High Availability
7. Set the following:
– Partner Contact Timeout – Enter the number of minutes that pass with no contact between the active
server and passive server. When the active receives no response from the passive, then the active
continues to start. If the passive has no contact with the active, the passive will start up as the active.
– Partner Failover Timeout – Enter the number of minutes that pass with no ping received from the
primary server. After this time, the passive switches to the active server.
– Reboot Blackout Window – On graceful shutdown passive switches to active after no response. You might
want to shut down the active UVM but not want the passive UVM to take control. For example, you might
want to move the active UVM and know that it will take approximately 30 minutes. To be sure the passive
does not take control while the active is offline, set the value here to 60 minutes.
You must shut down the primary from the Version Information tab.
Enter the number of minutes that pass before the passive takes control.
– Send Alerts on Failover – When selected, either an email is sent or events are sent to BeyondInsight. For
more information about alerts, see Configuring Notifications.
– Medium Failover Mode – When communication between the pairs is lost, the passive appliance is in a
failover pending state only. Action is required on your part to start a failover process. See Using Medium
Failover Mode.
– Background Settings Update Rate – Enter the number of minutes that pass before a file synchronization
occurs. Files copied to the passive server are configuration files, certificates, and registry files.
– Failed Notification Rate – Provides notification after your active appliance has failed over. If you are using
Medium Failover Mode, the email indicates that action is required on your part. The default value is 15
minutes.
– Queue File Synchronization – Click to start a file synchronization.
UVM Appliance User Guide 44 © 2018. BeyondTrust Software, Inc.
Using High Availability
8. Click Update Settings.
Using a Load Balancer in an Active-Passive Configuration
When setting up an active-passive pair, you might want to configure a load balancer that acts as a DNS-redirector.
Configure the load balancer between two appliances so that it can determine which appliance is active and which
is passive. The load balancer then sends the traffic to the active appliance.
You can use the following endpoint API to configure the load balancer. Refer to your load balancer documentation
to ensure that it is configured to use the endpoints.
Endpoint:
GET https://<UVMAddress>/UVMInterface/api/HighAvailability
It will return an object with one member.
{
string Role;
}
You can set the formatting of the requested return value in the Content-Type request header.
For example, to get JSON, you can specify:
Content-Type: application/json;charset=UTF-8
The available values for Role are:
UVM Appliance User Guide 45 © 2018. BeyondTrust Software, Inc.

Using High Availability
Off - High Availability is not turned on.
Active - UVM is in Active mode.
Passive - UVM is in Passive mode.
Testing HA Failover
Note: The Attempt Auto-Resync setting is a quick way to restore high availability in a scenario where databases
on the active and passive servers are synchronized. It is not recommended for a production failover
scenario. Data loss can occur if databases are not synchronized.
To test failover:
1. Select the Attempt Auto Resync of Database When Connecting After Failover.
2. Unplug or power off the active server.
3. Wait for failover. Check that the passive is now the active.
4. Restore the active (turn on or plug in).
5. The auto re-sync should restore high availability configuration.
6. Note that the passive server will be acting as the active. Click the Switch Roles button to restore the server
partners to their original roles.
Using Medium Failover Mode
Use Medium Failover mode when you do not want the services on the passive appliance to start automatically
when the communication between pairs is lost.
The passive appliance waits in a pending state until you manually start the failover process. When your active fails,
you must log on to the appliance software to start the failover process to the passive appliance.
To use medium availability, you must turn on Medium Failover Mode. See Configuring High Availability.
To start the failover:
1. Log on to the appliance, and then select High Availability.
2. In the High Availability Maintenance section, click Failover to this UVM. Note that the button is only active
when the primary appliance is down.
Clicking the button starts the services and database.
Resuming and Suspending SQL Mirroring
You can suspend and resume SQL Server mirroring. You might want to pause mirroring if you want to take care of
maintenance tasks on the database server.
A failover cannot occur when the database is in a suspended state.
Note that if the appliance is in a failover state and mirroring is suspended, you can click Resume to start mirroring.
To resume or suspend mirroring:
1. Log on to the appliance, and then select High Availability.
2. Click Suspend to pause mirroring.
3. Click Resume to start mirroring again.
UVM Appliance User Guide 46 © 2018. BeyondTrust Software, Inc.

Using High Availability
Discarding HA Configuration Settings
To reset the appliances to the Initial Setup state, you can remove all HA configuration settings established between
HA appliances. You might want to do this if you want to set up new HA pairs.
1. Select High Availability from the menu.
2. Click Abandon Configuration.
Recognizing a Failover
Review the following to help you determine if a failover has occurred.
• In appliance v. 1.5.4 and later, an email is sent to the address set in the configuration wizard.
If you are using an appliance version earlier than 1.5.4, you can contact BeyondTrust Technical Support to
activate the email feature.
• If you are not using a load balancer, you might notice that BeyondInsight is no longer responsive on the active
server.
• On the Diagnostics web site (for the primary), only two tabs are displayed. This indicates the server is in Passive
mode.
• Confirm the passive server is in Active mode.
Disaster Recovery
If you are using High Availability as a disaster recovery solution, review the following points as a guide to restoring
roles.
• Determine if the active server failed. Confirm the role of your live server (or the “primary” server).
• If a failure occurred on the primary, investigate and resolve issues on the primary.
• After a failover to the disaster recovery server (or the “secondary”), you can restore roles on the appliance
web site from the Active server.
UVM Appliance User Guide 47 © 2018. BeyondTrust Software, Inc.

Using High Availability
Verifying Connectivity Between Servers
On the High Availability Configuration page, verify that the communication between appliances is active.
The Last Heartbeat indicates the last ping to the passive server and the return response to the active.
Database Status After a Failover
Important: In all scenarios, we strongly recommend investigating the cause of the failure. We do not recommend
resuming database mirroring until issues are resolved.
The following database status indicators might display after a failover.
• DISCONNECTED – Failover was catastrophic (server is completely unavailable/unreachable). Turn off High
Availability and investigate the issues with the failed server.
After the failed server is cleared for use, turn on High Availability and synchronize the databases.
• EXPOSED – If the other server is still available (and possibly still healthy) but the failover was serious or lengthy
enough that High Availability was disabled.
After the failed server is cleared for use, turn on High Availability and synchronize the databases.
• SUSPENDED – If the interruption was of a minor or transient nature. While it may be possible to restore
connectivity without disabling High Availability, we encourage you to turn off HA and investigate the issues with
the other server.
After the failed server is cleared for use, turn on High Availability and synchronize the databases. Optionally,
contact BeyondTrust Technical Support to see if mirroring can be restored.
Restoring Roles After a Failover
After a failure has been identified and resolved on an appliance, you can restore the roles to the initial state.
1. Log on to the appliance web site from the Active appliance.
2. Select High Availability from the menu.
3. Click Switch Roles.
Reviewing Database Metrics
On the High Availability Settings page, you can review information about earlier database synchronizations and the
size of the current BeyondInsight database.
You can then determine from these values how long a synchronization between servers might take.
UVM Appliance User Guide 48 © 2018. BeyondTrust Software, Inc.

Using High Availability
Checking the Database Connection Status
Check the status of the BI Mirror State on the High Availability tab to ensure that synchronizations are occurring
between the active and passive servers.
Database Mirror States
State Description
EXPOSED Databases are not mirrored.
SYNC PENDING: INITIAL DB SYNC
STARTED
SYNC PENDING: SET MIRROR CALLED
SYNCHRONIZING
EXPOSED – MAX SYNC ATTEMPTS
REACHED
SYNCHRONIZED Databases are actively mirrored. HA is considered to be working.
Started to back up and transfer database to passive server.
Database is transferred and restored to the passive server, now turning on
mirroring.
Server is actively transmitting Transaction Logs to the other database to
apply changes.
5 consecutive attempts were made and failed to establish mirroring.
Mirror was not established and is no longer trying.
To troubleshoot:
• Check for connectivity issues. Ensure the database mirror port is set to
5022.
UVM Appliance User Guide 49 © 2018. BeyondTrust Software, Inc.
Configuring Backup and Restore
Configuring Backup and Restore
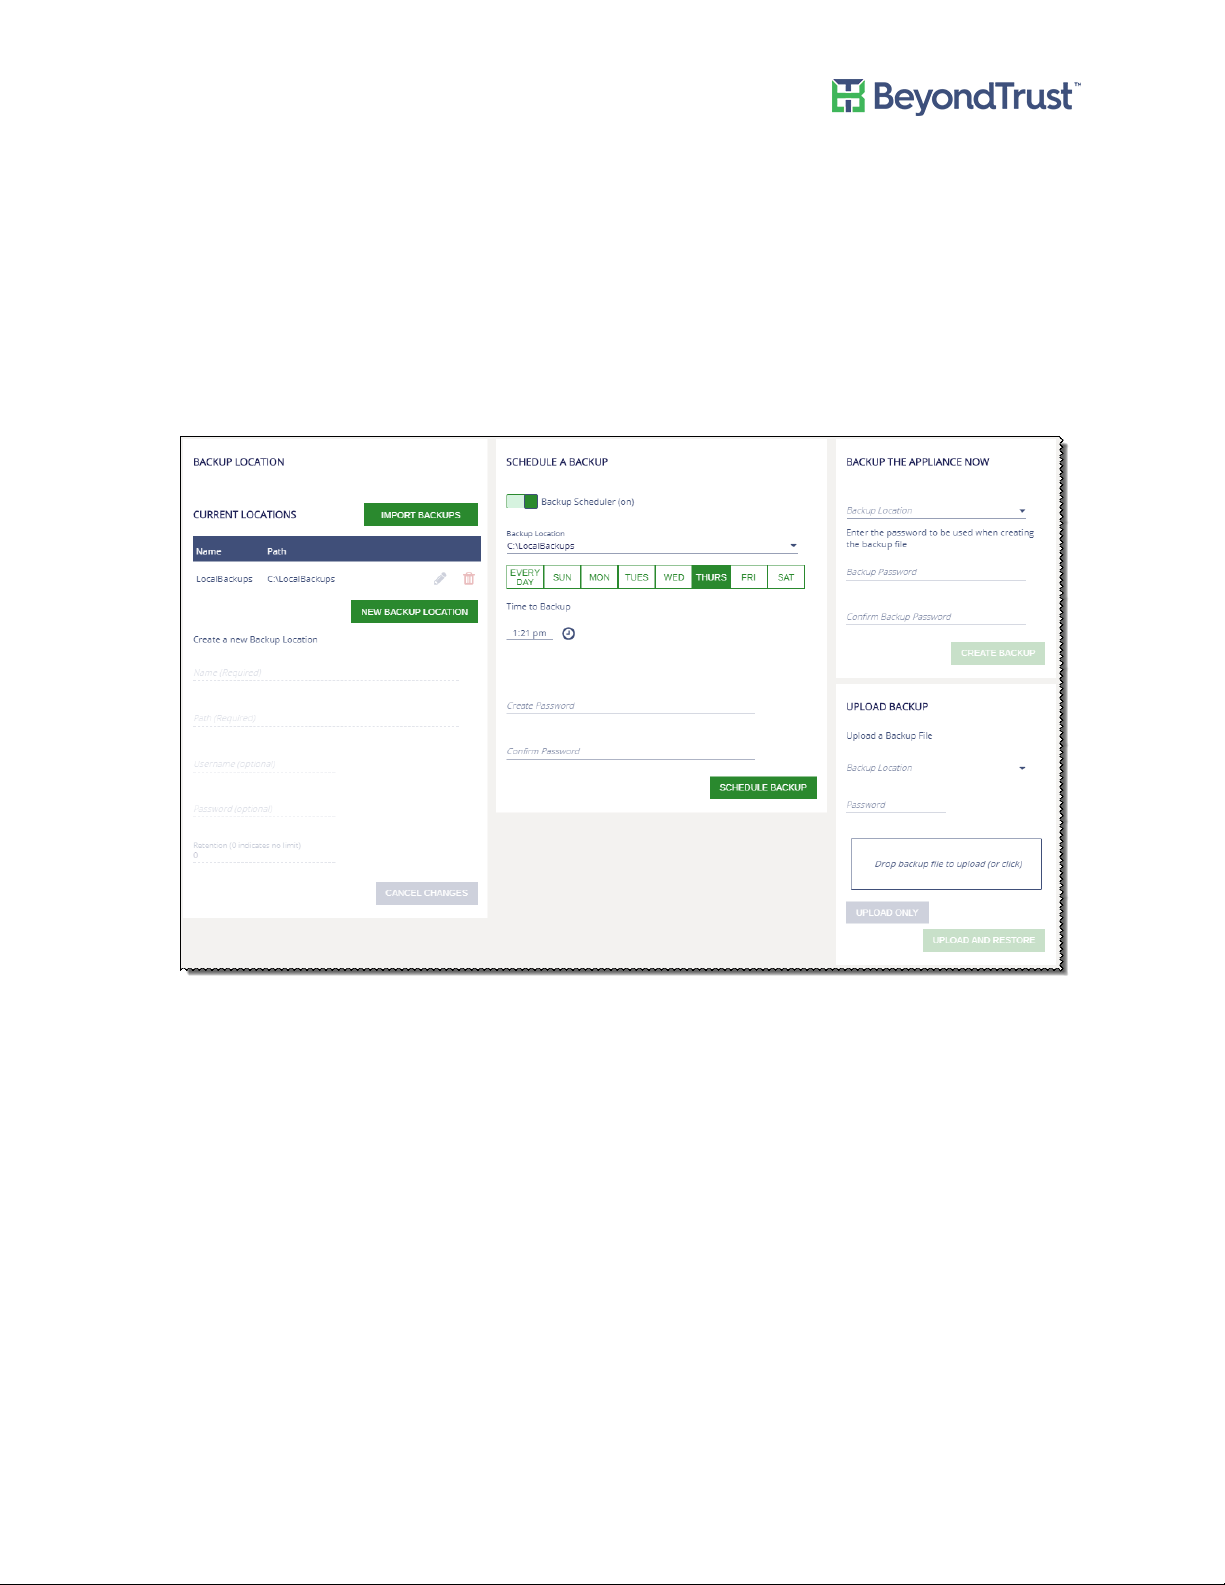
You can back up the appliance immediately or schedule a back up to occur at regular intervals.
Scheduling a Backup
To schedule a backup:
1. Select Backup and Restore from the Maintenance menu.
2. Click Backup Scheduler to turn on scheduling.
3. Enter the information for the remote share where the .zip file will be saved.
4. Select the day of the week and time to run the backup.
5. Enter the password for the .zip file.
6. Click Schedule Backup.
Restoring the Appliance
You must restart the appliance and reset the passwords after restoring.
To restore the appliance from the last backup:
UVM Appliance User Guide 50 © 2018. BeyondTrust Software, Inc.

Configuring Backup and Restore
1. Select Backup and Restore from the Maintenance menu.
2. Enter the password, and then click Restore Appliance.
To restore the appliance from a backup file:
1. Select Backup and Restore from the Maintenance menu.
2. Drop the file to upload.
3. After the backup is uploaded, enter the password and click Restore Appliance.
UVM Appliance User Guide 51 © 2018. BeyondTrust Software, Inc.

UVM Recovery
UVM Recovery
This section applies to UVM20 and UVM50 appliances.
Use the recovery procedure to rebuild your UVM.
All information saved or configured on the UVM will be lost.
There is no way to recover this data.
Note: Retrieve BitLocker keys before starting the recovery process.
1. After the appliance is restarted and you see the following screen, press the F8 key to enter the Windows boot
options. Try pressing the key a few seconds apart to make sure you don’t miss the chance to access the boot
options.
2. Press Enter to go to the BitLocker key prompt.
3. Enter the BitLocker Password for the C: Drive (match up the corresponding ID#) and press Enter.
4. On the Advanced Boot Options screen, press Enter to choose Repair Your Computer.
5. Click Troubleshoot.
6. Click Reset Your PC.
7. Enter Drive password for ID which is displayed and click Continue.
8. Click Next.
9. (UVM50 Only). Select All drives.
10. Click Just remove my files.
UVM Appliance User Guide 52 © 2018. BeyondTrust Software, Inc.

UVM Recovery
11. Click Reset.
Note that BitLocker drive encryption will be turned off. It will be enabled again later in the process.
The Appliance is being imaged with the original Manufacturing image.
12. Insert the USB which contains the BitLocker keys. The BitLocker keys will be regenerated and saved to the USB.
On the first reboot, scripts run that are required to set up the appliance. This part of recovery is automatic and
it will force a system reboot when it is complete.
After the second reboot, a command window is displayed. BitLocker starts the drive encryption. Updates are
displayed on the drive encryption progress.
13. After BitLocker is complete, run Update Appliance.bat on the desktop.
14. Click Next on the Auto Update window.
15. All products will update to the most recent version on the Public Update Server. Click Next when Auto Update
is finished. All updates are now complete.
16. Enter the license key for Windows. Then enter the license key for SQL Server.
17. For the final stage of preparation, run Prepare For Shipping.bat.
All temporary and setup files are removed; Windows and SQL Server are licensed.
You are now ready to configure your appliance. See Configuring Your UVM Appliance.
UVM Appliance User Guide 53 © 2018. BeyondTrust Software, Inc.

Appendix A: Configuring VLAN
Appendix A: Configuring VLAN
Note: On the Microsoft Windows Server 2012 R2 appliances, the Broadcom Advanced Control Suite 4
application is already installed. Access the application from the Start menu.
For all other appliances, you can use the following procedures.
Tagged VLAN configuration on Physical UVM20/50
Broadcom BCM5709C NetXtreme II GigE
1. Download “Gigabit Management Applications Installer for Windows (x64)”
Contact BeyondTrust Technical Support to get the installer file.
2. Install utility (rename setup.exe if required).
3. Run Broadcom Control Suite 4 from Control Panel or Start Menu.
a. Filter by Team View from the menu at top.
b. Under Unassigned Adapters select the Adapter being used (if connected it will have a green checkmark).
c. Right-click and click Create a VLAN > Next.
d. Enter name for team (i.e. VLAN).
e. Enter name for VLAN (i.e. VLAN10) > Next.
f. Click Tagged > Next.
g. Enter VLAN Tag (i.e. 10) > Next.
h. Click Finish.
i. Click Yes to acknowledge there may be a temporary network interruption.
j. Right-click on the Team that was created from the previous step (i.e. VLAN) and click Add VLAN.
k. Enter name (i.e. VLAN20) > Next.
l. Select Tagged > Next.
m. Enter VLAN Tag (i.e. 20) > Next.
n. Click Yes to add more VLAN's and repeat, or No if finished.
o. Click Finish.
UVM Appliance User Guide 54 © 2018. BeyondTrust Software, Inc.

Appendix A: Configuring VLAN
4. Network configuration can be Static or Dynamic depending on the environment/needs but would be
configured just as a normal adapter is configured.
Virtual Guest Tagging (VGT) VLAN configuration on Virtual UVM20
Intel(r) 82574L Gigabit Network Connection (Intel E1000)
To install the required driver within a Windows 2012 R2 guest operating system:
1. Download ProWinx64 from Intel located here: http://downloadmirror.intel.com/18718/eng/PROWinx64.exe
Use 7zip to extract contents to a temp folder.
2. Right-click the network adapter and click Update Driver Software.
3. Click Browse my computer for driver software.
4. Click Let me pick from a list of device drivers on my computer.
5. Click Have Disk.
6. Click Browse.
7. Browse to temp location driver files were extracted to.
8. Click Next to install the driver.
9. Repeat Steps 2-8 for each network adapter you have for the virtual machine.
10. After all the adapters are updated, run the PROWinx64.exe file, rather than extracting it. You should now be
able to install the Advanced Network Services software with VLANs.
To configure VLAN tagging on a Virtual Machine:
1. Open Device Manager.
2. Right-click Network Adapter and select Properties.
There will now be a VLANs tab available. This is not displayed before installing the PROWinx64.exe file above.
3. Click New.
4. Enter VLAN ID (for example, 20).
5. Enter VLAN Name (for example, VLAN20).
6. Click OK.
7. Continue these steps for as many VLAN’s that are required.
UVM Appliance User Guide 55 © 2018. BeyondTrust Software, Inc.

Appendix A: Configuring VLAN
There will now be a new network adapter displayed under Network Connections for each VLAN created.
8. Network configuration can be Static or Dynamic depending on the environment or your requirements but
would be configured just as a normal adapter is configured.
UVM Appliance User Guide 56 © 2018. BeyondTrust Software, Inc.

Appendix B: Optional Appliance Configuration
Appendix B: Optional Appliance Configuration
Configuring iDRAC
You can use the iDRAC tool to remotely manage your UVM appliance (UVM20 or UVM50). Configuring iDRAC is
optional.
For more information about configuring iDRAC, refer to Dell product documentation.
1. At startup, press F2 to enter the Setup menu.
2. Select iDRAC Settings.
3. Select Network.
4. Set "Enable NIC" to Enabled.
5. Configure IP address settings as per your Network Administrator (DHCP/Static).
Setting NIC selection to Dedicated only allows the physical iDRAC port on the back to be used for iDRAC
communication. Setting it to another port will allow it to share the same physical connection.
6. Save your settings.
If using DHCP IP configuration, watch for the iDRAC IP address to be displayed at start up and record this for future
use.
Open a browser and enter the IP address associated with the iDRAC port. Use the default logon credentials:
User: root
Password: calvin
iDRAC Commands
The below commands can be used to configure iDRAC settings from a Windows command prompt.
For the complete user guide with all supported commands go to http://search.dell.com and search for “RACADM
Command Line Reference Guide”.
Enable
Racadm setniccfg -o
Set useraccount
racadm config -g cfgUserAdmin -o cfgUserAdminPassword -i 2 <password>
Set Static IP
racadm setniccfg -s < IPv4Address> < netmask> < IPv4 gateway>
Set DHCP on
racadm setniccfg -d
Get Info
Racadm getniccfg
UVM Appliance User Guide 57 © 2018. BeyondTrust Software, Inc.

Appendix B: Optional Appliance Configuration
Configuring NIC Teaming or Link Aggregation
Note: On the Microsoft Windows Server 2012 R2 appliances, the Broadcom Advanced Control Suite 4
application is already installed. Access the application from the Start menu. For all other appliances, you
can use the following procedure.
The appliance has a Broadcom NetXreme II four-port Network Interface card. Work with your Network
Administrator before you configure NIC teaming or aggregation. Your administrator must provide IP address
information for the environment where the appliance is being deployed.
You must download the Broadcom management utility before you can manage and configure NIC teaming.
For more information, contact BeyondTrust Technical Support to get the installer file.
UVM Appliance User Guide 58 © 2018. BeyondTrust Software, Inc.

Appendix C: Setting up a Cold Spare Appliance
Appendix C: Setting up a Cold Spare Appliance
You can set up an appliance that can be used as the main appliance if the first one needs to be taken offline.
Requirements
• The BeyondInsight version on the cold spare must be the same or greater than the version on the source
appliance.
• It is recommended that both appliances turn on the Auto Updates role.
• Ensure the cold spare is receiving updates so that it matches the source appliance.
• For Analytics and Reporting, ensure SQL Server versions match on both appliances.
• The source and spare appliances need the same name.
Note: If the SQL Server database is remote, the data will not be copied to the cold spare.
To set up the spare:
1. Select Roles Editor from the menu.
2. Click the Cold Spare role.
3. Turn on the role.
4. Click Locations +.
a. Enter the path to the shared location where the back up files are saved. Optionally, select an existing share
location.
b. If applicable, enter the credentials that can access the share. Click the Test the Remote Share Credentials
button to test the connection.
UVM Appliance User Guide 59 © 2018. BeyondTrust Software, Inc.

Appendix C: Setting up a Cold Spare Appliance
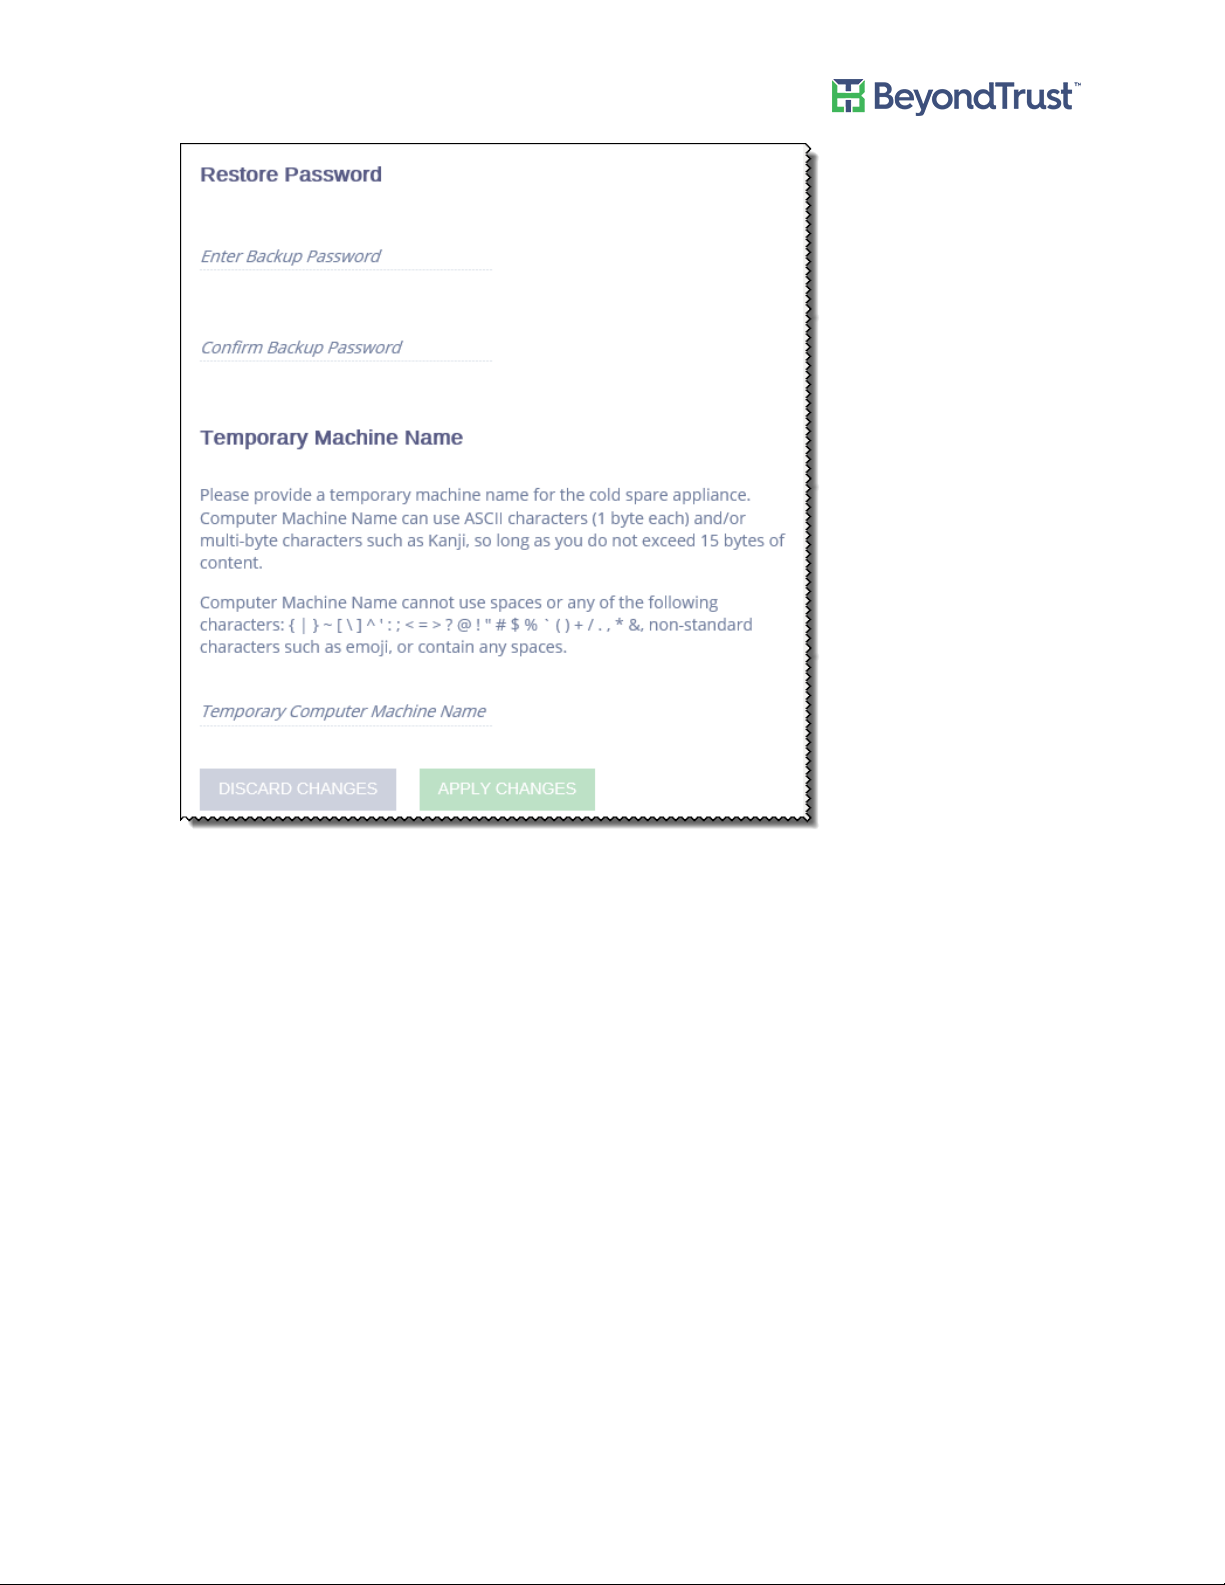
5. Set scheduling information, including the day of the week and time. The cold spare retrieves the information
from the backup file at this time. When the cold spare starts up the data from the last backup file retrieved is
used.
6. Enter a restore password.
7. Provide a temporary machine name.
UVM Appliance User Guide 60 © 2018. BeyondTrust Software, Inc.
Appendix C: Setting up a Cold Spare Appliance
8. Click Apply Changes.
9. On the Roles Editor main page, click Apply Pending Changes.
A restart is required after the settings are saved. A dialog box is displayed when the appliance is ready to shut down
and restart.
UVM Appliance User Guide 61 © 2018. BeyondTrust Software, Inc.
 Loading...