

Page 1
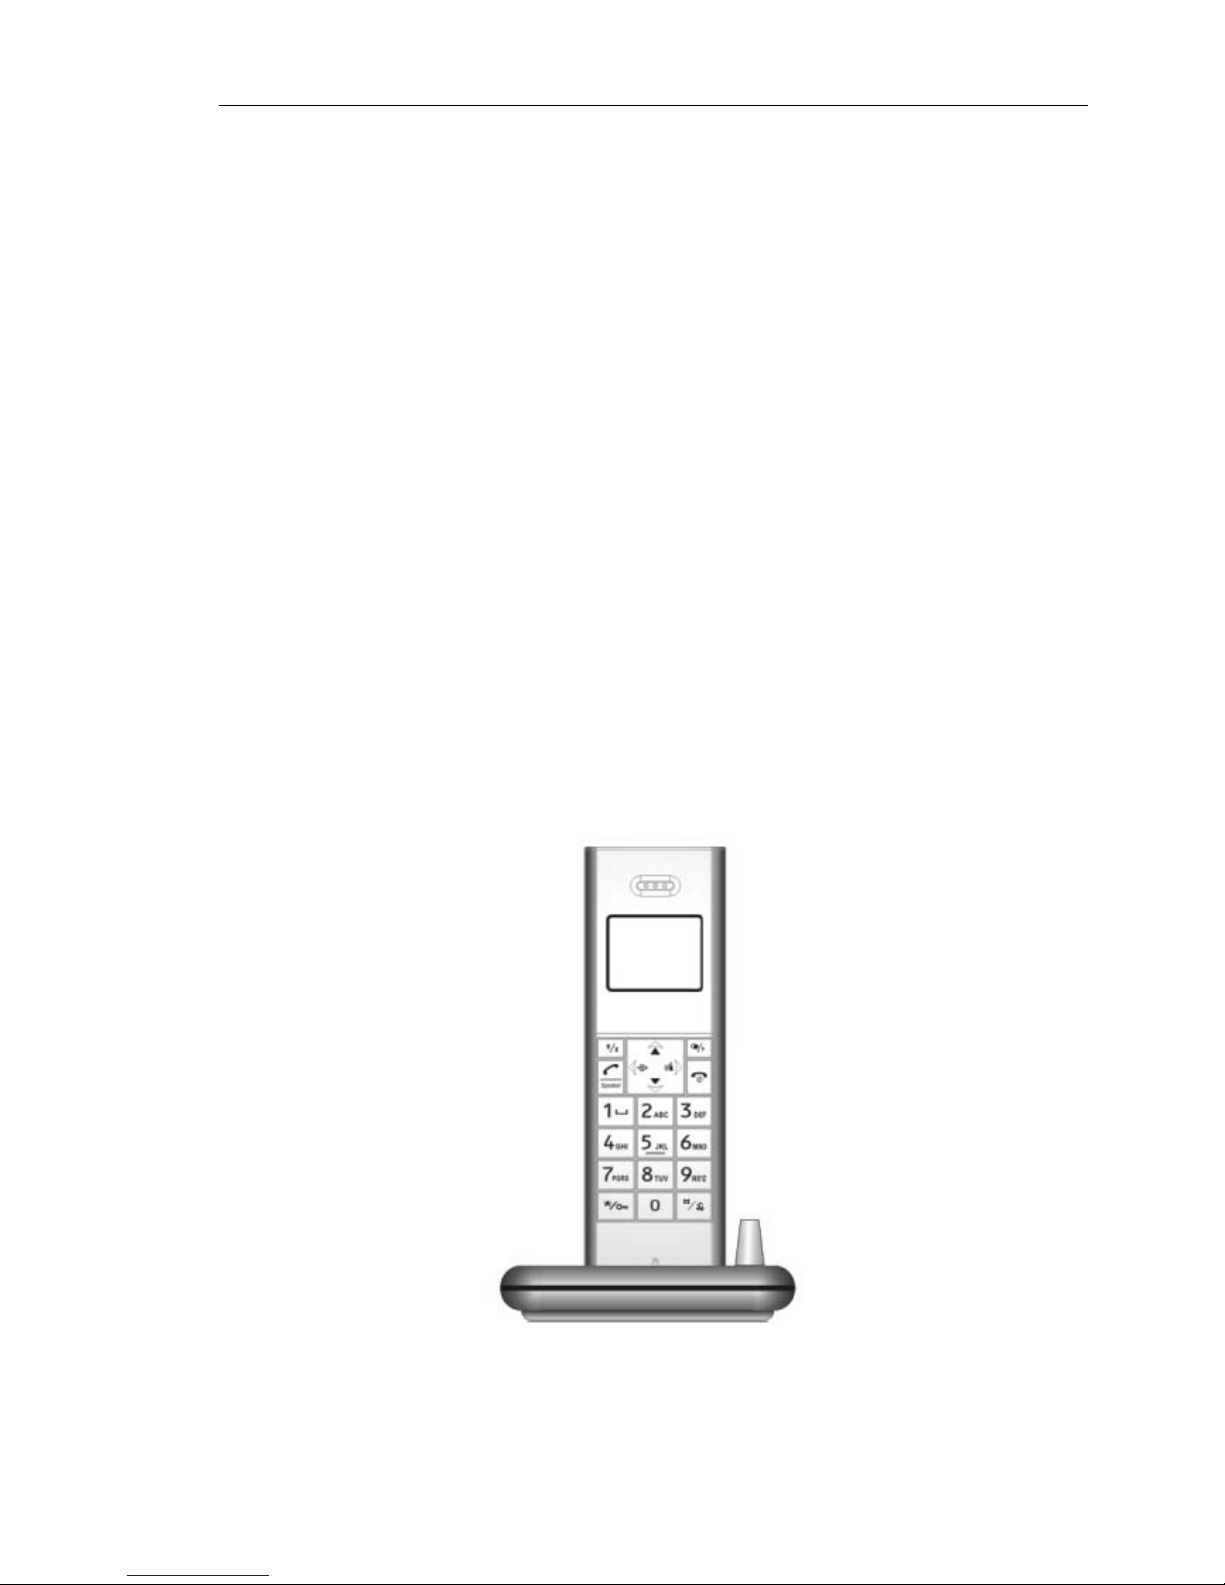
User Manual for Wireless VoIP Phone
- 1 - Version1.0 2007-12-29
User Manual
For Wireless VoIP Phone
Thank you for your purchase, please read this manual before use
Page 2

User Manual for Wireless VoIP Phone
- 2 - Version1.0 2007-12-29
Contents
MAIN FEATURES..............................................................................................................................................- 4 -
CAUTION............................................................................................................................................................- 5 -
PHONE LAYOUT...............................................................................................................................................- 6 -
CONNECTION INSTRUCTION......................................................................................................................- 7 -
BASE UNIT:.....................................................................................................................................................- 7 -
HANDSET:.......................................................................................................................................................- 7 -
MENU OVERVIEW...........................................................................................................................................- 8 -
SKYPE INSTALLATION...................................................................................................................................- 9 -
SKYDECT DRIVER INSTALLATION............................................................................................................- 9 -
PREFERED VOIP APPLICATION SETTINGS............................................................................................- 13 -
INTELLIGENT ROUTER FOR SKYPEOUT SETTINGS..........................................................................- 13 -
PHONEBOOK DOWNLOADING..................................................................................................................- 14 -
THE SKYPE CALL FUNCTION....................................................................................................................- 16 -
△ DIAL A SKYPE CALL...................................................................................................................................- 16 -
△ DIAL A SKYPEOUT CALL............................................................................................................................- 17 -
△ RECEIVE A SKYPE CALL.............................................................................................................................- 18 -
△ PAGE FROM BASE TO HANDSET ........................................................................................................- 18 -
△ CALL TRANSFER...................................................................................................................................- 19 -
FUNCTION SETTINGS...................................................................................................................................- 19 -
△ HANDSET SETTING MODE..........................................................................................................................- 19 -
△ REGISTER AND DEREGISTER .......................................................................................................................- 19 -
△ INCOMING CALL REVIEWING/CALL-BACK/STORE/DELETE..........................................................................- 22 -
△ OUTGOING CALL REVIEWING / REDIAL / STORE / DELETE............................................................................- 23 -
△ DIALING MODE SETTING ...........................................................................................................................- 25 -
△ AUTO ANSWER SETTING .............................................................................................................................- 26 -
△ FLASH TIME SETTING (100MS/300MS/600MS).....................................................................................- 26 -
△ HANDSET NAME SETTING..................................................................................................................- 27 -
△ LANGUAGE SETTING...........................................................................................................................- 27 -
△ EDIT PIN CODE.......................................................................................................................................- 28 -
△ TIME SETTING .......................................................................................................................................- 28 -
△ LCD CONTRAST SETTING ...........................................................................................................................- 29 -
△ RESTORE FACTORY DEFAULT SETTINGS.........................................................................................- 29 -
Page 3

User Manual for Wireless VoIP Phone
- 3 - Version1.0 2007-12-29
△ ALARM CLOCK SETTING.....................................................................................................................- 30 -
△ PHONE BOOK FUNCTION ....................................................................................................................- 31 -
△ CALL BARRING SETTING....................................................................................................................- 33 -
△ WALKIE TALKIE SETTING ...................................................................................................................- 34 -
△ RING MELODY SETTING......................................................................................................................- 35 -
△ DIALING MODE “TONE”SETTING..................................................................................................- 36 -
△ RINGER VOLUME SETTING.................................................................................................................- 37 -
△ REDIAL....................................................................................................................................................- 38 -
△ NON-DISTURB FUNCTION...................................................................................................................- 38 -
△ KEYPAD LOCK ON/OFF FUNCTION ...................................................................................................- 38 -
△ HANDSET ON/OFF FUNCTION............................................................................................................- 38 -
△ INTERCOM FUNCTION.........................................................................................................................- 38 -
MAINTENANCE..............................................................................................................................................- 39 -
TROUBLE SHOOTING...................................................................................................................................- 39 -
Page 4

User Manual for Wireless VoIP Phone
- 4 - Version1.0 2007-12-29
Main Features
z 1.8G/1.9G wireless VoIP phone with USB 2.0 interface
z Seamless integration with Skype and 11 other popular VoIP services.
z Effective working range: indoor 50m; outdoor 250 m
z Blue backlit LCD supports 16 languages and caller ID display
z Advanced echo-cancellation and noise-reduction technology
z Hands free Speakerphone with full duplex communication
z Call transfer
z Intercom, Page, 3-way conference
z Melody ring tones
z Non-disturb function
z Key pad knock function.
z Register up to 5 handset
z Phonebook function
Page 5

User Manual for Wireless VoIP Phone
- 5 - Version1.0 2007-12-29
Caution
Rechargeable battery
It is recommended to replace with well-known brand battery in case the original battery is run out,
never use unknown brand ones.
Power Adapter
Avoid putting flammable stuffs near 20cm around power jack, never attempt to use nude line cord or
multiple power sockets to install the phones, it may risk electronic shock.
Emergency-shooting
In case of burned smell or the power adapter get over heat, unplug the power jack or remove the
batteries immediately, it may risk fire under the abnormal use. Contact with our service if any
abnormal performance happened.
*Recycle batteries for reclaim*
Package contents:
Item Quantity
Base 1 pcs
Handset 1 pcs
USB cable 1 pcs
User’s manual 1 book
Installation CD 1 pcs
Power adapter (DC6v/200mA) 1 pcs
Rechargeable battery (1.2v/400mAh) 2 pcs
Page 6
User Manual for Wireless VoIP Phone
- 6 - Version1.0 2007-12-29
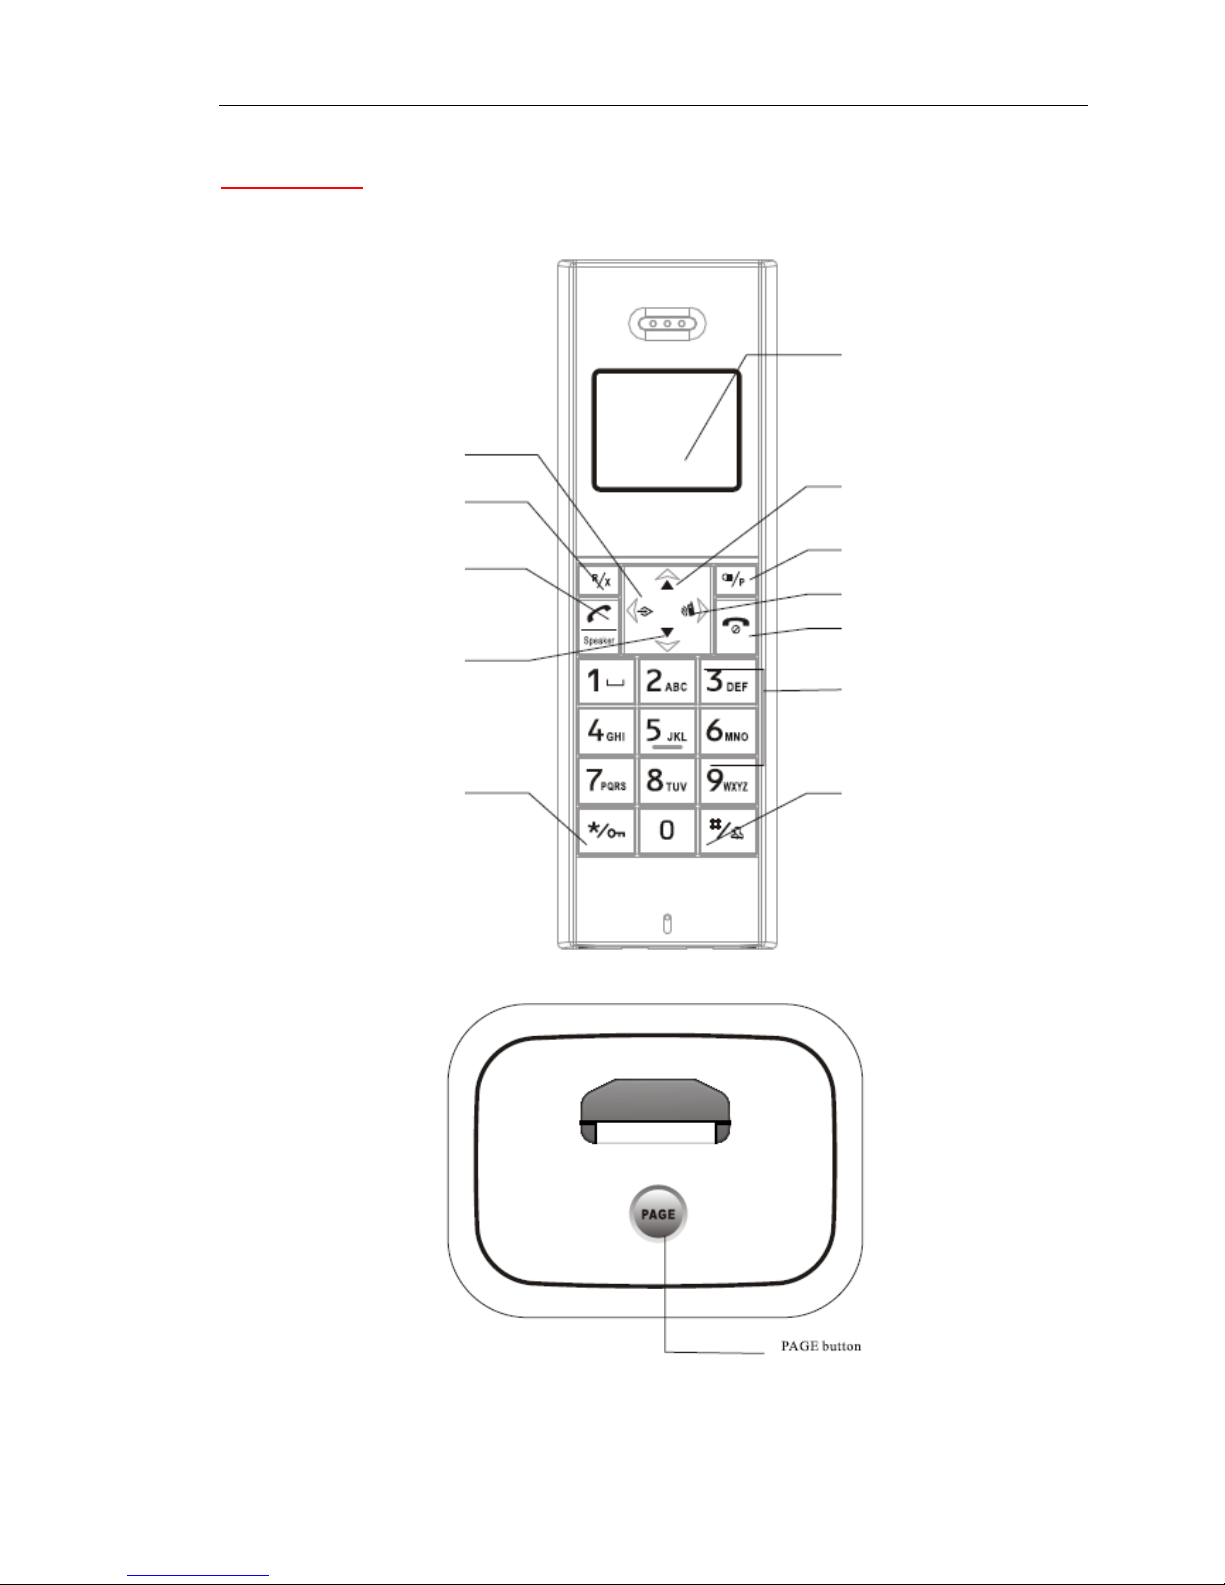
Phone layout
LCD Screen
Redial
Down Arrow
Up Arrow
Page button
End/Off
Numbers
Hash / Vibration Star / Lock
TALK
Return / Delete
Menu / Confirm
Page 7
User Manual for Wireless VoIP Phone
- 7 - Version1.0 2007-12-29
Connection Instruction
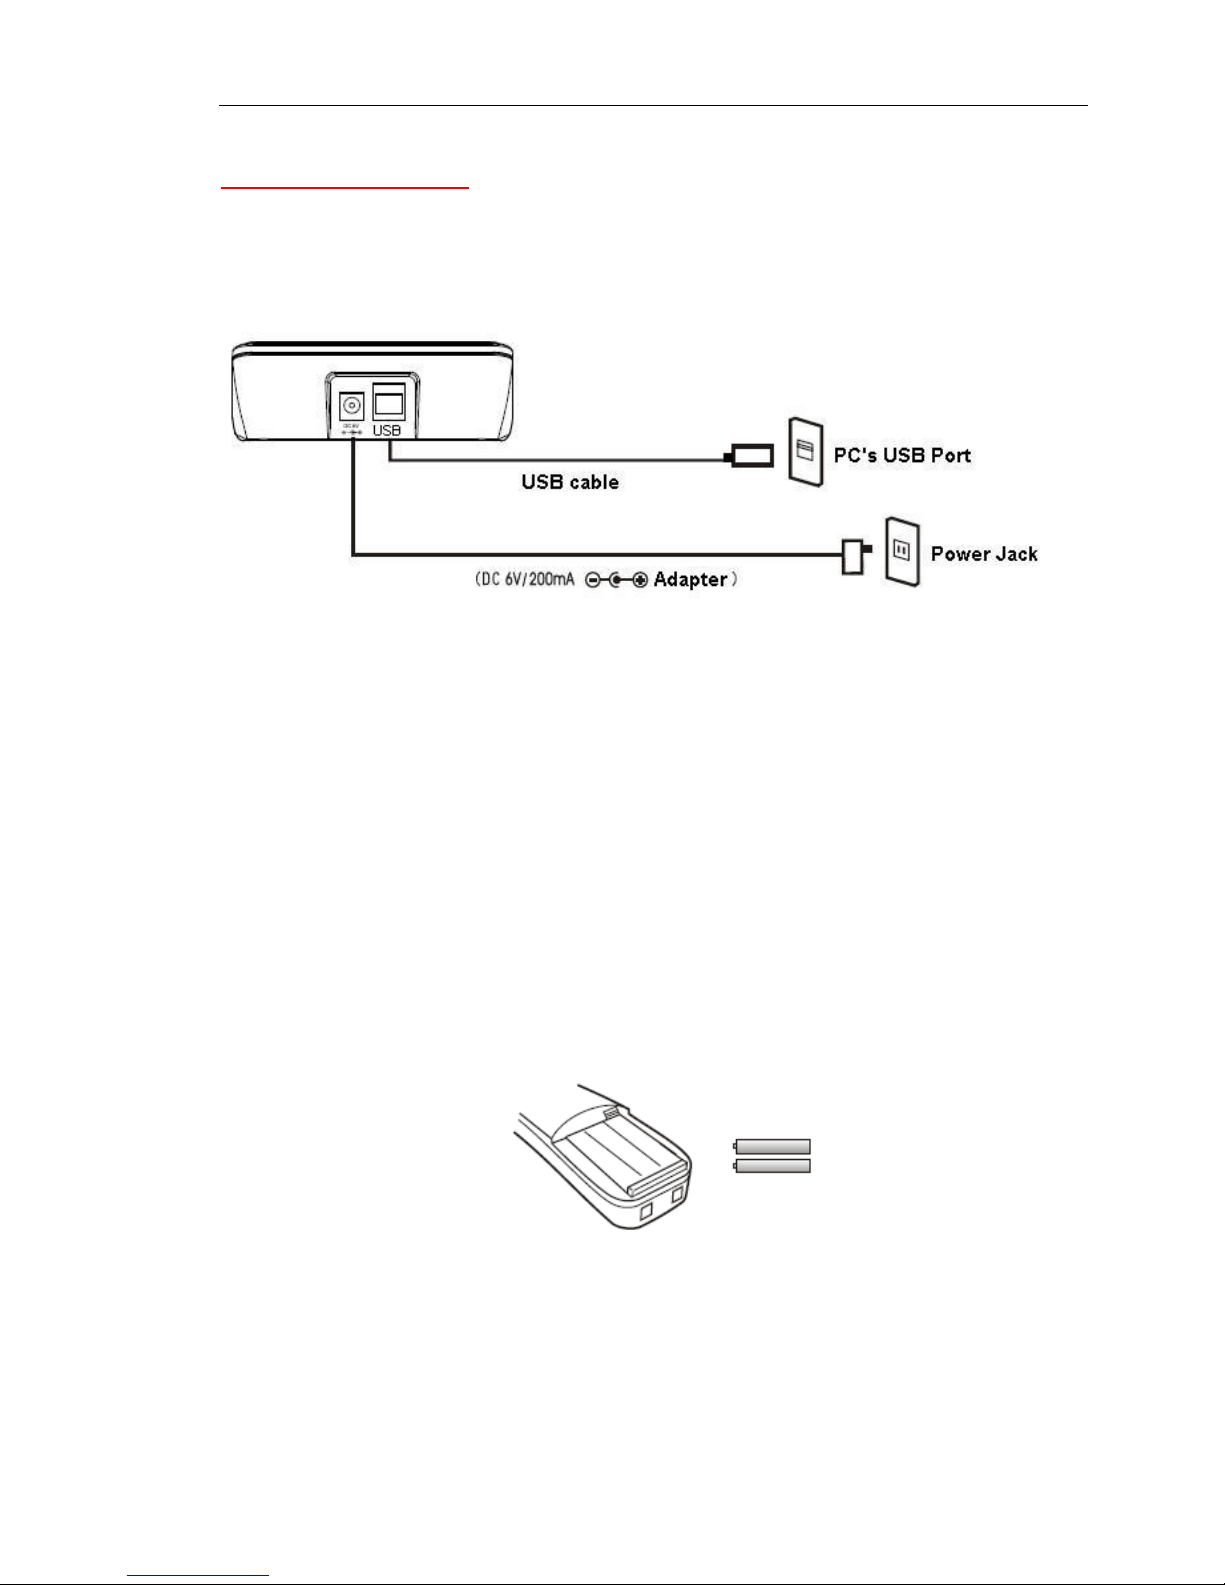
BASE UNIT:
※ USB cable, USB port, adapter, power jack,
※ It is not recommended to install extension handsets over 3 units which may degrade the
conversation quality .
※ Please check before use whether our adapter (DC6V/200mA) comply with your local standard of
voltage. If not so, please contact your local dealer for help.
HANDSET:
(1.2v/400mA rechargeable battery 2pcs)
※ To fully perform this device, we recommend having the batteries charged for over 10 hours at the
initial use.
Page 8
User Manual for Wireless VoIP Phone
- 8 - Version1.0 2007-12-29
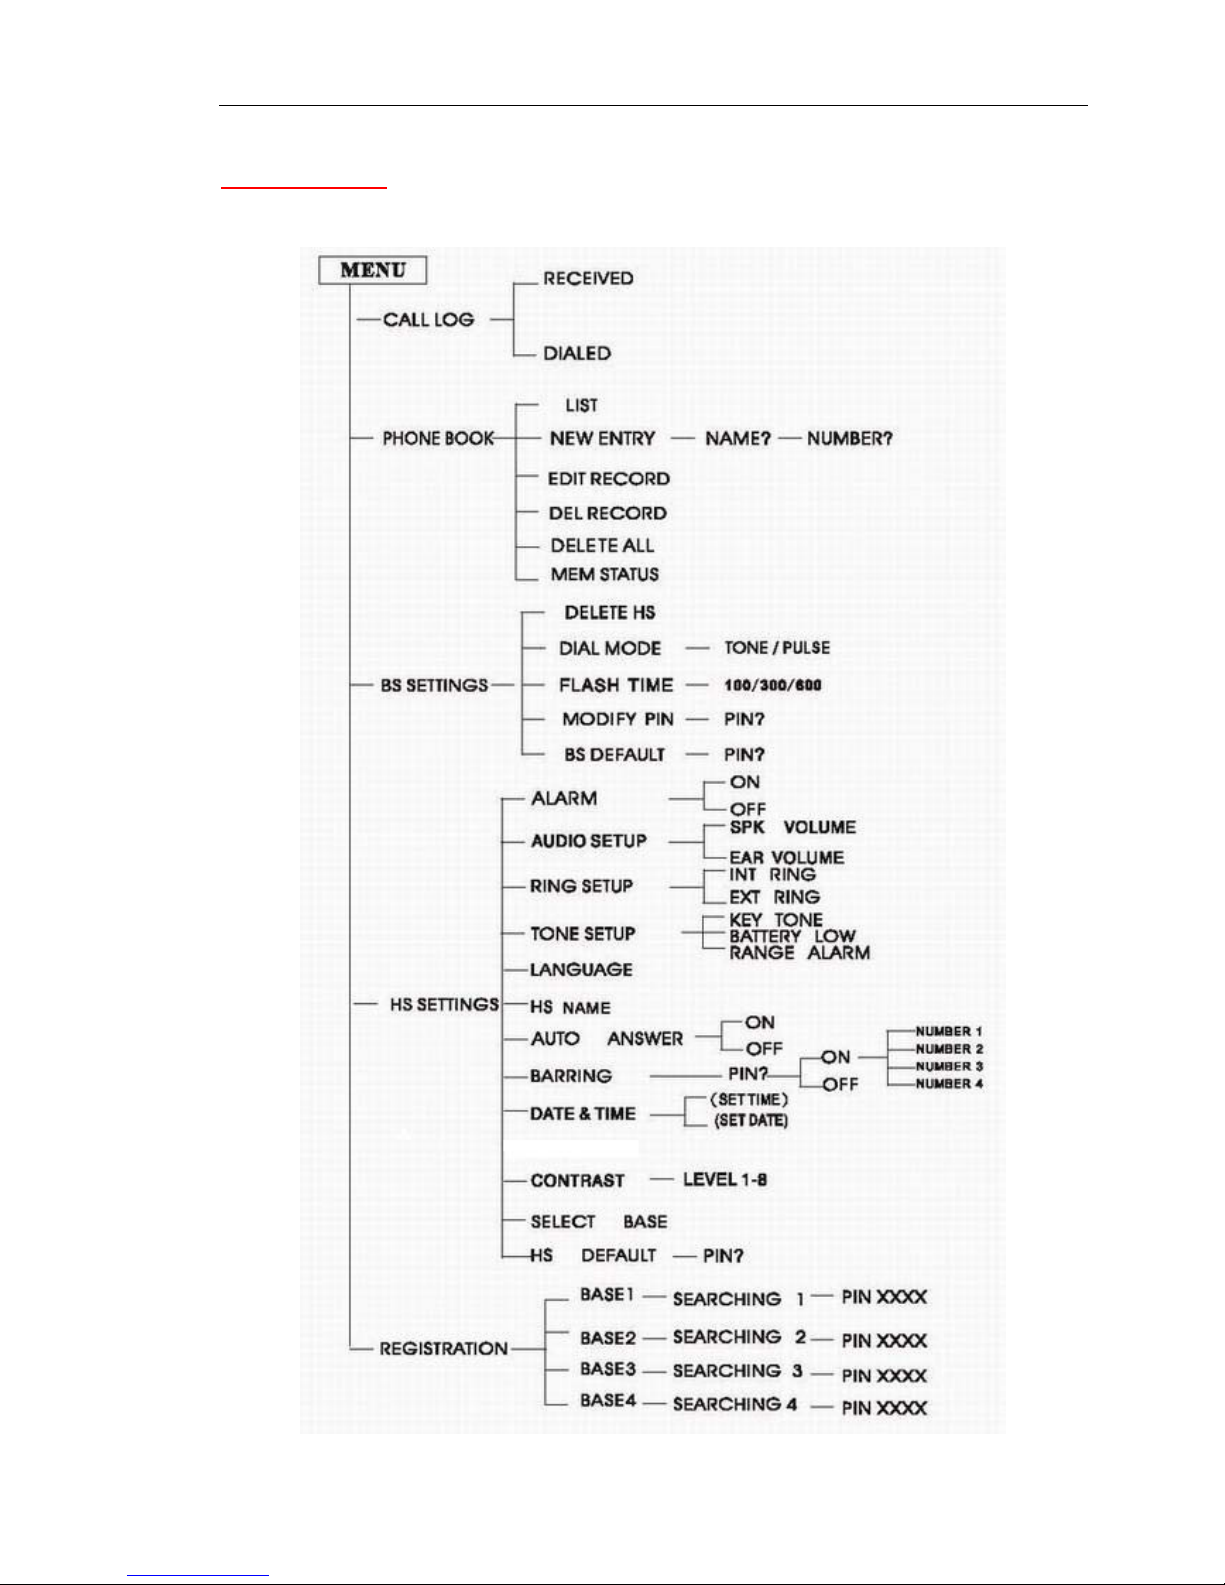
Menu Overview
Page 9

User Manual for Wireless VoIP Phone
- 9 - Version1.0 2007-12-29
Skype Installation
The latest version of Skype (Version 3.0 or above ) is strongly recommended. You can download it from
Skype’s official website:
http://www.skype.com/download/skype/windows/
Other VoIP applications can be downloaded in the following websites:
VoipBuster
http://www.voipbuster.com/en/download.html
VoipStunt
http://www.voipstunt.com/en/download.html
VoIPCheap
http://www.voipcheap.co.uk/en/download.html
VoipDiscount
http://www.voipdiscount.com/en/download.html
SparVoip
http://www.sparvoip.de/de/download.html
Internetcalls
http://www.internetcalls.com/en/download.html
NetAppel
http://www.netappel.fr/fr/download.html
FreeCall
http://www.freecall.com/en/download.html
WebCallDirect
http://www.webcalldirect.com/en/download.html
VoipCheapCom
http://www.voipcheap.com/en/download.html
Poivy
http://www.poivy.com/en/download.html
SkyDECT Driver Installation
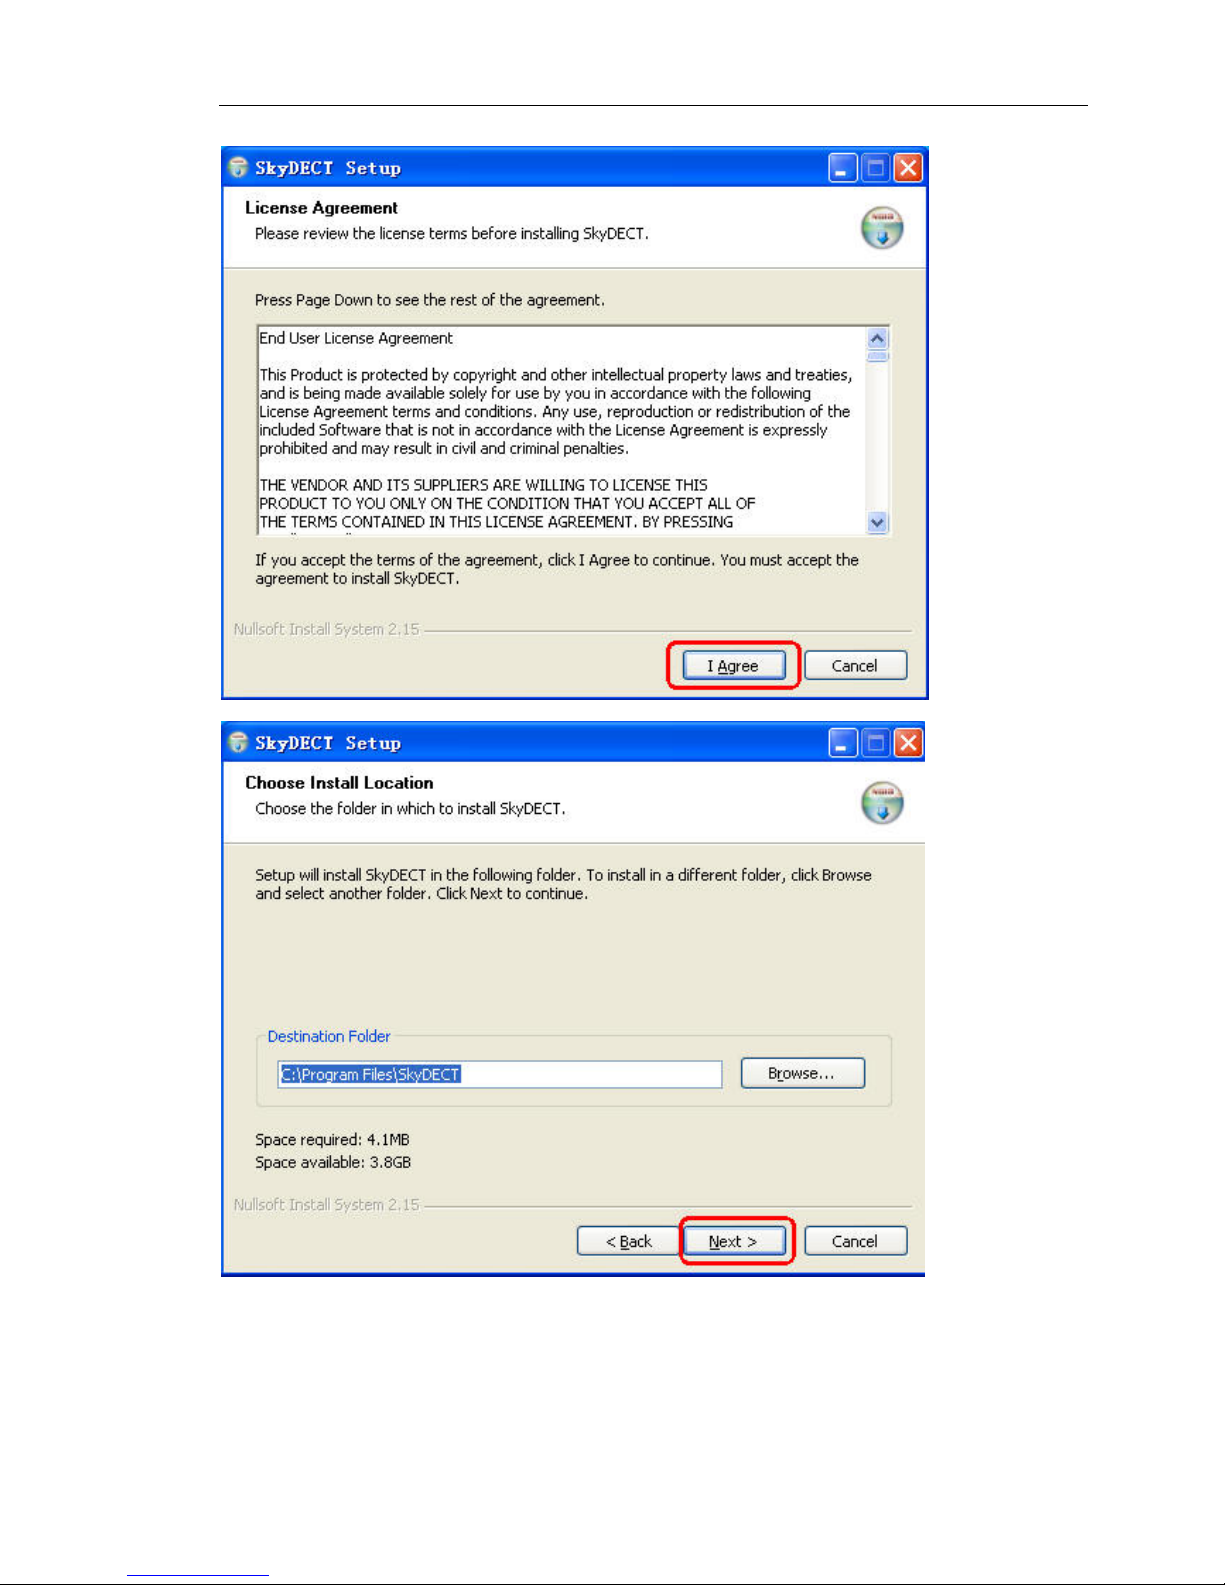
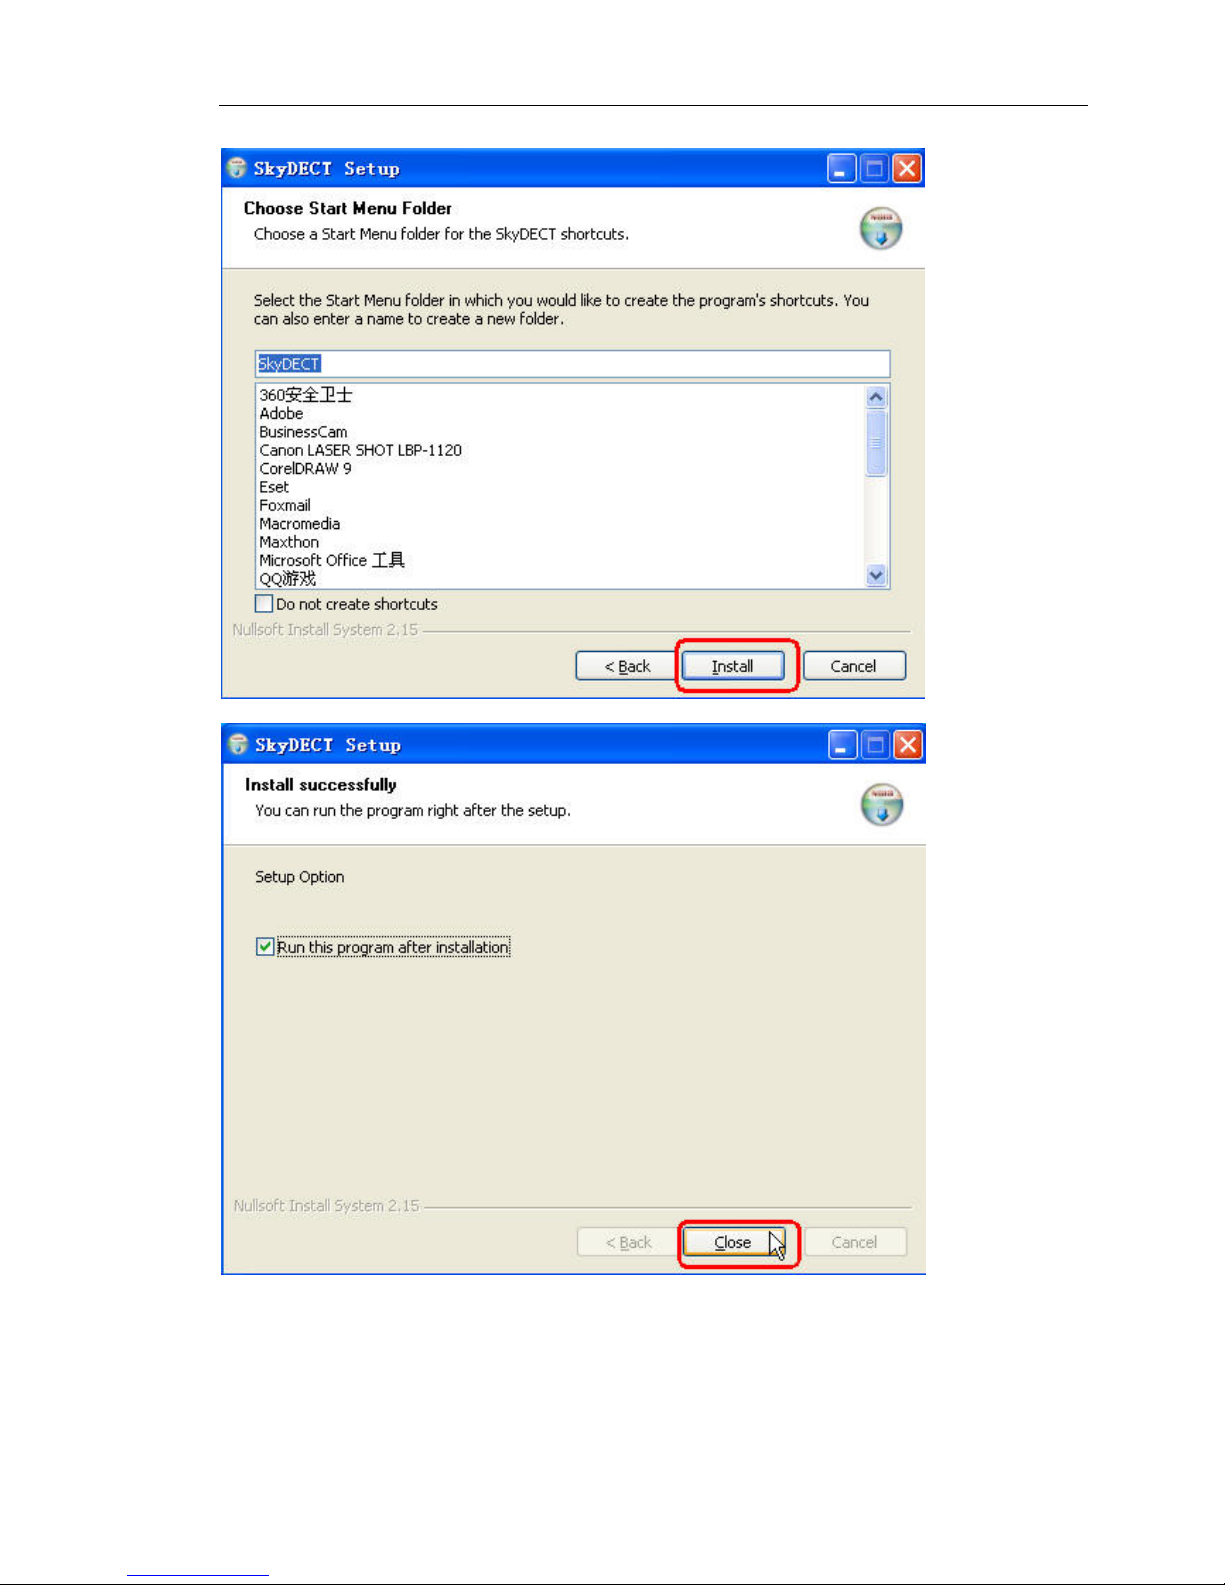
You can insert the supplied installation CD into your PC and the installation will run automatically. And
the latest SkyDECT driver, which can be downloaded from the of fici al website http://www.skydect.net
is
strongly recommended for the best performance of your wireless VoIP phone.
Please follow the instructions to install your SkyDECT driver as below:
Page 10
User Manual for Wireless VoIP Phone
- 10 - Version1.0 2007-12-29
Page 11
User Manual for Wireless VoIP Phone
- 11 - Version1.0 2007-12-29
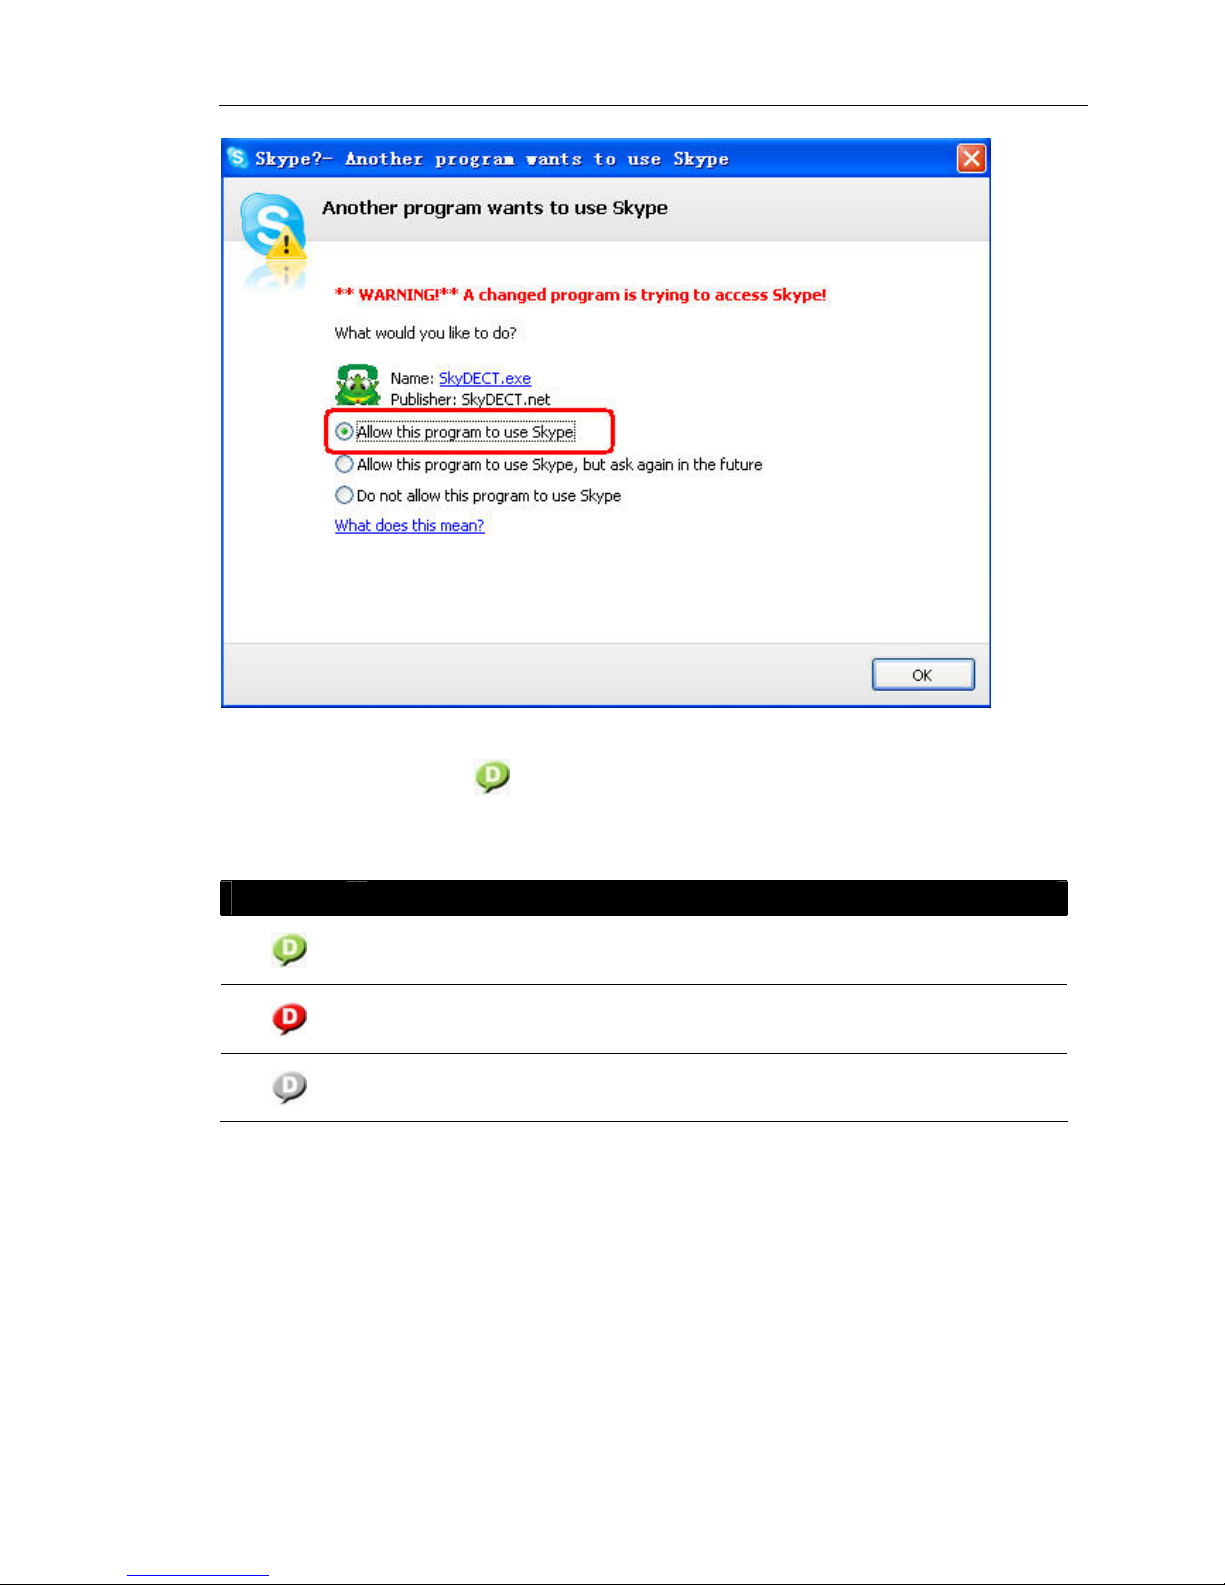
When the SkyDECT Driver runs for the first time, Skype will pop up the following window. Please select
“Allow this program to use Skype” as the illustration shown below:
Page 12
User Manual for Wireless VoIP Phone
- 12 - Version1.0 2007-12-29
Now you can see a green icon
in the task bar which indicates you are ready to make/receive calls
with the wireless VoIP phone.
Driver Icons Indications
The phone works normally.
The phone fails to communicate with the computer. (Please refer to T rouble
Shooting Q7)
The phone fails to communicate with Skype or Internet. (Please refer to Trouble
Shooting Q8)
Page 13
User Manual for Wireless VoIP Phone
- 13 - Version1.0 2007-12-29
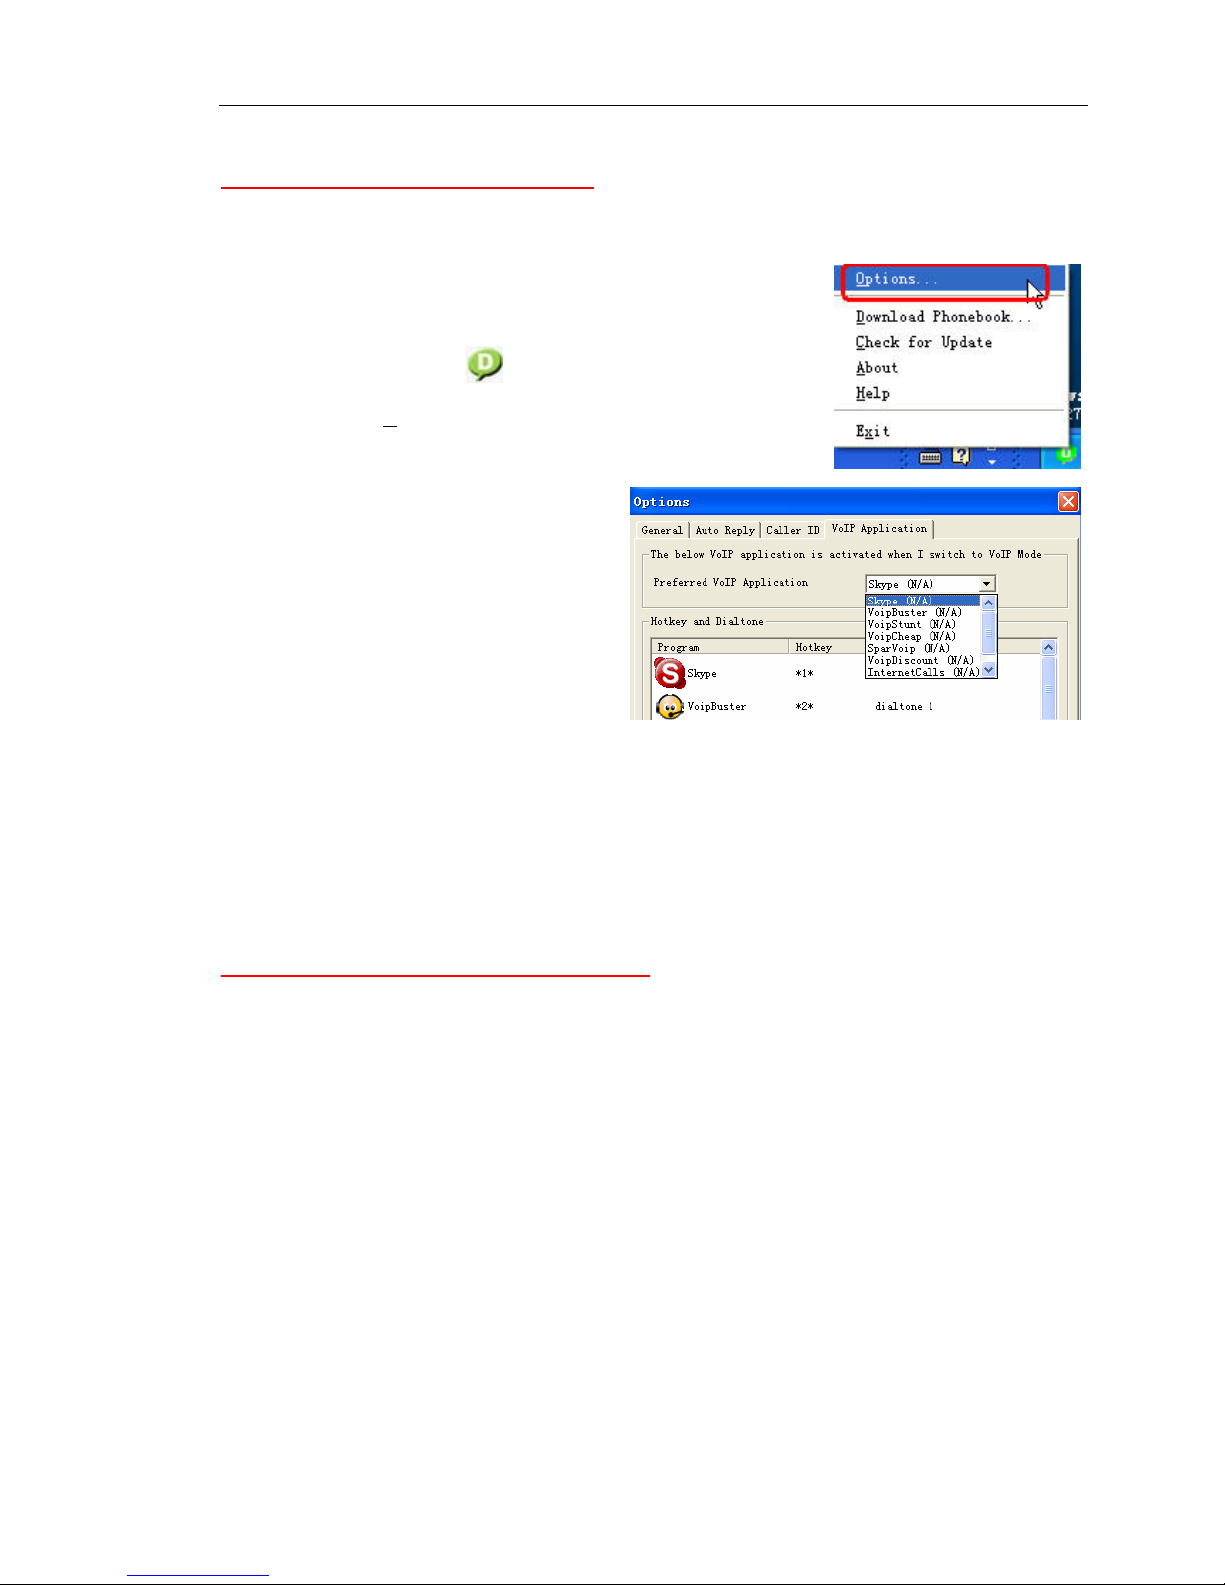
Prefered VoIP Application Settings
>>Select your favorite VoIP application by
right clicking the driver icon
in the tray
icon bar, and click “O
ptions…”.
>>Choose “VoIP Application” and select the
preferred VoIP Application
Intelligent Router for SkypeOut Settings
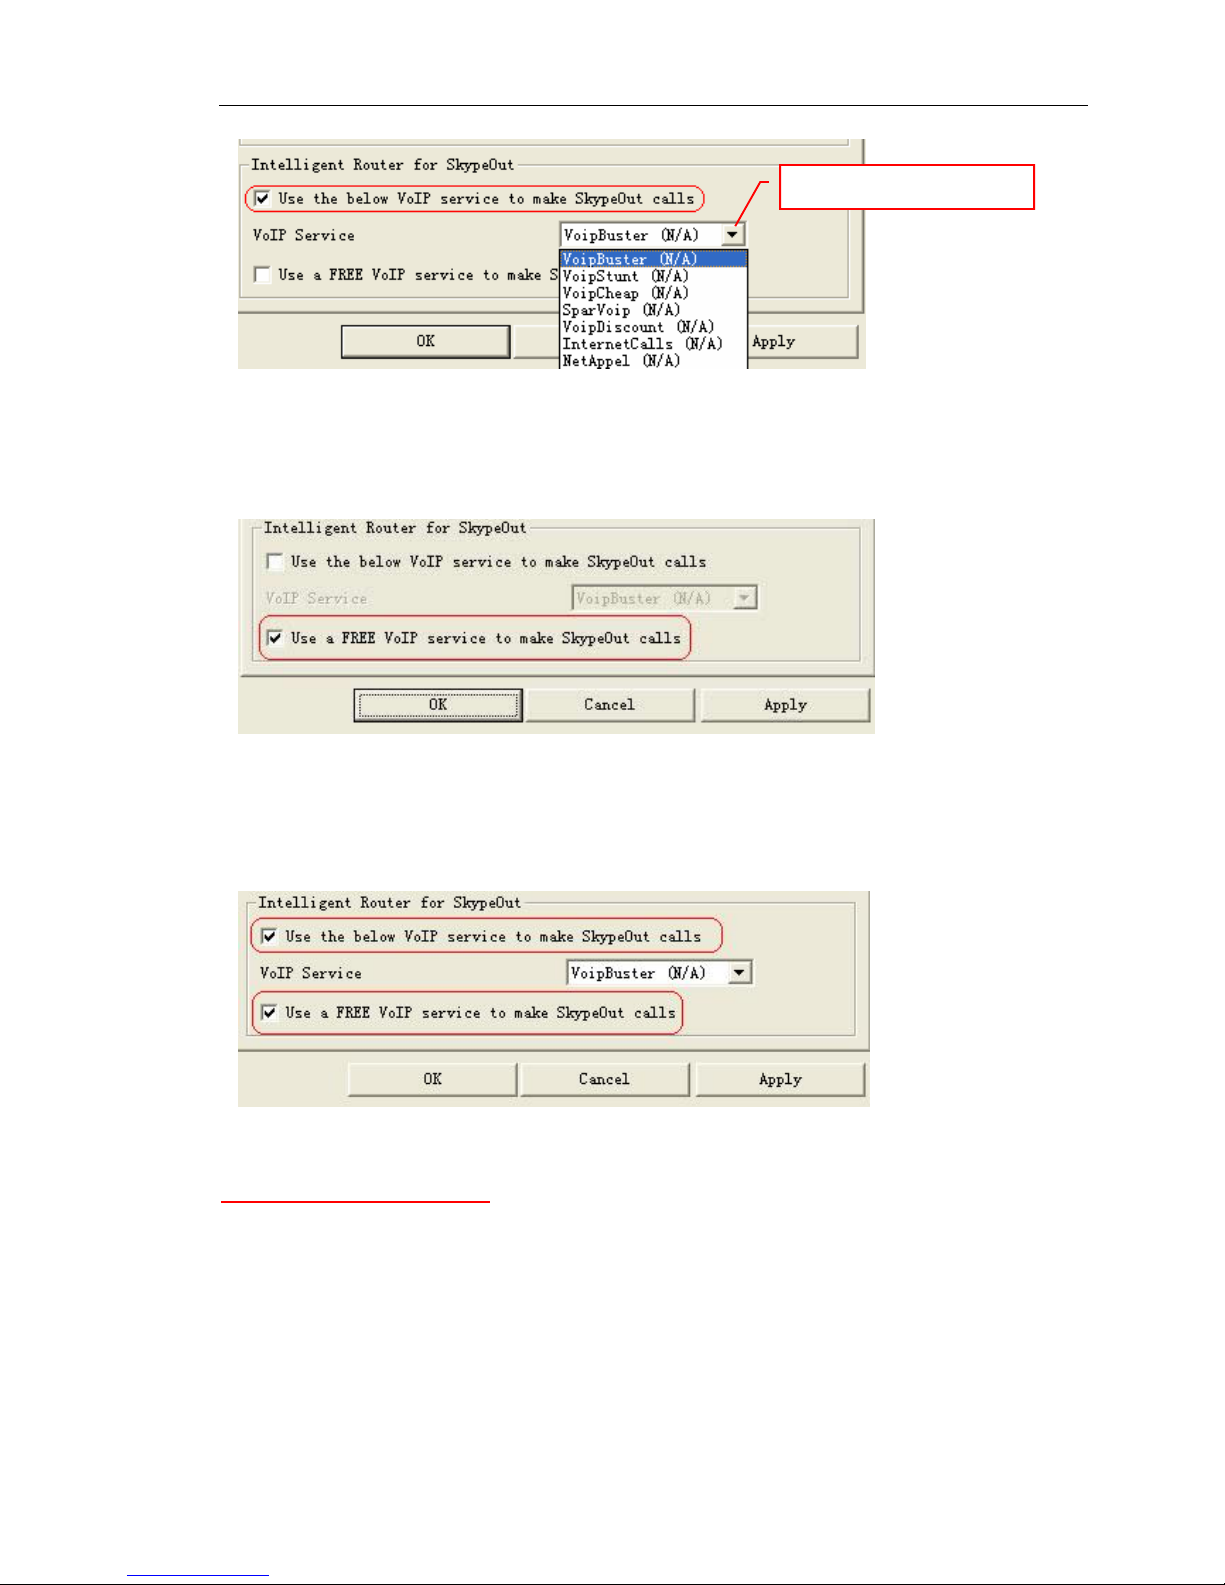
There are some other famous VoIP applications except Skype providing cheaper or free VoipOut
service for subscribers. Th e “Intelligent Router for SkypeOut” is designed for you to enjoy this
cheaper or free VoipO ut service s when you make a SkypeOut calls. You can set the “Intelligent
Router for SkypeOut” as follows:
Right click on the driver icon and choose “Options” ---“VoIP Application”
Page 14
User Manual for Wireless VoIP Phone
- 14 - Version1.0 2007-12-29
Now whenever you make a SkypeOut call, the call will be routed to the selected VoIP service
automatically.
To make a free V oIP calls, you can click “Use a FREE VoIP service to make SkypeOut calls”. If the free
VoIP service is unavailable, the SkypeOut calls will be made thru SkypeOut service.
If you click both
“Use a FREE VoIP service to make SkypeOut calls” and “Use the below VoIP service to
make SkypeOut calls”, the SkypeOut calls will be routed to the selected VoIP service if the free VoIP
service is unavailable.
Phonebook downloading
As for easier operation, it is recommended to download your Skype contact list from your computer to
your handset before using the wireless VoIP phone.
Note: The Skype contact list stored in your handset can be visible and useful only when it is linked to
THIS computer. If you con nect this handset and base unit to another computer, you must reload the
contact list.
Select a VoIP service
Page 15
User Manual for Wireless VoIP Phone
- 15 - Version1.0 2007-12-29
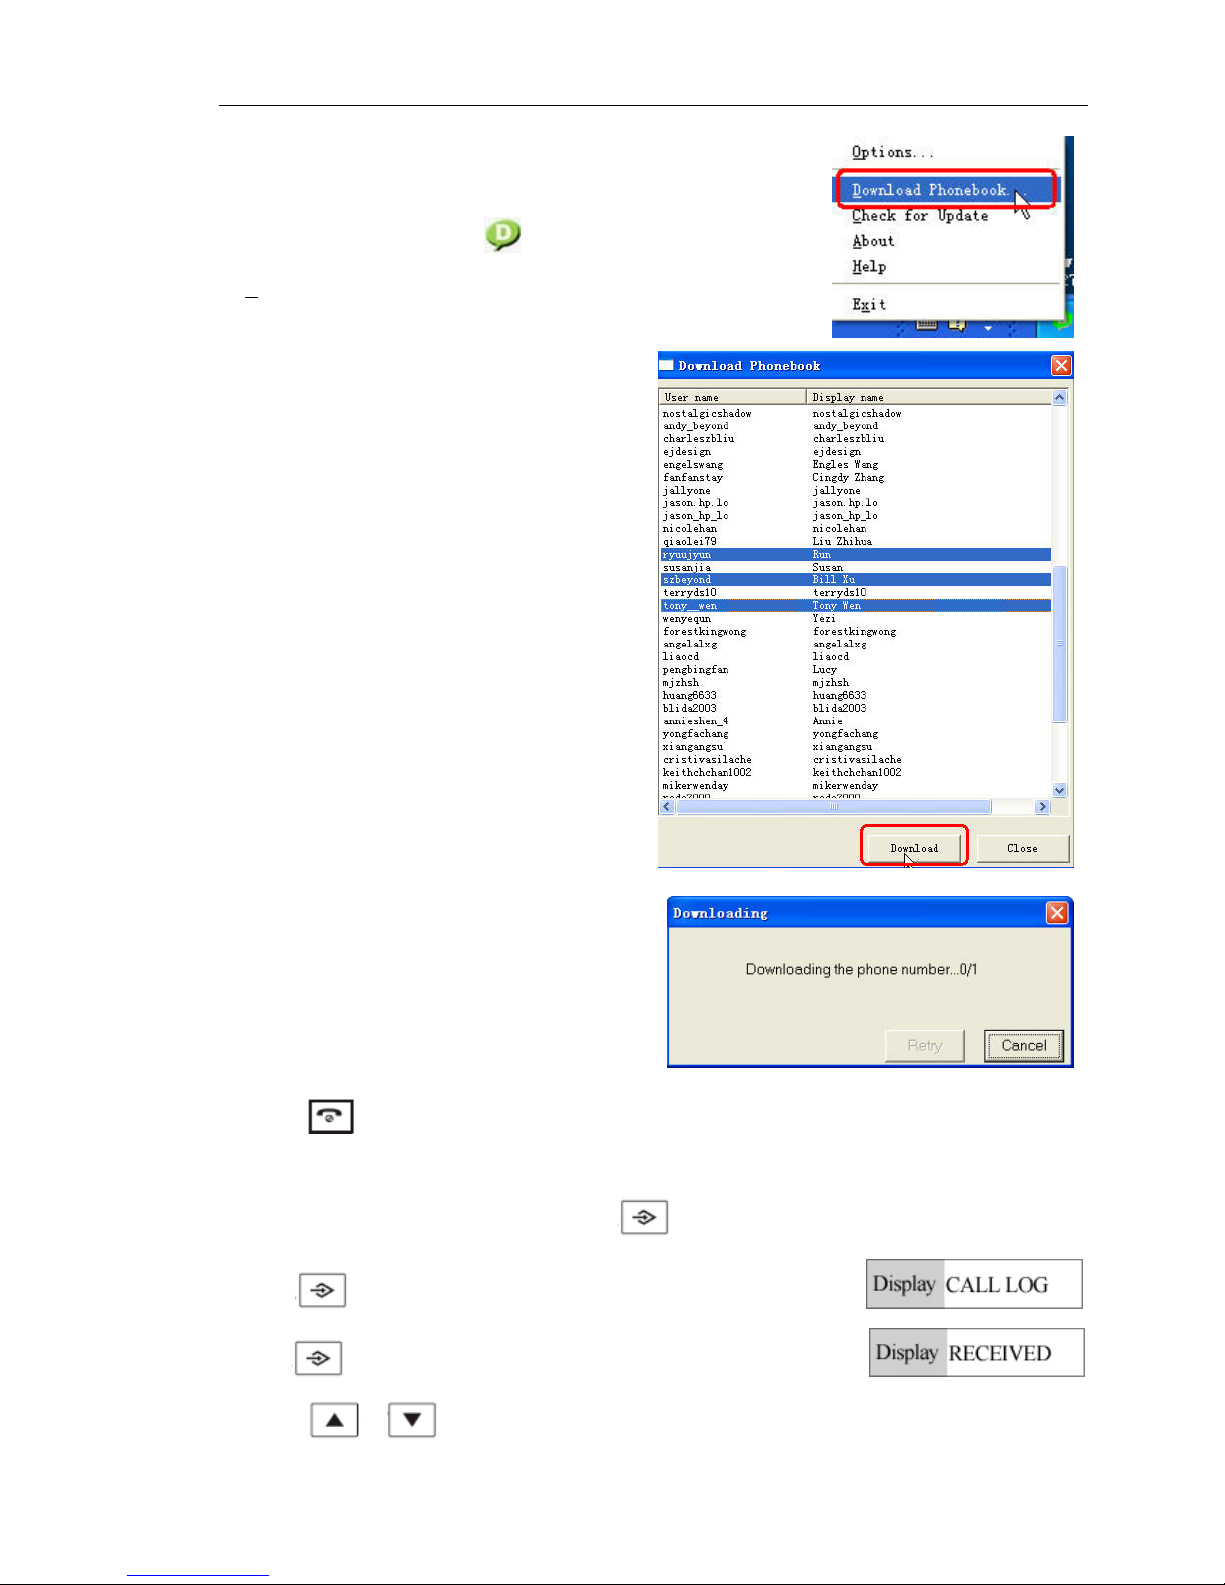
Step 1: Download the Phonebook
>> Right click on the icon and choose
“D
ownload phonebook…”
>>Choose the contacts that you want to download
to your handset (Press [Ctrl] key on your
keyboard to select several contacts at one time.)
and click “Download”
>> The handset will ring for every contact and
please wait with patience until the ring stops.
>> Press to go back to the standby mode.
Step 2: Store the Phonebook in the Handset
>>Pick up the handset in standby mode, press
button to enter setting mode
>>Press button to enter “CALL LOG”
>>Press
button to review the “RECEIVED CALLS”
>> Press
or button to find the Skype contacts you have chosen before.
Page 16
User Manual for Wireless VoIP Phone
- 16 - Version1.0 2007-12-29
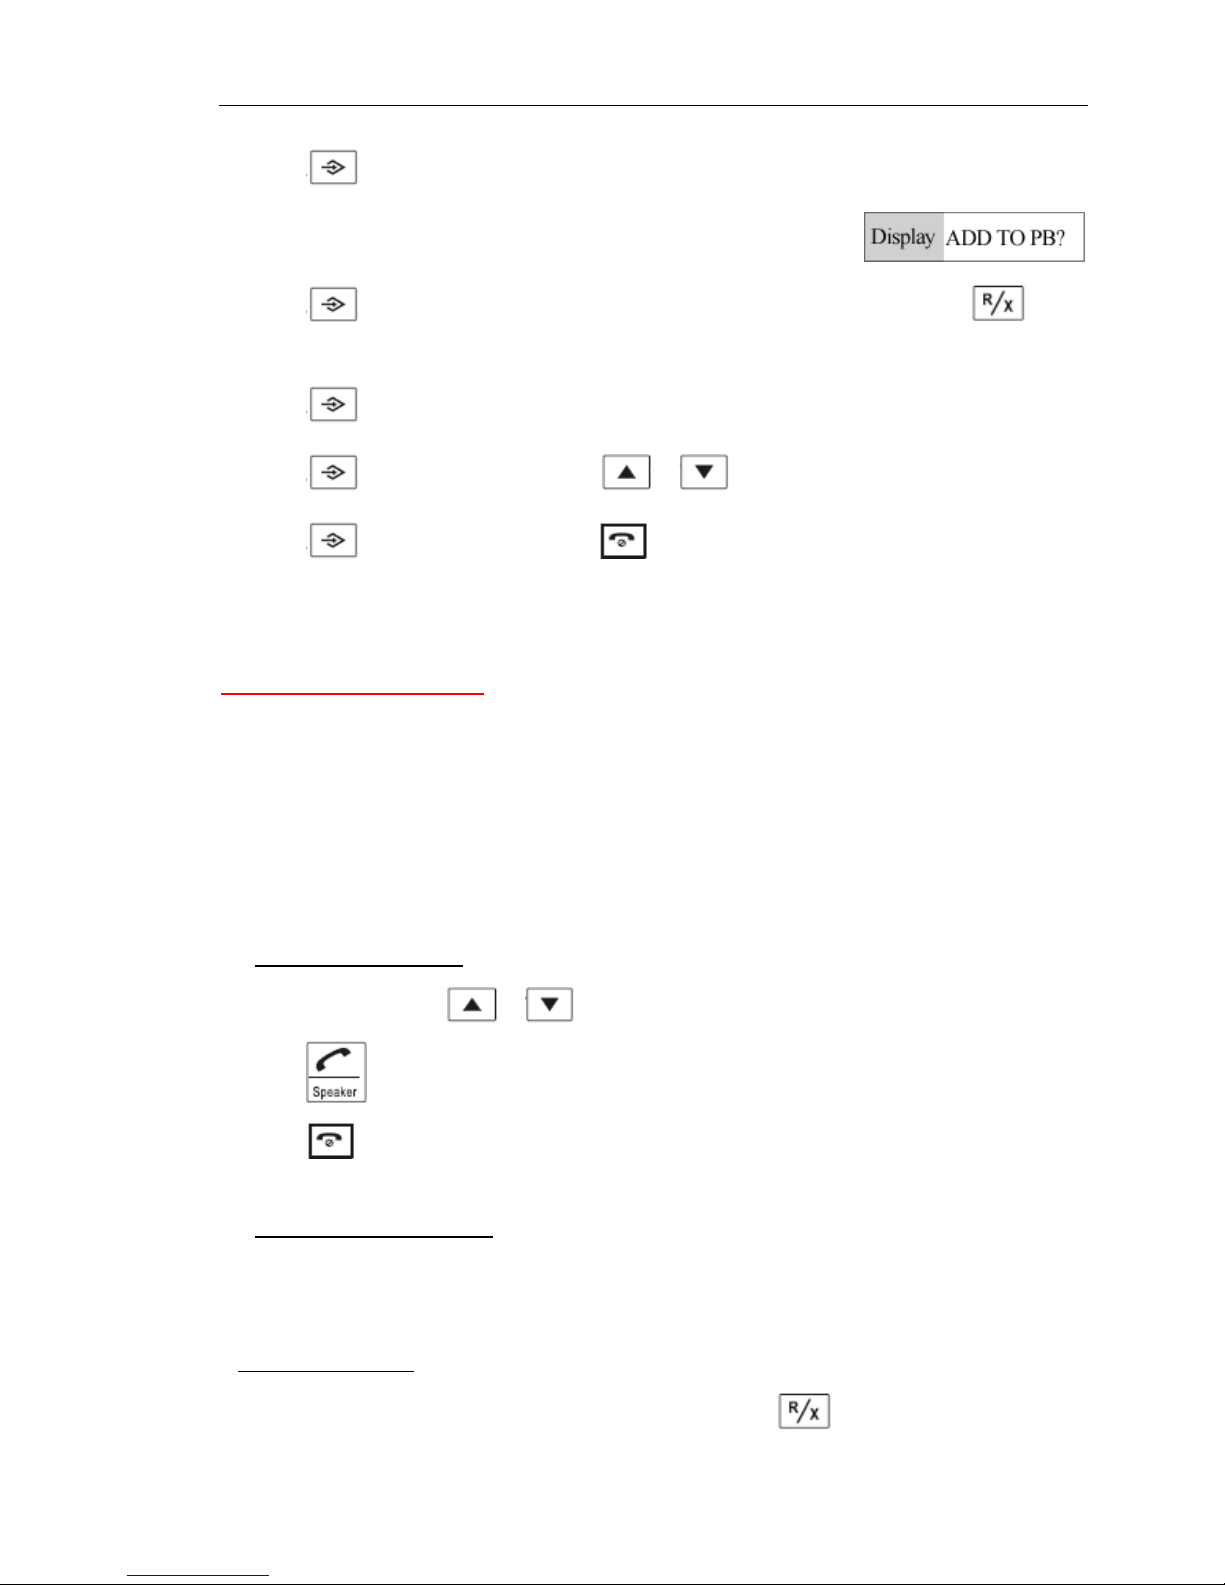
>> Press button to confirm and you will see “ADD TO PB?” in the LCD.
>> Press
button to confirm and edit the contact name if necessary. (You can press to
delete a character.)
>> Press
button to confirm and you will see a number assigned by the system.
>> Press
button to confirm and press or button to select melody for this contact.
>> Press
button to confirm and press to turn into standby mode.
The Skype Call Function
△ Dial a Skype Call
There are three methods to make a Skype call: A) from the dialed history B) tho ugh Speed-dial number c)
from handset’s phonebook.
A) From the dialed history
>> In standby mode, press
or button to find the wanted dialed Skype contacts
>> Press
button to make the call
>> Press
to end the call.
B) though Speed-dial number
Note: for how to assign speed dial number for Skype contacts please refer to the “Trouble shooting
Q10” .
The Pre-dial method:
>> In standby mode, press the speed dial number. (You can pre ss
to delete a digit if necessary.)
Page 17
User Manual for Wireless VoIP Phone
- 17 - Version1.0 2007-12-29
>> Press button to make the call
>> Press
to end the call.
The normal method:
>> In standby mode, press
button to activate the Skype.
>> Press the speed dial number. (You can press
to delete a digit if necessary.)
>> Press “
#” on your keypad to make the call
>> Press
to end the call.
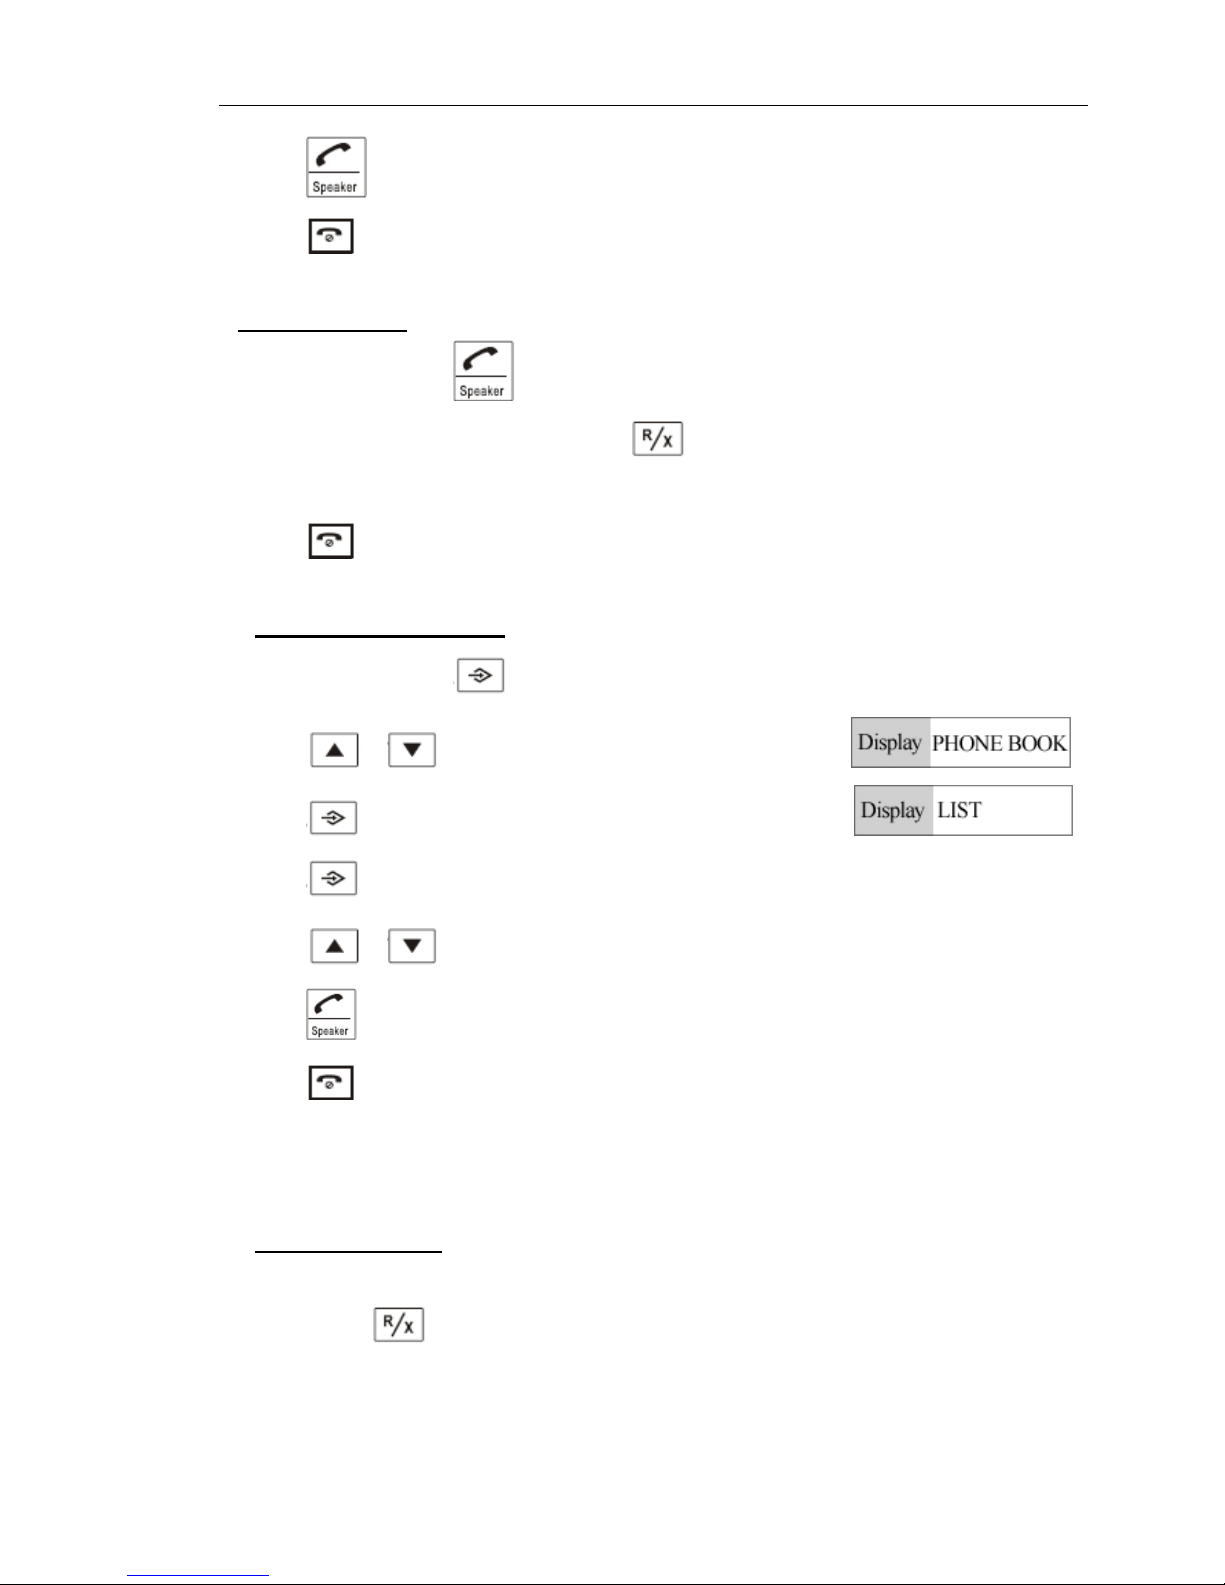
C) from handset’s phonebook
>> In standby mode, press
button to enter setting mode
>> Press
or button to find “PHONE BOOK”
>> Press
button to enter “PHONE BOOK” and you will see “LIST”
>> Press
button to confirm.
>> Press
or button to find the wanted contacts.
>> Press
button to make the call
>> Press
to end the call.
△ Dial a SkypeOut Call
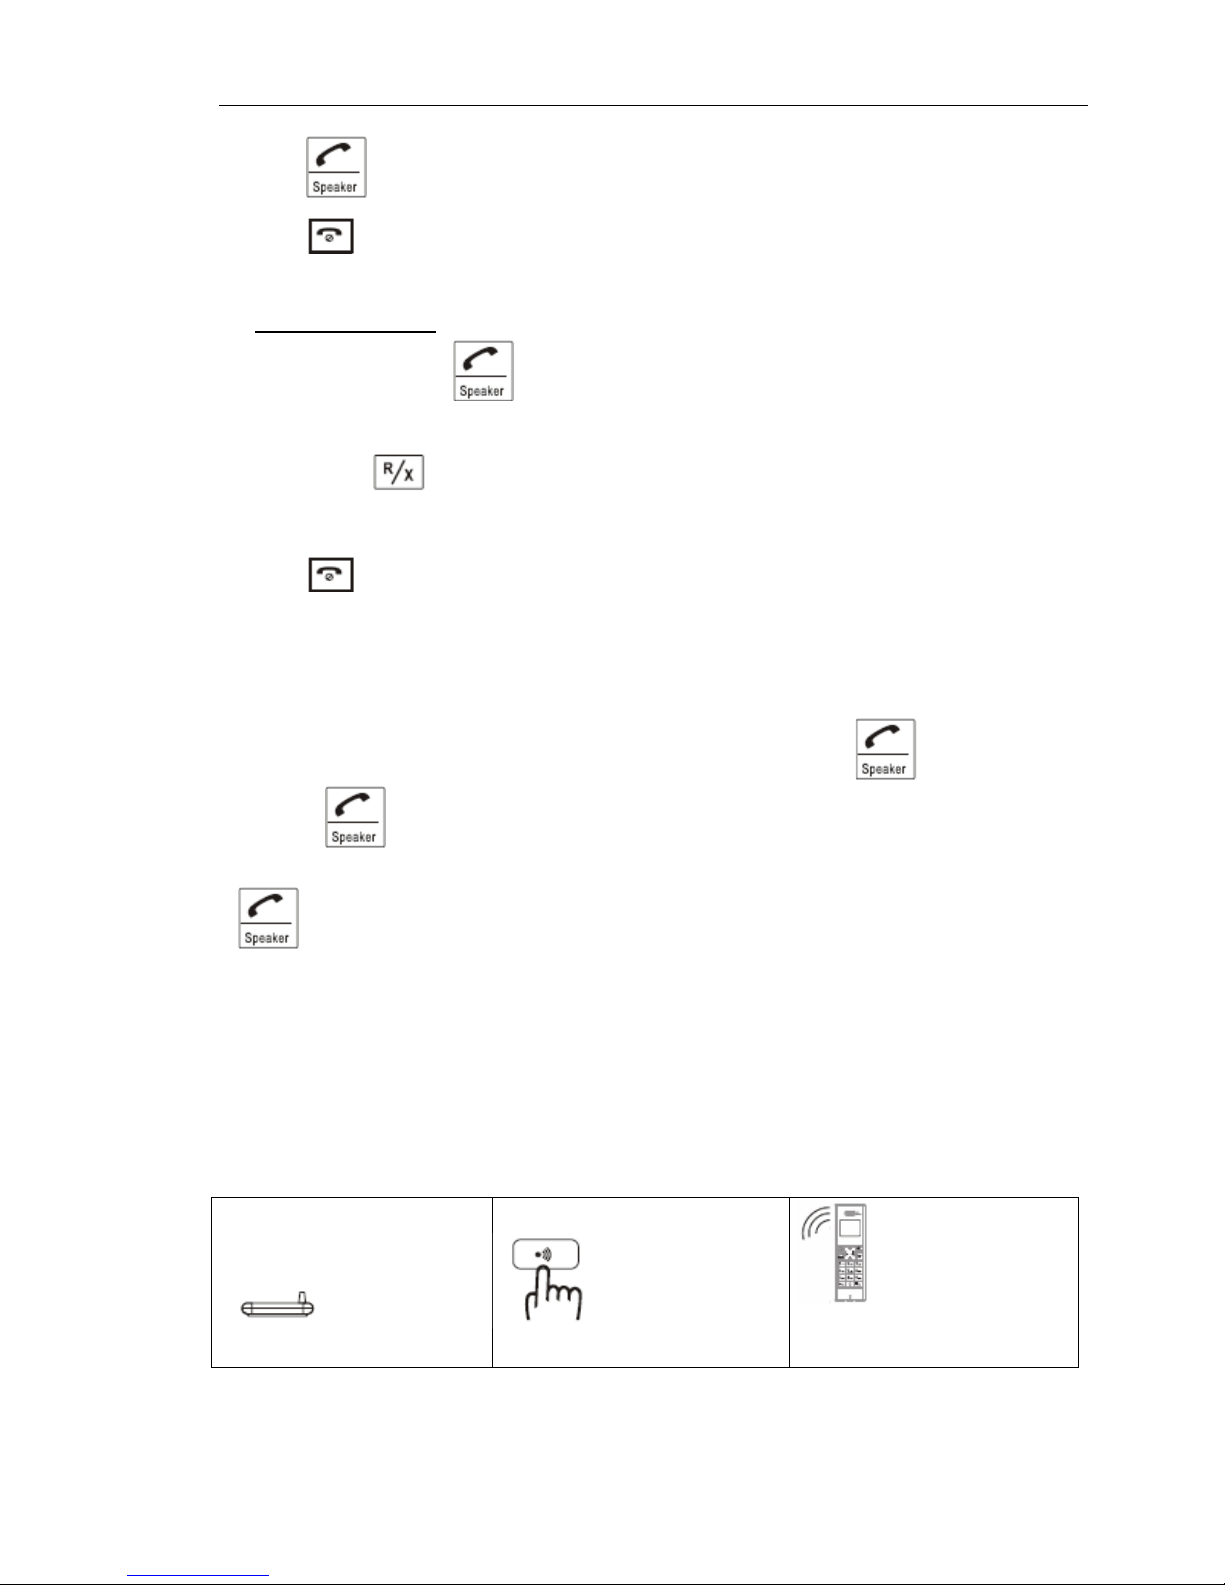
A) The Pre-dial method:
>> In standby mode, press “00” + ”Country Code” + “City Code” + “telephone number” on your keypad.
(You can press
to delete a digit if necessary.)
Eg. (Here we use the country code "1" for calling USA): 00 1 555 1234567
Page 18
User Manual for Wireless VoIP Phone
- 18 - Version1.0 2007-12-29
>> Press button to make the call
>> Press
to end the call.
B) The normal method:
>> In standby mode, press
button to activate the Skype.
>> Press “00” + ”Country Code” + “City Code” + “telephone number” on your keyp ad to make the call.
(You can press
to delete a digit if necessary.)
>> Press “#” button to make the call
>> Press
to end the call.
△ Receive a Skype Call
>> When the “AUTO ANSWER” mode is off, pick up the handset and press to answer it. If you
press the
again you will switch to Speakerphone mode.
>> When the “AUTO ANSWER” mode is on, pick up the handset to answer it directly. If you press the
and you will switch to Speakerphone mo de.
Note: for the “AUTO ANSWER” mode please refer to chapter of “Function Settings”
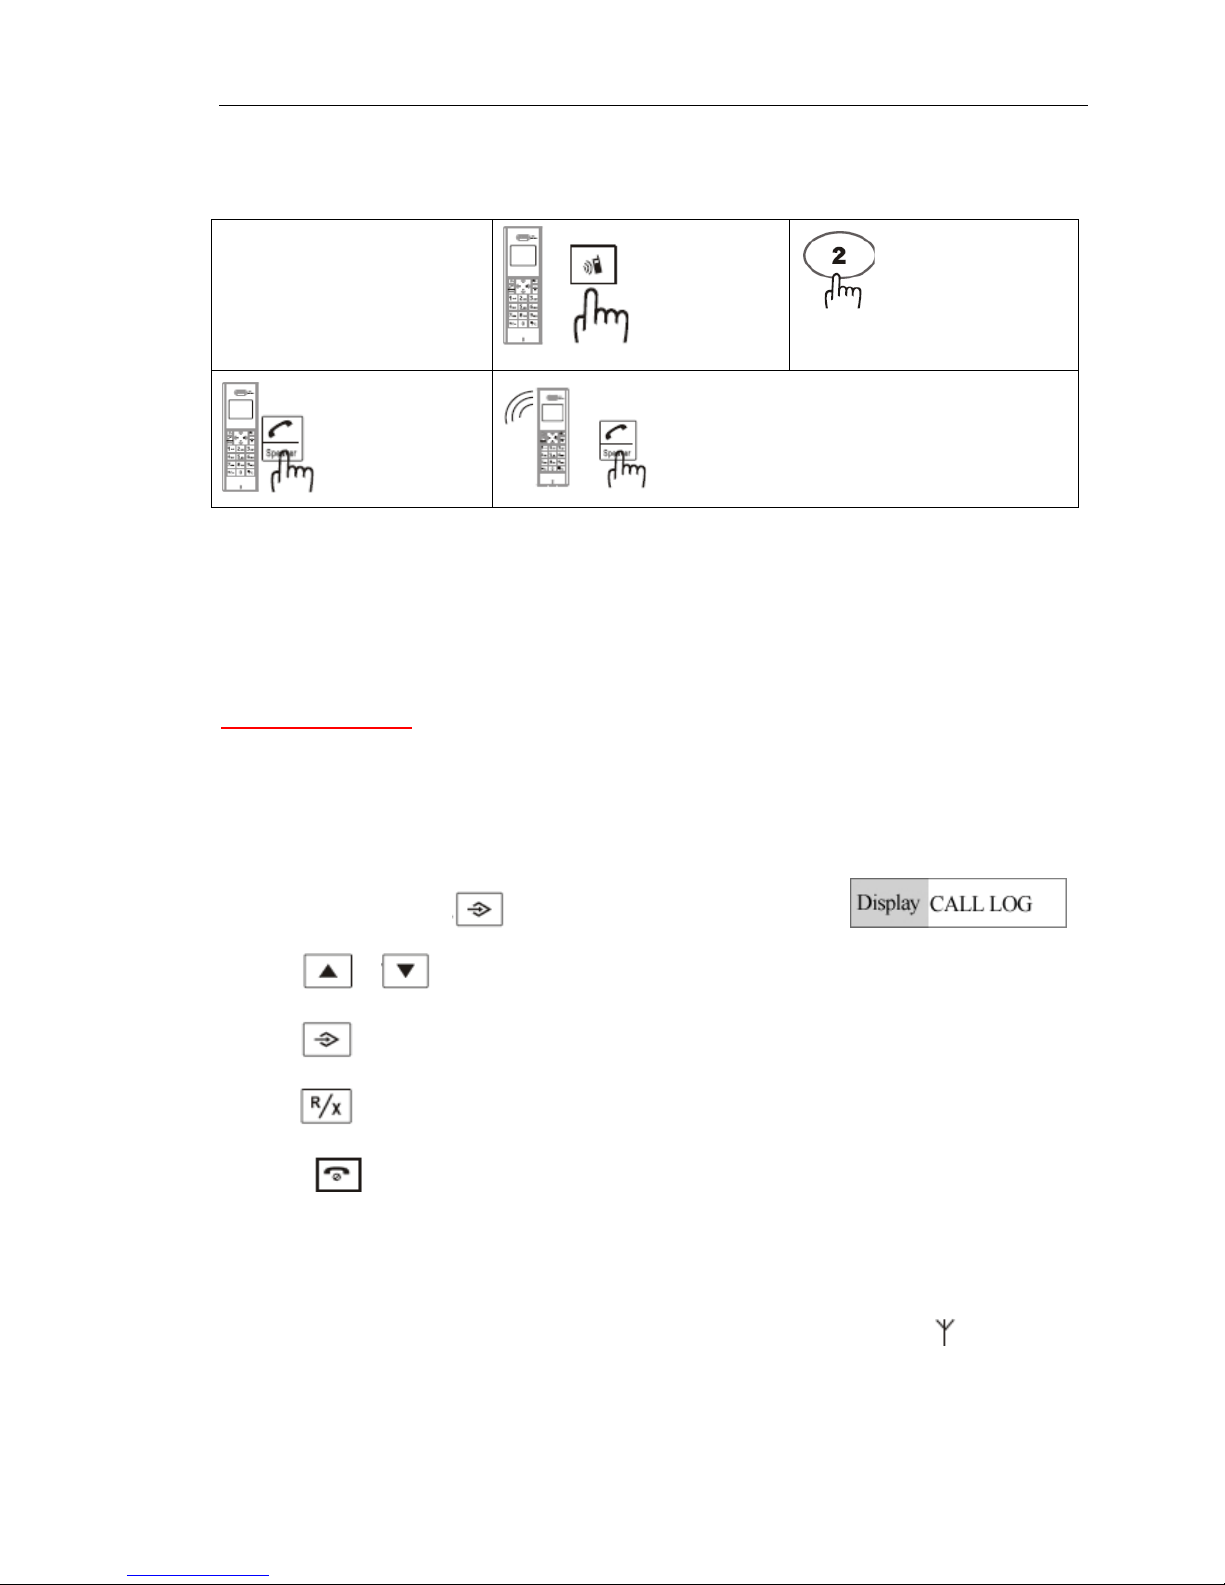
△ PAGE FROM BASE TO HANDSET
In standby mode
1
Press the PAGE
button on the base
2
3
The handset is
ringing
Page 19
User Manual for Wireless VoIP Phone
- 19 - Version1.0 2007-12-29
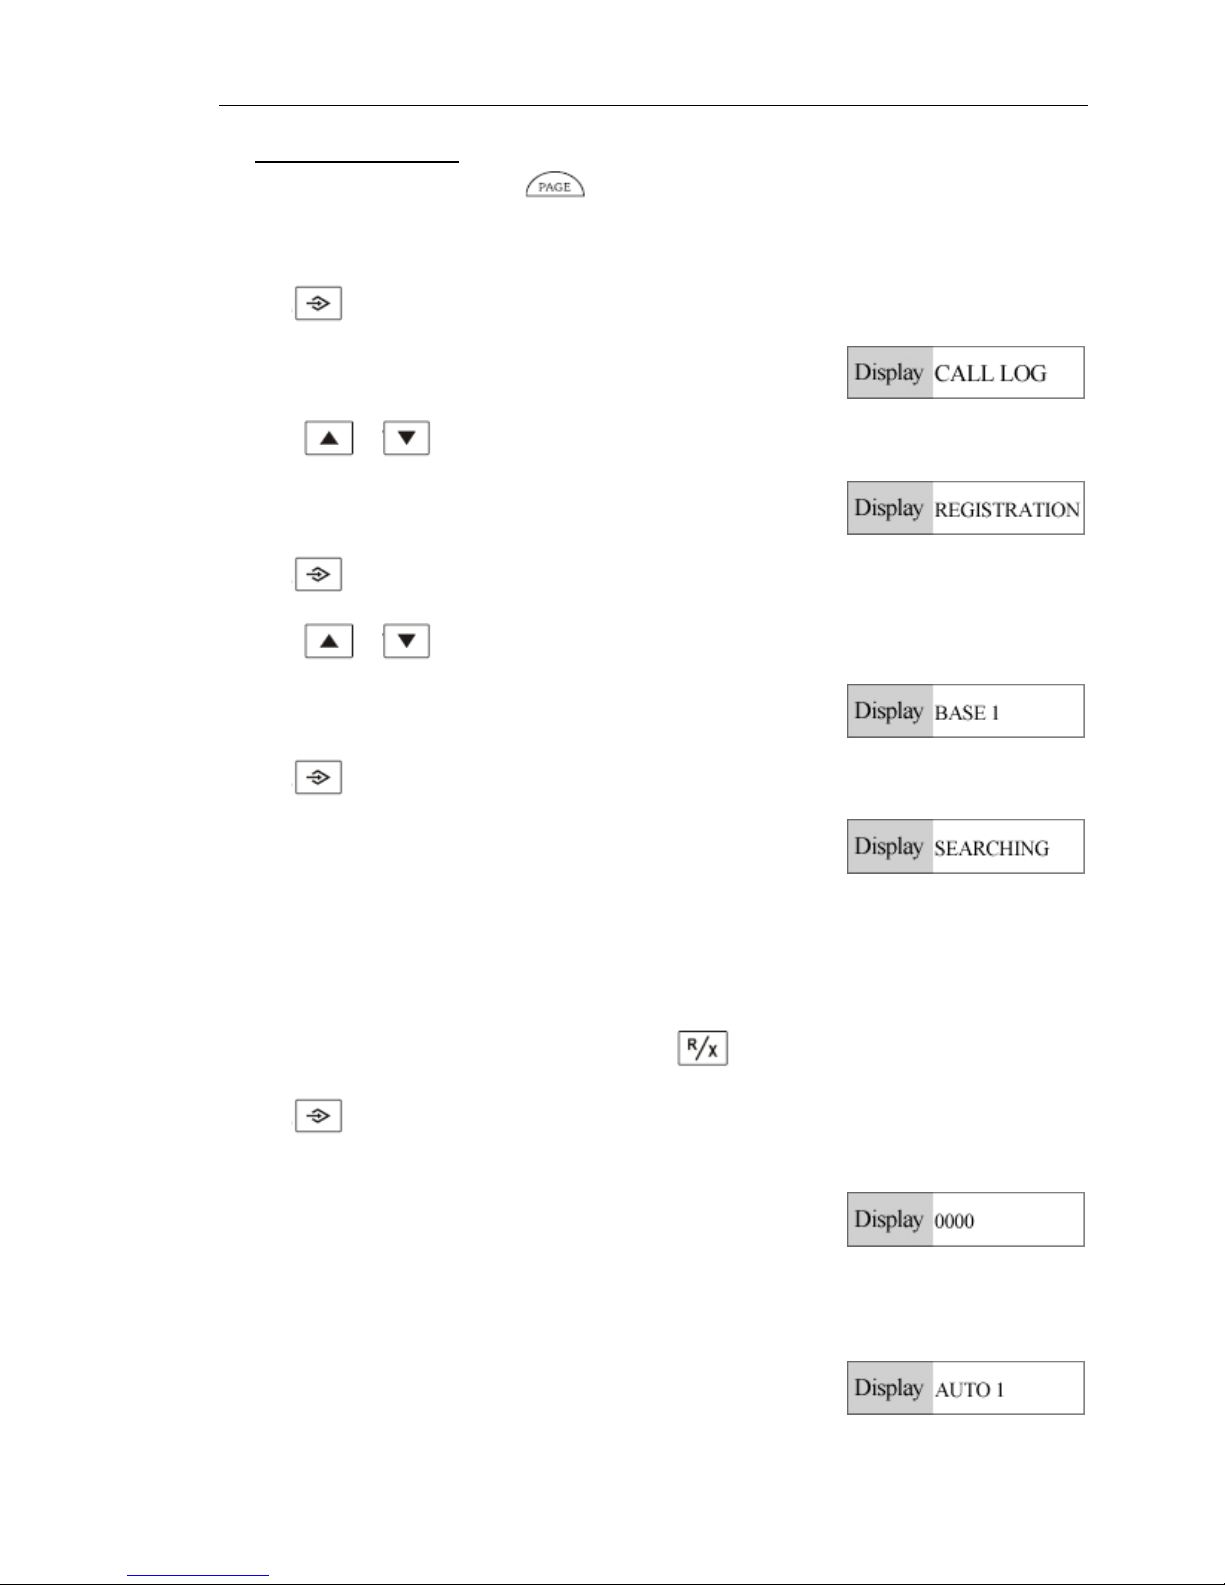
△ CALL TRANSFER
Handset 1 holder is on
T ALKING mode
1
2
3
4
Function Settings
△ Handset Setting Mode
1. In stand by mode, press button to enter setting mode:
2. Press
or button to scroll setting item.
3. Press
to enter the selected function setting.
4. Press
button to back last main menu setting.
5. Press
to exit.
△ Register and deregister
Note: the registration is already done on this device when ex-factory, antenna icon will appear in
top left corner when it connect with the telephone line. It indicate s the registration is lost and the repe at
registration is required if no antenna icon displays and the displaying is blinking.
Press PAGE
button on handset
which is talking
Input the wanted handset
to transfer the call like
input “2”
The call will transfer back to handset holder in
case no answer on the wanted handset. You can
press TALK button on handset holder 1 to
continue the conversation
The wanted
handset is ringing.
Press TALK
button on the
handset 2 to
answer it.
Page 20
User Manual for Wireless VoIP Phone
- 20 - Version1.0 2007-12-29
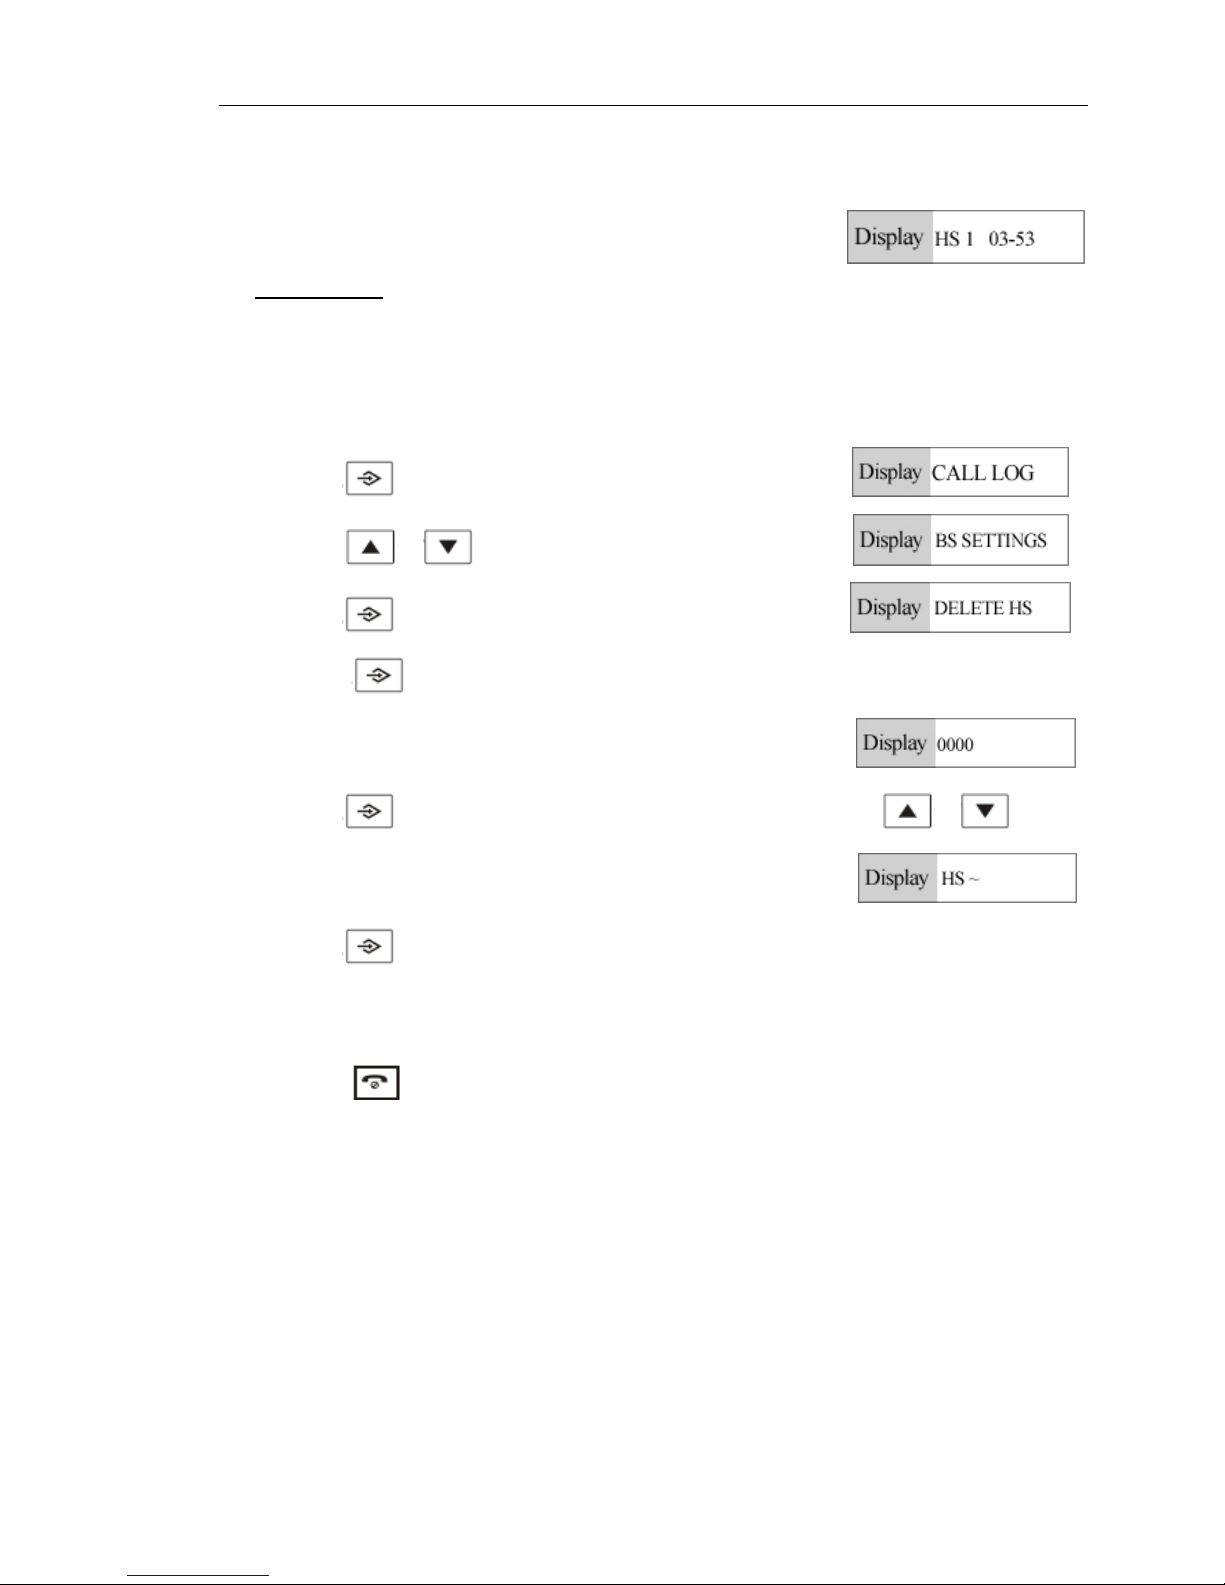
A) Registration Operation
>>at standby mode, press and hold
button on base unit continuously over 5 seconds in till
ON/CHARGING LED blink.
With presence of above state, do the operation on handset
>>Press
button of handset in standby mode, then the screen displays
>>Press
or button to select REGISTRATION
>>Press
button to confirm.
>>Press
or button to select the wanted registration base unit ranged BASE 1~4
>>Press
button to activate the SEARCHING on handset and then screen displays
Note: It will take few seconds to success the registration till LCD screen displays “PIN?“, otherwise, the
repeat operation above is required.
>>Then input register pin code like PIN 0000 (pressing
button to erase if any error)
>>Press
button to confirm, once registration succeed, a sound of “Di du du” can be heard and the
screen will display:
>>Long sound of “bi bi” will heard and screen displays “AUTO 1” and kee p blinking if fail in registration,
this device will return to standby mode automatically 2 seconds later and it is required the regi stration
again.
Page 21
User Manual for Wireless VoIP Phone
- 21 - Version1.0 2007-12-29
>>To activate the additional handset(s) (if available), the repeat operation is required as above (max link
up to 5 handsets); once the registration succeed, then the screen will display HS2 or HS3 ac cordingly.
B) Deregistration
Note: it is not recommend to do deregistration unless the link-up between handset and base is lost
permanently.
Handset Deregister
>>Press
button in standby mode, then the screen displays
>>Press
or button to select BS SETTINGS
>>Press
button and the screen displays
>>Press
button and it displays “PIN?”. Input registration pin code like PIN 0000 (Note:
0000 is the defaulted pin code on this device)
>>Press
button to enter handset deregistration setting mode, press or button
to select handset to be deregistered.
>>Press
button to confirm, a sound of “DiDu” will guide you the successful deregistration is
done, or else a sound of ‘bibi” heard to indicate deregistration is failed (Note: the original No.1
handset are restricted to do deregistration)
>>Press
button to turn into standby mode
Base Deregister
>>at standby mode, press and hold PAGE button continuously up to 5S’till OFF/CHARGE LED
blinking, fast press PAGE button intermittently for 7 times and then the OFF/CHARGE LED will
get blinking fast, until OFF/CHARGE LED turn off. It indicates that deregistration succeeds.
(Note: the operation is effective only under fast operation of the pressing)
Page 22
User Manual for Wireless VoIP Phone
- 22 - Version1.0 2007-12-29
△ Incoming call reviewing/call-back/store/Delete
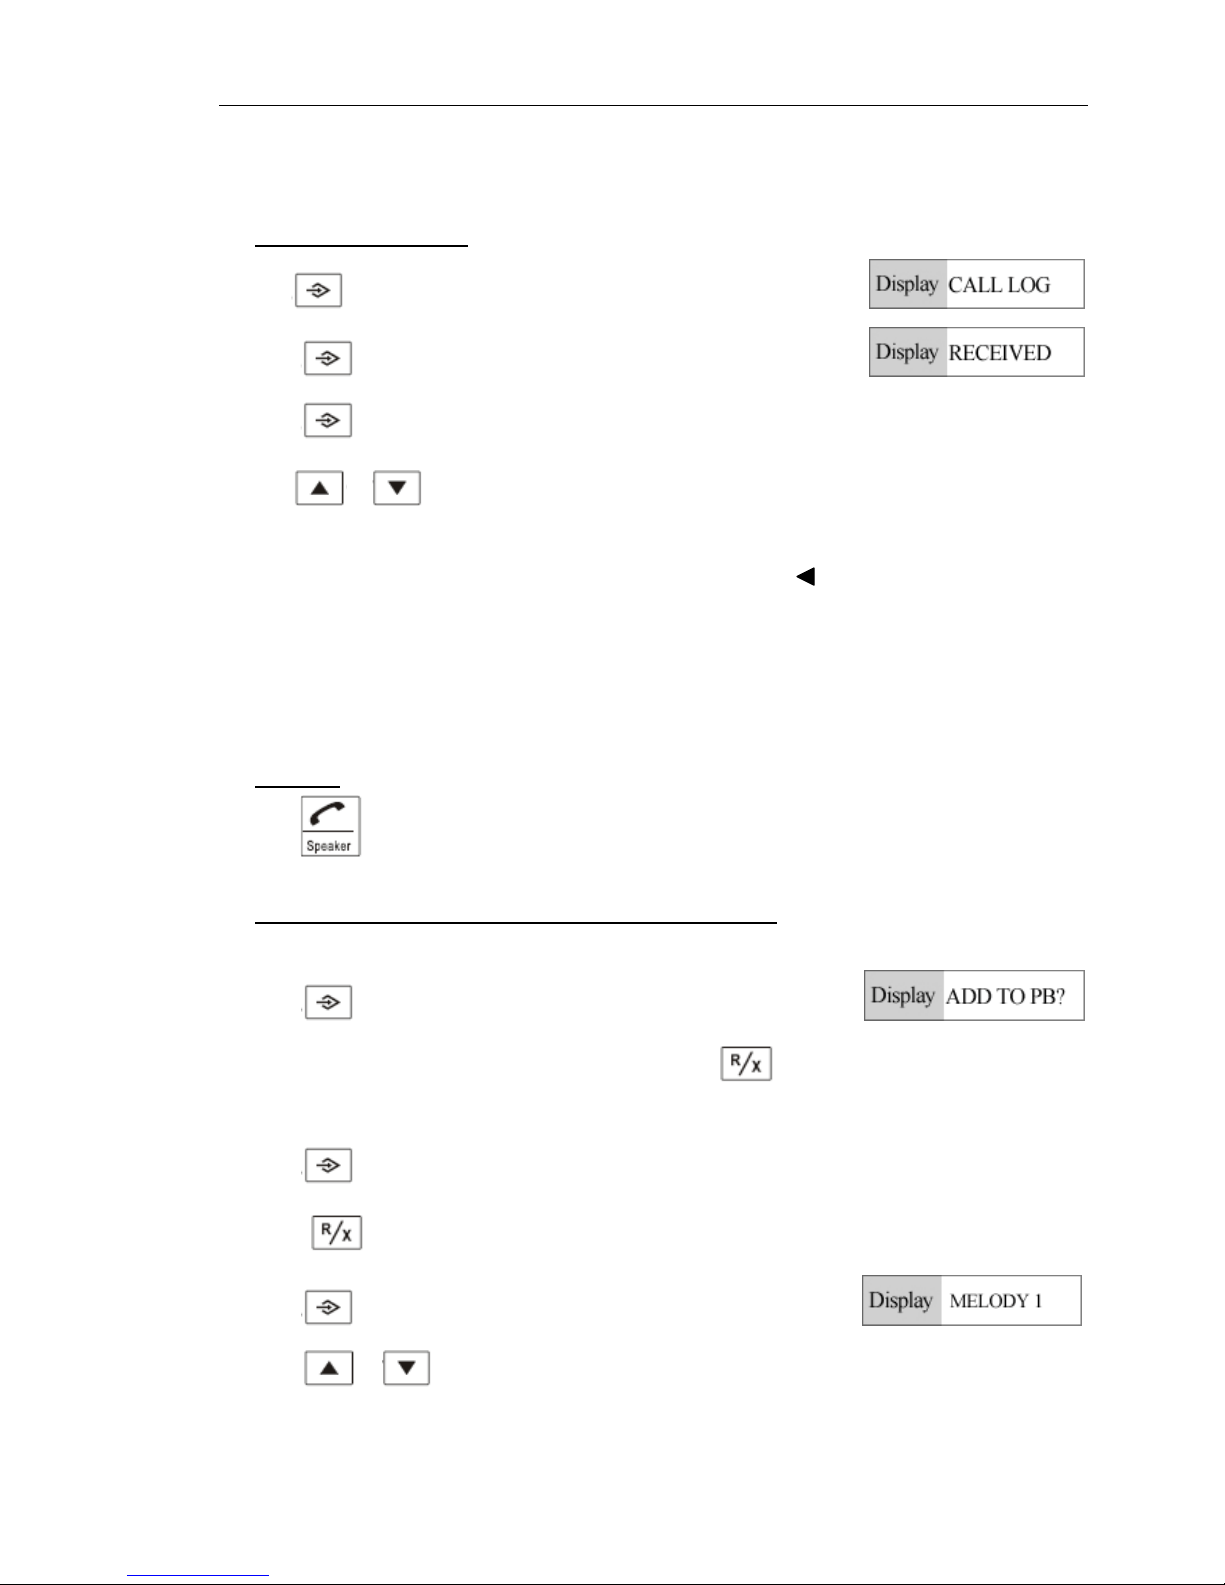
A) Incoming call reviewing
>>Press
button in standby mode and it displays CALL LOG
>>Press
button and it displays RECEIVED
>>Press
button and it displays the latest incoming call number
>>Press
or button to review the latest 40 groups’ incoming calls memory
Note:
It indicate the calls number length exceed 12 digits if the symbol display on top right corner
>> press “0” to display the other digits
>>Press “0” again and it displays the call’s date and time, displaying format like 20/03 12:30
Note: only the name will display on LCD screen when the reviewed number is prior stored in the memory,
the number could be displayed only press “0”
B) Call Back
>>Press
button to dial out the number directly when the reviewed number/name is displayed on
LCD screen
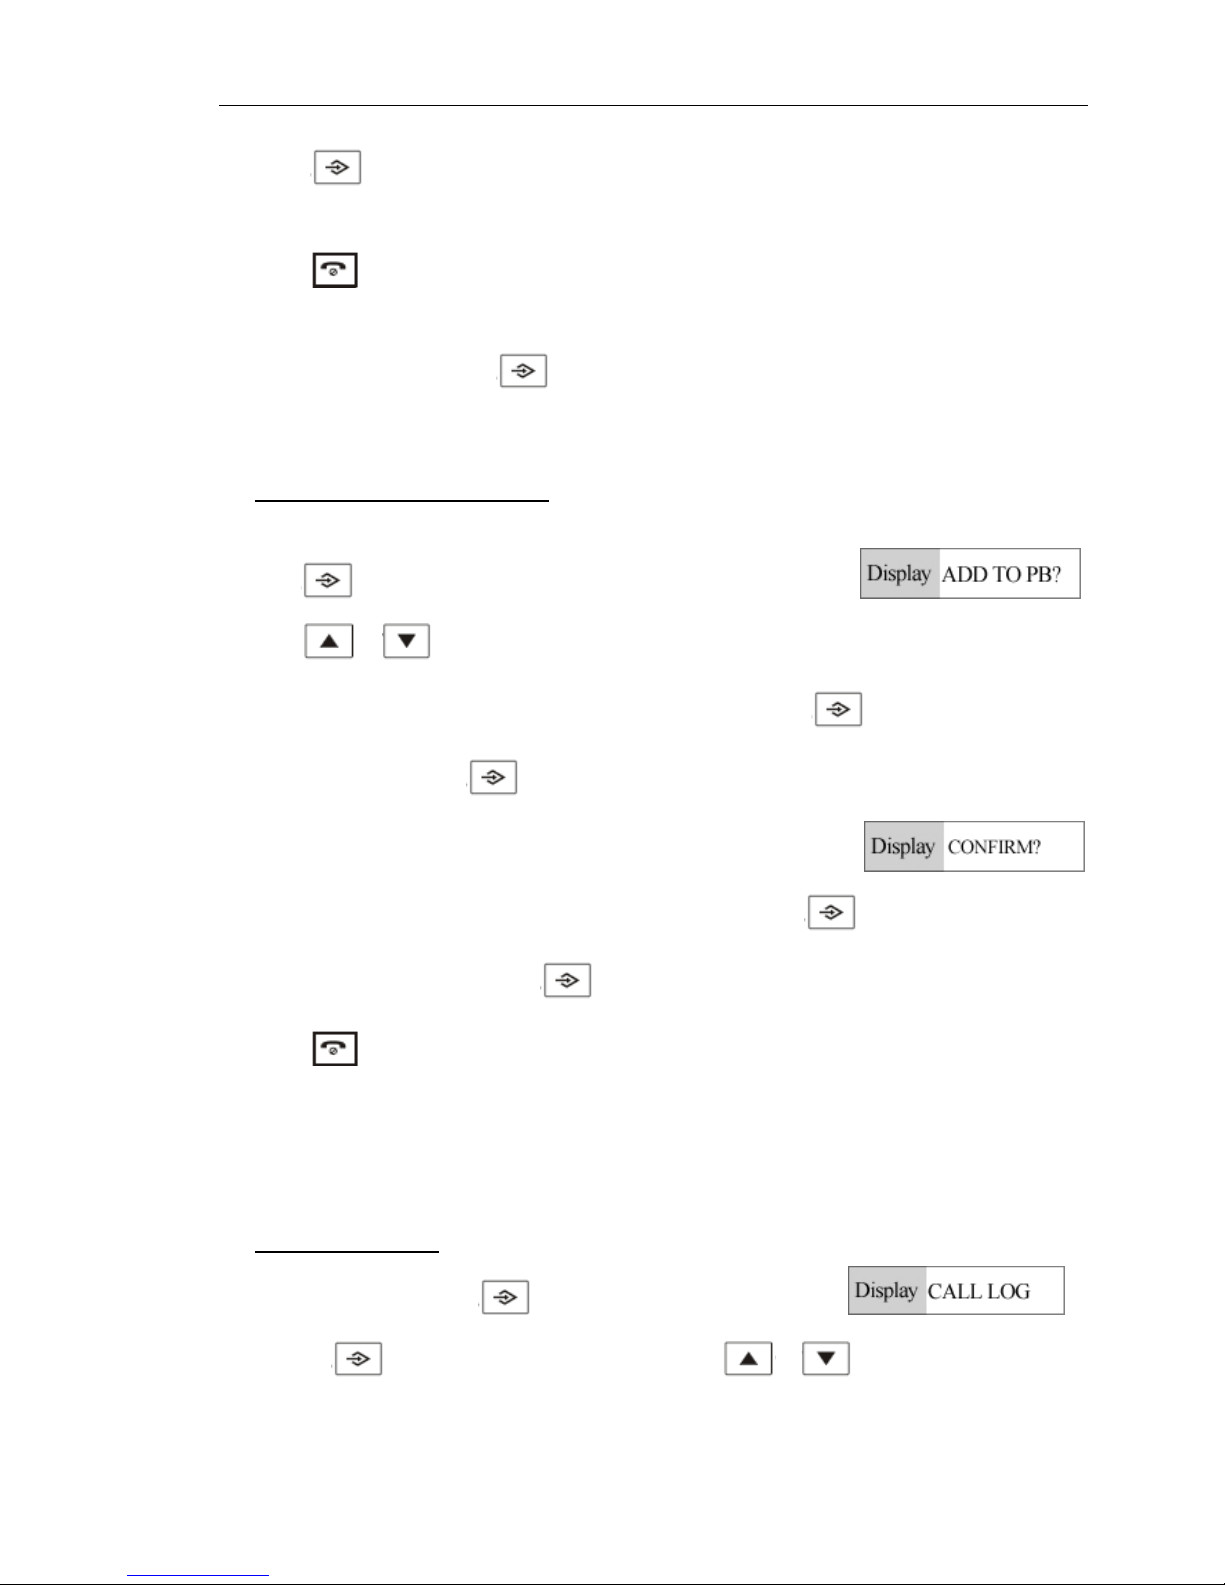
C) Incoming call store and ring tone setting of incoming calls
When reviewing the desired memory number,
>>Press
to confirm, LCD screen display
>>Edit the name by pressing numerical keypad and press
button to delete a character if
necessary.
>>Press
button to confirm, it will display the reviewed number
>>Press
button to edit the number if necessary.
>>Press
button to confirm and the LCD will display “MELODY 1”
>>Press or button to select the desired melody as its ring tone.
Page 23
User Manual for Wireless VoIP Phone
- 23 - Version1.0 2007-12-29
>>Press button to confirm and go back to Call Review mode, so that to store other incoming call
number.
>>Press
button to directly go back to standby mode directly.
Note: The ring tone is not available if different number stored in the same name memory. After editing
number, press the confirm button
, it will go back to incoming call review mode.
D) Delete the incoming call memory
After reviewed the desired memory number
>>Press
button to confirm, LCD screen display ADD TO PB?
>>Press
or button to select among 1. ADD TO PB? 2. DELETE, 3. DELETE ALL.
>>To delete the single memory number, select the DELETE and press
button to confirm, LCD will
display CONFIRM? Press
button to confirm the delete to the single number
>>To delete all memory numbers, select the DELETE ALL and press
button to confirm,
LCD will display CONFIRM? Press
button to confirm the delete to all numbers
>>Press
button to go back standby mode
△ Outgoing call reviewing / redial / store / delete
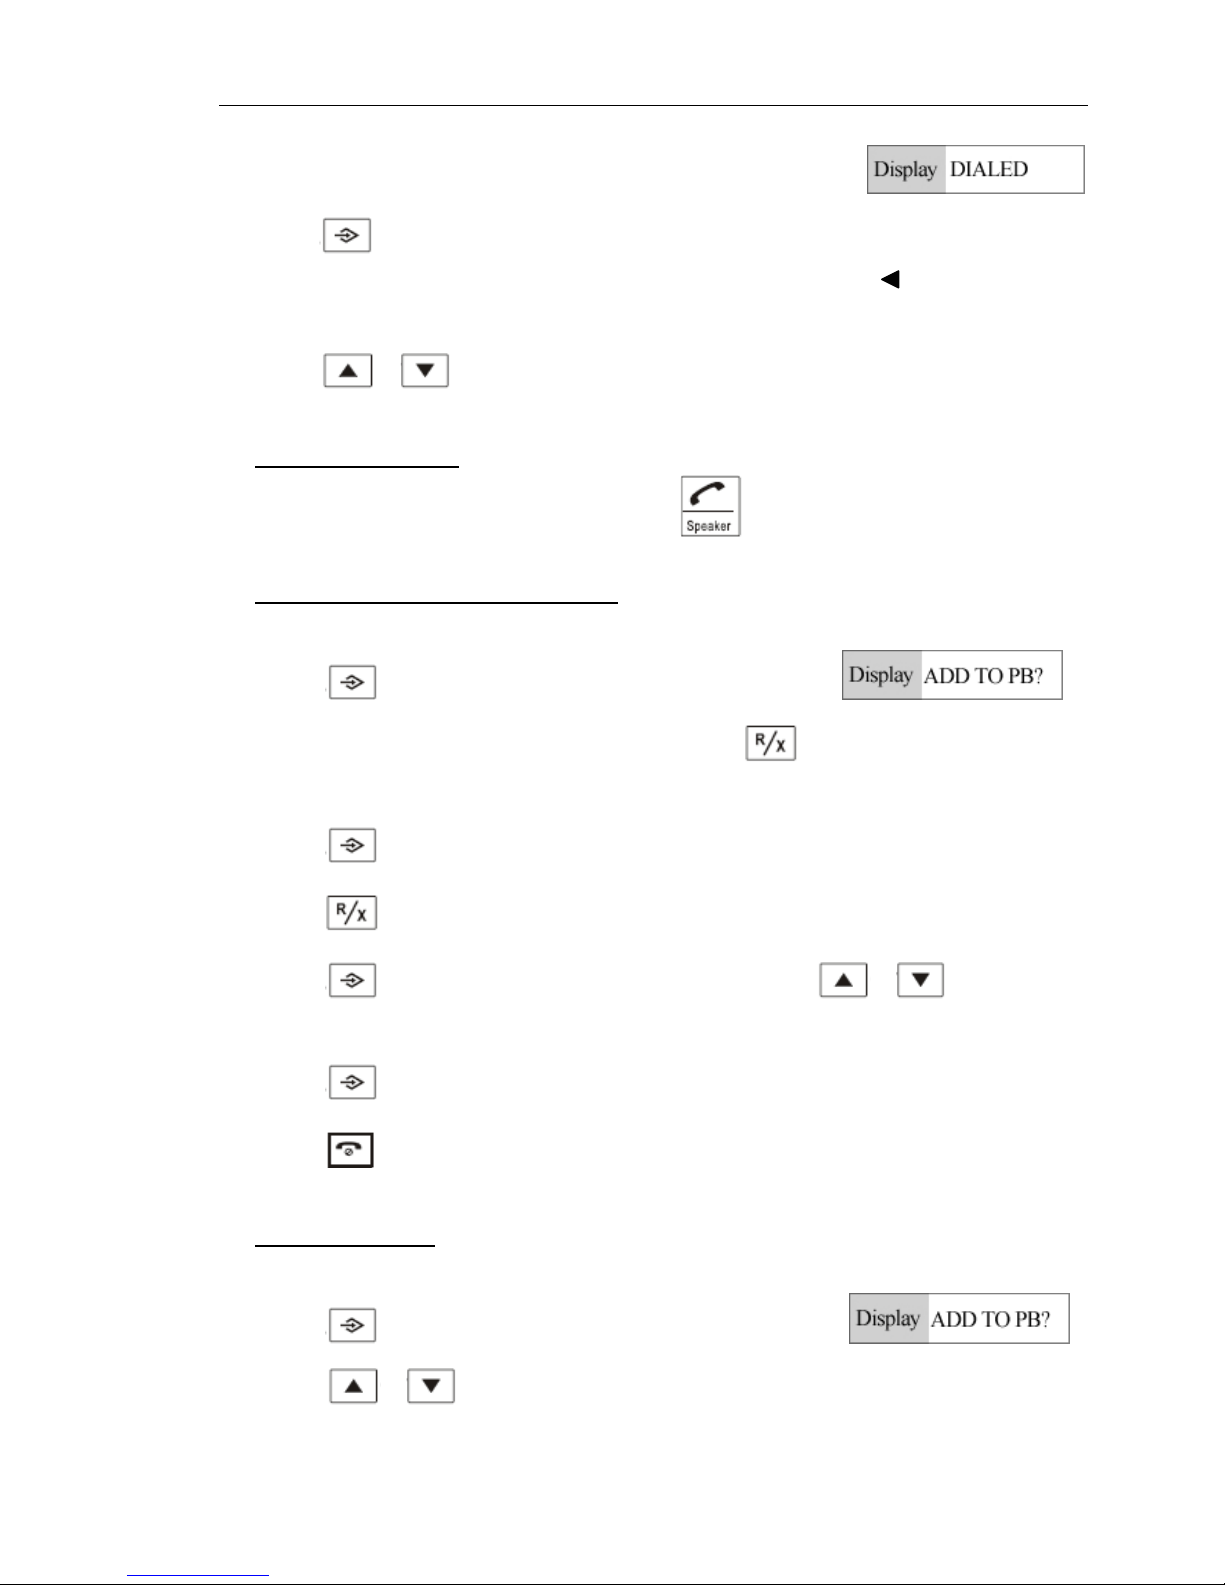
A) Outgoing call review
>>In standby mode, press
button and it displays CALL LOG
>>Press
button and it displays RECEIVED, press or button to select “DIALED”.
Page 24
User Manual for Wireless VoIP Phone
- 24 - Version1.0 2007-12-29
>>Press
button and it displays the latest outgoing calls number (press “0” button to check t he
remaining digits if the number length is over 12 digits which will with icon display on top left
corner on LCD screen)
>>Press
or button to check the latest 10 groups outgoing calls memory
B) Outgoing call redialing
After reviewing the desired memory number, press
button to dial it out directly
C) Outgoing call store and ring tone setting
After reviewing the desired memory number
>>Press
button and the screen display “ADD TO PB”?
>>Edit the name by pressing numerical keypad and press
button to delete a character if
necessary.
>>Press
button to confirm the name and LCD screen will display the reviewed number,
>>Press
button to delete a digit if required to edit the number.
>>Press
button and the screen displays “MELODY 1”, press or button to select
the favorite melody as ring tone
>>Press
button to confirm and go back outgoing call memory reviewing mode
>>Press
button to turn into standby mode
D) Outgoing call delete
After reviewing the desired redialed memory number
>>Press
button and the screen display “ADD TO PB”?
>>Press
or button, the screen displays 1. ADD TO PB? 2. DELETE 3. DELETE ALL
Page 25
User Manual for Wireless VoIP Phone
- 25 - Version1.0 2007-12-29
>>To delete the single memory number, select the “DELETE” and press button to confirm.
LCD will display CONFIRM? Press
button to confirm the delete to the single number
>>To delete all memory numbers, select the “DELETE ALL” and press
button to confirm. LCD
will display CONFIRM? Press
button to confirm the delete to all outgoing number
Note: the sound of “Di” will be heard if the operation is succeeds
>>Press
button to go back to standby mode
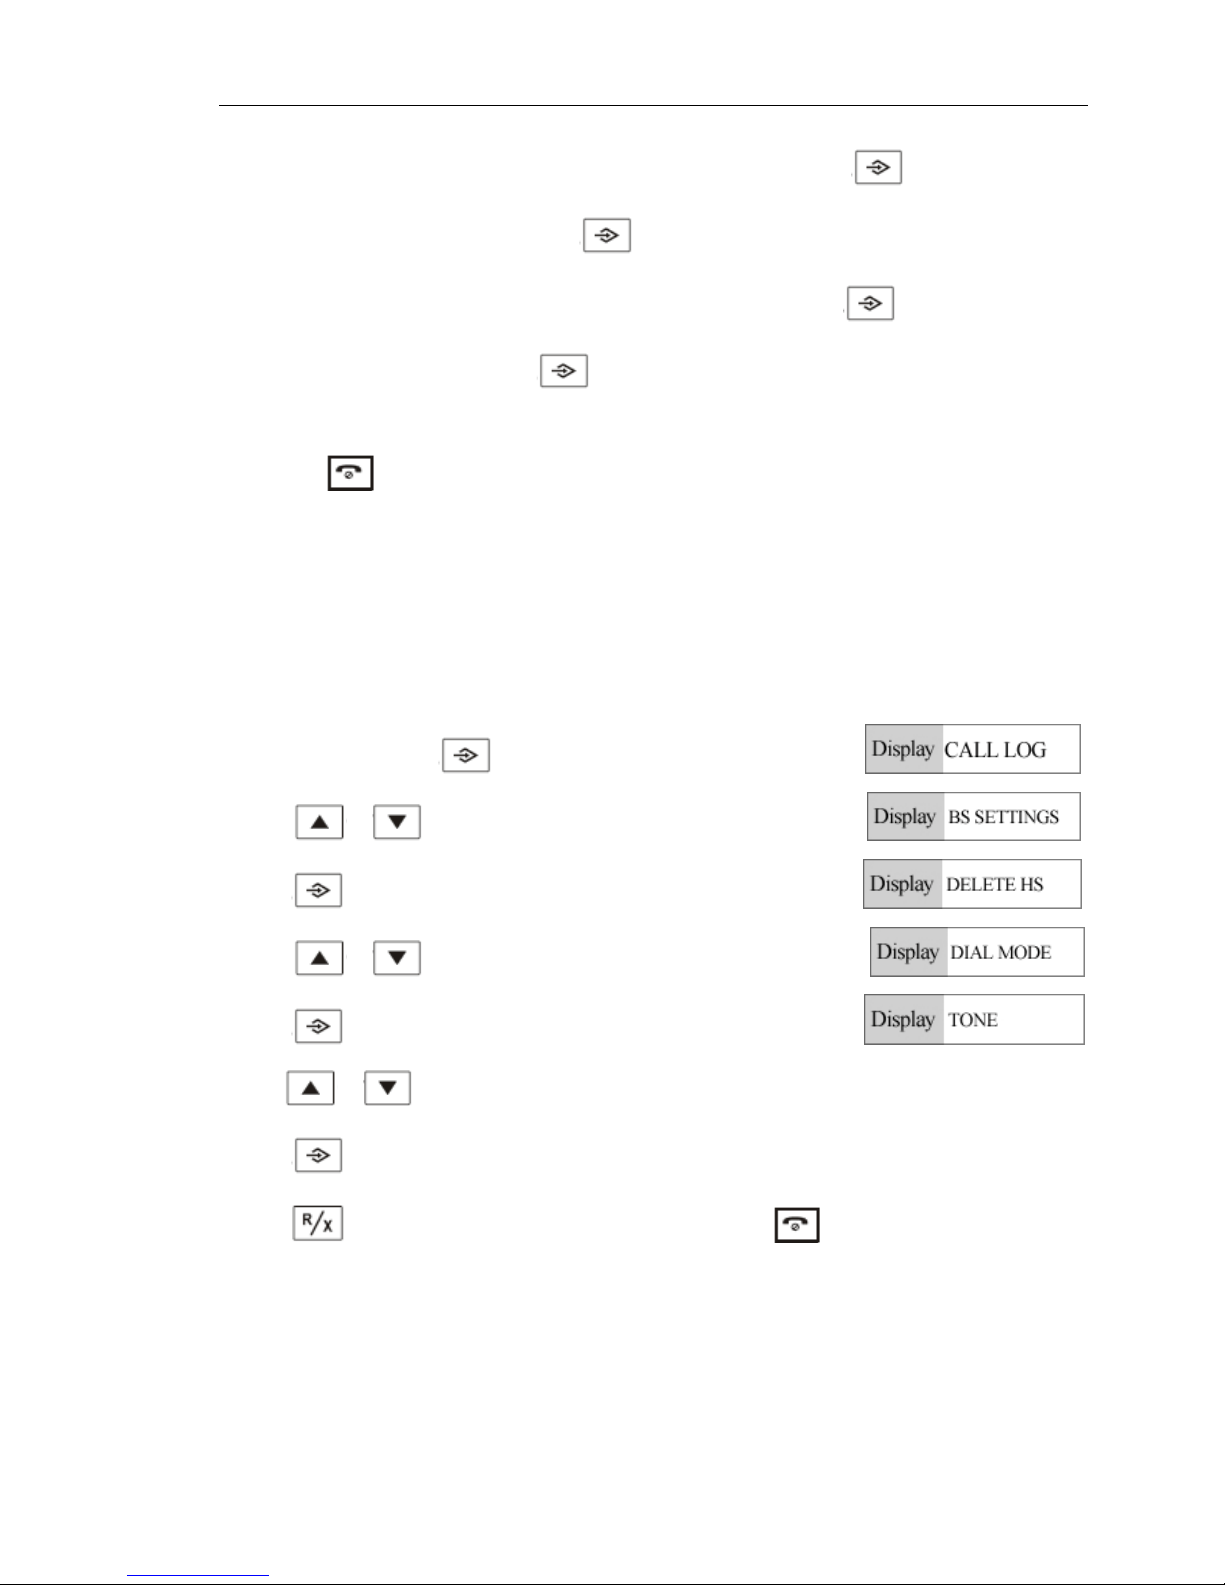
△ Dialing Mode Setting
(It is not recommend to change the defaulted PULSE dialing mode)
>>In standby mode, press button to enter setting mode.
>>Press
or button to select “BS SETTINGS” function
>>Press
button, then it displays “DELETE HS”
>>Press
or button to select “DIAL MODE”
>>Press
button and it displays “TONE”
>>Pres
or button to select “TONE/PULSE” dialing mode
>>Press
button to confirm, it indicate the operation succeeds after a “DiDu” sound heard
>>Press
button to go back to prior main menu setting. Press button to exit and turn into
standby mode
Page 26
User Manual for Wireless VoIP Phone
- 26 - Version1.0 2007-12-29
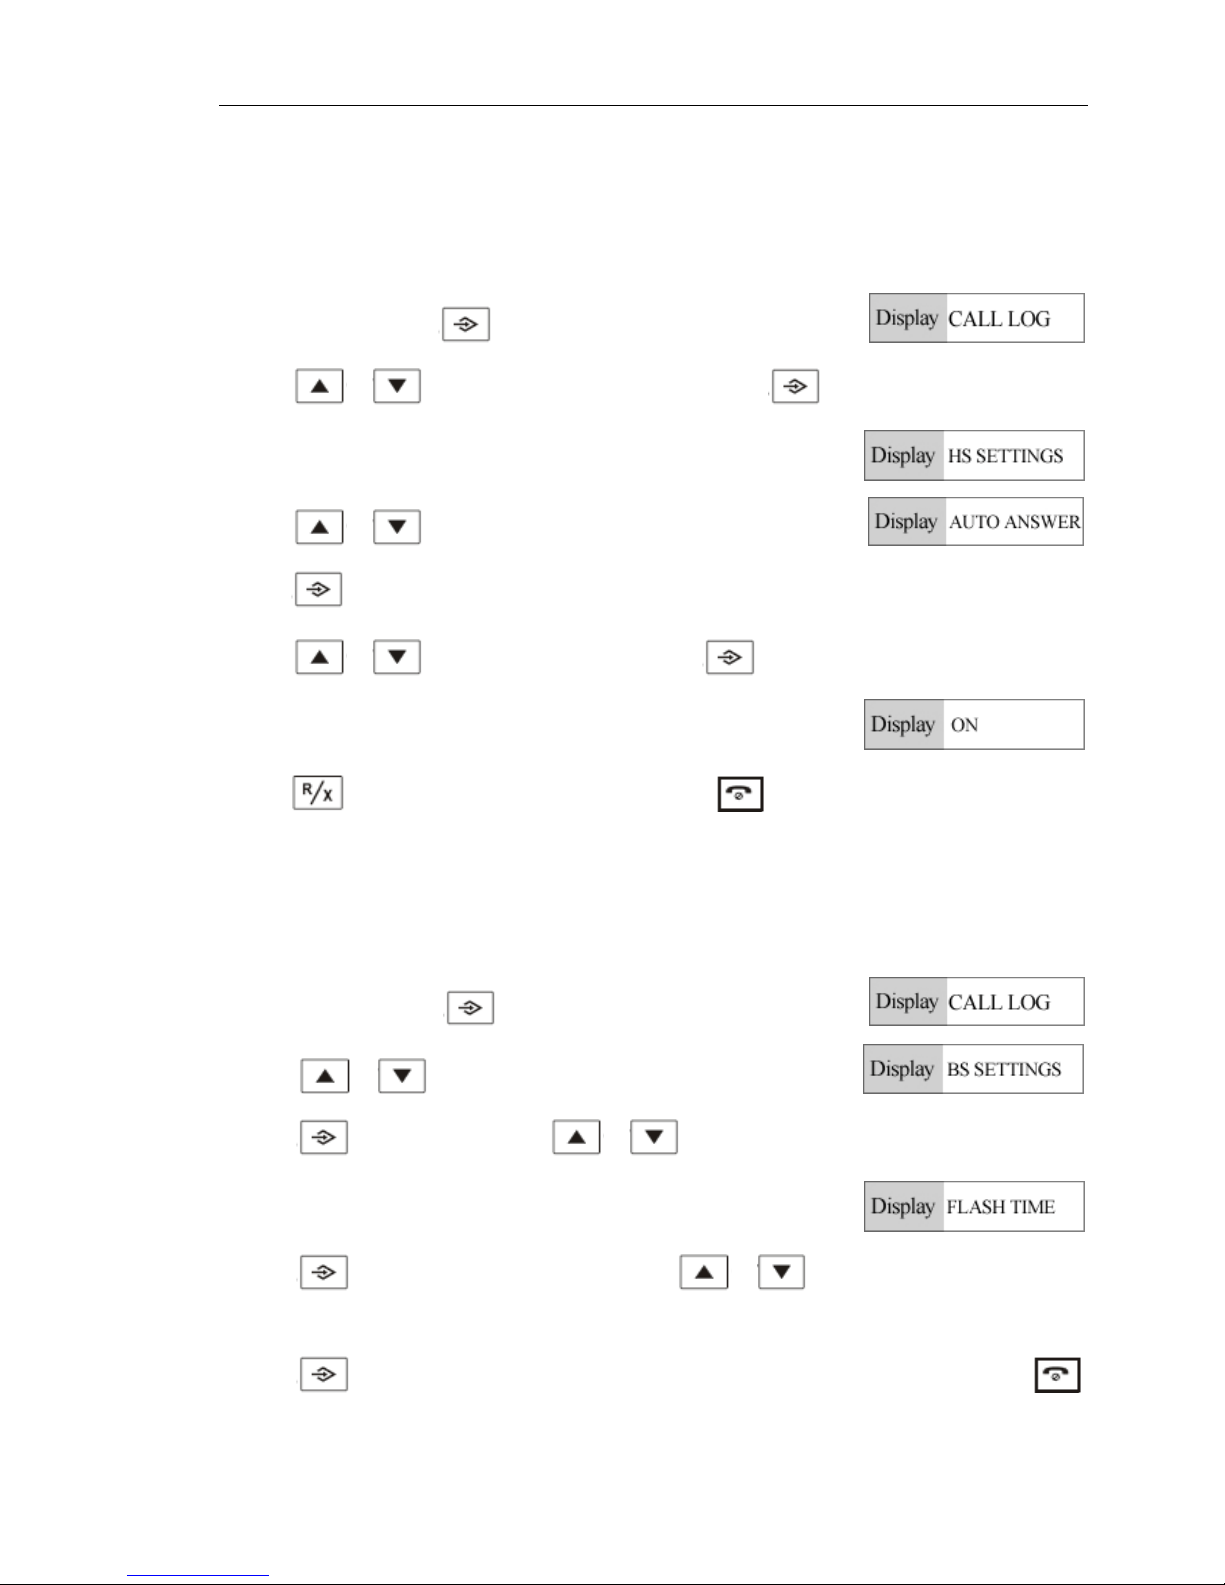
△ Auto answer setting
Note: when this function is activated, if the handset is in charging status, pick up the handset when there
is an incoming call, it will turn into talking status immediately.
>>In standby mode, press
button to enter setting mode
>>Press
or button to select HS SETTINGS and press button.
>>Press
or button to select “AUTO ANSWER”
>>Press
button to confirm
>>Press
or button to select OFF or ON, press button to confirm, a sound of “DiDu” will
heard once the setting succeeds.
>>Press
to turn into prior main menu setting, or press to exit
△ FLASH TIME SETTING (100ms/300ms/600ms)
>> In standby mode, press button to enter setting mode.
>> Press or button to select “BS SETTINGS” function
>> Press
button to confirm, press or button to select “FLASH TIME” function
>> Press
button to enter flash time setting, press or button to select flash time among
100ms, 300ms and 600ms.
>> Press
button to confirm, a sound of “DiDu” will heard once the setting is succeed, press
to exit
Page 27
User Manual for Wireless VoIP Phone
- 27 - Version1.0 2007-12-29
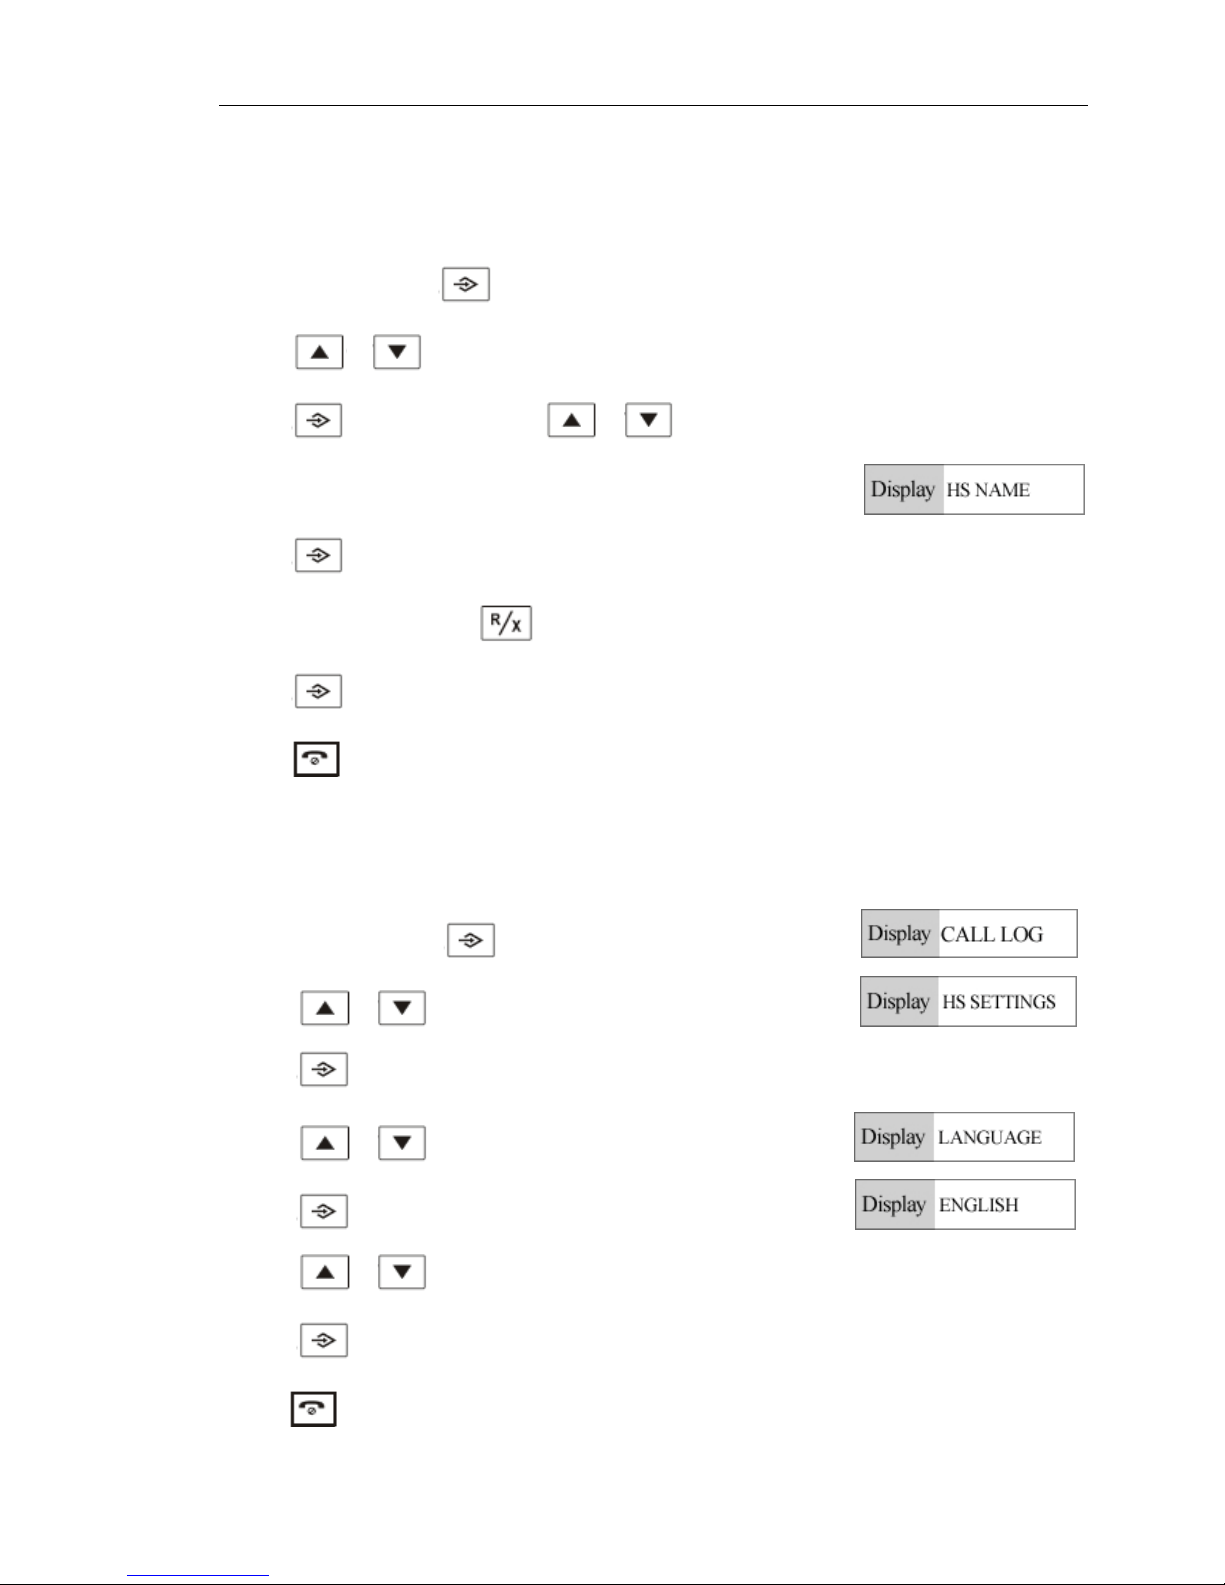
△ HANDSET NAME SETTING
This function is to edit the handset name to display your favorite name on LCD screen
>>In standby mode, press button to enter setting mode.
>>Press
or button to select “HS SETTINGS” function
>>Press
button to confirm, press or button to select HS NAME
>>Press
.button to enter “Handset Name” setting mode, the blinking cursor will guide you to input
the name like JACK. (Press
button to delete a character if necessary.)
>>Press
button to confirm, a sound of “DiDu” will be heard once the setting succeeds.
>>Press
to exit.
△ LANGUAGE SETTING
>> In standby mode, press button and it displays CALL LOG
>> Press
or button to select “HS SETTING” function
>> Press
button to confirm
>> Press
or button to select “LANGUAGE” function
>> Press
button and it displays “ENGLISH”
>> Press
or button to select your desired language (16 languages for option)
>> Press
button to confirm, a sound of “DiDu” will be heard once the setting succeeds.
Press
to exit.
Page 28
User Manual for Wireless VoIP Phone
- 28 - Version1.0 2007-12-29
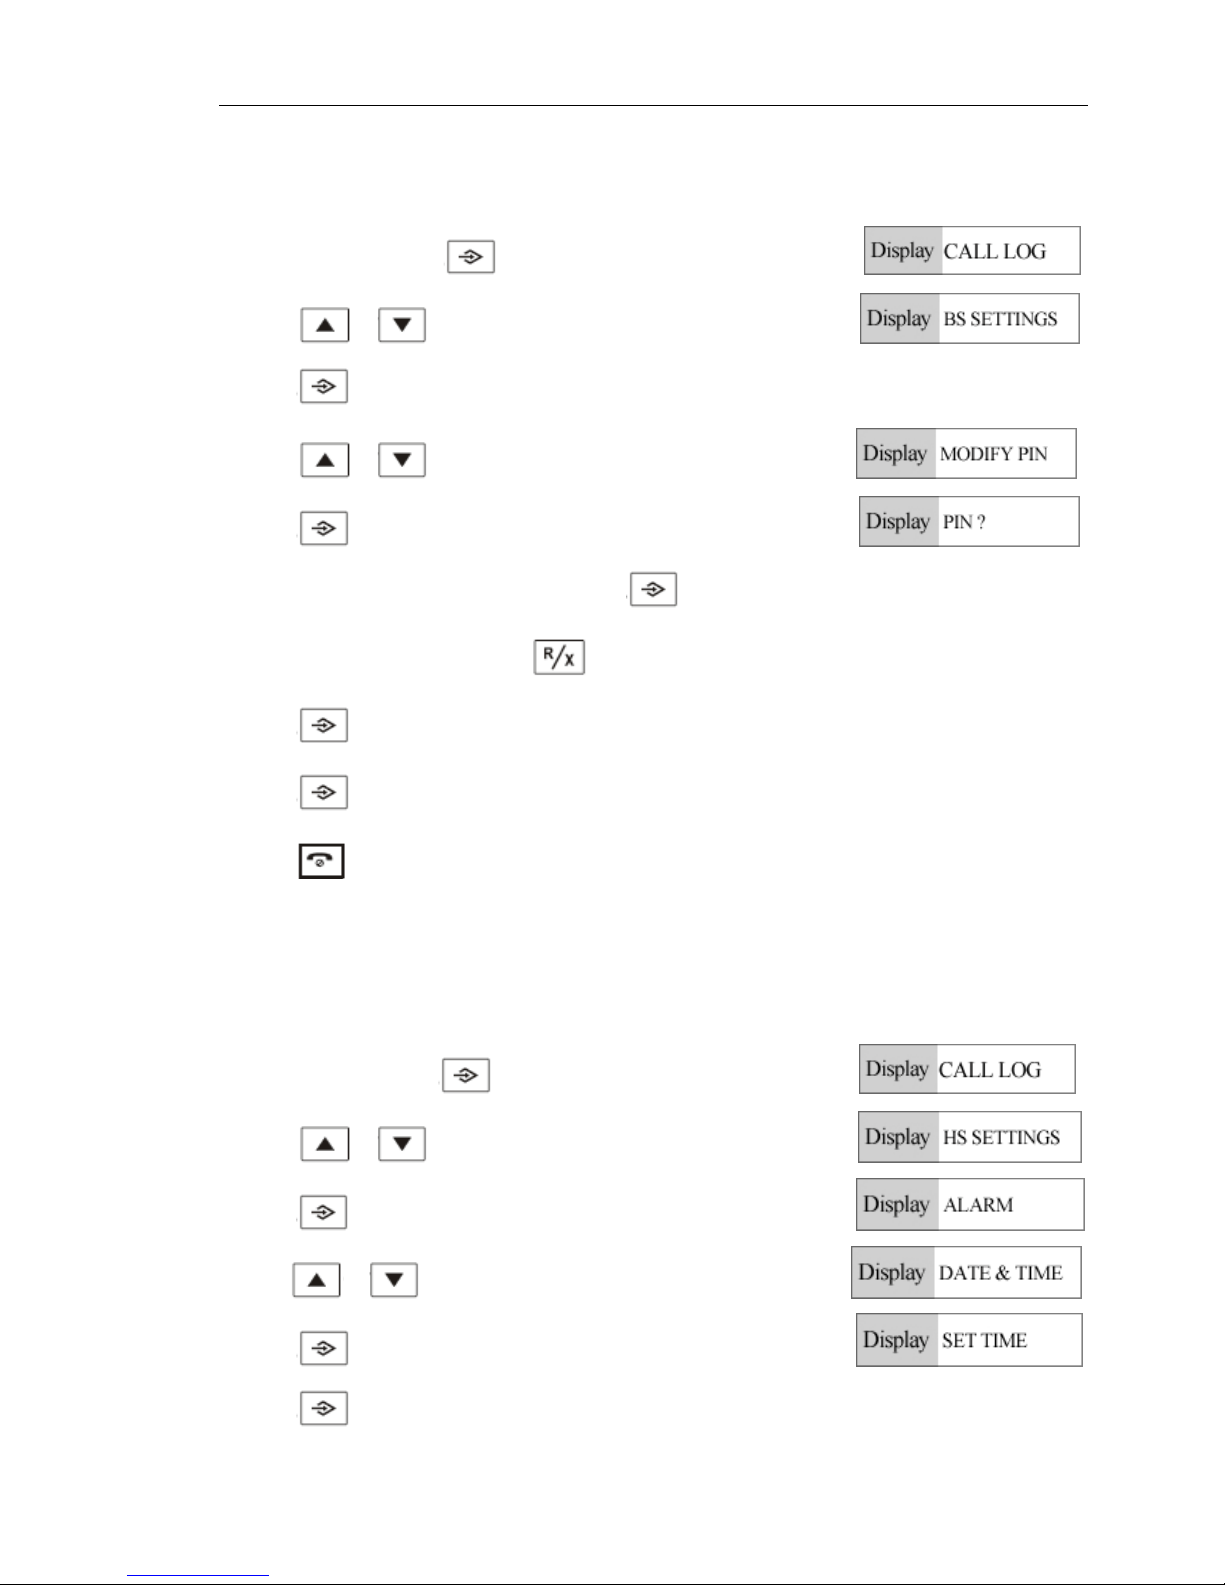
△ EDIT PIN CODE
>> In standby mode, press button to enter setting mode
>> Press
or button to select “BS SETTING” function
>> Press
to confirm.
>> Press
or button to select “MODIFY PIN” function
>> Press
button to confirm, and it displays “PIN?”
>> Input defaulted pin code 0000 and then press
button
>> Input your favorite pin code (press
button to exit to repeat the operation if any wrong inputting)
>> Press
button to confirm, the screen displays REPEAT. Then input your desired pin code again.
>> Press
button to confirm, a sound of “DiDu” will be heard once the setting succeed
>> Press
button to exit, turn into standby mode.
△ TIME SETTING
>> In standby mode press button to enter setting mode
>> Press
or button to select “HS SETTINGS”
>> Press
button to confirm, it displays “ALARM”
Press
or button to select “DATE&TIME”
>> Press
to confirm, the LCD displays “SET TIME”.
>> Press
button, the screen displays the time and blinks.
Page 29
User Manual for Wireless VoIP Phone
- 29 - Version1.0 2007-12-29
>> Input the correct time, press or button to select the portion modification of time. .
>>Press
button to confirm, a sound of “DiDu” will be heard once the setting succeeds
>>Press
button to exit, turn into standby mode.
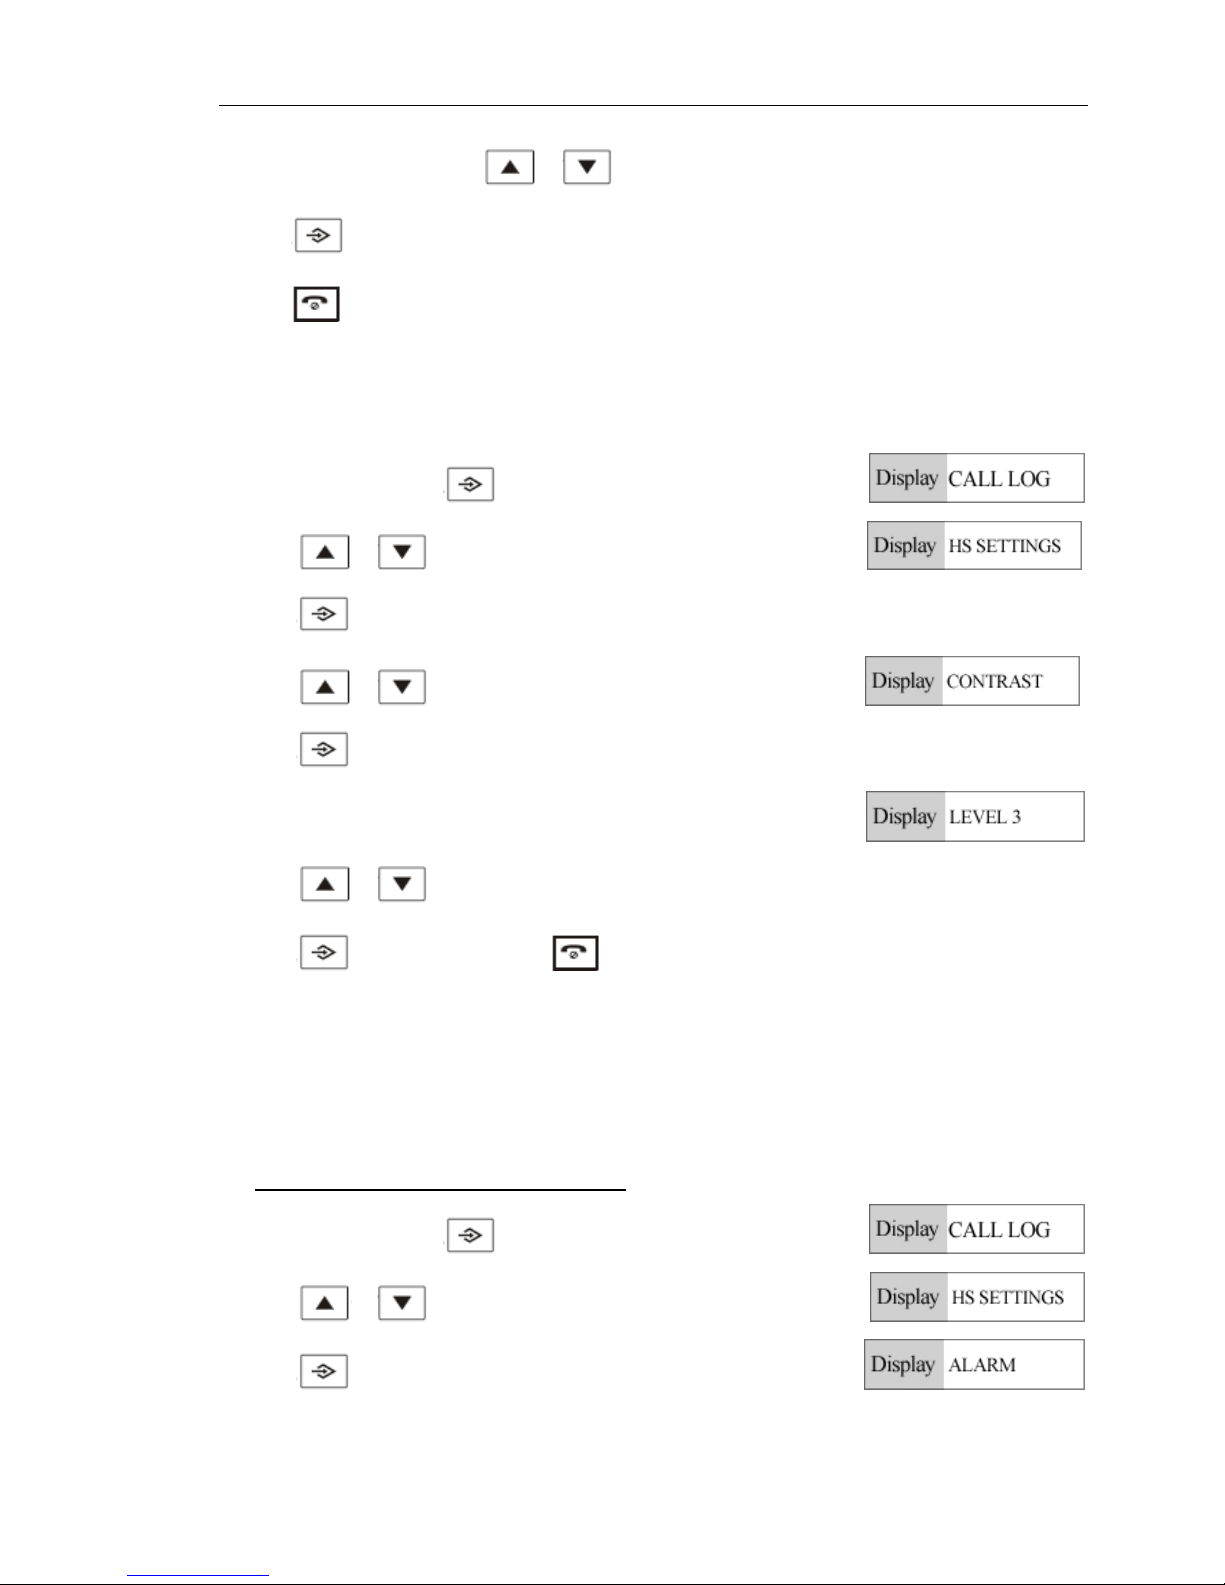
△ LCD contrast setting
>> In standby mode, press button to enter setting mode.
>> Press
or button to select “HS SETTINGS”
>> Press
button to confirm.
>> Press
or button to select “CONTRAST”
>> Press
button to confirm.
>> LCD displays “LEVEL 3”
>> Press
or button to adjust LCD contrast.
>> Press
button to confirm. Press button to exit.
△ RESTORE FACTORY DEFAULT SETTINGS
Note: It is not recommended to attempt to this setting function, for all default parameter will get restore
once this setting is done.
A) Handset restores factory default settings.
>> In standby mode, press
button to enter setting mode.
>> Press
or to select “HS SETTINGS” function
>> Press
button to enter “ALARM” function
Page 30
User Manual for Wireless VoIP Phone
- 30 - Version1.0 2007-12-29
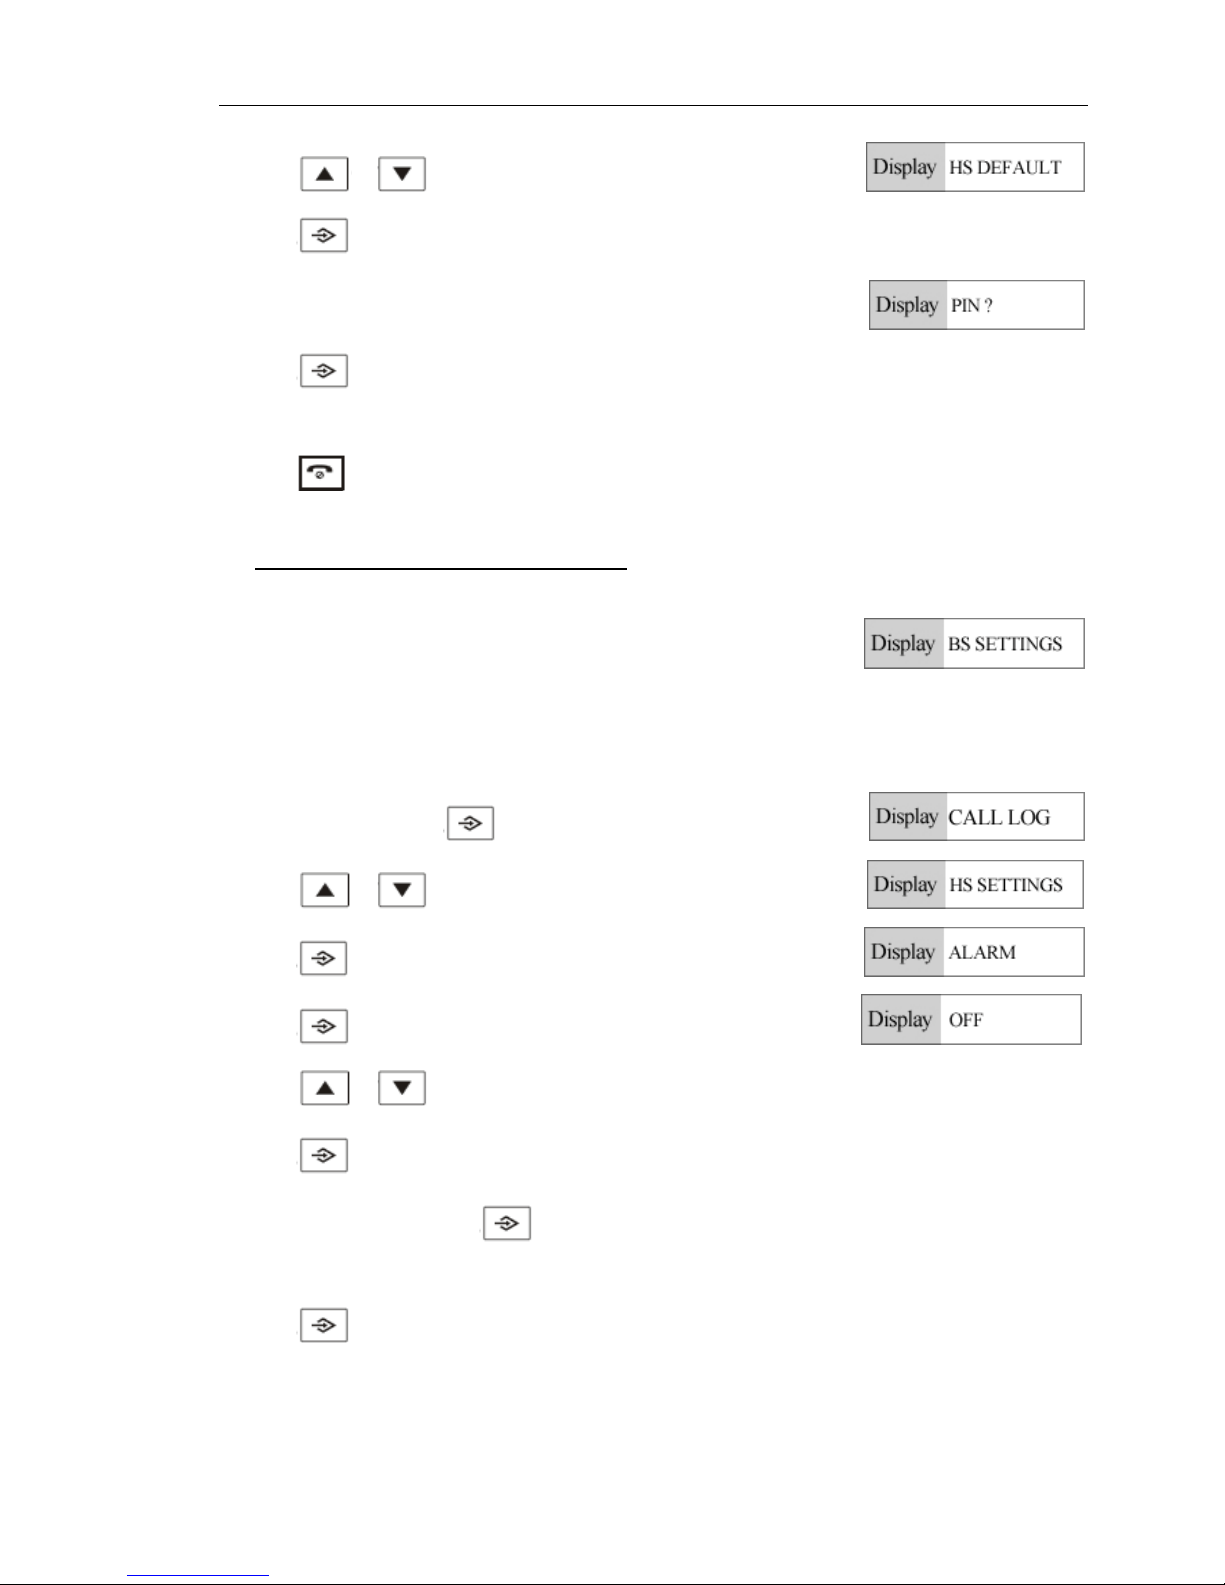
>> Press or button to select “HS DEF A ULT”
>> Press
button to confirm, it will display “PIN?” Input PIN CODE, eg.0000
>> Press
to confirm, a sound of “Di” will be heard to indicate the setting succeeds, or a sound of
“Du” will be heard to indicate the setting is failed..
>> Press
button to exit
B) Base unit restore factory default settings.
After select “BS SETTINGS”, other operations are same as hand set operation.
△ ALARM CLOCK SETTING
>> In standby mode, press button to enter setting mode.
>> Press
or button to select “HS SETTING”
>> Press
button and the screen displays “ALARM”.
>> Press
button and the screen displays OFF.
>> Press
or button to select ON or OFF.
>> Press
button to confirm ALARM ON or ALARM OFF.
>> In ALARM ON mode, press
button and it displays the alarm time and the cursor will guide you
to input the alarm time
>> Press
button and it displays “SNOOZE ON”, it indicate the ALARM SETTING is activated, the
ALARM will be inactivated if the OFF is selected.
Page 31
User Manual for Wireless VoIP Phone
- 31 - Version1.0 2007-12-29
Note: Press button to stop the alarm when it is ringing.
△ PHONE BOOK FUNCTION
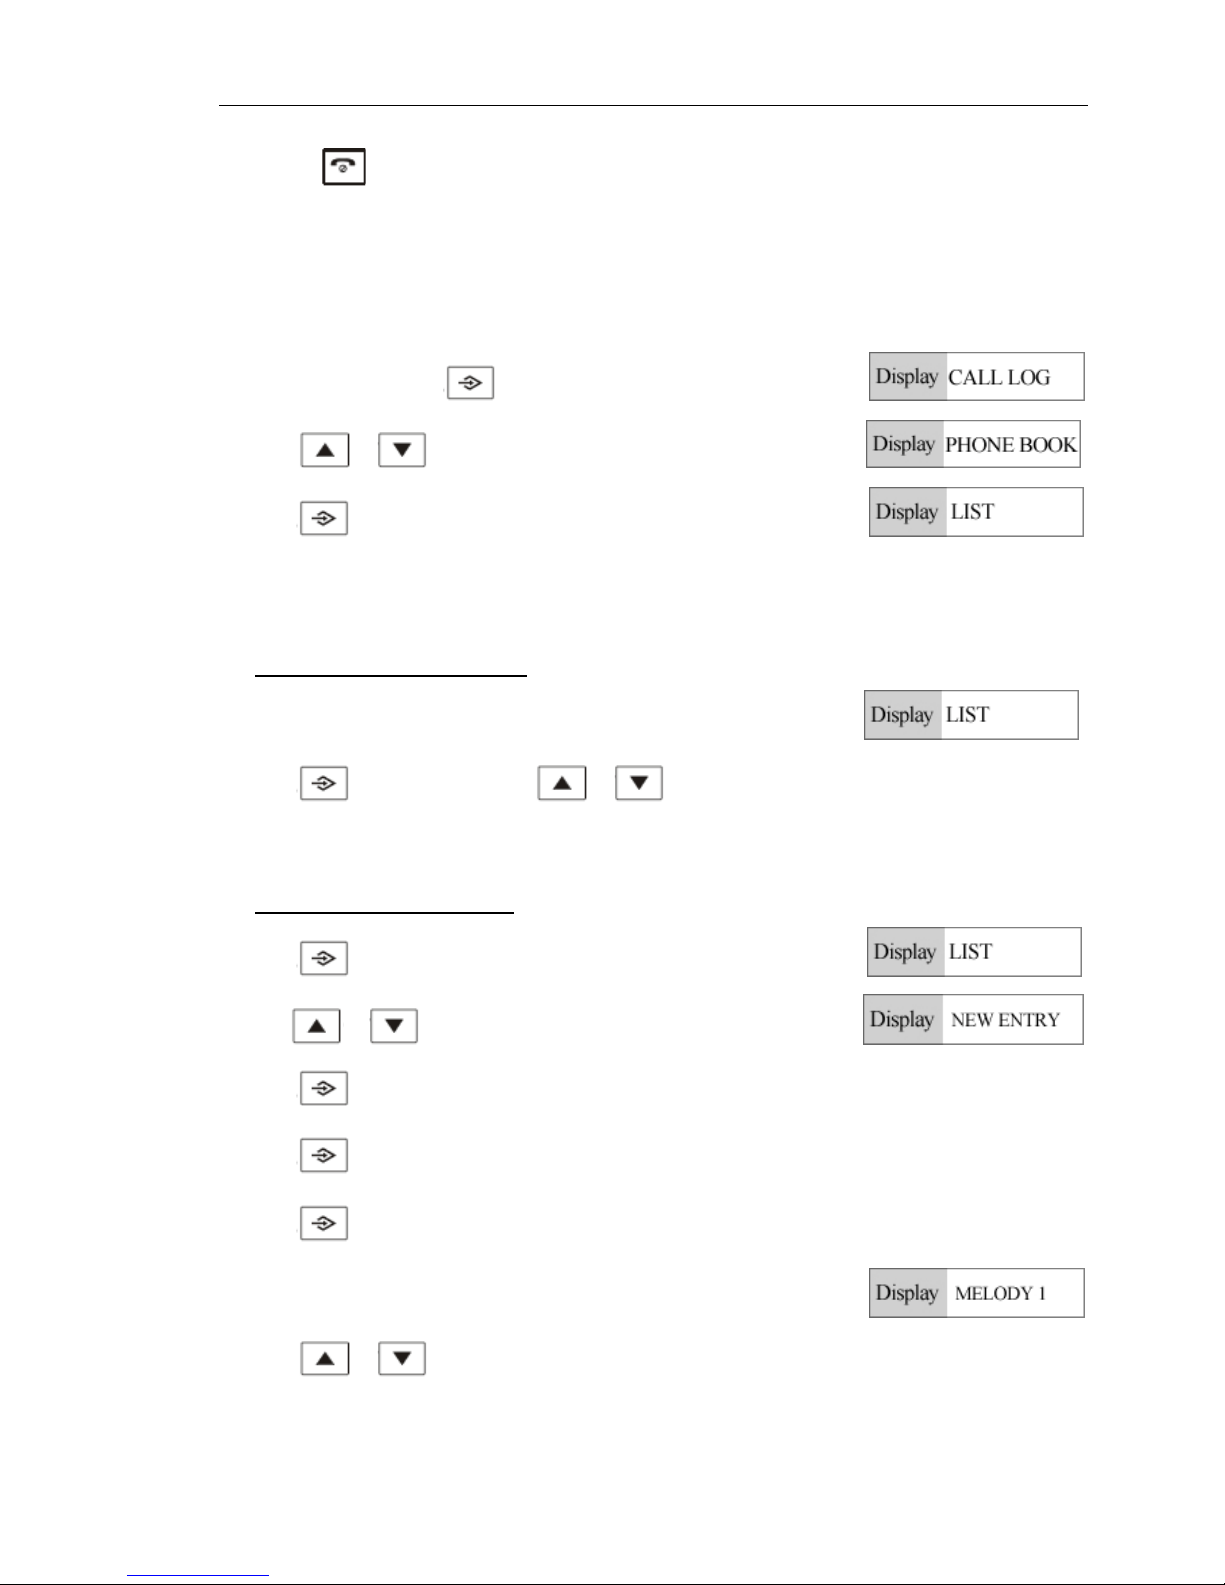
>> In standby mode, press button to enter setting mode.
>> Press
or button to select phone book function.
>> Press
to confirm and it displays
A) T o review Phonebook memory
In Phonebook mode, the LCD displays “LIST”
>> Press
button and then press or button to review phone memory
>> Press 0 to review memory number
B) T o store Phonebook memory
>> Press
to enter phone book mode, the LCD displays “LIST”
Press
or to select “NEW ENTRY ”
>> Press
to confirm, input the name. eg. “JACK”
>> Press
button to confirm, and input memory number
>> Press
button to enter VIP ring tone setting, LCD screen will display “MELODY 1”
>> Press
or button to select the favorite ring tone as VIP ringer
Page 32
User Manual for Wireless VoIP Phone
- 32 - Version1.0 2007-12-29
>> Press button to confirm and the “DiDu” tone will indicate the setting is done
>> Press
button to exit and go back to standby mode; press button to turn into previous main
setting.
C) T o edit Phonebook memory
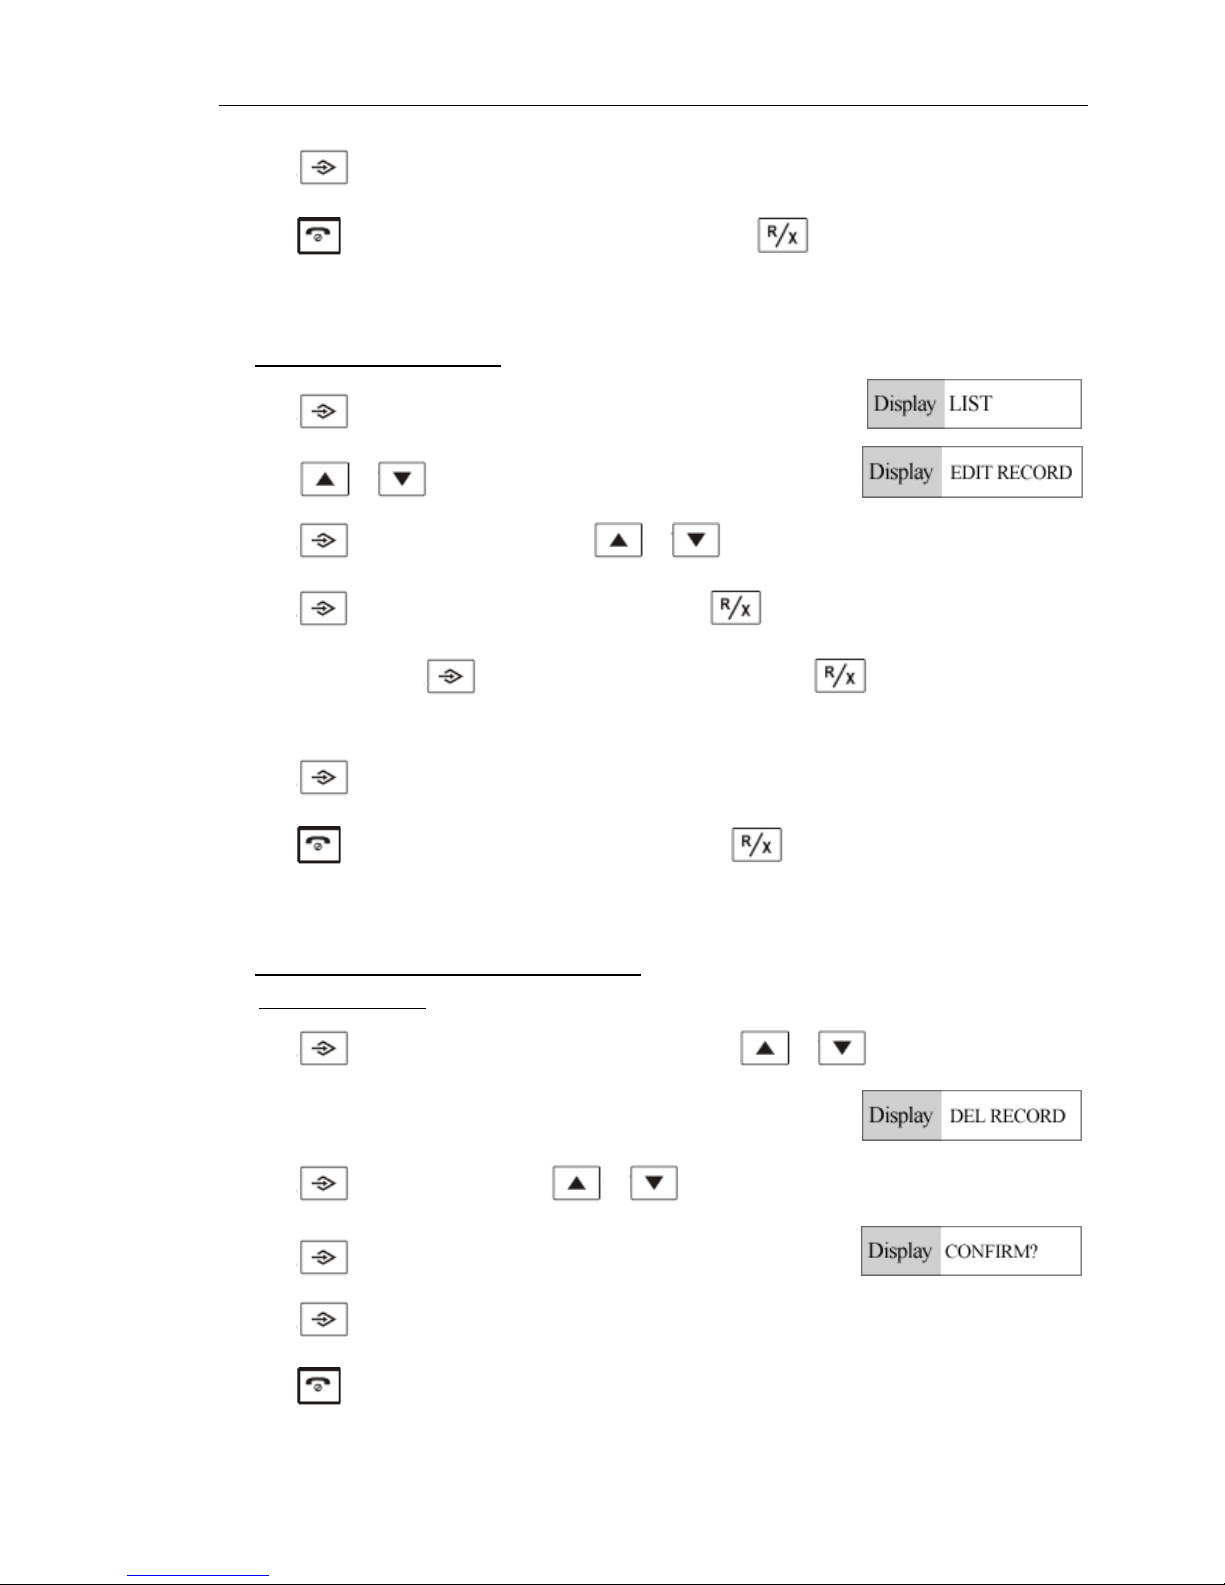
>> Press
button to enter phonebook edit mode, LCD displays “LIST”
>> Press
or button to select “EDIT RECORD”
>> Press
button to confirm, then press or button to select the name to edit
>> Press
button to enter name edit mode, then press button to delete or input desired name.
After edit name, press
button to enter number edit mode; press button to delete and input
correct numbers.
>> Press
button to confirm and the “DiDu” tone will indicate the setting is done.
>> Press
button to exit and back to standby mode; press button to turn into previous main
setting.
D) T o delete the reviewed phonebook memory
In phonebook mode
>> Press
button to enter phonebook delete mode; press or button to select “DEL
RECORD”
>> Press
button to confirm, press or button to select the desired number to delete
>> Press
button to confirm, it displays “CONFIRM?”
>> Press
button to confirm, a sound of “DiDu” tone will indicate the setting is done
>> Press
button to return to standby mode.
Page 33
User Manual for Wireless VoIP Phone
- 33 - Version1.0 2007-12-29
E) To delete all phonebook memory
In phonebook mode
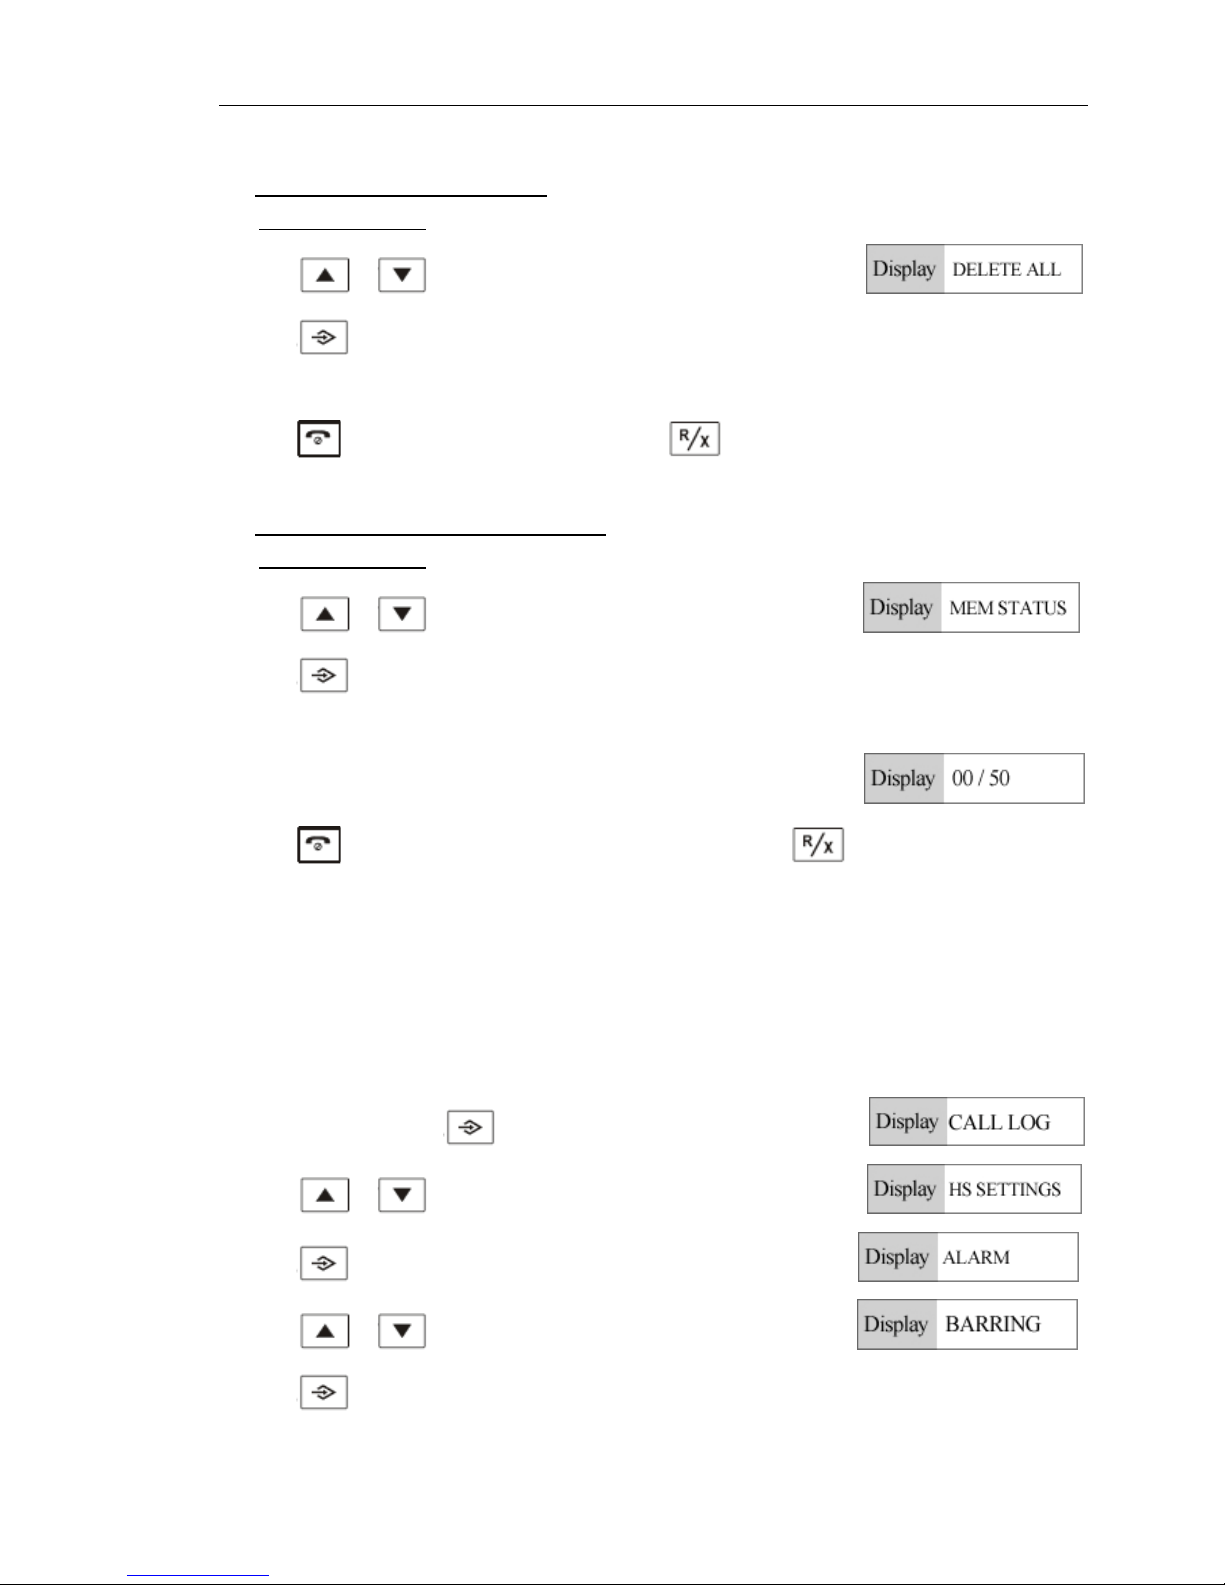
>> Press
or button to select “DELETE ALL”
>> Press
button to confirm. After a sou nd of “DiDu” tone is heard, it indicate all phonebook
memory have been deleted
>> Press
button to return to standby mode; press button to turn into previous main setting.
F) T o review phonebook memory capacity
In phonebook mode
>> Press
or button to select “MEM STATUS”
>> Press
button to confirm, the LCD screen will displays 00/50 to indicate current engaged
phonebook memory. (50 means this device provide 50 groups phonebook memory capacities)
>> Press
button return to standby mode after checking, or press button to turn into prior main
menu.
△ CALL BARRING SETTING
Note: this device provides 4 groups call barring number
>> In standby mode, press
button to enter setting mode.
>> Press
or button to select “HS SETTINGS”
>> Press
button to confirm, it displays “ALARM”
>> Press
or button to select “BARRING”
>> Press
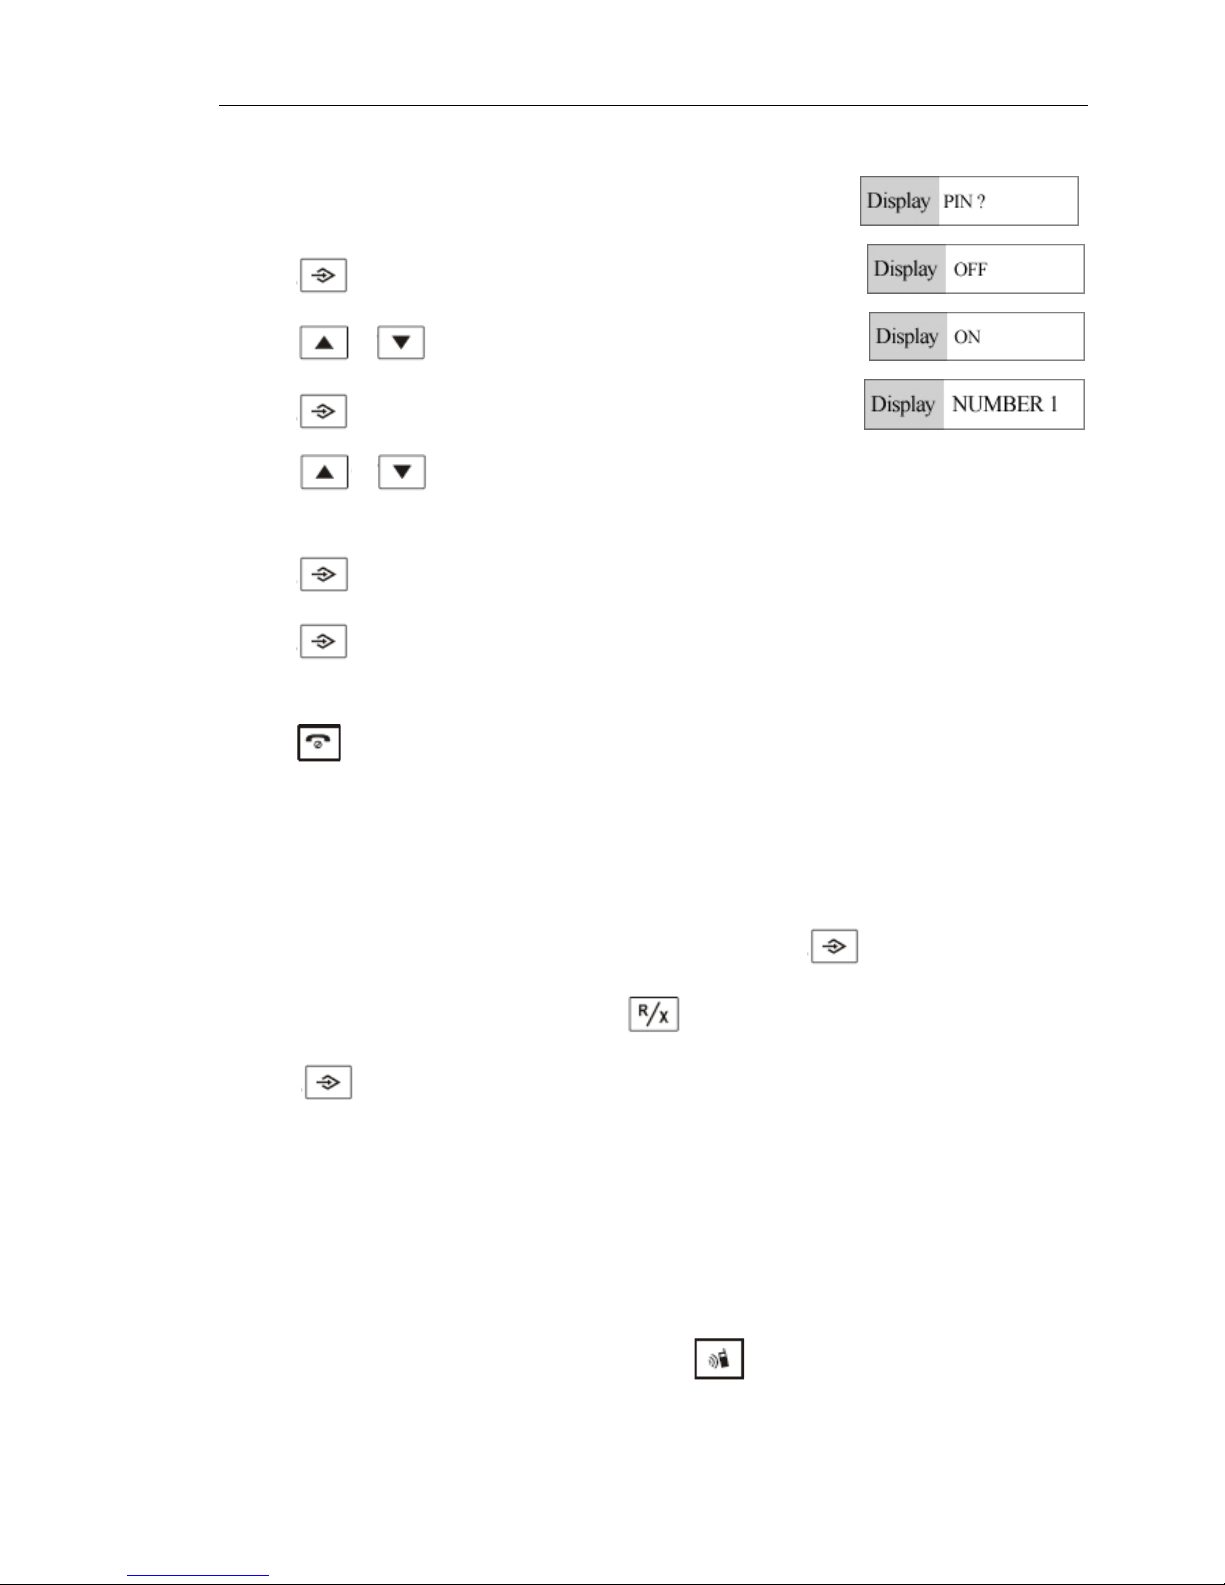
button to confirm and the screen displays “PIN?” Input pin code 0000 ( Note: the
Page 34
User Manual for Wireless VoIP Phone
- 34 - Version1.0 2007-12-29
defaulted pin code is 0000, the new pin code should be input if the defaulted pin code 0000 is
replaced )
>> Press
to confirm, the screen display OFF;
press
or button to select ON
>> Press
button to confirm, the screen displays “NUMBER1”
>> Press
or button to select the barring number ranged 4 groups (the barring number length
are restricted to 4 digits)
>> Press
button to confirm, input the desired barring number
>> Press
button to confirm, after a sound of “DiDu” tone being heard, it indicate th e barring num ber
setting is done.
>> Press
.button to turn into standby mode
Note:
1. The barring number is to restrict the number, which its initial number is the same as the barring
number dialed. If the set barring number is “0”, then all number with 0 as its initial number couldn’t be
dialed out. The situation is same if the set barring number is others.
2. To delete the barring number; select the barring number and press
button to confirm, the
screen will display the barring number; press
button to delete the barring number;
press
button to confirm. A sound of “DiDu” will be heard to indicate the setting is done
△ WALKIE TALKIE SETTING
Note:
1. Walkie Talkie function is activated only with power supply available
2. Walkie Talkie is workable only based on more than one handset
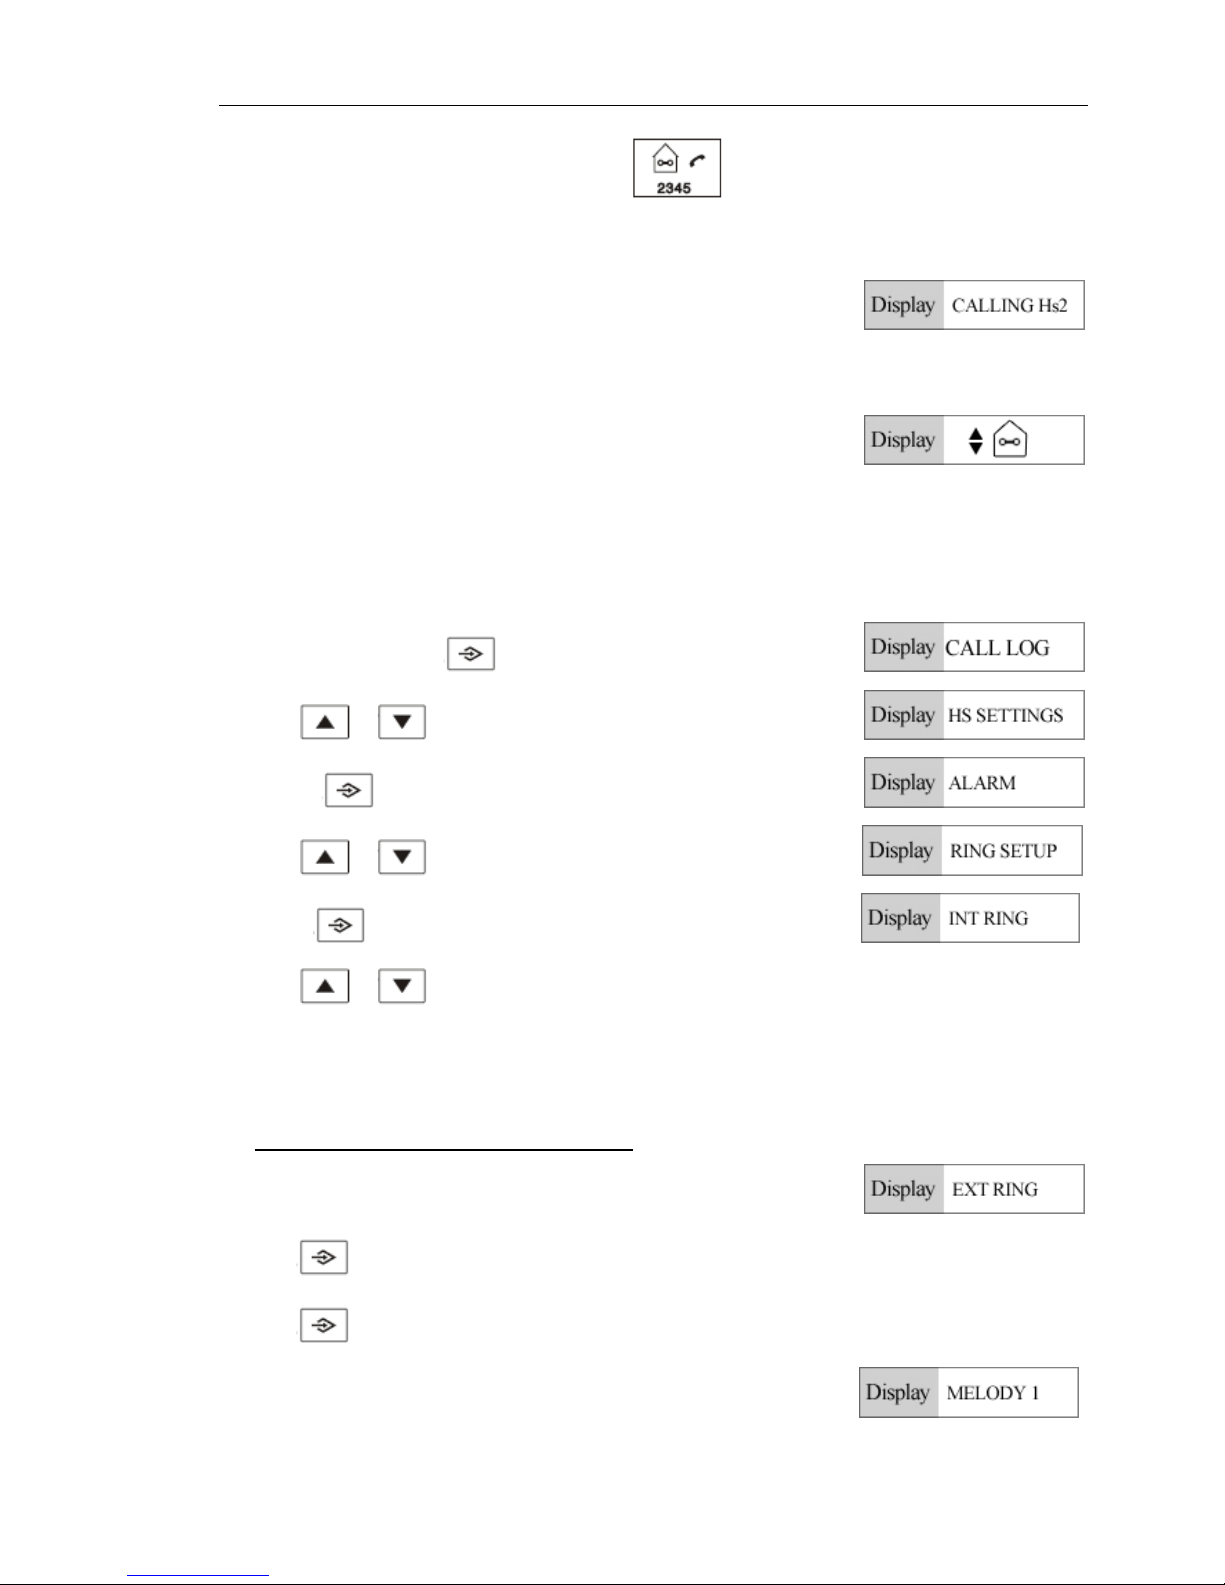
On more-than-one-handset-available situation, press button on one handset, LCD will display
Page 35
User Manual for Wireless VoIP Phone
- 35 - Version1.0 2007-12-29
walkie-talkie symbol and the cursor will blink
>> Input the wanted paged handset code like 2, LCD will display CALLING HS2
>> The paged handset 2 will ring, press TALK button on paged handset 2 to start the Walkie Talkie
>> Press PAGE button on any handset to quit the Walkie Talkie and go back to standby mode.
△ RING MELODY SETTING
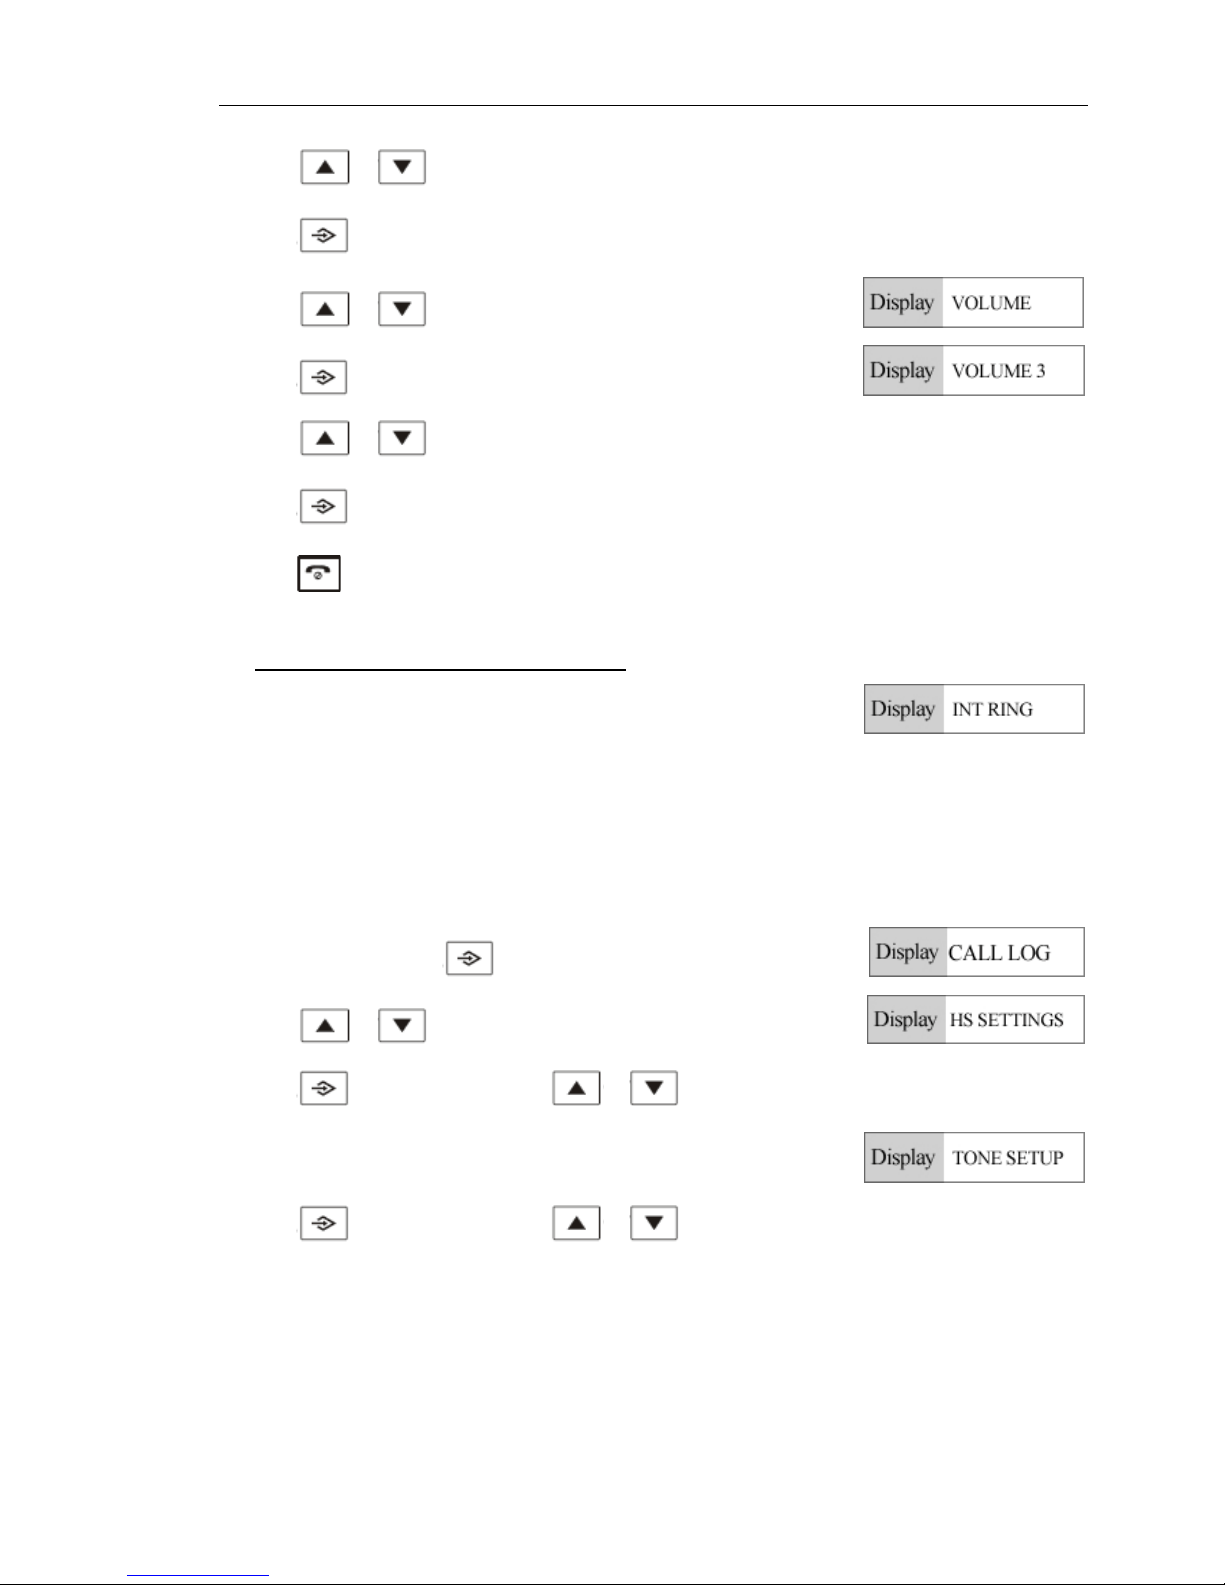
>> In standby mode, press button, LCD will display “CALL LOG”
>> Press
or button and select “HS SETTINGS”
>> Pressing
button and it displays “ALARM”
>> Press
or button to select “RING SETUP”.
Pressing
button and it displays “INT RING”
>> Press
or to select 1. INT RING 2. EXT RING
Select INT RING to set the internal ring tone
Select EXT RING to set the external ring tone
A) External ring tone and ring volume setting
>> Repeat the above operation setting to select “EXT RING”
>> Press
button and the screen will display “MELODY”
>> Press
button, the melody will play and the screen will display the melody name,
eg. “MELODY 1”
Page 36
User Manual for Wireless VoIP Phone
- 36 - Version1.0 2007-12-29
>> Press or button to select the favorite ring tone (10 groups available)
>> Press
button to confirm.
>> Press
or button to select the “VOLUME”
>> Press
to check the current volume level like “VOLUME 3”
>> Press
or to select the ring volume level (5 levels available + VOL OFF)
>> Press
button to confirm, after a sound of “DiDu” tone being heard, it indicate the setting is done,
>> Press
button to turn into standby mode
B) Internal ring tone and ring volume setting
>> Repeat the above operation setting to select “INT RING”
The setting procedure is exactly same as above “External Ring Tone and Ring Volume Setting”
△ DIALING MODE “TONE”SETTING
(Handset key tone/battery low tone/ range alarm tone setting)
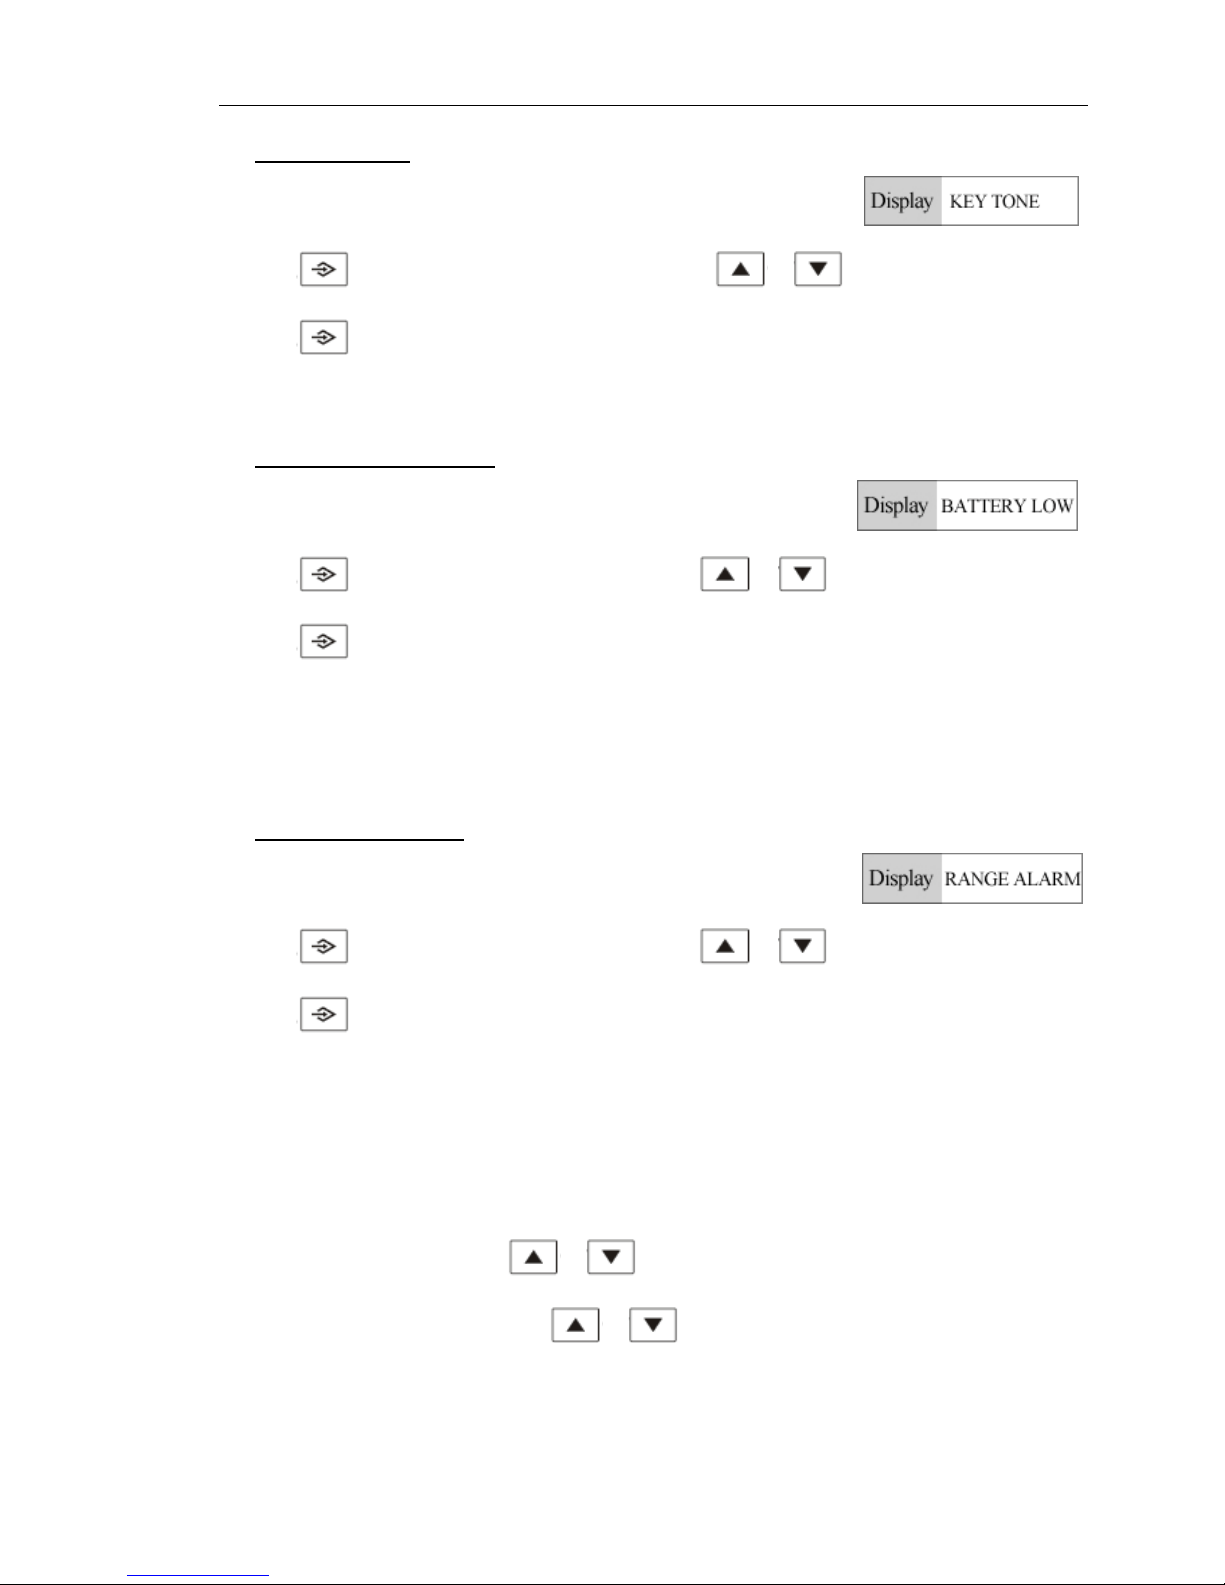
>> In standby mode, press
button to displays “CALL LOG”
>> Press
or button to select “HS SETTINGS”
>> Press
button to confirm; press or button to select “TONE SETUP”
>> Press
button to confirm; press or to select
1.KEY TONE 2. BATTERY LOW 3. RANGE ALARM
Page 37
User Manual for Wireless VoIP Phone
- 37 - Version1.0 2007-12-29
A) To set KEY TONE
After enter “KEY TONE” setting,
>> Press
button and the screen displays “ON”; press or to select “ON” and “OFF”
>> Press
button to confirm, a sound of “DiDu” will be heard to indicate the setting is done
>> Press button to turn into standby mode.
B) T o set BATTERY LOW alert
After enter “BATTERY LOW” setting,
>> Press button and the screen displays ON, press or to select “ON” and “OFF”
>> Press
button to confirm, a sound of “Bi” will be heard to indicate the setting is done
Note: The low battery alert is activated by a sound of “Bi” only when the telephone is in TALK mode;
there is no “Bi” tone generated at standby mode, as it is replaced by the battery capacity icon blinking.
C) To set RANGE ALARM
After enter “RANGE ALARM” setting,
>> Press button and the screen displays ON; press or to select “ON” and “OFF”
>> Press
button to confirm, a sound of “DiDu” will be heard to indicate the setting is done
Note: a series sound of “Bi Bi…” will be heard to alarm the handset is out of range which is activated only
when the handset is in TALK mode
△ RINGER VOLUME SETTING
1. In TALK mode (handset), press or button to adjust the ring volume (5 levels for option)
2. In SPEAKER mode (handset), press
or button to adjust the ring volume (5 levels for
option)
Page 38

User Manual for Wireless VoIP Phone
- 38 - Version1.0 2007-12-29
△ REDIAL
The redial function is to facilitate you to dial the repeat number.
When the telephone line is busy , press
and then press button to dial the same number again
△ NON-DISTURB FUNCTION
Press and hold button continuously for 3S’ to enter non-disturb function, the LCD screen will
display
, it indicate the non-disturb function is activated; press button for 3S’ will inactivate the
non-disturb function and the icon
will disappear.
Note: no ring sound generate when the non-disturb function is activated while the Caller ID could be
displayed.
△ KEYPAD LOCK ON/OFF FUNCTION
In standby mode, press and hold button for 3S’, the LCD screen will display to indicate the
keypad is locked and no button are activated except “#” button; press and hold
button for 3S’ to
inactivate the keypad lock and the icon
will disappear.
△ HANDSET ON/OFF FUNCTION
Press and hold button continuously up to 3S’, the handset will power off, press and hold button
continuously up to 3S’ again to power on the handset
△ INTERCOM FUNCTION
(ACTIV ATED ONLY WITH ONE MORE THANDSET AVAILABLE)
The INTERCOM function could allow the 3rd party to join the conversation.
Page 39

User Manual for Wireless VoIP Phone
- 39 - Version1.0 2007-12-29
When the handset 1 holder is in talking mode, if you’d like to invite handset 2 holder to join, you can
press
button on handset 1, and press 2 to call handset 2 holder. When the handset 2 is ringing,
press
button and handset 1 holder press button to activate the intercom function.
Press
button on any involved handset to exit the conversation
MAINTENANCE
※ Keep dry: Do not put this phone near a bathtub, wet basement or anywhere near water.
※ Do not open unit: Do not take this phone apart. If re pair work i s required ta ke it to a qualified servi ce
representative.
※ Away form electrical equipment: Place the unit over 2 feet away form electrical equipment.
※ Avoid high temperature: Do not put the unit under sun shining or near high tem perature
environment.
※ Careful clearing: Do not clean the unit using chemic liquor.
※ No shocking: Do not put the unit on an unstable place; do not shock the unit.
※ Press the button properly: Press keypad pro perly to ensure normal operation of the phone.
※ Battery replacement: Replace the battery if the power is poor; take out the battery if the unit is not
worked long time.
TROUBLE SHOOTING
Q1: Why there is no incoming call display on LCD?
※ Check if the battery is installed correctly and if power is full.
※ Check if the phone connection is in a normal status.
Q2: The LCD display effect is not so good. How to solve it?
※ Check if the battery is installed correctly and if the power is full.
※ Adjust the LCD contrast again.
Q3: Why there is no dial tone or rings?
※ Check the line connection
※ Check if the non-disturb function is activated
Page 40
User Manual for Wireless VoIP Phone
- 40 - Version1.0 2007-12-29
Q4: There is serious noise during the conversation. How to solve it?
※ Check if the line connection is loose.
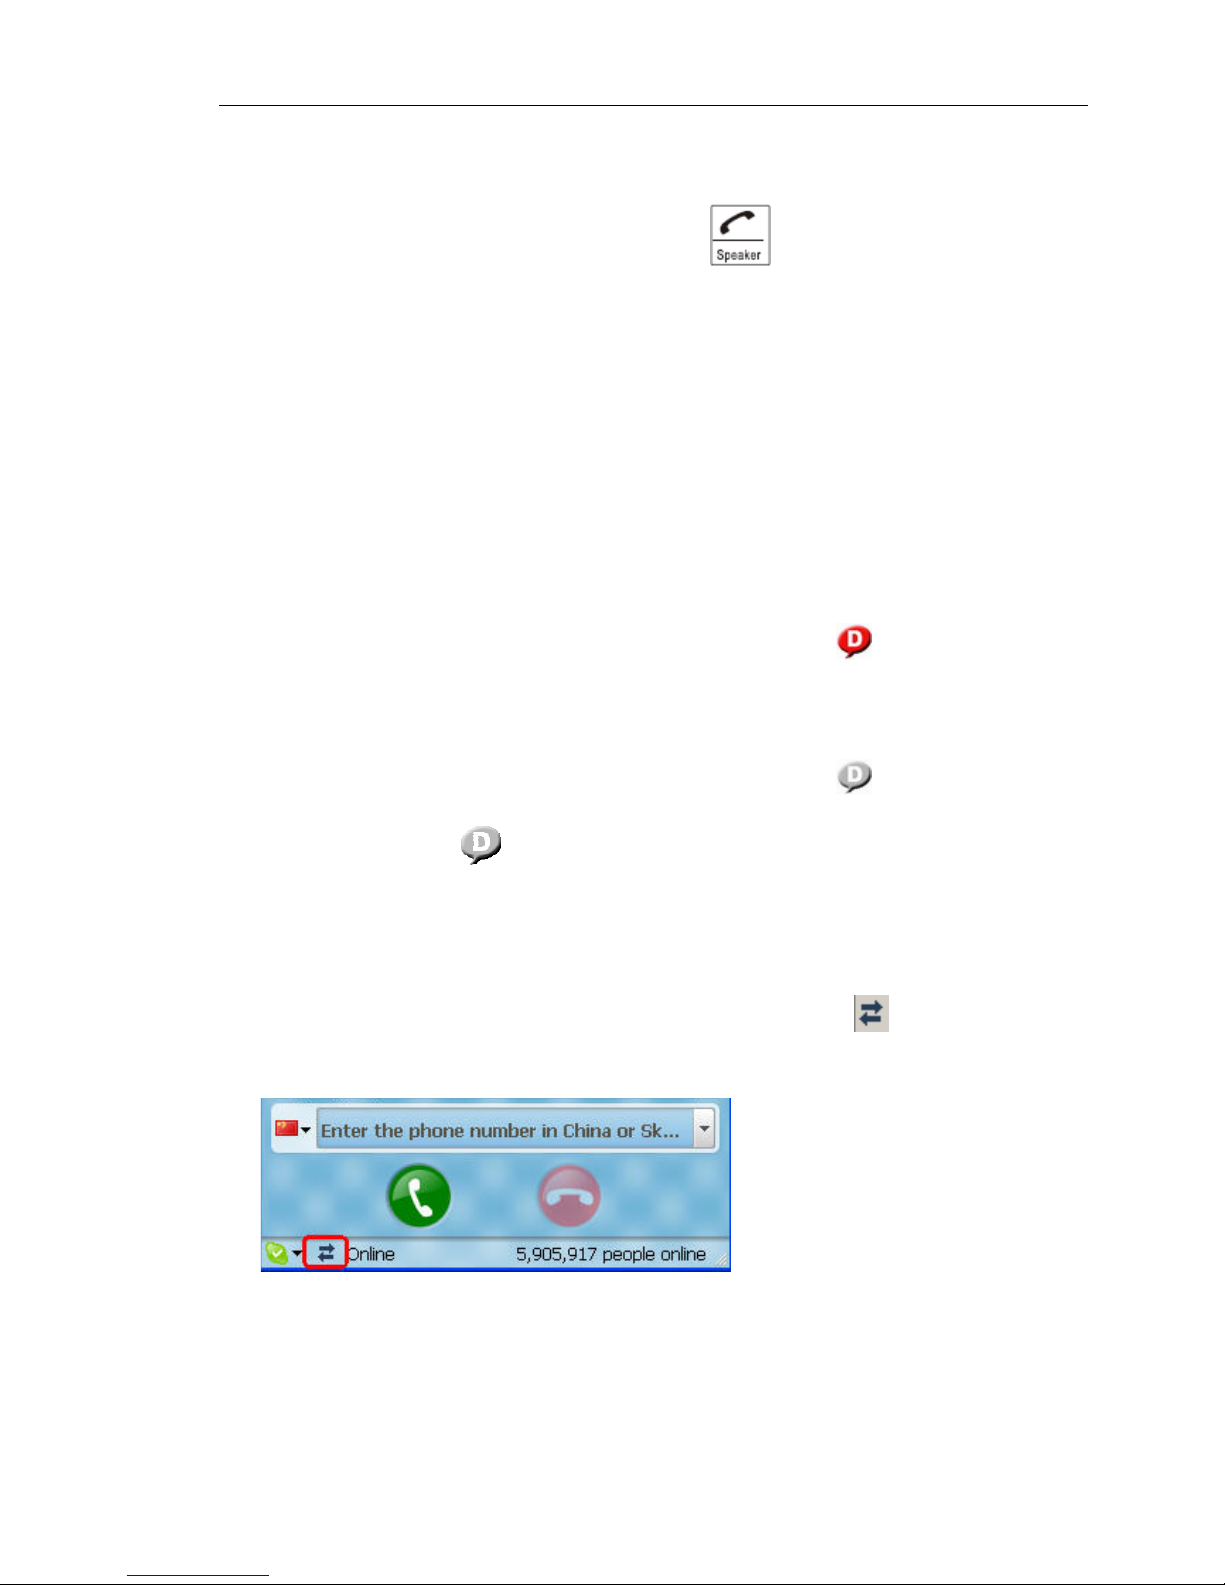
※ If it is on a hands-free speakerphone mode, press the
button to switch back to
non-speakerphone mode.
Q5: The phone cannot work properly. Why?
※ Check if the battery is installed correctly and if the power is full.
※ Take out the battery and telephone line, after 10 minutes install the battery and telephone line again.
※ Check if the base unit is too far away from handset.
※ Check if the base unit and handset are registered correctly (PAGE SETTING), and register
repeatedly.
Q7: The driver tray icon is in an abnormal state with a cross on it like
and how to solve it?
※ Check the USB port of your PC and re-plug the USB cable into the USB port of the PC.
Q8: The driver tray icon is in an abnormal state with a cross on it like
and how to solve it?
※ If you see the grey icon
① please check whether there is any VoIP application running at the moment. If not, please
run a VoIP application;
② If you are using Skype, please check whether you can see the icon
in the Skype
Windows.
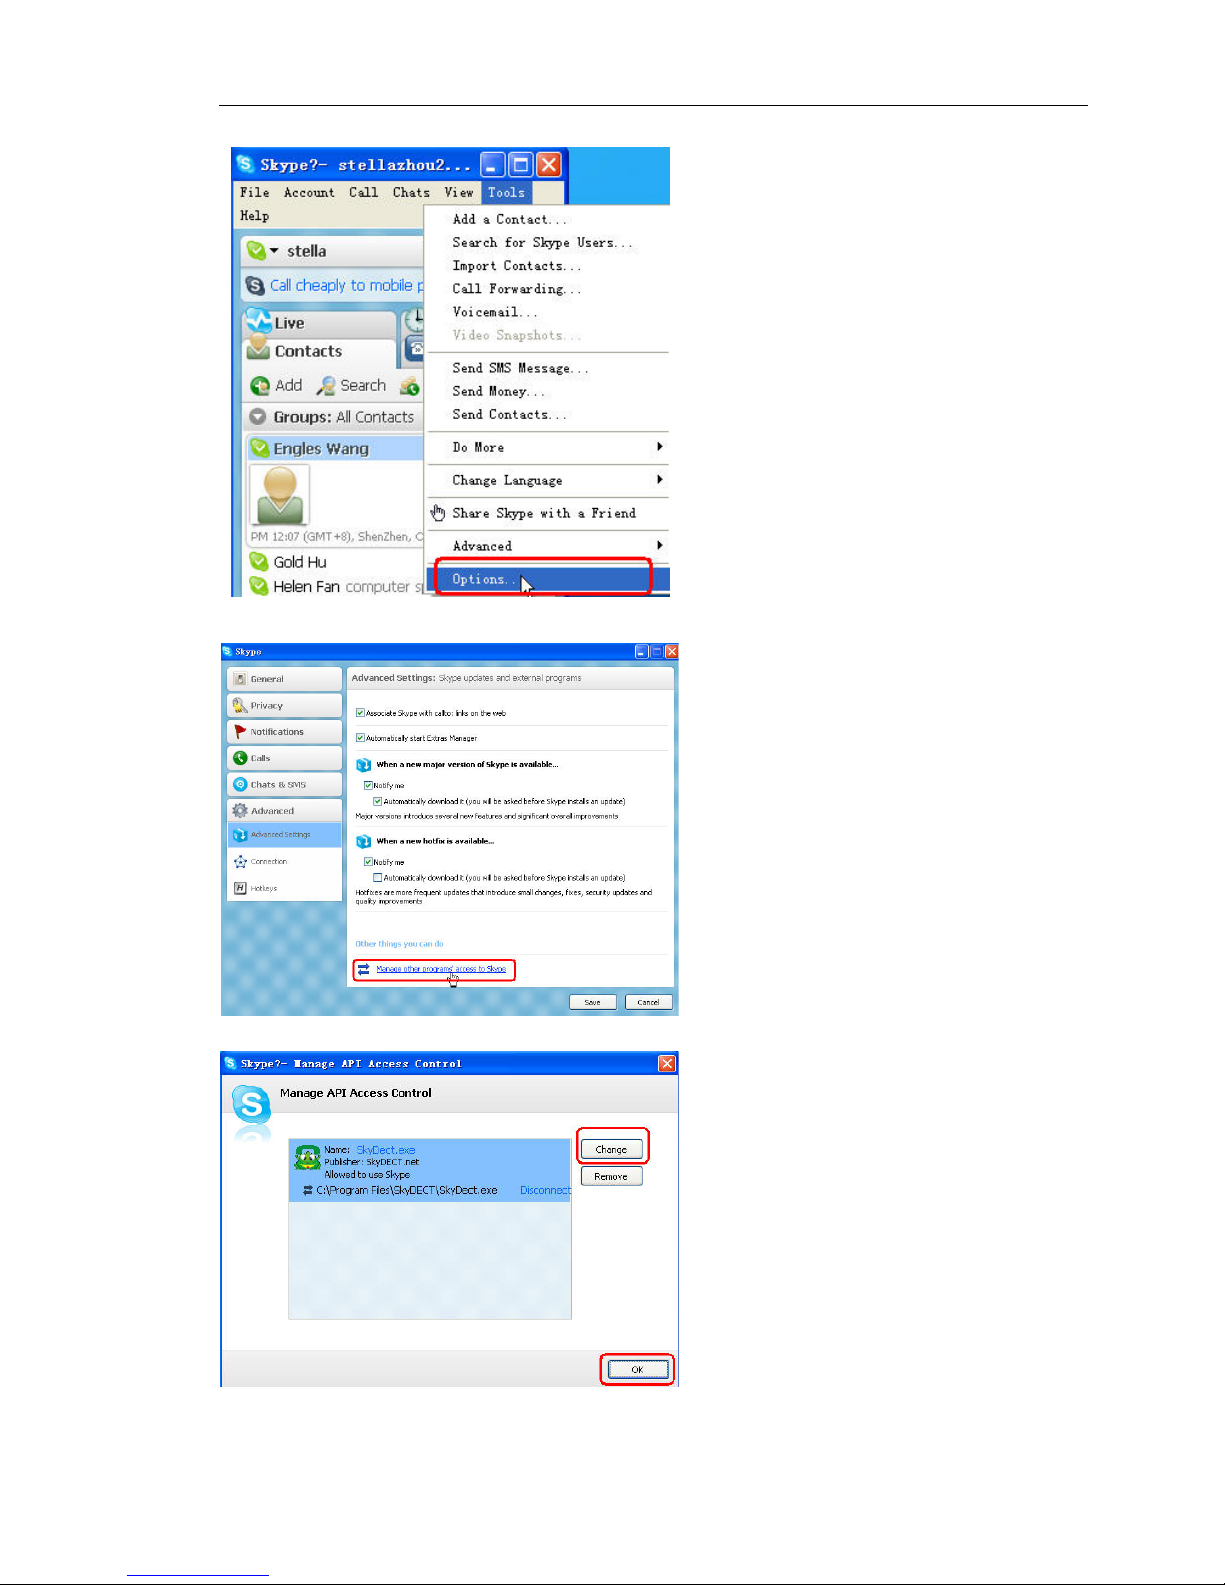
But if you cannot see this icon, please follow the steps below:
Page 41
User Manual for Wireless VoIP Phone
- 41 - Version1.0 2007-12-29
Step1: “Tools” —“Options”.
Step 2: “Advanced”--“Advanced Settings”
---“Other things you can do: Manage other
program’s access to Skyp e”.
Step 3: Choose “Change”
Page 42
User Manual for Wireless VoIP Phone
- 42 - Version1.0 2007-12-29
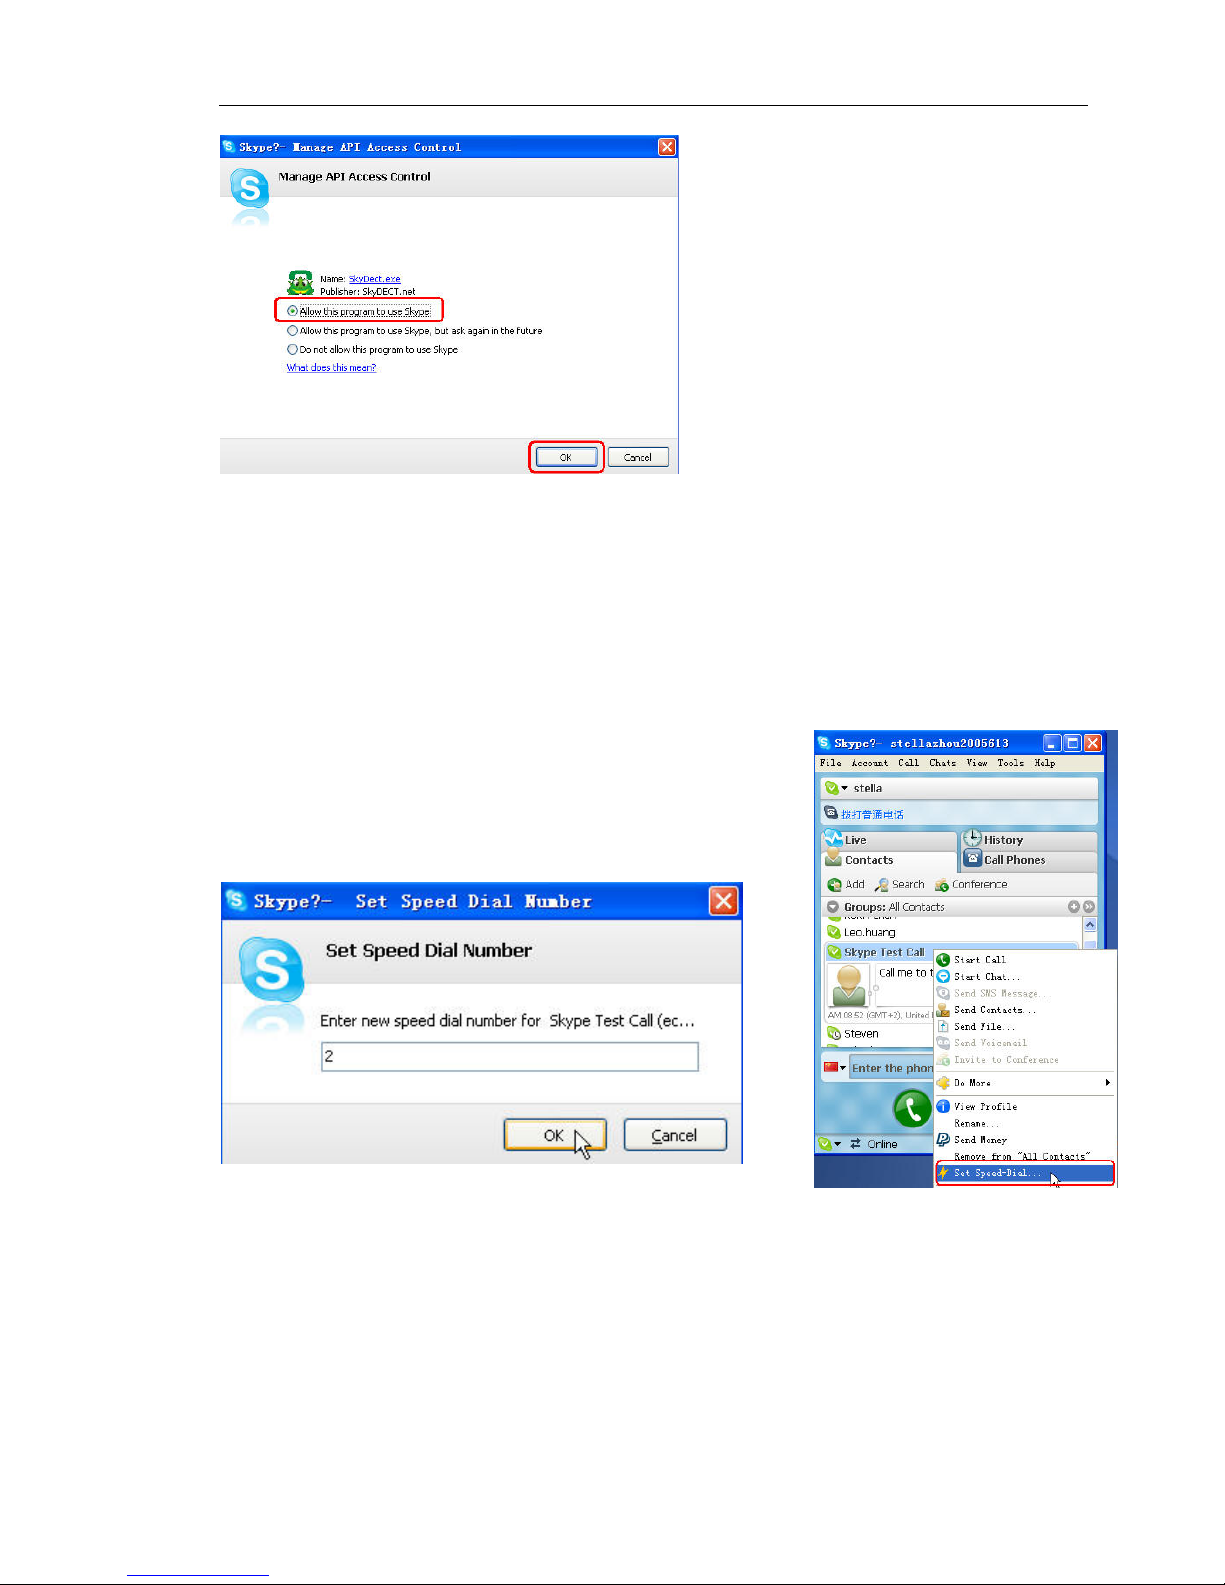
Step 4: Choose “Allow this program to use
Skype”
Q9: I found no history calls were recorded on my handset and the recorded cont act s in the phone
book are gone. What happened?
※ The History record and the phonebook record are linked to the computer from which you do wnload
the Skype’s phonebook. Therefore, when you connect the base unit to another computer, the
previous saved contacts and history record are not workable unless you download the phonebook
again.
Q10: How to assign speed dial for Skype contacts?
※ Select and right click on the Skype contact, choose “Set
Speed-Dial”.
※ Input the desired speed dial number in the pop-up window.
 Loading...