

Page 1

OPERATING INSTRUCTIONS
S 910
Handheld Transmitter
TS 910
Beltpack Transmitter
Page 2

Page 3

CONTENTS
OPERATING INSTRUCTIONS S 910 / TS 910
Safety Instructions . . . . . . . . . . . . . . . . . . . . . . . . . . . . . . . . . . . . Page 4
S 910 Handheld Transmitter . . . . . . . . . . . . . . . . . . . . . . . . . . . . Page 6
TS 910 Beltpack Transmitter . . . . . . . . . . . . . . . . . . . . . . . . . . . . Page 12
LC-Display; Battery Status;
How to switch off the Transmitter . . . . . . . . . . . . . . . . . . . . . . . . Page 19
Battery Change; Before the Soundcheck;
Positioning of Transmitters if Interferences occur . . . . . . . . . . . . . Page 20
What to do to avoid Feedback; Trouble Shooting; Service . . . . . . Page 21
Licensing; Components . . . . . . . . . . . . . . . . . . . . . . . . . . . . . . . . Page 22
Optional Accessories . . . . . . . . . . . . . . . . . . . . . . . . . . . . . . . . . . Page 23
Technical Specifications . . . . . . . . . . . . . . . . . . . . . . . . . . . . . . . . Page 24
3
Page 4

OPERATING INSTRUCTIONS S 910 / TS 910
Thank you for selecting the S 910 handheld or TS 910 beltpack transmitter.
Please take some time to read carefully through this manual before setting up
the equipment.
Important:
• When you unpack the product, inspect it for transport damage. If you do
find transport damage, notify the transportation company without delay.
Delay in reporting transport damage could result in the loss of your rights
to compensation.
Safety Instructions
• Protect the transmitter from moisture and sudden impacts. You could either
injure yourself or others or damage the transmitter.
• Do not blow into the microphone. In a condenser microphone this could
damage the transformer. It is preferable to carry out a speech trial.
• Clip-on microphones are often very compact. If they are accidentally
swallowed there is a risk of choking. Always keep this type of microphone
away from small children.
• Always switch off the transmitter before charging or changing the battery.
• If the transmitter is fitted with a normal battery, never charge it in the
charging unit. The transmitter or the batteries could be destroyed. There is
a risk of explosion.
• The normal commercial 9 V alkaline batteries can have a length tolerance
of 2 - 3 mm. When changing the battery always ensure good contact.
• From time to time the battery contacts should the moistened with spirits
or alcohol and cleaned with a soft cloth.
• If the transmitter is not being used for weeks or months, please remove
the batteries. Batteries can leak when not being used for a long time and
corrode the conductor strips and components. Repair is not then possible.
In this case all warranty claims are null and void. The description “leak
proof” on batteries is no guarantee that they will not run out.
• Never take batteries apart yourself. The battery acid contained will
damage skin and clothing.
• Do not throw used batteries into the domestic rubbish, but hand them in to
local collection points.
4
Page 5

5
FCC ID: OSDS910 for S 910 C, S 910 M
FCC ID: OSDTS910 for TS 910 C, TS 910 M
Canada: IC: 3628A-S910 for S 910 C, S 910 M
Canada: IC: 3628A-TS910 for TS 910 C, TS 910 M
This equipment has been tested and found to comply with the limits for a
Class B digital device, pursuant to Part 15 of the FCC Rules. These limits are
designed to provide reasonable protection against harmful interference in a
residential installation. This equipment generates, uses and can radiate radio
frequency energy and, if not installed and used in accordance with the
instructions, may cause harmful interference to radio communications. There
is no guarantee, however, that interference will not occur in a particular
installation. If this equipment does cause harmful interference to radio or
television reception, which can be determined by turning the equipment off
and on, the user is encouraged to try to correct the interference by one or
more of the following measures:
• Reorient or relocate the receiving antenna.
• Increase the separation between the equipment and receiver.
• Connect the equipment into an outlet on a circuit different from that to
which the receiver is connected.
• Consult the dealer or an experienced radio/TV technician for help.
In accordance with FCC requirements, changes or modifications not expressly
approved by beyerdynamic GmbH & Co. KG could void the user’s authority to
operate this product. Any changes or modifications not expressly approved
by the party responsible for compliance could void the user’s authority to
operate this equipment.
CONSUMER ALERT
Most users do not need a license to operate this wireless microphone system.
Nevertheless, operating this microphone system without a license is subject
to certain restrictions: the system may not cause harmful interference; it must
operate at a low power level (not in excess of 50 milliwatts); and it has no
protection from interference received from any other device.
Purchasers should also be aware that FCC is currently evaluating use of wireless microphone systems, and these rules are subject to change.
For more information, call the FCC at 1-888-CALL-FCC (TTY: 1-888-TELL-FCC)
or visit the FCC´s wireless microphone website at
www.fcc.gov/cgb/wirelessmicrophones.
Page 6
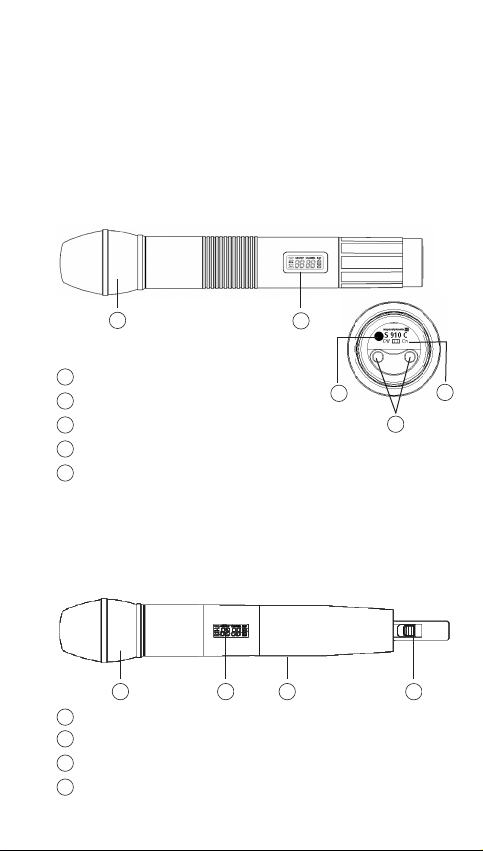
1. S 910 Handheld Transmitter
1.1 Controls and indicators
There are different condenser and dynamic microphone capsules for the
handheld transmitter (refer to Optional Accessories).
The S 910 C handheld transmitter has charging contacts and can be operated
with the integrated rechargeable battery pack only. For charging, the SLG 900
charger is available. Avoid a direct contact of the charging contacts to the
skin, as there is a voltage of 3 V at maximum.
S 910 C
1
Microphone capsule (can be unscrewed)
1
LC-Display
2
Infrared diode (at the bottom of the transmitter)
3
On/Off switch (at the bottom of the transmitter)
4
Charging contacts (at the bottom of the transmitter S 910 C only )
5
S 910 M
1 2
Microphone capsule (can be unscrewed)
1
LC-Display
2
Infrared diode (on the rear)
3
On/Off switch
4
6
2
3
3
4
5
4
Page 7
7
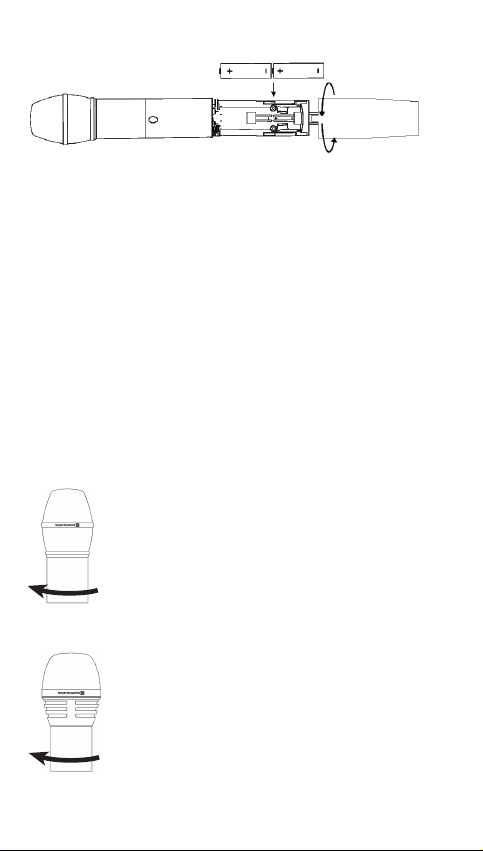
1.2 How to insert the batteries (S 910 M)
1. Unscrew the shaft of the S 910 M counter-clockwise.
2. Insert two 1.5 V batteries into the battery compartment observing polarity
markings.
Note:
The S 910 C transmitter is powered by rechargeable batteries which cannot be
changed by the user. If the rechargeable batteries have to be changed, please
contact your beyerdynamic dealer.
1.3 How to change the microphone capsule
There are different microphone capsules available for the handheld transmitter.
If you want to change the microphone capsule, turn it anti-clockwise to
unscrew it from the transmitter. Put the selected microphone capsule onto
the transmitter and turn it clockwise to tighten.
CM 930
Cardioid condenser microphone capsule for vocals
and speech applications. For maximum gain before
feedback.
DM 960
Hypercardioid dynamic microphone capsule.
Suitable for vocals and broadcasting applications.
Page 8
DM 969
Supercardioid dynamic microphone capsule.
Suitable for vocals.
EM 981
Cardioid electret condenser microphone
capsule for solo vocals, conferences and speech.
RM 510
Cardioid dynamic ribbon microphone head.
Weight 165 g.
1.4 Maintenance
• Protect the handheld transmitter from humidity, knocks and shock. Avoid
dropping the transmitter at all times.
• For cleaning metal surfaces, use a soft cloth moistened with methylated
spirits or alcohol.
• As soon as your microphone sounds dull, you should clean the integrated
pop shield. Proceed as described in the following.
CM 930
• Unscrew the microphone capsule (turn anticlockwise).
• Unscrew the wire mesh pop shield (turn anticlockwise).
• Clean the pop shield under clear running water.
• Allow the pop shield to dry overnight before you
replace it.
• The wire mesh pop shield cannot be cleaned in
a dishwasher.
8
Page 9

9
DM 960
• Unscrew the upper part of the microphone
basket (turn anti-clockwise).
• Clean it under clear water.
• Let the pop shield dry overnight before you
replace it.
• The upper part of the microphone basket
cannot be cleaned in a dishwasher.
DM 969
• Unscrew the upper part of the microphone
basket (turn anti-clockwise).
• Pull out the foam pop shield and clean it under
clear running water.
• If necessary, use a mild washing-up liquid.
• Dry it afterwards with a hairdryer or allow it to
dry overnight.
• Place the dry pop shield inside the microphone
basket and replace the microphone basket by
screwing it on clockwise.
EM 981
• Unscrew the microphone capsule (turn anticlockwise).
• Unscrew the wire mesh pop shield (turn anticlockwise).
• Clean the pop shield under clear running water.
• Allow the pop shield to dry overnight before you
replace it.
• The wire mesh pop shield cannot be cleaned in
a dishwasher.
Page 10

RM 510
• Loosen the screws.
• Unscrew the upper part of the microphone head
(turn anti-clockwise).
• Clean the upper basket under clear running
water.
• Allow the upper basket to dry overnight before
you replace it.
• The upper basket cannot be cleaned in a
dishwasher.
10
Page 11

11
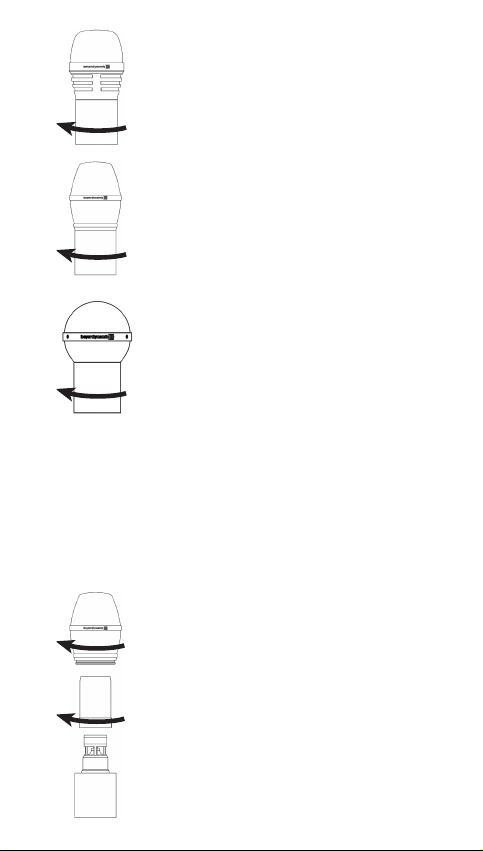
1.5 How to adjust the gain of the handheld transmitter
• To adjust the gain unscrew the complete microphone head with the upper
shaft as indicated by the arrows.
• Use a screwdriver to select the gain (0 dB, -10 dB, -20 dB, -30 dB).
• Standard setting: high gain (0 dB).
Unscrew microphone head
Unscrew microphone head
Select gain
1.6 How to set the low-cut filter
• The CM 930 and EM 981 microphone capsules feature a low-cut filter to
compensate the close-miking effect which ususally occurs with directional
microphones. To set the low-cut filter unscrew the complete microphone
head with the upper shaft as indicated by the arrows.
• At the bottom of the microphone head you can set the low-cut filter.
• Standard setting: linear (position Lin)
Set low-cut filter
Page 12

2. TS 910 Beltpack Transmitter
The TS 910 C beltpack transmitter provides charging contacts and can be
powered by the optional beyerdynamic TS 900 AP rechargeable battery pack.
For charging, the SLG 900 charger is available. With this charger the TS 900 AP
battery pack inside the TS 910 C beltpack transmitter can be recharged only,
no standard rechargeable batteries.
2.1 Controls and indicators
TS 910 C
1
234
5
6
7
12
TS 910 C
8
9
10
11
Page 13

13
AF input, 4-pin mini XLR for microphones (lavalier, neckworn mics). For
connection please refer to chapter 2.5 “AF Connection”.
ON/OFF switch
(ON = switch to “ON“ position; OFF = switch to “OFF“ position).
Switch off the transmitter when not in use.
TS 910 C only: Battery status LED to indicate the power on / off
and battery status.
(a) When the beltpack transmitter is switched on this LED will flash for a
moment to indicate the normal battery status.
(b) When the LED stays red after having switched on the transmitter the
battery is to weak and must be replaced.
Transmitting antenna
LC-Display
Infrared receiving diode for ACT function.
Gain control to adjust input gain.
GT/MT switch: When you use electric guitars this switch must be
in the “GT“ position.
In the GT mode the gain control is deactivated. Switch to the
“MT“ position when you use condenser and wired microphones. In the
MT mode the gain control is activated.
Battery compartment and cover for two 1.5 V batteries (AA)
or TS 900 AP rechargeable battery pack.
TS 910 C only: Charging contacts for TS 900 AP battery pack only
(not supplied).
Removable belt clip can be rotated 360°. To remove use a
screwdriver at a 45° angle.
1
2
3
4
5
6
7
8
9
10
11
Page 14

TS 910 M
24
5
TS 910 M
6
7
1
11
8
9
14
Page 15

15
AF input, 4-pin mini XLR for microphones (lavalier, neckworn mics). For
connection please refer to chapter 2.5 “AF Connection”.
ON/OFF switch
(ON = switch to “ON“ position; OFF = switch to “OFF“ position).
Switch off the transmitter when not in use.
Transmitting antenna
LC-Display
Infrared receiving diode for ACT function.
Gain control to adjust input gain.
GT/MT switch: When you use electric guitars this switch must be
in the “GT“ position.
In the GT mode the gain control is deactivated. Switch to the
“MT“ position when you use condenser and wired microphones.
In the MT mode the gain control is activated.
Battery compartment and cover for two 1.5 V batteries (AA).
Removable belt clip can be rotated 360°. To remove use a
screwdriver at a 45° angle.
1
2
4
5
6
7
8
9
11
This is how to remove the belt clip
Page 16

2.2 How to insert the batteries / rechargeable
battery pack
1. Push down the two snap locks on the right and left of the battery
compartment and open it. Remove the batteries. Refer to Fig. 1.
2. Insert two 1.5 V batteries into the battery compartment observing polarity
markings. Refer to Fig. 2. The battery pack is secured mechanically against
confusing the poles. Then close the battery compartment again.
TS 910 M: Insert batteries
Fig. 1 Fig. 2
TS 910 C: Insert rechargeable battery pack
Fig. 1 Fig. 2
16
Page 17

17
2.3 Setting up
1. Push down the two snap locks on the right and left of the battery
compartment and open it. Now you can adjust the GT/MT switch and
the gain control .
2. Make sure that the transmitter and receiver are on the same frequency.
3. The LED of the TS 910 C will flash for a moment when the transmitter is
switched on and indicates the normal battery status. When the LED fails
to flash, there is no battery inserted, the battery is leaking or inserted
incorrectly.
The battery status of the TS 910 M can be seen in the LC-Display.
4. Connect the microphone or instrument to the input socket . Refer to
illustration below.
2.4 Adjusting the input gain
1. Switch on the TS 910 beltpack transmitter with the ON/OFF switch. Turn
the gain control fully anti-clockwise to minimum gain.
2. Speak into the microphone at the maximum level you expect to use. We
recommend you use the letter “U” as a spoken “U” has a relatively good
sine wave shape. Adjust the gain control to the desired gain. On the
NE 911/912/914 receiver the AF level must not show any clipping. When
miking instruments, play at the maximum level you expect to use.
8
7
1
7
7
Page 18

2.5 AF connection
(1) 2-Wire Electret Condenser Microphone Capsule
e.g. MCE 5.18,
MCE 10.18,
MCE 60.18
(2) 3-Wire Electret Condenser Microphone Capsule
e.g. Opus 54.18,
Opus 55.18,
Opus 56.18,
MCE 7.18
(3) Dynamic Microphone
(4) Electric Guitar
(5) Line-in (impedance 8Ω, attenuation 10 dB)
18
Page 19

19
3. LC-Display
4. Battery status
1. “ERR“ Message: When the “ERR“ message is displayed, there is an error.
ERR noo3: The frequency you want to program is above the switching
bandwidth of the transmitter. Use a receiver with an appropriate
frequency group. (At this time the microphone is still operating and the
frequency remains unchanged. To clear the displayed “ERR“ message
switch off the handheld transmitter and on again.)
ERR noo4: The frequency you want to program is below the switching
bandwidth of the transmitter. Use a receiver with an appropriate
frequency group. (At this time the microphone is still operating and the
frequency remains unchanged. To clear the displayed “ERR“ message
switch off the handheld transmitter and on again.)
2. “Group” & “Channel”: When both indications are displayed, it means
that you are using the pre-programmed frequency of the receiver.
3. “Channel”: If “Channel“ is displayed only, it means that you are using a
frequency which is not pre-programmed.
• When the battery is exhausted, “0%“ is displayed. When “PoFF“ is
displayed, the transmitter is switched off, to avoid over-discharging the
battery.
Furthermore, the “Batt Low” LED of the TS 910 C beltpack transmitter will
illuminate.
Replace or recharge the battery.
5. How to switch off the transmitter
When the ON/OFF switch is switched to “OFF“, at first “PoFF“ is displayed
and as soon as the transmitter is completey off the display is blank. Wait one
second if you want to switch on the transmitter again immediately.
Page 20

6. Battery change
• Switch the transmitter off before changing the battery.
• If you do not use the transmitter for several weeks or months, please
remove the battery as it can leak after some time and damage parts of
the transmitter. Even “leak proof” may leak after some time. Damage
caused by leaking batteries is not covered under warranty.
• Clean the battery contacts from time to time by using a soft cloth
moistened with spirits or alcohol.
• Please do not throw used battery packs away with your household
rubbish, but take them to your local collection points.
• When using the S 910 C handheld transmitter or TS 910 C beltpack
transmitter (fitted with TS 900 AP rechargeable battery pack) use the
beyerdynamic SLG 900 charger only.
7. Before the soundcheck
1. Check the transmitter battery and replace or recharge it if necessary. Use
fresh alkaline batteries only or recharge the rechargeable batteries inside
the S 910 C handheld transmitter or TS 910 C beltpack transmitter (fitted
with TS 900 AP).
2. When the transmitter is switched off and immediately switched on again,
it is possible that the transmitter remains switched off. The cause is the
function that allows to switch the transmitter on / off silently. Should this
problem occur during operation, the battery might have contact problems.
After switching off the transmitter you should wait at least 1 second, until
you switch the transmitter on again.
3. Check the performance area for dropouts. If you find any dropouts, try to
eliminate them by repositioning the antennae or the receiver.
4. The receiving antennas should be placed so that the distance between
receiving antennae and transmitter is at least 3 m. If necessary, use
remote antennae (AT 70 A/B).
8. Positioning of transmitters if interferences
occur
Put all transmitters in their position and switch them on. Switch each
transmitter off one at a time and check the receiver for interference in the
corresponding channel.
The interference is possibly eliminated by changing the squelch.
When using multi-channel-systems, please contact beyerdynamic.
Interferences can also be caused by DVB-T television transmitters in the
neighbourhood.
20
Page 21

21
9. What to do to avoid feedback
Feedback is caused by your microphone getting too close to a loudspeaker.
We recommend:
• Move away from the loudspeaker.
• Turn the microphone away from the loudspeaker.
10. Trouble shooting
Problem Possible Cause Solution
No function • Transmitter and
receiver have different
frequencies
• Insufficient battery
voltage
• Poor battery contact,
battery inserted
incorrectly eingelegt
• Check if transmitter
and receiver have
the same frequency
• Replace the batteries
or recharge them,
if you use
rechargeable
batteries
• Check the battery
and insert it again
No RF-indication
at the receiver
•
Transmission distance
between transmitter
and receiver is too big
• Reduce the
distance between
transmitter and
receiver
Noise/chirping •
Interference from
other transmitters
• Two transmitters are
on the same frequency
• Battery of the
transmitter is too weak
• Switch off the
other transmitters
• Change the
frequency of one
transmitter
• Replace the
batteries
11. Service
In the unlikely event of equipment failure, the product should be returned to
your beyerdynamic dealer. Unauthorised attempts at repair may invalidate the
warranty.
Page 22

12. Licensing
In most countries around the world, wireless systems must be approved for
use by the authorities and it may be necessary to obtain a licence to use it
legally. Your local beyerdynamic dealer will be able to give you details on
wireless system regulations for your area.
The components of the Opus 910 system are approved according to the
directive 99/5/EEC:
TS 910 M, TS 910 C
S 910 M, S 910 C
under the CE 0682 ! identification.
13. Components
Handheld Transmitter
S 910 M UHF handheld transmitter, metal housing, black,
S 910 C UHF handheld transmitter, plastic housing,
Beltpack Transmitter
TS 910 M UHF beltpack transmitter, metal housing,
TS 910 C UHF beltpack transmitter, plastic housing,
22
482 – 518 MHz (US) . . . . . . . . . . . . . . . . . . Order # 705.233
same as above, but 518 – 554 MHz (US). . . Order # 705.241
same as above, but 554 – 590 MHz (US). . . Order # 705.268
same as above, but 590 – 626 MHz (US). . . Order # 705.276
same as above, but 626 – 662 MHz (US). . . Order # 705.284
same as above, but 662 – 698 MHz (US). . . Order # 705.292
black, with charging contacts,
482 – 518 MHz (US) . . . . . . . . . . . . . . . . . . Order # 705.381
same as above, but 518 – 554 MHz (US). . . Order # 705.403
same as above, but 554 – 590 MHz (US). . . Order # 705.411
same as above, but 590 – 626 MHz (US). . . Order # 705.438
same as above, but 626 – 662 MHz (US). . . Order # 705.446
same as above, but 662 – 698 MHz (US). . . Order # 705.454
482 – 518 MHz (US). . . . . . . . . . . . . . . . . . . Order # 705.691
same as above, but 518 – 554 MHz (US). . . Order # 705.705
same as above, but 554 – 590 MHz (US). . . Order # 705.713
same as above, but 590 – 626 MHz (US). . . Order # 705.721
same as above, but 626 – 662 MHz (US). . . Order # 705.748
same as above, but 662 – 698 MHz (US). . . Order # 705.756
with charging contacts,
482 – 518 MHz (US) . . . . . . . . . . . . . . . . . . Order # 705543
same as above, but 518 – 554 MHz (US). . . Order # 705.551
same as above, but 554 – 590 MHz (US). . . Order # 705.578
same as above, but 590 – 626 MHz (US). . . Order # 705.586
same as above, but 626 – 662 MHz (US). . . Order # 705.594
same as above, but 662 – 698 MHz (US). . . Order # 705.608
Page 23

23
14. Optional Accessories
S 910 Handheld Transmitter
Microphone Capsules
CM 930 B Condenser, cardioid, black . . . . . . . . . . . . . Order # 490.539
CM 930 S Condenser, cardioid, silver. . . . . . . . . . . . . . Order # 491.721
DM 960 B Dynamic, hypercardioid, black. . . . . . . . . . . Order # 490.490
DM 960 S Dynamic, hypercardioid, silver . . . . . . . . . . . Order # 490.504
DM 969 S Dynamic, supercardioid, silver . . . . . . . . . . . Order # 490.512
EM 981 S Electret condenser, cardioid, silver . . . . . . . . Order # 490.520
RM 510 Ribbon, dynamic, cardioid, silver . . . . . . . . . Order # 703.109
TS 910 Beltpack Transmitter
Microphones
MCE 5.18 Condenser clip-on microphone,
omnidirectional, black. . . . . . . . . . . . . . . . . Order # 471.879
MCE 10.18 Condenser clip-on microphone,
cardioid, black. . . . . . . . . . . . . . . . . . . . . . . Order # 471.895
MCE 60.18 Condenser clip-onmicrophone,
omnidirectional, black. . . . . . . . . . . . . . . . . Order # 469.548
Opus 54.18 Neckworn microphone, cardioid,
black. . . . . . . . . . . . . . . . . . . . . . . . . . . . . . Order # 464.945
Opus 55.18 Neckworn microphone, omnidirectional,
black. . . . . . . . . . . . . . . . . . . . . . . . . . . . . . Order # 465.356
TG-X 54.18 Neckworn microphone, supercardioid,
black. . . . . . . . . . . . . . . . . . . . . . . . . . . . . . Order # 700.061
TG-X 55.18 Neckworn microphone, omnidirectional,
black. . . . . . . . . . . . . . . . . . . . . . . . . . . . . . Order # 700.096
Cable
MJ 41 G Cable for instruments with 1/4" jack (6.35 mm),
for TS 910 (C / M) beltpack transmitter . . . . Order # 460.087
S 910 C Handheld Transmitter and TS 910 C Beltpack Transmitter
NiMH battery Rechargeable battery, 1.2 V / 2500 mAh
for S 910 C . . . . . . . . . . . . . . . . . . . . . . . . . Order # 903.442
TS 900 AP Rechargeable battery pack, NiMH,
2 x 1.5 V (AA) for TS 910 C . . . . . . . . . . . . . Order # 486.957
SLG 900 Charger with two charging
compartments for S 910 C or TS 910 C. . . . Order # 485.292
Page 24

15. Technical Specifications
Handheld Transmitter
Polar pattern . . . . . . . . . . . . . . . . . . . Hypercardioid (S 910 + DM 960)
Transducer type . . . . . . . . . . . . . . . . . True condenser (S 910 + CM 930)
Frequency range. . . . . . . . . . . . . . . . . 482 – 518 MHz (US)
Modulation . . . . . . . . . . . . . . . . . . . . FM
Nominal deviation . . . . . . . . . . . . . . . ± 40 kHz
Radiated transmitter power . . . . . . . . 10 mW
Compander system. . . . . . . . . . . . . . . NE572
Max. SPL . . . . . . . . . . . . . . . . . . . . . . 146 dB
AF transmission range
S 910 + DM 960 . . . . . . . . . . . . . . . . . 55 - 18,000 Hz (close miking 2 cm)
S 910 + DM 969 . . . . . . . . . . . . . . . . . 65 - 16,000 Hz (close miking 2 cm)
S 910 + EM 981 . . . . . . . . . . . . . . . . . 50 - 18,000 Hz (close miking 2 cm)
S 910 + CM 930 . . . . . . . . . . . . . . . . . . 40 - 20,000 Hz (close miking 2 cm)
S 910 + RM 510. . . . . . . . . . . . . . . . . . . 70 - 14,000 Hz (close miking 2 cm)
Rear attenuation
S 910 + DM 960. . . . . . . . . . . . . . . . . -20 dB at 1 kHz / 120°
S 910 + DM 969. . . . . . . . . . . . . . . . . -15 dB at 1 kHz / 145°
S 910 + EM 981 . . . . . . . . . . . . . . . . . -15 dB at 1 kHz / 180°
S 910 + CM 930. . . . . . . . . . . . . . . . . -20 dB at 1 kHz / 180°
S 910 + RM 510 . . . . . . . . . . . . . . . . . -18 dB at 1 kHz / 180°
Signal-to-noise ratio . . . . . . . . . . . . . . > 110 dB
T.H.D.. . . . . . . . . . . . . . . . . . . . . . . . . < 0.5% at 1 kHz
Transmission range. . . . . . . . . . . . . . . 100 m
Power supply . . . . . . . . . . . . . . . . . . . 2 x 1.5 V batteries (AA) or
Current consumption . . . . . . . . . . . . . approx. 85 mA
Operating time . . . . . . . . . . . . . . . . . . > 20 hours with alkaline batteries
Supercardioid (S 910 + DM 969)
Cardioid (S 910 + RM 510,
S 901 + EM 981, S 910 + CM 930)
Dynamic (S 910 + DM 960,
S 910 + DM 969)
Dynamic, ribbon (S 910 + RM 510)
Electret condenser (S 910 + EM 981)
518 – 554 MHz (US)
554 – 590 MHz (US)
590 – 626 MHz (US)
626 – 662 MHz (US)
662 – 698 MHz (US)
at 80 dB SPL
at 80 dB SPL
at 80 dB SPL
at 80 dB SPL
at 80 dB SPL
rechargeable batteries
24
Page 25

25
Dimensions
Length . . . . . . . . . . . . . . . . . . . . . . . . . . . S 910 C: 188 mm S 910 M: 210.5 mm
Shaftø . . . . . . . . . . . . . . . . . . . . . . . . S 910 C: 38 mm S 910 M: 38 mm
Weight with batteries. . . . . . . . . . . . . S 910 C: 169 g S 910 M: 172 g
Beltpack Transmitter
Frequency range. . . . . . . . . . . . . . . . . 482 – 518 MHz (US)
518 – 554 MHz (US)
554 – 590 MHz (US)
590 – 626 MHz (US)
626 – 662 MHz (US)
662 – 698 MHz (US)
Modulation . . . . . . . . . . . . . . . . . . . . FM
Nominal deviation . . . . . . . . . . . . . . . ± 40 kHz
Radiated transmitter power . . . . . . . . 20 mW
Compander system. . . . . . . . . . . . . . . NE572
Signal-to-noise ratio . . . . . . . . . . . . . . > 110 dB
T.H.D.. . . . . . . . . . . . . . . . . . . . . . . . . < 0.5% at 1 kHz
Frequency response . . . . . . . . . . . . . . 50 Hz - 18,000 Hz
Gain . . . . . . . . . . . . . . . . . . . . . . . . . . 10 mV - 0.3 V adjustable,
at nominal deviation
Power supply . . . . . . . . . . . . . . . . . . . 2 x 1.5 V batteries (AA) or
rechargeable batteries
Current consumption . . . . . . . . . . . . . approx. 85 mA
Operating time . . . . . . . . . . . . . . . . . . > 20 hours with alkaline batteries
Dimensions (L x W x D). . . . . . . . . . . . TS 910 C: 110 x 63 x 21.5 mm
TS 910 M: 110 x 65.5 x 24.5 mm
Weight . . . . . . . . . . . . . . . . . . . . . . . . TS 910 C: 155 g
TS 910 M: 156 g
4-pin connection . . . . . . . . . . . . . . . . Pin 1 = Ground, Pin 2 = IN1,
Pin 3 = IN2,
Pin 4 = +5 V;
refer also to chapter
2.5 “AF Connection”
Page 26

Page 27

Page 28

beyerdynamic GmbH & Co. KG
Theresienstr. 8 | 74072 Heilbronn –Germany
Tel. +49 (0) 7131 / 617 - 0 | Fax +49 (0) 7131 / 617 - 204
info@beyerdynamic.de | www.beyerdynamic.com
For further distributors worldwide, please go to www.beyerdynamic.com
DEF1/PI S910 / TS 910 (11.10) • Subject to change without notice
 Loading...