

Page 1

BEDIENUNGSANLEITUNG
OPERATING INSTRUCTIONS
NOTICE D’UTILISATION
ISTRUZIONI PER L’USO
MANUAL DE INSTRUCCIONES
Инструкция по эксплуатации
KÄYTTÖOHJE
BRUKSANVISNING
RSX 700
Funkkopfhörer-System
Wireless Headphones
Système de casque sans fil
Sistema di cuffie stereo
Sistema de auriculares inalámbricos
Комплект беспроводных наушников
Johdoton kuulokejärjestelmä
Trådlöst hörlurssystem
Page 2

3
BEDIENUNGSANLEITUNG RSX 700
OPERATING INSTRUCTIONS RSX 700
NOTICE D’UTILISATION RSX 700
deutschenglishfrançais
INHALT / CONTENTS / SOMMAIRE
Sicherheitsinformationen . . . . . . . . . . . . . . . . . . . . . . . . . . . . . Seite 8
1. Sender . . . . . . . . . . . . . . . . . . . . . . . . . . . . . . . . . . . . . . . Seite 9
1.1 Inbetriebnahme Sender . . . . . . . . . . . . . . . . . . . . . . . . . . Seite 9
2. Kopfhörer . . . . . . . . . . . . . . . . . . . . . . . . . . . . . . . . . . . . Seite 11
2.1 Inbetriebnahme Kopfhörer. . . . . . . . . . . . . . . . . . . . . . . . Seite 11
3. Aufladen der Akkus . . . . . . . . . . . . . . . . . . . . . . . . . . . . . Seite 12
4. Pflege . . . . . . . . . . . . . . . . . . . . . . . . . . . . . . . . . . . . . . . Seite 13
5. Hinweise für störungsfreien Empfang. . . . . . . . . . . . . . . . Seite 13
6. Fehlerbehebung. . . . . . . . . . . . . . . . . . . . . . . . . . . . . . . . Seite 14
7. Technische Daten. . . . . . . . . . . . . . . . . . . . . . . . . . . . . . . Seite 15
8. Entsorgung . . . . . . . . . . . . . . . . . . . . . . . . . . . . . . . . . . . Seite 15
Konformitätserklärung . . . . . . . . . . . . . . . . . . . . . . . . . . . . . . . Seite 72
Safety Information . . . . . . . . . . . . . . . . . . . . . . . . . . . . . . . . . . Page 16
1. Transmitter. . . . . . . . . . . . . . . . . . . . . . . . . . . . . . . . . . . . Page 17
1.1 How to operate the Transmitter . . . . . . . . . . . . . . . . . . . . Page 17
2. Headphone . . . . . . . . . . . . . . . . . . . . . . . . . . . . . . . . . . . Page 19
2.1 How to operate the Headphone. . . . . . . . . . . . . . . . . . . . Page 19
3. Charging of rechargeable Batteries . . . . . . . . . . . . . . . . . Page 20
4. Maintenance . . . . . . . . . . . . . . . . . . . . . . . . . . . . . . . . . . Page 21
5. Tips for a noise-free Reception . . . . . . . . . . . . . . . . . . . . . Page 21
6. Trouble Shooting . . . . . . . . . . . . . . . . . . . . . . . . . . . . . . . Page 22
7. Technical Specifications . . . . . . . . . . . . . . . . . . . . . . . . . . Page 23
8. Disposal . . . . . . . . . . . . . . . . . . . . . . . . . . . . . . . . . . . . . . Page 23
Declaration of Conformity . . . . . . . . . . . . . . . . . . . . . . . . . . . . Page 72
Consignes de sécurité. . . . . . . . . . . . . . . . . . . . . . . . . . . . . . . . Page 24
1. Émetteur . . . . . . . . . . . . . . . . . . . . . . . . . . . . . . . . . . . . . Page 25
1.1 Mise en service de l’émetteur. . . . . . . . . . . . . . . . . . . . . . Page 25
2. Casque . . . . . . . . . . . . . . . . . . . . . . . . . . . . . . . . . . . . . . Page 27
2.1 Mise en service du casque . . . . . . . . . . . . . . . . . . . . . . . . Page 27
3. Chargement des accumulateurs. . . . . . . . . . . . . . . . . . . . Page 28
4. Entretien . . . . . . . . . . . . . . . . . . . . . . . . . . . . . . . . . . . . . Page 29
5. Conseils pour une réception sans parasites. . . . . . . . . . . . Page 29
6. Dépannage . . . . . . . . . . . . . . . . . . . . . . . . . . . . . . . . . . . Page 30
7. Spécifications techniques . . . . . . . . . . . . . . . . . . . . . . . . . Page 31
8. Evacuation . . . . . . . . . . . . . . . . . . . . . . . . . . . . . . . . . . . . Page 31
Déclaration de conformité . . . . . . . . . . . . . . . . . . . . . . . . . . . . Page 72
Page 3

5
ISTRUZIONI PER L’USO RSX 700
MANUAL DE INSTRUCCIONES RSX 700
ИНСТРУКЦИЯ ПО ЭКСПЛУАТАЦИИ RSX 700
italianoespañol
Русский
CONTENUTO / CONTENIDO / СОДЕРЖАНИЕ
Informazioni di sicurezza. . . . . . . . . . . . . . . . . . . . . . . . . . . . . . Pagina 32
1. Trasmettitore . . . . . . . . . . . . . . . . . . . . . . . . . . . . . . . . . . Pagina 33
1.1 Messa in funzione del trasmettitore . . . . . . . . . . . . . . . . . Pagina 33
2. Cuffie . . . . . . . . . . . . . . . . . . . . . . . . . . . . . . . . . . . . . . . Pagina 35
2.1 Messa in funzione delle cuffie . . . . . . . . . . . . . . . . . . . . . Pagina 35
3. Carica degli accumulatori. . . . . . . . . . . . . . . . . . . . . . . . . Pagina 37
4. Pulizia . . . . . . . . . . . . . . . . . . . . . . . . . . . . . . . . . . . . . . . Pagina 37
5. Indicazioni per una ricezione senza disturbi . . . . . . . . . . . Pagina 37
6. Risoluzione dei problemi . . . . . . . . . . . . . . . . . . . . . . . . . Pagina 38
7. Dati tecnici. . . . . . . . . . . . . . . . . . . . . . . . . . . . . . . . . . . . Pagina 39
8. Smaltimento . . . . . . . . . . . . . . . . . . . . . . . . . . . . . . . . . . Pagina 39
Dichiarazione di conformità . . . . . . . . . . . . . . . . . . . . . . . . . . . Pagina 72
Informaciones de seguridad . . . . . . . . . . . . . . . . . . . . . . . . . . . Página 40
1. Emisor . . . . . . . . . . . . . . . . . . . . . . . . . . . . . . . . . . . . . . . Página 41
1.1 Puesta en funcionamento del emisor . . . . . . . . . . . . . . . . Página 41
2. Auriculares. . . . . . . . . . . . . . . . . . . . . . . . . . . . . . . . . . . . Página 43
2.1 Puesta en funcionamento de los auriculares . . . . . . . . . . . Página 43
3. Carga de los acumuladores . . . . . . . . . . . . . . . . . . . . . . . Página 44
4. Mantenimiento . . . . . . . . . . . . . . . . . . . . . . . . . . . . . . . . Página 45
5. Consejos para disfrutar de une recepción libre de
interferencias . . . . . . . . . . . . . . . . . . . . . . . . . . . . . . . . . . Página 45
6. Solución de problemas . . . . . . . . . . . . . . . . . . . . . . . . . . . Página 46
7. Datos técnicos . . . . . . . . . . . . . . . . . . . . . . . . . . . . . . . . . Página 47
8. Gestión de residuos . . . . . . . . . . . . . . . . . . . . . . . . . . . . . Página 47
Declaración de conformidad . . . . . . . . . . . . . . . . . . . . . . . . . . . Página 72
Информация по безопасности эксплуатации . . . . . . . . . . . Страница 48
1. Передатчик . . . . . . . . . . . . . . . . . . . . . . . . . . . . . . . . . . Страница 49
1.1 Подключение передатчика . . . . . . . . . . . . . . . . . . . . . Страница 49
2. Наушники. . . . . . . . . . . . . . . . . . . . . . . . . . . . . . . . . . . . Страница 51
2.1 Подключение наушников. . . . . . . . . . . . . . . . . . . . . . . Страница 51
3. Зарядка аккумуляторов . . . . . . . . . . . . . . . . . . . . . . . Страница 52
4. Уход и обслуживание. . . . . . . . . . . . . . . . . . . . . . . . . . Страница 53
5. Обеспечение устойчивого сигнала . . . . . . . . . . . . . . . Страница 53
6. Устранение неисправностей . . . . . . . . . . . . . . . . . . . . Страница 54
7. Технические характеристики. . . . . . . . . . . . . . . . . . . . Страница 55
8. Утилизация . . . . . . . . . . . . . . . . . . . . . . . . . . . . . . . . . . Страница 55
Заявление производителя о соответствии
действующим нормам . . . . . . . . . . . . . . . . . . . . . . . . . . . . . . Страница 72
Page 4

7
KÄYTTÖOHJE RSX 700
BRUKSANVISNING RSX 700
suomisvenska
SISÄLLYSLUETTELO / INDEX
Turvaohjeet. . . . . . . . . . . . . . . . . . . . . . . . . . . . . . . . . . . . . . . . Sivu 56
1. Lähetin . . . . . . . . . . . . . . . . . . . . . . . . . . . . . . . . . . . . . . Sivu 57
1.1 Lähettimen käyttö . . . . . . . . . . . . . . . . . . . . . . . . . . . . . . Sivu 57
2. Kuulokkeet . . . . . . . . . . . . . . . . . . . . . . . . . . . . . . . . . . . Sivu 59
2.1 Kuulokkeiden käyttö . . . . . . . . . . . . . . . . . . . . . . . . . . . . Sivu 59
3. Akkujen lataaminen . . . . . . . . . . . . . . . . . . . . . . . . . . . . . Sivu 60
4. Puhdistus ja huolto . . . . . . . . . . . . . . . . . . . . . . . . . . . . . Sivu 61
5. Vihjeitä häiriöiden poistamiseksi. . . . . . . . . . . . . . . . . . . . Sivu 61
6. Vianmääritys . . . . . . . . . . . . . . . . . . . . . . . . . . . . . . . . . . Sivu 62
7. Tekniset tiedot . . . . . . . . . . . . . . . . . . . . . . . . . . . . . . . . . Sivu 63
8. Hävittäminen . . . . . . . . . . . . . . . . . . . . . . . . . . . . . . . . . . Sivu 63
EC-Declaration of Conformity. . . . . . . . . . . . . . . . . . . . . . . . . . Sivu 72
Säkerhetsföreskrifter. . . . . . . . . . . . . . . . . . . . . . . . . . . . . . . . . Sida 64
1. Sändaren . . . . . . . . . . . . . . . . . . . . . . . . . . . . . . . . . . . . . Sida 65
1.1 Användning av sändaren . . . . . . . . . . . . . . . . . . . . . . . . . Sida 65
2. Hörlurarna . . . . . . . . . . . . . . . . . . . . . . . . . . . . . . . . . . . . Sida 67
2.1 Användning av hörlurarna . . . . . . . . . . . . . . . . . . . . . . . . Sida 67
3. Uppladdning av batterier . . . . . . . . . . . . . . . . . . . . . . . . . Sida 68
4. Rengöring och skötsel . . . . . . . . . . . . . . . . . . . . . . . . . . . Sida 69
5. Tips för att undvika störningar . . . . . . . . . . . . . . . . . . . . . Sida 69
6. Felsökning . . . . . . . . . . . . . . . . . . . . . . . . . . . . . . . . . . . . Sida 70
7. Tekniska data. . . . . . . . . . . . . . . . . . . . . . . . . . . . . . . . . . Sida 71
8. Avfallshantering. . . . . . . . . . . . . . . . . . . . . . . . . . . . . . . . Sida 71
EC-Declaration of Conformity. . . . . . . . . . . . . . . . . . . . . . . . . . Sida 72
Page 5
deutsch
98
FUNKKOPFHÖRER-SYSTEM RSX 700
Sie haben sich für das Funkkopfhörer-Set RSX 700 von beyerdynamic entschieden.
Wir danken für Ihr Vertrauen.
Das Funkkopfhörer-Set RSX 700 arbeitet im 2,4 GHz-Bereich. Ein Empfang ist im
Umkreis von bis zu 20 Metern auch durch Wände und Zimmerdecken hindurch
möglich. Mit dem Kopfhörer haben Sie sowohl in der Wohnung als auch draußen
volle Bewegungsfreiheit. Mit einem Sender können Sie beliebig viele Kopfhörer
verwenden.
Sicherheitsinformationen
• Betreiben Sie den Sender nur mit dem mitgelieferten Netz teil. Überprüfen
Sie, ob die Anschlusswerte mit der vorhandenen Netzstromversorgung übereinstimmen. Bei Anschluss des Systems an die falsche Stromversorgung können
ernsthafte Schäden entstehen.
• Das Netzteil muss so installiert werden, dass es bei Bedarf leicht vom Netz
getrennt werden kann.
• Wenn Sie Leitungen umstecken oder den Sender an einen an deren Platz
stellen wollen, trennen Sie immer die Ver bin dung zum Netz.
• Lassen Sie Ar bei ten an stromführenden Teilen nur von ge schul tem Fach personal durchführen. Öffnen Sie nie selbst elektronische Geräte, Sie verlieren
sonst Ihre Garantie an sprüche.
• Benutzen Sie die Geräte nur in trockenen Räumen. Sender und Netzteil
lassen Sie bitte immer im Haus, mit dem Kopfhörer können Sie auch
draußen hören, wenn es trocken ist.
• Setzen Sie das Netzteil niemals Tropf- oder Spritzwasser aus.
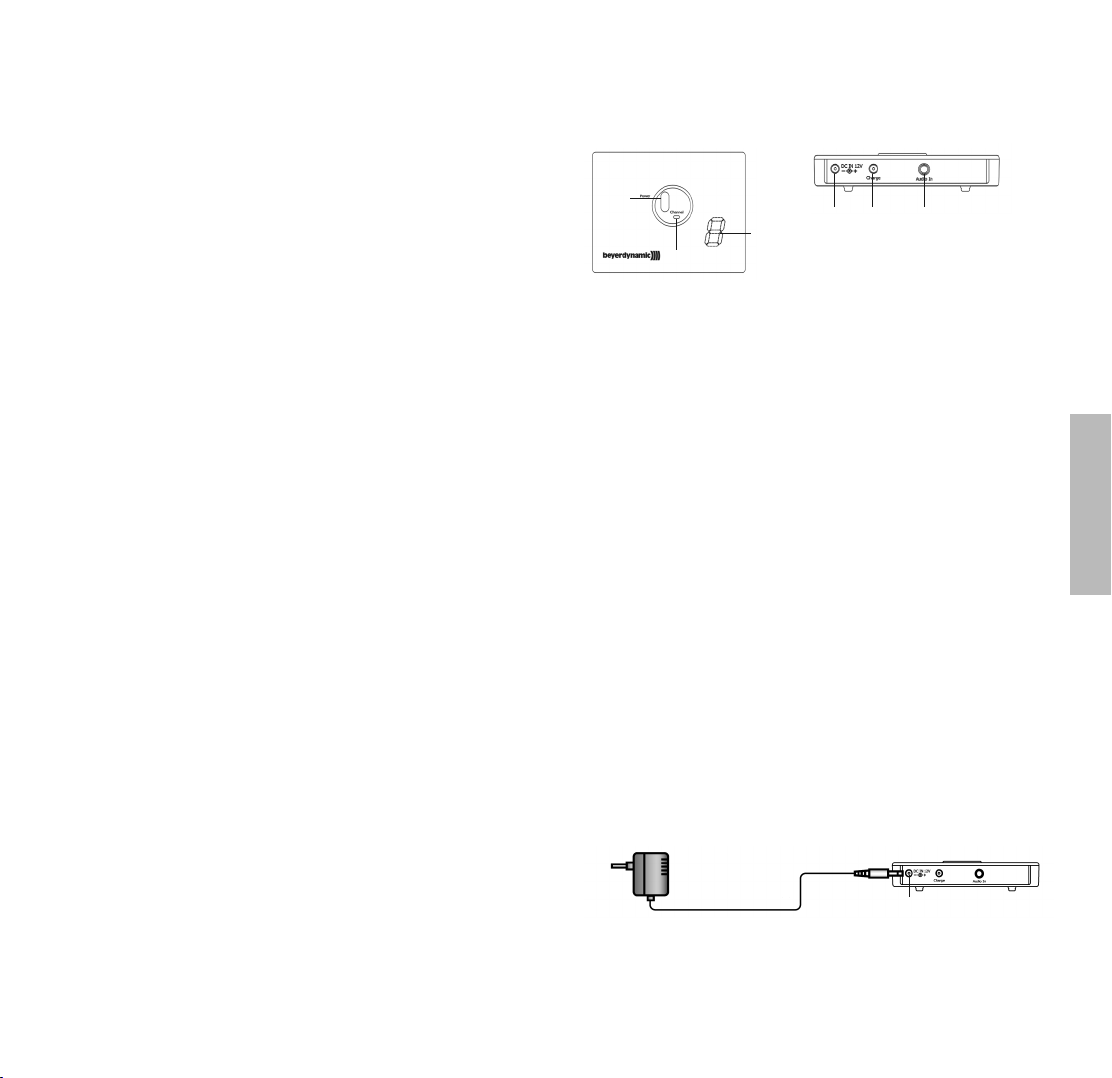
1. Sender
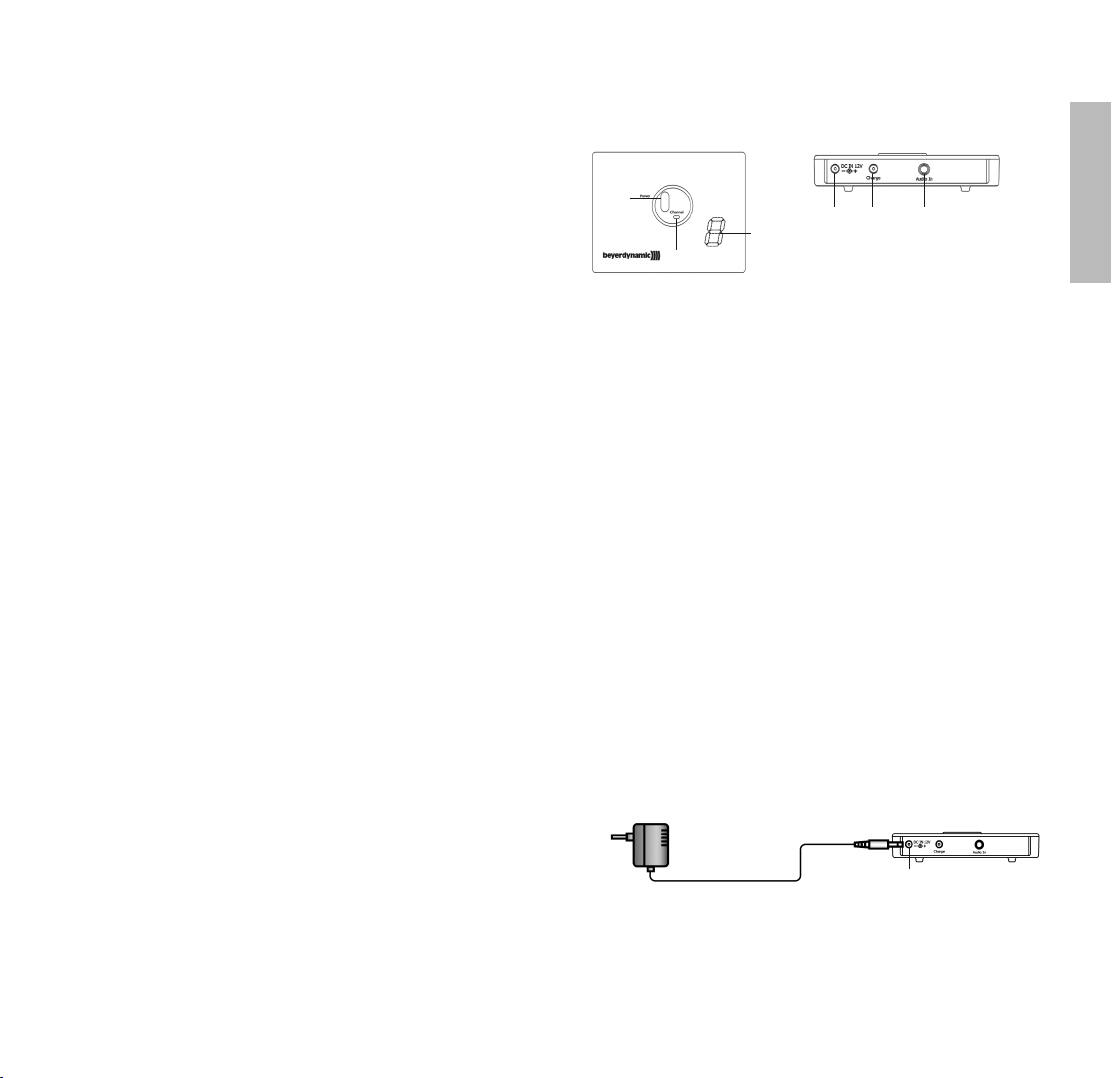
Bedienelemente
Ansicht von oben Ansicht von hinten
Lieferumfang
Dieses Funkkopfhörer-Set besteht aus folgendem Zubehör:
1 Sender
1 Kopfhörer
1 AC/DC-Adapter 12 Volt/300 mA
1 Audiokabel (3,5 mm Stereoklinke - 3,5 mm Stereoklinke)
1 Adapterkabel mit 2 Cinch-Steckern, rot (rechts) und weiß (links)
1 Adapter (3,5 mm Stereoklinke - 6,35 mm Stereoklinke)
1 Ladekabel
2 NiMH-Akkus vom Typ AAA, 1,2 V, 1000 mAh
1.1 Inbetriebnahme Sender
Aufstellort
• Stellen Sie den Sender in der Nähe Ihrer Tonquelle (HiFi-Anlage, CD/DVDPlayer, Fernseher etc.) auf. Für einen störungs frei en Empfang sollten Sie den
Sender jedoch nicht direkt neben Funkgeräten, Mobiltelefonen, Mikrowellen oder über der Bildröhre von Fernsehern oder Monitoren betreiben.
• Stellen Sie den Sender nicht direkt in der Sonne oder in der Nähe von
Metallgegenständen auf und vermeiden Sie es ebenso Metallgegenstände
auf dem Sender abzustellen.
Netzanschluss
• Schließen Sie das Stromversorgungskabel an die Buchse an und stecken
Sie das Netzteil in die Steckdose. Das Netzteil des Senders kann dauernd am
Stromnetz ange schlossen sein, ohne dass das Netzteil oder der Sender
Scha den erleiden.
Betriebsanzeige leuchtet rot sobald der Sender überträgt
Kanalwahlschalter zum Einstellen der Sendefrequenz
Kanalanzeige, schaltbar von 0 - 7
Wichtig: „0“ zeigt ebenfalls einen Kanal an.
Buchse zum Anschluss des Netzteils für Stromversorgung des Senders
Buchse zum Anschluss des Ladekabels
Audioeingangsbuchse (Klinke 3,5 mm)
Europäische Vorschriften
Dieses Produkt wurde im Einklang mit der europäischen R&TTE-Richtlinie
1999/5/EEC konstruiert, geprüft und hergestellt.
Laut dieser Richtlinie kann dieses Produkt in den folgenden Ländern benutzt
werden:
Belgien, Dänemark, Deutschland, Estland, Finnland, Frankreich, Griechenland,
Irland, Island, Italien, Lettland, Liechtenstein, Litauen, Luxemburg, Malta,
Niederlande, Norwegen, Österreich, Polen, Portugal, Schweiz, Schweden,
Slowakei, Slowenien, Spanien, Tschechische Republik, Ungarn, Vereinigtes
Königreich und Zypern.
Darüber hinaus ist dieser Frequenzbereich auch in vielen anderen Ländern
zugelassen.
Stromversorgungskabel an den
Sender anschließen
Netzteil an Steckdose anschließen
Page 6
deutsch
1110
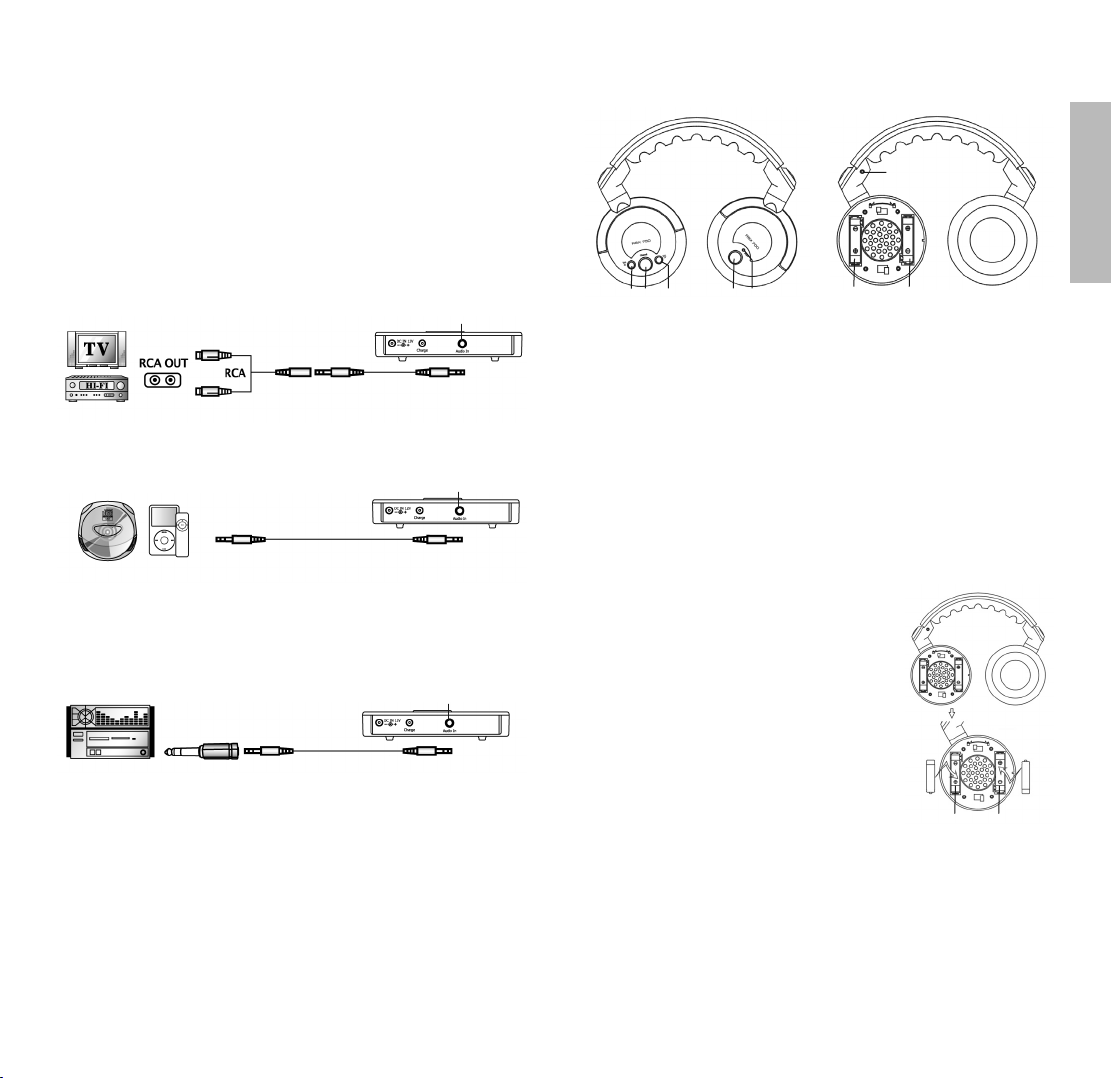
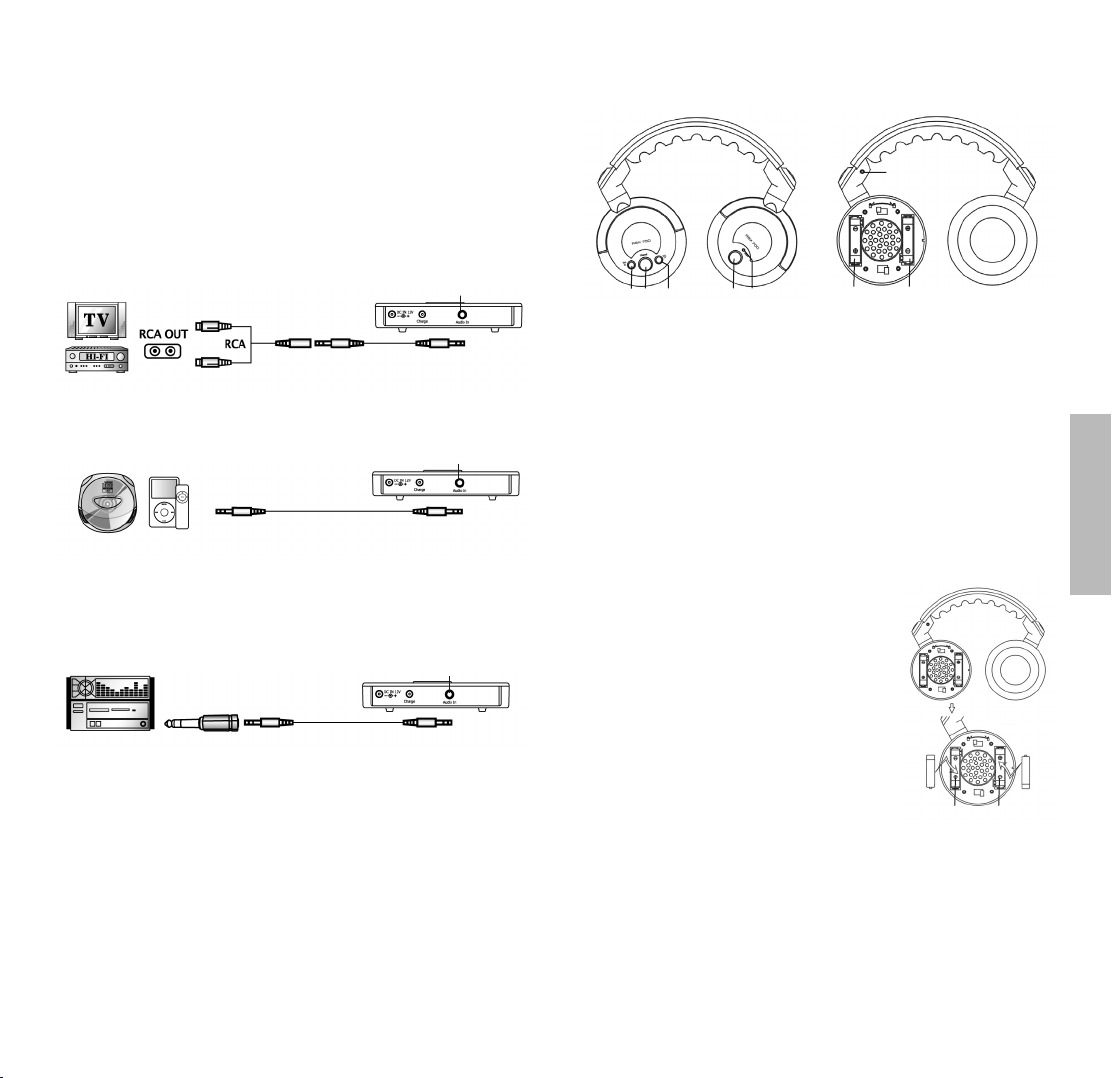
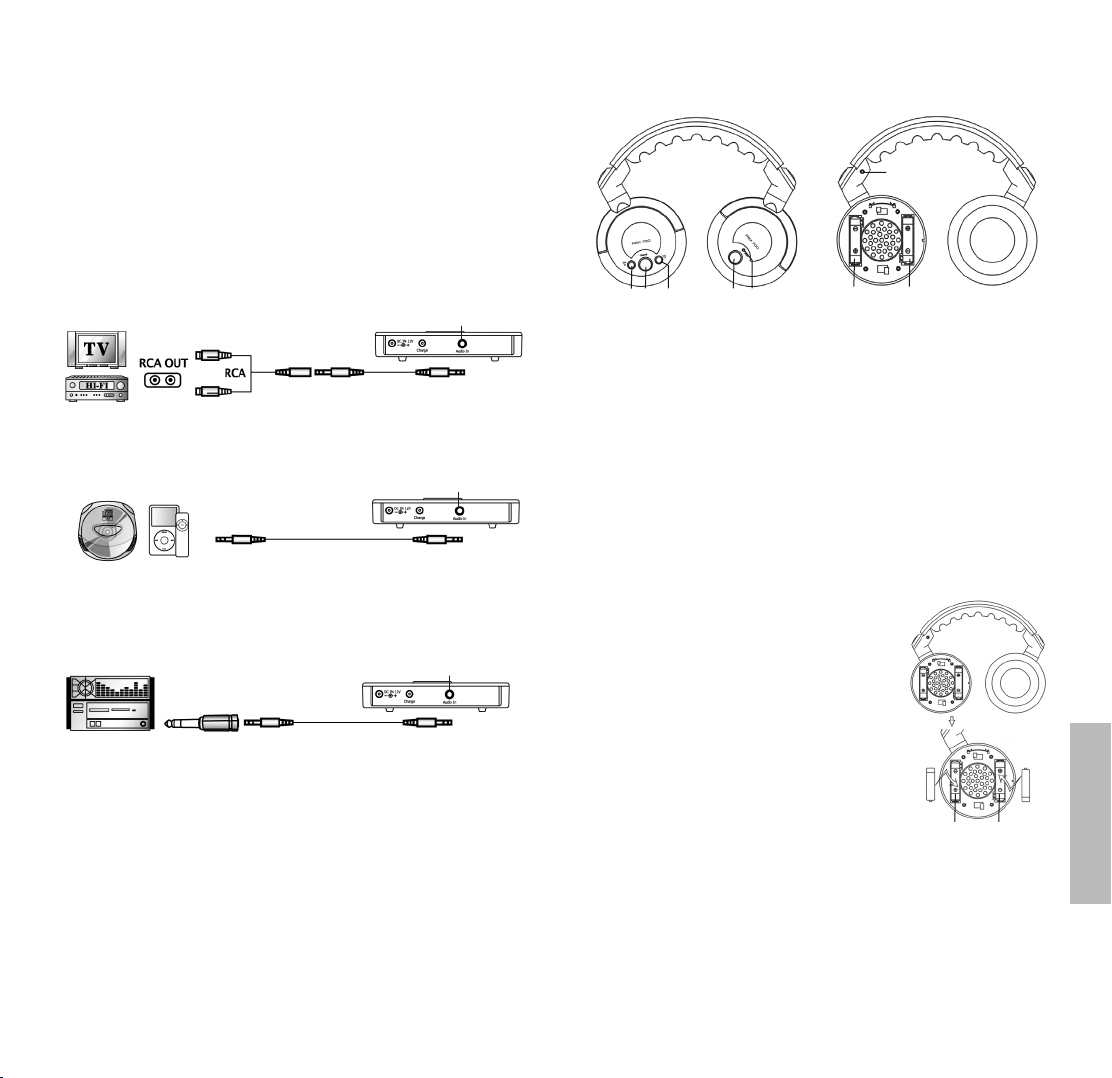
Audioanschluss
• Verbinden Sie mit dem mitgelieferten Audiokabel und Adapterkabel die
Audioeingangsbuchse des Senders vorzugsweise mit den Cinch-Buchsen
Ihrer Audioquelle/Stereoanlage.
Wichtig: Achten Sie beim Anschluss an die Cinch-Buchsen auf die richtige
Polung der Audiokabel, d. h. rechts zu rechts (rot) bzw. links zu links (weiß).
• Alternativ ist ein Anschluss an den Kopfhörerausgang (3,5 mm Klinke;
6,35 mm Klinke mit entsprechendem Adapter) Ihrer Audioquelle/Stereoanlage
möglich. Bitte beachten Sie, dass in diesem Fall die Lautstärke der Audioquelle (Fernseher, Stereoanlage) genügend aufgedreht ist.
Sender an TV-Gerät oder Stereoanlage über Cinch anschließen
Kabel an Audioeingang
des Senders anschließen
Sender an CD- oder MP3-Player über 3,5 mm Klinke anschließen
CD- oder MP3-Player
Lautstärke muss genügend
aufgedreht sein
Sender an Stereoanlage über 6.35 mm Klinke anschließen
Einschalten
• Schalten Sie die Tonquelle ein, mit welcher der Sender verbun den ist.
Sobald dem Sender ein Signal zugespielt wird, leuchtet die rote Betriebsanzeige .
Achtung:
• Wird dem Sender kein Signal zugespielt, schaltet er sich nach
ca. 3 Minuten ab, wobei die Betriebsanzeige erlischt.
• Wird dem Sender erneut ein Signal zugespielt, wird dieser automatisch
eingeschaltet. Der Kanal entspricht dem vorher gewählten, die
Anzeige zeigt aber immer „0“ an.
Taster zum Erhöhen der Lautstärke des Kopf hörers
Channel-Taster für automatischen Suchlauf zum Einstellen der
Emp fangs fre quenz des Hörers auf die Frequenz des Senders
Taster zum Reduzieren der Lautstärke des Kopfhörers
Ein-/Ausschalter
Betriebskontroll-LED leuchtet grün, wenn der Kopfhörer einge schal tet ist;
leuchtet rot während des Ladevorgangs
Ladebuchse zum Anschluss des Ladekabels der linken Hörerseite
Batteriefach zum Einlegen der mitgelieferten Akkus der linken Hörerseite
2.1 Inbetriebnahme Kopfhörer
Akkus einlegen/wechseln
• Drehen Sie die Ohrmuschel der linken Hörer-
seite im Uhrzeigersinn und ziehen Sie leicht an
der Ohrmuschel, um sie abzunehmen.
• Legen Sie die Akkus (AAA-Größe, 1,2 V)
gemäß den Symbolen „+/-“ in die vorgesehenen Fächer ein.
Achtung: Die Akkus müs sen vor dem
ersten Gebrauch aufgeladen werden
(siehe 3. Aufladen der Akkus).
• Verwenden Sie andere, als die von
beyerdynamic mitgelieferten Akkus, müssen Sie
am Minuspol das Ende abisolieren, d.h. mit
einem Messer oder ähnlichem den äußeren
Kunststoffmantel etwas entfernen, so dass die
seitlichen Ladekontakte im Batteriefach direkt
Kontakt haben.
• Anstelle von Akkus können Sie auch bau gleiche Batterien verwenden.
Achtung: Auf keinen Fall den Kunststoffmantel an der Batterie
entfernen, sonst besteht Explosionsgefahr falls der Kopfhörer aus
Versehen geladen wird!
• Setzen Sie die Ohrmuschel wieder auf die linke Hörerseite auf und drehen
Sie sie entgegen dem Uhrzeigersinn, bis sie einrastet.
Drücken Sie beim Drehen etwas auf die Ohrmuschel.
Wichtig: Beachten Sie, dass die Vorhängeschlosssymbole in der
Ohr muschel beim Aufsetzen übereinstimmen.
Lautstärke an Stereoanlage
muss genügend aufgedreht
sein
Kabel an Audioeingang
des Senders anschließen
Kabel an Audioeingang
des Senders anschließen
2. Kopfhörer
Bedienelemente
Page 7
deutsch
1312
Einschalten
• Schalten Sie den Kopfhörer ein . Die Betriebskontroll-LED leuchtet
grün.
Ausschalten
• Schalten Sie den Hörer nach Gebrauch aus . Die Be triebs kontroll-LED
erlischt.
Empfang und Lautstärke einstellen
• Setzen Sie den Kopfhörer seitenrichtig auf. Stellen Sie die Lautstärke mit
den Tastern und ent spre chend Ihren Bedürf nissen ein. Mit dem Taster
wird die Lautstärke erhöht; mit Taster reduziert.
• Mit dem Channel-Taster können Sie über einen Suchlauf die Emp fangs fre quenz des Hörers automatisch auf die Sendefrequenz des Senders einstellen.
• Sie sollten sich nun frei mit dem Kopfhörer von Raum zu Raum oder im
Freien bewegen können.
• Wichtig:
Stellen Sie die Lautstärke nicht zu hoch ein, denn lautes Hören
schädigt Ihr Gehör. Bereits vorhandene Hörschäden können weiter
zunehmen.
Frequenz wechseln
• Wenn es zu Störungen durch andere Geräte oder durch Interferenzen
kommt, sollten Sie am Sender mit dem Kanalwahlschalter eine andere
Frequenz wählen und diese am Hörer wieder entsprechend mit dem
Channel-Taster über den Suchlauf automatisch einstellen.
• Wichtig:
Beim Ausschalten des Senders wird der Kanal gespeichert, die Anzeige
zeigt beim Wiedereinschalten jedoch immer „0“ an.
LED-Anzeige / Betriebszeit
• Wenn die Akkus leer sind, erlischt die Betriebskontroll-LED . Die Betriebszeit der Akkus beträgt ca. 6 Stunden.
• Je nachdem, wie laut Sie mit dem Kopfhörer hören, kann die Betriebszeit
jedoch von diesem Wert abweichen.
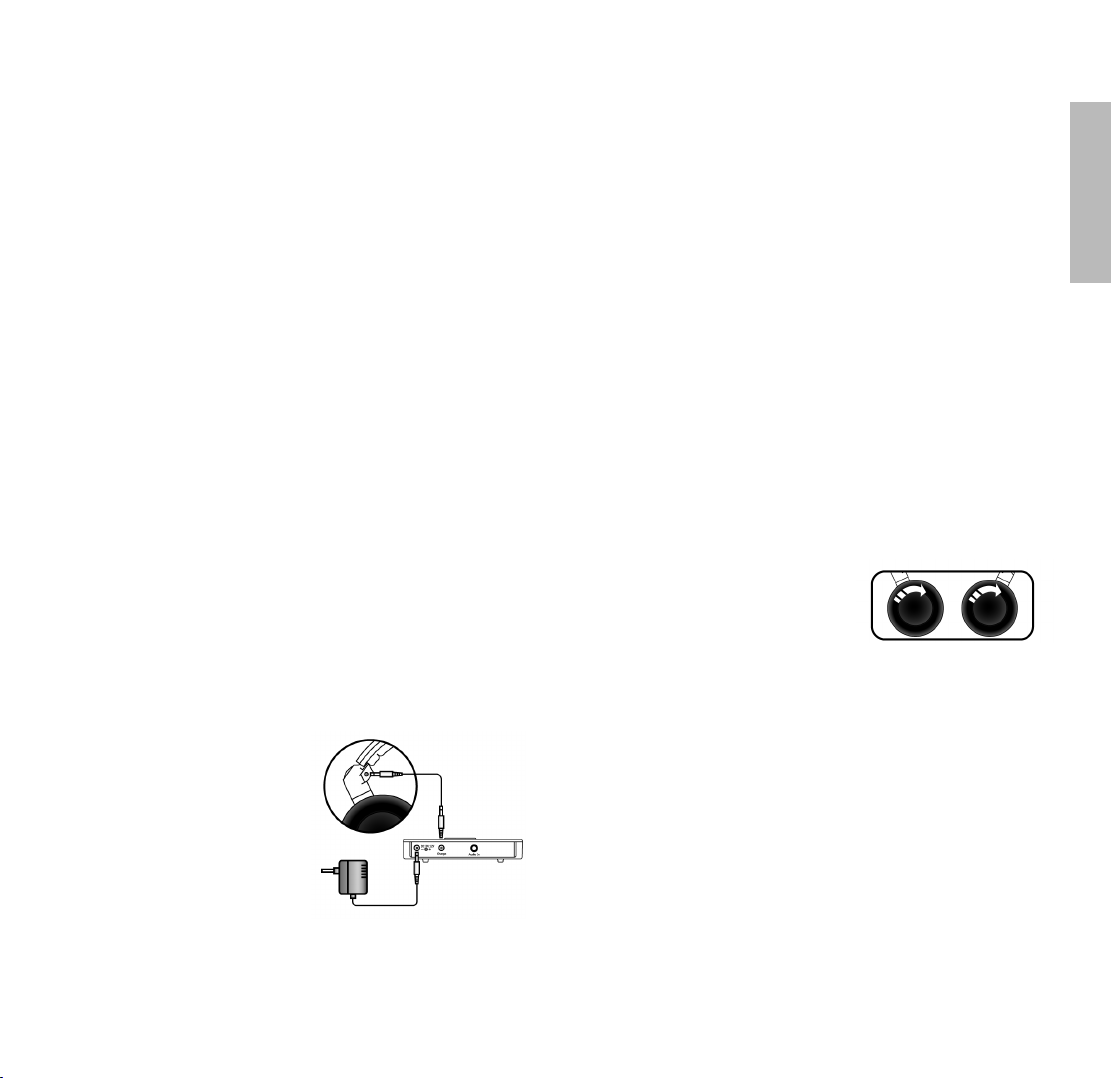
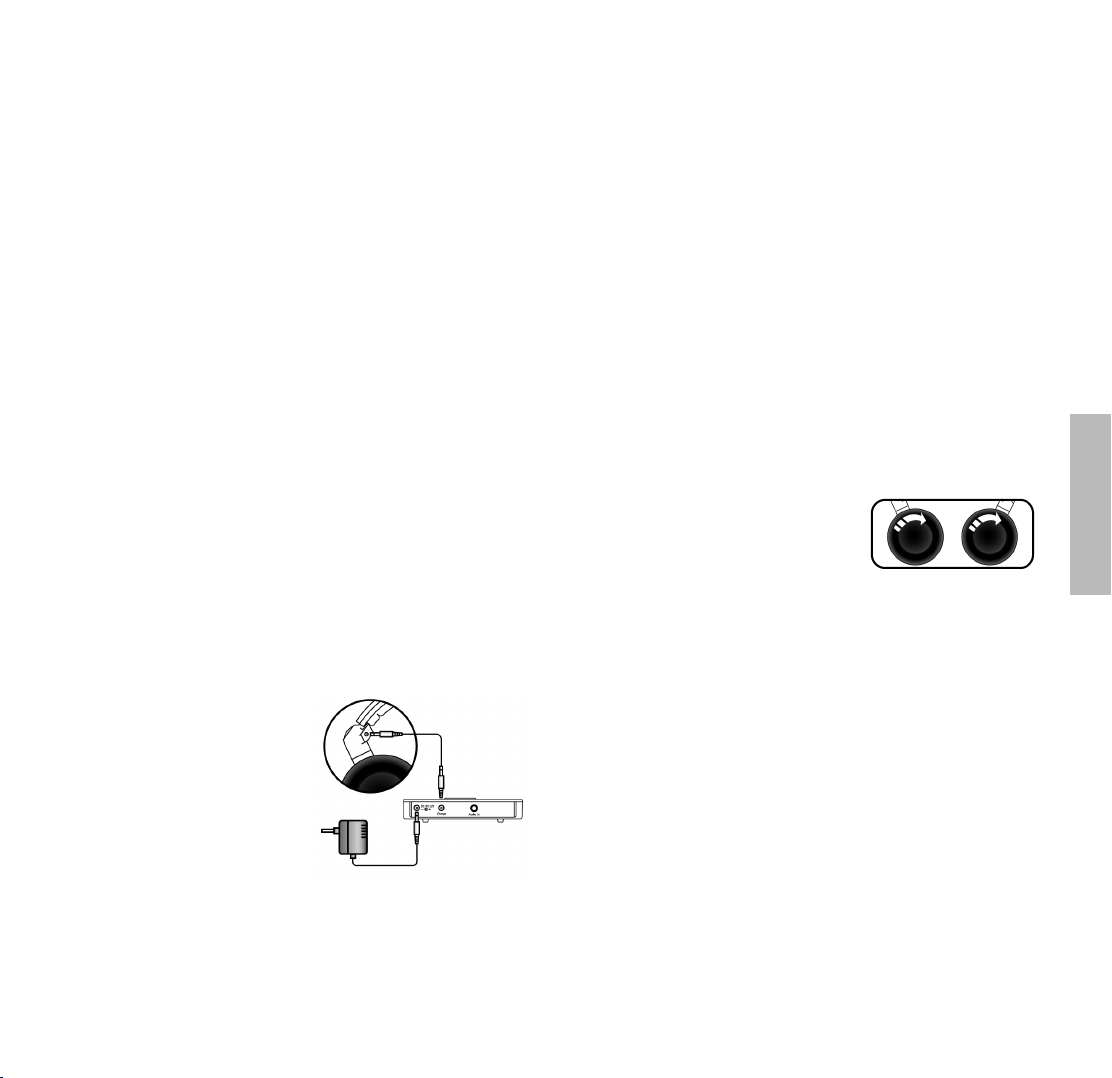
3. Aufladen der Akkus
• Achten Sie darauf, dass wiederaufladbare Akkus eingesetzt sind (keine
Batterien).
• Schalten Sie den Kopfhörer aus
und schließen Sie das Ladekabel an
die Ladebuchse des Kopfhörers an.
• Schließen Sie das andere Ende des Ladekabels an die Ladebuchse des
Senders an.
• Während des Ladevorgangs leuchtet
die Betriebskontroll-LED am Hörer
rot. Auch wenn die Akkus voll geladen sind, leuchtet die BetriebskontrollLED weiterhin rot.
• Beim ersten Ladevorgang sind die Akkus nach ca. 24 Stunden voll
aufgeladen und Sie können den Ladevorgang beenden. Danach benötigt
jeder weitere Ladevorgang ca. 6 bis 8 Stunden.
Wichtige Hinweise:
• Wenn Sie den Ladevorgang vorzeitig unterbrechen, sind die Akkus nur unvollständig aufgeladen, die Betriebszeit wird kürzer. Wird der Ladevorgang
wieder aktiviert, dauert es je nach Ladezustand der Akkus bis zu 14 Std. bis
die Akkus voll geladen sind.
• Nach langem Gebrauch kann es sein, dass Ihre Akkus verbraucht sind und
sich nicht mehr ausreichend aufladen lassen. Diese Akkus müssen durch
neue ersetzt werden. Neue Akkus bekom men Sie z.B. bei Ihrem
beyerdynamic-Händler.
• Sie können die Akkus auch außerhalb des Kopfhörers mit einem geeigneten
externen Lade gerät aufladen.
• Wenn Sie den Kopfhörer für Wochen oder Monate nicht benutzen,
entfernen Sie bitte die Akkus/Batterien aus dem Kopfhörer. Akkus/Batterien
können nach längerem Nichtgebrauch auslaufen und Teile des Kopfhörers
zerstören.
Auch die Bezeichnung „Leak proof“ auf Akkus/Batterien ist keine Garantie
gegen Auslaufen.
• Werfen Sie verbrauchte Akkus/Batterien nicht in den Hausmüll, sondern
geben Sie diese an den örtlichen Sammel stellen ab.
Netzteil an Steckdose und Sender
anschließen
Ladekabel an
Kopfhörer
und Sender
an schließen
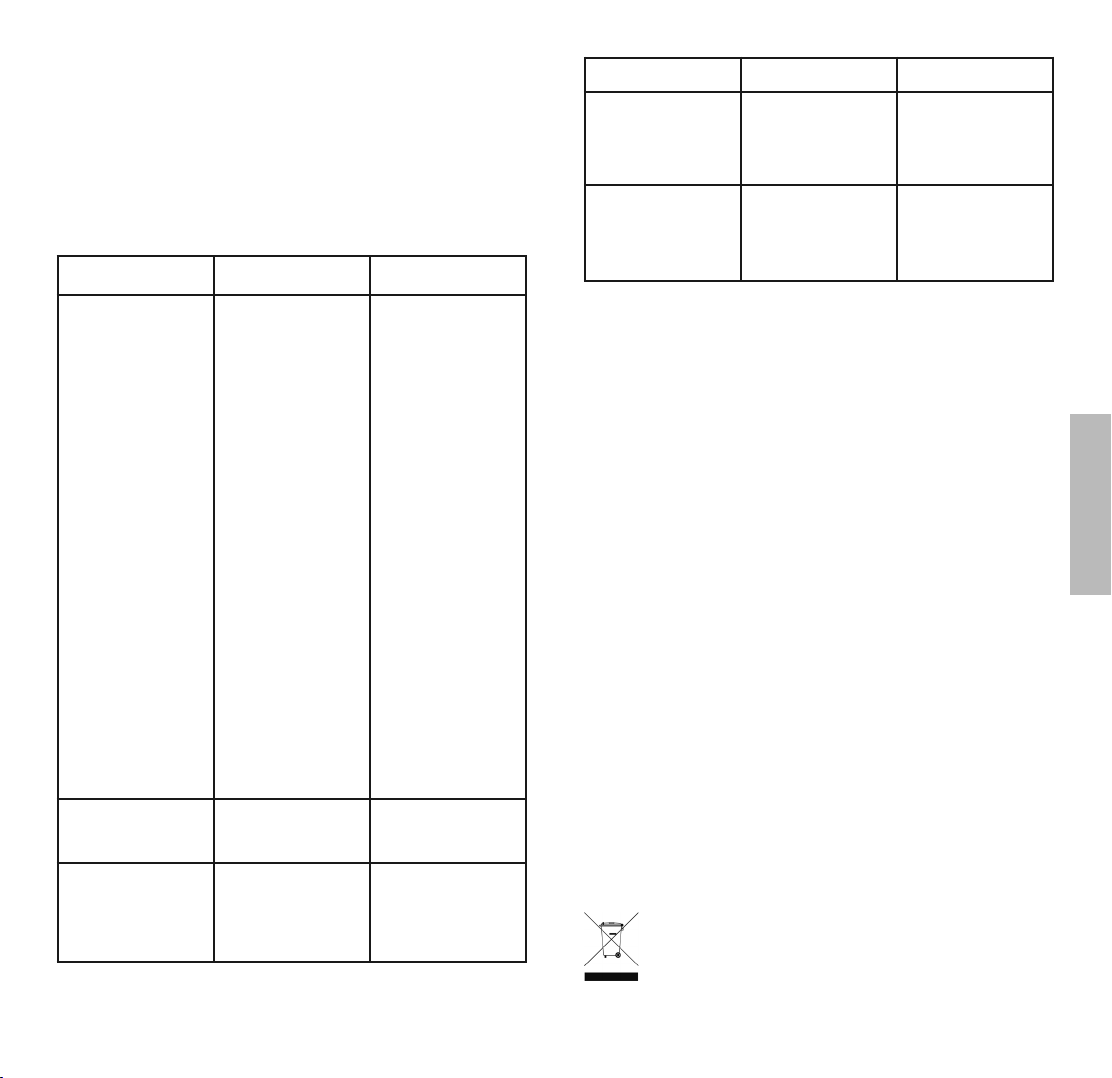
4. Pflege
• Reinigen Sie den Kopfhörer und Sender gelegentlich mit einem weichen,
feuchten Tuch. Achten Sie darauf, dass kein Wasser in die Ohrmuscheln
hineinläuft. Verwenden Sie auf keinen Fall Lösungs- oder Reinigungsmittel.
• Sobald die Ohrpolster unansehnlich geworden sind, sollten Sie sie austauschen. Austausch-Ohrpolster bekommen Sie bei Ihrem beyerdynamicHändler.
• Nehmen Sie die alten Ohrpolster vor sichtig
vom Gehäuse ab, indem Sie sie im
Uhrzeigersinn drehen. Legen Sie die
neuen Ohrpolster auf und drehen Sie
sie entgegen dem Uhrzeigersinn fest, bis
die Bajonettverriegelung einrastet.
5. Hinweise für einen störungsfreien Empfang
• Bei Störungen und Reichweiteproblemen sollten Sie den Sender an einem
anderen Ort aufstellen.
• Ändert sich an den Empfangsbedingungen nichts, ziehen Sie den Netzteilstecker aus dem Sender und hören mit dem Hörer das komplette Frequenzband ab, indem Sie mehrmals auf den Channel-Taster drücken. Bleibt
der Hörer stumm, sind die äußeren Bedingungen in Ordnung.
• Hören Sie jedoch Störgeräusche, Sprache oder Musik, dann ist in Ihrer Nähe
ein weiterer Funkhörer, Babyphone, Wech sel sprechanlage etc. in Betrieb und
stört den Empfang. In diesem Fall sollten Sie am Sender die Frequenz wechseln
und am Hörer mit dem Channel-Taster den Suchlauf starten.
• Der Kopfhörer verfügt über eine integrierte Rauschsperre, d.h. befindet man
sich außerhalb des Empfangsbereichs oder schaltet sich der Sender ab, wird
die Rauschsperre aktiv und der Kopfhörer wird stummgeschaltet. Sobald
man sich wieder im Empfangsbereich befindet, ist das übertragene Signal
wieder hörbar.
Page 8
deutsch
1514
6. Fehlerbehebung
Wenn ein Fehler auftritt, prüfen Sie zunächst die nachfolgenden Punkte, bevor
Sie das Gerät zur Reparatur geben.
Wenn Sie das Problem nicht durch Befolgen der Vorschläge lösen können,
sollten Sie sich an Ihren beyerdynamic-Händler wenden.
Achtung:
Versuchen Sie auf keinen Fall, das Gerät selbst zu reparieren, weil
dadurch die Garantie erlischt.
Problem Mögliche Ursache Lösung
Kein Ton Kopfhörer ist nicht
eingeschaltet
Akkus/Batterien sind
nicht polungsrichtig im
Hörer eingelegt
Lautstärke am Hörer ist
auf Minimum
Netzteil ist nicht richtig
angeschlossen
Tonquelle ist nicht
eingeschaltet
Regler an Tonquelle ist
nicht genügend
aufgedreht
NiMH-Akkus im
Kopfhörer sind leer
Kanal des Kopfhörers
entspricht nicht dem des
Senders
Schalten Sie den Kopf hörer mit dem Ein-/ Aus schalter ein
Legen Sie die
Akkus/Batterien
polungsrichtig ein
Erhöhen Sie die
Lautstärke am Hörer
Überprüfen Sie, ob das
Netzteil richtig ange schlossen ist
Schalten Sie die Tonquelle
ein
Bei Anschluss an eine
regelbare Audiobuchse
stellen Sie sicher, dass der
Lautstärkeregler
genügend aufgedreht ist
Laden Sie die Akkus
wieder auf
Drücken Sie den
Channel-Taster am
Hörer, um den automatischen Suchlauf zu
aktivieren
Ton nur auf einer
Hörerseite
Stecker des Audiokabels ist nicht fest
angeschlossen
Überprüfen Sie das
Audiokabel und
stecken Sie den Stecker
ganz ein
Gestörter Ton Störungen durch andere
Geräte oder durch
Interferenzen
Ändern Sie die Sende-frequenz des Senders und
betätigen Sie den Taster
am Hörer
Problem Mögliche Ursache Lösung
Gestörter Ton Adapterkabel ist nicht
richtig auf das Audio kabel aufgesteckt
Sorgen Sie dafür, dass
Adapter- und Audiokabel
richtig Kontakt haben;
ggf. senden Sie das
Audio- und Adapterkabel
ein.
Ton klingt verzerrt Akku im Hörer ist
erschöpft
Lautstärke an der Tonquelle ist zu hoch
Laden Sie den Akku
wieder auf
Reduzieren Sie die Lautstärke
7. Technische Daten
Sender
Stromversorgung. . . . . . . . . . . . . . . . AC/DC Adapter 12 V / 300 mA
Übertragungsfrequenzen. . . . . . . . . . 8 Kanäle im 2,4 GHz-Bereich,
Abstand je 9 MHz, schaltbar
Modulation . . . . . . . . . . . . . . . . . . . . digital
Eingangsimpedanz . . . . . . . . . . . . . . > 10 kΩ
Reichweite . . . . . . . . . . . . . . . . . . . . bis zu 20 m (freie Sicht)
Geräuschspannungsabstand . . . . . . . > 85 dB (A)
Einschaltung . . . . . . . . . . . . . . . . . . . automatisch bei Eingangssignal > 10 mV
Ausschaltung . . . . . . . . . . . . . . . . . . automatisch nach ca. 2 min bei
Eingangssignal < 5 mV
Abmessungen . . . . . . . . . . . . . . . . . . 95 x 75 x 17 mm
Gewicht . . . . . . . . . . . . . . . . . . . . . . 65 g
Kopfhörer
Wandlerprinzip . . . . . . . . . . . . . . . . . dynamisch
Arbeitsweise . . . . . . . . . . . . . . . . . . . geschlossen
Übertragungsbereich. . . . . . . . . . . . . 20 - 20.000 Hz
Max. Schalldruck. . . . . . . . . . . . . . . . 113 dB
Klirrfaktor . . . . . . . . . . . . . . . . . . . . . ≤ 0,5%
Ankopplung an das Ohr . . . . . . . . . . ohrumschließend
Andruckkraft . . . . . . . . . . . . . . . . . . ~ 2 N
Stromversorgung. . . . . . . . . . . . . . . . 2 x 1,2 V NiMH Akku AAA, 1000 mAh
Betriebsdauer . . . . . . . . . . . . . . . . . . ca. 6 Std.
Gewicht (mit Batterien) . . . . . . . . . . . 270 g
Dieses Produkt darf am Ende seiner Lebensdauer nicht über
den normalen Haushaltsabfall entsorgt werden, sondern muss
an einem Sammelpunkt für das Recycling von elektrischen und
elektronischen Geräten abgegeben werden. Das Symbol auf
dem Produkt, der Gebrauchsanweisung oder der Verpackung
weist darauf hin.
8. Entsorgung
Page 9
english
1716
RSX 700 WIRELESS HEADPHONE SYSTEM
Thank you for selecting the RSX 700 wireless headphone system from
beyerdynamic. Please take some time to read carefully through this manual
before using the product.
The RSX 700 wireless headphone system operates in the frequency range of
2.4 GHz. Reception is possible over a range of approximately 20 metres, even
through walls and ceilings, making it possible to move around freely within
your home or outdoors. It is possible to operate several headphones with only
one transmitter.
Safety Information
• Only use the power adapter that was originally supplied with the transmitter.
Make sure that the voltage rating of the adapter
matches that of the AC mains outlet you are to use. If you connect the
adapter to the wrong voltage, you may seriously damage it.
• The power adapter must be accessible to disconnect it easily from the mains
if necessary.
• Always disconnect the power adapter when changing connection or moving
the transmitter.
• Never open electronic components! This must only be carried out by
authorised service personnel. Any such tampering by non-authorised
persons can invalidate your warranty and could be dangerous.
• Use the devices in dry rooms only. You can also use the headphone outside
in dry weather, but always leave the transmitter and power adapter inside
the house.
• Never expose the power adapter to rain or water.
1. Transmitter
Controls and Indicators
Top view Rear view
Supplied Accessories
This wireless headphone system includes:
1 Transmitter
1 Headphone
1 AC/DC adapter 12 V / 300 mA
1 Audio cable (3.5 mm stereo jack - 3.5 mm stereo jack)
1 Adapter cable with 2 RCA plugs, red (right) and white (left)
1 Adapter (3.5 mm stereo jack - 6.35 mm (1/4") stereo jack
1 Charging cable
2 NiMH rechargeable batteries AAA-size 1.2 V, 1000 mAh
1.1 How to operate the Transmitter
Location
• Choose a suitable place near your audio source (hi-fi system, CD/DVD
player, television set etc.). To ensure noise-free reception you should not
operate the transmitter in the immediate vicinity of radio equipment, mobile
phones, microwaves or above the picture tube of TV sets or monitors.
• Do not expose the transmitter to direct sunlight or near metallic objects and
avoid placing metallic objects onto the transmitter.
Mains Connection
• Connect the cable to the socket on the transmitter and the power
adapter to the mains socket. The power adapter of the transmitter can be
connected permanently to the mains supply without harming the power
adapter itself or the transmitter.
Power on LED is illuminated red when the transmitter is active
Channel selector to adjust the transmitting frequency
Channel display, from 0 - 7
Important: “0” also indicates a channel.
Socket to connect the power adapter to supply the transmitter
Socket to connect the charging cable
Audio input socket (mini jack 3.5 mm)
European Regulations
This product has been designed, tested and manufactured according to the
European R&TTE Directive 1999/5/EEC.
Following this Directive, this product can be used in the following countries:
Austria, Belgium, Cyprus, Czech Republic, Denmark, Estonia, Finland, France,
Greece, Germany, Hungary, Iceland, Ireland, Italy, Latvia, Liechtenstein,
Lithuania, Luxembourg, Malta, Norway, The Netherlands, Poland, Portugal,
Slovakia, Slovenia, Spain, Sweden, Switzerland and United Kingdom.
Furthermore, this frequency range is approved in many other countries.
Connect the power cable to
the transmitter
Connect the power adapter to the
mains socket
Page 10
english
1918
Audio Connection
• Connect the supplied audio cable and adapter cable to the audio input
socket of the transmitter and preferably to the phono/RCA sockets of
your audio source/hi-fi system.
Important: Ensure that the polarity of the phono/RCA connectors is
correct, i.e. right to right (red) and left to left (white).
• As an alternative you can use the headphone output (mini jack 3.5 mm;
6.35 mm (1/4") jack by using an appropriate adapter) of your audio source/
hi-fi system. Please note that in this case the volume must be turned up
sufficiently.
Connect the transmitter to a TV set or hi-fi system via RCA
Connect the cable to
the audio input of the
transmitter
Connect the transmitter to a CD or MP3 player via mini jack
(3.5 mm)
Volume of the CD or MP3
player must be turned up
sufficiently
Connect the transmitter to a hi-fi system via 1/4" jack (6.35 mm)
Switching on
• Switch on the audio source to which the transmitter is connected. When
the transmitter receives a signal, the red Power On LED will illuminate.
Attention:
• If the transmitter does not receive any signal, it will automatically
switch off after approximately 3 minutes and the Power On LED
will go out.
• If the transmitter receives a signal again, it is turned on automatically. The
channel display , however, always indicates “0”.
Button to increase the volume of the headphone
Channel button to scan and set the receiving frequency
automatically to the frequency of the transmitter
Button to reduce the volume of the headphone
On/Off button
Power on LED will illuminate green when the headphone is turned on;
when charging it will illuminate red
Charging socket to connect the charging cable to the left hand side
Battery compartment to insert the rechargeable batteries into the left ear
cup
2.1 How to operate the Headphone
How to insert/replace the Batteries
• Turn the left ear cup clockwise and remove it
by pulling slightly.
• Insert the rechargeable batteries (AAA size,
1.2 V) according to the “+/-“ symbols into the
appropriate compartments .
Attention: The rechargeable batteries must be
charged before the first use (refer to chapter
3. “Charging of rechargeable Batteries”).
• If you use other rechargeable batteries instead
of those supplied by beyerdynamic, you must
remove a bit of the plastic jacket at the
negative pole by using a knife or something
similar to ensure contact to the lateral charging
contacts inside the battery compartment.
• Instead of rechargeable batteries you use normal
dry cell batteries.
Warning: Do not remove the plastic jacket of normal dry cell batteries,
as there could be danger of explosion, if you try to charge by mistake!
• Replace the left ear cup and turn it anti-clockwise by pressing slightly onto
the ear cup until it locks into place.
Important: Use the padlocked symbols as a location guide when the
ear cup is replaced.
Volume of the hi-fi system
must be turned up
sufficiently
Connect the cable to
the audio input of the
transmitter
Connect the cable to
the audio input of the
transmitter
2. Headphone
Controls and Indicators
Page 11
english
2120
Switching on
• Switch the headphone on . The Power on LED will illuminate green.
Switching off
• Switch off the headphone after use . The Power on LED goes out.
How to adjust the Reception and Volume
• Place the headphone on your head observing the left and right indications.
Use the buttons and to set the volume to suit your requirements.
Use the button to increase the volume; use the button to reduce the
volume.
• Use the channel button to scan and set the receiving frequency of the
headphone automatically to the frequency of the transmitter.
• You should now be able to move freely from one room to another.
• Important:
Do not set the volume too high, because it can damage your hearing
or cause existing hearing damage to deteriorate.
How to change the Frequency
• If noise caused by other devices or interferences occur, change the frequency
of the transmitter and use the channel button of the headphone to
scan and set the receiving frequency automatically.
• Important:
When the transmitter is turned off, the channel is saved.
The channel display , however, always indicates “0”.
LED Indication / Operating Time
• When the batteries are empty, the Power on LED will go out. The operating
time with rechargeable batteries is around 6 hours.
• Depending on the volume setting, the approximate operating time can
differ from this value.
3. Charging of rechargeable Batteries
• Make sure that rechargeable
batteries are inserted (no normal dry
cells).
• Switch the headphone off and
connect the charging cable to the
charging socket of the headphone.
• Connect the other end of the
charging cable to the charging socket
of the transmitter.
• During the charging process the
Power on LED of the headphone
will illuminate red. The Power on LED
continues to illuminate red even when the
rechargebale batteries are fully charged.
• When charging the batteries for the first time, they are fully charged after
approximately 24 hours and you can finish the process.
Thereafter, the batteries are fully charged after 6 to 8 hours.
Important:
• If you interrupt the charging process, the operating time of the battery will
be greatly reduced. If the charging process is re-activated again, it takes up
to 14 hours until the batteries are fully charged depending on the charging
state.
• Rechargeable batteries have a life span dependent on the amount of use
and will eventually need to be replaced by new ones. New battery packs can
be obtained from your beyerdynamic dealer.
• You can also use an appropriate external charger for charging the batteries
outside the headphone.
• If you do not intend to use the headphone for several weeks or months it is
recommended that you remove the batteries as they may leak and cause
damage to the components. Even “leak-proof” batteries should be removed
as a precaution.
• Please do not throw used battery packs away with your household rubbish,
take them to your local collection points.
Connect the
power adapter to
the mains socket
and to the
transmitter
Connect the
charging
cable to the
headphone
and the
transmitter
4. Maintenance
• Use a damp cloth for cleaning the transmitter and headphone, taking care
not to allow any water to enter the transducers. Never use solvent agents.
• With time, ear pads will need replacing. These can be obtained from your
beyerdynamic dealer.
• To replace them, remove the old ear pads
by turning them clockwise. Place the
new ear pads on the housing and turn
them anti-clockwise to tighten.
5. Tips for a noise-free Reception
• If interference or problems with the transmission range occur, you should
place the transmitter in another area.
• If the reception does not improve, disconnect the transmitter from the
mains and check the frequency range with the headphone by pressing the
channel button several times. If the headphone remains silent, the
conditions are clear.
• However, if you hear noise, speech or music, then there is another wireless
headphone, baby phone, walkie talkie etc. in operation, which is interfering
with the reception. In this case you should change the frequency for the
transmitter and headphone by pressing the channel button .
• The headphone has an integrated squelch function. This means that, when
you are outside of the reception area or when the transmitter is switched off,
the squelch function is activated and the headphone is muted. As soon as you
are within the reception area the transmitter signal can be heard again.
Page 12
english
2322
6. Trouble Shooting
If a problem occurs, please check the items below before taking the set for
repair.
If you are not able to solve a problem by following these hints, please contact
your beyerdynamic dealer.
Warning:
Do not try to repair the set yourself, as this would invalidate the
warranty.
7. Technical Specifications
Transmitter
Power supply. . . . . . . . . . . . . . . . . . . AC/DC adapter 12 V / 300 mA
Transmission frequencies . . . . . . . . . . 8 channels in the 2.4 GHz range,
9 MHz channel spacing, switchable
Modulation . . . . . . . . . . . . . . . . . . . . digital
Input impedance . . . . . . . . . . . . . . . . > 10 kΩ
Operating distance . . . . . . . . . . . . . . up to 20 m (at clear sight)
Signal-to-noise ratio . . . . . . . . . . . . . > 85 dB (A)
Switching on. . . . . . . . . . . . . . . . . . . automatic at input signal > 10 mV
Switching off. . . . . . . . . . . . . . . . . . . automatic after approx. 2 min at
input signal < 5 mV
Dimensions . . . . . . . . . . . . . . . . . . . . 95 x 75 x 17 mm
Weight . . . . . . . . . . . . . . . . . . . . . . . 65 g
Headphone
Transducer type. . . . . . . . . . . . . . . . . dynamic
Operating principle . . . . . . . . . . . . . . closed
Frequency response. . . . . . . . . . . . . . 20 - 20,000 Hz
Max. SPL . . . . . . . . . . . . . . . . . . . . . . 113 dB
T.H.D. . . . . . . . . . . . . . . . . . . . . . . . . ≤ 0.5%
Sound coupling to the ear. . . . . . . . . circumaural
Headband pressure . . . . . . . . . . . . . ~ 2 N
Power supply. . . . . . . . . . . . . . . . . . . 2 x 1.2 V NiMH rechargeable battery
AAA, 1000 mAh
Operating time . . . . . . . . . . . . . . . . . approx. 6 hours
Weight (with batteries) . . . . . . . . . . . 270 g
Problem Possible Cause Solution
No audible signal Headphone is not
switched on
Batteries in the
headphone are not
inserted correctly
Volume of the
headphone is turned
down
Power adapter is not
connected correctly
Audio source is not
turned on
Volume control of the
audio source is turned
down
NiMH batteries in the
headphone are not charged
Headphone channel does
not correspond
to the transmitter channel
Switch on the
headphone with the
On/Off button
Insert the batteries
according to the polarity
marks
Increase the volume of
the headphone
Check the power
adapter connection
Turn on the audio source
Turn the volume
control on the audio
source up
Recharge the batteries
Press the channel
button of the
headphone to start
the automatic channel
search
Signal only on one side
of the headphone
Plug of the audio
cable is not connected
properly
Check the audio cable
and connect the plug
properly
Signal distorted Interference caused by
other units
Change the transmission
frequency of the
transmitter and press the
channel button of the
headphone
Problem Possible Cause Solution
Signal distorted Adapter cable is not pro-
perly connected to the
audio cable
Make sure that adapter
and audio cable are
properly connected. If
necessary return the
cables for repair.
Distorted sound Batteries inside the head-
phone are empty
Volume of the audio
source is too high
Recharge/replace the
batteries
Reduce the volume
This symbol on the product, in the instructions or on the
packaging means that your electrical and electronic equipment
should be disposed at the end of its life separately from your
household waste. There are separate collection systems for
recycling in the EU. For more information, please contact the
local authority or your retailer where you purchased the product.
8. Disposal
Page 13

français
2524
SYSTEME DE CASQUE SANS FIL RSX 700
Vous avez opté pour le kit casque sans fil RSX 700 de beyerdynamic. Nous
vous remercions pour la confiance que vous nous accordez.
Le système de casque sans fil RSX 700 opère sur la bande 2,4 GHz. La
réception est possible dans un rayon de 20 mètres maximum à travers murs et
plafonds. Ce casque vous offre aussi bien à l’intérieur qu’à l’extérieur une
entière liberté de mouvement. Un nombre illimité de casques peut être utilisé
avec un émetteur.
Consignes de sécurité
• N’utilisez l’émetteur qu’avec le bloc secteur fourni. Vérifiez que les valeurs
de raccordement correspondent à celles de votre alimentation secteur. Un
branchement à une alimentation électrique inappropriée peut causer de
graves dommages sur l’appareil.
• Le bloc secteur doit être installé de sorte à pouvoir être le cas échéant
facilement débranché du secteur.
• Si vous souhaitez permuter des lignes ou déplacer l'émetteur, veuillez
toujours débrancher l’appareil du secteur
• Ne confiez les travaux sur des pièces conductrices de courant qu’à un
personnel qualifié. N’ouvrez jamais un appareil électrique, vous risqueriez
de perdre vos droits de garantie.
• N’utilisez les appareils que dans des locaux secs. Veuillez toujours laisser
l’émetteur et le bloc secteur à l’intérieur de l’habitation. Le casque peut
quant à lui être également utilisé à l’extérieur par temps sec.
• N’exposez jamais le bloc secteur à des gouttes ou projections d’eau.
1. Emetteur
Éléments de commande
Vue du haut Vue arrière
Contenu de la livraison
Ce kit casque sans fil comprend les accessoires suivants:
1 émetteur
1 casque
1 adaptateur AC/DC 12 volts/300 mA
1 câble audio (fiche jack stéréo 3,5 mm – fiche jack stéréo 3,5 mm)
1 câble adaptateur avec 2 connecteurs RCA, rouge (droite) et blanc (gauche)
1 adaptateur (fiche jack stéréo 3,5 mm – fiche jack stéréo 6,35 mm)
1 câble de chargement
2 accumulateurs NiMH de type AAA, 1,2 V, 1000 mAh
1.1 Mise en service de l’émetteur
Lieu d’emplacement
• Placez l’émetteur à proximité de votre source sonore (chaîne hi-fi, lecteur
CD/DVD, téléviseur etc.). Pour une réception sans parasites, nous vous
recommandons toutefois de ne pas utiliser l’émetteur à proximité directe
d’appareils de radio, de téléphones mobiles, de fours micro-ondes ou sur le
tube de téléviseurs ou de moniteurs.
• N’exposez pas l’émetteur à la lumière directe du soleil ou à proximité
d’objets métalliques, évitez également de poser des objets en métal sur
l’émetteur.
Connexion au secteur
• Connectez le cordon d’alimentation à la prise et branchez le bloc secteur
à votre prise de courant. Le bloc secteur de l’émetteur peut être branché en
permanence au réseau électrique sans préjudice pour le bloc secteur ou
l’émetteur.
Le témoin de fonctionnement rouge s’allume sitôt que l'émetteur
transmet un signal.
Bouton de sélection de canal pour réglage de la fréquence d’émission.
Affichage canal, réglable de 0 - 7
Important: «0» indique également un canal.
Prise pour branchement du bloc secteur (alimentation de l’émetteur)
Prise pour branchement du câble de chargement
Prise d’entrée audio (jack 3,5 mm)
Directives européennes
Ce produit a été conçu, testé et fabriqué en accord avec la directive européenne
R&TTE 1999/5/EEC.
Selon cette directive, le produit peut être utilisé dans les pays suivants:
Belgique, Danemark, Allemagne, Estonie, Finlande, France, Grèce, Irlande,
Islande, Italie, Lettonie, Lichtenstein, Lituanie, Luxembourg, Malte, Pays-Bas,
Norvège, Autriche, Pologne, Portugal, Suisse, Suède, Slovaquie, Slovénie,
Espagne, République tchèque, Hongrie, Royaume-Uni et Chypre.
Cette bande de fréquence est en outre autorisée dans de nombreux autres pays.
Brancher le câble d’alimentation
à l’émetteur
Brancher le bloc secteur à la prise de
courant
Page 14
français
2726
Connexion audio
• Reliez à l'aide du câble audio et du câble adaptateur fournis la prise
d’entrée audio de l’émetteur de préférence aux prises RCA de votre
source audio/chaîne stéréo.
Important: lors du raccordement aux prises RCA, veillez à respecter la
bonne polarité des câbles audio: droite à droite (rouge), gauche à gauche
(blanc).
• Une connexion à la sortie casque (jack 3,5 mm; jack 6,35 mm avec
adaptateur correspondant) de votre source audio/chaîne stéréo est
également possible. Dans ce dernier cas, veillez à ce que le volume sonore
de la source audio (téléviseur, chaîne stéréo) soit suffisamment élevé.
Branchement de l’émetteur sur téléviseur ou chaîne stéréo via RCA
Connecter le câble à
l’entrée audio de
l’émetteur
Branchement de l’émetteur sur lecteur CD ou MP3 via jack
3,5 mm
Lecteur CD ou MP3
Volume sonore doit être
suffisamment élevé
Branchement de l’émetteur sur chaîne stéréo via jack 6,35 mm
Mise en marche
• Mettez sous tension la source sonore à laquelle l’émetteur est branché. Le
témoin de fonctionnement rouge s’allume sitôt qu’un signal est envoyé à
l’émetteur.
Attention:
• Si aucun signal n’est envoyé à l’émetteur, ce dernier est automatique-
ment mis hors-circuit au bout de 3 minutes env. et le témoin de
fonctionnement s’éteint.
• Si un signal est de nouveau envoyé à l’émetteur, ce dernier est
automatiquement activé. Le canal correspond au canal sélectionné
auparavant, l’écran affiche cependant toujours «0».
Touche d’augmentation du volume du casque
Touche Channel (canal) de recherche automatique pour ajustage de la
fréquence de réception du casque sur la fréquence de l’émetteur.
Touche de diminution du volume du casque
Interrupteur marche/arrêt
Témoin LED de contrôle de fonctionnement vert lorsque le casque est
allumé, rouge durant le processus de chargement.
Prise pour branchement du câble de chargement de l’écouteur gauche
Compartiment à piles pour insertion des accus de l’écouteur gauche
fournis
2.1 Mise en service du casque
Insertion/remplacement des accus
• Tournez le pavillon de l’écouteur gauche
dans le sens horaire et tirez légèrement pour le
retirer.
• Insérez les accus (type AAA, 1,2 V) selon les
symboles « +/- » dans les compartiments
prévus .
Attention: avant la première mise en
service, les accus doivent être chargés
(cf. 3. Chargement des accumulateurs).
• Si vous utilisez des accus autres que ceux fournis
par beyerdynamic, vous devez isoler l’extrémité
du pôle moins, c’est-à-dire, à l’aide d’un couteau ou outil similaire retirer une petite partie
de la gaine en matière synthétique de sorte à
ce que les contacts de charge latéraux dans le
compartiment à piles aient un contact direct.
• Au lieu d’accus, vous pouvez également utiliser des piles de type
analogue. Attention: ne retirez en aucun cas la gaine en matière
synthétique sur la pile, vous pourriez provoquer une explosion au
cas où le casque serait chargé par inadvertance!
• Replacez le pavillon sur l’écouteur gauche et tournez dans le sens
contre-horaire jusqu’à ce qu’il s’enclenche. Lors de la rotation, pressez l
égèrement sur le pavillon.
Important: veillez à ce que les symboles de cadenas dans le pavillon
correspondent.
Volume sonore sur chaîne
stéréo doit être
suffisamment élevé
Connecter le câble à
l’entrée audio de
l’émetteur
Connecter le câble à
l’entrée audio de
l’émetteur
2. Casque
Éléments de commande
Page 15

français
2928
Mise en marche
• Mettez le casque sous tension . Le témoin LED de contrôle de fonctionnement s’allume en vert.
Mise hors tension
• Eteignez le casque après utilisation . Le témoin LED de contrôle de
fonctionnement s’éteint.
Réglage de la réception et du volume
• Posez le casque sur votre tête en respectant la droite et la gauche. Réglez le
volume sonore à l’aide des touches et selon vos besoins. La touche
permet d’augmenter le volume, la touche de le baisser.
• Avec la touche Channel , vous pouvez via recherche automatique ajuster
la fréquence de réception du casque sur la fréquence d'émission de l'émetteur.
• Vous pouvez à présent vous déplacer librement avec le casque d’une pièce à
une autre ou à l’extérieur.
• Important: Ne réglez pas le volume sonore à un niveau trop élevé,
une écoute à fort volume peut causer des dommages auditifs. Des
lésions auditives existantes peuvent être aggravées.
Changement de fréquence
• En cas de perturbations par d’autres appareils ou d’interférences, nous vous
recommandons de sélectionner une autre fréquence sur l’émetteur à l’aide
du bouton de sélection de canal puis de régler cette dernière sur le
casque via recherche automatique avec la touche Channel .
• Important: Lors de l’extinction de l’émetteur, le canal est mémorisé.
Néanmoins, lors de la remise en marche de l’émetteur, l’écran
affichera de nouveau «0».
Témoin LED / Autonomie
• Lorsque les accus sont vides, le témoin LED de contrôle de fonctionnement
s’éteint. La durée de fonctionnement des accus est d’environ 6 heures.
• Elle peut varier suivant le niveau d’écoute sonore.
3. Chargement des accumulateurs
• Veuillez utiliser des accus
rechargeables (pas de piles).
• Eteignez le casque et connectez le
câble de chargement à la prise de
chargement du casque.
• Branchez l’autre extrémité du câble
de chargement à la prise de chargement de l’émetteur .
• Durant le processus de chargement,
le témoin LED de contrôle de fonctionnement est allumé en rouge.
Même lorsque les accus sont complètement chargés, le témoin
LED de contrôle de fonctionnement reste allumé en rouge.
• Lors du premier chargement, les accus sont entièrement chargés au bout
d'environ 24 heures, vous pouvez ensuite interrompre le chargement. Les
chargements suivants prendront de 6 à 8 heures.
Consignes importantes:
• Si vous interrompez prématurément le processus de chargement, les accus
ne sont pas entièrement chargés, leur durée de fonctionnement s’en trouve
raccourcie. Si le processus de chargement est de nouveau activé, il peut
s’écouler jusqu'à 14 heures, selon le niveau de chargement des accus, avant
que ces derniers ne soient entièrement chargés.
• Après une longue utilisation, il se peut que les accus soient usés et ne
puissent plus être suffisamment chargés. Ces accus doivent alors être
remplacés. De nouveaux accus sont par exemple disponibles auprès de
votre revendeur beyerdynamic.
• Vous ne pouvez charger les accus qu’à l’extérieur du casque et au moyen
d’un chargeur adapté.
• Si vous n’utilisez pas le casque durant des semaines ou des mois, veuillez
retirer les accus/piles. En cas de non utilisation prolongée, ces derniers
peuvent en effet fuir et détruire des pièces du casque.
L’indication « Leak proof » figurant sur les accus/piles ne constitue pas de
garantie contre les fuites.
• Ne jetez pas les piles/accus usagés avec les ordures ménagères, déposez-les
à un point de recyclage.
Brancher le bloc
secteur sur la
prise de courant
et l’émetteur
Brancher le
câble de
chargement
sur le casque
et l’émetteur
4. Entretien
• Nettoyez de temps à autre le casque et l’émetteur à l’aide d’un chiffon doux
humidifié d’eau. Veillez à ce qu’aucun liquide ne pénètre dans les pavillons.
N’utilisez en aucun cas des nettoyants ou solvants.
• Dès que vous constaterez une dégradation de l’aspect des oreillettes du
casque, nous vous recommandons de remplacer ces dernières. Des oreillettes
de rechange sont par exemple disponibles auprès de votre revendeur
beyerdynamic.
• Retirez avec précaution les oreillettes
usagées du boîtier en tournant dans
le sens horaire. Positionnez les nouvelles
oreillettes et tournez dans le sens
contre-horaire jusqu’à ce que le
verrouillage baïonnette s’enclenche.
5. Conseils pour une réception sans parasites
• En cas de parasites et de problèmes de portée, nous vous conseillons de
changer l’emplacement de l’émetteur.
• Si vous ne constatez aucune amélioration, débranchez la fiche du bloc
secteur de l'émetteur et parcourez toute la bande de fréquence avec le
casque en pressant à plusieurs reprises sur la touche . Si le casque reste
muet, les conditions extérieures sont correctes.
• Si par contre vous entendez des bruits parasites, des voix ou de la musique,
cela signifie qu’un autre appareil d’écoute radioguidé, un babyphone, un
interphone etc. fonctionnent à proximité et perturbent la réception. Dans
ce dernier cas, nous vous recommandons de changer la fréquence sur
l'émetteur et de lancer la recherche automatique sur le casque via la touche
Channel .
• Le casque est équipé d’un circuit d’assourdissement électronique (squelch) :
si l’utilisateur se situe en-dehors de la bande de réception ou que l’émetteur
s’éteint, le squelch est activé et le casque mis sur muet. Dès que l’utilisateur
se trouve de nouveau dans la bande de réception, le signal transmis est de
nouveau audible.
Page 16
français
3130
6. Dépannage
En cas de dysfonctionnement, veuillez vérifier tout d’abord les points suivants
avant de confier l’appareil à un dépanneur.
Si le problème persiste après observation des recommandations suivantes,
veuillez vous adresser à votre revendeur spécialisé beyerdynamic.
Attention:
Ne tentez en aucun cas de réparer vous-même l’appareil, vous perdriez
vos droits de garantie.
Problème Cause éventuelle Solution
Son perturbé Câble adaptateur n’est
pas correctement
connecté au câble audio
Assurez-vous que le câble
adaptateur et le câble
audio sont bien en
contact ; le cas échéant,
renvoyez-les.
Son affecté de
distorsion
L’accu dans le casque est
usé
Le volume de la source
sonore est trop élevé
Rechargez l’accu
Baissez le volume sonore
7. Spécifications techniques
Emetteur
Alimentation . . . . . . . . . . . . . . . . . . . adaptateur AC/DC 12 V / 300 mA
Fréquences de transmission. . . . . . . . 8 canaux sur la bande 2,4 GHz,
paliers 9 MHz, réglables
Modulation . . . . . . . . . . . . . . . . . . . . numérique
Impédance d’entrée . . . . . . . . . . . . . > 10 kΩ
Portée de transmission . . . . . . . . . . . jusqu’à 20 m (vue libre)
Rapport signal/bruit. . . . . . . . . . . . . . > 85 dB (A)
Mise en marche. . . . . . . . . . . . . . . . . automatique
avec signal d’entrée > 10 mV
Mise hors circuit . . . . . . . . . . . . . . . . automatique après 2 min. env. avec
signal d’entrée < 5 mV
Dimensions . . . . . . . . . . . . . . . . . . . . 95 x 75 x 17 mm
Poids 65 g
Casque
Type de transducteur. . . . . . . . . . . . . dynamique
Principe de fonctionnement. . . . . . . . fermé
Bande de transmission. . . . . . . . . . . . 20 - 20 000 Hz
Pression sonore maximale . . . . . . . . . 113 dB
Taux de distorsion audio . . . . . . . . . . ≤ 0,5%
Couplage à l’oreille . . . . . . . . . . . . . . circumaural
Force d’appui sur l’oreille . . . . . . . . . ~ 2 N
Alimentation . . . . . . . . . . . . . . . . . . . 2 accus NiMH 1,2 V AAA, 1000 mAh
Durée de fonctionnement . . . . . . . . . env. 6 heures
Poids (avec piles) . . . . . . . . . . . . . . . . 270 g
Problème Cause éventuelle Solution
Pas de son Le casque n’est pas
allumé
La polarité n’a pas été
respectée lors de l’insertion
des accus/ piles dans le
casque
Le volume sur le
casque est réglé au
niveau minimum
Le bloc secteur n’est pas
correctement
branché
La source son n’est pas
allumée
Le volume de la source
son n’est pas suffisant
Les accus NiMH dans le
casque sont vides
Le canal du casque ne
correspond pas à celui de
l’émetteur.
Allumez l’appareil via
l'interrupteur marche/arrêt
Insérez les accus/piles en
respectant la polarité
Augmentez le volume
sonore sur le casque
Assurez-vous que le bloc
secteur est correctement
connecté
Allumez la source
sonore
En cas de branchement à
une prise audio réglable,
vérifiez que le niveau de
volume sonore est
suffisant
Rechargez les accus
Pressez la touche
Channel
sur l’écou-
teur pour activer la
recherche automatique
Son sur un écouteur seulement
Le câble audio n’est pas
correctement
branché
Vérifiez le branchement
du câble audio, insérez
fermement ce dernier
Son perturbé Parasites causés par d’au-
tres appareils ou interférences
Modifiez la fréquence
d’émission de l’émetteur
et activez la touche
sur le casque
Ce symbole sur le produit, l’emballage ou dans le manuel
signifie que votre équipement électrique et électronique doit
être, en fin de vie, jeté séparement de vos déchets ménages. Il
existe en France des systèmes de collecte différents pour les
déchets recyclables. Pour plus d’information, veuillez contacter
les autorités locales ou le revendeur chez qui vous avez acheté
le produit.
8. Evacuation
Page 17

italiano
3332
SISTEMA DI CUFFIE STEREO RSX 700
Avete acquistato un kit di cuffie stereo RSX 700 di beyerdynamic.
Vi ringraziamo per la fiducia accordataci.
Il kit di cuffie stereo RSX 700 opera nella banda 2,4 GHz. È possibile una
ricezione entro un raggio di 20 metri, anche attraverso pareti e soffitti.
Con le cuffie godrete di una completa libertà di movimento sia nel vostro
appartamento che all’esterno. Con un trasmettitore avete la possibilità di
utilizzare tutte le cuffie che desiderate.
Informazioni di sicurezza
• Azionate il trasmettitore esclusivamente con l’alimentatore in dotazione.
Verificate che i valori di alimentazione concordino con l’alimentazione di
energia elettrica presente. Se il sistema viene collegato ad un’alimentazione
elettrica non corretta potrebbero sorgere seri danni.
• L’alimentatore deve essere installato in modo da poter essere scollegato
facilmente dalla rete in caso di necessità.
• Per modificare i collegamenti o posizionare il trasmettitore in un altro luogo,
scollegate sempre l’apparecchio dalla rete elettrica.
• Gli interventi su parti sotto tensione devono essere eseguiti esclusivamente
da personale qualificato. Non aprite mai gli apparecchi elettronici, poiché
causereste l’annullamento della validità della garanzia.
• Utilizzate gli apparecchi solamente in ambienti asciutti. Lasciate il trasmettitore
e l’alimentatore sempre in casa; con le cuffie è invece possibile uscire
all’aperto, se si tratta di ambiente asciutto.
• Non esporre l’alimentatore a gocce o spruzzi d’acqua.
1. Trasmettitore
Elementi di comando
Vista dall’alto Vista posteriore
Dotazione di consegna
Questo kit di cuffie stereo è composto dai seguenti accessori:
1 trasmettitore
1 cuffia
1 adattatore CC/CA 12 Volt/300 mA
1 cavo audio (connettore jack stereo 3,5 mm - connettore jack stereo 3,5 mm)
1 cavo adattatore con 2 connettori Cinch, rosso (destra) e bianco (sinistra)
1 adattatore (connettore jack stereo 3,5 mm - connettore jack stereo 6,35 mm)
1 caricabatteria
2 accumulatori NiMH del tipo AAA, 1,2 V, 1000 mAh
1.1 Messa in funzione del trasmettitore
Luogo di installazione
• Posizionate il trasmettitore in prossimità della vostra sorgente sonora
(impianto HiFi, lettore CD/DVD, televisore, ecc.). Per una ricezione senza
disturbi è tuttavia sconsigliato utilizzare il trasmettitore nelle immediate
vicinanze di apparecchi radiofonici, telefoni cellulari, microonde o sopra i
tubi catodici di televisori o monitor.
• Non collocate il trasmettitore alla luce diretta del sole o in prossimità di
oggetti metallici ed evitate inoltre di posizionare oggetti metallici sul
trasmettitore.
Collegamento alla rete
• Collegate il cavo di alimentazione alla presa e collegate l’alimentatore
alla presa. L’alimentatore del trasmettitore può restare costantemente
collegato alla rete di alimentazione senza che l’alimentatore o il
trasmettitore subiscano danni.
L’indicatore di funzionamento rosso si accende non appena il
trasmettitore avvia la trasmissione
Selettore canali per l’impostazione della frequenza di trasmissione
Visualizzazione canali, selezionabile da 0 a 7
Importante: anche con „0“ si visualizza un canale
Presa per il collegamento dell’alimentatore per l’alimentazione del
trasmettitore
Presa per il collegamento del caricabatteria
Presa ingresso audio (connettore jack 3,5 mm)
Norme europee
Questo prodotto è stato costruito, testato e fabbricato in conformità alla
direttiva europea R&TTE 1999/5/CE.
Conformemente a questa direttiva, questo prodotto può essere utilizzato nei
seguenti paesi:
Belgio, Danimarca, Germania, Estonia, Finlandia, Francia, Grecia, Irlanda,
Islanda, Italia, Lettonia, Liechtenstein, Lituania, Lussemburgo, Malta, Paesi
Bassi, Norvegia, Austria, Polonia, Portogallo, Svizzera, Svezia, Slovacchia,
Slovenia, Spagna, Repubblica Ceca, Ungheria, Regno Unito e Cipro.
Inoltre questo range di frequenza è ammesso anche in molti altri paesi.
Collegare il cavo di alimentazione
al trasmettitore
Collegare l’alimentatore alla presa
Page 18

italiano
3534
Collegamento audio
• Mediante il cavo audio e il cavo adattatore in dotazione, collegate la presa
di ingresso audio del trasmettitore preferibilmente con la presa Cinch
della sorgente sonora/dell’impianto stereo.
Importante: durante il collegamento alle prese Cinch fare attenzione alla
corretta polarità dei cavi audio, ovvero il destro a destra (rosso) e il sinistro a
sinistra (bianco).
• In alternativa è possibile effettuare un collegamento all’uscita cuffie (3,5 mm
connettore jack; connettore jack 6,35 mm con apposito adattatore) della
sorgente sonora/dell’impianto stereo. In questo caso controllate bene
che il volume della sorgente sonora (televisore, impianto stereo) sia
sufficientemente alto.
Collegare il trasmettitore all’apparecchio TV o all’impianto
stereo tramite Cinch
Collegare il cavo
all’ingresso audio del
trasmettitore
Collegare il trasmettitore al lettore CD o MP3 tramite
connettore jack 3,5 mm
Il volume del lettore
CD o MP3 deve essere
sufficientemente alto
Collegare il trasmettitore all’impianto stereo tramite connettore jack
6,35 mm
Attivazione
• Attivate la sorgente sonora collegata al trasmettitore. Non appena
il segnale arriverà al trasmettitore, si accenderà l’indicatore di
funzionamento rosso .
Attenzione:
• Se il trasmettitore non riceve alcun segnale, si disattiva dopo
3 minuti circa mentre l’indicatore di funzionamento si spegne.
• Se il trasmettitore riceve nuovamente un segnale, si attiva
automaticamente. Il canale corrisponde a quello selezionato in
precedenza, tuttavia il visualizzatore indica sempre “0”.
Tasto per l’aumento del volume delle cuffie
Tasto Channel per la ricerca automatica per l’impostazione della
frequenza di ricezione delle cuffie sulla frequenza del trasmettitore
Tasto per la diminuzione del volume delle cuffie
Interruttore accensione/spegnimento
Il LED per il controllo del funzionamento si illumina di verde quando le cuffie
sono attivate, si illumina invece di rosso durante il processo di carica
Presa per il collegamento del caricabatteria del lato sinistro delle cuffie
Vano batterie in cui inserire gli accumulatori in dotazione del lato sinistro delle
cuffie
2.1 Messa in funzione delle cuffie
Inserimento/sostituzione degli accumulatori
• Ruotate l’auricolare sinistro in senso orario
e tirate leggermente per sollevarlo.
• Inserite gli accumulatori (tipo AAA, 1,2 V) nei
vani previsti secondo i simboli „+/-“.
Attenzione: prima del primo utilizzo è
necessario caricare gli accumulatori (vedi
sezione 3. Carica degli accumulatori).
• Se si utilizzano accumulatori diversi da quelli
forniti da beyerdynamic, è necessario rimuovere
l’isolamento dell’estremità al polo negativo:
con un coltello o simili rimuovere in parte la
guaina in materiale plastico, in modo che i
contatti per la carica laterali abbiano contatto
diretto nel vano batterie.
• Al posto degli accumulatori potete utilizzare
anche batterie dello stesso tipo.
Attenzione: non rimuovere in nessun caso la guaina in materiale
plastico delle batterie: sussiste pericolo di esplosione se le cuffie
vengono ricaricate per sbaglio!
• Applicate nuovamente l'auricolare sinistro e ruotate in senso antiorario fino
all’aggancio. Ruotando, premete leggermente sull’auricolare.
Importante: durante l’applicazione dell’auricolare fate attenzione che i
simboli del lucchetto coincidano.
Il volume dell’impianto
stereo deve essere
sufficientemente alto
Collegare il cavo
all’ingresso audio del
trasmettitore
Collegare il cavo
all’ingresso audio del
trasmettitore
2. Cuffie
Elementi di comando
Page 19

italiano
3736
Attivazione
• Attivate le cuffie . Il LED di controllo del funzionamento si illumina di
verde.
Disattivazione
• Disattivate le cuffie dopo l’uso . Il LED di controllo del funzionamento
si spegne.
Impostazione della ricezione e del volume
• Indossate le cuffie nel verso corretto. Impostate il volume con i tasti e
in base alle vostre esigenze. Con il tasto il volume aumenta, con il tasto
diminuisce.
• Con il tasto Channel avete la possibilità di avviare una ricerca per
impostare automaticamente la frequenza di ricezione delle cuffie sulla
frequenza di trasmissione del trasmettitore.
• Ora dovreste avere la possibilità di indossare le cuffie e muovervi
liberamente di stanza in stanza o all’aperto.
• Importante: non impostate un volume troppo alto, poiché potrebbe
danneggiare il vostro udito. Danni all’udito già presenti possono
peggiorare ulteriormente.
Cambiare frequenza
• Se si creano disturbi a causa di altri apparecchi o interferenze, è consigliato
selezionare una frequenza diversa sul trasmettitore mediante il selettore
canali e impostarla automaticamente sulle cuffie effettuando una ricerca
tramite il tasto Channel .
• Importante: Allo spegnimento del trasmettitore viene memorizzato
il canale, alla riaccensione il visualizzatore indica comunque
sempre “0”.
Indicatore LED / Autonomia
• Quando gli accumulatori sono scarichi, il LED di controllo del funzionamento . si spegne. L’autonomia degli accumulatori è di circa 6 ore.
• A seconda del volume che impostate sulle cuffie, è possibile una variazione
dell’autonomia rispetto al valore indicato.
3. Carica degli accumulatori
• Fate attenzione a utilizzare accumulatori
ricaricabili (non batterie).
• Disattivate le cuffie e collegate il
caricabatteria alla presa delle
cuffie.
• Collegate l’altra estremità del cavo
caricabatteria alla presa del
trasmettitore.
• Durante il processo di carica, il LED di
controllo del funzionamento sulle
cuffie si illumina di rosso. Anche
quando gli accumulatori sono
completamente carichi, il LED di controllo del funzionamento continua ad
essere rosso.
• Durante il primo processo di carica, gli accumulatori sono completamente
carichi dopo circa 24 ore e potete interrompere il processo. Per ogni
processo di carica successivo sono poi necessarie dalle 6 alle 8 ore.
Indicazioni importanti:
• Se interrompete il processo di carica prima del tempo, gli accumulatori sono
carichi solo parzialmente e l’autonomia si riduce. Se il processo di carica
viene nuovamente attivato, a seconda dello stato di carica degli accumulatori,
possono essere necessarie fino a 14 ore prima che gli accumulatori siano
completamente carichi.
• In seguito a un uso prolungato può accadere che i vostri accumulatori siano
consumati e che risulti impossibile caricarli a sufficienza. È necessario
sostituirli con accumulatori nuovi. Potete trovare nuovi accumulatori ad es.
presso il vostro rivenditore beyerdynamic.
• Avete la possibilità di caricare gli accumulatori anche esteriormente alle
cuffie, utilizzando un apposito caricatore esterno.
• Se non utilizzate le cuffie per settimane o mesi, siete pregati di rimuovere
gli accumulatori/le batterie dalle cuffie. In caso di inutilizzo prolungato, gli
accumulatori/le batterie si possono esaurire e danneggiare irreparabilmente
parti delle cuffie.
Anche l’indicazione „Leak proof“ su accumulatori/batterie non rappresenta
una garanzia contro l’esaurirsi di tali componenti.
• Le batterie/gli accumulatori esauriti devono essere smaltiti separatamente
dai rifiuti domestici e vanno consegnati ai centri di raccolta locali.
Collegare il
caricabatteria
alle cuffie e al
trasmettitore
4. Pulizia
• Di tanto in tanto pulite le cuffie e il trasmettitore con un panno morbido e
umido. Assicuratevi che non penetri acqua nell’auricolare. Non utilizzate in
nessun caso solventi o detergenti.
• Ai primi segni di usura dei cuscinetti auricolari è necessario sostituirli.
Potete trovare cuscinetti auricolari di sostituzione presso il vostro rivenditore
beyerdynamic.
• Ruotandoli in senso orario, estraete
con cautela i vecchi cuscinetti
dall’alloggiamento. Inserite i nuovi
cuscinetti e ruotate in senso antiorario
fino all'innesto della chiusura a
baionetta.
5. Indicazioni per una ricezione senza disturbi
• In caso di disturbi o di problemi di portata dovete posizionare il
trasmettitore in un altro luogo.
• Se le condizioni di ricezione non cambiano, estraete la spina
dell’alimentatore dal trasmettitore ed esaminate con le cuffie tutta la banda
di frequenza premendo ripetutamente il tasto . Se le cuffie restano mute,
le condizioni esterne sono corrette.
• Se tuttavia udite rumori di disturbo, voci o musica, significa che nelle
vicinanze sono in funzione altre cuffie, babyphone, interfono, ecc. e
disturbano la ricezione. In questo caso è necessario modificare la frequenza
al trasmettitore e avviare una ricerca automatica sulle cuffie con il tasto
Channel .
• Le cuffie sono dotate di una funzione di soppressione dei rumori integrata:
se vi trovate fuori dal campo di ricezione o se il trasmettitore si disattiva, la
funzione di soppressione dei rumori si attiva e le cuffie vengono commutate
su mute. Non appena si rientra nel campo di ricezione, si può udire
nuovamente il segnale trasmesso.
Collegare
l’alimentatore
alla presa e al
trasmettitore
Page 20

italiano
3938
6. Risoluzione dei problemi
In caso di guasto, controllate per prima cosa i punti seguenti prima di dare
l’apparecchio in riparazione.
Se non risulta possibile risolvere il problema seguendo le indicazioni proposte,
è necessario rivolgersi al proprio rivenditore beyerdynamic.
Attenzione:
non tentate in nessun caso di riparare l’apparecchio, altrimenti annullerete
la validità della garanzia.
Problema Possibile causa Soluzione
Suono disturbato Il cavo adattatore non è
correttamente
collegato al cavo audio
Assicuratevi che il cavo
adattatore e audio
ricevano correttamente il
contatto; eventualmente
inviate il cavo audio e
adattatore.
Il suono è distorto L’accumulatore è esaurito
Il volume della sorgente
sonora è troppo alto
Caricate nuovamente
l’accumulatore
Riducete il volume
7. Dati tecnici
Trasmettitore
Alimentazione. . . . . . . . . . . . . . . . . . Adattatore CC/CA 12 V/300 mA
Frequenze di trasmissione . . . . . . . . . 8 canali nella banda 2,4 GHz,
intervallo ogni 9 MHz, selezionabile
Modulazione. . . . . . . . . . . . . . . . . . . digitale
Impedenza d’ingresso . . . . . . . . . . . . > 10 kΩ
Portata . . . . . . . . . . . . . . . . . . . . . . . fino a 20 m (campo libero)
Rapporto segnale/rumore . . . . . . . . . > 85 dB (A)
Attivazione . . . . . . . . . . . . . . . . . . . . automatica con
segnale in ingresso > 10 mV
Disattivazione . . . . . . . . . . . . . . . . . . automatica dopo 2 minuti circa con
segnale in ingresso < 5 mV
Dimensioni . . . . . . . . . . . . . . . . . . . . 95 x 75 x 17 mm
Peso . . . . . . . . . . . . . . . . . . . . . . . . . 65 g
Cuffie
Principio di funzionamento . . . . . . . . dinamico
Modo di funzionamento . . . . . . . . . . chiuso
Banda di trasmissione . . . . . . . . . . . . 20 - 20.000 Hz
Pressione sonora max.. . . . . . . . . . . . 113 dB
Distorsione . . . . . . . . . . . . . . . . . . . . ≤ 0,5%
Adattamento all’orecchio . . . . . . . . . avvolgente
Forza di pressione . . . . . . . . . . . . . . . ~ 2 N
Alimentazione. . . . . . . . . . . . . . . . . . 2 x 1,2 V accumulatore NiMH AAA,
1000 mAh
Autonomia . . . . . . . . . . . . . . . . . . . . 6 ore circa
Peso (con batterie). . . . . . . . . . . . . . . 270 g
Problema Possibile causa Soluzione
Nessun suono Le cuffie non sono
attivate
Nell’inserimento di
accumulatori/batterie
non è stata rispettata la
corretta polarità
Il volume delle cuffie è al
minimo
L’alimentatore non è
correttamente collegato
La sorgente sonora non è
attivata
Il regolatore della
sorgente sonora non è
impostato su un volume
sufficientemente alto
Gli accumulatori NiMH
nelle cuffie sono
scarichi
Il canale delle cuffie non
corrisponde a quello del
trasmettitore
Attivate le cuffie con
l’interruttore di
accensione/
spegnimento
Inserite gli accumulatori/ le
batterie rispettando la
corretta polarità
Aumentate il volume
delle cuffie
Controllate che
l'alimentatore sia
correttamente collegato
Attivate la sorgente
sonora
Nel collegamento a una
presa audio regolabile,
assicuratevi che il regolatore sia impostato per un
volume sufficientemente
alto
Caricate nuovamente gli
accumulatori
Premere il tasto
Channel
sulle cuffie
per avviare la ricerca
automatica
Suono solo da un
lato
Il connettore del
cavo audio non è
stabilmente collegato
Controllate il cavo audio
e inserite completamente
il connettore
Suono disturbato Disturbi a causa di altri
apparecchi o interferenze
Modificate la frequenza di
trasmissione del
trasmettitore e premete il
tasto
sulle cuffie
Questo prodotto non può essere eliminato, al termine della
sua durata, nei normali rifiuti domestici, ma deve essere
portato ad un punto di raccolta per il riciclaggio di apparecchi
elettrici ed elettronici, come indicato dal simbolo posto sul
prodotto, dalle istruzioni per l'uso e dalle indicazioni poste
sulla confezione.
8. Smaltimento
Page 21

español
4140
SISTEMA DE AURICULARES INALÁMBRICOS RSX 700
Le agradecemos la confianza que ha depositado en beyerdynamic al adquirir el
set de auriculares inalámbricos RSX 700.
El set de auriculares inalámbricos RSX 700 trabaja en la gama de frecuencias
de 2,4 GHz. La recepción es posible en un área de hasta 20 metros, incluso a
través de paredes y techos interiores. Con estos auriculares no sólo gozará de
una absoluta libertad de movimientos en el interior, sino también en el
exterior. Con un único emisor puede utilizar tantos auriculares como desee.
Informaciones de seguridad
• Utilice el emisor únicamente con el bloque de alimentación adjunto.
Compruebe que la potencia conectada coincide con la alimentación de la
red existente. La conexión del sistema a una red de alimentación equivocada
puede provocar graves daños.
• El bloque de alimentación se debe instalar de manera que permita su fácil
retirada de la red en caso de necesidad.
• Cuando desee cambiar cables o la ubicación del emisor, desconecte siempre
el sistema de la red.
• No intente usted mismo modificar componentes que trabajen con electricidad,
deje que el personal especializado se encargue de ello. No abra nunca
aparatos electrónicos, de lo contrario perderán su garantía.
• Utilice los aparatos únicamente en espacios secos. Deje el emisor y el bloque
de alimentación en el interior de la casa, podrá utilizar los auriculares
también fuera, en condiciones secas.
• Evite rociar o que caigan gotas de agua sobre el bloque de alimentación.
1. Emisor
Componentes de manejo
Vista desde arriba Vista desde atrás
Volumen de suministro
Este set de auriculares inalámbricos incluye los siguientes accesorios:
1 emisor
1 auricular
1 adaptador AC/DC 12 voltios/300 mA
1 cable audio (clavija estéreo de 3,5 mm. – clavija estéreo de 3,5 mm.)
1 cable adaptador con dos conexiones Cinch, roja (derecha) y blanca (izquierda)
1 adaptador (clavija estéreo 3,5 mm. – clavija estéreo 6,35 mm.)
1 cable de carga
2 acumuladores NiMH del tipo AAA, 1,2 V, 1000 mAh
1.1 Puesta en funcionamiento del emisor
Lugar de colocación
• Coloque el emisor cerca de su fuente de sonido (equipo de alta fidelidad,
reproductor de CD/DVD, televisor, etc.). Para disfrutar de una recepción
libre de interferencias, evite colocar el emisor junto a aparatos inalámbricos,
teléfonos móviles o microondas, así como accionarlo sobre el tubo de
imagen de su televisor o monitores.
• No exponga el emisor a radiación solar directa, no lo coloque cerca de
objetos metálicos ni coloque objetos metálicos sobre él.
Conexión a la red
• Conecte el cable de alimentación eléctrica a la hembrilla e introduzca el
bloque de alimentación en el enchufe. El bloque de alimentación puede
permanecer conectado a la red constantemente sin que por ello se produzcan
daños en el bloque de alimentación o en el emisor.
El indicador de funcionamiento emite una luz roja en el momento en que
el emisor transmite.
Selector de canal para sintonizar la frecuencia del emisor.
Indicador de canal, seleccionable de 0 a 7
Importante: “0” indica también un canal.
Hembrilla del bloque de alimentación para la alimentación eléctrica del
emisor.
Hembrilla para conectar el cable de carga.
Jack de entrada de audio (clavija 3,5 mm.)
Reglamentación europea
Este producto ha sido construido, comprobado y producido siguiendo la
directiva europea R&TTE 1999/5/EEC.
De acuerdo con lo previsto en esta directiva este producto se puede utilizar en
los siguientes países:
Bélgica, Dinamarca, Alemania, Estonia, Finlandia, Francia, Grecia, Irlanda,
Islandia, Italia, Letonia, Liechtenstein, Lituania, Luxemburgo, Malta, Holanda,
Noruega, Austria, Polonia, Portugal, Suiza, Suecia, Eslovaquia, Eslovenia,
España, la República Checa, Hungría, el Reino Unido y Chipre.
Además esta gama de frecuencias también está autorizada en muchos otros
países.
Conectar el cable de
alimentación eléctrica al emisor.
Introducir el bloque de
alimentación en el enchufe.
Page 22

español
4342
Conexión de audio
• Con la ayuda del cable de audio adjunto y el adaptador del cable, conecte
el jack de entrada de audio del emisor, preferiblemente con las conexiones
Cinch, a su fuente de sonido/equipo estéreo.
Importante: a la hora de conectar las conexiones Cinch tenga en cuenta la
polaridad del cable de audio, es decir la derecha con la derecha (rojo) y la
izquierda con la izquierda (blanco).
• También puede conectar su fuente de sonido/equipo estéreo a la salida
de los altavoces (clavija 3,5 mm.; clavija 6,35 mm. con el adaptador
correspondiente). En este caso, tenga en cuenta que el volumen de la
fuente de sonido (televisor, equipo estéreo) esté lo suficientemente alto.
Conectar el emisor al aparato de TV o al equipo estéreo a través de una
conexión Cinch
Conectar el cable a la
entrada de audio del
emisor.
Conectar el emisor a un reproductor de CD o MP3 a través de la clavija
de 3,5 mm.
En el reproductor de CD o
MP3 el volumen debe estar
lo suficientemente alto.
Conectar el emisor al equipo estéreo a través de la clavija de 6,35 mm.
Conectar
• Ponga en funcionamiento la fuente de sonido con la que está conectado el
emisor. Tan pronto como el emisor detecte una señal, se pondrá en marcha
la luz roja indicadora de funcionamiento .
Atención:
• En caso de que el emisor no reciba señal alguna, se desconectará
transcurridos 3 minutos, con lo que se apagará la luz indicadora de
funcionamiento .
• En caso de que la emisora reciba de nuevo una señal, ésta se conecta
automáticamente. El canal coincide con el que se ha seleccionado
anteriormente, el indicador muestra sin embargo siempre “0”.
Tecla para aumentar el volumen de los auriculares
Tecla Channel de búsqueda automática, para ajustar la frecuencia de
recepción del auricular a la frecuencia del emisor.
Tecla para reducir el volumen del auricular
Interruptor on/off
Indicador LED de control. La luz verde indica que el auricular está en
funcionamiento, la roja indica el proceso de carga.
Jack de carga para conectar el cable de carga de la parte izquierda de los
auriculares
Compartimento para introducir los acumuladores adjuntos de la parte
izquierda de los auriculares
2.1 Puesta en funcionamiento de los auriculares
Introducir/cambiar acumuladores
• Gire la cápsula del auricular izquierdo en
sentido de las agujas del reloj y tire de él con
cuidado para retirarlo.
• Coloque los acumuladores (tamaño AAA,
1,2 V) prestando atención a la disposición de
los símbolos "+/-" en los compartimentos
destinados para ello .
Atención: se debe cargar los acumuladores
antes de ser utilizados por primera vez
(véase 3. carga de acumuladores).
• En caso de que utilice otros acumuladores,
diferentes a los de la marca beyerdynamic
adjuntos, deberá retirar el aislante del extremo,
es decir, con un cuchillo u objeto similar, retire
un poco el revestimiento plástico exterior de
manera que los contactos de carga laterales estén en contacto directo con el
compartimento de la batería.
• En lugar de acumuladores también puede utilizar pilas del mismo tipo.
Atención: ¡No retire bajo ningún concepto el revestimiento plástico
de las pilas, de lo contrario se corre el riesgo de explosión en caso de
que se carguen los auriculares accidentalmente!
• Coloque la cápsula de nuevo sobre el auricular izquierdo y gírela en sentido
contrario a las agujas del reloj hasta que ésta quede bloqueada. Presione
ligeramente sobre ella al girar.
Importante: compruebe que los símbolos de la cápsula coinciden una
vez colocada.
El volumen del equipo
estéreo debe estar lo
suficientemente alto.
Conectar el cable a la
entrada de audio del
emisor.
Conectar el cable a la
entrada de audio del
emisor.
2. Auriculares
Componentes de manejo
Page 23

español
4544
Conexión
• Ponga en marcha el auricular . El indicador LED de funcionamiento
lemite una luz verde.
Desconexión
• Apague el auricular cuando ya no vaya a utilizarlo más . El indicador LED
de funcionamiento se apaga.
Recepción y ajuste del volumen
• Colóquese los auriculares correctamente según el lado. Ajuste el volumen a
sus preferencias personales con las teclas y . Con la tecla aumentará
el volumen y con la lo reducirá.
• Con la tecla Channel se realiza una búsqueda para ajustar la frecuencia
de recepción con la frecuencia del emisor.
• A partir de este momento ya puede desplazarse libremente de una
habitación a otra o incluso salir al exterior.
• Importante: Evite escuchar con un volumen muy alto, ya que ello
puede dañar su órgano auditivo, y además puede aumentar los daños
ya existentes.
Cambio de frecuencia
• En caso de que otros aparatos produzcan interferencias, busque otra
frecuencia con el selector de canales , posteriormente podrá ajustarla
también en el auricular con la búsqueda automática que se realiza al
presionar la tecla Channel .
• Importante: Cuando desconecte la emisora quedará memorizado el
canal, sin embargo cuando vuelva a conectarla el indicador
mostrará siempre “0”.
Indicador LED / Tiempo de funcionamiento
• Cuando los acumuladores están descargados el indicador LED de
funcionamiento se apaga. El tiempo de funcionamiento de los
acumuladores es de aproximadamente 6 horas.
• La duración de los acumuladores puede variar según el volumen con el que
escuche sus auriculares.
3. Carga de los acumuladores
• Asegúrese de que dispone de
acumuladores recargables (no pilas).
• Desconecte el auricular y conecte
el cable de carga en la conexión de
carga del
auricular.
• Conecte el otro extremo del cable de
carga a la conexión de carga del
emisor.
• Durante el proceso de carga, el
indicador LED de funcionamiento
del auricular emite una luz roja. Incluso cuando los acumuladores están totalmente cargados, el indicador LED de
control seguirá emitiendo esta luz roja.
• La primera vez que los cargue, los acumuladores necesitarán
aproximadamente 24 horas hasta que se concluya el proceso de carga, una
vez transcurridas estas 24 horas podrá concluir el proceso de carga. Las cargas
posteriores requieren aproximadamente de 6 a 8 horas.
Advertencias importantes:
• Si interrumpe el proceso de carga antes de que éste haya concluido, los
acumuladores estarán sólo parcialmente cargados por lo que el tiempo de
funcionamiento será menor. En caso de que se vuelva a activar el proceso
de carga, éste puede durar, según el estado de carga de los acumuladores,
hasta 14 horas hasta que la carga quede totalmente completa.
• Con el uso exhaustivo puede suceder que sus acumuladores se hayan
desgastado y no se carguen lo suficiente. En este caso se deberá reemplazar
estos acumuladores por otros nuevos, que podrá adquirir, por ejemplo, en
su distribuidor oficial beyerdynamic.
• Asimismo si usted dispone de un cargador adecuado podrá cargar los acumuladores separados de los auriculares.
• En caso de que no vaya a utilizar los auriculares durante semanas o meses,
retire los acumuladores/pilas del auricular, pues al no utilizarlos durante
mucho tiempo podría producirse un derrame de líquidos que dañaría irreparablemente algunos componentes del auricular.
Incluso el distintivo "Leak proof" que aparece en algunos
acumuladores/pilas no garantiza que no se produzcan derrames.
• No tire los acumuladores/pilas usados en la basura doméstica, deposítelos
en los lugares de recogida específicos.
Conectar el
cable de
carga al
auricular y al
emisor
4. Mantenimiento
• Limpie los auriculares y el emisor regularmente con un paño húmedo y
suave. Asegúrese de que no entra agua en la cápsula. No utilice bajo
ninguna circunstancia disolventes ni detergentes.
• Reemplace los acolchados tan pronto como empiecen a tener un aspecto
deteriorado. Encontrará acolchados de repuesto en su distribuidor oficial
beyerdynamic.
• Retire los acolchados cuidadosamente del
receptáculo girando en el sentido de las
agujas del reloj. Coloque los nuevos y
gire en sentido contrario a las agujas del
reloj hasta que la junta de bayoneta
quede bloqueada.
5. Consejos para disfrutar de una recepción libre
de interferencias
• En caso de interferencias y problemas de alcance, deberá cambiar la ubicación
del emisor.
• Si así no se produce un cambio en la recepción, desconecte el bloque de
alimentación del emisor y escuche con el auricular toda la banda de
frecuencias presionando repetidas veces la tecla . Si el auricular
permanece en silencio, las condiciones exteriores son las adecuadas.
• Si, por el contrario, se oyen ruidos molestos, voces, o música, significa que
hay otro auricular, babyphone, telefonillo, etc., en funcionamiento cerca
de usted, que interfiere en su recepción. En este caso deberá cambiar la
frecuencia del emisor e iniciar un proceso de búsqueda de frecuencia en el
auricular presionando la tecla Channel .
• El auricular está equipado con una función de bloqueo anti-ruido integrada,
lo cual implica que si se encuentra fuera del alcance de la recepción o si se
apaga el emisor, esta función se activa y el auricular queda en silencio. Tan
pronto como se vuelva a recibir la señal acústica, se podrá oír de nuevo.
Conectar el bloque
de alimentación al
enchufe y al emisor.
Page 24

español
4746
6. Solución de problemas
Cuando se produzca un fallo le recomendamos comprobar primero los puntos
siguientes antes de llevar su aparato a reparar.
Si no puede solucionar el problema con ayuda de las sugerencias que aparecen
a continuación, diríjase a su distribuidor oficial beyerdynamic.
Atención:
No intente en ningún caso reparar el aparato usted mismo, ya que con
ello perdería su derecho a hacer uso de la garantía.
Problema Causa posible Solución
Sonido con
interferencias
El cable adaptador
no está conectado
correctamente al cable
de audio
Asegúrese de que el
adaptador y el cable
están perfectamente
conectados; dado el caso
envíe el cable adaptador y
el de audio.
Deformación de sonido El acumulador en el au-
ricular está agotado
El volumen en la fuente
de sonido está demasiado alto
Cargue el acumulador de
nuevo
Reduzca el volumen
7. Datos técnicos
Emisor
Suministro de energía . . . . . . . . . . . . Adaptador AC/DC 12 V / 300 mA
Frecuencias portadoras . . . . . . . . . . . 8 canales en la gama 2,4 GHz,
Distancia de cada uno 9 MHz,
conmutable
Modulación. . . . . . . . . . . . . . . . . . . . digital
Impedancia de entrada . . . . . . . . . . . > 10 kΩ
Alcance. . . . . . . . . . . . . . . . . . . . . . . hasta 20 m. (sin obstáculos)
Distancia de tensión sofométrica . . . . > 85 dB (A)
Conexión . . . . . . . . . . . . . . . . . . . . . automática con entrada
de señal > 10 mV
Desconexión . . . . . . . . . . . . . . . . . . . automática transcurridos 2 minutos
tras la entrada de señal < 5 mV
Dimensiones . . . . . . . . . . . . . . . . . . . 95 x 75 x 17 mm.
Peso . . . . . . . . . . . . . . . . . . . . . . . . . 65 g.
Auriculares
Principio transductor . . . . . . . . . . . . . dinámico
Principio de operación. . . . . . . . . . . . cerrado
Gama de frecuencias. . . . . . . . . . . . . 20 - 20.000 Hz
Máx. nivel de intensidad sonora . . . . 113 dB
Coeficiente de distorsión. . . . . . . . . . ≤ 0,5%
Acoplamiento a la oreja. . . . . . . . . . . rodean la oreja
Presión de contacto . . . . . . . . . . . . . ~ 2 N
Suministro de energía . . . . . . . . . . . . 2 acumuladores NiMH tipo AAA
1,2 V, 1000 mAh
Tiempo de funcionamiento . . . . . . . . aprox. 6 horas.
Peso (con pilas) . . . . . . . . . . . . . . . . . 270 g.
Problema Causa posible Solución
No se oye sonido
alguno
Los auriculares no están
conectados
Los acumuladores/pilas
no están bien colocados
en cuanto a la polaridad
en el auricular.
El volumen en el
auricular está al mínimo
El bloque de alimentación no está bien
conectado
La fuente de sonido no
está conectada
El selector de la fuente
de sonido no se ha
girado lo suficiente
Los acumuladores NiMH
en el auricular están vacíos
El canal del auricular no
se corresponde con el de
la emisora
Ponga en marcha los
auriculares con el
interruptor on/off
Coloque los acumuladores
/pilas correctamente
según la polaridad
Eleve el volumen en el
auricular
Compruebe que el
bloque de alimentación
está bien conectado
Conecte la fuente de
sonido
Con una conexión con
un jack de audio regulable, asegúrese de que el
selector de volumen se
ha girado lo suficiente
Vuelva a cargar los
acumuladores
Presione la tecla de canal
Channel
en el auricu-
lar para iniciar el proceso
de búsqueda automática
Sólo se recibe sonido en
un lado
La clavija del cable de
audio no está bien
conectada
Compruebe el cable de
audio e introduzca la clavija completamente
Sonido con
interferencias
Ruidos molestos
producidos por otros
aparatos o por
interferencias
Cambie la frecuencia
emisora del emisor y
presione la tecla
en el
auricular
Una vez transcurrida su vida útil, este producto no debe ser
eliminado junto con los residuos de la basura doméstica
normal, sino que debe ser entregado en un centro de recogida
para el reciclaje de aparatos eléctricos y electrónicos. El
símbolo que aparece en el producto, en las instrucciones de
servicio o en el embalaje le indica que se trata de residuos
contaminantes.
8. Gestión de residuos
Page 25

Русский
4948
КОМПЛЕКТ БЕСПРОРОДНЫХ НАУШНИКОВ RSX 700
Вы приобрели беспроводные наушники RSX 700 от компании
beyerdynamic. Спасибо за доверие.
Беспроводные наушники RSX 700 работают в диапазоне частот
2,4 ГГц. Связь с передатчиком поддерживается в радиусе 20 метров,
причем стены и перекрытия не являются препятствиями. Наушники
будут работать как в помещении, так и вне его, при этом сохраняется
полная свобода движения. Один передатчик может работать с любым
количеством наушников одновременно.
Информация по безопасности эксплуатации
• Подача питания к передатчику осуществляется от блока питания
из комплекта поставки. Убедитесь, что параметры электросети
соответствуют требуемым. Несоответствие параметров электросети
может стать причиной выхода из строя наушников.
• Блок питания должен располагаться в легкодоступном месте, чтобы
при необходимости быстро отключить подачу питания.
• При переключении соединительных проводов или переносе
передатчика в другое место рекомендуется отключать питание.
• Выполнение работ на токоведущих частях оборудования
рекомендуется поручать специалисту. Запрещается нарушать
целостность корпуса электронных приборов, в противном случае
гарантийные обязательства исключаются.
• Рекомендуется использовать оборудование в сухих помещениях.
Передатчик и сетевой адаптер должны постоянно находиться в
помещении, наушниками можно пользоваться и на улице, но только
в сухую погоду.
• Не допускайте попадания капель воды или намокания сетевого
адаптера.
1.Передатчик
Элементы управления
Вид сверху Вид сзади
Комплект поставки
В комплект беспроводных наушников входят следующие омплектующие:
1 Передатчик
1 Наушники
1 Преобразователь напряжения и блок питания 12 В/300 мА
1 Аудиокабель (3,5 мм штекер - 3,5 мм штекер)
1 Кабель преобразователя с двумя штекерами RCA, красный (справа)
и белый (слева)
1 Переходной кабель (3,5 мм штекер - 6,35 мм штекер)
1 Зарядный кабель
2 Элементы питания - аккумуляторы NiMH, тип AAA, 1,2 в, 1000 мАч
1.1 Подключение передатчика
Место установки
• Передатчик устанавливают вблизи источника звукового сигнала
(Музыкальный центр Hi-Fi, проигрыватель CD/DVD, телевизор и
т.д.). Тем не менее, для обеспечения устойчивого приема сигнала не
следует располагать передатчик в непосредственной близости от
радиопередающих устройств, мобильных телефонов, микроволновых
печей или над электро-лучевой трубкой телевизора или монитора.
• Не подвергайте передатчик воздействию прямых солнечных лучей,
не допускается нахождение металлических предметов вблизи
передатчика, а также установка их на корпус передающего
устройства.
Подключение к сети электропитания
• Подключите кабель электропитания к разъему , а вилку
электрокабеля сетевого адаптера воткните в розетку электрической
сети. Сетевой адаптер можно длительное время не отключать от
сети электропитания без ущерба для него или передатчика.
При передаче сигнала загорается красный индикатор
Переключатель для выбора передающей частоты
Индикатор выбранного канала, переключение от 0 до 7
Внимание: „0“ также указывает на выбранный канал.
Разъем для подключения сетевого адаптера к передатчику
Разъем для подключения зарядного кабеля
Разъем для подключения штекера входящего аудиосигнала
(штекер 3,5 мм)
Европейские нормы
Конструкция изделия сертифицирована и отвечает европейскиv
нормам, а именно основным требованиям R&TTE 1999/5/EEC.
В соответствии с указанными требованиями изделие допущено к
применению в следующих странах:
Бельгия, Дания, Германия, Эстония, Финляндия, Франция,
Греция, Ирландия, Исландия, Италия, Латвия, Лихтенштейн, Литва,
Люксембург, Мальта, Нидерланды, Норвегия, Австрия, Польша,
Португалия, Швейцария, Швеция, Словакия, Словения, Испания,
Чешская Республика, Венгрия, Соединенное Королевство и Кипр.
Помимо этого работа в указанном частотном диапазоне разрешена
и в ряде других стран.
Подключите кабель питания
к передающему устройству.
Подключите сетевой адаптер к
розетке электропитания
Page 26

Русский
5150
Подключение аудиокабеля
• С помощью аудиокабеля и переходного кабеля из комплекта
поставки соедините разъем для входа аудиосигнала передатчика
с разъемами на корпусе источника аудиосигнала/стереосистемы,
желательно разъемами для подключения RCA-кабеля
Внимание: При подключении соблюдайте полярность аудиокабеля,
т.е. правый штекер в правый разъем (красный), соответственно,
левый штекер в левый разъем (белый).
• Как вариант возможно подключение к выходу для наушников
(штекер 3,5 мм, штекер с переходником) стереосистемы. При этом
следует увеличить громкость источника аудиосигнала (телевизор,
стереосистема).
Подключение передатчика к разъему RCA телевизора или
стереосистемы
Подключить кабель к
аудиовходу
передатчика.
Подключение передатчика к СD- или MP3-проигрывателю с
помощью штекера 3,5 мм
CD- или MP3-проигрыватель
Следует увеличить
громкость источника
сигнала
Подключите передатчик к стереосистеме с помощью штекера
6,35 мм
Включение
• Включите источник сигнала, с которым соединен передатчик. В
момент получения аудиосигнала загорается красный светодиод на
корпусе передатчика .
Внимание:
• При отсутствии сигнала, передатчик выключится через
3 минуты, при этом светодиод погаснет.
• В момент получения повторного сигнала автоматически включается
передатчик. Канал соответствует тому, который был выбран
ранее, но на индикаторе будет отображаться „0“.
Кнопка увеличения громкости наушников
Кнопка выбора канала для автоматического поиска и настройки
на частоту передатчика
Кнопка уменьшения громкости наушников
Выключатель
Контрольный светодиод загорается зеленым при включении
наушников, красный цвет - процесс зарядки аккумуляторов
Разъем для подключения зарядного кабеля с левой стороны наушников
Отсек для установки аккумуляторов из комплекта поставки с
левой стороны наушников
2.1 Включение наушников
Установка/замена аккумуляторов
• Путем поворота по часовой стрелке
крышки левого наушника снимаем ее.
• Устанавливаем аккумуляторы (тип AAA,
1,2 в), соблюдая полярность „+/-“, в отсекe
.
Внимание: Аккумуляторы перед первым
использованием требуют зарядки
(см. 3. Зарядка аккумуляторов).
• При использовании аккумуляторов,
отличных от поставляемых в комплекте
фирмой beyerdynamic, необходимо со
стороны отрицательного полюса снять
изоляцию, для этого можно использовать
нож или иной острый предмет. Теперь
боковые выводы для зарядки будут
находиться в контакте с аккумуляторами.
• Вместо аккумуляторов можно использовать батареи аналогичного
размера. Внимание: Запрещается снимать или повреж дать
пластиковую оболочку батареек, иначе не исключена
вероя
тность взрыва, если по ошибке начнется их зарядка.
• Установите крышку левого наушника в прежнее положение и
поверните ее против часовой стрелки до упора. Вращайте крышку
с легким нажимом. Внимание: При одевании наушников следите
за тем, чтобы совпадали символы висячего замка на корпусе.
Следует увеличить
громкость
стереосистемы
Подключите кабель к
аудиовходу
передатчика.
Подключите кабель к
аудиовходу
передатчика.
2. Наушники
Элементы управления
Page 27

Русский
5352
Включение
• Включите наушники . Загорится зеленый светодиодный индикатор .
Выключение
• По окончании использования выключите наушники . Светодиодный
индикатор погаснет.
Настройка диапазона приема и громкости звука
• Оденьте наушники, соблюдая правила. Отрегулируйте громкость
звучания с помощью кнопок и . Клавиша - увеличение
громкости; клавиша - уменьшение громкости.
• С помощью кнопки выбора канала выполняется автоматическая
синхронизация частоты приема наушников и частоты работы
передающего устройства.
• Теперь можно свободно перемещаться из комнаты в комнату, не
снимая наушников.
• Внимание:
Не рекомендуется устанавливать высокий уровень громкости,
поскольку это вредно для слуха. Возможно обос
трение
имеющихся проблем с органами слуха.
Смена частоты
• Если при воспроизведении имеют место помехи от электронных
приборов, то с помощью переключателя каналов рекомендуется
изменить частоту передачи, и с помощью кнопки на корпусе
наушников выполнить автоматическую синхронизацию с частотой
передатчика.
• Внимание:
При выключении передатчика канал сохраняется, однако при
включении на индикаторе будет всегда отображаться „0“.
Светодиодный индикатор/время ра
боты
• При полном разряде аккумуляторов гаснет светодиодный индикатор .
Продолжительность работы без подзарядки около 6 часов.
• В зависимости от установленного в наушниках уровня громкости
продолжительность работы без подзарядки может отличаться от
указанного выше.
3. Зарядка аккумуляторов
• Убедитесь, что в наушниках
установлены аккумуляторы
(не пальчиковые батарейки).
• Отключите наушники и
подсоедините к гнезду
зарядный кабель.
• Другой конец кабеля
подсоедините к гнезду
передатчика.
• Во время зарядки загорается
красный светодиодный
индикатор наушников.
Светодиодный индикатор не
гаснет при завершении зарядки аккумуляторов.
• Первичная зарядка продолжается не менее 24 часов. В дальнейшем
для зарядки аккумуляторов требуется 6 - 8 часов.
Внимание:
• При сокращении времени зарядки аккумуляторы заряжаются
лишь частично, а время работы их до следующей подзарядки
сокращается. При возобновлении процесса зарядки требуется уже
гораздо больше времени до полной зарядки аккумуляторов, до
14 часов.
• В процессе длительной эксплуатации аккумуляторы вырабатывают
ресурс, их зарядка становится неполной. Такие аккумуляторы
подлежат замене. Новые аккумуляторы можно приобрести,
например, у любого дилера beyerdynamic.
• Заряжать аккумуляторы можно и с помощью внешнего зарядного
устройства.
• При длительных перерывах в эксплуатации на срок несколько
недель или месяцев рекомендуется хранить аккумуляторы
отдельно от наушников. Поскольку аккумуляторы/пальчиковые
батарейки могут вытечь, и наушники придут в негодность.
Маркировка „Leak proof“ на аккумуляторах/пальчиковых батарейках
не является гарантированной защитой от вытекания.
• Запрещается утилизация отслуживших свой срок
аккумуляторов/элементов питания вместе с бытовыми отходами,
местные сборные пункты осуществляют их приемку для последующей
утилизации.
Соединить
наушники и
передатчик
зарядным
кабелем.
4.Уход и обслуживание
• Регулярно необходимо протирать наушники и передатчик мягкой
влажной тряпкой. Следите, чтобы вода не попала в амбушюры.
Запрещается пользоваться растворителями или чистящими
средствами.
• При износе покрытия амбушюров они подлежат замене. Сменные
амбушюры можно приобрести у дилеров beyerdynamic.
• Осторожно снимите амбушюры, поворачивая их по часовой
стрелке. Установите новые
амбушюры, закрепив их путем
вращения против часовой стрелки
до срабатывания байонетного
затвора.
5. Обеспечение устойчивого сигнала
• В случае помех при приеме сигнала или ухудшения приема в
радиусе действия необходимо сменить место расположения
передатчика.
• Если это не приведет к улучшению принимаемого сигнала,
отключите блок питания от передатчика и выполните
переключение по всему диапазону частот, многократно нажимая на
кнопку Тишина в наушниках свидетельствует об отсутствии
внешних помех.
• Если же Вы слышите шумы, речь или музыку, то это говорит о том,
что в непосредственной близости от Вас работают другие
беспроводные наушники, детский телефон, включено переговорное
устройство и т.д. Смените частоту работы передатчика, выполнив
поиск нажатием кнопки выбора канала .
• В наушниках имеется встроенный шумовой фильтр, т.е. при
нахождении вне радиуса действия или при отключении передатчика
фильтр активируется и отключает наушники. При возврате в зону
действия передатчика, прием сигнала возобновляется.
Подать питание
от розетки через
блок питания к
передатчику.
Page 28
Русский
5554
6.Устранение неисправностей
При возникновении неисправности до обращения в сервисную службу
выполните следующие действия.
Если все-таки не удастся устранить неисправность, обращайтесь к
дилеру beyerdynamic.
Внимание:
Не пытайтесь выполнить ремонт собственными силами, поскольку
это приведет к исключению гарантийных обязательств.
Проблема Вероятная причина Решение
Помехи при воспроизведении звука
Ненадежное соединение аудиакабеля и
переходного кабеля
Проверьте контакт
аудиокабеля и
переходного кабеля,
при необходимости
восстановите его.
Звук с искажениями Разрядка
аккумуляторов в
наушниках
Уровень громкости источника аудисигнала
слишком велик
Выполните зарядку
аккумуляторов
Уменьшите уровень
громкости
7. Те хнические характеристики
Передатчик
Питание. . . . . . . . . . . . . . . . . . . . . . Преобразователь напряжения и
блок питания 12 В/300 мА
Рабочий диапазон частот . . . . . . . 8 каналов в диапазоне 2,4 ГГц,
с полосой по 9 МГц, возможность
выбора частоты
Модуляция . . . . . . . . . . . . . . . . . . . цифровая
Полное сопротивление . . . . . . . . . > 10 кΩ
Радиус действия . . . . . . . . . . . . . . до 20 м (прямая видимость)
Относительный уровень шумов . . > 85 дБ (A)
Включение . . . . . . . . . . . . . . . . . . . автоматическое при
входящем сигнале > 10 мВ
Отключение . . . . . . . . . . . . . . . . . . автоматически через 2 мин при
входящем сигнале < 5 мВ
Габаритные размеры . . . . . . . . . . . 95 x 75 x 17 мм
Вес. . . . . . . . . . . . . . . . . . . . . . . . . . 65 г
Наушники
Принцип генерирования звука . . . динамический
Конструкция наушников . . . . . . . . закрытые
Рабочий диапазон частот . . . . . . . 20 - 20.000 Гц
Макс. уровень звукового
давления. . . . . . . . . . . . . . . . . . . . . 113 дБ
Коэффициент гармонических
искажений на 1 кГц . . . . . . . . . . . . ≤ 0,5%
Расположение. . . . . . . . . . . . . . . . . закрывает уши
Усилие прижима . . . . . . . . . . . . . . ~ 2 Н
Питание. . . . . . . . . . . . . . . . . . . . . . Элементы питания -
аккумуляторы NiMH, тип AAA, 1,2 в,
1000 мАч
Продолжительность
работы без подзарядки. . . . . . . . . ок. 6 часов
Вес (с элементами питания) . . . . . 270 г
Проблема Вероятная причина Решение
Нет звука Наушники не
подключены
Неправильно
установлены
аккумуляторы/
пальчиковые батарейки
Уровень громкости
установлен на минимум
Неправильно
подключен блок
питания
Отключен источник
аудиосигнала
Регулятор уровня
громкости источника
аудиосигнала
установлен на минимум
Разряжены
аккумуляторы (NiMH)
Канал наушников
соответствует каналу
передатчика
Включите
переключатель
на
корпусе наушников
Правильно установите
аккумуляторы
Прибавьте громкость
воспроизведения на
наушниках
Проверьте
правильность
подключения блока
питания
Включите источник
аудиосигнала
При подключении
штекера к разъему
аудиосигнала
убедитесь, что
регулятор громкости
включен
Выполните зарядку
аккумуляторов
Чтобы активировать
автоматический
поиск, нажмите на
кнопку выбора канала
, расположенную на
наушнике
Звук только в одном
из наушников
Не до конца вставлен
в гнездо штекер
аудиокабеля
Проверьте
подключение
аудиокабеля
Помехи при воспроизведении звука
Помехи вызваны
работой электронных
приборов
Измените часто¬ту,
на которой работает
передатчик, и
нажмите кнопку
на
наушниках
После окончания срока использования данного продукта запрещено
утилизировать его вместе с обычным бытовым мусором и отходами.
Следует сдать данный продукт на специальном пункте сбора электрических
и электронных устройств, откуда они направляются на последующую
утилизацию. О способе утилизации данного продукта сообщает символ,
нанесённый на сам продукт, изображённый в руководстве по использованию
или на упаковке.
8.Утилизация
Page 29

RSX 700 johdoton kuulokejärjestelmä
Tutustu huolellisesti tähän käyttöohjeeseen ennen kuin alat käyttää
laitetta.
Langaton kuulokejärjestelmä RSX 700 toimii 2,4 GHz:n taajuusalueella.
Vastaanotto on mahdollista noin 20m:n säteellä riippumatta välissä olevista
tavanomaisista katto- ja seinärakenteista.
Näin ollen voit vapaasti liikkua sisätiloissa ja pihapiirissä käyttäessäsi
kuulokkeita. Samaan lähettimeen voidaan liittää useita kuulokkeita.
Eurooppalaiset määräykset
Tämä tuote on suunniteltu, testattu ja valmistettu Euroopan R&TTE Direktiivin
1999/5/EEC mukaisesti.Tämän direktiivin mukaan tätä tuotetta voidaan käyttää
seuraavissa maissa:
Itävalta, Belgia, Kypros, Tsekin tasavalta, Tanska, Eesti, Espanja, Suomi, Ranska,
Kreikka, Saksa, Unkari, Islanti, Italia, Irlanti, Latvia, Liettua, Alankomaat,
Liechtenstein, Luxemburg, Norja, Malta, Puola, Portugali, Slovakia, Slovenia,
Sveitsi, Ruotsi ja Englanti. Lisäksi yllä mainittu taajuusalue on hyväksytty myös
useissa muissa maissa.
Mukana toimitettavat varusteet
Tähän langattomaan kuulokejärjestelmään sisältyy:
1 Lähetin
1 Kuulokkeet
1 AC/DC-jännitesovitin 12V / 300mA
1 audiokaapeli, jossa stereojakki 3.5 mm <-> 3,5mm stereojakki
1 Sovitinkaapeli, jossa 2 RCA -pistoketta, punainen (oikea kanava) ja valkoinen
(vasen kanava)
1 Sovitin (3,5mm stereojakki <-> 6.35 mm (1/4") stereojakki
1 Latauskaapeli
2 NiMH-ladattavaa paristoa AAA- 1.2 V, 1000 mAh
Turvaohjeet
• Käytä ainoastaan alkuperäistä jännitesovitinta, joka on toimitettu laitteen
mukana.
Varmista, että kytket jännitesovittimen ainoastaan sellaiseen pistorasiaan,
jonka jännitearvot vastaavat jännitesovittimessa ilmoitettuja jännitearvoja.
Väärään jännitteeseen kytkeminen voi vaurioittaa laitetta vakavasti.
• Jännitesovittimen tulee sijaita helposti ulottuvilla, jotta se tarvittaessa
voidaan nopeasti irrottaa verkkovirrasta.
• Irrota aina virtapistoke, ennen kuin muutat kytkentöjä tai siirrät laitetta.
• Älä koskaan ryhdy purkamaan laitetta! Omatoiminen korjailu voi olla
vaarallista ja se johtaa aina takuun raukeamiseen. Mahdolliset korjaukset
saa tehdä vain valtuutettu huoltohenkilö.
• Käytä laitteita vain kuivissa tiloissa. Jos ulkona on kuivaa, voit käyttää
kuulokkeita ulkona, mutta pidä aina lähetin ja virtalähde sisätiloissa.
• Älä koskaan altista jännitesovitinta roiskevedelle tai sateelle.
1. Lähetin
Säätimet ja ilmaisimet
EDESTÄ KATSOTTUNA TAKAA KATSOTTUNA
Toiminnan LED-merkkivalo palaa punaisena, kun lähetin on aktivoitu
Kanavakytkin, jolla valitaan lähetystaajuus
Kanavanilmaisin, 0-7
Huom! ”0” on myös kanava
Virtaliitäntä, johon yhdistetään jännitesovitin
Latausliitäntä, johon yhdistetään latausjohto
Audiotulo ohjelmalähteen liittämiseksi (3,5mm jakki)
1.1 Lähettimen käyttö
Sijainti
• Valitse laitteelle sopiva paikka lähellä audio-ohjelmalähdettä (hifi-järjestelmä,
CD/DVD-soitin, televisio jne.). Häiriöiden välttämiseksi älä sijoita lähetintä
radiolaitteen tai matkapuhelimen lähettyville äläkä aseta sitä television tai
monitorin päälle.
• Älä altista lähetintä suoralle auringonpaisteelle ja vältä metalliesineiden
läheisyyttä.
Virrankytkentä
• Yhdistä jännitesovittimen tasavirtapistoke lähettimen DC-virtaliittimeen ja
yhdistä jännitesovittimen verkkopistoke pistorasiaan. Lähettimen jännitesovitin
voi olla kytkettynä jatkuvasti verkkovirtaan ilman, että se vahingoittaa
lähetintä tai jännitesovitinta
Yhdistä jännitesovittimen verkkopistoke
pistorasiaan
Yhdistä jännitesovittimen
tasavirtapistoke lähettimen
DC-virtaliittimeen
suomi
5756
Page 30

Audiokytkennä
• Yhdistä audio-ohjelmalähde lähettimen audiotuloon käyttäen mukana
toimitettua audiokaapelia (3,5mm jakki). Yhdistä kaapelin toinen pää
audio-ohjelmalähteen RCA—lähtöön.
Tärkeää: Varmista, että RCA-liittimien kanavakohtainen kytkentä tapahtuu
oikeaoppisesti: punainen liitin (punaiseen) oikeaan kanavaan ja valkoinen
liitin (valkoiseen) vasempaan kanavaan.
• Vaihtoehtoisesti voit yhdistää toisen pään audio-ohjelmalähteen
kuulokeliitäntään käyttämällä mukana toimitettua sovitinta.
Jälkimmäisessä tapauksessa sinun tulee huolehtia siitä, että
kuulokevoimakkuus on säädetty riittävän suurelle tasolle.
2. Kuulokkeet
Säätimet ja ilmaisimet
Kytke lähetin television tai hifi-järjestelmän RCA-liitäntään
Kytke kaapeli lähettimen
Audio in-liitäntään 6
Kytke lähetin CD- tai MP3-soittimen minijakki (3,5mm)
–liitäntään.
CD- tai MP3-soittimen
äänenvoimakkuus on säädettävä riittävän suureksi
Kytke kaapeli lähettimen
Audio in-liitäntään 6
Kytke lähetin hifi-järjestelmän kuulokeliitäntään (6,35mm:n jakki)
CD- tai MP3-soittimen
äänenvoimakkuus on
säädettävä riittävän
suureksi
Kytke kaapeli lähettimen
Audio in-liitäntään 6
Lähettimen kytkeminen päälle
• Kytke virta ohjelmalähteenä toimivaan laitteeseen, johon lähetin on yhdistetty.
Heti, kun lähetin tunnistaa audiosignaalin, punainen LED-merkkivalo syttyy.
Huomaa:
• Jos lähetin ei saa mitään signaalia, se katkaisee virran auto-
maattisesti n.3 min. kuluttua, jolloin LED-merkkivalo sammuu.
• Jos lähetin vastaanottaa uudestaan signaalin, se kytkeytyy
automaattisesti päälle ja valitsee kanavan ”0”.
Äänenvoimakkuuden lisäyspainike
Kanavapainike – hakee ja valitsee automaattisesti lähettimen taajuuden
Äänenvoimakkuuden vähennyspainike
Virtapainike
Virran merkkivalo palaa vihreänä, kun kuulokkeet ovat päällä ja
punaisena, kun kuulokkeiden akkuja ladataan.
Liitäntä latausjohdolle kuulokkeiden vasemmalla puolella
Paristolokero ladattaville akuille kuulokkeiden vasemmalla puolella
2.1 Kuulokkeiden käyttö
Ladattavien akkujen asettaminen/vaihtaminen
• Avaa paristolokero kääntämällä kuulokkeiden
vasemman korvan yksikköä myötäpäivään ja
irrota se vetämällä kevyesti.
• Aseta paristolokeroon ladattavat akut
(AAA -koko, 1.2 V). Varmista oikea
napaisuus (+) ja (-) kuvassa .
Huomaa: Jotta kuulokkeet voivat
toimia, akut on ensin ladattava
asianmukaisesti (ks. tarkemmat tiedot
kohdassa 3. “Akkujen lataaminen”).
• Jos käytät muita kuin mukana toimitettuja
beyerdynamic-akkuja, joudut poistamaan
hieman muovikaulusta negatiivisen navan
kohdalta, jotta kontaktipinta latausliuskan ja
akun navan välillä varmistetaan.
• Voit myös käyttää tavallisia paristoja.
Varoitus: Jos käytät tavallisia ei-ladattavia paristoja, älä poista
muovikaulusta niistä, jotta ne eivät vahingossa altistuisi lataukselle.
Älä koskaan yritä ladata niitä. Tavalliset ei-ladattavat paristot
saattavat räjähtää latauksessa!
• Sulje paristolokero asettamalla vasemman korvan yksikkö takaisin paikalleen
kääntämällä sitä vastapäivään kevyesti painaen kunnes se lukkiutuu.
Tärkeää: Kuulokeyksikössä olevat merkit opastavat yksikön
paikalleen asettamista oikeaan kohtaan.
suomi
5958
Page 31
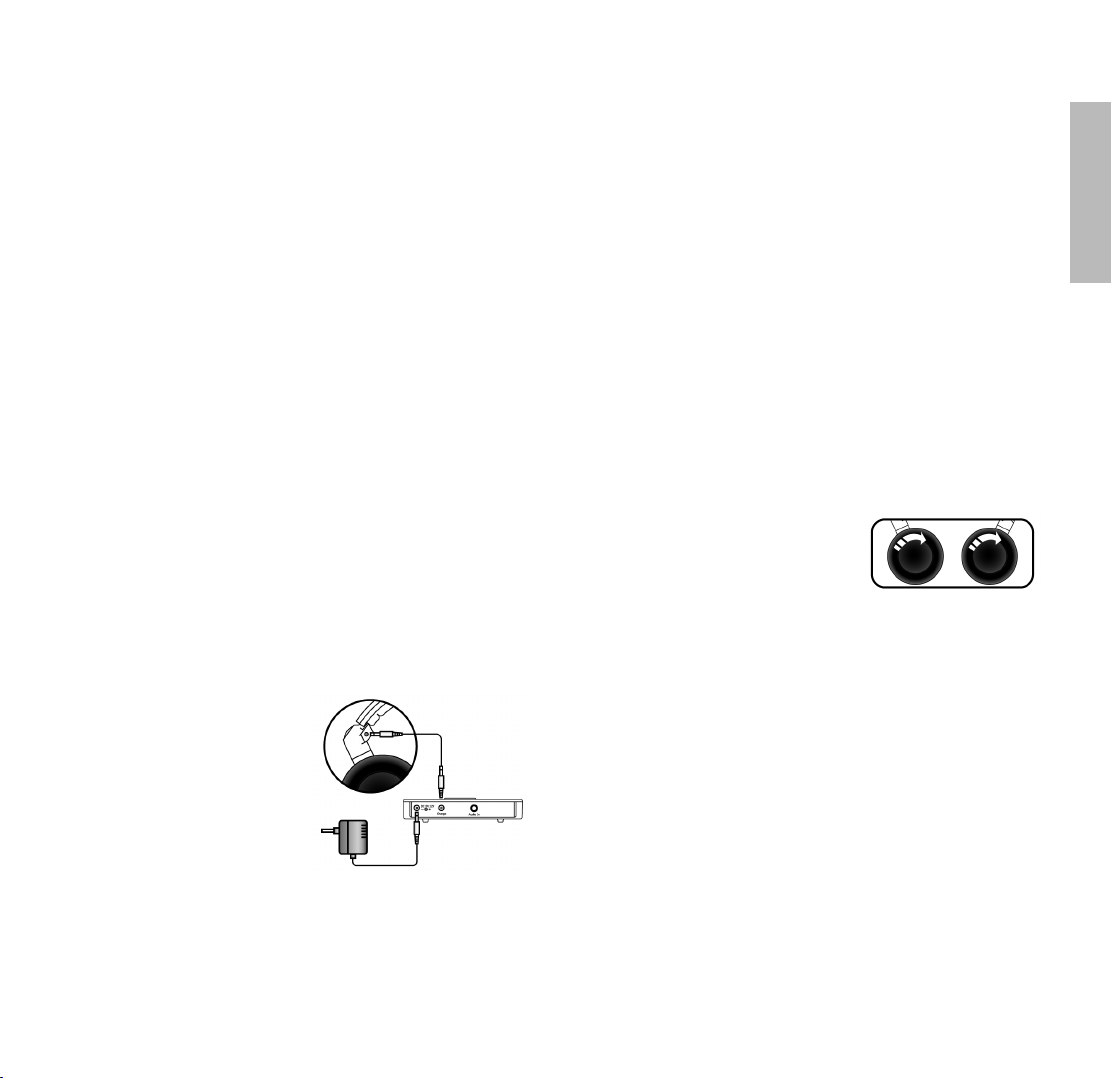
suomi
6160
Virrankytkentä
• Kytke virta kuulokkeisiin virtapainikkeella . Vihreä LED-merkkivalo syttyy.
Virrankatkaisu
• Katkaise virta kuulokkeista virtapainikkeella . Vihreä LED-merkkivalo
sammuu.
Vastaanottotaajuuden ja äänenvoimakkuuden säätö
• Aseta kuulokkeet päähäsi kuulokkeissa olevien ”vasen/oikea”-merkintöjen
mukaan. Säädä äänenvoimakkuus sopivaksi painikkeilla ja .
Painikkeella äänenvoimakkuus kasvaa, painikkeella äänenvoimakkuus
vähenee.
• Kanavapainikkeella voit hakea ja valita automaattisesti lähettimen
taajuuden.
• Tämän jälkeen sinun tulisi voida liikkua huoneesta toiseen ilman
vastaanotto-ongelmia.
• Tärkeää:
Älä säädä äänenvoimakkuutta liian suureksi.
Korvien altistaminen pitkäaikaiselle voimakkaalle äänelle voi
aiheuttaa pysyviä kuulovaurioita.
Taajuuden vaihtaminen
• Johtuen radiosignaalien luonteesta on mahdollista, että muut radiolaitteet
aiheuttavat kuulokejärjestelmään häiriöitä. Mikäli näin tapahtuu, muuta
lähettimen lähetystaajuutta kanavakytkimellä ja säädä kuulokkeiden
vastaanottotaajuus automaattisesti kanavapainikkeella .
LED-ilmaisin / Toiminta-aika:
• Kun akuista loppuu virta, LED-merkkivalo . sammuu. Ladattavien akkujen
toiminta-aika on pyöreästi 6 tuntia
• Riippuen käytetystä äänenvoimakkuudesta, keskimääräinen toiminta-aika
voi vaihdella tämän arvon molemmin puolin.
3. Akkujen lataaminen
• Varmista, että kuulokkeissa on
ladattavat akut (ei tavallisia
kuivaparistoja). Erittäin tärkeää: Älä
koskaan yritä ladata tavallisia paristoja. Ne saattavat räjähtää ja vioittaa
kuulokkeita.
• Katkaise virta kuulokkeista
virtapainikkeella . Yhdistä
latauskaapeli kuulokkeiden
liitäntään .
• Yhdistä kaapelin toinen pää
lähettimen latausliitäntään .
• Latauksen aikana kuulokkeissa palaa punainen LED-merkkivalo .
Latauksen punainen LED-merkkivalo palaa edelleen punaisena myös silloin,
kun akut ovat latautuneet täyteen.
• Ensimmäisellä latauskerralla akut tulevat täyteen n. 24 tunnin lataamisen
jälkeen, jonka jälkeen voit katkaista lataustoiminnon. Seuraavilla
latauskerroilla akut tulevat täyteen 6-8 tunnin lataamisen jälkeen.
Tärkeää:
• Jos keskeytät lataustoiminnon, akkujen toiminta-aika lyhenee merkittävästi.
Jos lataustoiminto käynnistetään uudelleen, voi akkujen lataustilasta
riippuen kestää jopa 14 tuntia kunnes ne ovat täyteen ladatut.
• Ladattavien akkujen käyttöikä on rajallinen ja se on riippuvainen akkujen
käyttöasteesta ja latauskerroista. Kun tarvitset uudet akut, ota yhteys
beyerdynamic-jälleenmyyjään.
• Voit myös käyttää yleislaturia akkujen lataamiseksi.
• Jos et aio käyttää kuulokkeita useaan viikkoon tai kuukauteen, on
suositeltavaa, että poistat akut paristolokerosta. Käyttämättömänä akut
voivat alkaa vuotaa ja saattavat pilata kuulokkeet. Jopa ns. ”vuotamattomat
akut” on syytä poistaa varotoimenpiteenä.
• Älä hävitä käytöstä poistettuja akkuja/paristoja talousjätteen yhteydessä,
vaan toimita ne asianmukaiseen keräyspisteeseen.
Yhdistä jännitesovitin
lähettimeen ja
verkkopistorasiaan
Yhdistä
latauskaapeli
kuulokkeeseen ja
lähettimeen
4. Puhdistus ja huolto
• Puhdista kuulokkeet ja lähetin kostealla liinalla varoen kuitenkin
päästämästä kosteutta laitteisiin.
Älä koskaan käytä liuottimia puhdistamiseen.
• Ajan myötä korvatyynyt on vaihdettava uusiin. Kun vaihto tulee
ajankohtaiseksi, ota yhteys beyerdynamic-jälleenmyyjään.
• Poistaaksesi vanhat tyynyt irrota ne
kummastakin kuulokeyksiköstä
kääntämällä korvatyynyjä myötäpäivään.
Aseta tilalle uudet korvatyynyt ja kiristä
ne paikalleen kääntämällä niitä
vastapäivään.
5. Vihjeitä häiriöiden poistamiseksi
• Jos vastaanotossa esiintyy häiriöitä, kokeile lähettimen sijoittamista toiseen
paikkaan.
• Jos vastaanoton laatu ei parane, irrota lähetin sähköverkosta ja
tarkista vastaanottotaajuusalue painamalla toistuvasti kuulokkeiden
kanavapainiketta . Jos kuulokkeista ei kuulu virityksen aikana mitään,
olosuhteet ovat häiriöttömät.
• Jos kuitenkin kuulet ääniä, keskustelua tai musiikkia, on ilmeistä, että
lähistöllä on toiminnassa jokin toinen radiolähetin kuten vastaavanlainen
langaton kuulokejärjestelmä, itkuhälytin, radiopuhelin jne. Voit estää tämän
lähettimen aiheuttamat häiriöt vaihtamalla kuulokejärjestelmäsi taajuutta.
Taajuus on vaihdettava sekä lähettimessä että kuulokkeissa kanavakytkimellä
ja kanavapainikkeella .
• Kuulokkeissa on sisäänrakennettu kohinasalpa. Tämä merkitsee seuraavaa:
Kun siirryt lähettimen kantaman ulkopuolelle tai kun lähettimen virta katkeaa,
kohinasalpa aktivoituu ja mykistää kuulokkeet. Heti, kun lähettimen signaali
on jälleen vastaanotettavissa, kohinasalpa kytkeytyy pois päältä ja kuulokkeet
toistavat ääntä normaalisti.
Page 32
suomi
6362
6. Vianmääritys
Mikäli käytössä ilmenee ongelmia tarkista seuraavasta taulukosta mahdollinen
ratkaisu, ennen kuin otat yhteyttä korjaajaan. Ellet löydä taulukosta ratkaisua
pulmaasi, ota yhteys beyerdynamic-jälleenmyyjään.
Varoitus: Älä yritä korjata laitetta itse. Omatoimiset korjaukset
saattavat aiheuttaa turvallissuuriskin ja ne aiheuttavat myös aina
takuun raukeamisen.
Ongelma Mahdollinen syy Ratkaisu
Ei ääntä Kuulokkeita ei ole
kytketty päälle
Kuulokkeiden akut on
asetettu väärin
Kuulokkeiden
äänenvoimakkuus
on liian pienellä
Jännitesovitin ei ole
kytketty oikein
Audiolähde ei ole kytketty
päälle
Audiolähteen
äänenvoimakkuus
on liian pienellä
Kuulokkeiden NiMH-akut
ovat tyhjät
Kytke kuulokkeet päälle
virtapainikkeella
Noudata paristolokeron
napaisuusmerkintöjä
Käännä
äänenvoimakkuussäädintä (7) suuremmalle
Tarkista jännitesovittimen
kytkentä
Kytke audiolähde päälle
Säädä audiolähteen
äänenvoimakkuus
suuremmalle
Lataa akut
Ääni kuuluu vain toiselta
puolelta
Audiokaapelin pistoke ei
ole kunnolla kytketty
Tarkista kaapeli ja kytke
pistoke kunnolla
Häiriöitä vastaanotossa Lähistöllä on toinen radi-
olähetin
Sovitusjohtoa ei ole
kiinnitetty kunnolla
audiokaapeliin
Muuta lähettimen
taajuutta kytkimellä
ja viritä kuulokkeiden
vastaanottotaajuus
vastaavasti painikkeella
Tarkista, että sovitin on
kunnolla kiinni
audiokaapelissa.
Tarvittaessa palauta
kaapelit vaihtoa/korjausta
varten
Ongelma Mahdollinen syy Ratkaisu
Häiriöitä äänessä Kuulokkeiden akut ovat
tyhjentyneet
Audiolähteen äänenvoimakkuus on säädetty
liian suureksi
Lataa akut tai vaihda
tilalle uudet
Säädä audiolähteen
äänenvoimakkuus
pienemmäksi
7. Tekniset tiedot
Lähetin
Virtalähde . . . . . . . . . . . . . . . . . . . . . AC/DC sovitin 12 V/300mA
Lähetystaajuudet. . . . . . . . . . . . . . . . 8 kanavaa (vaihtokytkin )
2,4 GHz:n taajuusalueella
9 MHz:n rasterilla,
Modulaatio . . . . . . . . . . . . . . . . . . . . digitaalinen
Tuloimpedanssi . . . . . . . . . . . . . . . . . > 10 kohmia
Kantama . . . . . . . . . . . . . . . . . . . . . . enint. 20 metriä (esteettömässä tilassa)
Signaali/kohina . . . . . . . . . . . . . . . . . > 85 dB (A)
Kytkentä (päälle) . . . . . . . . . . . . . . . . automaattinen, tulosignaalin ollessa
> 10 mV
Kytkentä (pois) . . . . . . . . . . . . . . . . . automaattinen, 2 min.
kuluttua tulosignaalin
ollessa < 5 mV
Mitat. . . . . . . . . . . . . . . . . . . . . . . . . 95 x 75 x 17mm
Paino. . . . . . . . . . . . . . . . . . . . . . . . . 65 g
Kuulokkeet
Anturin tyyppi . . . . . . . . . . . . . . . . . . dynaaminen
Toimintaperiaate . . . . . . . . . . . . . . . . suljettu
Taajuusvaste . . . . . . . . . . . . . . . . . . . 20 - 20,000 Hz
Maksimi äänenpainetaso (SPL). . . . . . 113 dB
Kokonaissärö (T.H.D) . . . . . . . . . . . . . < 0,5%
Korvatyyny . . . . . . . . . . . . . . . . . . . . korvan peittävä
Tukipannan puristusvoima . . . . . . . . noin 2 N
Käyttöjännite. . . . . . . . . . . . . . . . . . . 2 x 1.2 V ladattavat NiMH-akut
AAA 1000mAh
Toiminta-aika. . . . . . . . . . . . . . . . . . . keskimäärin 6 tuntia
Paino (sisältää akut). . . . . . . . . . . . . . noin 270 g
Tätä tuotetta ei saa hävittää normaalin talousjätteen mukana
sen käyttöiän päätyttyä, vaan se on vietävä sähkö- ja
elektroniikkalaitteiden keräyspisteeseen. Tähän viittaa
tuotteessa, käyttöohjeessa tai pakkauksessa oleva symboli.
8. Hävittäminen
Page 33

RSX 700 trådlöst hörlurssystem
Vi gratulerar! Du har gjort ett bra val genom att köpa det trådlösa
hörlursystemet beyerdynamic RSX 700.
Läs denna bruksanvisning omsorgsfullt innan du börjar använda systemet.
Det trådlösa hörlurssystemet RSX 700 fungerar på frekvensområdet 2,4 GHz.
Mottagningen är möjlig inom en räckvidd på 20m oberoende av omringande
väggar och takkonstruktioner av sedvanligt material.
Således kan du röra dig fritt inomhus och i trädgården när du använder
hörlurarna. Till samma sändare kan anslutas flera hörlurar.
Europeiska bestämmelser
Denna produkt har konstruerats, testats och tillverkats i enlighet med det
europeiska R&TTE-direktivet 1999/5/EEC.
I enlighet med detta direktiv kan denna apparat tas i bruk i följande länder:
Österrike, Belgien, Cypern, Tjeckien, Danmark, Estland, Spanien, Finland,
Frankrike, Grekland, Tyskland, Ungern, Island, Italien, Irland, Lettland, Litauen,
Holland, Liechtenstein, Luxemburg, Norge, Malta, Polen, Portugal, Slovakien,
Slovenien, Schweitz, Sverige och England.
Dessutom är detta ovan nämnda frekvensområde godkännt i många andra
länder.
Bipackade tillbehör
Detta trådlösa hörlurssystem innehåller:
1x Sändare
1x Hörlurar
1x AC/DC-spänningsadapter 12V / 300mA
1x Audiokabel (sterojack 3.5 mm <-> 3,5mm stereojack)
1x Adapterkabel med 2 RCA -kontakter, röd (höger kanal) och vit
(vänster kanal)
1x Adapter (3,5mm stereojack <-> 6.35 mm (1/4") stereojack
1x Laddningskabel
2x NiMH-laddningsbara batterier AAA- 1.2 V, 1000 mAh
Säkerhetsföreskrifter
• Använd endast original spänningsadapter, som levereras med systemet.
Säkerställ att du kopplar spänningsadaptern endast till en sådan strömdosa,
vars spänning motsvarar spänningsvärdet som anges på adaptern.
Anslutning till fel spänning kan leda till att apparaten skadas allvarligt.
• Spänningsadaptern bör placeras så, att den är lätt åtkommlig och kan
snabbt kopplas bort från nätström vid behov.
• Koppla alltid bort nätströmmen innan du flyttar apparaten eller kopplar om
kablar.
• Plocka inte isär produkten! Icke-auktoriserad reparation kan leda till skada
eller kortslutning och dessutom förfaller garantin. Om du får problem med
apparaten, kontakta en auktoriserad service verkstad.
• Använd apparaten endast i torra utrymmen. Om det är torrt väder, kan du
använda hörlurarna utomhus, men håll sändaren och nätadaptern alltid
inomhus.
• Undvik att utsätta apparaten för fukt och släpp aldrig någon vätska in i
apparaten.
1. Sändaren
Kontroller och indikatorer
FRAMIFRÅN BAKIFRÅN
Ljusindikering för drift, den röda LED-lampan lyser, när sändaren är
aktiverad
Kanalomkopplare för val av sändarkanal
Kanalindikering, 0-7
Obs! ”0” är även en kanal
Spänningsanslutning för spänningsadapter
Laddningskontakt för anslutning av laddningskabel
Audioingång för anslutning av programkälla (3,5mm jack)
1.1 Användning av sändaren
Placering
• Placera sändaren på ett lämpligt ställe i närheten av audioljudkällan (hifisystem, CD/DVD-spelare, television osv.). För att undvika störningar i mottagningen, placera aldrig sändaren i närheten av andra radiosändare,
mobiltelefoner och dylika. Placera icke heller sändaren ovan på en
tv-apparat eller monitor
• Ställ alldrig sändaren i direkt solljus och undvik närhet av metallföremål.
Påkoppling av strömmen
• Anslut spänningsadapterns likströmskontakt till DC-ingången och anslut
spänningsadaptern till en nätströmskontakt. Sändarens spänningsadapter
kan vara permanent kopplad till nätströmmen, utan att detta skadar
spänningsadaptern eller sändaren.
Koppla spänningsadaptern till
nätström
Koppla spänningsadapterns
likströmskontakt till DC-ingången
svenska
6564
Page 34

Audioanslutningar
• Anslut audiokällan till sändarens audioingång med medföljande audiokabel (3,5mm jack). Anslut kabelns andra ända till audiokällans RCA-uttag.
Viktigt att veta: Säkerställ att höger- och vänster kanal fördelas rätt när du
kopplar RCA-kontakterna: röd kontakt till (röd) höger kanal och vit kontakt
till (vit) vänster kanal.
• Alternativt kan du koppla andra ändan till ljudkällans hörlursanslutning med
hjälp av bipackad adapter. I senare fallet bör du kontrollera, att volymen i
hörlursanslutningen är på tillräckligt hög nivå.
Koppling av sändaren till TV eller hifi-anläggning via
RCA-anslutning
Anslut kabeln tillsändarens Audio ingång
Koppling av sändaren till CD- eller MP3-spelare via minijack (3,5mm)
2. Hörlurarna
Kontroller och indikatorer
Knapp för volymökning
Kanalknapp – söker och väljer automatiskt sändarfrekvensen
Knapp för volymsänkning
Knapp för på/avkoppling
LED-ljusindikering; lyser grön när hörlurarna är påkopplade och röd under
uppladdning av batterier.
Anslutning för laddningskabel på vänstra sidan av hörlurarna.
Batterifack för laddningsbara batterier på vänstra sidan av
hörlurarna.
Volymen av CD- eller MP3spelaren bör vara tillräckligt
hög
Anslut kabeln till sändarens Audio ingång
Koppling av sändaren till hifi-anläggning via hörlursuttaget (6,35mm:
n jack)
Volymen av CD- eller MP3spelaren bör vara tillräckligt
hög
Anslut kabeln till sändarens Audio ingång
Påkoppling av sändaren
• Koppla på strömmen till ljudkällan, som är ansluten till sändaren.
So snart som sändaren identifierar en audiosignal, börjar LED
ljusindikeringen lysa i röd färg.
Observera:
• Om sändaren inte känner av en signal, kopplas strömmen bort
automatiskt om ca. 3 min. och LED-ljusindikeringen släcks.
• Om sändaren identifierar en signal på nytt, aktiveras sändaren
automatiskt och den väljer kanal ”0” till sändarkanal.
2.1 Användning av hörlurarna
Inläggning/ombyte av laddningsbara
batterier
• Öppna batterifacket genom att vrida på
vänstra öronmusslan medsols och dra den
försiktigt ut .
• Lägg in i batterifacket bifogade batterierna
(2x AAA , 1.2 V), samt säkerställ rätt polaritet (+)
och (-) se bild .
Observera: För att hörlurarna skall kunna
fungera måste batterierna först uppladdas.
Se punkt 3.”Uppladdning av batterier”.
• Om du i stället för beyerdynamic använder
något annat märke av laddningsbara
batterier, måste du avlägsna en liten del av
manteln vid den negativa polen av batteriet.
Detta säkerställer att kontaktytan mellan
batteriet och laddaren blir tillräcklig.
• Du kan även använda vanliga batterier.
Varning: Du bör inte avlägsna material från manteln på ett vanligt
batteri, emedan detta kan orsaka explosion, om du i misstag laddar ett
sådant batteri!
• Stäng batterifacket genom att lägga på vänstra öronmusslan. Tryck lätt och
vrid motsols tills den låser fast.
Viktigt: Observera symbolerna på öronmusslan och se till att de
överensstämmer, då du stänger batterifacket.
svenska
6766
Page 35

svenska
6968
Påkoppling
• Koppla på strömmen till hörlurarna med knapp . LED-ljusindikeringen
lyser grön.
Avkoppling
• Koppla av strömmen med knapp . Den gröna LED-ljusindikeringen
slocknar.
Inställning av mottagarfrekvens och volym
• Lägg på hörlurarna samt observera kanalindikeringen L=vänster R=höger
Ställ in lämplig volym med volymknapparna och .
• Med kanalknapp kan du automatiskt söka och välja hörlurarnas
mottagarfrekvens för optimal återgivning.
• Nu bör du kunna flytta dig från rum till rum utan problem med mottagning.
• Viktigt:
Undvik att ställa volymen alltför högt. Hög nivå av volym kan leda
till permanent hörselskada.
Att byta sändarfrekvens
• På grund av radiosignalens natur är det möjligt att andra radioapparater
förorsakar störningar i mottagningen. I fall detta skulle förekomma, bör
du byta sändarens frekvens med kanalomkopplare samt avstämma
mottagarfrekvensen automatiskt med kanalknapp tills återgivningen är
optimal.
LED-ljusindikering /Driftid
• När batterierna börjar bli tomma, släcks LED-ljuset . Drifttiden av
bifogade batterier med full uppladdning är ca. 6 timmar.
• Beroende av inställd ljudvolym kan drifttiden variera på ömse sidor av detta
värde.
3. Uppladdning av batterier
• Säkerställ att laddningsbara batterier
är insatta i hörlurarna (ej vanliga
batterier).
• Bryt strömmen i hörlurarna med
knapp . Anslut laddningskabeln till
laddningskontakten .
• Anslut laddningskabelns andra ända
till sändarens laddningskontakt .
• Under uppladdningen lyser
hörlurarnas LED-ljusindikering röd.
Den röda LED-lampan fortsätter att
lysa även efter att batterierna har blivit
fullt uppladdade.
• Vid första uppladdningen blir batterierna fullt uppladdade efter
ca. 24 timmar, varefter du kan avsluta laddningen. Vid följande
uppladdningar blir batterierna fulla efter 6-8 timmars laddning.
Viktigt:
• Om du avbryter uppladdningen, förkortas batteriernas drifttid avsevärt. I fall
uppladdningen startas om, kan tiden till full uppladdning av batterierna ta
up till 14 timmar beroende av batteriernas tillstånd.
• Livslängden av laddningsbara batterierna är begränsad och beroende av
användningsgrad och antalet uppladdningar. Om du behöver nya
laddningsbara batterier, kontakta din beyerdynamic-återförsäljare.
• Du kan även använda universalladdare för uppladdning av batterierna.
• Om din avsikt är att inte använda hörlurarna under en längre period (flera
veckor eller månader), rekommenderas att batterierna avlägsnas. Batterier
som inte används kan börja läcka, vilket möjliggör att hörlurarna blir
förstörda och som säkerhetsåtgärd bör även såkallade icke-läckande
batterier avlägsnas.
• Blanda inte kasserade batterier med hushållsavfall utan för dina gamla
batterier till närmaste återvinningsstation för elektriska och elektroniska
apparater.
Koppla spänningsadaptern till
sändaren och till
nätström
Anslut laddningskabeln
till hörlurarna
och sändaren
4. Rengöring och skötsel
• Rengör hörlurarna och sändaren med en fuktig duk, men se till att ingen
vätska hamnar in i enheterna.
Använd aldrig lösningsmedel till rengöring.
• Beroende av användningsgraden blir det förr eller senare dags att
utbyta öronkuddarna. När utbytet blir
aktuellt, kontakta din beyerdynamicåterförsäljare.
• För att avlägsna den gamla kudden vrid
den medsols. Lägg på ny kudde och vrid
den motsols.
5. Tips för att undvika störningar
• Om störningar förekommer i mottagningen, försök placera sändaren på ett
annat ställe.
• Om störningarna kvarstår, koppla bort sändaren från nätet och kontrollera
frekvensområdet av mottagaren med att trycka upprepade gånger på
kanalknappen . Om inget ljud återges från hörlurarna under
avstämningen är omständigheterna i ordning.
• Om du däremot kan höra tal, ljud eller musik är det uppenbart att i
närheten finns en motsvarande aktiv radiosändare såsom en dylik trådlös
hörlur, babyphone, walkie talkie osv. Du kan undvika störningarna genom
att byta frekvensen på din sändare med kanalomkopplaren. Frekvensen
måste återavstämmas även i mottagaren med hörlurarnas kanalknapp .
• Hörlurarna har en inbyggd brusspärr. Detta betyder att:
När du avlägsnar dig utanför räckvidden av sändaren eller om strömmen
avbryts i sändaren, kopplas brusspärren på och ljudet i hörlurarna spärras.
So snart som mottagningen av sändarsignalen återställs kopplas brusspärren
bort och hörlurarna återger ljudet normalt.
Page 36

svenska
7170
6. Felsökning
Om problem förekommer under användning, kontrollera först om du hittar
en lösning i följande tabell innan du lämnar in apparaten till en verkstad för
reparation. Om du inte hittar en lösning till ditt problem, kontakta din
beyerdynamic-återförsäljare.
Varning:
Försök inte själv att reparera apparaten. Detta kan orsaka skada och
dessutom utgår garantin.
7. Tekniska data
Sändare
Spänningskälla . . . . . . . . . . . . . . . . . AC/DC adapter 12 V/300mA
Sändarfrekvenser. . . . . . . . . . . . . . . . 8 kanaler (omkopplare ) 2,4 GHz
området med 9 MHz:n raster
Modulering . . . . . . . . . . . . . . . . . . . . digital
Ingångsimpedans . . . . . . . . . . . . . . . > 10 kohm
Räckvidd . . . . . . . . . . . . . . . . . . . . . . upp till 20 meter (öppet område)
Signal/brus . . . . . . . . . . . . . . . . . . . . > 85 dB (A)
Påkoppling . . . . . . . . . . . . . . . . . . . . automatisk, vid ingångssignal > 10 mV
Avkoppling . . . . . . . . . . . . . . . . . . . . automatisk, efter ca. 2min.
vid ingångssignal < 5 mV
Dimensioner . . . . . . . . . . . . . . . . . . . 95x75x17mm
Vikt. . . . . . . . . . . . . . . . . . . . . . . . . . 65g
Hörlur
Omvandlare . . . . . . . . . . . . . . . . . . . dynamisk
Funktionsprincip . . . . . . . . . . . . . . . . sluten
Frekvensomfång . . . . . . . . . . . . . . . . 20 - 20,000 Hz
Max ljudtryck (SPL) . . . . . . . . . . . . . . 113 dB
Distorsion (T.H.D). . . . . . . . . . . . . . . . < 0,5%
Öronkudde . . . . . . . . . . . . . . . . . . . . omringande
Tryckkraften av stödbandet . . . . . . . . ca. 2 N
Driftspänning . . . . . . . . . . . . . . . . . . 2 x 1.2 V laddningsbara
NiMH-batterier AAA 1000mAh
Drifttid . . . . . . . . . . . . . . . . . . . . . . . ca. 6 timmar
Vikt (ing. batterier) . . . . . . . . . . . . . . ca. 270 g
Problem Orsak Lösning
Inget ljud Hörlurarna är inte
påkopplade
Polariteten av batterierna
är omvänd
Hörlurarnas volym ligger
på låg nivå
Nätadaptern saknar
kontakt
Audio ljudkällan är inte
påkopplad
Audio ljudkällans volym
ligger på låg nivå
NiMH-batterierna är
tomma
Koppla på hörlurarna
med knappen
Korrigera polariteten
(se batterifacket)
Vrid upp volymen med
volymknappen
Kontrollera kontakterna i
nätadaptern
Koppla på audio
ljudkällan
Vrid upp volymen i audio
ljudkällan
Ladda batterierna
Ljud endast i ena
kanalen
Audiokabelns kontakt är
bristfälligt ansluten
Kontrollera kabeln och
koppla in kontakten
ordentligt
Störningar i mottagningen
I närheten finns en annan
radiosändare
Adaptern är kopplad
bristfälligt till audiokabeln
Byt sändarfrekvensen
med omkopplaren
och avstämm mottagaren
till den nya frekvensen
med kanalknappen
Kontrollera att adaptern
sitter ordentligt fast i
audiokabeln. Vid behov
returnera adaptern för
ombyte/reparation
Problem Orsak Lösning
Störningar i ljudet Hörlurarnas batterier är
urladdade
Audiokällans volym är för
hög
Ladda batterierna eller
lägg in nya batterier
Ställ audiokällans volym
på lägre nivå
Denna produkt får inte kastas tillsammans med normalt
hushållsavfall utan skall lämnas till en återvinningsstation för
elektriska och elektroniska apparater. Detta framgår av
symbolen på produkten, bruksanvisningen eller förpackningen.
8. Avfallshantering
Page 37

72
EC-DECLARATION
OF CONFORMITY
Application of
Council Directive: 93/68/EEC Low Voltage Directive
99/5/EC R&TTE Directive
Standards to which
Conformity is declared: EN 300 440 Radio Spectrum
EN 301 489-1-3 EMC
EN 61558-2-6:1997 &
EN 61558-1/A11:2003 Safety
Manufacturer's Name: beyerdynamic GmbH & Co. KG
Manufacturer's Address: Theresienstrasse 8, 74072 Heilbronn,
Germany
Type of Equipment: Digital Wireless Stereo Headphone
Model Numbers: RSX 700
I, the undersigned, as an employee of beyerdynamic, hereby declare that the
equipment specified conforms to the above Directive and
Standards.
Date: 1
st
February 2007
Full Name: Ulrich Roth
Position: Director of R&D
RSX 700 is a class 1 device
Page 38

DEF 4/BA RSX 700 (02.09) • Änderungen und Irrtümer vorbehalten • Subject to change without notice • Sous réserve de modifications
beyerdynamic GmbH & Co. KG
Theresienstr. 8 | 74072 Heilbronn – Germany
Tel. +49 (0) 7131 / 617 - 0 | Fax +49 (0) 7131 / 617 - 224
info@beyerdynamic.de | www.beyerdynamic.de
Weitere Vertriebspartner weltweit finden Sie unter www.beyerdynamic.de
For further distributors worldwide, please go to www.beyerdynamic.com
 Loading...