

Page 1

HS 400 Signum
HS 400 Rotor
PRODUKTINFORMATION
PRODUCT INFORMATION
Page 2

Inhalt
1. Sicherheitshinweis . . . . . . . . . . . . . . . . . . . . . . . . . . . . . . . . . . . . . 6
2. Anwendungen. . . . . . . . . . . . . . . . . . . . . . . . . . . . . . . . . . . . . . . . 6
3. Benutzung . . . . . . . . . . . . . . . . . . . . . . . . . . . . . . . . . . . . . . . . . . . 6
3.1 HS 400 aufbewahren und pflegen . . . . . . . . . . . . . . . . . . . . . . . . . 6
3.2 Einstellungen für den Betrieb - Headset . . . . . . . . . . . . . . . . . . . . . 6
3.2.1 Kopfbügel . . . . . . . . . . . . . . . . . . . . . . . . . . . . . . . . . . . . . . . . . . . 6
3.2.2 Mikrofon . . . . . . . . . . . . . . . . . . . . . . . . . . . . . . . . . . . . . . . . . . . . 7
3.3 Einstellungen für den Betrieb - Audiobox . . . . . . . . . . . . . . . . . . . . 8
3.3.1 Bedienelemente Audiobox . . . . . . . . . . . . . . . . . . . . . . . . . . . . . . . 8
3.3.2 Lautstärkeregler . . . . . . . . . . . . . . . . . . . . . . . . . . . . . . . . . . . . . . . 9
3.3.3 Mono-Stereo-Schalter . . . . . . . . . . . . . . . . . . . . . . . . . . . . . . . . . . 9
3.3.4 Ein-/Aus-Taster . . . . . . . . . . . . . . . . . . . . . . . . . . . . . . . . . . . . . . . . 9
3.3.5 Auto-Mute-Taster. . . . . . . . . . . . . . . . . . . . . . . . . . . . . . . . . . . . . . 9
4. Anschluss externer Geräte an die Audiobox . . . . . . . . . . . . . . . . . 10
4.1 Sicherheitshinweis . . . . . . . . . . . . . . . . . . . . . . . . . . . . . . . . . . . . 10
4.2 Musikeinspielung . . . . . . . . . . . . . . . . . . . . . . . . . . . . . . . . . . . . . 10
4.2.1 Anschluss. . . . . . . . . . . . . . . . . . . . . . . . . . . . . . . . . . . . . . . . . . . 10
4.2.2 Betrieb. . . . . . . . . . . . . . . . . . . . . . . . . . . . . . . . . . . . . . . . . . . . . 10
4.3 Mobiltelefon . . . . . . . . . . . . . . . . . . . . . . . . . . . . . . . . . . . . . . . . 10
4.3.1 Anschluss. . . . . . . . . . . . . . . . . . . . . . . . . . . . . . . . . . . . . . . . . . . 10
4.3.2 Betrieb. . . . . . . . . . . . . . . . . . . . . . . . . . . . . . . . . . . . . . . . . . . . . 11
5. Batteriewechsel . . . . . . . . . . . . . . . . . . . . . . . . . . . . . . . . . . . . . . 11
6. Wechsel der Ohrpolster . . . . . . . . . . . . . . . . . . . . . . . . . . . . . . . . 11
7. Pflege . . . . . . . . . . . . . . . . . . . . . . . . . . . . . . . . . . . . . . . . . . . . . 12
8. Service . . . . . . . . . . . . . . . . . . . . . . . . . . . . . . . . . . . . . . . . . . . . . 12
9. Versionen. . . . . . . . . . . . . . . . . . . . . . . . . . . . . . . . . . . . . . . . . . . 12
deutsch
2 | 3
Page 3

10. Zubehör - Lieferumfang . . . . . . . . . . . . . . . . . . . . . . . . . . . . . . . . 12
11. Ersatzeile / Zubehör . . . . . . . . . . . . . . . . . . . . . . . . . . . . . . . . . . . 12
12. Technische Daten . . . . . . . . . . . . . . . . . . . . . . . . . . . . . . . . . . . . . 13
13. Garantie. . . . . . . . . . . . . . . . . . . . . . . . . . . . . . . . . . . . . . . . . . . . 14
14. Entsorgung . . . . . . . . . . . . . . . . . . . . . . . . . . . . . . . . . . . . . . . . . 15
Frequenzkurve, Richtdiagramm . . . . . . . . . . . . . . . . . . . . . . . . . . . . . . . . 30
Konformitätserklärung. . . . . . . . . . . . . . . . . . . . . . . . . . . . . . . . . . . . . . . 31
4 | 5
deutsch
Page 4
PRODUKTINFORMATION HS 400 Signum / HS 400 Rotor
Sie haben sich für das Pilotenheadset HS 400 von beyerdynamic entschieden.
Vielen Dank für Ihr Vertrauen. Nehmen Sie sich bitte einige Minuten Zeit und lesen Sie diese
Produktinformation vor Inbetriebnahme aufmerksam durch.
1. Sicherheitshinweis
Mit dem HS 400 können sich für Ihr Flugzeug oder Ihren Helikopter typische Geräusche
(z.B. Motoren-, Propellerklang, Warnsignale usw.) anders anhören. Machen Sie sich daher vor
dem Start mit allen wichtigen Geräuschen vertraut. Stellen Sie die Lautstärke so ein, dass Sie alle
wichtigen Geräusche, Warntöne oder Geräusche, die durch Fehlfunktionen entstehen, hören
können.
2. Anwendungen
Das HS 400 ist ein Pilotenheadset in geschlossener Bauweise für gehobene Ansprüche. Das
HS 400 ist nicht TSO zugelassen und deshalb nicht für den Einsatz im kommerziellen Luftverkehr
geeignet.
3. Benutzung
3.1 HS 400 aufbewahren und pflegen
Am sichersten ist das Headset in der mitgelieferten gepolsterten Tasche aufbewahrt. Vermeiden
Sie die Lagerung bei extremen Temperaturen, Feuchtigkeit und direkter Sonneneinstrahlung.
Reinigen Sie das HS 400 mit einem weichen Tuch. Tauchen Sie es auf keinen Fall in Wasser.
3.2 Einstellung für den Betrieb - Headset
3.2.1 Kopfbügel
Um den Tragekomfort und die Lärmdämpfung zu optimieren, müssen Sie den Kopfbügel des
Headsets an Ihren Kopf anpassen.
Wenn der Kopfbügel über die Kopfmitte verläuft, sollte der Bügel so eingestellt sein, dass
• beide Ohren komplett umschlossen sind
• ein leichter Druck um die Ohren zu spüren ist
• beide Seiten des Bügels gleich verlängert sind
3.2.2 Mikrofon
• Ziehen Sie den Windschutz auf das Mikrofon, so dass dieser das Mikrofon komplett umschließt.
• Biegen Sie den flexiblen Schwanenhals so, dass das Mikrofon möglichst dicht mittig vor Ihrem
Mund platziert ist. Zur Vermeidung von Überdehnungen und frühzeitigem Verschleiß darf
der Schwanenhals nur max. 90 Grad gebogen werden.
6 | 7
deutsch
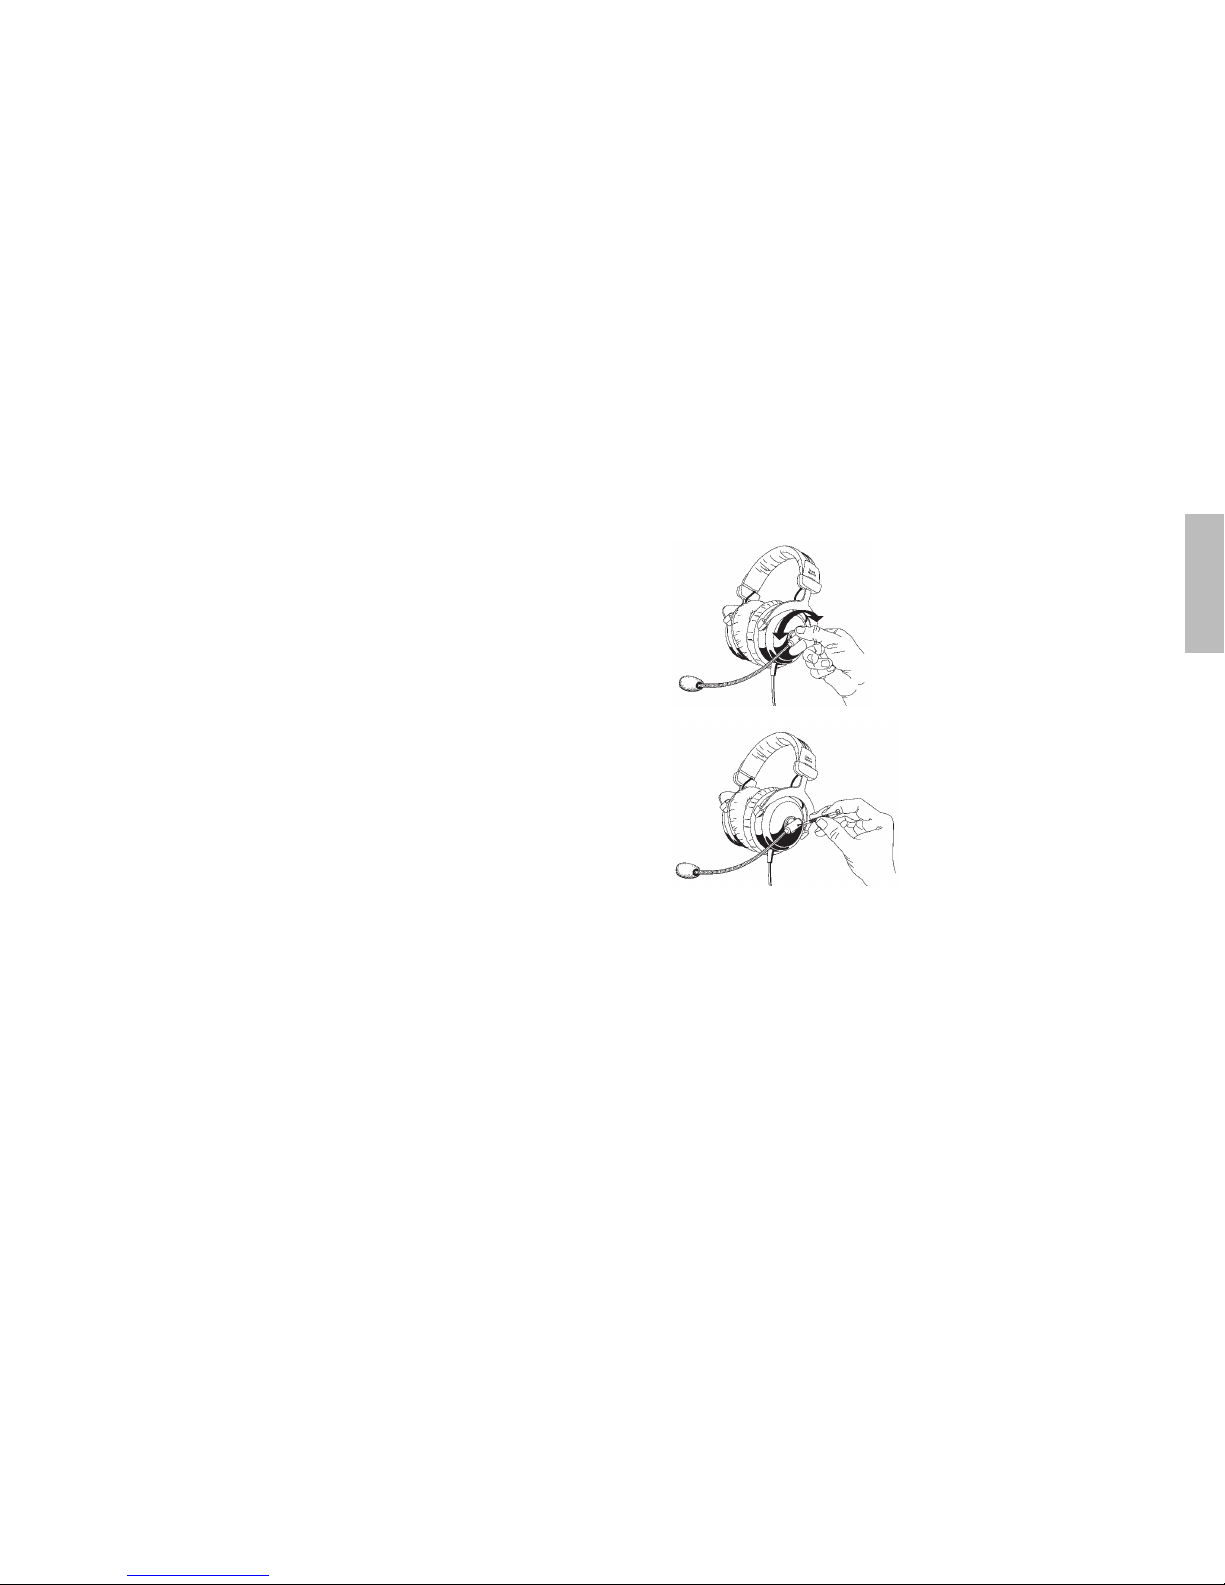
• Drehen Sie am festen Mikrofonarm halter (niemals am Schwanenhals!) das Mikrofon auf die
von Ihnen gewünschte Seite.
• Die Empfindlichkeit des Mikrofons können Sie
mit dem mitgelieferten Schraubendreher an
einem Potentiometer einstellen (siehe Abbildung).
• Werkseitig ist eine hohe Empfindlichkeit eingestellt. Drehen der Potentiometereinstellung
nach links reduziert die Empfindlichkeit.
Page 5
3.3 Einstellungen für den Betrieb - Audiobox
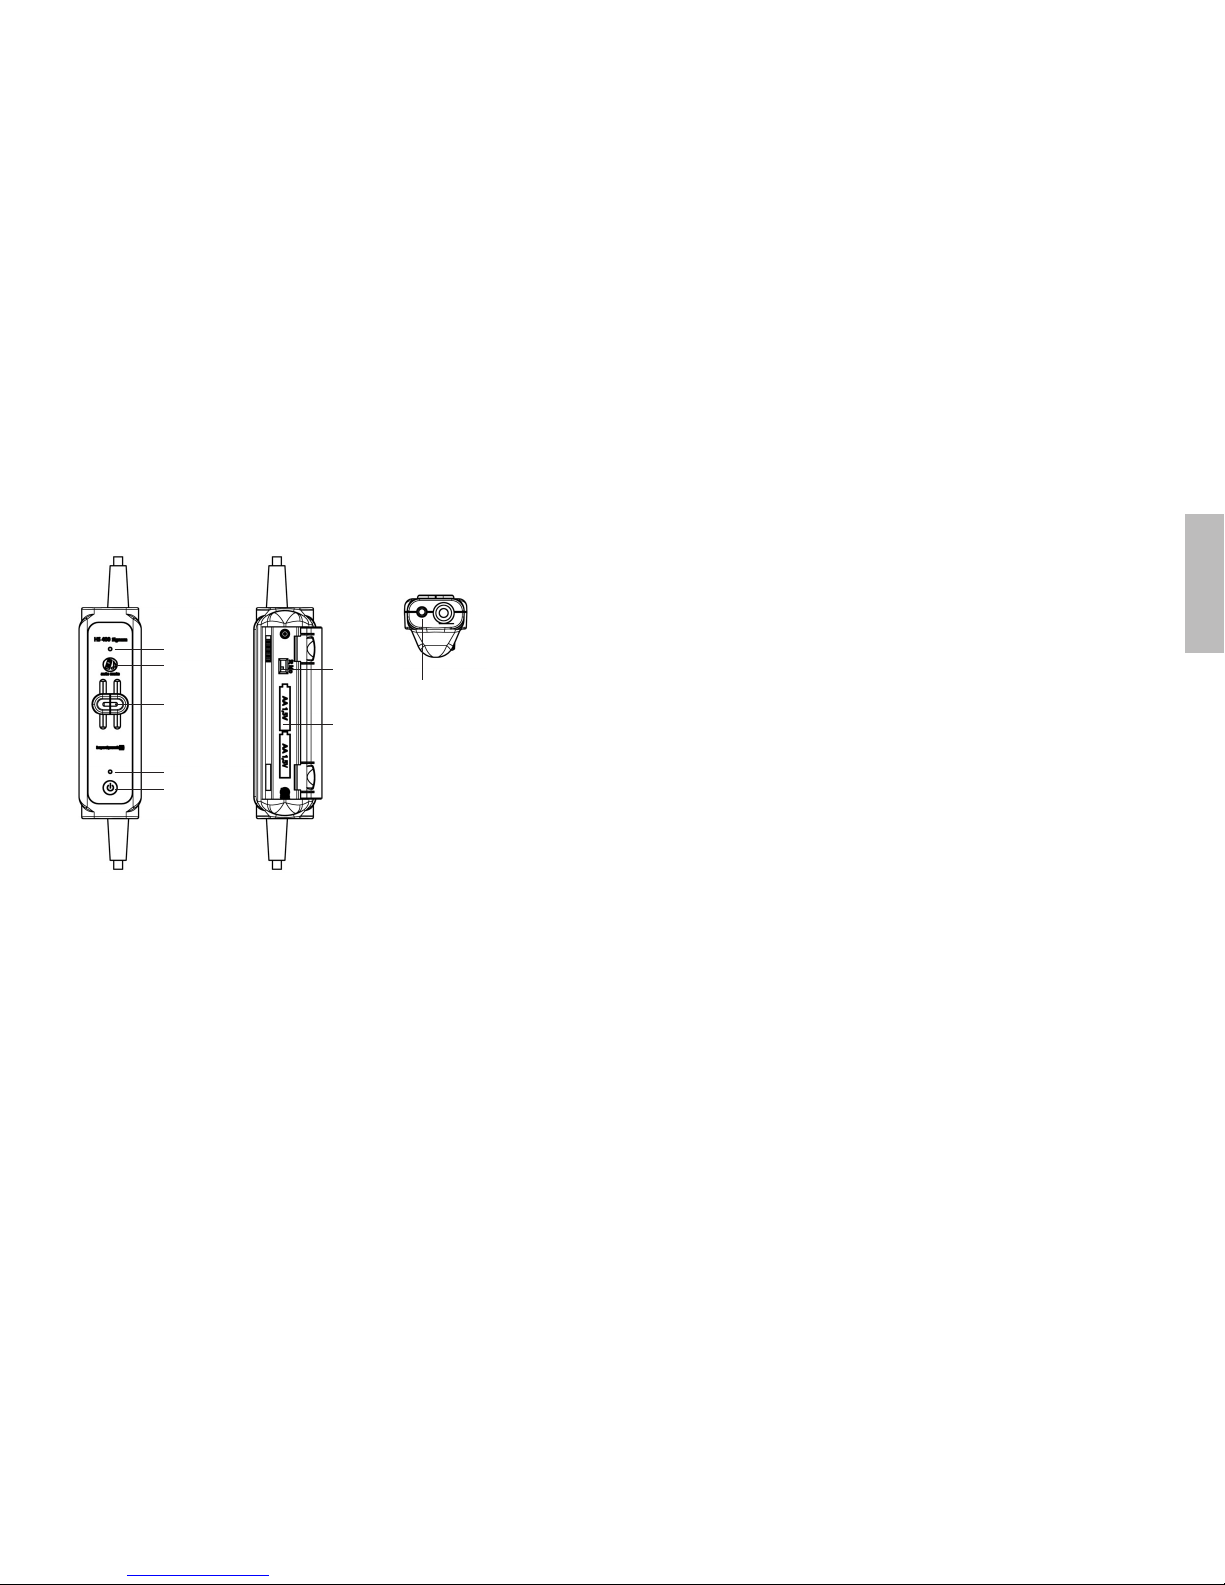
3.3.1 Bedienelemente Audiobox
Ein-Aus-Taster für die externe Audio-Schnittstelle
Betriebskontroll-LED für die externe Audio-Schnittstelle
Lautstärkeregler Kopfhörer
Auto-Mute-Taster
Status-LED für die Auto-Mute-Funktion
Mono-Stereo-Schalter
Batteriefach für zwei AA-Batterien
Anschluss für Mobiltelefon oder Abspielgerät
3.3.2 Lautstärkeregler
Stellen Sie mit den Lautstärkereglern eine mittlere Lautstärke ein. Der linke Schieber regelt die
Lautstärke auf dem linken Ohr und umgekehrt, wenn das Headset so aufgesetzt wird, dass das
Mikrofon links getragen wird. Mit den Lautstärkereglern lässt sich nur die Lautstärke des Intercom-Signals einstellen. Die Lautstärke externer Audioquellen (z.B. MP3 Spieler) muss am Gerät
selbst eingestellt werden.
Zu hohe Lautstärke schädigt Ihr Gehör und erschwert die Wahrnehmung von
Warntönen!
3.3.3 Mono-Stereo-Schalter
Üblicherweise empfangen Sie Ihre Tonquelle vom Intercom-System in Mono. Sie können dann
den Mono-/Stereo-Schalter in der voreingestellten Mono-Stellung belassen. Schalten Sie bei
einem Stereo-Intercom-System auf „Stereo“ um.
Hinweis:
Wenn Sie trotz Mono-Intercom den Schalter auf Stereo stellen, hören Sie das Kopfhörersignal nur auf einer Seite.
3.3.4 Ein-/Aus-Taster
Bei Betätigung des Ein-/Aus-Tasters wird die externe Audioschnittstelle der Audiobox
aktiviert. Sie brauchen die Audiobox durch Drücken des Tasters nur einzuschalten, wenn Sie ein
Mobiltelefon oder ein Abspielgerät anschließen möchten. Halten Sie den Taster solange gedrückt, bis die LED leuchtet oder erlischt.
Bei eingeschalteter Audiobox leuchtet die LED über dem Taster . Verringert sich die Batteriekapazität, fängt die LED an langsam zu blinken. Die Kapazität der Batterie beträgt dann noch
ca. 20 Stunden. Lässt sich die Audiobox nicht einschalten oder schaltet sie sich nach kurzer
Betriebsdauer wieder ab, müssen Sie die Batterien wechseln.
Hinweis:
Auch bei ausgeschalteter Audiobox funktioniert das HS 400.
3.3.5 Auto-Mute-Taster
Mit dem Auto-Mute-Taster können Sie die Auto-Mute-Funktion der Audiobox ein- und ausschalten. Bei aktiviertem Auto-Mute regelt sich die Lautstärke der externen Einspielung automatisch auf 10% der Lautstärke herunter, wenn ein Signal vom Funkgerät bzw. der
Intercom-Anlage kommt. Kurz nach dem Signal wird die Lautstärke der externen Einspielung
wieder auf das eingestellte Niveau angehoben.
Wenn die Auto-Mute-Funktion aktiviert ist, leuchtet die Status-LED .
8 | 9
deutsch
Page 6
Hinweis:
Zum Telefonieren empfiehlt es sich, die Auto-Mute-Funktion zu deaktivieren. Ansonsten
kann es durch die eigene Stimme, die vom Intercom wiedergegeben wird, zum Ausblenden des Gespräches kommen.
4. Anschluss externer Geräte an die Audiobox
4.1 Sicherheitshinweis
Bei Benutzung eines Mobiltelefons im Cockpit können Sie gesetzliche Bestimmungen
verletzen. Bitte informieren Sie sich bei der zuständigen Behörde des jeweiligen Landes über die
geltenden Regelungen. Wir empfehlen die Benutzung des Mobiltelefons mit dem HS 400 grundsätzlich nur am Boden.
4.2 Musikeinspielung
4.2.1 Anschluss
Benutzen Sie das Kabel mit den beiden 3,5 mm Klinkensteckern.
4.2.2 Betrieb
• Um Gehörschäden zu vermeiden, stellen Sie sicher, dass die Lautstärke des Einspielgeräts auf
Minimum gestellt ist.
• Schalten Sie die Audiobox mit dem Taster ein.
• Regeln Sie die Lautstärke des Einspielgeräts langsam auf das gewünschte Niveau.
• Stellen Sie sicher, dass Sie alle wichtigen Geräusche wie z.B. Warntöne hören können.
4.3 Mobiltelefon
Die gängigsten Mobiltelefone können an das HS 400 angeschlossen werden. Wir garantieren
nicht, dass sich alle Mobiltelefone an das HS 400 anschließen lassen! Das Mikrofon des HS 400
funktioniert nur, wenn es über den PJ-068 Stecker mit Strom versorgt wird.
4.3.1 Anschluss
Zum Anschluss eines Mobiltelefons verwenden Sie das beigelegte Kabel. Achtung: Schließen Sie
das Kabel zuerst an die Audiobox und danach an das Mobiltelefon an, damit das HS 400 vom
Mobiltelefon als Headset erkannt wird. Verfügt Ihr Telefon nicht über eine passende Buchse,
benötigen Sie einen Adapter, den es im Zubehörhandel für Mobiltelefone gibt oder einen der in
Kapitel 11. „Ersatzteile / Zubehör“ aufgeführten Adapter.
4.3.2 Betrieb
Um Gehörschäden zu vermeiden, stellen Sie sicher, dass die Lautstärke des Mobiltelefons auf
Minimum gestellt ist und erhöhen Sie dann langsam auf das gewünschte Niveau.
Deaktivieren Sie die Auto-Mute-Funktion mit dem Auto-Mute-Taster .
5. Batteriewechsel
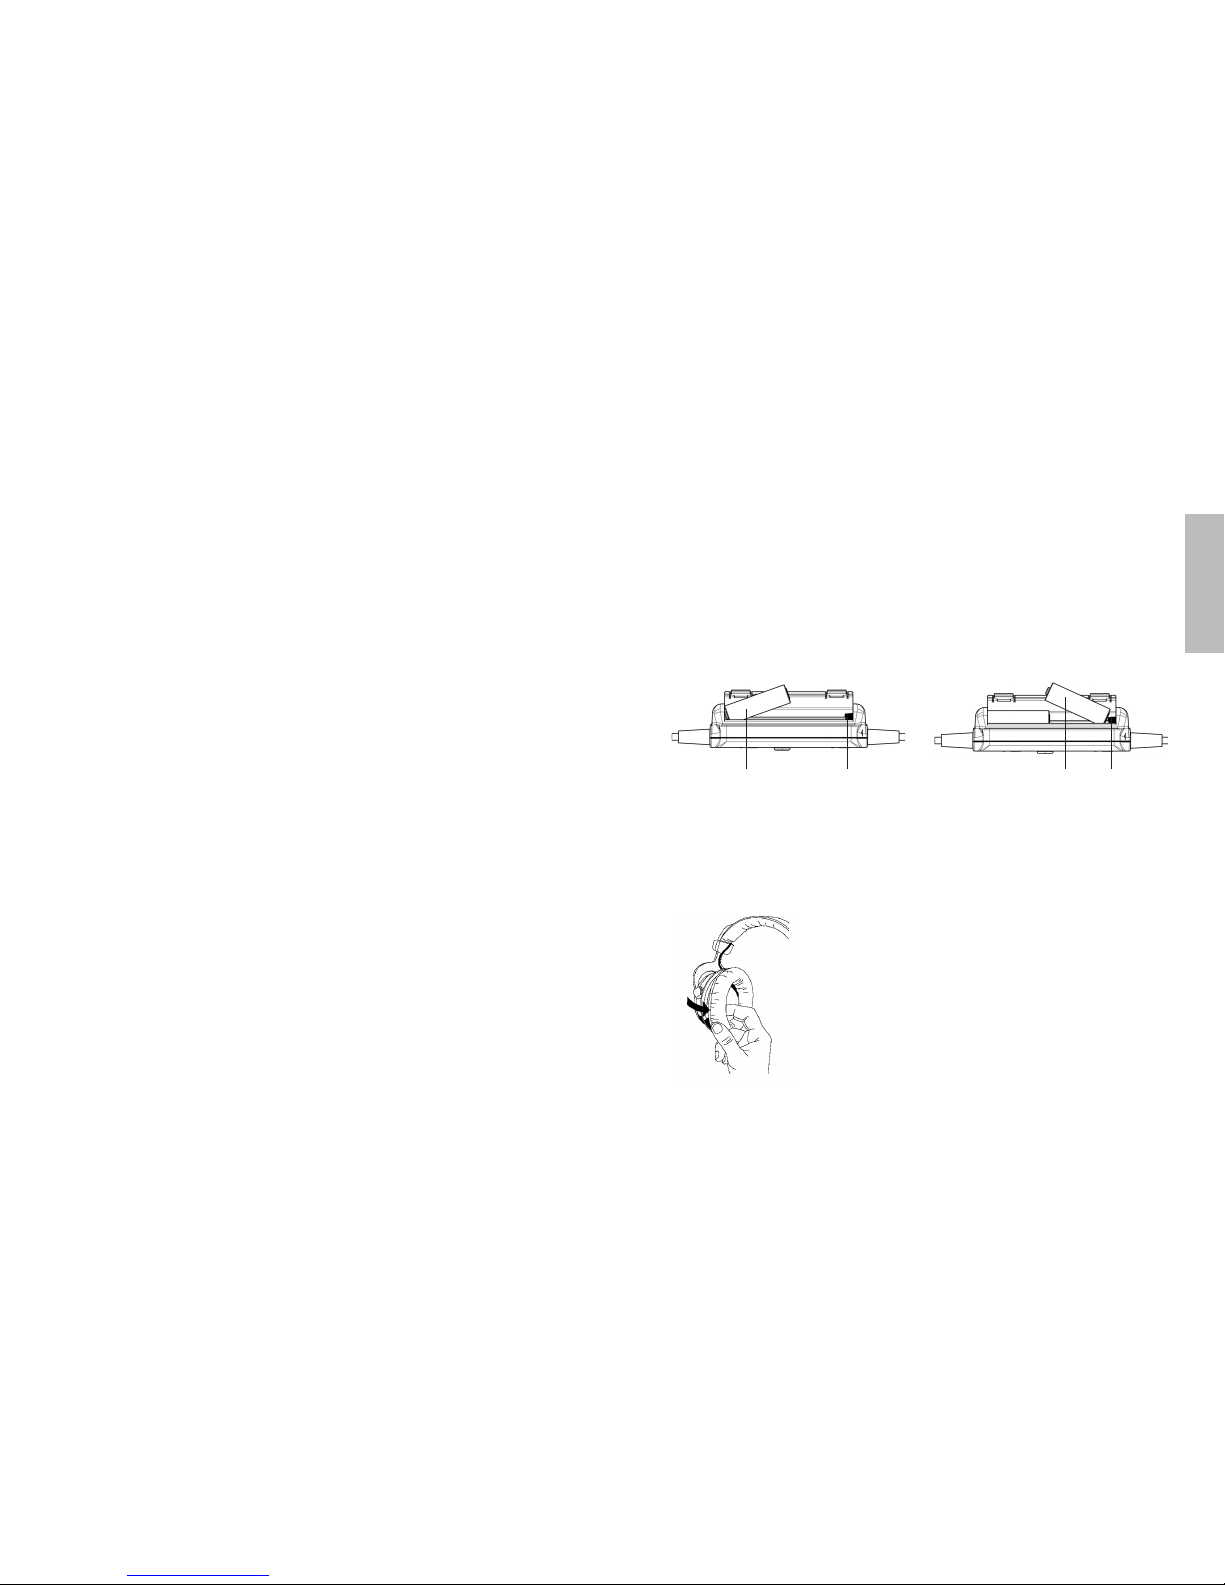
Die Audiobox hat ein Batteriefach für zwei AA-Batterien. Alternativ lassen sich auch AA-Akkus
verwenden. Die Position der Batterien im Fach entnehmen Sie der Skizze auf dem Boden des
Batteriefaches.
Legen Sie die Batterien in derselben Reihenfolge ein wie in den Zeichnungen dargestellt.
Die Betriebskontroll-LED beginnt langsam zu blinken, wenn die Batterien noch Kapazität für
ca. zwanzig Betriebsstunden haben. Ein schnelleres Blinken der Betriebskontroll-LED signali-
siert, dass die Kapazität der Batterien bzw. Akkus erschöpft ist und diese gegen neue ausgetauscht werden sollten. Die Kapazität von Akkus und Batterien ist unterschiedlich. Außerdem ist
zu berücksichtigen, dass Akkus sich bei längerer Lagerzeit selbst entladen können.
6. Wechsel der Ohrpolster
10 | 11
deutsch
• Da Ohrpolster einem natürlichen Verschleiß unterliegen,
wird es von Zeit zu Zeit notwendig sie auszutauschen.
• Sobald Sie das alte Ohrpolster von der Hörerkappe
gezogen haben, können Sie das neue auf die Hörerkappe
ziehen.
• Müssen weitere Kompo nen ten ersetzt werden, wenden Sie
sich bitte an Ihre zustän dige beyerdynamic-Vertretung.
1. Batterie 2. BatterieFeder Feder
Page 7

7. Pflege
• Aus hygienischen Gründen sollten Sie die Ohr polster und den Kopfbügel gelegentlich mit
einem weichen feuchten Tuch reinigen. Achten Sie darauf, dass kein Wasser in die Wandler
läuft.
• Den Windschutz des Mikrofons können Sie abnehmen und unter fließendem Wasser
reinigen. Bei Bedarf können Sie ein mildes Reinigungsmittel (z.B. Geschirrspül mittel) verwenden. Der Wind schutz muss ganz trocken sein, bevor Sie ihn wieder auf das Mikrofon setzen.
8. Service
Im Servicefall wenden Sie sich bitte an autorisiertes Fach personal oder direkt an:
beyerdynamic Service- und Logistik Center
August-Häußer-Str. 9, 74080 Heilbronn
Fax: +49 (0)7131 – 617-252
E-Mail: service@beyerdynamic.de
Öffnen Sie das Headset auf keinen Fall selbst, Sie könnten sonst alle Garantieansprüche verlieren.
9. Versionen
HS 400 Signum Pilotenheadset mit 6,35 mm und
PJ-068 Klinkenstecker . . . . . . . . . . . . . . . . . . . . . . . . . . . . Best.-Nr. 721.298
HS 400 Rotor Pilotenheadset mit U-174/U Klinkenstecker für
Helikopter, Spiralkabel. . . . . . . . . . . . . . . . . . . . . . . . . . . . Best.-Nr. 722.480
10. Zubehör - Lieferumfang
• Gepolsterte Tragetasche
• Windschutz für das Mikrofon
• Anschlusskabel mit Klinkenstecker (3,5 mm, 4-pol.) für iPhone, kompatible Mobiltelefone
und externe Abspielgeräte (z.B. CD- oder MP3-Player)
Bei individueller Konfiguration enthält der Lieferumfang ggf. weitere Artikel.
11. Ersatzteile / Zubehör
BN 59-53/D Kopfpolster schwarz, Kunstleder. . . . . . . . . . . . . . . . . . . . Best.-Nr. 990.681
EDT 600 SS Ohrpolstersatz, Softskin, schwarz, viskoelastisch . . . . . . . . Best.-Nr. 904.872
EDT 300 GS Ohrpolstersatz, gelgefüllt, schwarz . . . . . . . . . . . . . . . . . . Best.-Nr. 900.799
WS 20 sw Windschutz, schwarz . . . . . . . . . . . . . . . . . . . . . . . . . . . . Best.-Nr. 439.975
Adapter für Mobiltelefone von Nokia, Sony, Ericsson, Samsung, Motorola, LG:
Mobiltelefonadapter, 3,5 mm Klinke 4-pol.. . . . . . . . . . . . . . . . . . . . . . . . . Best.-Nr. 703.656
Mobiltelefonadapter, 2,5 mm Klinke 4-pol.. . . . . . . . . . . . . . . . . . . . . . . . . Best.-Nr. 703.648
12. Technische Daten
Hörer
Wandlerprinzip. . . . . . . . . . . . . . . . . . Dynamisch
Arbeitsprinzip. . . . . . . . . . . . . . . . . . . Geschlossen
Übertragungsbereich . . . . . . . . . . . . . 10 - 20.000 Hz
Nennimpedanz mono/stereo. . . . . . . . 210 Ω / 270 Ω
Kennschalldruckpegel. . . . . . . . . . . . . 95 dB SPL
Klirrfaktor. . . . . . . . . . . . . . . . . . . . . . < 0,2%
Nennbelastbarkeit . . . . . . . . . . . . . . . 100 mW
Art der Ankopplung an das Ohr . . . . . ohrumschließend
Isolierung von Außengeräuschen . . . . ca. 30 dB / frequenzabhängig
Nennandrückkraft . . . . . . . . . . . . . . . 8 N
Mikrofon
Wandlerprinzip. . . . . . . . . . . . . . . . . . Kondensator (Back-Elektret)
Übertragungsbereich . . . . . . . . . . . . . 400 - 15.000 Hz
Richtcharakteristik . . . . . . . . . . . . . . . Acht
Ausgangsspannung bei 1 kHz . . . . . . 1 mV - 11 mV/1 Pa, regelbar
Max. Schalldruckpegel . . . . . . . . . . . . 120 dB
Nennimpedanz. . . . . . . . . . . . . . . . . . ca. 350 Ω
Stromaufnahme . . . . . . . . . . . . . . . . . ca. 6 - 18 mA
Versorgungsspannung . . . . . . . . . . . . typ. 16 V DC (8 - 16 V DC, nach RTCA/DO 214)
Allgemein
Gewicht ohne Kabel /
Bedieneinheit . . . . . . . . . . . . . . . . . . . ca. 325 g
HS 400 Signum
Kabel . . . . . . . . . . . . . . . . . . . . . . . . . ca. 1,80 m, gestrecktes Kabel
Anschluss
Kopfhörer. . . . . . . . . . . . . . . . . . . . . . Stereoklinkenstecker 6,35 mm
Mikrofon . . . . . . . . . . . . . . . . . . . . . . Klinkenstecker PJ-068
Musikeinspielung / Mobiltelefon. . . . . Klinkenbuchse 3,5 mm, 4-pol.
12 | 13
deutsch
Page 8

HS 400 Rotor
Kabel . . . . . . . . . . . . . . . . . . . . . . . . . Spiralkabel
Anschluss
Kopfhörer, Mikrofon. . . . . . . . . . . . . . Klinkenstecker U-174/U
Musikeinspielung / Mobiltelefon. . . . . Klinkenbuchse 3,5 mm, 4-pol.
13. Garantie
beyerdynamic GmbH & Co. KG gewährt Ihnen auf das HS 400 fünf Jahre Garantie ab Kaufdatum.
Bitte bewahren Sie den Kaufbeleg auf. Ohne diesen Nachweis können Reparaturen grundsätzlich nur kostenpflichtig ausgeführt werden. Die Garantieleistung beinhaltet Material und
Arbeitszeit zur Behebung nachweislicher Material- und Fabrikationsfehler. Der Garantieanspruch
erlischt bei Bedienungsfehlern, unsachgemäßen Eingriffen, elektrischen und mechanischen
Beschädigungen sowie bei unsachgemäßer Reparatur durch nicht autorisierte Werkstätten. Vom
Garantieanspruch ausgenommen sind im Lieferumfang enthaltene Batterien, Akkus, sowie Teile,
die beim Gebrauch einem natürlichen Verschleiß unterliegen, wie Anschlusskabel, Ohrmuscheln,
Kopfpolster, etc.
Die Garantie kann in allen Ländern in Anspruch genommen werden, deren rechtliche
Bestimmungen der Garantieleistung nicht entgegen stehen. In allen Ländern gelten neben den
gesetzlichen Bestimmungen die von beyerdynamic-Verkaufsstellen gewährleisteten Garantieleistungen.
Im Servicefall senden Sie das Headset an:
beyerdynamic Service- und Logistik Center
August-Häußer-Str. 9
74080 Heilbronn
Tel.: +49 (0)7131 – 617-349
Fax: +49 (0)7131 – 617-252
E-Mail: service@beyerdynamic.de
14. Entsorgung
Dieses Produkt darf am Ende seiner Lebensdauer nicht über den normalen
Haushaltsabfall entsorgt werden, sondern muss an einem Sammelpunkt für das
Recycling von elektrischen und elektronischen Geräten abgegeben werden. Das
Symbol auf dem Produkt, der Gebrauchsanweisung oder der Verpackung weist
darauf hin.
• Wenn Sie das Gerät verschrotten, entfernen Sie die Batterien bzw. Akkus, trennen Sie
Gehäuse, Elektronik sowie Kabel und entsorgen Sie alle Komponenten gemäß den dafür
geltenden Entsorgungsvorschriften.
• Altbatterien enthalten möglicherweise Schadstoffe, die Umwelt und Gesundheit schaden
können.
• Entsorgen Sie verbrauchte Batterien und Akkus immer gemäß den geltenden Entsorgungsvorschriften. Werfen Sie Batterien oder Akkus weder ins Feuer (Explosionsgefahr) noch in
den Restmüll. Bitte geben Sie die Batterien/Akkus im Handel oder an den Recyclinghöfen der
Kommunen ab. Die Rückgabe ist unentgeltlich und gesetzlich vorgeschrieben. Bitte werfen
Sie nur entladene Batterien in die aufgestellten Behälter.
• Wie Sie die Batterien/Akkus dem Gerät entnehmen, finden Sie im Kapitel 5. „Batteriewechsel“.
• Alle Batterien und Akkus werden wieder verwertet. So lassen sich wertvolle Rohstoffe wie
Eisen, Zink oder Nickel wieder gewinnen.
14 | 15
deutsch
Page 9

Contents
1. Safety Information . . . . . . . . . . . . . . . . . . . . . . . . . . . . . . . . . . . . 20
2. Applications. . . . . . . . . . . . . . . . . . . . . . . . . . . . . . . . . . . . . . . . . 20
3. Usage . . . . . . . . . . . . . . . . . . . . . . . . . . . . . . . . . . . . . . . . . . . . . 20
3.1 How to store and maintain the HS 400 . . . . . . . . . . . . . . . . . . . . 20
3.2 How to prepare the Headset for Use . . . . . . . . . . . . . . . . . . . . . . 20
3.2.1 Adjusting the Headband . . . . . . . . . . . . . . . . . . . . . . . . . . . . . . . 20
3.2.2 Adjusting the Microphone . . . . . . . . . . . . . . . . . . . . . . . . . . . . . . 21
3.3 How to use the Audio Box . . . . . . . . . . . . . . . . . . . . . . . . . . . . . . 22
3.3.1 Controls and Indicators . . . . . . . . . . . . . . . . . . . . . . . . . . . . . . . . 22
3.3.2 Volume Control . . . . . . . . . . . . . . . . . . . . . . . . . . . . . . . . . . . . . . 23
3.3.3 Mono/Stereo Switch. . . . . . . . . . . . . . . . . . . . . . . . . . . . . . . . . . . 23
3.3.4 On/Off Button . . . . . . . . . . . . . . . . . . . . . . . . . . . . . . . . . . . . . . . 23
3.3.5 Auto-Mute Button . . . . . . . . . . . . . . . . . . . . . . . . . . . . . . . . . . . . 23
4. How to connect external Devices to the Audio Box . . . . . . . . . . . 24
4.1 Safety Information . . . . . . . . . . . . . . . . . . . . . . . . . . . . . . . . . . . . 24
4.2 Music Players . . . . . . . . . . . . . . . . . . . . . . . . . . . . . . . . . . . . . . . . 24
4.2.1 Connection . . . . . . . . . . . . . . . . . . . . . . . . . . . . . . . . . . . . . . . . . 24
4.2.2 Operation . . . . . . . . . . . . . . . . . . . . . . . . . . . . . . . . . . . . . . . . . . 24
4.3 Mobile Phones . . . . . . . . . . . . . . . . . . . . . . . . . . . . . . . . . . . . . . . 24
4.3.1 Connection . . . . . . . . . . . . . . . . . . . . . . . . . . . . . . . . . . . . . . . . . 24
4.3.2 Operation . . . . . . . . . . . . . . . . . . . . . . . . . . . . . . . . . . . . . . . . . . 24
5. How to insert/replace the Batteries. . . . . . . . . . . . . . . . . . . . . . . . 25
6. How to replace the Ear Pads. . . . . . . . . . . . . . . . . . . . . . . . . . . . . 25
7. Maintenance . . . . . . . . . . . . . . . . . . . . . . . . . . . . . . . . . . . . . . . . 26
8. Service . . . . . . . . . . . . . . . . . . . . . . . . . . . . . . . . . . . . . . . . . . . . . 26
9. Versions. . . . . . . . . . . . . . . . . . . . . . . . . . . . . . . . . . . . . . . . . . . . 26
16 | 17
english
Page 10

10. Supplied Accessories . . . . . . . . . . . . . . . . . . . . . . . . . . . . . . . . . . 26
11. Spare Parts / Accessories . . . . . . . . . . . . . . . . . . . . . . . . . . . . . . . 26
12. Technical Specifications . . . . . . . . . . . . . . . . . . . . . . . . . . . . . . . . 27
13. Warranty . . . . . . . . . . . . . . . . . . . . . . . . . . . . . . . . . . . . . . . . . . . 28
14. Disposal . . . . . . . . . . . . . . . . . . . . . . . . . . . . . . . . . . . . . . . . . . . . 29
Frequency Response Curve, Polar Pattern. . . . . . . . . . . . . . . . . . . . . . . . . 30
EC-Declaration of Conformity . . . . . . . . . . . . . . . . . . . . . . . . . . . . . . . . . 31
18 | 19
english
Page 11

PRODUCT INFORMATION HS 400 Signum / HS 400 Rotor
Thank you for selecting the HS 400 aviation headset. Please take some time to read carefully
through this product information before using the headset.
1. Safety Information
When using the HS 400 headset, typical aircraft sounds (e.g. those from engines, propellers,
warning alarms etc.) may sound different to you. Before operating the aircraft, please make sure
that you can hear and recognise these sounds. Set the volume to safe levels that do not interfere
with your ability to hear important sounds and warning alarms.
2. Applications
The HS 400 is an aviation headset which has a closed design to meet high standards. The HS 400
is not TSO approved and therefore it is not suitable for use in commercial aviation.
3. Usage
3.1 How to store and maintain the HS 400
It is best to store the headset in the supplied padded leather bag. While storing the headset
make sure that it is not exposed to extreme temperatures, humidity or direct sunlight. Use
a soft cloth when cleaning the HS 400. Do not immerse the headset in water.
3.2 How to prepare the Headset for Use
3.2.1 Adjusting the Headband
For best comfort and noise attenuation, the headband has to be adjusted to fit your head
properly.
Wear the headset so that the headband runs over the top of your head and adjust the headband
so that
• your ears are completely enclosed by the ear cushions,
• you feel a gentle pressure around your ears,
• both ends of the headband have the same length to ensure a proper fit
3.2.2 Adjusting the Microphone
• Place the wind shield onto the microphone and make sure that the microphone is completely
enclosed.
• Bend the flexible gooseneck so that the microphone is placed as close as in front of the
middle of your mouth. In order to avoid overstretching and premature wear and tear never
bend the gooseneck more than 90°.
20 | 21
english
• Turn the microphone holder (not the gooseneck!)
to position the microphone on the left or right
hand side of the mouth.
• Adjust the gain of the microphone via a
potentiometer by using the supplied small
screwdriver (refer to the illustration).
• At the factory a high gain has been set. The
gain is reduced by turning the potentiometer
to the left.
Page 12

3.3 How to use the Audio Box
3.3.1 Controls and Indicators
On/Off button for external audio interface
Operating control LED for external audio interface
Volume controls for headphone
Auto-Mute button
Status LED for the Auto-Mute function
Mono/Stereo switch
Battery compartment for two AA batteries
Connection for mobile phones or music players
3.3.2 Volume Control
Set the volume controls to a medium level. With the left control you can adjust the volume
for the left ear and vice versa, if you put on the headset to wear the microphone on the left hand
side. With the volume controls only the volume of the intercom signal can be adjusted. The
volume of external audio sources (e.g. MP3 players) must be set at the appropriate devices.
If the volume level is set too high you can damage your hearing and critical sounds
such as warning alarms are hard to hear!
3.3.3 Mono/Stereo Switch
In general you will receive a mono sound source so that the Mono/Stereo switch can remain
set to “Mono”. When using a stereo intercom system, set the Mono/Stereo switch to “Stereo”.
Note:
If you set the Mono/Stereo switch to stereo despite a mono intercom system, you will
hear the headphone signal only on one side.
3.3.4 On/Off Button
Pressing the On/Off button activates the external audio interface of the audio box. The audio
box has to be turned on only when using a mobile phone or music player such as a CD or MP3
player. Hold down the button until the LED will illuminate or extinguish.
When the audio box is turned on, the LED above the button will illuminate. If the battery
capacity is reduced, the LED starts flashing slowly to indicate that the battery capacity is around
20 hours. If you cannot turn on the audio box or if it turns off after a short time of operation
you will have to change the batteries.
Note:
The HS 400 headset can also be operated when the audio box is turned off.
3.3.5 Auto-Mute Button
By using the auto-mute button you can turn the auto mute function of the audio box on or
off. If a signal from the wireless receiving set or intercom system occurs, the volume of the
external device is set automatically to 10% of the volume when the auto-mute function is
activated. Shortly after the signal the volume of the external device is set to the previous level.
When the auto-mute function is activated, the status LED will illuminate.
Note:
When phoning we recommend deactivating the auto-mute function. Otherwise your
own voice, which is reproduced by the intercom system, can fade out the person you are
talking to.
22 | 23
english
Page 13

4. How to connect external Devices to the Audio Box
4.1 Safety Information
When using a mobile phone in the cockpit you might break legal requirements. Please check the
currently valid regulations at the local responsible authorities of the appropriate country. We
recommend using a mobile phone with the HS 400 only when you are on ground.
4.2 Music Players
4.2.1 Connection
Use the supplied cable with the two mini jack plugs (3.5 mm).
4.2.2 Operation
• In order to avoid damage to your hearing, make sure that the volume of the external music
player is set to minimum.
• Turn on the audio box with the on/off button .
• Adjust the volume of the external music player slowly to the desired level.
• Make sure that you can still hear all important sounds such as warning alarms.
4.3 Mobile Phones
Standard mobile phones can be connected to the HS 400. We cannot give any guarantee that all
mobile phones can be connected to the HS 400! The microphone of the HS 400 is only working
if it is powered via the PJ-068 plug.
4.3.1 Connection
To connect a mobile phone, please use the supplied cable. Caution: Connect the cable to the
audio box first, then to the mobile phone so that the mobile phone will recognise the HS 400
as headset. If your mobile phone does not have an appropriate jack socket, you can purchase
an adapter at a shop for mobile phones and accessories or you will find it in chapter 11. “Spare
Parts / Accessories”.
4.3.2 Operation
In order to avoid damage to your hearing, make sure that the volume of the mobile phone is set
to minimum and adjust the desired level slowly. Deactivate the auto-mute function with the
auto-mute button .
5. How to insert/replace the Batteries
Insert two AA batteries into the battery compartment of the audio box. As an alternative you
can use rechargeable AA batteries. Observe the polarity marks on the bottom of the battery
compartment.
Insert the batteries in the same sequence as indicated in the drawings below.
If the operating control LED starts flashing slowly, the batteries still have the capacity for an
operating time of twenty hours. If the operating control LED flashes faster, the capacity of the
batteries is exhausted and the batteries have to be replaced by new ones. The capacity of
batteries or rechargeable batteries is different. Furthermore, please note that rechargeable
batteries can discharge when they are stored for a longer time.
6. How to replace the Ear Pads
24 | 25
english
• Should it become necessary, replace the ear pads.
• Pull the ear pads up and remove them from the
earcups. Attach the new ear pads to the earcups.
• If other components have to be replaced, please contact
your beyerdynamic dealer.
1st battery 2nd batteryspring spring
Page 14

7. Maintenance
• As with any equipment, which will be used in close proximity to sensitive areas of the body,
it is essential that the ear pads and headband are kept clean. Use a damp cloth for cleaning
using warm water only taking care not to allow any water drops into the transducers.
• For cleaning the wind shield remove it from the microphone and wash it under clear
running water. If necessary you can use a mild cleansing agent (e.g. washing-up liquid). Make
sure that the wind shield is completely dry before you replace it onto the microphone.
8. Service
Servicing must be carried out by qualified service personnel only or directly by:
beyerdynamic Service- und Logistik Center
August-Häußer-Str. 9, 74080 Heilbronn, Germany
Fax: +49 (0)7131 – 617-252
E-mail: service@beyerdynamic.de
Dismantling the headset yourself will invalidate the guarantee.
9. Versions
HS 400 Signum Aviation headset with 6.35 mm (1/4") and
PJ-068 jack plugs. . . . . . . . . . . . . . . . . . . . . . . . . . . . . . . Order # 721.298
HS 400 Rotor Aviation headset with U-174/U jack plug
for helicopters, coiled cable . . . . . . . . . . . . . . . . . . . . . . . Order # 722.480
10. Supplied Accessories
• Padded case
• Wind shield for the microphone
• Connecting cable with 4-pole mini jack plug (3.5 mm) for iPhones,
compatible mobile phones and portable music players such as CD or MP3 players
Customised versions may include different accessories.
11. Spare Parts / Accessories
BN 59-53/D Headband pad, black, leatherette . . . . . . . . . . . . . . . . . . Order # 990.681
EDT 600 SS Ear pads, leatherette, black, viscoelastic. . . . . . . . . . . . . . Order # 904.872
EDT 300 GS Ear pads, gel-filled, black. . . . . . . . . . . . . . . . . . . . . . . . . Order # 900.799
WS 20 sw Wind shield, black . . . . . . . . . . . . . . . . . . . . . . . . . . . . . . Order # 439.975
Adapters for mobile phones from Nokia, Sony, Ericsson, Samsung, Motorola, LG:
Mobile phone adapter, 4-pole mini jack (3.5 mm). . . . . . . . . . . . . . . . . . . . Order # 703.656
Mobile phone adapter, 4-pole mini jack (2.5 mm). . . . . . . . . . . . . . . . . . . . Order # 703.648
12. Technical Specifications
Headphone
Transducer type . . . . . . . . . . . . . . . . . Dynamic
Operating principle. . . . . . . . . . . . . . . Closed
Frequency response . . . . . . . . . . . . . . 10 - 20,000 Hz
Nominal impedance mono/stereo . . . . 210 Ω / 270 Ω
Nominal SPL . . . . . . . . . . . . . . . . . . . . 95 dB SPL
T.H.D.. . . . . . . . . . . . . . . . . . . . . . . . . < 0.2%
Power handling capacity. . . . . . . . . . . 100 mW
Sound coupling to ear . . . . . . . . . . . . Circumaural
Ambient noise attenuation . . . . . . . . . approx. 30 dB / dependent on the frequency
Nominal headband pressure . . . . . . . . 8 N
Microphone
Transducer type . . . . . . . . . . . . . . . . . Condenser (back electret)
Frequency response . . . . . . . . . . . . . . 400 - 15,000 Hz
Polar pattern . . . . . . . . . . . . . . . . . . . Figure eight
Output voltage at 1 kHz . . . . . . . . . . . 1 mV - 11 mV/1 Pa, adjustable
Max. SPL . . . . . . . . . . . . . . . . . . . . . . 120 dB
Nominal impedance . . . . . . . . . . . . . . approx. 350 Ω
Current consumption . . . . . . . . . . . . . approx. 6 - 18 mA
Supply voltage . . . . . . . . . . . . . . . . . . typ. 16 V DC (8 - 16 V DC, acc. to RTCA/DO 214)
General
Weight without cable / audio box . . . . . approx. 325 g (0.72 lb)
HS 400 Signum
Cable . . . . . . . . . . . . . . . . . . . . . . . . . approx. 1.80 m (70.87"), straight cable
Connection
Headphone . . . . . . . . . . . . . . . . . . . . 6.35 mm stereo jack plug (1/4")
Microphone . . . . . . . . . . . . . . . . . . . . PJ-068 jack plug
Music player / mobile telephone . . . . . 4-pole mini jack socket (3.5 mm)
26 | 27
english
Page 15

14. Disposal
This symbol on the product, in the instructions or on the packaging means that
your electrical and electronic equipment should be disposed at the end of its life
separately from your household waste. There are separate collection systems for
recycling in the EU. For more information, please contact the local authority or
your retailer where you purchased the product.
• If you throw away the device, please remove the batteries. Separate the housing, electronics
and cables and dispose all components according to the applicable disposal regulations.
• Old batteries may contain substances that harm the environment and health.
• Dispose used batteries always according to the applicable disposal regulations. Please do not
throw used battery packs into the fire (danger of explosion) or your household rubbish, take
them to your local collection points. The return is free and required by law. Please dispose
discharged batteries only.
• For removing the batteries, please refer to chapter 5. “How to insert/replace the batteries”.
• All batteries are recycled to reclaim valuable material such as iron, zinc or nickel.
HS 400 Rotor
Cable . . . . . . . . . . . . . . . . . . . . . . . . . Coiled cable
Connection
Headphone, microphone . . . . . . . . . . U-174/U jack plug
Music player / mobile telephone . . . . . 4-pole mini jack socket (3.5 mm)
13. Warranty
beyerdynamic GmbH & Co. KG provides a five-year warranty to the original purchaser of the
HS 400 from the date of purchase.
Please keep your sales receipt and / or invoice. Without this proof of purchase repairs will be
chargeable. The warranty extends to cover against defects in both materials and workmanship
but excludes faults occurring due to operating errors, improper operation, electric and mechanical
damage, as well as repairs carried out by an unauthorised service centre.
Excluded from the warranty claim are batteries and rechargeable batteries (included in the
delivery) as well as parts that are subject to natural wear and tear during usage such as
connecting cables, ear cushions, headband pads etc.
This warranty is valid in any country in which beyerdynamic is represented by an authorised
distributor. The provisions of this warranty do not exclude your rights under local consumer law.
If your headset needs servicing, please send it to:
beyerdynamic Service- und Logistik Center
August-Häußer-Str. 9
74080 Heilbronn, Germany
Tel.: +49 (0)7131 – 617-349
Fax: +49 (0)7131 – 617-252
E-mail: service@beyerdynamic.de
28 | 29
english
Page 16

Frequenzkurve / Frequency Response Curve
HS 400 (Mic)
EC-DECLARATION
OF CONFORMITY
Standards to which
Conformity is declared: RTCA DO-160
Environmental Conditions and Test Procedures for
Airborne Equipment
DO-160D, Section 20 : Radio Frequency Susceptibility
DO-160E, Section 21 : Emission & Section 25 : ESD
Manufacturer’s Name: beyerdynamic GmbH & Co. KG
Manufacturer’s Address: Theresienstr. 8, 74072 Heilbronn, Germany
Type of Equipment: Headset
Model Numbers: HS 400
I, the undersigned, as an employee of beyerdynamic, hereby declare that the
equipment specified conforms to the above Directive and Standards.
Manufacturer’s Signature:
Full Name: Ulrich Roth
Date: July 1, 2010
Position: Director of R&D
30 | 31
± 2.5 dB HS 400 Mikrofon / Microphone 0 dB = 1 - 11 mV / 1 Pa @ 1 kHz
Richtdiagramm / Polar Pattern
Page 17

DE4/PI HS 400 (07.12)/618.055/Hoh. • Änderungen und Irrtümer vorbehalten • Subject to change without notice • Printed in Germany
beyerdynamic GmbH & Co. KG
Theresienstr. 8 | 74072 Heilbronn –Germany
Tel. +49 (0) 7131 / 617 - 0 | Fax +49 (0) 7131 / 617 - 204
info@beyerdynamic.de | www.beyerdynamic.com
Weitere Vertriebspartner weltweit finden Sie unter www.beyerdynamic.com
For further distributors worldwide, please go to www.beyerdynamic.com
 Loading...