

Page 1

CLASSIS RM 30
CLASSIS RM 31
KONDENSATORMIKROFON
CONDENSER MICROPHONE
MICROPHONE À CONDENSATEUR
Produktinformation
Product Information
Informations de produit
Page 2

Page 3

Classis RM 30 | RM 31 – Inhalt
1. Sicherheitsinformationen . . . . . . . . . . . . . . . . . . . . . . 4
2. Anwendung . . . . . . . . . . . . . . . . . . . . . . . . . . . . . . . 4
3
3. Anschluss. . . . . . . . . . . . . . . . . . . . . . . . . . . . . . . . . 4
4. Mikrofonpositionierung . . . . . . . . . . . . . . . . . . . . . . . 7
5. Pflege . . . . . . . . . . . . . . . . . . . . . . . . . . . . . . . . . . . 8
6. Service. . . . . . . . . . . . . . . . . . . . . . . . . . . . . . . . . . . 8
7. Versionen . . . . . . . . . . . . . . . . . . . . . . . . . . . . . . . . . 8
8. Optionales Zubehör . . . . . . . . . . . . . . . . . . . . . . . . . . 8
9. Technische Daten . . . . . . . . . . . . . . . . . . . . . . . . . . . 9
10. Entsorgung . . . . . . . . . . . . . . . . . . . . . . . . . . . . . . . 10
Frequenzkurve . . . . . . . . . . . . . . . . . . . . . . . . . . . . . . . . 32
Richtdiagramme . . . . . . . . . . . . . . . . . . . . . . . . . . . . . . 34
Anschlussdiagramme . . . . . . . . . . . . . . . . . . . . . . . . . . . 35
deutsch
Page 4

4
Sie haben sich für das Revoluto Mikrofon Classis RM 30 bzw. RM 31
von beyerdynamic entschieden. Vielen Dank für Ihr Vertrauen.
Nehmen Sie sich bitte einige Minuten Zeit und lesen Sie diese
Produktinfor mation vor Inbetriebnahme aufmerksam durch.
Classis RM 30 | RM 31
1. Sicherheitsinformationen
• Schützen Sie das Mikrofon vor Feuchtigkeit, Herunterfallen und
Schlag. Sie könnten sich oder andere verletzen bzw. das Mikrofon
beschädigen.
• Pusten Sie nicht in das Mikrofon. Geben Sie einer Sprechprobe
den Vorzug.
2. Anwendung
Das Classis RM 30 | RM 31 ist ein neuartiges Mikrofon für
Diskussionsrunden, Podiumsbeiträge, Tele/Videokonferenzen, Durchsagen und Rednerpulten.
Die Revoluto-Technologie mit integrierten Mikrofonkapseln hat eine
Korridorcharakteristik, aufgrund derer das Mikrofon rückkopplungsarm
ist und dem Sprecher ein weiter Raum mit guter Sprachqualität garantiert wird. Innerhalb dieser Sprechzone können sich bis zu zwei Sprecher
frei bewegen, d.h. aufstehen, sich hinsetzen, den Kopf drehen, neigen
oder heben und sich auf die Sprechstelle zu und von ihr weg bewegen.
3. Anschluss
In die Tischplatte wird z.B. eine XLR-Flanschbuchse eingebaut und
mit dem Verstärkereingang verkabelt. Alternativ sind beyerdynamic
Einbau- oder Tischfußhalterungen erhältlich (siehe „Optionales
Zubehör“).
Das Mikrofon wird in die Buchse eingesteckt und ist sofort betriebsbereit.
Die Mikrofone Classis RM 30, RM 31 SP und RM 31 RC benötigen
zum Betrieb eine Phantomspeisung zwischen 8 und 52 V.
Q-Version
Um Störungen auszuschließen, empfiehlt es sich, die NF-Leitungen
in einem separaten Schirm zu führen bzw. getrennt von der Leuchtringversorgung zu verlegen. Das Mikrofon Classis RM 31 Q benötigt
zum Betrieb eine Spannung von 5 V.
Page 5
Classis RM 30 | RM 31
lassis RM 31 SP Version mit Leuchtring und programmierbaren
C
Taster
ei der SP-Variante kann über den programmierbaren Taster zwischen
B
den Betriebsarten ON/OFF, Push-To-Talk und Push-To-Mute gewählt
erden. Die Mikrofontaste kann auch ganz außer Funktion
w
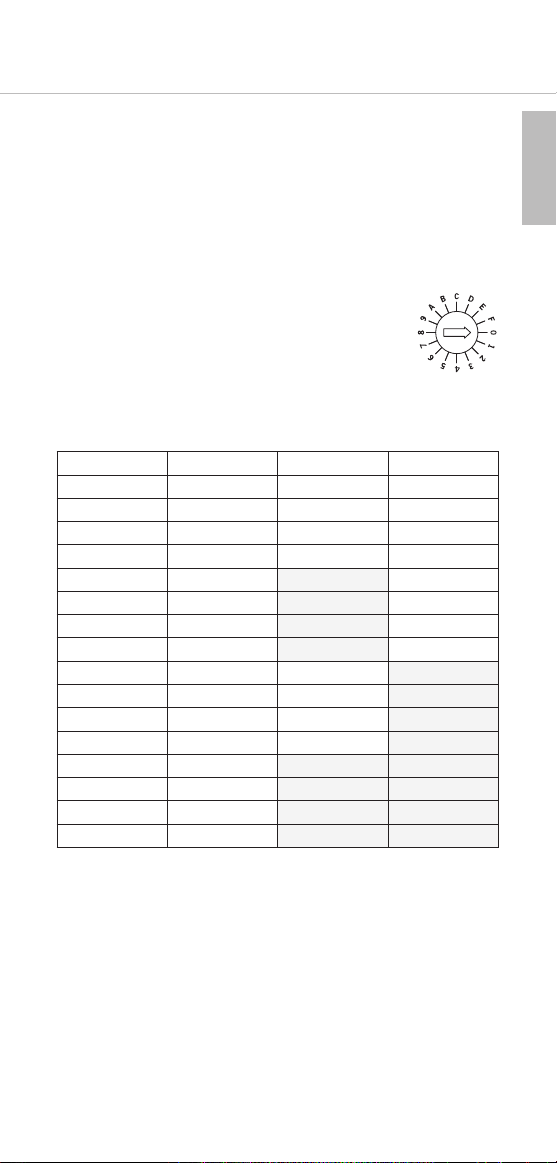
genommen werden (Button Mode - Disabled (ON)). Der Frequenzgang kann in zwei Stufen eingestellt werden: Linear oder mit Tiefenabsenkung zur Unterdrückung tieffrequenter Störungen. Der
Leuchtring zur Anzeige des Mikrofonstatus kann deaktiviert werden.
Zum Einstellen der gewünschten Tastenfunktion über
den Drehcodierschalters sowie zum Einstellen des
Frequenzgangs verwenden Sie einen kleinen Schlitzschraubendreher.
Positionsbelegung Drehcodierschalter siehe nachfolgende Tabelle:
Position Button Mode HP Filter LED Ring
0 PTT ON ON
1 PTM ON ON
2 Disabled (ON) ON ON
3 ON/OFF ON ON
4 PTT OFF ON
5 PTM OFF ON
6 Disabled (ON) OFF ON
7 ON/OFF OFF ON
8 PTT ON OFF
9 PTM ON OFF
A Disabled (ON) ON OFF
B ON/OFF ON OFF
C PTT OFF OFF
D PTM OFF OFF
E Disabled (ON) OFF OFF
F ON/OFF OFF OFF
5
deutsch
Page 6
6
lassis RM 31 RC Version mit Leuchtring, programmierbarem Taster
C
Classis RM 30 | RM 31
und Fernsteuerung
ie RC-Variante bietet neben den Merkmalen der SP-Varianten die
D
Möglichkeit der Bedienung durch eine externe Ansteuerung. Zusätz-
ich lässt sich mit dem Steuerausgang beim Bedienen der Mikrofon-
l
taste ein externes Gerät ansteuern.
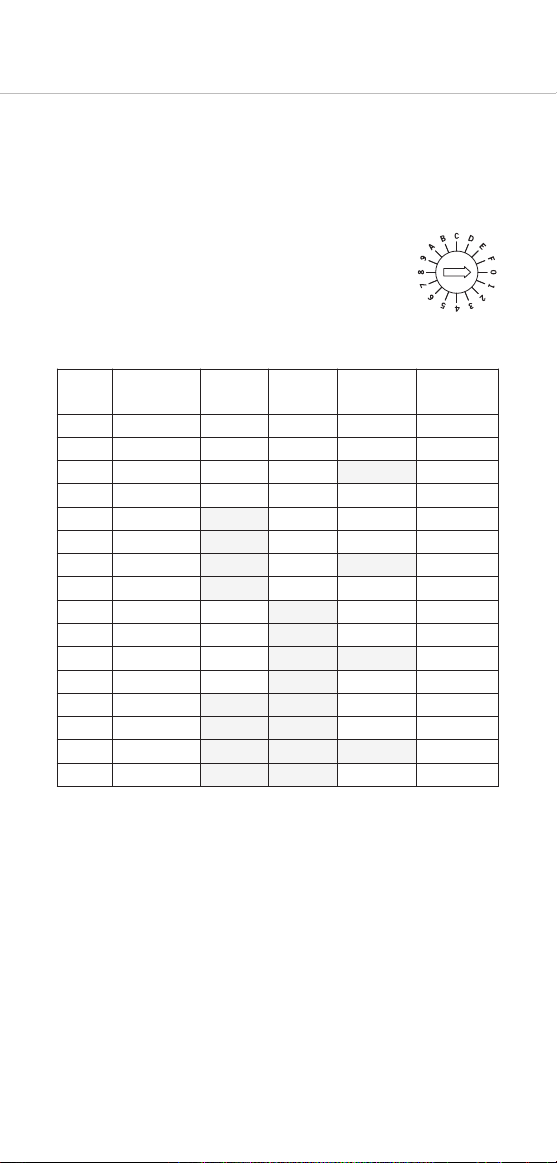
Zum Einstellen der gewünschten Tastenfunktion über
den Drehcodierschalters sowie zum Einstellen des
Frequenzgangs verwenden Sie einen kleinen Schlitzschraubendreher.
Positionsbelegung Drehcodierschalter siehe nachfolgende Tabelle.
Position Button Mode HP Filter LED Ring Control ext.
0 PTT ON ON ON ON
1 PTM ON ON ON ON
2 Remote only ON ON OFF ON
3 ON/OFF ON ON ON ON
4 PTT OFF ON ON ON
5 PTM OFF ON ON ON
6 Remote only OFF ON OFF ON
7 ON/OFF OFF ON ON ON
8 PTT ON OFF ON ON
9 PTM ON OFF ON ON
A Remote only ON OFF OFF ON
B ON/OFF ON OFF ON ON
C PTT OFF OFF ON ON
D PTM OFF OFF ON ON
E Remote only OFF OFF OFF ON
F ON/OFF OFF OFF ON ON
Dev.
Controlled by
ext. Dev.
Page 7
Classis RM 30 | RM 31
> 15 cm
> 15 cm
> 5 m
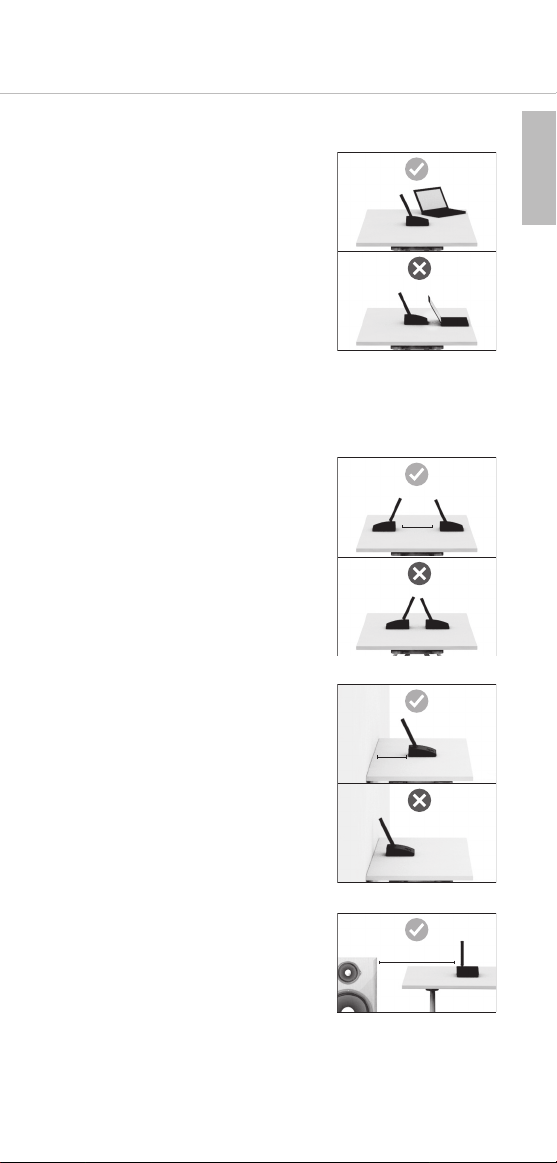
4. Mikrofonpositionierung
eim Einsatz von Notebooks ist Rück-
B
sicht auf die Mikrofone zu nehmen.
Notebooks sollten immer seitlich versetzt zu den Mikrofonen aufgestellt
werden, da ansonsten der aufgeklappte
LCD-Monitor den Schall abschattet.
Ebenso könnten dies z.B. freistehende
Monitore sein. Ein ausreichender Abstand ist entscheidend für die Richtwirkung und eine gute Rückkoppelunterdrückung. Darüberhinaus haben
Notebooks häufig die Lüfter im
hinteren Bereich eingebaut. Die
Lüftergeräusche werden dann vom
Mikrofon aufgenommen.
Zwei Classis RM 31 Q sollten nicht
direkt mit dem Rücken aneinander
stehen, da sonst der Lautsprecher der
zweiten Einbau- oder Tischsprechstelle
vom Mikrofon aufgenommen wird und
Rückkopplungen verursacht. Ein
Mindestabstand von 15 cm sollte eingehalten werden.
7
deutsch
Zu Wänden sollte ein Mindestabstand
von 15 cm eingehalten werden.
Eine Schallabschattung durch
Verdecken mit Gegenständen wie
z.B. Büchern, Zeitschriften oder
Tagungsunterlagen führt zu erheblichen Leistungseinbußen.
Um Rückkopplungen zu vermeiden,
sollte der Abstand zwischen Lautsprecher und Classis RM 30 bzw.
Classis RM 31 mindestens 5 m betragen.
Weitere Informationen zu Anwendungsbeispielen finden Sie im
beyerdynamic „Revoluto Design Guide“.
Page 8

8
Classis RM 30 | RM 31
5. Pflege
Zum Reinigen der Oberfläche nehmen Sie ein feuchtes, weiches Tuch.
Bei Bedarf können Sie ein mildes Reinigungsmittel (z.B. Geschirrspülmittel) verwenden. Auf keinen Fall lösemittelhaltige Reiniger. Achten
Sie darauf, dass kein Wasser in das Mikrofon eindringt.
6. Service
Im Servicefall wenden Sie sich bitte an autorisiertes Fachpersonal.
Öffnen Sie das Mikrofon auf keinen Fall selbst, Sie könnten sonst
alle Garantie an sprüche verlieren.
7. Versionen
Classis RM 30 3-pol. XLR-Stecker,
Classis RM 31 SP 3-pol. XLR-Stecker,
Classis RM 31 RC 5-pol. XLR-Stecker,
Classis RM 31 Q 5-pol. XLR-Stecker,
Phantomspeiseadapter,
Filter . . . . . . . . . . . . . . . . . Best.-Nr. 729.388
Phantomspeiseadapter,
programmierbarer Taster
(PTT, PTM, ON/OFF) mit
Braillebeschriftung,
schaltbarer Low-cut Filter,
schaltbarer Leuchtring . . . . . Best.-Nr. 729.396
Phantomspeiseadapter,
programmierbarer Taster
(PTT, PTM, ON/OFF) mit
Braillebeschriftung,
schaltbarer Low-cut Filter,
schaltbarer Leuchtring,
Fernbedienungsfunktion . . . . . Best.-Nr. 729.825
Leuchtring. . . . . . . . . . . . . . Best.-Nr. 729.302
8. Optionales Zubehör
GMB 33 S Mikrofontischfuß mit Taster,
GMS 32 Elastische Halterung für
GMS 52 Elastische Halterung für
3-pol. XLR-Anschluss
nur für Classis RM 30 . . . . . Best.-Nr. 725.242
Tischeinbau, für Classis RM 30
und RM 31 SP,
3-pol. XLR-Anschluss,
schwarz. . . . . . . . . . . . . . . . Best.-Nr. 729.582
Tischeinbau, für Classis RM 31 Q,
5-pol. XLR-Anschluss,
schwarz. . . . . . . . . . . . . . . . Best.-Nr. 729.434
Page 9

Classis RM 30 | RM 31
SH 20 Elastische Halterung für
Z
Tischeinbau, schwarz . . . . . . Best.-Nr. 454.559
9
9. Technische Daten
Mikrofon . . . . . . . . . . . . . . . Revoluto Mikrofon Array, patentiert
Wandler . . . . . . . . . . . . . . . Elektret-Kondensator
Arbeitsprinzip . . . . . . . . . . . Druckgradient
Richtcharakteristik. . . . . . . . Korridor
Horizontal . . . . . . . . . . . . Niere
Vertikal . . . . . . . . . . . . . . . Keule
Optimaler Abstand
vom Sprecher . . . . . . . . . . . 40 – 80 cm
Übertragungsbereich
Classis RM 31 Q/31SP/31RC. 110 - 20.000 Hz
Classis RM 30. . . . . . . . . . . 90 - 20.000 Hz
Empfindlichkeit
Classis RM 31 Q . . . . . . . . 28,7 mV/Pa = -30,9 dBV ±2 dB
Classis RM 30/31SP/31RC . . 28,5 mV/Pa = -30,9 dBV ±2 dB
Nennimpedanz
Classis RM 31 Q . . . . . . . . < 20 Ω
Classis RM 30/31SP/31RC . . < 200 Ω
Nennabschlussimpedanz
Classis RM 31 Q . . . . . . . . ≥ 100 Ω
Classis RM 30/31SP/31RC . . ≥ 1 kΩ
Geräuschspannungsabstand /
Geräuschspannung
Classis RM 31 Q . . . . . . . . 68 dB [A] / 11,5 μV [A]
Classis RM 30/31SP/31RC . . 67,2 dB [A] / 12,5 μV [A]
Max. Grenzschalldruckpegel . 107 dB [SPL @ 1% THD]
Äquivalentschalldruckpegel. . 26,8 dB [A]
Beschaltung
Classis RM 31 Q . . . . . . . . unsymm. mit 5-pol. XLR-Stecker, male
Classis RM 30/31SP . . . . . . symm. mit 3-pol. XLR-Stecker, male
Classis RM 31RC. . . . . . . . . symm. mit 5-pol. XLR-Stecker, male
Speisespannung / Speisestrom
Classis RM 31 Q . . . . . . . . 5 V / 8,5 mA (mit LED)
Classis RM 30. . . . . . . . . . . Phantomspeisung
P48 (+48 VDC ±4 VDC, 6,8 kΩ ±20%, < 4,5 mA)
P24 (+24 VDC ±4 VDC, 1,2 kΩ ±20%, < 4,5 mA)
P12 (+12 VDC ±1 VDC, 680 Ω ±20%, < 4,5 mA)
Classis RM 31SP/31RC . . . . Phantomspeisung
P48 (+48 VDC ±4 VDC, 6,8 kΩ ±20%, < 9,5 mA)
P24 (+24 VDC ±4 VDC, 1,2 kΩ ±20%, < 9,5 mA)
P12 (+12 VDC ±1 VDC, 680 Ω ±20%, < 9,5 mA)
Temperaturbereich . . . . . . . . -10 °C bis +40 °C
Abmessungen: . . . . . . . . . . . RM 30 RM 31SP RM 31RC RM 31Q
Länge (in mm). . . . . . . . . . . 260 300 300 219
Kapseldurchmesser (in mm) . 25 25 25 25
Gewicht (in g) . . . . . . . . . . . 153 186 186 107
deutsch
Page 10

10
Classis RM 30 | RM 31
10. Entsorgung
ieses Produkt darf am Ende seiner Lebensdauer nicht
D
über den normalen Haushaltsabfall entsorgt werden,
sondern muss an einem Sammelpunkt für das Recycling
von elektrischen und elektronischen Geräten abgegeben
werden. Das Symbol auf dem Produkt, der Gebrauchsanweisung oder der Verpackung weist darauf hin.
Page 11

Classis RM 30 | RM 31
11
deutsch
Page 12

Page 13

Classis RM 30 | RM 31 – Contents
1. Safety Information . . . . . . . . . . . . . . . . . . . . . . . . . 14
2. Applications . . . . . . . . . . . . . . . . . . . . . . . . . . . . . . 14
3. Connection. . . . . . . . . . . . . . . . . . . . . . . . . . . . . . . 14
4. Microphone Positioning . . . . . . . . . . . . . . . . . . . . . . 17
5. Maintenance. . . . . . . . . . . . . . . . . . . . . . . . . . . . . . 18
6. Service. . . . . . . . . . . . . . . . . . . . . . . . . . . . . . . . . . 18
7. Versions . . . . . . . . . . . . . . . . . . . . . . . . . . . . . . . . . 18
8. Optional Accessories . . . . . . . . . . . . . . . . . . . . . . . . 18
9. Technical Specifications . . . . . . . . . . . . . . . . . . . . . 19
10. Disposal . . . . . . . . . . . . . . . . . . . . . . . . . . . . . . . . . 20
Frequency Response Curve . . . . . . . . . . . . . . . . . . . . . . . 32
Polar Patterns . . . . . . . . . . . . . . . . . . . . . . . . . . . . . . . . 34
Wiring Diagrams. . . . . . . . . . . . . . . . . . . . . . . . . . . . . . . 35
13
english
Page 14

14
Thank you for selecting the Classis RM 30 or RM 31 Revoluto
microphone. Please take some time to read carefully through this
information before using the product.
Classis RM 30 | RM 31
1. Safety Information
• Protect the microphone from moisture and sudden impacts. You
could either injure yourself or others or damage the microphone.
• Do not blow into the microphone, you could damage the
transformer. It is preferable to carry out a speech trial.
2. Applications
The Classis RM 30 | RM 31 is a modern desktop microphone
which is ideal for discussions, podiums, tele/video conferencing,
announcements and lecterns.
The Revoluto technology with integrated microphone capsules provides
a corridor characteristic which ensures a wide range of good voice
quality. Within this range up to two speakers can move freely, i.e. they
can stand up or sit down, move their head and move towards or away
from the microphone.
3. Connection
For example an XLR flange socket is installed into the tabletop and
ted to the amplifier input (pin 1: ground, pin 2: NF+,
connec
pin 3: NF-). As an alternative there are installation and shockmounted
holders available (refer to “Optional Accessories”).
The microphone is connected and ready for operation.
The Classis RM 30, RM 31 SP and RM 31 RC microphones need a
phantom supply of 8 - 52 V for operation.
Q Version
In order to avoid interference, we recommend that the audio and
the supply to the illuminated ring are individually shielded. The
Classis RM 31 Q microphone requires a voltage of 5 V for operation.
Page 15

Classis RM 30 | RM 31
lassis RM 31 SP version with illuminated ring and programmable
C
15
button
ith the SP variant you can select via the programmable button
W
between the operating modes ON/OFF, Push-To-Talk and Push-To-
ute. The microphone button can also be disabled (Button Mode -
M
Disabled (ON)). The frequency response can be set with a separate
switch in two stages: Linear or with bass roll-off to suppress low frequency interference. The illuminated ring indicating the microphone status can be deactivated.
In order to select the requested button function with
the rotary selector switch and for setting the
frequency response, use a small Phillips screwdriver.
For assignments of the rotary selector switch, please refer to the
following table.
Position Button Mode HP Filter LED Ring
0 PTT ON ON
1 PTM ON ON
2 Disabled (ON) ON ON
3 ON/OFF ON ON
4 PTT OFF ON
5 PTM OFF ON
6 Disabled (ON) OFF ON
7 ON/OFF OFF ON
8 PTT ON OFF
9 PTM ON OFF
A Disabled (ON) ON OFF
B ON/OFF ON OFF
C PTT OFF OFF
D PTM OFF OFF
E Disabled (ON) OFF OFF
F ON/OFF OFF OFF
english
Page 16

16
lassis RM 31 RC version with illuminated ring, programmable
C
Classis RM 30 | RM 31
button and remote control
n addition to the features of the SP variants, the RC variant provides
I
the option of external control. Furthermore, when operating the
microphone button, an external device can be controlled via the
control output.
In order to select the requested button function with
the rotary selector switch and for setting the
frequency response, use a small Phillips screwdriver.
For assignments of the rotary selector switch, please refer to the
following table.
Position Button Mode HP Filter LED Ring Control ext.
Dev.
0 PTT ON ON ON ON
1 PTM ON ON ON ON
2 Remote only ON ON OFF ON
3 ON/OFF ON ON ON ON
4 PTT OFF ON ON ON
5 PTM OFF ON ON ON
6 Remote only OFF ON OFF ON
7 ON/OFF OFF ON ON ON
8 PTT ON OFF ON ON
9 PTM ON OFF ON ON
A Remote only ON OFF OFF ON
B ON/OFF ON OFF ON ON
C PTT OFF OFF ON ON
D PTM OFF OFF ON ON
E Remote only OFF OFF OFF ON
F ON/OFF OFF OFF ON ON
Controlled by
ext. Dev.
Page 17

Classis RM 30 | RM 31
> 15 cm
> 15 cm
> 5 m
4. Microphone Positioning
hen notebooks are being used, it is
W
also necessary to consider the microphones. Notebooks should always be
positioned to the side of the microphones. Otherwise, when opened, the
LCD screen would obstruct the
sound. This also applies to free standing monitors. Sufficient
distance is the key to the directional
effect and good feedback suppression.
Moreover, notebooks often have fans
at the back. The noise of the fan
would then be picked up by the
microphone.
Two Classis RM 31 Q should not be
directly placed back to back, because
the loudspeaker of the second builtin or desktop microphone unit will be
picked up by the microphone and
cause feedback. The minimum
distance should be 15 cm.
17
english
The minimum distance to walls
should be 15 cm. An acoustic
shadow due to obstructions, such as
books, newspapers or conference
papers, deteriorates performance
greatly.
In order to avoid feedback, the
minimum distance between external
loudspeakers and the Classis RM 30
or Classis RM 31 should be 5 m.
For more information about application examples, please refer to the
beyerdynamic “Revoluto Design Guide”.
Page 18

18
Classis RM 30 | RM 31
5. Maintenance
Use a soft, damp cloth for cleaning the microphone. If necessary,
you can use a gentle cleansing agent (such as washing-up liquid).
Make sure not to allow any water to enter the transducer
element and never use any solvent cleansers.
6. Service
Servicing must be carried out by qualified service personnel only.
Dismantling the microphone yourself will invalidate the guarantee.
7. Versions
Classis RM 30 3-pin male XLR connector,
Classis RM 31 SP 3-pin male XLR connector,
Classis RM 31 RC 5-pin male XLR connector,
Classis RM 31 Q 5-pin male XLR connector,
phantom power adapter,
filter . . . . . . . . . . . . . . . . . . Order # 729.388
phantom power adapter,
programmable button
(PTT, PTM, ON/OFF) with
braille, switchable
low-cut filter, switchable
LED ring . . . . . . . . . . . . . . . Order # 729.396
phantom power adapter,
programmable button
(PTT, PTM, ON/OFF) with
braille, switchable
low-cut filter, switchable
LED ring, remote control
function. . . . . . . . . . . . . . . . . Order # 729.825
LED ring . . . . . . . . . . . . . . . Order # 729.302
8. Optional Accessories
GMB 33 S Microphone base with button,
GMS 32 Shock-mounted holder for
GMS 52 Shock-mounted holder for
ZSH 20 Shock-mounted holder for
3-pin female XLR connector for
Classis RM 30 . . . . . . . . . . . Order # 725.242
table installations, for Classis RM 30
and RM 31 SP, 3-pin female
XLR connector, black . . . . . . Order # 729.582
table installations, for
Classis RM 31 Q, 5-pin female
XLR connector, black . . . . . . Order # 729.434
table installations, black. . . . Order # 454.559
Page 19

Classis RM 30 | RM 31
9. Technical Specifications
Microphone . . . . . . . . . . . . . Revoluto microphone array, patented
Transducer type . . . . . . . . . Electret condenser
Operating principle . . . . . . . Pressure gradient
Polar pattern . . . . . . . . . . . . Corridor
Horizontal . . . . . . . . . . . . Cardioid
Vertical . . . . . . . . . . . . . . . Lobe
Optimal distance to
the speaker . . . . . . . . . . . . . 40 - 80 cm [15.75" - 31.5"]
Frequency response
Classis RM 31 Q / SP / RC . 110 - 20,000 Hz
Classis RM 30. . . . . . . . . . . 90 - 20.000 Hz
Sensitivity
Classis RM 31 Q . . . . . . . . 28.7 mV/Pa = -30.9 dBV ±2 dB
Classis RM 30/31SP/31RC. . 28.5 mV/Pa = -30.9 dBV ±2 dB
Nominal impedance
Classis RM 31 Q . . . . . . . . < 20 Ω
Classis RM 30/31SP/31RC . . < 200 Ω
Load impedance
Classis RM 31 Q . . . . . . . . ≥ 100 Ω
Classis RM 30/31SP/31RC . . ≥ 1 kΩ
Signal-to-noise ratio /noise voltage
Classis RM 31 Q . . . . . . . . 68 dB [A] / 11.5 μV [A]
Classis RM 30/31SP/31RC . . 67.2 dB [A] / 12.5 μV [A]
Max. SPL . . . . . . . . . . . . . . 107 dB [SPL @ 1% THD]
Equivalent SPL . . . . . . . . . . 26.8 dB [A]
Connector
Classis RM 31 Q . . . . . . . . unbalanced, 5-pin XLR male
Classis RM 30/31SP/31RC . . balanced, 3-pin XLR male
Classis RM 31RC. . . . . . . . . balanced, 5-pin XLR male
Supply voltage / supply current
Classis RM 31 Q . . . . . . . . 5 V / 8.5 mA (with LED)
Classis RM 30. . . . . . . . . . . Phantom power
P48 (+48 VDC ±4 VDC, 6.8 kΩ ±20%, < 4.5 mA)
P24 (+24 VDC ±4 VDC, 1.2 kΩ ±20%, < 4.5 mA)
P12 (+12 VDC ±1 VDC, 680 Ω ±20%, < 4.5 mA)
Classis RM 31SP/31RC . . . . Phantom power
P48 (+48 VDC ±4 VDC, 6.8 kΩ ±20%, < 9.5 mA)
P24 (+24 VDC ±4 VDC, 1.2 kΩ ±20%, < 9.5 mA)
P12 (+12 VDC ±1 VDC, 680 Ω ±20%, < 9.5 mA)
Temperature range . . . . . . . . -10 °C bis +40 °C [14 °F to 104 °F]
Dimensions: . . . . . . . . . . . . RM 30 RM 31SP RM 31RC RM 31Q
Length mm . . . . . . . . . . 260 300 300 219
inch . . . . . . . . . 10.24" 11.81" 11.81" 8.62"
Capsule ø mm. . . . . . . . . . 25 25 25 25
inch . . . . . . . . . 0.98" 0.98" 0.98" 0.98"
Weight g. . . . . . . . . . . . 153 186 186 107
lbs . . . . . . . . . . 0.23 0.41 0.41 0.37
19
english
Page 20

20
Classis RM 30 | RM 31
10. Disposal
his symbol on the product, in the instructions or on the
T
packaging means that your electrical and electronic equipment should be disposed at the end of its life separately
from your household waste. There are separate collection
systems for recycling in the EU. For more information,
please contact the local authority or your retailer where
you purchased the product.
Page 21

Classis RM 30 | RM 31
21
english
Page 22

Page 23

Classis RM 30 | RM 31 – Sommaire
1. Consignes de sécurité . . . . . . . . . . . . . . . . . . . . . . . 24
2. Applications . . . . . . . . . . . . . . . . . . . . . . . . . . . . . . 24
3. Branchement . . . . . . . . . . . . . . . . . . . . . . . . . . . . . 24
4. Positionnement du microphone . . . . . . . . . . . . . . . . 27
5. Entretien . . . . . . . . . . . . . . . . . . . . . . . . . . . . . . . . 28
6. Service après-vente . . . . . . . . . . . . . . . . . . . . . . . . . 28
7. Versions . . . . . . . . . . . . . . . . . . . . . . . . . . . . . . . . . 28
8. Accessoires en option . . . . . . . . . . . . . . . . . . . . . . . 28
9. Spécifications techniques . . . . . . . . . . . . . . . . . . . . 29
10. Mise au rebut . . . . . . . . . . . . . . . . . . . . . . . . . . . . . 30
Courbe de fréquence . . . . . . . . . . . . . . . . . . . . . . . . . . . 32
Diagrammes de directivité. . . . . . . . . . . . . . . . . . . . . . . . 34
Diagrammes de câblage . . . . . . . . . . . . . . . . . . . . . . . . . 35
23
français
Page 24

24
ous vous félicitions pour l’achat du microphone Revoluto
N
Classis RM 30 ou RM 31 de beyerdynamic et vous remercions de
otre confiance. Veuillez lire attentivement ces informations produit
v
avant la mise en marche du microphone.
Classis RM 30 | RM 31
1. Consignes de sécurité
• Veillez à ce que le microphone soit protégé de l’humidité et de
tous dommages résultant de chutes ou de chocs mécaniques.
• Ne soufflez pas dans le microphone, vous pourriez endommager le
transformateur. Effectuez plutôt un test de parole.
2. Applications
Le Classis RM 30 | RM 31 est un microphone de table novateur
approprié pour les cercles de discussion, débats, téléconférences et
vidéoconférences, transmissions verbales et pupitres d’orateurs.
La technologie Revoluto avec capsules de microphone intégrées
possède une directivité dite « corridor » qui garantit à l’orateur une large
plage de mouvement tout en conservant une bonne qualité
vocale. A l’intérieur de cette zone de captation, jusqu’à deux orateurs
peuvent bouger librement, par exemple se lever, s’asseoir, tourner,
baisser ou relever la tête ainsi que se rapprocher ou s’éloigner du poste
d’appel.
3. Branchement
Par exemple une embase XLR est montée dans le dessus de table
et branchée sur l’entrée de l’amplificateur (broche 1: masse;
broche 2: BF+; broche 3: BF-).
Des supports de montage ou pour pied de table beyerdynamic sont
également disponibles (cf. Accessoires - en option).
Après l’insertion dans l’embase, le microphone est prêt à
fonctionner.
Les microphones Classis RM 30, RM 31 SP et RM 31 RC nécessitent
une alimentation fantôme de 8 - 52 V.
Version Q
Nous recommandons de brancher les fils BF sur un blindage séparée
ou de les placer séparément de l’alimentation pour l’anneau, afin
d’éviter des perturbations. Le microphone Classis RM 31 Q nécessite
une tension de 5 V.
Page 25

Classis RM 30 | RM 31
lassis RM 31 SP Version avec anneau lumineux et bouton-poussoir
C
25
programmable
ur la variante SP, le bouton-poussoir programmable permet la
S
sélection des différents modes de fonctionnement ON/OFF, Push-To-
alk ou Push-To-Mute. La touche microphone peut également être
T
entièrement désactivée (Button Mode - Disabled (ON)). La courbe de
fréquence peut être réglée sur deux positions : linéaire ou avec
atténuation des graves pour supprimer les perturbations à basse
fréquence. L'anneau lumineux pour l'affichage du statut du microphone peut être désactivé.
Pour régler la fonction de touche souhaitée via le
commutateur de codage rotatif ainsi que pour régler
la courbe de fréquence, veuillez utiliser un petit
tournevis plat.
Affectation du commutateur de codage rotatif, cf. tableau suivant.
Position Button Mode HP Filter LED Ring
0 PTT ON ON
1 PTM ON ON
2 Disabled (ON) ON ON
3 ON/OFF ON ON
4 PTT OFF ON
5 PTM OFF ON
6 Disabled (ON) OFF ON
7 ON/OFF OFF ON
8 PTT ON OFF
9 PTM ON OFF
A Disabled (ON) ON OFF
B ON/OFF ON OFF
C PTT OFF OFF
D PTM OFF OFF
E Disabled (ON) OFF OFF
F ON/OFF OFF OFF
français
Page 26

26
lassis RM 31 RC Version avec anneau lumineux, bouton-poussoir
C
Classis RM 30 | RM 31
programmable et commande à distance
a variante RC offre, outre les caractéristiques des variantes SP, une
L
possibilité de pilotage via commande externe. Lors de l'utilisation de
a touche microphone, la sortie de commande permet également le
l
pilotage d'un appareil externe.
Pour régler la fonction de touche souhaitée via le
commutateur de codage rotatif ainsi que pour régler
la courbe de fréquence, veuillez utiliser un petit tournevis plat.
Affectation du commutateur de codage rotatif, cf. tableau suivant.
b
d
e
l
l
o
r
t
n
Co
.
t
x
e
l
o
r
t
n
Co
g
n
ED Ri
L
r
e
t
l
i
P F
H
e
d
Mo
n
o
t
t
Bu
n
o
i
t
i
s
Po
v.
. De
t
x
e
v.
De
ON
ON
OF
ON
ON
ON
OF
ON
ON
ON
OFF
ON
ON
ON
OFF
ON
F
F
onl
onl
ly
n
F
ly
n
F
y
y
ON ON
ON
ON ON
ON ON
ON
F
ON
F
OF
ON
F
OF
ON
F
OF
ON
ON
ON
OFF OFF
OFF
OFF OFF
OFF OFF
OF
OF
OFF
OFF
OFF
F
F
T
0
1
2
3
4
5
6
7
8
9
A
B
C
D
E
F
PT
PT
mo
Re
/
ON
PT
PT
mo
Re
/
ON
PT
PT
Remote
ON/OFF
PTT
PTM
Remote
ON/OFF
t
OF
t
OF
M ON
o
e
T OF
M
o
e
T
M ON
ON
ON
ON
ON
ON
ON
ON
ON
ON
ON
ON
ON
ON
ON
ON
ON
y
Page 27

Classis RM 30 | RM 31
> 15 cm
> 15 cm
> 5 m
4. Positionnement du microphone
n cas d’utilisation d’ordinateurs
E
portables également, veuillez observer
certaines précautions. Nous recommandons de placer les ordinateurs
portables sur le côté, légèrement en
retrait par rapport aux microphones,
l’écran LCD ouvert pouvant sinon
faire obstacle à la diffusion sonore. Il
en est de même pour les moni-teurs
PC placés librement sur une table.
Une distance suffisante est déterminante pour la directivité et une bonne
réduction de l’effet Larsen. Par
ailleurs, les ventilateurs des ordinateurs portables sont fréquemment
situés à l’arrière de l’ordinateur: les
bruits de ventilation sont alors perçus
par le microphone.
Nous recommandons de ne pas
placer deux Classis RM 31 Q directement dos à dos, car sinon le hautparleur du deuxième poste d’appel
de table ou encastré est perçu par le
microphone et entraîne des rétroactions. Une distance minimum de
15 cm doit être respectée.
27
français
Il est recommandé de respecter une
distance minimale de 15 cm par
rapport aux murs.
Pour garantir un fonctionnement
sans perte de qualité, veuillez ne pas
couvrir l’appareil avec des objets tels
que livres, magazines ou documents
de conférence pouvant étouffer le
son.
Pour éviter l’effet Larsen, la distance
entre le haut-parleur et Classis RM 30
ou Classis RM 31 doit être d’au
moins 5 m.
Page 28

28
our davantage d’informations et exemples d’applications, veuillez vous
P
reporter au «Revoluto Design Guide» de beyerdynamic (uniquement
disponible en anglais ou allemand).
Classis RM 30 | RM 31
5. Entretien
Utilisez un tissu doux humidifié pour nettoyer le microphone. Si
nécessaire, vous pouvez ajouter un produit vaisselle, mais n’utilisez
jamais des dissolvants; veillez à ce que toute pénétration de l’eau dans
le transducteur du microphone soit évitée.
6. Service après-vente
En cas de nécessité veuillez vous adresser à un technicien
beyerdynamic autorisé. N’ouvrez jamais le microphone, vous
risquerez sinon de perdre vos droits de garantie.
7. Versions
Classis RM 30 connecteur XLR 3 broches,
Classis RM 31 SP connecteur XLR 3 broches,
Classis RM 31 RC connecteur XLR 5 broches,
Classis RM 31 Q connecteur XLR 5 broches,
adaptateur alimentation fantôme,
filtre . . . . . . . . . . . . . . . . . . Art. N° 729.388
adaptateur alimentation fantôme,
bouton-poussoir programmable
(PTT, PTM, ON/OFF) avec
inscription en braille,
filtre passe-bas commutable,
anneau à DEL commutable . . Art. N° 729.396
adaptateur alimentation fantôme,
bouton-poussoir programmable
(PTT, PTM, ON/OFF) avec inscription
en braille, filtre passe-bas commutable,
anneau à DEL commutable,
fonction de commande
à distance. . . . . . . . . . . . . . . . Art. N° 729.825
anneau lumineux . . . . . . . . . Art. N° 729.302
8. Accessoires en option
GMB 33 S Pied de table pour microphone
avec bouton poussoir,
prise XLR 3 broches
uniquement pour
Classis RM 30 . . . . . . . . . . . . Art. N° 725.242
Page 29

Classis RM 30 | RM 31
MS 32 Support élastique pour
G
MS 52 Support élastique pour
G
ZSH 20 Support élastique pour
9. Spécifications techniques
Microphone . . . . . . . . . . . . . Microphone-Array, breveté
Type de transducteur . . . . . . condensateur (back-électret)
Principe de fonctionnement . gradient de pression
Directivité . . . . . . . . . . . . . . corridor
Horizontalement . . . . . . . . cardioïde
Verticalement . . . . . . . . . . lobe
Distance optimale
par rapport au microphone . . 40 - 80 cm
Bande de transmission
Classis RM 31 Q / SP / RC . 110 - 20.000 Hz
Classis RM 30. . . . . . . . . . . 90 - 20.000 Hz
Efficacité en champ libre à 1 kHz
Classis RM 31 Q . . . . . . . . 28,7 mV/Pa = -30,9 dBV ±2 dB
Classis RM 30/31SP/31RC . 28,5 mV/Pa = -30,9 dBV ±2 dB
Impédance nominale
Classis RM 31 Q . . . . . . . . < 20 Ω
Classis RM 30/31SP/31RC . . < 200 Ω
Impédance de charge
Classis RM 31 Q . . . . . . . . ≥ 100 Ω
Classis RM 30/31SP/31RC . . ≥ 1 kΩ
Rapport signal/bruit /
Tension de bruit
Classis RM 31 Q . . . . . . . . 68 dB [A] / 11,5 μV [A]
Classis RM 30/31SP/31RC . . 67,2 dB [A] / 12,5 μV [A]
Niveau max. de
pression sonore . . . . . . . . . . 107 dB [SPL @ 1% THD]
Niveau de pression
sonore équivalent. . . . . . . . . 26,8 dB [A]
Disposition
Classis RM 31 Q . . . . . . . . asymétrique, fiche XLR 5 broches,
Classis RM 30/31SP . . . . . . symétrique, fiche XLR 3 broches,
Classis RM 31RC. . . . . . . . . symétrique, fiche XLR 5 broches,
montage dans table,
our Classis RM 30 et RM 31 SP,
p
prise XLR 3 broches, noir . . . . Art. N° 729.582
montage dans table,
pour Classis RM 31 Q,
prise XLR 5 broches, noir . . . . Art. N° 729.434
montage dans table, noir. . . . . Art. N° 454.559
mâle
mâle
mâle
29
français
Page 30

30
limentation / courant d’alimentation
A
Classis RM 31 Q . . . . . . . . 5 V / 8,5 mA (avec DEL)
lassis RM 30. . . . . . . . . . . Alimentation fantôme
C
P48 (+48 VDC ±4 VDC, 6,8 kΩ ±20%, < 4,5 mA)
24 (+24 VDC ±4 VDC, 1,2 kΩ ±20%, < 4,5 mA)
P
P12 (+12 VDC ±1 VDC, 680 Ω ±20%, < 4,5 mA)
Classis RM 31 SP/31 RC. . . . Alimentation fantôme
P48 (+48 VDC ±4 VDC, 6,8 kΩ ±20%, < 9,5 mA)
P24 (+24 VDC ±4 VDC, 1,2 kΩ ±20%, < 9,5 mA)
P12 (+12 VDC ±1 VDC, 680 Ω ±20%, < 9,5 mA)
Plage de températures . . . . . de -10 °C à +40 °C
Dimensions: . . . . . . . . . . . . RM 30 RM 31SP RM 31RC RM 31Q
Longueur (en mm) . . . . . . . . 260 300 300 219
Diamètre de capsule (en mm). . 25 25 25 25
Poids (en g). . . . . . . . . . . . . 153 186 186 107
Classis RM 30 | RM 31
10. Mise au rebut
À la fin de sa durée de vie, cet appareil ne doit pas être jeté
avec les ordures ménagères, mais doit être déposé dans
un point de collecte pour le recyclage des appareils
électriques et électroniques. Le symbole figurant sur le
produit, la notice d’utilisation ou l’emballage y fait
référence.
Page 31

Classis RM 30 | RM 31
31
français
Page 32

32
Classis RM 30 | RM 31
Frequenzkurve / Frequency Response Curve /
Courbe de fréquence
± 2 dB (1 m) Classis RM 30 / RM 31 SP / RM 31 RC 0 dB = 28.7 mV/Pa0 dB = 11 mV/Pa
Page 33

Classis RM 30 | RM 31
33
± 2 dB (1 m) Classis RM 31 Q 0 dB = 28.7 mV/Pa0 dB = 11 mV/Pa
Page 34

34
Classis RM 30 | RM 31
Richtdiagramme / Polar Patterns /
Diagrammes de directivité
horizontal
vertical
Page 35

Classis RM 30 | RM 31
Anschlussdiagramme / Wiring Diagrams /
Diagrammes de câblage
Classis RM 30
Classis RM 31 Q
Classis RM 31 SP
35
Classis RM 31 RC
Page 36

www.beyerdynamic.com
beyerdynamic GmbH & Co. KG . Theresienstraße 8 . 74072 Heilbronn . Germany
Tel. +49 7131 617-0 . Fax +49 7131 617-204 . info@beyerdynamic.de
Weitere Vertriebspartner weltweit finden Sie im Internet unter www.beyerdynamic.com
Abbildungen nicht vertragsbindend. Änderungen vorbehalten.
For further distributors worldwide, please go to www.beyerdynamic.com
Non-contractual illustrations. Subject to change without notice.
DE-EN-FR 1 / Classis RM 30/31 (08.16) / 658.189
 Loading...