

Bewator K12 Installation & User Manual

1 2 3
65
98
4
7
B0
A
1
8
5
3
2
6
K12
Installation & User Manual
EN

Copyright © 2005 Bewator AB, Solna.
Material from this manual may only be copied with the consent in writing of Bewator. Bewator reserves the right to alter both the content of
the manual and the design of the product.
Document number: 81091-2
Bewator AB is part of the Swedish Bewator Group AB, which develops
and markets a complete security product range that includes access
control and alarm. Sales, installation and servicing are handled by a
national dealer network.
Actions (such as unauthorised manipulation, copying etc.), must not be
taken with the software contained in the products and systems. Such
actions are regarded as copyright violation and may result in imprisonment or fines and may likewise lead to an obligation to pay damages
and compensation for using the software.

K12 Installation & User Manual 3
Content
What is K12 ? ................................................. 4
Deactivate an alarm and unlock a door using one code .....4
Alarm Control .................................................................. 5
Alarm activation with button or timer ...............................6
Red LED Control ..............................................................6
Disable the codes whenever needed ................................ 7
Duress or alert ................................................................8
Keypad .......................................................... 9
Wiring .......................................................... 10
Programming ............................................... 12
Buzzer and LEDs ............................................................ 12
Choose password ......................................................... 13
Change password ......................................................... 13
Select Alarm by-pass relay mode .................................. 14
Program codes .............................................................. 15
Erase codes .................................................................. 16
Change codes ................................................................17
Set opening time...........................................................18
Set door held warning time ........................................... 19
Door control on/off .......................................................20
Alert output on/off ........................................................ 21
Duress output on/off .....................................................22
Background lighting on/off ...........................................23
Erase the memory .........................................................24
Using K12 .................................................... 25
Entrance ....................................................................... 25
Activating an intruder alarm .......................................... 25
Deactivating an intruder alarm ...................................... 25
Enter duress code ..........................................................26
Technical data ..............................................27
Programming overview.................................28

4 K12 Installation & User Manual
What is K12 ?
K12 is a compact, multifunctional alarm by-pass
unit with two relay outputs. This makes K12
capable of controlling both an intruder alarm
and a door. In both cases either a four- or a
six-digit code can be used. All programming is
done from the keypad.
Deactivate an alarm and unlock a door using one code
The advantage of using two relay outputs is
that two functions can be activated at the
same time, using only one code. For example,
the code can deactivate an intruder alarm and
open the lock at the same time.
For every code you can decide:
Control an alarm by-pass relay and a door
relay.
Control only a door relay.
Control only an alarm by-pass relay.
Different codes for alarm and door
If unique codes are used for alarm control only
they are programmed for this and cannot unlock the door. Separate codes have to be used
for that.
•
•
•

K12 Installation & User Manual 5
Alarm Control
K12 can be used for either monostable alarm
by-pass – or bistable intruder alarm control.
What method used is programmable. Factory
setting is monostable function.
Monostable
Monostable function will (beside opening relay)
also activate the alarm by-pass relay when a
code or exit button is used. Maximum time is
opening time + door held warning time. If the
door is closed during this time both relays are
deactivated. Note that this requires that door
monitor contact be connected. See also section
Door Control.
Bistable
Using bistable function allows activating an intruder alarm with Code + B. Any codes for only
door opening as well as remote opening will be
disabled. Note that the alarm relay will change
immediately.
Deactivation of the alarm is done with Code +
A. If the code also should activate the opening
relay a delay of one second is used. It is also
possible to use door monitoring together with
bistable alarm control. See Door Control.

6 K12 Installation & User Manual
Alarm activation with button or timer
K12 allows that a bistable alarm can be activated using a button or an external timer connected to an input in the K12.
Red LED Control
To indicate that the alarm is on, the red LED
on the front can be lit. This is controlled by an
external signal connected to the K12.

K12 Installation & User Manual 7
Disable the codes whenever needed
K12 offers the possibility to disable codes at
certain times. For example, the cleaning staff’s
access to the building can be limited to certain
hours, while tenants/staff can have access to
the door 24 hours a day.
By connecting two time clocks to K12, three
different time zones can be used to control the
codes: one controlled by time clock 1, one controlled by time clock 2 and one that is valid 24
hours a day, i.e. no time control.

8 K12 Installation & User Manual
Duress or alert
K12 is equipped with an output that can be
activated for one of the following reasons:
A user enters a duress code (see the Duress
output on/off section)
or
The door held warning time expires or the
door is forced open (see the Alert output
on/off section)
Choose which alternative to use. Then connect
e.g. a burglar alarm or similar to the output.
•
•
K12 Installation & User Manual 9
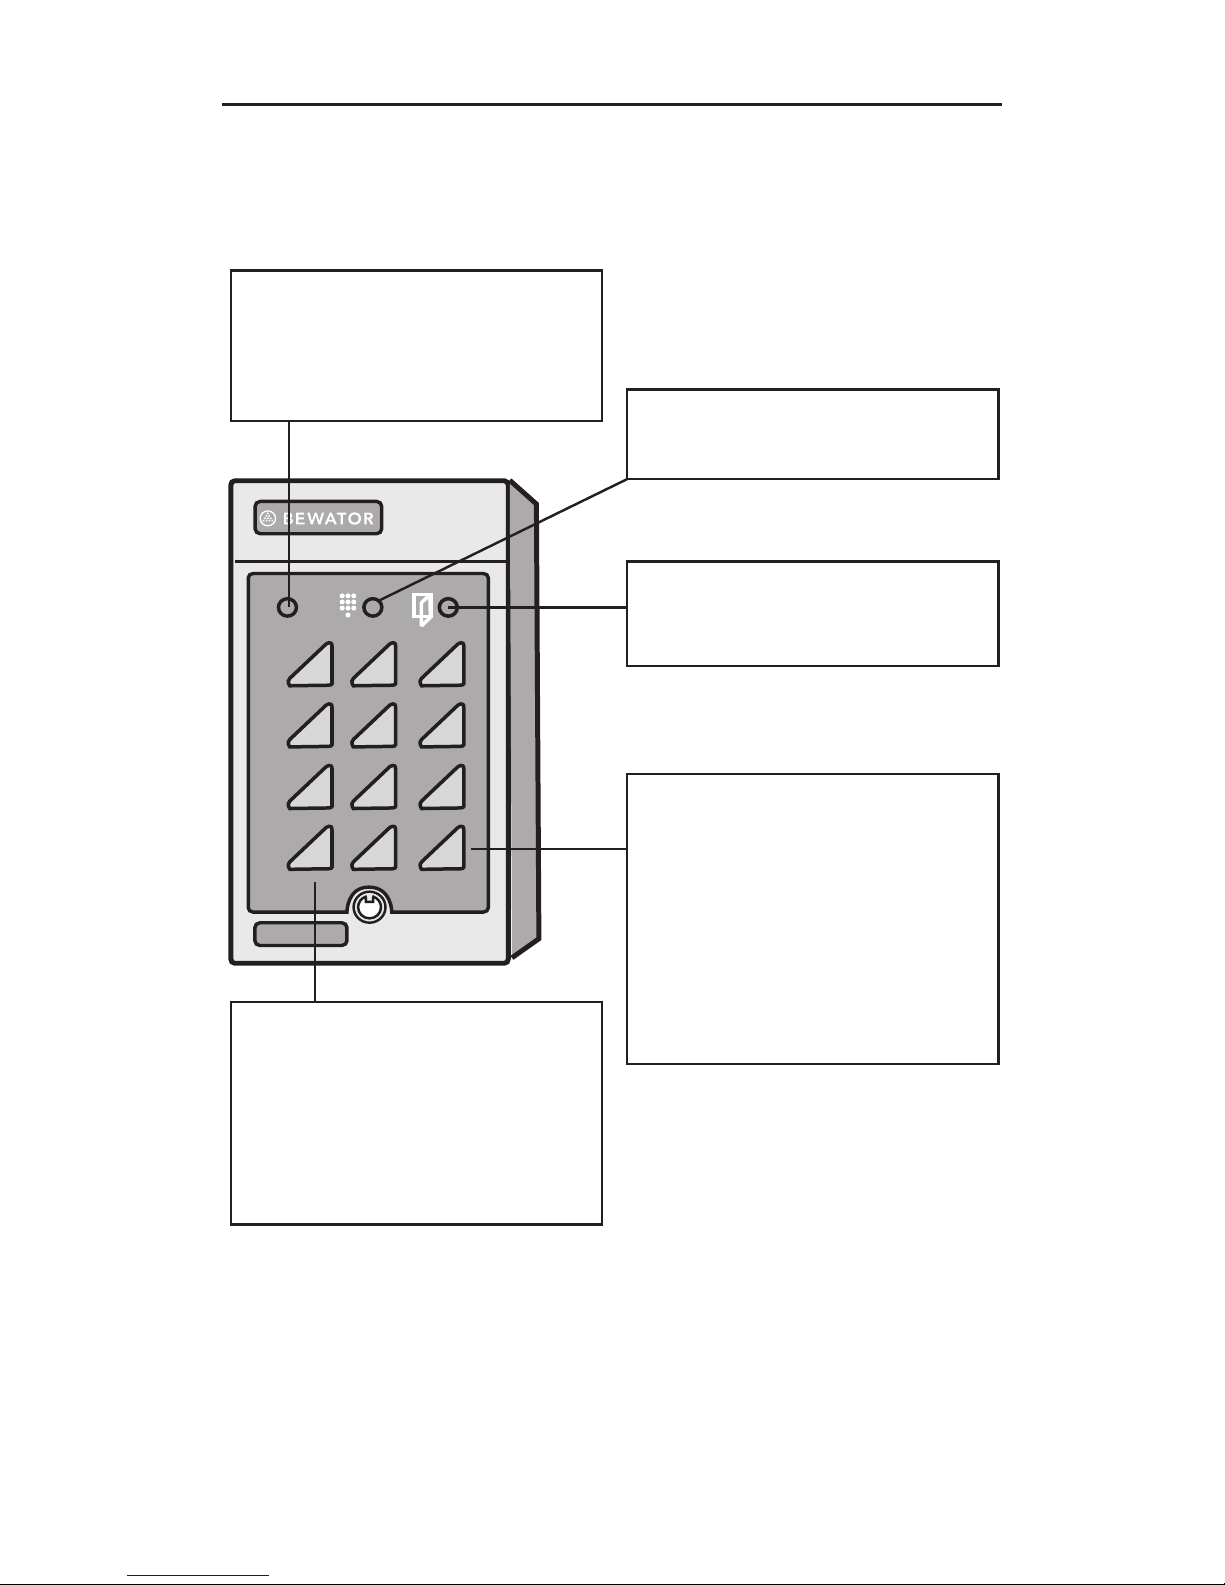
Keypad
1 2 3
65
98
4
7
B0
A
Red LED
For optional use, e g to
indicate Alarm on.
A
Used when deactivating an
intruder alarm and for
programming of the K12.
E g A21 to programme
codes.
Yellow LED
Indicates key presses.
Green LED
Lit when lock is open
B
Press B and enter the
6-digit password to
programme the K12.
B is also used when
activating an intruder
alarm.

10 K12 Installation & User Manual
Wiring
The numbers refer to the diagram on the right.
1
Power in, terminal nos 1(+) and 2. 12-24 V.
2
Input for extra LED (red), terminal nos 3 and 4.
10-35 V DC.
3
Tamper switch, terminal nos 5 and 6. Closed
when the housing is closed.
4
Code disabling from external time clock.
Input 1: Close terminal nos 8 and 7.
Input 2: Close terminal nos 9 and 7.
5
Output for alert or duress. Use E7 relay. Connect
between terminal nos 10 and 1(+).
6
Input for door contact. The contact is closed
when the door is closed. Terminal 19 and 21.
7
Exit button. The door opens on closing terminal
nos 20 and 21.
8
Electric locking device. Dashed line refers to
locks with fail-safe function.
9
SW1 push button. Used when choosing password and erasing memory.
10
Alarm By-pass relay. Monostable or Bistable
mode (shown in OFF position)..
11
Alarm button: Close terminal nos 13 and 15 (The
alarm by-pass relay will change directly).
 Loading...