


Codoor CD3500
Installation and Users Guide
Codoor is only for internal fitting and operation
GB


- 3 -
Table of Contents
1 Codoor - General ........................................................... 4
2 Setting the programming code..................................... 5
3 Installation kit................................................................. 6
4 Fitting to door ................................................................ 7
5 Install reinforcing spring............................................... 8
6 Setting codes ................................................................. 9
7 Deactivation function .................................................. 10
8 Buzzer........................................................................... 11
9 Using Codoor............................................................... 12
10 Testing ...................................................................... 13
11 Backup power supply .............................................. 14
12 Changing the batteries ............................................ 15
13 Erase memory .......................................................... 15
14 Troubleshooting....................................................... 16
15 Where can Codoor be fitted? .................................. 17
16 Technical specifications.......................................... 18
Document number: 81020-2
- 4 -
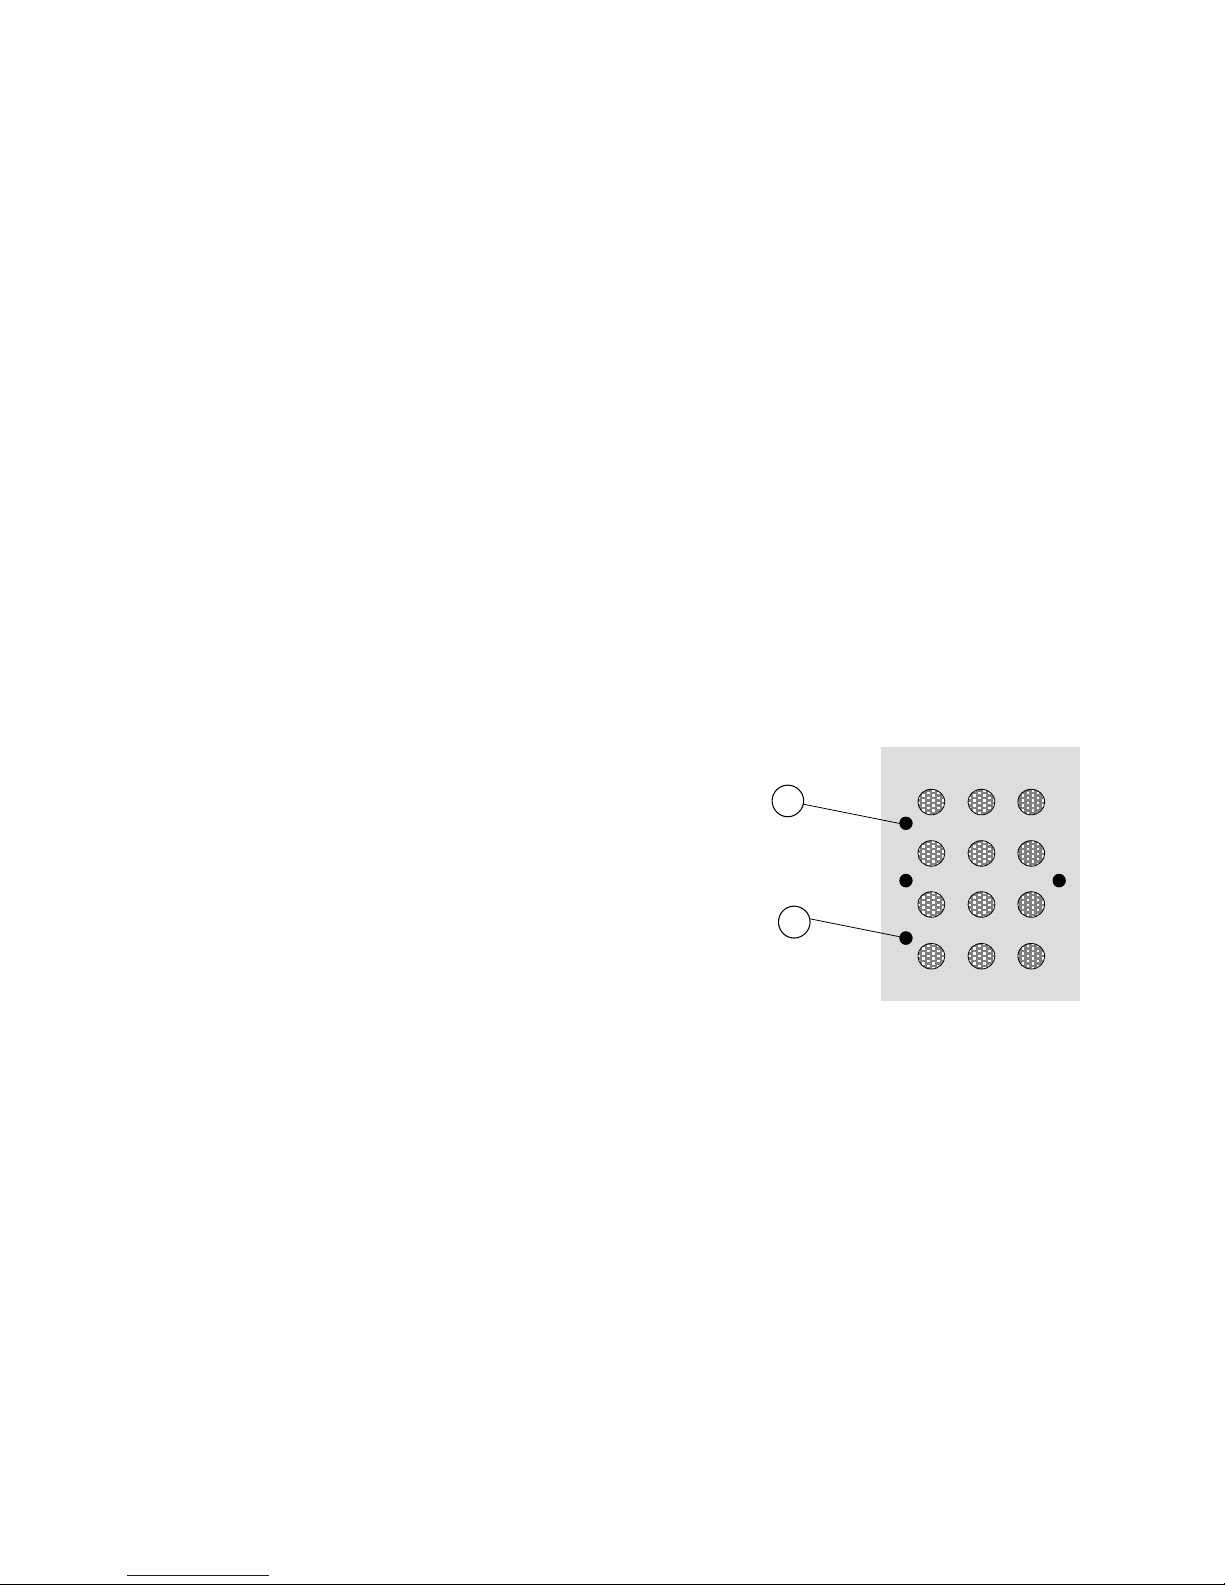
1 Codoor - General
Codoor 3500, a complete code lock suitable for fitting to a
single door, incorporates an electronic code lock, a mechanical
locking device and a power unit in the same housing. Codoor
may be fitted on most doors with handle operated ASSA type
mortice locks. When Codoor is fitted; the outside door handle is
disengaged and may be pressed down without opening the door.
To open the door, a 4-digit code has to be entered. The handle
on the inside of the door is not affected by Codoor, and works
normally for people leaving the premises. All programming,
except for setting of the programming code, is entered via the
keypad (see figure). Besides the keys, the keypad includes two
LEDs, one green and one red.
GREEN - In programming mode, the green
LED indicates that codes etc. have
been entered correctly. It also
confirms each key press in
programming mode.
RED - In operating mode, the red LED
confirms each key press.
In programming mode, the LED
flashes slowly until a command is
entered. Then the LED flashes
quickly.
Codoor also incorporates a buzzer, both to confirm each key press (if
required) and to indicate “battery low” by sounding a low tone (see
section Backup Power Supply). Otherwise, the buzzer sounds to
confirm successful programming.
The programming code must be set before the unit is fitted to the
door (see next page).
* 0
#
45
6
78
9
12
3
2
1
- 5 -
0 0
2 Setting the programming code
When Codoor is delivered, the memory is completely empty. The
first thing you have to do is to set a programming code, before you
fit Codoor to a door. To set the programming code for the first time,
connect the batteries and proceed as follows:
1. Press the reset button on the rear of Codoor and
hold it down as you press the # button for at least 2
seconds.
2. The red LED will flash quickly, accompanied by
simultaneous sounding of the buzzer.
3. While buzzer sound - press , then enter the
desired 6-digit programming code. Finish by
pressing .
4. The green LED is lit for 2 seconds. A rising tone
from the buzzer confirms that the programming code
has been set.
Note! Programming must be done while the red LED flashes and the buzzer
sounds.
How to change an existing programming code:
1. Press , then enter the existing programming
code (6 digits). Finish by pressing .
2. The red LED will flash slowly, accompanied by
simultaneous sounding of the buzzer.
3. Enter 99 . The red LED will flash quickly.
4. Press then enter the new programming code
(6 digits). Finish by pressing . The green
LED is lit for 2 seconds.
5. Finish programming by entering 00 . As
a confirmation, a rising tone sounds from the
buzzer.
R+
- 6 -
Having set the programming code, Codoor can be fitted to the door
in accordance with the accompanying installation instructions. Do
not forget to make a note of the programming code.
Programming code
NOTE:- The first 4 digits in the
programming code
must never be used
for any of the 9 access
codes
Code 1:
Code 2:
Code 3:
Code 4:
Code 5:
Code 6:
Code 7:
Code 8:
Code 9:
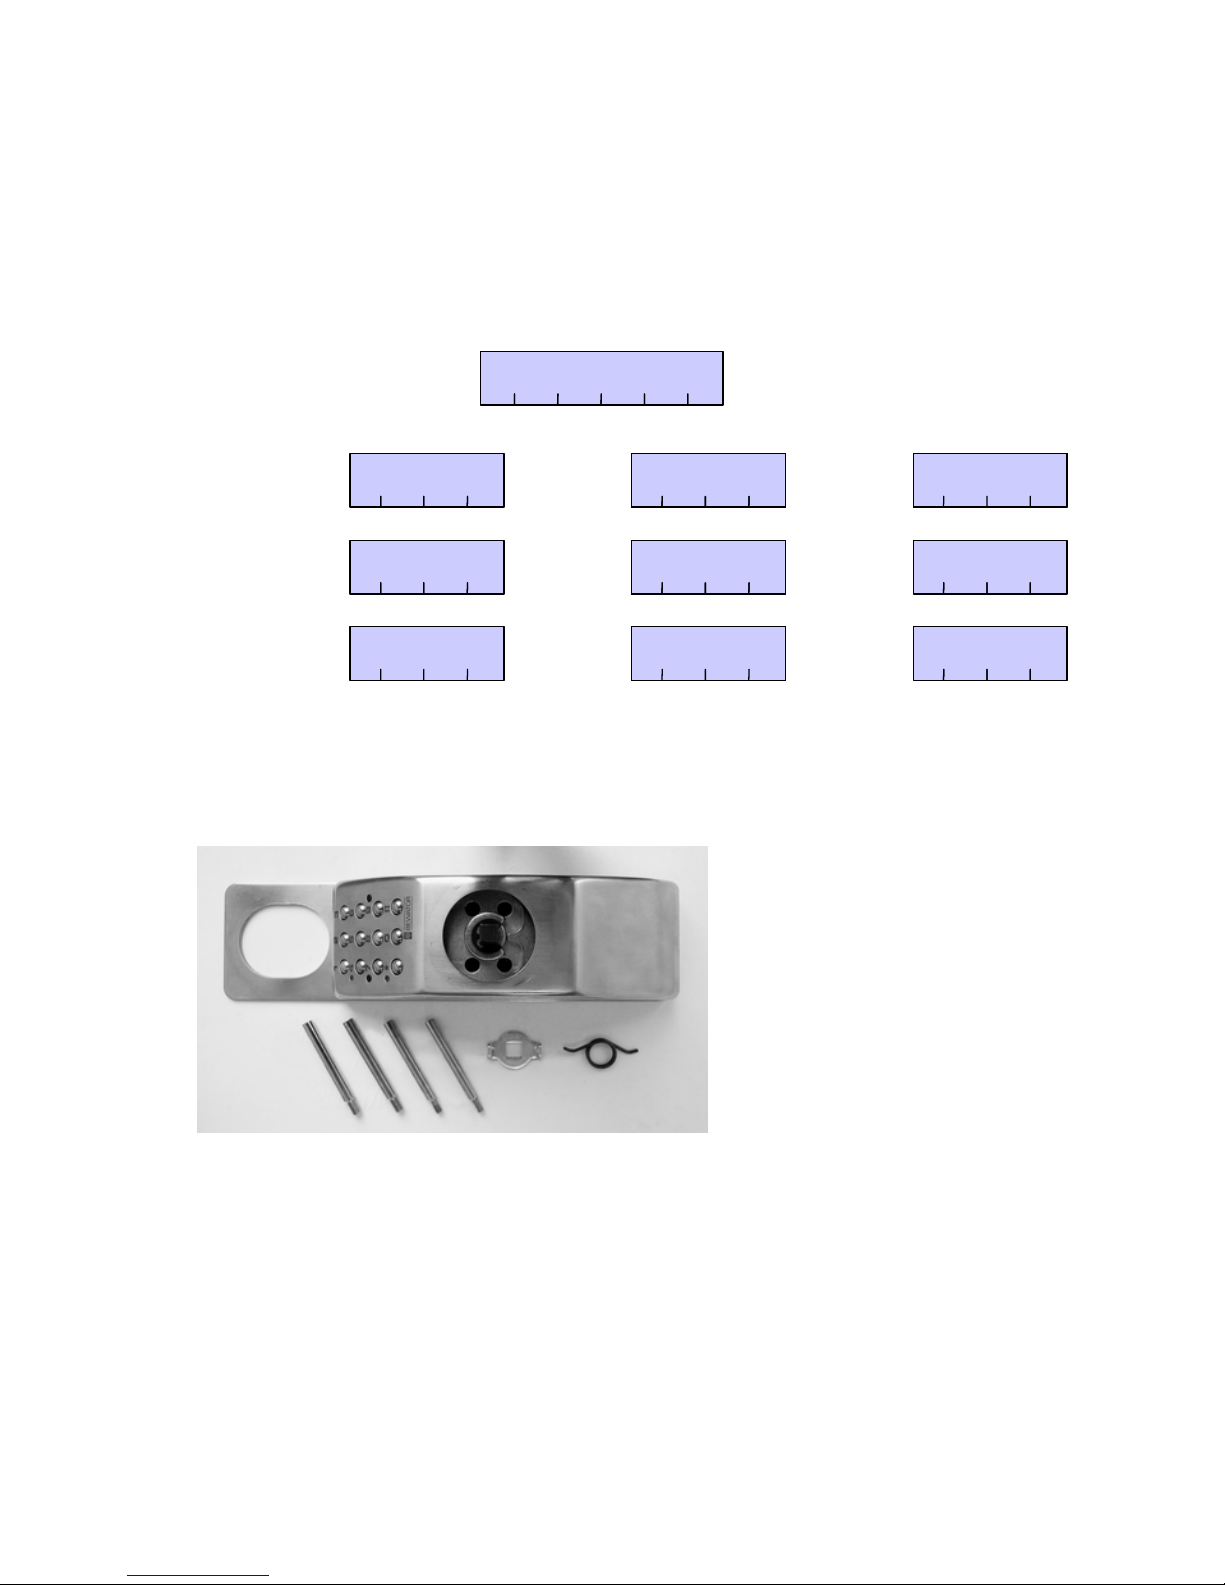
3 Installation kit
Make sure you have the following tools handy:
Cross-head screwdriver for door handle and cylinder ring screws.
Hack saw for trimming lever handle spindle. (See section Fitting to door).
The following parts are
supplied:
1 Codoor (batteries excluded).
4 extension sleeves for handle
nipples (2 M4 and 2 M5; use
only one pair).
1 reinforcing spring.
1 reinforcing spring holder.
- 7 -
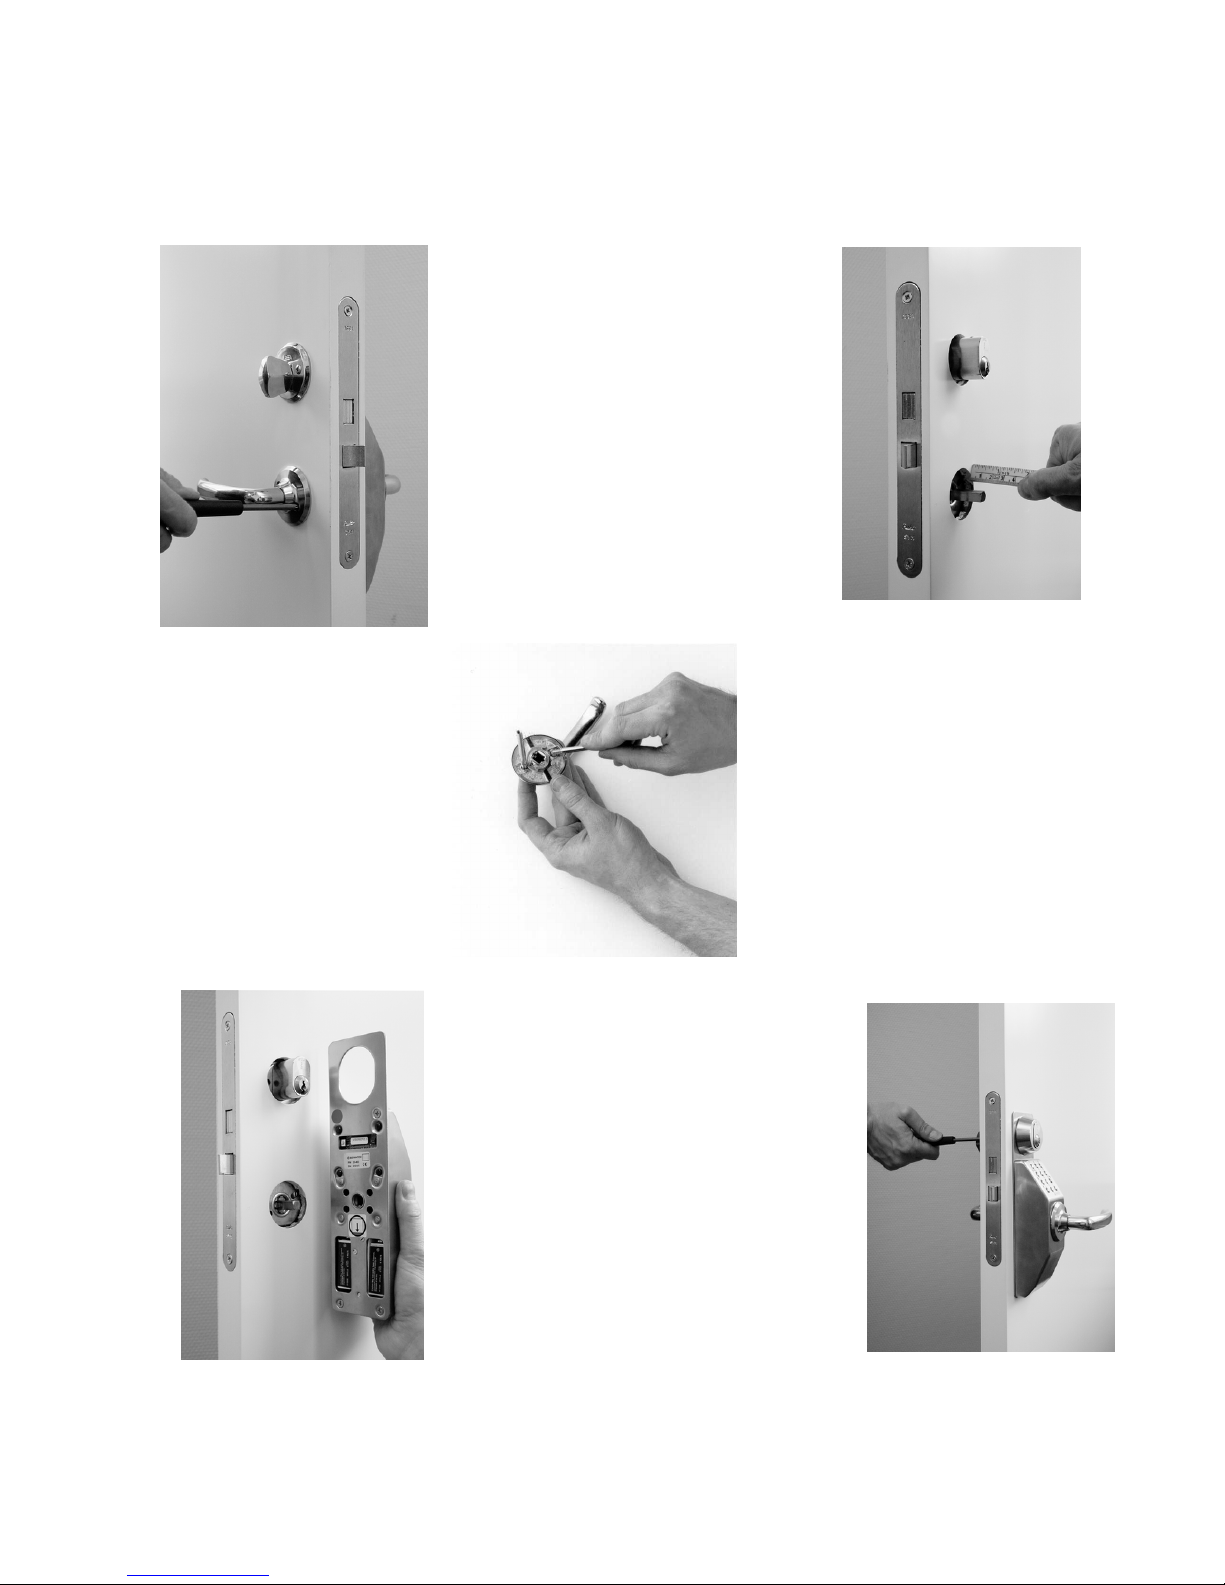
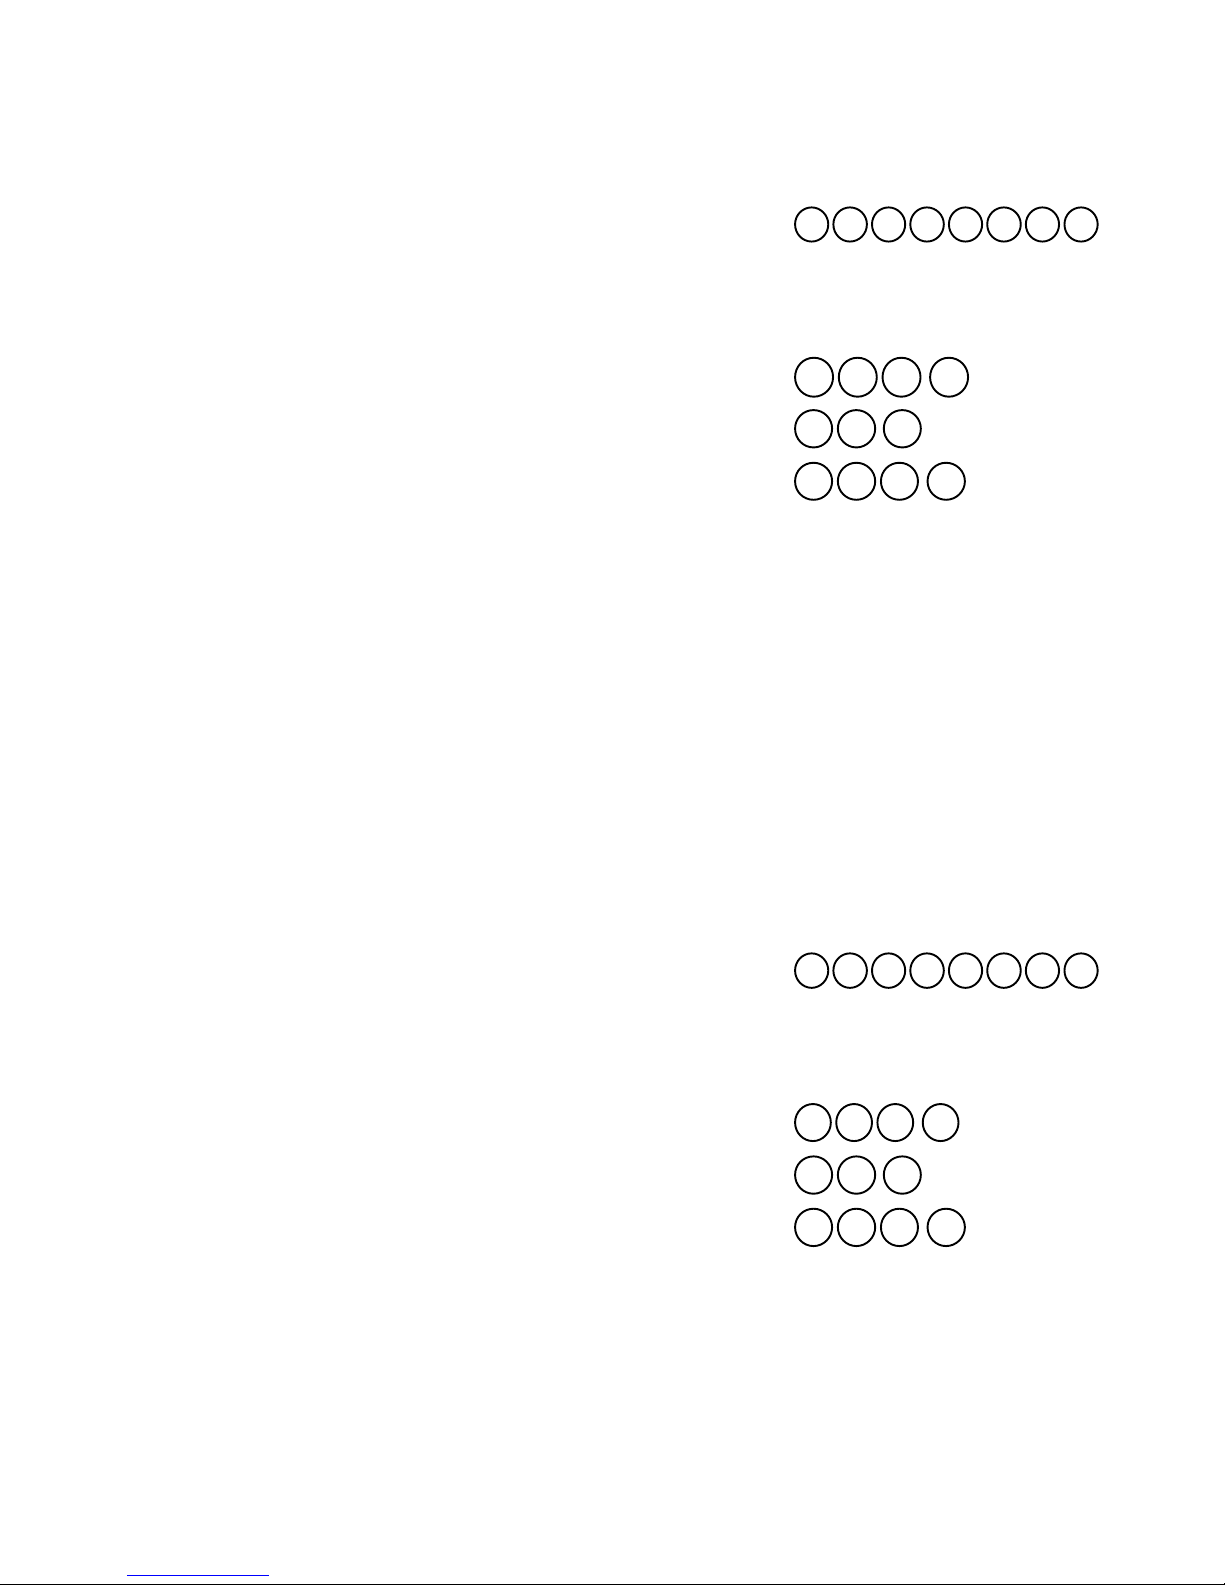
4 Fitting to door
1. Remove the cylinder ring and
the door handle from the door
by loosening the four screws.
2. The lever handle spindle
should project no more than
20 mm on the outside of the
door. If the spindle is too
long, push it through into the
handle on the inside. If this
cannot be done, cut the
spindle to the right length.
3. Screw the supplied
extension sleeves to the
nipples for the handle.
4. Place Codoor on the outside of
the door with the handle
attached, and pass the lever
handle spindle through the
square hole. Note! The red
mark on the follower should
always point downwards.
5. Tighten, not too hard, the four
previously loosened screws (the
screws for the handle first).
- 8 -
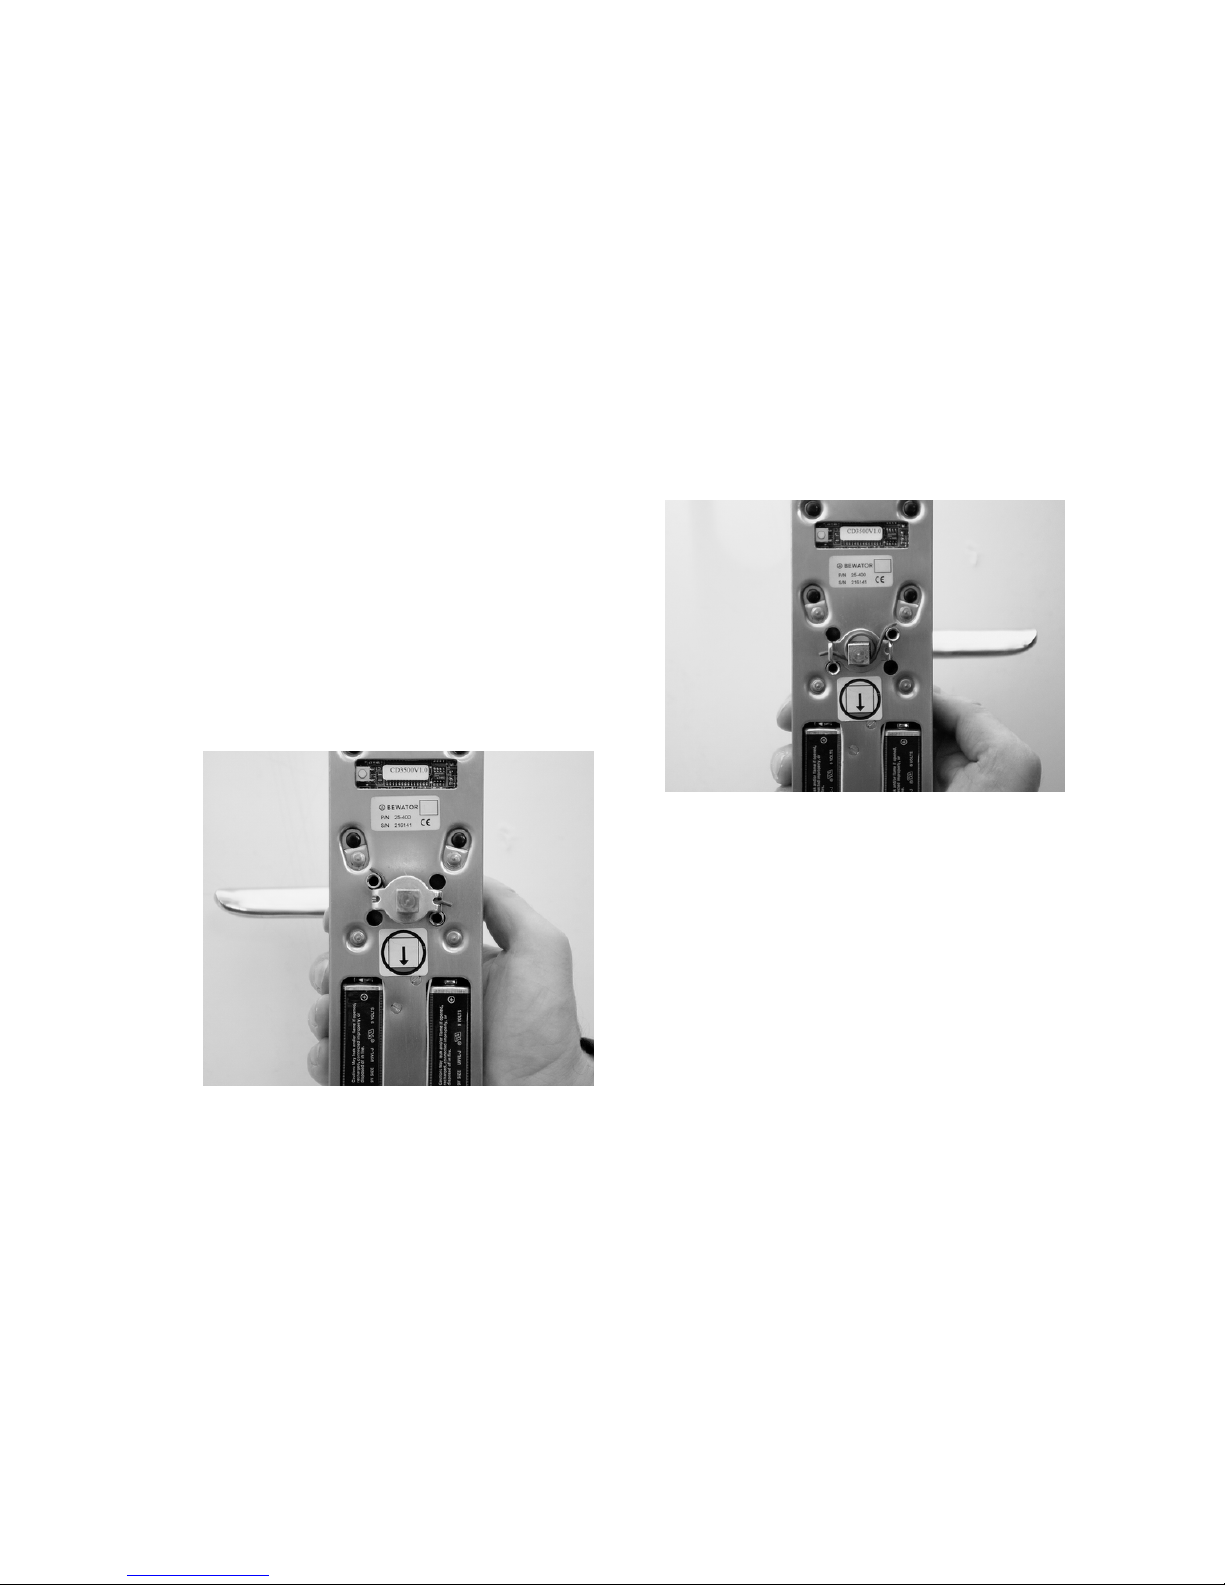
5 Install reinforcing spring
For Codoor’s mechanical release to work properly, the follower
spring in the lock case in the door must be capable of holding the
inside handle in a horizontal position. If the handle on the inside sags
(could be the result of the handle being screwed too tightly), or if the
follower spring in the lock case in the door appears weak, the
reinforcing spring supplied should be fitted. Follow these steps:
1. Put the outside door handle on the
Codoor unit.
2. Pass the lever handle spindle
through the square hole at the rear
of Codoor. Note: The red mark on
the follower should always point
downwards.
3. Door hung on the right:
Insert one end of the spring into the hole
on the spring holder, on the right in the
picture. Place the other end of the spring
on top of the end of the extension sleeve
that is on the left in the picture. The end
of the spring holder on the left should
then be bent into position under this end
of the extension sleeve.
4. Door hung on the left:
Insert one end of the spring into
the hole, on the right in the
picture. Unlike doors hung on the
right; the spring holder should be
adjacent to Codoor, with the
spring on top, as shown. Place the
other end of the spring holder on
top of the end of the extension
sleeve on the left, as shown. Then
bend the end of the spring on the
sleeve into position under this end
of the extension sleeve. If needed,
unscrew the sleeve some distance
from the fixing. This gives you a
longer projection to work with.
5. Fit Codoor to the door as described earlier (see section Fit to door).

- 9 -
6 Setting codes
With Codoor 3500 you can program up to 9 different codes
(codes 01-09). Follow these steps:
1. Press then enter the 6-digit programming
code. Finish by pressing .
2. The red LED will flash slowly, accompanied by
simultaneous sounding of the buzzer.
3. Press then enter the code number (01-09) you
want to program. Finish by pressing . The red
LED will flash faster.
4. Press then enter the desired 4-digit code.
Finish by pressing . The green LED will come
on for 2 seconds. To enter any additional codes,
repeat steps 3 and 4.
5. Exit programming mode by entering 00 .
The buzzer sounds a rising tone to confirm.
Note! The unit automatically switches out of programming mode into
operating mode if no key is pressed within 10 seconds. Programming must be
done while the red LED flashes and the buzzer sounds.
Delete code
1. Press then enter the 6-digit programming
code. Finish by pressing .
2. The red LED will flash slowly, accompanied by
simultaneous sounding of the buzzer.
3. Press #, then enter the code (01 - 09) you wish to
delete. Finish by pressing #. The green LED will
come on.
4. If you wish to delete more than one code, repeat
step 3 for each code.
5. Exit programming mode by entering 00 .
The buzzer sounds a rising tone to confirm.
0 0
0
0

- 10 -
7 Deactivation function
The ninth code may be used as a “deactivation” code, by which
Codoor may be set manually in the unlocked position. Follow
these steps:
1. Press then enter code 9 (4 digits). Finish
by pressing .
2. The red LED will flash slowly, accompanied
by simultaneous sounding of the buzzer.
3. Press 1 . The green LED will come on. The
buzzer sounds a rising tone to confirm the code
has been entered.
4. After 4 seconds the lock will open. It will then open
automatically each time the door handle is used.
Codoor will remain unlocked until reset to the
locked position.
Note! If the Codoor fails to open the lock (i.e. the handle is held own), it will
attempt to open the lock 10 times. It will try a further 10 times if a button is
pressed at least 10 seconds after Codoor has tried unsuccessfully to unlock
the door.
Return to locked position
1. Press then enter code 9 (4 digits). Finish
by pressing .
2. Enter 0 . The green LED will come on.
The buzzer sounds a rising tone to confirm
the code has been entered.
3. Press the door handle down once to relock
the door.
Of course, code 9 works as a normal code if is not entered before and after
the code. You can disconnect the deactivation function by following these
steps:
Continued on next page.
1
0
- 11 -
Continued from previous page.
1. Press , and then enter the 6-digit
programming code. Finish by pressing .
2. The red LED will flash slowly, accompanied by
simultaneous sounding of the buzzer.
3. Enter 68 . The red LED will flash faster..
4. Enter 0 . The green LED will come on.
5. Exit programming mode by entering 00 .
The buzzer sounds a rising tone to confirm.
If you want to reconnect the deactivation function, repeat steps 1
to 5, but enter 1 instead of 0 in step 4.
8 Buzzer
In operating mode, Codoor’s buzzer may be programmed to
sound as each key is pressed, or to remain silent. At delivery, the
buzzer is programmed to sound. However, if silent operation is
required, proceed as follows:
1. Press , then enter the 6-digit programming
code. Finish by pressing .
2. The red LED will flash slowly, accompanied
by simultaneous sounding of the buzzer.
3. Enter 65 . The red LED will flash faster.
4. Enter 0 . The green LED will come on.
5. Exit programming mode by entering 00 .
The buzzer sounds a rising tone to confirm.
If you wish to reactivate the buzzer, follow steps 1 to 5, but
press 1 instead of 0 in step 4.
6 8
0 0
0
6
5
0 0
0

- 12 -
9 Using Codoor
Access
1. Enter any of the programmed codes (without pressing ) and without
touching the door handle. At each key press, an audible signal is sounded
(if the buzzer is enabled) and the red LED on the keypad flashes once.
2. A click sound confirms that the code has been correctly entered.
3. The door must be opened within 4 seconds.
Leaving the premises
Codoor’s mechanical locking device only affects the outside
door handle. The door can always be opened from the inside as
usual.
Automatic resetting
Codoor has two separate resetting systems to return the lock to
the locked position after a code has been entered.
- Mechanical: the lock is reset each time the door handle is
used during access.
- Electronically: the lock is reset if the handle is not used
within 4 seconds of a code being entered.
This provides security against unauthorised access, since
Codoor can never be left in the unlocked position. However, it is
important to remember that Codoor should not be left in the
deactivated mode (see section Deactivation function).
Access blocking
To thwart attempts to obtain an access code by trial and error,
Codoor incorporates a blocking function to disable the unit after
16 false key presses (four successive incorrect 4-digit codes).
The unit remains blocked until 2 correct codes are entered
successively. This means that further instructions to users are
not required.

- 13 -
10 Testing
• It must always be possible to open the door from the inside.
• The handle on the outside should not be disengaged, and should
not open the door until the correct code is entered.
• When the correct code is entered, the handle on the outside should
activate the lock, but only once. As the handle is released, it
should again disengage.
• The handle on the outside must not be jammed in any position,
and should spring back up completely after being pressed down.
• If the code is entered, Codoor should automatically reset to the
disengaged position after about 4 seconds.
Test Mode
A test mode is implemented primarily to test and set up the unit, and
also for field service. The unit will remain in test mode until the
appropriate command is given to leave it. It is not necessary to put the
processor into SLEEP mode other than by specific function.
Entering test mode
Test mode is entered by holding the button in at the rear of the unit
and pressing * for at least 2 seconds. The buzzer will give a short beep
and the green LED will be lit continuously, unless otherwise stated, to
indicate test mode. Each time a key is pressed the buzzer should be
sounded and the red LED lit as per normal operation.
Pressing one of the keys as follows then enters each test.
Test modes
Button 1 Flashes the green and red LEDs simultaneously with the sounding of the
buzzer. This will continue until another key is pressed.
Button 2 Checks the RAM of the processor. If successful a confirm tone is given or
if unsuccessful an error tone is given. The unit returns to test mode with
the green LED continuously lit.
Button 3 Checks the non-volatile memory (non destructively). If successful a
confirm tone is given or if unsuccessful an error tone is given. The unit
returns to test mode with the green LED continuously lit.
Button 4 Fires the solenoid in and out every 4 seconds, the status of reed switch
sensor is given on the LEDs, with contact locked given by the green LED
and unlocked given by the red LED.

- 14 -
Button 5 Puts the unit into sleep mode to enable the current consumption of the unit
tobe measured. The unit will come out of this function when any key is
pressed.
Button 6 Only shows the status of the position sensor. Red LED – unit locked
(solenoid un-engaged), green LED - unit unlocked (solenoid engaged).
Button 7 Puts the unit into an unlocked state with the status of the position sensor
shown on the LEDs as previously stated.
Button 8 Shows the status of the low battery input. Low battery detected the red
LED will show. If the battery voltage is OK the green LED will show.
Button 9 Does nothing except beep and light the red LED.
Button * Does nothing except beep and light the red LED.
Button 0 Does nothing except beep and light the red LED.
Button # Exits test mode with a confirm tone, leaving all the data intact in the non-
volatile memory.
Reset By pressing and holding the reset for 2 seconds the Condor’s
button on memory button is cleared back to factory settings. E.G.
rear
• No programming code set.
• No access codes set.
• Buzzer enabled.
• Deactivation function enabled.
The reset function can only be used when in
test mode!
11 Backup power supply
When the batteries are running low, Codoor will operate with
the buzzer sounding a low tone. The lock has a backup power
supply sufficient for a limited number of openings once the
batteries have run down.
In order not to jeopardise security, the backup power supply is
restricted to 50 openings, after which the backup function is
terminated to conserve the remaining battery power. However,
to allow battery replacement to be carried out by the person in
charge, the programming code is not disabled, to allow the door
to be opened.

- 15 -
12 Changing the batteries
When the unit’s batteries run out, Codoor will stop working.
The lock has a backup power supply that will allow the door to
be opened a limited number of times, but the batteries should be
replaced as soon as they fail. Follow these steps:
1. Remove Codoor from the door.
2. Remove the batteries from the rectangular shaped holes on the lower part
of the back of the unit (2 batteries type U9VL).
3. Always change both batteries. Changing only one battery will
dramatically reduce the life of the new battery. The batteries should be
lithium type.
4. Re-fix the housing.
13 Erase memory
In cases where the Codoor is moved to another door (with new
users), you should be sure that no old codes remains. The best
way is to erase the memory. Proceed as follows:
1. Remove Codoor from the door.
2. Press and hold the reset button on the rear of Codoor
and - button simultaneously - until the green LED
lit.
3. Release both buttons simultaneously.
4. Press the reset button once again for 2 seconds.
5. As a confirmation, a rising tone sounds from the buzzer.
R+
*

- 16 -
14 Troubleshooting
Symptom Remedy
Lock does not open
when code us entered.
Check that the right code has been
entered.
Make sure the handle is not pressed
down as the code is entered.
Check that the handle is not sagging.
Check that the time limit for automatic
reset has elapsed.
Check that Codoor is fitted exactly
vertical.
Check that the lock is not fitted too
tightly to the door, in which case the
handle could be jammed.
Check that the red mark on the follower
for the lever handle spindle is pointing
downwards.
Codoor is in unlocked
position.
Set Codoor to locked position (if
required) according to the instructions
in section Deactivation function.
Codoor does not sound
following key presses.
Activate the buzzer (see section Buzzer)
Check the batteries and change any
discharged batteries.
Batteries are rapidly
discharged.
Frequent use requires frequent change
of batteries. The batteries last up to
150,000 openings (lithium-type) and
50.000 openings with alkaline-type.
Lock does not open even
though backup power.
The blocking counter is activated. See
section Access blocking.
Enter the programming code (skip
before and after the code).
The batteries may be bad and should be
changed immediately.
The batteries are completely discharged
and should be changed immediately.

- 17 -
15 Where can Codoor be fitted?
Codoor is suitable for most doors with handle-operated mortice
locks. Check suitability by simply measuring your own lock: the
distance between the center of the handle follower and the
center of the cylinder follower should be between 105 and 116
mm.
Codoor may be used with any of the following types of lock:
ASSA 760 Requires locking of upper latch bolt into lock case (daytime)
762 - ” 500/4 - ” -
500/9 - ” -
765 Requires dead bolt to be retracted into lock case (daytime)
1520 - ” -
2000 - ” -
8761 Opened with key or handle (deadlocked bolt).
8762 - ” -
8765 - ” -
Codoor is only for internal fitting and operation
and should not be specified for back to back
installation

- 18 -
16 Technical specifications
Number of codes: 9.
Handle: Spindle, 8 mm square.
Environment: Indoors, dry.
Ambient temperature: 0 to +50°C.
Power: Two batteries, 9V type 6LR61
(Not included).
Operating life: Up to 150,000 openings (lithium
batteries) or 50 000 openings
(alkaline batteries) - or one year,
which ever comes first.
Dimensions: 64 x 245 x 47 mm, excluding handle
(W x H x D)


 Loading...