

Page 1
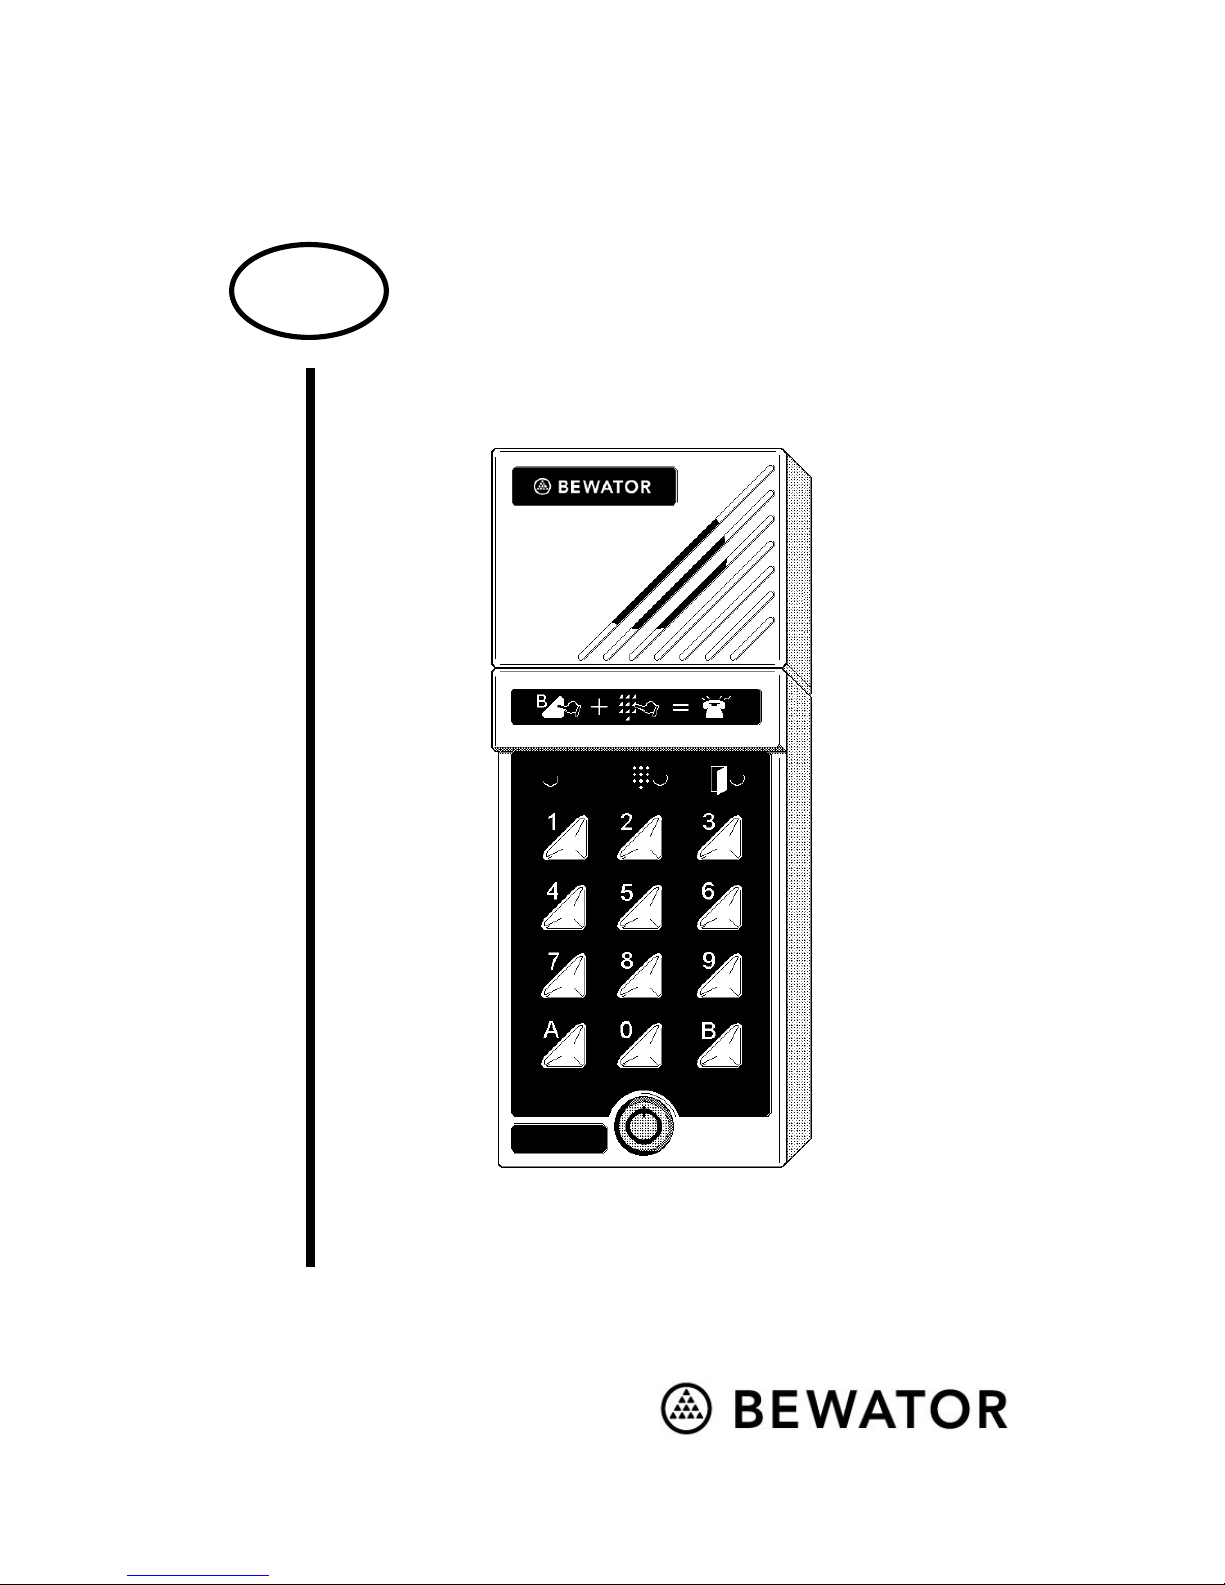
Bewacom
Technical manual
GB
Page 2

Copyright © January 2001 Bewator AB, Solna, Sweden.
Material from the Bewacom Technical manual may only be copied with
the consent in writing of Bewator. Bewator reserves the right to alter
both the content of the manual and the design of the product without
notice.
Document no: 80642-2
Bewator AB are parts of Bewator Group, which develops and markets
a complete security product range that includes, access control and
alarm. Sales, installation and servicing are handled by a national dealer
network.
Actions (such as unauthorised manipulation, copying etc.), must not be
taken with the software contained in the products and systems. Such
actions are regarded as copyright violation and may result in
imprisonment or fines and may likewise lead to an obligation to pay
damages and compensation for using the software.
Page 3

Bewacom Technical manual 3
Contents
WHAT IS BEWACOM?........................... 5
How Bewacom works...................... 5
Points to remember ......................... 6
Time control of the access codes..... 6
Monitoring camera.......................... 6
Limitations ....................................... 7
Requirements for connecting
Bewacom to a telephone system ..... 7
INSTALLING BEWACOM....................... 8
INSTALLATION .................................... 10
THE KEYPAD ....................................... 12
PROGRAMMING .................................. 13
Internal sounder and LEDs .......... 13
Setting a password......................... 14
Setting Bewacom to programming
mode................................................ 14
Programming access codes (first
time)................................................ 15
Changing entrance codes .............. 16
Erasing access codes...................... 17
Changing the door unlock time .... 18
Extending the opening time 10 times18
Changing the calling time ............. 19
Page 4

4 Bewacom Technical manual
Extending the calling time 10 times19
Time control of the telephone
opening function ............................ 20
Background lighting...................... 21
Internal sounder ............................ 22
Possibility to call the Bewacom .... 23
”Hotline” ........................................ 24
Erasing the memory ...................... 25
PROGRAMMING OVERVIEW .............. 26
THIS IS HOW THE NEW DOOR
TELEPHONE WORKS.......................... 28
CALLING BEWACOM .......................... 29
TROUBLESHOOTING .......................... 30
TECHNICAL DATA............................... 32
NOTES .................................................. 33
Page 5

Bewacom Technical manual 5
What is Bewacom?
Bewacom is a door telephone which can be
directly connected, like an extension, to an
internal telephone system (PABX).
Using the Bewacom, visitors may call any
telephone connected to the telephone system.
The person answering the telephone can talk to
the visitor and open the door from the
extension telephone.
Bewacom includes a built-in codelock to allow
access for staff.
How Bewacom works
To make a call from the Bewacom, the visitor
presses B + the desired extension on the
keypad. Available extensions should be
displayed on a name plate next to the door.
At the other end, the telephone rings as usual.
It is possible to speak with the visitor for 30
seconds (extendable).
To open the door, the person called presses 5
on the telephone keypad and hangs up. To not
open, press 0 and hang up.
Page 6

6 Bewacom Technical manual
Points to remember
Bewacom only allows communication in one
direction at a time. Each person must speak in
turn for satisfactory communication.
Time control of the access codes
The access codes can be time controlled from
external time clock(s) connected to the
Bewacom. For example, the cleaning staff
code could only be valid certain times, while
other codes should operate 24 hours a day.
By connecting two time clocks, three time
zones can be used: one controlled by time
clock 1, one by time clock 2 and one that is
valid 24 hours a day, i.e. no time control.
The access codes can be programmed to the
required time control group.
Monitoring camera
If desired, a CCTV camera can be controlled
from an output of the Bewacom. The camera
will be automatically activated when the
visitor presses the B button and remain active
during the calling time plus the door open
time.
Page 7

Bewacom Technical manual 7
Limitations
Bewacom cannot normally call extensions
beginning with 0 or extensions consisting of
more than 4 digits. If the installation requires
alterations in these limits, contact Bewator.
Requirements for connecting
Bewacom to a telephone system
An analogue extension (two wires) must be
used for the connection of Bewacom. The
telephones to be called by Bewacom must be
able to send a standard tone signal to
Bewacom for the door release function to
work.
How to test whether the telephone system
meets the requirements or not:
1 Connect an ordinary push button
telephone to the Bewacom extension, and
dial any of the other extensions on the
telephone system.
2 Ask the person answering at the other
end to press the 5 key on the telephone
keypad. If a tone is heard, Bewacom
should work correctly.
Page 8
8 Bewacom Technical manual
Installing Bewacom
Install the Bewacom at a height of 120–140
cm (from the floor to the bottom edge of the
Bewacom). To cater for disabled persons, a
suitable height is approximately 95 cm.
1 Open the Bewacom with the key
supplied. The lock is located on the front.
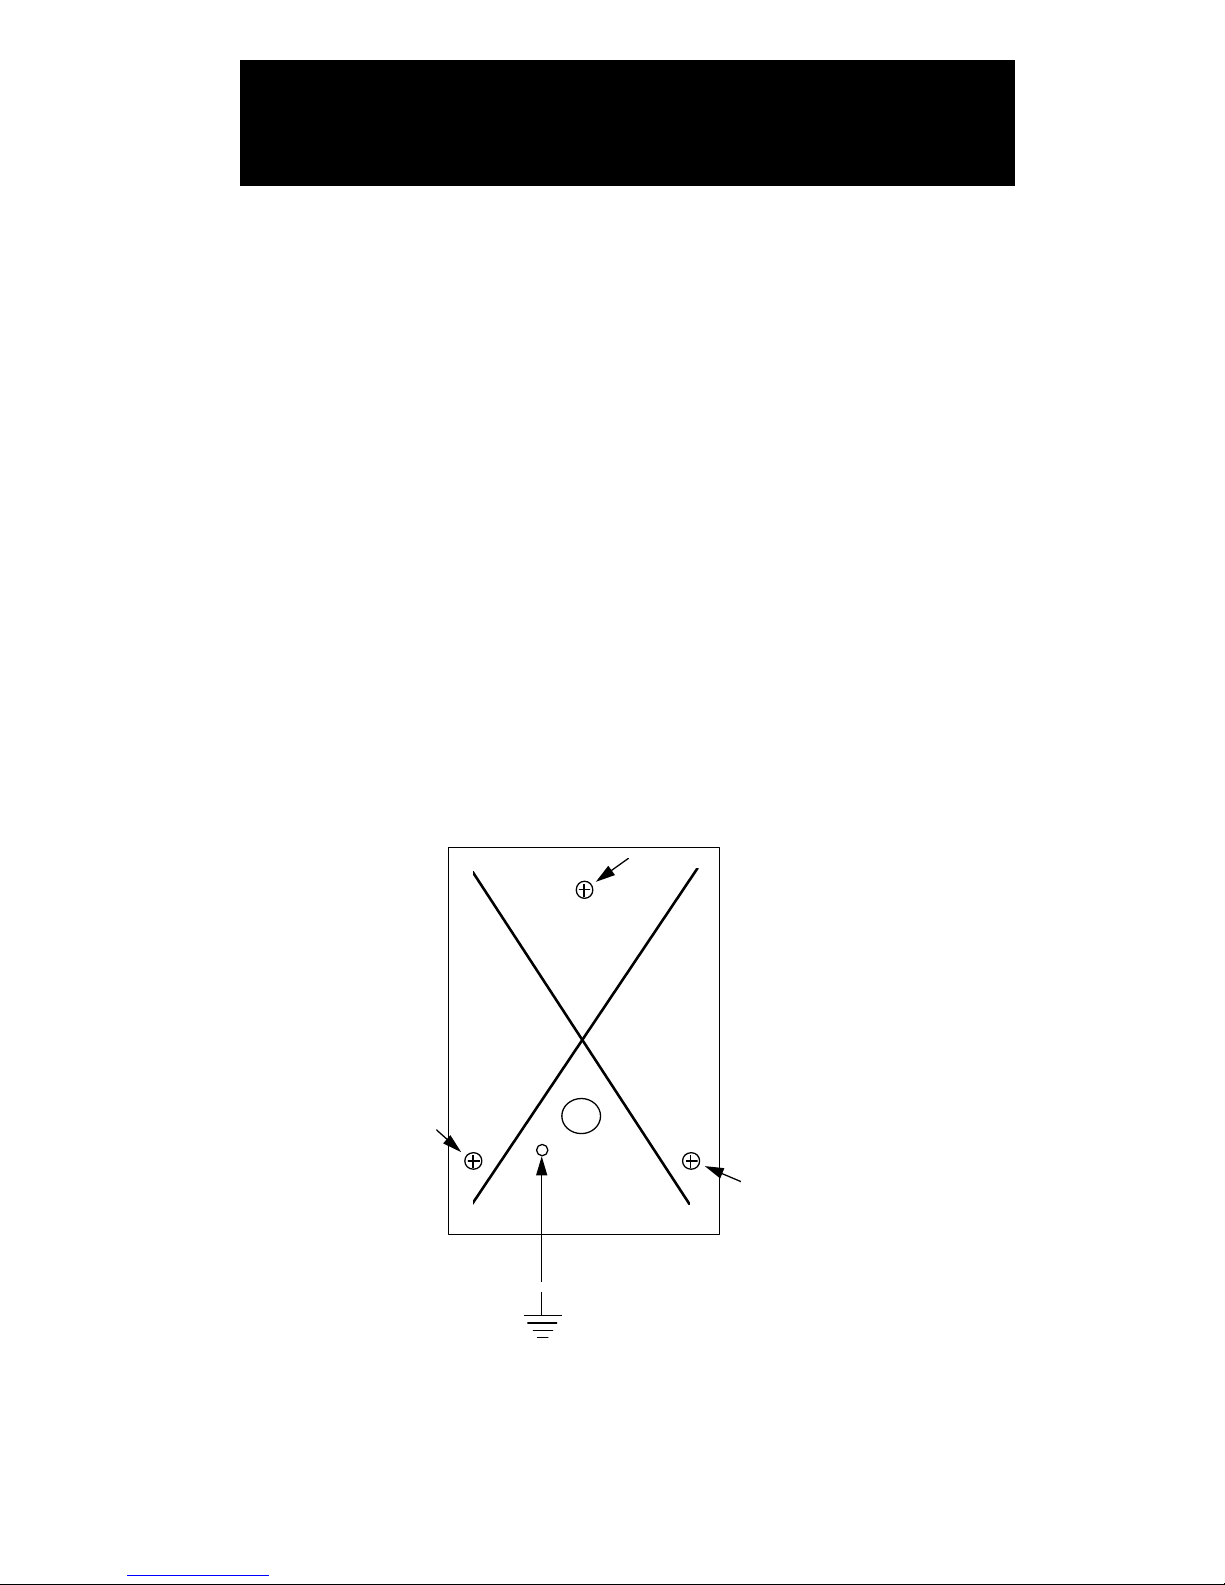
2 Fasten the back plate against the wall,
using three screws as shown in the
illustration below. Seal the screw and
cable holes with sealant if the unit is
externally mounted.
Page 9

Bewacom Technical manual 9
3 Unless the unit is already mounted on a
metallic earthed surface, earth the back
plate. Use a separate cable to the earthing
point. Make sure the front and back plate
are connected with the internal strap.
4 Fit the front and check that the Bewacom
is securely fastened.
Page 10
10 Bewacom Technical manual
Installation
SW1
9
8
7
6
CAMERA
TAMPER
0V
EXIT
TELE
2
1
12-24V
LOCK
13
12
11
10
15
14
1
2
3
4
5
2
+
4
1
5
6
7
8
3
9
10
12V
24V
11
Page 11
Bewacom Technical manual 11
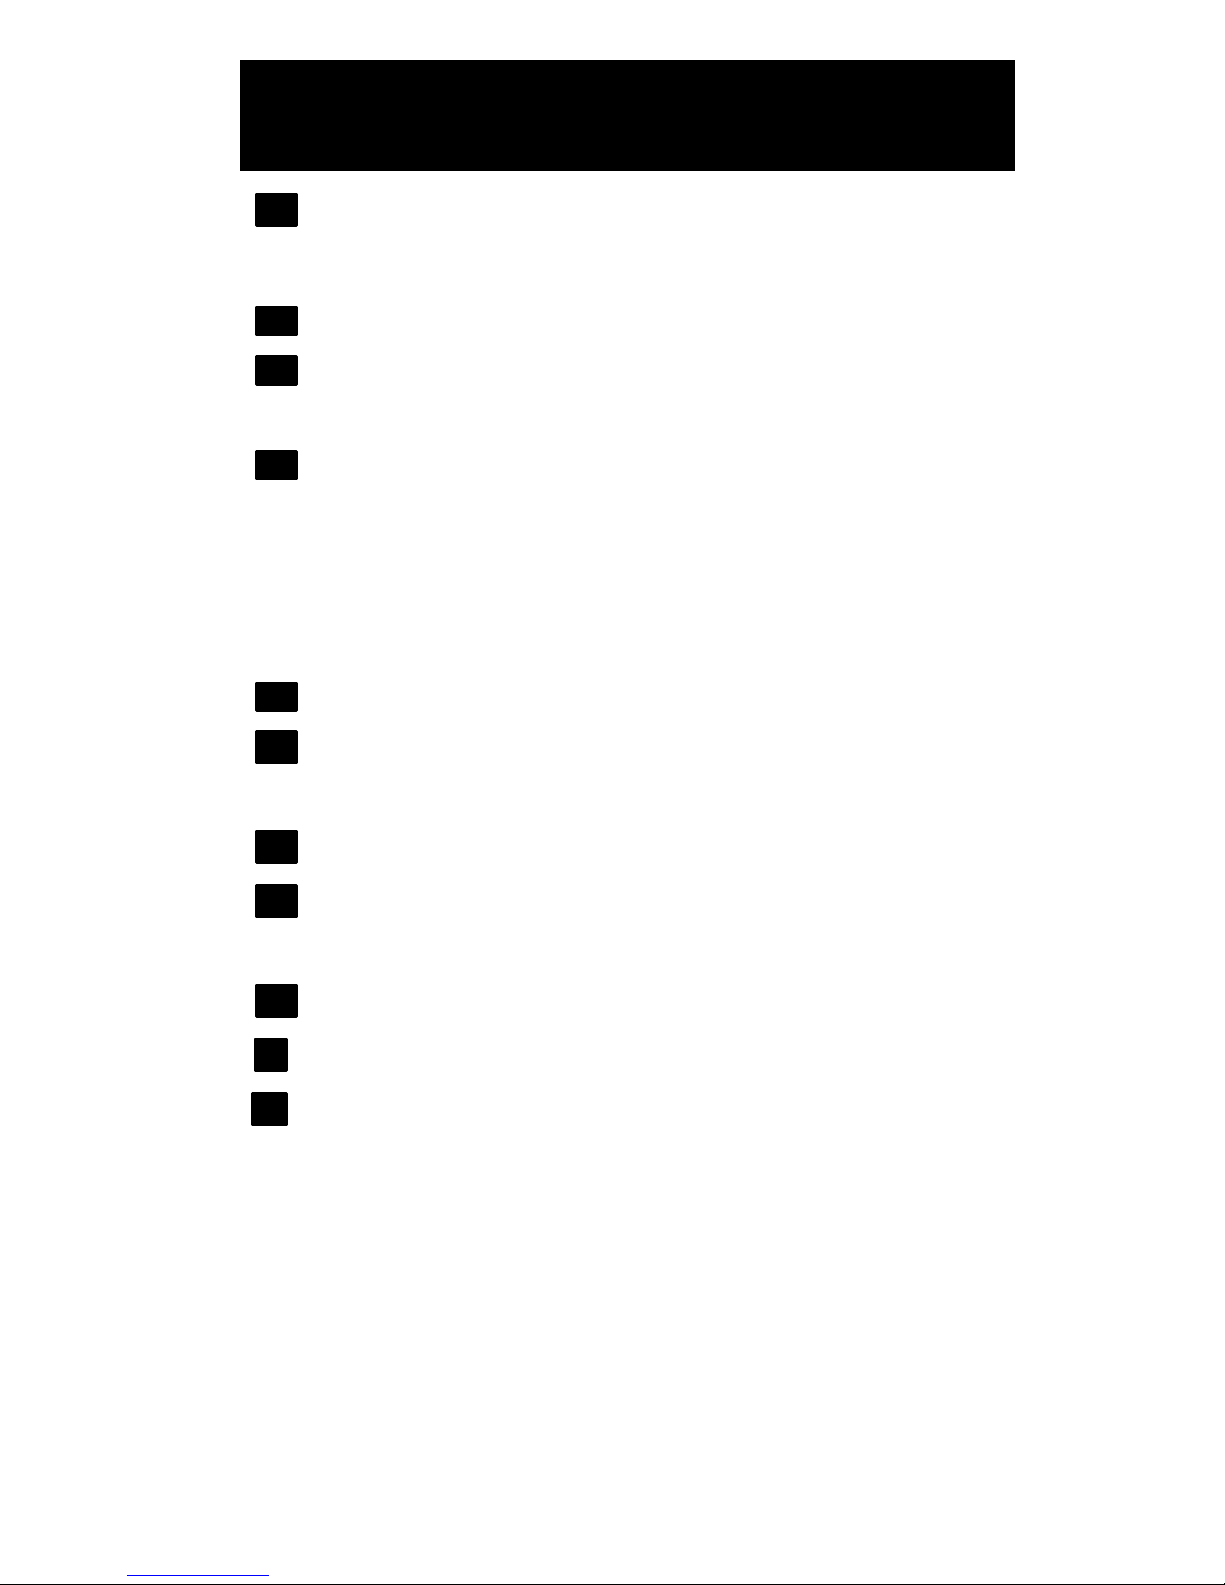
1
SW1 push button. Used to set the
password and erase the memory.
2
Connection to the telephone system.
3
Exit button. Connect terminal nos 12
and 13. Looped = door open.
4
Time control from the external time
clock. Input 1: Connect terminal nos 11
and 13. Input 2: Connect terminal nos 10
and 13. Looped input = the codes are
disabled.
5
Camera relay output.
6
Tamper switch. Normally closed when
the housing is closed.
7
Power supply in, terminal nos 1 and 2.
8
Electric locking device. Dashed line
refers to locks with failsafe function.
9
Speaker volume.
10
Microphone sensitivity.
11
Jumper for 12 or 24 V voltage suuply. If
above 20 V, set the jumper to 24 V.
Page 12
12 Bewacom Technical manual
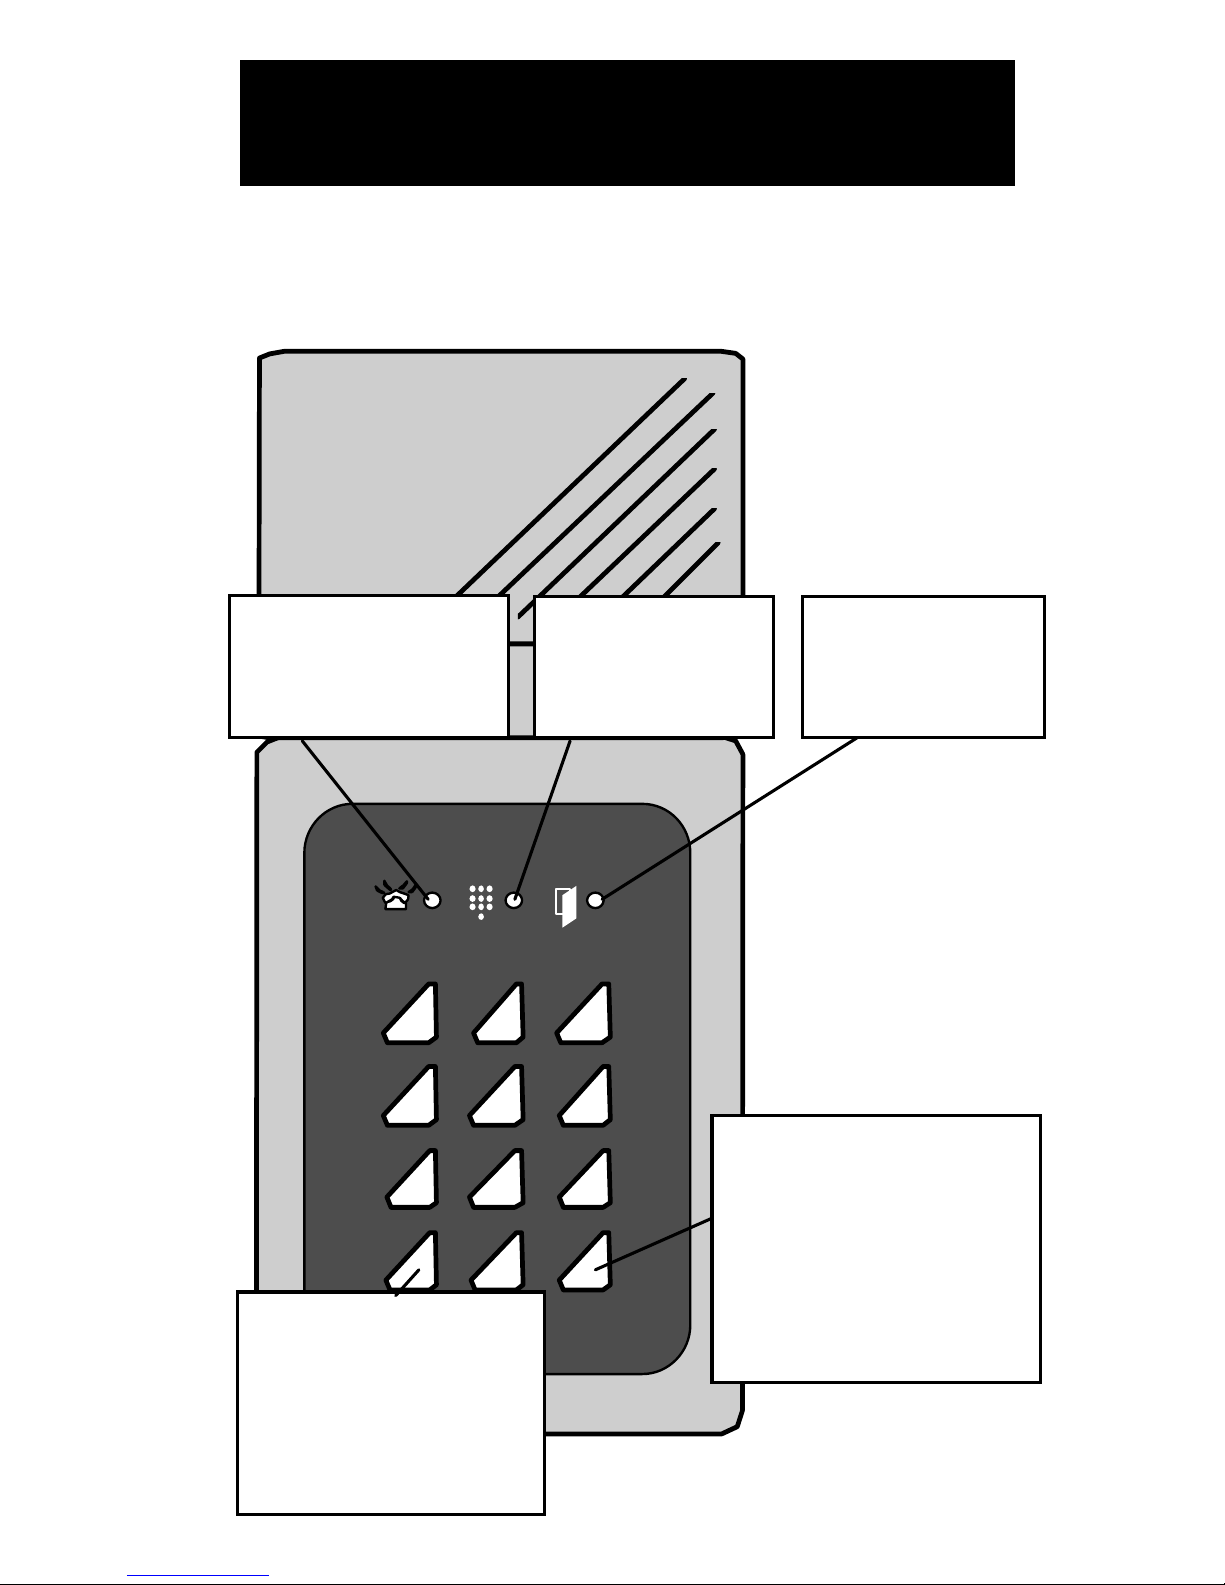
The keypad
123
456
789
A0B
Red LED.
Indicates busy
telephone line.
Yellow LED.
Indicates
keypresses.
Green LED.
Lit to indicate
door released.
A.
Starts a program ming sequence,
e.g. A29 to change
calling time.
B.
Press B + the desired
extension to make a
call. Press B + the 6
digit password to
programme Bewacom.
Page 13

Bewacom Technical manual 13
Programming
The sections below describe how to
programme Bewacom.
Internal sounder and LEDs
During programming, guidance will be given
by the internal sounder and the LEDs.
In the manual the LED indications are shown
as follows:
= Off z = Lit = Flashes
In programming mode before a function is
chosen: Red and yellow LED flashes.
During programming: The LEDs are lit or off
depending on the function being programmed.
Correct programming: Confirmed by a rising
signal – two quick beeps.
Faulty programming: Confirmed by a falling
signal – two quick beeps.
Note! Once programming mode has been
entered, if a key is not pressed within 15
seconds, the unit will return to normal
operation.
Page 14

14 Bewacom Technical manual
Setting a password
The first thing to do is to set a password. You
will later use the password each time you want
to programme the Bewacom.
1 Open the Bewacom and turn it around so
the circuit board can be seen.
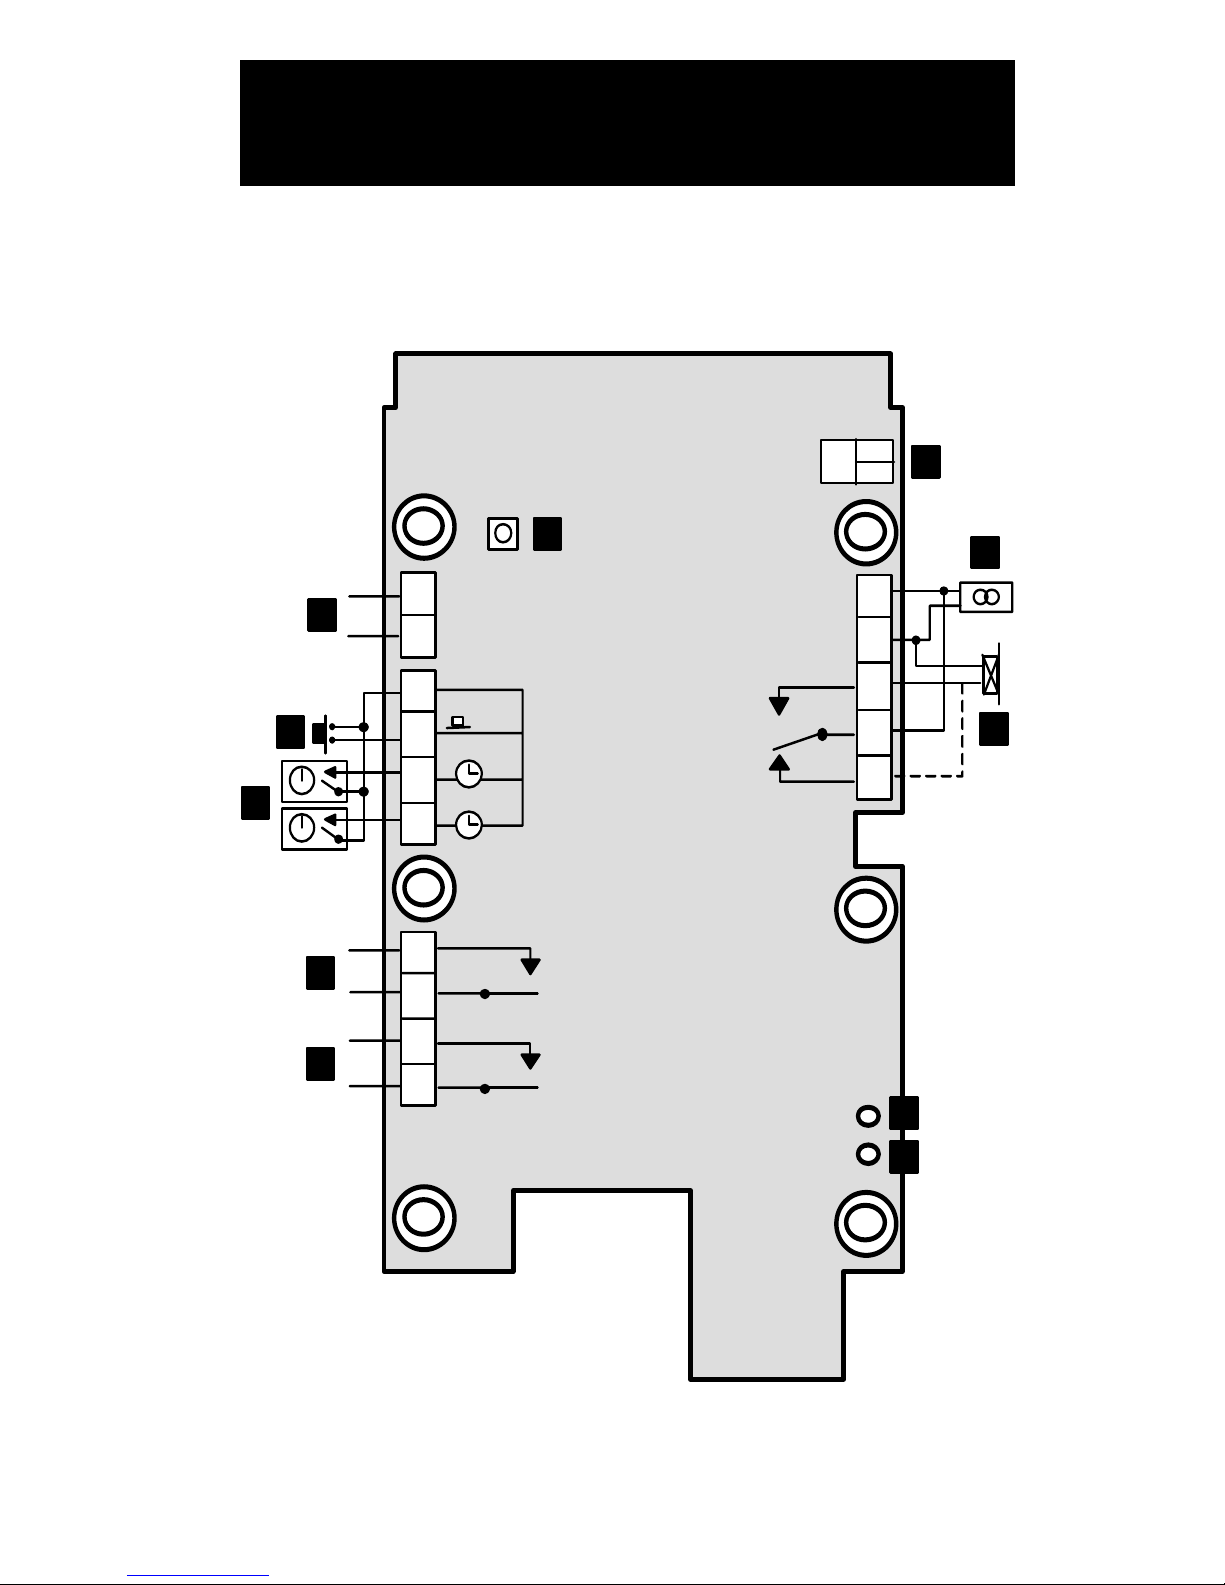
2 Press the SW1 button (see the wiring
diagram on page 10). zz
3 Enter the desired 6-digit password.
4 Make a note of the password and store
the note in a safe place.
Setting Bewacom to programming
mode
To programme a function, set Bewacom to
programming mode.
1 Press and hold the B button on the
Bewacom keypad until the beeper goes
off an the yellow LED goes out (approx
3 seconds).
2 Enter the 6-digit password. zz
Page 15

Bewacom Technical manual 15
Programming access codes
(first time)
Four different 4-digit entrance codes can be
programmed.
1 Set Bewacom to programming mode.
2 Press 0000.
3 Enter the desired access code using
4 digits.
4 Enter the code once again.
5 If the code is not to be time controlled,
press 0.
If the code is to be time controlled,
select the desired input (see below).
1 = the code can be timed from a
time clock connected to input 1.
2 = the code can be timed from a
time clock connected to input 2.
Also see the wiring diagram on
page 10.
6 Follow steps 2-5 to programme the next
code.
7 Press B to exit programming.
Page 16

16 Bewacom Technical manual
Changing entrance codes
1 Set Bewacom to programming mode.
2 Enter the access code to change.
3 Enter the new access code.
4 Enter the new access code again.
5 To only change the code – without
changing the time control group – press
B now.
If the code is not timed, press 0.
If the is timed, select the desired
input (see below).
1 = the code can be timed from a
time clock connected to input 1.
2 = the code can be timed from a
time clock connected to input 2.
Also see the wiring diagram on
page 10.
6 Follow steps 2-5 to change the next code.
7 Press B to exit programming.
Page 17

Bewacom Technical manual 17
Erasing access codes
To erase a programmed access code:
1 Set Bewacom to programming mode.
2 Enter the access code to erase.
3 Enter 0000.
4 Enter 0000 again.
5 Press B.
6 Press B to exit programming.
Page 18

18 Bewacom Technical manual
Changing the door unlock time
When Bewacom is delivered the door unlock
time is set to 7 seconds.
1 Set Bewacom to programming mode.
2 Press A28.
3 Select the required unlock time in
seconds (01-99).
4 Press B to exit programming.
Extending the opening time 10
times
Using this function the door unlock time can
be increased by a factor of ten.
1 Set Bewacom to programming mode.
2 Press A64.
3 Press 1 to extend opening time 10 times.
4 Press B to leave programming mode.
To deactivate the function, press 0 in step 3
instead.
Page 19

Bewacom Technical manual 19
Changing the calling time
When Bewacom is delivered the calling time is
set to 30 seconds.
1 Set Bewacom to programming mode.
2 Press A29.
3 Select the desired calling time in seconds
(01-99).
4 Press B to exit programming.
Extending the calling time 10 times
Using this function the calling time can be
increased by a factor of ten.
1 Set Bewacom to programming mode.
2 Press A61.
3 Press 1 to extend the calling time 10
times.
4 Press B to leave programming mode.
To deactivate the function, press 0 in step 3
instead.
Page 20

20 Bewacom Technical manual
Time control of the telephone
opening function
This will set the time period during which it
will be possible to open the door from a
telephone extension.
1 Set Bewacom to programming mode.
2 Press A30.
3 Select any of the following alternatives:
0 = Opening enabled 24 hours a
day (delivery setting).
1 = Opening controlled by time
clock connected to input 1.
2 = Opening controlled by time
clock connected to input 2.
3 = The door cannot be opened
from telephone extensions.
4 Press B to exit programming.
Page 21

Bewacom Technical manual 21
Background lighting
This function allows you to turn off the keypad
background lighting of the Bewacom. The
default setting is on.
1 Set Bewacom to programming mode.
2 Press A60.
3 Press 0 to shut off background lighting.
4 Press B to leave programming mode.
To turn it on again, press 1 in step 3 instead.
Page 22

22 Bewacom Technical manual
Internal sounder
When Bewacom is delivered the internal
sounder is on. If the sounder is not required to
sound on keypresses and door release, you can
turn it off. Note that the sounder will still be
sounding during programming.
1 Set Bewacom to programming mode.
2 Press A65.
3 Press 0 to shut off the sounder.
4 Press B to leave programming mode.
To reactivate the sounder, press 1 in step 3
instead.
Page 23

Bewacom Technical manual 23
Possibility to call the Bewacom
Using this function, the Bewacom can be
called from the switchboard or from an
extension to assist a visitor having trouble
using the door telephone.
To enable the function:
1 Set Bewacom to programming mode.
2 Press A66.
3 Select and programme the desired 4-digit
code. The code is keyed in at the
telephone to open the door.
4 Enter the code one more time.
5 Press B to leave programming mode.
To deactivate the function, follow the above
instruction, only press 0000 instead in steps 3
and 4.
On page 29 you will find instructions on how
to call the Bewacom.
Page 24

24 Bewacom Technical manual
”Hotline”
By using the facilities of the telephone system,
this function can be used to call a particular
extension from a single push of the B button
on the Bewacom. When this function is set,
the Bewacom will seize the line immediately
the B button is pressed. No other number is
permitted at this point (the keyboard is
disabled). The telephone system is then
programmed to respond to this ”hotline”
condition.
To enable this function.
1 Set Bewacom to programming mode.
2 Press A67.
3 Press 1 to enable hotline.
4 Press B to leave programming mode.
To deactivate the function, press 0 in step 3
instead.
Page 25

Bewacom Technical manual 25
Erasing the memory
Using this function all programmed
information in the Bewacom can be erased and
the unit set back to factory defaults.
1 Set Bewacom to programming mode.
2 Open the Bewacom and turn it around so
the circuit board can be seen.
3 Press the SW1 button (see the wiring
diagram on page 10).
4 Press 112186 on Bewacom’s keypad.
5 Press 112186 again.
Bewacom now has the default settings:
Password: 112233
Opening time: 7 secs
Calling time: 30 secs
Door release from telephone: 0
Background lighting: On
Internal sounder: On
Possibility to call into Bewacom: Off
Hotline Off
Extended opening time Off
Extended calling time Off
Page 26
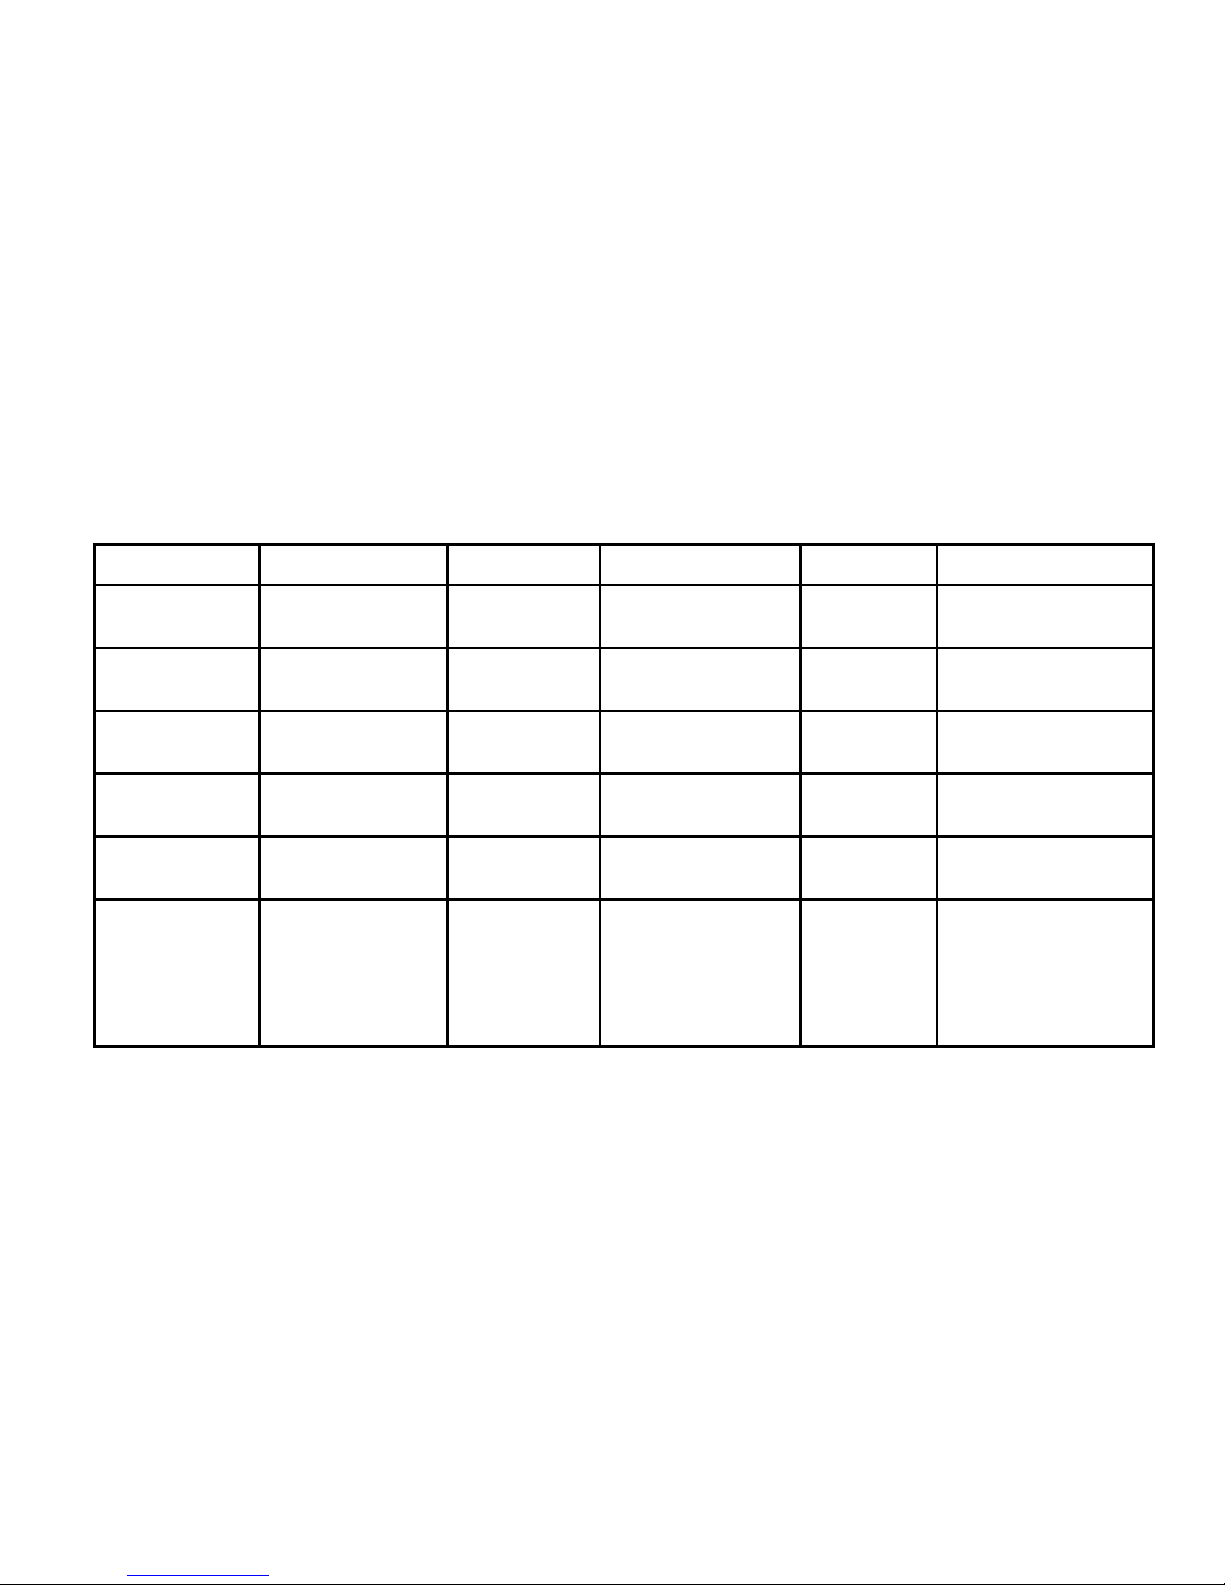
Programming overview
Function Step 1 Step 2 Step 3 Step 4 Step 5
Programme
access codes
Set Bewacom to
programming mode
Enter 0000 Enter code
(4 digits)
Enter code
once again
Ent er t ime contro l
group (0, 1 or 2)
Change access
codes
Set Bewacom to
programming mode
Enter code to
change
Enter new code
(4 digits)
Enter code
once again
Ent er t ime contro l
group (0, 1 or 2)
Erase access
codes
Set Bewacom to
programming mode
Enter code to
erase
Enter 0000 Enter 0000
once again
Change opening
time
Set Bewacom to
programming mode
Press A28 Enter opening time
(2 digits)
Change calling
time
Set Bewacom to
programming mode
Press A29 Enter calling time
(2 digits)
Time control of
the telephone
opening function
Set Bewacom to
programming mode
Press A30 0 = no time control
1 = input 1
2 = input 2
3 = opening disabled
Page 27

Function Step 1 Step 2 Step 3 Step 4 Step 5
Background
light ing
Set Bewacom to
programming mode
Press A60 0 = off
1 = on
Internal sounder Set Bewacom to
programming mode
Press A65 0 = off
1 = on
Door unlock time
extended by a
factor of 10
Set Bewacom to
programming mode
Press A64 0 = off
1 = on
Calling time
extended by a
factor of 10
Set Bewacom to
programming mode
Press A61 0 = off
1 = on
Erase memory Set Bewacom to
programming mode
Open Bewacom Press SW1 on the
circuit board
Enter 112186
on the keypad
Enter 112186
once again
Possibility to call
into Bewacom
Set Bewacom to
programming mode
Press A66 0 = off
1 = on
Hotline Set Bewacom to
programming mode
Press A67 0 = off
1 = on
Page 28

28 Bewacom Technical manual
This is how the new
door telephone works
We have recently installed a door telephone
which will be in use from _________.
If access codes are used you may enter a 4digit code to open the door. The code is
______.
The code is valid:
Monday – Friday between _____ and _____
____________________________________
When your visitor arrives they should press B
on the door telephone keypad and then enter
the reception number or your extension
number.
You may talk to the visitor for _____ seconds.
To open the door, press 5 on your telephone’s
keypad and hang up.
To not open the door, press 0 and hang up.
Page 29

Bewacom Technical manual 29
Calling Bewacom
This is how to call the door telephone, e.g. if
you want to assist a visitor trying to get in.
1 Dial the door telephone extension
number. The line is connected so you can
talk to the visitor.
2 To release the door enter a valid 4-digit
access code (see page 23)
3 To finish the call without releasing the
door, press # on your
telephone.
Page 30
30 Bewacom Technical manual
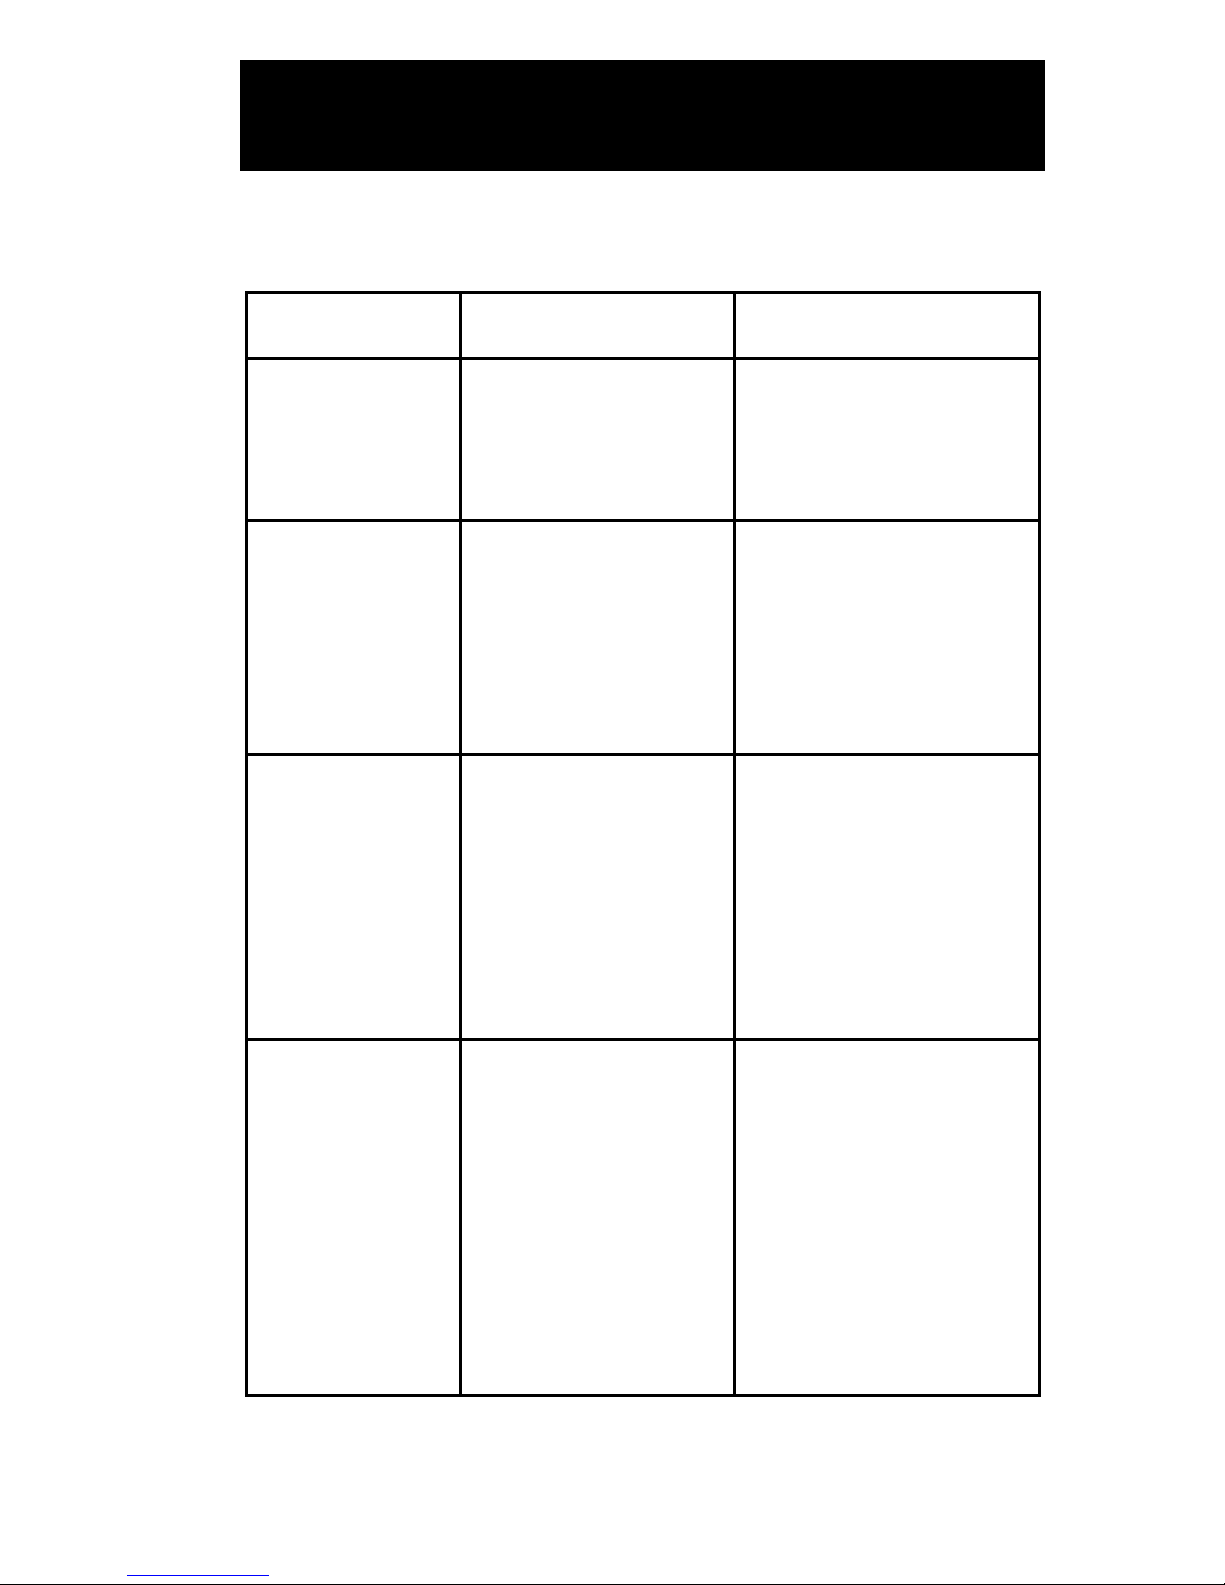
Troubleshooting
Problem Possible cause Action
Nothing
happens when
a code is
entered.
The code is timed. Check connected time
clock.
Unable to
enter
programming
mode. Red
LED lit after
two trials.
Wrong password. Determine the correct
password.
Green LED lit
following an
accepted code,
but the door
does not open.
Lock fault.
Link between block
nos 1 and 4 in
Bewacom is
missing.
Check cable between
door telephone and
lock. Change locks.
Attach link.
The B button
is pressed, but
no dial tone is
heard.
Faulty connection
between Bewacom
and telephone
system.
The door telephone
extension is not
analogue.
Check connections
and cable.
Check the telephone
system. Connect an
ordinary push-button
telephone instead of
Bewacom.
Page 31

Bewacom Technical manual 31
Problem Possible cause Action
The B button is
pressed, a line
tone is heard, the
extension is
dialled but it does
not ring.
The telephone
system does not
receive DTMF
tones from
Bewacom.
The extension has
more than four
digits.
The extension
begins with 0
(zero).
Check the
telephone system.
Try to connect an
ordinary pushbutton telephone
instead of
Bewacom.
Contact Bewator.
Contact Bewator.
The call is
received, but the
lock does not
react to the 5 key
DTMF tone. No
tone is heard in
Bewacom.
The telephone
system does not
send DTMF tones
to Bewacom.
Check the
telephone system.
Page 32

32 Bewacom Technical manual
Technical data
Power supply: 12-24 V AC/DC
Power consumption: 60 mA quiescent
Maximum load over
the relay contacts: 2 A 28 V DC
Door unlock time: 1-99 seconds
(extendable by a
factor of ten)
Calling time: 1-99 seconds
(extendable by a
factor of ten)
Temperature range: –35° to +50° at
90 % relative
humidity
Dimensions: 200 x 80 x 40 mm
(HxWxD)
Recommended
height: 1200-1400 mm from
ground to bottom
edge
Page 33

Bewacom Technical manual 33
Notes
_____________________________________
_____________________________________
_____________________________________
_____________________________________
_____________________________________
_____________________________________
_____________________________________
_____________________________________
_____________________________________
_____________________________________
_____________________________________
_____________________________________
_____________________________________
_____________________________________
_____________________________________
_____________________________________
_____________________________________
_____________________________________
_____________________________________
_____________________________________
_____________________________________
_____________________________________
_____________________________________
_____________________________________
Page 34

34 Bewacom Technical manual
_____________________________________
_____________________________________
_____________________________________
_____________________________________
_____________________________________
_____________________________________
_____________________________________
_____________________________________
_____________________________________
_____________________________________
_____________________________________
_____________________________________
_____________________________________
_____________________________________
_____________________________________
_____________________________________
_____________________________________
_____________________________________
_____________________________________
_____________________________________
_____________________________________
_____________________________________
_____________________________________
_____________________________________
Page 35

Page 36

 Loading...