

Bewacard
BC615, BC615Prox, BC615EM
Installation and User manual
GB

Copyright © 2004 Bewator AB, Solna, Sweden.
Material from this manual may only be copied with the consent in writing of
Bewator. Bewator reserves the right to alter both the content of the manual and the
design of the product.
Document no: 80601-12
Bewator AB is part of Bewator Holding AB, which develops and markets a complete
security product range that includes access control and alarm. Sales, installation and
servicing are handled by an International and national dealer network.
Actions (such as unauthorised manipulation, copying etc.), must not be taken with the
software contained in the products and systems. Such actions are regarded as
copyright violation and may result in imprisonment or fines and may likewise lead to
an obligation to pay damages and compensation for using the software.

BC615 Installation and User Manual 3
Contents
WHAT IS THE BC615?...................................................................... 5
Features included ..................................................................... 6
How does the card reader work? ............................................7
Security levels........................................................................... 7
Time zones and day types .......................................................9
Time schedules .......................................................................11
PROXIMITY FUNCTION .................................................................. 12
General..................................................................................... 12
Reading distance ....................................................................12
KEYPAD LAYOUT ........................................................................... 13
INSTALLING THE CARD READER ................................................14
HOW TO SELECT CONNECTING CABLES...................................15
WIRING ............................................................................................16
Recommended cables ............................................................ 18
Considerations concerning earthing & screening .............. 18
Connecting the power supplies............................................. 19
Connecting BC615 to the CR1 converter .............................21
ENTRO WIRING EXAMPLE ............................................................23
COMMISSIONING THE SYSTEM.................................................... 24
Standalone card readers ........................................................ 24
Card readers in Entro systems..............................................24
PROGRAMMING (STANDALONE INSTALLATION) .....................25
Buzzer and LEDs..................................................................... 25
Set password...........................................................................26
Set the card reader to programming mode .......................... 26
Set time and date .................................................................... 27
Program time zones................................................................ 28
Erase a time zone.................................................................... 28
Program time schedules ........................................................29
Erase a time schedule ............................................................29
Define the “Door unlocked” security level........................... 30
Define the “Common code” security level ........................... 30
Define the “Card Only” security level................................... 30
Define the “Card + PIN” security level.................................. 31
Define the “Toggle” security level ........................................ 31
Log on a card (with a card) ....................................................32
Log on a card (without the card) ........................................... 33
Log on a series of cards......................................................... 34
Cancel card (with card) ..........................................................34

4 BC615 Installation and User Manual)
Cancel card (without card)..................................................... 35
Program/change/erase common code.................................. 35
Program holidays.................................................................... 36
Delete individual holidays...................................................... 36
Delete all holidays................................................................... 37
Set door release time.............................................................. 37
Set door held warning time....................................................37
Buzzer on/off ...........................................................................38
Calculated PIN......................................................................... 39
Card reading parameters .......................................................40
Change programming password........................................... 41
Erase the memory................................................................... 42
Printout of events ...................................................................43
Printout of programmed common codes ............................. 43
Printout of programmed time zones and time schedules ..44
Printout of reader information ............................................... 45
Printout of logged on cards ................................................... 46
Printout of programmed holidays .........................................46
Explanation on event codes .................................................. 47
PROGRAMMING OVERVIEW ......................................................... 49
DAILY USE....................................................................................... 54
Entrance................................................................................... 54
Choose/change PIN code (Calculated PIN not set) .............54
Duress ...................................................................................... 55
TROUBLESHOOTING ..................................................................... 56
TECHNICAL INFORMATION ..........................................................57
CHARTS........................................................................................... 58

BC615 Installation and User Manual 5
What is the BC615?
BC615 is a compact card reader for magnetic cards – and BC615-Prox
is a compact card reader for proximity cards. Both models have
capacity for 1000 cards.
In the following chapters the name BC615 will refer to both models
because the only difference is the way of reading cards.
See also chapter Proximity function on page 12 for more information of
the proximity function.
BC615 can be used as a stand-alone unit or be included in a system
consisting of several BC615 card readers.
• As a stand-alone unit: Programming is done on the card reader’s
keypad.
• As a component in a large system: Programming is done from a
PC using the Bewator Entro application with SR32i and software
installed.
This manual only describes keypad programming. PC programming is
described in the Bewator Entro manuals respectively.

6 BC615 Installation and User Manual
Features included
These are the main features included in BC615:
• Six different security levels. Various methods of opening the door,
e.g. Card, Card + PIN and Common code.
• Built-in time clock. Enables time control of cards and security
levels. Holidays, half-days and holiday periods can be preprogrammed.
• Door Monitoring. Enables activation of an alarm if the door is
forced open or held open too long.
• Access registration. Enables time-controlled printouts of the 1000
latest events, sorted according to date, card or alarm.
• Duress. Enables users who are being forced to open the door under
threat to enter a special code that activates an alarm. Note! Duress
is only applicable during the Card + PIN security level.
• Automatic adjustment of clock for daylight saving according to
European standard (last Sunday in March and October).

BC615 Installation and User Manual 7
How does the card reader work?
BC615 can easily be adapted to the security requirements in a
particular building, a particular day of the week or time of day. To
make this possible you have to be familiar with the following concepts:
• Security levels
• Time zones
• Day types
• Time schedules
Security levels
The security level determines what action is required to open the door.
The following security levels exist:
• Unlocked door. Neither cards nor codes are needed to open the
door. (Free access)
• Common code. A four-digit code (one code per Time Schedule) is
required to open the door.
• Card. The user must swipe or present their card to open the door.
• Card + PIN. The user must swipe or present their card and enter a
personal code to open the door. The cardholder can choose/change
their personal code on the keypad (in Bewator Entro installations
the PIN code is set from the PC).
• Toggle function. Used together with current security level, i.e.
Card, Common code or Card + PIN. When the card/code is used
the first time the door is opened and remains unlocked until the
card/code is used the next time or until another security level
starts.
• Card reader Inhibited. The card reader is completely inhibited.
Only exit request works.

8 BC615 Installation and User Manual
Examples of timing security levels
During office hours, when there are people in the premises, the security
level may not need to be so high: Unlocked door or Common code may
be suitable levels.
During lunch time, the level may be raised to Card.
The remaining time, i.e. evenings, nights and weekends
Card + PIN is a suitable security level.
The Toggle function can be used in premises where a person is
responsible during certain hours; e.g. a class-room or a loading bay
door. In a class-room, the teacher can open the door, which remains
open until he or she locks the door. The pupils may come in and out
without having cards or common code.

BC615 Installation and User Manual 9
Time zones and day types
There are two purposes of creating time zones:
• To be able to assign different security levels to different times of
the day.
• To be able to make certain cards valid at certain times.
Example: The working hours in an office could be as follows:
Monday to Friday: 08.30-11.59 and 13.00-17.59
Lunch: 12.00-12.59
Saturdays, Sundays
and holidays:
Closed
Half-days, e.g. the day
before Christmas:
08.30-11.59 and 13.00-14.59
To make the card reader understand that holidays, e.g. Christmas Eve
and holiday periods, should not be treated as ordinary working days,
this information must be programmed.
Note! A time zone is valid from and including the first second in the
first minute up to and including the last second in the last minute.
The day type determines what day of the week the time zone applies. 1
= Monday, 2 = Tuesday etc. 8 is an extra day type that can be used for
half-days, e.g. the day before Christmas.

10 BC615 Installation and User Manual
Each time zone may consist of two intervals. To be able to assign
suitable security levels to the office example above, the following time
zones are needed:
Time zone no Applies
01 Applies 24 hours a day (all day types). Note:
Default time zone that can be changed.
02 08.30 – 11.59 and 13.00 – 17.59 Monday to
Friday (day types 1, 2, 3, 4 and 5).
03 12.00 – 12.59 Monday to Friday and half-days
(day types 1, 2, 3, 4, 5 and 8).
04 00.00 – 08.29 and 18.00 – 23.59 Monday to
Friday (day types 1, 2, 3, 4 and 5).
05 00.00 – 23.59 Saturdays and Sundays (day
types 6 and 7).
06 08.30 – 11.59 and 13.00 – 14.59 on half-days
(day type 8).
07 00.00 – 08.29 and 15.00 – 23.59 on half-days
(day type 8).
Up to 15 different time zones can be created. You may for example
define a specific time zone for the cleaning staff:
08 Applies between 06.00 and 07.59 (day types 1
and 3).

BC615 Installation and User Manual 11
Time schedules
There are two purposes for creating time schedules:
To be able to combine time zones for the control of security levels.
To be able to combine time zones defined for the time control of
specific cards.
Up to four time zones can be included in one time schedule.
When the desired time schedules have been defined, it is an easy task to
tie them either to a certain security level or to specific cards (see the
Programming chapter).
This example shows how to include time zones into time schedules (the
time zones defined in the previous example are used).
Time schedule no Includes time zone/s
01 01 (enabling assignment of time zone 01
to the cards). Note: Default time
schedule that can be changed
02 02 and 06 (enabling the ”Common code”
security level to be assigned to both time
zones).
03 03 (enabling assignment of the ”Card”
security level to the lunch hour).
04 04, 05 and 07 (enabling assignment of
the ”Card + PIN” security level to
evenings, nights, weekends and
holidays).
05 08 (enabling assignment of time zone 08
to the cleaning staff’s cards).
Up to 15 different time schedules can be created.
12 BC615 Installation and User Manual
Proximity function
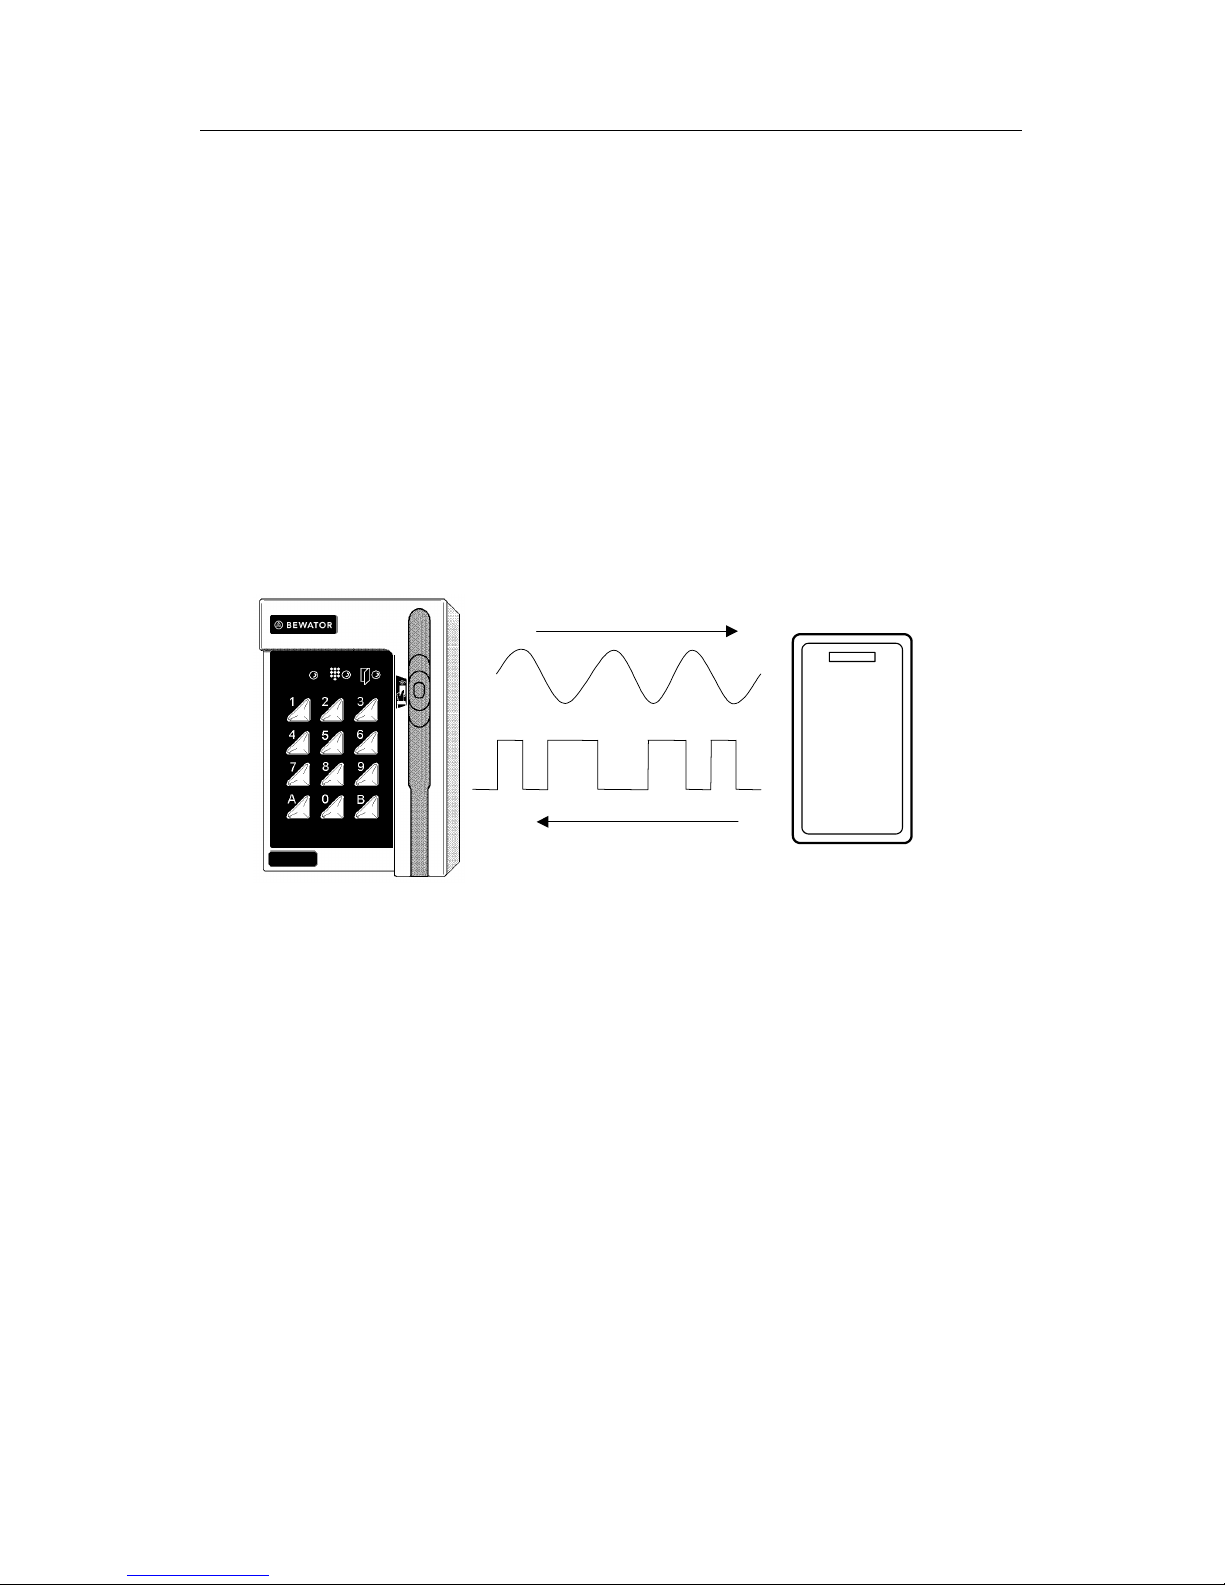
General
The Proximity function means that the reader can read cards or tags
without them being in contact with the reader.
The reader continuously transmits a low power radio frequency. When
a card or tag is presented within the field of the reader it activates and
transmits a unique identification number (card number) back to the
reader.
The reader can be mounted on all types of materials. The only limit is
that the reader may not be completely surrounded by metal.
Reading distance
Depending on the type of cards or tags the reading distance could be
slightly different.
Active cards have a built-in battery, which gives a distance of approx.
10 centimetres.
Passive cards lack the battery and give approx. 3 centimetres.
Laminated cards (complete with magnetic stripe) are of passive type.
BC615 Installation and User Manual 13
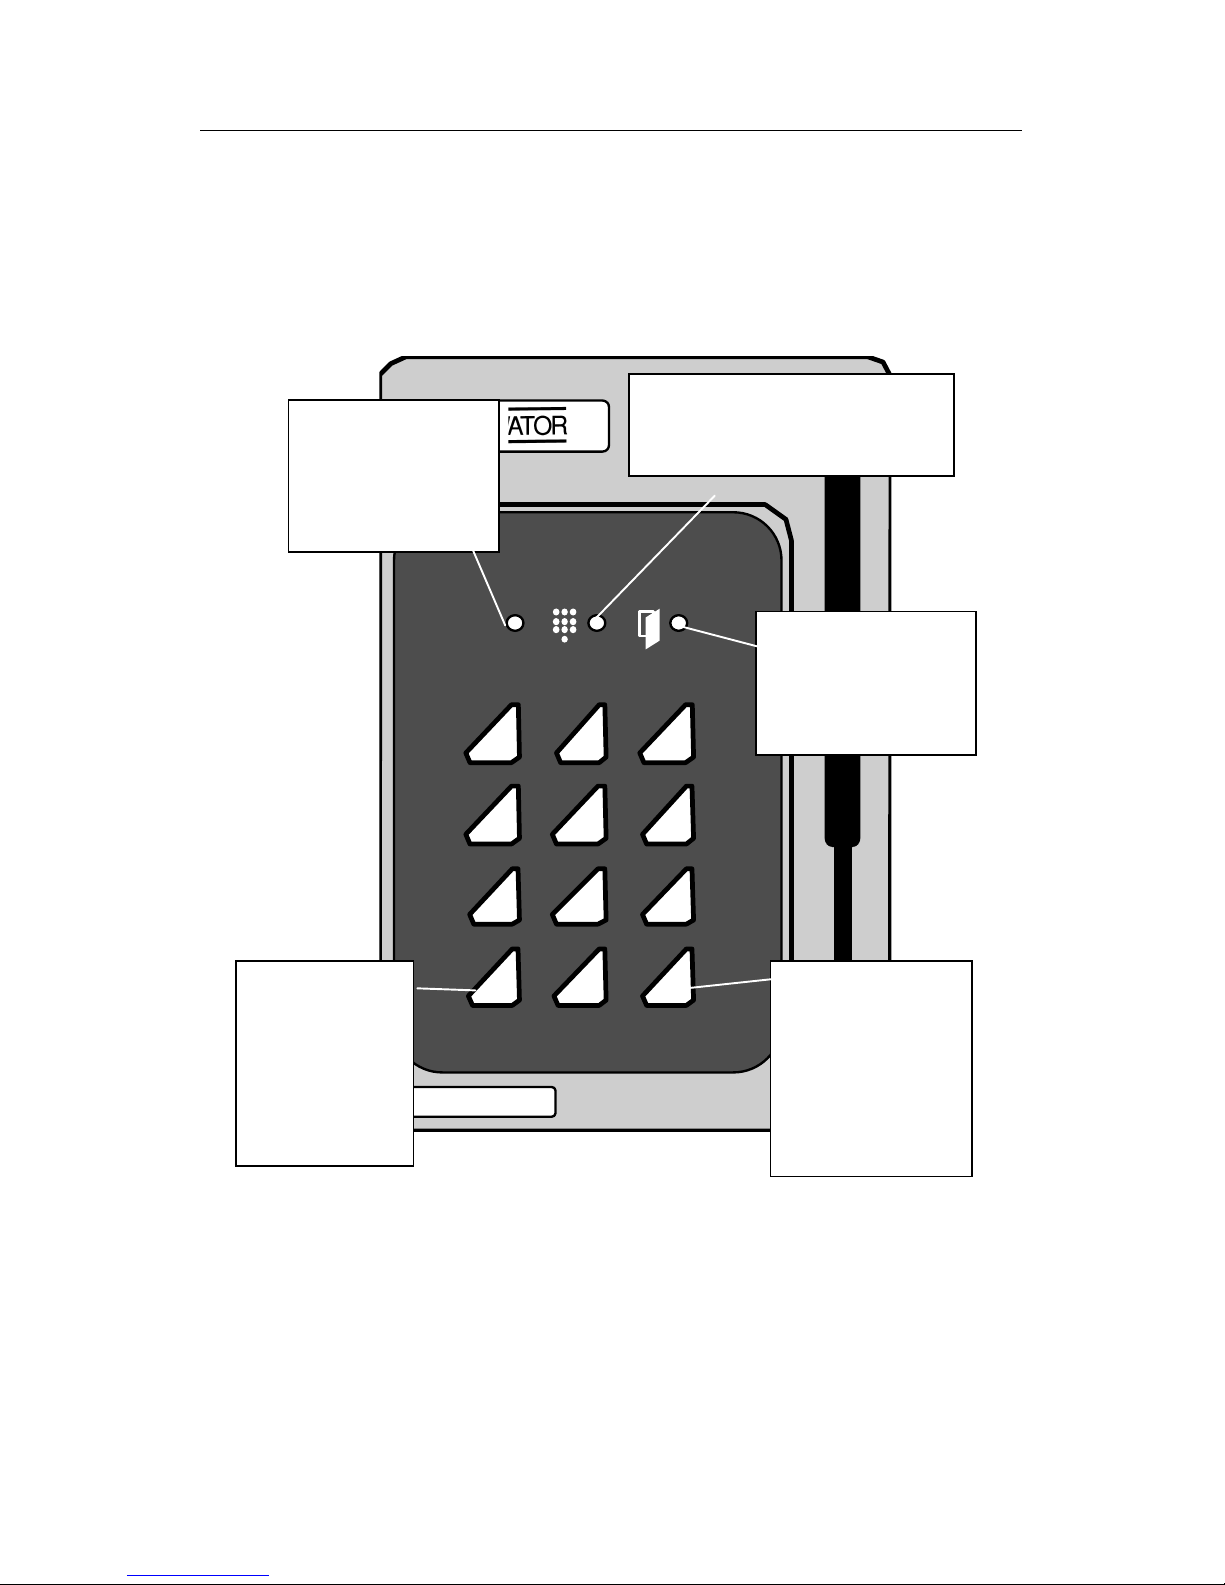
Keypad layout
Diagram of the LEDs and pushbuttons on the BC615 keypad.
123
456
789
A0B
Red LED.
Indicates errors. E.g.
cancellation of card
following 3 incorrect
PIN codes.
Green LED.
Lit when the door is
unlocked. E.g.
Accepted card
transaction.
Yellow LED.
Indicates keypresses. Lit when PIN
code should be entered.
A.
Initiates programming sequence,
e.g. A01 to log on
cards. Also used
when choosing
PIN code.
B.
Press B + the 6-digit
password whenever
you want to program
BC615. Press B to
leave programming
mode.
All LEDs are flashing in programming mode. The LEDs also have
other indications explained in full later.
14 BC615 Installation and User Manual
Installing the card reader
Install the card reader at a height of 120–140 cm (from the floor to the
bottom edge of the card reader). To cater for disabled persons, a
suitable height is approximately 95 cm.
When installing the BC615-Prox, care should be taken to avoid sources
of electrical noise, such as motors, generators, pumps, computer
installation and mains cabling.
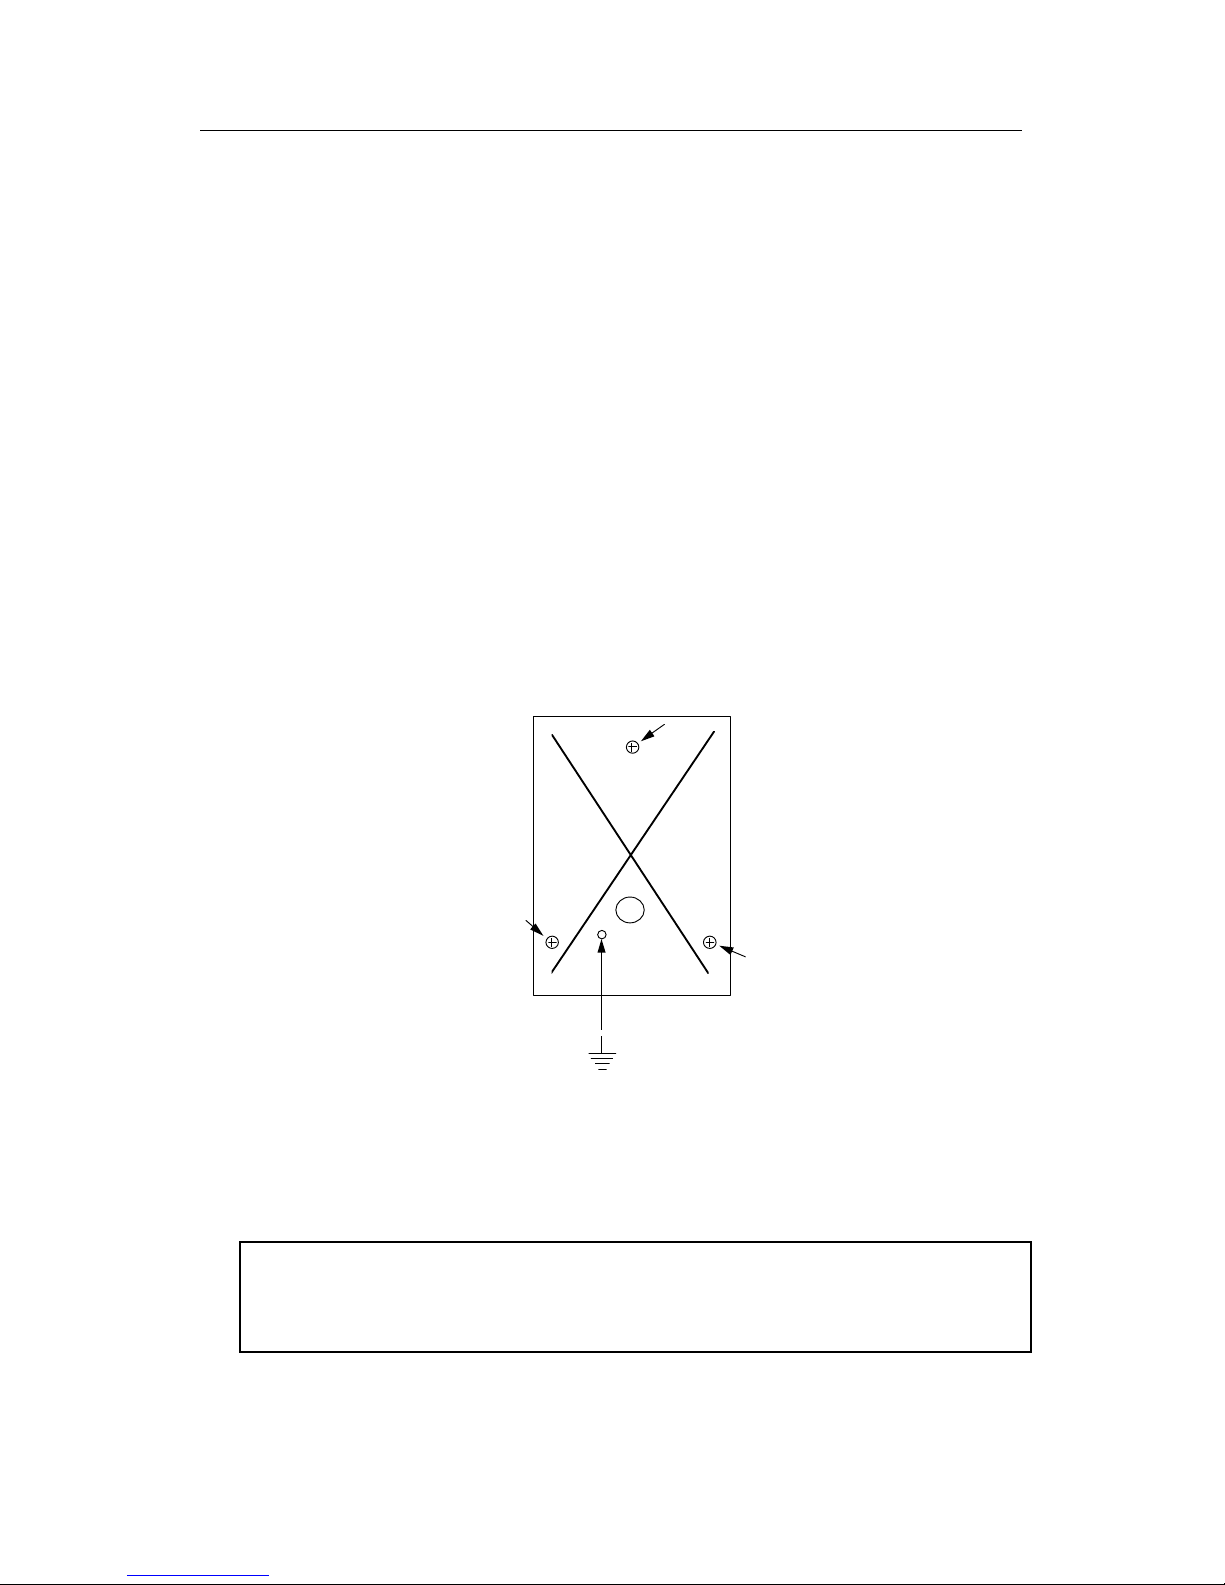
To install the card reader:
1 Open the card reader with the key supplied. The lock is located on
the underside of the reader.
2 Fasten the back plate against the wall, using three screws
according to the illustration below. Seal the screw and cable holes
with sealant if the unit is externally mounted.
3 Make sure the back plate is earthed. Use a separate cable to the
earthing point. Make sure the front and back plates are connected
with the internal strap.
4 Fit the front and check that the card reader is securely fastened.
Note! If you are using the Bewacard BC600 card reader product to
control an electric lock strike plate – we recommend you to earth the
lock. The wiring should be as near the lock as possible.

BC615 Installation and User Manual 15
How to select connecting cables
It is important to use cables with the correct conductor gauge, to keep
the voltage drop in the cables as low as possible.
• 12 volt supplies. A 12 V electric locking device generally needs at
least 11 V to work properly, so the voltage at the card reader
should never be less than 11 V.
• 24 volt supplies. A 24 V electric locking device generally needs at
least 21 V to work properly, so the voltage at the card reader
should never be less than 21 V.
The recommended gauge (cross-sectional area) of the conductor
depends on the distance between the power supply and the card reader,
and on the load at the card reader.
The table below is for a Bewacard 615 with an electric release. The
total load is 300 mA at 24 V or 600 mA at 12 V.
24 V Supply
12 V Supply
Cable
length
(metres)
Min conductor
Min conductor
area
(mm
2
)
dia
(mm)
area
(mm2)
dia
(mm)
0-50 0.17 0.46 0.51 0.80
51-100 0.34 0.65 1.02 1.14
101-150 0.51 0.80 1.53 1.40
151-200 0.68 0.93 2.04 1.61
201-250 0.85 1.04 2.55 1.80
251-300 1.02 1.14 3.06 1.95
16 BC615 Installation and User Manual
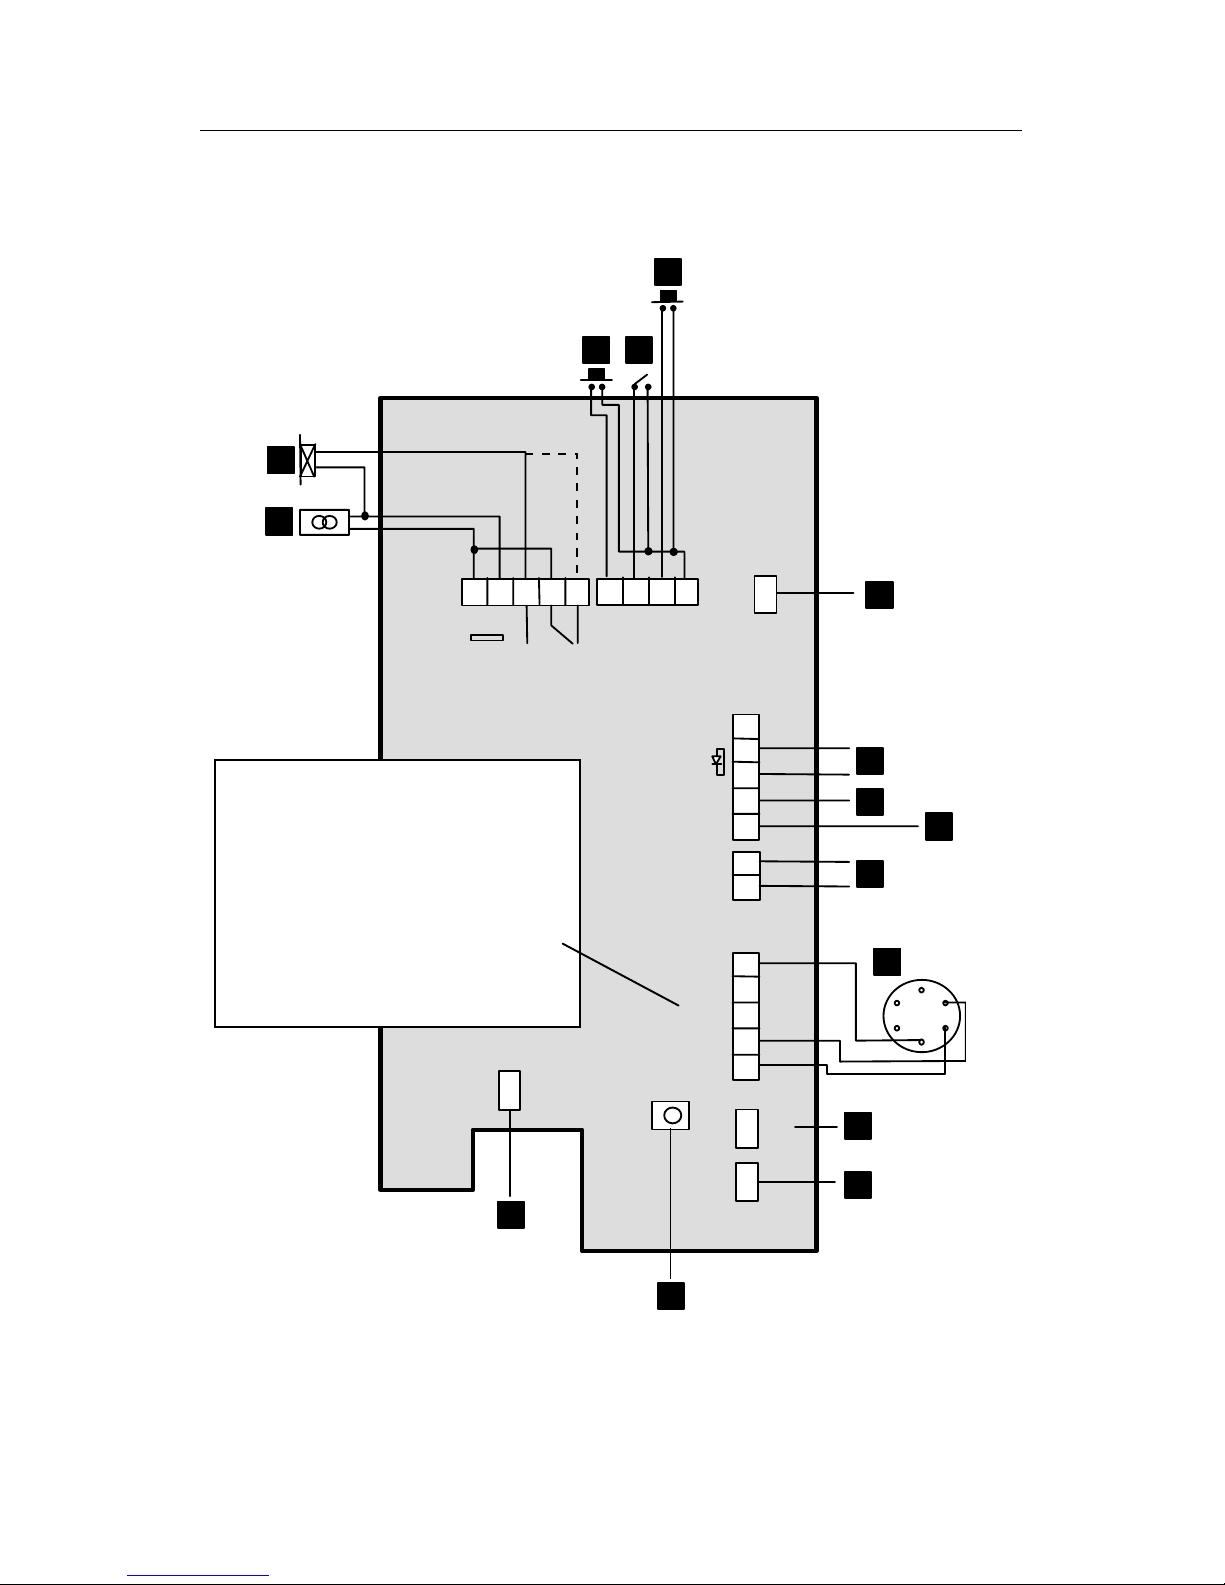
Wiring
0V
6 7 8 9
LOCK
12-30V
1
2
+
1 2 3 4 5
E
X
I
T
B
U
T
D
O
O
R
C
O
N
R
D
R
I
N
H
3 4
5
6
10
11
12
13
14
15
A
LM
A
LERT
DUR
TAM
TAM
RS-232
TX
RX
ENAB
DTR
0V
16
17
18
19
20
12
13
7
8
9
10
15
EXT
INT
N/W
S/A
BACK
LIGHT
LINK OUT
DOOR CON
SW1
1
652
3
4
11
14
21
+
Connection to PC
Wall 9 pin 25 pin
RS-232 socket DSUB DSUB
TX 17 2 2 3
RX 18 1 3 2
ENAB
DTR
0V 21 5 5 7
BC615 Installation and User Manual 17
1
Electric locking device. Dashed line shows connection to locks with
power to lock operation.
2
Power in, terminal block nos. 1 and 2. BC615Prox : 12 – 35 VDC.
BC615: 8 - 24 VAC or 10 – 35 VDC.
3
Exit request button. To operate, short terminal nos. 6 and 9.
4
Input for door monitor contact. Link out by jumper 6 if not used.
The contact should be closed when the door is closed.
5
Input for reader inhibit. To operate, short terminal nos. 8 and 9. The
red LED on the reader flashes.
6
Place jumper if door monitor contacts is not used.
7
Alarm set input (red LED lit). Terminal no 11 +, no 12 –.
8
Alert output. Use an E7 relay. Connect between terminal nos. 13
and
+ (10). Activated when a door is forced open or following door
release + door held warning time and when door contacts are not
closed.
9
Duress output. Used for activating an external alarm. Use an E7
relay. Connect between terminal nos. 14 and + (10).
10
Tamper switch. Normally closed when the housing is closed.
11
Connection to printer. For connection to PC, see previous diagram.
RS232 interface: 9 600 bps, no parity, 8 bits, 1 start bit, 1 stop bit
12
If the card reader is used with Bewator Entro system, attach jumper
to N/W (network), otherwise to S/A (standalone).
13
Remove jumper if backlighting is not required.
14
The SW1 push button. Used when erasing the memory and setting a
new password.
15
If the card reader is part of a Bewator Entro system, place jumper
on INT (attempts of tamper will be displayed as messages on the
PC’s screen), otherwise to EXT. (Direct connection to external
alarm)

18 BC615 Installation and User Manual
Recommended cables
Cable from Bewator Entro to CR1
Maximum length: 1200 metres.
• Pair twisted screened (1 pair + screen), e.g. Beldon 9502
(communication) and 1.5mm
2
(power)
OR
• PAARFLEX CY (Bewapass custom cable comprising
communication and power in one cable).
Cables between CR1 and BC615
Maximum length: 15 metres. Specified cable: Straight screened cable
(4 + screen), e.g. Beldon 9534.
Considerations concerning earthing & screening
The cable screens must be connected to protective earth, but only in
one place in the system. Also remember that metal parts in doors or
vehicle barriers can be in contact with earth. For readers installed on
these surfaces, the screen must not be connected to the metalwork.
Avoid placing the cables close to heavy current installations, (e.g. lifts
and power doors) since they may cause disturbance.
BC615 Installation and User Manual 19
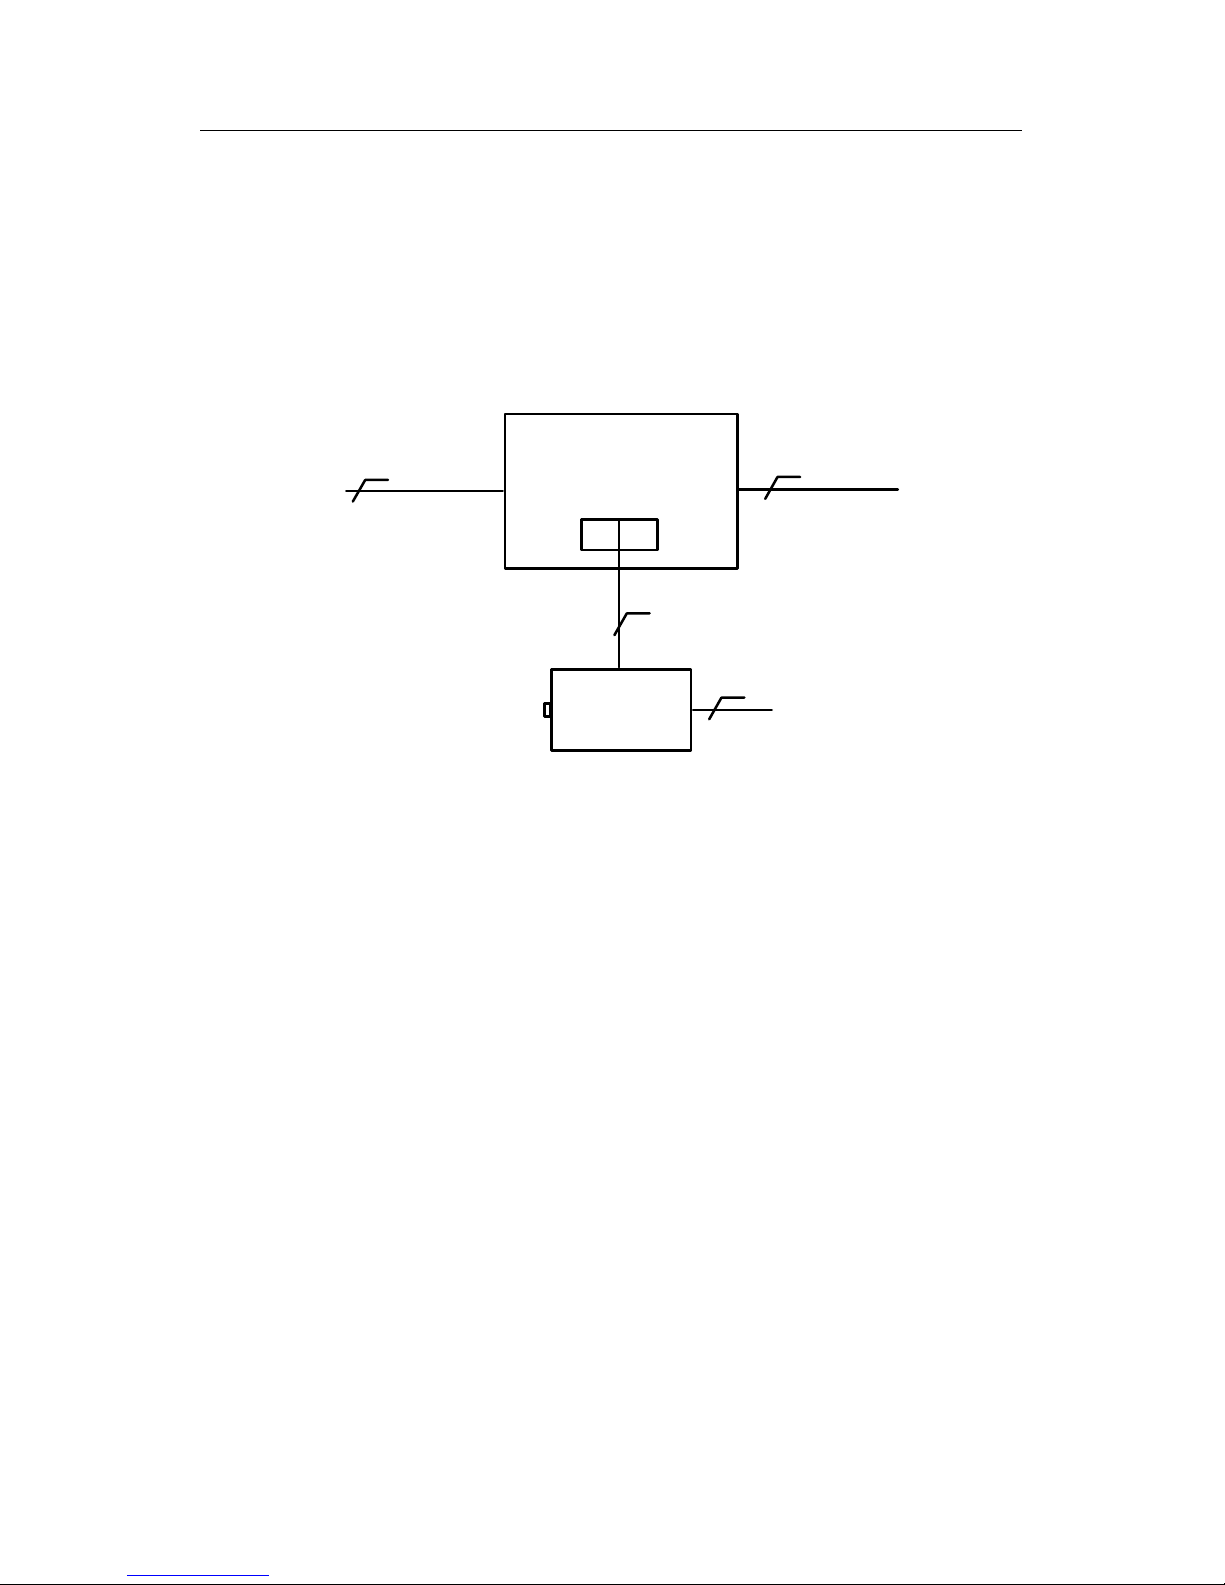
Connecting the power supplies
Connect the power supply according to the instructions below, but do
not connect the power to outgoing cables. Apply power when you start
the system (see the Check the communications circuit section).
Battery
backup
2
4 + screen
4 + screen
2 + protective earth
220 V
CR1
1 2
The system cables screen can be earthed at the power supply. Connect
the screen to protective earth, but remember that the system cables’
screen must be earthed at one point only in the system.
Also remember that metal parts in doors or vehicle barriers can be in
contact with earth. For readers installed on these surfaces, the screen
must not be connected to the metalwork.
20 BC615 Installation and User Manual
Central power supply
If central power supply is used, precautions should taken against
voltage drop. Dimension the power supply equipment and cables so
that the voltage at the last door is not below the lock or reader’s
tolerance. A 24V electric locking device for example, has a tolerance of
+ -15% which is equivalent to 20,4V.
One way of reducing unnecessary power loss is to place the power
supply equipment somewhere in the middle of the circuit. Thus, the
load will be equal on each side of the power supply. If the distances or
the load are too great, multiple power supply units will be required.
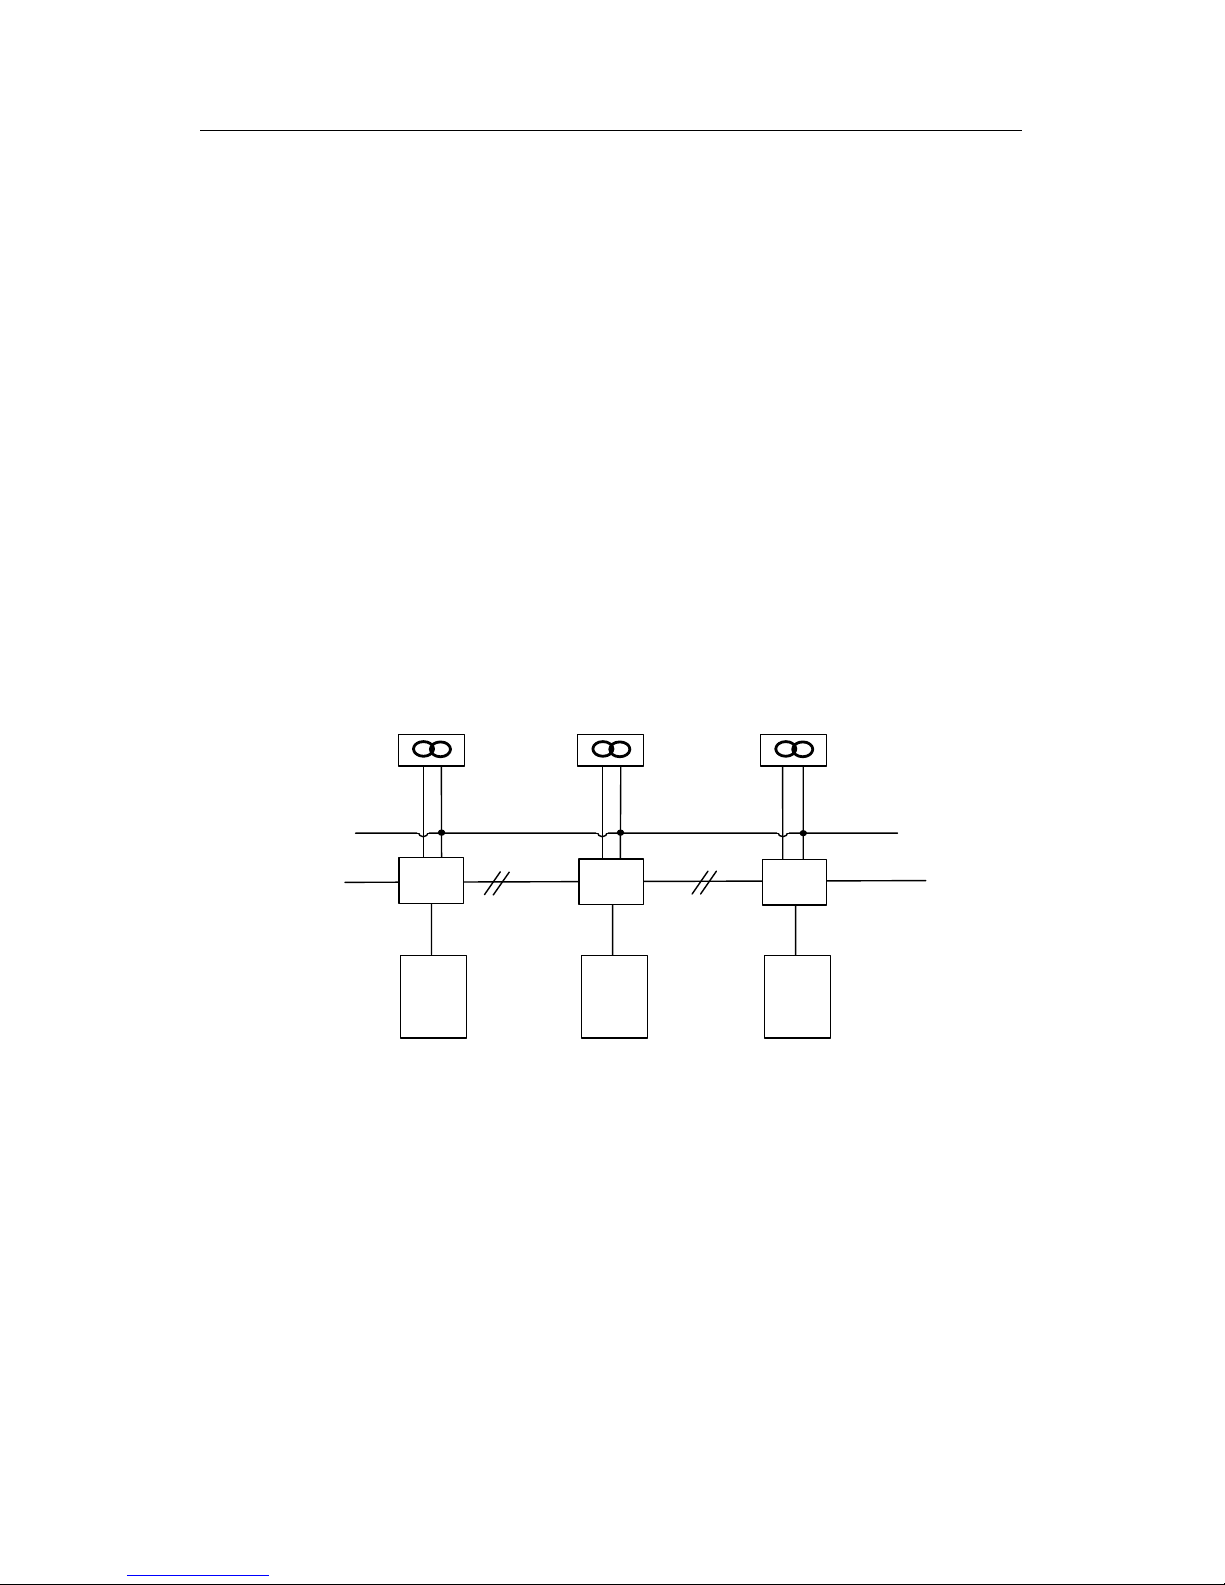
Local reader power supply
Whenever one or several readers are connected to a local power supply,
remember to join the negative wires (0 volt) to avoid potential
differences. See example below.
CR1
BC615 BC615 BC615
+
___
++
CR1
CR1

BC615 Installation and User Manual 21
Connecting BC615 to the CR1 converter
6 7 8 9
LOCK
12-30V
+
1 2 3 4 5
11
12
13
14
15
16
ALM
ALERT
DUR
TAM
TAM
RS-232
TX
RX
ENAB
DTR
0V
17
18
19
20
21
EXT
INT
N/W
S/A
BACK
LIGHT
LINK OUT
DOOR CON
SW1
12-24V
12-24V
POWER
RX
TX
RTS
12-24V
FG TX RX RTS 0V
12-24V
1
2
3
4
5
4
1
2
3
4
5
1
2
3
4
5
CR1
B
A
FRAME
B
A
FRAME
6
6
1
2
3
4
5
1
2
3
4
5
10
+
0VE
X
I
T
B
U
T
D
O
O
R
C
O
N
R
D
R
I
N
H
22 BC615 Installation and User Manual
1
Power LED. Lit green when CR1 is powered.
2
RX. Yellow LED flashing quickly when CR1 is communicating
with the PC.
3
TX/RTS. Flashes green/red when CR1 is communicating with the
card reader.
4
Power supply to card reader. Connect to terminal nos 1 and 2 on the
BC615 circuit board.
5
Communication between CR1 and card reader. Connect TX to TX,
RX to RX, RTS to ENAB and 0V to 0V.
6
Connection to the next dropbox or SR32i in Entro system.
Note! Fit 120 ohm resistor between the A and B of the communications in
the CR1 unit at the each end of the line .
BC615 Installation and User Manual 23
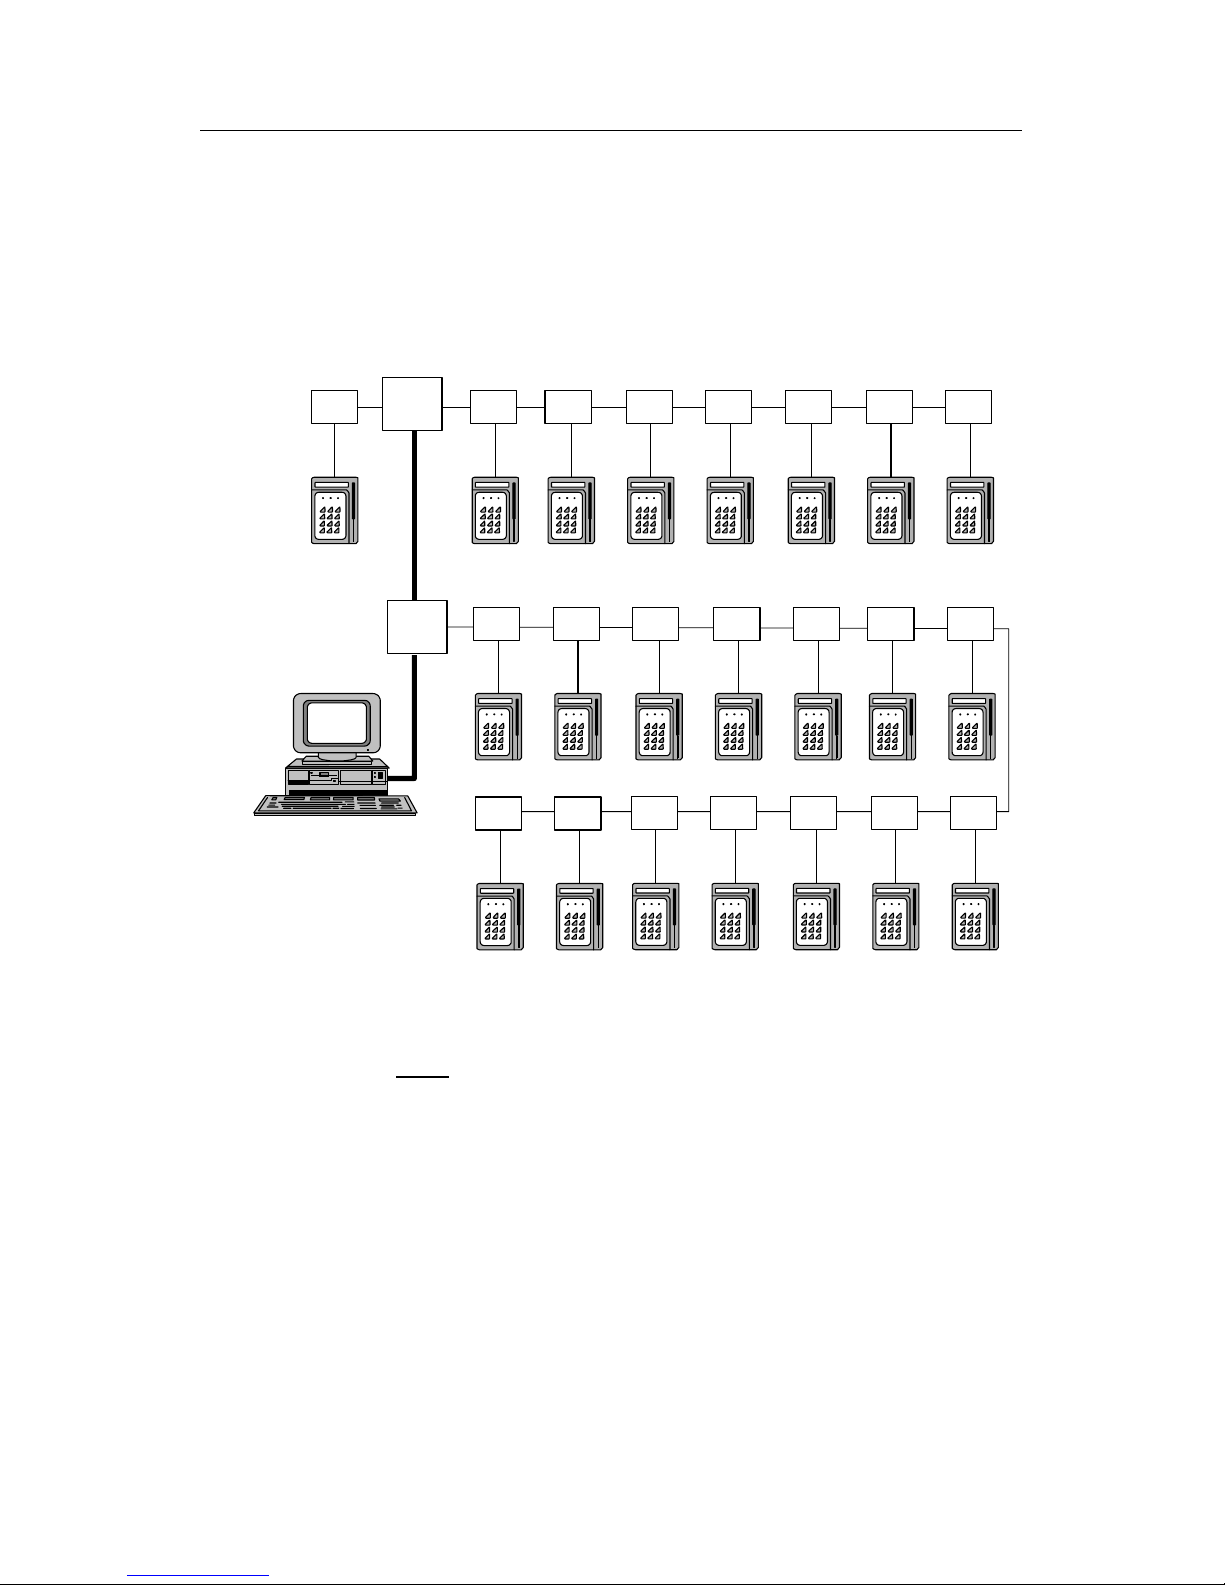
Entro wiring example
In premises where the system is more extensive, the BC615 card
readers can be connected to a Bewator Entro system.
CR1
CR1
CR1
CR1
SR32
PC
BC615 BC615 BC615BC615
CR1
CR1
CR1
BC615 BC615 BC615
CR1
BC615
SR32
Drop
box
BC615 BC615 BC615 BC615 BC615
Drop
box
DT05 BC43 DT05 BC43 DT05
BC615 BC615
DC21
Drop
box
Drop
box
DC21
BC43 BC43
DC21
Drop
box
Drop
box
Drop
box
Drop
box
Drop
box
Drop
box
DC21
The SR32i segment controllers can be connected to the PC in a ”daisy
chain” configuration. Each SR32i is controlling the card readers. A
maximum of
eight BC615s can be connected to each SR32i, but other
reader types can be included. The BC615s are connected to the system
via the CR1 converter.

24 BC615 Installation and User Manual
Commissioning the system
Standalone card readers
Having installed the card reader, simply fill in the charts at the back of
this manual and start programming the reader according to the
instructions in the Programming chapter.
Card readers in Entro systems
Having installed the card readers and connected them to the CR1
converter, addresses should be allocated to each card reader and the
communications circuit and power supply should be checked.
Check the communications circuit
When all units are connected (but with all removable terminal blocks
disconnected in the CR1s), check on reader block nos. 3 and 4 in the
CR1 that the resistance on the communication circuit is 60 Ω (ohm)
plus the cable resistance. If the resistance is 120 Ω plus the cable
resistance, one termination resistor is missing. If the resistance is much
less than 60 Ω, there is a short circuit in the communications circuit. If
the resistance is much greater than 120 Ω (open circuit), there is a
circuit break or the termination is missing in both ends.
Check the power supply
Connect the power supplies. Check that the voltage is approximately
that of the power supply output and that + and – are in the right
positions.
Allocate addresses to the card readers
1 Open the card reader if it is not already open.
2 Set the Link 1 jumper to N/W.
3 Press SW1 for about 3 seconds. The card reader starts beeping.
4 Set the address (A1-A8 Entro) on the card reader keypad.
Start programming
Start programming according to the instructions in the Bewator Entro
manual.

BC615 Installation and User Manual 25
Programming (standalone installation)
In the sections below are the instructions on how to program the BC615
if the card reader is operating as a standalone unit. Programming
Bewator Entro installations is described in the Bewator Entro manuals.
To be able to program the card reader you have to set the card reader to
programming mode. This is done by entering a six-digit code (see the
next page).
Buzzer and LEDs
During programming you will be guided by the buzzer and the LEDs.
In this manual the LEDs are illustrated in the following way:
= Off z = Lit = Flashes
In programming mode before a function is chosen: All three LEDs
are flashing.
During programming: The LEDs are lit or off depending on the
function being programmed.
Correct programming: Confirmed by a rising signal consisting of two
quick beeps.
Faulty programming: Confirmed by a falling signal consisting of one
long and one short beep.
Note! If, having entered programming mode, no key is pressed within
20 seconds, the unit will leave programming mode.

26 BC615 Installation and User Manual
Set password
The first thing to do before starting to program the card reader is to set
a password.
1 Open the card reader with the key supplied. The lock is located on
the underside of the card reader.
2 Press and hold the SW1 button (see wiring diagram on page 16)
until the card reader starts beeping.
3 Enter the desired 6-digit password on the card reader’s keypad.
The password is now set.
Set the card reader to programming mode
To program a function, the card reader has to be in programming mode.
Proceed as follows:
1 Press B.
2 Enter the 6-digit password.
The card reader is now in programming mode.
Note! If the wrong password is entered two times in succession, the
card reader is blocked from further attempts for 40 seconds. From then
on the card reader is blocked for 40 seconds each time two incorrect
passwords are entered.

BC615 Installation and User Manual 27
Set time and date
1 Set the card reader to programming mode.
2 Press A23. zzz
3 Enter the current year, month and date, e.g. 981021 for the 21
st
of
October 1998.
4 Enter the current day of the week.
Example: 1 = Monday, 2 = Tuesday etc.
5 Enter the current time, e.g. 1601 for one minute past 4 PM.
The unit automatically goes back to programming mode.

28 BC615 Installation and User Manual
Program time zones
This function is used to program the time zones to be used in the
installation.
1 Take out the completed time zone chart/s.
2 Set the card reader to programming mode.
3 Press A31. z
4 Enter the number of the time zone to be programmed. Use two
digits, e.g. 01 for time zone 1.
5 Enter the starting time of the first time interval using four digits,
e.g. 0800 for 8 am.
6 Enter the finishing time of the first time interval using four digits,
e.g. 1159 for 11.59 pm.
If there is no need for a second time interval, press A to skip. Go to
step 9.
7 Enter the start time of the second time interval using four digits,
e.g. 1300 for 1 pm.
8 Enter the stop time of the second time interval using four digits,
e.g. 1659 for 16.59 pm.
9 Enter the desired day type/s for this time zone.
10 Press B and go to step 4 to program another time zone or press B
twice to go back to programming mode.
Erase a time zone
1 Set the card reader to programming mode.
2 Press A31. z
3 Enter the number of the time zone to be erased.
4 Press A.

BC615 Installation and User Manual 29
Program time schedules
This function is used to program the time schedules to be used in the
installation.
1 Take out the completed time schedule chart/s.
2 Set the card reader to programming mode.
3 Press A32. z
4 Enter the number of the time schedule to be programmed. Use two
digits, e.g. 01 for time schedule 1.
5 Enter the time zones to be included in the time schedule. Example:
To include time zones 1, 2 and 4, enter 010204.
6 Press B and go to step 4 to program another time schedule or press
B twice to go back to programming mode.
Erase a time schedule
1 Set the card reader to programming mode.
2 Press A32. z
3 Enter the number of the time schedule to be erased.
4 Press A.

30 BC615 Installation and User Manual
Define the “Door unlocked” security level
1 Set the card reader to programming mode.
2 Press A33. z
3 Enter the number of the time schedule to control the “Door
unlocked” security level. Use two digits, e.g. 01 for time schedule
1.
4 Press B to leave programming mode.
To remove a time schedule from this security level, enter 00 in step 3
instead.
Define the “Common code” security level
1 Set the card reader to programming mode.
2 Press A34. z
3 Enter the number of the time schedule to control the “Common
code” security level. Use two digits, e.g. 01 for time schedule 1.
4 Press B to leave programming mode.
To remove a time schedule from this security level, enter 00 in step 3
instead.
Define the “Card Only” security level
1 Set the card reader to programming mode.
2 Press A35. z
3 Enter the number of the time schedule to control the “Card Only”
security level. Use two digits, e.g. 01 for time schedule 1.
4 Press B to leave programming mode.
To remove a time schedule from this security level, enter 00 in step 3
instead.

BC615 Installation and User Manual 31
Define the “Card + PIN” security level
1 Set the card reader to programming mode.
2 Press A36. z
3 Enter the number of the time schedule to control the “Card + PIN”
security level. Use two digits, e.g. 01 for time schedule 1.
4 Press B to leave programming mode.
To remove a time schedule from this security level, enter 00 in step 3
instead.
Define the “Toggle” security level
1 Set the card reader to programming mode.
2 Press A37. z
3 Enter the number of the time schedule to control the “Toggle”
security level. Use two digits, e.g. 01 for time schedule 1.
4 Press B to leave programming mode.
To remove a time schedule from this security level, enter 00 in step 3
instead.

32 BC615 Installation and User Manual
Log on a card (with a card)
Using this function, the cards to be used are programmed.
1 Set the card reader to programming mode.
2 Press A01. zz
3 Enter the time schedule during which the card/s should be valid.
Use 2 digits, e.g. 01 for time schedule 1.
4 Swipe the card (BC615) – or present the card (BC615-Prox).
5 If several cards should be valid during the same time schedule,
swipe or present these cards as well.
6 When finished, press B to go back to programming mode.
7 Press B one more time to leave programming mode.

BC615 Installation and User Manual 33
Log on a card (without the card)
Using this function, cards can be programmed by keying in the card
number.
1 Set the card reader to programming mode.
2 Press A03. zz
3 Enter the time schedule during which the card/s should be valid.
Use 2 digits, e.g. 01 for time schedule 1.
4 Enter the card number on the keypad.
5 If several cards should be valid during the chosen time schedule,
key in these cards as well.
6 When finished, press B to go back to programming mode.
7 Press B one more time to leave programming mode.

34 BC615 Installation and User Manual
Log on a series of cards
Using this function you can quickly log on a contiguous series of cards.
1 Set the card reader to programming mode.
2 Press A04. zz
3 Enter the time schedule during which the cards should be valid.
Use 2 digits, e.g. 01 for time schedule 1.
4 Enter the card number of the first card in the series.
5 Enter the card number of the last card in the series. The red LED
flashes as the cards are logged on.
6 Press B to leave programming mode.
Cancel card (with card)
Using this function a card can be cancelled (with the card) so that it
cannot be used in the card reader.
1 Set the card reader to programming mode.
2 Press A14. z
3 Swipe the card (BC615) – or present the card (BC615-Prox).
4 Swipe or present the next card, as required.
5 When finished, press B to go back to programming mode.
6 Press B one more time to leave programming mode.

BC615 Installation and User Manual 35
Cancel card (without card)
Using this function, cards can be cancelled using the card number.
1 Set the card reader to programming mode.
2 Press A16. z
3 Enter the card number. If the card is not logged on the ”faulty
programming” signal is heard
4 Cancel the next card, as required.
5 When finished, press B to go back to programming mode.
6 Press B one more time to leave programming mode.
Program/change/erase common code
This is how to program a common code.
1 Set the card reader to programming mode.
2 Press A21. zz
3 Enter to which time schedule the code should belong/belongs. Use
2 digits, e.g. 01 for time schedule 1.
4 Enter a four-digit common code. The existing code, if any, will be
over-written.
To erase the common code so that it does not work, enter 0000.
5 To programme, change or erase another common code, follow
steps 3-4.
6 Press B to leave programming mode.

36 BC615 Installation and User Manual
Program holidays
This function is used to pre-program holidays that do not occur on
Sundays and holiday periods.
1 Set the card reader to programming mode.
2 Press A51. zz
3 Enter the number of the holiday using two digits (01-15).
4 Enter the date of the holiday, e.g. 1224 for the 24
th
of December.
To program a holiday period, enter the starting date of the period,
e.g. 0701 for the 1
st
of July.
5 If an isolated holiday is being programmed, enter 01.
If a holiday period is being programmed, enter the duration in days
of the period, including the starting date. Max number days 21.
6 Enter the day type to apply for this holiday/holiday period, e.g. 7
for Sunday.
7 Follow steps 3-6 to enter a new holiday/holiday period or press B
to go back to programming mode.
Delete individual holidays
This function is used to delete individual holidays, as distinct to
deleting all programmed holidays (see the next section).
1 Set the card reader to programming mode.
2 Press A52. zz
3 Enter the number of the holiday, e.g. 01.
4 Press B to go back to programming mode.

BC615 Installation and User Manual 37
Delete all holidays
This function is used to delete all programmed holidays.
1 Set the card reader to programming mode.
2 Press A55. zz
3 Press A55 one more time.
The unit automatically goes back to programming mode.
Set door release time
The door release time determines for how long the lock should remain
released following a correct transaction. The default value is 7 seconds.
This is how to change the opening time, if required:
1 Set the card reader to programming mode.
2 Press A28. zzz
3 Enter the desired door release time (between 01 and 99 seconds).
4 Press B to leave programming mode.
Set door held warning time
If the door is still open when the door release time is over, a buzzer
sounds at the door for the time set as door held warning time. The
buzzer reminds the person entering to close the door immediately as an
alarm is about to go off. This is how to change the door held warning
time, if required:
Set the card reader to programming mode.
1 Press A29. zzz
2 Enter the desired door held warning time (between 01 and 99
seconds).
3 Press B to leave programming mode.

38 BC615 Installation and User Manual
Buzzer on/off
The default is that the buzzer is activated. If you do not want the buzzer
to beep on key presses or door opening, it can be turned off. Note that
even when the buzzer is off for normal operation, it will continue to
sound during programming.
1 Set the card reader to programming mode.
2 Press A65. zzz
3 Press 0.
4 Press B to leave programming mode.
To reactivate the buzzer, press 1 in step 3 instead.

BC615 Installation and User Manual 39
Calculated PIN
If it is preferred not to have the users choose their own PIN codes, this
function will enable automatic calculation of PIN codes, based on the
card holder’s card number. Proceed as follows:
1 Set the card reader to programming mode.
2 Press A24. zz
3 Enter a 4-digit calculation factor.
4 Press B to leave programming mode.
To disable the function, enter 0000 in step 3.
The calculation factor is added to the last four digits in the card
number.
Example: If the card number is 15278014 and the calculation factor is
4567, the code will be 2571.
8014 + 4567 = 12571
All the extra result (1) is disregarded.
1 1
8014
4567
12571
40 BC615 Installation and User Manual
Card reading parameters
NOTE: Card-reading parameters can only be changed if using a
magnetic strip card reader.
Magnetic strip card reader
When BC615 is delivered, the card reader reads positions 9 to 16 on the
card’s magnetic strip, or the last 8 positions if they are fewer than 16. If
you want to use your own cards and they should be read differently,
enter from which position on the magnetic strip the reader should start
reading and how many digits should be read (max. 8).
Note! Previously logged on cards will not work if you change the card
parameters.
1 Set the card reader to programming mode.
2 Press A97. zz
3 Enter from which digit in the card number (01-40) the digits
should be read.
To reset this function to the default setting, press A at this point.
4 Enter the number of digits to be read (1-8).
5 Press B to leave programming mode.
Note! If less than 8 digits are used in the card number, add as many 0
digits as necessary to make up an eight-digit card number when using
the A03, A04 and A16 commands.
Example: If the card number is 5432, enter 00005432 when using the
A03, A04 and A16 commands.
Proximity reader
When using proximity readers the co-operation between the reader and
the cards are stated at the factory and cannot be changed. The digits
used for logging on a card – or cancelling a card – will be the eight
digits seen on the card. E g 00226225.
Note! Only cards and tags delivered from Bewator will be valid
because the identification number sent from the card contains more
information than the eight digits visible on the card.

BC615 Installation and User Manual 41
Change programming password
To change the password:
1 Press B and enter the present password.
2 Press A27. zzz
3 Enter the new password. A warning tone is heard.
4 Enter the new password again. The warning tone sounds until all
six digits have been entered.
5 Press B to leave programming mode.
6 Make a note of the new password.
Note! If you should forget the password you can set a new password.
Read the Set password.

42 BC615 Installation and User Manual
Erase the memory
When the card reader’s memory is erased, the default settings are
restored (see below).
1 Set the card reader to programming mode.
2 Open the card reader with the key supplied. The lock is located on
the underside of the card reader.
3 Press and hold the SW1 button (see the wiring diagram on page
16) until a rising tone is heard.
4 Press 112186.
5 Press 112186 one more time.
All previously data have now been erased. The card reader reverts to
the following settings:
• Password: 112233
• Common code: None
• Opening time: 7 seconds
• Door held warning time: 30 seconds
• Card parameters: Position 9-16, the last 8 positions if fewer than
16 positions.
• Time zone 01: 00.00 – 23.59, day types 1-7
• Time schedule 01: time zone 01

BC615 Installation and User Manual 43
Printout of events
Using this function, printouts of events occurred can be requested.
1 Set the card reader to programming mode.
2 Press A41. z
3 Press B to cancel the printout at any time.
4 Printout format:
YY-MM-DD D HH:MM TS XXXXXXXX TA
YY-MM-DD =Date
D =Daytype
HH:MM =Time
TS =Time schedule (if needed)
XXXXXXXX =Card number (if used)
TA =Type of event
5 Press B to leave programming mode.
Printout of programmed common codes
Using this function, printouts of programmed common codes can be
requested.
1 Set the card reader to programming mode.
2 Press A44. z
Printout format:
TS CCCC
TS = Time schedule
CCCC = Common code
3 Press B to leave programming mode.

44 BC615 Installation and User Manual
Printout of programmed time zones and time
schedules
Using this function, printouts of programmed time zones, time
schedules and printer time zones can be requested.
1 Set the card reader to programming mode.
2 Press A45. z
Press B to cancel the printout at any time.
Printout format Time zones:
TZ ON1 OFF1 ON2 OFF2 DAYS
TZ = Timezone ( 01-15 )
ON = Start time
OFF = Stop time
DAYS = Daytype
Printout format Time schedules:
TS TZs
TS = Time schedule (01-15)
TZs = Time zones (01-15. Max four time zones)
PTS = Not used
3 Press B to leave programming mode.

BC615 Installation and User Manual 45
Printout of reader information
1 Set the card reader to programming mode.
2 Press A46. z
Press B to cancel the printout at any time.
Printout format:
BC615 Ver XX.XX Version number on software
04-02-27 5(5) 11:34 Date, Daytype, (Halfday) and Time.
ID A Reader ID no.
RT 07 S Release time 07 sec.
DHWT 10 S Door held warning time 10 sec.
A33 TS Time schedule Door unlocked
A34 TS Time schedule Common code
A35 TS Time schedule Card
A36 TS Time schedule Card + PIN
A37 TS Time schedule Toggle
3 Press B to leave programming mode.

46 BC615 Installation and User Manual
Printout of logged on cards
1 Set the card reader to programming mode.
2 Press A47. z
Press B to cancel the printout at any time.
Printout format:
XXXXXXXX TS Card number and Time schedule
3 Press B to leave programming mode.
Printout of programmed holidays
1 Set the card reader to programming mode.
2 Press A48. z
Press B to cancel the printout at any time.
Printout format:
HOL START DAYS TYPE
HOL = Number on holiday (01-15)
START = Start date
DAYS = Number of days (01-21)
TYPE = Daytype
3 Press B to leave programming mode.

BC615 Installation and User Manual 47
Explanation on event codes
Event code Explanation
------
Access events
CC Access granted. Common code
CO Access granted. Card
CP Access granted. Card + PIN
DU Access granted. Card + PIN Duress
IC Access denied. Illegal common code
NL Access denied. Card not logged on
IP Access denied. Illegal PIN
TB Access denied. Time blocked
------
Door events
DF Door forced
DH Door held
DC Door closed
------
Reader events
TO Tamper switch open
TC Tamper switch closed


Programming overview
Startup Step 1 Step 2 Step 3 Step 4 Step 5 Step 6 Step 7 Step 8 Step 9
Set password Open
BC615
Press the
SW1 button
Enter a 6-
digit
password
Set BC615 to
programming mode
Press
B
Enter
password
Set time and date Enter
progr.
mode
Press A23 Enter current
date
(YYMMDD)
Enter current
day type (1-7)
Enter current
time (HHMM)
Time zones
Program time zones Enter
progr.
mode
Press A31 Enter time
zone no
Enter start time
for 1
st
interval
(HHMM)
Enter stop time
for 1
st
interval
(HHMM)
Enter start time
for 2
nd
interval
(HHMM) or press
A to skip
Enter stop
time for 2
nd
interval
(HHMM)
Enter
day
type/s
(1-8)
Press B to
end input and
enter new
time zone
Time schedules
Program time schedules Enter
progr.
mode
Press A32 Enter time
schedule no
Enter time zone
no/s included
Press B to end
input and enter
new time
schedule

Security levels Step 1 Step 2 Step 3 Step 4 Step 5
Set time schedule using
the ”Open” security
level
Enter progr. mode Press A33 Enter time
schedule no
Set time schedule using
the ”Common code”
security level
Enter progr. mode Press A34 Enter time
schedule no
Set time schedule using
the ”Card” security
level
Enter progr. mode Press A35 Enter time
schedule no
Set time schedule using
the ”Card+PIN”
security level
Enter progr. mode Press A36 Enter time
schedule no
Set time schedule using
the ”Toggle” security
level
Enter progr. mode Press A37 Enter time
schedule no
Cards
Log on card with card Enter progr. mode Press A01 Enter time
schedule no
Swipe/present card
Log on card without
card
Enter progr. mode Press A03 Enter time
schedule no
Enter card number
(8 digits)
Log on a series of cards Enter progr. mode Press A04 Enter time
schedule no
Enter first card
number in the series
Enter last card number in
the series (8 digits)
Cancel card with card Enter progr. mode Press A14 Swipe/present
card
Cancel card without
card
Enter progr. mode Press A16 Enter card number

Common code Step 1 Step 2 Step 3 Step 4 Step 5 Step 6
Program common code Enter progr. mode Press A21 Enter time
schedule no
Enter common code
Change common code Enter progr. mode Press A21 Enter time
schedule no
Enter old code Enter new code
Erase common code Enter progr. mode Press A21 Enter existing
code
Enter 0000
Holidays
Program holidays Enter progr. mode Press A51 Enter holiday no Enter date (MMDD) Enter no of days including
start date, e.g. 01
Enter day type
(1-8)
Delete individual
holidays
Enter progr. mode Press A52 Enter holiday no
Delete all holidays Enter progr. mode Press A55 Press A55 once
again

Other functions Step 1 Step 2 Step 3 Step 4 Step 5
Set door release time Enter progr. mode Press A28 Enter no of seconds (01-99)
Set door held warning time Enter progr. mode Press A29 Enter no of seconds
(01-99)
Buzzer on/off Enter progr. mode Press A65 1 = Buzzer on
0 = Buzzer off
Calculated PIN Enter progr. mode Press A24 Enter a 4-digit calculation factor
Card reading parameters Enter progr. mode Press A97 Enter start position
(01-40)
Enter no of positions to
be read (1-8)
Change password Enter progr. mode Press A27 Enter new password
(6 digits)
Enter new password
once again
Erase memory Open BC615 Make link 1 and
remove
Enter 112186 on the keypad Enter 112186 on the
keypad once again

Printouts Step 1 Step 2 Step 3 Step 4 Step 5
Printout of latest events in
memory by date
Enter progr. mode Press A41 Press B to cancel printout if
desired
Printout of programmed
common codes
Enter progr. mode Press A44 Press B to cancel printout if
desired
Printout of programmed
time zones and time
schedules
Enter progr. mode Press A45 Press B to cancel printout if
desired
Printout of reader
information
Enter progr. mode Press A46 Press B to cancel printout if
desired
Printout of logged on cards Enter progr. mode Press A47 Press B to cancel printout if
desired
Printout of programmed
holidays
Enter progr. mode Press A48 Press B to cancel printout if
desired

54 BC615 Installation and user manual
Daily use
Entrance
To open the door the user should do the following:
• Enter a four-digit common code (if Common code is the current
security level).
• Use a card (if Card is the current security level).
• Use a card and enter a personal code belonging to the card (if Card
+ PIN is the current security level). Should the wrong PIN-code be
entered 3 times in succession the card is automatically cancelled
and must be logged on once again.
The toggle function
If the toggle function is activated, the user can open the door in one of
the above-mentioned ways (depending on the current security level).
The door remains open until a user (need not be the same one as
opened the door) again completes a valid transaction or until another
security level starts.
Choose/change PIN code (Calculated PIN not set)
To choose/change your individual PIN (in Bewator Entro installations
the PIN code is set from the PC):
1 Press A on the card reader’s keypad.
2 Use your card at the card reader.
3 If it is the first you are choosing a PIN code for this card, enter
0000. Otherwise enter the existing code.
4 Enter the new code using four digits.
5 Enter the new code again.
You have now set the PIN for your card.

BC615 Installation and User Manual 55
Duress
This is how to activate the duress alarm output if forced to open the
door under threat (this works during the Card + PIN security level
only):
Swipe or present the card at the card reader and enter the usual PIN
code, only add 1 to the last digit in the code.
Example 1: If the PIN code is 1234, press 1235 instead.
Example 2: If the PIN code is 1239, press 1230 instead.
When a duress code is entered, the door is opened at the same time as
the alarm output is activated (an alarm is sent to a security guard or
similar). The alarm output will be activated until it is reset by entering
programming mode.

56 BC615 Installation and user manual
Troubleshooting
Problem Possible cause Action
Red, yellow and green
LEDs blink on power
up
A button is pressed.
Memory error.
Adjust the button.
Change card reader.
Cannot enter
programming mode.
Red LED is lit after
two trials.
Wrong password. Choose a new
password.
Green LED is lit on
accepted entrance but
the door does not open.
Lock error.
The jumper between
terminal block nos.
1 and 4 in the card
reader is missing.
Check cable
between card reader
and lock. Change
locks.
Attach jumper.
A card is used at the
card reader but nothing
happens. No beep is
heard.
The reader head is
loose. (Magnetic
only
The reader head is
dirty. (Magnetic
only)
The reader head is
damaged.
Tighten the reader
head.
Clean the reader
head using a special
cleaning card.
Change card reader
or reader head.
A card is used at the
reader, a beep is heard,
but nothing happens.
The card is not
logged on.
Card + PIN is the
current security
level and the card
does not have a PIN
code.
Log on the card.
Select a PIN code.

BC615 Installation and User Manual 57
Technical information
Power supply: 8 – 24V AC, 12 – 35 V DC.
Max power
consumption: BC615: 70 mA.
BC615Prox & BC615EM: 120mA.
Lock relay: Max 2A, 30 V DC.
Duress output: Open collector to 0 volt. Max 500 mA, 30VDC.
Alarm output: Open collector to 0 volt. Max 500 mA, 30VDC.
Tamper switch: Max 1A, 30 V DC.
Inputs: Normally pulled high. Active when pulled low,
i.e. 0 V.
Red LED external
control: Galvanic insulation. 12-30 V DC.
Communications port: RS-232 (printer, PC or system).
Temperature range: BC615: –35° C to +50° C
BC615Prox & BC615EM: –30° C to +50° C
(at 90 % relative air humidity).
Housing protection
class: IP54
Dimensions: 108 x 160 x 45 mm (WxHxD).
Minimum PC system requirements:
• 486 processor (Pentium recommended)
• 16 MB RAM
• At least 20 MB free disk space
• 3,5” floppy disk unit
• VGA screen
• Serial port and Parallel port
• Windows 95 (OSR2
)
BC615Prox is notified, according to the R&TTE Directive (1999/5/IEC), for use in
following countries: Austria, Belgium, Denmark, Finland, France, Germany, Greece, Iceland,
Ireland, Italy, Spain, Sweden, the Netherlands and United Kingdom.

58 BC615 Installation and user manual
Charts
Time zones
No
(01-15)
Name 1st interval
From To
2nd interval
From To
Day
type/s
Example:
No
(01-15)
Name 1
st
interval
From To
2nd interval
From To
Day
type/s
01 Working hrs 0830 1159 1300 1759 12345

BC615 Installation and User Manual 59
Time schedules
No (01-15) Name Time zones included
Example:
No (01-15) Name Time zones included
01 Office staff 01020305
In the above example are time zones nos 1, 2, 3 and 5 included in time
schedule no 1.

60 BC615 Installation and user manual
Security levels
Level Time schedule
Door unlocked
Common code
Card
Card + PIN
Toggle
Special settings
Function Setting Default
Password 112233
Common code None
Release time 7 sec
Door held warning
time
10 sec
Buzzer OFF (0) ON (1) ON

BC615 Installation and User Manual 61
Holidays
No
Date
(MMDD)
Duration
in days
Day
type
No
Date
(MMDD)
Duration
in days
Day
type
Example:
No
Date
(MMDD)
Duration
in days
Day
type
No
Date
(MMDD)
Duration
in days
Day
type
01 1224 01 7 02 0701 21 7

62 BC615 Installation and user manual
Persons
Name Card number Time schedule
Example:
Name Card number Time schedule
Edwards Anthony 12345678 01


 Loading...