

Page 1

3077860
BLAST CHILLER AND FREEZING
CELLULES DE REFRIFERATION RAPIDE ET CELLULES MIXTES
ABATEDORES DE TEMPERATURA
USE AND INSTALLATION MANUAL
MANUEL D’UTILISATION ET D’INSTALLATION
MANUAL DE US
Rev.1 02/2007
Page 2

Carefully read the instructions contained in the handbook. You may find important safety instructions and
recommendations for use and maintenance.
Please retain the handbook for future reference.
The Manufacturer is not liable for any change s to this handbook, which may be altered w ithout prior
notice.
Lire avec attention les instructions contenues dans ce livret car elles fournissent d'importants renseignements
pour ce qui concerne la sécurité, l'emploi et l'entretien.
Garder avec soin ce livret pour des consultations ultérieures de différents opérateurs.
Le constructeur se réserve le droit d'apporter des modifications à ce manuel, sans préavis ni
responsabilité d'aucune sorte.
Leia com atenção as advertências contidas neste manual pois fornecem importantes indicações para a
segurança, a utilização e a manutenção do aparelho.
O construtor reserva-se o direito de modificar o manual sem dar aviso prévio e sem nenhuma
responsabilidade.
FR
P
GB
Page 3

-
-
-
I
I
I
N
N
N
D
D
D
E
E
E
X
X
X
-
-
-
1st PART INSTRUCTION MANUAL …………………………………3
2st PART INSTALLATION MANUAL ………………………………31
0 INFORMATION FOR THE READER ………………………………………………3
1 GENERAL INSTRUCTIONS ON DELIVERY ……………………………………3
• GENERAL INSTRUCTIONS ……………………………………………………………………3
• TECHNICAL DATA ………………………………………………………………………………3
• LIST OF REGULATION REFERENCES ……………………………… ……………………3
• GENERAL INSTRUCTIONS ……………………………………………………………………3
• SETTING UP ………………………………………………………………………………………4
• TESTING …………………………………………………………………………………………4
MACHINE LOADING …………………………………………………………………………………………………5
POSITION OF TRAYS ………………………………………………………………………………………………5
LENGTH ………………………………………………………………………………………………………………5
2 CONTROL PANEL …………………………………………………………………7
• DESCRIPTION OF CONTROLS ………………………………………………………………7
• CORE PROBE ……………………………………………………………………………………8
• GENERAL SETTING ……………………………………………………………………………8
LANGUAGE …………………………………………………………………………………………………………8
CLOCK ………………………………………………………………………………………………………………9
TEMPERATURE UNIT OF MEASUREMENT ……………………………………………………………………9
3 WORKING …………………………………………………………………………11
PRE-COOLING CYCLE ………………… ………… ……… ………… ……… ………… ……… ………… ………1 1
• QUICK COOLING CYCLE ……………………………………………………………………11
IFR POSITIVE QUICK COOLING CYCLE ………………………………………………………………………13
CORE PROBE POSITIVE QUICK COOLING CYCLE …………………………………………………………14
CORE PROBE NEGATIVE QUICK COOLING CYCLE ………………………………………………………15
TIME-CONTROLLED POSITIVE QUICK COOLING CYCLE …………………………………………………16
TIME-CONTROLLED NEGATIVE QUICK COOLING CYCLE ………………… ………… ……… ………… …17
CORE PROBE HARD QUICK COOLING CYCLE ………………………………………………………………18
TIME-CONTROLLED HARD QUICK COOLING CYCLE ………………………………………………………19
• STORING CYCLE ………………………………………………………………………………21
POSITIVE STORING CYCLE ……………………………………………………………………………………21
NEGATIVE STORING CYCLE ……………………………………………………………………………………22
• MEMORIZING PROGRAMMES ………………………………………………………………23
• USING MEMORIZED PROGRAMMES ………………………………………………………23
• USING RECOMMENDED PROGRAMMES …………………………………………………24
• DEFROSTING …………………………………………………………………………………24
4 ACCESSORIES ……………………………………………………………………26
• PRINTING MEMORIZED CYCLES ……………………………………………………………26
5 MAINTENANCE ……………………………………………………………………27
• MAINTENANCE AND CLEANING ……………………………………………………………27
CLEANING THE CABINET …………………………………………………………………………………………27
CLEANING THE AIR CONDENSER ……………………………………………………………………………28
STAINLESS-STEEL MAINTENANCE ……………………………………………………………………………28
DISCONTINUED USE ………………………………………………………………………………………………29
Page 4

-
-
-
I
I
I
N
N
N
D
D
D
E
E
E
X
X
X
-
-
-
• INSTALLATION ……………………………………………………………………………… …31
INTRODUCTION ……………………………………………………………………………………………………31
MAX ROOM TEMPERATURE ……………………………………………………………………………………31
POSITIONING ………………………………………………………………………………………………………31
WIRING ………………………………………………………………………………………………………………33
PLEASE USE CERTIFIED APPROVED MATERIALS …………………………………………………………33
REFRIGERATING CONNECTION …………………….…………………………………………………………33
CONNECTION TO CONDENSATE DRAIN ………………………………………………………………………33
• GENERAL SETTING ……………………………………………………………………………34
TESTING ……………………………………………………………………………………………………………34
LANGUAGE …………………………………………………………………………………………………………34
CLOCK ………………………………………………………………………………………………………………35
TEMPERATURE UNIT OF MEASUREMENT ……………………………………………………………………35
•
PRINTER INSTALLATION ……………………………………………………………………36
• SERVICE FUNCTIONS …………………………………………………………………………36
CHANGING PARAMETERS ………………………………………………………………………………………36
DESCRIPTION OF PARAMETERS ………………………………………………………………………………37
• ALARMS AND FAULT ANALYSIS …………………………………………………………40
• DISPLAYING INPUTS/OUTPUTS STATE …………………………………………………41
• DISPLAYING THE LATEST DEFROST CYCLES …………………………………………42
• DISPLAYING DOOR OPENINGS ……………………………………………………………42
• ALARMS AND USER PROGRAMMES CANCELLATION ………………………………43
• RESTORING PRE-SET PARAMETERS ……………………………………………………44
• MAINTENANCE OF PANEL BOARD ………………………………………………………45
• WIRING DIAGRAM PLATE …………………………………………………………………46
• CONTROL AND SAFETY SYSTEMS ………………………………………………………46
• DISPOSAL ………………………………………………………………………………………46
• REFRIGERANT MATERIAL SAFETY DATA SHEET …..…………………………………47
• DIMENSIONS …………………………………………………………………………………48
ANNEXES …………………………………………………………………………49
Page 5

-
-
-
I
I
I
N
N
N
S
S
S
T
T
T
R
R
R
U
U
U
C
C
C
T
T
T
I
I
I
O
O
O
N
N
N
M
M
M
A
A
A
N
N
N
U
U
U
A
A
A
L
L
L
-
-
-
3
INFORMATION FOR THE READER CHAPTER 0
This manual is subdivided into two parts.
1st part: covers all the information
necessary to the user.
2nd part: covers all the information necessary to
the qualified operators authorized to move,
transport, install, service, repair and demolish the
appliance.
While users are instructed to refer to the 1st part
only, the 2ndpart is addressed to skilled
operators. They may also read the1st part for a
more complete picture of the information provided
if necessary.
GENERAL INSTRUCTIONS ON DELIVERY CHAPTER 1
GENERAL INSTRUCTIONS
Make sure that the consignment has not been tampered with or damaged during transport.
After unpacking the cooling cabinet make sure all sections or components have been included and
specifications and conditions are as to your order.
If not, please inform the retailer immediately.
We assure you have made the best choice in purchasing our products and hope you will be fully satisfied
with our their performance. To this purpose, we recommend you strictly comply with the instructions and
regulations contained in this handbook.
Please remember that no reproductions of this handbook are allowed. Due to our constant technological
updating and research, the features described in this handbook may be altered without prior notice.
TECHNICAL DATA
Please refer to the technical data of your own appliance. (tab.1a-1b)
LIST OF REGUALATION REFERENCES
The cooling cabinet we manufacture fully complies with the following regulations:
UL Listed for electrical safety
NSF standard 7 for sanitation
GENERAL INSTRUCTIONS
The quick cooler is a refrigerating appliance which can cool cooked foodstuffs to a temperature of +38 [°F]
(positive quick cooling) and to 0 [°F] (negative quick cooling).
Machine capacity as to the quantity to be cooled depend on the model purchased.
Page 6
-
-
-
I
I
I
N
N
N
S
S
S
T
T
T
R
R
R
U
U
U
C
C
C
T
T
T
I
I
I
O
O
O
N
N
N
M
M
M
A
A
A
N
N
N
U
U
U
A
A
A
L
L
L
-
-
-
4
SETTING UP
Before setting to operation thoroughly clean the cooling cabinet with a suitable detergent or sodium bycarb
dissolved in lukewarm water. Clean the appliance inside to remove any condensate caused by the
Manufacturer's final testing.
Cooling and freezing speed depends on the following factors:
a) container shape, type and material;
b) whether container lids are used;
c) foodstuff features (density, water contents, fat contents);
d) starting temperature;
e) thermal conduction inside the foodstuffs
Positive /Negative quick cooling time depends on type of foodstuffs to be processed.
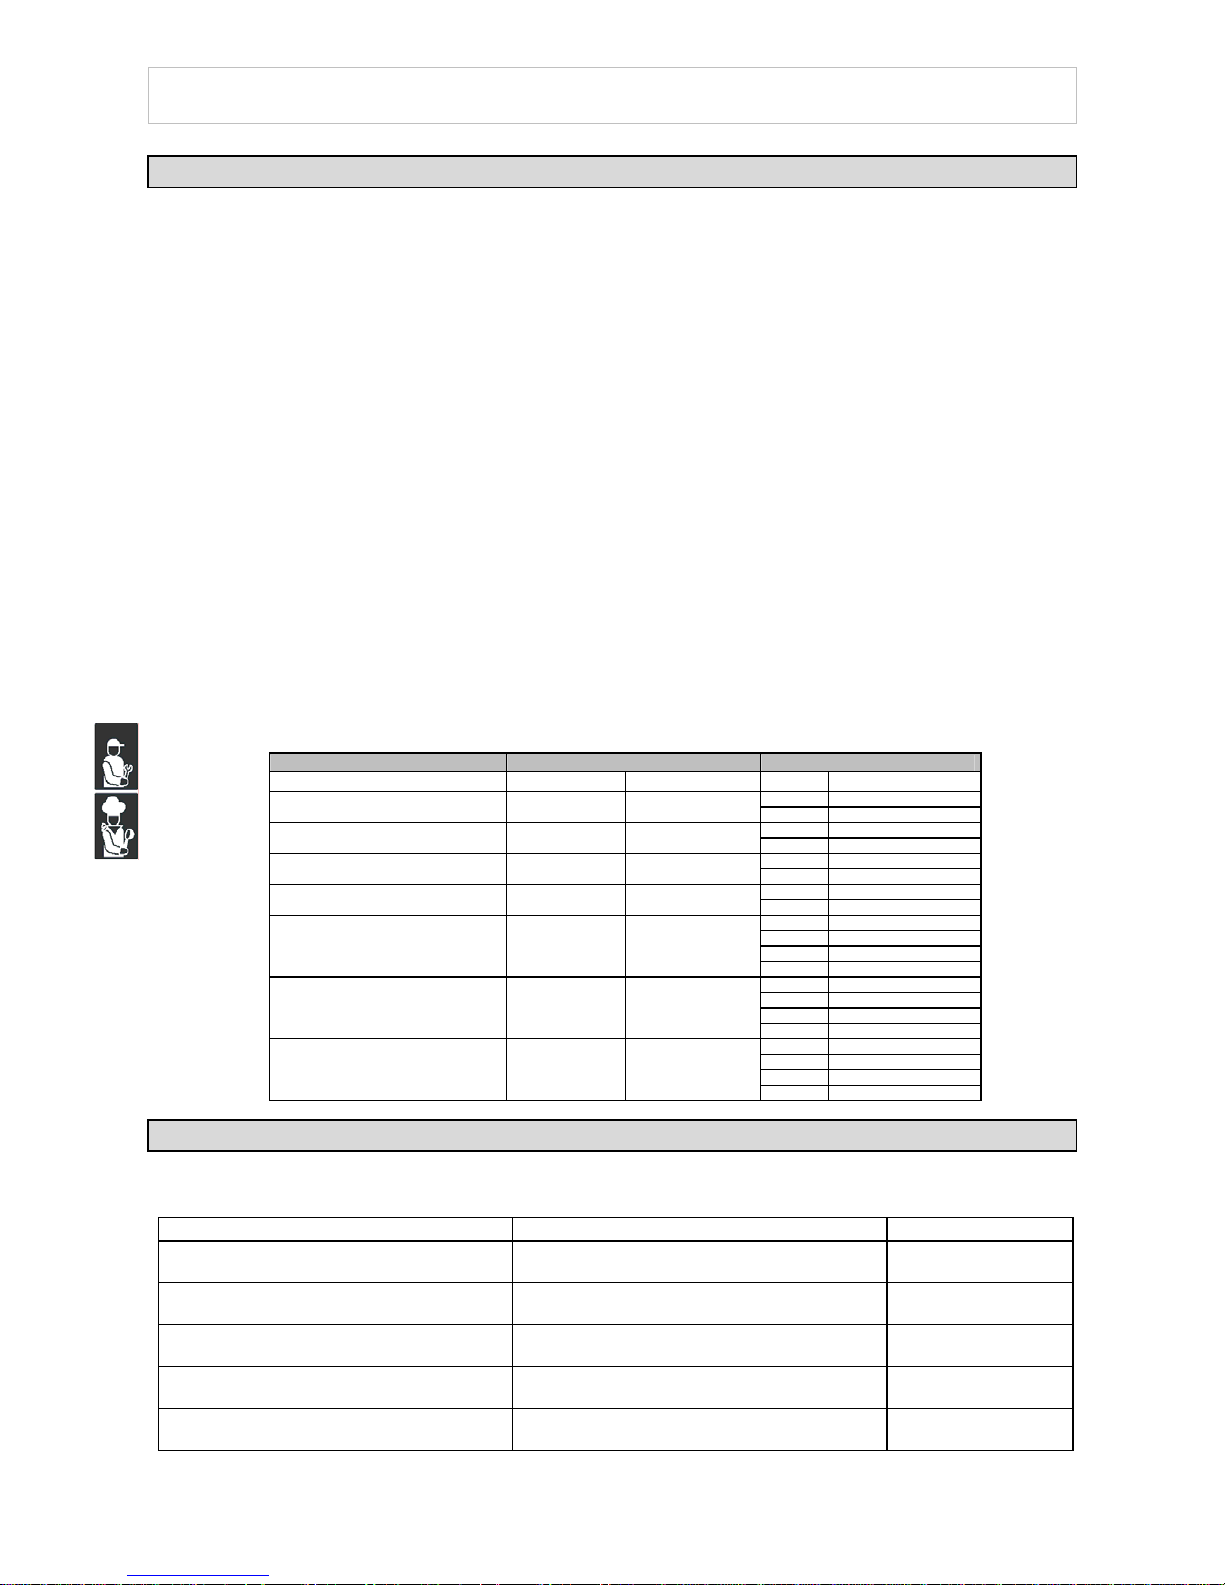
Full-speed cycle is recommended for high-density or large-sized foodstuffs. However, the following limits
should never be exceeded : a 7.1 pounds load for 12”x20”x2-1/2” or 14 pounds load for 18”x26”, a 2”
thickness or freezing and an 3” thickness for cooling (tab.2).
The low-speed cycle is suitable to process delicate foodstuffs, such as vegetables, creamy products, creamy
desserts or low-thickness produ cts.
We recommend making sure that any positive quick cooling cycles, up to +38 [°F] to the core of the product,
do not last over 90 minutes, and that negative quick cooling cycles , up to 0 [°F] to the core of the product,
do not last over 4 hours.
The processing room is to be pre-cooled before starting the positive and /or negative quick cooling cycle.
Moreover, avoid covering the foodstuffs during the cycle, which would increase the cycle length.
We recommend using the core probe in order to have the exact core temperature reading. Do not stop the
cycle before reaching a temperature of +38 [°F] during positive quick cooling and 0 [°F] during negative quick
cooling.
Tab.2
TESTING
Name and Surname Address Tel./fax no.
Model Max. output/cycle Capacity
+160[°F]÷+38[°F] +160[°F]÷+0[°F]
n° max
5 12“x20“x1,5“
IM51M-IM51C 44[lb] 24[lb]
4 12“x20“x2,5“
5 12“x20“x1,5“
IR51M-IR51C 40[lb] -
4 12“x20“x2,5“
14 12“x20“x1,5“
IM101L-IM101S 93[lb] 55[lb]
8 12“x20“x2,5“
14 12“x20“x1,5“
IR101L-IR101S 80[lb] -
8 12“x20“x2,5“
26 12“x20“x1,5“
14 12“x20“x2,5“
13 18“x26“x1,5“
IM72S 115[lb] 55[lb]
7 18“x26“x2,5“
26 12“x20“x1,5“
14 12“x20“x2,5“
13 18“x26“x1,5“
IR72S 113[lb] -
7 18“x26“x2,5“
32 12“x20“x1,5“
20 12“x20“x2,5“
16 18“x26“x1,5“
IM102S 220[lb] 110[lb]
10 18“x26“x2,5“
Page 7
-
-
-
I
I
I
N
N
N
S
S
S
T
T
T
R
R
R
U
U
U
C
C
C
T
T
T
I
I
I
O
O
O
N
N
N
M
M
M
A
A
A
N
N
N
U
U
U
A
A
A
L
L
L
-
-
-
5
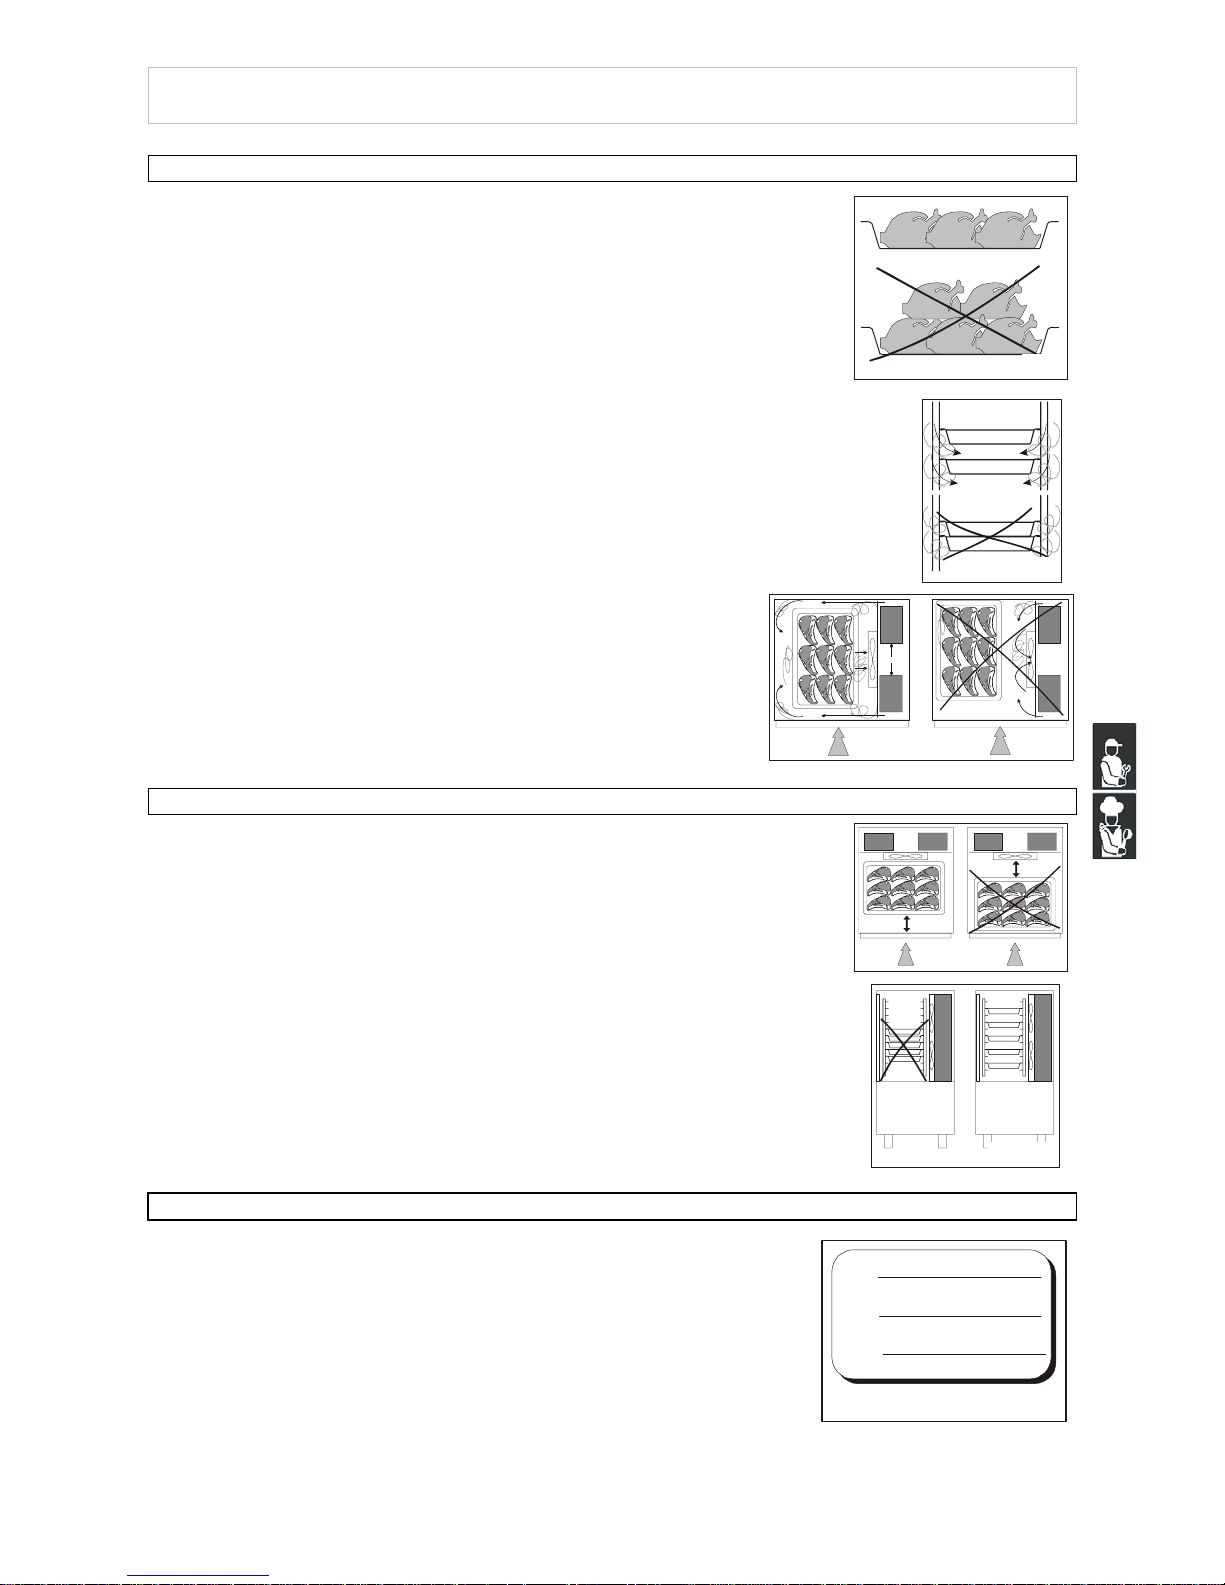
MACHINE LOADING
Do not pile up foodstuffs to be cooled. Thickness should be lower than 2” in
negative quick cooling and lower than 3” in positive quick cooling. (pict.1)
Make sure air circulation is not hampered between food trays. (pict.2)
The grid-holding frame (included in those models which include
trolleys) is to be located at the centre of the cabinet. (pict.3)
POSITION OF TRAYS
Place the trays as close to the evaporator as possible. (pict.4)
If the cabinet is not full place the trays at equal distance from one another. (pict.5)
LENGTH
Cooled or frozen processed foodstuffs may be stored in a refrigerator for 5
days of processing with no quality alterations.
For best results we recommend keeping temperature constant throughout the
storing (32[°F] to 38[°F]), according to the various commodities.
Storing time may be increased to approx. two weeks by using vacuum
processing.
After a negative quick cooling cycle, foodstuffs may be stored safely for 3 to 18
months, according to the type of foodstuff processed.
We strongly recommend keeping storing temperature at 0[°F] or below.
A
B
C
Pict.3
Pict.4
Pict.5
Pict.6
0.5 - 2 cm.
Pict.1
Pict.2
0,19”-0,79”
Page 8
-
-
-
I
I
I
N
N
N
S
S
S
T
T
T
R
R
R
U
U
U
C
C
C
T
T
T
I
I
I
O
O
O
N
N
N
M
M
M
A
A
A
N
N
N
U
U
U
A
A
A
L
L
L
-
-
-
6
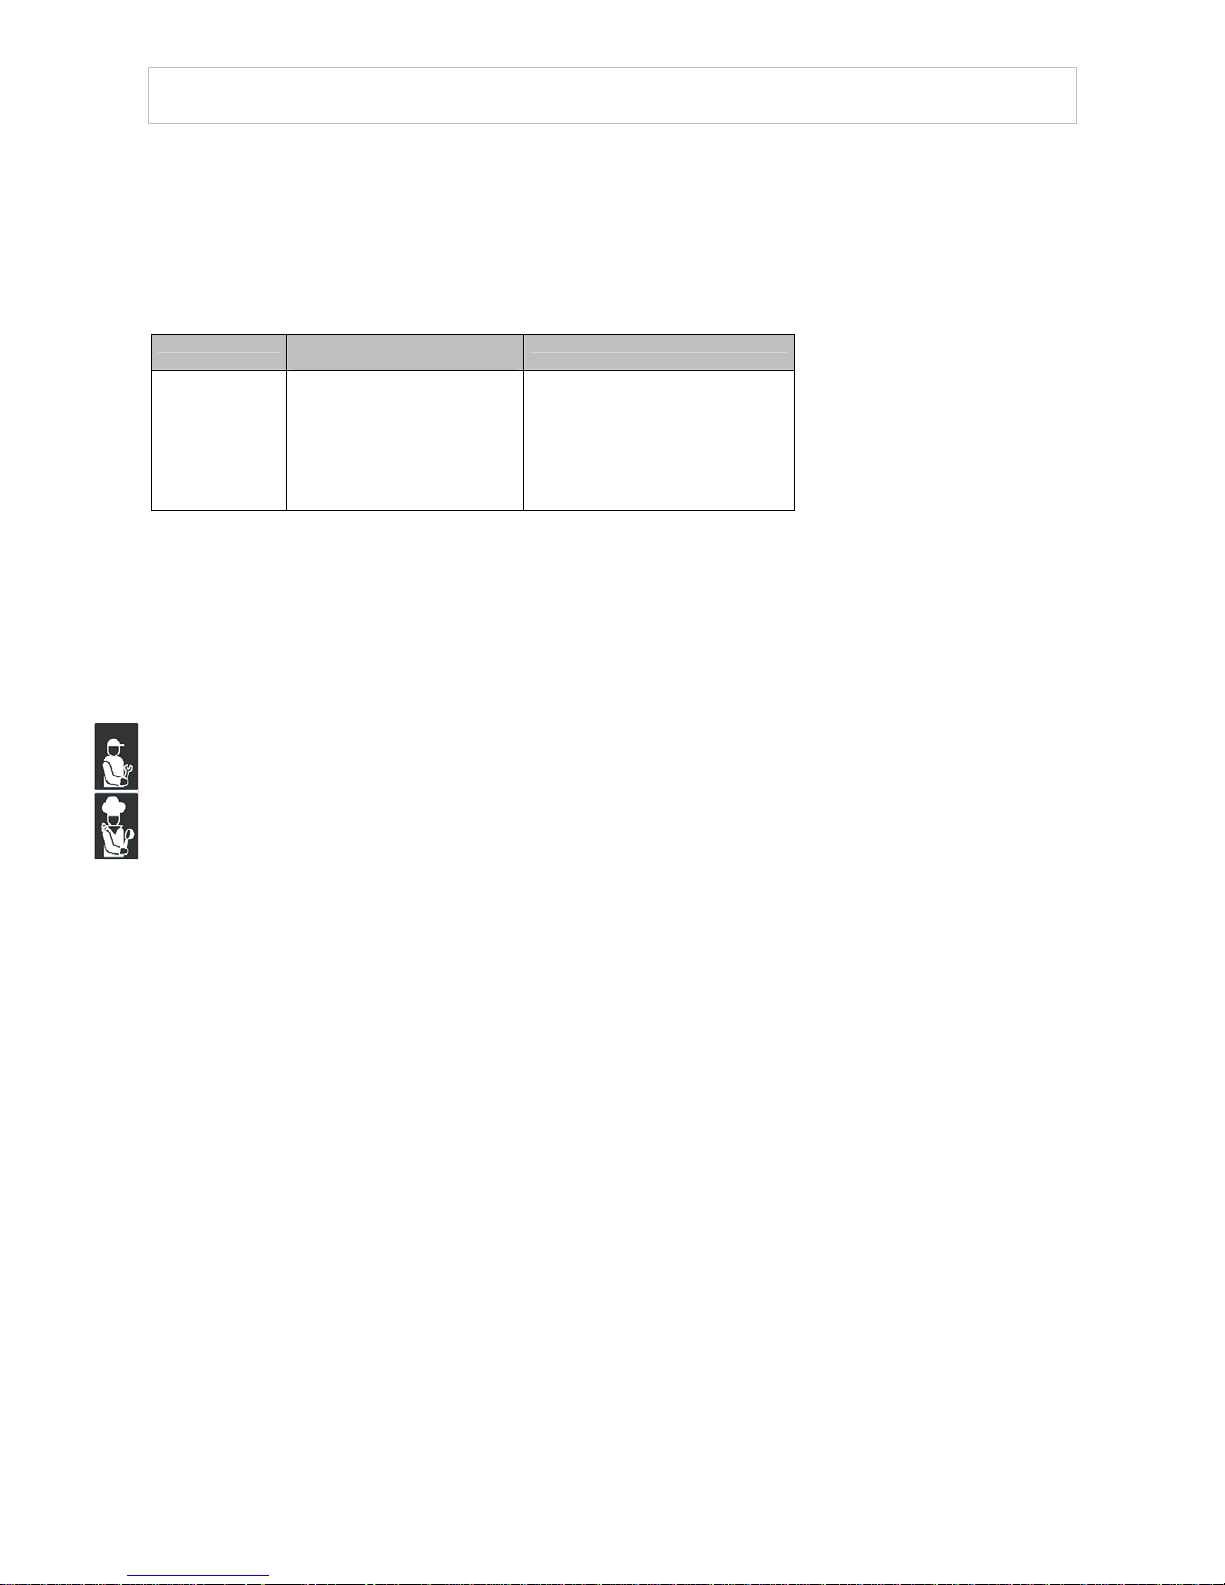
Table 3 shows the storing time rates for a few examples of frozen food.
Do not leave cooked products at room temperature before quick cooling.
Avoid any loss of moisture, which will affect food freshness.
The cooled product should be wrapped in a specific film for foodstuffs (better
still, vacuum stored) and provided with a sticker reporting the content [A], date
of processing [B] and expiry date [C] written in permanent type ink (pict.6).
Tab.3
Foodstuff Storing tmperature
[°F]
Recommended storing time
Pork 0 6
Beef 0 9
Poultry 0 10
Fat fish 0 2
Lean fish 0 4
Peas 0 12
Strawberries 0 12
Spinach 0 6
Page 9

-
-
-
I
I
I
N
N
N
S
S
S
T
T
T
R
R
R
U
U
U
C
C
C
T
T
T
I
I
I
O
O
O
N
N
N
M
M
M
A
A
A
N
N
N
U
U
U
A
A
A
L
L
L
-
-
-
7
CONTROL PANEL CHAPTER 2
DESCRIPTION OF CONTROLS
ON/OFF key
Pressing the key for 5 sec the controller turns off and the sign blinks on the
display
Pressing the key again the controller restarts in the Stand-By mode.
Enter key
Allows access to a menu or parameter selection.
Manual defrost
: press the key fro 5 s
Menu key
Allows access to the main menu or return to the previous menu.
IFR Quick cooling
: press the key for 5 s
Up e Down keys
Allow to scroll the different menus or change parameter values.
Quick cooling pos.
: press the key for 5 s
Quick cooling neg.
: press the key for 5 s
Keyboard lock
: press the keys for 5s
Start/Stop key
Allow to start/stop a quick cooling cycle.
O
FF
ON/OFF KEY
ENTER KEY
MENU KEY DOWN KEYS
UP KEYS
START/STOP KEY
Page 10
-
-
-
I
I
I
N
N
N
S
S
S
T
T
T
R
R
R
U
U
U
C
C
C
T
T
T
I
I
I
O
O
O
N
N
N
M
M
M
A
A
A
N
N
N
U
U
U
A
A
A
L
L
L
-
-
-
8
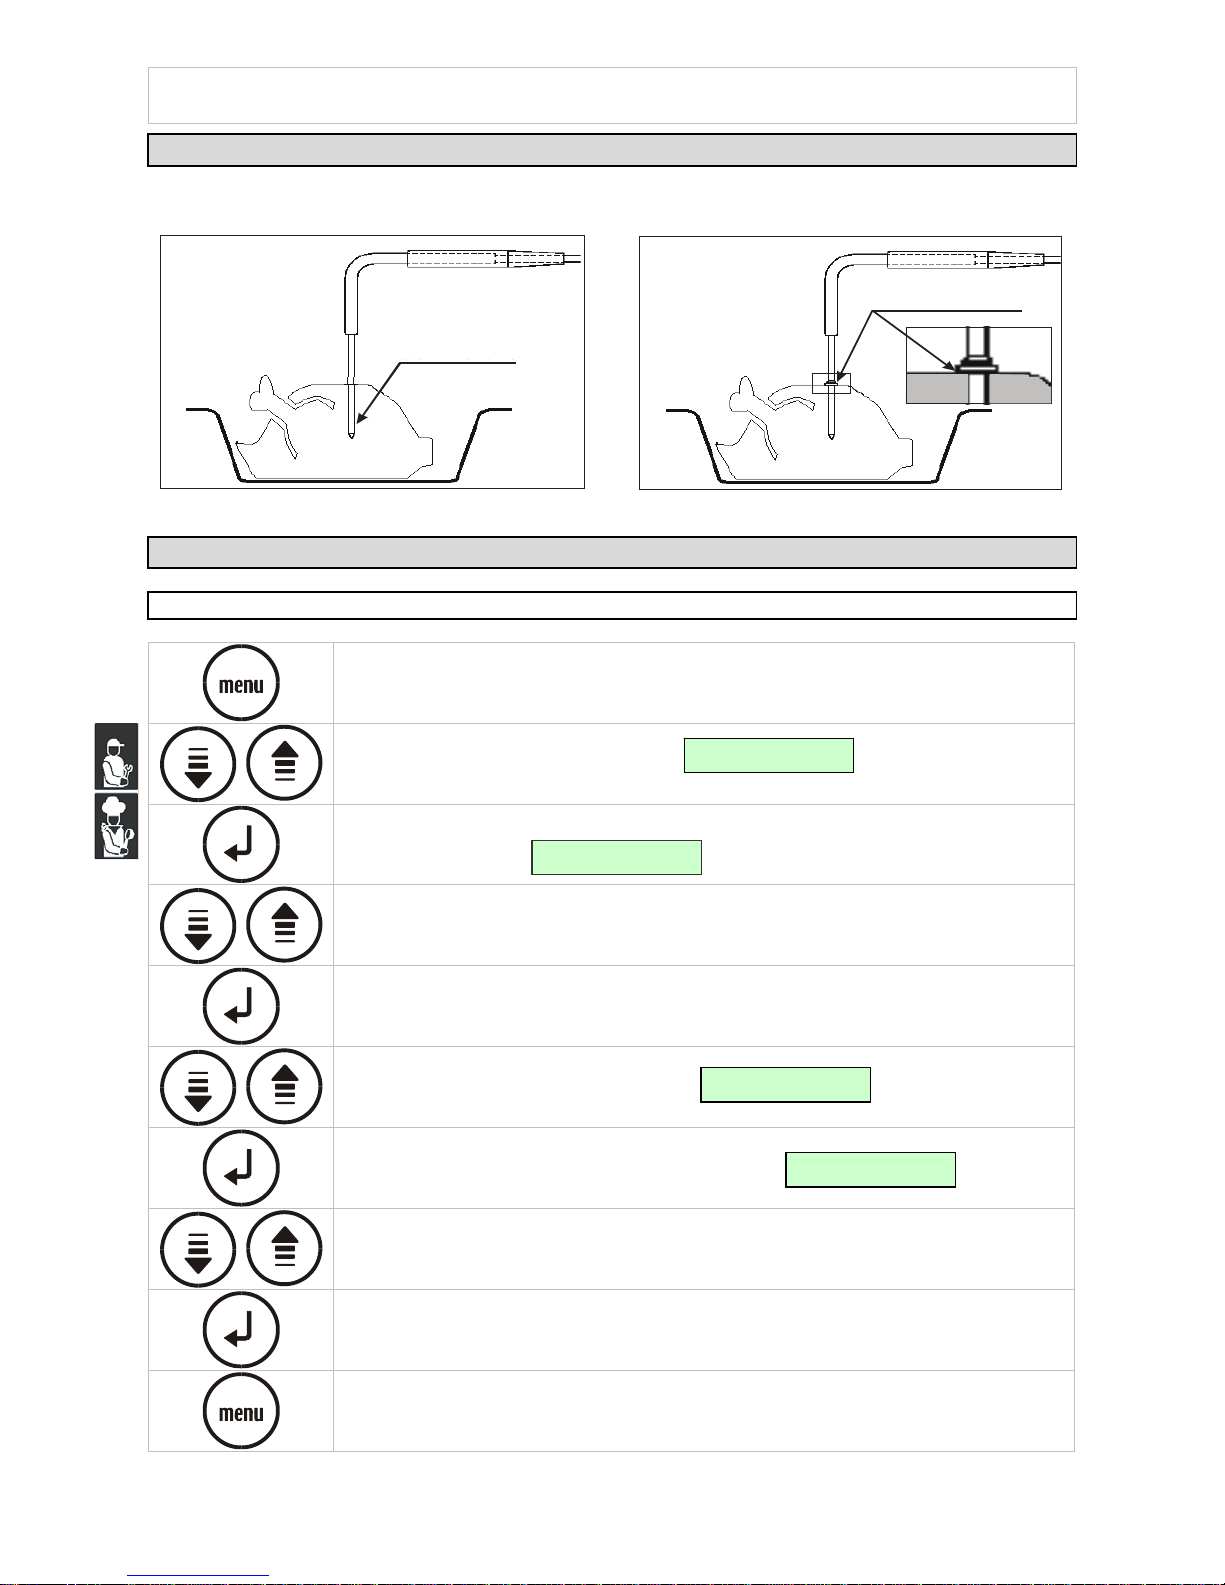
CORE PROBE
For proper position of the probe, refer to the following pictures.
SONDA A SINGOLO
RILEVAMENTO
CUORE PROD OTTO
SONDA A M ULTIPLO
RILEVAMENTO
SUP ER FICIE PRO D OT TO
GENERAL SETTING
LANGUAGE
Press the menu key to select the desired menu
Use the keys up and down to display
Press the enter key to gain access to the setting submenus
The display shows
Use the keys up and down to select the password “-19”
Press enter to confirm your choice
Use the keys up and down to display
Press enter to display the first language available
Use the keys up and down to select the desired language
Press enter to confirm your choice
Press menu several times to exit
S
et Up 04
Languag
e
L
anguage
I
taliano
S
et Up
P
assword 0
Menu 05
S
et U
p
SINGLE-DETECTOR
PROBE
MULTI-DETECTOR
PROBE
PRODUCT CORE
PRODUCT SURFACE
Page 11

-
-
-
I
I
I
N
N
N
S
S
S
T
T
T
R
R
R
U
U
U
C
C
C
T
T
T
I
I
I
O
O
O
N
N
N
M
M
M
A
A
A
N
N
N
U
U
U
A
A
A
L
L
L
-
-
-
9
D
01 = 0
CLOCK
Press the menu key to select the desired menu
Use the keys up and down to display
Press enter to gain access to the clock setting mode
The display shows
Use the keys up and down to change the flashing digit
Press enter to confirm and pass to the next value
Press menu several times to exit
TEMPERATURE UNIT OF MEASUREMENT
Press the menu key to select the desired menu
Use the keys up and down to display
Press the enter key to gain access to the setting submenus
The display shows
Use the keys up and down to select the password “-19”
Press enter to confirm your choice
Use the keys up and down to display
Press enter to gain access to the parameter programming mode
The first parameter is displayed
Use the keys up and down to display parameter D01
Press enter to confirm your choice
D
ate: 06/11/05
H
our: 14:22:46
Menu 06
C
lock Settin
g
S
et Up 03
P
arameters
A01 = 23°F
L
ow Alar
m
S
et Up
P
assword 0
Menu 05
S
et U
p
Page 12

-
-
-
I
I
I
N
N
N
S
S
S
T
T
T
R
R
R
U
U
U
C
C
C
T
T
T
I
I
I
O
O
O
N
N
N
M
M
M
A
A
A
N
N
N
U
U
U
A
A
A
L
L
L
-
-
-
10
Use the keys up and down to select the new value (0 Celsius, 1 Fahrenheit)
Press enter to confirm your choice
Press menu several times to exit
Page 13

-
-
-
I
I
I
N
N
N
S
S
S
T
T
T
R
R
R
U
U
U
C
C
C
T
T
T
I
I
I
O
O
O
N
N
N
M
M
M
A
A
A
N
N
N
U
U
U
A
A
A
L
L
L
-
-
-
11
OPERATION CHAPTER 3
PRE-COOLING CYCLE
We recommend starting a pre-cooling cycle before selecting quick cooling cycles.
Press the menu key to select the desired menu
Use the keys up and down to display
Press enter to gain access to the mode for setting quick cooling cycle s
Set
Use the keys up and down to pass to the next values
Set
Press enter to change the flashing values
Press the key start/stop to start the pre-cooling cycle immediately
Once the temperature of -4[°F] has been reached, press the key start/stop to interrupt
the pre-cooling cycle
QUICK COOLING CYCLE
IFR POSITIVE QUICK COOLING CYCLE
: automatic cycle preventing the product surface (any
thickness and material) from freezing, while respecting the multi-detector core probe insertion.
CORE PROBE POSITIVE QUICK COOLING CYCLE
: cycle suitable for cooling foodstuffs with
thickness lower than 1,5” using a room temperature of about +32[°F]. The cycle is controlled by the
core probe.
CORE PROBE NEGATIVE QUICK COOLING CYCLE
: cycle suitable for freezing foodstuffs using a
room temperature of about -22[°F]. The cycle is controlled by the core probe.
TIME-CONTROLLED POSITIVE QUICK COOLING CYCLE
: cycle suitable for cooling foodstuffs with
thickness lower than 1,5” using a room temperature of about +32[°F]. The cycle is time-controlled.
TIME-CONTROLLED NEGATIVE QUICK COOLING CYCLE
: cycle suitable for freezing foodstuffs
using a room temperature of about -22[°F]. The cycle is time-controlled.
CORE PROBE HARD QUICK COOLING CYCLE
: cycle suitable for cooling foodstuffs with thickness
exceeding 1,5” using a room temperature ranging from -22[°F] to +23[°F]. The cycle is controlled by
the core probe.
Quick Cooling
Ne
g
ative
Menu 01
S
et
Quick Cooling
Time
Page 14

-
-
-
I
I
I
N
N
N
S
S
S
T
T
T
R
R
R
U
U
U
C
C
C
T
T
T
I
I
I
O
O
O
N
N
N
M
M
M
A
A
A
N
N
N
U
U
U
A
A
A
L
L
L
-
-
-
12
TIME-CONTROLLED HARD QUICK COOLING CYCLE
: cycle suitable for cooling foodstuffs with
thickness exceeding 1,5” using a room temperature ranging from -22[°F] to +23[°F]. The cycle is
time-controlled.
NOTE: At the end of the quick cooling phase, the device starts the storing phase (+28[°F] at the end of the
positive quick cooling; -7[°F] at the end of the negative quick cooling).
Cooling time
FOODSTUFF SHEET MAX. LOAD
PRODUCT
THICKNESS
QUICK COOLING
TIME
CYCLE
FIRST COURSES
Bechamel GN1/1 h60 0,21 cuft 1,5” 70 minutes HARD
Meat broth GN1/1 h110 0,28 cuft 2,7” 110 minutes HARD
Cannelloni GN1/1 h40 9 lbs 1,5” 40 minutes HARD
Vegetable soup GN1/1 h100 0,17 cuft 2” 100 minutes HARD
Fresh pasta GN1/1 h40 0,5 lbs 2” 20 minutes NEGATIVE
Meat and tomato
sauce
GN1/1 h60 11 lbs 2” 90 minutes HARD
Bean soup GN1/1 h60 11 lbs 2” 100 minutes HARD
Fish soup GN1/1 h60 9 lbs 2” 110 minutes HARD
MEAT AND POULTRY
Roast pork GN1/1 h60 17,7 lbs 4” 110 minutes HARD
Braised beef GN1/1 h60 17,7 lbs 6” 110 minutes HARD
Boiler beef GN1/1 h60 13,24 lbs 6” 110 minutes HARD
Chicken breast GN1/1 h40 11 lbs 2” 30 minutes SOFT
Roast-beef GN1/1 h40 9 lbs 4” 80 minutes HARD
FISH
Baked grouper GN1/1 h40 6,5 lbs 2” 110 minutes HARD
Squill GN1/1 h40 4,4 lbs 1,2” 25 minutes HARD
Vacuum-stored
mussel
grid GN1/1 4,4 lbs max 2,5” 20 minutes HARD
Fish salad GN1/1 h40 8,8 lbs 1,5” 30 minutes POSITIVE
Boiled polyp GN1/1 h60 11 lbs - 60 minutes HARD
Stewed cuttlefish GN1/1 h60 8,8 lbs 2” 60 minutes HARD
VEGETABLES
Carrots trifolate GN1/1 h60 8,8 lbs 2” 60 minutes HARD
Mushrooms trifolati GN1/1 h60 8,8 lbs 2” 60 minutes HARD
Zucchinis trifolate GN1/1 h60 6,6 lbs 2” 90 minutes HARD
PASTRY/DESSERT
Vanilla / chocolate
pudding
GN1/1 h60 0,21 cuft 2” 90 minutes
POSITIVE
Creme anglaise GN1/1 h60 0,1 cuft 2” 100 minutes POSITIVE
Custard a GN1/1 h60 0,1 cuft 2” 100 minutes POSITIVE
Panna cotta
(single portion)
grid 0,1 cuft 2,3” 60 minutes
POSITIVE
Ice-cream cake grid 6,6 lbs 2,3” 50 minutes POSITIVE
Tiramisù GN1/1 h60 11 lbs 2” 45 minutes POSITIVE
Page 15
-
-
-
I
I
I
N
N
N
S
S
S
T
T
T
R
R
R
U
U
U
C
C
C
T
T
T
I
I
I
O
O
O
N
N
N
M
M
M
A
A
A
N
N
N
U
U
U
A
A
A
L
L
L
-
-
-
13
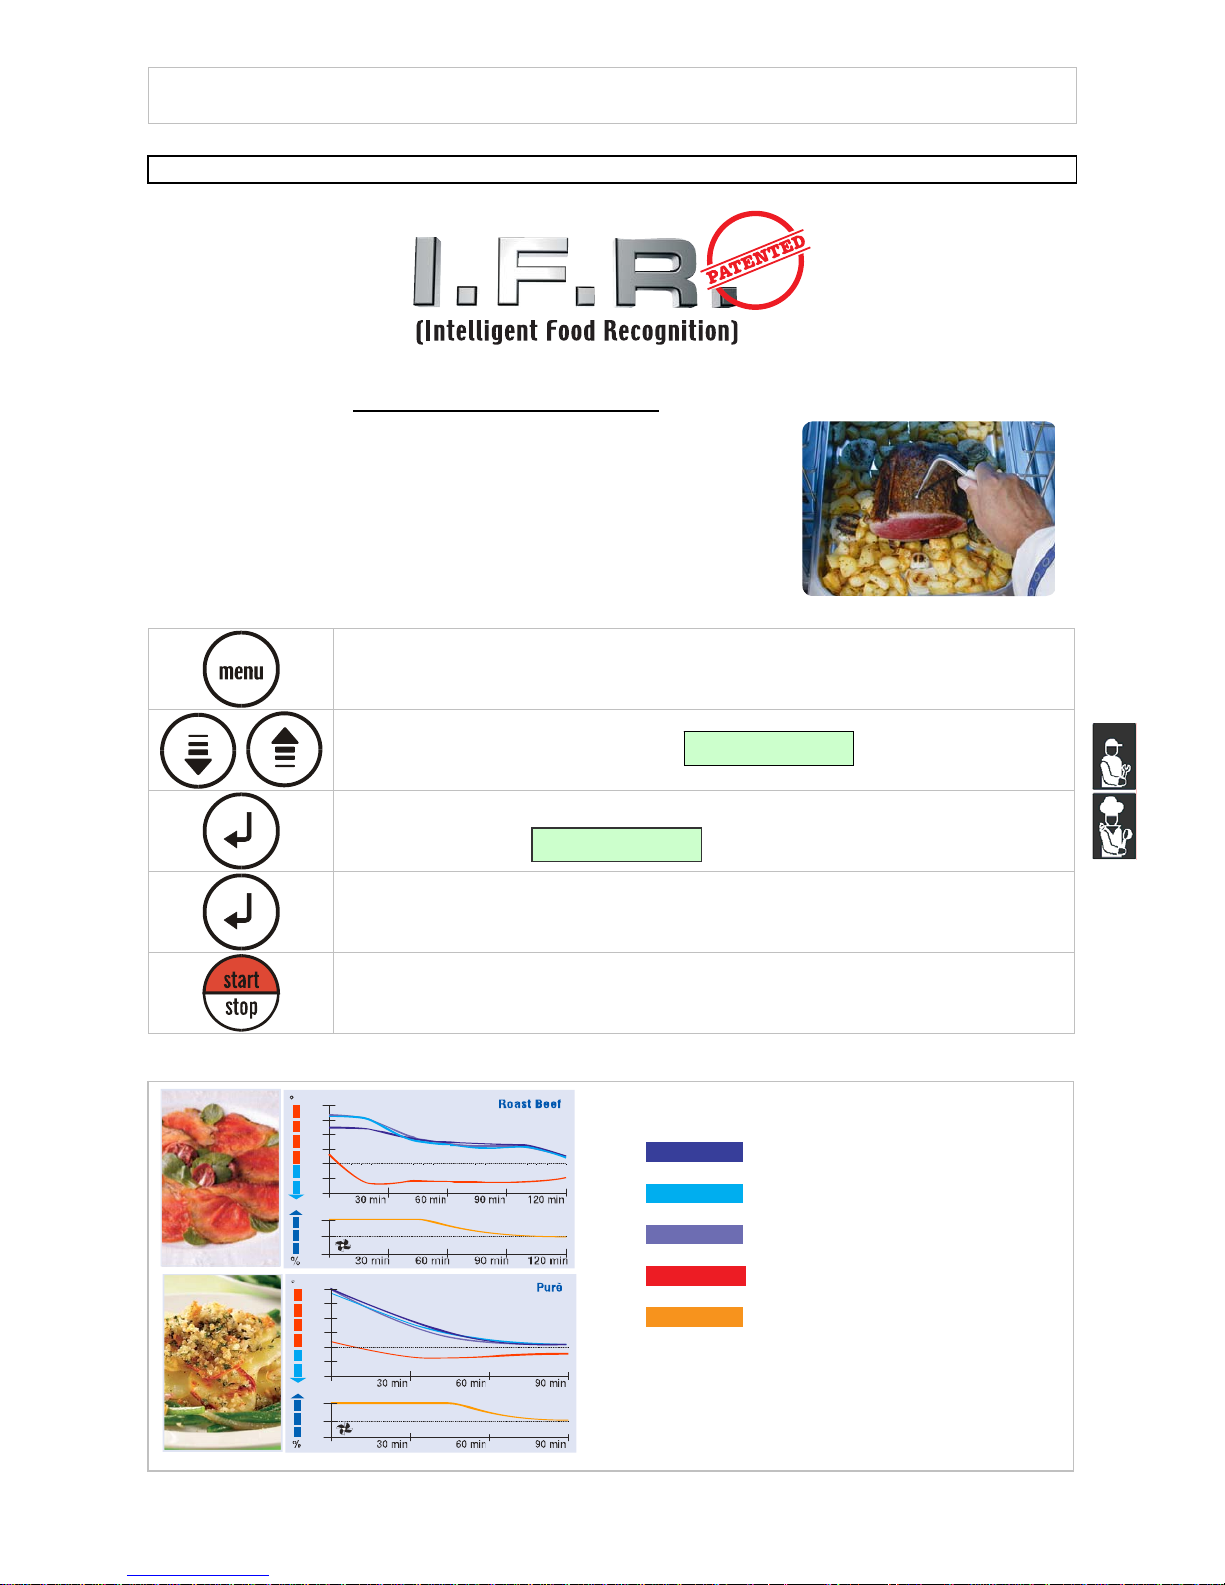
IFR POSITIVE QUICK COOLING CYCLE
The IFR is an innovative patented system of positive quick cooling which allows the cycle optimisation for
each type of foodstuffs by preventing superficial freezing.
Temperatures are detected by a three-sensor multipoint needle probe.
The position inside the foodstuff is determined univocally by a reference
disk located along the needle. (ref. pag 8, par. “core probe”).
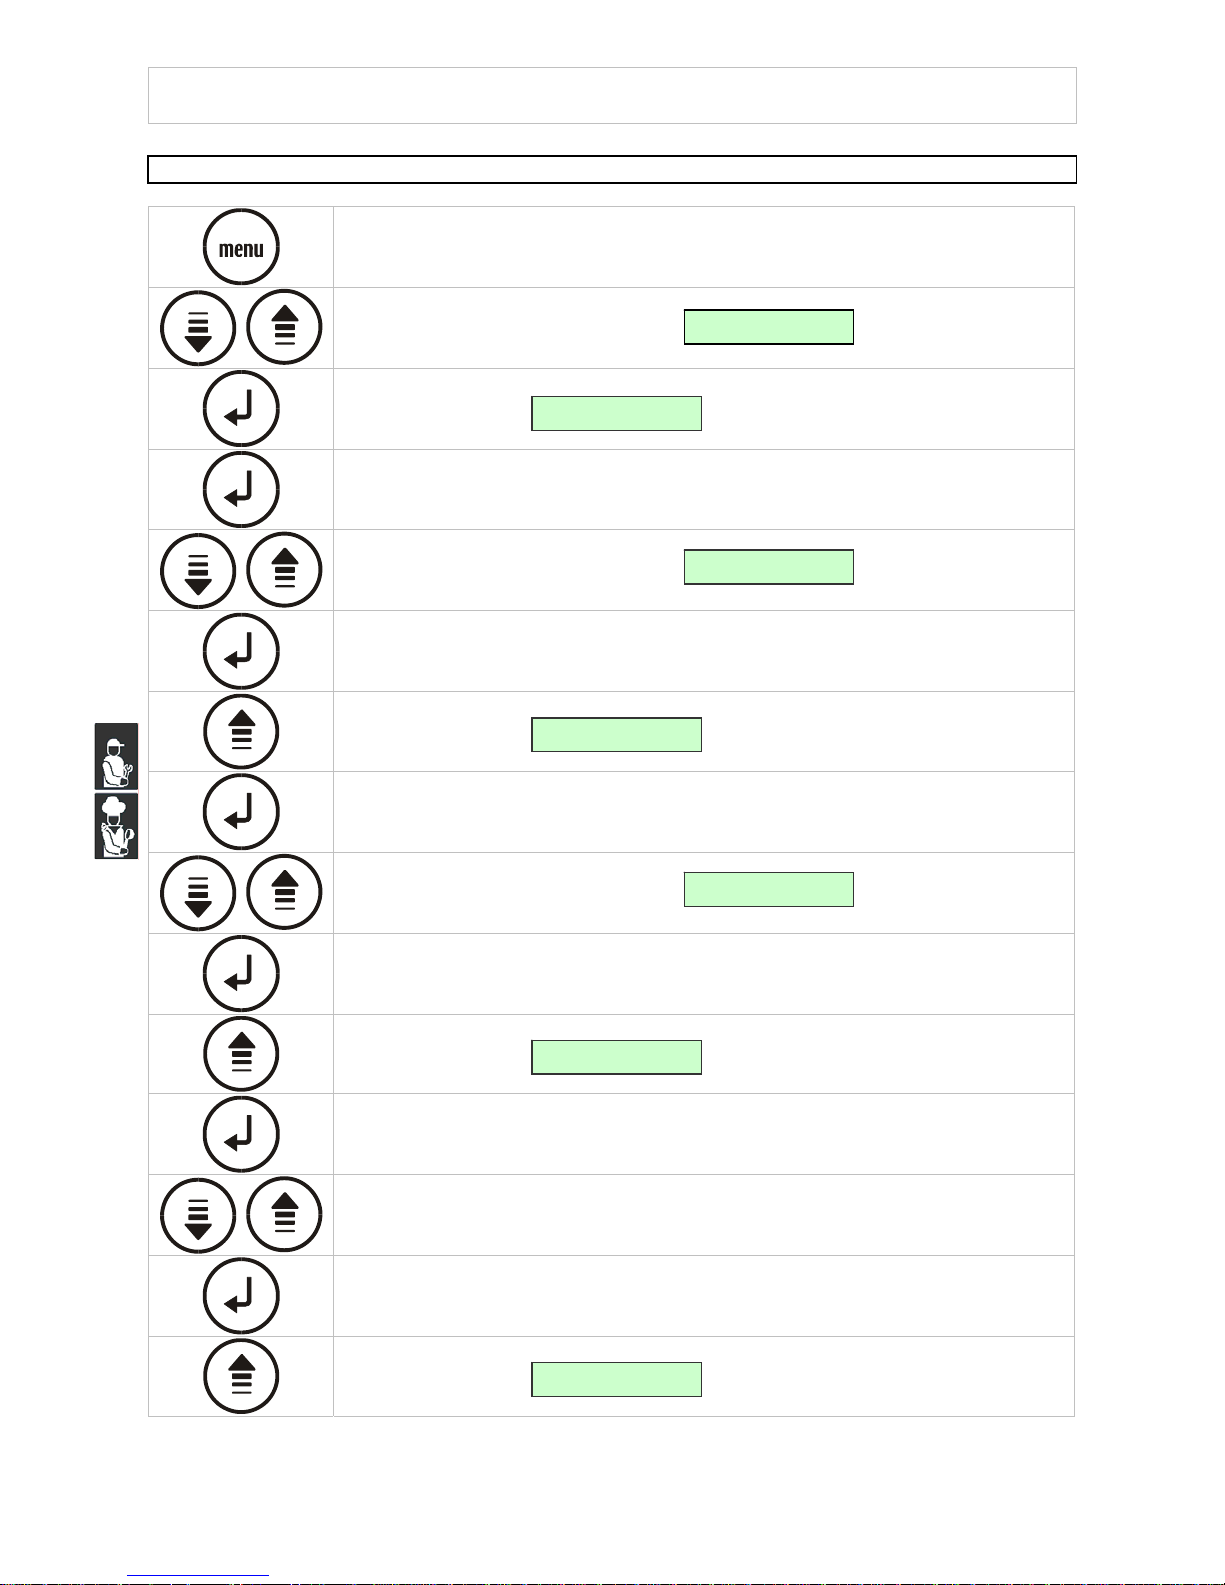
Press the menu key to select the desired menu
Use the keys up and down to display
Press enter to gain access to the programme selecting mode
The display shows
Press enter to confirm your choice
Press the key start/stop to start the selected quick cooling cycle immediately
-4
-40
100
50
0
32
68
104
140
176
F
-4
-40
100
50
0
32
68
104
140
176
F
PRODUCT CORE
INTERMEDIATE
PRODUCT SURFACE
ROOM TEMPERATURE
ROOM VENTILATION SPEED
P
rogra
m
IFR
Menu 03
Prog
rammes
Page 16
-
-
-
I
I
I
N
N
N
S
S
S
T
T
T
R
R
R
U
U
U
C
C
C
T
T
T
I
I
I
O
O
O
N
N
N
M
M
M
A
A
A
N
N
N
U
U
U
A
A
A
L
L
L
-
-
-
14
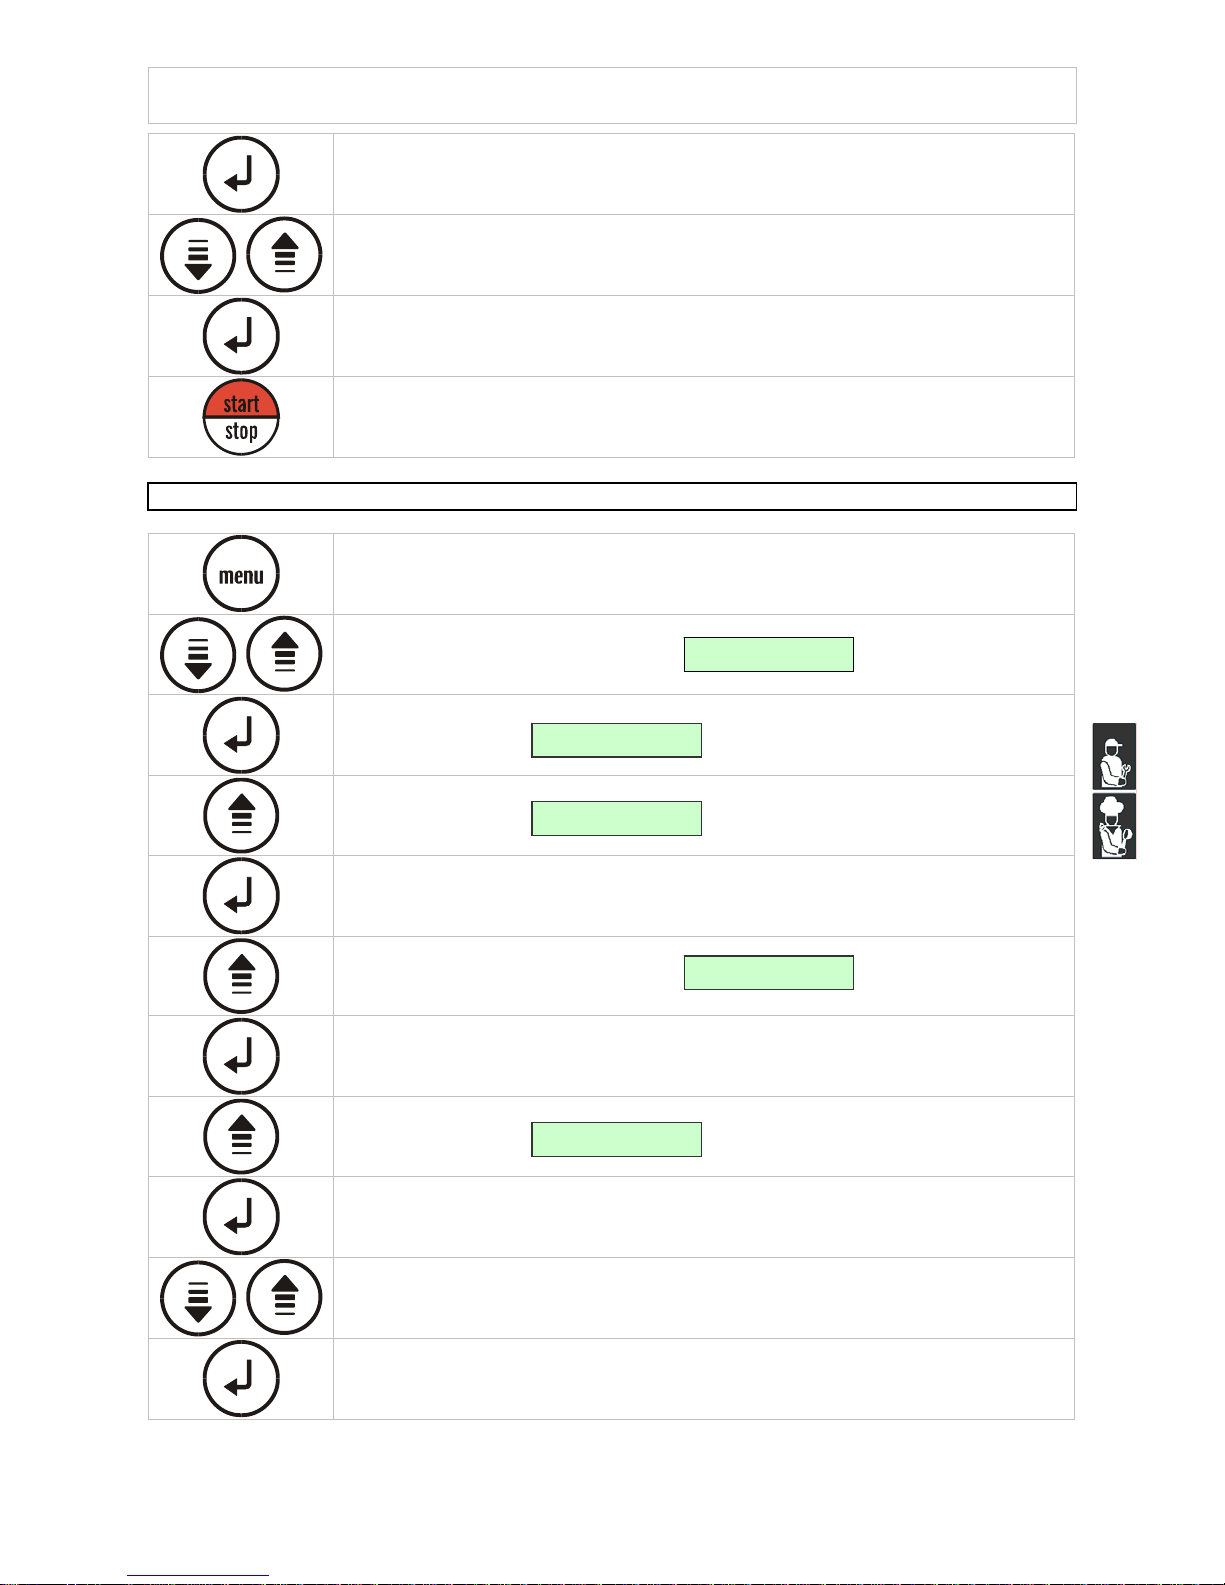
CORE PROBE POSITIVE QUICK COOLING CYCLE
Press the menu key to select the desired menu
Use the keys up and down to display
Press enter to gain access to the mode for setting quick cooling cycle s
The display shows
Press enter to change the flashing values
Use the keys up and down to display
Press enter to confirm your choice, the value stops flashing
Use the keys up and down to pass to the next values
The display shows
Press enter to change the flashing values
Use the keys up and down to display
Press enter to confirm your choice, the value stops flashing
Use the keys up and down to pass to the next values
The display shows
Press enter to change the flashing values
Use the keys up and down to display the room temperature desired value
Press enter to confirm your choice, the value stops flashing
Use the keys up and down to pass to the next values
The display shows
Q
uick Cooling
Ne
g
ative
Menu 01
S
et
Q
u
ick Cooling
P
ositive
Q
uick Cooling
T
ime
Q
uick Cooling
C
ore
S
et Point
-
2
5
S
pee
d
5
0%
Page 17
-
-
-
I
I
I
N
N
N
S
S
S
T
T
T
R
R
R
U
U
U
C
C
C
T
T
T
I
I
I
O
O
O
N
N
N
M
M
M
A
A
A
N
N
N
U
U
U
A
A
A
L
L
L
-
-
-
15
Press enter to change the flashing values
Use the keys up and down to display the desired value
Press enter to confirm your choice, the value stops flashing
Press the key start/stop to start the selected quick cooling cycle immediately
CORE PROBE NEGATIVE QUICK COOLING CYCLE
Press the menu key to select the desired menu
Use the keys up and down to display
Press enter to gain access to the mode for setting quick cooling cycles
The display shows
Use the keys up and down to pass to the next values
The display shows
Press enter to change the flashing values
Use the keys up and down to display
Press enter to confirm your choice, the value stops flashing
Use the keys up and down to pass to the next values
The display shows
Press enter to change the flashing values
Use the keys up and down to display the desired value
Press enter to confirm your choice, the value stops flashing
Q
uick Cooling
Ne
g
ative
Menu 01
S
et
Q
uick Cooling
T
ime
Q
uick Cooling
C
ore
S
et Point
-
2
5
Page 18

-
-
-
I
I
I
N
N
N
S
S
S
T
T
T
R
R
R
U
U
U
C
C
C
T
T
T
I
I
I
O
O
O
N
N
N
M
M
M
A
A
A
N
N
N
U
U
U
A
A
A
L
L
L
-
-
-
16
Use the keys up and down to pass to the next values
The display shows
Press enter to change the flashing values
Use the keys up and down to display the desired value
Press enter to confirm your choice, the value stops flashing
Press the key start/stop to start the selected quick cooling cycle immediately
TIME-CONTROLLED POSITIVE QUICK COOLING CYCLE
Press the menu key to select the desired menu
Use the keys up and down to display
Press enter to gain access to the mode for setting quick cooling cycle s
The display shows
Press enter to change the flashing values
Use the keys up and down to display
Press enter to confirm your choice, the value stops flashing
Use the keys up and down to pass to the next values
The display shows
Press enter to change the flashing values
Press enter to confirm your choice, the value stops flashing
Use the keys up and down to pass to the next values
The display shows
S
pee
d
5
0%
Q
uick Cooling
Ne
g
ati
v
e
Menu 01
S
et
Q
uick Cooling
P
ositive
Q
uick Cooling
T
ime
L
ength
9
0 min
Page 19

-
-
-
I
I
I
N
N
N
S
S
S
T
T
T
R
R
R
U
U
U
C
C
C
T
T
T
I
I
I
O
O
O
N
N
N
M
M
M
A
A
A
N
N
N
U
U
U
A
A
A
L
L
L
-
-
-
17
Press enter to change the flashing values
Use the keys up and down to display the desired value
Press enter to confirm your choice, the value stops flashing
Use the keys up and down to pass to the next values
The display shows
Press enter to change the flashing values
Use the keys up and down to display the desired value
Press enter to confirm your choice, the value stops flashing
Press the key start/stop to start the selected quick cooling cycle immediately
TIME-CONTROLLED NEGATIVE QUICK COOLING CYCLE
Press the menu key to select the desired menu
Use the keys up and down to display
Press enter to gain access to the mode for setting quick cooling cycle s
The display shows
Use the keys up and down to pass to the next values
The display shows
Press enter to change the flashing values
Press enter to confirm your choice, the value stops flashing
Use the keys up and down to pass to the next values
The display shows
S
pee
d
5
0%
Q
uick Cooling
Ne
g
ative
Menu 01
S
et
Q
uick Cooling
T
ime
L
ength
2
40 min
Page 20

-
-
-
I
I
I
N
N
N
S
S
S
T
T
T
R
R
R
U
U
U
C
C
C
T
T
T
I
I
I
O
O
O
N
N
N
M
M
M
A
A
A
N
N
N
U
U
U
A
A
A
L
L
L
-
-
-
18
Press enter to change the flashing values
Use the keys up and down to display the desired value
Press enter to confirm your choice, the value stops flashing
Use the keys up and down to pass to the next values
The display shows
Press enter to change the flashing values
Use the keys up and down to display the desired value
Press enter to confirm your choice, the value stops flashing
Press the key start/stop to start the selected quick cooling cycle immediately
CORE PROBE HARD QUICK COOLING CYCLE
Press the menu key to select the desired menu
Use the keys up and down to display
Press enter to gain access to the mode for setting quick cooling cycle s
The display shows
Press enter to change the flashing values
Use the keys up and down to display
Press enter to confirm your choice, the value stops flashing
Use the keys up and down to pass to the next values
The display shows
S
pee
d
5
0%
Q
uick Cooling
Ne
g
ative
Menu 01
S
et
Q
uick Cooling
Hard
Q
uick Cooling
T
ime
Page 21

-
-
-
I
I
I
N
N
N
S
S
S
T
T
T
R
R
R
U
U
U
C
C
C
T
T
T
I
I
I
O
O
O
N
N
N
M
M
M
A
A
A
N
N
N
U
U
U
A
A
A
L
L
L
-
-
-
19
Press enter to change the flashing values
Use the keys up and down to display
Press enter to confirm your choice, the value stops flashing
Use the keys up and down to pass to the next values
The display shows
Press enter to change the flashing values
Use the keys up and down to display the desired value
Press enter to confirm your choice, the value stops flashing
Use the keys up and down to pass to the next values
The display shows
Press enter to change the flashing values
Use the keys up and down to display the desired value
Press enter to confirm your choice, the value stops flashing
Press the key start/stop to start the selected quick cooling cycle immediately
TIME-CONTROLLED HARD QUICK COOLING CYCLE
Press the menu key to select the desired menu
Use the keys up and down to display
Press enter to gain access to the mode for setting quick cooling cycle s
The display shows
Q
uick Cooling
C
o
re
S
et Point
-
2
5
S
pee
d
5
0%
Q
uick Cooling
Ne
g
ative
Menu 01
S
et
Page 22

-
-
-
I
I
I
N
N
N
S
S
S
T
T
T
R
R
R
U
U
U
C
C
C
T
T
T
I
I
I
O
O
O
N
N
N
M
M
M
A
A
A
N
N
N
U
U
U
A
A
A
L
L
L
-
-
-
20
Press enter to change the flashing values
Use the keys up and down to display
Press enter to confirm your choice, the value stops flashing
Use the keys up and down to pass to the next values
The display shows
Press enter to change the flashing values
Press enter to confirm your choice, the value stops flashing
Use the keys up and down to pass to the next values
The display shows
Press enter to change the flashing values
Use the keys up and down to display the desired value
Press enter to confirm your choice, the value stops flashing
Use the keys up and down to pass to the next values
The display shows
Press enter to change the flashing values
Use the keys up and down to display the desired value
Press enter to confirm your choice, the value stops flashing
Press the key start/stop to start the selected quick cooling cycle immediately
Q
uick Cooling
Hard
Q
uick Cooling
T
ime
L
ength
9
0 min
S
pee
d
5
0%
Page 23

-
-
-
I
I
I
N
N
N
S
S
S
T
T
T
R
R
R
U
U
U
C
C
C
T
T
T
I
I
I
O
O
O
N
N
N
M
M
M
A
A
A
N
N
N
U
U
U
A
A
A
L
L
L
-
-
-
21
STORING CYCLE
Storing cycles and quick cooling cycles can be started separately
POSITIVE STORING CYCLE
Press the menu key to select the desired menu
Use the keys up and down to display
Press enter to gain access to the mode for starting a storing cy cle
The display shows
Press enter to change the flashing values
Use the keys up and down to display
Press enter to confirm your choice, the value stops flashing
Use the keys up and down to pass to the next values
The display shows
Press enter to change the flashing values
Use the keys up and down to display the desired value
Press enter to confirm your choice, the value stops flashing
Use the keys up and down to pass to the next values
The display shows
Press enter to change the flashing values
Use the keys up and down to display the desired value
Press enter to confirm your choice, the value stops flashing
S
toring
Ne
g
ative
Menu 02
S
torin
g
S
toring
P
ositive
S
et Point
+
2
S
pee
d
5
0%
Page 24

-
-
-
I
I
I
N
N
N
S
S
S
T
T
T
R
R
R
U
U
U
C
C
C
T
T
T
I
I
I
O
O
O
N
N
N
M
M
M
A
A
A
N
N
N
U
U
U
A
A
A
L
L
L
-
-
-
22
Press the key start/stop to start the storing cycle immediately
NEGATIVE STORING CYCLE
Press the menu key to select the desired menu
Use the keys up and down to display
Press enter to gain access to the mode for starting a storing cy cle
The display shows
Press enter to change the flashing values
Press enter to confirm your choice, the value stops flashing
Use the keys up and down to pass to the next values
The display shows
Press enter to change the flashing values
Use the keys up and down to display the desired value
Press enter to confirm your choice, the value stops flashing
Use the keys up and down to pass to the next values
The display shows
Press enter to change the flashing values
Use the keys up and down to display the desired value
Press enter to confirm your choice, the value stops flashing
Press the key start/stop to start the storing cycle immediately
S
toring
Ne
g
ative
Menu 02
S
torin
g
S
et Point
-
2
2
S
pee
d
5
0%
Page 25

-
-
-
I
I
I
N
N
N
S
S
S
T
T
T
R
R
R
U
U
U
C
C
C
T
T
T
I
I
I
O
O
O
N
N
N
M
M
M
A
A
A
N
N
N
U
U
U
A
A
A
L
L
L
-
-
-
23
MEMORIZING PROGRAMMES
It is possible to memorize up to 20 USER programmes.
The last set programme can be memorized as follows:
Press the menu key to select the desired menu
Use the keys up and down to display
Press enter to gain access to the mode for memorizing a quick cooling cycle
previously set
The display shows the programme number and indicates
whether it is already memorized or not
Use the keys up an down to scroll all programmes from 01 to 20, and select the
desired number to save the programme
Press enter to confirm your choice
USING MEMORIZED PROGRAMMES
The memorized USER programmes can be activated as follows:
Press the menu key to select the desired menu
Use the keys up and down to display
Press enter to gain access to the programme selecting mode
The display shows
Use the keys up and down to display
Press enter to gain access to the User programmes selection (1-20)
The display shows the programme number as well as the type of cycle memorized
Use the keys up and down to scroll all the memorized programmes
Press the key start/stop to start the selected quick cooling cycle immediately
Program 03
------
Menu 07
Memorization
Menu 03
Prog
rammes
P
rogra
m
IFR
P
rogra
m
U
ser
Page 26

-
-
-
I
I
I
N
N
N
S
S
S
T
T
T
R
R
R
U
U
U
C
C
C
T
T
T
I
I
I
O
O
O
N
N
N
M
M
M
A
A
A
N
N
N
U
U
U
A
A
A
L
L
L
-
-
-
24
USING RECOMMENDED PROGRAMMES
PRESET programmes are working cycles recommended by the manufacturer. Parameters cannot be
changed.
Press the menu key to select the desired menu
Use the keys up and down to display
Press enter to gain access to the programme selecting mode
The display shows
Use the keys up and down to display
Press enter to gain acces to the memorized programmes selection (21-29)
The display shows the programme number and name
Use the keys up and down to scroll all the memorized programmes
Press the key start/stop to start the selected quick cooling cycle immediately
The recommend programmes are listed below:
Prog Name of the programme
Positive
negative
Time/Core hard
Room set
storing
time Ventilat.
21
QC meats positive core yes +35°F 120 min 100%
22
QC creams positive
time no +35°F 90 min 100%
23
QC pies positive
time no +35°F 90 min 100%
24
QC compounds positive
time no +35°F 90 min 100%
25
QC ichthyc products positive
time yes +35°F 90 min 100%
26
QC avicultural products positive
time yes +35°F 90 min 100%
27
vegetables positive
time no +35°F 90 min 100%
28
Temper. freezing negative
core yes -8°F 240 min 100%
29
Time freez in g negative
time yes -8°F 240 min 100%
DEFROSTING
Press the menu key to select the desired menu
Use the keys up and down to display
Menu 03
Prog
rammes
P
rogra
m
IFR
P
rogra
m
P
reset
Program 21
MEATS
Menu 04
D
efrost
Page 27

-
-
-
I
I
I
N
N
N
S
S
S
T
T
T
R
R
R
U
U
U
C
C
C
T
T
T
I
I
I
O
O
O
N
N
N
M
M
M
A
A
A
N
N
N
U
U
U
A
A
A
L
L
L
-
-
-
25
Press enter to gain access to the defrost activation
The display shows
Press Up to start defrost
Press the key start/stop to stop defrost.
Note: immediate defrost can be starter from the main menu by pressing the key
for at least 5 seconds
Start Defrost?
NoO
k
Page 28

-
-
-
I
I
I
N
N
N
S
S
S
T
T
T
R
R
R
U
U
U
C
C
C
T
T
T
I
I
I
O
O
O
N
N
N
M
M
M
A
A
A
N
N
N
U
U
U
A
A
A
L
L
L
-
-
-
26
ACCESSORIES CHAPTER 4
The following accessories are available upon request. (pict.7)
A) THERMAL PRINTER
B) PROBE SUPPORT
(useful in quick cooling cycles for liquid foodstuffs)
PRINTING MEMORIZED CYCLES
NOTE: the printer is not supplied as standard equipment. It is an optional item.
Press the menu key to select the desired menu
Use the keys up and down to display
Press enter to gain access to the mode for printing the quick cooling cycles
memorized
The display shows
Press Up to start printing the memorized cycles
Menu 09
P
rint
Print Dates?
NoO
k
Pict.7
A
B
Page 29

-
-
-
I
I
I
N
N
N
S
S
S
T
T
T
R
R
R
U
U
U
C
C
C
T
T
T
I
I
I
O
O
O
N
N
N
M
M
M
A
A
A
N
N
N
U
U
U
A
A
A
L
L
L
-
-
-
27
MAINTENANCE CHAPTER 5
MAINTENANCE AND CLEANING
CLEANING THE CABINET
Clean inside the cooling cabinet daily.
Both the cabinet and all the internal components have been designed and shaped to
allow washing and cleaning all parts easily.
Before cleaning, defrost the appliance and remove the internal drain.
Disconnect the master switch.
Clean all components (stainless-stell, plastic or painted parts) with lukewarm water
and detergent.
Then rinse and dry without using abrasives or chermical solvents. (pict.8)
Do not wash the appliance by spraying high-pressure water on the machine. (pict.9)
Do not rinse with sharp or abrasive tools, especially the evaporator. (pict.10)
You may clean inside the evaporator after loosening the knobs and rotating the
protection component. (pict.11)
Remove the front control board with a tool and clean the raceway to remove all dirt.
(pict.12)
D
E
T
E
R
S
I
V
O
A
B
R
A
S
I
V
O
Pict.8
Pict.9
Pict.10
Pict.11
Pict.12
Page 30

-
-
-
I
I
I
N
N
N
S
S
S
T
T
T
R
R
R
U
U
U
C
C
C
T
T
T
I
I
I
O
O
O
N
N
N
M
M
M
A
A
A
N
N
N
U
U
U
A
A
A
L
L
L
-
-
-
28
Wash the door gasket with water. Accurately dry with a dry cloth. We
recommend wearing protecting gloves throughout the operations. (pict.13)
Hand-wash the probe using lukewarm water and a mild detergent or products
with biodegradability higher than 90%. Rinse with water and sanitary solution.
Do not use detergents containing solvents (such as trichloroethylene, etc) or
abrasive powders
ATTENTION: do not use hot water to wash the probe (pict.14)
CLEANING THE AIR CONDENSER
The air condenser should be kept clean to ensure the appliance's performance and
efficiency, as air should freely circulate inside the appliance. (pict.15)
The condenser should therefore be cleaned every 30 days, using non-metal brushes
to remove all dust and dirt from condenser blades.
Access to the condenser is obtained by removing the front panel. (pict.16)
STAINLESS-STEEL MAINTENANCE
By stainless steel we mean INOX AISI 304 steel. We recommend following the
instructions below for the maintenance and cleaning of stainless-steel parts.
This is of the utmost importance to ensure the non-toxicity and complete
hygiene of the processed foodstuffs. Stainless-steel is provided with a thin
oxide layer which prevents it from rusting. However, some detergents may
destroy or affect this layer, therefore causing corrosion. Before using any
cleansing product, ask your dealer about a neutral chloriness cleansing
product, as to avoid steel corrosions. If the surface has been scratched polish
it with fine STAINLESS-STEEL wool or a synthetic-fibre abrasive sponge.
Always rub in the direction of the silking. (pict.17)
WARNING: Never use iron wool for cleaning STAINLESS STEEL.
Furthermore, avoid leaving iron wool on the appliance surface as tiny iron
deposits may cause the surface to rust by contamination and affect the
hygiene of the appliance.
Pict.15
Pict.16
Pict.17
Pict.13
Pict.14
Page 31

-
-
-
I
I
I
N
N
N
S
S
S
T
T
T
R
R
R
U
U
U
C
C
C
T
T
T
I
I
I
O
O
O
N
N
N
M
M
M
A
A
A
N
N
N
U
U
U
A
A
A
L
L
L
-
-
-
29
DISCONTINUED USE
Should the machine be disconnected over long periods, follow the instructions below
to maintain the appliance in good condition:
Turn the mains switch OFF. (pict.18)
Disconnect the plug. (pict.19)
Empty the appliance and clean it in accordance
with the instructions given in the chapter
"CLEANING". Leave the door ajar to prevent a
bad smell.
Cover the compressor unit with a nylon cloth to
protect it from dust. (pict.20)
In case of appliances with remote control, if you
decide to turn it off, remember to put the switch
off also in the remote control.
OFF
Pict.18
Pict.19
Pict.20
Page 32

Page 33

-
-
-
I
I
I
N
N
N
S
S
S
T
T
T
A
A
A
L
L
L
L
L
L
A
A
A
T
T
T
I
I
I
O
O
O
N
N
N
M
M
M
A
A
A
N
N
N
U
U
U
A
A
A
L
L
L
-
-
-
31
INSTALLATION
INTRODUCTION
After unpacking the appliance make sure it has not been damaged. (pict.21)
Make sure the technical wiring specifications comply with the ratings (i.e., V, kW, Hz,
no. phases and mains power Check the power supply type, adjustments, performance
and calibration of the device located before the appliance. Check and record the
coolant type inside the system and refer to the recorded data in any refill.
Please quote the product's serial number (shown on the rating plate) on any enquiry
to the Manufacturer. (pict.22)
List of rates shown on the rating plate:
1) Model
2) Manufacturer’s name and address
3) Date of make
4) Year of make
5) Serial number
6) Power insulation class
8) Maximum pressare of refrigerant
9) Minimum pressare of refrigerant
10) Minimum Circuity Amp.
11) Max Fuse Size
A) Input voltage
B) Electric current intensity
C) Frequency
D) Number phases
E) Total lamp power
G) Refrigerant type
H) Refrigerant quantity
L) Class of temperature
M) Max hydraulic supply pressure
N) Condenser fan current and fans number
P) Current rated compressor
Q) Locked rotor compressor
S) Evaporator fan current and fans number
MAX ROOM TEMPERATURE (TAB.4)
Air-condenser units should not operate if room temperature is over 100[°F]. Above 90[°F] amximum output is
not guaranteed.
POSITIONING
The appliance must be installed and tested in full compliance with accident-prevention
regulations contained in national law and current guidelines. Installers are to comply
with any current local regulations.
An omnipolar switch is to be installed before the appliance, in compliance with the
current regulations applied in the country where the appliance is installed.(pict.24)
Pict.21
Pict.24
10
11
__/__/__
S
N
8 9
Pict.22
Page 34

-
-
-
I
I
I
N
N
N
S
S
S
T
T
T
A
A
A
L
L
L
L
L
L
A
A
A
T
T
T
I
I
I
O
O
O
N
N
N
M
M
M
A
A
A
N
N
N
U
U
U
A
A
A
L
L
L
-
-
-
32
Do not place the refrigerated compartment near heat
sources. (pict.25)
Remove pvc protective film from all over the
appliance. (pict.26)
Place the appliance onto the required working site.
(pict.27)
Avoid locations with exposure to direct sunlight.
Do not place the appliance in hot, poorly-ventilated
rooms.
Leave a min. 4” clearance around the appliance on
the sides where air inlet and outlet are located.
(pict.28)
Level the appliance by means of adjustable feet. (pict.29)
Use suitable fork lift trucks to level heavier appliances
(39[lb] models onwards).
WARNING: If the appliance is not properly levelled the performance and condensate drain may be
hampered.
Pict.29
Pict.25
Pict.26
Pict.27
Pict.28
2”
4”
4”
Page 35

-
-
-
I
I
I
N
N
N
S
S
S
T
T
T
A
A
A
L
L
L
L
L
L
A
A
A
T
T
T
I
I
I
O
O
O
N
N
N
M
M
M
A
A
A
N
N
N
U
U
U
A
A
A
L
L
L
-
-
-
33
WIRING
The connection to power supply may be carried out at the back of the appliance after
removing the protection grid. (pict.31)
For remote condensing unit, to make the connection using:
Multipolar wiring made by 11 poles with 4 section AWG 16 and 7 section AWG 12.
PLEASE USE CERTIFIED APPROVED MATERIALS
All wiring cables are to comply with the ratings shown on the technical specifications.
Cables are to be connected to the equipotential terminal. (pict.34)
The grounding cable is to be directly connected to a good grounding system.
(pict.35)
REFRIGERATING CONNECTION
For remote condensing unit, to make the connection in accordance with “Safety Code for Mechanical
Refrigeration, ANSI/ASHRAE 15-1989”.
Models are to be connected to remote unit condensing using:
High pressure pipe = Copper pipe 3/8” of thickness 1/25.4”
Low pressure pipe = Copper pipe 12/17” of thickness 1/25.4”
Low pressure Pipe connection is to be insulation.
CONNECTION TO CONDENSATE DRAIN
On certain models, a condensation discharge φ 1,2” hose
installation is necessary, "SAREL" or any similar type). The
current general and local regulations as to drains are to be
complied with. (pict.36)
The guarantee will cease and the Manufacturer will not be liable for any damage to appliances or
operators arising from the non-compliance with the and tamperings to any part of the appliance
(electric, thermodynamic or hydraulic plant).
Pict.31
Pict.34
Pict.35
Pict.36
Page 36

-
-
-
I
I
I
N
N
N
S
S
S
T
T
T
A
A
A
L
L
L
L
L
L
A
A
A
T
T
T
I
I
I
O
O
O
N
N
N
M
M
M
A
A
A
N
N
N
U
U
U
A
A
A
L
L
L
-
-
-
34
GENERAL SETTING
TESTING
Carry out the following checkings:
1) Outside temperatures must be included between 50[°F] and 110[°F].
2) Check power input.
3) Carry out at least one full quick cooling cycle
Should the appliance have been transported horizontally instead of a vertical position DO NOT START THE
APPLIANCE IMMEDIATELY. WAIT FOR AT LEAST 4 HOURS BEFORE OPERATING.
LANGUAGE
Press the menu key to select the desired menu
Use the keys up and down to display
Press the enter key to gain access to the setting submenus
The display shows
Use the keys up and down to select the password “-19”
Press enter to confirm your choice
Use the keys up and down to display
Press enter to display the first language available
Use the keys up and down to select the desired language
Press enter to confirm your choice
Press menu several times to exit
Menu 05
S
et U
p
S
et Up
P
assword 0
S
et Up 04
Languag
e
L
anguage
I
taliano
Page 37

-
-
-
I
I
I
N
N
N
S
S
S
T
T
T
A
A
A
L
L
L
L
L
L
A
A
A
T
T
T
I
I
I
O
O
O
N
N
N
M
M
M
A
A
A
N
N
N
U
U
U
A
A
A
L
L
L
-
-
-
35
D
01 = 0
CLOCK
Press the menu key to select the desired menu
Use the keys up and down to display
Press enter to gain access to the clock setting mode
The display shows
Use the keys up and down to change the flashing digit
Press enter to confirm and pass to the next value
Press menu several times to exit
TEMPERATURE UNIT OF MEASUREMENT
Press the menu key to select the desired menu
Use the keys up and down to display
Press the enter key to gain access to the setting submenus
The display shows
Use the keys up and down to select the password “-19”
Press enter to confirm your choice
Use the keys up and down to display
Press enter to gain access to the parameter programming mode
The first parameter is displayed
Use the keys up and down to display parameter D01
Menu 06
C
lock Settin
g
D
ate: 06/11/05
H
our: 14:22:46
Menu 05
S
et U
p
S
et Up
P
assword 0
S
et Up 03
P
arameters
A01 = 23°F
L
ow Alar
m
Page 38

-
-
-
I
I
I
N
N
N
S
S
S
T
T
T
A
A
A
L
L
L
L
L
L
A
A
A
T
T
T
I
I
I
O
O
O
N
N
N
M
M
M
A
A
A
N
N
N
U
U
U
A
A
A
L
L
L
-
-
-
36
Press enter to confirm your choice
Use the keys up and down to select the new value (0 Celsius, 1 Fahrenheit)
Press enter to confirm your choice
Press menu several times to exit
PRINTER INSTALLATION
The printer is not supplied as standard equipment .
Should you purchase the printer, please follow the installation instructions to install.
SERVICE FUNCTIONS
CHANGING PARAMETERS
Press the menu key to select the desired menu
Use the keys up and down to display
Press the enter key to gain access to the setting submenus
The display shows
Use the keys up and down to select the password “-19”
Press enter to confirm your choice
Use the keys up and down to display
Press enter to gain access to the parameter programming mode
The first parameter is displayed
Use the keys up e down to scroll all the controller parameters
Press enter to confirm your choice
Menu 05
S
et U
p
S
et Up
P
assword 0
S
et Up 03
P
arameters
A01 = 23°F
L
ow Alar
m
Page 39

-
-
-
I
I
I
N
N
N
S
S
S
T
T
T
A
A
A
L
L
L
L
L
L
A
A
A
T
T
T
I
I
I
O
O
O
N
N
N
M
M
M
A
A
A
N
N
N
U
U
U
A
A
A
L
L
L
-
-
-
37
Use the keys up e down to select the new value of the parameter
Press enter to confirm your choice
Press menu several times to exit
DESCRIPTION OF PARAMETERS
Parameter Description
Default
(IM...)
Default
(IR...)
min MAX
POSITIVE QUICK COOLING
P01 Room SetPoint in pos. quick cooling, Soft phase 23°F 23°F -22°F 86°F
P02 SetPoint cella in abbattimento Hard -13°F -13°F -40°F 86°F
P03 Needle SetPoint in pos. quick cooling , Soft phase 38°F 38°F -22°F 86°F
P04 Needle SetPoint in Hard quick coolong 68°F 68°F -22°F 86°F
P05 Positive quick cooling duration 90min 90min 0min 900min
P06 Hard phase duration expressed as % in relation to P05 60% 60% 0% 100%
P07 Room SetPoint in pos. storing 36°F 36°F -22°F 86°F
NEGATIVE QUICK COOLING
N01 Room SetPoint in neg, quick cooling -13°F -13°F -40°F 86°F
N02 Needle SetPoint in neg. quick cooling -0°F -0°F -22°F 86°F
N03 Negative quick cooling duration 240min 240min 0min 900min
N04 Room SetPoint in neg. storing -8°F -8°F -40°F 86°F
ALARMS
A01 Temperature alarm hysteresis 36°F 36°F 32°F 122°F
A02 High temperature limit alarm in pos. storing in relation to P07 50°F 50°F 32°F 122°F
A03 Low temperature limit alarm in pos. storing in relation to P07 14°F 14°F -58°F 32°F
A04 High temperature limit alarm in neg. storing in relation to N04 50°F 50°F 32°F 122°F
A05 Low temperature limit alarm in neg. storing in relation to N04 14°F 14°F -58°F 32°F
A06 Temperature alarm delay fron storing or defrost start 60min 60min 0min 300min
A07 Temperature alarm delay 30min 30min 0min 300min
A08 Duration of the buzzer in the alarm mode 1min 1min 0min 240min
DISPLAY
D01 Temperature unit of measurement (0 Cel s i u s ; 1 F a h r e n h e i t ) 0 0 0 1
D02 Room probe Offset 32°F 32°F 14°F 50°F
D03 BackLight (0 on when pressing a key; 1 always on) 0 0 0 1
DEFROST
S01
Performs defrost on quick cooling start
0 = No; 1 = Yes
0 0 0 1
S02 End-of-defrost temperature 47°F 47°F 14°F 86°F
S03 Defrost max. duration 15 min 15 min 1 min 90 min
S04 Interval between defrosts in storing (0=excluded) 0 ore 0 ore 0 18 ore
S05
Type of defrost:
0= electrical or due to compressor stop
1= hot gas
2= air
2 2 0 2
S06 Dripping time 1 min 1 min 0 min 90 min
S07 Compressor activation delay with hot gas defrost 0 sec 0 sec 0 sec 600 sec
S08 First defrost activation time from storing start (0=excluded) 0 0 0 90 min
S09 Ignores compressor protection delays in defrost 0 0 0 1
Page 40

-
-
-
I
I
I
N
N
N
S
S
S
T
T
T
A
A
A
L
L
L
L
L
L
A
A
A
T
T
T
I
I
I
O
O
O
N
N
N
M
M
M
A
A
A
N
N
N
U
U
U
A
A
A
L
L
L
-
-
-
38
Parameter Description
Default
(IM...)
Default
(IR...)
min MAX
S10
Defrost type started through keyboard:
0= electrical or due to compressor stop
1= hot gas
2= air
0 0 0 2
CONFIGURATION
C01 Door input (0 de-activated; 1 activated) 1 1 0 1
C02 Door open polarity 0 0 0 1
C03 Door open alarm delay 2 min 2 min 0 min 60 min
C04 Activates buzzer (0 de-activated; 1 activated) 1 1 0 1
C05 Buzzer duration at the end of quick cooling cycle 10 sec 10 sec 0 600 sec
C06
Temperature difference in the first phase of needle insertion
test (0 = test excluded)
45°F 45°F 0 140°F
C07
Duration of the second phase of needle insertion test (0=test
excluded)
56 sec 56 sec 0 600 sec
C08
Activates condenser probe
0 = no probe
1 = probe
1
1
0
1
C09 Compressor stop delay due to door opening 30 sec 30 sec 0 sec 60 sec
C10 Pressostat alarm detection time 5 sec 5 sec 0 sec 60 sec
C11 High pressare digital input polarity 0 0 0 1
C12 Resistances starting SetPoint 23°F 23°F 14°F 68°F
ADJUSTMENT
R01 Compressor start/stop hysteresis 38°F 38°F 32°F 68°F
R02 Min. interval between 2 compressor starting 2 min 2 min 0 min 30 min
R03 Compressor start delay from card activation 0 sec 0 sec 0 sec 300 sec
R04 Compressor Duty-Cycle time with faulty room probe in storing 10 min 10 min 0 min 90 min
R05 Compressor ON time faulty room in pos. storing 3 min 3 min 0 min 90 min
R06 Compressor ON time with faulty room in neg. storing 8 min 8 min 0 min 90 min
R07 Needle min. temperature for starting quick cooling 158°F 158°F 32°F 194°F
R08 Compressor inhibition temperature 194°F 194°F 32°F 212°F
R09 Compressor Protection function activation time 24 ore 24 ore 0 ore 240 ore
R10 Pulse duration 2 sec 2 sec 1 sec 10 sec
R11 Pause between pulses 4 sec 4 sec 1 sec 10 sec
R12 Number of pulses 3 3 1 20
FANS
F01 Evaporator fans activation hysteresis 36°F
36°F
32°F 68°F
F02 Condenser fans activation hysteresis 36°F
36°F
32°F 68°F
F03 Evaporator fans activation SetPoint 41°F 41°F -58°F 122°F
F04 Condenser fans activation SetPoint 59°F 59°F -58°F 122°F
F05
Evaporator fans during defrost
0 = fans OFF; 1 = fans ON
0 0 0 1
F06
Condenser fans during defrost
0 = fans OFF; 1 = fans ON
0 0 0 1
F07 Fans stop time after defrost 1 min 1 min 0 min 30 min
F08 Condenser fans stop delay 30 sec 30 sec 0 sec 300 sec
F09
Evaporator fans control during quick cooling:
0 = fans always ON
1 = fans thermostated by evaporator temperature
0 0 0 1
F10
Evaporator fans control during storing:
0 = fans in parallel with the compressor
1 = fans thermostated by evaporator temperature
0 0 0 1
F11 Evaporator fans inhibition temperature 158°F 158°F 32°F 194°F
PRINT
PR1 Sampling time 10 min
10 min
1 min 60 min
Page 41

-
-
-
I
I
I
N
N
N
S
S
S
T
T
T
A
A
A
L
L
L
L
L
L
A
A
A
T
T
T
I
I
I
O
O
O
N
N
N
M
M
M
A
A
A
N
N
N
U
U
U
A
A
A
L
L
L
-
-
-
39
Parameter Description
Default
(IM...)
Default
(IR...)
min MAX
VENTILATION SPEED (P.W.M.)
CF1 Evaporator fan min. speed 20
20
0 100
CF2 Evaporator fan min. speed selectable in a quick cooling cycle 50
50
0 100
I.F.R.
B01 Room thermostating temperature in the first phase -13°F -13°F -58°F 122°F
B02 Subcutane T control start temperature
86°F 86°F -58°F 210°F
B03 First coefficient of the control relation
-2 -2 -50 50
B04 Second coefficient of the control relation
16 16 -50 50
B05 Third coefficient of the control relation
-8 -8 -50 50
B06 Subcutane T initial value determining the end of the first phase
34°F 34°F -58°F 210°F
B07 Phase two formula coefficient
10 10 0 99
B09 Subcutane t min. value allowed durino the third phase
30°F 30°F -58°F 210°F
B10 End of intelligent quick cooling core temperature
38°F 38°F -58°F 210°F
B11
Delay from the positive result of the needle test for starting the
procedure to determine the end of the first phase
60 sec 60 sec 0 sec 99 sec
B12 First phase temperature detection time
30 sec 30 sec 0 sec 99 sec
B13 First phase min. duration
6 min 6 min 0 min 99min
B16 Defrost on starting intell. QC cycle (0=no 1=yes)
0 0 0 1
B17 Inhibition temperature
176°F 176°F -58°F 210°F
B18
Room Set point in the event of automatic switch to time or
temperature mode
32°F 32°F -58°F 210°F
B19 Max. duration possibile for intelligent QC process
150 min 150 min 1 min 999 min
B20
Subcutane T safety value determining the end of the first
phase
38°F 38°F -58°F 210°F
B21 First coefficient of the room thermostating curve (third phase)
-25 -25 -90
99
B22
Second coefficient of the room thermostating curve (third
phase)
-28 -28 -90 99
B23
Storing activation at the end of intell. QC cycle (0 = no; 1
= yes)
1 1 0 1
B24 Room thermostating Set-point in storing
36°F 36°F -130°F 194°F
B26 Core temperature limit for the timer start
0 0 0 999
B27 Adjuster of fans speed in the third phase
0 0 0 99
B28 Cold pulse adjuster
0 0 0 99
COMMUNICATION
ADD Device Address 1 1 1 147
SC
Serial Control :
0 = not activated
1 = print
2 = ModBus
1
1
0
2
MB1 BaudRate: 0 = 2400; 1 = 4800; 2 = 9600; 3 = 18200
2 2 0 3
MB2 Parity: 0 = no parity; 1 = odd; 2 = even
2 2 0 2
TYPE OF CYCLE
G01
Positive QC cycles only :
0 = Positive and Negative
1 = Positive only
0 0 0 1
Page 42

-
-
-
I
I
I
N
N
N
S
S
S
T
T
T
A
A
A
L
L
L
L
L
L
A
A
A
T
T
T
I
I
I
O
O
O
N
N
N
M
M
M
A
A
A
N
N
N
U
U
U
A
A
A
L
L
L
-
-
-
40
ALARMS AND FAULT ANALYSIS (TAB.5)
Press the menu key to select the desired menu
Use the keys up and down to display
Press enter to gain access to the mode for displaying alarms
If there are no alarms memorized, the display shows
If there are alarms memorized, the display shows the last alarm starting time as well
as the progressive number ranging from A01 to A30
Press enter to get further information about the alarm:
The max. or min. temperature, the duration, call SERVICE, the alarm de-activation
time or the indication that the alarm is still in progress
Use the keys up and down to display all the memorized alarms
Press menu several times to exit
If the fault is not corrected by following the above instructions ask for skilled assistance and avoid carrying
out any other operations, especially on the electricals. When informing the servicing company of the fault,
state 1 and 5 numbers (pict.37)
10
11
__/__/__
S
N
8 9
Pict.37
Menu 08
Alar
m
No Date
A05 Err Roo
m
S 14:21 15/12/03
A
05 Err Room
P
resent
Page 43

-
-
-
I
I
I
N
N
N
S
S
S
T
T
T
A
A
A
L
L
L
L
L
L
A
A
A
T
T
T
I
I
I
O
O
O
N
N
N
M
M
M
A
A
A
N
N
N
U
U
U
A
A
A
L
L
L
-
-
-
41
TAB.5
DISPLAYING INPUTS/OUTPUTS STATE
Press the menu key to select the desired menu
Use the keys up and down to display
Press enter to gain access to the mode for displaying inputs and outputs
The display shows
Use the keys up and down to scroll the data to display
C Compressor R Door resistance
D Defrost A Alarm
FE Evaporator fan DI1 Inputs state micro
FC Condenser fan DI2 Inputs state thermostat
L Sterilisation FAN Evaporator fan speed
Press menu several times to exit
FAULT CAUSE REMEDY
No voltage on
Anomalous stop
No power supply
Blown fuse
Loosened connections
Restore power supply
Replace fuses
Check connection fitting
Compressor failure High and Low-pressure pressure-
switch on
Clicker on
Contactor failure
Compressor thermal relay on
Ask for skilled assistance
Ask for skilled assistance
Ask for skilled assistance
Ask for skilled assistance
The compressor is working but
the cabinet is not cooling
Frosted evaporator
No coolant inside the refrigerating
system
Delivery solenoid valve failure
Open the door and carry out defrost cycle
Ask for skilled assistance
Ask for skilled assistance
Evaporator fans are not working Fan failure or short-circuit
Door micro failure
Ask for skilled assistance
Ask for skilled assistance
The cycle cannot start Wrong cycle programming Check time and temperature parameters
AL High Press Pressostat intervention Qualified technician required
AL Room Probe Room Probe interrupted Qualified technician required
AL Evap Probe Evap Probe interrupted Qualified technician required
AL Cond Probe Cond Probe interrupted Qualified technician required
AL Needle Probe Needle Probe interrupted Qualified technician required
AL Insert Needle Needle Probe not inserted Check the probe inserting cone
High T Room Room Temp above set value If the temperature is not within the specified range, apply
to a qualified technician
Low T Room Room Temp below set value If the temperature is not within the specified range, apply
to a qualified technician
AL BlackOut No power supply When power is restored, check the max. temperature
reached inside the room
AL Door Open QC room door open
Door micro faulty
Close the door
Qualified technician required
Menu 10
Inp
uts/Outputs
R
oom 21°F
Needle 59°F
Room 21°F
Needle 59°F
Room and Needle temperature values
DI1 DI2 FAN
0 1 80
C D FE FC L R A
1 0 0 1 1 0 0
Evapor. 14°F
Conden. 70°F
Digital inputs state and evaporator
fan s
p
eed
Outputs state
1 = relay activated
0 = rela
y
de-activated
Evaporator and Condenser temperature values
Page 44

-
-
-
I
I
I
N
N
N
S
S
S
T
T
T
A
A
A
L
L
L
L
L
L
A
A
A
T
T
T
I
I
I
O
O
O
N
N
N
M
M
M
A
A
A
N
N
N
U
U
U
A
A
A
L
L
L
-
-
-
42
DISPLAYING THE LATEST DEFROST CYCLES
Press the menu key to select the desired menu
Use the keys up and down to display
Press the enter key to gain access to the setting submenus
The display shows
Use the keys up and down to select the password “-19”
Press enter to confirm your choice
Use the keys up and down to display
Press enter to gain access to the mode for displaying the latest 32 defrost cycles
If there are no defrost cycles memorized, the display shows
As for the memorized cycles, the display shows the starting time and date, the
duration expressed in minutes, and the corresponding progressive number ranging
from D01 to D32
Where M indicates the type of defrost start:
M = 1 defrost started through the keyboard during storing.
M = 2 periodic defrost in storing .
M = 3 defrost started on the quick cooling starting
Use the keys up and down to display all the memorized defrost cycles
Press menu several times to exit
DISPLAYING DOOR OPENINGS
Press the menu key to select the desired menu
Use the keys up and down to display
Press the enter key to gain access to the setting submenus
The display shows
S
et Up 01
D
efrost
S
et Up
P
assword 0
Menu 05
S
et U
p
N
o Date
S
et Up
P
assword 0
Menu 05
S
et U
p
D09 22Min M=03
S 11:44 10
/12/
03
Page 45

-
-
-
I
I
I
N
N
N
S
S
S
T
T
T
A
A
A
L
L
L
L
L
L
A
A
A
T
T
T
I
I
I
O
O
O
N
N
N
M
M
M
A
A
A
N
N
N
U
U
U
A
A
A
L
L
L
-
-
-
43
Use the keys up and down to select the password “-19”
Press enter to confirm your choice
Use the keys up and down to display
Press enter to gain access to the mode for displaying the door opening records during
a quick cooling of the last day.
The controller allows to record up to 31 days. Each operating day is allotted a memory
cell where the total number of door openings is recorded, along with the door openings
exceeding a duration of C03 minutes and the total time of door opening. The memory
capacity allows to record up to 31 days. Parameter C01, if other than zero, activates the
door micro input.
For the records relating to the other days use the keys up and down.
Press menu several times to exit
ALARMS AND USER PROGRAMMES CANCELLATION
Press the menu key to select the desired menu
Use the keys up and down to display
Press the enter key to gain access to the setting submenus
The display shows
Use the keys up and down to select the password “-19”
Press enter to confirm your choice
Use the keys up and down to display
Press enter to gain access to the mode for cancelling the data stored in the memory
The display shows
Total number of door
0
5/11 01h34
m
long
:01 tot:03
Day and month of record
Door o
p
enings total
Number of door openings exceeding
parameter C03
S
et Up 05
R
eset Memor
y
R
eset Memory?
No
O
k
S
et Up
P
assword 0
Menu 05
S
et U
p
S
et Up 02
D
oor Open
Page 46

-
-
-
I
I
I
N
N
N
S
S
S
T
T
T
A
A
A
L
L
L
L
L
L
A
A
A
T
T
T
I
I
I
O
O
O
N
N
N
M
M
M
A
A
A
N
N
N
U
U
U
A
A
A
L
L
L
-
-
-
44
Press Up to cancel the whole memory
Press menu several times to exit
RESTORING PRE-SET PARAMETERS
ATTENTION: should you use the device with the “RESTORE” option, available on the card, please apply to
the manufacturer for proper setting of the electronic controller configuration parameters.
Press the menu key to select the desired menu
Use the keys up and down to display
Press the enter key to gain access to the setting submenus
The display shows
Use the keys up and down to select the password “-19”
Press enter to confirm your choice
Use the keys up and down to display
Press enter to gain access to the mode for cancelling the data stored in the memory
The display shows
Press Up to cancel the whole memory
Press menu several times to exit
S
et Up 06
R
estore
R
estore?
No
O
k
S
et Up
P
assword 0
Menu 05
S
et U
p
Page 47

-
-
-
I
I
I
N
N
N
S
S
S
T
T
T
A
A
A
L
L
L
L
L
L
A
A
A
T
T
T
I
I
I
O
O
O
N
N
N
M
M
M
A
A
A
N
N
N
U
U
U
A
A
A
L
L
L
-
-
-
45
MAINTENANCE OF PANEL BOARD
The following operations are to be carried out by skilled staff only.
Turn the mains switch OFF. (pict.38)
Disconnect the plug. (pict.39)
To be able to access the electric picture:
Mod. 22lb
Remove the front panel (pict.40) with a tool and move the electric board box
(pict.41) along the slides
Remove the electrical board cover with a tool to access the internal components.
Two delayed fuses are inserted in the power supply line.
For replacement remove the cover by unscrewing the fixing screws, extract the
blown fuse and replace it with a fuse having the same characteristics. (pict.42)
Mod. 44lb-66lb-88lb
Remove the front panel (pict.43) and the control panel by means of a suitable tool.
Remove the cover to have access to the components using a suitable tool (pict.44).
OFF
Pict.38
Pict.39
Pict.40
Pict.41
Pict.42
Pict.43
Pict.44
Page 48

-
-
-
I
I
I
N
N
N
S
S
S
T
T
T
A
A
A
L
L
L
L
L
L
A
A
A
T
T
T
I
I
I
O
O
O
N
N
N
M
M
M
A
A
A
N
N
N
U
U
U
A
A
A
L
L
L
-
-
-
46
Two delayed fuses are inserted in the power supply line;
extract the blown fuse and replace it with a fuse having the same characteristics.
(pict.45)
WIRING DIAGRAM PLATE
The diagram is shown on pict.47.
CONTROL AND SAFETY SYSTEMS
The following information concerns skilled staff only:
Door micro-switch: Prevents the appliance from working when the door is open
Overall protection fuses: Protect the whole power circuit from and short-circuits and overloads
Compressor thermal relay: Operates in case of an overload or working failures
Motor-fan thermal relay: Operates in case of an overload or working failures
Safety pressure-switch: Operates in case of coolant over-pressure
Cabinet temperature control: Is run by NTC probe through the relevant electronic card
Core temperature control: Is run by PT100 probe through an electronic card
Controlled substances leakage: appliances with a content of coolant exceeding 7lb should be checked
for leakage yearly
DISPOSAL
WASTE STORAGE
Appliances that have reached the end of their service life should be suitably disposed of. The doors should
be removed before disposal. Temporary storage of special waste is permitted while waiting for disposal by
treatment and/or final collection. Dispose of special waste in accordance with the laws in force with regard to
protection of the environment in the country of the user.
PROCEDURE FOR ROUGH DISMANTLING THE APPLIANCE
All couintries have different legislation; provision laid down by the laws and the authorised bodies of the
countries where the demolition takes place are therefore to be observed. A general rule is to deliver the
appliance to specialised collection and demolition centres. Dismantle the refrigerator grouping together the
components according to their chemical nature. The compressor contains lubricating oil and refrigerant,
which may be recycled. The refrigerator components are considered special waste, which can be assimilated
with domestic waste. Make the appliance totally unusable by removing the power cable and any door locking
mechanisms in order to avoid the risk of anyone being trapped inside.
DISMANTLING OPERATIONS SHOULD BE CARRIED OUT BY QUALIFIED PERSONNEL.
Pict.45
Page 49

-
-
-
I
I
I
N
N
N
S
S
S
T
T
T
A
A
A
L
L
L
L
L
L
A
A
A
T
T
T
I
I
I
O
O
O
N
N
N
M
M
M
A
A
A
N
N
N
U
U
U
A
A
A
L
L
L
-
-
-
47
REFRIGERANT MATERIAL SAFETY DATA SHEET
R134a
GWP = 1300
ODP = 0
R404a: fluid components
trifluoroethane (HFC 143a) 52%
pentafluoroethane (HFC 125) 44%
tetrafluoroethane (HFC 134a) 4%
GWP = 3750
ODP = 0
Hazard identification
Overexposure through inhalation may cause anaesthetic effects. Acute overexposure may cause cardiac
rhythm disorders and sudden death. Product mists or sprays may cause ice burns of eyes and skin.
First aid procedures
• Inhalation:
keep injured person away from exposure, warm and relaxed. Use oxygen, if necessary. Give artificial
respiration if respiration has stopped or is about to stop. In case of cardiac arrest give external cardiac
massage. Seek immediate medical attention.
• Skin:
use water to remove ice from affected areas. Remove contaminated clothes.
CAUTION: clothes may adhere to skin in case of ice burns.
In case of contact with skin, wash with copious quantities of lukewarm water. In case of symptoms (irritation
or blisters) seek medical attention.
• Eyes:
immediately wash with ocular solution or fresh water, keeping eyelids open for at least 10 minutes. Seek
medical attention.
• Ingestion:
it can cause vomit.. If conscious, rinse mouth with water and drink 200-300 ml of water. Seek medical
attention.
• Other medical treatment:
symptomatic treatment and support therapy when indicated. Do not administer adrenaline or
sympatheticomimetic drugs after exposure, due to the risk of arrhythmia and possible cardiac arrest.
Environmental data
Persistence and degradation
• HFC 143a:
slow decomposition in lower atmosphere (troposphere). Duration in atmosphere is 55 years.
• HFC 125:
slow decomposition in lower atmosphere (troposphere). Duration in atmosphere is 40 years.
• HFC 134a:
relatively rapid decomposition in lower atmosphere (troposphere). Duration in atmosphere is 15.6 years.
• HFC 143a, 125, 134a:
does not affect photochemical smog (not included in volatile organic components – VOC – as established in
the UNECE agreement). Does not cause ozone rarefaction.
PRODUCT EXHAUSTS RELEASED IN THE ATMOSPHERE DO NOT CAUSE LONG-TERM WATER
CONTAMINATION.
Page 50

-
-
-
I
I
I
N
N
N
S
S
S
T
T
T
A
A
A
L
L
L
L
L
L
A
A
A
T
T
T
I
I
I
O
O
O
N
N
N
M
M
M
A
A
A
N
N
N
U
U
U
A
A
A
L
L
L
-
-
-
48
DIMENSIONS
Please refer to the dimensions of your own appliance.
IM101L
IR101L
31-1/2”
2-1/3” 26- 3/4”
32-2/3”
27-11/20
61-3/5”
5-9/10”
36”
68-9/10”
3-9/10” 5-1/10”23-3/5
25-3/5”
IM101S
IR101S
16-1/3” 9-1/4”
IM51M
IR51M
29-1/3”
2-3/5” 2-3/5”24-1/10”
27-11/20”
24-2/5”
54-3/20”
3-1/4”
17-17/ 20”
33-1/2”
2” 4-7/10”20-17/20”
24-3/5”
2-1/3”
2-1/3”
IM51C
IR51C
39-2/5”
IM102S
IM72S
IR72S
Ø1-1/5”
24-4/5” 10-1/5”
40-19/20”
2-1/3” 2-1/3”36-1/5”
39-3/5”
34-9/20”
77-19/20”
5-9/10”
42-2/3”
73-3/5 ”
2-1/3” 5-1/10”32-4/50”
35”
7-4/5”33-3/20” 16-23/25”22-3/5”
Ø1-1/5”
29-1/3”
2-3/5” 2-3/5”24-1/10”
27-11/20”
24-2/5”
54-3/20”
3-1/4”
17-17/ 20”
2” 4-7/10”20-17/20”
24-3/5”
2-1/3”
2-1/3”
2-1/3”
31-1/2”
2-1/3” 26-3/4”
32-2/3”
27-11/20
61-3/5”
5-9/10”
36”
68-9/10”
3-9/10” 5-1/10”23-3/5
25-3/5”
2-1/3”
Ø1-1/5”
24-4/5” 10-1/5”
40-19/20”
2-1/3” 2-1/3”36-1/5”
39-3/5”
34-9/20”
77-19/20”
5-9/10”
42-2/3”
73-3/5 ”
2-1/3” 5-1/10”32-4/50”
35”
7-4/5”33-3/ 20” 16-23/25”22-3/5”
Ø1-1/5”
Page 51

-
-
-
I
I
I
N
N
N
S
S
S
T
T
T
A
A
A
L
L
L
L
L
L
A
A
A
T
T
T
I
I
I
O
O
O
N
N
N
M
M
M
A
A
A
N
N
N
U
U
U
A
A
A
L
L
L
-
-
-
49
ANNEXES
TAB.1a
Cooling time increases by 20% if the machine is leaning against the wall.
Model
IM51M-IM51C
(22lb)
IM101L
(44lb L)
IM101S
(44lb S)
IM72S
(66lb)
IM102S
(88lb)
Gross weight [lb] 276 485 485 551 706
Net weight [lb] 254 430 430 485 640
Dimensions
29,3x27,5
x33,5/39,4
31,5x32,7
x68,9
31,5x32,7
x68,9
40,9x39,6
x73,6
40,9x39,6
x73,6
Capacity
Mass /cycle [lb] 22 44 44 55 88
Internal volume [cuft] 2,55 5,52 5,52 13,58 13,58
Rails GN1/1
20,8x15,75
GN1/1
20,8x15,75
GN1/1
20,8x15,75
GN2/1
20,8x31,5
GN2/1
20,8x31,5
Trays 3 6 6 6 10
Power supply
Voltage [V] 220 ~ 220 ~ 220 ~ 220 ~ 220 ~
Frequency [Hz] 60 60 60 60 60
Intensity [A] 5,5 12,5 12,5 13,3 17
Phase 1 ph 3 ph 3 ph 3 ph 3 ph
Refrigerating unit
Refrigerating power [W] 617 2011 2011 2011 2400
Evaporation temperature [°F] -22 -22 -22 -22 -22
Cooling temperature [°F]
+194÷+38 +194÷+38 +194÷+38 +194÷+38 +194÷+38
Cooling time [min] 90 90 90 90 90
Freezing temperature [°F]
+194÷0 +194÷0 +194÷0 +194÷0 +194÷0
Freezing time [min] 240 240 240 240 240
Condensation temperature [°F] +130 +130 +130 +130 +130
Max room temperature [°F] +90 +90 +90 +90 +90
Compressor type Ermetic Ermetic Ermetic Ermetic Ermetic
Fluid refrigerant R404a R404a R404a R404a R404a
Fluid refrigerant qty [lb] 3 4,4 4,4 5 7,7
Condesation air Air Air Air Air Air
Noise [dB] (A) 65 72 72 72 72
IFR
• • • • •
Multi-detector probe
• • • • •
Page 52

-
-
-
I
I
I
N
N
N
S
S
S
T
T
T
A
A
A
L
L
L
L
L
L
A
A
A
T
T
T
I
I
I
O
O
O
N
N
N
M
M
M
A
A
A
N
N
N
U
U
U
A
A
A
L
L
L
-
-
-
50
TAB.1b
Cooling time increases by 20% if the machine is leaning against the wall.
TAB.4
Min. air circulation
Model Air q.ty
[cfm]
22 lb 650
44 lb
66 lb
88 lb
2.060
2.530
5.300
Model
IR51M-IR51C
(22lb)
IR101L
(44lb L)
IR101S
(44lb S)
IR72S
(66lb)
Gross weight [lb] 276 485 485 551
Net weight [lb] 254 430 430 485
Dimensions 29,3x27,5
x33,5/39,4
31,5x32,7
x68,9
31,5x32,7
x68,9
40,9x39,6
x73,6
Capacity
Mass /cycle [lb] 22 44 44 55
Internal volume [cuft] 2,55 5,52 5,52 13,58
Rails GN1/1
20,8x15,75
GN1/1
20,8x15,75
GN1/1
20,8x15,75
GN2/1
20,8x31,5
Trays 3 6 6 6
Power supply
Voltage [V] 220 ~ 220 ~ 220 ~ 220 ~
Frequency [Hz] 60 60 60 60
Intensity [A] 3,5 5 5 6
Phase 1 ph 3 ph 3 ph 3 ph
Refrigerating unit
Refrigerating power [W] 692 2245 2245 3325
Evaporation temperature [°F] 14 14 14 14
Cooling temperature [°F]
+194÷+38 +194÷+38 +194÷+38 +194÷+38
Cooling time [min] 90 90 90 90
Freezing temperature [°F] - - - Freezing time [min] - - - Condensation temperature [°F] +130 +130 +130 +130
Max room temperature [°F] +90 +90 +90 +90
Compressor type Ermetic Ermetic Ermetic Ermetic
Fluid refrigerant R404a R404a R404a R404a
Fluid refrigerant qty [lb] 2,2 4 4 4,4
Condesation air Air Air Air Air
Noise [dB] (A) 65 72 72 72
IFR
• • • •
Multi-detector probe
• • • •
Page 53

-
-
-
I
I
I
N
N
N
S
S
S
T
T
T
A
A
A
L
L
L
L
L
L
A
A
A
T
T
T
I
I
I
O
O
O
N
N
N
M
M
M
A
A
A
N
N
N
U
U
U
A
A
A
L
L
L
-
-
-
51
Pict.47
N° DESCRIPTION N° DESCRIPTION
1
COMPRESSOR
76
DOOR MICRO-SWITCH
2
CONDENSER FAN MOTOR
77
ROOM PROBE
2A
CONDENSER
FAN MOTOR TERMOST.
78
EVAPORATOR/DEFROST PROBE
3
SUPPLY TERMINAL BLOCK
79A
MULTIPOINT CORE PROBE
3A
TERMINAL BLOCK
80
COMPRESSOR PTC RESISTOR
9
EVAPORATOR FAN MOTOR
85A
JUNTION BOX WITH TERMINALBLOCK (EVAP.)
9A
EVAPORATOR FAN MOTOR
85B
JUNTION BOX WITH TERMINALBLOCK (COND.)
20
ANTI-CONDENSATION DOOR HEATER
86
CONDENSER PROBE
44
RELAY FINDER
87
RUN CAPACITOR FORCONDENSER FAN MOTOR 4µF
65
CONTACTOR
87A
RUN CAPACITOR FOR CONDENSERFAN MOTOR
TERMOST.4µF
66
SOLID STATE OVERLOAD RELAY
88
DOOR HEATER TRANSFORMER
67
RUN
CAPACITOR FOR EVAPORATOR FAN
MOTOR 8µF
89
2
FUSE-HOLDER +2 FUSES OFPROTECTION
TRANSFORMER
67A
RUN CAPACITOR FOR EVAPORATOR FAN
MOTOR 8µF
92
PRINTER PM100A
69
TERMINAL GROUND
94
DISCONNECTOR
70
HIGH PRESSURE LIMIT SWITCH
96
2 FUSE-HOLDER + 2 FUSES
70A
LOW PRESSURE LIMIT SWITCH
97
MOTHER BOARD AND CONTROL PANEL
73
3 FUSE-HOLDER + 3 FUSES
97A
FASEC
75
AUXILIARY
VALVE
Page 54

 Loading...