

Page 1
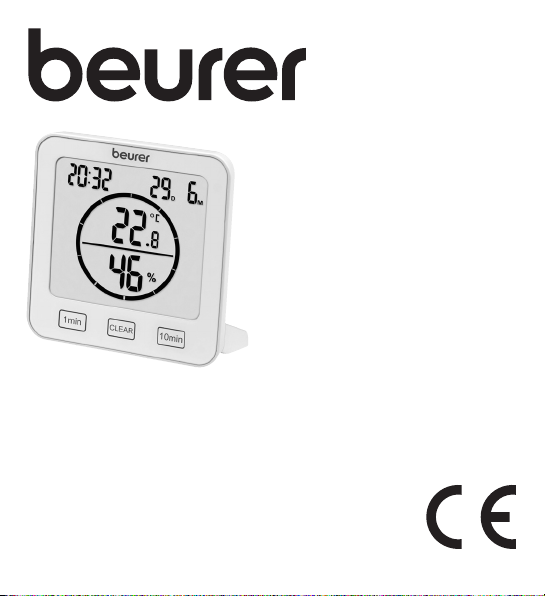
HM 22
DE Thermo-Hygrometer
Gebrauchsanweisung ....................3
EN Thermo hygrometer
Instructions for use ...................... 19
FR Thermo-hygromètre
Mode d’emploi ............................35
ES Termohigrómetro
Instrucciones de uso ................... 51
IT Termoigrometro
Istruzioni per l’uso ....................... 67
TR Termo-higrometre
Kullanım kılavuzu ......................... 83
RU Термогигрометр
Инструкция поприменению .....99
PL Termohigrometr
Instrukcja obsługi ......................115
Page 2

Page 3
DEUTSCH
Lesen Sie diese Gebrauchsanweisung
aufmerksam durch, bewahren Sie sie für
späteren Gebrauch auf, machen Sie sie anderen Benutzern zugänglich und beachten
Sie die Hinweise.
Sehr geehrte Kundin, sehr geehrter Kunde,
wir freuen uns, dass Sie sich für ein Produkt unseres Sortimentes entschieden
haben. Unser Name steht für hochwertige und eingehend geprüfte Qualitätsprodukte aus den Bereichen Wärme, Gewicht, Blutdruck, Körpertemperatur, Puls,
Sanfte Therapie, Massage, Beauty, Baby und Luft.
Mit freundlicher Empfehlung
Ihr Beurer-Team
Inhaltsverzeichnis
1. Zum Kennenlernen .......................... 4
2. Lieferumfang..................................... 4
3. Zeichenerklärung .............................. 4
4. Bestimmungsgemäßer Gebrauch ..... 5
5. Warn- und Sicherheitshinweise ........ 6
6. Gerätebeschreibung ......................... 8
7. Inbetriebnahme .............................. 10
7.1 Batterien einlegen ......................... 10
7.2 Datum / Uhrzeit /
Temperatureinheit einstellen .......... 11
7.3 Auf Werkseinstellung
zurücksetzen ................................. 12
8. Anwendung .................................. 12
8.1 Standard-Modus ........................... 12
8.2 Timer ............................................. 13
9. Reinigung und Pflege ................... 14
10. Was tun bei Problemen? .............. 14
11. Entsorgung ................................... 15
12. Technische Angaben .................... 16
13. Garantie/Service ........................... 16
Page 4
1. Zum Kennenlernen
Mit dem Thermo-Hygrometer HM 22 können Sie die aktuelle Raumtemperatur und
relative Luftfeuchtigkeit messen und am Display ablesen. Zusätzlich besitzt das
Thermo-Hygrometer einen Timer, mit dem Sie eine Kurzzeitmessung einstellen
können.
Durch seine handliche Größe können Sie das Thermo-Hygrometer überall aufstellen. Auf der Rückseite des Thermo-Hygrometers befindet sich eine Aufhängevorrichtung, mit der Sie das Gerät an der Wand befestigen können.
2. Lieferumfang
1 x Thermo-Hygrometer
2 x AAA Batterien
1 x Diese Gebrauchsanweisung
3. Zeichenerklärung
Folgende Symbole werden in der Gebrauchsanweisung bzw. auf dem Gerät
verwendet:
WARNUNG
ACHTUNG
Hinweis Hinweis auf wichtige Informationen
Gebrauchsanweisung lesen
Warnhinweis auf Verletzungsgefahren oder
Gefahren für Ihre Gesundheit
Sicherheitshinweis auf mögliche Schäden an
Gerät/Zubehör
4
Page 5
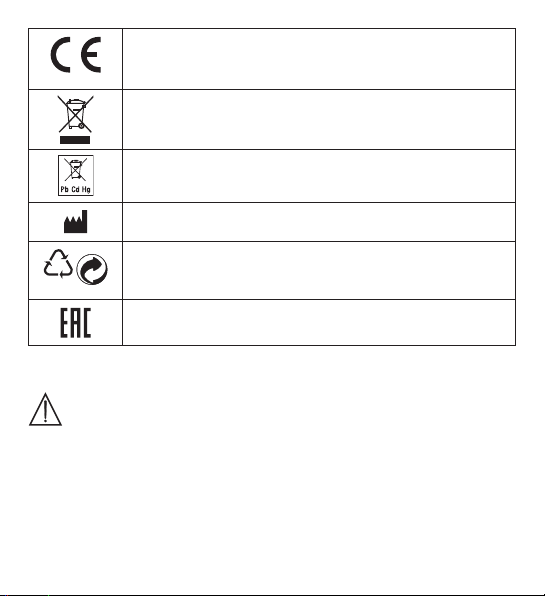
CE-Kennzeichnung
PAP
Dieses Produkt erfüllt die Anforderungen der geltenden europäischen und nationalen Richtlinien
Entsorgung gemäß Elektro- und Elektronik-Altgeräte EGRichtlinie WEEE (Waste Electrical and Electronic Equipment)
Schadstoffhaltige Batterien nicht im Hausmüll entsorgen
Hersteller
21
Verpackung umweltgerecht entsorgen
Die Produkte entsprechen nachweislich den Anforderungen
der Technischen Regelwerke der EAWU
4. Bestimmungsgemäßer Gebrauch
WARNUNG
Das Gerät ist ausschließlich zur Messung von Luftfeuchtigkeit und Raumtemperatur bestimmt.
Das Gerät ist nur für den privaten Gebrauch bestimmt. Verwenden Sie das
Gerät ausschließlich für den Zweck, für den es entwickelt wurde und auf die in
dieser Gebrauchsanweisung angegebene Art und Weise. Jeder unsachgemäße
Gebrauch kann gefährlich sein! Der Hersteller haftet nicht für Schäden, die
durch unsachgemäßen oder falschen Gebrauch verursacht wurden.
5
Page 6
5. Warn- und Sicherheitshinweise
WARNUNG
•
Halten Sie Kinder von Verpackungsmaterial fern. Es besteht Erstickungsgefahr.
•
Das Gerät ist kein Spielzeug. Bewahren Sie es außerhalb der Reichweite von Kindern auf.
•
Sie dürfen das Gerät keinesfalls öffnen oder reparieren, da sonst
eine einwandfreie Funktion nicht mehr gewährleistet ist. Bei Nichtbeachtung erlischt die Garantie.
•
Wenden Sie sich bei Reperaturen an den Kundenservice oder an
einen autorisierten Händler.
•
Halten Sie das Gerät von offenen Flammen (z.B. Kerzen) fern.
•
Tauchen Sie das Gerät niemals in Wasser oder andere Flüssigkeiten.
•
Betreiben Sie das Gerät nie unter einer Abdeckung, wie z.B. Decke
oder Kissen.
•
Verwenden Sie das Gerät nicht im Freien.
Hinweise zum Umgang mit Batterien
WARNUNG
•
Wenn Flüssigkeit aus einer Batteriezelle mit Haut oder Augen in
Kontakt kommt, die betroffene Stelle mit Wasser auswaschen und
ärztliche Hilfe aufsuchen.
•
Verschluckungsgefahr! Kleinkinder könnten Batterien verschlu-
cken und daran ersticken. Daher Batterien für Kleinkinder unerreichbar aufbewahren!
6
Page 7
•
Auf Polaritätskennzeichen Plus (+) und Minus (-) achten.
•
Wenn eine Batterie ausgelaufen ist, Schutzhandschuhe anziehen
und das Batteriefach mit einem trockenen Tuch reinigen.
•
Schützen Sie Batterien vor übermäßiger Wärme.
•
Explosionsgefahr! Keine Batterien ins Feuer werfen.
•
Batterien dürfen nicht geladen oder kurzgeschlossen werden.
•
Bei längerer Nichtbenutzung des Geräts die Batterien aus dem
Batteriefach nehmen.
•
Verwenden Sie nur denselben oder einen gleichwertigen Batterietyp.
•
Immer alle Batterien gleichzeitig auswechseln.
•
Keine Akkus verwenden!
•
Keine Batterien zerlegen, öffnen oder zerkleinern.
ACHTUNG
•
Schützen Sie das Gerät vor Stößen, Feuchtigkeit, Staub, Chemikalien, starken Temperaturschwankungen, direkter Sonneneinstrahlung, Spritzwasser, Sand und zu nahen Wärmequellen (Öfen oder
Heizkörper).
•
Legen Sie keine Gegenstände auf dem Gerät ab.
•
Reinigen Sie das Gerät mit einem feuchten Tuch. Benutzen Sie keine
scharfen Reingungsmittel.
•
Verwenden und lagern Sie das Gerät in einer Umgebungstemperatur
zwischen -10°C bis 50°C. Höhere oder niedrigere Temperaturen
können das Gerät beschädigen.
•
Bei wechselnder Umgebung benötigt das Gerät 10 Minuten, um sichere
Messwerte zu liefern.
•
Ziehen Sie vor der ersten Inbetriebnahme die Schutzfolie des Displays ab.
7
Page 8
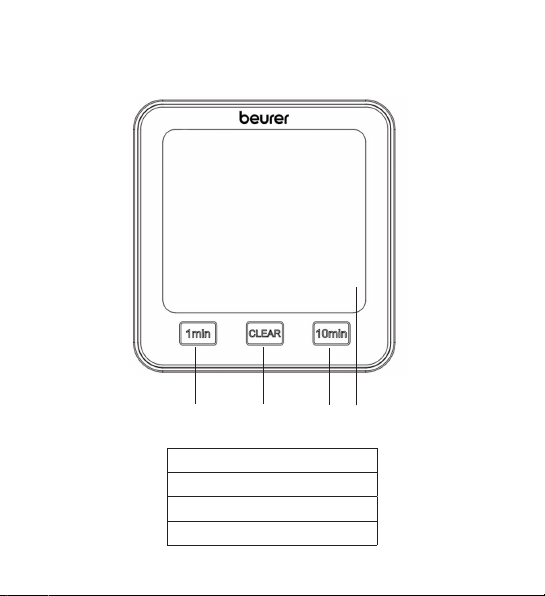
6. Gerätebeschreibung
1
1 [1 min]-Taste
2 [CLEAR]-Taste
3 [10 min]-Taste
4 Display
Vorderseite
2
8
4
3
Page 9
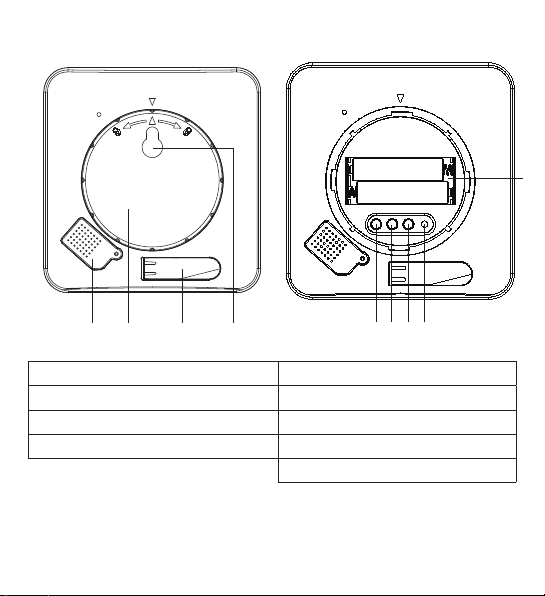
Rückseite
9
TIME DOWN RESETUP/CF
4
3
2
1
7
5
6
1 Sensoren-Abdeckung 5 [TIME]-Taste
2 Batteriefach-Abdeckung 6 [UP/CF]-Taste
3 Ausklappbarer Standfuß 7 [DOWN]-Taste
4 Aufhängevorrichtung 8 [RESET]-Taste
9 Batteriefach
9
8
Page 10
7. Inbetriebnahme
7.1 Batterien einlegen
Hinweis
Bevor Sie das Thermo-Hygrometer in Betrieb nehmen können, müssen Sie
zuerst zwei AAA-Batterien (im Lieferumfang enthalten) in das Batteriefach
einlegen. Gehen Sie dazu wie folgt vor:
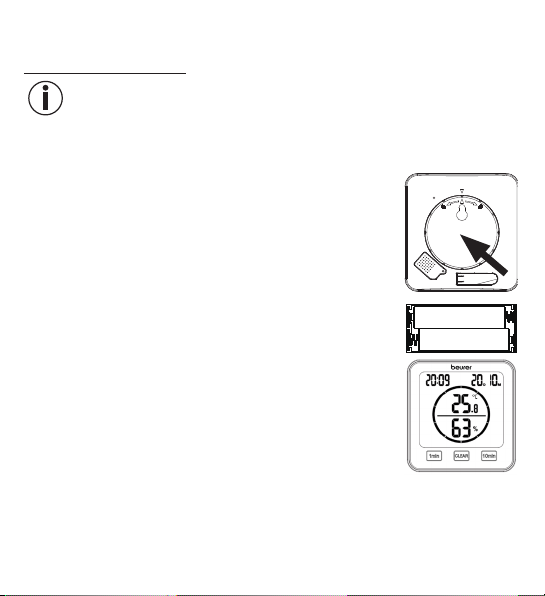
1. Auf der Rückseite des Thermo-Hygrometers befindet sich
eine runde Batteriefach-Abdeckung. Drehen Sie die Batteriefach-Abdeckung gegen den Uhrzeigersinn auf. Nehmen
Sie nun die Batteriefach-Abdeckung ab.
2. Legen Sie die zwei im Lieferumfang enthaltenen AAA-Bat-
terien in das Batteriefach ein. Achten Sie beim Einlegen
der Batterien auf die korrekte Polung (+/-), wie sie im Batteriefach abgebildet ist. Sobald die Batterien korrekt eingelegt sind, erscheinen auf dem Display alle Anzeigen für
3 Sekunden. Anschließend wechselt das Thermo-Hygrometer automatisch in den Standard Modus.
3.
Bevor Sie die Batteriefach-Abdeckung wieder aufsetzen, müssen Sie zuerst
Datum und Uhrzeit einstellen. Befolgen Sie dazu die Anweisungen im nächsten Abschnitt.
10
Page 11
7.2 Datum / Uhrzeit / Temperatureinheit einstellen
1.
Um zwischen 12- und 24-Stundenmodus zu wechseln, drücken Sie die [TIME]-
Taste. Um zwischen Celsius (°C) und Fahrenheit (°F) zu wechseln, drücken Sie
die [UP/CF]-Taste.
2. Die Reihenfolge im Einstellungsmenü lautet:
Jahr -> Monat -> Tag -> Stunde -> Minute
Um in das Einstellungsmenü zu gelangen, halten Sie die [TIME]-Taste für
3Sekunden gedrückt. Im Display beginnt die Jahreszahl zu blinken.
3.
Stellen Sie mit den [UP/CF] / [DOWN]-Tasten das aktuelle Jahr ein. Bestätigen Sie mit der
[TIME]-Taste. Im Display blinkt nun der Monat.
4. Stellen Sie nun auf dieselbe Weise nacheinander Monat, Tag, Stunde und Mi-
nute mit den
[TIME]-Taste.
Wenn Sie im Einstellungsmenü 7 Sekunden lang keine Taste drücken, wird
das Einstellungsmenü automatisch verlassen.
[UP/CF] / [DOWN]-Tasten
ein und bestätigen Sie jeweils mit der
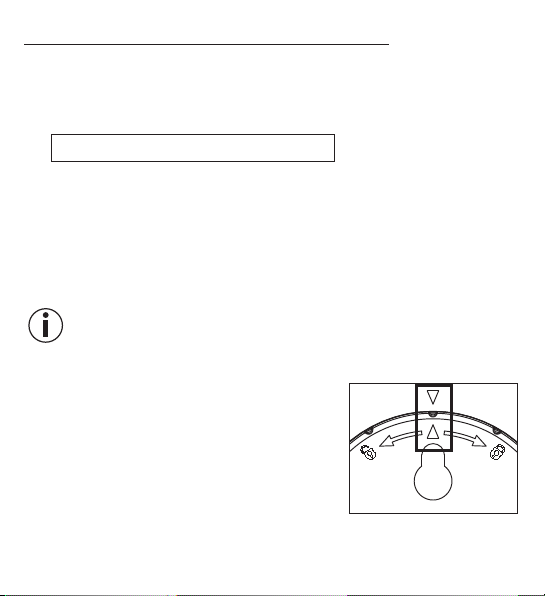
5. Setzen Sie die Batteriefach-Abdeckung wieder auf das Batteriefach
6.
Drehen Sie die Batteriefach-Abdeckung im Uhrzeigersinn fest zu, bis sie spürbar einrastet. Achten
Sie darauf, dass die Pfeilmarkierungen des Geräts und der Batteriefach-Abdeckung übereinander liegen.
7.
Sie können das Gerät mit Hilfe des ausklappbaren Standfußes als Standgerät verwenden oder
mit Hilfe der Aufhängevorrichtung (befindet sich auf der Geräterückseite) an
einer Wand montieren.
11
.
Page 12
7.3 Auf Werkseinstellung zurücksetzen
Um das Datum und die Uhrzeit auf die Werkseinstellung zurückzusetzen, drücken
Sie mit einem spitzen Gegenstand kurz die [RESET]-Taste.
8. Anwendung
Das Thermo-Hygrometer besitzt einen Standard-Modus und einen Timer.
8.1 Standard-Modus
Wenn Sie am Thermo-Hygrometer keine Taste drücken, wird Ihnen auf dem
Display automatisch der Standard-Modus angezeigt.
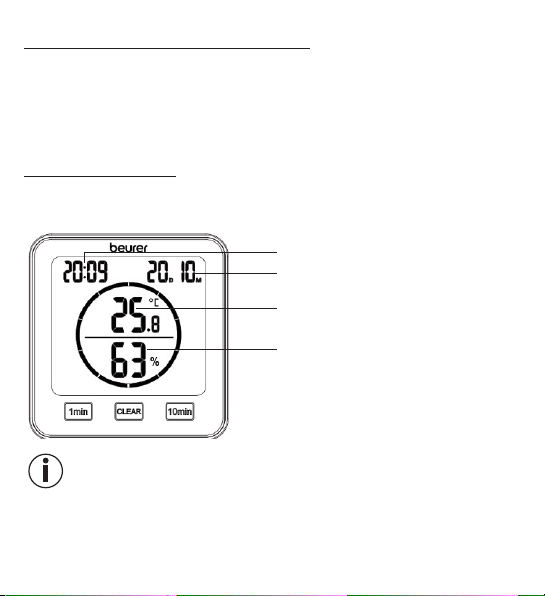
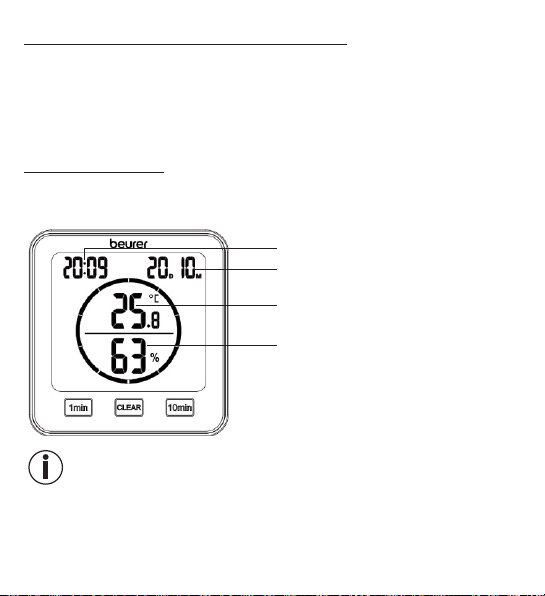
Uhrzeit
Datum
(D = Tag, M = Monat)
Raumtemperatur
Relative Luftfeuchtigkeit
Hinweis
Nach Inbetriebnahme kann es 10 Minuten dauern, bis die korrekte Temperatur
und Luftfeuchtigkeit angezeigt werden.
12
Page 13
8.2 Timer
Sie können am Thermo-Hygrometer auch einen Timer von bis zu 99 Minuten
einstellen.
1.
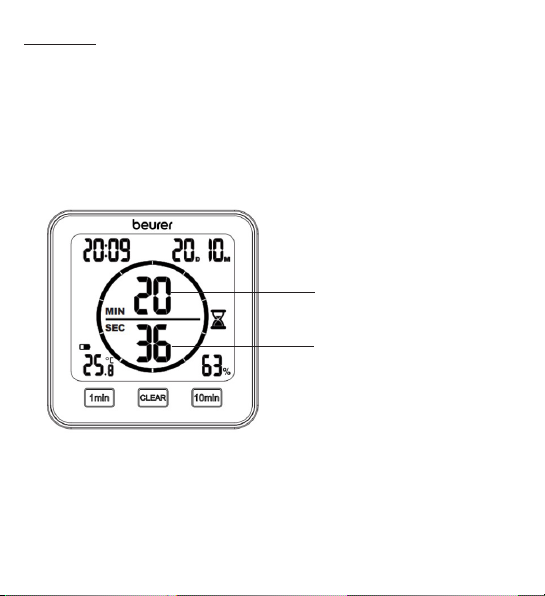
Um den Timer zu starten, stellen Sie mit der [1 min]-Taste und der [10 min]-Taste
Ihre gewünschte Timer-Dauer ein. In der Mitte des Displays erscheint die eingestellte Timer-Dauer. Wenn Sie für 3 Sekunden keine Taste drücken, startet der
Timer automatisch mit einem Piepton. Nach Ablauf des Timers ertönt erneut
ein Pieptoton. Um den Piepton auszuschalten, drücken Sie die
2. Um einen Timer vorzeitig zu beenden, drücken Sie die [CLEAR]-Taste.
[CLEAR]-Taste.
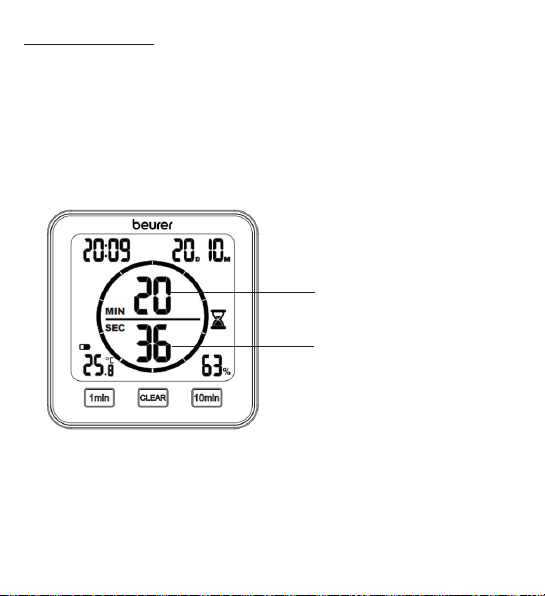
Verbleibende Minuten des
Timers
Verbleibende Sekunden
des Timers
13
Page 14
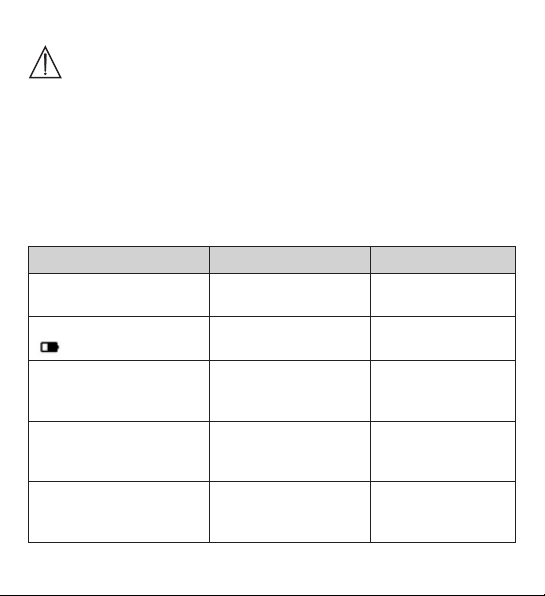
9. Reinigung und Pflege
ACHTUNG
•
Reinigen Sie das Gerät mit einem feuchten Tuch. Benutzen Sie
keine scharfen Reinigungsmittel oder harte Bürsten!
•
Es darf keinesfalls Flüssigkeit in das Gerät eindringen.
•
Wenn Sie das Gerät längere Zeit nicht verwenden, empfehlen wir
Ihnen, es in der Originalverpackung in trockener Umgebung und
ohne Beschwerung aufzubewahren.
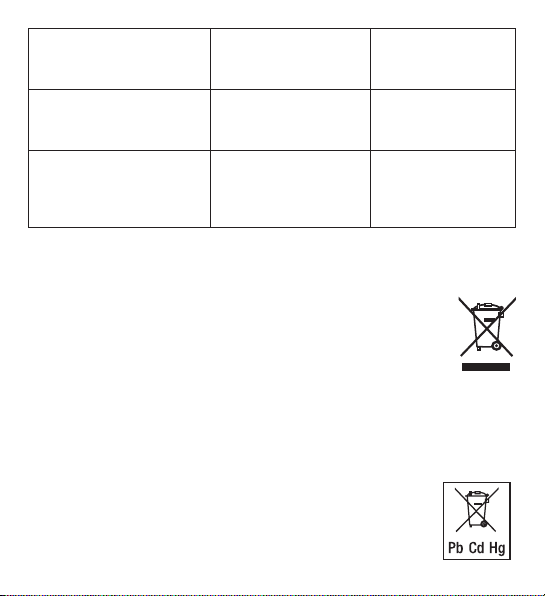
10. Was tun bei Problemen?
Problem Mögliche Ursache Behebung
Gerät lässt sich nicht
einschalten
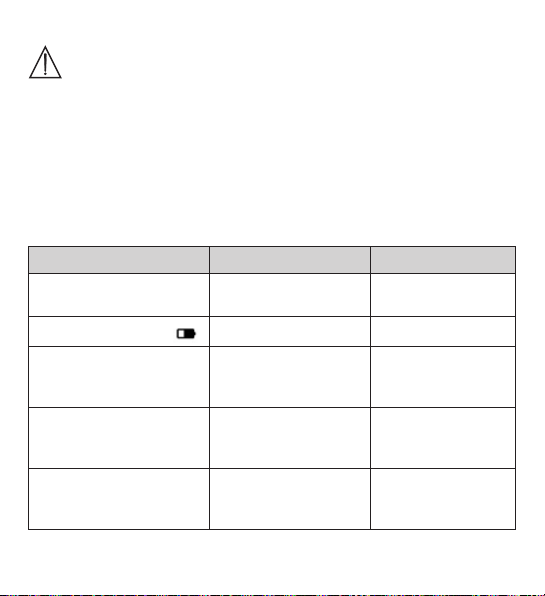
Auf dem Display erscheint
Gerät lässt sich nicht
einschalten, trotz neuer
Batterien
Auf dem Display erscheint
LL.L
Auf dem Display erscheint
HH.H.
Batterien leer
Batterien fast leer
Das Gerät ist defekt
Raumtemperatur unter
-10°C (14°F)
Raumtemperatur über
50°C (122°F)
14
Neue Batterien
einlegen
Neue Batterien
einlegen
Kontaktieren Sie den
Kundendienst
Raumtemperatur
liegt außerhalb des
Messbereichs
Raumtemperatur
liegt außerhalb des
Messbereichs
Page 15
Auf dem Display erscheint LLRelative Luftfeuchtig-
Auf dem Display erscheint
HH
Gerät zeigt keine oder
falsche Temperatur und
relative Luftfeuchtigkeit
keit unter 20 %
Relative Luftfeuchtigkeit über 95 %
Wechselnde Umgebung
Relative Luftfeuchtigkeit liegt außerhalb
des Messbereichs
Relative Luftfeuchtigkeit liegt außerhalb
des Messbereichs
Nach Inbetriebnahme
kann es 10 Minuten
dauern bis korrekte Da
ten angezeigt werden
-
11. Entsorgung
Im Interesse des Umweltschutzes darf das Gerät am Ende seiner Lebensdauer
nicht mit dem Hausmüll entsorgt werden. Die Entsorgung kann über entsprechende Sammelstellen in Ihrem Land erfolgen. Entsorgen Sie das Gerät
gemäß der Elektro- und Elektronik Altgeräte EG-Richtlinie – WEEE
(Waste Electrical and Electronic Equipment).
Bei Rückfragen wenden Sie sich an die für die Entsorgung zuständige
kommunale Behörde.
Batterie Entsorgung
Die verbrauchten, vollkommen entladenen Batterien müssen Sie über speziell gekennzeichnete Sammelbehälter, Sondermüllannahmestellen oder über den Elektrohändler entsorgen. Sie sind gesetzlich dazu verpflichtet, die Batterien zu entsorgen.
Diese Zeichen finden Sie auf schadstoffhaltigen Batterien:
Pb = Batterie enthält Blei,
Cd = Batterie enthält Cadmium,
Hg = Batterie enthält Quecksilber.
15
Page 16
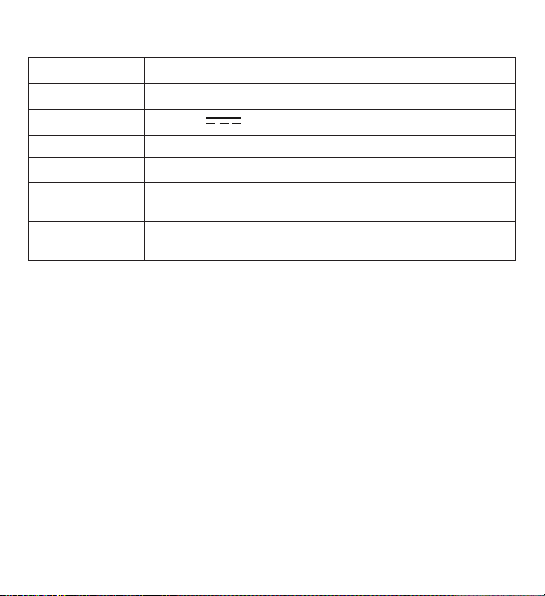
12. Technische Angaben
Typ HM 22
Artikelnummer
Versorgung 2 x 1,5 V
Gewicht 135 g (ohne Batterien)
Maße 110 x 105 x 29,5 mm
Messbereich
Temperatur
Messbereich
Feuchtigkeit
678.04
Batterie AAA LR03
-10 bis 50 °C (14 bis 122 °F)
20 bis 95 % relative Luftfeuchtigkeit
13. Garantie/Service
Die Beurer GmbH, Söflinger Straße 218, D-89077 Ulm (nachfolgend „Beurer“
genannt) gewährt unter den nachstehenden Voraussetzungen und in dem nachfolgend beschriebenen Umfang eine Garantie für dieses Produkt.
Die nachstehenden Garantiebedingungen lassen die gesetzlichen Gewährleistungsverpflichtungen des Verkäufers aus dem Kaufvertrag mit dem
Käufer unberührt. Die Garantie gilt außerdem unbeschadet zwingender
gesetzlicher Haftungsvorschriften.
Beurer garantiert die mangelfreie Funktionstüchtigkeit und die Vollständigkeit
dieses Produktes.
Die weltweite Garantiezeit beträgt 3 Jahre ab Beginn des Kaufes des neuen,
ungebrauchten Produktes durch den Käufer.
Diese Garantie gilt nur für Produkte, die der Käufer als Verbraucher erworben
hat und ausschließlich zu persönlichen Zwecken im Rahmen des häuslichen
Gebrauchs verwendet.
Es gilt deutsches Recht.
16
Page 17

Falls sich dieses Produkt während der Garantiezeit als unvollständig oder in der
Funktionstüchtigkeit als mangelhaft gemäß der nachfolgenden Bestimmungen
erweist, wird Beurer gemäß diesen Garantiebedingungen eine kostenfreie Ersatzlieferung oder Reparatur durchführen.
Wenn der Käufer einen Garantiefall melden möchte, wendet er sich zunächst an den Beurer Kundenservice:
Beurer GmbH, Servicecenter
Tel: +49 731 3989-144
Für eine zügige Bearbeitung nutzen Sie bitte unser Kontaktformular auf der
Homepage www.beurer.com unter der Rubrik ‚Service‘.
Der Käufer erhält dann nähere Informationen zur Abwicklung des Garantiefalls,
z.B. wohin er das Produkt kostenfrei senden kann und welche Unterlagen erforderlich sind.
Eine Inanspruchnahme der Garantie kommt nur in Betracht, wenn der Käufer
- eine Rechnungskopie/Kaufquittung und
- das Original-Produkt
Beurer oder einem autorisierten Beurer Partner vorlegen kann.
Ausdrücklich ausgenommen von dieser Garantie sind
- Verschleiß, der auf normalem Gebrauch oder Verbrauch des Produktes beruht;
- zu diesem Produkt mitgelieferte Zubehörteile, die sich bei sachgemäßen Gebrauch abnutzen bzw. verbraucht werden (z.B. Batterien, Akkus, Manschetten,
Dichtungen, Elektroden, Leuchtmittel, Aufsätze, Inhalatorzubehör);
- Produkte, die unsachgemäß und/oder entgegen der Bestimmungen der Bedienungsanleitung verwendet, gereinigt, gelagert oder gewartet wurden sowie Produkte, die vom Käufer oder einem nicht von Beurer autorisierten Servicecenter
geöffnet, repariert oder umgebaut wurden;
- Schäden, die auf dem Transportweg zwischen Hersteller und Kunde bzw.
zwischen Servicecenter und Kunde entstehen
- Produkte, die als 2.Wahl-Artikel oder als gebrauchte Artikel gekauft wurden;
17
Page 18

- Folgeschäden, welche auf einem Mangel dieses Produktes beruhen (es können
für diesen Fall jedoch Ansprüche aus Produkthaftung oder aus anderen zwingenden gesetzlichen Haftungsbestimmungen bestehen).
Reparaturen oder ein Komplettaustausch verlängern in keinem Fall die Garantiezeit.
18
Irrtum und Änderungen vorbehalten
Page 19
ENGLISH
Read these instructions for use carefully and
keep them for later use; be sure to make
them accessible to other users and observe
the information they contain.
Dear customer,
Thank you for choosing a product from our range. Our name is synonymous
with high-quality, thoroughly tested products for applications in the areas of
heat, weight, blood pressure, body temperature, pulse, gentle therapy, massage,
beauty, baby and air.
With kind regards,
Your Beurer team
Table of contents
1. Getting to know your device ......... 20
2. Included in delivery......................... 20
3. Signs and symbols ......................... 20
4. Proper use ...................................... 21
5. Warnings and safety notes ............. 22
6. Device description .......................... 24
7. Initial use ........................................ 26
7.1 Inserting the batteries.................... 26
7.2 Setting the date/time/
temperature unit ............................ 26
7.3 Resetting to factory settings ......... 27
8. Usage ........................................... 28
8.1 Standard mode.............................. 28
8.2 Timer ............................................. 28
9. Cleaning and maintenance ........... 29
10. What if there are problems? ......... 30
11. Disposal ........................................ 31
12. Technical specifications ............... 32
13. Warranty/service ........................... 32
19
Page 20
1. Getting to know your device
Using the HM 22 thermo hygrometer, you can measure the current room temperature
and relative humidity and read them from the display. In addition, the thermo
hygrometer has a timer which you can set.
Due to its handy size, you can set up the thermo hygrometer anywhere. There
is a mounting fixture on the back of the thermo hygrometer that you can use to
attach the device to the wall.
2. Included in delivery
1 x thermo hygrometer
2 x AAA batteries
1 x set of these instructions for use
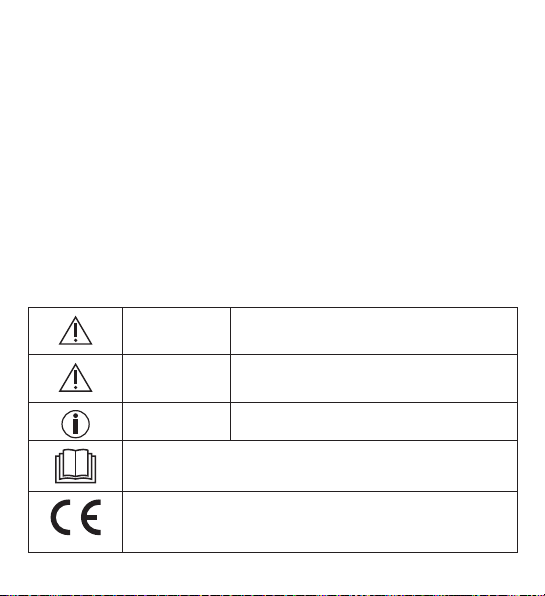
3. Signs and symbols
The following symbols appear in the instructions for use and on the device:
WARNING
IMPORTANT
Note Note on important information
Read the instructions for use
CE labelling
This product satisfies the requirements of the applicable
European and national directives
Warning notice indicating a risk of injury or
damage to health
Safety note indicating possible damage to
the device/accessory
20
Page 21
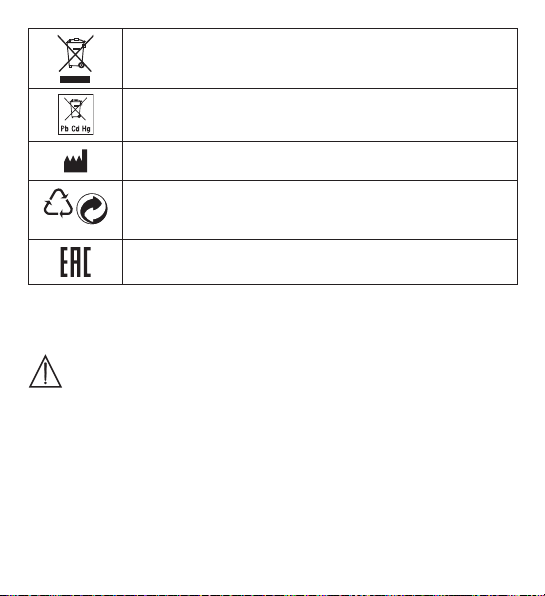
Disposal in accordance with the Waste Electrical and
PAP
Electronic Equipment EC Directive – WEEE
Do not dispose of batteries containing harmful substances
with household waste
Manufacturer
21
Dispose of packaging in an environmentally friendly manner
The products demonstrably meet the requirements of the
Technical Regulations of the EAEU
4. Proper use
WARNING
The device is solely intended for measuring humidity and room temperature.
The device is intended for private use only. Use the device for the purpose it was
developed for only and in the manner specified in these instructions for use. Any
form of improper use can be dangerous! The manufacturer is not liable for damage
resulting from improper or incorrect use.
21
Page 22
5. Warnings and safety notes
WARNING
•
Keep packaging material away from children. There is the risk of
suffocation.
•
The device is not a toy. Keep out of the reach of children.
•
Under no circumstances should you open or repair the device
yourself, as faultless functionality can no longer be guaranteed
thereafter. Failure to comply will invalidate the warranty.
•
For repairs, please contact Customer Services or an authorised
retailer.
•
Keep the device away from naked flames (e.g. candles).
•
Never submerge the device in water or other liquids.
•
Never use the device underneath a cover, such as a blanket or
pillow.
•
Do not use the device outside.
Notes on handling batteries
WARNING
•
If your skin or eyes come into contact with battery fluid, rinse the
affected area with water and seek medical assistance.
•
Choking hazard! Small children may swallow and choke
on batteries. Therefore, store batteries out of the reach of small
children.
•
Observe the plus (+) and minus (-) polarity signs.
22
Page 23
•
If a battery has leaked, put on protective gloves and clean the
battery compartment with a dry cloth.
•
Protect batteries from excessive heat.
•
Risk of explosion! Do not throw batteries into a fire.
•
Do not charge or short-circuit batteries.
•
If the device is not to be used for a long period of time, remove the
batteries from the battery compartment.
•
Use identical or equivalent battery types only.
•
Always replace all batteries at the same time.
•
Do not use rechargeable batteries.
•
Do not disassemble, open or crush the batteries.
IMPORTANT
•
Protect the device from knocks, damp, dust, chemicals, significant
fluctuations in temperature, direct sunlight, splashes, and sand,
and ensure that sources of heat are at a sufficient distance (ovens
or heaters).
•
Do not place any objects on top of the device.
•
Clean the device with a damp cloth. Do not use any abrasive
cleaning products.
•
Use and store the device at an ambient temperature between -10°C
and 50°C. Higher or lower temperatures may damage the device.
•
In a changing environment the device requires 10 minutes to deliver
a reliable measurement.
•
Before using the device for the first time, remove the protective
film from the display.
23
Page 24
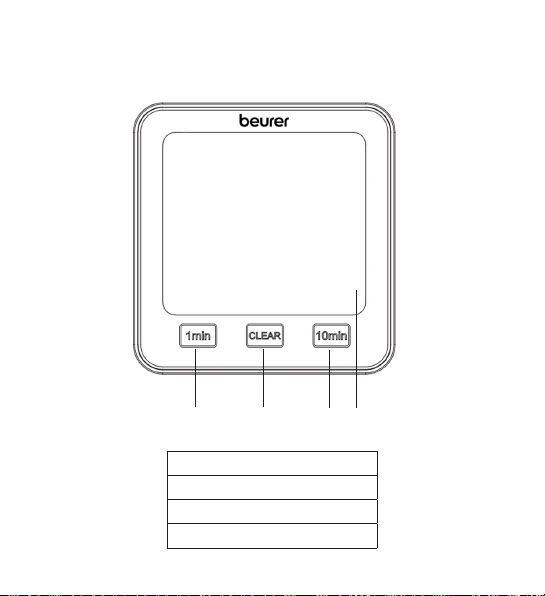
6. Device description
1
1 [1 min] button
2 [CLEAR] button
3 [10 min] button
4 Display
Front
2
24
4
3
Page 25
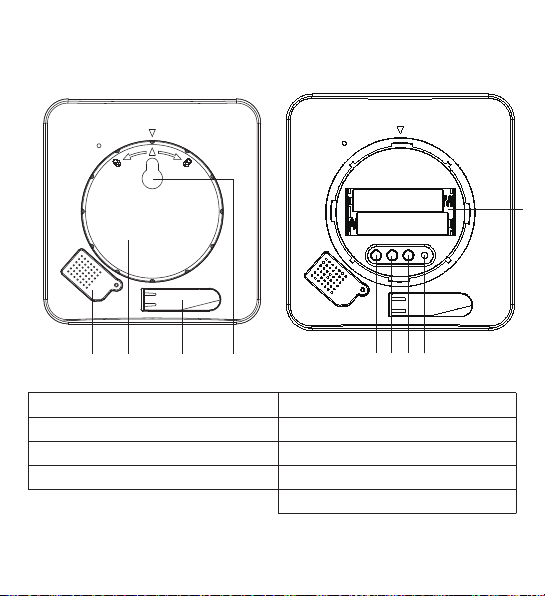
Rear
9
TIME DOWN RESETUP/CF
4
3
2
1
7
5
6
1 Sensor cover 5 [TIME] button
2 Battery compartment lid 6 [UP/CF] button
3 Fold-out stand 7 [DOWN] button
4 Mounting fixture 8 [RESET] button
9 Battery compartment
25
8
Page 26
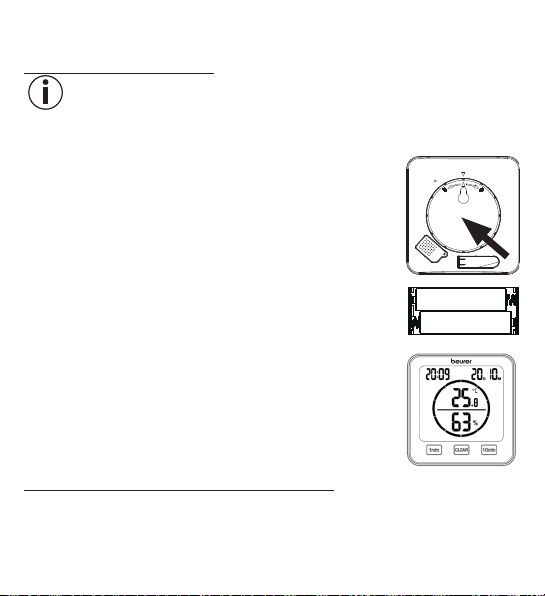
7. Initial use
7.1 Inserting the batteries
Note
Before you can use the thermo hygrometer, you first have to insert two AAA
batteries (included in delivery) into the battery compartment. Proceed as follows:
1. A round battery compartment lid is located on the rear of
the thermo hygrometer. Twist the battery compartment lid
anti-clockwise. Now remove the battery compartment lid.
2.
Insert the two AAA batteries included in delivery into the
battery compartment. When inserting the batteries, pay
attention to the correct polarity (+/-), as shown in the battery
compartment. As soon as the batteries are correctly inserted,
all display elements appear on the display for 3 seconds. The
thermo hygrometer then automatically switches to standard
mode.
3.
Before you replace the battery compartment lid, you
first have to set the date and time. To do so, follow the
instructions in the following section.
7.2 Setting the date/time/temperature unit
1.
To switch between the 12 and 24-hour modes, press the [TIME] button. To
switch between Celsius (°C) and Fahrenheit (°F), press the [UP/CF] button.
26
Page 27
2. The order in the settings menu is:
Year -> Month -> Day -> Hour -> Minute
To access the settings menu, press and hold the [TIME] button for 3
seconds. The year starts to flash in the display.
3.
Set the current year using the [UP/CF]/[DOWN] buttons. Confirm using the
[TIME] button. The month now flashes in the display.
4.
Now set the month, day, hour and minute one after the other in the same manner
using the [UP/CF]/[DOWN] buttons and confirm each using the [TIME] button.
If you do not press any buttons for 7 seconds in the settings menu,
you will automatically exit the settings menu.
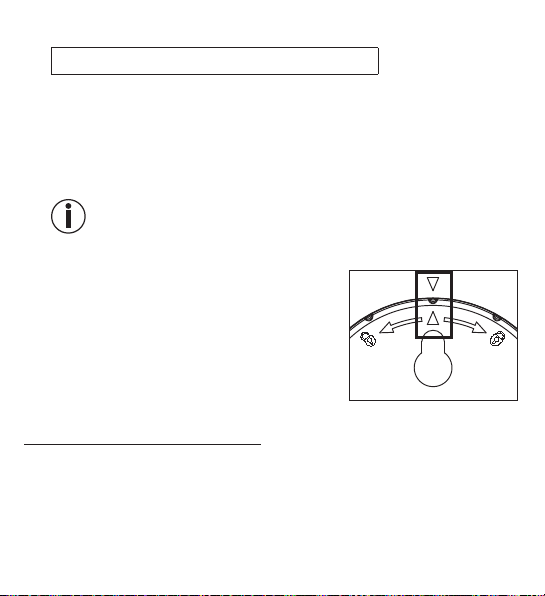
5. Place the battery compartment lid back on the battery compartment.
6. To close the battery compartment lid, twist it in a
clockwise direction until you feel it click firmly into
place. Make sure that the arrow markings of the
device and the battery compartment lid line up.
7. You can use the fold-out stand to create a stand-
alone device or you can mount it on the wall using
the mounting fixture (on the back of the device).
7.3 Resetting to factory settings
To reset the date and time to factory settings, briefly press the [RESET] button
using a pointed object.
27
Page 28
8. Usage
The thermo hygrometer has a standard mode and a timer mode.
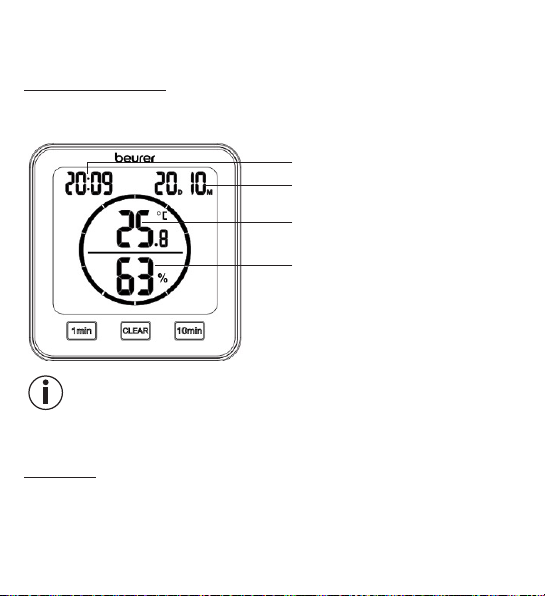
8.1 Standard mode
If you do not press any buttons on the thermo hygrometer, the standard mode is
automatically shown on the display.
Time
Date (D = day, M = month)
Room temperature
Relative humidity
Note
After initial use, it may take 10 minutes until the correct temperature and humidity
are displayed.
8.2 Timer
You can also set a timer of up to 99 minutes on the thermo hygrometer.
1.
In order to start the timer, set your desired timer duration using the [1 min]
button and the [10 min] button. The set timer duration appears in the centre
of the display. If you do not press any buttons for 3 seconds, the timer starts
28
Page 29
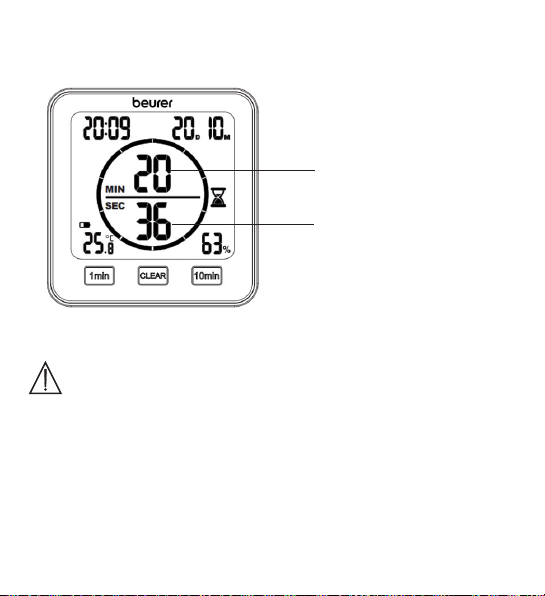
automatically with a beep. A beep sounds again when the timer elapses. To
switch o the beep, press the [CLEAR] button.
2. In order to end a timer early, press the [CLEAR] button.
Remaining minutes on
the timer
Remaining seconds on
the timer
9. Cleaning and maintenance
IMPORTANT
•
Clean the device with a damp cloth. Do not use any abrasive
cleaning products or hard brushes.
•
Under no circumstances may liquid enter the device.
•
If you do not plan to use the device for a long period of time, we
recommend that you store it in the original packaging in a dry
environment, ensuring it is not weighed down by additional items.
29
Page 30
10. What if there are problems?
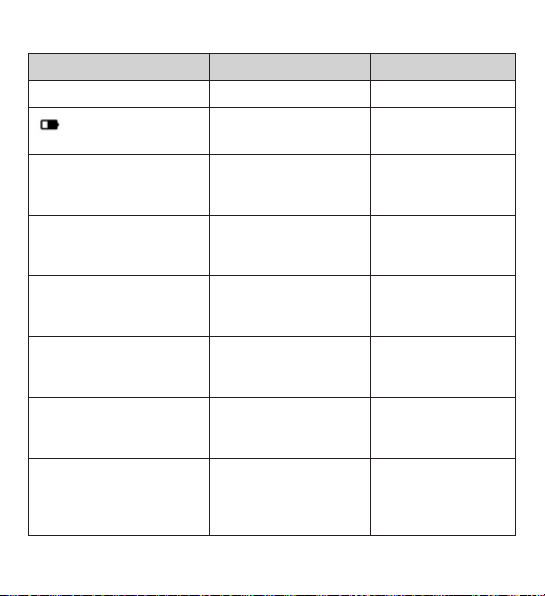
Problem Possible cause Solution
Device will not switch on Flat batteries Insert new batteries
appears on the
display
The device will not switch
on although new batteries
have been inserted
LL.L appears on the
display
HH.H. appears on the
display
LL appears on the display
HH appears on the display
Device displays an
incorrect temperature and
relative humidity or does
not display them at all
Batteries almost flat Insert new batteries
The device is faulty
Room temperature
below -10°C (14°F)
Room temperature
above 50°C (122°F)
Relative humidity below
20%
Relative humidity above
95%
Changing environment
30
Contact Customer
Services
Room temperature
is outside the
measurement range
Room temperature
is outside the
measurement range
Relative humidity
is outside the
measurement range
Relative humidity
is outside the
measurement range
After initial use, it
may take 10minutes
until the correct data
is displayed
Page 31
11. Disposal
For environmental reasons, do not dispose of the device in household waste at the
end of its service life. Dispose of the device at a suitable local collection or recycling
point in your country. Dispose of the device in accordance with EC
Directive – WEEE (Waste Electrical and Electronic Equipment).
If you have any questions, please contact the local authorities
responsible for waste disposal.
Battery disposal
Empty, completely flat batteries must be disposed of through specially designated
collection boxes, recycling points or electronics retailers. You are legally required
to dispose of the batteries.
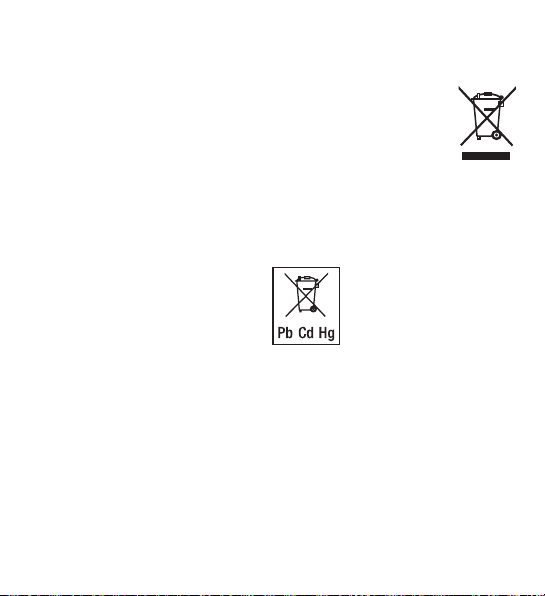
The codes below are printed on batteries containing harmful substances:
Pb = battery contains lead,
Cd = battery contains cadmium,
Hg = battery contains mercury.
31
Page 32
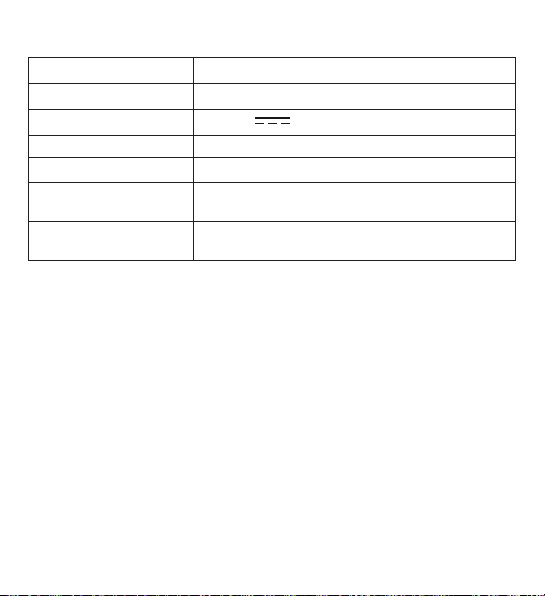
12. Technical specifications
Type HM 22
Item number 678.04
Supply 2 x 1.5 V
Weight 135 g (without batteries)
Dimensions 110 x 105 x 29.5 mm
Temperature
measurement range
Humidity measurement
range
-10 to 50°C (14 to 122°F)
20 to 95% relative humidity
AAA LR03 battery
13. Warranty/service
Beurer GmbH, Söflinger Straße 218, 89077 Ulm, Germany
(hereinafter referred to as “Beurer”) provides a warranty for this
product, subject to the requirements below and to the extent
described as follows.
The warranty conditions below shall not aect the seller’s
statutory warranty obligations which ensue from the sales
agreement with the buyer.
The warranty shall apply without prejudice to any mandatory
statutory provisions on liability.
32
Page 33

Beurer guarantees the perfect functionality and completeness of
this product.
The worldwide warranty period is 3 years, commencing from the
purchase of the new, unused product from the seller.
The warranty only applies to products purchased by the buyer
as a consumer and used exclusively for personal purposes in the
context of domestic use.
German law shall apply.
During the warranty period, should this product prove to be
incomplete or defective in functionality in accordance with
the following provisions, Beurer shall carry out a repair or a
replacement delivery free of charge, in accordance with these
warranty conditions.
If the buyer wishes to make a warranty claim, they should
approach their local retailer in the first instance: see the
attached “International Service” list of service addresses.
The buyer will then receive further information about the processing
of the warranty claim, e.g. where they can send the product and
what documentation is required.
33
Page 34

A warranty claim shall only be considered if the buyer can provide
Beurer, or an authorised Beurer partner, with
– a copy of the invoice/purchase receipt, and
– the original product.
The following are explicitly excluded from this warranty:
– deterioration due to normal use or consumption of the product;
– accessories supplied with this product which are worn out
or used up through proper use (e.g. batteries, rechargeable
batteries, cus, seals, electrodes, light sources, attachments and
nebuliser accessories);
– products that are used, cleaned, stored or maintained improperly
and/or contrary to the provisions of the instructions for use, as
well as products that have been opened, repaired or modified by
the buyer or by a service centre not authorised by Beurer;
– damage that arises during transport between manufacturer and
customer, or between service centre and customer;
– products purchased as seconds or as used goods;
– consequential damage arising from a fault in this product
(however, in this case, claims may exist arising from product
liability or other compulsory statutory liability provisions).
Repairs or an exchange in full do not extend the warranty period
under any circumstances.
34
Subject to errors and changes
Page 35
FRANÇAIS
Lisez attentivement ce mode d’emploi,
conservez-le pour un usage ultérieur, mettez-le à disposition des autres utilisateurs et
suivez les consignes qui y figurent.
Chère cliente, cher client,
Nous vous remercions d’avoir choisi l’un de nos produits. Notre société est
réputée pour l’excellence de ses produits et les contrôles de qualité auxquels
ils sont soumis. Nos produits couvrent les domaines de la chaleur, du poids, de
la pression sanguine, de la température corporelle, de la thérapie douce, des
massages, de la beauté, des soins pour bébé et de l’amélioration de l’air.
Sincères salutations,
Votre équipe Beurer
Table des matières
1. Familiarisation avec l’appareil ........36
2. Contenu .......................................... 36
3. Symboles utilisés ............................ 36
4. Utilisation conforme aux
recommandations ........................... 37
5. Consignes d’avertissement et
de mise en garde ............................ 38
6. Description de l’appareil ................. 40
7. Mise en service ............................... 42
7.1 Insérer les piles.............................. 42
7.2 Réglage de la date/ de l’heure /
de l’unité de température .............. 43
7.3 Repasser aux réglages d’usine ..... 44
8. Utilisation ...................................... 44
8.1 Mode Standard ............................. 44
8.2 Minuteur ........................................ 45
9. Nettoyage et entretien .................. 46
10. Que faire en cas de problèmes?.. 46
11. Élimination .................................... 47
12. Caractéristiques techniques ......... 48
13. Garantie/maintenance .................. 49
35
Page 36
1. Familiarisation avec l’appareil
Le thermo-hygromètre HM 22 vous permet de mesurer la température ambiante actuelle et l’humidité relative et la consulter sur l’écran. En outre, le thermo-hygromètre
est équipé d’un minuteur vous permettant de régler une mesure sur un temps court.
Sa taille compacte pratique vous permet de poser le thermo-hygromètre partout.
L’arrière du thermo-hygromètre est équipé d’un système d’accrochage qui vous
permet de fixer l’appareil au mur.
2. Contenu
1x thermo-hygromètre
2x piles AAA
1xmode d’emploi
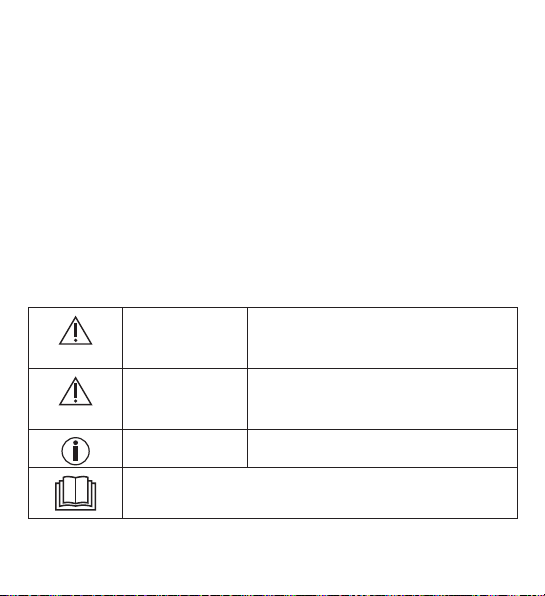
3. Symboles utilisés
Les symboles suivants sont employés dans ce mode d’emploi et sur l’appareil:
AVERTISSEMENT
ATTENTION
Remarque Indication d’informations importantes
Consulter le mode d’emploi
Ce symbole vous avertit des risques de
blessures ou des dangers pour votre
santé
Ce symbole vous avertit des éventuels
dommages au niveau de l’appareil ou
d’un accessoire
36
Page 37
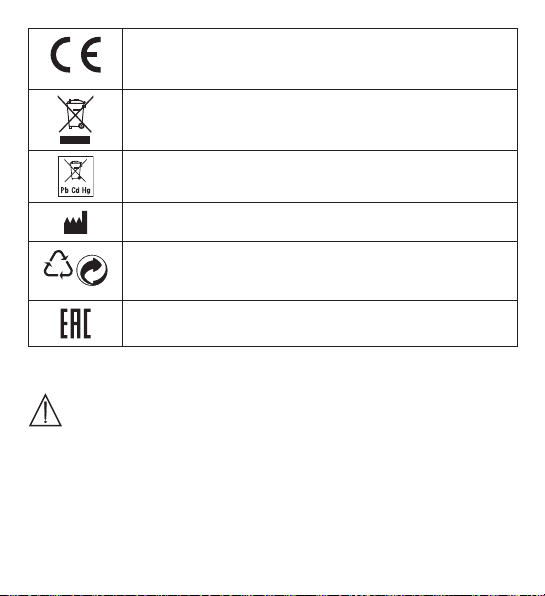
Sigle CE
PAP
Ce produit répond aux exigences des directives européennes
et nationales en vigueur
Élimination conformément à la directive européenne WEEE
(Waste Electrical and Electronic Equipment) relative aux
déchets d’équipements électriques et électroniques
Ne pas jeter les piles à substances nocives avec les déchets
ménagers
Fabricant
21
Éliminer l’emballage dans le respect de l’environnement
Les produits sont complètement conformes aux exigences des
règlements techniques de l’UEEA.
4. Utilisation conforme aux recommandations
AVERTISSEMENT
L’appareil est conçu exclusivement pour mesurer l’humidité de l’air et la température ambiante.
L’appareil est conçu uniquement pour un usage personnel. N’utilisez l’appareil
qu’aux fins pour lesquelles il a été conçu et conformément aux indications
données par ce mode d’emploi. Toute utilisation inappropriée peut être dangereuse! Le fabricant ne peut être tenu pour responsable des dommages
causés par une utilisation inappropriée ou non conforme.
37
Page 38
5. Consignes d’avertissement et de mise en garde
AVERTISSEMENT
•
Conservez les emballages hors de la portée des enfants. Ils pourraient s’étouffer.
•
L’appareil n’est pas un jouet. Tenez-le hors de portée des enfants.
•
Vous ne devez en aucun cas ouvrir ou réparer l’appareil; le bon
fonctionnement de l’appareil ne serait plus assuré. Le non-respect
de cette consigne annulerait la garantie.
•
Pour toute réparation, adressez-vous au service client ou à un revendeur agréé.
•
Maintenez l’appareil à l’écart des flammes ouvertes (p. ex. bougies).
•
N’immergez jamais l’appareil dans de l’eau ou d’autres liquides.
•
N’utilisez jamais l’appareil dans un endroit couvert, sous une couverture ou des coussins par exemple.
•
N’utilisez pas l’appareil en plein air.
Remarques relatives aux piles
AVERTISSEMENT
•
Si du liquide de la cellule de pile entre en contact avec la peau ou les
yeux, rincer la zone touchée avec de l’eau et consulter un médecin.
•
Risque d’ingestion! Les enfants en bas âge pourraient avaler
des piles et s’étouffer. Conserver les piles hors de portée des en
fants en bas âge!
•
Respecter les signes de polarité plus (+) et moins (-).
38
-
Page 39
•
Si une pile a coulé, enfiler des gants de protection et nettoyer le
compartiment à piles avec un chiffon sec.
•
Protéger les piles d’une chaleur excessive.
•
Risque d’explosion! Ne pas jeter les piles dans le feu.
•
Les piles ne doivent être ni rechargées ni court-circuitées.
•
En cas de non-utilisation prolongée de l’appareil, retirer les piles
du compartiment à piles.
•
Utiliser uniquement des piles identiques ou équivalentes.
•
Toujours remplacer toutes les piles simultanément.
•
Ne pas utiliser de batteries rechargeables!
•
Ne pas démonter, ouvrir ou casser les piles.
ATTENTION
•
Protégez l’appareil contre les coups, l’humidité, la poussière, les
produits chimiques, les fortes variations de température, les rayons
directs du soleil, les éclaboussures, le sable et les sources de cha
leur trop proches (four ou radiateur).
•
Ne posez aucun objet sur l’appareil.
•
Nettoyez l’appareil à l’aide d’un chiffon humide. N’utilisez pas de
produits nettoyants abrasifs.
•
Utilisez et conservez l’appareil à une température comprise entre
-10°C et 50°C. Des températures plus basses ou plus élevées
pourraient endommager l’appareil.
•
Si les conditions ambiantes sont changeantes, il faut compter
10minutes avant que l’appareil fournisse des mesures fiables.
•
Avant la première mise en service, retirez le film de protection de
l’écran.
39
-
Page 40
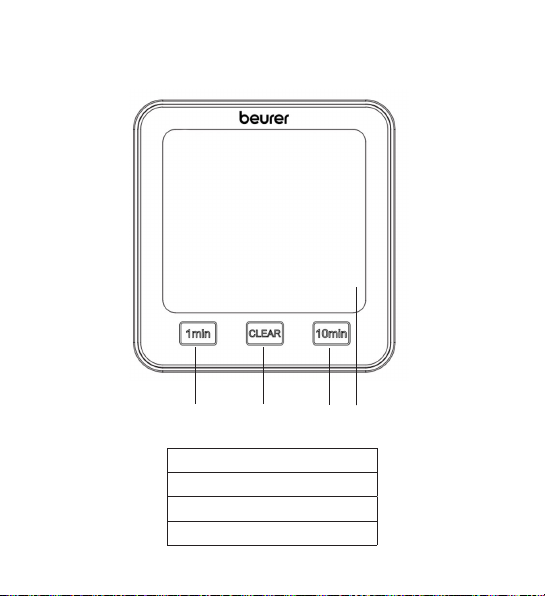
6. Description de l’appareil
Face avant
1
1 Touche [1 min]
2 Touche [CLEAR]
3 Touche [10 min]
4 Écran
4
2
40
3
Page 41
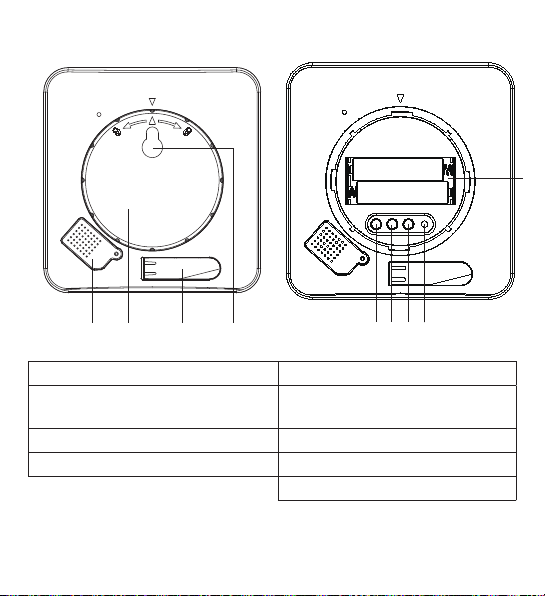
Face arrière
9
TIME DOWN RESETUP/CF
4
3
2
1
7
5
6
1 Couvercle du capteur 5 Touche [TIME]
2 Couvercle du compartiment
6 Touche [UP/CF]
à piles
3 Pied déployable 7 Touche [DOWN]
4 Système d’accrochage 8 Touche [RESET]
9 Compartiment à piles
41
8
Page 42
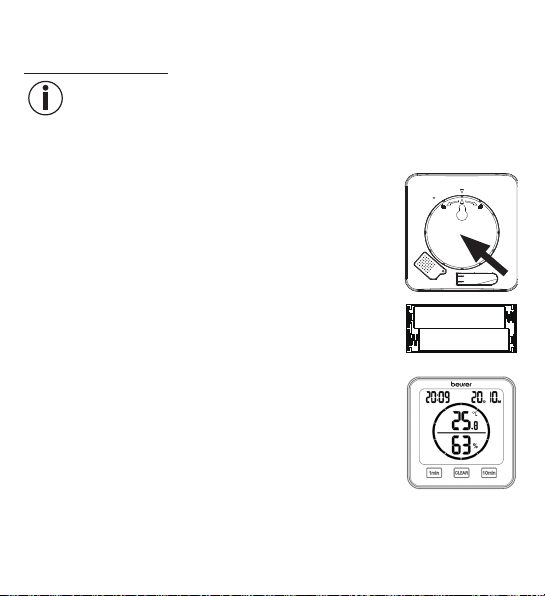
7. Mise en service
7.1 Insérer les piles
Remarque
Avant de pouvoir mettre en service le thermo-hygromètre, vous devez d’abord
insérer deux piles AAA (fournies) dans le compartiment à piles. Pour ce faire,
procédez comme suit:
1.
Un couvercle rond du compartiment à piles se trouve à
l’arrière du thermo-hygromètre. Tournez le couvercle du
compartiment à piles dans le sens inverse des aiguilles
d’une montre. Retirez le couvercle du compartiment à piles.
2. Insérez les deux piles AAA fournies dans le compartiment
à piles. Lors de l’insertion des piles, assurez-vous de bien
respecter la polarité (+/-) indiquée dans le compartiment.
Dès que les piles sont correctement insérées, tous les affichages apparaissent à l’écran pendant 3secondes. Puis
le thermo-hygromètre passe automatiquement au mode
Standard.
3. Avant de remettre le couvercle du compartiment à piles, vous devez d’abord
régler la date et l’heure. Pour cela, suivez les instructions de la section suivante.
42
Page 43
7.2 Réglage de la date/ de l’heure / de l’unité de température
1.
Pour basculer entre le mode 12 heures et 24 heures, appuyez sur la touche
[TIME]. Pour basculer entre Celsius (°C) et Fahrenheit (°F), appuyez sur la touche
[UP/CF].
2. L’ordre dans le menu de réglage est:
Année -> Mois -> Jour -> Heure-> Minutes
Pour accéder au menu de configuration, appuyez sur la touche [TIME] et
maintenez-la enfoncée pendant environ 3secondes. L’année commence à
clignoter à l’écran.
3. Utilisez les touches [UP/CF] / [DOWN] pour régler l’année actuelle. Confirmez
avec la touche [TIME] Le mois clignote alors à l’écran.
4. De la même manière, réglez successivement le mois, le jour, l’heure et les minutes avec les touches [UP/CF] / [DOWN] et confirmez à chaque fois avec la
touche [TIME].
Si vous n’appuyez sur aucune touche pendant 7 secondes dans le menu
de réglage, celui-ci se ferme automatiquement.
5. Remettez le couvercle sur le compartiment à piles.
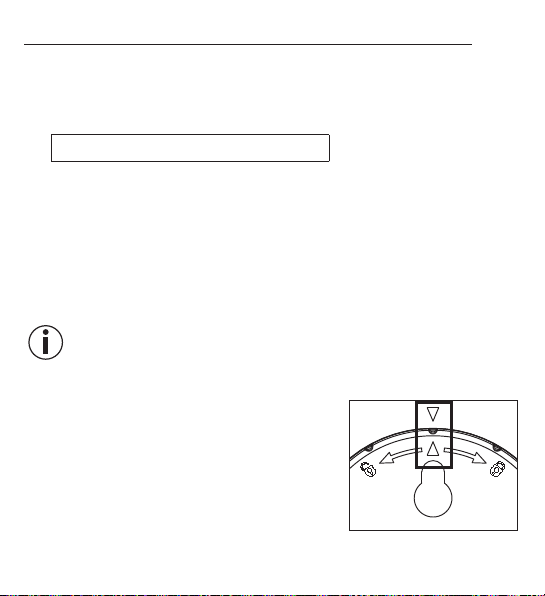
6.
Tournez le couvercle du compartiment à pile dans
le sens des aiguilles d’une montre jusqu’à ce qu’il
s’enclenche. Assurez-vous que les flèches de l’appareil et du couvercle du compartiment à piles
sont alignées.
7.
Vous pouvez placer l’appareil sur une surface
plane à l’aide du pied déployable ou le poser au
mur grâce au système d’accrochage au dos de l’appareil.
43
Page 44
7.3 Repasser aux réglages d’usine
Pour réinitialiser la date et l’heure aux réglages d’usine, utilisez un objet pointu
pour appuyer sur la touche [RESET].
8. Utilisation
Le thermo-hygromètre possède un mode Standard et un minuteur.
8.1 Mode Standard
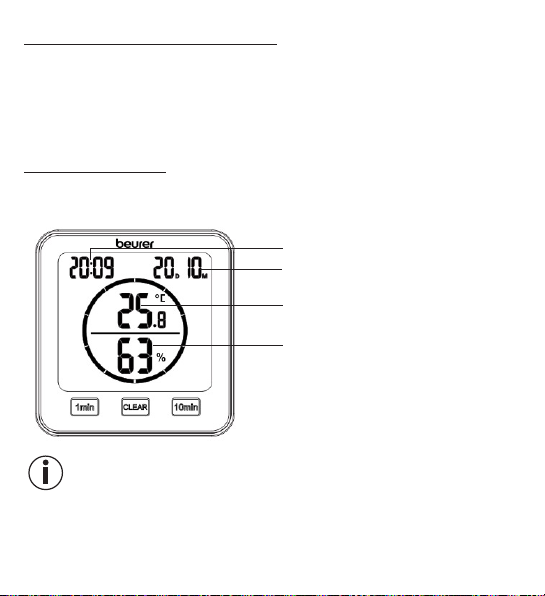
Si vous n’appuyez sur aucune touche du thermo-hygromètre, le mode Standard
s’affiche automatiquement à l’écran.
Heure
Date (D = jour, M = mois)
Température ambiante
Humidité relative de l'air
Remarque
Après la mise en service, il peut falloir 10 minutes jusqu’à ce que la température
et l’humidité de l’air correctes s’affichent.
44
Page 45
8.2 Minuteur
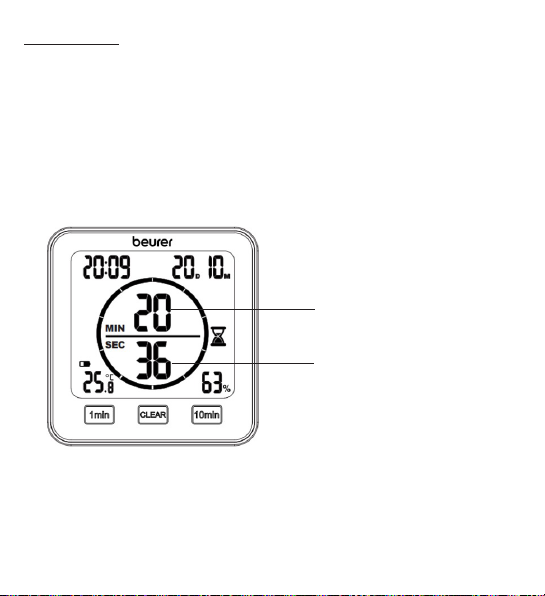
Vous pouvez aussi régler un minuteur de jusqu’à 99minutes sur le thermo-hygromètre.
1. Pour démarrer le minuteur, utilisez la touche [1 min] et la touche [10 min] pour
régler la durée de minuteur souhaitée. La durée de minuteur réglée s’ache au
milieu de l’écran. Si vous n’appuyez sur aucune touche pendant 3secondes, le
minuteur démarre automatiquement avec un bip. Un autre bip retentit lorsque
le temps est écoulé. Pour désactiver le signal sonore, appuyez sur la touche
[CLEAR].
2. Pour arrêter un minuteur avant la fin, appuyez sur la touche [CLEAR].
Minutes restantes du
minuteur
Secondes restantes du
minuteur
45
Page 46
9. Nettoyage et entretien
ATTENTION
•
Nettoyez l’appareil à l’aide d’un chiffon humide. N’utilisez ni
détergent dur ni brosse dure!
•
En aucun cas, un liquide ne doit pénétrer dans l’appareil.
•
Si vous n’utilisez pas l’appareil pendant une période prolongée,
nous vous recommandons de le ranger dans on emballage
d’origine sans rien poser dessus.
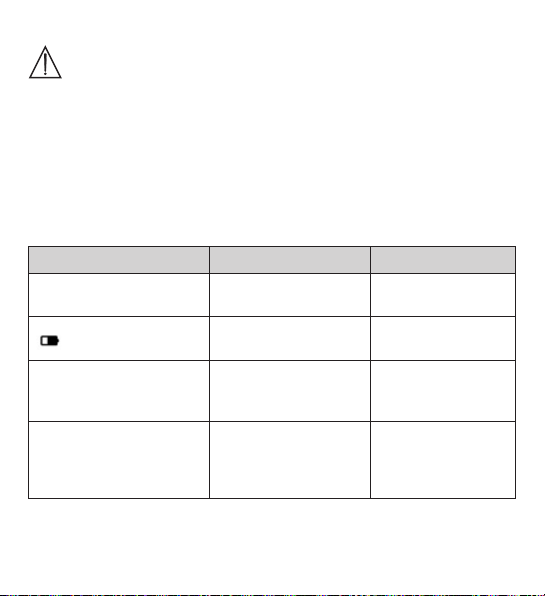
10. Que faire en cas de problèmes?
Problème Cause possible Solution
Il est impossible d’allumer
l’appareil
s’affiche à l’écran
Il est impossible d’allumer
l’appareil malgré les piles
neuves
LL.L s’affiche à l’écran
Piles vides
Piles presque vides
L’appareil est
défectueux
Température ambiante
inférieure à -10°C
(14°F)
46
Insérer de nouvelles
piles
Insérer de nouvelles
piles
Contacter le service
client
La température
ambiante est en
dehors de la plage
de mesure
Page 47
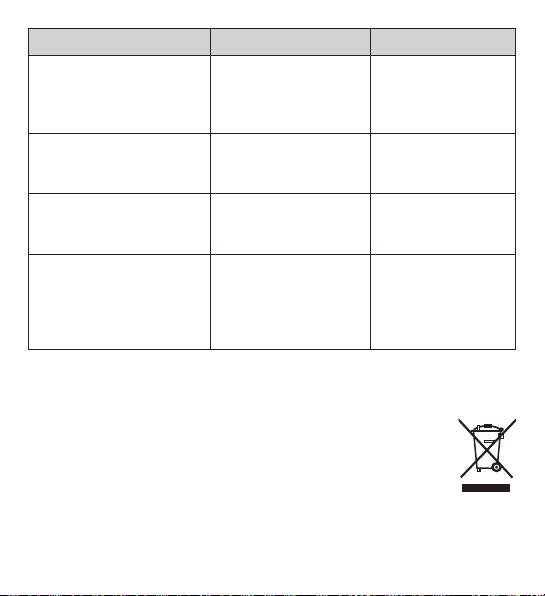
Problème Cause possible Solution
La température
ambiante est en
dehors de la plage
de mesure
L’humidité relative
est en dehors de la
plage de mesure
L’humidité relative
est en dehors de la
plage de mesure
Après la mise en
service, il peut falloir
10minutes jusqu’à
ce que des données
correctes s’affichent
HH.H. s’affiche à l’écran
LL s’affiche à l’écran
HH s’affiche à l’écran
L’appareil ne montre pas
de température et d’humidité relative ou des valeurs
erronées
Température ambiante
supérieure à 50°C
(122°F)
Humidité relative inférieure à 20 %
Humidité relative supérieure à 95 %
Environnement variable
11. Élimination
Dans l’intérêt de la protection de l’environnement, l’appareil ne doit pas être jeté
avec les ordures ménagères à la fin de sa durée de service. L’élimination doit se
faire par le biais des points de collecte compétents dans votre pays.
Éliminez l’appareil conformément à la directive européenne – WEEE
(Waste Electrical and Electronic Equipment) relative aux appareils électriques et électroniques usagés.
Pour toute question, adressez-vous aux collectivités locales responsables de l’élimination et du recyclage de ces produits.
47
Page 48
Élimination des piles
Les piles usagées et complètement déchargées doivent être mises au rebut dans
des conteneurs spéciaux ou aux points de collecte réservés à cet usage ou bien
déposées chez un revendeur d’appareils électriques. L’élimination des piles est
une obligation légale qui vous incombe.
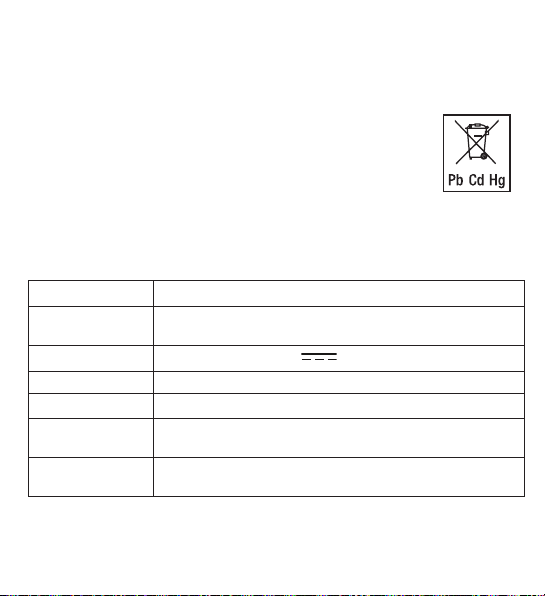
Ces pictogrammes se trouvent sur les piles à substances
nocives:
Pb = pile contenant du plomb,
Cd = pile contenant du cadmium,
Hg = pile contenant du mercure.
12. Caractéristiques techniques
Type HM 22
Référence de
l’article
Alimentation 2piles AAA LR03 1,5V
Poids 135 g (sans les piles)
Dimensions 110x105x29,5 mm
Plage de mesure
de la température
Plage de mesure
de l’humidité
678.04
-10 à 50 °C (14 à 122 °F)
20 à 95 % d’humidité relative
48
Page 49

13. Garantie/maintenance
La société Beurer GmbH, sise Söflinger Straße 218, 89077 Ulm, Allemagne,
(ci-après désignée «Beurer») propose une garantie pour ce produit dans les
conditions suivantes et dans la mesure prévue ci-après.
Les conditions de garantie suivantes n’affectent en rien les obligations de
garantie du vendeur découlant du contrat de vente conclu avec l’acheteur.
La garantie s’applique également sans préjudice de la responsabilité légale
obligatoire.
Beurer garantit le bon fonctionnement et l’intégrité de ce produit.
La période de garantie mondiale est de 3 ans à compter de la date d’achat par
l’acheteur du produit neuf et non utilisé.
Cette garantie ne s’applique qu’aux produits achetés par l’acheteur en tant que
consommateur et utilisés uniquement à des fins personnelles dans le cadre
d’une utilisation domestique.
Le droit allemand s’applique.
Si, au cours de la période de garantie, ce produit s’avère incomplet ou défectueux conformément aux dispositions suivantes, Beurer s’engage à proposer
gratuitement un remplacement ou une réparation conformément aux présentes
Conditions de garantie.
Si l’acheteur souhaite faire valoir la garantie, il doit d’abord s’adresser au
revendeur local: cf. liste «Service client à l’international» ci-jointe pour
connaître les adresses du service après-vente.
49
Page 50

L’acheteur recevra ensuite des informations complémentaires concernant le déroulement de la demande de garantie, par exemple, l’adresse à laquelle envoyer
le produit et les documents requis.
Une demande de garantie ne peut être prise en compte que si l’acheteur présente
– une copie de la facture/du reçu et
– le produit d’origine
à Beurer ou à un partenaire autorisé de Beurer.
La présente Garantie exclut expressément
– toute usure découlant de l’utilisation ou de la consommation normale du
produit;
– les accessoires fournis avec le produit qui s’usent ou qui sont consommés
dans le cadre d’une utilisation normale du produit (par exemple, piles, piles
rechargeables, manchettes, joints, électrodes, ampoules, embouts et
accessoires pour inhalateur);
– les produits utilisés, nettoyés, stockés ou entretenus de manière inappro-
priée et/ou contraire aux conditions d’utilisation, ainsi que les produits
ouverts, réparés ou modifiés par l’acheteur ou par un service client non
agréé par Beurer;
– les dommages survenus lors du transport entre le fabricant et le client ou
entre le service client et le client;
– les produits achetés en tant qu’article de second choix ou d’occasion;
– les dommages consécutifs qui résultent d’une défaillance du produit (dans
ce cas, toutefois, des réclamations peuvent être soulevées relatives à la
responsabilité du fait des produits ou à d’autres dispositions légales obliga-
toires relatives à la responsabilité).
Les réparations ou le remplacement complet ne prolongent en aucun cas la
période de garantie.
50
Sous réserve d’erreurs et de modifications
Page 51
ESPAÑOL
Lea detenidamente estas instrucciones de
uso, consérvelas para su futura utilización,
póngalas a disposición de otros usuarios y
respete las indicaciones.
Estimada clienta, estimado cliente:
Nos complace que haya elegido un producto de nuestra colección. Nuestro
nombre es sinónimo de productos de alta y comprobada calidad en los ámbitos
de aplicación de calor, peso, presión arterial, temperatura corporal, pulso, tratamiento suave, masaje, belleza, bebés y aire.
Atentamente,
El equipo de Beurer
Índice
1. Información general ....................... 52
2. Artículos suministrados .................. 52
3. Explicación de los símbolos ........... 52
4. Uso correcto ................................... 53
5. Indicaciones de advertencia y de
seguridad ........................................ 54
6. Descripción del aparato ................. 56
7. Puesta en funcionamiento .............. 58
7.1 Inserción de las pilas ..................... 58
7.2 Ajuste de fecha, hora y unidad de
temperatura ................................... 59
7.3 Reposición a la configuración de
fábrica ........................................... 60
8. Utilización ..................................... 60
8.1 Modo estándar .............................. 60
8.2 Temporizador ................................61
9. Limpieza y cuidado ...................... 62
10. Resolución de problemas ............. 62
11. Eliminación ................................... 63
12. Datos técnicos .............................. 64
13. Garantía/asistencia ....................... 65
51
Page 52
1. Información general
El termohigrómetro HM 22 le permite medir la temperatura ambiente actual y la humedad relativa del aire y leer los valores en la pantalla. Además, el termohigrómetro
cuenta con un temporizador con el que podrá ajustar una medición de tiempo corto.
Su tamaño compacto permite colocarlo en cualquier lugar. En la parte trasera del
termohigrómetro hay una anilla para colgar con la que podrá sujetar el aparato
en la pared.
2. Artículos suministrados
1x termohigrómetro
2x pilas AAA
1x estas instrucciones de uso
3. Explicación de los símbolos
En las presentes instrucciones de uso y en el aparato se utilizan los siguientes
símbolos:
ADVERTENCIA
ATENCIÓN
Nota Indicación de información importante
Leer las instrucciones de uso
Indicación de advertencia sobre peligro de
lesiones u otros peligros para la salud
Indicación de seguridad sobre posibles
daños del aparato o de los accesorios
52
Page 53
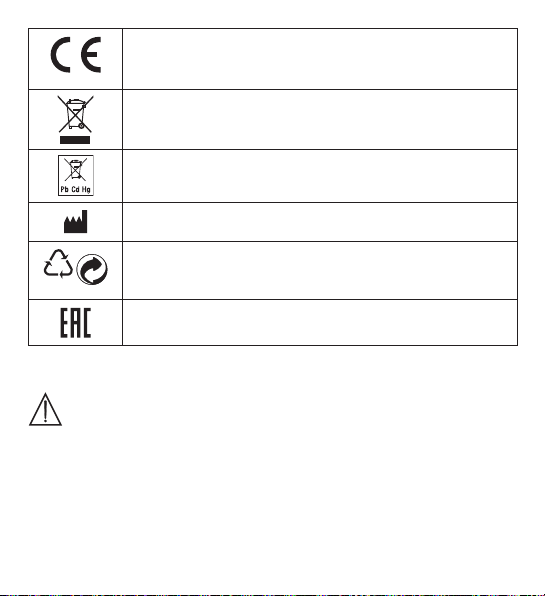
Marcado CE
PAP
Este producto cumple los requisitos de las directivas europeas
y nacionales vigentes.
Eliminación según la Directiva europea sobre residuos de
aparatos eléctricos y electrónicos (RAEE)
No desechar con la basura doméstica pilas que contengan
sustancias tóxicas
Fabricante
21
Eliminar el embalaje respetando el medio ambiente
Está demostrado que los productos cumplen los requisitos de
las normas técnicas de la Unión Económica Euroasiática.
4. Uso correcto
ADVERTENCIA
El aparato está destinado exclusivamente a la medición de la humedad relativa
y de la temperatura ambiente.
Este aparato solo está destinado al uso privado. Utilícelo exclusivamente para
el fin para el que ha sido diseñado y del modo indicado en estas instrucciones
de uso. ¡Todo uso inadecuado puede ser peligroso! Por lo tanto, el fabricante declina toda responsabilidad por daños debidos a un uso inadecuado o
incorrecto.
53
Page 54
5. Indicaciones de advertencia y de seguridad
ADVERTENCIA
•
No deje el material de embalaje al alcance de los niños. Existe
peligro de asfixia.
•
Este aparato no es un juguete. Manténgalo fuera del alcance de
los niños.
•
No debe abrir ni reparar el aparato bajo ningún concepto; en caso
contrario, ya no se garantizará su correcto funcionamiento. El in
cumplimiento de esta disposición anula la garantía.
•
Diríjase al servicio de atención al cliente o a un distribuidor autorizado para llevar a cabo las reparaciones.
•
Mantenga el aparato alejado de llamas abiertas (p.ej., velas).
•
No sumerja nunca el aparato en agua ni en ningún otro líquido.
•
No use nunca el aparato si está cubierto, p.ej., por una manta o
un cojín.
•
No utilice el aparato al aire libre.
Indicaciones para la manipulación de pilas
ADVERTENCIA
•
En caso de que el líquido de una pila entre en contacto con la piel
o los ojos, lave la zona afectada con agua y busque asistencia
médica.
•
¡Peligro de asfixia! Los niños pequeños podrían tragarse las
pilas y asfixiarse. ¡Guarde las pilas fuera del alcance de los niños
pequeños!
54
-
Page 55
•
Respete los símbolos más (+) y menos (-) que indican la polaridad.
•
Si se derrama el líquido de una pila, póngase guantes protectores
y limpie el compartimento de las pilas con un paño seco.
•
Proteja las pilas de un calor excesivo.
•
¡Peligro de explosión! No arroje las pilas al fuego.
•
Las pilas no se pueden cargar ni cortocircuitar.
•
Si no va a utilizar el aparato durante un periodo de tiempo prolongado, retire las pilas de su compartimento.
•
Utilice únicamente el mismo tipo de pila o uno equivalente.
•
Cambie siempre todas las pilas a la vez.
•
¡No utilice pilas recargables!
•
No despiece, abra ni triture las pilas.
ATENCIÓN
•
Proteja el aparato de golpes, humedad, polvo, sustancias químicas,
fuertes cambios de temperatura, la luz directa del sol, salpicaduras de
agua, arena y la cercanía de fuentes de calor (hornos o radiadores).
•
No coloque objetos sobre el aparato.
•
Limpie el aparato con un paño húmedo. No utilice productos de
limpieza corrosivos.
•
Utilice y conserve el aparato a una temperatura ambiente de entre
-10°C y 50°C. Temperaturas superiores o inferiores pueden dañarlo.
•
Cuando se cambia su ubicación, el aparato necesita 10 minutos
para facilitar valores de medición seguros.
•
Antes de ponerlo en funcionamiento por primera vez, retire la lámina
protectora de la pantalla.
55
Page 56
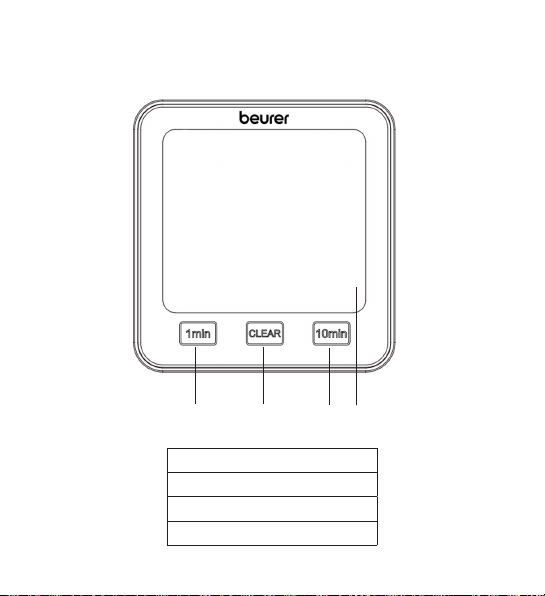
6. Descripción del aparato
Parte delantera
1
1 Botón [1 min]
2 Botón [CLEAR]
3 Botón [10 min]
4 Pantalla
4
2
56
3
Page 57
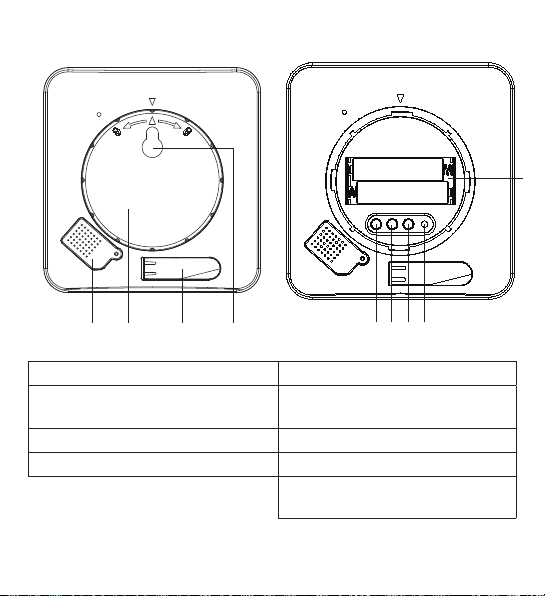
Parte trasera
9
TIME DOWN RESETUP/CF
4
3
2
1
7
5
6
1 Tapa de sensor 5 Botón [TIME]
2 Tapa del compartimento de
6 Botón [UP/CF]
las pilas
3 Pie de apoyo abatible 7 Botón [DOWN]
4 Anilla para colgar 8 Botón [RESET]
9 Compartimento de las
pilas
57
8
Page 58
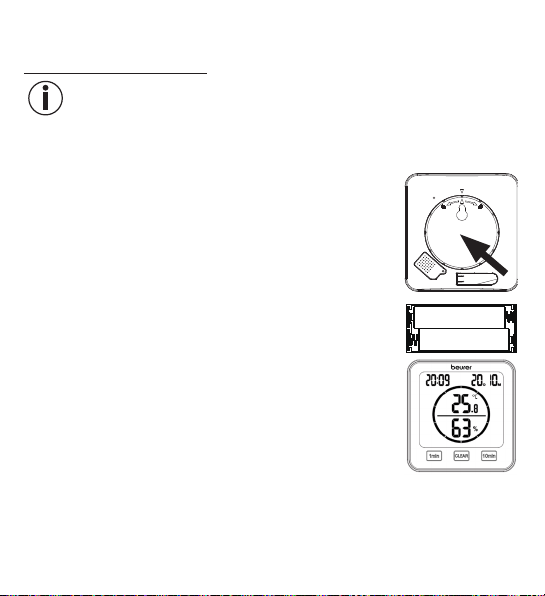
7. Puesta en funcionamiento
7.1 Inserción de las pilas
Nota
Para poder poner en funcionamiento el termohigrómetro deberá insertar dos
pilas AAA (incluidas en los artículos suministrados) en el compartimento de las
pilas. Proceda para ello del siguiente modo:
1.
En la parte trasera del termohigrómetro hay una tapa re-
donda del compartimento de las pilas. Gire la tapa en el
sentido contrario a las agujas del reloj para abrirla. Retire
la tapa.
2.
Coloque en el compartimento de las pilas las dos pilas AAA
suministradas. Al colocar las pilas respete la polaridad (+/-),
tal como se indica en el compartimento. En cuanto las pilas
se colocan correctamente, en la pantalla aparecen todas
las indicaciones durante 3 segundos. A continuación, el
termohigrómetro pasa automáticamente al modo estándar.
3.
Antes de volver a colocar la tapa del compartimento de las pilas deberá ajustar
la fecha y la hora. Siga para ello las instrucciones que se dan en el siguiente
apartado.
58
Page 59
7.2 Ajuste de fecha, hora y unidad de temperatura
1. Para cambiar entre el modo de 12 y de 24 horas, pulse el botón [TIME]. Para
cambiar entre Celsius (°C) y Fahrenheit (°F), pulse el botón [UP/CF].
2. Este es el orden en el menú de ajuste:
año-> mes -> día -> hora -> minuto
Para acceder al menú de ajuste, mantenga pulsado el botón [TIME] durante
3 segundos. En la pantalla empieza a parpadear el año.
3. Ajuste el año actual con los botones [UP/CF]/[DOWN]. Confirme con el botón
[TIME]. En la pantalla parpadea ahora el mes.
4.
Ajuste del mismo modo sucesivamente el mes, el día, la hora y los minutos con
los botones [UP/CF]/[DOWN] y confirme respectivamente con el botón [TIME].
Si no pulsa ningún botón durante 7 segundos en el menú de ajuste, saldrá
automáticamente del mismo.
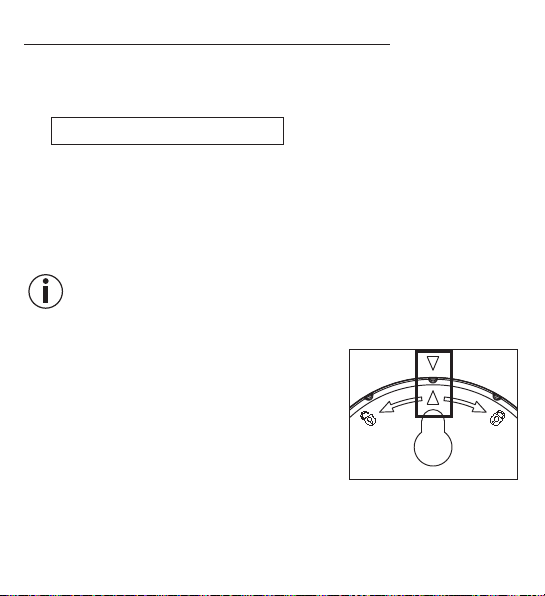
5. Vuelva a colocar la tapa del compartimento de las pilas.
6. Ciérrela girándola en el sentido de las agujas del
reloj hasta que encaje. Asegúrese de que las marcas de flecha del aparato coincidan con las de
la tapa.
7. Puede utilizar el aparato como aparato autónomo
con el pie de apoyo abatible o montarlo en una
pared usando la anilla para colgar (situada en la
parte trasera del aparato).
59
Page 60
7.3 Reposición a la configuración de fábrica
Para reponer la fecha y la hora a los ajustes de fábrica, pulse brevemente con un
objeto afilado el botón [RESET].
8. Utilización
El termohigrómetro dispone de un modo estándar y un temporizador.
8.1 Modo estándar
Si no pulsa ningún botón del termohigrómetro, en la pantalla se mostrará automáticamente el modo estándar.
Hora
Fecha (D = día, M = mes)
Temperatura ambiente
Humedad relativa del aire
Nota
Tras ponerlo en marcha, pueden pasar 10 minutos hasta que se muestren la
temperatura y la humedad ambiental correctas.
60
Page 61
8.2 Temporizador
También puede ajustar en el termohigrómetro un temporizador de hasta 99
minutos.
1.
Para iniciar el temporizador, ajuste la duración que desee con el botón [1 min] y
el botón [10 min]. La duración ajustada aparece en el centro de la pantalla. Si no
pulsa ningún botón durante 3 segundos, el temporizador se iniciará automáticamente con un pitido. Una vez transcurrido el tiempo ajustado en el temporizador,
volverá a sonar un pitido. Para desactivar el pitido, pulse el botón [CLEAR].
2. Para finalizar el temporizador antes de tiempo, pulse el botón [CLEAR].
Minutos restantes del
temporizador
Segundos restantes del
temporizador
61
Page 62
9. Limpieza y cuidado
ATENCIÓN
•
Limpie el aparato con un paño húmedo. ¡No utilice productos
abrasivos ni cepillos duros para la limpieza!
•
Bajo ningún concepto deben penetrar líquidos en el aparato.
•
Si no va a utilizar el aparato durante un periodo de tiempo prolongado, le recomendamos que lo guarde en su embalaje original
en un ambiente seco y sin soportar cargas.
10. Resolución de problemas
Problema Posible causa Solución
El aparato no se enciende Pilas gastadas Colocar pilas nuevas
En la pantalla aparece
El aparato no se enciende
a pesar de las pilas nuevas
En la pantalla aparece
En la pantalla aparece
LL.L
HH.H
Pilas casi gastadas Colocar pilas nuevas
El aparato está
defectuoso
Temperatura ambiente
inferior a -10°C (14°F)
Temperatura ambiente
superior a 50°C
(122°F)
62
Póngase en contacto
con el servicio de
atención al cliente
La temperatura ambiente está fuera del
rango de medición
La temperatura ambiente está fuera del
rango de medición
Page 63
Problema Posible causa Solución
En la pantalla aparece
En la pantalla aparece
El aparato muestra
una temperatura o una
humedad relativa del aire
incorrectas o no muestra
ninguna
LL
HH
Humedad relativa del
aire inferior al 20%
Humedad relativa del
aire superior al 95%
Entorno cambiante
La humedad relativa
del aire está fuera del
rango de medición
La humedad relativa
del aire está fuera del
rango de medición
Tras ponerlo en marcha, pueden pasar
10 minutos hasta
que se muestren los
datos correctos
11. Eliminación
A fin de preservar el medio ambiente, cuando el aparato llegue al final de su vida
útil no lo deseche con la basura doméstica. Lo puede desechar en los puntos de
recogida adecuados disponibles en su zona. Deséchelo según la Directiva europea sobre residuos de aparatos eléctricos y electrónicos
(RAEE).
Para más información, póngase en contacto con la autoridad municipal
competente en materia de eliminación de residuos.
63
Page 64
Eliminación de las pilas
Las pilas usadas y completamente descargadas deben desecharse en contenedores de recogida señalados de forma especial, los puntos de recogida de residuos
especiales o entregándolas a un distribuidor de equipos electrónicos. Los usuarios
están obligados por ley a desechar las pilas correctamente.
Estos símbolos se encuentran en pilas que contienen sustancias tóxicas:
Pb: la pila contiene plomo,
Cd: la pila contiene cadmio,
Hg: la pila contiene mercurio.
12. Datos técnicos
Tipo HM 22
Referencia 678.04
Alimentación 2 pilas de 1,5 V
Peso 135 g (sin pilas)
Dimensiones 110 x 105 x 29,5 mm
Rango de medición
de temperatura
Rango de medición
de humedad
-10 a 50°C (14 a 122°F)
Humedad relativa del aire del 20 al 95 %
AAA LR03
64
Page 65

13. Garantía/asistencia
Beurer GmbH, Söflinger Straße 218, D-89077 Ulm (en lo sucesivo, “Beurer”)
concede una garantía para este producto. La garantía está sujeta a las siguientes
condiciones y el alcance de la misma se describe a continuación.
Las siguientes condiciones de garantía no afectan a las obligaciones de
garantía que la ley prescribe para el vendedor y que emanan del contrato
de compra celebrado con el comprador.
La garantía se aplicará además sin perjuicio de las normas legales preceptivas.
Beurer garantiza el perfecto funcionamiento y la integralidad de este producto.
La garantía mundial tiene una validez de 3 años a partir de la fecha de compra
del producto nuevo y sin utilizar por parte del comprador.
Esta garantía se ofrece solo para productos que el comprador haya adquirido en
tanto que consumidor con fines exclusivamente personales en el marco de una
utilización privada en el hogar.
Se aplica la legislación alemana.
En el caso de que, durante el periodo de garantía, este producto resultara
estar incompleto o no funcionara correctamente conforme a lo dispuesto en
las siguientes disposiciones, Beurer se compromete a sustituir el producto o a
repararlo según las presentes condiciones de garantía.
Cuando el comprador desee recurrir a la garantía lo hará dirigiéndose en
primera instancia al distribuidor local: véase la lista adjunta “Servicio internacional” que contiene las distintas direcciones de servicio técnico.
65
Page 66

A continuación, el comprador recibirá información pormenorizada sobre la
tramitación de la garantía, como el lugar al que debe enviar el producto y qué
documentos deberá adjuntar.
El comprador solo podrá invocar la garantía cuando pueda presentar:
– una copia de la factura o del recibo de compra y
– el producto original
a Beurer o a un socio autorizado por Beurer.
Quedan excluidos explícitamente de la presente garantía
– el desgaste que se produce por el uso o el consumo normal del producto;
– los accesorios suministrados con el producto que se desgastan o con-
sumen durante un uso normal (p.ej., pilas, baterías, brazaletes, juntas,
electrodos, luminarias, cabezales y accesorios de inhalación);
– productos cuyo uso, limpieza, almacenamiento o mantenimiento sea inde-
bido o vaya contra lo dispuesto en las instrucciones de uso, así como productos que hayan sido abiertos, reparados o modificados por el comprador
o por un centro de servicio técnico no autorizado por Beurer;
– daños que se hayan producido durante el transporte entre las instalaciones
del fabricante y las del cliente o bien entre el centro de servicio técnico y
el cliente;
– productos que se hayan adquirido como productos de calidad inferior o de
segunda mano;
– daños derivados que resulten de una falta del producto. En este caso,
podrían invocarse eventualmente derechos derivados de la normativa de
responsabilidad de productos o de otras disposiciones de responsabilidad
legal preceptiva.
Las reparaciones o la sustitución del producto no prolongarán en ningún
caso el periodo de garantía.
66
Salvo errores y modificaciones
Page 67
ITALIANO
Leggere attentamente le presenti istruzioni per l'uso, conservarle per impieghi futuri,
renderle accessibili ad altri utenti e attenersi
alle indicazioni.
Gentile cliente,
grazie per aver scelto un prodotto del nostro assortimento. Il nostro marchio è
garanzia di prodotti di elevata qualità, controllati nei dettagli, relativi ai settori
calore, peso, pressione, temperatura corporea, pulsazioni, terapia dolce, massaggio, Beauty, Baby e aria.
Cordiali saluti
Il team Beurer
Indice
1. Introduzione ................................... 68
2. Fornitura .........................................68
3. Spiegazione dei simboli .................. 68
4. Uso conforme ................................. 69
5. Avvertenze e indicazioni
di sicurezza ..................................... 70
6. Descrizione dell'apparecchio ......... 72
7. Messa in funzione ........................... 74
7.1 Inserimento delle batterie .............. 74
7.2 Impostazione di data/ora/unità di
temperatura ................................... 75
7.3 Ripristino delle impostazioni di
fabbrica ......................................... 76
8. Utilizzo .......................................... 76
8.1 Modalità standard ......................... 76
8.2 Timer ............................................. 77
9. Pulizia e cura ................................ 78
10. Che cosa fare in caso
di problemi? .................................. 78
11. Smaltimento ................................. 79
12. Dati tecnici .................................... 80
13. Garanzia/Assistenza ..................... 81
67
Page 68
1. Introduzione
Con il termoigrometro HM 22 è possibile misurare la temperatura ambiente attuale
e l'umidità relativa dell'aria e visualizzarle sul display. Inoltre, il termoigrometro è
dotato di un timer che consente di impostare una misurazione a breve termine.
Grazie alla dimensione che lo rende maneggevole, il termoigrometro può essere
posizionato ovunque. Sul lato posteriore del termoigrometro è presente una
predisposizione per il fissaggio a parete.
2. Fornitura
1x termoigrometro
2x batterie AAA
1x Le presenti istruzioni per l'uso
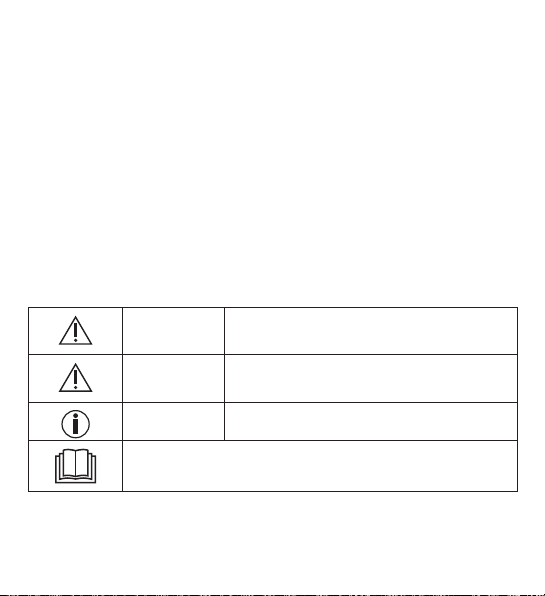
3. Spiegazione dei simboli
I seguenti simboli sono utilizzati nelle istruzioni per l'uso e/o sull'apparecchio:
AVVERTENZA
ATTENZIONE
Indicazione Indicazione di informazioni importanti
Leggere le istruzioni per l'uso
Avvertimento di pericolo di lesioni o di pericoli
per la salute
Indicazione di sicurezza per possibili danni
all'apparecchio/agli accessori
68
Page 69
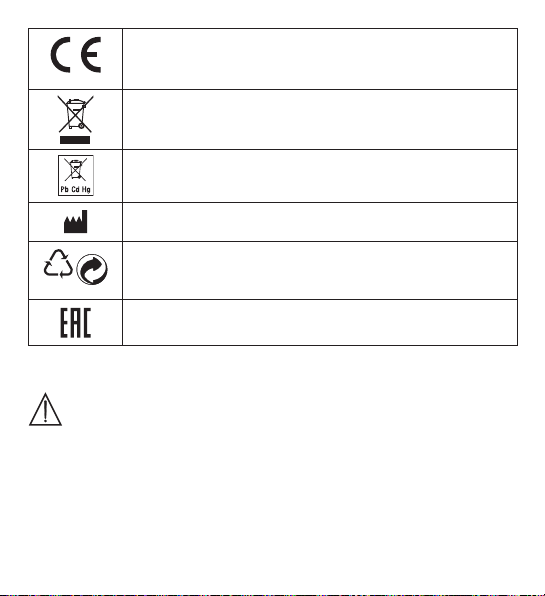
Marcatura CE
PAP
Il presente prodotto soddisfa i requisiti delle direttive europee
e nazionali vigenti
Smaltimento secondo la direttiva europea sui rifiuti di apparecchiature elettriche ed elettroniche (RAEE)
Non smaltire le batterie contenenti sostanze tossiche insieme
ai rifiuti domestici
Produttore
21
Smaltire la confezione nel rispetto dell'ambiente
I prodotti sono comprovatamente conformi ai requisiti delle
normative tecniche dell'UEE.
4. Uso conforme
AVVERTENZA
Questo apparecchio è destinato esclusivamente alla misurazione dell'umidità
dell'aria e della temperatura ambiente.
Questo apparecchio è concepito unicamente per l'uso privato. Utilizzare l'apparecchio solo per lo scopo per il quale è stato concepito e come descritto
nelle presenti istruzioni per l'uso. Qualsiasi uso non conforme comporta un
pericolo! Il produttore non risponde di danni causati da un uso improprio o
non conforme.
69
Page 70
5. Avvertenze e indicazioni di sicurezza
AVVERTENZA
•
Tenere lontani i bambini dal materiale d'imballaggio. Pericolo di
soffocamento.
•
Questo apparecchio non è un giocattolo. Tenerlo fuori dalla portata
dei bambini.
•
Non aprire o riparare l'apparecchio per non comprometterne il funzionamento corretto. In caso contrario la garanzia decade.
•
Per le riparazioni rivolgersi all'Assistenza clienti o a un rivenditore
autorizzato.
•
Tenere l'apparecchio lontano da fiamme libere (ad es. candele).
•
Non immergere mai l'apparecchio in acqua o altri liquidi.
•
Non coprire l'apparecchio durante l'uso, ad esempio con una coperta o un cuscino.
•
Non utilizzare l'apparecchio all'aperto.
Indicazioni sull'uso delle batterie
AVVERTENZA
•
Se il liquido di una batteria viene a contatto con la pelle o con gli
occhi, sciacquare le parti interessate con acqua e consultare un
medico.
•
Pericolo di ingestione! I bambini potrebbero ingerire le batterie
e soffocare. Tenerle quindi lontano dalla portata dei bambini.
•
Prestare attenzione alla polarità positiva (+) e negativa (-).
70
Page 71
•
In caso di fuoriuscita di liquido dalle batterie, indossare guanti protettivi e pulire il vano batterie con un panno asciutto.
•
Proteggere le batterie dal caldo eccessivo.
•
Pericolo di esplosione! Non gettare le batterie nel fuoco.
•
Le batterie non devono essere ricaricate o mandate in cortocircuito.
•
Qualora l'apparecchio non dovesse essere utilizzato per un periodo
prolungato, rimuovere le batterie dal relativo vano.
•
Utilizzare solo tipologie di batterie uguali o equivalenti.
•
Sostituire sempre tutte le batterie contemporaneamente.
•
Non utilizzare batterie ricaricabili!
•
Non smontare, aprire o frantumare le batterie.
ATTENZIONE
•
Proteggere l'apparecchio da urti, umidità, polvere, prodotti chimici, forti sbalzi di temperatura, irraggiamento solare diretto, spruzzi
d'acqua, sabbia e fonti di calore troppo vicine (forni, caloriferi).
•
Non posizionare oggetti sull'apparecchio.
•
Pulire l'apparecchio con un panno umido. Non utilizzare detergenti
corrosivi.
•
Utilizzare e conservare l'apparecchio a una temperatura ambiente
compresa tra -10°C e 50°C. Temperature superiori o inferiori pos
sono danneggiare l'apparecchio.
•
In caso di cambio di ambiente, è necessario attendere 10 minuti
prima di poter ottenere risultati di misurazione attendibili.
•
Prima della prima messa in funzione, rimuovere la pellicola protettiva
dal display.
71
-
Page 72
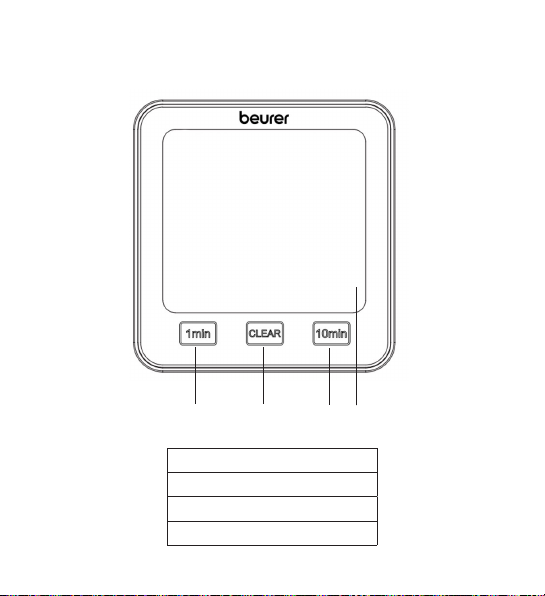
6. Descrizione dell'apparecchio
Vista anteriore
1
1 Pulsante [1 min]
2 Pulsante [CLEAR]
3 Pulsante [10 min]
4 Display
2
72
4
3
Page 73
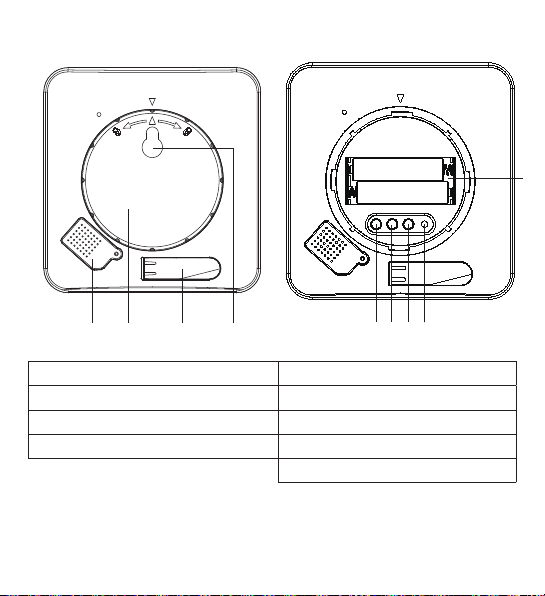
Vista posteriore
9
TIME DOWN RESETUP/CF
4
3
2
1
8
7
5
6
1 Coperchio dei sensori 5 Pulsante [TIME]
2 Coperchio del vano batterie 6 Pulsante [UP/CF]
3 Supporto apribile 7 Pulsante [DOWN]
4 Predisposizione per fissaggio 8 Pulsante [RESET]
9 Vano batterie
73
Page 74
7. Messa in funzione
7.1 Inserimento delle batterie
Indicazione
Prima di mettere in funzione il termoigrometro, è necessario inserire le due
batterie AAA in dotazione nell'apposito vano. Procedere come descritto di
seguito:
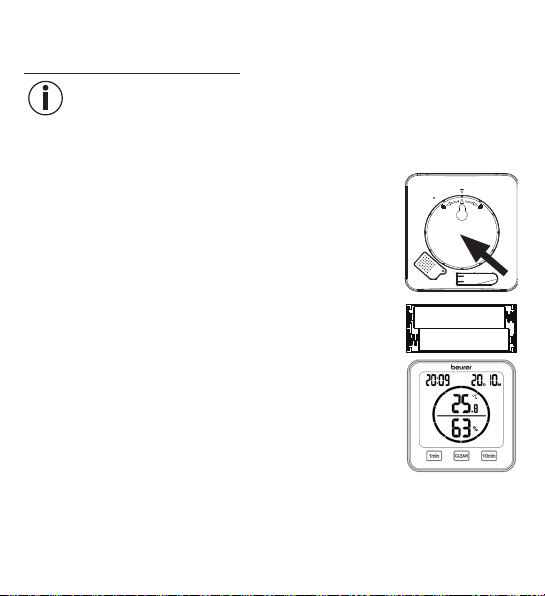
1.
Sul lato posteriore del termoigrometro è presente un coperchio rotondo per il vano batterie. Ruotare il coperchio del
vano batterie in senso antiorario. A questo punto rimuovere il coperchio.
2. Inserire nel vano le due batterie AAA fornite in dotazione.
Prestare attenzione a rispettare la corretta polarità (+/-),
come indicato nel vano batterie. Una volta inserite correttamente le batterie, tutti gli indicatori verranno visualizzati
sul display per 3 secondi. Il termoigrometro passa quindi
automaticamente alla modalità standard.
3. Prima di riposizionare il coperchio del vano batterie, è necessario impostare la
data e l'ora. A tal fine attenersi alle indicazioni riportate nella prossima sezione.
74
Page 75
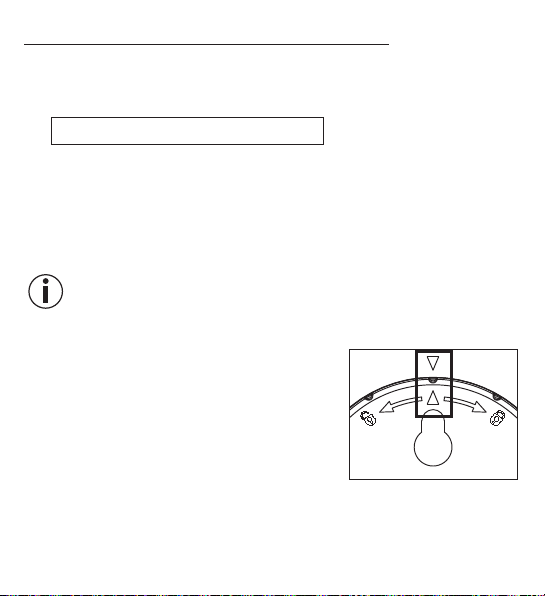
7.2 Impostazione di data/ora/unità di temperatura
1.
Per commutare tra le modalità 12 ore e 24 ore, premere il pulsante [TIME].
Per commutare tra Celsius (°C) e Fahrenheit (°F), premere il pulsante [UP/CF].
2. L'ordine nel menu delle impostazioni è:
Anno -> Mese -> Giorno -> Ora -> Minuto
Per accedere al menu delle impostazioni, tenere premuto il pulsante [TIME]
per 3 secondi. L'anno inizia a lampeggiare sul display.
3.
Impostare l'anno attuale con i pulsanti [UP/CF] / [DOWN]. Confermare con il
pulsante [TIME]. Sul display lampeggia il mese.
4.
Impostare nello stesso modo mese, giorno, ora e minuti con i pulsanti [UP/CF] /
[DOWN] e confermare di volta in volta con il pulsante [TIME].
Se non si preme alcun pulsante per 7 secondi nel menu delle
impostazioni, si esce automaticamente dal menu.
5. Riposizionare il coperchio sul vano batterie.
6.
Ruotare il coperchio del vano batterie in senso ora
rio fino a sentire lo scatto in posizione. Assicurarsi
che il contrassegno della freccia sull'apparecchio
si trovi in corrispondenza di quello riportato sul
coperchio del vano batterie.
7. È possibile posizionare l'apparecchio su una su-
perficie tramite il supporto apribile oppure montarlo a parete utilizzando l'apposita predisposizione (sul retro dell'apparecchio).
75
-
Page 76
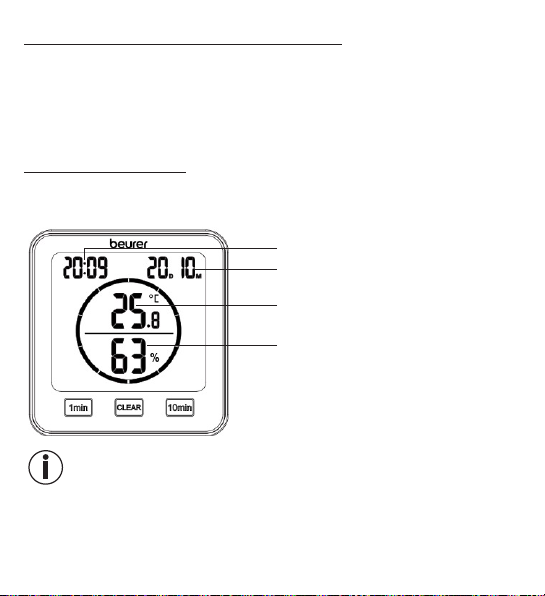
7.3 Ripristino delle impostazioni di fabbrica
Per ripristinare le impostazioni di fabbrica di data e ora, premere brevemente il
pulsante [RESET] con un oggetto appuntito.
8. Utilizzo
Il termoigrometro possiede una modalità standard e un timer.
8.1 Modalità standard
Se non si preme alcun pulsante sul termoigrometro, sul display viene visualizzata
automaticamente la modalità standard.
Ora
Data (D = giorno, M = mese)
Temperatura ambiente
Umidità relativa dell'aria
Indicazione
Dopo la messa in funzione, potrebbero essere necessari 10 minuti per visualizzare la temperatura e l'umidità corrette.
76
Page 77
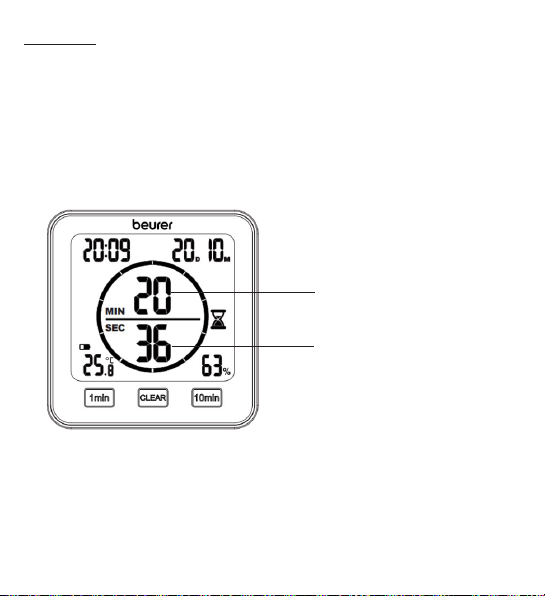
8.2 Timer
Sul termoigrometro è inoltre possibile impostare un timer fino a 99 minuti.
1. Per avviare il timer, utilizzare il pulsante [1 min] e il pulsante [10 min] per impo-
stare la durata del timer desiderata. La durata del timer impostata viene visualizzata al centro del display. Se non si preme alcun pulsante per 3 secondi, il
timer si avvia automaticamente con un segnale acustico. Allo scadere del tempo
viene di nuovo emesso un segnale acustico. Per disattivare il segnale acustico,
premere il pulsante [CLEAR].
2. Per disattivare anticipatamente il timer, premere il pulsante [CLEAR].
Minuti rimanenti del timer
Secondi rimanenti del timer
77
Page 78
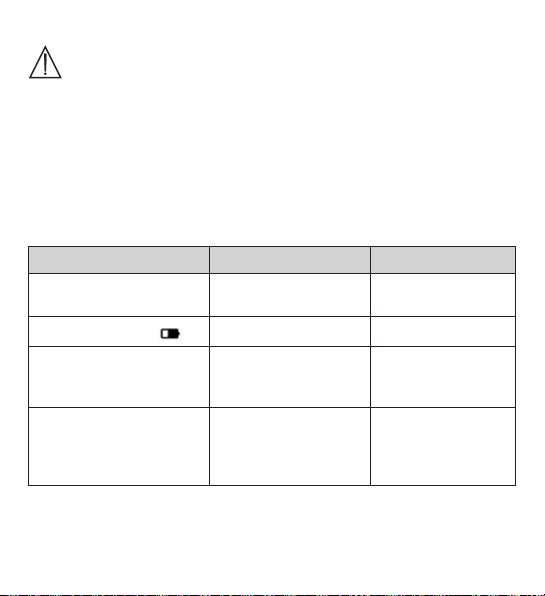
9. Pulizia e cura
ATTENZIONE
•
Pulire l'apparecchio con un panno umido. Non utilizzare detergenti corrosivi o spazzole dure!
•
Non deve in nessun caso penetrare liquido nell'apparecchio.
•
Se l'apparecchio non viene usato per lunghi periodi, si consiglia
di conservarlo nell'imballo originale in un ambiente asciutto e
senza sovrapporvi carichi.
10. Che cosa fare in caso di problemi?
Problema Possibile causa Soluzione
Non è possibile
accendere l'apparecchio
Sul display compare
L'apparecchio non si
accende, nonostante le
batterie nuove
Sul display compare
Batterie scariche Inserire batterie nuove
Batterie quasi scariche Inserire batterie nuove
L'apparecchio è
difettoso
Temperatura ambiente
LL.L
inferiore a -10°C (14°F)
78
Contattare il Servizio
clienti
La temperatura
ambiente è al di
fuori dell'intervallo di
misurazione
Page 79
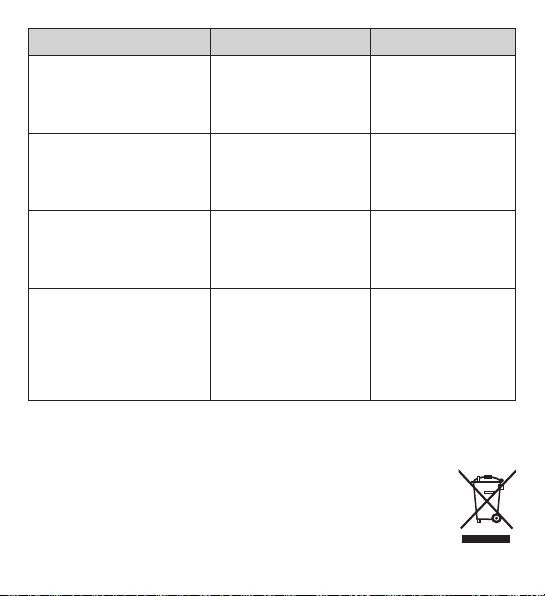
Problema Possibile causa Soluzione
La temperatura
Sul display compare
Sul display compare
Sul display compare
L'apparecchio non visualizza o visualizza in modo
errato la temperatura e
l'umidità relativa dell'aria
HH.H.
LL
HH
Temperatura ambiente
superiore a 50°C (122°F)
Umidità relativa dell'aria
inferiore al 20%
Umidità relativa dell'aria
superiore al 95%
Cambio di ambiente
ambiente è al di
fuori dell'intervallo di
misurazione
L'umidità relativa
dell'aria è al di fuori
dell'intervallo di misurazione
L'umidità relativa
dell'aria è al di fuori
dell'intervallo di misurazione
Dopo la messa in
funzione, potrebbero
essere necessari
10minuti per una
corretta visualizzazione dei dati
11. Smaltimento
A tutela dell'ambiente, al termine del suo ciclo di vita, l'apparecchio non deve essere smaltito nei rifiuti domestici, ma conferito negli appositi centri di raccolta.
Smaltire l'apparecchio secondo la direttiva europea sui rifiuti di apparecchiature elettriche ed elettroniche (RAEE).
In caso di dubbi, rivolgersi alle autorità comunali competenti per lo
smaltimento.
79
Page 80
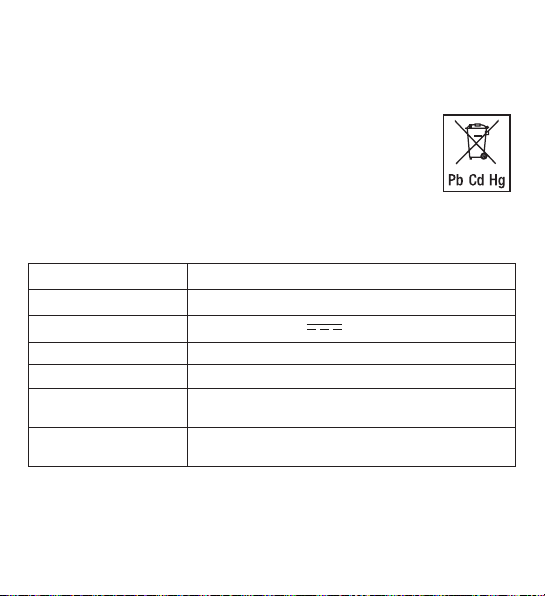
Smaltimento delle batterie
Smaltire le batterie esauste e completamente scariche presso gli appositi punti di
raccolta, i punti di raccolta per rifiuti tossici o i negozi di elettronica. Lo smaltimento
delle batterie è un obbligo di legge.
Sulle batterie contenenti sostanze tossiche sono riportati i
seguenti simboli:
Pb = batteria contenente piombo,
Cd = batteria contenente cadmio,
Hg = batteria contenente mercurio.
12. Dati tecnici
Tipo HM 22
Codice articolo 678.04
Alimentazione 2 batterie da 1,5 V
Peso 135 g (senza batterie)
Dimensioni 110 x 105 x 29,5 mm
Intervallo di misurazione
temperatura:
Intervallo di misurazione
dell'umidità
da -10 a 50 °C (da 14 a 122 °F)
dal 20 al 95% di umidità relativa dell'aria
80
AAA LR03
Page 81

13. Garanzia/Assistenza
Beurer GmbH, Söflinger Strasse 218, D-89077 Ulm (di seguito denominata
“Beurer”) offre una garanzia per questo prodotto, nel rispetto delle seguenti
condizioni e nella misura descritta di seguito.
Le seguenti condizioni di garanzia lasciano invariati gli obblighi di garanzia
di legge del venditore stabiliti nel contratto di acquisto con l’acquirente.
La garanzia si applica inoltre fatte salve le prescrizioni di legge obbligatorie
in materia di responsabilità.
Beurer garantisce la perfetta funzionalità e la completezza di questo prodotto.
La garanzia mondiale è di 3 anni a partire dall’acquisto del prodotto nuovo, non
usato, da parte dell’acquirente.
Questa garanzia copre solo i prodotti che l’acquirente ha acquistato come consumatore e che utilizza esclusivamente a scopo personale, in ambito domestico.
Vale il diritto tedesco.
Nel caso in cui il prodotto, durante il periodo di garanzia, si dimostrasse incompleto o presentasse difetti di funzionamento in linea con le seguenti disposizioni,
Beurer provvederà a sostituire o riparare gratuitamente il prodotto in base alle
presenti condizioni di garanzia.
Per segnalare un caso di garanzia, l’acquirente deve rivolgersi innanzitutto
al proprio rivenditore locale: vedere l’elenco “Service International” in cui
sono riportati gli indirizzi dei centri di assistenza.
81
Page 82

L’acquirente riceverà quindi informazioni più dettagliate sulla gestione del caso
di garanzia, ad esempio dove deve inviare il prodotto e quali documenti sono
necessari.
L’attivazione della garanzia viene presa in considerazione solo se l’acquirente
può presentare
– una copia della fattura/prova d’acquisto e
– il prodotto originale
a Beurer o a un partner Beurer autorizzato.
Sono espressamente esclusi dalla presente garanzia
– l’usura dovuta al normale utilizzo o al consumo del prodotto;
– gli accessori forniti assieme a questo prodotto che, in caso di utilizzo con-
forme, si consumano o si esauriscono (ad es. batterie, batterie ricaricabili,
manicotti, guarnizioni, elettrodi, lampadine, accessori e accessori per
inalatore);
– i prodotti che sono stati utilizzati, puliti, conservati o sottoposti a manu-
tenzione in modo improprio e/o senza rispettare le disposizioni riportate
nelle istruzioni per l’uso, nonché i prodotti che sono stati aperti, riparati
o smontati e rimontati dall’acquirente o da un centro di assistenza non
autorizzato da Beurer;
– i danni occorsi nel trasporto dal produttore al cliente o tra il centro di assi-
stenza e il cliente;
– i prodotti acquistati come articoli di seconda scelta o usati;
– i danni conseguenti che dipendono da un difetto del prodotto (in questo ca-
so possono tuttavia esistere diritti derivanti dalla responsabilità per i prodot-
ti o da altre disposizioni di legge obbligatorie in materia di responsabilità).
Le riparazioni o la sostituzione completa non prolungano in alcun caso il
periodo di garanzia.
82
Salvo errori e modifiche
Page 83
TÜRKÇE
Bu kullanım kılavuzunu dikkatle okuyun, ileride kullanmak üzere saklayın, diğer kullanıcıların erişebilmesini sağlayın ve içindeki
yönergelere uyun.
Sayın müşterimiz,
Ürünlerimizden birini seçtiğiniz için teşekkür ederiz. Isı, ağırlık, kan basıncı, vücut
sıcaklığı, nabız, yumuşak terapi, masaj, güzellik, bebek ve hava konularında
değerli ve titizlikle test edilmiş kaliteli ürünlerimiz, dünyanın her tarafında tercih
edilmektedir.
Yeni cihazınızı iyi günlerde kullanmanızı dileriz
Beurer Ekibiniz
İçindekiler
1. Ürün özellikleri ............................... 84
2. Teslimat kapsamı ............................ 84
3. İşaretlerin açıklaması ...................... 84
4. Amacına uygun kullanım ................ 85
5. Uyarılar ve güvenlik yönergeleri ...... 86
6. Cihaz açıklaması ............................. 88
7. İlk çalıştırma .................................... 90
7.1 Pillerin takılması ............................. 90
7.2 Tarih, saat, sıcaklık birimi ayarı ...... 91
7.3 Fabrika ayarlarına geri alma .......... 92
8. Kullanım ........................................ 92
8.1 Standart mod ................................ 92
8.2 Zamanlayıcı ................................... 93
9. Temizlik ve bakım .........................94
10. Sorunların giderilmesi ................... 94
11. Bertaraf etme ................................ 95
12. Teknik veriler ................................. 96
13. Garanti/servis ............................... 96
83
Page 84
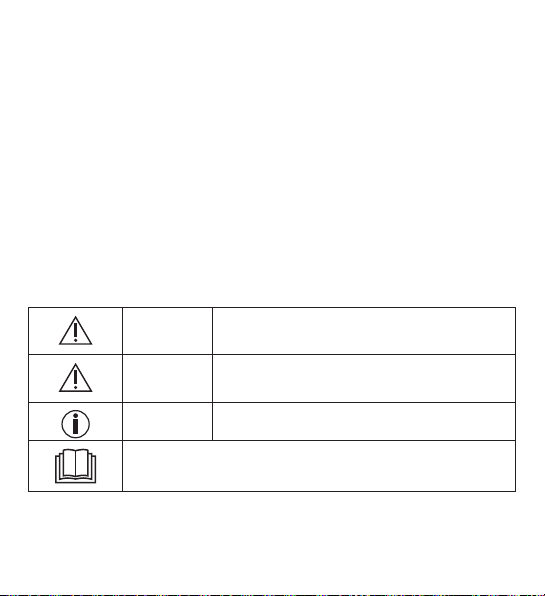
1. Ürün özellikleri
HM 22 termo-higrometre ile, bulunduğunuz mekandaki sıcaklığı ve bağıl hava nemini
ölçebilir ve değerleri cihazın ekranından okuyabilirsiniz. Termo-higrometrede ayrıca,
kısa süreli ölçümler ayarlamanıza olanak veren bir zamanlayıcı mevcuttur.
Küçük boyutları sayesinde termo-higrometreyi her yerde kullanabilirsiniz. Termo-higrometrenin arka tarafında, cihazı duvara sabitlemek için kullanabileceğiniz
bir asma deliği mevcuttur.
2. Teslimat kapsamı
1x adet termo-higrometre
2x adet AAA pil
1x adet kullanım kılavuzu
3. İşaretlerin açıklaması
Kullanım kılavuzunda ya da cihazın üzerinde aşağıdaki semboller kullanılmıştır:
UYARI
DİKKAT
Not Önemli bilgilere yönelik not
Kullanım kılavuzunu okuyun
Yaralanma tehlikelerine veya sağlığınızla ilgili
tehlikelere yönelik uyarı
Cihazda ve aksesuarlarda meydana gelebilecek
hasarlara yönelik güvenlik uyarısı
84
Page 85
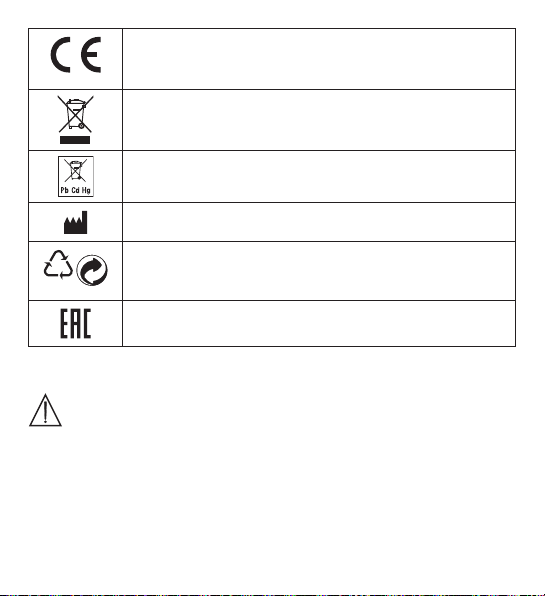
CE işareti
PAP
Bu ürün geçerli Avrupa Birliği yönergelerinin ve ulusal yönergelerin gereklerini yerine getirmektedir
Elektrikli ve elektronik atık cihazlarla ilgili AB direktifine (WEEE
- Waste Electrical and Electronic Equipment) uygun şekilde
bertaraf edilmelidir
Zararlı madde içeren piller evsel atıklarla birlikte bertaraf
edilmemelidir
Üretici
21
Ambalaj çevreye zarar vermeyecek şekilde bertaraf edilmelidir
Ürünlerin, AEB'nin belirlediği teknik kuralların gerektirdiği
şartlara uygun olduğu belgelenmiştir
4. Amacına uygun kullanım
UYARI
Cihaz sadece hava nemi ve oda sıcaklığı ölçümü için tasarlanmıştır.
Cihaz sadece kişisel kullanım için tasarlanmıştır. Cihazı sadece geliştirilme
amacına uygun ve bu kullanım kılavuzunda belirtilen şekilde kullanın. Usulüne
uygun olmayan her türlü kullanım tehlikeli olabilir! Usulüne uygun olmayan
ve yanlış kullanım sonucu oluşan hasarlardan üretici firma sorumlu değildir.
85
Page 86
5. Uyarılar ve güvenlik yönergeleri
UYARI
•
Çocukları ambalaj malzemesinden uzak tutun. Boğulma tehlikesi
vardır.
•
Bu cihaz oyuncak değildir. Cihazı çocukların ulaşamayacağı bir
yerde saklayın.
•
Cihazı kesinlikle sökmeyin veya onarmaya çalışmayın, aksi halde
kusursuz çalışması garanti edilemez. Bu husus dikkate alınmadığı
takdirde garanti geçerliliğini yitirir.
•
Onarım için müşteri hizmetlerine veya yetkili bir satıcıya başvurun.
•
Cihazı açık alev kaynaklarından (örn. mumlar) uzak tutun.
•
Cihazı asla suyun veya diğer sıvıların içine sokmayın.
•
Cihazı battaniye veya yastık gibi nesnelerle örterek kullanmayın.
•
Cihazı dışarıda kullanmayın.
Pillerin kullanımıyla ilgili bilgiler
UYARI
•
Pilden sızan sıvı cilt veya gözlerle temas ettiğinde, ilgili yeri suyla
yıkayın ve bir doktora başvurun.
•
Nefes borusuna kaçma tehlikesi! Piller çocukların nefes borusuna kaçabilir ve boğulmalarına neden olabilir. Bu nedenle pilleri
küçük çocukların erişmeyeceği bir yerde saklayın!
•
Artı (+) ve eksi (-) kutup işaretlerine dikkat edin.
86
Page 87
•
Bir pil aktığında koruyucu eldiven giyin ve pil bölmesini kuru bir
bezle temizleyin.
•
Pilleri aşırı ısıya karşı koruyun.
•
Patlama tehlikesi! Piller ateşe atılmamalıdır.
•
Piller şarj edilmemeli veya kısa devre yaptırılmamalıdır.
•
Cihaz uzun süre kullanılmayacaksa pilleri pil bölmesinden çıkarın.
•
Sadece aynı tip veya eşdeğer piller kullanın.
•
Her zaman tüm pilleri aynı anda değiştirin.
•
Şarj edilebilir pil kullanmayın!
•
Pilleri parçalarına ayırmayın, açmayın veya ezmeyin.
DİKKAT
•
Cihazı darbelerden, nemden, tozdan, kimyasallardan, aşırı sıcaklık
değişikliklerinden, doğrudan gelen güneş ışığından, sıçrayan sudan, kumdan ve çok yakın ısı kaynaklarından (soba veya kalorifer
radyatörü) koruyun.
•
Cihazın üzerine herhangi bir cisim koymayın.
•
Cihazı nemli bir bezle temizleyin. Agresif temizlik maddeleri kullanmayın.
•
Cihazı -10°C ile 50°C arasındaki ortam sıcaklıklarında kullanın veya
saklayın. Daha yüksek veya düşük sıcaklıklar cihaza zarar verebilir.
•
Ortam değişikliği durumunda, cihazın güvenilir ölçüm sonuçları verebilmesi için 10 dakika geçmesi gerekir.
•
İlk kullanımdan önce ekrandaki koruyucu folyoyu çıkarın.
87
Page 88
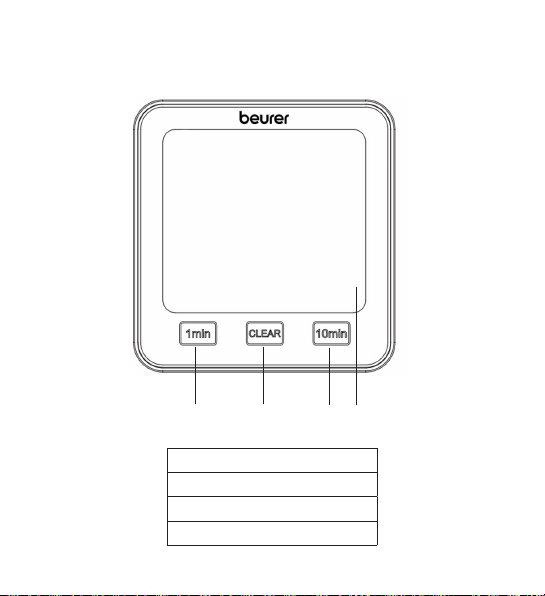
6. Cihaz açıklaması
1
1 [1 min] tuşu
2 [CLEAR] tuşu
3 [10 min] tuşu
4 Ekran
Ön taraf
2
88
4
3
Page 89
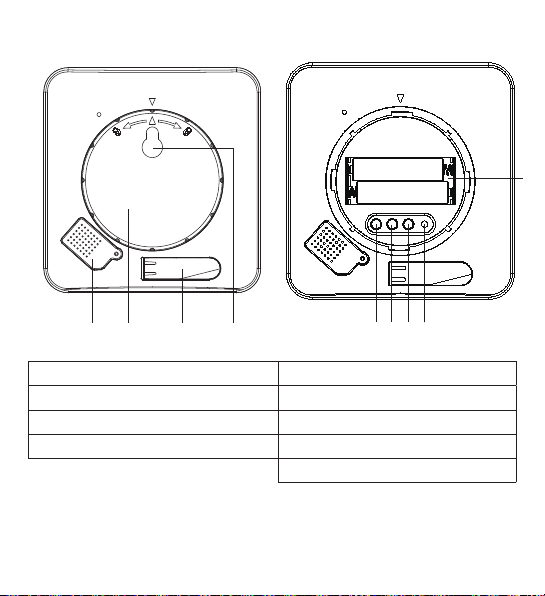
Arka taraf
9
TIME DOWN RESETUP/CF
4
3
2
1
5
6
1 Sensör kapağı 5 [TIME] tuşu
2 Pil bölmesi kapağı 6 [UP/CF] tuşu
3 Açılır-kapanır ayak 7 [DOWN] tuşu
4 Asma deliği 8 [RESET] tuşu
9 Pil bölmesi
89
8
7
Page 90
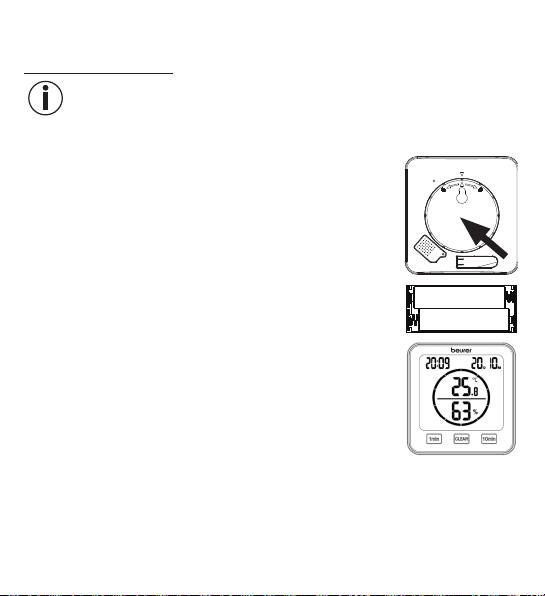
7. İlk çalıştırma
7.1 Pillerin takılması
Not
Termo-higrometreyi çalıştırabilmek için önce iki adet AAA pili (teslimat kapsamına
dahildir) pil bölmesine yerleştirmeniz gerekir. Bunun için aşağıdakileri yapın :
1. Termo-higrometrenin arka tarafında yuvarlak bir pil bölmesi kapağı mevcuttur. Pil bölmesi kapağını saat yönünün aksine döndürün. Şimdi pil bölmesi kapağını çıkarın.
2. Teslimat kapsamındaki iki adet AAA pili pil bölmesine yerleştirin. Pilleri yerleştirirken kutupların pil bölmesinde gösterilen işaretlerle (+/-) aynı yönde olmasına dikkat edin. Piller
doğru yerleştirildiğinde ekrandaki tüm göstergeler 3 saniye
yanar. Ardından termo-higrometre otomatik olarak standart
moda geçiş yapar.
3. Pil bölmesi kapağını tekrar yerleştirmeden önce tarihi ve saati ayarlamanız gerekir. Bunun için sonraki bölümde yer alan talimatları uygulayın.
90
Page 91
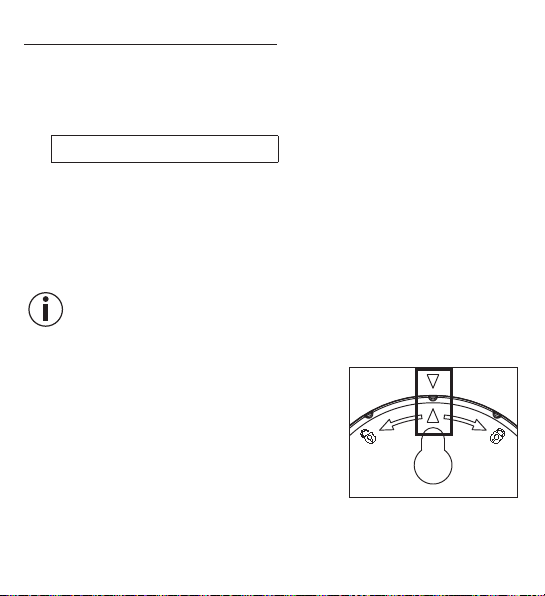
7.2 Tarih, saat, sıcaklık birimi ayarı
1.
12 saat modu ve 24 saat modu arasında geçiş yapmak için [TIME] tuşuna
basın. Santigrat (°C) ve Fahrenheit (°F) arasında geçiş yapmak için [UP/CF]
tuşuna basın.
2. Ayar menüsündeki sıralama şöyledir:
Yıl -> Ay -> Gün -> Saat -> Dakika
Ayar menüsüne erişmek için [TIME] tuşunu 3 saniye basılı tutun. Ekranda yıl
yanıp sönmeye başlar.
3.
[UP/CF] / [DOWN] tuşlarını kullanarak geçerli yılı ayarlayın. [TIME] tuşu ile onay
layın. Ekranda şimdi ay yanıp söner.
4.
[UP/CF] / [DOWN] tuşlarını kullanarak aynı şekilde ay, gün, saat ve dakika ayarlarını da yapın ve her bir ayarı [TIME] tuşu ile onaylayın.
Ayar menüsündeyken 7 dakika boyunca hiçbir tuşa basmazsanız ayar
menüsünden otomatik olarak çıkılır.
5. Pil bölmesi kapağını tekrar pil bölmesine takın.
6. Pil bölmesinin kapağını saat yönünde döndürerek
hissedilir şekilde yerine oturmasını sağlayın. Cihazın ve pil bölmesi kapağının ok işaretlerinin aynı
hizaya gelmesine dikkat edin.
7. Cihazı açılır-kapanır ayağı sayesinde bağımsız bir
cihaz olarak kullanabilir veya asma deliği (cihazın
arka tarafında bulunur) yardımıyla duvara monte
edebilirsiniz.
91
-
Page 92
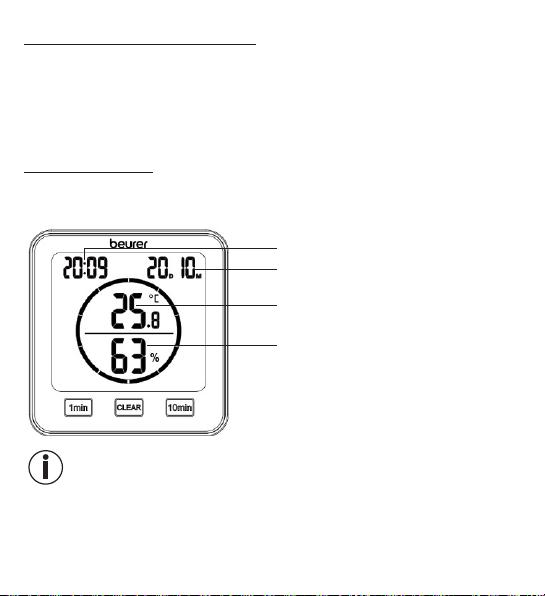
7.3 Fabrika ayarlarına geri alma
Tarihi ve saati fabrika ayarlarına geri almak için sivri uçlu bir nesne ile [RESET]
tuşuna kısa süre basın.
8. Kullanım
Termo-higrometrede bir standart mod ve bir zamanlayıcı mevcuttur.
8.1 Standart mod
Termo-higrometrede herhangi bir tuşa basmazsanız ekranda otomatik olarak
Standart mod gösterilir.
Saat
Tarih (D = Gün, M = Ay)
Oda sıcaklığı
Bağıl hava nemi
Not
Cihaz çalıştırıldıktan sonra doğru sıcaklığı ve nemi göstermesi 10 dakika kadar
sürebilir.
92
Page 93
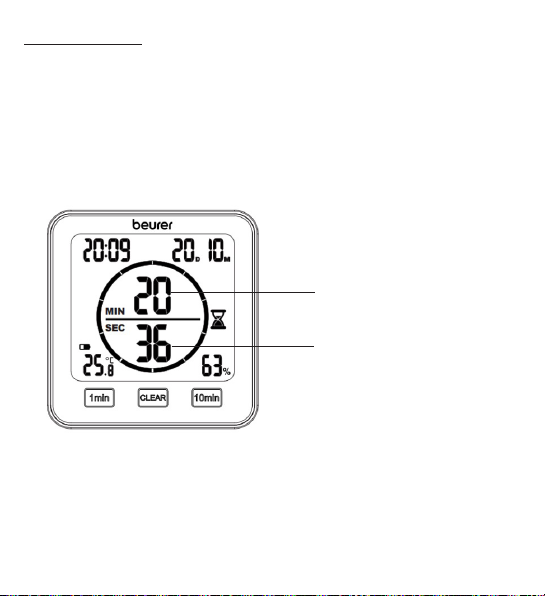
8.2 Zamanlayıcı
Termo-higrometrede 99 dakikaya kadar ayarlayabileceğiniz bir zamanlayıcı
mevcuttur.
1. Zamanlayıcıyı başlatmak için [1 min] tuşu ve [10 min] tuşu ile istediğiniz süreyi
ayarlayın. Ayarladığınız zamanlayıcı süresi ekranın ortasında gösterilir. 3 saniye
boyunca hiçbir tuşa basmazsanız zamanlayıcı bir bip sesi ile birlikte otomatik
olarak çalışmaya başlar. Zamanlayıcının süresi bittiğinde bir bip sesi duyulur.
Bip sesini kapatmak için [CLEAR] tuşuna basın.
2. Zamanlayıcıyı daha erken sonlandırmak için [CLEAR] tuşuna basın.
Dakika olarak kalan
zamanlayıcı süresi
Saniye olarak kalan
zamanlayıcı süresi
93
Page 94
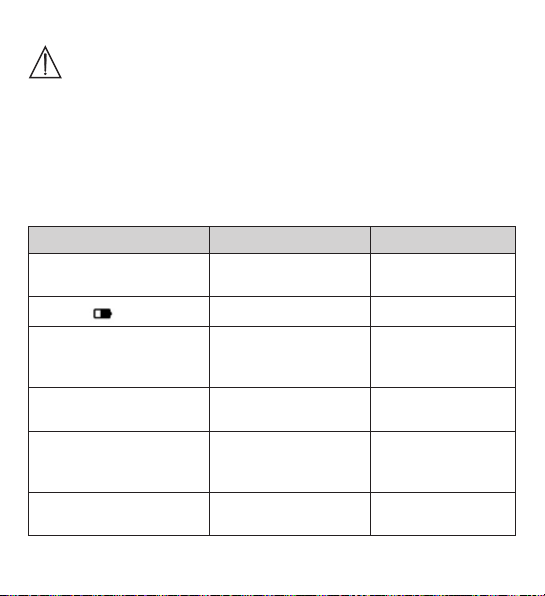
9. Temizlik ve bakım
DİKKAT
•
Cihazı nemli bir bezle temizleyin. Agresif temizlik maddeleri ya da
sert fırçalar kullanmayın!
•
Cihaza kesinlikle su girmemelidir.
•
Cihazı uzun süre kullanmayacaksanız, orijinal ambalajı içinde,
kuru bir ortamda ve üzerinde ağırlık olmadan saklamanızı öneririz.
10. Sorunların giderilmesi
Sorun Olası neden Çözüm
Cihaz
açılmıyor
Ekranda
görünüyor
Piller boşalmış Yeni piller yerleştirin
Piller boşalmak üzere Yeni piller yerleştirin
Yeni piller takılmış olmasına
rağmen cihaz açılmıyor
Ekranda
LL.L görünüyor
HH.H. görünüyor
Ekranda
LL görünüyor
Ekranda
Cihaz arızalı
Oda sıcaklığı -10°C
(14°F) altında
Oda sıcaklığı 50°C
(122°F) üzerinde
Bağıl nem %20 altında
94
Müşteri hizmetlerine
danışın
Oda sıcaklığı ölçüm
aralığının dışında
Oda sıcaklığı ölçüm
aralığının dışında
Bağıl nem ölçüm
aralığının dışında
Page 95
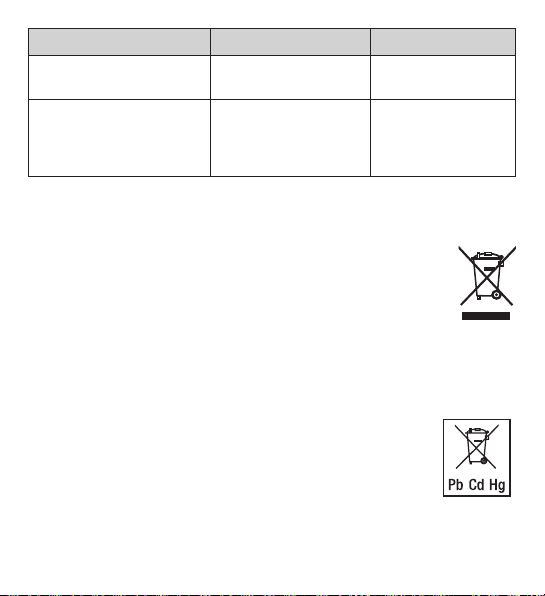
Sorun Olası neden Çözüm
Ekranda
HH görünüyor
Cihaz sıcaklık veya nem
değeri göstermiyor veya
hatalı gösteriyor
Bağıl nem %95
üzerinde
Ortam değişikliği
Bağıl nem ölçüm
aralığının dışında
Cihaz çalıştırıldıktan
sonra doğru verilerin
gösterilmesi 10 dakika kadar sürebilir
11. Bertaraf etme
Çevreyi korumak için, kullanım ömrü dolan cihaz evsel atıklarla beraber bertaraf
edilmemelidir. Cihaz, ülkenizdeki uygun atık toplama merkezleri aracılığıyla bertaraf
edilebilir. Cihazı, elektrikli ve elektronik hurda cihazlarla ilgili AB direktifine (WEEE - Waste Electrical and Electronic Equipment) uygun şekilde
bertaraf edin.
Bertaraf etme ile ilgili sorularınızı, ilgili yerel makamlara iletebilirsiniz.
Pillerin bertaraf edilmesi
Kullanılmış, tamamen boşalmış piller özel işaretli toplama kutularına atılarak, özel atık
toplama yerlerine veya elektrikli cihaz satıcılarına teslim edilerek bertaraf edilmelidir.
Pillerin bertaraf edilmesi, yasal olarak sizin sorumluluğunuzdadır.
Bu işaretler, zararlı madde içeren pillerin üzerinde bulunur:
Pb = Pil kurşun içerir,
Cd = Pil kadmiyum içerir,
Hg = Pil cıva içerir.
95
Page 96
12. Teknik veriler
Tip HM 22
Ürün numarası 678.04
Güç kaynağı 2 x 1,5 V
Ağırlık 135 g (piller hariç)
Ölçüler 110 x 105 x 29,5 mm
Sıcaklık ölçüm aralığı -10 ila 50°C (14 ila 122°F)
Nem ölçüm aralığı %20 – 95 bağıl hava nemi
AAA LR03 pil
13. Garanti/servis
Beurer GmbH, Söflinger Straße 218, D-89077 Ulm (aşağıda “Beurer” olarak
anılacaktır) bu ürün için aşağıdaki koşullar çerçevesinde ve aşağıda açıklanan
kapsamda bir garanti sunmaktadır.
Aşağıdaki garanti koşulları, satıcının müşteri ile yaptığı satış sözleşmesinden doğan yasal garanti yükümlülüklerini etkilemez.
Garanti, yasalarla zorunlu kılınan sorumlulukların kapsamında herhangi bir
kısıtlamaya neden olmaksızın geçerlidir.
Beurer, bu ürünün kusursuz bir şekilde çalıştığını ve eksiksiz olduğunu garanti
eder.
Yeni ve kullanılmamış bir ürünün müşteri tarafından satın alınmasıyla başlayan ve
dünya genelinde geçerli olan garanti süresi 3 yıldır.
96
Page 97

Bu garanti sadece tüketici olarak müşteri tarafından satın alınan ve bireysel
amaçlarla sadece evde kullanılan ürünler için geçerlidir.
Alman yasaları geçerlidir.
Bu ürünün garanti süresi içinde aşağıda belirtilen hükümler uyarınca eksiksiz
olmadığı veya çalışma açısından kusurlu olduğu saptanırsa, Beurer bu garanti
koşulları kapsamında ücretsiz bir ikame ürün teslimatı veya onarım gerçekleştirmekle yükümlüdür.
Müşteri bir garanti talebinde bulunmak istediğinde önce yerel satıcıya başvuracaktır: Servis adreslerinin olduğu ekteki “Uluslararası Servis” listesini
inceleyin.
Bu durumda müşteriye, garanti işlemlerinin yürütülmesiyle ilgili olarak örneğin
ürünün nereye gönderileceği ve hangi belgelerin gerekli olduğu gibi ayrıntılı
bilgiler verilecektir.
Garanti talebi ancak müşterinin
– faturanın/satın alma belgesinin bir kopyasını ve
– orijinal ürünü
yetkili bir Beurer iş ortağına sunabilmesi halinde işleme konabilir.
Aşağıdaki durumlar kesinlikle bu garanti kapsamının dışındadır:
– Ürünün normal kullanımından veya tüketiminden kaynaklanan aşınmalar ve
yıpranmalar;
– Bu ürün ile birlikte teslim edilen ve usulüne uygun kullanıldığında da yıpranabi-
lecek veya tükenebilecek aksesuar parçaları (örneğin piller, şarj edilebilir piller,
manşetler, contalar, elektrotlar, aydınlatma malzemeleri, başlıklar ve nebulizatör
aksesuarları);
– Kullanım kılavuzundaki bilgiler dikkate alınmadan ve/veya usulüne uygun olma-
yan bir şekilde kullanılan, temizlenen, depolanan veya bakımı yapılan ürünler ve
97
Page 98

Beurer tarafından yetkilendirilmemiş bir servis merkezi veya müşterinin kendisi
tarafından açılan, onarılan veya üzerinde değişiklik yapılan ürünler;
– Ürünün üreticiden müşteriye nakliyesi sırasında oluşan hasarlar;
– İkinci kalite ürün veya kullanılmış ürün olarak satın alınan ürünler;
– Bu üründeki bir kusurdan kaynaklanan müteakip hasarlar (ancak bu durumda
ürün sorumluluğu veya yasal zorunlu sorumluluk hükümleri uyarınca tüketici
hakları olabilir).
Onarım veya komple değişim garanti süresini hiçbir şekilde uzatmaz.
Hata ve değişiklik hakkı saklıdır
98
Page 99
РУССКИЙ
Внимательно прочитайте данную инструкцию поприменению, сохраните еедля по
следующего использования, предоставьте
другим пользователям возможность сней
ознакомиться иследуйте ееуказаниям.
Уважаемый покупатель!
Благодарим Вас завыбор продукции нашей компании. Мыпроизводим
современные, тщательно протестированные высококачественные изделия
для обогрева тела, измерения массы, кровяного давления, температуры
тела, пульса, для легкой терапии, массажа, косметических процедур, ухода
задетьми иочистки воздуха.
Снаилучшими пожеланиями,
компания Beurer
Содержание
1. Ознакомительная информация 100
2. Комплект поставки ..................... 100
3. Пояснения ксимволам ............... 100
4. Использование поназначению . 102
5. Предупреждения иуказания
потехнике безопасности ........... 102
6. Описание прибора ...................... 105
7. Подготовка кработе ................... 107
7.1 Установка батареек ................... 107
7.2 Настройка даты/времени/
единицы измерения ................... 108
7.3 Сброс назаводские
настройки ................................... 109
8. Применение ............................... 109
8.1 Стандартный режим .................. 109
8.2 Таймер ........................................ 110
9. Очистка иуход .......................... 111
10. Что делать при возникновении
проблем? ................................... 111
11. Утилизация ................................ 113
12. Технические характеристики ... 114
13. Гарантия/сервисное
обслуживание ........................... 114
99
-
Page 100
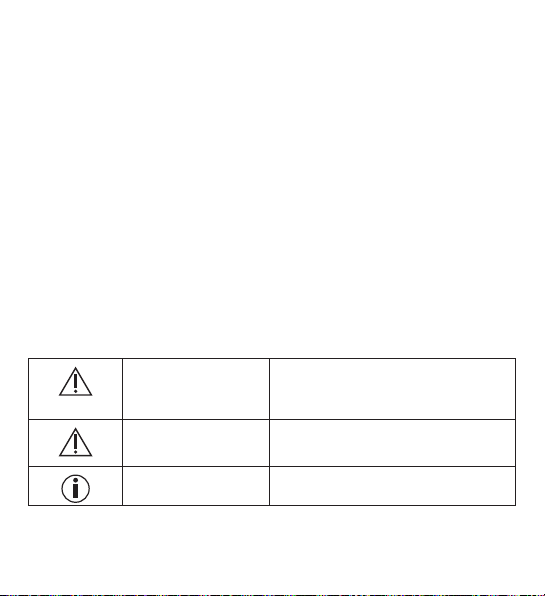
1. Ознакомительная информация
Термогигрометр HM22 измеряет температуру иотносительную влажность
воздуха впомещении. Полученные значения отображаются надисплее.
Дополнительно термогигрометр оснащен таймером, при помощи которого
Выможете настроить кратковременное измерение.
Благодаря небольшим размерам термогигрометр можно установить
влюбом месте. Собратной стороны термогигрометра имеется приспособление для подвешивания, при помощи которого прибор можно закрепить
настене.
2. Комплект поставки
1x термогигрометр
2x батарейки типа ААА
1x инструкция поприменению
3. Пояснения ксимволам
Винструкции поприменению инаприборе используются следующие
символы.
ПРЕДУПРЕЖДЕНИЕ
ВНИМАНИЕ
Указание Содержит важную информацию.
Предупреждает обопасности травмирования или нанесения вреда
здоровью.
Указывает навозможные повреждения прибора или принадлежностей.
100
 Loading...