

Page 1

EN 1809 ED. 12/05
BOUÉES D’ÉQUILIBRAGE
BUOYANCY COMPENSATORS / TARIERJACKETS
CHALECOS HYDROSTATICOS / COLETES COMPENSADORES
GIUBBETTI EQUILIBRATORI / TRIMJACKS / KAMIZELKI WYPORNOSCIOWE
ÚSZÓKÉPESSÉG SZABÁLYOZÓK /
,
Page 2

Buoyancy compensators
> User guide
Page 3

Introduction
1 - Models in the Beuchat product range 28
2 - Technical description 30
3 - Buoyancy compensator (BC) features 31
Implementation
1 - Attaching the BC to the tank 32
2 - Connecting the regulator 34
3 - Settings - Adjustments 36
4 - Auxiliary inflation system 39
To check before diving 40
Use
1 - Inflation features 41
2 - Air dump instructions 43
Maintenance - Storage 45
Warranty 46
Summary
Page 4

1. Models in the product range
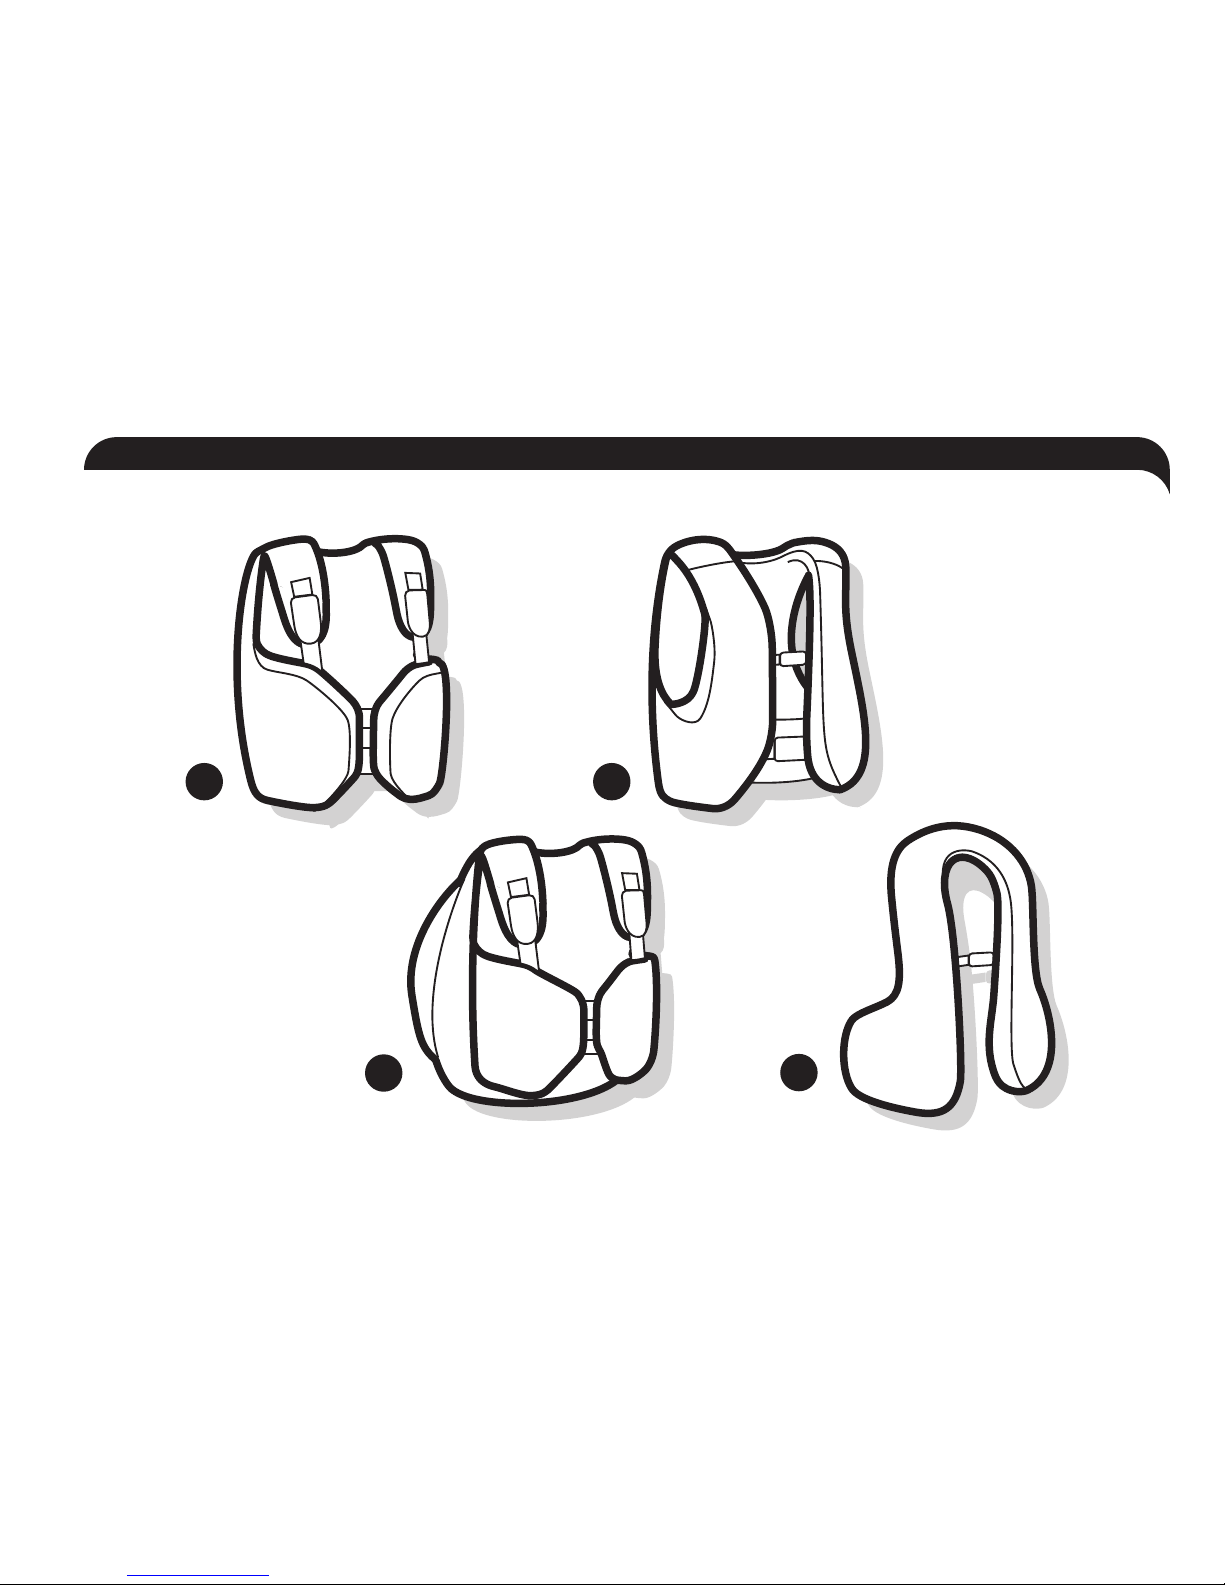
The BCs in the product range can be divided into
four categories:
A > BCs with chest adjustment:
Due to their frontal adjustment feature, these BCs are
extremely comfortable.
B > Integrated system BCs:
This type of BC offers maximum buoyancy. There is no
shoulder adjustment feature.
C > Back inflation BCs:
These BCs place all inflation behind the diver. They are
designed to offer complete freedom of movement.
The harness has an adjustable chest strap.
D > Combined Buoyancy Compensator-Life Jackets:
This BC, specially designed for the needs of the Navy,
can be used with all sorts of dive suits. Its large volume
assures both impressive buoyancy and optimal surface
safety.
Introduction
28 > Instructions for use / Introduction
Page 5
A B
D
C
Introduction / Instructions for use > 29
Page 6

2. Technical description
Depending on the type of BC, the air bladder can
be integrated into a jacket or can be attached to
an independent harness.
A > The air bladder:
The watertight bladder is made of 420 or 840 denier
polyamide material with a polyurethane coating, bound
together at a high frequency.
The different inflation and air dump systems, as well as
the backpack, are placed around the bladder. There are
also adjustable straps, pockets, and convenient
accessory attachment rings.
B > The backpack:
Independent at the rear of the BC, the backpack holds
the tank firmly in place with an adjustable strap. This
backpack offers additional lumbar support that adjusts
to fit the diver's chest height.
30 > Instructions for use / Introduction
Page 7

3. Buoyancy compensator (BC) features
The Buoyancy compensator (BC) allows the user to:
A > While diving:
•find neutral buoyancy at all depths using the inflation
and air-dump systems,
•control buoyancy while resurfacing using the power
inflator.
B > At the surface:
•easily and effortlessly put on and take off equipment in
the water,
•safely maintain surface buoyancy without having to fin
kick.
Introduction / Instructions for use > 31
Page 8
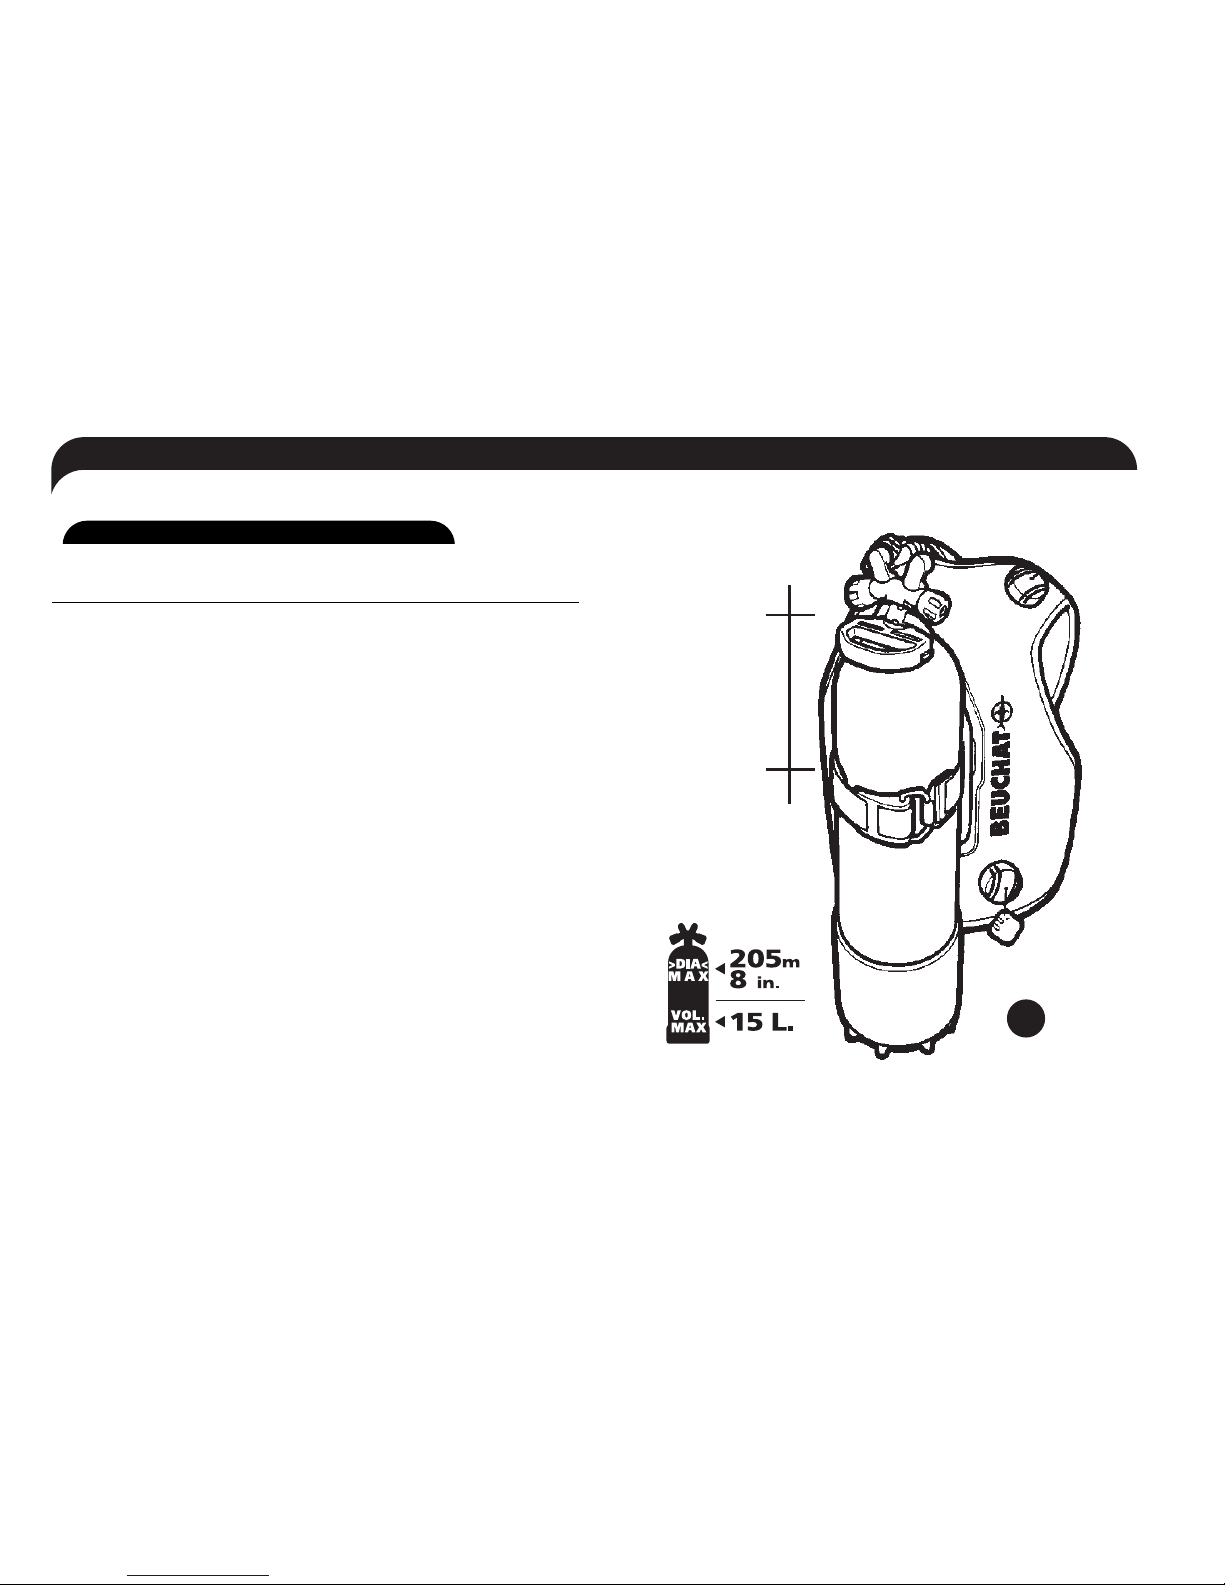
1. Attaching the BC to the tank:
The BC is securely fixed to the tank by a tank band
equipped with a cam buckle that locks tightly in place
once adjusted.
This tank band is equipped with a quick release buckle
that allows for easy handling without affecting the
adjusted settings.
Putting the BC on the tank:
•Hang the BC over the tank's valve by its rear clamp.
•Place the tank band around the upper third of the
tank, using the suspension clamp at the back of the BC
to adjust to the desired height (see figure 1).
•Pass the tank band through the buckle, as shown.
1/3
1
Implementation
32 > Instructions for use / Implementation
Page 9
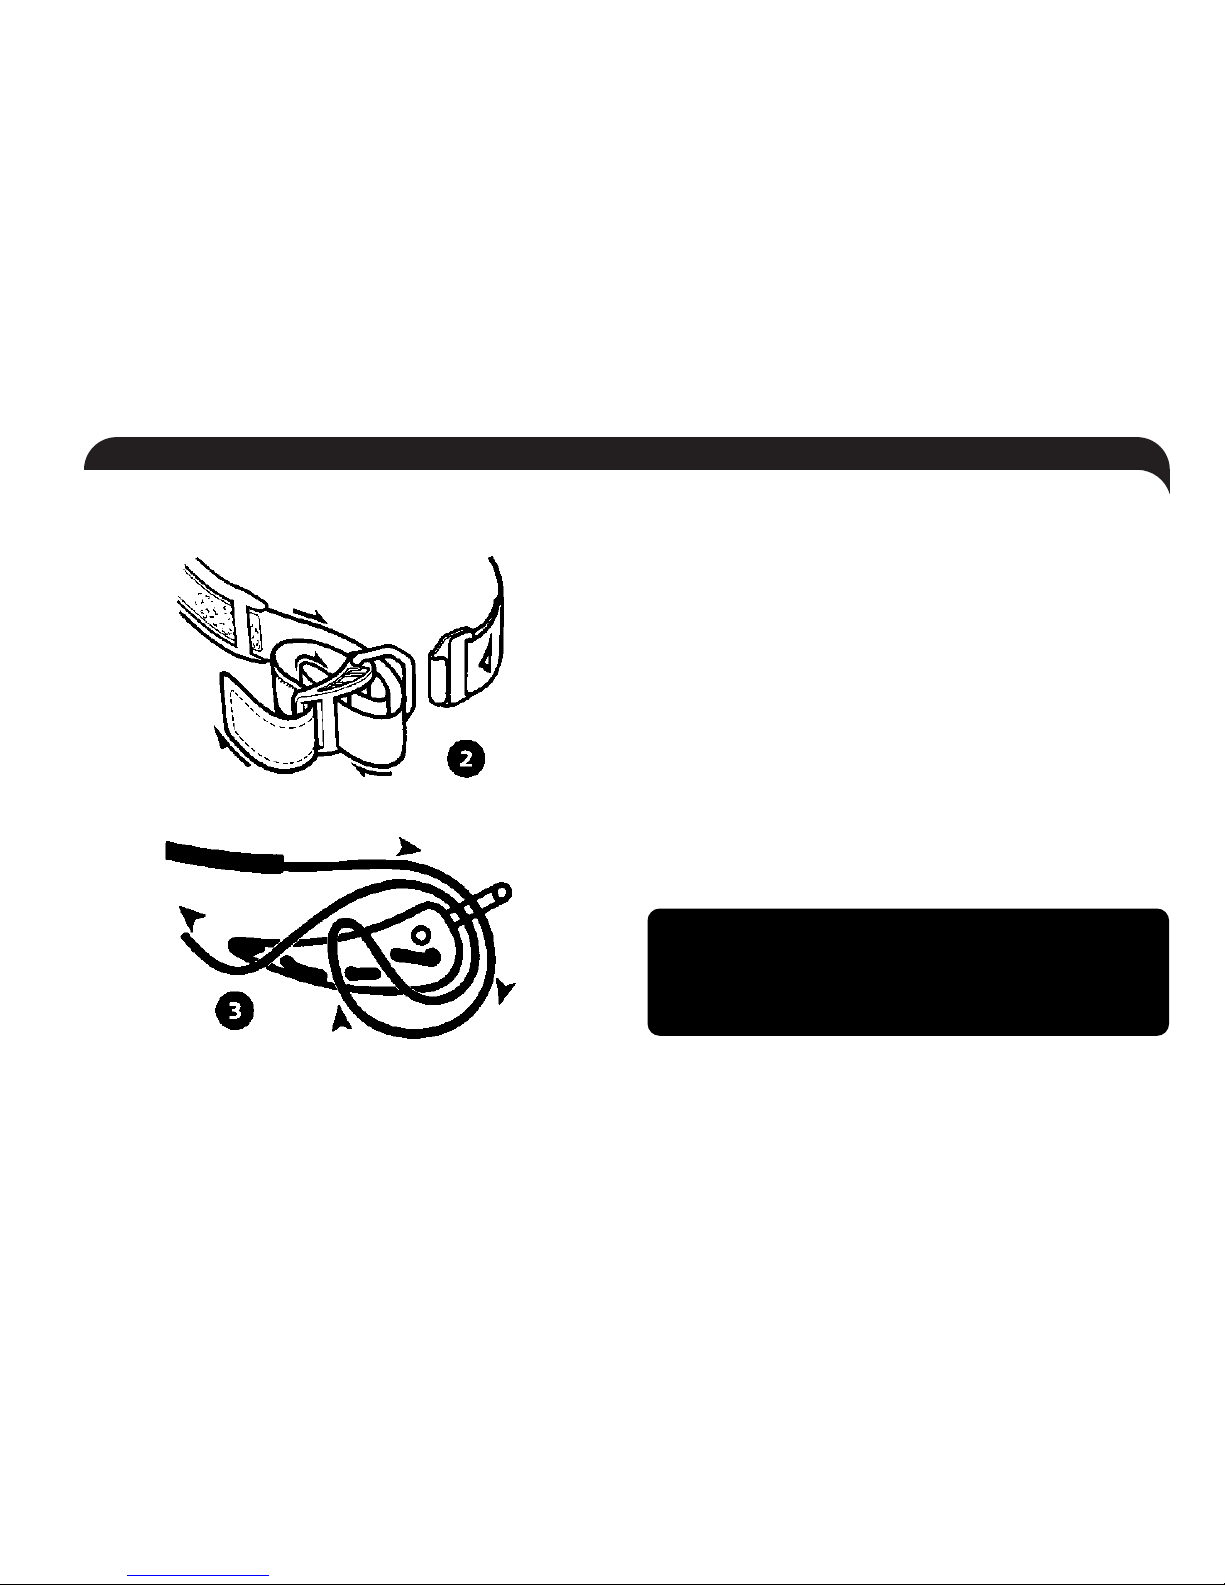
•Tighten the tank band by pulling on its end.
•Close the buckle by pushing it back towards the tank
and press the remaining strap end onto the Velcro
security band (see figures 2 and 3).
Note 1: wet the tank band before mounting it on the tank, if possible.
Note 2: it is not necessary to completely undo the tank band from the
buckle after each use. After having released the buckle, loosen the
tank band enough to allow it to slide up the tank.
Note 3: use of the "quick release" buckle does not require you to
retighten the tank band after each use. To allow for tightening and
loosening, you simply need to put the hook through, or remove it
from, the metallic ring.
WARNING: ensure that your BC is securely
attached to your tank before diving by lifting it
up a couple of times. There should not be any
slippage.
Implementation / Instructions for use > 33
Page 10
2 - Connecting the regulator:
The BC is manually inflated using the power inflator; this
power inflator may also be referred to as a directsystem. The power inflator is supplied with air at
intermediate pressure by a tube attached to the first
stage of the regulator and connected to the power
inflator by a quick connector.
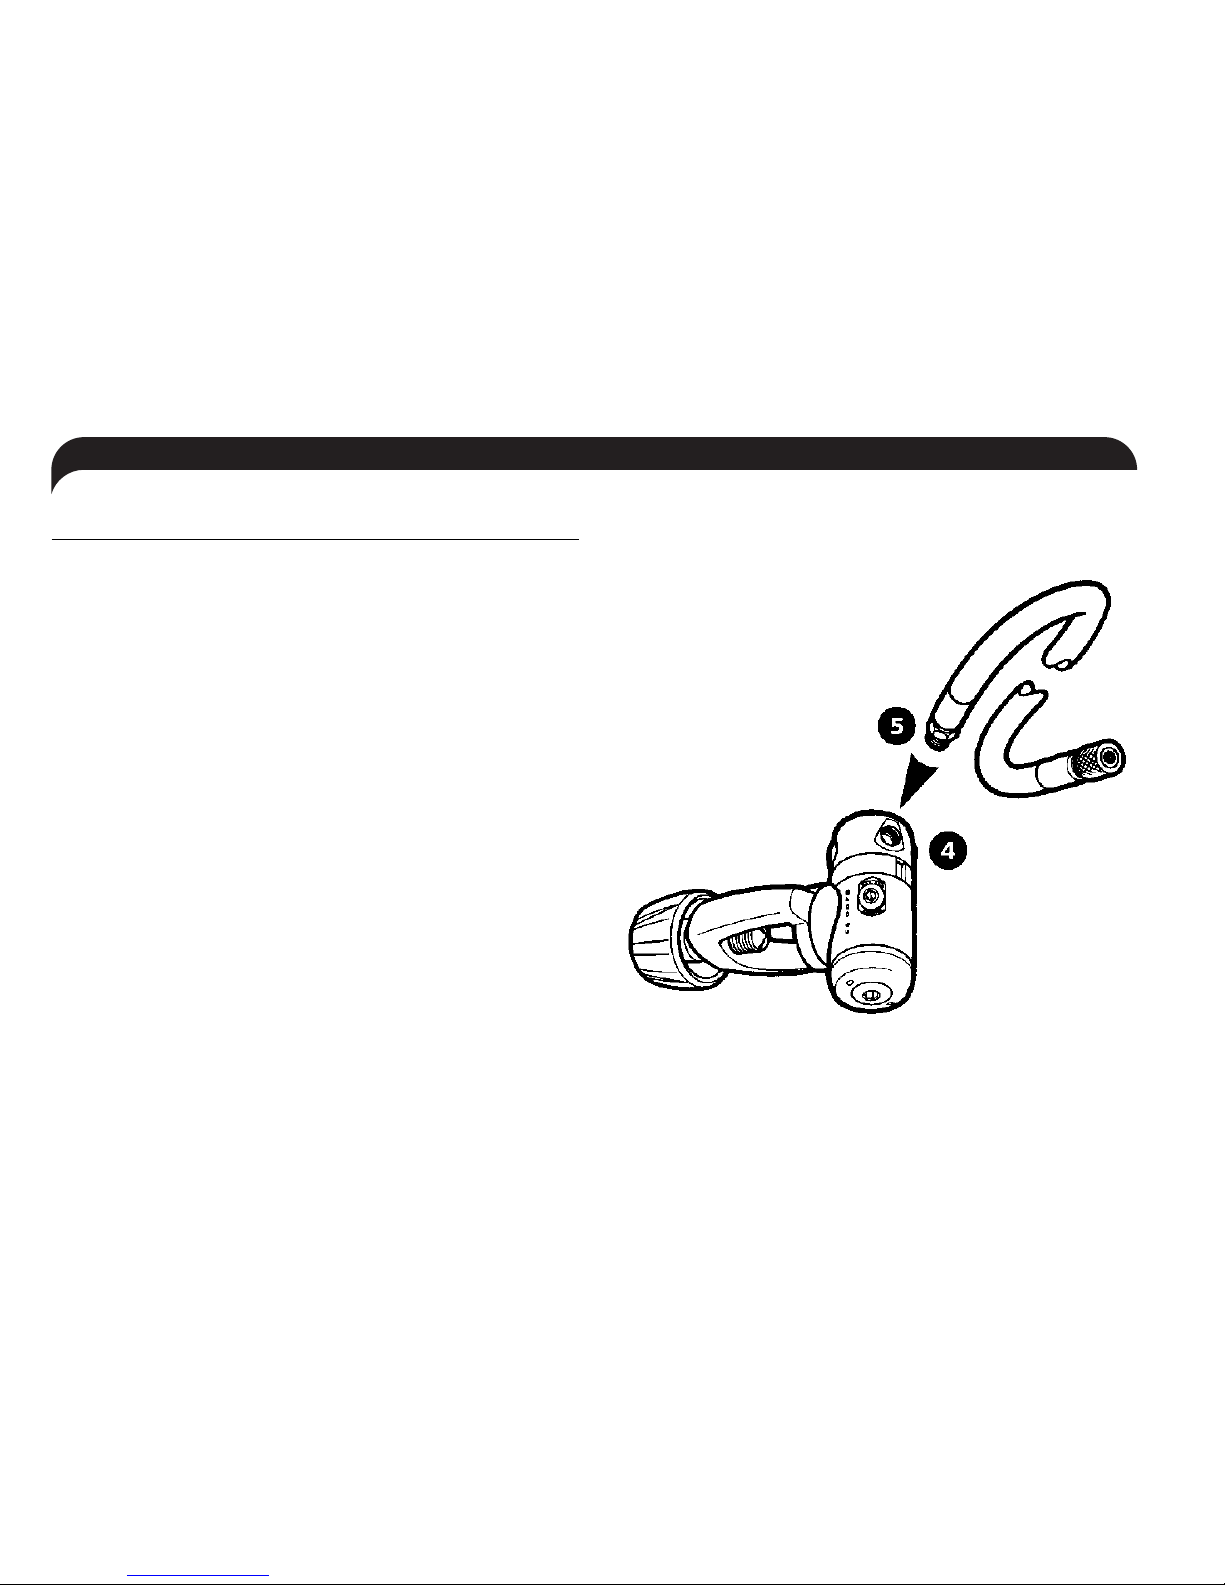
A > Connecting the regulator's first stage:
•Undo one of the intermediate pressure valves
(see figure 4) on the first stage.
•Ensure that the screws are compatible (3/8'' - 24 UNF).
•Screw the hose into place (see figure 5) and tighten,
but not excessively, with a size 14 flat spanner.
•After you've connected the regulator to the tank, open
the air flow and ensure that there are no leaks.
34 > Instructions for use / Implementation
Page 11
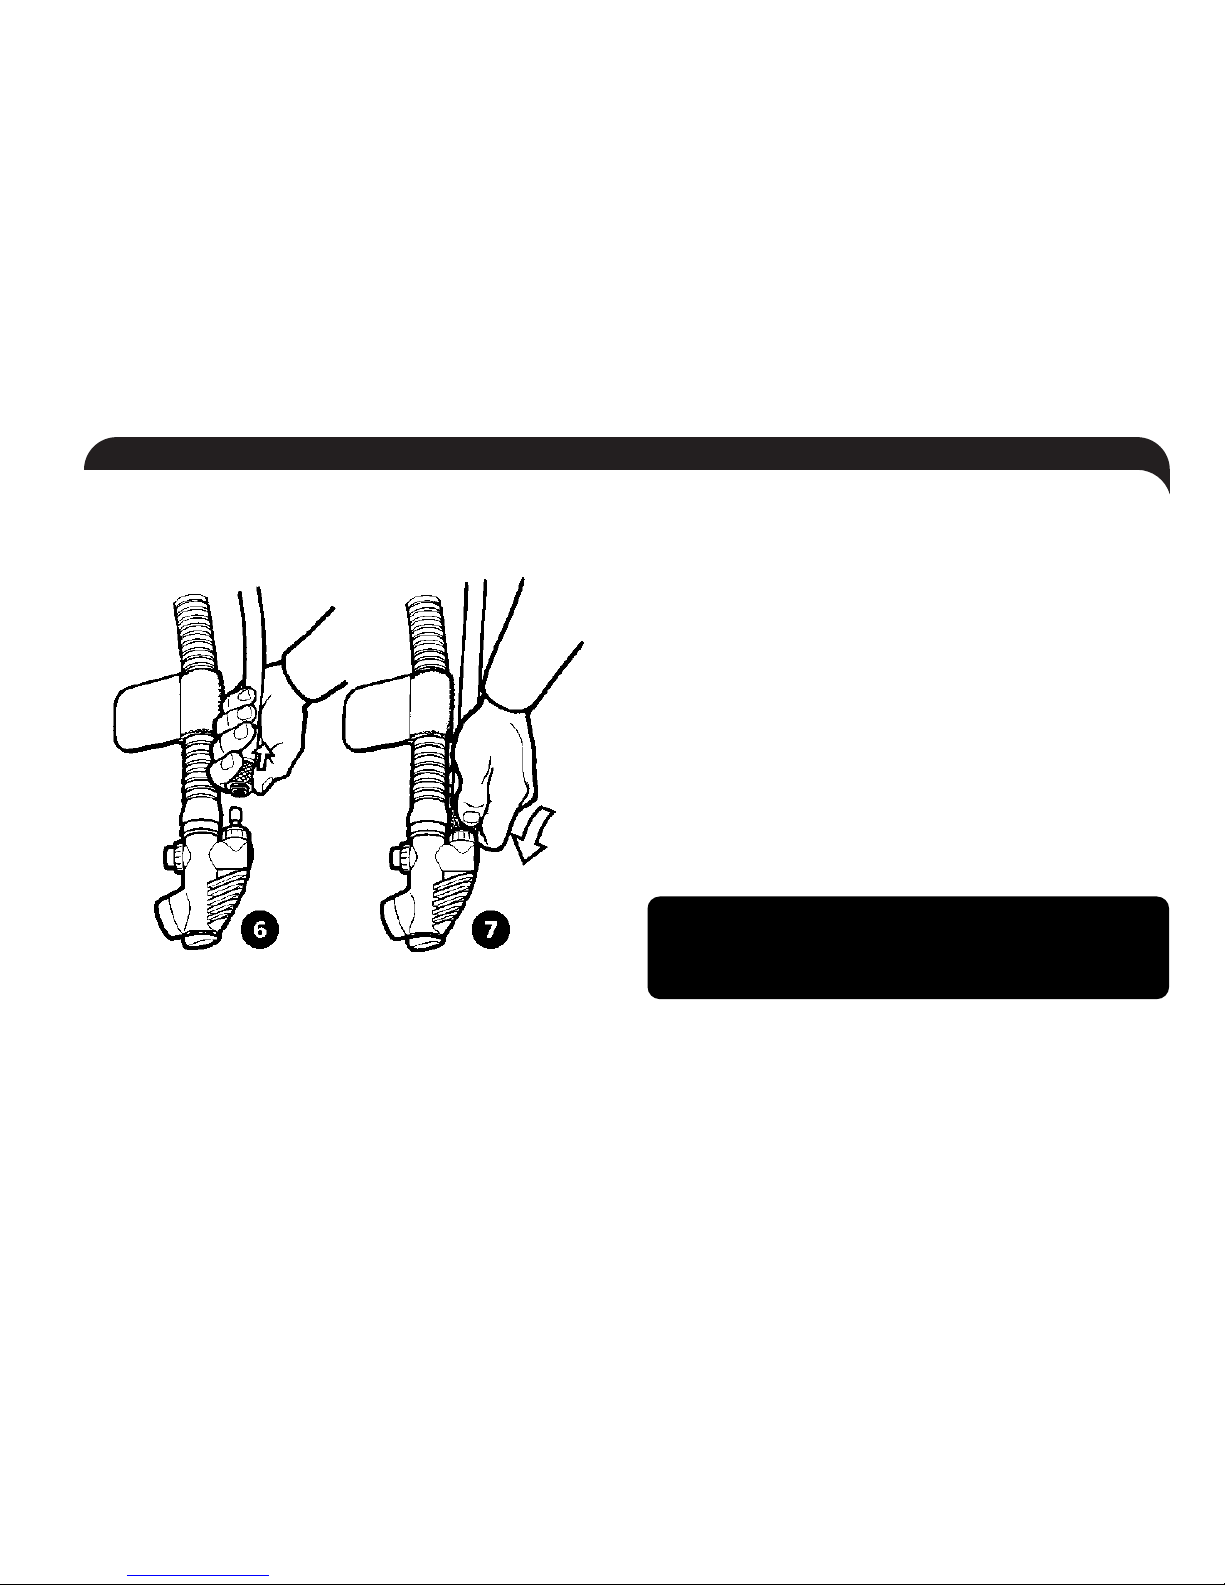
B > Connecting the power inflator with the quick
connector:
•Complete this operation before putting the hose under
pressure.
•Push back the moveable ring on the quick connector
(see figure 6).
•Place the end of the power inflator into the connector.
•Bring the connector's ring back toward the front
(see figure 7).
•Ensure that it is properly connected by pulling lightly
on the hose.
•Place the hose under pressure by opening the air flow
and ensure that there are no air leaks.
WARNING: if you are unsure or detect a leak,
have your equipment inspected at a specialized
scuba centre.
Implementation / Instructions for use > 35
Page 12
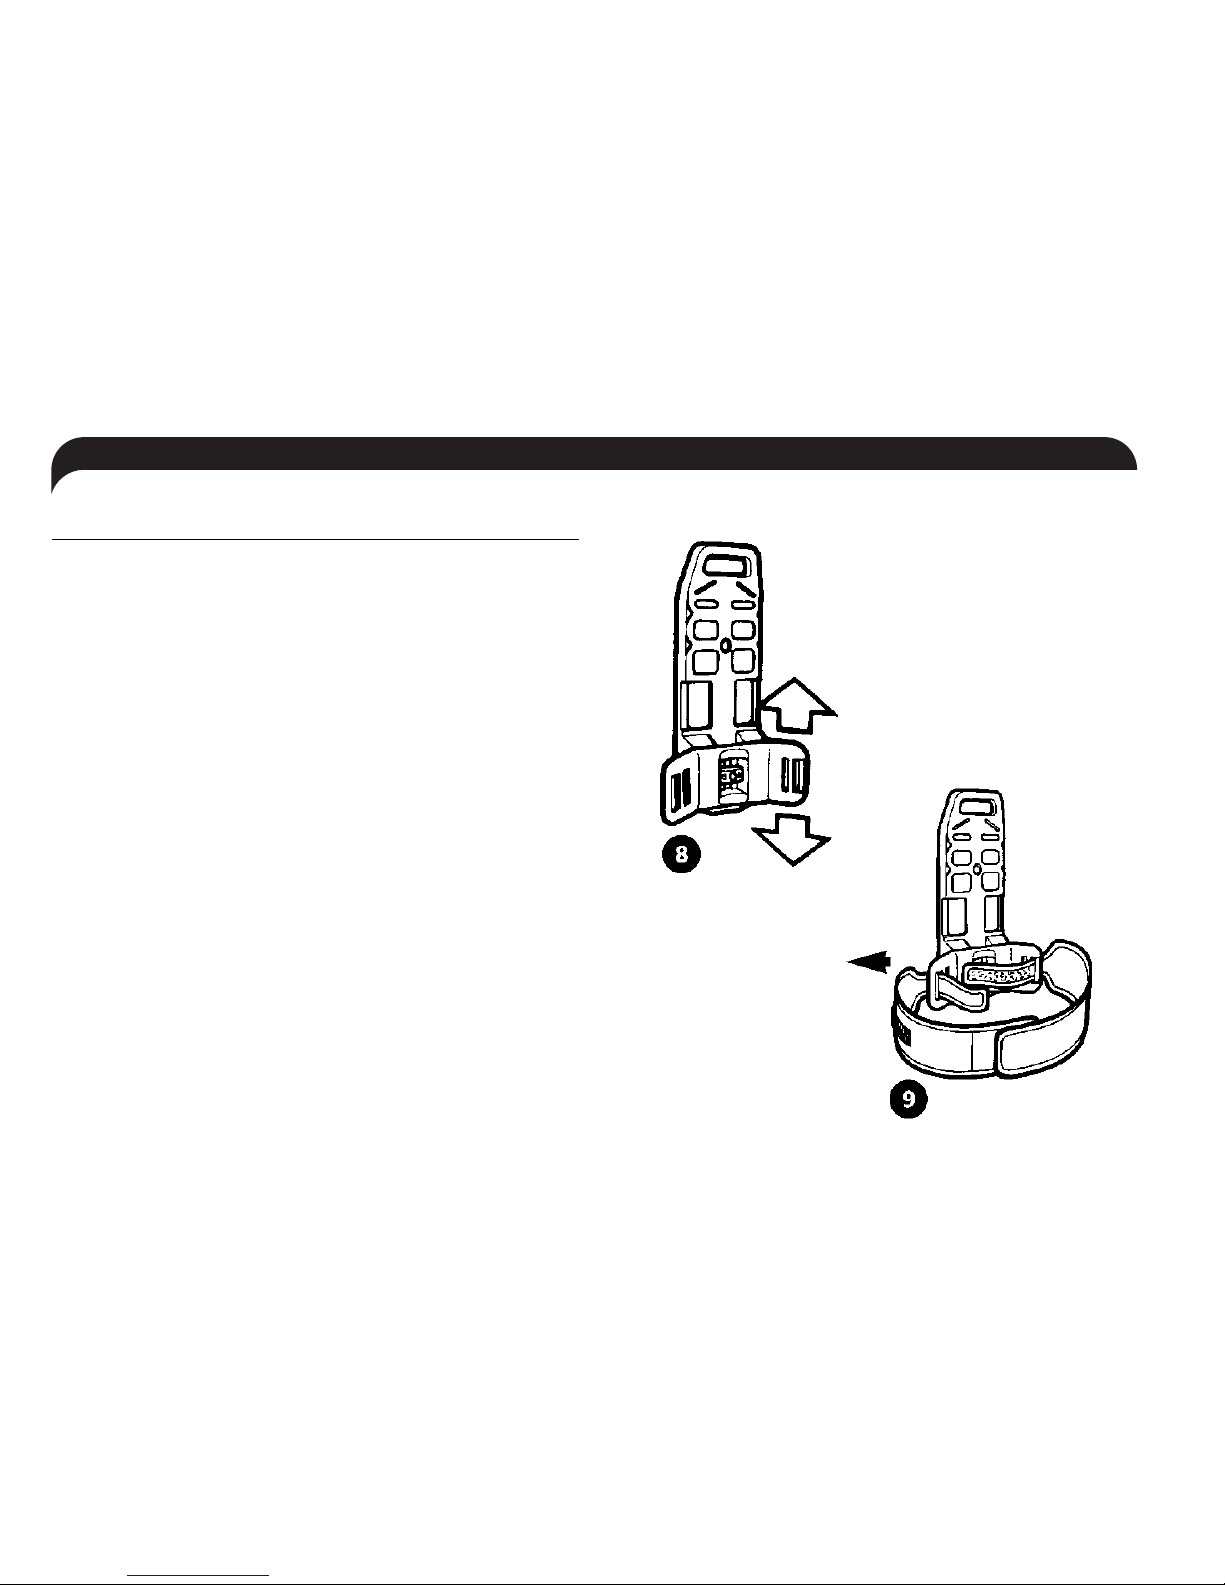
3 - Settings - Adjustments:
A > Adjusting the backpack (figure 8):
The backpack offers lumbar support that adjusts heightwise to fit the diver's chest height:
•Do not undo the main fastening screw.
•Lightly fold the horizontal part forward to release the
adjustable notches.
•Adjust the backplate to the desired height, trying it
both with and without the tank connected to the BC.
•Replace the flap
36 > Instructions for use / Implementation
Page 13
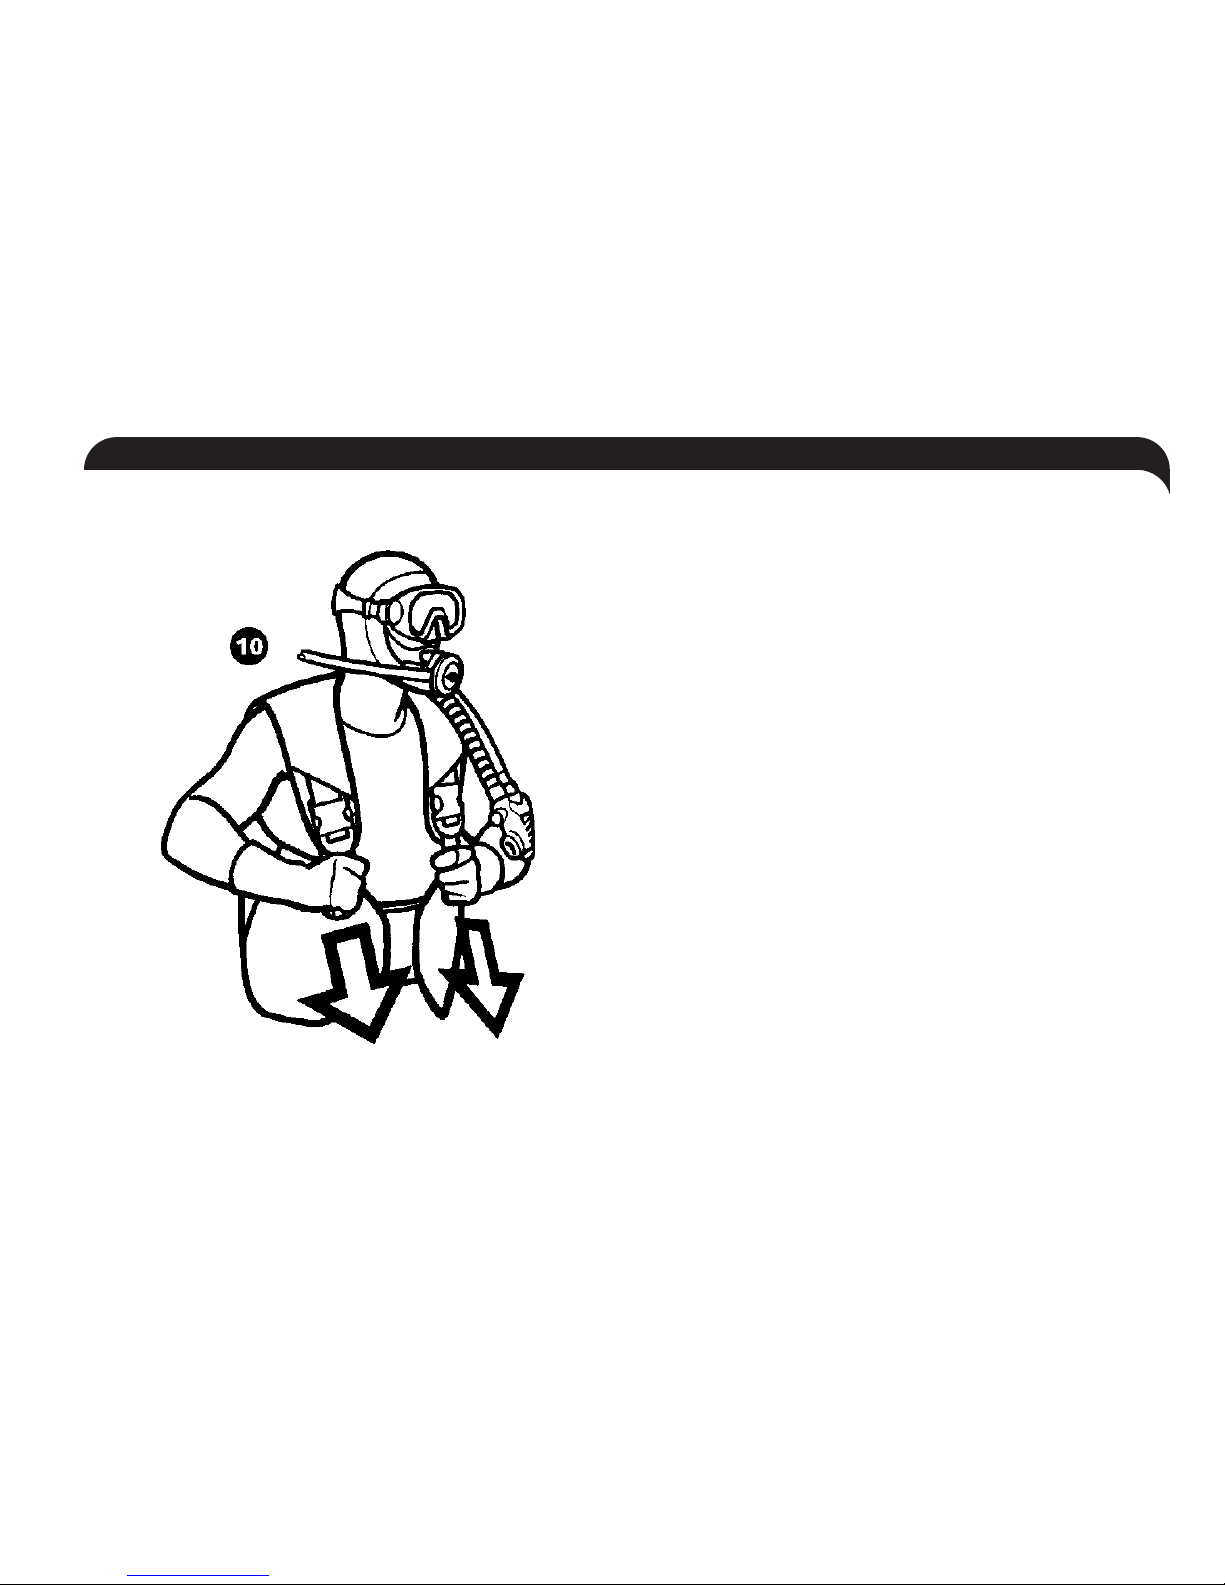
B > Adjusting the cummerbund (figure 9):
•Adjust the cummerbund by adjusting the length of the
straps with the plastic buckles.
•Ensure that there are 15 to 20 cm of Velcro covering
around the waist.
C > Adjusting the chest straps (figure 10):
•Adjust the length of the chest straps by simultaneously
pulling the ends of both straps.
•To lengthen the straps, lift the front part of the buckle.
•To undo, simultaneously press on both sides of the
buckle.
Note 1: for ideal comfort, do not over-tighten the straps.
Note 2: use of the quick release buckles allows for easy equipment
removal.
Implementation / Instructions for use > 37
Page 14
38 > Instructions for use / Implementation
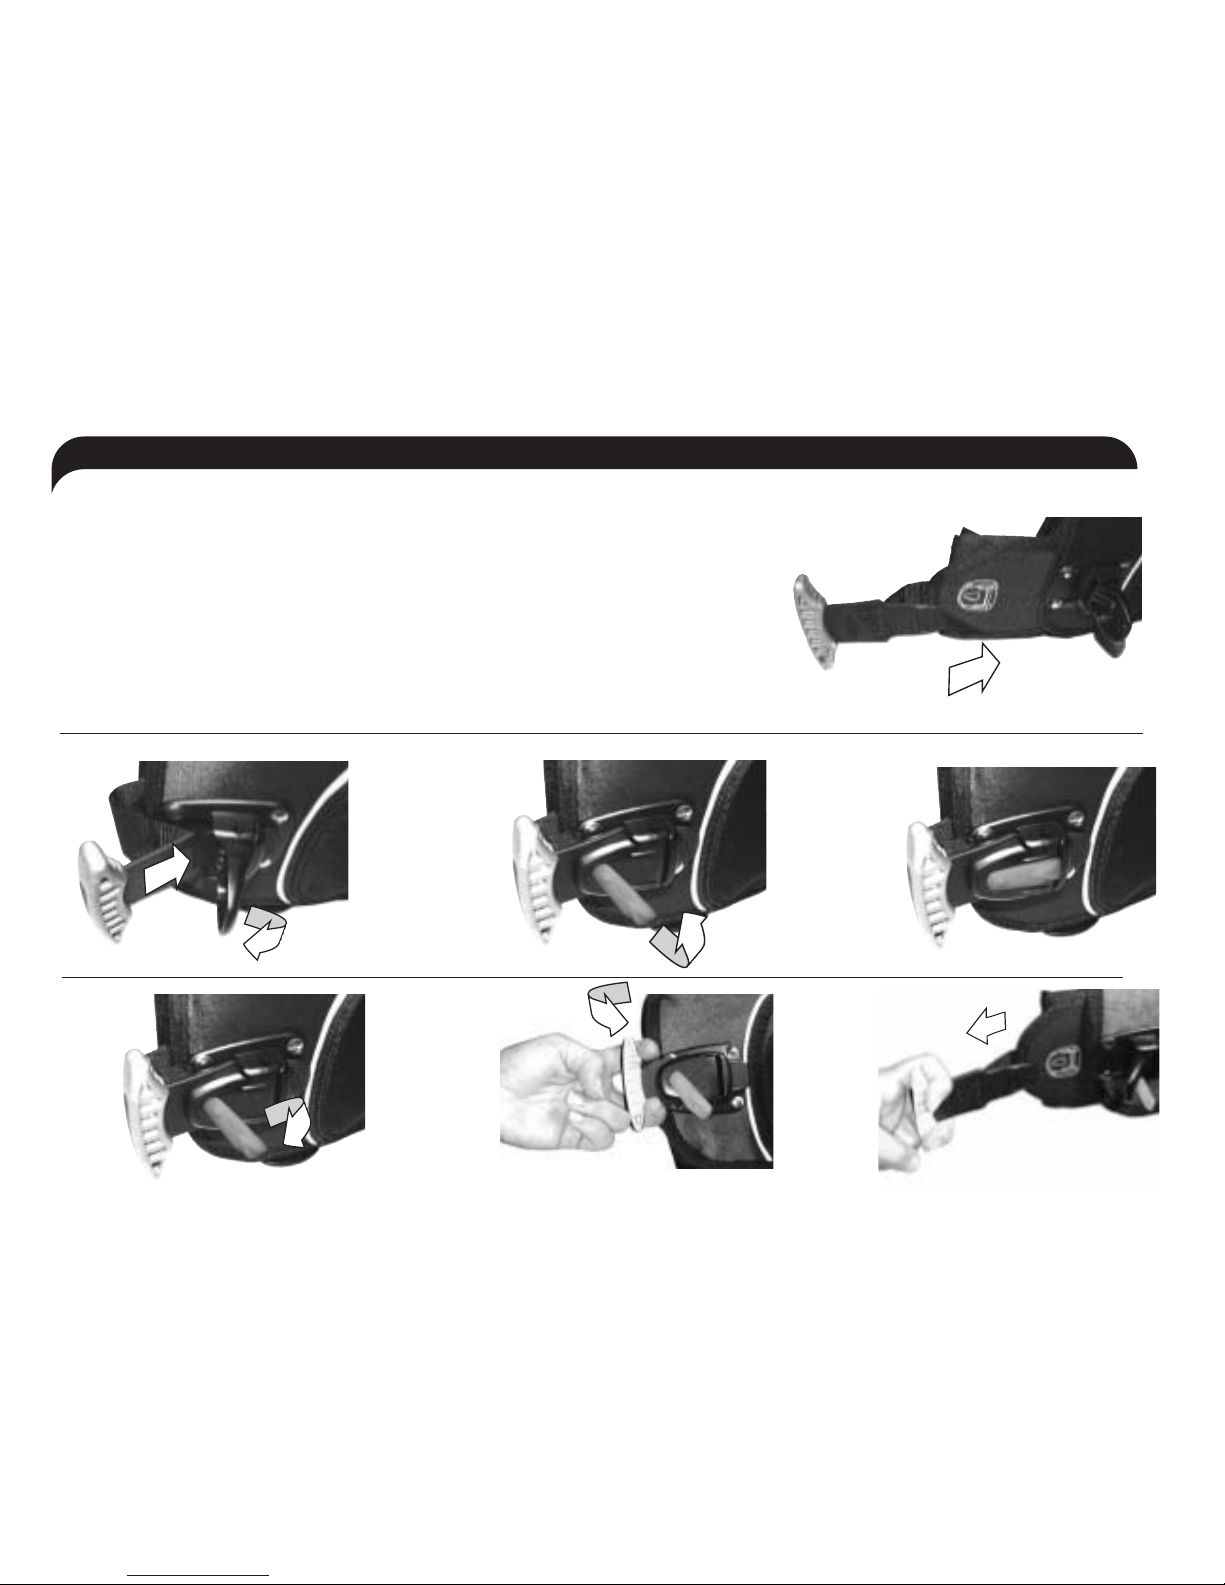
11. Position the weights (traditional or integrated) in the removable pockets and close the
flaps.
12. Position the removable pockets in the BC's integrated weight system as shown in the
diagram.
13. Fasten and secure the removable pockets in place as indicated below.
14. To remove the pockets, unbolt and first pull the handle to the side and then tug forward firmly.
12
14
13
a) b)
c)
a) b)
c)
Page 15
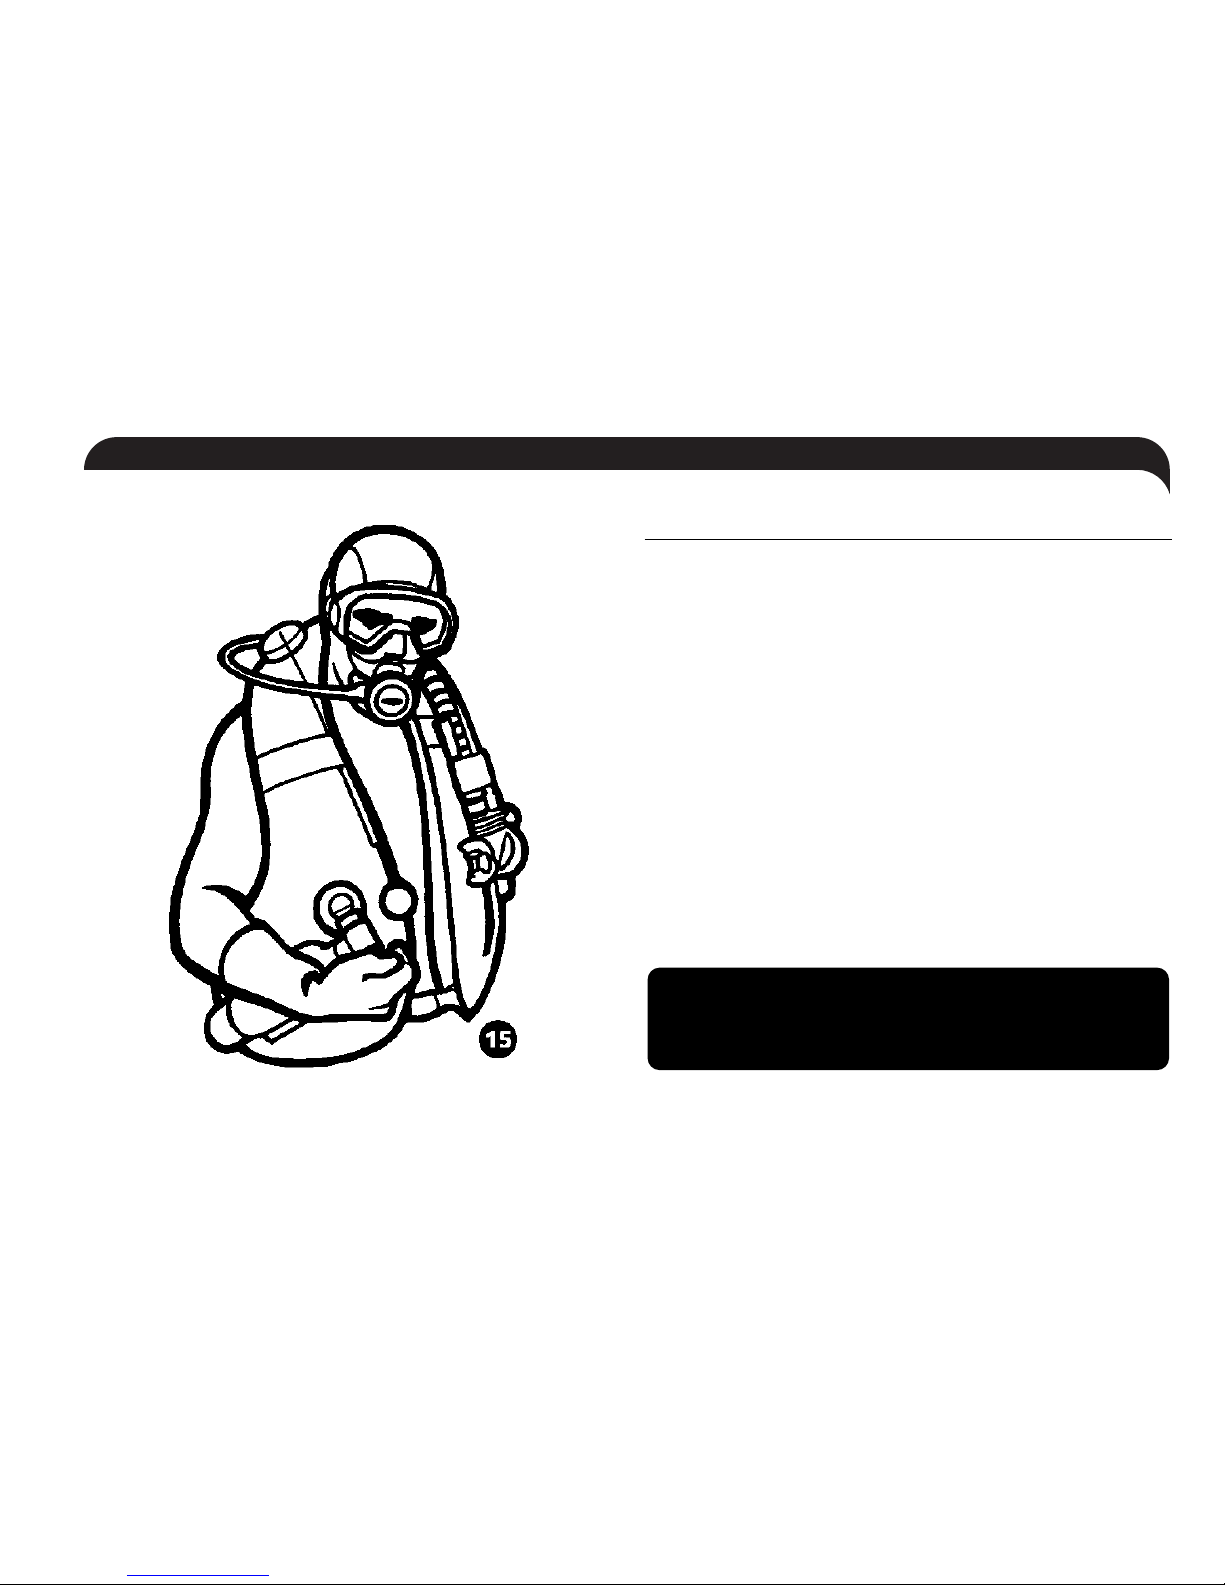
4 - Auxiliary inflation system:
This inflation system exists only on the Océane model.
It consists of a 0.4 liter tank and valve attached to the
BC and allows for very fast emergency inflation by
manually opening the valve (see figure 15). Ensure that
the auxiliary tank is properly filled before diving.
WARNING: as 0.4 liter tanks do not undergo retesting, it is imperative that you have your tank
visually inspected at least once a year.
Implementation / Instructions for use > 39
Page 16

It is important to be sure of the good condition and
proper functioning of your entire BC:
•Ensure that the hose is properly attached to the
regulator and in good condition.
•Once you have inflated the BC using the power
inflator, activate the purge valves.
•Ensure that the tank is properly mounted.
•Once in the water, ensure that the harness straps are
correctly adjusted.
To check before diving
40 > Instructions for use / Checks
Page 17
It is recommended that you use a BC only after
having fully learned from a certified instructor.
1 - Inflation features:
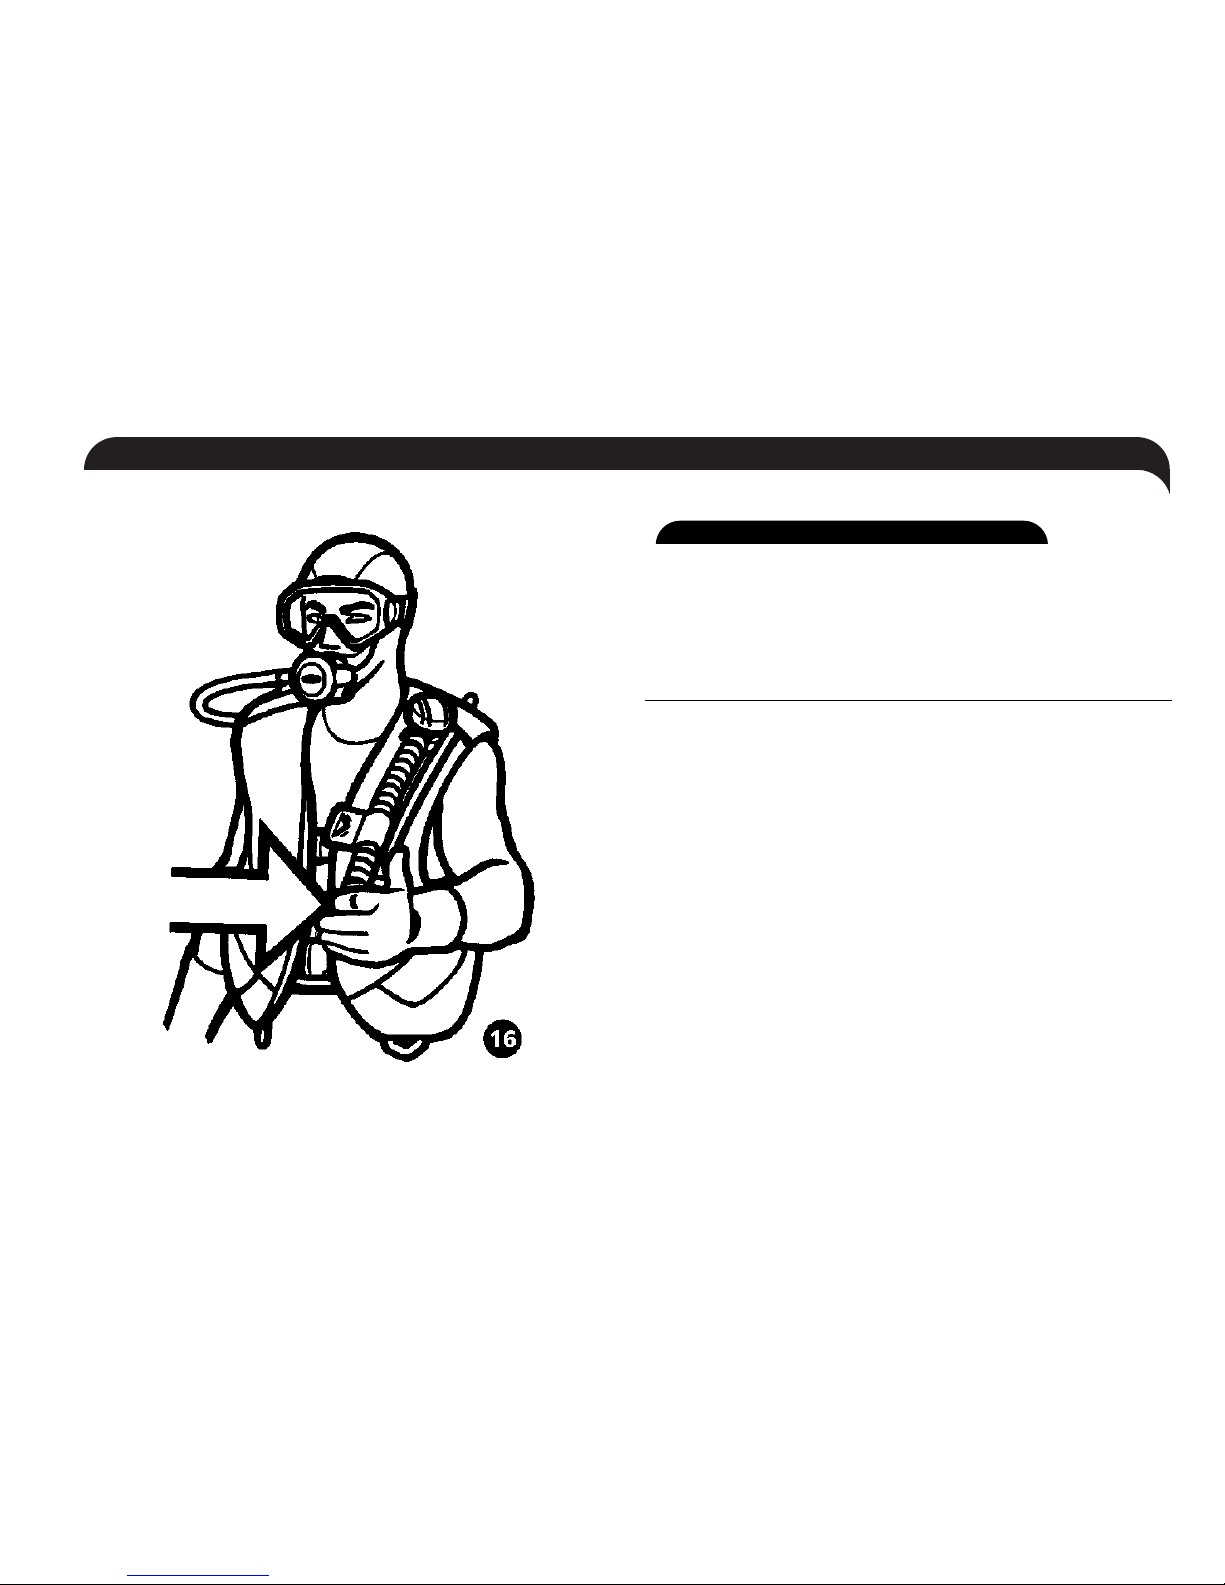
A > Inflation with the power inflator:
This type of inflation is used in all circumstances.
It allows for precise adjustment of buoyancy.
It is easy to use and quick, making it preferable to oral
inflation.
•Take the power inflator in your left hand, as shown
(see figure 16).
•Repeatedly press the lateral button to inject the desired
amount of air.
Use
Use / Instructions for use > 41
Page 18
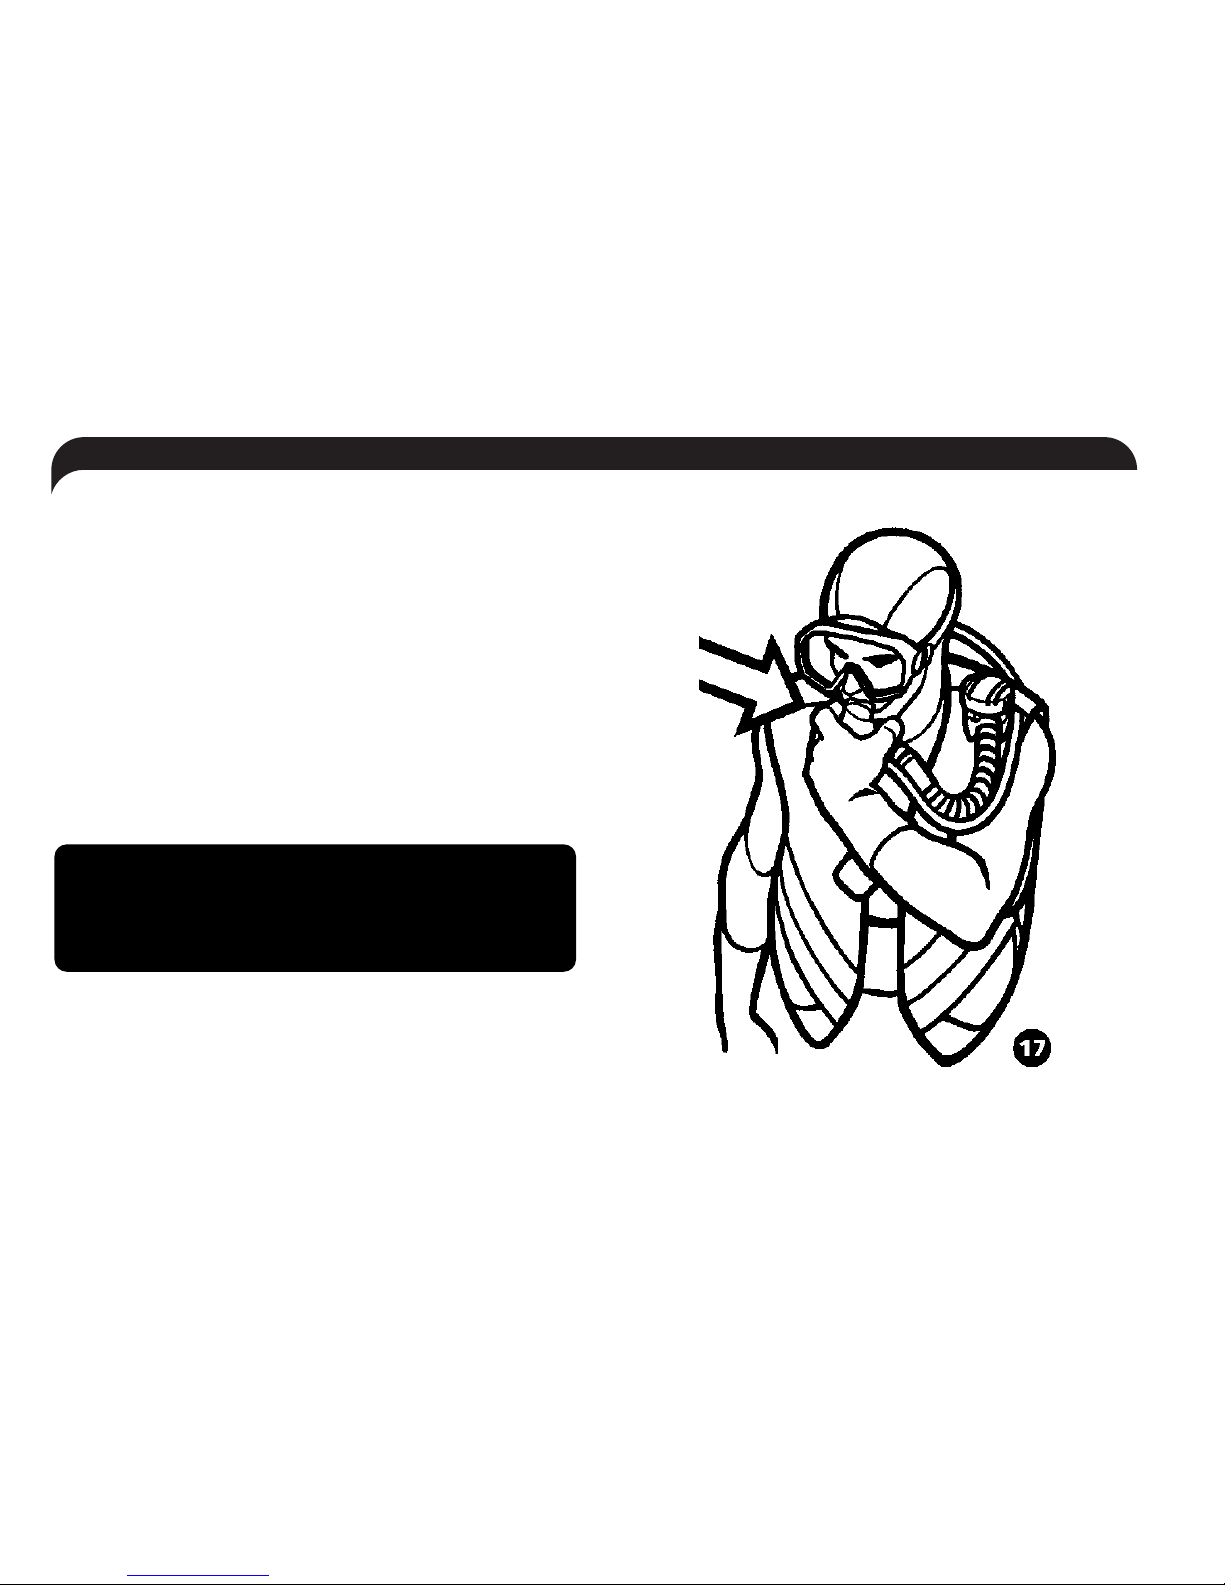
B > Oral inflation:
A procedure preferably executed at the surface to
reduce the risk of breathlessness or hyperventilation.
•Take the inflator in your left hand and bring it to
mouth level.
•Take a deep breath from the regulator.
•Place the oral inflator piece against your lips and start
to blow, simultaneously pushing on the button at the
inflator's end (see figure 17).
•Repeat as much as necessary, until the desired
buoyancy has been obtained.
WARNING: do not breathe in air from the BC's
air bladder. Control your ascent speed. Not
respecting your ascent speed while resurfacing
can be very dangerous.
42 > Instructions for use / Use
Page 19
2 - Air dump instructions:
There are numerous ways of dumping air from your BC.
The choice of air dump method depends on the diver's
situation during the course of the dive and the degree
of urgency needed to control buoyancy.
All of the purge valves installed on models in the
Beuchat product range are overpressure relief valves;
therefore they prevent all risk of bursting due to overinflation or uncontrolled ascent.
A >
SSllooww ddeeffllaattiioonn
: integrated in the power
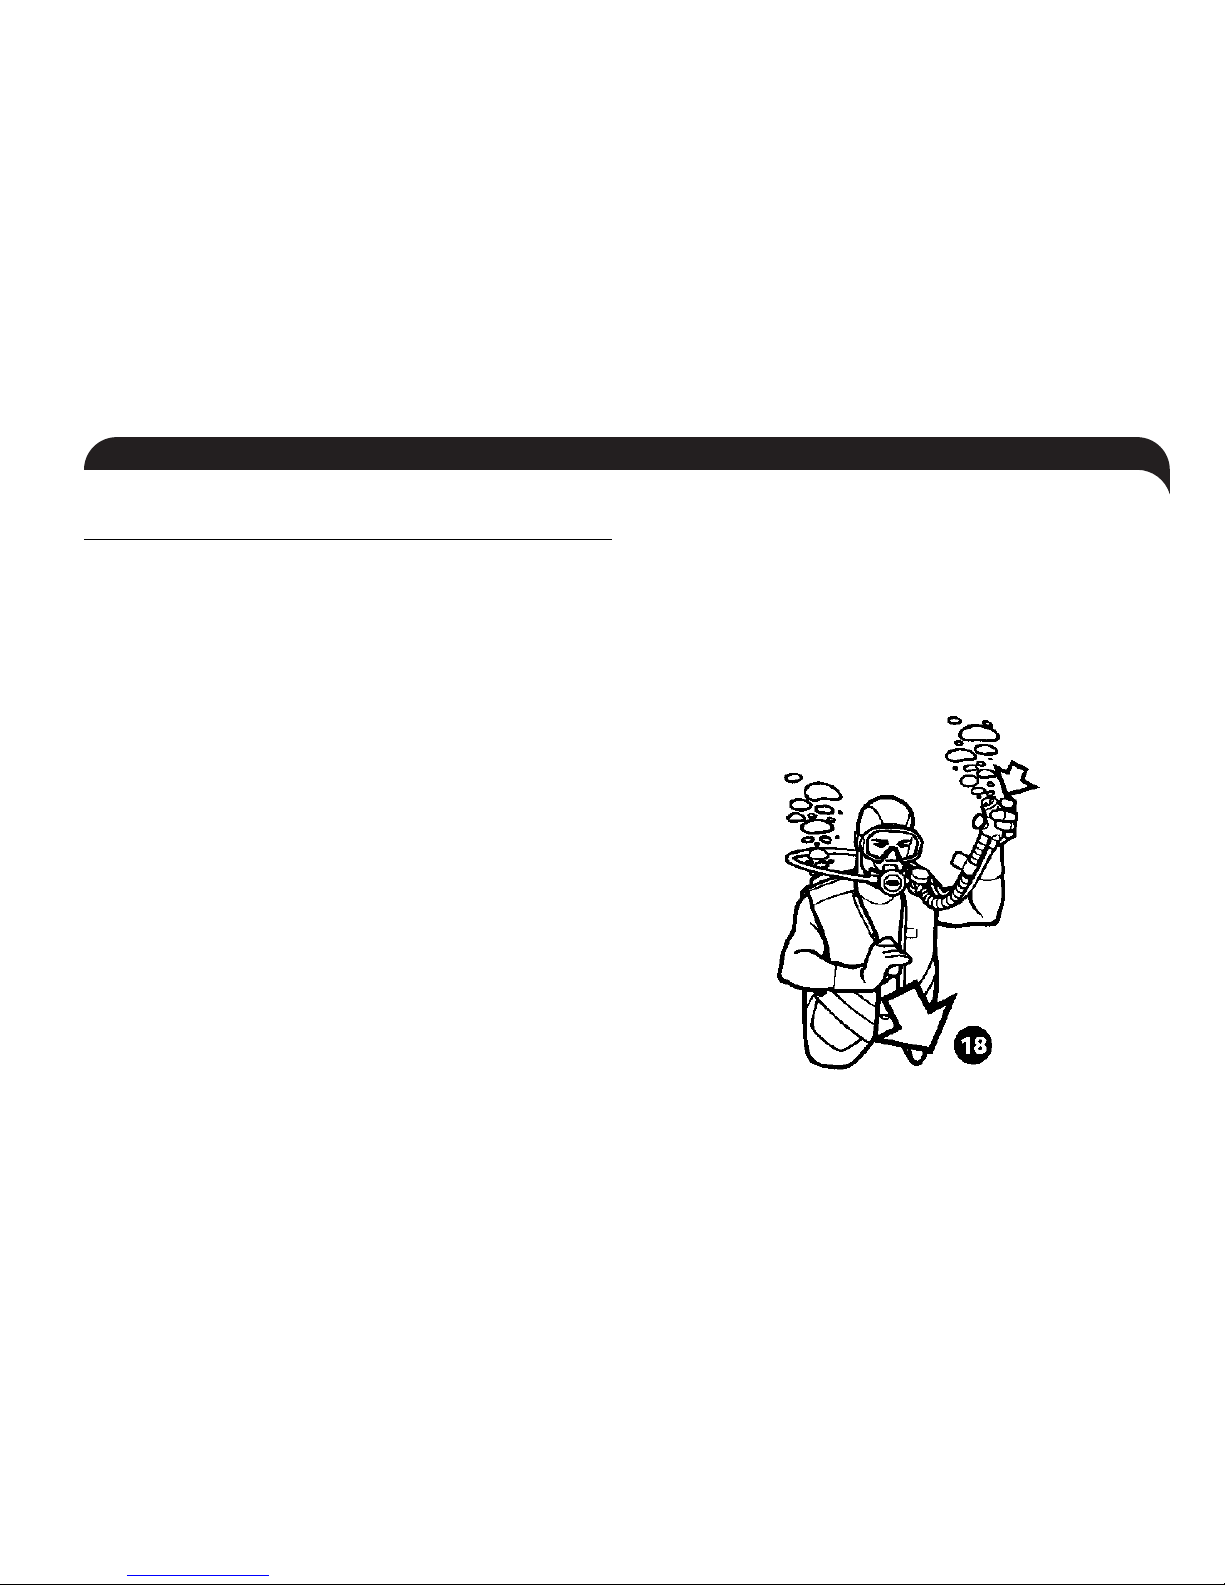
inflator.
This procedure is done preferably in an upright position
(see figure 18).
•Take the power inflator in your left hand.
•Raise the inflator.
•To deflate, press the button at the inflator's end.
The buoyancy adjustment obtained during this
procedure is very precise.
B >
UUppppeerr eexxhhaauusstt vvaallvvee
: found on the right
shoulder.
This procedure allows for a very fast air dump, from a
horizontal or vertical position (see figure 18).
•Take the dump valve in your right hand.
•Pull, but not excessively, toward the bottom of the BC.
Use / Instructions for use > 43
Page 20
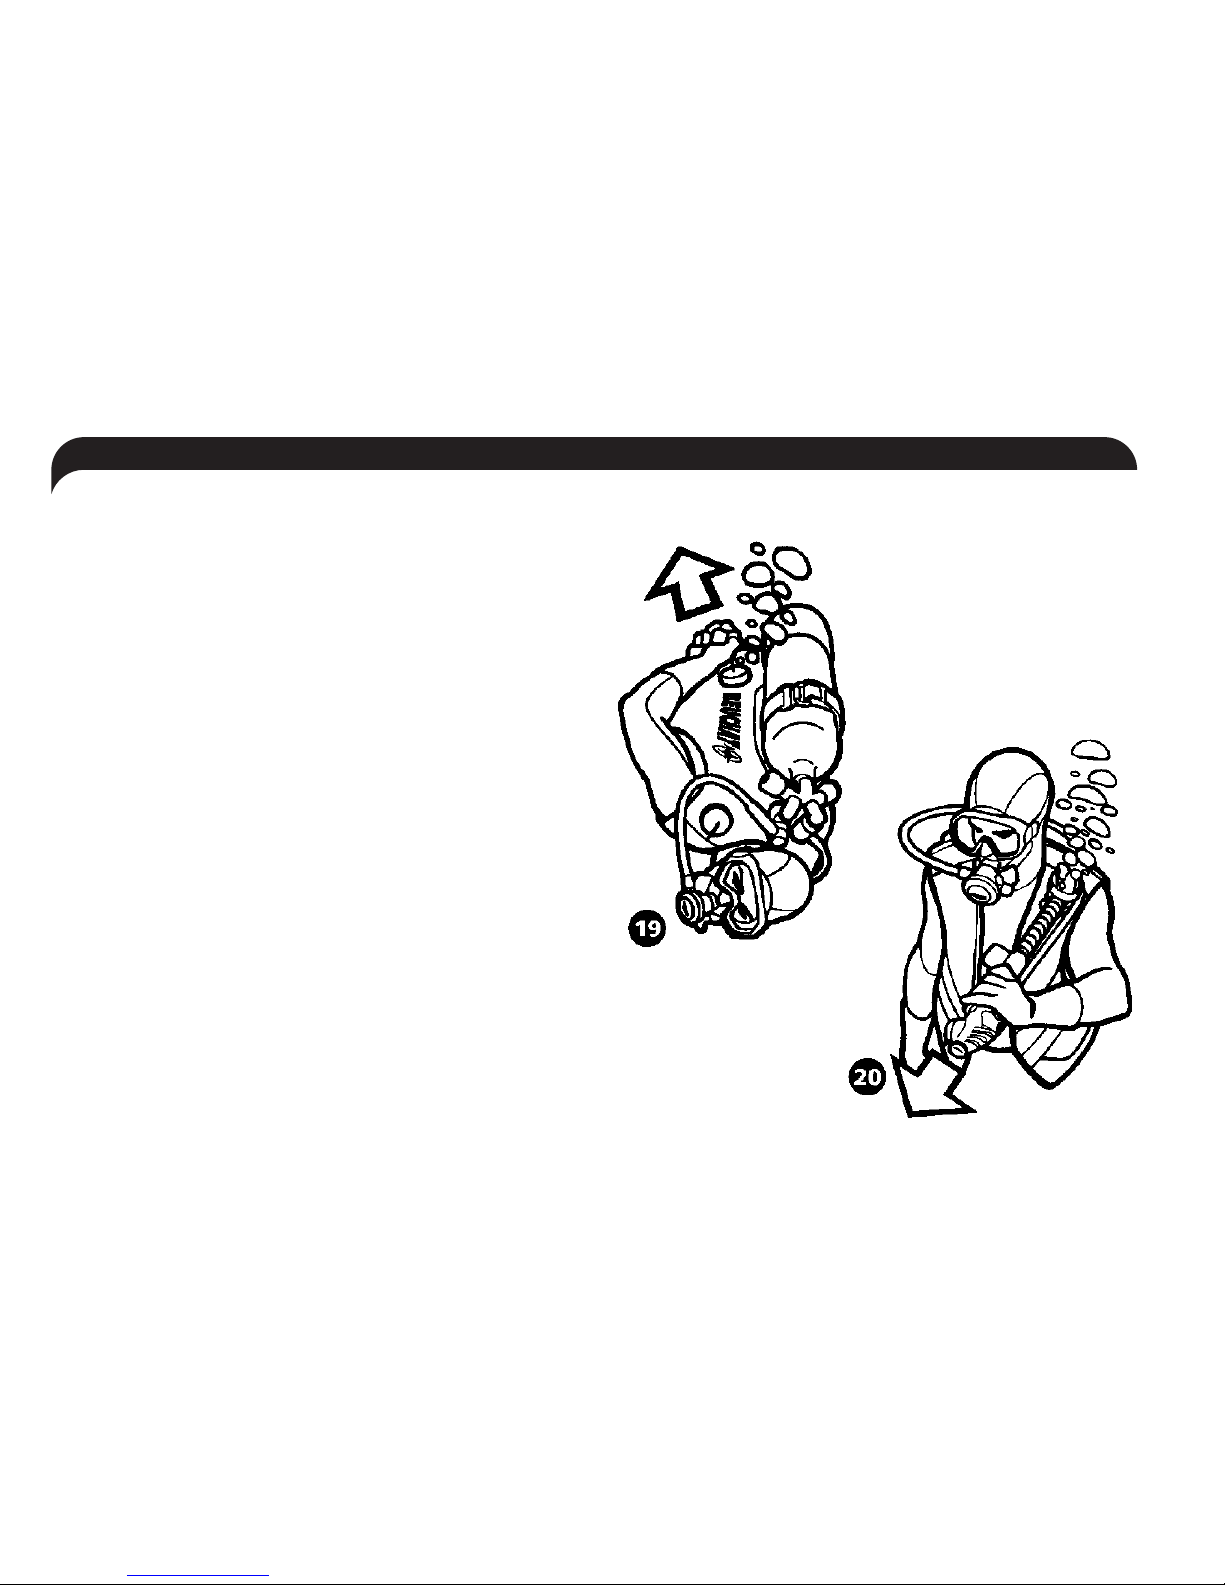
C >
LLoowweerr eexxhhaauusstt vvaallvvee
: found at the back on
the lower right-hand side of the BC.
This valve allows for air dump from a head-down
position (see figure 19).
•Take the dump valve in your right hand.
•Pull, but not excessively.
D >
PPuurrggiinngg wwiitthh tthhee DDuummpp VVaallvvee
:
This purge feature, integrated in the power inflator,
allows you to control your buoyancy with a single hand
(inflation and air dump) (see figure 20).
This procedure may be executed in a vertical or
horizontal position.
•Take the main part of the power inflator in your left
hand.
•Pull, but not excessively, the whole inflator system
downward.
•Air will release from the upper part of the BC.
44 > Instructions for use / Use
Page 21
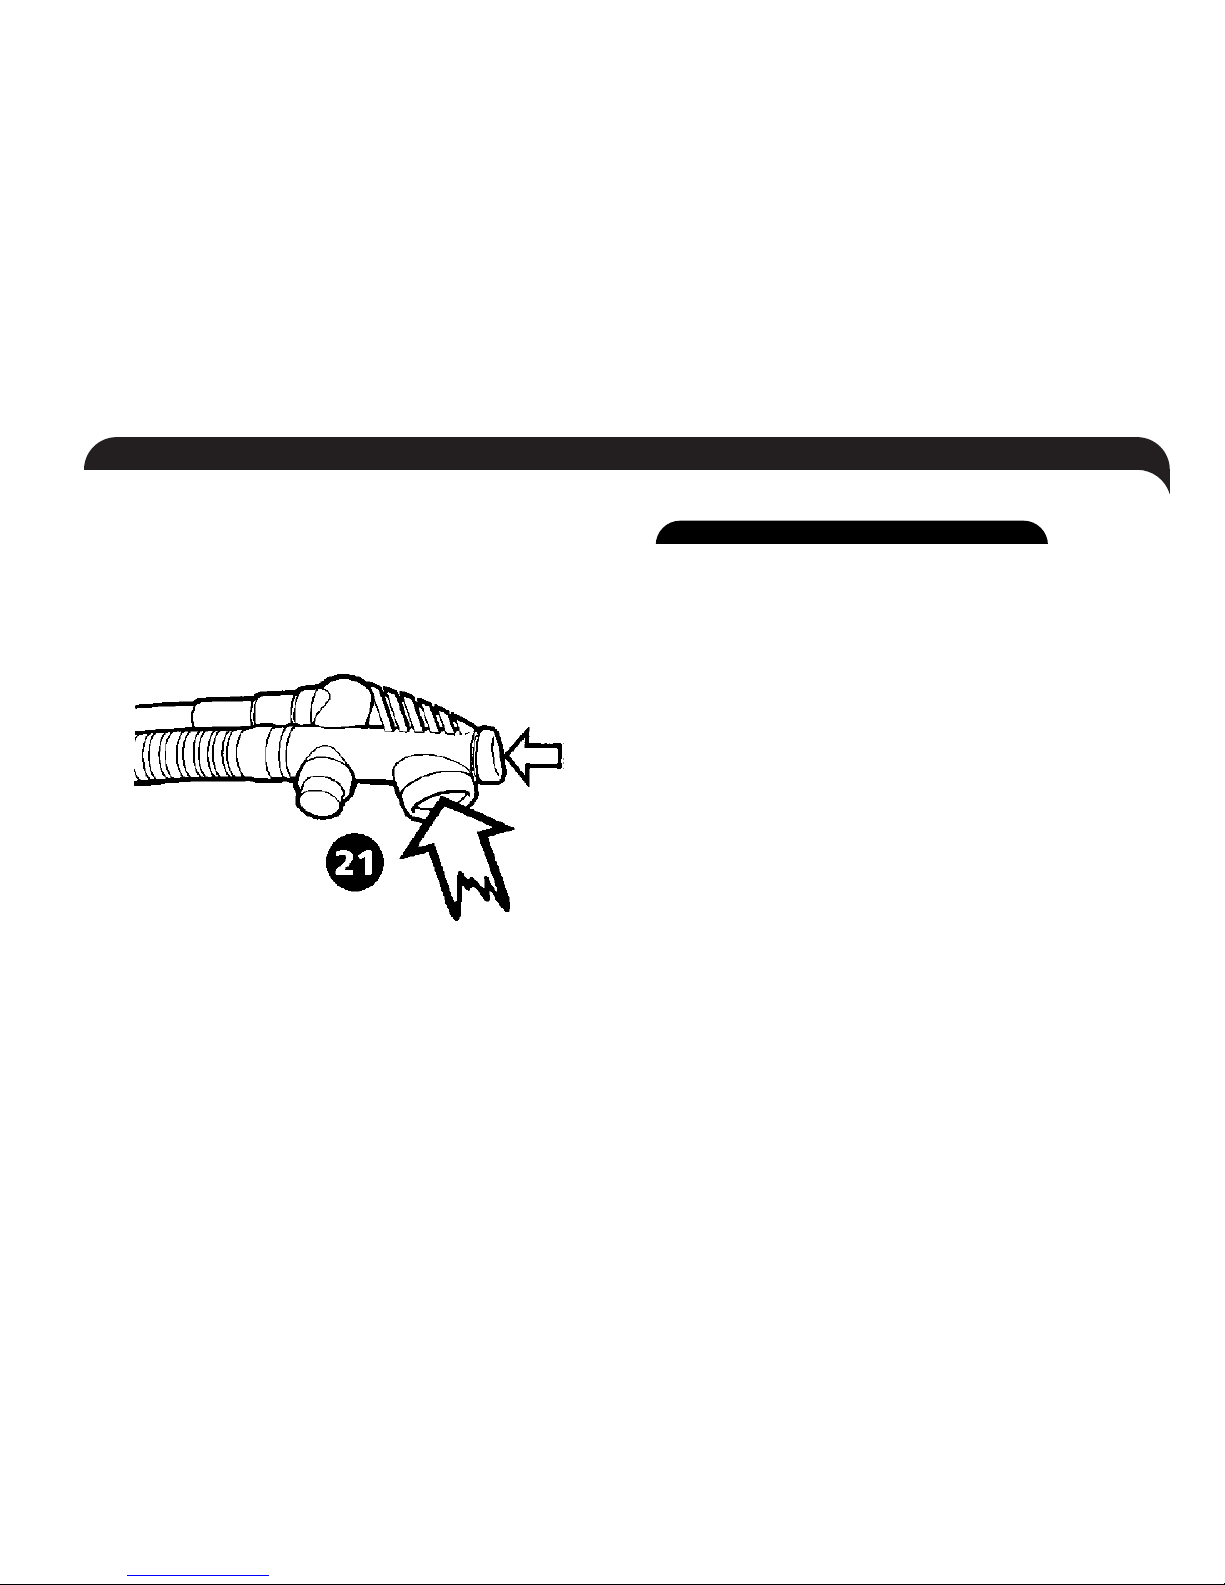
•Rinse fully in fresh water after each use.
•Inject fresh water into the BC via the inflator's oral
inflation piece while pressing the purge button
(see figure 21).
•Distribute water evenly inside the BC by shaking gently.
•With the BC turned upside down, use the inflator to
empty the water.
•Dry the BC, slightly inflated and out of direct sunlight.
•Store in a dry place.
Maintenance / Storage
Maintenance / Storage / Instructions for use > 45
Page 22

All our products are guaranteed in compliance with current laws in
the country of purchase from the date of purchase by the user for
non-professional, recreational sporting use. The warranty covers
parts recognized as defective by our technical services, and
manufacturing and material defects with the exception of parts
worn by use. The warranty does not cover damages caused by rough
handling, dropping, or incorrect use at the surface or while diving.
The warranty does not cover defects in appearance or function that
are due to normal wear of the product or to its ageing. The
warranty shall not be valid if the product was not cared for or used
as stipulated in the user guide or if the product was opened or
maintenanced by a person lacking adequate technical training and
not using the proper maintenance equipment. The responsibility
resulting from the sale of our products is limited exclusively to the
above warranty and excludes all possibility of recourse to penalties
or damages. To benefit from the present warranty, the product
must be returned along with proof of purchase.
Warranty conditions
46 > Instructions for use / Warranty
Page 23

Réf. 60385
Other distributor
Siège Social / Head Quarters
BEUCHAT International
34, av Boisbaudran
13015 Marseille - FRANCE
ESPAÑA :
BEUCHAT Sub España S.A.
CALLE BALMES N° 8 4° 8
08291 RIPOLLET BARCELONA, SPAIN
IMPRIMÉ EN CHINE / PRINTED IN CHINA
 Loading...