

Page 1

Service Instructions
Part Number: 153955, Rev. B
Release: May 2012
LCD PAK Seal Installation for CBA Series
Actuators
Page 2

Page 3

Service Instructions
Part Number:153955, Rev. B
Table of Contents
Section 1: Introduction
1.1 Purpose ......................................................................................................... 1
1.2 Denitions .................................................................................................... 1
1.3 Service Tool Information ............................................................................... 1
1.4 Lubrication Requirements ............................................................................. 1
1.5 Other Notes .................................................................................................. 1
Section 2: Installation
2.1 Tools Used..................................................................................................... 2
2.2 Kit Items ....................................................................................................... 2
2.3 Procedure ..................................................................................................... 3
Table of Contents
May 2012
Section 3: Document Revision
Revision Overview..................................................................................................10
Appendix A: List of Figures
List of Figures.........................................................................................................11
Table of Contents
I
Page 4

Page 5

Service Instructions
Part Number:153955, Rev. B May 2012
Section 1: Introduction
Section 1: Introduction
1.1 Purpose
The purpose of these instructions is to inform the reader/installer on the correct procedure for
installing CBA torque-shaft seals, using Installation Rings that are designed specically for this
task and are included in CBA service kits. If instructions are followed, the chance for seal damage upon installation should be eliminated.
1.2 Definitions
1.2.1 Installation Ring - A rubber ring that comes with the CBA service kit to be installed into
the snap ring groove of the torque-shaft prior to new seal installation.
1.2.2 LCD PAK Seal - A custom seal designed with a double sealing point surface. LCD stands
for “Lip Cut Double.” The term “PAK” received its name from the “PolyPak” seal which
is a combination of a PolyPak shell energized with an O-Ring expander. The LCD PAK
seal used for the CBA does not contain an O-Ring expander.
1.3 Service Tool Information
There are many ways to install the LCD PAK seals, because different tools can be used to do so.
In these instructions, basic shop tools that are commonly available were used to illustrate that
it is not needed or important to use special tools.
1.4 Lubrication Requirements
It is very important to not over-grease the seal upon installation. Over lubricating can cause
problems during installation by halting the seal from seating all the way in the groove (if too
much grease is between the seal and housing). As shown in the pictures below, use a light coat
of grease on the seals when installing.
1.5 Other Notes
The Installation Rings (or ller rings as commonly referred to), are disposable items as they only
need to be used one time and are contained in the CBA service kits. However, it is possible to
reuse them by picking instead of cutting them out of the rotor clip groove.
Introduction
1
Page 6

Section 2: Installation
May 2012
Section 2: Installation
WARNING: DANGEROUS GAS AND/OR LIQUIDS
It is possible, that the actuator may contain a dangerous gas and/or liquids. Ensure that
all proper measures have been taken to prevent exposure or release of these types of
contaminants before commencing any work.
2.1 Tools Used
(1) Plastic mallet
(2) Socket extension (see 1.3 above)
(3) Pick
Service Instructions
Part Number:153955, Rev. B
(4) Rotor Clip Pliers
2.2 Kit Items
(A) Grease
(B) Two Installation Rings
(C) Two LCD PAK seals
(D) Two Rotor Clips
Figure 1 Tools and Kit Items Needed
1
3
2
4
D
A
D
2
B
Installation
Page 7

Service Instructions
Part Number:153955, Rev. B May 2012
Section 2: Installation
2.3 Procedure
1. Remove the Rotor Clip on side 1 of actuator housing using Rotor Clip Pliers.
Figure 2 Rotor Clip Removal Side 1
2. Use the mallet to tap the torque-shaft inward with the use of an extension rod to expose the existing seal.
Figure 3 Exposing the Seal - Side 1
Installation
3
Page 8

Section 2: Installation
May 2012
3. Use the Pick to remove old seal and clear groove of old grease and debris.
Figure 4 Cleaning the groove - Side 1
Service Instructions
Part Number:153955, Rev. B
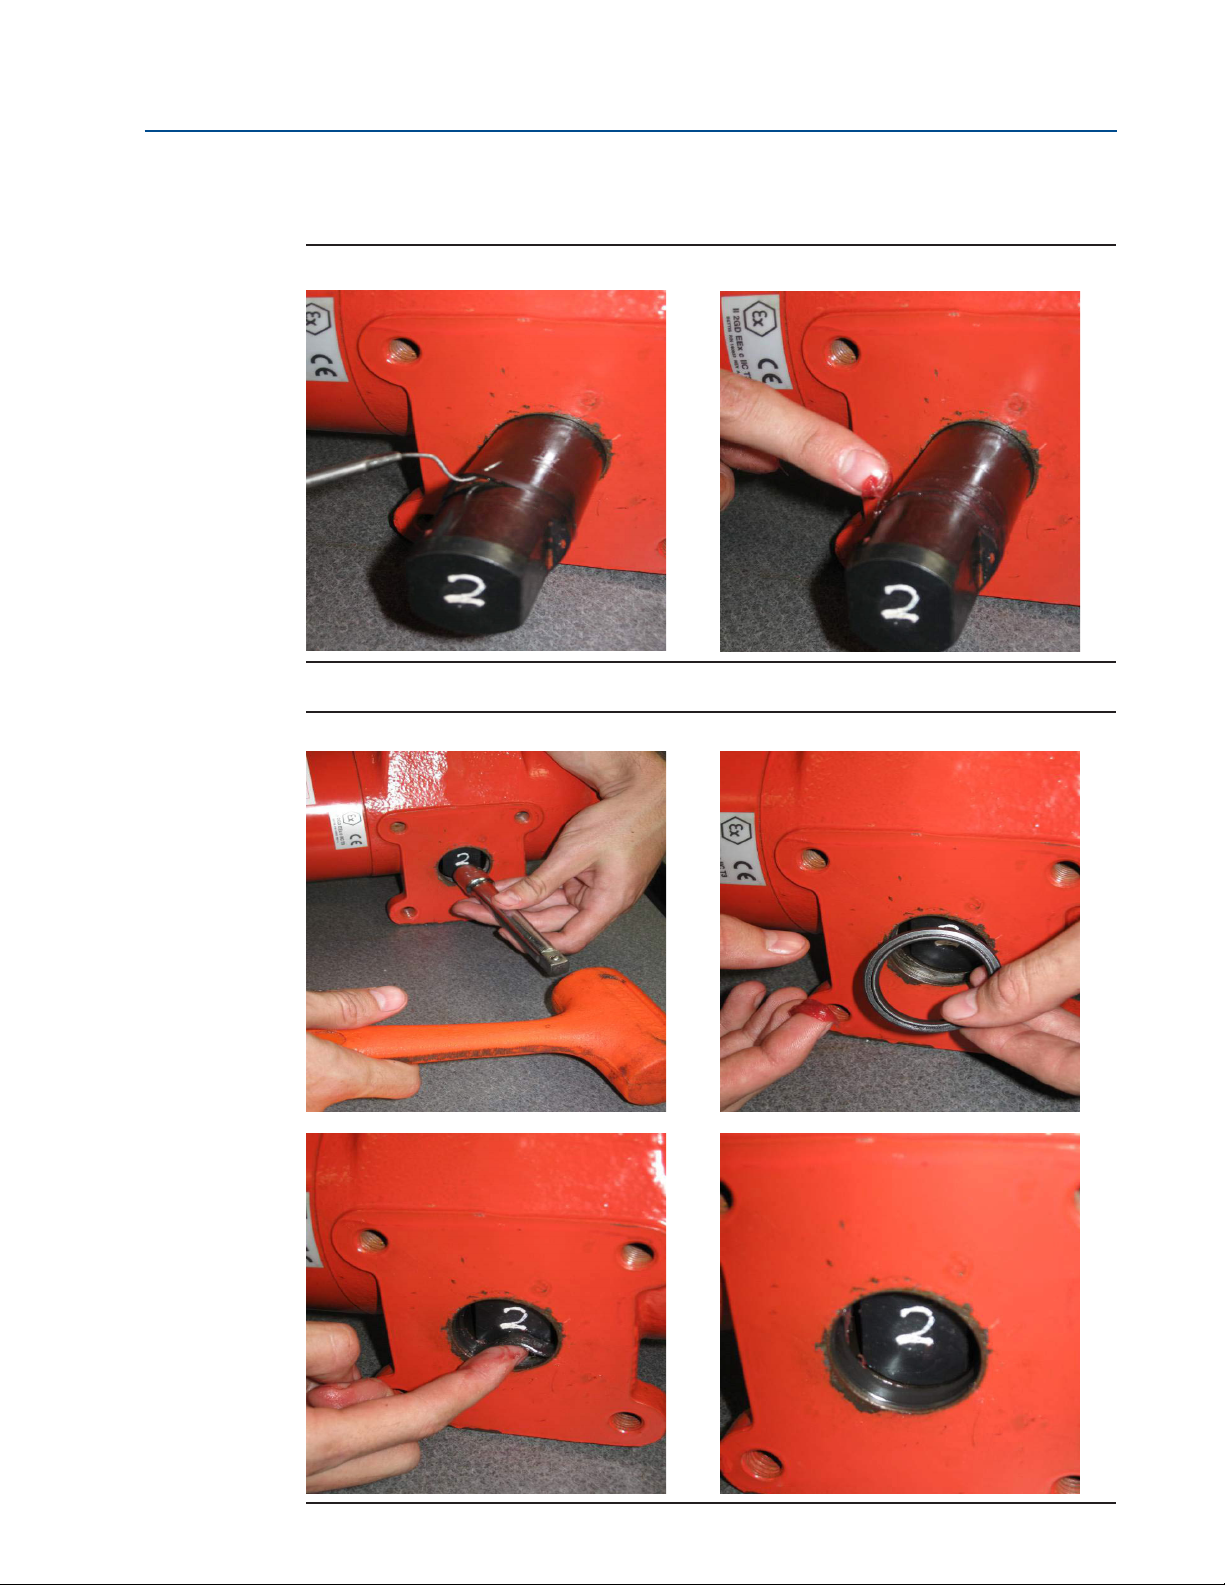
4. Turn actuator to second side (side 2) and use Rotor Clip Pliers to remove rotor clip, tap
shaft to expose seal, remove old seal and clean groove by repeating steps 1-3.
Figure 5 Rotor Clip Removal Side 2
4
Installation
Page 9

Service Instructions
Part Number:153955, Rev. B May 2012
Section 2: Installation
5. Place Installation Ring into Rotor Clip groove of side 1. Use a pick or similar tool to aid
installation. When shaft is tted with ring, lightly grease ring surface.
Figure 6 Ring Installation - Side 1
Make sure that the Installation
Ring is seated completely ush
with the surface of the torque-
shaft
Installation
5
Page 10

Section 2: Installation
May 2012
6. Tap side one inward to expose seal groove. Install new seal after lightly greasing.
Figure 7 New Seal Installation - Side 1
Service Instructions
Part Number:153955, Rev. B
1
2
When installing, insert the top of the seal rst, with the lip side inward towards shaft, then work
the sides in. When the seal is mostly in, invert the bottom of the seal (see photo #3) into a wave
like shape. When you release, the seal should seat itself smoothly into the groove. Press the seal
in from all angles with your nger to make sure it is ush with the housing bore (see photo #4).
3
4
6
Installation
Page 11
Service Instructions
Part Number:153955, Rev. B May 2012
Section 2: Installation
7. On side 2, place Installation Rings on torque-shaft. Lightly grease as per step 5.
Figure 8 Ring Installation - Side 2
8. Tap shaft inward to expose second seal groove. Install seal as per step 6.
Figure 9 New Seal Installation - Side 2
Installation
7
Page 12

Section 2: Installation
May 2012
9. Carefully tap torque-shaft back through housing and newly installed seals. If resistance
Figure 10 Re-installing torque shaft with newly installed seals
Service Instructions
Part Number:153955, Rev. B
is felt (a bouncy feeling especially), gently tap forward and backward until it becomes
easier.
10. Remove side 1 Installation Ring and discard.
Figure 11 Discard Installation Ring - Side 1
8
Installation
Page 13

Service Instructions
Part Number:153955, Rev. B May 2012
Section 2: Installation
11. On side 1, place Rotor Clip on torque-shaft. Tap this side towards the housing, pressing
the Rotor Clip against the housing This makes it easier to remove the side 2 Installation
Ring.
Figure 12 Rotor Clip Installation - Side 1
12. Remove and discard side 2 Installation Seal and then install a new Rotor Clip.
Figure 13 Discard Installation Ring and Rotor Clip Installation - Side 2
Installation
9
Page 14

Section 3: Document Revision
May 2012
Section 3: Document Revision
Table 1. Revision Overview
ECN DATE REV BY * DATE
Released 17 December 2001 A COMPILED B. Cornelius 17 December 2001
CHECKED B. Cornelius 17 December 2001
APPROVED R. Smith 17 December 2001
COMPILED A. Cruz 5/16/12
0526 001 May 2012 B
* Signatures on le Bettis Actuator & Controls, Waller, Texas
CHECKED B. Jumawan 8/21/12
APPROVED B. Jumawan 9/26/12
Service Instructions
Part Number:153955, Rev. B
10
Document Revision
Page 15

Service Instructions
Part Number:153955, Rev. B May 2012
Appendix
Appendix A: List of Figures
Figure 1 Tools and Kit Items Needed ................................................................................... 2
Figure 2 Rotor Clip Removal Side 1 ...................................................................................... 3
Figure 3 Exposing the Seal - Side 1 ...................................................................................... 3
Figure 4 Cleaning the groove - Side 1 .................................................................................. 4
Figure 5 Rotor Clip Removal Side 2 ...................................................................................... 4
Figure 6 Ring Installation - Side 1 ........................................................................................ 5
Figure 7 New Seal Installation - Side 1 ................................................................................. 6
Figure 8 Ring Installation - Side 2 ........................................................................................ 7
Figure 9 New Seal Installation - Side 2 ................................................................................. 7
Figure 10 Re-installing torque shaft with newly installed seals .............................................. 8
Figure 11 Discard Installation Ring - Side 1 ............................................................................ 8
Figure 12 Rotor Clip Installation - Side 1 ................................................................................ 9
Figure 13 Discard Installation Ring and Rotor Clip Installation - Side 2 .................................. 9
Appendix
11
Page 16

Contact Us: Emerson Process Management, Valve Automation facilities at your nearest location:
NORTH & SOUTH AMERICA
18703 GH Circle
PO Box 508
Waller, TX 77484
USA
T +1 281 727 5300
F +1 281 727 5353
2500 Park Avenue West
Mansfield, OH 44906
USA
T +1 419 529 4311
F +1 419 529 3688
9009 King Palm Drive
Tampa, FL 33619
USA
T +1 813 630 2255
F +1 813 630 9449
13840 Pike Road
Missouri City, Texas 77489
USA
T +1 281 499 1561
F +1 281 499 8445
Av. Hollingsworth,
325, Iporanga Sorocaba,
SP 18087-105
Brazil
T +55 15 3238 3788
F +55 15 3228 3300
MIDDLE EAST & AFRICA
P. O. Box 17033
Dubai
United Arab Emirates
T +971 4 811 8100
F +971 4 886 5465
P. O. Box 105958
Abu Dhabi
United Arab Emirates
T +971 2 697 2000
F +971 2 555 0364
P. O. Box 3911
Al Khobar 31952
Saudi Arabia
T +966 3 814 7560
F +966 3 814 7570
P. O. Box 10305
Jubail 31961
Saudi Arabia
T +966 3 340 8650
F +966 3 340 8790
P. O. Box 32281
Doha
Qatar
T +974 4 576777
F +974 4 315448
24 Angus Crescent
Longmeadow Business Estate
East P.O. Box 6908; Greenstone;
1616 Modderfontein, Extension 5
South Africa
T +27 11 451 3700
F +27 11 451 3800
EUROPE
Asveldweg 11
7556 BR Hengelo (O)
The Netherlands
T +31 74 256 1010
F +31 74 291 0938
Siemensring 112
47877 Willich
Germany
T +49 2154 499 660
F +49 2154 499 6613
25, Rue de Villeneuve
Silic – BP 40434
94583 Rungis
France
T +33 1 49 79 73 00
F +33 1 49 79 73 99
Via Montello 71/73
20038 Seregno (Milan)
Italy
T +39 0362 2285 207
F +39 0362 2436 55
6 Bracken Hill
South West Industrial Estate
Peterlee SR8 2LS
United Kingdom
T +44 191 518 0020
F +44 191 518 0032
2A Szturmowa Str
02-678 Warsaw
Poland
T +48 22 45 89 237
F +48 22 45 89 231
C/ Francisco Gervás, 1
28108 Alcobendas – Madrid
Spain
T +34 0913 586 000
F +34 0913 589 145
Letnikovskaya Str. 10-2
115114 Moscow
Russia and FSU
T +7 495 981 98 11
F +7 495 981 98 10
ASIA PACIFIC
No. 9 Gul Road
#01-02 Singapore 629361
T +65 6501 4600
F +65 6268 0028
9/F Gateway Building
No. 10 Ya Bao Road
Chaoyang District
Beijing 100020
P.R.China
T +86 10 5821 1188
F +86 10 5821 1100
No.15 Xing Wang Road
Wuqing Development Area
Tianjin 301700
P.R.China
T +86 22 8212 3300
F +86 22 8212 3308
Lot 13112, Mukim Labu
Kawasan Perindustrian Nilai
71807 Nilai, Negeri Sembilan
Malaysia
T +60 6 799 2323
F +60 6 799 9942
471 Mountain Highway
Bayswater, Victoria 3153
Australia
T +61 3 9721 0200
F +61 3 9720 0588
Delphi B Wing, 601 & 602
6th Floor, Central Avenue
Powai, Mumbai – 400 076
India
T +91 22 6662 0566
F +91 22 6662 0500
NOF, Shinagawa Konan Bldg
1-2-5, Higashi-shinagwa
Shinagwa-ku, Tokyo
140-0002 Japan
T +81 3 5769 6873
F +81 3 5769 6902
Please visit our web site for up to date product data.
www.EmersonProcess.com/BETTIS
All Rights Reserved.
We reserve the right to modify or improve the designs or specications of the products mentioned in this manual at any time without notice.
Emerson Process Management does not assume responsibility for the selection, use or maintenance of any product. Responsibility for proper
selection, use and maintenance of any Emerson Process Management product remains solely with the purchaser.
©2012 Emerson Electric Co.
 Loading...