

Page 1
BT5000
2-DIN DVD MULTIMEDIA STATION BUILT-IN NAVIGATION/BLUETOOTH
OPERATING INSTRUCTION
Page 2
EN - 1
Precautions
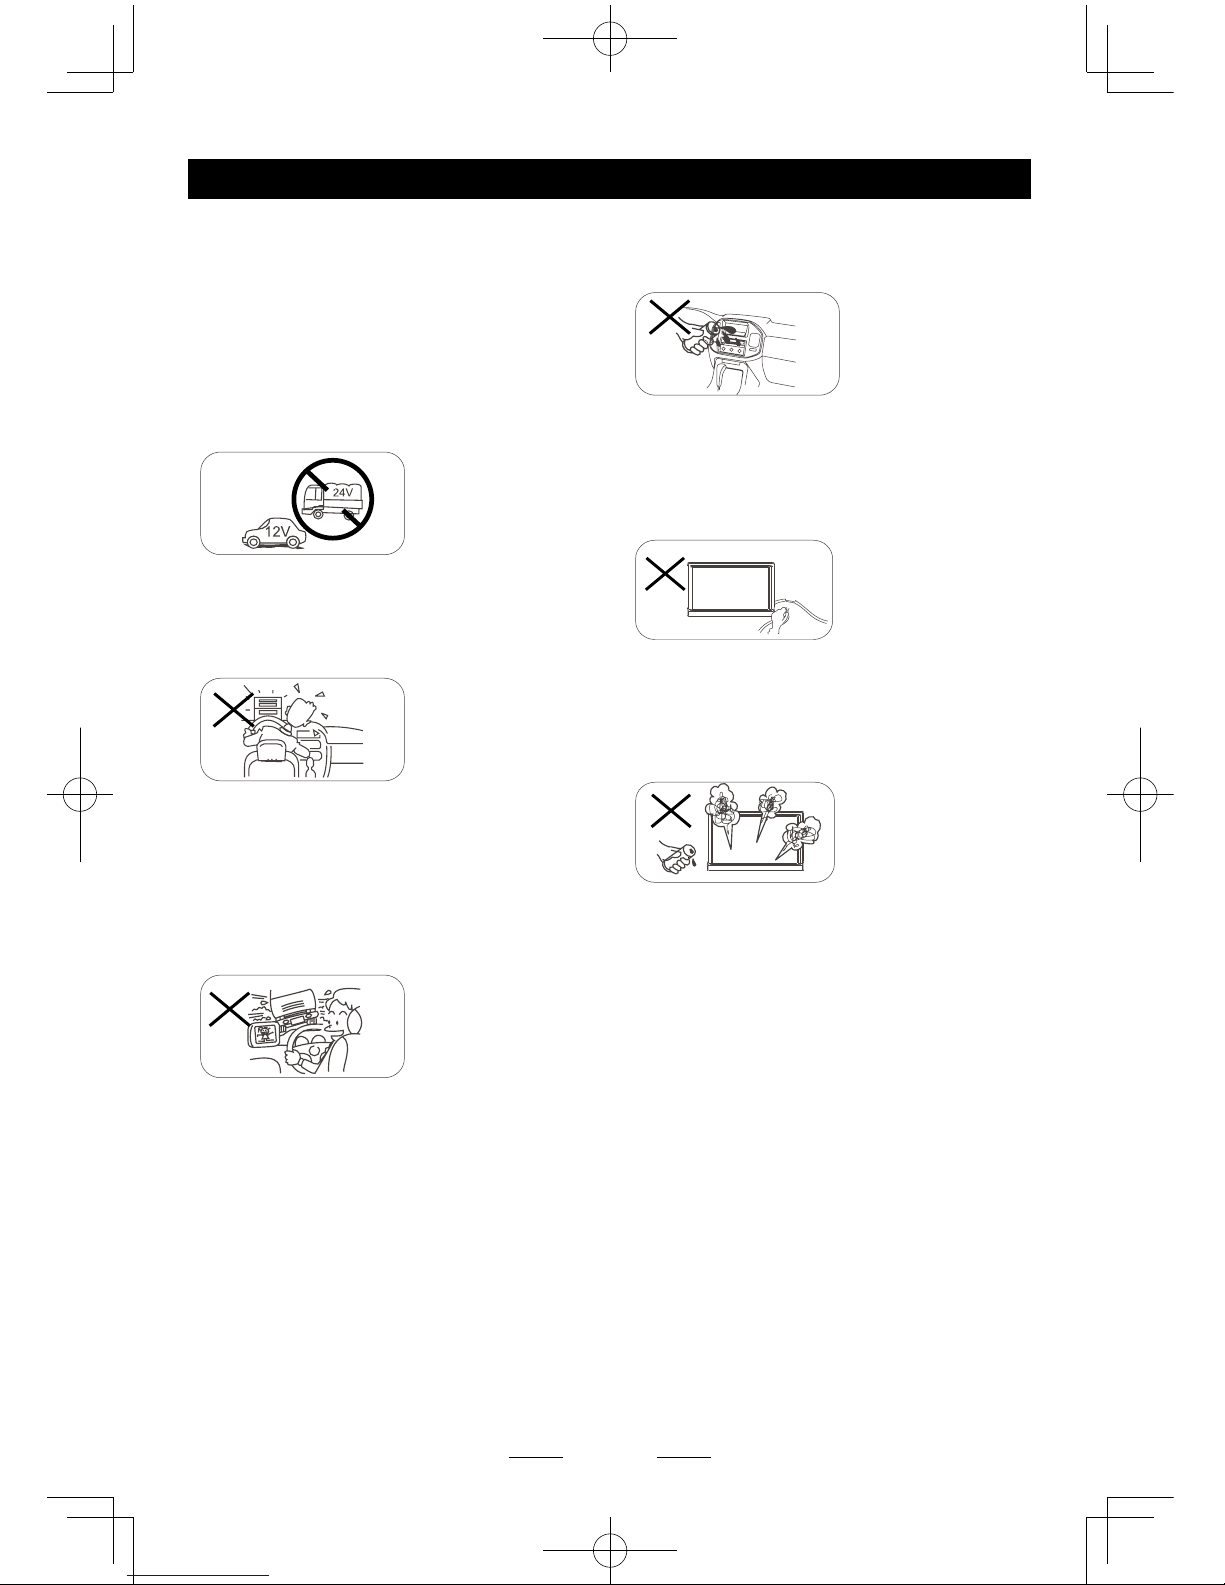
To ensure safe driving, please adjust the
volume to a safe & comfortable level in case
of emergency situations.
Never expose this unit, amplier or speakers
to moisture or water to prevent electronic
sparks or res.
Please don’t change the fuse on the power
cord without professional guidance, using
an improper fuse may cause damage to this
unit or even cause re.
Please power off this unit at once and send it
back to the after-sales service center or the
dealer /distributor you purchased from if one
of the following symptoms is found:
(a). No audio output;
(b). No image output;
(c). Water or other obstacle enters the unit;
(d). Smoking;
(e). Peculiar smell.
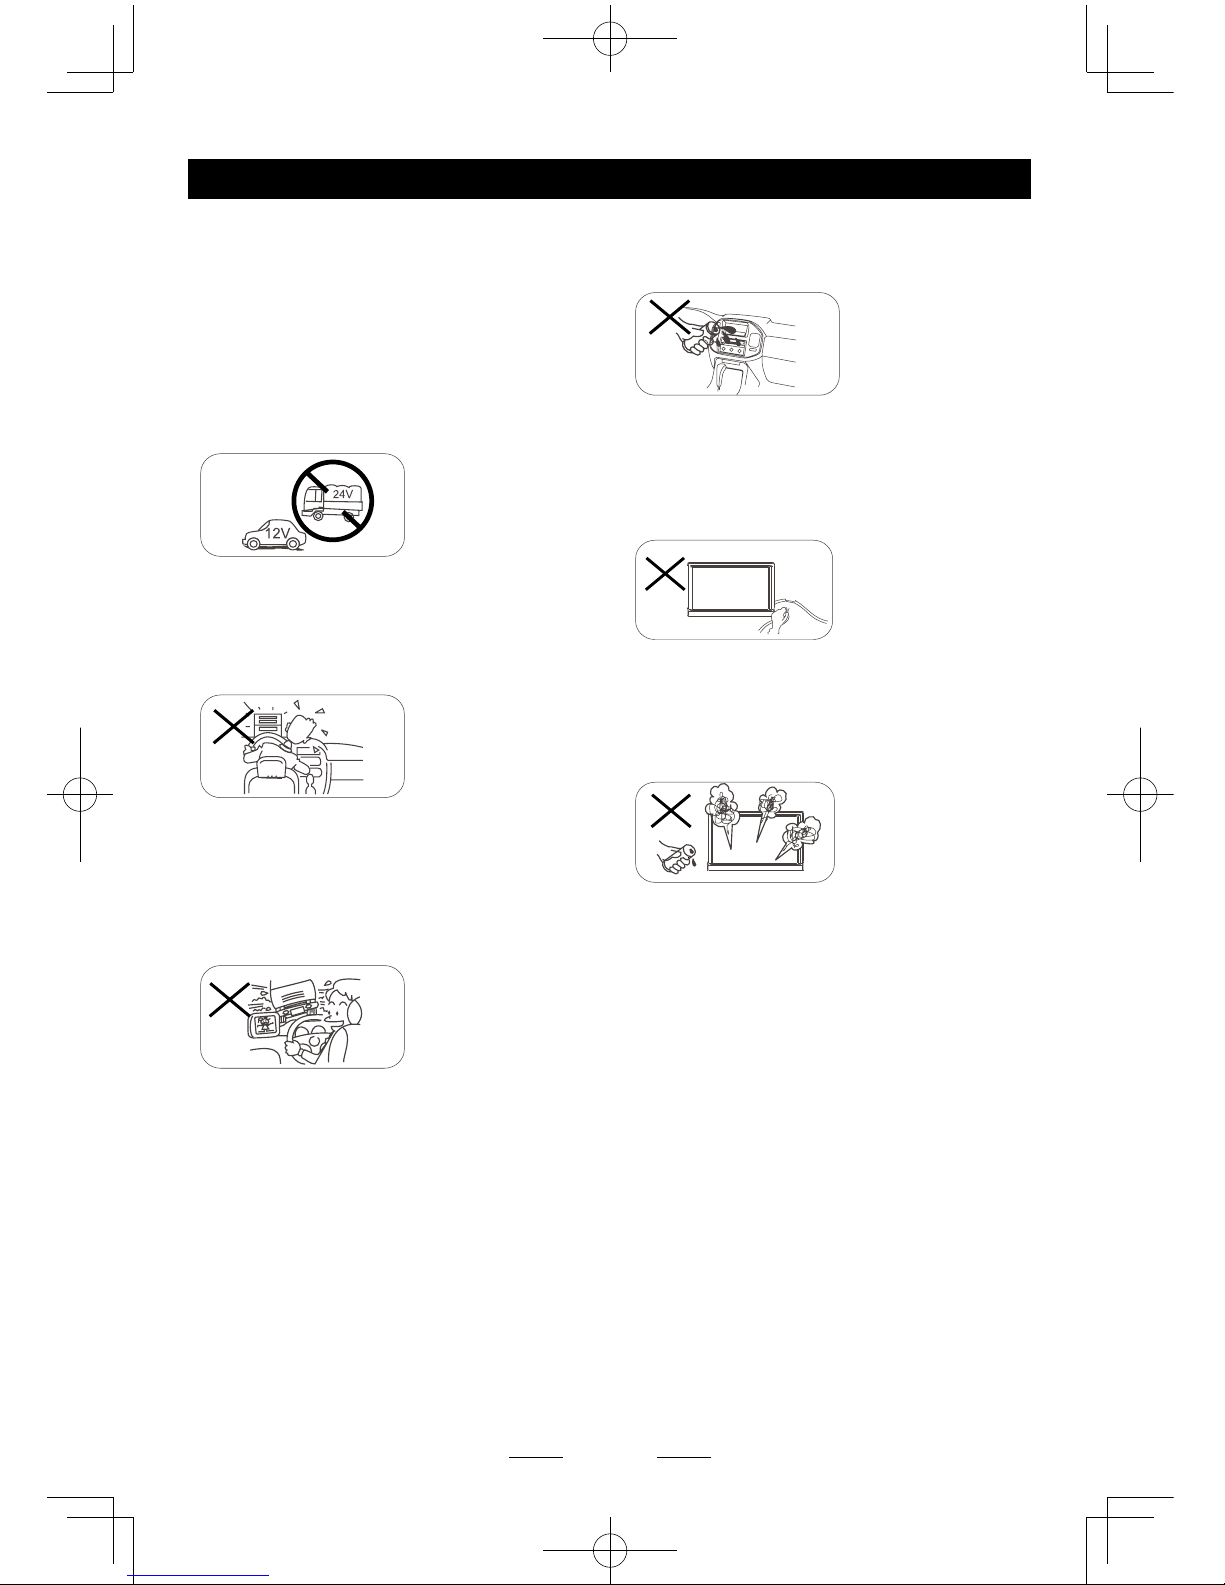
Only connect the unit to a 12-volt power
supply with negative grounding.
Never install this unit where the operation
and condition for driving safely is
compromised.
Never use the video display while the car
is in motion. The use of video playback
while driving is a violation of trafc laws and
increases the risk of trafc accidents.
MUTE
OK
Thank you for purchasing this product.
Please read through the Owners Manual to
learn how to properly operate the unit. After
you have nished reading the manual, please
keep it in a safe place for future reference.
To provide a clear demonstration and an
alternative for easy understanding of the
operation of this unit, graphic illustration
was used. However, this illustration is not
necessary printed as the actual image found
on the unit.
Page 3
EN - 2
Warning
Operate the unit correctly according to the
instruction manual to prevent unnecessary
problems.
CAUTIONS ON HANDLING
This product is a
CLASS 1 LASER PRODUCT.
Use of controls or adjustments or performance
of procedures other than those specified
herein may result in hazardous radiation
exposure. Do not open covers and do not
repair yourself. Refer servicing to qualified
personnel.
Two laser products
Wave length: CD: 780nm DVD: 650nm
Laser power: No hazardous radiation is
emitted with safety protection.
To reduce the risk of fire electric shock, and
annoying interference, use only the included
components.
Caution of disc using
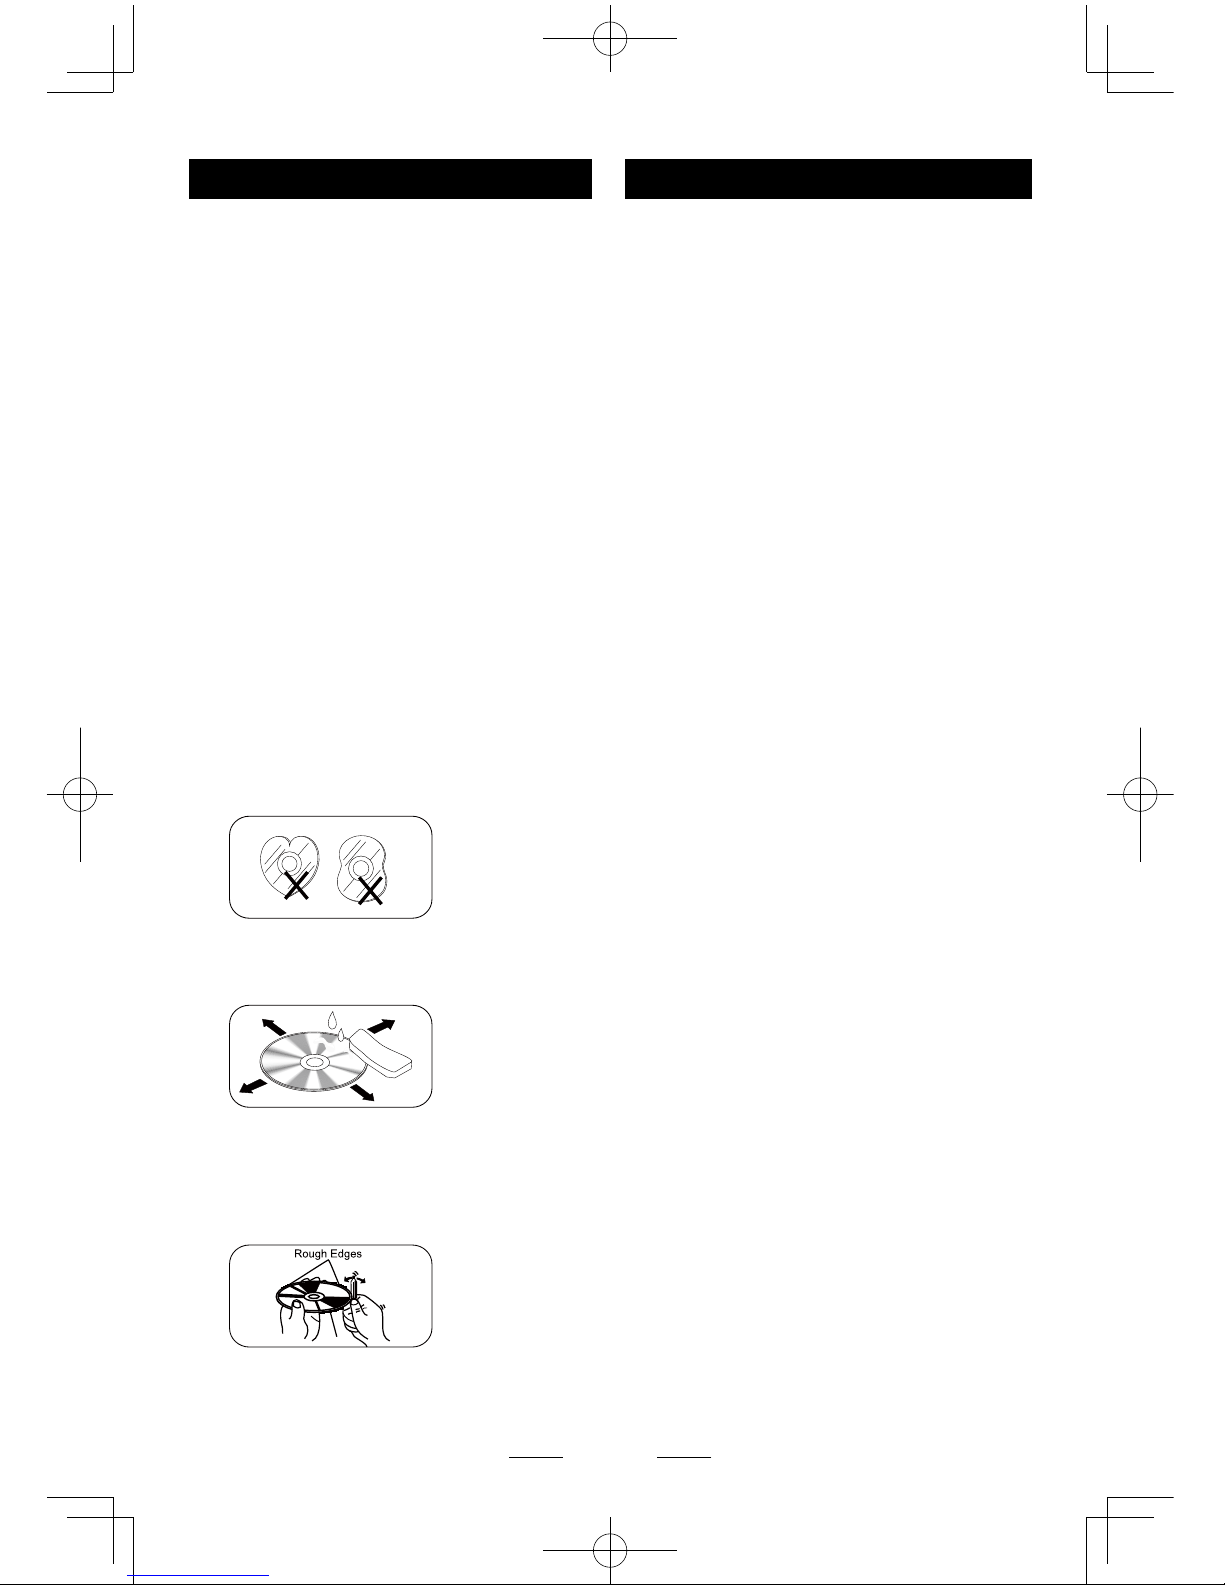
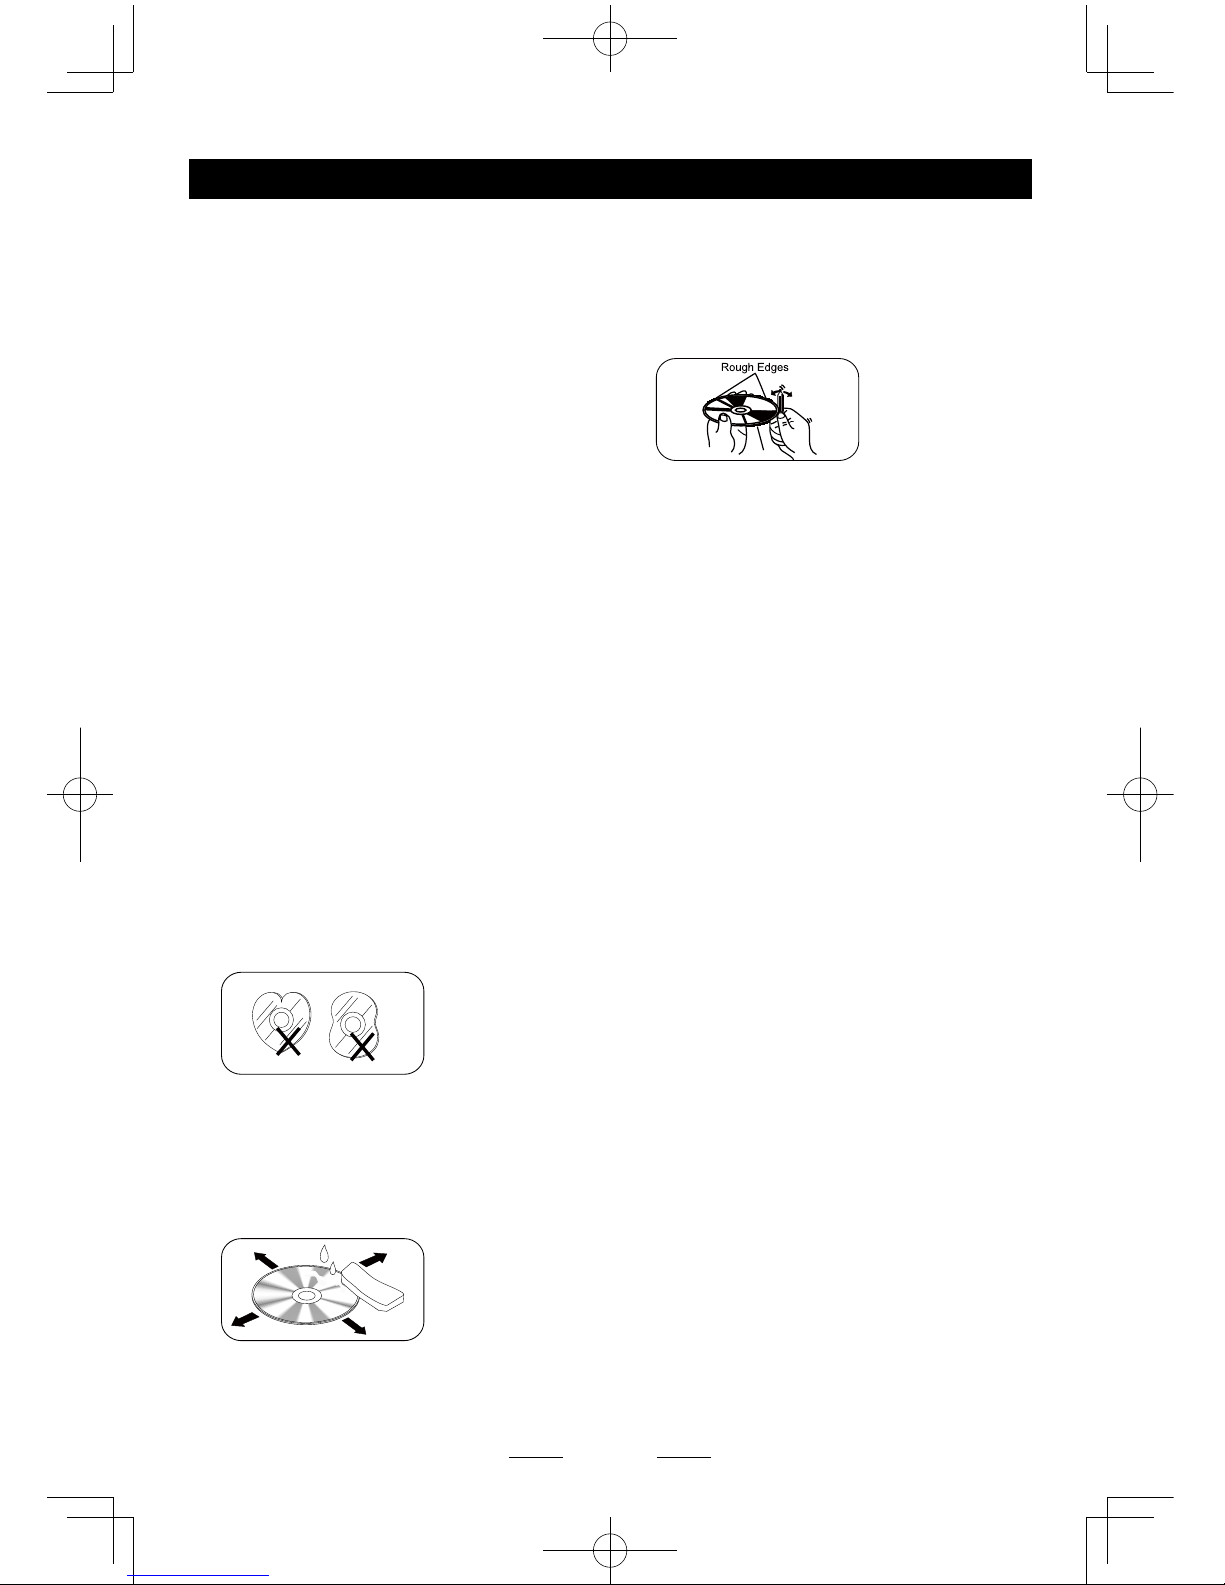
1. DO NOT use irregular shaped disc.
2. Disc Cleaning. Use a dry, soft cloth to
wipe the disc from center to edge, only neutral
detergent can be used.
3. When playing a new disc. New disc may
have some rough spots around the inner and
outer edges. If such a disc is used, remove
these rough spots with a pencil or ball-point
pen, etc.
Precautions Contents
Precautions ...............................................1
Panel Controls ..........................................3
Remote Control .........................................4
Basic Operations ......................................6
Turn on/off the power..............................6
Mute ........................................................6
Adjust the volume ...................................6
Playing source selection .........................6
When Vehicle is Put in Reverse .............6
When parking brake applied ...................6
Wallpaper................................................6
Main menu .................................................7
Main Menu ..............................................7
Applications menu ..................................7
Disc Operation ..........................................7
Radio Operations ....................................10
SD/USB Operations ................................11
Bluetooth Operations .............................14
iPod/iPhone Operations .........................16
Internet ....................................................17
3G APN Settings...................................17
Wi-Fi Settings .......................................18
Create Wi-Fi Hotspot ............................18
Visit Website .........................................19
E-mail....................................................19
Other Mode ..............................................19
Navigation Operations ..........................19
AUX Operations ....................................19
Steering Wheel Control.........................19
i-Mode (Siri) Function ...........................20
Google calendar conguration ..............20
Delete Gmail Account ...........................21
System settings ......................................22
Sound setting ..........................................23
Device Connections ...............................24
Wiring Diagram .....................................26
Troubleshooting .....................................27
Specications .........................................28
Page 4
EN - 3
Panel Controls
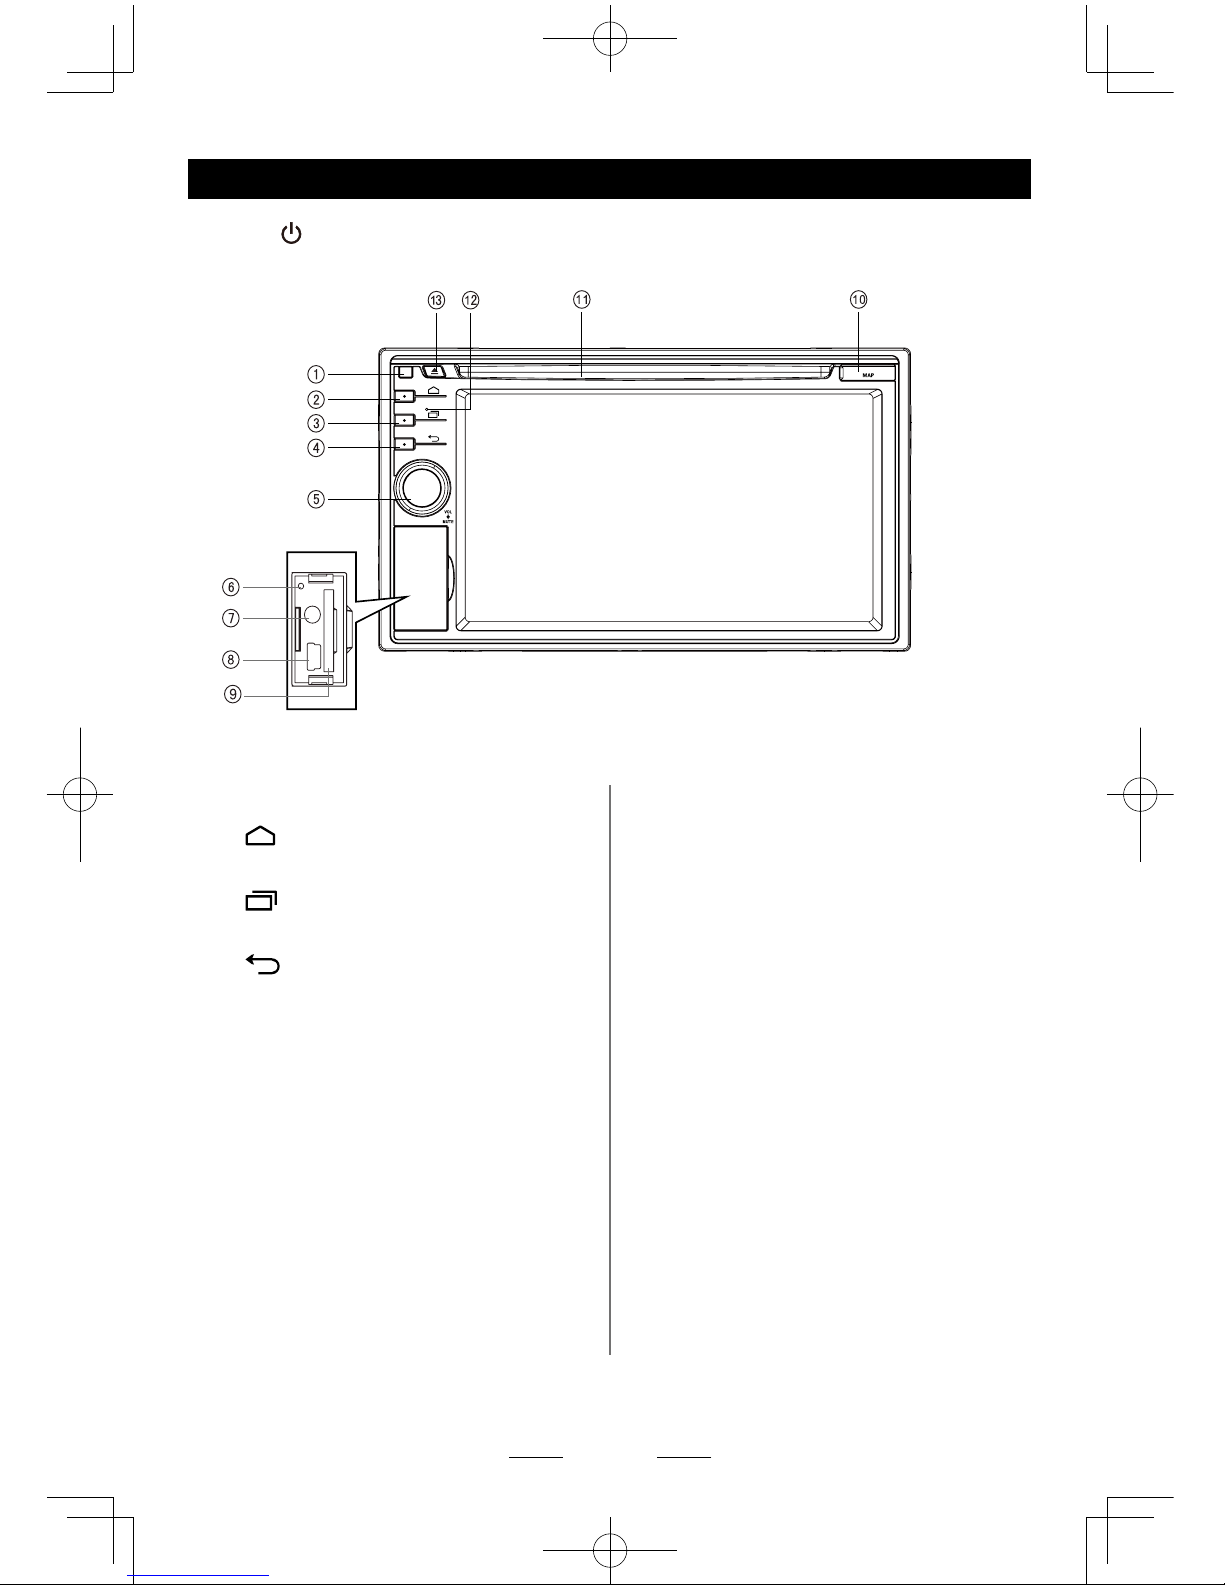
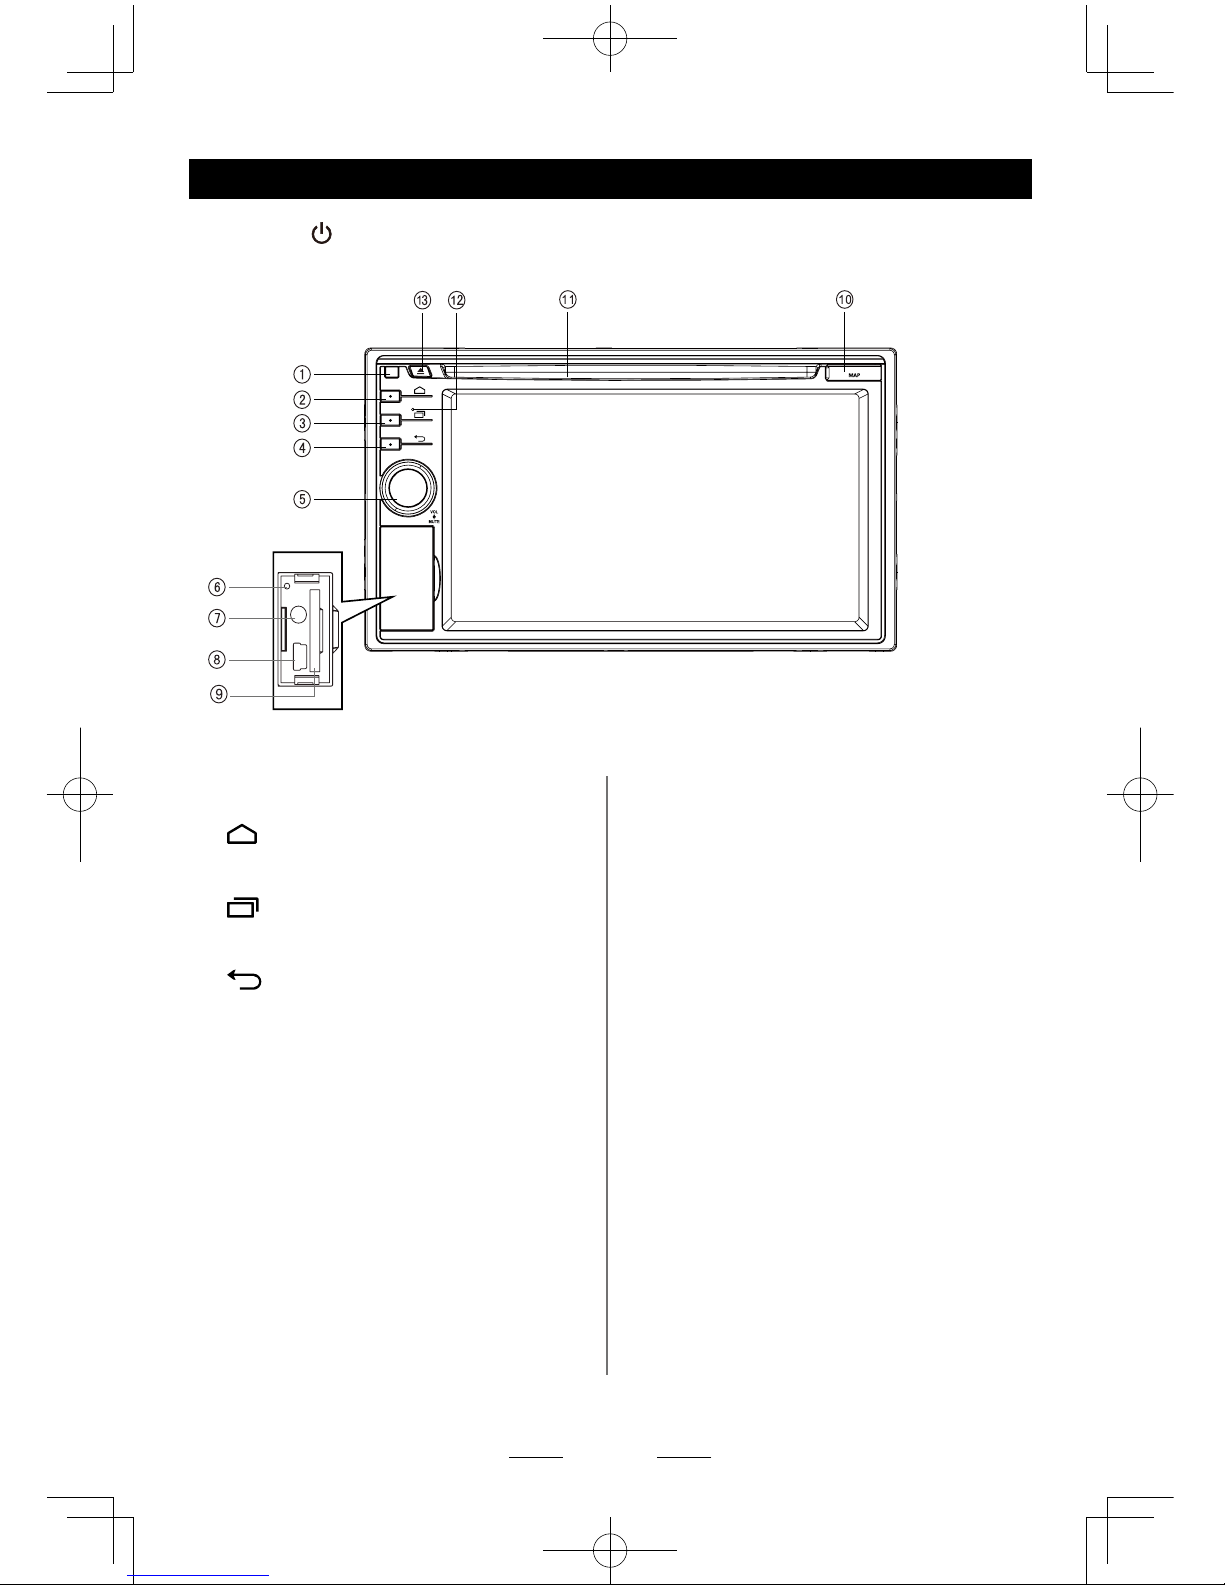
Press [ ] knob (5) to turn on the unit.
1. Remote Sensor
2.
HOME button
Show main source menu
3. MENU button
Show MENU options
4. BACK button
Back to previous menu.
5. VOL knob
> Power on (press)
> Adjust volume (rotate)
> Mute the volume (press when on)
> Power off (long press)
6. Reset
Load factory settings
7. AUX in Jack
8. USB Connector
9. SD Card Slot
10. Map Card Slot
11. Disc Slot
Insert the disc with label side facing up.
12. Microphone
13. Eject
Eject disc (when disc inserted)
*
Default Path:
1. Path of SD Card(9): /sdcard/sd_media
2. Path of USB(8): /sdcard/external_usb
3. Path of Map Card(10): /sdcard/external_
sd
To install a new map, please install the
apk le rst, then start the application and
set the path.
Page 5
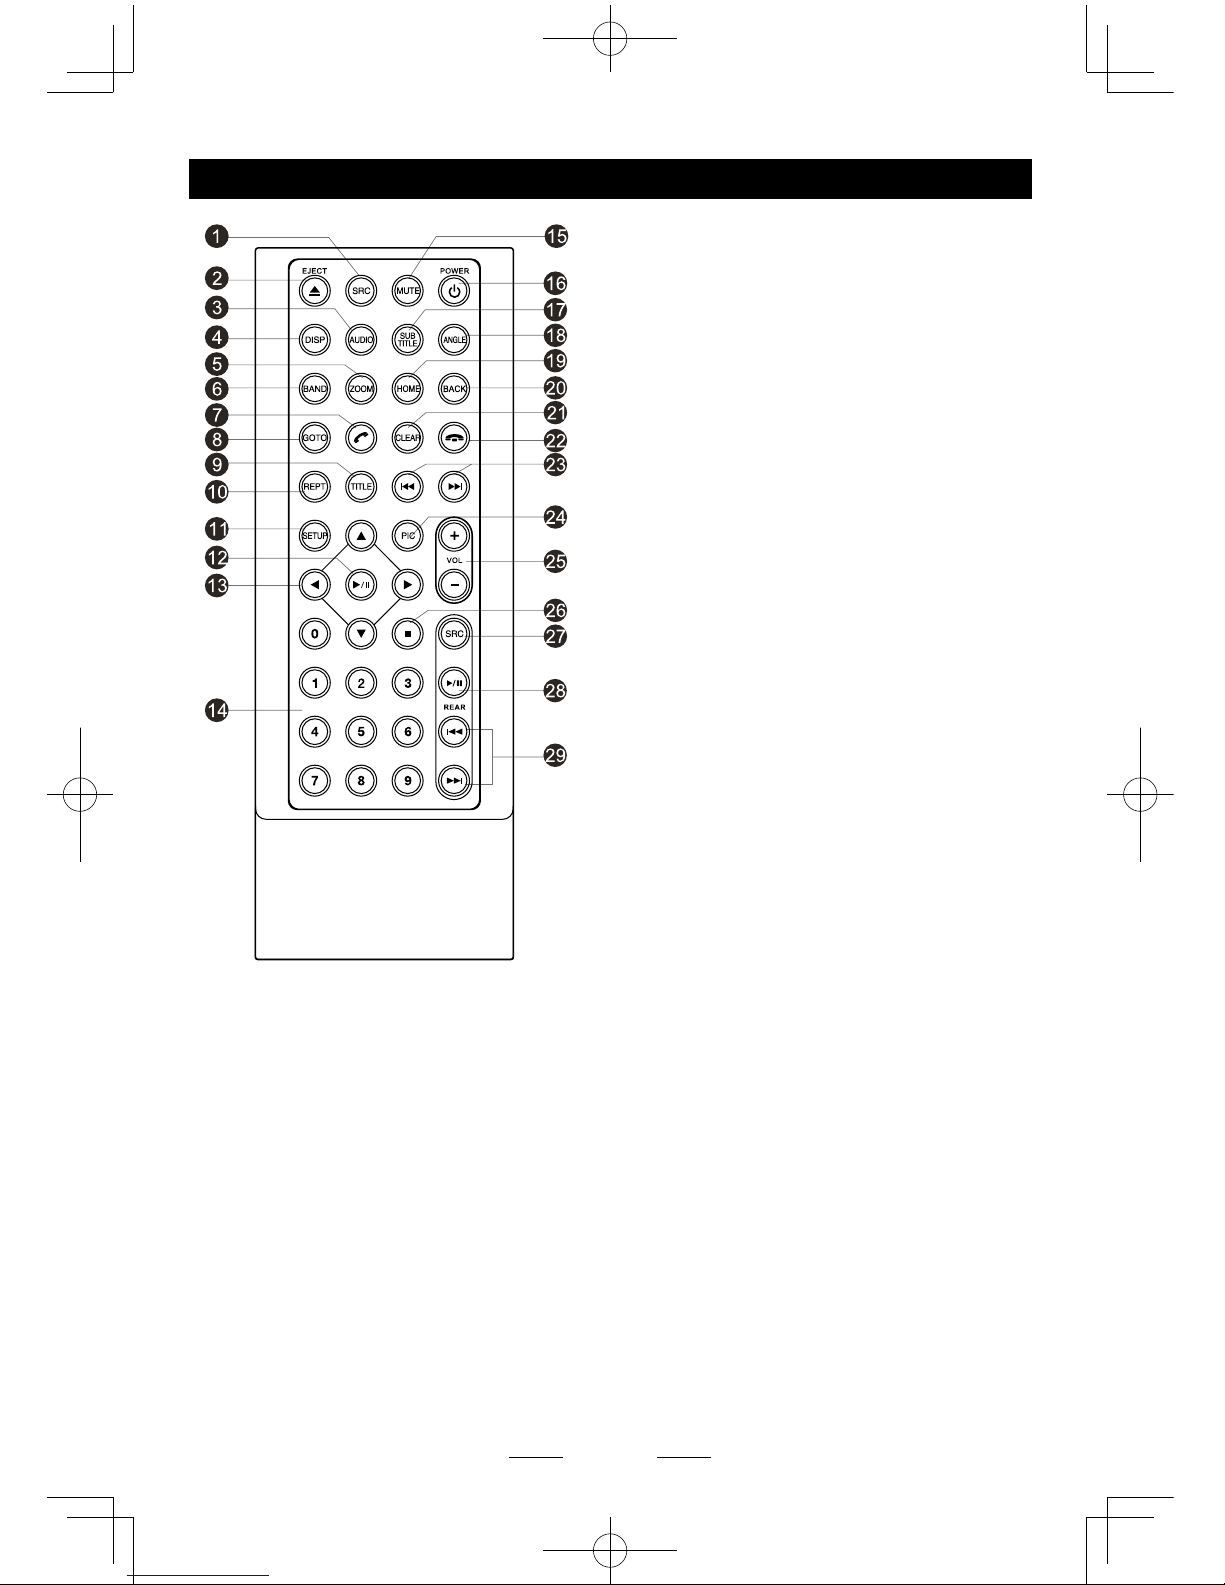
EN - 4
Remote Control
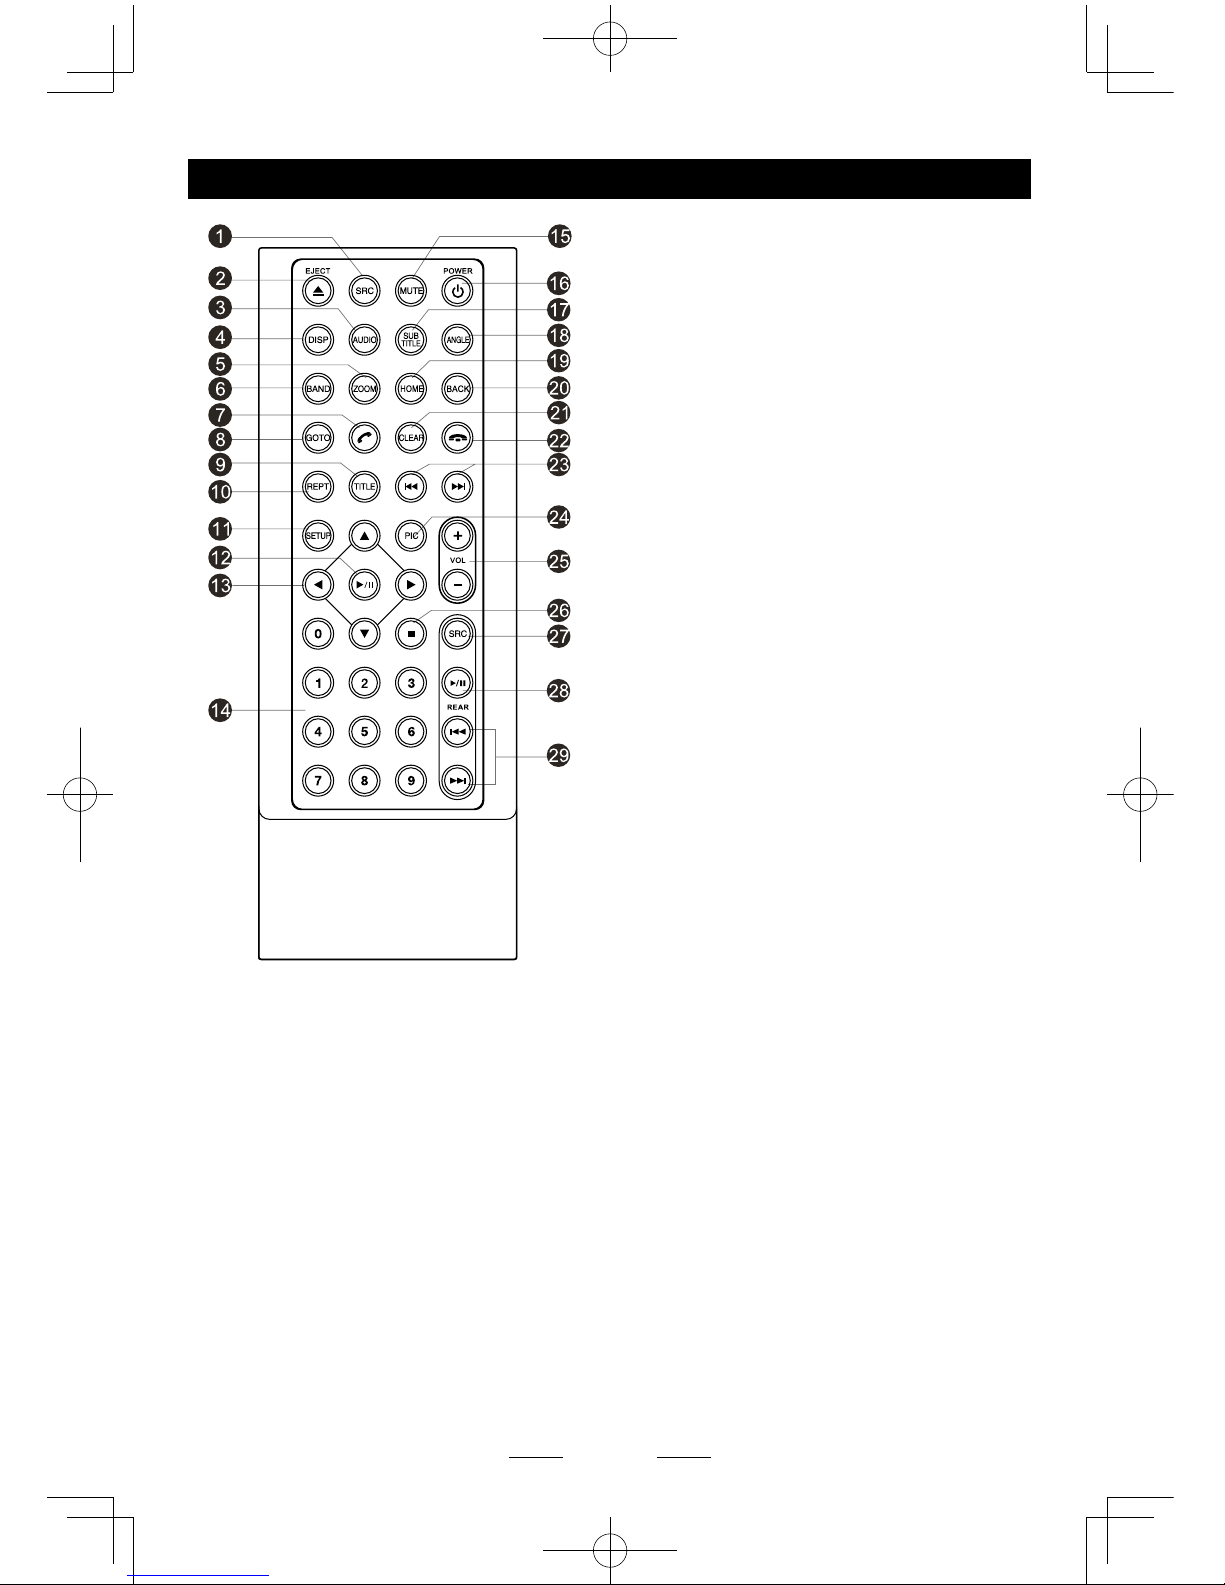
1. Change playing source in sequence
2. Eject the disc
3. Select audio language
Show music catalog
4. Display playback information
5. Zoom
6. Select radio band
7. Call out
8. Goto search
9. DVD title
10. Repeat playback
11. Setup menu
12. Play / Pause
13. Move the cursor up/down/left/right.
Up/down: Manual tuning
14. Numeric keys
15. Mute the volume
16. Unit power
17. Select DVD subtitle language
18. Select DVD angle
19. Show / exit home menu
20. Return to previous display
21. Clear information
22. Hang up
23. Previous/Next
Auto tuning (long press)
Fast backward/forward (long press)
24. Display settings
25. Adjust volume
26. Stop playback
Rear zone (not used)
27. Change next rear source
28. Play/Pause
29. Previous/Next track
Fast backward/forward (long press)
Page 6
EN - 5
Remote Control
Notes of remote control using
1) Aim the remote control at the remote sensor on the unit.
2) Remove the battery from the remote control or insert a battery insulator if the battery has not
been used for a month or longer.
3) DO NOT store the remote control under direct sunlight or in high temperature environment, or it
may not function properly.
4) The battery can work for 6 months under normal condition. If the remote control doesn’t work,
please change the battery.
5) Use“button shaped” lithium battery “CR2025”(3V) only.
6) DO NOT recharge, disassemble, heat or expose the battery in re.
7) Insert the battery in proper direction according to the ( + ) and ( - ) poles.
8) Store the battery in a place where children cannot reach to avoid the risk of accident.
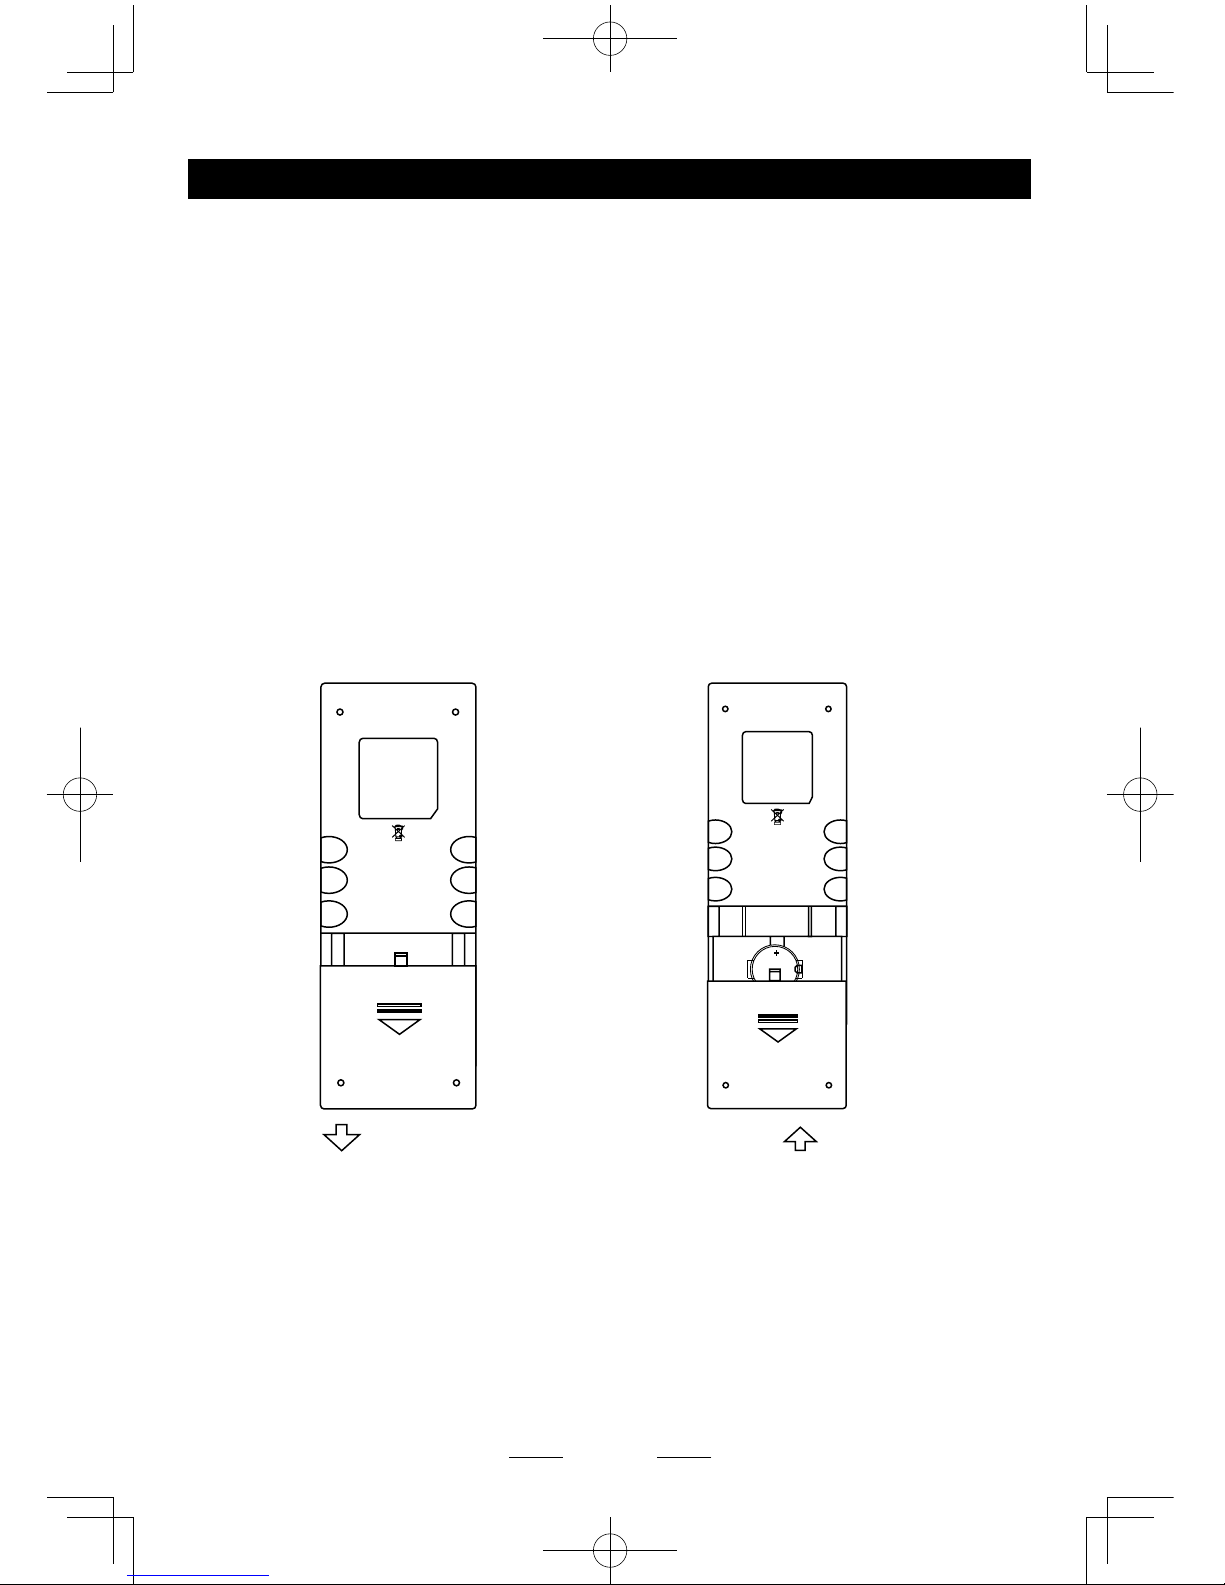
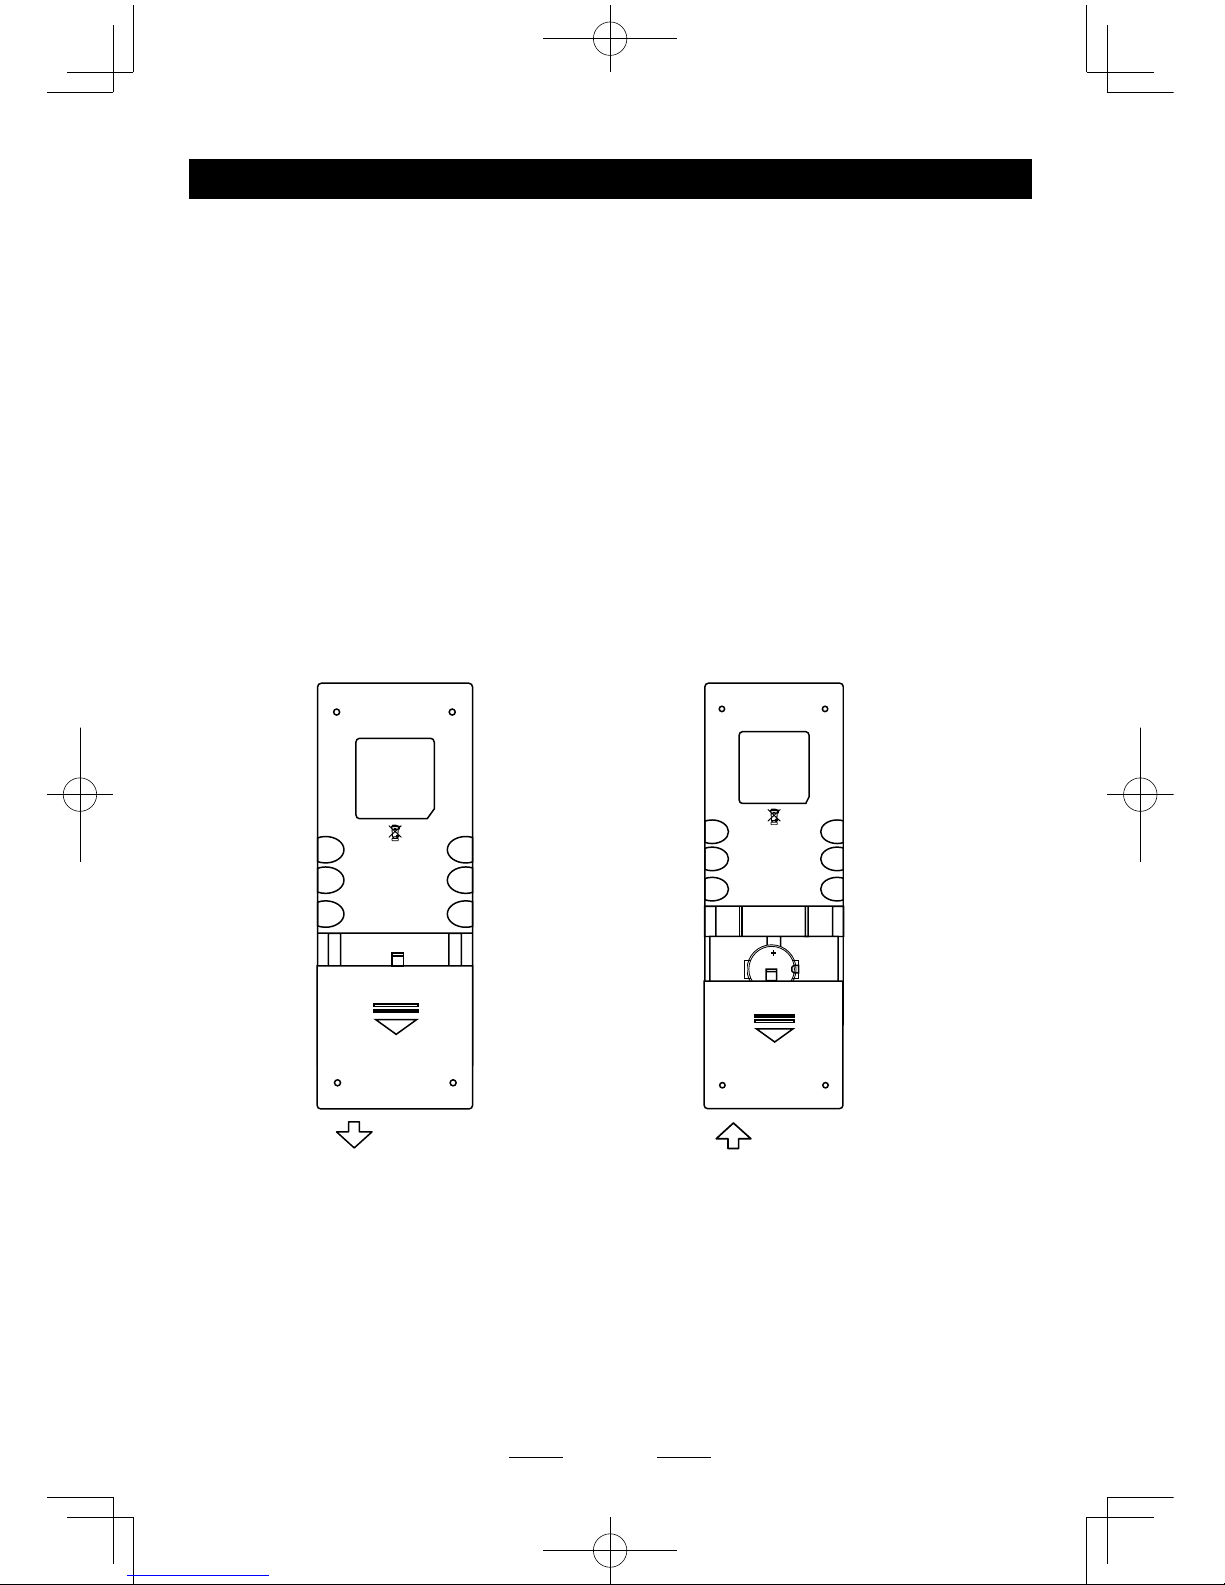
Uninstall Battery
Slide out the battery compartment tray
at the bottom on the back of the remote
control.
Install Battery
Use button-shaped lithium battery
CR2025 (3V)” only. Insert the battery
to the battery tray with proper direction
according to the (+) and (-) poles.
PULL OUT PUSH IN
Page 7
EN - 6
Basic Operations
Turn on/off the power
1. Press [ VOL ] knob to turn on the unit.
The unit will go back to the last source
used prior to the radio being powered off.
2. When on, long press [ VOL ] knob to turn
off the unit.
Mute
Press [ VOL ] knob to mute the sound.
Note:
• Pressing [VOL]knobagain or adjusting
volumewillreleasemuting.
Adjust the volume
Rotate [ VOL ] knob to increase or decrease
the volume level.
The adjustable range of volume is 0 to 50.
Playing source selection
1. Press [ ] button on the panel to show
main source menu.
2. Touch desired icon on the bottom of the
screen to enter corresponding working
mode, such as Disc, Navi, Radio, etc.
Drag left/right to scroll.
When Vehicle is Put in
Reverse
If the rear view video camera is connected,
the unit automatically switches to CAMERA
source during reverse driving. The unit returns
to the previous source after the vehicle has
been taken out of reverse.
When parking brake applied
1. If 'PRK SW' cable is connected to hand
brake switch, the video display of the TFT
monitor will be controlled by driving status,
system setup and input video sources.
2. When the car is moving forward, and a
video source is being played, the screen
will display a warning disclaimer and a
blank screen. The warning screen will
prevent the driver from watching images.
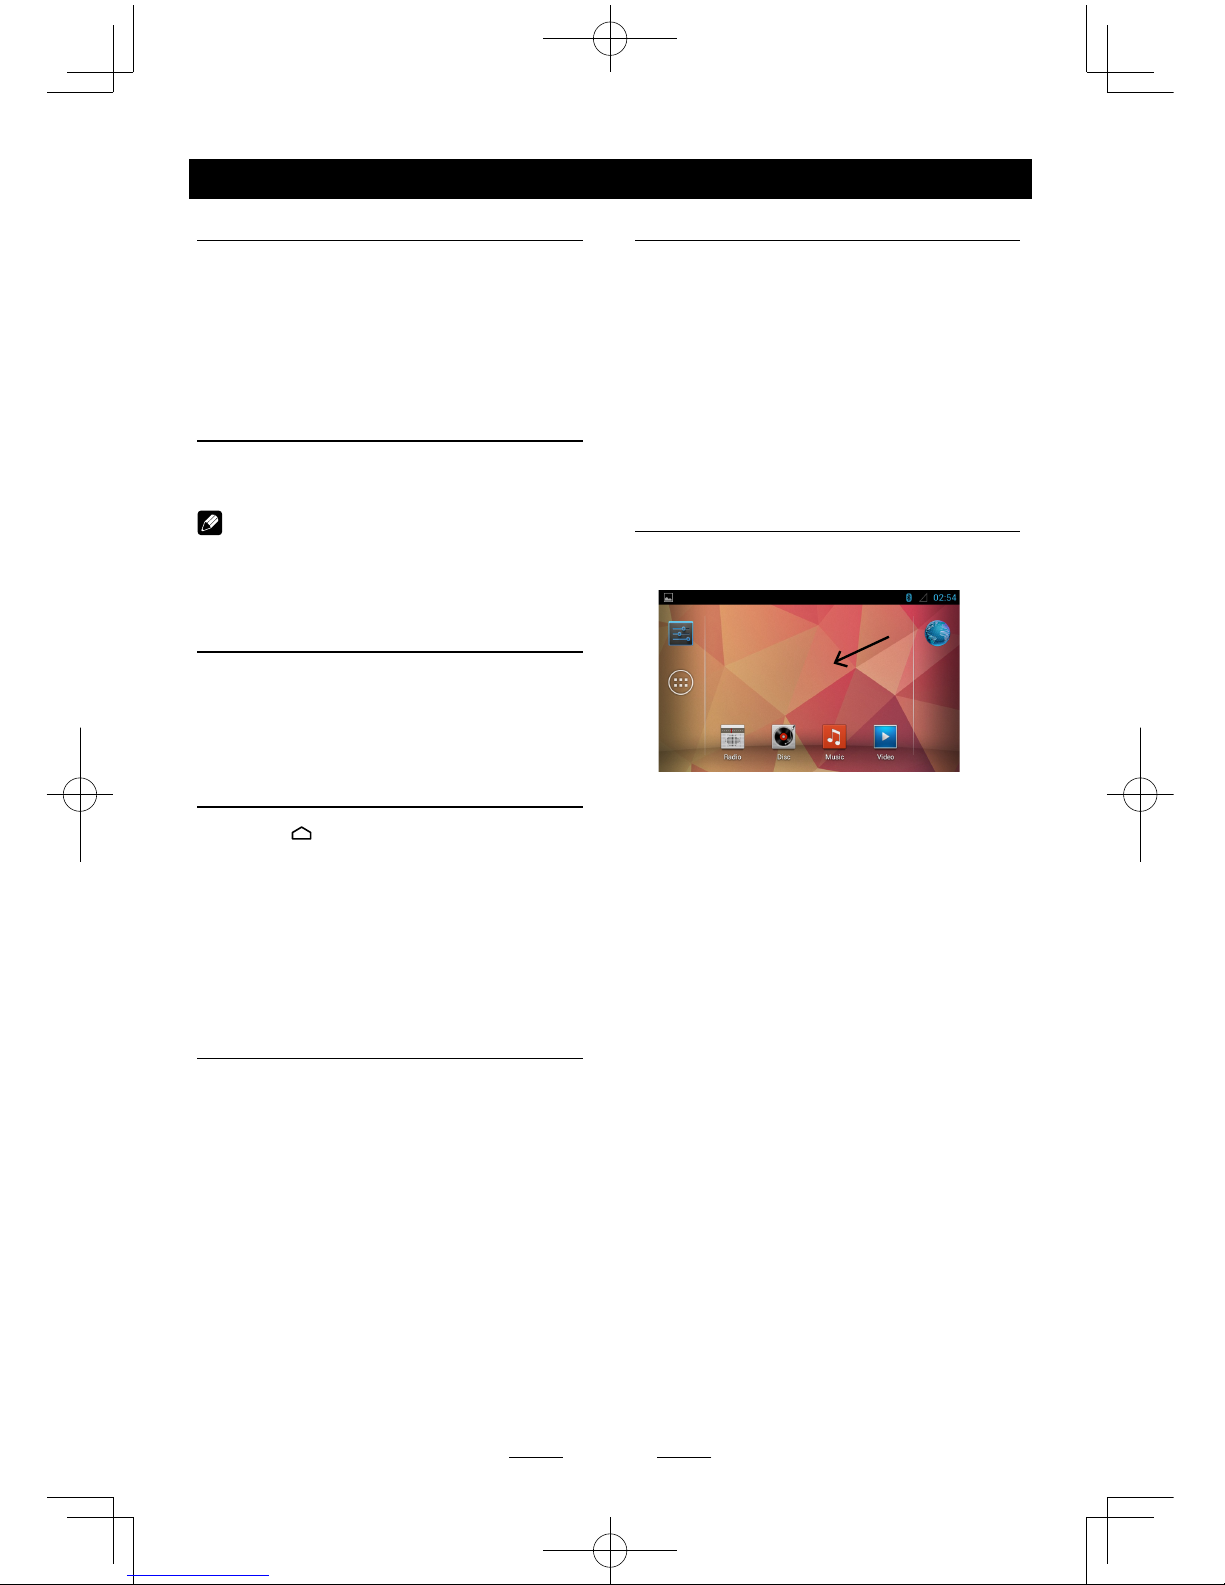
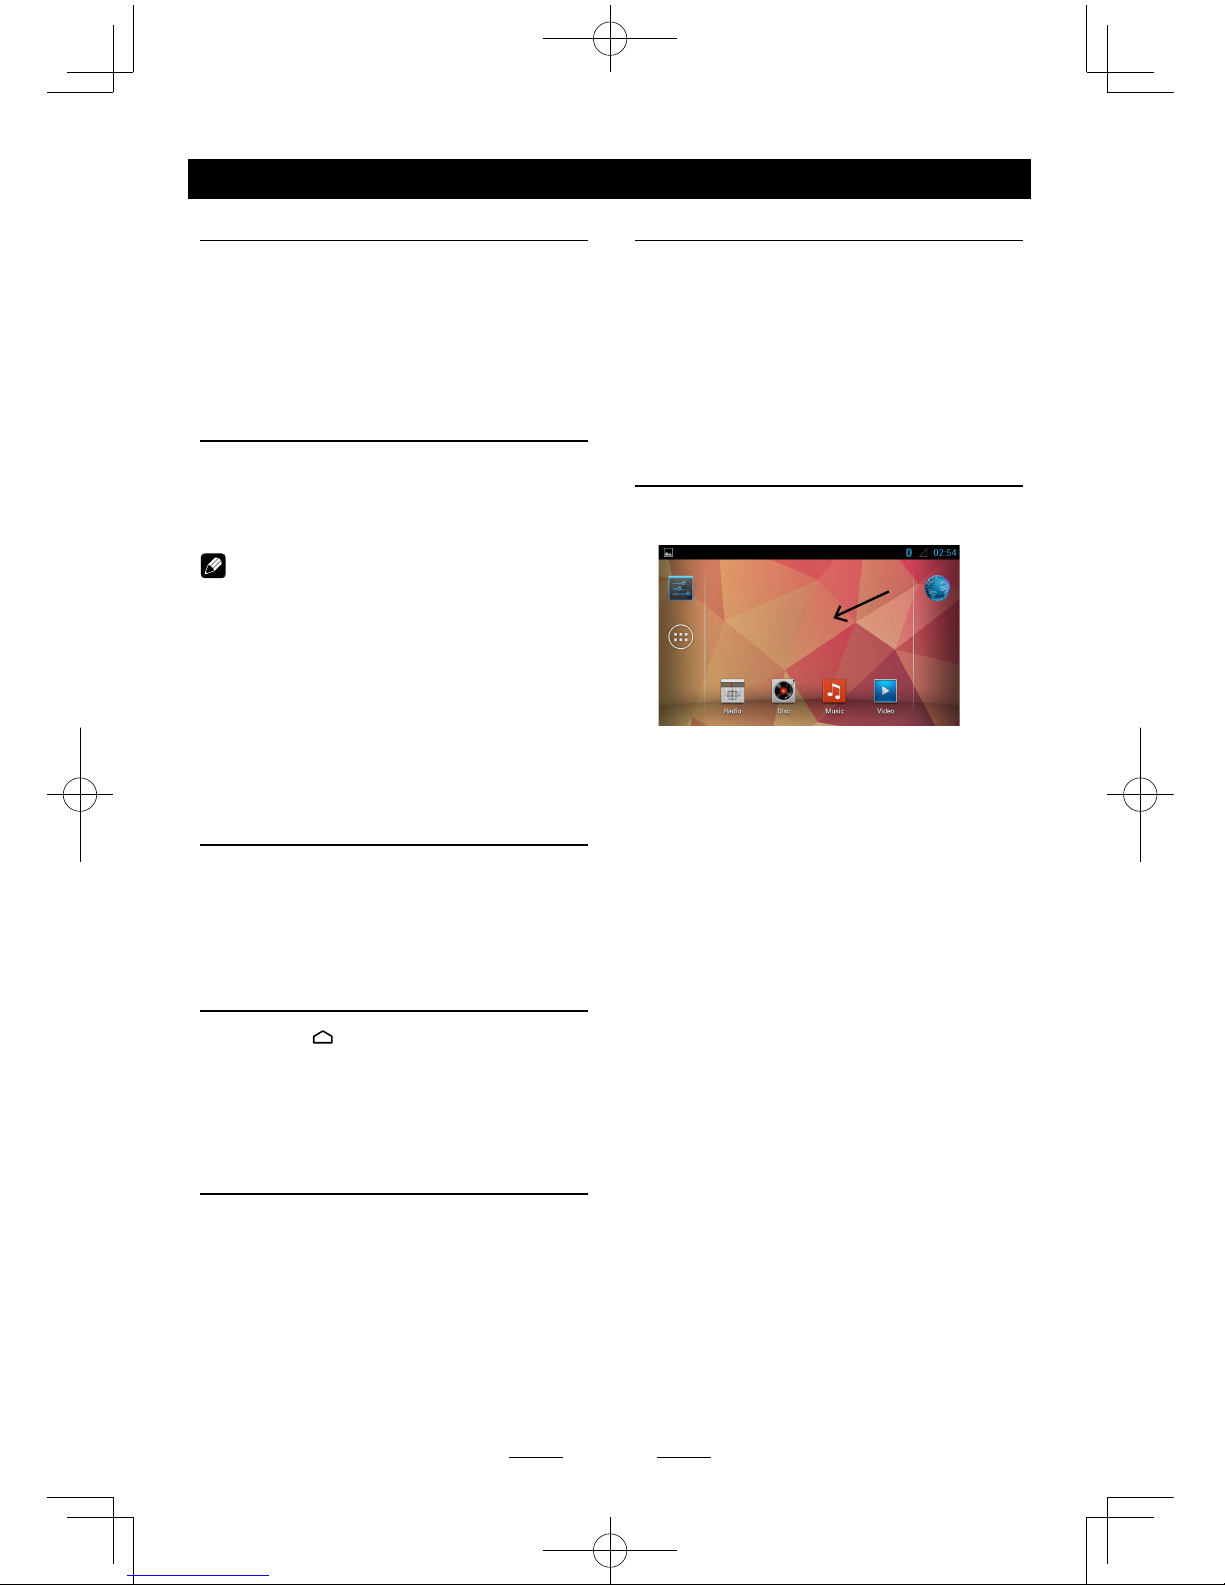
Wallpaper
1. Long press the blank area of the main
menu.
2. Select a source from:
[Gallery]: to visit the gallery of mobile
storage.
[Live wallpapers]: to show the wallpapers
with animation stored in the unit. Drag up/
down to scroll.
[Wallpapers]: to show the wallpapers
stored in the unit. Drag left/right to scroll.
3. Select desired picture to view, touch [Set
wallpaper] or [OK] to conrm selection.
Page 8
EN - 7
Main menu
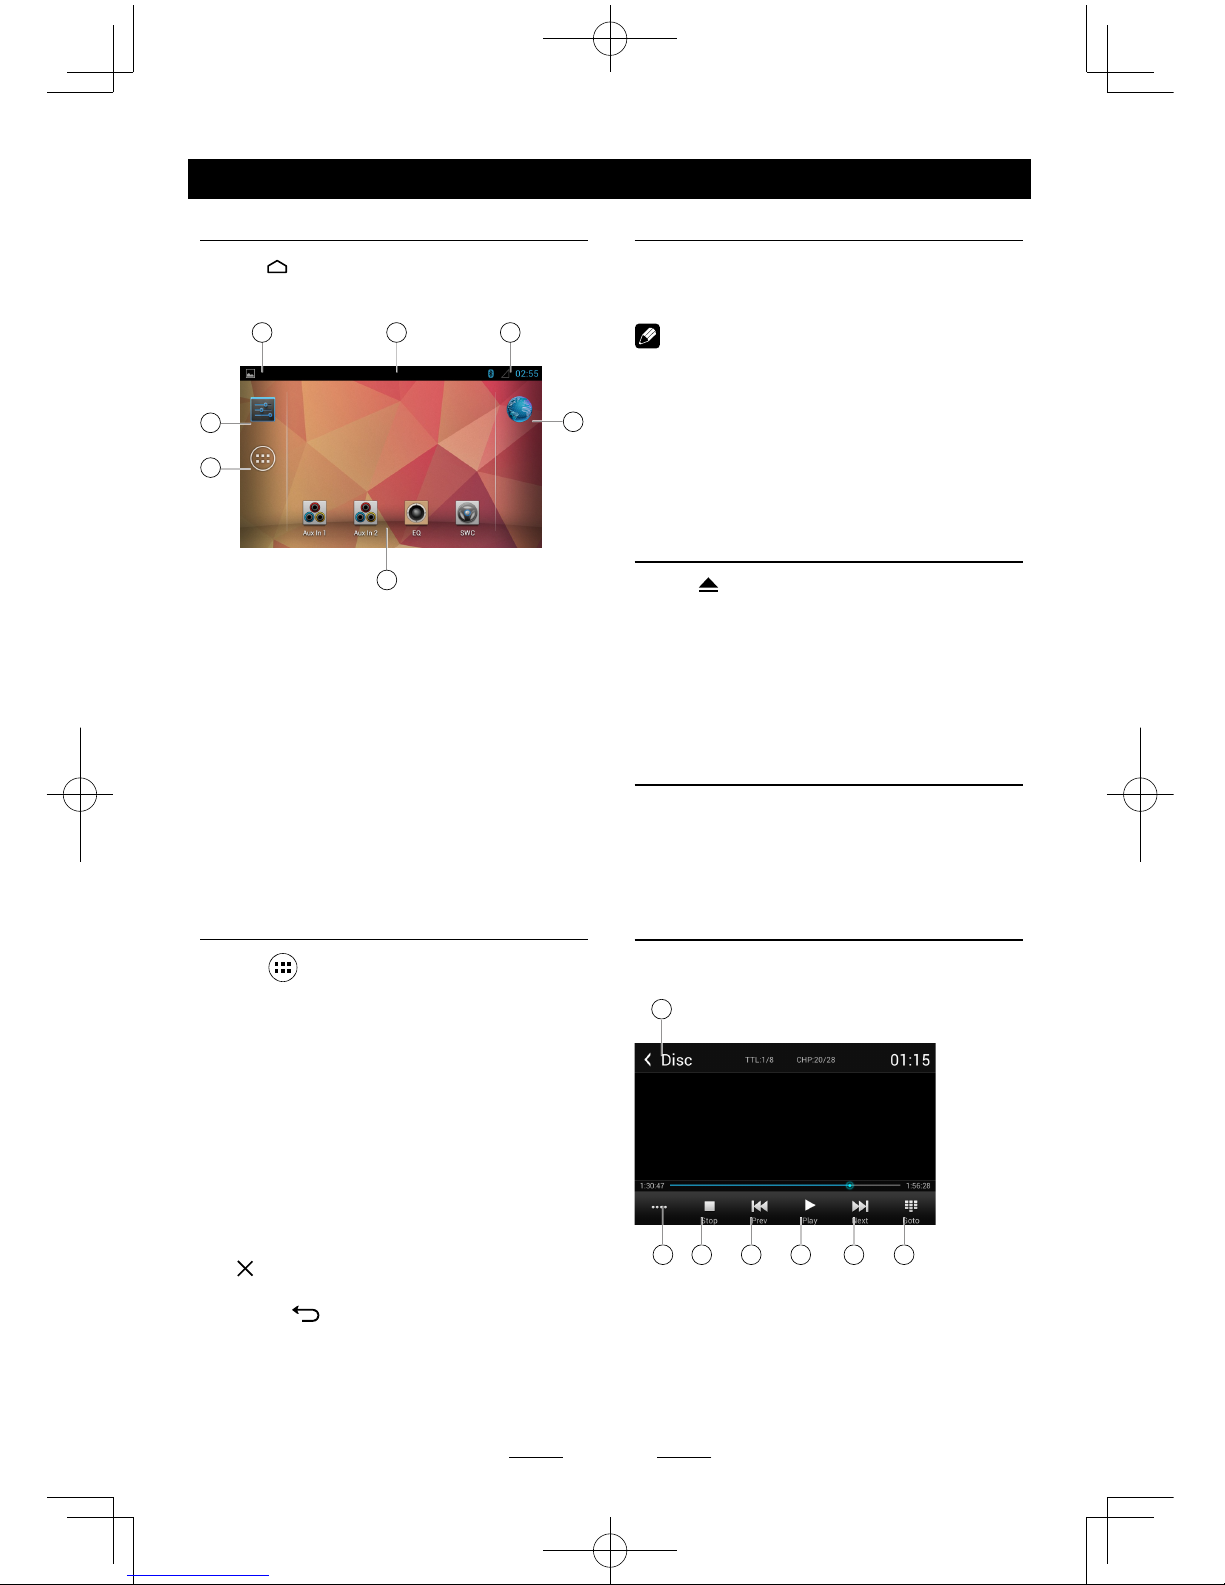
Main Menu
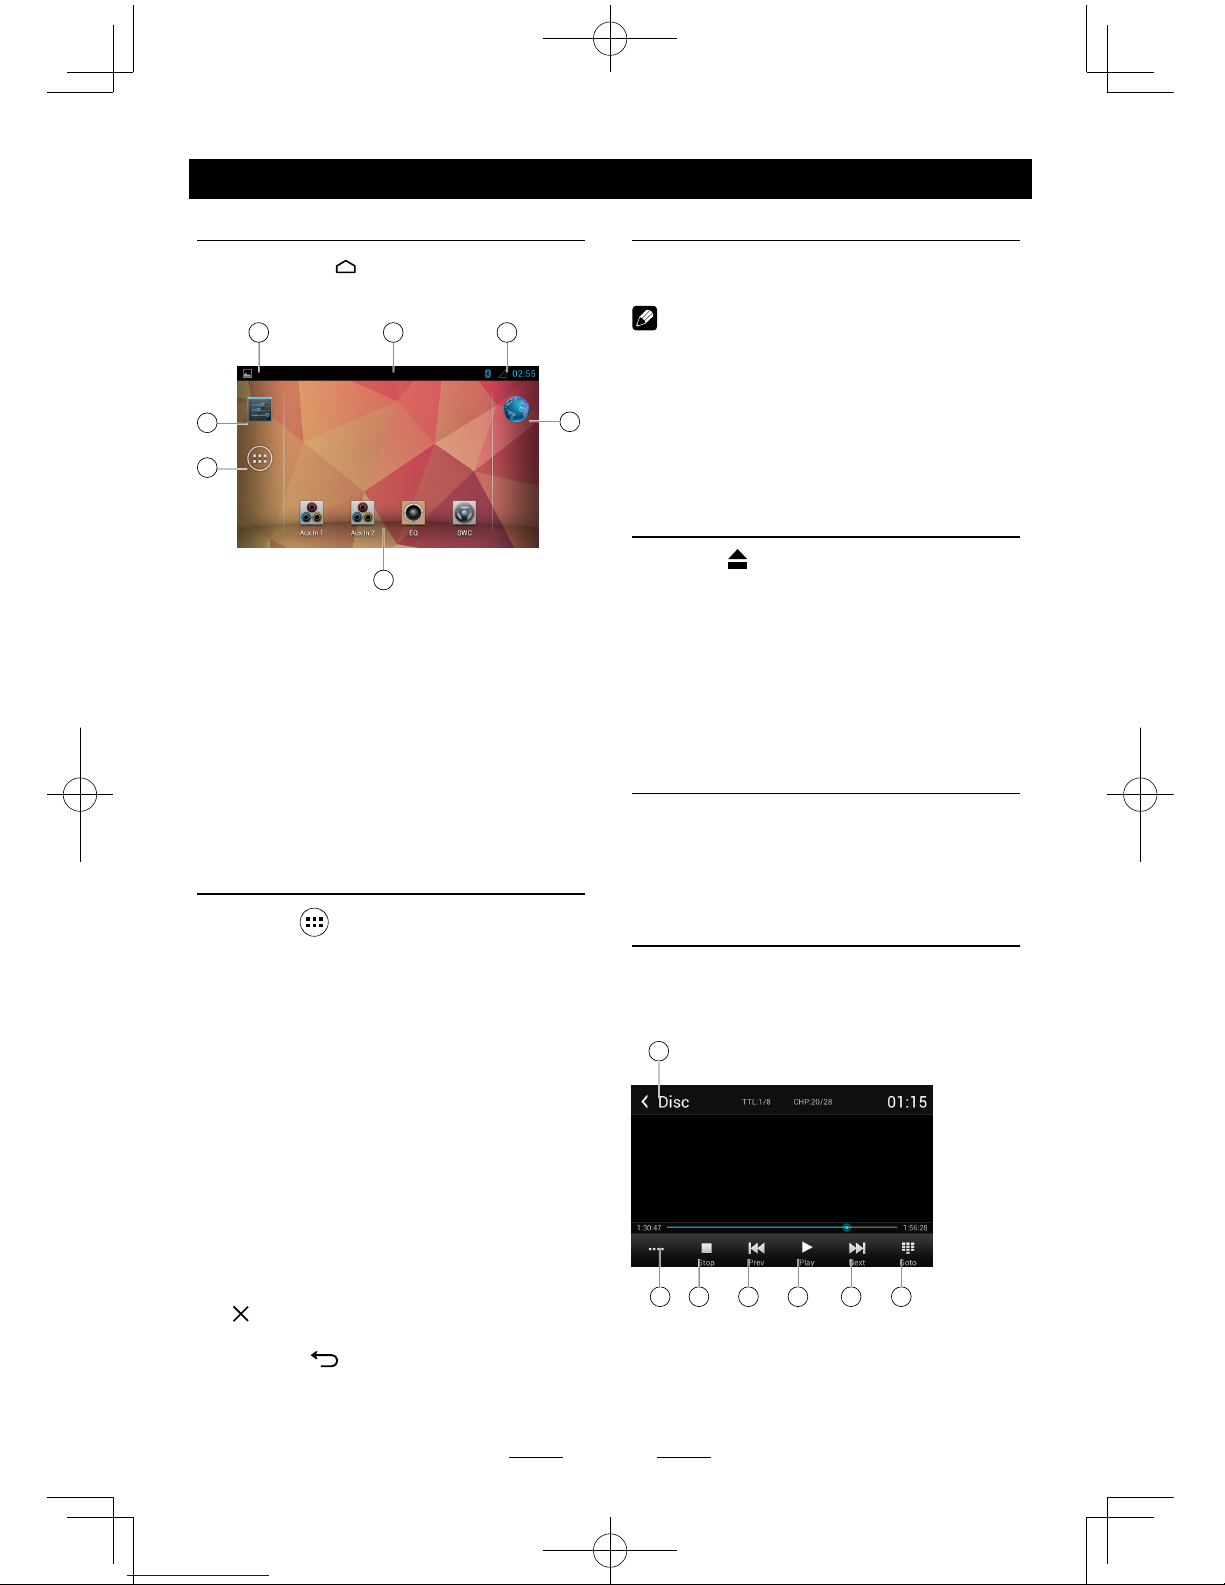
Press [ ] button on the panel to enter main
source menu.
1
4
6
5
7
2 3
1. Indicator of mobile storages.
2. Hold and drag down to show the
notications.
3. Wireless signal and time indicator.
4. Enter settings menu
5. Show applications list.
6. Access web browser.
7. Car AV system source bar:
Touch and hold the center of the bar and
drag left/right to show more icons.
Touch desired icon to enter corresponding
mode.
Applications menu
Touch [ ] to enter applications menu.
1. IN-CAR
Show the Car AV applications.
2. APPS
Show the Android applications installed.
3. WIDGETS
Show the widget applications.
In the list menu, drag left/right to scroll.
Touch and hold an icon for more than 2
seconds to add shortcut to the desktop. To
delete the shortcut, hold it and drag to the
[
] on the bottom, and release after it
turns red.
Touch [ ] button on the panel to exit.
Disc Operation
Insert a disc
Insert a disc into the slot, and the unit will
change to disc mode automatically.
Notes:
• Please confirm whether there is a disc in
the unit before you insert another one.
• The unit will exit current playing source and
enter DVD mode when one disc is inserted.
• The following disc formats are supported:
CD-R, CD-RW, DVD-R, DVD+R, DVD-RW,
DVD + RW .
Eject the disc
Press [ ] on the panel to eject the disc.
Notes:
• After ejecting the disc, the unit reverts to
another source automatically.
• If the disc is not removed from the unit
within 10 seconds, the disc will be reloaded
to prevent accidental damage.
Disc playback
When a disc is inserted, the display will
show “Loading...”. For MP3/WMA or a disc
with mixed files, reading time may exceed 1
minute.
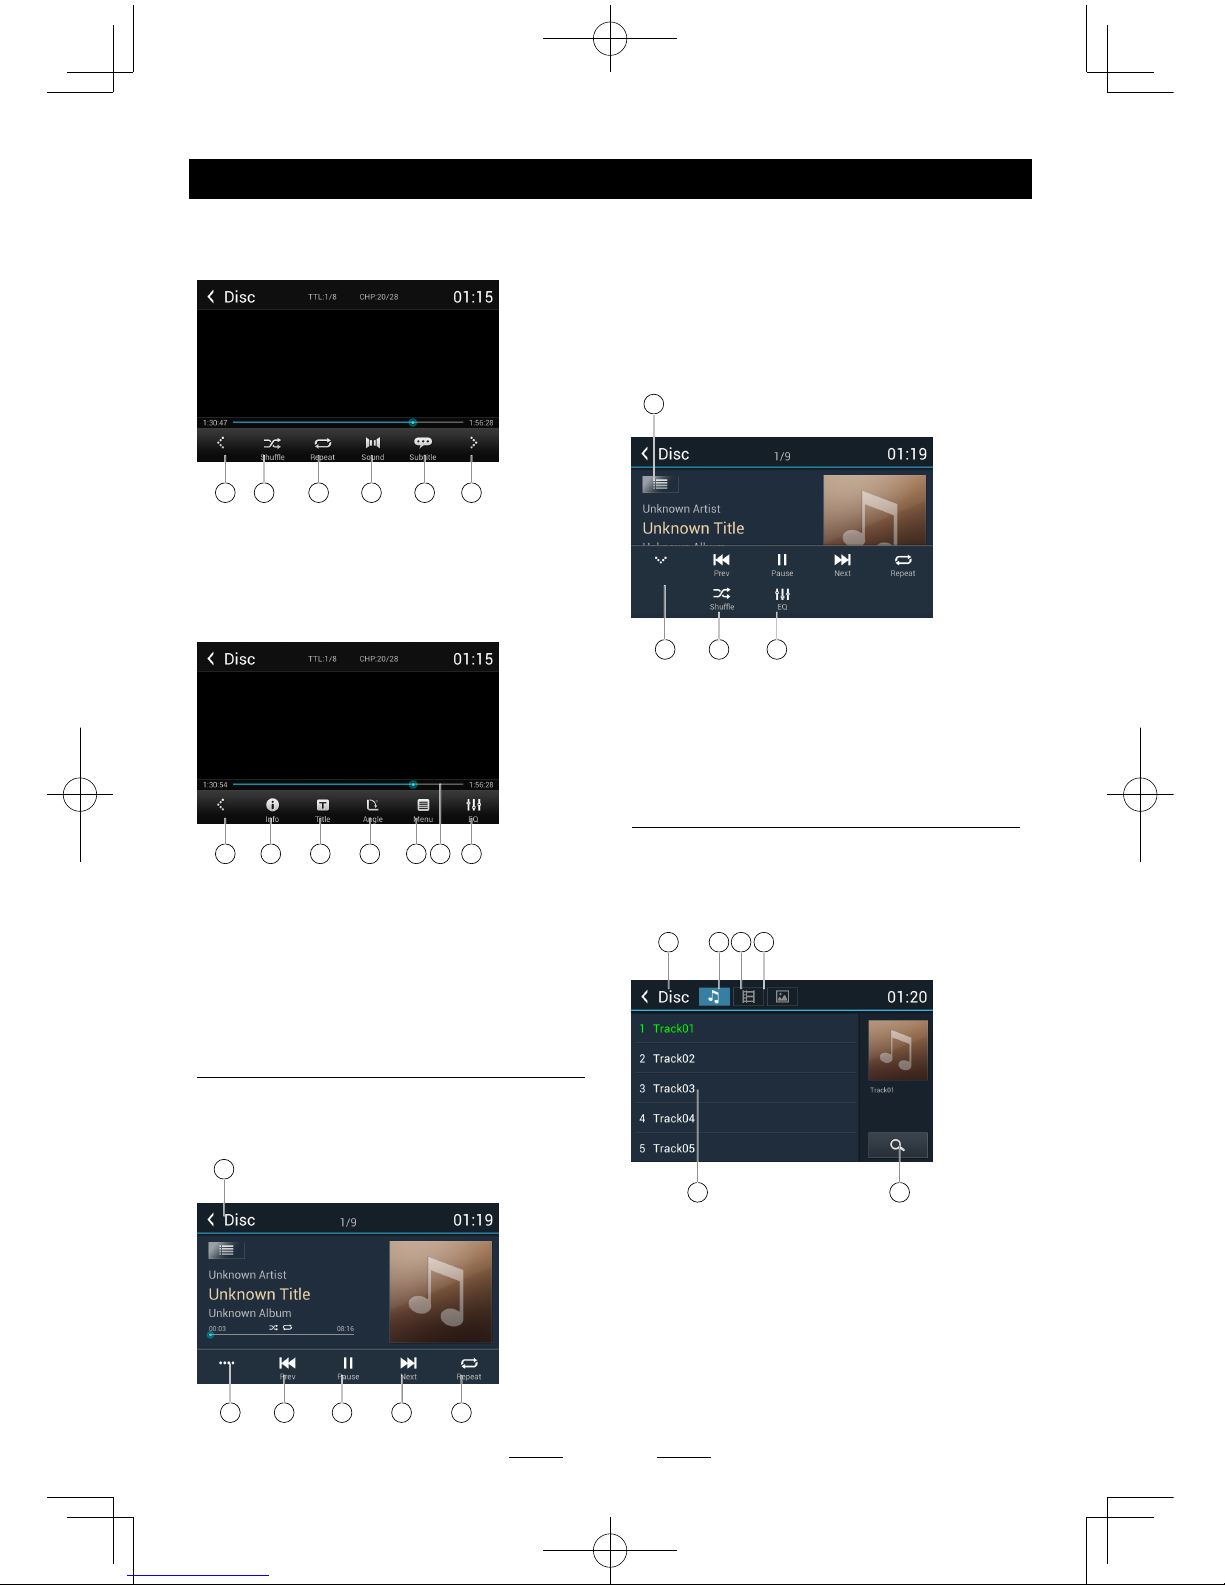
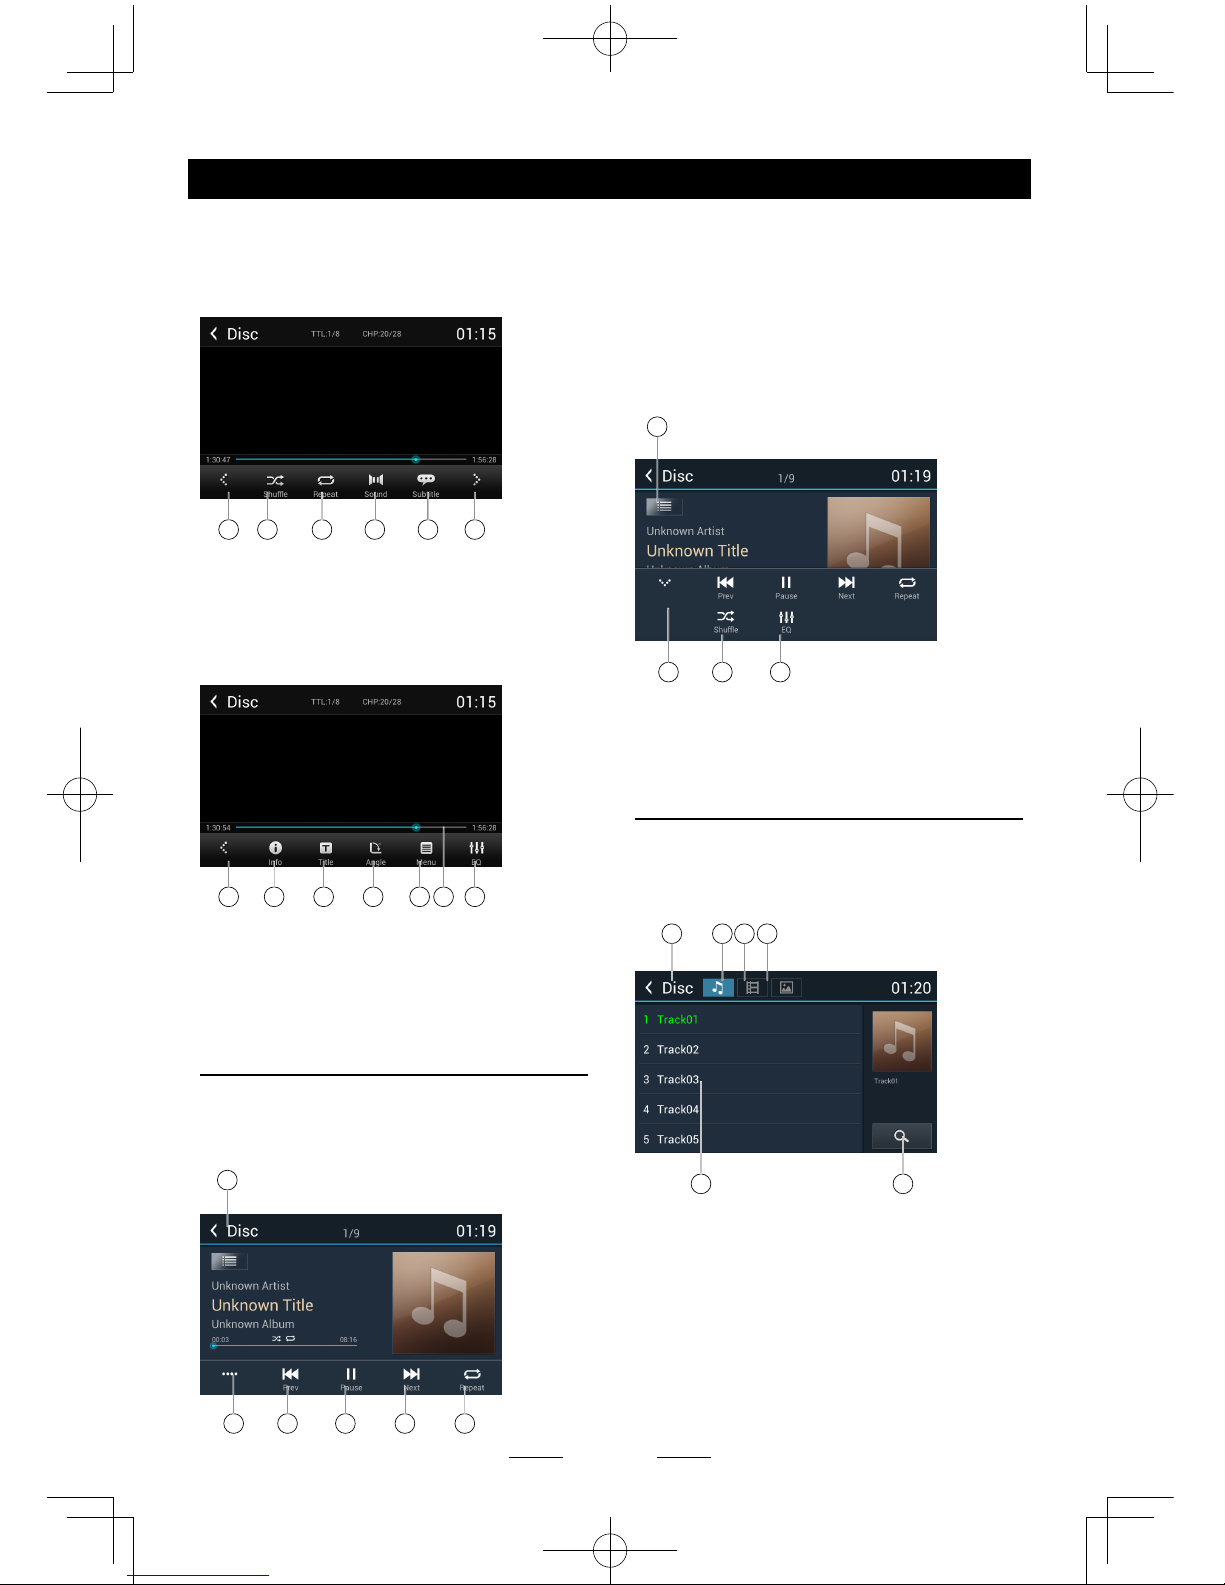
DVD Playback Menu
During playback, touch the screen(except top
left corner) to show control buttons.
1
2 3 4 5 6 7
1. Return to home menu
2. Show more control buttons
3. Stop playback
4. Previous chapter
Fast backward (long press)
5. Play/Pause
Page 9
EN - 8
Disc Operation
6. Next chapter
Fast forward (long press)
7. To enter search menu
8 9 10 11 12 13
8. Previous page of control buttons
9. Random play
10. Repeat play
11. Select audio channel
12. Select subtitle language
13. Next page of control buttons
8 14 15 16 17 1918
14. Show DVD informations
15. Show DVD title
16. Select viewing angle
17. Show DVD menu
18. Progress bar
19. Enter EQ menu
CD Playback
Insert a CD in the disc slot, and the unit will
read the disc. For some discs, you will need to
choose Music/Video/Photo for playback.
1
2 3 4 5 6
1. Return to home menu
2. Show more control buttons
3. Previous track
Fast backward (long press)
4. Play/Pause
5. Next track
Fast forward (long press)
6. Repeat play
7
8 9 10
7. Show le list
8. Hide the second line of control buttons
9. Shufe play
10. Enter EQ menu
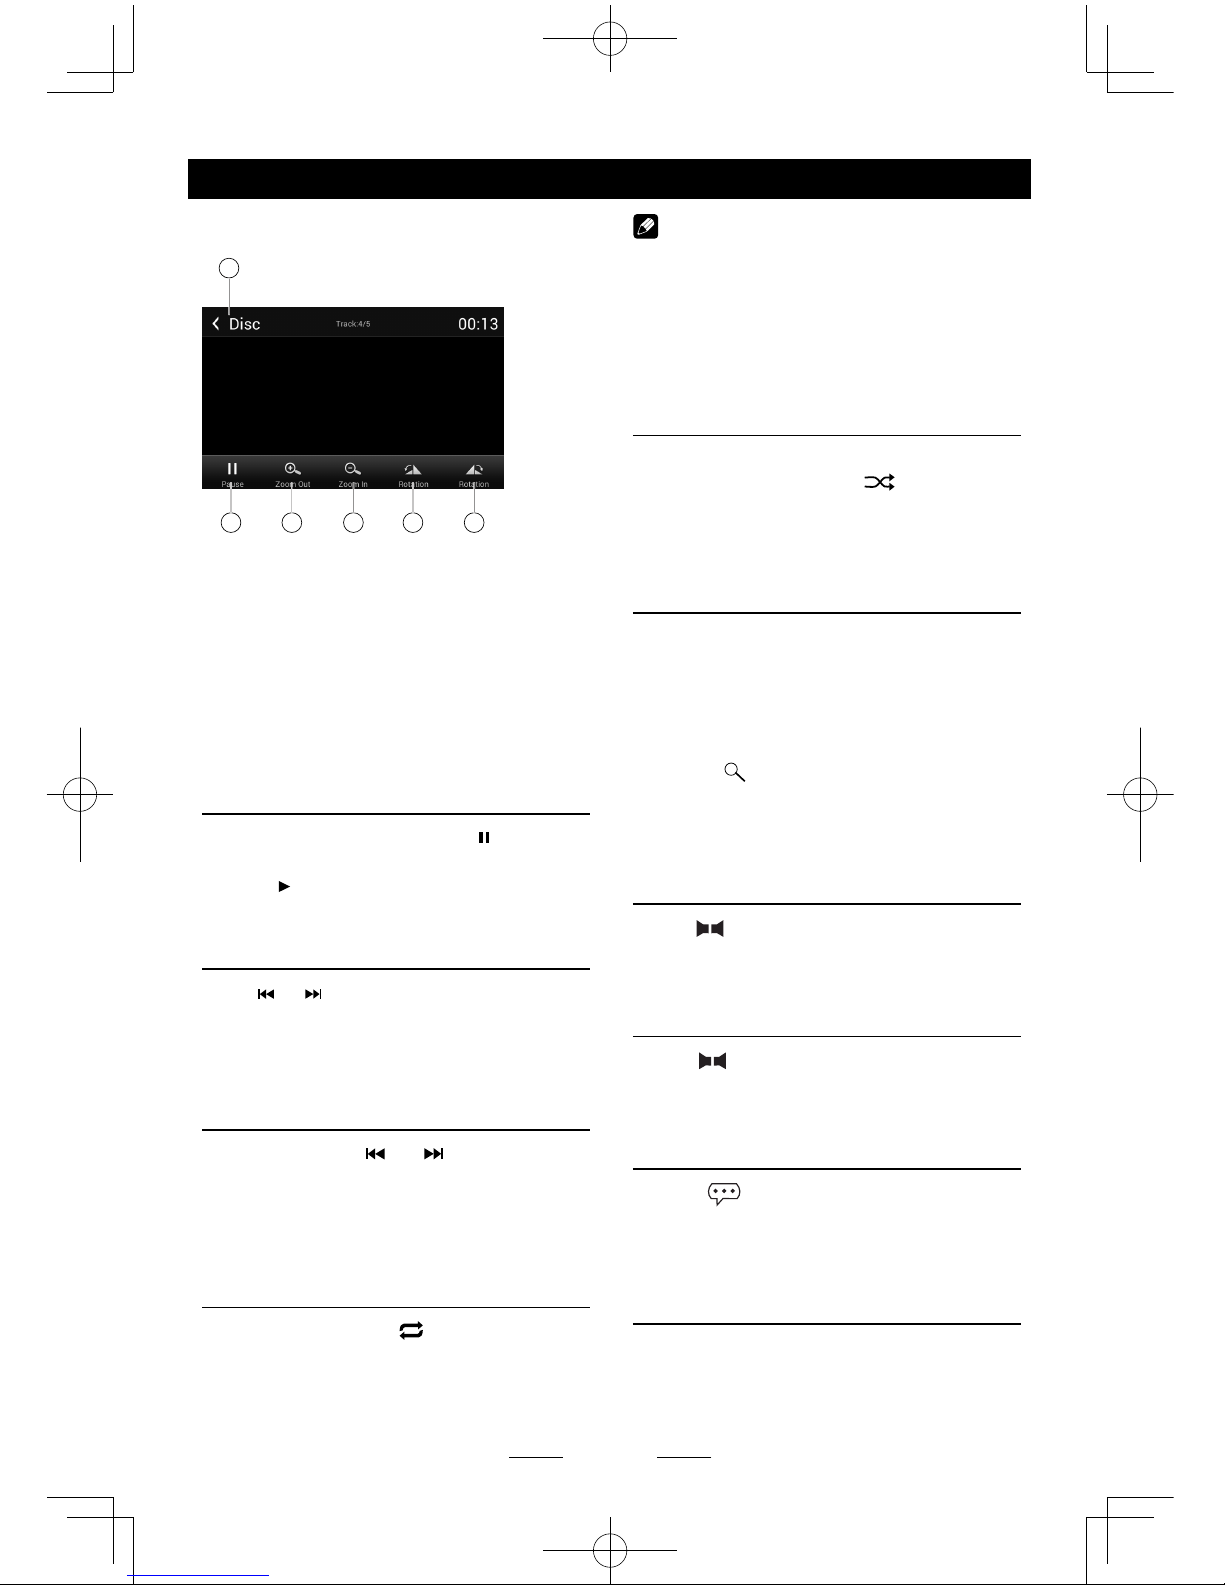
Mixed Disc Playback
When inserting a mixed disc, the unit will read
the disc and show the files list. For some
discs, you need to choose Music/Video/Photo
to play back.
1 2 3 4
65
1. Return to home menu
2. Show music list
3. Show video list
4. Show photo list
5. File/Folder list
Drag the list up/down to scroll.
Touch a le name to visit it.
6. Enter search menu
Page 10
EN - 9
When view a picture, touch the screen(except
top left corner) to show control buttons.
1
2 3 4 5 6
1. Return to home menu
2. Play/Pause
3. Zoom out
4. Zoom in
5. Rotate counterclockwise
6. Rotate clockwise
* Video/Audio playback reference DVD/CD
playback.
Stop playback temporarily
1. During playback, press to pause
playback. The sound will be muted.
2. Press to continue playback.
Select desired track/chapter
Press or to skip to the previous or next
track/chapter.
Fast forward/backward during
playback
Press and hold or button to fast
backward or forward during playback.
During the fast forward or backward operation,
the volume will be muted.
Repeat
During playback, press button on screen to
select repeat playback.
• Default setting is off.
Disc Operation
Note:
If you do not select Repeat on, when the
entire disc or TITLE playback has finished,
the system will stop. If no other control, after 5
minutes the unit will turn into standby mode.
Random track playback (for
CD/VCD/MP3/WMA Only)
You can play all the tracks in random order.
1. During playback, press [ ] button on the
screen to select random playback.
2. Press again to select normal playback.
Search
For DVD/VCD:
1. Touch [Goto] on the control bar.
2. Input the chapter number.
3. Touch [OK] to conrm.
For Mixed disc:
1. Touch [
] icon.
2. Input the le name.
3. Touch [ Done ] to conrm.
DVD audio select
Press [ ] button to select audio language to
listen if the DVD has multiple audio languages.
VCD audio select
Press [ ] button to select audio channel to
listen (L, R, Stereo).
DVD subtitle select
Press [ ] button to select the subtitle
language to show if the DVD has multiple
language subtitles.
DVD title select
Touch [ T ] button to display title or chapter
list, touch desired title to play.
Page 11
EN - 10
Radio Operations
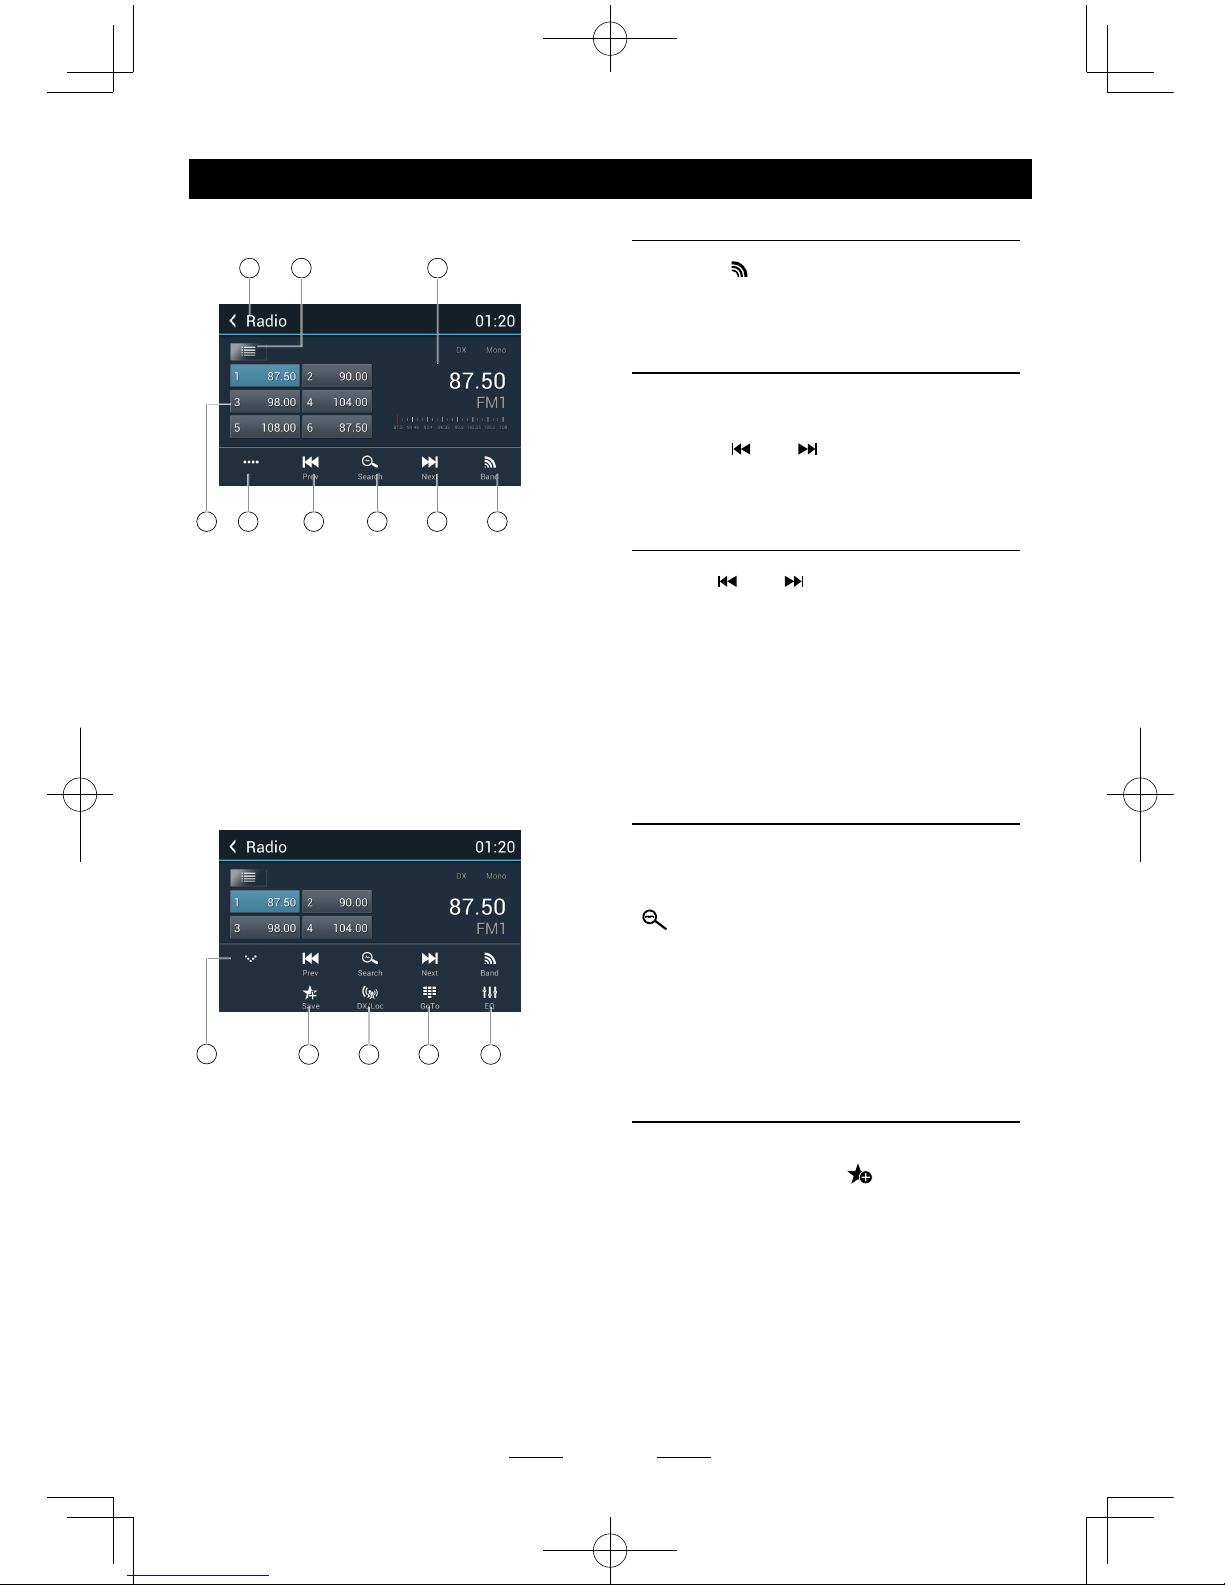
Select [Radio] on the main menu to enter
radio mode.
1 2 3
54 6 7 8 9
1. Return to home menu
2. Preset stations list
3. Current frequency
4. Preset stations of current band
Touch 1~6 to listen to preset station.
5. Show more control buttons
6. Tune backward
Auto tune backward. (long press)
7. Search and store preset stations
automatically
8. Tune forward
Auto tune forward. (long press)
9. Band switch
10
11 12 13 14
10. Hide the second line of control buttons
11. Save stations manually
12. To receive local / distant radio stations
13. Goto station by inputting frequency
14. Enter EQ menu
Select one radio band
Touch the [ ] button to select one radio
band among FM1, FM2, FM3, AM1 and AM2.
Manual tuning
During manual tuning, the frequency will be
changed in steps.
Touch the [
] or [ ] button on the
operation bar to tune in a lower/higher station.
Auto tuning
Hold the [ ] or [ ] button on the operation
bar for more than 2 seconds to seek a lower/
higher station.
To stop searching, repeat the operation above
or press other buttons having radio functions.
Note:
Whenastationis received, searching stops
andthestationisplayed.
Auto store
Only stations with sufcient signal strength will
be detected and stored in the memory.
To start automatic station search, touch the
[
] button on the operation bar.
To stop auto store, press other buttons having
radio functions.
Note:
Afterautostore,the previous stored stations
willbeoverwritten.
Manual store
1. When one expected radio station has
been detected, touch [ ] button on the
operation bar to show the preset station
store list.
2. Touch to select an item on the list to store
the current station in the memory.
3. Touch top left of the screen to exit.
Page 12
EN - 11
Radio Operations
Recall the stored stations
Method 1:
Touch the 1~6 on the left of screen to listen to
the preset station of current band.
Method 2:
1. Touch [ ] button on the screen to show
the preset stations list.
2. Select a band
3. Touch a station on the list to listen to.
4. Touch top left of the screen to exit.
Local seeking
When LOCAL seeking is on, only radio
stations with strong radio signal will be be
received.
To open LOCAL function, touch [ ] button
on the operation bar, then touch the [
]
button to select “Loc” or “DX”.
Note
Thenumberofradiostations that can be
receivedwill decreaseaftertheLoc seeking
modeison.
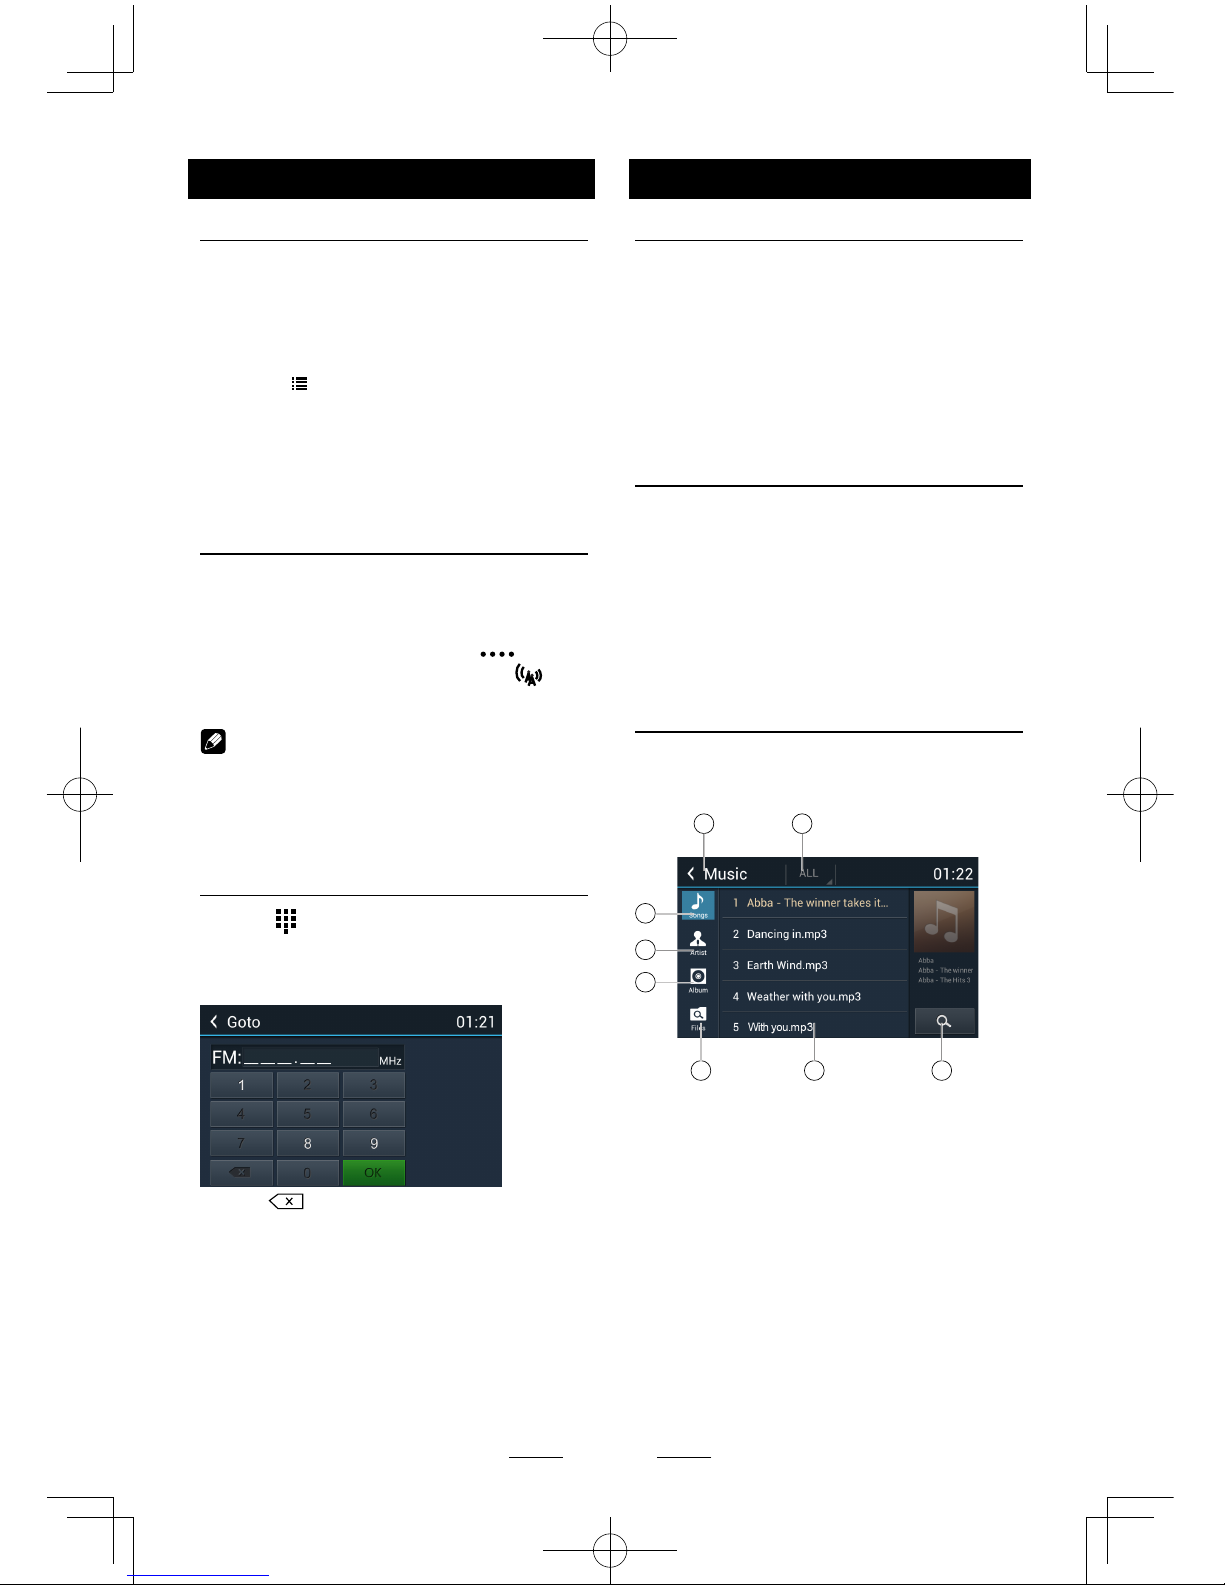
Key Search
Touch [ ] button on the operation bar to
show key search menu.
Touch the keypad to input the frequency,
touch [ OK ] to goto the station directly.
Touch [ ] to clear all the digits.
SD/USB Operations
Using an SD Card
1. Open the card slot cap, insert an SD card
into the corresponding slot, the unit will load
the les automatically.
2. To remove the card, you should rst select
another source, in order to avoid damaging
the card, press the card slightly, and take
off the card after it pops out.
Using USB device
1. Connect your USB device to the USB
cable.
When connecting an USB device, the unit
will read the les automatically.
2. To remove the USB device, you should
rst select another source, in order to avoid
damaging the USB device.
Music Playback
Select [Music] on the applications menu, the
unit will display all the music on the mobile
storages.
1 2
6
3
4
5
7 8
1. Return to home menu
2. Select le source
3. List the les by song name
Touch a song to start play.
4. List the les by artist
5. List the les by album
6. Show the folders
7. List window
Drag up/down to scroll.
Touch an item to select.
8. Enter search menu.
Page 13
EN - 12
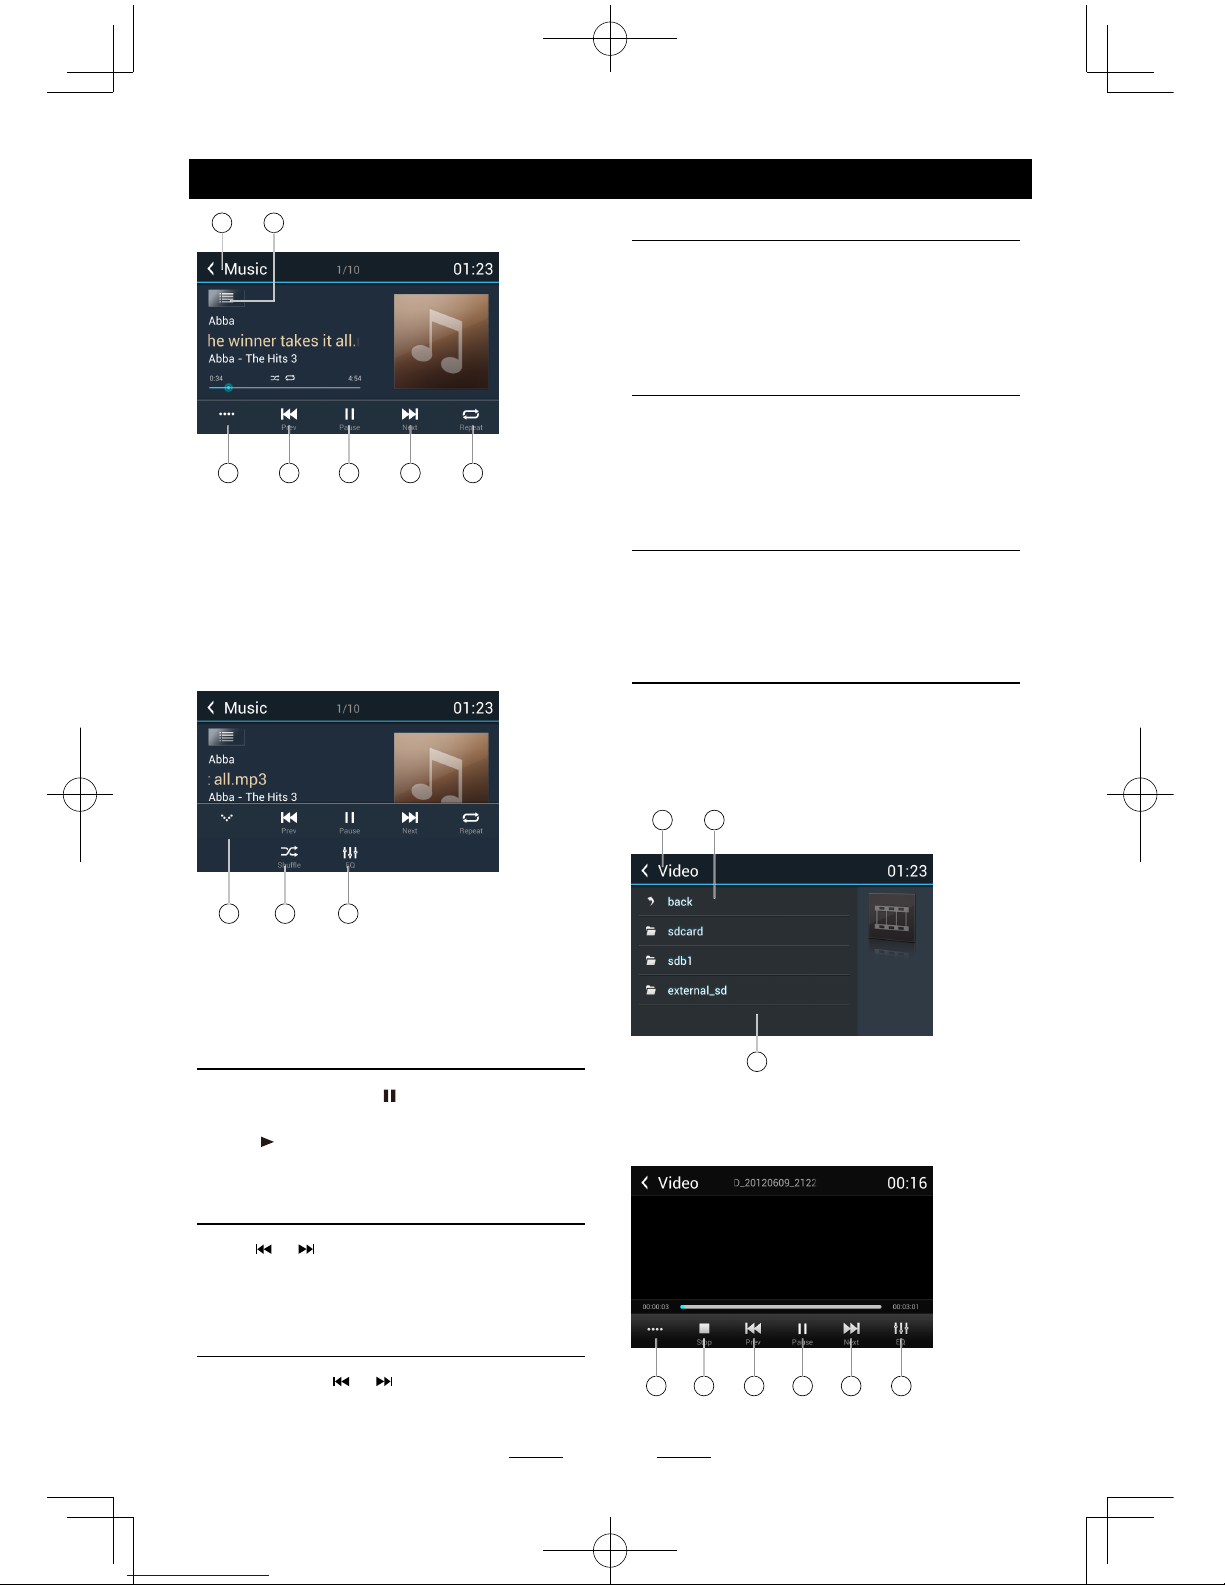
SD/USB Operations
9 10
11 12 13 14 15
9. Return to home menu
10. Show list menu
11. Show more control buttons
12. Previous track
Fast backward (long press)
13. Play/Pause
14. Next track
Fast forward (long press)
15. Repeat play
16 17 18
16. Hide the second line of control buttons.
17. Shufe play
18. Enter EQ menu.
Play/Pause
When playing, press [ ] button to pause, and
the sound will be mute.
Press [ ] button to play.
Previous/next track
Press or button to go to previous or next
track.
Fast forwarding or reversing
Press and hold or button to fast
backward/forward.
Select Music by Artist
1. Touch [Artists] on the left of the screen.
2. Touch an artist shown on the list.
3. Select a song to play.
Select Music by Album
1. Touch [Albums] on the left of the screen.
2. Touch an album shown on the list.
3. Select a song to play.
Select Music by Song Name
1. Touch [Songs] on the left of the screen.
2. Select a song to play.
Video Playback
Select [Video] on the applications menu,
the unit will display all the video files on the
storages.
During playback, touch the screen(except top
left corner) to show control buttons.
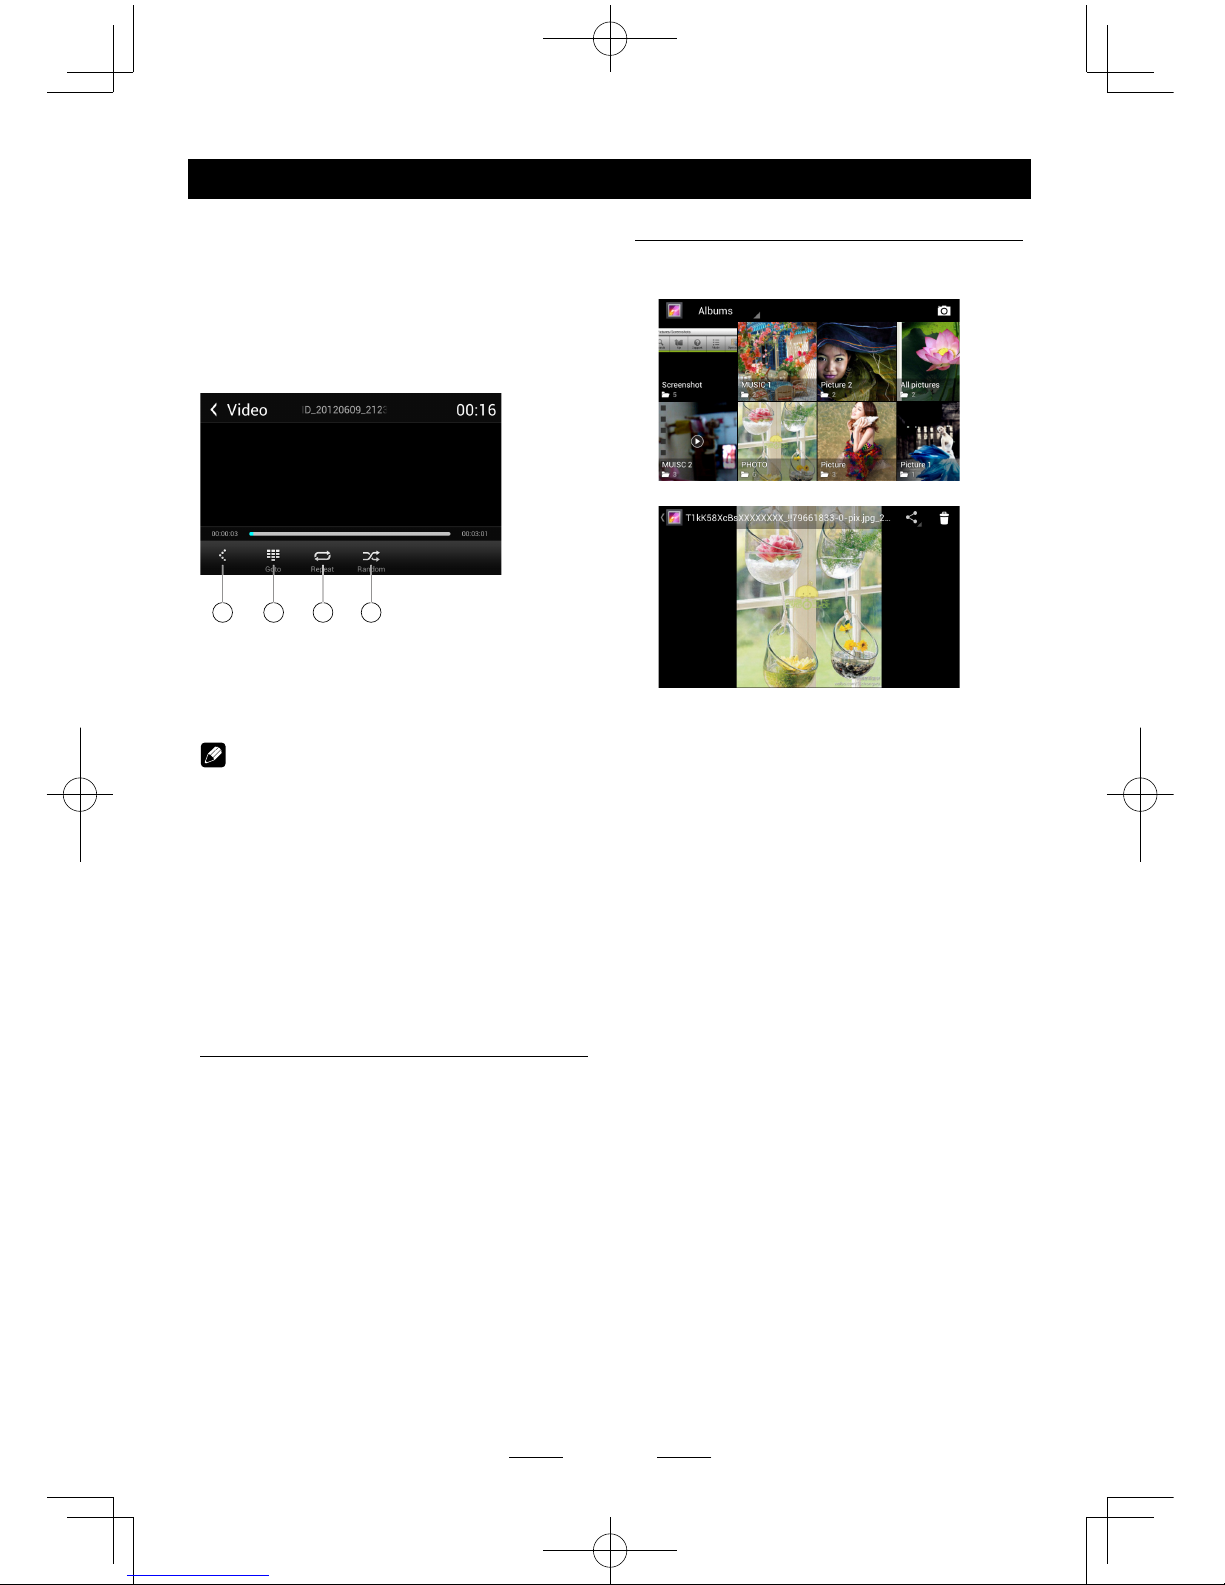
1 2
3
1. Return to home menu
2. Back
3. Folder/File list
Drag up/down to scroll, touch to access.
4 5 6 7 8 9
Page 14
EN - 13
SD/USB Operations
4. Show more control buttons
5. Stop playback
6. Previous chapter
Fast backward (long press)
7. Play/Pause
8. Next chapter
Fast forward (long press)
9. Enter EQ menu
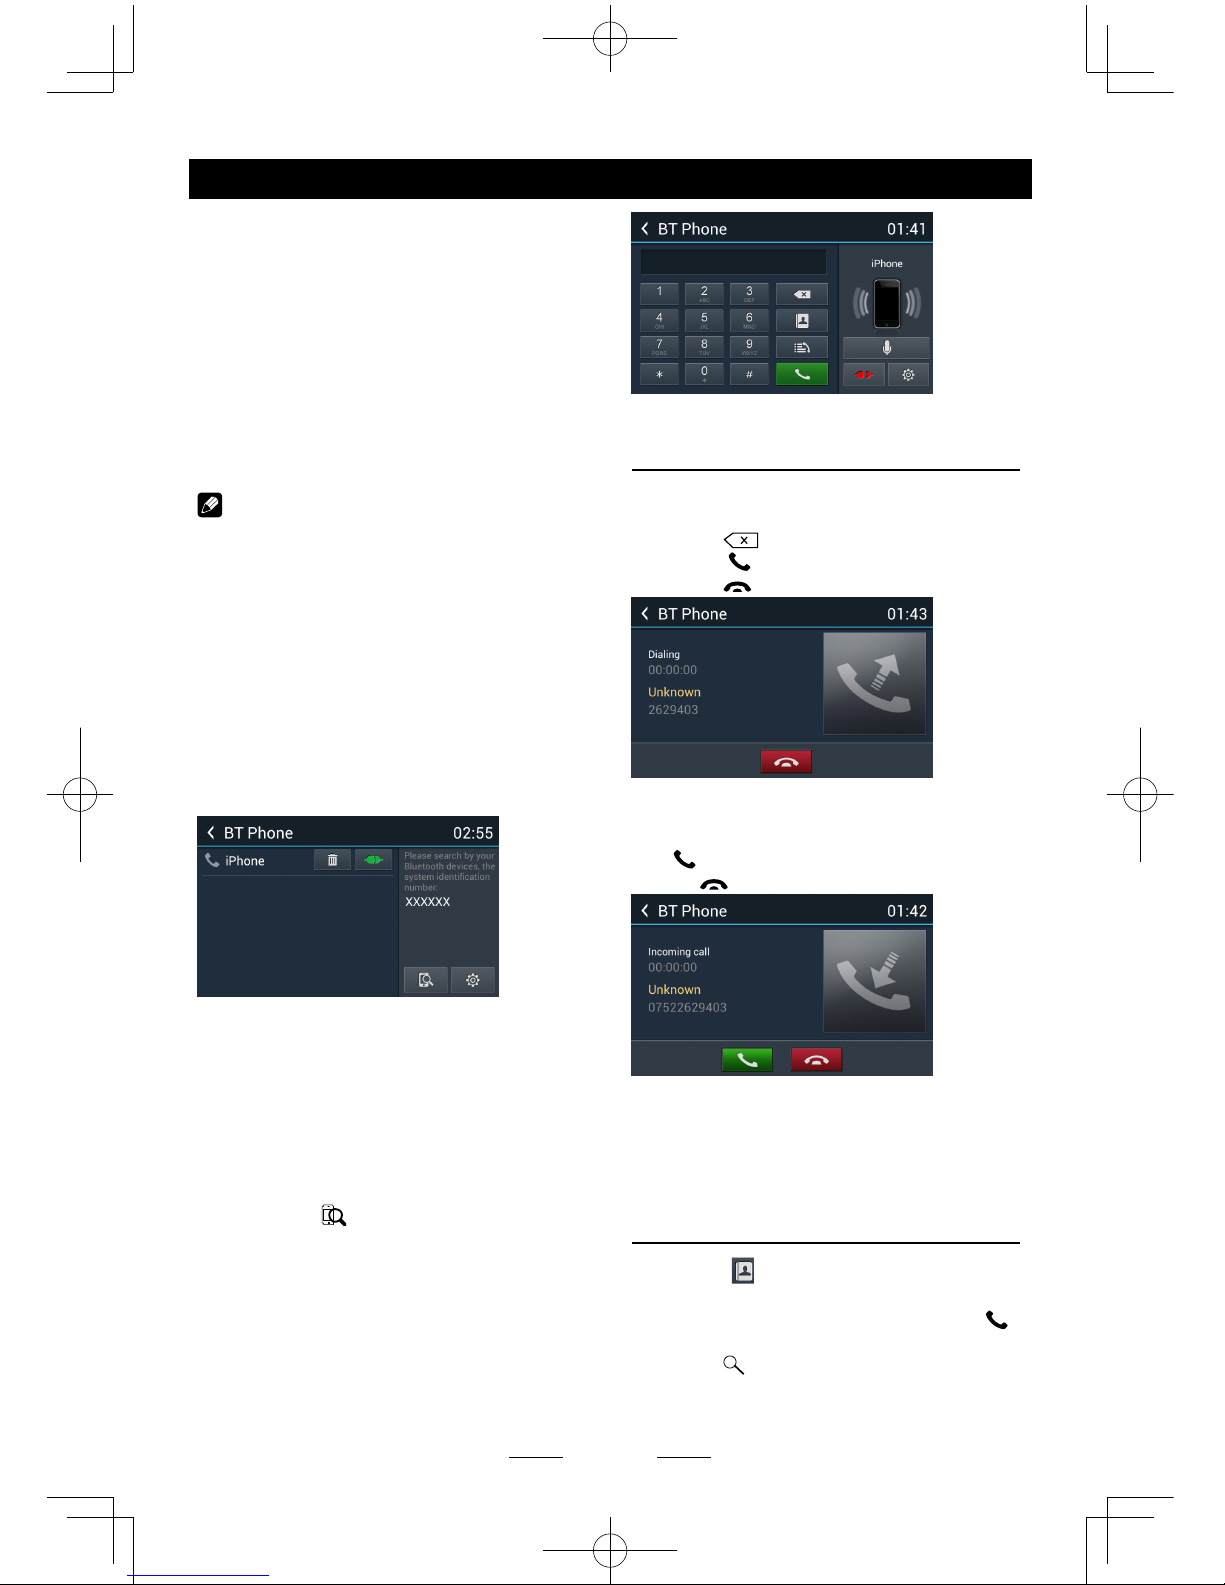
10 11 12 13
10. Show previous page of control buttons
11. Enter search menu
12. Repeat play
13. Random play
Notes
• DisconnectUSBstoragedevicesfromthe
unitwhennotinuse.
• Useanoptional cableto connect the USB
audioplayer/USBmemoryasanydevice
connecteddirectlyto the unit willprotrude
outfromtheunitandmaybedangerous.
• Donotuseunauthorizedproducts.
Using an Android mobile
phone as an USB storage
device
If you want to use your Android mobile phone
as an USB storage device.
1. Connect your Android mobile phone to the
unit with an USB cable.
2. Set USB connection type of your mobile
phone to “Mount SD card”.
* If you select “Charge only”, it won’t be
recognized by the unit.
3. In the setting menu of the unit, select
“Storage”, then “Mount USB disk”.
Gallery Operations
1. Select [Gallery] on the APPS menu.
2. Select one gallery to show the picture list.
3. Touch to view it.
Drag left/right to scroll.
Touch the top right corner to delete the
photo.
Touch top left corner to back.
Page 15
EN - 14
The Bluetooth allows you to utilize your car’s
built-in audio system for handsfree wireless
mobile phone or music communication. Some
Bluetooth mobile phones have the audio
features, and some portable audio players
support Bluetooth feature. This system can
play audio data stored in a Bluetooth audio
device. The car stereo with Bluetooth will be
able to retrieve phonebook contacts, received
calls, dialed calls, missed calls, incoming calls,
outgoing call and listen to music.
Notes:
• Thissystemwillnotoperateormayoperate
improperlywithsome Bluetooth audio
players.
• Theunitcannotguaranteethecompatibility
ofallmobilephonestogetherwiththeunit.
• Audio playbackwillbeset to the same
volumelevelasset during telephonecall.
Thiscancauseproblems,ifextremevolume
levelissetduringthetelephonecall.
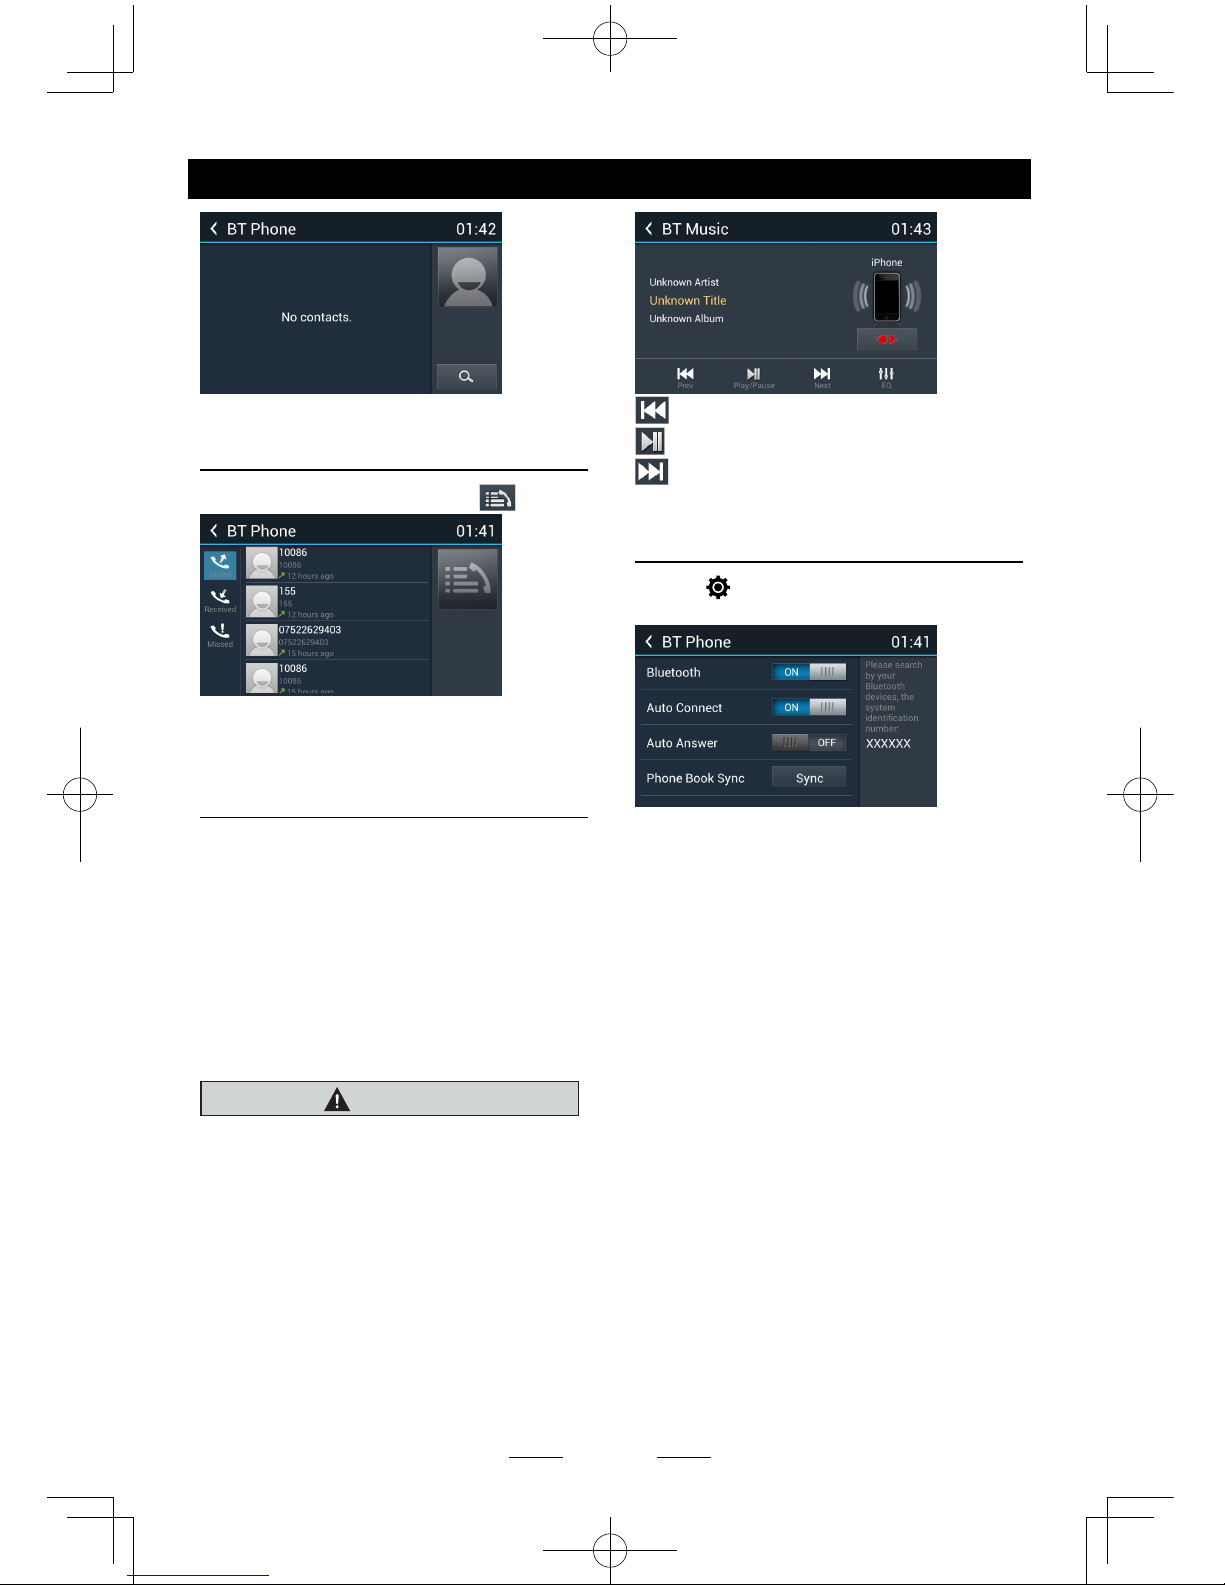
Touch [BT Phone] on the main menu to enter
Bluetooth Phone mode.
1. If the Bluetooth function of the unit is off,
the unit will ask you to turn it on.
(Default setting is on)
2. Turn on Bluetooth function of your mobile
phone.
3. Search for new Bluetooth devices on your
phone. Select the model name from the
pairing list on the mobile phone, and enter
password (Default password: 0000)
Or touch [
] button on the screen to
search mobile Bluetooth devices.
After connect successfully, the unit show
following menu.
Bluetooth Operations
Making a call
• DialNumber
1. Input numbers by digit-keys on the screen.
Touch [ ] to clear the digits.
2. Touch [ ] button to dial out.
3. Touch [ ] button to terminate call.
• Answeringacall
You can answer an incoming call by pressing
the [ ] button.
Touch [ ] button to reject an incoming call.
• Disconnect
To disconnect a paired device, touch
[Disconnect] button.
Call from Phonebook
1. Touch [ ] button to show your phone
book.
2. Select a number to select and touch [
]
button to dial out.
3. Touch [
] to search a contact name.
Page 16
EN - 15
Bluetooth Operations
Call History
Access Call History by touching [ ] button.
Then select a number from Dialled/Missed/
Received calls.
Bluetooth Audio
What is audio streaming?
Audio streaming is a technique for transferring
audio data such that it can be processed
as a steady and continuous stream. Users
can stream music from their external audio
player to their car stereo wirelessly and listen
to the tracks through the car’s speakers.
Please consult your nearest dealer for more
information on the product of wireless audio
streaming transmitter offered.
CAUTION
Please avoid operating your connected
mobile phone while audio streaming as
this may cause noise or the sound to cut in
and out on playback.
Audio streaming may or may not resume
after telephone interrupt as this is
dependent on your mobile phone.
Touch [BT Music] button to play music on your
mobile phone.
: Previous track
: Play/Pause
: Next track
Bluetooth Settings
Touch [ ] button to show Bluetooth setting
menu.
Page 17
EN - 16
iPod/iPhone Operations
This unit supports only the following iPod/iPhone models:
· iPhone 5
· iPhone 4S
· iPhone 4
· iPod touch (5th generation)
· iPod touch (4th generation)
· iPod classic
· iPod nano (7th generation)
· iPod nano (6th generation)
· iPod nano (5th generation)
“Made for iPod,” and “Made for iPhone” mean that an electronic accessory has been designed to
connect specically to iPod, or iPhone, respectively, and has been certied by the developer to
meet Apple performance standards.
Apple is not responsible for the operation of this device or its compliance with safety and
regulatory standards. Please note that the use of this accessory with iPod or iPhone may affect
wireless performance.
iPhone and iPod are trademarks of Apple Inc., registered in the U.S. and other countries.
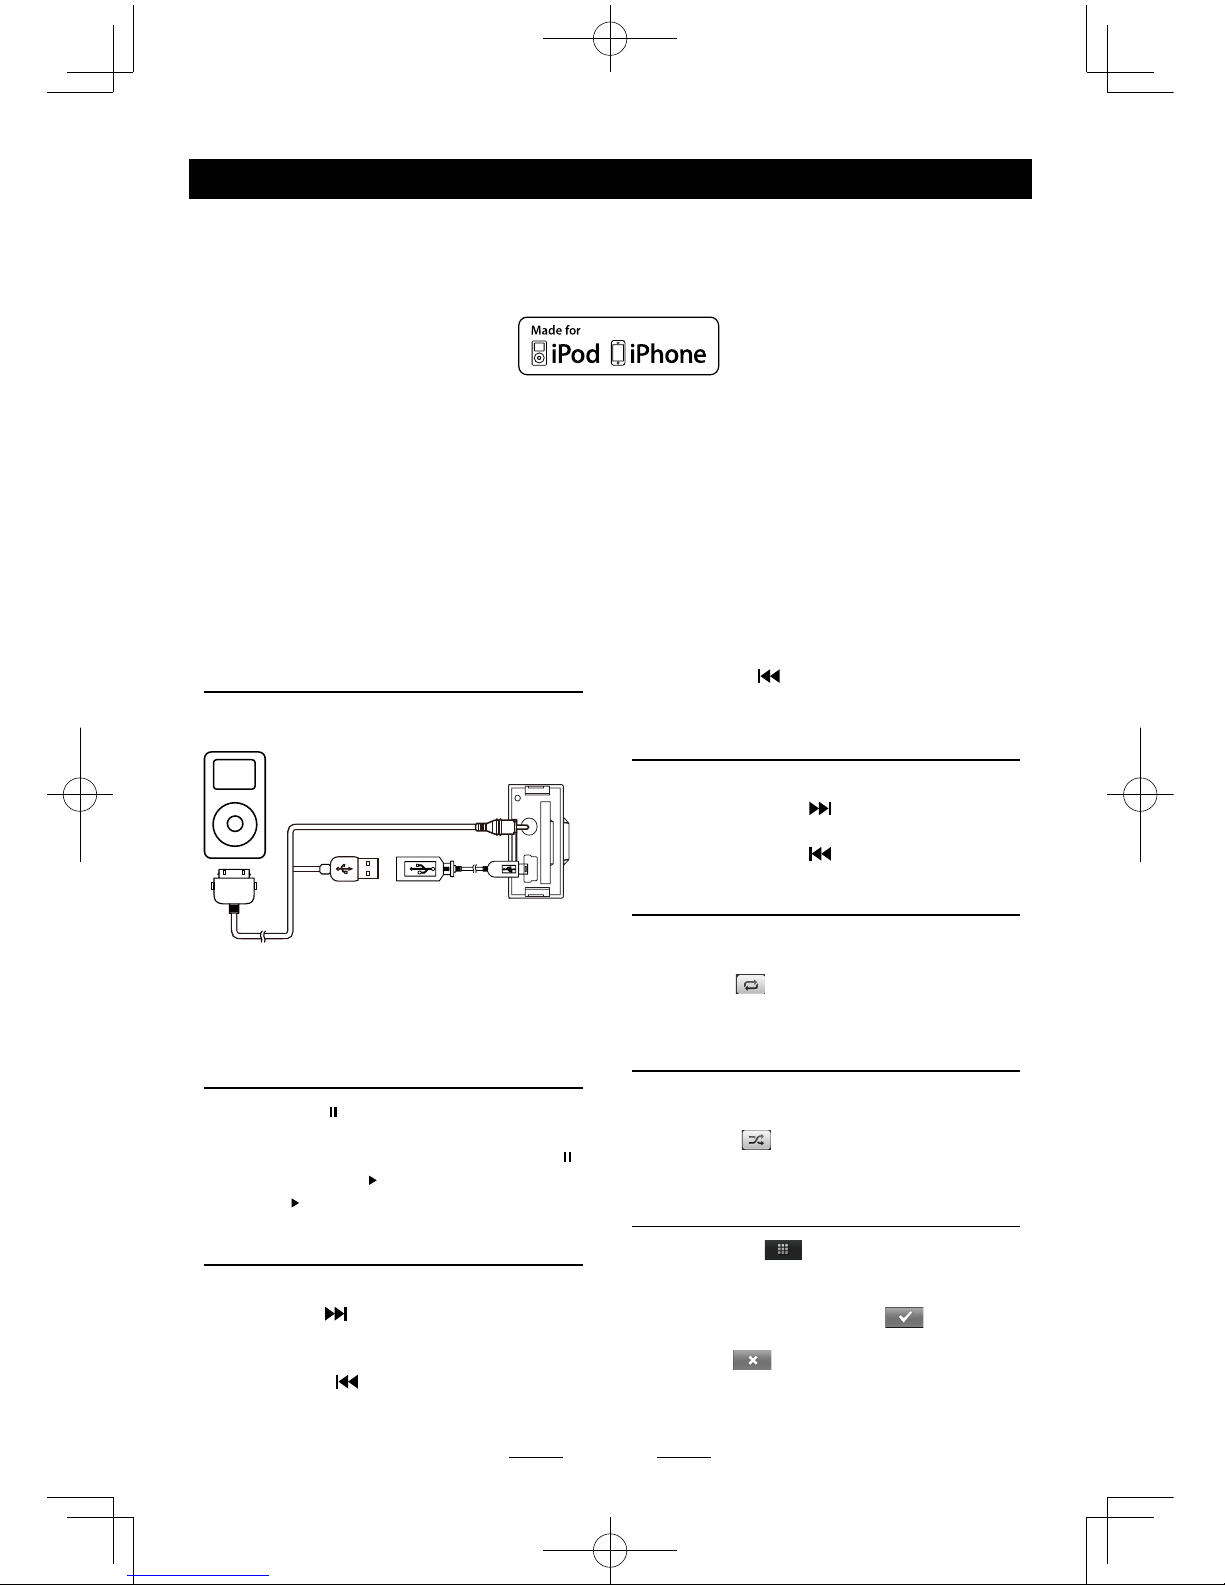
Accessing iPod mode
Connect an iPod or iPhone to the USB
connector via an iPod cable.
Touch [iPod] on the main menu to enter iPod
menu.
If [iPod] isn’t on the current menu, slide the
bottom bar left or right to nd it.
Pausing play
1. Touch the [ ] button on the bottom of the
screen to pause play.
“PAUSE” appears in the display, and [ ]
button becomes [
] .
2. Touch [ ] button to resume play.
Selecting a track
Track-up
Touch the [ ] button to move to the
beginning of the next track.
Track-down
1. Touch the [
] button to move back to
the beginning of the current track.
2. Touch the [ ] button twice to move back
to the beginning of the previous track.
Fast forward/Fast reverse
Fast forward
Touch and hold the [ ] button .
Fast reverse
Touch and hold the [ ] button .
Repeat play
This function allows you to play the track
repeatedly.
Touch the [
] button to select Repeat one
or Repeat all.
Random play
This function allows you to play all tracks
recorded in a random order.
Touch the [
] button to perform random
play.
Search function
1. Touch the [ ] button to enter search
menu.
2 Input number by touching buttons on
the screen, then touch [
] to begin
searching.
Touch [ ] button to delete inputted
number.
Page 18
EN - 17
3G APN Settings
Note:
Contact the manufacturer for latest compatible
3G devices.
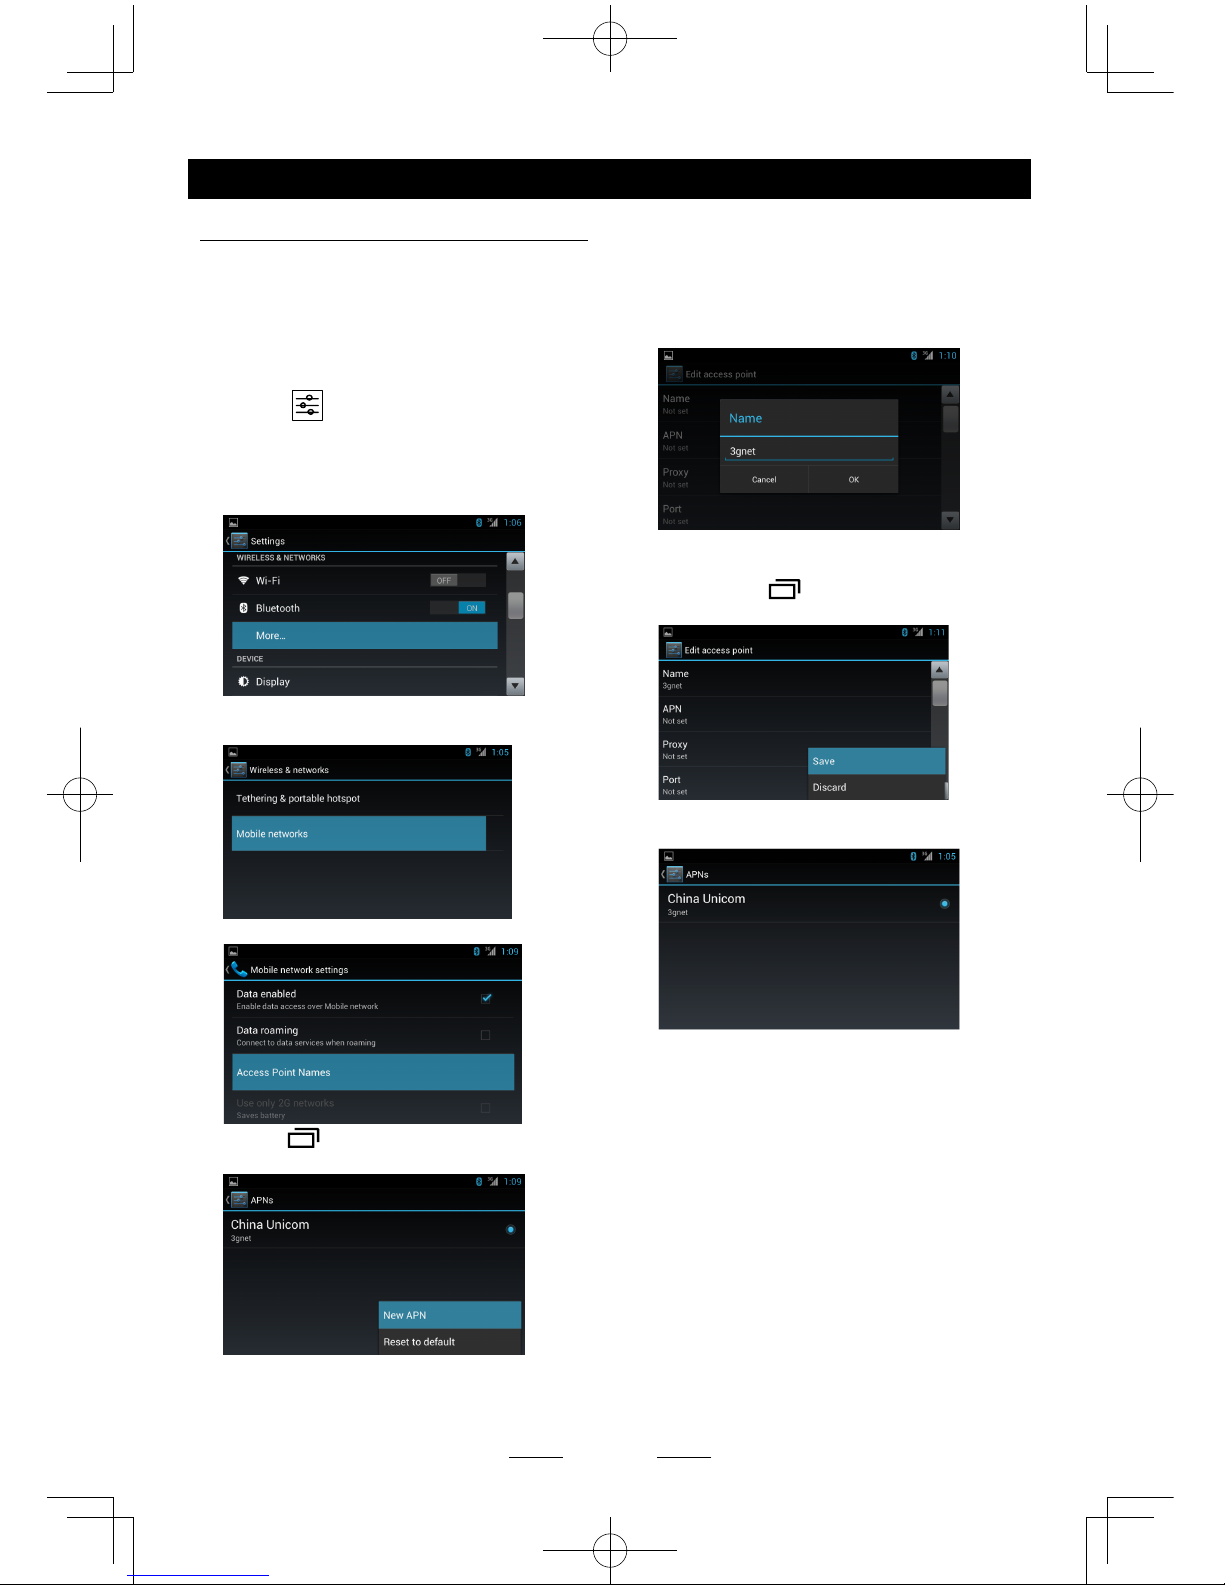
User set the APN to access the internet.
1. Insert the 3G dongle.
2. Select [
] on the main menu to enter
the setting interface.
3. Click the [Wireless & networks] to enter
the Wireless & network settings and click
[more...].
4. Click [Mobile network] to enter the Mobile
network settings.
5. Click the [Access Point Names].
6. Press [ ] (MENU) button on the front
panel, then click the [New APN].
Internet
7. Need to setup following options: Name,
APN, MCC, MNC.
Touch the dialogue box to show keypad,
and input your desired name.
APN according to the operator to
determine.
The unit will detect your 3G module to
determine the MCC and MNC.
8. Then press [
] (MENU) button and click
the [Save] button.
9. Select the APN, 3G icon appears on the
top right corner of the taskbar.
Page 19
EN - 18
Internet
Wi-Fi Settings
The unit support the WiFi dongle: realtek
8188cu, 8188eu.
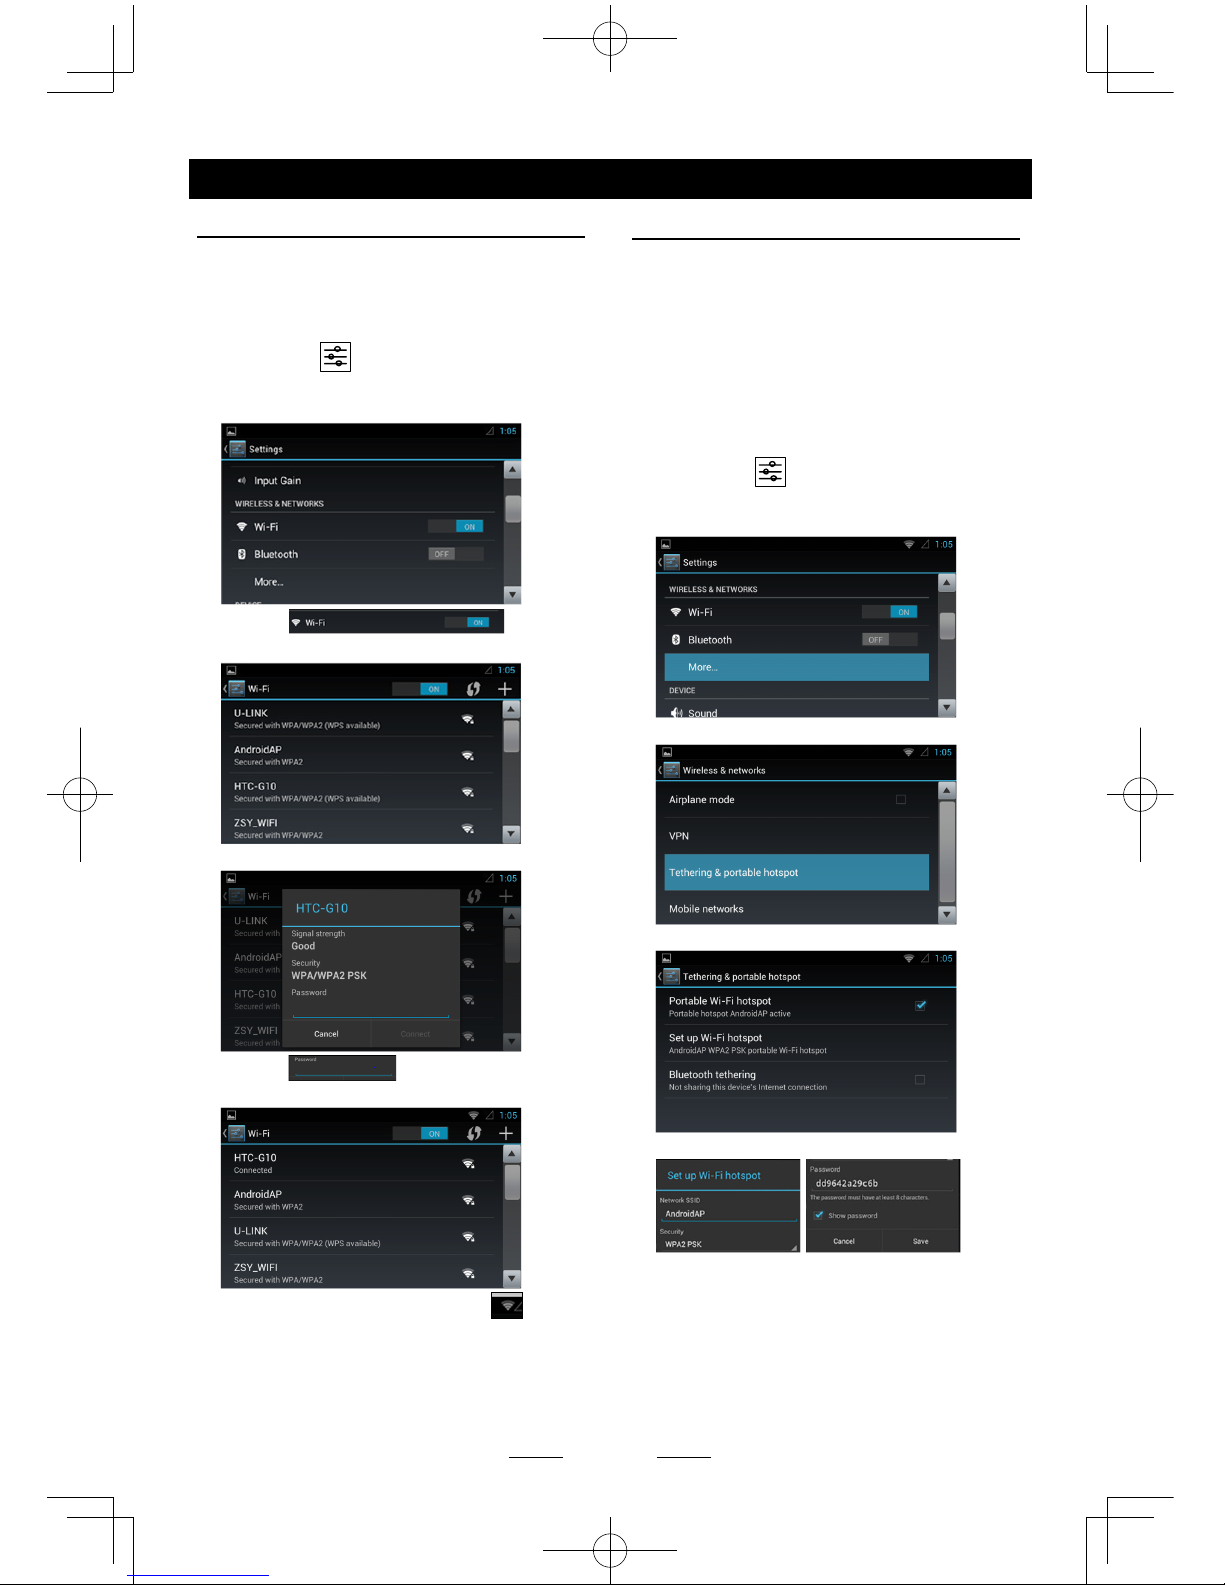
1. Connect the WiFi dongle to the unit.
Touch the [
] icon on the main menu
to enter setting menu, and turn on Wi-Fi (if
necessary).
2. Touch [ ] to enter
WiFi setting menu.
3. Touch an available WiFi hotspot.
4. Touch [ ] and input the
password, touch [Connect] to conrm.
5. After connect successfully, the [ ]
icon appears on the top right corner of the
screen. Now you can access internet.
Create Wi-Fi Hotspot
User can use the unit to create a personal
Wi-Fi hotspot. All your other Wi-Fi enabled
devices will then be able to connect to this
hotspot and share the primary internet
connection.
1. Connect the Wi and 3G dongle to the USB
slots on the rear of the unit.
Refer to “Device Connections”.
2. Touch the [
] icon on the main
menu, and drag down to “WIRELESS &
NETWORKS”.
3. Select “More...”.
4. Touch “Tethering & portable hotspot”.
5. Touch “Portable Wi-Fi hotspot”.
After setting done, you can touch “Set up WiFi hotspot” to modify the settings.
Page 20
EN - 19
Internet
Visit Website
To visit internet, you need setup wireless &
network in system setting menu.
Select [
] on the main menu to view web
site.
Touch the dialog box on the upper side of
the screen to show keypad. Input the website
address, and touch [Go] to visit it. Drag the
web page to scroll.
E-mail
Select [Email] or other mail software on the
applications menu.
First you need establish an account. Enter
your Email address and password. Then you
can send/receive E-mails through the unit.
Navigation Operations
To navigate by the unit, select the navigantion
application on the main menu, such as iGO.
Then Navigate by the touch screen.
AUX Operations
Select [Aux In 1] on the main menu to visit
front auxiliary device, and select [AUX IN 2] to
enter rear auxiliary device.
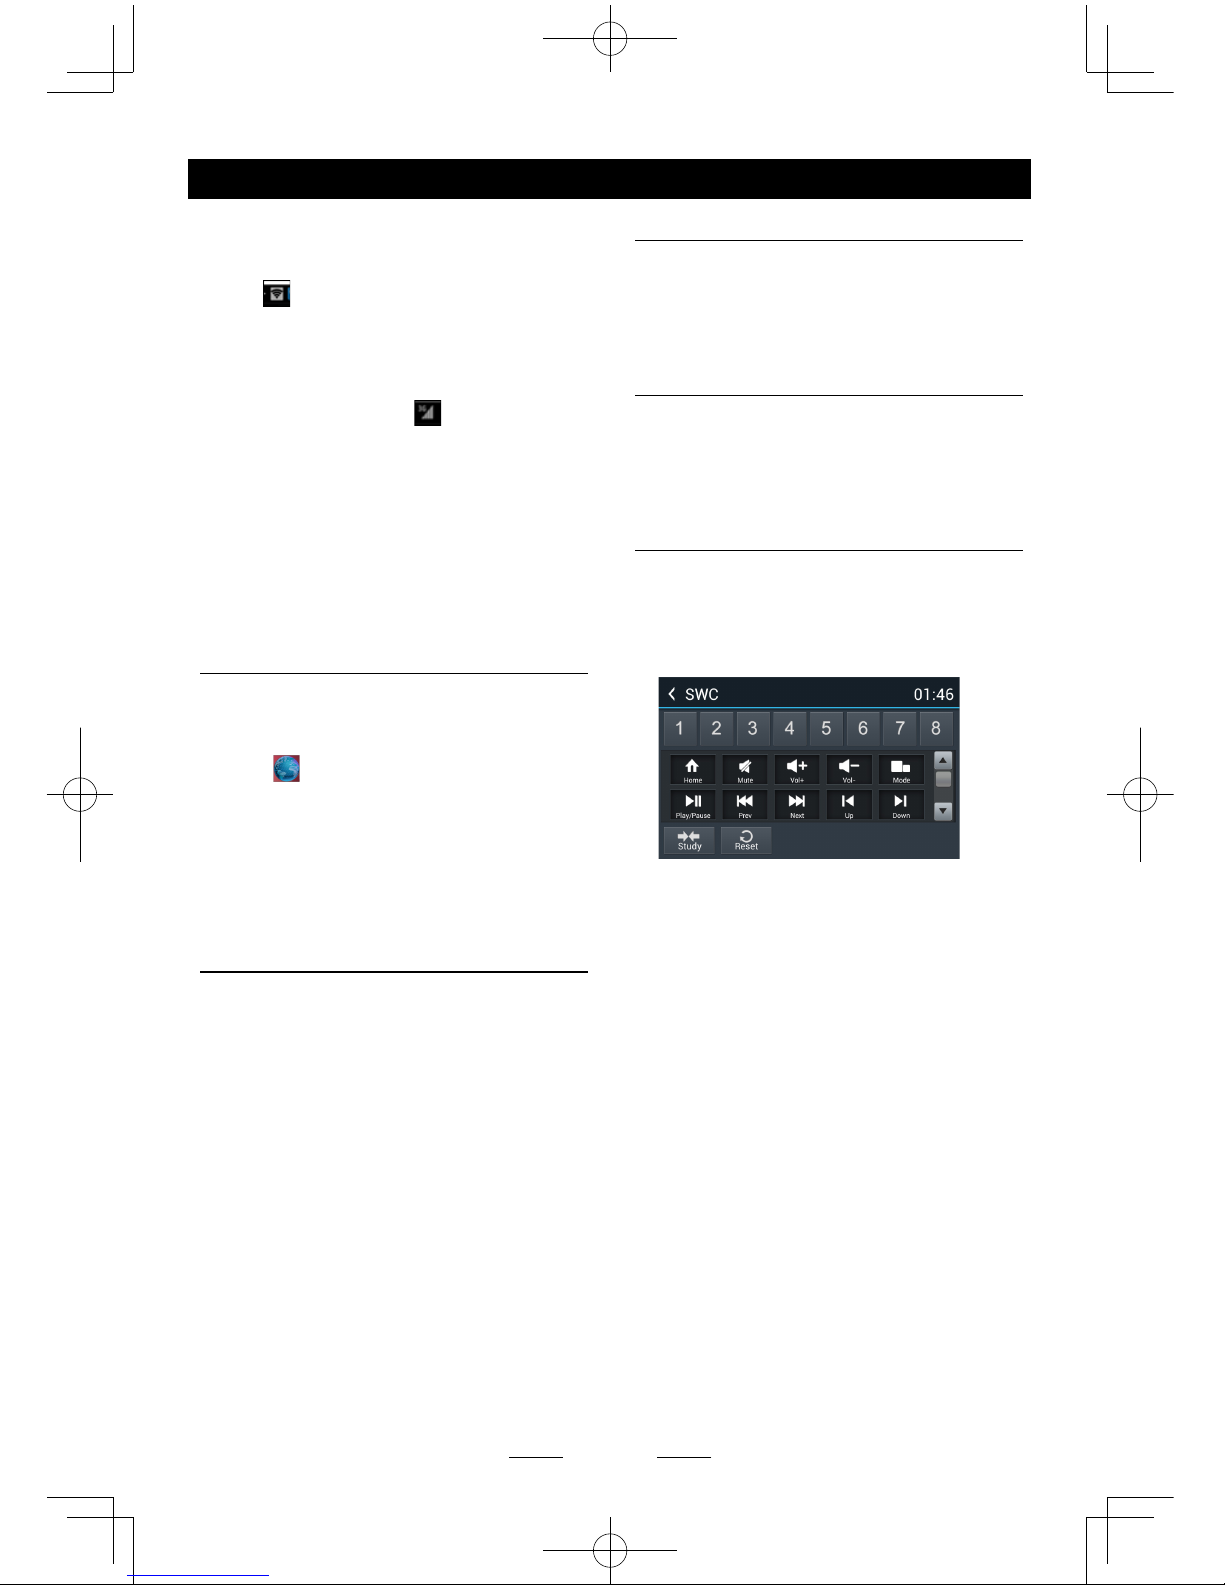
Steering Wheel Control
Select [SWC] on the main menu to enter SWC
setting menu.
1. Touch number button to select a SWC
button.
2. Select a function.
3. Press each individual steering wheel control
button for each corresponding function.
4. Touch [Study] to program.
5. Once the nal steering wheel control button
is programmed, the functions are saved
and the programming will end.
6. Touch [ Reset ] to reset the programming.
Other Mode
If your device can’t connect to the Wi-Fi
hotspot:
1. Check the Wi-Fi network.
The
icon will appears on the top left of
the screen after setting successfully. If not,
check your Wi-Fi dongle connection and
the Hotspot settings.
2. Check the 3G network.
If the singnal indicator
on the top
taskbar turns grey, the network is
unavailable, check your 3G dongle
connection and 3G settings.
3. Be sure to input the correct password.
4. There are too many devices connected to
the hotspot.
Page 21
EN - 20
i-Mode (Siri) Function
1. Turn on the bluetooth function of both the
unit and smartphone.
Make sure the smartphone has internet
access (iPhone 4S, iPhone 5, iPhone 5S,
iPad, Samsung Galaxy, etc.).
2. Turn on the ‘Siri’ application of iPhone/iPad
or ‘Talk Assistant’ application of Android
phones.
3. Pair your phone to the unit through the
Bluetooth module.
4. Touch [
] to select i-Mode on.
5. When speaking through the external
microphone of the unit, voice signals will be
transferred to the phone.
The phone will process the data and search
the relative information on local memory or
the internet, then transfer the result back to
the unit.
Other Mode
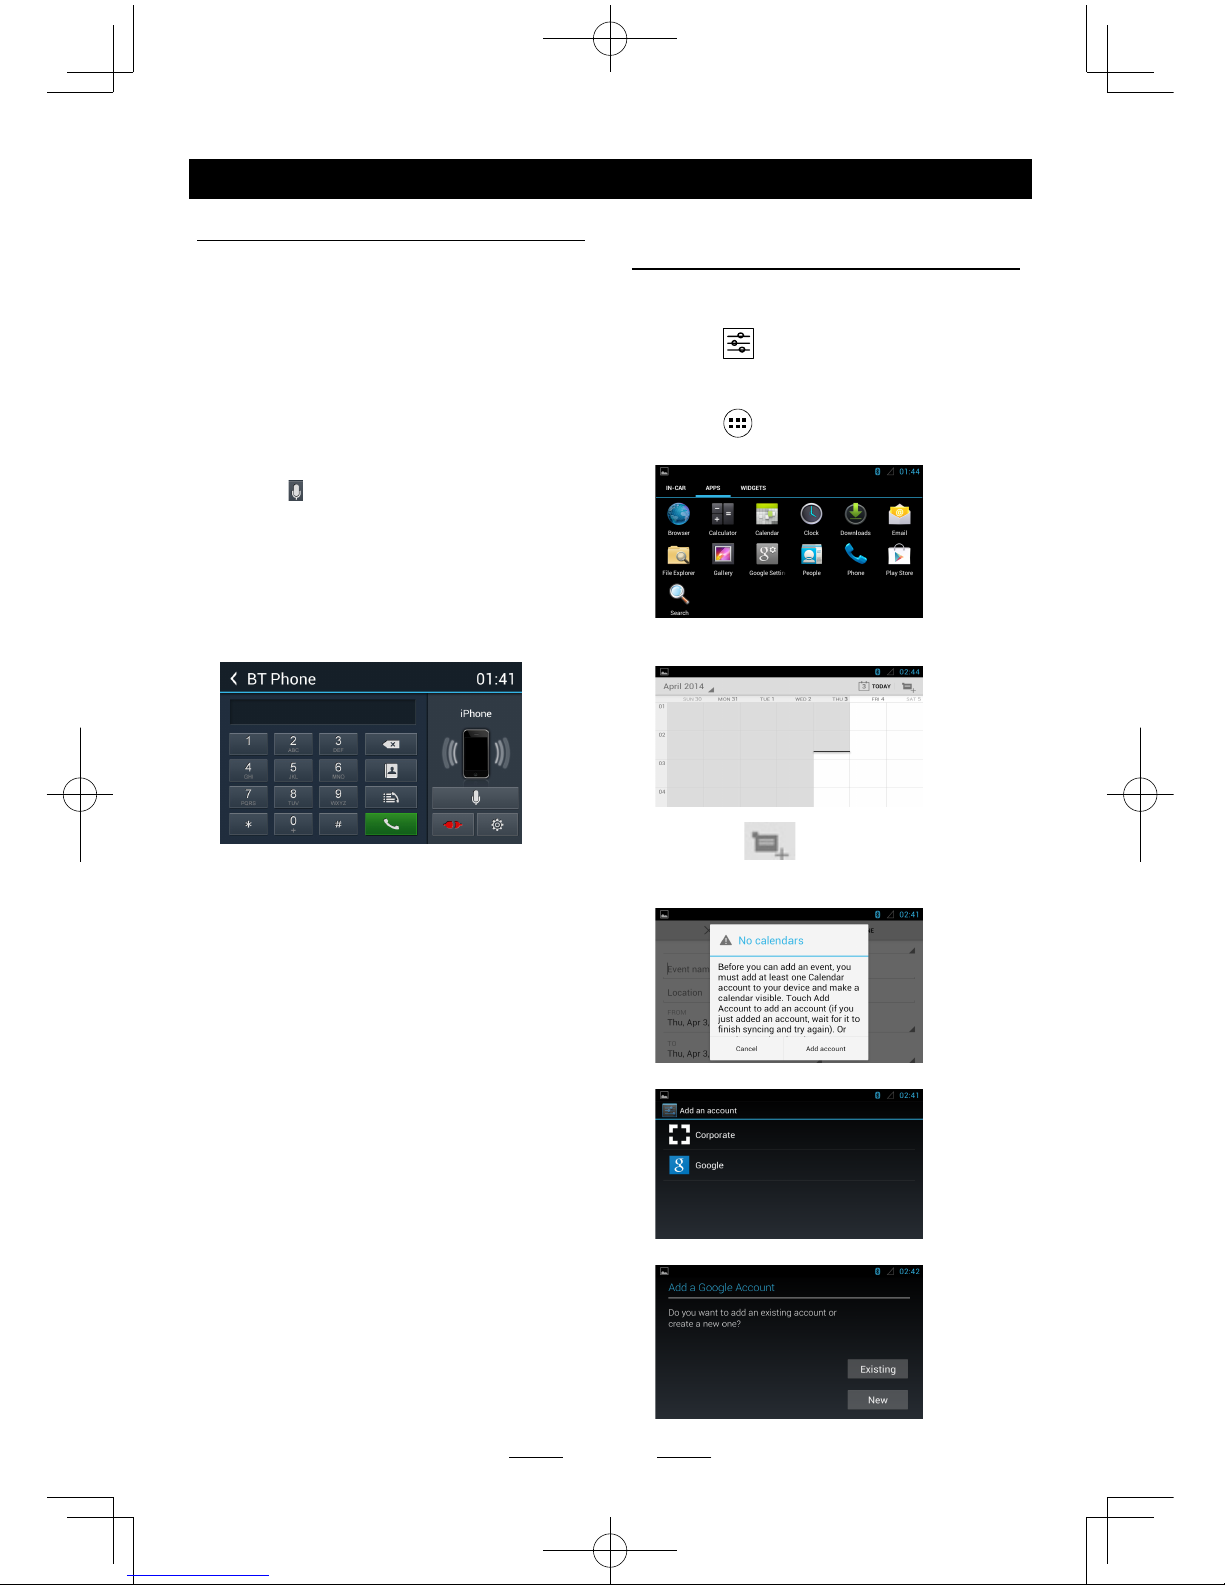
Google calendar
conguration
1. Ensure the network is available, refer
<Internet>.
2. Touch [
] icon on the main menu, select
[Date & time] in the settings menu, then set
the correct local time.
3. Touch [
] icon on the main menu to
enter applications menu and select “APPS”.
Select the Calendar icon to show the
following menu.
Touch the icon on the top right
corner, the unit will pop up the following
menu when you use the Calendar rst time.
Touch "Add account".
Select “Google”.
Page 22
EN - 21
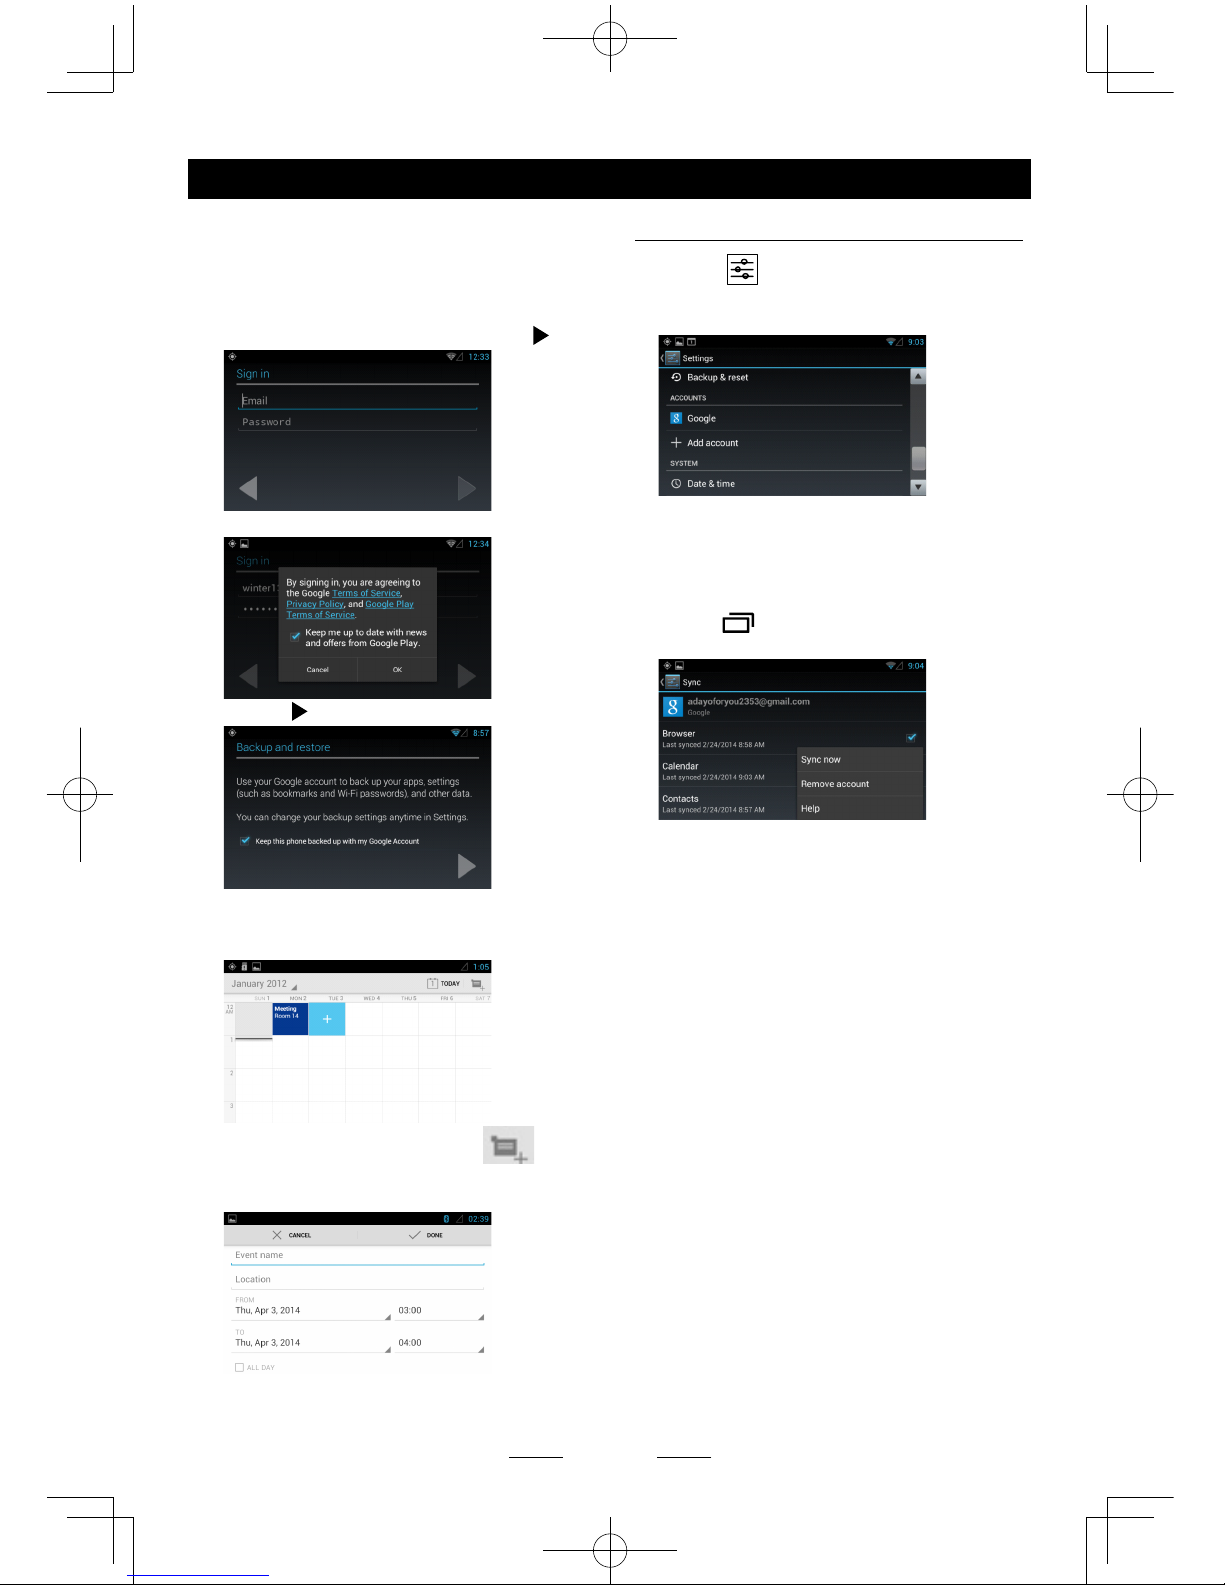
If you want to establish a new account,
please touch [New].
If you want to use an existing account,
please touch [Existing].
After select “Existing”, input your mail
account and password. Then touch [
].
Touch [OK] button to conrm
Touch [ ] to nish setting.
4. Select Calendar in APPS menu to show the
calendar and the arrangements. You can
select a date to view the details.
To add a new event, touch the icon
on the top right corner, or touch [ + ] icon on
the blank area.
Delete Gmail Account
1. Touch [ ] icon on the main menu to
enter settings menu, slide down the screen
to nd "Google".
2. Touch [Google], if you logged on a google
account before, the address appears.
Select the mail address to show the details.
Press [
] (MENU) button on the front
panel to pop up the sub-menu.
Select "Remove account" to delete this
account.
Other Mode
Page 23
EN - 22
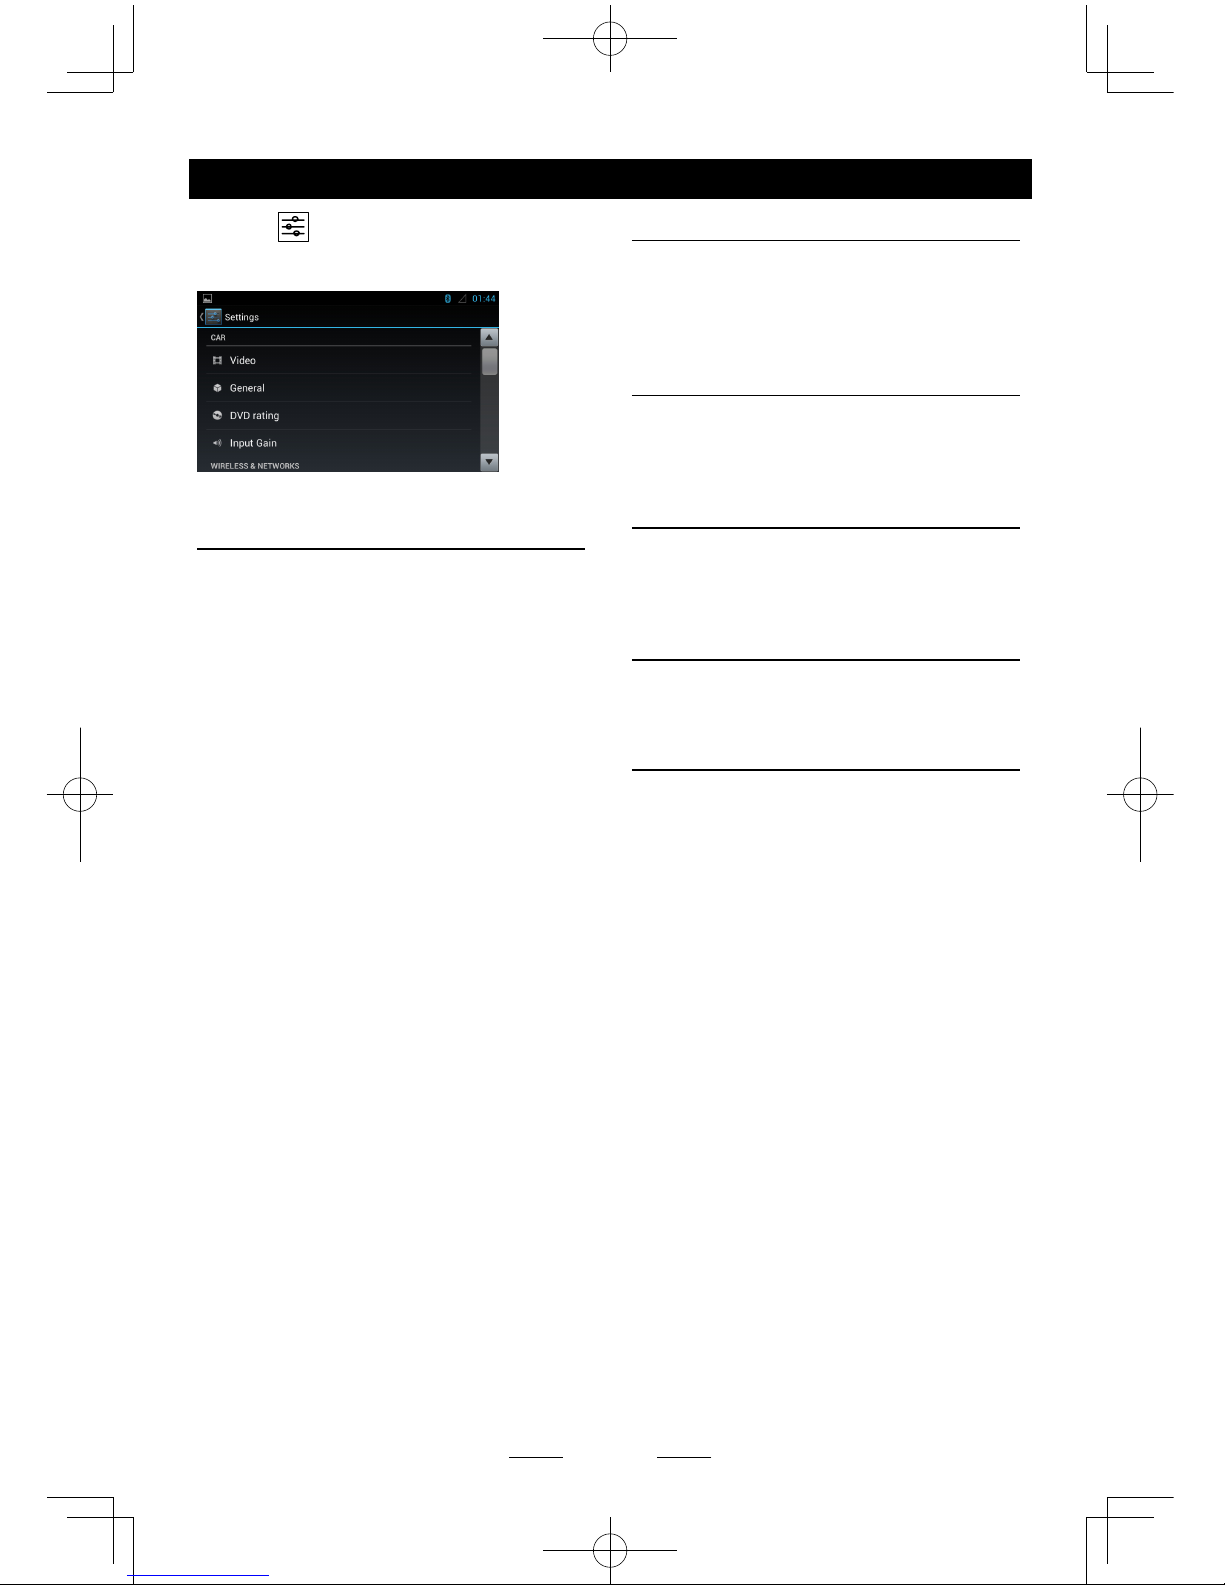
Select [ ] on the main menu to enter
setting mode.
Drag up/down to scroll the options.
CAR
Video
Video input: Choose video input mode
Rear camera: Choose rear camera display
mode.
General
Lighting: Choose button backlight.
Radio region: Choose radio region.
Radio range: Choose radio seeking mode:
local or distance.
Blackout: Choose screen blackout off, 10s
or 20s.
Beep:Turn on or off button beep sound.
Calibration: To calibrate the screen.
DVD rating
DVD audio: Choose DVD audio language.
DVD subtitle: Choose DVD subtitle
language.
Disc menu: Choose DVD menu language.
Set password: To set password for rating.
Input 4-digit password, touch [√] to conrm,
touch [DEL] to delete a number inputted.
Touch [X] to exit.
Rating level:To setup the rating level.
Kid safe, G, PG, PG-13, PG-R, R, NC-17,
Adult.
Input Gain
Choose input volume gain of each source.
System settings
WIRELESS & NETWORKS
To setup the wireless configuration, such as
Wi-Fi, VPN, 3G network.
* For 3G APN settings, refer to “Internet”.
DEVICE
To setup the Sound, Display, and Storage,
Applications management.
PERSONAL
To Setup Location services, Security and
Language & keyboard, etc.
ACCOUNTS
Accounts management.
SYSTEM
To setup Date, time and Accessibility, etc.
Page 24
EN - 23
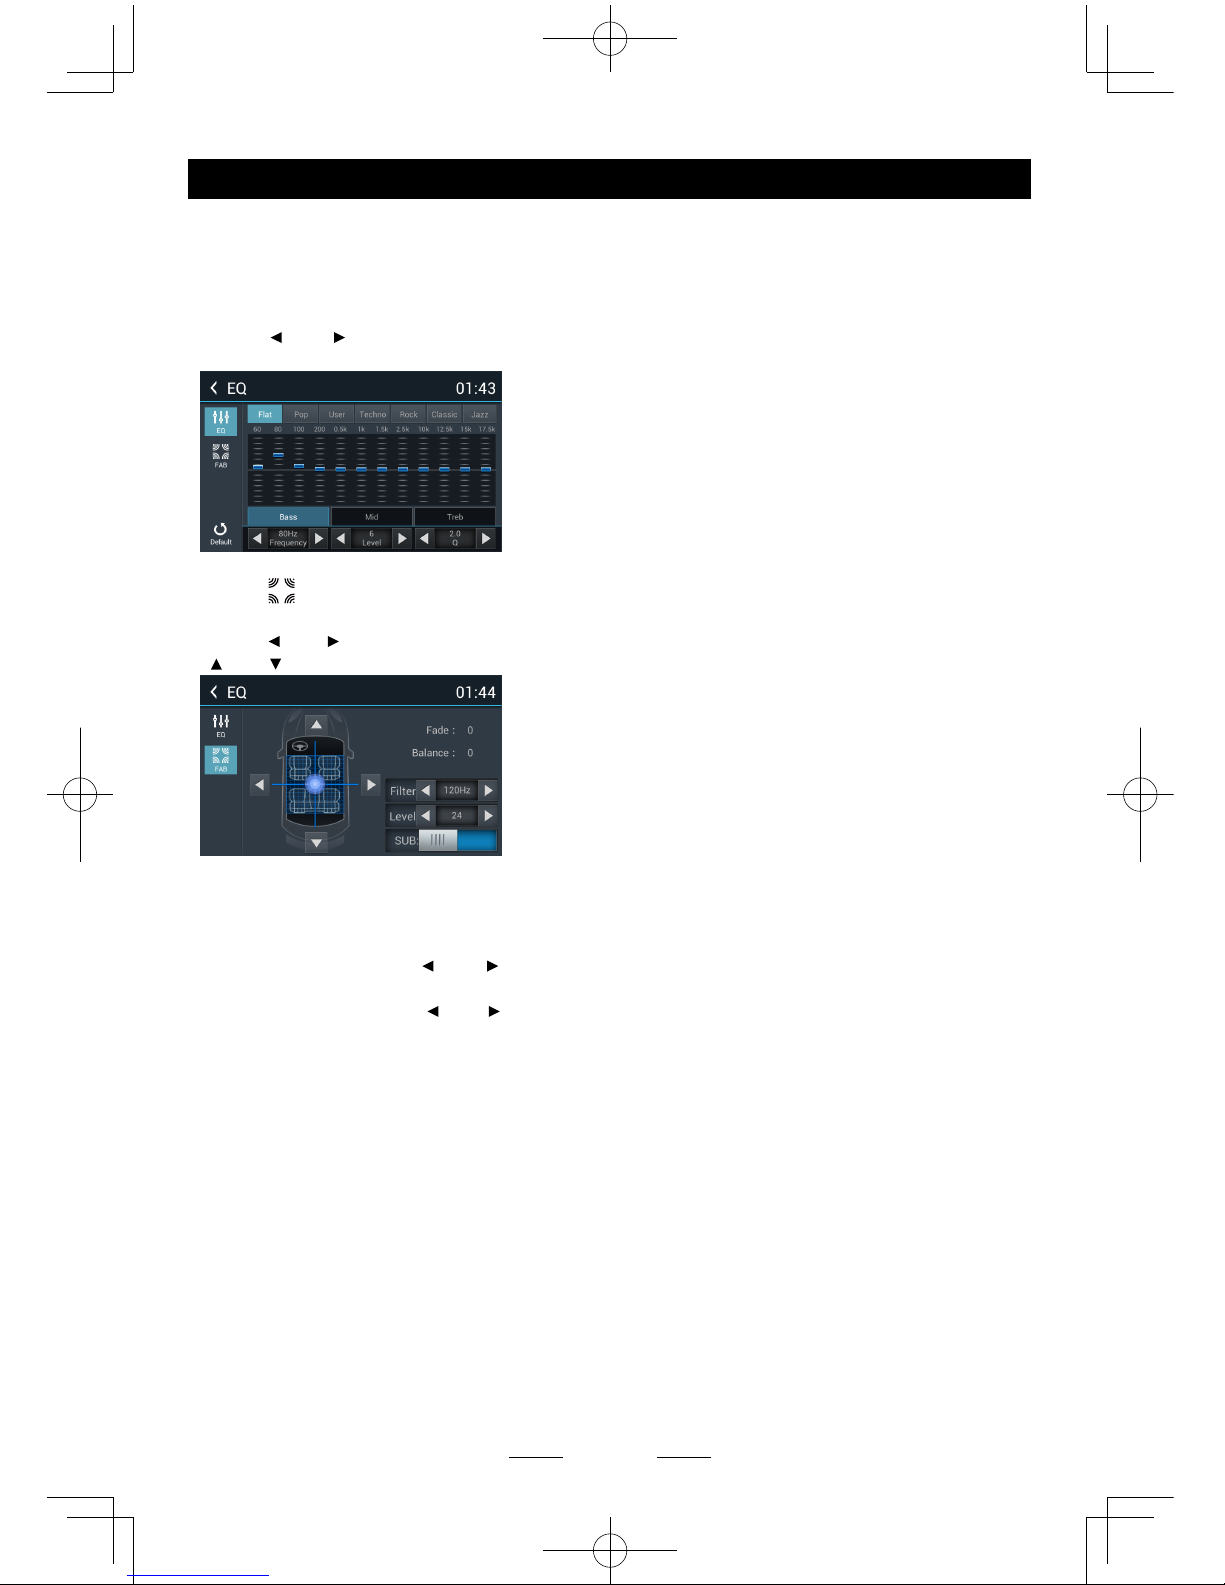
Select [EQ] on the menu to enter sound
setting mode.
Touch to select a preset EQ on upper side
of the screen from Flat, Pop, User, Techno,
Rock, Classic and Jazz.
Touch [ ] or [ ] to adjust the level of Bass/
Mid/Treb.
Touch [ ] to enter Fader/Balance/
Subwoofer setting menu.
Touch [
] or [ ] to setup Balance, touch
[ ] or [ ] to setup Fader.
Sub Woofer
Sub woofer: Turn on/off the sub woofer
playback.
Sub woofer lter: Touch [ ] or [ ] to select
subwoofer Filter.
Sub woofer Level: Touch [ ] or [ ] to adjust
subwoofer Level.
Sound setting
Page 25

EN - 24
Device Connections
Notes of connection
• This unit is designed to be used in a vehicle with a 12-volt battery and negative grounding.
Before installing this unit to a recreational vehicle, a bus, or a truck, make sure the battery
voltage is appropriate for this unit to be used, otherwise, have a professionally installed
transformer to convert the output voltage to 12V.
• To avoid short circuit in the electrical system, ensure that the negative battery cable is
disconnected before installation.
• To prevent short circuit in the wiring and damaging to this unit, secure all wirings with cable
clamp or adhesive tape. Route the wirings in a secured, out of heating place without touching
any moving parts such as gear shift, handbrake, and seat rails to prevent the wiring insulation
being melted / worn off.
• Never pass the yellow power cord through the installation hole into the engine compartment
and connect to the car battery. Otherwise, a high possibility of serious short circuit to the
electrical system may occur.
• If you need to replace the fuse, please replace with a 15A fuse. Using no fuse or a fuse with
an improper rating may cause damage to the unit or a potential re. If a proper fuse is installed
and problems continue to occur, please contact your local retailer or installer.
• DO NOT connect other equipments with the car battery to avoid battery overheating.
• Please make sure all the wiring connections & the cables of the Speakers are well-insulated.
Otherwise, this unit may be damaged by short circuit.
• If there is no ACC available, please connect ACC lead to the power supply with a switch.
• If an external power amplier is connected, please don't connect P.CONT lead to the power
lead of the external power amplier, otherwise, electric spark or other damage may result.
• Never ground the speaker output to prevent the damage to the built-in power amplier.
Page 26
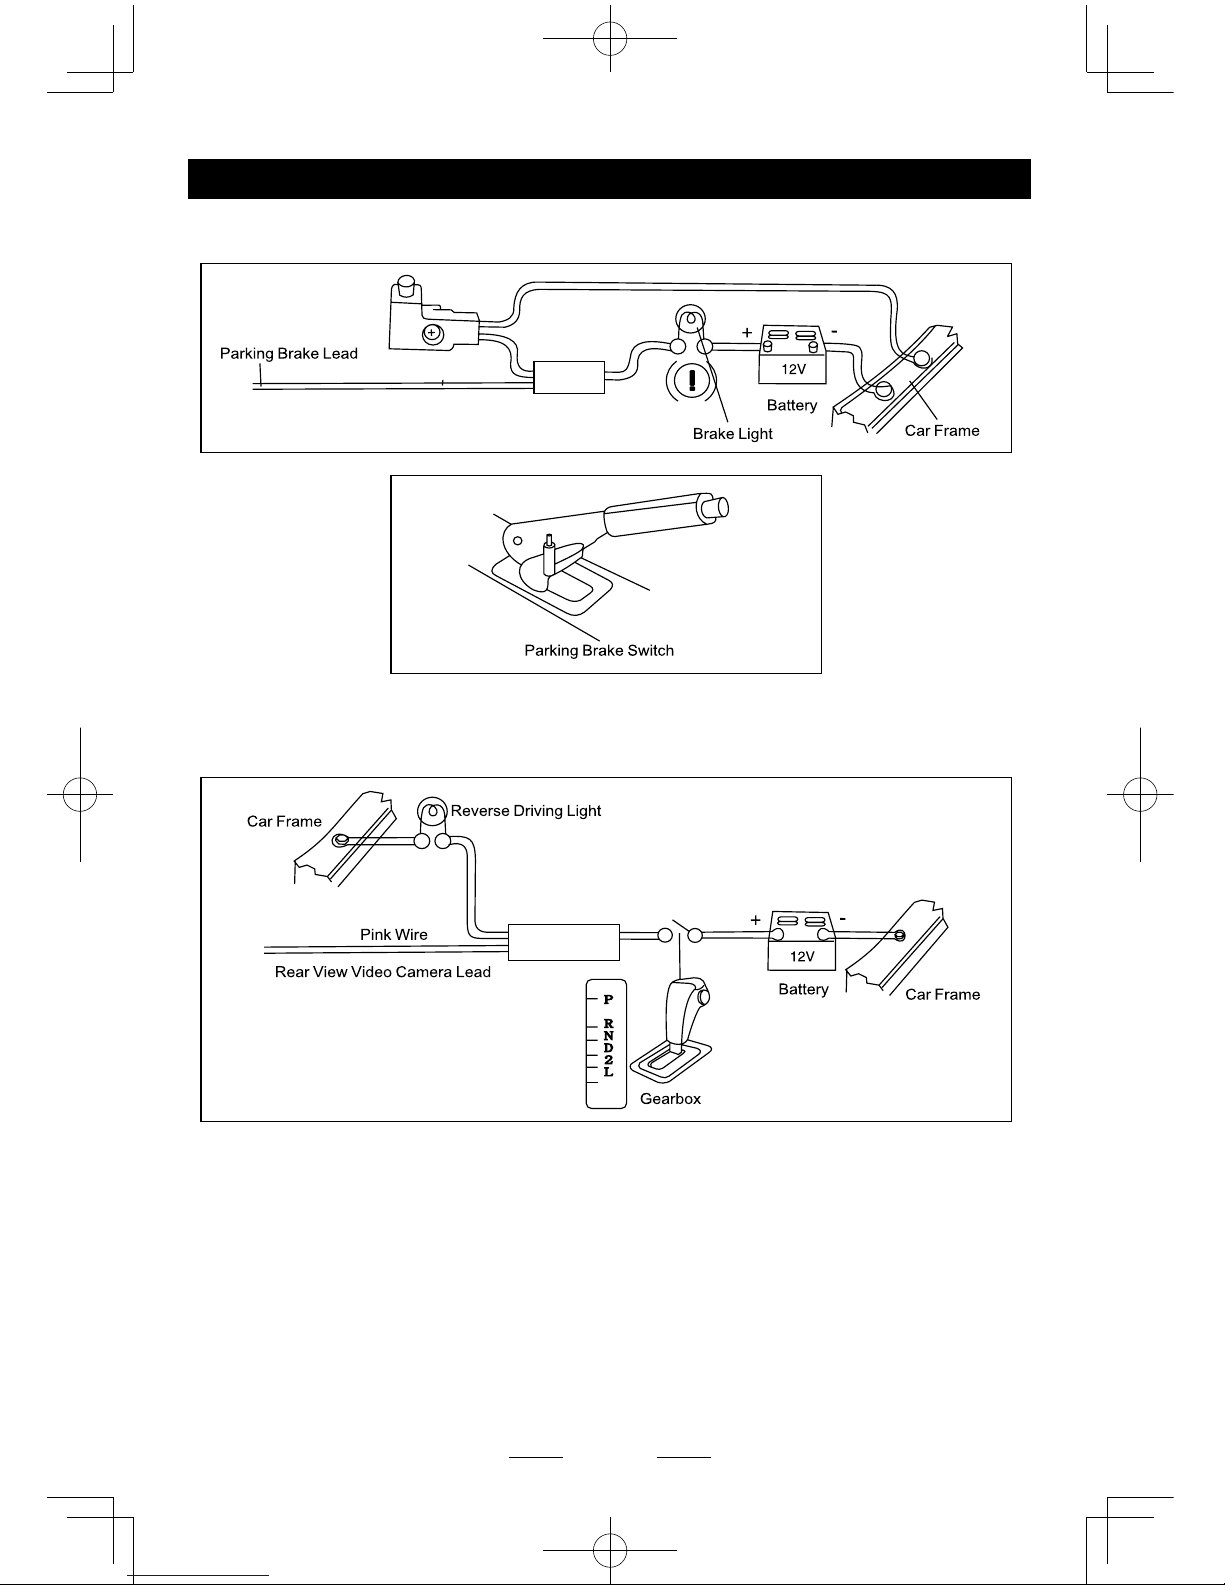
EN - 25
Parking Brake Cable Connections
Back Up Camera Connections
Device Connections
Green/White Wire
Page 27
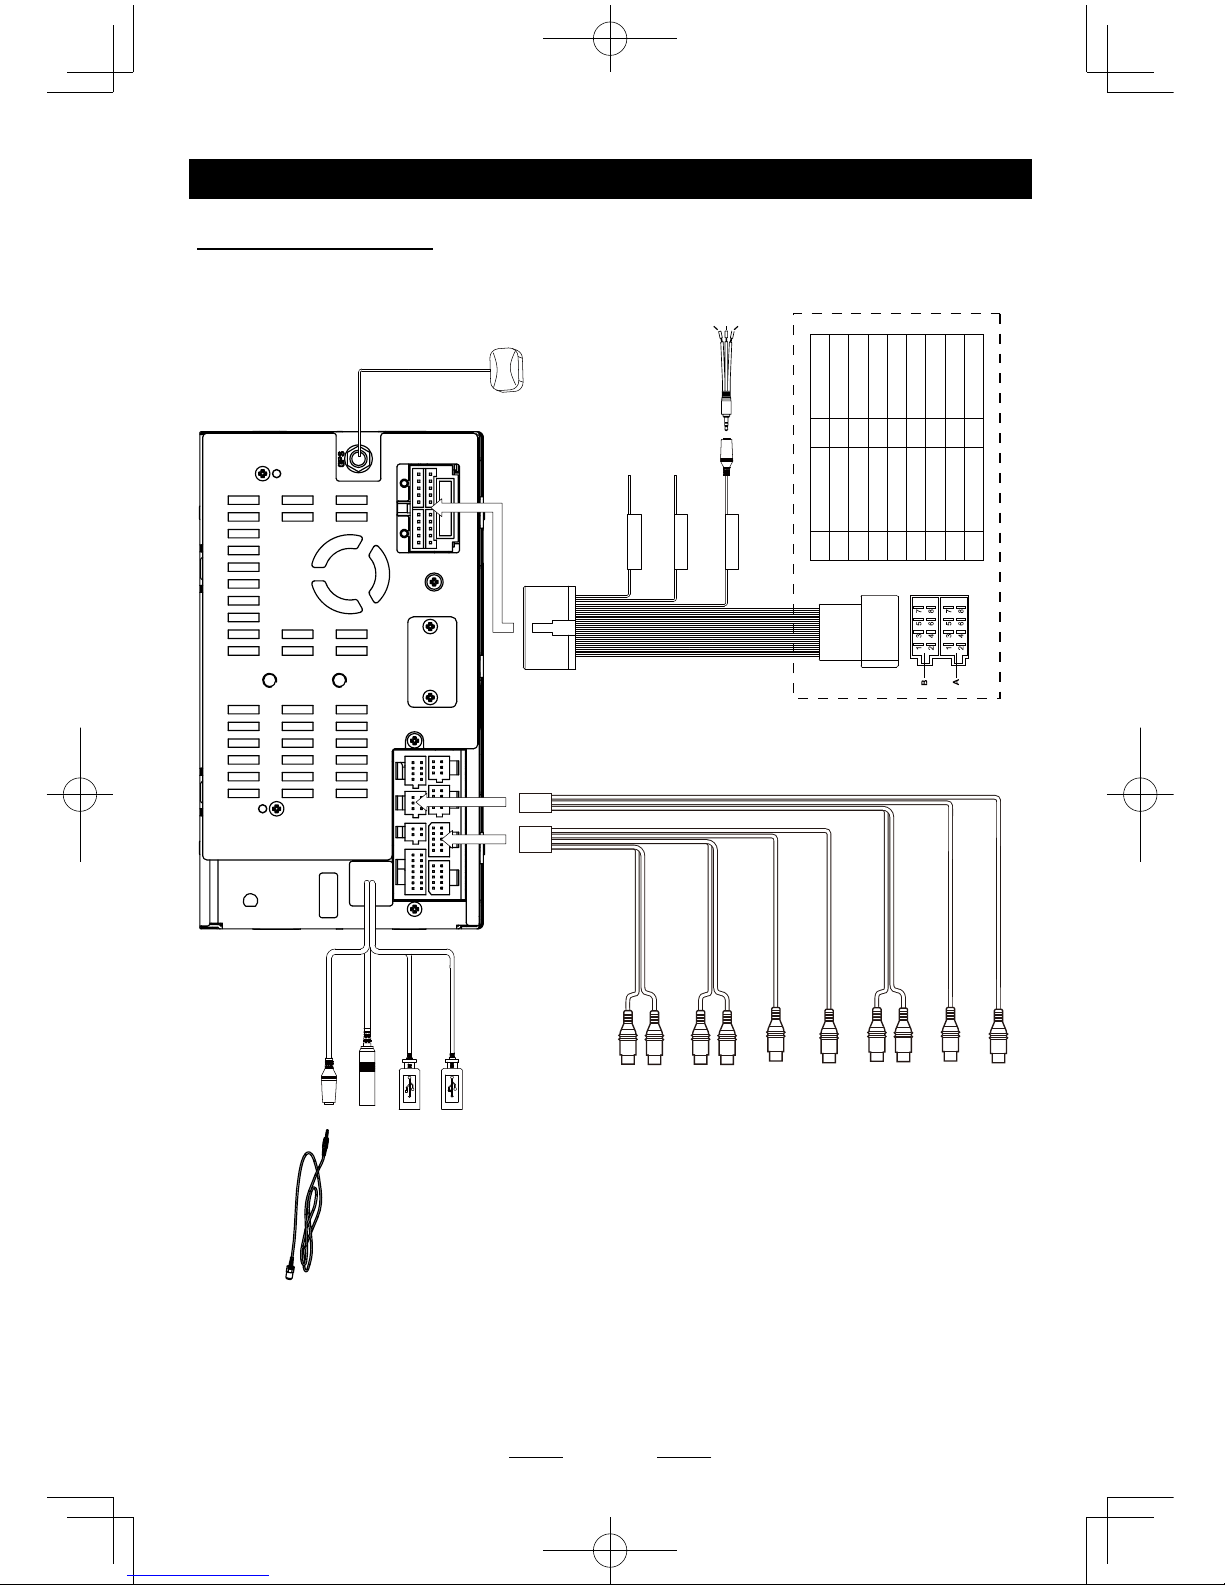
EN - 26
Device Connections
Wiring Diagram
PIN PART A
1 NC
2 NC
3 NC
4
Battery +12V
5 P.ANT
6 Illumination
7
ACC
8 GND
PIN PART B
1 Rear R+
2 Rear R-
3 Front R+
4 Front R-
5 Front L+
6 Front L-
7 Rear L+
8 Rear L-
AUX IN
Red
Red(R)
Blue
Yellow
Yellow
Yellow
White(L)
Red(R)
White(L)
Red(R)
White(L)
Green
White
FRONT OUT
GPS ANTENNA
Black
MICROPHONE
RADIO ANT
Black
Black
Black
3G/WIFI
3G/WIFI
Black
REAR OUT
Grey
VIDEO OUT
Black
VIDEO IN
Black
CAMERA VIDEO
Black
SUB WOOFER
Black
Orange
Pink
Black
PARKING
REVERSE
SWC
Microphone
Key A
Key B
GND
Page 28
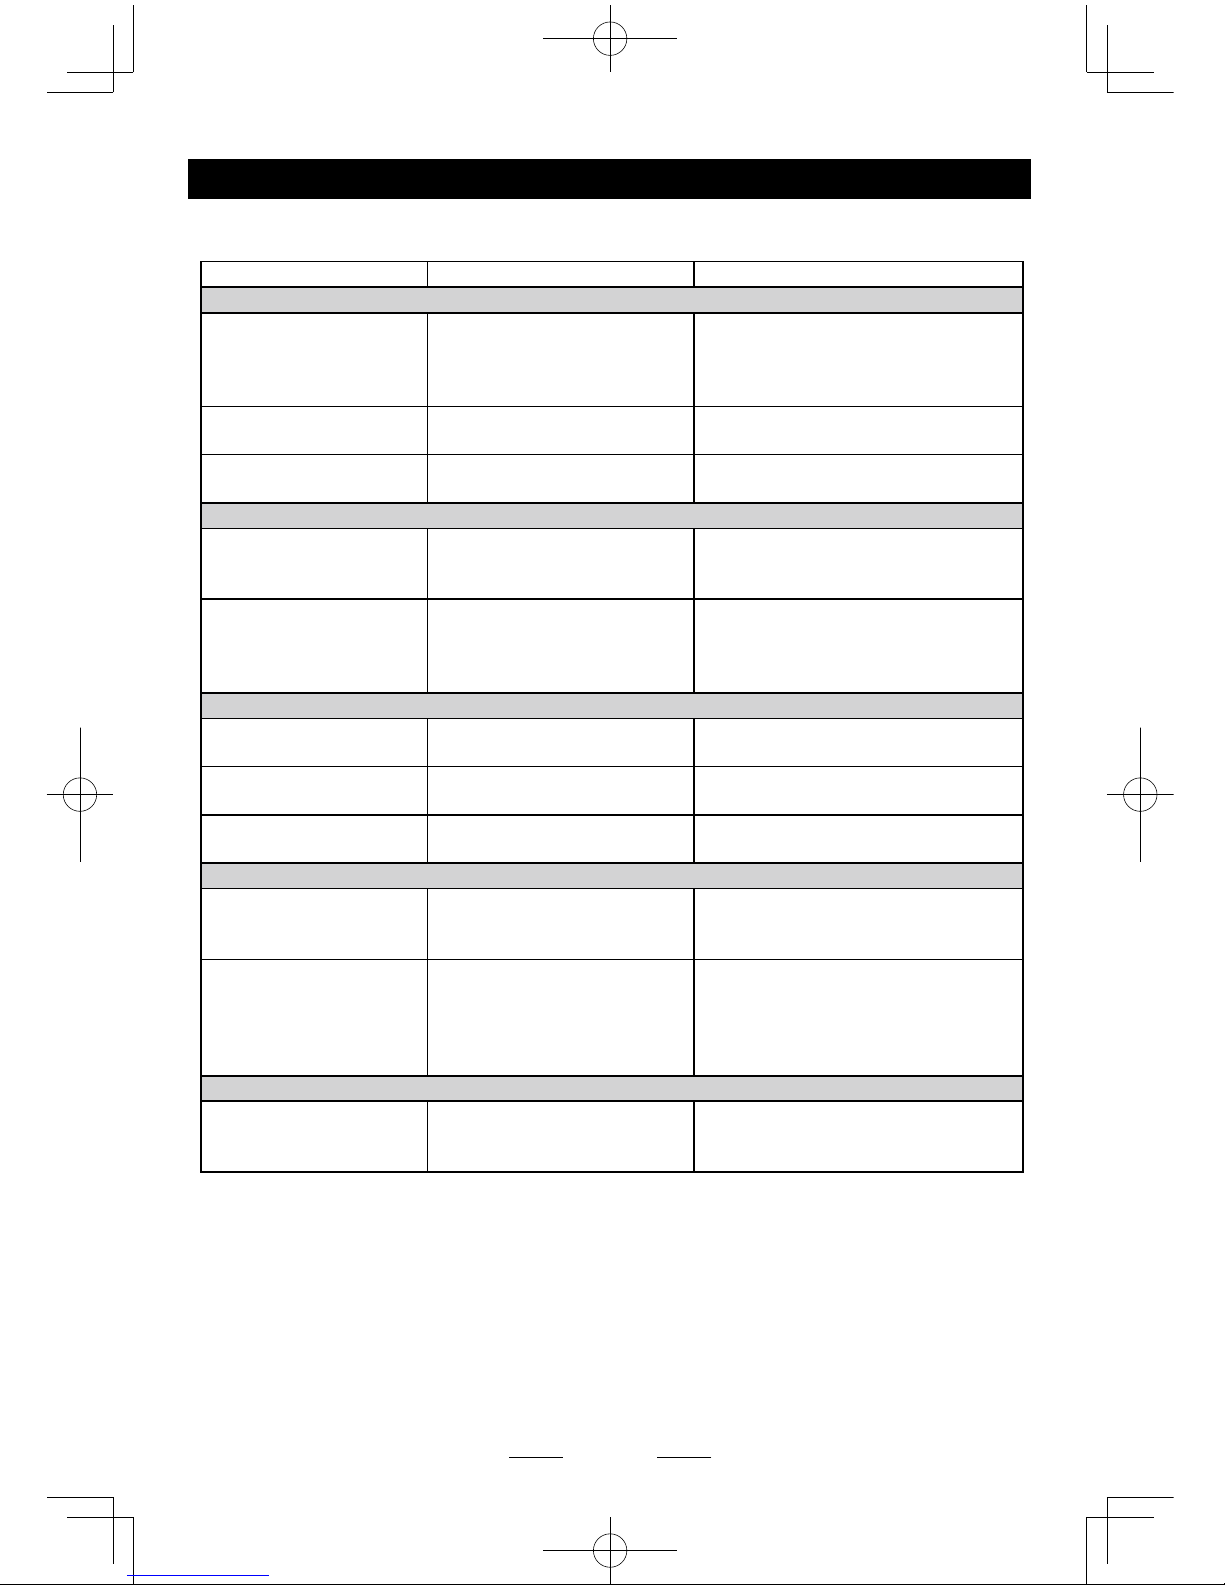
EN - 27
Troubleshooting
The following checklist can help you solve the problems which you may encounter when using the
unit. Before consulting it, check the connections and follow the instructions in the user manual.
Problem Possible cause Solution
General
The unit will not switch on.
Car ignition is not on.
Cable is not properly
connected.
Fuse is burnt.
Turn your car key in the ignition.
Check cable connection.
Replace fuse with a new fuse of the
same capacity.
No sound
Volume is set at minimum or
the mute function is on.
Check the volume or switch the mute
function off.
The unit or screen does
not function normally.
The unit system is unstable. Press the RESET button.
DVD mode
The appliance will not play
discs.
The disc is inserted incorrectly.
The disc is dirty or damaged.
Disc must be inserted with the label
side facing up. Clean the disc and
check for damage. Try another disc.
Sound skips due to
vibration.
Mounting angle is over 30˚.
Mounting is unstable.
Adjust mounting angle to less than
30˚.
Mount the unit securely with the
supplied parts.
TUNER mode
Unable to receive stations.
The antenna is not connected
properly.
Connect the antenna properly.
Poor quality reception of
radio station.
The antenna is not fully
extended or it is broken.
Fully extend the antenna and if
broken, replace it with a new one.
Preset stations are lost.
The battery cable is not
properly connected.
Connect the permanent live on the unit
to the permanent live on the vehicle.
USB/SD mode
Unable to insert USB
device or SD card.
The memory card or USB
device has been inserted the
wrong way round.
Insert it the other way around.
The USB device or SD
card cannot be read.
NTFS format is not supported.
Check that the USB disk le system
is in FAT or FAT32 format. Due to
different formats, some models of USB
storage devices or MP3 players may
not be read.
Remote control
The remote control is not
working or does not work
properly
The batteries are low or empty. Change the batteries.
Page 29

EN - 28
Specications
General
Reference Supply Voltage ....................................................................12V(DC)
Operating Voltage Range ........................................................ 10.5 - 15.8V(DC)
Max Operating Current .................................................................................15A
Grounding System .................................................... Car Battery Negative Pole
Dimensions(WXHXD) ......................................................... 178X101.5X159mm
Weight(main unit) ...................................................................................... 1.9kg
FM
Signal Noise Ratio ................................................................................ ≥55dB
Usable Sensitivity(S/N=30dB) ..........................................................≤15dBμV
Frequency Response(-3dB) ..........................................................20Hz~7KHz
Station Seeking Level .................................................................... 20~28dBμV
Distortion .............................................................................................. ≤1.0%
Stereo Separation(1KHz) .....................................................................≥25dB
Antenna Impedance ...................................................................................75Ω
AM
Usable Sensitivity(S/N=20dB) ..........................................................≤30dBμV
Frequency Response(-3dB) ..........................................................50Hz~2KHz
LCD
Screen size ............................................................................. 6.2 inches(16:9)
Display resolution ........................................................................800X480dots
Contrast radio ............................................................................................. 400
Brightness..........................................................................................400cd/m
2
DVD Player
Signal / Noise Ratio .............................................................................. ≥70dB
Dynamic Range .................................................................................... ≥70dB
Distortion(line out) ................................................................................ ≤0.8%
Frequency Response(±3dB) .......................................................20Hz~20KHz
Maximum Output Power ........................................................................4×50W
Load Impedance ........................................................................................... 4Ω
AUX IN
Distortion .............................................................................................. ≤0.8%
Frequency Response(±3dB) .......................................................20Hz~20KHz
Audio Input Level ...................................................................................500mV
Audio
Audio Output Impedance ......................................................................... 10KΩ
Audio Output Level ....................................................................... 2Vrms(Max)
Video
Normal Video Input Level(CVBS) .......................................................1.0±0.2V
Video Input Impedance...............................................................................75Ω
Video Output Impedance ............................................................................ 75Ω
Video Output Level .............................................................................1.0±0.2V
Environment
Operating Temperature .............................................................-10°C ~ +60°C
Storing Temperature..................................................................-20°C ~ +70°C
Operating Humidity ..................................................................... 45%~80%RH
Storing Humidity ......................................................................... 30%~90%RH
Notice:
When the unit is operated extremely, such as operated with maximum power output for a long
time, or the temperature is over 70°C, it will enter heat protection mode, the volume will be lower
automatically. This is normal.
Page 30
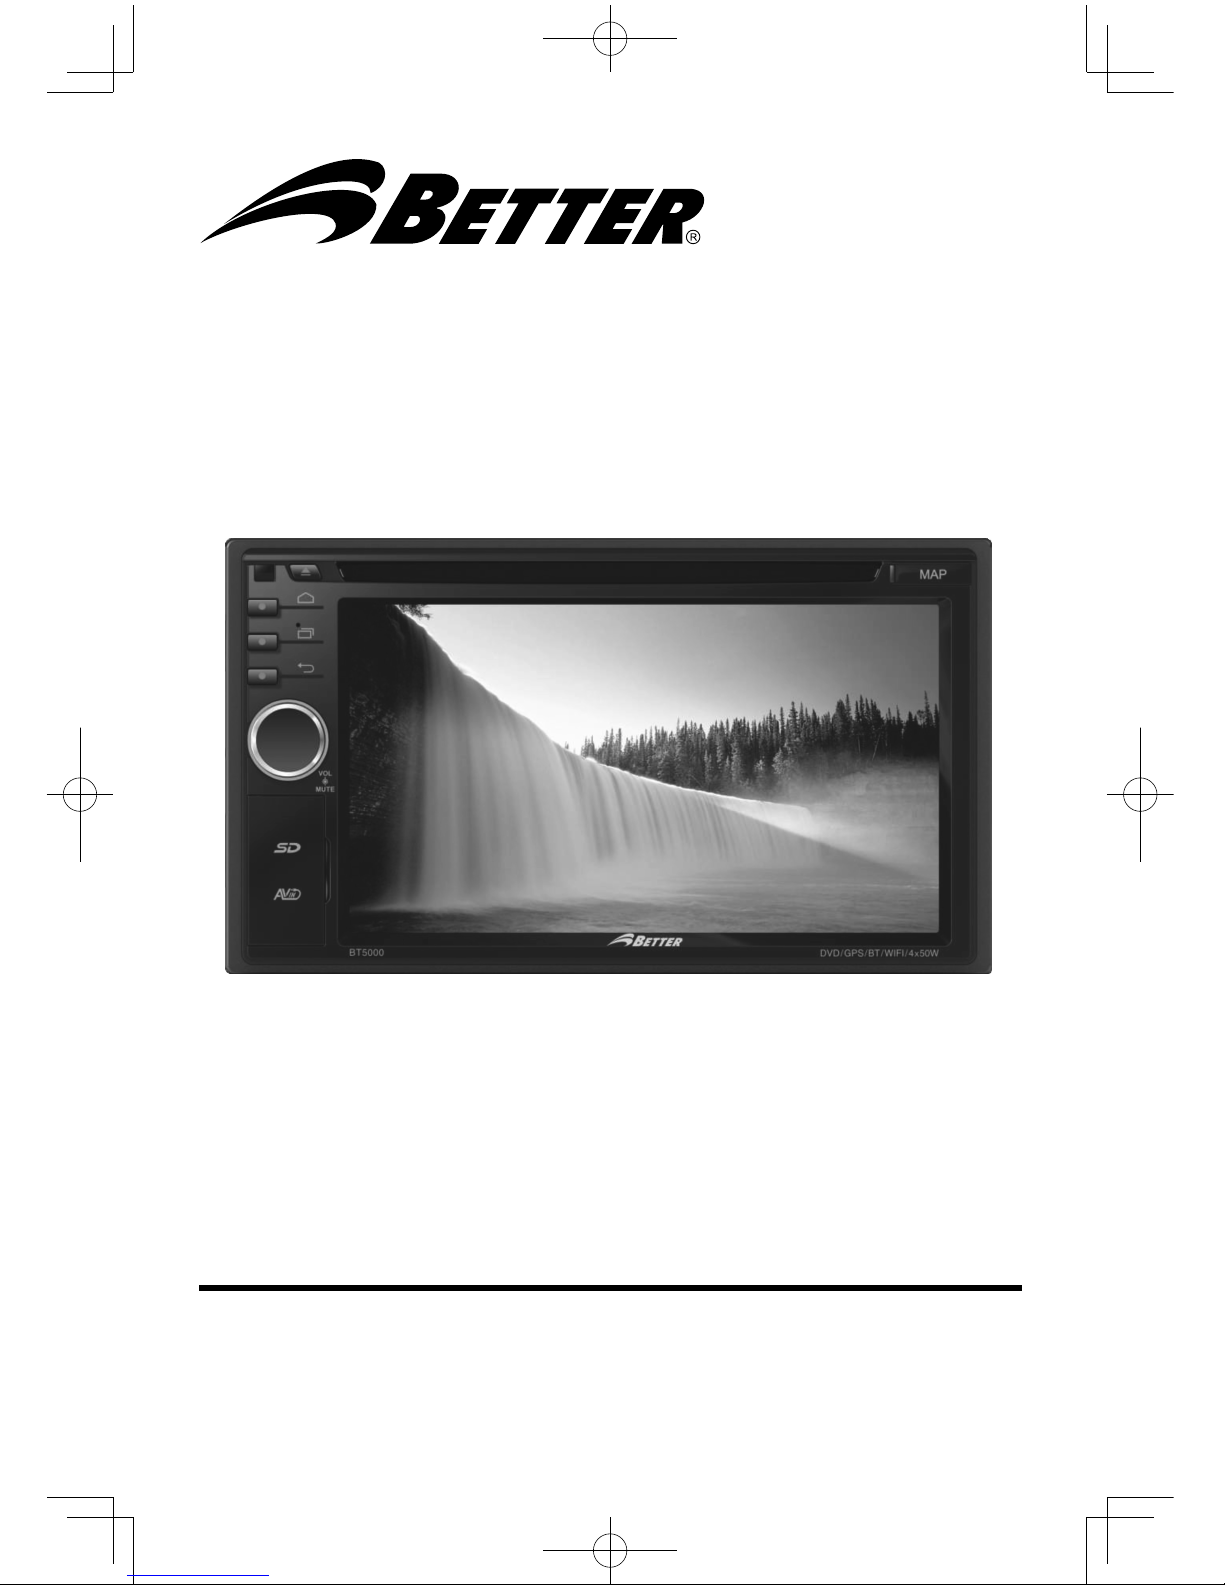
2-DIN DVD MULTIMEDIA CON NAVEGACION/BLUETOOTH
MANUAL DE OPERACIONES
BT5000
Page 31
SP - 1
Precauciones
Para una conducción segura, ajuste el
volumen a un nivel cómodo, seguro y
adecuado en caso de situaciones de
emergencia.
Nunca exponga esta unidad, el amplificador
ni los parlantes a la humedad o al agua con el
n de evitar chispas eléctricas o incendios.
Por favor no cambie el fusible del cable de
poder sin ayuda profesional, de lo contrario
el uso de fusibles inadecuados pueden dañar
esta unidad o causar incendios.
Por favor apague la unidad inmediatamente
y diríjase al centro de servicio autorizado o a
su distribuidor una vez se presenta alguno de
los siguientes problemas:
(a). No hay salida de audio;
(b). No hay imagen en la pantalla;
(c). Ingresó agua o alguna partícula extraña a
la unidad;
(d). Hay humo;
(e). Hay un olor particular no deseado.
Conecte únicamente la unidad a una fuente
de 12 voltios con polo a tierra negativo.
Nunca instale esta unidad donde la operación
y condiciones reduzcan una conducción del
vehículo con seguridad.
Nunca use la función de video en la parte
delantera mientras conduzca su vehículo con
el fin de prevenir posibles violaciones a las
leyes y regulaciones locales y también para
reducir el riesgo de accidentes a excepción de
la cámara de reversa.
MUTE
OK
Gracias por adquirir este producto. Lea por
favor este manual de instrucciones con
el fin de aprender a operar este modelo
apropiadamente. Después de terminar de
leer las instrucciones, conserve este manual
en un lugar seguro para futuras referencias.
Con el ánimo de ofrecer una más clara
demostración para el fácil entendimiento de
la operación de esta unidad, se han utilizado
gráficas. Sin embargo, estas ilustraciónes
no son necesariamente copia exacta de la
unidad.
Page 32
SP - 2
Atención
Poner a funcionar la unidad después de leer
este manual preverá posibles daños.
Precauciones de manejo
Este producto es un PRODUCTO LÁSER
CLASE 1. En caso de utilizar controles o
procedimientos diferentes a los incluidos en
este manual puede resultar en exposición
a radiaciones peligrosas. No abra las tapas
ni intente reparar la unidad usted mismo.
Diríjase a un servicio técnico autorizado con
personal calicado.
Productos Dos Láser
Longitud de Onda: CD: 780nm
DVD: 650nm
Potencia del Láser: Se emite radiación no
peligrosa con protección.
Para reducir el riesgo de corto circuito e
interferencia no deseada use únicamente los
componentes incluidos con este producto.
Precaución uso de disco
1. NO USE discos de formas irregulares.
Nunca inserte un CD de 3 pulgadas
(8 cm.) en un adaptador o discos de
formas irregulares. La unidad no podrá
expulsarlo dando como resultado un mal
funcionamiento de la unidad.
2. Limpieza. Use un paño seco y suave para
limpiar el disco desde el centro hacia fuera.
Solamente se puede usar un detergente
neutro.
Precauciones
3. Cuando reproduzca un disco nuevo. Los
discos nuevos pueden tener partes gruesas
alrededor de los bordes internos y externos.
De ser así, remuévalos con un bolígrafo de
punta redonda, etc.
Page 33

SP - 3
Contenido
Precauciones ............................................1
Panel de Control .......................................4
Control Remoto ........................................5
Operaciones Básicas ...............................7
Encendido On/Off ...................................7
Mute ........................................................7
Ajuste de volumen ..................................7
Selección del menú ................................7
When Vehicle is Put in Reverse .............7
Freno de mano ......................................7
Fondo de pantalla ..................................7
Menú principal ..........................................8
Menú principal ........................................8
Menú de aplicaciones .............................8
Funcionamiento disco .............................8
Insertar un disco .....................................8
Expulsar el disco.....................................8
Reproducción del disco ..........................8
Menú de reproducción de DVD .............8
Reproducción de CD ..............................9
Reproducción de disco mixto..................9
Detener la reproducción temporalmente 10
Seleccione la pista/capitulo deseado ...10
Avance / retroceso rápido durante
reproducción .........................................10
Repetir ..................................................10
Reproducción de las pistas al azar (solo
CD/VCD/MP3/WMA).............................10
Buscar...................................................10
DVD audio ............................................10
VCD audio ............................................10
Selección de subtítulos de DVD ...........10
Selección titulo de DVD ........................10
Operaciones con el radio.......................11
Seleccione una banda de radio ............11
Selección de banda manual .................11
Sincronización automática ....................11
Auto búsqueda de frecuencias .............11
Almacenamiento manual ......................11
Seleccionar una emisora seleccionada 12
Buscador local ....................................12
Tecla de búsqueda ..............................12
Funcionamiento SD/USB .......................12
Uso de la tarjeta SD..............................12
Uso de un dispositivo USB ...................12
Reproducción de música ......................12
Reproducir / pause ...............................13
Pista anterior / siguiente .......................13
Avance rápido o retroceso rápido .........13
Seleccionar música por artista..............13
Seleccione música por álbum ...............13
Seleccionar música por el nombre de la
canción .................................................13
Reproducción de video .........................13
Using an Android mobile phone as an USB
storage device ......................................14
Operaciones de la galería de imágenes 14
Funcionamiento Bluetooth ....................15
Realizando una Llamada ......................15
Call from Phonebook ............................16
Historia de llamadas .............................16
Audio Bluetooth ....................................16
Conguración del Bluetooth .................16
iPod/iPhone Operations .........................17
Accessing iPod mode ...........................17
Pausing play .........................................17
Selecting a track ...................................17
Fast forward/Fast reverse .....................17
Repeat play...........................................17
Random play.........................................17
Search function .....................................17
Internet ....................................................18
Conguración APN 3G .........................18
Conguración Wi-Fi ..............................19
Create Wi-Fi Hotspot ............................19
Visitar pagina web ................................20
Correo Electrónico ................................20
OTROS MODOS ......................................20
Funcionamiento de navegación ............20
Funciones auxiliar .................................20
Control del volante ................................20
i-Mode (Siri) Function ...........................21
Google calendar conguration ..............21
Delete Gmail Account ...........................22
Conguración del sistema.....................23
CAR ......................................................23
Inalámbrico & redes ..............................23
DEVICE ................................................23
PERSONAL ..........................................23
ACCOUNTS..........................................23
SYSTEM ...............................................23
Conguración de sonido .......................24
Conexión de dispositivos ......................25
Wiring Diagram .....................................27
Solución de problemas ..........................28
Especicaciones ....................................29
Page 34
SP - 4
Panel de Control
Presione [ ] el botón (5) para encender la unidad
1. Sensor remote
2.
HOME
botone
Muestra el menú principal
3. MENU
botone
Mostrar el menú de opciones
4. BACK
Para regresar al menú anterior.
5. Botón Volumen
> Encender (presione)
> Ajuste de volumen (gire)
>
Silencio (presione cuando este encendido)
> Apagar (mantenga oprimido)
6. Reset
Volver a la conguración de fábrica
7. Entrada de AUX
8. USB conector
9. Ranura de SD
10. Ranura del mapa
11. Ranura de CD
Inserte el CD con la cara hacia arriba.
12. Micrófono
13. Expulsar
>
Expulse los discos (cuando están dentro)
*
Ruta predeterminada:
1. Ruta de la tarjeta SD (9): / sdcard /sd_
media
2. Ruta de USB (8): / sdcard /external_usb
3. Ruta de la tarjeta del mapa (10): / sdcard /
external_sd
Para instalar un nuevo mapa instale
primero el archivo apk, a continuación,
iniciar la aplicación y establecer la ruta.
Page 35
SP - 5
Control Remoto
1. Cambiar la fuente de reproducción en
secuencia.
2. Expulsar CD
3. Selección del audio
4. Información en pantalla
5. Zoom
6. Selección de banda
7. Contestar
8. Buscar
9. DVD titulo
10. Repetir canción
11. Menú de conguración
12. Reproducción y pausa
13. Mover el cursor en todas las
direcciones.
Arriba/abajo sintonización manual
14. Teclas numéricas
15. Silencio
16. Encender
17. Seleccionar DVD subtitulo y lenguaje
18. Seleccionar DVD Angulo
19. Mostrar/salir menú
20. Volver a la pantalla anterior
21. Borrar información
22. Colgar
23. Anterior/siguiente
Sintonización automática (mantenga
oprimido)
Búsqueda rápida (mantenga oprimido)
24. Conguración de pantalla
25. Ajuste del volumen
26. Detener
Zona (no se utiliza)
27. Cambiar aplicación de la zona
28. Reproducir /pausa
29. Anterior/siguiente
Búsqueda rápida (mantenga oprimido)
Page 36
SP - 6
Control Remoto
Notas acerca del uso del control remoto
1) El control remoto debe apuntar hacia el sensor de la unidad.
2) Retire la batería o envuélvala con un aislante eléctrico cuando no vaya a utilizarla por un
período prolongado, de lo contrario puede iniciar un corto o incendio.
3) No exponga el control remoto ni almacene bajo los rayos directos del sol o en ambientes bajo
altas temperaturas, de lo contrario podrá funcionar erróneamente.
4) Bajo condiciones normales la batería puede trabajar de forma normal durante 6 meses. Si el
control remoto no puede ser usado, por favor reemplace la batería.
5) Utilice baterías de litio CR2025 de 3V únicamente en “forma de botón-moneda”.
6) NO recargue, desmantele, caliente ni exponga la batería al fuego.
7) Inserte la batería en la dirección apropiada de acuerdo a los polos positivo (+) y negativo (-).
8) Almacene la batería fuera del alcance de los niños para evitar accidentes. En caso de tragarla
accidentalmente, consulte al médico de forma inmediata.
EXTRACCIÓN DE LA BATERÍA
Deslice la tapa del compartimiento de la
batería ubicado al respaldo del control
remoto en la parte inferior.
INSTALACCIÓN DE LA BATERÍA
Utilice únicamente baterías de 3V
CR2025. Inserte la batería en la dirección
apropiada.
PULL OUT PUSH IN
Hale
Presione
Page 37
SP - 7
Operaciones Básicas
Encendido On/Off
1. Encendido: presione [ VOL ] brevemente el
botón en el panel frontal para encender la
unidad o POWER en el control remoto;
2. Apagado: presione [ VOL ] durante un
tiempo prolongado. La unidad se apagará.
Mute
Presione brevemente [ VOL ] en el panel
frontal o MUTE en el control remoto para
silenciar la salida de audio del sistema.
Anotacion::
(1) [ VOL ] Si ya se había silenciado, al
repetir la
acción o al incrementar el volumen MUTE
se cancelará.
(2) Las frases MUTE ON o MUTE OFF
aparecerán en la parte superior derecha
de la pantalla una vez se haya generado la
acción.
Ajuste de volumen
Gire el botón del volumen en el panel frontal o
sobre el control remoto de forma repetida para
ajustar el volumen entre 0 y 50.
Selección del menú
1. presione [ ] para ver los demás
botones en pantalla.
2. Presione para cambiar las diferentes
fuentes y aplicaciones.
Cuando el vehículo es puesto
en reversa
Si la cámara de reversa está conectada, la
unidad automáticamente mostrara la cámara
cuando la reversa entre a funcionar. La
unidad retornara a su trabajo normal después
de funcionar la reversa.
Freno de mano
1. Si el cable del sensor del freno de mano
esta conectado, la unidad solo mostrara
video cuando este este puesto.
2. Cuando el carro este en movimiento y si el
video esta funcionado aparecerá un aviso
de peligro, con el n de prever accidentes y
que el conductor no se distraiga.
Fondo de pantalla
1. Mantenga oprimida el área blanca en el
menú.
2. Seleccione una fuente de:
[Galería]: para visitar la galería del
almacenamiento móvil.
[Fondos de pantalla en vivo]: para mostrar
los fondos de pantalla con la animación
almacenado en la unidad. Para desplazarse
Arrastre hacia arriba / abajo.
[Fondo de pantalla]: para mostrar las
imágenes guardadas en la unidad. Para
desplazarse arrastre hacia la izquierda /
derecha.
4. Seleccione el fondo que quiera tocando
la imagen [Set wallpaper] or [OK] para
conrmar la selección.
Page 38
SP - 8
Funcionamiento disco
Insertar un disco
Inserte el disco por la ranura, y la unidad
cambiara a modo disco automáticamente.
Nota:
• Verique si hay un disco en la unidad antes
de insertar otro.
• La unidad saldrá de la fuente de
reproducción actual y entrara a modo DVD
cuando un disco de este sea insertado.
• La unidad es compatible con la siguiente
clase de disco: CD-R, CD-RW, DVD-R,
DVD + R, DVD-RW, DVD + RW.
Expulsar el disco
Presione [ ] en el panel para expulsar un
disco.
Notas:
• Al expulsar el disco la unidad volverá a otro
modo de manera automática.
• Si el disco no es retirado de la unidad
dentro de los 10 segundos después de ser
expulsado, este volverá a ingresar a la
unidad de manera automática para prevenir
daños.
Reproducción del disco
Al insertar un disco en la pantalla de la unidad
aparecerá un mensaje que dice “cargando...”.
Para MP3/WMA o disco con formatos mixtos,
el tiempo de lectura podrá ser superior a un
minuto.
Menú de reproducción de DVD
Durante la reproducción, toque la pantalla
(excepto en la parte superior y la esquina
superior izquierda) para mostrar los botones
de control.
1
2 3 4 5 6 7
1. Regresar al menú de inicio
2. Mostrar más botones de control
3. Detener la reproducción
4. Capitulo anterior
Retroceso hacia atrás rápido (mantener
presionado)
Menú principal
Menú principal
Pulse el botón [ ] en el panel para ingresar
al menú principal.
1
4
6
5
7
2 3
1. Indicador de almacenajes móviles.
2. Sostenga y arrastre hacia abajo para
mostrar la noticaciones.
3. Hora e indicador de señal inalámbrica.
4. Conguración del menú
5. Menú (lista de aplicaciones)
6. Navegador
7. Sistema AV del carro, pulse en la barra
y arrastre hacia la derecha o izquierda
para mostrar más iconos, presione el icono
deseado para entrar a la aplicación.
Menú de aplicaciones
Presione [ ] para acceder al menú de
aplicaciones.
1. IN-CAR
Muestra las aplicaciones AV del vehículo.
2. APPS
Muestra las aplicaciones Android
instaladas.
3. WIDGETS
Muestra las aplicaciones widget.
En la lista de menú, arrastre hacia arriba o
hacia abajo para desplazarse.
Presione y mantenga pulsado un icono
durante más de 2 segundos para añadir un
acceso directo al escritorio. Para eliminar
el acceso directo, mantenga y arrastre a la
[
] en la parte inferior, y suelte el botón
después de que se vuelve rojo.
Presione [ ] para salir.
Page 39
SP - 9
5. Reproducir / Pausa
6. Capitulo siguiente
Avance rápido hacia adelante (mantener
presionado)
7. Ingresar al menú de búsqueda
8 9 10 11 12 13
8. Página anterior de los botones de control
9. Reproducción aleatoria
10. Repetir la reproducción
11. Seleccionar el idioma del audio
12. Seleccione el idioma de subtítulos
13. Página siguiente de los botones de
control
8 14 15 16 17 1918
14. Muestra información del DVD
15. Mostar el titulo del DVD
16. Seleccionar el ángulo de visión
17. Mostrar menú DVD
18. Barra de progreso
19. Ingresar en el menú EQ
Reproducción de CD
Inserte un disco en la ranura y la unidad
leerá el disco. En algunos casos, es necesario
seleccionar Música /Video/reproducción de
imágenes.
1
2 3 4 5 6
1. Regresa al menú de inicio
2. Muestra más botones de control
3. Pista anterior
Retroceso rápido (mantener presionado)
4. Reproducir / pausar
5. Pista siguiente
Avance rápido hacia adelante (mantener
presionado)
6. Repetir la reproducción
7
8 9 10
7. Mostar la lista de archivos
8. Oculta la segunda línea de botones de control
9. Reproducción aleatoria’
10. Ingresar en el menú EQ
Reproducción de disco mixto
Al insertar un disco mixto, la unidad leerá el
disco y mostrara los archivos en lista. Para
algunos disco es necesario elegir música /
video / fotos para reproducción.
1 2 3 4
65
1. Regresar al menú de inicio
2. Mostrar la lista de música
3. Mostrar la lista de videos
4.
Mostrar la lista de imágenes
5. Lista de archivos / carpetas
Arrastre la lista de arriba / abajo para
desplazarse.
Seleccione un archivo para visualizar o
escuchar.
6. Modo de búsqueda
Funcionamiento disco
Page 40
SP - 10
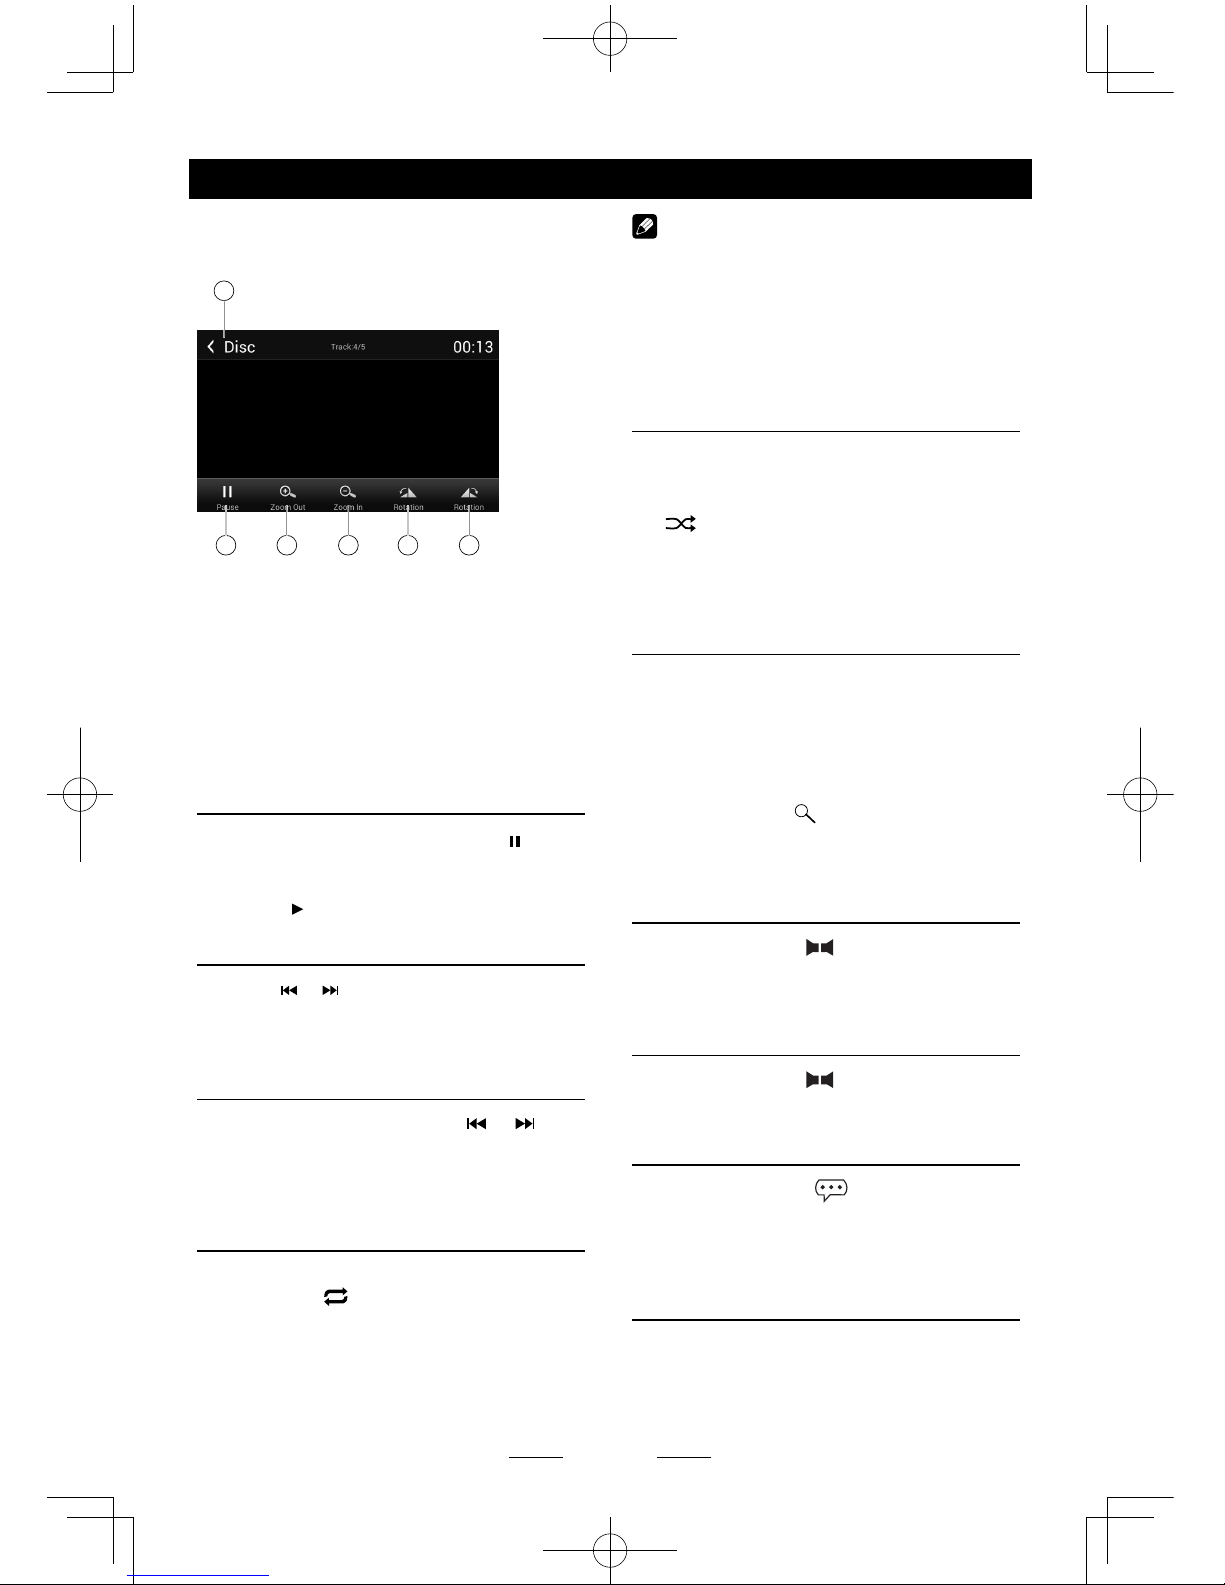
Al ver una imagen, toque la pantalla (excepto
esquina superior izquierda) para mostrar los
botones de control.
1
2 3 4 5 6
1. Regresar al menú de inicio
2. Reproducir / pausar
3. Alejar
4. Acercar
5. Gire hacia la izquierda
6. Girar a la derecha
* Video / audio reproducen referencia al
insertar un CD / DVDs
Detener la reproducción temporalmente
1. Durante la reproducción, presione para
hacer una pausa en la reproducción. El
sonido se silenciara.
2.
Presione para continuar con la reproducción.
Seleccione la pista/capitulo deseado
Presione o para pasar a la siguiente o
anterior pista / capitulo.
Avance / retroceso rápido
durante reproducción
Mantenga pulsado el botón o para
adelantar o retroceder de forma rápida durante
la reproducción. Durante la función de avance o
retroceso rápido el volumen será silenciado.
Repetir
Durante la reproducción presione el boton
en la pantalla para seleccionar repetir la
reproducción.
• El ajuste predeterminado es off (apagado).
Funcionamiento disco
Nota:
Si usted no selecciona activar la función de
repetir, cuando el disco vaya a terminar el
sistema se detendrá. Si no recibe mando
alguno después de 5 minutos la unidad
pasara a modo de espera (standby).
Reproducción de las pistas al
azar (solo CD/VCD/MP3/WMA)
Usted puede reproducir todas las pistas en
orden aleatorio.
1. Durante la reproducción, pulse el botón
[ ] en la pantalla para seleccionar
la reproducción aleatoria.
2. Presione nuevamente para seleccionar la
reproducción normal.
Buscar
Para DVD / VCD:
1. Toque [Ir] en la barra de control.
2. Introduzca el número de capítulo.
3. Toque [OK] para conrmar.
Para un disco mixto:
1. Toque el icono [
].
2. Ingrese el nombre del archivo.
3. Pulse [Hecho] para conrmar.
DVD audio
Presione el botón [ ] para seleccionar el
idioma que desea escuchar, si el DVD cuenta
con múltiples selección de idiomas para audio.
VCD audio
Presione el botón [ ] para seleccionar el
canal de audio a escuchar (L, R, estéreo).
Selección de subtítulos de DVD
Presione el botón [ ] para seleccionar
el lengua del subtitulo eso solo se podrá
si el DVD cuenta con múltiples idiomas de
subtítulos.
Selección titulo de DVD
Presione el botón [ T ] para ver la lista de
titulo o capitulo, seleccione el titulo que desea
reproducir.
Page 41
SP - 11
Operaciones con el radio
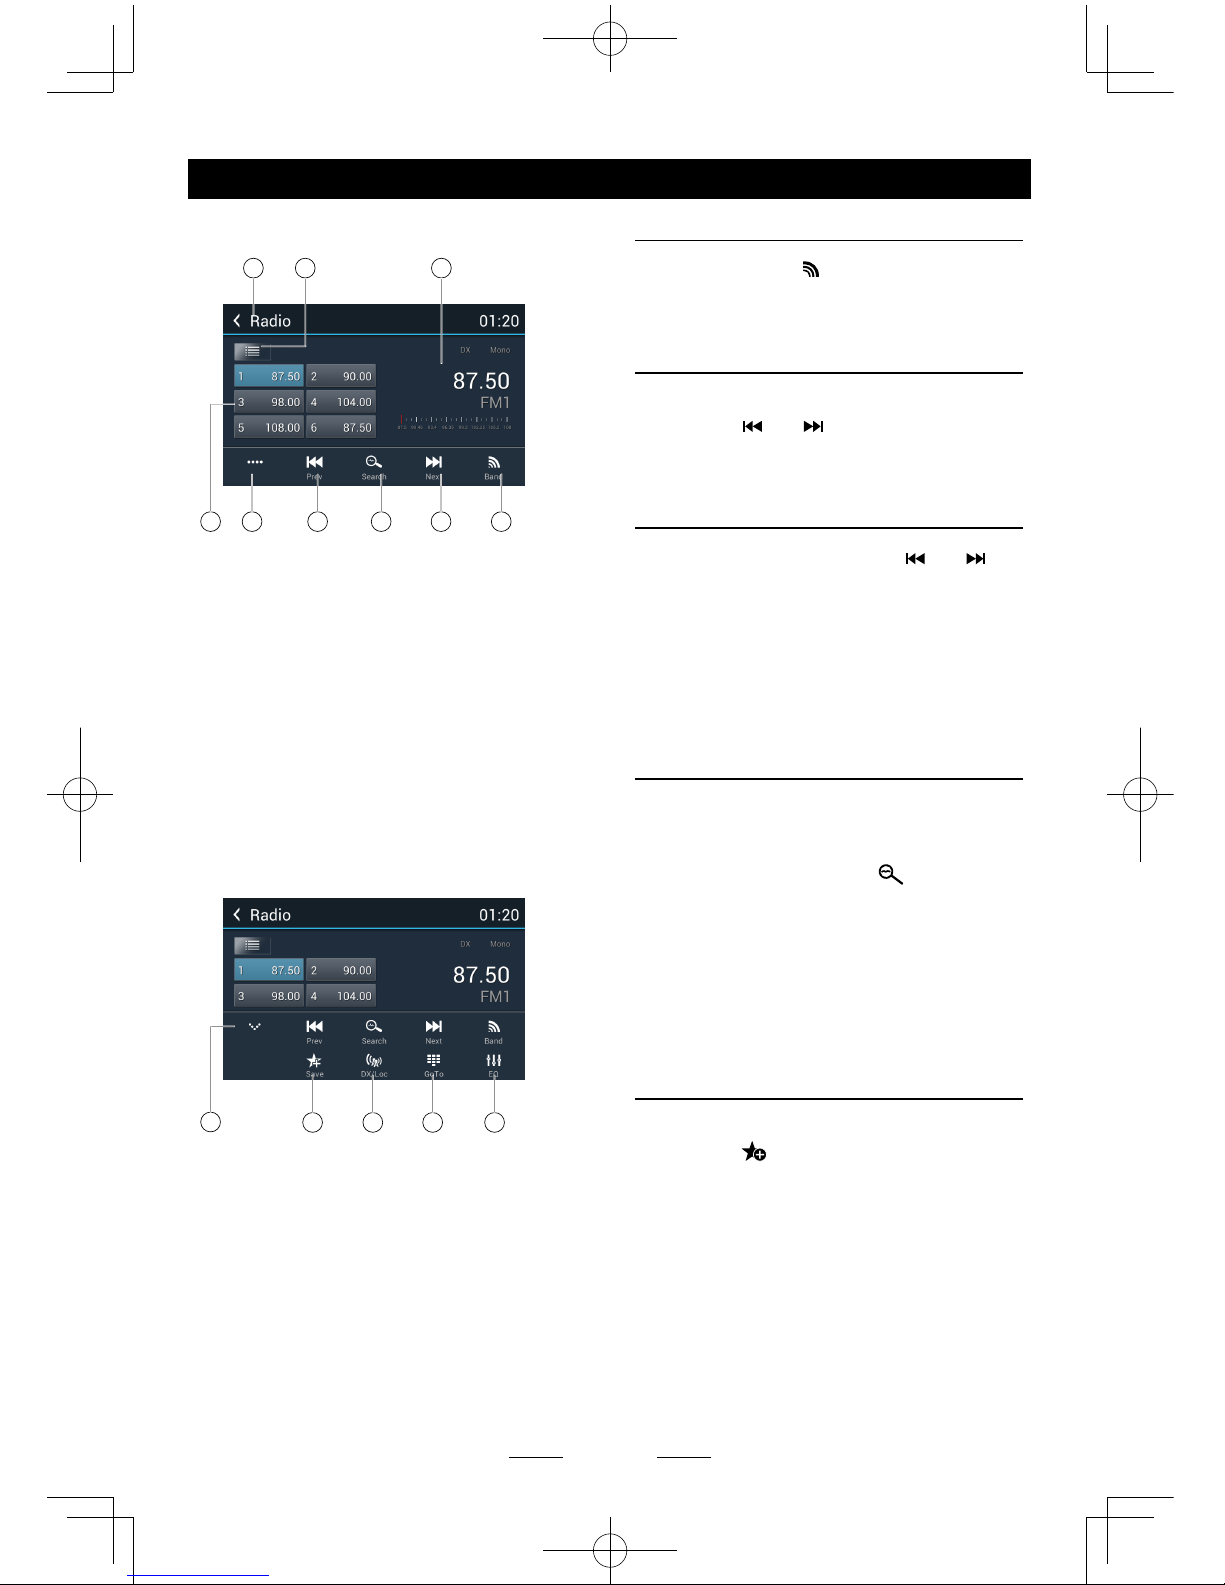
Seleccione [Radio] en el menú principal para
entrar en modo radio.
1 2 3
54 6 7 8 9
1. Regresar al menú de inicio
2. Estaciones de la lista de presintonías
3. Frecuencia sintonizada.
4. Estaciones preseleccionadas de la banda
actual
(presione P1 – P6 para escuchar las
estaciones presentes).
5. Mostrar más opciones.
6. Buscar frecuencias anteriores (para una
búsqueda automática presione por un
tiempo).
7. Buscar y guarda las seis (6) estaciones de
radio con señal más fuerte.
8. Buscar frecuencias siguientes (para una
búsqueda automática presione por un
tiempo).
9. Cambio de banda.
10
11 12 13 14
10. Ocultar la segunda línea de los botones
de control
11. Guardar emisoras manualmente
12. Para recibir las emisoras de radio locales
/ distantes
13. Introducir una frecuencia de forma
manual.
14. Ingresar en el menú EQ
Seleccione una banda de radio
Presione el botón [ ] para seleccionar una
banda entre FM1, FM2, FM3, AM1 y AM2.
Selección de banda manual
Para cambiar de frecuencias manualmente
presione el [ ] o [ ] para sintonizar una
estación de alta / baja.
Sincronización automática
Mantenga presionado el botón [ ] o [ ]
durante más de 2 segundos para buscar una
estación, para detener la búsqueda presione
cualquier otro botón de función del radio.
Nota:
Cuando se recibe una emisora, la búsqueda
se detiene automáticamente.
Auto búsqueda de frecuencias
Las emisoras con señal más fuerte serán
detectadas y almacenada en la memoria.
Para iniciar la búsqueda automática de
emisoras, persone el botón [
] en la barra
de operación.
Para detener el almacenamiento automático,
presione cualquier otro botón del radio.
Nota:
La búsqueda automática borrara las emisoras
anteriormente guardadas en la memoria.
Almacenamiento manual
1. Al detectar una estación de radio presione
el botón [ ] en la barra de tareas para
mostrar la lista de emisoras almacenadas.
2. Toque para seleccionar un elemento de la
lista para almacenar la emisora actual en la
memoria.
3. Toque la parte superior izquierda de la
pantalla para salir.
Page 42
SP - 12
Seleccionar una emisora
seleccionada
Metodo1:
Presione P1 – P6 en la pantalla para
escuchar la emisora presente.
Metodo2:
1. Toque el botón [ ] en la pantalla
para mostrar la lista de las emisoras
memorizadas.
2. Seleccione una banda
3. Toque una estación en la lista para
escuchar.
4. Toque la parte superior izquierda de la
pantalla para salir.
Buscador local
Cuando la búsqueda LOCAL esta activada,
esta solo tomara las emisoras con mayor
fuerza en señal.
Para abrir la función LOCAL, toque el botón
[ ] en la barra de operación seguido a
esto presione el botón [ ] para seleccionar
“Loc” o “DX”.
Nota:
El número de estaciones de radio que pueda
ser recibida se reducirá después de que la
búsqueda local sea activada.
Tecla de búsqueda
Toque el botón
[ ]
en la barra de operación
para mostrar el menú de búsqueda por escritura.
Presione el teclado para introducir la
frecuencia, presión [ OK ] para ir a escuchar
la estación directamente.
Presione [ ] para borrar todos los dígitos.
Funcionamiento SD/USB
Uso de la tarjeta SD
1. Abra la tapa de la ranura de la tarjeta,
insertar la tarjeta SD en la ranura
correspondiente, la unidad la leerá
automáticamente.
Usted podrá elegir Música / Video / Imágenes.
2. Para retirar la tarjeta, primero debe
seleccionar otro modo, con el n de evitar
daños a la tarjeta, pulse la tarjeta un poco,
y tomar la tarjeta después que esta salga.
Uso de un dispositivo USB
1. Conecte el dispositivo USB al cable USB.
Al conectar un dispositivo USB, la unidad
leerá los archivos de forma automática.
2. Para remover el dispositivo USB, debe
primero seleccionar otra fuente, con el n
de evitar daños al dispositivo USB.
Reproducción de música
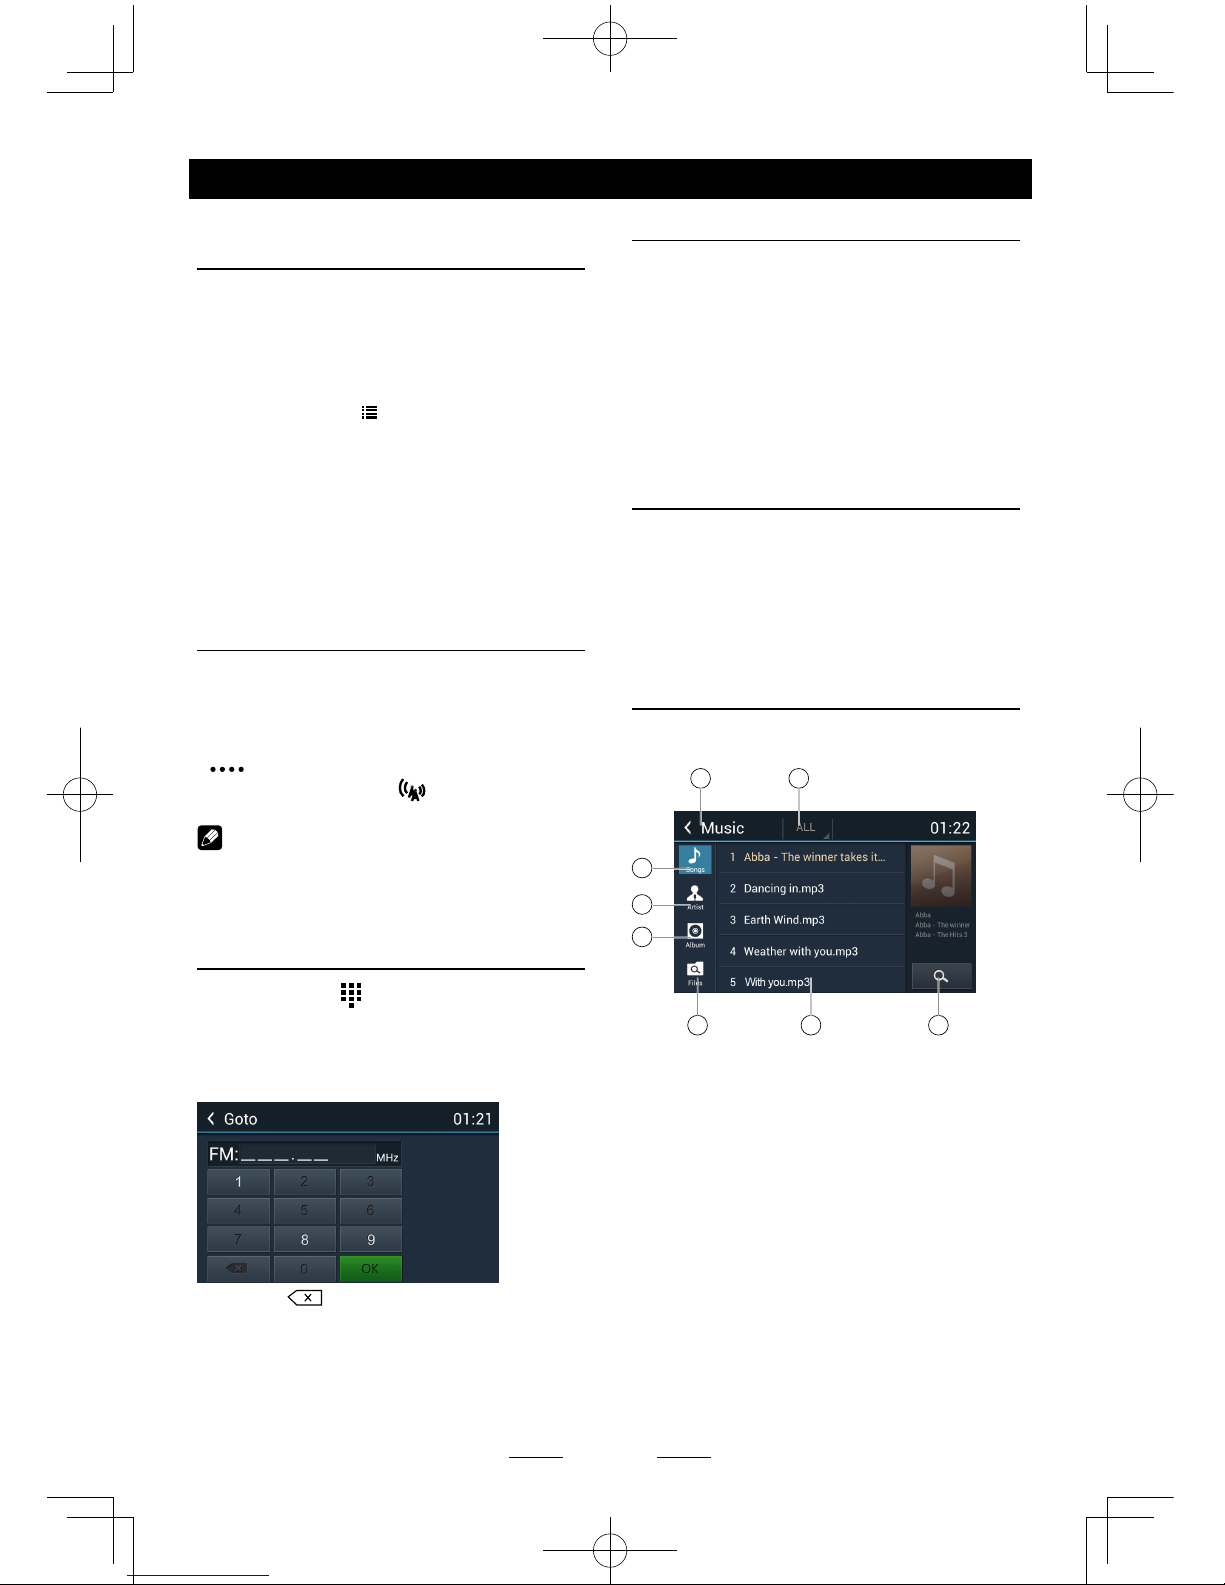
Seleccione [Música] del menú de aplicaciones,
la unidad mostrara toda la música.
1 2
6
3
4
5
7 8
1. Regresar al menú de inicio
2. Seleccione la fuente de archivo
3. Enumerar los archivos por nombre de
canción
Toque una canción para iniciar la
reproducción.
4. Lista de archivos por artistas
5. Lista de los archivos por álbum
6. Mostrar las carpetas
7. Lista de ventanas
Arrastre hacia arriba / abajo para
desplazarse.
Toque un elemento para seleccionarlo.
8. Entre en el menú de búsqueda.
Operaciones con el radio
Page 43
SP - 13
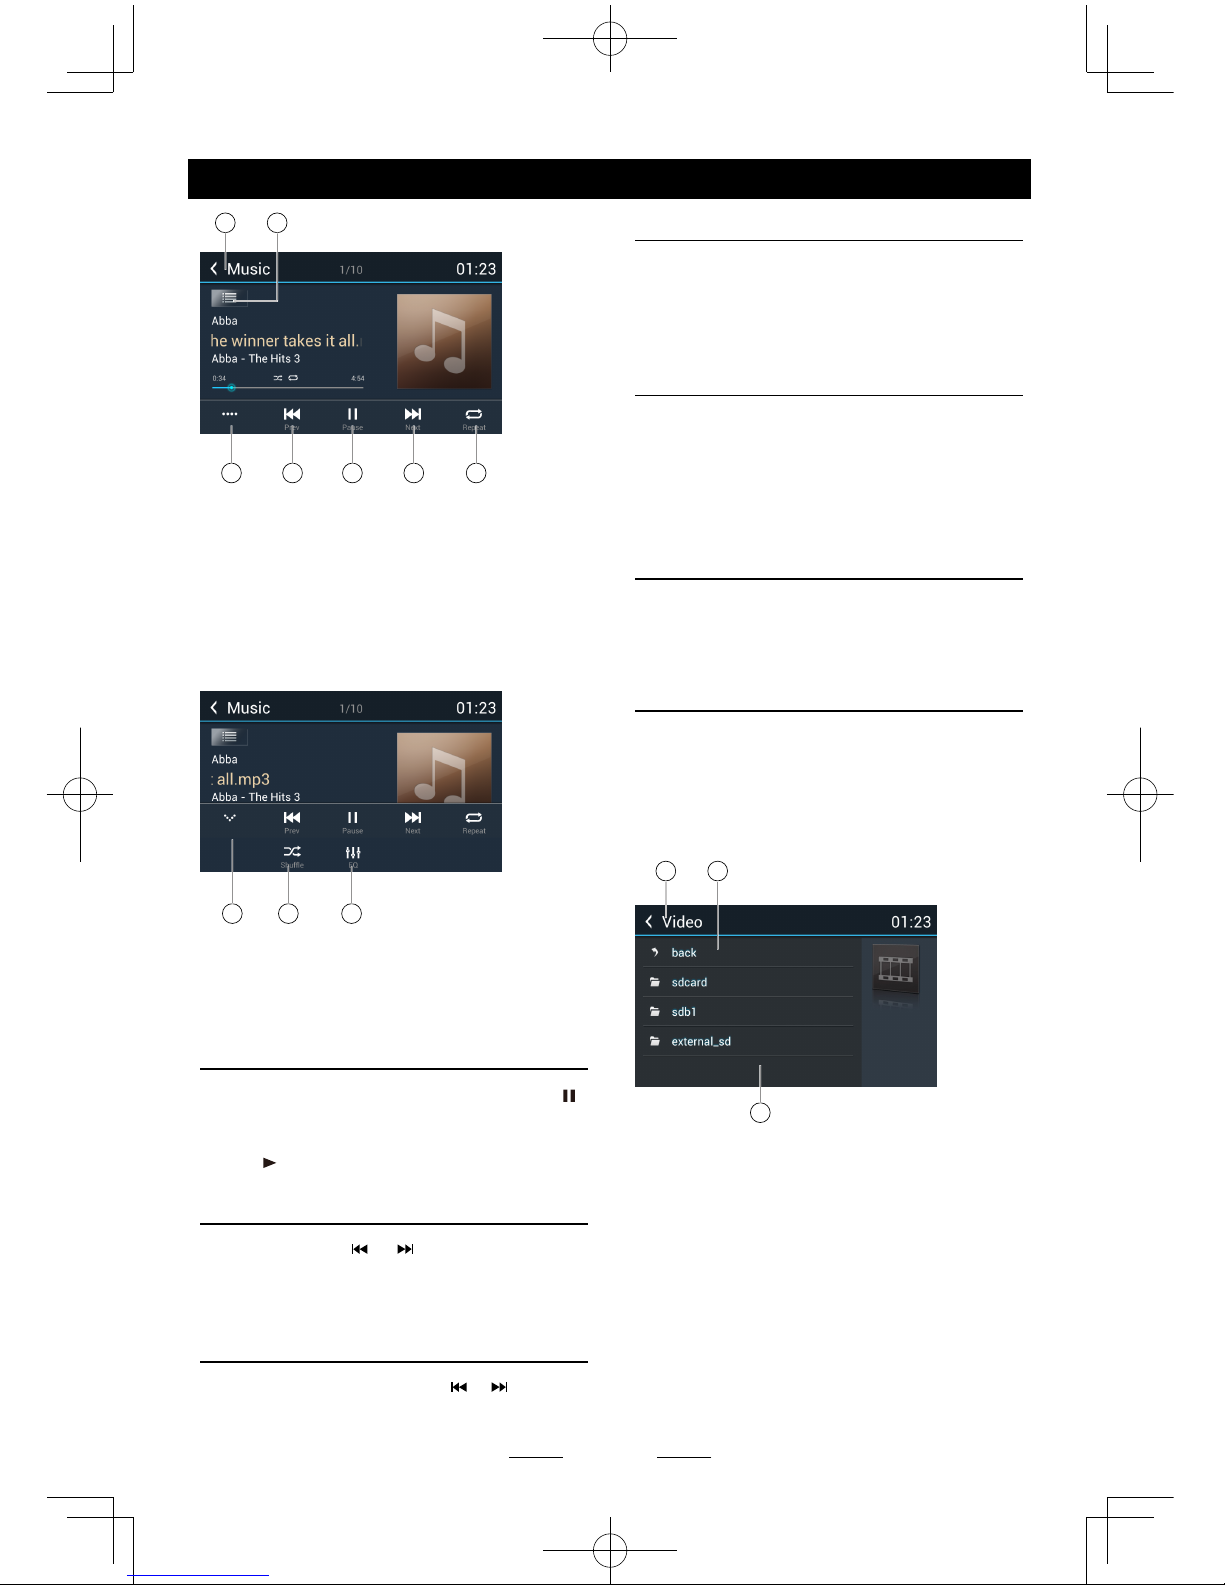
9 10
11 12 13 14 15
9. Regresar al menú de inicio
10. Mostrar lista Menú
11. Mostrar más botones de control
12. Pista anterior
Retroceso rápido (mantener presionado).
13. Reproducir / pausa
14. Pista siguiente
Avance rápido (mantener pulsado).
15. Repetición de la reproducción
16 17 18
16. Ocultar la segunda línea de botones de
control.
17. Reproducción aleatoria
18. Ingresar en el menú EQ.
Reproducir / pause
Cuando se reproduce, pulse el botón [ ]
para hacer una pausa, y
El sonido se silenciará.
Pulse [
] para Reproducir.
Pista anterior / siguiente
Pulse el botón o para ir a la pista
siguiente o anterior.
Avance rápido o retroceso
rápido
Mantenga pulsado el botón o para un
avance o retroceso rápido.
Funcionamiento SD/USB
Seleccionar música por artista
1. Pulse [Artistas] en la parte superior de la
pantalla.
2.
Seleccione un artistas que aparece en la lista.
3. Seleccione una canción para reproducir
Seleccione música por álbum
1. Presione [Álbumes] en la parte superior de
la pantalla.
2. Presione un álbum que aparece en la lista.
3. Seleccione una canción para reproducir.
Seleccionar música por el
nombre de la canción
1. Presione [canciones] en la parte superior
de la pantalla.
2. Seleccione una canción para reproducir.
Reproducción de video
Seleccione [Vídeo] en el menú de
aplicaciones, la unidad mostrará todos los
archivos de vídeo en la almacenes.
Durante la reproducción, toque la pantalla
(excepto la esquina superior izquierda) para
mostrar los botones de control.
1 2
3
1. Regresar al menú de inicio
2. Anterior
3. Carpetas / lista de archivos
Seleccionar arriba/abajo desplegar
Presione para acceder
Page 44
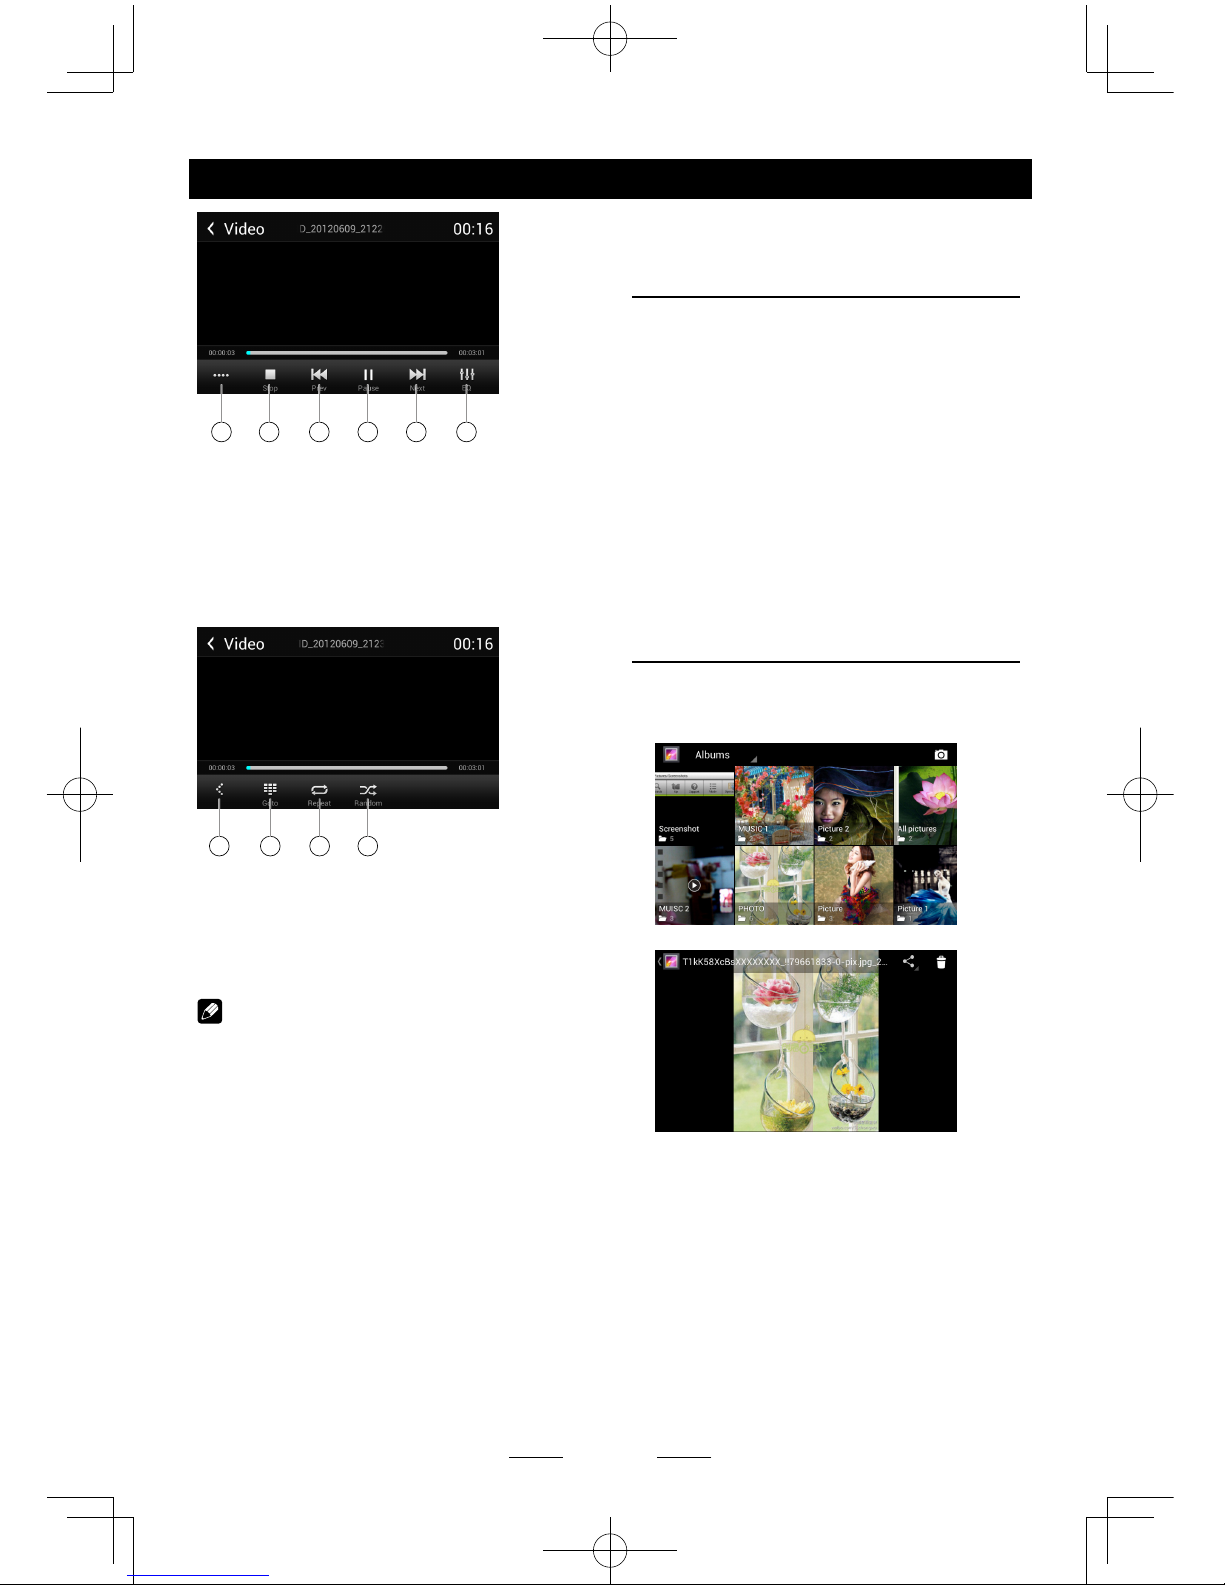
SP - 14
4 5 6 7 8 9
4. Mostrar más botones de control
5. Detener la reproducción
6. Capitulo anterior
Rápido Retroceso (pulsación larga)
7. Reproducir / pausa
8. Siguiente capitulo
Avance Rápido (pulsación larga)
9. Ingresar en el menú EQ
10 11 12 13
10. Mostrar la página anterior de botones de
control
11. Entre en el menú de búsqueda
12. Repetir Reproducción
13. Reproducción aleatoria
Notas:
• Desconectelosdispositivodela
almacenamiento USB de la unidad cuando
no esté en uso.
• Puedeutilizarlaopcióndeuncablepara
conectar la USB ya que cualquier
dispositivo conectado directamente a la
unidad sobre saldrá de esta y puede ser
peligroso.
• Noutilizarproductosnoautorizados.
Funcionamiento SD/USB
El uso de un teléfono móvil
Android como un dispositivo
de memoria USB
Si desea utilizar su teléfono móvil Android
como un dispositivo de almacenamiento USB.
1. Conecte el teléfono móvil Android a la
unidad con un cable USB.
2. Seleccione el Tipo de conexión de su
teléfono móvil “Montar tarjeta SD”.
* Si selecciona “Sólo carga”, no será
reconocido por la unidad.
3. En el menú de conguración de la unidad,
seleccione “Storage”, y luego “disco USB
Mount”.
Operaciones de la galería de
imágenes
1. Seleccione [Galería] en el menú APPS.
2. Seleccione una galería para mostrar la lista
de imágenes.
3. Toque para visualizarla.
Arrastre hacia la izquierda / derecha para
desplazarse.
Toque la esquina superior derecha para
borrar la foto.
Toque la esquina superior izquierda para ir
hacia atrás.
Page 45
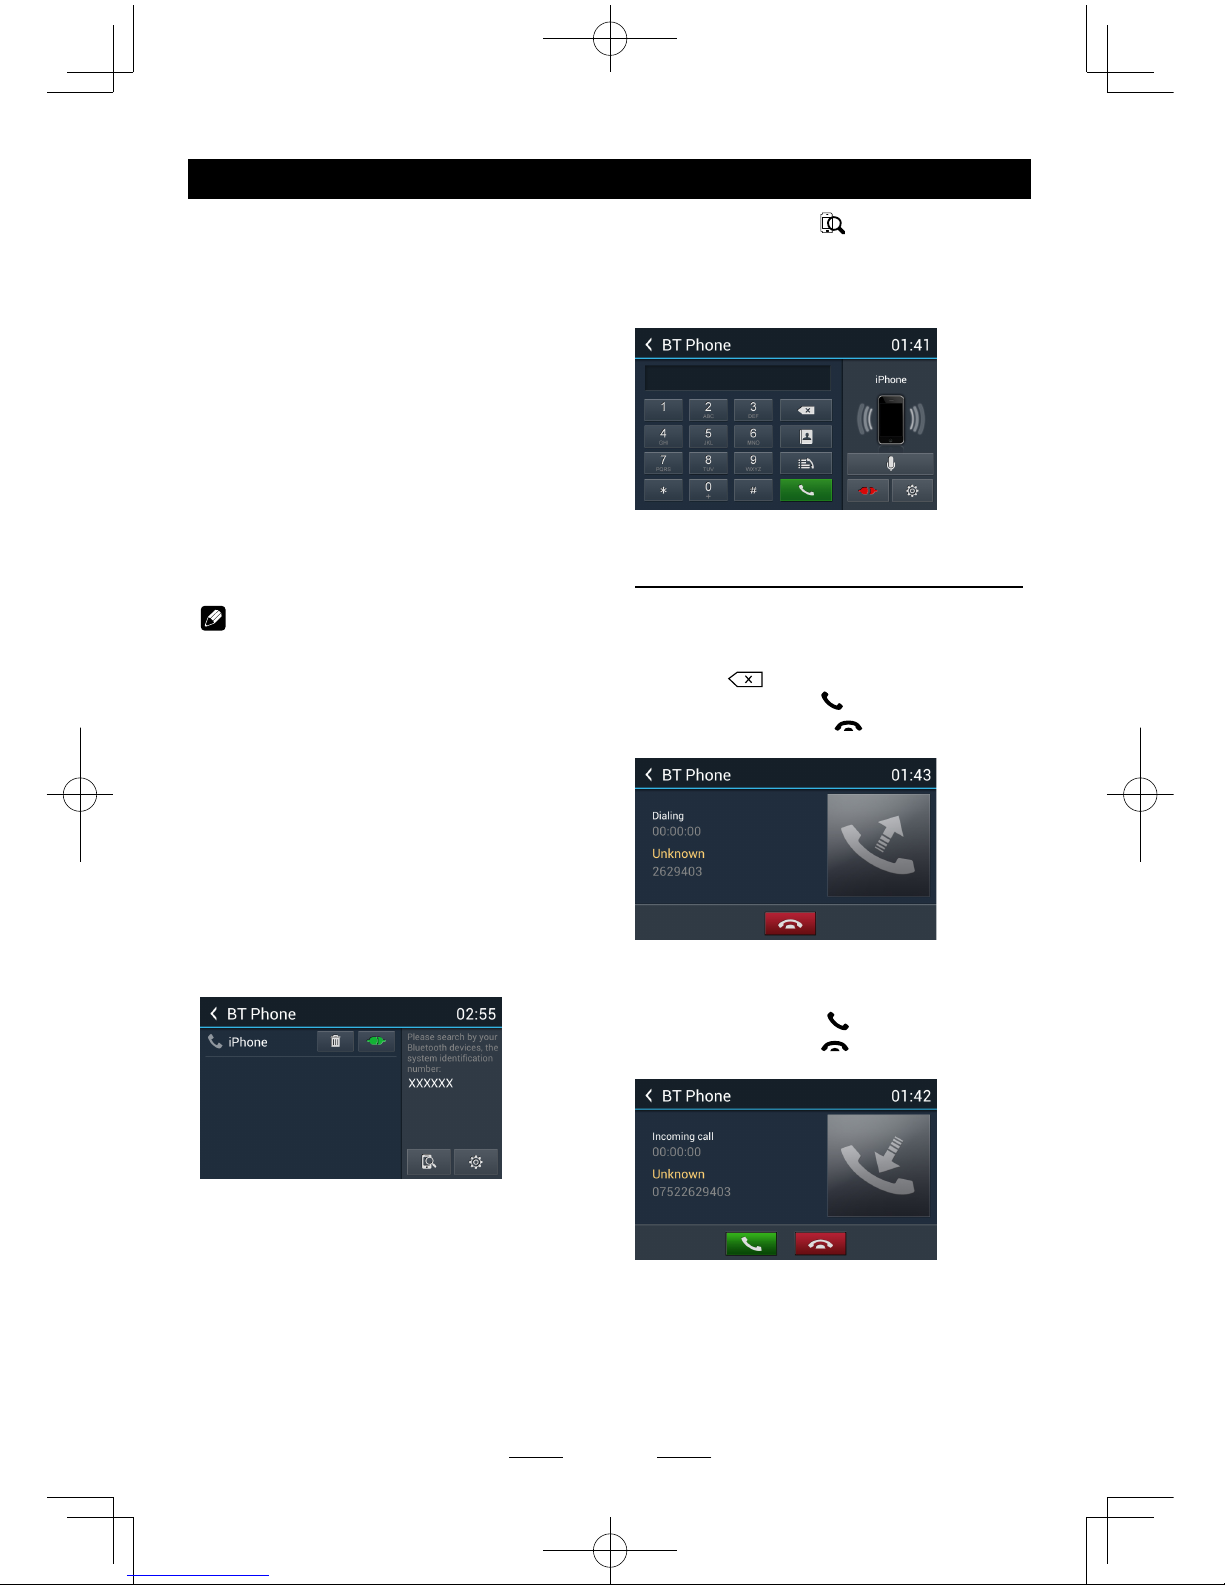
SP - 15
La tecnología Bluetooth le permite utilizar
el sistema de audio para conexiones
inalámbricas con su teléfono móvil o
comunicación manos libres para la música.
Algunos teléfonos móviles Bluetooth
tienen características de audio y algunos
reproductores portátiles e audio son
compatibles con la función de Bluetooth. Este
sistema puede reproducir datos de audio
almacenados en un dispositivo de audio con
Bluetooth. El equipo estéreo del vehículo con
Bluetooth será capaz de recuperar contactos
de la agenda telefónica, llamadas recibidas,
llamadas marcadas, llamadas perdidas,
llamadas entrantes, llamadas salientes y
escuchar música.
Notas:
• Este sistema nofuncionaraopuede
funcionar de forma incorrecta con algunos
dispositivos de audio con Bluetooth.
• Launidadnopuede garantizar la
compatibilidad con todos los teléfonos
móviles.
• Reproducción de audioseestablecerá
con el mismo nivel de volumen según lo
establecido durante la llamada telefónica.
Esto podría causar problemas, si un nivel
extremo de volumen se establece durante
la llamada telefónica.
Presione [BT Phone] en el menú principal
para ingresar al modo Bluetooth.
1. Si la función Bluetooth de la unidad está
apagada, la unidad le pedirá que vuelva
a encenderlo. (Ajuste por defecto está
activado)
2. Encienda la función Bluetooth de su
teléfono móvil.
3. Buscar nuevos dispositivos Bluetooth en su
teléfono. Seleccione el nombre del modelo
de la lista de emparejamiento en el teléfono
móvil e introduzca contraseña (contraseña
por defecto: 0000)
Funcionamiento Bluetooth
O toque el botón [ ] en la pantalla para
buscar dispositivos Bluetooth móviles.
Después de conectar con éxito, la unidad
mostrara el siguiente menú.
Realizando una Llamada
• Marcación
1. Digite los números presionando las teclas
en la pantalla.
Toque [ ] para borrar los dígitos.
2. Presione el botón [ ] para marcar.
3. Presione el botón [ ] para terminar la
llamada.
• Contestar una llamada
Puede contestar una llamada entrante
presionando el botón [ ].
Presione el botón [ ] para rechazar la
llamada entrante.
• Desconectarse
Para desconectar un dispositivo asociado,
toque el botón [Desconectar].
Page 46
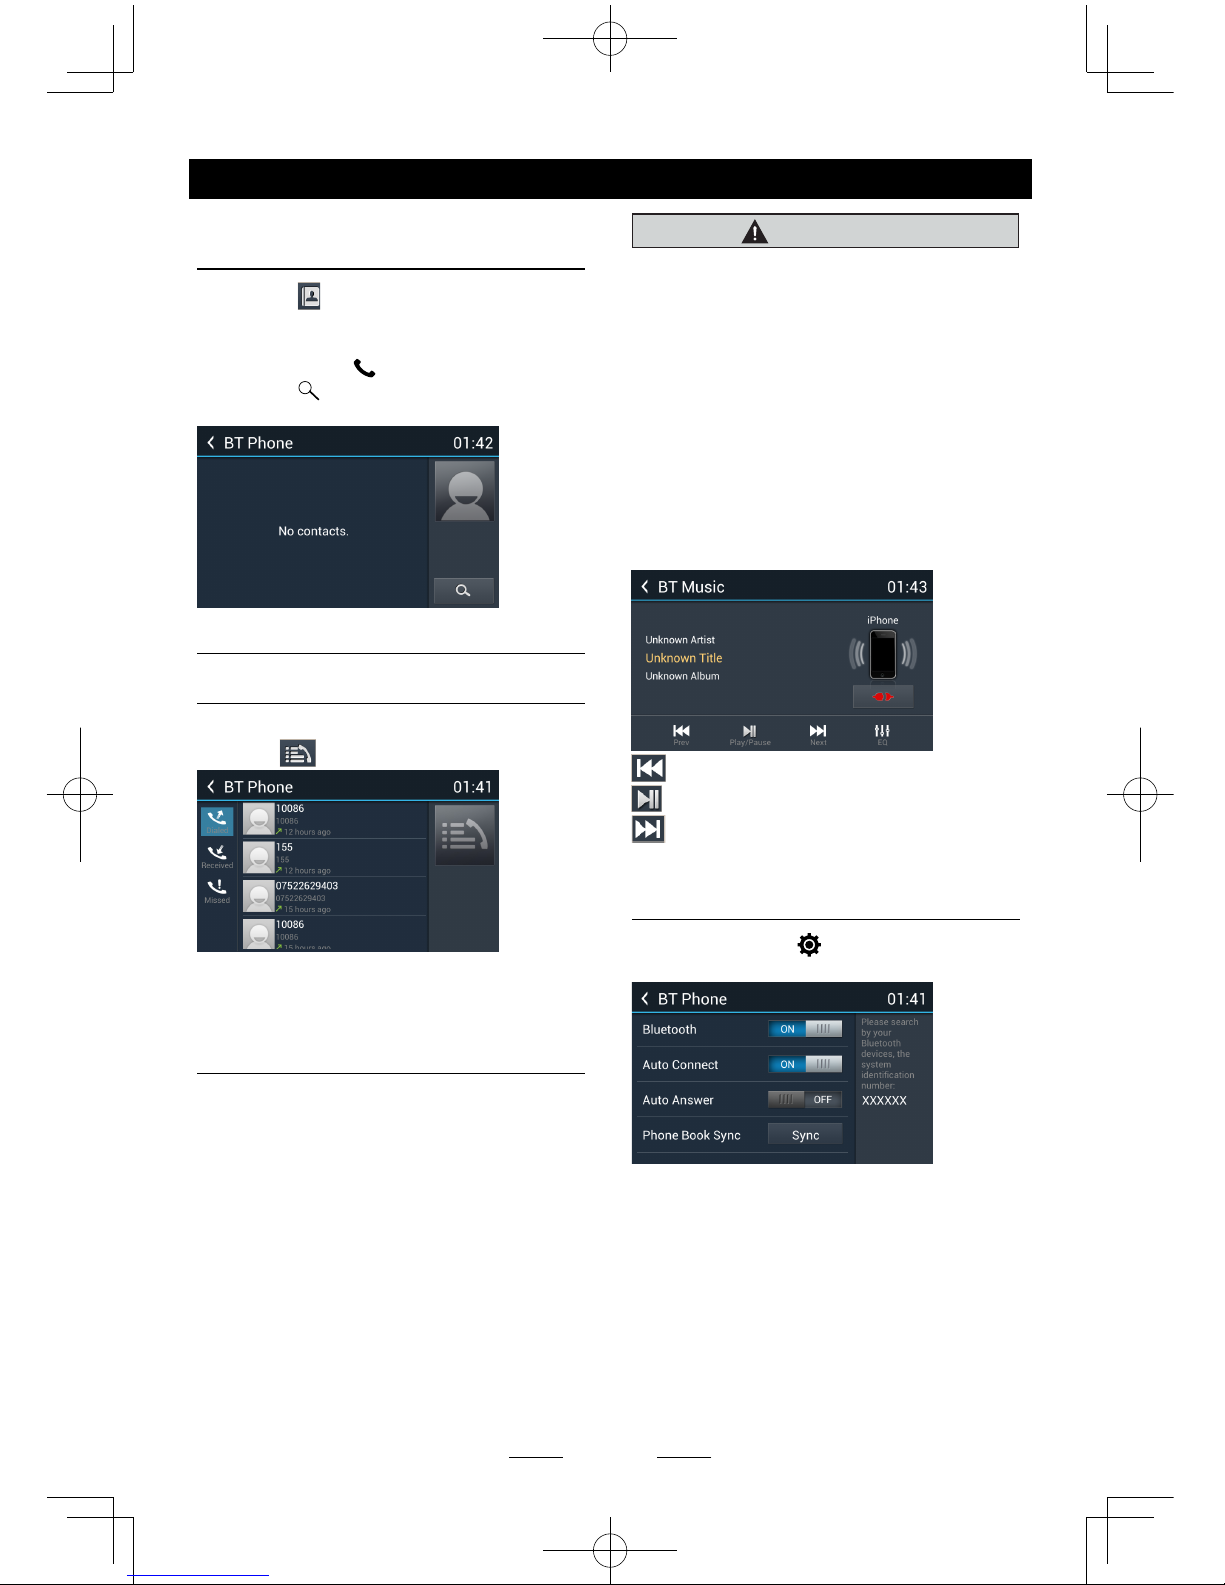
SP - 16
Funcionamiento Bluetooth
Llamada desde la agenda
telefónica
1. Toque [ ] para mostrar la agenda de
teléfonos.
2. Seleccione un número para seleccionar y
pulse el botón [
] para marcar.
3. Toque [
] para buscar un nombre de
contacto.
Historia de llamadas
Aceda a la historia de llamadas presionando
el botón [
].
A continuación, seleccione un número de
marcadas/ perdidas / Llamadas recibidas.
Audio Bluetooth
¿Qué es el streaming de audio?
Audio streaming es una técnica para transferir
datos de audio de modo que pueda ser
procesada al mismo tiempo que se descarga.
Usuarios puede transmitir música desde sus
reproductores de audio externa al equipo
estéreo del vehículo de forma inalámbrica y
escuchar las pistas a través de los parlantes
del vehículo.
Por favor, consulte a su distribuidor más
cercano para obtener más
información sobre el producto transmisor de
audio inalámbrico que ofrece el equipo.
PRECAUCION
Por favor, evite utilizar su conexión
de teléfono celular mientras está en
funcionamiento el streaming de audio, ya
que esto podría causar ruido o un sonido
entrecortado en la reproducción de las
canciones.
La transmisión de audio puede o no puede
volver después de interrumpir el teléfono
ya que esto depende de teléfono móvil.
Presione el botón [BT Music] para reproducir
música en su teléfono celular.
: Pista anterior
: Reproducir / pause
: Siguiente canción
Conguración del Bluetooth
Presione el botón [ ] para mostrar el menú
de conguración del Bluetooth.
Page 47
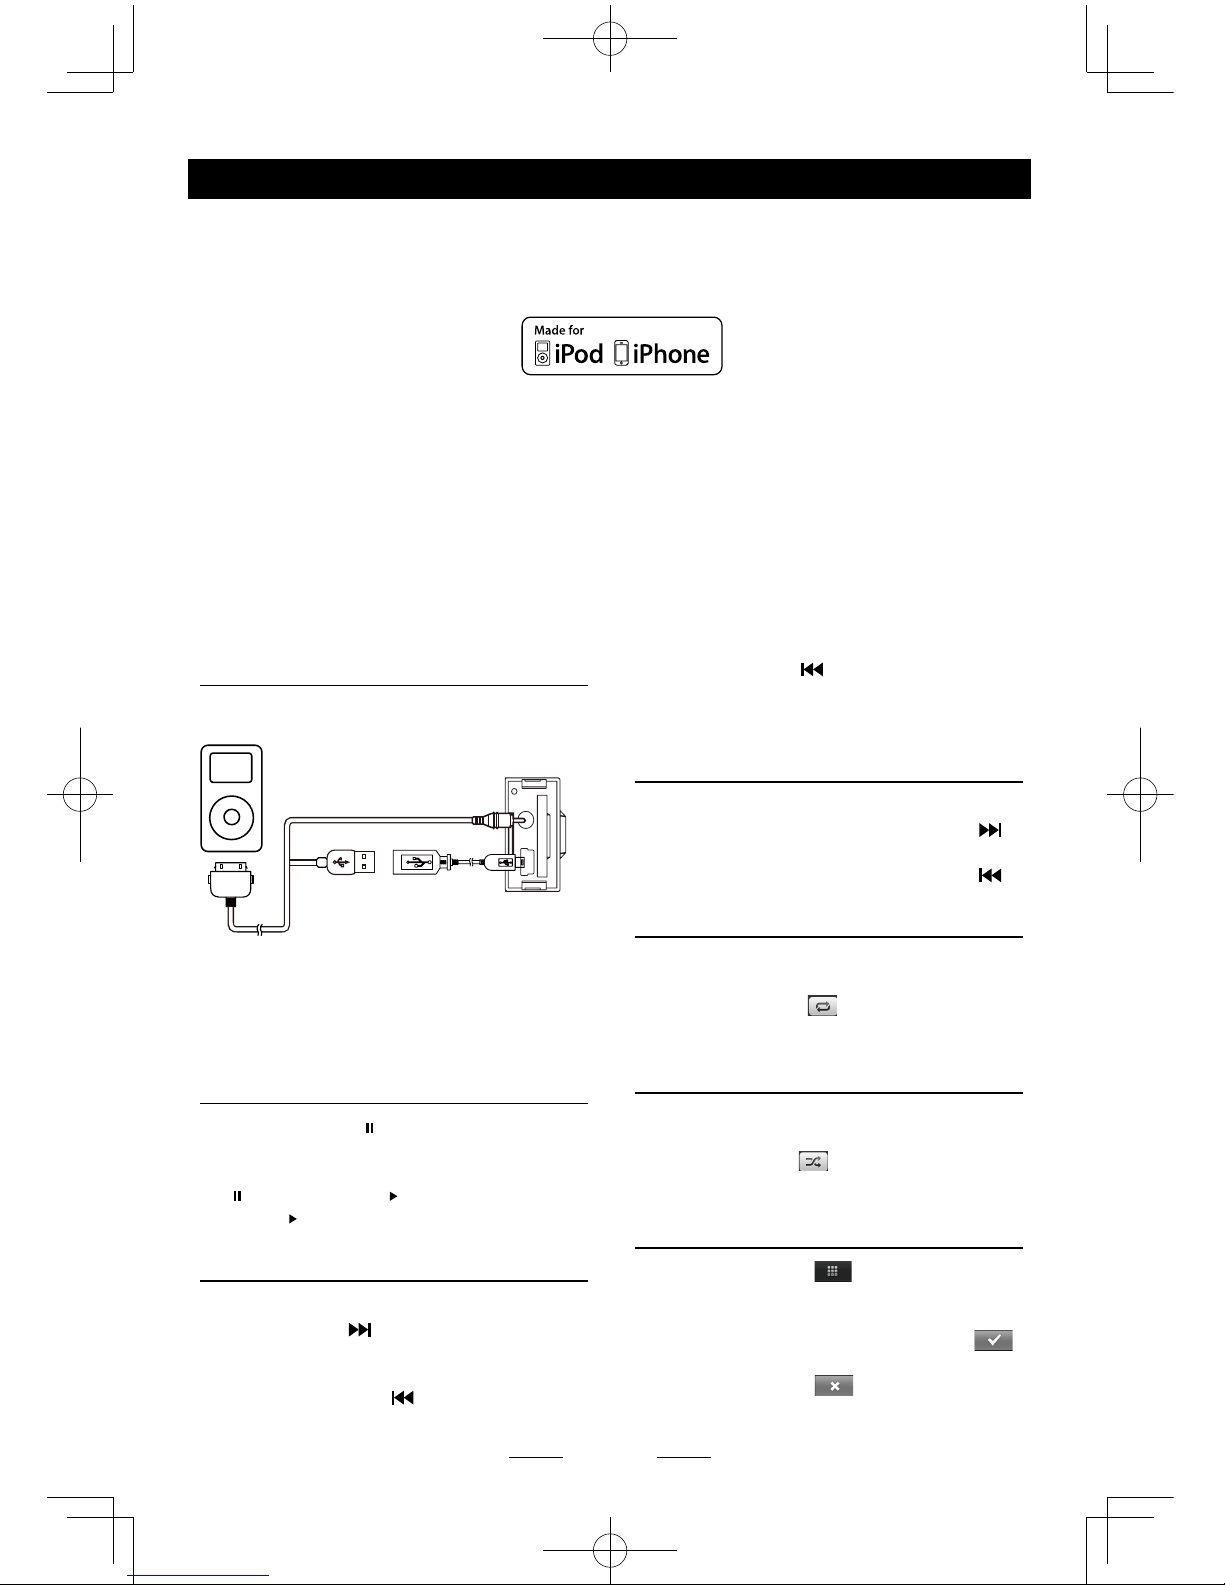
SP - 17
Funcionamiento del iPod / iPhone
Esta unidad sólo es compatible con los siguientes modelos de iPod / iPhone:
• IPhone 5
• IPhone 4S
• IPhone 4
• IPod touch (5 ª generación)
• IPod touch (4 ª generación)
• IPod classic
• IPod nano (séptima generación)
• IPod nano (6 ª generación)
• IPod nano (5 ª generación)
“Made for iPod” y “Made for iPhone” signican que un accesorio electrónico ha sido diseñado
para conectarse especícamente a un iPod o iPhone, respectivamente, y ha sido certicado por
el desarrollador para cumplir con los estándares de rendimiento de Apple.
Apple no se hace responsable del funcionamiento de este dispositivo o de su cumplimiento con
la seguridad y las normas reglamentarias. Tenga en cuenta que el uso de este accesorio con
iPod o iPhone puede afectar el rendimiento inalámbrico.
iPhone y iPod son marcas comerciales de Apple Inc., registradas en los EE.UU. y otros países.
Acceso al modo iPod
Conecte un iPod o iPhone al puerto USB,
conectar a través de un cable de iPod.
Pulse [iPod] en el menú principal para entrar
en el menú iPod.
Si [iPod] no está en el menú actual, deslice la
barra de abajo a la izquierda o a la derecha
para encontrarlo.
Pausar la reproducción
1. Toque el botón [ ] en la parte inferior de la
pantalla para pausar la reproducción.
“PAUSE” aparece en la pantalla, y el botón
[ ] se convierte en [ ].
2. Toque [ ] para reanudar la reproducción.
Selección de una pista
Hacia adelante
Toque el botón [ ] para pasar al inicio de
la siguiente pista.
Hacia atrás
1. Toque el botón [ ] para volver a el
principio de la pista actual.
2. Toque el botón [ ] dos veces para volver
al comienzo de la pista anterior.
Avance rápido / Retroceso
rápido
Avance rápido
Toque y mantenga presionado el botón [ ].
Retroceso rápido
Toque y mantenga presionado el botón [ ].
Repetir de la reproducción
Esta función le permite reproducir la pista
repetidamente.
Toque el botón [
] para seleccionar
Repetir uno o Repetir todos
Reproducción aleatoria
Esta función le permite reproducir todas las
pistas grabadas en un orden aleatorio.
Toque el botón [
] para reproducir de
forma aleatoria.
Función de búsqueda
1. Toque el botón [ ] para entrar en la
búsqueda menú.
2. Introduzca el número tocando los botones
en la pantalla, a continuación, toque [
]
para empezar la búsqueda.
Toque el botón [ ] para eliminar los
numero introducidos
Page 48
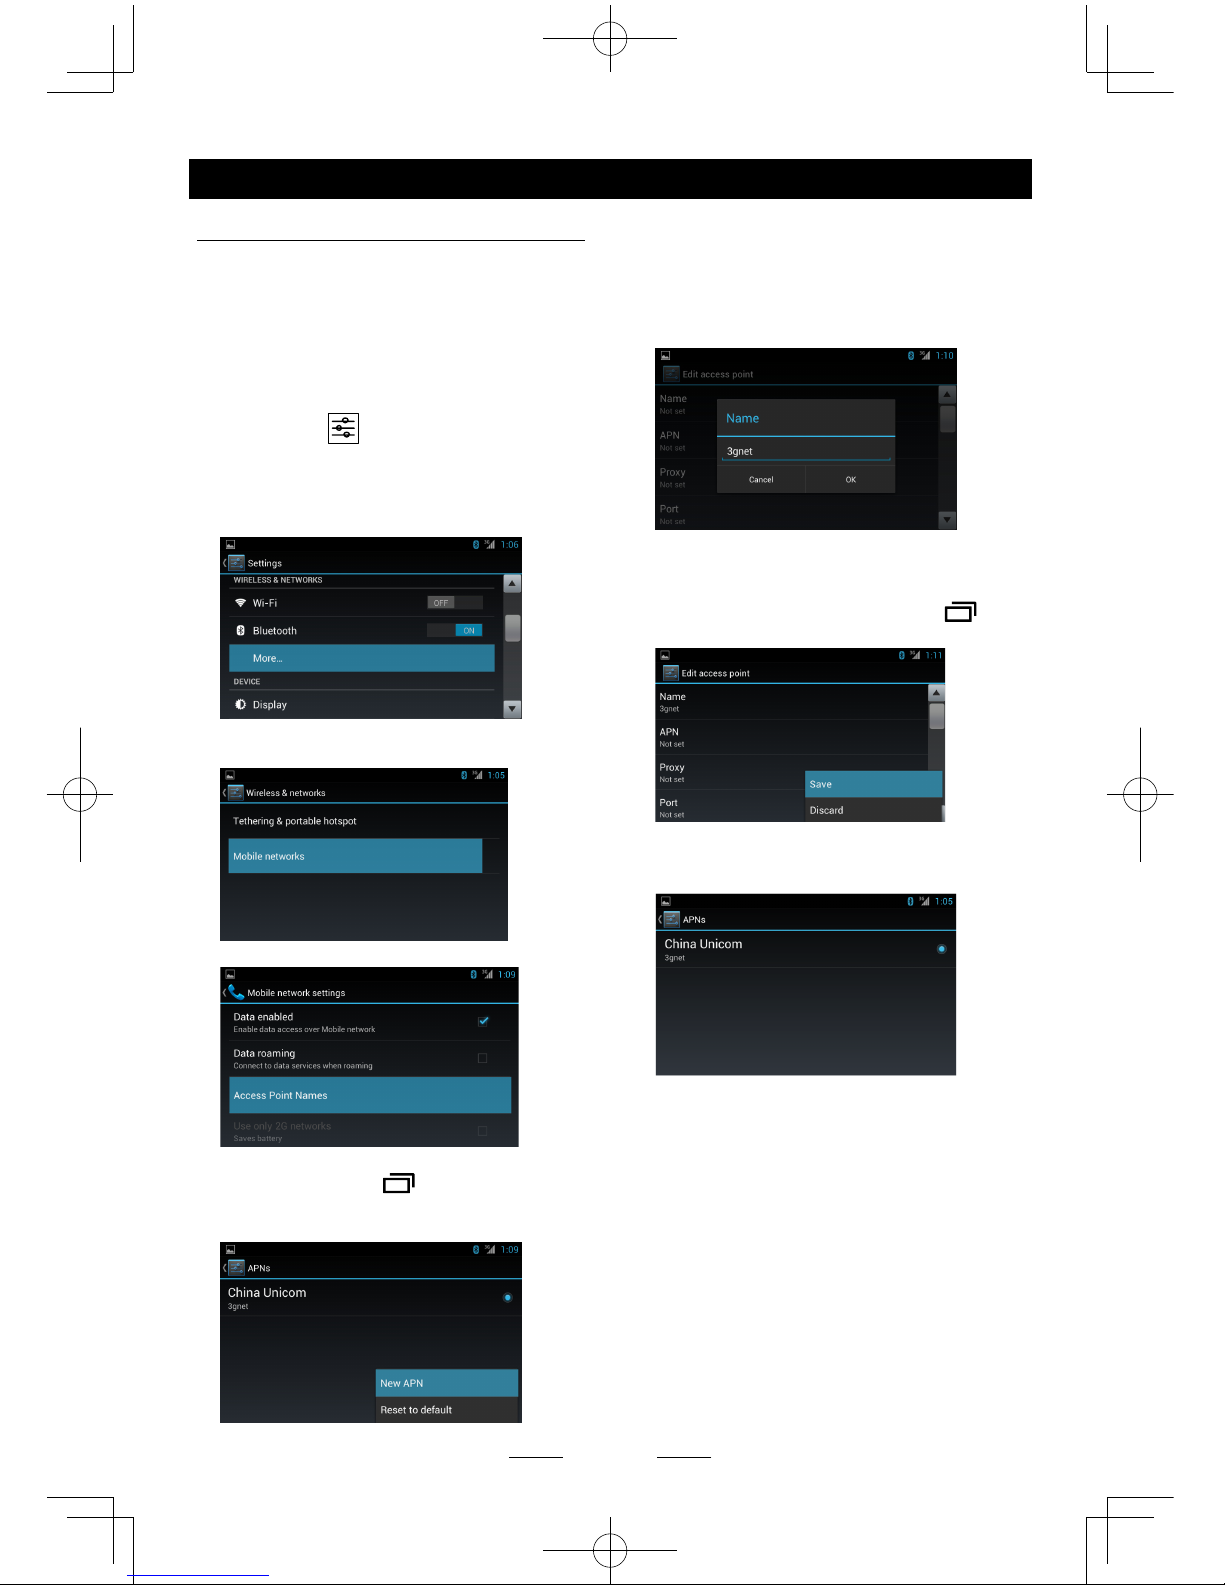
SP - 18
Conguración APN 3G
Nota:
Póngase en contacto con el fabricante para la
última compatible de Dispositivos 3G.
El usuario debe congurar el APN para
acceder a internet.
1. Inserte el modulo 3G
2. Seleccione [
] en el menú principal para
ingresar a la interfaz de conguración.
3. Clic [inalámbrico & redes] para ingresar a
la conguración de conexión inalámbrica &
redes y haga clic en [más...].
4. Clic [red móvil] para ingresar a la
conguración de la red móvil.
5. Clic [el nombre del punto de acceso].
6. Presione el botón [ ] (MENU) en el
panel frontal, a continuación de clic en
[Nuevo APN].
Internet
7. Debe congurar las siguientes opciones:
Nombre, APN, MCC, MNC.
Presione la caja de dialogo para mostrar el
teclado, y ingrese el nombre deseado.
APN acorde al determinado por el
operador móvil.
La unidad detectara su modem 3G para
determinar el MCC y MNC.
8. A continuación presione el botón [
]
(MENU) y clic el botón [save-Guardar].
9. Seleccione el APN, el icono 3G aparecerá
en la esquina superior derecha de la barra
de tareas.
Page 49
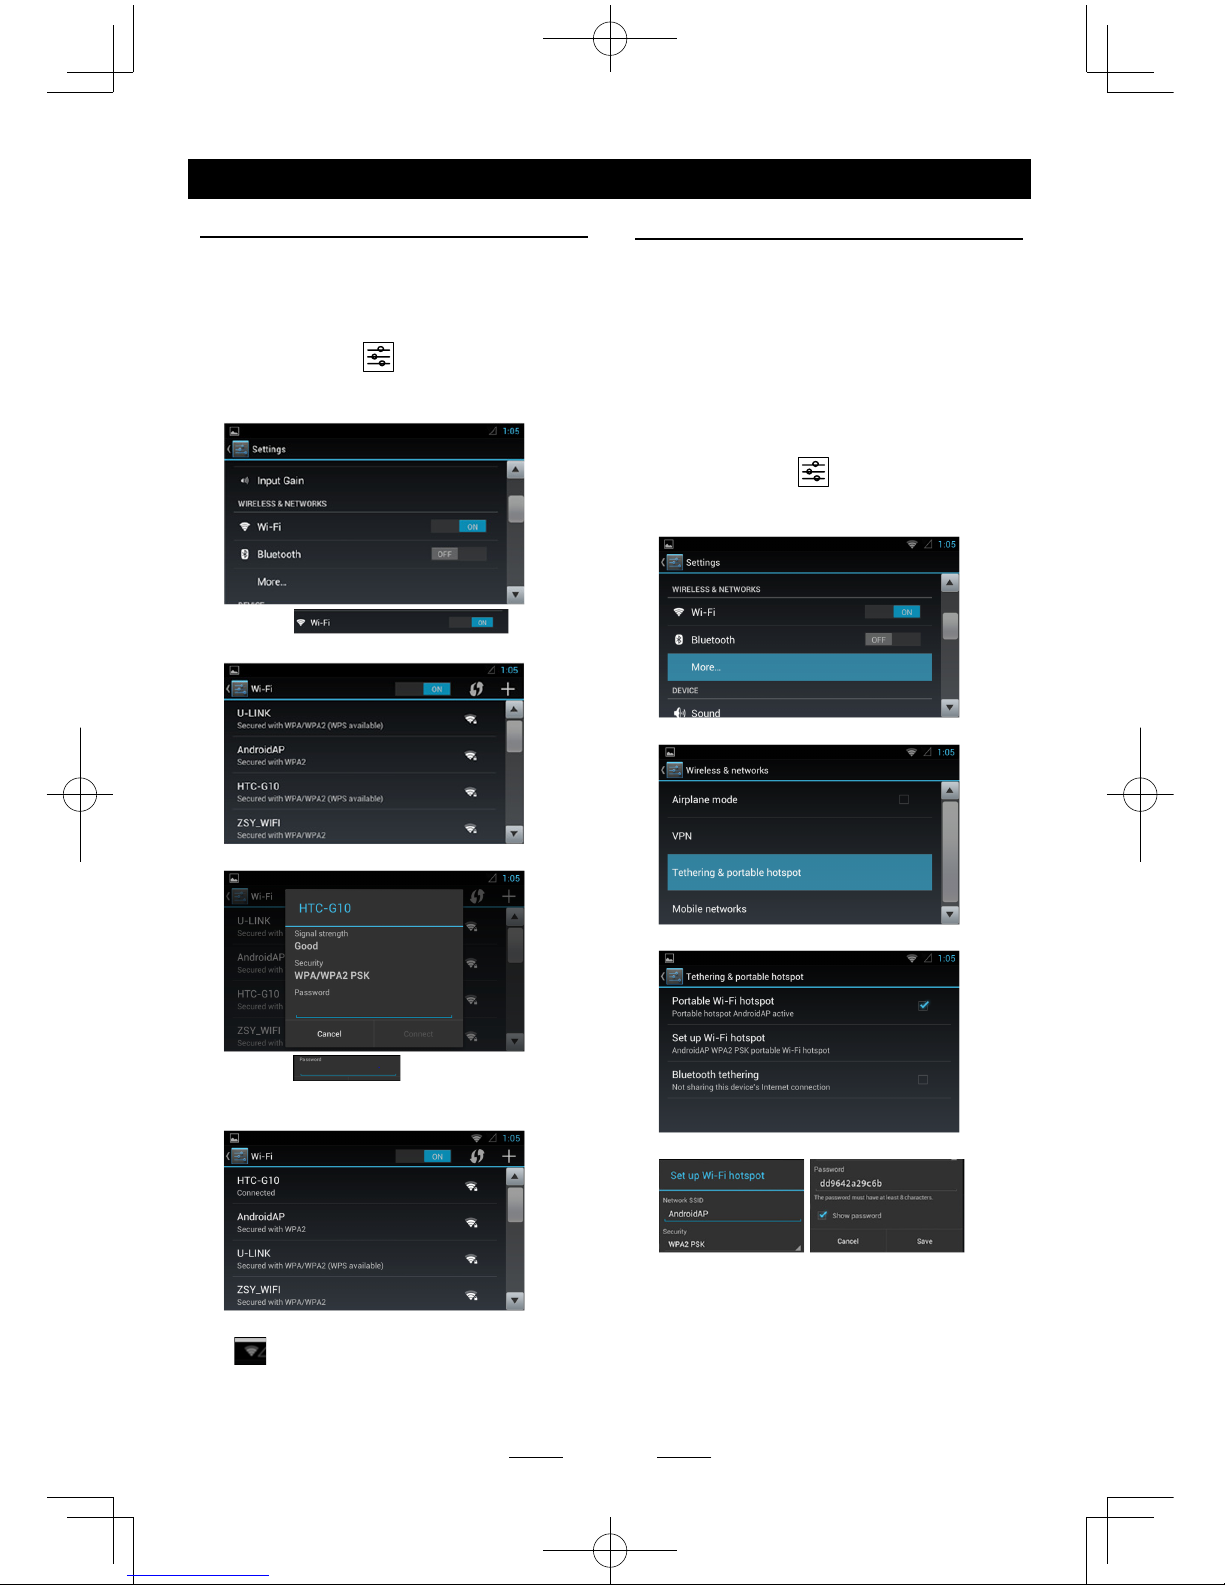
SP - 19
Internet
Conguración Wi-Fi
La unidad soporta el modem WiFi: realtek
8188cu, 8188eu.
1. Conecte el modem WiFi a la unidad.
Toque el icono [
] en el menú principal
para entrar en el menú de ajustes y activar
la función Wi-Fi (si es necesario).
2. Toque [ ] para
entrar al Menú de conguración de WiFi.
3. Toque un punto de acceso WiFi disponible.
4. Toque [ ] e introduzca
la contraseña, toque [Conectar] para
conrmar.
5. Después de conectar con éxito, el icono
[
] aparece en la esquina superior
derecha de la pantalla. Ahora se puede
acceder a Internet.
Crear Wi-Fi Hotspot
El usuario puede utilizar la unidad para crear
un punto personal de acceso Wi-Fi. Todos
sus otros dispositivos con Wi-Fi podrán
conectarse a este hotspot y compartir la
conexión primaria de internet.
1. Conecte el modem Wi y 3G al puerto USB
en la parte posterior de la unidad.
Consulte “Conexiones de dispositivos”.
2. Toque el icono [
] en el menú principal
y arrastre hacia abajo a “INALÁMBRICO Y
REDES”.
3. Seleccione “Más...”.
4. Toque “Anclaje a red y zona Wi-Fi”.
5. Toque “hotspot Wi-Fi portátil”.
Después de realizar la conguración, puede
tocar “Congurar Wi-Fi hotspot” para modicar
los ajustes.
Page 50
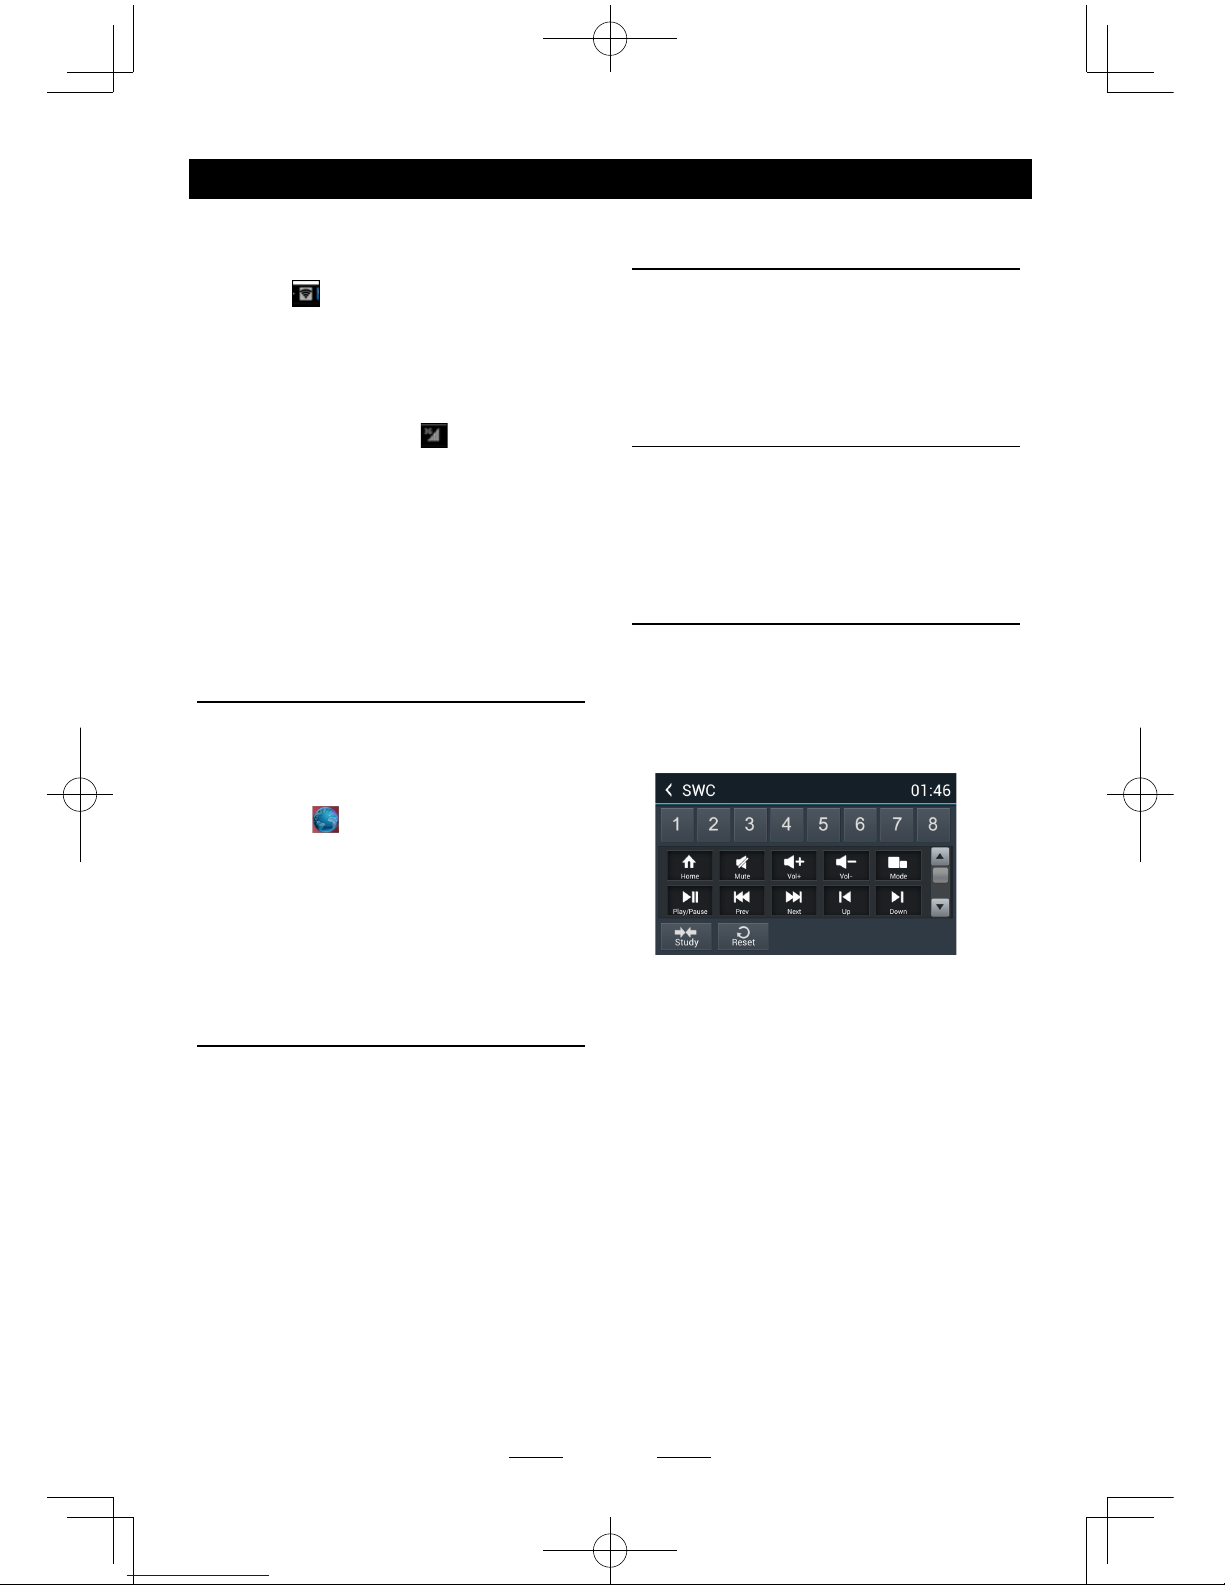
SP - 20
Internet
Visitar pagina web
Para visitar internet, debe configurar una
conexión inalámbrica o redes en el menú
principal del sistema.
Seleccione [
] en el menú principal para
ver la pagina web.
Presione el cuadro de dialogo en la parte
superior de la pantalla para mostrar el teclado.
Ingresa la dirección de pagina web, y presione
[Go – Ir] para acceder. Arrastre la pagina web
para desplazarse.
Correo Electrónico
Seleccione [Email] u otro programa de correo
en el menú de aplicaciones.
Primero debe establecer una cuenta.
Ingrese su dirección de correo electrónico
y contraseña. A continuación podrá enviar/
recibir emails a través de la unidad.
Si el dispositivo no puede conectarse al punto
de acceso de la red Wi-Fi:
1. Compruebe la red Wi-Fi.
El icono
aparece en la parte superior
izquierda de la pantalla después de
establecer la conexión con éxito. Si no
aparece, compruebe su conexión y modem
Wi-Fi y la conguración de la zona activa.
2. Compruebe la red 3G.
Si el indicador de señal
en la parte
superior de la barra de tareas se vuelve
gris, la red no está disponible, compruebe
los ajustes de conexión de su modem 3G y
la conguración 3G.
3. Asegúrese de introducir la contraseña
correcta.
4. Hay demasiados dispositivos conectados a
el punto de acceso.
Funcionamiento de
navegación
Para navegar por la unidad, seleccione la
aplicación de navegación en el menú principal,
tales como iGO.
Entonces navegue por la pantalla táctil.
Funciones auxiliar
Seleccione [AUX IN 1] en el menú principal
para ingresar al dispositivo auxiliar frontal,
y seleccione [AUX IN 2] para ingresar al
dispositivo auxiliar trasero.
Control del volante
Seleccione [SWC] en el menú principal para
ingresar al menú de conguración SWC.
1. Toque los botones numéricos para
seleccionar un botón de los mandos de
timón.
2. Seleccione una función.
3. Presione cada botón del control del
volante por separado para cada función
correspondiente.
4. Toque [Estudio] para programar.
5. Una vez que el último botón de control del
volante se ha programado, las funciones se
guardan y la programación terminará.
6. Pulse [Cambiar] para restablecer la
programación.
OTROS MODOS
Page 51
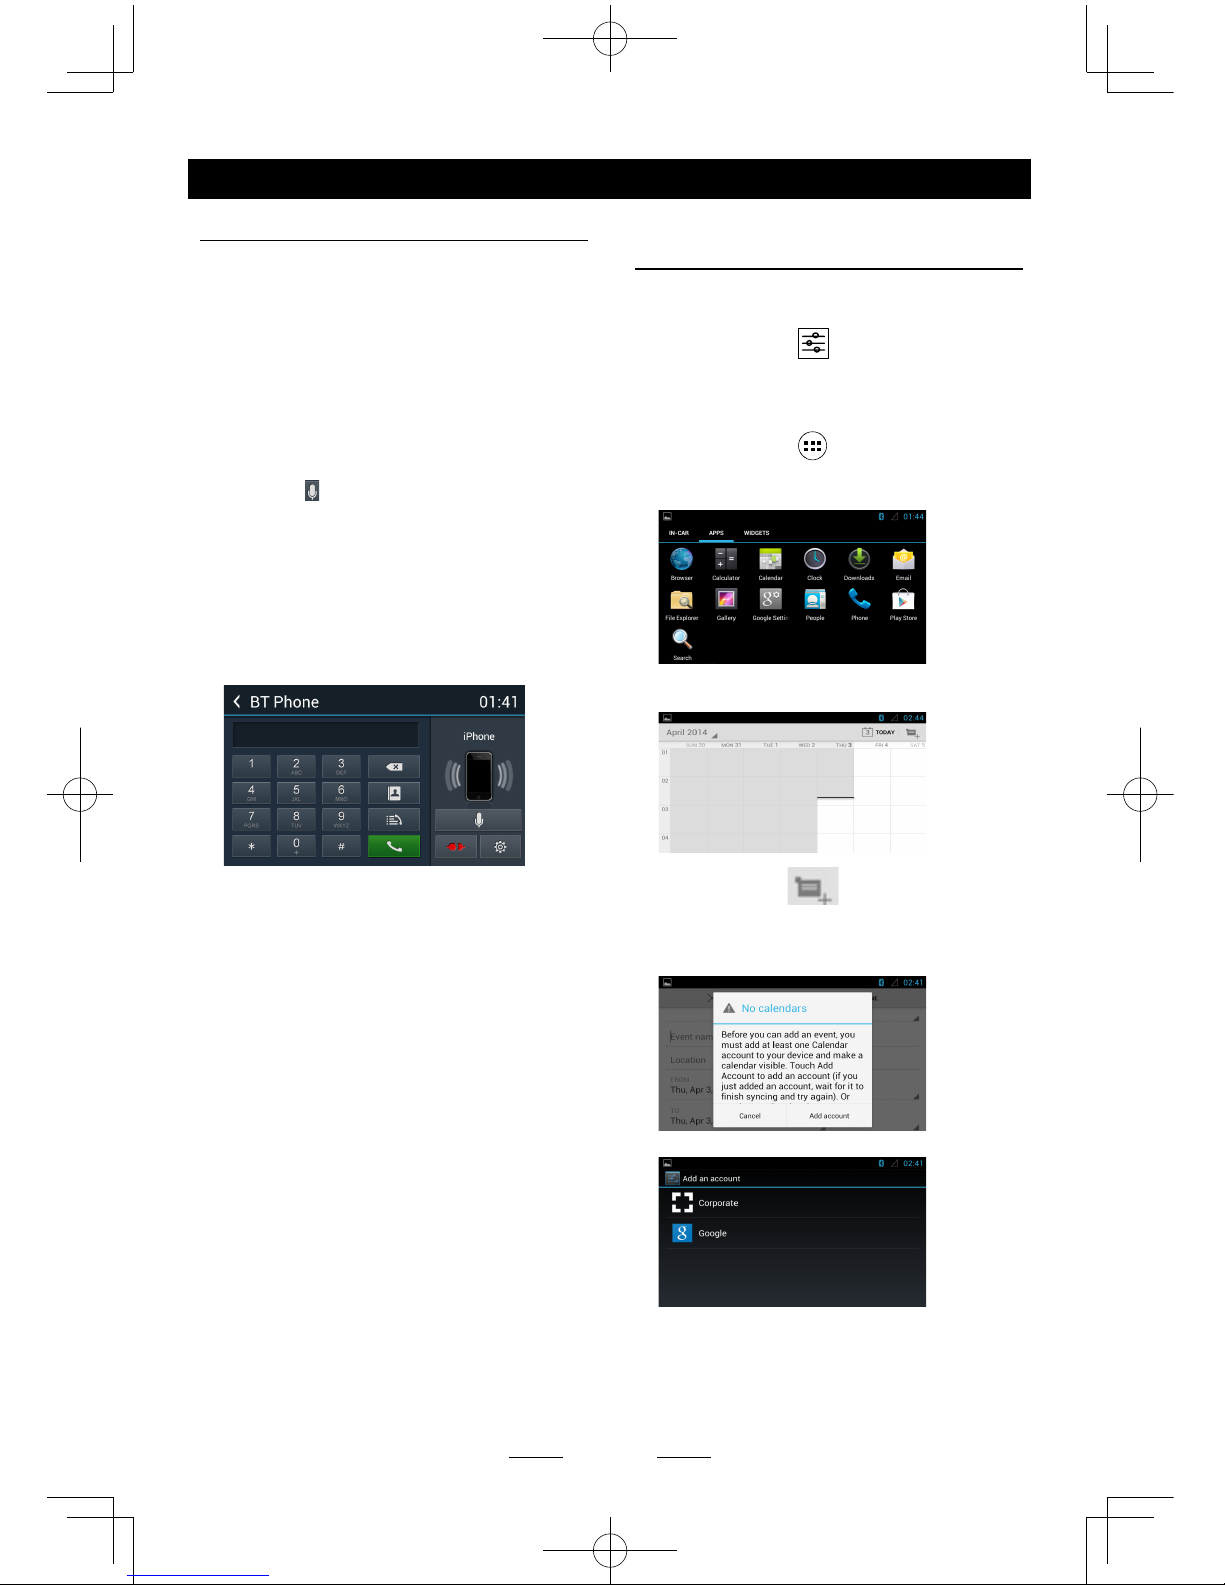
SP - 21
Función i-Mode (Siri)
1. Encienda la función de bluetooth, tanto de
la unidad y el teléfono inteligente.
Asegúrese de que el Smartphone tiene
acceso a internet (iPhone 4S, iPhone 5,
iPhone 5S, iPad, Samsung Galaxy, etc.)
2. Encienda la aplicación ‘Siri’ de iPhone /
iPad o la aplicación ‘Talk Asistente’ en
teléfonos Android.
3. Vincule su teléfono a la unidad a través del
Módulo Bluetooth.
4. Toque [
] para seleccionar y activar
i-Mode.
5. Cuando se habla a través del micrófono
externo de la unidad, las señales de voz
serán transferidas al teléfono.
El teléfono procesara los datos y la
búsqueda de la información relativa en la
memoria local o internet, a continuación,
transferirá el resultado a la unidad.
OTROS MODOS
Conguración calendario de
Google
1. Asegúrese de que la red esté disponible,
consulte <Internet>.
2. Toque el icono [
] en el menú principal,
seleccione [Fecha y hora] en el menú de
conguración, a continuación, establecer la
hora local correcta.
3. Toque el icono [
] en el menú principal
para acceder al menú de aplicaciones y
seleccione “Aplicaciones”.
Seleccione el icono del calendario para
visualizar el siguiente menú.
Toque el icono en la esquina
superior derecha, la unidad desplegara el
siguiente menú cuando utilice el calendario
por primera vez.
Toque "Añadir cuenta".
Seleccionar “Google”.
Page 52
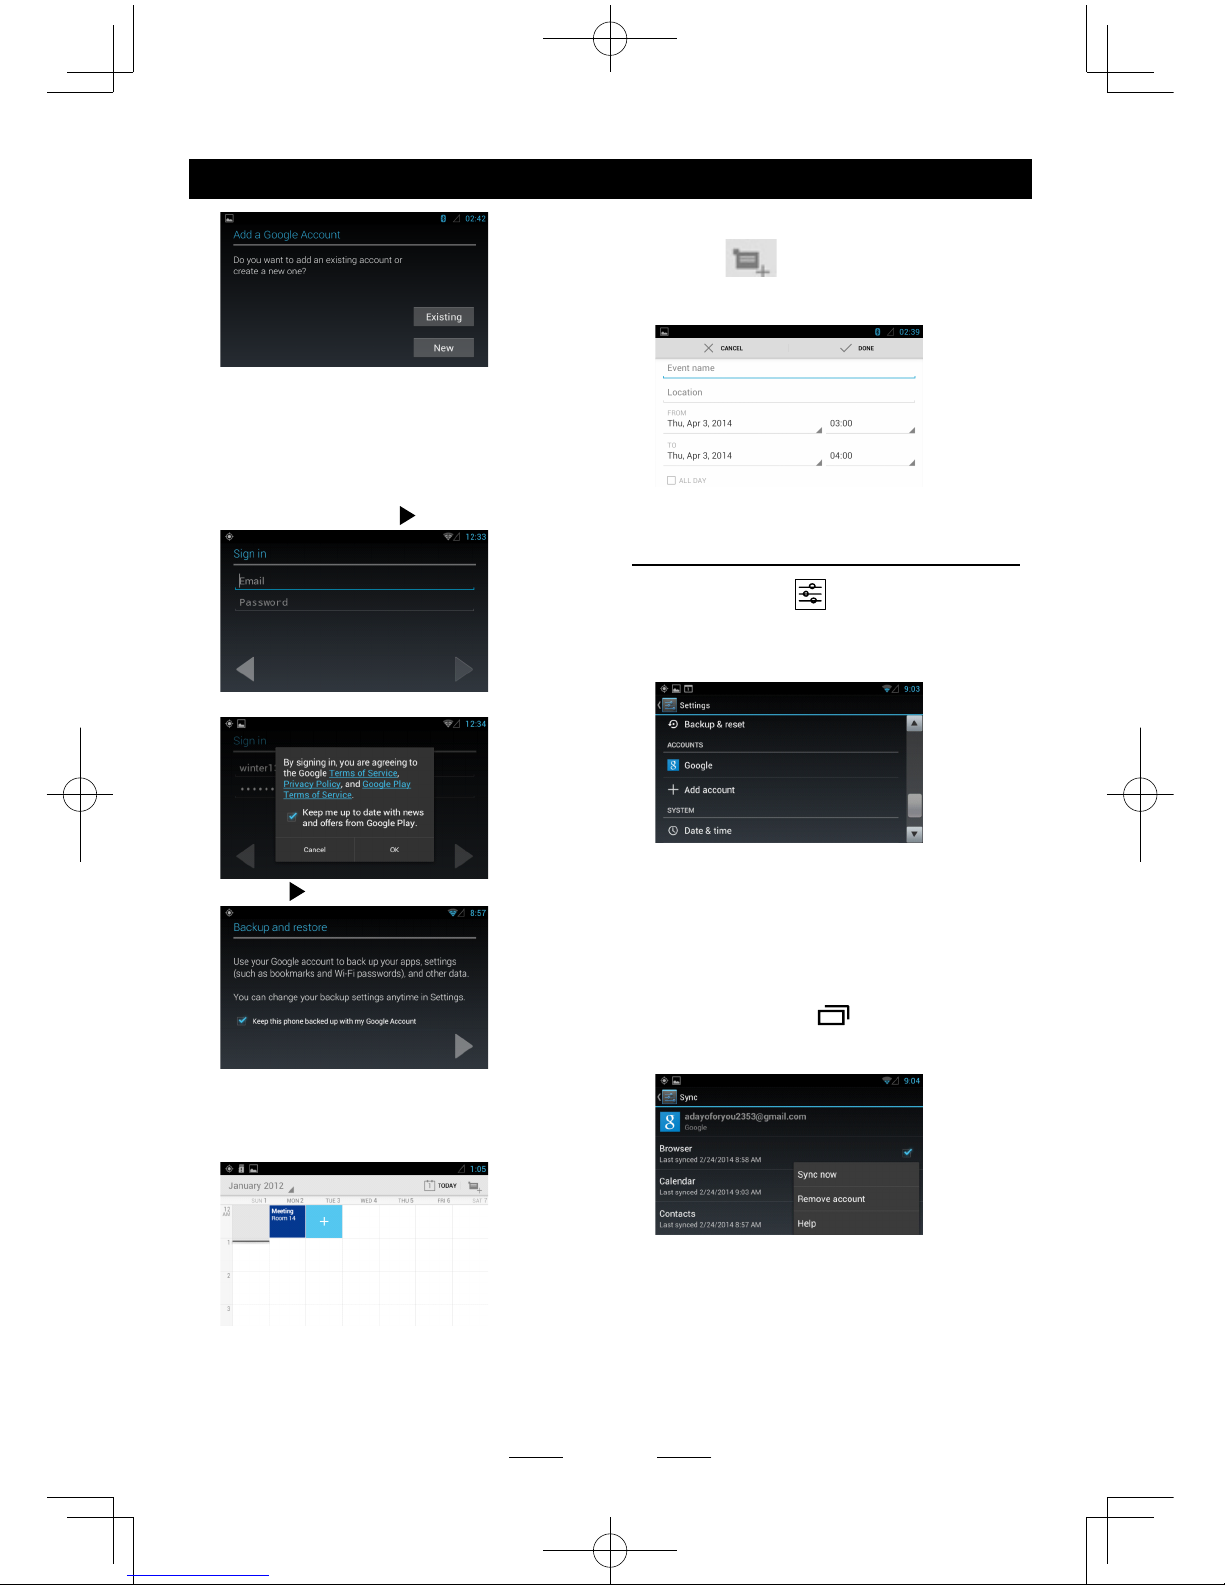
SP - 22
Si desea establecer una nueva cuenta, por
favor, pulse [Nueva].
Si desea utilizar una cuenta existente, por
favor, toque [existente].
Después de seleccionar "existente", ingrese
su correo electrónico y contraseña. A
continuación, toque [
].
Toque el botón [OK] para conrmar
Toque [ ] para nalizar la conguración.
4. Seleccione Calendario en el menú APPS
para mostrar el calendario y los arreglos.
Usted puede seleccionar una fecha para
ver los detalles.
Eliminar cuenta Gmail
1. Toque el icono [ ] en el menú principal
para acceder al menú de conguración,
deslice hacia abajo la pantalla para
encontrar "Google".
2. Toque [Google], si ha iniciado sesión con
una cuenta de google antes, aparecerá la
dirección.
Seleccione el correo electrónico para
mostrar los detalles.
Presione el botón [
] (MENU) en
el panel frontal para que aparezca el
submenú.
Seleccione "Eliminar cuenta" para eliminar
esta cuenta.
OTROS MODOS
Para agregar un nuevo evento, toque
el icono
en la esquina superior
derecha, o toque el icono [ + ] en el área
en blanco.
Page 53
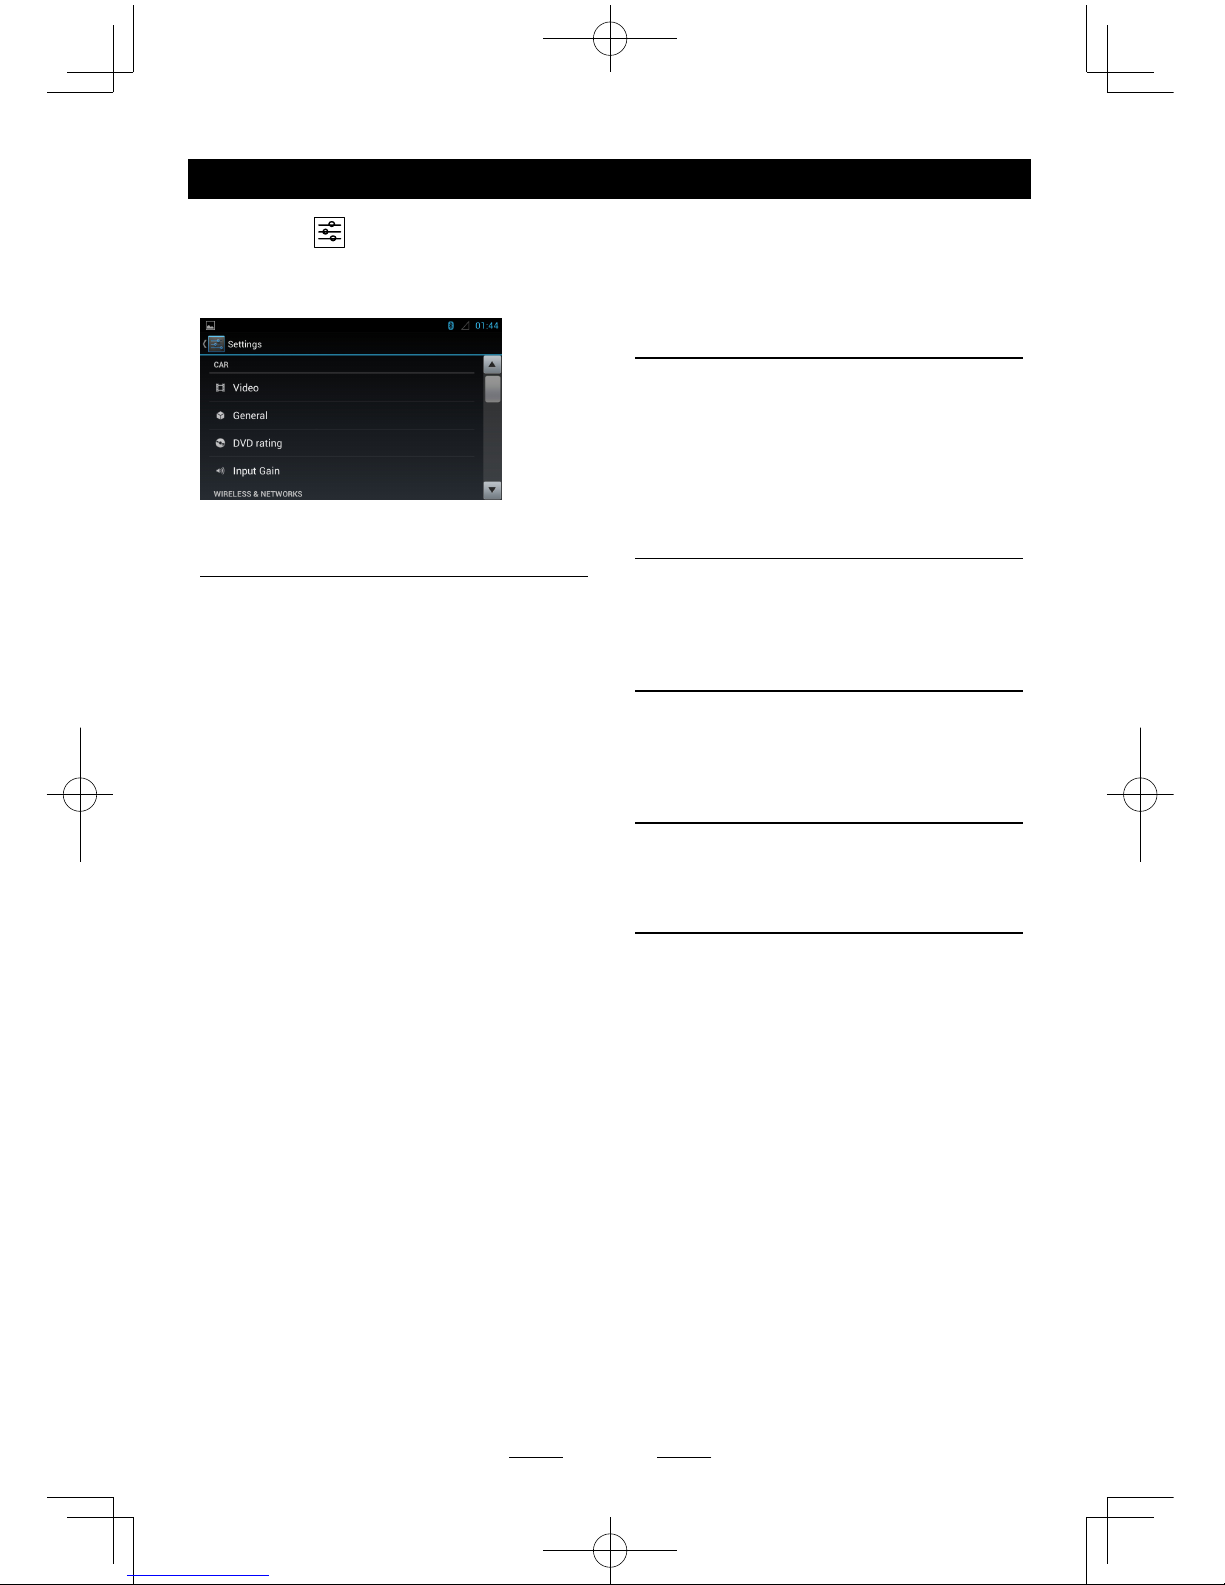
SP - 23
Seleccione [ ] en el menú principal para
ingresar al modo de conguración.
Arrastre hacia arriba/abajo para desplazarse
por las opciones.
CAR
Video
Entrada de video: Seleccione el modo de
entrada de video.
Cámara de reversa: Seleccione modo
visualización cámara de reversa.
Parqueo: Encienda/apagar función de
parqueo. Si esta encendido, las imágenes
en movimiento fueron prohibidas mientras
conduce.
General
Iluminación: Seleccione el botón de luz de
fondo.
Región de radio: Selección la región.
Rango de radio: Seleccione el modo de radio
de búsqueda: local o a distancia.
Apagón: Selección desactivar pantalla oscura,
10s o 20S
Sonido: Activar o desactivar el sonido de los
botones.
Calibración: para calibrar la pantalla
DVD
Audio DVD: selección el idioma del audio del
DVD.
Subtítulos DVD : Seleccione el idioma de
subtítulos del DVD.
Menú disco: Seleccione el idioma del menú.
Configurar contraseña: para establecer una
contraseña para la clasicación.
Ingrese 4-digitos de contraseña, presione
[√]
para conrmar, presione [DEL] para eliminar
un numero ingresado. Presione [X] para salir.
Nivel de clasicación: para congurar el nivel
de clasificación, seguridad para los niños,
G,PG, PG-13,PG-R,R,NC-17,ADULT
Configuración del sistema
Ganancia de entrada
Seleccione el aumento de volumen de entrada
de cada fuente.
Inalámbrico & redes
Para congurar la conguración inalámbrica,
por ejemplo como Wi-Fi, VPN, la red 3G.
* Para conguración del APN 3G, referirse a
“internet”.
DISPOSITIVO
Para congurar el sonido, visualización y
almacenamiento, Gestión de aplicaciones.
PERSONAL
Para los servicios de instalación de Ubicación,
Seguridad e Idioma y teclado, etc.
CUENTAS
Gestión de cuentas.
SISTEMA
Para congurar la fecha, hora y accesibilidad,
etc.
Page 54
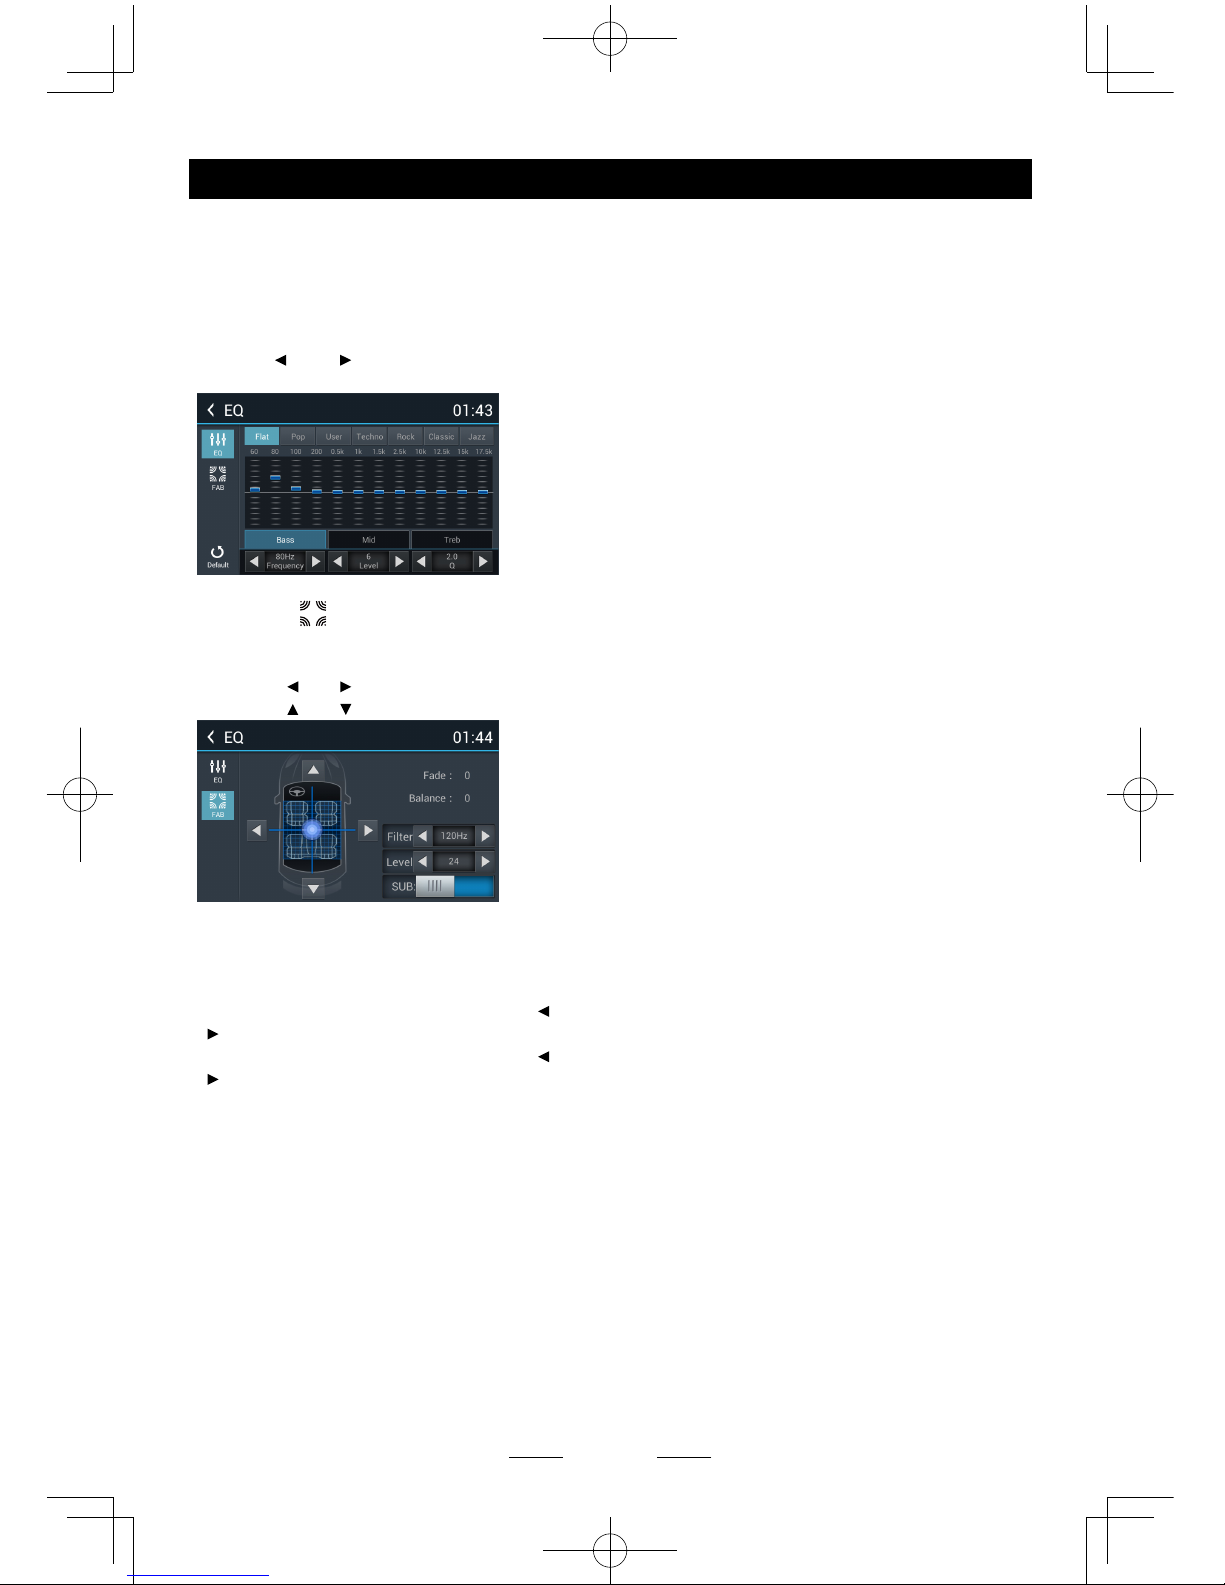
SP - 24
Configuración de sonido
Seleccione [EQ] en el menú principal para
ingresar al modo de conguración de sonido.
Toque para seleccionar un ecualizador pre
ajustado en la parte superior de la pantalla
como Flat, Pop, Usuario, Techno, Rock,
Clásica y Jazz.
Toque [ ] o [ ] para ajustar el nivel de
graves / Medio / agudos.
Presione [ ] para ingresar al menú de
conguración fader/balance/sub.
Presione [
] o [ ] para congurar balance.
Presione [
] o [ ] para congurar fader.
Sub Woofer
Sub woofer: Encender / apagar la
reproducción del altavoz de subgraves.
Filtro del altavoz de sub woofer: Toque [ ] o
[ ] para seleccionar Filtro de subwoofer.
Nivel del altavoz de sub woofer: Toque [ ] o
[ ] para ajustar Nivel subwoofer.
Page 55

SP - 25
Conexión de dispositivos
Notas de conexión
• Esta unidad está diseñada para ser utilizado en un vehículo con una batería de 12 voltios y
tierra a negativo. Antes de instalar esta unidad en un vehículo recreativo, un autobús o un
camión, asegúrese de que el voltaje de la batería es apropiado para el uso de esta unidad, de
lo contrario, instalar un convector de voltaje por profesionales para convertir el voltaje de salida
a 12V.
• Para evitar cortocircuitos en el sistema eléctrico, asegúrese de que el cable negativo de la
batería esta desconectado antes de la instalación.
• Para evitar cortocircuitos en el cableado y dañar la unidad, asegure todo el cableado con una
amarradera o con cinta adhesiva. Ubique el cableado en una parte segura, lejos de un lugar
muy caliente, sin tocar alguna parte en movimiento como la caja de cambios, freno de mano y
raíles de los asientos para evitar que el aislamiento del cableado se fundan / desaparezca.
• Nunca pase el cable amarillo de potencia a través del agujero de instalación en el
compartimiento del motor para conectar a la batería del vehículo. En caso contrario, habrá una
alta posibilidad de que ocurra un cortocircuito grave para el sistema eléctrico.
• Remplace un nuevo fusible con una clasicación de 15A cuando el fusible viejo se rompa, no
usar el fusible o un fusible con una clasicación diferente, esto puede causar daños en la
unidad o incluso incendios. Si un fusible adecuado está instalado y problemas eléctricos siguen
ocurriendo, por favor póngase en contacto con su agente local de servicio técnico autorizado.
• NO conecte otros equipos a la batería del vehículo para evitar el sobrecalentamiento de la
batería.
• Por favor, asegúrese de que todas las conexiones y los cables de los parlantes están bien
aislados. De lo contrario, esta unidad puede ser dañada por un cortocircuito.
• Si no hay ACC disponible, por favor conecte el cable ACC a la fuente de alimentación con un
interruptor.
• Si un amplicador de potencia externo está conectado, por favor, no conecte el cable P.CONT
al cable de alimentación del amplicador de potencia externo, de lo contrario, puede causar
chispas eléctricas u otros daños.
• Nunca conecte a tierra la salida de los parlantes para evitar el daño al amplicador de potencia
incorporado.
Page 56
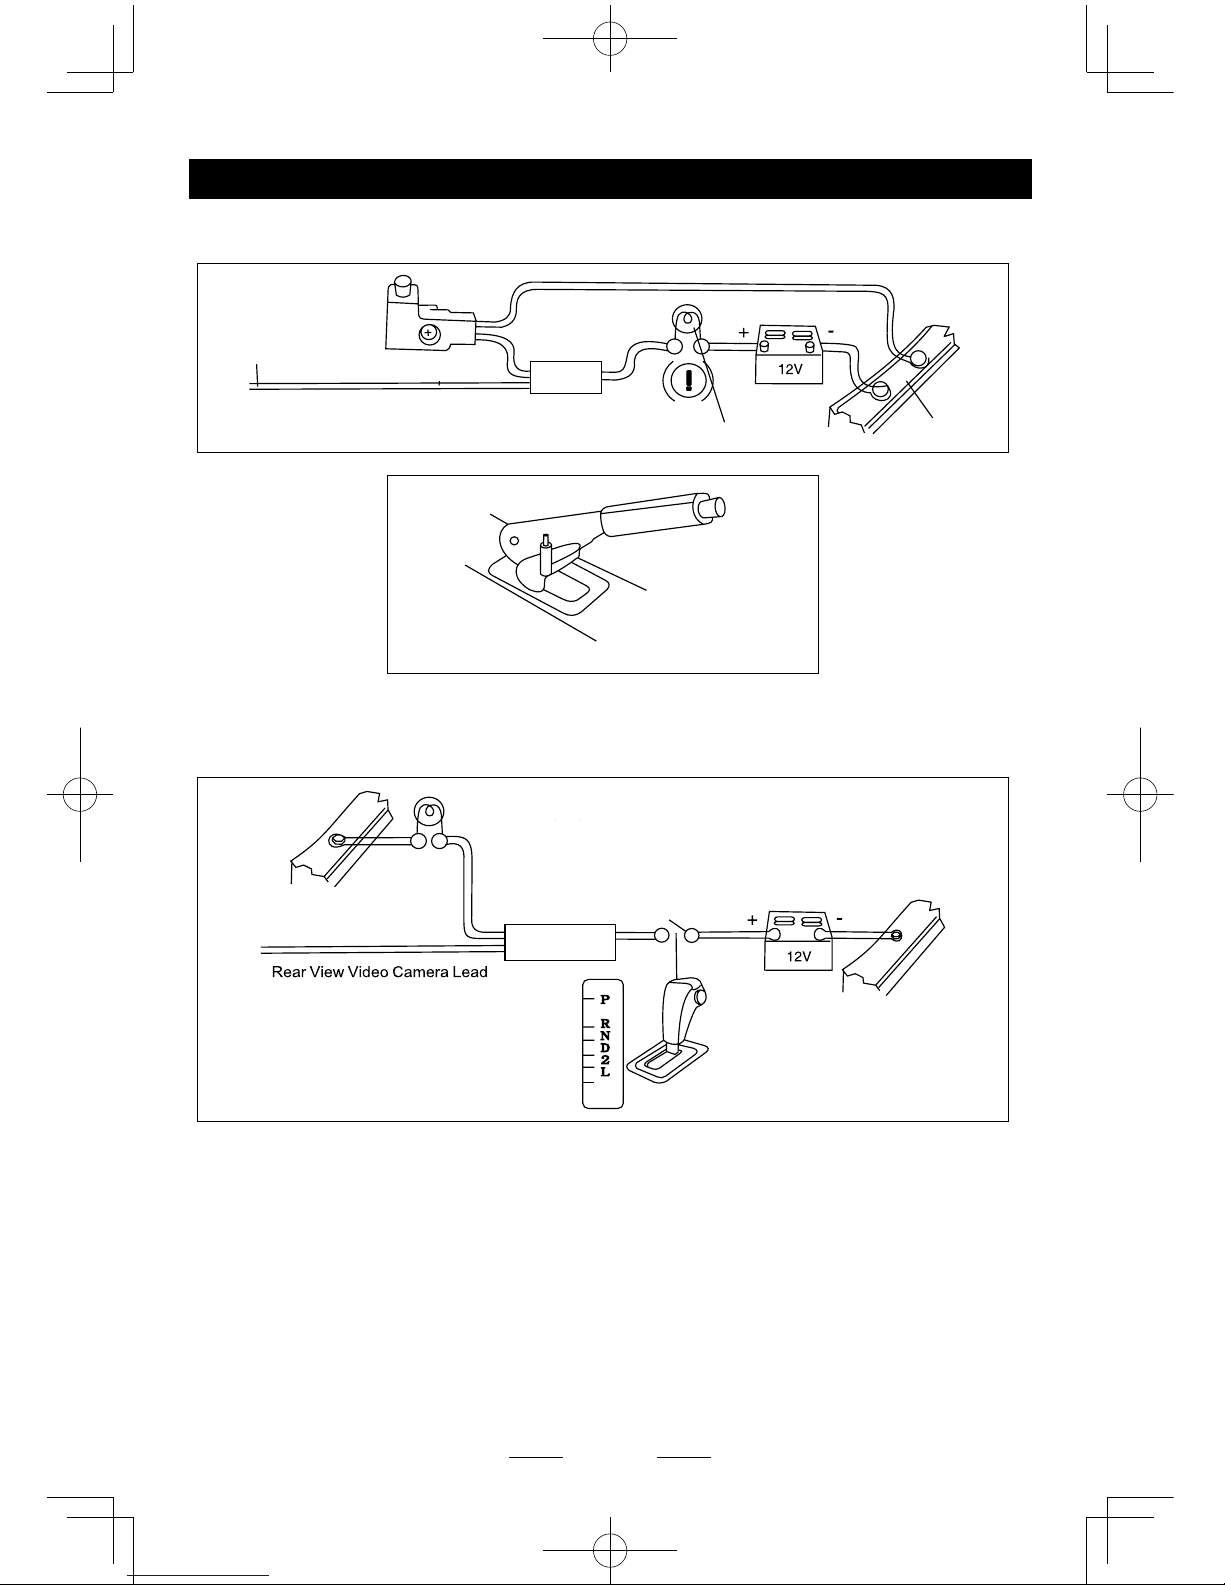
SP - 26
Conexiones cables de freno de estacionamiento
Conexiones de la cámara de reversa
Conexiones de dispositivos
Green/White Wire
Cable del freno de parqueo
Cable verde/blanco
Batería
Luz de freno
Marco del
vehículo
Interruptor del freno
Marco del
vehículo
Luz de reversa
Cable rosado
Caja de cambios
Batería
Marco del
vehículo
Page 57
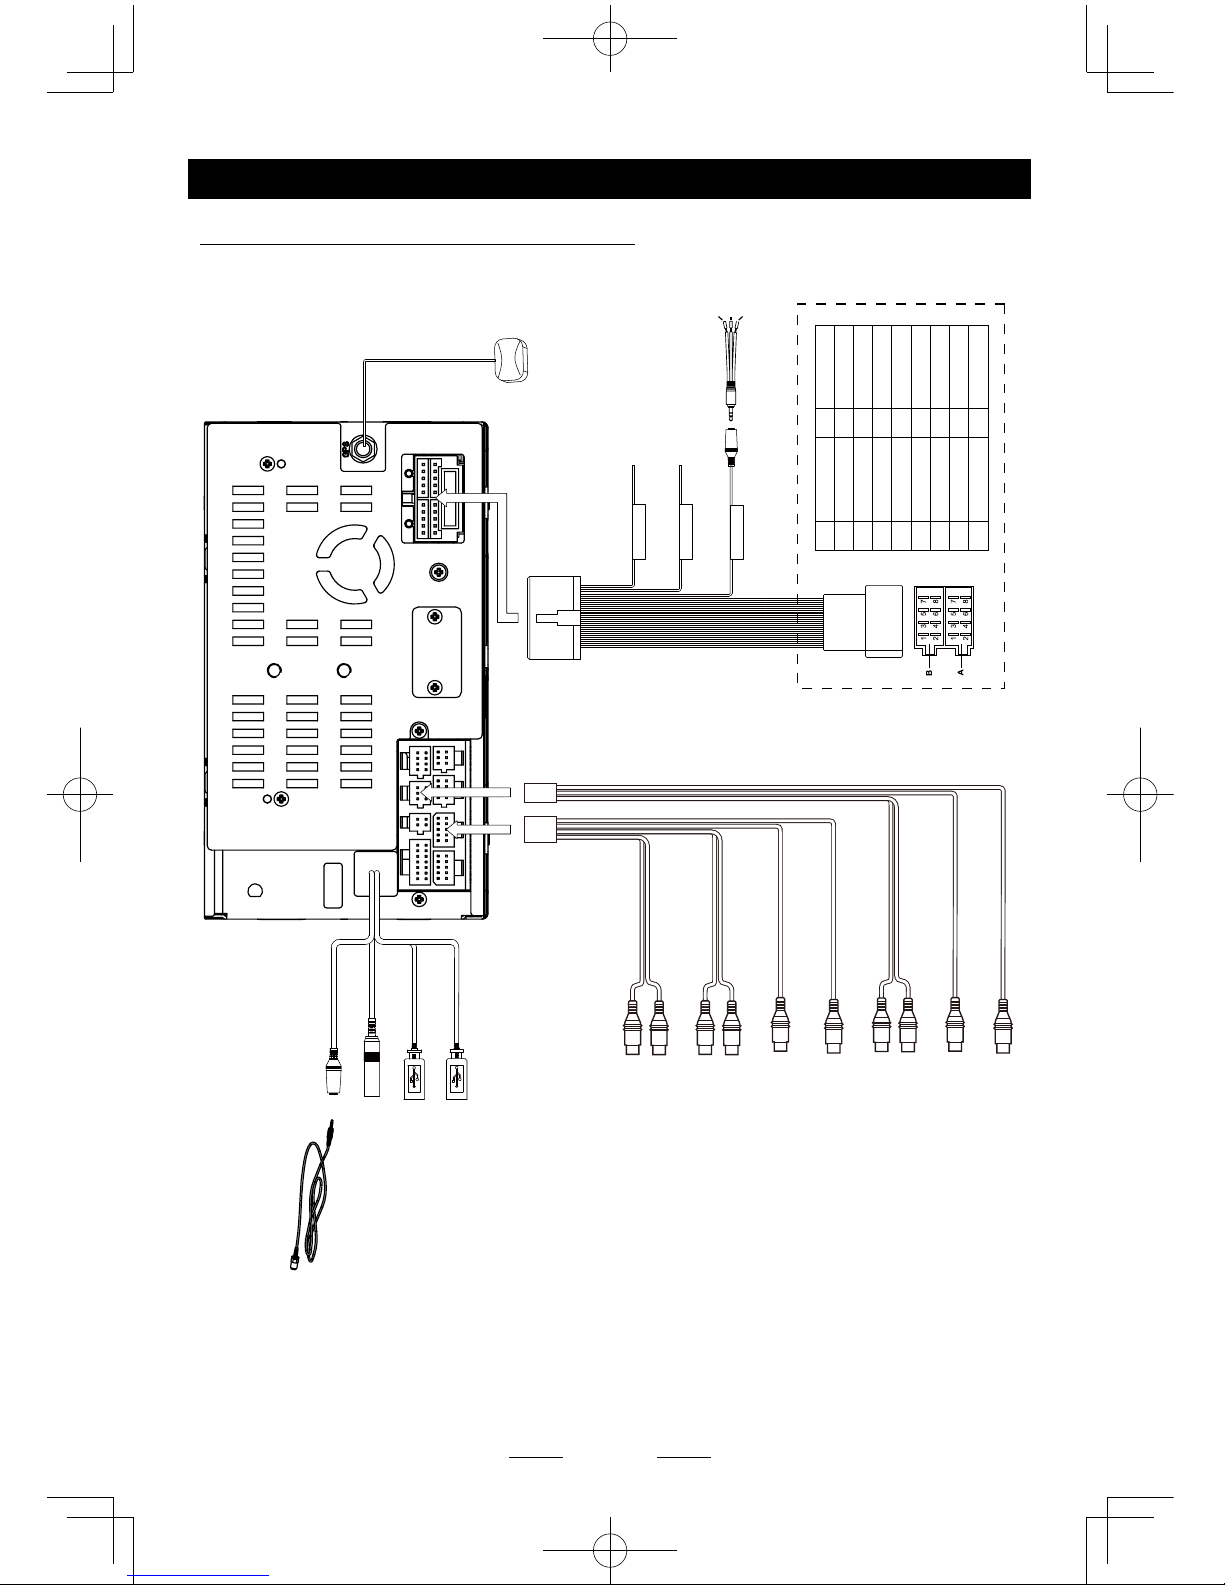
SP - 27
Conexiones de dispositivos
Diagrama de cableado
PIN PART A
1 NC
2 NC
3 NC
4
Battery +12V
5 P.ANT
6 Illumination
7
ACC
8 GND
PIN PART B
1 Rear R+
2 Rear R-
3 Front R+
4 Front R-
5 Front L+
6 Front L-
7 Rear L+
8 Rear L-
AUX IN
Red
Red(R)
Blue
Yellow
Yellow
Yellow
White(L)
Red(R)
White(L)
Red(R)
White(L)
Green
White
FRONT OUT
GPS ANTENNA
Black
MICROPHONE
RADIO ANT
Black
Black
Black
3G/WIFI
3G/WIFI
Black
REAR OUT
Grey
VIDEO OUT
Black
VIDEO IN
Black
CAMERA VIDEO
Black
SUB WOOFER
Black
Orange
Pink
Black
PARKING
REVERSE
SWC
Microphone
Key A
Key B
GND
Page 58
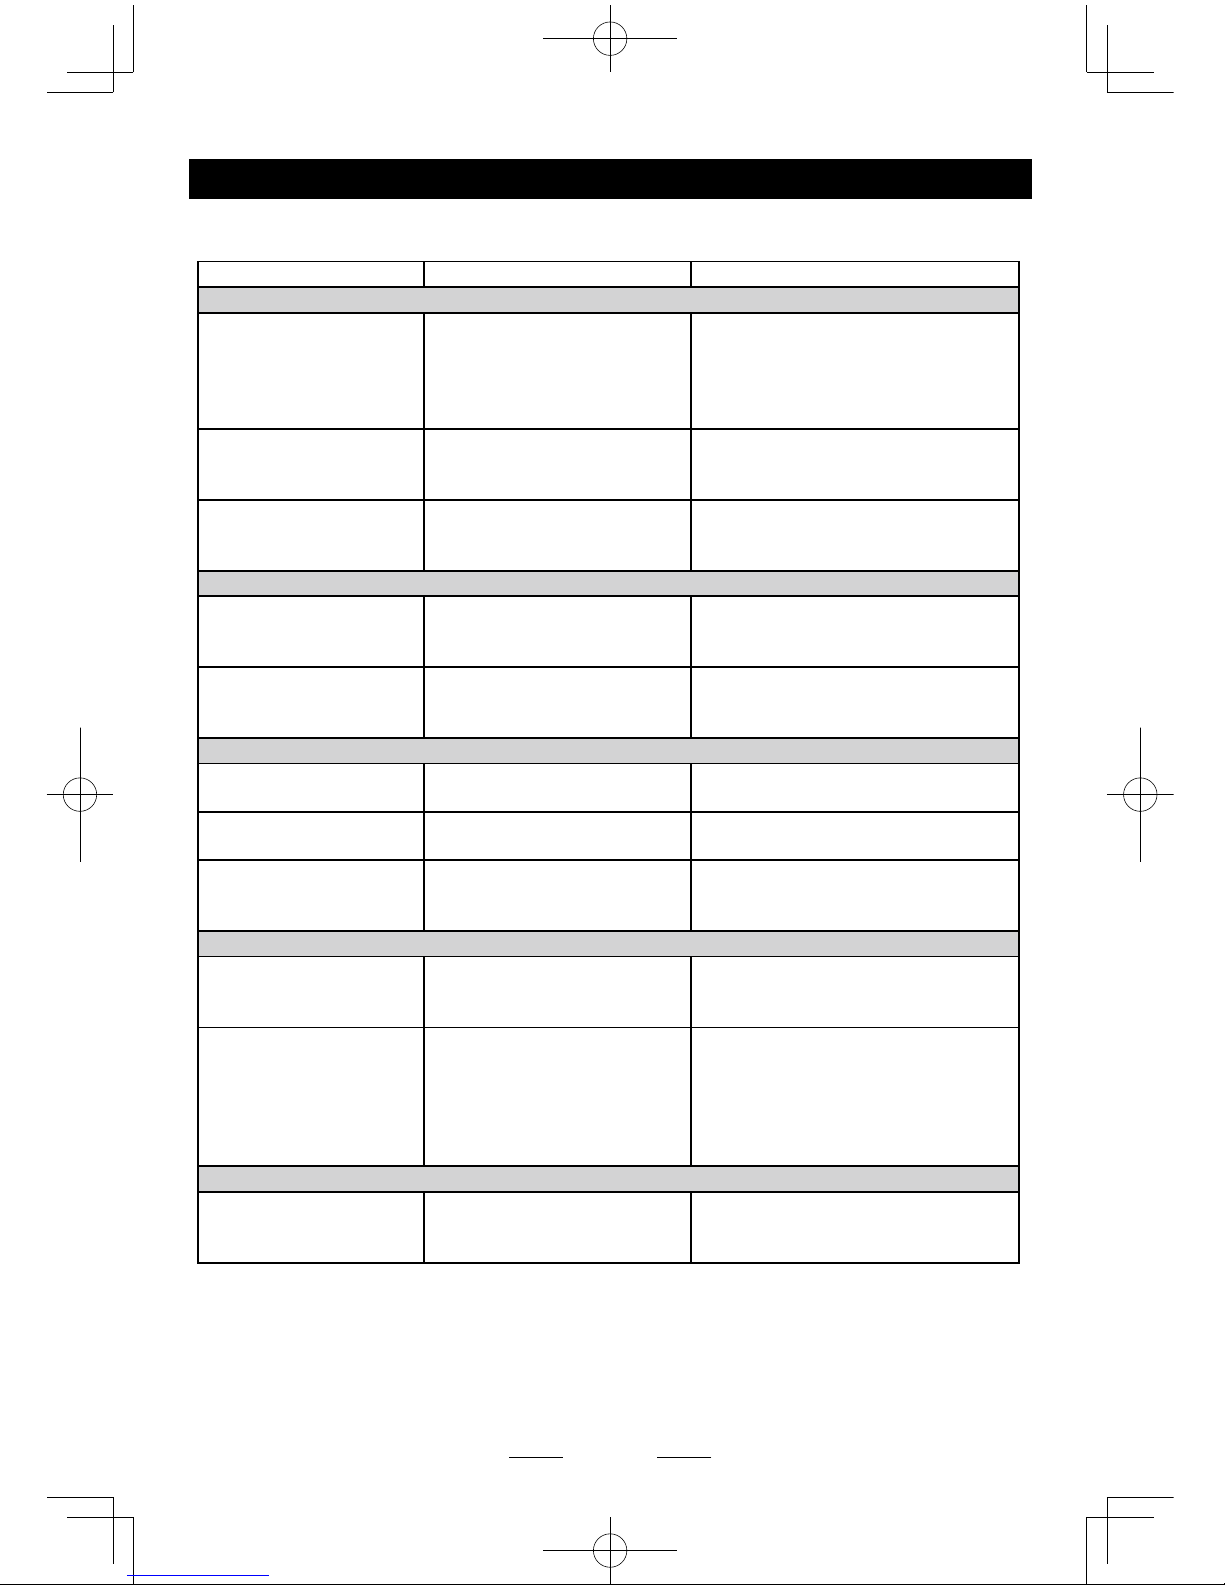
SP - 28
Solución de problemas
La siguiente lista puede ayudarle a solucionar los problemas que puedan surgir al utilizar la unidad.
Antes de consultar, compruebe las conexiones y siga las instrucciones en el manual del usuario.
Problema Posible causa Solución
General
La unidad no prende.
El encendido del vehículo
no está prendido. Un cable
no está conectado de forma
apropiada. El fusible está
quemado.
Encienda la llave de arranque del
vehículo. Revise la conexión de los
cables. Remplace el fusible con un
nuevo fusible de la misma capacidad.
No hay sonido.
El volumen está configurado
en lo mínimo o la función de
silencio esta activa.
Revise el volumen o cambie la función
mute a desactivado.
La unidad o pantalla
no está funcionando
normalmente.
El sistema de la unidad esta
inestable.
Presione el botón de resetiar o
restaurar.
Modo DVD
La unidad no reproduce el
disc o.
El disco se inserto de forma
incorrecta. El disco está sucio
o dañado.
El disco debe ser insertado con la etiqueta
hacia arriba. Limpie el disco y revise por
algún daño. Intente con otro disco.
El sonido salta debido a
vibraciones.
El ángulo de montaje es de
más de 30 grados. El montaje
es inestable.
Ajuste el ángulo de montaje menos de
30 grados. Monte la unidad de forma
segura con las partes provistas.
Modo emisora
Sin disponibilidad de
recibir emisoras.
La antena no está conectada
adecuadamente.
Conecte la antena de forma
apropiada.
Pobre recepción de
estaciones.
La antena no está totalmente
extendida o está quebrada.
Extienda totalmente la antena y si
esta partida, remplace por una nueva.
Estaciones presentes
están perdidas.
El cable de la batería no está
conectado apropiadamente.
Conecte la vida permanente de la
unidad a la vida permanente del
vehículo.
Modo USB/SD
No se puede instalar
el dispositivo USB o la
tarjeta SD.
La memoria SD o el dispositivo
USB ha sido insertado de
forma incorrecta.
Insértelo de forma contraria.
No se puede leer el
dispositivo USB o la
memoria SD.
No es compatible con formato
NTFS.
Revise los archivos del USB si
son formato FAT o FAT31. Debido
a diferentes formatos, algunos
modelos de almacenamiento USD o
reproductores MP3 no pueden ser
reconocidos.
Control Remoto
El control remoto no está
funcionando o no funciona
adecuadamente.
La batería esta baja o sin nada
de carga.
Cambie la batería.
Page 59

SP - 29
Especificaciones
General
Voltaje de referencia de suministro...................................................12 V (DC)
Rango de voltaje....................................................................10,5 - 15.8V(DC)
Max Corriente de funcionamiento.............................................................. 15A
Sistema de puesta a tierra .................Polo negativo de la batería del vehículo
Dimensiones (AnxAlxProf).................................................178X101.5X159mm
Peso (unidad principal)........................................................................... 1.9 kg
FM
Relación Señal Ruido ........................................................................... ≥55dB
Sensibilidad útil (S / N = 30dB) .........................................................≤15dBμV
Respuesta de frecuencia (-3dB) ....................................................20Hz~7KHz
Nivel búsqueda de estación .......................................................... 20~28dBμV
Distorsión ............................................................................................. ≤1,0%
Separación estéreo (1 kHz) ..................................................................≥25dB
Impedancia de la antena ............................................................................75Ω
AM
Sensibilidad útil (S / N = 20dB) .........................................................≤30dBμV
Respuesta de frecuencia (-3dB) ....................................................50Hz~2KHz
LCD
Tamaño de la pantalla ....................................................... 6.2 pulgadas (16:9)
Resolución de la pantalla ............................................................800X480dots
Contraste .................................................................................................... 400
Brillo...................................................................................................400cd/m
2
Reproductor DVD
Relación señal / ruido ........................................................................... ≥70dB
Rango Dinámico ................................................................................... ≥70dB
Distorsión (salida de línea) ................................................................... ≤0.8%
Respuesta de frecuencia (± 3 dB) ...............................................20Hz~20KHz
Potencia máxima de salida....................................................................4×50W
Impedansa de carga ..................................................................................... 4Ω
Impedansa de carga
Distorsión.............................................................................................. ≤0.8%
Respuesta de frecuencia (± 3 dB) ...............................................20Hz~20KHz
Nivel de entrada de audio......................................................................500mV
Audio
Impedancia salida de audio ..................................................................... 10KΩ
Nivel de salida de audio ............................................................... 2Vrms(Max)
Video
Nivel de entrada de Imagen normal (CVBS) ......................................1,0±0,2V
Impedancia entrada de video .....................................................................75Ω
Impedancia salida de vídeo ........................................................................ 75Ω
Nivel salida de vídeo ..........................................................................1,0±0,2V
Medio ambiente
Temperatura de funcionamiento................................................-10°C ~ +60°C
Temperatura de almacenamiento..............................................-20°C ~ +70°C
Humedad de funcionamiento...................................................... 45%~80%HR
Humedad de almacenamiento.................................................... 30%~90%HR
Aviso:
Cuando la unidad ha estado en funcionamiento extremo, como funcionar con la potencia de salida
máxima por un largo tiempo o bajo temperaturas superiores a 70 ° C, la unidad entrará en modo
de protección contra el calor, el volumen se ajustara de forma automática a un menor nivel. Esto
es normal.
Page 60
¿NECESITA AYUDA?
Para servicio, reparaciones o preguntas relacionadas al producto, por favor llame
al número de centro de servicio en la ciudad donde usted compró su producto. NO
devuelva el producto al fabricante. Llame o lleve el producto a un centro de servicio
autorizado.
UN AÑO DE GARANTÍA LIMITADA
¿Qué cubre la garantía?
• La garantía cubre cualquier defecto de materiales o de mano de obra. BETTER no
se responsabiliza por ningún costo que exceda el valor de compra del producto.
¿Por cuánto tiempo es válida la garantía?
• Por un año a partir de la fecha original de compra.
¿Cómo se puede obtener servicio?
• Conserve la factura original de compra.
• Por favor llame al centro de servicio autorizado.
Esta garantía NO cubre:
• Los productos que han sido utilizados en condiciones distintas a las normales.
• Los daños ocasionados por el mal uso, el abuso o negligencia.
• Los productos que han sido alterados de alguna manera.
• Los daños producidos por el uso comercial del producto.
• Los productos utilizados o reparados fuera del país original de compra.
• Las piezas adicionales empacadas con el producto.
• Los gastos de tramitación y embarque asociados al reemplazo del producto.
• Los daños y perjuicios indirectos o incidentales.
Page 61
NEED HELP?
For service, repair or any questions regarding your appliance, call the appropriate
service number. Do not return the product to the place of purchase. Do not mail the
product back to the manufacturer nor bring it to an unauthorized service center.
One-year Limited Warranty
What does it cover?
• Any defect in material or workmanship; provided; however, BETTER’s liability
will not exceed the purchased price of the product.
For how long?
• One year after the date of original purchase.
What will we do to help you?
• Provide you with a reasonably similar replacement product that is either new or
factory refurbished.
How do you get service?
• Save your receipt as proof of the date of sale.
• Call our number for general warranty service.
What does your warranty not cover?
• Damage for commercial use.
• Damage from misuse, abuse or neglect.
• Products that have been modied in any way.
• Products used or serviced outside the country of purchased.
• Parts and other accessories items that are packed with the unit.
• Shipping and handling costs associated with the replacement of the unit.
• Consequential or incidental damages.
• This warranty gives you specic legal rights, and you may also have other rights
that vary from state or province to province.
Page 62
PÓLIZA DE GARANTÍA
Duración
BETTER CORP. Garantiza este producto por 1 año a partir de la fecha de compra.
¿Qué cubre esta garantía?
Esta garantía cubre cualquier defecto que presenten las piezas, componentes y la
mano de obra contenidas en este producto.
Requisitos para hacer válida esta garantía
Presentar al centro de servicio autorizado la póliza sellada por el establecimiento en
donde adquirió el producto. Si no la tiene, podrá presentar la factura de compra original.
¿Dónde puedo hacer válida la garantía?
Comuníquese al teléfono (1) 321 4537 en Bogotá o en comuníquese a ventas@
bettercaraudio.com, para ubicar el centro de Servicio Autorizado más cercano a su
domicilio en donde usted podrá encontrar partes, componentes, consumibles
y accesorios.
Procedimiento para hacer válida la garantía
Acuda al centro de servicio autorizado con el producto y con la factura de compra
original, ahí se reemplazará cualquier pieza o componente defectuoso sin cargo alguno
para el usuario nal. Esta garantía incluye los gastos de transportación que se deriven
de su cumplimiento.
Excepciones
Esta garantía no será válida cuando el producto:
(A) Se hubiese utilizado en condiciones distintas a las normales.
(B) No hubiese sido operado de acuerdo con el instructivo de uso que le acompaña.
(C) Cuando el producto hubiese sido alterado o reparado por personas no autorizadas
por BETTER.
Page 63
CLASS 1
LASER PRODUCT
P/N: 127075005960
 Loading...