


Operating Instructions & Parts List for
Manual # 188000
Issued : September 1, 2009
TMC #754
For Assistance, Write:
BETTCHER INDUSTRIES INC.
P.O. Box 336
Vermilion, Ohio 44089-0336
U.S.A.
Phone: 440/965-4422
Phone: 800/321-8763
Fax: 440/965-4900
www.bettcher.com

Information in this document is subject to change without notice.
No part of this document may be reproduced or transmitted in any form or any means, electronic
or mechanical, for any purpose, without the express written permission of Bettcher Industries Inc.
Written permission to reproduce in whole or part is herewith granted to the legal owners of the
Whizard® AirMax MACH 3 with which these Operating Instructions have been supplied.
Operating Instructions in other languages are available on request. Additional copies of Operating
Instructions are available by calling or writing your Regional Manager, or by contacting:
BETTCHER INDUSTRIES, INC.
P.O. Box 336
Vermilion, Ohio 44089-0336
U.S.A.
Telephone : 440/965-4422
(In The U.S.A.) : 800/321-8763
Fax : 440/965-4900
www.bettcher.com
The Information Provided In These Operating Instructions Is Important To Your
Health, Comfort And Safety.
For Safe And Proper Operation, Read This Entire Manual Before Using This
Equipment.
Copyright 2009 By Bettcher Industries, Inc.
All Rights Reserved.
Original Instructions
Page i

Table of Contents
Section 1……………Safety and Ergonomics
Section 2……………Designated Use
Section 3……………Unpacking and Installation
Section 4……………Instructions for Operation
Section 5……………Maintenance
Section 6……………Cleaning
Section 7……………Service Parts
Section 8……………Contact and Document Information


Safety and Ergonomics
Manual No. 188000
September 1, 2009
Safety and Ergonomics
Whizard® AirMax MACH 3 Operating Instructions and Parts
List
1-1
Section 1
Safety and
Ergonomics
NOTICE
The manufacturer assumes no liability for any unauthorized
changes in operating procedures or for unauthorized changes or
modifications made to the design of the machine or any factoryinstalled safety equipment, whether these changes are made by
the owner of this equipment, by his employees, or by service
providers not previously approved by Bettcher Industries, Inc.
CONTENTS OF THIS SECTION
Safety Recommendations and Warnings ............................................................................... 1-2
Safety Features ...................................................................................................................... 1-6
Ergonomic Features ............................................................................................................... 1-6
Additional Features ................................................................................................................. 1-6
Safety and Ergonomics
1-2
Safety and Ergonomics
Whizard® AirMax MACH 3 Operating Instructions and
Parts List
Manual No. 188000
September 1, 2009
W A R N I N G
THE MANUFACTURER ASSUMES NO LIABILTY FOR ANY
UNAUTHORIZED DESIGN CHANGES, MODIFICATION,
OR USE OF PARTS NOT SUPPLIED BY THE MANUFACTURER
OR
THE USE OF PARTS NOT DESIGNED FOR USE ON THAT
SPECIFIC MODEL, INCLUDING CHANGES IN OPERATING
PROCEDURES MADE BY THE OWNER OR ANY OF HIS
PERSONNEL.
THE USE OF PARTS OTHER THAN THOSE LISTED IN THE
PARTS LIST FOR THE SPECIFIC MODEL MAY CAUSE BLADE
LOCK-UP RESULTING IN AN UNSAFE OPERATING
CONDITION.
W A R N I N G
SHARP BLADE MAY CAUSE INJURY !
Safety Recommendations and Warnings
Whizard® AirMax MACH 3 Trimmers are used for removal of fat and tissue, the recovery of
lean meat from bone, and as a universal cutting tool in industry. Any use in applications other
than those for which the Whizard® trimmer was designed and built may result in serious injuries.

Safety and Ergonomics
Manual No. 188000
September 1, 2009
Safety and Ergonomics
Whizard® AirMax MACH 3 Operating Instructions and Parts
List
1-3
W A R N I N G
SHARP BLADES MAY CAUSE CUT INJURY!
FOR PROPER PROTECTION OF HANDS, A PROTECTIVE
GLOVE SHOULD BE USED WHEN OPERATING THIS
EQUIPMENT AND DURING THE HANDLING OF THE BLADES.
METAL MESH GLOVES ARE RECOMMENDED FOR THE “NON-
KNIFE” HAND.
W A R N I N G
KEEP HANDS AWAY FROM MOVING BLADES!
W A R N I N G
IF AT ANY TIME THIS MACHINE DOES NOT APPEAR TO
OPERATE NORMALLY OR EXHIBITS A MARKED CHANGE IN
PERFORMANCE, IT SHOULD BE IMMEDIATELY SHUT DOWN,
DISCONNECTED FROM THE AIR SUPPLY, AND TAGGED AS
“UNSAFE” UNTIL SUCH TIME AS PROPER REPAIRS ARE
MADE AND THE MACHINE AGAIN OPERATES NORMALLY.
Safety Recommendations and Warnings (Continued)
Whizard® AirMax MACH 3 Trimmers have been designed to obtain the highest possible degree
of safety. The trimmer contains a sharp knife blade. Handle this equipment with caution, as you
would any sharp object. In particular, read and apply the following safety recommendations:
Warnings identify conditions that can cause serious bodily injury to the user.
Cautions identify conditions that are important to the operation, care and maintenance of the
machine.
Safety and Ergonomics
1-4
Safety and Ergonomics
Whizard® AirMax MACH 3 Operating Instructions and
Parts List
Manual No. 188000
September 1, 2009
W A R N I N G
HEARING LOSS MAY OCCUR!
ALWAYS OPERATE WITH HOSE AND MUFFLER ATTACHED.
W A R N I N G
SHARP BLADE MAY CAUSE INJURY!
ALWAYS DISCONNECT AIR SUPPLY PRIOR TO
SERVICING UNIT.
W A R N I N G
LONG OR REPEATED USE OF VARIOUS POWER TOOLS
VIBRATING EXCESSIVELY IS SUSPECTED OF CONTRIBUTING
TO CERTAIN HAND, WRIST OR FOREARM DISORDERS IN
SUSCEPTIBLE INDIVIDUALS. IF EXCESSIVE VIBRATION
OCCURS, IT IS AN INDICATION THAT THERE ARE WORN
PARTS THAT NEED REPLACEMENT.
Safety Recommendations and Warnings (Continued)

Safety and Ergonomics
Manual No. 188000
September 1, 2009
Safety and Ergonomics
Whizard® AirMax MACH 3 Operating Instructions and Parts
List
1-5
W A R N I N G
IF YOUR TRIMMER DEVELOPS UNUSUAL VIBRATION, DO NOT
CONTINUE TO USE IT WITHOUT FIRST UNDERTAKING
CORRECTIVE ACTION AS OUTLINED IN THE FAULT AND
DETECTION SECTION OF THIS OPERATING INSTRUCTION.
C A U T I O N
USE ONLY REPLACEMENT PARTS MANUFACTURED BY
BETTCHER INDUSTRIES, INC.
USE OF SUBSTITUTE PARTS WILL VOID THE
WARRANTY AND MAY CAUSE INJURY TO OPERATORS AND DAMAGE TO
EQUIPMENT.
Safety Recommendations and Warnings (Continued)

Safety and Ergonomics
1-6
Safety and Ergonomics
Whizard® AirMax MACH 3 Operating Instructions and
Parts List
Manual No. 188000
September 1, 2009
Safety Features
Two-handed start-up prevents the tool from being started accidentally.
The air supply is disconnected from the motor when the run lever is released.
Ergonomic Features
Right and Left-Handed – The Whizard®AirMax MACH 3 Trimmers have been
manufactured in both right and left-handed configurations.
Optional Thumb Support - A thumb support is available to ensure a proper and comfortable
fit while providing added control and stability of the tool during use.
Additional Features
The hose assembly swivels for easier trimmer rotation and operator comfort.
The hose is ten feet (3.05 m) long to allow for greater operator mobility.

Designated Use
Manual No. 188000
September 1, 2009
Designated Use
Whizard® AirMax MACH 3 Operating Instructions and Parts
List
2-1
Section 2
Designated Use
CONTENTS OF THIS SECTION
Recommended Operation ................................................................................................................... 2-2
Model 350 / 360 ................................................................................................................. 2-2
Model 620 .......................................................................................................................... 2-2
Model 625 .......................................................................................................................... 2-3
Model 500 .......................................................................................................................... 2-3
Model 505 .......................................................................................................................... 2-3
Model 750 .......................................................................................................................... 2-3
Model 850 / 1850 ............................................................................................................... 2-4
Model 880-B / 1880 with Adjustable Depth Gauge ............................................................. 2-4
Model 880-S with Adjustable Depth Gauge ........................................................................ 2-4
Model 1000 ........................................................................................................................ 2-5
Model 1300 ........................................................................................................................ 2-5
Model 1400 with Adjustable Depth Gauge ......................................................................... 2-5
Model 1500 with Adjustable Depth Gauge ......................................................................... 2-6
Model TRIMVAC® 18AMX ................................................................................................. 2-6
Model TRIMVAC® 45AMX .................................................................................................. 2-6

Designated Use
2-2
Designated Use
Whizard® AirMax MACH 3 Operating Instructions and
Parts List
Manual No. 188000
September 1, 2009
BEEF
PORK
POULTRY
Cartilage Removal
Liver Spotting
Bone Trimming
Strip Intestine
Button Bones
Bone Trimming
Spotting Livers / Removing
Gall Sacks
Turkey Breast
Turkey Necks
Chicken Backs
Turkey Thighs
Turkey Cage
Oil Sacks
BEEF KILL/OFFAL
POULTRY
PORK KILL/OFFAL
Removing Lean from
Heads
De-Veining Livers
Removing Lean from Turkey
Carcasses
Removing Lean from Turkey
Necks
Removing Oil Sacks
Removing Eyelids
Cleaning Stick Wounds
Removing Eardrums
Removing Lean from Heads
Spotting Livers / Removing
Gall Sacks
BEEF BONING / FABRICATION
PORK CUT
Removing Lean from Bones, Especially:
- Neck Bones - Atlas Bones
- Chine Bones from Strips or Rib Eyes
- Pelvic Bones / Aitch Bones
- Rib Cages
- Blade Bones
- Strip Bones
- Feather Bones
Trimming Neck Bones
Removing Lean from Bones
Removing Tails
Recommended Operation
Whizard® AirMax MACH 3 Trimmers are made for several recommended operations. Assure
that you are using the correct tool for your specific application. The following recommendation
list is not intended to be a total and comprehensive listing, but is offered as a guide. Additional
applications are possible.
Model 350 / 360
Model 620

Designated Use
Manual No. 188000
September 1, 2009
Designated Use
Whizard® AirMax MACH 3 Operating Instructions and Parts
List
2-3
BEEF
POULTRY
PORK
Upgrading Retrim
Fat Trimming of Turkey
Thighs
Trimming of Turkey Skins
Fat Trimming of Pork Loins
Upgrading Retrim
POULTRY
PORK KILL
PORK CUT
Turkey Thigh Knuckles
Trim Pork Snouts
Trim Pork Trachea
Trim Pork Heads
Remove Lean from Neck
Bones of Heavy Hogs
Remove Tails from Heavy
Hogs
Removing 99% Picnic Muscle
from Bellies
Removing Pork Tenderloins
INDUSTRIAL
Foam Industry
POULTRY
Turkey Thigh Trim
BEEF BONING/FABRICATION
Removing Lean from Fat Generated in Fabrication
PORK CUT
PORK KILL
FOAM INDUSTRY
Remove Diaphragm Lean
Removal of Picnic Hearts
Remove Cheek Meat
Remove Blood Clots from
Jowls
Remove Defects
Flash Trimming
Recommended Operation (Continued)
Model 625
Model 500
Model 505
Model 750

Designated Use
2-4
Designated Use
Whizard® AirMax MACH 3 Operating Instructions and
Parts List
Manual No. 188000
September 1, 2009
PORK KILL
HAM PROCESSING
BEEF
Removing Leaf Lard
External Ham Defatting
Internal Ham Defatting
Defat Pork Loins
Remove Oyster Meat
Recover Lean from Fat
Trim Lean from Rib Caps
Trim Beef Tripe
POULTRY
Defatting Turkey Skins
Defatting Turkey Thighs
BEEF BONING/FABRICATING
Removing Dirt and Hair
- Slaughter Floor
- Prior to Loading
- Upon Receiving
- Prior to Fabrication
Final Trim on Primal Fat Shaping
PORK
POULTRY
BEEF
Remove Skin or Hair
Patches
Trimming Pork Loins and
Canadian Backs
Internal and External
Defatting of Hams
Defatting Turkey Thighs
Removing Membranes and
Light Fat Covering from Top
Rounds, Bottom Rounds,
Briskets and Cube Steak
Material
Recommended Operation (Continued)
Model 850 / 1850
Model 880-B / 1880 with Adjustable Depth Gauge
Model 880-S with Adjustable Depth Gauge

Designated Use
Manual No. 188000
September 1, 2009
Designated Use
Whizard® AirMax MACH 3 Operating Instructions and Parts
List
2-5
PORK CUT
BEEF SLAUGHTER
Defat Hams, Picnics and Butts
Removing Lean from:
- Picnic Face
- Fat Backs
- Clear Plates
- Bootjack
Jowls Shoulder End of Belly
Belly (Wire Muscle – Pickle Pocket)
Plate Trim
Defatting Hot Beef Externally & Internally
Kidney Fat, Heart Fat, Pelvic Fat & Cod Fat
BEEF KILL
BEEF BONING / FABRICATION
HAM BONING
Pizzle Cord Removal
Removing External Fat
Primal Fat Shaping :
- Strips
- Sirloin Butts
- Ribs
Defat Navels (Pastrami)
External Defat of Hams
External Defat of Pork
Shoulders
PORK PROCESSING
BEEF PROCESSING
Defatting
- Whole Hams
- Shoulders
- Canadian Backs
Removing Beater Marks
Scraping Leaf Lard
Carcass Hair & Dirt Removal
Defatting
- New York Strips & Sirloin Butts
- Rounds and Ribeyes
Recommended Operation (Continued)
Model 1000
Model 1300
Model 1400 with Adjustable Depth Gauge

Designated Use
2-6
Designated Use
Whizard® AirMax MACH 3 Operating Instructions and
Parts List
Manual No. 188000
September 1, 2009
PORK PROCESSING
BEEF SLAUGHTER
Removing Skin Patches from Bellies
Defatting
- Whole Hams
- Pork Loins
Defatting Hot Beef Externally
Hair and Dirt Removal
BEEF and PORK SLAUGHTER
Removal of Spinal Column
BEEF and PORK SLAUGHTER
Internal Defatting
Salmon and Whitefish Processing
Frame Scraping
Cheese Processing
Remove Mold
Recommended Operation (Continued)
Model 1500 with Adjustable Depth Gauge
Model TRIMVAC® 18AMX
Model TRIMVAC® 45AMX

Unpacking and Installation
Manual No. 188000
September 1, 2009
Unpacking and Installation
Whizard® AirMax MACH 3 Operating Instructions and Parts
List
3-1
Section 3
Unpacking and
Installation
CONTENTS OF THIS SECTION
Safety First ............................................................................................................................. 3-2
Included with your Machine – (Small Whizard® AirMax MACH 3 Tools) ................................. 3-2
Models: 350, 360, 620, 625, 500, 505 ............................................................................... 3-2
Included With Your Machine – (Large Whizard® AirMax MACH 3 Tools) ............................... 3-3
Models: 750, 850, 880-B, 880-S, 1850, 1880, 1000, 1300, 1400, 1500 ............................ 3-3
Included With Your Machine – (TRIMVAC® Tools) ................................................................ . 3-4
Installation .............................................................................................................................. 3-6

Unpacking and Installation
3-2
Unpacking and Installation
Whizard® AirMax MACH 3 Operating Instructions and
Parts List
Manual No. 188000
September 1, 2009
W A R N I N G
SHARP BLADES MAY CAUSE CUT INJURY!
UNPACK THE WHIZARD TRIMMER CAREFULLY.
Part
Number
Description
173226
Filter Regulator Lubricator (FRL) Kit
100655
Special Stone
100641
Special Steel
103603
Pint of Oil
113326
Planetary Gear Grease Gun (Needle-Nose)
184134
Spanner Wrench
184128
Hex Wrench
184282
4 oz. Tube of Max-Z-Lube
And one of the following:
143631
14 oz. Cartridge of Special Whizard® Grease
100608
8 oz. Tube of Special Whizard® Grease
Safety First
Included with your Machine – (Small Whizard® AirMax MACH 3
Tools)
Models: 350, 360, 620, 625, 500, 505

Unpacking and Installation
Manual No. 188000
September 1, 2009
Unpacking and Installation
Whizard® AirMax MACH 3 Operating Instructions and Parts
List
3-3
Part
Number
Description
173226
Filter Regulator Lubricator (FRL) Kit
100660
Special Stone
100642
Special Steel
103603
Pint of Oil
113326
Planetary Gear Grease Gun (Needle-Nose)
184134
Spanner Wrench
184128
Hex Wrench
184282
4 oz. Tube of Max-Z-Lube
And one of the following:
143631
14 oz. Cartridge of Special Whizard® Grease
100608
8 oz. Tube of Special Whizard® Grease
Included With Your Machine – (Large Whizard® AirMax MACH 3
Tools)
Models: 750, 850, 880-B, 880-S, 1850, 1880, 1000, 1300, 1400, 1500

Unpacking and Installation
3-4
Unpacking and Installation
Whizard® AirMax MACH 3 Operating Instructions and
Parts List
Manual No. 188000
September 1, 2009
Part
Number
Description
113326
Planetary Gear Grease Gun (Needle-Nose)
184134
Spanner Wrench
184128
Hex Wrench
184325
Hex Wrench – 3/32”
184437
Hex Wrench – 9/64”
184282
4 oz. Tube of Max-Z-Lube
Included With Your Machine – (TRIMVAC® Tools)
Models: TRIMVAC® 18AMX and TRIMVAC® 45AMX

Unpacking and Installation
Manual No. 188000
September 1, 2009
Unpacking and Installation
Whizard® AirMax MACH 3 Operating Instructions and Parts
List
3-5
THIS PAGE INTENTIONALLY LEFT BLANK

Unpacking and Installation
3-6
Unpacking and Installation
Whizard® AirMax MACH 3 Operating Instructions and
Parts List
Manual No. 188000
September 1, 2009
Installation
The workstation for each operator should be designed so that the operator's movements in
performing the job are natural and easy. A sideways sweeping motion with the Whizard
®
AirMax MACH 3 Trimmer is preferable to a reaching motion. Long reaching motions and high
muscle strain should be avoided if possible. Also, a proper working height is needed to avoid
excessive shoulder and back exertion.
Air Supply
A clean, dry, lubricated air supply is critical to proper operation. The filter, regulator and
lubricator (FRL) unit, furnished with your complete Whizard® AirMax MACH 3, should be
mounted horizontally at the air supply outlet and in such a position as to be easily reached for
draining the filter bowl and refilling the lubricator. The filter bowl should be drained, and the
lubricator refilled, daily.
IMPORTANT: Be sure the air supply is a constant 90 pounds per square inch (6.2 bar) and the
volume is a minimum of 14 cubic feet per minute (396 liters per minute) per unit.
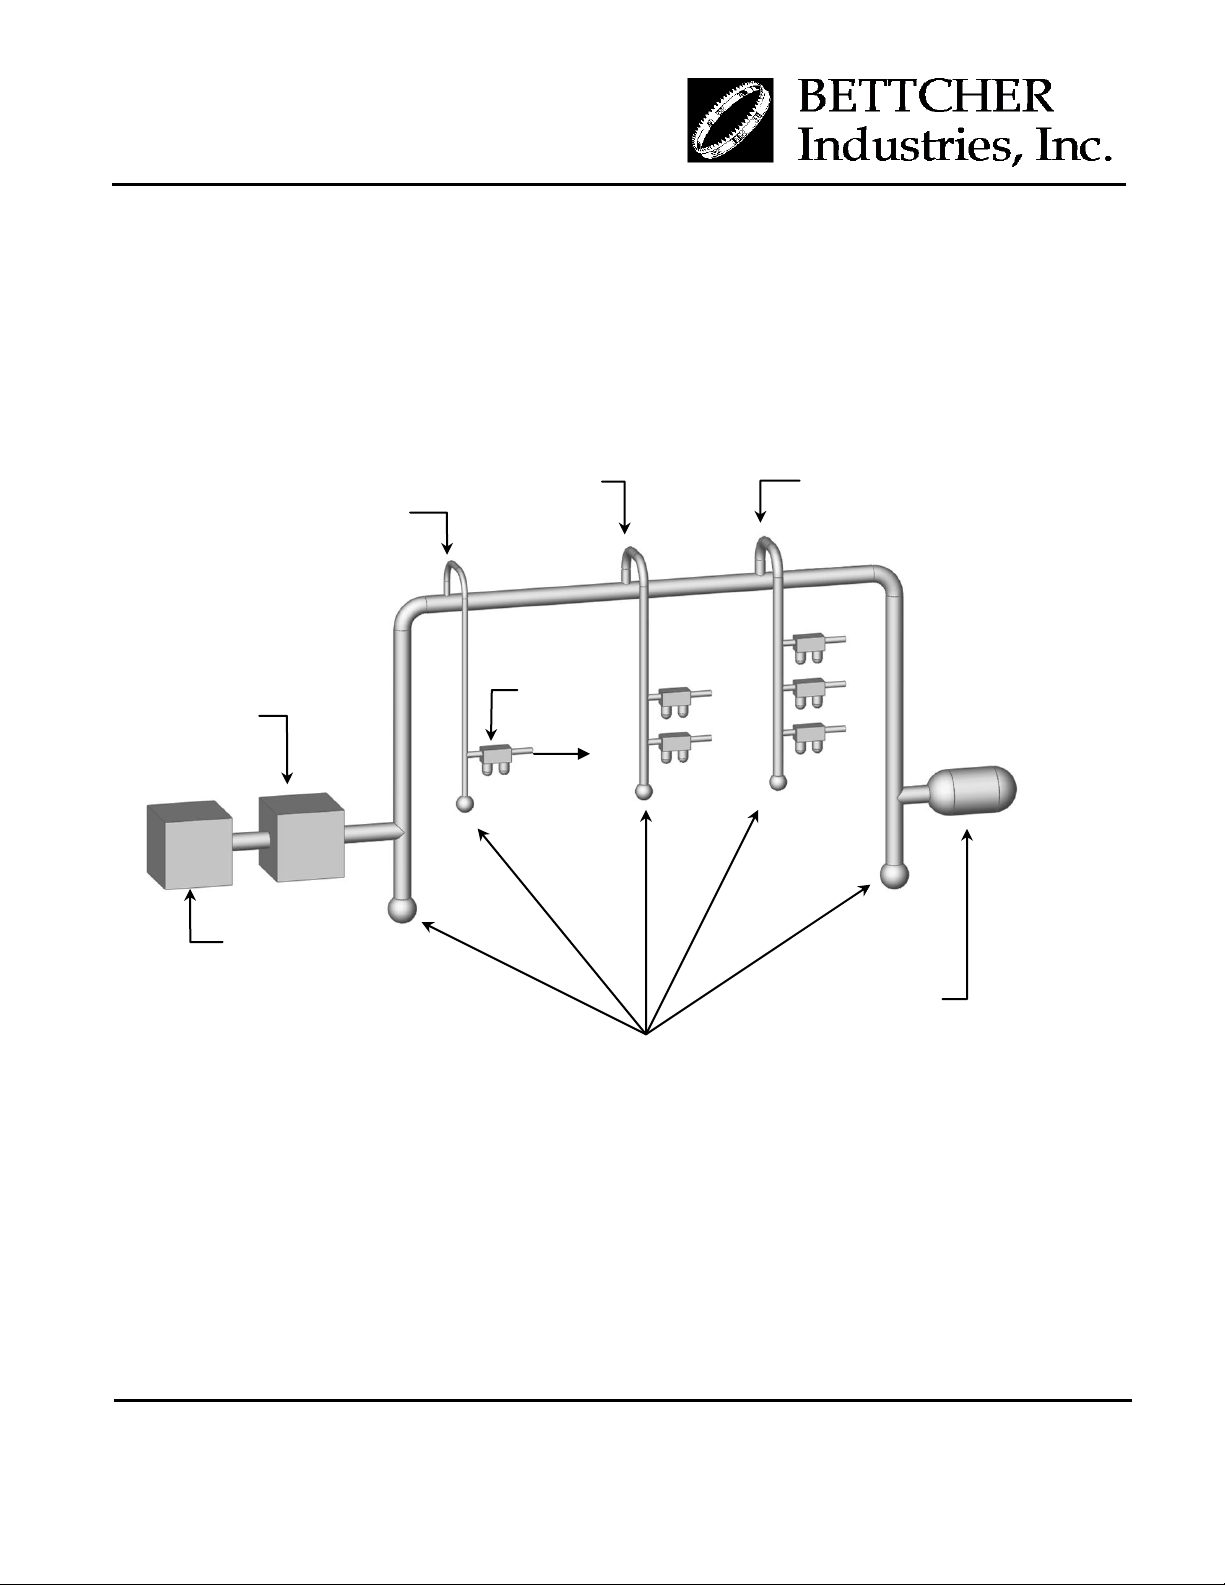
Supply Line:
Use a 2 inch to 6 inch (5 cm to 15 cm) pipe for the air supply.
All air outlet drops should be connected to the top of the main air supply line to
minimize the possibility of moisture and dirt reaching the motor.
Drops should be at least:
¾ inch (2 cm) pipe for one (1) tool.
1 inch (2.54 cm) pipe for two (2) tools.
1 ¼ inch (3.18 cm) pipe for three (3) tools.
A FRL should be used for each tool. Do not run multiple tools off of a single
FRL.
All air outlets should be located close enough to the operator’s work station so that
additional hose is not required.
Unpacking and Installation
Manual No. 188000
September 1, 2009
Unpacking and Installation
Whizard® AirMax MACH 3 Operating Instructions and Parts
List
3-7
Air
Compressor
Air Dryer
To
Tool
¾” Drop
(2 cm)
1” Drop
(2.54 cm)
1 ¼ ” Drop
(3.18 cm)
Accumulator
Tank
FRL
Water Trap Drain
Installation (Continued)


Instructions for Operation
Manual No. 188000
September 1, 2009
Instructions for Operation
Whizard® AirMax MACH 3 Operating Instructions and Parts
List
4-1
Section 4
Instructions for
Operation
CONTENTS OF THIS SECTION
Optional Thumb Support ........................................................................................................ 4-2
Power Unit / Head Assembly - Attachment and Adjustment ................................................... 4-3
Hose Assembly Attachment ..................................................................................................4-10
Starting the Trimmer with Standard Hose Assembly .............................................................4-11
Starting the Trimmer with Quick-Start Hose Assembly ..........................................................4-12
Depth Gauge Adjustment ......................................................................................................4-13
Tool Operation .......................................................................................................................4-15
Blade Steeling .......................................................................................................................4-16
Blade Changing .....................................................................................................................4-19

Instructions for Operation
4-2
Instructions for Operation
Whizard® AirMax MACH 3 Operating Instructions and
Parts List
Manual No. 188000
September 1, 2009
NOTE
If the operator normally wears a glove, this process
should be done with the glove(s) used in normal operation.
We do not recommend the use of Nitrile gloves in direct
contact with the Whizard® AirMax MACH 3 handles because
the gloves may become slippery.
Optional Thumb Support
Your Whizard® AirMax MACH 3 Trimmer has been supplied with a spacer ring and an
optional thumb support. If using the optional thumb support, the operator’s thumb
should be fully supported and rest comfortably in the support. The thumb support has
been optimized to fit most hands comfortably.
Instructions for Operation
Manual No. 188000
September 1, 2009
Instructions for Operation
Whizard® AirMax MACH 3 Operating Instructions and Parts
List
4-3
W A R N I N G
SHARP BLADES MAY CAUSE INJURY!
Power Unit / Head Assembly - Attachment and Adjustment
The Whizard® AirMax MACH 3 Trimmers have been designed to allow the head of the tool to
be rotated relative to the handle. In this way, the tool can be adjusted to align the blade with the
product, while maintaining a comfortable position for the operator’s wrist.
The position that is selected should be based on the individual workstation, product, and
operator. To determine the proper position, it will be necessary to observe the operator while
trying various positions. Select the position which is most comfortable to the operator.
Note that left-handed tools are available for left-handed users. Do not assign a right-handed tool
to a left-handed user.
Instructions for Operation
4-4
Instructions for Operation
Whizard® AirMax MACH 3 Operating Instructions and
Parts List
Manual No. 188000
September 1, 2009
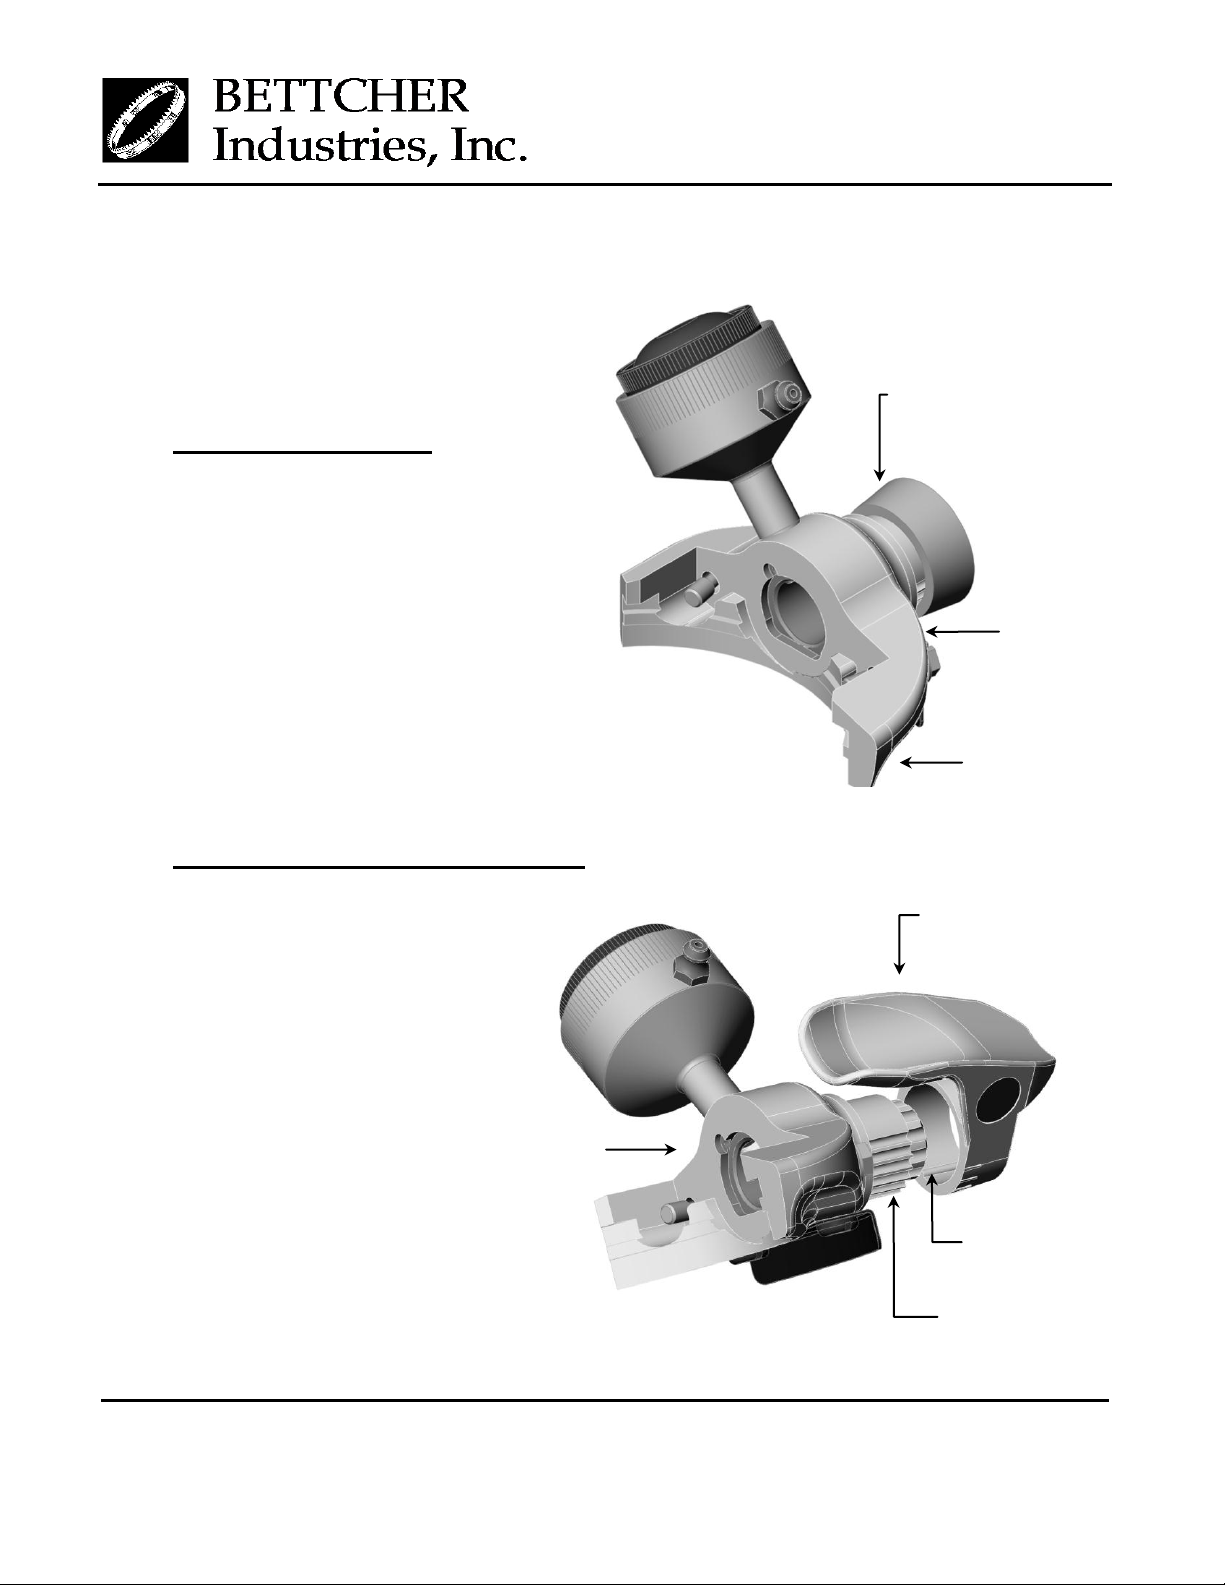
Thumb
Support
Tab
Frame
Notches
Spacer Ring
Small End
Frame
Power Unit / Head Assembly - Attachment and Adjustment
(Continued)
Step 1:
Select the spacer ring or optional
thumb support.
If a spacer ring is used: Slide the
spacer ring onto the frame, small
end first.
If an optional thumb support is used: The thumb support should be positioned on the
opposite side of the grease cup.
Align the thumb
support tab with a notch
on the underside of the
frame and slide the
thumb support onto the
frame.
The frame is designed
with multiple
notches to allow
the thumb support
to be adjusted to the
most comfortable
position for the
operator.
Instructions for Operation
Manual No. 188000
September 1, 2009
Instructions for Operation
Whizard® AirMax MACH 3 Operating Instructions and Parts
List
4-5
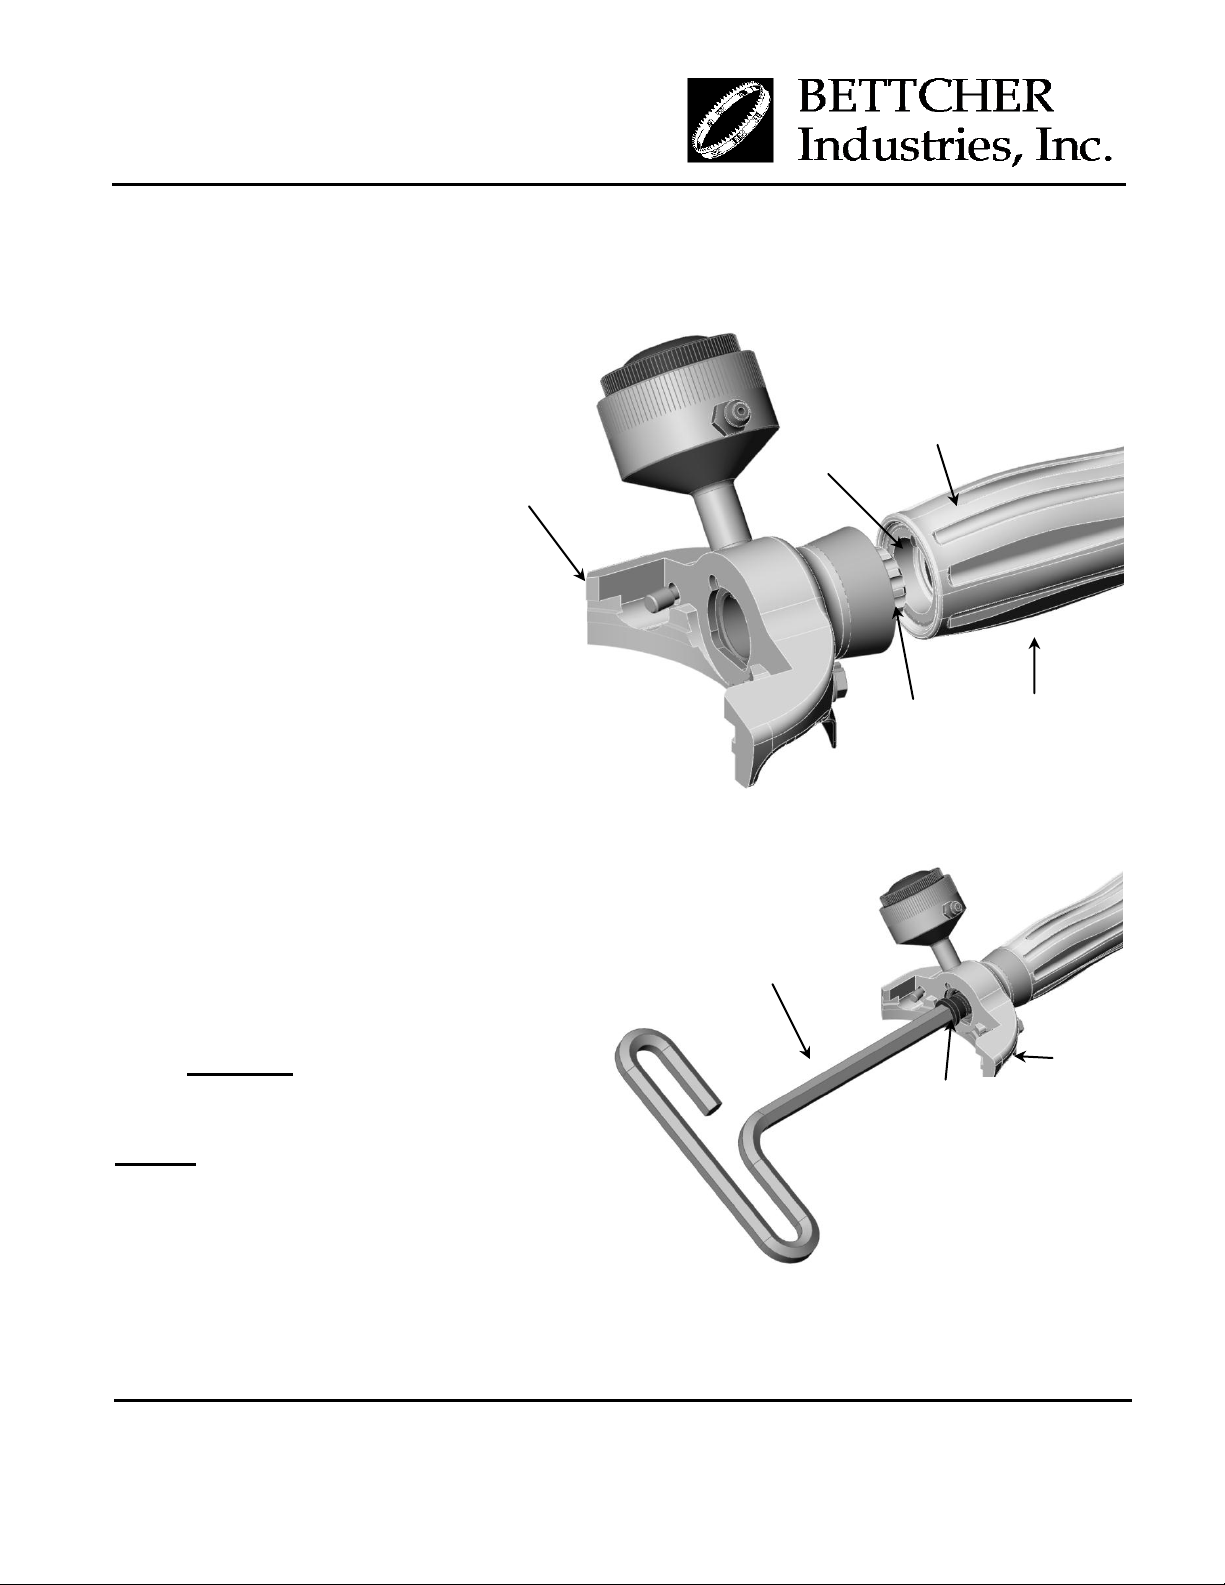
Pin
Short
Groove
Notches
Frame
Power
Unit
Hex
Wrench
Frame
Attachment
Screw
Power Unit / Head Assembly - Attachment and Adjustment
(Continued)
Step 2:
While holding the
Whizard® AirMax
MACH 3 frame, align
the pin in the power
unit with one of the
notches on the frame.
The frame is designed
with multiple notches
to allow the head to be
adjusted to the most
comfortable position
for the operator.
For the initial
adjustment position, the
short groove on the
power unit should be
facing up. See illustration at right.
Step 3:
Insert the attachment screw in
the frame.
Tighten the attachment screw
FIRMLY, using the supplied
hex wrench.
NOTE: Recommended torque of
115-140 lb-in (13-16 N-m).
Instructions for Operation
4-6
Instructions for Operation
Whizard® AirMax MACH 3 Operating Instructions and
Parts List
Manual No. 188000
September 1, 2009
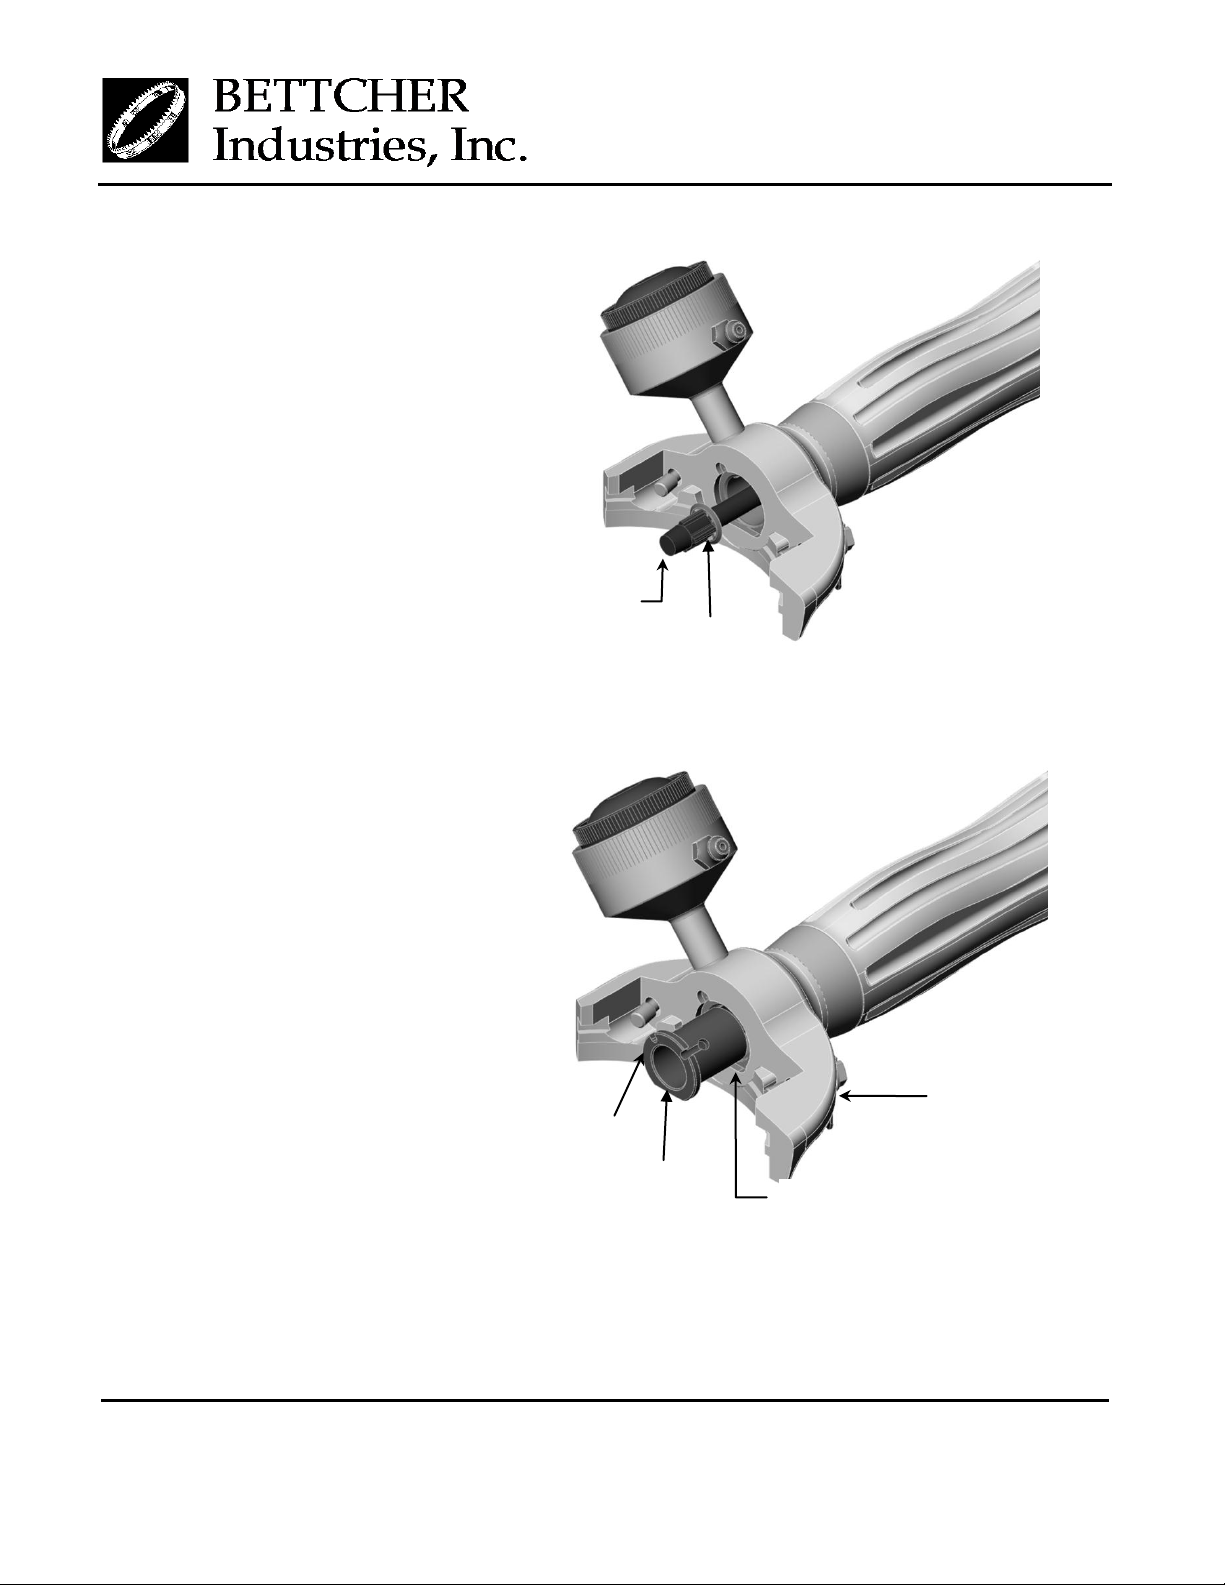
Bearing
Frame
Flat
Frame
Bearing
Flat
Drive
Adapter
Retaining
Ring
Power Unit / Head Assembly - Attachment and Adjustment
(Continued)
Step 4: Install Drive Adapter
Insert the drive adapter and align
the square end with the square hole
in the power unit.
The drive adapter should drop in
with no force required.
The retaining ring will sit flush
against the attachment screw when
properly aligned.
Step 5: Install Bearing
Slide the handpiece bearing into
the frame bore, aligning the
bearing flat with the frame flat.
The bearing should go in with
minimal effort and not require
pressing.
Do not force the bearing into the
frame. If the bearing does not go
in easily, check frame and
bearing for damage or build-up.

Instructions for Operation
Manual No. 188000
September 1, 2009
Instructions for Operation
Whizard® AirMax MACH 3 Operating Instructions and Parts
List
4-7
Pinion
Bearing
Cover
Plate
Cover
Retaining
Frame
Blade Housing
Power Unit / Head Assembly - Attachment and Adjustment
(Continued)
Step 6: Install Pinion
Insert the pinion into the bearing bore.
The pinion should go in with minimal
effort and not require pressing.
Do not force the pinion into the
bearing. If the pinion does not go in
easily, check bearing and pinion for
damage or build-up.
The pinion should sit flush against the
bearing. If the pinion does not, rotate
the pinion to seat it flush with the
bearing.
STEP 7: Install Cover And Blade
Housing
Set the blade housing on the
frame and place the cover plate
over the blade housing.
While holding the cover plate
firmly against the housing and
frame, start the two cover
retaining screws.
Thread the cover retaining
screws in, leaving a slight
tension to allow for blade
adjustment.

Instructions for Operation
4-8
Instructions for Operation
Whizard® AirMax MACH 3 Operating Instructions and
Parts List
Manual No. 188000
September 1, 2009
Left Cover
Retaining
Screw
Pivot Support
Point
Housing
Slot
Screwdriver
Left Cover
Retaining
Screw
Screwdriver
Power Unit / Head Assembly - Attachment and Adjustment
(Continued)
NOTE: Leave a slight tension on the
left cover retaining screw so the
blade housing will stay open on its own.
Step 8: Install Blade
Holding the tool blade side up, pry
open the blade housing with a
screwdriver.
Insert a new blade into the
housing.
Loosen the left cover retaining
screw to allow the housing to
close.
Tighten the right cover retaining
screw.
With left cover retaining screw ½
turn loose, adjust housing for proper fit.
Gently pry the housing open until the blade
rotates freely and has enough clearance
to allow the blade to move forward and
backward in the housing. Only a slight
amount of movement is necessary.
Tighten the cover retaining screws to the
recommended torque.
NOTE: Recommended torque of 30-40 lb-in
(3.4-4.5 N-m).
IMPORTANT: Be sure that the blade is free to move
in the housing. If the blade does not move freely, it
may cause the trimmer to overheat.

Instructions for Operation
Manual No. 188000
September 1, 2009
Instructions for Operation
Whizard® AirMax MACH 3 Operating Instructions and Parts
List
4-9
Model Shown is
880-B
Depth Gauge Assembly
Depth Gauge
Mounting
Screws
Cover
Power Unit / Head Assembly - Attachment and Adjustment
(Continued)
Step 9: Install Depth Gauge (Optional)
Loosen depth gauge mounting screws.
Slide depth gauge onto the cover.
Adjust the depth gauge to the desired height.
(See Depth Gauge Adjustment for more information)
Tighten the depth gauge mounting screw(s).

Instructions for Operation
4-10
Instructions for Operation
Whizard® AirMax MACH 3 Operating Instructions and
Parts List
Manual No. 188000
September 1, 2009
Hose
Assembly
Power Unit
Pin (2)
Groove
(2)
Power Unit
Lever
Hose Assembly
Hose Assembly Attachment
Step 1:
Align the pins in the hose assembly with the
grooves on the power unit.
Step 2:
Slide the power unit into the hose
assembly
Rotate the power unit 90°
Lever will rotate toward the bottom
of the tool.

Instructions for Operation
Manual No. 188000
September 1, 2009
Instructions for Operation
Whizard® AirMax MACH 3 Operating Instructions and Parts
List
4-11
Hose
Assembly
Power Unit
Flange
Hose Clamp
Push
Power Unit
Lever
Lever
Starting the Trimmer with Standard Hose Assembly
Hold the power unit and push the flange
and or hose clamp of the hose assembly
toward the power unit.
Hold the lever against the power unit to
keep the trimmer running.
Release the lever to turn the trimmer off.

Instructions for Operation
4-12
Instructions for Operation
Whizard® AirMax MACH 3 Operating Instructions and
Parts List
Manual No. 188000
September 1, 2009
Lever
Power Unit
Lever
Lever
Safety
Power
Unit
Hose
Assembly
Starting the Trimmer with Quick-Start Hose Assembly
Fold the safety into the lever.
Hold the lever against the power unit to
keep the trimmer running.
Release the lever to turn the trimmer off.

Instructions for Operation
Manual No. 188000
September 1, 2009
Instructions for Operation
Whizard® AirMax MACH 3 Operating Instructions and Parts
List
4-13
W A R N I N G
SHARP BLADES MAY CAUSE CUT INJURY!
FOR PROPER PROTECTION OF HANDS, A PROTECTIVE
GLOVE SHOULD BE USED WHEN OPERATING THIS
EQUIPMENT AND DURING THE HANDLING OF BLADES.
ALWAYS DISCONNECT THE TOOL FROM THE AIR SUPPLY
PRIOR TO SERVICING.
Slide to Adjust
Moving Up = Thicker Cut
Moving Down = Thinner Cut
Depth Gauge
Mounting
Screws
Depth Gauge
Mounting
Screws
Depth Gauge Adjustment
Models 880, 1880, 1400, 1500 and optional 505:
These models are equipped with an adjustable depth gauge for setting a controlled product trim
thickness. The depth gauge can be adjusted for cuts up to ¼” thick. A depth gauge setting
device is also available.
To adjust the depth:
Hold the handpiece with the blade facing downward.
Loosen the depth gauge mounting screw(s).
Adjust the depth gauge setting by sliding it up or down to the desired height.
Retighten the depth gauge mounting screw(s).
Depth Gauge Adjustment Range:
Model 880 Whizard® AirMax MACH 3 Model 1400 Whizard® AirMax MACH 3

Instructions for Operation
4-14
Instructions for Operation
Whizard® AirMax MACH 3 Operating Instructions and
Parts List
Manual No. 188000
September 1, 2009
W A R N I N G
SHARP BLADES MAY CAUSE CUT INJURY!
FOR PROPER PROTECTION OF HANDS, A PROTECTIVE
GLOVE SHOULD BE USED WHEN OPERATING THIS
EQUIPMENT AND DURING THE HANDLING OF BLADES.
ALWAYS DISCONNECT THE TOOL FROM THE AIR SUPPLY
PRIOR TO SERVICING.
Adjustment
Knob
Depth Gauge Adjustment (Continued)
Optional Adjustable Fat (F) and Skinner (S) Disc Gauges for the 850, 1000 and
1300
Hold the handpiece with the blade facing
downward.
Adjustments – Turn the adjustment knob
clockwise for a thicker cut, or
counterclockwise for a thinner cut.
Important: Take care not to turn the
adjustment knob too far as the disc may
disengage from the shaft.

Instructions for Operation
Manual No. 188000
September 1, 2009
Instructions for Operation
Whizard® AirMax MACH 3 Operating Instructions and Parts
List
4-15
W A R N I N G
SHARP BLADES MAY CAUSE CUT INJURY!
NEVER HOLD THE PRODUCT BEING TRIMMED IN YOUR
HAND.
ALWAYS LAY THE PRODUCT FLAT ON THE WORK SURFACE.
Tool Operation
Always hold the handle of the Whizard® AirMax MACH 3 Trimmer with your thumb extended.
Let the handle rest naturally in your hand, in a relaxed manner. Each person should be allowed
to hold the handpiece in a position that is most comfortable to them.
The most-commonly used motion is a long sweeping or gliding stroke across the trimming
surface. Hold the blade surface as flat to the trim surface as possible. A scooping action should
be used around the vertebra.
On flat bones, such as backbones or blades, use a long, quick, gliding stroke.
During the cutting operation do not try to pull the blade out of a cut. Let the blade do the work,
as you would any other cutting tool. Finding the proper angle for Whizard® AirMax MACH 3
trimming will become easier as the operator gains experience using the tool.
As with any meat cutting tool, your speed and efficiency is only as good as the blade sharpness.
In order to achieve maximum unit and operator efficiency, it is recommended that sharp blades
be installed at each shift break. For this reason, it is suggested that extra blades be kept on hand.
For example, if 4 units are being used and there are 3 shift breaks, 16 blades would be required.
This would provide a sharp blade for start up and one for each break.
When following this procedure, steeling of the blade is minimized, and blades need only be
sharpened once a day with the use of a Whizard Model 210 Universal Blade Sharpener,
Whizard Model 214 Blade Sharpener, Bettcher® AutoEdge, or by hand stoning.
If blades are not changed at each shift break, it may be required to steel the blade.

Instructions for Operation
4-16
Instructions for Operation
Whizard® AirMax MACH 3 Operating Instructions and
Parts List
Manual No. 188000
September 1, 2009
W A R N I N G
SHARP BLADES MAY CAUSE CUT INJURY!
FOR PROPER PROTECTION OF HANDS, A PROTECTIVE
GLOVE SHOULD BE USED WHEN OPERATING THIS
EQUIPMENT AND DURING THE HANDLING OF BLADES.
ALWAYS DISCONNECT THE TOOL FROM THE AIR SUPPLY
PRIOR TO SERVICING.
Cross-Section View of
Steeling Outside Blade Edge
Cross-Section View of
Steeling Inside Blade Edge
Blade Steeling
Steeling For Models: 350, 500, 620 and 750:
Be sure to hold the steel at the actual angle of the blade edge. Running the steel at an
angle greater than the factory ground angle will round over the edge and make resharpening more difficult.
Whizard Special Steel
Use the steel lightly and always make the last pass of the steel on the inside surface of the
blade.
Steeling can be accomplished with much greater consistency with the use of the specially
designed Whizard® EdgeMaster™ Steels. See Section 7; Blade Sharpening and Steeling
Equipment, or contact your Regional Manager or Bettcher Industries, Inc. for more
information.
Replace or sharpen the blade if this procedure does not improve the cutting action.
The Whizard
quickly removed and reinstalled.
®
AirMax MACH 3 Trimmers have been designed to allow the blades to be

Instructions for Operation
Manual No. 188000
September 1, 2009
Instructions for Operation
Whizard® AirMax MACH 3 Operating Instructions and Parts
List
4-17
Whizard® Special
Steel
*Note: Do not
touch the steel to
the blade.
Whizard® Special
Steel
Blade Steeling (Continued)
Steeling for Model: 360
Steel the outside edge of the blade by laying the special Whizard
outside surface of the blade. Be sure to hold the steel flat and across the centerline of the
blade to prevent “rounding off” or rolling of the edge.
Steel the inside of the blade by placing the cone shaped tip of the Whizard
on the inside edge of the blade. Do not touch the blade with the shaft of the Whizard®
special steel.
®
steel flat against the
®
special steel

Instructions for Operation
4-18
Instructions for Operation
Whizard® AirMax MACH 3 Operating Instructions and
Parts List
Manual No. 188000
September 1, 2009
Push Button
Steeling
Device
Whizard®
Special Steel
Model 880-B Whizard
®
AirMax MACH 3 Shown
Push Button
Steeling
Device
Whizard®
Special Steel
Model 1400 Whizard
®
AirMax MACH 3 Shown
Blade Steeling (Continued)
Steeling for Models: 505, 625, 850, 880, 1850, 1880, 1000, 1300, 1400 and 1500
Use the Whizard
special steel against the flat ground surface on the outside surface of
the blade. Be sure to hold the steel flat and across the centerline of the blade to prevent
"rounding off" or rolling of the edge.
The inside edge of the blade should be steeled only with the special steeling device
mounted on the inside diameter of the blade housing. This is accomplished as follows :
Hold the Whizard
special steel on the bottom edge of the blade, and the handpiece in
your normal operating hand, with the blade down, or away from you.
At the same time, lightly push down with your thumb on the push button, holding the
steeling device lightly against the blade edge for several blade rotations.

Instructions for Operation
Manual No. 188000
September 1, 2009
Instructions for Operation
Whizard® AirMax MACH 3 Operating Instructions and Parts
List
4-19
W A R N I N G
SHARP BLADES MAY CAUSE CUT INJURY!
FOR PROPER PROTECTION OF HANDS, A PROTECTIVE
GLOVE SHOULD BE USED WHEN OPERATING THIS
EQUIPMENT AND DURING THE HANDLING OF BLADES.
ALWAYS DISCONNECT THE TOOL FROM THE AIR SUPPLY
PRIOR TO SERVICING.
Left Cover
Retaining
Screw
Screwdriver
Blade Changing
The Whizard® AirMax MACH 3 Trimmers have been designed to allow the blades to be quickly
removed and reinstalled.
To Change the Blade
Loosen only the left cover retaining screw.
NOTE: Slight tension on the left cover screw will allow the blade housing to stay open.
Holding the tool blade side up, pry
open the blade housing with a
screwdriver.
Carefully remove the old blade.
Insert a new blade in the housing.

Instructions for Operation
4-20
Instructions for Operation
Whizard® AirMax MACH 3 Operating Instructions and
Parts List
Manual No. 188000
September 1, 2009
Left Cover
Retaining
Screw
Screwdriver
Left Cover
Retaining
Screw
Pivot Support
Point
Housing
Slot
Screwdriver
Blade Changing (Continued)
Loosen the left cover retaining screw to allow the housing to close.
Tighten the right cover retaining screw.
With left cover retaining screw ½ turn loose, adjust housing for proper fit.
Gently pry the housing open until the blade rotates freely and has enough clearance to
allow the blade to move forward and backward in the housing. Only a slight amount of
movement is necessary.
Tighten the cover retaining screws to the recommended torque.
NOTE: Recommended torque of 30-40 lb-in (3.4-4.5 N-m).
IMPORTANT: Be sure that the blade is free to move in the housing. If the blade does
not move freely, it may cause the trimmer to overheat.

Maintenance
Manual No. 188000
September 1, 2009
Maintenance
Whizard® AirMax MACH 3 Operating Instructions and Parts
List
5-1
Section 5
Maintenance
Maintenance Schedule ........................................................................................................... 5-3
General Maintenance ............................................................................................................. 5-3
Handpiece Maintenance ......................................................................................................... 5-3
Required Tools for Handpiece Maintenance ...................................................................... 5-3
Disassembly of Handpiece ................................................................................................. 5-4
Inspection and Maintenance of Handpiece ...................................................................... 5-10
Blade Sharpening ............................................................................................................. 5-13
Assembly of Handpiece .................................................................................................... 5-15
TRIMVAC® AMX Handpiece Maintenance ............................................................................5-21
Required Tools for Handpiece Maintenance .................................................................... 5-21
CONTENTS OF THIS SECTION
Disassembly of TRIMVAC® AMX Handpiece ................................................................... 5-22
Inspection and Maintenance of TRIMVAC® AMX Handpiece ........................................... 5-29
Blade Sharpening of TRIMVAC® AMX Handpiece ........................................................... 5-31
Assembly of TRIMVAC® AMX Handpiece ........................................................................ 5-33
Power Unit Maintenance .......................................................................................................5-44
Required Tools for Power Unit Maintenance .................................................................... 5-44
Disassembly of Power Unit .............................................................................................. 5-44
Inspection and Maintenance of Power Unit ...................................................................... 5-47
Assembly of Power Unit ................................................................................................... 5-51
Seal Plate Maintenance .........................................................................................................5-55
Required Tools for Seal Plate Maintenance ..................................................................... 5-55
Replace Seal .................................................................................................................... 5-55

Maintenance
5-2
Maintenance
Whizard® AirMax MACH 3 Operating Instructions and
Parts List
Manual No. 188000
September 1, 2009
Contents of this section (Continued)
Air Motor Maintenance .......................................................................................................... 5-56
Required Tools for Air Motor Maintenance ....................................................................... 5-56
Disassembly of Air Motor .................................................................................................. 5-57
Inspection and Maintenance of Air Motor ......................................................................... 5-60
Assembly of Air Motor ...................................................................................................... 5-62
Valve and Hose Assembly Maintenance .............................................................................. 5-65
Required Tools for Valve and Hose Assembly Maintenance ............................................ 5-65
Inspection of Valve and Hose Assembly .......................................................................... 5-65
Disassembly of Valve and Hose ....................................................................................... 5-66
Assembly of Valve and Hose ............................................................................................ 5-67
Quick Start Valve and Hose Assembly Maintenance ............................................................ 5-68
Required Tools for Quick Start Valve and Hose Assembly Maintenance ......................... 5-68
Inspection of Valve and Hose Assembly .......................................................................... 5-68
Disassembly of Quick Start Valve and Hose .................................................................... 5-69
Assembly of Quick Start Valve and Hose ......................................................................... 5-70
Fault Detection and Correction ............................................................................................. 5-71

Maintenance
Manual No. 188000
September 1, 2009
Maintenance
Whizard® AirMax MACH 3 Operating Instructions and Parts
List
5-3
Description
Maintenance Schedule
Handpiece
Daily
Power Unit
After Every 80 Hours of Use
Hose Assembly
As Required
W A R N I N G
SHARP BLADES MAY CAUSE INJURY!
FOR PROPER PROTECTION OF HANDS, A PROTECTIVE
GLOVE SHOULD BE USED WHEN OPERATING THIS
EQUIPMENT AND DURING THE HANDLING OF BLADES.
ALWAYS DISCONNECT AIR SUPPLY AND REMOVE TOOL
FROM HOSE ASSEMBLY PRIOR TO SERVICING.
Maintenance Schedule
General Maintenance
Drain filter bowls daily.
Inspect filter for damage and dirt build-up. Replace when necessary.
Fill lubricator (oiler) daily or more often if needed.
Verify oiler is set to deliver 3 drops of oil per minute.
Verify air pressure is set at 90-100 psi. Do not exceed 100 psi!
Handpiece Maintenance
The Whizard® AirMax MACH 3 Trimmer was designed to allow quick and easy removal of the
handpiece from the hose assembly. This allows the trimmer to be removed from the hose
assembly while still on the production line. The hose assembly can be left hanging on the
production line and the handpiece can be returned to the knife room for service. It is
recommended that this procedure be followed. The removal of the 10 feet (3.05 m) of hose will
allow easier service, storage, and handling by knife room personnel.
Required Tools for Handpiece Maintenance
1 – Flat head screwdriver
1 – Hex Wrench (supplied with the Whizard
®
AirMax MACH 3 Trimmer)

Maintenance
5-4
Maintenance
Whizard® AirMax MACH 3 Operating Instructions and
Parts List
Manual No. 188000
September 1, 2009
Lever
Grease Cup
Knob
Assembly
Handpiece
Cap
Handpiece
Disassembly of Handpiece
Step 1: Remove Handpiece from Hose Assembly:
While holding the handpiece, grip the knob assembly with the opposite hand.
Rotate the knob assembly 90° and pull the hose assembly from the handpiece.
NOTE: The lever will rotate toward the grease cup for right-handed models,
and away from the grease cup for left-handed models.
Place the cap over the end of the handpiece to protect the handle and protect the motor
from water damage.

Maintenance
Manual No. 188000
September 1, 2009
Maintenance
Whizard® AirMax MACH 3 Operating Instructions and Parts
List
5-5
Depth Gauge
Attachment Screws
Depth Gauge
Disassembly of Handpiece (Continued)
Step 2: Removal/Disassembly of the Depth Gauge from the Cover:
Loosen, but do not remove, the depth gauge attachment screw(s) located inside the depth
gauge.
Slide the depth gauge upward until the depth gauge clamp(s) slide out of the cover plate
grooves.

Maintenance
5-6
Maintenance
Whizard® AirMax MACH 3 Operating Instructions and
Parts List
Manual No. 188000
September 1, 2009
Left Cover
Retaining
Screw
Screwdriver
Left Cover
Retaining
Screw
Pivot Support
Point
Housing
Slot
Screwdriver
Disassembly of Handpiece (Continued)
Step 3: Remove Blade:
Hold the tool with
the blade side up.
Loosen only the left
cover retaining screw.
NOTE: A slight tension on the left
cover screw will allow the blade
housing to stay open on its own.
Insert a screwdriver into the housing
slot.
Using the frame as the support point,
spread
open the housing, just far enough to
remove the blade.
Carefully remove the blade.

Maintenance
Manual No. 188000
September 1, 2009
Maintenance
Whizard® AirMax MACH 3 Operating Instructions and Parts
List
5-7
Cover
Pinion
Frame
Cover Retaining
Screws (2)
Blade Housing
Disassembly of Handpiece (Continued)
Step 4: Remove Cover and Blade Housing:
Loosen the cover retaining screws until the cover can be removed.
Remove the blade housing and cover.
Step 5: Remove Pinion:
Pull the pinion out of the frame.

Maintenance
5-8
Maintenance
Whizard® AirMax MACH 3 Operating Instructions and
Parts List
Manual No. 188000
September 1, 2009
Drive
Adapter
Frame
Bearing
Frame
Disassembly of Handpiece (Continued)
Step 6: Remove Bearing:
Pull the bearing out of the frame.
Step 7: Remove Drive Adapter:
Pull the drive adapter out of the frame.

Maintenance
Manual No. 188000
September 1, 2009
Maintenance
Whizard® AirMax MACH 3 Operating Instructions and Parts
List
5-9
Power Unit
Frame
Hex Wrench
Attachment
Screw
Disassembly of Handpiece (Continued)
Step 8: Remove Frame from Power Unit:
Remove attachment screw from inside the frame using the supplied hex wrench.
Remove the frame from the power unit.

Maintenance
5-10
Maintenance
Whizard® AirMax MACH 3 Operating Instructions and
Parts List
Manual No. 188000
September 1, 2009
W A R N I N G
SHARP BLADES MAY CAUSE CUT INJURY!
ALWAYS DISCONNECT THE AIR SUPPLY PRIOR TO
SERVICING.
FOR PROPER PROTECTION OF HANDS, A PROTECTIVE
GLOVE SHOULD BE USED WHEN OPERATING THIS
EQUIPMENT AND DURING THE HANDLING OF BLADES.
Gap –
Housing is Acceptable
No Gap –
Replace Housing
Inspection and Maintenance of Handpiece
Blade
Inspect the cutting edge height with a Whizard
®
blade gauge.
Check for worn or chipped teeth.
Check for damage to the cutting edge.
Blade Housing
Inspect inner diameter of the housing for wear.
Look for evidence of the blade rubbing the outer wall of the housing.
When holding the housing with a new blade installed, if the split in the housing touches
the other side, and the blade is still loose, the housing needs to be replaced. If a gap is
seen, the housing is acceptable.

Maintenance
Manual No. 188000
September 1, 2009
Maintenance
Whizard® AirMax MACH 3 Operating Instructions and Parts
List
5-11
Inspection and Maintenance of Handpiece (Continued)
Pinion Gear
Check for worn or chipped teeth. Worn out teeth are indicated by rounded off or pointed
tops on the teeth.
Bearing
Install a new pinion and move the pinion side to side.
If the pinion feels loose in the bearing, the bearing should be replaced.
The bearing should be replaced after 500 hours of use.
Cover Plate
Look for signs of corrosion or wear on the cover.
Pay special attention to the area covering the gear teeth.
If the edge of the cover is worn, exposing the pinion and blade teeth, the cover should be
replaced.
Look for signs of wear on the pinion cover surface. If excessive wear signs are present,
check the seal on the power unit for leakage.
Frame
Inspect the frame surface where the housing is attached.
Look for corrosion and any nicks or burrs that may prevent proper housing seating.
Inspect the housing locating key for damage.
Inspect the cover retaining screws and replace if bent or damaged.
Steeling Device
Inspect the surface condition of the carbide steel. If chipped or cracked, it should be
replaced.
The plunger and steel should be cleaned and oiled with mineral oil in order to keep free
movement and prevent build-up of dirt.
Depth Gauge and Depth Gauge Clamps
Inspect the depth gauge for wear or damage.
If the depth gauge clamps are bent, replace the depth gauge.

Maintenance
5-12
Maintenance
Whizard® AirMax MACH 3 Operating Instructions and
Parts List
Manual No. 188000
September 1, 2009
Inspection and Maintenance of Handpiece (Continued)
Drive Adapter Assembly
Inspect the drive adapter assembly for the following. Replace the drive adapter assembly
if damaged.
Inspect the square end of the driver for rounded corners.
Inspect the retaining ring for damage.
If retaining ring has moved out of the groove or is missing, replace drive adapter
assembly.

Maintenance
Manual No. 188000
September 1, 2009
Maintenance
Whizard® AirMax MACH 3 Operating Instructions and Parts
List
5-13
W A R N I N G
SHARP BLADES MAY CAUSE INJURY!
FOR PROPER PROTECTION OF HANDS, A PROTECTIVE
GLOVE SHOULD BE USED WHEN OPERATING THIS
EQUIPMENT AND DURING THE HANDLING OF BLADES.
W A R N I N G
AFTER SHARPENING, ALL ABRASIVE DUST MUST BE
COMPLETELY REMOVED FROM THE HANDPIECE.
DISASSEMBLE THE UNIT AND CAREFULLY WASH EACH
PIECE WITH HOT, SOAPY WATER AND A SMALL BRUSH.
Blade Sharpening
The blade should be sharpened daily with the use of a Whizard
Blade Sharpener, a Whizard Model 214 Blade Sharpener, a Bettcher® AutoEdge, or by
hand stoning.
Clean all grease and meat particles from the blade before sharpening. Sharpening blades
that have not been cleaned will coat the stone or grinding wheel and greatly reduce its
effectiveness.
If the stone or grinding wheel becomes coated, gently scrub them clean using hot,
soapy water.
®
Model 210 Universal

Maintenance
5-14
Maintenance
Whizard® AirMax MACH 3 Operating Instructions and
Parts List
Manual No. 188000
September 1, 2009
W A R N I N G
SHARP BLADES MAY CAUSE INJURY!
FOR PROPER PROTECTION OF HANDS, A PROTECTIVE
GLOVE SHOULD BE USED.
Stone
Blade Sharpening (Continued)
Hand Stoning
With the motor running, apply the flat side of the stone to the flat part of the blade.
Move the stone, using a “back and forth” motion.
Use the Special Whizard
®
Steel to finish sharpening. (See Blade Steeling in Section 4)

Maintenance
Manual No. 188000
September 1, 2009
Maintenance
Whizard® AirMax MACH 3 Operating Instructions and Parts
List
5-15
Thumb
Support
Tab
Frame
Notches
Spacer Ring
Small End
Frame
Assembly of Handpiece
Prior to assembly, be sure all parts are clean and have been inspected for wear per Section 5.
Step 1: Attach Head to Power Unit
Select the spacer ring or optional
thumb support.
If a spacer ring is used: Slide the
spacer ring onto the frame, small end
first.
If an optional thumb support is used:
The thumb support should be positioned on the opposite side of the grease cup.
Align the thumb
support tab with a notch
on the underside of the
frame and slide the
thumb support onto the
frame.
The frame is designed
with multiple
notches to allow
the thumb support
to be adjusted to the
most comfortable
position for the
operator.

Maintenance
5-16
Maintenance
Whizard® AirMax MACH 3 Operating Instructions and
Parts List
Manual No. 188000
September 1, 2009
Pin
Short
Groove
Notches
Frame
Power
Unit
Hex Wrench
Frame
Attachment
Screw
Assembly of Handpiece (Continued)
While holding the
Whizard® AirMax
MACH 3 frame, align
the pin in the power
unit with one of the
notches on the frame.
The frame is designed
with multiple notches
to allow the head to be
adjusted to the most
comfortable position
for the operator.
For the initial
adjustment position, the
short groove on the
power unit should be facing up. *See illustration at right.
Insert the attachment screw in
the frame.
Tighten the attachment screw
FIRMLY, using the supplied
hex wrench.
NOTE: Recommended torque of
115-140 lb-in (13-16 N-m)

Maintenance
Manual No. 188000
September 1, 2009
Maintenance
Whizard® AirMax MACH 3 Operating Instructions and Parts
List
5-17
Drive Adapter
Retaining Ring
Bearing
Bearing Flat
Frame Flat
Frame
Assembly of Handpiece (Continued)
Step 2: Install Drive Adapter
Insert drive adapter and align the square
end with the square hole in the power
unit.
Drive adapter should drop in with no
pressing force required.
The retaining ring will sit flush against
the attachment screw when properly
aligned.
Step 3: Install Bearing
Push handpiece bearing into the
frame bore and align the bearing flat
with the frame flat.
The bearing should go in with
minimal effort and not require
pressing.
Do not force the bearing in. If the
bearing does not go in easily, check
frame and bearing for damage or
build-up.

Maintenance
5-18
Maintenance
Whizard® AirMax MACH 3 Operating Instructions and
Parts List
Manual No. 188000
September 1, 2009
Pinion
Bearing
Cover
Plate
Cover
Retaining
Screw (2)
Frame
Blade Housing
Assembly of Handpiece (Continued)
Step 4: Install Pinion
Insert the pinion into the bearing bore.
The pinion should go in with minimal
effort and not require pressing.
Do not force the pinion into the
bearing. If the pinion does not go in
easily, check bearing and pinion for
damage or build-up.
The pinion should sit flush against the
bearing. If it does not, rotate the
pinion to seat it flush with the bearing.
Step 5: Install Cover and Blade Housing
Set the blade housing on the frame
and place the cover plate over the
blade housing.
While holding the cover plate firmly
against the housing and frame, start
the two cover mounting screws.
Thread the cover retaining screws in,
leaving a slight tension to allow for
blade adjustment.

Maintenance
Manual No. 188000
September 1, 2009
Maintenance
Whizard® AirMax MACH 3 Operating Instructions and Parts
List
5-19
Left Cover
Retaining
Screw
Screwdriver
Left Cover
Retaining
Screw
Pivot Support
Point
Housing
Slot
Screwdriver
Assembly of Handpiece (Continued)
Step 6: Install Blade
Holding the tool blade side up, pry
open the blade housing with a
screwdriver.
Insert a new blade into the housing.
Loosen the left cover retaining screw to
allow the housing to close.
Tighten the right cover retaining screw.
With left cover retaining screw ½ turn
loose, adjust housing for proper fit.
Gently pry the housing open until the
blade rotates freely and has enough
clearance to allow the blade to move
forward and backward in the housing.
Only a slight amount of movement is
necessary.
NOTE: Recommended torque of 30-40 lbin (3.4-4.5 N-m).
IMPORTANT: Be sure that the blade is
free to move in the housing. If the blade
does not move freely, it may cause the
trimmer to overheat.
Tighten the cover retaining screws to
the recommended torque.

Maintenance
5-20
Maintenance
Whizard® AirMax MACH 3 Operating Instructions and
Parts List
Manual No. 188000
September 1, 2009
Model Shown is
880-B
Depth Gauge Assembly
Depth Gauge
Mounting
Screws
Cover
Assembly of Handpiece (Continued)
Step 7: Install Depth Gauge (Optional)
Loosen depth gauge mounting screw(s).
Slide depth gauge onto the cover.
Adjust the depth gauge to the desired height.
(See Depth Gauge Adjustment for more information)
Tighten the depth gauge mounting screw(s).

Maintenance
Manual No. 188000
September 1, 2009
Maintenance
Whizard® AirMax MACH 3 Operating Instructions and Parts
List
5-21
W A R N I N G
SHARP BLADES MAY CAUSE INJURY!
FOR PROPER PROTECTION OF HANDS, A PROTECTIVE
GLOVE SHOULD BE USED WHEN OPERATING THIS
EQUIPMENT AND DURING THE HANDLING OF BLADES.
ALWAYS DISCONNECT AIR SUPPLY AND REMOVE TOOL
FROM HOSE ASSEMBLY PRIOR TO SERVICING.
TRIMVAC® AMX Handpiece Maintenance
Required Tools for Handpiece Maintenance
1 – Flat head screwdriver
1 – 3/32” hex wrench (supplied with the TRIMVAC® AMX Trimmer)
1 – 9/64” hex wrench (supplied with the TRIMVAC® AMX Trimmer)
1 – 3/8” hex wrench (supplied with the TRIMVAC® AMX Trimmer)

Maintenance
5-22
Maintenance
Whizard® AirMax MACH 3 Operating Instructions and
Parts List
Manual No. 188000
September 1, 2009
Disassembly of TRIMVAC® AMX Handpiece
Step 1: Remove Blade from Handpiece:
TRIMVAC® 18AMX:
Hold the tool with the blade side up.
Loosen only the left cover retaining screw, using the
supplied 3/32” hex wrench.
Insert a screwdriver into the housing slot.
Using the frame support point, spread open the
housing, just far enough to remove the blade.
Carefully remove the blade.

Maintenance
Manual No. 188000
September 1, 2009
Maintenance
Whizard® AirMax MACH 3 Operating Instructions and Parts
List
5-23
Disassembly of TRIMVAC® AMX Handpiece (Continued)
TRIMVAC® 45AMX:
Hold the tool with the blade side up.
Loosen only the left cover retaining screw.
Insert a screwdriver into the housing slot.
Using the frame support point, spread open the
housing, just far enough to remove the blade.
Carefully remove the blade.

Maintenance
5-24
Maintenance
Whizard® AirMax MACH 3 Operating Instructions and
Parts List
Manual No. 188000
September 1, 2009
Disassembly of TRIMVAC® AMX Handpiece (Continued)
Step 2: Remove Vacuum Hose:
Slide the Whizard
®
AirMax MACH 3 hose out of the
clips on the vacuum hose.
Repeat for each clip.
Loosen the screw on the hose clamp.
Slide the vacuum hose off of the hose adapter.
Slide the hose out of the vacuum hose bracket.

Maintenance
Manual No. 188000
September 1, 2009
Maintenance
Whizard® AirMax MACH 3 Operating Instructions and Parts
List
5-25
Disassembly of TRIMVAC® AMX Handpiece (Continued)
Step 3: Remove Handpiece from Hose Assembly:
While holding the handpiece grip the knob
assembly with the other hand.
Rotate the knob assembly 90º and pull the hose
assembly from the handpiece.
Step 4: Remove Hose Adapter, Cover, and Blade Housing:
TRIMVAC® 18AMX:
Loosen the cover retaining screws until the hose
adapter, cover, and blade housing can be removed.
Remover the hose adapter, cover and blade housing

Maintenance
5-26
Maintenance
Whizard® AirMax MACH 3 Operating Instructions and
Parts List
Manual No. 188000
September 1, 2009
Disassembly of TRIMVAC® AMX Handpiece (Continued)
Step 4: Remove Hose Adapter, Cover, and Blade Housing (Continued):
Separate the parts.
TRIMVAC® 45AMX:
Loosen the cover retaining screws until the hose
adapter, cover and blade housing can be removed.
Remove the hose adapter, cover and blade housing
Separate the parts.

Maintenance
Manual No. 188000
September 1, 2009
Maintenance
Whizard® AirMax MACH 3 Operating Instructions and Parts
List
5-27
Disassembly of TRIMVAC® AMX Handpiece (Continued)
Step 5: Remove Pinion:
Pull the pinion out of the bearing.
Step 6: Remove Bearing:
Pull the bearing out of the frame.
Step 7: Remove Drive Adapter:
Pull the drive adapter out of the frame.

Maintenance
5-28
Maintenance
Whizard® AirMax MACH 3 Operating Instructions and
Parts List
Manual No. 188000
September 1, 2009
Disassembly of TRIMVAC® AMX Handpiece (Continued)
Step 8: Remove Vacuum Hose Bracket:
Loosen the hose bracket screws.
Slide the hose bracket off of the power unit.
Step 9: Remove Frame from Power Unit:
Remove the attachment screws from inside the frame using the supplied hex wrench.
Remove the frame from the power unit.

Maintenance
Manual No. 188000
September 1, 2009
Maintenance
Whizard® AirMax MACH 3 Operating Instructions and Parts
List
5-29
W A R N I N G
SHARP BLADES MAY CAUSE CUT INJURY!
ALWAYS DISCONNECT THE AIR SUPPLY PRIOR TO
SERVICING.
FOR PROPER PROTECTION OF HANDS, A PROTECTIVE
GLOVE SHOULD BE USED WHEN OPERATING THIS
EQUIPMENT AND DURING THE HANDLING OF BLADES.
Gap –
Housing is Acceptable
No Gap –
Replace Housing
Inspection and Maintenance of TRIMVAC® AMX Handpiece
Blade
Inspect the cutting edge height with a Bettcher blade gauge.
Check for worn or chipped teeth.
Check for damage to the cutting edge.
Blade Housing
Inspect inner diameter of the housing for wear.
Look for evidence of the blade rubbing the outer wall of the housing.
When holding the housing with a new blade installed, if the split in the housing touches
the other side, and the blade is still loose, the housing needs to be replaced. If a gap is
seen, the housing is acceptable.

Maintenance
5-30
Maintenance
Whizard® AirMax MACH 3 Operating Instructions and
Parts List
Manual No. 188000
September 1, 2009
Inspection and Maintenance of TRIMVAC® AMX Handpiece
(Continued)
Pinion Gear
Check for worn or chipped teeth. Worn out teeth are indicated by rounded off or pointed
tops on the teeth.
Bearing
Install a new pinion and move the pinion side to side.
If the pinion feels loose in the bearing, the bearing should be replaced.
The bearing should be replaced after 500 hours of use, or if it is worn, whichever comes
first.
Cover Plate
Look for signs of corrosion or wear on the cover.
Pay special attention to the area covering the gear teeth.
If the edge of the cover is worn, exposing the pinion and blade teeth, the cover should be
replaced.
Look for signs of wear on the pinion cover surface. If excessive wear signs are present,
check the seal on the power unit for leakage.
Hose Adapter
Inspect the hose adapter for chips or cracks and replace if damaged.
Frame
Inspect the frame surface where the housing is attached.
Look for corrosion and any nicks or burrs that may prevent proper seating of the housing.
Inspect the housing locating key for damage.
Inspect the cover retaining screws and replace if bent or damaged.
Drive Adapter Assembly
Inspect the drive adapter assembly for the following. Replace the drive adapter assembly
if damaged.
Inspect the square end of the driver for rounded corners.
Inspect the retaining ring for damage.
Press the retaining ring back into the groove if the retaining ring has moved.

Maintenance
Manual No. 188000
September 1, 2009
Maintenance
Whizard® AirMax MACH 3 Operating Instructions and Parts
List
5-31
W A R N I N G
SHARP BLADES MAY CAUSE INJURY!
FOR PROPER PROTECTION OF HANDS, A PROTECTIVE
GLOVE SHOULD BE USED WHEN OPERATING THIS
EQUIPMENT AND DURING THE HANDLING OF BLADES.
W A R N I N G
AFTER SHARPENING, ALL ABRASIVE DUST MUST BE
COMPLETELY REMOVED FROM THE HANDPIECE.
DISASSEMBLE THE UNIT AND CAREFULLY WASH EACH
PIECE WITH HOT, SOAPY WATER AND A SMALL BRUSH.
Blade Sharpening of TRIMVAC® AMX Handpiece
The blade should be sharpened daily with the use of a Whizard
Blade Sharpener, a Whizard® Model 214 Blade Sharpener, Bettcher® AutoEdge, or by
hand stoning.
Clean all grease and meat particles from the blade before sharpening. Sharpening blades
that have not been cleaned will contaminate the stone or grinding wheel and greatly
reduce its effectiveness.
If the stone or grinding wheel becomes contaminated, gently scrub them clean
using hot, soapy water.
®
Model 210 Universal

Maintenance
5-32
Maintenance
Whizard® AirMax MACH 3 Operating Instructions and
Parts List
Manual No. 188000
September 1, 2009
Blade Sharpening of TRIMVAC® AMX Handpiece (Continued)
TRIMVAC® Sharpening
With the trimmer running, insert the blade into the TRIMVAC
®
Sharpener. The plastic
cap on the top of the sharpener will guide the handpiece into the sharpener.
Press the blade lightly onto the sharpening and steeling rods for a few seconds.

Maintenance
Manual No. 188000
September 1, 2009
Maintenance
Whizard® AirMax MACH 3 Operating Instructions and Parts
List
5-33
Assembly of TRIMVAC® AMX Handpiece
Prior to assembly, be certain all parts are clean and have been inspected for wear per Section 5.
Step 1: Attach Frame to Power Unit:
Slide the spacer ring onto the frame, small end
first.
While holding the Whizard
frame, align the pin in the power unit with one of
the notches on the frame.
®
AirMax MACH 3
The frame is designed with multiple notches to
allow the head to be adjusted to the most
comfortable position for the operator
For the initial adjustment position, the short
groove on the power unit should be facing up.
Insert the attachment screw in the frame.
Tighten the attachment screw firmly, using
the supplied hex wrench.
NOTE: Recommended torque of 115-140 lb-in (13-16 N-m).
Step 2: Install Drive Adapter:
Insert the drive adapter and align the square end
with the square hole in the power unit.
The drive adapter should drop in with no pressing
force required.
The retaining ring will sit flush against the
attachment screws when properly inserted.

Maintenance
5-34
Maintenance
Whizard® AirMax MACH 3 Operating Instructions and
Parts List
Manual No. 188000
September 1, 2009
Align Flats
Assembly of TRIMVAC® AMX Handpiece (Continued)
Step 3: Install Bearing:
Push the handpiece bearing into the frame bore and align the bearing flat with the frame
flat.
The bearing should go in with minimal effort and not require pressing.
Do not force the bearing in. If the bearing does not go in easily, check frame and bearing
for damage or build-up.
Step 4: Install Pinion:
Insert the pinion into the bearing bore.
The pinion should go in with minimal effort and
not require pressing.
Do not force the pinion into the bearing. If the
pinion does not go in easily, check the bearing
and pinion for damage or build-up.
The pinion should sit flush against the bearing.
If it does not, rotate the pinion to seat it flush
with the bearing.

Maintenance
Manual No. 188000
September 1, 2009
Maintenance
Whizard® AirMax MACH 3 Operating Instructions and Parts
List
5-35
TRIMVAC® 18AMX
TRIMVAC® 45AMX
Assembly of TRIMVAC® AMX Handpiece (Continued)
Step 5: Install Hose Adapter onto Housing:
Slide the hose adapter into the housing.

Maintenance
5-36
Maintenance
Whizard® AirMax MACH 3 Operating Instructions and
Parts List
Manual No. 188000
September 1, 2009
Assembly of TRIMVAC® AMX Handpiece (Continued)
Step 6: Attach Housing to Frame:
TRIMVAC® 18AMX:
Set the blade housing with the hose adapter installed on the frame.
Insert the cover plate into the housing. Align the holes in the cover plate with the holes
in the frame.
Insert the cover retaining screws. Thread the cover retaining screws in, leaving a slight
tension to allow for blade adjustment.

Maintenance
Manual No. 188000
September 1, 2009
Maintenance
Whizard® AirMax MACH 3 Operating Instructions and Parts
List
5-37
Assembly of TRIMVAC® AMX Handpiece (Continued)
Step 6: Attach Housing to Frame (Continued):
TRIMVAC® 45AMX:
Insert the cover into the hose adapter and blade housing assembly.
Set the blade housing on the frame. Make sure both the housing and cover are seated
properly.
While holding the cover plate firmly against the housing and frame, start the two cover
retaining screws.
Thread the cover retaining screws in, leaving a slight tension to allow for blade
adjustment.

Maintenance
5-38
Maintenance
Whizard® AirMax MACH 3 Operating Instructions and
Parts List
Manual No. 188000
September 1, 2009
Assembly of TRIMVAC® AMX Handpiece (Continued)
Step 7: Install Blade:
TRIMVAC® 18AMX:
Hold the tool with the blade side up.
Loosen only the left cover retaining screw using the supplied 3/32” hex wrench.
NOTE: Leave a slight tension on the left cover retaining screw so the blade housing will stay open.
Insert a screwdriver into the housing slot.
Using the frame support point, spread open the housing, just far enough to install the
blade.

Maintenance
Manual No. 188000
September 1, 2009
Maintenance
Whizard® AirMax MACH 3 Operating Instructions and Parts
List
5-39
Assembly of TRIMVAC® AMX Handpiece (Continued)
Step 7: Install Blade (Continued):
TRIMVAC® 18AMX:
Carefully insert the blade.
Loosen the left cover retaining screw so the housing will close.
NOTE: Be certain that the blade is free to move in the housing. If the blade does not move freely, it
may cause the trimmer to overheat.
Adjust the housing for proper running clearance.
When the housing is properly adjusted there will
be a slight “left to right” movement, plus a light
“up and down” movement.
If the blade does not move “left to right” and “up
and down”, pry the housing open slightly.
Retighten the cover retaining screws.
NOTE: Recommended torque of 30-40 lb-in (3.4-4.5 N-m)

Maintenance
5-40
Maintenance
Whizard® AirMax MACH 3 Operating Instructions and
Parts List
Manual No. 188000
September 1, 2009
Assembly of TRIMVAC® AMX Handpiece (Continued)
Step 7: Install Blade (Continued):
TRIMVAC® 45AMX:
Hold the tool with the blade side up.
Loosen only the left cover retaining screw.
NOTE: Leave a slight tension on the left cover retaining screw so the blade housing will stay open.
TRIMVAC® 45AMX:
Insert a screwdriver into the housing slot.
Using the frame support point, spread open the housing, just far enough to install the
blade.

Maintenance
Manual No. 188000
September 1, 2009
Maintenance
Whizard® AirMax MACH 3 Operating Instructions and Parts
List
5-41
Assembly of TRIMVAC® AMX Handpiece (Continued)
Step 7: Install Blade (Continued):
Carefully insert the blade.
Loosen the left cover retaining screw so the housing will close.
NOTE: Be certain that the blade is free to move in the housing. If the blade does not move freely, it
may cause the trimmer to overheat.
TRIMVAC® 45AMX:
Adjust the housing for proper running clearance.
If the blade is tight in the housing, adjustments can
be made by loosening the left cover retaining screw
and slightly spreading open the housing. Check for
free movement.
Retighten the cover retaining screws.
NOTE: Recommended torque of 30-40 lb-in (3.4-4.5 N-m)

Maintenance
5-42
Maintenance
Whizard® AirMax MACH 3 Operating Instructions and
Parts List
Manual No. 188000
September 1, 2009
Assembly of TRIMVAC® AMX Handpiece (Continued)
Step 8: Install Vacuum Hose Bracket:
Slide the hose bracket onto the power unit.
Align the flat on the vacuum hose bracket with the lever relief groove on the power unit.
Tighten the hose bracket screws.
Step 9: Attach Whizard® AirMax MACH 3 Hose to Power Unit:
Align the pins in the hose assembly with the
grooves on the power unit.
Slide the power unit into the hose assembly.
Rotate the power unit 90º.
The lever will rotate toward the bottom of the
tool.

Maintenance
Manual No. 188000
September 1, 2009
Maintenance
Whizard® AirMax MACH 3 Operating Instructions and Parts
List
5-43
Assembly of TRIMVAC® AMX Handpiece (Continued)
Step 10: Attach Vacuum Hose:
Slide the vacuum hose through the vacuum hose
bracket.
Slide the vacuum hose onto the hose adapter.
Tighten the hose clamp screw.
Slide the Whizard
clips on the vacuum hose.
®
AirMax MACH 3 hose into the
Repeat step for each clip.

Maintenance
5-44
Maintenance
Whizard® AirMax MACH 3 Operating Instructions and
Parts List
Manual No. 188000
September 1, 2009
Power Unit
Spanner Wrench
Retainer
Spanner Wrench
Power Unit
Cap
Power Unit Maintenance
Required Tools for Power Unit Maintenance
1 – Spanner Wrench (Supplied with your Whizard® AirMax MACH 3 Trimmer)
Disassembly of Power Unit
Step 1: Remove Cap
Remove the cap.
NOTE: Do not discard the cap.
Step 2: Unscrew Retainer
Unscrew the retainer using the supplied spanner wrench. The retainer is a left-handed
thread and must be turned to the right (clockwise) to unscrew.

Maintenance
Manual No. 188000
September 1, 2009
Maintenance
Whizard® AirMax MACH 3 Operating Instructions and Parts
List
5-45
Handle
Seal Plate
Gear Head
Disassembly of Power Unit (Continued)
STEP 3: Slide Components Out Of Handle
Slide the seal plate, gear head,
air motor, adapter plate,
muffler, and retainer out of the
handle.
The parts should slide out
easily. If the parts do not slide
out, tap the handle lightly
against a plastic block to
dislodge the parts.
STEP 4: Separate Seal Plate And Gear Head Assembly
Separate the seal plate and gear head assembly
from the air motor, adapter plate, muffler, and
retainer.

Maintenance
5-46
Maintenance
Whizard® AirMax MACH 3 Operating Instructions and
Parts List
Manual No. 188000
September 1, 2009
Air Motor
Retainer
Muffler
Adapter
Plate
Seal Plate
Gear Head
Screwdriver
Disassembly of Power Unit (Continued)
Step 5: Remove Seal Plate
Remove the seal plate from the top of the gear head.
Insert a screwdriver between the seal plate and ring gear and twist to remove the seal
plate.
Step 6: Separate Remaining Components
Separate air motor, adapter plate, muffler, and retainer.

Maintenance
Manual No. 188000
September 1, 2009
Maintenance
Whizard® AirMax MACH 3 Operating Instructions and Parts
List
5-47
Grip
Groove (2)
Inspection and Maintenance of Power Unit
Inspection and maintenance should be performed after every 80 hours of use.
Handle
Clean the handle with warm soapy water and a soft brush. Remove any build up from the
grooves. Rinse the handle and dry thoroughly.
Inspect the handle for the following and replace if damage is detected.
Inspect the handle grip for tears, cuts, or wear.
Inspect the handle grooves for nicks or wear.
Inspect the handle I.D. for dents.

Maintenance
5-48
Maintenance
Whizard® AirMax MACH 3 Operating Instructions and
Parts List
Manual No. 188000
September 1, 2009
Seal Plate
Seal
Shaft
Grease Holes
(on both sides)
Inspection and Maintenance of Power Unit (Continued)
Seal Plate
Inspect the seal plate I.D. and O.D. for nicks, dents or wear. Replace the seal plate if damaged.
(See Seal Plate Maintenance).
Inspect the seal I.D. for nicks, cuts or cracks. Replace the seal if damaged. (See Seal Plate
Maintenance).
Gear Head
Inspect the gear head, by rotating the shaft.
If the shaft does not rotate, replace the gear head.
If you feel a rough or gritty resistance while rotating the shaft, replace the gear head.
Re-grease gear head with Max-Z-Lube grease every 80 hours of use.
Squeeze grease in through the rotor shaft hole in the bottom of the gear head.
Continue to supply grease until clean grease comes out of the grease holes in the ring
gear.
This method will thoroughly re-grease gear head and clean out debris trapped in the gear
NOTE: Use only Max-Z-Lube high performance lubricant.
head.

Maintenance
Manual No. 188000
September 1, 2009
Maintenance
Whizard® AirMax MACH 3 Operating Instructions and Parts
List
5-49
Exhaust
Ports
Shaft
Guide
Pin
Vane (5)
Inlet
Port
Gear Teeth
Upper Bearing
Plate
Inspection and Maintenance of Power Unit (Continued)
Air Motor
Clean all build-up out of the inlet and exhaust ports.
Inspect the air motor for the following and replace or repair the air motor if damage is detected.
(See Air Motor Maintenance Section to repair the air motor).
Check for worn or chipped teeth. Worn out teeth are indicated by rounded off or pointed
tops on the teeth.
Look for cracked or broken gear teeth.
Inspect the upper bearing plate I.D. and O.D. for nicks, dents, or wear.
Inspect the vanes for chipped or broken tips by looking through the exhaust ports and
rotating the shaft to see all five vanes.
Inspect the guide pin to verify it is not bent.
The shaft should rotate freely.
Lubricate the air motor with mineral oil through the exhaust ports.

Maintenance
5-50
Maintenance
Whizard® AirMax MACH 3 Operating Instructions and
Parts List
Manual No. 188000
September 1, 2009
Adapter
Plate
O-Ring
Note:
Do not clean the muffler
while it is installed in the
power unit.
Inspection and Maintenance of Power Unit (Continued)
Adapter Plate
Inspect the adapter plate for cracks or chips. Replace the adapter plate if damaged.
Inspect o-ring for nicks, cuts or tears. Replace the o-ring if damaged.
Muffler
Inspect the muffler for broken or protruding wires. Replace the muffler if damaged.
Muffler may be cleaned with parts cleaner to remove build-up. Replace muffler if
excessive build up prevents proper cleaning.
Retainer
Inspect the retainer for cracks or chips. Replace the retainer if damaged.
Inspect the retainer threads for damage. Replace the retainer if damaged.

Maintenance
Manual No. 188000
September 1, 2009
Maintenance
Whizard® AirMax MACH 3 Operating Instructions and Parts
List
5-51
Gear Head
Air
Motor
Align
NotchesUpper Bearing Plate
Shaft
Lubricate
Seal I.D.
Gear Head
Assembly of Power Unit
Step 1: Install Seal Plate
Apply a small amount of
Max-Z-Lube to the seal I.D.
NOTE: Use only Max-Z-Lube
high performance lubricant.
Slide the seal plate over the
gear head shaft and onto the
gear head bearing.
Step 2: Align Gear Head And Air Motor
Slide the gear head over the rotor shaft.
Align the top notches on the gear head and upper bearing plate.
Seat gear head in top plate.

Maintenance
5-52
Maintenance
Whizard® AirMax MACH 3 Operating Instructions and
Parts List
Manual No. 188000
September 1, 2009
Air
Motor
Adpater
Plate
Pin
Exhaust Notches
Components
Handle
Assembly of Power Unit (Continued)
Step 3: Align Adapter Plate
Slide the adapter plate over the pin in the
air motor.
Align the exhaust notches on the adapter
plate and the air motor.
Step 4: Slide Components Into Handle
Slide components up into the handle.
Be careful not to let the components
separate and become misaligned.
While holding the components in place,
turn the handle over.

Maintenance
Manual No. 188000
September 1, 2009
Maintenance
Whizard® AirMax MACH 3 Operating Instructions and Parts
List
5-53
Muffler
Muffler
Installed
Retainer
Spanner
Wrench
Assembly of Power Unit (Continued)
Step 5: Install Muffler
Slide the muffler into the power unit.
Step 6: Install Retainer
Screw the retainer firmly into the power unit, using the supplied spanner wrench. The
retainer is a left-hand thread, and must be turned to the left (counter clockwise), to
tighten.
NOTE: Recommended torque of 25-30 lb-in (2.8-3.4 N-m)
IMPORTANT: Be careful not to cross thread the retainer.
This will cause poor motor performance.

Maintenance
5-54
Maintenance
Whizard® AirMax MACH 3 Operating Instructions and
Parts List
Manual No. 188000
September 1, 2009
Grease Inside of Handle
Grease Inside ofAdapter Plate
Cap
Assembly of Power Unit (Continued)
Step 7: Grease Power Unit
Grease the inside of the handle and the inside of the adapter plate with Max-Z-Lube.
Step 8: Install Cap
Slide the cap over the end of the power unit.

Maintenance
Manual No. 188000
September 1, 2009
Maintenance
Whizard® AirMax MACH 3 Operating Instructions and Parts
List
5-55
Seal Plate
Seal
Screwdriver
Lip
Seal
Lubricate I.D.
Seal
Seal
Seal Plate
Seal Plate Maintenance
Required Tools for Seal Plate Maintenance
1 – Small flat head screwdriver
Replace Seal
Step 1: Remove Seal
Use a small flat head screwdriver to pry the seal out of the seal plate.
Step 2: Install Seal
Apply a small amount of Max-Z-Lube to ID of the seal plate.
NOTE: Use only Max-Z-Lube high performance lubricant.
Press the seal into the seal plate. The lip of the seal should curl into the seal plate.

Maintenance
5-56
Maintenance
Whizard® AirMax MACH 3 Operating Instructions and
Parts List
Manual No. 188000
September 1, 2009
Cup Assembly
Air Motor Assembly Tool
Rotor
Removal
Punch
Gear Teeth
Cap
Bearing Tool
Upper Bearing
Plate Removal
Clamps
Air Motor Maintenance
Required Tools for Air Motor Maintenance
1 – Hammer
1 – Whizard® AirMax MACH 3 Maintenance Kit
 Loading...