

Page 1
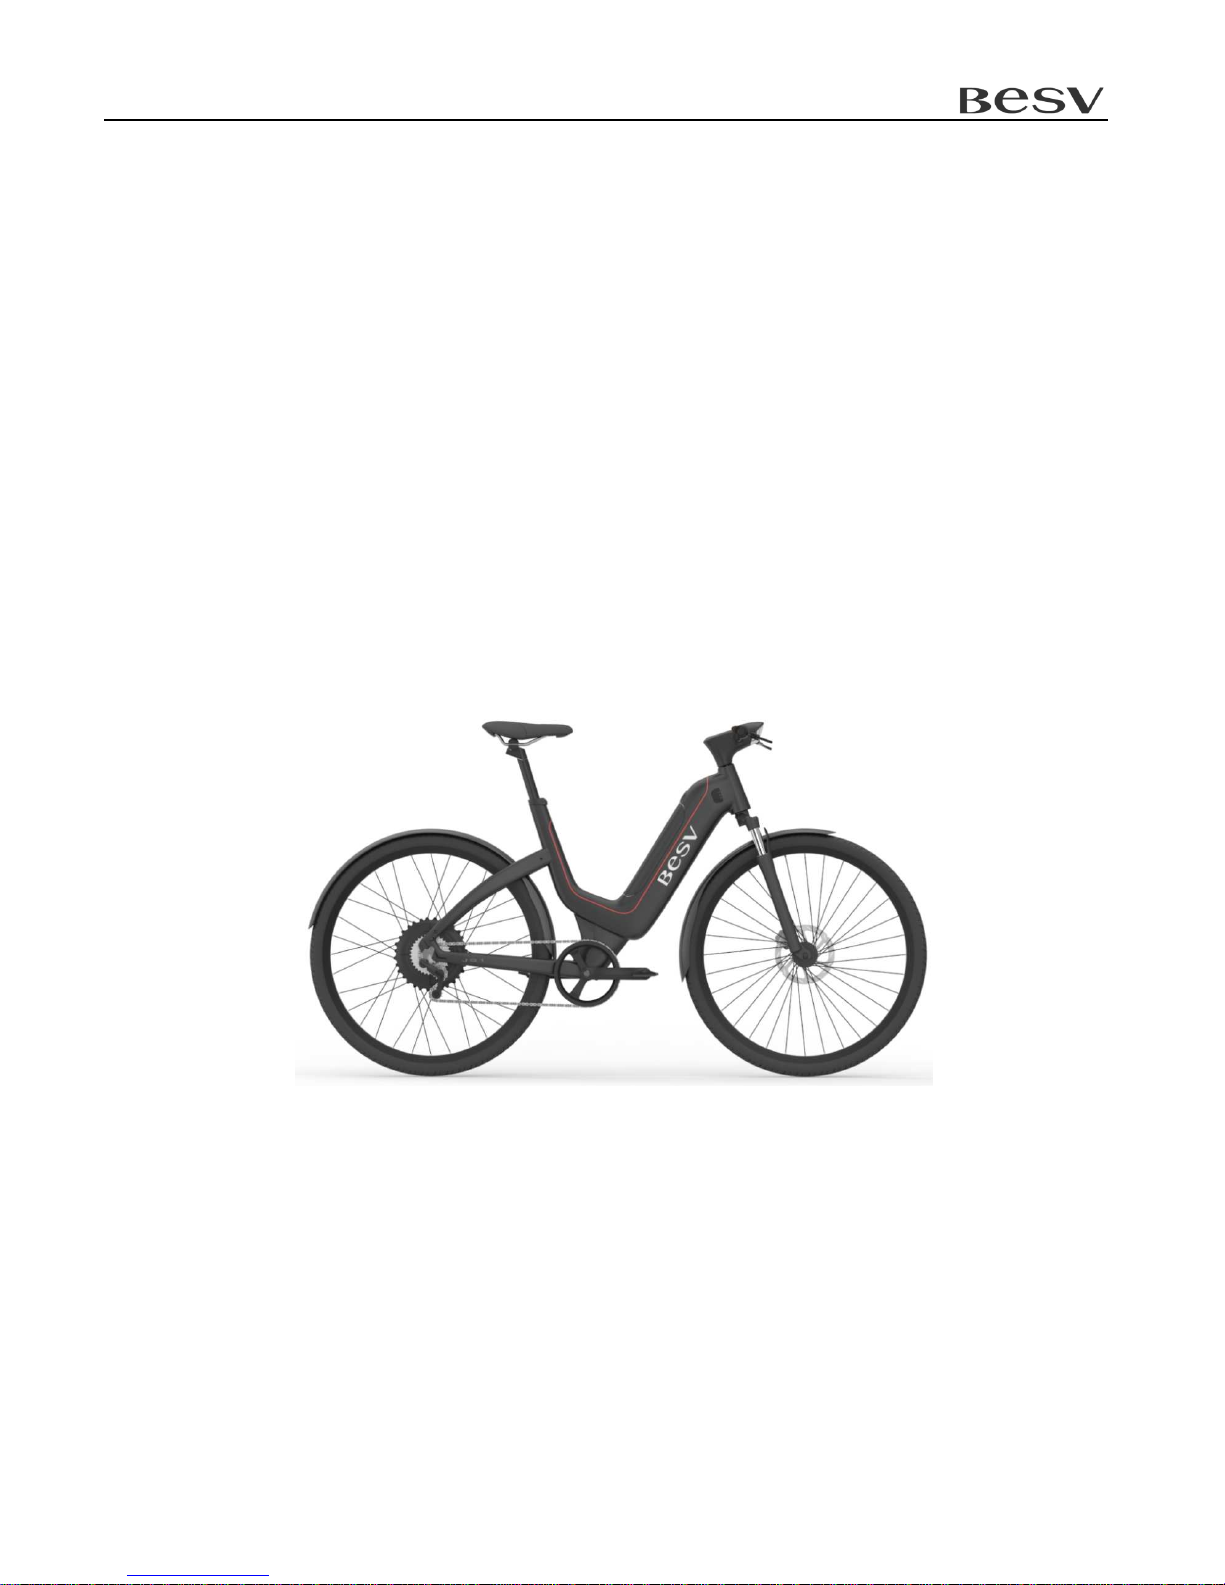
Quick Assembly Guide - BESV JS1
Quick Assembly Guide
Quick Assembly GuideQuick Assembly Guide
Quick Assembly Guide
BESV JS
BESV JSBESV JS
BESV JS1111
V. 1.0, April. 2015
Page 2

Quick Assembly Guide - BESV JS1
1
Contents
1. What’s in the Box .......................................................................................................................... 2
1.1 Main Box Contents ............................................................................................................. 2
1.2 Accessory Box Contents .................................................................................................... 3
2. Assembly Procedures ................................................................................................................... 4
2.1 Front Wheel ........................................................................................................................ 4
2.2 Front Fender and Reflector ................................................................................................ 7
2.3 Pedal .................................................................................................................................. 9
2.4 Battery .............................................................................................................................. 10
2.5 Saddle & Seat Post ........................................................................................................... 11
2.6 Rear Light ......................................................................................................................... 11
3 Checklist ..................................................................................................................................... 14
Page 3
Quick Assembly Guide - BESV JS1
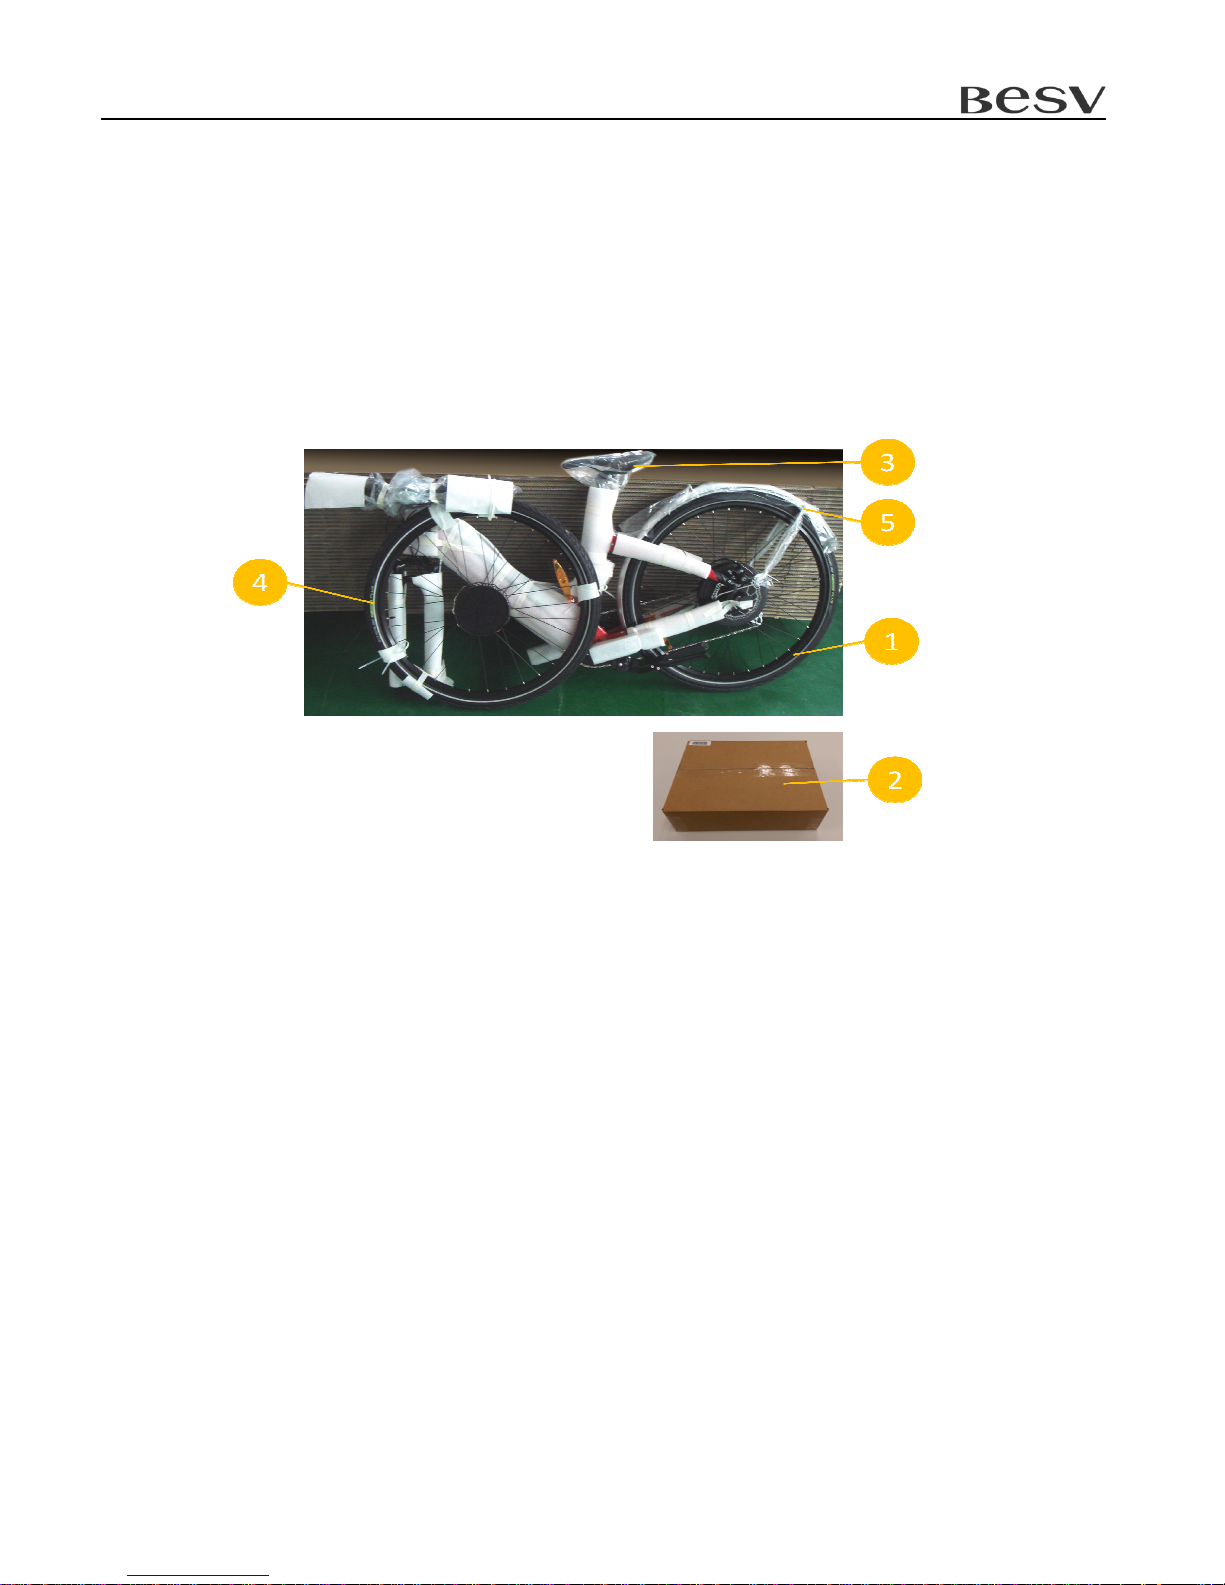
What’s in the Box
1.1
Main Box Contents
1. Main Bike Assembly
2. Accessory Box
3. Saddle/Seat Post Set
4. Front Wheel
5. Front Fender
2
Page 4
Quick Assembly Guide - BESV JS1
1.2
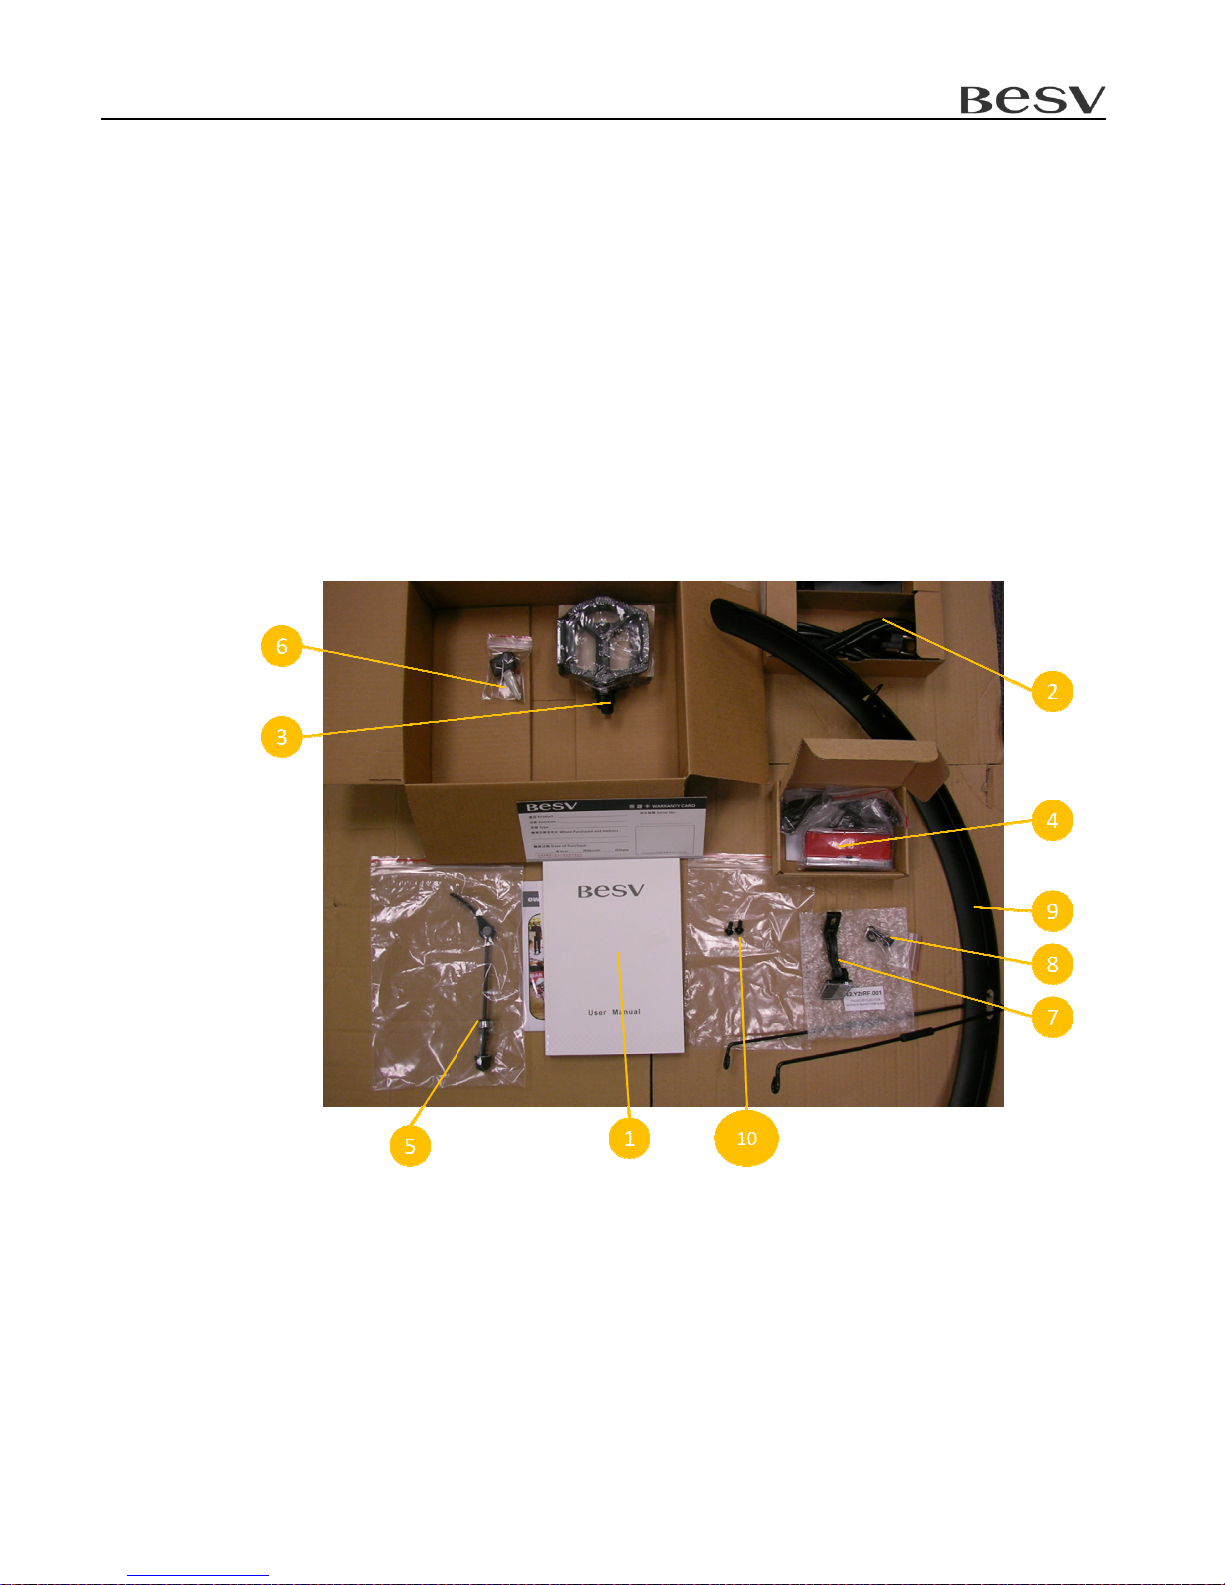
Accessory Box Contents
1.
Product Documentation
2. Charger
3. Pedals
4.
Rear Light & Reflector
5.
Quick Release (QR) for the Front Wheel
6. Key
7. Front reflector
8. Screw sets for
Reflector and
9. Front Fender
10. Screws fix for F
ront
Front Fender
Fender on Front Fork
3
Page 5
Quick Assembly Guide - BESV JS1
4
Assembly Procedures
2.1 Front Wheel
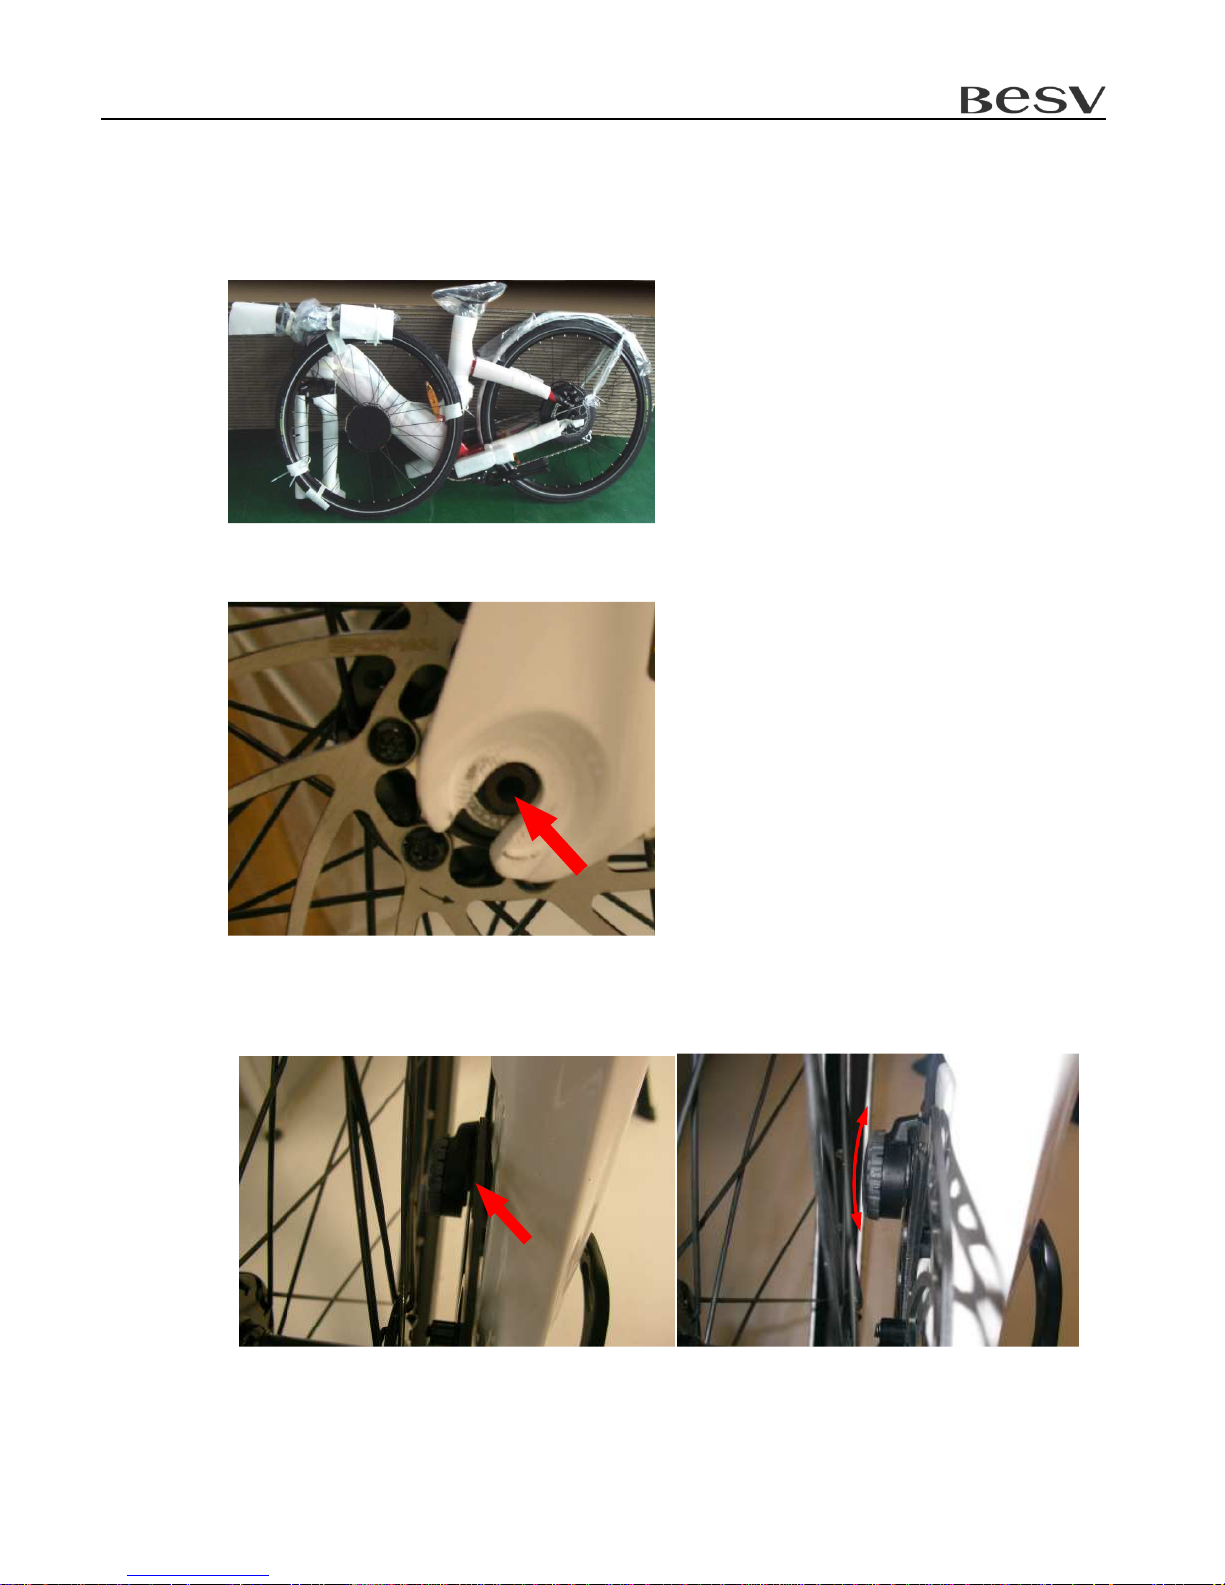
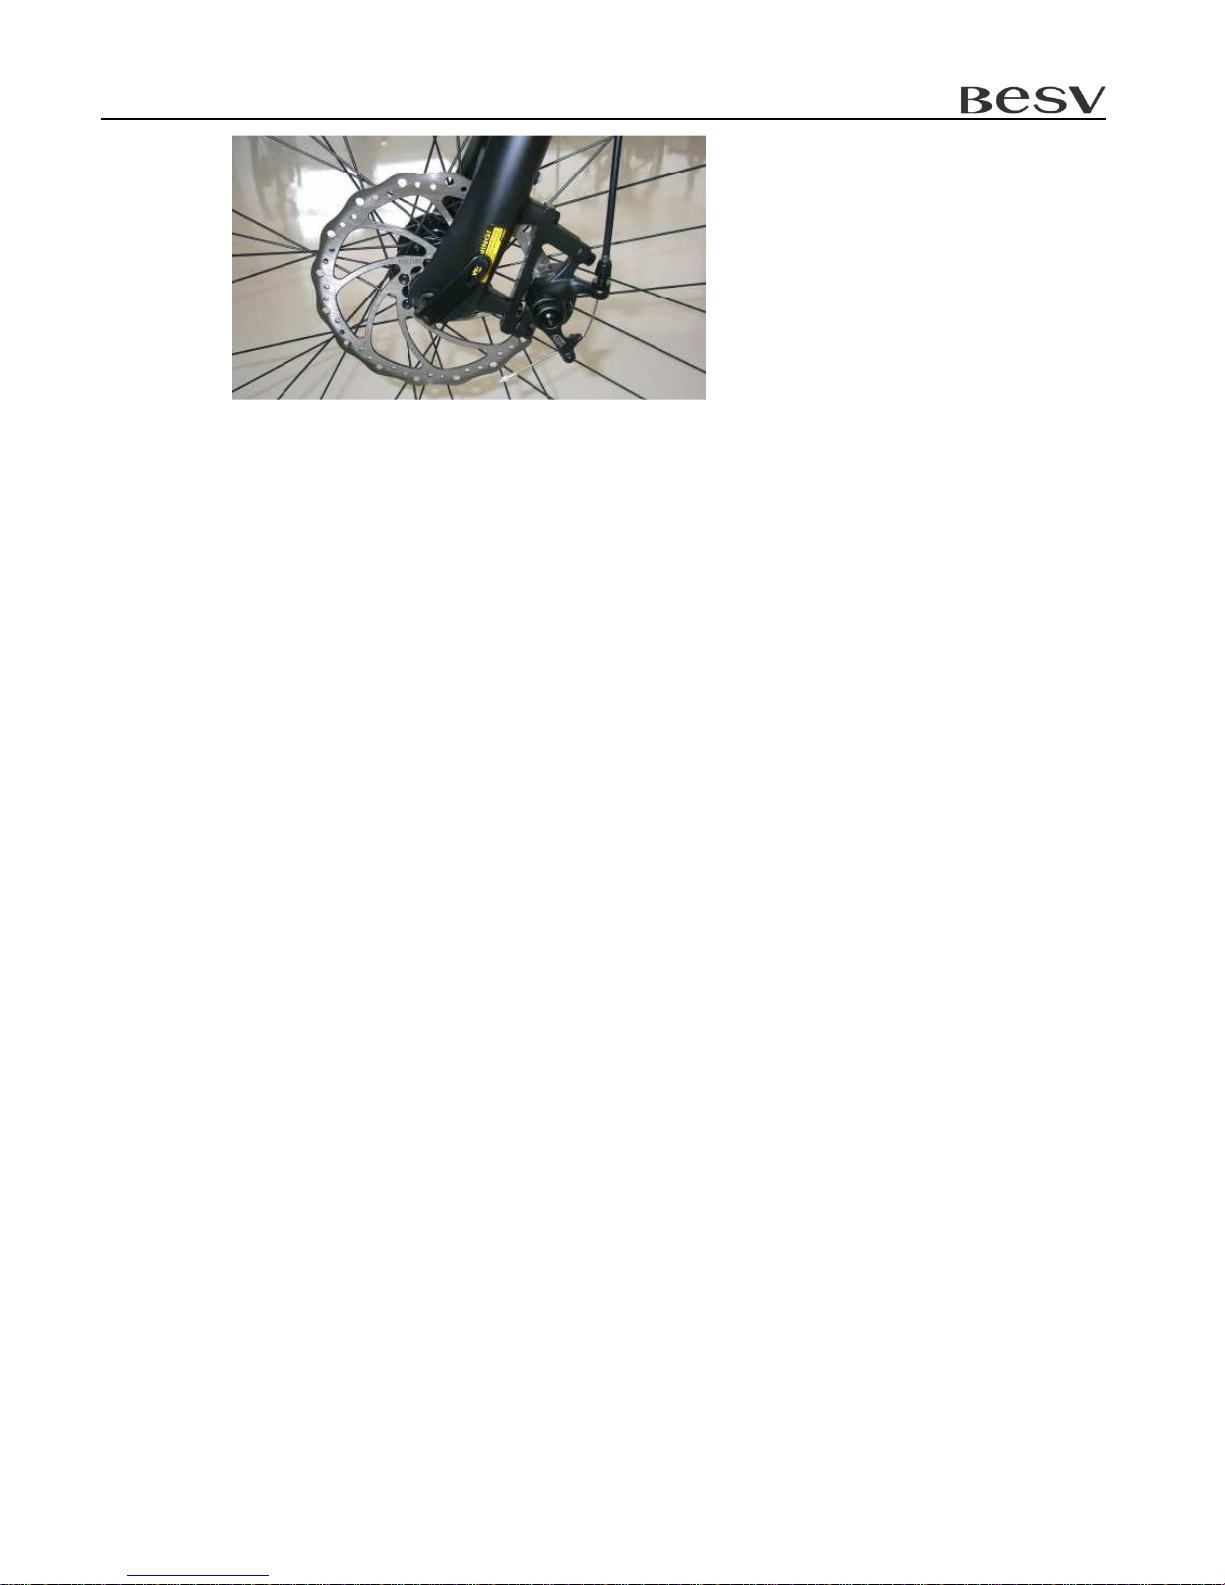
2.1.1 Unpack the front wheel and the main bike assembly.
2.1.2 Insert the wheel into the fork end.
Attention: The disk should be placed between the brake pads.
Use the inner knob fine tuning.
Page 6
Quick Assembly Guide - BESV JS1
5
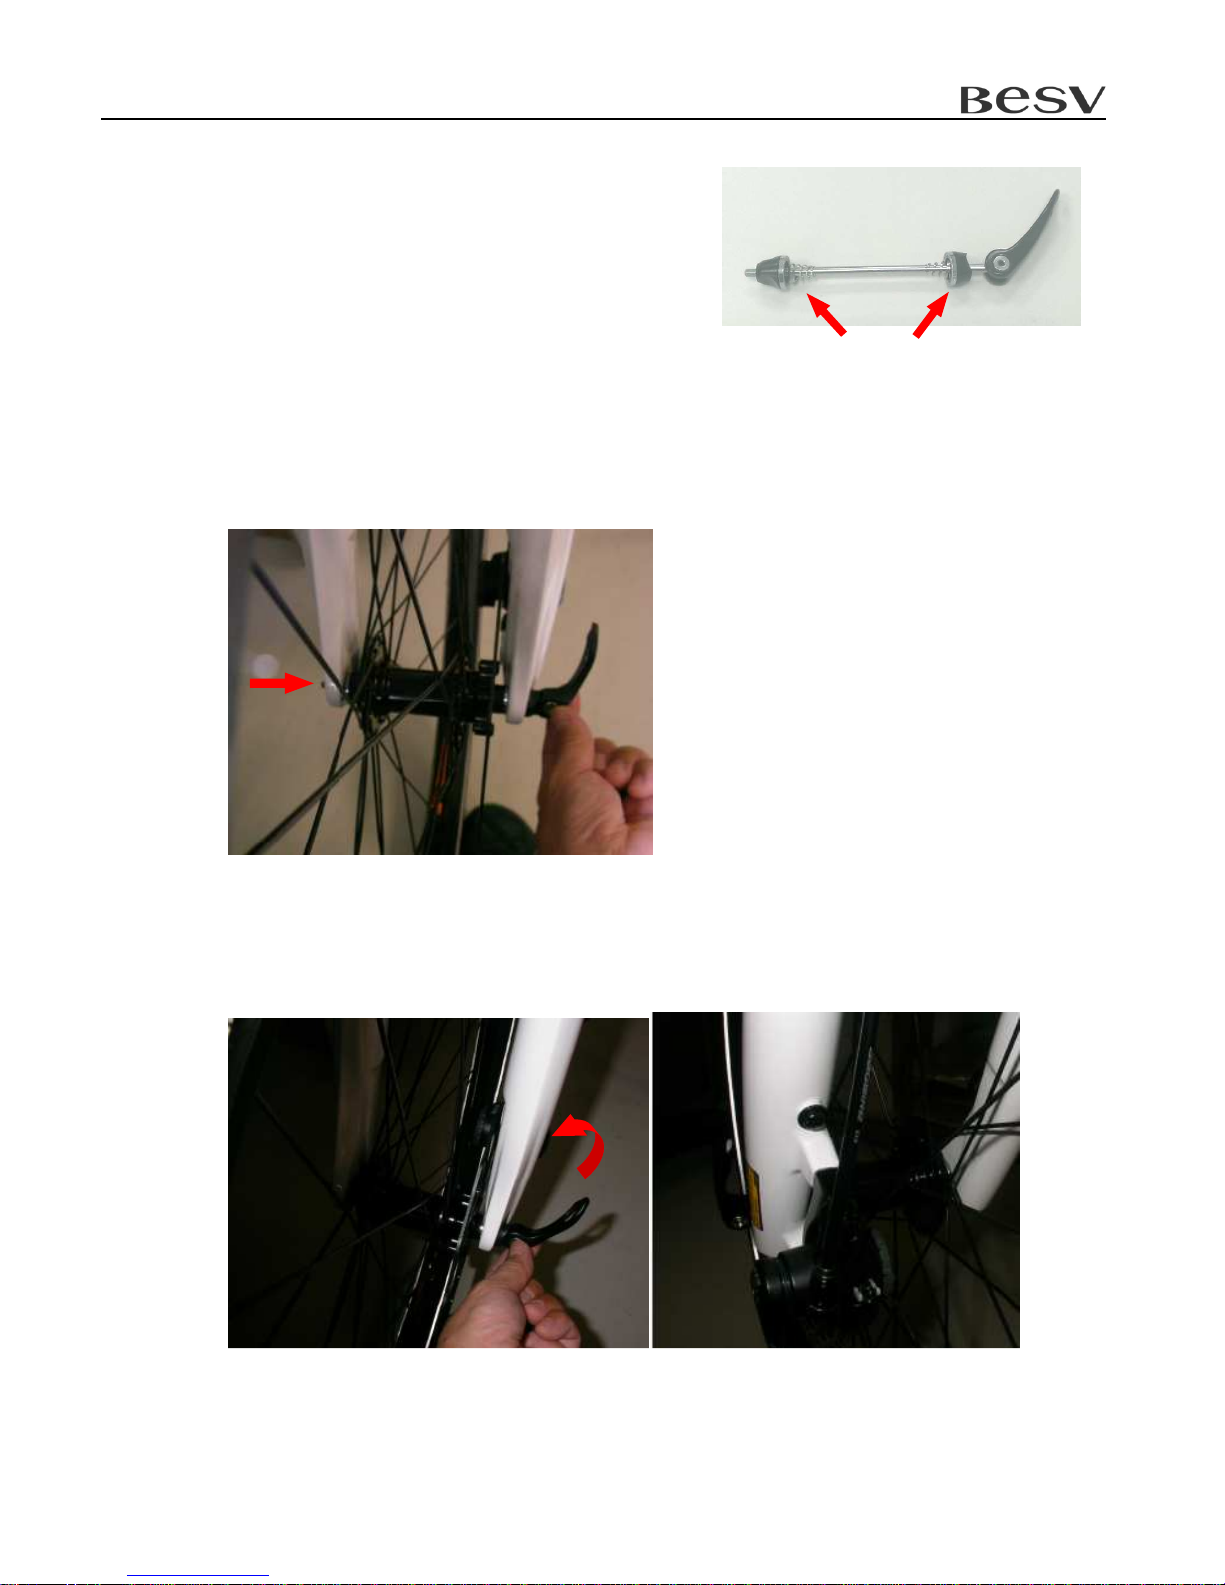
2.1.3 Set the quick release (QR)
Unscrew the nut and spring from the QR and
insert the QR stem from the left side of the bike.
Attention: The quick release handle should be
on the left side of bike.
2.1.4 Tighten the nut
Place the spring back in the QR stem and tighten the nut until you encounter resistance.
Then loosen 1/4 turn。
Note: The tapered end of the spring should be facing inward.
2.1.5 Tighten the nut
Lock the QR by pushing the handle upwards until parallel with fork. Turn the wheel and
verify the rotation is smooth
Page 7
Quick Assembly Guide - BESV JS1
6
Page 8
Quick Assembly Guide - BESV JS1
7
2.2
Front Fender and Reflector
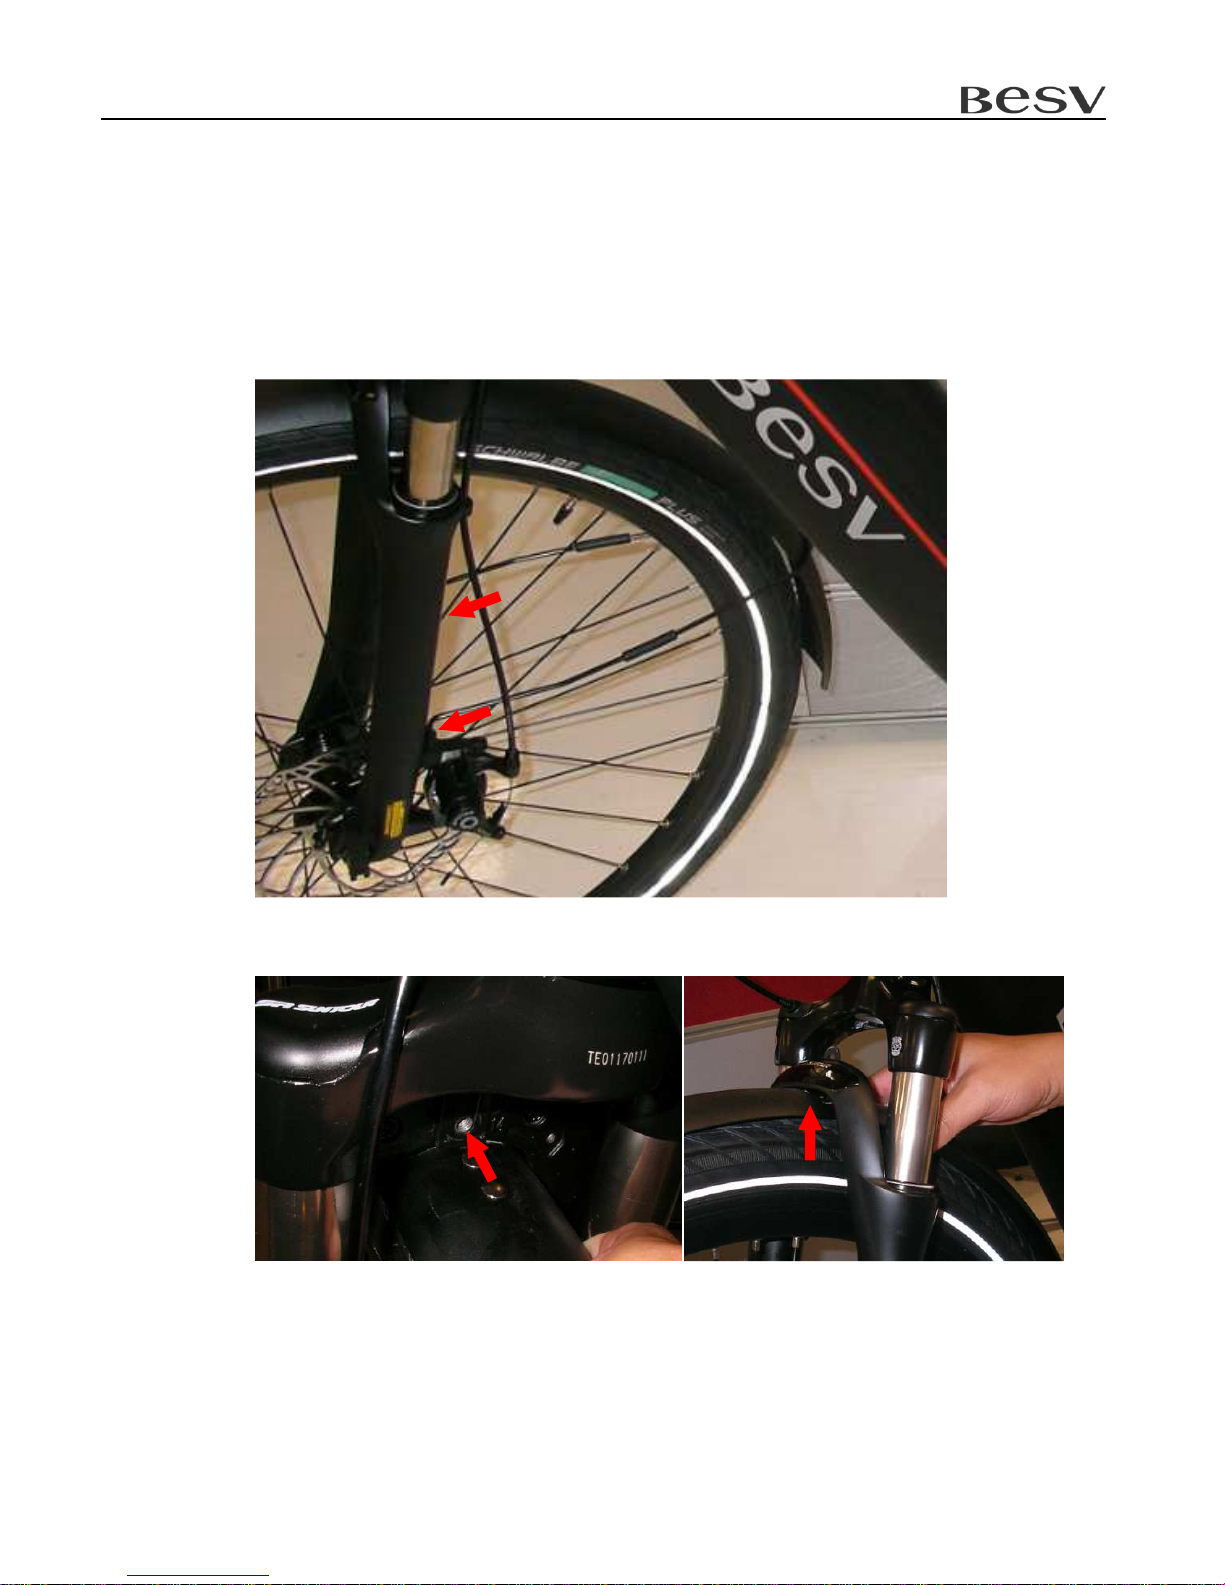
Place the fix plate at the bottom of the front fork and loosely secure with the 2-M5 screws.
2.2.1 Place 2-M5 screws go through front fender support and insert Front Fork M5 screw
holes fixed.
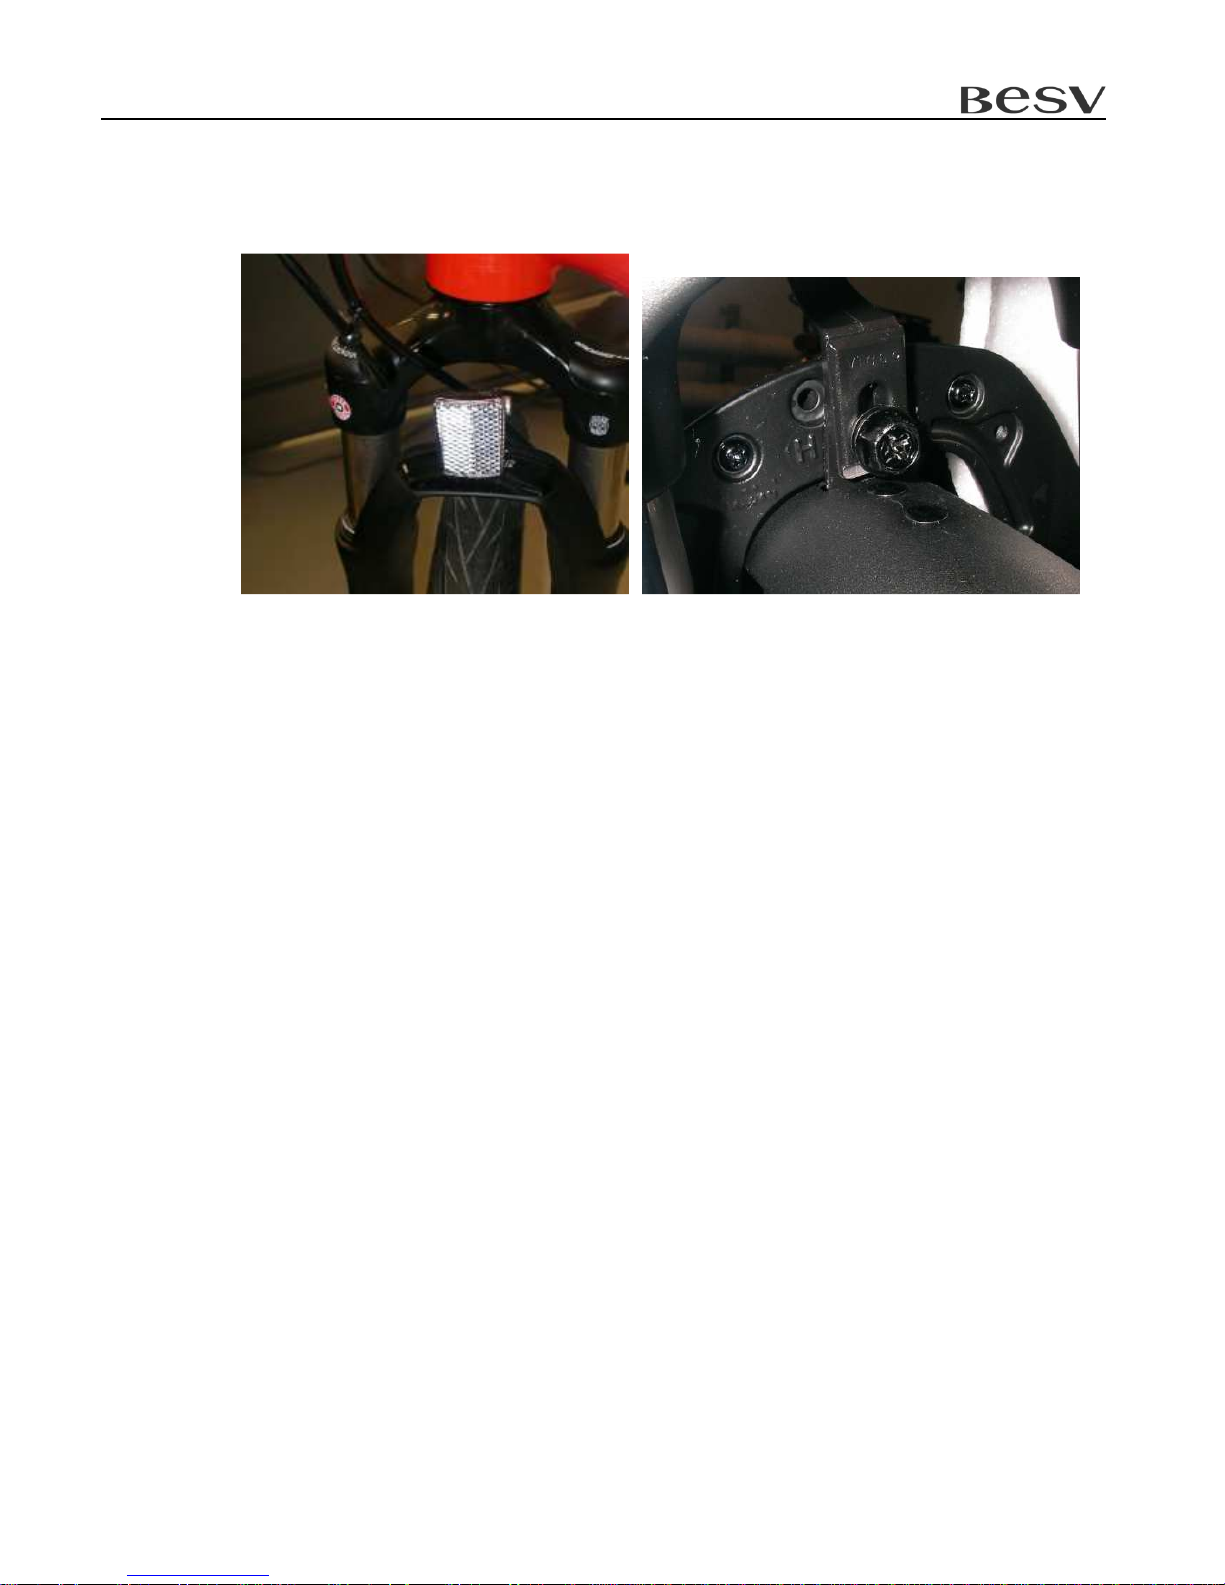
2.2.2 Place the front reflector at the top of the fork where the fender meets the fork, then
loosely secure with the fender screw.
Page 9
Quick Assembly Guide - BESV JS1
8
2.2.3 Adjust the fender to top position, and then tighten the screws at the reflector and at the
fix plate.
Suggest Front Tire pressure is 60psi.
Note: When securing the reflector to the fork, make sure the placement order is fork,
fender and then reflector.
Page 10
Quick Assembly Guide - BESV JS1
9
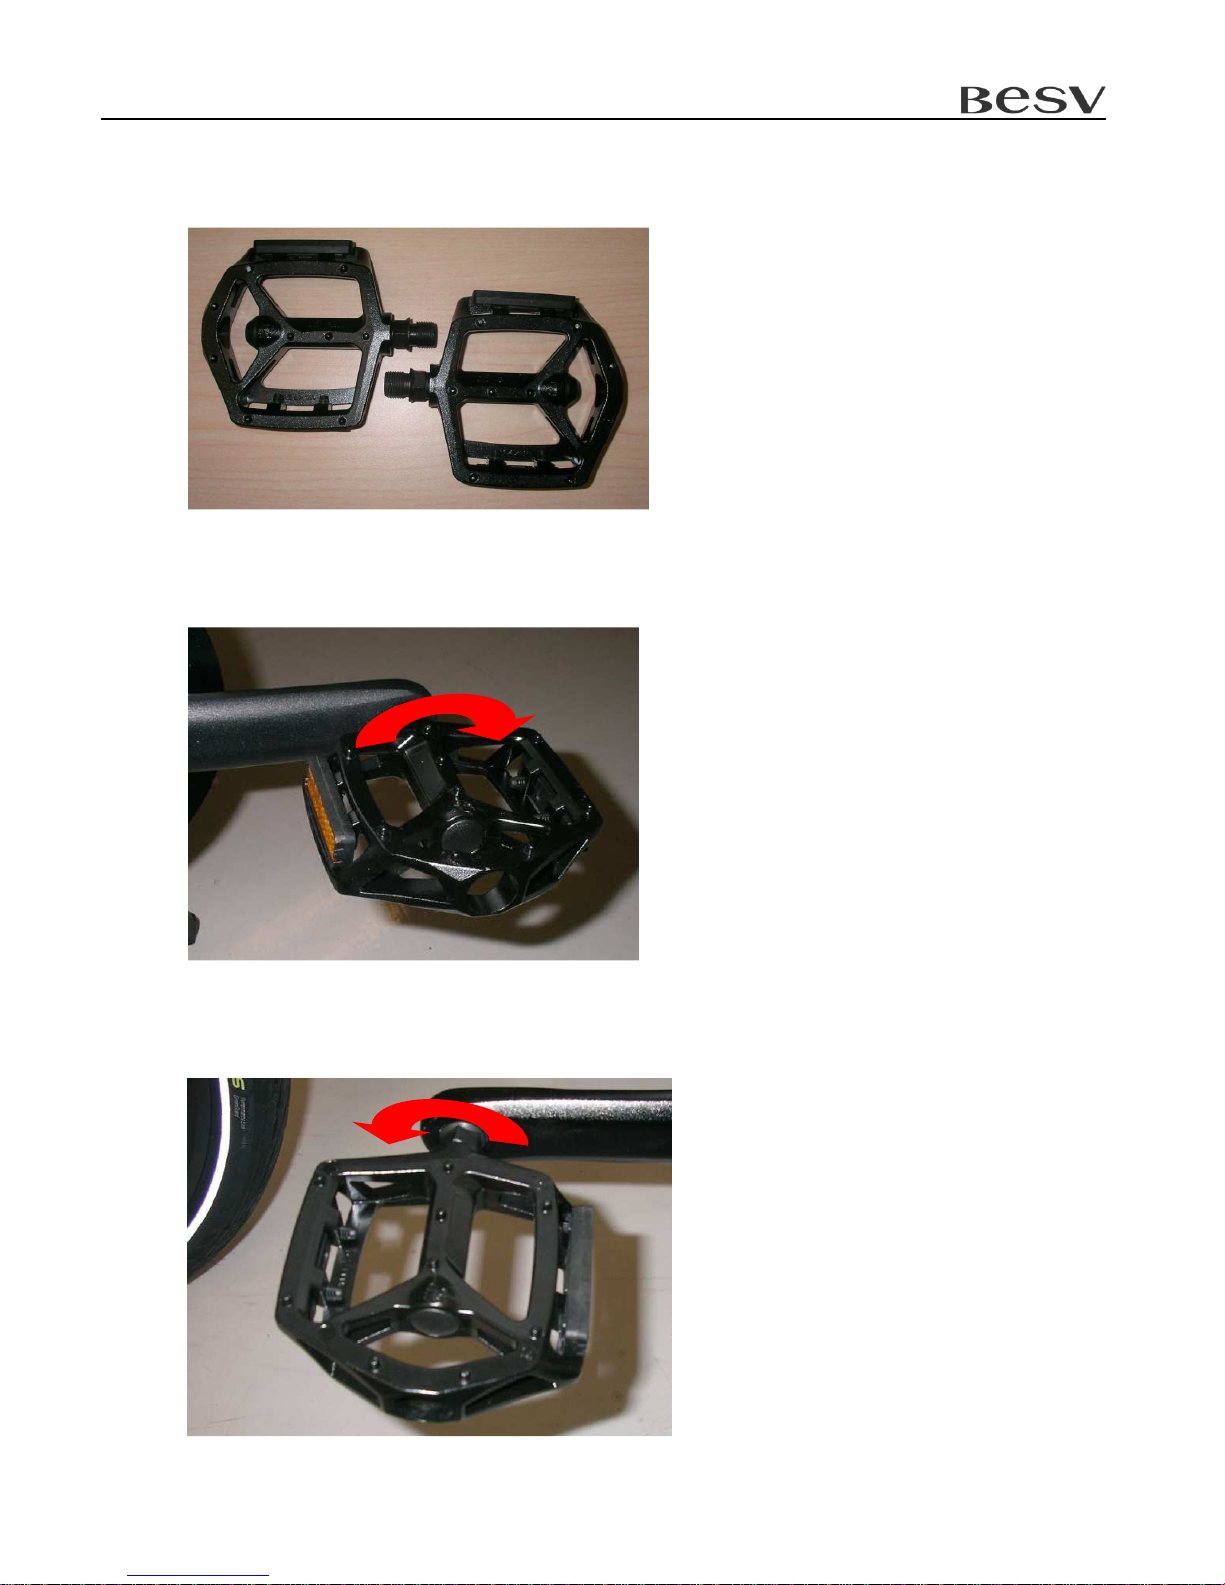
2.3 Pedal
2.3.1 Take out the pedal.
2.3.2 Set up the right pedal
Note: There is a mark “R” on one of the pedal. Assemble it onto the right crank clockwise.
2.3.3 Set up the left pedal
Take another pedal and assemble it to the left crank counterclockwise.
Page 11
Quick Assembly Guide - BESV JS1
10
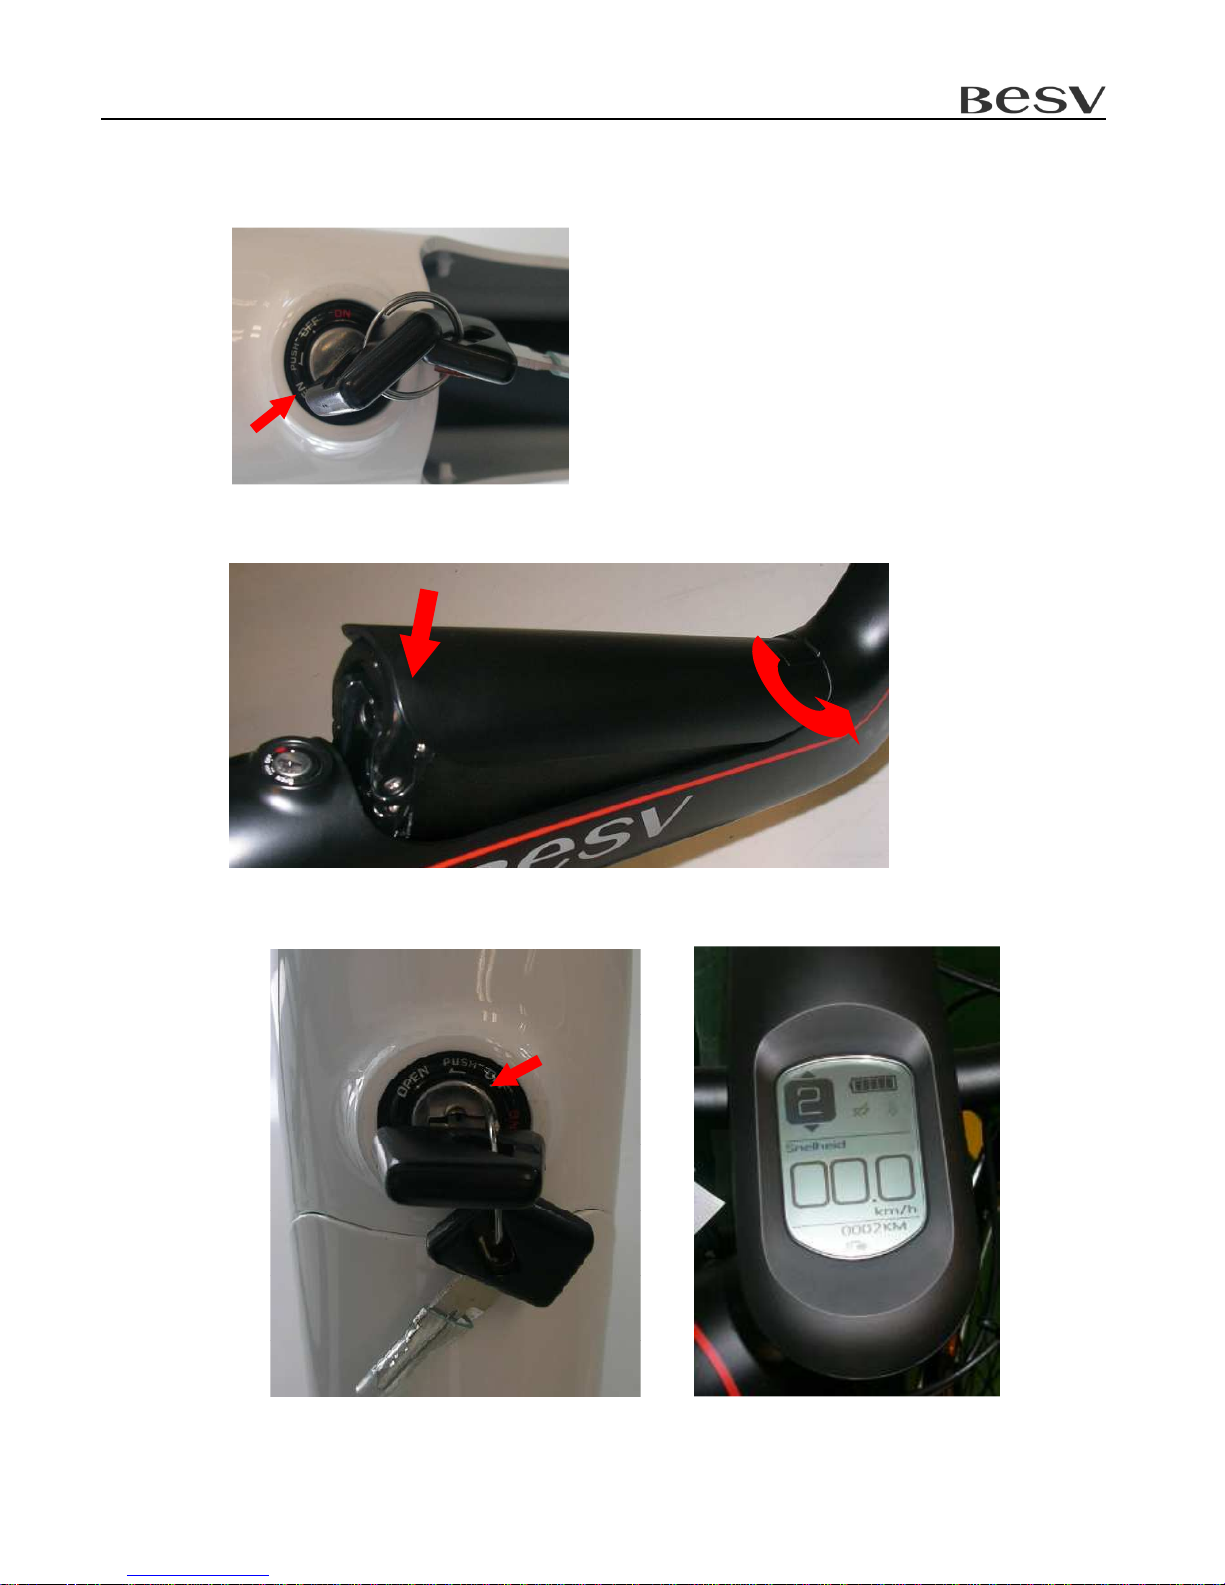
2.4 Battery
2.4.1 Insert the key and turn it to the “OPEN” position.
2.4.2 Slide the battery in and push it until it firmly connects to the socket.
2.4.3 Close the battery cover. Push the key in and turn it to “OFF” position to lock the battery
cover in place. While turn to “ON” (red test), the HMI monitor will appearance function.
Page 12
Quick Assembly Guide - BESV JS1
11
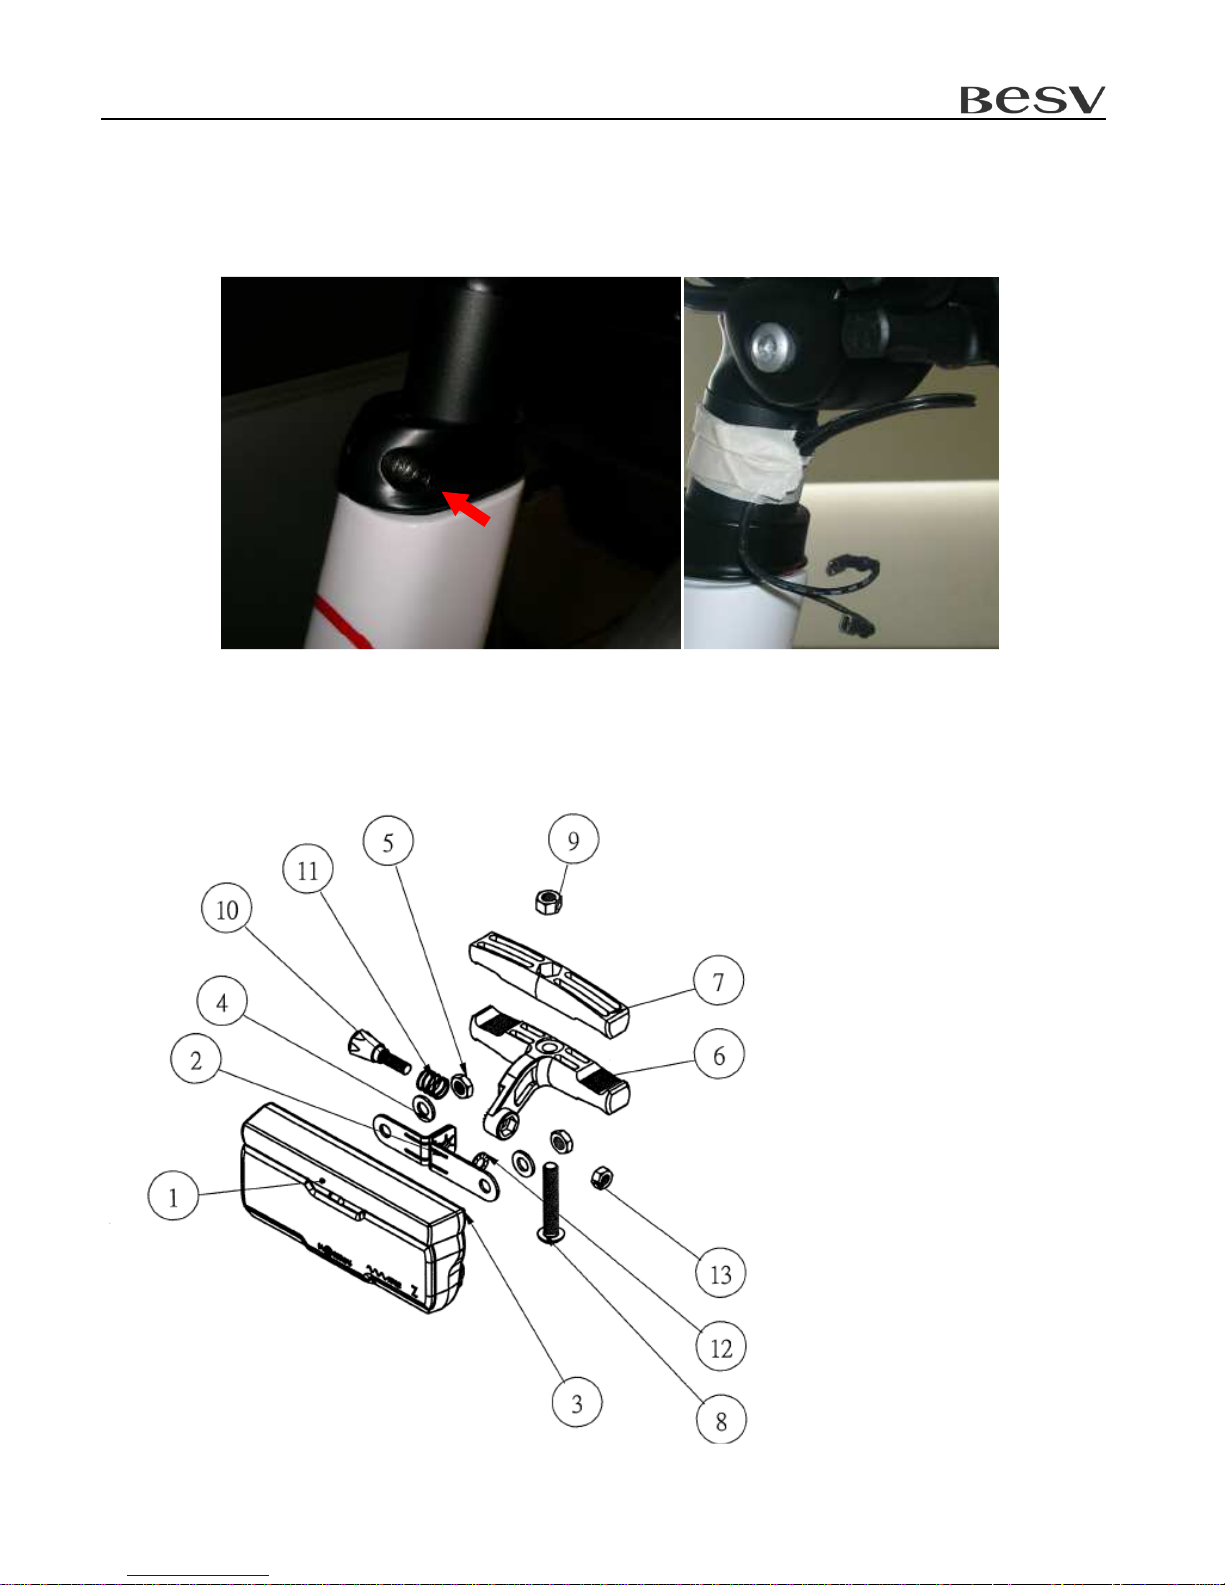
2.5 Saddle & Seat Post
2.5.1 Screw released the seat post clamp and adjust the height. Lock the seat post clamp.
Attention: Please don’t let cable go inside seat post.
2.6 Rear Light
Page 13
Quick Assembly Guide - BESV JS1
12
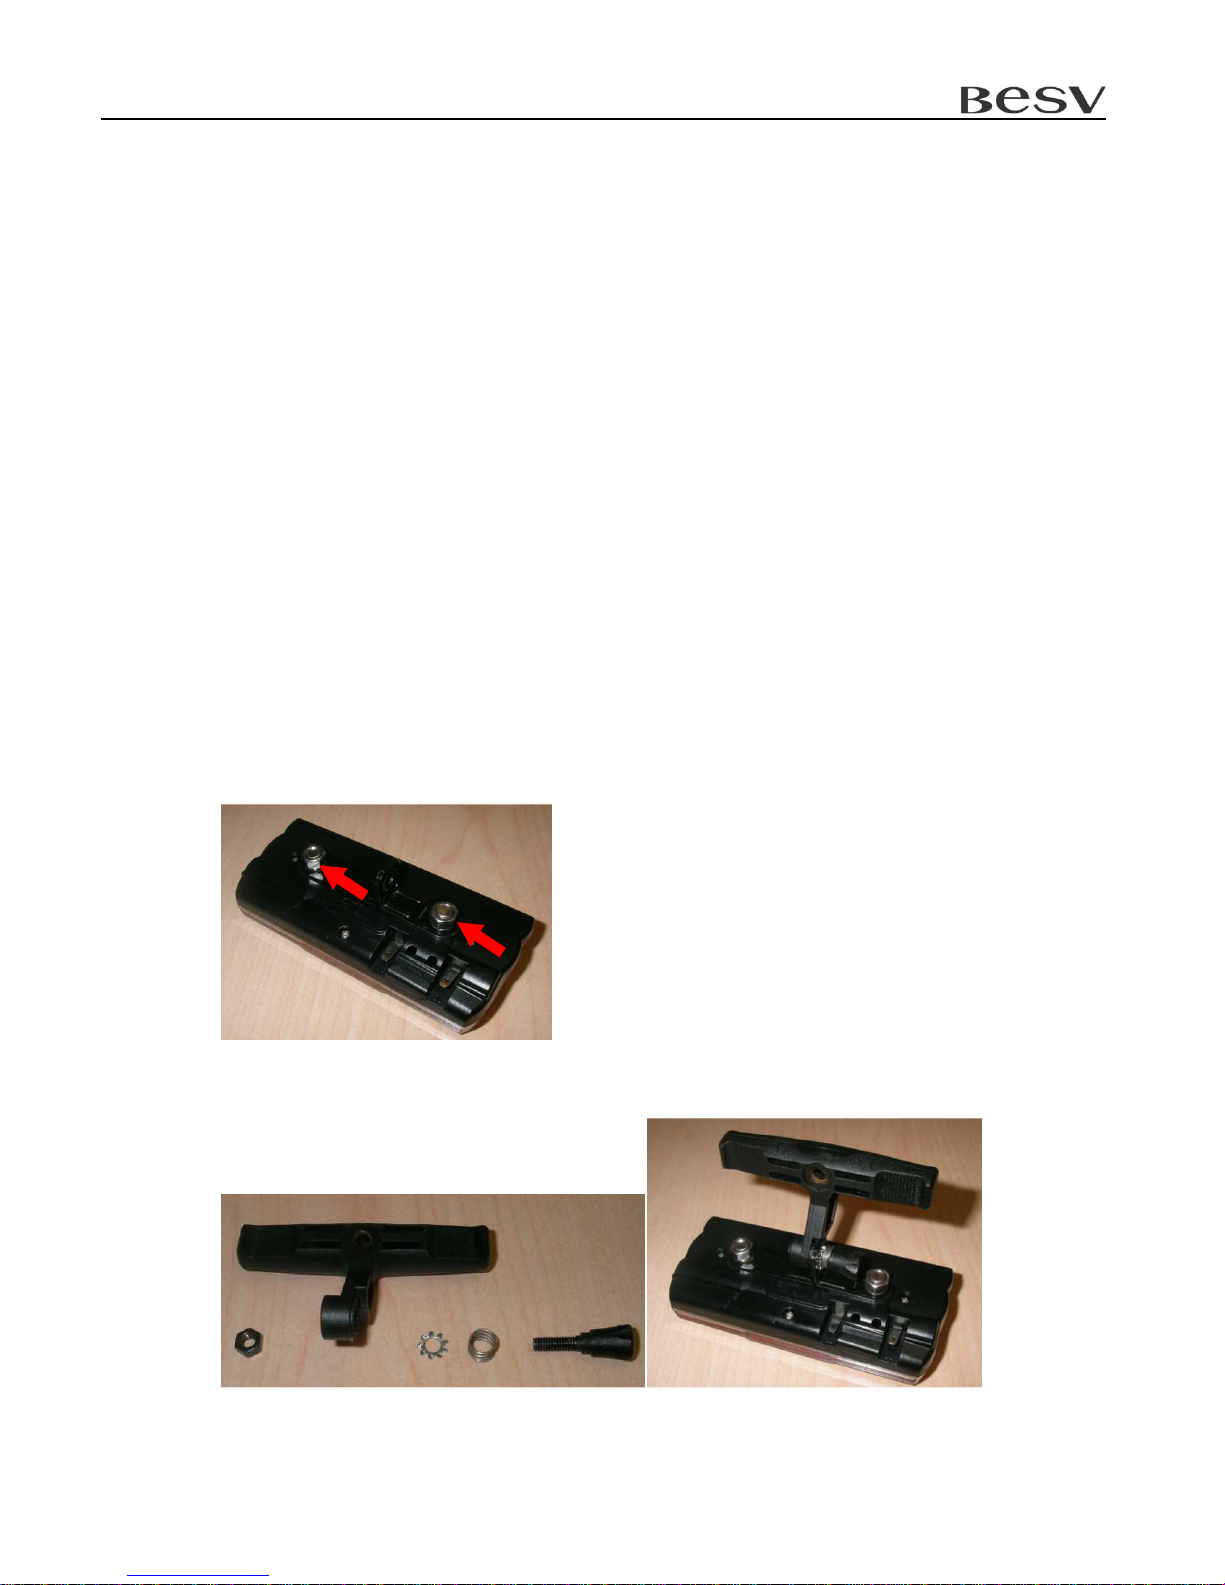
1. Rear Light
2. Bracket
3. M5 Screw
4. M5 Spring Washer
5. M5 Nut x2 (Thin)
6. Base Support
7. Top Clip
8. M5 x 35 Screw
9. M5 Nut (Thick)
10. M4 Screw with Plastic Knob
11. Spring
12. Gear Washer
13. M4 Nut
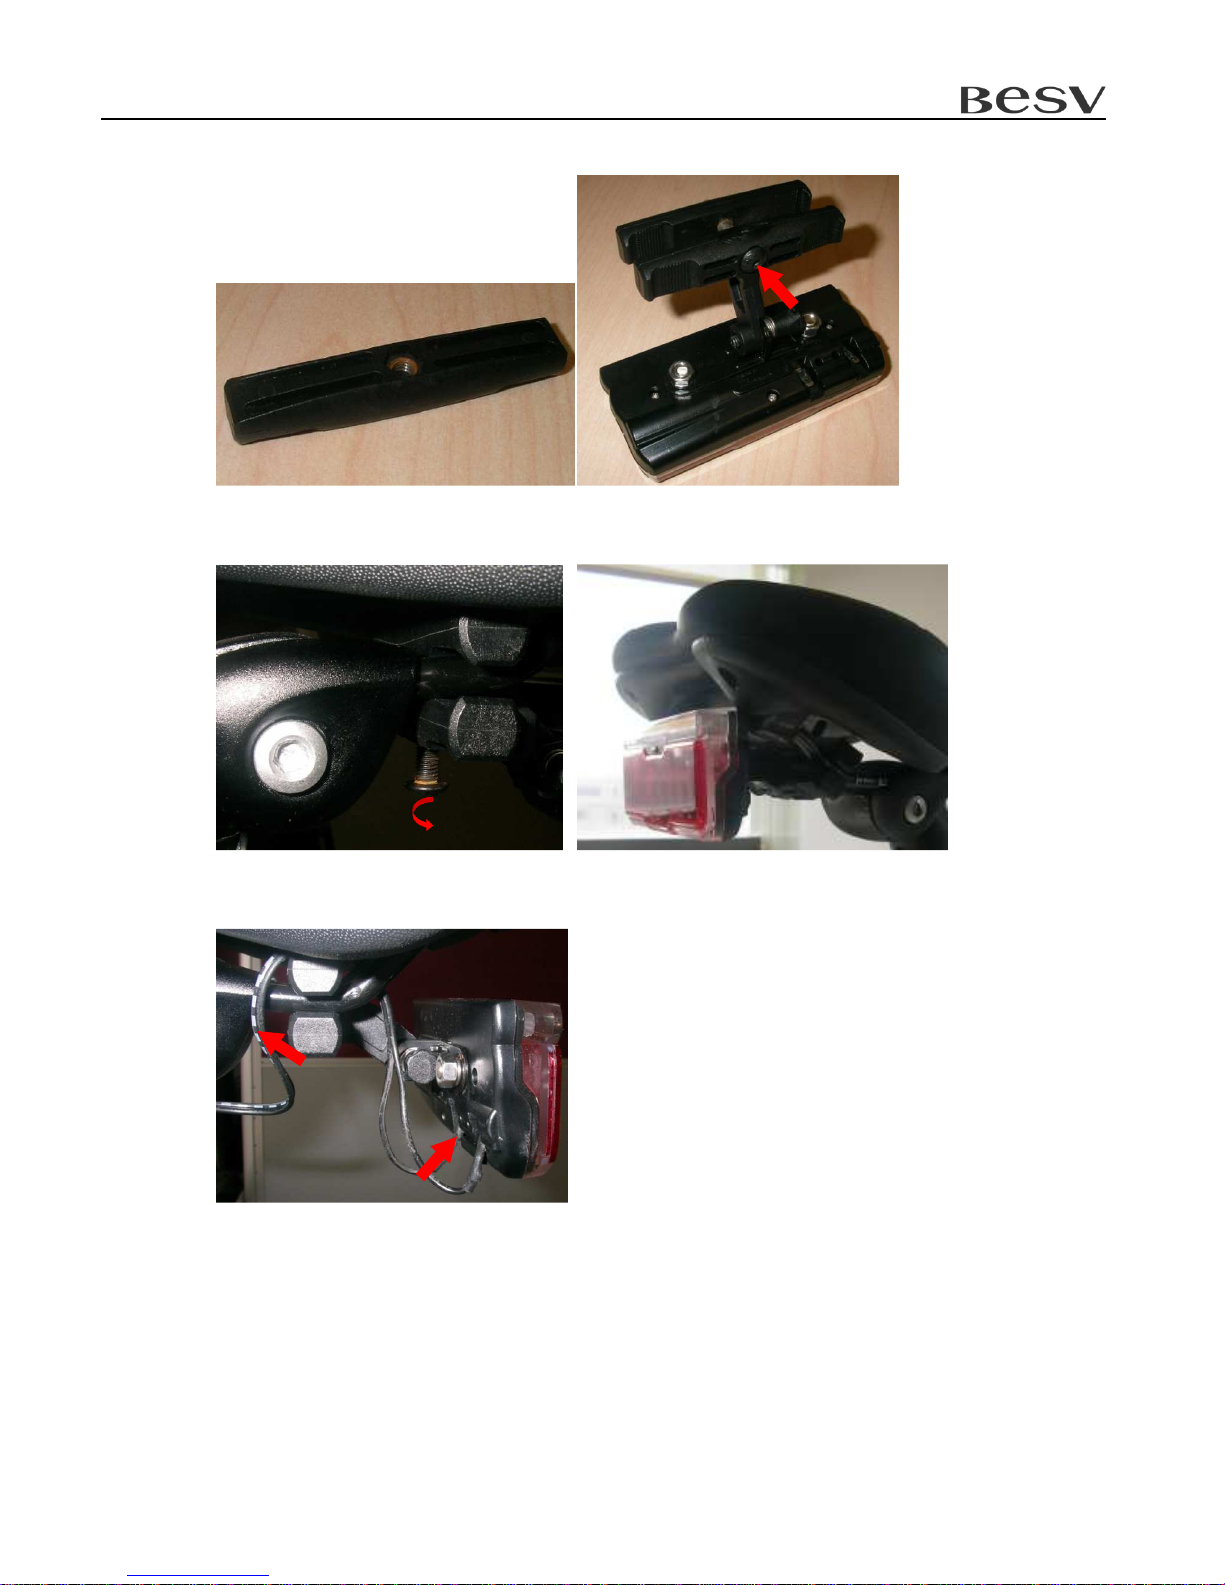
2.6.1 Bracket.
Put the 2-M5 nut fix bracket and rear light.
2.6.2 Combine Support and Rear Light housing by gear washer/spring/M4 screw.
Page 14
Quick Assembly Guide - BESV JS1
13
2.6.3 Combine Clip and Rear right by M6 screw.
2.6.4 Upper and lower clip fixed on seat bow by M5 screw.
2.6.5 The Rear Light cable should around the clip above and go connecting terminals.
Attention:
Attention: Attention:
Attention: The cable surface has white lines,
The cable surface has white lines, The cable surface has white lines,
The cable surface has white lines,
PPPPlease put into Rear Light negative
lease put into Rear Light negative lease put into Rear Light negative
lease put into Rear Light negative ““““––––““““terminal
terminalterminal
terminal(left side)
(left side)(left side)
(left side)....
Page 15
Quick Assembly Guide - BESV JS1
14
3 Checklist
3.1 Check the tire pressure is normal.
3.2 Check the function of the brakes, derailleur, and chain.
3.3 Check the function of the electric module and the battery power. Please refer to JS1 user
manual.
 Loading...