

Page 1
U
A
Q
L
P
I
T
Y
O
T
EASY HOME
G
E
U
E
T
A
R
N
A
1800
Watts
DE
FR
NL
220
240
Volts
Bedienungsanleitung
Mode d’emploi
Handleiding
50
Hz
INSTRUCTION MANUAL
EN
Instruction manual
Istruzioni per l’uso
IT
Manual del usuario
ES
AEA6088P
Page 2

Page 3

Page 4

DE
HERZLICHEN GLÜCKWUNSCH!
Herzlichen Glückwunsch zum Erwerb dieses Bestron-Produktes.
In dieser Gebrauchsanweisung erläutern wir die Funktion und die
Benutzung. Lesen Sie somit diese Gebrauchsanweisung aufmerksam
durch, bevor Sie das Gerät benutzen. Verwenden Sie das Gerät nur so,
wie es in der Gebrauchsanweisung beschrieben ist. Bewahren Sie die
Gebrauchsanweisung danach sorgfältig auf.
Bei einem Defekt:
Sollte das Gerät unverhofft einen Defekt aufweisen, versuchen Sie dann
nie, die Reparatur selbst vorzunehmen. Lassen Sie Reparaturen immer
von einem qualifizierten Mechaniker ausführen.
Benutzung durch Kinder:
• Dieses Gerät darf nicht von Kindern und Personen mit vermindertem
körperlichen, sinnlichen oder geistigen Vermögen oder Mangel an
Erfahrung und Kenntnis verwendet werden.
• Die Reinigung und Wartung darf nicht von Kindern durchgeführt
werden.
• Halten Sie das Gerät und das Kabel außerhalb der Reichweite von
Kindern wenn es eingeschaltet ist oder sich abkühlt.
• Kinder müssen im Auge gehalten werden, um sich dessen sicher zu
sein, dass sie nicht mit dem Gerät spielen.
4
Page 5

DE
WAS SIE ÜBER ELEKTROGERÄTE WISSEN MÜSSEN
• Kontrollieren Sie, ob die Netzspannung der auf dem Typenschild eines
Elektrogerätes angegebenen Netzspannung entspricht, bevor Sie es
benutzen.
• Kontrollieren Sie, ob die Steckdose, an die Sie ein Elektrogerät
anschließen, geerdet ist.
• Stellen Sie Elektrogeräte immer an einer Stelle auf, an der sie nicht
fallen können, und auf einen stabilen und ebenen Untergrund.
• Bestimmte Teile eines Elektrogerätes können warm oder manchmal heiß
werden. Berühren Sie diese nicht, um Verbrennungen zu vermeiden.
• Sorgen Sie dafür, dass Ihre Hände trocken sind, wenn Sie ein
Elektrogerät, ein Kabel oder einen Stecker berühren.
• Elektrogeräte müssen zur Vermeidung einer Feuergefahr ihre Wärme
abgeben können. Sorgen Sie somit dafür, dass das Gerät ausreichend
frei ist und nicht mit brennbarem Material in Kontakt kommen kann.
Elektrogeräte dürfen nie bedeckt werden.
• Sorgen Sie dafür, dass Elektrogeräte, Kabel oder Stecker nicht mit
Wasser in Berührung kommen.
• Tauchen Sie Elektrogeräte, Kabel oder Stecker nie in Wasser oder eine
andere Flüssigkeit.
• Fassen Sie Elektrogeräte nie an, wenn sie ins Wasser gefallen sind.
Ziehen Sie direkt den Stecker aus der Steckdose. Benutzen Sie das
Gerät nicht mehr.
• Sorgen Sie dafür, dass Elektrogeräte, Kabel und Stecker nicht mit
Hitzequellen, wie zum Beispiel eine heiße Kochplatte oder offenes
Feuer, in Berührung kommen.
• Lassen Sie Kabel nie über den Rand der Anrichte, Arbeitsplatte oder
einen Tisch hängen.
• Ziehen Sie den Stecker immer aus der Steckdose, wenn Sie das
Elektrogerät nicht benutzen.
• Wenn Sie den Stecker aus der Steckdose ziehen, ziehen Sie dann am
Stecker selbst und nicht am Kabel.
• Kontrollieren Sie regelmäßig, ob das Kabel des Elektrogerätes noch
intakt ist. Benutzen Sie das Gerät nicht, wenn das Kabel Beschädigungen
aufweist. Wenn das Kabel beschädigt ist, muss es vom Hersteller,
einem technischen Kundendienst oder einer Person mit einer ähnlichen
Qualifikation ersetzt werden, um jede Gefahr zu vermeiden.
• Das Gerät darf nicht mittels eines externen Zeitschalters oder durch ein
separates System mit Fernbedienung eingeschaltet werden.
5
Page 6
DE
WAS SIE ÜBER DIESES GERÄT WISSEN MÜSSEN
• Seien Sie vorsichtig, wenn Sie das Gerät im Freien benutzen.
• Benutzen Sie das Gerät nie in feuchten Räumen.
• Reinigen Sie das Gerät nach der Benutzung gründlich (siehe Reinigung
und Wartung).
• Verschieben Sie das Gerät keinesfalls in eingeschaltetem Zustand oder
wenn es noch warm ist. Schalten Sie das Gerät immer zuerst aus.
• Halten Sie das Gerät niemals während der Benutzung auf dem Kopf. Heißes
Wasser könnte vom Bügeleisen tropfen und Verbrennungen verursachen.
• Befüllen Sie den Wasserbehälter nicht über den Höchststand. Überprüfen
Sie dies, indem Sie das Bügeleisen aufrecht stellen. Überschüssiges
Wasser im Vorratsbehälter könnte während des Betriebs überlaufen und
einen Kurzschluss verursachen.
• Verwenden Sie das Bügeleisen nicht mehr, wenn es heruntergefallen ist,
sichtbare Schäden aufweist oder undicht ist.
• Lassen Sie das Bügeleisen niemals unbeaufsichtigt, wenn es angeschlossen
ist
UMWELT
• Werfen Sie Verpackungsmaterial, wie zum Beispiel Plastik und
Karton, in die dazu bestimmten Container.
• Dieses Produkt am Ende der Nutzungsdauer nicht als normalen
Haushaltabfall entsorgen, sondern bei einer Sammelstelle zur
Wiederverwendung von elektrischem und elektronischem Gerät.
Achten Sie auf das Symbol auf dem Produkt, der Gebrauchsanweisung
oder Verpackung.
• Die Materialien können wie angegeben wiederverwendet werden.
Durch Ihre Hilfe bei der Wiederverwendung, der Verarbeitung der
Materialien oder anderen Formen der Nutzung des alten Gerätes
leisten Sie einen wichtigen Beitrag zum Schutz unserer Umwelt.
• Informieren Sie sich bei der Gemeinde nach der richtigen
Sammelstelle bei Ihnen in der Nähe.
CE-KONFORMITÄTSERKLÄRUNG
Dieses Produkt erfüllt die Anforderungen gemäß den Europäischen Richtlinien.
R. Neyman
Quality control
6
Page 7
DE
FUNKTION - Allgemein
Das Gerät ist nur für den Hausgebrauch
vorgesehen und nicht für die professionelle
Verwendung.
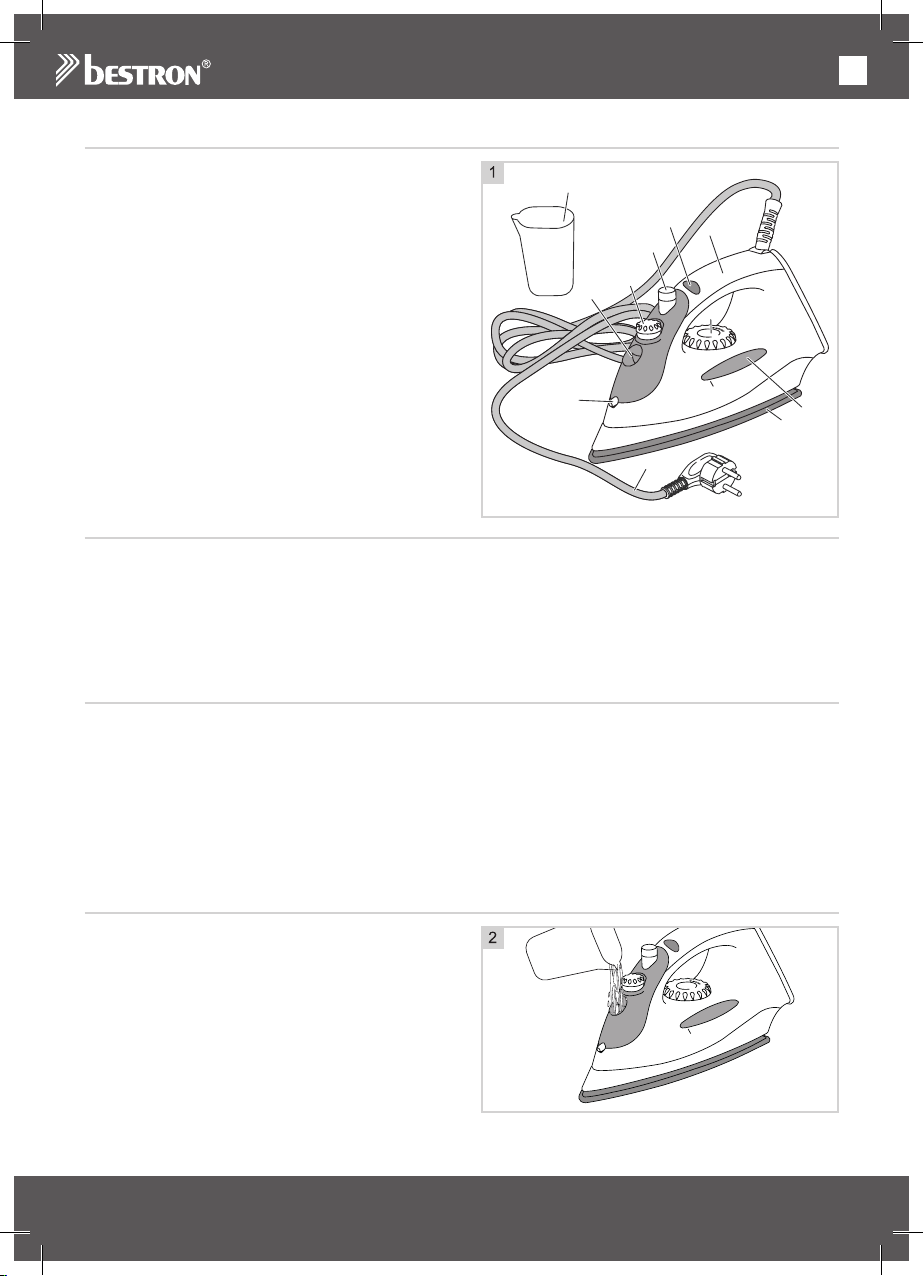
1. Edelstahlbügelsohle
2. Wasserbehälter
3. Sprühöffnung
4. Einfüllöffnung
5. Dampfeinstellknopf und Selbstreinigungsknopf
6. Wahlknopf dampf/sprüh
7. Griff
8. Kabel und Stecker
9. Temperaturanzeigelampe
10. Temperaturknopf
11. Füllbecher
VOR DER ERSTEN VERWENDUNG
Wenn Sie das Bügeleisen zum ersten Mal benutzen, dann testen Sie es auf einem alten Stück Stoff um zu
kontrollieren, ob die Bügelsohle und der Wasserbehälter sauber sind. Verfahren Sie ebenso, wenn Sie das
Bügeleisen längere Zeit nicht benutzt haben.
ACHTUNG:
• Bei der ersten Verwendung des Geräts können eine leichte Rauchentwicklung sowie ein spezieller
Geruch entstehen. Das ist normal und geht von selbst wieder weg. Sorgen Sie für ausreichende
Belüftung.
BENUTZUNG - Trocken bügeln
1. Stecken Sie den Stecker in die Steckdose.
2. Drehen Sie den Dampfeinstellknopf auf Stufe ‘0’.
3. Drehen Sie den Temperaturschalter auf die gewünschte Stufe (siehe Tabelle unter
‘Bügelanweisungen’). Die Temperaturanzeigelampe geht an.
4. Stellen Sie das Bügeleisen auf das Bügelheck und warten Sie, bis die Temperaturanzeigelampe
erlischt.
5. Bügeln Sie den Stoff, indem Sie mit dem Bügeleisen darüber fahren.Das Heizelement schaltet sich
während des Bügelns ständig ein und aus, um die Temperatur der Bügelsohle konstant zu halten. Die
Temperaturanzeigelampe schaltet sich folglich auch ein und aus.
6. Stellen Sie nach der Benutzung den Temperaturschalter auf Stufe “0”, ziehen Sie den Stecker aus der
Steckdose und stellen Sie das Bügeleisen auf das Bügelheck, damit es abkühlen kann.
11
9
7
6
5
4
3
10
MAX
2
1
8
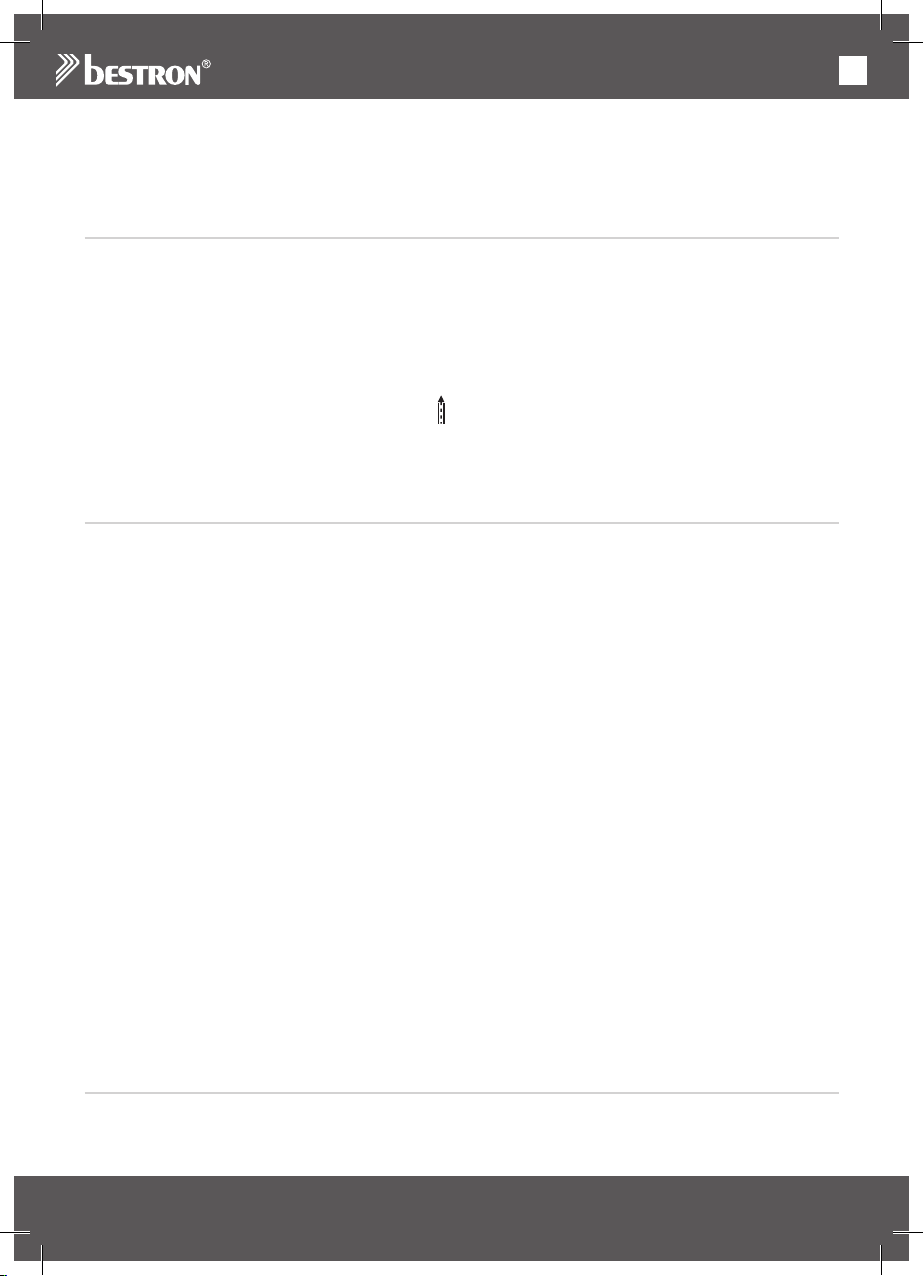
BENUTZUNG - Wasserbehälter füllen
1. Ziehen Sie den Stecker aus der Steckdose.
2. Stellen Sie den Dampfeinstellknopf auf Stufe ’0’.
3. Füllen Sie diesen mit sauberem Leitungswasser.
Verwenden Sie hierzu den mitgelieferten
Füllbecher (siehe Abbildung 2).
4. Trocknen Sie die Außenseite des Bügeleisens mit
einem trockenen Tuch ab.
ACHTUNG:
• Befüllen Sie den Wasserbehälter nicht über den
Maximalwert. Überprüfen Sie dies, indem Sie
das Bügeleisen aufrecht stellen. Überschüssiges
Wasser im Vorratsbehälter könnte während des
Betriebs überlaufen und einen Kurzschluss verursachen.
MAX
7
Page 8
DE
BENUTZUNG - Sprühfunction verwenden
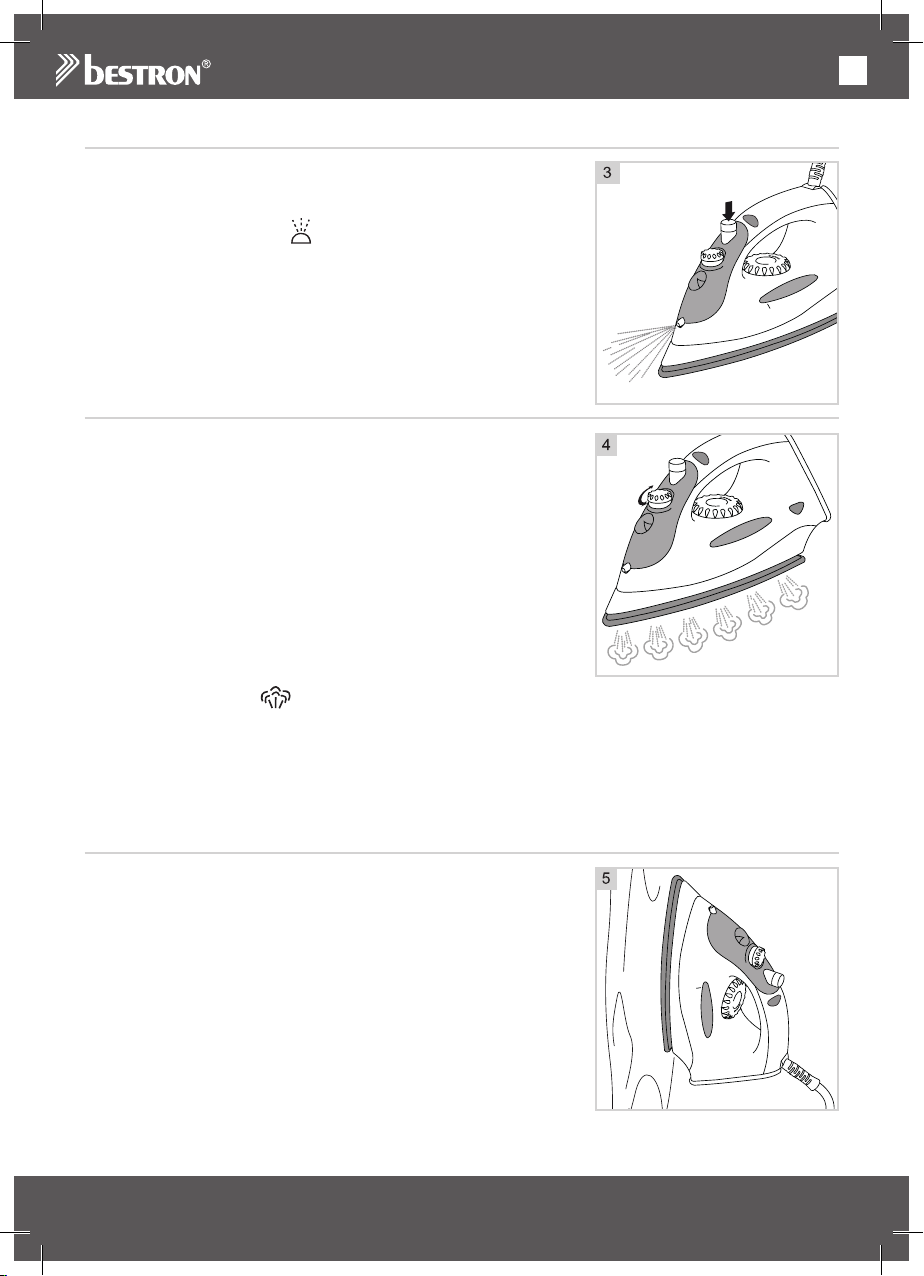
Mit der Sprühfunktion können Sie den Stoff, den Sie
gerade bügeln, befeuchten. Damit können Sie eventuelle
Knitter im Stoff besser entfernen. Die Sprühfunktion
können Sie bei jeder Temperatur verwenden, indem
Sie den Wahlknopf auf Stufe
drücken Sie danach darauf (siehe Abbildung 3).
ACHTUNG:
• Damit Sie die Sprühfunktion verwenden können,
muss im Wasserbehälter ausreichend Wasser
vorhanden sein.
BENUTZUNG - Dampfbügeln
1. Füllen Sie den Wasserbehälter mit Wasser (siehe
‘Behälter mit Wasser füllen’).
2. Stecken Sie den Stecker in die Steckdose.
3. Drehen Sie den Temperaturschalter innerhalb des
“Dampfbereichs“ auf die gewünschte Stufe (siehe
Tabelle unter ‘Bügelanweisungen’). Die
Temperaturanzeigelampe geht an.
4. Stellen Sie das Bügeleisen auf das Bügelheck und
warten Sie, bis die Temperaturanzeigelampe erlischt.
5. Stellen Sie mithilfe des Dampfeinstellknopfs die
gewünschte Dampfmenge ein (siehe Abbildung 4).
6. Bügeln Sie den Stoff, indem Sie mit dem Bügeleisen
darüber fahren.Das Heizelement schaltet sich
während des Bügelns ständig ein und aus, um die Temperatur
der Bügelsohle konstant zu halten. Die Temperaturanzeigelampe
schaltet sich folglich auch ein und aus.
7. Die Dampfstoßfunktion können Sie verwenden, indem Sie den
Wahlknopf auf Stufe
8. Stellen Sie nach der Benutzung den Temperaturschalter auf Stufe “0“, ziehen Sie den Stecker aus der
Steckdose und stellen Sie das Bügeleisen auf das Bügelheck, damit es abkühlen kann.
ACHTUNG:
• Wenn die Temperatur zu niedrig eingestellt ist, kann Wasser aus der Bügelsohle austreten. Dies kann
Flecken verursachen. Wenn Sie Wassertropfen sehen, sollten Sie den Temperaturregler auf den
empfohlenen Bereich stellen. Sobald die richtige Temperatur erreicht ist, wird Dampf abgegeben.
stellen und
MAX
stellen und drücken Sie danach darauf.
BENUTZUNG - Vertikal Bügeln
1. Stecken Sie den Stecker in die Steckdose.
2. Drehen Sie den Temperaturschalter auf die Stufe “MAX“.Die
Temperaturanzeigelampe geht an.
3. Stellen Sie das Bügeleisen auf das Bügelheck und warten Sie, bis
die
Temperaturanzeigelampe erlischt.
4. Halten Sie das Bügeleisen auf die Rückseite des zu bügelnden
Stoffes (siehe Abbildung 5).
5. Bewegen Sie das Bügeleisen am Stoff entlang.Das Heizelement
schaltet sich während des Bügelns ständig ein und aus, um die
Temperatur der Bügelsohle konstant zu halten.
Die Temperaturanzeigelampe schaltet sich folglich auch ein und
aus.
6. Stellen Sie nach der Benutzung den Temperaturschalter auf Stufe
“0“, ziehen
MAX
8
Page 9
DE
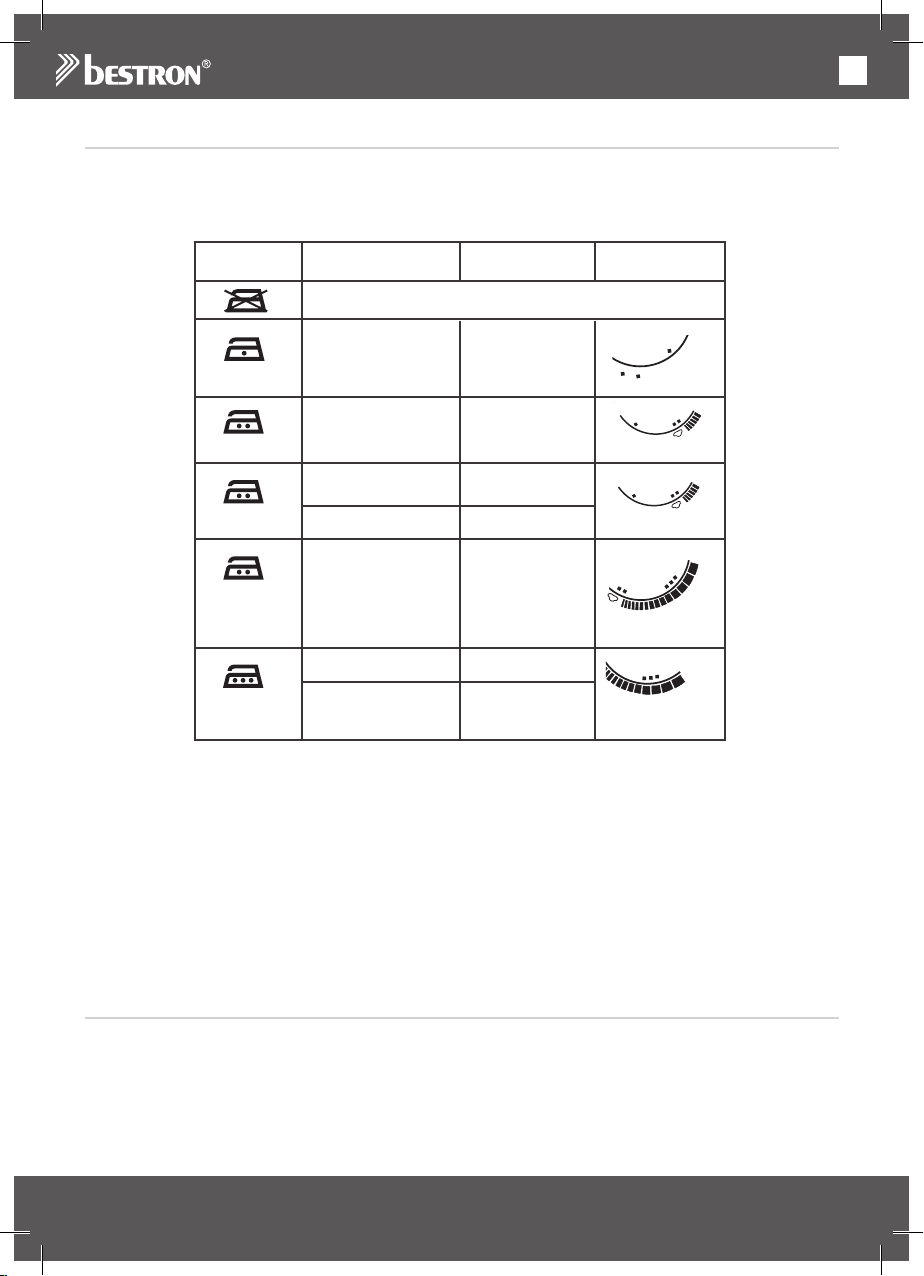
BENUTZUNG - Bügelanwisungen
NYLON
NYLON
RAYON
WOOL
CO
WOOL
COTTON
LINEN
MAX
COTTON
LINEN
MAX
NYLON
RAYON
WOOL
CO
• Überprüfen Sie vor dem Bügeln, ob sich an dem Kleidungsstück, das Sie bügeln wollen, ein Etikett mit
Bügelanweisungen befindet. Richten Sie sich immer nach diesen Anweisungen. In der unten
stehenden Tabelle werden die möglichen Symbole auf einem Etikett erläutert.
• Wenn ein Etikett fehlt, aber Sie trotzdem wissen, aus welchem Stoff das Kleidungsstück besteht, dann
richten Sie sich nach den Bügelanweisungen in der folgenden Tabelle
Symbol Textilsorte MaterialTemperatur-
Der Artikel darf nicht gebügelt werden.
SynthetischAcryl
SynthetischAcetat
Polypropylen
Polyurethan
Nylon
schalter
SynthetischPolyester
SeideSeide
WolleWolle
Baumwolle Baumwolle
Leinen Leinen
• Die vorgeschriebenen Temperatureinstellungen gelten nur für die genannten Materialien. Bügeln Sie
Stoffe, die glänzen oder auf denen Drucke angebracht sind, auf niedriger Temperatur.
• Sortieren Sie die Stoffe nach Bügeltemperatur: Wolle zu Wolle, Baumwolle zu Baumwolle etc.
• Bügeln Sie zuerst die Kleidungsstücke, die auf niedriger Temperatur gebügelt werden müssen und erst
danach die Kleidungsstücke, die auf einer höheren Temperatur gebügelt werden müssen. Das
Bügeleisen wird nämlich schneller warm, als dass es sich abkühlt.
• Wenn ein Stoff beispielsweise aus 60% Polyester und 40% Baumwolle besteht, dann nehmen Sie die
niedrigste Bügeltemperatur, also die für Polyester.
• Wenn Sie nicht wissen, aus welchem Stoff ein Kleidungsstück besteht, dann beginnen Sie mit der
niedrigsten Temperatur. Bügeln Sie an einer unauffälligen Stelle, zum Beispiel an der Innenseite des
Kleidungsstücks.
• Reine Wollstoffe (100% Wolle) können Sie mit Dampf bügeln. Verwenden Sie vorzugsweise ein
trockenes Bügeltuch. Sie können Wollstoffe am besten an der Innenseite bügeln.
• Bügeln Sie Samt und andere Stoffe, auf denen schnell glänzende Flecken entstehen, immer in eine
Richtung und üben Sie dabei nur geringen Druck aus.
Viskose
Dampf oder trocken
Dampf oder trocken
REINIGUNG UND WARTUNG
1. Stellen Sie den Dampfeinstellknopf auf Stufe ’0’.
2. Drehen Sie den Temperaturschalter auf die Stufe “0“.
3. Ziehen Sie den Stecker aus der Steckdose.
4. Stellen Sie das Bügeleisen auf das Bügelheck und lassen Sie das Gerät komplett abkühlen.
5. Entfernen Sie eventuell im Wasserbehälter zurückgebliebenes Wasser, indem Sie das Bügeleisen über
ein Waschbecken verkehrt herum halten.
6. Reinigen Sie die Bügelsohle mit einem Tuch und einer Wasser-Essiglösung.
7. Verstauen Sie das Bügeleisen.
9
Page 10
DE
ACHTUNG:
• Verwenden Sie nie Metallgegenstände oder einen Scheuerschwamm, um die Bügelsohle zu
reinigen. Diese können die Bügelsohle beschädigen.
• Verwenden Sie zur Reinigung keine aggressiven Reinigungs- oder Scheuermittel oder scharfen
Gegenstände (wie Messer oder harte Bürsten).
REINIGUNG UND WARTUNG - Selbstreinigungssysteem
Um die Lebensdauer Ihres Bügeleisens zu verlängern, müssen Sie es 1 bis 2 Mal pro Monat wie folgt
reinigen:
1. Drehen Sie den Dampfeinstellknopf auf Stufe „0“.
2. Füllen Sie den Wasserbehälter bis zur Anzeige „max“ mit Wasser.
3. Stecken Sie den Stecker in die Steckdose und stellen Sie den Temperaturschalter auf die Stufe „max“.
4. Stellen Sie das Bügeleisen auf das Bügelheck und warten Sie, bis die Temperaturanzeigelampe
erlischt.
5. Ziehen Sie den Stecker aus der Steckdose.
6. Halten Sie das Bügeleisen mit der Bügelsohle nach unten horizontal über ein Waschbecken.
7. Drehen Sie den Dampfeinstellknopf auf Stufe
8. Wenn der Dampf abnimmt, dann drehen Sie den Dampfeinstellknopf wieder auf die Stufe „0“.
9. Stecken Sie den Stecker in die Steckdose und lassen Sie das Bügeleisen auf Temperatur kommen.
10. Fahren Sie mit dem Bügeleisen über ein altes Handtuch, um das restliche Wasser verdampfen zu
lassen.
GARANTIEBESTIMMUNGEN
Bestron handhabt unter den folgenden Bedingungen eine Garantie von 60 Monaten ab Kaufdatum gegen
Defekte, die durch Herstellungs- und/oder Materialfehler entstanden sind.
1. Im genannten Garantiezeitraum werden keine Kosten für Arbeitslohn und Material berechnet.
2. Die unter der Garantie ausgeführte Reparatur verlängert nicht die Garantiefrist.
3. Defekte Zubehörteile oder bei Umtausch die defekten Geräte selbst werden automatisch Eigentum von
Bestron.
4. Die Garantie gilt ausschließlich für den ersten Käufer und ist nicht übertragbar.
5. Die Garantie gilt nicht für einen Schaden, der entstanden ist durch:
• Unfälle
• falsche Benutzung
• Verschleiß
• Verwahrlosung
• Fehlerhafte Installation
• Anschluss an eine andere Netzspannung als die, die auf dem Typenschild genannt ist
• Unautorisierte Veränderung
• Von nicht qualifizierten Dritten ausgeführte Reparaturen
• Benutzung entgegen den geltenden gesetzlichen, technischen oder Sicherheitsnormen
• Unsorgfältigen Transport ohne geeignete Verpackung oder anderen Schutz
6. Ein Anspruch auf Garantie kann nicht erhoben werden bei:
• Einem Schaden während des Transports
• Der Entfernung oder Änderung der Seriennummer des Gerätes
7. Von der Garantie ausgenommen sind:
• Kabel
• Lampen
• Zubehörteile aus Glas
8. Die Garantie berechtigt neben dem Ersatz beziehungsweise der Reparatur der defekten Zubehörteile
nicht zu irgendeiner Erstattung eines eventuellen Schadens. Bestron kann nie für einen eventuellen
Folgeschaden oder irgendwelche andere Konsequenzen, die durch oder in Bezug auf das von ihr
gelieferte Gerät entstanden sind, haftbar gemacht werden.
9. Der Garantieanspruch kann nur bei Ihrem (Web-)Händler oder direkt beim Bestron Kundendienst geltend
gemacht werden. Senden Sie ein Gerät nicht ohne vorherige Rücksprache zurück. Das Paket kann dann
abgelehnt werden und eventuelle Kosten gehen zu Ihren Lasten. Nehmen Sie erst für Anweisungen,
wie Sie das Gerät einpacken und versenden müssen, Kontakt auf. Jedem Garantieanspruch muss der
Kaufbeleg beigefügt werden.
SERVICE
Sollte sich unverhofft eine Störung ergeben, dann können Sie mit dem BESTRON-Kundendienst Kontakt
aufnehmen: www.bestron.com/service
.
10
Page 11

FR
FÉLICITATIONS !
Nous vous félicitons pour l’achat de votre produit Bestron. Dans le présent
manuel d’utilisation, nous vous expliquons comment celui fonctionne et
comment vous devez l’utiliser. Nous vous invitons par conséquent à
lire attentivement les instructions d’utilisation avant d’utiliser l’appareil.
Lorsque vous l’utilisez, prenez soin de suivre parfaitement les instructions
d’utilisation. Conserver-les précautionneusement.
En cas de dysfonctionnement :
Si l’appareil devait malencontreusement ne plus fonctionner, n’essayez
jamais de le réparer vous-même. Vous devez laisser le soin de le faire à
un réparateur/technicien qualifié.
Utilisation par des enfants :
• Cet appareil ne peut être utilisé par des enfants ni par des
personnes dont les facultés physiques, sensorielles ou psychiques
sont diminuées ou des personnes n’ayant ni l’expérience ni les
connaissances requises.
• Le nettoyage et l’entretien ne peuvent être effectués par des enfants.
• Gardez l’appareil et le câble hors de la portée des enfants lorsque ce
dernier est allumé ou en train de refroidir.
• Veillez à toujours surveiller les enfants de sorte à vous assurer qu’ils
ne jouent pas avec l’appareil.
11
Page 12

FR
CE QUE VOUS DEVEZ SAVOIR AU SUJET DES APPAREILS
ÉLECTRIQUES
• Avant toute utilisation, vérifiez que la tension électrique du réseau
correspond à la tension électrique indiquée sur la plaque signalétique
de l’appareil concerné.
• Contrôlez que la prise à laquelle vous raccordez l’appareil électrique
est reliée à la terre.
• Veillez toujours à placer les appareils électriques sur une surface
stable et plane et à un endroit où celui-ci ne peut pas tomber.
• Certains éléments d’un appareil électrique peuvent devenir chauds
ou parfois même brûlants. Prenez soin de ne pas les toucher afin
d’éviter de vous brûler.
• Assurez-vous que vos mains sont sèches lorsque vous touchez un
appareil électrique, un fil/câble ou une prise.
• Les appareils électriques doivent pouvoir libérer la chaleur qu’ils
produisent de sorte à éviter tout risque d’incendie. Vérifiez par
conséquent s’il y a suffisamment d’espace autour de l’appareil et
faites en sorte que celui-ci ne puisse entrer en contact avec du
matériel inflammable. Les appareils électriques ne doivent jamais
être couverts.
• Assurez-vous que les appareils électriques, les fils/câbles ou les
prises n’entrent pas en contact avec de l’eau.
• N’immergez jamais des appareils électriques, des fils/câbles ou
prises dans de l’eau ou dans un autre liquide.
• Ne saisissez jamais un appareil électrique lorsque celui-ci est tombé
dans l’eau. Débranchez-le immédiatement et ne l’utilisez plus.
• Assurez-vous que les appareils électriques, les fils/câbles ou les
prises n’entrent pas en contact avec des sources de chaleur comme
une plaque de cuisson brûlante ou avec du feu.
• Ne laissez pas pendre des fils/câbles sur le rebord d’un évier, d’un
plan de travail ou d’une table.
• Débranchez toujours l’appareil de la prise de contact lorsque vous
ne l’utilisez pas.
• Lorsque vous débranchez l’appareil de la prise de contact, prenez
soin de tirer en saisissant la partie dure de la prise mâle et non pas
en tirant sur le fil/câble.
• Contrôlez régulièrement si le fil/câble de l’appareil électrique est
encore intact. N’utilisez pas l’appareil si le fil/câble présente des
signes d’endommagement. Si le fil/câble est endommagé, celui-ci
doit être remplacé par le fabricant, par un service technique ou par
une personne ayant une compétence/qualification similaire, ceci afin
d’éviter tout danger.
• L’appareil ne peut être mis en marche en ayant recours à une
minuterie externe ou à un système séparé avec télécommande.
12
Page 13
FR
CE QUE VOUS DEVEZ SAVOIR AU SUJET DE CET APPAREIL
• Soyez prudent lorsque vous utilisez l’appareil à l’extérieur.
• N’utilisez jamais l’appareil dans des pièces humides.
• Après utilisation, nettoyez soigneusement l’appareil (voir Nettoyage et
entretien).
• Never hold the iron upside down during use. Hot water could drip from
the iron and cause burns.
• Do not fill the water reservoir above the ‘max’ level. Verify by this by
standing the iron upright. Excess water in the reservoir could overflow
during use and cause a short circuit.
• Arrêtez d’utiliser le fer s’il est tombé, a des dommages visibles ou s’il
fuit.
• Ne laissez jamais le fer sans surveillance lorsqu’il est connecté
ENVIRONNEMENT
• Débarrassez-vous du matériel d’emballage comme le plastique et
les boîtes dans les containers destinés à cet effet.
• À la fin de sa durée de vie, ne jetez pas ce produit comme un
simple déchet ménager mais remettez-le à un centre de collecte
de recyclage des produits électriques et électroniques. Consultez
le symbole sur le produit, le mode d’emploi ou l’emballage.
• Les matériels/matériaux peuvent être réutilisés comme indiqué.
En apportant votre aide au recyclage et au traitement des
matériels/matériaux ou à tout autre forme de réutilisation d’anciens
appareils, vous contribuez à la protection de l’environnement.
• Informez-vous auprès de votre commune pour obtenir la liste des
points de collecte à proximité de chez vous.
DÉCLARATION DE CONFORMITÉ CE
Ce produit répond aux exigences des directives Européennes.
R. Neyman
Contrôle qualité
13
Page 14
FR
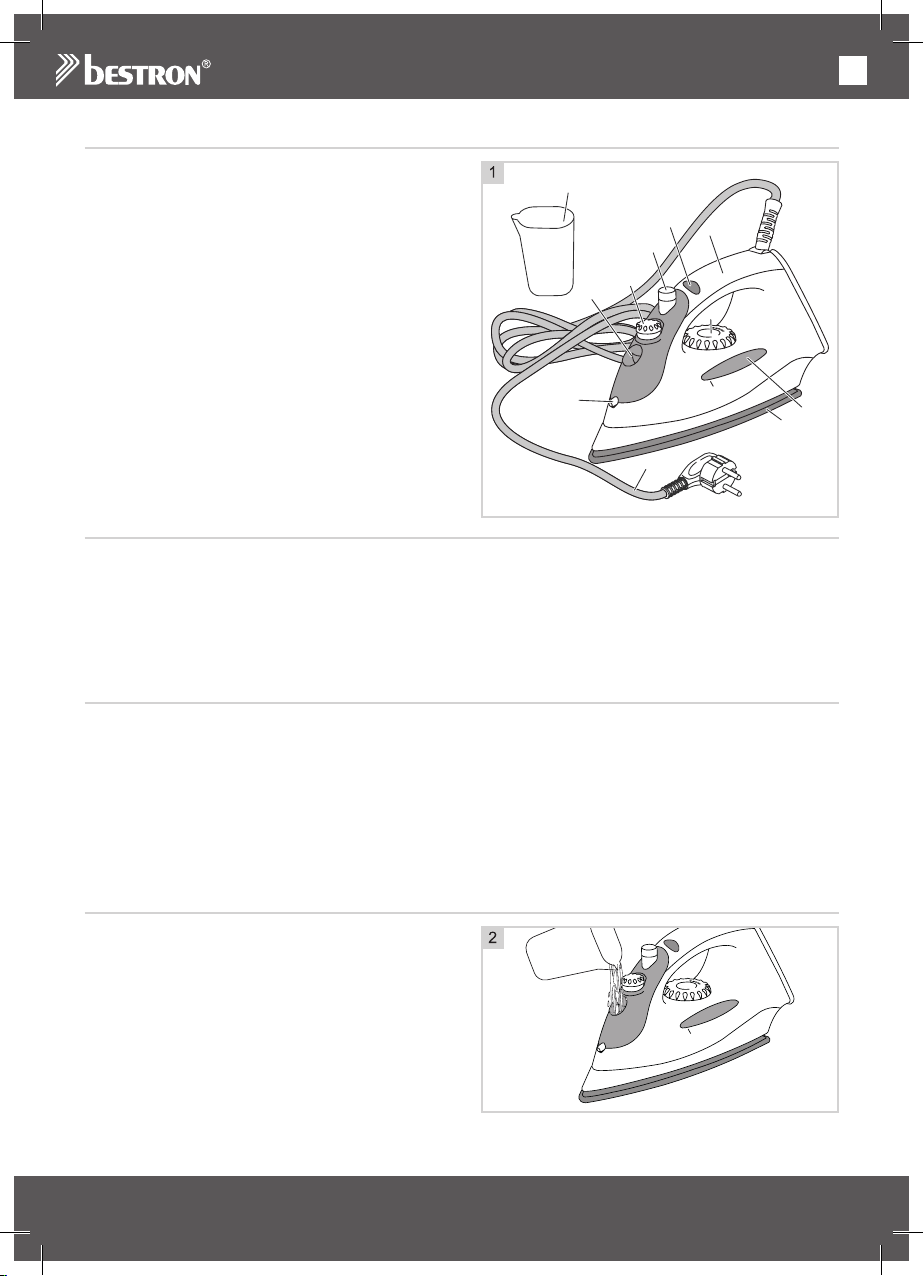
FONCTIONNEMENT - Généralités
Cet appareil est destiné uniquement à l’utilisation
domestique, et non à l’usage professionnel.
1. Une semelle en inox
2. Réservoir d’eau
3. Ouverture du spray
4. Orifice de remplissage
5. Réglage de la vapeur e bouton
d’auto-nettoyage
6. Bouton de fonction spray/coup de vapeur
7. Poignée
8. Cordon et fiche
9. Témoin indicateur de température
10. Bouton de réglage de la température
11. Godet de remplissage
AVANT LA PREMIÈRE UTILISATION
Lorsque vous utilisez le fer à repasser pour la première fois, essayez-le d’abord sur un chiffon pour contrôler
que la semelle et le réservoir d’eau sont propres. Ceci vaut aussi lorsqu’il y a longtemps que vous avez
utilisé le fer à repasser pour la dernière fois.
ATTENTION:
• Lorsque vous utilisez l’appareil pour la première fois, une légère fumée peut se développer, accompagnée
d’une odeur caractéristique. C’est un phénomène normal qui disparaît de lui-même. La ventilation doit
toujours être suffisante.
UTILISATION - Repassage à sec
1. Branchez la fiche.
2. Mettez le bouton de réglage de la vapeur sur la position ‘0’.
3. Mettez le bouton de réglage de la température sur la position désirée (voir le tableau sous ‘Instruction
de repassage’). Le témoin indicateur de température s’allume.
4. Posez le fer à repasser debout sur l’arrière et attendez que le témoin indicateur de température se soit
éteint.
5. Passez et repassez le fer à repasser sur l’étoffe pour la lisser.Pendant que l’appareil est en marche, la
résistance thermique s’allume et s’éteint pour maintenir la semelle du fer à repasser à température
constante. Le témoin indicateur de température s’allume et s’éteint donc lui aussi.
6. Quand vous avez fini d’utiliser l’appareil, mettez le bouton de réglage de la température sur la position
”0”, débranchez la fiche et posez le fer à repasser sur son arrière pour le laisser refroidir.
11
9
7
6
5
4
3
10
MAX
2
1
8
UTILISATION - Remplissage du réservoir d’eau
1. Débranchez la fiche.
2. Mettez le bouton de réglage de la vapeur sur la
position ‘0’.
3. Remplissez le réservoir d’eau avec de l’eau claire.
Servez-vous pour cela du godet de remplissage
fourni avec l’appareil.
4. Séchez bien l’extérieur du fer à repasser avec
un chiffon sec (voir la figure 2).
ATTENTION:
• Ne remplissez pas le réservoir d’eau au-dessus
du niveau maximum. Vérifiez par ceci en mettant
le fer à la verticale. L’excès d’eau dans le réservoir
pourrait déborder pendant l’utilisation et provoquer un court-circuit.
MAX
14
Page 15
FR
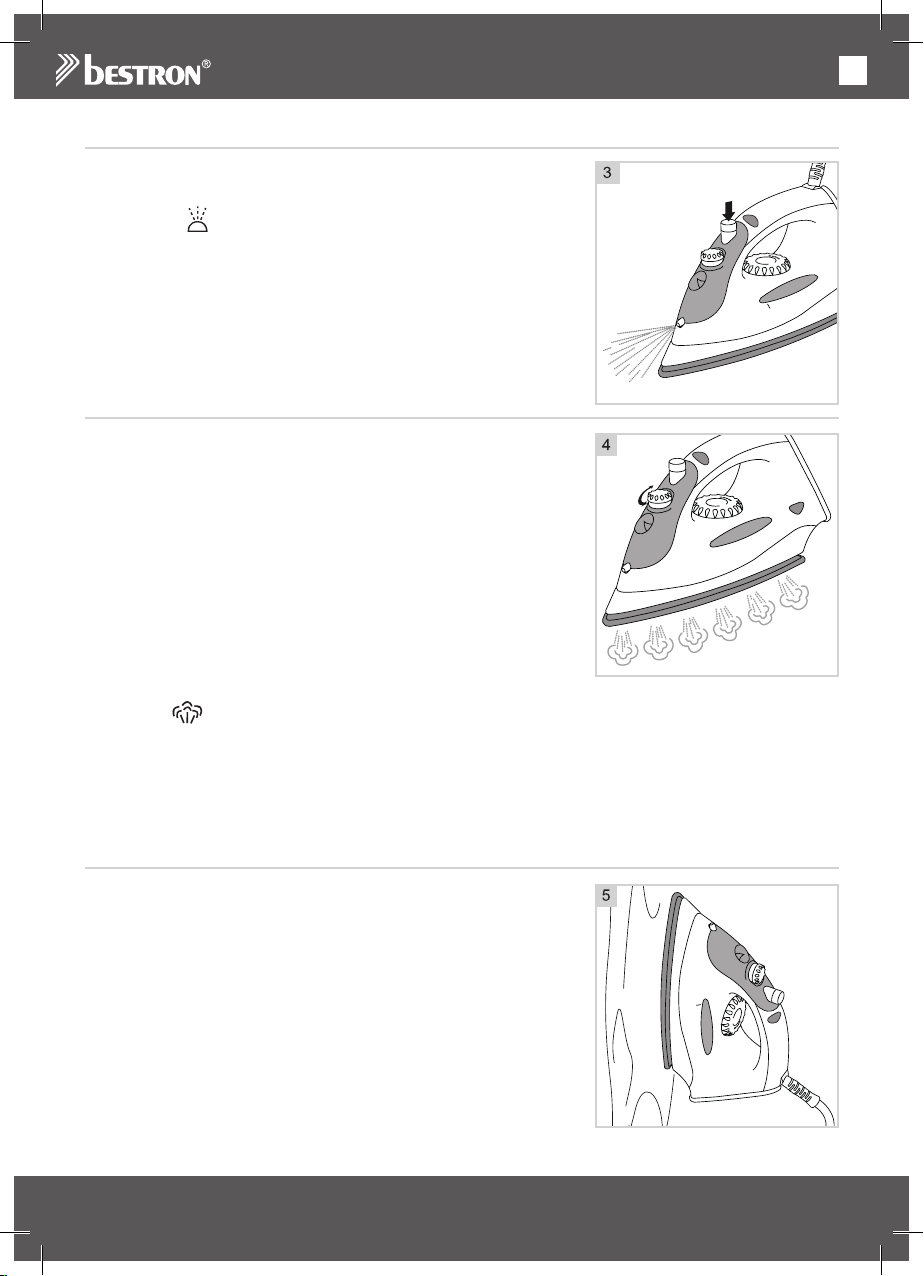
UTILISATION - Utilisation du spray
Le spray vous permet d’humecter l’étoffe que vous êtes en train de
repasser. Ceci aide à lisser l’étoffe. Vous pouvez utiliser le spray pour
tous les température: mettez le bouton de fonction spray
sur la position
ATTENTION:
• Il faut qu’il y a suffisamment d’eau dans le
réservoir pour que vous puissiez utiliser le spray.
UTILISATION - Rempassage à la vapeur
1. Remplissez le réservoir d’eau (voir ‘Remplissage
du réservoir’).
2. Branchez la fiche.
3. Mettez le bouton de réglage de la température
sur la position désirée, dans la zone ‘vapeur’
(voir le tableau sous ‘Instruction de repassage’).
Le témoin indicateur de température s’allume
4. Posez le fer à repasser debout sur l’arrière et
attendez que le témoin indicateur de température
se soit éteint.
5. Mettez le bouton de réglage de la vapeur sur la position désirée
pour la quantité de vapeur voulue (voir la figure 4).
6. Passez et repassez le fer à repasser sur l’étoffe pour la lisser.
Pendant que l’appareil est en marche, la
résistance thermique s’allume et s’éteint pour maintenir la semelle
du fer à repasser à température constante. Le témoin indicateur
de température s’allume et s’éteint donc lui aussi.
7. Le coup de vapeur s’utilise de cette maniere: mettez le bouton pour coup de vapeur sur la
position
8. Quand vous avez fini d’utiliser l’appareil, mettez le bouton de réglage de la température sur la position
‘0’, débranchez la fiche et posez le fer à repasser sur son arrière pour le laisser refroidir.
ATTENTION:
• L’eau peut fuir de la semelle si la température est trop basse. Cela peut causer des taches. Si vous
voyez des gouttes d’eau, tournez le bouton de réglage de la température sur la plage recommandée.
La vapeur sera émise une fois la température correcte atteinte.
et il suffit d’appuyer sur le bouton (voir la figure 3).
MAX
et il suffit d’appuyer sur le bouton.
UTILISATION - Repassage à la verticale
1. Branchez la fiche.
2. Mettez le bouton de réglage de la température sur la position
‘MAX’.Le témoin indicateur de température s’allume.
3. Posez le fer à repasser debout sur l’arrière et attendez que le
témoin
indicateur de température se soit éteint.
4. Tenez le fer à repasser devant l’étoffe à repasser, dressé sur
l’arrière,
la semelle à la verticale (voir la figure 5).
5. Passer le fer à repasser devant l’étoffe.Pendant que l’appareil
est en marche, la résistance thermique s’allume et s’éteint pour
maintenir la semelle du fer à repasser à température constante.
Le témoin
indicateur de température s’allume et s’éteint donc lui aussi.
6. Quand vous avez fini d’utiliser l’appareil, mettez le bouton de
réglage de la température sur la position ‘0’, débranchez la fiche
et posez le fer à repasser sur son arrière pour le laisser refroidir.
MAX
15
Page 16
FR
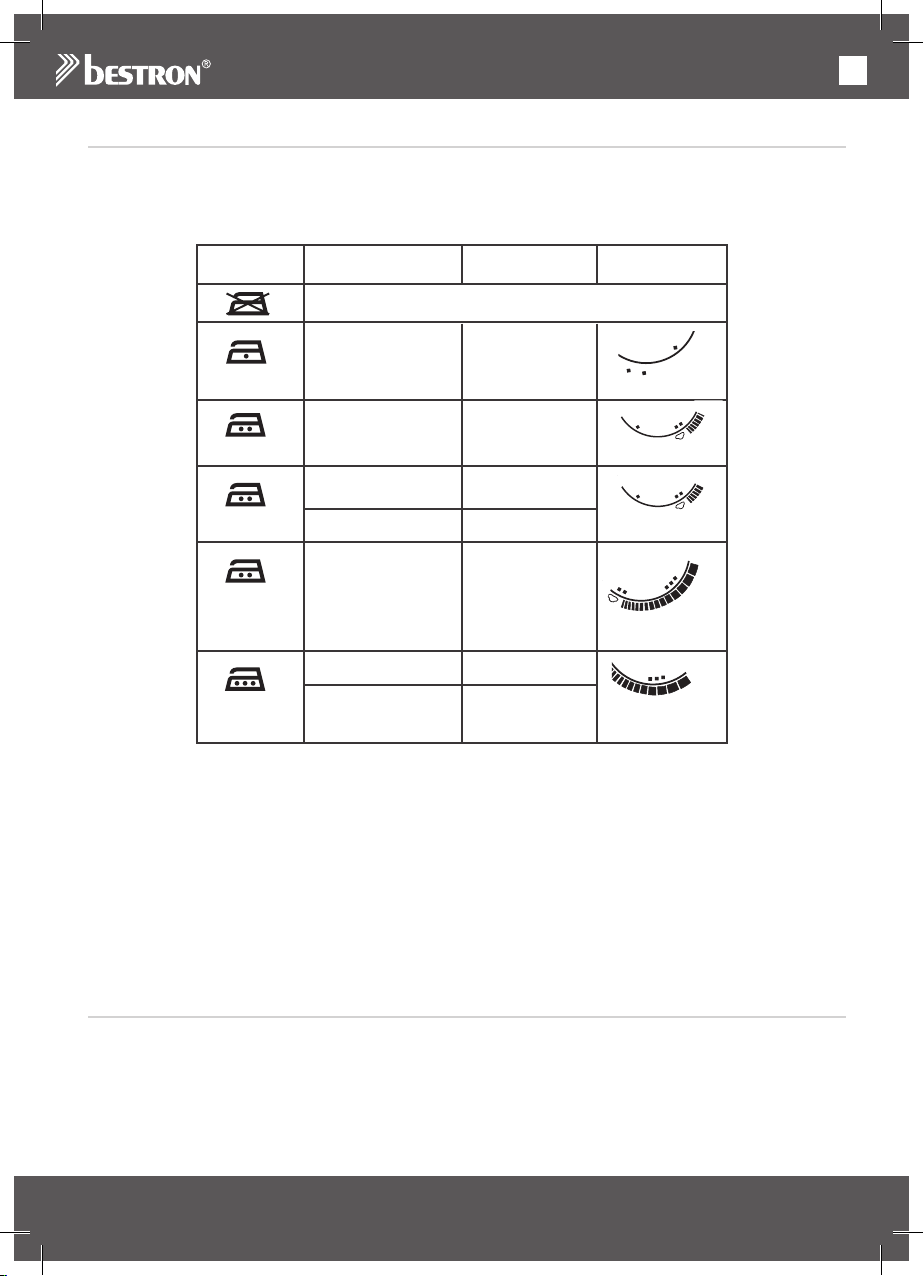
UTILISATION - Instruction de repassage
N
NYLON
RAYON
WOOL
CO
WOOL
COTTON
LINEN
MAX
COTTON
LINEN
MAX
NYLON
RAYON
WOOL
CO
• Avant de repasser un textile, cherchez s’il a un étiquette donnant des instructions d’entretien. Suivez
toujours ces instructions. Voir le tableau cidessous pour l’explication des symboles pouvant figurer sur
l’étiquette.
• Dans le cas où il n’y a pas d’étiquette, mais où vous connaissez la composition du textile, suivez les
instructions du tableau ci-dessous.
SymboleTextile Matériaux Position
Le textile ne doit jamais être repassé
SynthétiqueAcrylique
SynthétiqueAcétate
Polypropylène
Polyuréthane
Nylon
température
NYLO
SynthétiquePolyester
SoieSoie
Laine Laine
Coton Coton
Lin Lin
• Les positions indiquées pour la température ne sont valables que pour les matériaux indiqués.
Lorsqu’une étoffe a été apprêtée (lustrage, relief), repassez-la à une température plus basse.
• Triez vos textiles selon la température à laquelle vous les repassez : la laine avec la laine, le coton
avec le coton, et ainsi de suite.
• Commencez par les textiles à repasser à basse température, et poursuivez par ceux qui demandent
une température plus élevée. En effet, le fer à repasser se réchauffe plus rapidement qu’il ne se
refroidit.
• Si un textile se compose de 60% de polyester et de 40% de coton, retenez la température de
repassage la plus basse, celle du polyester.
• Si vous ne connaissez pas la composition d’un textile, commencez par la température la plus basse.
Choisissez un endroit caché, à l’intérieur d’un vêtement par exemple.
• Les étoffes de pure laine (100% laine) peuvent être pressées à la vapeur. Utilisez alors une
pattemouille. Il est recommandé de presser les étoffes de laine à l’intérieur.
• Dans le cas des velours et autres textiles où le repassage laisse facilement des taches luisantes,
faites attention à repasser toujours dans la même direction et à ne pas appuyer trop fort sur le fer
Viscose
à vapeur ou à sec
à vapeur ou à sec
NETTOYAGE ET ENTRETIEN
1. Mettez le bouton de réglage de la vapeur sur la position ‘0’.
2. Mettez le bouton de réglage de la température sur la position ‘0’.
3. Débranchez la fiche.
4. Posez le fer à repasser sur son arrière et laissez refroidir complètement l’appareil.
5. S’il reste de l’eau dans le réservoir, videz-le: tenez le fer à repasser à l’envers au-dessus de l’évier.
6. Nettoyez la semelle avec un chiffon et un peu d’eau vinaigrée.
7. Rangez le fer à repasser.
16
Page 17
FR
ATTENTION:
• N’utilisez jamais d’objets métalliques ni d’éponge à récurer pour le nettoyage la semelle. Ils
peuvent endommager la semelle.
• N’utilisez pas de détergents agressifs ou décapants ni d’objets tranchants (tels que couteaux ou
brosses dures) pour le nettoyage.
NETTOYAGE ET ENTRETIEN - Système autonettoyant
Vous prolongerez la durée de vie du fer à repasser, vous le nettoyez 1 à 2 fois par mois selon la procédure
suivante:
1. Mettez le bouton de réglage de la vapeur sur la position ‘0’.
2. Remplissez le réservoir d’eau jusqu’au niveau ‘max’.
3. Branchez la fiche et mettez le bouton de réglage de la température sur la position ‘max’.
4. Posez le fer à repasser debout sur l’arrière et attendez que le témoin indicateur de température se soit
éteint.
5. Débranchez la fiche.
6. Tenez le fer à repasser au dessus de l’évier, la semelle dirigée vers le bas, à l’horizontale.
7. Mettez le bouton de réglage de la vapeur sur la position
8. Lorsque la vapeur diminue, remettez le bouton de réglage de la vapeur sur la position ‘0’.
9. Branchez la fiche et attendez que le fer à repasser atteigne la température réglée.
10. Passez le fer à repasser sur un vieux linge pour laisser s’évaporer le reste de l’eau.
DISPOSITIONS CONCERNANT LA GARANTIE
Le présent produit Bestron bénéficie – aux conditions ci-après – d’une garantie de 60 mois suivant la date
d’achat et couvrant toute panne résultant d’un défaut/vice de fabrication et/ou de fonctionnement.
1. Pendant la période de garantie précitée, aucun frais ne sera facturé au titre des coûts de main-d’œuvre
et de matériel.
2. Les réparations effectuées au cours de la période de garantie n’entraînent pas de prolongation du délai
de garantie.
3. Les éléments/composantes défectueux – ou l’appareil lui-même en cas d’échange de l’appareil – devi-
ennent automatiquement la propriété de Bestron.
4. La garantie profite exclusivement au premier acheteur et n’est pas transmissible.
5. La garantie ne joue pas pour les dommages résultant :
• D’accidents
• D’une utilisation inappropriée
• De l’usure
• D’une manipulation négligente
• D’une installation erronée
• Du raccordement à un réseau électrique autre que celui indiqué sur la plaque signalétique
• De modifications non autorisées apportées à l’appareil
• De réparations effectuées par des personnes non qualifiées
• D’une utilisation contraire aux normes légales, techniques ou de sécurité s’appliquant
• D’un transport négligent sans utiliser un emballage adéquat ou une autre protection
6. Il n’est pas possible de mettre en œuvre la garantie en cas de :
• Dommages apparus pendant le transport
• Suppression ou modification du numéro de série de l’appareil
7. Ne bénéficient pas de la garantie :
• Les fils/câbles
• Les lampes
• Les parties/composantes en verre
8. La garantie ne donne pas droit à l’indemnisation d’éventuels dommages en sus du remplacement ou de
la réparation des parties/composantes défectueuses. La responsabilité de Bestron ne peut jamais être
engagée pour les éventuels dommages consécutifs ou pour toute autre conséquence causés l’appareil
livré par Bestron ou en relation avec celui-ci.
9. Pour faire jouer la garantie, il convient de s’adresser au vendeur (sur Internet) ou directement au
Service assistance de Bestron. N’envoyez jamais un article de votre propre initiative. Le paquet peut
être en effet refusé et les éventuels frais seront à votre charge. Contactez d’abord le vendeur ou le
Service assistance de Bestron qui vous indiqueront comment vous devez emballer l’appareil et comment l’expédier. Toute demande de mise en œuvre de la garantie doit être accompagnée d’une preuve
d’achat.
SERVICE
En cas de panne ou de dysfonctionnement de votre appareil, contactez le service assistance de
BESTRON : www.bestron.com/service
.
17
Page 18

NL
PROFICIAT!
Proficiat met de aankoop van dit Bestron-product. In deze
gebruiksaanwijzing leggen we de werking en het gebruik uit. Lees
de gebruiksaanwijzing dus aandachtig door vóór u het apparaat
gaat gebruiken. Gebruik het apparaat alleen zoals beschreven in de
gebruiksaanwijzing. Bewaar de gebruiksaanwijzing daarna zorgvuldig.
Bij een defect:
Mocht het apparaat onverhoopt defect raken, probeer dan nooit zélf
de reparatie uit te voeren. Laat reparaties altijd uitvoeren door een
gekwalificeerde monteur.
Gebruik door kinderen:
• Dit apparaat mag niet worden gebruikt door kinderen en personen
met verminderde lichamelijke, zintuiglijke of geestelijke vermogens
of gebrek aan ervaring en kennis.
• Reiniging en onderhoud moeten niet worden gedaan door
kinderen.
• Houd het toestel en de kabel buiten bereik van kinderen wanneer
deze aanstaat of staat af te koelen.
• Kinderen moeten in de gaten gehouden worden om er zeker van te
zijn dat ze niet met het apparaat spelen.
18
Page 19

NL
WAT U MOET WETEN OVER ELEKTRISCHE APPARATEN
• Controleer of de netspanning overeenkomt met de aangegeven
netspanning op het typeplaatje van een elektrisch apparaat, voordat
u het gebruikt.
• Controleer of het stopcontact waarop u een elektrisch apparaat
aansluit, geaard is.
• Plaats elektrische apparaten altijd op een stabiele en vlakke
ondergrond, op een plaats waar het niet kan vallen.
• Bepaalde delen van een elektrisch apparaat kunnen warm of zelfs
heet worden. Raak deze niet aan om te voorkomen dat u zich
verbrandt.
• Zorg ervoor dat uw handen droog zijn als u een elektrisch apparaat,
een snoer of een stekker aanraakt.
• Elektrische apparaten moeten hun warmte kwijt kunnen om
brandgevaar te voorkomen. Zorg er dus voor dat het apparaat
voldoende vrij is en niet in contact kan komen met brandbaar
materiaal. Elektrische apparaten mogen nooit worden bedekt.
• Zorg ervoor dat elektrische apparaten, snoeren of stekkers niet in
aanraking komen met water.
• Dompel elektrische apparaten, snoeren of stekkers nooit onder in
water of een andere vloeistof.
• Pak elektrische apparaten niet op wanneer ze in het water zijn
gevallen. Trek direct de stekker uit het stopcontact. Gebruik het
apparaat niet meer.
• Zorg ervoor dat elektrische apparaten, snoeren en stekkers niet in
aanraking komen met hittebronnen, zoals een hete kookplaat of
open vuur.
• Laat snoeren niet over de rand van het aanrecht, werkblad of een
tafel hangen.
• Haal stekkers altijd uit het stopcontact wanneer u het elektrisch
apparaat niet gebruikt.
• Als u de stekker uit het stopcontact neemt, trek dan aan de stekker
zelf en niet aan het snoer.
• Controleer regelmatig of het snoer van het elektrisch apparaat nog
intact is. Gebruik het apparaat niet als het snoer beschadigingen
vertoont. Als het snoer beschadigd is, moet het vervangen worden
door de fabrikant, een technische servicedienst of een persoon met
een gelijkaardige kwalificatie, om elk gevaar te vermijden.
• Het apparaat mag niet in werking worden gesteld door middel van
een externe tijdschakelaar, of door een afzonderlijk systeem met
afstandsbediening.
19
Page 20
NL
WAT U MOET WETEN OVER DIT APPARAAT
• Wees voorzichtig wanneer u het apparaat buitenshuis gebruikt.
• Gebruik het apparaat nooit in vochtige ruimten.
• Maak het apparaat na gebruik grondig schoon (zie Reiniging en
onderhoud).
• Houd het strijkijzer nooit ondersteboven tijdens het gebruik. Heet
water kan uit het strijkijzer druppelen en brandwonden veroorzaken.
• Vul het waterreservoir niet boven het ‘max’-niveau. Controleer dit
door het strijkijzer rechtop te zetten. Overtollig water in het reservoir
kan tijdens gebruik overlopen en kortsluiting veroorzaken.
• Gebruik het strijkijzer niet meer als deze is gevallen, zichtbare
schade heeft of als het lekt.
• Laat het strijkijzer nooit onbeheerd achter als deze is aangesloten
MILIEU
• Werp verpakkingsmateriaal zoals plastic en dozen in de
daarvoor bestemde containers.
• Dit product aan het eind van de gebruiksduur niet inleveren
als normaal huishoudelijk afval, maar bij een inzamelpunt voor
hergebruik van elektrische en elektronische apparatuur. Let
op het symbool op het product, de gebruiksaanwijzing of de
verpakking.
• De materialen kunnen hergebruikt worden zoals aangegeven.
Door uw hulp bij hergebruik, de verwerking van de materialen
of ander vormen van de benutting van oude apparatuur levert
u een belangrijke bijdrage aan de bescherming van ons
milieu.
• Informeer bij de gemeente naar het juiste inzamelpunt bij u in
de buurt.
EU-CONFORMITEITSVERKLARING
Dit product voldoet aan de eisen volgens de Europese richtlijnen.
R. Neyman
Quality control
20
Page 21
NL
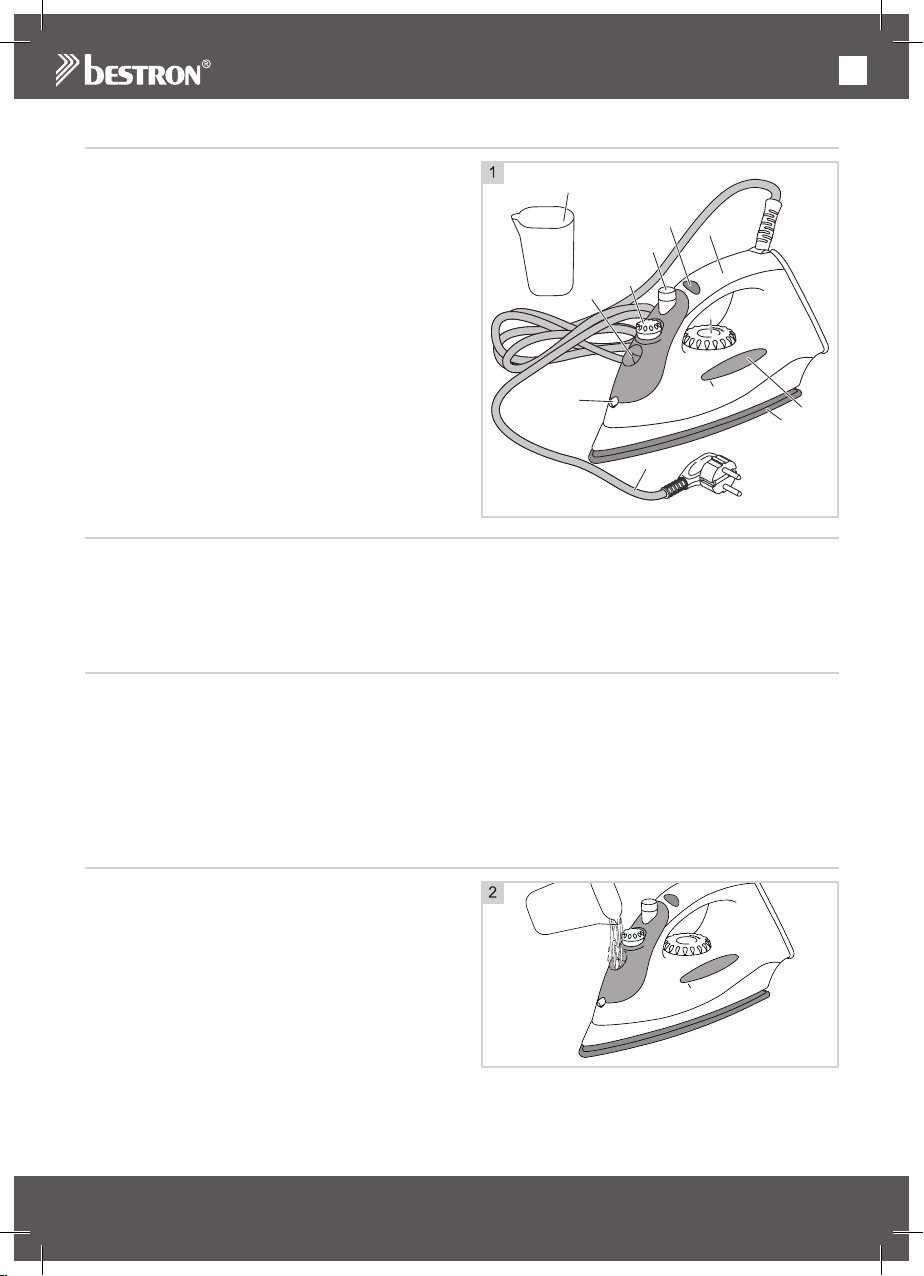
WERKING - ALGEMEEN
Het apparaat is alleen bedoeld voor huishoudelijke
doeleinden, niet voor professioneel gebruik.
1. Roestvrijstalen strijkzool
2. Waterreservoir
3. Sproeigaatje
4. Vulopening waterreservoir
5. Stoominstelknop en zelfreinigingsknop
6. Keuzeknop stoom/sproei
7. Handgreep
8. Snoer en stekker
9. Temperatuurindicatielampje
10. Temperatuurknop
11. Vulbeker
VOOR HET EERSTE GEBRUIK
Als u het strijkijzer voor de eerste keer gebruikt, test het dan op een oud stukje stof om te controleren of
de strijkzool en het waterreservoir schoon zijn. Doe dit ook als u het strijkijzer lange tijd niet heeft gebruikt.
LET OP:
• De eerste keer dat u het apparaat in gebruik neemt, kan er lichte rookontwikkeling en een specifieke
geur ontstaan. Dit is normaal en zal vanzelf verdwijnen. Zorg voor voldoende ventilatie.
11
9
7
6
5
4
3
10
MAX
2
1
8
GEBRUIK - Droog strijken
1. Steek de stekker in het stopcontact.
2. Draai de stoominstelknop naar de positie “0”.
3. Draai de temperatuurschakelaar naar de gewenste positie (zie tabel bij ‘Strijkinstructies’). Het
temperatuurindicatielampje gaat aan.
4 Zet het strijkijzer rechtop en wacht totdat het temperatuurindicatielampje is uitgegaan.
5. Strijk de stof door het strijkijzer over de stof te bewegen.Tijdens het strijken zal het
verwarmingselement continu in- en uitschakelen om de temperatuur van de strijkzool constant te
houden. Het temperatuurindicatielampje zal dus ook aanen uitgaan.
6. Draai na gebruik de temperatuurschakelaar naar de positie “0”, neem de stekker uit het stopcontact en
zet het strijkijzer op de achterkant om af te koelen.
GEBRUIK - Waterreservoir vullen
1. Neem de stekker uit het stopcontact.
2. Zet de stoominstelknop in de positie “0”.
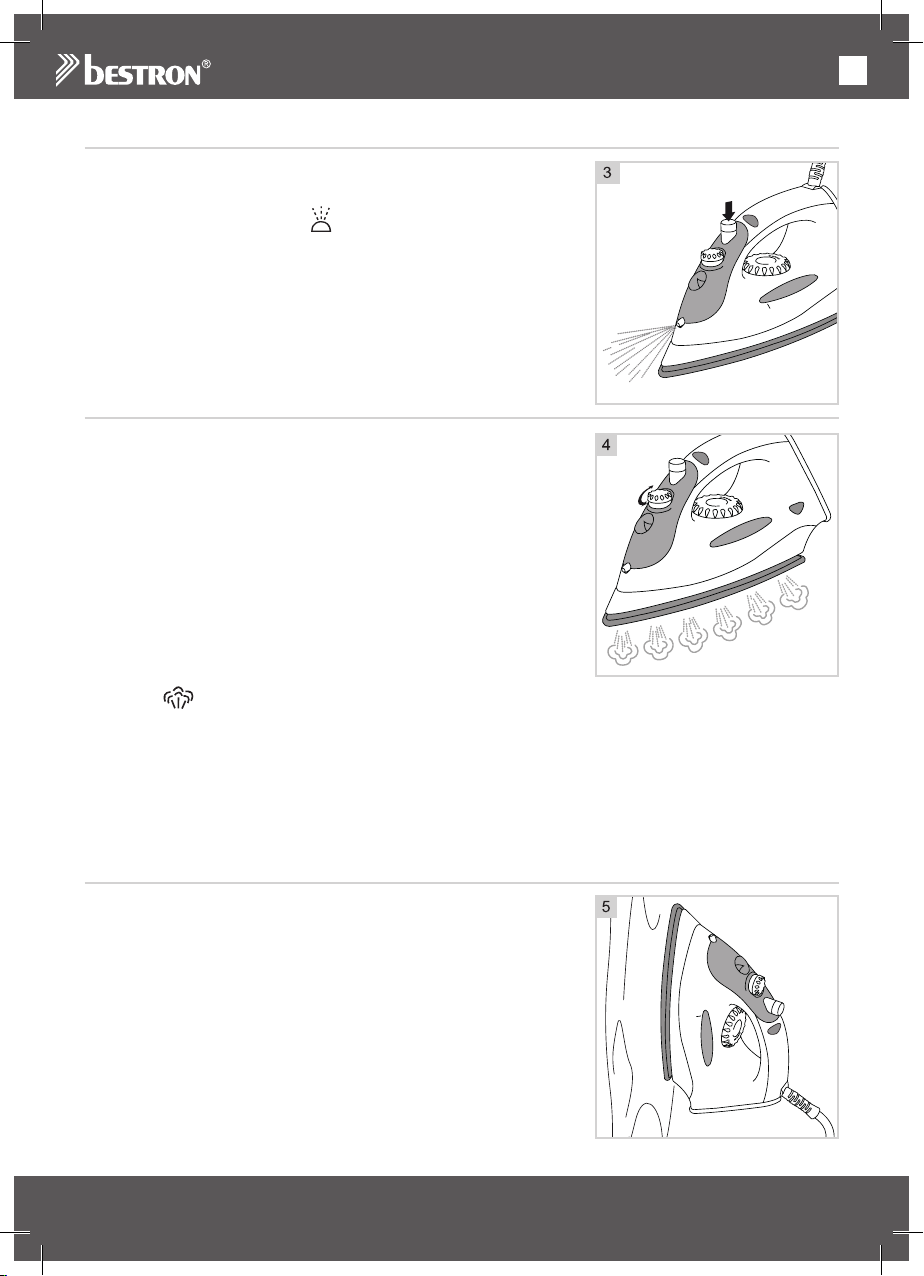
3. Vul het waterreservoir met schoon kraanwater.
Gebruik hiervoor de meegeleverde vulbeker.
4. Droog de buitenzijde van het strijkijzer met een
droge doek.
LET OP:
• Vul het waterreservoir niet boven het ‘max’niveau. Controleer dit door het strijkijzer rechtop te
zetten. Overtollig water in het reservoir kan tijdens
gebruik overlopen en kortsluiting veroorzaken
MAX
21
Page 22
NL
GEBRUIK - Sproeifunctie
Met de sproeifunctie kunt u de stof die u aan het strijken bent, nat
maken. Het is dan eenvoudiger om eventuele kreukels in de stof te
verwijderen. De sproeifunctie kunt u bij elke temperatuur gebruiken
door de keuzeknop naar positie
(zie figuur 3).
LET OP:
• Om de sproeifunctie te kunnen gebruiken moet er voldoende
water in het waterreservoir aanwezig zijn.
te draaien en daarna in te drukken
MAX
GEBRUIK - Stoomstrijken
1. Vul het waterreservoir met water (zie ‘Reservoir
met water vullen’).
2. Steek de stekker in het stopcontact.
3. Draai de temperatuurschakelaar naar de
gewenste positie binnen het ‘stoomgebied’
(zie tabel bij ‘Strijkinstructies’). Het temperatuur
indicatielampje gaat aan.
4. Zet het strijkijzer op de achterkant en wacht
totdat het temperatuurindicatielampje is uitgegaan.
5. Stel met behulp van de stoominstelknop de
gewenste hoeveelheid stoom in (zie figuur 4).
6. Strijk de stof door het strijkijzer over de stof te
bewegen.Tijdens het strijken zal het verwarmingselement continu
in- en uitschakelen om de temperatuur van de strijkzool constant
te houden. Het temperatuurindicatielampje zal dus ook
aanen uitgaan.
7. De stoomstootfunctie kunt u gebruiken door de keuzeknop naar
positie
8. Draai na gebruik de temperatuurschakelaar naar de positie ‘0’, neem de stekker uit het stopcontact en
zet het strijkijzer op de achterkant om af te koelen.
LET OP:
• Bij een te lage temperatuur kan er water uit de
strijkzool lekken. Dit kan vlekken veroorzaken.
Als dit gebeurt, draai dan de temperatuurschakelaar
naar de geadviseerde positie. Het stomen begint
weer als de juiste temperatuur is bereikt.
te draaien en daarna in te drukken.
GEBRUIK - Verticaal strijken
1. Steek de stekker in het stopcontact.
2. Draai de temperatuurschakelaar naar de positie ‘MAX’.Het
temperatuurindicatielampje gaat aan.
3. Zet het strijkijzer op de achterkant en wacht totdat het
temperatuurindicatielampje is uitgegaan.
4. Houd het strijkijzer op de achterkant voor de te strijken stof
(zie figuur 5).
5. Beweeg het strijkijzer langs de stof.Tijdens het strijken zal het
warmingselement continu in- en uitschakelen om de temperatuur
van de strijkzool constant te houden. Het temperatuurindicatielampje
zal dus ook aan- en uitgaan.
6. Draai na gebruik de temperatuurschakelaar naar de positie ‘0’,
neem de stekker uit het stopcontact en zet het strijkijzer op de
achterkant om af te koelen.
MAX
22
Page 23
NL
GEBRUIK - Strijkinstructies
NYLON
NYLON
RAYON
WOOL
CO
WOOL
COTTON
LINEN
MAX
COTTON
LINEN
MAX
NYLON
RAYON
WOOL
CO
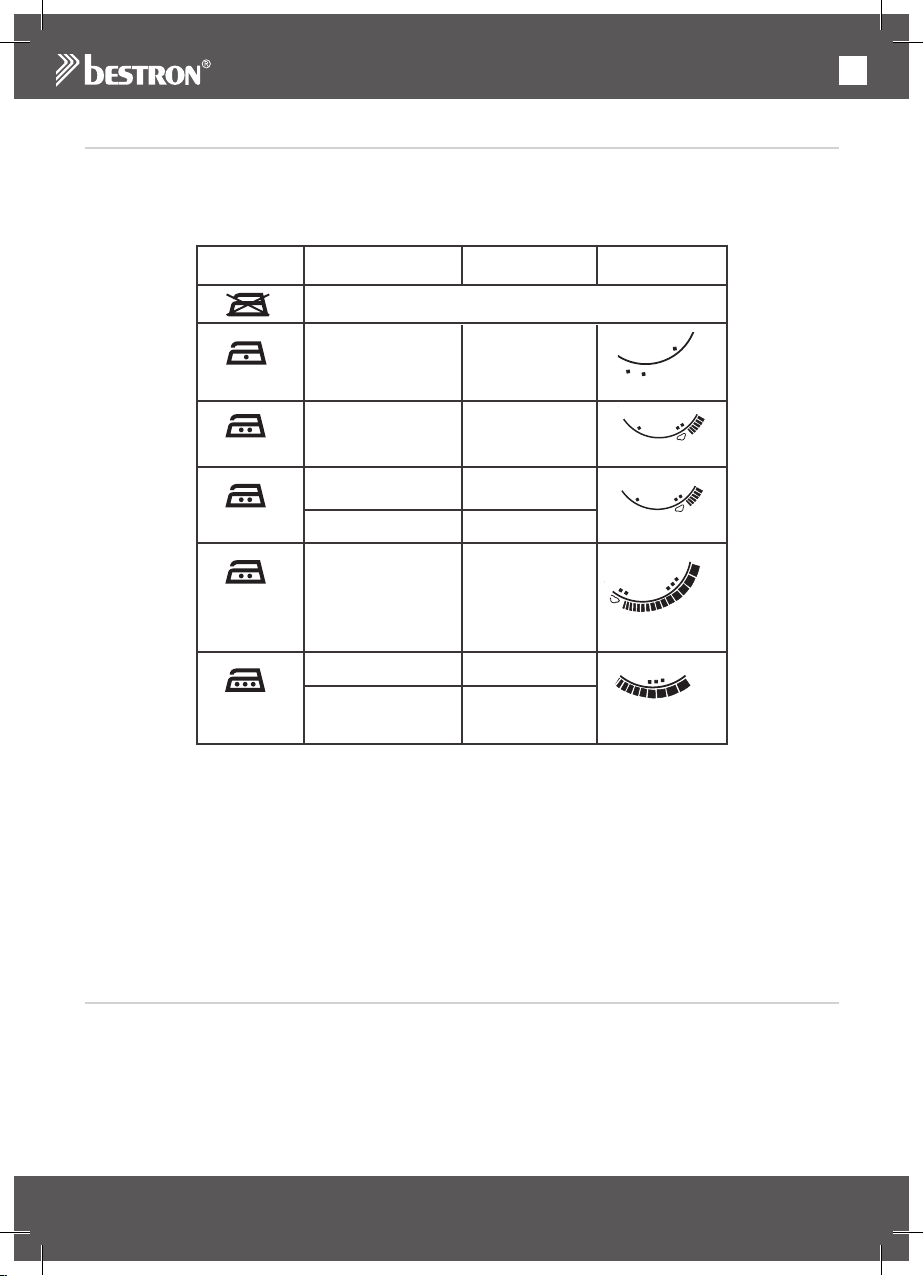
• Controleer voordat u gaat strijken of aan het kledingstuk dat u wilt strijken een label met
strijkinstructies is bevestigd. Volg deze instructies altijd op. Zie onderstaande tabel voor uitleg over de
mogelijke symbolen op een label.
• Als een label ontbreekt maar u weet wel uit welke stof het kledingstuk bestaat, volg dan de
strijkinstructies in de volgende tabel op.
Symbool Soort textiel MateriaalTemperatuur
Het artikel mag niet worden gestreken
schakelaar
SynthetischAcryl
SynthetischAcetaat
SynthetischPolyester
ZijdeZijde
WolWol
KatoenKatoen
Linnen Linnen
• De voorgeschreven temperatuurinstellingen gelden alleen voor de aangegeven materialen. Strijk
stoffen waar glans of reliëf op is aangebracht, op een lagere temperatuur.
• Sorteer de stoffen op strijktemperatuur: wol bij wol, katoen bij katoen, et cetera.
• Strijk eerst de kledingstukken die op een lage temperatuur moeten worden gestreken en pas daarna
de kledingstukken die op een hogere temperatuur moeten worden gestreken. Het strijkijzer wordt
namelijk sneller warm dan dat het afkoelt.
• Als een stof uit bijvoorbeeld 60% polyester en 40% katoen bestaat, houd dan de laagste
strijktemperatuur, dus die voor polyester, aan.
• Als u niet weet uit welke stof een kledingstuk bestaat, begin dat met de laagste temperatuur. Doe dit
op een onopvallende plaats, bijvoorbeeld aan de binnenzijde van het kledingstuk.
• Puur wollen stoffen (100% wol) kunt u met stoom persen. Gebruik bij voorkeur een droge persdoek. U
kunt de wollen stoffen het beste aan de binnenzijde persen.
• Strijk fluweel en andere stoffen waar snel glimmende vlekken op komen altijd in één richting; oefen
daarbij slechts lichte druk uit.
Polypropyleen
Polyurethaan
Nylon
Viscose
stoom of droog
stoom of droog
REINIGING EN ONDERHOUD
1. Zet de stoominstelknop in de positie ”0”.
2. Draai de temperatuurschakelaar naar de positie ‘0’.
3. Neem de stekker uit het stopcontact.
4. Zet het strijkijzer op de achterkant en laat het apparaat volledig afkoelen.
5. Verwijder eventueel resterend water uit het waterreservoir door het strijkijzer boven een wasbak
ondersteboven te houden.
6. Reinig de strijkzool met een doek en een water-azijnoplossing.
7. Berg het strijkijzer op.
23
Page 24
NL
LET OP:
• Gebruik nooit metalen voorwerpen of een schuursponsje om de strijkzool te reinigen. Deze kunnen
de strijkzool beschadigen.
• Gebruik geen agressieve of schurende schoonmaakmiddelen of scherpe voorwerpen (zoals
messen of harde borstels) bij het reinigen.
REINIGING EN ONDERHOUD - Zelfreinigend systeem
Om de levensduur van uw strijkijzer te verlengen moet u het strijkijzer 1 à 2 keer per
maand als volgt reinigen:
1. Draai de stoominstelknop naar de positie ‘0’.
2. Vul het waterreservoir tot de aanduiding ‘max’ met water.
3. Steek de stekker in het stopcontact en draai de temperatuurschakelaar naar de positie ‘max’.
4. Zet het strijkijzer op de achterkant en wacht totdat het temperatuurindicatielampje is uitgegaan.
5. Neem de stekker uit het stopcontact.
6. Houd het strijkijzer horizontaal boven een wasbak met de strijkzool naar beneden.
7. Draai de stoominstelknop naar de positie
8. Als de stoom afneemt, draai de stoominstelknop dan weer naar de positie ‘0’.
9. Steek de stekker in het stopcontact en laat het strijkijzer op temperatuur komen.
10. Strijk het strijkijzer over een oude handdoek om al het resterende water te laten verdampen.
GARANTIEBEPALINGEN
Bestron hanteert onder de volgende voorwaarden 60 maanden na aankoopdatum garantie op deze apparatuur tegen defecten die zijn ontstaan door fabricage- en/of materiaalfouten.
1. In de genoemde garantieperiode zullen geen kosten worden berekend voor arbeidsloon en materiaal.
2. De onder garantie uitgevoerde reparatie verlengt de garantietermijn niet.
3. Defecte onderdelen of bij omruiling de defecte apparaten zelf, worden automatisch eigendom van Bestron.
4. De garantie is uitsluitend geldig voor de eerste koper en niet overdraagbaar.
5. De garantie is niet geldig voor schade die is ontstaan door:
• Ongevallen
• Verkeerd gebruik
• Slijtage
• Verwaarlozing
• Foutieve installatie
• Aansluiting op een andere netspanning dan die op het typeplaatje is vermeld
• Ongeautoriseerde wijziging
• Reparaties uitgevoerd door niet-gekwalificeerde derden
• Gebruik in strijd met de geldende wettelijke, technische of veiligheidsnormen
• Onzorgvuldig transport zonder geschikte verpakking of andere bescherming
6. Aanspraak op garantie kan niet worden gedaan bij:
• Schade tijdens het transport
• Het verwijderen of wijzigen van het serienummer van het apparaat.
7. Uitgezonderd van garantie zijn:
• Snoeren
• Lampen
• Glazen onderdelen
8. De garantie geeft geen enkel recht op vergoeding van eventuele schade, buiten de vervanging respectievelijk reparatie van de defecte onderdelen. Bestron kan nooit aansprakelijk gesteld worden voor
eventuele vervolgschade of enigerlei andere consequenties die door of in relatie met de door hem
geleverde apparatuur zijn ontstaan.
9. Aanspraak op garantie kan alleen bij uw (web-)winkelier of rechtstreeks bij de Bestron Service Dienst.
Stuur echter nooit zomaar iets op. Het pakket kan dan namelijk geweigerd worden en eventuele kosten
zijn voor uw rekening. Neem eerst contact op voor aanwijzingen hoe u het apparaat moet inpakken en
verzenden. Elke aanspraak op garantie dient vergezeld te gaan van het aankoopbewijs.
SERVICE
Mocht zich onverhoopt een storing voordoen, dan kunt u contact opnemen met de BESTRON-servicedienst:
www.bestron.com/service
.
24
Page 25

EN
CONGRATULATIONS!
Congratulations with the purchase of this Bestron product. These
instructions tell you how the product works and how to use it. Read
the instructions carefully before you start using the appliance. Only use
the appliance in the manner described in the instructions. Keep these
instructions in a safe place for future reference.
Defects:
If the appliance is defective, do not try to repair it yourself. Always have
a qualified mechanic carry out any repairs.
Children:
• This device may not be used by children and persons with reduced
physical, sensory or mental capabilities or lack of experience and
know-how.
• Children are not allowed to clean or maintain the appliance.
• Keep the device and the cable out of the reach of children when it
is switched on or is cooling down.
• Keep an eye on children to ensure that they do not play with the
appliance.
25
Page 26

EN
WHAT YOU SHOULD KNOW ABOUT ELECTRICAL APPLIANCES
• Check that the mains voltage corresponds with that shown on the
rating plate of an electrical appliance before you use it.
• Check that the socket to which you connect the electrical appliance
is earthed.
• Always install electrical appliances on a stable and level surface
where it cannot fall over.
• Certain parts of an electrical appliance may become warm or
sometimes hot. Do not touch them as you may burn yourself.
• Make sure your hands are dry when you touch an electrical appliance,
a cord or a plug.
• Electrical appliances must be able to lose their heat to avoid fire
hazards. Therefore, make sure that the appliance has sufficient
clearance around it and that it does not come into contact with
flammable materials. Electrical appliances must never be covered.
• Make sure that electrical appliances, cords or plugs do not come into
contact with water.
• Never immerse electrical appliances, cords or plugs in water or any
other liquid.
• Do not touch electrical appliances if they have fallen in the water.
Immediately pull the plug out of the socket. Stop using the appliance.
• Make sure that electrical appliances, cords and plugs do not come
into contact with heat sources, such as a hot hob or open fire.
• Never let cords hang over the edge of the sink, a worktop or a table.
• Always remove plug from the socket when you are not using the
electrical appliance.
• Remove the plug from the socket by pulling the plug itself and not
the cord.
• Regularly check if the cord of the electrical appliance is not damaged.
Do not use the electrical appliance if the cord shows signs of damage.
If the cord is damaged, it should be replaced by the manufacturer, a
technical service provider or a person with an equivalent qualification,
to avoid any danger.
• The appliance may not be switched on with the aid of an external
time switch, or by a separate system with remote control.
26
Page 27
EN
WHAT YOU SHOULD KNOW ABOUT THIS APPLIANCE
• Be careful when using the appliance outdoors.
• Never use the appliance in damp or wet locations.
• Thoroughly clean the appliance after use (see Cleaning and
Maintenance).
• Never hold the iron upside down during use. Hot water could drip
from the iron and cause burns.
• Do not fill the water reservoir above the ‘max’ level. Verify by this
by standing the iron upright. Excess water in the reservoir could
overflow during use and cause a short circuit.
• Stop using the iron if it has been dropped, has visible damage or is
leaking.
• Never leave the iron unattended when it is connected
ENVIRONMENT
• Dispose of packaging material such as plastic and cardboard
boxes in the designated containers.
• Do not dispose of this product as normal domestic waste at the
end of its life, but hand it in at a collection point for the reuse of
electric and electronic equipment. Look for the symbol on the
product, the user instructions or the packaging showing the
type of waste.
• The materials can be used as indicated. By helping us
reuse and process the materials or otherwise recycle the
old equipment, you will be making an important contribution
towards the protection of the environment.
• Your municipality can tell you where to find the designated
waste collection point in your neighbourhood.
CE DECLARATION OF CONFORMITY
This product meets the requirements of European guidelines.
R. Neyman
Quality control
27
Page 28
EN
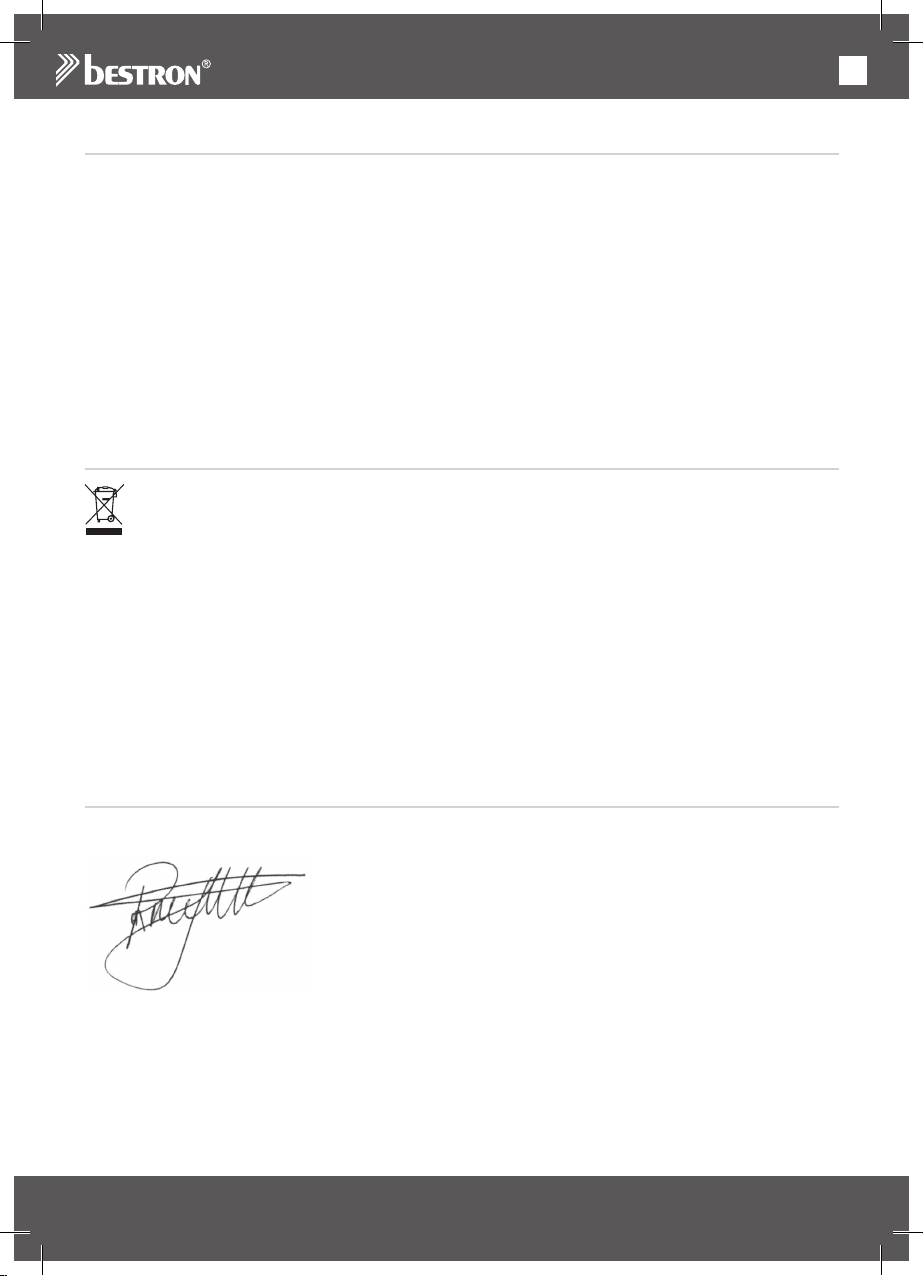
OPERATION - General
The appliance is intended only for domestic use,
not for professional use.
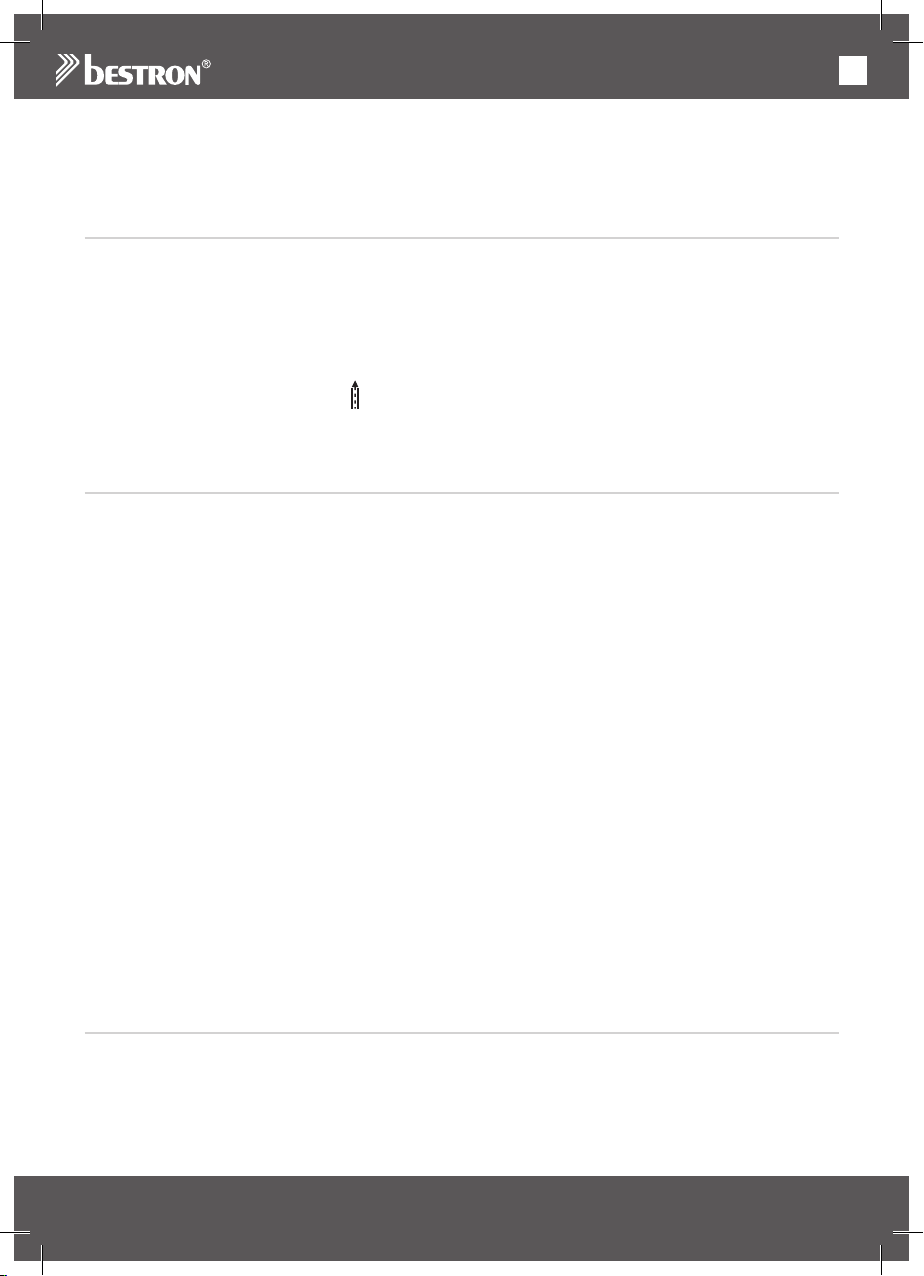
1. Stainless-steel soleplate
2. Water reservoir
3. Spray nozzle
4. Water filling funnel
5. Steam-control dial and self-cleaning button
6. Selection button steam/spray
7. Handle
8. Power cord and plug
9. Temperature-indication light
10. Temperature-control dial
11. Filling cup
BEFORE FIRST USE
Before using the steam iron for the first time begin by ironing a piece of old fabric to verify that the soleplate
and water reservoir are clean. Repeat this when the steam iron has not been used for a period of time.
WARNING:
• The appliance may emit a little smoke and a characteristic smell when you switch it on for the first time.
This is normal and will stop on its own. Make sure the appliance has sufficient ventilation.
11
9
7
6
5
4
3
10
MAX
2
1
8
USE - Dry ironing
1. Put the plug into the wall socket.
2. Turn the steam-control dial to the “0” position
3. Turn the temperature-control dial to the required position (see ‘Ironing instructions’). The temperature-
indication light will illuminate.
4. Put the steam iron upright and wait until the temperature-indication light extinguishes.
5. Iron the fabric by sliding the iron over the fabric. While you are ironing, the heating element will
automatically switch on and off to maintain the soleplate at the set temperature. Consequently the
temperature-indication light will also automatically illuminate and extinguish.
6. When you are finished, turn the temperature-control dial to the “0” position, remove the plug
from the wall socket and put the steam iron upright so it can cool down
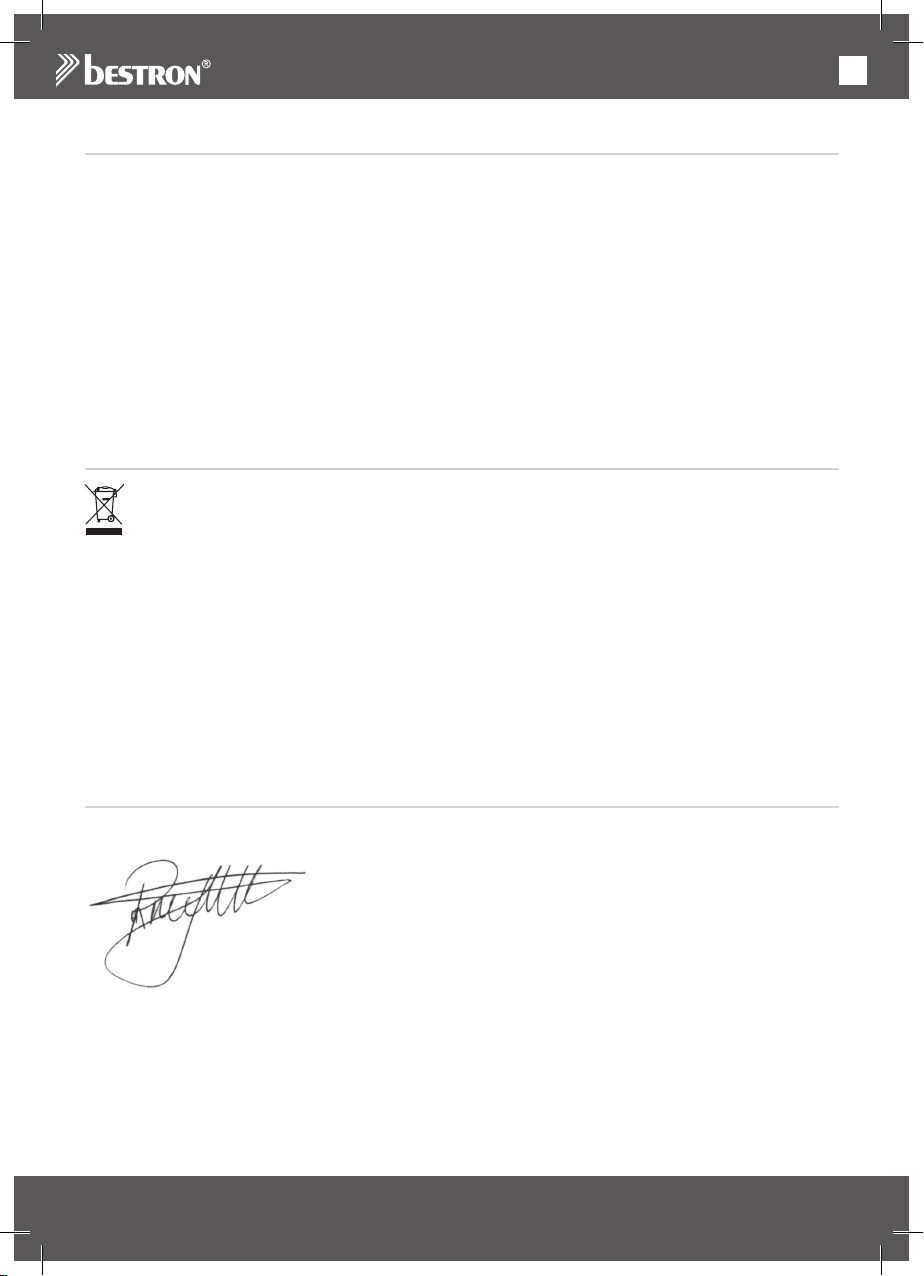
USE - Fillig the water reservoir
1. Remove the plug from the wall socket.
2. Turn the steam-control dial to the “0” position.
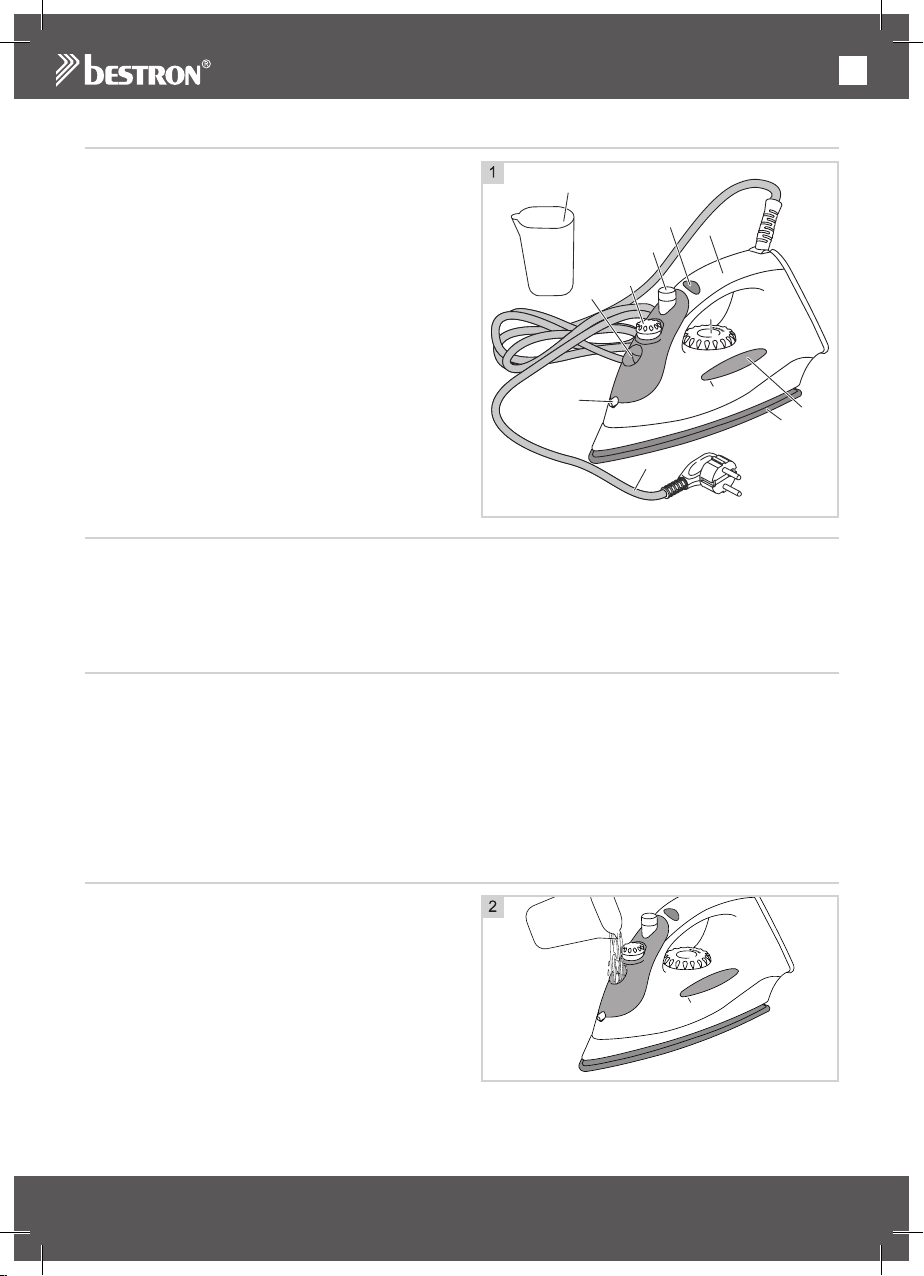
3. Fill the water reservoir with clean tap water. Use
the filling cup to fill the water reservoir.
4. Dry the exterior of the iron with a dry cloth (see
Figure 2).
WARNING:
• Do not fill the water reservoir above the ‘max’ level.
Verify by this by putting the iron upright. Excess
water in the reservoir could overflow during use
and cause a short circuit.
28
MAX
Page 29
EN
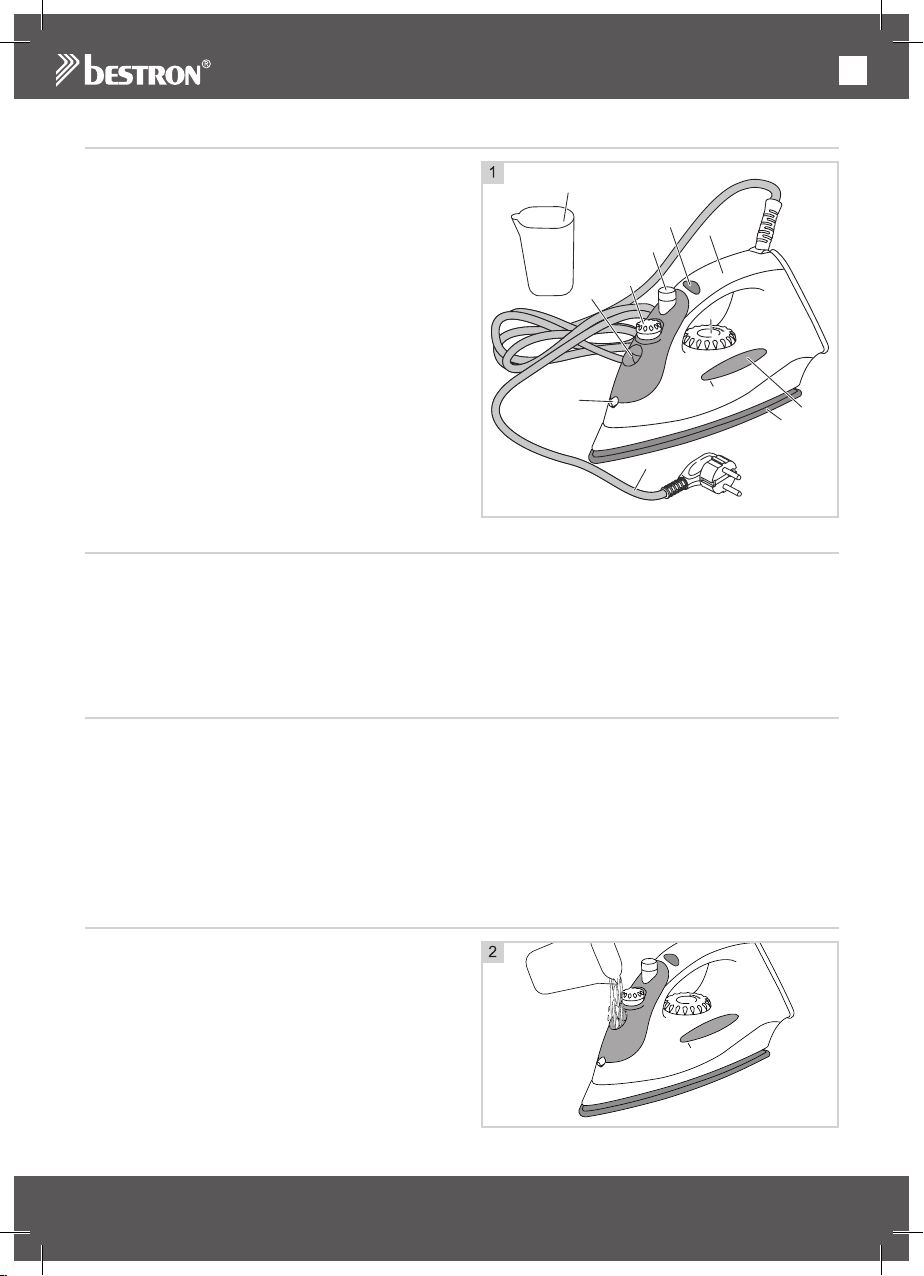
USE - Spray function
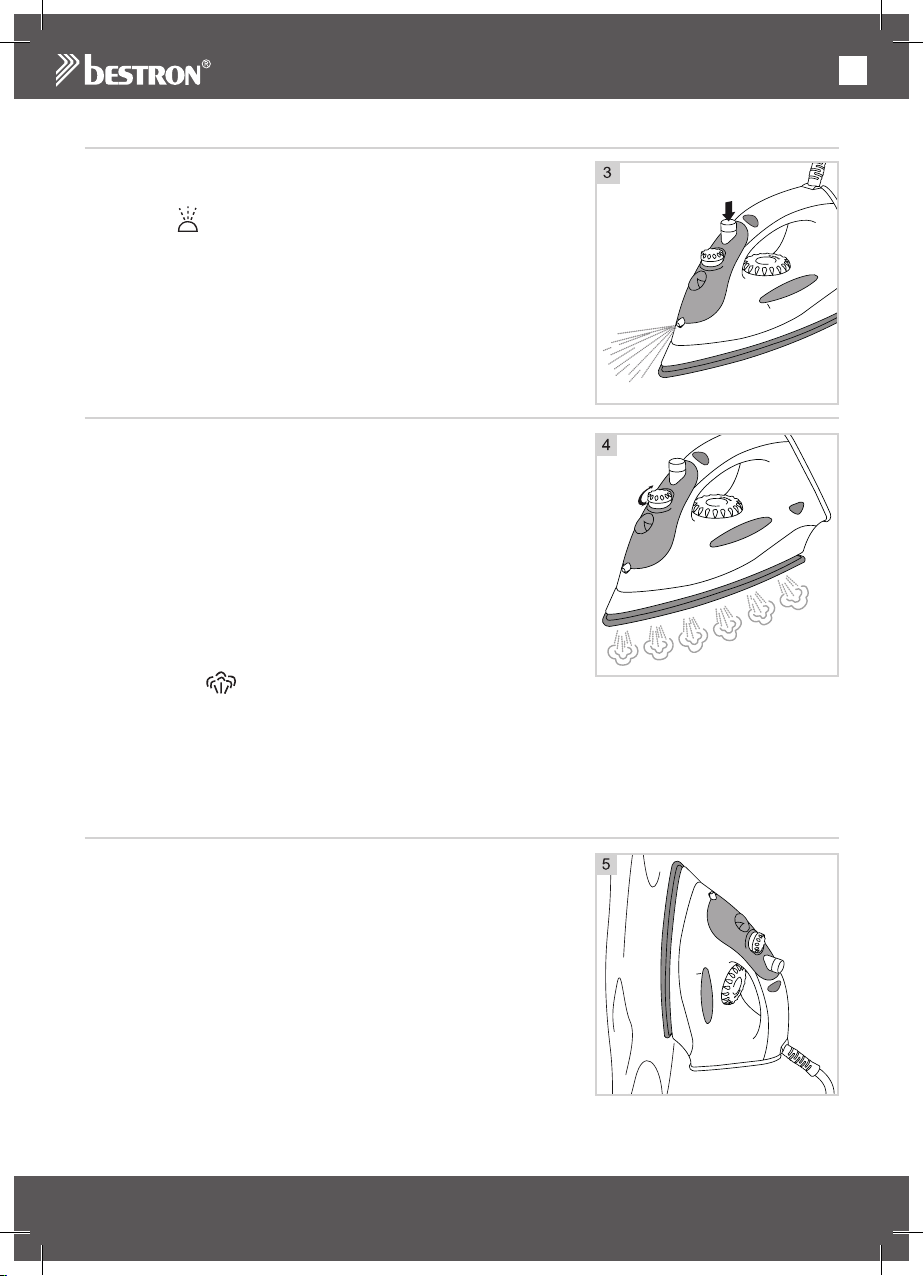
You can use the spray function to moisten the fabric. Moistening the
fabric makes it easier to smoothen any wrinkles. You can use the spray
function at any temperature by switching the selection
button to the
WARNING:
• The spray function can only be used when the water reservoir
contains sufficient water.
position and then press it (see figure 3).
MAX
USE - Steam ironing
1. Fill the water reservoir with clean tap water (see ‘Filling the water
reservoir’).
2. Put the plug into the wall socket.
3. Turn the temperature-control dial to the required position within
the ‘steam range’ (see ‘Ironing instructions’). The temperatureindication light will illuminate.
4. Put the steam iron upright and wait until the
temperature-indication light extinguishes.
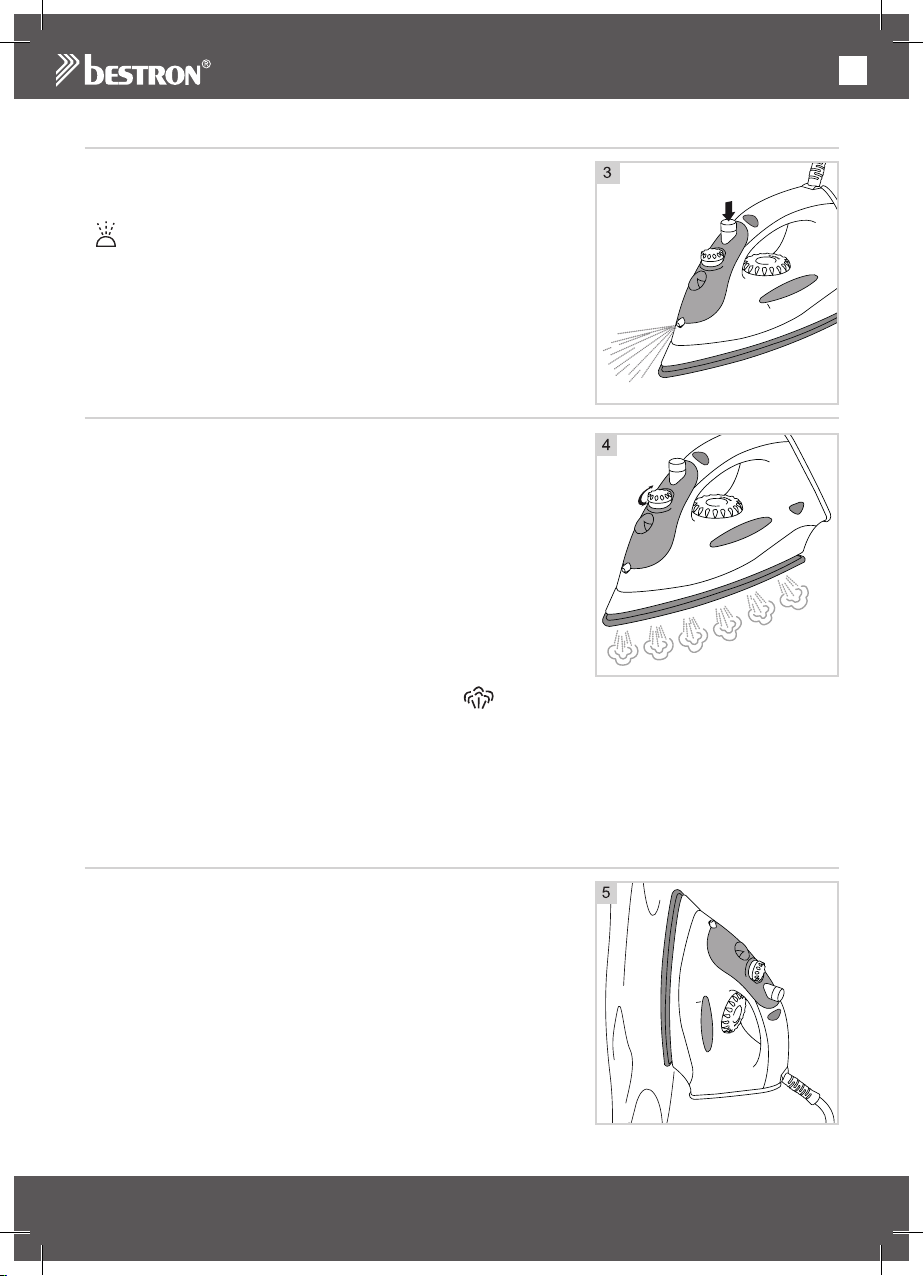
5. Use the steam-control dial to adjust the quantity
of steam to the required level (see Figure 4).
6. Iron the fabric by sliding the steam iron over the fabric. While you
are ironing, the heating element will automatically switch on and off
to maintain the soleplate at the set temperature. Consequently the
temperature-indication light will also automatically illuminate and
extinguish.
7. You can use the steam shot function by switching the selection
button to the
8. When you are finished, turn the temperature-control dial to the “0” position, remove the plug from the
wall socket and put the steam iron upright to allow it to cool.
WARNING:
• Water can leak from the soleplate if the temperature is set to too low.
This can cause stains. If you see drops of water you should turn the temperature-control dial to
the recommended range. Steam will be emitted once the correct temperature is reached.
position and then press it.
USE - Vertical ironing
1. Put the plug into the wall socket.
2. Turn the temperature-control dial to the ‘max’ position. The
temperature-indication light will illuminate.
3. Put the steam iron upright and wait until the temperature-indication
light extinguishes.
4. Hold the iron by its handle in front of the fabric you wish to iron (see
Figure 5).
5. Slide the steam iron over the fabric. While you are ironing, the
heating element will automatically switch on and off to maintain the
soleplate at the set temperature. Consequently the temperatureindication light
will also automatically illuminate and extinguish.
6. When you are finished, turn the temperature-control dial to the “0”
position, remove the plug from the wall socket, and stand the iron
upright to allow it to cool.
MAX
29
Page 30
EN
USE - Ironing instructions
NYLON
NYLON
RAYON
WOOL
CO
WOOL
COTTON
LINEN
MAX
COTTON
LINEN
MAX
NYLON
RAYON
WOOL
CO
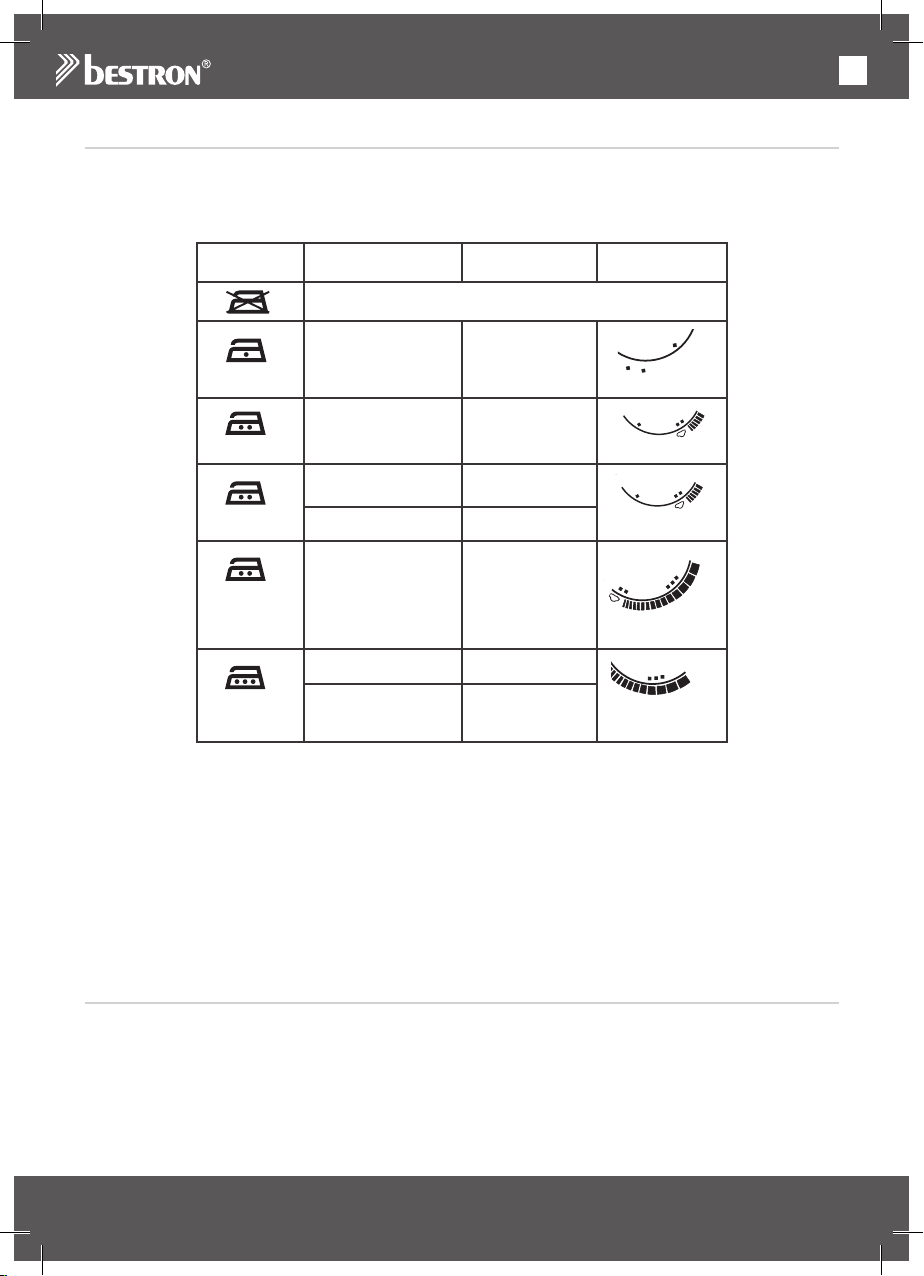
• Before ironing a garment check whether the garment has a label with ironing directions. Always
observe these directions. The following table explains the meaning of symbols that may be shown on
these labels.
• You can also use the following table when the garment does not have a label but you do know which
fabric was used to make the garment.
Symbol Type of fabric FabricTemperature-
Do not iron
SyntheticAcrylic
SyntheticAcetate
Polypropylene
Polyurethane
Nylon
control dial
SyntheticPolyester
SilkSilk
Wool Wool
CottonCotton
LinenLinen
• The prescribed temperature settings are applicable solely to the specified fabrics. Fabrics with a glossy
or raised surface should be ironed at a lower temperature.
• Sort the fabrics by ironing temperature, i.e. wool with wool, cotton with cotton, etc.
• Begin by ironing the garments that need to be ironed at a lower temperature before moving on to the
garments that need to be ironed at a higher temperature. This is advisable because the iron heats up
faster than it cools down.
• Iron garments containing a mixture of fabrics, for example 60% polyester and 40% cotton, at the lowest
temperature – in this example, the ironing temperature for polyester.
• When ironing garments made from an unknown fabric always begin at a lower temperature. Test the
iron on a concealed area, for example an area on the inside of the garment.
• Pure woollen fabrics (100% wool) can be pressed using steam. Preference is given to the use of a dry
cloth between the iron and the wool. It is best to press wool on the inner surface of the fabric.
• Always iron velvety fabrics and other fabrics that readily become shiny in one direction; apply gentle
pressure to the iron.
CLEANING AND MAINTENANCE
1. Turn the steam-control dial to the ‘0’ position.
2. Turn the temperature-control dial to the ‘0’ position.
3. Remove the plug from the wall socket.
4. Put the steam iron upright, and allow it to cool down completely.
5. Empty any water that may still be in the water reservoir by holding the iron upside down above a sink.
6. Clean the soleplate with a cloth moistened with vinegar.
7. Store the iron.
Viscose
steam or dry
steam or dry
30
Page 31
EN
WARNING:
• Never use metal implements or scourers to clean the soleplate; otherwise the soleplate could be
damaged.
• Never use corrosive or scouring cleaning agents or sharp objects (such as knives or hard brushes) to
clean the appliance
CLEANING AND MAINTENANCE - Self-cleaning system
You can prolong your iron’s useful life by cleaning the appliance once or twice a month according to the
following procedure:
1. Turn the steam-control dial to the “0” position.
2. Fill the water reservoir with water to the ‘max’ level.
3. Put the plug in the wall socket, and turn the temperature-control dial to the ‘max’ position.
4. Put the steam iron upright and wait until the temperature-indication light extinguishes.
5. Remove the plug from the wall socket.
6. Hold the iron horizontally above a sink, with the soleplate facing downwards.
7. Turn the steam-control dial to the
8. When the steam flow decreases turn the steam-control dial back to the “0” position.
9. Put the plug in the wall socket, and allow the iron to heat.
10. Iron an old towel to allow the residual water to evaporate.
WARRANTY CONDITIONS
Bestron offers a 60-month warranty on this equipment against defects resulting from manufacturing and/or
material errors, subject to the following conditions.
1. No labour or material costs will be charged during this warranty period.
2. Any repairs carried out under the warranty will not extend the warranty period.
3. Faulty parts, or in the event of exchange, the faulty equipment itself, will automatically become the pro-
perty of Bestron.
4. The warranty is valid for the first buyer only and is non-transferable.
5. The warranty is not valid for damage caused by:
• Accidents
• Improper use
• Wear and tear
• Neglect
• Faulty installation
• Connection to a different mains voltage than indicated on the type plate
• Unauthorised changes
• Repairs carried out by unqualified third parties
• Use in violation with the applicable statutory, technical or safety standards
• Careless transport without suitable packaging or other protection
6. Warranty cannot be claimed:
• For damage during transport
• If the serial number of the appliance is removed or changed
7. Items excluded from warranty are:
• Cords
• Lamps
• Glass parts
8. The warranty does not entitle the purchaser to compensation for any damage other than replacement
or repair of the faulty parts. Bestron cannot in any event be held liable for any indirect or consequential
losses caused by or in relation to the equipment it has provided.
9. Claims under a warranty may only be submitted to your (online) retailer or directly to the Bestron Service
Department. Never send items without being asked to. We may refuse the parcel and you will be liable
for the costs. Contact us first and we tell you how the appliance should be packaged and sent. Each
claim under a warranty must be accompanied by the relevant receipt.
SERVICE
If an unexpected problem occurs, please contact the BESTRON service department:
www.bestron.com/service
position.
31
Page 32

IT
COMPLIMENTI!
Congratulazioni per l’acquisto di questo prodotto Bestron. Nelle
presenti istruzioni per l’uso viene spiegato il funzionamento e l’impiego
dell’apparecchio. Pertanto, prima di utilizzarlo, leggerle attentamente.
Utilizzare l’apparecchio esclusivamente come di seguito descritto.
Conservare queste istruzioni in luogo sicuro.
In caso di guasto:
Nel caso indesiderato in cui l’unità dovesse guastarsi, non tentare mai
di ripararla da soli. Far sempre eseguire le riparazioni da un tecnico
qualificato.
Utilizzo da parte dei bambini:
• Questo dispositivo non deve essere utilizzato da bambini o persone
con ridotte capacità fisiche, sensoriali o mentali o con scarsa
esperienza e conoscenza.
• Pulizia e manutenzione non devono essere effettuate dai bambini.
• Tenere il dispositivo e il cavo fuori dalla portata dei bambini quando
è acceso o si sta raffreddando.
• I bambini devono essere costantemente sorvegliati per assicurarsi
che non giochino con il dispositivo.
32
Page 33

IT
COSA È NECESSARIO SAPERE SUI DISPOSITIVI ELETTRICI
• Prima di utilizzare un dispositivo elettrico, assicurarsi che la tensione
di rete corrisponda alla tensione di rete indicata sulla sua targhetta
d’identificazione.
• Assicurarsi che la presa elettrica a cui si intende collegare un
dispositivo elettrico sia collegata a terra.
• Collocare sempre gli apparecchi elettrici su una superficie stabile e
piana, in modo che non possano cadere.
• Alcune parti di un dispositivo elettrico possono riscaldarsi o, a volte,
surriscaldarsi. Per evitare le ustioni, evitare di toccarle.
• Quando si tocca un apparecchio elettrico, un cavo o una spina,
assicurarsi che le mani siano asciutte.
• Le apparecchiature elettriche devono poter dissipare il calore
prodotto al fine di evitare il rischio di incendio. Pertanto, assicurarsi
che l’unità sia sufficientemente libera da ingombri e che non possa
venire a contatto con materiale combustibile. Non coprire mai gli
apparecchi elettrici.
• Evitare il contatto di apparecchi, cavi o spine elettriche con l’acqua.
• Mai immergere apparecchi elettrici, cavi o spine in acqua o in altri
liquidi.
• Se gli apparecchi elettrici dovessero cadere in acqua, mai tentare di
raccoglierli. Scollegare immediatamente la spina dalla presa elettrica
e non riutilizzare l’apparecchio.
• Assicurarsi che gli apparecchi elettrici, i cavi e le spine non entrino
in contatto con fonti di calore, come piastre calde o fiamme libere.
• Non lasciare i cavi appesi sopra il bordo del lavandino, del piano di
lavoro o del tavolo.
• Quando il dispositivo non è in uso, scollegare sempre il cavo di
alimentazione.
• Nello scollegare il cavo di alimentazione dalla spina elettrica,
assicurarsi di tirare la spina stessa e non il cavo.
• Controllare regolarmente che il cavo del dispositivo elettrico sia
intatto. Non utilizzare l’unità se il cavo risulta essere danneggiato. Se
il cavo è danneggiato, per evitare qualsiasi rischio, è necessario che
venga sostituito dal produttore, da un servizio di assistenza tecnica
o da una persona qualificata.
• L’apparecchio non deve essere azionato da un timer esterno o da un
sistema separato dotato di telecomando.
33
Page 34
IT
COSA È NECESSARIO SAPERE SU QUESTO DISPOSITIVO
• Fare attenzione quando si utilizza il dispositivo all’aperto.
• Non utilizzare mai l’apparecchio in ambienti umidi.
• Pulire accuratamente l’unità dopo l’uso (vedere la sezione Pulizia e
manutenzione).
• Non tenere mai il ferro capovolto durante l’uso. L’acqua calda
potrebbe gocciolare dal ferro e causare ustioni.
• Non riempire il serbatoio dell’acqua sopra il livello ‘max’. Verificare in
questo modo posizionando il ferro in posizione verticale. L’acqua in
eccesso nel serbatoio potrebbe traboccare durante l’uso e causare
un cortocircuito.
• Smettere di usare il ferro se è caduto, presenta danni visibili o perde.
• Non lasciare mai il ferro incustodito quando è collegato
DISPOSIZIONI AMBIENTALI
• Smaltire i materiali di imballaggio, come plastica e scatole di
cartone, negli appositi contenitori.
• Al termine della sua vita utile, non smaltire il prodotto come
un normale rifiuto domestico, ma conferire presso un punto
di raccolta per il riciclaggio di apparecchiature elettriche ed
elettroniche. Osservare il relativo simbolo apposto sul prodotto,
contenuto nelle istruzioni per l’uso o stampato sull’imballaggio.
• I materiali possono essere riutilizzati come indicato. Con il
vostro aiuto per il riutilizzo, l’elaborazione dei materiali o altre
forme di riciclaggio di vecchi apparecchi, contribuite in modo
importante alla protezione dell’ambiente.
• Chiedete al vostro comune di residenza dove è ubicato il punto
di raccolta appropriato.
DICHIARAZIONE DI CONFORMITÀ CE
Questo prodotto soddisfa i requisiti delle linee guida Europee.
R. Neyman
Controllo qualità
34
Page 35
IT
FUNZIONAMENTO - Avvertenze generali
Questo apparecchio è concepito esclusivamente
per l’impiego domestico, e non per l’uso professionale.
1. Piastra in acciaio inossidabile
2. Serbatoio acqua
3. Foro spray
4. Riempire il serbatoio dell’acqua
5. Tasto manopola di regolazione
del vapore e di pulizia automatica
6. Tasto vapore/spray
7. Impugnatura
8. Cavo e spina
9. Spia luminosa del termostato
10. Manopola di regolazione della temperatura
11. Misurino
OPERAZIONI PRELIMINARI AL PRIMO UTILIZZO
Se si utilizza il ferro da stiro per la prima volta, provare l’apparecchio su un vecchio pezzo di stoffa per
controllare che la piastra e il serbatoio acqua siano puliti. Eseguire tale operazione anche nel caso in cui il
ferro da stiro sia rimasto a lungo inutilizzato.
ATTENZIONE:
• La prima volta che si utilizza l’apparecchio, può verificarsi una leggera emissione di fumo accompagnata
da un odore particolare. Si tratta di un fenomeno normale che scomparirà automaticamente. Predisporre
una ventilazione adeguata.
11
9
7
6
5
4
3
10
MAX
2
1
8
USO - Stiratura a secco
1. Inserire la spina nella presa di corrente.
2. Ruotare la manopola di regolazione del vapore in posizione di arresto (‘0’).
3. Ruotare la manopola di regolazione della temperatura nella posizione desiderata (vedere la tabella
riportata nel capitolo “Istruzioni per la stiratura”). La spia luminosa del termostato si attiverà.
4. Posizionare il ferro da stiro sulla parte posteriore e attendere che la spia luminosa del termostato si
disattivi.
5. Stirare il tessuto passandovi sopra il ferro da stiro.Durante la stiratura la resistenza si attiverà e
disattiverà continuamente per mantenere costante la temperatura della piastra. Pertanto, anche la spia
luminosa del termostato si accenderà e spegnerà di conseguenza.
6. Dopo l’uso ruotare la manopola di regolazione della temperatura in posizione di “0”, estrarre la spina
dalla presa e posizionare il ferro da stiro sulla parte posteriore per farlo raffreddare.
USO - Riempire il serbatoio di acqua
1. Disinserire la spina dalla presa.
2. Ruotare la manopola di regolazione del vapore in
posizione di arresto ‘0’.
3. Riempire il serbatoio con acqua di rubinetto pulita.
A tale scopo, utilizzare il misurino fornito in
dotazione.
4. Asciugare la parte esterna del ferro da stiro con un
panno asciutto (vedere la figura 2).
ATTENZIONE:
• Non riempire il serbatoio dell’acqua sopra il livello
‘max’. Verificare in questo modo mettendo il ferro
in posizione verticale. L’acqua in eccesso nel
serbatoio potrebbe traboccare durante l’uso e causare un cortocircuito.
MAX
35
Page 36
IT
USO - Utilizzo della funzione spray
Con la funzione spray è possibile inumidire il tessuto da stirare. In
tal modo è possibile eliminare la formazione di eventuali pieghe nel
tessuto. È possibile utilizzare la funzione di irrorazione con tutte le
temperature cambiando il pulsante di selezione,
il
la posizione e quindi premere (vedere la figura 3).
ATTENZIONE:
• Per utilizzare la funzione spray è necessaria la
presenza di una quantità di acqua sufficiente nel
serbatoio acqua.
MAX
USO - Stiratura a vapore
1. Riempire il serbatoio con acqua di rubinetto pulita
(vedere il capitolo “Riempire il serbatoio di acqua”).
2. Inserire la spina nella presa di corrente.
3. Ruotare la manopola di regolazione della temperatura nella
posizione desiderata compresa nella “zona vapore” (vedere la
tabella riportata nel capitolo “Istruzioni per la stiratura”). La spia
luminosa del termostato si attiverà.
4. Posizionare il ferro da stiro sulla parte posteriore eattendere che la
spia luminosa del termostato si disattivi.
5. Regolare l’intensità di vapore desiderata con l’ausilio dell’apposita
manopola (vedere la figura 4).
6. Stirare il tessuto passandovi sopra il ferro da stiro.Durante la
stiratura, la resistenza si attiverà e disattiverà continuamente
per mantenere costante la temperatura della piastra. Pertanto,
anche la spia luminosa del termostato si accenderà e spegnerà di
conseguenza.
7. È possibile utilizzare la funzione di vapore tiro con tutte le
temperature cambiando il pulsante di selezione , il
8. Dopo l’uso ruotare la manopola di regolazione della temperatura in posizione di “0”, estrarre la spina
dalla presa e posizionare il ferro da stiro sulla parte posteriore per farlo raffreddare.
ATTENZIONE:
• In caso di temperatura troppo bassa può fuoriuscire dell’acqua dalla piastra. Ciò può dare origine
a macchie. Nel caso in cui ciò si verifichi, ruotare la manopola di regolazione della temperatura nella
posizione consigliata. L’erogazione del vapore riprende una volta raggiunta la temperatura impostata.
la posizione e quindi premere.
USO - Stiratura verticale
1. Inserire la spina nella presa di corrente.
2. Ruotare la manopola di regolazione della temperatura in posizione
di “MAX”.La spia luminosa del termostato si attiverà.
3. Posizionare il ferro da stiro sulla parte posteriore e attendere che la
spia luminosa del termostato si disattivi.
4. Mantenere il ferro da stiro in posizione verticale per procedere alla
stiratura del tessuto (vedere la figura 5).
5. Passare il ferro da stiro sul tessuto.Durante la stiratura, la resistenza
si attiverà e disattiverà continuamente per mantenere costante la
temperatura della piastra. Pertanto, anche la spia luminosa del
termostato si accenderà e spegnerà di conseguenza.
6. Dopo l’uso ruotare la manopola di regolazione della temperatura in
posizione di “0”, estrarre la spina dalla presa e posizionare il ferro da
stiro sulla parte posteriore per farlo raffreddare.
MAX
36
Page 37
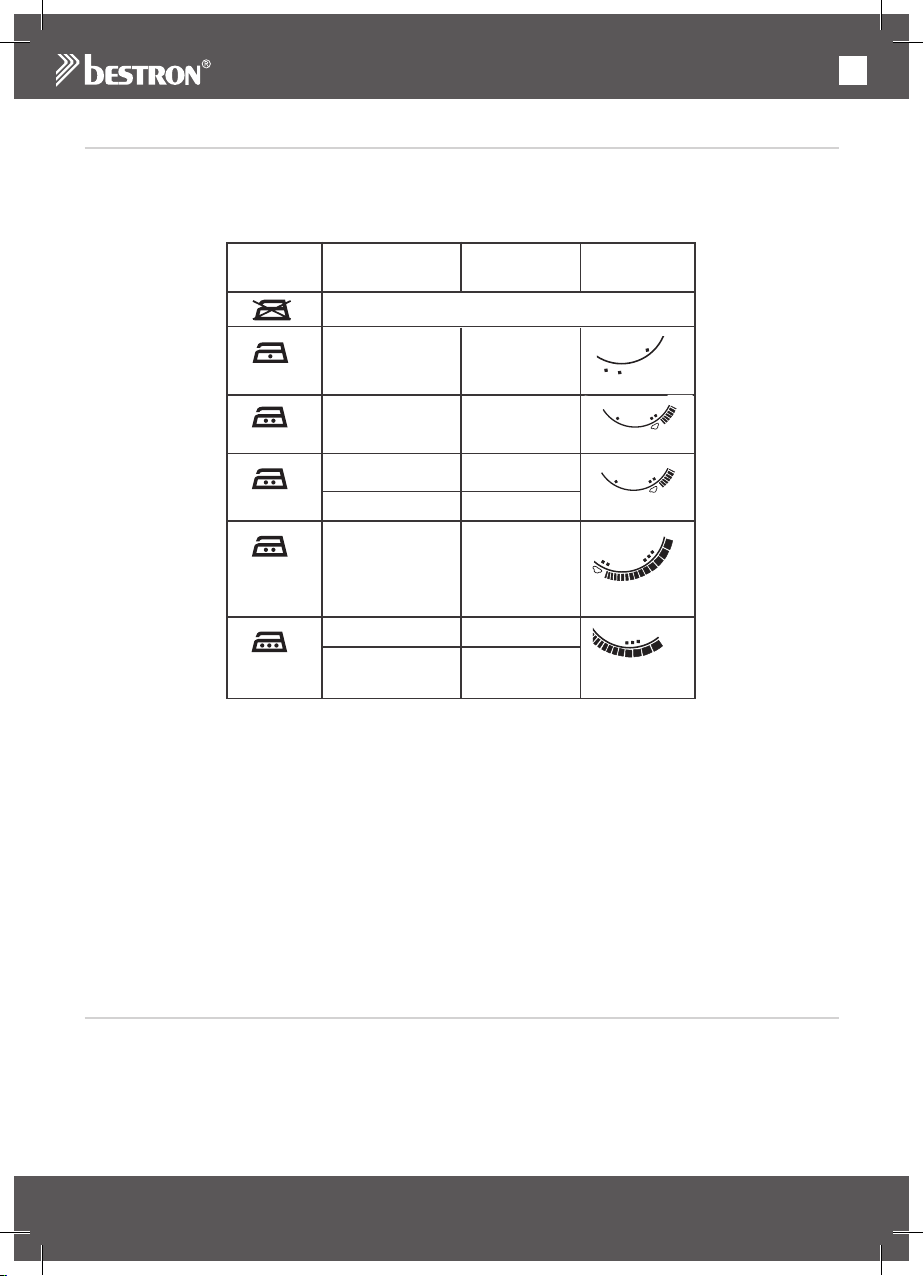
IT
USO - Istruzioni per la stiratura
NYLON
NYLON
RAYON
WOOL
CO
WOOL
COTTON
LINEN
MAX
COTTON
LINEN
MAX
NYLON
RAYON
WOOL
CO
• Prima di procedere alla stiratura del capo desiderato, controllare se questo sia provvisto di un’etichetta
che riporti istruzioni per la stiratura. Seguire sempre le istruzioni indicate. Consultare la tabella riportata
di seguito per una spiegazione dei possibili simboli indicati sull’etichetta.
• Nel caso in cui non sia presente nessuna etichetta ma si conosca la composizione del tessuto del
capo, seguire le istruzioni per la stiratura riportate nella tabella seguente.
SimboloTipo di tessuto Materiale Manopola di
Non è possibile stirare il capo
Sintetico Acrilico
Sintetico Acetato
Polipropilene
Poliuretano
Nylon
regolazione
temperatura
della
Sintetico Poliestere
SetaSeta
LanaLana
Cotone Cotone
Biancheria Biancheria
• Le regolazioni della temperatura indicate qui sopra sono valide unicamente per i materiali indicati.
Assicurarsi di stirare i tessuti trattati o dotati di applicazioni e/o stampe a temperature più basse di
quelle indicate in tabella.
• Assicurarsi di raggruppare i tessuti da stirare a seconda della temperatura di stiratura: i tessuti in lana
con i tessuti in lana, i tessuti in cotone con i tessuti in cotone, eccetera.
• Stirare innanzitutto i capi che necessitano una temperatura di stiratura inferiore e solo
successivamente i capi che necessitano una temperatura maggiore: il tempo di riscaldamento del ferro
da stiro, infatti, è inferiore al suo tempo di raffreddamento.
• Se un tessuto, ad esempio, è composto per il 60% di poliestere e per il 40% di cotone, adottare la
temperatura di stiratura inferiore (temperatura del poliestere).
• Nel caso in cui si ignori la composizione del tessuto del capo, iniziare a stirare alla temperatura
minima. Eseguire tale operazione in un punto poco visibile come, ad esempio, nella parte interna del
capo.
• I tessuti in pura lana (100% lana) possono essere stirati mediante pressatura a vapore. Utilizzare
preferibilmente un panno asciutto da interporre tra il ferro e il capo. È raccomandabile pressare i
tessuti in lana nella parte interna.
• Stirare il velluto e altri tessuti soggetti alla formazione di pieghe lucide sempre nello stesso verso ed
esercitando solamente una leggera pressione
PULIZIA E MANUTENZIONE
1. Ruotare la manopola di regolazione del vapore in posizione di arresto “0”.
2. Ruotare la manopola di regolazione della temperatura in posizione di “0”.
3. Disinserire la spina dalla presa.
4. Posizionare il ferro da stiro sulla parte posteriore e lasciare raffreddare completamente l’apparecchio.
5. Rimuovere eventuale acqua residua dal serbatoio acqua tenendo il ferro da stiro in posizione
capovolta su un lavello.
6. Pulire la piastra con un panno e una soluzione di acqua e aceto.
7. Riporre quindi il ferro da stiro.
Viscosa
a vapore o a secco
a vapore o a secco
37
Page 38
IT
ATTENZIONE:
• Evitare di utilizzare oggetti in metallo o spugne abrasive per pulire la piastra. Essi potrebbero
danneggiare la piastra.
• Non utilizzare detergenti aggressivi o abrasivi né utensili taglienti o acuminati (come coltelli o
spazzole dure) per eseguire la pulizia.
PULIZIA E MANUTENZIONE - Sistema di autopulizia
Per prolungare la vita economica del ferro da stiro è necessario procedere alla sua pulizia 1-2 volte al mese
attenendosi alle istruzioni riportate qui di seguito:
1. Ruotare la manopola di regolazione del vapore in posizione di arresto (“0”).
2. Riempire il serbatoio di acqua fino all’indicatore di livello massimo “max”.
3. Inserire la spina nella presa e ruotare la manopola di regolazione della temperatura in posizione di
“max”.
4. Posizionare il ferro da stiro sulla parte posteriore e attendere che la spia luminosa del termostato si
disattivi.
5. Disinserire la spina dalla presa.
6. Tenere il ferro da stiro in posizione orizzontale su un lavello con la piastra rivolta verso il basso.
7. Ruotare la manopola di regolazione del vapore in posizione di
8. Se il vapore diminuisce, ruotare nuovamente la manopola di regolazione del vapore in posizione di
arresto (“0”).
9. Inserire la spina nella presa e lasciare riscaldare il ferro da stiro.
10. Passare il ferro da stiro su un vecchio asciugamano per fare evaporare qualsiasi residuo di acqua.
DISPOSIZIONI DI GARANZIA
In base alle seguenti condizioni, Bestron garantisce questo apparecchio per la durata di 60 mesi dalla data
di acquisto contro i guasti causati da difetti di fabbricazione e/o del materiale.
1. Durante il periodo di garanzia non verranno addebitati costi di manodopera e per i materiali necessari.
2. La riparazione effettuata in garanzia non prolunga il periodo di garanzia.
3. Al momento della sostituzione, le parti difettose o gli stessi apparecchi guasti, torneranno automatica-
mente a essere proprietà di Bestron.
4. La garanzia è valida solo per l’acquirente originale e non è trasferibile.
5. La garanzia non è valida in caso di danni causati da:
• Incidenti ed infortuni
• Uso improprio
• Usura
• Negligenza
• Installazione errata
• Collegamento a una tensione di rete diversa da quella indicata sulla targhetta di identificazione del
dispositivo
• Modifiche non autorizzate
• Riparazioni effettuate da terzi non qualificati
• Utilizzo in violazione delle norme giuridiche, tecniche o di sicurezza applicabili
• Trasporto incauto senza idoneo imballaggio o altre protezioni
6. Non sono ammesse richieste di risarcimento in garanzia in caso di:
• Danni subiti durante il trasporto
• Rimozione o modifica del numero di serie del dispositivo
7. Quanto segue è escluso dalla garanzia:
• Cavi
• Lampade
• Parti in vetro
8. La garanzia non dà diritto ad alcun risarcimento per danni diversi dalla sostituzione o dalla riparazione
delle parti difettose. Bestron non può essere in nessun caso ritenuta responsabile per danni consequenziali o altre conseguenze derivanti da o in relazione alle apparecchiature da essa fornite.
9. I reclami in garanzia possono essere inoltrati solo al vostro rivenditore/rivenditore web o direttamente al
servizio assistenza Bestron. Non limitarsi a inviare un oggetto senza preavviso. Il pacchetto può essere
rifiutato e gli eventuali costi saranno a carico del mittente. In primo luogo, contattateci per ricevere le
istruzioni su come imballare e spedire il dispositivo. Qualsiasi reclamo in garanzia deve essere accompagnato dalla prova di acquisto.
SERVIZIO ASSISTENZA
Nell’indesiderata eventualità di un malfunzionamento, contattare il servizio assistenza BESTRON visitando
il seguente sito: www.bestron.com/service
.
38
Page 39

ES
¡FELICIDADES!
Felicidades por la compra de este producto Bestron. En estas
instrucciones le explicamos su funcionamiento y cómo usarlo. Antes de
usar el aparato, lea bien el manual de instrucciones. Utilice el aparato
únicamente tal y como se describe en el manual de instrucciones.
Guarde las instrucciones como referencia en el futuro.
En el caso de una avería:
Si el aparato se averiara inesperadamente, nunca intente arreglarlo usted
mismo. Deje que las reparaciones las haga un mecánico cualificado.
Uso por niños:
• Este aparato no lo pueden usar niños menores de 8 años y personas
con una limitación física, sensorial o mental o una falta de experiencia
y conocimiento.
• La limpieza y mantenimiento no la pueden realizar niños.
• Mantenga el dispositivo y el cable fuera del alcance de los niños
cuando esté encendido o se esté enfriando.
• Hay que vigilar a los niños para asegurarse de que no jueguen con
el aparato.
39
Page 40

ES
QUÉ DEBE SABER SOBRE LOS APARATOS ELÉCTRICOS
• Antes de usar un aparato eléctrico, compruebe que la tensión
coincida con la tensión indicada en su placa descriptiva.
• Compruebe que el enchufe que vaya a utilizar para un aparato
eléctrico tenga contacto a tierra.
• Coloque los aparatos eléctricos siempre sobre una superficie estable
y plana, en un un sitio donde no se puedan caer.
• Algunas partes de un aparato eléctrico pueden calentarse ligeramente
o mucho. Para evitar quemaduras, no las toque.
• Procure que sus manos estén siempre secas cuando toque un
aparato eléctrico, un cable o un enchufe.
• Los aparatos eléctricos tienen que poder eliminar su calor para
evitar el riesgo de incendios. Procure que el aparato tenga suficiente
espacio alrededor y no pueda estar en contacto con material
inflamable. No cubra nunca los aparatos eléctricos.
• Procure que los aparatos eléctricos, cables o enchufes no entren en
contacto con el agua.
• Nunca sumerja los aparatos eléctricos, cables o enchufes en agua
ni en ningún otro líquido.
• No toque los aparatos eléctricos si se han caído al agua. Desenchúfelo
inmediatamente de la toma de corriente. No vuelva a usar el aparato.
• Procure que los aparatos eléctricos, cables o enchufes no entren
en contacto con fuentes de calor, como una plancha caliente o una
llama.
• No deje los cables sobre el borde de la encimera, tabla de cortar o
una mesa.
• Desenchufe siempre los aparatos eléctricos si no los está utilizando.
• Al desenchufarlo, no tire del cable sino del enchufe.
• Compruebe con regularidad si el cable del aparato eléctrico está
todavía en buen estado. No vuelva a usar el aparato si el cable está
un poco dañado. Si el cable está dañado, el fabricante, un servicio
técnico o una persona con una cualificación similar lo tiene que
sustituir, para evitar cualquier riesgo.
• No se puede poner el aparato en funcionamiento por medio de un
interruptor externo o con un sistema especial con mandos a distancia.
40
Page 41
ES
QUÉ NECESITA SABER SOBRE ESTE APARATO
• Tenga cuidado al usar el dispositivo en el exterior.
• No use nunca el aparato en espacios húmedos.
• Limpie bien el aparato después de su uso, véase «Limpieza y
mantenimiento».
• Nunca sostenga la plancha boca abajo durante el uso. El agua
caliente podría gotear de la plancha y causar quemaduras.
• No llene el depósito de agua por encima del nivel “máximo”. Verifique
esto colocando la plancha en posición vertical. El exceso de agua
en el depósito podría desbordarse durante el uso y provocar un
cortocircuito.
• Deje de usar la plancha si se ha caído, tiene daños visibles o tiene
fugas.
• Nunca deje la plancha desatendida cuando esté conectada.
MEDIO AMBIENTE
• Tire el material de embalaje, como plástico y cajas, en el
contenedor apropiado.
• Al final de su vida útil, no se desprenda de este producto como
un residuo normal. Llévelo a un punto blanco de su ciudad
para el reciclaje de aparatos eléctricos y electrónicos. Preste
atención al símbolo en el producto, las instrucciones o el
embalaje.
• Los materiales se pueden reutilizar tal y como se indica.
Reciclando, procesando los materiales o aprovechando
antiguos equipos de otra forma, hace una gran aportación a la
protección del medio ambiente.
• Infórmese en su municipio del punto blanco correcto cerca de
usted.
DECLARACIÓN DE CONFORMIDAD CE
Este producto cumple con los requisitos de las directrices Europeas.
R. Neyman
Control de calidad
41
Page 42
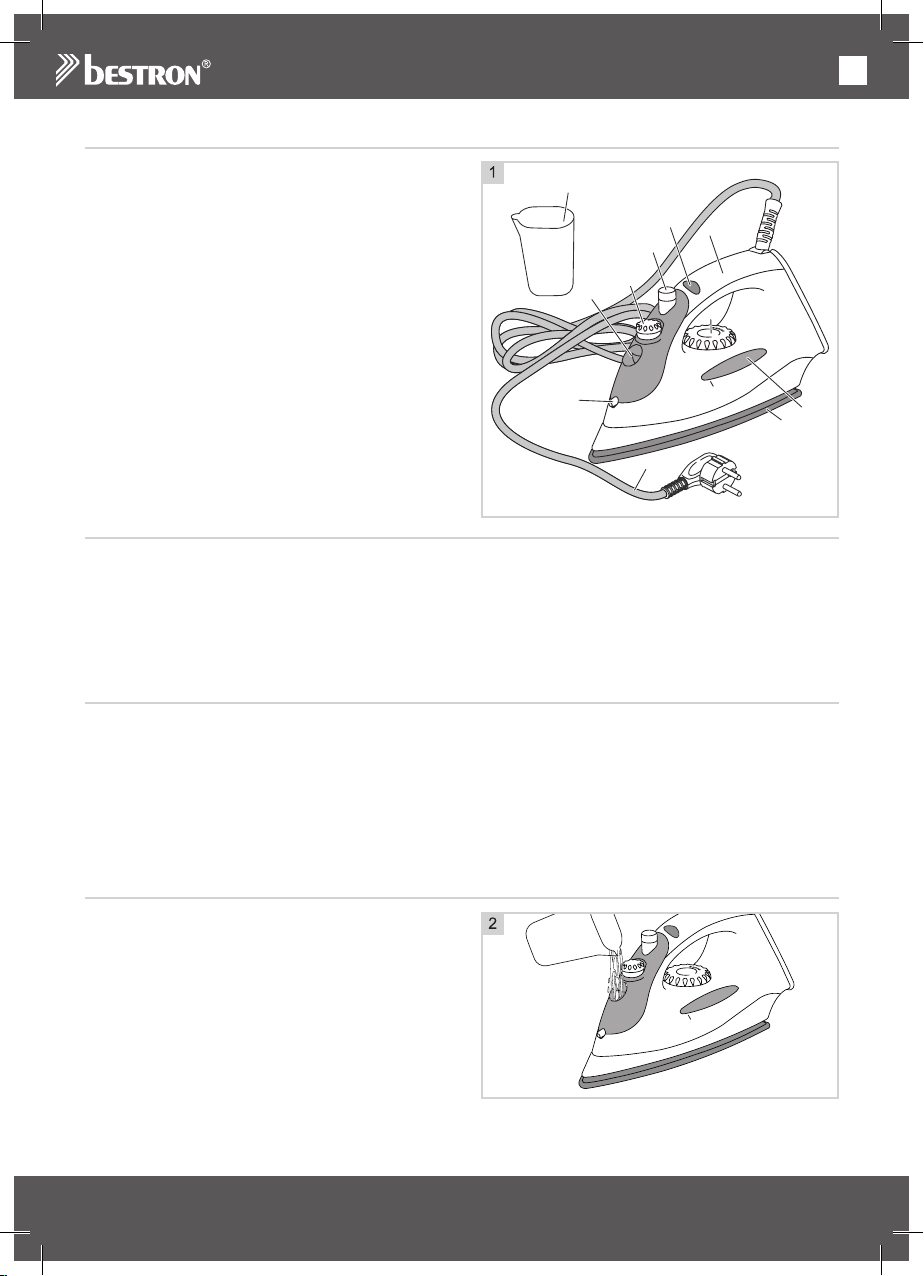
ES
FUNCIONAMIENTO - General
Este aparato está concebido únicamente para
uso doméstico, no para uso profesional.
1. Suela deplanchado en acero inoxidable
2. Depósito para el agua
3. Orificio de rociado
4. Ilenar el depósito de agua
5. Botón para ajustar el vapor y de
limpieza automática
6. Botón de vapor/rociado
7. Empuñadura
8. Cable y enchufe
9. Testigo indicador de temperatura
10. Selector de la temperatura
11. Medidor
ANTES DEL PRIMER USO
Cuando vaya a usar la plancha por primera vez, ensáyela primero en un pedazo de tela viejo para verificar
que la suela de la plancha y el depósito para el agua están limpios. Haga lo mismo si no ha usado la plancha
por largo tiempo.
ATENCIÓN:
• Cuando se utiliza el aparato por primera vez, éste puede producir un poco de humo y desprender un
olor particular. Esto es normal y tanto el humo como el olor desaparecerán automáticamente. Procure
tener suficiente ventilación.
11
9
7
6
5
4
3
10
MAX
2
1
8
USO - Planchado en seco
1. Introduzca el enchufe en la toma de alimentación.
2. Coloque el botón de emisión de vapor en la posición ‘0’.
3. Coloque el selector de temperatura en la posición deseada (véase el cuadro ‘Instrucciones para
planchar’). El testigo indicador de temperatura se encenderá.
4. Coloque la plancha en posición vertical y espere a que el testigo se apague.
5. Planche la prenda pasando la plancha sobre la tela.Mientras plancha, el elemento calefactor se
enciende y se apaga continuamente para mantener constante la temperatura. El testigo también se
encenderá y se apagará continuamente.
6. Cuando haya terminado de usar la plancha, gire el selector de temperatura a la posición “0”, retire el
enchufe de la toma de alimentación y coloque la plancha en posición vertical para dejarla enfriar.
USO - Lienado de depósito para el agua
1. Retire el enchufe de la toma de alimentación.
2. Coloque el botón de emisión de vapor en la
posición ‘0’.
3. Llene el depósito con agua limpia del grifo. Use
para ello el medidor adjunto.
4. Seque el exterior de la plancha con un paño seco
(véase la figura 2).
ATENCIÓN:
• No llene el depósito de agua por encima del nivel
“máximo”. Verifique esto colocando la plancha en
posición vertical. El exceso de agua en el depósito
podría desbordarse durante el uso y provocar un
cortocircuito.
MAX
42
Page 43
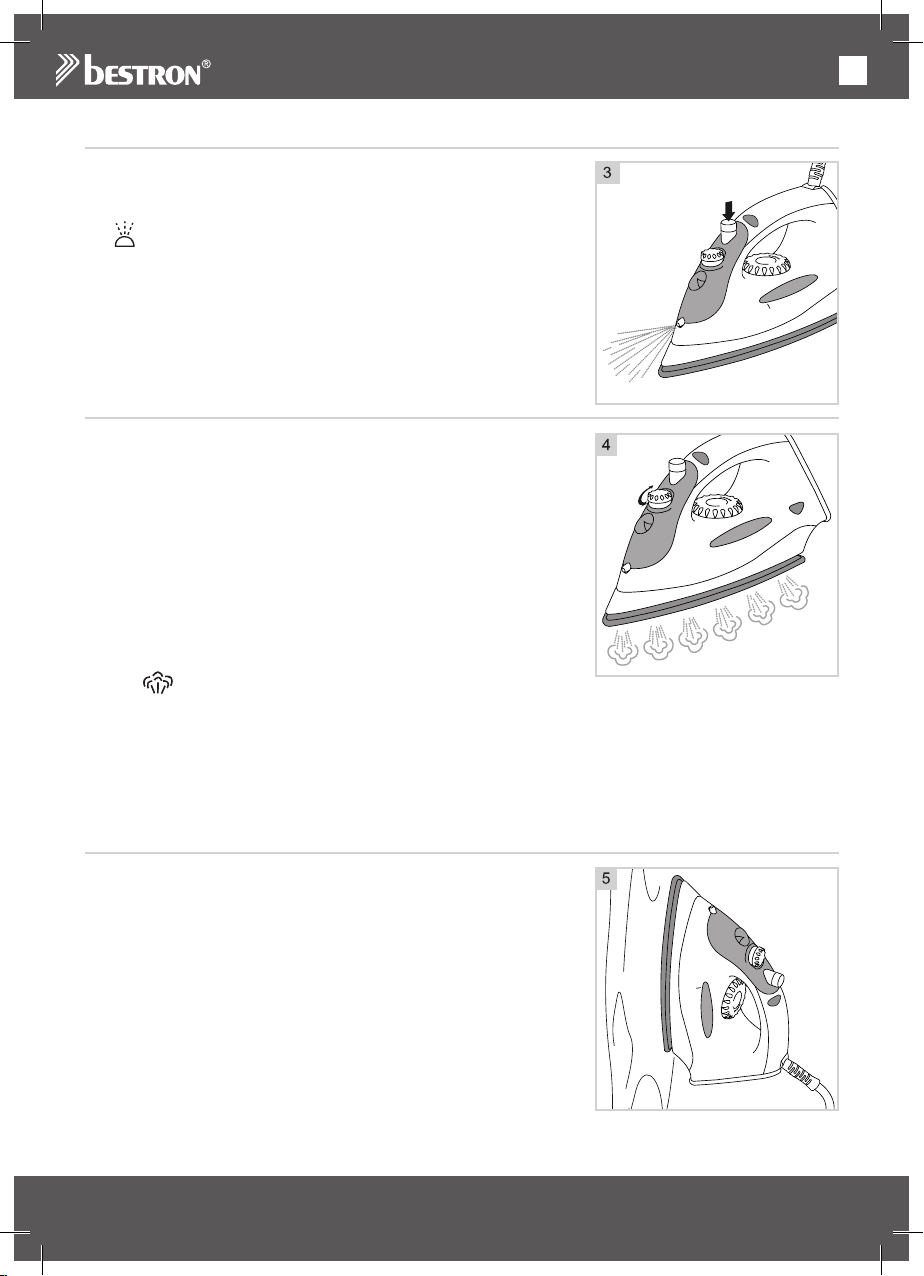
ES
USO - Uso de la función de raciado
Mediante la función de rociado puede usted remojar la prenda que está
planchando. Esta función es muy útil para eliminar posibles arrugas de
la tela. Puede utilizar la función de la pulverización con todas las
temperaturas cambiando el botón de selección
a la
la posición y luego se presiona (véase la figura 3).
ATENCIÓN:
• Para poder usar la función de rociado debe
haber suficiente cantidad de agua en el depósito.
MAX
USO - Planchado a vapor
1. Llene con agua el depósito (véase el capítulo
‘Llenado del depósito para el agua’).
2. Introduzca el enchufe en la toma de alimentación.
3. Coloque el selector de temperatura en la posición deseada dentro
del campo marcado ‘zona de vapor’ (véase el cuadro ‘Instrucciones
para planchar’). El testigo indicador de temperatura se encenderá.
4. Coloque la plancha en posición vertical y espere a que el testigo
se apague.
5. Ajuste la cantidad de vapor deseada mediante el botón
correspondiente (véase la figura 4).
6. Planche la prenda pasando la plancha sobre la tela.Mientras
plancha, el elemento calefactor se enciende y se apaga
continuamente para mantener constante la temperatura. El testigo
también se encenderá y se apagará continuamente.
7. Puede utilizar la función de vapor disparó con todas las
temperaturas cambiando el botón de selección
a la
8. Cuando haya terminado de usar la plancha, gire el selector de temperatura a la posición ‘0’, retire el
enchufe de la toma de alimentación y coloque la plancha en posición vertical para dejarla enfriar.
la posición y luego se presiona.
ATENCIÓN:
• El agua puede escaparse de la suela si la temperatura está demasiado baja. Esto puede causar
manchas. Si ve gotas de agua, debe girar el dial de control de temperatura al rango recomendado. El
vapor se emitirá una vez que se alcance la temperatura correcta.
USO - Planchado vertical
1. Introduzca el enchufe en la toma de alimentación.
2. Gire el selector de temperatura a la posición ‘MAX’.El testigo
indicador de temperatura se encenderá.
3. Coloque la plancha en posición vertical y espere a que el testigo
se apague.
4. Sostenga la plancha en posición vertical frente a la prenda que
desea planchar (véase la figura 5).
5. Mueva la plancha por la prenda.Mientras plancha, el elemento
calefactor se enciende y se apaga continuamente para mantener
constante la temperatura. El testigo también se encenderá y se
apagará continuamente.
6. Cuando haya terminado de usar la plancha, gire el selector de
temperatura a la posición ‘0’, retire el enchufe de la toma de
alimentación y coloque la plancha en posición vertical para dejarla
enfriar.
MAX
43
Page 44
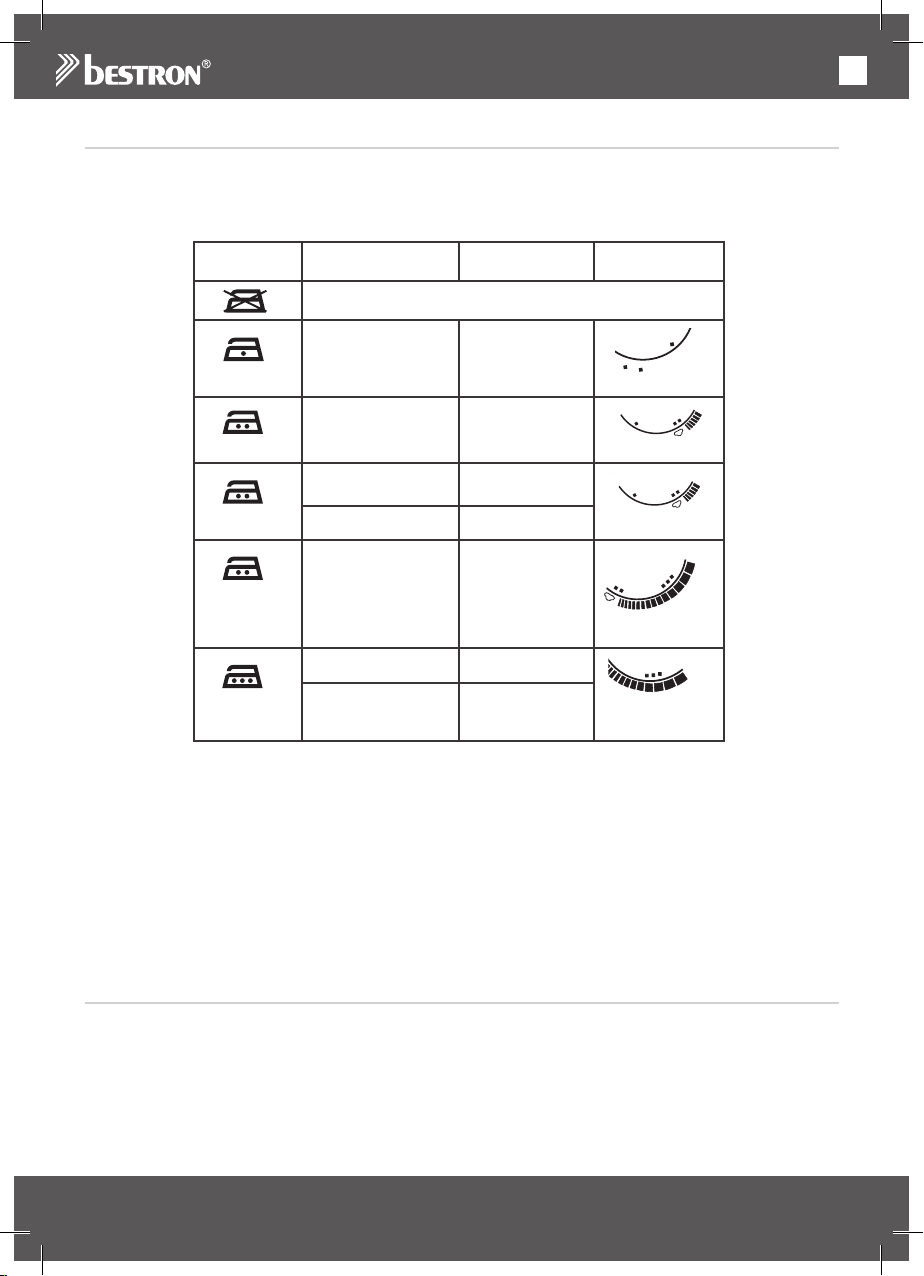
ES
USO - Instrucciones para plachar
NYLON
NYLON
RAYON
WOOL
CO
WOOL
COTTON
LINEN
MAX
COTTON
LINEN
MAX
NYLON
RAYON
WOOL
CO
• Antes de empezar, revise si la prenda que desea planchar está provista de una etiqueta con las
instrucciones de planchado. Siga siempre estas instrucciones al pie de la letra. Véase en el cuadro
siguiente una explicación de los posibles símbolos que encontrará en la etiqueta.
• Si la prenda no tiene etiqueta, pero sabe en qué material está confeccionada, siga las instrucciones
de planchado que se indican en el cuadro.
SimboloTipo de textil Material Selector de
Este artículo no se debe aplanchar
Sintético Acrílico
Sintético Acetato
Polipropileno
Poliuretano
Nylon
temperatura
Sintético Poliéster
SedaSeda
LanaLana
Algodón Algodón
LinoLino
• Las temperaturas recomendadas aplican únicamente para los materiales indicados en el cuadro. Las
telas brillantes o estampadas en relieve deben plancharse a una temperatura baja.
• Clasifique los materiales según la temperatura de planchado: lana con lana, algodón con algodón,
etcétera.
• Planche primero las prendas que deben plancharse a temperatura baja y sólo después aquellas que
deben plancharse a una temperatura más alta. La plancha se calienta más rápido de lo que se enfría.
• Si una prenda está fabricada, por ejemplo, en un 60% de poliéster y un 40% de algodón, seleccione la
temperatura más baja, en este caso, la del poliéster.
• Si no sabe en qué material está confeccionada una prenda, empiece a plancharla con la temperatura
más baja. Planche primero un lugar poco visible de la prenda, por ejemplo, la parte interior.
• Prendas de lana pura (100% lana) se pueden planchar con vapor. Use, de preferencia, un paño seco
para planchar. Las prendas de lana se planchan mejor por el revés.
• El terciopelo y otras telas delicadas se deben planchar siempre en un mismo sentido; tenga cuidado
de no ejercer presión sobre la plancha al hacerlo
Viscosa
vapor o seco
vapor o seco
LIMPIEZA Y MANTENIMIENTO
1. Coloque el botón de emisión de vapor en la posición ‘0’.
2. Gire el selector de temperatura a la posición ‘0’.
3. Retire el enchufe de la toma de alimentación.
4. Coloque la plancha en posición vertical y deje que se enfríe completamente.
5. Tire el agua restante que haya quedado en el depósito. Para hacerlo, sostenga la plancha en posición
invertida sobre un lavabo.
6. Limpie la suela de la plancha con un paño y una solución de agua y vinagre.
7. Guarde el aparato.
44
Page 45
ES
ATENCIÓN:
• No use nunca objetos metálicos o estropajos para limpiar la suela de la plancha. Éstos pueden
dañar la suela.
• No use limpiadores fuertes ni abrasivos, ni objetos con filo (como cuchillos o cepillos con cerdas
duras) para limpiar el aparato
LIMPIEZA Y MANTENIMIENTO - Sistema de autolimpieza
Para prolongar la vida útil de su plancha debe limpiarla 1 a 2 veces por mes. Para hacerlo, proceda de la
siguiente manera:
1. Coloque el botón de emisión de vapor en la posición ‘0’.
2. Llene el depósito con agua hasta la medida ‘MAX’.
3. Introduzca el enchufe en la toma de alimentación y gire el selector de temperatura a la posición ‘MAX’.
4. Coloque la plancha en posición vertical y espere a que el testigo se apague.
5. Retire el enchufe de la toma de alimentación.
6. Sostenga la plancha en posición horizontal sobre un lavabo, con la suela hacia abajo.
7. Coloque el botón de emisión de vapor en la posición
8. Cuando se reduzca la emisión de vapor, gire el botón nuevamente a la posición ‘0’.
9. Introduzca el enchufe en la toma de alimentación y deje que la plancha se caliente.
10. Pase la plancha sobre una toalla vieja para dejar evaporar el resto del agua.
CONDICIONES DE GARANTÍA
Bestron ofrece 60 meses de garantía después de la fecha de compra de este equipo. La garantía cubre las
averías por errores de fabricación y/o material y se atiene a las siguientes condiciones.
1. La garantía no cubre ningún gasto por mano de obra ni material.
2. La reparación que se realice durante el plazo de la garantía no implica una prórroga de dicho plazo.
3. Cualquier pieza defectuosa o aparatos averiados y devueltos se convierten automáticamente en pro-
piedad de Bestron.
4. La garantía es únicamente válida para el primer comprador y no es transferible.
5. La garantía no cubre los daños por:
• Accidentes
• Uso equivocado
• Desgaste
• Descuido
• Mala instalación
• Conexión a otra tensión que la que se especifica en la placa de modelo.
• Modificación no autorizada
• Reparaciones realizadas por terceros no cualificados
• Uso incumpliendo las normas vigentes legales, técnicas y de seguridad.
• Descuidos en el transporte, sin embalaje adecuado o sin otra protección
6. No se puede reclamar la garantía en el caso de:
• Daños durante el transporte
• Quitar o modificar el número de serie del aparato.
7. La garantía no cubre:
• Los cables
• Las bombillas
• Las piezas de cristal
8. La garantía no le concede el derecho a una compensación por un posible daño, aparte de sustituir o
reparar las piezas defectuosas. Bestron no puede hacerse responsable de cualquier posible daño o de
cualquier tipo de consecuencia que surgieran o estuvieran relacionadas con el aparato entregado.
9. Solo puede reclamar la garantía a su empresa de venta (en línea) o directamente al Servicio de aten-
ción Bestron. Sin embargo, no nos envíe ninguna pieza sin preguntar antes. Puede que rechacemos el
paquete y esto podría suponer unos gastos para usted. Póngase primero en contacto con nosotros para
que le expliquemos cómo tiene que embalar el aparato y mandárnoslo. Cualquier reclamación sobre la
garantía debe ir acompañada de una prueba de compra.
SERVICIO DE ATENCIÓN
Si hubiera una avería inesperada, póngase en contacto con el servicio de atención BESTRON:
www.bestron.com/service
.
45
Page 46

Page 47

Page 48
v201006-02
NEED HELP? CHAT WITH US!
WHATSAPP CUSTOMER SERVICE
BESTRON.COM/WHATSAPP
 Loading...