

Page 1
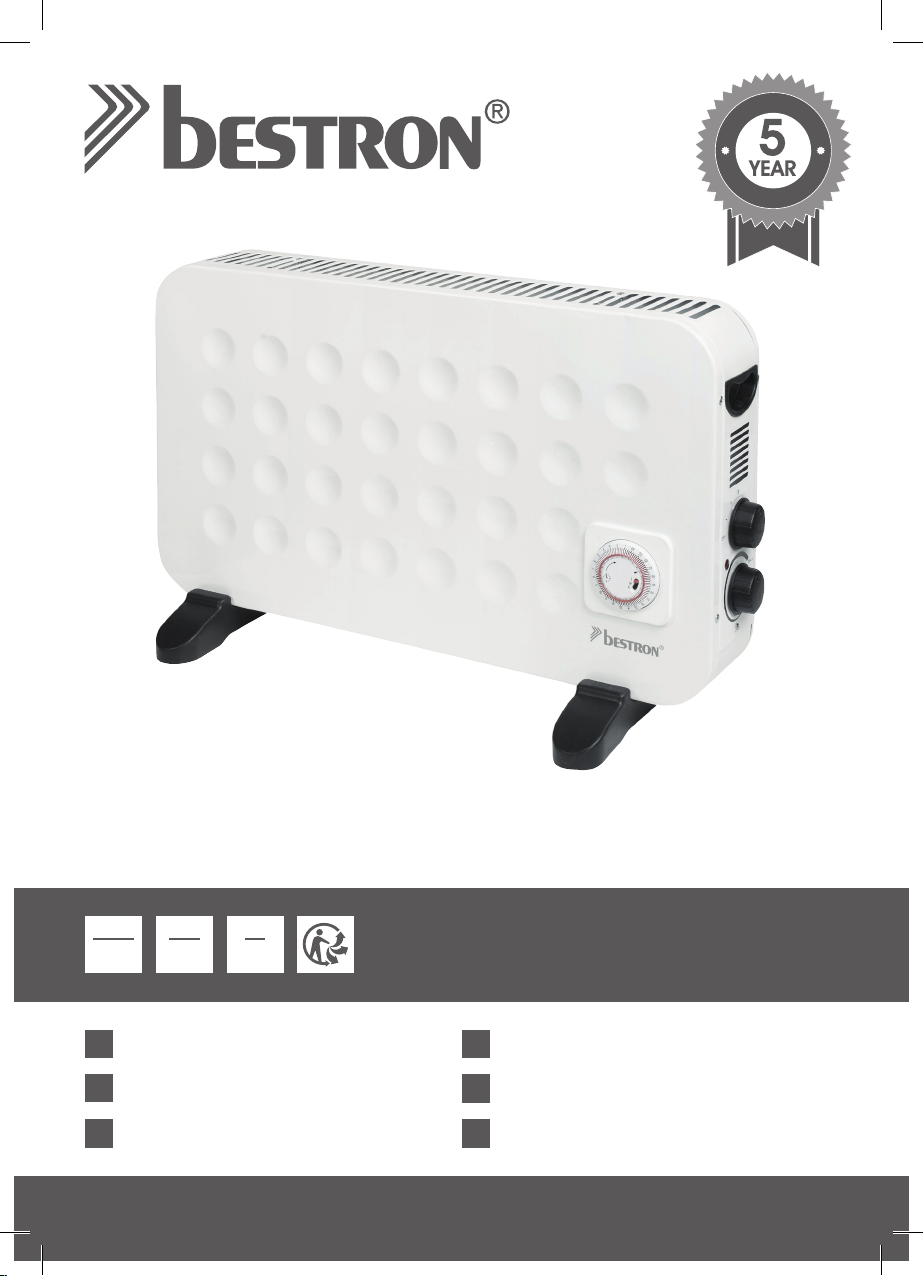
U
A
Q
L
P
I
T
Y
O
T
WINTER WARM
G
E
U
E
T
A
R
N
A
1800
2000
Watts
DE
FR
NL
220
240
Volts
Bedienungsanleitung
Mode d’emploi
Handleiding
50
60
Hz
• Dieses Produkt ist nur für gut isolierte Räume oder für den gelegentlichen Gebrauch geeignet
• Ce produit ne peut être utilisé que dans des locaux bien isolés ou de manière occasionnelle
• Dit product is uitsluitend geschikt voor goed geïsoleerde plaatsen of voor incidenteel gebruik
• This product is only suitable for well insulated spaces or occasional use
• Il presente prodotto è adatto solo a ambienti correttamente isolati o ad un uso occasionale
• Este producto está indicado únicamente en lugares abrigados o para una utilización puntual
ACV3000T
INSTRUCTION MANUAL
EN
Instruction manual
Istruzioni per l’uso
IT
Manual del usuario
ES
Page 2

Page 3
DE
HERZLICHEN GLÜCKWUNSCH!
Herzlichen Glückwunsch zum Erwerb dieses Bestron-Produktes.
In dieser Gebrauchsanweisung erläutern wir die Funktion und die
Benutzung. Lesen Sie somit diese Gebrauchsanweisung aufmerksam
durch, bevor Sie das Gerät benutzen. Verwenden Sie das Gerät nur so,
wie es in der Gebrauchsanweisung beschrieben ist. Bewahren Sie die
Gebrauchsanweisung danach sorgfältig auf.
Bei einem Defekt:
Sollte das Gerät unverhofft einen Defekt aufweisen, versuchen Sie dann
nie, die Reparatur selbst vorzunehmen. Lassen Sie Reparaturen immer
von einem qualifizierten Mechaniker ausführen.
Benutzung durch Kinder:
• Dieses Gerät muss aus der Reichweite von Kindern unter 3 Jahren
gehalten werden, wenn sie nicht ständig beaufsichtigt werden.
• Kinder zwischen 3 und 8 Jahren dürfen dieses Gerät nur an- und
ausstellen, wenn das Gerät gut platziert und in einer normalen
Position installiert wurde und wenn die Kinder beaufsichtigt werden
oder bezüglich der Funktion des Geräts und der Sicherheit aufgeklärt
wurden und sie sich der potenziellen Gefahren, die entstehen
können, bewusst sind.
• Kinder zwischen 3 und 8 Jahren dürfen das Gerät nicht anschließen
und einstellen.
• Die Reinigung und Wartung dürfen nicht von Kindern durchgeführt
werden.
• Kinder müssen im Auge behalten werden, um sich dessen sicher zu
sein, dass sie nicht mit dem Gerät spielen.
WAS SIE ÜBER ELEKTROGERÄTE WISSEN MÜSSEN
• Kontrollieren Sie, ob die Netzspannung der auf dem Typenschild
eines Elektrogerätes angegebenen Netzspannung entspricht, bevor
Sie es benutzen.
• Kontrollieren Sie, ob die Steckdose, an die Sie ein Elektrogerät
anschließen, geerdet ist.
• Stellen Sie Elektrogeräte immer an einer Stelle auf, an der sie nicht
fallen können, und auf einen stabilen und ebenen Untergrund.
• Bestimmte Teile eines Elektrogerätes können warm oder manchmal
heiß werden. Berühren Sie diese nicht, um Verbrennungen zu
vermeiden. Besondere Aufmerksamkeit muss dort gelten, wo Kinder
und schutzbedürftige Personen anwesend sind.
• Sorgen Sie dafür, dass Ihre Hände trocken sind, wenn Sie ein
Elektrogerät, ein Kabel oder einen Stecker berühren.
3
Page 4

DE
• Elektrogeräte müssen zur Vermeidung einer Feuergefahr ihre
Wärme abgeben können. Sorgen Sie somit dafür, dass das Gerät
ausreichend frei ist und nicht mit brennbarem Material in Kontakt
kommen kann. Elektrogeräte dürfen nie bedeckt werden.
• Sorgen Sie dafür, dass Elektrogeräte, Kabel oder Stecker nicht mit
Wasser in Berührung kommen.
• Tauchen Sie Elektrogeräte, Kabel oder Stecker nie in Wasser oder
eine andere Flüssigkeit.
• Fassen Sie Elektrogeräte nie an, wenn sie ins Wasser gefallen sind.
Ziehen Sie direkt den Stecker aus der Steckdose. Benutzen Sie das
Gerät nicht mehr.
• Sorgen Sie dafür, dass Elektrogeräte, Kabel und Stecker nicht mit
Hitzequellen, wie zum Beispiel eine heiße Kochplatte oder offenes
Feuer, in Berührung kommen.
• Lassen Sie Kabel nie über den Rand der Anrichte, Arbeitsplatte oder
einen Tisch hängen.
• Ziehen Sie den Stecker immer aus der Steckdose, wenn Sie das
Elektrogerät nicht benutzen.
• Wenn Sie den Stecker aus der Steckdose ziehen, ziehen Sie dann
am Stecker selbst und nicht am Kabel.
• Kontrollieren Sie regelmäßig, ob das Kabel des Elektrogerätes noch
intakt ist. Benutzen Sie das Gerät nicht, wenn das Kabel Beschädigungen aufweist. Wenn das Kabel beschädigt ist, muss es vom
Hersteller, einem technischen Kundendienst oder einer Person mit
einer ähnlichen Qualifikation ersetzt werden, um jede Gefahr zu vermeiden.
• Das Gerät darf nicht mittels eines externen Zeitschalters oder durch
ein separates System mit Fernbedienung eingeschaltet werden.
WAS SIE ÜBER DIESES GERÄT WISSEN MÜSSEN
• Seien Sie vorsichtig, wenn Sie das Gerät im Freien benutzen.
• Benutzen Sie das Gerät nie in feuchten Räumen.
• Reinigen Sie das Gerät nach der Benutzung gründlich (siehe
Reinigung und Wartung).
• Sorgen Sie dafür das brennbare Gegenstände nicht in Kontakt
kommen mit heißes Luft.
• Stecken Sie niemals Gegenstände durch den Korb.
• Benutzen Sie das Gerät nur in Verikalehn Position.
• Stellen Sie das Gerät nicht direkt unten den Wandsteckdose oder
auf hochfloriger Teppich.
• Nehmen Sie Rucksicht mit ein offen Raum 50 cm seitlich und oben
das Gerät und 120 cm an die Vorderseite des Gerätes.
4
Page 5
DE
Um überhitzung zu vermeiden, decken Sie das Gerät nicht ab!
UMWELT
• Werfen Sie Verpackungsmaterial, wie zum Beispiel Plastik
und Karton, in die dazu bestimmten Container.
• Dieses Produkt am Ende der Nutzungsdauer nicht als normalen
Haushaltabfall entsorgen, sondern bei einer Sammelstelle
zur Wiederverwendung von elektrischem und elektronischem
Gerät. Achten Sie auf das Symbol auf dem Produkt, der
Gebrauchsanweisung oder Verpackung.
• Die Materialien können wie angegeben wiederverwendet
werden. Durch Ihre Hilfe bei der Wiederverwendung, der
Verarbeitung der Materialien oder anderen Formen der
Nutzung des alten Gerätes leisten Sie einen wichtigen Beitrag
zum Schutz unserer Umwelt.
• Informieren Sie sich bei der Gemeinde nach der richtigen
Sammelstelle bei Ihnen in der Nähe.
CE-KONFORMITÄTSERKLÄRUNG
Dieses Produkt erfüllt die Bestimmungen in den folgenden europäischen
Richtlinien auf Sicherheitsgebiet:
• EMV–Richtlinie 2014/30/EU
• Niederspannungsrichtlinie 2014/35/EU
• RoHS–Richtlinie 2011/65/EU
R. Neyman
Quality control
5
Page 6
DE
FUNKTION - Allgemein
Das Gerät ist nur für den Hausgebrauch vorgesehen und nicht für die professionelle Verwendung.
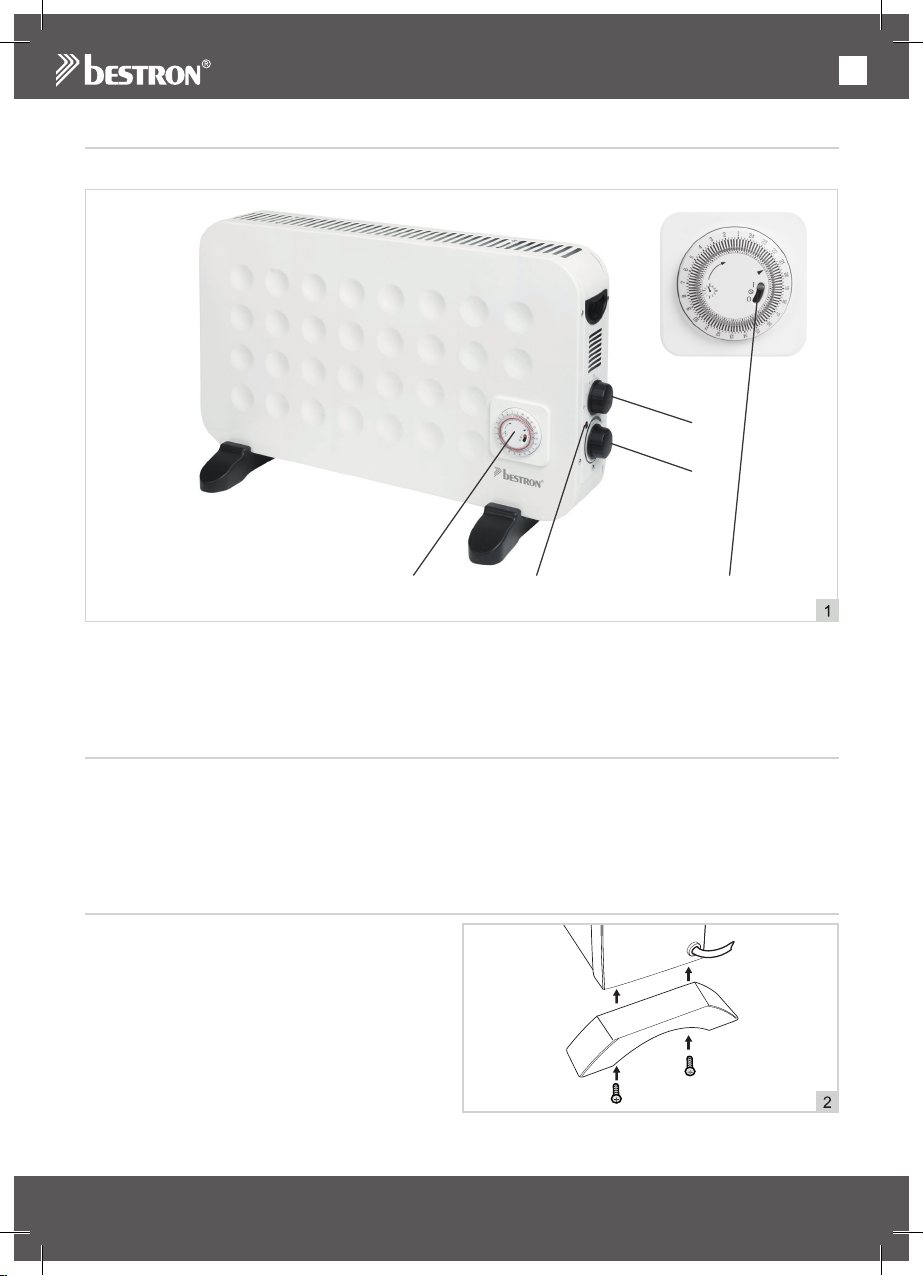
1
2
4
1. Auswahlschalter
I = 750Watt
II = 1250 Watt
III = 2000 Watt
FUNKTION - Vor der ersten Verwendung
Nehmen Sie das Gerät aus der Verpackung und entfernen Sie das Verpackungsmaterial.
ACHTUNG:
• Um überhitzung zu vermeiden, decken Sie das Gerät nicht ab.
• Das Gerät darf nicht unmittelbar unterhalb einer Wandsteckdose aufgestellt werden.
• gebrauchen Sie das Gerät nicht nahe bei Bädern, Duschen und Schwimmbäder.
BENUTZUNG - Montage der Stützfüße
Bevor Sie den Konvektorofen benutzen können,
müssen die zwei Stützfüße montiert werden mit
den mitgelieferten Schrauben. Siehe Abbildung 2.
3
2. Thermostatschalter
3. Kontrollleuchte
4. Timer
5. Timer Schalter
5
6
Page 7
DE
BENUTZUNG - Aufstellung
Stellen Sie den Konvektor in dem zu heizenden Raum auf einem stabilen Untergrund auf. Die Funktion
basiert auf der Erwärmung längsströmender Luft. Daher ist es am besten, den Konvektor ungefähr 20 bis
25 cm vor dem Fenster aufzustellen. Durch Abkühlung der Luft durch das Fenster und Erwärmung durch
den Konvektor tritt eine Luftzirkulation ein.
ACHTUNG:
• Sorgen Sie dafür, dass die Luft bequem durch den Ofen strömen kann. Aus diesem Grund müssen die
Unter- und die Oberseite des Konvektorofens immer frei bleiben. Hängen Sie keinesfalls Dinge zum
Trocknen auf den Konvektorofen. Aufgrund der sich entwickelnden Wärme können diese sehr leicht
Feuer fangen.
BENUTZUNG OHNE TIMER
Stellen Sie sicher, dass der Timer-Schalter auf 1 steht, da sonst das Gerät nicht funktioniert.
1. Drehen Sie den Thermostatschalter ganz auf MIN.
2. Stecken Sie den Stecker in die Steckdose.
3. Wählen Sie mit dem Auswahlschalter die gewünschte Einstellung:
I = 750 W
II = 1250 W
III = 2000 W
4. Drehen Sie den Thermostatknopf. Das Gerät schaltet sich ein, wenn Sie ein Klicken hören, die
Kontrollleuchte (3) leuchtet auf. Durch weiteres Drehen des Thermostatknopfs auf MAX erhöhen Sie die
eingestellte Temperatur.
5. Schalten Sie das Gerät wieder aus, indem Sie den Auswahlschalter auf O stellen, den Thermostatknopf
auf MIN drehen und den Stecker aus der Steckdose ziehen.
Zur Ermittlung der idealen Thermostateinstellung drehen Sie den Thermostatschalter bis zum Anschlag nach
rechts. Drehen Sie dann, wenn der Raum die gewünschte Temperatur hat, den Schalter langsam wieder
zurück nach links, bis ein Klicken zu hören ist. Das Gerät schaltet sich dann aus. Die Temperaturüberwachung
bewirkt, dass die eingestellte Temperatur beibehalten wird.
BENUTZUNG MIT TIMER
Stellen Sie sicher, dass der Timer auf eingestellt ist, andernfalls schaltet der Timer das Gerät nicht
ein oder aus.
1. Stellen Sie sicher, dass die gewünschte Temperatur bereits eingestellt ist, zum Beispiel basierend auf
vorheriger Verwendung. Oder wählen Sie die gewünschte Einstellung mit dem Auswahlknopf und
stellen Sie den Thermostatschalter auf die gewünschte Position.
2. Stellen Sie den Timer auf die Position .
3. Bestimmen Sie die aktuelle Zeit. Drehen Sie den Timer so, dass die Zeitanzeige am Außenring mit dem
Pfeil am Gerät übereinstimmt.
4. Stecken Sie den Stecker in die Steckdose. Der Timer fängt jetzt an zu laufen. Sie erkennen dies an dem
kleinen Sekundenzeiger, der sich dreht.
5. Bestimmen Sie die Einschaltzeit und drücken Sie den roten Stift zum entsprechenden Zeitpunkt mit
einem spitzen Gegenstand (mit einem Stift oder Ihrem Nagel) heraus.
6. Drücken Sie von diesem Zeitpunkt an mehr rote Stifte heraus, um das Gerät länger eingeschaltet zu
halten. Je mehr rote Stifte Sie herausdrücken, desto länger bleibt das Gerät eingeschaltet. Zum Zeitpunkt,
an dem das Gerät wieder ausgeschaltet werden soll, hören Sie auf, die roten Stifte herauszudrücken.
Beispiel:
Es ist 17:00 Uhr und Sie möchten, dass sich das Gerät um 19:00 Uhr automatisch einschaltet. Sie möchten,
dass sich das Gerät um 22:00 Uhr wieder ausschaltet.
Drehen Sie den Außenring so, dass die Zeit 17 am Außenring mit dem Pfeil in der Mitte des Timers
übereinstimmt. Drücken Sie alle roten Stifte zwischen Zeit 19 und 22 heraus.
Achtung:
Wenn Sie möchten, dass das Gerät jeden Tag zur gleichen Zeit vom Timer ein- und ausgeschaltet wird,
lassen Sie den Stecker in der Steckdose, da sonst der Timer stoppt.
7
Page 8
DE
ACHTUNG:
• Achten Sie darauf, dass der Lufteinlass und -auslass nie abgedeckt sind.
• Der Thermostat schaltet das Heizelement und den Turboventilator aus, sobald die gewünschte Tempe-
ratur erreicht ist.
• Der Konvektorofen ist mit einem Überhitzungsschutz ausgerüstet. Bei einer hohen Betriebstemperatur
schaltet sich der Konvektorofen automatisch aus. Sobald die Temperatur ausreichend gesunken ist,
wird der Überhitzungsschutz ausgeschaltet und kann der Konvektorofen wieder verwendet werden.
REINIGUNG UND WARTUNG
• Ziehen Sie den Stecker aus der Steckdose und lassen Sie den Konvektorofen gut abkühlen.
• Reinigen Sie den Konvektorofen mit einem feuchten Tuch. Falls erforderlich können Sie den
Konvektorofen mit Seifenwasser reinigen. Achten Sie darauf, dass keine Flüssigkeit in den
Konvektorofen gelangt.
• Trocknen Sie das Gerät nach der Reinigung gründlich ab.
• Tauchen Sie das Gerät nie unter Wasser.
ACHTUNG:
• Verwenden Sie zur Reinigung keine aggressiven Reinigungs- oder Scheuermittel oder scharfen Ge-
genstände (wie Messer oder harte Bürsten).
GARANTIEBESTIMMUNGEN
Bestron handhabt unter den folgenden Bedingungen eine Garantie von 60 Monaten ab Kaufdatum gegen
Defekte, die durch Herstellungs- und/oder Materialfehler entstanden sind.
1. Im genannten Garantiezeitraum werden keine Kosten für Arbeitslohn und Material berechnet.
2. Die unter der Garantie ausgeführte Reparatur verlängert nicht die Garantiefrist.
3. Defekte Zubehörteile oder bei Umtausch die defekten Geräte selbst werden automatisch Eigentum von
Bestron.
4. Die Garantie gilt ausschließlich für den ersten Käufer und ist nicht übertragbar.
5. Die Garantie gilt nicht für einen Schaden, der entstanden ist durch:
• Unfälle
• falsche Benutzung
• Verschleiß
• Verwahrlosung
• Fehlerhafte Installation
• Anschluss an eine andere Netzspannung als die, die auf dem Typenschild genannt ist
• Unautorisierte Veränderung
• Von nicht qualifizierten Dritten ausgeführte Reparaturen
• Benutzung entgegen den geltenden gesetzlichen, technischen oder Sicherheitsnormen
• Unsorgfältigen Transport ohne geeignete Verpackung oder anderen Schutz
6. Ein Anspruch auf Garantie kann nicht erhoben werden bei:
• Einem Schaden während des Transports
• Der Entfernung oder Änderung der Seriennummer des Gerätes
7. Von der Garantie ausgenommen sind:
• Kabel
• Lampen
• Zubehörteile aus Glas
• Filter
8. Die Garantie berechtigt neben dem Ersatz beziehungsweise der Reparatur der defekten Zubehörteile
nicht zu irgendeiner Erstattung eines eventuellen Schadens. Bestron kann nie für einen eventuellen
Folgeschaden oder irgendwelche andere Konsequenzen, die durch oder in Bezug auf das von ihr
gelieferte Gerät entstanden sind, haftbar gemacht werden.
9. Der Garantieanspruch kann nur bei Ihrem (Web-)Händler oder direkt beim Bestron Kundendienst geltend
gemacht werden. Senden Sie ein Gerät nicht ohne vorherige Rücksprache zurück. Das Paket kann dann
abgelehnt werden und eventuelle Kosten gehen zu Ihren Lasten. Nehmen Sie erst für Anweisungen,
wie Sie das Gerät einpacken und versenden müssen, Kontakt auf. Jedem Garantieanspruch muss der
Kaufbeleg beigefügt werden.
SERVICE
Sollte sich unverhofft eine Störung ergeben, dann können Sie mit dem BESTRON-Kundendienst Kontakt
aufnehmen: www.bestron.com/service
8
Page 9
FR
FÉLICITATIONS !
Nous vous félicitons pour l’achat de votre produit Bestron. Dans le présent
manuel d’utilisation, nous vous expliquons comment celui fonctionne et
comment vous devez l’utiliser. Nous vous invitons par conséquent à
lire attentivement les instructions d’utilisation avant d’utiliser l’appareil.
Lorsque vous l’utilisez, prenez soin de suivre parfaitement les instructions
d’utilisation. Conserver-les précautionneusement.
En cas de dysfonctionnement :
Si l’appareil devait malencontreusement ne plus fonctionner, n’essayez
jamais de le réparer vous-même. Vous devez laisser le soin de le faire
à un réparateur/technicien qualifié.
Utilisation par des enfants :
• Le présent appareil doit être tenu hors de portée des enfants de
moins de 3 ans, sauf en cas de surveillance constante.
• Les enfants entre 3 et 8 ans peuvent seulement allumer et éteindre
l'appareil, à condition que celui-ci soit placé correctement et installé
dans une position normale et que les enfants soient surveillés ou
qu'ils aient reçu des instructions concernant le fonctionnement de
l'appareil ainsi que sur les mesures de sécurité à respecter et à
condition que ceux-ci aient suffisamment conscience des dangers
potentiels qu'ils peuvent courir.
• Les enfants entre 3 et 8 ans ne peuvent pas brancher l'appareil et
le régler.
• Le nettoyage et l'entretien ne peuvent être effectués par des enfants.
• Prenez soin de toujours surveiller les enfants de sorte à vous assurer
qu'ils ne jouent pas avec l'appareil.
CE QUE VOUS DEVEZ SAVOIR AU SUJET DES APPAREILS
ÉLECTRIQUES
• Avant toute utilisation, vérifiez que la tension électrique du réseau
correspond à la tension électrique indiquée sur la plaque signalétique
de l’appareil concerné.
• Contrôlez que la prise à laquelle vous raccordez l’appareil électrique
est reliée à la terre.
• Veillez toujours à placer les appareils électriques sur une surface
stable et plane et à un endroit où celui-ci ne peut pas tomber.
• Certains éléments d’un appareil électrique peuvent devenir chauds
ou parfois même brûlants. Prenez soin de ne pas les toucher afin
d’éviter de vous brûler. Une attention particulière doit être accordée
aux enfants et aux personnes vulnérables.
• Assurez-vous que vos mains sont sèches lorsque vous touchez un
appareil électrique, un fil/câble ou une prise.
9
Page 10
FR
• Les appareils électriques doivent pouvoir libérer la chaleur qu’ils
produisent de sorte à éviter tout risque d’incendie. Vérifiez par
conséquent s’il y a suffisamment d’espace autour de l’appareil et
faites en sorte que celui-ci ne puisse entrer en contact avec du
matériel inflammable. Les appareils électriques ne doivent jamais
être couverts.
• Assurez-vous que les appareils électriques, les fils/câbles ou les
prises n’entrent pas en contact avec de l’eau.
• N’immergez jamais des appareils électriques, des fils/câbles ou
prises dans de l’eau ou dans un autre liquide.
• Ne saisissez jamais un appareil électrique lorsque celui-ci est tombé
dans l’eau. Débranchez-le immédiatement et ne l’utilisez plus.
• Assurez-vous que les appareils électriques, les fils/câbles ou les
prises n’entrent pas en contact avec des sources de chaleur comme
une plaque de cuisson brûlante ou avec du feu.
• Ne laissez pas pendre des fils/câbles sur le rebord d’un évier, d’un
plan de travail ou d’une table.
• Débranchez toujours l’appareil de la prise de contact lorsque vous
ne l’utilisez pas.
• Lorsque vous débranchez l’appareil de la prise de contact, prenez
soin de tirer en saisissant la partie dure de la prise mâle et non pas
en tirant sur le fil/câble.
• Contrôlez régulièrement si le fil/câble de l’appareil électrique est
encore intact. N’utilisez pas l’appareil si le fil/câble présente des
signes d’endommagement. Si le fil/câble est endommagé, celui-ci
doit être remplacé par le fabricant, par un service technique ou par
une personne ayant une compétence/qualification similaire, ceci afin
d’éviter tout danger.
• L’appareil ne peut être mis en marche en ayant recours à une
minuterie externe ou à un système séparé avec télécommande.
CE QUE VOUS DEVEZ SAVOIR AU SUJET DE CET APPAREIL
• Soyez prudent lorsque vous utilisez l’appareil à l’extérieur.
• N’utilisez jamais l’appareil dans des pièces humides.
• Après utilisation, nettoyez soigneusement l’appareil (voir Nettoyage
et entretien).
• Maintenir le fil à distance des grilles d’entrée et d’échappement.
• L’appareil ne doit être utilisé qu’en position verticale.
• Pour éviter toute surchauffe, veuillez à ce que les grilles d’entrée et de
sortie restent dégagées. Ne les obstruez jamais. En outre, il convient
de dépoussiérer ces grilles régulièrement à l’aide d’un aspirateur.
• Ne pas positionner l’appareil directement au dessous d’une prise de
courant.
• Laisser toujours une espace libre de 50 cm à coté et au dessus de
l’appareil, et une espace de 120 cm avant de l’appareil.
10
Page 11
FR
Ne couvrez pas l’appareil ne marche pas,
pour éviter la surchauffe!
ENVIRONNEMENT
• Débarrassez-vous du matériel d’emballage comme le plastique et les boîtes dans les containers destinés à cet effet.
• À la fin de sa durée de vie, ne jetez pas ce produit comme
un simple déchet ménager mais remettez-le à un centre de
collecte de recyclage des produits électriques et électroniques.
Consultez le symbole sur le produit, le mode d’emploi ou
l’emballage.
• Les matériels/matériaux peuvent être réutilisés comme indiqué. En apportant votre aide au recyclage et au traitement
des matériels/matériaux ou à tout autre forme de réutilisation d’anciens appareils, vous contribuez à la protection de
l’environnement.
• Informez-vous auprès de votre commune pour obtenir la liste
des points de collecte à proximité de chez vous.
DÉCLARATION DE CONFORMITÉ CE
Le présent produit répond aux exigences des directives européennes
suivantes en matière de sécurité :
• Directive CEM 2014/30/EU
• Directive Basse tension 2014/35/EU
• Directive RoHS 2011/65/EU
R. Neyman
Contrôle qualité
11
Page 12
FR
FONCTIONNEMENT - Généralités
L’appareil est destiné uniquement à l’utilisation domestique, et non à l’usage professionnel.
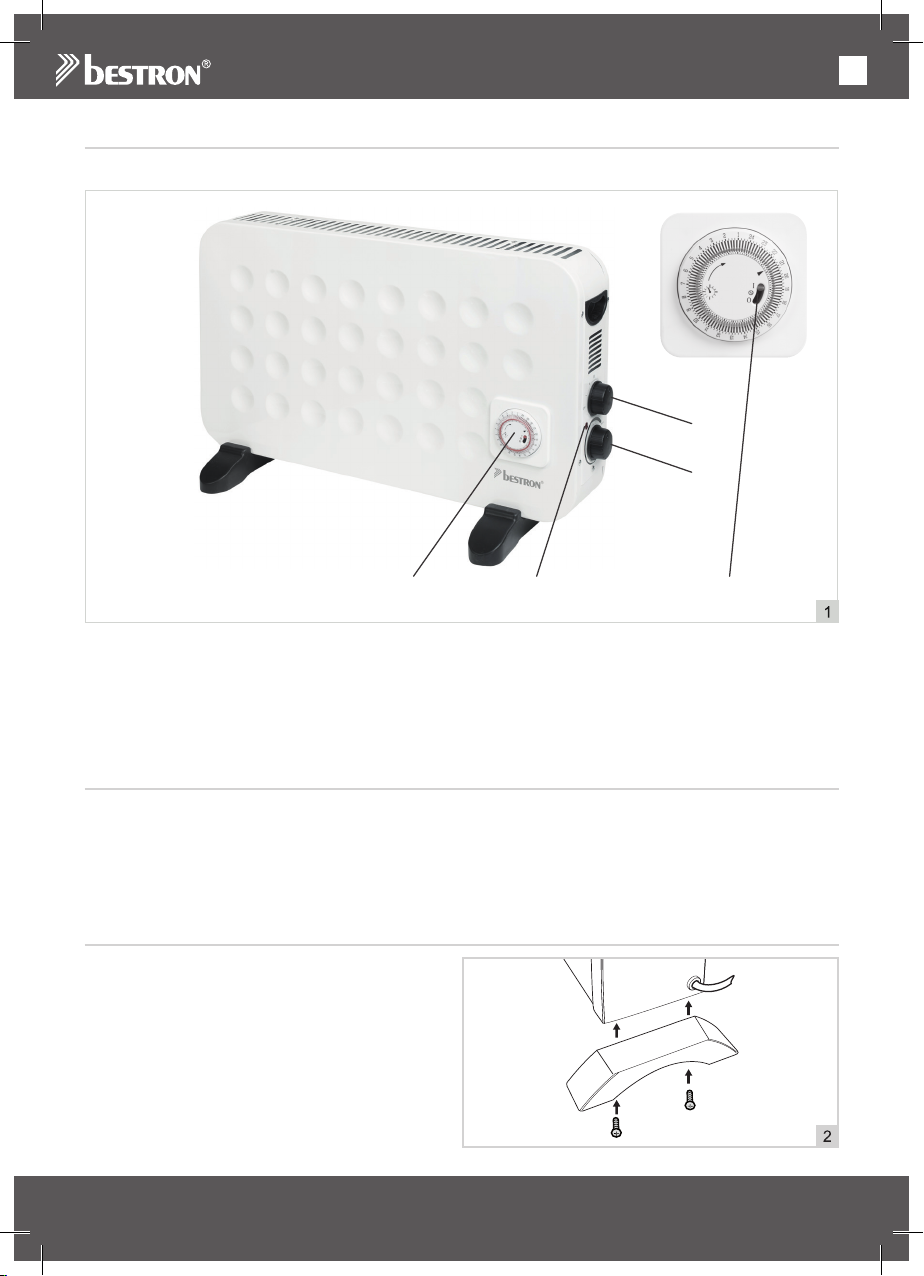
1
2
4
1. Bouton de fonction:
I = 750 W
II = 1250 W
III = 2000 W
FONCTIONNEMENT - Avant la première utilisation
Retirez l’appareil de l’emballage et enlevez tous les composants d’emballage.
ATTENTION:
• Ne couvrez pas l’appareil ne marche pas pour éviter la surchauffe.
• Ne placez pas le dispositif, directement sous une prise socket.
• Ne pas utiliser ce chauffe dans les environs immédiats d’une baignoire, une douche ou une piscine.
UTILISATION - Montage des pieds d’appui
Avant d’utiliser le radiateur à convection, vous devez
obligatoirement monter les deux pieds d’appui
avec les vis fournies, voir la figure 2.
3
2. Bouton de réglage de la température
3. voyant
4. Minuterie
5. interrupteur minuterie
5
12
Page 13
FR
UTILISATION - Emplacement
Placez le radiateur à convection dans la pièce à chauffer, sur une surface stable. Le principe de fonctionnement du radiateur est de réchauffer l’air qui passe. La place idéale du radiateur à convection sera à 20 à
25 cm devant une fenêtre. La circulation de l’air se fait automatiquement, parce que la fenêtre le refroidit et
que le radiateur le réchauffe.
ATTENTION:
• Veillez à ce l’air circule librement à travers le radiateur. Le dessus et le dessous du radiateur à
convection doivent toujours rester libres. Ne suspendez jamais aucun objet directement sur le radiateur
à convection pour le faire sécher. La chaleur développé peut le mettre en feu trop facilement.
UTILISATION - UTILISATION SANS MINUTERIE
Veillez à ce que l’interrupteur de la minuterie soit placé sur 1, autrement l’appareil ne fonctionnera
pas.
1. Mettez le bouton de réglage de la température à fond sur “MIN”.
2. Branchez la fiche.
3. Sélectionnez la touche de fonction souhaitée est le réglage désiré:
I = 750 W
II = 1250 W
III = 2000 W
4. Tournez le bouton de réglage de la température vers la marque “MAX”. L’appareil se met à fonctionner
au moment où vous entendez le déclic, et le témoin lumineux marche/arrêt s’allume. Vous continuez de
tourner le bouton de réglage de la température pour régler une température plus élevée.
5. Éteignez l’appareil (sélecteur de fonction sur “O”) et débranchez la fiche dès que vous avez fini de
l’utiliser. Remettez le bouton de réglage de la température sur “MIN”.
Pour déterminer la position idéale du bouton de réglage de la température, vous tournez d’abord le bouton à
fond vers la droite. Dès que la pièce a atteint la température désirée, vous tournez le bouton en sens inverse,
vers la gauche, jusqu’à ce que vous entendiez le déclic. L’appareil cesse son activité. Le mécanisme de
contrôle de la température maintient maintenant la température réglée.
FONCTIONNEMENT – UTILISATION AVEC MINUTERIE
Veillez à ce que l’interrupteur de la minuterie soit placé sur , autrement la minuterie n’allumera pas
et n’arrêtera pas l’appareil.
1. Veillez à ce que la température souhaitée soit déjà définie. Par exemple sur base d’une utilisation
précédente. Ou choisissez bien le réglage souhaité avec le bouton de sélection et placez l’interrupteur
du thermostat sur la position souhaitée.
2. Placez la minuterie en position .
3. Définissez l’heure actuelle. Pour que l’heure sur l’anneau extérieur soit identique à la flèche sur
l’appareil.
4. Placez la fiche dans la prise de courant. L’horloge va à présent fonctionner. Vous pouvez le voir à
l’aiguille des secondes qui tourne.
5. Définissez le moment d’enclenchement et poussez vers l’extérieur la petite broche rouge placée à côté
de l’heure correspondante avec un objet pointu (un stylo ou votre ongle).
6. A partir de cette heure poussez vers l’extérieur d’autres petites broches rouges pour garder l’appareil
allumé plus longtemps. Plus vous poussez de petites broches rouges vers l’extérieur, plus l’appareil
restera allumé longtemps. Vous arrêtez de pousser vers l’extérieur les petites broches rouges à l’heure
à laquelle l’appareil doit à nouveau être coupé.
Exemple :
Il est 17h00 et vous voulez que l’appareil s’enclenche automatiquement à 19h00. A 22h00, vous voulez que
l’appareil se coupe.
Tournez l’anneau extérieur pour que l’heure 17 sur celui-ci coïncide à la flèche au centre de la minuterie.
Poussez vers l’extérieur toutes les petites broches rouges entre 19 et 22.
Attention :
Si vous voulez que la minuterie active et coupe l’appareil tous les jours aux mêmes heures, il faut laisser la
fiche dans la prise de courant, autrement la minuterie s’arrête.
13
Page 14
FR
ATTENTION:
• Veillez à ne jamais recouvrir l’entrée ni la sortie d’air.
• Le thermostat arrête l’élément chauffant et le turboventilateur dès que la température réglée est atteinte.
• Le radiateur à convection est équipé d’un coupe-circuit thermique. Si la température de fonctionnement
est trop élevée, le radiateur à convection s’éteint automatiquement. Une fois que la température est
redescendue à un niveau sûr, le coupe-circuit thermique se désactive et le radiateur à convection est à
nouveau utilisable.
NETTOYAGE ET ENTRETIEN
• Débranchez la fiche et laissez bien refroidir le radiateur à convection.
• Nettoyez le radiateur à convection avec un chiffon humide. Si nécessaire, vous pouvez nettoyer le
radiateur à convection avec un peu d’eau chaude additionnée d’un peu de détergent pour la vaisselle.
Ne laissez pas l’humidité pénétrer à l’intérieur du radiateur à convection.
• Après le nettoyage, séchez bien l’appareil.
• N’immergez jamais l’appareil.
ATTENTION:
• N’utilisez pas de détergents agressifs ou décapants ni d’objets tranchants (tels que couteaux ou brosses
dures) pour le nettoyage.
DISPOSITIONS CONCERNANT LA GARANTIE
Le présent produit Bestron bénéficie – aux conditions ci-après – d’une garantie de 60 mois suivant la date
d’achat et couvrant toute panne résultant d’un défaut/vice de fabrication et/ou de fonctionnement.
1. Pendant la période de garantie précitée, aucun frais ne sera facturé au titre des coûts de main-d’œuvre
et de matériel.
2. Les réparations effectuées au cours de la période de garantie n’entraînent pas de prolongation du délai
de garantie.
3. Les éléments/composantes défectueux – ou l’appareil lui-même en cas d’échange de l’appareil –
deviennent automatiquement la propriété de Bestron.
4. La garantie profite exclusivement au premier acheteur et n’est pas transmissible.
5. La garantie ne joue pas pour les dommages résultant :
• D’accidents
• D’une utilisation inappropriée
• De l’usure
• D’une manipulation négligente
• D’une installation erronée
• Du raccordement à un réseau électrique autre que celui indiqué sur la plaque signalétique
• De modifications non autorisées apportées à l’appareil
• De réparations effectuées par des personnes non qualifiées
• D’une utilisation contraire aux normes légales, techniques ou de sécurité s’appliquant
• D’un transport négligent sans utiliser un emballage adéquat ou une autre protection
6. Il n’est pas possible de mettre en œuvre la garantie en cas de :
• Dommages apparus pendant le transport
• Suppression ou modification du numéro de série de l’appareil
7. Ne bénéficient pas de la garantie :
• Les fils/câbles
• Les lampes
• Les parties/composantes en verre
• Les filtres
8. La garantie ne donne pas droit à l’indemnisation d’éventuels dommages en sus du remplacement ou de
la réparation des parties/composantes défectueuses. La responsabilité de Bestron ne peut jamais être
engagée pour les éventuels dommages consécutifs ou pour toute autre conséquence causés l’appareil
livré par Bestron ou en relation avec celui-ci.
9. Pour faire jouer la garantie, il convient de s’adresser au vendeur (sur Internet) ou directement au Service
assistance de Bestron. N’envoyez jamais un article de votre propre initiative. Le paquet peut être en
effet refusé et les éventuels frais seront à votre charge. Contactez d’abord le vendeur ou le Service
assistance de Bestron qui vous indiqueront comment vous devez emballer l’appareil et comment
l’expédier. Toute demande de mise en œuvre de la garantie doit être accompagnée d’une preuve
d’achat.
SERVICE
En cas de panne ou de dysfonctionnement de votre appareil, contactez le service assistance de
BESTRON : www.bestron.com/service
14
Page 15
NL
PROFICIAT!
Proficiat met de aankoop van dit Bestron-product. In deze
gebruiksaanwijzing leggen we de werking en het gebruik uit. Lees
de gebruiksaanwijzing dus aandachtig door vóór u het apparaat
gaat gebruiken. Gebruik het apparaat alleen zoals beschreven in de
gebruiksaanwijzing. Bewaar de gebruiksaanwijzing daarna zorgvuldig.
Bij een defect:
Mocht het apparaat onverhoopt defect raken, probeer dan nooit zélf
de reparatie uit te voeren. Laat reparaties altijd uitvoeren door een
gekwalificeerde monteur.
Gebruik door kinderen:
• Dit apparaat dient buiten bereik gehouden te worden van kinderen
onder de 3 jaar, tenzij zij onder continu toezicht staan.
• Kinderen tussen 3 en 8 jaar oud mogen dit apparaat enkel aan en uit
zetten, mits het apparaat goed geplaatst is en geïnstalleerd in een
normale positie, en dat de kinderen onder toezicht staan of instructies
hebben ontvangen betreffende de werking van het apparaat en de
veiligheid en dat zij zich bewust zijn van de potentiële gevaren die
kunnen ontstaan.
• Kinderen tussen 3 en 8 jaar oud mogen het apparaat niet aansluiten
en niet regelen.
• Reiniging en onderhoud moeten niet worden gedaan door kinderen.
• Kinderen moeten in de gaten gehouden worden om er zeker van te
zijn dat ze niet met het apparaat spelen.
WAT U MOET WETEN OVER ELEKTRISCHE APPARATEN
• Controleer of de netspanning overeenkomt met de aangegeven
netspanning op het typeplaatje van een elektrisch apparaat, voordat
u het gebruikt.
• Controleer of het stopcontact waarop u een elektrisch apparaat
aansluit, geaard is.
• Plaats elektrische apparaten altijd op een stabiele en vlakke onder-
grond, op een plaats waar het niet kan vallen.
• Bepaalde delen van een elektrisch apparaat kunnen warm of soms
heet worden. Raak deze niet aan om te voorkomen dat u zich
verbrandt. Speciale oplettendheid dient in acht te worden genomen
bij aanwezigheid van kinderen en kwetsbare personen.
• Zorg ervoor dat uw handen droog zijn als u een elektrisch apparaat,
een snoer of een stekker aanraakt.
• Elektrische apparaten moeten hun warmte kwijt kunnen om brand-
15
Page 16
NL
gevaar te voorkomen. Zorg er dus voor dat het apparaat voldoende
vrij is en niet in contact kan komen met brandbaar materiaal. Elektrische apparaten mogen nooit worden bedekt.
• Zorg ervoor dat elektrische apparaten, snoeren of stekkers niet in
aanraking komen met water.
• Dompel elektrische apparaten, snoeren of stekkers nooit onder in
water of een andere vloeistof.
• Pak elektrische apparaten niet op wanneer ze in het water zijn
gevallen. Trek direct de stekker uit het stopcontact. Gebruik het
apparaat niet meer.
• Zorg ervoor dat elektrische apparaten, snoeren en stekkers niet in
aanraking komen met hittebronnen, zoals een hete kookplaat of
open vuur.
• Laat snoeren niet over de rand van het aanrecht, werkblad of een
tafel hangen.
• Haal stekkers altijd uit het stopcontact wanneer u het elektrisch
apparaat niet gebruikt.
• Als u de stekker uit het stopcontact neemt, trek dan aan de stekker
zelf en niet aan het snoer.
• Controleer regelmatig of het snoer van het elektrisch apparaat nog
intact is. Gebruik het apparaat niet als het snoer beschadigingen
vertoont. Als het snoer beschadigd is, moet het vervangen worden
door de fabrikant, een technische servicedienst of een persoon met
een gelijkaardige kwalificatie, om elk gevaar te vermijden.
• Het apparaat mag niet in werking worden gesteld door middel van
een externe tijdschakelaar, of door een afzonderlijk systeem met
afstandsbediening.
WAT U MOET WETEN OVER DIT APPARAAT
• Wees voorzichtig wanneer u het apparaat buitenshuis gebruikt.
• Gebruik het apparaat nooit in vochtige ruimten.
• Maak het apparaat na gebruik grondig schoon (zie Reiniging en
onderhoud).
• Zorg ervoor dat brandbare voorwerpen niet in contact komen met de
warme lucht.
• Steek geen voorwerpen in de ventilatorkachel.
• Het apparaat uitsluitend in een verticale positie gebruiken.
• Zorg ervoor dat de luchtopeningen vrij zijn.
• Plaats dit apparaat niet direct onder een stopcontact en niet op
hoogpolig tapijt.
• Houdt bij plaatsing rekening met een vrije ruimte van 50 cm opzij en
boven het toestel en 120 cm voor het toestel.
16
Page 17
NL
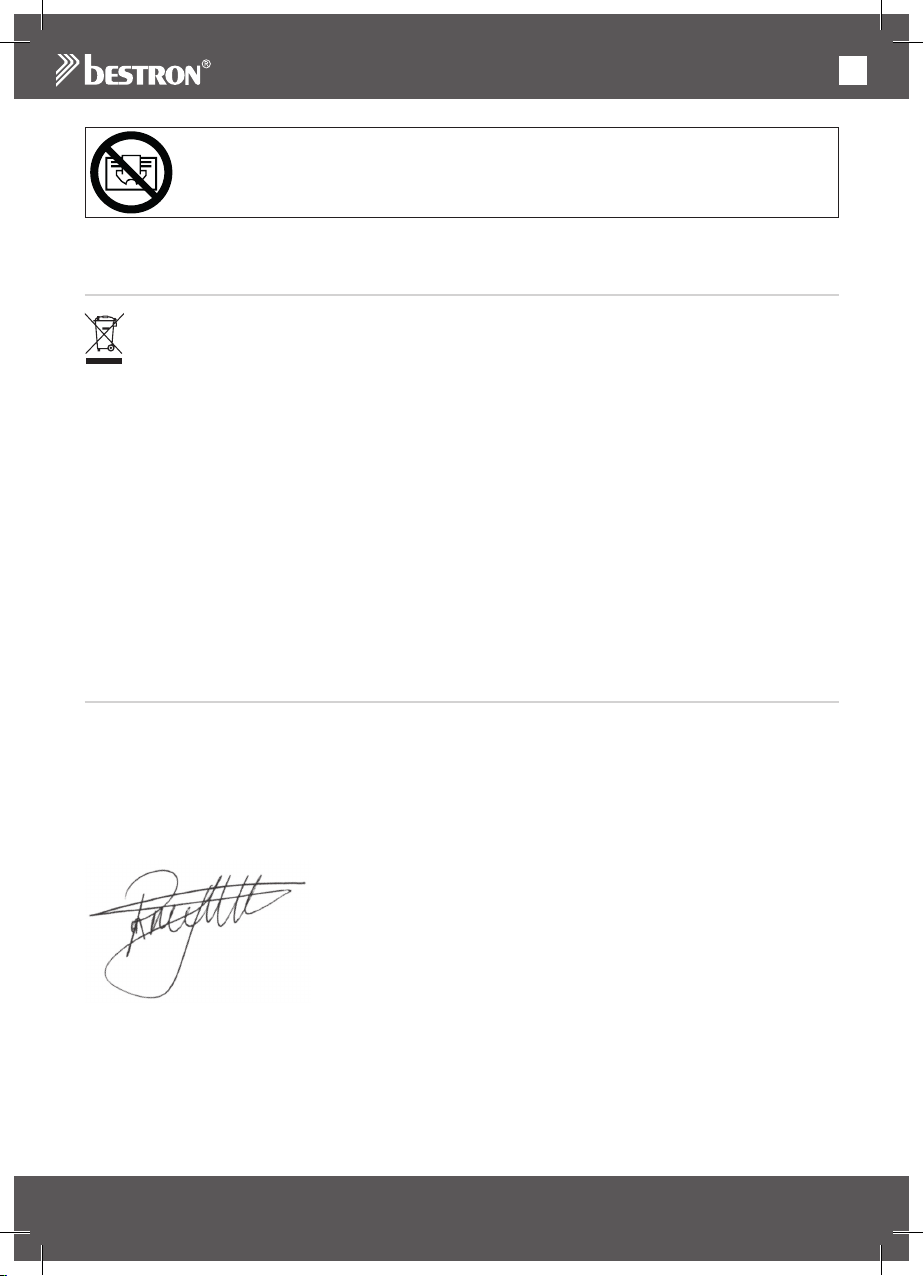
Dek het apparaat niet af, om oververhitting te voorkomen!
MILIEU
• Werp verpakkingsmateriaal zoals plastic en dozen in de daarvoor bestemde containers.
• Dit product aan het eind van de gebruiksduur niet inleveren
als normaal huishoudelijk afval, maar bij een inzamelpunt voor
hergebruik van elektrische en elektronische apparatuur. Let
op het symbool op het product, de gebruiksaanwijzing of de
verpakking.
• De materialen kunnen hergebruikt worden zoals aangegeven.
Door uw hulp bij hergebruik, de verwerking van de materialen
of ander vormen van de benutting van oude apparatuur levert
u een belangrijke bijdrage aan de bescherming van ons
milieu.
• Informeer bij de gemeente naar het juiste inzamelpunt bij u in
de buurt.
CE-CONFORMITEITSVERKLARING
Dit product voldoet aan de bepalingen in de volgende Europese richtlijnen op het gebied van veiligheid
• EMC – Richtlijn 2014/30/EU
• Laagspanningsrichtlijn 2014/35/EU
• RoHS – Richtlijn 2011/65/EU
R. Neyman
Quality control
17
Page 18
NL
WERKING - Algemeen
Het apparaat is alleen bedoeld voor huishoudelijke doeleinden, niet voor professioneel gebruik.
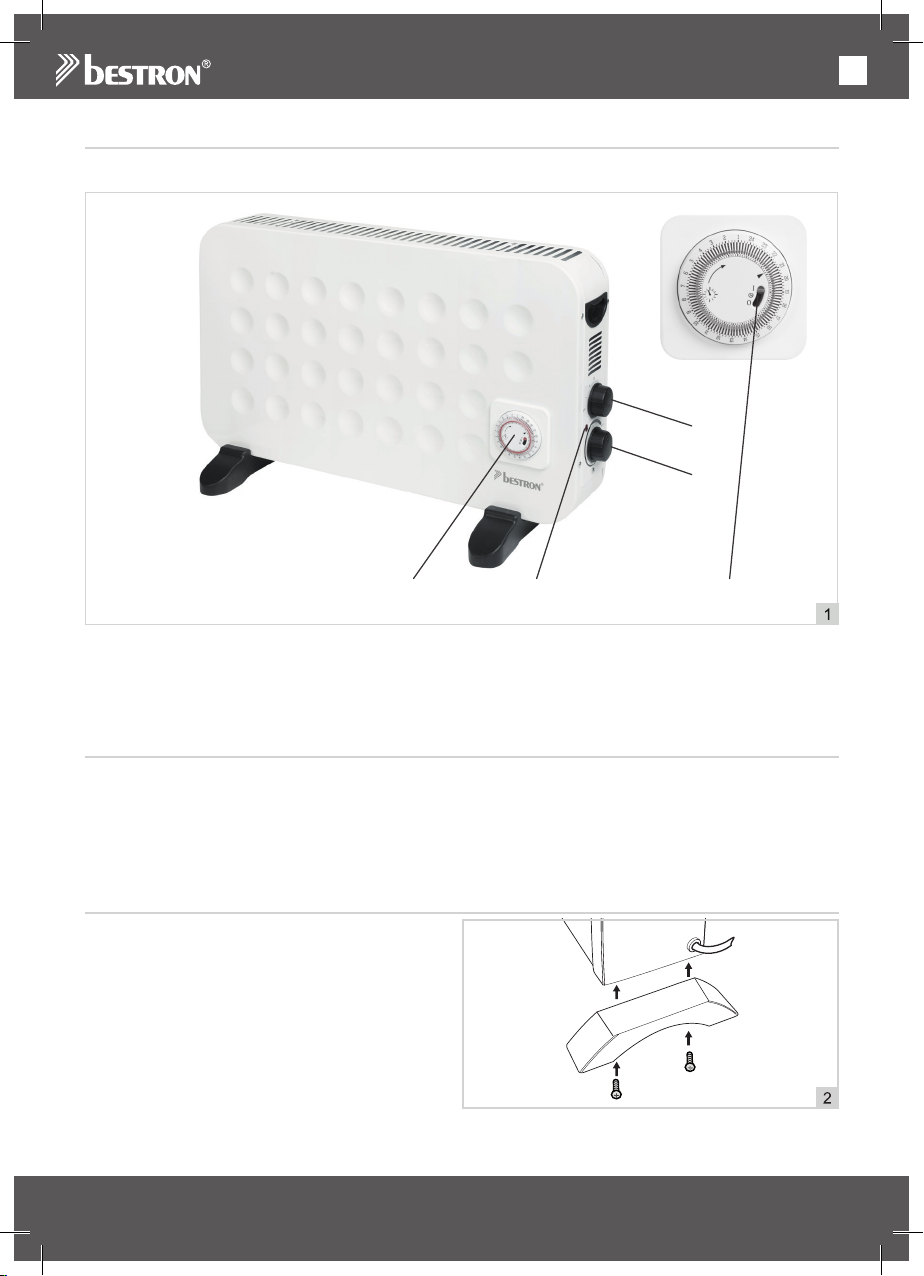
1
2
4
1. Functieschakelaar
I = 750 Watt
II = 1250 Watt
III = 2000 Watt
WERKING - Voor het eerste gebruik
Haal het apparaat uit de verpakking en verwijder alle verpakkingsonderdelen.
LET OP:
• Dek het apparaat niet af om oververhitting te voorkomen.
• Plaats het apparaat niet direct onder een stopcontact.
• Gebruik dit apparaat niet in de onmiddellijke omgeving van een bad, een douche of een zwembad.
WERKING - Montage steunvoetjes
Voordat u de convectorkachel mag gebruiken,
moeten de twee steunvoetjes gemonteerd worden
door middel van de bijgeleverde schroefjes, zie
figuur 2.
3
2. Thermostaatknop
3. Indicatielampje
4. Timer
5. Timerschakelaar
5
18
Page 19
NL
WERKING - Plaatsing
Plaats de convectorkachel in de te verwarmen ruimte, op een stabiele ondergrond. De werking van de kachel
is gebaseerd op het verwarmen van langsstromende lucht. Daarom is de beste plek om de convectorkachel
te plaatsen ongeveer 20 à 25 cm voor het raam. Circulatie van lucht treedt op door afkoeling van de lucht
door het raam en verwarming door de convectorkachel.
LET OP:
• Zorg ervoor dat lucht gemakkelijk door de kachel kan stromen. Daarom moeten de onderkant en
bovenkant van de convectorkachel altijd vrij blijven. Hang nooit artikelen op de convectorkachel om te
drogen. Door de ontwikkelde warmte kunnen deze zeer gemakkelijk vlam vatten.
WERKING - Gebruik zonder timer
1. Draai de thermostaatknop helemaal naar “MIN” .
2. Steek de stekker in het stopcontact.
3. Kies met de gewenste functieknop de gewenste instelling:
I = 750 Watt
II = 1250 Watt
III = 2000 Watt
4. Draai de thermostaatknop in de richting van “MAX”. Het apparaat schakelt in als u een klik hoort, het
indicatielampje gaat dan branden. Door de thermostaatknop verder door te draaien, verhoogt u de
ingestelde temperatuur.
5. Zet na gebruik het apparaat weer uit door de functieknop uit zetten en neem de stekker uit het
stopcontact. Zet de thermostaatknop weer op “MIN”.
Om de ideale thermostaatinstelling te vinden, draait u de thermostaatknop helemaal rechtsom. Wanneer de
ruimte op de gewenste temperatuur is, draait u de knop weer langzaam linksom, totdat u een klik hoort. Het
apparaat slaat nu af. De temperatuurcontrole zorgt ervoor dat de ingestelde temperatuur gehandhaafd blijft.
LET OP:
• Zorg dat u de luchtinlaat en -uitlaat nooit afdekt.
• De thermostaat schakelt het verwarmingselement en de turboventilator uit zodra de gewenste tempera-
tuur is bereikt.
• De convectorkachel is voorzien van een oververhittingsbeveiliging. Bij een te hoge bedrijfstemperatuur
schakelt de convectorkachel automatisch uit. Als de temperatuur voldoende gedaald is, schakelt de
oververhittingsbeveiliging uit en kan de convectorkachel weer gebruikt worden.
WERKING – GEBRUIK MET TIMER
Zorg dat de timerschakelaar op staat ingesteld, anders zal de timer het apparaat niet inschakelen
of uitschakelen.
1. Zorg dat de gewenste temperatuur al ingesteld is. Bijvoorbeeld op basis van eerder gebruik.
Of kies met de selectieknop de gewenste instelling en zet de thermostaat-schakelaar in de gewenste
stand.
2. Zet de timer in de
3. Bepaal de huidige tijd. Draai aan de timer zodat de tijdsaanduiding op de buitenring gelijk komt te staan
met de pijl op het apparaat.
4. Steek de stekker in het stopcontact. De klok gaat nu lopen. U kunt dat zien aan de kleine secondewijzer
die ronddraait.
5. Bepaal het inschakeltijdstip en druk met een puntig voorwerp (met een pen of uw nagel) het rode
pinnetje bij het corresponderende tijdstip naar buiten.
6. Druk vanaf dat tijdstip meer rode pinnetjes naar buiten om het apparaat langer ingeschakeld te houden.
Hoe meer rode pinnetjes u naar buiten drukt, hoe langer het apparaat ingeschakeld zal blijven. U stopt
met naar buiten drukken van de rode pinnetjes bij het tijdstip waarbij het apparaat weer uitgeschakeld
moet worden.
stand.
19
Page 20

NL
Voorbeeld:
Het is 17.00 uur en u wilt het apparaat automatisch laten inschakelen om 19.00 uur. Om 22.00 uur wilt u het
apparaat weer uit laten schakelen.
Draai aan de buitenring zodat het tijdstip 17 op de buitenring gelijk komt te staan aan de pijl in het midden
van de timer. Druk alle rode pinnetjes tussen het tijdstip 19 en 22 naar buiten.
Let op:
Als u het apparaat dagelijks op dezelfde tijden wil laten in-en uitschakelen door de timer, laat dan de stekker
in het stopcontact zitten, anders stopt de timer.
GARANTIEBEPALINGEN
Bestron hanteert onder de volgende voorwaarden 60 maanden na aankoopdatum garantie op deze apparatuur tegen defecten die zijn ontstaan door fabricage- en/of materiaalfouten.
1. In de genoemde garantieperiode zullen geen kosten worden berekend voor arbeidsloon en materiaal.
2. De onder garantie uitgevoerde reparatie verlengt de garantietermijn niet.
3. Defecte onderdelen of bij omruiling de defecte apparaten zelf, worden automatisch eigendom van Be-
stron.
4. De garantie is uitsluitend geldig voor de eerste koper en niet overdraagbaar.
5. De garantie is niet geldig voor schade die is ontstaan door:
• Ongevallen
• Verkeerd gebruik
• Slijtage
• Verwaarlozing
• Foutieve installatie
• Aansluiting op een andere netspanning dan die op het typeplaatje is vermeld
• Ongeautoriseerde wijziging
• Reparaties uitgevoerd door niet-gekwalificeerde derden
• Gebruik in strijd met de geldende wettelijke, technische of veiligheidsnormen
• Onzorgvuldig transport zonder geschikte verpakking of andere bescherming
6. Aanspraak op garantie kan niet worden gedaan bij:
• Schade tijdens het transport
• Het verwijderen of wijzigen van het serienummer van het apparaat.
7. Uitgezonderd van garantie zijn:
• Snoeren
• Lampen
• Glazen onderdelen
• Filters
8. De garantie geeft geen enkel recht op vergoeding van eventuele schade, buiten de vervanging
respectievelijk reparatie van de defecte onderdelen. Bestron kan nooit aansprakelijk gesteld worden
voor eventuele vervolgschade of enigerlei andere consequenties die door of in relatie met de door hem
geleverde apparatuur zijn ontstaan.
9. Aanspraak op garantie kan alleen bij uw (web-)winkelier of rechtstreeks bij de Bestron Service Dienst.
Stuur echter nooit zomaar iets op. Het pakket kan dan namelijk geweigerd worden en eventuele kosten
zijn voor uw rekening. Neem eerst contact op voor aanwijzingen hoe u het apparaat moet inpakken en
verzenden. Elke aanspraak op garantie dient vergezeld te gaan van het aankoopbewijs.
SERVICE
Mocht zich onverhoopt een storing voordoen, dan kunt u contact opnemen met de BESTRON-servicedienst:
www.bestron.com/service
20
Page 21
EN
CONGRATULATIONS!
Congratulations with the purchase of this Bestron product. These
instructions tell you how the product works and how to use it. Read
the instructions carefully before you start using the appliance. Only use
the appliance in the manner described in the instructions. Keep these
instructions in a safe place for future reference.
Defects:
If the appliance is defective, do not try to repair it yourself. Always have
a qualified mechanic carry out any repairs.
Children:
• This appliance must be kept out of reach of children under the age of
three, unless they are constantly supervised.
• Children between the ages of 3 and 8 are only allowed to switch
this device on and off, provided that it is firmly secured and installed
in a normal position, and that the children are supervised or have
received instructions on how the appliance works and its safety and
that they are aware of the potential dangers that may occur.
• Children between the ages of 3 and 8 are not allowed to connect or
adjust the appliance.
• Children are not allowed to clean and maintain the appliance.
• Keep an eye on children to ensure that they do not play with the
appliance.
WHAT YOU SHOULD KNOW ABOUT ELECTRICAL APPLIANCES
• Check that the mains voltage corresponds with that shown on the
rating plate of an electrical appliance before you use it.
• Check that the socket to which you connect the electrical appliance
is earthed.
• Always install electrical appliances on a stable and level surface
where it cannot fall over.
• Certain parts of an electrical appliance may become warm or
sometimes hot. Do not touch them as you may burn yourself.
Particular attention has to be given where children and vulnerable
people are present.
• Make sure your hands are dry when you touch an electrical appliance,
a cord or a plug.
• Electrical appliances must be able to lose their heat to avoid fire
hazards. Therefore, make sure that the appliance has sufficient
clearance around it and that it does not come into contact with
flammable materials. Electrical appliances must never be covered.
21
Page 22
EN
• Make sure that electrical appliances, cords or plugs do not come into
contact with water.
• Never immerse electrical appliances, cords or plugs in water or any
other liquid.
• Do not touch electrical appliances if they have fallen in the water.
Immediately pull the plug out of the socket. Stop using the appliance.
• Make sure that electrical appliances, cords and plugs do not come
into contact with heat sources, such as a hot hob or open fire.
• Never let cords hang over the edge of the sink, a worktop or a table.
• Always remove plug from the socket when you are not using the
electrical appliance.
• Remove the plug from the socket by pulling the plug itself and not
the cord.
• Regularly check if the cord of the electrical appliance is not damaged.
Do not use the electrical appliance if the cord shows signs of damage.
If the cord is damaged, it should be replaced by the manufacturer, a
technical service provider or a person with an equivalent qualification,
to avoid any danger.
• The appliance may not be switched on with the aid of an external
time switch, or by a separate system with remote control.
WHAT YOU SHOULD KNOW ABOUT THIS APPLIANCE
• Be careful when using the appliance outdoors.
• Never use the appliance in damp or wet locations.
• Thoroughly clean the appliance after use (see Cleaning and
Maintenance).
• Take care that inflammable objects do not get in touch with warm air
of the fan heater.
• Do not insert objects through the grille.
• Use the appliance only in a vertical position.
• Do not place the fan heater directly beneath the wall socket or on
deep ply carpet.
• Keep a free space of 50 cm besides and above the appliance and
120 cm in front of the appliance.
22
Page 23
EN
In order to avoid overheating, do not cover the device!
ENVIRONMENT
• Dispose of packaging material such as plastic and cardboard
boxes in the designated containers.
• Do not dispose of this product as normal domestic waste at the
end of its life, but hand it in at a collection point for the reuse of
electric and electronic equipment. Look for the symbol on the
product, the user instructions or the packaging showing the
type of waste.
• The materials can be used as indicated. By helping us
reuse and process the materials or otherwise recycle the
old equipment, you will be making an important contribution
towards the protection of the environment.
• Your municipality can tell you where to find the designated
waste collection point in your neighbourhood.
CE DECLARATION OF CONFORMITY
This product conforms to the requirements of the following European
Directives on safety:
• EMC Directive 2014/30/EU
• Low Voltage Directive 2014/35/EU
• RoHS Directive 2011/65/EU
R. Neyman
Quality control
23
Page 24
EN
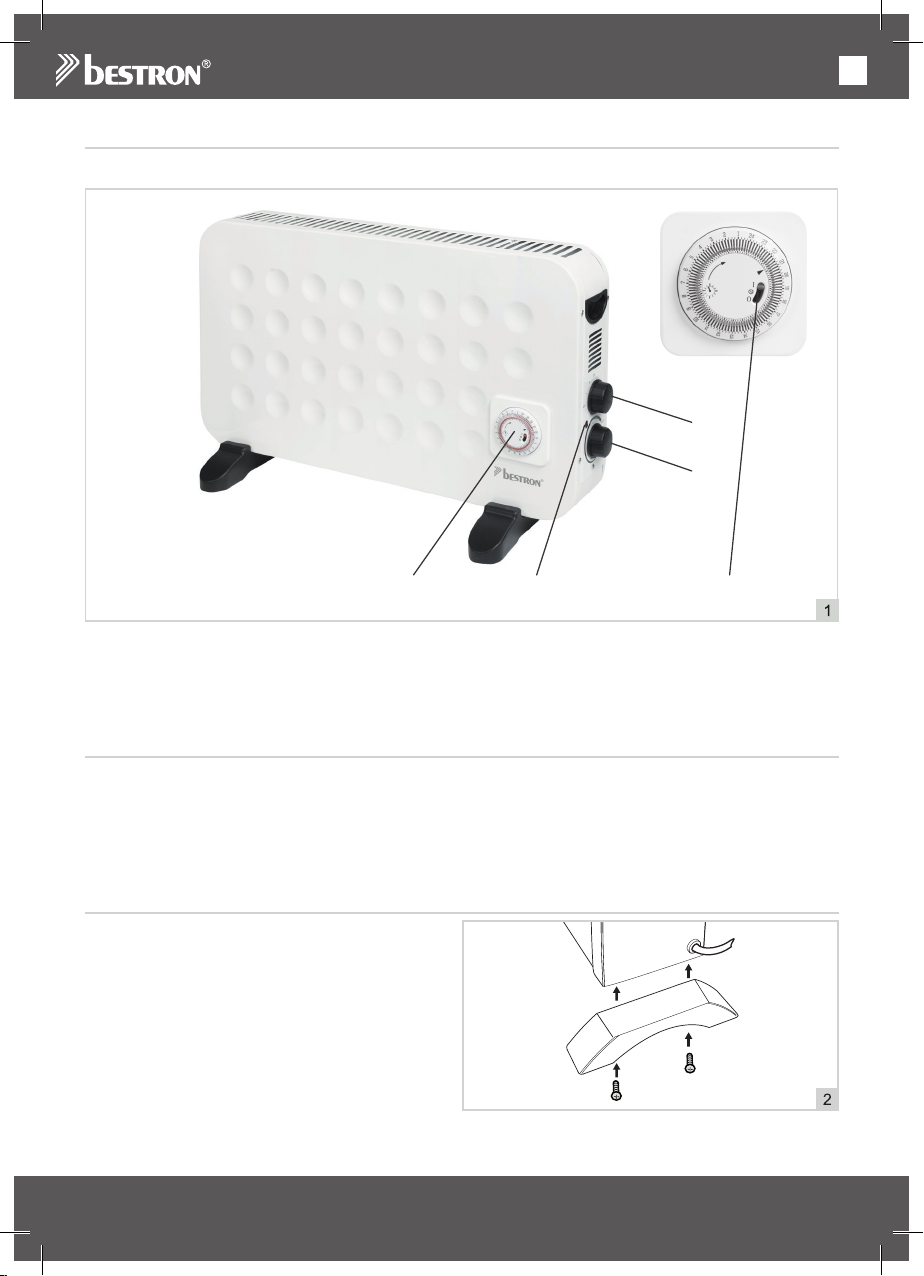
OPERATION - General
The appliance is intended only for domestic use, not for professional use.
1
2
4
1. Function dial:
I = 750 Watt
II = 1250 Watt
III = 2000 Watt
OPERATION - Before first use
Remove the device from the packaging and remove all the packaging materials.
WARNING:
• In order to avoid overheating, do not cover the device.
• The device must not be located immediately below a socket-outlet.
• Do not use this device in the immediate surroundings of a bath, shower or swimming pool.
USE - Assembly of the foot support
The two support feet must be fitted by using the
screws, before you use the convector heater.
Please see figure 2.
3
2. Thermostat dial
3. Timer
4. Timer switch
5
24
Page 25
EN
USE - Location
Place the convector heater on a stable surface in the room to be heated. The heater heats the air flowing
past the appliance. For this reason, the best place for the convector heater is 20 to 25 cm in front of a
window. An air flow is generated by the cooling of air passing the window and the heating of air passing the
convector heater.
WARNING:
• Make sure that air can pass through the heater easily. For this reason the top and bottom of the convector
heater must always remain unobstructed. Never hang clothing, etc., over the convector heater to dry.
The heat produced by the heater could readily result in a fire.
OPERATION – USE WITHOUT TIMER
1. Rotate the thermostat dial to “MIN”.
2. Insert the plug into the plug socket.
3. Use the function dial to select the desired setting:
I = 750 Watt
II = 1250 Watt
III = 2000 Watt
4. Rotate the thermostat dial towards the “MAX” setting. The appliance will turn itself on, a click will be
heard and the indicator light will be lit. The temperature is increased by turning the thermostat dial
further.
5. Switch the appliance off after use by turning the function dial to the “O” position and remove the plug
from the wall socket. Set the thermostat dial to the “MIN” setting again.
To find the ideal thermostat setting, rotate the thermostat dial clockwise as far as possible. Once the room
has reached the desired temperature, slowly rotate the dial anticlockwise until a click is heard. The appliance
will then turn itself off. The temperature control will ensure that the room remains at the set temperature.
OPERATION – USE WITH TIMER
Make sure the timer switch is set to , otherwise the unit will not turn on or off.
1. Make sure the desired temperature is already set. Based on previous use, for instance.
Or use the selection button to select the desired setting and set the thermostat switch to the desired
position.
2. Set the timer to the setting.
3. Determine the current time. Turn the timer so that the time indication on the outer ring matches to the
arrow on the unit.
4. Insert the plug into the wall socket. The clock now starts running. You can tell by the small seconds hand
that starts to turn.
5. Determine the switch-on time and use a pointy object (a pen or your nail) to push out the red pin at the
corresponding time.
6. Push out more red pins from that time to keep the unit turned on longer. The more red pins you push out,
the longer the unit will stay on. Stop pushing out the red pins at the time when the unit should be
switched off again.
Example:
It is currently 17:00 and you want the unit to switch on automatically at 19:00. You want the unit to switch
off again at 22.00.
Turn the timer so that the arrow in the middle of the timer points to the time 17 on the outer ring. Push out
all red pins between time 19 and 22.
Note:
If you want the unit to be switched on and off by the timer at the same times every day, leave the plug in the
socket, otherwise the timer will stop.
25
Page 26
EN
WARNING:
• Never cover the air inlet or the air outlet.
• The thermostat switches off the heating element and the turbo fan once the desired temperature has
been reached.
• The convector heater is fitted with an overheating safeguard. The convector heater will be switched off
automatically if the appliance’s internal temperature becomes too high. The overheating safeguard will
be disabled once the appliance has cooled down sufficiently and the convector heater can then be used
again.
CLEANING AND MAINTENANCE
• Remove the plug from the plug socket and allow the convector heater to cool down.
• Clean the convector heater with a damp cloth. If necessary, use a little washing-up liquid to clean the
convector heater. Make sure no moisture enters the convector heater.
• Dry the appliance thoroughly after cleaning.
• Never immerse the appliance in water.
WARNING:
• Never use corrosive or scouring cleaning agents or sharp objects (such as knives or hard brushes) to
clean the appliance.
WARRANTY CONDITIONS
Bestron offers a 60-month warranty on this equipment against defects resulting from manufacturing and/or
material errors, subject to the following conditions.
1. No labour or material costs will be charged during this warranty period.
2. Any repairs carried out under the warranty will not extend the warranty period.
3. Faulty parts, or in the event of exchange, the faulty equipment itself, will automatically become the pro-
perty of Bestron.
4. The warranty is valid for the first buyer only and is non-transferable.
5. The warranty is not valid for damage caused by:
• Accidents
• Improper use
• Wear and tear
• Neglect
• Faulty installation
• Connection to a different mains voltage than indicated on the type plate
• Unauthorised changes
• Repairs carried out by unqualified third parties
• Use in violation with the applicable statutory, technical or safety standards
• Careless transport without suitable packaging or other protection
6. Warranty cannot be claimed:
• For damage during transport
• If the serial number of the appliance is removed or changed
7. Items excluded from warranty are:
• Cords
• Lamps
• Glass parts
• Filters
8. The warranty does not entitle the purchaser to compensation for any damage other than replacement
or repair of the faulty parts. Bestron cannot in any event be held liable for any indirect or consequential
losses caused by or in relation to the equipment it has provided.
9. Claims under a warranty may only be submitted to your (online) retailer or directly to the Bestron Service
Department. Never send items without being asked to. We may refuse the parcel and you will be liable
for the costs. Contact us first and we tell you how the appliance should be packaged and sent. Each
claim under a warranty must be accompanied by the relevant receipt.
SERVICE
If an unexpected problem occurs, please contact the BESTRON service department:
www.bestron.com/service
26
Page 27
IT
COMPLIMENTI!
Congratulazioni per l’acquisto di questo prodotto Bestron. Nelle
presenti istruzioni per l’uso viene spiegato il funzionamento e l’impiego
dell’apparecchio. Pertanto, prima di utilizzarlo, leggerle attentamente.
Utilizzare l’apparecchio esclusivamente come di seguito descritto.
Conservare queste istruzioni in luogo sicuro.
In caso di guasto:
Nel caso indesiderato in cui l’unità dovesse guastarsi, non tentare mai di
ripararla da soli. Far sempre eseguire le riparazioni da un tecnico qualificato.
Utilizzo da parte dei bambini:
• Questo dispositivo deve essere tenuto fuori dalla portata dei bambini
di età inferiore ai 3 anni, a meno che non siano costantemente
sorvegliati.
• I bambini da 3 a 8 anni possono accendere e spegnere l'apparecchio
solo se correttamente e normalmente posizionato e installato e a
condizione che i bambini siano sorvegliati o abbiano ricevuto le
necessarie istruzioni relative al funzionamento e alla sicurezza
dell'apparecchio e che siano quindi consapevoli dei potenziali pericoli
che possono insorgere.
• I bambini tra i 3 e gli 8 anni non sono autorizzati a collegare il
dispositivo o a modificarne le impostazioni.
• Pulizia e manutenzione non devono essere effettuate dai bambini.
• I bambini devono essere costantemente sorvegliati per assicurarsi
che non giochino con il dispositivo.
COSA È NECESSARIO SAPERE SUI DISPOSITIVI ELETTRICI
• Prima di utilizzare un dispositivo elettrico, assicurarsi che la tensione
di rete corrisponda alla tensione di rete indicata sulla sua targhetta
d’identificazione.
• Assicurarsi che la presa elettrica a cui si intende collegare un
dispositivo elettrico sia collegata a terra.
• Collocare sempre gli apparecchi elettrici su una superficie stabile e
piana, in modo che non possano cadere.
• Alcune parti di un dispositivo elettrico possono riscaldarsi o, a volte,
surriscaldarsi. Per evitare le ustioni, evitare di toccarle. Particolare
attenzione deve essere data a bambini e persone vulnerabili.
• Quando si tocca un apparecchio elettrico, un cavo o una spina,
assicurarsi che le mani siano asciutte.
• Le apparecchiature elettriche devono poter dissipare il calore
prodotto al fine di evitare il rischio di incendio. Pertanto, assicurarsi
che l’unità sia sufficientemente libera da ingombri e che non possa
27
Page 28

IT
venire a contatto con materiale combustibile. Non coprire mai gli
apparecchi elettrici.
• Evitare il contatto di apparecchi, cavi o spine elettriche con l’acqua.
• Mai immergere apparecchi elettrici, cavi o spine in acqua o in altri liquidi.
• Se gli apparecchi elettrici dovessero cadere in acqua, mai tentare di
raccoglierli. Scollegare immediatamente la spina dalla presa elettrica
e non riutilizzare l’apparecchio.
• Assicurarsi che gli apparecchi elettrici, i cavi e le spine non entrino
in contatto con fonti di calore, come piastre calde o fiamme libere.
• Non lasciare i cavi appesi sopra il bordo del lavandino, del piano di
lavoro o del tavolo.
• Quando il dispositivo non è in uso, scollegare sempre il cavo di
alimentazione.
• Nello scollegare il cavo di alimentazione dalla spina elettrica,
assicurarsi di tirare la spina stessa e non il cavo.
• Controllare regolarmente che il cavo del dispositivo elettrico sia
intatto. Non utilizzare l’unità se il cavo risulta essere danneggiato. Se
il cavo è danneggiato, per evitare qualsiasi rischio, è necessario che
venga sostituito dal produttore, da un servizio di assistenza tecnica
o da una persona qualificata.
• L’apparecchio non deve essere azionato da un timer esterno o da un
sistema separato dotato di telecomando.
COSA È NECESSARIO SAPERE SU QUESTO DISPOSITIVO
• Fare attenzione quando si utilizza il dispositivo all’aperto.
• Non utilizzare mai l’apparecchio in ambienti umidi.
• Pulire accuratamente l’unità dopo l’uso (vedere la sezione Pulizia e
manutenzione).
• Non infilare oggetti nella stufa del ventilatore.
• Utilizzare l’apparecchio esclusivamente in posizione verticale.
• Assicurarsi che gli sfiati dell’aria non siano ostruiti.
• Non posizionare l’apaprecchio direttamente sotto una presa e un
tappeto a pelo lungo.
• Durante la sistemazione dell’apparecchio, tener conto di uno spazio
libero di 50 cm laterale e sopra l’apparecchio e di 120 cm davanti
all’apparecchio.
28
Page 29
IT
Non coprire l’apparecchio non funziona per
evitare il surriscaldamento!
DISPOSIZIONI AMBIENTALI
• Smaltire i materiali di imballaggio, come plastica e scatole di
cartone, negli appositi contenitori.
• Al termine della sua vita utile, non smaltire il prodotto come
un normale rifiuto domestico, ma conferire presso un punto
di raccolta per il riciclaggio di apparecchiature elettriche ed
elettroniche. Osservare il relativo simbolo apposto sul prodotto,
contenuto nelle istruzioni per l’uso o stampato sull’imballaggio.
• I materiali possono essere riutilizzati come indicato. Con il
vostro aiuto per il riutilizzo, l’elaborazione dei materiali o altre
forme di riciclaggio di vecchi apparecchi, contribuite in modo
importante alla protezione dell’ambiente.
• Chiedete al vostro comune di residenza dove è ubicato il punto
di raccolta appropriato.
DICHIARAZIONE DI CONFORMITÀ CE
Questo prodotto è conforme alle disposizioni delle seguenti direttive
europee in materia di sicurezza:
• EMC – Direttiva 2014/30/UE
• Direttiva sulla bassa tensione 2014/35/UE
• RoHS – Direttiva 2011/65/UE
R. Neyman
Controllo qualità
29
Page 30
IT
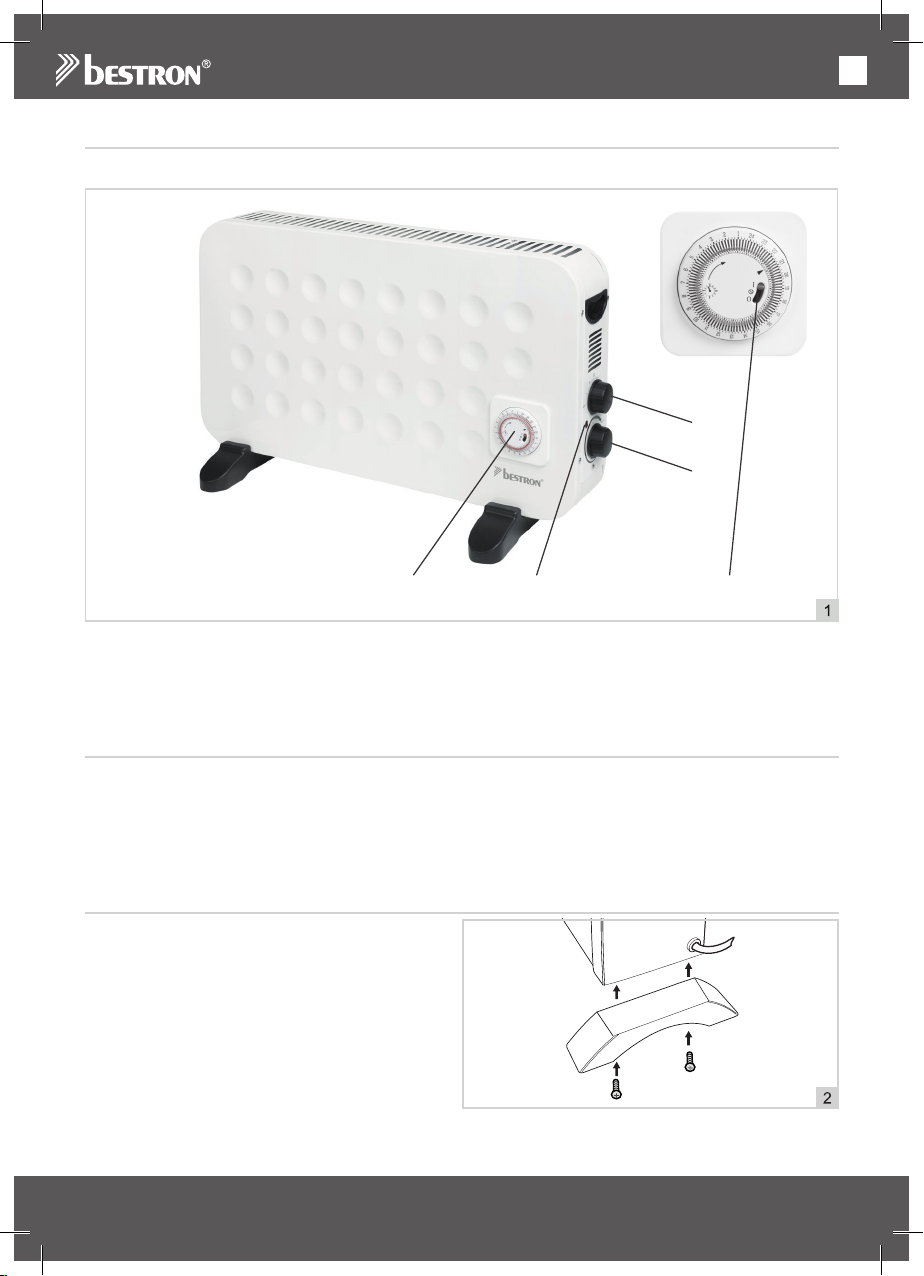
FUNZIONAMENTO - Avvertenze generali
Il dispositivo è destinato esclusivamente ad uso domestico e non professionale.
1
2
4
1. Interruttore di funzione
I = 750 Watt
II = 1250 Watt
III = 2000 Watt
FUNZIONAMENTO - Operazioni preliminari al primo utilizzo
Rimuovere il dispositivo dalla confezione e rimuovere tutti i materiali di imballaggio.
ATTENZIONE:
• Non coprire l’apparecchio non funziona per evitare il surriscaldamento.
• Non posizionare il dispositivo direttamente sotto una presa di corrente
• Non usare questo riscaldatore nelle immediate vicinanze di una vasca da bagno, doccia o in piscina.
USO - Montaggio del piedino
I due piedi di sostegno devono essere montati con
le viti, prima di utilizzare il termoconvettore. Vedi
figura 2.
3
2. Termostato
3. Spia
4. Timer
5. Interruttore timer
5
30
Page 31
IT
USO - Posizione
Collocare il riscaldatore su una superficie stabile nella stanza da scaldare. L’elettrodomestico riscalderà
il flusso d’aria che lo attraversa. Per questa ragione è opportune collocarlo a 20-25 cm da una finestra.
Un flusso d’aria viene generato tramite il raffreddamento dell’aria che passa dalla finestra all’interno
dell’elettrodomestico, dove viene riscaldata.
ATTENZIONE:
• Assicurarsi che l’aria passi agevolmente attraverso il riscaldatore. Per questa ragione la parte alta e
la base del riscaldatore devono rimanere libere. Non appendere mai indumenti o altro ad asciugare
sull’elettrodomestico, in quando il calore prodotto dal riscaldatore potrebbe in breve tempo provocare
un incendio.
FUNZIONAMENTO – UTILIZZO SENZA TIMER
1. Ruotare la manopola del termostato su “MIN”.
2. Inserire la spina nella presa.
3. Utilizzare il selettore di funzione per selezionare l’impostazione desiderata:
I = 750 Watt
II = 1250 Watt
III = 2000 Watt
4. Ruotare la manopola del termostato verso la posizione “MAX”. L’apparecchio si accende, un clic di
essere ascoltati e di accensione / spegnimento spia si accende. La temperatura aumenta ruotando la
manopola del termostato oltre.
5. Dopo l’uso spegnere l’elettrodomestico, portando la manopola in posizione “O” e togliere la spina.
Portare nuovamente la manopola del termostato su “MIN”.
Per individuare l’impostazione corretta del termostato, ruotare il termostato quanto più possibile in senso
orario. Una volta raggiunta la temperatura ideale nel locale da riscaldare, ruotare il termostato in senso
antiorario sino a udire un clic. Il ventilatore si spegnerà e il sistema di controllo della temperatura farà in
modo che la temperatura del locale si mantenga sempre al livello impostato.
FUNZIONAMENTO – UTILIZZO CON IL TIMER
Assicurarsi che l’interruttore del timer sia impostato su , altrimenti il timer non accende o spegne
il dispositivo.
1. Assicurarsi di aver impostato la temperatura desiderata. Ad esempio, basandosi sugli usi precedenti.
Oppure selezionare l’impostazione desiderata con l’apposita manopola e impostare l’interruttore del
termostato nella posizione desiderata.
2. Mettere il timer in posizione .
3. Determinare l’orario corrente. Ruotare il timer in modo che l’indicatore dell’orario sull’anello esterno sia
allineato con la freccia sul dispositivo.
4. Inserire la spina nella presa elettrica. Quindi l’orologio inizierà a funzionare. Lo si nota dalla piccola
lancetta dei secondi che inizia a girare.
5. Stabilire l’orario di accensione e spingere verso l’esterno il perno rosso in corrispondenza dell’orario con
un oggetto appuntito (come una penna o un’unghia).
6. A partire da questo orario, premere gli altri perni rossi per continuare a mantenere il dispositivo acceso.
Più perni rossi vengono selezionati, e più a lungo il dispositivo resterà acceso. Quando si giunge
all’orario in cui il dispositivo deve essere spento, bisogna smettere di selezionare i perni rossi.
Esempio:
Sono le ore 17:00 e si desidera che il dispositivo si accenda automaticamente alle 19:00. E si desidera che
il dispositivo si spenga di nuovo alle ore 22:00.
Ruotare l’anello esterno in modo che l’orario delle 17 sull'anello esterno venga a corrispondere alla freccia
al centro del timer. Premere tutti i perni rossi presenti tra le ore 19 e le 22.
Attenzione:
Se si desidera che il dispositivo si accenda e si spenga con il timer ogni giorno alla stessa ora, bisogna
lasciare la spina inserita all’interno della presa elettrica, altrimenti l’orologio si ferma.
31
Page 32
IT
ATTENZIONE:
• Non coprire mai le bocchette di immissione o emissione dell’aria.
• Il termostato spegnerà la resistenza e la ventola al raggiungimento della temperatura desiderata.
• Il riscaldatore è dotato di un dispositivo di sicurezza contro il surriscaldamento. Si spegnerà
automaticamente quando la temperatura interna dell’elettrodomestico raggiunge un livello eccessivo.
Il dispositivo di sicurezza sarà disattivato non appena l’elettrodomestico si sarà sufficientemente
raffreddato; a quel punto il riscaldatore potrà essere messo nuovamente in funzione.
PULIZIA E MANUTENZIONE
• Togliere la spina dalla presa a muro e lasciare raffreddare completamente l’elettrodomestico.
• Pulire il riscaldatore con un panno umido. Se necessario, utilizzare del detersivo per stoviglie per pulire
il riscaldatore. Evitare che l’acqua entri nel riscaldatore.
• Dopo la pulizia, asciugarlo accuratamente.
• Non immergere mai l’elettrodomestico in acqua.
ATTENZIONE:
• Per la pulizia dell’elettrodomestico non utilizzare detergenti corrosivi o abrasivi né oggetti appuntiti
(coltelli o spazzole).
DISPOSIZIONI DI GARANZIA
In base alle seguenti condizioni, Bestron garantisce questo apparecchio per la durata di 60 mesi dalla data
di acquisto contro i guasti causati da difetti di fabbricazione e/o del materiale.
1. Durante il periodo di garanzia non verranno addebitati costi di manodopera e per i materiali necessari.
2. La riparazione effettuata in garanzia non prolunga il periodo di garanzia.
3. Al momento della sostituzione, le parti difettose o gli stessi apparecchi guasti, torneranno automatica-
mente a essere proprietà di Bestron.
4. La garanzia è valida solo per l’acquirente originale e non è trasferibile.
5. La garanzia non è valida in caso di danni causati da:
• Incidenti ed infortuni
• Uso improprio
• Usura
• Negligenza
• Installazione errata
• Collegamento a una tensione di rete diversa da quella indicata sulla targhetta di identificazione del
dispositivo
• Modifiche non autorizzate
• Riparazioni effettuate da terzi non qualificati
• Utilizzo in violazione delle norme giuridiche, tecniche o di sicurezza applicabili
• Trasporto incauto senza idoneo imballaggio o altre protezioni
6. Non sono ammesse richieste di risarcimento in garanzia in caso di:
• Danni subiti durante il trasporto
• Rimozione o modifica del numero di serie del dispositivo
7. Quanto segue è escluso dalla garanzia:
• Cavi
• Lampade
• Parti in vetro
• Filtri
8. La garanzia non dà diritto ad alcun risarcimento per danni diversi dalla sostituzione o dalla riparazione
delle parti difettose. Bestron non può essere in nessun caso ritenuta responsabile per danni consequenziali o altre conseguenze derivanti da o in relazione alle apparecchiature da essa fornite.
9. I reclami in garanzia possono essere inoltrati solo al vostro rivenditore/rivenditore web o direttamente al
servizio assistenza Bestron. Non limitarsi a inviare un oggetto senza preavviso. Il pacchetto può essere
rifiutato e gli eventuali costi saranno a carico del mittente. In primo luogo, contattateci per ricevere le
istruzioni su come imballare e spedire il dispositivo. Qualsiasi reclamo in garanzia deve essere accompagnato dalla prova di acquisto.
SERVIZIO ASSISTENZA
Nell’indesiderata eventualità di un malfunzionamento, contattare il servizio assistenza BESTRON visitando
il seguente sito: www.bestron.com/service
32
Page 33
ES
¡FELICIDADES!
Felicidades por la compra de este producto Bestron. En estas
instrucciones le explicamos su funcionamiento y cómo usarlo. Antes de
usar el aparato, lea bien el manual de instrucciones. Utilice el aparato
únicamente tal y como se describe en el manual de instrucciones.
Guarde las instrucciones como referencia en el futuro.
En el caso de una avería:
Si el aparato se averiara inesperadamente, nunca intente arreglarlo usted
mismo. Deje que las reparaciones las haga un mecánico cualificado.
Uso por niños:
• Hay que mantener este aparato fuera del alcance de los niños
menores de 3 años, siempre que no estén bajo la supervisión
constante de un adulto.
• Los niños de entre 3 y 8 años solo pueden encender y apagar este
aparato, siempre que esté correctamente colocado e instalado en
una posición normal y que los niños estén bajo la supervisión de un
adulto o se les haya instruido sobre el funcionamiento del aparato
y la seguridad y que sean conscientes de los posibles peligros que
pueda haber.
• Los niños de entre 3 y 8 años no pueden enchufar o regular el
aparato.
• La limpieza y mantenimiento no las pueden realizar niños.
• Hay que vigilar a los niños para asegurarse de que no jueguen con
el aparato.
QUÉ DEBE SABER SOBRE LOS APARATOS ELÉCTRICOS
• Antes de usar un aparato eléctrico, compruebe que la tensión
coincida con la tensión indicada en su placa descriptiva.
• Compruebe que el enchufe que vaya a utilizar para un aparato
eléctrico tenga contacto a tierra.
• Coloque los aparatos eléctricos siempre sobre una superficie estable
y plana, en un un sitio donde no se puedan caer.
• Algunas partes de un aparato eléctrico pueden calentarse ligeramente
o mucho. Para evitar quemaduras, no las toque. Se debe prestar
especial atención a la presencia de niños y personas vulnerables.
• Procure que sus manos estén siempre secas cuando toque un
aparato eléctrico, un cable o un enchufe.
• Los aparatos eléctricos tienen que poder eliminar su calor para
evitar el riesgo de incendios. Procure que el aparato tenga suficiente
espacio alrededor y no pueda estar en contacto con material
33
Page 34
ES
inflamable. No cubra nunca los aparatos eléctricos.
• Procure que los aparatos eléctricos, cables o enchufes no entren en
contacto con el agua.
• Nunca sumerja los aparatos eléctricos, cables o enchufes en agua
ni en ningún otro líquido.
• No toque los aparatos eléctricos si se han caído al agua. Desenchúfelo
inmediatamente de la toma de corriente. No vuelva a usar el aparato.
• Procure que los aparatos eléctricos, cables o enchufes no entren
en contacto con fuentes de calor, como una plancha caliente o una
llama.
• No deje los cables sobre el borde de la encimera, tabla de cortar o
una mesa.
• Desenchufe siempre los aparatos eléctricos si no los está utilizando.
• Al desenchufarlo, no tire del cable sino del enchufe.
• Compruebe con regularidad si el cable del aparato eléctrico está
todavía en buen estado. No vuelva a usar el aparato si el cable está
un poco dañado. Si el cable está dañado, el fabricante, un servicio
técnico o una persona con una cualificación similar lo tiene que
sustituir, para evitar cualquier riesgo.
• No se puede poner el aparato en funcionamiento por medio de un
interruptor externo o con un sistema especial con mandos a distancia.
QUÉ NECESITA SABER SOBRE ESTE APARATO
• Tenga cuidado al usar el dispositivo en el exterior.
• No use nunca el aparato en espacios húmedos.
• Limpie bien el aparato después de su uso, véase «Limpieza y
mantenimiento».
• No introduzca ningún objeto en la rejilla del ventilador.
• Utilice el aparato únicamente en posición vertical.
• Procure que nada obstruya los orificios de ventilación.
• No coloque el aparato directamente bajo un enchufe ni sobre una
alfombra de pelo largo.
• Al colocar el aparato en su sitio, deje un espacio libre de 50 cm a los
lados y por encima y de 120 cm por delante.
34
Page 35
ES
No cubra el dispositivo no funciona para
evitar el sobrecalentamiento!
MEDIO AMBIENTE
• Tire el material de embalaje, como plástico y cajas, en el
contenedor apropiado.
• Al final de su vida útil, no se desprenda de este producto como
un residuo normal. Llévelo a un punto blanco de su ciudad
para el reciclaje de aparatos eléctricos y electrónicos. Preste
atención al símbolo en el producto, las instrucciones o el
embalaje.
• Los materiales se pueden reutilizar tal y como se indica.
Reciclando, procesando los materiales o aprovechando
antiguos equipos de otra forma, hace una gran aportación a la
protección del medio ambiente.
• Infórmese en su municipio del punto blanco correcto cerca de
usted.
DECLARACIÓN DE CONFORMIDAD CE
Este producto cumple con las disposiciones de las siguientes directivas
europeas en el campo de la seguridad:
• CEM – Directivas 2014/30/EU
• Directiva sobre baja tensión 2014/35/EU
• RoHS – Directiva 2011/65/EU
R. Neyman
Control de calidad
35
Page 36
ES
FUNCIONAMIENTO - General
Este aparato está concebido únicamente para uso doméstico, no para uso profesional.
1
2
4
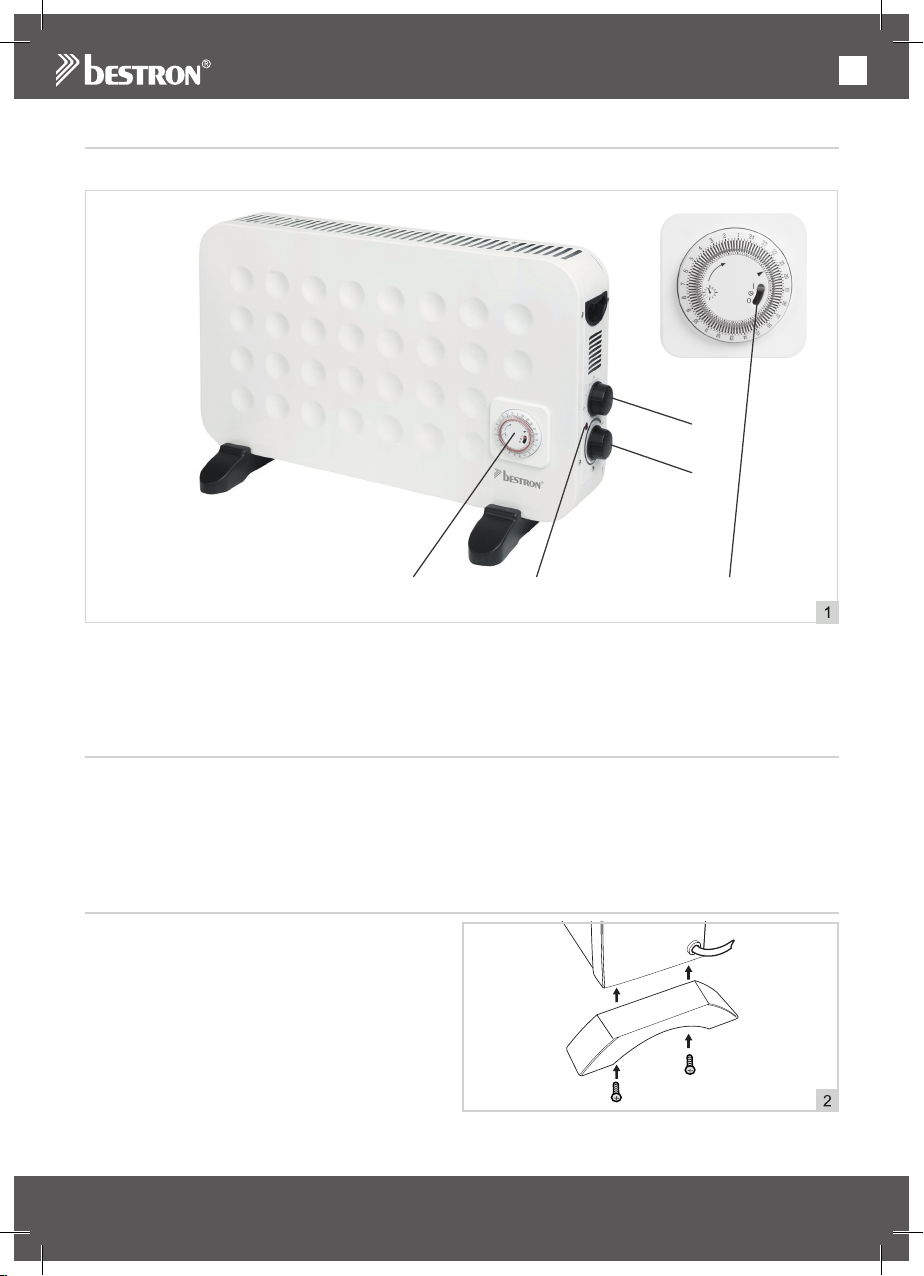
1. Interruptor de función
I = 750 Watt
II = 1250 Watt
III = 2000 Watt
FUNCIONAMIENTO - Antes del primer uso
Retire el dispositivo del embalaje y retire todos los materiales de embalaje.
ATENCIÓN:
• No cubra el dispositivo no funciona para evitar el sobrecalentamiento.
• No coloque el dispositivo directamente debajo de una toma de corriente
• No utilice este calentador en las inmediaciones de una bañera, ducha o piscina.
USO - Montaje de pies de soporte
Los dos pies de apoyo deberá estar equipado con
los tornillos, antes de utilizar el aire caliente por
convección. Véase figura 2.
3
2. Regulador del termostato
3. luz indicadora
4. Temporizador
8. Interruptor temporizador
5
36
Page 37
ES
USO - Colocación
Coloque el convector en el lugar que desea calentar, sobre una superficie estable. El funcionamiento de la
calefacción se basa en el calentamiento de aire circulante. Por ello, el mejor lugar para colocar el convector
es frente a una ventana, a unos 20-25 cm de la misma. La circulación del aire se origina por el enfriamiento
del aire por la ventana y el calentamiento del convector.
ATENCIÓN:
• Asegúrese de que el aire puede circular fácilmente por la calefacción. Por ello la parte inferior y superior
del convector siempre deben permanecer libres. Nunca cuelgue artículos en el convector para secar.
Por el calor desarrollado pueden prender fuego fácilmente.
USO SIN TEMPORIZADOR
1. Gire la perilla del termostato completamente a la posión “MIN” .
2. Introduzca el enchufe en la toma de alimentación.
3. Utilice el dial de función para seleccionar el ajuste deseado:
I = 750 Watt
II = 1250 Watt
III = 2000 Watt
4. Gire el mando del termostato hacia la “MAX”. El aparato se enciende, un “clic” ser oído y el de encendido
/ apagado la luz indicadora se encenderá. Se aumenta la temperatura girando el mando del termostato
más.
5. Después de usar el aparato, devuelva la perilla de función a la posición “O” para apagarlo y retire el
enchufe de la toma de alimentación. Vuelva a colocar la perilla del termostato en la posición “MIN”
Para encontrar la posición ideal, gire el regulador del termostato completamente hacia la derecha. Una
vez el lugar haya alcanzado la temperatura, devuelva el regulador hacia la izquierda hasta que escuche
un clic. El aparato se apaga. El sistema de control de la temperatura se encarga de mantener constante la
temperatura fijada.
USO CON TEMPORIZADOR
Asegúrese de que el interruptor del temporizador esté en , de lo contrario el temporizador no
encenderá ni apagará la unidad.
1. Asegúrese de que la temperatura deseada ya esté fijada. Por ejemplo, basándose en el uso anterior.
O utilice el botón regulador para seleccionar el ajuste deseado y coloque el interruptor del termostato
en la posición deseada
2. Ponga el temporizador en la posición .
3. Configure la hora. Gire el temporizador para que la indicación del tiempo en el círculo exterior coincida
con la flecha en el aparato
4. Coloque el enchufe (7) en la toma de la pared. El reloj comenzará a funcionar. Se puede comprobar por
el avance de la manecilla del segundero
5. Determine la hora de encendido, y con un objeto puntiagudo (con un bolígrafo o la uña) tire hacia fuera
la pequeña clavija roja de la hora elegida
6. Para mantener el aparato encendido durante más tiempo a partir de ese momento, saque más clavijas.
Cuantas más clavijas saque, más tiempo permanecerá encendido el aparato. Cuando llegue al
momento en que quiera que el aparato vuelva a apagarse, deje de sacar clavijas
Ejemplo:
Son las 17:00 horas y quiere que el aparato se encienda automáticamente a las 19:00. Y quiere que a las
22:00 se vuelva a apagar.
Gire el círculo exterior de tal modo que la indicación horaria 17 coincida con la flecha en el centro del
temporizador. Saque todas las clavijas rojas entre las horas 19 y 22.
ATENCIÓN:
Si quiere que el temporizador encienda y apague el aparato a las mismas horas todos los días, no lo
desenchufe. Si lo hace, el temporizador se detendrá.
37
Page 38
ES
ATENCIÓN:
• Asegúrese de no cubrir nunca los orificios de entrada y salida del aire.
• El termostato apaga el calefactor y el turboventilador en cuanto se ha alcanzado la temperatura
deseada.
• El convector está equipado con un sistema de seguridad para evitar el recalentamiento. Cuando la
temperatura de funcionamiento es demasiado alta, el convector se apaga automáticamente.Cuando
la temperatura ha descendido lo suficiente, el sistema de seguridad para evitar el recalentamiento se
apaga y puede volver a usarse el convector.
LIMPIEZA Y MANTENIMIENTO
• Retire el enchufe de la fuente de alimentación y deje enfriar bien el convector.
• Limpie el convector con un paño húmedo. De ser necesario también puede limpiar el convector con
agua jabonosa. Asegúrese de que la humedad no entra al interior del aparato.
• Después de la limpieza, séquelo bien.
• No sumerja nunca este aparato en agua.
ATENCIÓN:
• No use limpiadores fuertes ni abrasivos, ni objetos con filo (como cuchillos o cepillos con cerdas duras)
para limpiar el aparato.
CONDICIONES DE GARANTÍA
Bestron ofrece 60 meses de garantía después de la fecha de compra de este equipo. La garantía cubre las
averías por errores de fabricación y/o material y se atiene a las siguientes condiciones.
1. La garantía no cubre ningún gasto por mano de obra ni material.
2. La reparación que se realice durante el plazo de la garantía no implica una prórroga de dicho plazo.
3. Cualquier pieza defectuosa o aparatos averiados y devueltos se convierten automáticamente en pro-
piedad de Bestron.
4. La garantía es únicamente válida para el primer comprador y no es transferible.
5. La garantía no cubre los daños por:
• Accidentes
• Uso equivocado
• Desgaste
• Descuido
• Mala instalación
• Conexión a otra tensión que la que se especifica en la placa de modelo.
• Modificación no autorizada
• Reparaciones realizadas por terceros no cualificados
• Uso incumpliendo las normas vigentes legales, técnicas y de seguridad.
• Descuidos en el transporte, sin embalaje adecuado o sin otra protección
6. No se puede reclamar la garantía en el caso de:
• Daños durante el transporte
• Quitar o modificar el número de serie del aparato.
7. La garantía no cubre:
• Los cables
• Las bombillas
• Las piezas de cristal
• Los filtros
8. La garantía no le concede el derecho a una compensación por un posible daño, aparte de sustituir o
reparar las piezas defectuosas. Bestron no puede hacerse responsable de cualquier posible daño o de
cualquier tipo de consecuencia que surgieran o estuvieran relacionadas con el aparato entregado.
9. Solo puede reclamar la garantía a su empresa de venta (en línea) o directamente al Servicio de aten-
ción Bestron. Sin embargo, no nos envíe ninguna pieza sin preguntar antes. Puede que rechacemos el
paquete y esto podría suponer unos gastos para usted. Póngase primero en contacto con nosotros para
que le expliquemos cómo tiene que embalar el aparato y mandárnoslo. Cualquier reclamación sobre la
garantía debe ir acompañada de una prueba de compra.
SERVICIO DE ATENCIÓN
Si hubiera una avería inesperada, póngase en contacto con el servicio de atención BESTRON:
www.bestron.com/service
38
Page 39

Page 40
v200528-01
NEED HELP? CHAT WITH US!
WHATSAPP CUSTOMER SERVICE
BESTRON.COM/WHATSAPP
 Loading...