

Page 1
U
A
Q
L
P
I
T
Y
O
T
COPPER COLLECTION
G
E
U
E
T
A
R
N
A
500
Watts
DE
FR
NL
220
240
Volts
Bedienungsanleitung
Mode d’emploi
Handleiding
50
60
Hz
INSTRUCTION MANUAL
EN
Instruction manual
Istruzioni per l’uso
IT
Manual del usuario
ES
ABL500CO
Page 2

Page 3

DE
HERZLICHEN GLÜCKWUNSCH!
Herzlichen Glückwunsch zum Erwerb dieses Bestron-Produktes.
In dieser Gebrauchsanweisung erläutern wir die Funktion und die
Benutzung. Lesen Sie somit diese Gebrauchsanweisung aufmerksam
durch, bevor Sie das Gerät benutzen. Verwenden Sie das Gerät nur so,
wie es in der Gebrauchsanweisung beschrieben ist. Bewahren Sie die
Gebrauchsanweisung danach sorgfältig auf.
Bei einem Defekt:
Sollte das Gerät unverhofft einen Defekt aufweisen, versuchen Sie dann
nie, die Reparatur selbst vorzunehmen. Lassen Sie Reparaturen immer
von einem qualifizierten Mechaniker ausführen.
Benutzung durch Kinder:
• Dieses Gerät darf nicht von Kindern und Personen mit vermindertem
körperlichen, sinnlichen oder geistigen Vermögen oder Mangel an
Erfahrung und Kenntnis verwendet werden.
• Die Reinigung und Wartung darf nicht von Kindern durchgeführt
werden.
• Halten Sie das Gerät und das Kabel außerhalb der Reichweite von
Kindern.
• Kinder müssen im Auge gehalten werden, um sich dessen sicher zu
sein, dass sie nicht mit dem Gerät spielen.
WAS SIE ÜBER ELEKTROGERÄTE WISSEN MÜSSEN
• Kontrollieren Sie, ob die Netzspannung der auf dem Typenschild
eines Elektrogerätes angegebenen Netzspannung entspricht, bevor
Sie es benutzen.
• Kontrollieren Sie, ob die Steckdose, an die Sie ein Elektrogerät
anschließen, geerdet ist.
• Stellen Sie Elektrogeräte immer an einer Stelle auf, an der sie nicht
fallen können, und auf einen stabilen und ebenen Untergrund.
• Bestimmte Teile eines Elektrogerätes können warm oder manchmal
heiß werden. Berühren Sie diese nicht, um Verbrennungen zu
vermeiden.
• Sorgen Sie dafür, dass Ihre Hände trocken sind, wenn Sie ein
Elektrogerät, ein Kabel oder einen Stecker berühren.
• Elektrogeräte müssen zur Vermeidung einer Feuergefahr ihre
Wärme abgeben können. Sorgen Sie somit dafür, dass das Gerät
ausreichend frei ist und nicht mit brennbarem Material in Kontakt
kommen kann. Elektrogeräte dürfen nie bedeckt werden.
• Sorgen Sie dafür, dass Elektrogeräte, Kabel oder Stecker nicht mit
Wasser in Berührung kommen.
3
Page 4

DE
• Tauchen Sie Elektrogeräte, Kabel oder Stecker nie in Wasser oder
eine andere Flüssigkeit.
• Fassen Sie Elektrogeräte nie an, wenn sie ins Wasser gefallen sind.
Ziehen Sie direkt den Stecker aus der Steckdose. Benutzen Sie das
Gerät nicht mehr.
• Sorgen Sie dafür, dass Elektrogeräte, Kabel und Stecker nicht mit
Hitzequellen, wie zum Beispiel eine heiße Kochplatte oder offenes
Feuer, in Berührung kommen.
• Lassen Sie Kabel nie über den Rand der Anrichte, Arbeitsplatte oder
einen Tisch hängen.
• Ziehen Sie den Stecker immer aus der Steckdose, wenn Sie das
Elektrogerät nicht benutzen.
• Wenn Sie den Stecker aus der Steckdose ziehen, ziehen Sie dann
am Stecker selbst und nicht am Kabel.
• Kontrollieren Sie regelmäßig, ob das Kabel des Elektrogerätes noch
intakt ist. Benutzen Sie das Gerät nicht, wenn das Kabel Beschädigungen aufweist. Wenn das Kabel beschädigt ist, muss es vom
Hersteller, einem technischen Kundendienst oder einer Person mit
einer ähnlichen Qualifikation ersetzt werden, um jede Gefahr zu vermeiden.
• Das Gerät darf nicht mittels eines externen Zeitschalters oder durch
ein separates System mit Fernbedienung eingeschaltet werden.
WAS SIE ÜBER DIESES GERÄT WISSEN MÜSSEN
• Seien Sie vorsichtig, wenn Sie das Gerät im Freien benutzen.
• Benutzen Sie das Gerät nie in feuchten Räumen.
• Reinigen Sie das Gerät nach der Benutzung gründlich (siehe
Reinigung und Wartung).
• Benutzen Sie das Gerät nie mit kochenden Flüssigkeiten.
• Schalten Sie das Gerät keinesfalls ohne Inhalt an.
• Benutzen Sie den Mixer nie länger als 120 Sekunden. Warten Sie
danach einige Minuten, bevor Sie den Mixer wieder einschalten.
• Berücksichtigen beim Füllen des Messbehälters dessen maximales
Fassungsvermögen. Dieses beträgt 1,5 Liter.
4
Page 5
DE
UMWELT
• Werfen Sie Verpackungsmaterial, wie zum Beispiel Plastik
und Karton, in die dazu bestimmten Container.
• Dieses Produkt am Ende der Nutzungsdauer nicht als normalen
Haushaltabfall entsorgen, sondern bei einer Sammelstelle
zur Wiederverwendung von elektrischem und elektronischem
Gerät. Achten Sie auf das Symbol auf dem Produkt, der
Gebrauchsanweisung oder Verpackung.
• Die Materialien können wie angegeben wiederverwendet
werden. Durch Ihre Hilfe bei der Wiederverwendung, der
Verarbeitung der Materialien oder anderen Formen der
Nutzung des alten Gerätes leisten Sie einen wichtigen Beitrag
zum Schutz unserer Umwelt.
• Informieren Sie sich bei der Gemeinde nach der richtigen
Sammelstelle bei Ihnen in der Nähe.
CE-KONFORMITÄTSERKLÄRUNG
Dieses Produkt erfüllt die Anforderungen gemäß den Europäischen
Richtlinien.
R. Neyman
Quality control
5
Page 6
VERWENDUNG - Allgemein
DE
Das Gerät ist nur für den Hausgebrauch vorgesehen
und nicht für die professionelle Verwendung.
1.
2.
3.
4.
5.
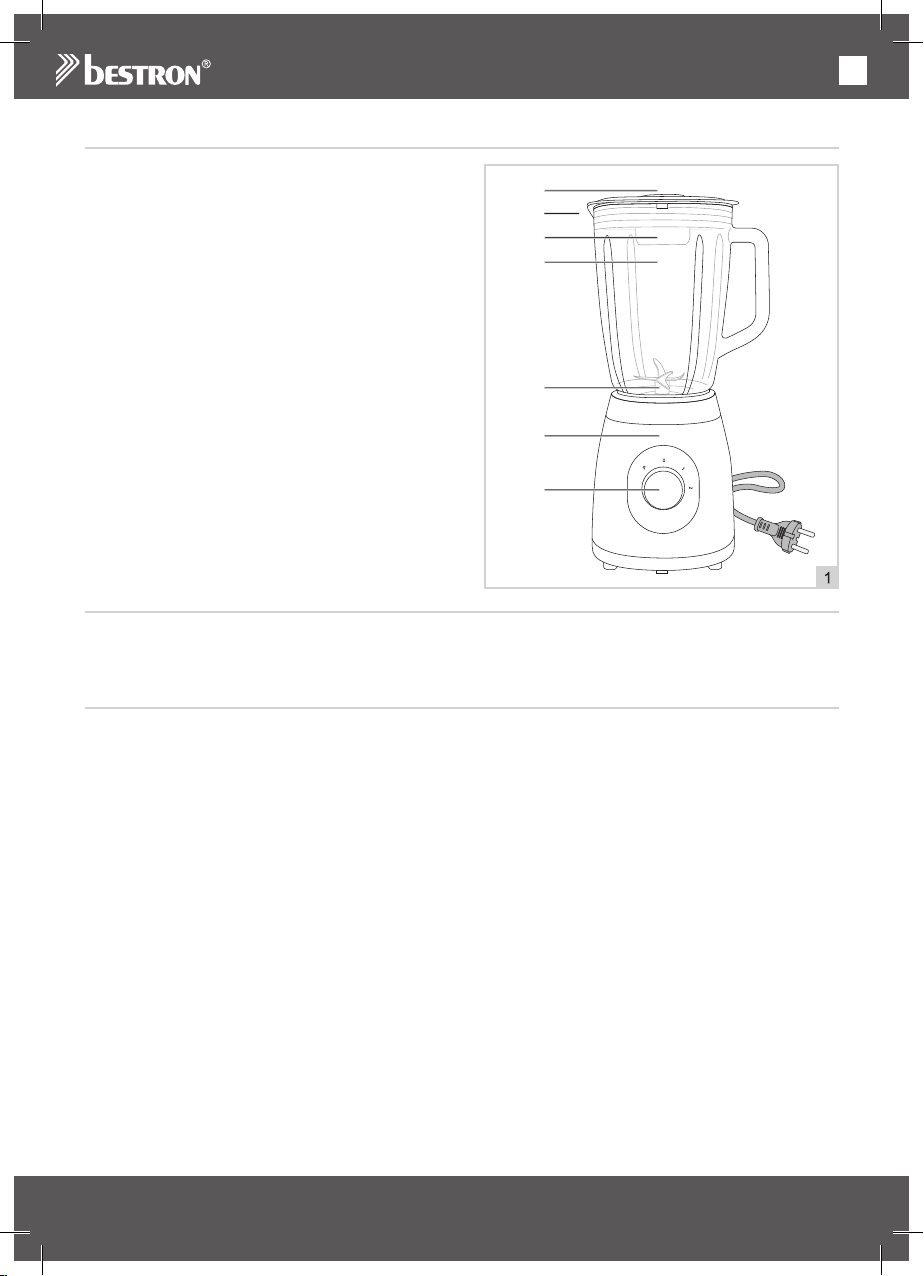
1. Verschlusskappe
6.
2. Deckel mit Sicherheits-Stopp-Funktion
3. Einfüllöffnung
4. Mixbecher mit Griff aus Glas
5. Klingeneinheit
6. Motorgehäuse
7. Geschwindigkeitsschalter
VERWENDUNG - Vor den ersten gebrauch
1. Entfernen Sie die Verpackung.
2. Säubern Sie das Gerät. Siehe „Reinigung und Wartung“.
VERWENDUNG - Gebrauch
1. Stecken Sie den Stecker in die Steckdose.
2. Setzen Sie den Mixbecher (4) (mit dem Griff rechts) auf das Motorgehäuse (6).
3. Schneiden Sie die festen Zutaten in kleine Stücke.
4. Füllen Sie den Mixbecher mit den Zutaten. Fügen Sie danach etwas Flüssigkeit hinzu (max.1 Liter).
5. Setzen Sie den Deckel (2) auf den Mixbecher und drehen Sie ihn nach rechts, bis Sie ein Klicken
hören.
6. Bringen Sie die Verschlusskappe (1) in dem Einfüllöffnung (3) an.
7. Drehen Sie den Geschwindigkeitsschalter (7) in die gewünschte Einstellung:
P = Pulse, 0 = Aus, 1 = mäßig, 2 = schnell
8. Während der Mixer in Betrieb ist, können Sie weitere Zutaten über die Einfüllöffnung im Deckel
hinzugeben. Entfernen Sie zuerst die Kappe von der Deckelöffnung, geben Sie dann die Zutaten hinzu
und verschließen Sie die Deckelöffnung mit der Kappe.
9. Schalten Sie den Mixer aus (Position 0).
10. Nehmen Sie den Mixbecher vom Motorgehäuse, wenn die Messer im Mixer völlig zum Stillstand
gekommen sind.
ACHTUNG:
• Der Mixer ist mit einem Sicherheitssystem ausgestattet. Wenn Sie den Mixbecher nicht oder falsch
auf dem Motorgehäuse anbringen, können Sie den Mixer nicht einschalten. Dieser Mixer verfügt über
einen Sicherheits-Stopp-Funktion, der die Klingen beim Öffnen des Deckels automatisch anhält.
• Je länger der Mixer arbeitet (maximal 120 Sekunden), desto feiner werden die Zutaten zerkleinert.
• Für die Zubereitung von Tomatensaft schneiden Sie die Tomaten in Viertel. Geben Sie die Tomatenstücke
über die Füllöffnung im Deckel in den Mixbecher, wenn dieser eingeschaltet ist.
• Wenn der Mixer nicht schnell genug zerkleinert, dann schalten Sie das Gerät aus (Position 0) und:
a. stellen Sie den Schalter auf die Pulse-Position oder b. rühren Sie die Zustaten mit einem Spatel
durch oder c. entnehmen Sie einen Teil der Zutaten aus dem Mixbecher.
7.
6
Page 7
VERWENDUNG - Pulse-Position
DE
In der Pulse-Position dreht sich der Mixer kurz mit der maximalen Geschwindigkeit. Die Pulse-Position
funktioniert nur, wenn Sie den Schalter in dieser Position festhalten.
Crushed-Ice; Für gemahlenes Eis füllen Sie den Mixbecher mit Eiswürfeln. Drehen Sie mehrere Male die
Geschwindigkeitsschalter auf “P” Puls, bis die Eiswürfel ausreichend fein gemahlen wurden.
REINIGUNG UND PFLEGE - Vor den ersten gebrauch
Reinigen Sie vor dem ersten Gebrauch den Mixbecher, den Deckel mit
Verschlusskappe und die Klingen.
1. Entfernen Sie den Mixbecher (4) vom Motorgehäuse (6).
2. Drehen Sie den Mixbecher, um die Klingeneinheit (5) zu entfernen.
3. Stellen Sie den Mixbecher auf eine flache und stabile Oberfläche.
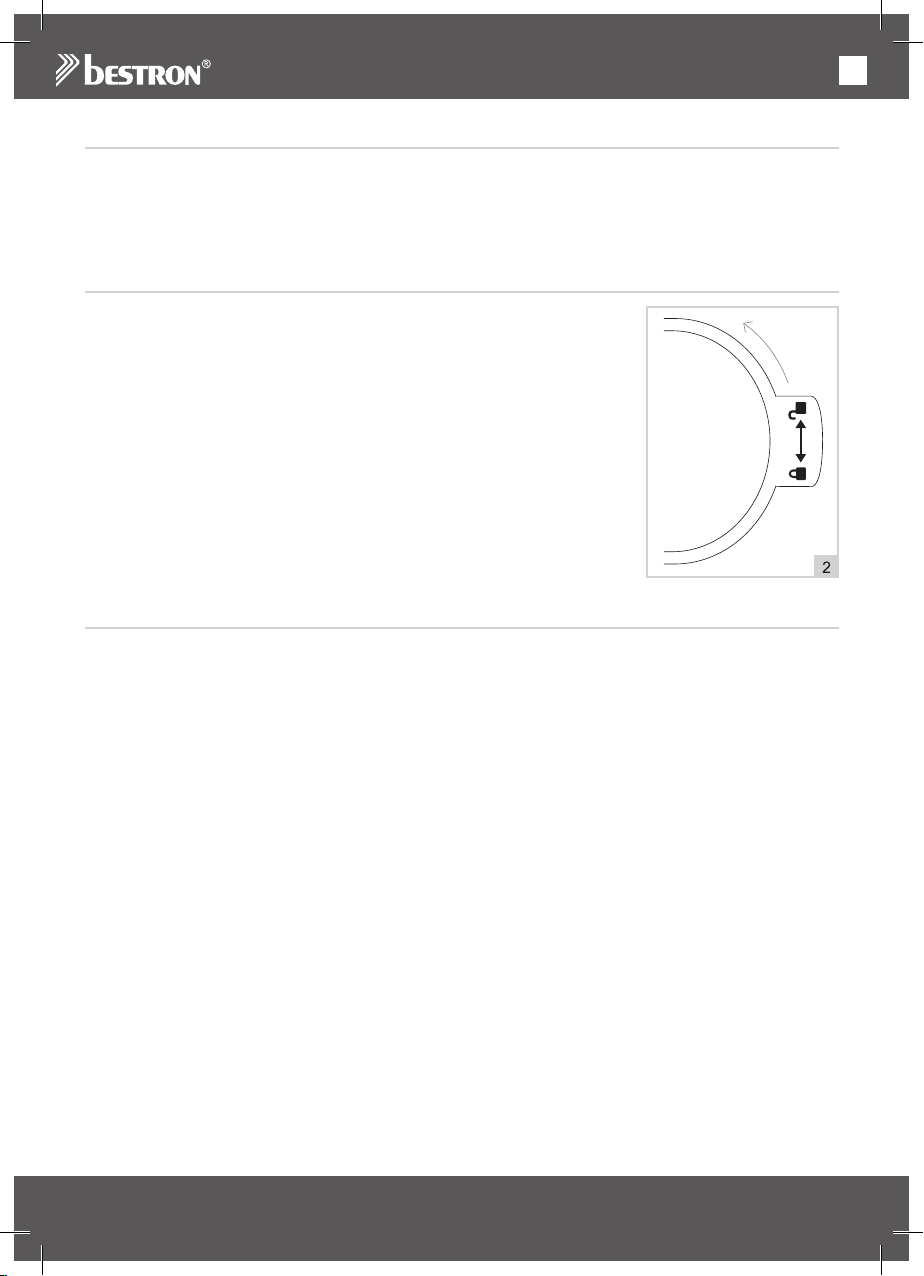
4. Drehen Sie den Deckel (2) um ± 45 ° gegen den Uhrzeigersinn, um ihn
vom Mixbecher zu entfernen. Ziehen Sie den Deckel ab.
(Siehe Abbildung 2).
5. Teile mit Seifenwasser reinigen, abspülen und gründlich trocknen.
6. Drücken Sie den Deckel wieder auf den Mixbecher und drehen Sie ihn ±
45 ° im Uhrzeigersinn, um ihn festzuziehen. Wenn Sie ein Klicken hören,
ist die Sicherung eingerastet.
7. Drehen Sie den Mixbecher wieder auf die Klingeneinheit.
8. Setzen Sie den Mixbecher wieder auf das Motorgehäuse.
9. Reinigen Sie das Motorgehäuse mit einem feuchten Tuch und
Seifenwasser und trocknen Sie es gründlich ab.
REINIGUNG UND PFLEGE - Nach jeder Verwendung
Reinigen Sie das Gerät und die Einzelteile nach jeder Verwendung gründlich. Reinigen Sie den Mixbecher
und die Klingen sofort nach Gebrauch, um das beste Reinigungsergebnis zu erzielen.
1. Drehen Sie den Geschwindigkeitsschalter auf 0 (aus).
2. Füllen Sie den Mixbecher für ¼ mit lauwarmem Wasser.
3. Drehen Sie den Geschwindigkeitsschalter auf 1.
4. Schalten Sie den Mixer nach 20 bis 30 Sekunden aus (Position 0) und ziehen Sie den Stecker aus der
Steckdose. Die Messer sind jetzt gereinigt.
5. Sie können den Mixbecher, den Deckel mit Verschlusskappe und die Klingen auch separat reinigen.
Mehr dazu unter “Reinigung und Wartung - Vor dem ersten Gebrauch”.
6. Reinigen Sie das Motorgehäuse mit einem feuchten Tuch und Spülmittel. Trocknen Sie das Gehäuse
danach gründlich ab.
7. Verstauen Sie den Mixer.
ACHTUNG:
• Verwenden Sie nur lauwarmes Wasser, heißem Wasser kann Risse verursachen.
• Weichen Sie den Mixbecher nicht für längere Zeit mit Seifenwasser ein.
• Verwenden Sie zur Reinigung keine aggressiven Reinigungs- oder Scheuermittel oder scharfen
Gegenstände (wie Messer oder harte Bürsten).
• Tauchen Sie das Motorgehäuse nie unter Wasser oder in andere Flüssigkeiten.
7
Page 8

GARANTIEBESTIMMUNGEN
DE
Bestron handhabt unter den folgenden Bedingungen eine Garantie von 60 Monaten ab Kaufdatum gegen
Defekte, die durch Herstellungs- und/oder Materialfehler entstanden sind.
1. Im genannten Garantiezeitraum werden keine Kosten für Arbeitslohn und Material berechnet.
2. Die unter der Garantie ausgeführte Reparatur verlängert nicht die Garantiefrist.
3. Defekte Zubehörteile oder bei Umtausch die defekten Geräte selbst werden automatisch Eigentum von
Bestron.
4. Die Garantie gilt ausschließlich für den ersten Käufer und ist nicht übertragbar.
5. Die Garantie gilt nicht für einen Schaden, der entstanden ist durch:
• Unfälle
• falsche Benutzung
• Verschleiß
• Verwahrlosung
• Fehlerhafte Installation
• Anschluss an eine andere Netzspannung als die, die auf dem Typenschild genannt ist
• Unautorisierte Veränderung
• Von nicht qualifizierten Dritten ausgeführte Reparaturen
• Benutzung entgegen den geltenden gesetzlichen, technischen oder Sicherheitsnormen
• Unsorgfältigen Transport ohne geeignete Verpackung oder anderen Schutz
6. Ein Anspruch auf Garantie kann nicht erhoben werden bei:
• Einem Schaden während des Transports
• Der Entfernung oder Änderung der Seriennummer des Gerätes
7. Von der Garantie ausgenommen sind:
• Kabel
• Lampen
• Zubehörteile aus Glas
8. Die Garantie berechtigt neben dem Ersatz beziehungsweise der Reparatur der defekten Zubehörteile
nicht zu irgendeiner Erstattung eines eventuellen Schadens. Bestron kann nie für einen eventuellen
Folgeschaden oder irgendwelche andere Konsequenzen, die durch oder in Bezug auf das von ihr
gelieferte Gerät entstanden sind, haftbar gemacht werden.
9. Der Garantieanspruch kann nur bei Ihrem (Web-)Händler oder direkt beim Bestron Kundendienst geltend
gemacht werden. Senden Sie ein Gerät nicht ohne vorherige Rücksprache zurück. Das Paket kann dann
abgelehnt werden und eventuelle Kosten gehen zu Ihren Lasten. Nehmen Sie erst für Anweisungen,
wie Sie das Gerät einpacken und versenden müssen, Kontakt auf. Jedem Garantieanspruch muss der
Kaufbeleg beigefügt werden.
SERVICE
Sollte sich unverhofft eine Störung ergeben, dann können Sie mit dem BESTRON-Kundendienst Kontakt
aufnehmen: www.bestron.com/service
8
Page 9

REZEPTEN
DE
Rucola Pesto
Zutaten
• 75g Rucola
• 40 g Walnüsse
• 2 Knoblauchzehen
• Milde Olivenöl
• Schwarze Pfeffer
Zubereiten
Rösten Sie die Walnüsse in eine trocken Pfanne.
Danach die Rucola, Knoblauch und Walnüsse in
die Blender pürieren. Fügen Sie die Olivenöl zu
bis ein sämiges Pesto. Fügen Sie die Schwarze
Pfeffer nach Geschmack zu. Herrlich auf Toast oder
Stangenbrot.
Frappuccino
Zutaten
• 200 ml Espresso eiskalt
• 200 ml Vollmilch
• 4 Kügeln Sirupwaffel Eis
• 2 Teelöffel Kaffee Sirup
• Sahne und Kakao
Zubereiten
Geben Sie den Espresso mit Milch, der Kaffee Sirup
und 2 Kügeln Eis in den Blender bis einer glatte
Menge. Schenk es in einem Glas. Tu in jedem Glas
noch eine Kügel Eis und garnier es mit Sahne und
Kakao.
Nudeln mit sonnengetrockneter Tomaten und
Basilikum
Zutaten
• 6 sonnengetrockneter Tomaten auf Ölbasis
• 10 g Basilikum
• 1 Beutel Mandelschabsel
• 2 Knoblauchzehen
• 1 Beutel Parmesankäse
• 250g Nudeln
• Salz und Pfeffer
Zubereiten
Geben Sie die sonnengetrockneter Tomaten,
der Knoblauch und Basilikum mit etwas Öl von
die Tomaten in den Blender. Fügen Sie etwas
Kochwasser vond die Nudeln zu. Mengen Sie alles
bis einem Sort Pesto. Fügen Sie die Käse, Pfeffer
und Salz nach Geschmack zu. Kochen Sie die
Nudeln gar mit ein bisschen Salz.
Oliv Tapenade
Zutaten
• 500 g Grüne Olives (kernlos)
• 150 g Schwarze Olives (kernlos)
• 6 gepulte Knoblauchzehen
• 70 g geriebene Parmesankäse
• 100 g weiche sonnengetrockneter Tomaten
Zubereiten
Geben Sie die Grüne und Schwarze Oliven,
Knoblauch, Käse und Tomaten in den Blender und
fügen langsam etwas virgin Olivenöl zu bis ein
flüssige (pürierte) Menge, welche gut streichfähig
ist. Fügen Sie frischem gemahlen Pfeffer zu für
ein Pikanten Geschmack. Herrlich auf Toast oder
Stangenbrot.
Himbeere Sorbett Eis
Zutaten
• 1 Zitrone
• 600 g Himbeere
• 150 g Puderzucker
• 1,5 dl Wasser
Zubereiten
Schneiden Sie die Zitrone mittendurch und
pressen Sie diese. Pürieren Sie die Himbeere
mit Zitronensaft, Zucker und 1,5 dl Wasser in die
Blender. Schenken Sie das Gemenge in einer
Gefrierdose. Setzen Sie die Dose vorsichtig ins
Tiefkühlapparat für ± 6 Uhren. Rühren Sie das
Gemenge um mit einen Gabel jedem Uhr. Sie
konnen das Gemenge auch in einer Eismachine
gießen und für 40 Minuten drehen lassen. Schöpfen
Sie das Eis danach in eine Schale oder Hörnchen.
Paprika Suppe
Zutaten
• 3 gelbe Paprikas
• 2 Esslöffel crème fraîche
• 150g Karotten
• 4 Frühling-zwiebeln
• 2 Knoblauchzehen
• 30g Parmesankäse
• 2 Teelöffel geriebene Ingwer Wurzel
• 3 Esslöffel gesnitten Basilikum
• 2 Esslöffel Olivenöl
• 4 Esslöffel Sahne
• 1 ltr. Gemüsebrühe
• Salz
Zubereiten
Halbieren Sie die Paprikas in der Lange, entfernen
Sie die Kern und schneid das Fruchtfleisch in kleine
Stücke. Schneiden Sie die Karotten in kleine Stücke
und schneid die Frühling-zwiebeln und Knoblauch
klein. Rösten Sie die Frühling-Zwiebeln, Knoblauch
und ein Teelöffel geriebene Ingwer Wurzel ins
Olivenöl und lass die Paprika und Karotten mit
rösten für 5 Minuten. Fügen Sie die Gemüsebrühe
zu und lass alles langsam kochen. Pürieren Sie die
Menge in die Blender. Geben Sie die Menge danach
in einer pfanne und erwärm diese. Mischen Sie die
crème fraîche hinein und füg Pfeffer und Salz zu
nach Geschmack. Rühren Sie die Parmesankäse,
Basilikum und überig geblieben Ingwer durch die
Sahne. Schöpfen Sie die Suppe in einer Schale und
Schöpf ein Löffel vond die Sahne Menge darauf.
9
Page 10

FR
FÉLICITATIONS !
Nous vous félicitons pour l’achat de votre produit Bestron. Dans le présent
manuel d’utilisation, nous vous expliquons comment celui fonctionne et
comment vous devez l’utiliser. Nous vous invitons par conséquent à
lire attentivement les instructions d’utilisation avant d’utiliser l’appareil.
Lorsque vous l’utilisez, prenez soin de suivre parfaitement les instructions
d’utilisation. Conserver-les précautionneusement.
En cas de dysfonctionnement :
Si l’appareil devait malencontreusement ne plus fonctionner, n’essayez
jamais de le réparer vous-même. Vous devez laisser le soin de le faire
à un réparateur/technicien qualifié.
Utilisation par des enfants :
• Cet appareil ne peut être utilisé par des enfants ni par des
personnes dont les facultés physiques, sensorielles ou psychiques
sont diminuées ou des personnes n’ayant ni l’expérience ni les
connaissances requises.
• Le nettoyage et l’entretien ne peuvent être effectués par des enfants.
• Conserver l’appareil et le câble hors de portée des enfants.
• Veillez à toujours surveiller les enfants de sorte à vous assurer qu’ils
ne jouent pas avec l’appareil.
CE QUE VOUS DEVEZ SAVOIR AU SUJET DES APPAREILS
ÉLECTRIQUES
• Avant toute utilisation, vérifiez que la tension électrique du réseau
correspond à la tension électrique indiquée sur la plaque signalétique
de l’appareil concerné.
• Contrôlez que la prise à laquelle vous raccordez l’appareil électrique
est reliée à la terre.
• Veillez toujours à placer les appareils électriques sur une surface
stable et plane et à un endroit où celui-ci ne peut pas tomber.
• Certains éléments d’un appareil électrique peuvent devenir chauds
ou parfois même brûlants. Prenez soin de ne pas les toucher afin
d’éviter de vous brûler.
• Assurez-vous que vos mains sont sèches lorsque vous touchez un
appareil électrique, un fil/câble ou une prise.
• Les appareils électriques doivent pouvoir libérer la chaleur qu’ils
produisent de sorte à éviter tout risque d’incendie. Vérifiez par
conséquent s’il y a suffisamment d’espace autour de l’appareil et
faites en sorte que celui-ci ne puisse entrer en contact avec du
matériel inflammable. Les appareils électriques ne doivent jamais
être couverts.
10
Page 11

FR
• Assurez-vous que les appareils électriques, les fils/câbles ou les
prises n’entrent pas en contact avec de l’eau.
• N’immergez jamais des appareils électriques, des fils/câbles ou
prises dans de l’eau ou dans un autre liquide.
• Ne saisissez jamais un appareil électrique lorsque celui-ci est tombé
dans l’eau. Débranchez-le immédiatement et ne l’utilisez plus.
• Assurez-vous que les appareils électriques, les fils/câbles ou les
prises n’entrent pas en contact avec des sources de chaleur comme
une plaque de cuisson brûlante ou avec du feu.
• Ne laissez pas pendre des fils/câbles sur le rebord d’un évier, d’un
plan de travail ou d’une table.
• Débranchez toujours l’appareil de la prise de contact lorsque vous
ne l’utilisez pas.
• Lorsque vous débranchez l’appareil de la prise de contact, prenez
soin de tirer en saisissant la partie dure de la prise mâle et non pas
en tirant sur le fil/câble.
• Contrôlez régulièrement si le fil/câble de l’appareil électrique est
encore intact. N’utilisez pas l’appareil si le fil/câble présente des
signes d’endommagement. Si le fil/câble est endommagé, celui-ci
doit être remplacé par le fabricant, par un service technique ou par
une personne ayant une compétence/qualification similaire, ceci afin
d’éviter tout danger.
• L’appareil ne peut être mis en marche en ayant recours à une
minuterie externe ou à un système séparé avec télécommande.
CE QUE VOUS DEVEZ SAVOIR AU SUJET DE CET APPAREIL
• Soyez prudent lorsque vous utilisez l’appareil à l’extérieur.
• N’utilisez jamais l’appareil dans des pièces humides.
• Après utilisation, nettoyez soigneusement l’appareil (voir Nettoyage
et entretien).
• N’utilisez pas l’appareil pour les liquides très chauds.
• Ne faites jamais fonctionner l’appareil à vide.
• Ne faites jamais fonctionner le bol mélangeur pendant plus de 120
secondes, et attendez ensuite pendant quelques minutes avant de
l’enclencher à nouveau.
• Lorsque vous remplissez le bol mélangeur, tenez bien compte de sa
capacité maximale. Elle est de 1,5 litres.
11
Page 12
FR
ENVIRONNEMENT
• Débarrassez-vous du matériel d’emballage comme le plastique et les boîtes dans les containers destinés à cet effet.
• À la fin de sa durée de vie, ne jetez pas ce produit comme
un simple déchet ménager mais remettez-le à un centre de
collecte de recyclage des produits électriques et électroniques.
Consultez le symbole sur le produit, le mode d’emploi ou
l’emballage.
• Les matériels/matériaux peuvent être réutilisés comme
indiqué. En apportant votre aide au recyclage et au traitement
des matériels/matériaux ou à tout autre forme de réutilisation
d’anciens appareils, vous contribuez à la protection de
l’environnement.
• Informez-vous auprès de votre commune pour obtenir la liste
des points de collecte à proximité de chez vous.
DÉCLARATION DE CONFORMITÉ CE
Ce produit répond aux exigences des directives Européennes.
R. Neyman
Contrôle qualité
12
Page 13
FONCTIONNEMENT - Généralités
FR
L’appareil est destiné uniquement à l’utilisation
domestique, et non à l’usage professionnel.
1.
2.
3.
4.
5.
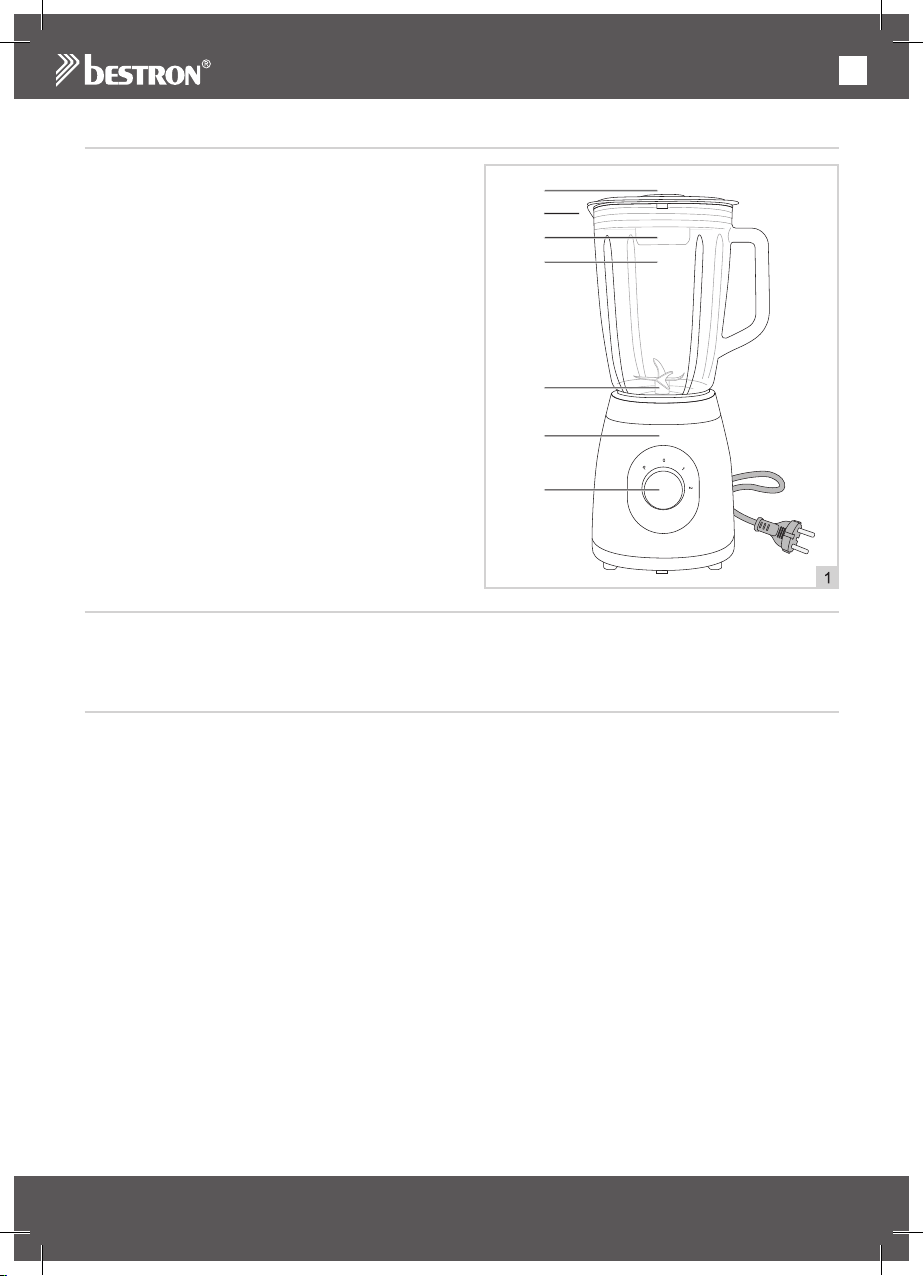
1. Bouchon d’étanchéité
6.
2. Couvercle avec sécurité marche/arrêt
3. Orifice de remplissage
4. Bol mélangeur en verre avec poignée
5. Unité à lames
6. Boîtier du moteur
7. Bouton de réglage de la vitesse
FONCTIONEMENT - Avant la première utilisation
1. Enlevez l’emballage.
2. Nettoyez l’appareil. Voir ‘Nettoyage et entretien’.
FONCTIONNEMENT - Utilisation
1. Branchez la fiche.
2. Placez le bol mélangeur (4) (la poignée à droite) sur l’unité du moteur (6).
3. Coupez en morceaux les ingrédients non liquides.
4. Mettez d’abord dans le bol (4) les ingrédients non liquides. Ajoutez ensuite d’éventuels liquides (jusqu’à
un maximum de 1 litre).
5. Placez le couvercle (2) sur le bol mélangeur et tournez-le à droite jusqu’à entendre un clic.
6. Fermez le orifice de remplissage avec le couvercle.
7.
Mettez le bouton de réglage de la vitesse (7) sur la position désirée:
P = Pulse, 0 = arrêt, 1 = moyen, 2 = rapide
8. Pendant que le blender fonctionne vous pouvez ajouter des ingrédients supplémentaires par l’ouverture
de remplissage dans le couvercle. Enlevez d’abord le capuchon de l’ouverture du couvercle, puis
ajoutez les ingrédients et fermez l’ouverture du couvercle avec le capuchon.
9. Éteignez le bol mélangeur - position 0.
10. Avant de retirer le bol du bloc moteur, attendez que les lames, à l’intérieur, se soient tout à fait
immobilisées.
ATTENTION:
• Le bol mélangeur est équipé d’un système de sécurité. Si le bol ne s’emboîte pas exactement sur le
bloc moteur, vous ne pouvez pas faire fonctionner le bol mélangeur. Ce blender est doté d’une sécurité
marche/arrêt qui fait automatiquement s’arrêter les lames lorsque le couvercle est ouvert.
• Plus le bol mélangeur fonctionne longtemps (maximum: 120 secondes), plus les ingrédients sont
hachés menu.
• Pour préparer du jus de tomate, coupez des tomates en quartiers et rajoutezles par l’ouverture de
remplissage pendant que le bol mélangeur est en marche.
7.
13
Page 14
• Si le bol mélangeur est trop lent, éteignez-le (position 0), puis: a. mettez le bouton de réglage en
FR
position Pulse, ou bien b. remuez les ingrédients avec une spatule, ou bien c. enlevez une partie des
ingrédients contenus dans le bol.
FONCTIONNEMENT - Glace pilée
La position Pulse vous permet de faire fonctionner le bol mélangeur brièvement à la vitesse maximum. En
position Pulse, vous devez maintenir le bouton pour faire fonctionner l’appareil.
Glace pilée; Pour faire de la glace pilée, remplissez le bol mélangeur de glaçons et positionnez plusieurs
fois sur le bouton de réglage de la vitesse en position “pulse” (“P”), jusqu’à ce que la glace soit pillée
suffisamment.
NETTOYAGE ET ENTRETIEN - Avant la première utilisation
Pour la première utilisation, nettoyez le bol mélangeur, le couvercle avec le
capuchon et les lames.
1. Retirez le bol mélangeur (4) du boîtier du moteur (6).
2. Tournez le bol mélangeur pour retirer l’unité à lames (5).
3. Placez le bol mélangeur sur une surface plate et stable.
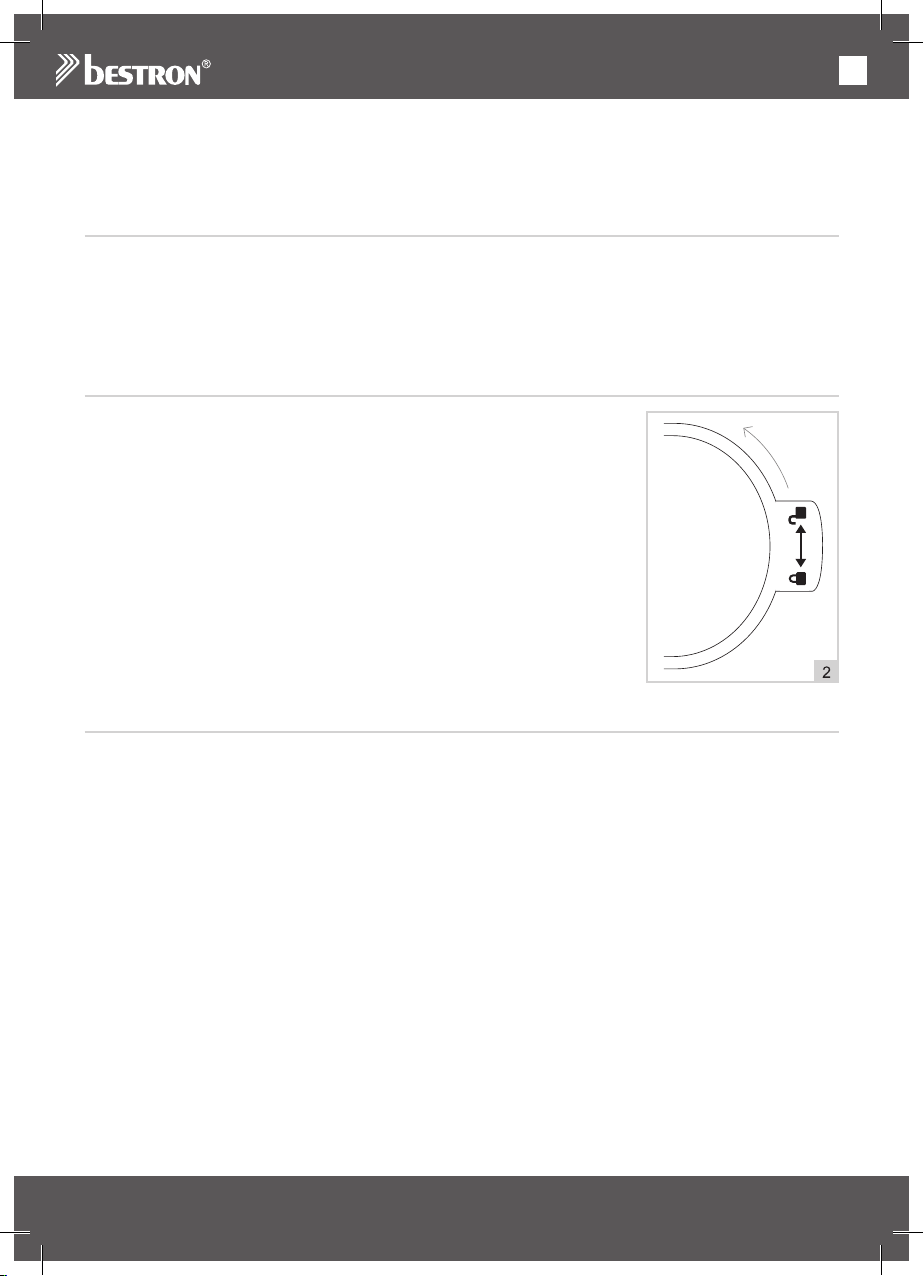
4. Tournez le couvercle à (2) ± 45° dans le sens inverse des aiguilles d’une
montre pour l’enlever du bol mélangeur. Tirez sur le couvercle pour le
retirer (voir figure 2).
5. Nettoyez les parties à l’eau savonneuse, rincez-les et séchez-les bien.
6. Remettez le couvercle sur le bol mélangeur en appuyant dessus et en
le tournant à ± 45° dans le sens des aiguilles d’une montre pour le fixer.
Lorsque vous entendez un clic, l’étiquette de sécurité est bien en place.
7. Tournez à nouveau le bol mélangeur sur l’unité à lames.
8. Remettez le bol mélangeur sur le boîtier du moteur.
9. Nettoyez le boîtier du moteur avec un chiffon humide et de l’eau
savonneuse et faites-le soigneusement sécher.
NETTOYAGE ET ENTRETIEN - Après chaque utilisation
Nettoyez l’appareil et tous les composants chaque fois que vous les avez utilisés. Nettoyez le bol
mélangeur et les lames juste après l’utilisation, pour de meilleurs résultats du nettoyage
1. Mettez le bouton de réglage de la vitesse en position 0 (éteindre).
2. Remplissez le bol mélangeur ¼ avec d’eau tiède.
3. Mettez le bouton de réglage de la vitesse en position 1.
4. Éteignez le bol mélangeur au bout de 20 à 30 secondes (position 0) et débranchez la fiche. Les lames
sont nettoyés.
5. Il est également possible de laver le bol mélangeur, le couvercle avec le capuchon et les lames en les
démontant pour les séparer. Voir « nettoyage et entretien – Avant la première utilisation ».
6. Nettoyez le bloc moteur avec un chiffon humide et éventuellement un peu de détergent pour la vaisselle.
Séchez-le ensuite avec soin.
7. Rangez le bol mélangeur.
ATTENTION:
• Utilisez uniquement de l’eau tiède, l’eau chaude peut provoquer des fissures.
• Ne laissez pas le bol tremper longuement dans de l’eau savonneuse.
• N’utilisez pas de détergent agressif ni de récurant pour le nettoyage, et n’utilisez pas d’outils pouvant
couper ou griffer (couteaux ou brosses dures).
• N’immergez jamais le bloc moteur dans l’eau ou dans un autre liquide.
14
Page 15

FR
DISPOSITIONS CONCERNANT LA GARANTIE
Le présent produit Bestron bénéficie – aux conditions ci-après – d’une garantie de 60 mois suivant la date
d’achat et couvrant toute panne résultant d’un défaut/vice de fabrication et/ou de fonctionnement.
1. Pendant la période de garantie précitée, aucun frais ne sera facturé au titre des coûts de main-d’œuvre
et de matériel.
2. Les réparations effectuées au cours de la période de garantie n’entraînent pas de prolongation du délai
de garantie.
3. Les éléments/composantes défectueux – ou l’appareil lui-même en cas d’échange de l’appareil –
deviennent automatiquement la propriété de Bestron.
4. La garantie profite exclusivement au premier acheteur et n’est pas transmissible.
5. La garantie ne joue pas pour les dommages résultant :
• D’accidents
• D’une utilisation inappropriée
• De l’usure
• D’une manipulation négligente
• D’une installation erronée
• Du raccordement à un réseau électrique autre que celui indiqué sur la plaque signalétique
• De modifications non autorisées apportées à l’appareil
• De réparations effectuées par des personnes non qualifiées
• D’une utilisation contraire aux normes légales, techniques ou de sécurité s’appliquant
• D’un transport négligent sans utiliser un emballage adéquat ou une autre protection
6. Il n’est pas possible de mettre en œuvre la garantie en cas de :
• Dommages apparus pendant le transport
• Suppression ou modification du numéro de série de l’appareil
7. Ne bénéficient pas de la garantie :
• Les fils/câbles
• Les lampes
• Les parties/composantes en verre
8. La garantie ne donne pas droit à l’indemnisation d’éventuels dommages en sus du remplacement ou de
la réparation des parties/composantes défectueuses. La responsabilité de Bestron ne peut jamais être
engagée pour les éventuels dommages consécutifs ou pour toute autre conséquence causés l’appareil
livré par Bestron ou en relation avec celui-ci.
9. Pour faire jouer la garantie, il convient de s’adresser au vendeur (sur Internet) ou directement au Service
assistance de Bestron. N’envoyez jamais un article de votre propre initiative. Le paquet peut être en
effet refusé et les éventuels frais seront à votre charge. Contactez d’abord le vendeur ou le Service
assistance de Bestron qui vous indiqueront comment vous devez emballer l’appareil et comment
l’expédier. Toute demande de mise en œuvre de la garantie doit être accompagnée d’une preuve
d’achat.
SERVICE
En cas de panne ou de dysfonctionnement de votre appareil, contactez le service assistance de
BESTRON : www.bestron.com/service
15
Page 16

RECETTES
FR
Pesto de roquette
Ingrédients
• 75 g de roquette
• 40 g de noix
• 2 petites gousses d’ail
• Huile d’olive douce
• Poivre noir
Préparation
Faites griller les noix dans une poêle très chaude,
sans matière grasse. Réduisez ensuite la roquette,
l’ail et les noix en purée dans le mixeur. Ajoutez de
l’huile d’olive jusqu’à obtenir un pesto onctueux.
Ajoutez du poivre noir du moulin à volonté. Délicieux
sur un toast ou une baguette.
Frappuccino
Ingrédients
• 200 ml d’espresso glacé
• 200 ml de lait entier
• 4 boules de glace au parfum de gaufrette à la
mélasse
• 2 cuillères à café de sirop de café
• Crème fraîche et cacao en poudre
Préparation
Placez l’espresso, le lait, le sirop de café et deux
boules de glace dans le mixeur, puis faites tourner
jusqu’à obtention d’une masse homogène. Versez
dans un verre. Déposez une boule de glace dans
chaque verre et garnissez éventuellement d’un peu
de crème fraîche et de cacao en poudre.
Pâtes aux tomates séchées et basilic
Ingrédients
• 6 tomates séchées à l’huile
• 10 g de basilic
• 1 sachet d’amandes effilées
• 2 petites gousses d’ail
• 1 sachet de parmesan
• 250 g de pâtes
• Sel et poivre
Préparation
Déposez les tomates séchées, l’ail et le basilic
dans le mixeur avec un peu de l’huile des tomates.
Ajoutez un peu du liquide de cuisson des pâtes.
Mixez le tout jusqu’à obtenir une sorte de pesto.
Ajoutez le fromage. Salez et poivrez à volonté.
Cuisez les pâtes al dente avec un peu de sel.
Tapenade d’olives
Ingrédients
• 500g d’olives vertes (dénoyautées)
• 150g d’olives noires (dénoyautées)
• 6 gousses d’ail épluchées
• 70g de parmesan râpé
• 100g de tomates séchées
Préparation
Déposez les olives noires, les olives vertes, l’ail, le
fromage et les tomates dans le mixeur, puis ajoutez
lentement un peu d’huile d’olive vierge extra jusqu’à
obtenir une masse liquide (bien mixée) qui s’étale
facilement. Ajoutez éventuellement un peu de
poivre fraîchement moulu. Délicieux sur un toast ou
une baguette.
Sorbet aux framboises
Ingrédients
• 1 citron
• 600 g de framboises
• 150 g de sucre impalpable
• 1,5 dl d’eau
Préparation
Coupez le citron en deux et pressez-le. Dans un
robot, réduisez les framboises en purée avec le
jus de citron, le sucre et 1,5 dl d’eau. Versez ce
mélange dans une boîte de congélation. Placez
la boîte avec soin dans le congélateur et laissez
congeler pendant ± 6 heures. Une fois par heure,
mélangez à l’aide d’une fourchette. Vous pouvez
également verser le mélange dans une sorbetière
que vous laisserez tourner ± 40 minutes. Servez
ensuite la glace dans une coupe ou un cornet.
Soupe aux poivrons
Ingrédients
• 3 poivrons jaunes
• 2 cuillères à soupe de crème fraîche
• 150 g de carottes
• 4 oignons de printemps
• 2 petites gousses d’ail
• 30 g de parmesan
• 2 cuillères à café de racine de gingembre râpée
• 3 cuillères à soupe de basilic coupé
• 2 cuillères à soupe d’huile d’olive
• 4 cuillères à soupe de crème fraîche
• 1 litre de bouillon de légumes
• Sel
Préparation
Coupez les poivrons en deux dans le sens de la
longueur, retirez les graines et découpez la chair
en petits morceaux. Coupez les carottes en petits
morceaux et hachez finement les oignons de printemps
et l’ail. Faites revenir les oignons de printemps, l’ail et 1
cuillère à café de gingembre râpé dans l’huile d’olive,
puis ajoutez les poivrons et les carottes et laissez-les
revenir pendant 5 minutes. Ajoutez le bouillon et laissez
le tout cuire à feu doux pendant 10 minutes. Réduisez
ce mélange en purée dans le robot, puis versez-le dans
une casserole et réchauffez-le. Incorporez-y la crème
fraîche, salez et poivrez. Incorporez le parmesan, le
basilic et le reste de gingembre râpé à la crème fraîche.
Servez la soupe dans des bols, en garnissant d’une
cuillère du mélange à base de crème fraîche.
16
Page 17

NL
PROFICIAT!
Proficiat met de aankoop van dit Bestron-product. In deze
gebruiksaanwijzing leggen we de werking en het gebruik uit. Lees
de gebruiksaanwijzing dus aandachtig door vóór u het apparaat
gaat gebruiken. Gebruik het apparaat alleen zoals beschreven in de
gebruiksaanwijzing. Bewaar de gebruiksaanwijzing daarna zorgvuldig.
Bij een defect:
Mocht het apparaat onverhoopt defect raken, probeer dan nooit zélf
de reparatie uit te voeren. Laat reparaties altijd uitvoeren door een
gekwalificeerde monteur.
Gebruik door kinderen:
• Dit apparaat mag niet worden gebruikt door kinderen en personen
met verminderde lichamelijke, zintuiglijke of geestelijke vermogens
of gebrek aan ervaring en kennis.
• Reiniging en onderhoud moeten niet worden gedaan door kinderen.
• Houd het toestel en de kabel buiten bereik van kinderen.
• Kinderen moeten in de gaten gehouden worden om er zeker van te
zijn dat ze niet met het apparaat spelen.
WAT U MOET WETEN OVER ELEKTRISCHE APPARATEN
• Controleer of de netspanning overeenkomt met de aangegeven
netspanning op het typeplaatje van een elektrisch apparaat, voordat
u het gebruikt.
• Controleer of het stopcontact waarop u een elektrisch apparaat
aansluit, geaard is.
• Plaats elektrische apparaten altijd op een stabiele en vlakke
ondergrond, op een plaats waar het niet kan vallen.
• Bepaalde delen van een elektrisch apparaat kunnen warm of soms
heet worden. Raak deze niet aan om te voorkomen dat u zich
verbrandt.
• Zorg ervoor dat uw handen droog zijn als u een elektrisch apparaat,
een snoer of een stekker aanraakt.
• Elektrische apparaten moeten hun warmte kwijt kunnen om
brandgevaar te voorkomen. Zorg er dus voor dat het apparaat
voldoende vrij is en niet in contact kan komen met brandbaar
materiaal. Elektrische apparaten mogen nooit worden bedekt.
• Zorg ervoor dat elektrische apparaten, snoeren of stekkers niet in
aanraking komen met water.
• Dompel elektrische apparaten, snoeren of stekkers nooit onder in
water of een andere vloeistof.
17
Page 18

NL
• Pak elektrische apparaten niet op wanneer ze in het water zijn
gevallen. Trek direct de stekker uit het stopcontact. Gebruik het
apparaat niet meer.
• Zorg ervoor dat elektrische apparaten, snoeren en stekkers niet in
aanraking komen met hittebronnen, zoals een hete kookplaat of
open vuur.
• Laat snoeren niet over de rand van het aanrecht, werkblad of een
tafel hangen.
• Haal stekkers altijd uit het stopcontact wanneer u het elektrisch
apparaat niet gebruikt.
• Als u de stekker uit het stopcontact neemt, trek dan aan de stekker
zelf en niet aan het snoer.
• Controleer regelmatig of het snoer van het elektrisch apparaat nog
intact is. Gebruik het apparaat niet als het snoer beschadigingen
vertoont. Als het snoer beschadigd is, moet het vervangen worden
door de fabrikant, een technische servicedienst of een persoon met
een gelijkaardige kwalificatie, om elk gevaar te vermijden.
• Het apparaat mag niet in werking worden gesteld door middel van
een externe tijdschakelaar, of door een afzonderlijk systeem met
afstandsbediening.
WAT U MOET WETEN OVER DIT APPARAAT
• Wees voorzichtig wanneer u het apparaat buitenshuis gebruikt.
• Gebruik het apparaat nooit in vochtige ruimten.
• Maak het apparaat na gebruik grondig schoon (zie Reiniging en
onderhoud).
• Gebruik het apparaat nooit voor kokende vloeistoffen.
• Zet het apparaat nooit aan zonder inhoud.
• Gebruik de blender nooit langer dan 120 seconden. Wacht daarna
enkele minuten voordat u de blender weer inschakelt.
• Houd bij het vullen van de mengbeker rekening met de maximale
inhoud van de mengbeker. Deze bedraagt 1,5 liter.
18
Page 19
NL
MILIEU
• Werp verpakkingsmateriaal zoals plastic en dozen in de
daarvoor bestemde containers.
• Dit product aan het eind van de gebruiksduur niet inleveren
als normaal huishoudelijk afval, maar bij een inzamelpunt voor
hergebruik van elektrische en elektronische apparatuur. Let
op het symbool op het product, de gebruiksaanwijzing of de
verpakking.
• De materialen kunnen hergebruikt worden zoals aangegeven.
Door uw hulp bij hergebruik, de verwerking van de materialen
of ander vormen van de benutting van oude apparatuur levert
u een belangrijke bijdrage aan de bescherming van ons
milieu.
• Informeer bij de gemeente naar het juiste inzamelpunt bij u in
de buurt.
EU-CONFORMITEITSVERKLARING
Dit product voldoet aan de eisen volgens de Europese richtlijnen.
R. Neyman
Quality control
19
Page 20
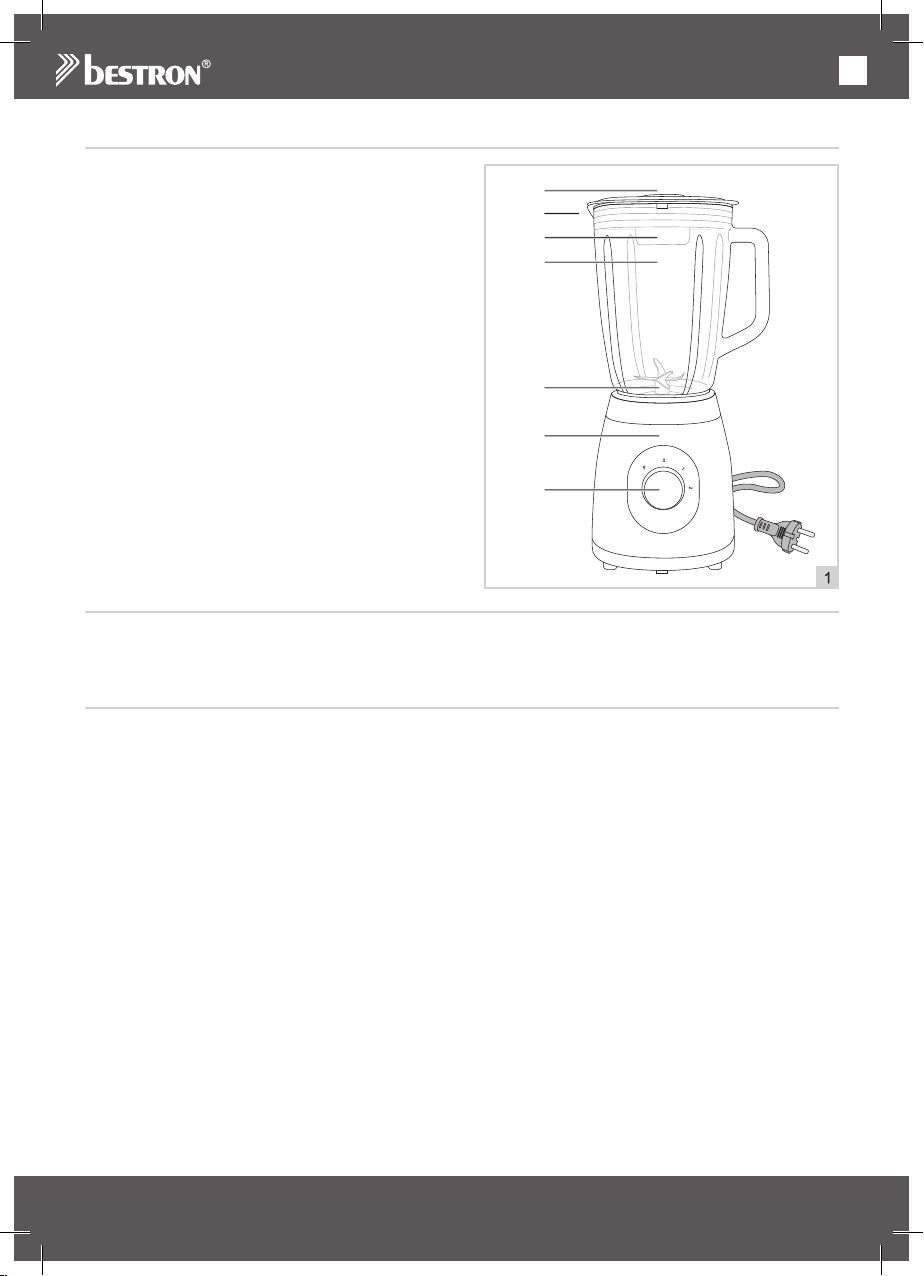
WERKING - Algemeen
NL
Het apparaat is alleen bedoeld voor
huishoudelijke doeleinden, niet voor
professioneel gebruik.
1.
2.
3.
4.
5.
1. Afsluitdop
6.
2. Deksel met veiligheids-stop-functie
3. Vulopening
4. Glazen mengbeker met handgreep
5. Messenblok
6. Motorbehuizing
7. Snelheidsschakelaar
WERKING - Voor het eerste gebruik
1. Verwijder de verpakking.
2. Reinig het apparaat. Zie ‘Reiniging en onderhoud’.
WERKING - Gebruik
1. Steek de stekker in het stopcontact.
2. Plaats de mengbeker (4) (met de handgreep aan de rechterzijde) op de motorbehuizing (6).
3. Snijd de vaste ingrediënten in kleine stukjes.
4. Vul de mengbeker met de ingrediënten. Voeg daarna de eventuele vloeistof toe (maximaal 1 liter).
5. Plaats de deksel (2) op de mengbeker en draai deze naar rechts tot je een klik hoort.
6. Plaats nu de afsluitdop (1) in de vulopening (3).
7. Draai de snelheidsschakelaar (7) in de gewenste stand: P = Pulse, 0 = uit, 1 = matig, 2 = snel
8. Wanneer de blender in werking is, kunt u ingrediënten via de vulopening in het deksel toevoegen. Haal
eerst de afsluitdop uit de deksel en sluit deze na het toevoegen weer af.
9. Schakel na het blenden de blender uit door de knop naar de 0 stand te draaien.
10. Verwijder de mengbeker pas van de motorbehuizing als de messen in de blender volledig tot stilstand
zijn gekomen.
LET OP:
• De blender is voorzien van een veiligheidssysteem. Wanneer u de mengbeker niet of onjuist op de
motorbehuizing plaatst, kunt u de blender niet inschakelen. Daarnaast heeft de blender op de deksel
een veiligheids-stop-functie waardoor de messen automatisch stoppen met draaien wanneer de deksel
geopend wordt.
• Hoe langer de blender in werking is (maximaal 120 seconden), des te fijner worden de ingrediënten
gemaald.
• Voor het bereiden van tomatensap snijdt u de tomaten in vieren en voegt u ze via de vulopening in het
deksel aan de mengbeker toe als deze in werking is.
• Indien de blender niet snel genoeg werkt, schakel het apparaat dan uit (stand 0) en: a. zet de schakelaar
in de stand Pulse, of b. roer de ingrediënten door met een spatel, of c. verwijder een gedeelte van de
ingrediënten in de mengbeker.
7.
20
Page 21
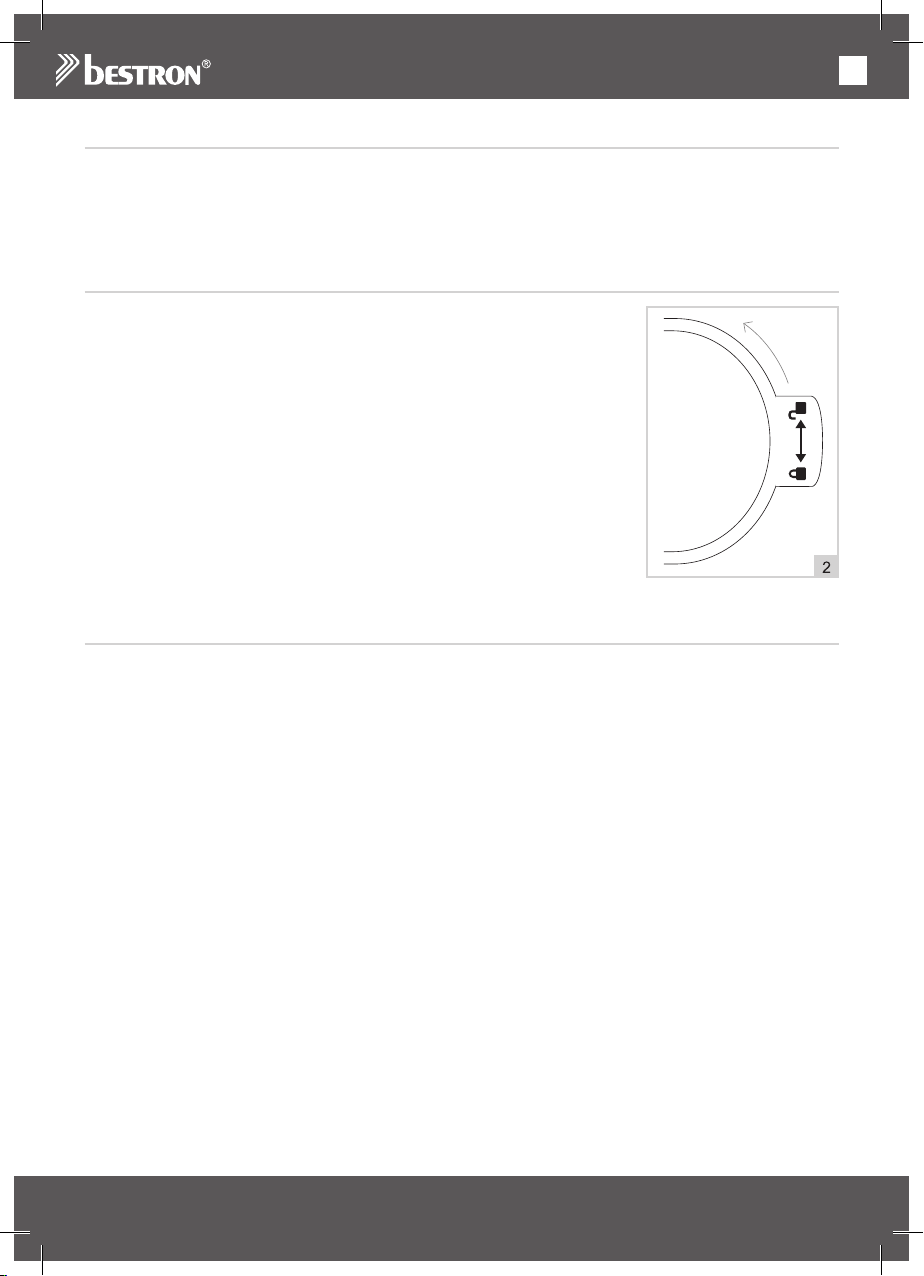
WERKING - Pulse stand
NL
In de stand Pulse kunt u de blender kort op maximale snelheid laten draaien. De stand Pulse
werkt alleen als u de schakelaar in deze stand vasthoudt.
Ice- crushing; Voor gemalen ijs vult u de mengbeker met ijsklontjes en draait u meerdere keren de
snelheidsschakelaar naar de Pulse (“P”) stand totdat de ijsklontjes voldoende zijn fijn gemaald.
REINIGING EN ONDERHOUD - Voor het eerste gebruik
Reinig de mengbeker, de messenblok en de deksel met afsluitdop voor het
eerste gebruik.
1. Til de mengbeker (4) van de moterbehuizing (6).
2. Draai de mengbeker om en draai het messenblok (5) los.
3. Plaats de mengbeker op een vlakke en stabiele ondergrond.
4. Draai de deksel (2) los van de mengbeker (4) door deze ± 45° tegen de
klok in te draaien. Trek nu de deksel los van de mengbeker.
(Zie afbeelding 2).
5. Reinig de onderdelen met zeepwater, spoel deze af en droog daarna
goed.
6. Duw de deksel terug op de mengbeker en draai deze vast door hem
± 45° met de klok mee draaien. Wanneer een klik hoorbaar is zit het
beveiligingsplaatje goed vast.
7. Draai de mengbeker om en draai het messenblok vast.
8. Plaats de mengbeker terug op de moterbehuizing.
9. Reinig de motorbehuizing met een vochtige doek met zeepwater
en droog deze vervolgens grondig.
REINIGING EN ONDERHOUD - Na elk gebruik
Reinig het apparaat en de losse onderdelen grondig na gebruik. U kunt het beste direct na gebruik de
mengbeker en messen reinigen.
1. Draai de snelheidsschakelaar naar stand 0 (uit).
2. Vul ¼ van de mengbeker met lauwwarm water.
3. Draai de snelheidsschakelaar naar stand 1.
4. Schakel na 20 à 30 seconden uit en trek de stekker uit het stopcontact. De messen zijn nu gereinigd.
5. Het is ook mogelijk om de mengbeker, deksel, afsluitdop en messen te reinigen door deze uit elkaar te
halen en de losse onderdelen te reinigen. Zie “reiniging en onderhoud - voor het eerste gebruik”.
6. Reinig de motorbehuizing met een vochtige doek met zeepwater en droog deze vervolgens grondig.
7. Berg de blender op.
LET OP:
• Gebruik alleen lauwwarm water, heet water kan barsten veroorzaken.
• Zet de mengbeker niet langdurig met zeepwater in de week.
• Gebruik geen agressieve of schurende schoonmaakmiddelen of scherpe voorwerpen (zoals messen of
harde borstels) bij het reinigen.
• Dompel de motorbehuizing nooit in water of een andere vloeistof.
21
Page 22

NL
GARANTIEBEPALINGEN
Bestron hanteert onder de volgende voorwaarden 60 maanden na aankoopdatum garantie op deze apparatuur tegen defecten die zijn ontstaan door fabricage- en/of materiaalfouten.
1. In de genoemde garantieperiode zullen geen kosten worden berekend voor arbeidsloon en materiaal.
2. De onder garantie uitgevoerde reparatie verlengt de garantietermijn niet.
3. Defecte onderdelen of bij omruiling de defecte apparaten zelf, worden automatisch eigendom van Be-
stron.
4. De garantie is uitsluitend geldig voor de eerste koper en niet overdraagbaar.
5. De garantie is niet geldig voor schade die is ontstaan door:
• Ongevallen
• Verkeerd gebruik
• Slijtage
• Verwaarlozing
• Foutieve installatie
• Aansluiting op een andere netspanning dan die op het typeplaatje is vermeld
• Ongeautoriseerde wijziging
• Reparaties uitgevoerd door niet-gekwalificeerde derden
• Gebruik in strijd met de geldende wettelijke, technische of veiligheidsnormen
• Onzorgvuldig transport zonder geschikte verpakking of andere bescherming
6. Aanspraak op garantie kan niet worden gedaan bij:
• Schade tijdens het transport
• Het verwijderen of wijzigen van het serienummer van het apparaat.
7. Uitgezonderd van garantie zijn:
• Snoeren
• Lampen
• Glazen onderdelen
8. De garantie geeft geen enkel recht op vergoeding van eventuele schade, buiten de vervanging
respectievelijk reparatie van de defecte onderdelen. Bestron kan nooit aansprakelijk gesteld worden
voor eventuele vervolgschade of enigerlei andere consequenties die door of in relatie met de door hem
geleverde apparatuur zijn ontstaan.
9. Aanspraak op garantie kan alleen bij uw (web-)winkelier of rechtstreeks bij de Bestron Service Dienst.
Stuur echter nooit zomaar iets op. Het pakket kan dan namelijk geweigerd worden en eventuele kosten
zijn voor uw rekening. Neem eerst contact op voor aanwijzingen hoe u het apparaat moet inpakken en
verzenden. Elke aanspraak op garantie dient vergezeld te gaan van het aankoopbewijs.
SERVICE
Mocht zich onverhoopt een storing voordoen, dan kunt u contact opnemen met de BESTRON-servicedienst:
www.bestron.com/service
22
Page 23

RECEPTEN
NL
Rucola pesto
Ingrediënten
• 75g Rucola
• 40g walnoten
• 2 knoflookteentjes
• Milde olijfolie
• Zwarte peper
Bereiden
Walnoten even roosteren in droge koekenpan.
daarna rucola, knoflook en walnoten in de blender
pureren. Olijfolie toevoegen tot een smeuïge pesto
ontstaat. Zwarte peper uit de molen naar smaak
toevoegen. Lekker op toast of stokbrood.
Frappuccino
Ingrediënten
• 200 ml espresso ijskoud
• 200 ml volle melk
• 4 bolletjes stroopwafelfeest ijs
• 2 theelepels koffiesiroop
• Slagroom
• Cacaopoeder
Bereiden
Doe de espresso met de melk, de koffiesiroop, en
twee bolletjes ijs in de blender, en draai tot een
gladde massa. Schenk het in een glas. Schep in
ieder glas nog een bolletje ijs, en garneer eventueel
met wat slagroom en cacaopoeder.
Pasta met zongedroogde tomaten en basilicum
Ingrediënten
• 6 zongedroogde tomaten op oliebasis
• 10g basilicum
• 1 zak amandelschaafsel
• 2 knoflookteentjes
• 1 zakje parmezaanse kaas
• 250g pasta
• Zout en peper
Bereiden
Doe de zongedroogde tomaten, de knoflook
en basilicum met wat olie van de tomaten in de
blender. Voeg wat kookvocht van de pasta toe. Mix
het geheel tot je een soort pesto krijgt. Voeg de
kaas, peper en zout naar smaak toe. Kook de pasta
al dente met een beetje zout.
Olijftapenade
Ingrediënten
• 500g groene olijven (zonder pit)
• 150g zwarte olijven (zonder pit)
• 6 gepelde knoflooktenen
• 70g geraspte parmezaanse kaas
• 100g zachte zongedroogde tomaten
Bereiden
Doe de groene en zwarte olijven, knoflook, kaas
en tomaten in de blender en voeg langzaam wat
extra virgin olijfolie toe tot het een vloeibare (goed
gepureerde) massa is, die goed smeerbaar is. Voeg
eventueel voor een pikant effect wat vers gemalen
peper toe. Lekker op toast of stokbrood.
Frambozen sorbetijs
Ingrediënten
• 1 citroen
• 600g frambozen
• 150g poedersuiker
• 1,5 dl water
Bereiden
Snij de citroen doormidden en pers de citroen uit.
Pureer in de blender de frambozen met citroensap,
suiker en 1,5 dl water. Schenk het mengsel in
de diepvriesdoos. Zet de doos voorzichtig in de
diepvries en laat het in ± 6 uur bevriezen. Schep
het mengsel elk uur in de vriezer om met een vork.
Je kunt het mengsel ook in een ijsmachine gieten
en de ijsmachine in ± 40 minuten ijs laten draaien.
Schep het ijs daarna in een schaaltje of in een
hoorntje.
Paprikasoep
Ingrediënten
• 3 stuks gele paprika’s
• 2 eetlepels crème fraîche
• 150g worteltjes
• 4 stuks lente-uitjes
• 2 knoflookteentjes
• 30g parmezaanse kaas
• 2 theelepels geraspte gemberwortel
• 3 eetlepels gesneden basilicum
• 2 eetlepels olijfolie
• 4 eetlepels slagroom
• 1 liter groentebouillon
• out
Bereiden
Halveer de paprika’s in de lengte, verwijder de
zaadlijsten en snijd het vruchtvlees in kleine stukjes.
Snijd de worteltjes in kleine stukjes en snijd de lenteuitjes en knoflook fijn. Fruit de lenteuitjes,knoflook
en 1 theelepel gemberrasp in de olijfolie en laat
de paprika en wortel 5 minuten mee fruiten. Voeg
de bouillon toe en laat alles 10 minuten zachtjes
koken. Pureer het mengsel in de blender. Doe het
mengsel vervolgens in een pan en verwarm deze.
Roer de crème fraîche erdoor en breng op smaak
met peper en zout. Roer de parmezaanse kaas,
basilicum en de overgebleven gemberrasp door de
slagroom. Schep de soep in de kommen en schep
er een lepel van het slagroommengsel op.
23
Page 24

EN
CONGRATULATIONS!
Congratulations with the purchase of this Bestron product. These
instructions tell you how the product works and how to use it. Read
the instructions carefully before you start using the appliance. Only use
the appliance in the manner described in the instructions. Keep these
instructions in a safe place for future reference.
Defects:
If the appliance is defective, do not try to repair it yourself. Always have
a qualified mechanic carry out any repairs.
Children:
• This device may not be used by children and persons with reduced
physical, sensory or mental capabilities or lack of experience and
know-how.
• Children are not allowed to clean or maintain the appliance.
• Keep the appliance and the cable out of reach of children.
• Keep an eye on children to ensure that they do not play with the
appliance.
WHAT YOU SHOULD KNOW ABOUT ELECTRICAL APPLIANCES
• Check that the mains voltage corresponds with that shown on the
rating plate of an electrical appliance before you use it.
• Check that the socket to which you connect the electrical appliance
is earthed.
• Always install electrical appliances on a stable and level surface
where it cannot fall over.
• Certain parts of an electrical appliance may become warm or
sometimes hot. Do not touch them as you may burn yourself.
• Make sure your hands are dry when you touch an electrical appliance,
a cord or a plug.
• Electrical appliances must be able to lose their heat to avoid fire
hazards. Therefore, make sure that the appliance has sufficient
clearance around it and that it does not come into contact with
flammable materials. Electrical appliances must never be covered.
• Make sure that electrical appliances, cords or plugs do not come
into contact with water. Never immerse electrical appliances, cords
or plugs in water or any other liquid.
• Do not touch electrical appliances if they have fallen in the water.
Immediately pull the plug out of the socket. Stop using the appliance.
• Make sure that electrical appliances, cords and plugs do not come
into contact with heat sources, such as a hot hob or open fire.
24
Page 25

EN
• Never let cords hang over the edge of the sink, a worktop or a table.
• Always remove plug from the socket when you are not using the
electrical appliance.
• Remove the plug from the socket by pulling the plug itself and not
the cord.
• Regularly check if the cord of the electrical appliance is not damaged.
Do not use the electrical appliance if the cord shows signs of damage.
If the cord is damaged, it should be replaced by the manufacturer, a
technical service provider or a person with an equivalent qualification,
to avoid any danger.
• The appliance may not be switched on with the aid of an external
time switch, or by a separate system with remote control.
WHAT YOU SHOULD KNOW ABOUT THIS APPLIANCE
• Be careful when using the appliance outdoors.
• Never use the appliance in damp or wet locations.
• Thoroughly clean the appliance after use (see Cleaning and
Maintenance).
• Never use the appliance with boiling liquids.
• Do not switch on the appliance while it is empty.
• Never use the appliance for longer than 120 seconds. Switch it off
and wait a few minutes to allow it to cool before continuing use.
• Do not fill the blender jug above the maximum level. The maximum
capacity of the blender is 1,5 litres.
25
Page 26
EN
ENVIRONMENT
• Dispose of packaging material such as plastic and cardboard
boxes in the designated containers.
• Do not dispose of this product as normal domestic waste at the
end of its life, but hand it in at a collection point for the reuse of
electric and electronic equipment. Look for the symbol on the
product, the user instructions or the packaging showing the
type of waste.
• The materials can be used as indicated. By helping us
reuse and process the materials or otherwise recycle the
old equipment, you will be making an important contribution
towards the protection of the environment.
• Your municipality can tell you where to find the designated
waste collection point in your neighbourhood.
CE DECLARATION OF CONFORMITY
This product meets the requirements of European guidelines.
R. Neyman
Quality control
26
Page 27
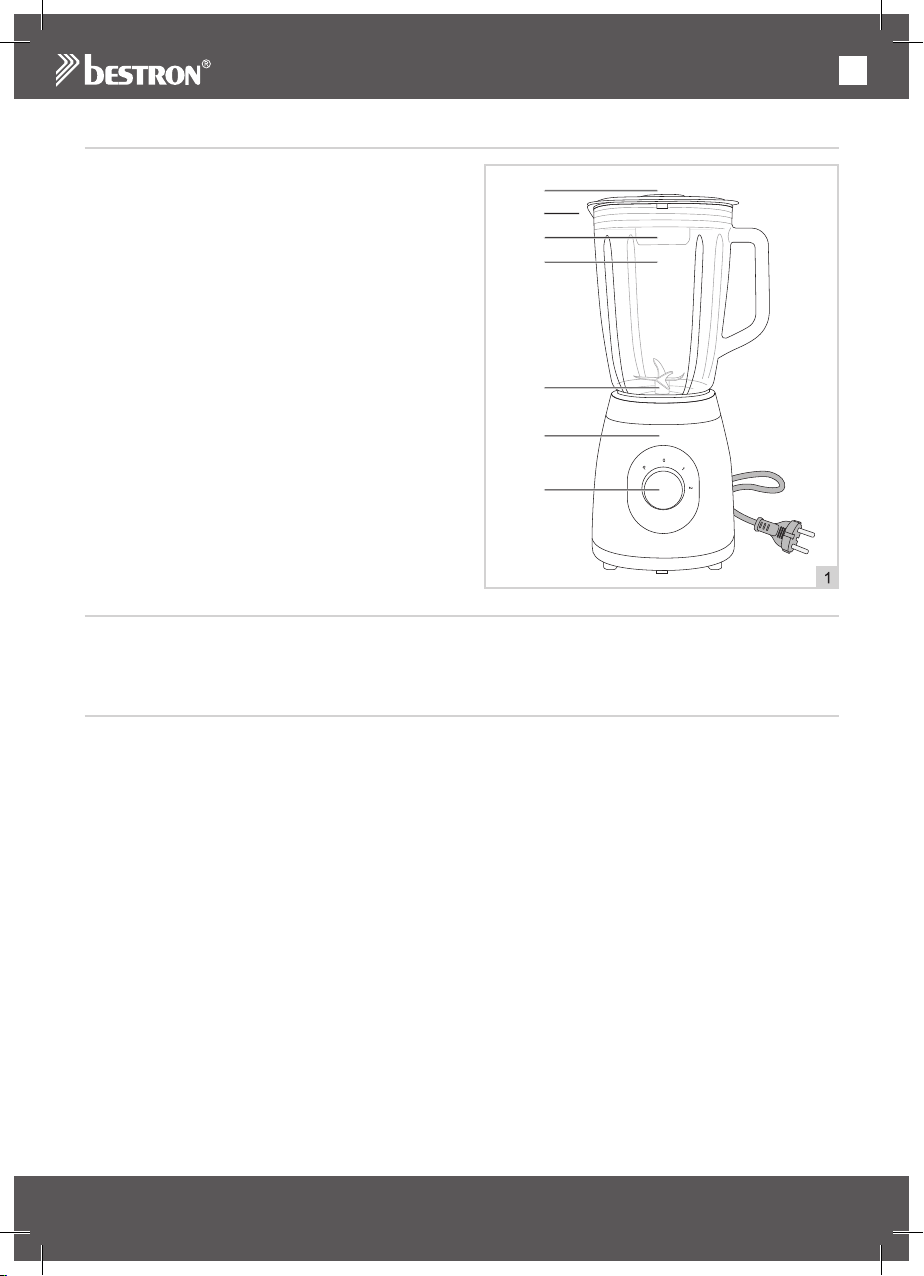
OPERATION - General
EN
The appliance is intended only for domestic use,
not for professional use.
1.
2.
3.
4.
5.
1. Lid insert
6.
2. Lid with safety-stop-function
3. Filling opening
4. Glass blender jug with handle
5. Blades unit
6. Motor unit
7. Speed dial
OPERATION - Before first use
1. Take the appliance out of the packaging.
2. Clean the appliance (see ‘Cleaning and maintenance’).
OPERATION - Use
1. Put the plug into the wall socket.
2. Put the blender jug (4) (with the handle on the right) on the motor unit (6).
3. Dice the solid ingredients.
4. Fill the blender jug with the ingredients, and then add the liquid, where relevant (maximum 1 liter).
5. Fit the lid (2) on the blender jug and turn it to the right until you hear a click sound.
6. Now place the lid insert (1) into the filling opening (3).
7. Turn the speed dial (7) to the required setting: P = Pulse, 0 = off, 1 = moderate, 2 = fast
8. Whilst the blender is in operation you can add additional ingredients via the filling opening in the lid.
First, remove the cap from the lid opening. Then add the ingredients and close the lid opening with the
cap.
9. Switch off the blender (set to ‘0’).
10. Wait until the blender’s knives have come to a complete standstill before removing the blender jug from
the motor unit.
WARNING:
• The blender is fitted with a safeguard. The blender cannot be switched on if the blender jug is not fitted
to the motor unit, or is not fitted in the correct manner. This blender has a safety-stop-function which
causes the blades to automatically stop when the lid is opened.
• The smoothness of the mixture increases with longer blending times (maximum of 120 seconds).
• To prepare tomato juice cut the tomatoes into four pieces and pour into the filling opening in the
blender jug’s lid whilst the blender is in operation.
• If the blender does not operate at the required speed switch off the appliance (‘0’) and: a. set the
switch to the Pulse position, or b. stir the ingredients with a spatula, or c. remove some of the
ingredients in the blender jug.
7.
27
Page 28
OPERATION - Pulse mode
EN
The Pulse setting can be used to operate the blender briefly at maximum speed. The Pulse function
operates only whilst the switch is held in the “pulse” position.
Ice- crushing; Prepare crushed ice by filling the blender jug with ice cubes and repeatedly turn the speed
dial to setting pulse (“P”) until you obtain ice of the required consistency.
CLEANING AND MAINTENANCE - Before first use
For the first use clean the mixing jug, lid with cap and blades.
1. Remove the mixing jug (4) from the motorhousing (6).
2. Turn the mixing jug to remove the blades unit (5).
3. Place the mixing jug on a flat and stable surface.
4. Turn the lid (2) ± 45° counter clockwise to remove it from the mixing jug.
Pull the lid to remove it. (See figure 2).
5. Clean the parts with soapy water, rinse and dry them thoroughly.
6. Press the lid back onto the mixing jug and turn it ± 45° clockwise to
tighten it. When a click is heard, the security tag is secure.
7. Turn the mixing jug back on the blades unit.
8. Place the mixing jug back on the motorhousing.
9. Clean the motorhousing with a damp cloth with soapy water and dry it
thoroughly.
CLEANING AND MAINTENANCE - After every use
Clean the appliance and the seperate parts thoroughly after each use. Clean the mixing jug and blades
right after use, for the best cleaning results.
1. Turn the speed dial to setting 0 (off).
2. Fill the blender jug for ¼ with warm water.
3. Turn the speed dial to setting 1.
4. Switch off the blender after about 20 to 30 seconds (‘0’) and disconnect the plug from the wall socket.
The blades are clean now.
5. It is also possible to clean the mixing jug, lid with cap and blades by disassembling them as separate
parts. See ‘cleaning and maintenance – Before first use’.
6. Clean the motor unit with a damp cloth, if necessary moistened with a couple of drops of washing-up
liquid. After cleaning, dry the motor unit thoroughly.
7. Store the blender.
WARNING:
• Use only lukewarm water, hot water can cause cracks.
• Do not leave the blender jug to soak in soapy water for too long.
• Never use corrosive or scouring cleaning agents or sharp objects (such as knives or hard brushes) to
clean the appliance.
• Do not immerse the motor unit in water, or in other liquids.
28
Page 29

WARRANTY CONDITIONS
EN
Bestron offers a 60-month warranty on this equipment against defects resulting from manufacturing and/or
material errors, subject to the following conditions.
1. No labour or material costs will be charged during this warranty period.
2. Any repairs carried out under the warranty will not extend the warranty period.
3. Faulty parts, or in the event of exchange, the faulty equipment itself, will automatically become the pro-
perty of Bestron.
4. The warranty is valid for the first buyer only and is non-transferable.
5. The warranty is not valid for damage caused by:
• Accidents
• Improper use
• Wear and tear
• Neglect
• Faulty installation
• Connection to a different mains voltage than indicated on the type plate
• Unauthorised changes
• Repairs carried out by unqualified third parties
• Use in violation with the applicable statutory, technical or safety standards
• Careless transport without suitable packaging or other protection
6. Warranty cannot be claimed:
• For damage during transport
• If the serial number of the appliance is removed or changed
7. Items excluded from warranty are:
• Cords
• Lamps
• Glass parts
8. The warranty does not entitle the purchaser to compensation for any damage other than replacement
or repair of the faulty parts. Bestron cannot in any event be held liable for any indirect or consequential
losses caused by or in relation to the equipment it has provided.
9. Claims under a warranty may only be submitted to your (online) retailer or directly to the Bestron Ser-
vice Department. Never send items without being asked to. We may refuse the parcel and you will be
liable for the costs. Contact us first and we tell you how the appliance should be packaged and sent.
Each claim under a warranty must be accompanied by the relevant receipt.
SERVICE
If an unexpected problem occurs, please contact the BESTRON service department:
www.bestron.com/service
29
Page 30

RECIPES
EN
Rucola pesto
Ingredients
• 75g of Rucola lettuce
• 40g of walnuts
• 2 cloves of garlic
• Mild olive oil
• Black pepper
Preparation
Roast the walnuts for a short time in a dry frying
pan. Mix the Rucola, garlic and walnuts in the
blender. Add the olive oil until a smooth pesto.
Add some black pepper. Tastes great on toast or
baguette.
Frappuccino
Ingrediënten
• 200 ml espresso ice-cold
• 200 ml whole milk
• 4 round treacle waffle ice cream scoops
• 2 teaspoons of coffee syrup
• Whipped cream
• Cocoa powder
Preparation
Put the espresso with the milk, coffee syrup and
2 round ice cream scoops in the blender until a
smooth mass. Pour it in a glass. Top each glass
with a round ice cream scoop and garnish with
some whipped cream and cocoa powder.
Pasta with sun-dried tomatoes and basil
Ingredients
• 6 sun-dried tomatoes in oil
• 10g basil
• 1 bag of almond flakes
• 2 cloves of garlic
• 1 bag of Parmesan cheese
• 250g pasta
• Salt and pepper
Preparation
Put the sun-dried tomatoes, garlic and basil with
some oil of the tomatoes in the blender. Add
some boil liquid of the pasta. Mix everything until
a sort of pesto. Add the cheese, pepper and salt.
Cook the pasta al dente with some salt.
Olive tapenade
Ingredients
• 500g green olives (pitted)
• 150g black olives (pitted)
• 6 peeled cloves of garlic
• 70g grated Parmesan cheese
• 100g soft sun-dried tomatoes
Preparation
Put the green and black olives, garlic, cheese and
tomatoes in the blender. Add some extra virgin
olive oil slowly until a liquid (pureed) mass,
which is well spreadable. Add some fresh grind
pepper for a piquant taste. Tastes great on toast
or baguette.
Raspberries sorbet ice cream
Ingredients
• 1 lemon
• 600g raspberries
• 150g powdered sugar
• 150 ml water
Preparation
Cut the lemon in two and squeeze the inside. Mix
the raspberries with the lemon juice, sugar and
1,5 dl of water in the blender. Pour the mixture in
a freezer box. Carefully put the box in the freezer
and let it freeze for 6 hours. Stir the mixture with
a fork every hour. You can also pour the mixture
in an ice cream maker and leave it there for 40
minutes. After that serve the ice cream in a bowl
or cone.
Paprika soup
Ingredients
• 3 yellow paprika’s
• 2 tablespoons of crème fraîche
• 150g of carrots
• 4 spring onions
• 2 cloves of garlic
• 30g Parmesan cheese
• 2 teaspoons of grated ginger-race
• 3 tablespoons of cutted basil
• 2 tablespoons of olive oil
• 4 tablespoons of whipped cream
• 1 litre vegetable tea
• Salt
Preparation
Cut the paprika’s lengthways in half, remove the
seeds and cut the flesh into small pieces. Cut the
carrots in small pieces and cut the spring onions
and garlic fine. Fry the spring onions, garlic and
1 teaspoon of grated ginger-race in olive oil, then
add the paprika and carrots and fry it with the
rest for 5 minutes. Add the vegetable tea and let
it cook slowly for 10 minutes. Puree the mixture
in the blender. Put the mixture in a pan and heat
it up. Stir the crème fraîche through it and add
some pepper and salt. Stir the Parmesan cheese,
basil and the rest of the ginger-race through the
whipped cream. Pour the soup into bowls and put
one tablespoon of the cream mixture on it.
30
Page 31

IT
COMPLIMENTI!
Congratulazioni per l’acquisto di questo prodotto Bestron. Nelle
presenti istruzioni per l’uso viene spiegato il funzionamento e l’impiego
dell’apparecchio. Pertanto, prima di utilizzarlo, leggerle attentamente.
Utilizzare l’apparecchio esclusivamente come di seguito descritto.
Conservare queste istruzioni in luogo sicuro.
In caso di guasto:
Nel caso indesiderato in cui l’unità dovesse guastarsi, non tentare mai di
ripararla da soli. Far sempre eseguire le riparazioni da un tecnico qualificato.
Utilizzo da parte dei bambini:
• Questo dispositivo non deve essere utilizzato da bambini o persone
con ridotte capacità fisiche, sensoriali o mentali o con scarsa
esperienza e conoscenza.
• Pulizia e manutenzione non devono essere effettuate dai bambini.
• Mantenere l’unità e il cavo di alimentazione fuori dalla portata dei
bambini.
• I bambini devono essere costantemente sorvegliati per assicurarsi
che non giochino con il dispositivo.
COSA È NECESSARIO SAPERE SUI DISPOSITIVI ELETTRICI
• Prima di utilizzare un dispositivo elettrico, assicurarsi che la tensione
di rete corrisponda alla tensione di rete indicata sulla sua targhetta
d’identificazione.
• Assicurarsi che la presa elettrica a cui si intende collegare un
dispositivo elettrico sia collegata a terra.
• Collocare sempre gli apparecchi elettrici su una superficie stabile e
piana, in modo che non possano cadere.
• Alcune parti di un dispositivo elettrico possono riscaldarsi o, a volte,
surriscaldarsi. Per evitare le ustioni, evitare di toccarle.
• Quando si tocca un apparecchio elettrico, un cavo o una spina,
assicurarsi che le mani siano asciutte.
• Le apparecchiature elettriche devono poter dissipare il calore
prodotto al fine di evitare il rischio di incendio. Pertanto, assicurarsi
che l’unità sia sufficientemente libera da ingombri e che non possa
venire a contatto con materiale combustibile. Non coprire mai gli
apparecchi elettrici.
• Evitare il contatto di apparecchi, cavi o spine elettriche con l’acqua.
• Mai immergere apparecchi elettrici, cavi o spine in acqua o in altri liquidi.
• Se gli apparecchi elettrici dovessero cadere in acqua, mai tentare di
raccoglierli. Scollegare immediatamente la spina dalla presa elettrica
e non riutilizzare l’apparecchio.
31
Page 32

IT
• Assicurarsi che gli apparecchi elettrici, i cavi e le spine non entrino
in contatto con fonti di calore, come piastre calde o fiamme libere.
• Non lasciare i cavi appesi sopra il bordo del lavandino, del piano di
lavoro o del tavolo.
• Quando il dispositivo non è in uso, scollegare sempre il cavo di
alimentazione.
• Nello scollegare il cavo di alimentazione dalla spina elettrica,
assicurarsi di tirare la spina stessa e non il cavo.
• Controllare regolarmente che il cavo del dispositivo elettrico sia
intatto. Non utilizzare l’unità se il cavo risulta essere danneggiato. Se
il cavo è danneggiato, per evitare qualsiasi rischio, è necessario che
venga sostituito dal produttore, da un servizio di assistenza tecnica
o da una persona qualificata.
• L’apparecchio non deve essere azionato da un timer esterno o da un
sistema separato dotato di telecomando.
COSA È NECESSARIO SAPERE SU QUESTO DISPOSITIVO
• Fare attenzione quando si utilizza il dispositivo all’aperto.
• Non utilizzare mai l’apparecchio in ambienti umidi.
• Pulire accuratamente l’unità dopo l’uso (vedere la sezione Pulizia e
manutenzione).
• Non utilizzare mai l’apparecchio con liquidi bollenti.
• Non avviare mai l’apparecchio vuoto.
• Non utilizzare mai il frullatore per più di 120 secondi. Quindi attendere
alcuni minuti prima di riaccendere il frullatore.
• Nel riempire il bicchiere tenere conto della capienza massima del
bicchiere. Tale capienza è di 1,5 litri.
32
Page 33
DISPOSIZIONI AMBIENTALI
IT
• Smaltire i materiali di imballaggio, come plastica e scatole di
cartone, negli appositi contenitori.
• Al termine della sua vita utile, non smaltire il prodotto come
un normale rifiuto domestico, ma conferire presso un punto
di raccolta per il riciclaggio di apparecchiature elettriche ed
elettroniche. Osservare il relativo simbolo apposto sul prodotto,
contenuto nelle istruzioni per l’uso o stampato sull’imballaggio.
• I materiali possono essere riutilizzati come indicato. Con il
vostro aiuto per il riutilizzo, l’elaborazione dei materiali o altre
forme di riciclaggio di vecchi apparecchi, contribuite in modo
importante alla protezione dell’ambiente.
• Chiedete al vostro comune di residenza dove è ubicato il punto
di raccolta appropriato.
DICHIARAZIONE DI CONFORMITÀ CE
Questo prodotto soddisfa i requisiti delle linee guida Europee.
R. Neyman
Controllo qualità
33
Page 34
FUNZIONAMENTO - Avvertenze general
IT
l’apparecchio è inteso soltanto per consumo interno,
non per uso professionale.
1.
2.
3.
4.
5.
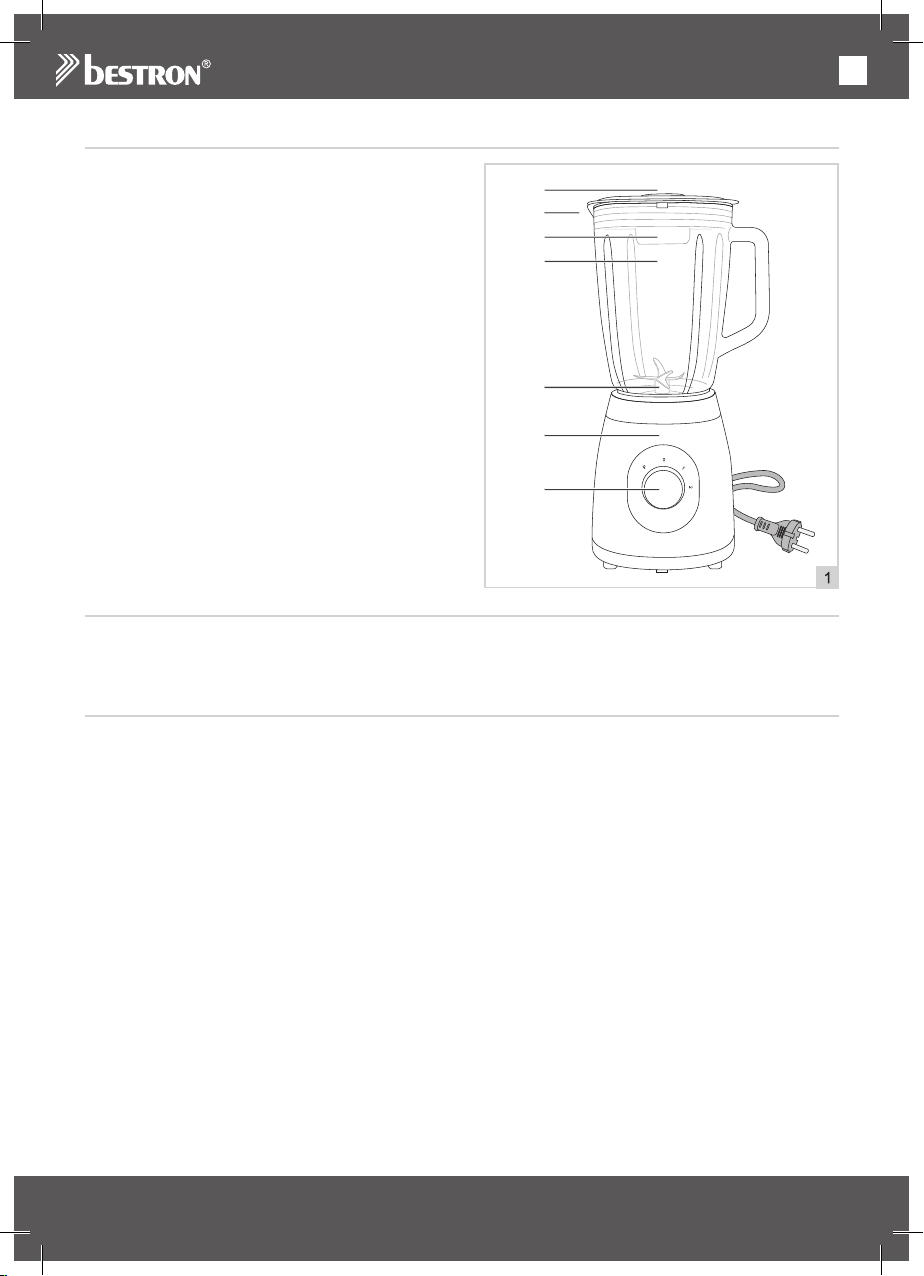
1. Tappo
6.
2. Coperchio con funzione di arresto di sicurezza
3. Foro per aggiungere ingredienti
4. Bicchiere di vetro con manico
5. Sistema di lame
6. Zoccolo motore / unità elettrica
7. Interruttore e regolatore di velocità
FUNZIONAMENTO - Primo utilizzo
1. Togliere l’imballaggio.
2. Lavare l’apparecchio. Vedere ‘Pulizia e manutenzione’.
FUNZIONAMENTO - Uso
1. Inserire la spina nella presa.
2. Posizionare il bicchiere di vetro (4) (con il manico a destra) sull’unità elettrica (6).
3. Tagliare gli ingredienti solidi in pezzetti.
4. Riempire il bicchiere con gli ingredienti solidi. Aggiungere successivamente gli eventuali liquidi
(massimo 1 litro).
5. Mettere il coperchio (2) sul bicchiere di vetro e ruotarlo verso destra finché non si sente il suono di un clic.
6. Posizionare il tappo (1) di chiusura sul foro (3).
7.
Ruotare il regolatore di velocità (7) sulla posizione desiderata: P = impulsi, 0 = off, 1 = moderato, 2 = veloce
8. Quando il frullatore è in funzione, si possono aggiungere altri ingredienti grazie all’apposita apertura
sul coperchio. Prima rimuovere il tappo dell’apertura del coperchio, quindi aggiungere gli ingredienti e
richiudere l’apertura del coperchio con il tappo.
9. Spegnere il frullatore (posizione 0).
10. Togliere il bicchiere dalla cassa motore quando le lame del frullatore si sono completamente arrestate.
ATTENZIONE:
• Il frullatore è fornito di un sistema di sicurezza. Se il bicchiere non è posizionato sulla cassa motore o
non è posizionato correttamente, non è possibile accendere il frullatore. Questo frullatore ha un sistema
di funzione di arresto di sicurezza, che provoca l’arresto automatico delle lame all’apertura del coperchio.
• Più a lungo il frullatore resta in funzione (massimo 120 secondi), più sottilmente vengono frullati gli
ingredienti.
• Per la preparazione di succhi di pomodoro, tagliare i pomodori in quattro e immetterli nel bicchiere
attraverso l’apertura del tappo mentre il frullatore è in funzione.
• Se il frullatore non gira abbastanza velocemente, spegnere l’apparecchio (posizione 0) e a. mettere
il regolatore in posizione Pulse, oppure b. mescolare gli ingredienti con una spatola, o c. togliere una
parte degli ingredienti dal bicchiere.
7.
34
Page 35
FUNZIONAMENTO - Posizione Pulse
IT
Nella posizione Pulse è possibile far ruotare il frullatore alla massima velocità per un breve tempo.La
posizione Pulse funziona soltanto se si tiene l’interruttore su tale posizione.
Tritaghiaccio; Per ottenere del ghiaccio tritato riempire il recipiente con cubetti di ghiaccio e ruotare più volte
il commutatore nella posizione Pulse (“P”) fino a quando i cubetti di ghiaccio non saranno sufficientemente
fini.
PULIZIA E MANUTENZIONE - Primo utilizzo
Per il primo utilizzo, pulire il recipiente di miscelazione, il coperchio con il suo
tappo e le lame.
1. Rimuovere il recipiente di miscelazione (4) dal supporto elettrico (6).
2. Ruotare il recipiente di miscelazione per rimuovere il sistema di lame (5).
3. Posizionare il recipiente di miscelazione su una superficie piana e stabile.
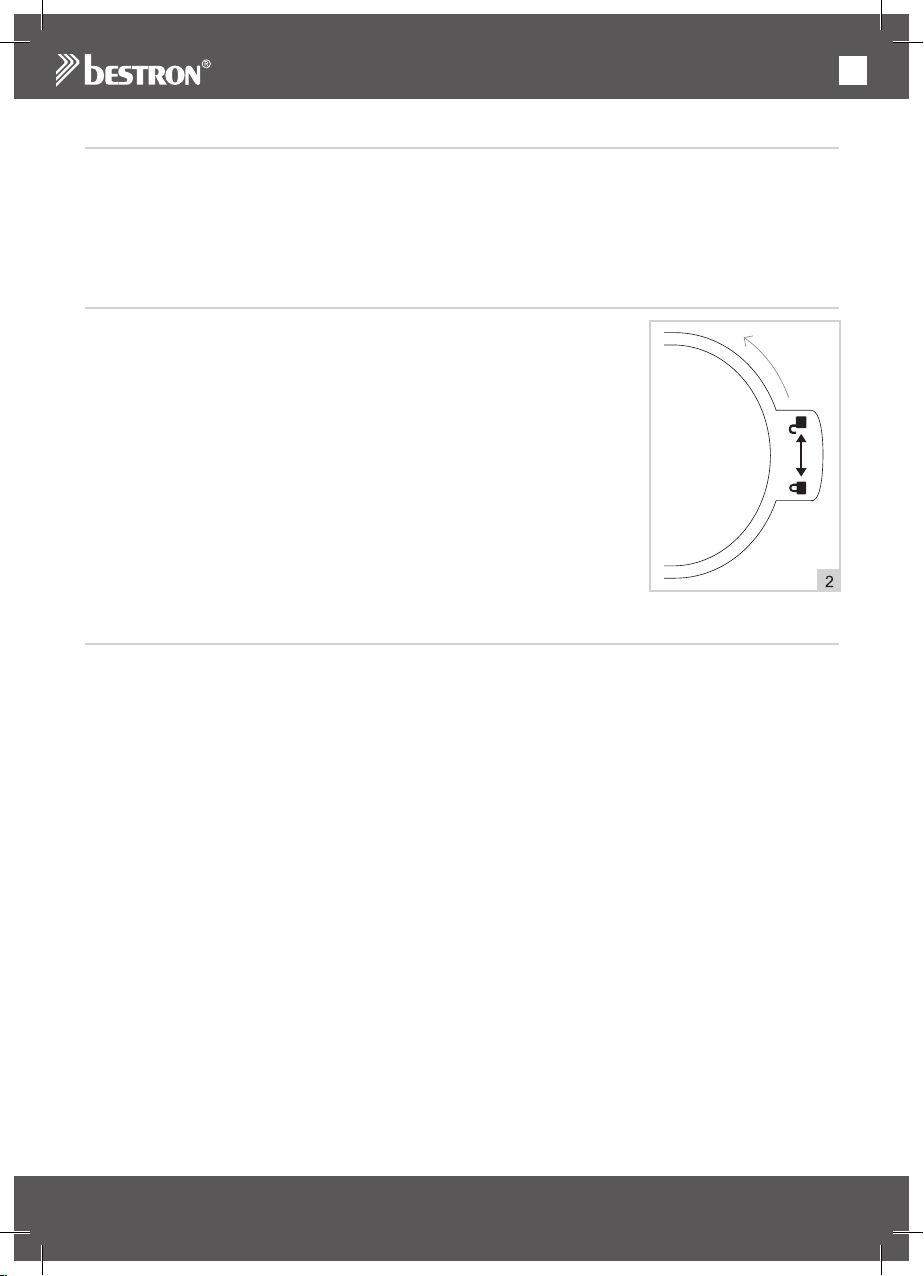
4. Ruotare il coperchio (2) di ± 45° in senso antiorario per rimuoverlo dal
recipiente del frullatore. Togliere il coperchio. (Guarda l’immagine 2).
5. Pulire i diversi componenti con acqua e sapone, risciacquare e asciugare
accuratamente.
6. Rimettere il coperchio sul recipiente del frullatore e ruotarlo di ± 45° in
senso orario per fissarlo. Quando si sente un clic, è stato chiuso il tag di
sicurezza.
7. Ruotare di nuovo il recipiente del frullatore sull’unità lame.
8. Riposizionare il recipiente di miscelazione sul supporto elettrico.
9. Pulire il supporto elettrico con un panno umido con acqua e sapone e
asciugarlo accuratamente.
PULIZIA E MANUTENZIONE - Dopo ogni utilizzo
Assicurarsi di pulire a fondo l’apparecchio e i componenti staccabili dopo ogni utilizzo. Per una pulizia più
efficace, pulire il recipiente e le lame subito dopo l’uso.
1. Ruotare il regolatore di velocità in posizione 0 (spento).
2. Riempire il bicchiere ¼ con acqua calda.
3. Ruotare il regolatore di velocità in posizione 1.
4. Spegnere il frullatore dopo 20-30 secondi (posizione 0) e disinserire la spina dalla presa di corrente. I
lame sono pulite.
5. È possibile pulire il recipiente di miscelazione, il coperchio con il tappo e le lame anche come parti
separate dopo averle smontate. Guarda ‘pulizia e manutenzione – Prima del primo utilizzo’.
6. Pulire la cassa motore con un panno umido ed eventualmente un po’ di sapone. Asciugare poi bene la
cassa.
7. Riporre il frullatore.
ATTENZIONE:
• Utilizzare solo acqua tiepida, l’acqua calda può causare incrinature.
• Non lasciare il bicchiere a lungo con acqua e sapone in ammollo.
• Non utilizzare per la pulizia prodotti aggressivi o abrasivi, né utensili taglienti (coltelli o spazzole dure).
• Non immergere mai la casa motore nell’acqua o in altri liquidi.
35
Page 36

DISPOSIZIONI DI GARANZIA
IT
In base alle seguenti condizioni, Bestron garantisce questo apparecchio per la durata di 60 mesi dalla data
di acquisto contro i guasti causati da difetti di fabbricazione e/o del materiale.
1. Durante il periodo di garanzia non verranno addebitati costi di manodopera e per i materiali necessari.
2. La riparazione effettuata in garanzia non prolunga il periodo di garanzia.
3. Al momento della sostituzione, le parti difettose o gli stessi apparecchi guasti, torneranno automatica-
mente a essere proprietà di Bestron.
4. La garanzia è valida solo per l’acquirente originale e non è trasferibile.
5. La garanzia non è valida in caso di danni causati da:
• Incidenti ed infortuni
• Uso improprio
• Usura
• Negligenza
• Installazione errata
• Collegamento a una tensione di rete diversa da quella indicata sulla targhetta di identificazione del
dispositivo
• Modifiche non autorizzate
• Riparazioni effettuate da terzi non qualificati
• Utilizzo in violazione delle norme giuridiche, tecniche o di sicurezza applicabili
• Trasporto incauto senza idoneo imballaggio o altre protezioni
6. Non sono ammesse richieste di risarcimento in garanzia in caso di:
• Danni subiti durante il trasporto
• Rimozione o modifica del numero di serie del dispositivo
7. Quanto segue è escluso dalla garanzia:
• Cavi
• Lampade
• Parti in vetro
8. La garanzia non dà diritto ad alcun risarcimento per danni diversi dalla sostituzione o dalla riparazione
delle parti difettose. Bestron non può essere in nessun caso ritenuta responsabile per danni consequenziali o altre conseguenze derivanti da o in relazione alle apparecchiature da essa fornite.
9. I reclami in garanzia possono essere inoltrati solo al vostro rivenditore/rivenditore web o direttamente al
servizio assistenza Bestron. Non limitarsi a inviare un oggetto senza preavviso. Il pacchetto può essere
rifiutato e gli eventuali costi saranno a carico del mittente. In primo luogo, contattateci per ricevere le
istruzioni su come imballare e spedire il dispositivo. Qualsiasi reclamo in garanzia deve essere accompagnato dalla prova di acquisto.
SERVIZIO ASSISTENZA
Nell’indesiderata eventualità di un malfunzionamento, contattare il servizio assistenza BESTRON visitando
il seguente sito: www.bestron.com/service
36
Page 37

RICETTE
IT
Rucola al pesto
Ingredienti
• 75 g di rucola
• 40 g di noci
• 2 spicchietti d’aglio
• Olio di oliva in abbondanza
• Pepe nero
Preparazione
Far abbrustolire leggermente le noci in una padella
asciutta, quindi passare la rucola, l’aglio e le noci
nel frullatore. Aggiungere l’olio di oliva fino ad
ottenere un pesto cremoso. Aggiungere del pepe
nero macinato a piacere. Appetitoso da gustare su
un toast o una baguette.
Frappuccino
Ingredienti
• 200 ml di espresso gelato
• 200 ml di latte intero
• 4 palline di gelato allo sciroppo di wafel
• 2 cucchiaini di sciroppo di caffé
• Panna
• Polvere di cacao
Preparazione
Versare nel frullatore l’espresso con latte, sciroppo
di caffé e due palline di gelato e frullare il tutto fino
ad ottenere un composto uniforme. Versarlo in un
bicchiere. In ogni bicchiere aggiungere quindi un’
altra pallina di gelato e guarnire eventualmente con
un po’ di panna e della polvere di cacao.
Pasta ai pomodori secchi e basilico
Ingredienti
• 6 pomodori secchi all’olio
• 10 g di basilico
• 1 bustina di pasta di mandorle
• 2 spicchietti d’aglio
• 1 bustina di parmigiano
• 250 g di pasta
• Sale e pepe
Preparazione
Mettere nel frullatore i pomodori secchi, l’aglio,
il basilico e un po’ di sughetto dei pomodori.
Aggiungere un po’ di acqua di cottura della pasta.
Frullare il tutto fino ad ottenere una specie di pesto.
Aggiungere quindi il formaggio, il pepe e il sale a
piacere. Cuocere la pasta al dente con l’aggiunta di
un pizzico di sale.
Tapenade alle olive
Ingredienti
• 500 g di olive verdi (snocciolate)
• 150 g di olive nere (snocciolate)
• 6 spicchi d’aglio sbucciati
• 70 g di parmigiano grattugiato
• 100 g di pomodori secchi dolci
Preparazione
Mettere nel frullatore le olive verdi e nere, l’aglio, il
formaggio e i pomodori e aggiungere lentamente un
goccino di olio extravergine di oliva fino ad ottenere
un composto fluido (ben passato) e spalmabile.
Per ottenere un gusto piccante, aggiungere
eventualmente un po’ di pepe fresco macinato.
Saporita da gustare su un toast o una baguette.
Sorbetto ai lamponi
Ingredienti
• 1 limone
• 600 g di lamponi
• 150 g di zucchero a velo
• 1,5 dl di acqua
Preparazione
Tagliare il limone in due e spremerlo. In un frullatore,
passare i lamponi con succo di limone, zucchero
e 1,5 dl di acqua. Versare il composto ottenuto in
un recipiente e metterlo con cura nel congelatore,
lasciandovelo per circa 6 ore.Rimestare quindi
il composto nel congelatore ogni ora con una
forchetta. Potete anche versare il composto in una
gelatiera e farlo riposare per circa 40 minuti. Versare
infine il gelato in una terrina o in un cornetto.
Zuppa di peperoni
Ingredienti
• 3 pezzi di peperoni gialli
• 2 cucchiai di panna acida
• 150 g di carotine
• 4 pezzi di cipolline primavera
• 2 spicchietti d’aglio
• 30 g di parmigiano
• 2 cucchiaini di radice di zenzero grattugiata
• 3 cucchiai di basilico tagliato
• 2 cucchiai di olio d’oliva
• 4 cucchiai di panna
• 1 litro di brodo di verdure
• Sale
Preparazione
Tagliare in due i peperoni per il lungo, rimuovere
i semini e tagliare la polpa di frutta a pezzettini.
Tagliare le carotine a pezzetti e le cipolline rimavera
e l’aglio a fettine sottili. Soffriggere le cipolline
primavera, l’aglio e 1 cucchiaino di zenzero
grattugiato nell’olio di oliva e rosolare il peperone
e le carote per 5 minuti. Aggiungere il brodo e
far cuocere il tutto per 10 minuti a fuoco lento.
Passare il composto nel frullatore. Versare quindi il
composto in un tegame e riscaldarlo. Mescolare la
panna acida e condire a piacere con sale e pepe.
Mescolare alla panna il parmigiano, il basilico e
lo zenzero grattugiato avanzato. Versare la zuppa
nelle scodelle e aggiungere un cucchiaio di panna.
37
Page 38

ES
¡FELICIDADES!
Felicidades por la compra de este producto Bestron. En estas
instrucciones le explicamos su funcionamiento y cómo usarlo. Antes de
usar el aparato, lea bien el manual de instrucciones. Utilice el aparato
únicamente tal y como se describe en el manual de instrucciones.
Guarde las instrucciones como referencia en el futuro.
En el caso de una avería:
Si el aparato se averiara inesperadamente, nunca intente arreglarlo usted
mismo. Deje que las reparaciones las haga un mecánico cualificado.
Uso por niños:
• Este dispositivo no puede ser utilizado por niños y personas con
capacidades físicas, sensoriales o mentales reducidas o falta de
experiencia y conocimiento.
• La limpieza y mantenimiento no la pueden realizar niños.
• Mantenga el equipo y el cable alejados del alcance de los niños.
• Hay que vigilar a los niños para asegurarse de que no jueguen con
el aparato.
QUÉ DEBE SABER SOBRE LOS APARATOS ELÉCTRICOS
• Antes de usar un aparato eléctrico, compruebe que la tensión
coincida con la tensión indicada en su placa descriptiva.
• Compruebe que el enchufe que vaya a utilizar para un aparato
eléctrico tenga contacto a tierra.
• Coloque los aparatos eléctricos siempre sobre una superficie estable
y plana, en un un sitio donde no se puedan caer.
• Algunas partes de un aparato eléctrico pueden calentarse ligeramente
o mucho. Para evitar quemaduras, no las toque.
• Procure que sus manos estén siempre secas cuando toque un
aparato eléctrico, un cable o un enchufe.
• Los aparatos eléctricos tienen que poder eliminar su calor para
evitar el riesgo de incendios. Procure que el aparato tenga suficiente
espacio alrededor y no pueda estar en contacto con material
inflamable. No cubra nunca los aparatos eléctricos.
• Procure que los aparatos eléctricos, cables o enchufes no entren en
contacto con el agua.
• Nunca sumerja los aparatos eléctricos, cables o enchufes en agua
ni en ningún otro líquido.
• No toque los aparatos eléctricos si se han caído al agua. Desenchúfelo
inmediatamente de la toma de corriente. No vuelva a usar el aparato.
• Procure que los aparatos eléctricos, cables o enchufes no entren
38
Page 39

ES
en contacto con fuentes de calor, como una plancha caliente o una
llama.
• No deje los cables sobre el borde de la encimera, tabla de cortar o
una mesa.
• Desenchufe siempre los aparatos eléctricos si no los está utilizando.
• Al desenchufarlo, no tire del cable sino del enchufe.
• Compruebe con regularidad si el cable del aparato eléctrico está
todavía en buen estado. No vuelva a usar el aparato si el cable está
un poco dañado. Si el cable está dañado, el fabricante, un servicio
técnico o una persona con una cualificación similar lo tiene que
sustituir, para evitar cualquier riesgo.
• No se puede poner el aparato en funcionamiento por medio de un
interruptor externo o con un sistema especial con mandos a distancia.
QUÉ NECESITA SABER SOBRE ESTE APARATO
• Tenga cuidado al usar el dispositivo en el exterior.
• No use nunca el aparato en espacios húmedos.
• Limpie bien el aparato después de su uso, véase «Limpieza y
mantenimiento».
• No lo utilice nunca para líquidos hirvientes!
• Nunca debe encender el aparato sin contenido.
• Evite utilizar la batidora durante más de 120 segundos. Luego,
espere unos minutos antes de volver a encender la batidora.
• Al llenar el vaso, tenga en cuenta que el contenido máximo del vaso
es de 1,5 litros.
39
Page 40
ES
MEDIO AMBIENTE
• Tire el material de embalaje, como plástico y cajas, en el
contenedor apropiado.
• Al final de su vida útil, no se desprenda de este producto como
un residuo normal. Llévelo a un punto blanco de su ciudad
para el reciclaje de aparatos eléctricos y electrónicos. Preste
atención al símbolo en el producto, las instrucciones o el
embalaje.
• Los materiales se pueden reutilizar tal y como se indica.
Reciclando, procesando los materiales o aprovechando
antiguos equipos de otra forma, hace una gran aportación a la
protección del medio ambiente.
• Infórmese en su municipio del punto blanco correcto cerca de
usted.
DICHIARAZIONE DI CONFORMITÀ CE
Este producto cumple con los requisitos de las directrices Europeas.
R. Neyman
Controllo qualità
40
Page 41
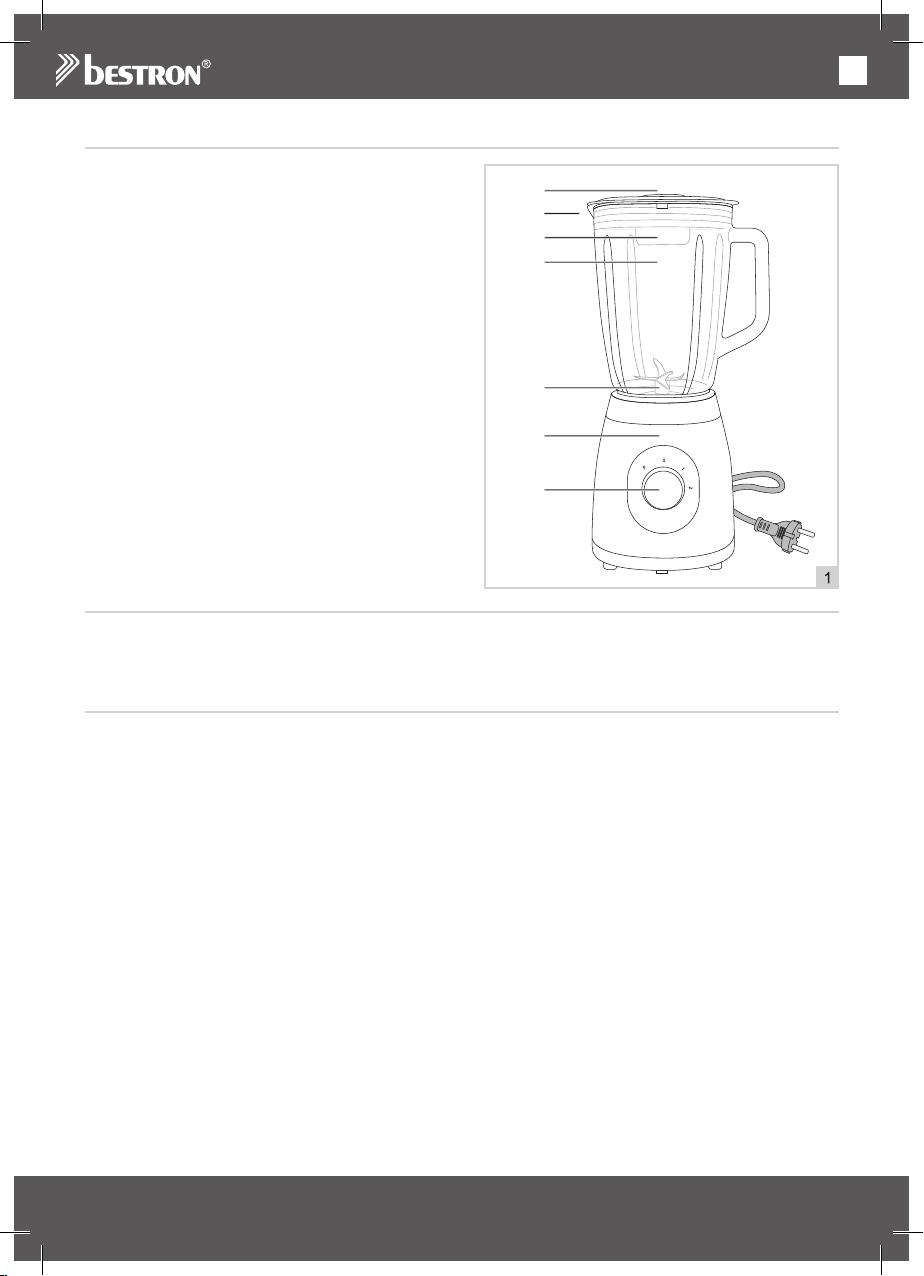
FUNCIONAMIENTO - Generalidades
ES
Este aparato está concebido únicamente para
uso doméstico, no para uso profesional.
1.
2.
3.
4.
5.
1. Tapón de cierre
6.
2. Tapa con función de parada de seguridad
3. Apertura de llenado
4. Vaso de cristal con asa
5. Unidad de las cuchillas
6. Alojamiento del motor
7. Selector de velocidad
FUNCIONAMIENTO - Antes del primer uso
1. Quite el embalaje.
2. Limpie el aparato. Véase ‘Limpieza y mantenimiento’.
FUNCIONAMIENTO - Uso
1. Introduzca el enchufe en la toma de pared.
2. Coloque el vaso de la licuadora (4) (con el mango a la derecha) en la unidad del motor (6).
3. Corte los ingredientes sólidos en trocitos.
4.
Llene el vaso con los ingredientes sólidos. A continuación, añada el líquido, si es necesario (máximo 1 litro).
5. Coloque la tapa (2) en el vaso de la licuadora y gírela hacia la derecha hasta que escuche un clic.
6. Coloque el tapón de cierre (1) en la apertura de llenado (3).
7.
Coloque el selector de velocidad (7) en la posición deseada: P = Pulso, 0 = apagado, 1 = moderado, 2 = rápido
8. Mientras la licuadora está funcionando, puede ir agregando ingredientes adicionales por la abertura
de llenado, que forma parte de la tapa. Primero, quite la tapa removible de la abertura de llenado;
posteriormente, agregue los ingredientes y cierre la abertura de llenado con la tapa removible.
9. Apague la batidora (posición 0).
10. No quite el vaso del alojamiento del motor, hasta que las cuchillas de la batidora estén completamente
paradas.
ATENCIÓN:
• La batidora está equipada con un sistema de seguridad. Cuando el vaso no ha sido colocado o ha sido
mal colocado en el alojamiento del motor, no es posible encender la batidora. Esta licuadora cuenta con
función de parada de seguridad, lo que hace que las cuchillas se detengan automáticamente cuando se
abre la tapa.
• Cuánto más tiempo funcione la batidora (con un máximo de 120 segundos), tanto más fino se cortarán
los ingredientes.
• Para preparar zumo de tomate, corte los tomates en cuatro e introdúzcalos en el vaso por el orificio en
la tapa mientras que el aparato esté funcionando.
• Si la batidora funciona con velocidad insuficiente, desconéctela (posición 0) y:a. coloque el selector
en posición ‘Pulse’, o b. remueva los ingredientes con una espátula, o c. saque una parte de los
ingredientes del vaso.
7.
41
Page 42
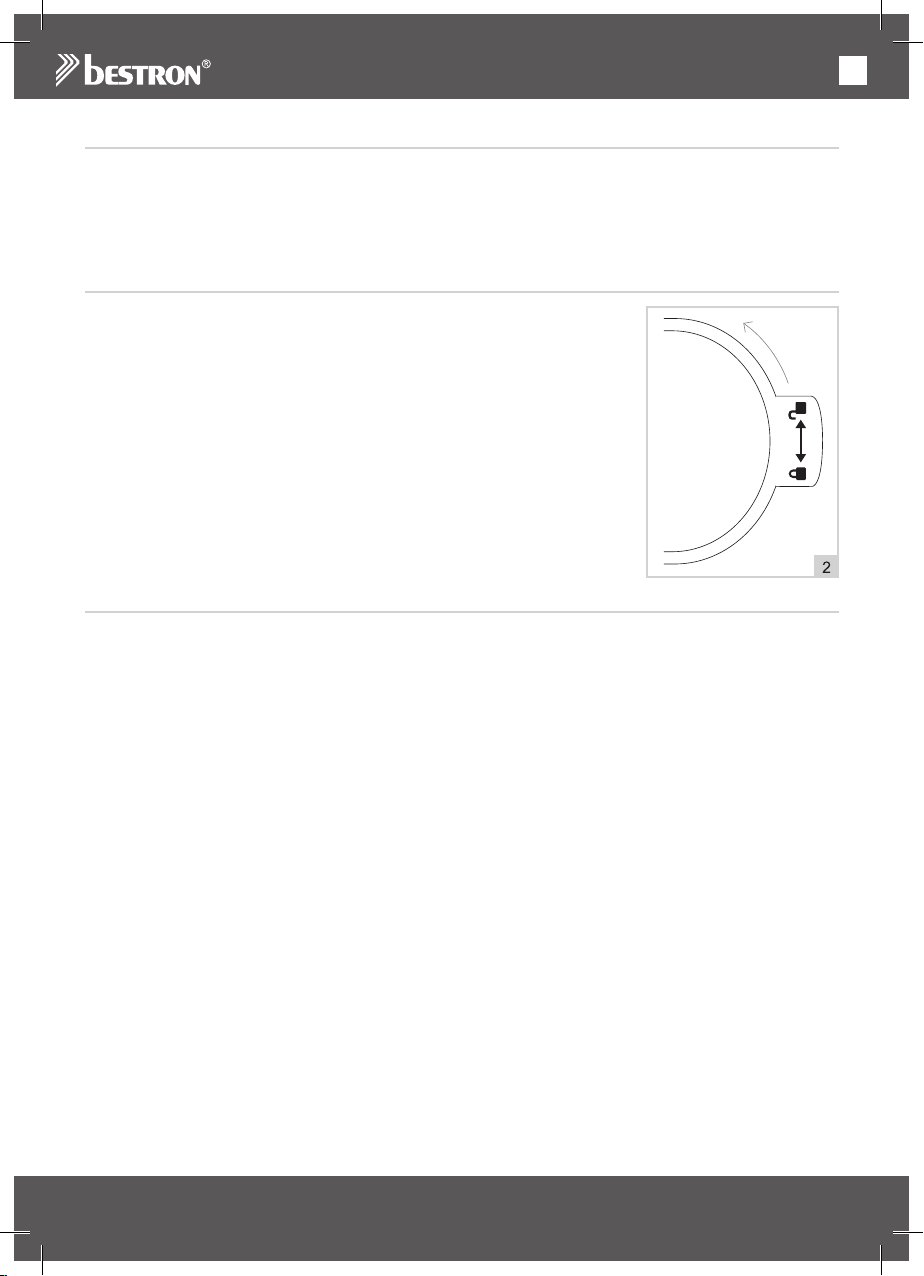
FUNCIONAMIENTO - POSICIÓN ‘PULSE’
ES
La posición ‘Pulse’ permite hacer funcionar la batidora brevemente a la máxima velocidad. La posición
‘Pulse’ sólo funciona cuando se mantiene el interruptor
Picar hielo; Para picar hielo, llene el vaso de cubos de hielo y gire varias veces el selector de velocidad a
la posición pulsos hasta que el hielo haya sido picado suficientemente.
LIMPIEZA Y MANTENIMIENTO - Antes del primer uso
Para el primer uso, limpie el vaso mezclador, la tapa con la tapa removible y
las cuchillas.
1. Quite el vaso mezclador (4) de la caja del motor (6).
2. Gire el vaso mezclador para quitar la unidad de las cuchillas (5).
3. Coloque el vaso mezclador sobre una superficie plana y estable.
4. Gire la tapa (2) ± 45° en sentido anti-horario para sacarla del vaso
mezclador. Tire de la tapa para quitarla. (Ver Figura 2).
5. Limpie las piezas con agua y jabón, enjuague y seque por completo.
6. Presione la tapa nuevamente sobre el vaso mezclador y gírela ± 45° en
sentido horario para ajustarla. Cuando escucha un clic, significa que la
etiqueta de seguridad está segura.
7. Vuelva a colocar el vaso mezclador en la unidad de las cuchillas.
8. Vuelva a colocar el vaso mezclador en la caja del motor.
9. Limpie la caja del motor con un paño húmedo, con agua y jabón, y
séquela bien.
LIMPIEZA Y MANTENIMIENTO - Después de cada uso
Limpie muy bien el aparato y las partes desarmables después de cada uso. Limpie el vaso mezclador y
las cuchillas inmediatamente después de su uso, para obtener los mejores resultados de limpieza.
1. Gire el selector de velocidad a la posición 0 (apagado).
2. Llene el vaso con ¼ de agua caliente.
3. Gire el selector de velocidad a la posición 1.
4. Desconecte la batidora al cabo de 20 – 30 segundos (posición 0) y retire el enchufe de la toma de
alimentación. Los cuchillas están limpiado.
5. También es posible limpiar el vaso mezclador, la tapa con tapa removible y las cuchillas si las desarma
como piezas separadas. Consulte la sección «Limpieza y mantenimiento: antes del primer uso».
6. Limpie el alojamiento del motor con un paño húmedo y eventualmente con un poco de detergente
líquido. A continuación, seque bien el alojamiento.
7. Guarde la batidora.
ATENCIÓN:
• Utilice sólo agua tibia, el agua caliente puede causar grietas.
• No se debe dejar el vaso a remojar en agua jabonosa durante mucho tiempo.
• No use limpiadores fuertes ni abrasivos, ni objetos con filo (como cuchillos o cepillos con cerdas duras)
para limpiar el aparato.
• No sumerja el alojamiento del motor en agua ni en ningún otro líquido.
42
Page 43

CONDICIONES DE GARANTÍA
ES
Bestron ofrece 60 meses de garantía después de la fecha de compra de este equipo. La garantía cubre las
averías por errores de fabricación y/o material y se atiene a las siguientes condiciones.
1. La garantía no cubre ningún gasto por mano de obra ni material.
2. La reparación que se realice durante el plazo de la garantía no implica una prórroga de dicho plazo.
3. Cualquier pieza defectuosa o aparatos averiados y devueltos se convierten automáticamente en pro-
piedad de Bestron.
4. La garantía es únicamente válida para el primer comprador y no es transferible.
5. La garantía no cubre los daños por:
• Accidentes
• Uso equivocado
• Desgaste
• Descuido
• Mala instalación
• Conexión a otra tensión que la que se especifica en la placa de modelo.
• Modificación no autorizada
• Reparaciones realizadas por terceros no cualificados
• Uso incumpliendo las normas vigentes legales, técnicas y de seguridad.
• Descuidos en el transporte, sin embalaje adecuado o sin otra protección
6. No se puede reclamar la garantía en el caso de:
• Daños durante el transporte
• Quitar o modificar el número de serie del aparato.
7. La garantía no cubre:
• Los cables
• Las bombillas
• Las piezas de cristal
8. La garantía no le concede el derecho a una compensación por un posible daño, aparte de sustituir o
reparar las piezas defectuosas. Bestron no puede hacerse responsable de cualquier posible daño o de
cualquier tipo de consecuencia que surgieran o estuvieran relacionadas con el aparato entregado.
9. Solo puede reclamar la garantía a su empresa de venta (en línea) o directamente al Servicio de aten-
ción Bestron. Sin embargo, no nos envíe ninguna pieza sin preguntar antes. Puede que rechacemos el
paquete y esto podría suponer unos gastos para usted. Póngase primero en contacto con nosotros para
que le expliquemos cómo tiene que embalar el aparato y mandárnoslo. Cualquier reclamación sobre la
garantía debe ir acompañada de una prueba de compra.
SERVICIO DE ATENCIÓN
Si hubiera una avería inesperada, póngase en contacto con el servicio de atención BESTRON:
www.bestron.com/service
43
Page 44

RECETAS
ES
Pesto de rúcula
Ingredientes
• 75 g de rúcula
• 40 g de nueces
• 2 dientes de ajo
• Aceite de oliva suave
• Pimienta negra
Preparación
Se tuestan un poco las nueces en una sartén seca.
A continuación, se trituran la rúcula, el ajo y las
nueces con la batidora. Se agrega aceite de
oliva hasta conseguir una consistencia cremosa.
Se agrega pimienta negra del molinillo al gusto.
Delicioso en tostadas o con pan.
Frappuccino
Ingredientes
• 200 ml de expreso helado
• 200 ml de leche entera
• 4 bolitas de helado de melaza
• 2 cucharaditas de sirope de café
• Nata batida
• Cacao en polvo
Preparación
Se pasa por la batidora el expreso con la leche,
el sirope de café y dos bolitas de helado, hasta
conseguir una masa lisa. Se sirve en vaso o copa.
En cada vaso, se coloca otra bolita de helado y se
puede adornar con un poco de nata batida y cacao
en polvo.
Pasta con tomates secados al sol y albahaca
Ingredientes
• 6 tomates secados al sol sobre base de aceite
• 10 g de albahaca
• 1 bolsa de virutas de almendra
• 2 dientes de ajo
• 1 bolsita de queso parmesano
• 250 g de pasta
• Sal y pimienta
Preparación
Se pasan por la batidora los tomates secados al sol,
el ajo y la albahaca con un poco de aceite de los
tomates. Se agrega un poco de líquido de occión
de la pasta. Se mezcla el conjunto hasta conseguir
una especie de pesto. Se agrega el queso, sal y
pimienta al gusto. La pasta se cocina al dente con
un poquito de sal.
Tapenade de aceitunas
Ingredientes
• 500 g de aceitunas verdes (sin hueso)
• 150 g de aceitunas negras (sin hueso)
• 6 dientes de ajo pelados
• 70 g de queso parmesano rallado
• 100 g de tomates suaves secados al sol
Preparación
Se pasan por la batidora las aceitunas verdes y
negras, el ajo, el queso y los tomates, agregando
lentamente un poco de aceite de oliva virgen extra,
hasta conseguir una masa fluida (bien triturada),
fácil de untar. Se puede agregar un poco de
pimienta recién molida para darle un toque picante.
Delicioso en tostadas o con pan.
Sorbete de frambuesas
Ingredientes
• 1 limón
• 600 g de frambuesas
• 150 g de azúcar en polvo
• 1,5 dl de agua
Preparación
Se corta el limón por la mitad y se exprime. Con la
batidora, se trituran las frambuesas con el zumo de
limón, el azúcar y 1,5 dl de agua. Se vierte la mezcla
en un recipiente para el congelador. Se coloca este
recipiente con cuidado en el congelador y se deja
dentro unas 6 horas. Cada hora, se bate la mezcla
en el congelador con un tenedor. También se puede
verter la mezcla en una máquina de hacer helados
y dejar ésta en marcha durante unos 40 minutos. A
continuación, se sirve el helado en una bandejita o
en un barquillo.
Sopa de pimiento
Ingredientes
• 3 pimientos enteros
• 2 cucharadas de crema fresca
• 150 g de zanahorias pequeñas
• 4 cebolletas
• 2 dientes de ajo
• 30 g de queso parmesano
• 2 cucharaditas de jengibre rallado
• 3 cucharadas de albahaca picada
• 2 cucharadas de aceite de oliva
• 4 cucharadas de nata batida
• 1 litro de caldo de verduras
• Sal
Preparación
Se parten los pimientos por la mitad a lo largo, se
quitan las semillas y se corta la pulpa en trocitos.
Se cortan las zanahorias en trocitos y se pican
finamente las cebolletas y el ajo. Se prepara un
sofrito de aceite de oliva con la cebolleta, el ajo y
una cucharadita de jengibre rallado, se agrega el
pimiento y la zanahoria y se deja sofreír todo junto
unos 5 minutos. Se agrega el caldo y se deja cocer
todo a fuego lento 10 minutos. Se pasa la mezcla
por la batidora. A continuación, se echa la mezcla
en una cazuela y se calienta. Se echa la crema
fresca removiendo y se adereza con sal y pimienta.
Se remueve la nata batida con el queso parmesano,
la albahaca y el jengibre rallado restante. Se sirve
la sopa en tazones y se añade una cucharada de la
mezcla de nata batida.
44
Page 45

Page 46

v201112-02
NEED HELP? CHAT WITH US!
WHATSAPP CUSTOMER SERVICE
BESTRON.COM/WHATSAPP
 Loading...