

Page 1
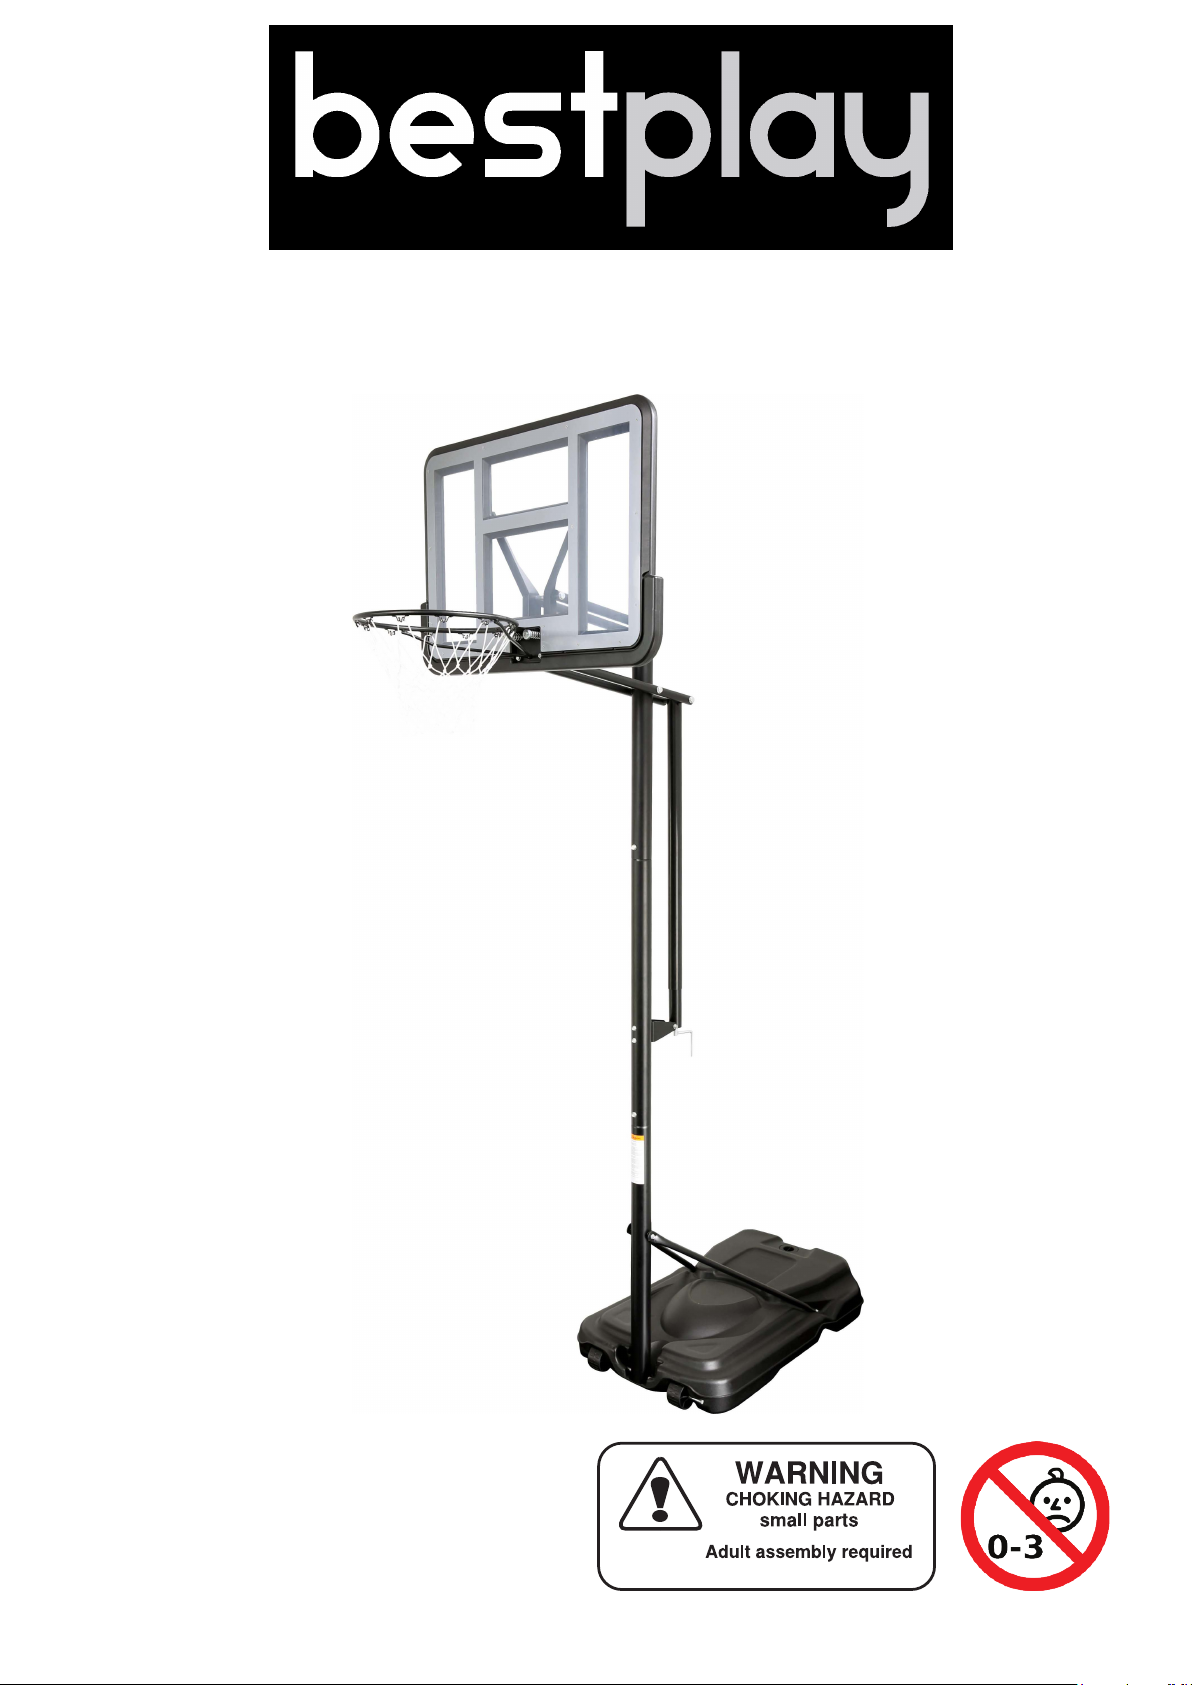
Basketballstander PRO/PRO safe
retain for future
reference
Page 2
Sikkerhedsadvarsel
Læs alle instrukser og færdiggør samlingen før brug. Hvis basketballstanderen er samlet og
bruges korrekt, kan den bruges til mange timers sjov og træning.
Tjek basketballstanderen før hvert brug. Hvis dele er slidte, i stykker eller manglende så
udskift disse. Spænd dele der måtte være løse.
Hav altid opsyn af en voksen hvis børn benytter basketballstanderen.
Lad aldrig et barn klatre på basketballstanderen, da dette kan få den til at vælte og kan
forårsage alvorlige skader på barnet.
OBS! Basketballstanderen kan vælte i blæsevejr.
Da rørene er elektrisk ledende, må elektriske dele aldrig komme i kontakt med
basketballstanderen. Dette inkluderer bl.a. lamper, forlængerledninger og andet elektrisk
udstyr.
Samlingsadvarsel
Saml aldrig basketballstanderen i voldsomt regnvejr, blæst, storm eller lignende forhold.
Når basketballstanderen skal flyttes, bør mindst to personer løfte den og med en lige
vægtfordeling. Placér basketballstanderen på en plan overflade ved ethvert brug.
Frigør pladsen omkring basketballstanderen, så der ikke hænger ledninger, grene eller er
andre forhindringer i nærheden.
Vedligeholdelse
Tjek basketballstanderen før hvert brug.
Følgende forhold kan potentielt udgøre fare:
1. Manglende, forkert eller usikker samling af basketballstanderen.
2. Hvis nettet er hullet, flosset eller ødelagt.
3. Bøjet eller brækket rør.
4. Udstikkende skarpe dele.
5. Løse eller manglende dele af basketballstanderen.
2
Page 3
Før samling af basketballstanderen
1. Der skal være 2 personer til at samle basketballstanderen.
2. Lad ikke basketballstanderen stå frit, før sandet er påfyldt i basen.
3. Brug ikke vand da dette vil sive ud af sandbasen.
4. Denne basketballstander er godkendt til at ”dunke” i, da den har fjedre ved kurven.
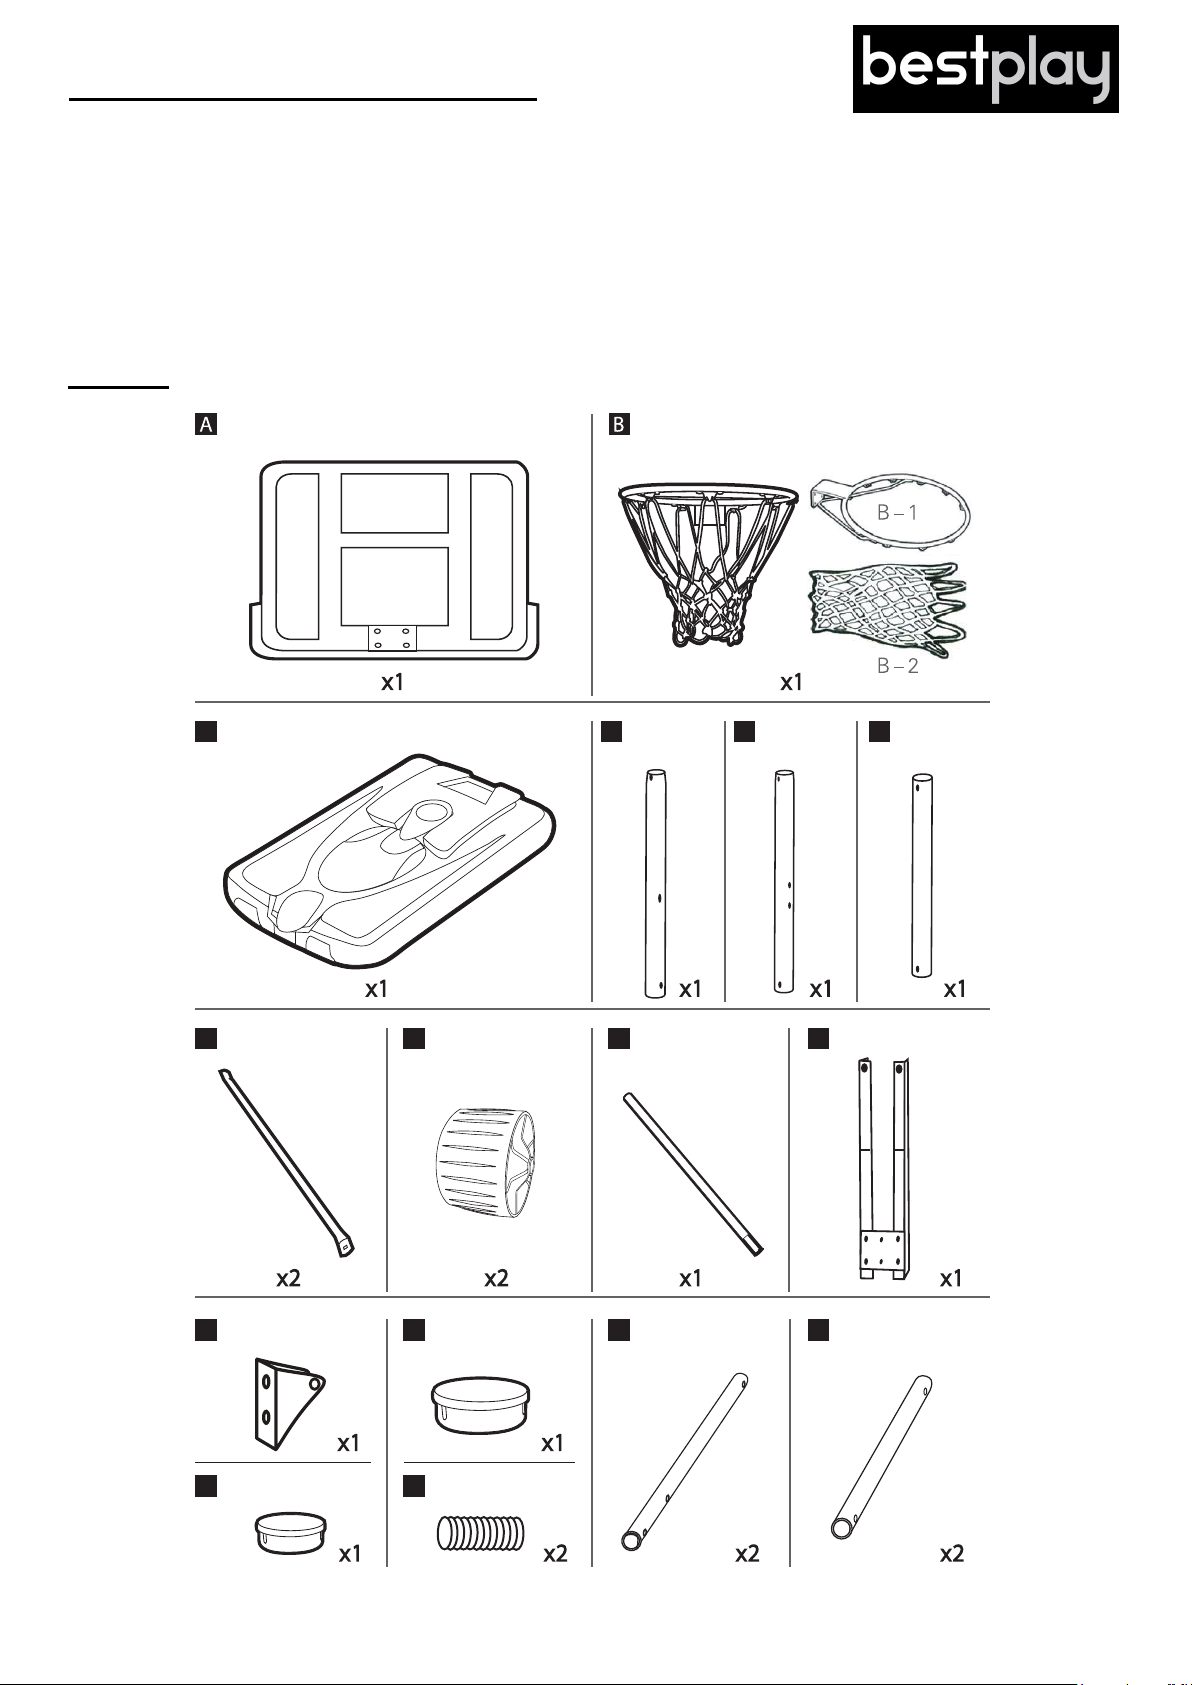
Indhold
Bagplade 80016189
C Sandbase 801624
Kurv og net
Kurv 801635
x1 x1
x1
Net 425824
D Nederste rør
801620
x1
E Midterste rør
801670
F Toprør
801622
x1 x1
G Supportstang 801623
H Hjul 801674
x2 x2
K U-beslag 801639 M Dæksel toprør 801669
x1 x1
L Dæksel 801669
x1
N Fjeder 801669
x2 x2 x2
I Hjulaksel 801675 J V-beslag 801625
x1
O Nederste arm (lang)
801647
P Øverste arm (kort)
801638
x1
3
Page 4
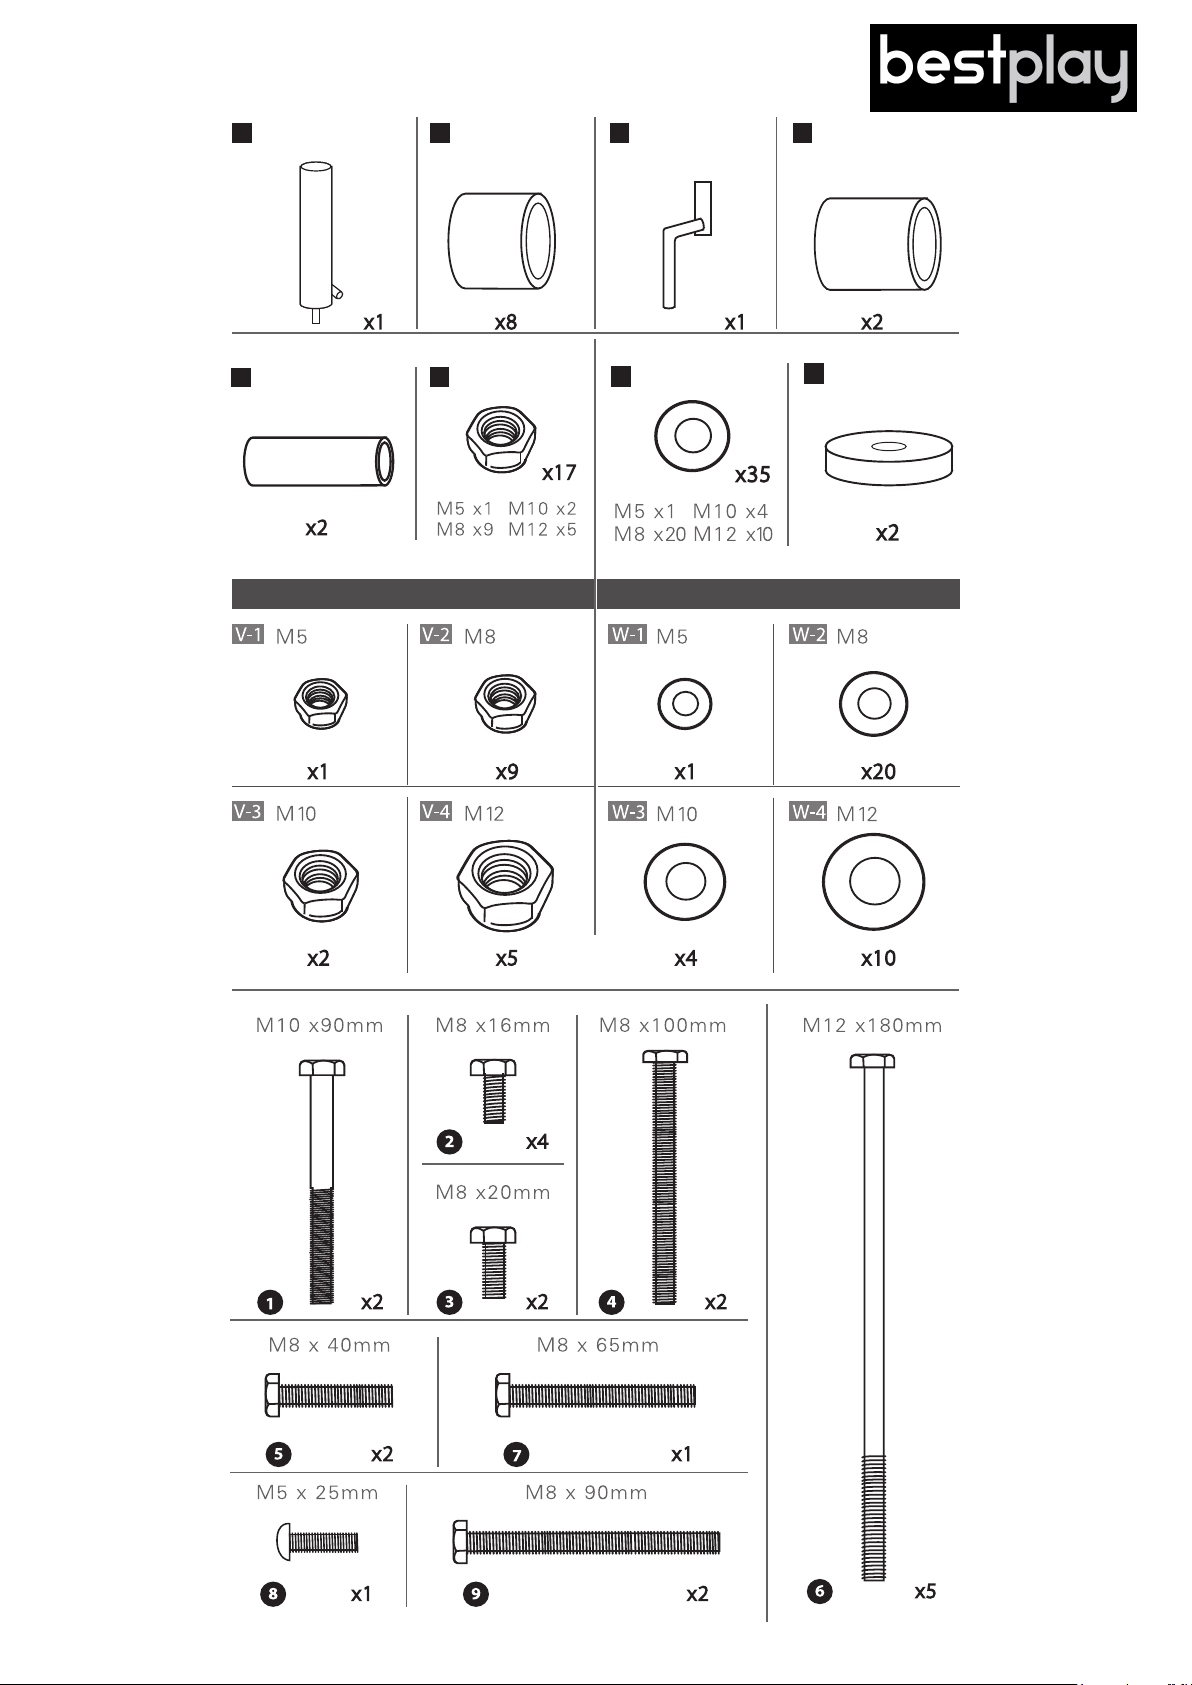
Q
Cylinder 801636
U Konsolrør 801669
R Plastikrør (lang)
801669
V Låsemøtrik 801669
Håndtag 801669
S
W Skive 801669
T Plastikrør (kort)
801669
X
Fjederskive 801669
Låsemøtrik detaljer
Skive detaljer
Obs! Billederne af
skruerne/boltene er
kun vejledende.
Gevindet kan
variere i forhold til
tegningerne.
4
Page 5
Anbefalet værktøj
Samling af basketballstanderen
Trin 1
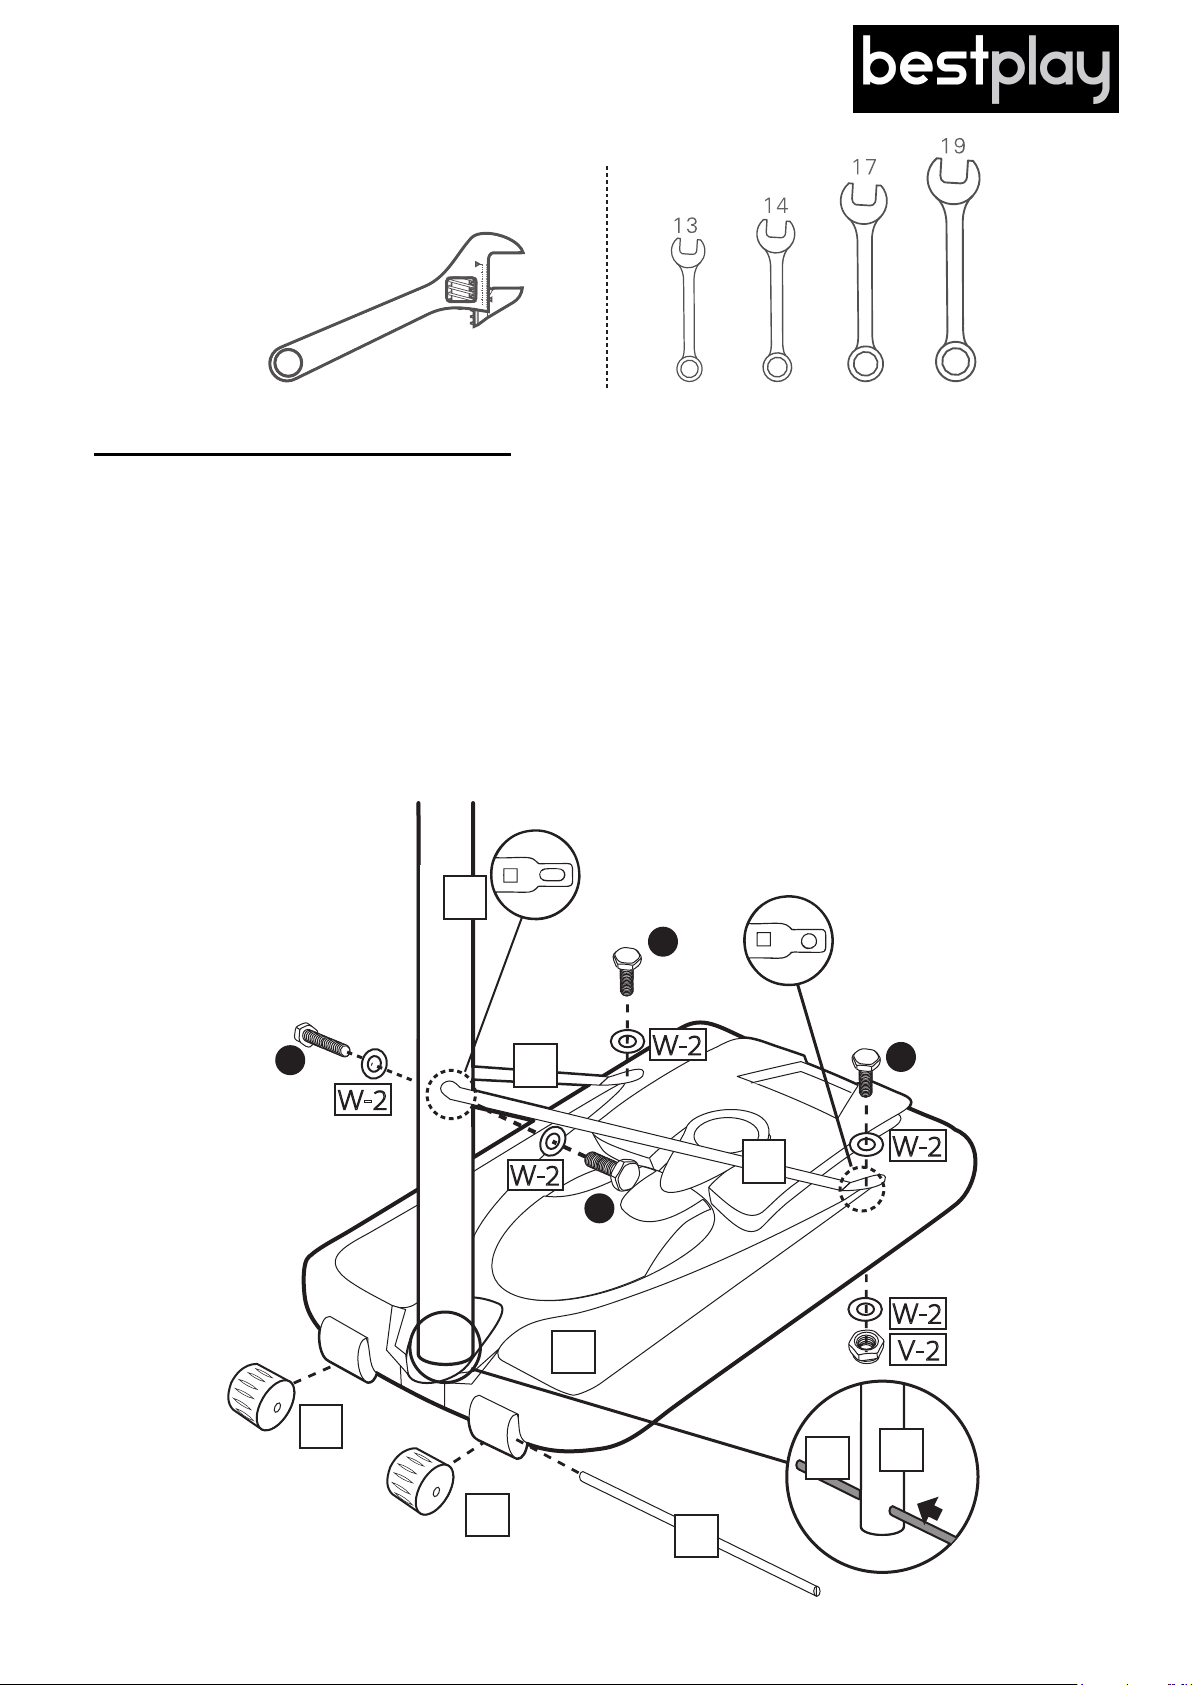
1. Før hjulaksel (I) igennem de 2 hjul (H) og det nederste rør (D) på sandbasen (C).
2. Fastgør de 2 supportstænger (G) på det nederste rør (D) med to bolte (2) og to
skiver (W-2).
3. Spænd derefter den anden ende af supportstængerne (G) fast i sandbasen (C) med
to bolte (3), fire skiver (W-2) og to møtrikker (V-2).
Supportstang med ovalt
G
D
hul skal forbindes med
det nederste rør (D).
3
2
G
W-2
W-2
W-2
2
G
G
Supportstang med rundt
hul skal forbindes med
sandbasen (C).
3
W-2
W-2
H
H
C
V-2
I
D
I
5
Page 6
Trin 2
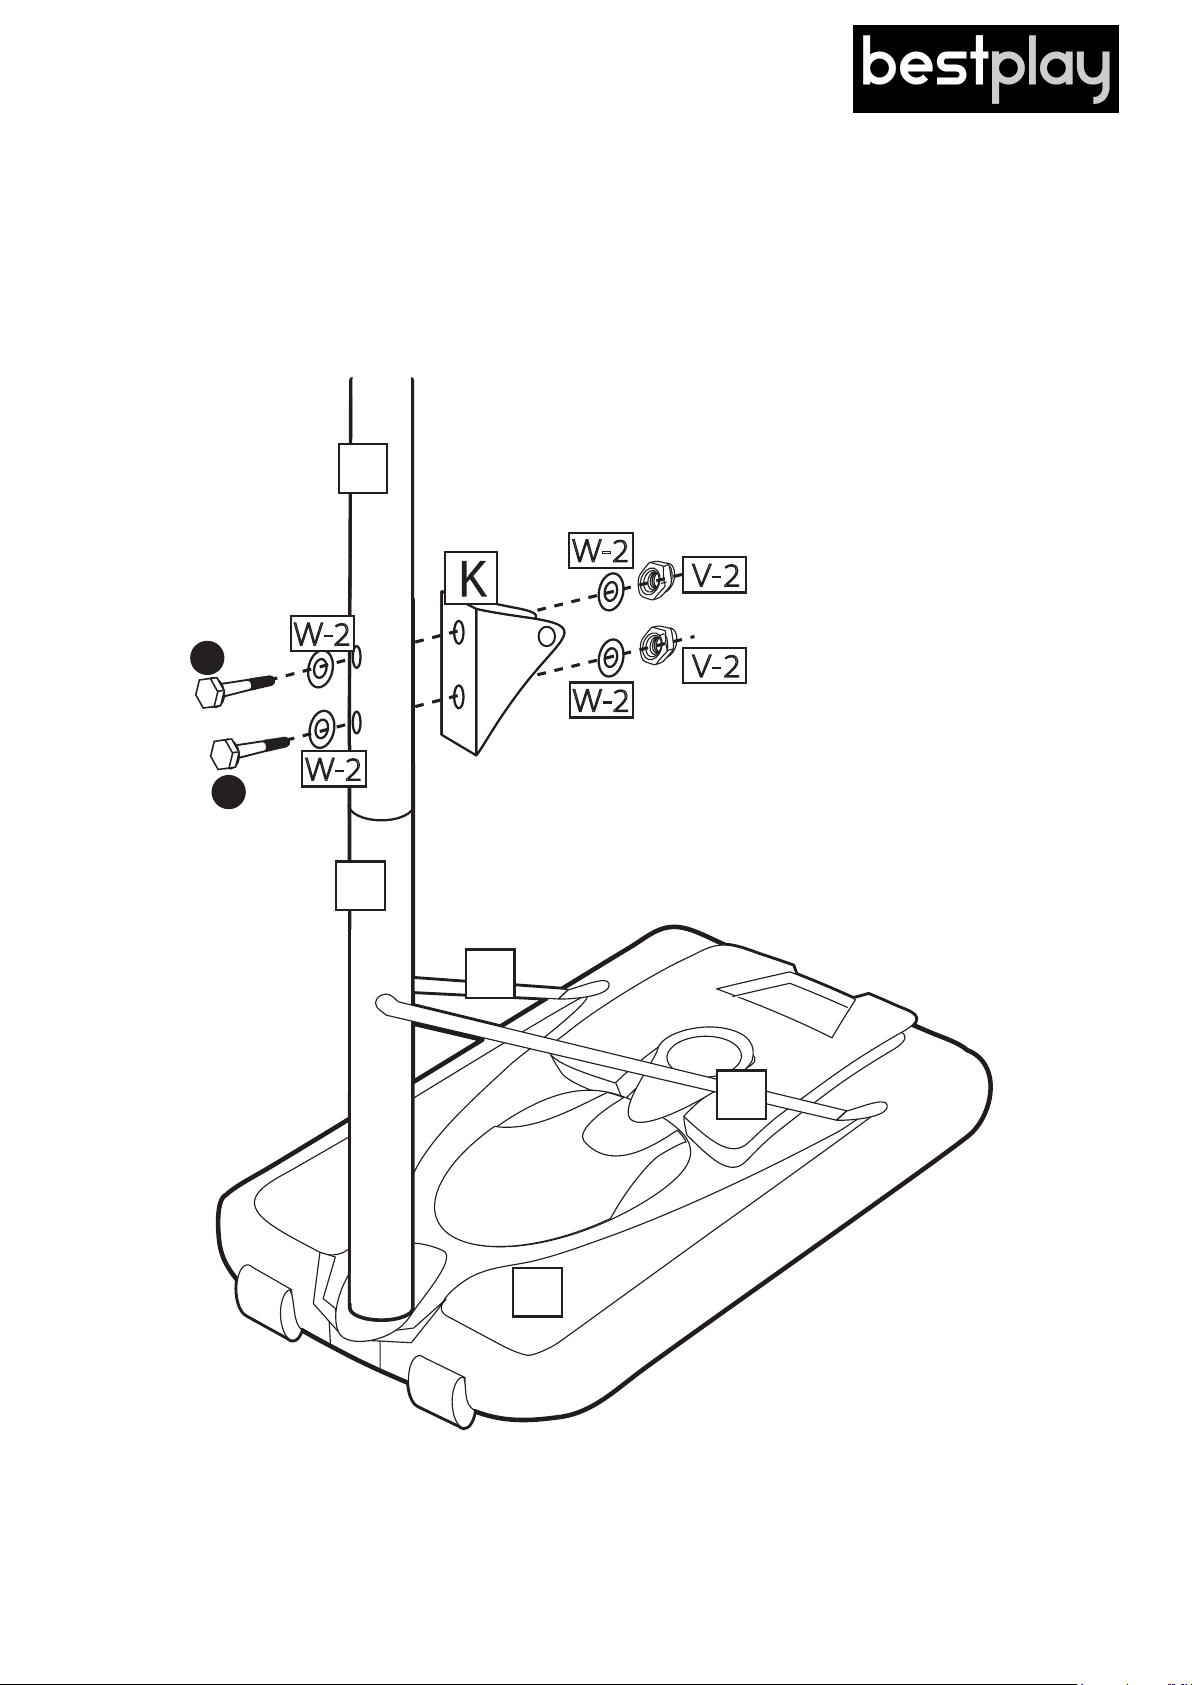
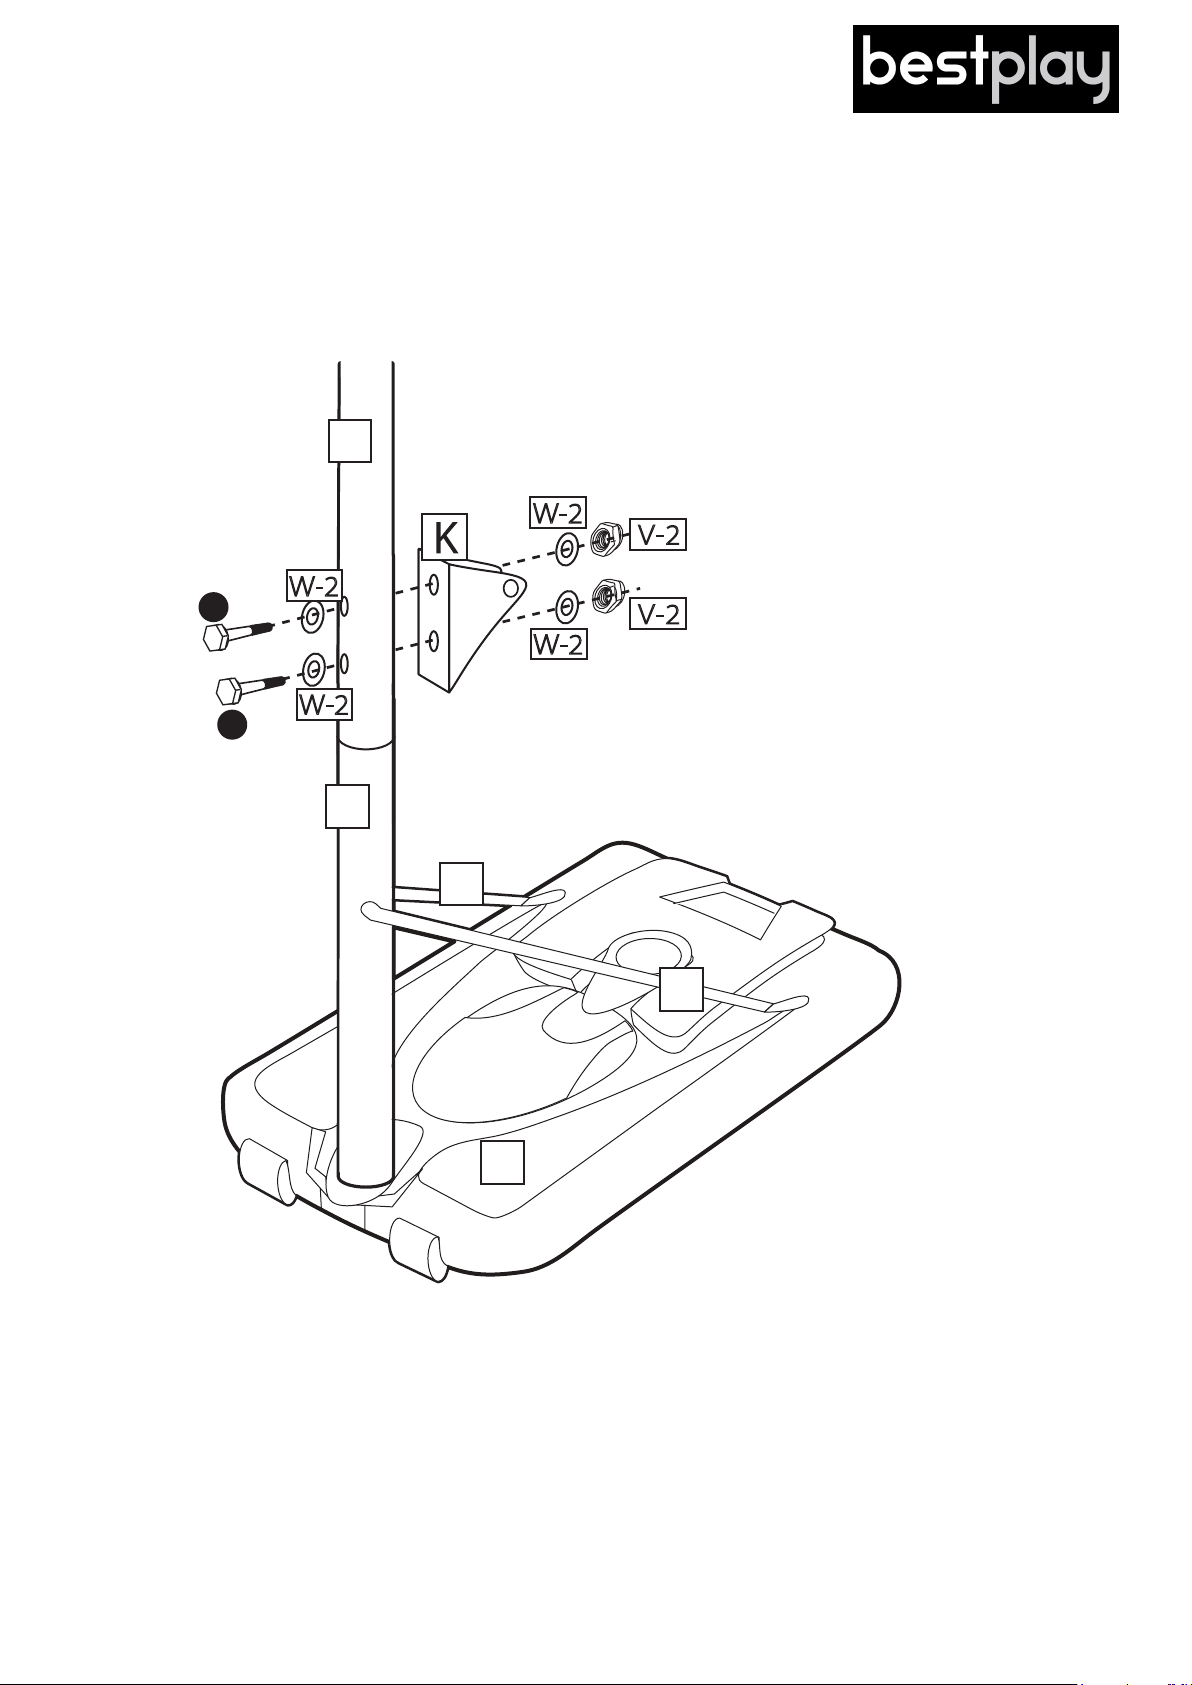
1. Sæt det midterste rør (E) sammen med det nederste rør (D).
2. Fastgør U-beslaget (K) på det midterste rør (E) med to bolte (9), fire skiver
(W-2) og to møtrikker (V-2).
E
9
9
D
G
G
C
6
Page 7
Trin 3
Sørg for at beslaget er i
korrekt position, inden du
spænder det på
bagpladen.
4
4
5
5
A
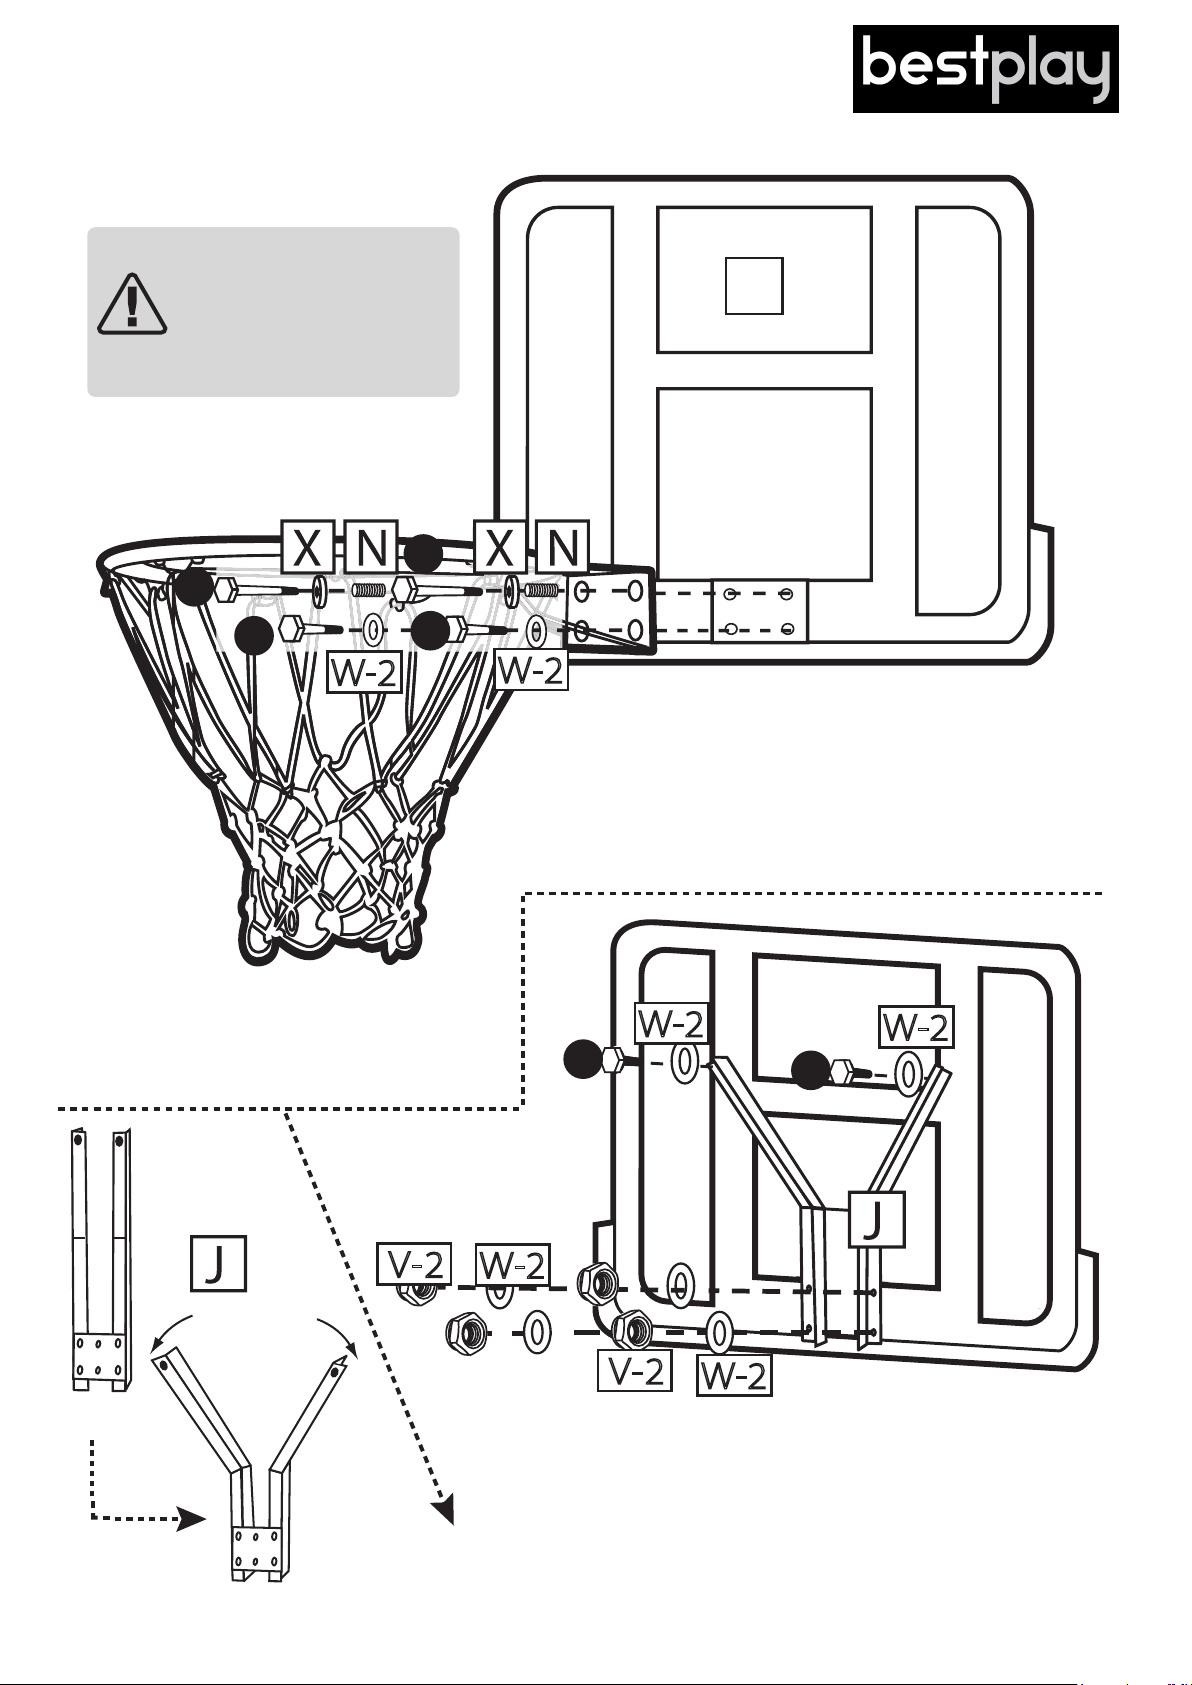
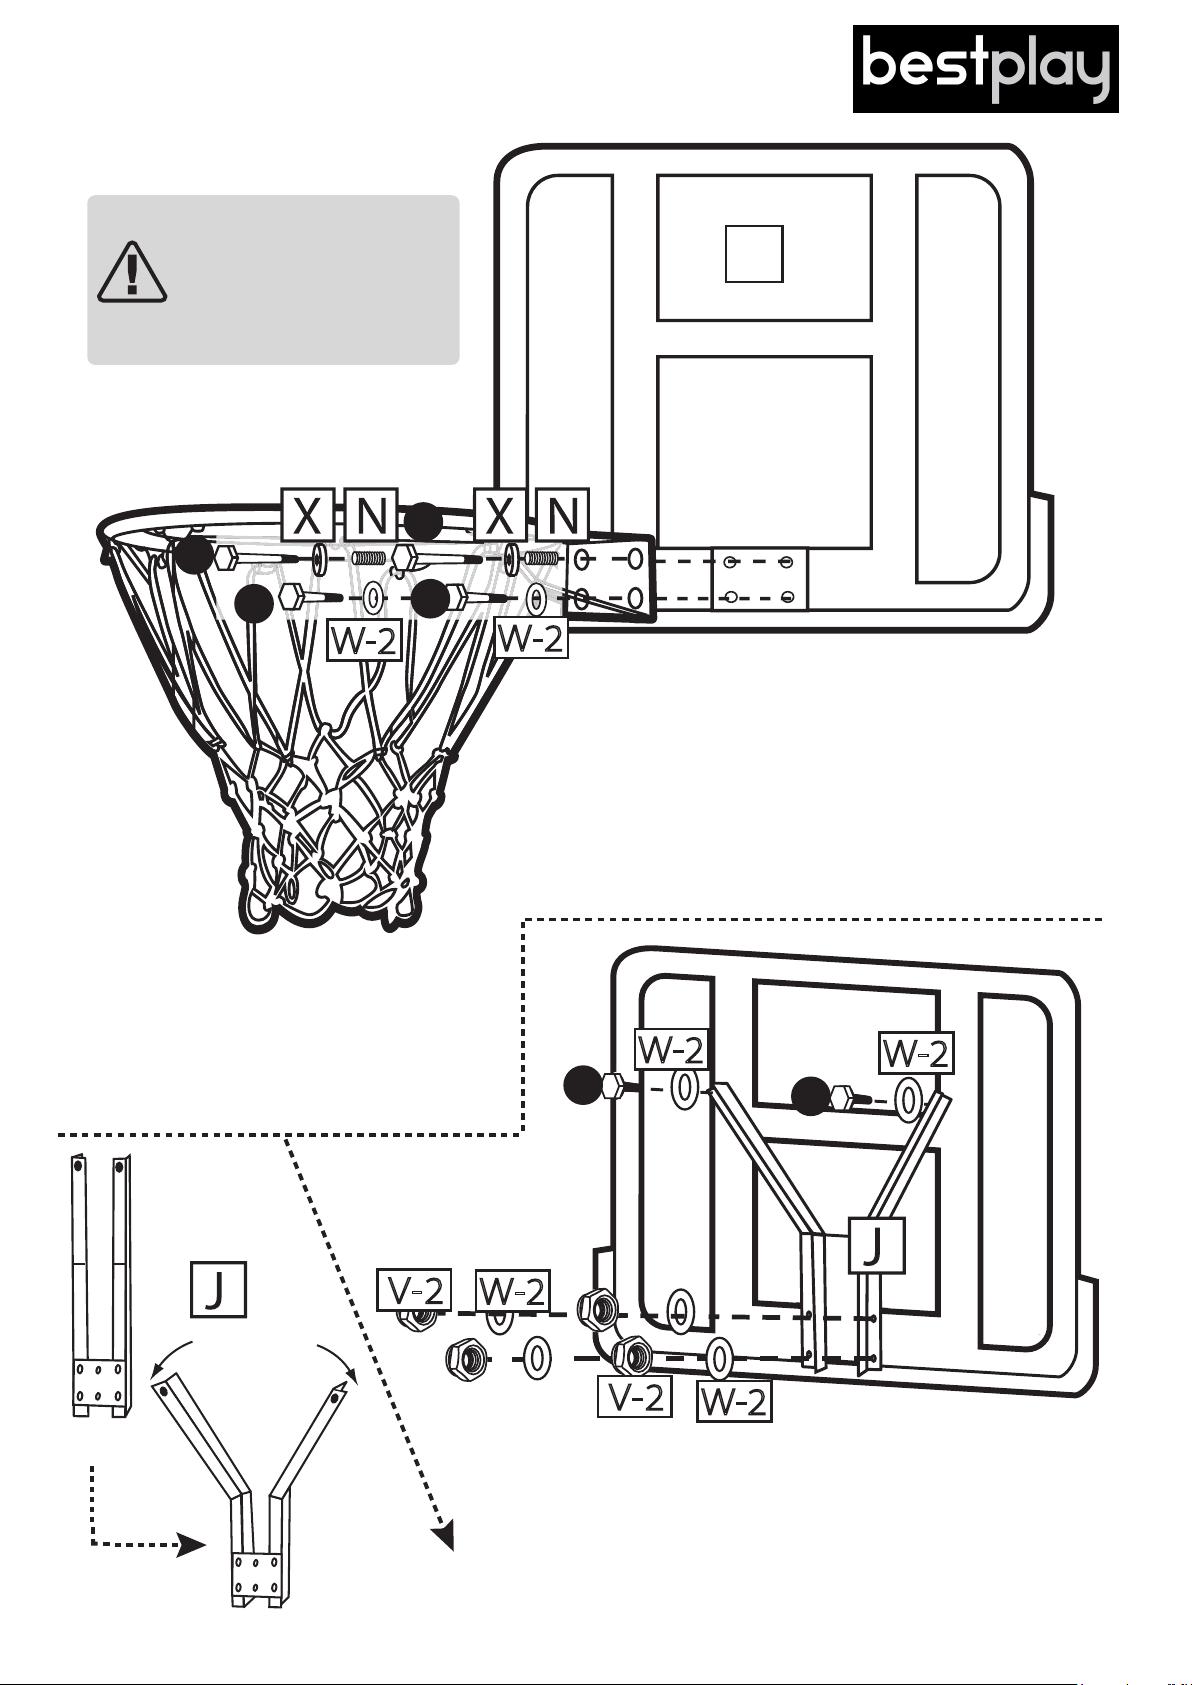
Fastgør kurven (B) på bagpladen (A) ved
1.
brug af to fjedersæt (X) og (N), to bolte
(4), to bolte (5), seks skiver (W-2) og fire
møtrikker (V-2).
2
2
Åbn V-beslaget (J) og fastgør beslaget
2.
på bagsiden af bagpladen (A) med to bolte
(2) og to skiver (W-2).
7
Page 8
Trin 4
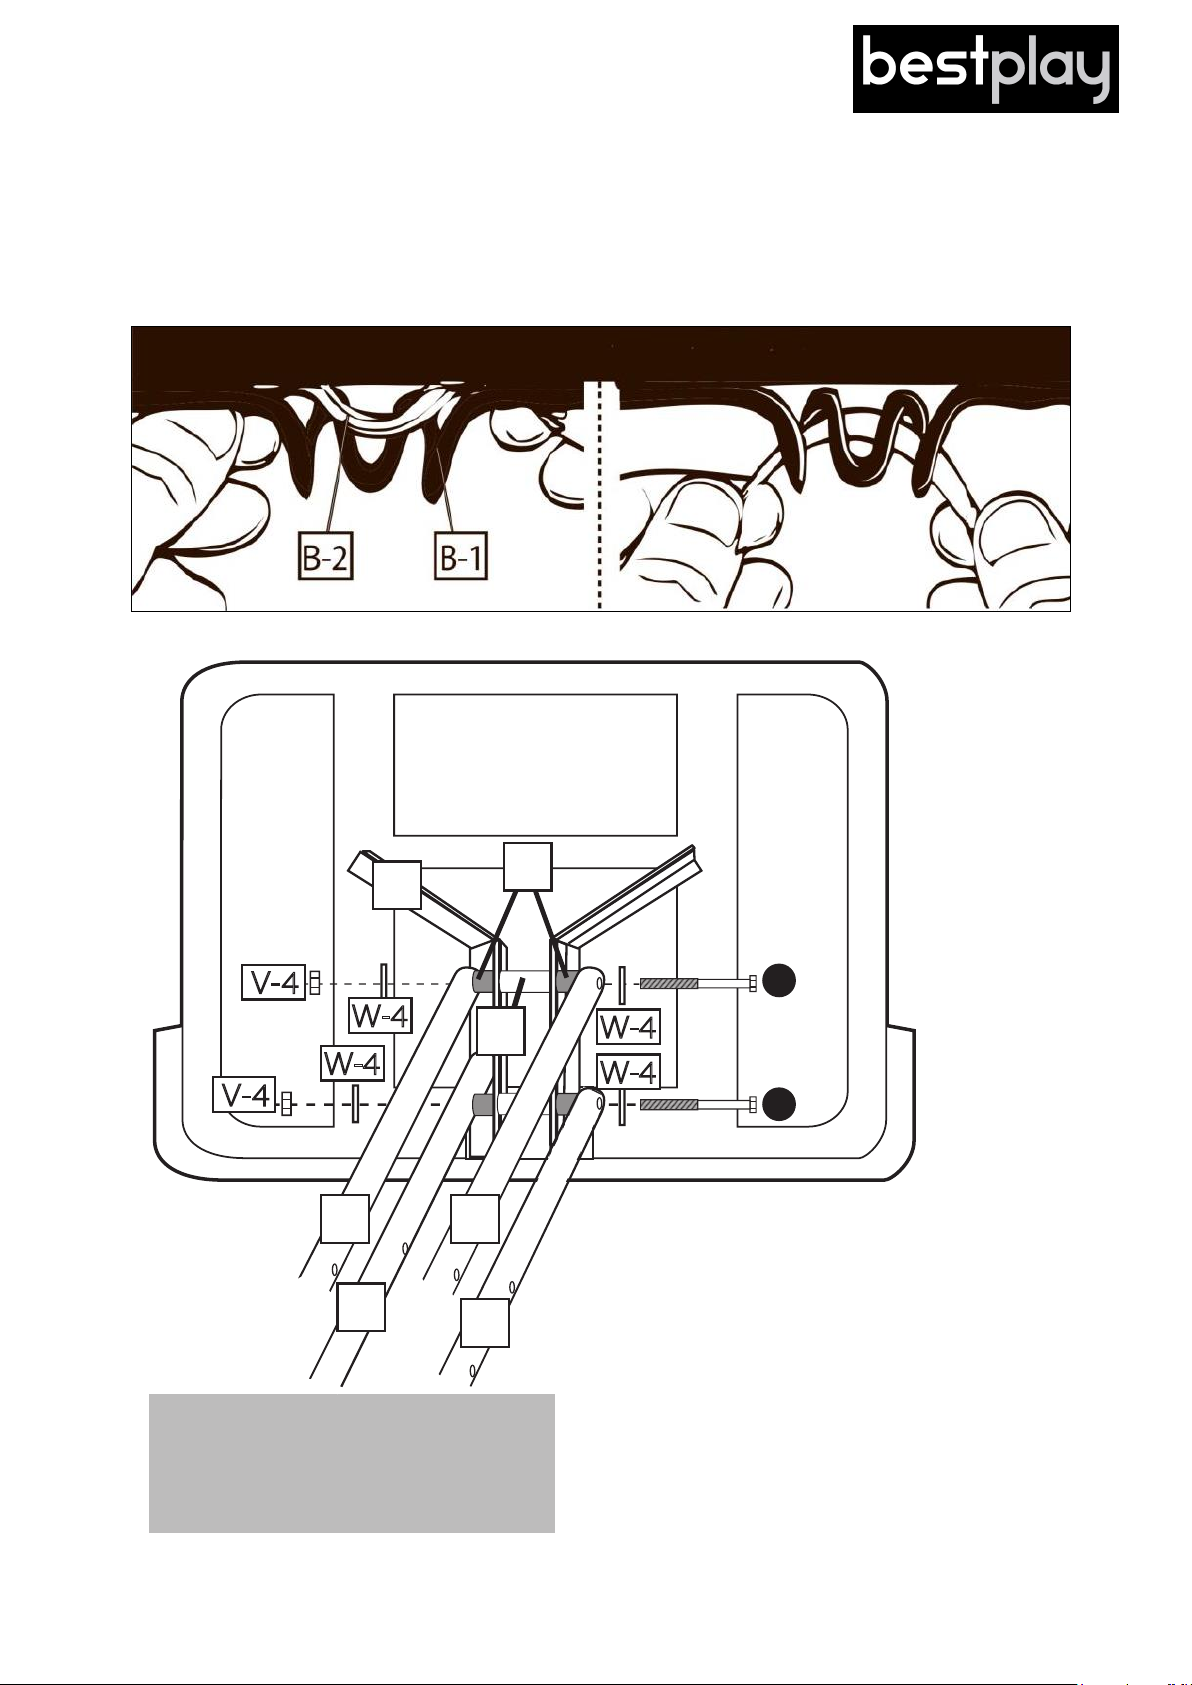
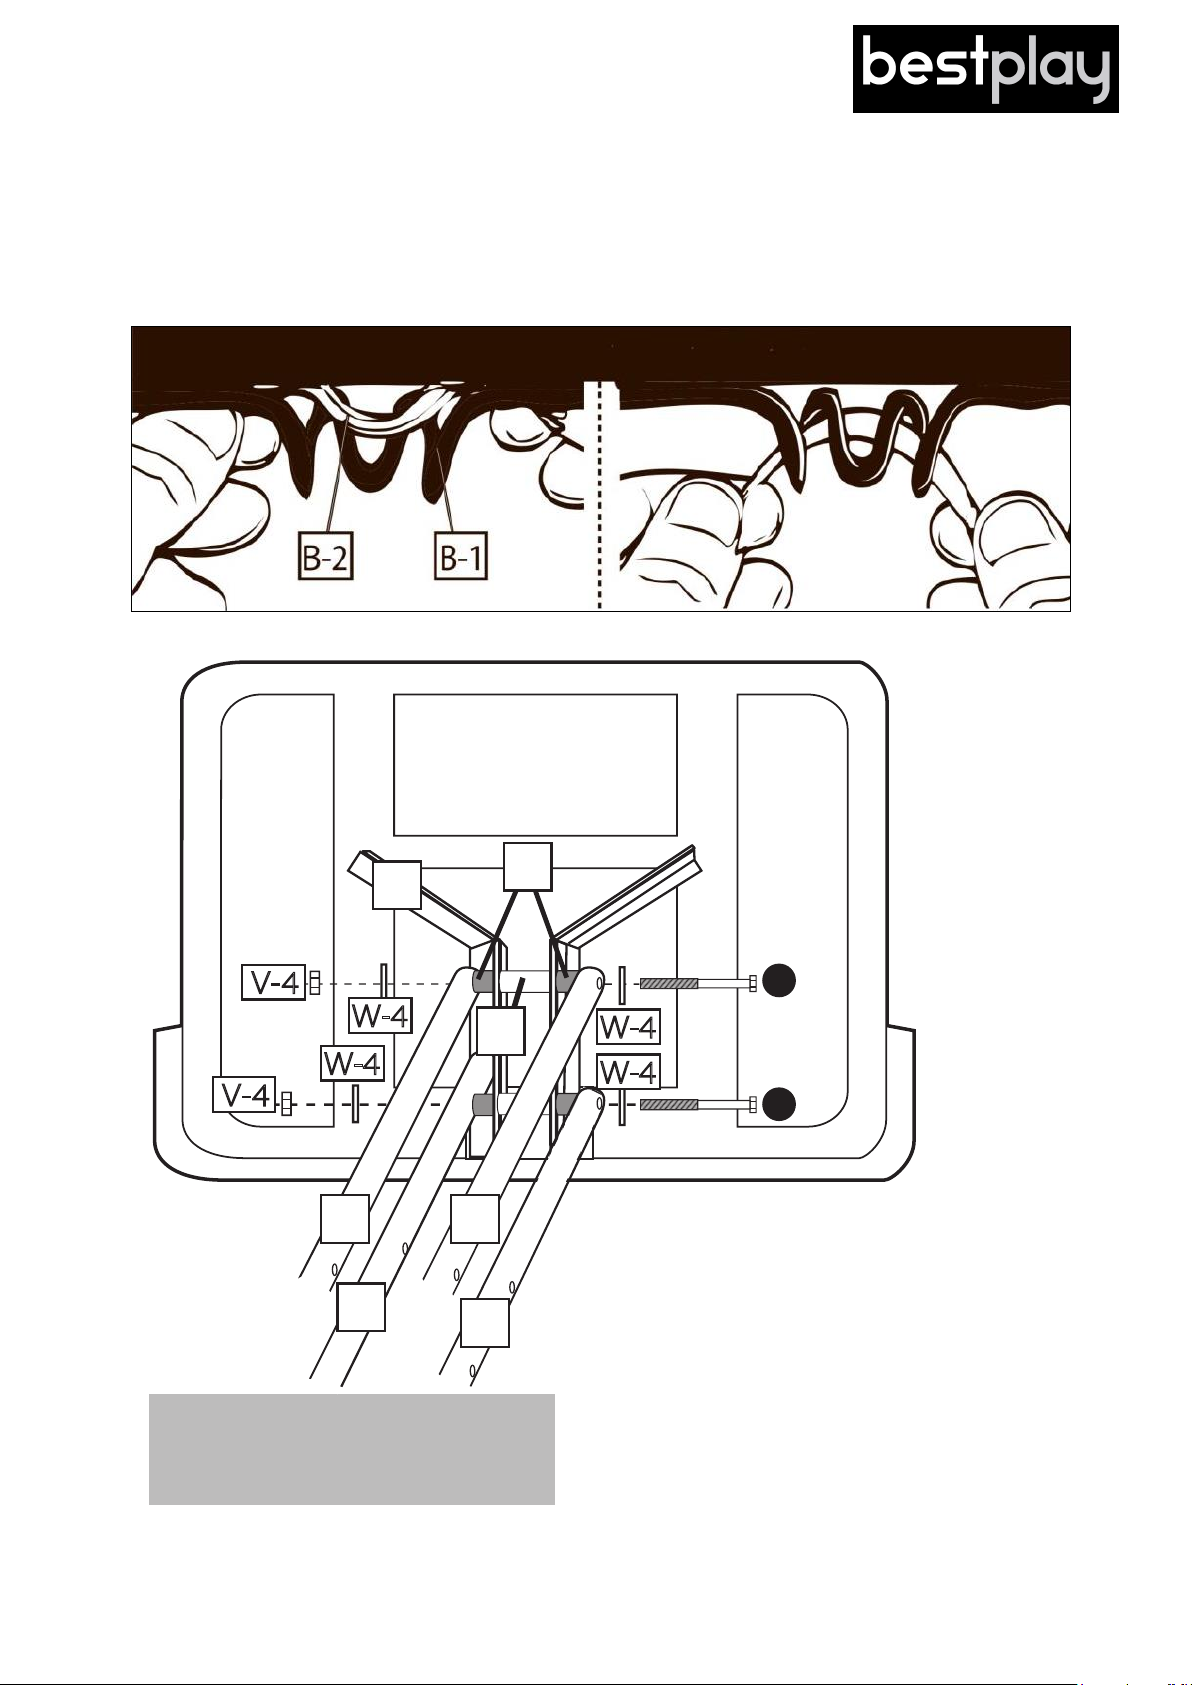
1. Montér nettet (B-
(B-2) og før nettet (B-2) over og rundt om midten på kurvens (B-1) kroge. Gentag for de
resterende kroge i kurven
2) på kurvens (B-1) kroge ved at finde huller i den øverste kant på nettet
J
R
U
P P
O
Sørg for at plastikrørene (R) og skiverne
(W-4) er i den rigtige position som
figurerne viser for at undgå unødige
problemer.
O
6
6
1.
Fastgør øverste arm (P) på V-beslaget (J)
med en bolt (6), to skiver (W-4), to
plastikrør (R) og et konsolrør (U).
Fastgør nederste arm (O) på V-beslaget (J)
2.
på samme måde som ovenfor.
8
Page 9
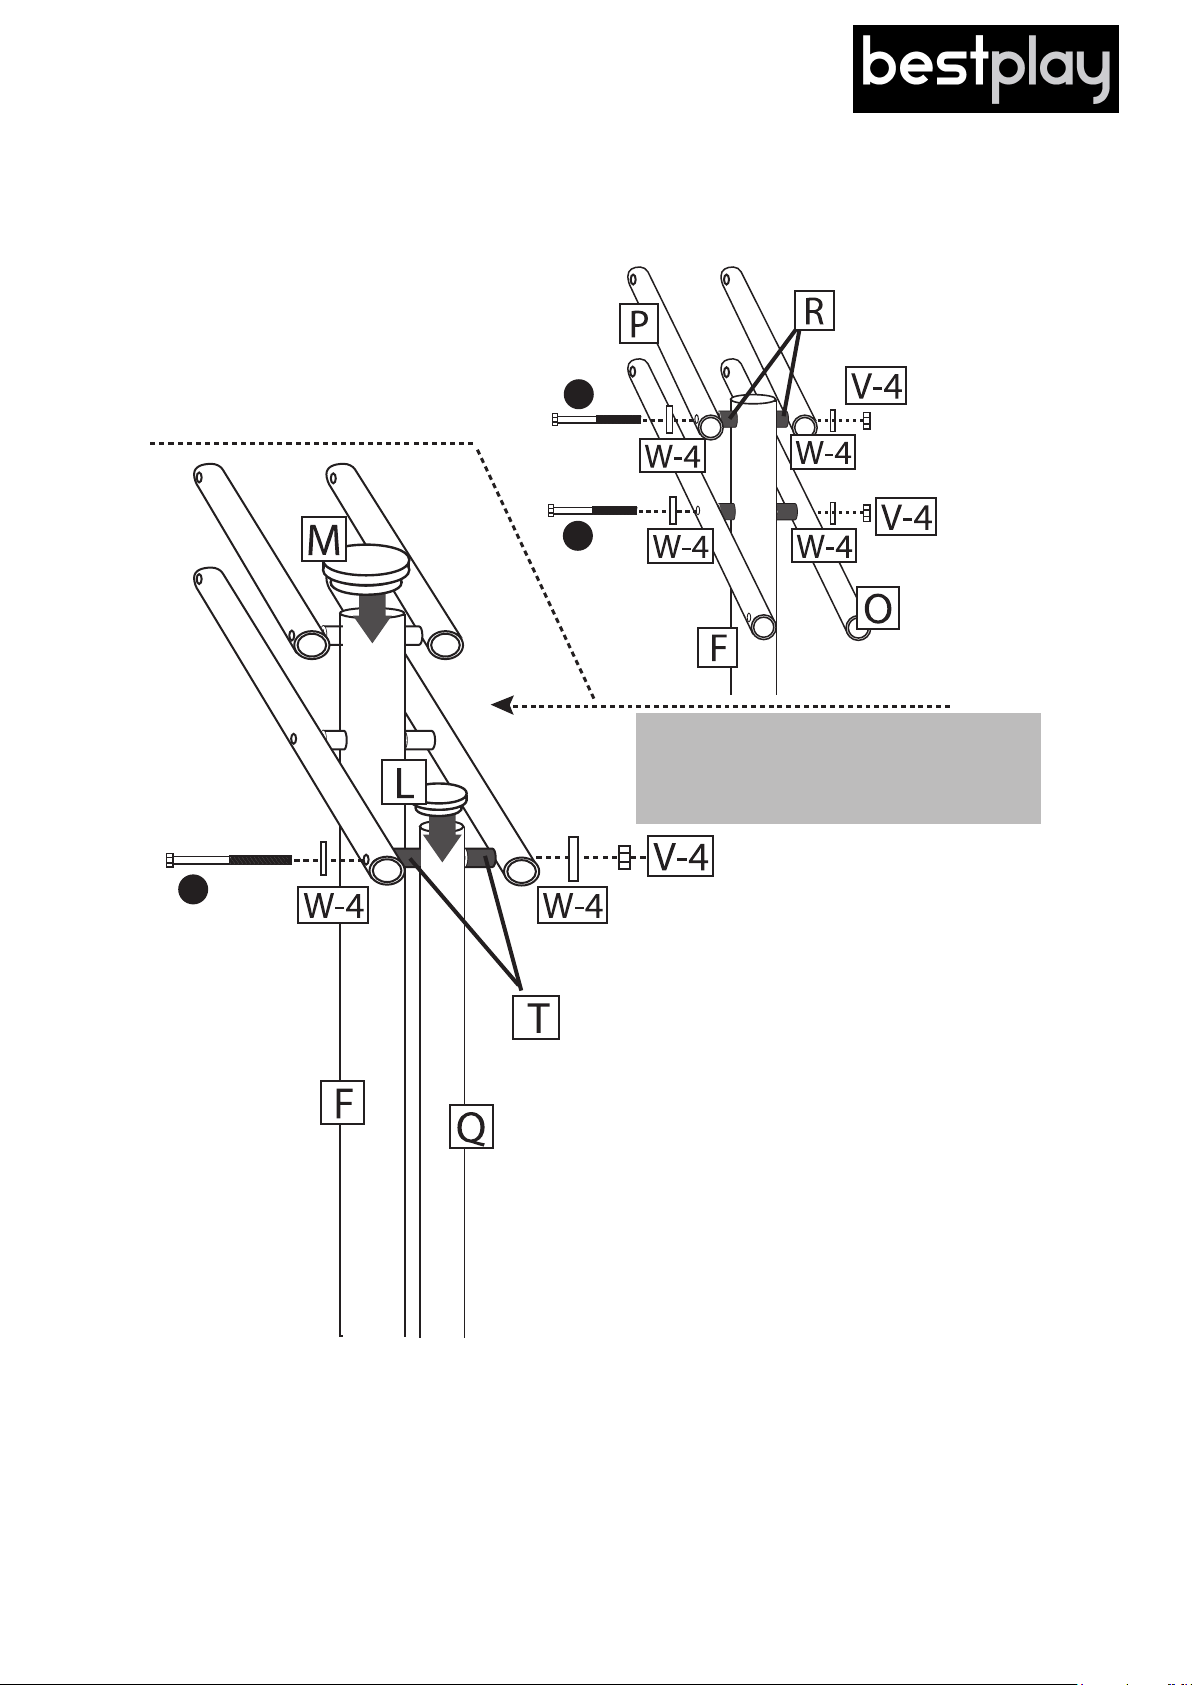
Trin 5
1.
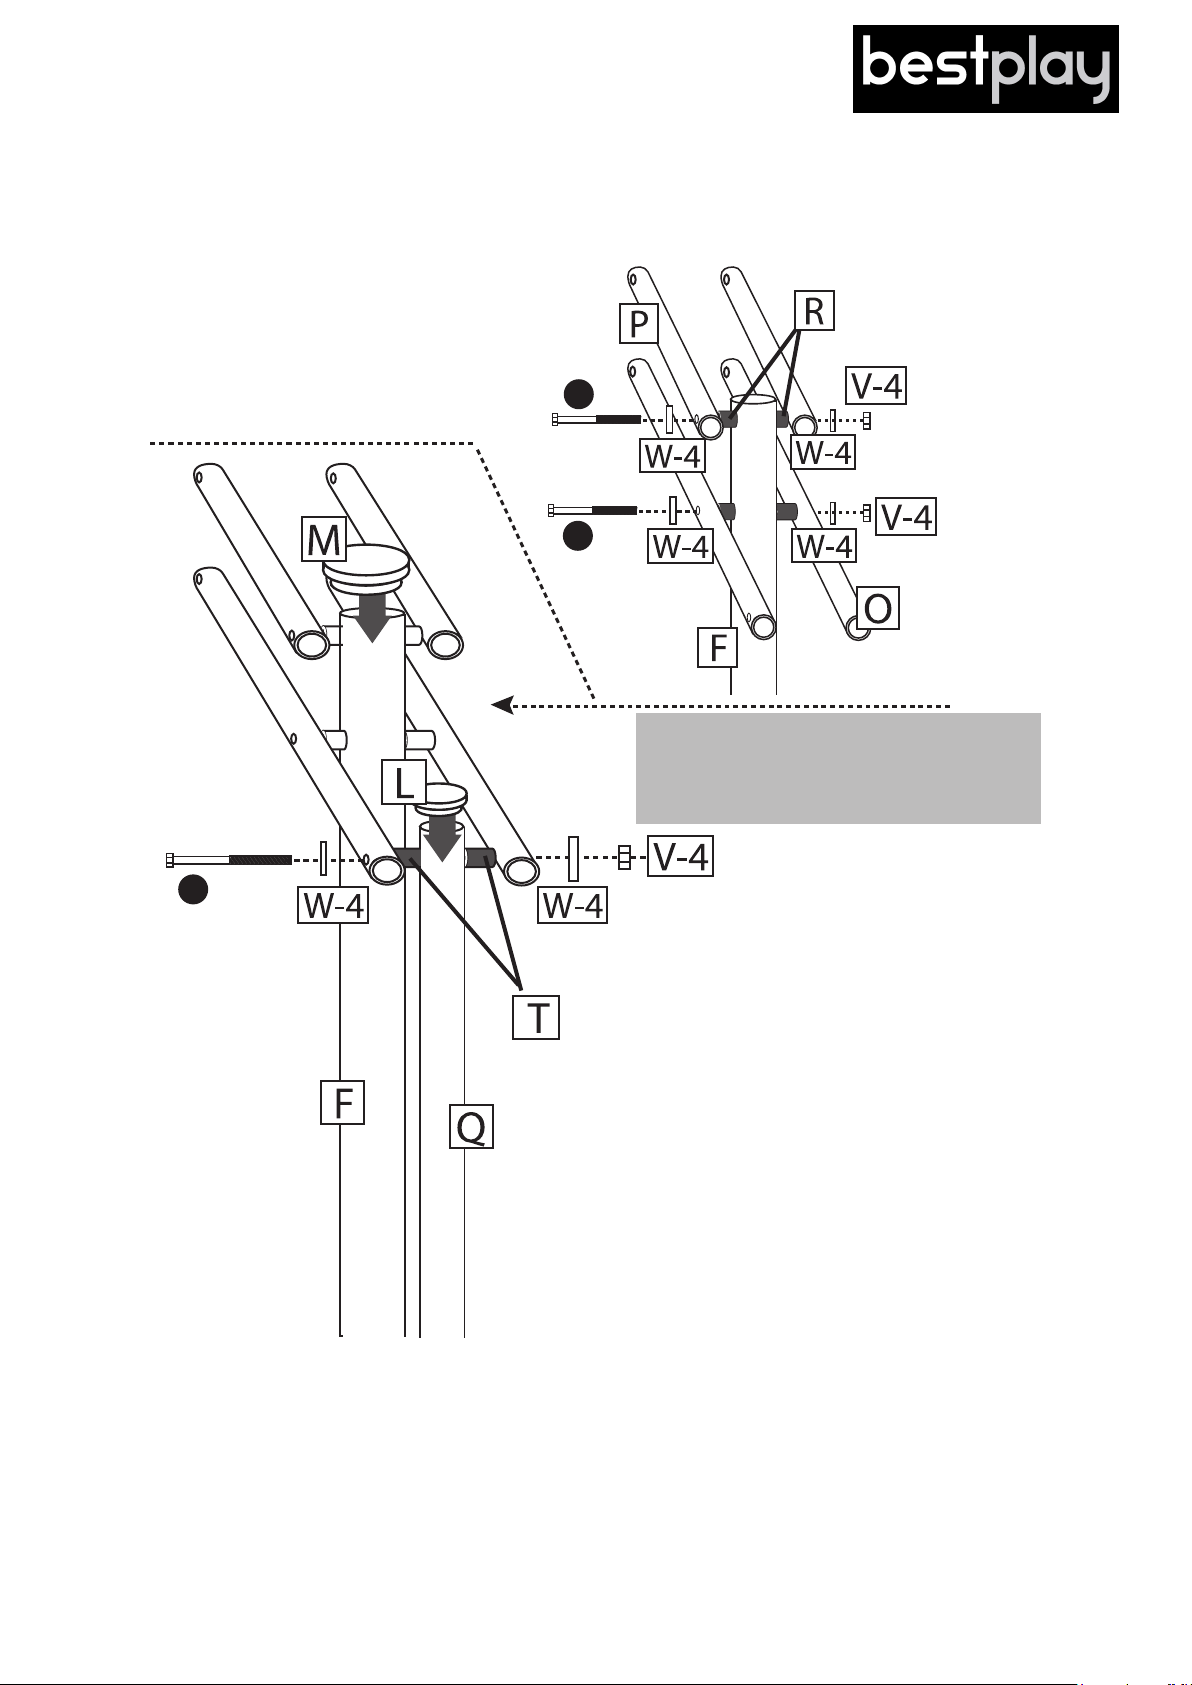
Fastgør nederste (O) og
øverste arm (P) på toprøret
(F) ved brug af to bolte (6),
fire skiver (W-4), fire plastikrør
(R) og to møtrikker (V-4).
6
6
Sørg for at plastikrørene og skiverne er i den
rigti
ge position som figurerne vise
undgå unødige problemer.
r for at
6
2.
Fastgør højdejustereren (Q) på de
nederste arme (O) ved brug af en
bolt (6), to skiver (W-4), to plastikrør
(T) og en møtrik (V-4).
Placer de to dæksler (M) og (L) på
3.
toprøret og højdejusteringen.
9
Page 10
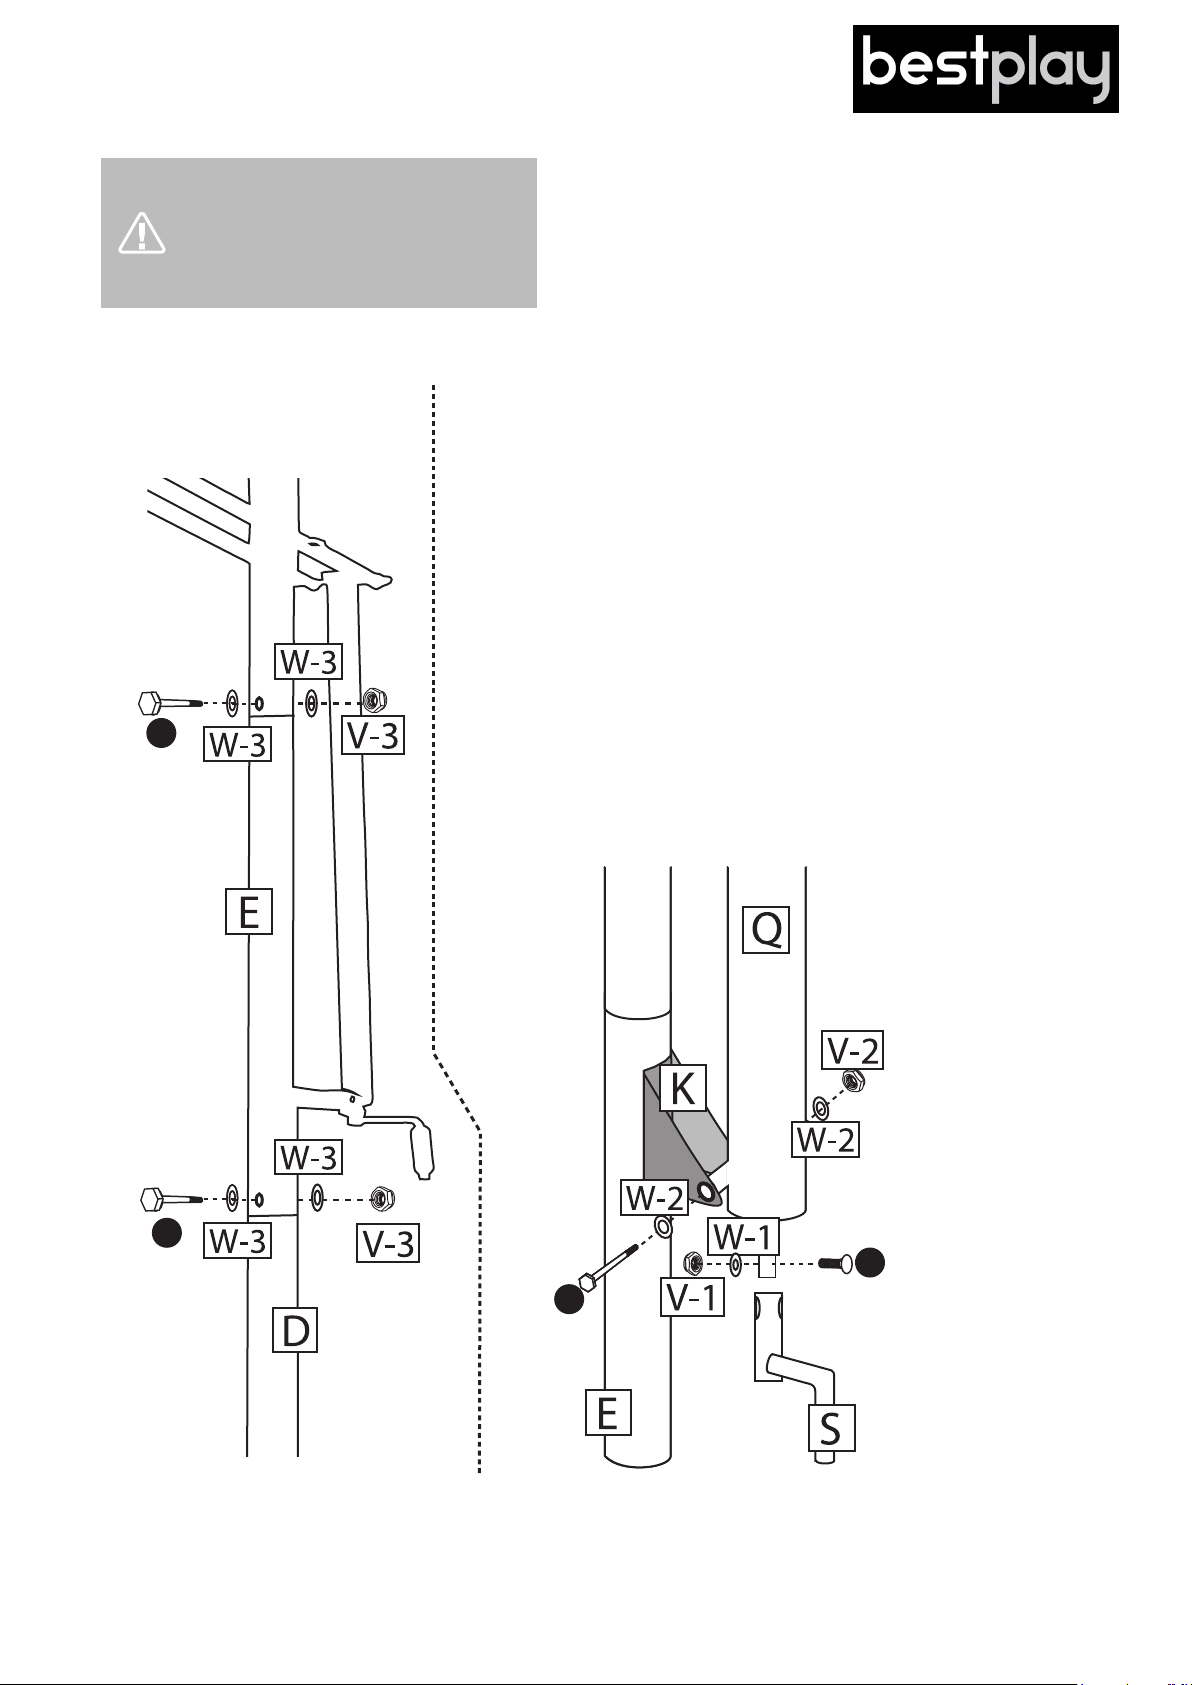
Trin 6
Juster højdejusteringen til en
passende højde for at placere
højdejustereren og U-beslaget
korrekt.
1.
Fastgør højdejusteringen (Q) på U-beslaget (K) ved
brug af en bolt (7), to skiver (W-2) og en møtrik (V-2).
2.
Sæt højdejusteringshåndtaget (S) i højdejustereren
ved brug af en skrue (8), en spændeskive (W-1) og
en møtrik (V-1).
3.
Fastgør toprøret på det midterste rør med en bolt (1),
1
to spændeskiver (W-3) og en møtrik (V-3). Sæt det
midterste og det nederste rør sammen på samme
måde.
1
8
7
10
Page 11
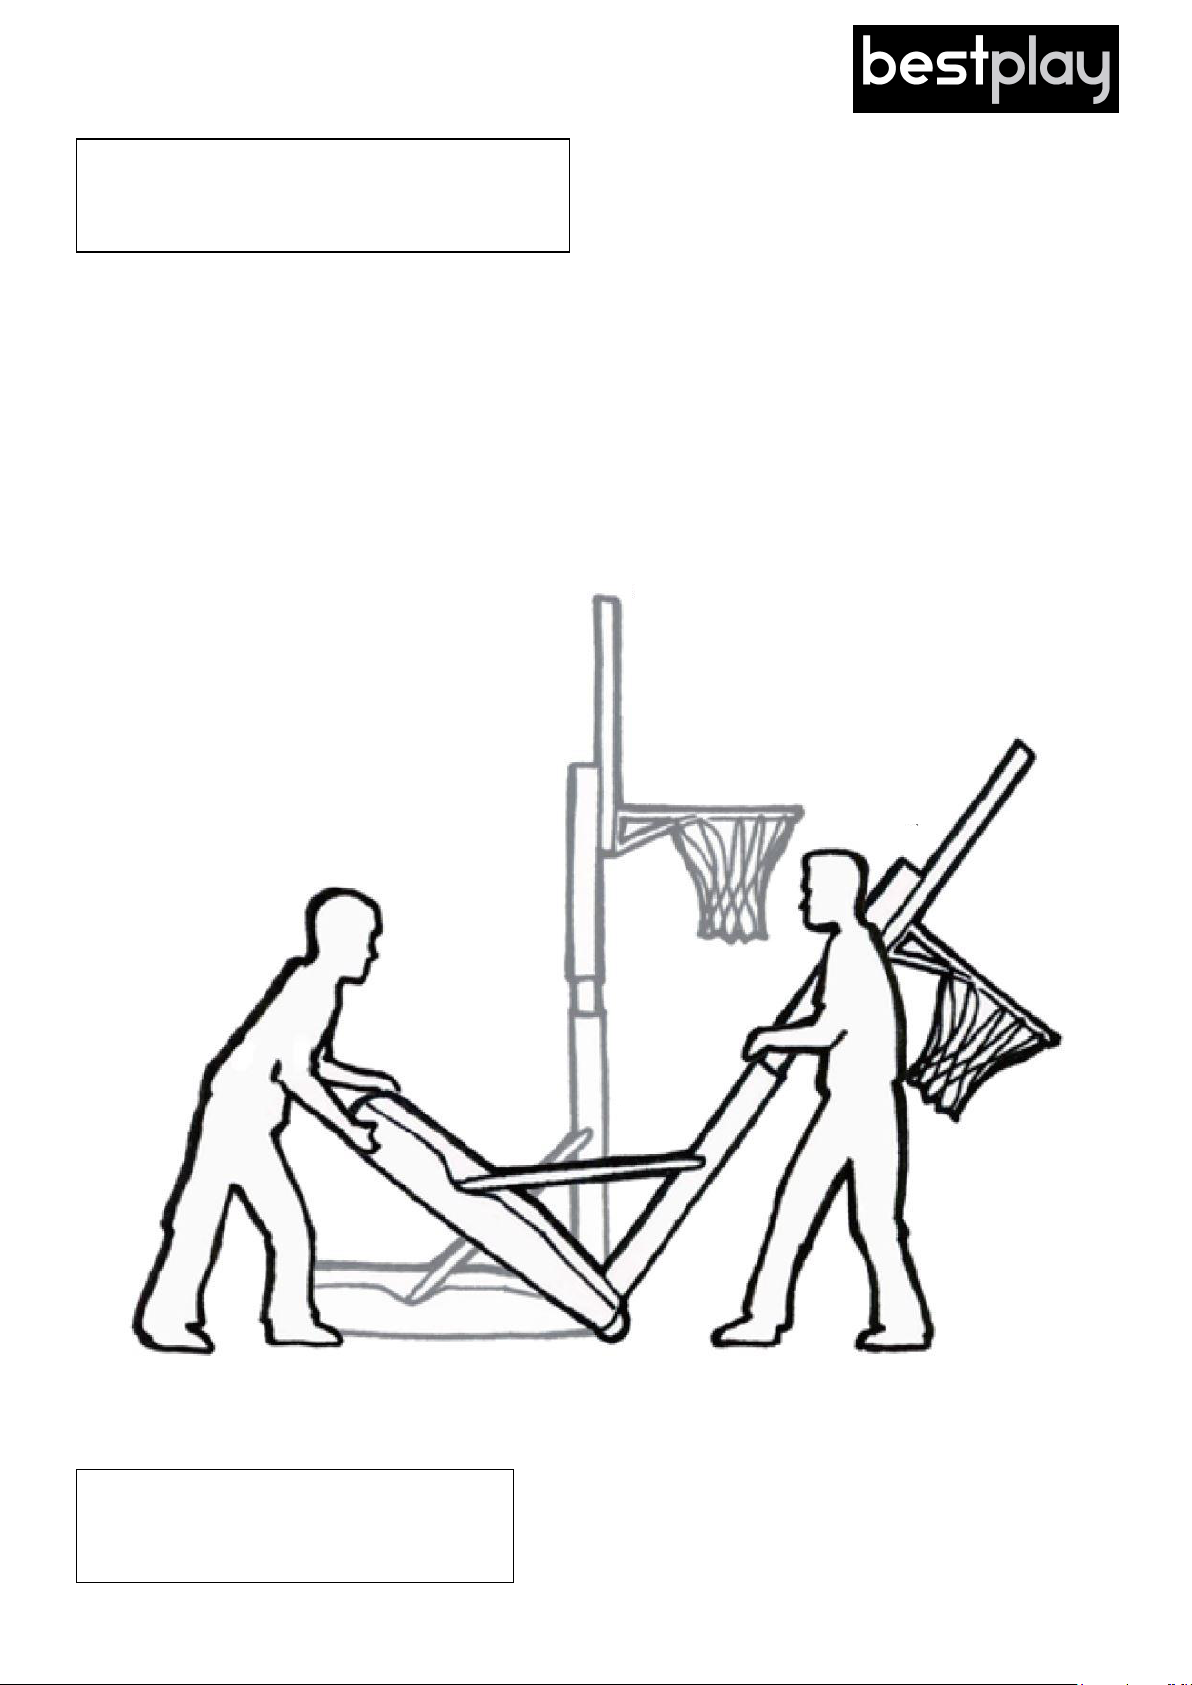
Trin 7
OBS! Der skal være 2 personer til at
påfylde sand i sandbasen. Brug ikke vand
da dette vil sive ud eller frostspringe.
1. Placér basketballstanderen hvor den skal benyttes og afmonter låget til sandbasen.
2. Justér basketballstanderen til laveste højde og tilt standeren i 45 grader.
3. Påfyld derefter sand i sandbasen.
4. Når sandbasen er fyldt med sand, tiltes basketballstanderen på plads og resten af
sandbasen fyldes med sand.
ADVARSEL! Hvis du ikke følger alle
instruktioner og advarsler præcist kan
det medføre alvorlig personskade.
11
Page 12

Bestplay A/S
Knullen 22
5260 Odense S
Tlf. +45 70 22 72 92
Danmark
SFP 19.1
Page 13
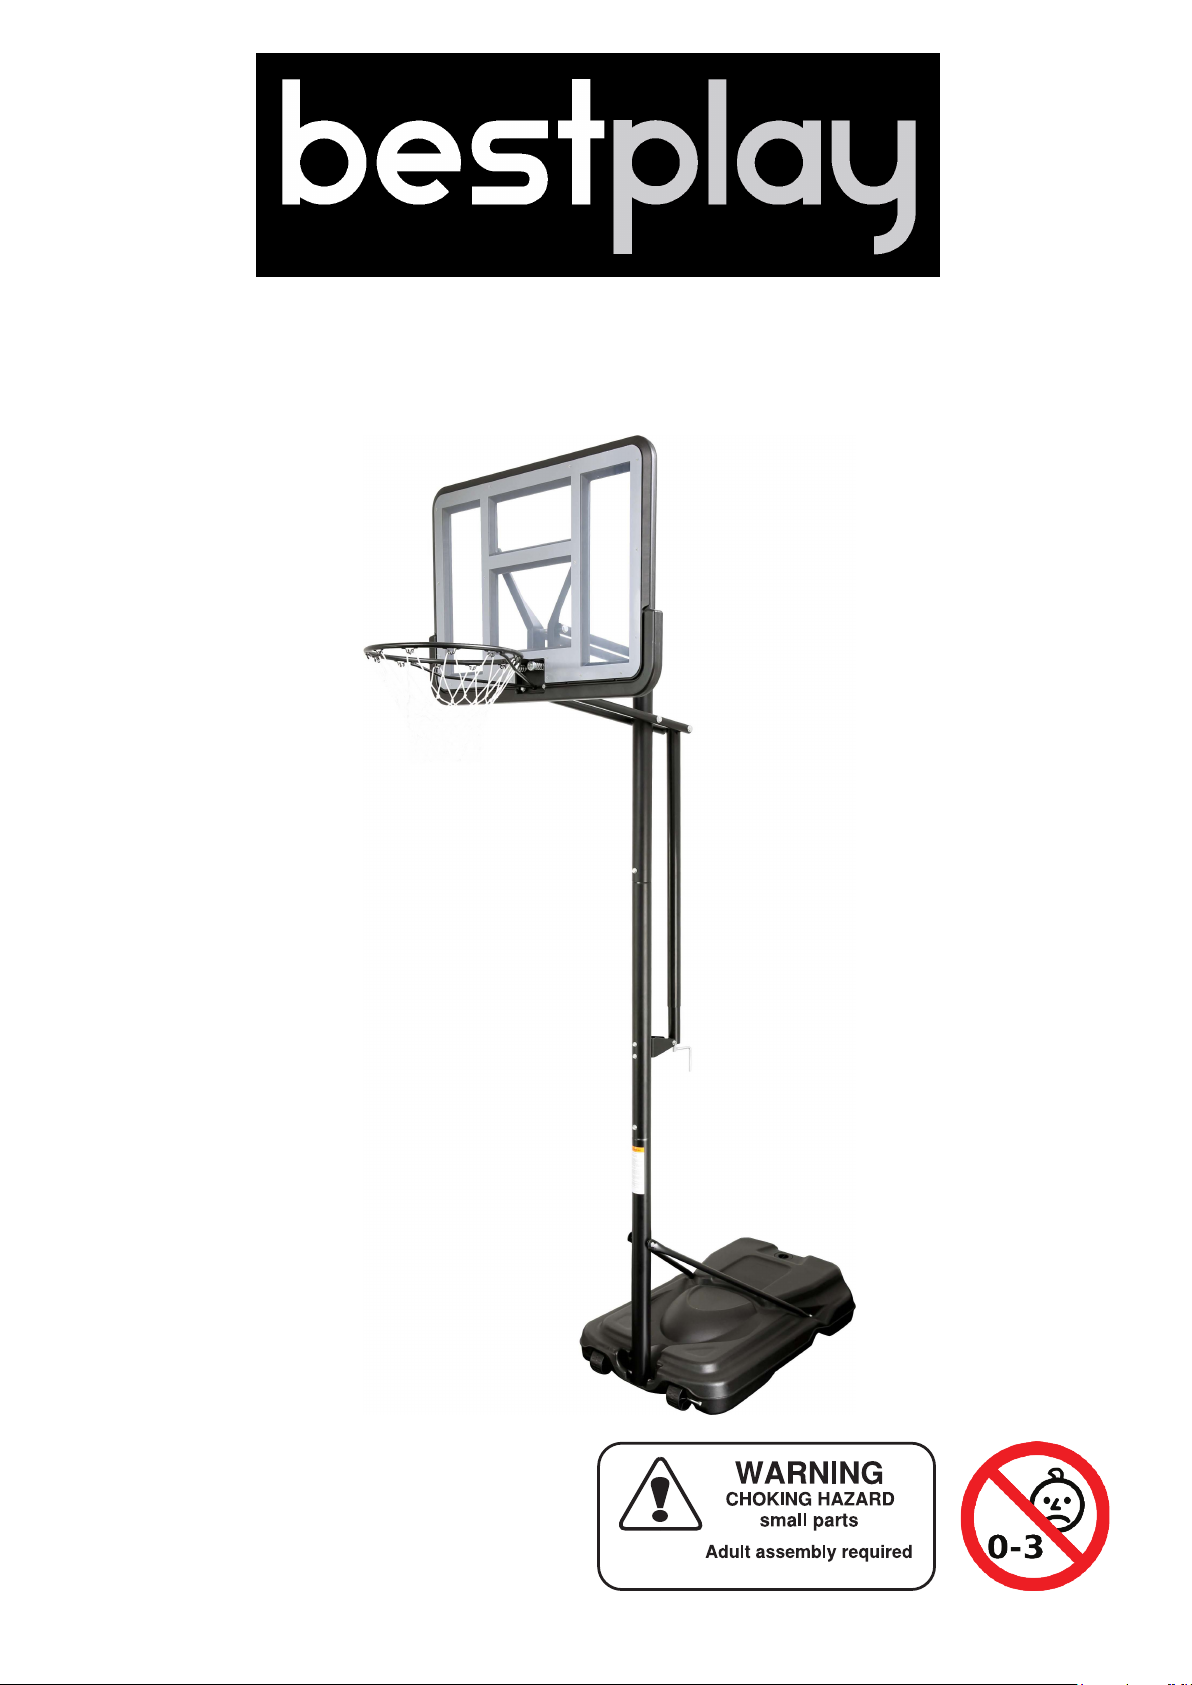
Basketball stand PRO/PRO safe
retain for future
reference
Page 14
Safety warning
Read all instructions and complete all assembly before using.
When properly assembled and used as intended, this basketball stand is designed to provide
many hours of training and playing enjoyment.
Inspect the basketball stand before every use. Make sure all parts are correctly and securely
positioned and attached. Tighten any loose parts. Replace any worn, defective, or missing
parts.
Never let children climb on the basketball stand as this can result in basketball stand tipping
over causing serious injuries to the child.
Adult supervision is necessary at all times when the basketball stand is used by children.
WARNING! The basketball stand can tip over in windy weather. Make sure to fasten it or
moving it to a secure lokation if weather is turning windy/stormy.
The metal frame of the basketball stand can conduct electricity. Lights, extension cords, and all
such electrical equipment must never be allowed to come in contact with the basketball stand.
Assembly
Clearance from all nearby objects is essential. Place the basketball stand away from walls,
structures and fences. Maintain a clear space on all sides of the basketball stand.
Adequate overhead clearance is essential. Provide clearance for wires, tree limbs, and other
possible obstacles.
Never set up the basketball stand in heavy rain, wind or storm conditions, especially storms.
When moving the assembled basketball stand have minimum two people to lift the basketball
stand off the ground with even weight distribution.
Place the basketball stand on an even surface before use.
Secure the basketball stand against unauthorized and unsupervised use.
Maintenance
Inspect the basketball stand before each use and replace any torn, defective, or missing parts.
The following conditions could present potential hazards:
1. Missing, wrongly positioned, or insecurely attached pipes or basket.
2. Punctures, frays, tears, or holes worn in the basketball stand.
3. A bent or broken pipe or support system.
4. Sharp points sticking out of the pipe or basket.
5. Loosened or missing hardware.
2
Page 15
Before assembling
1. It is recommended to be at least two persons to assemble this product.
2. Do not leave the basketball stand without support before the sandbase has been filled
with sand.
3. Do not use water, as this can leak. In cold weather water may freeze and damage the
base.
4. This basketball stand can not be used for dunks.
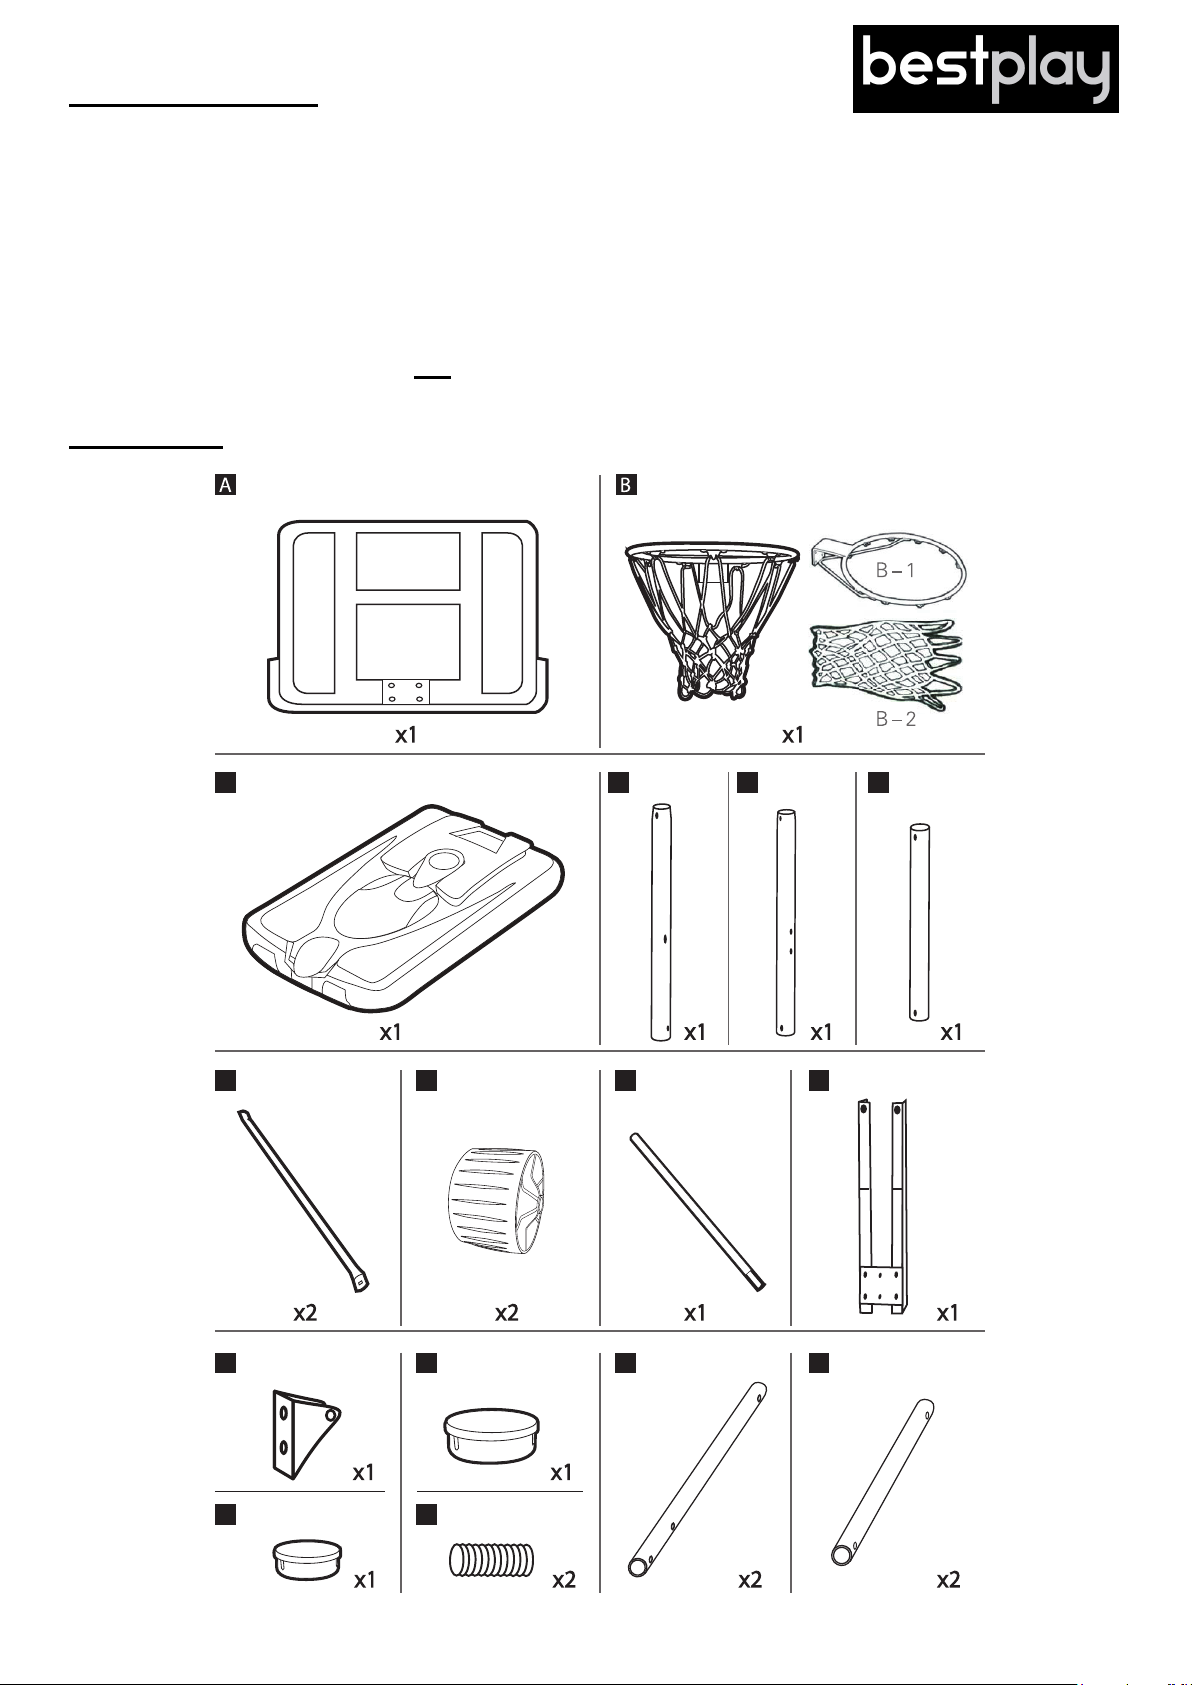
Packing list
Backboard
C Sandbase
Basket/Net
x1 x1
D Lower main
pipe
x1
E Middle main
pipe
x1
F Top main pipe
x1 x1
G Support-bars
x2 x2
K U-Bracket M Top Pole Cap O Lower Arms (Long)
H Wheels I Wheel axle J V-Bracket
x1
x1 x1
L Height Adjuster Cap N Spring
x1
x2 x2 x2
3
x1
P Upper Arms (Short)
Page 16
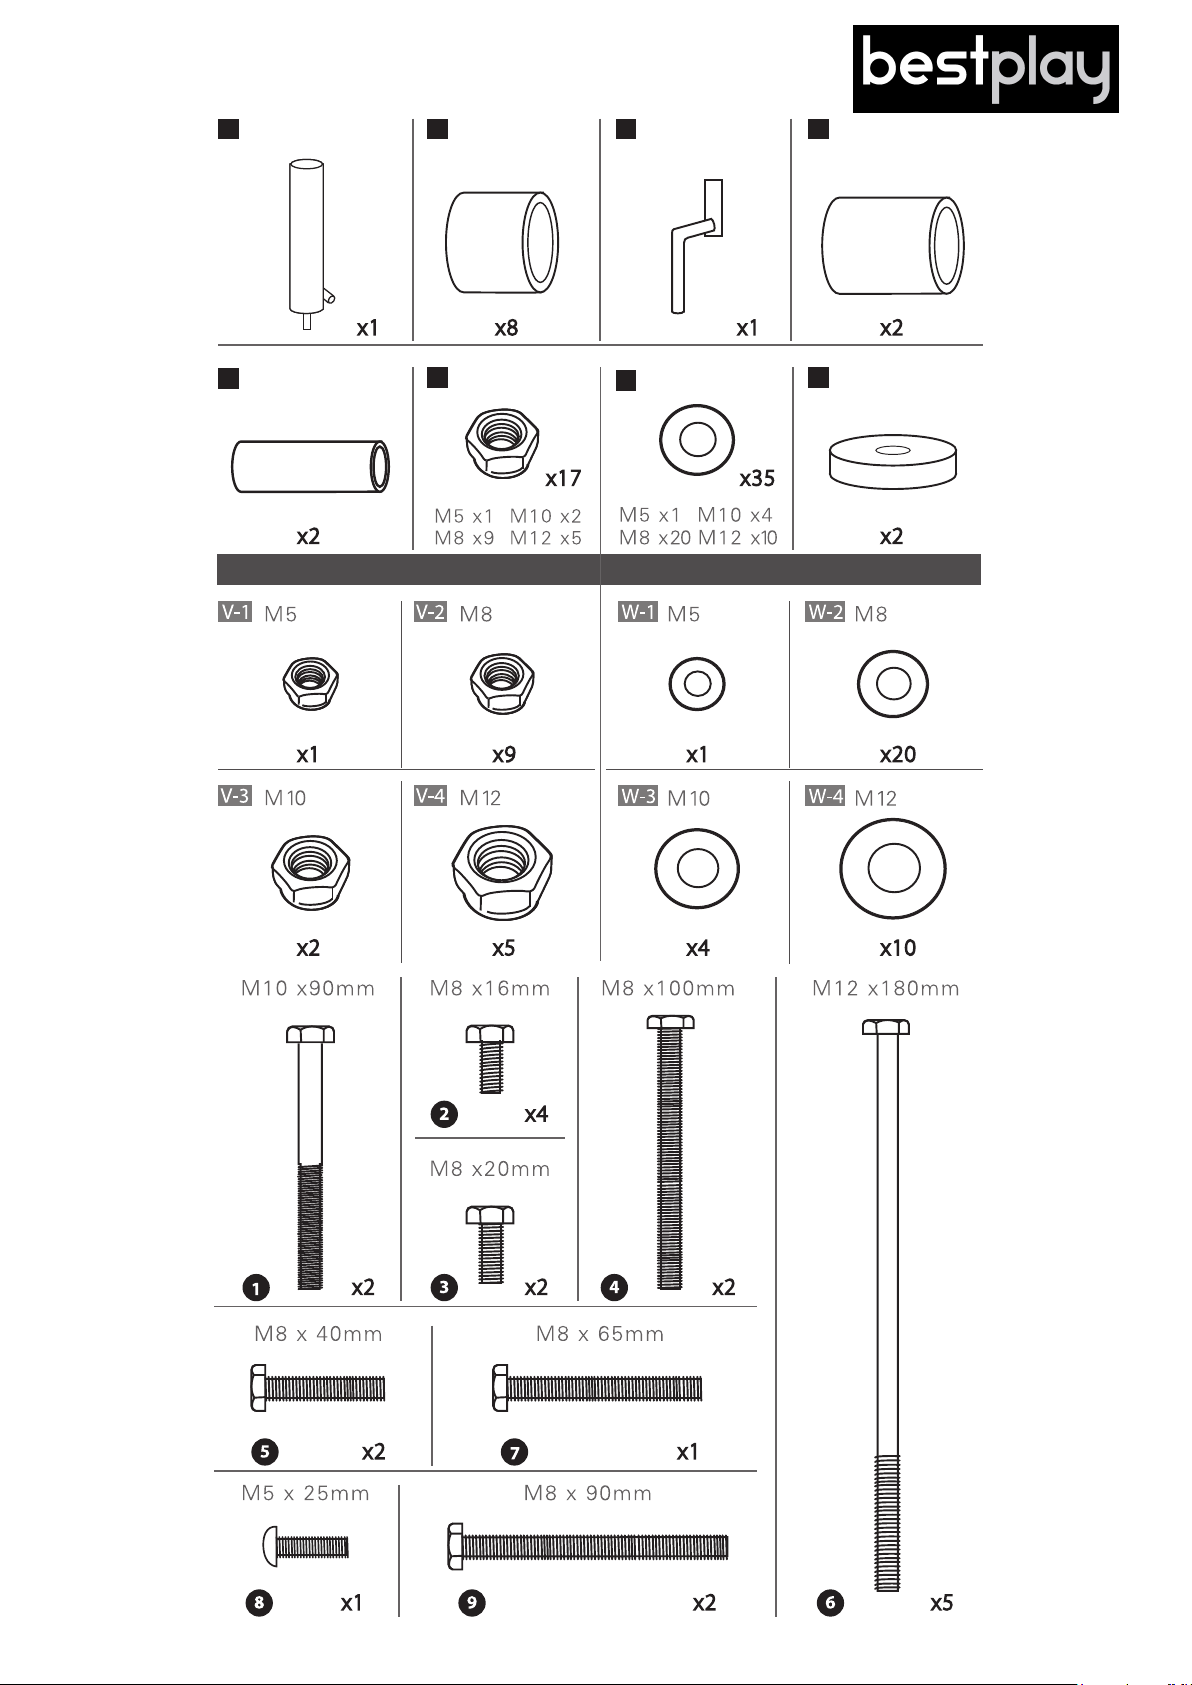
Q
Height Adjuster
R Plastic Mat (Long)
Height Adjuster
S
Handle
T Plastic Mat (Short)
U Bracket Tube
x2
Lock Nuts Details
x1 x9 x1 x20
x1
x8
V Lock Nut
x1 x2
W Washer
x17 x35
Washers Details
X Spring Cap
x2
x2 x5 x4 x10
x4
x2
x2
x2
x2
x1
x1
x2
4
x5
Page 17
Assembly
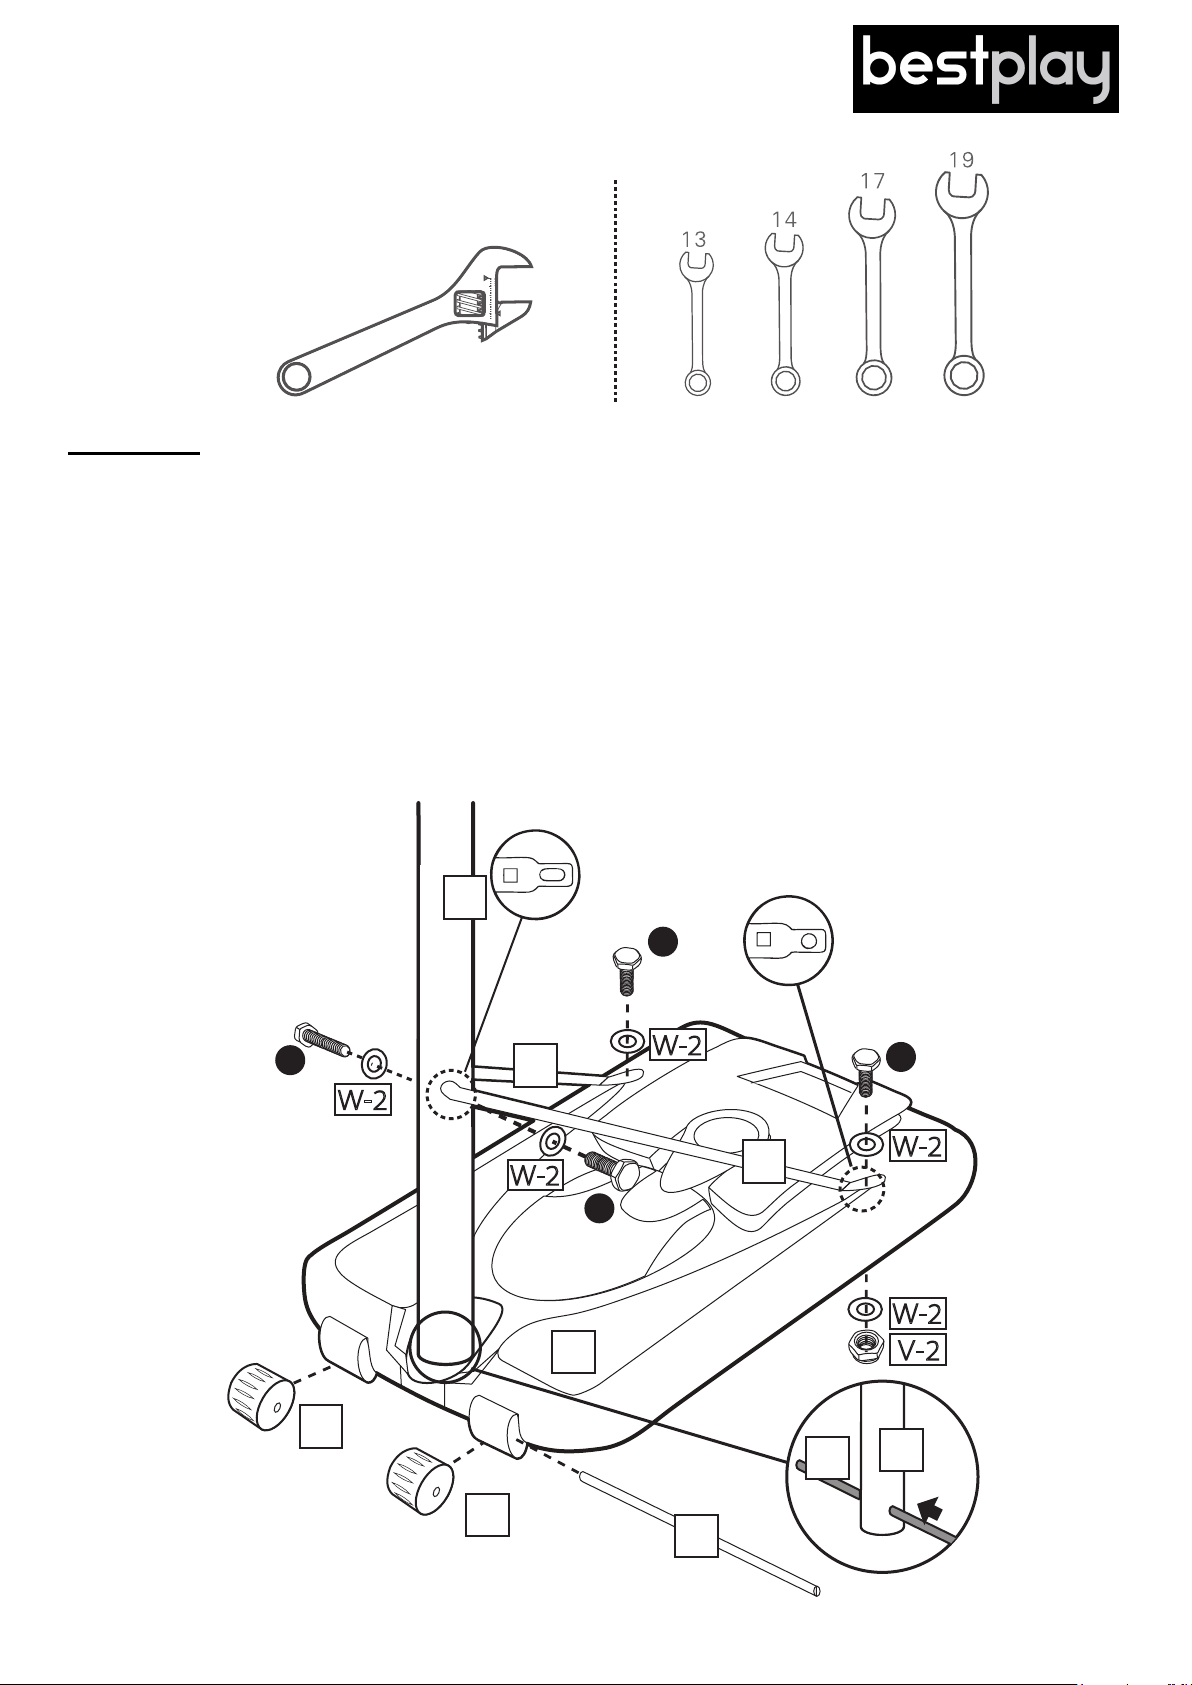
Step 1
1. Insert wheel axle (I) through the two wheels (H) and the lower main pipe (D) on the
sandbase (C).
2. Fasten the two support-bars (G) onto the lower main pipe (D) with two bolts (2) and two
washers (W-2).
3. Now fasten the other end of the support-bars (G) onto the sandbase (C) using two bolts
Assembly Required
Adjustable Spanner Wrenches
(3), four washers (W-2) and two nuts (V-2).
Support-bars (G) with oval hole
G
D
2
G
should connect with the
lower main pipe (D).
W-2
W-2
2
3
W-2
G
G
Support-bars (G) with
round hole should connect
with the sandbase (C).
3
W-2
W-2
H
H
C
V-2
I
D
I
5
Page 18
Step 2
1. Attached the middle main pipe (E) to the lower main pipe (D) straightly.
2. Secure the U-bracket (K) on the middle main pipe (E) at the joint by two bolts (9)
through four washers (W-2) and two nuts (V-2).
E
W-2
V-2
9
V-2
W-2
W-2
W-2
9
D
G
G
C
6
Page 19
Step 3
Please make sure the
bracket is in correct
position before tighten it
with backboard.
4
4
5
5
A
Attach the basket (B) and V-Bracket (J)
1.
on the backboard (A) by using two
spring set (N) and (X), two bolts (4),
two bolts (5) through six washers (W-2)
and four nuts (V-2).
2
2
Open the V-Bracket (J) to align at the joint of
2.
the backboard (A), secure it with two bolts (2)
and two washers (W-2).
7
Page 20
Step 4
1. Fasten the net (B-2) onto the baskets (B-1) hooks. Find loops at top edge of the
net (B-2). Hook one loop over and around center of the baskets hook (B-1). Pull loop
down to secure loop within baskets hook. Repeat for remaining net loops.
J
R
U
P P
O
Make sure the mats (R) and washers (W-4)
are in the right position as the figures
showing to avoid unnecessary troubles.
O
6
6
1. Attach the upper arms (P) on the V-Bracket
(J), using a bolt (6) through two washers
(W-4), two plastic mats (R) and a bracket tube.
2. Attach the lower arms (O) on the V-Bracket (J)
in the same way above.
8
Page 21
Step 5
1.
Attach the upper arms (P) and
lower arms (O) on the top main
pipe (F) by using two bolts (6)
through four washers (W-4), four
plastic mats (R) and two nuts
( V-4 ).
6
6
Make sure the mats (R) and washers
(W-4) are in the right position as the figures
showing to avoid unnecessary troubles.
6
2.
Attach the height adjuster (Q) on the
lower arms (O) by using a bolt (6)
through two washers (W-4), two
plastic mats (T) and a nut (V-4).
Cap the (M) and (L) onto the top
3.
main pipe and the height adjuster.
9
Page 22
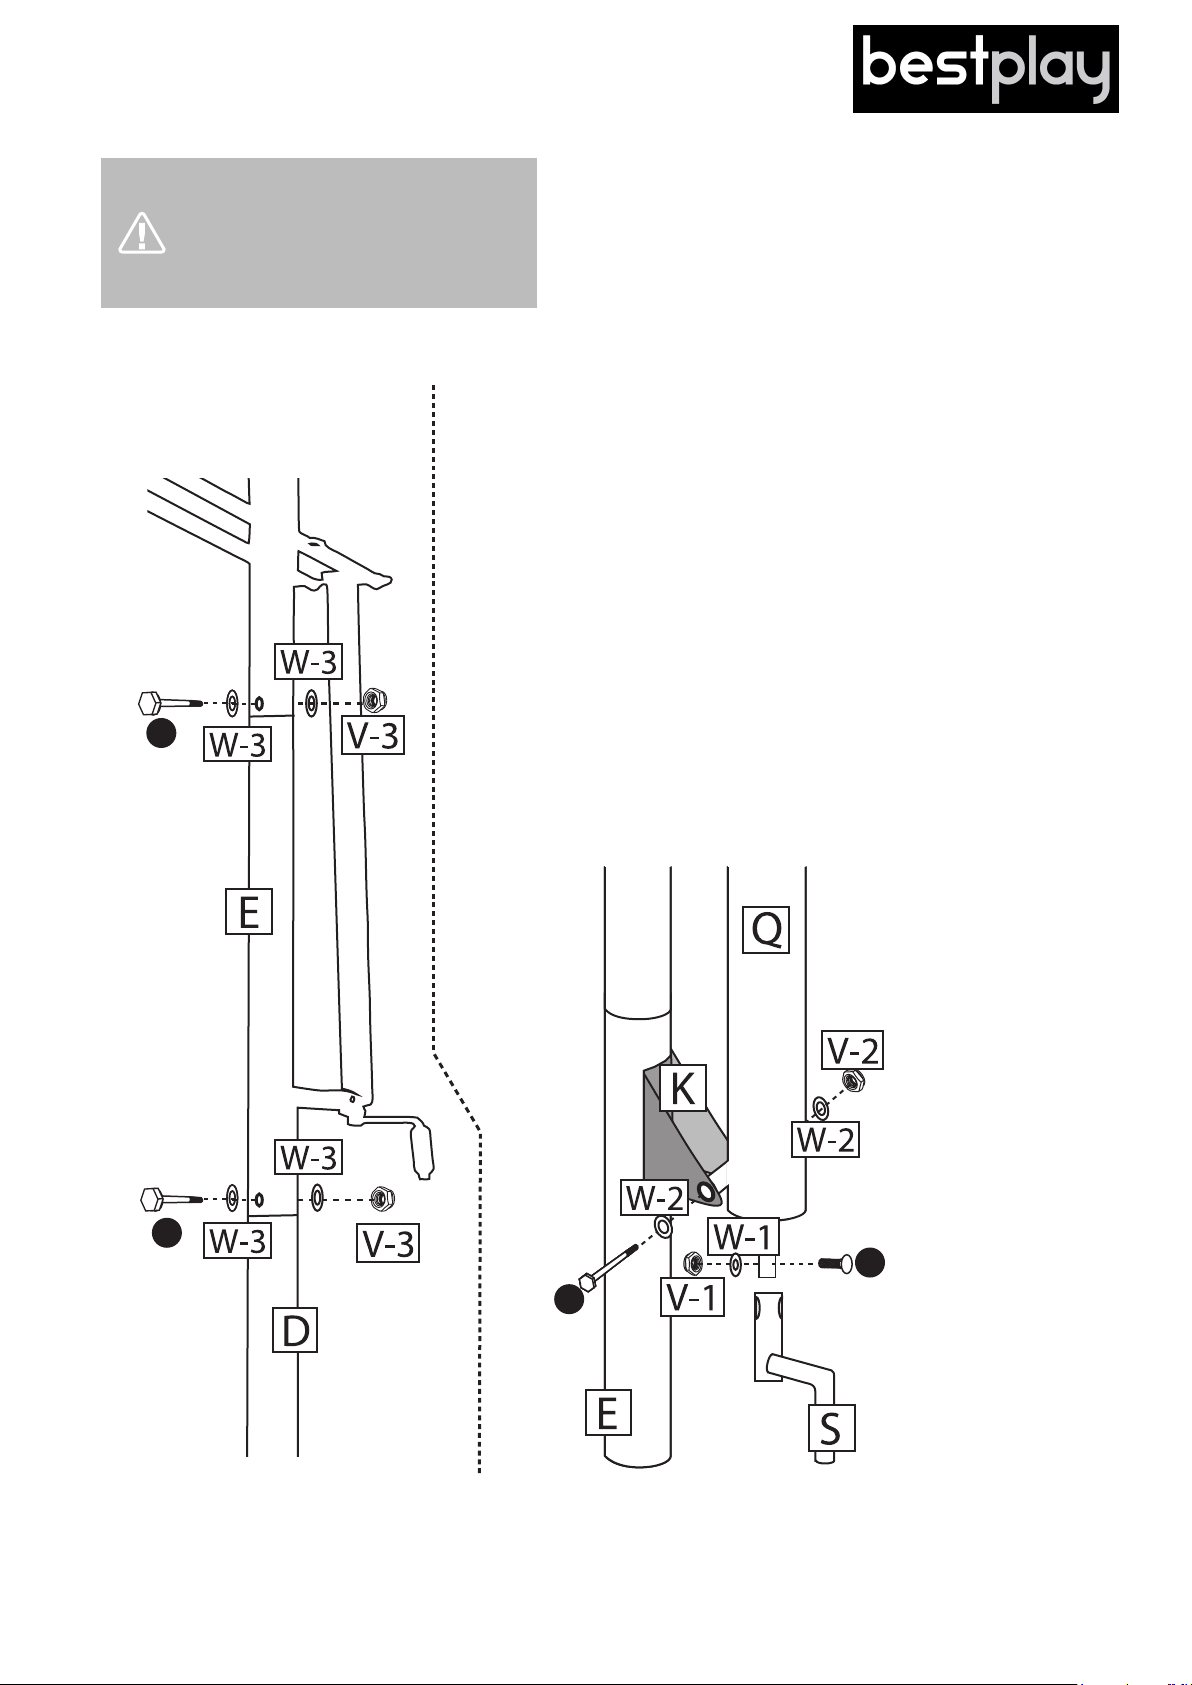
Step 6
Adjust the height adjuster (Q)
to a suitble height in order to
connect the height adjuster (Q)
and U-bracket (K) properly.
1.
Attach the height adjuster (Q) on the bracket (K) by
using a bolt (7) through two washers (W-2) and a nut
(V-2).
2.
Attach the height adjuster handle (S) into height
adjuster (Q) by using a screw (8) through a washer
(W-1) and a nut (V-1).
3.
Attach the top main pipe onto the middle main pipe at
1
the joint using a bolt (1) through two washers (W-3)
and a nut (V-3) to secure. Assemble the middle main
pipe and the lower main pipe in the same way.
1
8
7
10
Page 23
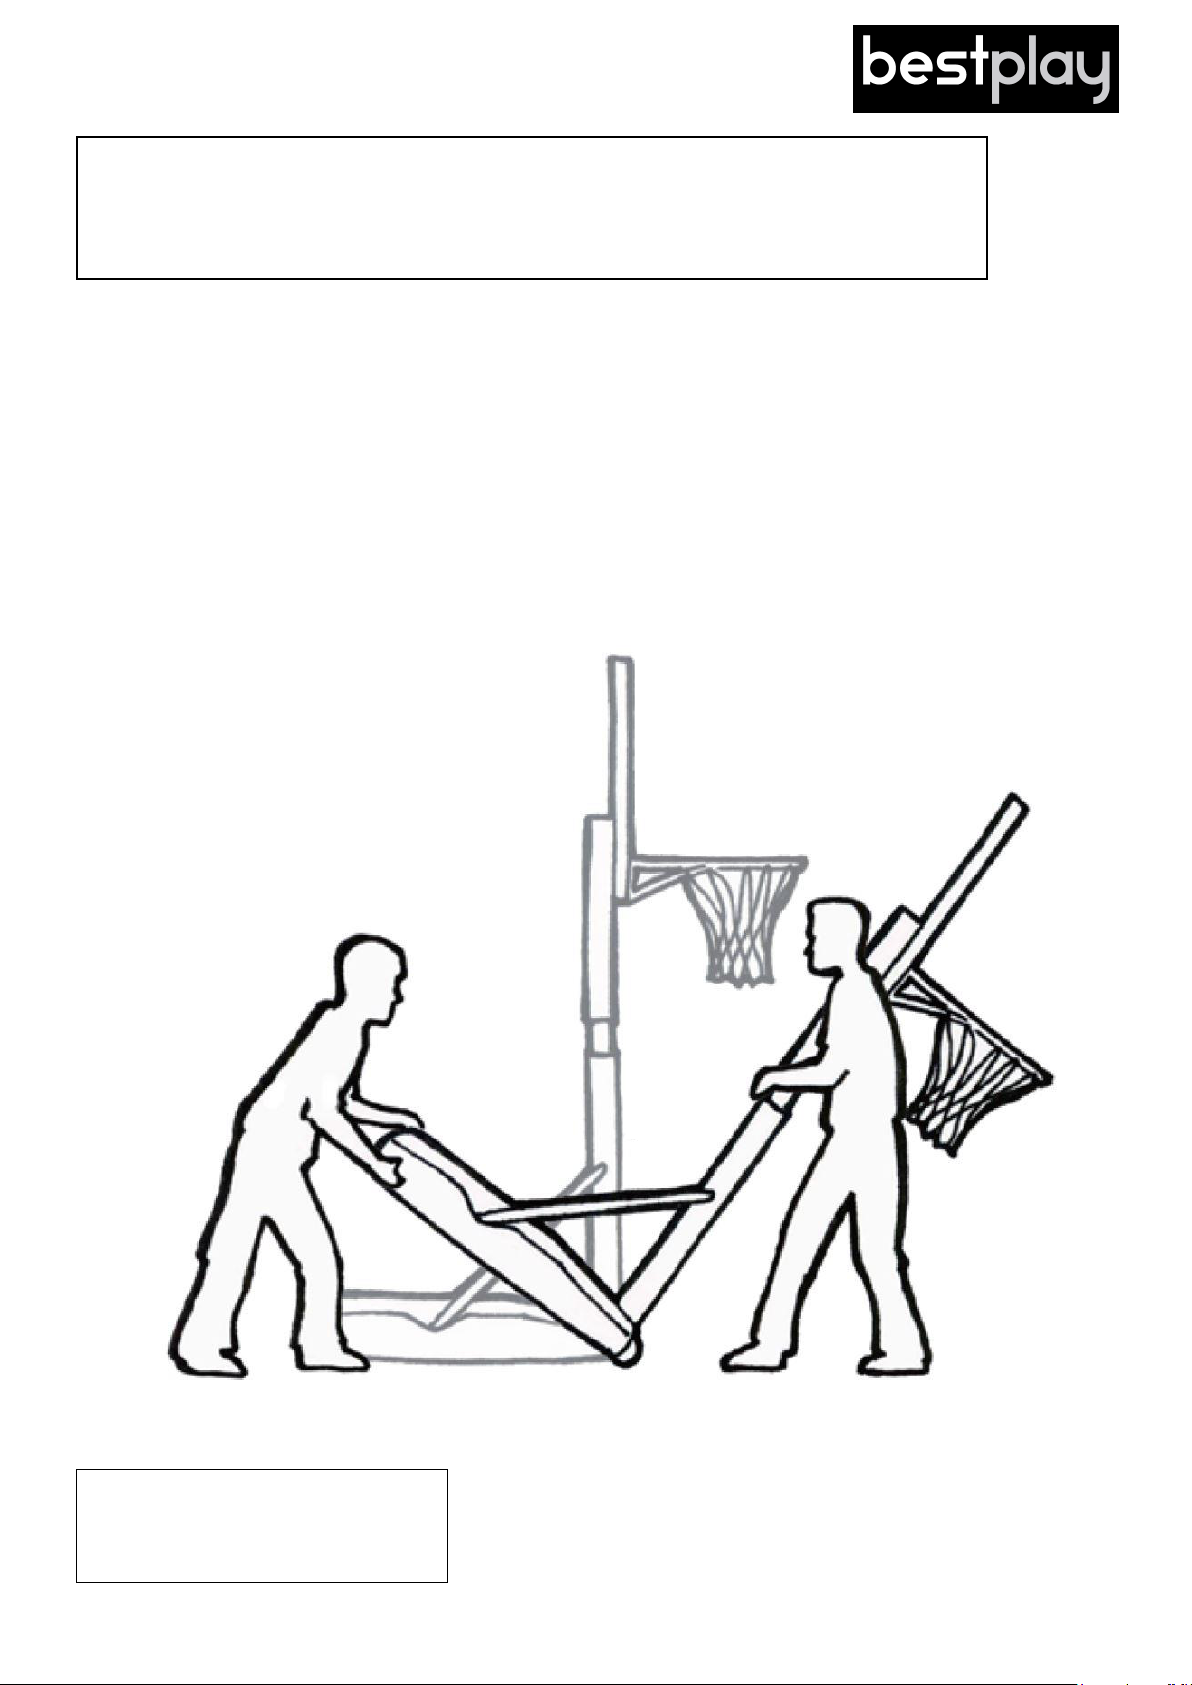
Step 7
Attention! It is recommended to be two persons when filling the base with sand.
Do not use water, as it can leak. In cold weater the freezing may cause damage
if the base is filled with water.
1. Place the basketball stand at a suitable location and unscrew the lid of the sandbase.
2. Adjust the basketball stand to lowest setting and tilt the stand 45 degrees, as shown on
picture below. It is recomended to be two adults.
3. Fill the sandbase with sand.
4. When the base is seemingly full of sand, tilt the basketball stand back down and pour
more sand into the base.
WARNING! Failure to follow the
instructions may cause bodily
damage.
11
Page 24

Bestplay A/S
Knullen 22
5260 Odense S
Tlf. +45 70 22 72 92
Denmark
SFP 19.1
 Loading...