

Page 1
Important:
Read these instructions carefully before use.
Familiarise yourself with the appliance before
connecting it to the gas container.
Keep the
Model No.: CS-02
Instruction manual for future reference.
OUTDOOR USE ONLY
OUTDOOR GAS STOVE
1008 CM 2513
Page 2
Dear Buyer,
We thank you for your choice of our camp stove/oven. By reading the
Instructions carefully, you will be satisfied with the stove/oven.
Please read this manual before you light your appliance
Once you have installed your appliance,
we recommend you to retain this manual for future reference.
CAMP STOVE INSTRUCTIONS
.1.
General Cautions:
1. DO NOT leave this appliance unattended while in use. The user must
remain in the immediate area of the product and have a clear view of
the product at all times during operation.
2. Keep children and pets away from burner at all times.
3. The use of alcohol, prescription or non-prescription drugs may
impair your ability to properly assemble of safely operate this
appliance.
4. For OUTDOOR use only. DO NOT use in a building, garage or any
other enclosed area. DO NOT use in or on recreational vehicles
or boats. NEVER use this appliance as a heater
5. DO NOT operate appliance under ANY overhead construction. Keep
a minimum cleance of 18cm from sides, front and back of appliance
to ANYconstruction. Keep the area clear of all combustible material
and flammable liquids, including wood, dry plants and grass, brush,
paper, and canvas.
6. USE ONLY on a level, stable non-combustible surface like brickes,
concrete or dirt. DO NOT use this appliance on any surface that will
burn or melt like wood, asphalt, vinyl, or plastic.
7. Keep the fuel supply hose away from any heated surfaces.
8. To prevent accidental fires, before using the appliance ensure that
the hose is not damaged and all joints and connections are not
leaking by turning on the cylinder valve. Leave the burner valve
closed, and apply a soapy solution to the joints and connections.
If a continuous hissing sound is heard, or if the soapy solution
bubbles, there is a leak. Do not use the appliance if there is a leak.
Replace the faulty parts.
9. Extinguish all open flames before connecting the gas supply to the
appliance and before checking for leaks.
10. When cooking with oil or grease, a thermometer MUST be used.
o
11. Never all oil or grease temperature to get hotter than 200C. If the
o
temperature exceeds 200C or if oil begins to smoke,
IMMEDIATELY turn burners off.
12. When cooking with oil or grease, fire extinguishing materials shall
be readily accessible. In the event of an oil or grease fire DO NOT
attempt to extinguish with water. Use a Type BC dry chemical fire
.10.
Page 3

instructions in this manual for establishing proper oil, grease or
water levels.
14. When frying with oil grease, all food products MUST be
completely thawed and towel dried to remove excess water. Failure
to complete thaw and dry food may cause oil or greacy to overflow.
Follow instructions in this manual for frying foods.
15. When frying, slowly submerse food products into the oil or grease.
DO NOT drop.
16. DO NOT place an empty cooking vessel on burner while in
operation. Use caution when placing anything in the cooking
vessel while burner is in operation.
17. In the event of rain while cooking with oil or grease,
IMMEDIATELY turn off burner(s) and gas supply, then cover
cooking vessel. DO NOT attempt to move the appliance or the
cooking vessel.
18. Avoid bumping or impact with the appliance to prevent spillage
or splashing of hot cooking liquid.
19. DO NOT move the appliance when in use. Allow until to cool to
o
45 C before moving or storing.
20. This appliance will be hot during and after use. Use insulated
oven mitts or gloves for protection from hot surfaces or splatter
from cooki ng liquids.
21. In case there is a fire, call the local fire department. Stay clear from
flames. Do not attempt to extinguish an oil or grease fire with water.
22. Use only accessories, such as cooking vessels recommended by the
seller, to allow safe and proper performance of the product. Never
use a cooking vessel larger than the capacity an diamete
recommended by the seller.
23. The Max Pot Diameter is 25cm, the Min Pot Diameter is 70mm.
24. The consumers and retails are not allowed to adjust, release,
remove or replace the valves, ask for help from techniciant if
this job is necessary.
13. NEVER overfill the cooking pot with oil, grease or water. Follow
extinguisher or smother fire with dirt, sand or baking soda.
.2.
Extinguish flames using a BC type fire extinguisher as
recommended by the fryer manufacturer: or
Smother flames with dirt or sand
In case there is a fire, call the local fire department.
To avoid accidental burns from burner flame or hot cooking
liquid, turn the the burner off before inserting or removing
food from the fryer.
When removing food from the fryer, be sure to avoid burns
from hot cooking liquid drippings.
.9.
Repair
Please return the appliance to seller or call the qualified person for
repair and spare parts. Do not repair it by yourself
The manufacturer warrants stove components (ecept paint and finish) to
be free from defect in materials and workmanship for 1 year from the
date of purchase. All accessories (included with stove or purchase
seperately) are warranted from defect in materials and workmanship for
90 days from the original purchase date. Within these periods the
manufacturer will replace or repair defective parts.
Limited warranty
Product paint and finish in not warranted. The exterior finish of the
product will wear down over time. Touch up the exterior with black,
high temperature spray paint as needed. Do not pain the inside surfaces.
Clean the unit after each ues to maintain the finish and prolong the life
of your product. Wipe away all grease and ashes. Keep metal products
free of moisture, salts, acids and harsh fluctuations in temperatures.
Warranty does not cover normal wear of parts or damage caused by
misuse, abuse, verheating and alteration. Repairs or alterations made
by anyone other than seller or appointed by manufacturer and seller are
not covered in this warranty. Manufacturer will not be held liable for
any loeese due to neglectful operation. Furthermore, this Warranty does
not cover damaged caused by natural disasters, such as earthquakes,
hurricanes, tornadoes, floods, lightning, fires, etc.
Upon the expiration of this warranty all such liability will terminate. No
other warranties are expressed or implied.
Keep the original sales receipts. Proof of purchse is required to obtain
warranty services. Prior written approval and a return authorization
unber must be obtained and accepted for repair or replacement only.
Returns must be shipped prepaid. Collect shipment or shipment without
a return authorization number will not be accepted.
Page 4

Model No.:
CS-02
Product name: CAMP STOVE
Production date:
BE,FR,GB,GR, IE,IT,PT,
ES,CH
CY,CZ,DK,EE FL,LV,LT
MT,NL,NO,SK,SI,SE
I3+
I3B/P
G30/G31
G30/G31
Country of destination
Category/ies
Gas Type
Supply pressure (mbar)
28-30/37
30
Burner
Oven
Injector Size (mm)
0.52
0.38
Heat Input (kW)
1.6/each
0.6
Specification:
Gas Consumption (g/h)
276g/h
for G30
272g/h
for G31
Total
3.8kW
1008 CM 2513
Setup Instructions:
Open the lid and attach the windsreens to the side of the oven as shown.
Type of gas: this appliance is designed for gas type: G30/G31,
the technical data label on the stove for specific gas information.
look at
TECHNICAL REQUEST & DATA:
.3.
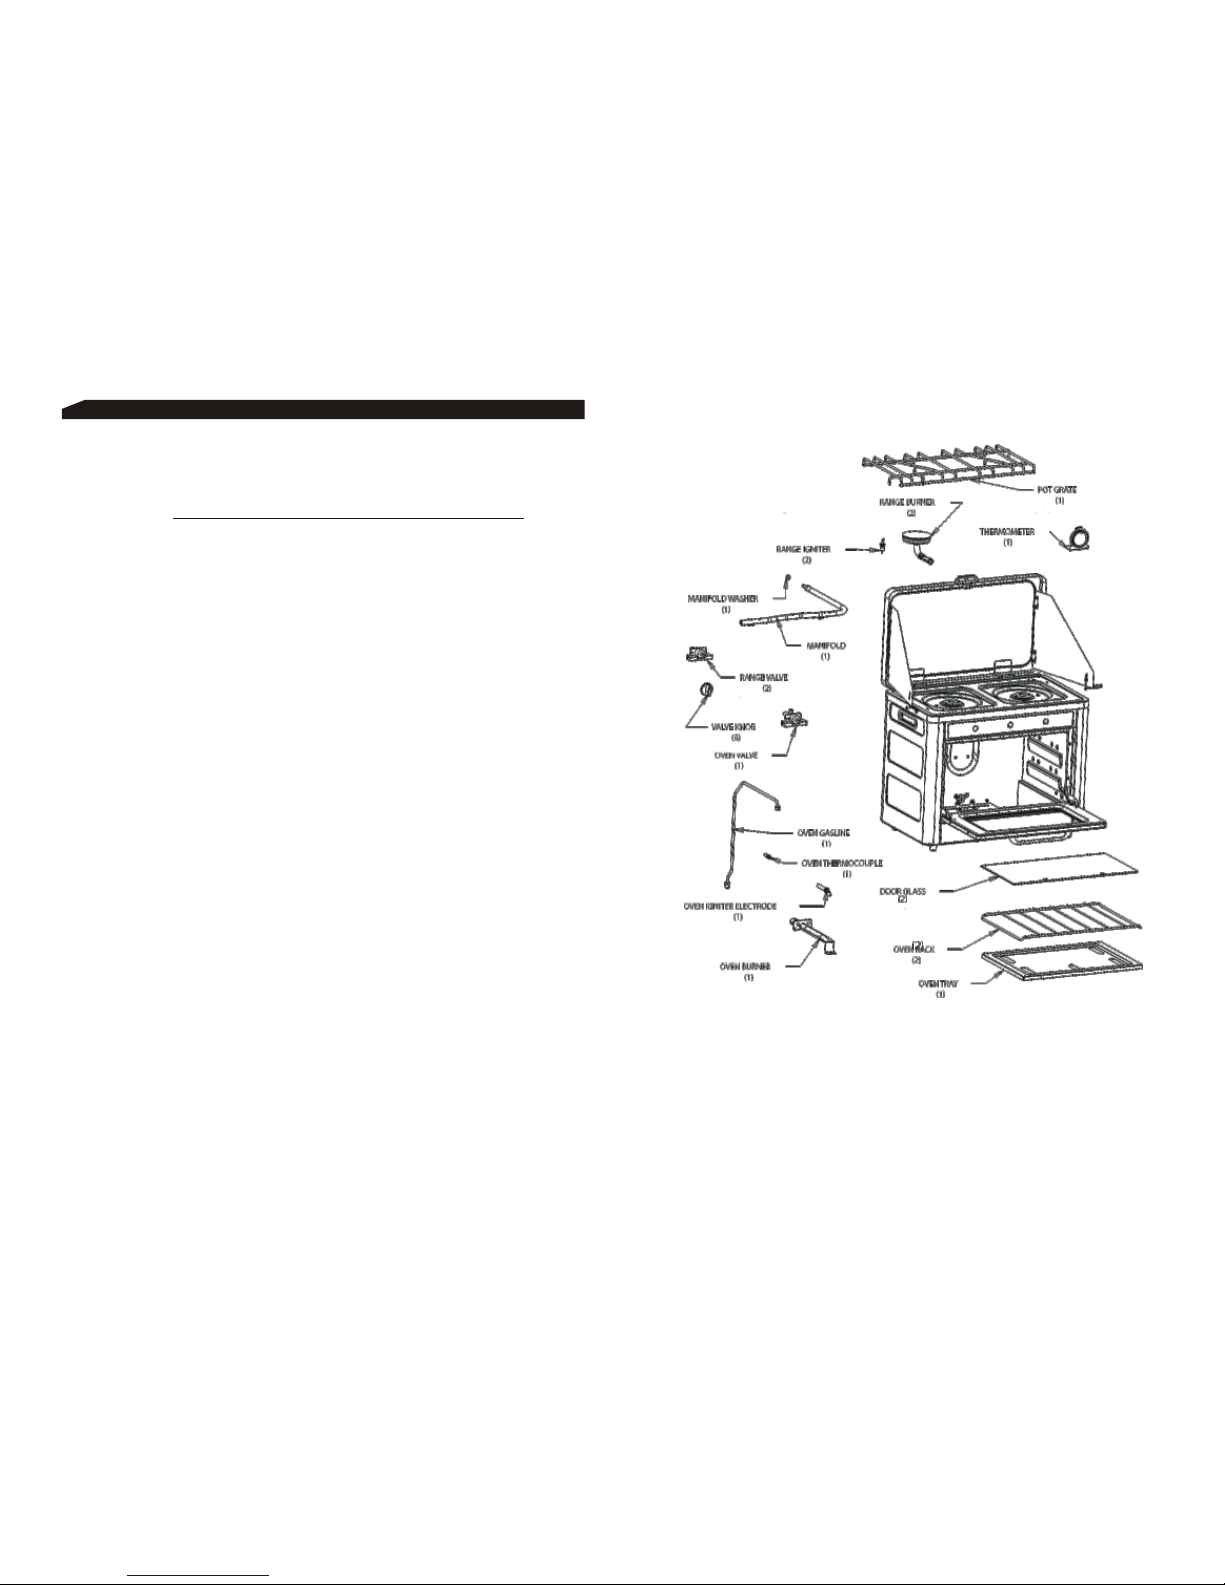
When you open the box of camp stove, you may find two important parts:
The camp stove body 1pc
The wire pan-grate 1pc
PARTS LIST:
The connection hose and regulator 1pc (available)
The oven rack 2pcs
The baking pan 1pc (available)
Notice:
2. The oven rack and tray is in the oven;
3. The connection hose and regulator is in the oven;
4. The parts maybe different for different clients, check with the
seller first to make sure that you understand the parts clearly.
1. The wire pan-grate is on the top burner;
Setup the oven on a level, non-combustible surface.
WARNING
This appliance is not intended for use as a poultry fryer
If Frying:
Follow instructions provided by the appliance manufacturer.
When cooking with oil or grease, a thermometer must be used.
Instruction of water from any source into the cooking oil or
grease may cause overflow and severe burns from hot oil and
water splatter. When frying with oil and grease, all food
products MUST be completely thawed and towel dried to
remove water before being immersed in the fryer.
Be sure thermometer is in good working condition. To check
the thermometer, insert it into a pot of boiling water and
o o
ensuring that it registers approximately 100C+10C. If it does
not function properly, obtain a replacement thermometer
specifed by the manufacturer before using the appliance.
Do not over fill the pot with cooking liquid. Never fill appliance
more than half full of cooking liquid or past the maximum fill
line (a permanent marking on the fryer)
If cooking liquid has spilled and ignited, do not attempt to
extinguish with water. Immediately turn gas supply OFF at the
supply cylinder and:
would emit excess gas
COOKING SURFACES, POTS AND PANS: Clean the cooking surface
with soapy water and a nylon cleaning pad
After appliance has cooled, wipe areas where paint and fihish have burned
off to minimize rusting.
Special operation
Using a thermometer
Prior to lighting, position thermometer clip so that at least
1.2cm of thermometer tip is submerged in oil. Reposition
thermometer as necessary to cook. Continue to use thermometer
until burner is turned off
.8.
Component cleaning:
Burner should be wired clean. Hot soapy water and a soft bristle brush
can be used to clean the burner surface. Clean clogged gas port holes
with an open paper clip. Replace corroded or damaged burners that
Page 5

.4.
Make sure the pot grate is installed properly with the wire ends fitting
into the holes on the top of the oven to present the rack from moving
(see picture)
Connect the gas to camp stove
Notice:
1. A low gas pressure regulator is request for operation, use the
regulator recommended by manufacturer or seller
3. The hose connecting the appliance and gas cylinder is required, and
the max. length should not exceed 1.5m
2. Before you assemble the regulator, please check the gas t
pressure shown on the gas cylinder, and make sure the information on
the regulator and cylinder match
ype and
4. The connecting hose could not be twisted & knoted .
5. Change the connecting hose when the national conditions require.
Connect:
1. Be sure that the burner & oven valves are in the “OFF”position
before you connect the stove to a gas or propane supply line.
2.Connect the inlet of the stove with the outlet of the gas regulator.
This connecton must be made with a specialised hose for LP gas.
3. Be sure that the hose is placed correctly and is not being stretched,
tied, or bent.
4. Also be sure that the hose is not too close to heat sources, especially
with the back of the camp stove.
5. It is recommended that a manual gas valve is placed between
gas pressure regulator and the inlet of the stove to open or shut off
the gas supply. This valve must be in an easily accessible location.
the
.7.
Do not move the appliance during operation
This appliance will be hot during and after use. Use insulated oven
mitts or gloves for protection from hot surfaces or splatter from
cooki ng liquids.
Keep children and pets away from burner at all times.
Suggested Cleaning Materials
Mild dish washing liquid detergent
Wire brush
Bylon cleaning pad
Hot water
Paper clip
Soft brass bristled brush
Disconnect the hose from camp stove by turning coupling nut
counterclockwise, disconnect the regulator from the gas tank as tank
manufacturer specified.
Do not store gas tank in an area where children play
Disconnect gas tank
Turn OFF all control knob(s) and gas tank valve.
All cleaning and maintenance should only be done when the appliance
is cool and with the fuel supply turned off . DO NOT clean any part
in a self-cleaning oven. The extreme heat will damage the finish
Correct care and maintenance will keep your appliance operating
smoothly. Clean regularly as determined by the amount of use.
Note: Clean the entire appliance each year and tighen all hardware
on a regular basis (1-2 times a year or more depending on usage).
Clean should be done where detergents will not harm patio, lawn, or
the like.
Before you move the product,wait more than 10 minutes after you
extinguished all flames, and the product is cool down.
Put the product into carton or handle bag when you do not use it,and the
product can be stored in house.
WARNING:
Clen and maintain the camp stove
Move and store the camp stove
It is not a toy for children.
WARNING:
Store the product on a level, stable place where out of reach of children.
ATTENTION:
Stay far away from flame when you change a new tank.
Page 6

WARNING:
5. If growing bubbles appear, there is a leak. Turn off the gas supply in
event of gas leak. If leaks cannot be stopped, do not try to repair.
Replace a new one.
6. Always close tank valve after performing tank leak test by turning
manual valve.
Do not use appliance until leak checked.
If you cannot stop a gas leak, immediately close gas tank valve and
call gas supplier or your fire department.
Lighting stove instruction:
Do not lean over the oven while lighting.
1. Remove all appliances from the burner to create a free flow or air.
2. Open lid. Do not attempt to light the stove with lid closed.
3. Fully open LP bottle valve is using a bulk tank
4. Turn control valve slowly to the High position. Cooker will ignite.
Adjust controls to desired temperature.
5. If ignition does not occur in 5 seconds, turn the burner contro(s) off,
wait 5 minutes, and repeat lighting procedure. If built-in ignitor will
not light follow instructions for lighting with a match.
7. Before each use, check to see if hoses are cut or worn. Replace
damaged hose assembly before using appliance. Use only valve/
hose/regulator specified by manufacturer or seller.
.5.
Leak Testing Valves, Hoses and Regulator
1. Turn all control knob(s) to “OFF”
2. Be sure regulator is tighly connected to gas tank.
3. Completely open tank valve by turning manual valve. If you hear a
rushing sound, turn gas off immediately. There is a major leak at the
connection. Correct before proceeding.
4. Brush soapy solution onto indicated connections showen below.
2. Open Oven Door. Do not attempt to light the oven with the door closed.
3. Remove the bottom oven tray to reveal the burner.
4. Push the gas valve handle in and turn slowly to the high position. The
oven Burner will ignite. (If lighting with a match, light match and
place it over the burner. Slowly turn on the valve, Do not stand with
head or arms over the burner.)
5. Keep handle depressed for 10 seconds.
6. If the burner does not stay lit repeat the process.
7. Re-install the bottom oven tray over the burner
8. Adjust the controls to the desired position
9. If ignition does not occur in 5 seconds, turn the burner control(s) off,
wait 5 minutes, and repeat the lighting procedure. If built-in ignitor
will not light follow instructions for lighting with a match.
Burner Flame Check
Light burner; rotate knob(s) from HIGH to LOW. You should see a
small flame in LOW position than seen on HIGH. Always check flame
prior to each use. A good flame should be blue with minimal yellow tip.
Some yellow tips on flames are acceptable as long as no carbon or soot
deposits appear.
Lighting Oven Instruction:
Do not lean over the Oven while lighting:
1. Remove all appliances from the oven to create a free flow of air.
OPERATION:
After you have ignited the gas stove
and/or oven, you can adjust the control
knob, which as the drawing shows,for
your ideal flame and temperature you want.
Do not put any items on the glass door
as the picture shown.
Do not exceed 4.5kg on the oven shelves
.6.
Pay attention to the high temperature when
o
temeprature raise of outer body over 50C
Turn off the gas supply at the gas container
after use, any modification of the appliance
may be dangerous
 Loading...