

Page 1
OPERATION MANUAL
BST-DL71
USB DATALOGGER
(Temp./RH/DP/WB)
Page 2
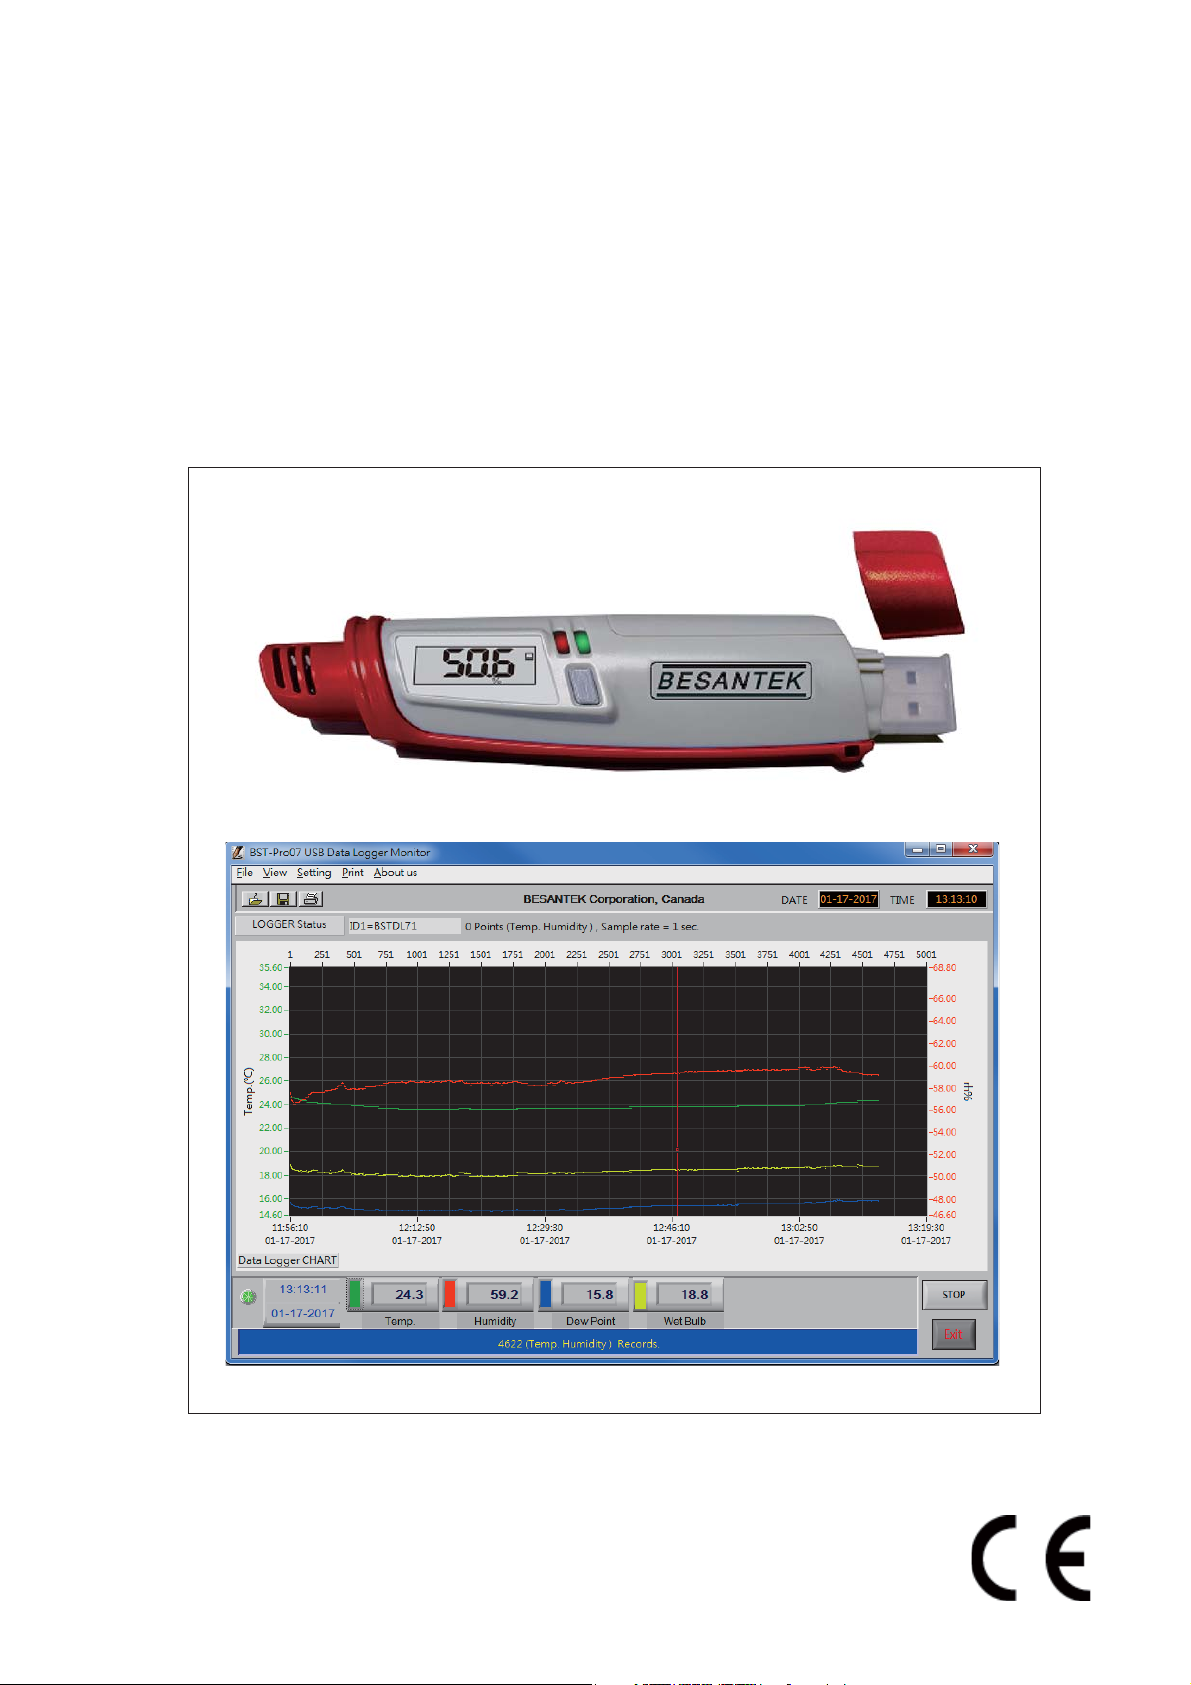
LOGGER INTRODUCTION
A very smart and cost-effective mini USB logger , save your cost
without logger cradle !
Many different parameters are selectable with the modern shape
design, versatile application is applicable and applied.
Ultrasonic sealed housing meets IP57 water resistant for Temp.RH
models.
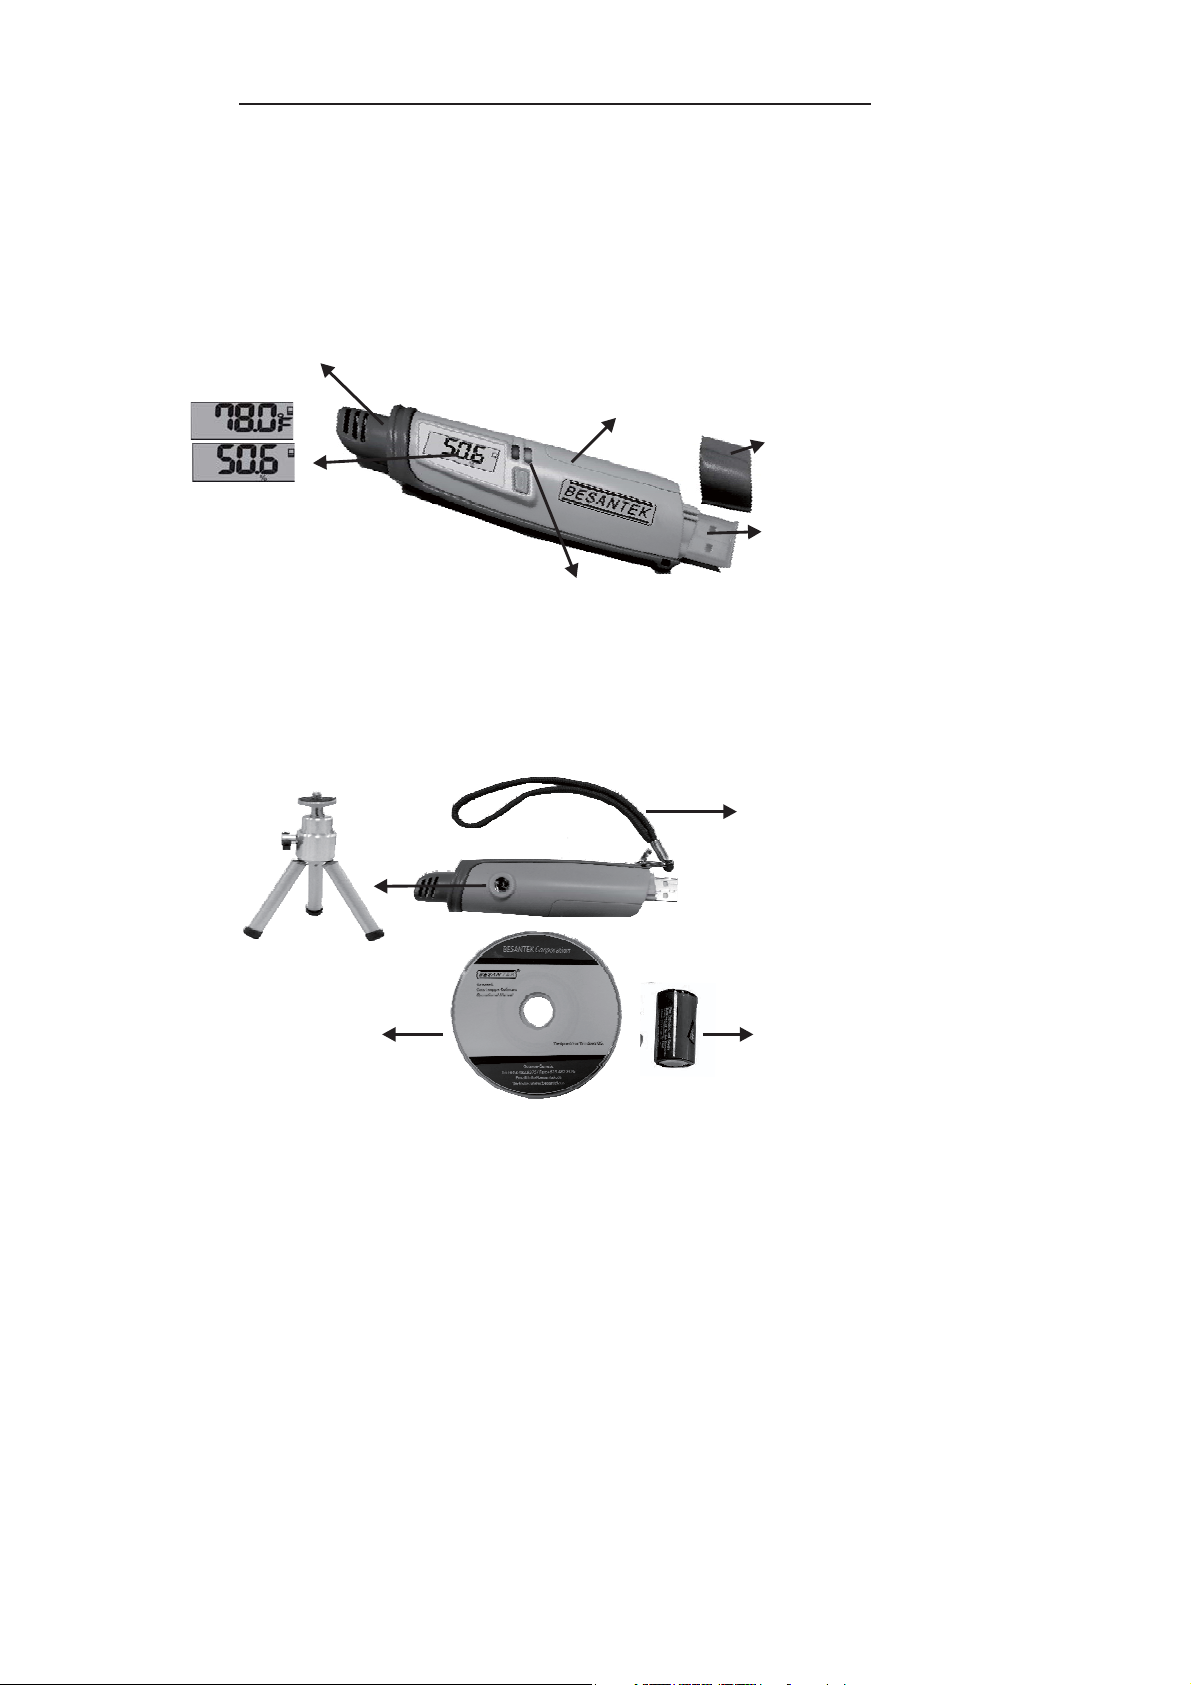
Sensor part
Battery compartment
easy to replace battery
Sensor cap
LCD display model shows
:Temperature and Relative
humidity interchange
Logger tripod receptacle
for tripod mountable device
User friendly
USB driver
and logger
software CD
USB cap
LED: Green and Red
Green LED flashing stands for logging is
in process
Red LED flashing stands for reading
exceeds High or Low alarm threshold.
Wrist strip conveniently carry
around and avoid falling off
Lithium battery
½AAsize
The standard package supplied :
a) USB logger unit with USB clear cap , sensor cap
b) CD (USB driver and logger software)
c) 1/2AA lithium battery x 1 pc
d) Operation and installation manual
e) Wrist stip x 1
Battery : 3.6V 1/2AA x 1
Battery life depends on sample rate, ambient temperature and sample point
setting,normally one year.
P1
Page 3
LOGGER SPECIFICATION
Model no. BST-DL71
Temp. range -40~85℃ (-40~185℉)
Accuracy ±0.5℃/1.2℉(-20~50℃), others±1.2℃
RH% range 0%RH~99.9%RH
Accuracy ±3%RH (at 25℃, 10~90%RH), others±5%RH)
Dew Point. Wet Bulb YES
Memory capacity 32,000 points
Power 3.6V battery 1/2AA
Logger 135 x 28.5 mm
LOGGER SETUP
A. Install logger driver for Windows OS ( WinXP, Vista,Win7.Win8,
Win8.1)
The PL2303_Prolific_DriverInstaller_v110.exedriver is for Windows operation
system,follow the installation steps hereunder:
1. Put the CD into CD driver in Step1, click
PL2303_Prolific_DriverInstaller_v110.exe for installation the driver.
2. The set up status
3. Click”NEXT” to continue.
4. After complete the installation , press Finished“”。
B Install the logger software for Windows OS (List above).
Please follow the following steps to install the software
1. Put CD into CD driver ,in Step 2. click Setup.exe to install“”
2. Select the destination folder you are go to save by click Browse button“”
3. Once you finish selecting ,press Next“”.
4. Select “I accept the License Agreemen:(s)” and press NEXT button.
5. Click NEXT button when you see the following.
6. Press FINISH button to complete the installation.
7. Restart the Windows XP system
P2
Page 4

C Run the software from Windows OS(List above).
1. Plug the USB cable into USB port, since you have already Installed the USB
driver, computer will automatically detect logger ,
2. Find “BST-Pro07” in START PROGRAMS BST Pro07→→-
3.Select logger software folder.
Reminder:
Software is installed completed,”Get Datalog’s Identifier”shows as
below(pic.1), then press SETTING button to enter Log setting
(Pic.1)
NOTE: If logger is not plugged in USB port, the warning message
“Reminder: Data Logger is not plugged in USB port!” shows next page (pic.2)
Make sure logger is plugged in and choose the correct COM port.
(Pic.2)
NOTE:
If software message box show as Pic2. Follow the next steps.
1.click My computer Content in hardware content,click Device manager to“””” “ ”
find the listed (COMx) listed under Ports(COM & LPT as below with red line.If
you may Prolific USB-to-Serial Comm. Port , it means the logger is connected to
computer properly.
2. Remember the Comm port number and go back to software.
3 Click “Setting” ”Comm port “ select the port number as you see from step 1,.
then press OK button.
P3
Page 5

(Pic.3)
LOGGER SETTING
BASIC:(Pic.3)
1:ID setting
Maximum 20 characters , name your logger press OK button
to confirm.
2:Current Date/Time
Clock setting, the system automatically shows current date
and time of your PC. Press OK to confirm.
(Note :Schedule date & time refer to current pc date and
time)
►Click OK to sync the meter’s date and time every time.
3 LCD display set: (N/A for non-LCD models)
Press ON ( Logger LCD still illuminated after complete
recording ), or OFF( LCD is not illuminated after complete
recording. Press OK after selection.
(Pic.4)
(Pic.5)
ALARM&SENSOR:(Pic.4)
1.Select Temp./Humidity alarm, set Hi/Lo Temp. and
Hi/Lo Humidity values.
(Red LED will flash if the current reading is over the setting.)
2.Select the parameter you want to record.
Example: Total is 32K memory, if choose Temp. and RH
sensors at the same time, memory store will split to 16K for
Temp.+16K for RH.
SETTING:(Pic.5)
1 Set sample point (K=1,000 multiple basis within total:
memory points)
2.Set sample rate, start mode to record:
Select “hour(1~6), “minute(0~59)”,“second(0~59)” time interval.
Select 5 start to record modes from: (See more detail below)
(a) Immediate
(b) Schedule
(c)Real-time (PC is always connected with the logger unit)
(d) Key start (Start recording by pressing button)
(e) Roll-over (when memory are full, logger covers the
earliest memory automatically)
P4
Page 6

3.Select Unit : Select Temperature unit °C/°F,press OK to confirm.
(a) Immediate
Select immediately start mode by pressing the OK
button. Logger starts recording at once.
(b) Schedule start mode:
Select the date and time meter will start recording.
Please follow the date and time form (M/D/Y,H:M:S)
( c)Real-time start mode:
1.After set start mode at real-time,datalogger starts login records. When logger
records, the green fan at left corner shows it is under recording.(Meter should
be connected with pc all the time,under this mode.)
2.In real-time mode, it shows “STOP” button instead of “DOWNLOAD”
at the right corner. Press “STOP” to stop real-time recording. Then button will
change into “DOWNLOAD”. Press “DOWNLOAD”for downloading data.
►Before exit software data has to be downloaded
(d) Key-start mode:
Press
1. Select start mode at “Key-start”, remove datalogger from pc.
2. Use a sharp pin to touch the grey button, start logging.
3. Datalogger stop recording after memory is full.
NOTE:
The button is designed for not easy to touch , users have to use a sharp pin to touch
(If you set up start mode as “BUTTON”) ,to prevent carelessly touch to start or stop
the recording.
After set up “key start” as start mode, remove the logger from USB port.
Use a sharp pin to push the middle of gray button, until you hear a “ click sound “,
the LED will flash to start recording.
(e) Roll-over mode:
Select the mode to record when the data is full, it will cover the earliest memory.
After download the data , long press grey button to record without reset up each
parameter and selection.
P5
Page 7

INTERFACE INTRODUCTION
Logger Status:
Before download data, press to show ID, Records, Sample rate,LOGGER status
Unit. NOTE: Once button is pressed, recording is inactivated.Download
Download data:
Press DOWNLOAD button, data download in few seconds. Graph shows
automatically
Please do not press DOWNLOAD button if you won’t stop record.NOTE:
You can press LOGGER STATUS button to see record points.
Retrieve file:
Press OPEN FILE button to select file and show
the graph.
Save data:
Press SAVE button to save txt.file.
View Data Table:
Press View button to get data table with details.(pic.6)
Print graph:
Press PRINT button and print graph. Follow the print setting below to print full
screen graph. Press OK to print pdf file.(pic.7)
Print Table Data:
Press table data, the screen shows the record range, enter the start number
to the end number (For example: 1~500 or 200~1000...or leave it blank for
printing all data ).(pic.8)
Save each pdf. files with different names.
√
√
(pic.6)
(pic.7)
(pic.8)
Data Clear
The data is stored in the memory till next setting start, meter will clean previous data
automatically. So if you start next data logging, there is no way you can find the data you haven't
stored.
P6
Page 8

Zoom in/out&Move
Hold
Hold
Hold
Press
Ctrl
Ctrl
Ctrl
+
+
+
or
Click
Click
Shift
Mouse
Mouse
Click
Screen graph zoom in
=
Screen graph zoom out
=
Mouse
Move screen graph
=
= Read each measurement .
NOTE: If the graph size is over zoom in/out,follow the color select below the
graphic will go back to default size
Line color selecting:
1.Click the color beside the reading(Temp. RH), color box shows below.
2.Move mouse to review and select color.
3.Click to save, the color appear on line and bar.
WARRANTY
This instrument is warranted for one years from the date of purchase (One year
limited warranty applies to cables). A Return Authorization letter must be
issued before returning for any reason. This warranty does not apply to defects
resulting from action of the user such as misuse, abuse, alteration neglect,
improper wiring, improper maintenance or repair, or unauthorized
modification, damage resulting from leaking batteries, operation outside of
specification.
During the warranty period the manufacturer reserved the right to decide
either to repair or replace the product. The meters are to be returned along
with good packing to prevent any damage in shipment and insured against
possible damage or loss.
The two years’ warranty doesn’t apply to:
Accessories and batteries (not covered by warranty).
Claims is not acceptable for improper use (including adaptation to particular
applications not foreseen in the instructions manual) or improper combination
with incompatible accessories or equipment, or by previous attempts for
repair carried out by none skilled or unauthorized personnel.
P7
 Loading...