

Page 1
OWNERS MANUAL
A-2TR - STANDARD
A-2TR - GMT
#
4
Congratulations! ... Nice Choice!
You are now the owner of a Bertucci® Performance Field Watch.™ You have something special because
every Bertucci® Watch has been carefully designed, made from only the best materials, and loaded with
premium features. Additionally, Bertucci® Watches are backed up with an industry leading 3 year warranty.
This is the basis for our Promise of Performance™ to you. Please carefully read this manual to familiarize
yourself with your new Bertucci® Watch. Please contact us with any questions you may have. Contact
information is in section 14.
Thank You!
Our Story – Your Watch:
Our story is simple... It’s about building a better watch. It’s a Promise of Performance™ to you that is
derived from a belief that innovative design and attention to detail matter. It is this focus, passion, and
integrity that drive us in the watches we make for you.
If you were to own only one watch... it would be a watch well suited for your life’s endeavors. It would
need to possess the qualities of durability, singularity of purpose, and versatility. Designed to balance form
and function, to be equally rugged and refined, with a classic, understated, enduring style... distinctly a
Bertucci® Field Watch™. Ready to survive the day to day challenges that come your way... wherever they
may be.
*Manufactured using one of more of the following U.S. Pat. No: 488388, 488075, 488724, 582296, 609586, 645766, 7832605, 8,960,510,B2 and other patents pending.
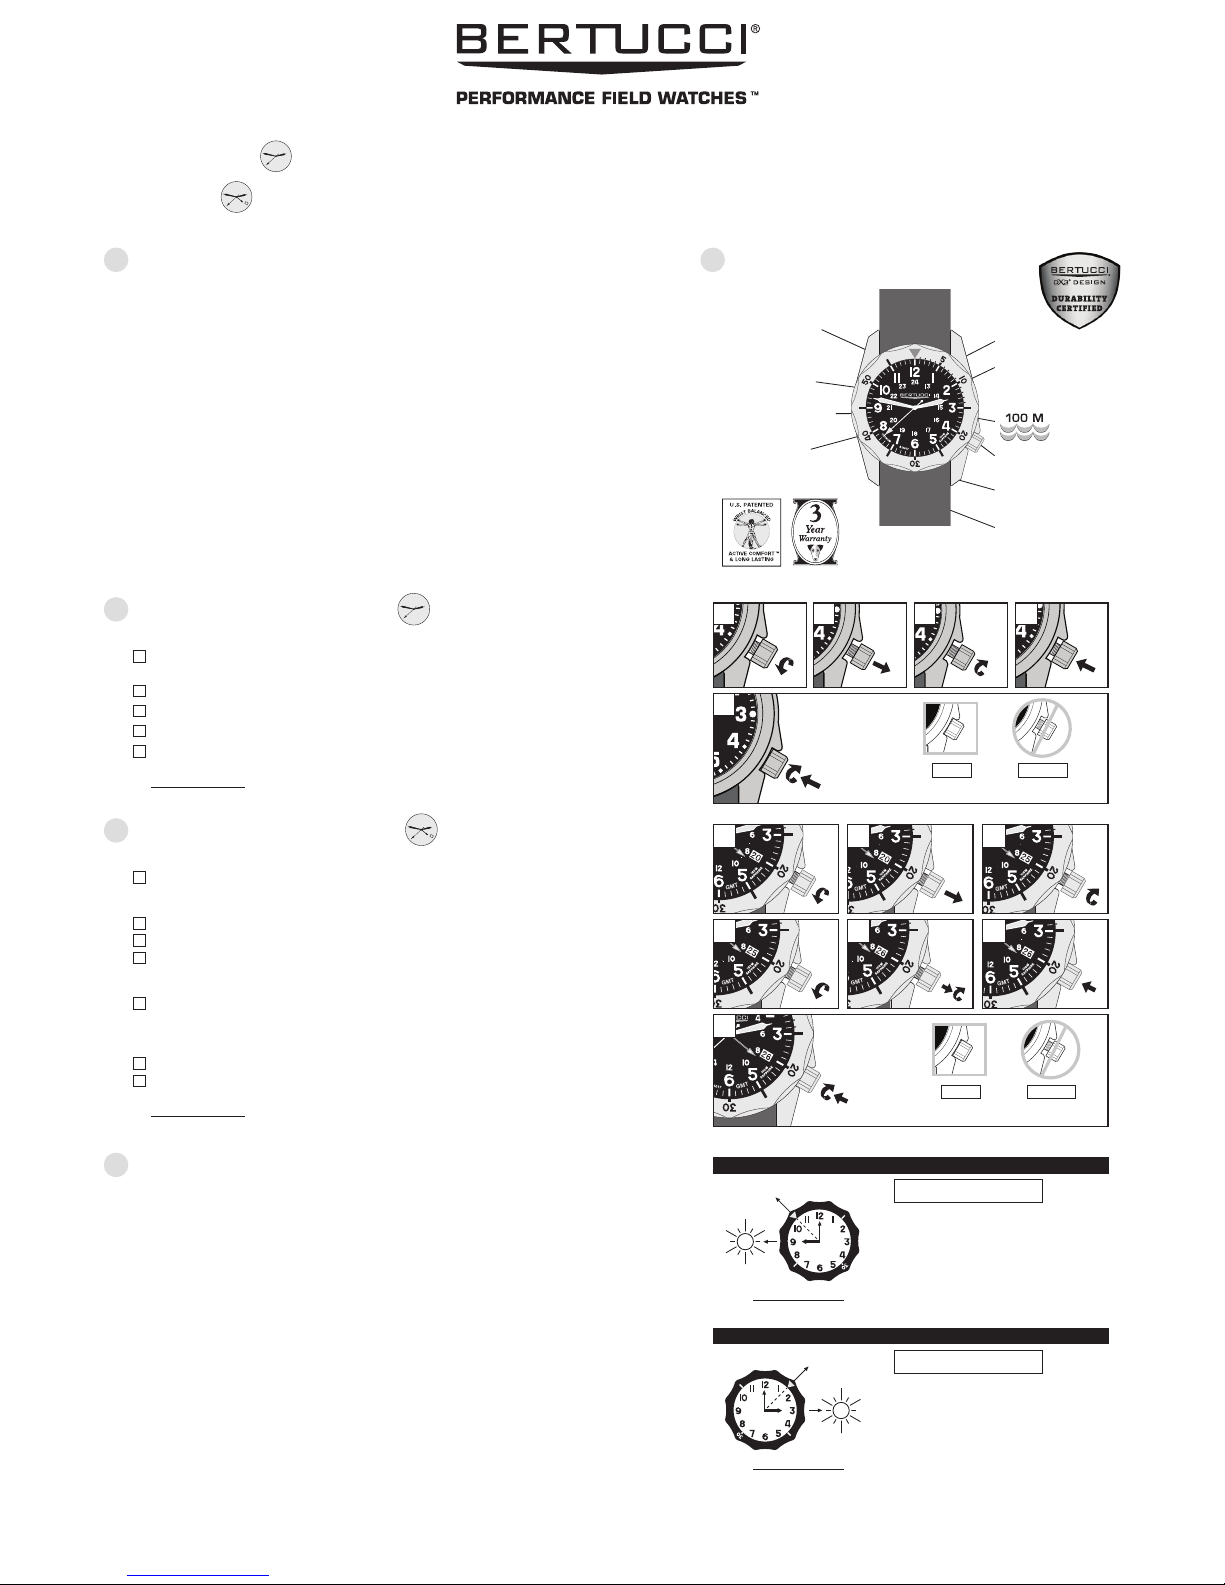
Durability by Design
®
Rugged U.S. Patented
Unibody™ case for
extreme durability
and comfort
Scratch resistant
sapphire crystal
Swiss Super Luminous
hands & markers
Rotating elapsed
time ring
Screw down crown &
case back
Integrated unbreakable
band retention lug bars
Equipped with U.S.
Patented long lasting
high performance band
Solid Titanium case
Premium precision &
reliable all-metal Swiss
made quartz movement
A-2TR STANDARD: Time Setting:
(Note: A red crown clip may be on setting crown - please carefully r emove.)
1 Turn crown counter clock-wise to unscrew (see fig. 1 to the right). The crown is completely unscrewed
when it turns freely. (Note: If crown is already in the out position or unscrewed, with second hand stopped, go to step 2.)
2 Gently and carefully pull crown out to stop second hand. Do not pull too hard (fig. 2).
3 Rotate the crown clock-wise advancing the hour and minute hands to set the desired time (fig. 3).
4 Push crown in to re-start second hand (fig. 4).
5 Push in again and turn crown clock-wise to engage threads. Continue to turn clockwise to firmly screw /
re-thread down crown. (A screwed down crown will prevent water damage to the movement.)
Do not overtighten (fig. 5).
4
32
Using The Rotating Bezel Ring:
Equipped with a solid titanium unidirectional rotating ring.
ELAPSED TIME
For simple quick method to measure up to 60 minutes... rotate the bezel ring counter clock-wise so that
the red triangle (the 0 minute marker) aligns with the minute hand. As the minute hand moves as time
passes, the time elapsed is shown on the outer ring minute markings where the minute hand has moved to.
COUNTDOWN TIME
Similar to the elapsed time is the countdown time. Instead of time increments going from zero to 60
minutes, they go from 60 minutes to zero. This can be useful for pilots or military or police operations
where synchronization is key and knowing when it’s time to go is critical. Set the desired time to match the
minute hand and when it reaches zero (red triangle), you’d better be on the move.
COMPASS
The rotating bezel ring may be used to find the direction during daylight hours. Substitute the markings at
“0”, “15”, “30”, and “45” for the directions North, East, South, and West respectively. See Illustrations to
the right:
Note 1: For use during daylight hours only, readjust every hour.
Note 2: For use during standard time, during Daylight Saving Time back the watch up an hour to account for this.
Note 3: This is an approximate system, there is no substitute for a compass.
A - Point the Hour hand at the sun.
B - Rotate the bezel ring until S (South / red
triangle) is half way between the hour hand
and 12:00.
C - The correct directions are shown on the dial.
A - Point the Hour hand at the sun.
B - Rotate the bezel ring until S (South / red
triangle) is half way between the hour hand
and 12:00.
C - The correct directions are shown on the dial.
W
E
Point the Hour hand
toward the sun.
SOUTH*
W
E
E
W
Point the Hour hand
toward the sun.
Point the Hour hand
toward the sun.
SOUTH*
SOUTH*
Finding direction in the morning hours (sunrise to noon)
Finding direction in the afternoon hours (noon to sunset)
A.M. Northern Hemisphere
P.M. Northern Hemisphere
A-2TR GMT: Time & Date Setting:
(Note: A red crown clip may be on setting crown - please carefully r emove.)
1 Turn crown counter clock-wise to unscrew (see fig. 1 to the right). The crown is completely unscrewed
when it turns freely. (Note: If crown is already in the out position or unscrewed, with second hand
stopped, go to step 2.)
2
Gently and carefully pull crown to 1st position. You will feel a “click” (fig. 2). Do not pull too hard.
3 Turn crown clock-wise to advance the date... continue to advance the date to yesterday’s date (fig. 3).
4 Turn crown counter clock-wise to set the GMT/ 2nd time zone. Move 4th red arrow hand to hour on
inner dial showing 2 through 24. (Note: 2nd time zone will utilize the same minute hand as primary time
zone.) (fig. 4).
5
Carefully pull the crown out further to 2nd position for a second “click” to set primary time. Rotate the
crown clock-wise to advance the time past midnight and you will see the date advance to today’s date.
Continue to advance to set the desired time. This will ensure the AM/PM is correct (fig. 5). Note: Date
will need to be reset for months not ending with 31 days.
6
Push crown in to re-start second hand (fig. 6).
7 Push in again and turn crown clock-wise to engage threads. Continue to turn clockwise to firmly screw/
re-thread down crown. (A screwed down crown will prevent water damage to the movement.)
Do not overtighten (fig. 7).
1
2
32
5 6
IMPORTANT!
It is critical that
the crown is
screwed down.
IMPORTANT!
It is critical that
the crown is
screwed down.
1
5
7
Properly screwed down
crown (setting knob).
Properly screwed down
crown (setting knob).
Not screwed down
crown.
Not screwed down
crown.
Correct
Correct
Incorrect
Incorrect
* - In the Southern Hemisphere point the 12:00 marker at the sun, and then place the red
triangle marker halfway between the 12:00 and the hour hand for NORTH.
* - In the Southern Hemisphere point the 12:00 marker at the sun, and then place the red
triangle marker halfway between the 12:00 and the hour hand for NORTH.
1 2
3
4
5
1
4
Page 2
Warranty:
Every Bertucci® Watch is carefully designed, manufactured and inspected to
ensure it meets our Promise of Performance™ to you. This is backed up by a 3
year warranty. In the event of a malfunction, please follow these steps.
Step 1 Determine whether your watch is in warranty. If your watch is in warranty, please follow the
remaining steps.
Step 2 Determine whether your watch has been abused. If not abused, please follow the remaining steps.
If the watch is abused please refer to our Repair & Refurbishment programs and/or our web site.
Step 3 Please have the battery checked by a local professional jeweler or consider our Battery & Band
replacement program in section 11 and our web site. Most malfunctions are simply battery
related. If the battery is good, and watch is still not functioning correctly, please follow next Step 4.
Step 4 Please return the defective watch (just the watch head, r emove the band) to the retail dealer or
send to us for exchange or repair.
NYLON LEATHER TRIDURA™
MODEL:
CASE DIAMETER:
ACCURACY:
WEIGHT w/ BAND:
WATER RESISTANCE:
BATTERY LIFE EST.:
BATTERY NUMBER:
MOVEMENT:
40 mm
-10 / +20 sec. per month
2.4 oz. 68 g
100 M / 328 ft.
5 Years 3.5 Years
371
BATTERY& BAND
Consumer Service
Consumer Service
Consumer Service
REPAIR & REFURB
WARRANTY
™
BATTERY & BAND
Consumer Service
™
BATTERY& BAND
Consumer Service
Consumer Service
REPAIR & REFURB
™
STANDARD GMT
Swiss made
quartz analog
jeweled all-metal
Swiss made
quartz analog
jeweled all-metal
GMT w/ date
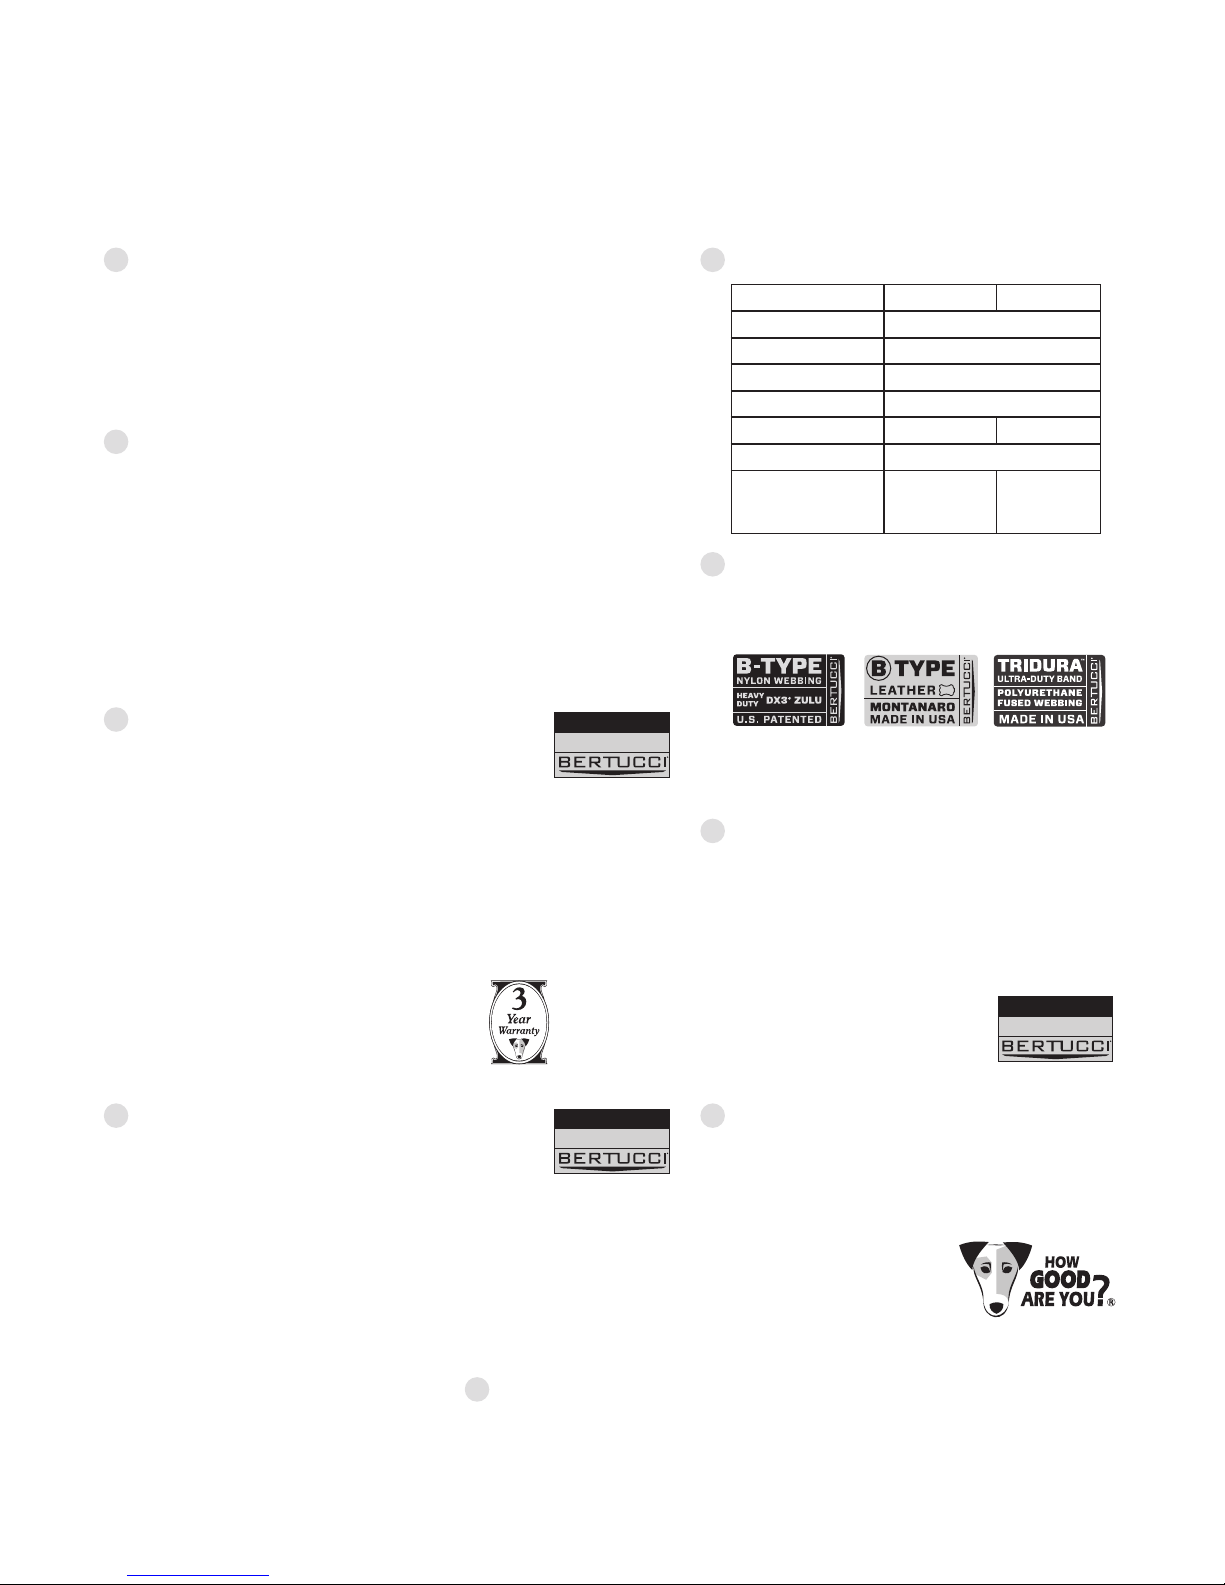
Water Resistance:
Your Bertucci® Watch has been carefully designed and tested to be used in water - 100 meters/ 328 feet
below sea level) if crown is completely screwed down.
1. Never adjust crown (setting knob) when watch is wet or submerged in water.
2. Never wear the watch unless the crown is completely screwed down.
3. The watch is water resistant only as long as crystal, crown and case are intact and undamaged.
4. Your Ber tucci® Watch has been designed to be worn during activities in which the watch will be exposed
to water and submersion in water. However, the watch is not a professional diver watch and should not
be used for diving.
Care for your Bertucci® Watch:
1. Never wear your watch unless the crown (setting knob) is completely screwed down.
2. We recommend rinsing your watch and band with fresh water after exposure to salt water, chlorinated
water, chemicals, soil loads or dust.
3. Never adjust crown when watch is wet or submerged in water.
4. Keep watch clean and free of debris. Use mild hand dish soap & warm water with a soft brush to clean.
Note: Keep setting crown screwed down.
5. Replace band if excessively worn, see Replacement Bands in section 9.
6. If watch has stopped, bring it to a local professional jeweler for battery replacement or contact us for
battery replacement service. See Battery Information in section 11.
7.
Do not expose your watch to intense magnetic fields and vibration such as loudspeakers and other electromagnetic devices.
8.
When setting your watch, handle the crown gently as this is a precision device.
9. Do not subject your watch to severe impact, avoid dropping.
0.
If watch is not in use for an extended time period, unscrew and/or pull crown out, stopping second
hand, to conserve battery life.
Specifications: STANDARD & GMT:
Replacement Bands Available:
Genuine U.S. Patented Bertucci® Watch Bands are available in a variety of
materials and design types.
Thank You!
Thank you for wearing a Bertucci® Performance Watch.™ You’ve made
an excellent choice. You’ll be pleased with your Bertucci® watch for years
to come. Please retain this manual for future reference.
Face Every Minute® In The Field With Bertucci
®
We would like to hear from you, so
please send us your stories, testimonials,
adventures, or experiences you’ve had
wearing your Bertucci® Watch.
BATTERY & BAND™ SERVICE: Send your watch
(remove the band) in to our service center
and we will perform the battery and o-ring
replacement and/or lubrication, clean and test
the watch, and send it back to you with the new
band of your choice at a special price.
Bertucci
®
watches feature a quick tool-less band change. Y
our watch can
be fitted with multiple material types & colors.
Battery Information:
Bertucci® Watches use environmentally friendly mercury free batteries.
Batteries should be replaced by a professional jeweler or use the
Bertucci® Battery & Band™ replacement program listed below... which
offers an outstanding value on a new battery & band for your Bertucci®
Watch. Do not attempt to remove the case back as it requires special
tools and skills. Proper replacement of batteries is critical to ensure the
long life of your Bertucci® Watch. Actual battery life may vary based on
environmental factors, normal battery variance, and usage pattern.
top
Repair Information:
W
e offer complete repair service to keep your Bertucci® Watch in
performing condition.
See web site for more information.
REPAIR SERVICE: If your watch requires repair service, we can run a diagnostic on the watch to
determine the issue and contact you with the repair estimate.
OUT OF WARRANTY REFURBISHMENT PROGRAM: Should your watch be out of warranty (more than 3
years old), damaged severely, deemed overly abused, or water damaged as a result of not screwing the
crown down, we offer our refurbishment program. The way it works is as follows – Send us your out of
warranty or damaged watch (remove the band) to the BCS address, shown in section 10,
c/o Refurbishment Dept., You will receive:
• refurbished, re-certified and cleaned watch head. • new band • new battery • 1 year warranty
Note: You may not get your exact watch back, but of equal or better condition, if original watch can not
be repaired.
6 7
9
11
13
8
10
12
1
Register Your Watch:
See web site to register your watch.
15
Page 3
Congratulations! ... Nice Choice!
You are now the owner of a Bertucci® Performance Field Watch.™ You have something special because
every Bertucci® Watch has been carefully designed, made from only the best materials, and loaded with
premium features. Additionally, Bertucci® Watches are backed up with an industry leading 3 year warranty.
This is the basis for our Promise of Performance™ to you. Please carefully read this manual to familiarize
yourself with your new Bertucci® Watch. Please contact us with any questions you may have. Contact
information is in section 15.
Thank You!
Our Story – Your Watch:
Our story is simple... It’s about building a better watch. It’s a Promise of Performance™ to you that is
derived from a belief that innovative design and attention to detail matter. It is this focus, passion, and
integrity that drive us in the watches we make for you.
If you were to own only one watch... it would be a watch well suited for your life’s endeavors. It would
need to possess the qualities of durability, singularity of purpose, and versatility. Designed to balance form
and function, to be equally rugged and refined, with a classic, understated, enduring style... distinctly a
Bertucci
®
Field Watch™. Ready to survive the day to day challenges that come your way... wherever they
may be.
*Manufactured using one of more of the following U.S. Pat. No: 488388, 488075, 488724, 582296, 609586, 645766, 7832605, 8,960,510,B2 and other patents pending.
Durability by Design
®
Rugged U.S. Patented
Unibody™ case for
extreme durability
and comfort
Hardened, scratch
resistant crystals
Equipped with U.S.
Patented long lasting
high performance band
Premium precision &
reliable all-metal quartz
movements
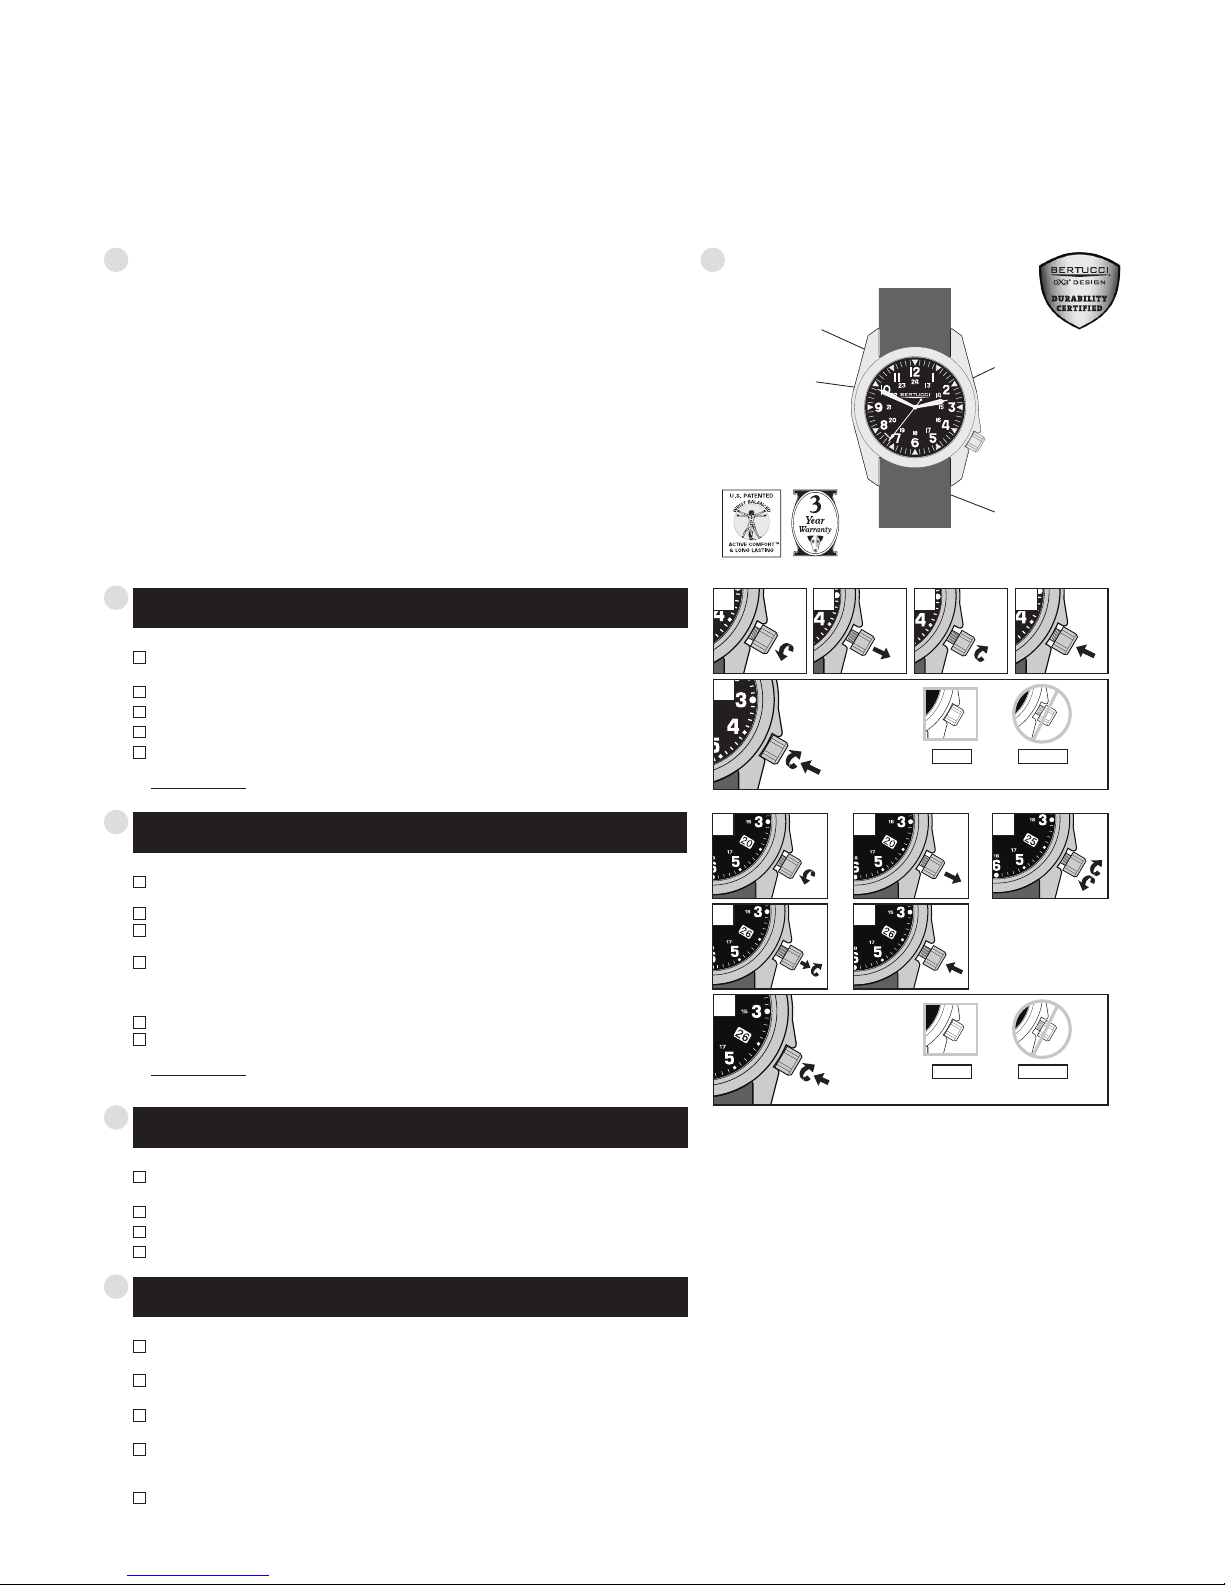
TITANIUM & STAINLESS STEEL CASES
Screw Down Crown Setting Instructions:
(Note: A red crown clip may be on setting crown - please carefully r emove.)
1 Turn crown counter clock-wise to unscrew (see fig.1 to the right). The crown is completely unscrewed
when it turns freely. (Note: If crown is already in the out position or unscrewed, with second hand stopped, go to step 2.)
2 Gently and carefully pull crown out to stop second hand. Do not pull too hard (fig. 2).
3 Rotate the crown clock-wise advancing the hour and minute hands to set the desired time (fig. 3).
4 Push crown in to re-start second hand (fig. 4).
5 Push in again and turn crown clock-wise to engage threads. Continue to turn clockwise to firmly screw /
re-thread down crown. (A screwed down crown will prevent water damage to the movement.)
Do not overtighten (fig. 5).
FIBER REINFORCED POLY-RESIN/ POLYCARBONATE CASES
Push In Crown Setting Instructions:
(Note: A red crown clip may be on setting crown - please carefully r emove.)
1 Gently and carefully pull crown out to stop second hand.
(Note: If crown is already in the out position, with second hand stopped, go to step 2.)
2 Gently and carefully pull crown out to stop second hand. Do not pull too hard.
3 Turn crown clock-wise or counter clock-wise, moving hour and minute hands, to set to the desired time.
4
Push crown in to re-start second hand.
FIBER REINFORCED POLY-RESIN/ POLYCARBONATE CASES
Push In Crown Setting Instructions: w/ DATE
(Note: A red crown clip may be on setting crown - please carefully r emove.)
1 Gently and carefully pull crown out to stop second hand.
(Note: If crown is already in the out position, with second hand stopped, go to step 2.)
2 Gently and carefully pull crown halfway out. You will feel a “click”. Do not pull too hard.
(See section 4 step 2).
3
Turn crown clock-wise or counter clock-wise (depending on the model) to advance the date, continue to
advance the date to yesterday’s date. (See section 4, step 3).
4
Carefully pull the crown out a bit further for a second “click”. Turn the crown clock-wise to cycle the time
past midnight, you will see the date advance to today’s date. Continue to advance to set the desired
time, this will ensure the AM/PM is correct (See section 4 step 4).
5 Push crown in to re-start second hand.
4
32
TITANIUM & STAINLESS STEEL CASES
Screw Down Crown Setting Instructions: w/ DATE
(Note: A red crown clip may be on setting crown - please carefully r emove.)
1 Turn crown counter clock-wise to unscrew (see fig. 1 to the right). The crown is completely unscrewed
when it turns freely. (Note: If crown is already in the out position or unscrewed, with second hand stopped, go to step 2.)
2 Gently and carefully pull crown to 1st position. You will feel a “click” (fig. 2). Do not pull too hard.
3 Turn crown clock-wise or counter clock-wise (depending on the model ) to advance the date... continue to
advance the date to yesterday’s date (fig. 3).
4
Carefully pull the crown out further to 2nd position for a second “click.” Rotate the crown clock-wise to
advance the time past midnight and you will see the date advance to today’s date. Continue to advance
to set the desired time. This will ensure the AM/PM is correct (fig. 4). Note: Date will need to be reset
for months not ending with 31 days.
5
Push crown in to re-start second hand (fig. 5).
6 Push in again and turn crown clock-wise to engage threads. Continue to turn clockwise to firmly screw /
re-thread down crown. (A scr ewed down crown will prevent water damage to the movement.)
Do not overtighten (fig. 6).
IMPORTANT!
It is critical that
the crown is
screwed down.
IMPORTANT!
It is critical that
the crown is
screwed down.
1
5
6
Properly screwed down
crown (setting knob).
Properly screwed down
crown (setting knob).
Not screwed down
crown.
Not screwed down
crown.
Correct
Correct
Incorrect
Incorrect
1 2
3
4
5
6
1
4
2 3
5
1
2
A-1S, A-2S, M-1S, A-1T, A-2T, A-3T,
A-4T, M-1T, B-1T, C-1T, D-1T
M-1S, A-2T, A-4T
A-2R,
A-3P
A-5P
Note: Case back is engraved with the case type
Page 4
Warranty:
Every Bertucci® Watch is carefully designed, manufactured and inspected to
ensure it meets our Promise of Performance™ to you. This is backed up by a 3
year warranty. In the event of a malfunction, please follow these steps.
Step 1 Determine whether your watch is in warranty. If your watch is in warranty, please follow the
remaining steps.
Step 2 Determine whether your watch has been abused. If not abused, please follow the remaining steps.
If the watch is abused please refer to our Repair & Refurbishment programs and/or our web site.
Step 3 Please have the battery checked by a local professional jeweler or consider our Battery & Band
replacement program in section 10 and our web site. Most malfunctions are simply battery
related. If the battery is good, and watch is still not functioning correctly, please follow next Step 4.
Step 4 Please return the defective watch (just the watch head, r emove the band) to the retail dealer or
send to us for exchange or repair.
NYLON LEATHER TRIDURA™
BATTERY& BAND
Consumer Service
Consumer Service
Consumer Service
REPAIR & REFURB
WARRANTY
™
BATTERY & BAND
Consumer Service
™
BATTERY& BAND
Consumer Service
Consumer Service
REPAIR & REFURB
™
Water Resistance:
Your Bertucci® Watch has been carefully designed and tested to be used in water. 86 P.S.I.A., 160 P.S.I.A.,
or 320 P.S.I.A. (equals immersion to 50 meters/ 164 feet, 100 meters/328 feet or 200 meters / 656
feet below sea level) if crown is pushed in or screwed down. See case back and/or dial for the water
resistance of your watch.
1. Never adjust crown (setting knob) when watch is wet or submerged in water.
2. Never wear the watch unless the crown is completely screwed down or pushed in.
3. The watch is water resistant only as long as crystal, crown and case are intact and undamaged.
4. Your Ber tucci® Watch has been designed to be worn during activities in which the watch will be exposed
to water and submersion in water. However, the watch is not a professional diver watch and should not
be used for diving.
Care for your Bertucci® Watch:
1. Never wear your watch unless the crown (setting knob) is completely screwed down or pushed in.
2. We recommend rinsing your watch and band with fresh water after exposure to salt water, chlorinated
water, chemicals, soil loads or dust.
3. Never adjust crown when watch is wet or submerged in water.
4. Keep watch clean and free of debris. Use mild hand dish soap & warm water with a soft brush to clean.
Note: Keep setting crown screwed down or pushed in.
5.
Replace band if excessively worn, see Replacement Bands in section 7.
6. If watch has stopped, bring it to a local professional jeweler for battery replacement or contact us for
battery replacement service. See Battery Information in section 10.
7.
Do not expose your watch to intense magnetic fields and vibration such as loudspeakers and other electromagnetic devices.
8.
When setting your watch, handle the crown gently as this is a precision device.
9. Do not subject your watch to severe impact, avoid dropping.
0.
If watch is not in use for an extended time period, unscrew and/or pull crown out, stopping second
hand, to conserve battery life.
Replacement Bands Available:
Genuine U.S. Patented Bertucci® Watch Bands are available in a variety of
materials and design types.
Thank You!
Thank you for wearing a Bertucci® Performance Watch.™ You’ve made
an excellent choice. You’ll be pleased with your Bertucci® watch for years
to come. Please retain this manual for future reference.
Face Every Minute® In The Field With Bertucci
®
We would like to hear from you, so
please send us your stories, testimonials,
adventures, or experiences you’ve had
wearing your Bertucci® Watch.
Register Your Watch:
See web site to register your watch.
Battery Information:
Bertucci® w
atches use environmentally friendly mercury free batteries.
Batteries should be replaced by a professional jeweler or use the
Bertucci® Battery & Band™ replacement program listed below... which
offers an outstanding value on a new battery & band for your Bertucci®
Watch. Do not attempt to remove the case back as it requires special
tools and skills. Proper replacement of batteries is critical to ensure the
long life of your Bertucci® Watch. Actual battery life may vary based on
environmental factors, normal battery variance, and usage pattern.
BATTERY & BAND™ SERVICE: Send your watch
(remove the band) in to our service center
and we will perform the battery and o-ring
replacement and/or lubrication, clean and test
the watch, and send it back to you with the new
band of your choice at a special price.
Bertucci
®
watches feature a quick tool-less band change. Your watch can
be fitted with multiple material types & colors.
top
Repair Information:
W
e offer complete repair service to keep your Bertucci® Watch in
performing condition.
See web site for more information.
REPAIR SERVICE: If your watch requires repair service, we can run a diagnostic on the watch to
determine the issue and contact you with the repair estimate.
OUT OF WARRANTY REFURBISHMENT PROGRAM: Should your watch be out of warranty (more than 3
years old), damaged severely, deemed overly abused, or water damaged as a result of not screwing the
crown down or pushing in, we offer our refurbishment program. The way it works is as follows – Send
us your out of warranty or damaged watch (remove the band) to the BCS address, in section 9, c/o
Refurbishment Dept., You will receive:
• refurbished, re-certified and cleaned watch head. • new band • new battery • 1 year warranty
Note: You may not get your exact watch back, but of equal or better condition, if original watch can not
be repaired.
6 7
10
13
14
11
8
9
12
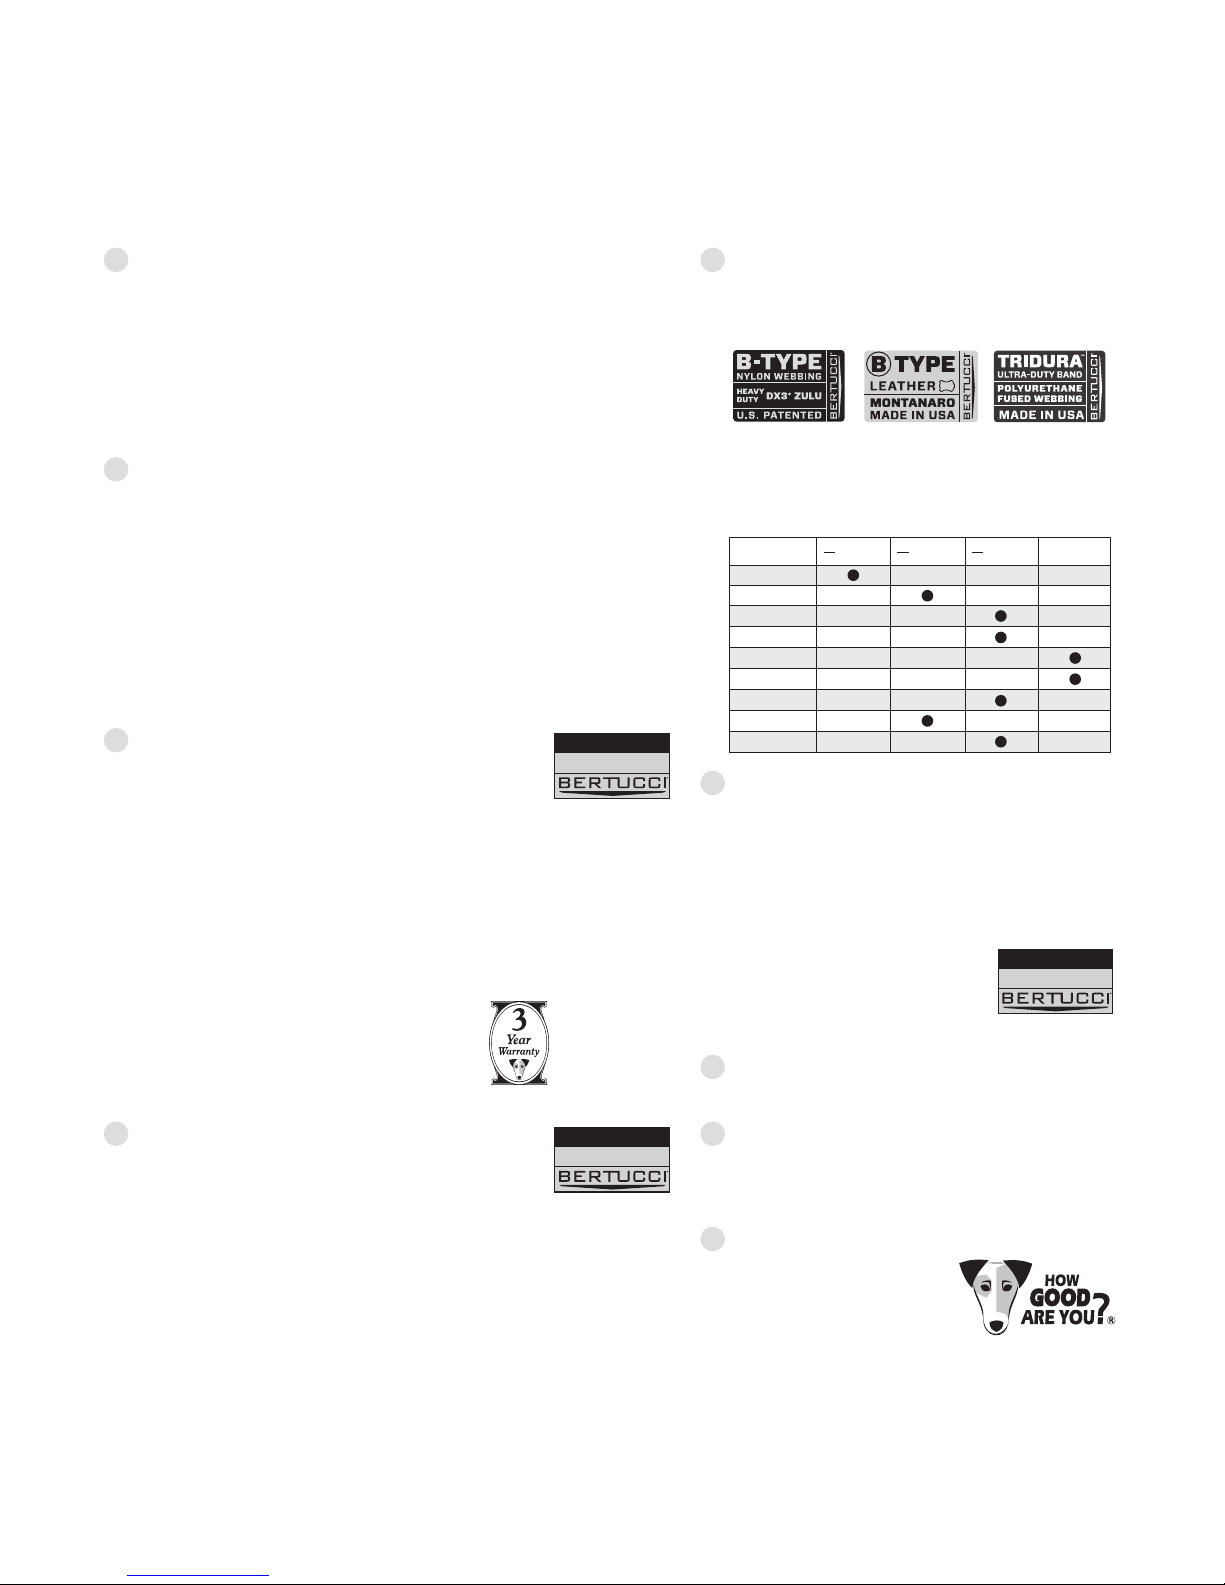
Replacement Band Sizing Matrix:
M-1
A-1
A-2
A-3
A-4
A-5
B-1
C-1
D-1
Case Type:
- 17mm - 19 mm - 22mm 1" - 26mm
5" 3" 7"
8 4 8
1
Page 5
3
AUTOMATIC
SELF WINDING MOVEMENT
Congratulations! ... Nice Choice!
You are now the owner of a Bertucci® Performance Watch.™ You
have something special because every Bertucci
®
Watch has been
carefully designed, manufactured from only the best materials and
loaded with premium features. Bertucci
®
Watches are backed up with
a 3 year warranty. This is the basis of our Promise of Performance™
to you. Please carefully read this manual to familiarize yourself with
your Bertucci
®
Watch. Please contact us with any questions you may
have.
Thank You!
*Manufactured using one of more of the following U.S. Pat. No: 488388, 488075, 488724, 582296, 609586,
645766, 7832605 and other patents pending.
1
Our story is a simple one. It’s about building a better watch. It’s
a Promise Of Performance™ that is derived from a belief that
innovative design and attention to detail matter. It is this focus and
integrity that drive us, an honest, true and authentic way. We believe
if a watch is done right, it connects with you… a personal expression
well suited to your lifestyle.
Bertucci® Watches balance form and function, with an enduring style
and rugged quality that are ready to survive the day to day challenges
that come your way… whatever they may be.
2
Our Story... Your Watch
Durability By Design
®
When we create a watch, we study the ways in which it
will be worn and used. As a result, every Bertucci
®
Watch
includes features that deliver performance and durability.
Rugged U.S. patented DX3® case
Hardened scratch resistant
crystal
Durable screw down crown
Integrated unbreakable band
retention lug bars
Equipped with durability certifi ed
Active Comfort™ high performance band
• Premium 24 jewel automatic movement w/ date
• Screw down case back
• 100 M water resistance
• Swiss super luminous
numbers/markers &
hands
• Sweeping second hand
w/ hacking feature
3
Movement: All-metal, 24 jewel, w/Date & Hack
(stop second hand) feature, Automatic movement.
Accuracy: –10 ~ +30 seconds/day
Running time: More than 42 hours
4
Durability By Design
®
(cont.):
Setting Instructions:
(See illustrations on opposite page)
Winding The Mainspring (for initial use or after several days of non use):
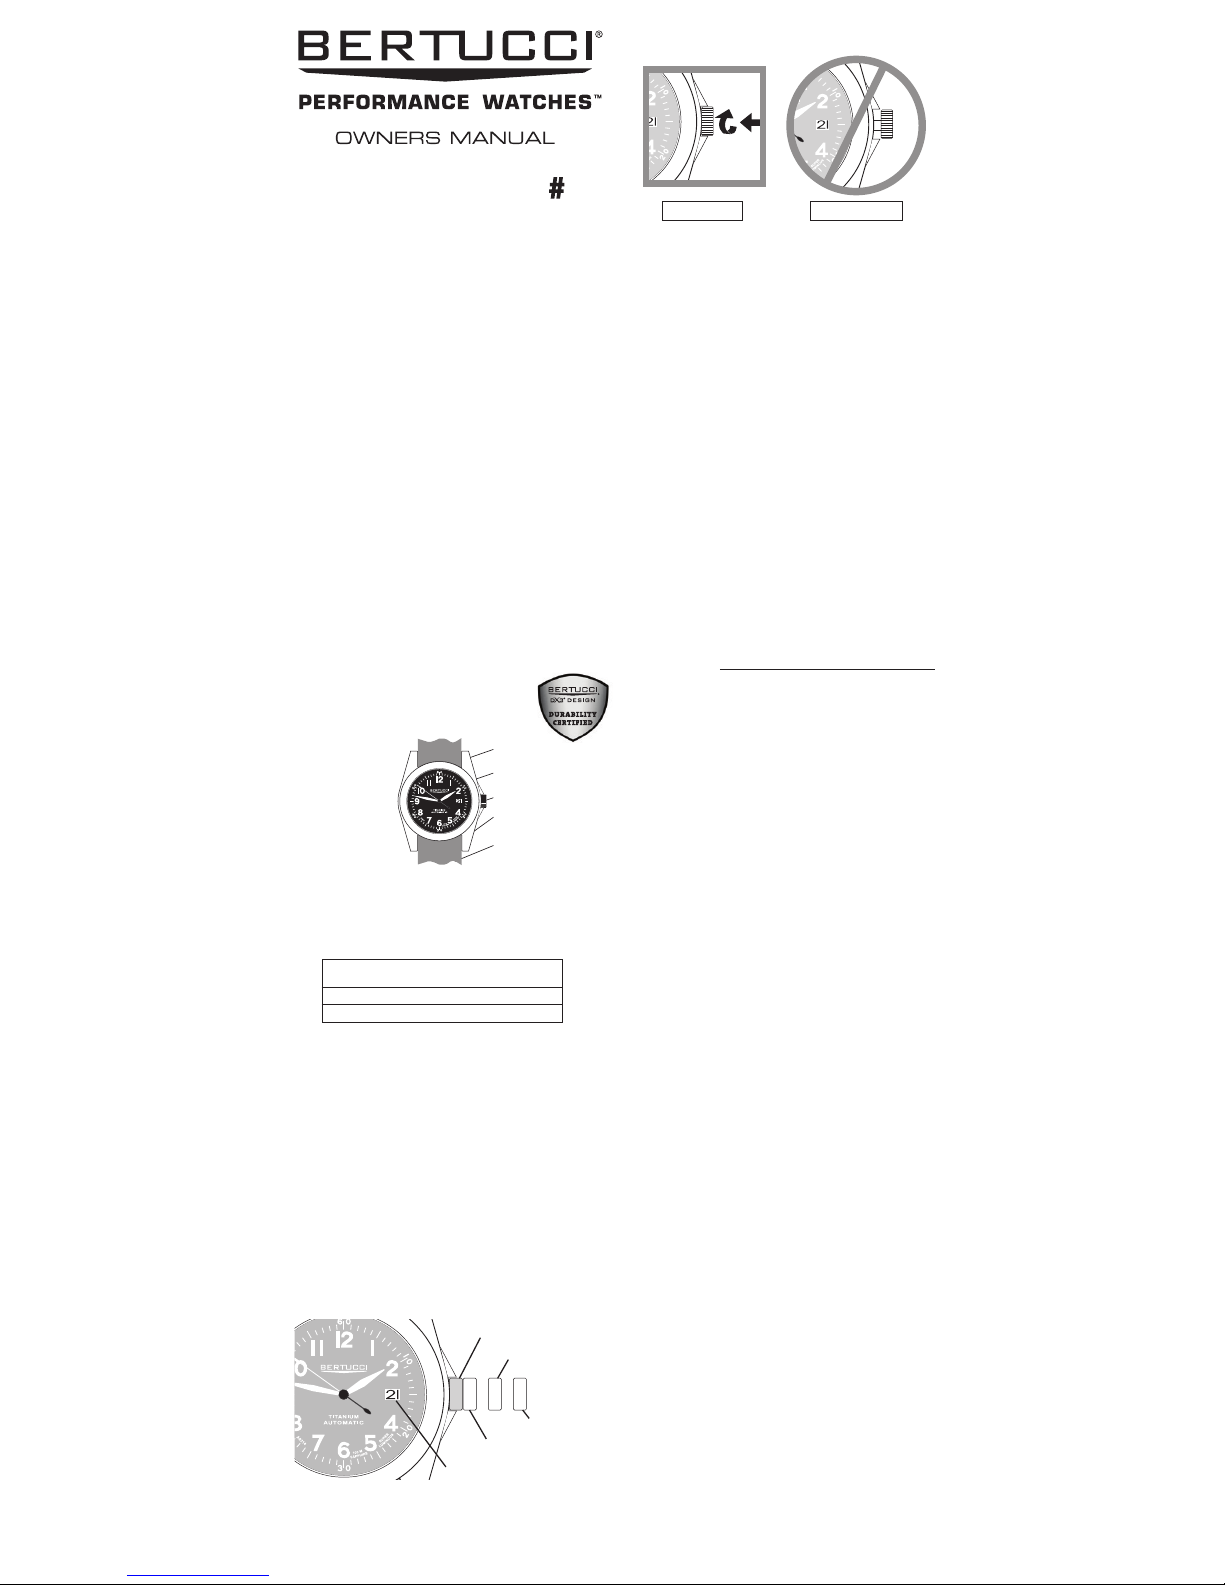
Manual wind by turning the setting crown in
“A” position. Wind 15 to 20
times clockwise until second hand starts to move. Gently handle the setting
crown. After this initial winding the watch will automatically self wind based
on the movement of your wrist.
Setting Date:
Pull crown out gently to
“B” position, adjust the date by rotating the
crown clockwise. Note: Advance the date to yesterday’s date, then adjust
the time to cycle past midnight, you will see the date advance to today’s
date. Continue to advance to the desired time, this will ensure the AM/PM
is correct.
Setting Time:
Pull crown out gently to
“C” position and adjust the time.
5
Setting Instructions: Crown Positions
A B C
B-Date adjusting
Screw Down Position
C-Time adjusting
A-Manual winding position
Date display
6
7
Properly screwed down
crown/setting knob
Not screwed down crown
Correct Incorrect
Water Resistance:
This Bertucci® watch has been carefully designed and tested to be used in water.
The case material, screw down crown, and case back are premium features to
improve water resistance performance. Most Bertucci® watches are engineered
to withstand water pressure to 160 P.S.I.A (equals immersion to 100 meters or
328 feet below sea level) if crown (setting knob) is screwed down.
1 Never adjust crown (setting knob) when watch is wet or submerged in water.
2 Never wear the watch unless the crown (setting knob) is completely screwed
down. Don’t forget to tighten crown (setting knob) down after setting time as
water will leak and damage movement.
3 The watch is water resistant only as long as crystal, crown and case are intact
and undamaged.
4 Your Bertucci® Watch has been designed to be worn during activities in which
the watch will be exposed to water and submerged in water. However, the
watch is not a professional diver watch and should not be used for diving.
8
9
1 We recommend rinsing your watch and band with fresh water after exposure
to salt water, chlorinated water, chemicals or soil loads.
2 Never adjust crown (setting knob) when watch is wet or submerged in water.
3 Keep watch clean and free of debris, especially around the crown area. Use
dish detergent & warm water with a soft brush to clean, keep crown (setting
knob) screwed down when cleaning.
4 If equipped with leather band and it is saturated with water allow it to air dry.
5 Replace band if excessively worn (see page 11).
6 Do not expose your watch to intense magnetic fields such as loudspeakers and
other electromagnetic devices.
7 When setting your watch, handle the crown (setting knob) gently as this is a
precision device.
8 Do not subject your watch to severe impact, avoid dropping.
9 Do not manually wind crown more than 20 times.
Care for your Bertucci® Watch:
Care for your Bertucci
®
Watch (cont.):
10 Most important: Keep crown (setting knob) screwed or rethreaded down.
10
Your watch is equipped with a screw down crown (setting knob). This
premium feature is the best design in order to maximize water-resistance
and durability to ensure protection of the watch movement.
Please note: After setting the time and/or date, it is critical that the crown
is tightened down by pushing in and gently turning clock-wise (to the right)
simultaneously in order rethread crown down, do not overtighten. See
illustration on page 7.
Failure to do so will potentially cause the watch’s internals to be flooded with
water and voiding warranty.
Following this simple practice will extend the watch life dramatically.
Genuine Bertucci® Replacement Watch Bands:
We offer a wide array of replacement bands in multiple colors & materials made specifically
for Bertucci® Watches. Bertucci® Watch Bands are U.S. patented and offer unmatched
durability, performance & comfort.
4 band materials to choose from:
1 DX3® Nylon Band – Rugged military spec. nylon, heavy duty stitching and stainless steel
hardware. The comfortable one piece U.S. patented design and extended adjustment range
ensures a perfect fit. One size fits all.
2 Montanaro Survival™ Leather – Manufactured from high performance top quality water
resistant leather with durable box stitch construction and stainless steel hardware.
3 Tridura™ Ultra-Duty™ – U.S. patented polyurethane coating heat fused to webbing core,
welded construction, and metal hardware provide extreme durability. Band is easy to clean,
and dries quickly, may be cut to length for smaller wrists and will not fray.
4 Heavy-Duty 2-Ply Nylon – U.S. patented one piece design features military spec. nylon,
rugged box stitch construction and all metal hardware.
11
12
DX3® Nylon Bands:
#95 7/8” Black
#96 7/8” Coyote
#97 7/8” Forest
#123 7/8” Defender Olive™
#124 7/8” Defender Khaki™
#125 7/8” Defender Drab™
Montanaro Survival™ Leather:
#9M 7/8” Olive Brown Duration™
#10M 7/8” Black Duration™
#46M 7/8” Chestnut Latigo
#126M 7/8” Horween® Nut Brown
#151M 7/8” Olive Survival™
#152M 7/8” Foliage Survival™
Tridura™ Ultra-Duty™ Bands:
#31 7/8” Black
#32 7/8” Foliage
#55 7/8” Coyote
2-Ply Nylon Bands:
#4 7/8” Black
#5 7/8” Olive
#27 7/8” Khaki
#28 7/8” Drab
#36 7/8” Dark Khaki
Check out the collection of wrist watches we offer.
 Loading...