

Page 1
BIC 2/4/6
User Manual
Landscape Irrigation Controller
Drip Irrigation | Micro Sprinklers | Sprinklers
Page 2
2
Table of Contents
Page
1. Components Identification
3
2. LCD Display and Keypad
7
3. Initialization
9
4. Setting Irrigation Programs
11
5. Irrigating by Days Interval 16
6. Setting Irrigation EVEN/ODD Days 17
7. Operating Group of Valves 18
8. Manual Irrigation 19
9. Resetting or Suspending the Controller 20
10. Connecting the Rain Sensor 20
11. Replacing the Batteries 21
12. Maintenance, Troubleshooting and Repairs 22
13. Bermad Warranty 23
Page 3
3
Thank you for purchasing BERMAD’s BIC 2/4/6 Irrigation Controller.
This manual describes how to get the BIC 2/4/6 Controller up and
running quickly.
After reading this manual and becoming familiar with the Controller’s
basic functionality the user may further use this manual as a reference
for the controller’s less common features and operations.
About the Controller
The BIC 2/4/6 control a two, four or six irrigation stations (according to
the specific model purchased). To each station the user can assign an
irrigation program that defines the start time and the irrigation duration.
The controller is powered by two AA Alkaline batteries that can last for up
to 3 years. The controller includes a rain sensor connection for efficient
and economical water usage.
The controller enclosed in a compact, outdoor waterproof housing that
protects it from the elements.
General
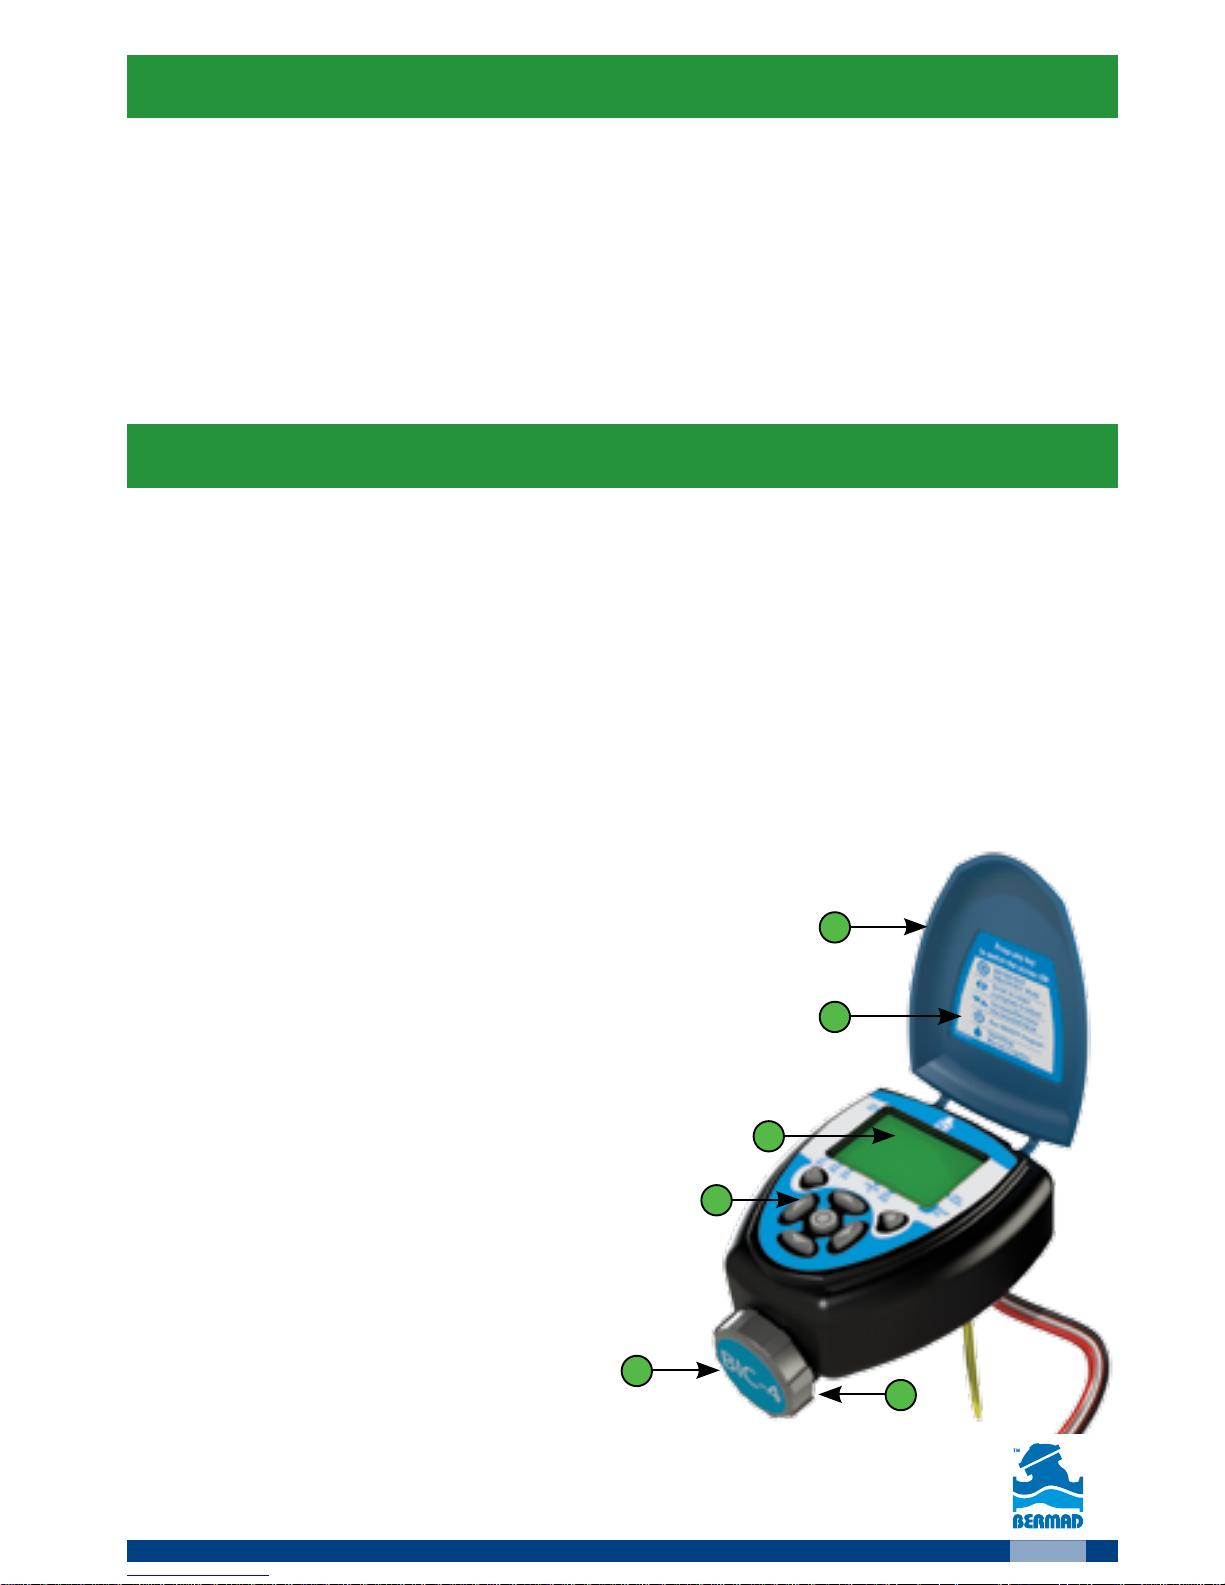
1. Components Identification
1. Controller’s Cover
2. Quick reference sticker
3. LCD display with icon based functions
4. 7 buttons keypad used for
programming, system on/off, manual
run and reviewing programs.
5. Batteries compartment cover for
two AA alkaline batteries (not included).
6. Controllers model sticker
2
3
4
6
1
5
Page 4
4
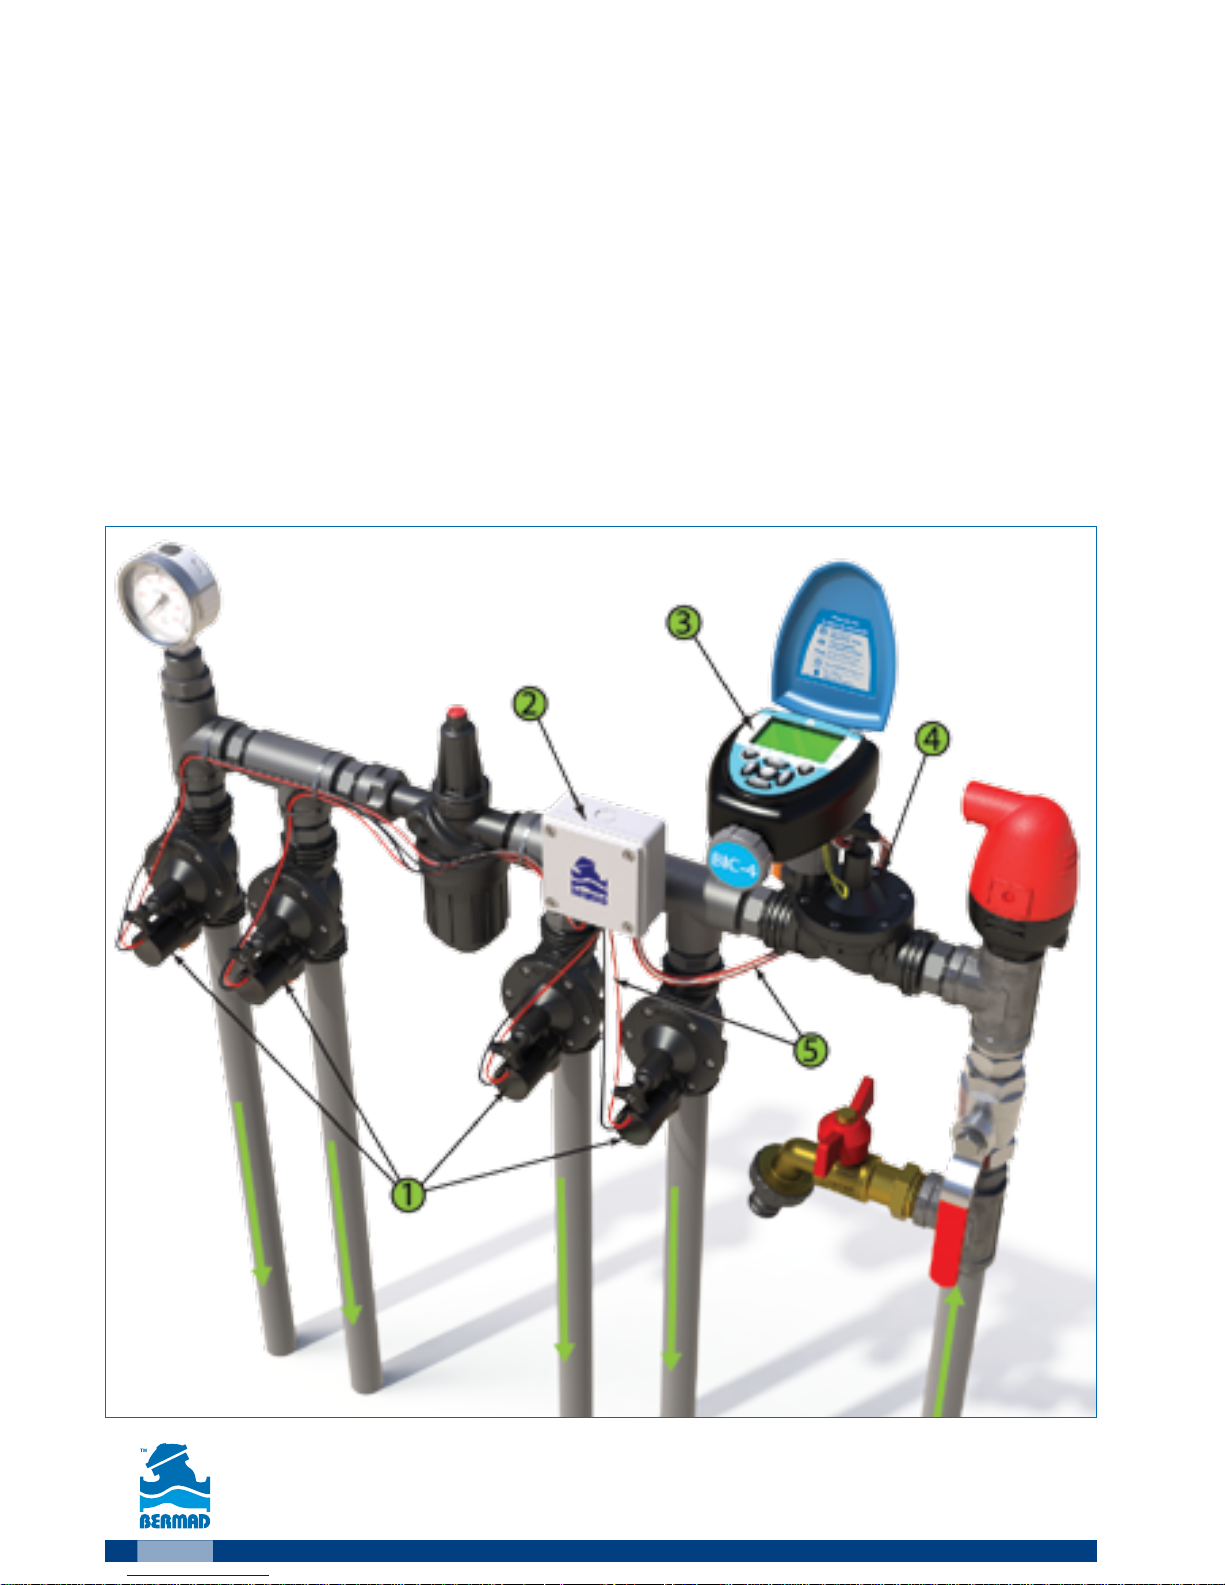
Typical Irrigation System
The controller is integrated in the irrigation system head (not supplied
with the controller) that includes:
1. Irrigation valves
2. Connection box for wiring the valves
3. BIC 2/4/6 Controller
4. Optional Main valve that opens before the first irrigation valve
and closes after the last valve completed its irrigation duration.
5. Wiring conduit for connecting the valves and the rain sensor
6. Additional components for regulation, filtration and air release from
the flowing water.
Page 5
5
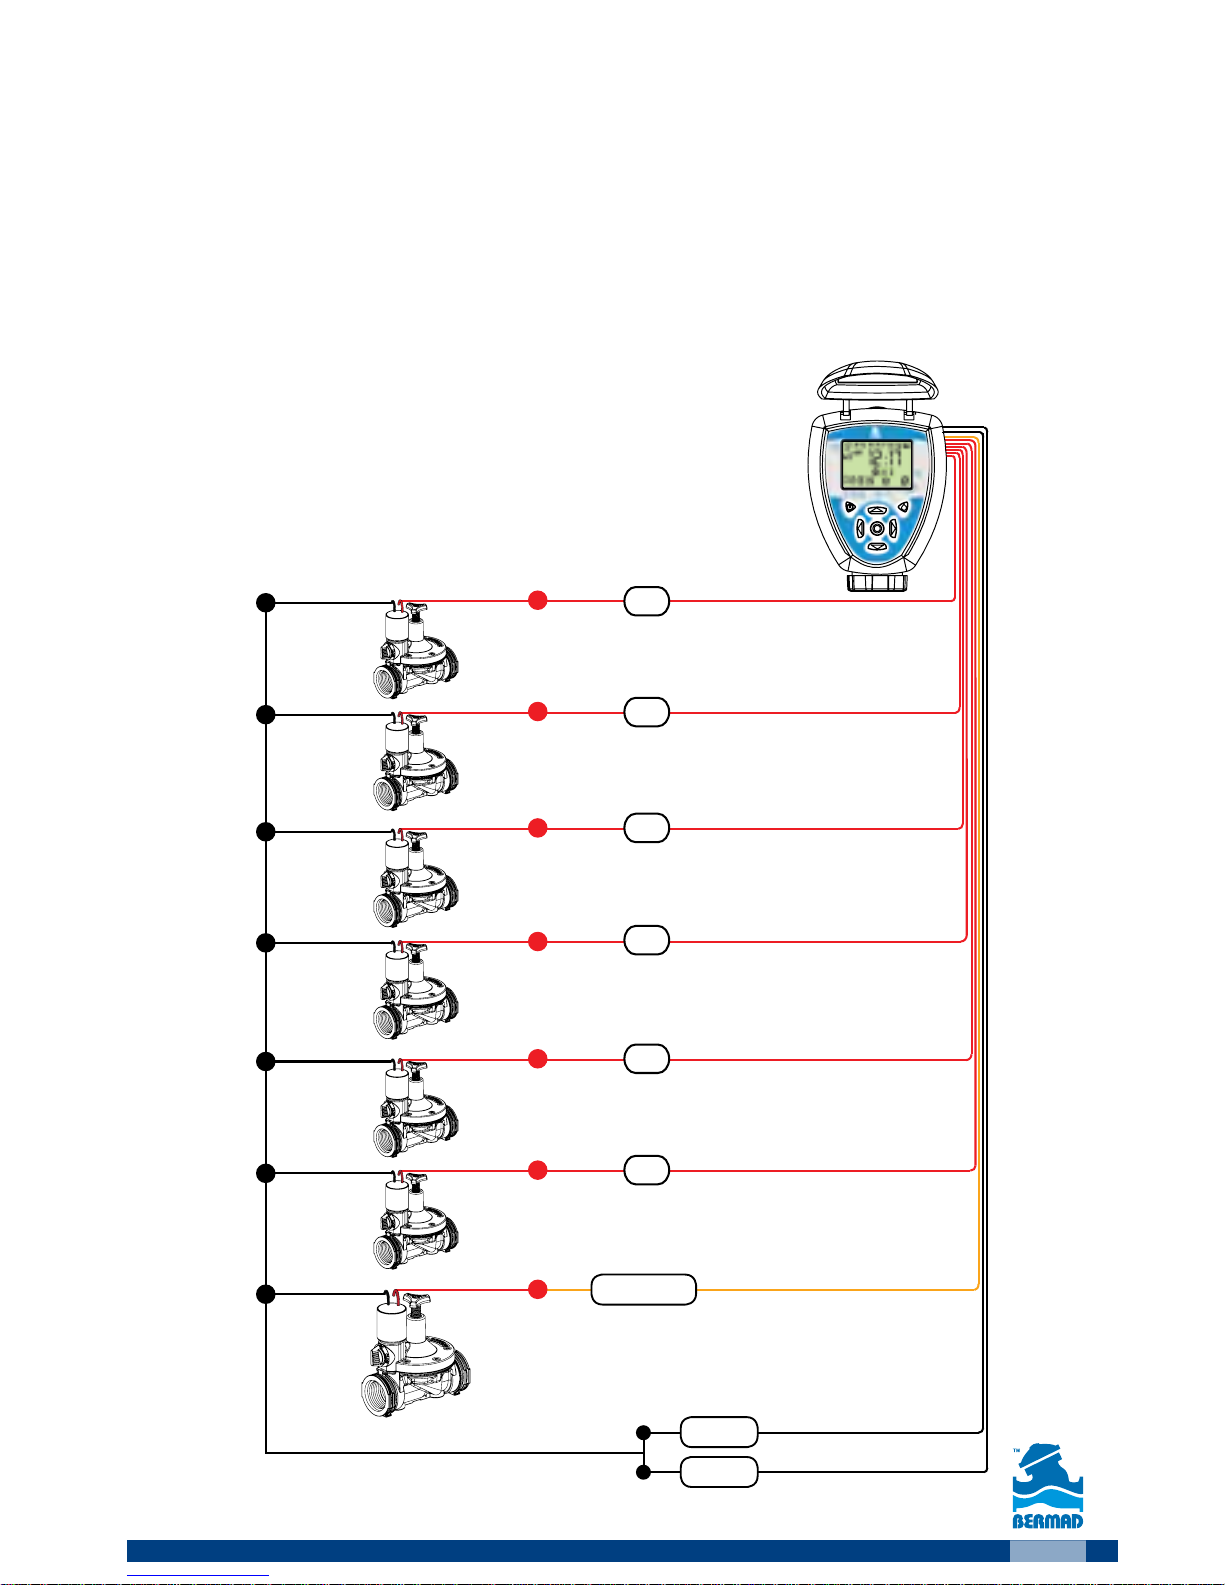
Controller’s Wiring
The controller is supplied with bundle of labeled wires.
1. Connect the Red wire of the valve to the Red wire of the controller that is
labeled with the corresponding valve number.
2. Connect the Red wire of the main valve to the Orange wire of the controller
that is labeled “Main”.
3. Connect the Black wires of all the valves to the two controller Black wires
labeled “Common”.
Remark: Use proper wire connectors and
junction box for protecting the electrical
connections from the elements.
רוחש
רוחש
םותכ
רוחש
םודא
םודא
םודא
םודא
םודא
םודא
םודא
1
2
3
4
5
6
ישאר
ףתושמ
ףתושמ
Red
Red
Red
Red
Red
Red
Red Orange
Black
Black
Black
Common
Common
Main
Page 6
6
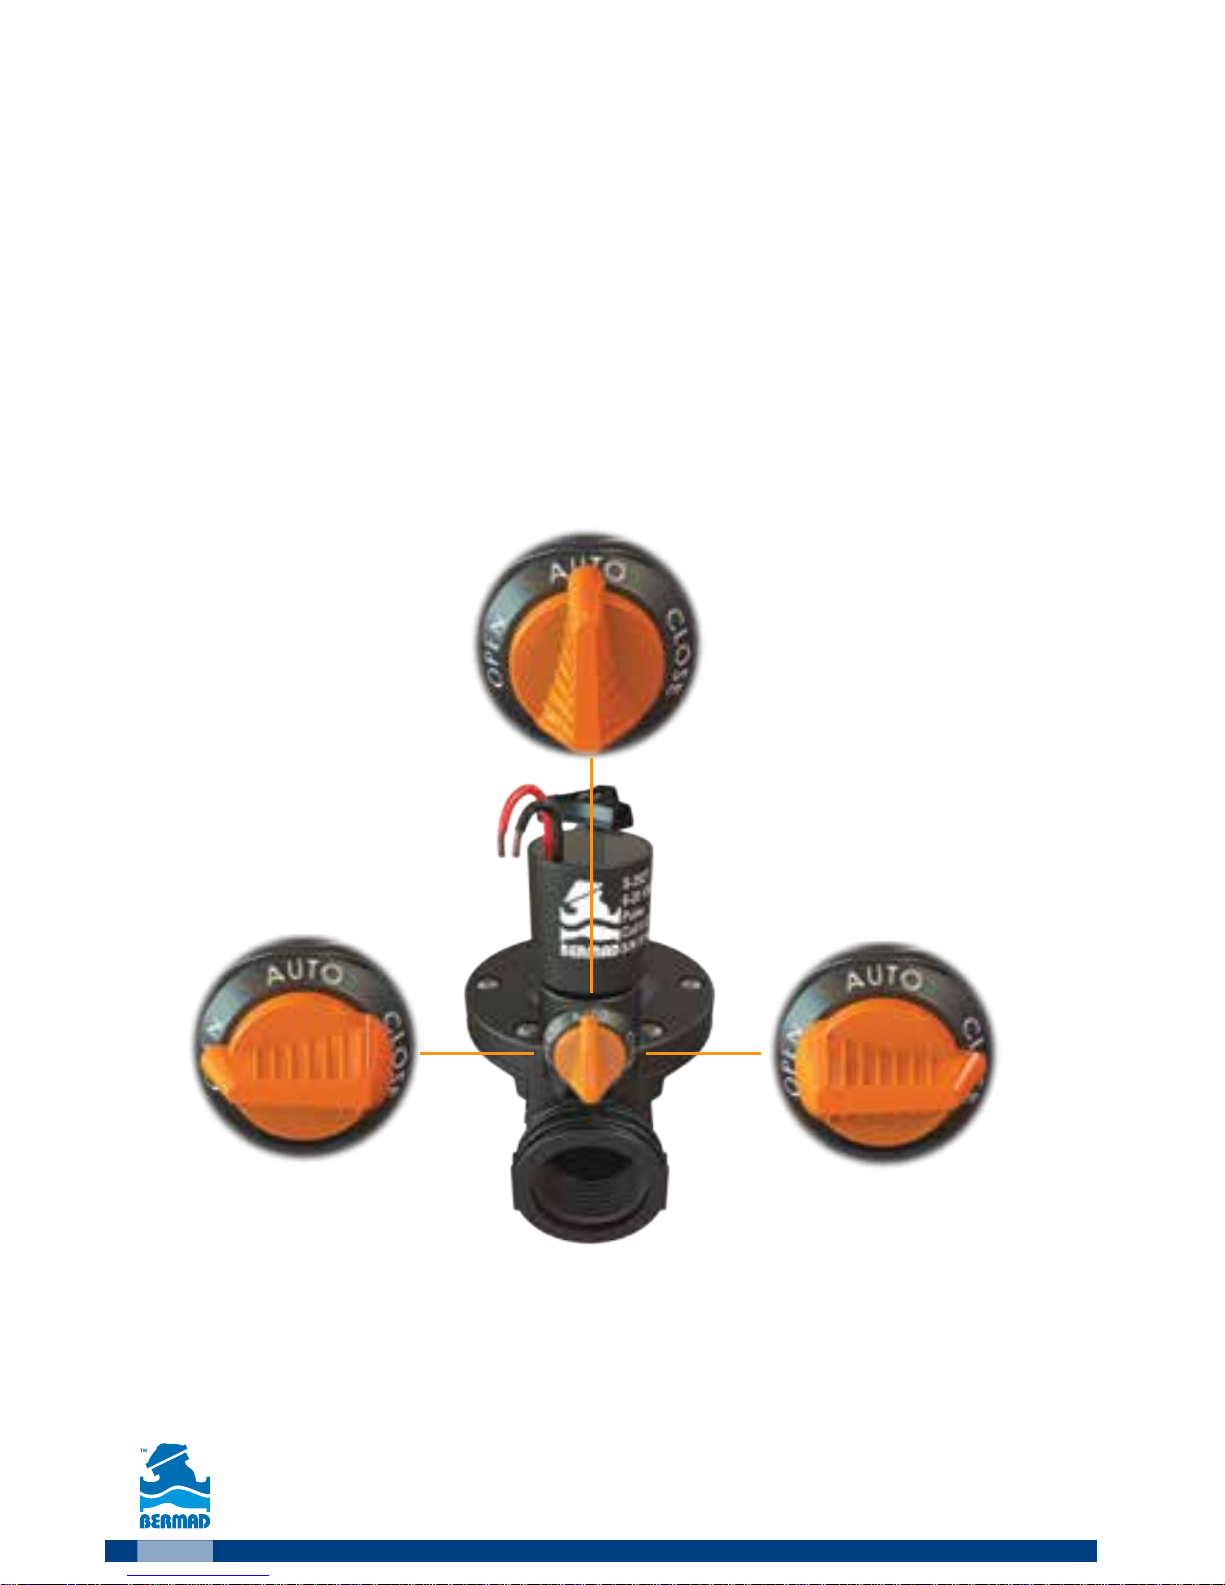
Valve Operation Handle
The valve includes an operation handle that allows the user to:
●
Manually operate the valve - OPEN or CLOSE positions
●
Automatically operate the valve - AUTO position
Remark: for operating the valve via the controller the handle must be in
the AUTO position.
CLOSE
רוגס
עובק
OPEN
חותפ
עובק
AUTO
ידי לע הלעפה
רקבה
AUTO
OPEN CLOSE
Operation
by the
controller
Constantly
Opened
Constantly
Closed
IMPORTENT: In order to shift back from manually "Open" to "Auto" you
must first turn the selector to "Close" position and then back to "Auto".
Page 7
7
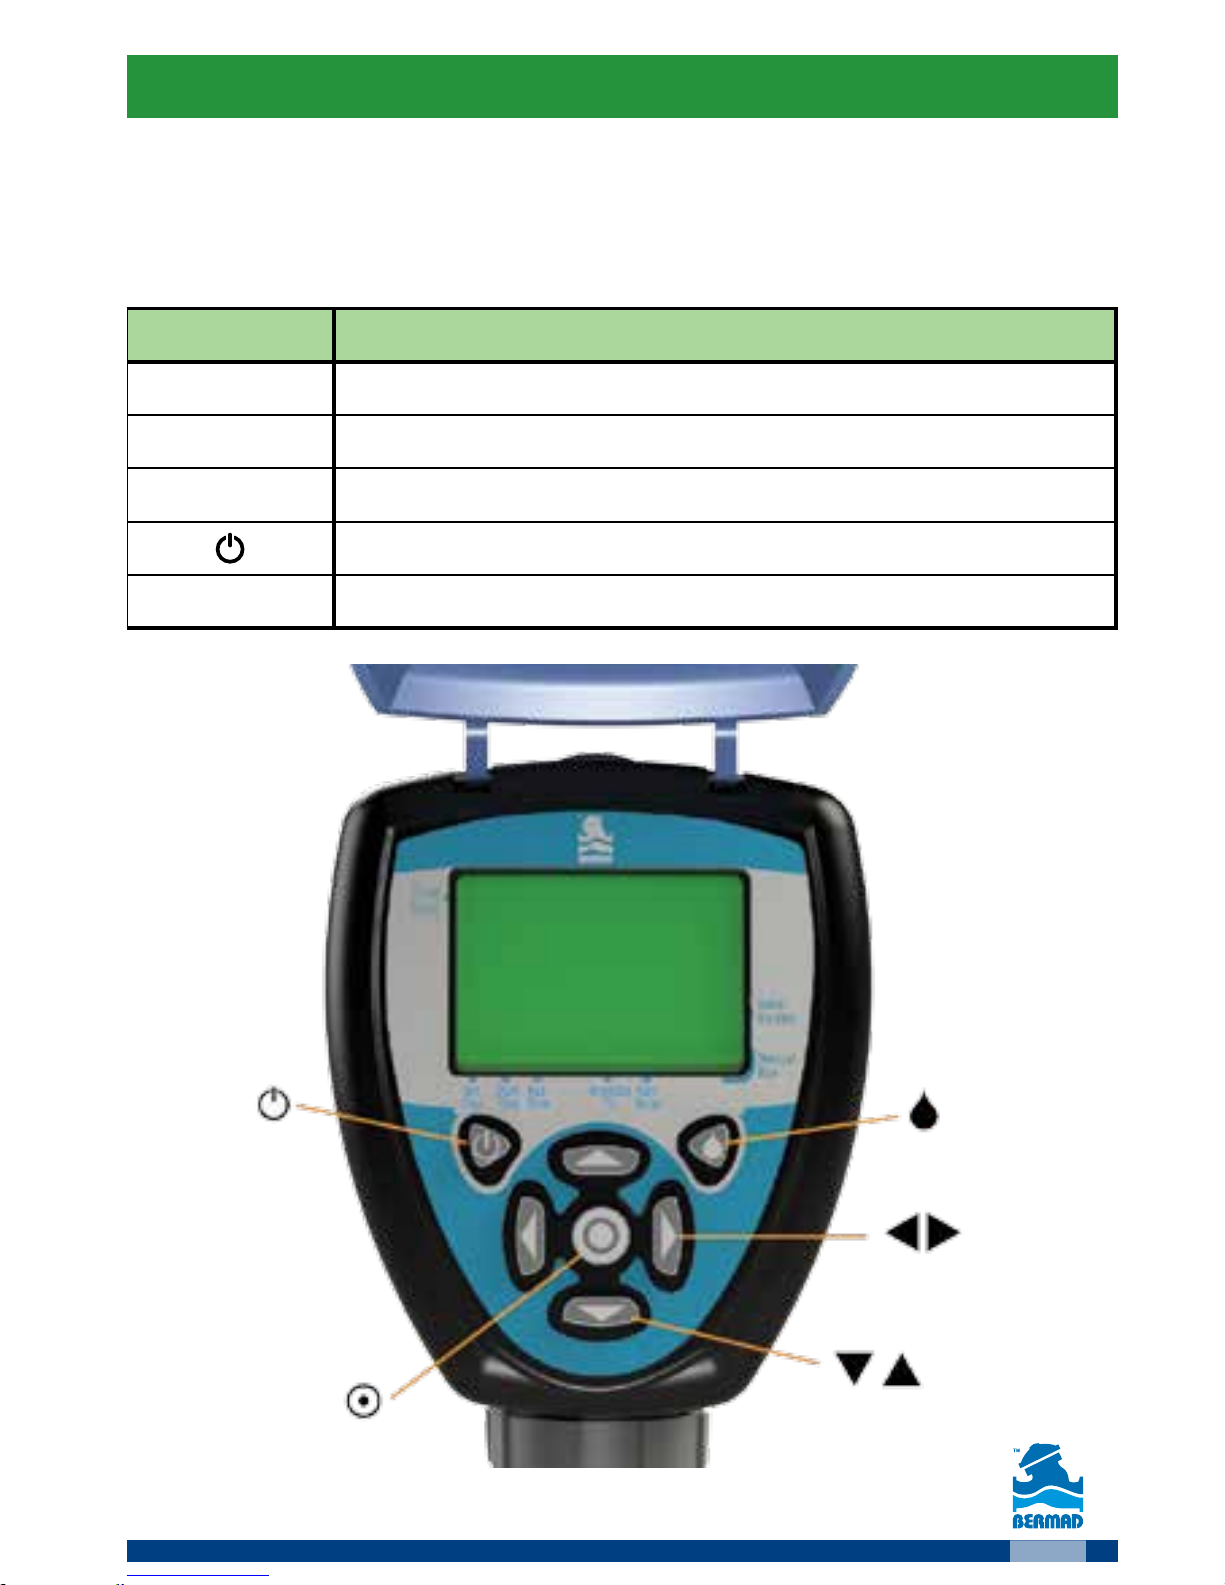
Button Description
ENTER/EXIT Adjustment Mode
Left/Right
Increase/Decrease the selected value
Run ON/OFF Program
Start/Stop manual irrigation
Keypad
The Keypad is used for programming and operating the controller. The
following Icons appear at the various sections of this user manual, they
represent the various actual keys of the controller’s keypad.
2. LCD Display and Keypad
Page 8
8
M
:17
3
AM
12
3
4
2
1
12
11
10
8
6
9
7
5
M Tu W Th F Sa Su
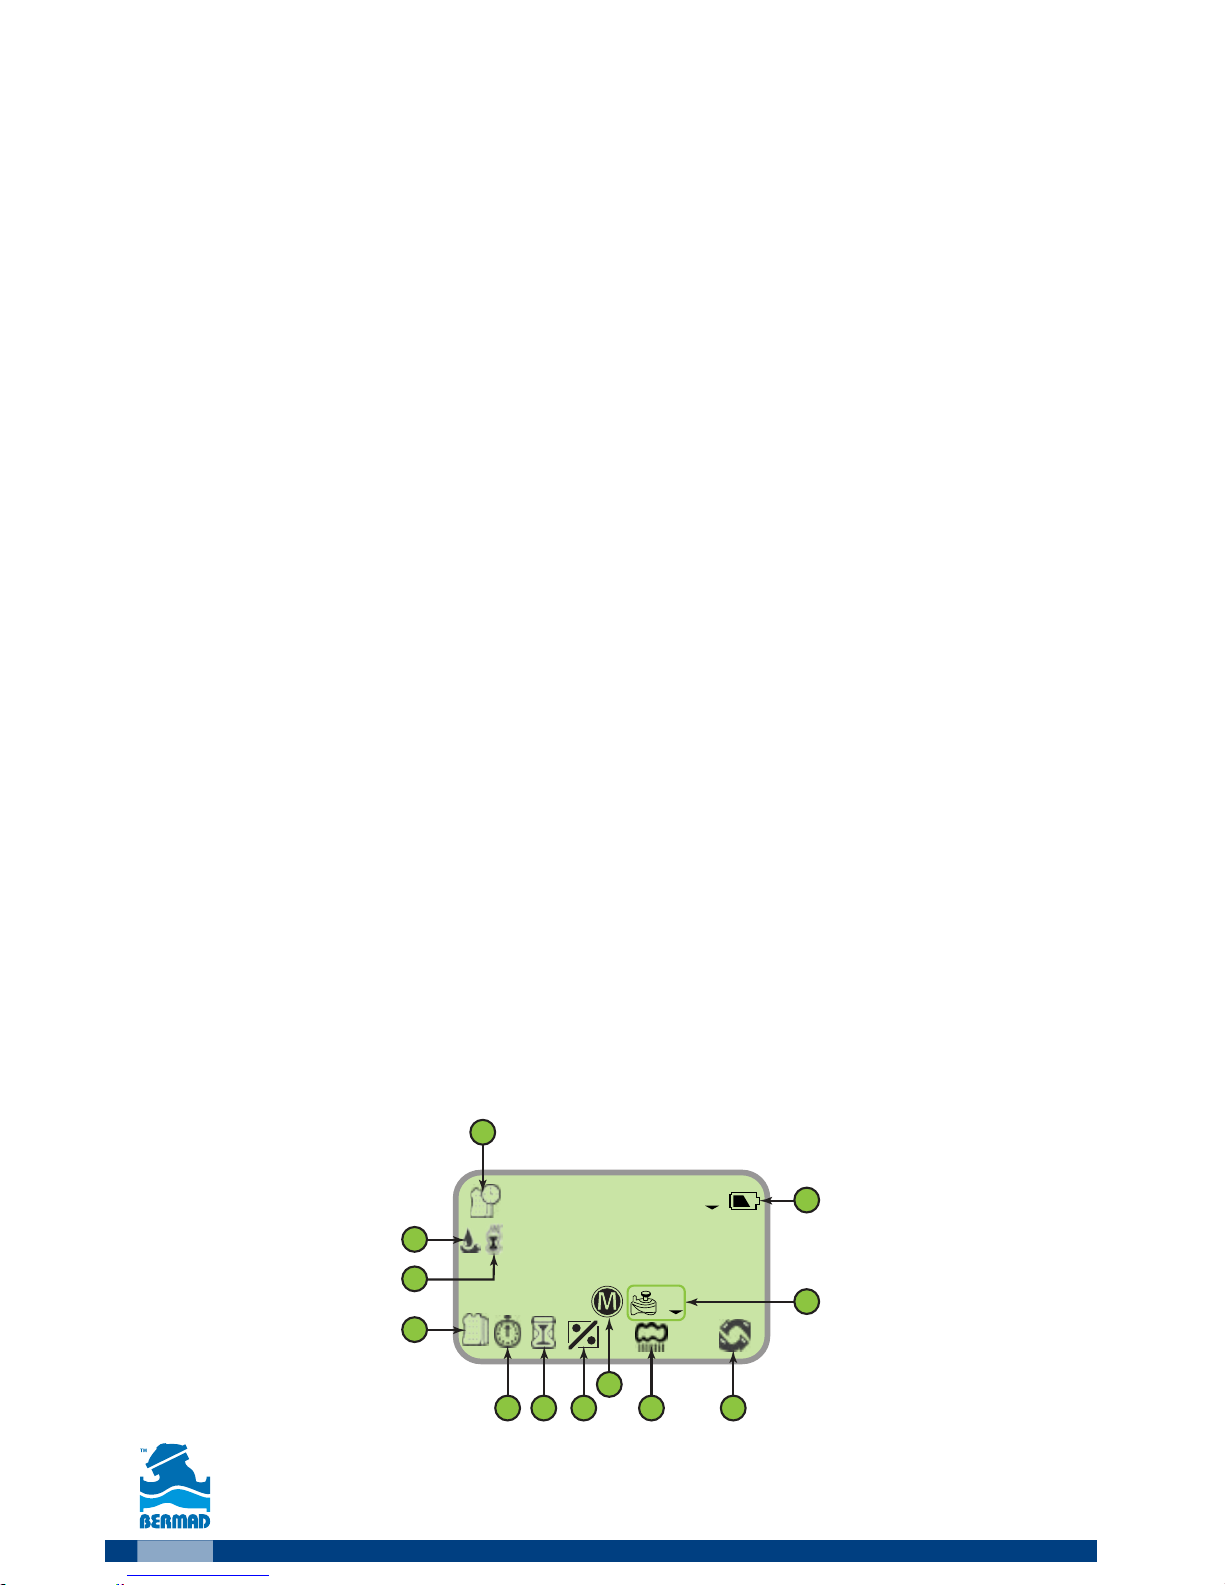
LCD
1. Set Irrigation Days Icon – Select specific irrigation days, odd/even
days or irrigation in up to every 30 days interval.
2. Rain Delay Icon – Appears during rainfall or when the Yellow cable
loop is cut; the irrigation is suspended.
3. Irrigation Status Icon – Appears when the controller is irrigating.
4. Time and Date Icon - appears when the current time and date are
displayed in the middle of the screen.
5. Battery Level Indicator – Flashes when the batteries are low and need
to be replaced.
6. Valve Number Icon - During operation displays the irrigating valve
number. During programming displays the number of the valve to be
programmed.
7. Manual Start Icon – Appears when the manual start button is pressed.
8. Rain Delay Icon – Enables irrigation delay from 1 to 99 days, irrigation
resumes automatically.
9. Main Valve Icon - Appears when the main valve is defined.
10. Irrigation Percentage Icon - Appears during setting irrigation as a
percentage of the regular program.
11. Run-time Icon – Select irrigation duration from 1 minute up to 5 hours
and 59 minutes.
12. Start-time Icon – Set up to 5 start times per day.
Page 9
9
:17
Su
3
AM
12
6
17
YR
Su
3
15
21 3
3. Initialization
This chapter describes the operations to be done during
the first start-up of the controller.
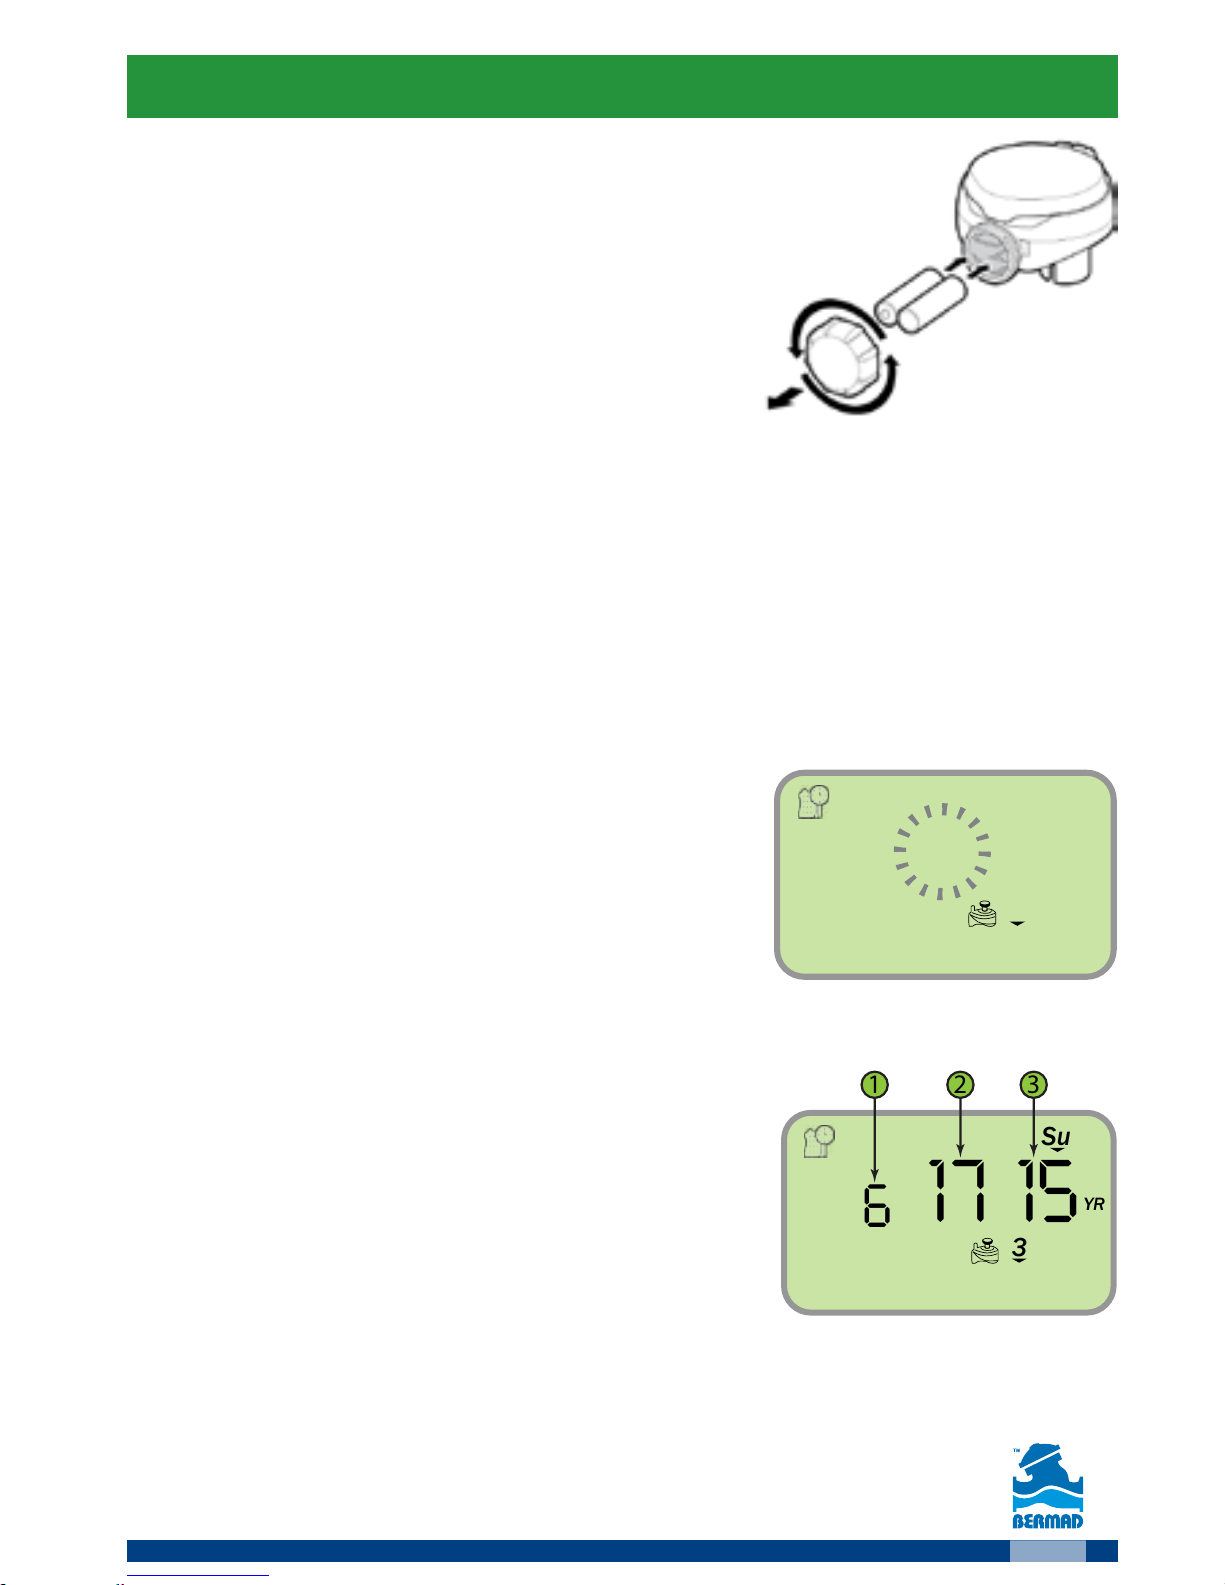
Installing the Batteries
1. Open the batteries compartment cover
by turning it counter-clockwise.
2. Install two, fresh, brand name, AA alkaline
batteries (not included).
Attention: note for the proper polarity direction as marked on the bottom
of the controller’s housing.
3. Insert and screw the batteries cover clockwise. Tighten the cover firmly
with hand force only. The controller display starts with the day, PM, and
the hour digit flashing. The controller is ready for programming.
Setting the current Time and Date
Perform the following actions when the Time/Date display is flashing:
1. Use the and buttons to set the Time.
Please note the AM/PM labels as they changed after the hour 12.
2. Press the button
The minutes digits start flashing
3. Use the
and buttons to set the Minutes.
4. Press the
button to move to
the Date values display
Please note that the date format is American; Month, then Day and finally
the Year. The day of the week is automatically set according to the date set.
5. Use the
and buttons to set the Month (1).
6. Press the
button to move to the
Day value display (2).
7. Use the
and buttons to set the Day.
8. Press the
button to move to the
Year value display (3).
9. Use the
and buttons to set the Year.
10. Press the
Icon to return to the main screen.
Remark: In order to ensure proper operation make sure that the controller
time and date are matching the actual current time and date.
For setting the Time/Date press the
Icon at the main screen.
Page 10
10
:00
Su
3
AM
12
1
3
2
:00
Su
24
:00
Su
PM
12
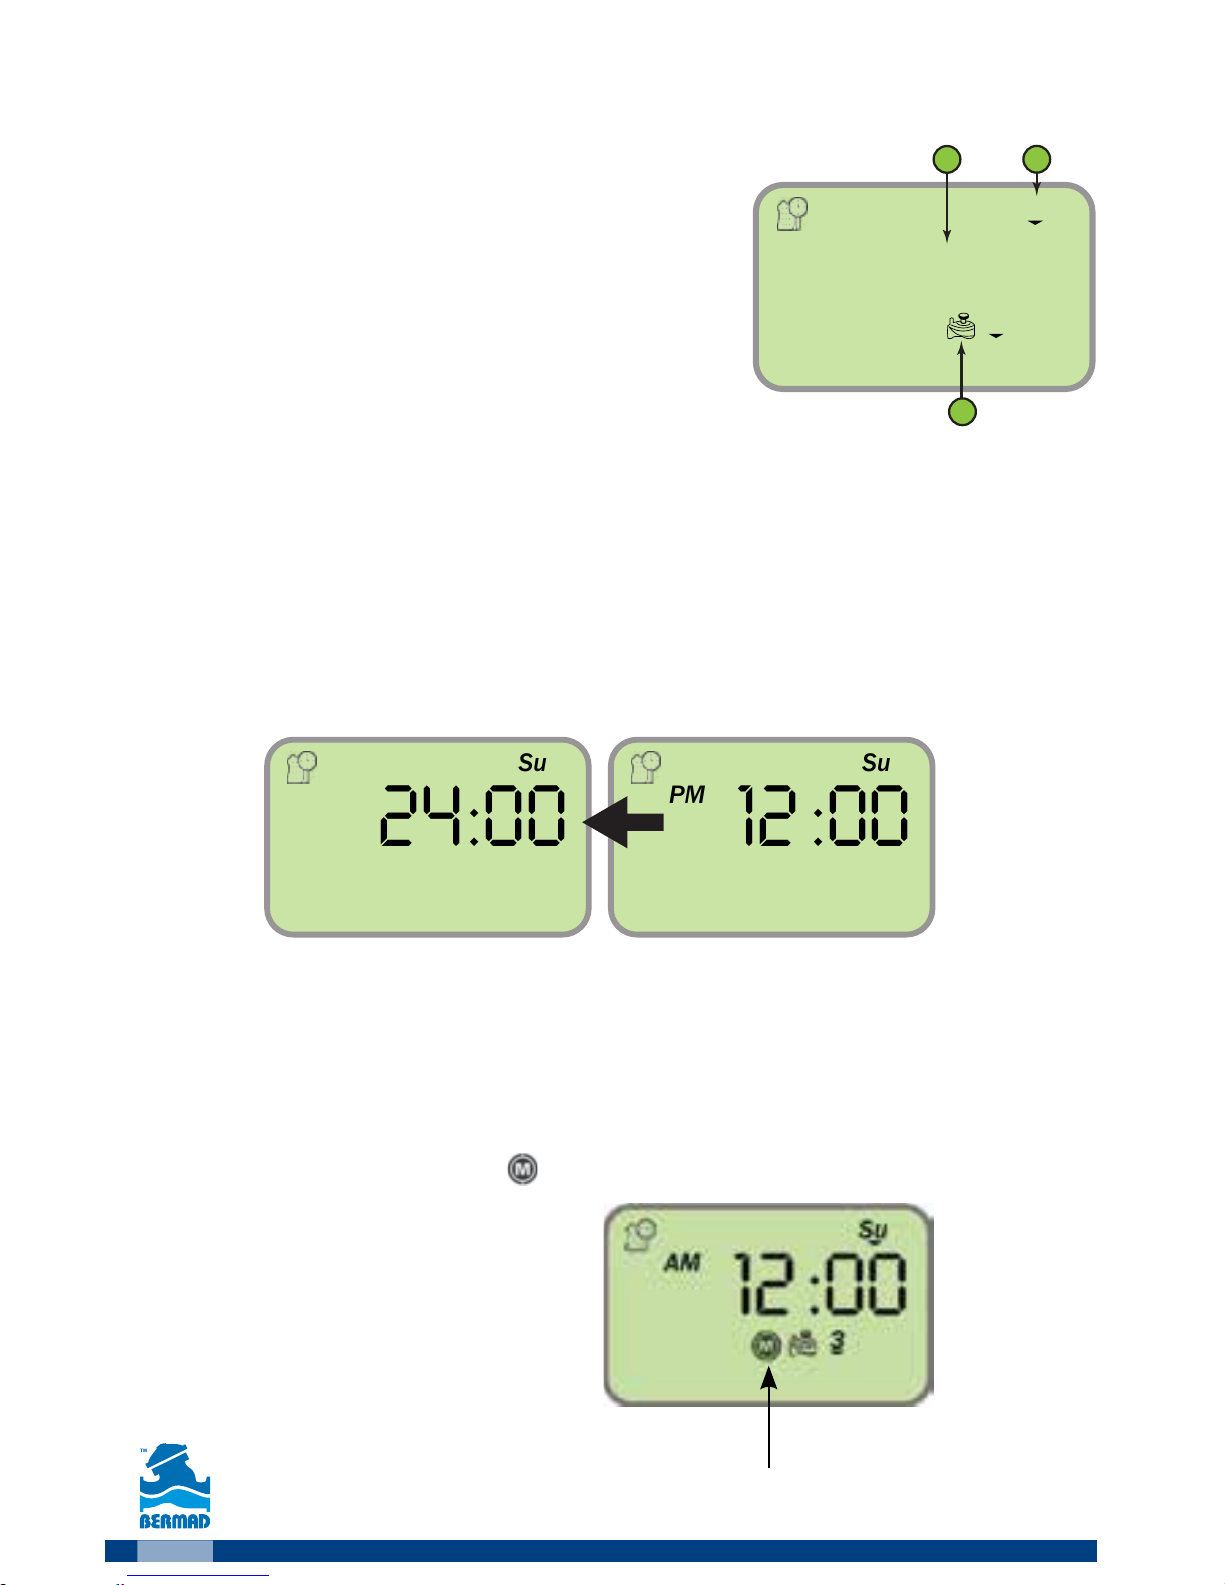
The Main Screen
The main screen is displayed during the
controller’s regular operation and is used as a
start point for the programming process as
described in the following paragraphs.
The main screen displays the following:
●
Day of the week (3).
●
System Time (2)
●
Information about the irrigating valves (1) or to be irrigating today.
Setting the Time format
In order to change the time format from the main screen:
1. At the main screen press the button for three seconds until the Time/Date
icon switches the time format. (The AM/PM label disappears at the 24h format).
Main Valve Definition
Whenever the main valve is defined as active, its icon will appear on the screen.
The main valve will open automatically with the opening of any valve.
To define the main valve as active, at the main screen press the
button for 3
seconds until the main valve icon appears on the screen.
Main valve
Page 11
11
:00
Su
3
AM
12
V 3
1
4. Setting Irrigation Programs
This chapter describes the programming process of automatic irrigation
programs:
The BIC controller allows different irrigation program per each system
valve.
The Main Screen
Make sure that the main screen is displayed
The system time appears in the middle of the
screen and the day of the week is displayed
on the screen’s upper part.
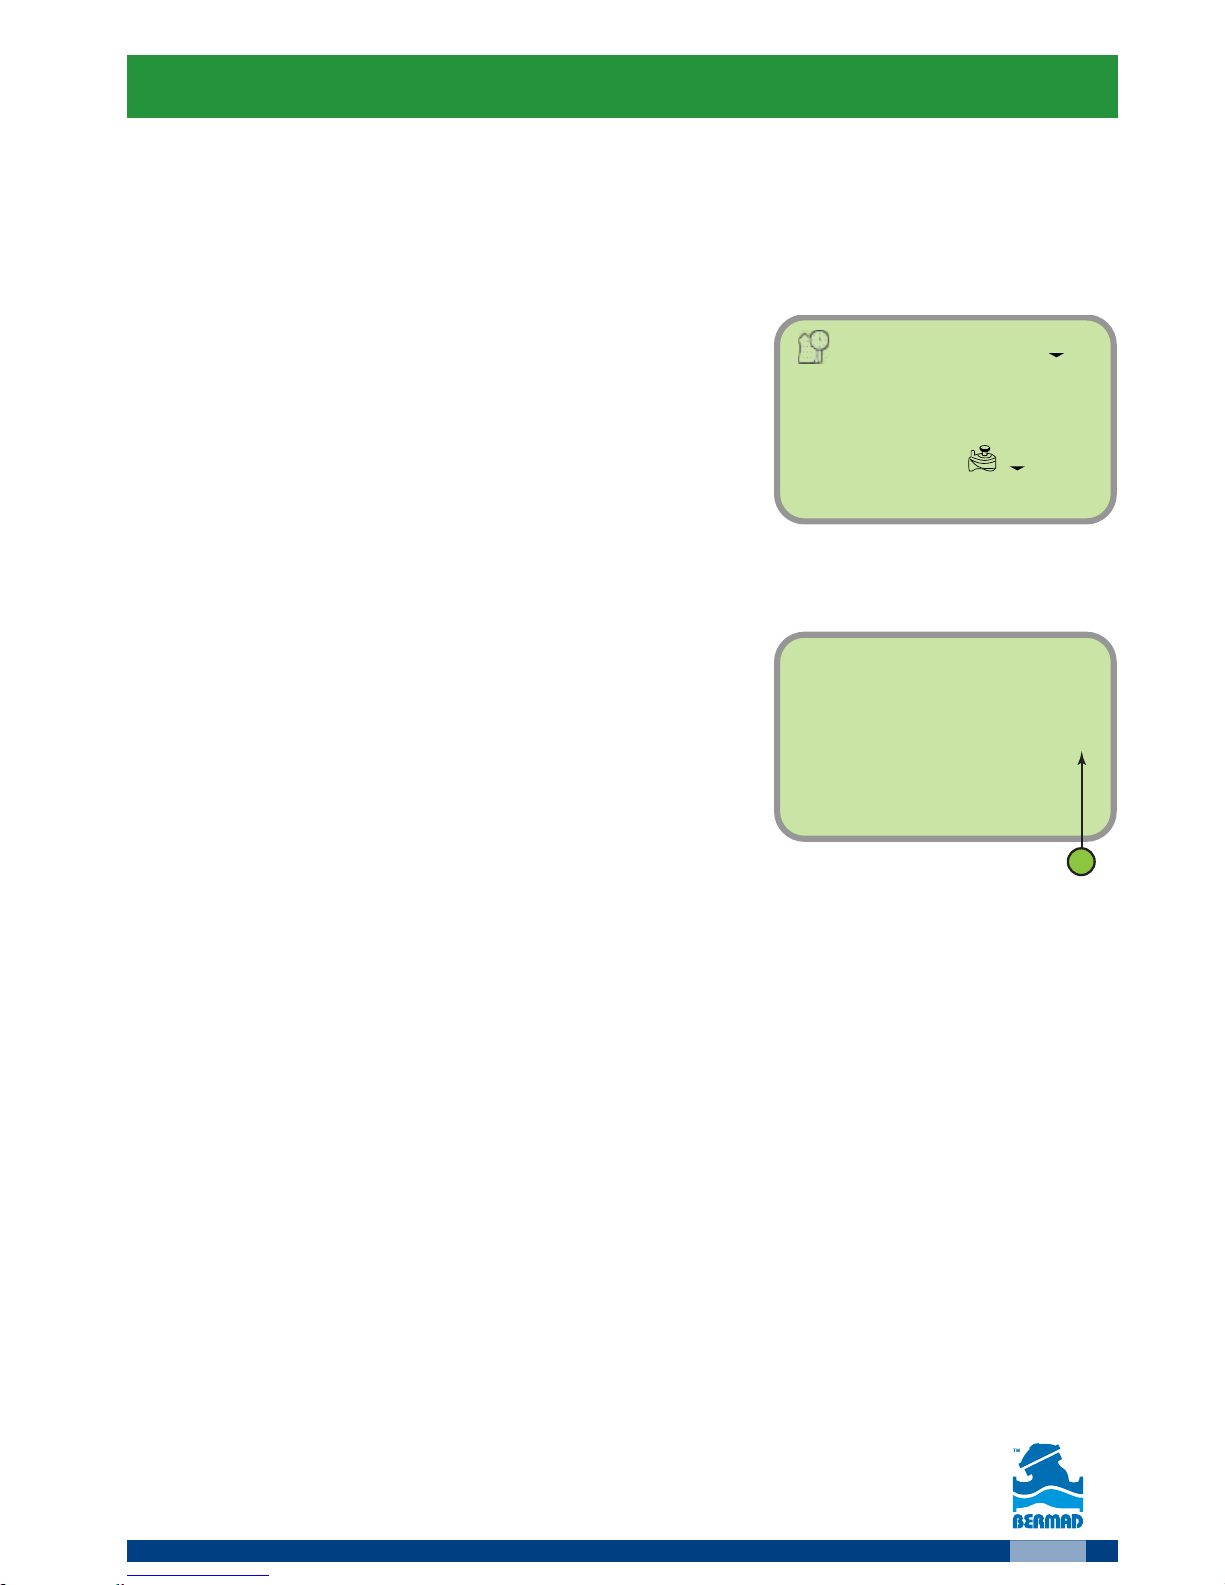
Selecting a Valve
For selecting the valve to be programmed:
1. At the main screen press the
button
The number of the valve appears
(umber 1 on the figure).
2. Press the
button, the valve number starts flashing.
3. Use the
and buttons to select the relevant valve number.
4. Press the
button to confirm your selection.
5. Press the
button to move to the next step “setting the irrigation days”.
Page 12
12
3
OFF
M Tu W Th F Sa Su
EVERY
3
1
2
M Tu W Th F Sa Su
EVERY
3
M Tu W Th F Sa Su
Th
Th
1
2
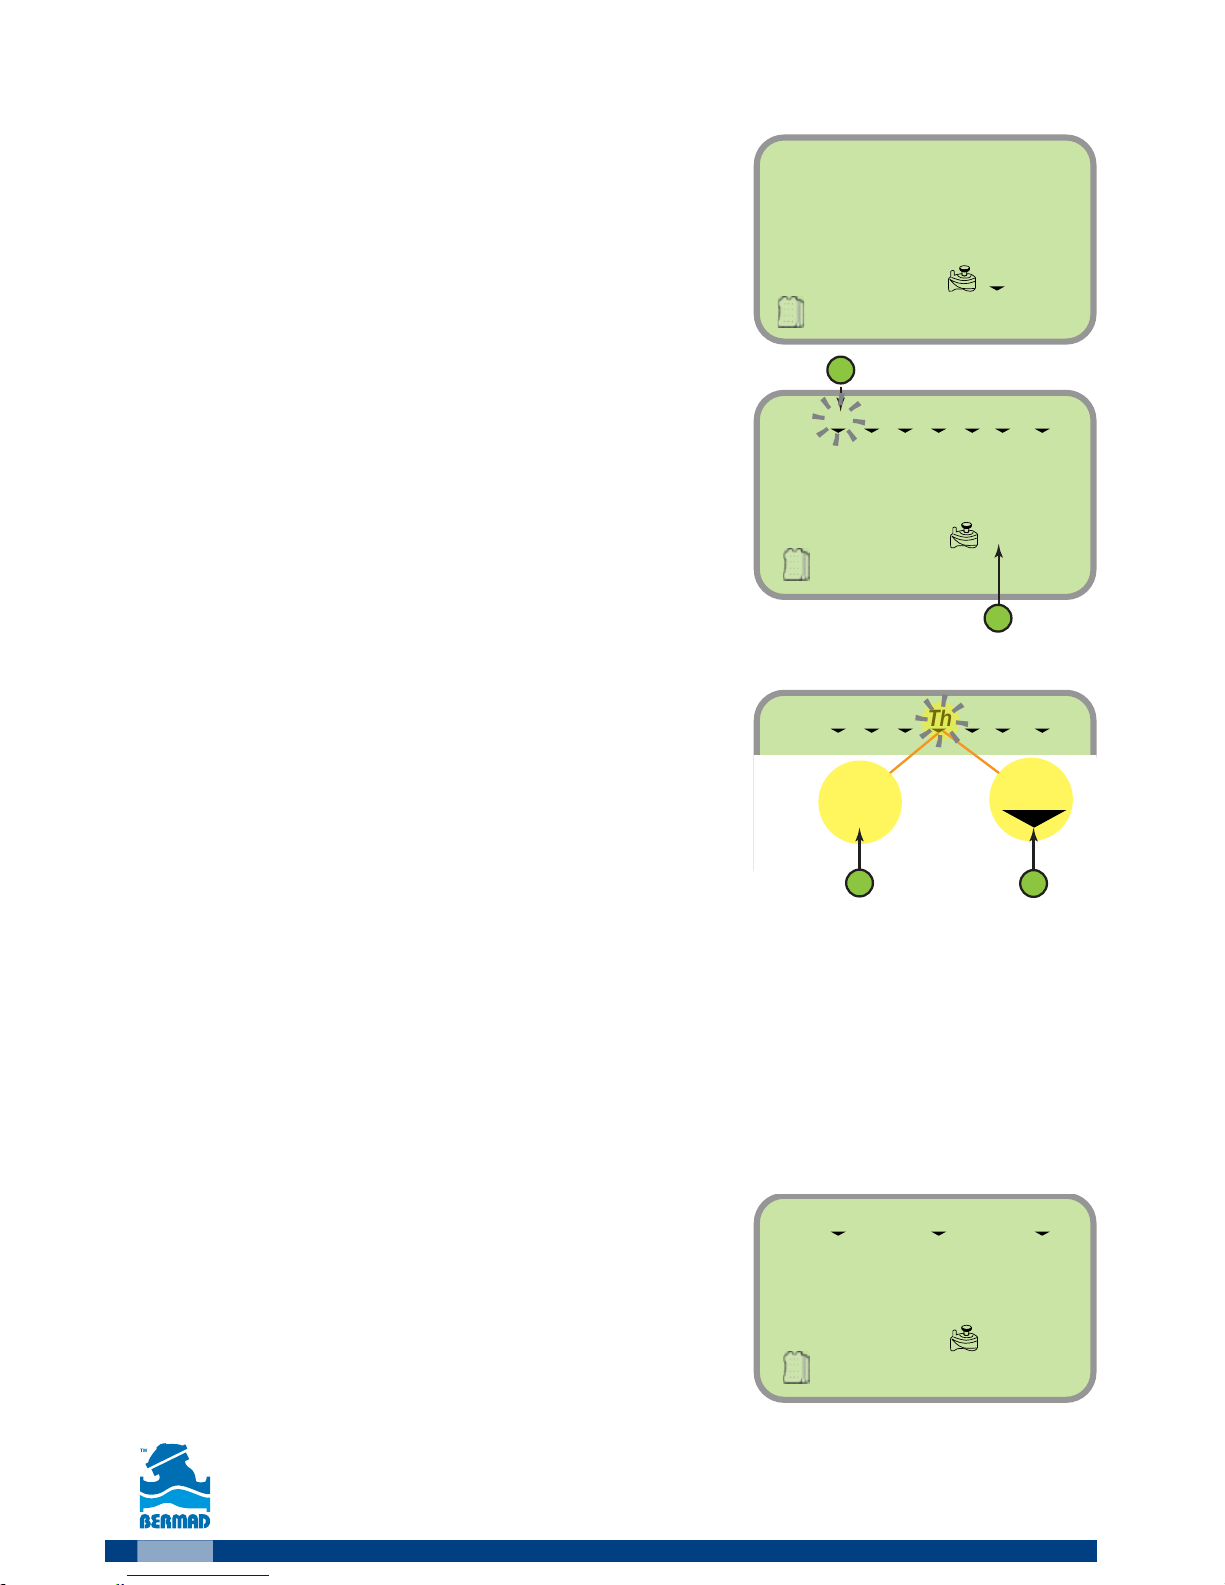
Setting the Irrigation Days
A screen with the valve number and the label
OFF appears.
This indicates that no irrigation program is set
for this valve.
Important: this screen does not appear when
this valve has an irrigation program already.
Press the
button
The screen displays the days of the week and
the valve number to be programmed.
The first day of the week (Monday) is flashing (2).
The arrow under the day symbol indicates that this
day is assigned for irrigation (see number 1 in the picture).
As default all the days of the week are assigned
for irrigation.
1. Press the
button (2) until the arrow under
the day symbol disappears. This action excludes
this day from the irrigation days.
2. Press the
button (1) until the arrow under
the day symbol appears. This action set this day for irrigation.
3. Use the
button to move to another day, the selected day starts flashing.
Important: Pressing the Y button while M is flushing or pressing the W
button while Su is flushing shifts the controller to irrigation by daysinterval mode. Press the opposite arrow to return to days of the week
mode.
4. Select the required irrigation days for the selected valve.
Example: The screen on the right displays
irrigation setting for valve number 3 on Monday,
Thursday and Sunday.
5. Press the
button
6. Press the
button to move to the next stage
“setting the irrigation start time”.
Page 13
13
M Tu W Th F Sa Su
OFF
3
START
1
1
2
M Tu W Th F Sa Su
:00
3
START
AM
6
1
2
Setting the Irrigation Start Time
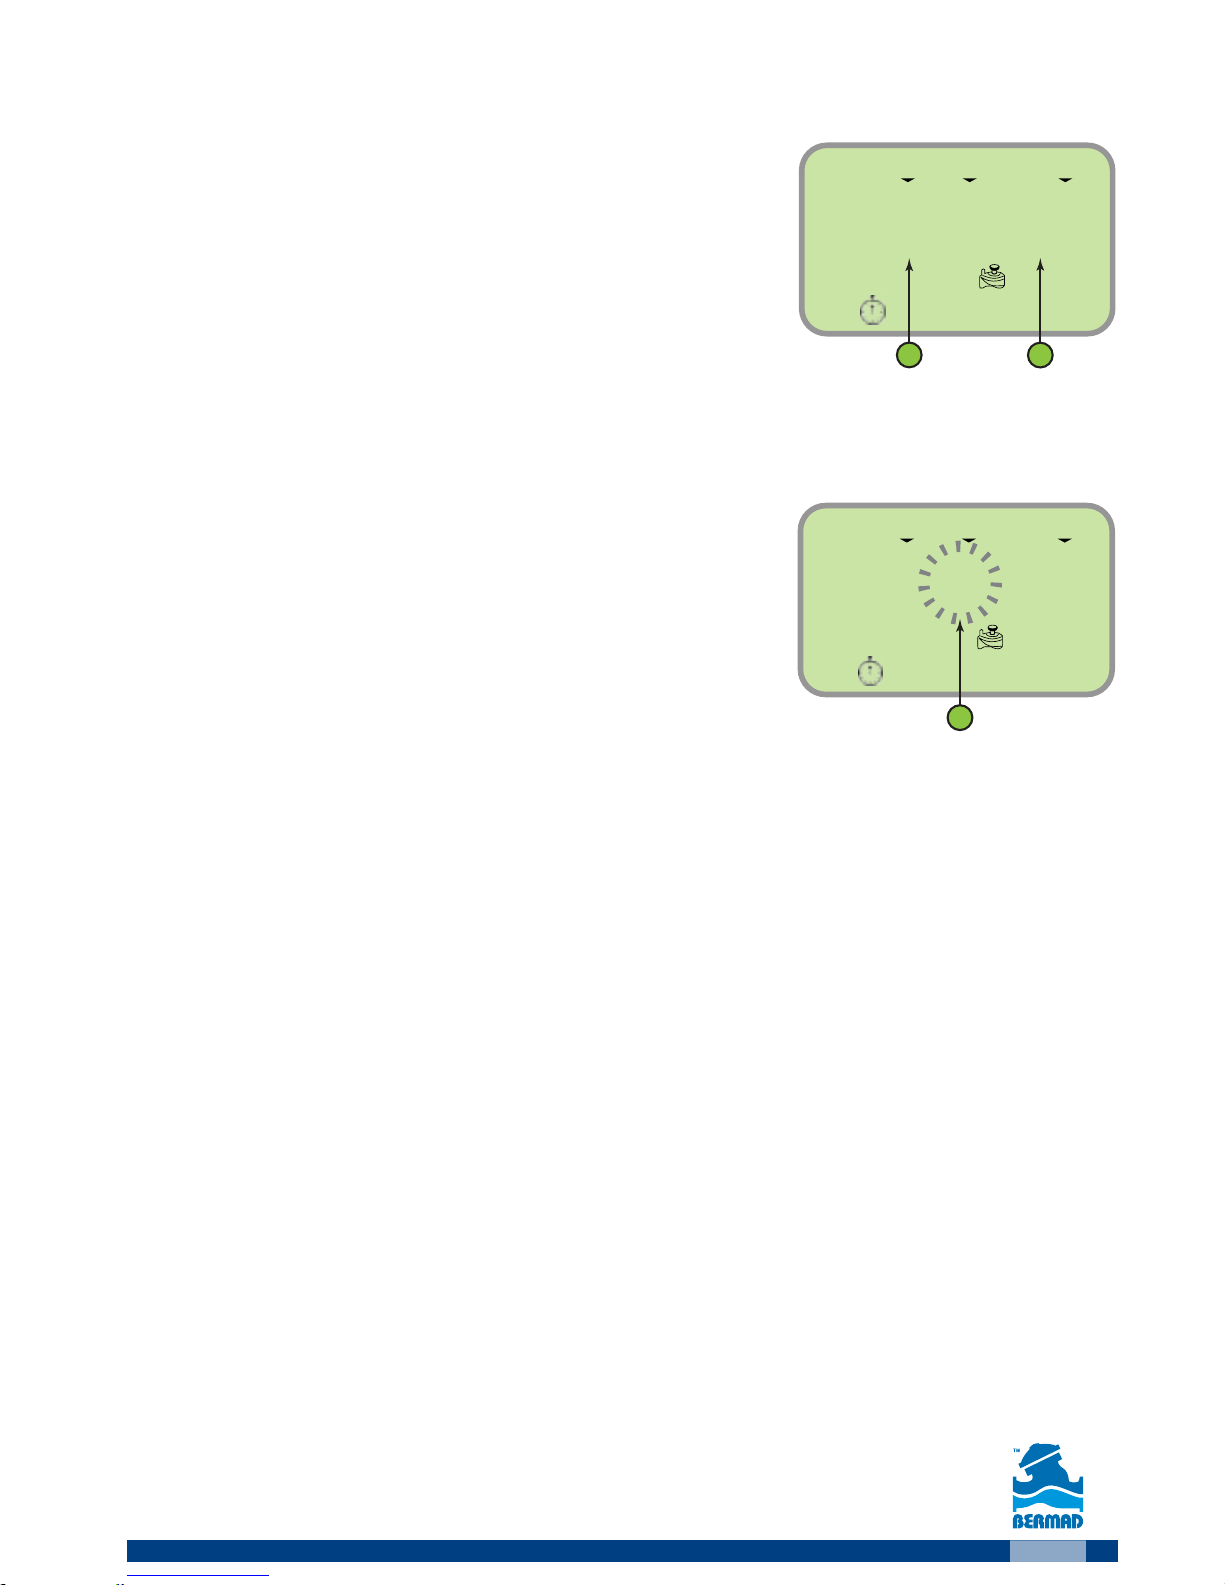
To each valve can be assigned with up to five
different start times per irrigation day.
For setting start time for the first daily cycle at
the selected day (START 1) press the
button
for setting the required start time. The value (2)
starts flashing.
Remark: The value OFF indicates that no start time is set.
1. Use the
and buttons to set the required
start hour (2).
Remark - To cancel an irrigation start time
press the
button when the hour digits are
flashing until you pass the midnight digits.
2. Use the
button to move to the minutes setting.
3. Use the
and buttons to set the required minute.
4. Press the
button to end the process.
For setting additional start times for this day:
5. Use the
and buttons to select the second start time (START 2).
6. Repeat steps 1-5 for setting the required start time.
7. Repeat these steps for each one of the start times you need to set.
8. Press the
button to move to the next stage “setting the irrigation
duration”.
Page 14
14
M Tu W Th F Sa Su
:05
3
0
M Tu W Th F Sa Su
%
100
6
1 2
Setting the Irrigation Duration
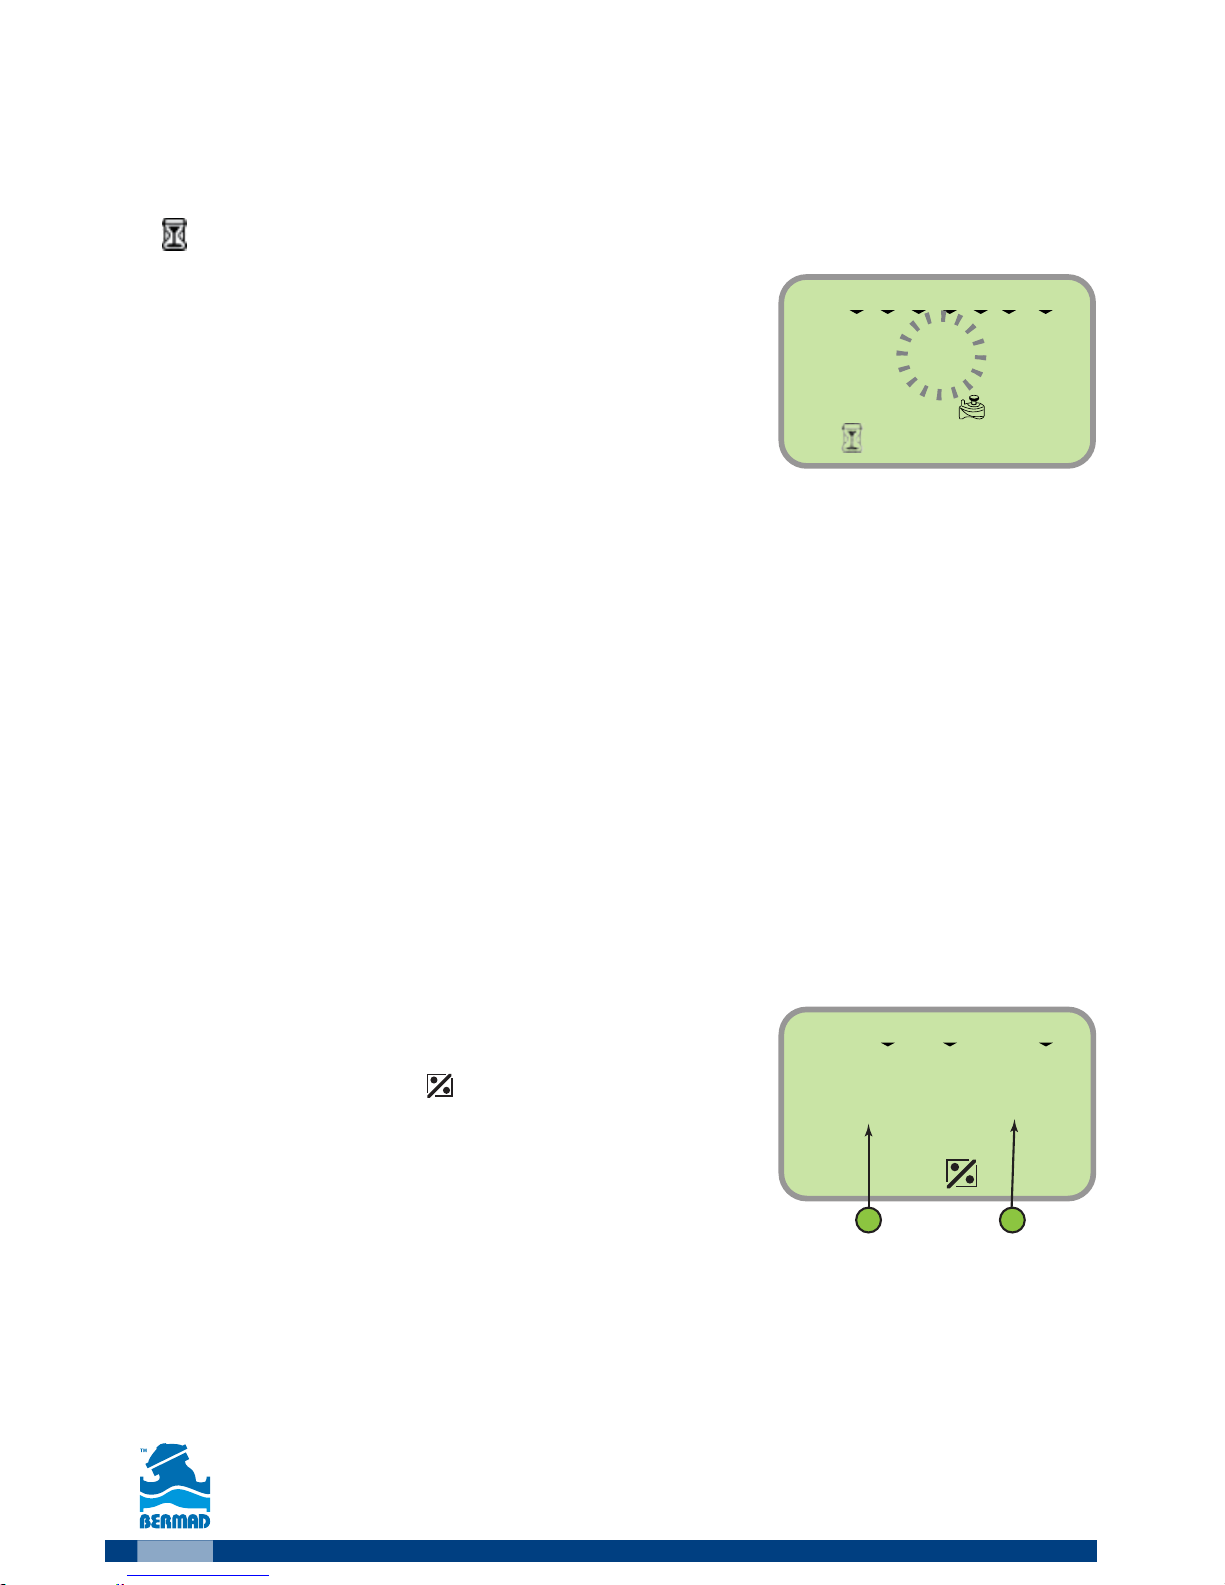
The irrigation duration is defined in hours and minutes. The irrigation
takes place on each day and start time as set in the previous programming
steps.
The
Icon appears on screen.
For setting the irrigation duration:
Press the
button the hours digits start flashing
Use the
and buttons to set the flashing value.
Use the
and buttons to move from the hours to
the minute’s digits and set the desired value.
Press the
button
Remark: The programming steps for the selected valve are completed.
In order to return to the main screen press three times on the button.
From the main screen you may repeat the above described steps in order
to set the irrigation program for the rest of the system’s valves.
For additional programming options and for irrigating percentage of an
existing program press the
button.
Irrigating a percentage of an existing program
When there is a need to change the irrigation duration for every month
of the year it is possible to set the percentage irrigation feature of the
controller (5% - 200%).
This feature helps to set the irrigation during weather changes without
changing the basic irrigation program.
Remark: These settings applied for all the
controller’s valves.
The screen displays the
icon, the month (1) and
the irrigation percentage (2).
Example: the figure depicts a setting for
irrigating 100% of the program during the
month of June.
1. For changing the settings press
The percentage value starts flashing.
2.
Use the and buttons to set the required percentage for the displayed month.
3.
Use the and buttons to move to a deferent month and set the desired percentage.
4. Press the button to end the programming process.
5. Press the
button to move to the “Setting rain delay” settings.
Page 15
15
OFF
START
In
14
DAYS
Setting the Rain Delay
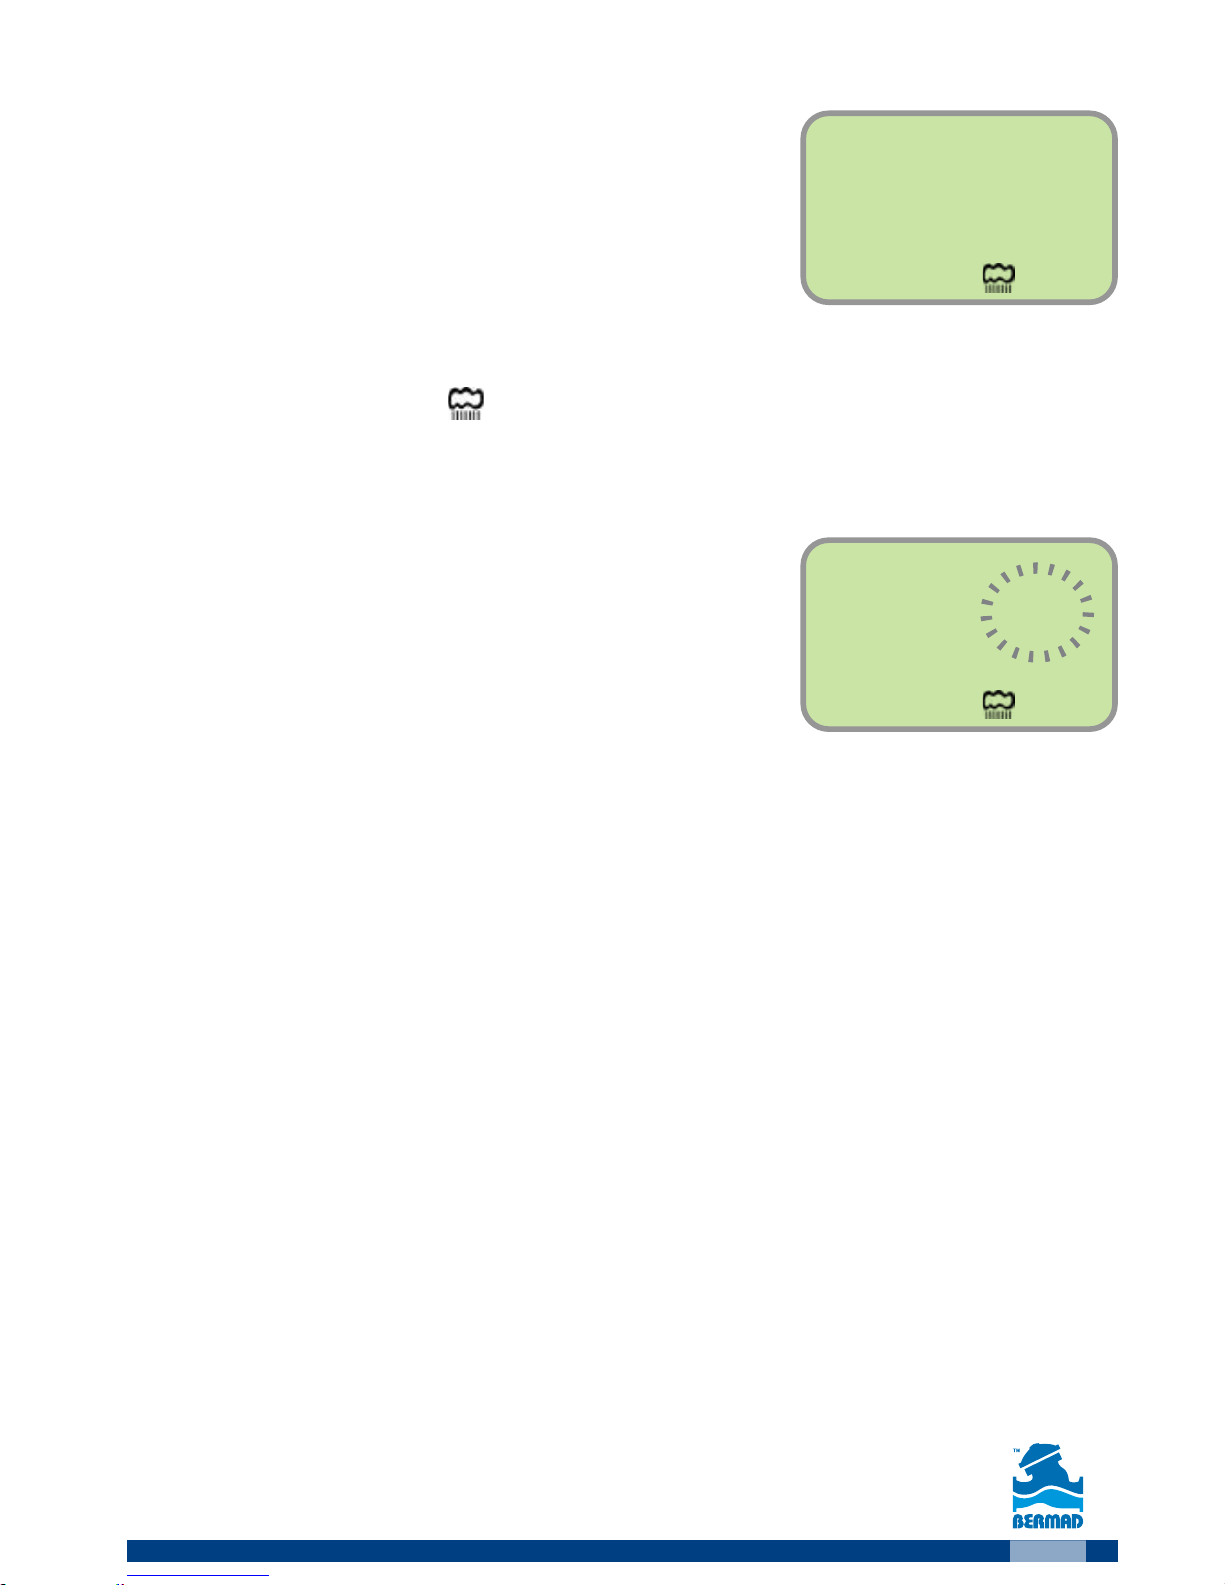
This option is used to suspend the irrigation
programs for a predefined number of days
when a signal is received from the rain sensor.
For example, during rainy weather regularly
scheduled programs can be suspended
for duration of 1-99 days. At the end of the
designated period, regularly scheduled
programming resume operation automatically.
The screen displays the
Icon and the delay days value. The label OFF
indicates that no rain delay is set.
For Setting rain delay:
1. For changing the settings press .
The value starts flashing.
2. Use the
and the buttons for setting
the maximal rain suspension days
between 1 to 99 days.
Remark: The value OFF appears between the 99 and the 1 values.
3. Press the
button to end the programming process.
4. Press the
button to return to the main screen.
Page 16
16
:00
Su
3
AM
12
V 3
1
M Tu W Th F Sa Su
EVERY
3
1
2
1
DAY
EVERY
3
5. Irrigating by Days Interval
For setting irrigation in pre-defined days interval:
The System’s Main Screen
Make sure that the main screen is displayed
The system time appears in the middle of the
screen and the day of the week is displayed on
the screen’s upper part.
Selecting a Valve
1. At the main screen press the button.
The number of the valve appears.
2. Use the
and buttons to select the valve
to be programmed.
3. Press
button to move to the next step.
Setting the Irrigation Days
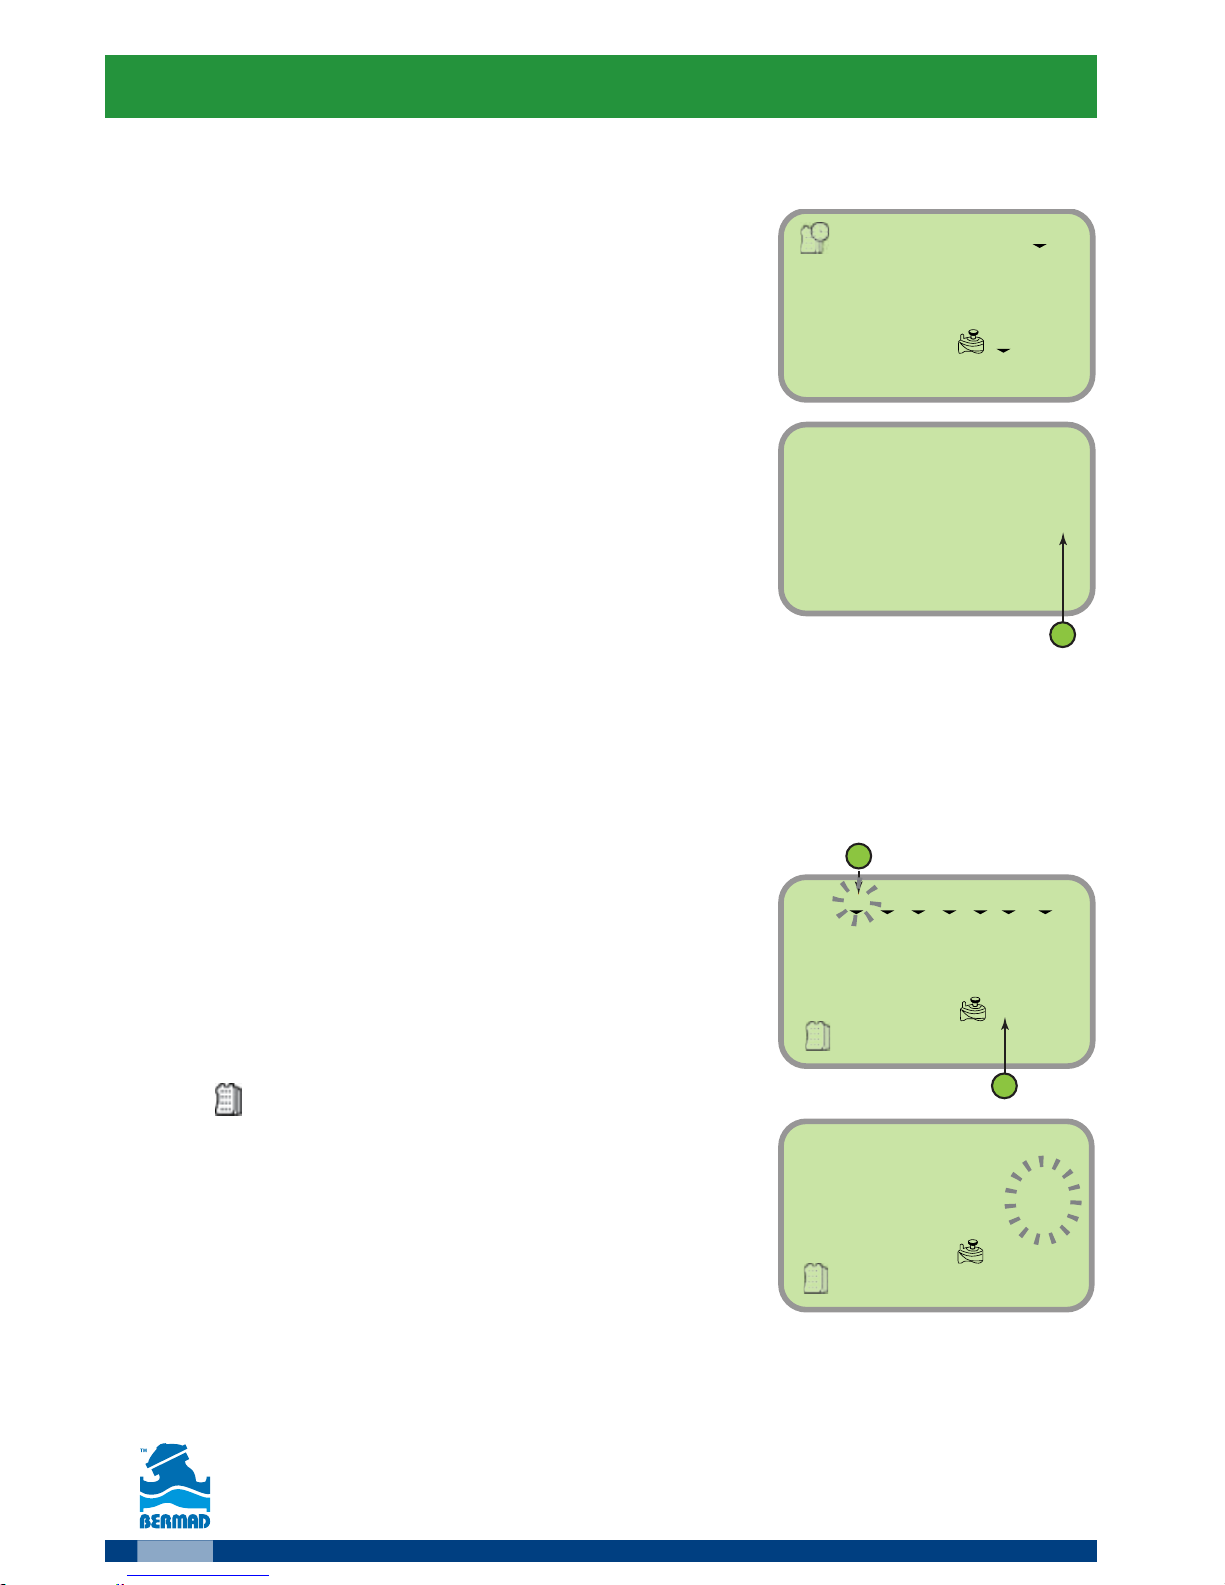
The screen displays the days of the week and the valve to be programmed
number (1).
Remark: The label OFF indicates that no
program is assigned to this valve.
1. Press the
button, the first day of the week
(Monday) starts flashing (2)
2. Press the
button to move to irrigation
by days’ interval.
The
icon appears and the number of days
starts flashing.
3.
Use the and buttons to set the required interval.
4.
Press the
button to end the programming process.
5. Press the button to move to the
“Start time’s settings” (see page 12).
6. Press the
button again to move to the
“Set the irrigation duration settings” (see page 13).
Page 17
17
:00
Su
3
AM
12
V 3
1
M Tu W Th F Sa Su
EVERY
3
1
2
EVEn
DAY
EVERY
3
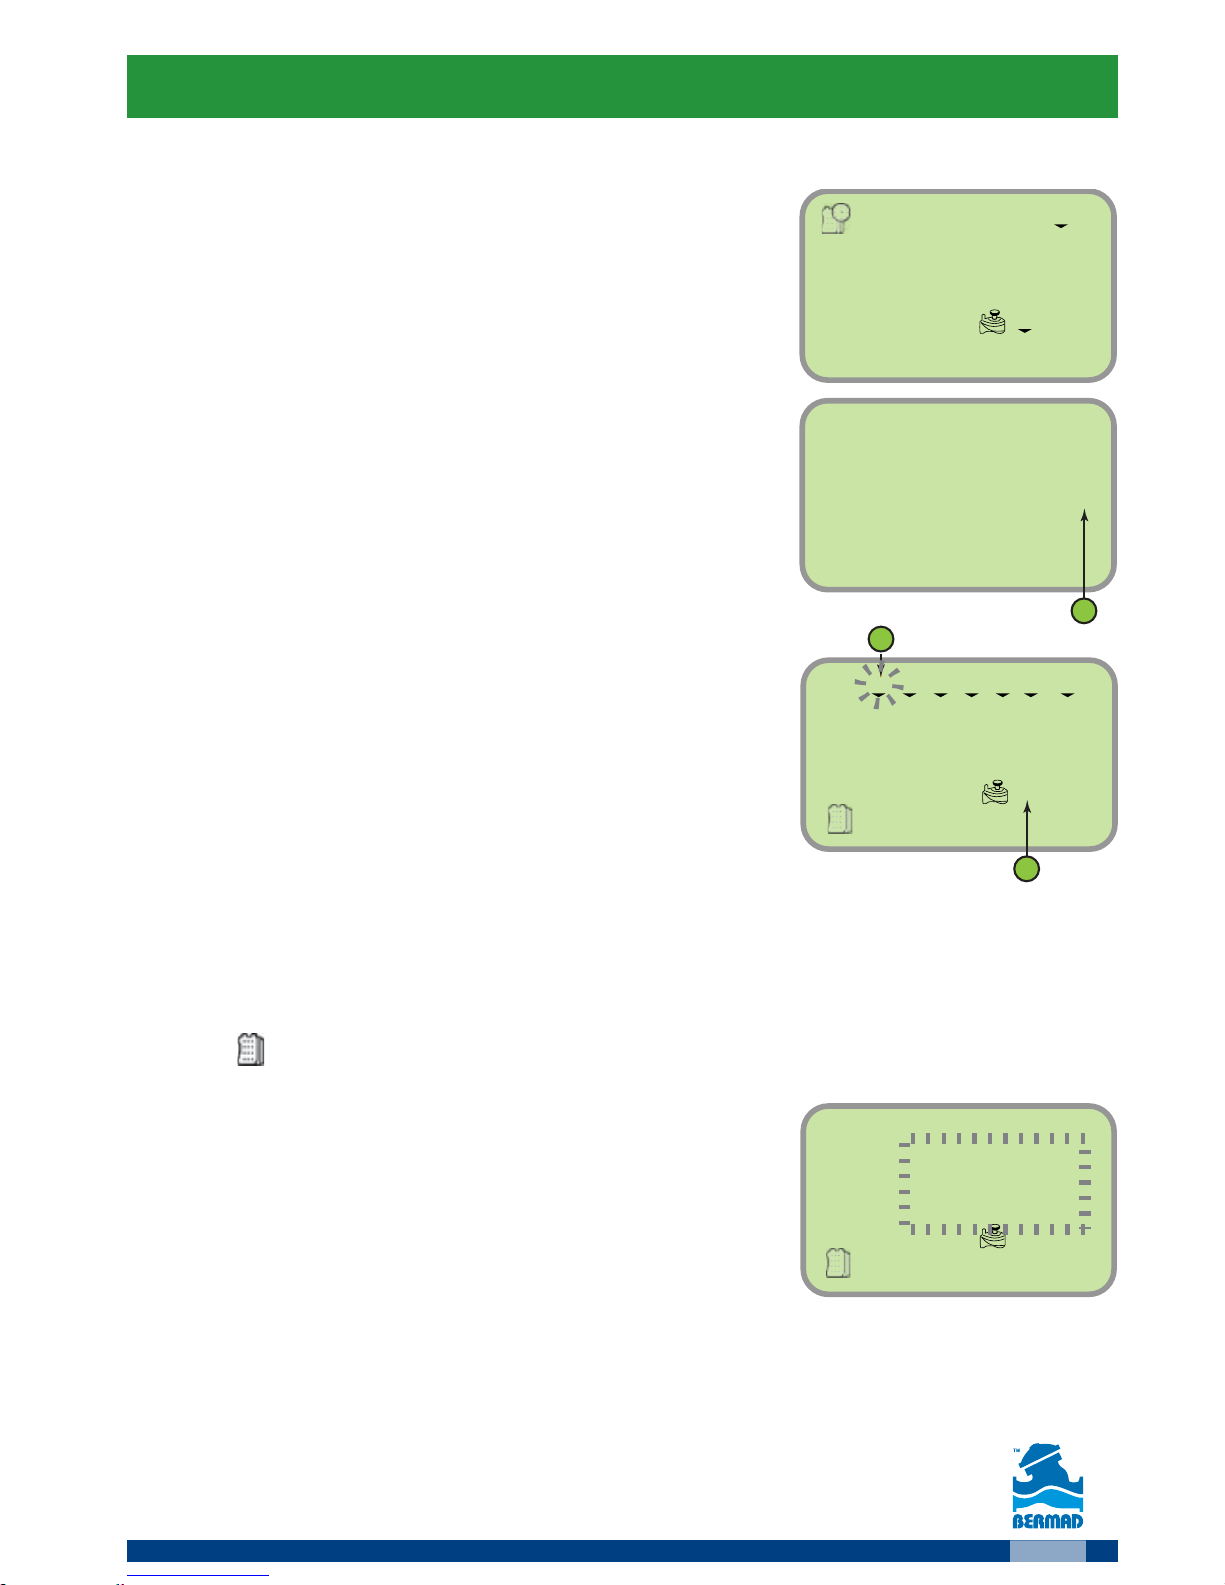
6. Irrigating on EVEN/ODD Days
For setting the irrigation programs for Even or Odd days of the month:
The System’s Main Screen.
Make sure that the main screen is displayed
The system time appears in the middle of the
screen and the day of the week is displayed on
the screen’s upper part.
Selecting a Valve
1. At the main screen press the button.
The number of the valve appears.
2. Use the
and buttons to select the valve
to be programmed.
3. Press
button to move to the next step.
Setting the Irrigation Days
The screen displays the days of the week and
the valve to be programmed number (1).
Remark: The label OFF indicates that no
program is assigned to this valve.
1. Press the
button, the first day of the week (Monday) starts flashing (2)
2. Press the
button to move to irrigation by days› interval.
3. Press the
button again to move to irrigation on EVEN/ODD days.
The
icon appears and the irrigation method starts flashing.
4. Use the
and buttons to select the
desired method.
●
EVEN - every even day of the month (2, 4, 6....)
●
ODD - every odd day of the month (1, 3, 5....)
5. Press the
button to end the programming
process.
6. Press the
button to move to the “Start time›s settings” (see page 12).
7. Press the
button again to move to the
“Set the irrigation duration settings” (see page 13).
Page 18
18
M Tu W Th F Sa Su
GrP
3
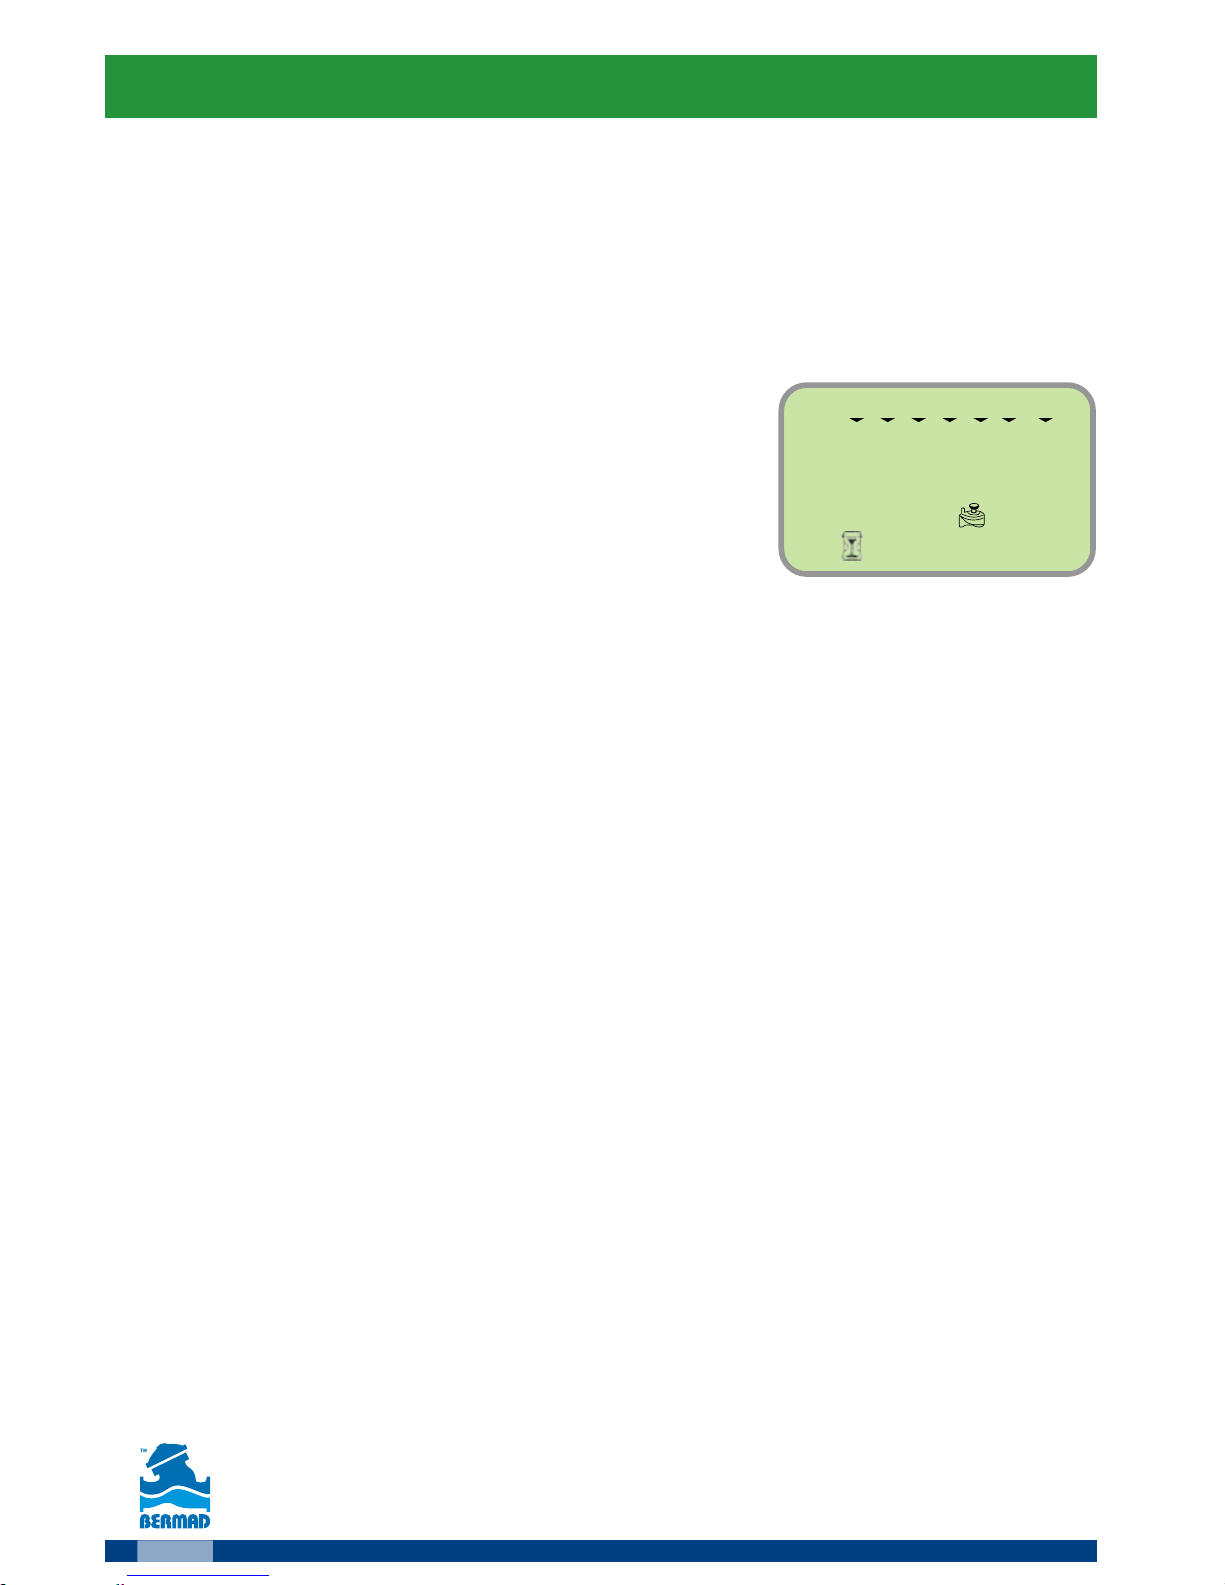
7. Operating Group of Valves
As default each valve operates separately according to its designated
irrigation program. For operating together two or more valves they should
be joined to a group. Valve can be connected to its previous valve only, e.g.
valve 3 to valve 2.
For setting a valves group:
1. in the “Set irrigation duration screen (Page 13)
use the
button to lower the irrigation
duration to less than 00:05, the label GRP
appears.
2. Press the
button
The valve is grouped now.
For example: the above screen shot shows that valve number 3 operates
together with valve 2 and according to the irrigation program of valve 2.
Page 19
19
:05
123456
0
12
On
123456
3
:05
123456
0
1
2
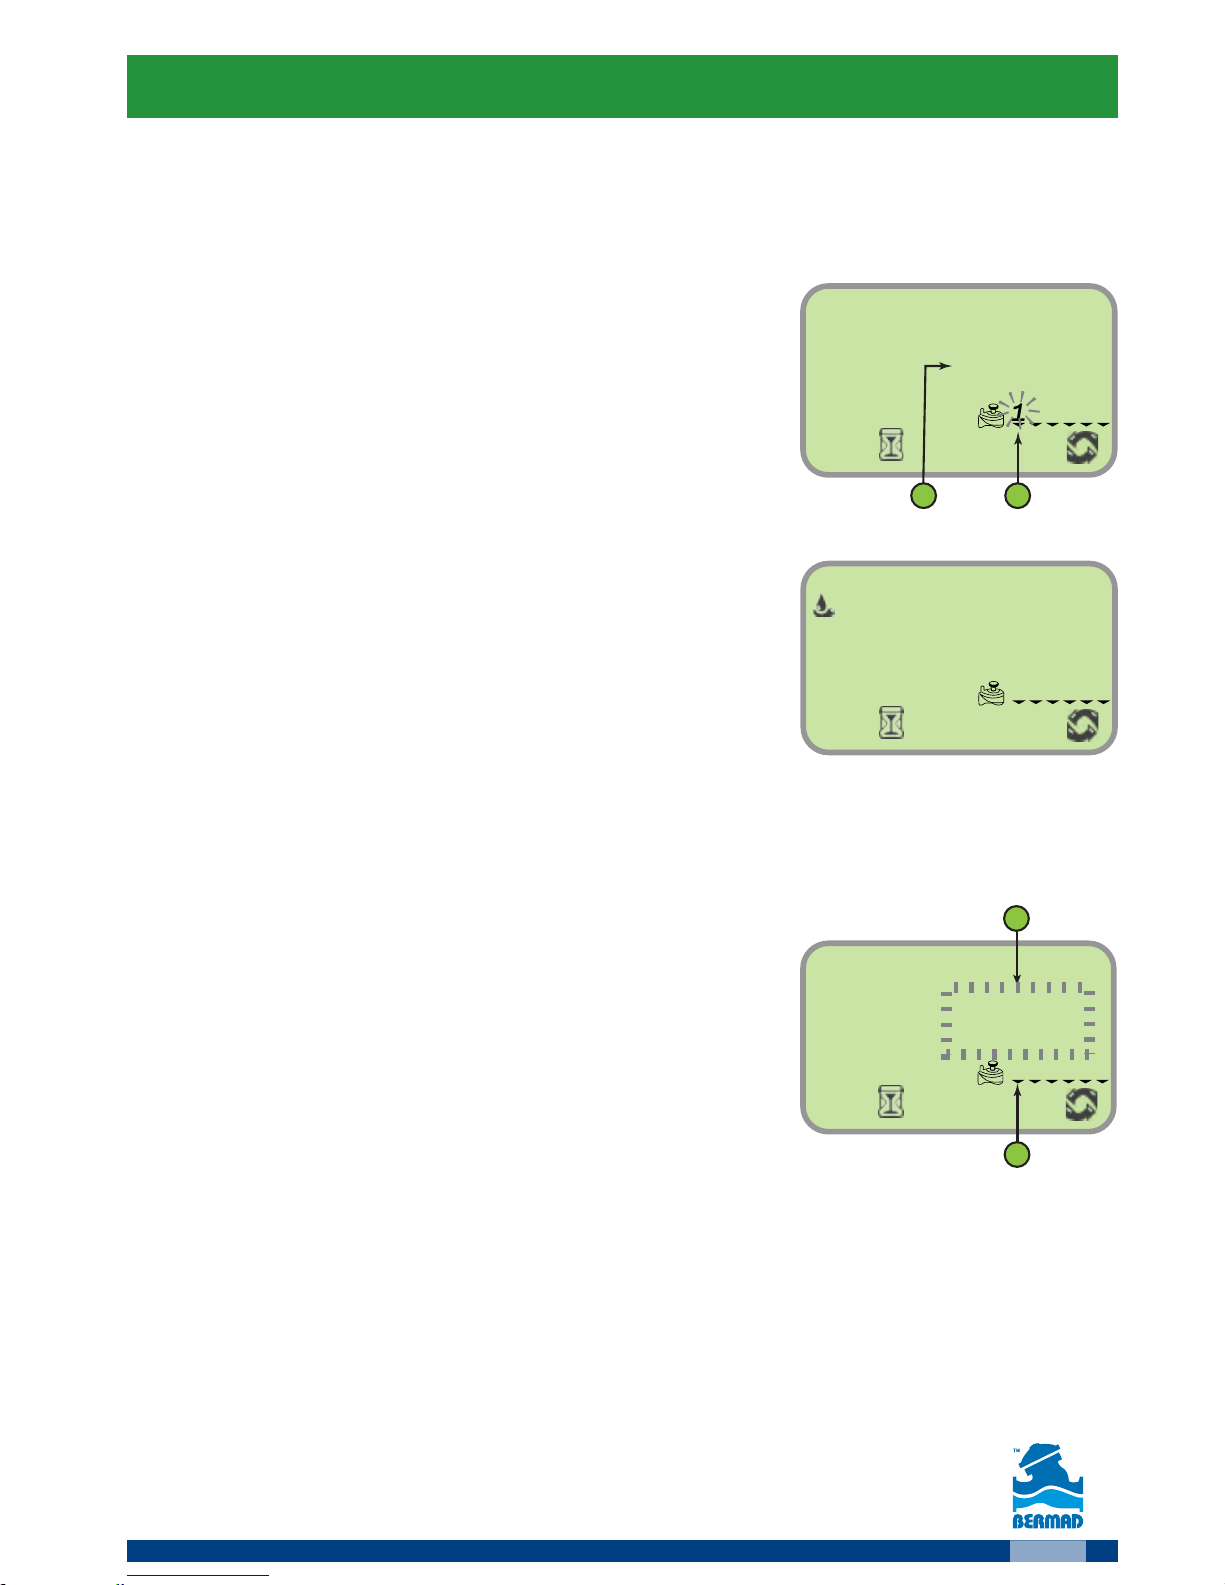
8. Manual Irrigation
It is possible to operate a valve for a preset time separated from its
regular irrigation program.
Selecting the Valve:
For manual operation of one of the valves:
1. From any screen press the
button.
●
The screen displays the list of the controller’s
valve and the time for the manual operation (2).
●
The selected valve starts flashing.
2. Use the
and buttons to select the
desired valve.
Operating the Valve
Press the button to operate the selected
valve.
The valve opens. The label ON and the valve number appear for short
time.
Setting/monitoring the irrigation duration
When the valve is ON:
●
The time left for the manual operation is
flashing (2).
●
The arrow under the opened valve is flushing (1).
1. As needed use the
and buttons to
change the irrigation duration.
2. Press the
button to end the manual irrigation.
The controller displays the label OFF and after 5 seconds returns to
the main screen.
Page 20
20
9. Resetting or Suspending the Controller
10. Connecting the Rain Sensor
To reset the controller to its factory default settings:
From the “Set irrigation days screen” (see page 11)
press the button for 3 seconds.
●
The main screen appears
●
All values return to their default settings.
●
The current Time and Date settings remain
Suspending the system operation
For suspending the controller and stopping the irrigation:
Press the
button
The controller displays the OFF label and the system is suspended.
Most “normally closed” rain sensors can be connected to the BIC 1
Controller. The function of the sensor is to suspend automatic irrigation
during rainfall.
To connect the sensor to the controller, please follow these steps:
1. Cut in the middle the yellow wire loop that hangs out of the controller’s
housing lower side.
2. Strip approximately ½” of the insulation from the ends of the cut
yellow wire.
Connect the two yellow wires to the wires of the rain sensor.
Use waterproof wire connectors to secure the connections.
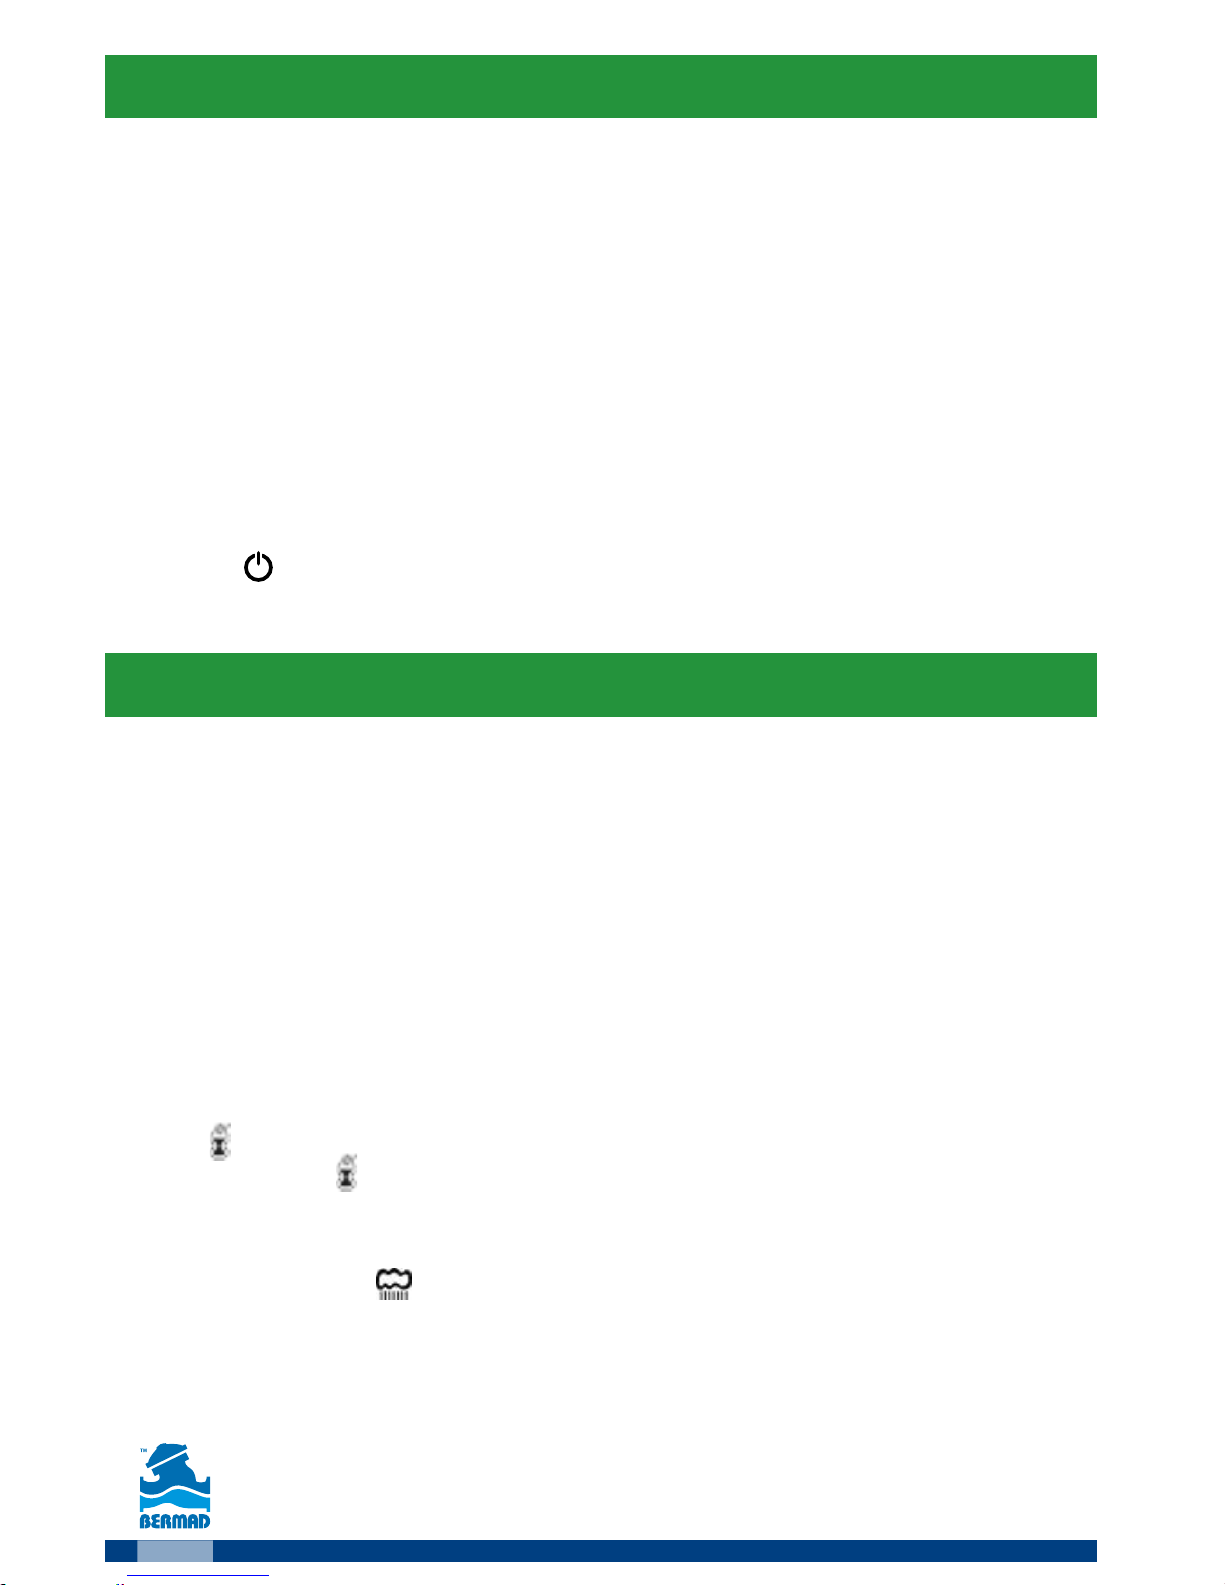
3. When the sensor is active and automatic irrigation is suspended,
the
icon appears on the screen.
Remark: the
icon appears when the sensor is active or when
the yellow wire loop is cut opened.
Attention:
●
The rain sensor is not part of this product and it is not supplied
with it.
●
Recommended rain sensors are supplies by Rain Bird RSD or
Hunter Mini-Clik
Page 21

21
The BIC controllers’ batteries can last up to 3 years when using good
quality AA alkaline batteries.
Actual battery life depends on the batteries sensitivity to temperature
variations the controller is exposed to, and to the number of valve
operations per day.
To ensure proper operation, it is recommended to regularly check the
batteries and replace them once the low battery indication starts flashing.
For replacing the batteries instructions see page??
In order not to reset the time and date settings the BIC controller is
designed to retain the current time settings for up to 60 seconds with the
batteries removed.
To change the batteries, see section 5.
Remark - in case the batteries are completely empty it is possible to
operate the valves manually (see the valve›s operating handle on page 5).
11. Replacing the Batteries
Page 22

22
12.
Maintenance, Troubleshooting and Repairs
Symptom: The valve fails to open automatically or manually.
Possible cause -
Too low water pressure
Solution -
Open the main valve of the water supply line
Symptom: The valve operates manually but not automatically
Possible cause -
The controller is in OFF mode
Solution -
make sure that the word OFF is not displayed instead
of the current Time and Date
Possible cause -
The AM/PM setting is not set correctly
Solution
- check the start time and if needed change the AM/PM setting
Possible cause -
The
rain sensor is suspending the irrigation
Solution -
set the rain sensor to OFF mode
Possible cause - The
yellow wire is cut
Solution -
reconnect the yellow wire with water proof connectors.
Possible cause -
The rain sensor is connected and suspends the irrigation
Solution -
check the rain sensor and its connections.
Make sure it is of NC (Normally closed) type.
Symptom: The screen is blank
Possible cause -
No key was pressed during the last 15 minutes
Solution
- Press any key on the keypad.
Symptom: The rain sensor dose not suspend the irrigation
Possible cause -
The
sensor id of NO (Normally Open) type, the sensor is faulty
or incorrectly wired.
Solution -
Make sure that the Rain Icon appears on screen when the
sensor is manually set to rain detection mode.
Check the sensor connections.
Symptom: The controller irrigates more that once a day
Possible cause - The controller is programmed for more than one start time per day
Solution -
Set the 2, 3, 4 and 5 start times› settings to OFF.
Page 23

23
BERMAD manufactured products are guaranteed to be free from defect in
material and/or workmanship and to perform as advertised when properly
installed, used and maintained in accordance with current instructions,
written or verbal.
Should any item prove defective within the period set forth for that item,
but in any case not later than within 12 (twelve) months from the time that
product left BERMAD’s premises, and shall be received by BERMAD or its
authorized representative, or written notice thereof from the purchaser
within 30 days of discovery of such failure – BERMAD will repair or replace
any item proven defective in workmanship or material, or will refund the
purchase price, at its sole option.
BERMAD will not be responsible for, nor does this warranty extend to, any
consequential or incidental damages or expenses of any kind or nature, of
any kind, regardless of the nature thereof, including without limitation injury
to persons or property, loss of use of the products, loss of goodwill, loss of
profits, or any other contingent liabilities of any kind or character alleged to
be the cause of loss or damage to the purchaser.
This warranty does not cover damage or failure caused by misuse, abuse
or negligence, nor shall it apply to our products upon which repairs
or alternations have been made by other than an authorized BERMAD
representative.
This warranty does not extend to components, parts or raw materials used
by BERMAD but manufactured by others, which shall be covered only to the
extent warranted by the manufacturer’s warranty.
There are no warranties, express or implied, except this warranty, which
is given in lieu of any other warranties, express or implied, including any
implied warranty of fitness for a particular purpose.
BERMAD Standard International Warranty
Page 24

[email protected] • www.BERMAD.com
The information herein is subject to change without notice. BERMAD shall not be held liable for any errors. All rights reserved.
© Copyright by BERMAD.
PUEAE16-BIC246 10/17 Rev.2
 Loading...