

Page 1
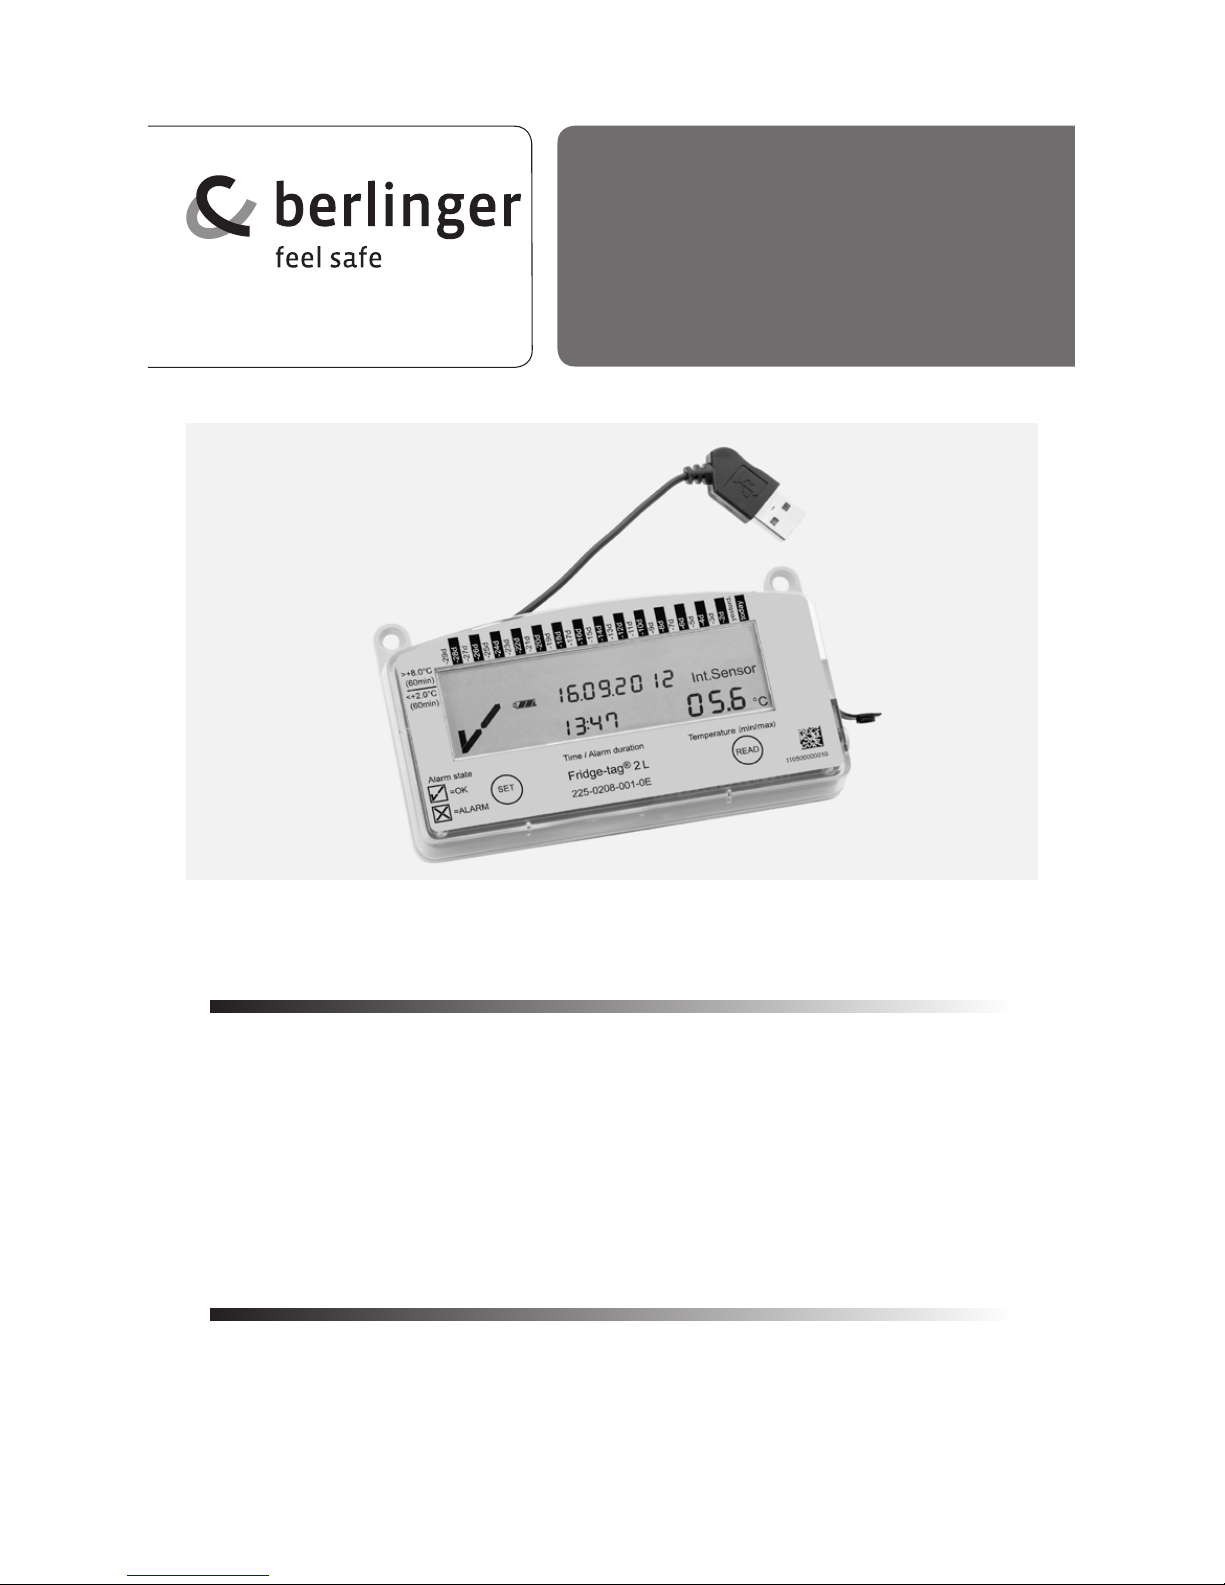
Fridge-tag® 2 L
with internal sensor
OPERATION MANUAL
ENGLISH PAGE 1-34
GEBRAUCHSANWEISUNG
DEUTSCH SEITE 35-68
Page 2

Content
1) Display explanations
2) State of delivery / Sleep Mode
3) Quality check prior to activation
4.3) Setting the calendar format
4.5) Setting the date
4.6) Setting the time
4.7) Setting the alarm limits (not standard)
4.4) Use of READ and SET
5) Placing the sensor of the Fridge-tag® 2 L
6) Read and change settings /
How to correct setting mistakes
7) Display indication during measurement
9) Reading the History
9.1) Option 1:
Read out day-per-day (30 day history)
9.2) Option 2:
Read out alarms (Alarm-Super-Jump function)
Read out audio Alarm
9.3) Option 3: Read out history via computer
9.4) Temperature record duration
10) Explanation of terms
11) Expiry code explanation
12) Technical specications
13) Important Information
4) Activation process
4.2) Activation
4.1) Overview sequences of activation
6.2) Menu entry
6.1) Overview menu
Page
4
13
18
32
32
33
22
11
17
32
7
4
21
25
27
23
3
7
9
30
6
6
18
19
8) Warning symbol
22
8
9.5)Verycationprocess
27
31
2
Page 3
English
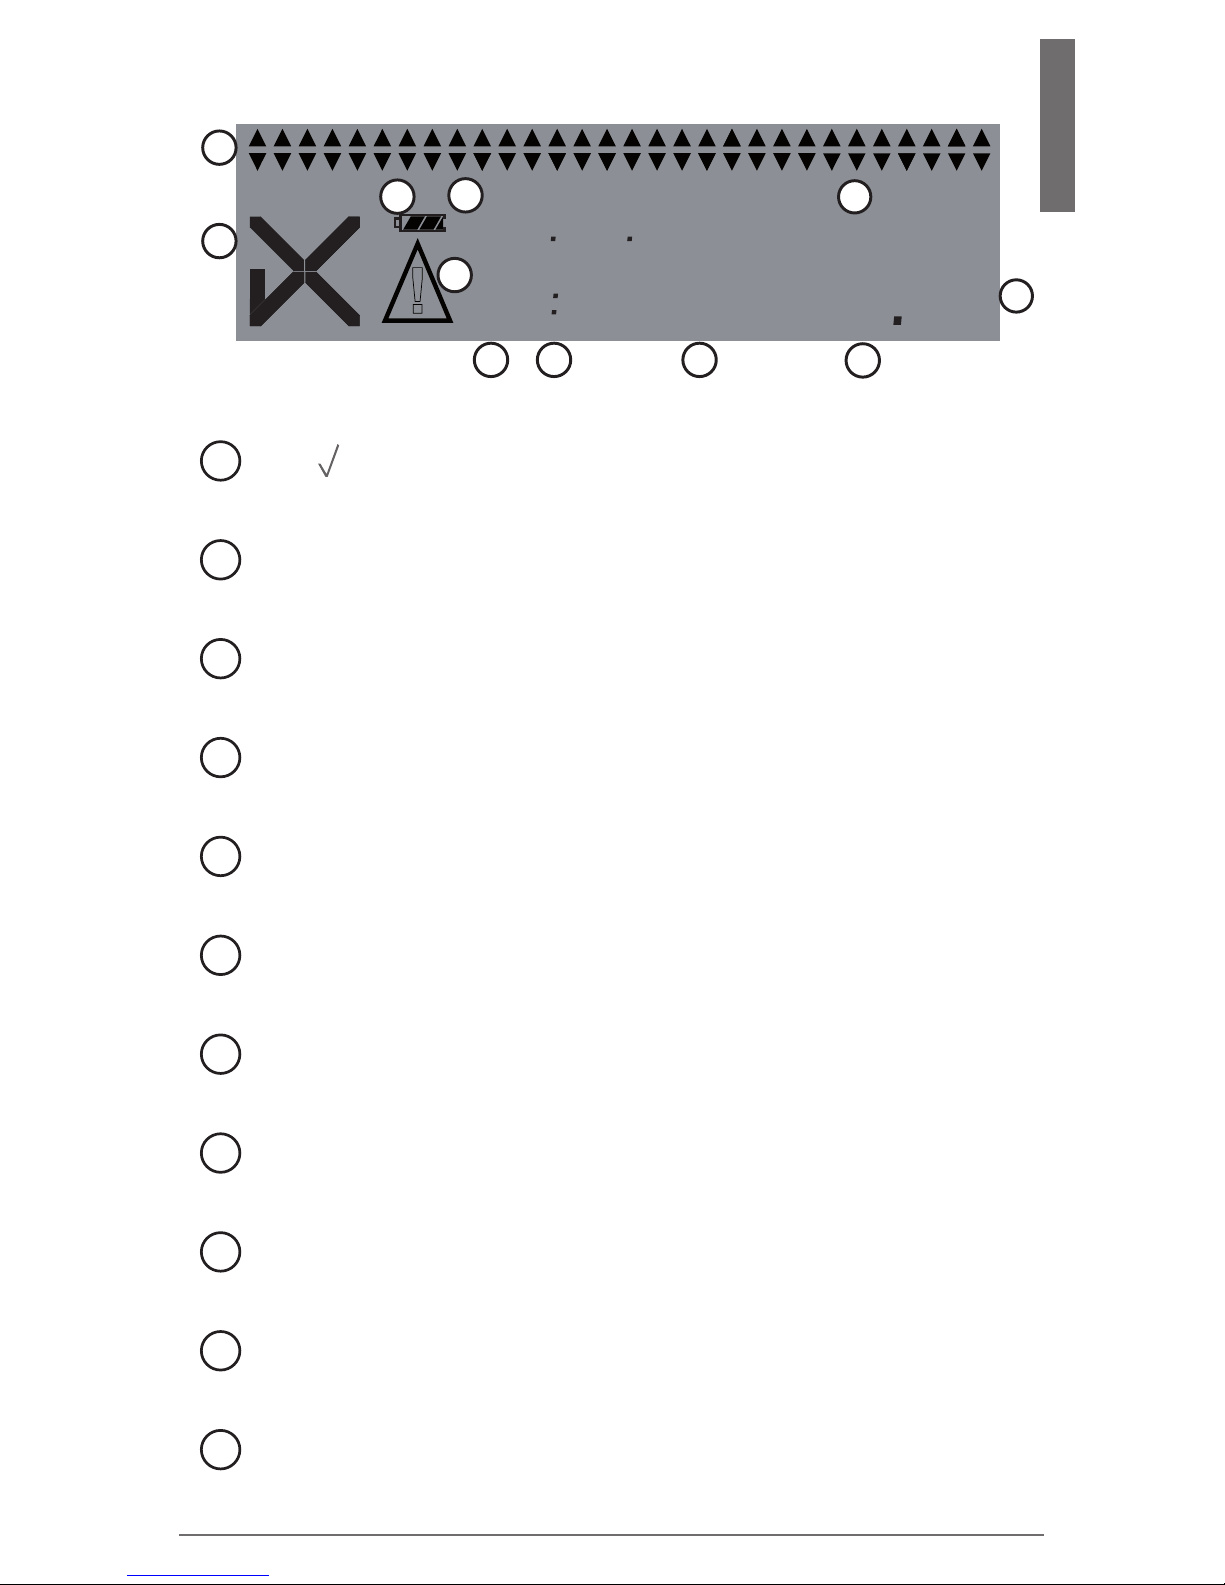
1) Display explanations
!
1-
888
8808 2888
8888
min.
max.
°F
°C
Int.
SensorSensor
Ext.
1
2
4
3
5
6
7
8
9
10
11
1
2
3
6
4
7
5
8
9
10
11
OK ( ) or ALARM (X) indicator
Battery power
This icon indicates the remaining capacity of the battery
Temperature display
Daily HIGH / LOW alarm indicator
(showing history of the last 30 days)
Date and text indicator
Additional warning symbol
Indicator of the temperature measurement unit (°F / °C)
Power on indicator (double point is ashing)
Indicator of measured minimum/maximum temperature
Time, duration and text indicator
Indicator of activated sensor:
Int. = internal sensor (inside the Fridge-tag® 2 L)
Ext. = external sensor (cable with temperature sensor)
3
Page 4
2) State of delivery / Sleep Mode
Fridge-tag 2 L
Temperature (min/max)
<2°C
(15min)
>8°C
(30min)
225-0208-001-00E
110500000010
-27d
-25d
-23d
-21d
-19d
-17d
-15d
-13d
-11d
-9d
-7d
-5d
-3d
yesterd.
-29d
-28d
-26d
-24d
-22d
-20d
-18d
-16d
-14d
-12d
-10d
-8d
-6d
-4d
-2d
today
Time / Alarm duration
SET
Alarm state
=OK
=ALARM
READ
®
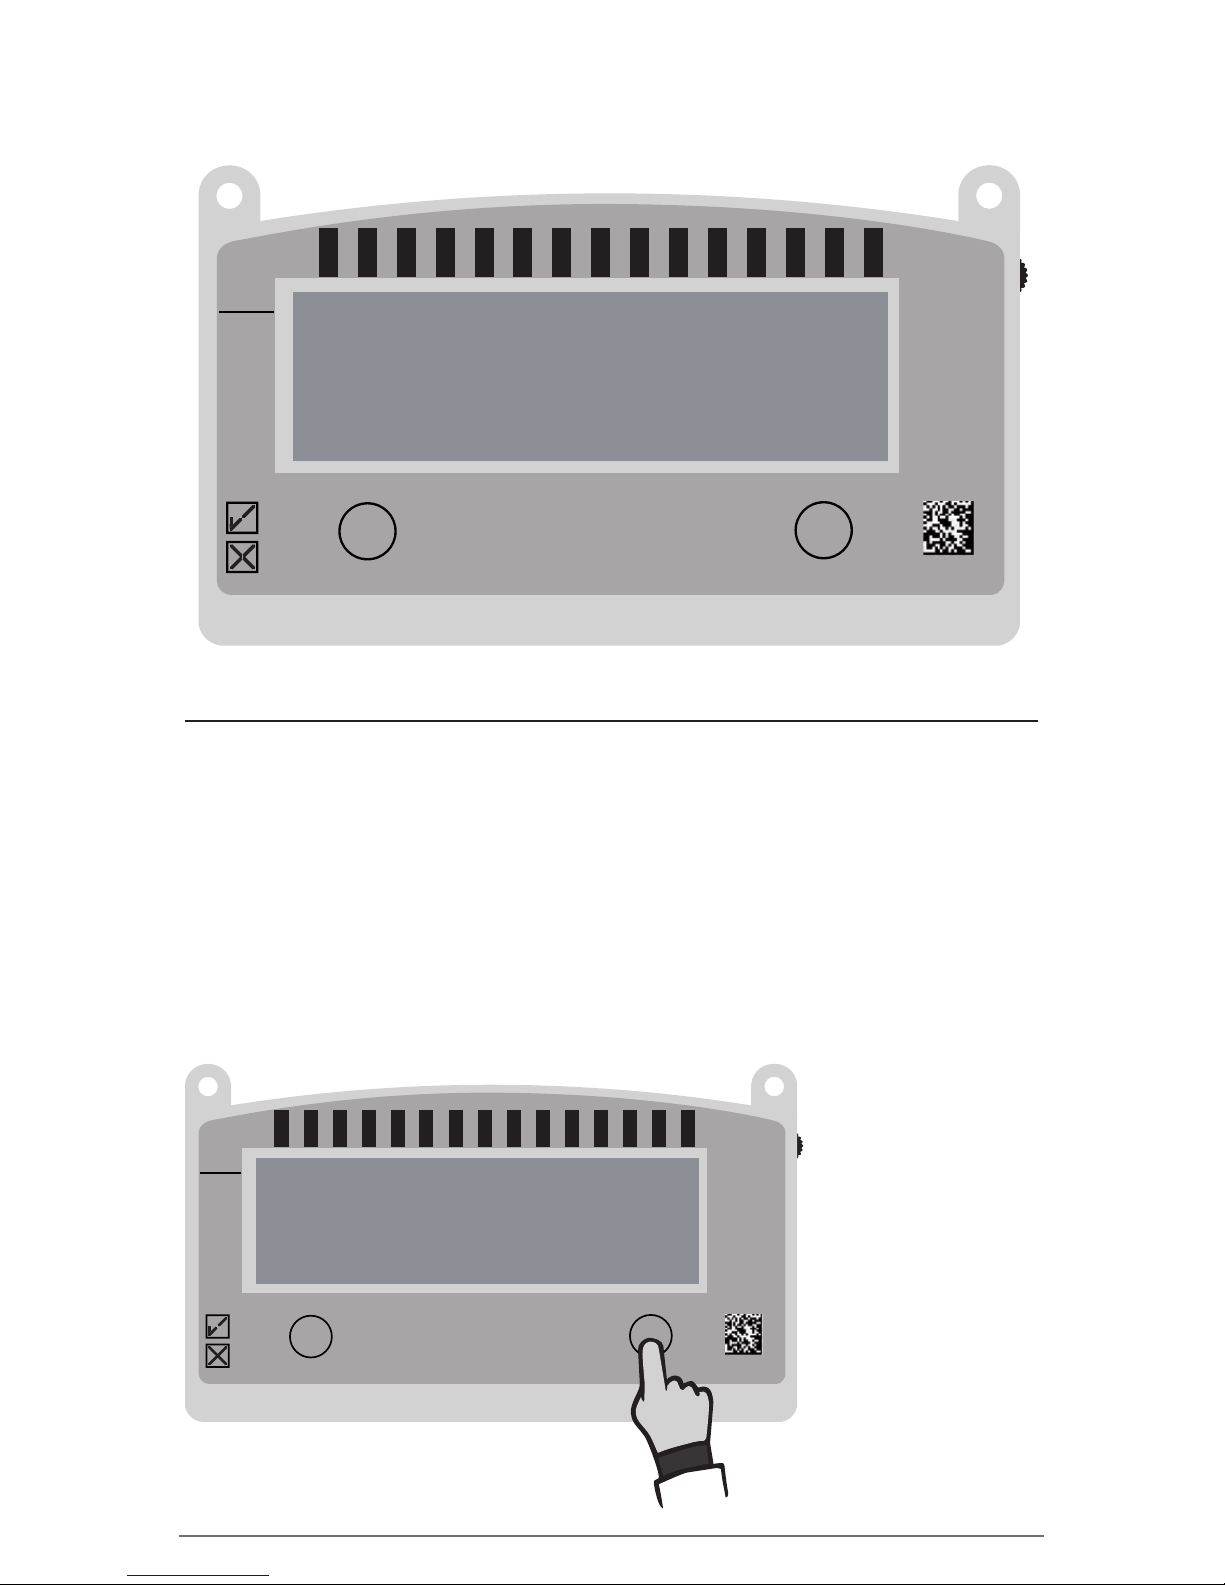
Fridge-tag® 2 L is shipped in its so-called „Sleep
Mode“.
The display (LCD) is blank.
3) Quality check prior to activation
(in Sleep Mode)
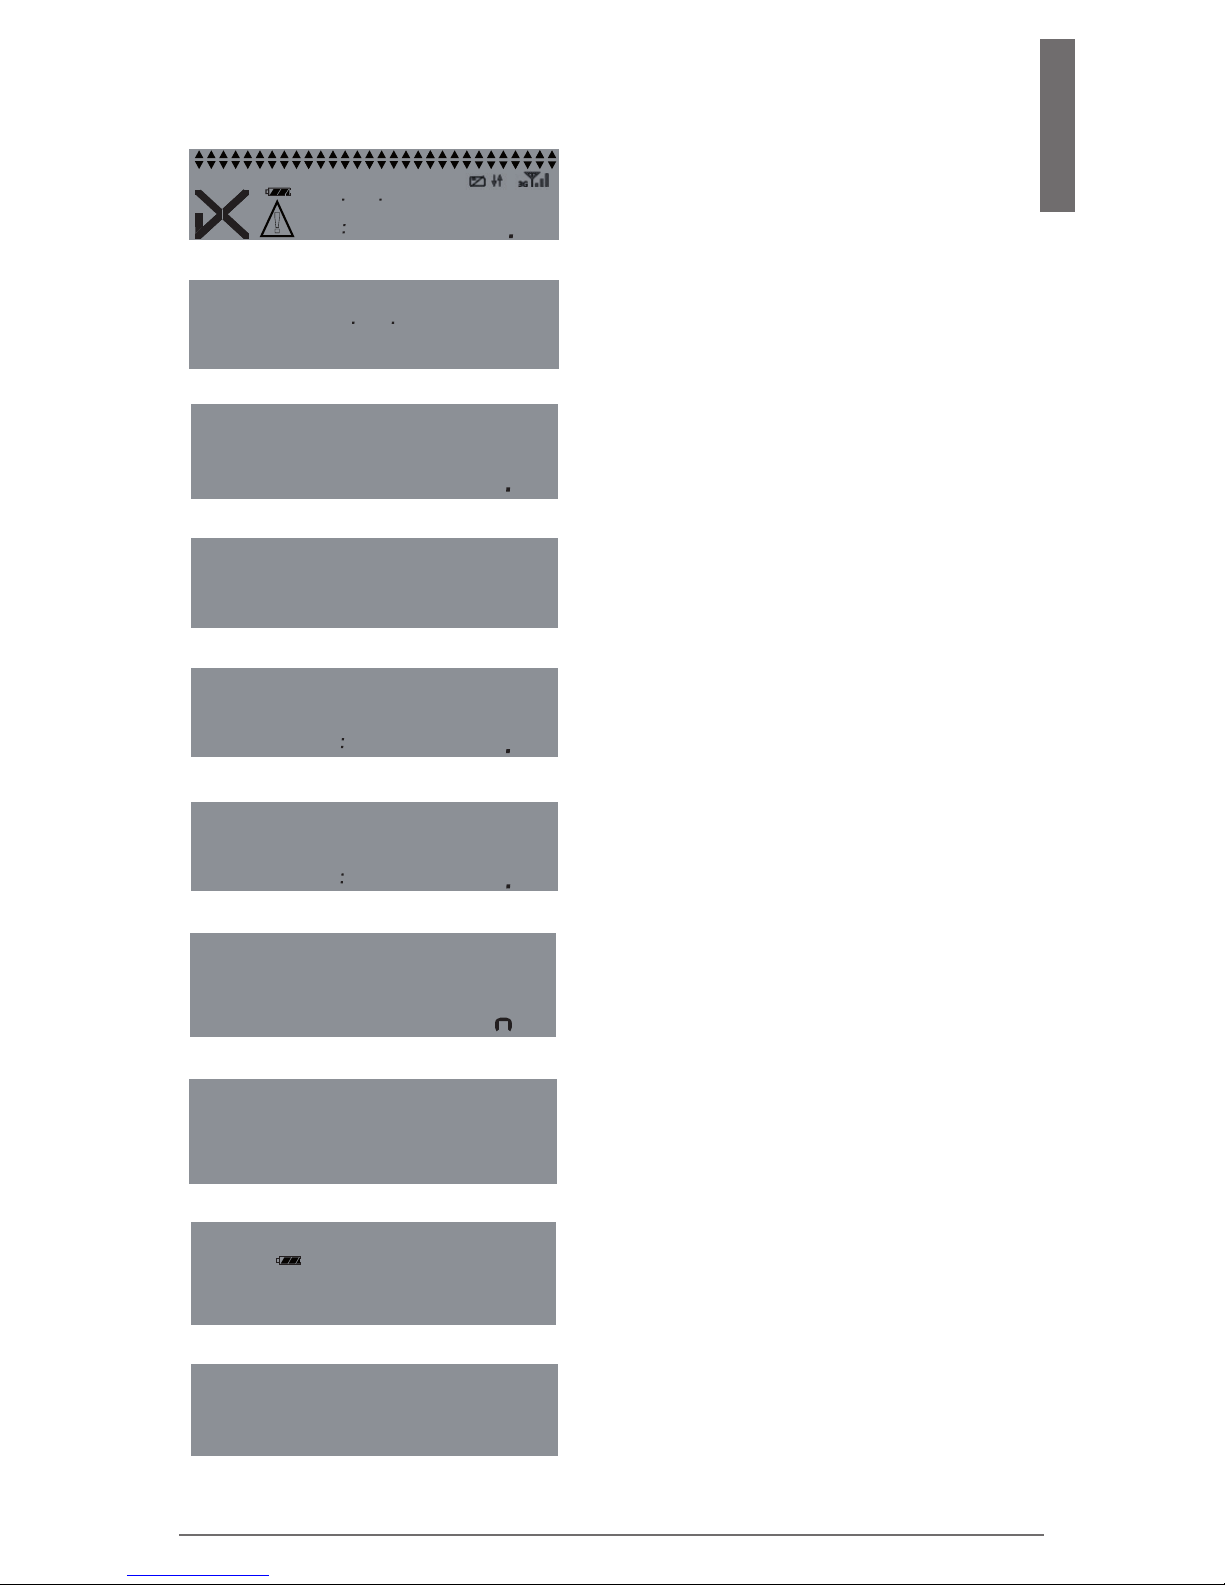
The following chart shows which information will be indicated on
the LCD screen upon successive READ button pressing while in
Sleep Mode.
After approx. 60 seconds without any button pressing the Fridge-
tag
®
2 L goes back into Sleep Mode; the display is blank again.
Fridge-tag 2 L
Temperature (min/max)
<2°C
(15min)
>8°C
(30min)
225-0208-001-00E
110500000010
-27d
-25d
-23d
-21d
-19d
-17d
-15d
-13d
-11d
-9d
-7d
-5d
-3d
yesterd.
-29d
-28d
-26d
-24d
-22d
-20d
-18d
-16d
-14d
-12d
-10d
-8d
-6d
-4d
-2d
today
Time / Alarm duration
SET
Alarm state
=OK
=ALARM
READ
®
Press continuously READ
to readout
information
4
Page 5
English
Indication of date and production test
result: 16. September 2015 / PASS
Pressing the READ-button
Displayed Information
Display test:
all segments activated
Indication of the current temperature
and which sensor is activated (--.-°C if
is not connected)
Indication of upper alarm settings.
Example shows duration and temperature limits: 10 hours, >+8°C, high
Indication of con guration ID number
(e.g. 1234)
Indication lower alarm settings: example shows duration and temperture
limits: 60 min., <-0.5°C, low
The display is blank again.
*(only indicated if factory preset, otherwise skipped)
5101 2096
P SS4n
80
1H
d ru
1 000
°C
-
05
0L
d ru
0 001
°C
1st press of READ:
25 8
°C
Int.
Sensor
C1 d
0000 0 0
1 342
!
1-
88 8
8808 2888
8888
min.
max.
°F
°C
Int.
SensorSensor
Ext.
Battery power:
3 bar = full (>70%)
2 bar = half-full (30-70%)
1 bar* = low (0-30%)
*Device should be replaced.
2nd press of READ:
3rd press of READ:
4th press of READ:
5th press of READ*:
6th press of READ*:
7th press of READ:
8th press of READ:
9th press of READ:
10th press of READ:
0484 13
0051
PCb
0500 00
3491
S
Serial number of the device
PCb number
(manufacturer information only)
C
P
4
n
100.0
5
Page 6
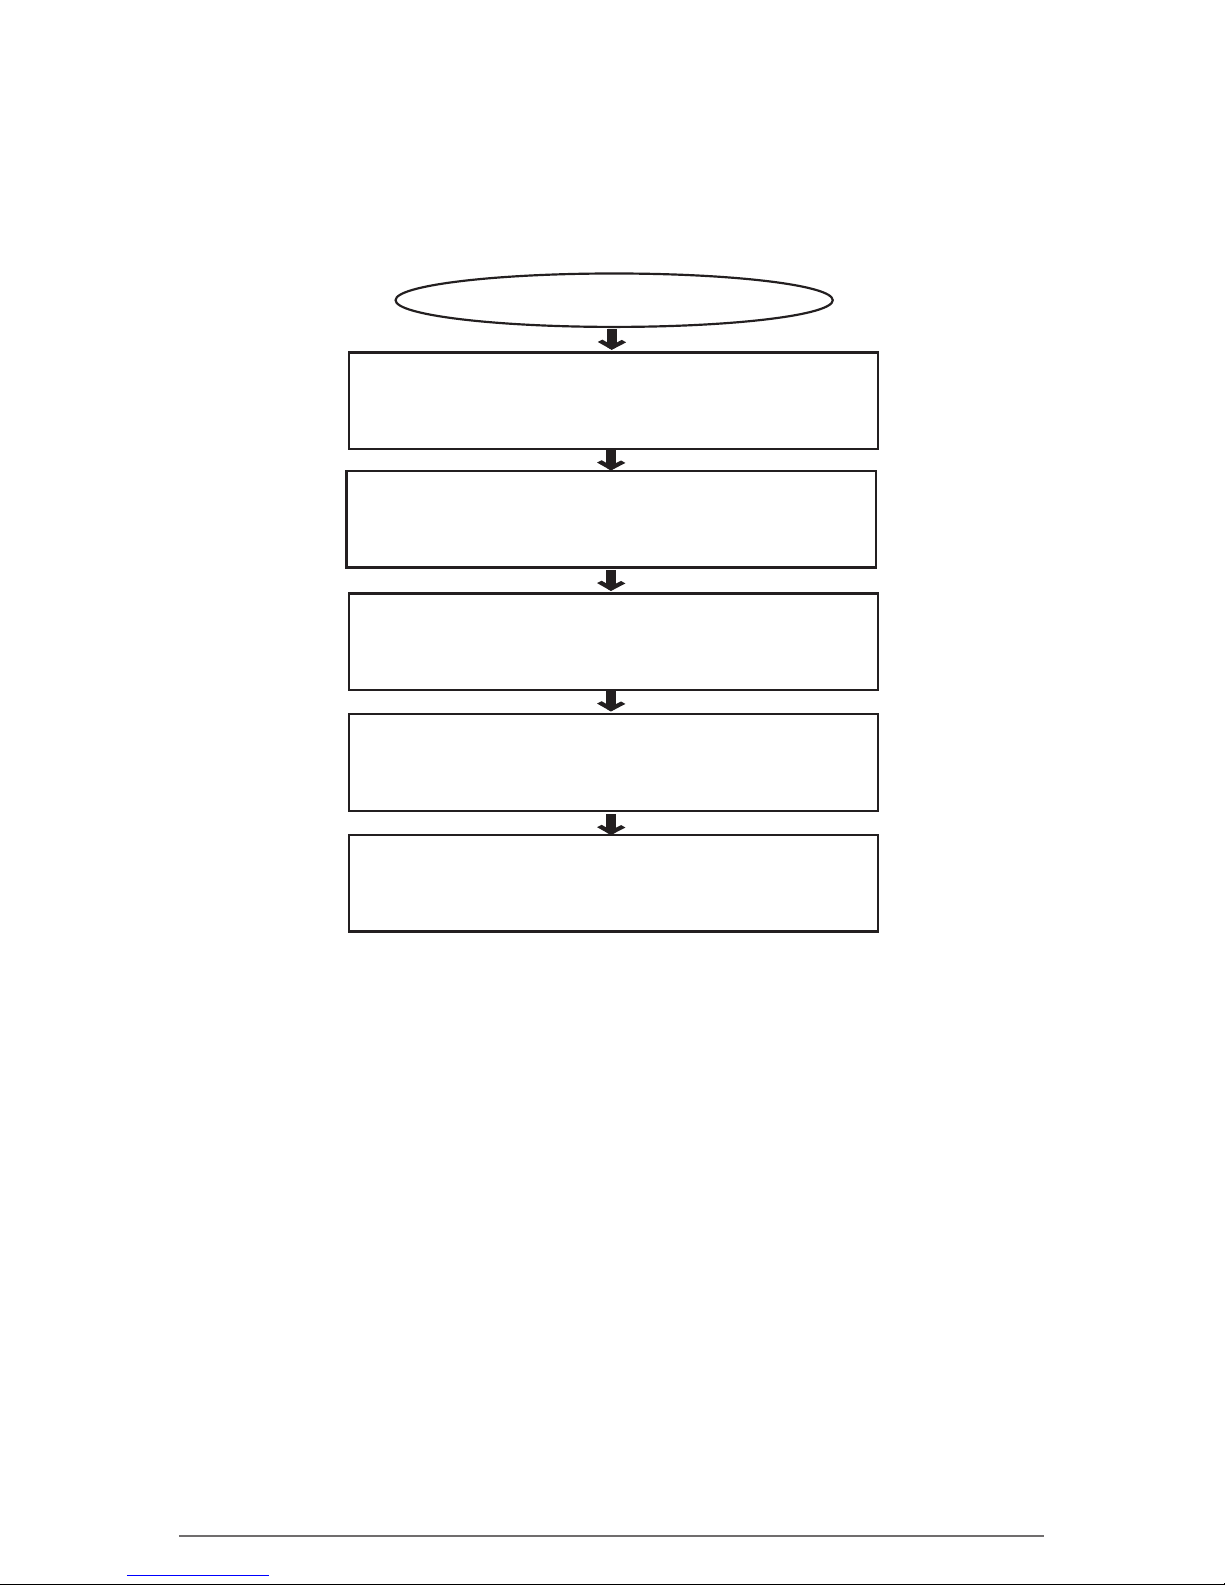
4) Activation process
4.1) Overview sequences of activation
NOTE:
If the activation process has not been completed - after approx.
60 seconds without any button operation - the device will go back
into sleep mode. The activation starts from the beginning.
If you want to read or change settings (e.g. change
°F to °C) after the activation has been completed, proceed as described in chapter „Read and
Change settings / How to correct setting mistakes“
State of delivery
4.5) Setting the date
4.2) Activation
4.6) Setting the time
4.7) Setting the alarm limits
(only if factory preset otherwise skipped)
4.3) Setting the calendar
format
6
Page 7
English
Fridge-tag 2 L
Temperature (min/max)
225-0208-001-00E
110500000010
-27d
-25d
-23d
-21d
-19d
-17d
-15d
-13d
-11d
-9d
-7d
-5d
-3d
yesterd.
-29d
-28d
-26d
-24d
-22d
-20d
-18d
-16d
-14d
-12d
-10d
-8d
-6d
-4d
-2d
today
Time / Alarm duration
SET
=OK
=ALARM
READ
®
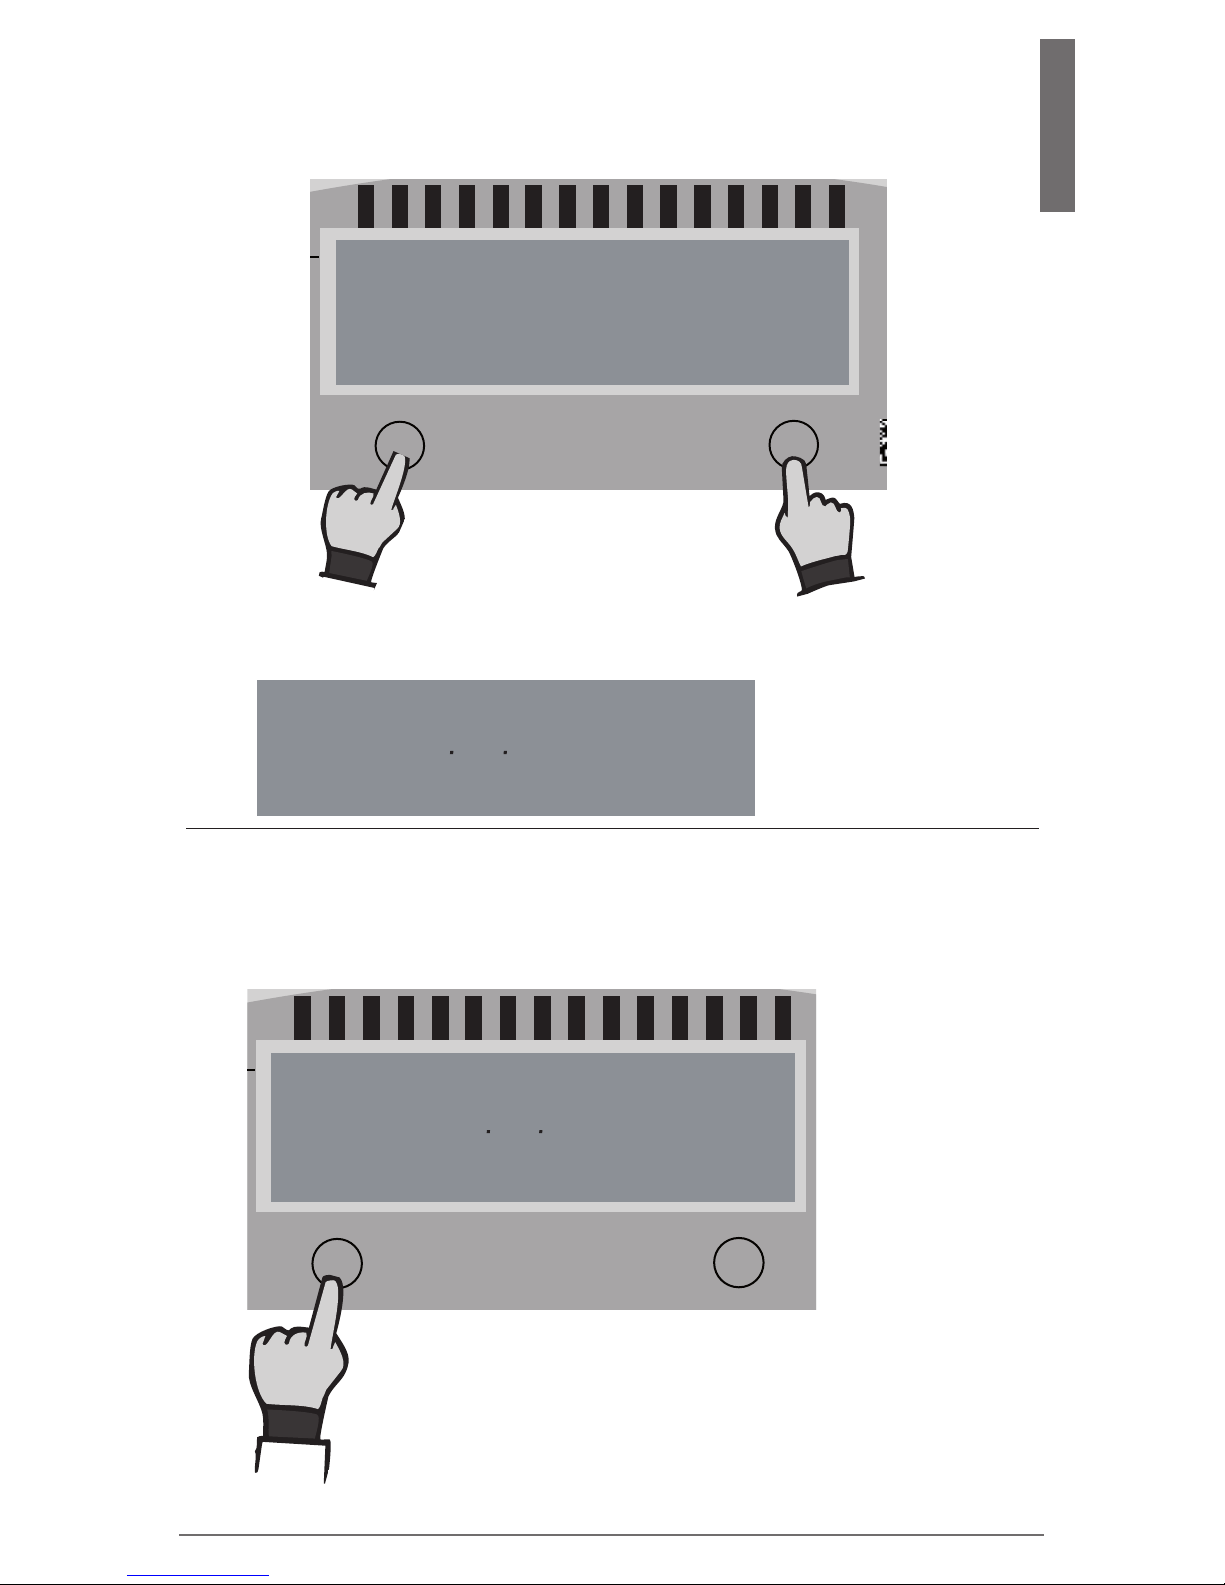
To activate the device press the SET and the READ button
simultaneously for more than 3 seconds.
4.2) Activation
4.3) Setting the calendar format
Option 1: Setting the date format to: dd.mm.yyyy
Press SET to save the
calendar format
-27d
-25d
-23d
-21d
-19d
-17d
-15d
-13d
-11d
-9d
-7d
-5d
-3d
yesterd.
-29d
-28d
-26d
-24d
-22d
-20d
-18d
-16d
-14d
-12d
-10d
-8d
-6d
-4d
-2d
today
Time / Alarm duration
SET
=OK
READ
Fridge-tag 2 L
Temperature (min/max)
225-0208-001-00E
110500000010
yyyd y__d
yyyd y__d
Successful activation is visible when the following will appear on
the screen:
7
Page 8
1
2
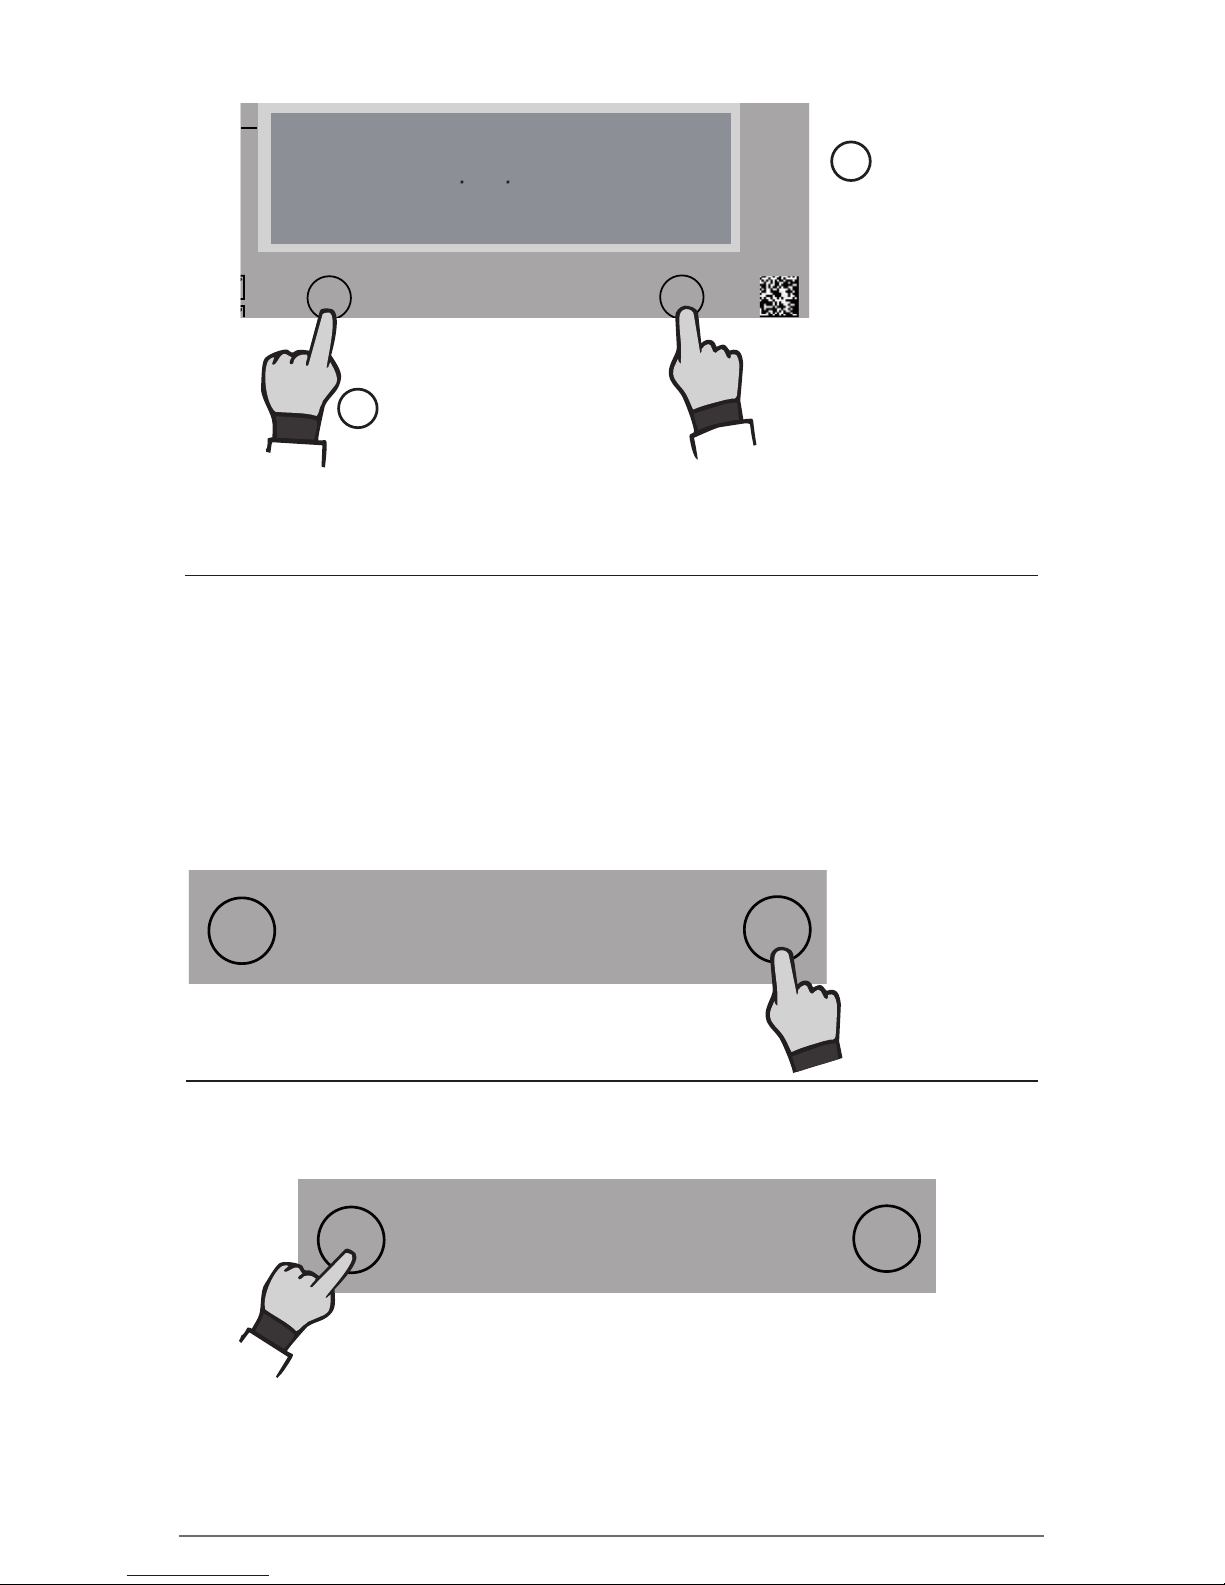
Option 2: Setting the date format to: mm.dd.yyyy
Then press SET to
save the calendar
format
Press READ
to change
the calendar
format
-27d
-25d
-23d
-21d
-19d
-17d
-15d
-13d
-11d
-9d
-7d
-5d
-3d
yesterd.
-29d
-28d
-26d
-24d
-22d
-20d
-18d
-16d
-14d
-12d
-10d
-8d
-6d
-4d
-2d
today
Time / Alarm duration
SET
=OK
READ
®
Fridge-tag 2 L
Temperature (min/max)
yyy_ ydd_
After setting the caldendar format, the rst digit of
the date will start fl ashing.
4.4) Instruction for the use of the
READ and the SET button
The SET button is used to save the number. After pressing the
SET button the next digit will start ashing.
The READ button is used to adjust the number. Each time you
press the READ button, the number in the ashing digit will increa-
se by 1. If you press READ more than necessary continue pressing
the READ button until you obtain the desired number.
-27d
-25d
-23d
-21d
-19d
-17d
-15d
-13d
-11d
-9d
-7d
-5d
-3d
yesterd.
-28d
-26d
-24d
-22d
-20d
-18d
-16d
-14d
-12d
-10d
-8d
-6d
-4d
-2d
today
Fridge-tag 2 L
Time / Alarm duration
SET
Temperature (min/max)
READ
®
225-0208-001-00E
110500000010
5101 2011
-27d
-25d
-23d
-21d
-19d
-17d
-15d
-13d
-11d
-9d
-7d
-5d
-3d
yesterd.
-28d
-26d
-24d
-22d
-20d
-18d
-16d
-14d
-12d
-10d
-8d
-6d
-4d
-2d
today
Fridge-tag 2 L
Time / Alarm duration
SET
Temperature (min/max)
READ
®
225-0208-001-00E
110500000010
5101 2011
Press READ
to adjust the
number
Press SET to con rm
Note: If SET is pressed mistakenly, continue with the set up. Instructions for changing the mistake are described in chapter „Read
and change settings / How to correct setting mistakes„
8
Page 9
English
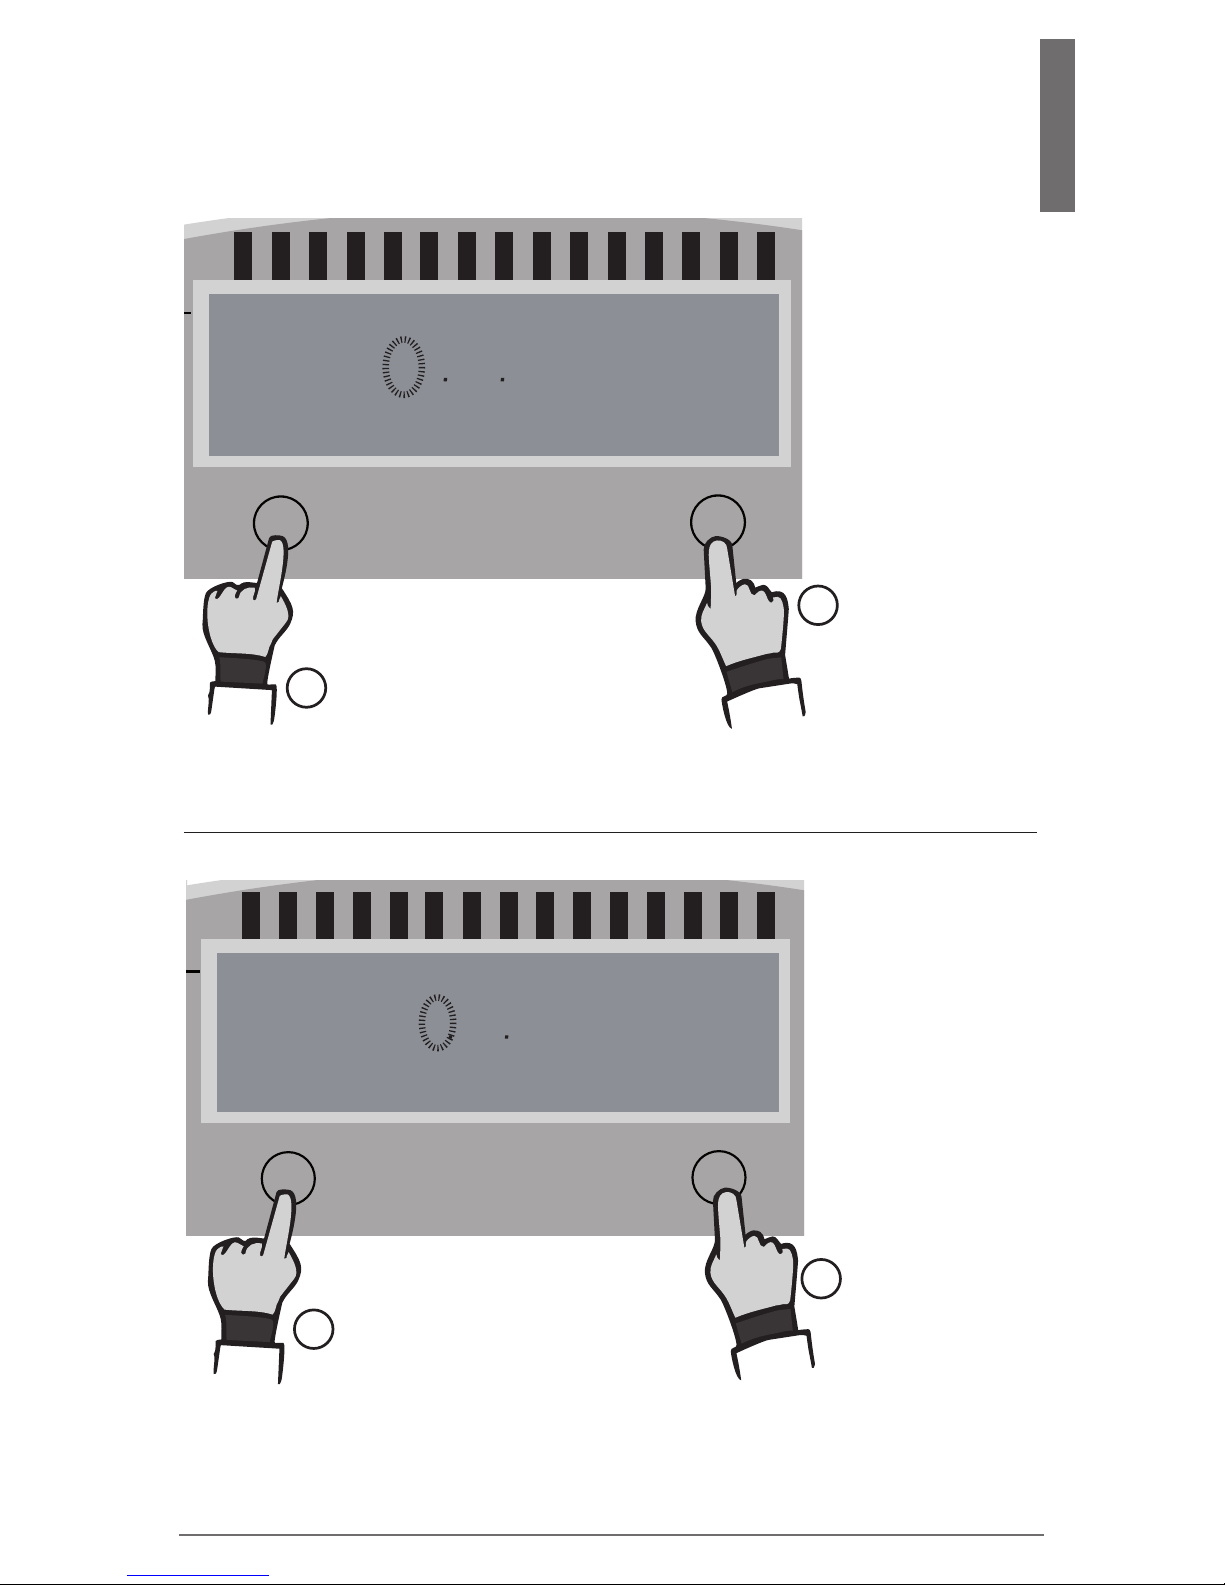
The following example shows how to set the date
to: 16th Sep. 2015 (16.09.2015) in Europe format
1
1
2
2
Press SET
to save
Press SET
to save
Press READ
until „1“
appears as the
rst digit
The rst digit is
ashing:
The second digit
is ashing:
Press READ
until „6“
appears as the
second digit
-27d
-25d
-23d
-21d
-19d
-17d
-15d
-13d
-11d
-9d
-7d
-5d
-3d
yesterd.
-29d
-28d
-26d
-24d
-22d
-20d
-18d
-16d
-14d
-12d
-10d
-8d
-6d
-4d
-2d
today
Fridge-tag 2 L
Time / Alarm duration
SET
Temperature (min/max)
READ
®
225-0208-001-00E
110500000010
5101 2011
-27d
-25d
-23d
-21d
-19d
-17d
-15d
-13d
-11d
-9d
-7d
-5d
-3d
yesterd.
-29d
-28d
-26d
-24d
-22d
-20d
-18d
-16d
-14d
-12d
-10d
-8d
-6d
-4d
-2d
today
Time / Alarm duration
SET
=OK
=ALARM
READ
®
Fridge-tag 2 L
Temperature (min/max)
225-0208-001-00E
110500000010
5101 2016
4.5) Setting the date
9
Page 10
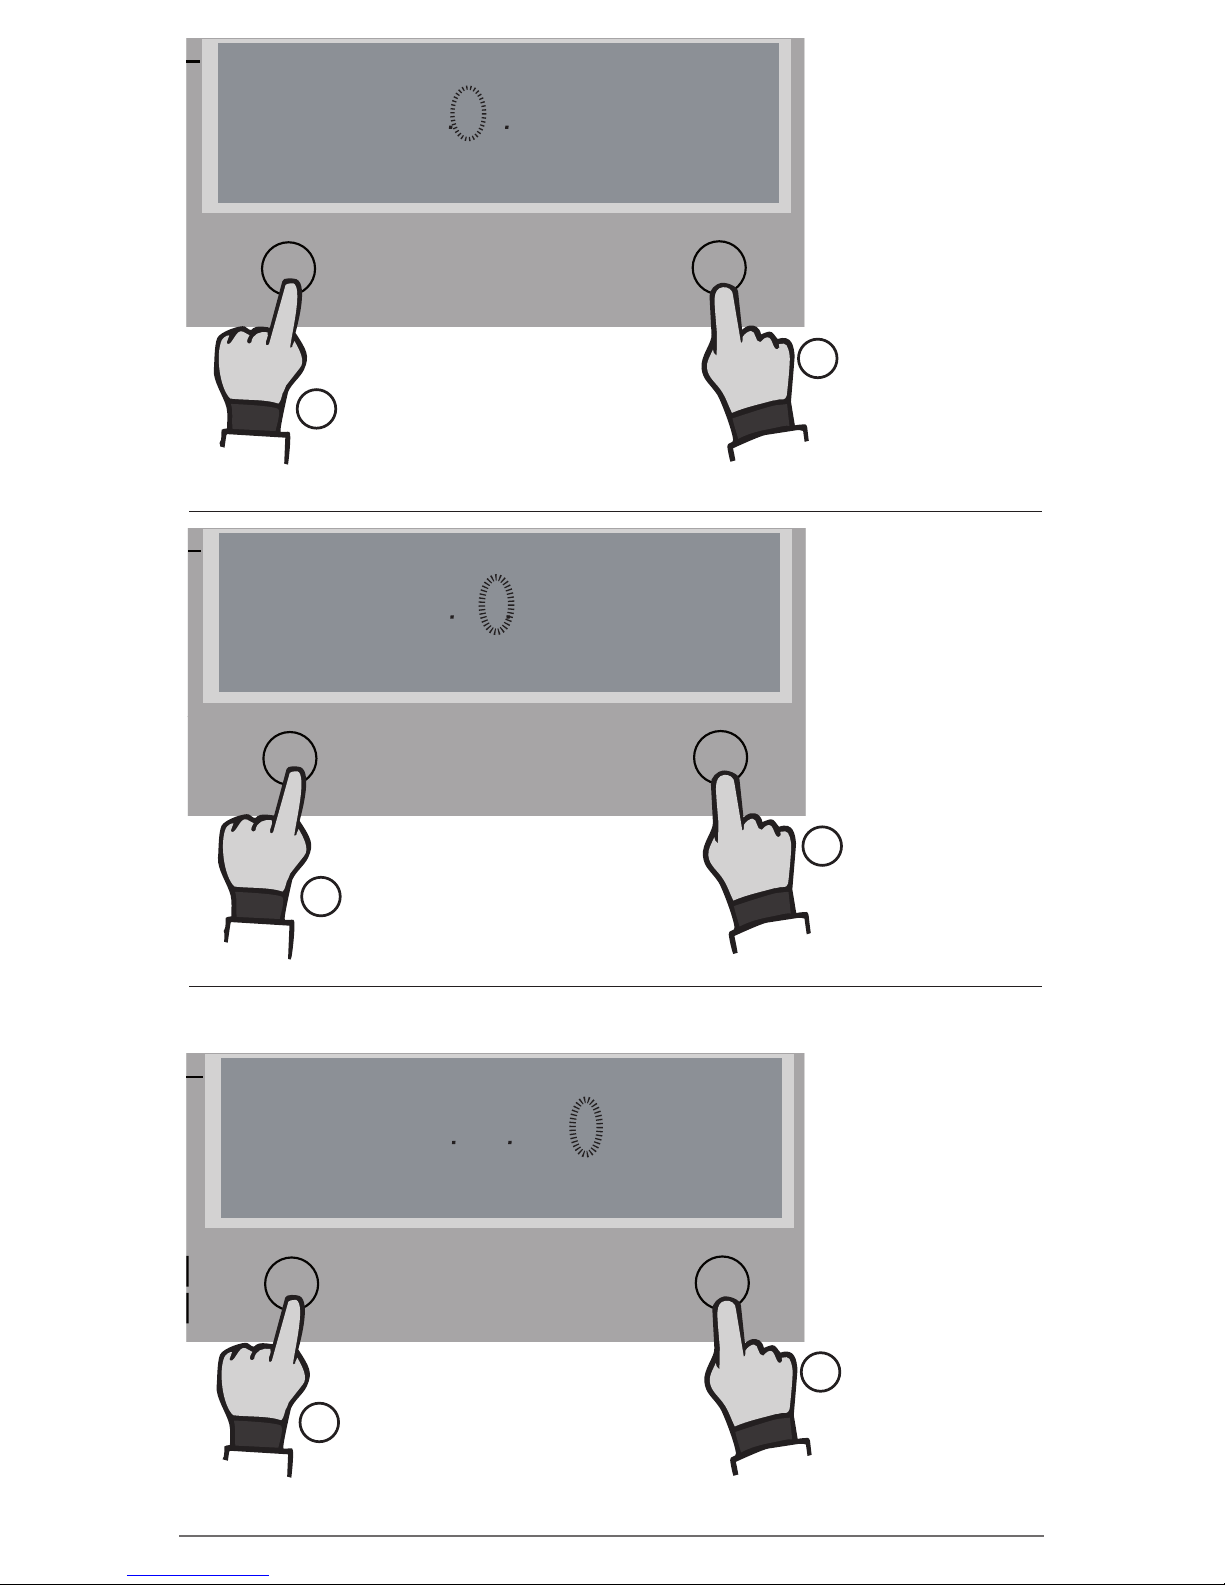
Press READ
until „0“
appears as the
third digit
Press READ
until. „9“
appears as the
fourth digit
Press READ
until „1“
appears as the
seventh digit
The fourth digit
is ashing:
The seventh
digit is ashing:
The third digit is
ashing:
-27d
-25d
-23d
-21d
-19d
-17d
-15d
-13d
-11d
-9d
-7d
-5d
-3d
yesterd.
-29d
-28d
-26d
-24d
-22d
-20d
-18d
-16d
-14d
-12d
-10d
-8d
-6d
-4d
-2d
today
Time / Alarm duration
SET
=OK
=ALARM
READ
®
Fridge-tag 2 L
Temperature (min/max)
225-0208-001-00E
110500000010
5101 2096
-27d
-25d
-23d
-21d
-19d
-17d
-15d
-13d
-11d
-9d
-7d
-5d
-3d
yesterd.
-29d
-28d
-26d
-24d
-22d
-20d
-18d
-16d
-14d
-12d
-10d
-8d
-6d
-4d
-2d
today
Time / Alarm duration
SET
=OK
=ALARM
READ
®
Fridge-tag 2 L
Temperature (min/max)
225-0208-001-00E
110500000010
5101 2096
-27d
-25d
-23d
-21d
-19d
-17d
-15d
-13d
-11d
-9d
-7d
-5d
-3d
yesterd.
-29d
-28d
-26d
-24d
-22d
-20d
-18d
-16d
-14d
-12d
-10d
-8d
-6d
-4d
-2d
today
Time / Alarm duration
SET
=OK
=ALARM
READ
®
Fridge-tag 2 L
Temperature (min/max)
225-0208-001-00E
110500000010
5101 2016
1
1
1
2
2
2
Press SET
to save
Press SET
to save
Press SET
to save
Note: The fth and sixth digit is set automatically.
10
Page 11
English
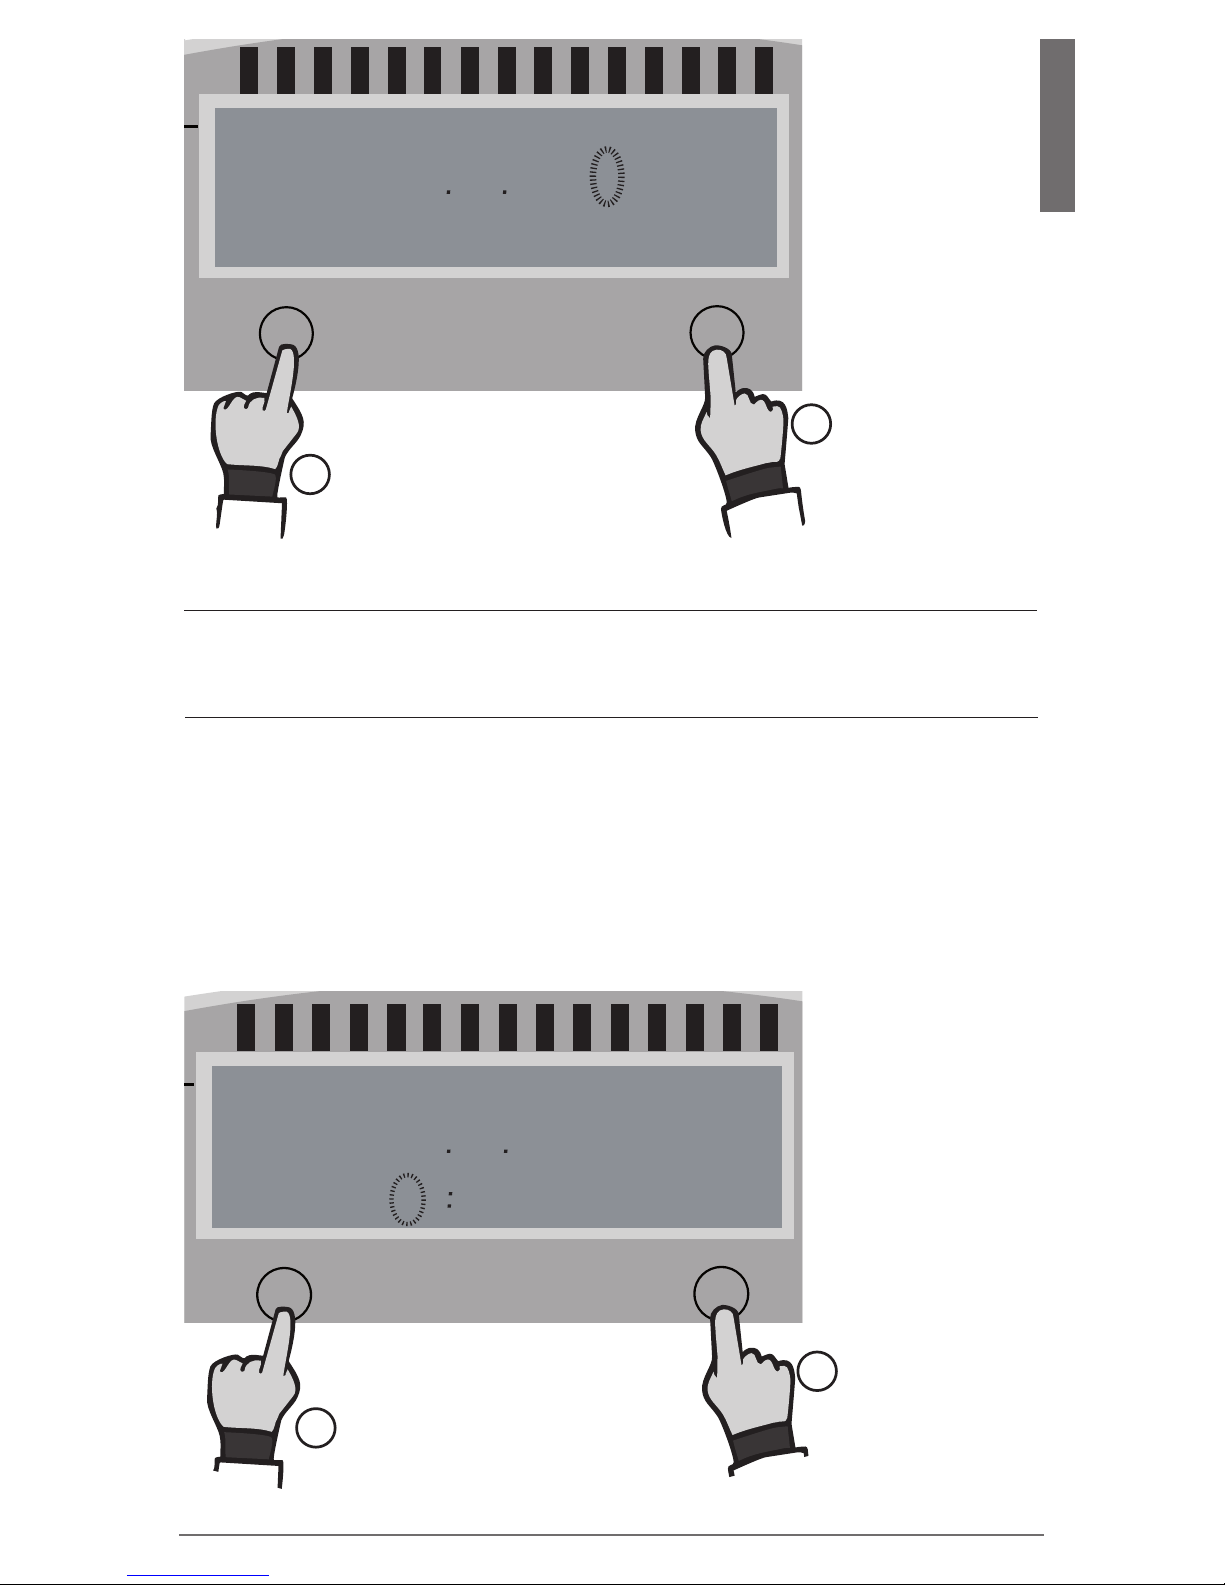
The date is now set to: 16.09.2015
Press READ
until „2“
appears as the
eighth digit
The eighth digit
is ashing:
-27d
-25d
-23d
-21d
-19d
-17d
-15d
-13d
-11d
-9d
-7d
-5d
-3d
yesterd.
-29d
-28d
-26d
-24d
-22d
-20d
-18d
-16d
-14d
-12d
-10d
-8d
-6d
-4d
-2d
today
Time / Alarm duration
SET
=OK
=ALARM
READ
®
Fridge-tag 2 L
Temperature (min/max)
225-0208-001-00E
110500000010
5101 2096
1
2
Press SET
to save
After setting the date, the rst digit of the time will
start fl ashing.
4.6) Setting the time
This example shows how to set the time to: 13:47
Note: The clock function operates as a 24 hour clock
(e.g. 1:47 pm = 13:47).
Press READ
until „1“
appears as the
rst digit
The rst digit is
ashing:
-27d
-25d
-23d
-21d
-19d
-17d
-15d
-13d
-11d
-9d
-7d
-5d
-3d
yesterd.
-29d
-28d
-26d
-24d
-22d
-20d
-18d
-16d
-14d
-12d
-10d
-8d
-6d
-4d
-2d
today
Time / Alarm duration
SET
=OK
READ
®
Fridge-tag 2 L
Temperature (min/max)
5101 2096
1 000
1
2
Press SET
to save
11
Page 12
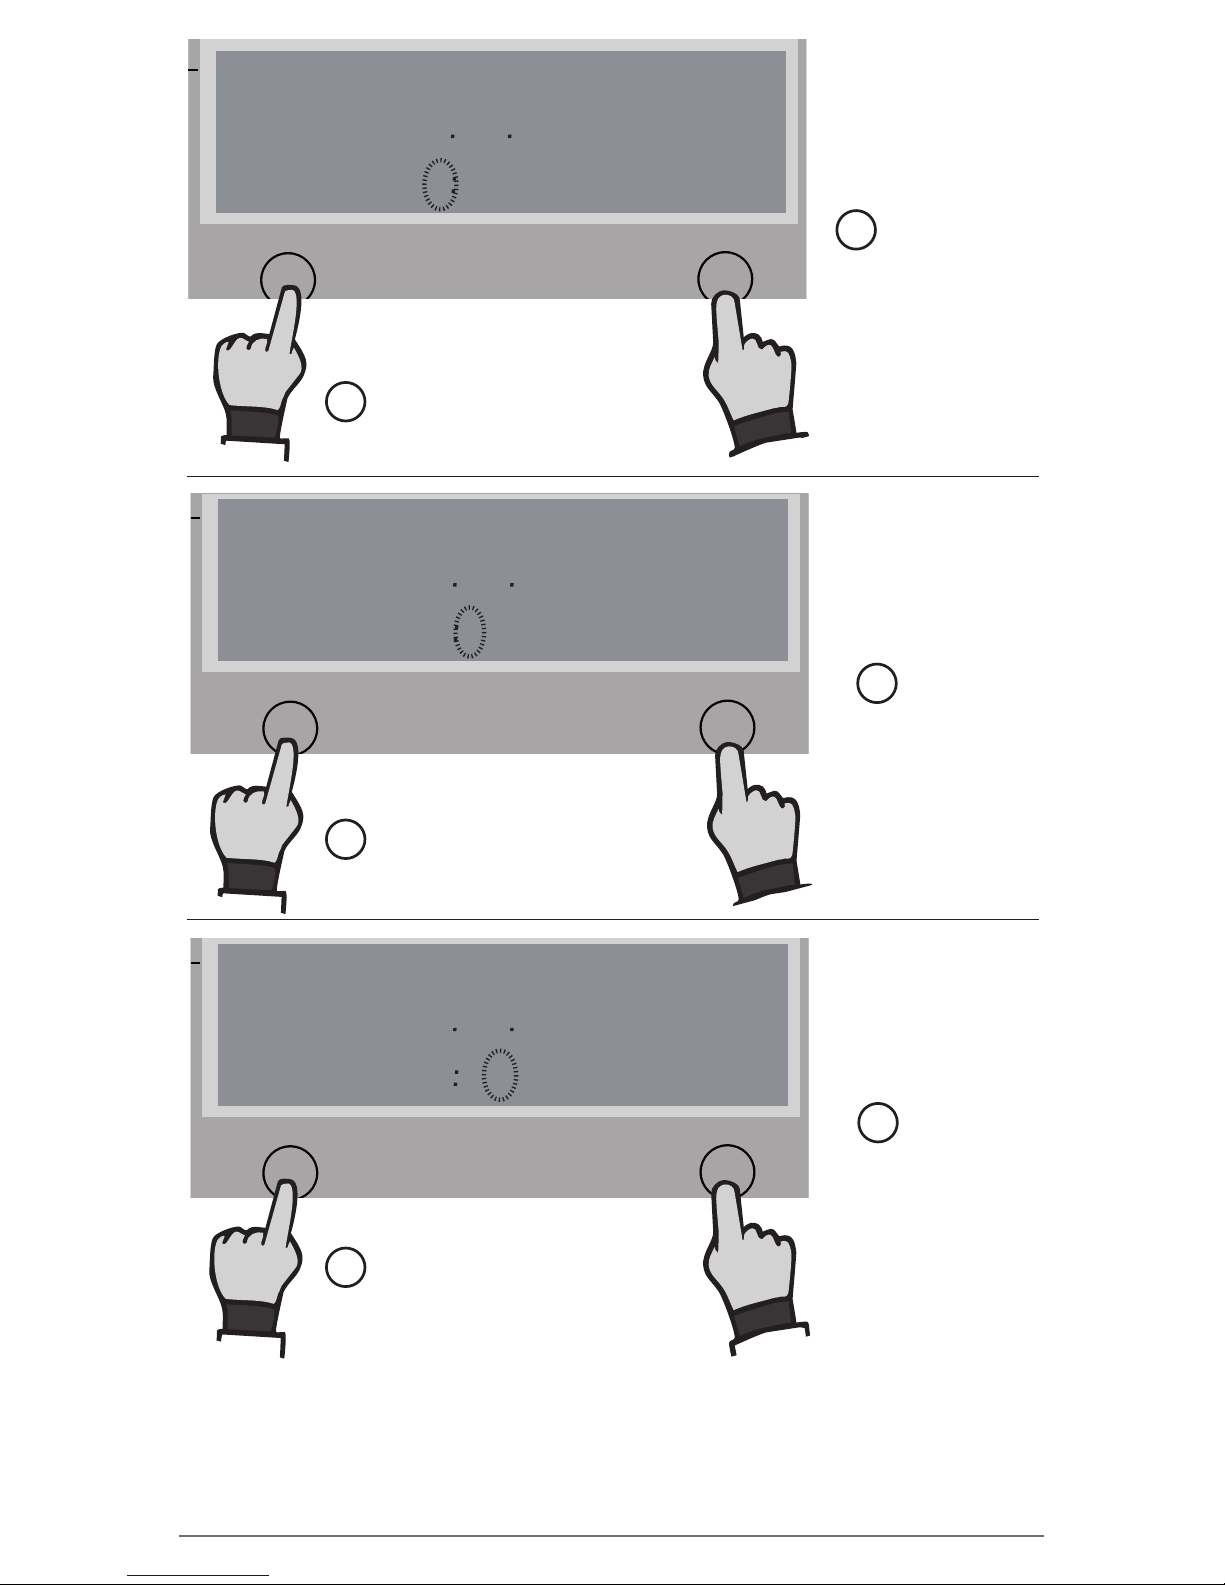
Press READ
until „3“
appears as the
second digit
The second digit
is ashing:
-27d
-25d
-23d
-21d
-19d
-17d
-15d
-13d
-11d
-9d
-7d
-5d
-3d
yesterd.
-29d
-28d
-26d
-24d
-22d
-20d
-18d
-16d
-14d
-12d
-10d
-8d
-6d
-4d
-2d
today
Time / Alarm duration
SET
=OK
READ
®
Fridge-tag 2 L
Temperature (min/max)
5101 2096
1 003
1
2
Press SET
to save
The time is now set to: 13:47
Press READ
until „4“
appears as the
third digit
Press READ
until „7“
appears as the
fourth digit
The third digit is
ashing:
The fourth digit
is ashing:
-27d
-25d
-23d
-21d
-19d
-17d
-15d
-13d
-11d
-9d
-7d
-5d
-3d
yesterd.
-29d
-28d
-26d
-24d
-22d
-20d
-18d
-16d
-14d
-12d
-10d
-8d
-6d
-4d
-2d
today
Time / Alarm duration
SET
=OK
READ
®
Fridge-tag 2 L
Temperature (min/max)
5101 2096
1
03
4
-27d
-25d
-23d
-21d
-19d
-17d
-15d
-13d
-11d
-9d
-7d
-5d
-3d
yesterd.
-29d
-28d
-26d
-24d
-22d
-20d
-18d
-16d
-14d
-12d
-10d
-8d
-6d
-4d
-2d
today
Time / Alarm duration
SET
=OK
READ
®
Fridge-tag 2 L
Temperature (min/max)
5101 2096
1 473
1
1
2
2
Press SET
to save
Press SET
to save
If you want to read or change settings (e.g. change °F to °C) after
the activation has been completed, proceed as described in chapter
„Read and Change settings / How to correct setting mistakes“
12
Page 13
English
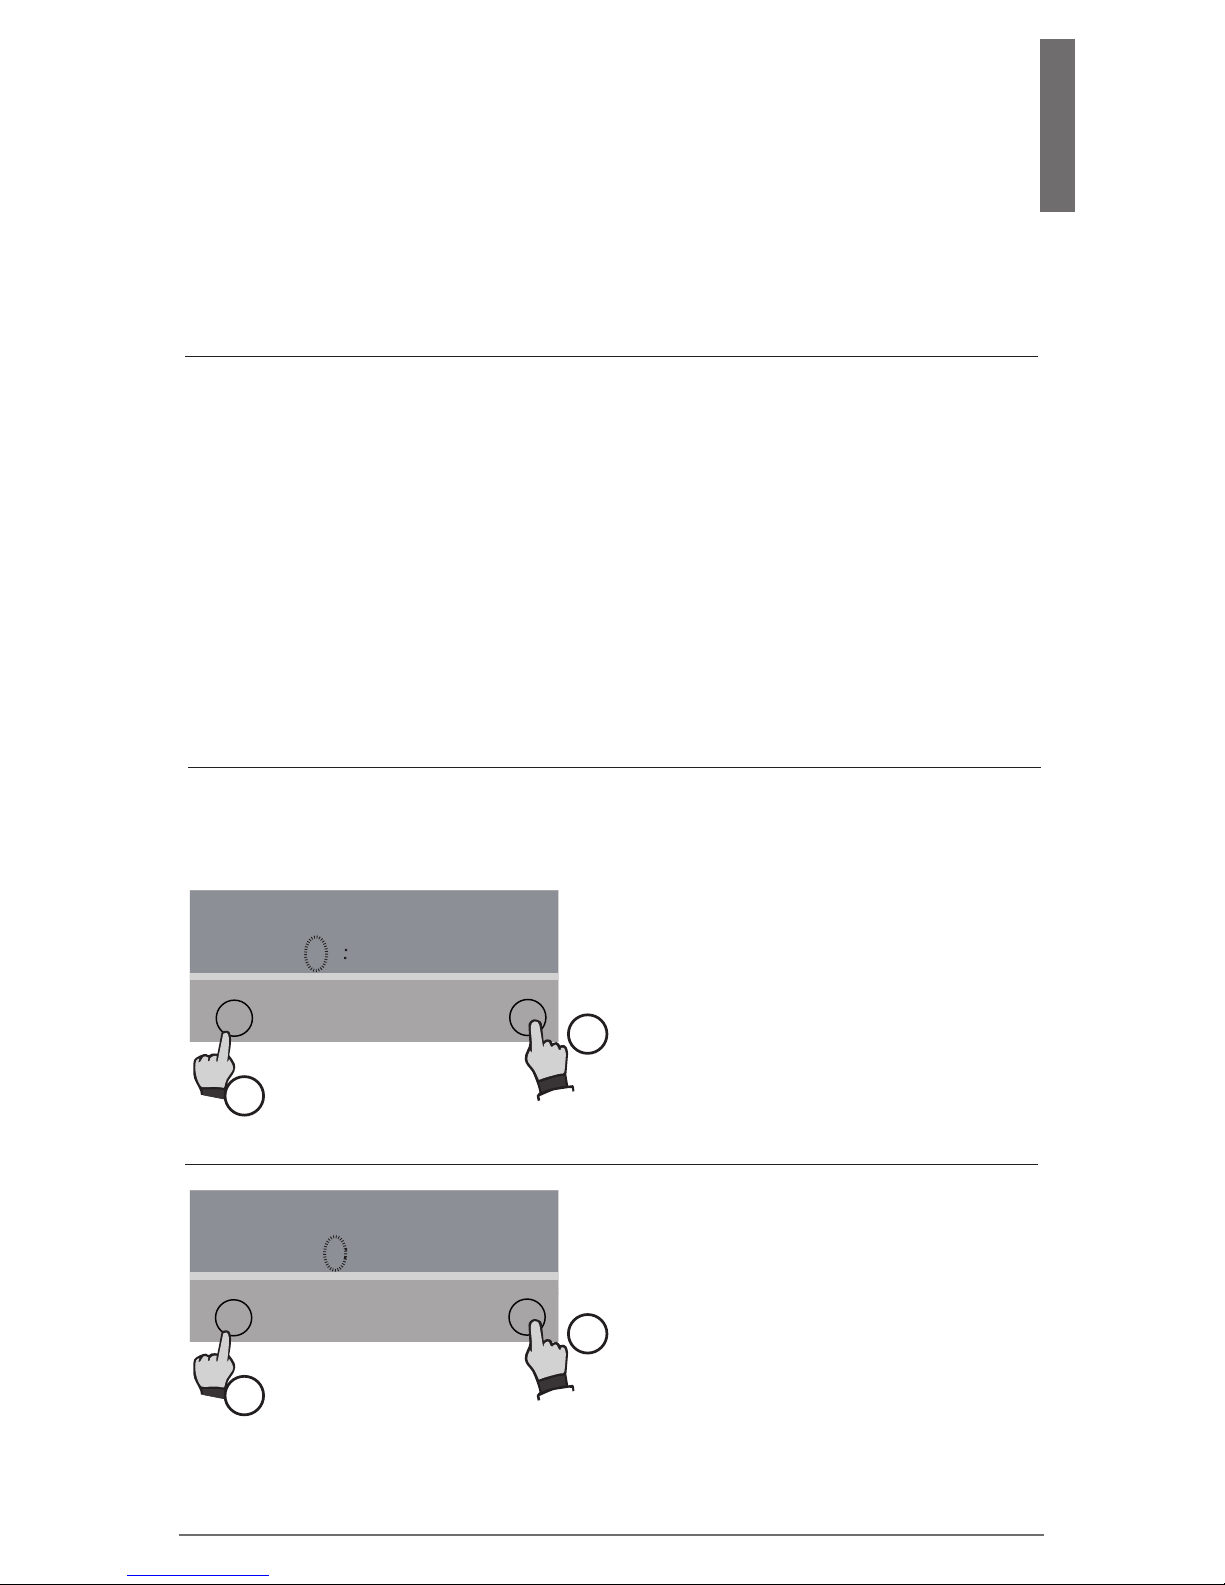
If not, the activation is now completed. Please continue with chapter 5 Placing the Fridge-tag 2 L.
Note: During max. 1 minute after activation no temperature is
displayed on the screen.
If the device is con gured with self-programmable
alarm limits proceed with the following chapter.
4.7) Setting the alarm limits
(Not standard, only by special order)
The rst digit is ashing:
Press READ to
adjust the number.
Press SET to
con rm the number
1) and 3) Setting the HI & LO alarm duration, they
are completed in the same manner
This adjustment is done in 4 steps:
1) Setting the duration of the upper alarm limit
2) Setting the temperature of the upper alarm limit
3) Setting the duration to the lower alarm limit
4) Setting the temperature of the lower alarm limit
-27d
-25d
-23d
-21d
-19d
-17d
-15d
-13d
-11d
-9d
-7d
-5d
-3d
yesterd.
-29d
-28d
-26d
-24d
-22d
-20d
-18d
-16d
-14d
-12d
-10d
-8d
-6d
-4d
-2d
today
Time / Alarm duration
SET
READ
®
Fridge-tag 2 L
Temperature (min/max)
1H
d ru
0 001
1
2
The second digit is ashing:
Press READ to
adjust the number.
-27d
-25d
-23d
-21d
-19d
-17d
-15d
-13d
-11d
-9d
-7d
-5d
-3d
yesterd.
-29d
-28d
-26d
-24d
-22d
-20d
-18d
-16d
-14d
-12d
-10d
-8d
-6d
-4d
-2d
today
Time / Alarm duration
SET
READ
®
Fridge-tag 2 L
Temperature (min/max)
1H
d ru
0 002
1
2
Press SET to
con rm the number
13
Page 14
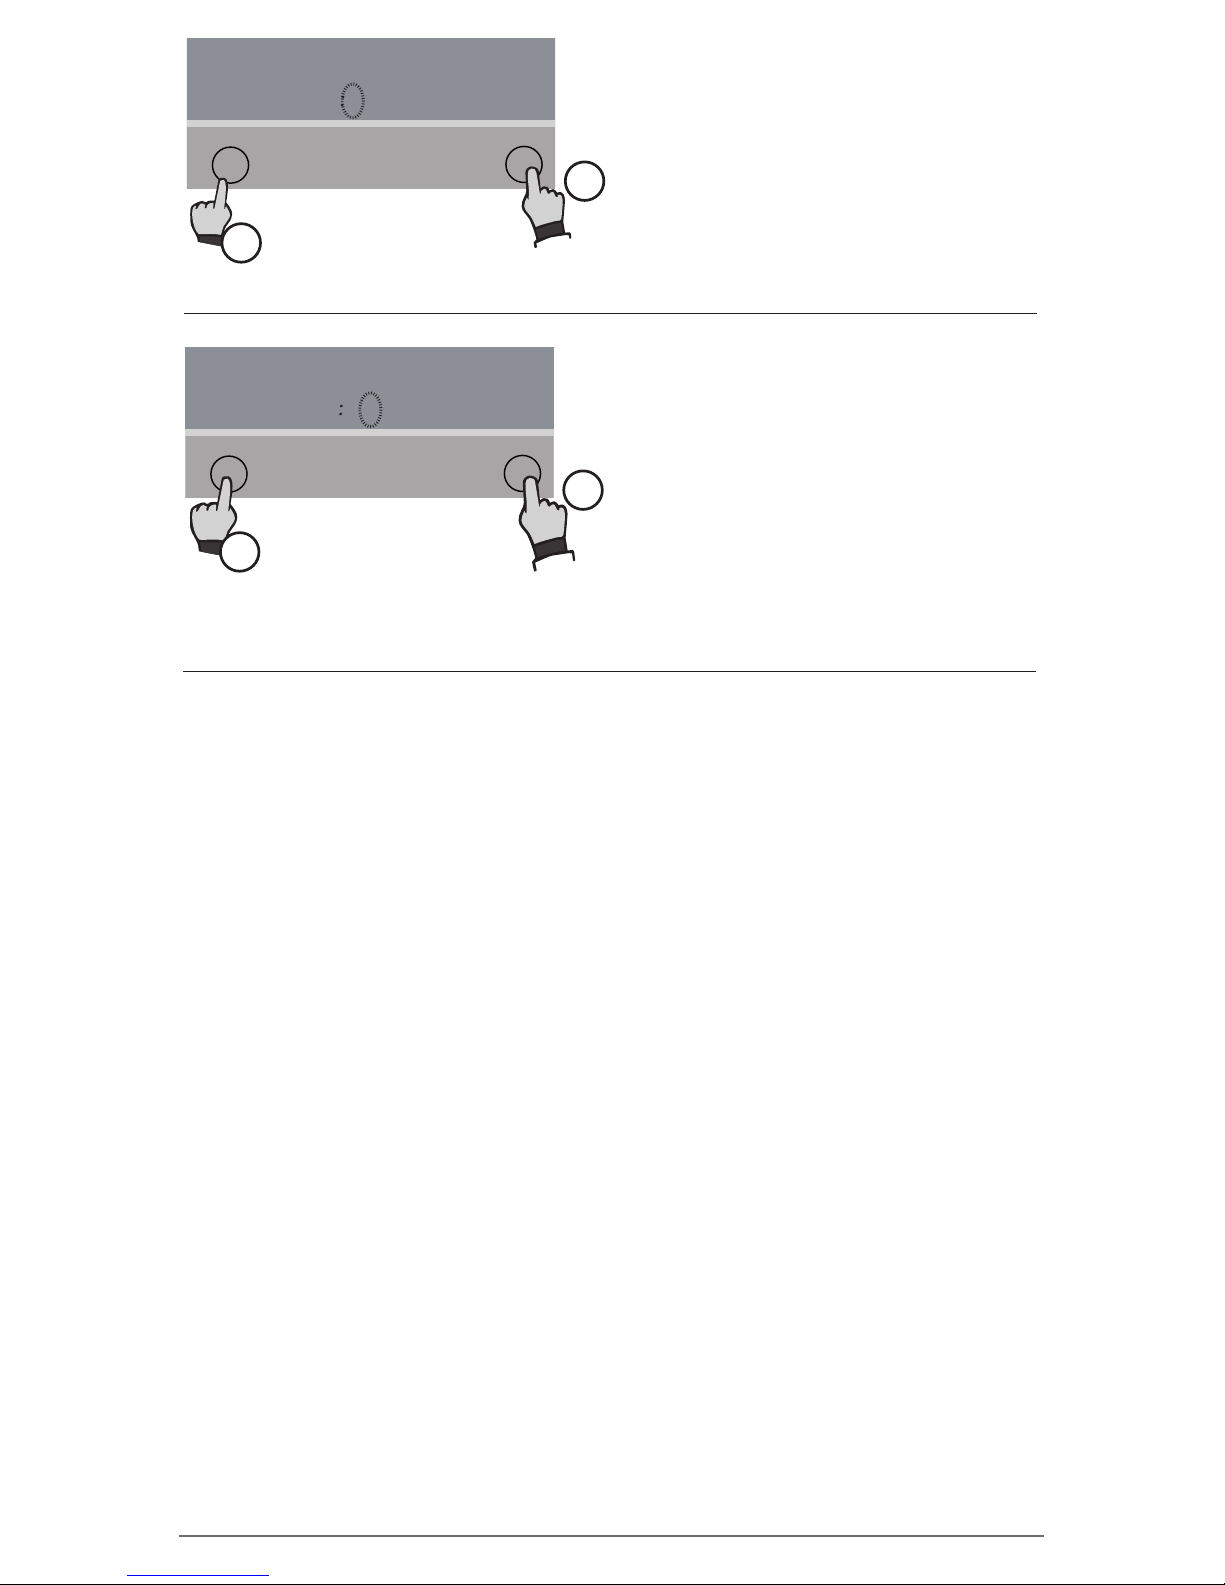
The third digit is ashing:
Press READ to
adjust the number.
-27d
-25d
-23d
-21d
-19d
-17d
-15d
-13d
-11d
-9d
-7d
-5d
-3d
yesterd.
-29d
-28d
-26d
-24d
-22d
-20d
-18d
-16d
-14d
-12d
-10d
-8d
-6d
-4d
-2d
today
Time / Alarm duration
SET
READ
®
Fridge-tag 2 L
Temperature (min/max)
1H
d ru
0 002
1
2
Press SET to
con rm the number
2) and 4) Setting the HI & LO alarm duration, they
are completed in the same manner
The fourth digit is ashing:
Press READ to
adjust the number.
The duration of the alarm limit is now set.
-27d
-25d
-23d
-21d
-19d
-17d
-15d
-13d
-11d
-9d
-7d
-5d
-3d
yesterd.
-29d
-28d
-26d
-24d
-22d
-20d
-18d
-16d
-14d
-12d
-10d
-8d
-6d
-4d
-2d
today
Time / Alarm duration
SET
READ
®
Fridge-tag 2 L
Temperature (min/max)
1H
d ru
0 002
1
2
Press SET to
con rm the number
Note: Alarm temperature limits must be no lower than -20 °C
(-4 °F) and no higher than +50 °C (+122 °F).
Note: The temperature measurement unit (°C / °F) can only be
changed after the device is activated in the menu. Go to chapter
„Read and change settings / How to correct setting mistakes“.
First you have to choose the range of the desired temperature limit.
You have the choice between negative and positive temperatures.
In case of a positive limit in Fahrenheit scale you may further choose if the limit shall be equal or above +100 °F. This choice is done
by repetitively pressing READ until the desired range is indicated.
14
Page 15
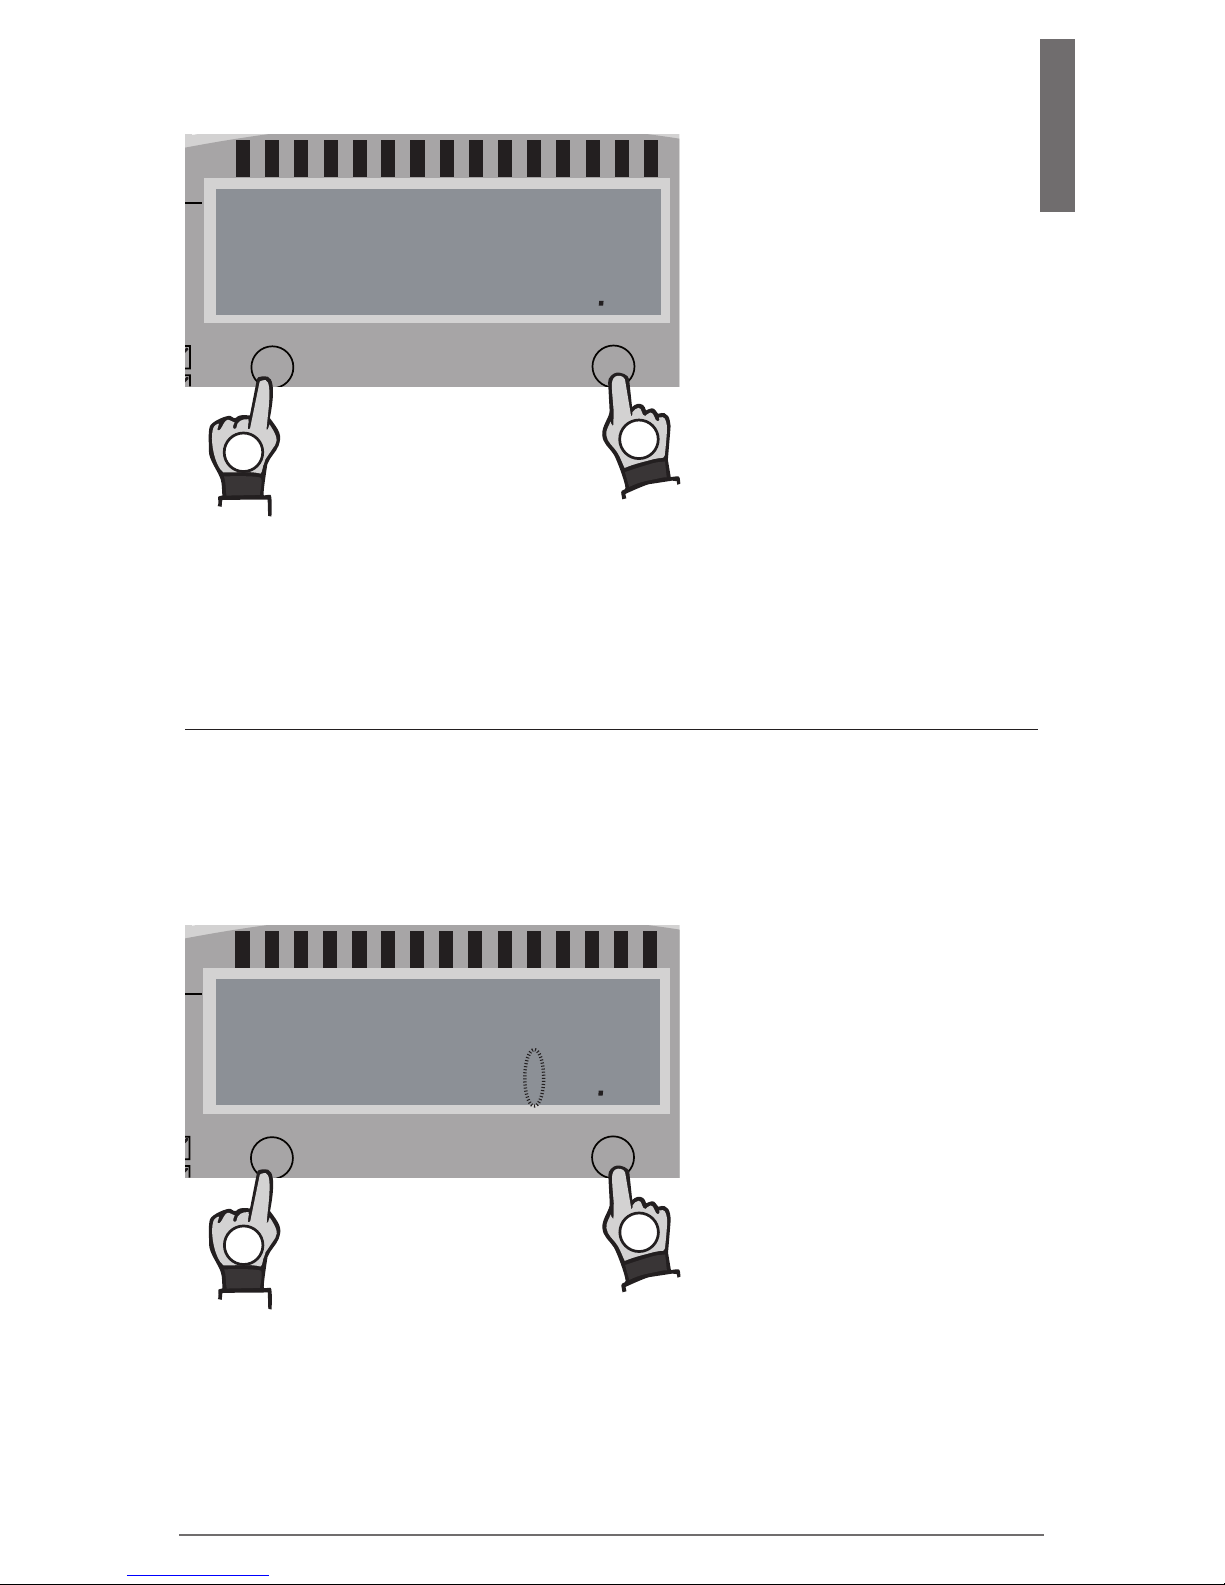
English
Instruction for setting a positive temperature limit
between 0 °C / 0 °F and +50 °C / +122 °F
Press SET to adjust the
limit between 0 °C / 0 °F
and +50 °C / +122 °F
Press READ until the
display shows
no fl ashing sign:
-27d
-25d
-23d
-21d
-19d
-17d
-15d
-13d
-11d
-9d
-7d
-5d
-3d
yesterd.
-29d
-28d
-26d
-24d
-22d
-20d
-18d
-16d
-14d
-12d
-10d
-8d
-6d
-4d
-2d
today
Time / Alarm duration
SET
=OK
READ
®
Fridge-tag 2 L
Temperature (min/max)
80
1H
°C
1
2
The next digit can now be set. Press READ until you reach the
desired number. Then press SET to con rm it. Then the next digit
will start ashing. Continue until all digits of the alarm temperature
are set.
Press READ until a
ashing leading „1“
is indicated on the
display:
Press SET to adjust
the limit equal or above
+100 °F
Instruction for setting a positive Fahrenheit temperature limit equal or above +100 °F
The next digit of the temperature starts ashing. Set the number
and continue until all digits of the alarm temperature are set.
(Important: the maximum Celsius temperature is +50 °C.
This Option is only for temperatures in Fahrenheit)
-27d
-25d
-23d
-21d
-19d
-17d
-15d
-13d
-11d
-9d
-7d
-5d
-3d
yesterd.
-29d
-28d
-26d
-24d
-22d
-20d
-18d
-16d
-14d
-12d
-10d
-8d
-6d
-4d
-2d
today
Time / Alarm duration
SET
=OK
READ
®
Fridge-tag 2 L
Temperature (min/max)
11
80 0
1H
°F
1
2
15
Page 16
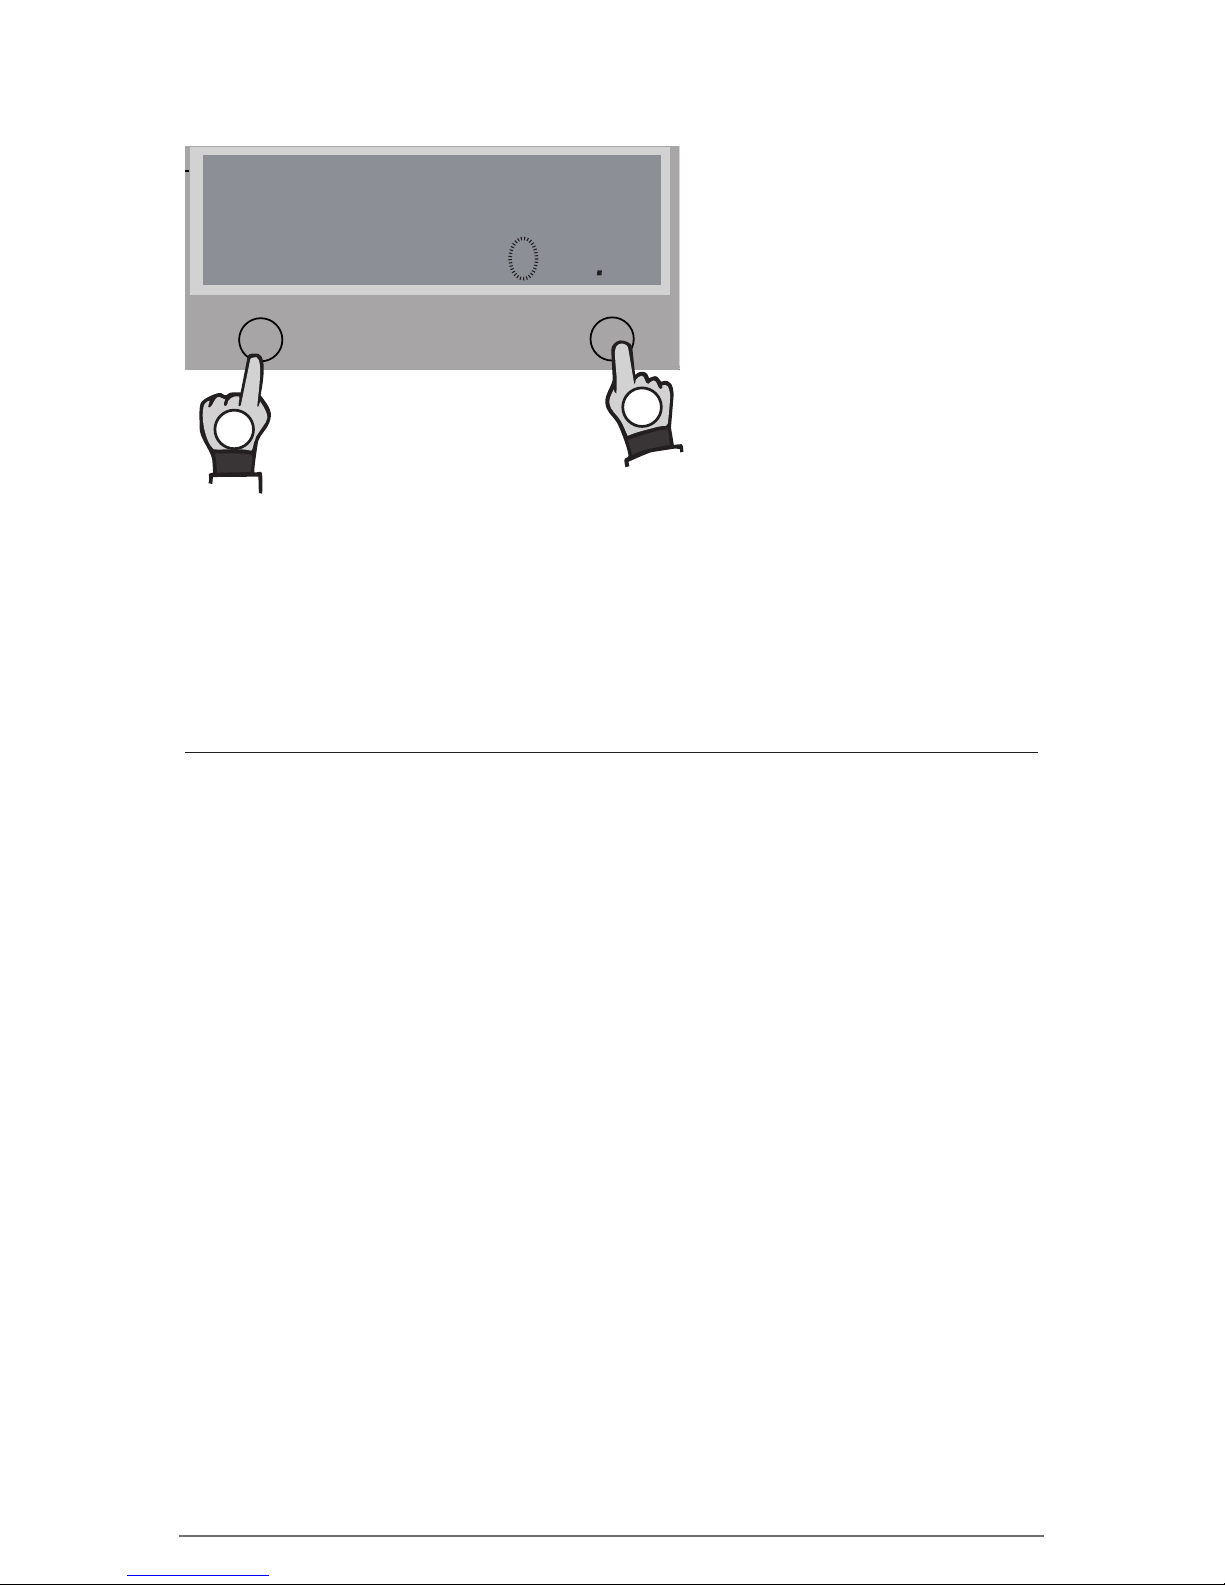
Setting a negative temperature limit below
0 °C / 0°F
Press READ until the
ashing „
-“ sign is
indicated on the screen:
-27d
-25d
-23d
-21d
-19d
-17d
-15d
-13d
-11d
-9d
-7d
-5d
-3d
yesterd.
-29d
-28d
-26d
-24d
-22d
-20d
-18d
-16d
-14d
-12d
-10d
-8d
-6d
-4d
-2d
today
Time / Alarm duration
SET
READ
®
Fridge-tag 2 L
Temperature (min/max)
-
80
1H
°C
Press SET to set
the limit below
0 °C / 0 °F
1
2
The next digit can now be set. Press READ until you reach the
desired number. Then press SET to con rm it. Then the next digit
will start ashing. Continue until all digits of the alarm temperature
are set.
As soon as the last digit of the lower alarm limit is
con rmed, the activation is completed.
NOTE:
In case the desired temperature limit cannot be con rmed, check
if the temperature is set within the allowed operating temperature
range.
As soon as the parameters of the upper alarm limit
are set, the rst digit of the duration of the lower
alarm limit will start fl ashing. Proceed the same
way as you did with the upper alarm limit.
16
Page 17

English
5) Placing the Fridge-tag® 2 L
Note: For the right positioning of the Fridge-tag® 2 L within the
fridge, please follow the instructions of WHO, CDC or any other
governmental requirements of your country. (For more information
visit www.berlinger.com)
Fridge-tag® 2 L with an internal sensor
The activated Fridge-tag® 2 L must be placed immediately in its
predetermined location. It is recommended and important to place
the device as close to the supervised goods as possible to ensure
a perfect temperature observation.
Please do not place the device into a Freezer as the screen will
freeze and the battery will lose power prematurely.
17
Page 18
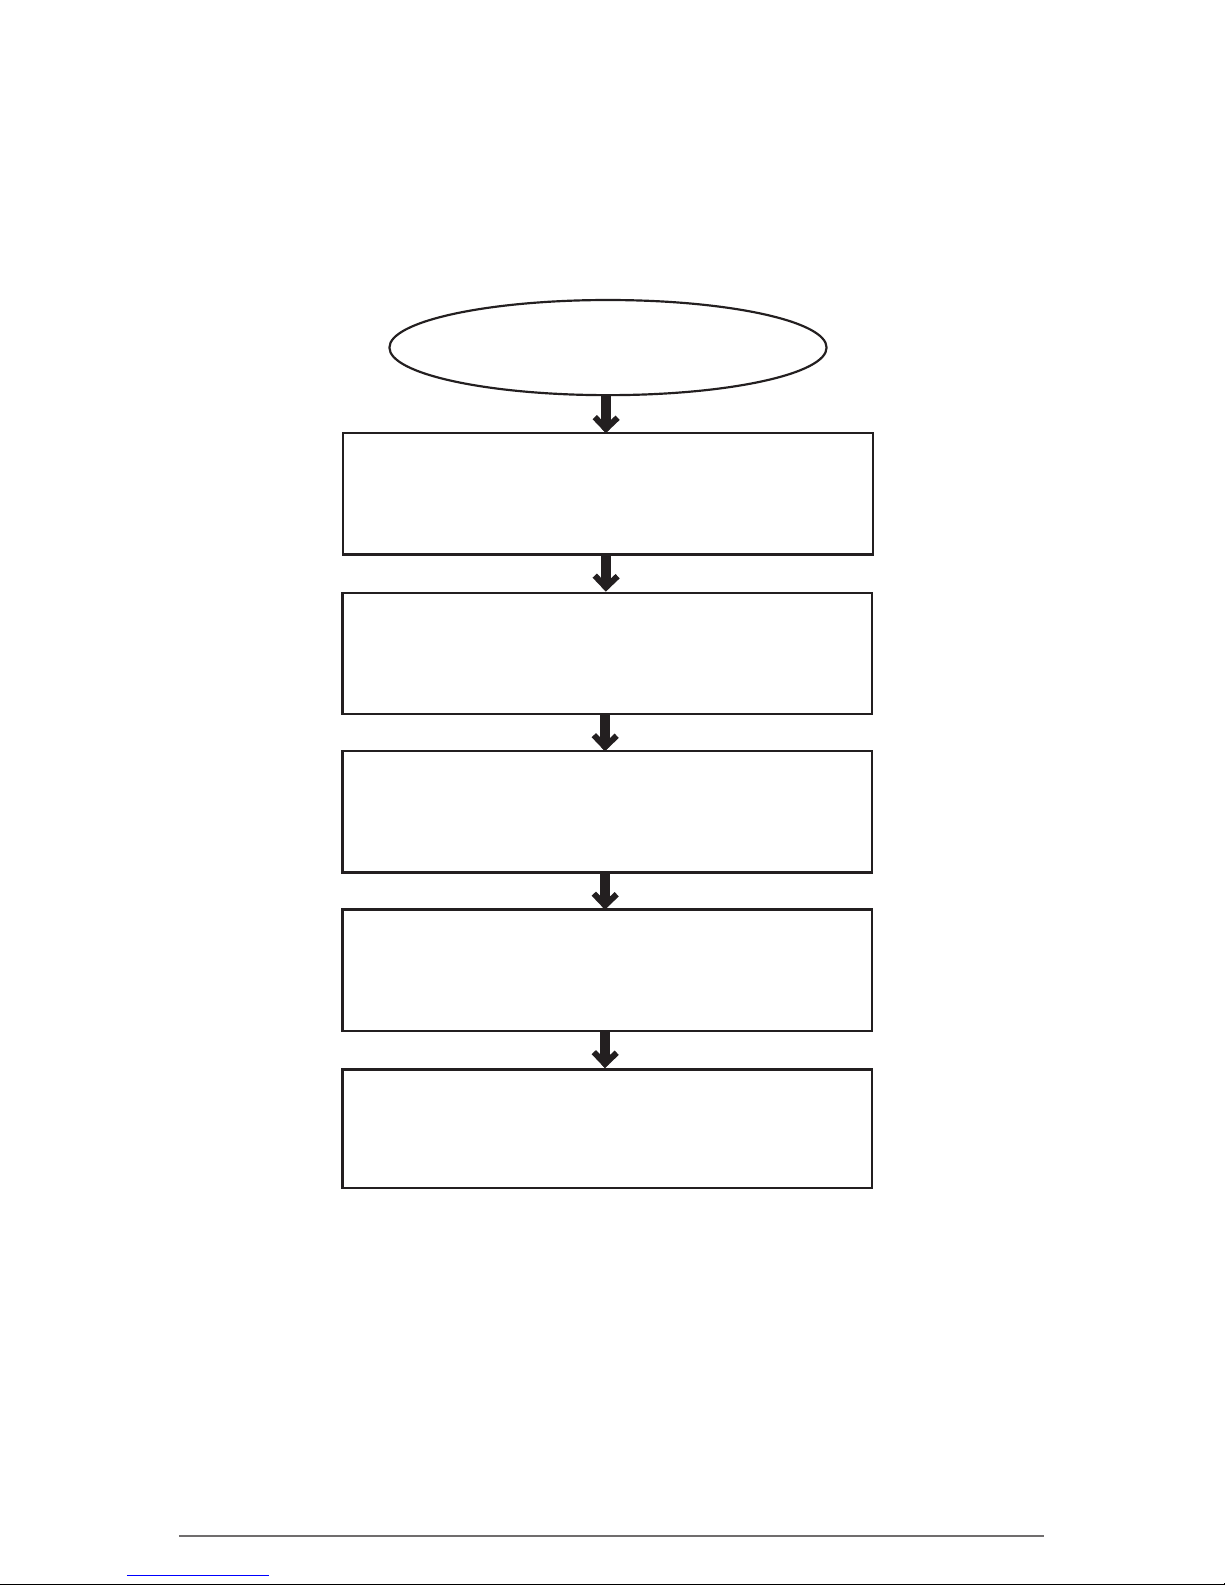
6.1) Overview menu
6) Read and change settings /
How to correct setting mistakes
6.2) Menu entry
Device activated
6.2.1) Menu: SET DATE
(Change date and / or time)
6.2.2) Menu: READ CONF
(Read alarm congurations)
6.2.4) Menu: SET CONF
(only if factory preset otherwise skipped)
6.2.3) Menu: CELS FAHR
(change alarm congurations)
NOTE:
If you scroll through the menu and you reach the display of the
measuring mode again you need to restart from the begining by
accessing the menu.
In order to adjust more than one setting (e.g. time & Celsius to
Fahrenheit) you must complete each change and return to menu
mode for the 2nd change.
18
Page 19
English
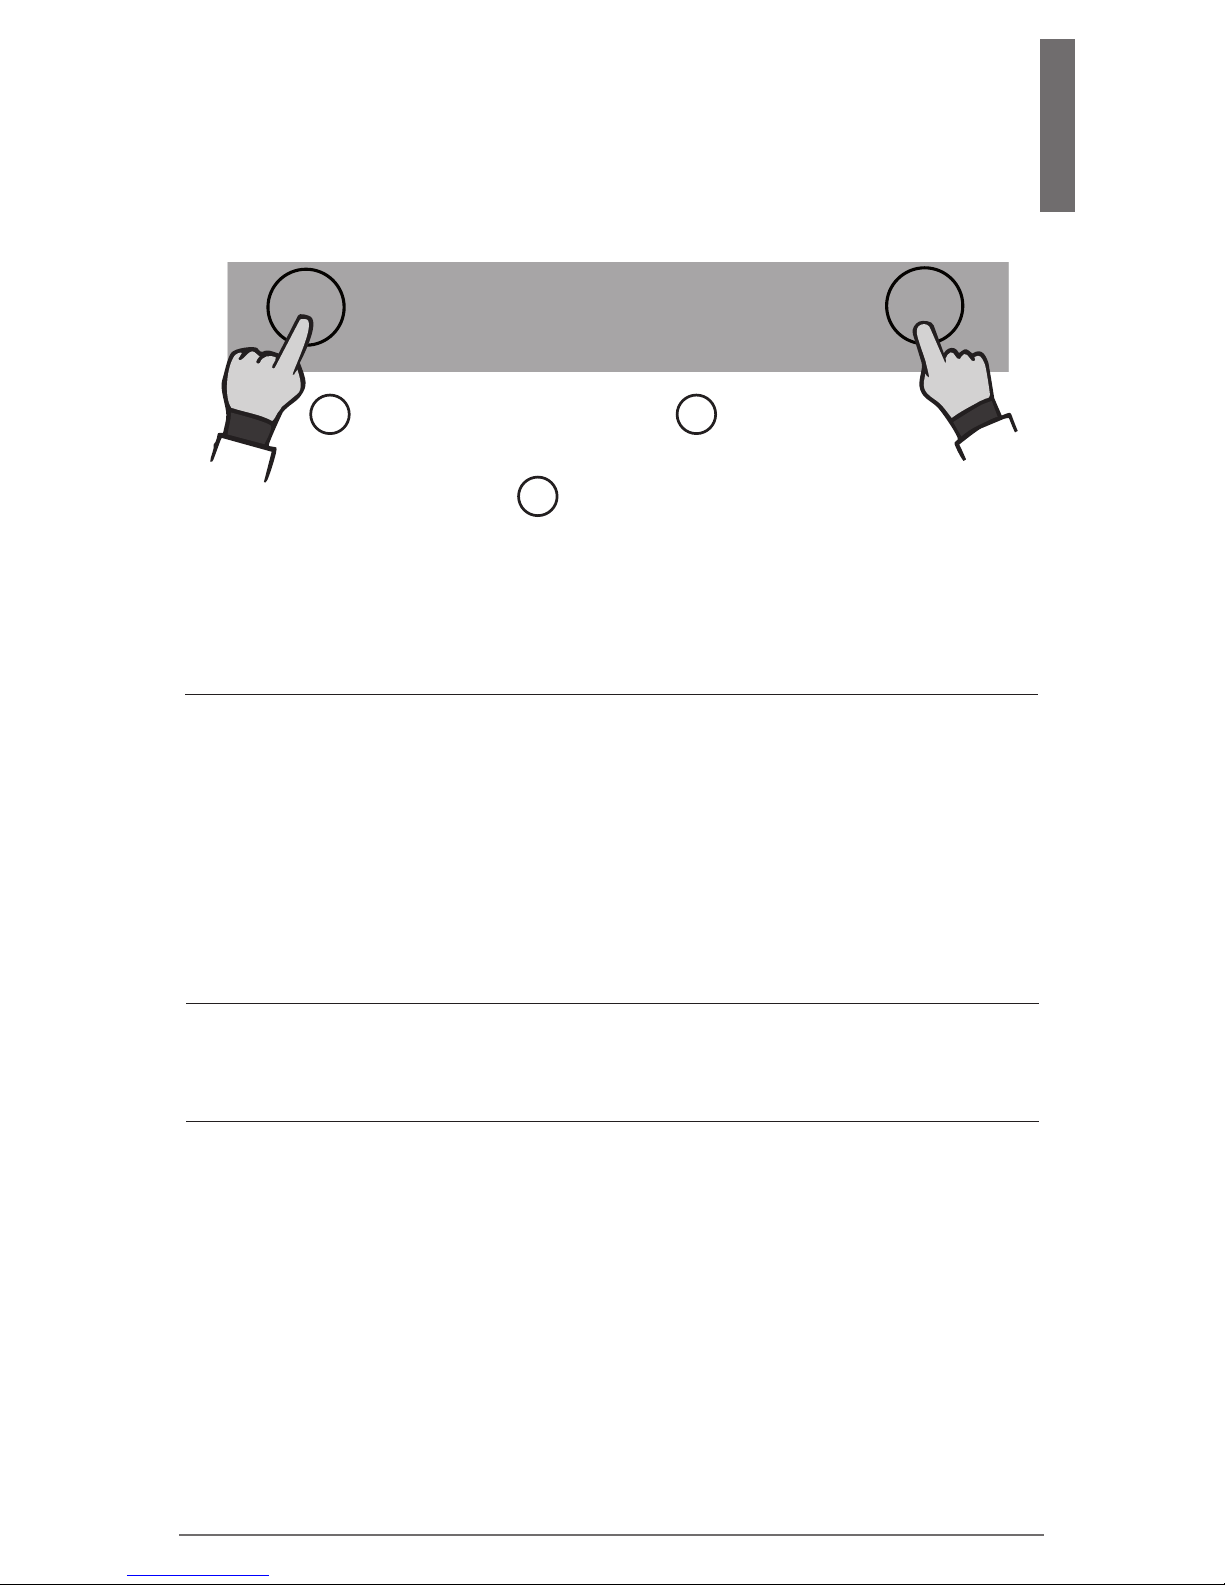
To change the date format, the date, the time, the temperature
measurement unit or the alarm settings or to read the pre-set alarm
limits please proceed as follows:
The display shows „SET DATE“. Press SET to access the menu
to adjust the date format, date or time settings. Then follow the
steps as described in chapter „Setting the date and time”.
Use the READ button to scroll through the menu.
Use the SET button to access the corresponding menu.
„SET DATE“ is now displayed on the screen.
You have now entered change mode and you may
choose which item you want to change
-27d
-25d
-23d
-21d
-19d
-17d
-15d
-13d
-11d
-9d
-7d
-5d
-3d
yesterd.
-29d
-28d
-26d
-24d
-22d
-20d
-18d
-16d
-14d
-12d
-10d
-8d
-6d
-4d
-2d
today
Fridge-tag 2 L
Time / Alarm duration
SET
Temperature (min/max)
READ
®
225-0208-001-00E
110500000010
5101 2011
...then press
READ shortly
...then release both
buttons simultaneously
Press and continue to
hold SET...
6.2.1) Access the menu „SET DATE“
You can access the following 4 menus:
1) SET DATE - change date and/or time settings
2) READ CONF - read the alarm settings
3) CELS FAHR - change to Celsius or Fahrenheit
4) SET CONF - change the alarm settings
(only if factory pre-set)
1 2
3
Information:
• Time and date adjustments have no effect on the alarm
records.
• Once the device is activated, it cannot be stopped anymore.
6.2) Menu entry to read and change
settings
19
Page 20
The display shows the menu „SET DATE“. Press READ until
the display shows „READ CONF“. Then Press SET to access
the menu to read the current alarm congurations. First the display
check appears. Then continuously press READ to scroll through
the pre-set alarm parameters.
*Changes of the alarm limits are only possible for devices which
are programmed with this feature.
The display shows the menu „SET DATE“. Press READ until
the display shows „CELS FAHR“. Then Press SET to access the
menu to change the temperature measurement unit. To change the
measurement unit (Celsius / Fahrenheit) press READ until the
display shows the desired sign (°C/°F). Press SET to conrm
the mesurement unit.
The display shows the menu „SET DATE“. Press READ until
the display shows „SET CONF“. Press SET to access the menu
to change the alarm congurations. To change the alarm limits
(duration or temperature) please proceed as described in chapter
„Setting the alarm limits“.
• The number of time adjustments during the same day is un-
limited. Note: After the adjustment has been done, the Fridge-
tag® 2 L will be locked for 24 hours after the clock passes
midnight and through the entire next day. (e.g. changes on the
15th Sep., device locked from 00:01 am on the 16th until 00.01
am on the 17th). This is for security reasons.
NOTE: If you experience this problem please wait for the time
on the device to cross over midnight and try again.
6.2.2) Access the menu „READ CONF“
6.2.3) Access the menu „CELS FAHR“
6.2.4)* Access the menu „SET CONF“
20
Page 21
English
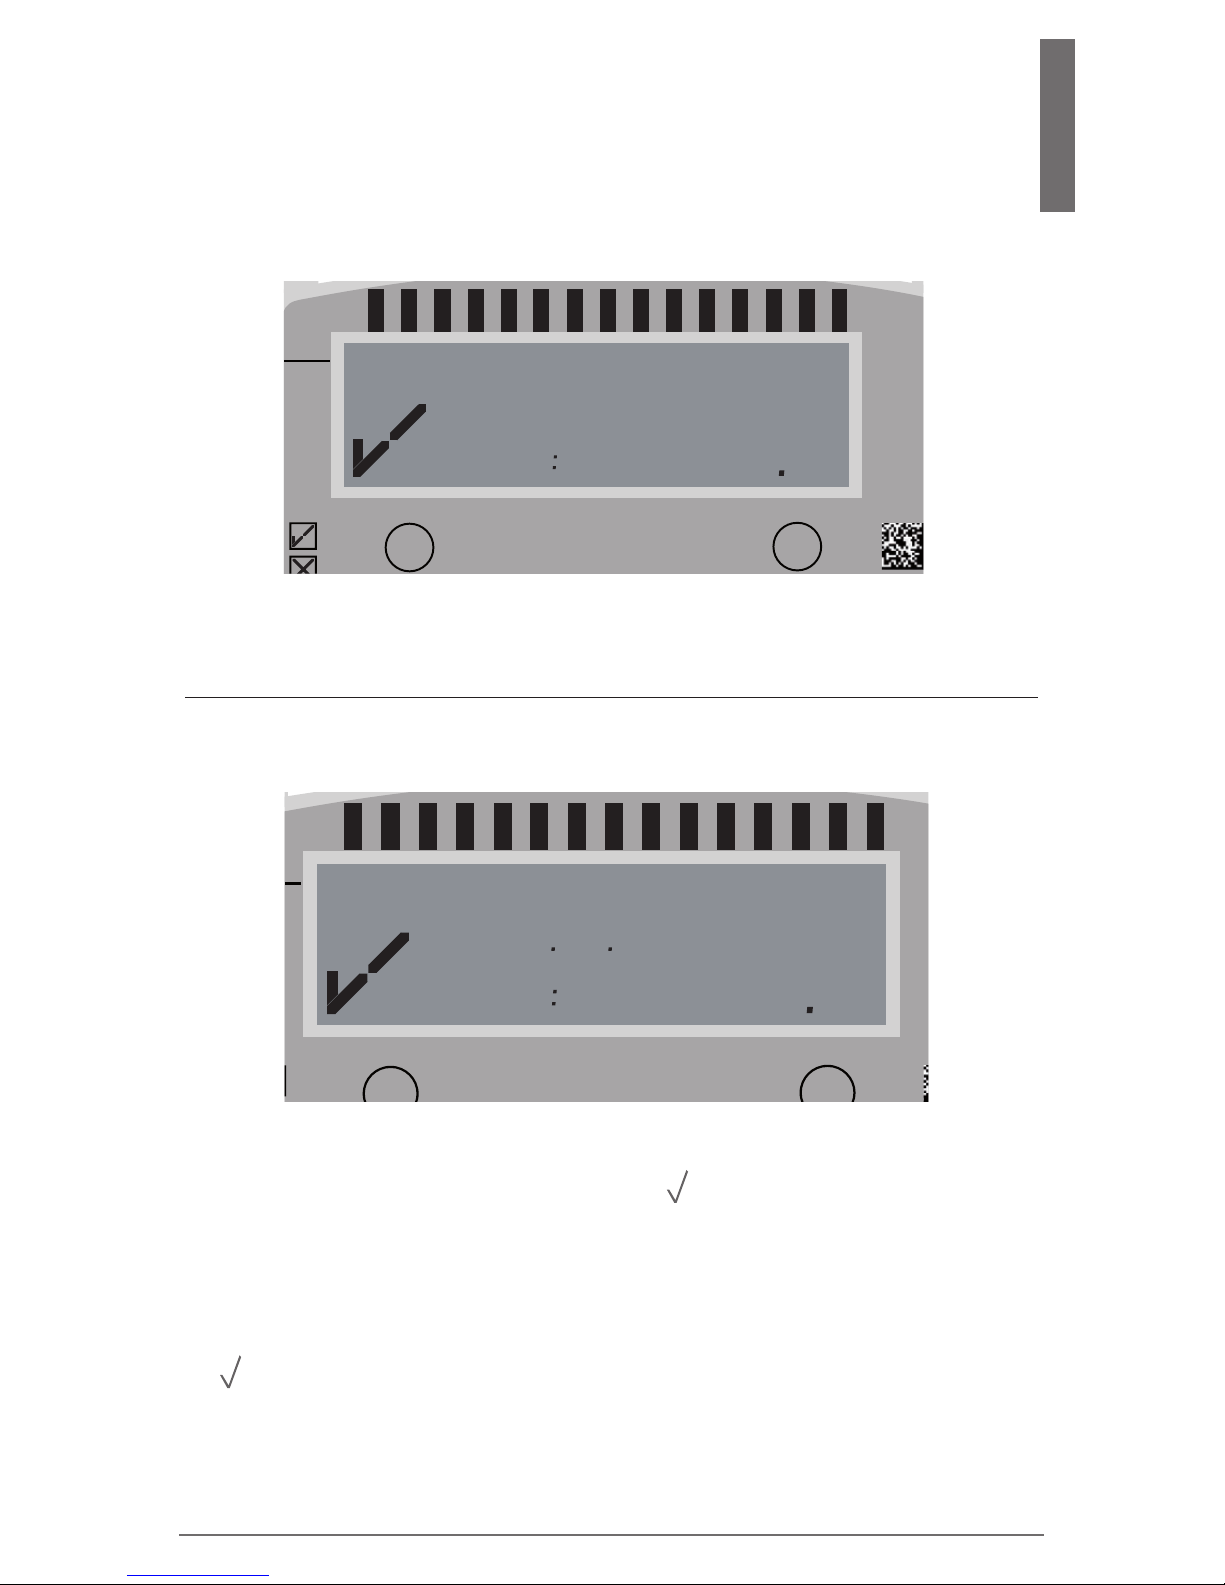
Example of OK Display - during measurement
Once the device is fully activated the (
) OK symbol, the current
temperature reading, the time and the date will be displayed on the
screen. The Fridge-tag
®
2 L will also indicate that the measuring is
made with an internal sensor.
A (
) (OK symbol) is indicated during normal operation as long
as no alarms have been recorded. The temperature and time
conditions were within the preset alarm parameters.
7) Display indication during
measurement mode
For max. 1 minute after completing the settings,
the following display will appear.
For a maximum of 1 minute no current temperature is displayed on
the screen, indicated by (--.-).
-27d
-25d
-23d
-21d
-19d
-17d
-15d
-13d
-11d
-9d
-7d
-5d
-3d
yesterd.
-29d
-28d
-26d
-24d
-22d
-20d
-18d
-16d
-14d
-12d
-10d
-8d
-6d
-4d
-2d
today
Time / Alarm duration
SET
Alarm state
=OK
READ
®
Fridge-tag 2 L
Temperature (min/max)
<2°C
(15min)
>8°C
(30min)
d ru
---
0 000
max.
°C
Int.
Sensor
-27d
-25d
-23d
-21d
-19d
-17d
-15d
-13d
-11d
-9d
-7d
-5d
-3d
yesterd.
-29d
-28d
-26d
-24d
-22d
-20d
-18d
-16d
-14d
-12d
-10d
-8d
-6d
-4d
-2d
today
Time / Alarm duration
SET
=OK
READ
®
Fridge-tag 2 L
Temperature (min/max)
5101 2096
056
1 473
°C
Int.
Sensor
21
Page 22
The information of the temperature excursions can either be viewed directly on the device for the past 30 days or on the generated
les (PDF/ASCII) for 28, 56, 84 or 112 days, depending upon how
the device is con gured.
9) Reading the History
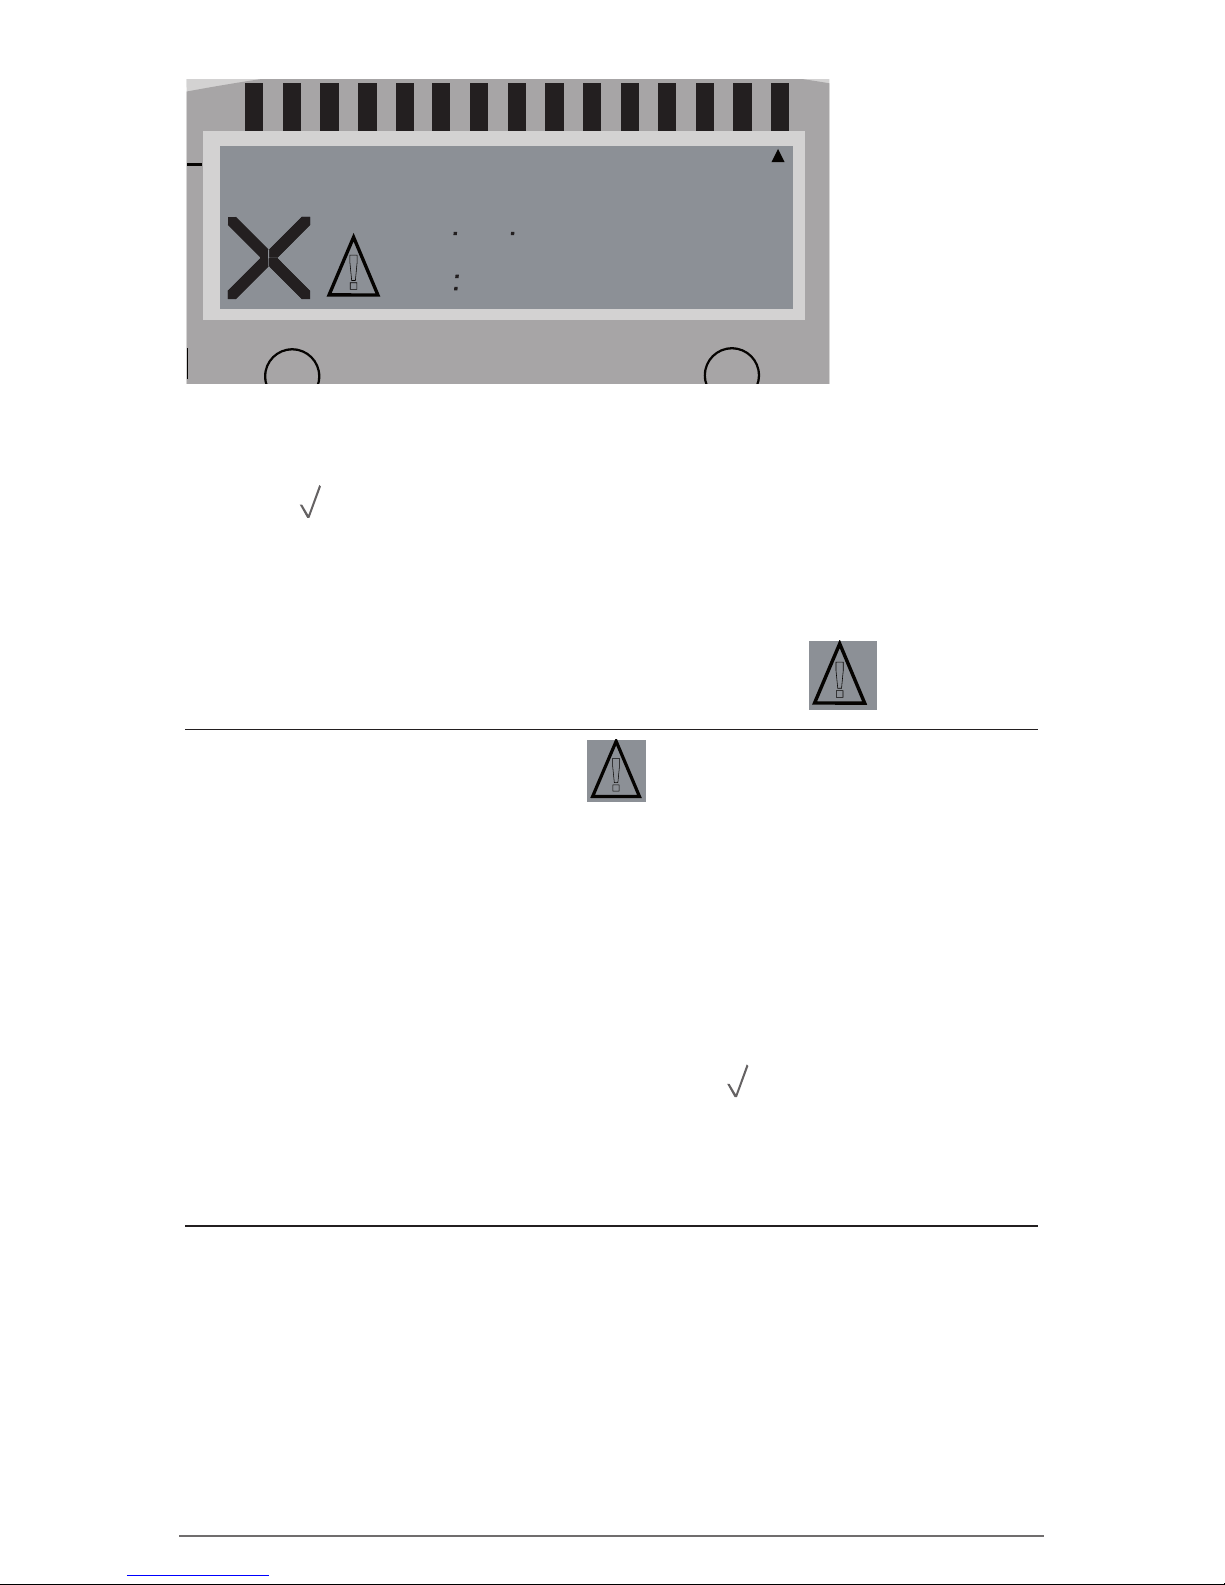
Example of ALARM Display - during measurement
If the temperature and time conditions are outside the preset alarm
parameters the following will be displayed on the screen:
• The (
) OK symbol will be replaced by (X) ALARM symbol
• An additional arrow will be indicated in the upper display area
to show which ALARM limit has been violated and on which
day.
• In addition to the (X) ALARM symbol the
warning symbol (!) will appear beside the (X).
!
1-
888
8808 2888
8888
min.
max.
°F
°C
Int.
SensorSensor
Ext.
-27d
-25d
-23d
-21d
-19d
-17d
-15d
-13d
-11d
-9d
-7d
-5d
-3d
yesterd.
-29d
-28d
-26d
-24d
-22d
-20d
-18d
-16d
-14d
-12d
-10d
-8d
-6d
-4d
-2d
today
Time / Alarm duration
SET
=OK
READ
®
Fridge-tag 2 L
Temperature (min/max)
!
5101 2096
088
1 425
°C
Int.
Sensor
8) Warning symbol
Option 1: The warning symbol will remain visible until the user
reads the details of the triggered alarm/s from the display. After that
it will disappear. ALARM indications cannot be cancelled nor reset.
!
1-
888
8808 2888
8888
min.
max.
°F
°C
Int.
SensorSensor
Ext.
Option 2: The warning and ALARM symbol (X) will remain
visible until the user reads the details of the triggered alarm/s
from the display. After that both symbols will disappear and
the display will go back to the OK Symbol (
).
Note: How the ALARM symbol (X) and the warning symbol
react is speci ed in the con guration of the device.
22
Page 23
English
-27d
-25d
-23d
-21d
-19d
-17d
-15d
-13d
-11d
-9d
-7d
-5d
-3d
yesterd.
-29d
-28d
-26d
-24d
-22d
-20d
-18d
-16d
-14d
-12d
-10d
-8d
-6d
-4d
-2d
today
Time / Alarm duration
SET
=OK
=ALARM
READ
®
Fridge-tag 2 L
Temperature (min/max)
d ru
029
0 000
min.
°C
Int.
Sensor
-27d
-25d
-23d
-21d
-19d
-17d
-15d
-13d
-11d
-9d
-7d
-5d
-3d
yesterd.
-29d
-28d
-26d
-24d
-22d
-20d
-18d
-16d
-14d
-12d
-10d
-8d
-6d
-4d
-2d
today
Time / Alarm duration
SET
READ
®
Fridge-tag 2 L
Temperature (min/max)
d ru
105
0 320
max.
°C
Int.
Sensor
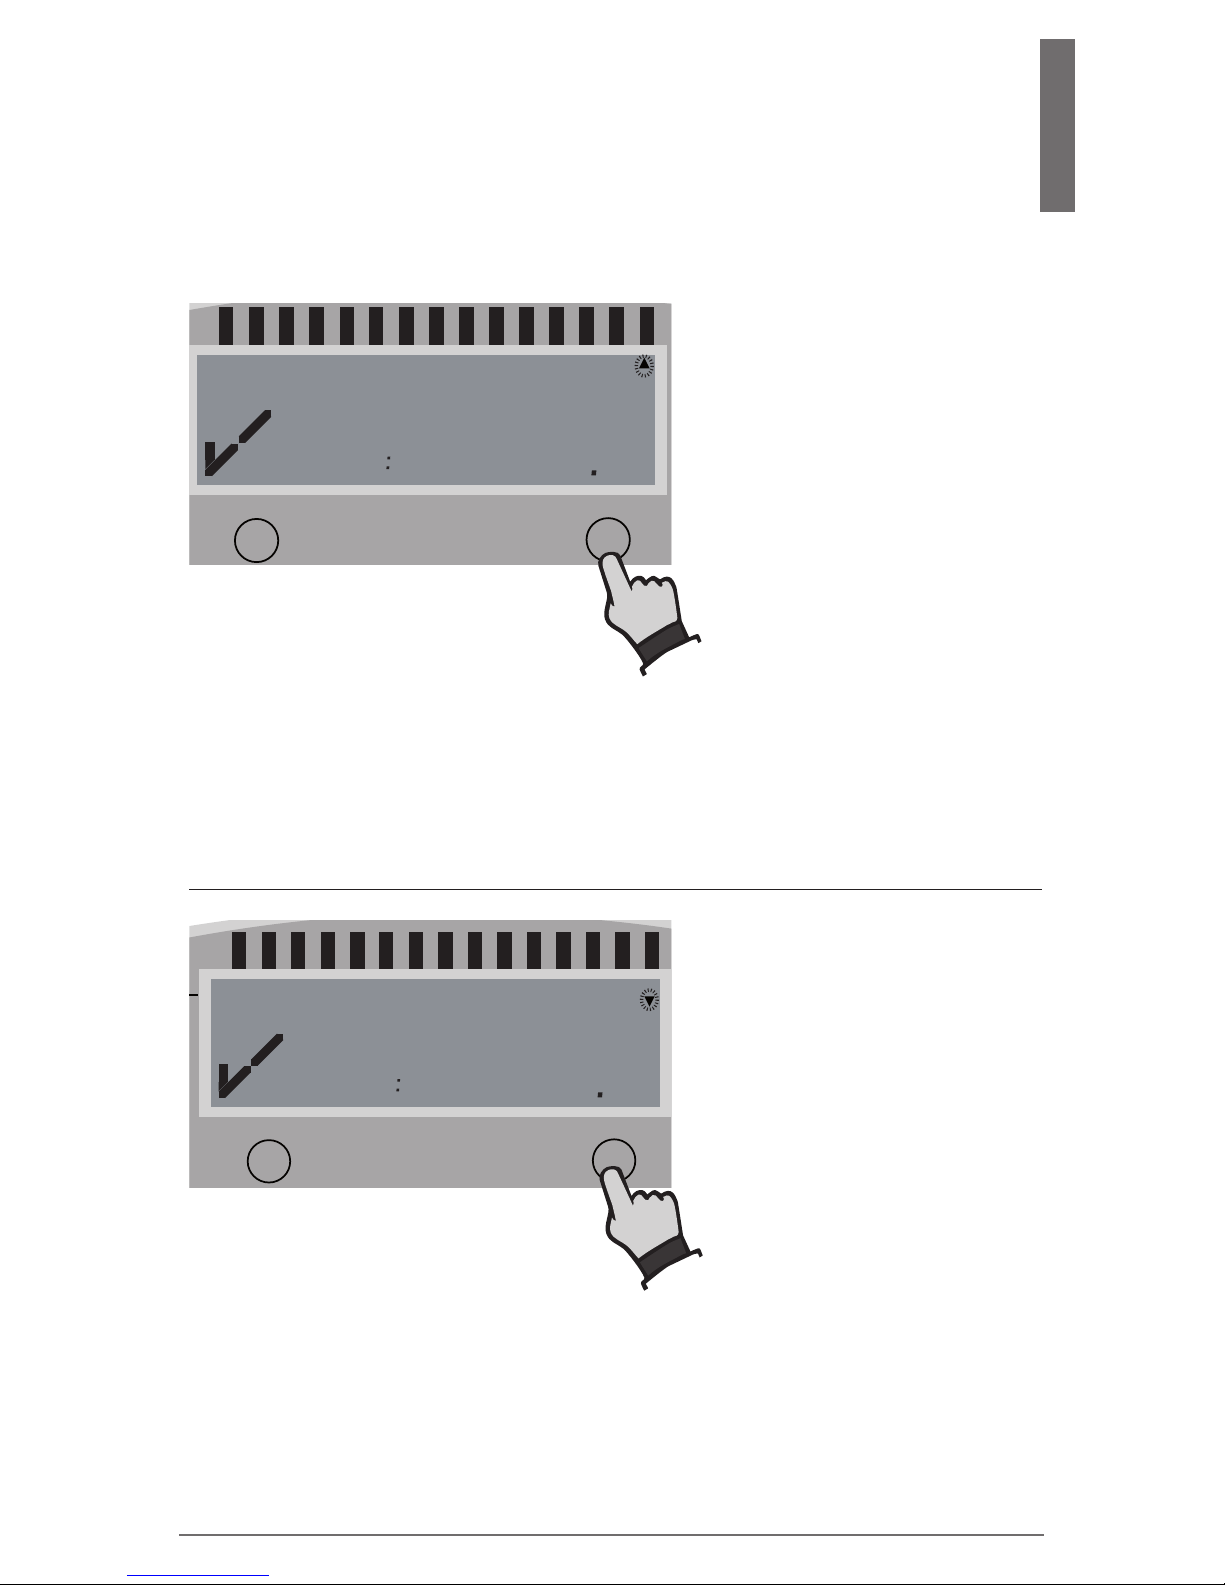
The following information is
indicated on the screen:
The following information is
indicated on the screen:
Press READ a
second time
Example of an OK display during read out of the history
• The OK symbol
• The corresponding arrow (example: high arrow of „today“)
• Highest recorded temperature (example: +10.5˚C)
• The time duration out of the preset temperature high limit
(example 00:32; hrs: min).
Press READ once
9.1) Option 1:
Read out day-per-day
directly on the device (30 day history)
23
Page 24
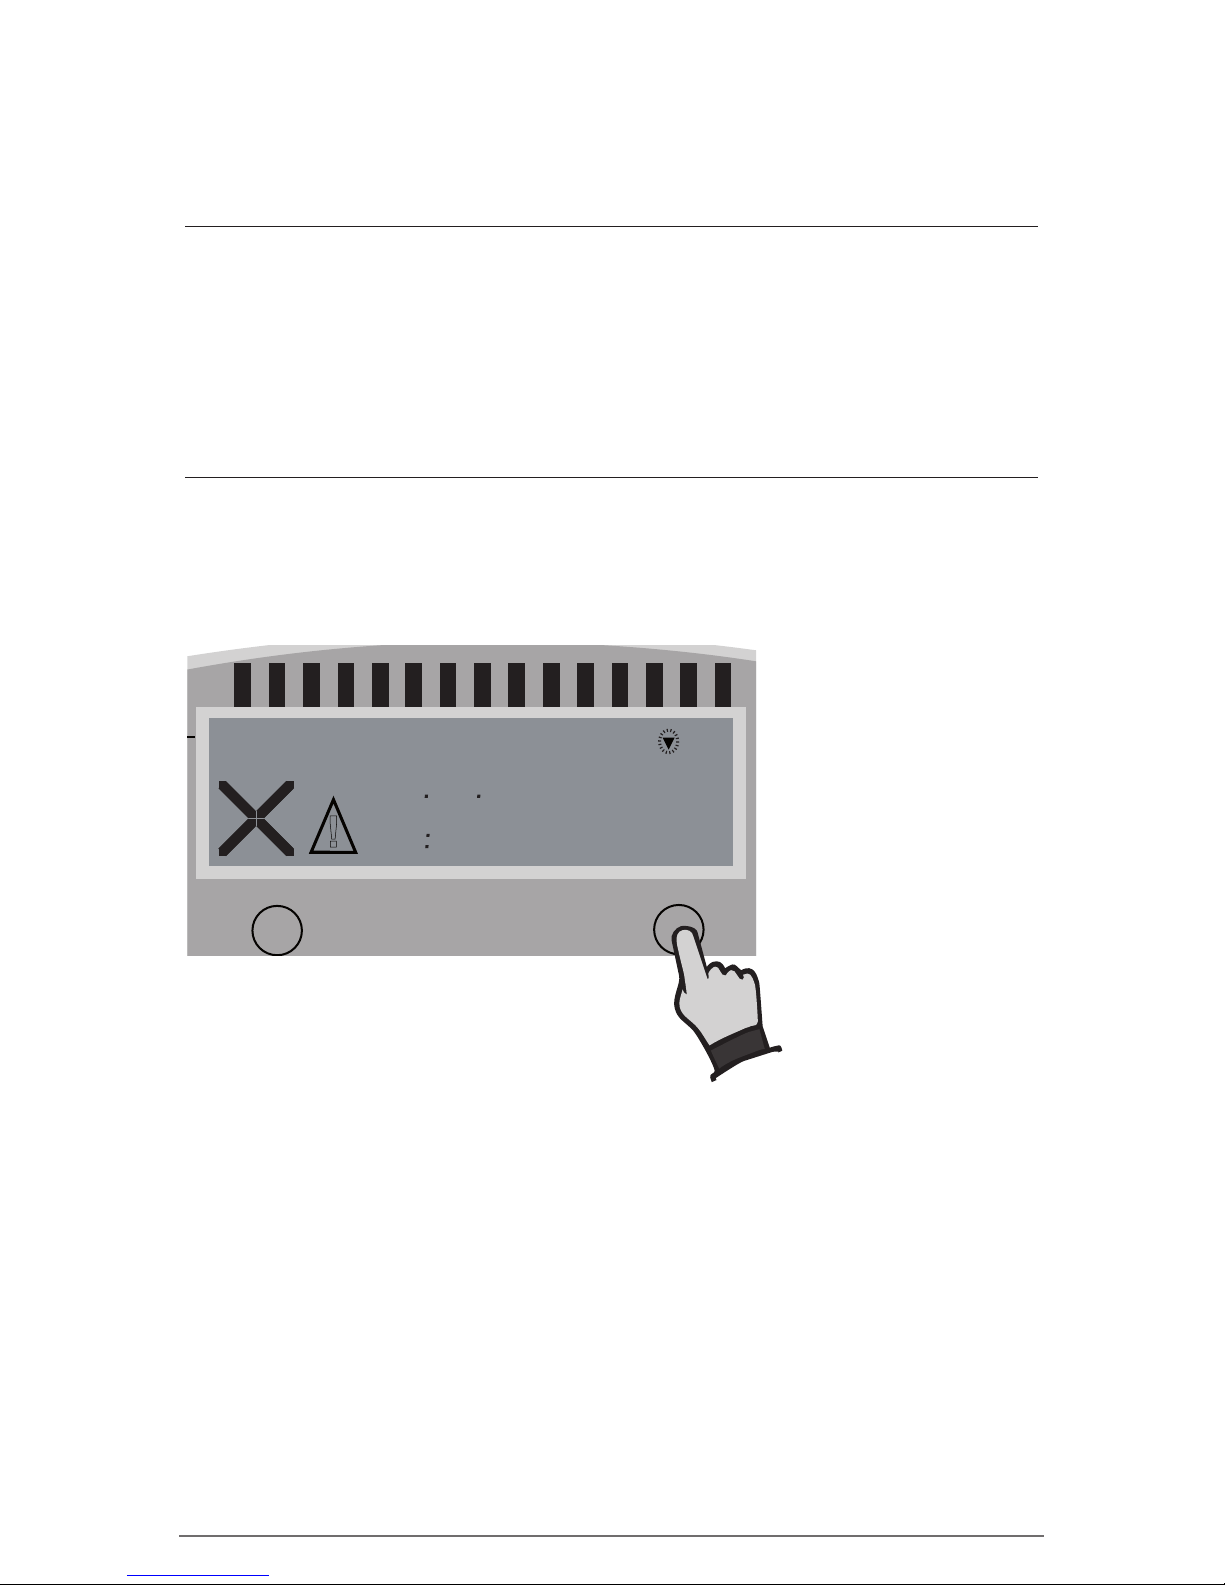
Example of an ALARM display during reading out of the history
The following information is indicated on the screen:
• The ALARM symbol
• The corresponding arrow: Lower ALARM limit
• Day of Alarm: 3 days ago (-3d)
• The date of excursion: 19.09.2015
• The time of excursion: 18:21
1st displayed screen of a „lower ALARM event“
Press READ
-27d
-25d
-23d
-21d
-19d
-17d
-15d
-13d
-11d
-9d
-7d
-5d
-3d
yesterd.
-29d
-28d
-26d
-24d
-22d
-20d
-18d
-16d
-14d
-12d
-10d
-8d
-6d
-4d
-2d
today
Time / Alarm duration
SET
READ
®
Fridge-tag 2 L
Temperature (min/max)
!
5101 2099
1 218
• The OK symbol
• The corresponding arrow (example: low arrow of „today“)
• Lowest recorded temperature (example: +2.9˚C)
• The time duration out of the preset temperature low limit
(example 00:00; hrs: min).
Information:
When you reach an ALARM event, the indication on the screen
of the Fridge-tag
®
2 L will be different to the indication of an OK
display.
Note: Continue repetitively pressing the READ button to read out
day per day the details of the past 30 days.
24
Page 25
English
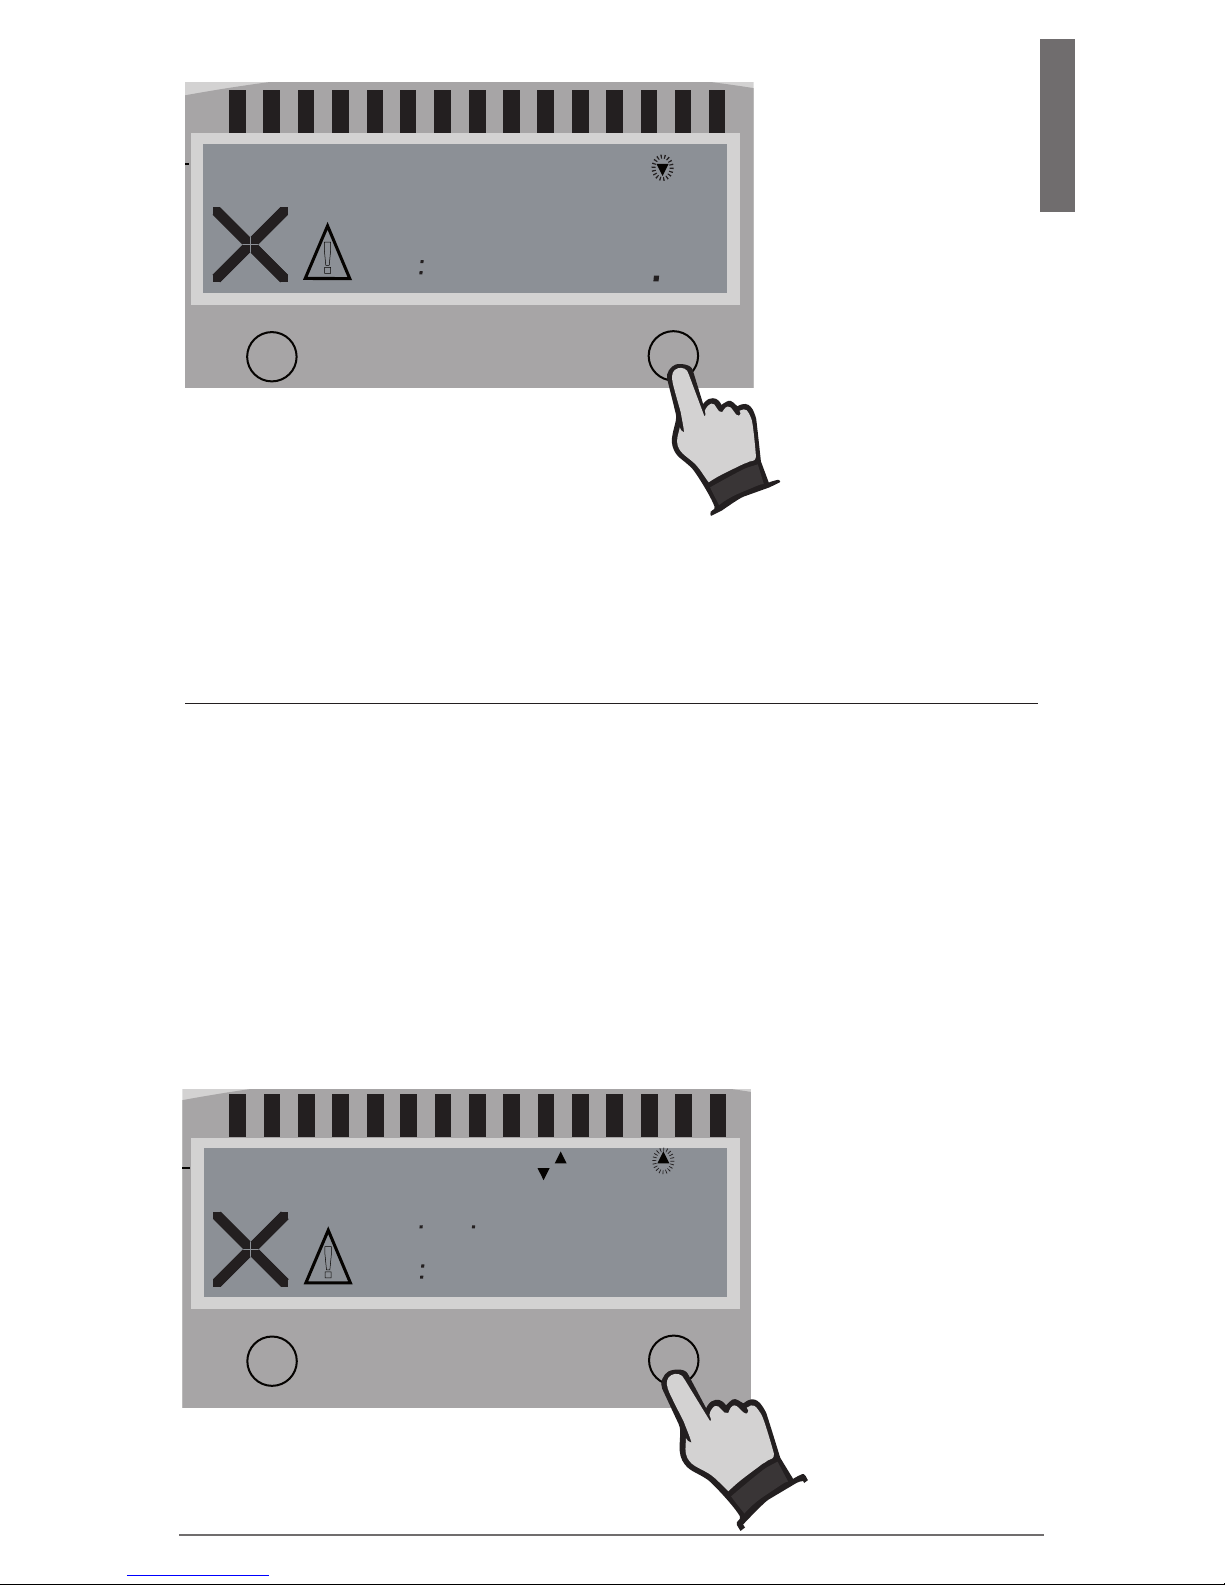
If you like to read out only the ALARMS directly on the device,
press and hold the READ button for at least 3 seconds.
These steps will also stop the device from beeping, except the
temperature is still out of the allowed temperature range.
9.2) Option 2:
Read out only alarms on the screen
(Alarm-Super-Jump
function, 30 day history)
-27d
-25d
-23d
-21d
-19d
-17d
-15d
-13d
-11d
-9d
-7d
-5d
-3d
yesterd.
-29d
-28d
-26d
-24d
-22d
-20d
-18d
-16d
-14d
-12d
-10d
-8d
-6d
-4d
-2d
today
Time / Alarm duration
SET
READ
®
Fridge-tag 2 L
Temperature (min/max)
!
-
d ru
011
0 351
min.
Int.
Sensor
The following additional information is indicated on the screen:
• Lowest recorded temperature: -1.1˚C
• The time duration out of the preset temperature low limit:
01:35; hrs:min
• Temperature recording with: internal sensor
2nd displayed screen of a „lower ALARM event“:
Press READ a second time
1st displayed screen of the latest ALARM event:
Press READ for 3 seconds
-27d
-25d
-23d
-21d
-19d
-17d
-15d
-13d
-11d
-9d
-7d
-5d
-3d
yesterd.
-29d
-28d
-26d
-24d
-22d
-20d
-18d
-16d
-14d
-12d
-10d
-8d
-6d
-4d
-2d
today
Time / Alarm duration
SET
READ
®
Fridge-tag 2 L
Temperature (min/max)
225-0208-001-00E
110500000010
!
5102 2090
2 300
25
Page 26
-27d
-25d
-23d
-21d
-19d
-17d
-15d
-13d
-11d
-9d
-7d
-5d
-3d
yesterd.
-29d
-28d
-26d
-24d
-22d
-20d
-18d
-16d
-14d
-12d
-10d
-8d
-6d
-4d
-2d
today
Time / Alarm duration
SET
=OK
=ALARM
READ
®
Fridge-tag 2 L
Temperature (min/max)
225-0208-001-00E
110500000010
d ru
!
105
1 241
max.
Int.
Sensor
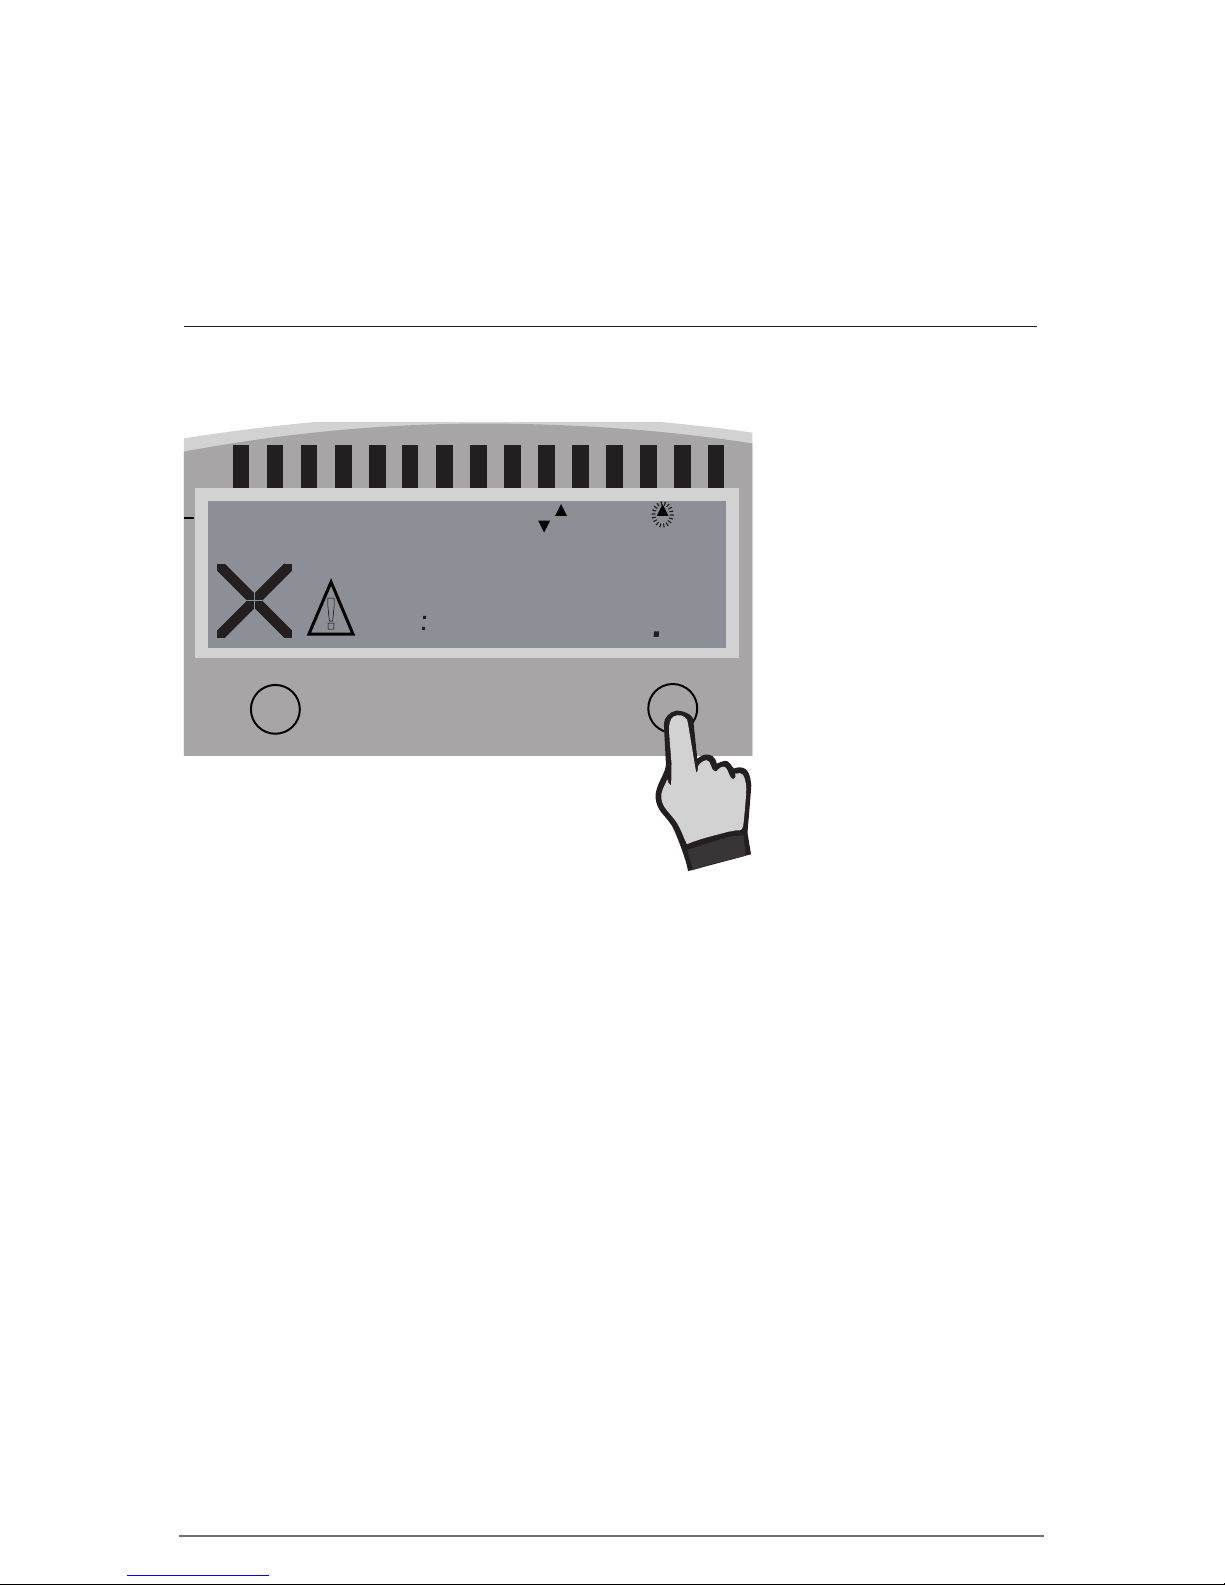
The following additional information is indicated on the screen:
• Highest recorded temperature (example: +10.5˚C)
• The time duration out of the preset temperature high limit
(example 11:24; hrs:min).
• Temperature recording with: internal sensor
2nd displayed screen of the latest ALARM event
Then press READ again
The following information is indicated on the screen:
• The ALARM symbol
• The corresponding arrow: Upper ALARM limit
• Day of Alarm: 3 days ago (-3d)
• The date of excursion: 20.09.2015
• The time of excursion: 20:30
Information:
Press and hold the READ button again for at least 3 seconds
and the next Alarm event will appear on the screen.
26
Page 27
English
9.3) Option 3: Read out data from the
les generated by the
Fridge-tag® 2 L by connecting
it with a computer
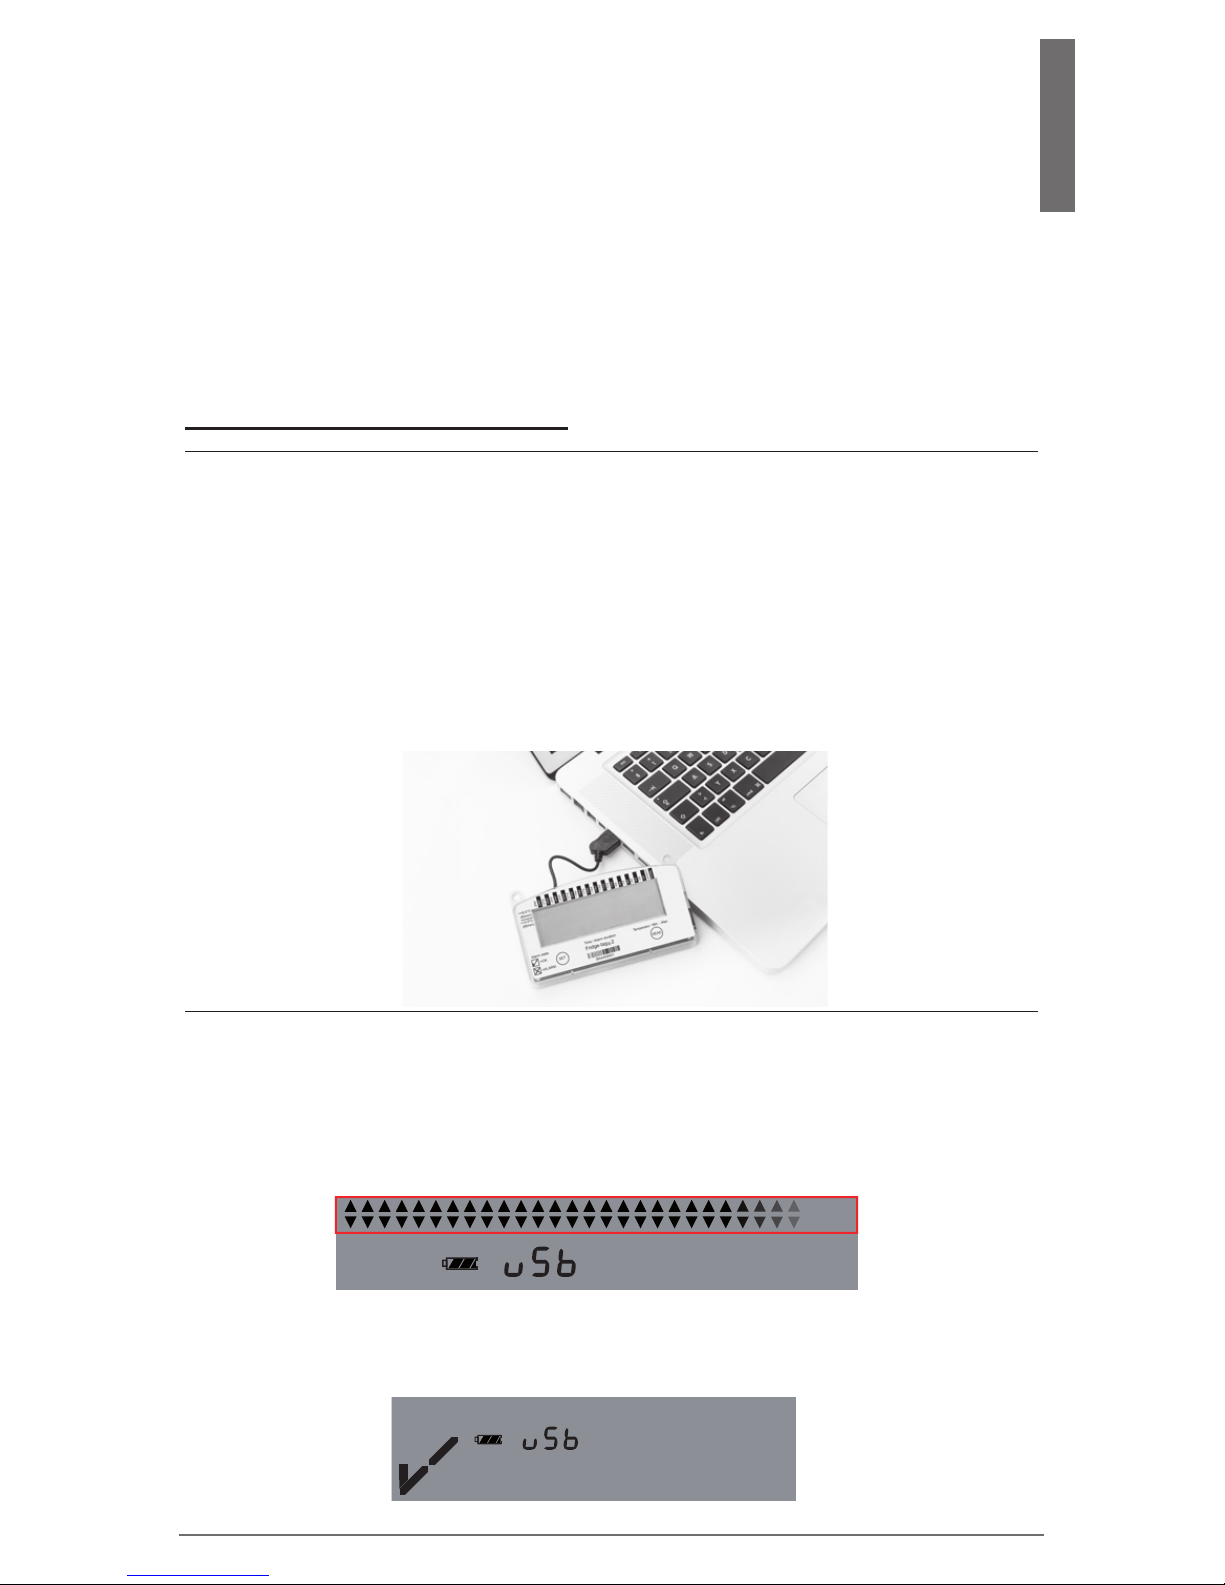
Plug the Fridge-tag® 2 L into any computer via USB Interface.
Make sure the device is plugged in properly.
In case of an upper or lower temperature overrun, 3 audible
ALARM signals will be triggered immediately. (500ms ON / 500ms
OFF). Thereafter:
During 10 minutes Every minute 1 ALARM -signal
During 50 minutes Every 10 minutes 1 ALARM -signal
During 11 hours Every hour 1 ALARM -signal
Acknowledge audible ALARM: Press the READ button (repeatedly)
Read out Audio ALARM
(optional factory setting)
Wait suf cient time for the device to generate the ASCII and PDF
les (depending on the programming, this process may take a
couple of minutes). You can see that the device is working from the
continuously appearing arrows in the upper display area.
Note: This process must not be interrupted, until the tick appears
on the display, indicating that the report creation is complete.
-27d
-25d
-23d
-21d
-19d
-17d
-15d
-13d
-11d
-9d
-7d
-5d
-3d
yesterd.
-29d
-28d
-26d
-24d
-22d
-20d
-18d
-16d
-14d
-12d
-10d
-8d
-6d
-4d
-2d
today
27
Page 28
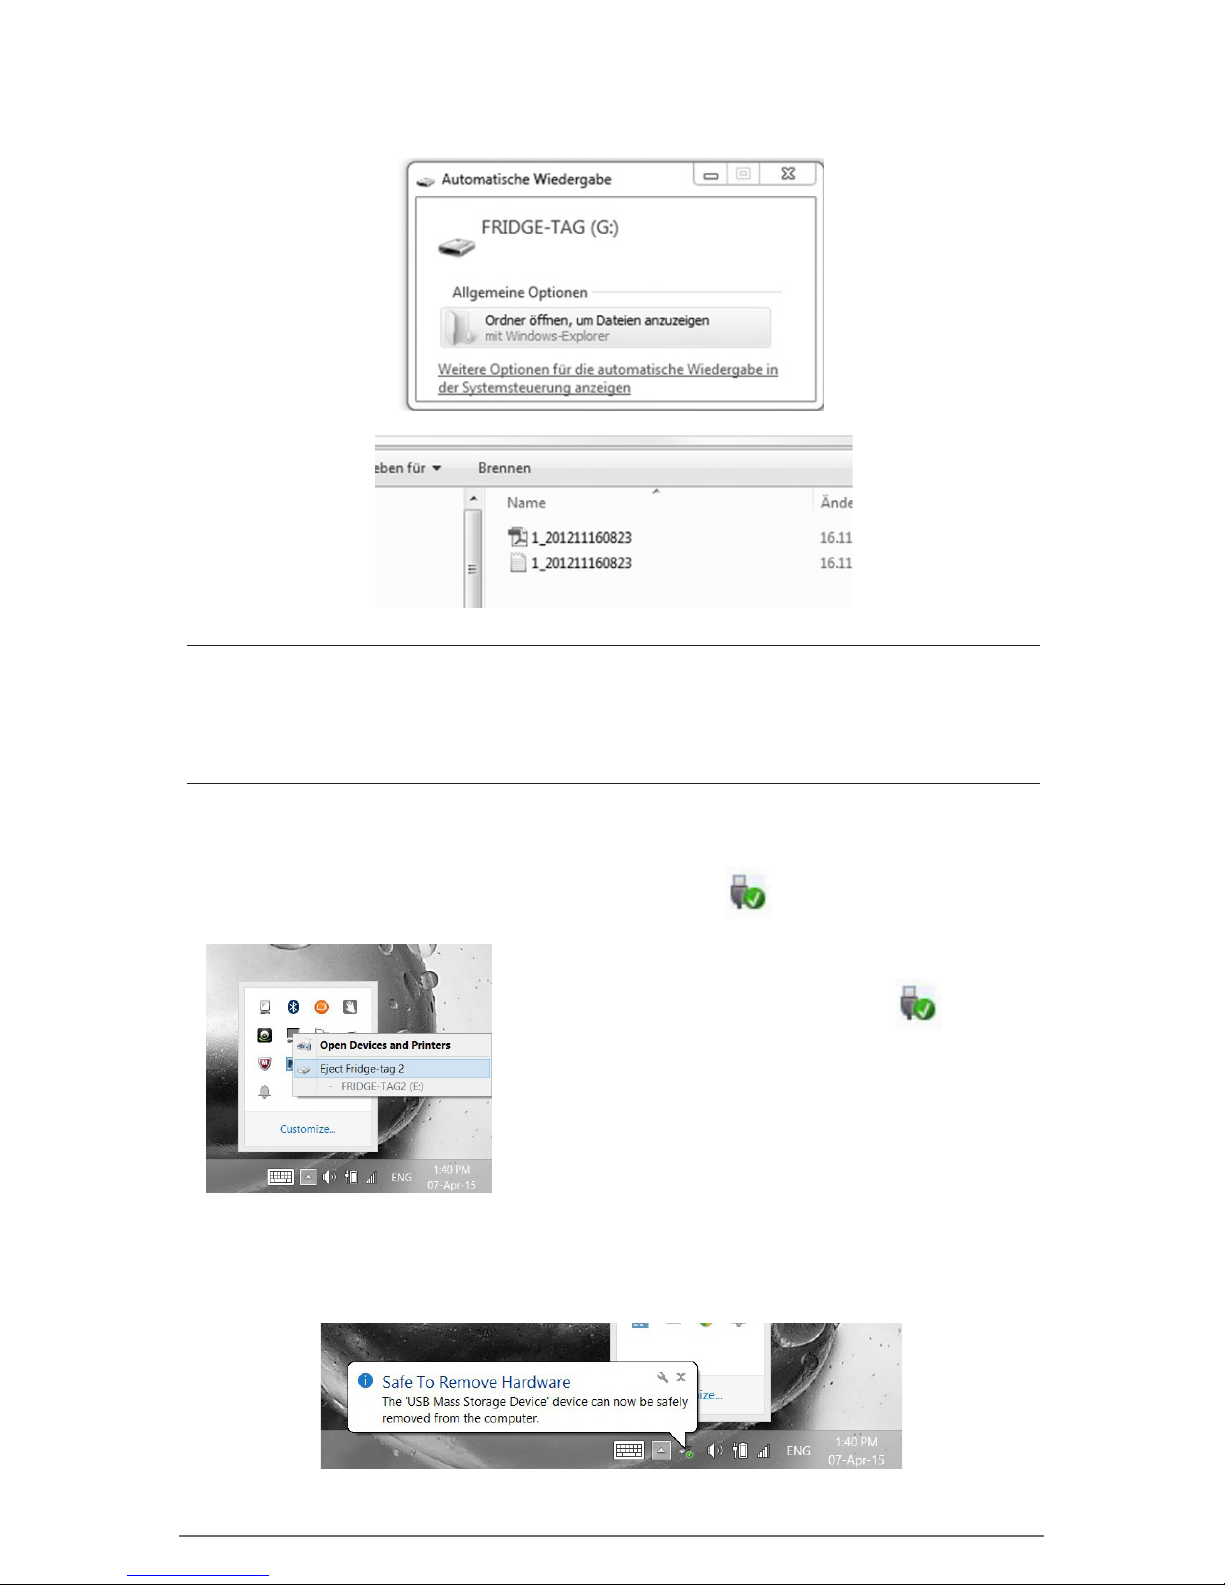
Note:
For a proper USB-port disconnection of the device, please always
use the “safely remove hardware” function on your PC/Mac.
Right mouse click on the icon .
Eject … (choose the right device to
remove).
Do not disconnect the device before you receive the following message, otherwise this could damage the device!
Information:
For this process no additional software is necessary.
When the report creation is complete, one of the following windows
will appear on your computer: Open the appropriate le generated
by the Fridge-tag® 2 L.
⚠
28
Page 29
English
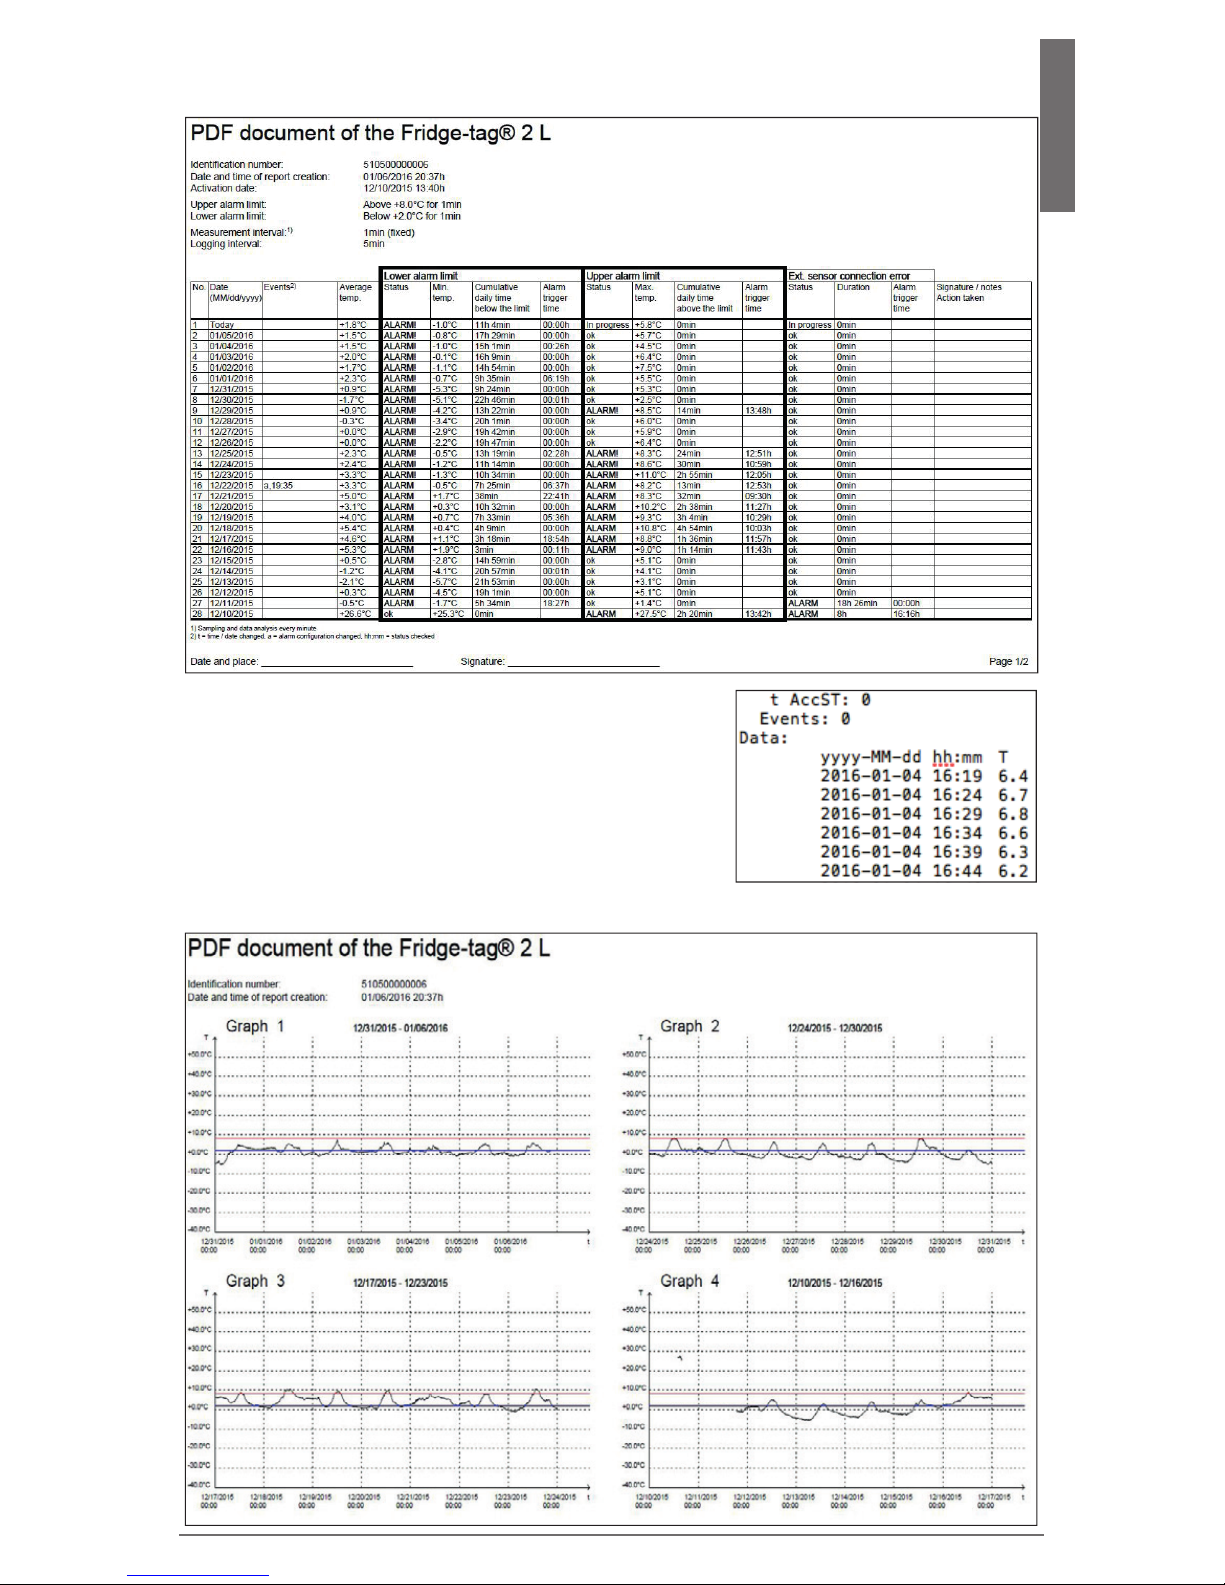
Sample of a PDF- le
Page 1/2
Page 2/2
If you need to use the individual tempera-
ture readings please open the ASCII le.
Scroll down in order to nd the recordings
of temperatures stamped with the date
and time based on the logging interval.
.txt fi le
29
Page 30

Date Date of measurement
Event: t Time / date changed
Event: a Alarm conguration changed
Event: hh:mm Time stamp: status checked
Average temp. Average temperature
Status: in progress The data collection of „Today“ is not
yet complete
Status: OK No alarm has been triggered the past
30 days (No alarm has yet been triggered
since the last data read out on the
device.*)
Status: ALARM! Alarm/s have been triggered
(With „!“ means that the details of the
corresponding alarm have not been read
out yet*)
Status: ALARM Alarm/s have been triggered
(Without „!“ means that the details of the
corresponding alarm have already been
read out on the device*)
Min. temp. Lowest recorded temperature
Cum. duration Cumulative daily time outside of the alarm
out of range limits
Alarm trigger time Time at which the alarm was triggered
Max. temp. Highest recorded temperature
Duration Duration of an external sensor connection
error
Explanation of PDF report:
Information: File names on the Fridge-tag® 2 L are write protected.
The names may only be changed after downloading onto a
computer. Changing is either possible directly on unopened les or
via open and save commands with the Adobe Reader. Using other
programs may cause loss of the digital signature.
* For more information go to chapter 8 „Warning symbol“
9.4) Temperature record duration
(optional factory setting)
Selectable record duration: 28, 56, 84, 112 days.
30
Page 31
English
9.5) Verycation process
This process is to verify if the les (PDF and ASCII-le) created by
the Fridge-tag® 2 L are authentic and have not been manipulated
or accidentally changed (meets the strict FDA CFR 21 Part 11
requirements).
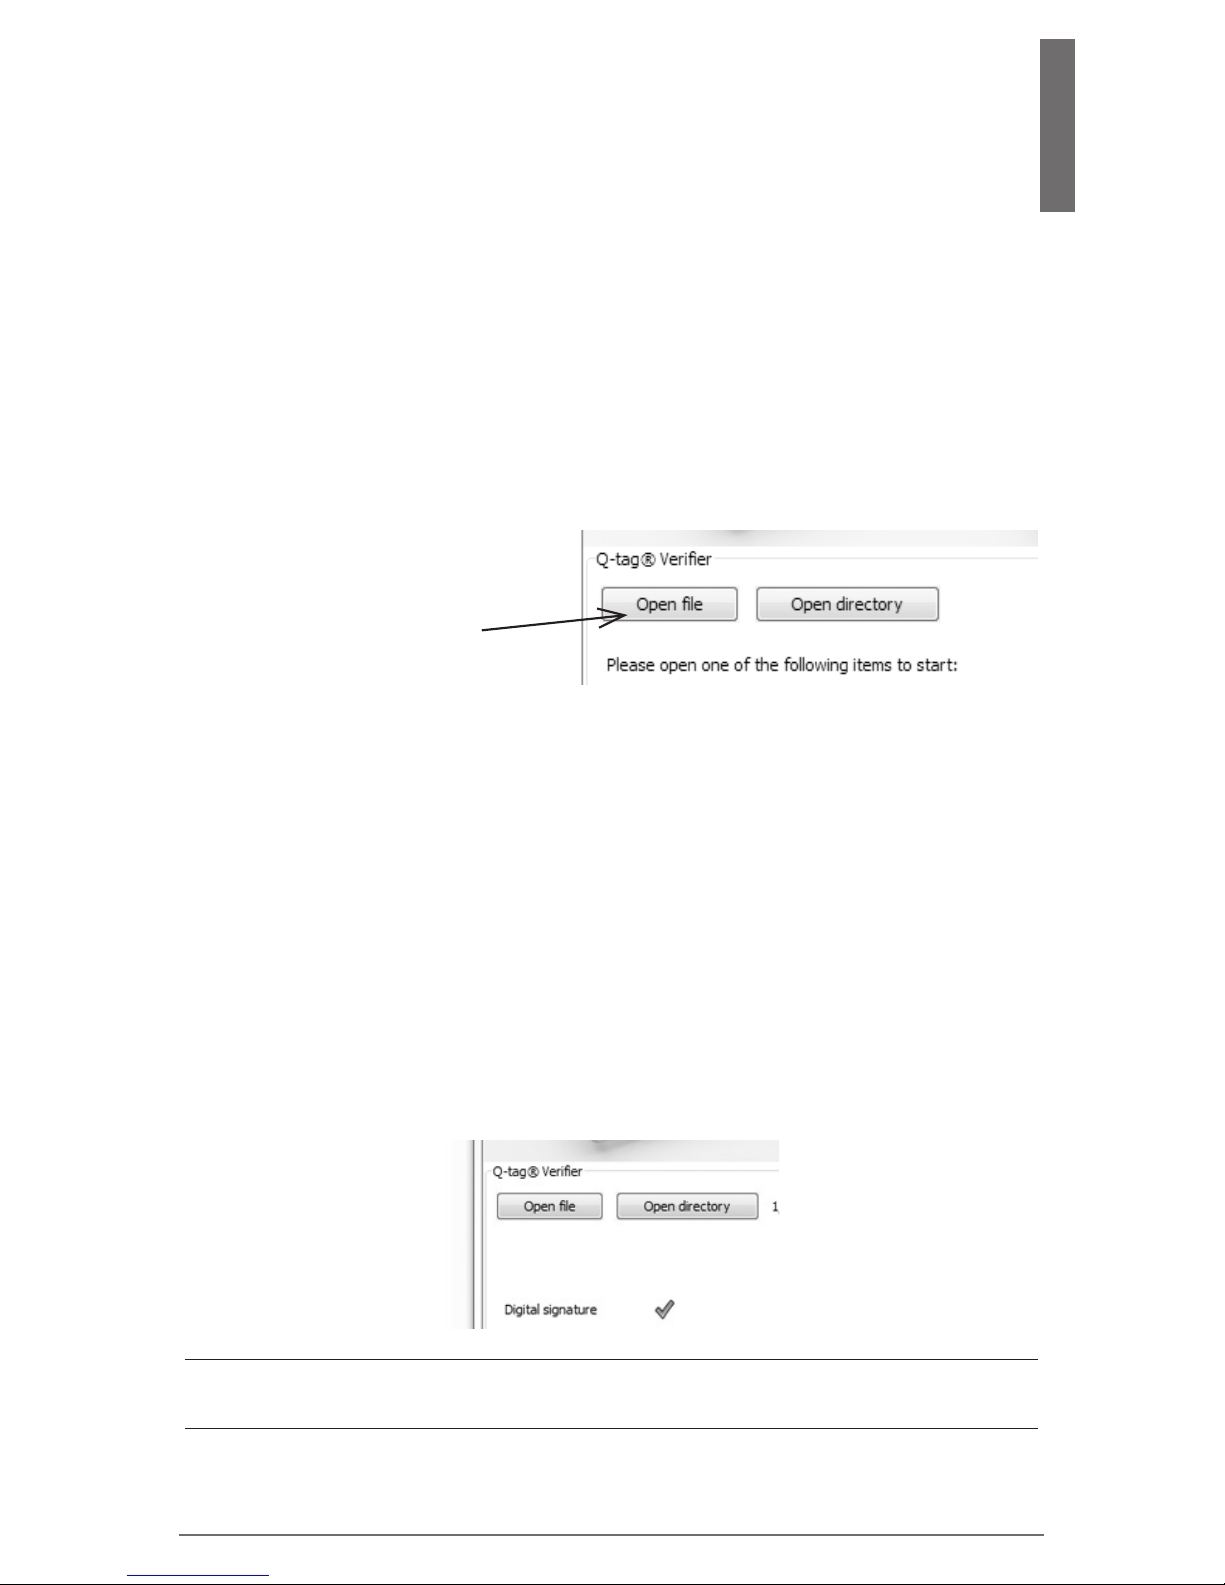
1st step:
Download the software „Verier“ from our website:
www.berlinger.com
2nd step:
Open the software. The following window will appear:
3rd step:
Click on „Open le“
4th step:
Select the le you would like to verify.
Option 1:
Option 2:
Select the les directly from the Fridge-tag
®
2 L which
is connected to your computer.
Select the les from the place where you saved them
on your computer.
When the le is correct and in its original condition, the following
window will appear:
Proceed the same way with the PDF or the .txt -le. The same OK
or ERROR messages will appear.
In case the le has been changed, an „error message“ will appear.
31
Page 32
Read out mode
In order to avoid incorrect data, the Fridge-tag® 2 L does not collect
any readings while in the Adjustment or Read-out mode (e.g. changing time, date and during reading of history). The Fridge-tag® 2 L
will fall back into normal operation after approx. 60 seconds without
pressing any buttons.
10) Explanations of terms
11) Expire code explanation
Sample: exp 2016-07
The sample shows the expiry date of the Fridge-tag® 2 L as July
2016 (2016-07).
More information about the Fridge-tag® 2 L can be found in the
sales brochure and on the website: www.berlinger.com
Storage condition (inactive) 0 °C to +30 °C
Operating temperature -25 °C to +55 °C
Accuracy of temperature +/- 0.8 °C (-25 °C to -10 °C)
measurement +/- 0.5 °C (-10 °C to +40 °C)
+/- 0.8 °C (+40 °C to +55 °C)
Accuracy of time measurement +/- 30 minutes/year
Temperature measurement interval every minute
Operating lifetime up to 3 years (check battery
indicator)
Protection class IP64
12) Technical specications
32
Page 33

English
13) Important Information
Liability
The manufacturer shall not be held liable:
• if the device was used beyond the manufacturer’s given limitations.
• for any claims due to the improper storage and use of the device.
• for any problems with the temperature controlling and / or cooling unit.
• for the bad quality of any monitored goods.
• for incorrect readings if the device was used beyond its expiry date.
Warranty: 2 years from date of delivery.
Battery
The Fridge-tag® 2 L contains a CR Lithium battery. Please pay strict attention
to the following points:
• The housing of the Fridge-tag® 2 L must never be opened nor destroyed.
• Never expose the Fridge-tag® 2 L to temperatures above the allowed
range (re, oven, micro waves, etc.).It may cause injuries.
• Always keep the Fridge-tag® 2 L out of the reach of Children.
• The battery complies with IATA DGR Packaging Instruction 970
Section 2 and is therefore not considered as dangerous good.
• Dispose or recycle the Fridge-tag® 2 L in accordance with the WEEE
2012/19/EU guidlines or your local regulations. The device may also be
returned to the manufacturer for proper recycling.
Useful life
The devices can be used up to 3 1/2 years after production date
(1/2 year storage / 3 years useful life) on the condition that:
• the buttons are not pressed for very long time, e.g. if jammed between
the goods in a shipment.
• storage and operation of the device should remain inside the recommendations of the manufacturer, especially temperatures below 0 °C or +32
°F could have a negative influence for the operating lifetime of the
battery.
The end of the useful life is indicated by the battery indicator on the display
(see chapter „Display information“ on page 5) .
Attention
• The Fridge-tag® 2 L monitors temperature exposure and not the product
quality. Its purpose is to signal if product quality evaluation or testing is
required.
33
Page 34
Manufacturer:
Q-tag AG
Mitteldorfstrasse 2
9608 Ganterschwil
Switzerland
www.q-tag.com
Subject to change. Please note that all information in this document is correct at the time of publication.
Due to our policy of continuous product development, we reserve the right to change this information
without prior notice.
20161110_Release_1.2
Sales:
Berlinger & Co. AG
Mitteldorfstrasse 2
9608 Ganterschwil
Switzerland
Tel.: +41 71 982 88 11
Fax: +41 71 982 88 39
E-Mail: [email protected]
Web: www.berlinger.com
Berlinger USA, LLC
222 Turnpike Road
Suite 3
Westborough, MA 01581
Tel.: +1-508-366-0084
Fax: +1-508-366-0087
E-Mail: [email protected]
Web: www.berlinger.com
34
 Loading...