

Page 1
Bedienungsanleitung
Operation instructions
Istruzioni per l'uso
KNX-Funk Universal-Dimmaktor
fach UP
1
KNX-RF universal dim actuator
1gang flush-mounted
KNX-Radio attuatore di regolazione
luce universale 1 canale da incasso
6T 7976-30a
est.-Nr./Order no./Nr. ord. 8547 51 00
B
D
§¶
Achtung :
Einbau und Montage dürfen nur durch
eine Elektrofachkraft gemäß den einschlägigen Installationsnormen des
andes erfolgen.
L
- Gerät nicht in unmittelbarer Nähe der zu
immenden Lampe installieren.
d
Achten Sie darauf, die Antenne möglichst
weit vom Produkt entfernt zu halten.
Das Gerät ist ein netzstromgespeister
Funkempfänger.
Es lässt sich durch Funksender fernsteuern
(z. B. Taster, Handsender).
Das Gerät eignet sich zum Dimmen
verschiedener Leuchtmittel (s. Tabelle
Lastarten).
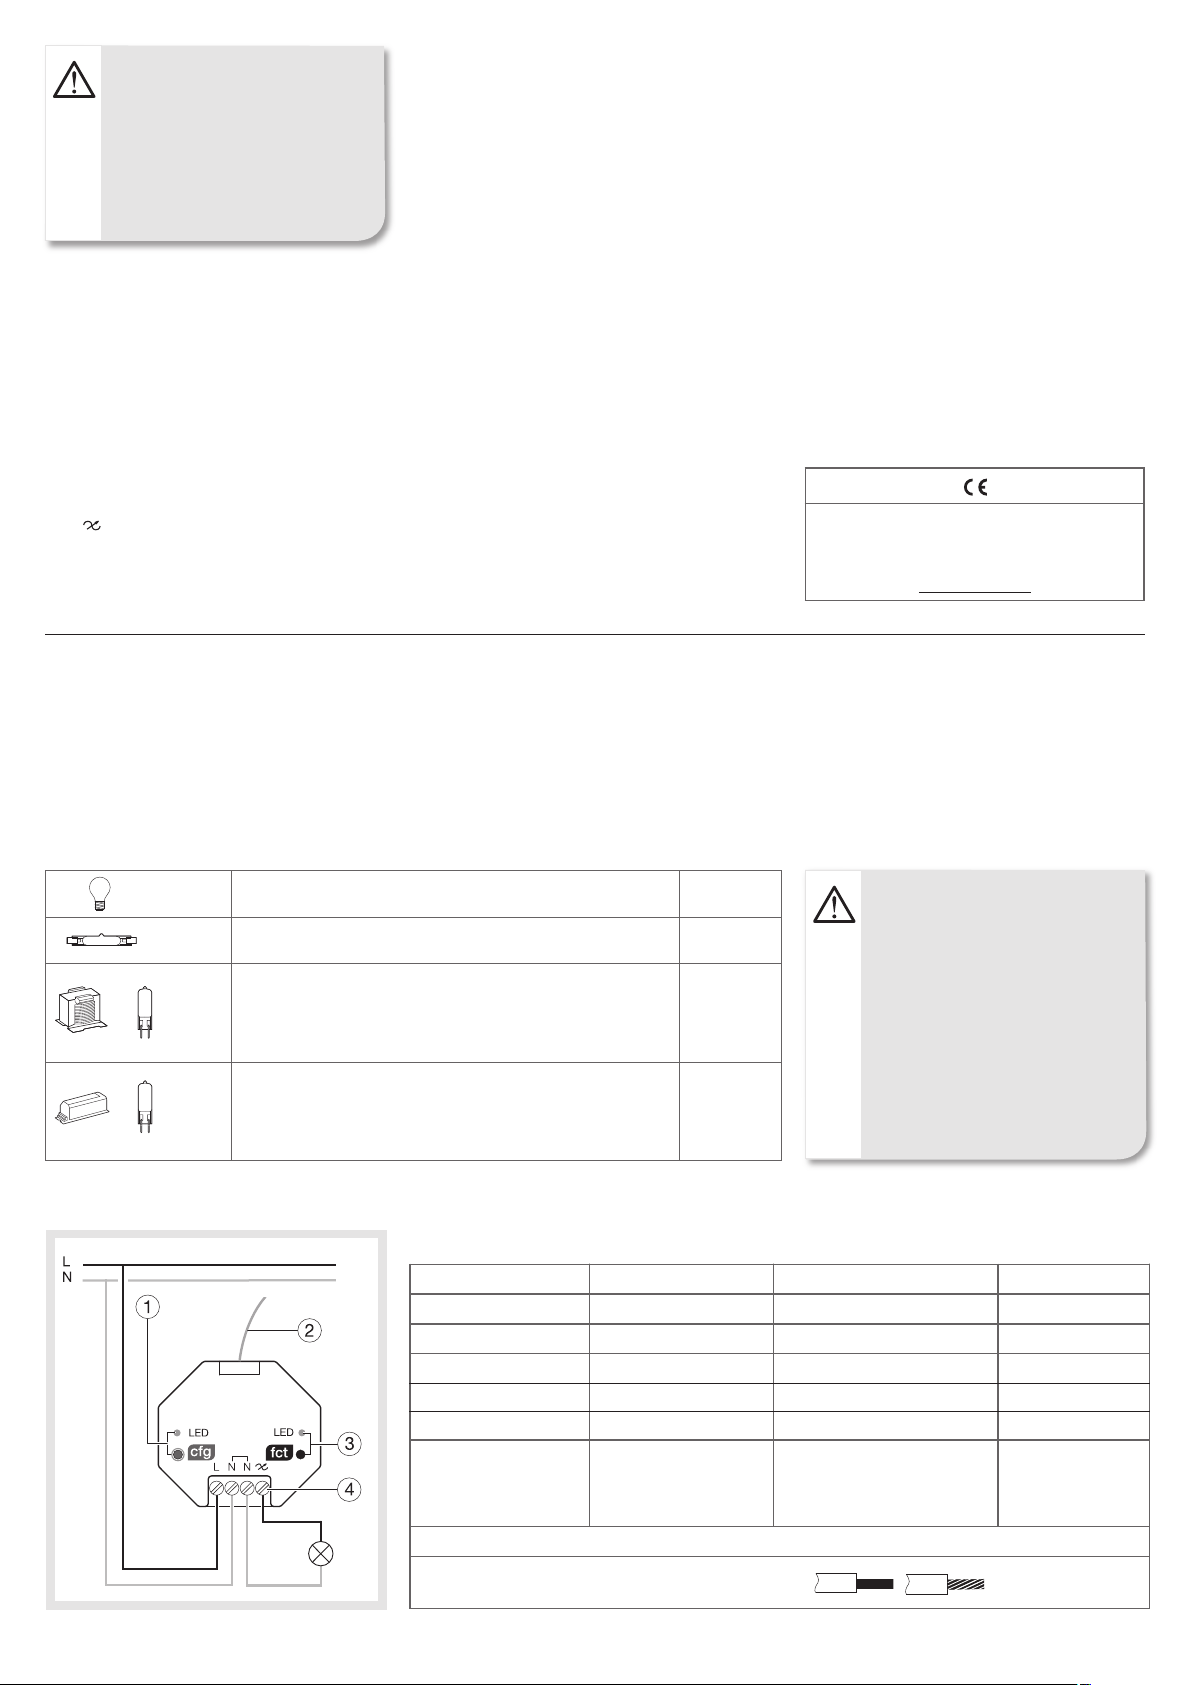
Legende
1 Konfigurations-Taste und -LED J
2 Funksender
3 Funktions-Taste und -LED K des
Ausgangs
4 Anschlussklemmenleiste:
- L : Außenleiter 230 V쓒
- N : Neutralleiter
- : Dimmer-Ausgang
Berker GmbH & Co. KG
Klagebach 38
58579 Schalksmühle/Germany
Telefon: + 49 (0) 23 55/90 5-0
Telefax: + 49 (0) 23 55/90 5-111
www.berker.com
05/2012
97-85475-100
Funktionen
• 1 Kanal Ansteuerung über KNX-Funk-Gerät
• Automatische Lastartenerkennung
Betrieb
Möglichkeit zur manuellen Ansteuerung über
•
TasteKgegeben
• Anzeige des Ausgangszustandes
(rot leuchtend = Ausgang aktiv).
Die genauen Funktionen dieser Geräte hängen von
der jeweiligen Konfiguration und den jeweiligen
Parametereinstellungen ab.
Schutz gegen Überhitzung bzw. Überlast
Das Gerät ist automatisch gegen Überlast,
Kurzschluß und Überhitzung geschützt.
Bei Überhitzung oder Überlast verringert sich
automatisch die Leistung.
Problemlösung:
- prüfen, ob ein Kurzschluß am Ausgang vorliegt,
- Leistung der an das Gerät angeschlossenen Last
drosseln.
Einstellungen
Das Gerät lässt sich auf 3 unterschiedliche Arten
konfigurieren:
• quicklink& : Konfiguration ohne Werkzeug,
direkt am Gerät über Tasten J und K
(siehe Konfigurationsanleitung quicklink&
• tebis TX: Konfiguration über Verknüpfungsgerät
von Hager
über
die LED fct
)
• ETS3/ETS4 über KNX-Funk/TP Gateway:
Applikation, Produktdatenbank und
Dokumentation beim Hersteller
erhältlich.
Um den Konfigurationsmodus zu ändern,
O
ist das Gerät zwingend auf
Werkseinstellung zurückzusetzen.
Zurücksetzen auf Werkseinstellungen
Taste J drücken und gedrückt halten,
bis die LED cfg blinkt >10 s, dann loslassen.
Das Zurücksetzen auf Werkseinstellungen wird
durch das Erlöschen der LED cfg angezeigt.
Bei dieser Operation wird die komplette
Konfiguration des Gerätes gelöscht,
unabhängig vom Konfigurationsmodus.
Nach dem Einschalten oder einem
Zurücksetzen auf Werkseinstellungen ist eine
Wartezeit von 15 s abzuwarten, bevor die
Konfiguration vorgenommen werden kann.
Verwendbar in ganz Europa und in der Schweiz
Hiermit erklärt Berker GmbH & Co. KG, dass sich dieser/
diese/ dieses 1-kanal-dimmer, Unterputzgerät in
Übereinstimmung mit den grundlegenden Anforderungen
und den anderen relevanten Vorschriften der Richtlinie
1999/5/EG befindet". (BMWi)
Die CE-Konformitätserklärung ist auf der Webseite:
www.hagergroup.net zugänglich.
Operation
Warning:
- This unit is to be installed by a qualified
professional only according to the installation standard in force in the country.
- Do not install the product close to the
controlled light.
- Make sure that the antenna is located as
far away as possible from the product.
The device is a mains supplied radio receiver.
It is remotely controlled by radio transmitters
(input devices, push-buttons, remote
controls…). It allows dimming of different
illuminants (see Table Load types) loads.
Caption
1 Button and J configuration LED
2 Antenna
3 Button and K LED feature of output
4 Connector block:
- L : Phase 230 V쓒
- N : Neutral
- : Dimming output
Functions
• 1 dimming channel controlled by KNX radio.
• Automatic detection of load types.
1 6T 7976-30a
• Availability of output manual control by button
• Display of output state on LED fct (red ON =
active output).
The specific features of each product depend on
configuration and set-up.
Protection against overheating or overload
The product is protected automatically against
overload, short-circuit and overheating.
In the event of overheating or overload, the power
is automatically lowered.
In order to remedy such problem:
- Check if the output is in short-circuit,
- Lower the power of the load connected to the
product.
Configuration
This device can be configured in 3 different ways:
• quicklink& : configuration without tool, directly
on the device via J and K buttons
(see configuration instructions quicklink& )
• tebis TX: Configuration using connection device
from Hager
• ETS3/ETS4 via KNX-RF/TP gateway: application,
product database and documentation available
from the manufacturer.
In order to change the configuration mode,
O
a reset to factory settings is obligatory.
K
Reset to factory setttings
Maintain J button down until LED cfg
flickers >10 s, then release. cfg LED turns OFF
to signal Factory Reset end.
This operation removes the entire product
configuration in any configuration mode.
After power switch-on or a reset to factory
settings, wait for 15 s before to do a new
configuration.
Usable in all Europe and in Switzerland
Hereby, Berker GmbH & Co. KG, declares that this onechannel flush-mounted dimmer is in compliance with the
essential requirements and other relevant provisions of
Directive 1999/5/EC.
The CE declaration can be consulted on the site :
www.hagergroup.net
Page 2
Attenzione :
- L'apparecchio va installato solo da un
nstallatore elettricista secondo le norme
i
d'installazione vigenti nel paese.
Non installare il prodotto nell’immediata
-
vicinanza di una lampada azionata NDT.
NOTA BENE: allungare al massimo
-
l’antenna dello strumento.
L'apparecchio è un ricevitore radio alimentato
dalla rete.
Comandato a distanza dalle emittenti radio
prodotti d’entrata, pulsanti, telecomandi...),
permette la variazione delle cariche
incandescenti, alogene BT e TBT.
Legenda
1 Tasto e LED di configurazione J
2 Antenna
3 Tasto e LED funzione K dell'uscita
4 Morsettiera di raccordo:
- L : Fase 230 V쓒
- N : Neutro
- : Uscita variazione
Funzioni
• 1 via comandata dalla radio KNX
• Rivelazione automatica del tipo di carica.
Funzionamento
Possibilità di comando manuale dell’uscita
•
tramite il tasto
K
• Visualizzazione dello stato dell'uscita sul LED fct
(acceso rosso = uscita attiva).
Le funzioni precise dello strumento dipendono dalla
configurazione e dalla parametrizzazione.
Protezione contro il surriscaldamento o contro i
sovraccarichi
Il prodotto è protetto automaticamente contro i
sovraccarichi, i cortocircuiti e i surriscaldamenti.
In caso di surriscaldamento o sovraccarico, la
potenza disponibile viene automaticamente ridotta.
Per risolvere questo problema:
- verificare se l’uscita è in cortocircuito,
- diminuire la potenza della carica collegata al
prodotto.
Configurazione
L'apparecchio può venire configurata in 3 (tre)
maniere diverse:
• quicklink& : configurazione senza utensili,
direttamente sull'apparecchio attraverso le tasti
J e K (si veda il quicklink& relativo alle
istruzioni di configurazione)
• tebis TX: configurazione attraverso il dispositivo
di Hager
• ETS3/ETS4 attraverso KNX-Radio/TP gateway:
Software applicativo, base di dati e descrizione
del software disponibile presso il costruttore.
Per cambiare il modo di configurazione,
O
occorre tassativamente effettuare un
“ripristino delle configurazioni di fabbrica”
del prodotto.
Ripristino delle impostazioni di fabbrica
Premere e mantenere premuto il tasto J
fino al lampeggio del LED cfg > 10 s poi
rilasciare.
La fine del ripristino è segnalata dallo
spegnimento del LED cfg. L'operazione
provoca la cancellazione completa della
configurazione dello strumento, qualunque
essa sia.
Dopo una messa sotto tensione o un ripristino
fabbrica attendere 15 s prima di procedere ad
una configurazione.
sato in Tutta Europa e in Svizzera
U
on la presente Berker GmbH & Co. KG dichiara che
C
uesto variatore 1 via encastrabile è conforme ai requisiti
q
ssenziali ed alle altredisposizioni pertinenti stabilite dalla
e
irettiva 1999/5/CE.
d
a dichiarazione CE può essere trovato sul sito web:
L
ww.hagergroup.net
w
Lastarten / Load types / Tipo di carico
230 V쓒
230 V쓒
Glühlampen / Incandescent lamps / Lampade ad incandescenza 20 ... 200 W
HV-Halogenlampen / halogen lamps / Lampade ad alogene 20 ... 200 W
Kleinspannungs-Halogenlampen über ferromagnetischen Trafo
12 V=
Halogen ELV (12 or 24 V) via ferromagnetic transformer
24 V=
Lampade ad alogene via trasformatore ferromagnetico
Kleinspannungs-Halogenlampen über elektronischen Trafo
12 V=
Halogen ELV (12 or 24 V) via electronic transformer
24 V=
Lampade ad alogene via trasformatore electtronico
Vorsicht:
NUR für Beleuchtungslasten geeignet.
20 ... 200 VA
Warning:
ONLY lighting loads connectable.
Attenzione :
Connettere SOLO le cariche luminose.
20 ... 200 VA
Technische Daten / Technical characteristics / Caratteristiche tecniche
Versorgungsspannung Supply voltage Tensione di alimentazione
Sendefrequenz Transmission frequency Frequenza portante 868,3 MHz
Abmessungen Dimensions Ingombro Ø 52 x 38 mm
Schutzart Degree of protection Grado di protezione IP 30
Betriebstemperatur Operating temperature Temperatura di funzionamento 0 … + 45 °C
Lagertemperatur Storage temperature Temperatura di stoccaggio -20 … + 70 °C
Standard Norms Norme
Receiver category 2 / Transmitter duty cycle 1 %
230 V쓒 +10 %-15%
EN 60669-2-1 /
EN 301489-3 /
EN 300220-2 /
EN 50491-3 /
EN 50428
Anschlusskapazität / Electric connection / Collegamenti : 1,5 … 2,5 mm
6T 7976-30a2
2
OCOM 113657
 Loading...