

Page 1
LC420WUD
Product Specification
SPECIFICATION
FOR
APPROVAL
)
(
(
Preliminary Specification
)
Final Specification
●
42.0” WUXGA TFT LCDTitle
GeneralBUYER
MODEL BR42010D
APPROVED BY
/
/
SIGNATURE
DATE
LG.Display Co., Ltd.SUPPLIER
BASE MODEL
SUFFIX
*When you obtain standard approval,
please use the above model name without suffix
APPROVED BY
J. T KIM / Team Leader
REVIEWED BY
S. S Lee / Project Leader
PREPARED BY
LC420WUD
SBM4 (High Luminance)
SIGNATURE
DATE
/
Please return 1 copy for your confirmation with
your signature and comments.
Ver. 1.0
D. K Yang / Engineer
TV Products Development Dept.
LG. Display LCD Co., Ltd
1 /42
Page 2
Product Specification
CONTENTS
LC420WUD
PageItemNumber
COVER
CONTENTS
RECORD OF REVISIONS
GENERAL DESCRIPTION1
ABSOLUTE MAXIMUM RATINGS2
ELECTRICAL SPECIFICATIONS3
ELECTRICAL CHARACTERISTICS3-1
INTERFACE CONNECTIONS3-2
SIGNAL TIMING SPECIFICATIONS3-3
SIGNAL TIMING WAVEFORMS3-4
COLOR INPUT DATA REFERENCE3-5
POWER SEQUENCE3-6
OPTICAL SPECIFICATIONS4
MECHANICAL CHARACTERISTICS5
1
2
3
4
5
6
6
8
10
11
12
13
15
19
RELIABILITY6
INTERNATIONAL STANDARDS7
SAFETY7-1
EMC7-2
PACKING8
DESIGNATION OF LOT MARK8-1
PACKING FORM8-2
PRECAUTIONS9
MOUNTING PRECAUTIONS9-1
OPERATING PRECAUTIONS9-2
ELECTROSTATIC DISCHARGE CONTROL9-3
PRECAUTIONS FOR STRONG LIGHT EXPOSURE9-4
STORAGE9-5
HANDLING PRECAUTIONS FOR PROTECTION FILM9-6
22
23
23
23
24
24
24
25
25
25
26
26
26
26
Ver. 1.0
2 /42
Page 3
Product Specification
RECORD OF REVISIONS
Final Specification-July. 14. 20091.0
High Luminance Modify
LC420WUD
DescriptionPageRevision DateRevision No.
Ver. 1.0
3 /42
Page 4
LC420WUD
Product Specification
1. General Description
LC420WUD is a Color Active Matrix Liquid Crystal Display
. The matrix employs a-Si Thin Film Transistor as the active element.
It is a transmissive type display operating in the normally black mode. It has a 42 inch diagonally measured
act i ve d ispl ay a r ea with W UX G A resolutio n (1080 ver t ical by 1 9 2 0 horizontal p ixe l array)
Each pixel is divided into Red, Green and Blue sub-pixels or dots which are arranged in vertical stripes.
Gray scale or the luminance of the sub-pixel color is determined with a 10-bit gray scale signal for
each dot, thus presenting a palette of more than 1.06Billion of colors.
It has been designed to apply the 10-bit 4 port LVDS interface.
It is intended to support LCD TV, PCTV where high brightness, super wide viewing angle, high color gamut,
high color depth and fast moving picture response time are important.
Mini-LVDS(RGB)
SDA
Source Driver Circuit
Gate Driver Circuit
S1 S1920
G1
TFT - LCD Panel
(1920 × RGB × 1080 pixels)
LVDS
2Port
+12.0V
LVDS
2Port
EXTVBR-B
CN2
(41pin)
CN1
(51pin)
LVDS 3,4
LVDS 1,2
Option signal
EEPROM
SCL
SDRAM
Timing Controller
(ASIC)
LVDS Select
Bit Select
Scan_BLK1
Scan_BLK2
Scan BLK1
Scan BLK2
Status
+24.0V, GND
CN3
(4 pin)
General Features
Active Screen Size
Outline Dimension
I2C
Inverter
Power Circuit
G1080
Block
P-Gamma
P-VCOM
3PinX2ea CN (High)
3PinX2ea CN (High)
42.02 inches(1067.31mm) diagonal
965.2(H) x 558.2 (V) x 36.5 mm(D) (Typ.)
0.4845 mm x 0.4845 mmPixel Pitch
1920 horiz. by 1080 vert. Pixels, RGB stripe arrangementPixel Format
10bit(D) , 1.06Billon colorsColor Depth
1000 cd/m2 (Center 1point ,Typ.)Luminance, White
Viewing angle free ( R/L 178 (Typ.), U/D 178 (Typ.))Viewing Angle (CR>10)
Scanning Block 2
Back light Assembly
Scanning Block 1
Scanning Block 2
Ver. 1.0
Total 227.2 W (Typ.)(Logic = 7.2 W, Invertert=220 W @EXTVBR-B 85% )Power Consumption
10.7 Kg (Typ.) Weight
Transmissive mode, Normally blackDisplay Mode
Hard coating(3H), Anti-glare treatment of the front polarizer (Haze 10% )Surface Treatment
4 /42
Page 5
LC420WUD
Product Specification
2. Absolute Maximum Ratings
The following items are maximum values which, if exceeded, may cause faulty operation or damage to the
LCD module.
Table 1. ABSOLUTE MAXIMUM RATINGS
Value
Parameter Note
Symbol
Unit
MaxMin
Power Input
Voltage
Inverter Control
Voltage
LCD circuit
ON/OFF
VDC+14.0+8.0VLCD
VDC27.0-0.3VBLInverter
VDC+5.5-0.3VOFF / VON
VDC+4.0-0.3EXTVBR-BBrightness Control Voltage
°C+500TOPOperating Temperature
°C+60-20TSTStorage Temperature
%RH9010HOPOperating Ambient Humidity
%RH9010HSTStorage Humidity
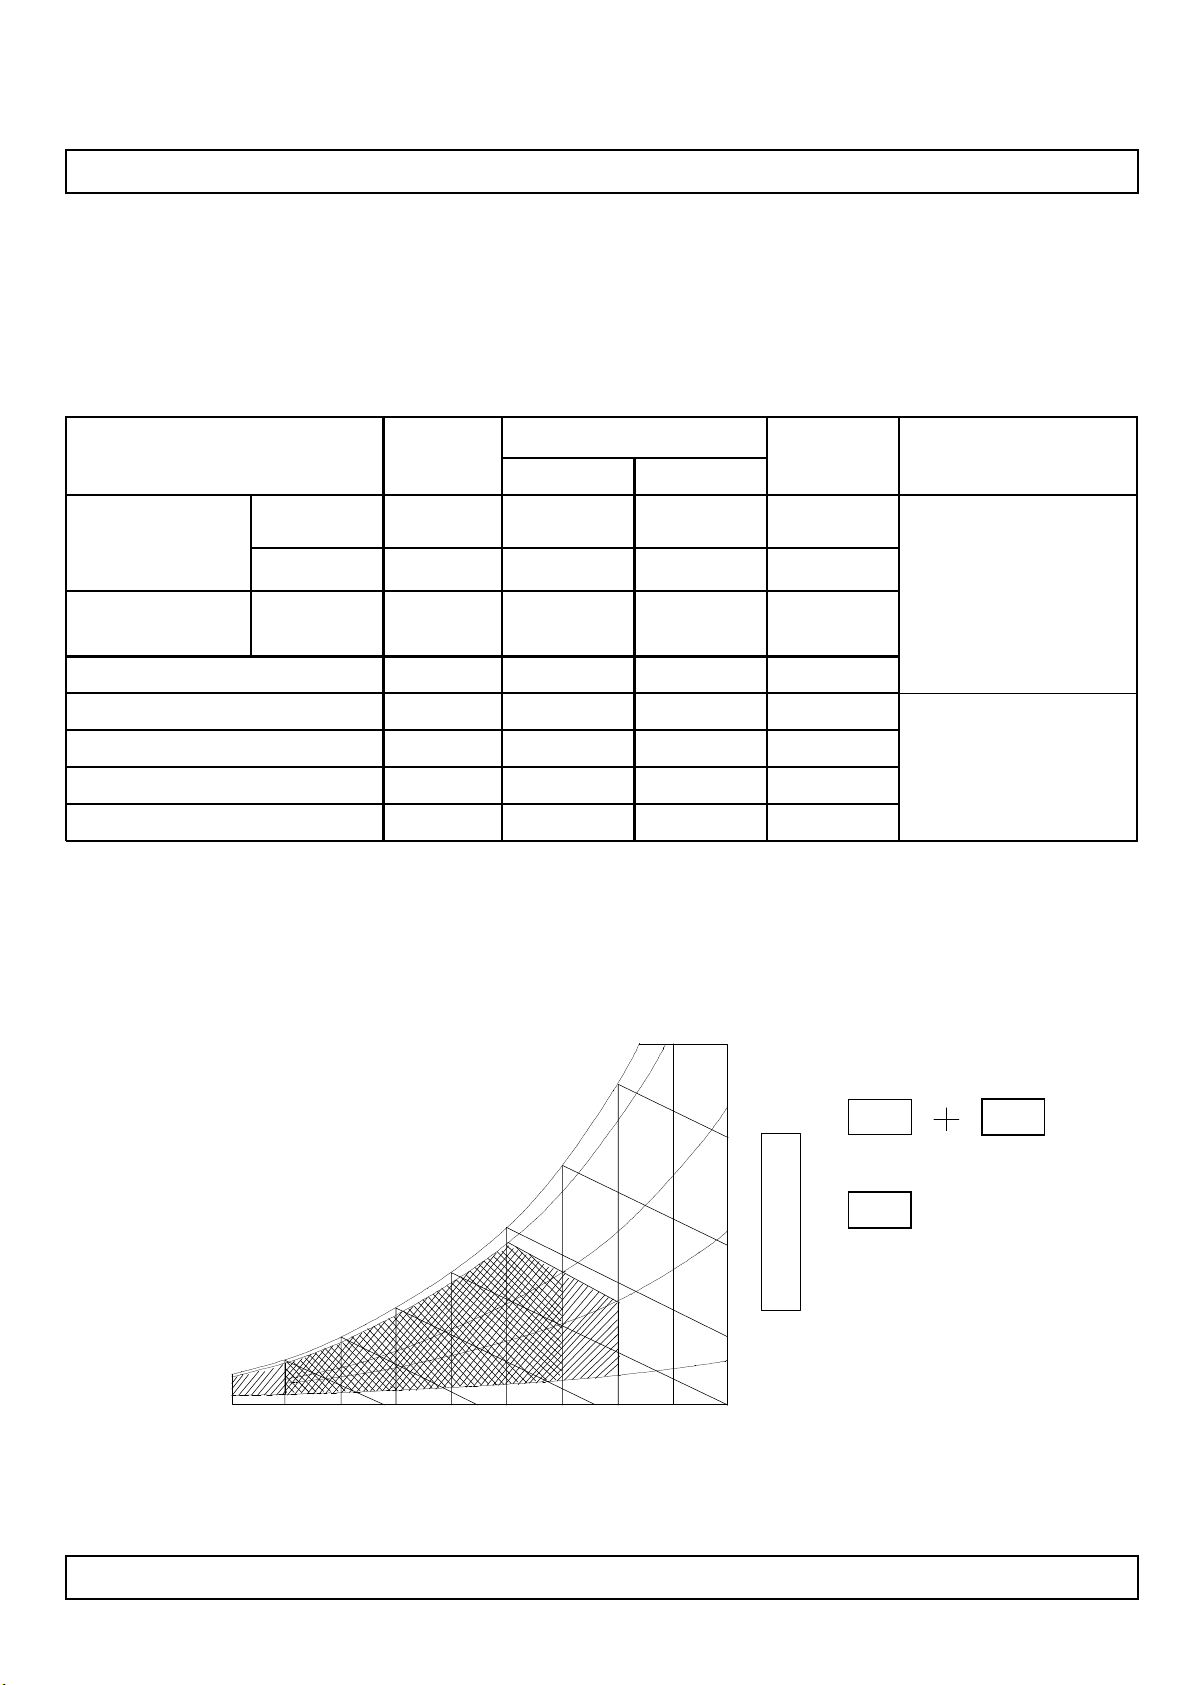
Note 1. Temperature and relative humidity range are shown in the figure below.
Wet bulb temperature should be Max 39 °C, and no condensation of water.
2. Gravity mura can be guaranteed below 40 °C condition.
at 25 ± 2 °C
1,2
Ver. 1.0
Wet Bulb
Temperature [°C]
20
10
0
10 20 30 40 50 60 70 800-20
Dry Bulb Temperature [°C]
30
40
50
60
90%
60%
40%
10%
Storage
Operation
Humidity [(%)RH]
5 /42
Page 6
LC420WUD
Product Specification
3. Electrical Specifications
3-1. Electrical Characteristics
It requires two power inputs. One is employed to power for the LCD circuit. The other Is used for the LED
backlight and inverter circuit.
Table 2. ELECTRICAL CHARACTERISTICS
Value
Parameter Symbol
MaxTypMin
Circuit :
V [DC]13.212.010.8VLCDPower Input Voltage
NoteUnit
ILCDPower Input Current
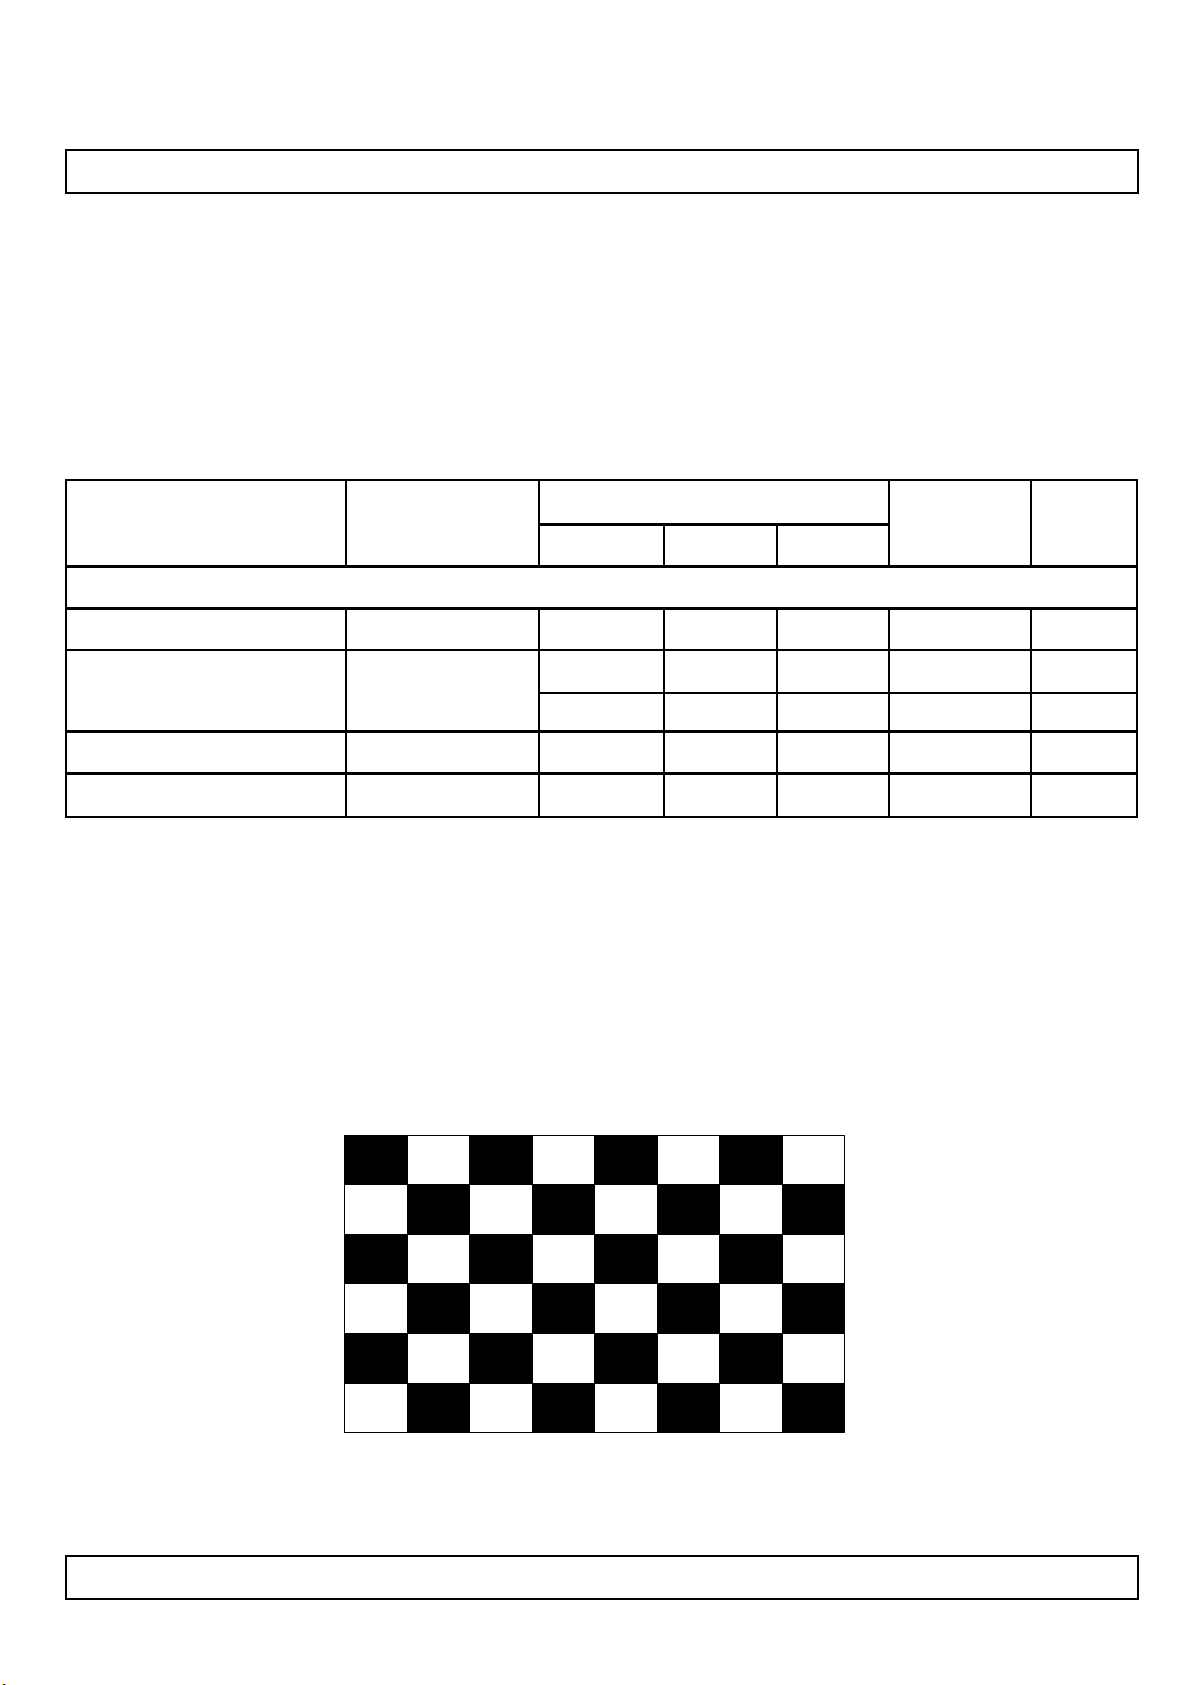
Note : 1. The specified current and power consumption are under the V
condition whereas mosaic pattern(8 x 6) is displayed and fVis the frame frequency.
2. The current is specified at the maximum current pattern.
3. The duration of rush current is about 2ms and rising time of power input is 0.5ms (min.).
White : 1023Gray
Black : 0Gray
=12.0V, 25 ± 2°C, fV=120Hz
LCD
1mA780600-
2mA1090840-
1Watt9.367.2PLCDPower Consumption
3A5--IRUSHRush current
Ver. 1.0
Mosaic Pattern(8 x 6)
6 /42
Page 7
Product Specification
Table 3. ELECTRICAL CHARACTERISTICS (Continue)
Parameter Symbol
Inverter :
LC420WUD
Values
NotesUnit
MaxTypMin
Power Supply
Input Current
Power Consumption
Input Voltage for
Control System
Signals
Lamp:
On/Off
Pulse Duty Level
(EXTVBR-B)
IBL_AAfter Aging
IBL_BBefore Aging
On VDC5.0-2.5VON
Off
VDC25.224.022.8VBLPower Supply Input Voltage
VBR-A = 1.65V … 1A-
-
--IRUSHPower Supply Input Current (In-Rush)
-PBL
9.29.0
12
220216
A
VDC3.31.650.0VBR-ABrightness Adjust
VDC0.80.0-0.3VOFF
VDC5.0-2.5High Level
VDC0.80.0-0.3Low Level
VBR-A = 3.3V … 1A
VBR-A = 1.65V … 2A-
VBR-A = 3.3V … 2A-
VBL = 22.8V
EXTVBR-B = 100%
VBR-A = 1.65V
V
BR-A
HIGH: Lamp on
LOW : Lamp off
1
= 3.3 V … 1W
On Duty%85-20EXTVBR-BBrightness Adjust
TsDischarge Stabilization Time
3min0
4Hrs50,000Life Time
Notes :
1. Electrical characteristics are determined after the unit has been ‘ON’ and stable for approximately 120
minutes at 25±2°C. The specified current and power consumption are under the typical supply Input voltage
24Vand VBR (VBR-A : 3.3V & EXTVBR-B : 85%), it is total power consumption.
2. Electrical characteristics are determined within 30 minutes at 25±2°C.
The specified currents are under the typical supply Input voltage 24V.
3. The brightness of the lamp after lighted for 5minutes is defined as 100%.
TS is the time required for the brightness of the center of the lamp to be not less than 95% at typical current.
The screen of LCD module may be partially dark by the time the brightness of lamp is stable after turn on.
4. Specified Values are for a single lamp which is aligned horizontally.
The life time is determined as the time which luminance of the lamp is 50% compared to that of initial value
at the typical lamp current (VBR-A : 1.65V & EXTVBR-B : 85%), on condition of continuous operating at 25± 2°C
5. The duration of rush current is about 10ms.
6. PWM_TIN is based on input PWM duty of the Timing controller.
Ver. 1.0
7 /42
Page 8
LC420WUD
Product Specification
3-2. Interface Connections
This LCD module employs two kinds of interface connection, 51-pin and 41-pin connector is used for the
module electronics and Master 14-pin and Slave 12-pin connectors are used for the integral backlight system.
3-2-1. LCD Module
- LCD Connector(CN1): FI-R51S-HF(manufactured by JAE) or KN25-51P-0.5SH(manufactured by Hirose)
(CN1) Refer to below and next Page table
- Mating Connector : FI-R51HL(JAE) or compatible
Table 4-1. MODULE CONNECTOR(CN1) PIN CONFIGURATION
1
2
3
4
5
6
7
8
9
10
11
12
13
14
15
16
17
18
19
20
21
22
23
24
25
26
GND
LVDS Select
R1AN
R1AP
R1BN
R1BP
R1CN
R1CP
GND
R1CLKN
R1CLKP
GND
R1DN
R1DP
R1EN
R1EP
Reserved
DescriptionSymbolNo
Ground
No ConnectionNC
No ConnectionNC
No ConnectionNC
No ConnectionNC
No ConnectionNC
‘H’ =JEIDA , ‘L’ or NC = VESA
External VBR (From System)EXTVBR-B
No ConnectionNC
‘H’ = Enable , ‘L’ or NC = Disable OPC Enable
No ConnectionNC
FIRST LVDS Receiver Signal (A-)
FIRST LVDS Receiver Signal (A+)
FIRST LVDS Receiver Signal (B-)
FIRST LVDS Receiver Signal (B+)
FIRST LVDS Receiver Signal (C-)
FIRST LVDS Receiver Signal (C+)
Ground
FIRST LVDS Receiver Clock Signal(-)
FIRST LVDS Receiver Clock Signal(+)
Ground
FIRST LVDS Receiver Signal (D-)
FIRST LVDS Receiver Signal (D+)
FIRST LVDS Receiver Signal (E-)
FIRST LVDS Receiver Signal (E+)
No connection or GND
No
27
28
29
30
31
32
33
34
35
36
37
38
39
40
41
42
43
44
45
46
47
48
49
50
51
-
Symbol
Bit Select
R2AN
R2AP
R2BN
R2BP
R2CN
R2CP
GND
R2CLKN
R2CLKP
GND
R2DN
R2DP
R2EN
R2EP
Reserved
Reserved
GND
GND
GND
NC
VLCD
VLCD
VLCD
VLCD
-
Description
‘H’ or NC= 10bit(D) , ‘L’ = 8bit
SECOND LVDS Receiver Signal (A-)
SECOND LVDS Receiver Signal (A+)
SECOND LVDS Receiver Signal (B-)
SECOND LVDS Receiver Signal (B+)
SECOND LVDS Receiver Signal (C-)
SECOND LVDS Receiver Signal (C+)
Ground
SECOND LVDS Receiver Clock Signal(-)
SECOND LVDS Receiver Clock Signal(+)
Ground
SECOND LVDS Receiver Signal (D-)
SECOND LVDS Receiver Signal (D+)
SECOND LVDS Receiver Signal (E-)
SECOND LVDS Receiver Signal (E+)
No connection or GND
No connection or GND
Ground
Ground
Ground
No connection
Power Supply +12.0V
Power Supply +12.0V
Power Supply +12.0V
Power Supply +12.0V
-
Notes :
Ver. 1.0
1. All GND(ground) pins should be connected together to the LCD module’s metal frame.
2. All VLCD (power input) pins should be connected together.
3. All Input levels of LVDS signals are based on the EIA 644 Standard.
4. Specific pins(pin No. #2~#6) are used for internal data process of the LCD module.
If not used, these pins are no connection.
5. Specific pins(pin No. #8) is used for OPC function of the LCD module.
If not used, these pins are no connection. (Please see the Appendix V for more information.)
6. LVDS pin (pin No. #24,25,40,41) are used for 10Bit(D) of the LCD module.
If used for 8Bit(R), these pins are no connection.
7. Specific pin No. #44 is used for “No signal detection” of system signal interface.
It should be GND for NSB(No Signal Black) during the system interface signal is not.
If this pin is “H”, LCD Module displays AGP(Auto Generation Pattern).
8 /42
Page 9
LC420WUD
Product Specification
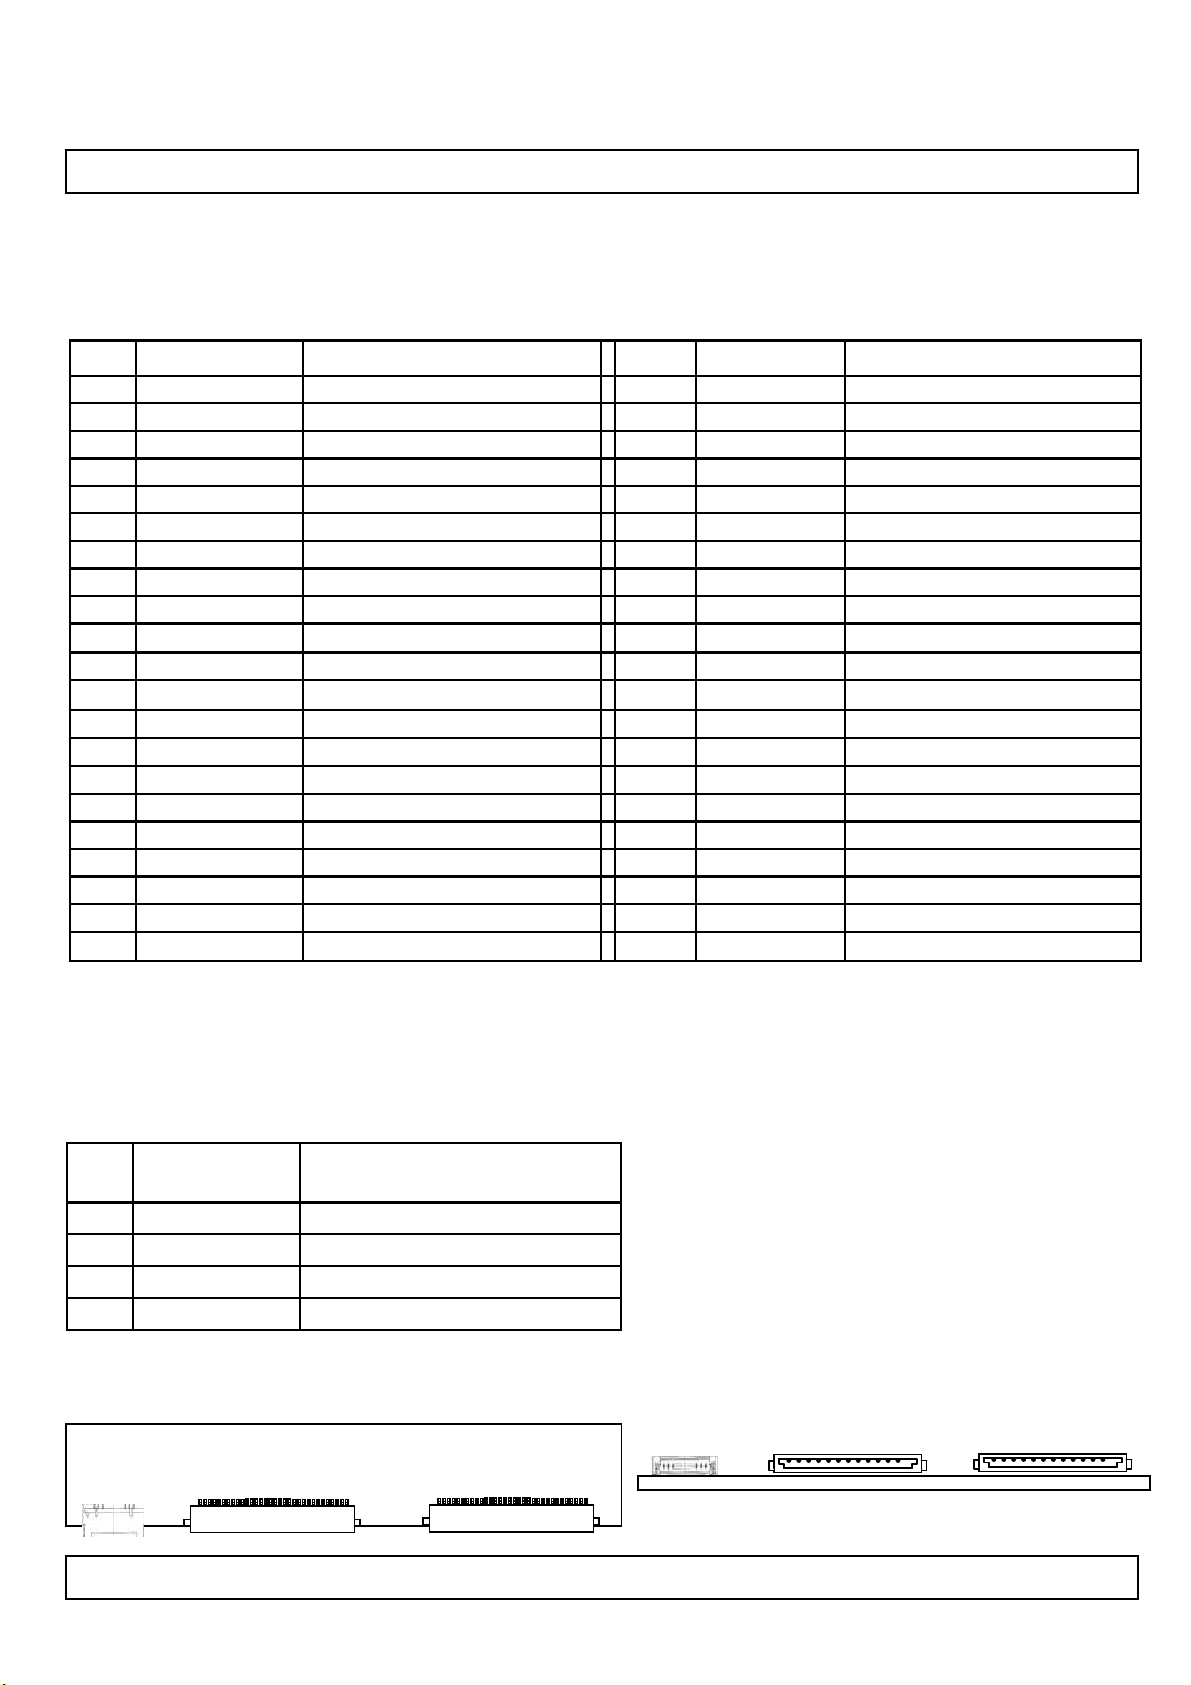
- LCD Connector(CN2): FI-RE41S-HF (manufactured by JAE) or KN25-41P-0.5SH (manufactured by Hirose)
- Mating Connector : FI-RE41HL
Table 4-2. MODULE CONNECTOR(CN2) PIN CONFIGURATION
2
3
5
6
7
8
9
10
11
12
14
15
16
17
19
20
21
NC
NC
NC
NC4
NC
NC
NC
NC
GND
RA3N
RA3P
RB3N
RB3P13
RC3N
RC3P
GND
RCLK3N
RCLK3P18
GND
RD3N
RD3P
DescriptionSymbolNo
No connection(Reserved)1
No connection
No connection
No connection
No connection
No connection
No connection
No connection
Ground
Third CHANNEL A-
Third CHANNEL A+
Third CHANNEL B-
Third CHANNEL B+
Third CHANNEL C-
Third CHANNEL C+
Ground
Third CLOCK CHANNEL Clk-
Third CLOCK CHANNEL Clk+
Ground
Third CHANNEL D-
Third CHANNEL D+
No
22
23
24
25
26
27
28
29
30
31
32
33
34
35
36
37
38
39
40
41
Symbol
RE3N
RE3P
GND
GND
RA4N
RA4P
RB4N
RB4P
RC4N
RC4P
GND
RCLK4N
RCLK4P
GND
RD4N
RD4P
RE4N
RE4P
GND
GND
-
Third CHANNEL E-
Third CHANNEL E+
Ground
Ground
Fourth CHANNEL A-
Fourth CHANNEL A+
Fourth CHANNEL B-
Fourth CHANNEL B+
Fourth CHANNEL C-
Fourth CHANNEL C+
Ground
Fourth CLOCK CHANNEL Clk-
Fourth CLOCK CHANNEL Clk+
Ground
Fourth CHANNEL D-
Fourth CHANNEL D+
Fourth CHANNEL E-
Fourth CHANNEL E+
Ground
Ground
Description
Notes : 1. All GND(ground) pins should be connected together to the LCD module’s metal frame.
2. LVDS pin (pin No. #22,23,38,39) are used for 10Bit(D) of the LCD module.
If used for 8Bit(R), these pins are no connection.
Table 4-3. MODULE CONNECTOR(CN3) PIN CONFIGURATION
DescriptionSymbolNo
Reference Mode SignalREF MODE
Scanning_BLK1 Signal (Output)
Scanning_BLK2 Signal (Output)
GroundGND
CN3
#1 #4
#1 #51
CN1 CN2
#1 #41
CN3
#1
1
2
3
SCAN_BLK1
SCAN_BLK2
4
CN1 CN2
#1 #51 #1 #41
#4
Rear view of LCM
Ver. 1.0
9 /42
Page 10
Product Specification
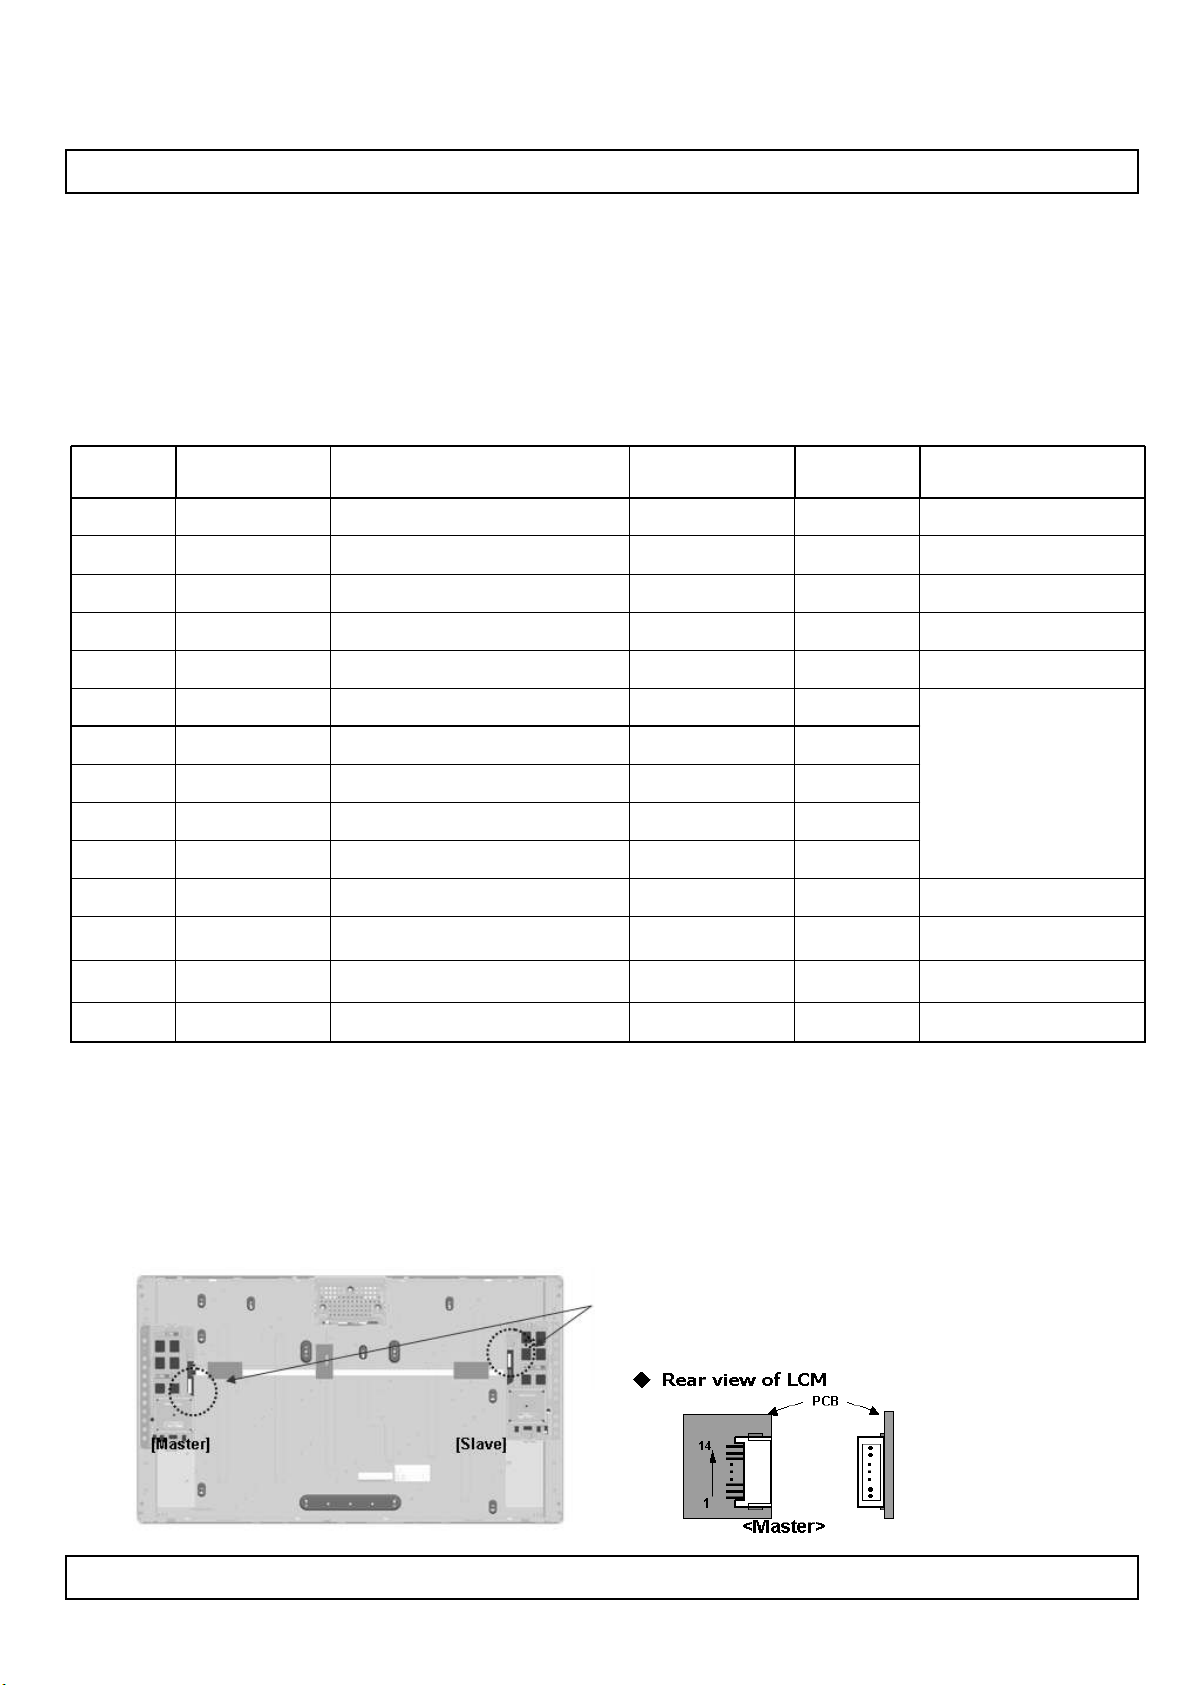
3-2-2. Backlight Module
Master
- Inverter Connector : 20022WR-14B1 (manufactured by Yeonho) or Equivalent
- Mating Connector : 20022HS-14 or Equivalent
Slave
- Inverter Connector : 20022WR-14B1 (manufactured by Yeonho) or Equivalent
- Mating Connector : 20022HS-14 or Equivalent
LC420WUD
1
2
3
4
5
6
7
8
9
10
11
12
13
14
GND
GND
GND
GND
GND
NC
ON/OFF
VBR
Power Supply +24.0VVBL
Power Supply +24.0VVBL
Power Supply +24.0VVBL
Power Supply +24.0VVBL
Power Supply +24.0VVBL
Backlight Ground
Backlight Ground
Backlight Ground
Backlight Ground
Backlight Ground
NC
Backlight ON/OFF controlV
PWM/Analog Dimming
Master
VBL
VBL
VBL
VBL
VBL
GND
GND
GND
GND
GND
-
ON/OFF
V
VBR-A
Slave
VBL
VBL
VBL
VBL
VBL
GND
GND
GND
GND
GND
Don’t care
-StatusLamp StatusStatus
NoteDescriptionSymbolPin No
Notes : 1. GND should be connected to the LCD module’s metal frame.
2. Minimum Brightness : 0.0V / Maximum Brightness : 3.3V / “OPEN” : 1.65V
3. ON : 2.5 ~ 5.0V / OFF : 0.0 ~ 0.8V . Open or ‘H’ for B/L On is default status.
4. Normal : Low (under 0.7V) / Abnormal : High (upper 3.0V)
Please see Appendix VI for more information.
5. Each impedance of pin #13, 12 is 143 [KΩ] , 40 [KΩ]
Ver. 1.0
10 /42
Page 11
LC420WUD
Product Specification
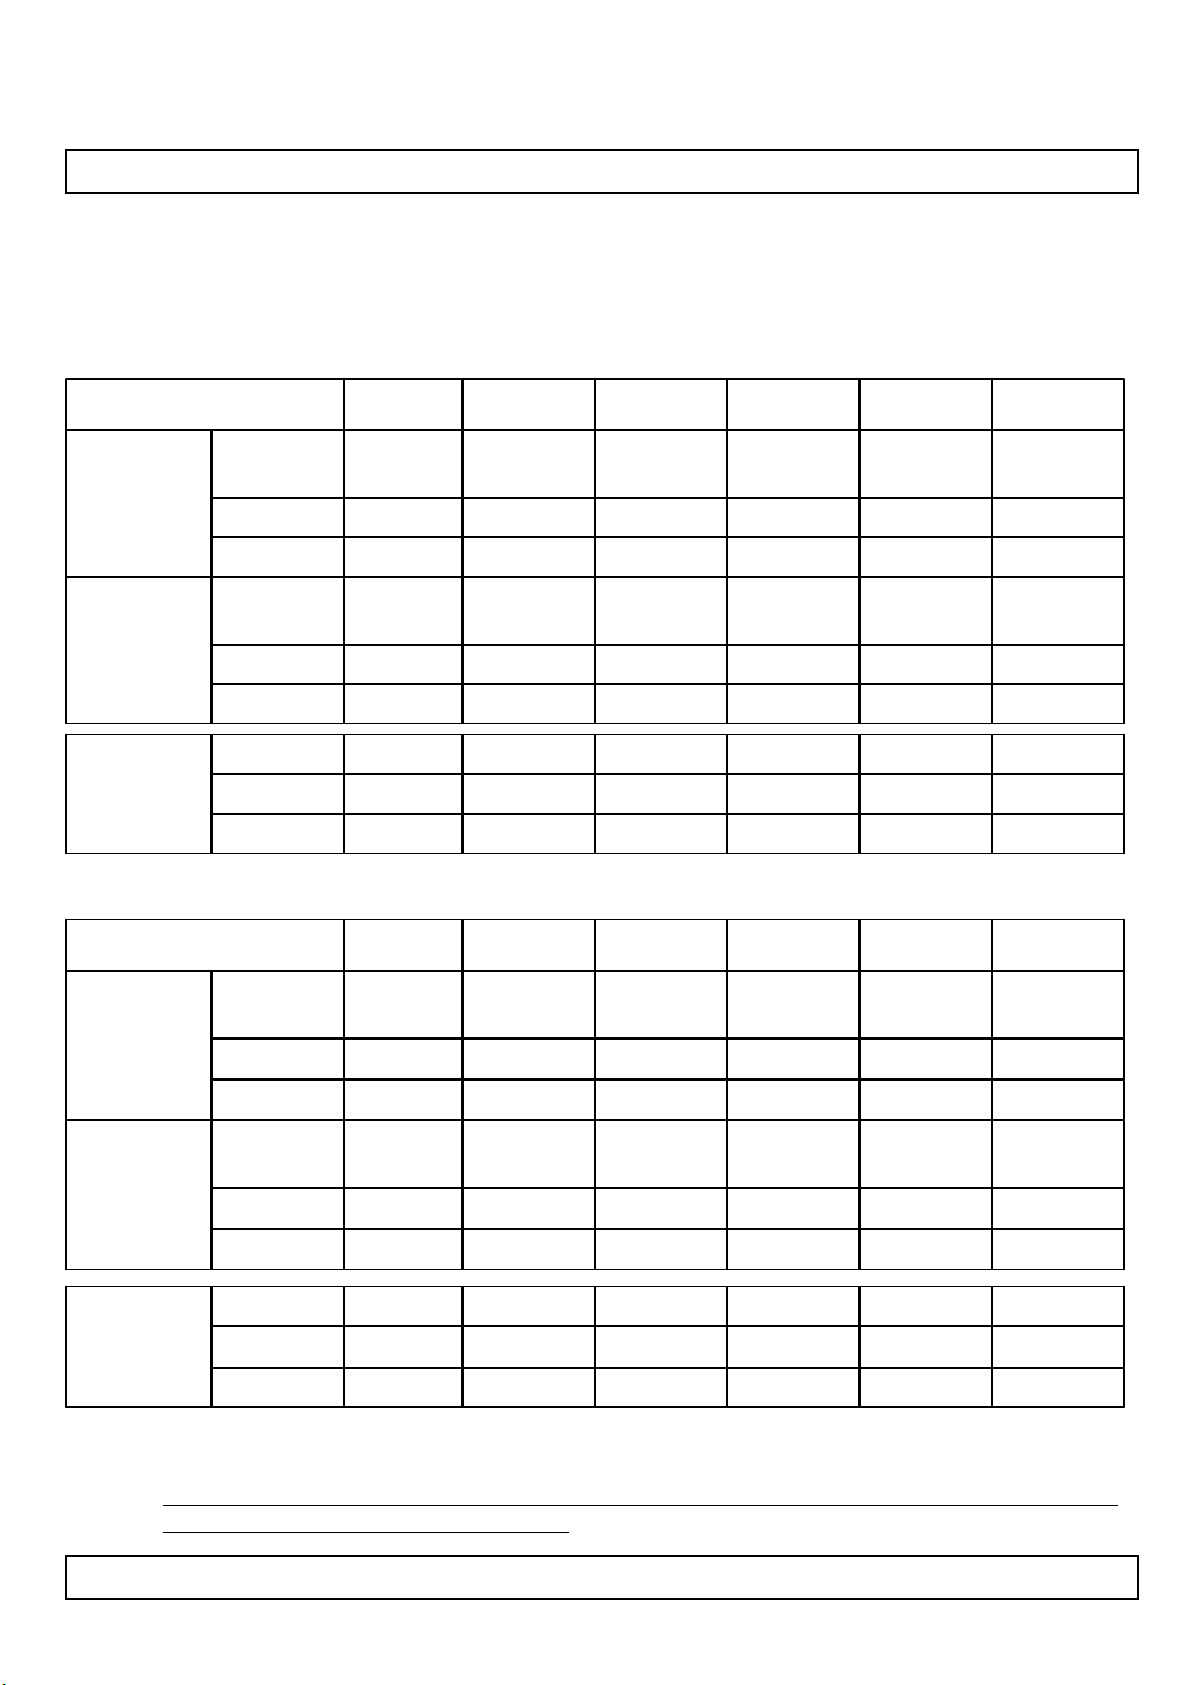
3-3. Signal Timing Specifications
Table 6 shows the signal timing required at the input of the LVDS transmitter. All of the interface signal timing
should be satisfied with the following specification for normal operation.
Table 6-1. TIMING TABLE for NTSC/PAL (DE Only Mode)
Symbol
Horizontal
Vertical
Frequency
Display
Period
Blank
Total
Display
Period
DCLK
Horizontal
Vertical
tHV
tHB
tHP
fCLK
fH
fV
Table 6-2 TIMING TABLE for DVB/PAL (DE Only Mode)
Symbol
NoteUnitMaxTypMinITEM
1920/4tCLK480480480
1tCLK2007040
tCLK680550520
Lines108010801080tVV
1Lines864510tVBBlank
Lines116611251090tVPTotal
MHz78.0074.2566.97
2KHz136.4135121.8
2Hz121.2120108.2
NoteUnitMaxTypMinITEM
Horizontal
Vertical
Frequency
Display
Period
Blank
Total
Display
Period
DCLK
Horizontal
Vertical
tHV
tHB
tHP
fCLK
fH
fV
1920/4tCLK480480480
1tCLK2007040
tCLK680550520
Lines108010801080tVV
1Lines300270228tVBBlank
Lines138013501308tVPTotal
MHz78.0074.2566.97
2KHz140135121.8
2Hz103.710095
Notes : 1. The Input of HSYNC & VSYNC signal does not have an effect on normal operation(DE Only Mode).
If you use spread spectrum for EMI, add some additional clock to minimum value for clock margin.
2. The performance of the electro-optical characteristics may be influenced by variance of the vertical
refresh rate and the horizontal frequency.
Ver. 1.0
11 /42
Page 12
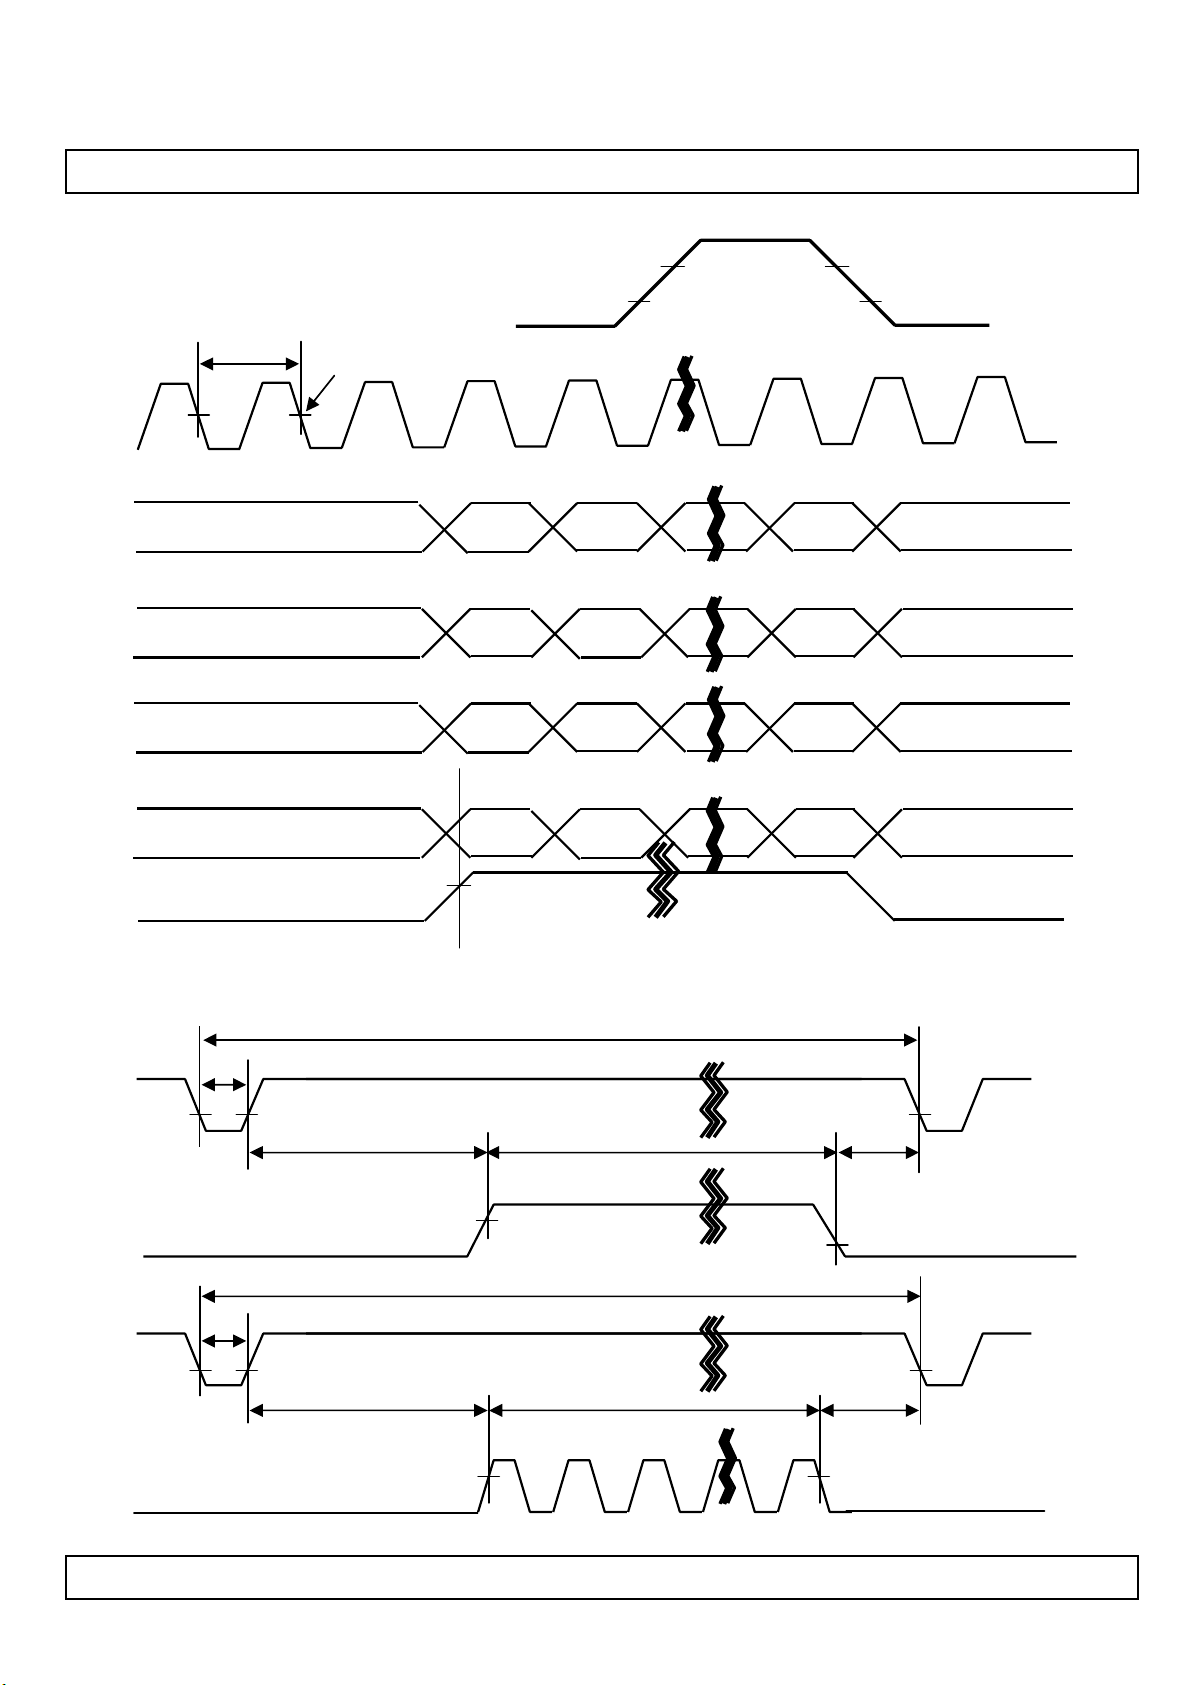
3-4. Signal Timing Waveforms
DE, Data
LC420WUD
Product Specification
0.7VDD
0.3VDD
DCLK
First data
Second data
Third data
Forth data
DE(Data Enable)
tCLK
0.5 VDD
Invalid data
Invalid data
Invalid data
Invalid data
Pixel 0
Pixel 1
Pixel 2
Pixel 3
Valid data
Pixel 4
Valid data
Pixel 5
Valid data
Pixel 6
Valid data
Pixel 7
Invalid data
Invalid data
Invalid data
Invalid data
* Reference : Sync. Relation
HSync
DE(Data Enable)
VSync
DE(Data Enable)
tWH
tHBP tHV
tWV
tVBP
tHP
tVP
tVV
* tHB = tHFP + tWH +tHBP
* tVB = tVFP + tWV +tVBP
tHFP
tVFP
Ver. 1.0
12 /42
Page 13
LC420WUD
Product Specification
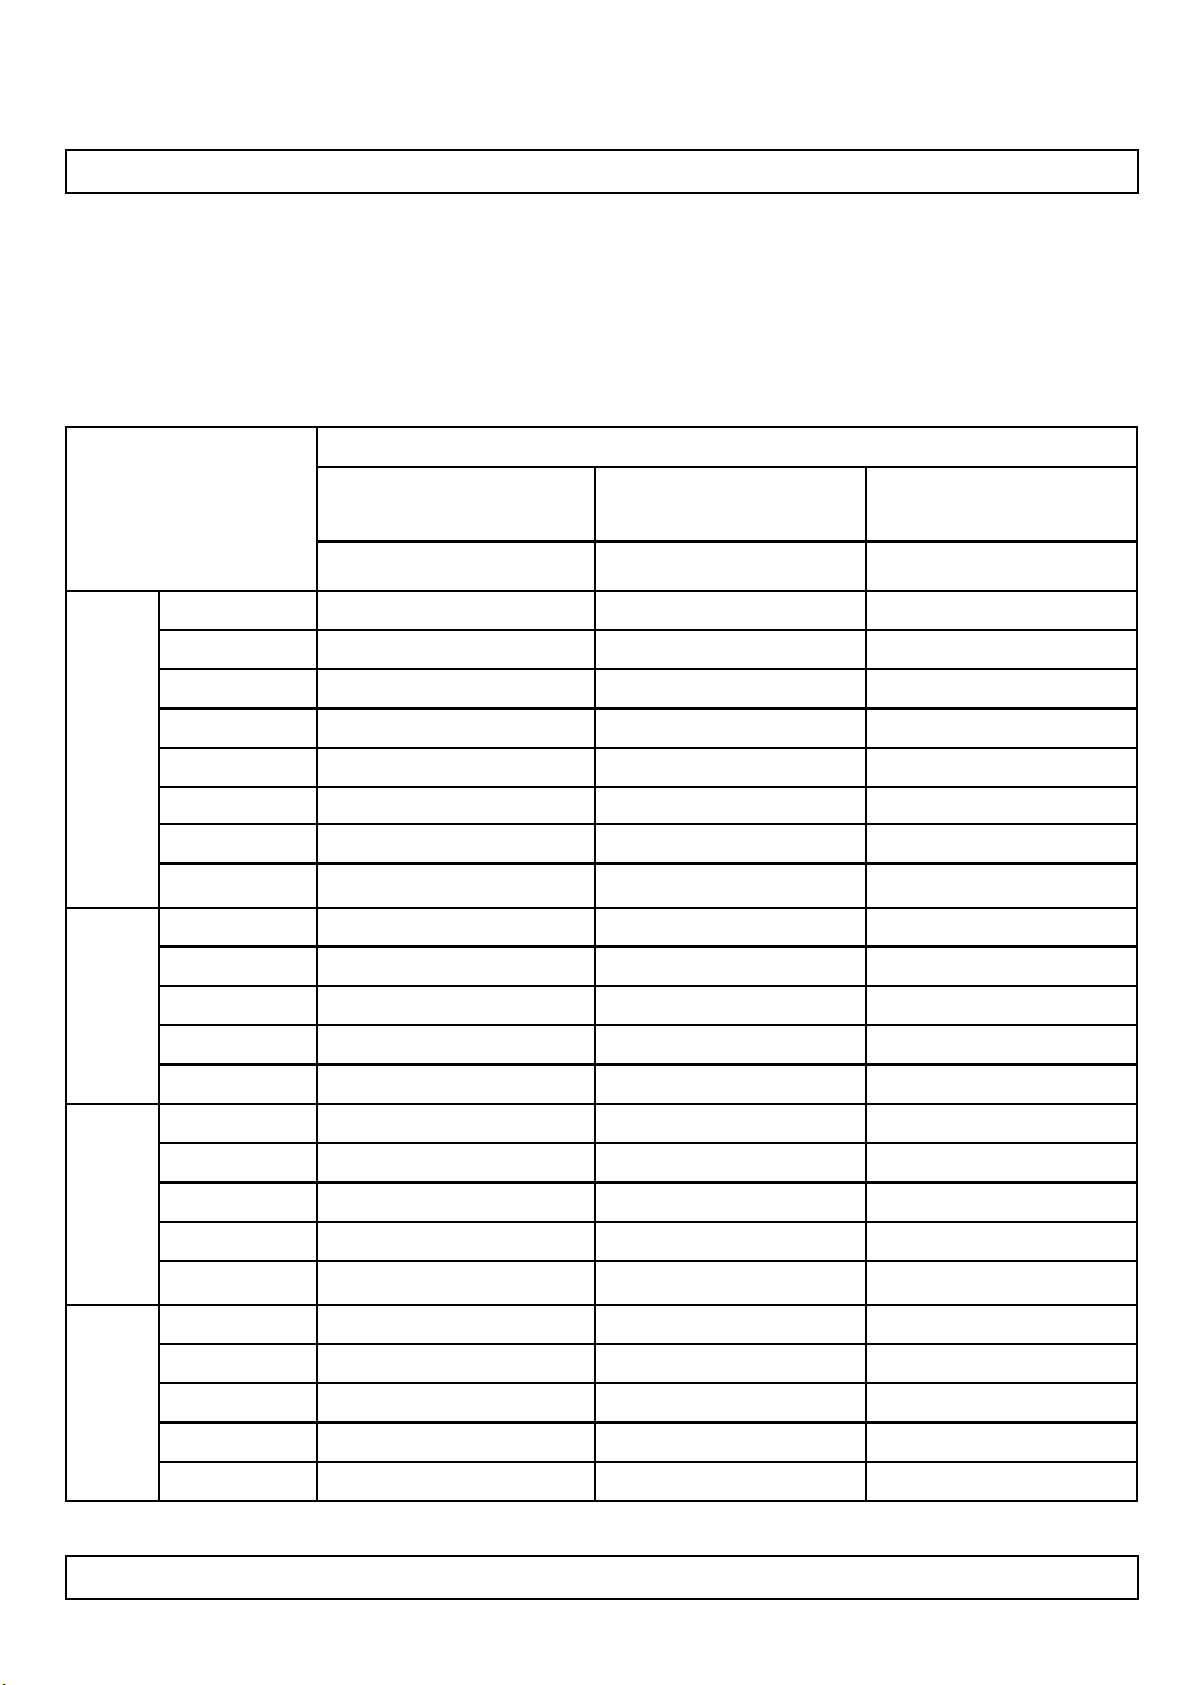
3-5. Color Data Reference
The brightness of each primary color(red,green,blue) is based on the 10bit gray scale data input for the color.
The higher binary input, the brighter the color. Table 7 provides a reference for color versus data input.
Table 7. COLOR DATA REFERENCE
Input Color Data
Basic
Color
RED
Color
Black
Red (1023)
Green (1023)
Blue (1023)
Cyan
Magenta
Yellow
White
RED (0000)
RED (0001)
…
RED (1022)
RED
MSB LSB
GREEN
MSB LSB
BLUE
MSB LSB
B9 B8 B7 B6 B5 B4 B3 B2 B1 B0G9 G8 G7 G6 G5 G4 G3 G2 G1 G0R9 R8 R7 R6 R5 R4 R3 R2 R1 R0
0 0 0 0 0 0 0 0 0 00 0 0 0 0 0 0 0 0 00 0 0 0 0 0 0 0 0 0
0 0 0 0 0 0 0 0 0 00 0 0 0 0 0 0 0 0 01 1 1 1 1 1 1 1 1 1
0 0 0 0 0 0 0 0 0 01 1 1 1 1 1 1 1 1 10 0 0 0 0 0 0 0 0 0
1 1 1 1 1 1 1 1 1 10 0 0 0 0 0 0 0 0 00 0 0 0 0 0 0 0 0 0
1 1 1 1 1 1 1 1 1 11 1 1 1 1 1 1 1 1 10 0 0 0 0 0 0 0 0 0
1 1 1 1 1 1 1 1 1 10 0 0 0 0 0 0 0 0 01 1 1 1 1 1 1 1 1 1
0 0 0 0 0 0 0 0 0 01 1 1 1 1 1 1 1 1 11 1 1 1 1 1 1 1 1 1
1 1 1 1 1 1 1 1 1 11 1 1 1 1 1 1 1 1 11 1 1 1 1 1 1 1 1 1
0 0 0 0 0 0 0 0 0 00 0 0 0 0 0 0 0 0 00 0 0 0 0 0 0 0 0 0
0 0 0 0 0 0 0 0 0 00 0 0 0 0 0 0 0 0 00 0 0 0 0 0 0 0 0 1
.........
0 0 0 0 0 0 0 0 0 00 0 0 0 0 0 0 0 0 01 1 1 1 1 1 1 1 1 0
GREEN
BLUE
Ver. 1.0
RED (1023)
GREEN (0000)
GREEN (0001)
...
GREEN (1022)
GREEN (1023)
BLUE (0000)
BLUE (0001)
…
BLUE (1022)
BLUE (1023)
0 0 0 0 0 0 0 0 0 00 0 0 0 0 0 0 0 0 01 1 1 1 1 1 1 1 1 1
0 0 0 0 0 0 0 0 0 00 0 0 0 0 0 0 0 0 00 0 0 0 0 0 0 0 0 0
0 0 0 0 0 0 0 0 0 00 0 0 0 0 0 0 0 0 10 0 0 0 0 0 0 0 0 0
.........
0 0 0 0 0 0 0 0 0 01 1 1 1 1 1 1 1 1 00 0 0 0 0 0 0 0 0 0
0 0 0 0 0 0 0 0 0 01 1 1 1 1 1 1 1 1 10 0 0 0 0 0 0 0 0 0
0 0 0 0 0 0 0 0 0 00 0 0 0 0 0 0 0 0 00 0 0 0 0 0 0 0 0 0
0 0 0 0 0 0 0 0 0 10 0 0 0 0 0 0 0 0 00 0 0 0 0 0 0 0 0 0
.........
1 1 1 1 1 1 1 1 1 00 0 0 0 0 0 0 0 0 00 0 0 0 0 0 0 0 0 0
1 1 1 1 1 1 1 1 1 10 0 0 0 0 0 0 0 0 00 0 0 0 0 0 0 0 0 0
13 /42
Page 14
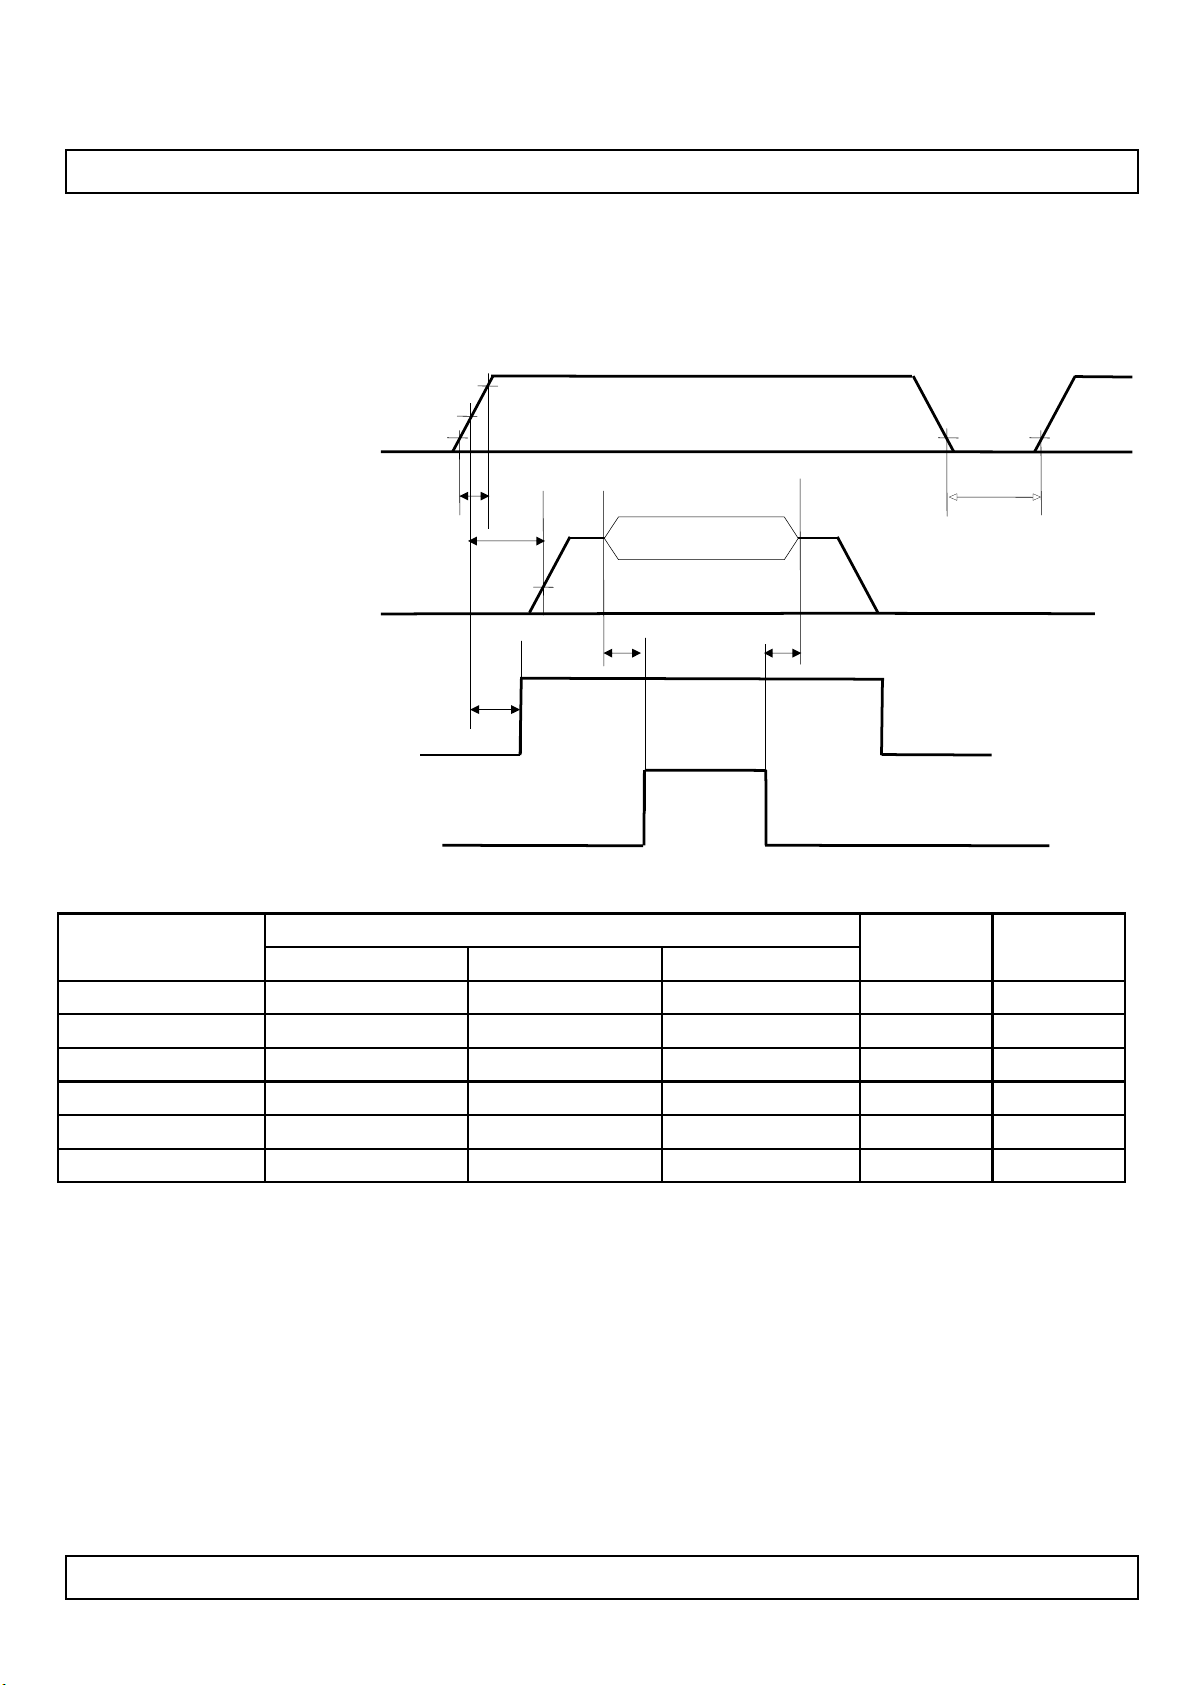
3-6. Power Sequence
3-6-1. LCD Driving circuit
Power Supply For LCD
V
LCD
0V
50%
10%
LC420WUD
Product Specification
90%
10%
Interface Signal (Tx_clock)
User Control Signal
(LVDS_select, BIT_select)
Power for Lamp
Table 8. POWER SEQUENCE
Parameter
0V
T1
T2
30%
T7
Invalid
Data
100%
Value
Valid Data
T3 T4
Lamp ON
MaxTypMin
--200T4
Invalid
Data
Unit
ms20-0.5T1
ms--0T2
ms--200T3
ms
s--1.0T6
T6
Note
4
3
3
5
4msT2-0T7
Note :
1. Please avoid floating state of interface signal at invalid period.
2. When the power supply for LCD (VLCD) is off, be sure to pull down the valid and invalid data to 0V.
3. The T3/T4 is recommended value, the case when failed to meet a minimum specification,
abnormal display would be shown. There is no reliability problem.
4. If the on time of signals(Interface signal and user control signals) precedes the on time of Power(V
it will be happened abnormal display. When T7 is NC status, T7 doesn’t need to be measured.
5. T6 should be measured after the Module has been fully discharged between power off and on
period.
Ver. 1.0
LCD
14 /42
),
Page 15
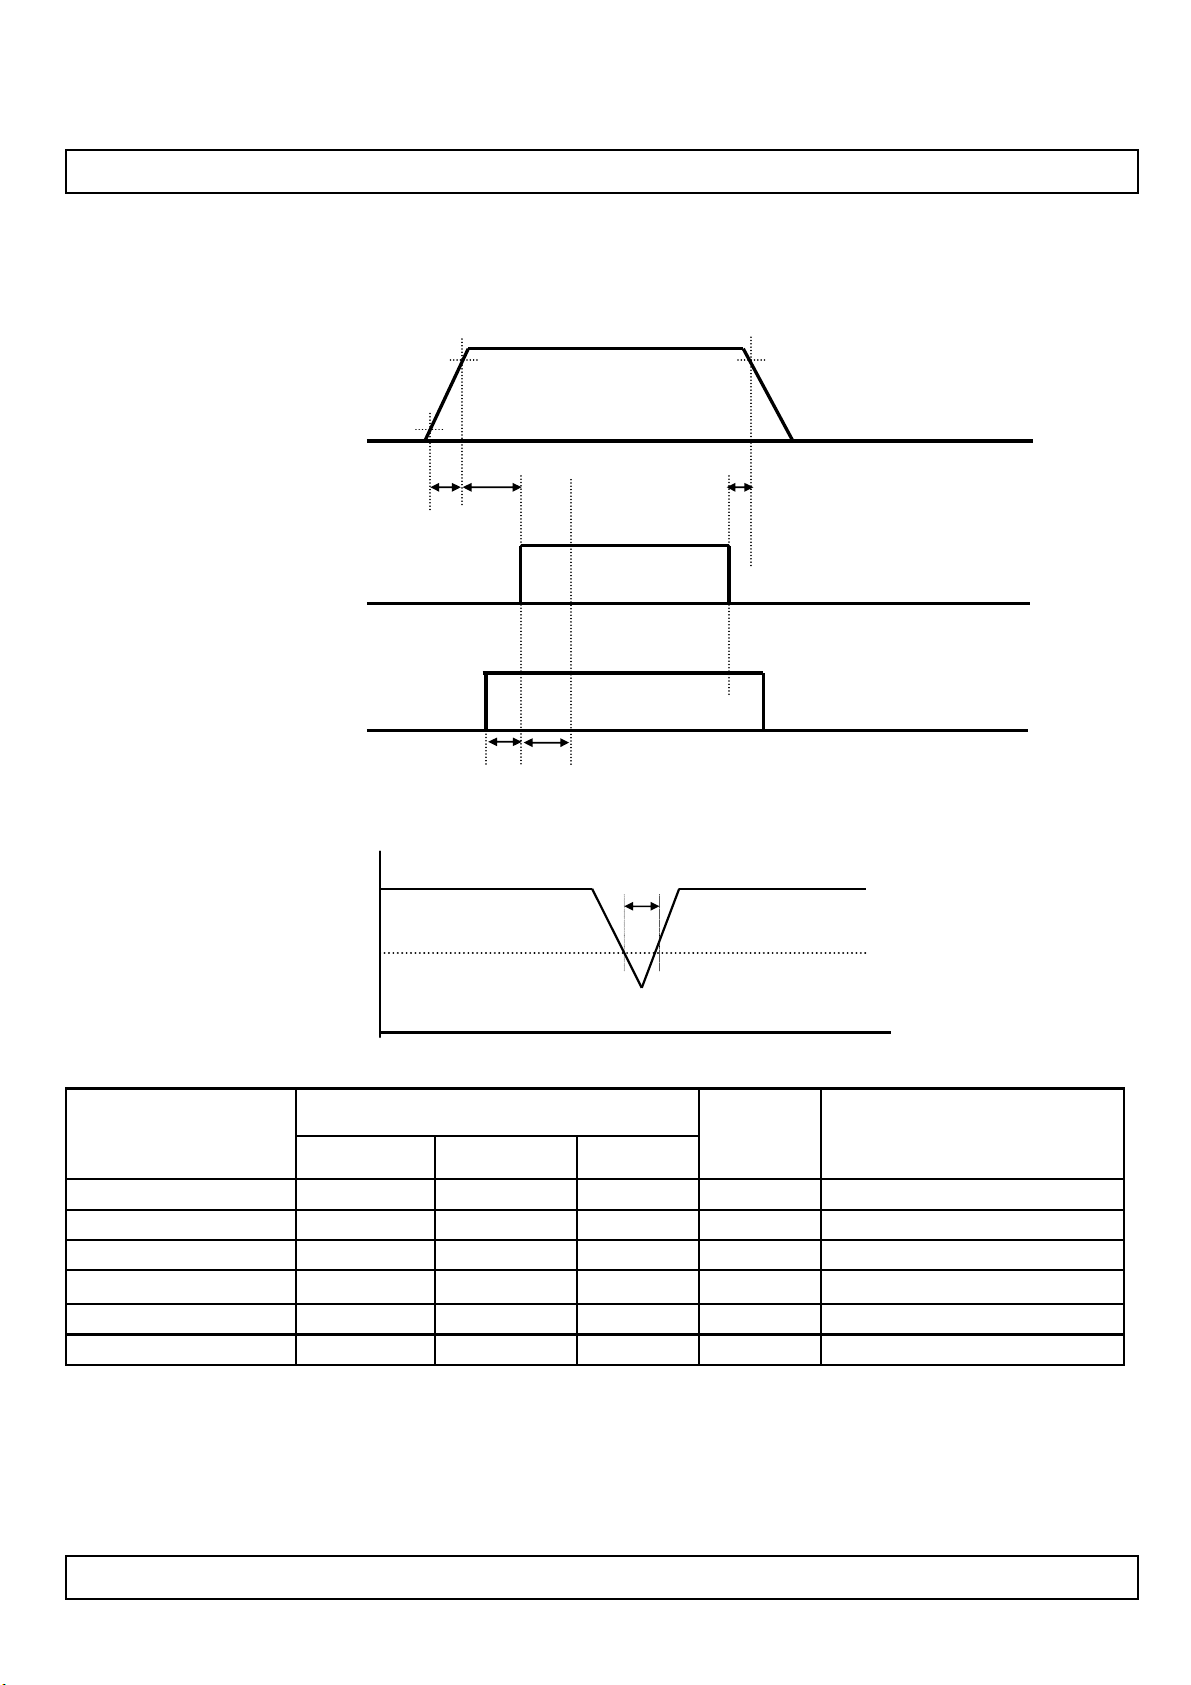
3-6-2. Sequence for Inverter
LC420WUD
Product Specification
Power Supply For Inverter
VBL
10%
0V
VON/OFF
VBR-A &
EXTVBR-B
3-6-3. Deep condition for Inverter
90%
T1 T2
T4
24V (typ.)
T7
Lamp ON
T6
T5
90%
V
: 24V
BL
VBL(Typ.) x 0.8
0 V
Table 9. POWER SEQUENCE
Values
Parameter
Units
MaxTypMin
ms--20T1
ms--500T2
-
ms--10T5
Remarks
VBL(Typ) x 0.80ms10--T6
1. T1 describes rising time of 0V to 24V and this parameter does not applied at restarting time.
Even though T1 is over the specified value, there is no problem if i2t spec of fuse is satisfied.
2. In T4 section, EXTVBR-B is not recommend 100%, but in T7 section, EXTVBR-B is certainly
recommend 100%, (up to 60% when varied by OPC function.)
1
2ms0T4
2ms--1000T7
Ver. 1.0
15 /42
Page 16
LC420WUD
Product Specification
4. Optical Specification
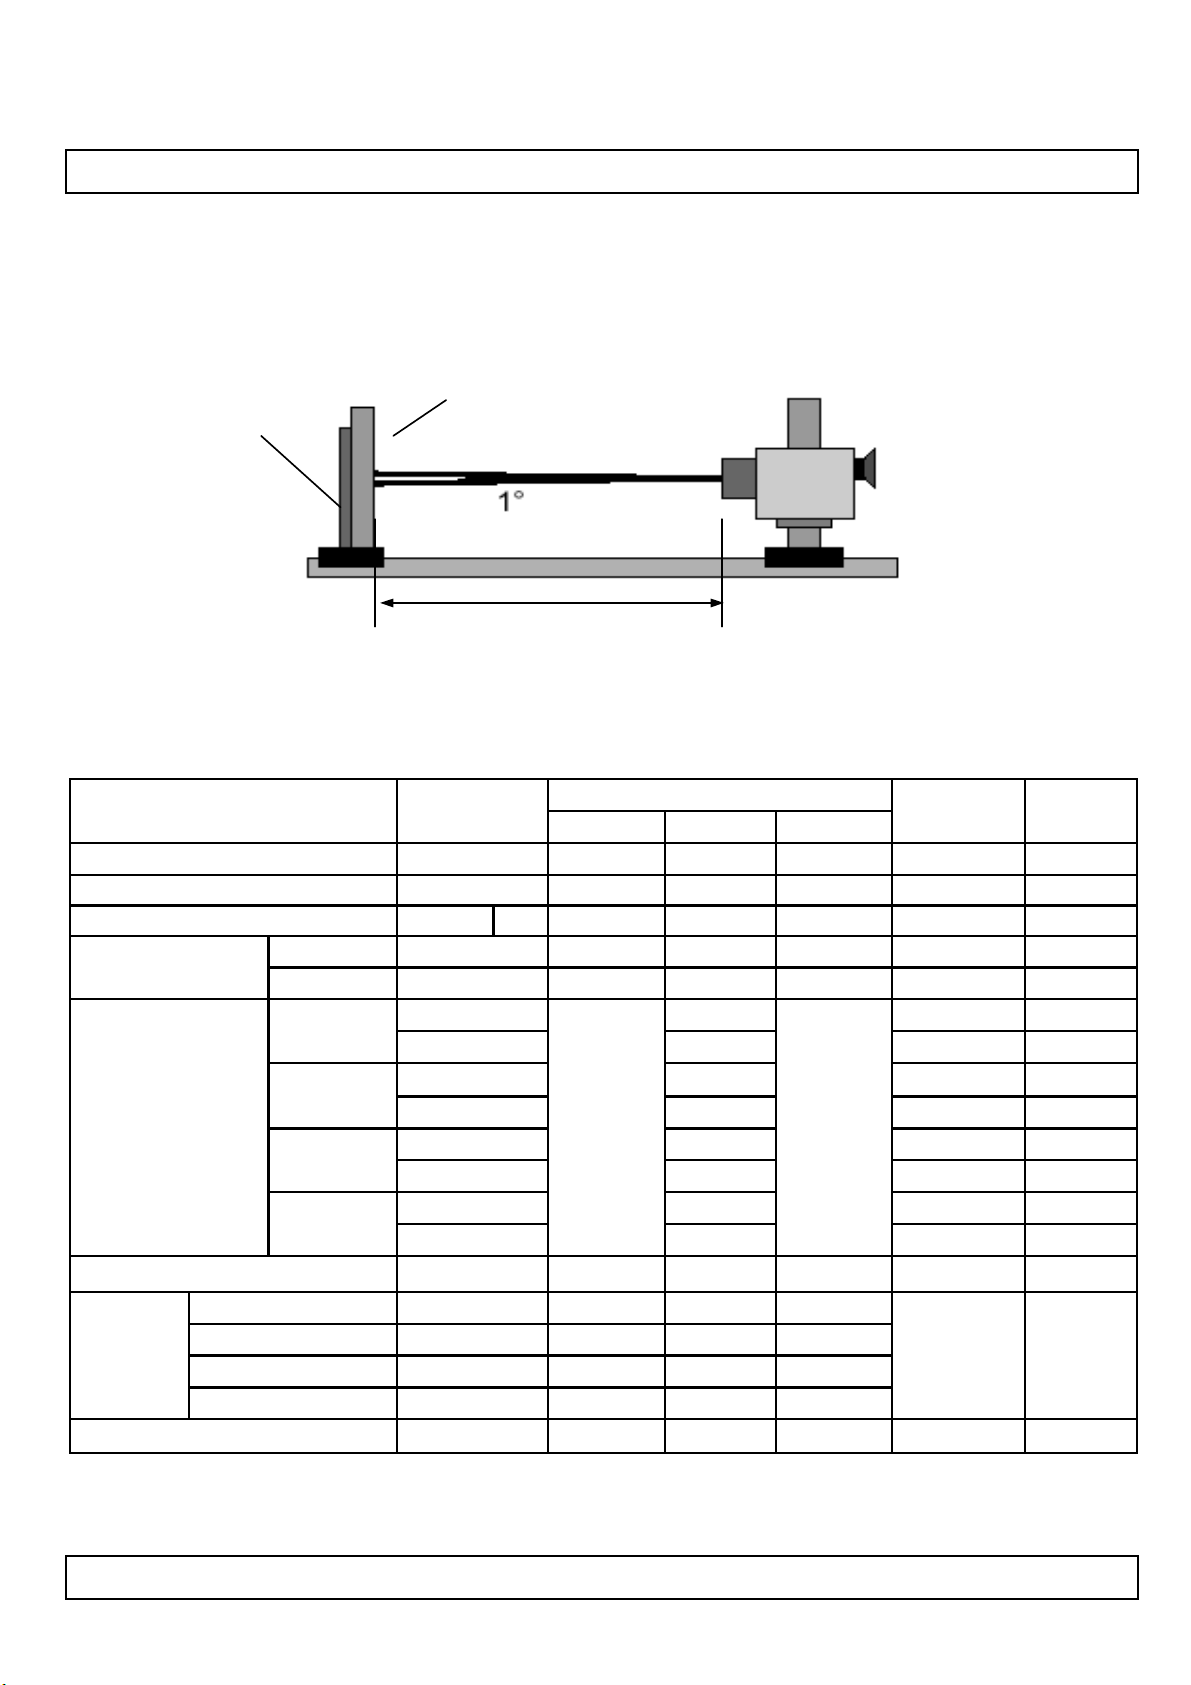
Optical characteristics are determined after the unit has been ‘ON’ and stable in a dark environment at
25±2°C. The values are specified at an approximate distance 50cm from the LCD surface at a viewing angle
of Φ and θ equal to 0 °.
It is presented additional information concerning the measurement equipment and method in FIG. 1.
Optical Stage(x,y)
FIG. 1 Optical Characteristic Measurement Equipment and Method
LCD Module
50cm
Pritchard 880 or
equivalent
Table 9. OPTICAL CHARACTERISTICS
SymbolParameter
Contrast Ratio
Surface Luminance, white
Luminance Variation
Response Time
Uniformity
RED
GREEN
Color Coordinates
[CIE1931]
BLUE
WHITE
Viewing Angle (CR>10)
WHITE
WH
MPRT
Rx
Wx
Wy
1000
Typ
-0.03
Ta= 25±2°C, V
=12.0V, fV=120Hz, Dclk=74.25MHz,
LCD
VBR-A =1.65V, EXTVBR-B =85%
Value
MaxTypMin
1000
0.638
0.334Ry
0.290Gx
0.606Gy
0.144Bx
0.064By
0.279
0.292
-950L
1--δ
Typ
+0.03
NoteUnit
1-1200CR
2
2cd/m
31.3--5Pδ
4ms106-MPRTMPRT
Ver. 1.0
x axis, right(φ=0°)
x axis, left (φ=180°)
y axis, up (φ=90°)
y axis, down (φ=270°)
--89θr
--89θl
--89θu
--89θd
5degree
6---Gray Scale
16 /42
Page 17
Product Specification
Note : 1. Contrast Ratio(CR) is defined mathematically as :
LC420WUD
Contrast Ratio =
Surface Luminance with all black pixels
It is measured at center 1-point.
2. Surface luminance are determined after the unit has been ‘ON’ and 1 Hour after lighting the
backlight in a dark environment at 25±2°C. Surface luminance is the luminance value at center
1-point across the LCD surface 50cm from the surface with all pixels displaying white.
For more information see the FIG. 2.
3. The variation in surface luminance , δ WHITE is defined as :
Surface Luminance with all white pixels
δ WHITE(5P) = Maximum(L
Where L
on1
to L
are the luminance with all pixels displaying white at 5 locations .
on5
on1,Lon2
, L
on3
, L
on4
, L
) / Minimum(L
on5
on1,Lon2
, L
on3
, L
on4
, L
on5
)
For more information, see the FIG. 2.
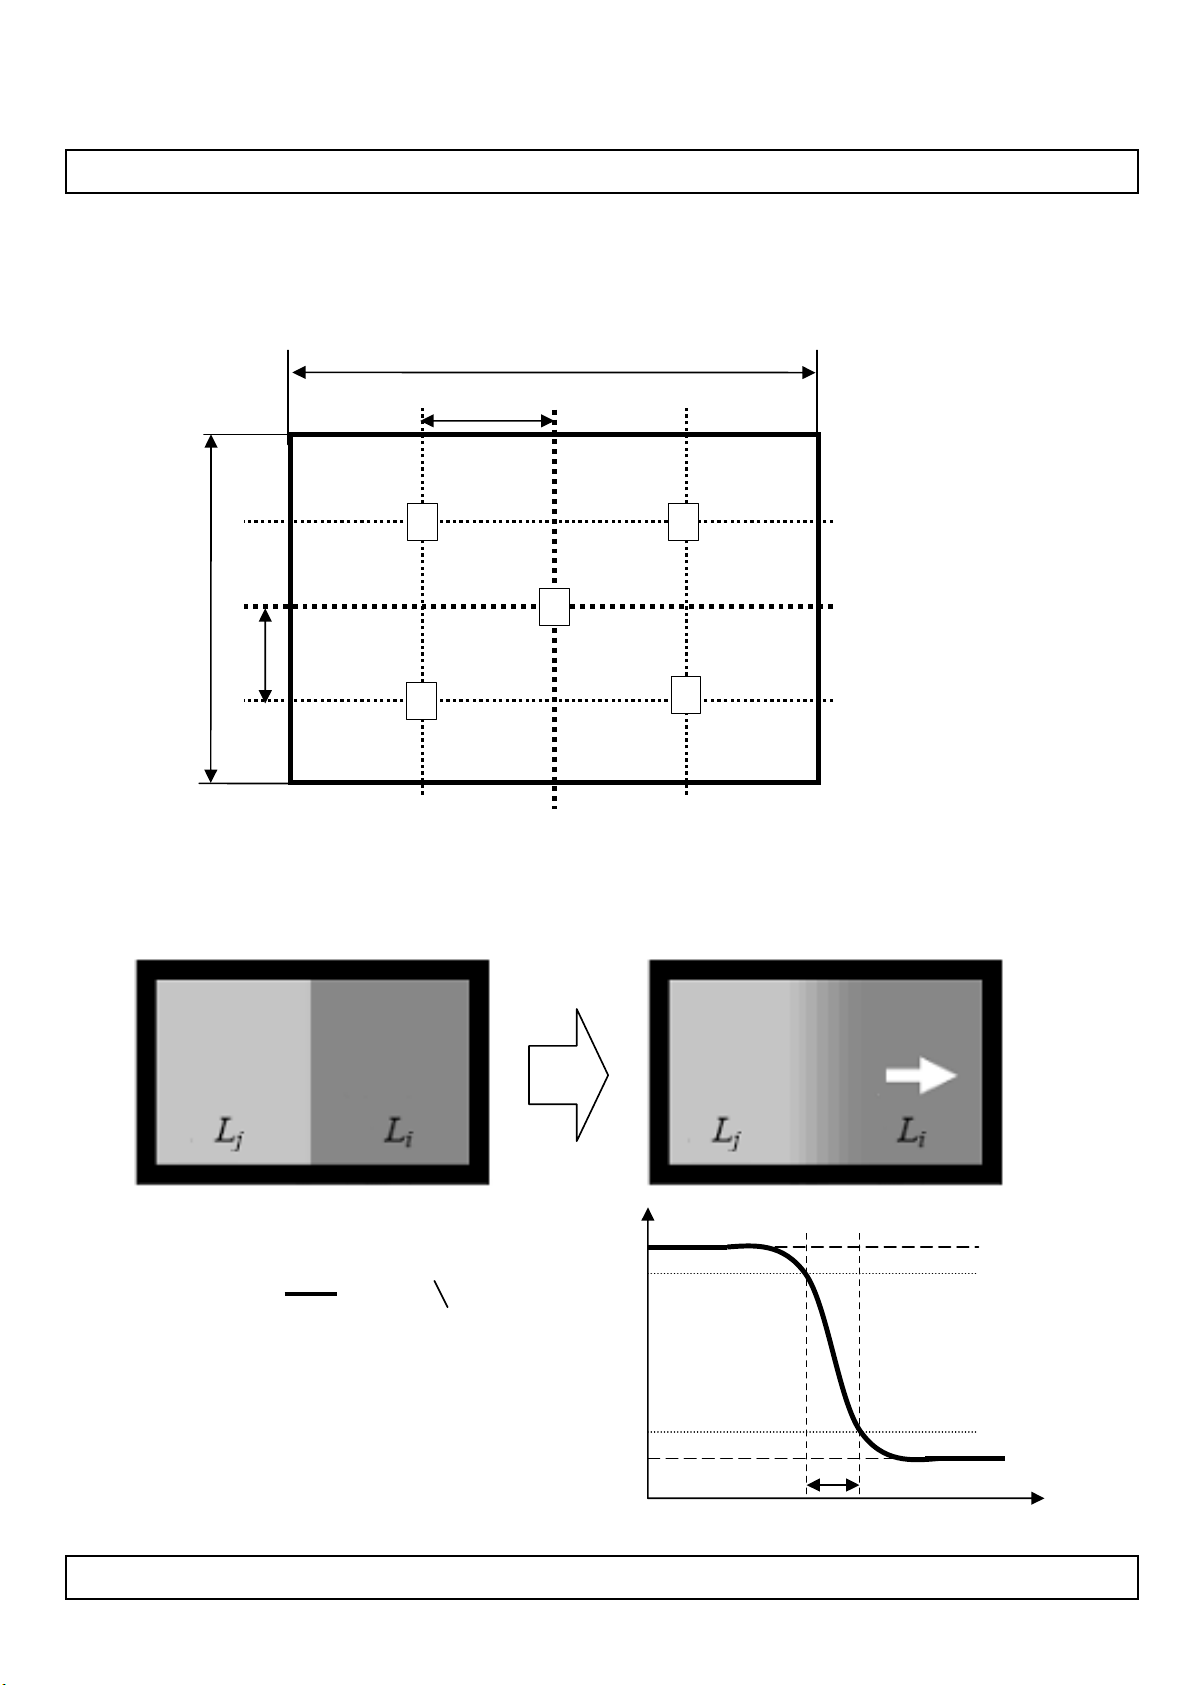
4. MPRT is defined as the 10% to 90% blur-edge width Bij(pixels) and scroll speed U(pixels/frame)at
the moving picture. For more information, see FIG 4
5. Viewing angle is the angle at which the contrast ratio is greater than 10. The angles are
determined for the horizontal or x axis and the vertical or y axis with respect to the z axis which
is normal to the LCD module surface. For more information, see the FIG. 4.
6. Gray scale specification
Gamma Value is approximately 2.2. For more information, see the Table 11.
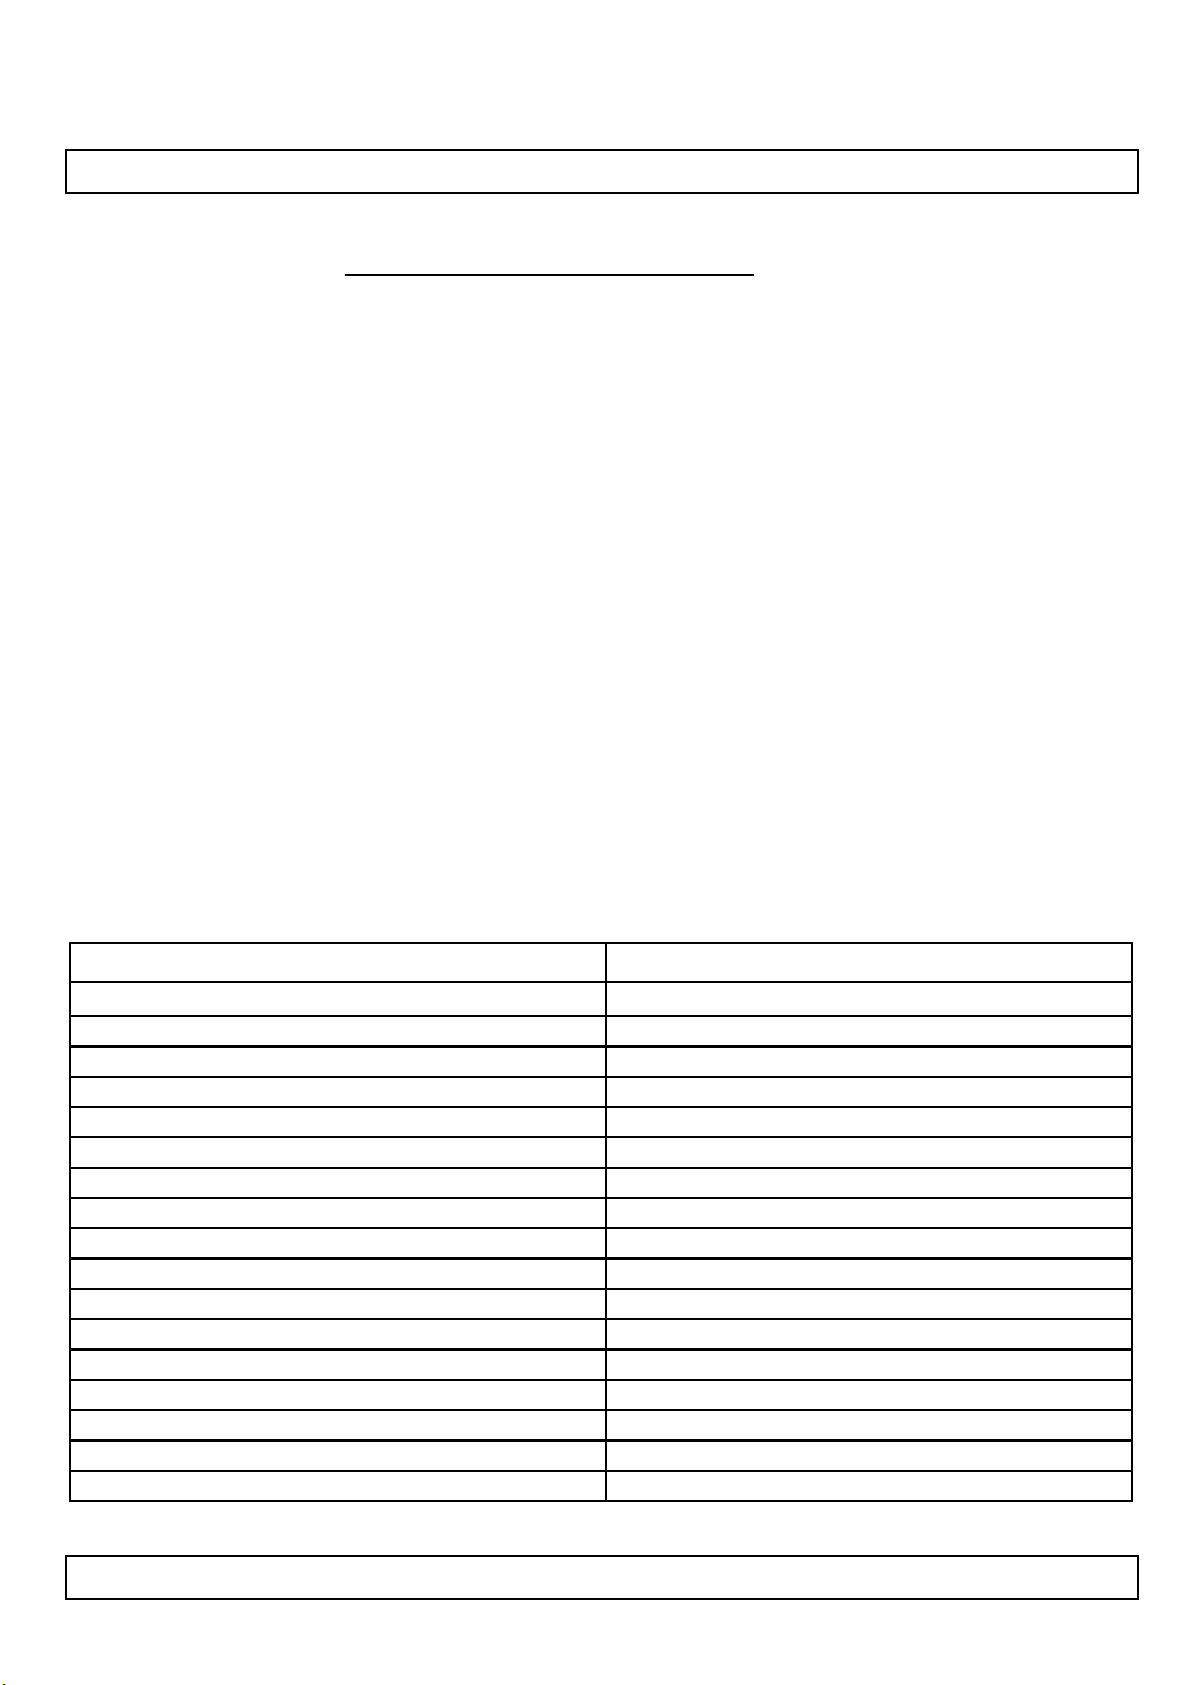
Table 11. GRAY SCALE SPECIFICATION
Gray Level
L0
L63
L127
L191
L255
L319
L383
L447
L511
L575
L639
L703
L767
L831
L895
L959
L1023
Luminance [%] (Typ.)
0.08
0.27
1.04
2.49
4.68
7.66
11.5
16.1
21.6
28.1
35.4
43.7
53.0
63.2
74.5
86.7
100
Ver. 1.0
17 /42
Page 18
Product Specification
Measuring point for surface luminance & measuring point for luminance variation.
H
A
③②
LC420WUD
V
①
B
A : H / 4 mm
④
FIG. 2 5 Points for Luminance Measure
MPRT is defined as the 10% to 90% blur-edge with Bij(pixels) and scroll speed U(pixels/frame)at the moving
picture.
⑤
B : V / 4 mm
@ H,V : Active Area
1
M =
Bij (i=j)
U
Example) Bij = 12pixels, U = 10pixels / 120Hz
M = 12pixels / (10pixels / 120Hz)
= 12pixels / {10pixels / (1/120)s}
= 12 / 1,200 s
= 10 ms
Ver. 1.0
Lj
90%
10%
Li
Bij
FIG. 4 MPRT
18 /42
Page 19
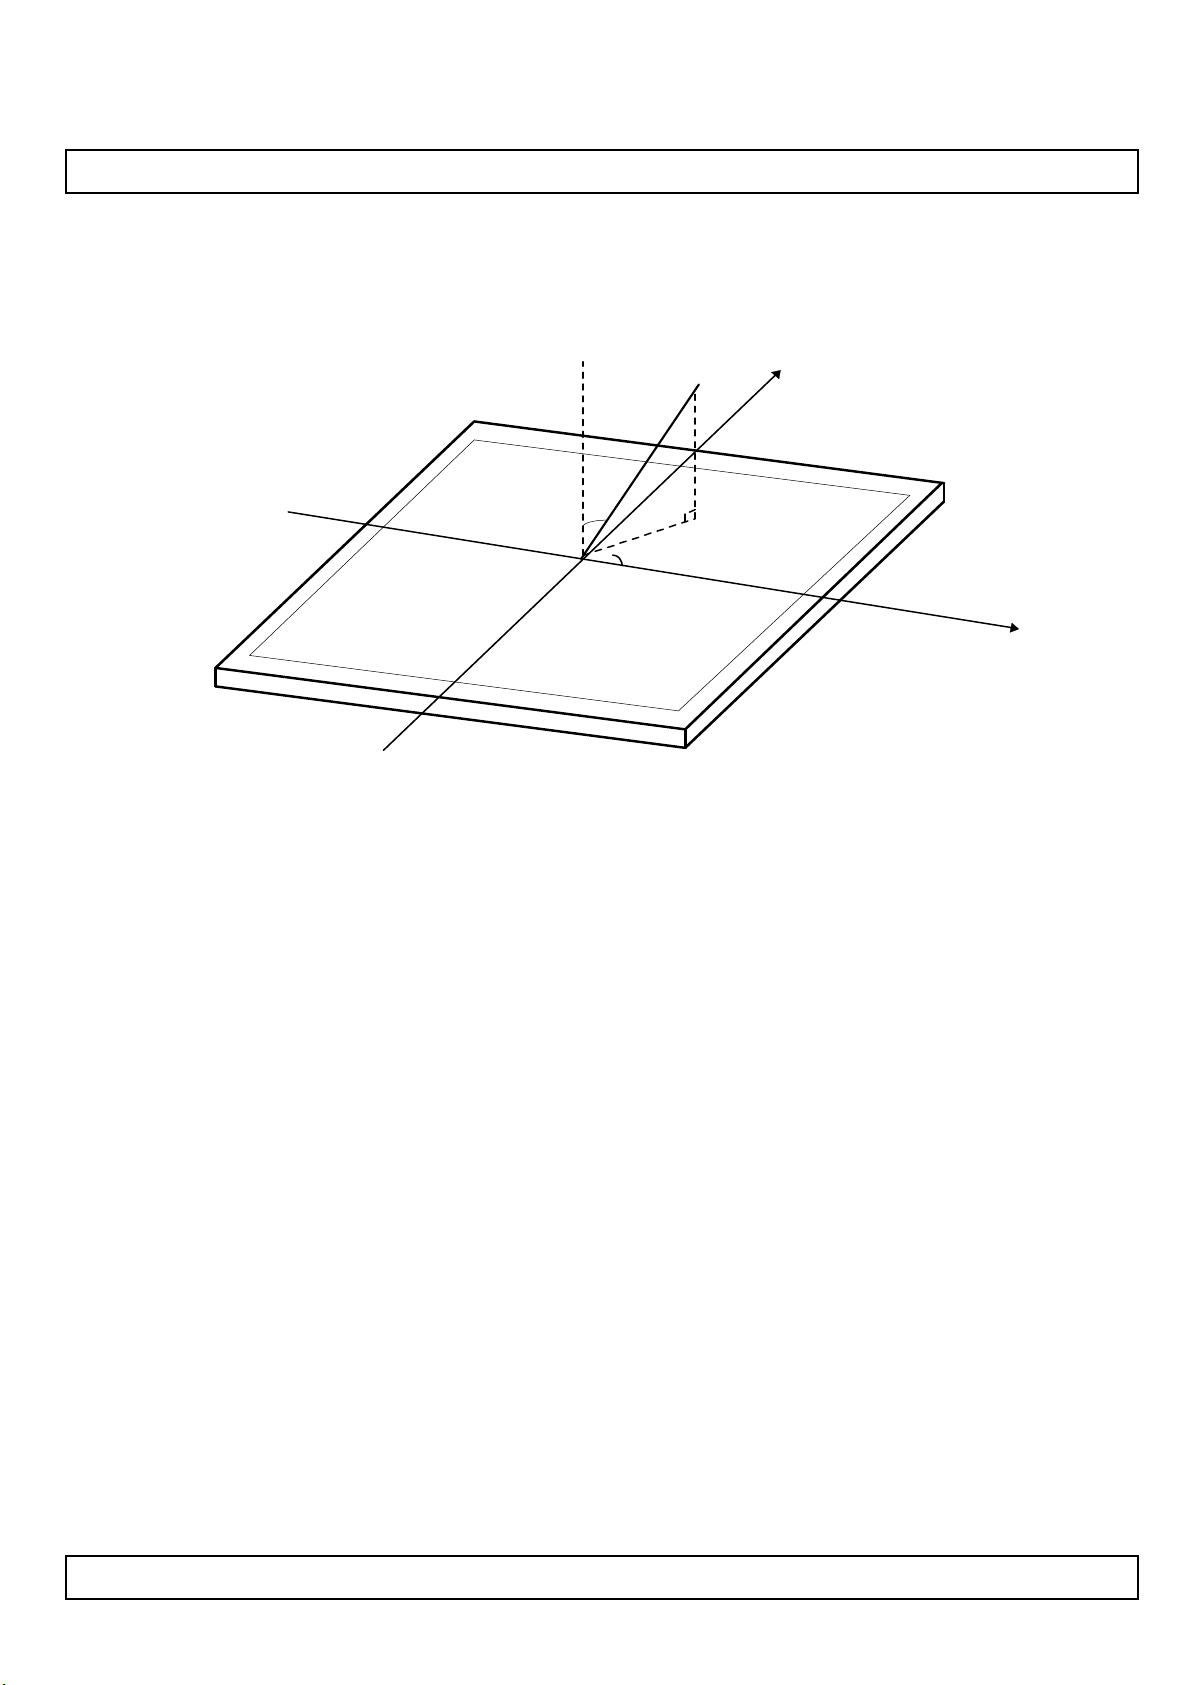
Dimension of viewing angle range
φ
= 180°, Left
Product Specification
Normal
E
θ
φ
Y
φ
= 90°, Up
φ
= 0°, Right
LC420WUD
φ
= 270°, Down
FIG. 5 Viewing Angle
Ver. 1.0
19 /42
Page 20
Product Specification
5. Mechanical Characteristics
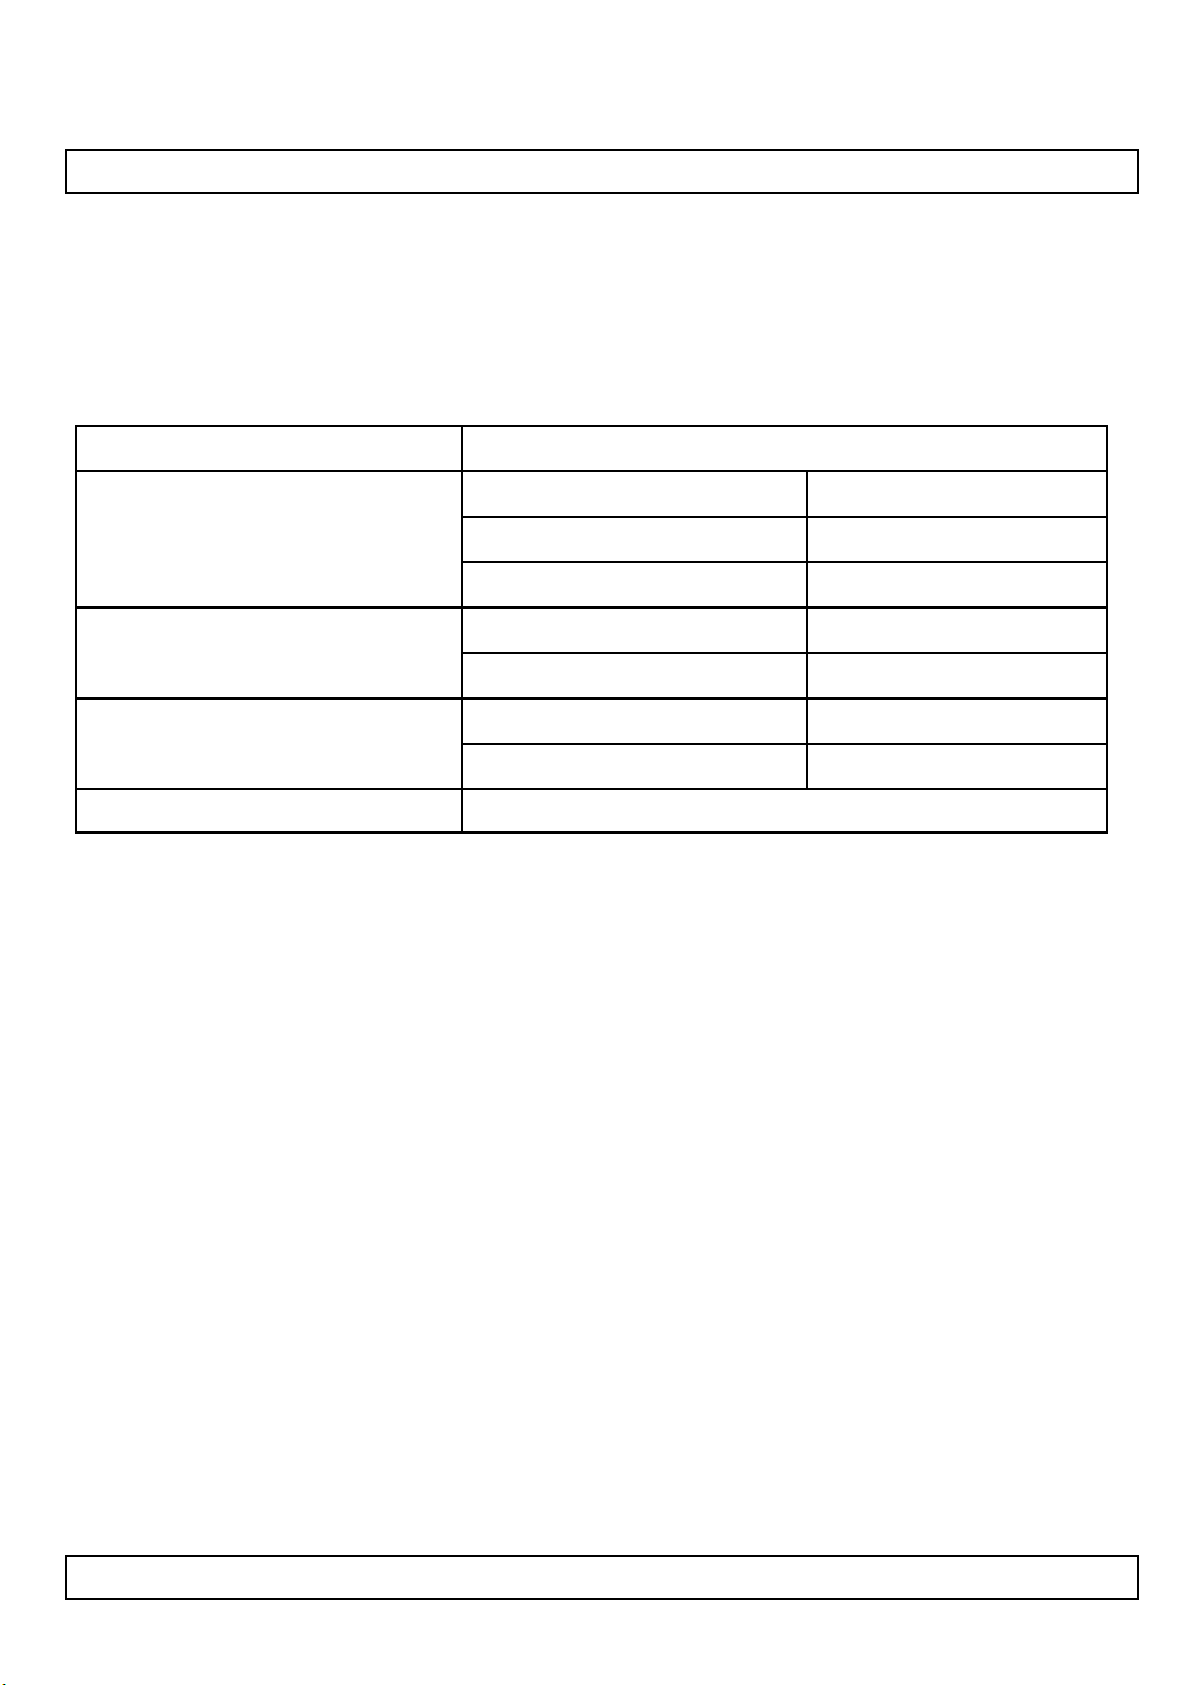
Table 11 provides general mechanical characteristics.
Table 11. MECHANICAL CHARACTERISTICS
LC420WUD
ValueItem
965.2 mmHorizontal
Outline Dimension
Bezel Area
Active Display Area
10.7 Kg (Typ.) , 12.0 Kg (Max.)Weight
558.2 mmVertical
36.5 mmDepth
938.2 mmHorizontal
531.0 mmVertical
930.24 mmHorizontal
523.26 mmVertical
Note : Please refer to a mechanical drawing in terms of tolerance at the next page.
Ver. 1.0
20 /42
Page 21
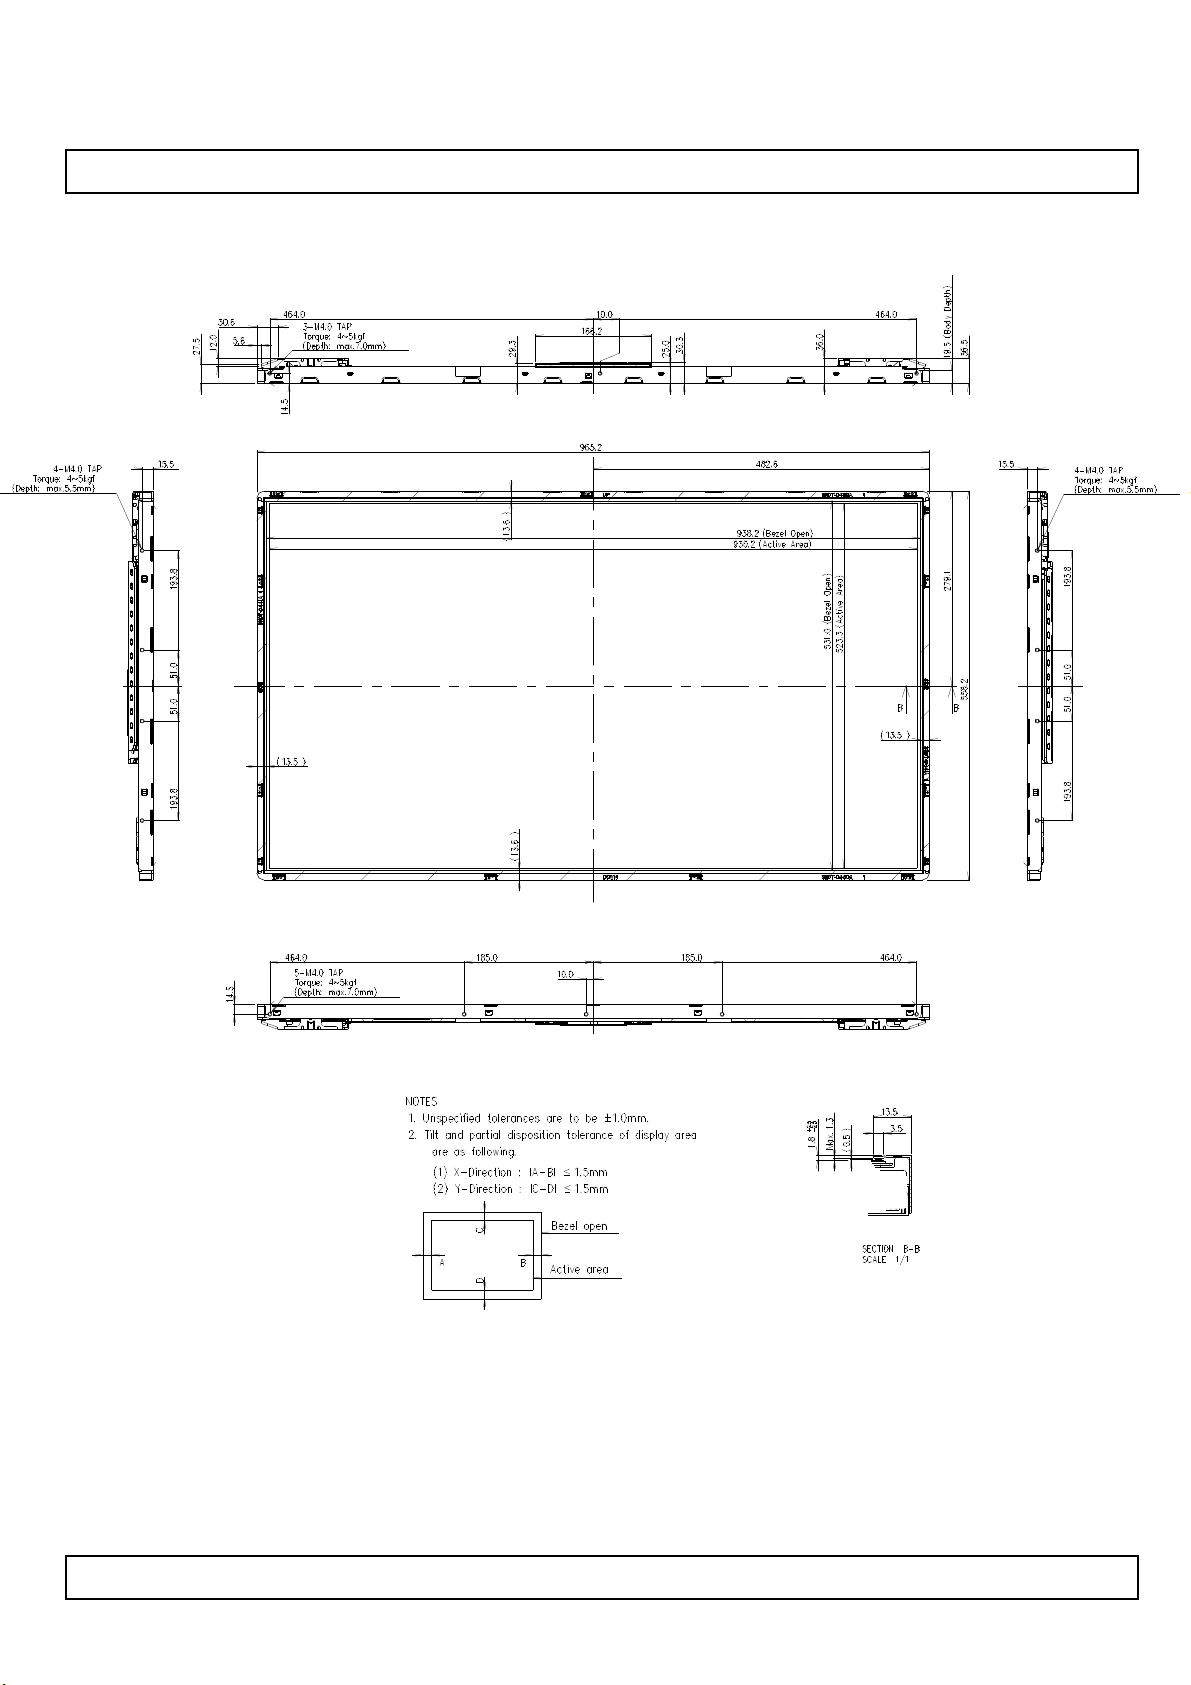
<FRONT VIEW>
LC420WUD
Product Specification
Ver. 1.0
21 /42
Page 22
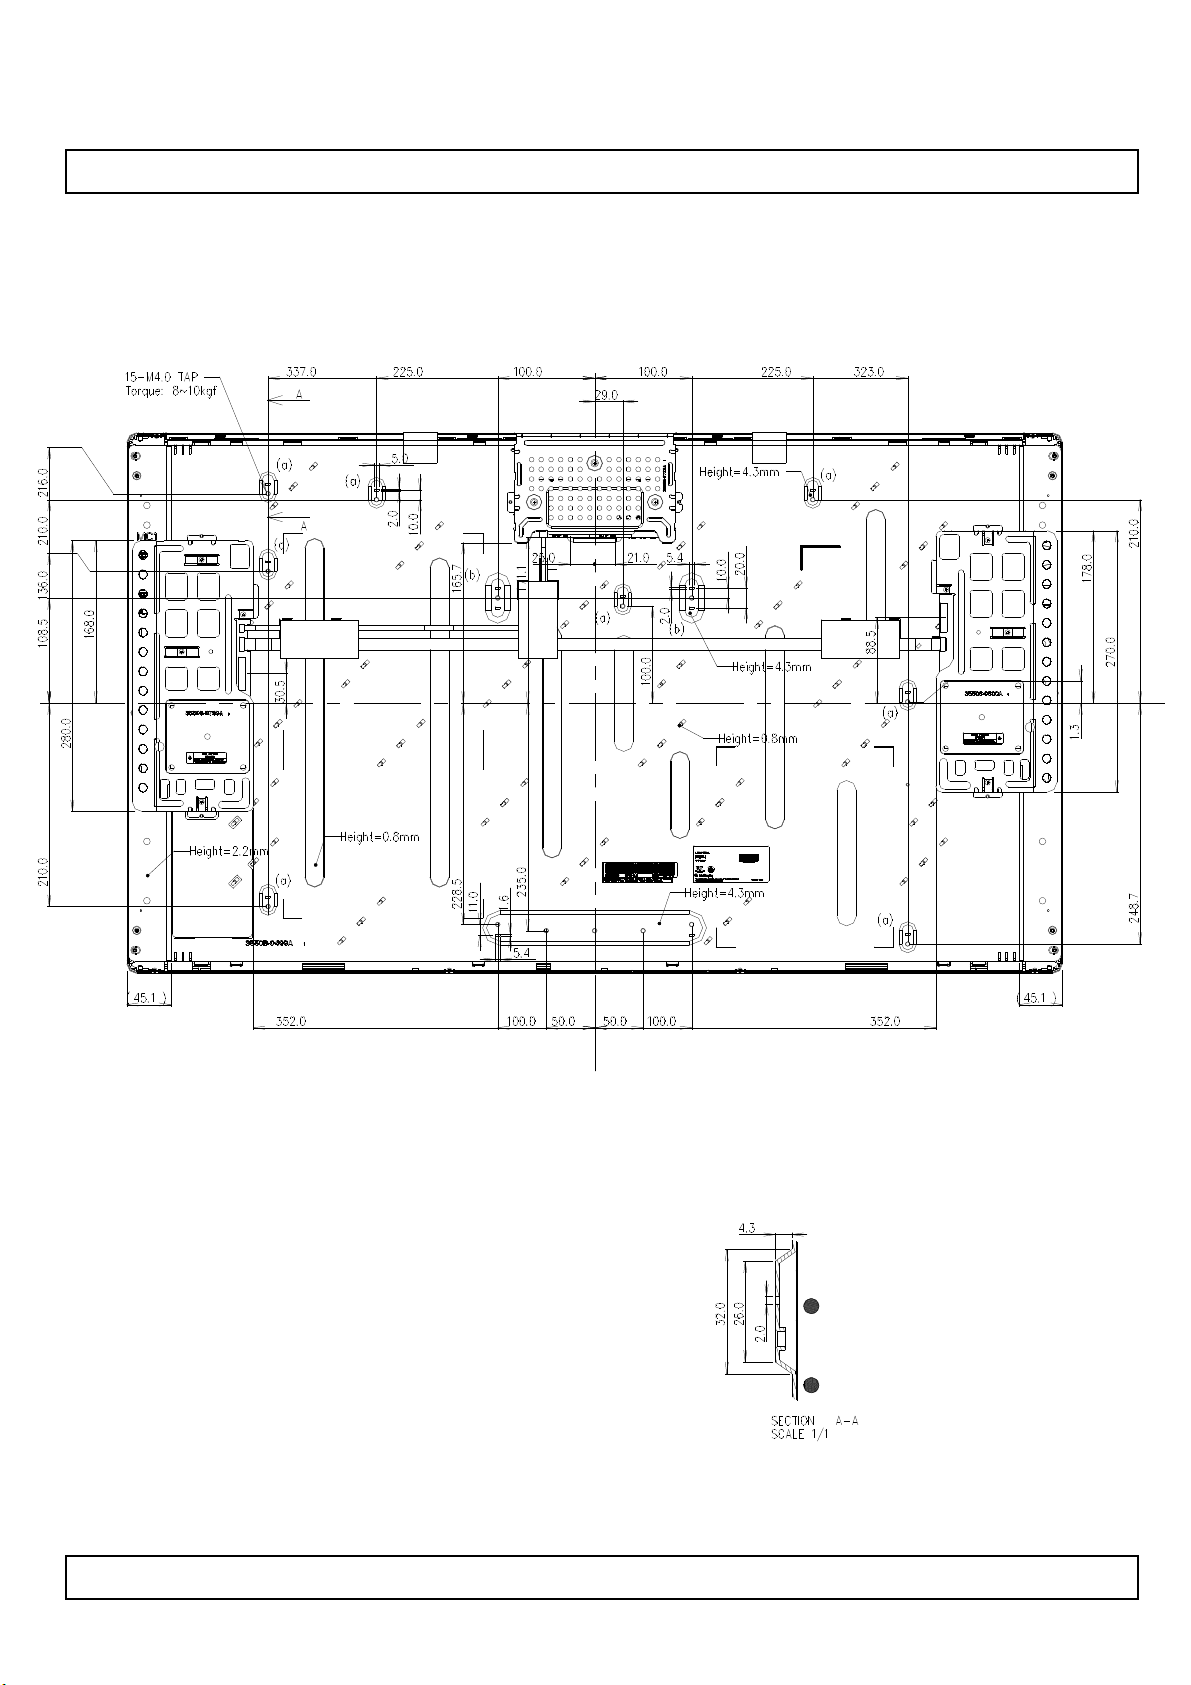
<REAR VIEW>
LC420WUD
Product Specification
Ver. 1.0
22 /42
Page 23
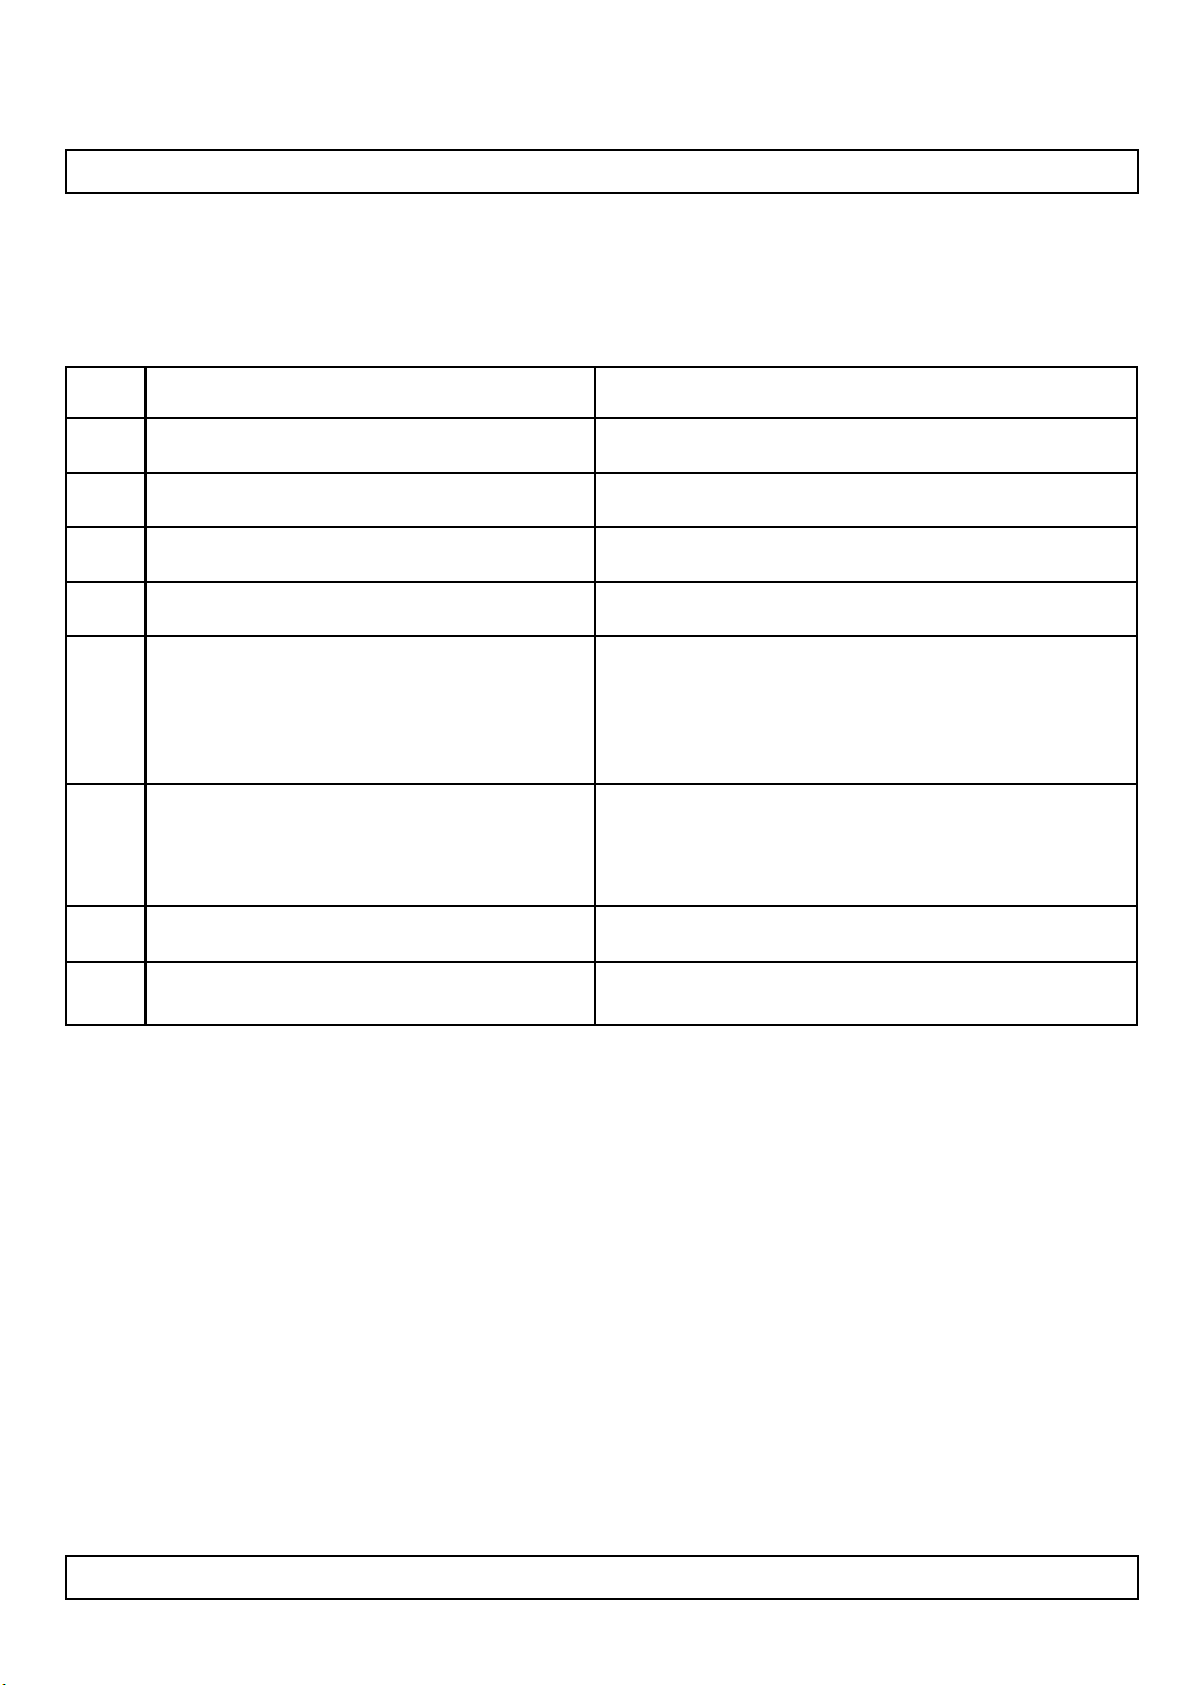
Product Specification
6. Reliability
Table 12. ENVIRONMENT TEST CONDITION
5
Vibration test
(non-operating)
LC420WUD
ConditionTest ItemNo.
Ta= 60°C, 75%RH, 240h High temperature storage test1
Ta= -20°C 240hLow temperature storage test2
Ta= 50°C 60%RH 240hHigh temperature operation test3
Ta= 0°C 240hLow temperature operation test4
Wave form : random
Vibration level : 1.0Grms
Bandwidth : 10-300Hz
Duration : X,Y,Z, 30 min
Each direction per 10 min
Shock level : 50G
6
8
Shock test
(non-operating)
Altitude operating
storage / shipment
Waveform : half sine wave, 11ms
Direction : ±X, ±Y, ±Z
One time each direction
Ta= 40 °C ,90%RHHumidity condition Operation7
0 - 15,000 ft
0 - 40,000 ft
Note : Before and after Reliability test, LCM should be operated with normal function.
Ver. 1.0
23 /42
Page 24

Product Specification
7. International Standards
7-1. Safety
a) UL 60065, Seventh Edition, Underwriters Laboratories Inc.
Audio, Video and Similar Electronic Apparatus - Safety Requirements.
b) CAN/CSA C22.2 No.60065:03, Canadian Standards Association.
Audio, Video and Similar Electronic Apparatus - Safety Requirements.
c) EN 60065:2002 + A11:2008, European Committee for Electrotechnical Standardization(CENELEC).
Audio, Video and Similar Electronic Apparatus - Safety Requirements.
d) IEC 60065:2005 + A1:2005, The International Electrotechnical Commission (IEC).
Audio, Video and Similar Electronic Apparatus - Safety Requirements.
7-2. EMC
a) ANSI C63.4 – 2003 “American National Standard for Methods of Measurement of Radio-Noise
Emissions from Low-Voltage Electrical and Electronic Equipment in the Range of 9 kHz to 40 GHz.”
American National Standards Institute (ANSI), 2003.
b) C.I.S.P.R. Pub. 22. Limits and methods of measurement of radio interference characteristics of
information technology equipment." International Special Committee on Radio Interference
(C.I.S.P.R.), 2005.
c) EN 55022 "Limits and methods of measurement of radio interference characteristics of information
technology equipment." European Committee for Electrotechnical Standardization (CENELEC), 2006.
LC420WUD
7-3. Environment
a) RoHS, Directive 2002/95/EC of the European Parliament and of the council of 27 January 2003
Ver. 1.0
24 /42
Page 25
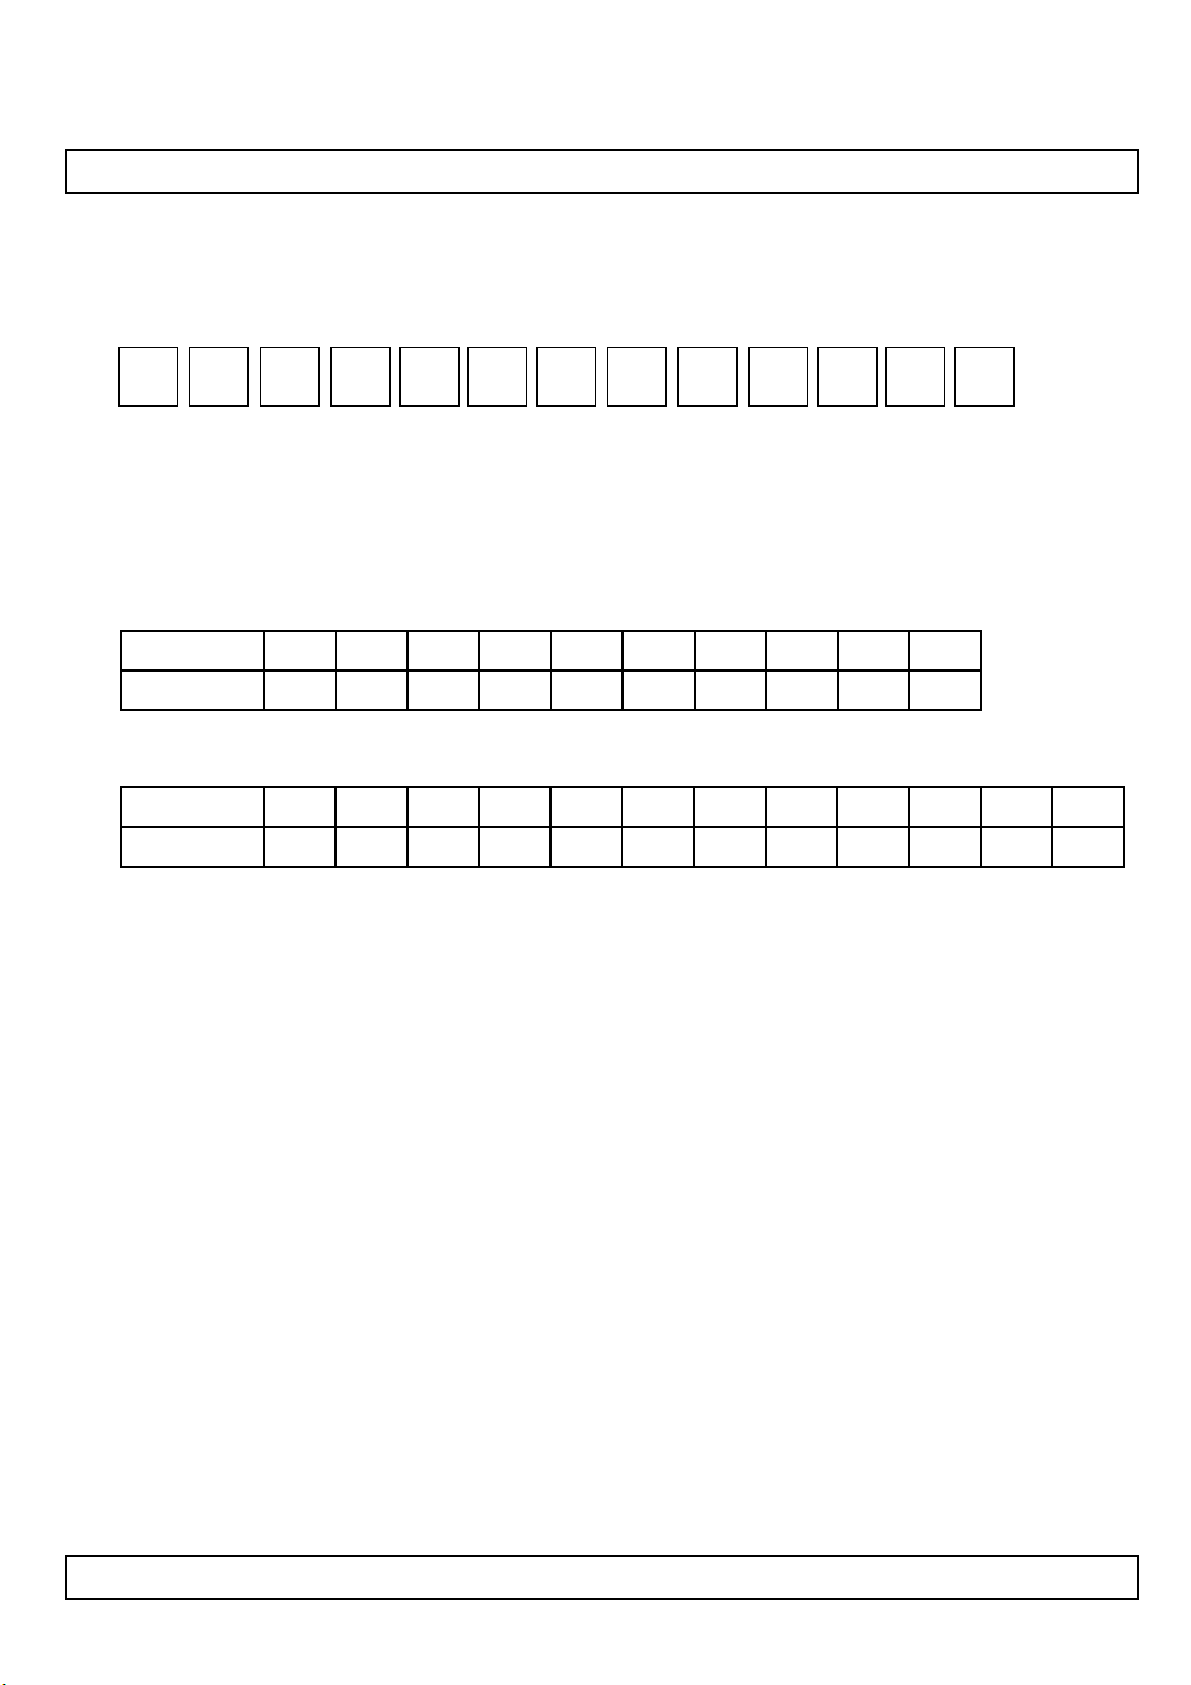
Product Specification
8. Packing
8-1. Designation of Lot Mark
a) Lot Mark
A B C D E F G H I J K L M
A,B,C : SIZE(INCH) D : YEAR
E : MONTH F ~ M : SERIAL NO.
Note
1. YEAR
LC420WUD
Year
Mark
321
200452005
4
200320022001
2006720078200892009
6
2. MONTH
Month
Mark
Apr5May
4
Jun
6
Jul
7
Aug9Sep
8
b) Location of Lot Mark
Serial No. is printed on the label. The label is attached to the backside of the LCD module.
This is subject to change without prior notice.
8-2. Packing Form
a) Package quantity in one box : 15 pcs
b) Box Size :1140 mm(L) X 990 mm(W) X 810 mm(H)
2010
0
Oct
A
Nov
B
DecMarFebJan
C321
Ver. 1.0
25 /42
Page 26

LC420WUD
Product Specification
9. Precautions
Please pay attention to the followings when you use this TFT LCD module.
9-1. Mounting Precautions
(1) You must mount a module using specified mounting holes (Details refer to the drawings).
(2) You should consider the mounting structure so that uneven force (ex. Twisted stress) is not applied to the
module. And the case on which a module is mounted should have sufficient strength so that external
force is not transmitted directly to the module.
(3) Please attach the surface transparent protective plate to the surface in order to protect the polarizer.
Transparent protective plate should have sufficient strength in order to the resist external force.
(4) You should adopt radiation structure to satisfy the temperature specification.
(5) Acetic acid type and chlorine type materials for the cover case are not desirable because the former
generates corrosive gas of attacking the polarizer at high temperature and the latter causes circuit break
by electro-chemical reaction.
(6) Do not touch, push or rub the exposed polarizers with glass, tweezers or anything harder than HB
pencil lead. And please do not rub with dust clothes with chemical treatment.
Do not touch the surface of polarizer for bare hand or greasy cloth.(Some cosmetics are detrimental
to the polarizer.)
(7) When the surface becomes dusty, please wipe gently with absorbent cotton or other soft materials like
chamois soaks with petroleum benzine. Normal-hexane is recommended for cleaning the adhesives
used to attach front / rear polarizers. Do not use acetone, toluene and alcohol because they cause
chemical damage to the polarizer.
(8) Wipe off saliva or water drops as soon as possible. Their long time contact with polarizer causes
deformations and color fading.
(9) Do not open the case because inside circuits do not have sufficient strength.
(10) If there is external force to LCM, it can effect to bend the slim. Since the bending, Lamp Mura can be
shown on display.
9-2. Operating Precautions
(1) The spike noise causes the mis-operation of circuits. It should be lower than following voltage :
V=±200mV(Over and under shoot voltage)
(2) Response time depends on the temperature.(In lower temperature, it becomes longer.)
(3) Brightness depends on the temperature. (In lower temperature, it becomes lower.)
And in lower temperature, response time(required time that brightness is stable after turned on) becomes
longer.
(4) Be careful for condensation at sudden temperature change. Condensation makes damage to polarizer or
electrical contacted parts. And after fading condensation, smear or spot will occur.
(5) When fixed patterns are displayed for a long time, remnant image is likely to occur.
(6) Module has high frequency circuits. Sufficient suppression to the electromagnetic interference shall be
done by system manufacturers. Grounding and shielding methods may be important to minimized the
interference.
(7) Please do not give any mechanical and/or acoustical impact to LCM. Otherwise, LCM can’t be operated
its full characteristics perfectly.
(8) A screw which is fastened up the steels should be a machine screw.
(if not, it causes metallic foreign material and deal LCM a fatal blow)
(9) Please do not set LCD on its edge.
(10) It is recommended to avoid the signal cable and conductive material over the inverter transformer
for it can cause the abnormal display and temperature rising.
(11) Partial darkness may happen during 3~5 minutes when LCM is operated initially in condition that
luminance is under 40% at low temperature (under 5℃). This phenomenon which disappears naturally
after 3~5 minutes is not a problem about reliability but LCD characteristic.
Ver. 1.0
26 /42
Page 27

LC420WUD
Product Specification
9-3. Electrostatic Discharge Control
Since a module is composed of electronic circuits, it is not strong to electrostatic discharge. Make certain that
treatment persons are connected to ground through wrist band etc. And don’t touch interface pin directly.
9-4. Precautions for Strong Light Exposure
Strong light exposure causes degradation of polarizer and color filter.
9-5. Storage
When storing modules as spares for a long time, the following precautions are necessary.
(1) Store them in a dark place. Do not expose the module to sunlight or fluorescent light. Keep the temperature
between 5°C and 35°C at normal humidity.
(2) The polarizer surface should not come in contact with any other object.
It is recommended that they be stored in the container in which they were shipped.
9-6. Handling Precautions for Protection Film
(1) The protection film is attached to the bezel with a small masking tape.
When the protection film is peeled off, static electricity is generated between the film and polarizer.
This should be peeled off slowly and carefully by people who are electrically grounded and with well ionblown equipment or in such a condition, etc.
(2) When the module with protection film attached is stored for a long time, sometimes there remains a very
small amount of glue still on the bezel after the protection film is peeled off.
(3) You can remove the glue easily. When the glue remains on the bezel surface or its vestige is recognized,
please wipe them off with absorbent cotton waste or other soft material like chamois soaked with normalhexane.
Ver. 1.0
27 /42
Page 28
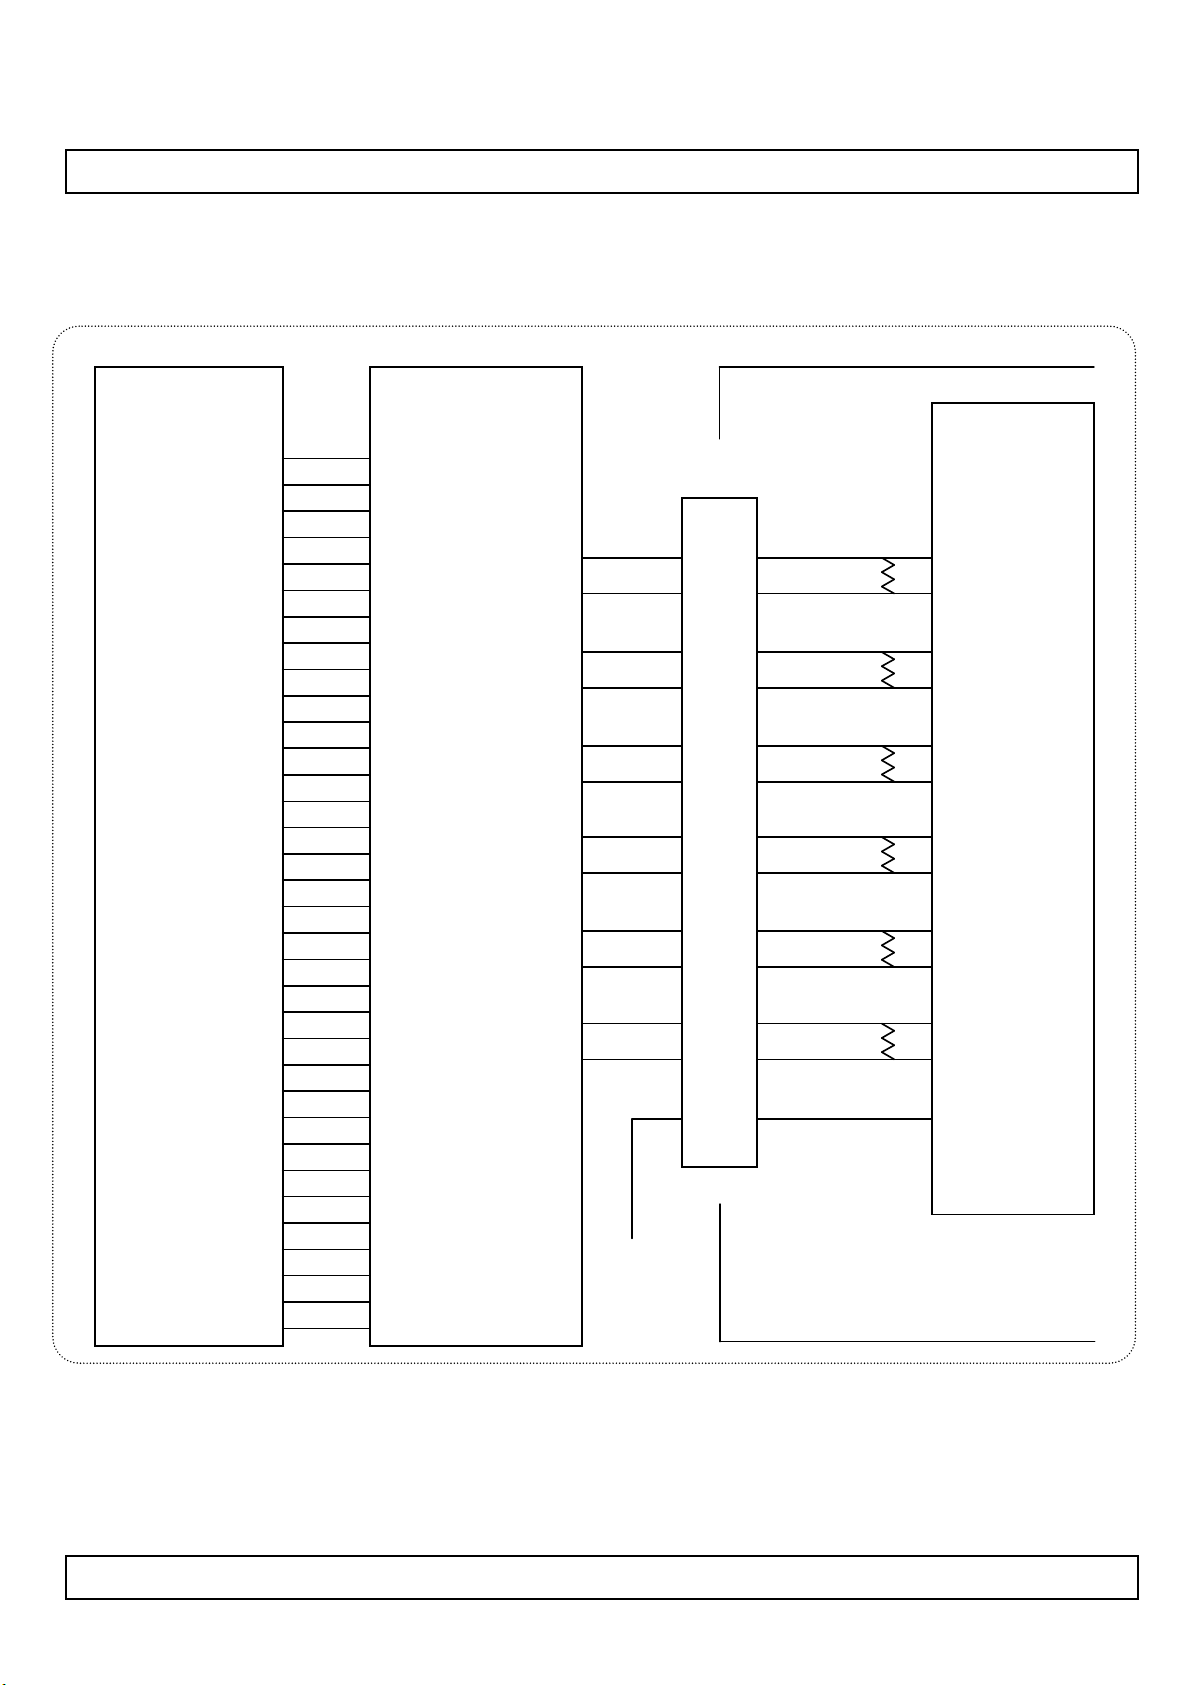
LC420WUD
Product Specification
# APPENDIX- I-1
■ Required signal assignment for Flat Link (Thine : THC63LVD103) Transmitter (Pin7=“L”)
Host System
30 Bit
RED0
RED1
RED2
RED3
RED4
RED5
RED6
RED7
RED8
RED9
GREEN0
GREEN1
GREEN2
GREEN3
GREEN4
GREEN5
GREEN6
GREEN7
GREEN8
GREEN9
BLUE0
BLUE1
BLUE2
BLUE3
BLUE4
BLUE5
BLUE6
BLUE7
BLUE8
BLUE9
Hsync
Vsync
Data Enable
CLOCK
THC63LVD103
or Compatible
33
34
35
36
37
38
59
61
4
5
40
41
42
44
45
46
62
63
6
8
48
49
50
52
53
54
64
1
9
11
55
57
58
12
TA-
TA+
TB-
TB+
TC-
TC+
TCLK-
TCLK+
TD-
TD+
TE-
TE+
31
30
29
28
25
24
23
22
21
20
19
18
FI-RE51S-HF
GND
12
13
14
15
16
17
19
20
22
23
24
25
7
100Ω
100Ω
100Ω
100Ω
100Ω
100Ω
LCM Module
Timing
Controller
RA1N
RA1P
RB1N
RB1P
RC1N
RC1P
RCLK1N
RCLK1P
RD1N
RD1P
RE1N
RE1P
VESA / JEIDA
Notes:
1. The LCD module uses a 100 Ohm(Ω) resistor between positive and negative lines
of each receiver input.
2. Refer to LVDS transmitter data sheet for detail descriptions. (THC63LVD103 or Compatible)
3. ‘9’ means MSB and ‘0’ means LSB at R,G,B pixel data.
Ver. 1.0
28 /42
Page 29
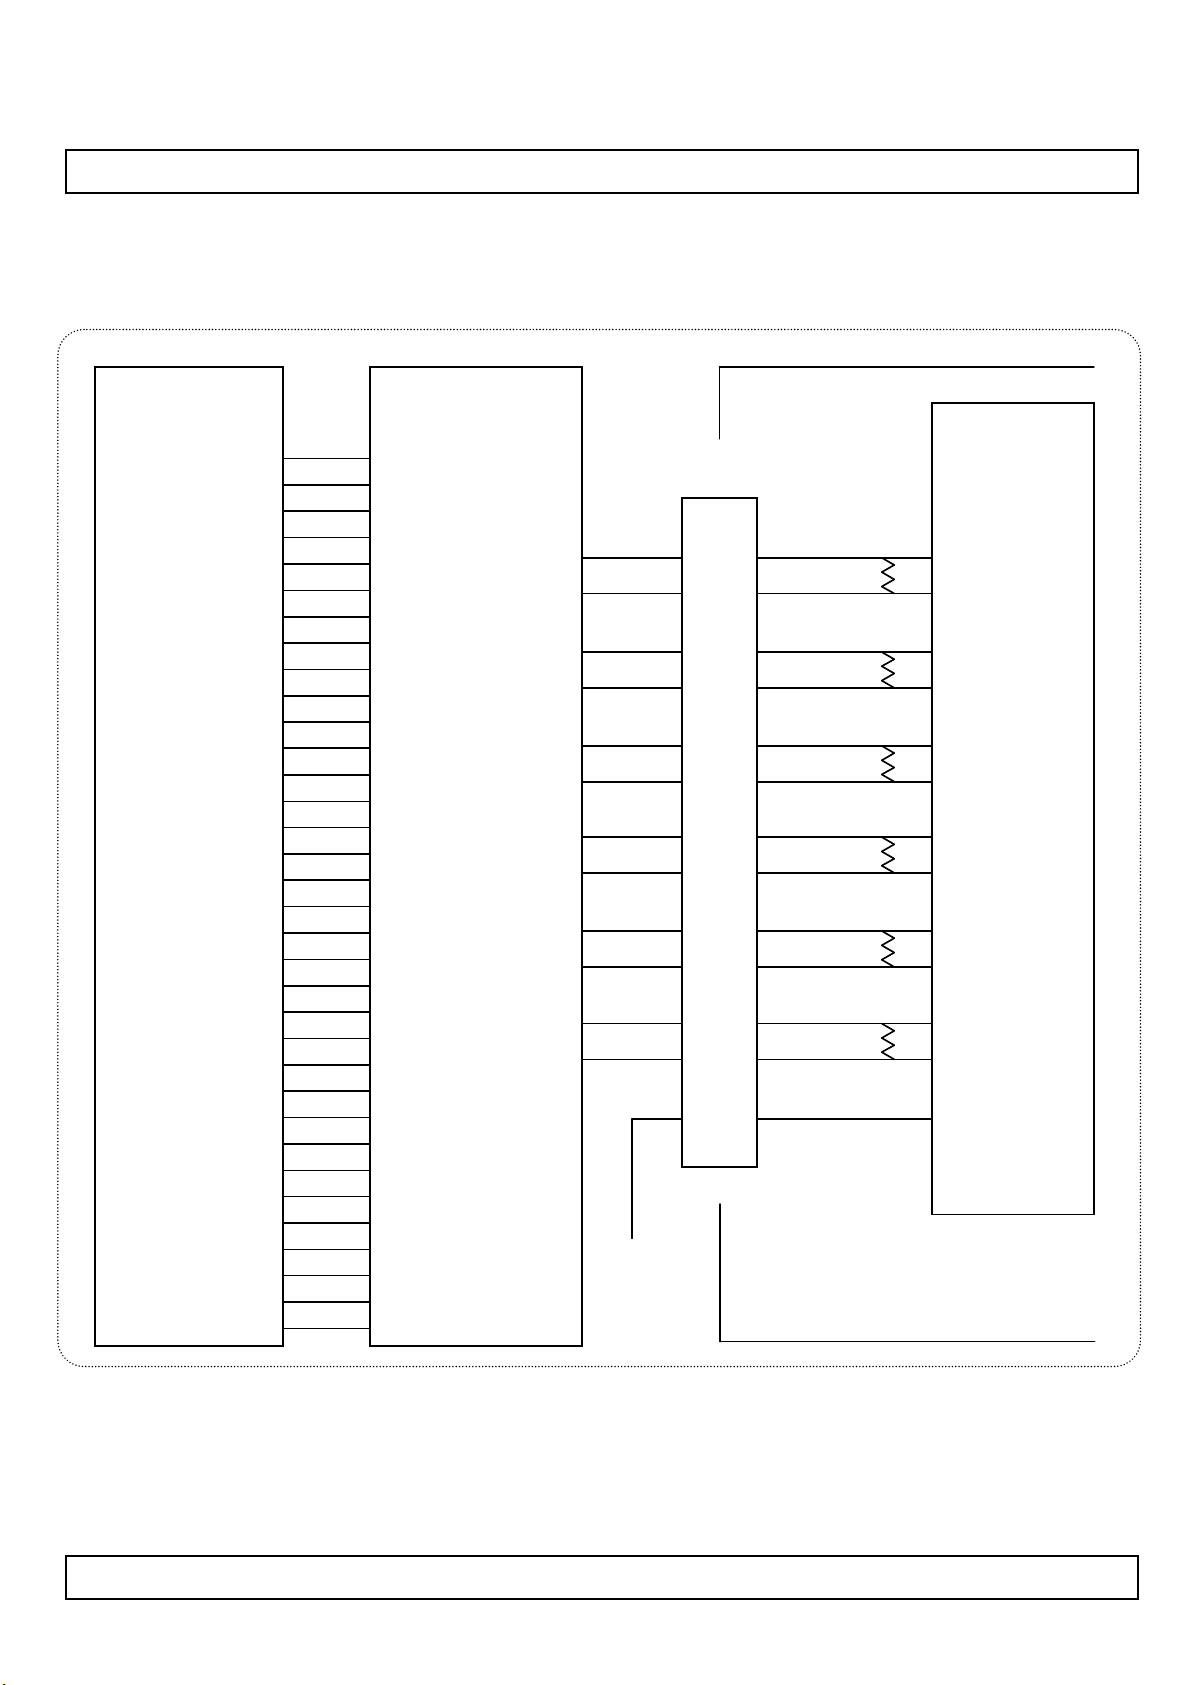
LC420WUD
Product Specification
# APPENDIX- 1-2
■ Required signal assignment for Flat Link (Thine : THC63LVD103) Transmitter (Pin7=“H”)
Host System
30 Bit
RED0
RED1
RED2
RED3
RED4
RED5
RED6
RED7
RED8
RED9
GREEN0
GREEN1
GREEN2
GREEN3
GREEN4
GREEN5
GREEN6
GREEN7
GREEN8
GREEN9
BLUE0
BLUE1
BLUE2
BLUE3
BLUE4
BLUE5
BLUE6
BLUE7
BLUE8
BLUE9
Hsync
Vsync
Data Enable
CLOCK
THC63LVD103
or Compatible
4
5
59
61
33
34
35
36
37
38
6
8
62
63
40
41
42
44
45
46
9
11
64
1
48
49
50
52
53
54
55
57
58
12
TA-
TA+
TB-
TB+
TC-
TC+
TCLK-
TCLK+
TD-
TD+
TE-
TE+
31
30
29
28
25
24
23
22
21
20
19
18
FI-RE51S-HF
VCC
12
13
14
15
16
17
19
20
22
23
24
25
7
100Ω
100Ω
100Ω
100Ω
100Ω
100Ω
LCM Module
Timing
Controller
RA1N
RA1P
RB1N
RB1P
RC1N
RC1P
RCLK1N
RCLK1P
RD1N
RD1P
RE1N
RE1P
VESA / JEIDA
Notes:
1. The LCD module uses a 100 Ohm(Ω) resistor between positive and negative lines
of each receiver input.
2. Refer to LVDS transmitter data sheet for detail descriptions. (THC63LVD103 or Compatible)
3. ‘9’ means MSB and ‘0’ means LSB at R,G,B pixel data.
Ver. 1.0
29 /42
Page 30
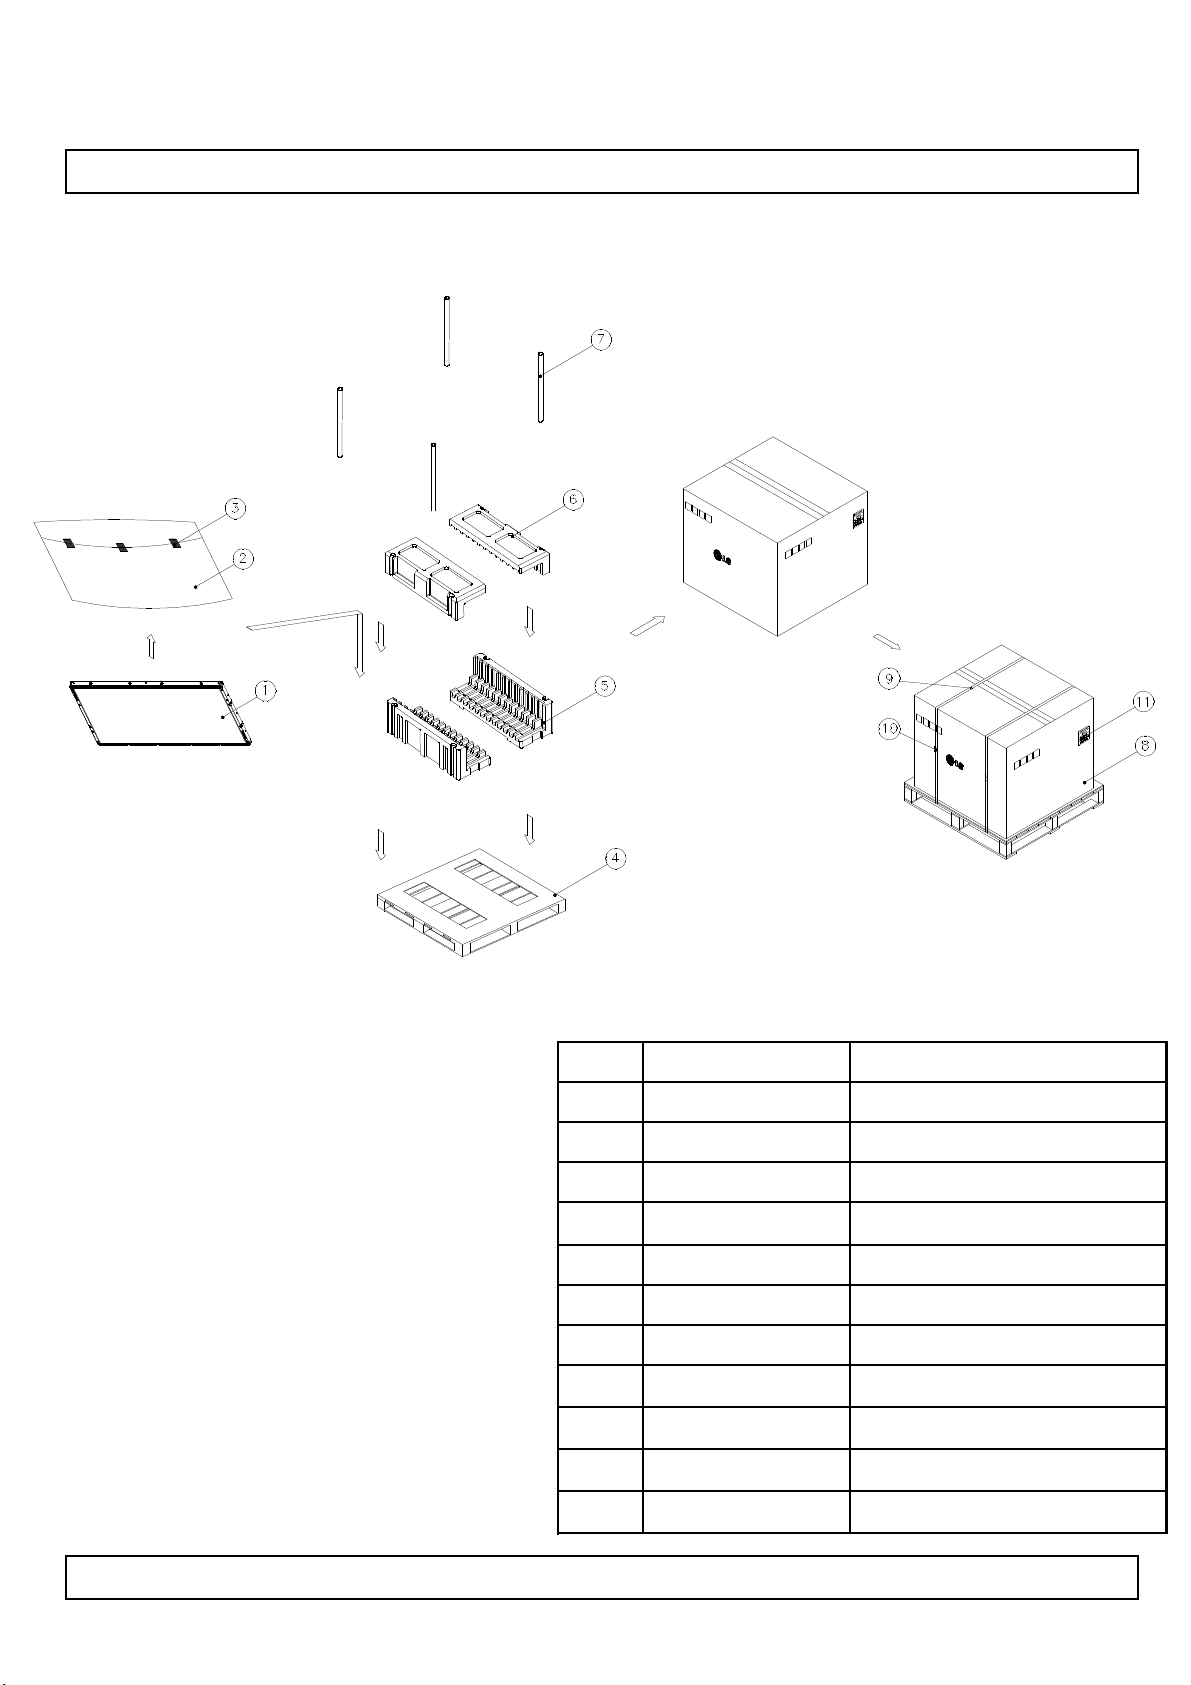
# APPENDIX-II
■ Pallet Ass’y
LC420WUD
Product Specification
Ver. 1.0
5
6
7
8
9
10
11
LCD Module1
BAG2
TAPE3
PALLET4
PACKING
PACKING
ANGLE_POST
ANGLE PACKING
BAND
BAND,CLIP
LABEL
MATERIALDESCRIPTIONNO.
42INCH
MASKING 20MM X 50M
Plywood(1140X990X117.5)
EPS
EPS
PAPER
PAPER
PP
STEEL
YUPO PAPER 80G 100X70
30 /42
Page 31
LC420WUD
# APPENDIX 2
Product Specification
# APPENDIX- III
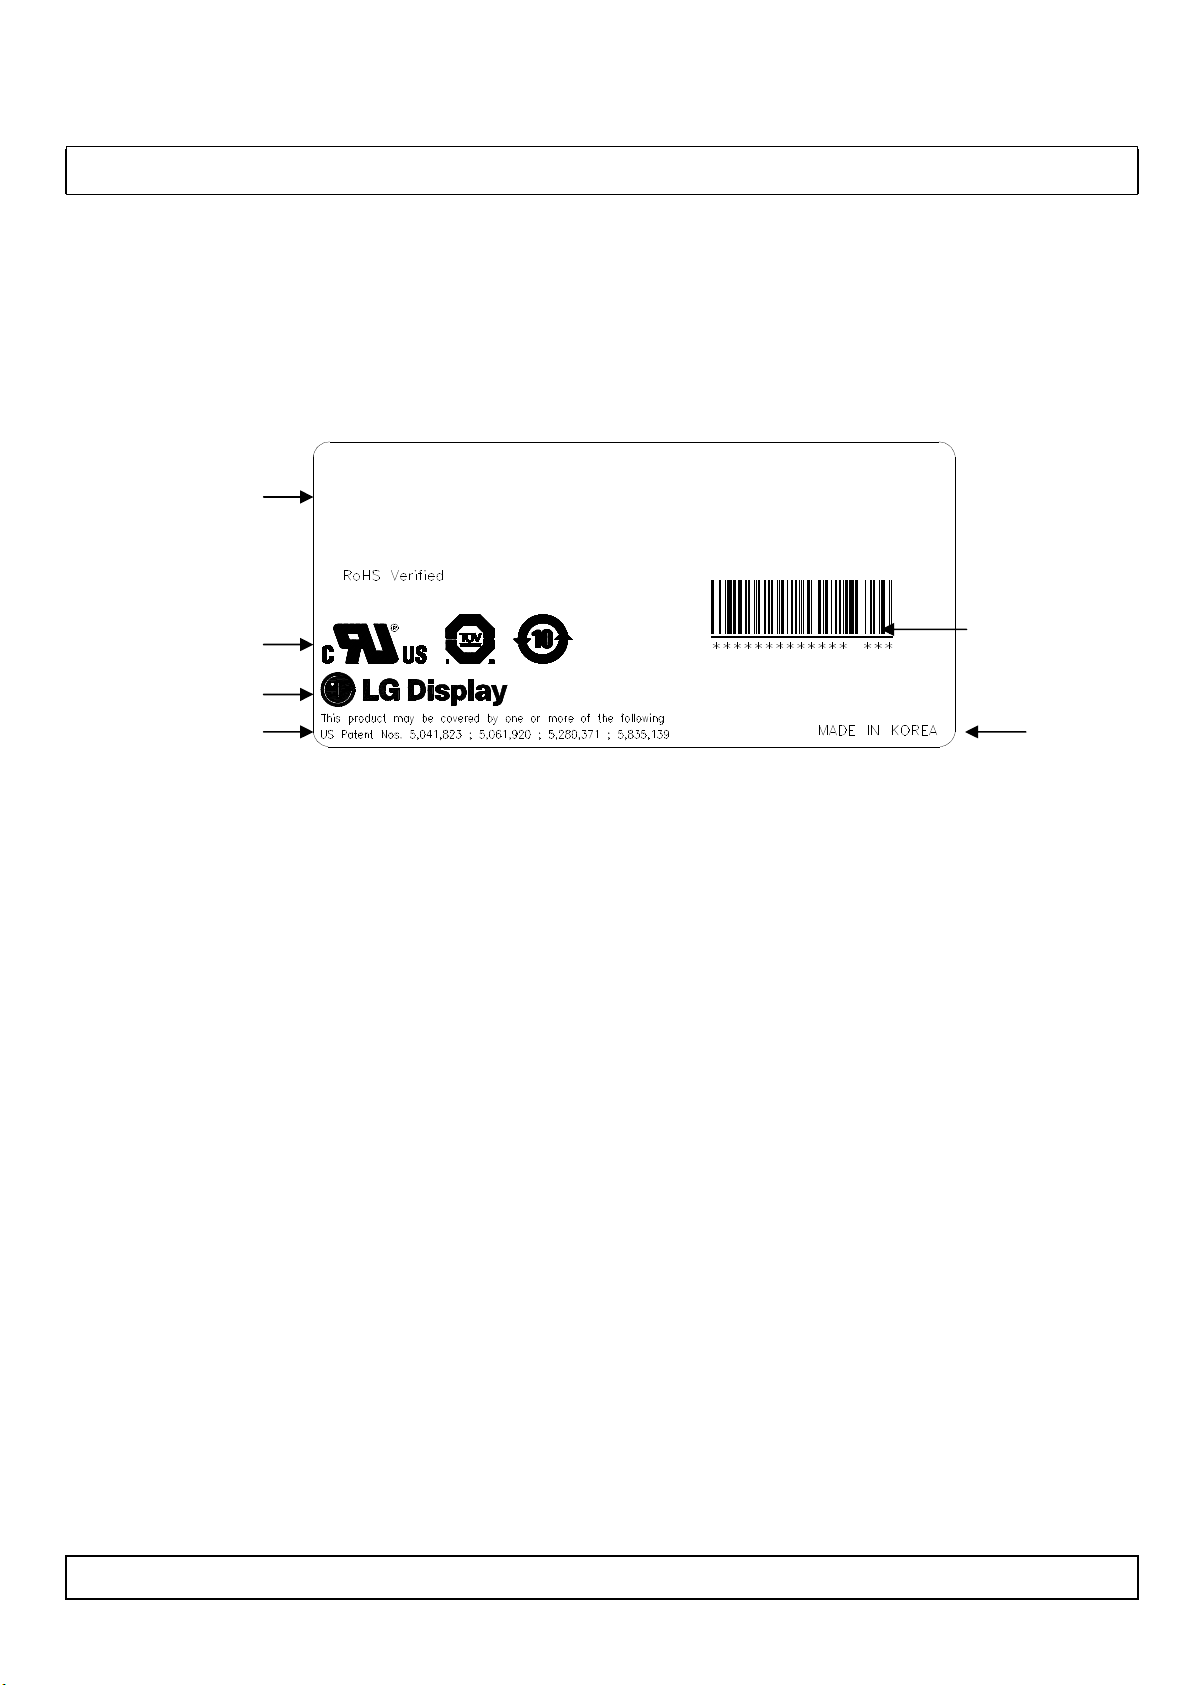
■ LCM Label
Model
LC420WUD
(SB)(M4)
UL, TUV Mark
LGD Logo
US PATENT No. Origin
Serial No.
Ver. 1.0
31 /42
Page 32
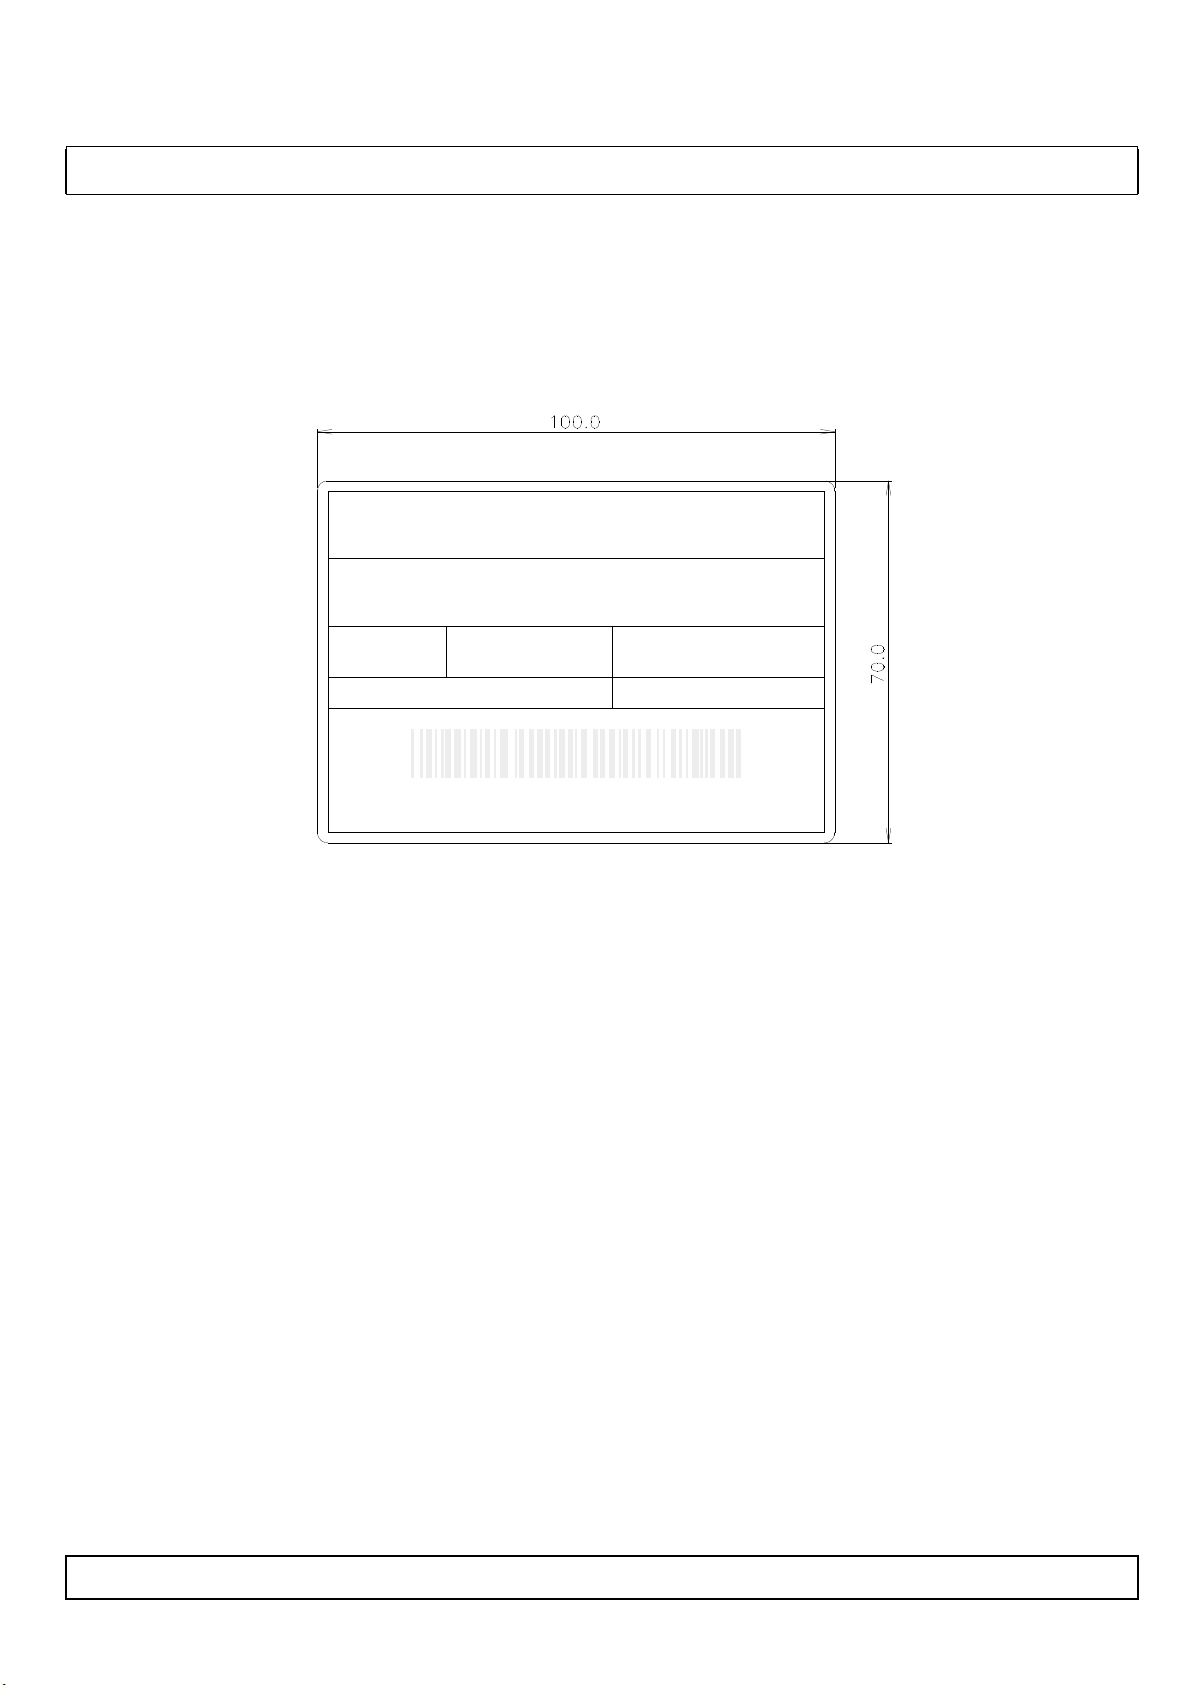
LC420WUD
# APPENDIX 3
# APPENDIX- IV
■ Pallet Label
Product Specification
LC420WUD
SBM4
15 PCS
MADE IN KOREA
001/01-01
RoHS Verified
XXXXXXXXXXXXX XXX
Ver. 1.0
32 /42
Page 33
LC420WUD
Product Specification
# APPENDIX-V
Scanning and OPC Design Guide
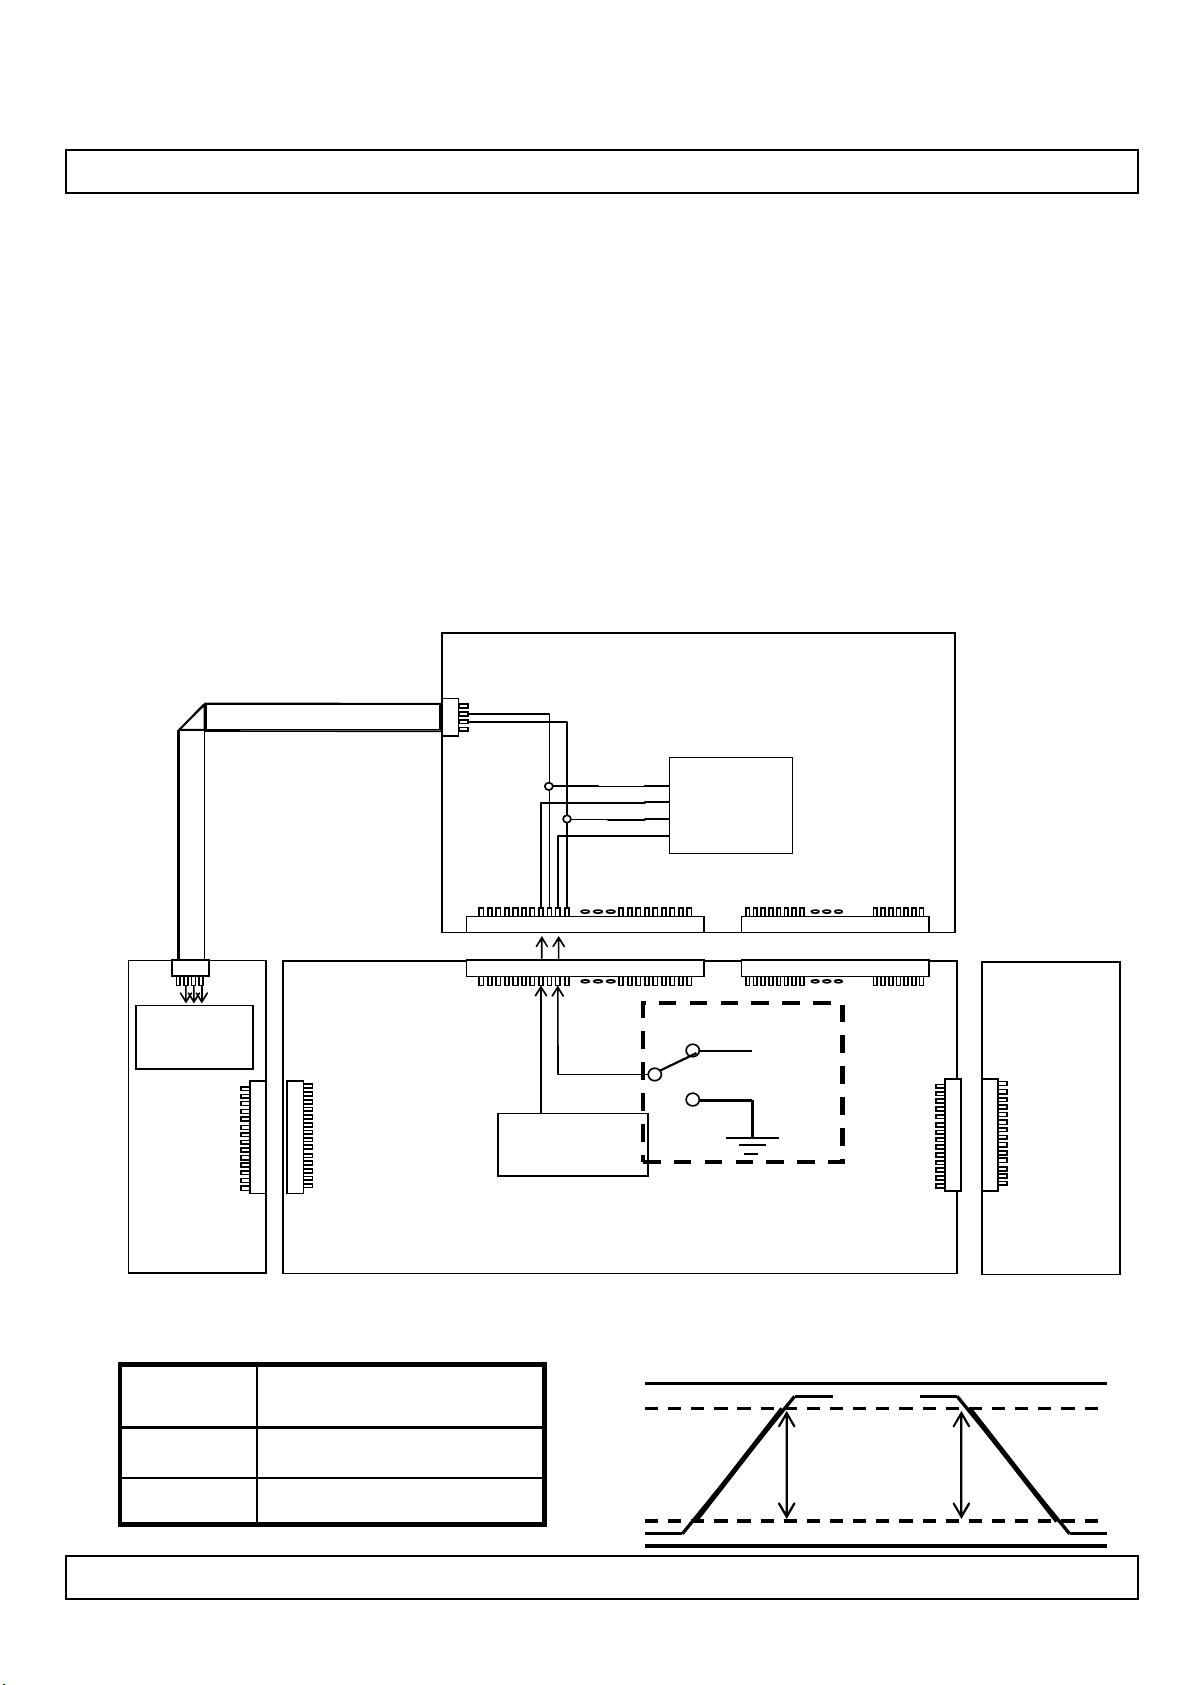
1) When OPC Enable is “L", SCAN_BLK1 & SCAN_BLK2 = System Dimming with 100Hz or 120Hz frequency.
2) SCAN_BLK1& SCAN_BLK2 signals are synchronized with V-Sync Freq. of System in T-Con Board.
3) Regardless of OPC, System should always give dimming Signal (EXTVBR-B) to T-con during operation.
4) EXTVBR-B Specification ( VCC = 3.3V ) @ OPC
a) High Voltage Range : 2.5 V ~ 3.6 V
b) Low Voltage Range : 0.0 V ~ 0.8 V
(4pin)
#1 : REF_MODE (100/120Hz Select)
#2 : SCAN_BLK1
#3 : SCAN_BLK2
#4 : GND
#1
LCM T-con Board
#14
B/L Signal
Generation
Block
INV
(51pin)
#8 : EXTVBR-B
#9 : SCAN_BLK1
#10 : OPC_EN
#11 : SCAN_BLK2
14pin
4
T-Con
#1 51 #1 41
CNT1 51pin CNT2 41pin
CNT3 44pin CNT4 26pin
OPC On
3.3V
System
Main IC
(PWM Generator)
<With Inverter Model>
OPC Off
Chassis
12pin
INV
Frequency
Rising Time
Falling Time
Ver. 1.0
Input
MAX 1Khz
(Recommendation:50~300Hz)
MAX 10.0 μs
MAX 10.0 μs
VDD
VDD*0.9
Rising Time
Falling Time
VDD*0.1
0
33 /42
Page 34
Product Specification
# APPENDIX-VI
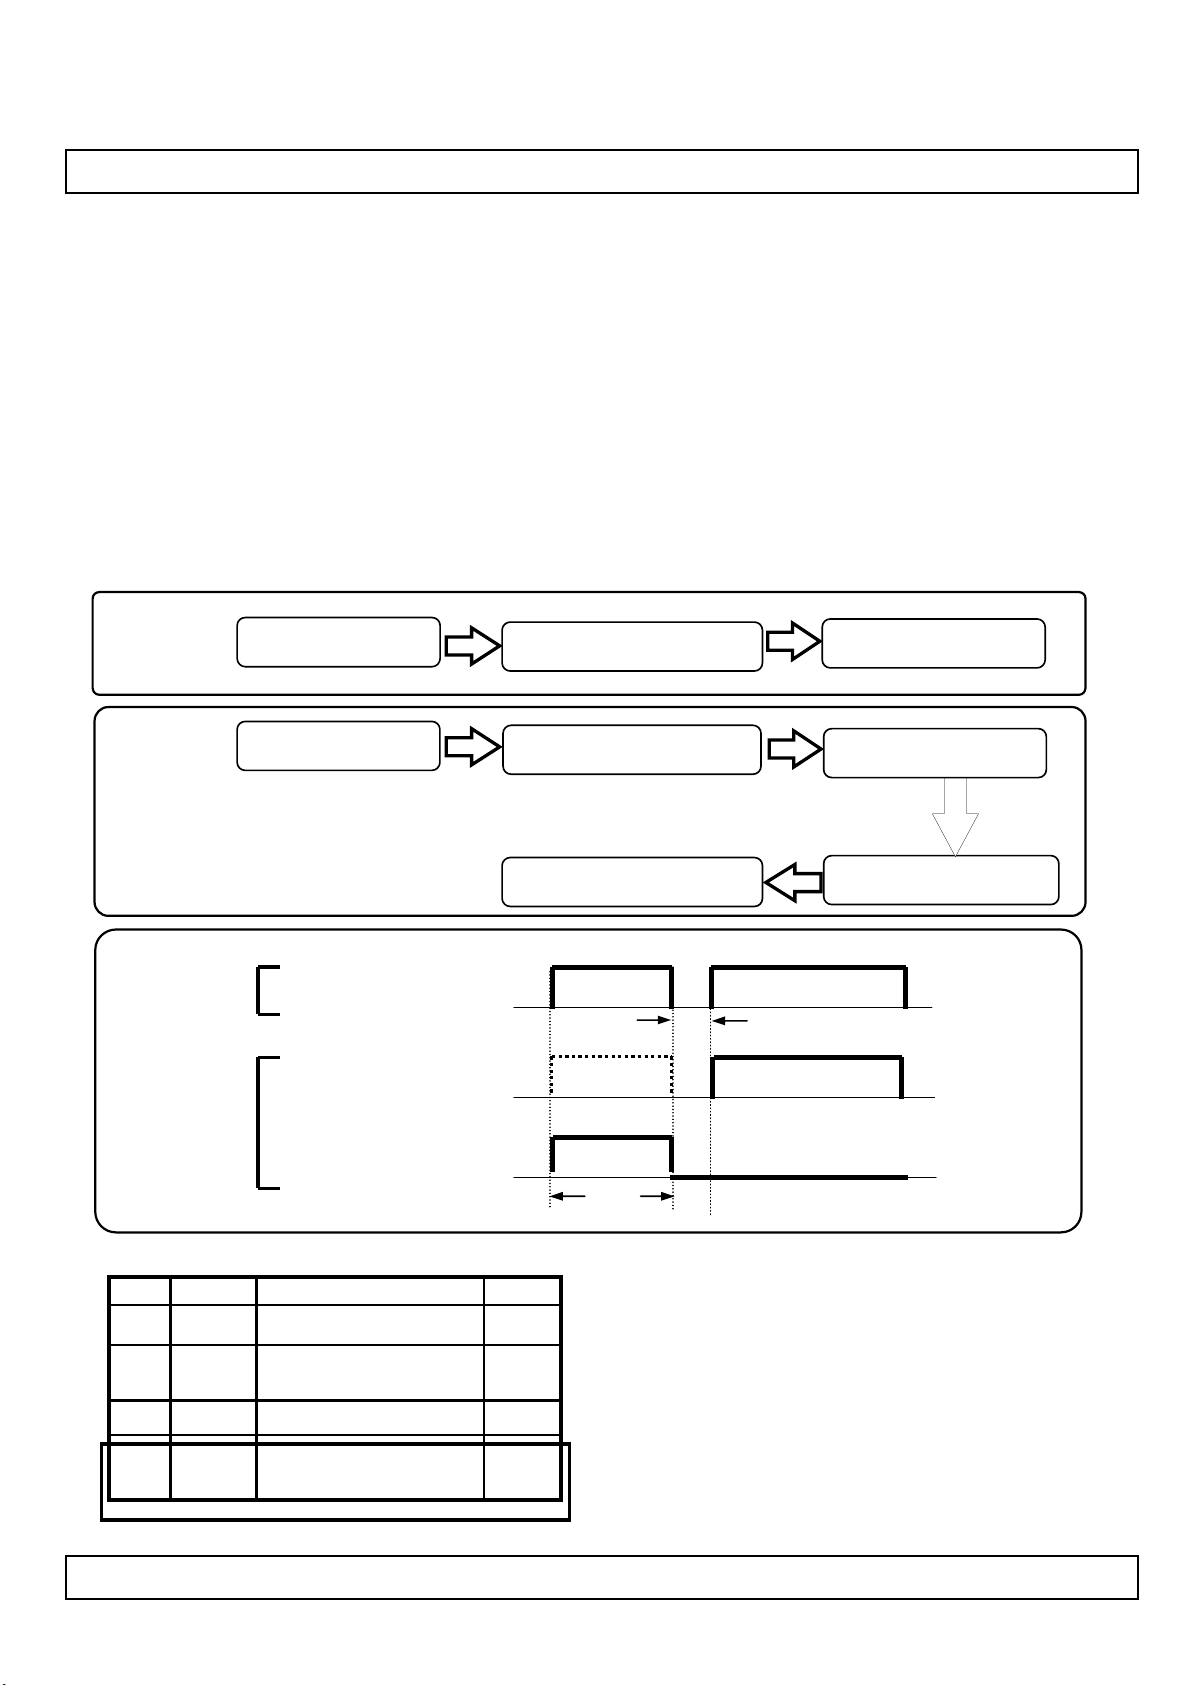
Inverter 14thPin (Status) Design Guide
Function of Status pin
- Purpose : Preventing of backlight off by restarting the inverter technically
- How to : When inverter is abnormal operation, TV system inputs the Von signal
in the inverter once more to turn on the lamp safely
- Attention : Restart system’s Von signal when status pin is high for some time (min:1sec , max:4sec).
(The turn on time of lamp can be late such as the low temperature or the storage time)
Status operation modes in TV set
LC420WUD
Normal
Mode
Status
operation
mode
System
Inverter
System Von
System Von
VON/OFF [12pin]
Backlight
Status [14pin]
Lamp turn on
Fail of Lamp turn on
Lamp turn on
V
ON
Fail
Status
1sec
~4sec
Status level low
Status level High
Feedback to system
Again System Von
Restart V
More than 0.1sec
Lamp ON
ON
Inverter pin map
Pin No
Analog dimming voltage
DC 0.0V ~ 3.3V (Typ : 1.65V)
NC
Normal : Under 0.7V
Abnormal : Upper 3.0V
13
14
Ver. 1.0
VBR-A11
NC
Status
Inv.DescriptionSymbol
VBR-A
On/Off0.0V ~ 5.0VVON/OFF12
status
34 /42
Page 35
Product Specification
# APPENDIX- VII-1
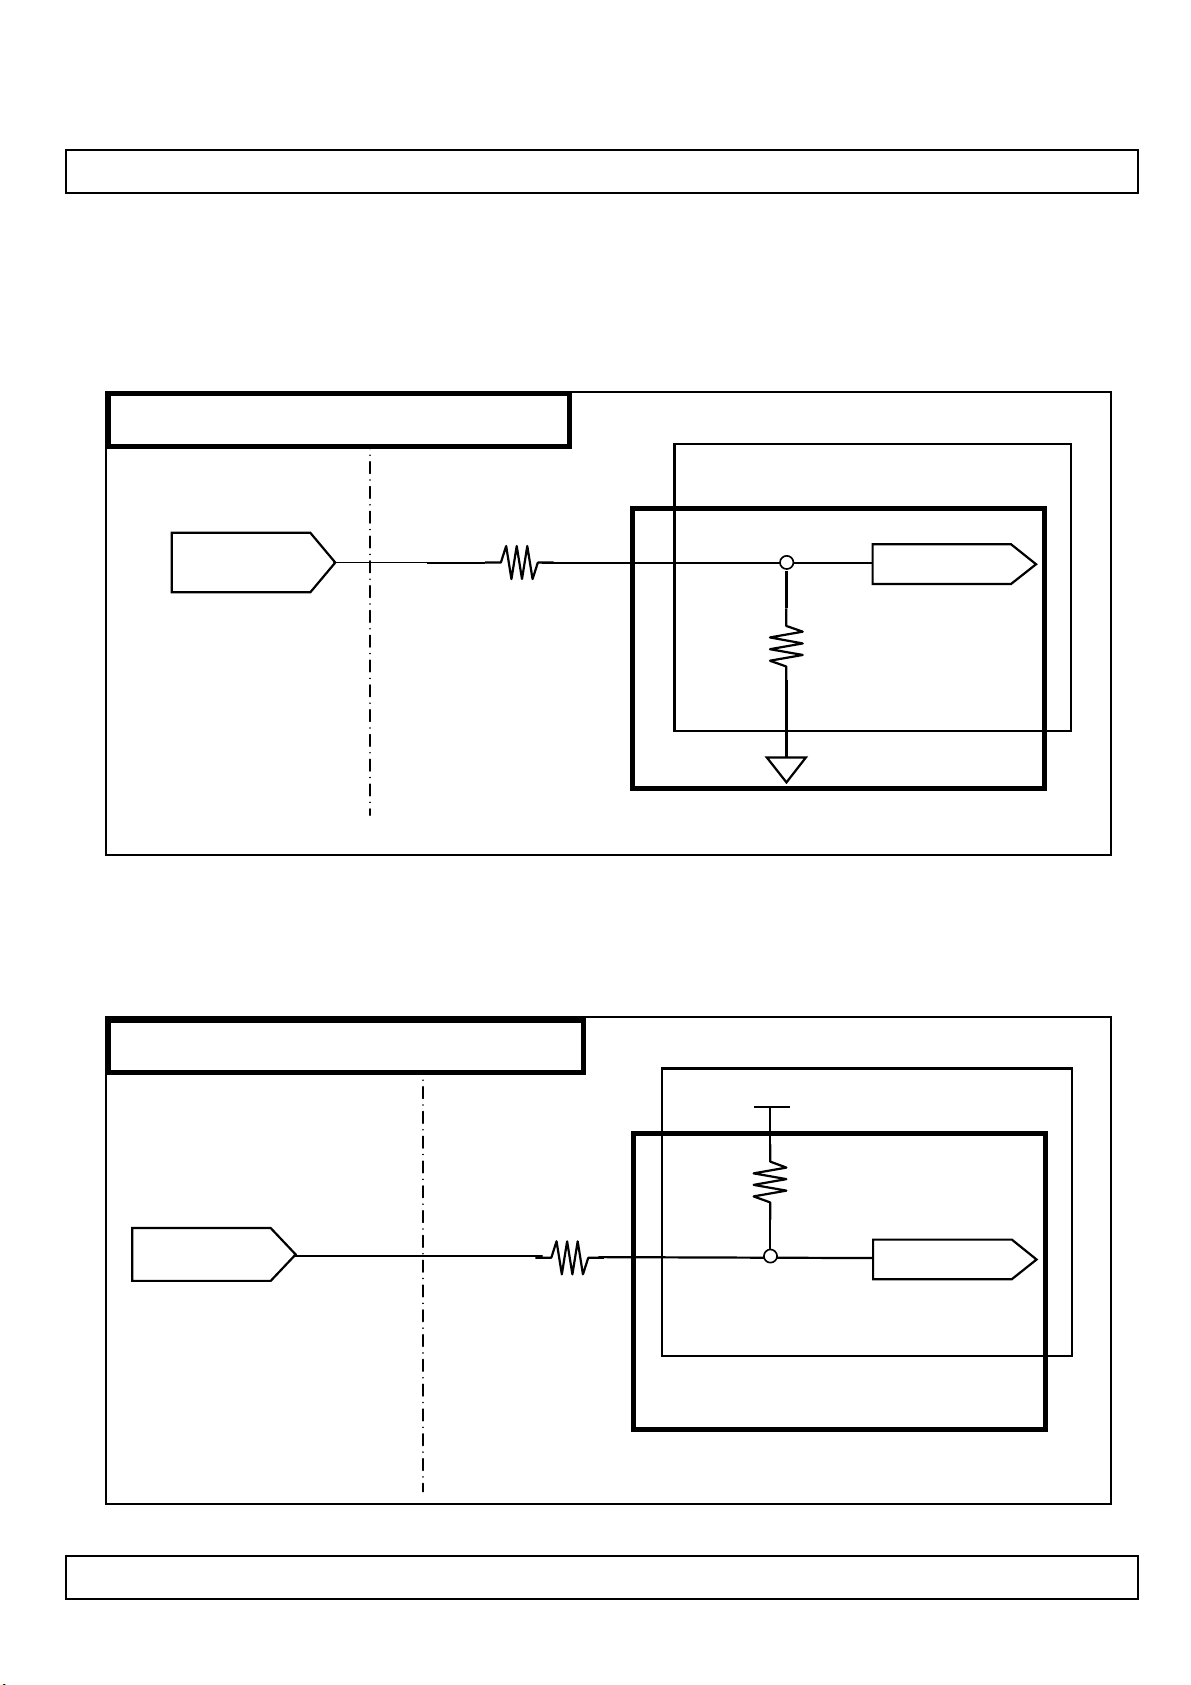
Option Pin Circuit Block Diagram
Circuit Block Diagram of LVDS Format Selection pin
LVDS Select Pin : Pin 7
1KΩ
LVDS Select
(Pin 7)
50 KΩ
LC420WUD
LVDS Select
ASIC
(TCON)
System Side LCM Side
Circuit Block Diagram of Bit Selection pin
Bit Select Pin : Pin 27
1KΩ
Bit Select
(Pin 27)
VCC
50 KΩ
Bit Select
ASIC
(TCON)
Ver. 1.0
System Side
LCM Side
35 /42
Page 36
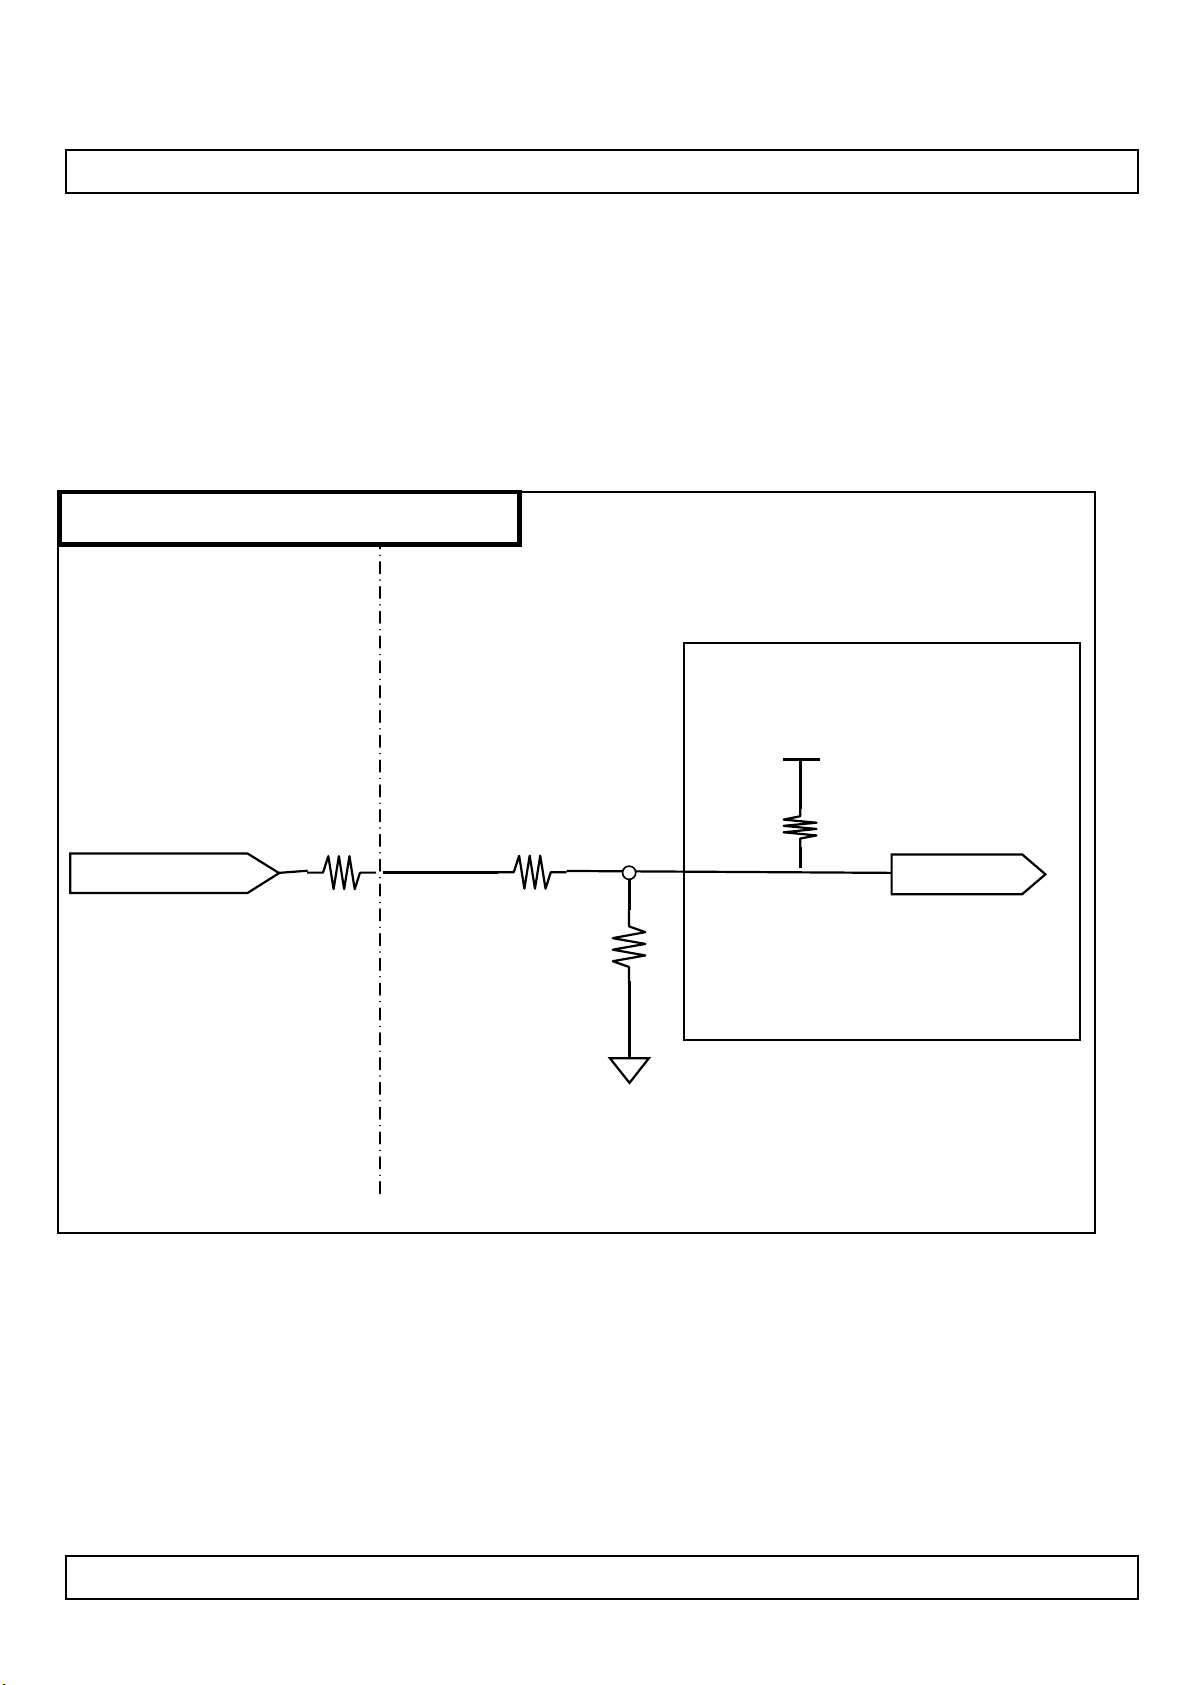
Product Specification
# APPENDIX- VII-2
Option Pin Circuit Block Diagram
Circuit Block Diagram of OPC Enable Selection pin
OPC Enable Pin : Pin 10
LC420WUD
OPC Enable (Pin 10)
System Side LCM Side
R1 ≤ 1KΩ
R1
R2 1KΩ
OPEN
VCC
R5
25KΩ~75KΩ
OPC Enable
R4
ASIC
(TCON)
Ver. 1.0
36 /42
Page 37
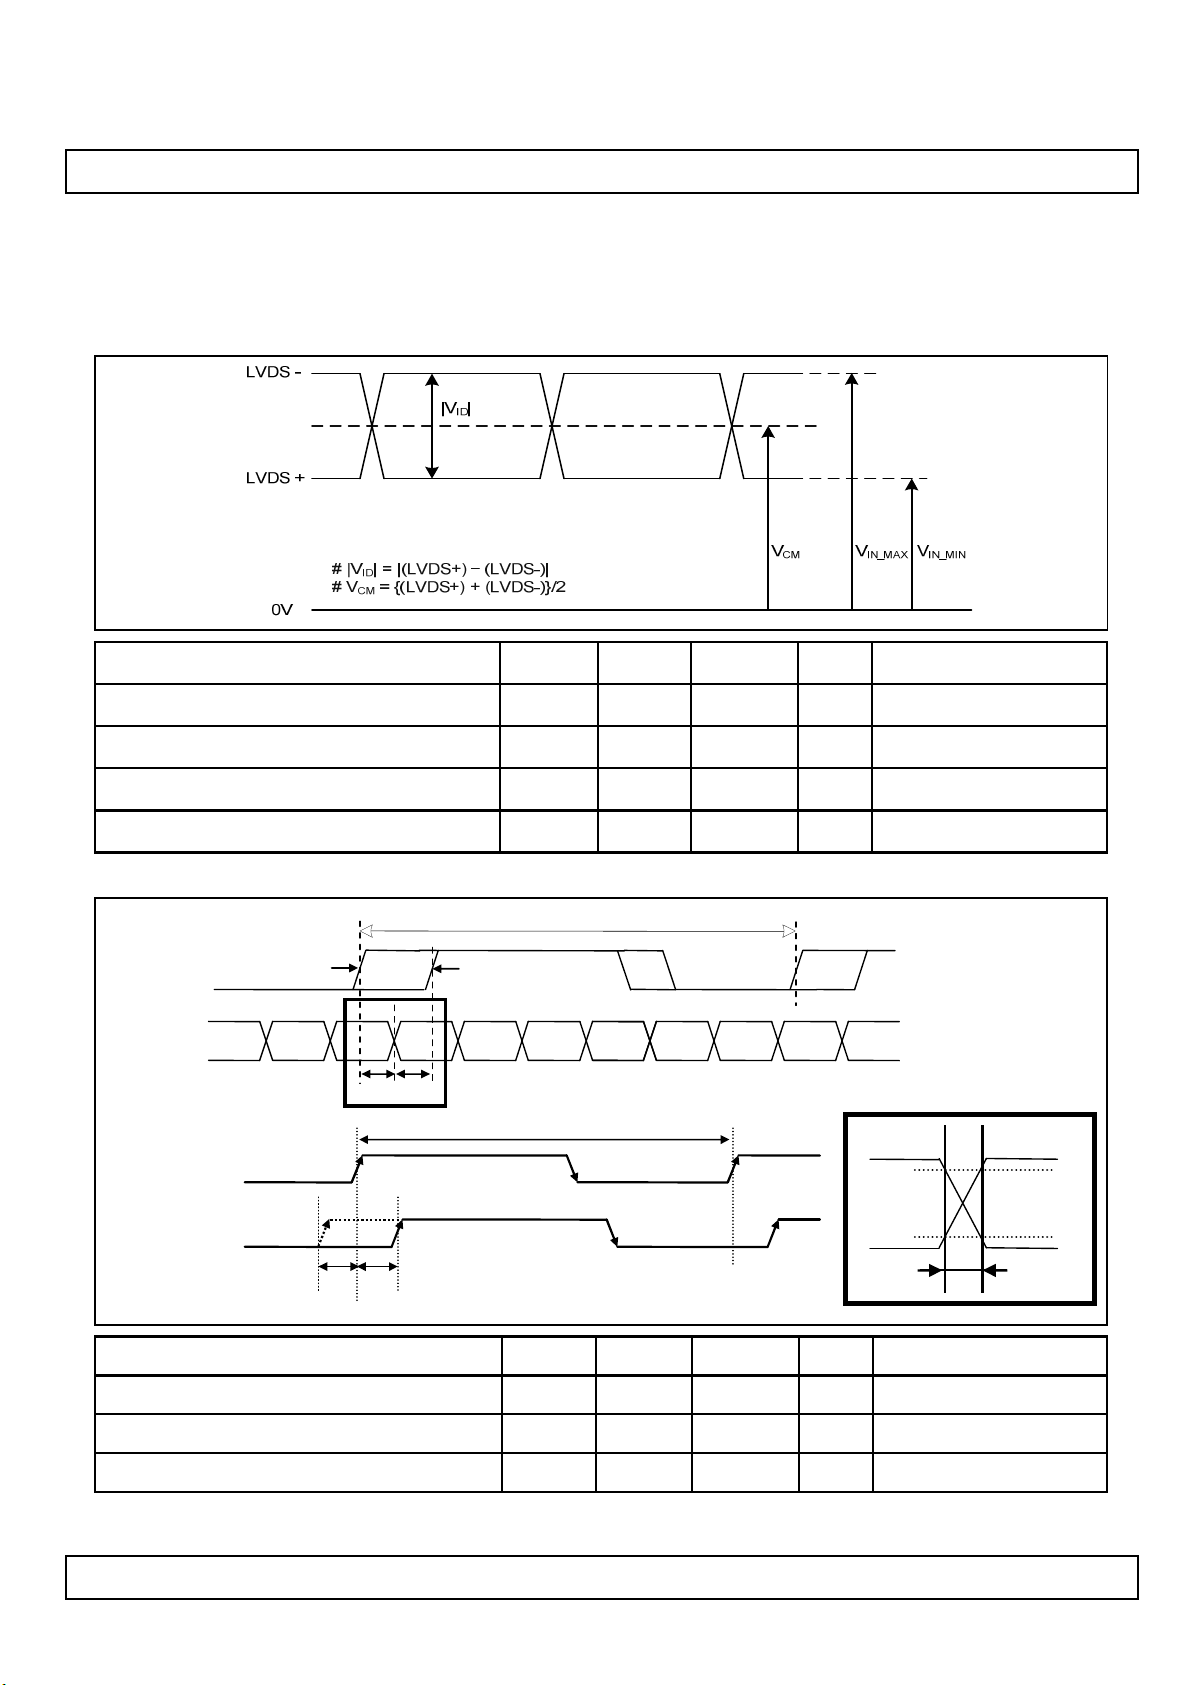
# APPENDIX- VIII-1
1. DC Specification
LC420WUD
Product Specification
LVDS Input characteristics
NotesUnitMaxMinSymbolDescription
-mV600200|VID|LVDS Single end Voltage
LVDS Common mode Voltage
LVDS Input Voltage Range
Change in common mode Voltage
2. AC Specification
LVDS Clock
LVDS Data
LVDS 1’st Clock
LVDS 2nd/ 3rd/ 4thClock
T
skew_minTskew_max
tSKEW
tSKEW
CM
IN
CM
T
clk
A
(F
= 1 /T
clk
)
clk
-V1.51.1V
-V1.80.7V
-mV250ΔV
A
T
clk
80%
20%
t
RF
LVDS Clock to Data Skew Margin
LVDS Clock/DATA Rising/Falling time
LVDS Clock to Clock Skew Margin (Even to Odd)
SKEW
RF
t
SKEW_EO
260 ps(0.3*T
1/7* T
)/7t
clk
clk
Note. All Input levels of LVDS signals are based on the EIA 644 Standard.
Ver. 1.0
NotesUnitMaxMinSymbolDescription
78MHz > Fclk ≥ 70MHzps480t
-
T
clk
-
37 /42
Page 38
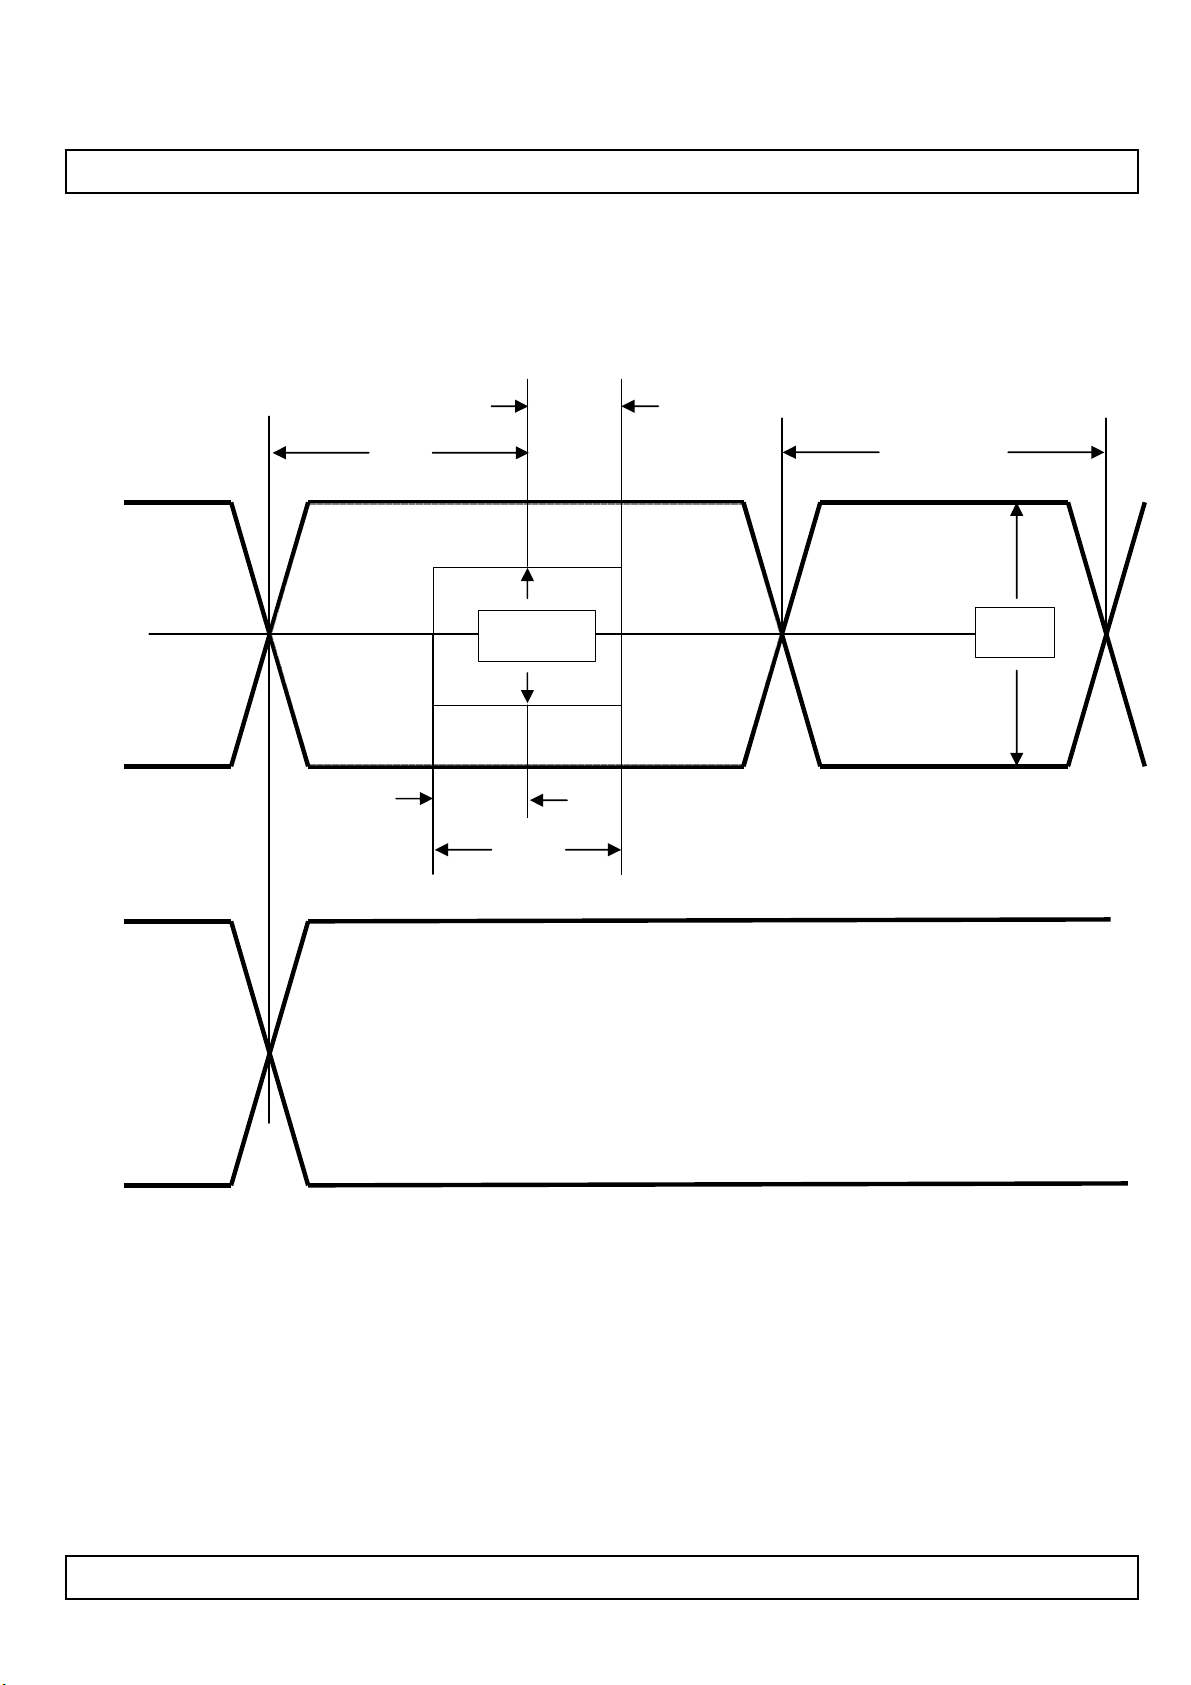
# APPENDIX- VIII-2
LC420WUD
Product Specification
LVDS Input characteristics
360ps
V+
data
Vcm
Vdata
V+
clk
0.5tui
│VID│
360ps
tui
Vfsw
teff
tui : Unit
Interval
Vcm
Vclk
Ver. 1.0
38 /42
Page 39
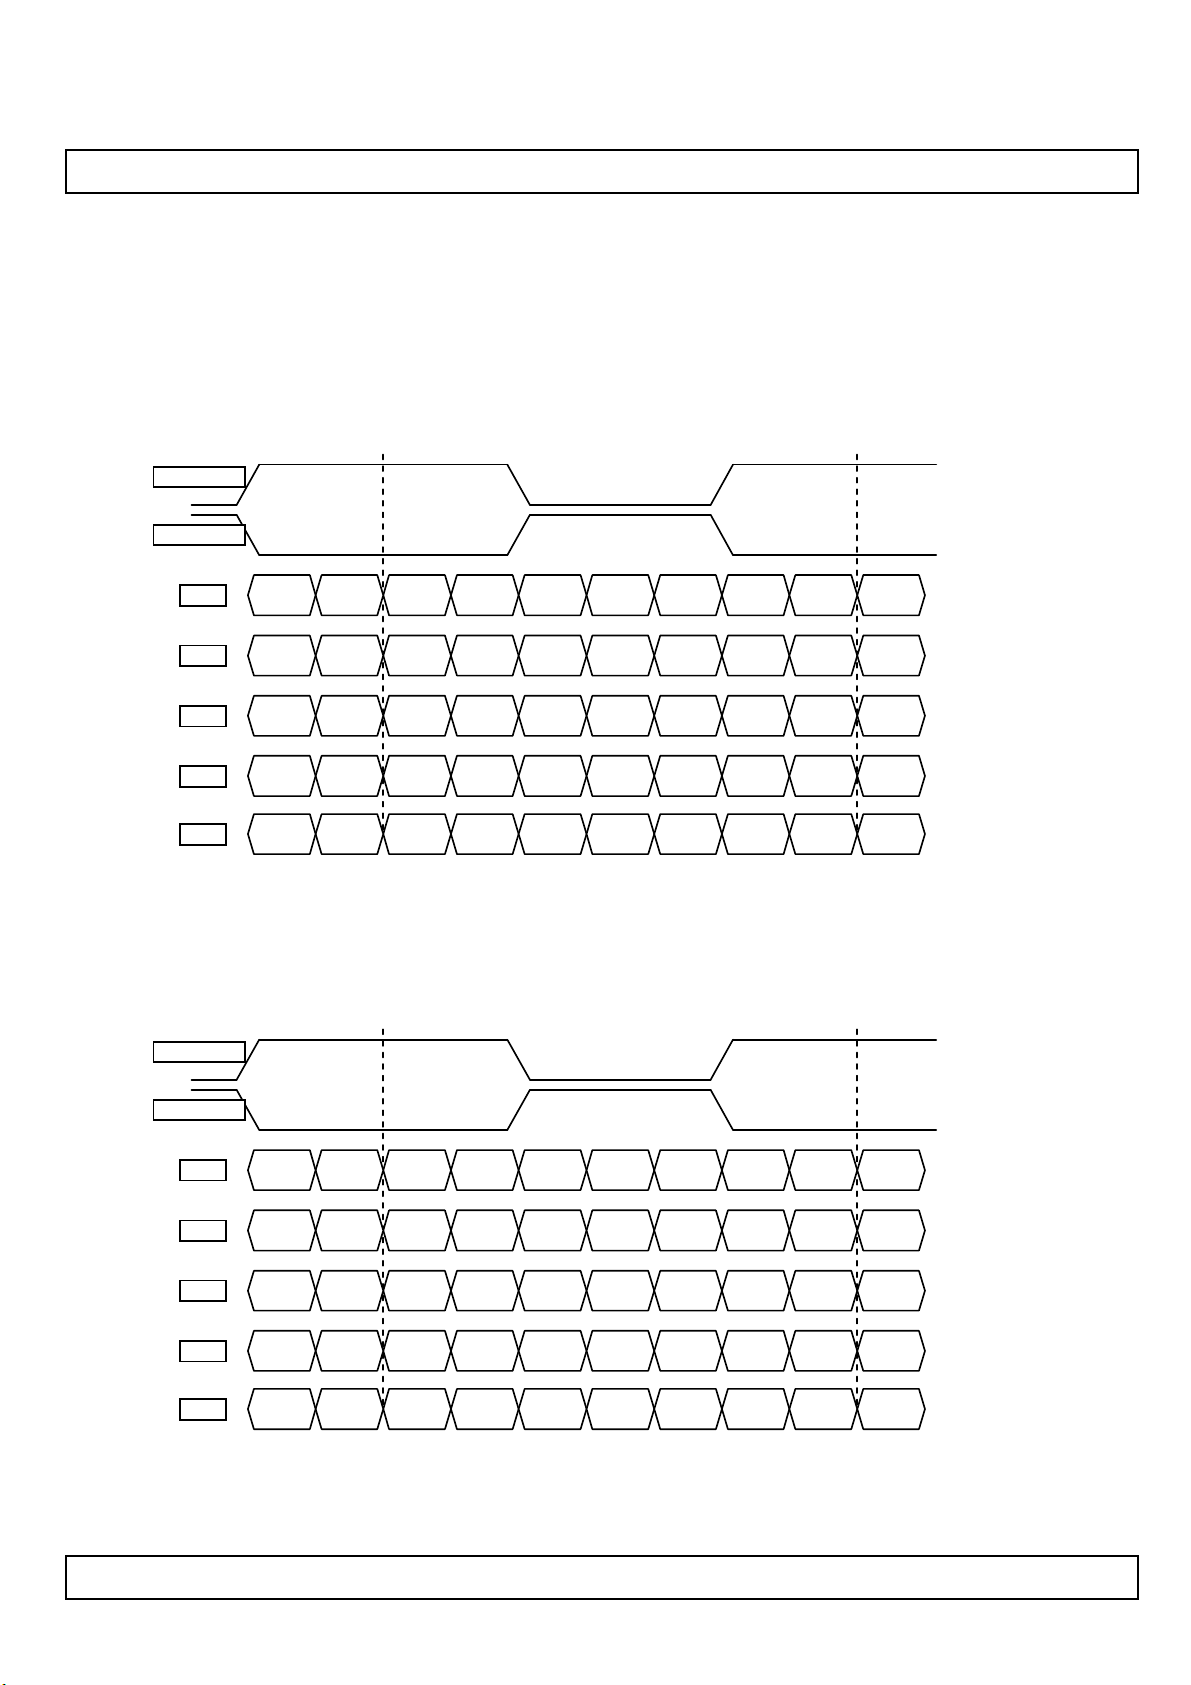
Product Specification
# APPENDIX- IX-1
LVDS Data-Mapping info. (10bit)
■ LVDS Select : “H” Data-Mapping (JEIDA format)
RCLKP
RCLKM
LC420WUD
RAP
RBP
RCP
RDP
REP
R19 R18 R17 R16G14 R15R14’ R14R15’ G14”
B14 G19 G18 G17B15 G16G15’ G15G16’ B15”
V
SYNCHSYNC
B13 B12 G13 G12X R13R12’ R12R13’ X”
B11 B10 G11 G10X R11R10’ R10R11’ X”
B19 B18DE B17B16’ B16B17’ DE”
■ LVDS Select : “L” Data-Mapping (VESA format)
RCLKP
RCLKM
RAP
R15 R14 R13 R12G10 R11R10’ R10R11’ G10”
Ver. 1.0
RBP
RCP
RDP
REP
B10 G15 G14 G13B11 G12G11’ G11G12’ B15”
V
SYNCHSYNC
B17 B16 G17 G16X R17R16’ R16R17’ X”
B19 B18 G19 G18X R19R18’ R18R19’ X”
B15 B14DE B13B12’ B12B13’ DE”
39 /42
Page 40
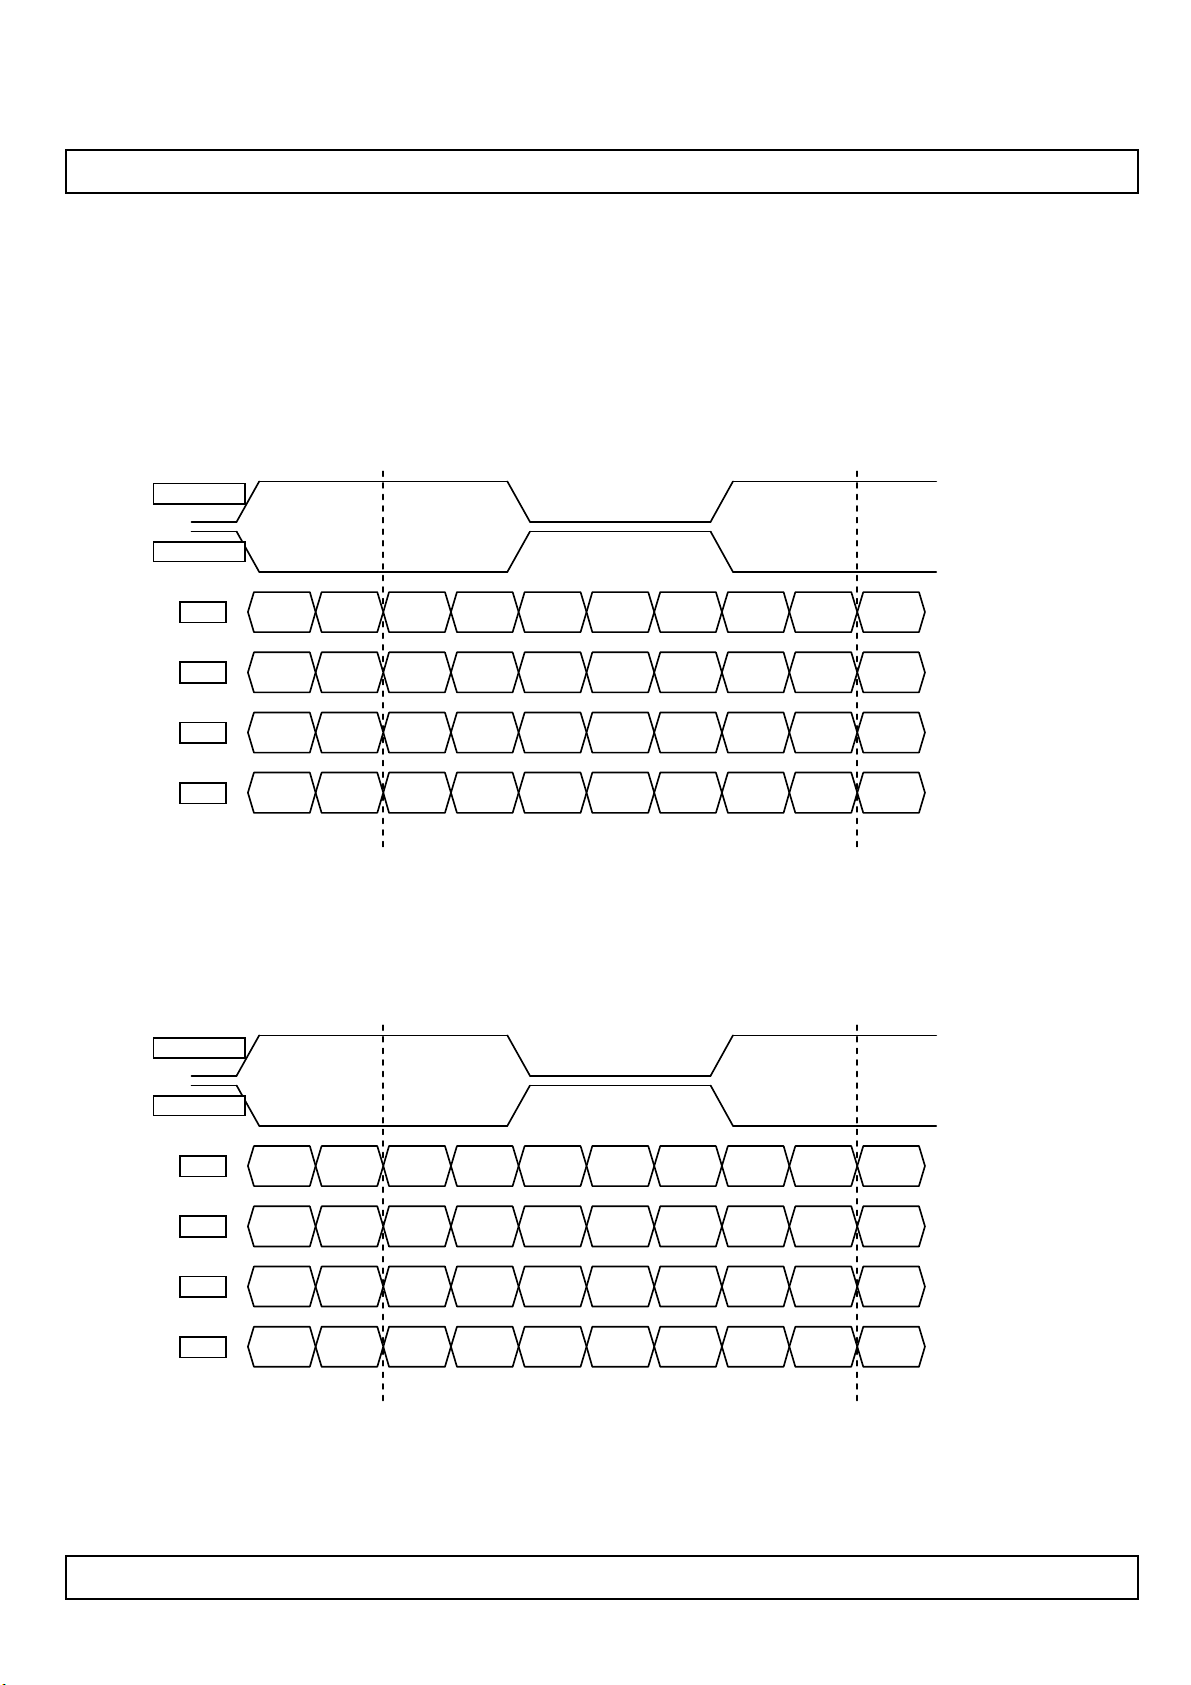
Product Specification
# APPENDIX- IX-2
LVDS Data-Mapping info. (8bit)
■ LVDS Select : “H” Data-Mapping (JEIDA format)
RCLKP
RCLKM
LC420WUD
RAP
RBP
RCP
RDP
R17 R16 R15 R14G12 R13R12’ R12R13’ G12”
B12 G17 G16 G15B13 G14G13’ G13G14’ B13”
V
SYNCHSYNC
B11 B10 G11 G10X R11R10’ R10R11’ X”
B17 B16DE B15B14’ B14B15’ DE”
■ LVDS Select : “L” Data-Mapping (VESA format)
RCLKP
RCLKM
RAP
R15 R14 R13 R12G10 R11R10’ R10R11’ G10”
Ver. 1.0
RBP
RCP
RDP
B10 G15 G14 G13B11 G12G11’ G11G12’ B15”
V
SYNCHSYNC
B17 B16 G17 G16X R17R16’ R16R17’ X”
B15 B14DE B13B12’ B12B13’ DE”
40 /42
Page 41
Product Specification
# APPENDIX- X-1
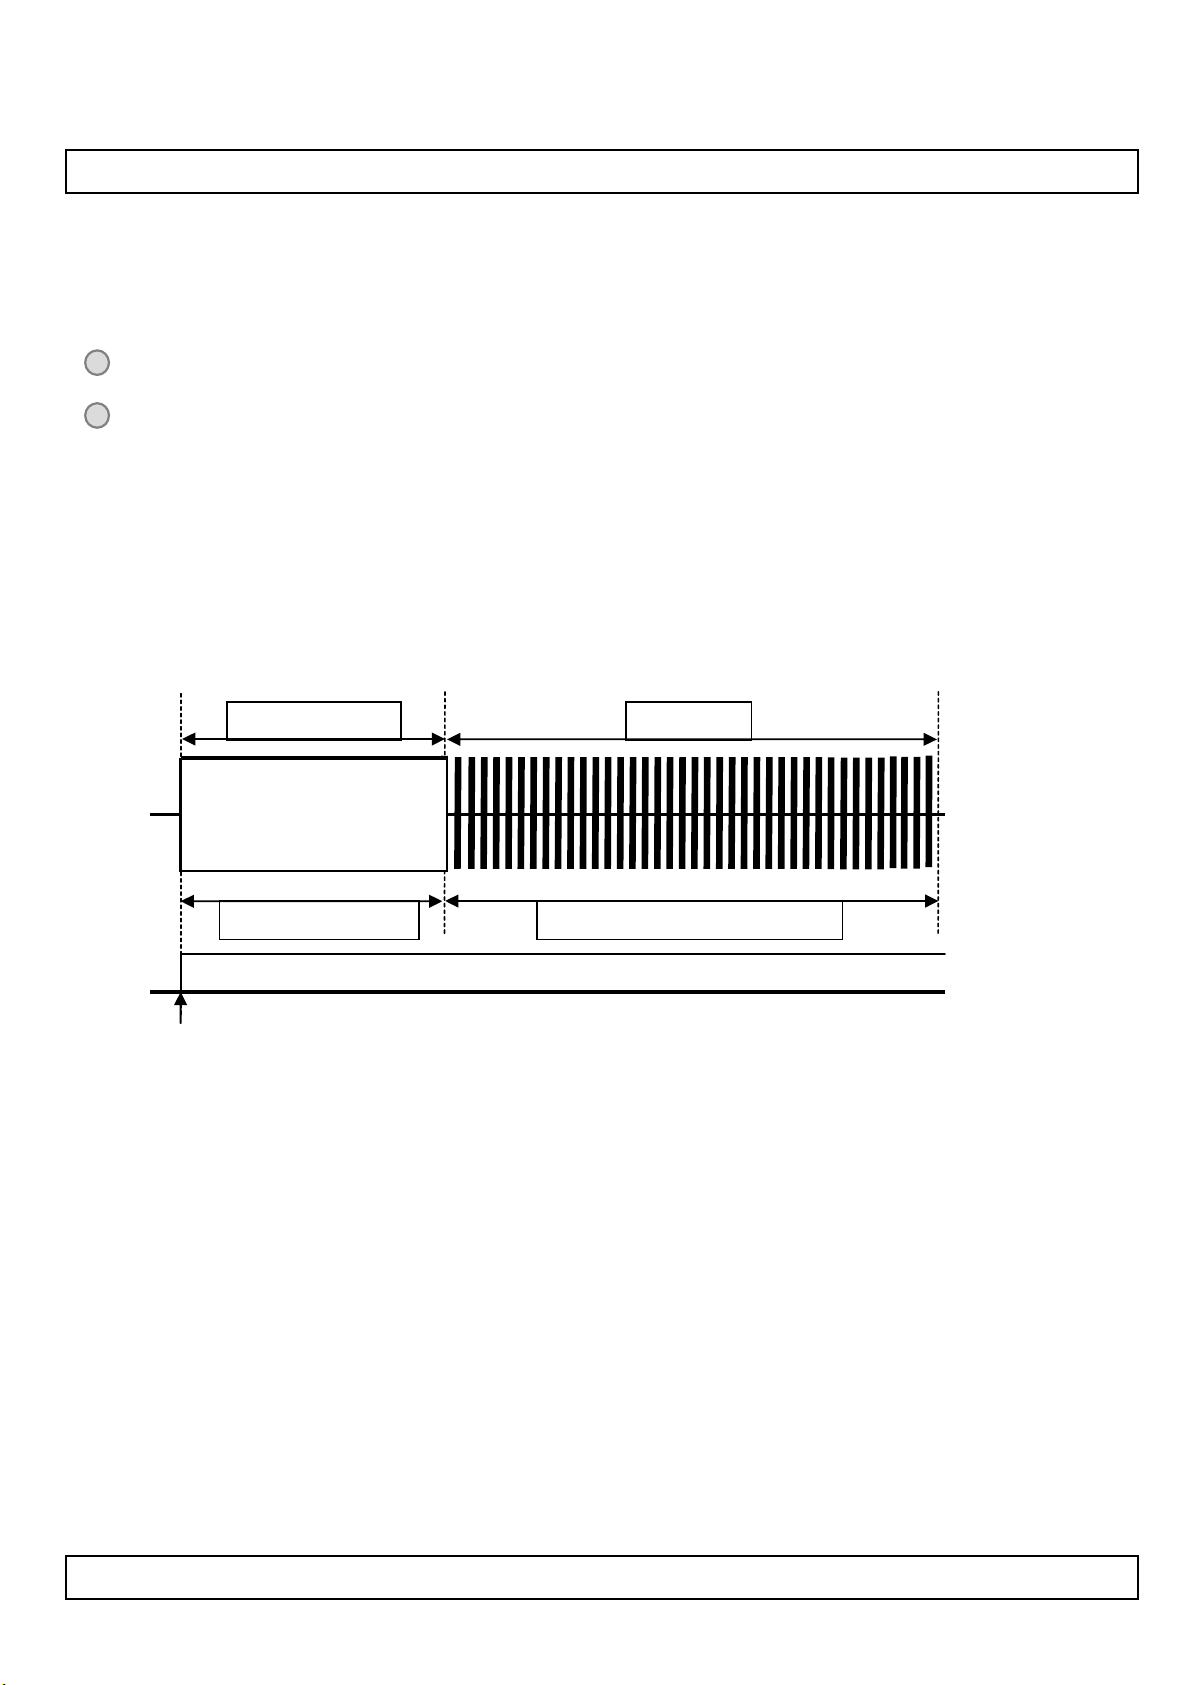
Mega DCR using condition(1)
After Inverter ON signal, PWM Duty 100% should be sustained during 2sec.
It is recommended not to sustain more than 10 min for Deep Dimming
( PWM Low Duty 0%~20%).
The deep dimming must be used very carefully due to limitation of lamp characteristics and specification.
1) For stable lamp on, its duty condition should follow below the condition.
After Inverter ON signal, T0 duration should be sustained.
Output current
LC420WUD
T0 = Min 1 [sec]
PWM High Duty(Min ~ Max Duty)PWM Duty Max Duty
LAMP ON
Inverter ON signal
2) Low duty(0%~Min duty) of the inverter output current, B/L may not satisfy some of LCM specification.
- Duration : the low duty operation(0% ~ Min duty) must be limited within 10 minutes for one time operation.
- Ratio : the period of the low duty operation must be less than 1/5 compare to that of the high duty
operation(Min~Max Duty) in a certain period to prevent unwanted operation.
Min 3[min]
- FOS : partial darkness or darkness of center area during the low duty might be happened due to
insufficient lamp current.
- Warm up : the low duty must be used 3 min after the lamps “ON”. In case of low temperature, more
warm up time may be needed.
Ver. 1.0
41 /42
Page 42
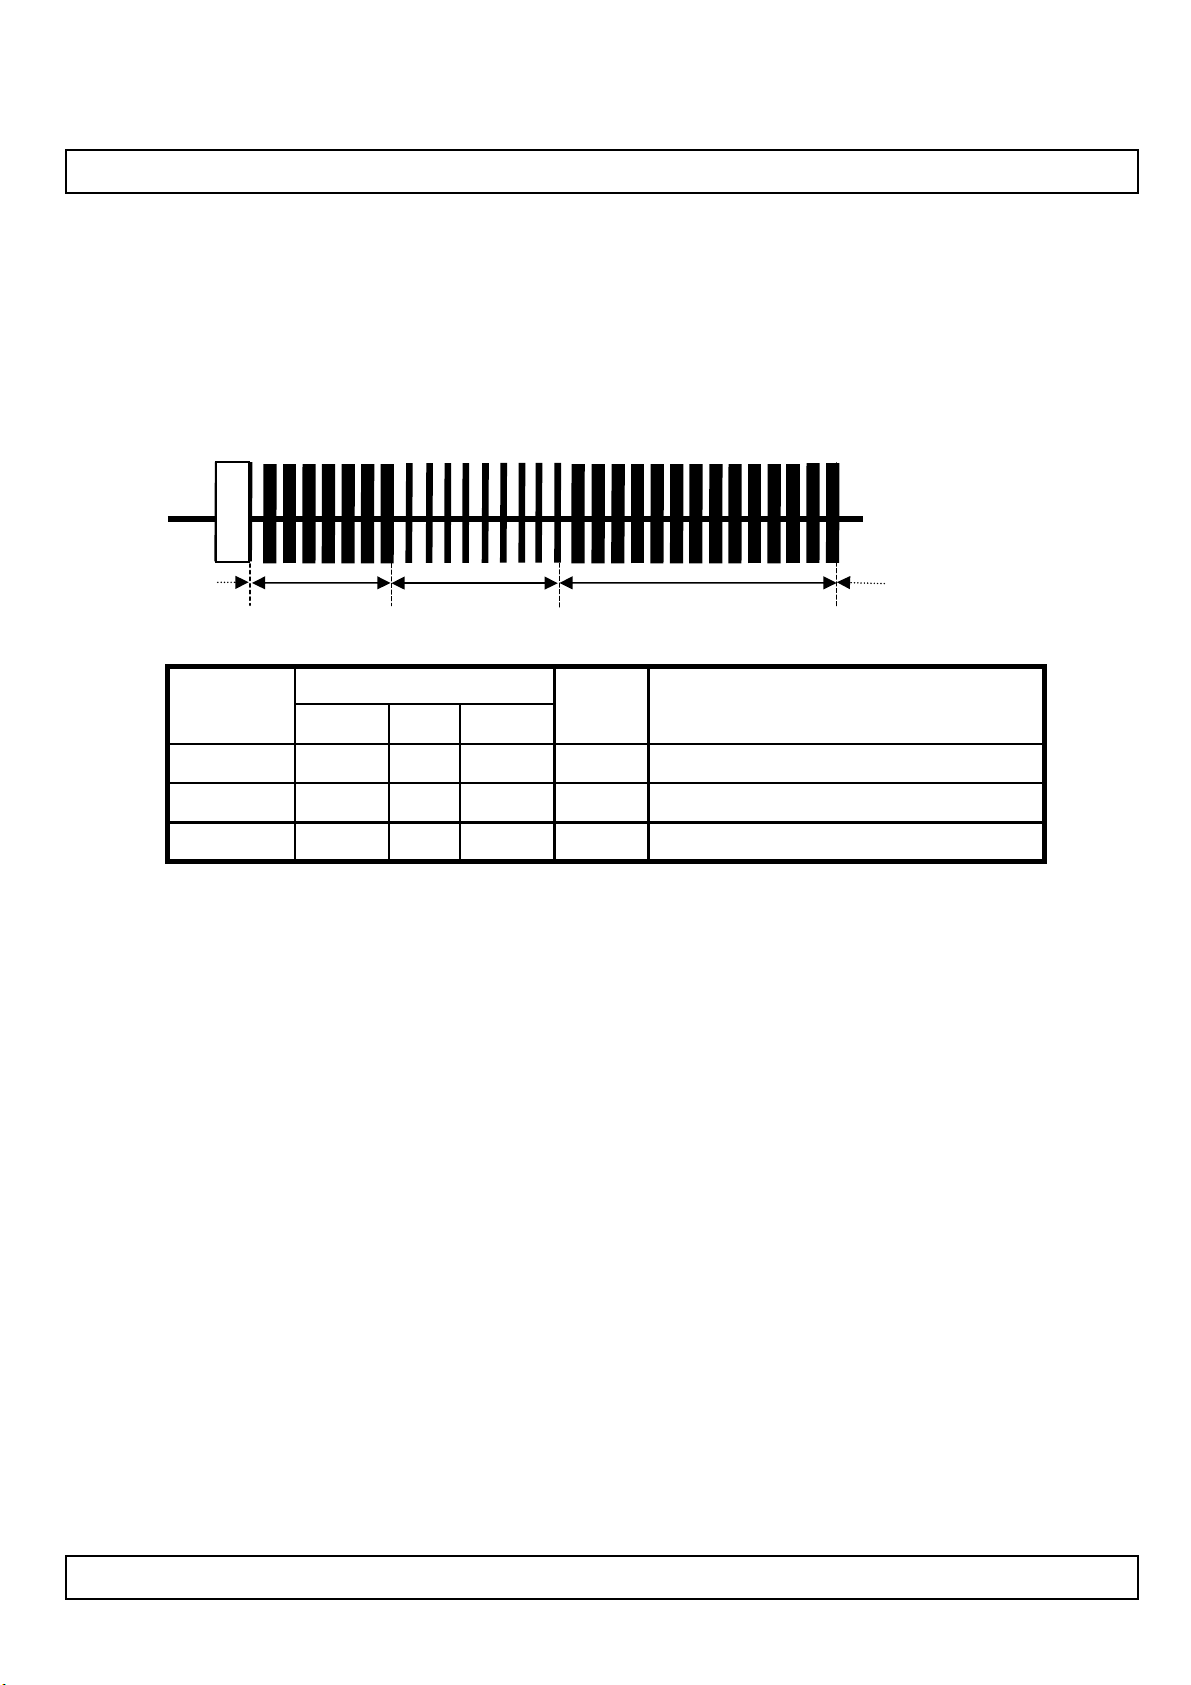
# APPENDIX- X-2
Output current
LC420WUD
Product Specification
Mega DCR using condition(2)
T0
Value
Parameter
T2 T3T1 T2
NoteUnit
MaxTypMin
Min ~ Max Dutymin--3T1
0% ~ Min Dutymin10--T2
Min ~ Max Dutymin--T2 x 5T3
3) The output current duty may not be same as input PWM duty due to rise/fall time of output.
4) Following the recommended conditions as mentioned, there is no difference of lamp
lifetime between conventional method and new one.
Ver. 1.0
42 /42
 Loading...