

Page 1

OptiPac 6611MD
User's Manual
Manual No. 11-16611-30
Revision A
© Copyright 2001
Bering Technology, Inc.
2827 Aiello Drive
San Jose, CA 95111-2155
(408) 229-6400
Page 2

Page 3

OVERVIEW
Important Notice
Important Notice
Important FCC
Information
Copyright © 2001 by Bering Technology, Inc. All rights reserved. No part of this
document may be reproduced in any way without the express written
permission of Bering Technology, Inc.
Printed in the United States of America.
The information contained in this document is subject to change without notice.
Every reasonable precaution has been taken in the preparation of this manual
to insure its accuracy. However, Bering Technology, Inc. assumes no liability
resulting from any errors or omissions in this manual, or from the use of the
information contained herein, nor does it make a commitment to update the
information contained herein.
OptiPac is a trademark of Bering Technology, Inc.
HP 1000 and HP7906 are a trademarks of Hewlett Packard Corp.
This peripheral device generates and uses radio frequency energy and if it is
not installed and used properly, that is, in strict accordance with this manual,
it may cause interference to radio and television reception. It has been type
tested and found to comply with the limits for a Class-A computing device in
accordance with the specifications in subpart J of part 15 of FCC Rules, which
are designed to provide reasonable protection against such interference when
operated in a commercial environment. However, there is no guarantee that
interference will not occur in a particular installation. Operation of this
equipment in a residential area is likely to cause interference and is up to the
user, at his own expense, to take whatever measures may be required to correct
the interference. You can test to see whether this equipment does cause
interference with radio or television reception by turning the disk drive off and
on . If it is causing i n te rference, try to c o r re ct the problem by on e or m o re of the
following measures:
Warning:
CAUTION
LASER
• Be sure you're using shielded interconnect cables.
• Reorient the receiving antenna.
• Relocate the drive with respect to the receiver.
• Move the receiver away from the disk drive, or vice versa.
• Plug the computer into a different outlet so that the computer and receiver
are on different circuits.
If necessary, consult your dealer or an experienced radio/television technician
for additional suggestions. You may also find a booklet prepared by the Federal
Communications Commission helpful. It is entitled How to Identify and Resolve
Radio-TV Interference Problems. Request Stock No. 004-000-00345-4, from the
U.S. Government Printing, Washington, D.C., 20402.
To prevent fire or shock hazard, do not expose the unit to rain or
moisture. To avoid electrical shock, do not open the cabinet. Refer
servicing to qualified personnel only.
The OptiPac product is classified as a CLASS 1 LASER PRODUCT.
A CLASS 1 LASER PRODUCT label is located on the internal drive
mechanism.
OptiPac 6611MD User's Manual iii
Page 4

OVERVIEW
Printing History
Printing History
New revision levels of the manual indicate a new rewrite of the
manual. This may include new installation instructions for a
particular operating system, or a new ROM version of the OptiPac
subsystem which affects functionality. You can determine the ROM
version of your OptiPac by using the front panel LCD controls. See
chapter 4 for details.
If you have upgraded your OptiPac and the LCD functions no longer
match those described in this manual, you should contact Bering
Customer Service to determine the proper revision of the
OptiPac
6611MD User’s Manual required for your OptiPac subsystem.
Date = Date this manual was printed
Rev = Revision level of this manual
Date Rev Changes to manual
July 2001 A First printing
iv OptiPac 6611MD User's Manual
Page 5

OVERVIEW
Warranty Statement
Warranty
Statement
OptiPac products sold in the U.S.A. and Canada carry a standard one year
warranty against defects in materials and workmanship.* During the warranty
period, Bering will, at its option, repair or replace equipment which proves to
be defective.
OptiPac cartridge media is warranted against defects for one year from the date
of purchase. If the media becomes defective, Bering will replace it upon receipt
of the defective media from the customer.
All repairs will be performed at the factory. Any other arrangement, such as onsite service, will be at your expense. Before any product is returned for repair,
a Return Materials Authorization number (RMA#) must first be obtained from
a Customer Service representative.
Customer Service
Bering Technology, Inc.
2827 Aiello Drive
San Jose, CA 95111-2155
(408) 229-6400
FAX (408) 229-6401
Email: [email protected]
The selection and use of media, supplies, and consumables is the customer's
responsibility. Bering reserves the right to exclude from the warranty any
damage caused by misuse of the product, unauthorized modification, shipping
damage, non-Bering-approved media, interface, software, or cleaning supplies.
NO OTHER WARRANTY IS EXPRESSED OR IMPLIED, INCLUDING, BUT NOT
LIMITED TO, THE IMPLIED WARRANTIES OR MERCHANTABILITY AND FITNESS
FOR A PARTICULAR PURPOSE. BERING SHALL NOT BE LIABLE FOR
CONSEQUENTIAL DAMAGES, DIRECTLY OR INDIRECTLY RELATED TO THE USE
OR PERFORMANCE OF BERING PRODUCTS.
For products sold outside the U.S.A. and Canada, contact your local Bering
distributor, representative, or dealer for warranty terms.
OptiPac 6611MD User's Manual v
Page 6

OVERVIEW
Configuration Settings
Configuration
Settings
Use this table to record the configuration settings of your Bering
OptiPac Magneto-optical disk drive subsystem.
Model __________________________
Serial Number __________________
Time Zone _______________
Format Switch
Protect rings
Protect ring H00
Emulation
❏
on
❏
on
❏
on
❏
7906
❏
7920
❏
❏
❏
off
off
off
12/24 hour clock
❏
7925
❏
12
❏
24
vi OptiPac 6611MD User's Manual
Page 7

Table of Contents
OVERVIEW
Table of Contents
1 INTRODUCTION . . . . . . . . . . . . . . . . . . . . . . . . . . . . . . . . . . . . . . . . . 1
Features. . . . . . . . . . . . . . . . . . . . . . . . . . . . . . . . . . . . . . . . . . . . . 1
Compatibility . . . . . . . . . . . . . . . . . . . . . . . . . . . . . . . . . . . . . 2
Regenerating the Operating System . . . . . . . . . . . . . . . . . . 2
Magneto-Optical Technology . . . . . . . . . . . . . . . . . . . . . . . . . . . 2
Conventions in this Manual . . . . . . . . . . . . . . . . . . . . . . . . . . . . 3
Unpacking . . . . . . . . . . . . . . . . . . . . . . . . . . . . . . . . . . . . . . . . . . . 4
2 INSTALLING THE OPTIPAC . . . . . . . . . . . . . . . . . . . . . . . . . . . . . . . . 5
Quick-Start Procedure . . . . . . . . . . . . . . . . . . . . . . . . . . . . . . . . . 5
Installing the MAC Disk Interface. . . . . . . . . . . . . . . . . . . . . . . . 6
Connecting the OptiPac Drive . . . . . . . . . . . . . . . . . . . . . . . . . . . 7
3 OPERATING THE DISK DRIVE & CARTRIDGE. . . . . . . . . . . . . . . . . . 9
6611MD Controls . . . . . . . . . . . . . . . . . . . . . . . . . . . . . . . . . . . . . 9
MO Controls . . . . . . . . . . . . . . . . . . . . . . . . . . . . . . . . . . . . . . . . 10
Loading a Cartridge. . . . . . . . . . . . . . . . . . . . . . . . . . . . . . . 10
Ejecting a Cartridge. . . . . . . . . . . . . . . . . . . . . . . . . . . . . . . 11
Write-Protecting a Cartridge. . . . . . . . . . . . . . . . . . . . . . . . 12
4 OPTIPAC SYSTEM FUNCTIONS . . . . . . . . . . . . . . . . . . . . . . . . . . . . 13
System Menu. . . . . . . . . . . . . . . . . . . . . . . . . . . . . . . . . . . . . . . . 14
Main Menu. . . . . . . . . . . . . . . . . . . . . . . . . . . . . . . . . . . . . . . . . . 15
Change Ring . . . . . . . . . . . . . . . . . . . . . . . . . . . . . . . . . . . . . 15
Unload Cartridge . . . . . . . . . . . . . . . . . . . . . . . . . . . . . . . . . 16
Configurations . . . . . . . . . . . . . . . . . . . . . . . . . . . . . . . . . . . 16
Utilities . . . . . . . . . . . . . . . . . . . . . . . . . . . . . . . . . . . . . . . . . 16
Display Time and Messages . . . . . . . . . . . . . . . . . . . . . . . . 16
Configurations Submenu. . . . . . . . . . . . . . . . . . . . . . . . . . . . . . 17
Change Format Switch . . . . . . . . . . . . . . . . . . . . . . . . . . . . 17
Change Protect Rings . . . . . . . . . . . . . . . . . . . . . . . . . . . . . 18
Change Protect Ring H00 . . . . . . . . . . . . . . . . . . . . . . . . . . 18
Change Emulation . . . . . . . . . . . . . . . . . . . . . . . . . . . . . . . . 18
Use 12 / 24 Hour Clock . . . . . . . . . . . . . . . . . . . . . . . . . . . 19
Set Time . . . . . . . . . . . . . . . . . . . . . . . . . . . . . . . . . . . . . . . . 19
Set Date . . . . . . . . . . . . . . . . . . . . . . . . . . . . . . . . . . . . . . . . 19
Utilities Submenu . . . . . . . . . . . . . . . . . . . . . . . . . . . . . . . . . . . . 21
Ring Utilities Submenu . . . . . . . . . . . . . . . . . . . . . . . . . . . . 22
Fixed Disk Utilities Submenu . . . . . . . . . . . . . . . . . . . . . . . 27
Cartridge Utilities Submenu . . . . . . . . . . . . . . . . . . . . . . . . 30
Tests Submenu . . . . . . . . . . . . . . . . . . . . . . . . . . . . . . . . . . 33
5 CARING FOR THE DISK DRIVE & CARTRIDGE . . . . . . . . . . . . . . . . 35
General Safeguards . . . . . . . . . . . . . . . . . . . . . . . . . . . . . . . . . . 35
Cartridge Care . . . . . . . . . . . . . . . . . . . . . . . . . . . . . . . . . . . . . . 36
Preventive Maintenance . . . . . . . . . . . . . . . . . . . . . . . . . . . . . . . 36
OptiPac 6611MD User's Manual vii
Page 8

OVERVIEW
Table of Contents
6 TROUBLESHOOTING & SERVICE . . . . . . . . . . . . . . . . . . . . . . . . . . .37
Before You Do Anything Else. . . . . . . . . . . . . . . . . . . . . . . . . . .37
Error Codes and LCD Messages . . . . . . . . . . . . . . . . . . . . .37
Fuse Replacement . . . . . . . . . . . . . . . . . . . . . . . . . . . . . . . . . . . .37
If You're Still Having Problems . . . . . . . . . . . . . . . . . . . . . . . . .38
A SPECIFICATIONS . . . . . . . . . . . . . . . . . . . . . . . . . . . . . . . . . . . . . . . .39
1.3GB Cartridge Disk Drive . . . . . . . . . . . . . . . . . . . . . . . . . . . .39
1.3GB Fixed Disk . . . . . . . . . . . . . . . . . . . . . . . . . . . . . . . . . . . . .40
General. . . . . . . . . . . . . . . . . . . . . . . . . . . . . . . . . . . . . . . . . . . . .41
B RACK MOUNT . . . . . . . . . . . . . . . . . . . . . . . . . . . . . . . . . . . . . . . . . .43
Installation. . . . . . . . . . . . . . . . . . . . . . . . . . . . . . . . . . . . . . . . . .43
INDEX . . . . . . . . . . . . . . . . . . . . . . . . . . . . . . . . . . . . . . . . . . . . . . . . .45
viii OptiPac 6611MD User's Manual
Page 9

1
INTRODUCTION
Features
Note:
1
Congratulations on purchasing what we think is the finest removable
cartridge system on the market. Bering OptiPac drives are built for years
of reliable service. We're sure you'll agree as you begin to work with
your drive.
The Bering OptiPac 6611MD subsystem is a 1.3GB Magneto-Optical
removable cartridge disk drive with a 1.3GB fixed disk compatible with
Hewlett-Packard 1000E, M, or F computers running RTE-IVB and RTEVI. In this manual we refer to the Bering OptiPac disk drive as OptiPac
and all HP systems as computer, unless otherwise indicated.
The Bering OptiPac 6611MD magneto-optical cartridge drive supports
1.3GB and 640MB cartridges. These cartridges are available through
Bering Technology’s sales department.
Serving a wide range of storage needs, the OptiPac comes in the
following configuration with HP7906M emulation. This provides a plug
and play solution to the aging inventory of HP7906M, 7920, and 7925
disk drives.
• 6611MD – a 1.3GB Magneto-Optical cartridge drive with a 1.3GB fixed
disk
The OptiPac 6611MD subsystem uses a 3.5 -inch removable cartridge
which can store 1.3GB. This means:
• Each cartridge contains multiple rings, so physical removal is not
required to change to another ring. Each ring emulates a 10MB HP
7906M cartridge.
• Your storage capacity is limited only by the number of cartridges you
use.
• Your data is portable and secure. Just remove the cartridge from the
drive and take it with you, or store it in a safe place.
• Your data cartridge is protected in a durable case.
• Your OptiPac can be used to back up the data on fixed disks.
The OptiPac provides fast, reliable storage that's always on hand. No
software or hardware modifications are required. The OptiPac supports
the AMIGO HP disk command sets.
The fixed disk and each cartridge is split into multiple 10.1 MB Rings,
which emulate a 10MB cartridge in the HP 7906M. The fixed disk has
100 (H0–H99) rings and each removable 1.3GB cartridge has 100 rings
(0–99), depending on the cartridge capacity and sector size. Selecting a
OptiPac 6611MD User's Manual 1
Page 10

▲
DANGER:
1
INTRODUCTION
Magneto-Optical Technology
ring from the front panel of the OptiPac is equivalent to changing the
cartridge in the 7906M. The first ring on the fixed disk (H00) emulates
the fixed disk in the 7906M, and is not accessible from the front panel
controls.
The rings on the fixed disk will all have an ID on the LCD display
beginning with “H.” Each ring on the removable cartridge is just a
number. So ring 23 on the hard drive will be displayed as “H23,” while
ring 23 on the cartridge will be displayed as “23.”
Use of the OptiPac other than as prescribed in this manual may result in
exposure to hazardous invisible laser radiation if the case is open during
operation. Avoid direct exposure to laser radiation. Do not operate the
OptiPac while the cover is removed.
Compatibility
Regenerating the
Operating System
MagnetoOptical
Technology
The OptiPac subsystems read, write, and format ISO 128MB, 230MB,
640MB cartridges, and the GIGAMO 1.3GB MO cartridge. The number of
rings is smaller on any cartridge smaller than 1.3GB. Use the “Show
Cartridge Information” function using the front panel control buttons
to determine the number of rings on an inserted cartridge.
Your HP operating system does not require regeneration if the 2000MX
MAC controller board replaces an HP 13037 MAC controller in the same
slot where the HP MAC controller was removed from.
If the 2000MX is inserted into any other slot, the operating system will
have to be regenerated.
All of the Bering OptiPac disk drives are based on magnetic and optical
technology. Like hard disks, a Magneto-Optical drive writes data to the
cartridge using a strong magnet that changes the magnetic fields at
specific locations from 1's to 0's and vice versa. But because of the
polycarbonate surface of the cartridge, the magnet is not powerful
enough to change the polarity of a bit by itself. This is where the optical
part of the write process comes in. In order for the magnet to change
the polarity of a bit, the area must be heated to a high temperature by
a focused, fine-point laser.
Because of the polycarbonate substrate on the cartridge, data stored on
Magneto-optical cartridges is highly secure for a long period of time.
The estimated storage life of data stored on this media is greater than
twenty years. Also the magnetic head does not “float” next to the surface
such as fixed disks. This means it is virtually impossible for the head
to crash.
2 OptiPac 6611MD User's Manual
Page 11

INTRODUCTION
Conventions in this Manual
Conventions in
this Manual
We'll use the following conventions to make the information in this
manual more clear and predictable:
• Keys on the keyboard are indicated by capital letters enclosed in square
brackets, e.g., [ENTER], regardless of whether the characters on your
keys are actually capitalized. On the other hand, buttons on the OptiPac
are indicated by underlined capital letters alone followed by the word
button, e.g.,
• A font
ENTER
like this
button.
indicates text you should see on the LCD. The bold font
will otherwise follow the conventions herein.
• Italics in any type face, like this, have a limited number of possible
meanings:
Words as words, letters as letters, or numerals as numerals, e.g., “the
word enter can be confused with the key on your keyboard, therefore
we will use type in its place.”
Titles of books, booklets, or disks, e.g., Bering OptiPac 6611MD User's
Manual
Symbolic of variable words, characters, or numerals. That is, something
must be in the variable's place, but the exact contents vary with different
situations and cannot be specified without knowing a particular
situation. Variable is not synonymous with optional. Frequently the
letter(s) n (for numerals), or x (for words or characters) are used to hold
the place of the variable, e.g., “the program will respond that there are
n widgets.”
OptiPac 6611MD User's Manual 3
Page 12

1
INTRODUCTION
Unpacking
Unpacking
Carefully unpack your OptiPac near the spot where you want to set it
up, noting the packing method as you go. Save the packing materials,
they'll come in handy if you ever want to ship the unit.
Besides this manual, you'll find:
• the OptiPac
• a removable data cartridge
• a SCSI terminator
• a power cable
• a warranty card
If any item is missing, please call your dealer or call
Bering Customer Service at (408) 229-6400.
4 OptiPac 6611MD User's Manual
Page 13

2
INSTALLING THE OPTIPAC
This chapter describes the installation procedure for the OptiPac and
is divided into two sections. The “Quick-Start Procedure” section
enables experienced users to begin operation right away. The
“Connecting the OptiPac Drive” section helps new users connect the
disk drive before going on to the next chapter for additional operating
instructions.
Quick-Start
Procedure
This section describes the quick-start procedure to set up the OptiPac
for use on a HP 1000 system. Most of the parameters are already set at
the factory. There may be some adjustments necessary before the
OptiPac can operate in your particular environment. Refer to your
operating system manuals for information.
These instructions assume you are replacing an HP 13037 MAC
controller with the Bering 2000MX controller.
1. Turn off your computer.
2. Remove the HP 13037 MAC (Multiple Access Controller) interface board
and module from the HP 1000.
2
3. Plug the Bering 2000MX MAC Disk Interface into the HP 1000 where the
13037 MAC interface board was removed from.
4. Attach the SCSI cable to the Bering MAC Disk Interface installed in the
computer and the other end to either SCSI connector on the back panel
of the OptiPac drive.
5. Install the SCSI terminator on the remaining SCSI connector on the back
of the OptiPac.
6. Turn on the OptiPac and wait for the self-test to end.
When the test ends without incident, the time and date should be
displayed on the front panel LCD and the clock should be running.
7. Load a cartridge.
8. Format the cartridge from the Removable Utilities menu. This step is
not necessary if the cartridge was previously formatted.
9. Turn on your computer.
10. Begin using the OptiPac.
OptiPac 6611MD User's Manual 5
Page 14
2
INSTALLING THE OPTIPAC
Installing the MAC Disk Interface
Installing the MAC
Disk Interface
Note:
The Bering 2000MX MAC (Multiple Access Controller) Disk Interface
must be installed in the HP 1000 computer before the OptiPac can be
connected. Refer to the 2000MX Installation Manual for jumper and
switch settings and specifications.
The Bering 2000MX MAC Disk Interface emulates the HP 13037 MAC
board.
1. Power off the HP 1000 computer.
To avoid regeneration of the operating system, the HP 13037 MAC board
must first be removed and the Bering MAC Disk Interface should be
inserted in the same slot.
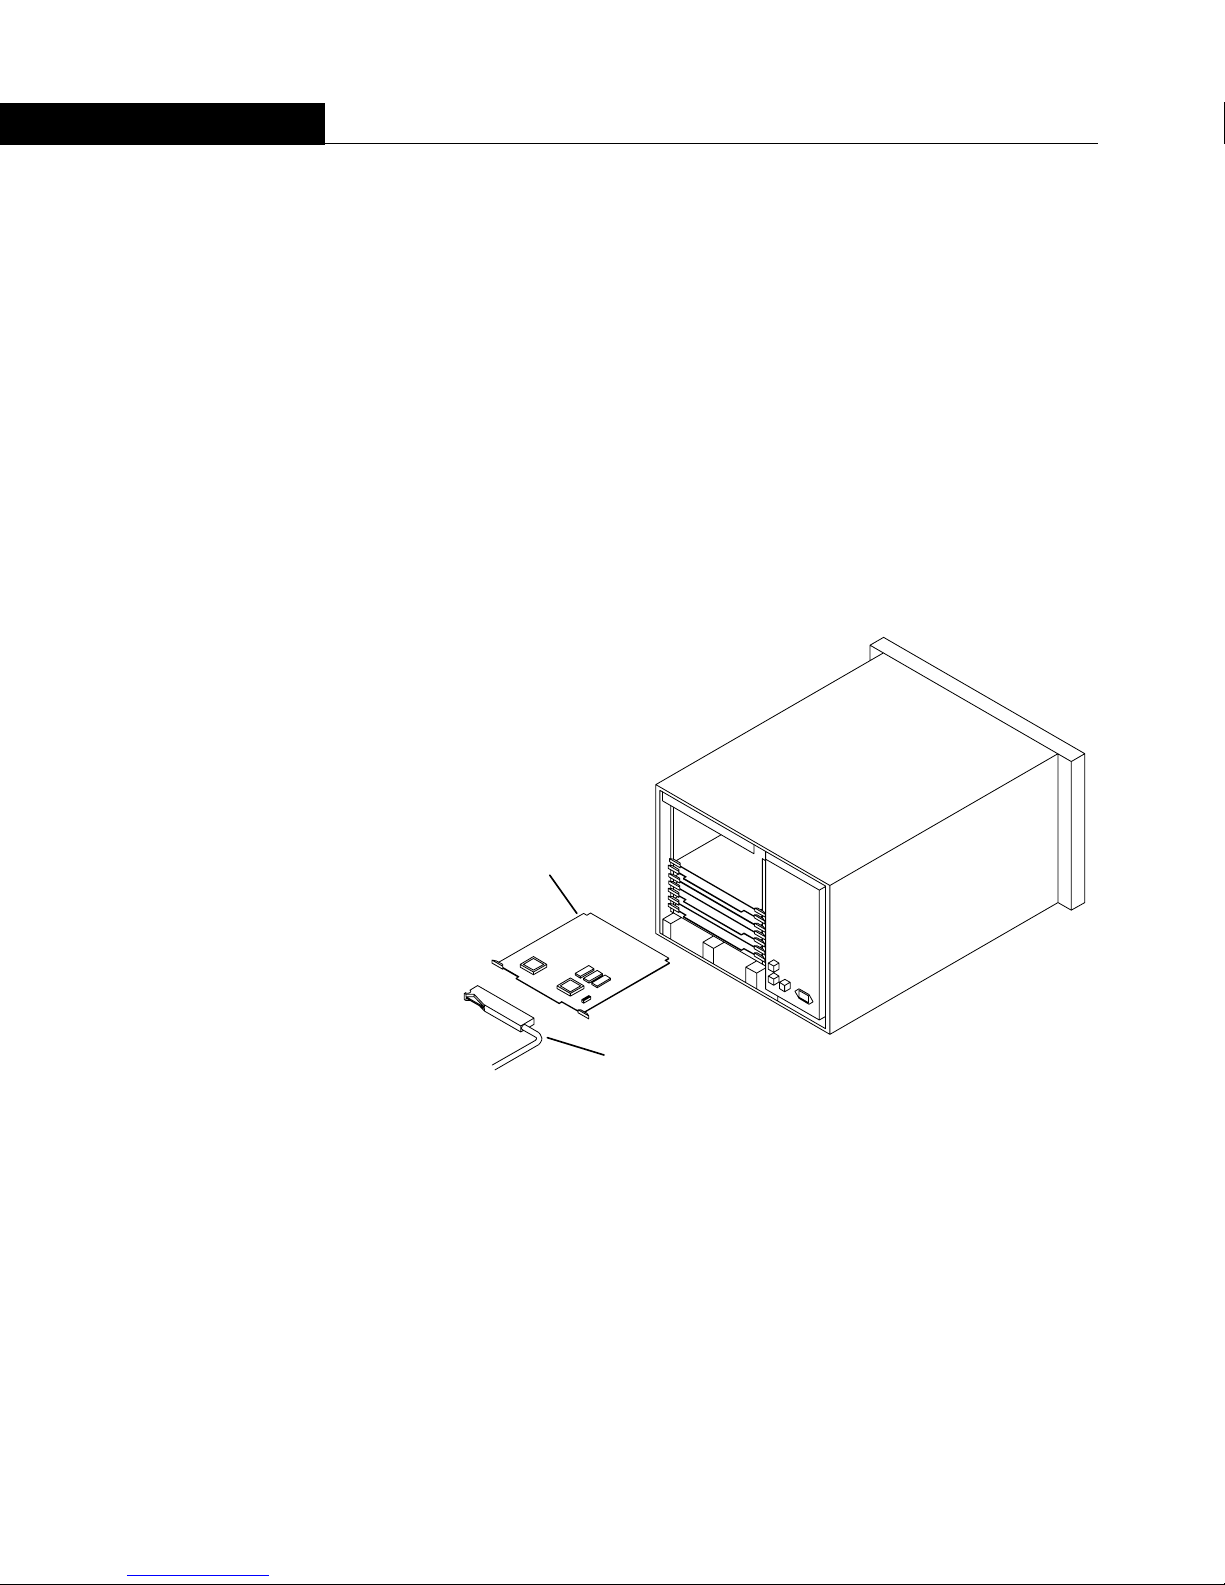
2. Slide the 2000MX MAC Disk Interface into the empty slot in the HP 1000
computer where the 13037 MAC board was removed from and push
until it is fully seated in the slot.
2000MX MAC
Disk Interface
SCSI cable
Figure 2-1: Installing the MAC Disk Interface
3. Plug the SCSI cable to the edge connector on the 2000MX MAC Disk
Interface as shown in the illustration.
The RTE operating system may need to be regenerated at this time. If
the 2000MX MAC Interface was installed in a different slot than the HP
13037 MAC, or if no 13037 MAC was previously installed a regeneration
is required. Refer to the RTE Manager’s Manual for information. No
regeneration is required if the 2000MX was installed in the same slot
where the HP 13037 MAC board was removed from.
6 OptiPac 6611MD User's Manual
Page 15
INSTALLING THE OPTIPAC
Connecting the OptiPac Drive
Connecting the
OptiPac Drive
▲
CAUTION:
For specific installation and configuration instructions for your
computer, refer to your RTE Manager’s Manual.
These instructions are for connecting an OptiPac 6611MD model to the
Bering 2000MX MAC Disk Interface installed in the HP 1000.
Turn off your computer and unplug the power cord from the wall outlet.
Disconnect any other cables attached to the back panel of your computer
that may be in your way.
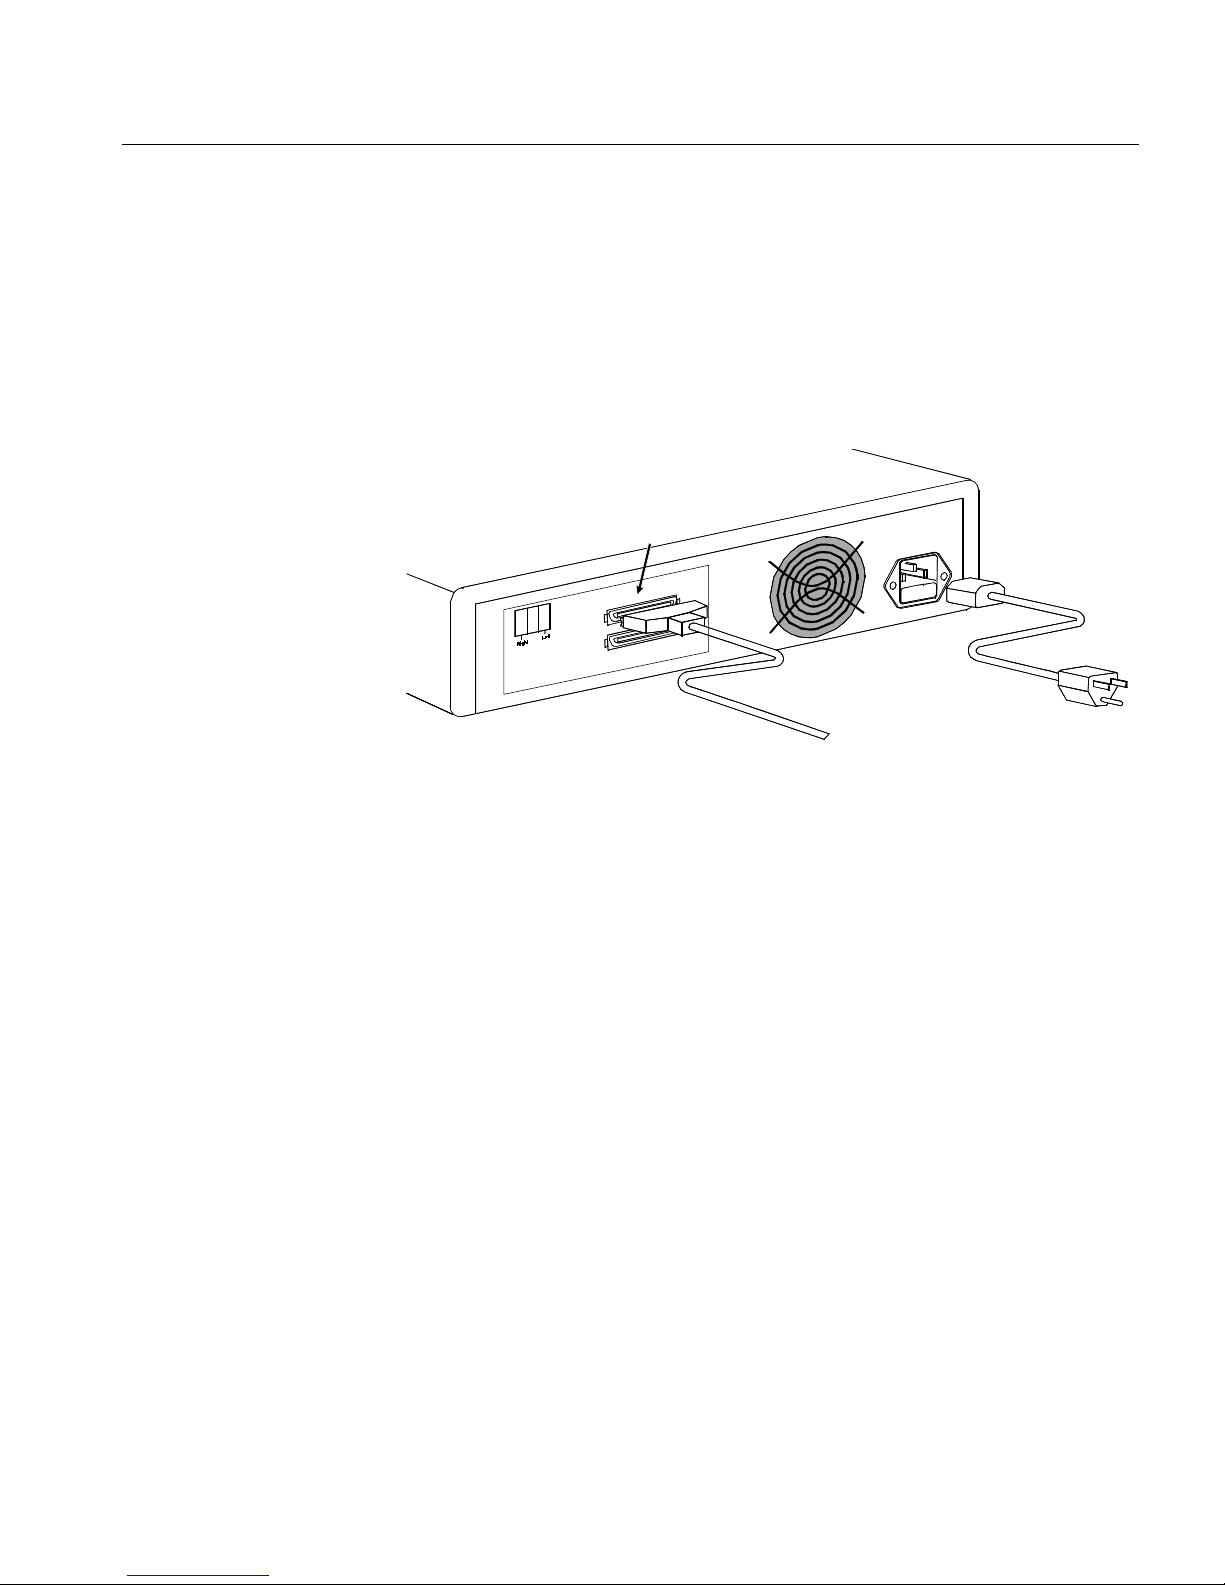
SCSI connectors
SCSI cable
Connect to
computer
AC receptacle
with fuse holder
and spare fuse
Power cable
▲
CAUTION:
Figure 2-2: Connecting the OptiPac
1. Turn off your computer and the OptiPac drive.
2. Connect the SCSI cable into either SCSI connector on the back panel of
the OptiPac.
3. Attach a SCSI terminator to the other SCSI connector on the back panel
of the OptiPac.
4. Plug the other end of the SCSI cable into the MX2000 card in the HP1000.
5. Connect the power cable to the back of the OptiPac. Make sure there is
at least one inch of space around the back and two inches around the
sides of the drive.
6. Plug the OptiPac and the computer into grounded electrical outlets or
a surge protector. The OptiPac should be on the same circuit as your
computer.
Make sure that other equipment or appliances which might generate
electrical noise or a power surge (such as electric typewriters or heaters)
are on separate circuits.
7. Turn on the OptiPac, the computer, and any other peripherals.
OptiPac 6611MD User's Manual 7
Page 16

2
INSTALLING THE OPTIPAC
Connecting the OptiPac Drive
8 OptiPac 6611MD User's Manual
Page 17
3
OPERATING THE DISK DRIVE & CARTRIDGE
6611MD
Controls
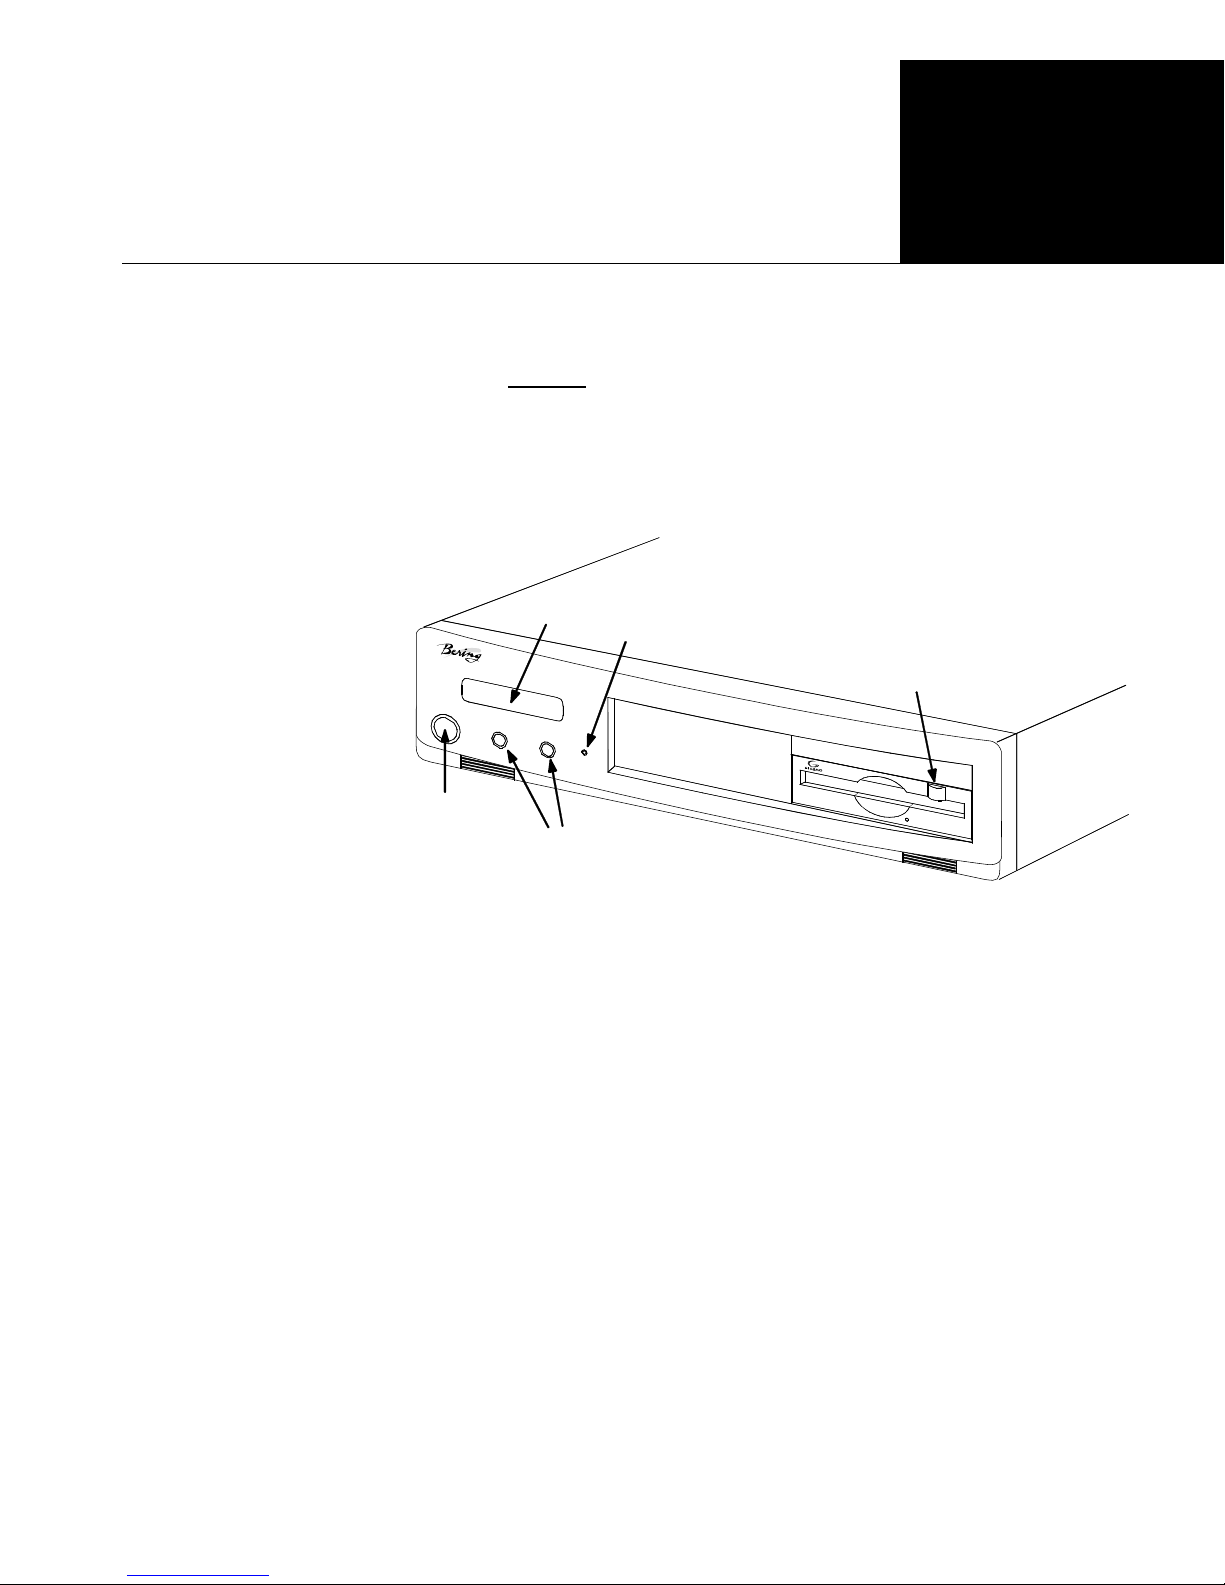
Figure 3-1 illustrates all controls and indicators required for operating
the OptiPac 6611MD.
1. Press the POWER
The LCD will display a self-test message and the disk drive model
number. This operation should take less than a minute. If a cartridge is
loaded, a read test will be performed. After the self-test is successfully
completed, the time, date and current ring will be displayed on the LCD.
LCD display
Power
switch
Control buttons
button on the front panel of the OptiPac.
Error LED/Fixed disk access
3
Drive Button and
MO Activity LED
Drive Button
Fixed Disk Access
Indicator
Error LED
Figure 3-1: OptiPac 6611MD front panel
The drive button is always locked out. The cartridge will not eject when
this button is depressed because the OptiPac controller has issued a
lock command to the cartridge drive. The cartridge must be ejected
using the
The fixed disk access indicator is on the lower middle of the front bezel.
Whenever the fixed disk is accessed the LED will flash on.
The Error LED turns red and stays illuminated when a system error is
detected. This LED is also used as a fixed disk access LED. It flashes
green when the fixed disk in the model 8611 is accessed.
Unload cartridge
function in the LCD main menu.
OptiPac 6611MD User's Manual 9
Page 18
3
OPERATING THE DISK DRIVE & CARTRIDGE
MO Controls
MO Controls
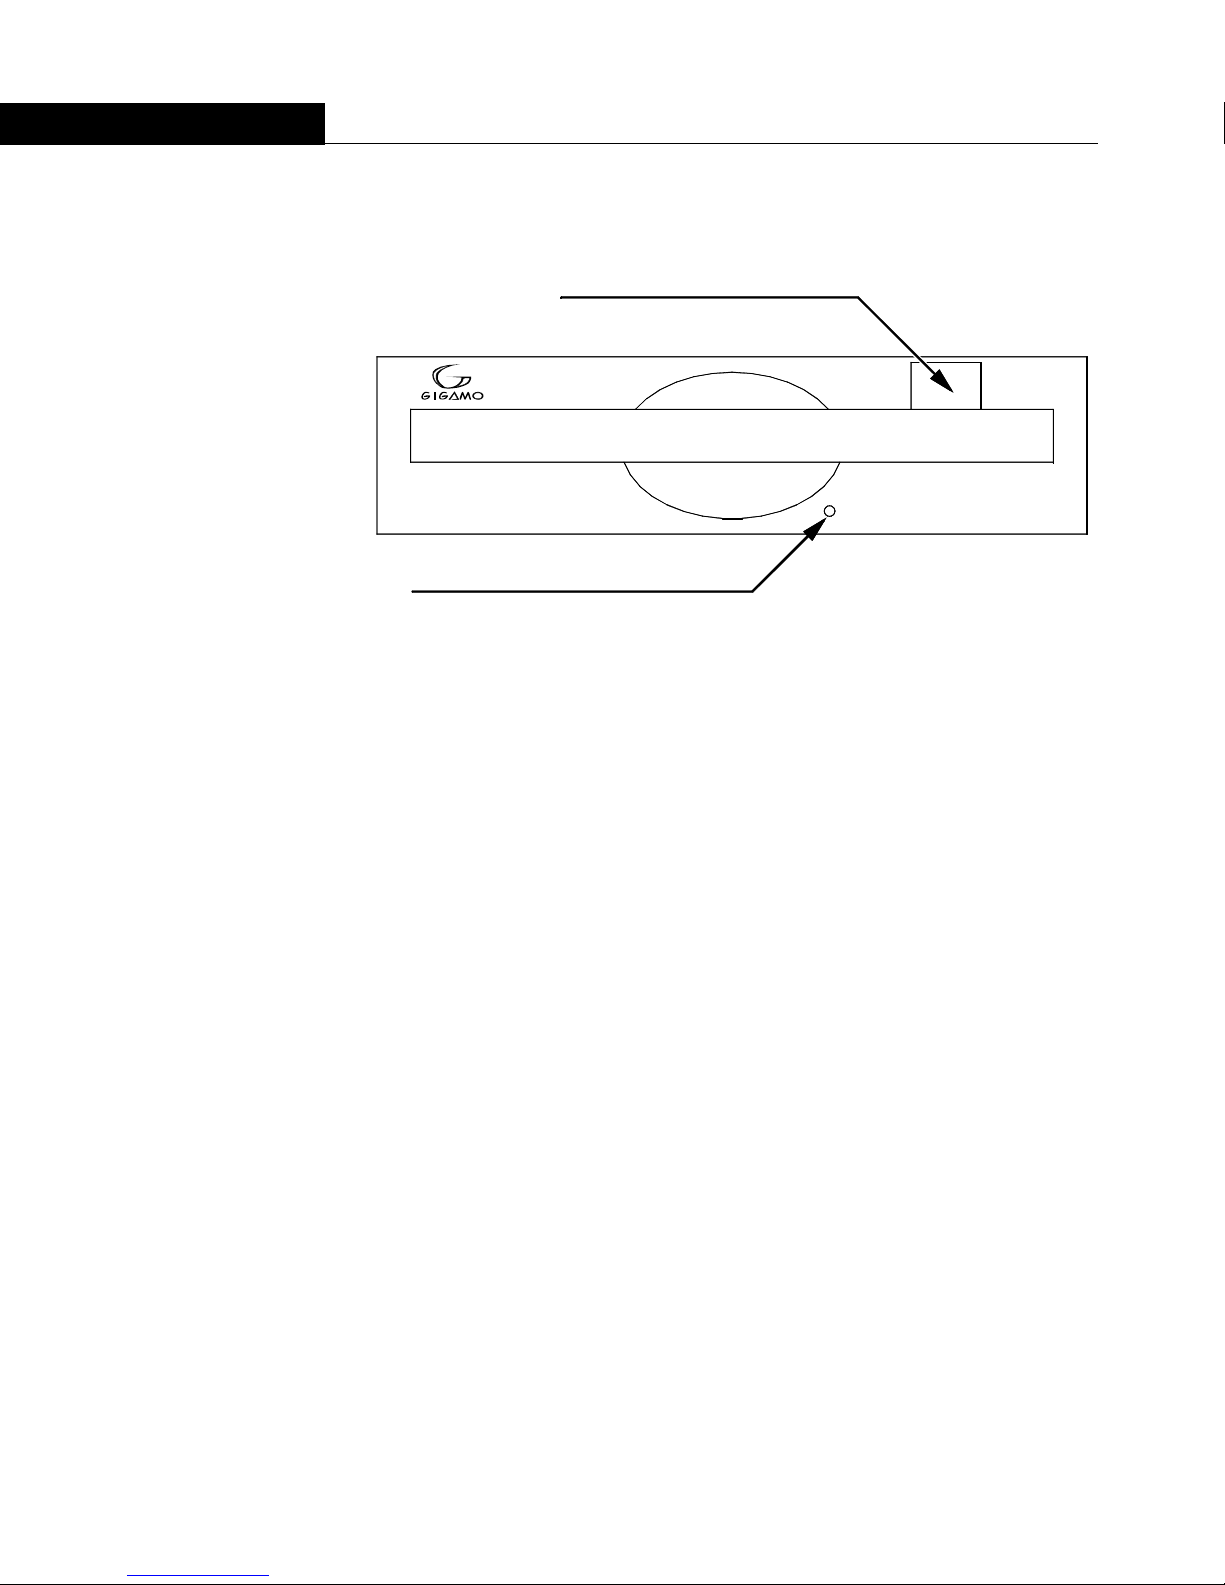
Emergency Eject Hole
Loading a Cartridge
The MO drive controls are simple.
Drive/Eject Button
Drive-Status Light
(Flashes when drive is busy)
Emergency Eject Hole
Figure 3-2: MO controls
In an emergency, such as a power outage, the cartridge can be manually
ejected by inserting a tool into this opening. Read the complete
instructions in the section titled “Ejecting a Cartridge Without Power.”
Loading a data cartridge is very much like loading a diskette.
▲
CAUTION:
Compatibility
1. Make sure the OptiPac is turned on before you load a cartridge.
2. Remove the cartridge from its plastic storage case.
3. Insert the cartridge into the drive slot with the label side up and push
the cartridge straight in, keeping it parallel with the top and bottom of
the drive.
4. Slide the cartridge all the way into the drive.
The activity LED on the front of the removable drive will flash green as
the drive spins up. After a brief test, the LED will extinguish when the
drive is ready. Thereafter, the status LED will flash whenever the
removable disk is accessed.
Never move or transport the OptiPac with a cartridge in the drive. This
may damage the cartridge and cause read/write head damage.
The OptiPac subsystems read, write, and format ISO 128MB, 230MB,
640MB cartridges, and the GIGAMO 1.3GB MO cartridge. The number of
rings is reduced with the smaller capacity cartridges. For full fixed disk
backup capabilities, the GIGAMO 1.3GB cartridges should be used.
10 OptiPac 6611MD User's Manual
Page 19

OPERATING THE DISK DRIVE & CARTRIDGE
MO Controls
Ejecting a Cartridge
Note:
It is important to remove the cartridge before you turn off the OptiPac.
If you leave the cartridge in the drive, the shutter remains open and the
recording media itself is vulnerable to dust. If the OptiPac is turned off
prior to cartridge removal, the automatic disk spin-down operation
does not occur and the cartridge disk will spin freely for up to 45
seconds. Attempting to remove the cartridge during this time may
damage the media.
The OptiPac must be turned on before you can unload a cartridge. If the
Drive button is enabled, which is the default, just press the eject button
on the front of the MO drive and proceed directly to step 3. If the drive
button is disabled perform the following steps to eject a cartridge.
1. With the time function displayed on the LCD, push the
SELECT
on the front panel.
Unload cartridge
The
function(s) will be displayed. For the 8602 dual-
drive system two options will be available:
Unload cartridge
2. Push the
ENTER
The cartridge will spin down and eject from the drive.
NEVER eject a cartridge while the file system is mounted on your
operating system.
button to execute the command.
button
Ejecting a Cartridge
Without Power
▲
CAUTION:
3. Remove the cartridge carefully and place it in the protective plastic
storage case immediately.
Remember to label and date the cartridge for future reference. Do not
mark on labels with a graphite pencil. The graphite dust may
contaminate the disk surface. Refer to Chapter 5, “Caring for The Disk
Drive & Cartridge,” for further information on cartridge care.
While the OptiPac is not powered on, you can manually eject a cartridge.
Never manually eject a cartridge while the power is on. This can damage
the drive and invalidate the warranty.
1. Wait for 45 seconds or more after the power is off.
2. Insert a paper clip into the emergency reject hole on the front of the
drive.
3. Gently push the paper clip into the hole until the cartridge pops out.
4. Return the cartridge to its protective case for storage or transport.
OptiPac 6611MD User's Manual 11
Page 20
3
OPERATING THE DISK DRIVE & CARTRIDGE
MO Controls
Write-Protecting a
Cartridge
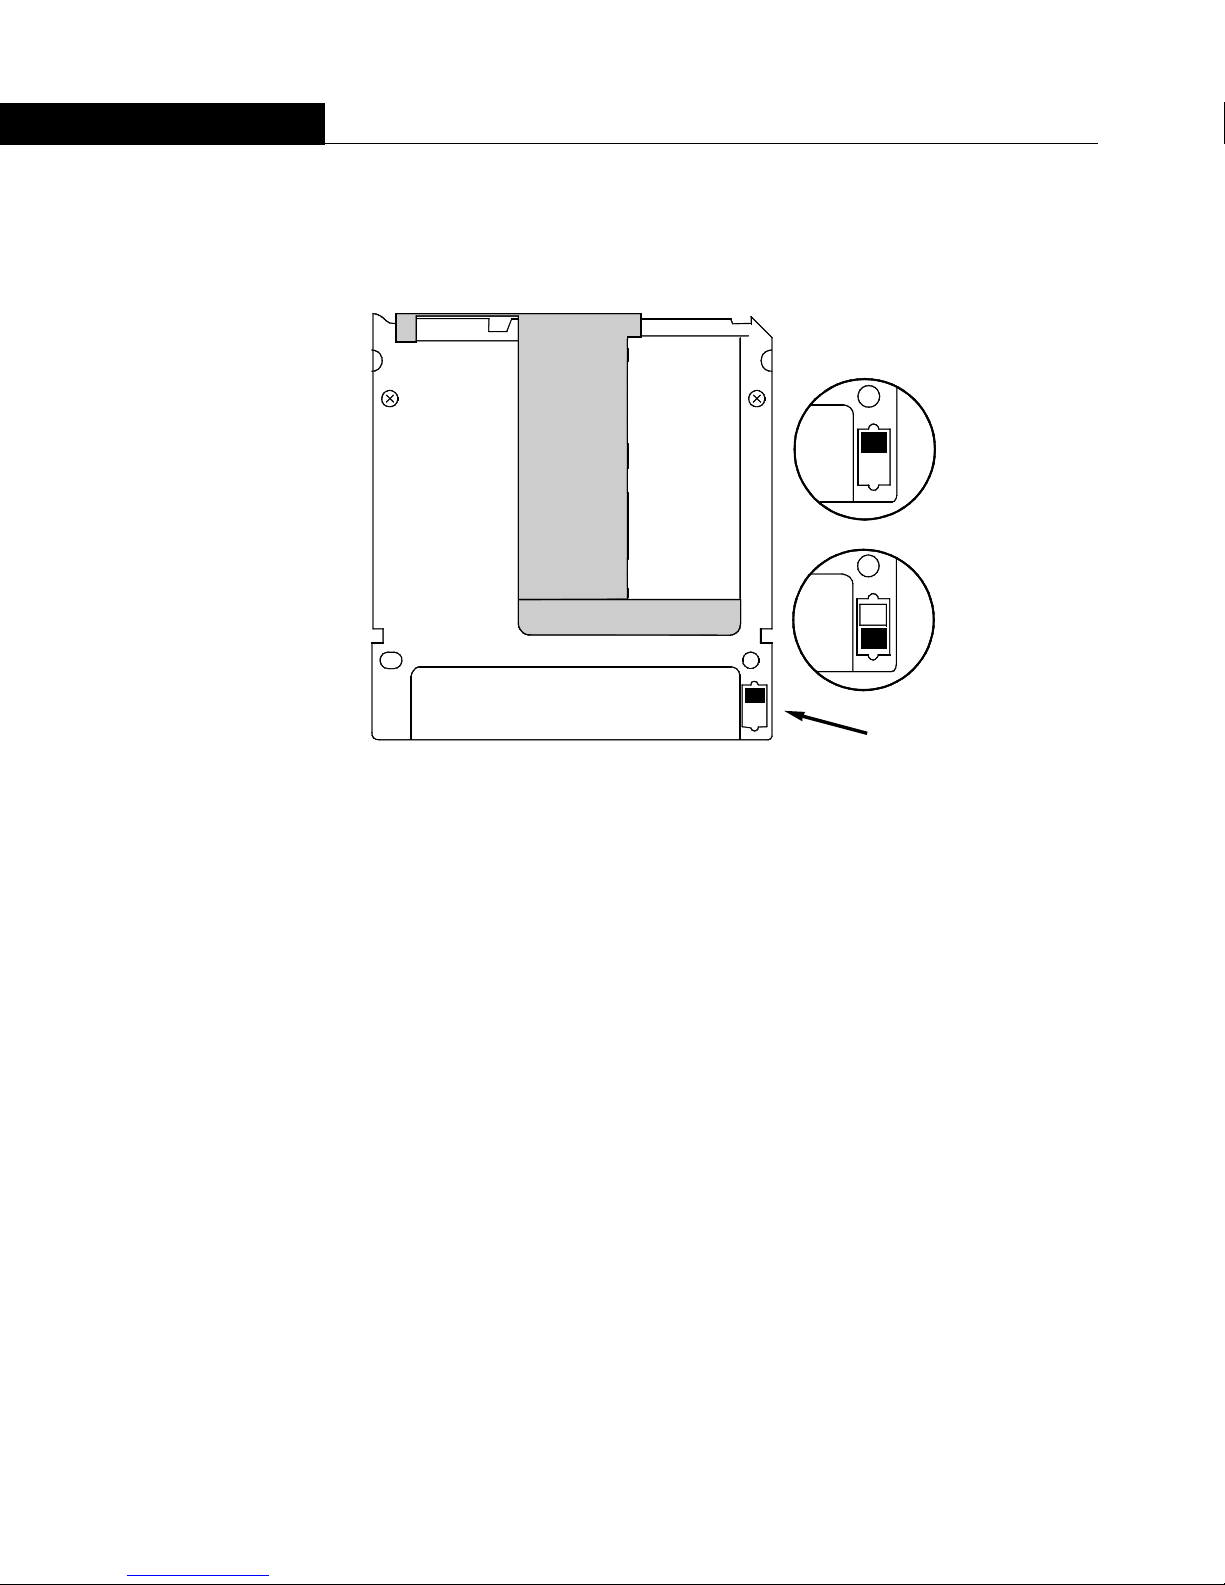
The MO cartridge can be physically write protected by pushing open the
slide cover on the cartridge. This is similar to write protecting a floppy
diskette.
Read/write
position
Read only
position
(write-protected)
Write-protect switch
Figure 3-3: Cartridge write-protect switch
12 OptiPac 6611MD User's Manual
Page 21
4
OPTIPAC SYSTEM FUNCTIONS
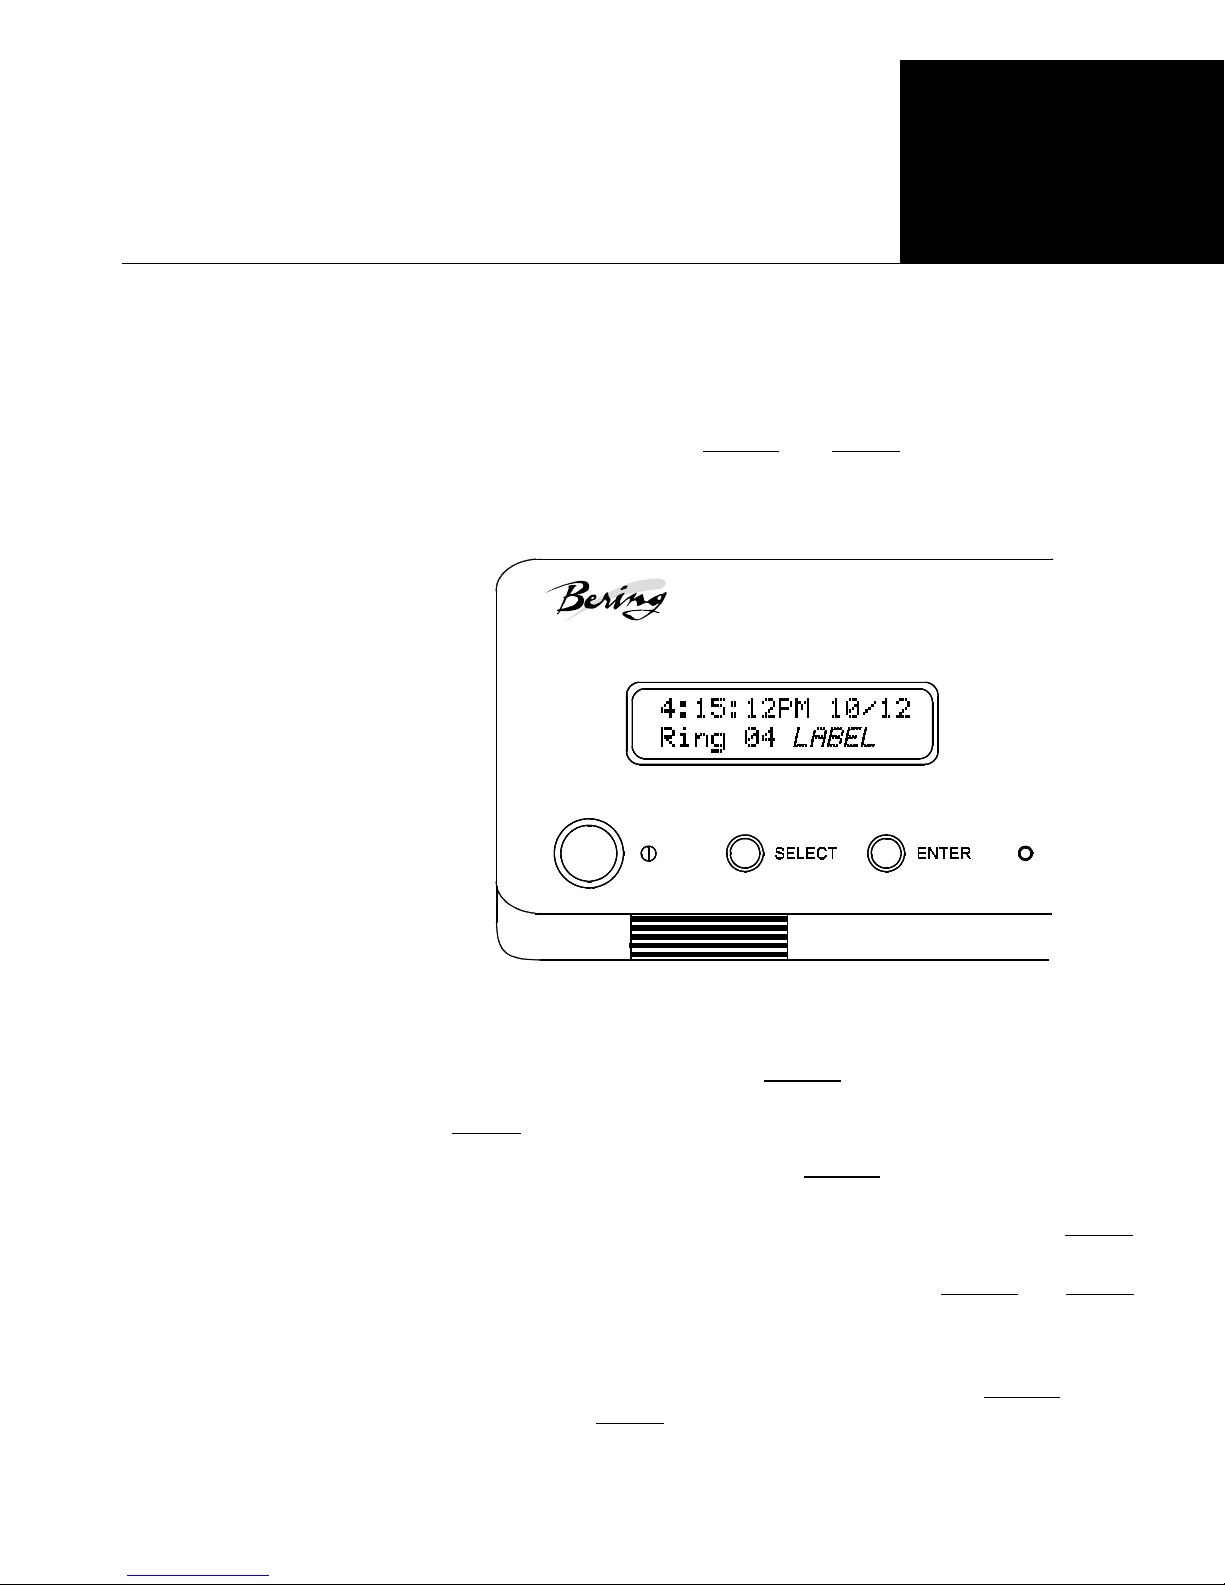
This chapter describes the OptiPac configuration and operating
procedures. The OptiPac 6611MD features a push-button operation for
performing configuration and operating procedures. This procedure is
based on a hierarchical structure of system functions displayed on the
disk drive's LCD. All procedures can be performed using the two front
panel push-button controls:
These instructions should be used in conjunction with your specific HP
computer's configuration procedure.”
SELECT
and
ENTER
4
.
All system operations are performed by first selecting a function and
then entering it for execution. The SELECT
through all the available system functions and select desired choices.
The ENTER
• To select a system function, press the
function appears on the LCD.
• To execute the chosen function or display its options, press the
button.
• If you want to abort the current operation, press the
buttons simultaneously.
The abort function is allowed only during certain operations.
• To scroll or step backward in a menu, press and hold the
first and then the
Figure 4-1: Front panel LCD and push-button controls
button enables you to scroll
button enables you to execute the chosen function.
ENTER
SELECT
button.
OptiPac 6611MD User's Manual 13
button until the desired
SELECT
and
SELECT
ENTER
ENTER
button
Page 22
4
OPTIPAC SYSTEM FUNCTIONS
System Menu
System Menu
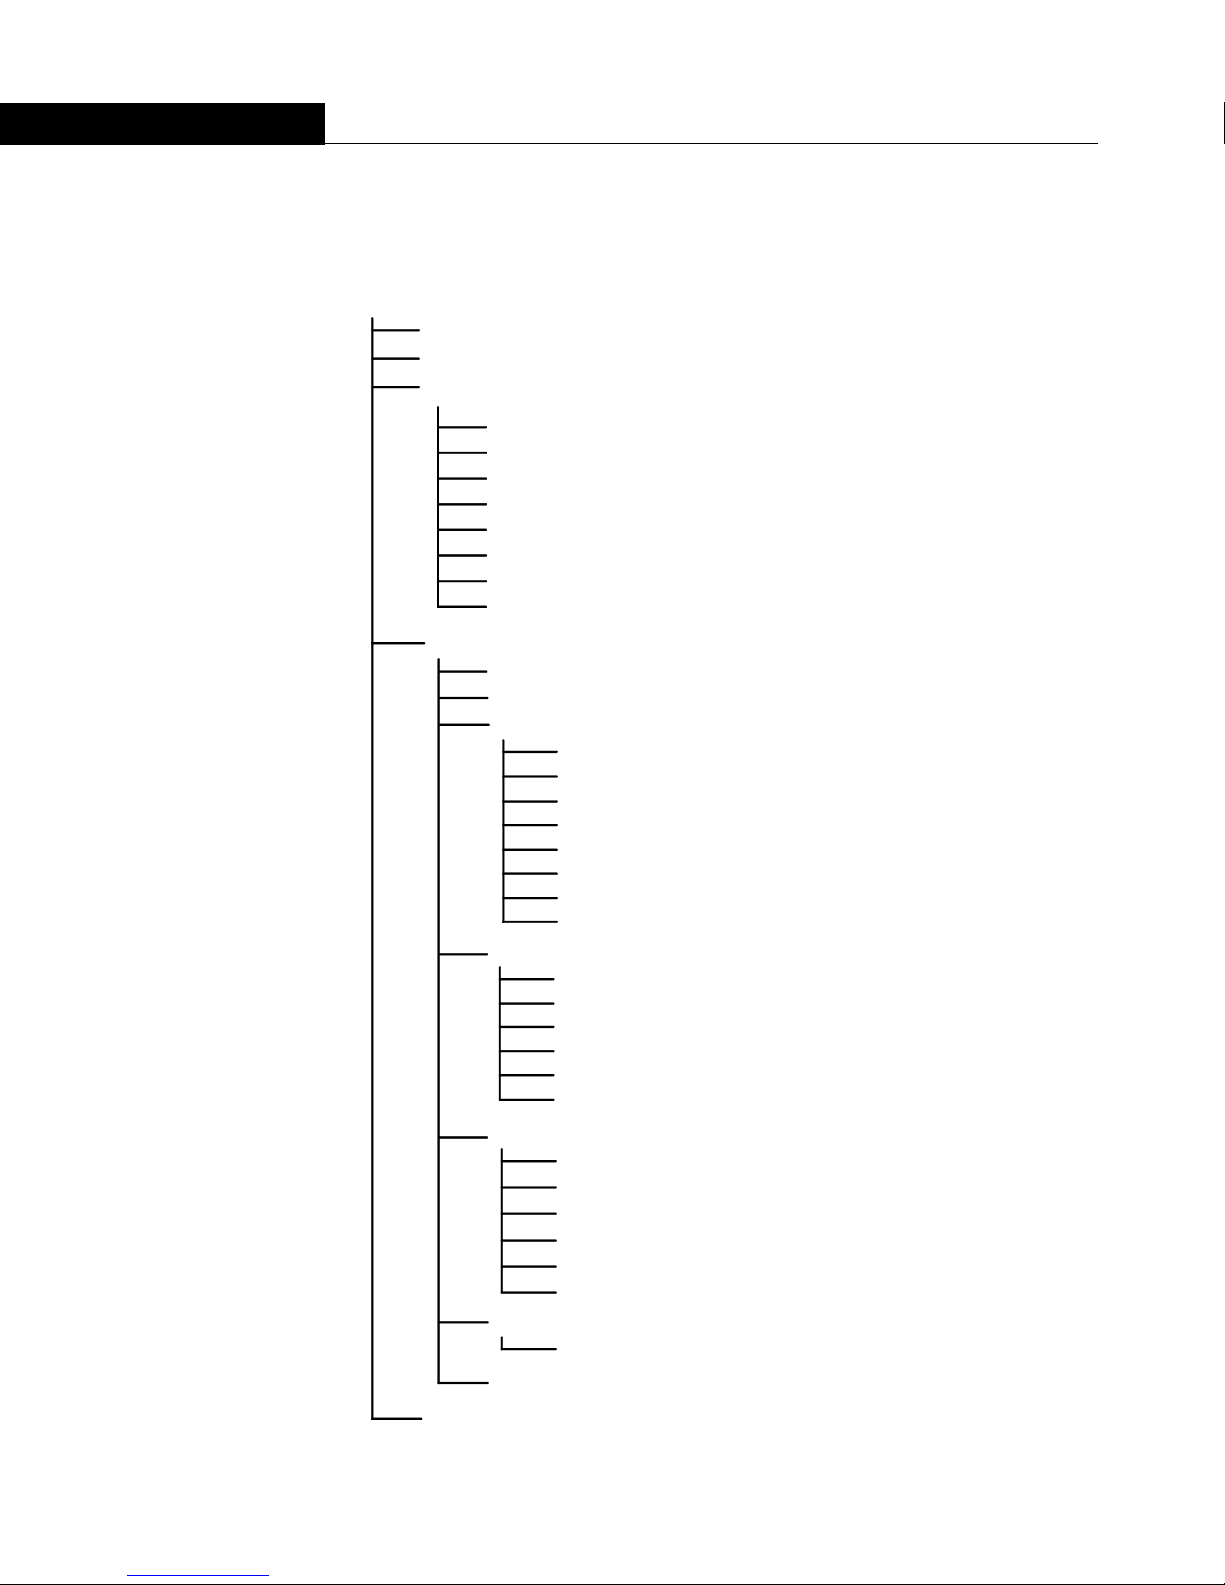
This section contains a menu structure of the commands which can be
accessed from the front panel LCD display and controls.
Time / Date
Change ring
Unload cartridge
Configurations
Change format switch
Change protect rings
Change protect ring H00 (7906 emulation only)
Change emulation
Use 12 / 24 hour clock
Set time
Set date
Return to main
Utilities
Bering model
ROM version / date
Ring utilities
Change ring
Change label
Copy ring
Backup rings
Restore rings
Erase ring
Erase rings
Previous menu
Fixed disk utilities
Show disk information
Spin down / up disk
Verify disk
Format disk
Erase disk
Previous menu
14 OptiPac 6611MD User's Manual
Cartridge utilities
Show cartridge information
Unload cartridge
Verify cartridge
Format cartridge
Erase cartridge
Previous menu
Tests
Test LCD display
Return to main
Display time and messages
Page 23

OPTIPAC SYSTEM FUNCTIONS
Main Menu
Main Menu
Note:
The default display on the front panel LCD is the time/date. When the
SELECT
displayed. You can scroll the Main menu by repeatedly pressing the
SELECT
menu, press the
similar to the following display when the system is first powered on
and when the unit is on-line:
button is pressed, the first choice of the Main menu will be
button. To execute the selected function or to enter the sub-
ENTER
button. The time/date display will look appear
4:15:12PM 10/12
Ring 04 LABEL
If a ring has a label, it will be displayed after the ring number. All ring
numbers on the hard drive begin with the letter H (H04), while all rings
on the removable cartridge have just a numeral (04).
Attempting to perform any function on a new and/or unformatted
cartridge may cause the following message to display:
Media not
initialized!
The cartridge must be formatted from the Removable Utilities menu
before it can be used.
The following options are available from the Main menu of the OptiPac:
Change Ring
Change ring
Unload cartridge
Configurations
Utilities
Display time and messages
This function allows you to change the current ring. When you return
to the main menu the current ring will be displayed. Rings that begin
with ‘H’ indicate a ring on the hard disk. Ring H000 emulates the hard
disk in a 7906M and cannot be accessed from the front panel LCD
controls. All other rings emulate removable disks.
1. Press the
the Main menu.
2. Press
3. Use the
see the desired ring, then press the
SELECT
ENTER
SELECT
button until the
to select this option.
button to scroll through the ring selections until you
Change ring
ENTER
button.
function is displayed on
OptiPac 6611MD User's Manual 15
Page 24

4
OPTIPAC SYSTEM FUNCTIONS
Main Menu
Unload Cartridge
Configurations
Use this function to unload the cartridge from the removable drive.
1. Use the
the Main menu:
SELECT
button to choose the function you want to initiate from
Unload cartridge
2. Press the
A request is sent to the host system for permission to remove the
cartridge. If the system grants the request or if there is no response for
one second, the cartridge will be ejected. This is required for some
operating systems and also prevents accidental ejection during
cartridge use.
If the cartridge is in use by the operating system, the following message
will appear.
ENTER
button
.
Cartridge in use
UNLOAD IT! (NO)
3. Press the
press the
This function changes the format switch, write protects rings, changes
emulation, selects the 24 hour clock format, and sets the date and time.
See the “Configurations Submenu” section for detailed information.
SELECT
ENTER
butto n to se lect
button to eject the cartridge.
Yes
, if need be; when
Yes
is selected,
Utilities
Display Time and
Messages
This function shows cartridge/disk information; verifies, and formats
the cartridge; formats the fixed disk; erases cartridge data; and
performs ring functions. Refer to the “Utilities Submenu” section for
detailed information.
This function exits the Main menu and displays the current date, time,
the current ring, and ring label.
16 OptiPac 6611MD User's Manual
Page 25

OPTIPAC SYSTEM FUNCTIONS
Configurations Submenu
Configurations
Submenu
Change Format
Switch
This function changes the format switch, write protects rings, and sets
the date and time.
1. Press the
on the Main menu.
The Configurations submenu will offer these functions:
ENTER
button when the
Configurations
function is displayed
Change format switch
Change protect rings
Change protect ring H00
Change emulation (while in HP7906 emulation only)
Use 24 / 12 hour clock
Set time
Set date
2. Press the
To return to the Main menu, press the
Return to main
This emulates the format switch on the front panel of an HP 7906M disk
drive. Setting the switch to on enables formatting of the current ring
from the computer.
SELECT
.
button to scroll through the functions.
ENTER
button when you see
To change the setting of the format switch between on and off follow
these instructions:
1. Press the
on the Main menu.
2. Use the
Change format switch
3. Press the
The LCD display will now show the following message:
ENTER
SELECT
ENTER
button when the Configurations function is displayed
button to scroll through the selections until you see
.
button to select this option.
Change format
switch (on)
4. Press the
scroll between off and on and then press
ENTER
button to select this option or the
ENTER
SELECT
at the desired setting.
button to
OptiPac 6611MD User's Manual 17
Page 26

4
OPTIPAC SYSTEM FUNCTIONS
Configurations Submenu
Change Protect
Rings
CAUTION:
▲
Change Protect
Ring H00
This function write protects the current ring displayed on the front
panel from being written to by the computer system. If this is on and
you change rings, the new ring and only the new ring will be write
protected until protect rings is turned off.
The front panel LCD controls can still write to the rings. Functions such
as Erase Ring and Copy Ring can overwrite the current ring even if
Protect Rings is on.
1. With the
button to choose this function
The following message will appear:
Change protect rings
function displayed, press the
.
ENTER
Protect rings
off / on
2. Press the
ENTER
The OptiPac will reset to the new value.
This function write protects ring H00 from being written to by the
computer system. If this is on, ring H00 will be write protected until
Protect Ring H00 is turned off. This function will not appear when the
Optipac is emulating an HP7920 or HP7925.
SELECT
button to choose the desired option
button to toggle between On and Off , then press the
.
CAUTION:
▲
Change Emulation
The front panel LCD controls can still write to the ring. Functions such
as Erase Disk can overwrite ring H00 even if Protect Ring H00 is on.
1. With the
button to choose this function
The following message will appear:
Change protect ring H00
function displayed, press the
.
Protect ring H00
off / on
2. Press the
ENTER
The OptiPac will reset to the new value.
This function caused the OptiPac to appear to the computer as one of
three HP drives: HP7906; HP7920; or HP7925.
1. With the
to choose this function
The following message will appear:
SELECT
button to choose the desired option
Change emulation
button to toggle between On and Off , then press the
.
ENTER
function displayed, press the
.
ENTER
button
18 OptiPac 6611MD User's Manual
Page 27

Change emulation
HP7906
OPTIPAC SYSTEM FUNCTIONS
Configurations Submenu
Use 12 / 24 Hour
Clock
Set Time
2. Press the
SELECT
and HP7906. then press the
button to toggle between through HP7920, HP7925,
ENTER
button to choose the desired option
The OptiPac will reset to the new value.
This function changes the clock display on the front panel LCD from a
12 hour clock to a 24 hour clock or vice versa.
1. Press the
ENTER
button until the
Use 12 / 24 hour clock
function is
displayed on the Configurations menu.
2. Press
ENTER
3. Use the
SELECT
to select this option.
ENTER
button to toggle between
button to return to the menu.
12
and 24. Then press the
This function allows you to change the time.
1. With the
Set time
function displayed, press the
ENTER
button
You'll see:
Set time
3:15:27 PM
The actual time displayed will vary. The hour field will be blinking.
.
.
Set Date
2. Press the
Holding the
SELECT
SELECT
button to increment the hour
button will cause the hour to increment (through
.
twelve hours) continuously. If you continue to hold down the
button, incrementing will speed up.
To decrement the hour, press and hold the
press the
ENTER
button. Again, decrementing will be continuous and
SELECT
button, and then
speeds up if you hold the buttons down.
3. When the correct hour is displayed, press the
SELECT
4.
SELECT
5.
SELECT
6.
You will now be returned to the
and
and
and
ENTER
ENTER
ENTER
the correct minute setting just as you did the
the correct setting for seconds
the correct AM/PM setting
Set time
option.
ENTER
.
button
.
This function allows you to change the date.
1. With the
Set date
function displayed, press the
ENTER
You'll see:
.
button.
SELECT
hour.
OptiPac 6611MD User's Manual 19
Page 28

4
OPTIPAC SYSTEM FUNCTIONS
Configurations Submenu
Set date
Wed Feb 12, 1992
The actual date displayed will vary. The day field will be blinking.
2. Press the
Holding the
SELECT
SELECT
button to increment the day
button will cause the day to increment (through the
.
days of the week) continuously. If you continue to hold down the
button, incrementing will speed up.
To decrement the day, press and hold the
the
ENTER
button. Again, decrementing will be continuous and speeds
SELECT
button, and then press
up if you hold the buttons down.
3. When the correct day is displayed, press the
ENTER
button.
The month field will start to blink.
4.
5.
6.
SELECT
SELECT
SELECT
and
and
and
ENTER
ENTER
ENTER
the correct month setting just as you did the day.
the correct date setting.
the correct year setting.
After you have made this setting, you'll be returned to the
option.
SELECT
Set date
20 OptiPac 6611MD User's Manual
Page 29

OPTIPAC SYSTEM FUNCTIONS
Utilities Submenu
Utilities
Submenu
This function shows cartridge information; verifies, and formats the
cartridge; copies and erases cartridge data; and formats and verifies the
fixed disk:
•
MODEL NUMBER
F/W VERSION
•
RING UTILITIES
•
rings, backs up rings and restores rings. Refer to the “Ring Utilities
Submenu” section for detailed information.
FIXED DISK UTILITIES
•
formats the disk. Refer to the “Fixed Disk Utilities Submenu” section
for detailed information.
CARTRIDGE UTILITIES
•
erases, and formats the cartridge. Refer to the “Removable Disk Utilities
Submenu” section for detailed information.
TESTS
•
information.
To access and exit these utilities …
1. Press the
Main menu
—Tests the LCD. Refer to the “Test Submenu” section for detailed
ENTER
—Displays the model number of the OptiPac.
—Displays the firmware version number and release date.
—Changes rings; changes ring labels, copies rings, erases
—Shows disk information; verifies, erases, and
—Shows cartridge information; unloads, verifies,
button when the
Utilities
function is displayed on the
.
The Utilities submenu appears and displays the following functions:
Model number
F/W version
Ring utilities
Fixed disk utilities
Cartridge utilities
Tests
Return to main
2. Press the
3. When you see
Main menu.
SELECT
button to scroll through the information or functions
Return to main
, press the
ENTER
button to return to the
.
OptiPac 6611MD User's Manual 21
Page 30

4
OPTIPAC SYSTEM FUNCTIONS
Utilities Submenu
Ring Utilities
Submenu
Change Ring
This function changes rings, labels rings, copies rings, backs up and
restores groups of rings, and erases rings.
1. Press the
the Utilities submenu.
The Ring utilities submenu then appears displaying these functions:
ENTER
button when the
Ring utilities
function is displayed on
Change ring
Change label
Copy ring
Backup rings
Restore rings
Erase ring
Erase rings
Previous menu
2. Press the
3. You can return to the
you see Previous menu.
This function allows you to change the current ring. When you return
to the main menu the current ring will be displayed. Rings that begin
with ’H’ indicate a ring on the hard disk. Ring H00 emulates the hard
disk in a 7906M and cannot be accessed from the front panel LCD
controls. All other rings emulate removable disks.
SELECT
button to scroll through the information or functi
Utilities
menu by pressing the
ENTER
button when
ons.
1. Press the
2. Press
3. Use the
see the desired ring, then press the
Change Label
This function allows you to change the label of the current ring. The
main menu will display the current ring label. The label can be up to
seven characters in length.
1. Press the
the Utilities submenu.
2. Use the
Change label
3. Press the
The current label will display.
4. Press the
$ % & * . / : space) for the desired digit. A space is represented by an
underscore character. To scroll backwards, press and hold the
22 OptiPac 6611MD User's Manual
SELECT
ENTER
SELECT
ENTER
SELECT
ENTER
SELECT
button until the
to select this option.
button to scroll through the ring selections until you
button when the Ring Utilities function is displayed on
button to scroll through the selections until you see
.
button to select this option.
button to scroll through the characters (A-Z, 0-9, ! #
Change ring
ENTER
button.
function is displayed.
SELECT
Page 31

OPTIPAC SYSTEM FUNCTIONS
Utilities Submenu
Copy Ring
button and press the
ENTER
button. The display will decrement the
digits.
5. Press the
ENTER
button to select a letter and go to the next digit.
This function allows you to copy any ring to any other ring. The label
of the source ring will also be copied to the target ring.
1. Press the
SELECT
button until the
Copy ring
function is displayed on the
Ring utilities menu.
2. Press
3. Use the
until you see the desired source ring, then press the
4. Use the
you see the desired target ring, then press the
ENTER
SELECT
SELECT
to select this option.
button to scroll through the copy from ring selections
ENTER
button.
button to scroll through the copy to ring selections until
ENTER
button.
You will see a display similar to this:
H02 Label to
03 Label No
5. Press the
SELECT
button to change No to
button to start the copy process.
Yes
and press the
ENTER
Backup Rings
This function allows you to backup a group of rings from one location
to another. The destination can be from one drive to the other or from
one area of a drive to another area of the same drive. This function
begins by asking for the beginning, ring, of the group to be backed up,
then asks for the first ring, where the group of rings is to be backed up
to, and then asks for the number of rings to be backed up.
The default values backup the highest numbered rings on the fixed disk
equivalent to the number of rings on the cartridge (100 on the cartridge),
so rings H000 through H99 will be backed up.
1. Press the
SELECT
button until the
Backup rings
function is displayed
on the Ring utilities menu.
2. Press
ENTER
to select this option
You will see the following display:
From ring
H000
3. Press the
ENTER
If you have a 2.6GB cartridge inserted, you will see a display similar to
the following:
SELECT
button to scroll through all of the rings and press
when the desired beginning or first source ring is displayed.
OptiPac 6611MD User's Manual 23
Page 32

4
OPTIPAC SYSTEM FUNCTIONS
Utilities Submenu
To ring
000
Restore Rings
4. Use the
the desired beginning or first target ring is displayed.
You will see a display similar to the following:
SELECT
button to scroll through the rings and press
ENTER
Number of rings
= 100
5. Press the
up. Leave the value at 100 to backup the entire hard drive to the
cartridge drive. Press
You will see a display similar to the following:
SELECT
button to change the number of rings to be backed
ENTER
when the desired value is displayed.
H000 to 000
100 rings No
6. Press the
and press
If you selected No, the backup will abort. If you selected Yes, the selected
number of rings will be backed up from the source rings to the target
rings.
This function allows you to restore a group of rings from one location
to another. The destination can be from one drive to the other or from
one area of a drive to another area of the same drive. This function
begins by asking for the beginning, or first ring, of the group to be
restored, then asks for the beginning, or first ring, where the group of
rings is to be restored to, and then asks for the number of rings to be
restored.
SELECT
ENTER
button to toggle between
when the correct selection is displayed.
Yes
and No on the display
when
The default values will restore all rings on the cartridge(100) to the last
100 rings of fixed disk.
1. Press the
on the Ring utilities menu.
2. Press
You will see the following display:
From ring
000
3. Press the
ENTER
You will see a display similar to the following:
24 OptiPac 6611MD User's Manual
SELECT
ENTER
SELECT
when the desired beginning or first source ring is displayed.
button until the
to select this option
button to scroll through all of the rings and press
Restore rings
function is displayed
Page 33

To ring
H000
OPTIPAC SYSTEM FUNCTIONS
Utilities Submenu
Erase Ring
4. Use the
SELECT
button to scroll through the rings and press
ENTER
the desired beginning or first target ring is displayed.
You will see a display similar to the following:
Number of rings
= 100
5. Press the
up. Leave the value at 100 to restore the entire cartridge to the hard
drive. Press
You will see a display similar to the following:
SELECT
ENTER
button to change the number of rings to be backed
when the desired value is displayed.
000 to H000
100 rings No
6. Press the
and press
SELECT
ENTER
button to toggle between
when the correct selection is displayed.
If you selected No, the restore will abort. If you selected Yes, the selected
number of rings will be restored from the source rings to the target
rings.
This function will erase the currently selected ring by performing a
security wipe delete. This wiping of data is done by filling the sectors
with hexadecimal characters in sequential passes. The characters are
written in the following sequence: 00, FF, 55, AA, 00. This method
prevents any traces of data from being read, even with sophisticated
techniques.
Yes
and No on the display
when
1. Press the
the Ring utilities menu.
2. Press
3. Press the
ENTER
Yes will continue. The following will display when Yes is selected:
4. Press the
ENTER
five erase cycles with five patterns; No will perform one erase pass.
SELECT
ENTER
button until the
to select this option. The following will display:
Erase ring
function is displayed on
ERASE 1 ring
031 No
SELECT
button to toggle between
button when your selection is displayed. No will abort the erase;
Yes
and No and press the
Security erase
No
SELECT
button to toggle between
button when your desired selection is displayed. Yes will perform
OptiPac 6611MD User's Manual 25
Yes
and No and press the
Page 34

4
OPTIPAC SYSTEM FUNCTIONS
Utilities Submenu
After confirming your selection the erase function will begin.
Erasing ring 5
pattern 1 of 5 <>
When the erase function is complete, the label of the erased ring will be
blank.
Erase Rings
CAUTION:
▲
This function is identical to the Erase ring function, except it will erase
a sequential range of rings. You will be asked for a beginning ring and
the number of rings to be erased.
1. Press the
the Ring utilities menu.
2. Press
3. Use the
until you see the desired beginning ring, then press the
4. Use the
until you see the desired number of rings to be erased, then press the
ENTER
the current ring and the end of the drive you are currently on.
Remember to count the first ring as one of the rings to be erased. So, to
erase rings 1 through 3 will be a total of three rings—not two.
SELECT
ENTER
SELECT
SELECT
button. The value will default to the number of rings between
button until the
to select this option.
button to scroll through the erase from ring selections
button to scroll through the number of rings selections
Erase rings
function is displayed on
ENTER
ERASE 34 rings
(30) label No
5. Press the
ENTER
Yes will continue. The following will display when Yes is selected:
SELECT
button when your selection is displayed. No will abort the erase;
button to toggle between
Yes
and No and press the
button.
Security erase
No
6. Press the
ENTER
five erase cycles with five patterns on each ring; No will perform one
erase pass on each ring.
After confirming your selection the erase function will begin. The
progress of the
Erasing ring 5
pattern 1 of 5 <>
26 OptiPac 6611MD User's Manual
SELECT
button when your desired selection is displayed. Yes will perform
button to toggle between
Erase rings
function will be displayed:
Yes
and No and press the
Page 35

OPTIPAC SYSTEM FUNCTIONS
Utilities Submenu
Fixed Disk Utilities
Submenu
Show DISK
Information
This function shows disk information; verifies, and formats the fixed
disk, and spins the disk down or up.
1. Press the
displayed on the Utilities submenu.
The Fixed disk utilities submenu then appears displaying the following
functions:
ENTER
button when the
Fixed disk utilities
function is
Show DISK information
Spin down/up disk
Verify disk
Format disk
Erase disk
Previous menu
2. Press the
3. You can return to the
you see Previous menu.
This function displays information similar to the following list about
the fixed disk.
SELECT
button to scroll through the information or functi
Utilities
Number of rings
Ring capacity
Ring size (cylinders)
Ring cylinder size (tracks)
Ring track size in sectors
Total sectors in ring
Total capacity of drive (kbytes)
Interleave
Sector size
Date disk last formatted*
Date disk last written*
Date disk last accessed*
menu by pressing the
ENTER
button when
ons.
* only if disk is formatted.
1. Press the
Spin Down / Up Disk
This function will spin the fixed disk drive down or up. Using this
function will help prevent wear on a drive which is constantly powered
on.
1. Press the
If the drive is already spun down, you will see the following message:
SELECT
ENTER
Spin up
disk
button
button to execute this f
to scroll through each field.
OptiPac 6611MD User's Manual 27
unction.
Page 36

4
OPTIPAC SYSTEM FUNCTIONS
Utilities Submenu
CAUTION:
▲
Verify Disk
2. Press the
The drive will spin up at the first sign of activity on the SCSI bus, or
when the LCD front panel controls access the drive.
If the computer system attempts to access the OptiPac while it is spun
down, the drive will automatically spin up, but the computer system may
time-out before the drive is ready, causing a system error.
This function scans every sector on the fixed disk for defects. If a bad
sector is found, this function will terminate with the LCD showing the
error.
1. Press the
As the verification progresses, the record address is updated. The
following message will appear:
ENTER
ENTER
button to spin the drive up
button to start
.
.
Verify DISK
block n
2. To abort the function at any time, press and hold both the
ENTER
buttons simultaneously until the following message appea
SELECT
Abort received.
wait …
and
rs:
Format Disk
CAUTION:
▲
3. Release the buttons.
The function will abort at the appropriate time and you'll see:
User abort
4. Press the
When the verify is complete, the following message will appear:
SELECT
button to exit
.
DISK verified
5. Press the
This function is used to format the fixed disk if the FORMAT utility is
not available in your host system.
The Format Disk function will erase all data on the fixed disk.
1. Press the
the Fixed disk utilities submenu
The Format disk submenu then appears displaying the following
message:
SELECT
ENTER
button to return to the Fixed disk utilities submenu
button when the
Format disk
function is displayed on
.
Erase entire
media? NO
.
28 OptiPac 6611MD User's Manual
Page 37

OPTIPAC SYSTEM FUNCTIONS
Utilities Submenu
2. Press the
3. Select
The following message will appear:
SELECT
YES
and press the
button to toggle between
ENTER
button to continue.
YES
and NO.
1 vols 512 bps
continue? No
If you choose No the FORMAT will abort and you'll be returned to the
Removable disk utilities menu.
4. Use the
the format process.
The following message will appear:
SELECT
button to select
Yes
and press the
ENTER
button to start
Formatting
DISK
Formatting will take up to 1 hour. After the format a verify pass will
occur. When the process is complete, the following message will appear:
DISK
formatted
Erase Disk
CAUTION:
▲
5. Press the
This function will erase the entire fixed disk by performing a security
wipe delete. This wiping of data is done by filling the sectors with
hexadecimal characters in sequential passes. The characters are written
in the following sequence: 00, FF, 55, AA, 00. This method prevents any
traces of data from being read, even with sophisticated techniques.
The erased fixed disk will be unreadable and must be formatted again
to be usable.
1. Press the
the fixed disk utilities submenu.
The Erase disk submenu will appear and ask:
SELECT
ENTER
button to return to the Fixed disk utilities submenu.
button when the
Erase disk
function is displayed on
Erase entire
media? NO
2. Use the
continue.
Upon successful completion, the following message will appear:
SELECT
button to select
YES
and press the
ENTER
button to
DISK erased
3. Press the
SELECT
button to return to the
OptiPac 6611MD User's Manual 29
Fixed disk utilities
submenu.
Page 38

4
OPTIPAC SYSTEM FUNCTIONS
Utilities Submenu
Cartridge Utilities
Submenu
Show Cartridge
Information
This function shows cartridge information; locks and unlocks, verifies,
and formats the cartridge.
1. Press the
on the Utilities submenu.
The Cartridge utilities submenu then appears displaying the following
functions:
ENTER
button when the
Cartridge utilities
function is displayed
Show Cartridge information
Unload cartridge
Verify cartridge
Format cartridge
Erase cartridge
Previous menu
2. Press the
3. You can return to the
you see Previous menu.
This function displays information similar to the following list about
the cartridge.
SELECT
button to scroll through the information or functions.
Utilities
Number of rings
Ring capacity
Ring size (cylinders)
Ring cylinder size (tracks)
Ring track size in sectors
Sectors in ring
Total capacity of drive (kbytes)
Interleave
Sector size
Date cartridge last formatted*
Date cartridge last written*
Date cartridge last accessed*
menu by pressing the
ENTER
button when
* Not displayed for unformatted cartridges.
1. Press the
Unload Cartridge
30 OptiPac 6611MD User's Manual
This is the same as
ENTER
button to scroll through each field.
Unload cartridge
in the Main menu.
Page 39

OPTIPAC SYSTEM FUNCTIONS
Utilities Submenu
Verify Cartridge
This function scans every sector on the cartridge for defects. If a bad
sector is found, this function will terminate with the LCD showing the
error.
1. Press the
As the verification progresses, the record address is updated. The
following message will appear:
ENTER
button to start.
Verify CARTRIDGE
block n
2. To abort the function at any time, press and hold both the
ENTER
buttons simultaneously until the following message appears:
SELECT
Abort received.
wait …
3. Release the buttons.
The function will abort at the appropriate time and you'll see:
User abort
4. Press the
When the verify is complete, the following message will appear:
ENTER
button to exit.
and
Format Cartridge
CARTRIDGE
verified
5. Press the
submenu.
All new cartridges should be formatted with this utility before using on
the computer system. This function is used to format the cartridge if
the FORMAT utility is not available in your host system.
1. Press the
on the Removable disk utilities submenu.
The Format cartridge submenu then appears displaying the following
message:
SELECT
ENTER
button to return to the Removable disk utilities
button when the
Format cartridge
function is displayed
Erase entire
media? NO
2. Press the
3. Select
The following message will appear showing the number of volumes
vols
(
SELECT
YES
and press the
) and the sector size (
button to toggle between
ENTER
button to continue.
bps
= bytes per sector):
YES
and NO.
OptiPac 6611MD User's Manual 31
Page 40

4
OPTIPAC SYSTEM FUNCTIONS
Utilities Submenu
1 vol 1024 bps
continue? NO
Erase Cartridge
CAUTION:
▲
4. Use the
start the format process.
The following message will appear:
SELECT
button to select
YES
and press the
ENTER
button to
Formatting
CARTRIDGE
Formatting will take up to 1 hour. After the format, a verify pass will
occur. When the process is complete, the following message will appear:
CARTRIDGE
formatted
5. Press the
submenu.
This function will erase the entire cartridge by performing a security
wipe delete. This wiping of data is done by filling the sectors with
hexadecimal characters in sequential passes. The characters are written
in the following sequence: 00, FF, 55, AA, 00. This method prevents any
traces of data from being read, even with sophisticated techniques.
The erased cartridge will be unreadable and must be formatted again
to be usable.
SELECT
button to return to the Removable disk utilities
1. Press the
on the Removable disk utilities submenu.
The Erase cartridge submenu will appear and ask:
Erase entire
media? NO
2. Use the
continue.
Upon successful completion, the following message will appear:
CARTRIDGE
erased
3. Press the
submenu.
32 OptiPac 6611MD User's Manual
ENTER
SELECT
SELECT
button when the
button to select
button to return to the
Erase cartridge
YES
function is displayed
and press the
ENTER
Removable disk utilities
button to
Page 41

OPTIPAC SYSTEM FUNCTIONS
Utilities Submenu
Tests Submenu
Test LCD Display
This function tests the LCD.
1. Press the
ENTER
button when the
Tests
function is displayed on the
Utilities submenu.
The Tests submenu will appear displaying the following function:
Test LCD display
2. Press the
3. To return to the Utilities menu, press the
SELECT
button to scroll through the information or functions.
ENTER
button when you see
Previous menu.
This function is used to make sure the LCD is working properly.
1. Press the
ENTER
button to start the test.
All of the segments on the LCD will be turned on. If there are any missing
segments (except the last character with an *), call the Bering Service
Department for assistance.
2. Press the
ENTER
button again to exit.
OptiPac 6611MD User's Manual 33
Page 42

4
OPTIPAC SYSTEM FUNCTIONS
Utilities Submenu
34 OptiPac 6611MD User's Manual
Page 43

5
CARING FOR THE DISK DRIVE & CARTRIDGE
This chapter describes how to care for your OptiPac and cartridges. It
is divided into two sections. The “General Safeguards” section tells you
what to look out for. The “Cartridge Care” section explains how to
handle removable cartridges. The “Preventive Maintenance” section will
explain user maintenance procedures. As long as you protect your
OptiPac from hazards, it will provide you with years of service.
General
Safeguards
To protect the OptiPac:
• To avoid overheating, place it where the air can circulate around it. Be
particularly careful to avoid blocking the cooling vent at the rear of the
unit.
• Make sure it is plugged into a grounded (three-hole) electrical outlet.
Verify that the outlet actually is grounded — that the third prong really
is connected to a ground. The OptiPac should be on the same circuit as
your computer.
• Make sure that other equipment or appliances which might generate
electrical noise or a power surge (such as electric typewriters or heaters)
are on separate circuits.
• Do not expose your OptiPac to extreme heat or cold. Prolonged exposure
to excessive heat, direct sunlight, or freezing conditions will harm the
drive.
• Keep it away from moisture, dirt, and contaminants such as spilled
liquids, steam, or excessive dust. Do not smoke near the OptiPac.
• Do not apply cleaners or lubricants to any part of the drive.
• Never bump the OptiPac when it's running.
• Always set the OptiPac upright on a flat surface.
5
▲
CAUTION:
Never transport the OptiPac with a cartridge in the drive. This could
damage the media.
You don't need to worry about leaving the OptiPac on for a long time
— it doesn't use much power. It's normal for the drive to feel warm (but
not hot) after it's been running for a while.
If the OptiPac does get hot, make sure the fan is running properly, the
vent at the rear is not blocked, and that the unit is placed where air can
circulate around it.
OptiPac 6611MD User's Manual 35
Page 44

5
CARING FOR THE DISK DRIVE & CARTRIDGE
Cartridge Care
Cartridge Care
Removable cartridges are highly reliable and have a very long service
life if you care for them properly.
• Store them properly. Remove the cartridge from the drive when you are
not us in g it an d st or e i t in it s p r ote ct ive ca se in a co ol , dr y, sa fe l oc at ion .
• Do not leave the cartridge in the OptiPac after it is powered down. This
leaves the cartridge shutter open and makes the recording media itself
vulnerable to dust.
• Do not turn the computer off to remove the cartridge. This will not eject
the cartridge. If the power is turned off, wait at least 60 seconds before
removing the cartridge. See “Unloading a Cartridge” in Chapter 3 for
more details.
• Keep your cartridges clean and dry and out of harm's way. Protect
cartridges from dirt, spills, and smoke. Avoid handling the shutter edge
of the cartridge since oil and dirt from your hands may be transferred
to the disk media or to the inside of the drive.
• Do not open the cartridge access shutter. Minute particles such as
smoke, pollen, or dust can contaminate the disk surface.
• Do not disassemble the cartridge.
• Use them at the correct temperature. Avoid using cartridges at
temperatures above 104° F (40° C) or below 41° F(5° C). To avoid
permanently damaging data, the drive, cartridge, and room should all
be about the same temperature within the above operating range when
you insert the cartridge into the drive.
• Do not move the drive with a cartridge loaded.
• Do not drop the cartridge. Sudden jolts may damage the media and/or
cause the loss of data.
• Label each cartridge clearly and make sure the label is securely attached
before loading the cartridge. Do not mark on labels with a graphite
pencil. The graphite dust from the pencil may contaminate the disk
surface.
• Do not use defective or questionable cartridges on another drive. You
may spread the problem.
Preventive
Maintenance
36 OptiPac 6611MD User's Manual
Bering subsystems will provide extended and reliable service as long as
the drives are properly maintained. The Bering OptiPac subsystems
require no preventive maintenance. If you have any questions
concerning the proper preventive maintenance procedures please
contact Bering Customer Support.
Page 45

6
TROUBLESHOOTING & SERVICE
This chapter describes basic trouble-shooting procedures. It is divided
into four sections: “Before You Do Anything Else,” “Error Codes and
LCD Messages,” “Fuse Replacement,” and “If You're Still Having
Problems.”
Before You Do
Anything Else
Error Codes and
LCD Messages
Often, problems you're having can be resolved by verifying that:
• The power cord is securely connected to the OptiPac and a wall outlet.
• The power is switched on, and the AC fuse in the back of the drive is
not blown.
• None of the pins on the cable connectors are loose, broken, or shorted.
• All cables are installed correctly.
• The cartridge has been properly formatted.
• Each peripheral connected to your computer has a unique address.
Occasionally, after installing an OptiPac, the system will display a disk
initialization error code upon start up. It is sometimes possible to solve
the problem by following the LCD instructions. Sometimes the LCD will
display an error code in the form of a number. This error code indicates
a problem that may be associated with another hardware device other
than the OptiPac. If this occurs, shut down your system and restart it
again. If the problem still occurs, contact Bering Technical Support at
(408) 229-6400.
6
Fuse
Replacement
If the drive fails to power on the AC fuse may be blown. The fuse is
located in the AC input jack.
Spare
fuse
Fuse
Figure 6-1: Replacing the AC fuse
OptiPac 6611MD User's Manual 37
Page 46

6
TROUBLESHOOTING & SERVICE
If You're Still Having Problems
If You're Still
Having
Problems
START-UP PROBLEMS
WHEN ALL ELSE FAILS...
If you are able to start up from another drive but not the OptiPac, or
from a cartridge and not the hard drive, the system files on the OptiPac
hard drive may be damaged.
If you're unable to start up from an OptiPac, try starting up the
computer with a different drive if available. If you're still unable to start
up, the problem is with the computer rather than the OptiPac. Refer to
the troubleshooting section in your computer manual for more
information.
If you still have problems after following the procedures in this chapter,
call Bering Technical Support at (408) 229-6400. When you call be ready
to tell the service representative:
• The model number and serial number of the OptiPac, the firmware
version of the OptiPac, the type of computer you're using, the operating
system, and the software version.
• Any error messages that have appeared.
• A description of the problem(s) and the steps you've taken to correct it.
Bering Customer Service can be reached by several methods. The
mailing/shipping address and phone numbers are:
▲
CAUTION:
Bering Technology, Inc.
Customer Service/Technical Support
2827 Aiello Drive
San Jose, CA 95111
(408) 229-6400
FAX: (408) 229-6401
Email: [email protected]
Never remove the cover of the OptiPac box. This voids the warranty.
38 OptiPac 6611MD User's Manual
Page 47

A
SPECIFICATIONS
A
1.3GB Cartridge
Disk Drive
1.3GB MO Cartridge
PERFORMANCE Rings 100 per side 1024 bps
ENVIRONMENTAL
(operational)
The specifications listed on this page are for a 1.3GB cartridge. The
1.3GB, 1024 bps cartridge is identical in capacity to the hard drive. Using
any other cartridge will cause fewer than 100 rings to be backed up.
w/ 1.3GB cartridge
Ring capacity 10.1 MB
Rotation speed 1.3GB cartridge 3,214 rpm
other cartridge 4,558 rpm
Average seek time 23 ms, read
MTBF 120,000 Power on Hours
Temperature 5° to 45° C
Relative humidity 10 to 85 % non-condensing
Vibration 5 to 500 Hz, 0.4 G's p-p
Shock 2 G, 10 ms half sine pulse
Altitude 0 to 10,000 feet
0 to 3,048 meters
(non-operating) Temperature -20° to 60° C
Relative Humidity 5 to 90 % non-condensing
Vibration 5 to 500 Hz, 1 G p-p
Shock (cartridge removed) 5 G's at 10 ms half sine pulse
transport 50 G’s at 10 ms half sine pulse
Altitude 0 to 40,000 feet
0 to 12,192 meters
LASER DIODE Type Semiconductor Laser
Wavelength 785nm, Continuous
Output power 30mW (max)
Classification Class 1 (IEC. 825) GaAIAs
OptiPac 6611MD User's Manual 39
Page 48

A
SPECIFICATIONS
1.3GB Fixed Disk
1.3GB Fixed Disk
PERFORMANCE Rings 100
Ring capacity 10.1 MB
Rotation speed 7200 rpm
Average latency 5.6 ms
Minimum seek time 2 ms
Average seek time 12.5 ms
Maximum seek time 22 ms
MTBF 300,000 Power On Hours
ENVIRONMENTAL
(operational)
(non-operating) Temperature -40° to 70° C
Temperature 5° to 55° C
41° to 131
Temperature gradient 15 ° C/hour
59 ° F/hour
Relative humidity 20 to 80 % non-condensing
Vibration 1 G, 5 to 250Hz
Shock 10 G, 10 ms max
Altitude 0 ~ 3,000 meters
0 ~ 10,000 feet
-40° to 158° F
Relative Humidity 5 to 90 %
Vibration 2 G, 5 to 250 Hz
Shock 75 G, 10 ms max
Altitude 0 ~ 12,000 meters
0 ~ 40,000 feet
°
F
40 OptiPac 6611MD User's Manual
Page 49

General
SPECIFICATIONS
General
Power
Requirements
Line voltage 96 - 240 volts
Line frequency 47 - 63 Hz
Current 0.5 Amps
Fuse “Slow blow” 1.6A, 250V
General Dimensions Interface SCSI, Common Command Set (CCS)
Dimension 3" x 12.8" x 14"
8.25 x 32.5 x 35.5 cm
Shipping weight 25 lbs.
11.3 Kg
Accessories Cartridge MO, 1.3GB ACCS-3070
Cartridge MO, 1.3GB, 5 pack ACCS-3071
Rack Mount Kit - 19" ACCS-7206
OptiPac 6611MD User's Manual 41
Page 50

A
SPECIFICATIONS
General
42 OptiPac 6611MD User's Manual
Page 51
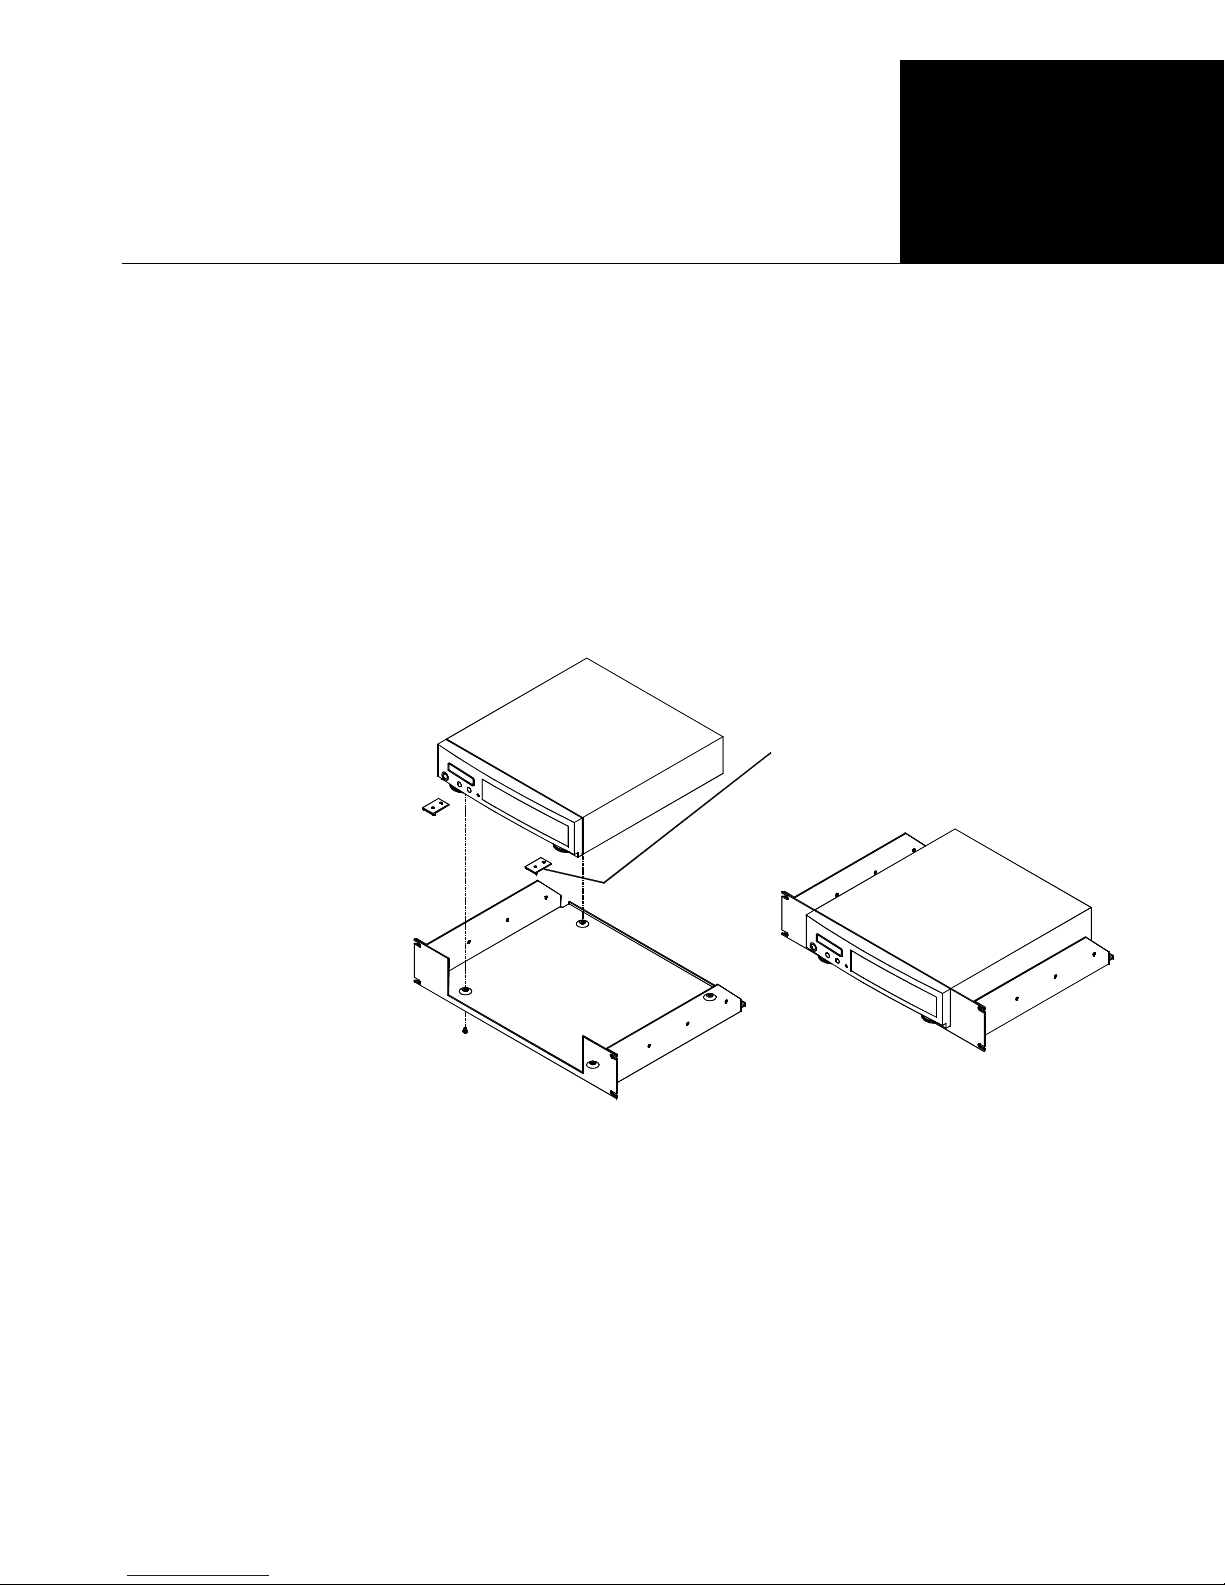
B
RACK MOUNT
Installation
B
If you purchased the rack mount kit, ACCS-7206 from Bering, these
instructions will show the installation procedures. It fits in a standard
19” rack cabinet. The front is a 3.5 in. panel with the holes on 3 in.
centers. The holes on the sides of the rack are 3.625 centers for
installation of a standard C300S-22 slide rail. The following instructions
are for installing the drive into a rack without slide rails.
1. Remove the front feet from the Bering drive by removing two screws in
each foot.
2. Mount the Bering drive to the rack mount shelf with four (4) 8-32x¼
screws inserted from the bottom through the shelf into the bottom of
the drive.
Remove front feet from drive
This step may be performed by turning the drive upside down and
placing the shelf on the drive while aligning the screw holes.
Figure B-1: Attaching the drive to the rack mount assembly
OptiPac 6611MD User's Manual 43
Page 52
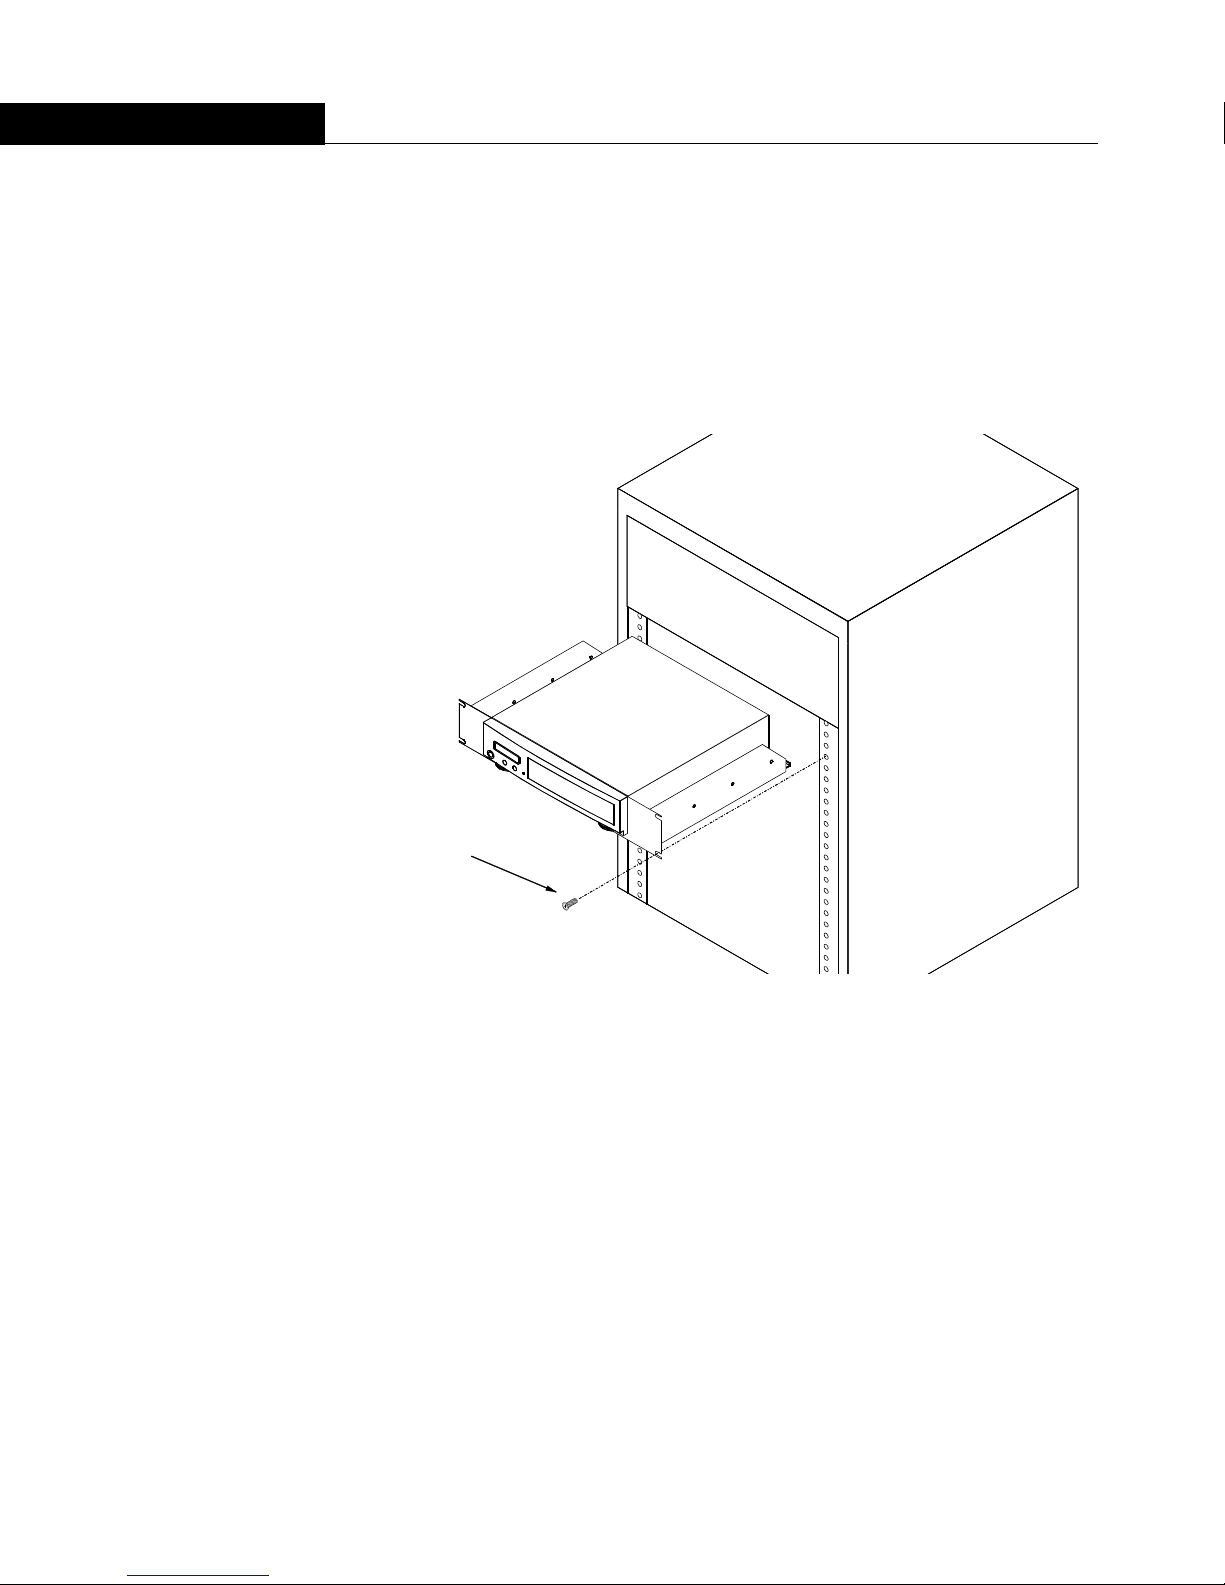
▲
CAUTION
B
RACK MOUNT
Installation
The following steps require two people to install the unit in a cabinet.
The shelf requires 3.5 inches of vertical clearance.
3. Insert the shelf with the Bering drive into the cabinet and hold it in place.
4. Insert the four (4) 10-32x5/16 screws from the front through the holes
in the cabinet. Screw the 10-32 nuts on the screws from the rear of the
panel and tighten.
10-32x5/16, 4 places
Figure B-2: Installing the rack mount in the chassis
44 OptiPac 6611MD User's Manual
Page 53

INDEX
A
Accessories 41
B
Backup rings 23
C
Cartridge
Care 36
Erase 32
Format 31
Loading 10
Show information 30
Specifications 39
Unload 16, 30
Unloading 11
Verify 31
Cartridge utilities submenu 30
Change emulation 18
Change format switch 17
Change label 22
Change protect ring H00 18
Change protect rings 18
Change ring 15, 22
Clock, 12 / 24 setting 19
Configurations submenu 17
Controls 9
Copy ring 23
Customer Service 38
D
Date
Setting 19
Disk
Format 28
Show information 27
Spin down 27
Verify 28
Display Time and Messages 16
E
Emergency eject hole 10
Emulation 18
Erase 26
Erase cartridge 32
Erase ring 25
Error LED 9
F
FCC iii
Firmware version 21
Fixed disk access indicator 9
Format cartridge 31
Format disk 28
Fuse replacement 37
L
Label, change 22
LCD
Backup rings 23
Cartridge utilities submenu 30
Change emulation 18
Change format switch 17
Change label 22
Change protect ring H00 18
Change protect rings 18
Change ring 15, 22
Configurations submenu 17
Copy ring 23
Erase cartridge 32
Erase ring 25
F/W version 21
Format cartridge 31
Format disk 28
Model number 21
Restore rings 24
Set date 19
Set time 19
Show cartridge information 30
Show disk information 27
Spin down / up disk 27
Test LCD display 33
Unload Cartridge 16
Unload cartridge 30
Use 24 hour clock 19
Utilities submenu 21
Verify cartridge 31
Verify disk 28
LCD Menu 14
LCD messages 37
LED, error 9
OptiPac 6611MD User's Manual 45
Page 54

INDEX
M
MAC Disk Interface 6
Magneto-Optical technology 2
Main menu 15
Media not initialized, message 15
Menu, system 14
Model number 21
N
New cartridge 15
O
Operation 9
P
Preventive maintenance 36
Protect ring H00 18
Protect rings 18
R
Rack mount installation 43
Rack mount kit 41
Regeneration 2
Ring
Backup 23
Erase 25
Protect 18
Restore 24
ROM version 21
U
Unload Cartridge 16
Unload cartridge 30
Unpacking 4
Utilities submenu 21
V
Verify cartridge 31
Verify disk 28
W
Warranty statement v
Write protection 12
Rings 18
S
Set date 19
Set time 19
Show cartridge information 30
Show disk information 27
Specifications
1.3GB cartridge drive 39
1.3GB Fixed disk 40
Cartridges 39
General 41
Spin down / up disk 27
T
Table of Contents vii
Technical Support 38
Test LCD display 33
Tests submenu 33
Time
Setting 19
46 OptiPac 6611MD User's Manual
 Loading...