

Page 1

ALARM CLOCKS / WECKER
Instruction Manual & Warranty
Bedienungsanleitung & Garantie
Page 2

START THE DAY WITH
SCANDINAVIAN SIMPLICITY
STEEL CASE
3-YEAR INTERNATIONAL WARRANTY
SILENT MOVEMENT
Explore the BERING world
www.beringtime.com
RADIO-CONTROLLED ANALOGUE
ALARM CLOCK DCF
Germa n radio tec hnology c lockwo rk 762 / 2 hands
- Full y automa tic time se tting
- Summer/ wintertime
- Anal ogue time di splay via h ands hrs. , mins.
- Alar m time disp lay via han d
- Alar m with var ying int erval s
- Time de viatio n 1 sec / 1 milli on years
FUNCTIONAL PRINCIPLE OF A
RADIO ALARM CLOCK:
This absolutely precisely timed radio-controlled alarm clock is automat icall y set by the w orld’s mos t accurat e clock – a cae sium ato mic time bas e.
The ra dio alar m clock rec eives the t ime signal s from the o fficial t ime tran smit ter DCF 77. On a fr equency o f 77.5 kHz, ti me signals a re autom atical ly
rece ived wit hin a radius o f approx. 15 00 km via a bu ilt-in ant enna. The
tran smitt er is locat ed near Fra nkfur t / Main. Day af ter day, t he alarm cl ock
auto matical ly sets i tself to t he exact m inutes, h ours displ ay, and seco nds
and aut omatic ally chan ges to summ er (CES T) and win terti me (CET ). If you
are ou t of recep tion rang e or if the st ation is oc casional ly not rec eived, th e
alar m clock wor ks as a high-p recision q uartz c lock.
EN
Page 3

EN
EN
TECHNICAL DATA
- Inte grated r adio rece iver for re ceiving t he time sign al trans mitter
DCF 77 a t 77.5 kHz
- Bat tery ty pe: 1 x IEC L R6, alka li-manga nese (mig non)
- Bat tery li fe: > 1 year
- Setting time during undisturbed reception : 2-9 minutes
- Full y automa tic summer /winte r time chan geover
- Alar m signal dur ation ap prox. 2 min utes wit h increas ing alar m signal
- Snooz e durati on (alar m repeti tion) a fter 4- 5 minutes
- Time zone function
PUTTING INTO OPERATION /
START-UP PROCEDURE
Inser t a new alka li-mang anese bat tery, t ype 1.5 V migno n LR6 into t he
bat tery com partme nt cover (1, b ack), i f necessar y, remove t he insula tor.
Ensur e that the p olarit y is corr ect as show n in the bat tery com partme nt.
Reinsert the batter y compartment cover.
AUTOMATIC ADJUSTMENT SEQUENCE:
Aft er inser ting the ba ttery, a s hort ala rm signal m ay be heard w hile the
hands a re moving t o 12:00 i n fast mode . Follow ing this, t he receiv er is
swit ched on. Dur ing the rec eption ph ase, the ha nds will s top at the 12 :00
posi tion. The e ntire se tting pr ocess of t he hands to th e exact ti me takes up
to 9 minu tes. Whe n insert ing the bat tery, ne ver press a nd hold the up per
but ton. When i n doubt, pl ease repe at the st arting pr ocedure .
TIME ZONE SETTING
With t he help of t he upper but ton, you c an set the a larm clo ck to any tim e
zone in t he world .
1. Pres s and hold th is butto n for at lea st 6 second s until a sho rt alar m sound
can be he ard, and th e time disp lay advan ces by 1 hour.
2. The re is a shor t alarm sou nd every t ime the but ton is pre ssed, adj usting
the ti me by one hour r especti vely.
3. The a djustme nt of the tim e zone is loc ked again af ter 10 seco nds foll owing
the la st press ing of a but ton. For re newed adju stment p lease res tart a t 1.
Page 4

EN
NOTE
The us ual recep tion area i s within a r adius of 150 0 km of the tr ansmit ter. The
recep tion can b e disturb ed by exte rnal infl uences ( e.g. reinf orced co ncrete
build ings, swi tched on T V sets, PC , etc.) . In case of m alfunct ions (ev en if the
bat tery is co rrect ), remov e the bat tery for a pprox. 3 0 seconds an d restar t
the al arm clock . If there i s still no r ecepti on, pleas e change loc ation.
CAUTION - MATERIAL DAMAGE
- Never e xpose th e alarm cl ock to seve re temper ature flu ctuat ions,
moisture, direct sunlight, dust or impact.
- Prot ect the ba tteri es from exc essive he at. Remo ve the bat tery fr om
the al arm clock w hen it is in a ho rizont al posit ion.
This w ill preve nt damage c aused by le akage.
- Do not us e abrasi ve or solve nt-based c leaning pr oducts t o clean
the al arm clock .
DISPOSAL
The al arm cloc k, its pac kaging and t he insert ed batt ery have b een manufact ured fro m valuabl e materi als that c an be recyc led. Recy cling redu ces
the amo unt of ref use and hel ps to pres erve the en viromen t. Dispo se of the
packa ging at the r ecyclin g point tha t sorts m aterial s by type . Make use of
the lo cal facil ities pr ovided fo r collec ting paper, c ardboar d and light weight
packaging.
Devic es marked w ith this s ymbol mus t not be dispo sed of alo ng
wit h normal hou sehold re fuse! You a re legal ly bound to di spose of
old appliances separately from household refuse. Information
abou t where old d evices ca n be dispose d of free of c harge is av ailable f rom
your local authorities.
Regul ar batt eries and r echarge able bat teries mu st not be dis posed
of alo ng with hou sehold re fuse! You a re legal ly bound to d ispose
of fla t batte ries or rec hargeabl e batte ries at a lo cal autho rity co llect ion point o r to retur n them to a ba ttery r etail er.
EN
Page 5

EN
SAFETY WARNINGS
Read t he safet y warning s carefu lly and onl y use the pro duct as des cribed
in thes e instru ctions t o avoid acci dental in jury or dam age. Keep th is
manua l for futu re refer ence. If yo u pass this p roduct on t o another p erson,
remember to give them these instructions.
INTENDED USE
- The al arm cloc k is designed t o displa y the time and w ake you up.
- It is in tended fo r home use and i s not suit able for co mmercial p urposes .
DANG ER TO CHILD REN
- Swal lowing b atter ies can be fa tal. Th erefor e, keep the ba tter y and the
alar m clock ou t of the reac h of infan ts. If a bat tery ha s been swal lowed,
seek medical advice immediately.
- Keep pa ckaging ma terial a way from ch ildren. T here is a ri sk of
suffocation !
WARN ING - RISK OF I NJURY
- If a bat tery ha s leaked, a void cont act wit h skin, eye s and mucous m em bran es. If neces sary, ri nse the af fected a reas wit h water and c onsult a
doctor immediately.
- Bat teries mu st not be cha rged, ta ken apart , thrown i nto fire or
short-circuited.
EN
Page 6

BEGINNE DEN TAG MIT
SKANDINAVISCHEM DESIGN
EDELSTAHL GEHÄUSE
3 JAHRE INTERNATIONALE GARANTIE
LEISES UHRWERK
Entdecke die BERING Welt
www.beringtime.com
FUNK-ANALOG-WECKER DCF
Deutsche Funktechnologie Werk 762 / 2 Zeiger
- Vollautomatische Einst ellung von Uhrzeit
- Sommer-/ Winterzeit
- analoge Zeitanzeige über Zeiger Std., Min.
- Weckzeitanzeige über Zeiger
- Alar m mit vari ierendem I nterva ll
- Zeit abweich ung 1 Sek. / 1 Millio n Jahre
FUNKTIONSPRINZIP EINES FUNK WECKERS:
Dieser absolut zeitpräzise, funkgesteuer te Wecker wird automatisch von
der genauesten Uhr der Welt – einer Caesium-Atomzeitbasis – eingestell t.
Der Funk wecker er hält die Z eitsign ale vom amt lichen Ze itsende r DCF 77. Auf
einer F requenz vo n 77,5 kHz wer den in einem Um kreis von c a. 1500 km di e
Zeitsignale über eine eingebaute Antenne automat. Empf angen. Der Sender
befind et sich in de r Nähe von Fra nkfur t am Main. Der W ecker ste llt sich
selb sttät ig Tag für Tag au f die exak ten Minut en, Stund enanzeig e und Sekunden ein u nd wechsel t automa t. Sommer zeit (M ESZ) und W interz eit (ME Z).
Wird der Empfangsbereich verlassen oder sollte der Sender gelegentlich
nicht empfangen werden, arbeitet der Wecker als hochgenaue Quartzuhr.
DE
Page 7

DE
TECHNISCHE DATEN
- Integrierter Funkempfänger zum Empfang des
Zeitzeichensenders DCF 77 auf 77,5 kHz
- Bat teriet yp: 1 x IE C LR6, Alka li Mangan ( Mignon )
- Bat teriel aufzei t: > 1 Jahr
- Eins tellze it bei unges tört em Empfan g: 2-9 Minu ten
- Sommer-/Winterzei tumstellung vollautomatisch
- Wecks ignaldau er ca. 2 Minu ten mit ans teigend em Wecksign al
- Snoozedauer (Weckwiederholung) nach 4-5 Minuten
- Zeitzonenfunktion
INBETRIEBNAHME / STARTVORGANG
In Batteriefachdeckel (1, Rückseite) eine neue Alkali-Mangan-Ba tterie,
Typ 1,5 V Mi gnon LR6 ein setzen ( ggf. Isol ator en tferne n). Ach ten Sie auf
richtige Polung, so wie im Batteriefach angezeigt ist. Batterie fachdeckel
wieder einsetzen.
AUTOMATISCHER EINSTELL-ABLAUF:
Nach Einlegen der Batterie kann es vorkommen, dass das Alarmsignal kurz
ert önt, währ end die Zei ger im Schne llgang au f 12:00 Uh r laufen . Danach
wird der Empfänger eingeschaltet. Während der Empfangsphase bleiben die
Zeige r auf der 12: 00 Uhr Pos ition st ehen. Der ge samte Ei nstell vorgang d er
Zeige r auf exak te Zeit da uert bis zu 9 M inuten. B eim Einleg en der Bat terie
bit te niemal s die obere Tas te gedrü ckt halt en. Im Zwei felfal l wiederho len
Sie bi tte den S tartga ng.
ZEITZONENEINSTELLUNG
Mit Hilfe der oberen Taste können Sie andere Zeitzonen der Erde einstellen.
1. Halt en Sie dazu di ese Taste l änger als 6 S ekunden ge drückt , bis ein kur zer
Alar mton er tönt und di e Zeitan zeige um 1 St unde vorw ärts ve rstell t wird.
2. Jeder weiter Tastendruck mit einem kurzen Alarmton verstellt um je eine
weitere Stunde.
3. Nach c a. 10 Sekund en nach der le tzten Ta stenbes tätig ung ist die Z eitzonenverstellung wieder gesperr t. Für erneutes Verstellen beginnen Sie
bit te wieder m it 1.
DE
Page 8

DE
DE
HINWEIS
Der übliche Empfangsbereich liegt in einem Umkreis von 1500 km des
Sende rs. Durch ä ußere Ein flüsse ka nn der Empf ang gestö rt werde n (z.B.
Stahlbeton-Bau ten, eingeschaltete TV-Geräte, PC, usw.)
Bei Funk tionss törung en (auch be i korrek ter Batt erie) i st die Bat terie fü r ca.
30 Sekunden herauszunehmen und der Wecker wieder neu zu start en. Ist
immer n och kein Emp fang gegeb en, bitt e den Stan dort wec hseln.
VORSICHT - SACHSCHÄDEN
- Setzen Sie den Wecker keinen starken Temperaturschwankungen,
Feuchtigkeit, direkt er Sonneneinstrahlung, Staub und Stößen aus.
- Schü tzen Sie Ba tteri en vor überm äßiger Wär me. Nehmen S ie die
verbrauchte Batt erie aus dem Wecker heraus. So vermeiden Sie Schäden,
die durch Auslaufen entstehen können.
- Verwenden Sie keine scheuernden oder lösungsmittelhaltigen Reinigungs mit tel, um den W ecker zu rei nigen.
ENTSORGEN
Der Wecker, ihre Verpackung und die bereits eingesetzt e Batterie wurden
aus wertvollen Mater ialien hergestellt, die wiederverwerte t werden
können. Dies verringert den Abfall und schont die Umwelt. Entsorgen Sie die
Ver- pack ung sorte nrein. Nu tzen Sie d afür die ör tlichen M öglichk eiten zum
Sammeln von Papier, Pappe und Leichtverpack ungen.
Geräte, die mit diesem Symbol gekennzeichnet sind dürfen nicht
mit dem H ausmüll e ntsorg t werden ! Sie sind ges etzlic h dazu
verp flichte t, Altge räte ge trennt vo m Hausmül l zu entsor gen.
Informationen zu Sammelstellen, die Altgerä te kostenlos entgegennehmen,
erhalten Sie bei Ihrer Gemeinde- oder Stadtverwaltung.
Bat terie und A kkus gehö ren nicht i n den Hausmül l! Sie sin d gesetz -
lich da zu verpfl ichtet , leere Ba tteri en und Akku s bei einer Sa mmel stelle Ihrer Gemeinde- oder Stadtver waltung oder beim batterievertreibenden Fachhandel abzugeben.
Page 9

DE
DE
SICHERHEITSHINWEISE
Lesen Sie aufmerksam die Sicherheitshinweise und benutzen Sie den Artikel
nur wie i n dieser An leitung b eschrieb en, damit e s nicht ver sehentl ich zu
Verletzungen oder Schäden kommt. Bewahren Sie diese Anleitung zum
spät eren Nach lesen auf. B ei Weiter gabe des Ar tikel s ist auch die se Anleitung mitzugeben.
VERWENDUNGSZWECK
- Der Funk wecker is t zum Anze igen der Uhr zeit sow ie zum
Wecken vorgesehen.
- Er ist f ür den priv aten Gebr auch konz ipiert un d für gewer bliche Zw ecke
nicht geeignet.
GEFAHR FÜR KINDER
- Batterien können bei Verschlucken lebensgefährlich sein.
Bewahren Sie deshalb Batterie und Wecker für Kleinkinder unerreichbar
auf. Wurde eine Batterie verschluckt , muss sofort medizinische Hilfe in
Anspruch genommen werden.
- Halt en Sie Kind er vom Verpac kungsma terial f ern. Es bes teht u.a .
Erstickungsgefahr !
WARNUNG VOR VERLETZUNGEN
- Soll te eine Bat terie a usgelau fen sein, v ermeiden S ie Kontak t mit Hau t,
Augen u nd Schleim häuten. S pülen Sie g gf. die bet roffe nen Stel len mit
Wasser und suchen Sie umgehend einen Arzt auf.
- Batterien dürfen nicht geladen, auseinander genommen, in Feuer
geworfen oder kurzgeschlossen werden.
Page 10

91066 - 22S, 54S, 74S
BATTERY COMPARTMENT / BATTERIEFACH
WAKE-U P TIM E SET TING WHEEL / WECKZEIT-STELLRAD
LIGHT / LICHT
SNOOZE / NACHWECKAUTOMATIK
ALARM ON/OFF SWITC H / ALARM EIN-/AUS-SCHALTER
TIME ZONE FUNCTION / ZEITZONENFUNKTION
Page 11
EN
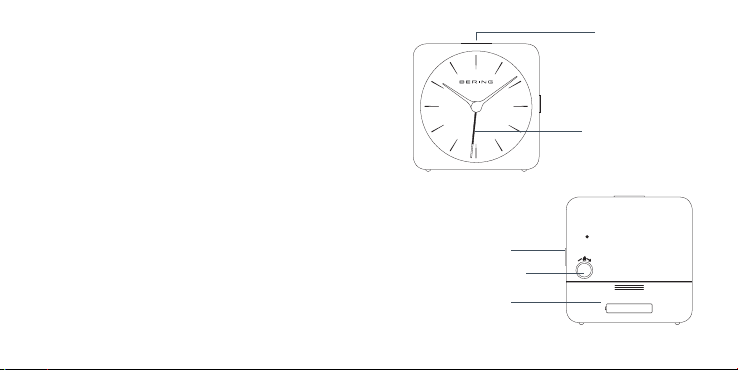
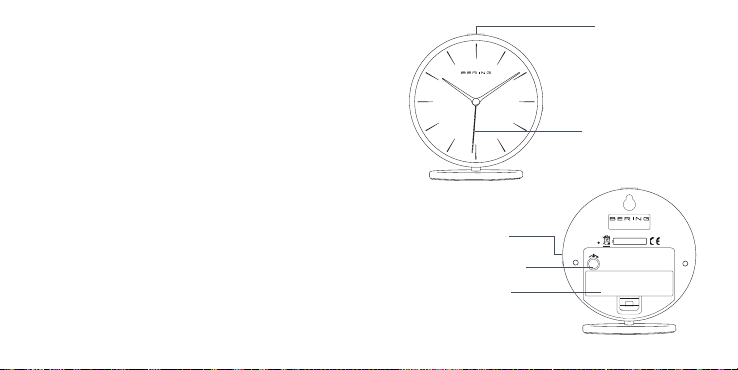
SET TING THE ALARM TIME
Set th e desired a larm tim e using the al arm time s etting w heel (2 ) at the
back . (Note t he direct ion of the ar row) . (Turning t he alarm t ime sett ing
wheel i n the oppos ite direc tion to th e arrow doe s not alwa ys set the al arm
time ). In orde r to set the a larm, pus h the side sw itch (4 ) upwards , a red field
becomes visible.
SET TING THE ALARM SIGNAL / SNOOZE
Brie fly press t he snooze /ligh t button ( 3) The a larm sign al will be in terrup ted
for 4 to 5 m inutes an d will soun d again af terwar ds. The sno oze funct ion can
be repe ated as of ten as des ired for a pe riod of app rox. 60 min utes. If t he
alar m is not int errupt ed or switc hed off, i t automa ticall y stops af ter abou t 2
minut es. It sou nds again 12 hou rs late r at the set a larm time . To turn of f the
alar m comple tely, slid e down the si de switch ( 4).
LIGHTING:
In orde r to star t the ligh t functio n, the ala rm clock mu st recei ve the time
signa l first. T he dial ill uminati on of your al arm clock i s automa tically s witched on f or 5 second s with each a larm sign al. Ever y time the up per butt on is
brie fly press ed (3) th e lightin g switch es on for 5 sec onds.
alar m on/o ff switc h (4)
alar m time set ting whe el (2)
bat tery cov er (1)
ligh t / snooze /
time z one (3)
alarm time
+
1,5V — LR6 –
EN
---
Page 12
DE
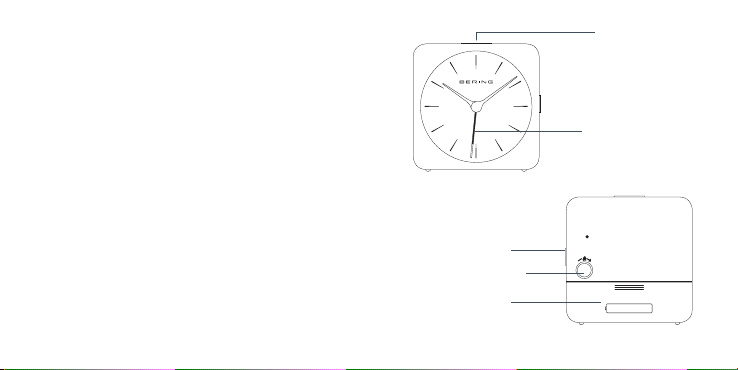
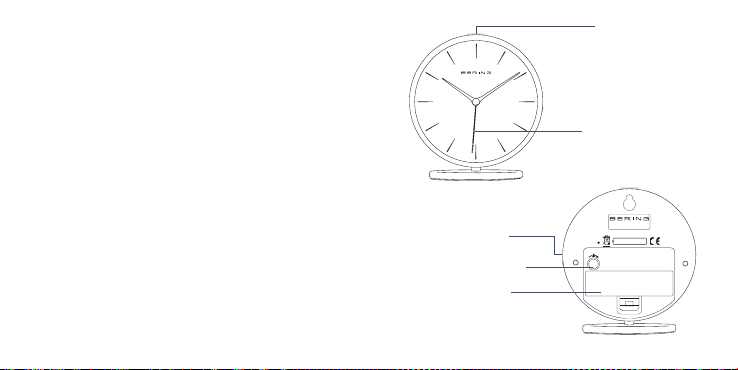
EINSTELLEN DER WECKZEIT
Ste llen Sie mi t Hilfe des a uf der Rücks eite befi ndlichen S tellr ads (2) ( Pfeil rich tung beach ten) di e gewünsch te Weckz eit ein. ( Ein Drehe n des Stel lrads
entgegen der Pfeilrichtung bewirkt nicht in jedem Fall eine Weckzeiteinstellung.) Um die Weckbereitschaf t herzustellen, schieben Sie bitte den
seit lichen Sc halter ( 4) nach obe n, ein rot es Feld wir d sichtba r.
WECKSIGNAL EINSTELLEN / SNOOZE
Drück en Sie kurz zeitig di e Snooze- /Bele uchtung stast e (3) Das W ecksigna l
wird f ür 4 bis 5 Minut en unter brochen un d ertön t danach ern eut. Der
Snooz ebetri eb ist für di e Dauer von ca . 60 Minut en beliebi g oft wied erholba r.
Wird d er Alarm ni cht unte rbrochen o der abgesc haltet , stoppt e r automa tisch
nach et wa 2 Minut en. Er er tönt 12 Stu nden spät er wieder zu r eingest ellten
Weck zeit. Um di e Weckfun ktion gan z abzust ellen, sc hieben Sie d en seitlichen Schalter (4) nach unten.
BELEUCHTUNG:
Um die Li chtfun ktion zu s tarte n, muss der We cker zuer st das Zeit signal
empfangen. Die Zifferblat tbeleuchtung Ihres Weckers wird bei jeder Wecksigna lauslös ung autom atisch f ür 5 Sekunde n eingesch altet. A uch bei jede r
kurz en Betät igung der ob eren Taste ( 3) wir d die Beleuc htung für d ie Dauer
von 5 Sekunden eingeschaltet.
Alar m Ein-/ Aus-Sch alter (4 )
Weckzeit-Stellrad (2)
Batteriefach (1)
Lich t / Snooze /
Zeitzone (3 )
Weckzeit
+
1,5V — LR6 –
DE
---
Page 13

90066 - 22S, 54S, 74S
BATTERY COMPARTMENT / BATTERIEFACH
WAKE-U P TIM E SET TING WHEEL / WECKZEIT-STELLRAD
ALARM ON/OFF SWITC H / ALARM EIN-/AUS-SCHALTER
Page 14
EN
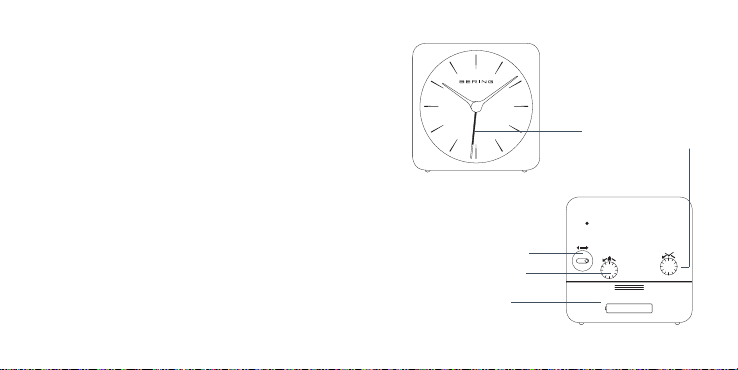
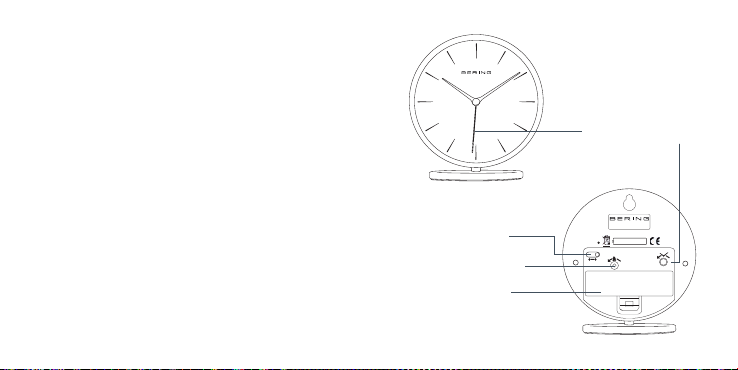
SET TING THE ALARM TIME
Set th e desired a larm tim e using the al arm time s etting w heel (2 ) at the
back . (Note t he direct ion of the ar row) . (Turning t he alarm t ime sett ing
wheel i n the oppos ite direc tion to th e arrow doe s not alwa ys set the al arm
time ). In orde r to set the a larm, pus h the swit ch (4) to „ on“. To turn of f the
alar m, push the s witch ( 4) to „of f“.
SETTING THE TIME
Set th e desired t ime using th e time set ting whee l (5) at t he back. To do t his,
turn t he wheel co untercl ockwis e. For a corr ection , the wheel c an also be
turned clockwise.
alar m on/o ff switc h (4)
alar m time set ting whe el (2)
bat tery cov er (1)
EN
alarm
time se tting w heel (5 )
ON OFF
+
1,5V — LR6 –
---
Page 15
DE
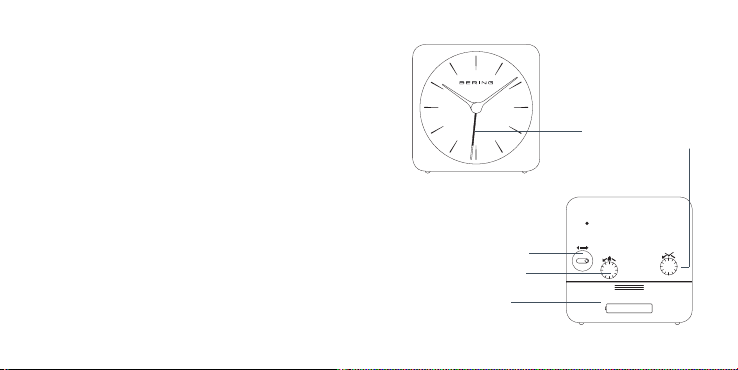
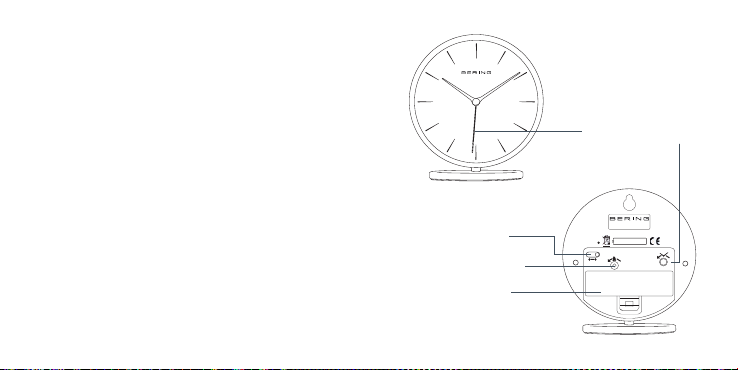
EINSTELLEN DER WECKZEIT
Ste llen Sie mi t Hilfe des a uf der Rücks eite befi ndlichen S tellr ads (2) ( Pfeil rich tung beach ten) di e gewünsch te Weckz eit ein. ( Ein Drehe n des Stel lrads
entgegen der Pfeilrichtung bewirkt nicht in jedem Fall eine Weckzeiteinstellung.) Um die Weckbereitschaf t herzustellen, schieben Sie bitte den
Schal ter (4 ) auf „on“. Um di e Weckzei t auszus tellen, m uss der Scha lter (4 )
auf „o ff“ ges tellt w erden.
EINSTELLEN DER UHRZEIT
Ste llen Sie mi t Hilfe des a uf der Rücks eite befi ndlichen S tellr ads (5 ) die
gewün schte Uhr zeit ein . Dazu müss en Sie das Rad e ntgegen d es Uhrzei gersinns drehen. Für eine Korrektur kann das Rad auch im Uhrzeigersinn
gedreht werden.
Alar m Ein-/ Aus-Sch alter (4 )
Weckzeit-Stellrad (2)
Batteriefach (1)
ON OFF
Weckzeit
+
1,5V — LR6 –
---
DE
Uhrzeit-Stell rad (5)
Page 16

91096 - 22S, 54S, 74S
BATTERY COMPARTMENT / BATTERIEFACH
WAKE-U P TIM E SET TING WHEEL / WECKZEIT-STELLRAD
LIGHT / LICHT
SNOOZE / NACHWECKAUTOMATIK
ALARM ON/OFF SWITC H / ALARM EIN-/AUS-SCHALTER
TIME ZONE FUNCTION / ZEITZONENFUNKTION
The al arm cloc ks can be used a s table cl ocks as wel l as wall cl ocks. In or der
to do so , simply scr ew the base o n or off.
Die Wecker können sowohl als Tischwecker, als auch als Weckeren genu tzt
werde n. Dafür kö nnen Sie den S tandf uß ganz einf ach an- und ab schraub en.
Page 17
EN
SET TING THE ALARM TIME
Set th e desired a larm tim e using the al arm time s etting w heel (2 ) at the
back . (Note t he direct ion of the ar row) . (Turning t he alarm t ime sett ing
wheel i n the oppos ite direc tion to th e arrow doe s not alwa ys set the al arm
time ). In orde r to set the a larm, pus h the side sw itch (4 ) upwards , a red field
becomes visible.
SET TING THE ALARM SIGNAL / SNOOZE
Brie fly press t he snooze /ligh t button ( 3) The a larm sign al will be in terrup ted
for 4 to 5 m inutes an d will soun d again af terwar ds. The sno oze funct ion can
be repe ated as of ten as des ired for a pe riod of app rox. 60 min utes. If t he
alar m is not int errupt ed or switc hed off, i t automa ticall y stops af ter abou t 2
minut es. It sou nds again 12 hou rs late r at the set a larm time . To turn of f the
alar m comple tely, slid e down the si de switch ( 4).
LIGHTING:
In orde r to star t the ligh t functio n, the ala rm clock mu st recei ve the time
signa l first. T he dial ill uminati on of your al arm clock i s automa tically s witched on f or 5 second s with each a larm sign al. Ever y time the up per butt on is
brie fly press ed (3) th e lightin g switch es on for 5 sec onds.
alar m on/o ff switc h (4)
alar m time set ting whe el (2)
bat tery cov er (1)
ligh t / snooze /
time z one (3)
alarm time
+
1,5V — LR6 –
EN
---
Page 18
DE
EINSTELLEN DER WECKZEIT
Ste llen Sie mi t Hilfe des a uf der Rücks eite befi ndlichen S tellr ads (2) ( Pfeil rich tung beach ten) di e gewünsch te Weckz eit ein. ( Ein Drehe n des Stel lrads
entgegen der Pfeilrichtung bewirkt nicht in jedem Fall eine Weckzeiteinstellung.) Um die Weckbereitschaf t herzustellen, schieben Sie bitte den
seit lichen Sc halter ( 4) nach obe n, ein rot es Feld wir d sichtba r.
WECKSIGNAL EINSTELLEN / SNOOZE
Drück en Sie kurz zeitig di e Snooze- /Bele uchtung stast e (3) Das W ecksigna l
wird f ür 4 bis 5 Minut en unter brochen un d ertön t danach ern eut. Der
Snooz ebetri eb ist für di e Dauer von ca . 60 Minut en beliebi g oft wied erholba r.
Wird d er Alarm ni cht unte rbrochen o der abgesc haltet , stoppt e r automa tisch
nach et wa 2 Minut en. Er er tönt 12 Stu nden spät er wieder zu r eingest ellten
Weck zeit. Um di e Weckfun ktion gan z abzust ellen, sc hieben Sie d en seitlichen Schalter (4) nach unten.
BELEUCHTUNG:
Um die Li chtfun ktion zu s tarte n, muss den We cker zuer st das Zeit signal
empfangen. Die Zifferblat tbeleuchtung Ihres Weckers wird bei jeder Wecksigna lauslös ung autom atisch f ür 5 Sekunde n eingesch altet. A uch bei jede r
kurz en Betät igung der ob eren Taste ( 3) wir d die Beleuc htung für d ie Dauer
von 5 Sekunden eingeschaltet.
Alar m Ein-/ Aus-Sch alter (4 )
Weckzeit-Stellrad (2)
Batteriefach (1)
Lich t / Snooze /
Zeitzone (3 )
Weckzeit
+
1,5V — LR6 –
DE
---
Page 19

90096 - 22R, 04R, 64R
BATTERY COMPARTMENT / BATTERIEFACH
WAKE-U P TIM E SET TING WHEEL / WECKZEIT-STELLRAD
ALARM ON/OFF SWITC H / ALARM EIN-/AUS-SCHALTER
The al arm cloc ks can be used a s table cl ocks as wel l as wall cl ocks. In or der
to do so , simply scr ew the base o n or off.
Die Wecker können sowohl als Tischwecker, als auch als Weckeren genu tzt
werde n. Dafür kö nnen Sie den S tandf uß ganz einf ach an- und ab schraub en.
Page 20
EN
SET TING THE ALARM TIME
Set th e desired a larm tim e using the al arm time s etting w heel (2 ) at the
back . (Note t he direct ion of the ar row) . (Turning t he alarm t ime sett ing
wheel i n the oppos ite direc tion to th e arrow doe s not alwa ys set the al arm
time ). In orde r to set the a larm, pus h the swit ch (4) to „ on“. To turn of f the
alar m, push the s witch ( 4) to „of f“.
SETTING THE TIME
Set th e desired t ime using th e time set ting whee l (5) at t he back. To do t his,
turn t he knob cou ntercl ockwise . For a corr ection, t he knob can a lso be
turned clockwise.
alar m on/o ff switc h (4)
alar m time set ting whe el (2)
bat tery cov er (1)
alarm
ON OFF
time se tting w heel (5 )
+
1,5V — LR6 –
---
EN
Page 21
DE
EINSTELLEN DER WECKZEIT
Ste llen Sie mi t Hilfe des a uf der Rücks eite befi ndlichen S tellr ads (2) ( Pfeil rich tung beach ten) di e gewünsch te Weckz eit ein. ( Ein Drehe n des Stel lrads
entgegen der Pfeilrichtung bewirkt nicht in jedem Fall eine Weckzeiteinstellung.) Um die Weckbereitschaf t herzustellen, schieben Sie bitte den
Schal ter (4 ) auf „on“. Um di e Weckzei t auszus tellen, m uss der Scha lter (4 )
auf „o ff“ ges tellt w erden.
EINSTELLEN DER UHRZEIT
Ste llen Sie mi t Hilfe des a uf der Rücks eite befi ndlichen S tellr ads (5 ) die
gewün schte Uhr zeit ein . Dazu müss en Sie den Kno pf entgeg en des Uhrz eigersinns drehen. Für eine Korrektur kann der Knopf auch im Uhrzeigersinn
gedreht werden.
Alar m Ein-/ Aus-Sch alter (4 )
Weckzeit-Stellrad (2)
Batteriefach (1)
Weckzeit
ON OFF
Uhrzeit-Stell rad (5)
+
1,5V — LR6 –
---
DE
Page 22

EN DE
WARRANTY
When pu rchasing a B ERING al arm clock y ou will ob tain a warr anty fr om
BERI NG Time whic h is valid f or 36 month s from the p urchase da te in
accor dance wi th the condi tions of t he warra nty. In ord er to util ise the
warr anty, you m ust pres ent a warr anty cer tifica te, fille d out compl etely an d
corr ectly by a n authori sed BERIN G dealer.
The wa rrant y is not vali d for the nor mal wear an d tear of you r BERING
alar m clock and w ill not co me into ef fect in th e case of imp roper tre atment .
Impro per trea tment inc ludes wat er damage, a ccident al damage ( such as
from a d rop or oth er force ), damage i ncurred a s a result of n ot foll owing the
opera ting ins tructi ons. The wa rrant y is also inv alid when a ny mainte nance
is car ried out by a t hird par ty who is no t author ized by BER ING.
Ther e is a 3-year w arrant y against d efect s in materi als and wor kmanshi p
(exc luding ba tterie s). Th e warran ty is vali d in the coun tries whe re the ala rm
cloc k is officia lly sold . A damaged or c racked di splay cov er is not cov ered
by the w arrant y. For defe cts which a re cover ed by the war ranty, i t is at the
discr etion of B ERING Tim e whethe r or not to car ry out a re pair or whe ther to
prov ide an ident ical repl acemen t or an alarm c lock wit h similar f eature s.
The BE RING ser vice cent er and aut horised BE RING deal ers are al so allow ed
to cha rge fees f or postag e, packagi ng, and insu rance if re quired. W hen
clai ming the war ranty, p lease con tact an a uthoris ed BERING d ealer or th e
BERING service center.
GARANTIE
Auf ihr em BERIN G Wecker erha lten Sie v on BERING T ime eine Gar antie
von 36 Mo naten ab K aufdat um gemäß Gar antieb estimmu ngen. Für die
Inanspruchnahme der Garantie muss der Garantieschein von einem
autorisierten BERING Händler vollst ändig und korrekt ausgefül lt vorgelegt
werden.
Die Gar antie gi lt nicht fü r die normal e Abnut zung und Alt erung ihr es BERING
Wecker s und trit t nicht be i unsachge mäßer Beha ndlung des W eckers in K raft.
Die unsachgemäße Behandlung schließt Wasserschäden, Unfallschäden
(wi e Stöße, Br üche) und S chäden, di e durch eine N ichtein haltung d er
Gebra uchsanw eisung ent stehen , mit ein. Die G aranti e ist nicht ig, wenn
Wart ung oder Rep aratur d es BERING W eckers von e iner nicht d urch BERI NG
autorisierten drit ten Person durchgeführt werden.
Es besteht eine 3-jährige Garantie auf Material- und Verarbeitungsfehler
(aus genommen der Batterien). Die Gar ant ie ist in den Ländern gültig, in
denen der Wecker offiziell verkauft wird. Ein beschädigter oder gesprungener
Displ ayschutz wird ni cht von der Gar antie abge deckt. Bei M ängeln, die unter
die Gar antie fa llen, lieg t es im Ermes sen von BERI NG Time, ob ei ne Reparat ur
durchgeführt werden kann oder der Wecker durch einen identischen oder
durch einen Wec ker mit ähnlichen Merkmalen er set zt wird. Das BERING
Service Center und die autorisierten BERING Händler können Gebühren für
Porto und ggf. Versicherung erheben. Für Inanspruchnahme der Garantie
wenden Sie sich bitte an ihren autorisier ten BERING Händler oder an das
BERING Service Center.
Page 23

WARRANTY / GARANTIE
Bought at / Gekauft bei
Date / D atum
Model Number / Modellnummer
Stamp and signature / Stempel und Unterschrif t
 Loading...