

Page 1

Page 2

Page 3

SO10
Istruzioni per l’uso
Instruction Manual
Page 4

– 52 –
ENGLISH
ALWAYS KEEP THIS MANUAL WITH YOUR FIREARM. INCLUDE IT WITH THE SHOTGUN WHEN
IT CHANGES OWNERSHIP OR WHEN IT IS LOANED OR PRESENTED TO ANOTHER PERSON.
NOTICE: The Manufacturer and/or its Local Official Distributors assume no responsibility for product
malfunction or for physical injury or property damage resulting in whole or in part from criminal or
negligent use of the product, improper or careless handling, unauthorized modifications, use of defective,
improper, hand-loaded, reloaded or remanufactured ammunition*, customer abuse or neglect of the
product, or other influences beyond manufacturer's direct and immediate control.
* See paragraph “Ammunition”.
WARNING: Always ensure that the safety is fully engaged until ready to fire.
WARNING: ALL FIREARMS HAVE LETHAL POTENTIAL. READ THE BASIC SAFETY RULES
CAREFULLY AND UNDERSTAND THEM FULLY BEFORE ATTEMPTING TO USE THIS FIREARM.
WARNING: READ THE ENTIRE MANUAL CAREFULLY BEFORE USING THIS FIREARM. MAKE
SURE THAT ANY PERSON USING OR HAVING ACCESS TO THIS FIREARM READS AND
UNDERSTANDS ALL OF THIS MANUAL PRIOR TO USE OR ACCESS.
!
!
!
WE RECOMMEND THE USE OF ORIGINAL BERETTA SPARE PARTS AND ACCESSORIES. THE
USE OF OTHER MANUFACTURER’S SPARE PARTS AND ACCESSORIES COULD CAUSE
MALFUNCTIONS AND/OR BREAKAGES THAT WILL NOT BE COVERED BY THE BERETTA
WARRANTY.
Page 5

– 53 –
CONTENTS
Page
Basic safety rules . . . . . . . . . . . . . . . . . . . . . . . . . . 54
Nomenclature . . . . . . . . . . . . . . . . . . . . . . . . . . . 60
Safety . . . . . . . . . . . . . . . . . . . . . . . . . . . . . . 61
The new SO10 over-and-under . . . . . . . . . . . . . . . . . . . . . 62
Assembly . . . . . . . . . . . . . . . . . . . . . . . . . . . . . 70
Check the gun is unloaded . . . . . . . . . . . . . . . . . . . . . . . 74
Decocking the hammers . . . . . . . . . . . . . . . . . . . . . . . . 75
Checking for obstructions . . . . . . . . . . . . . . . . . . . . . . . 77
Ammunition . . . . . . . . . . . . . . . . . . . . . . . . . . . . 78
Loading and firing . . . . . . . . . . . . . . . . . . . . . . . . . . 79
Unloading the shotgun . . . . . . . . . . . . . . . . . . . . . . . . 82
Disassembly . . . . . . . . . . . . . . . . . . . . . . . . . . . . 83
Disassembly of the side locks . . . . . . . . . . . . . . . . . . . . . . 86
Beretta Stainless Steel Optimachoke
®
Tubes . . . . . . . . . . . . . . . . . 92
Maintenance . . . . . . . . . . . . . . . . . . . . . . . . . . . . 96
Storage . . . . . . . . . . . . . . . . . . . . . . . . . . . . . . 99
This instruction manual consists of 99 pages.
Page 6
– 54 –
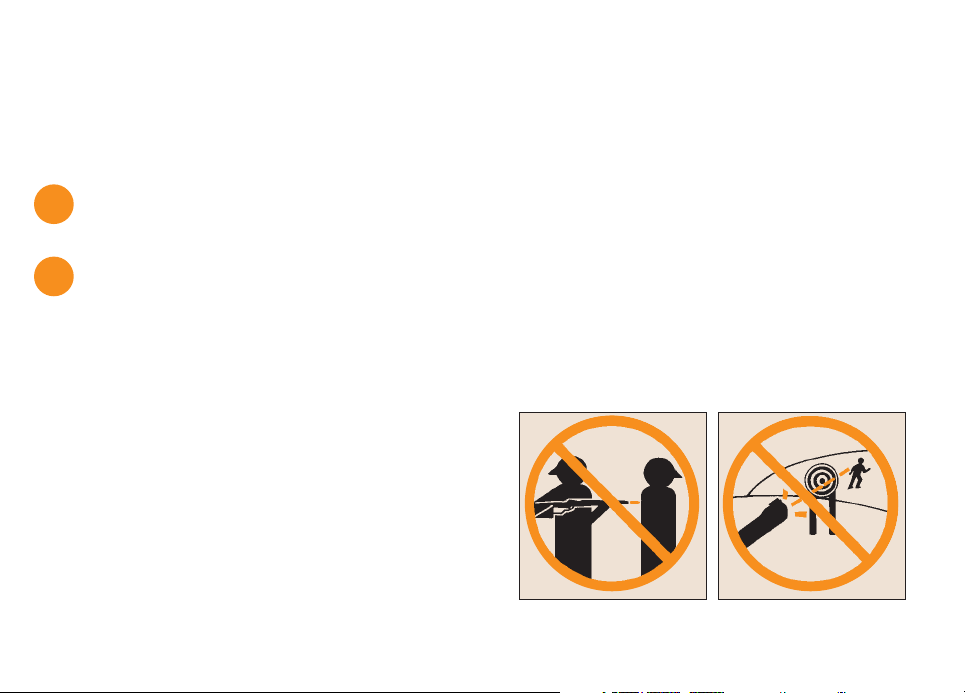
Never let the muzzle of a firearm point at any
part of your body or at another person. This is
especially important when loading or unloading
the firearm. When you are shooting at a target,
know what is behind it. Some bullets can travel
over a mile. If you miss your target or if the
bullet penetrates the target, it is your
responsibility to ensure that the shot does not
cause unintended injury or damage.
BASIC SAFETY RULES
WARNING: PLEASE READ THIS MANUAL BEFORE HANDLING YOUR SHOTGUN.
WARNING: FIREARMS CAN BE DANGEROUS AND CAN POTENTIALLY CAUSE SERIOUS INJURY,
DAMAGE TO PROPERTY OR DEATH, IF HANDLED IMPROPERLY. THE FOLLOWING SAFETY
RULES ARE AN IMPORTANT REMINDER THAT FIREARM SAFETY IS YOUR RESPONSIBILITY.
1. NEVER POINT A FIREARM AT SOMETHING THAT IS NOT SAFE TO SHOOT.
!
!
In addition to the following Basic Safety Rules, there are other safety rules pertaining the loading, unloading,
assembly and disassembly and use of this firearm, located throughout this manual.
Page 7
– 55 –
Never assume that a firearm is unloaded. The
only certain way to ensure that a firearm has the
chamber(s) empty is to open the chamber and
visually and physically examine the inside to see
if a round is present.
Removing or unloading the magazine will not
guarantee that a firearm is unloaded or cannot
fire. Shotguns and rifles can be checked by
cycling or removing all rounds and by then
opening and inspecting the chamber so that a
visual inspection of the chamber for any
remaining rounds can be made.
2. ALWAYS TREAT A FIREARM AS IF IT WERE LOADED.
It is your responsibility to ensure that children
under the age of 18 or other unauthorized
persons do not gain access to your firearm. To
reduce the risk of accidents involving children,
unload your firearm, lock it and store the
ammunition in a separate locked location.
Please note that devices intended to prevent
accidents - for example, cable locks, chamber
3. STORE YOUR FIREARM SO THAT CHILDREN CANNOT GAIN ACCESS TO IT.
Page 8

– 56 –
plugs, etc, - may not prevent use or misuse of your firearm by a determined person. Firearm storage in a
steel gun safe may be more appropriate to reduce the likelihood of intentional misuse of a firearm by an
unauthorized child or person.
4. NEVER SHOOT AT WATER OR AT A HARD SURFACE.
Shooting at the surface of water or at a rock or other hard surface
increases the chance of ricochets or fragmentation of the bullet or shot,
which can result in the projectile striking an unintended or peripheral
target.
5. KNOW THE SAFETY FEATURES OF THE FIREARM YOU ARE USING, BUT REMEMBER: SAFETY
DEVICES ARE NOT A SUBSTITUTE FOR SAFE HANDLING PROCEDURES.
Never rely solely on a safety device to prevent an accident. It is imperative that you know and use the
safety features of the particular firearm you are handling, but accidents can best be prevented by
following the safe handling procedures described in these safety rules and elsewhere in the product
manual. To further familiarize yourself with the proper use of this or other firearms, take a Firearms
Safety Course taught by an expert in firearms use and safety procedures.
Page 9

– 57 –
6. PROPERLY MAINTAIN YOUR FIREARM.
Store and carry your firearm so that dirt or lint does not accumulate in the
working parts. Clean and oil your firearm, following the instructions
provided in this manual, after each use to prevent corrosion, damage to the
barrel or accumulation of impurities which can prevent use of the gun in
an emergency. Always check the bore and chamber(s) prior to loading to
ensure that they are clean and free from obstructions. Firing with an
obstruction in the barrel or chamber can rupture the barrel and injure you
or others nearby. In the event you hear an unusual noise when shooting,
stop firing immediately, engage the manual safety and unload the firearm.
Make sure the chamber and barrel are free from any obstruction, like a
bullet blocked inside the barrel due to defective or improper ammunition.
7. USE PROPER AMMUNITION.
Only use factory-loaded, new ammunition manufactured to industry specifications: CIP (Europe and
elsewhere), SAAMI (U.S.A.). Be certain that each round you use is in the proper caliber or gauge and type
for the particular firearm. The caliber or gauge of the firearm is clearly marked on the barrels of shotguns
and on the slide or barrel of pistols. The use of reloaded or remanufactured ammunition can increase the
likelihood of excessive cartridge pressures, case-head ruptures or other defects in the ammunition that can
cause damage to your firearm and injury to yourself or others nearby.
Page 10

– 58 –
8. ALWAYS WEAR PROTECTIVE GLASSES AND EARPLUGS WHEN SHOOTING.
The chance that gas, gunpowder or metal fragments will blow back and
injure a shooter who is firing a gun is rare, but the injury that can be
sustained in such circumstances can be severe, including the possible loss
of eyesight. A shooter must always wear impact resistant shooting glasses
when firing any firearm. Earplugs or other high-quality hearing protectors
help reduce the chance of hearing damage from shooting.
9. NEVER CLIMB A TREE, FENCE OR OBSTRUCTION WITH A LOADED FIREARM.
Open and empty the chamber(s) of your firearm and engage the manual
safety before climbing or descending a tree or before climbing a fence or
jumping over a ditch or other obstruction. Never pull or push a loaded
firearm toward yourself or another person. Always unload a firearm,
visually and physically check to see that the magazine, loading mechanism
and chamber are unloaded, and action is open before handing it to another
person. Never take a firearm from another person unless it is unloaded,
visually and physically checked to confirm it is unloaded, and the action is
open.
Page 11

– 59 –
10. AVOID ALCOHOLIC BEVERAGES OR JUDGMENT/REFLEX IMPAIRING MEDICATION WHEN
SHOOTING.
Do not drink and shoot. If you take medication that can impair motor
reactions or judgment, do not handle a firearm while you are under the
influence of the medication.
Unload a firearm before putting it in a vehicle (chamber empty, magazine
empty). Hunters and target shooters should load their firearm only at
their destination, and only when they are ready to shoot. If you carry a
firearm for self-protection, leaving the chamber unloaded can reduce the
chance of an unintentional discharge.
11. NEVER TRANSPORT A LOADED FIREARM.
Discharging firearms in poorly ventilated areas, cleaning firearms, or handling ammunition may result
in exposure to lead and other substances known to cause birth defects, reproductive harm, and other
serious physical injury. Have adequate ventilation at all times. Wash hands thoroughly after exposure.
12. LEAD WARNING.
WARNING: IT IS YOUR RESPONSIBILITY TO KNOW AND ABIDE BY FEDERAL, STATE AND
LOCAL LAWS GOVERNING THE SALE, TRANSPORTATION AND USE OF FIREARMS IN YOUR
AREA.
WARNING: THIS FIREARM HAS THE CAPABILITY OF TAKING YOUR LIFE OR THE LIFE OF
SOMEONE ELSE! ALWAYS BE EXTREMELY CAREFUL WITH YOUR FIREARM. AN ACCIDENT IS
ALMOST ALWAYS THE RESULT OF NOT FOLLOWING BASIC FIREARM SAFETY RULES.
!
!
Page 12
– 60 –
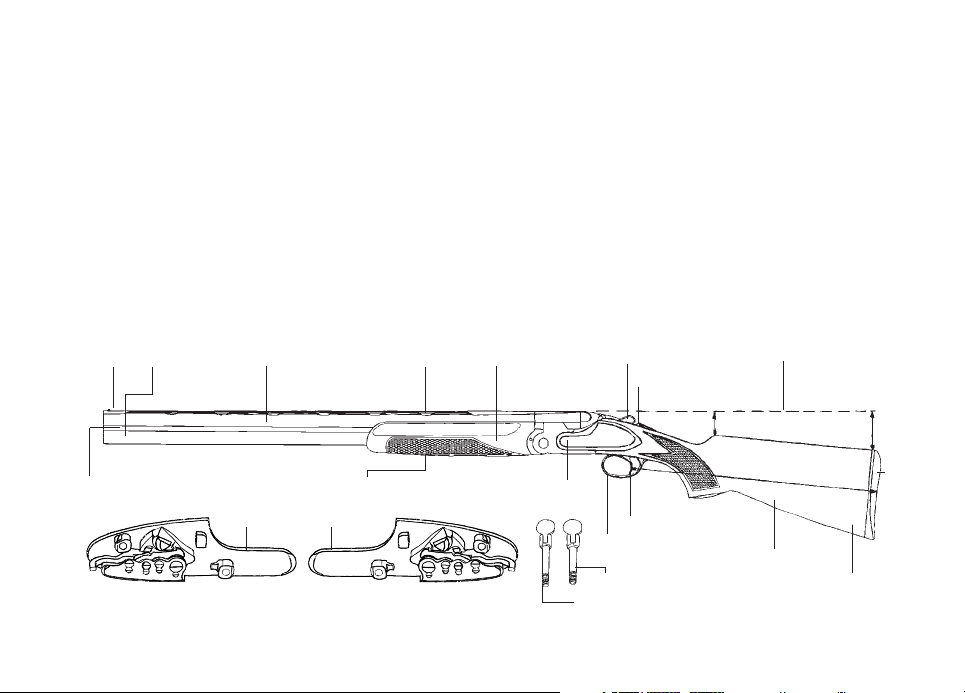
NOMENCLATURE
M
L
N B
D1
DI
H
E
F
G
S
P
R
O
Q
C
T
A Receiver
A1 Left side plate
(disassembled)
A2 Right side plate
(disassembled)
A3 Side plate disassembling
key (front)
A4 Side plate disassembling
key (rear)
B Barrels
C Stock
D Fore-end
D1 Fore-end catch lever
ETrigger/s
FTop lever
G Safety (with selector on
request)
HTrigger guard
ITop rib
L Side rib
MFront sight
N Muzzle
O Butt plate/Recoil pad
P Line of sight
QTrigger pull
RDrop at heel
SDrop at comb
TToe
A
A1 A2
A4
A3
Page 13
– 61 –
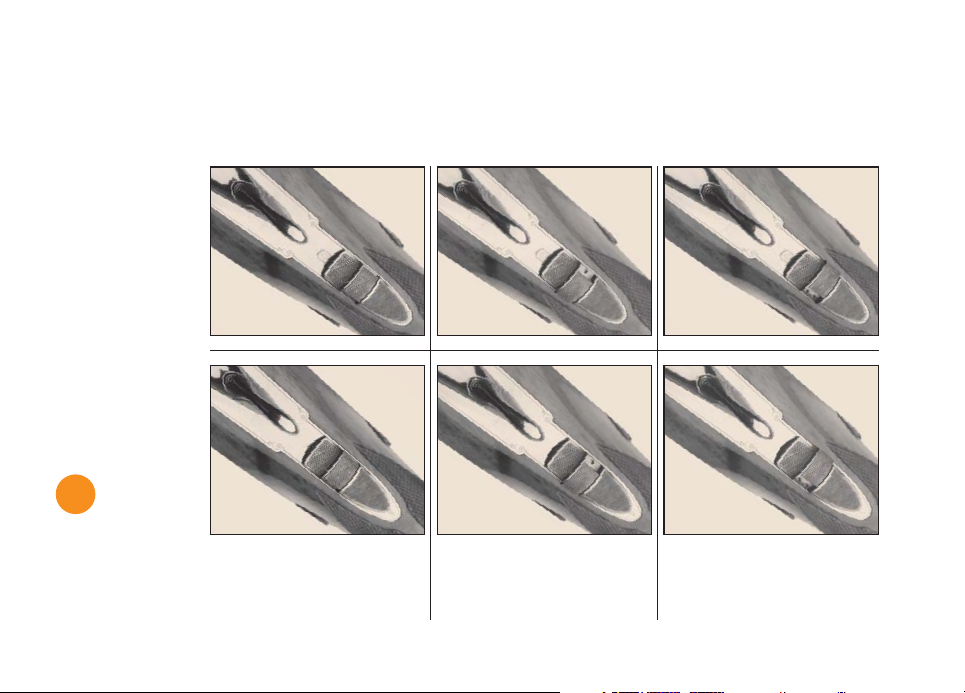
SAFETY
SAFETY ON
Without selector With selector
on the first barrel
With selector
on the second barrel
Fig. 1 Fig. 3 Fig. 5
SAFETY OFF
Fig. 2 Fig. 4 Fig. 6
The shotgun is ready to fire
first the cartridge inserted
in the bottom barrel.
The shotgun will fire first
the cartridge inserted
in the top barrel.
!
The shotgun
is ready
to fire!
Page 14

– 62 –
Seventy years from the first modern Beretta over-and-under (the model S1 that was launched in 1933), a
new true sidelock shotgun is born. The SO10 over-and-under: The deserving successor of the famous Beretta
SO series hunting and competition shotguns that have earned their reputation, on the Olympic podium and
on the most exclusive hunts in the world, from Europe to America to Africa, for being the most functional,
elegant and exclusive over-and-unders in the world.
Drawing from this very long experience, and under the dedicated guidance of the Beretta family, the most
gifted designers and gunsmiths of the company have created the new SO10 over-and-under, a synthesis of
aesthetic refinement, function and performance that place it at the peak of the world’s prestigious over-andunder offerings.
At Beretta, the best materials, the most accurate CNC machining, and the highest levels of craftsmanship –
from master barrel makers, to gunsmiths, to engravers, to stock makers - operate in perfect synergy and with
a common goal: To make a classic shotgun that is also modern, aesthetically superior, lightweight, perfectly
balanced and capable of guaranteeing impeccable performance for generations to come.
THE NEW SO10 OVER-AND-UNDER
Page 15
– 63 –
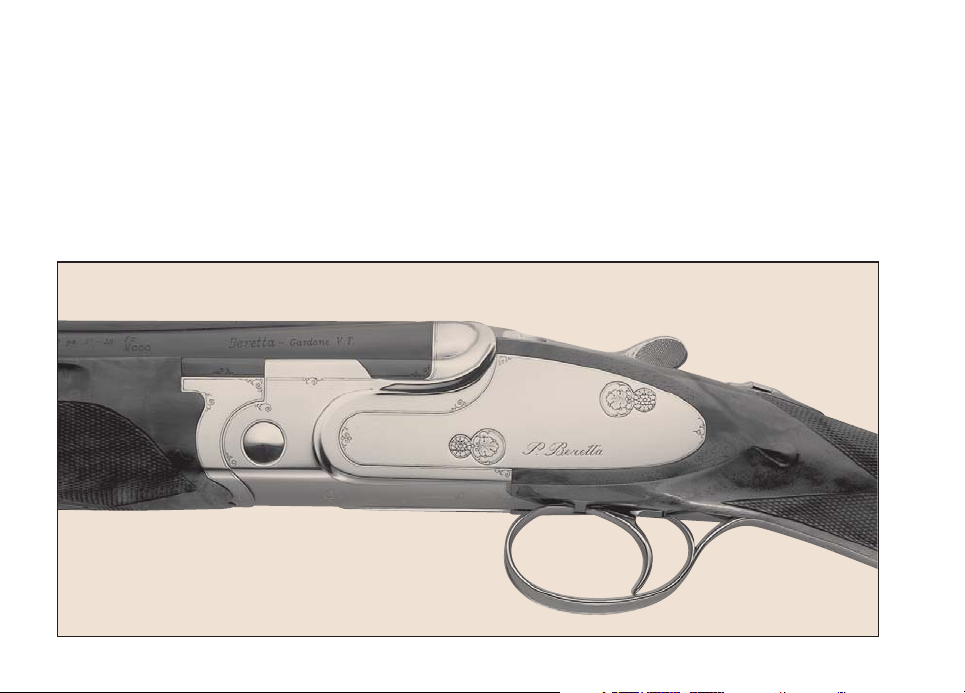
GRACEFUL AND PROPORTIONED RECEIVER.
The receiver of the Beretta SO10 over-and-under, depicting exquisitely double ribbed top moldings, blends
elegantly with the classic tapered external profile of the Beretta barrels. The top moldings have been
gracefully slimmed to offer the best lateral vision during aiming. Machined from a solid block of special,
high resistant tri-alloy steel, the receiver boasts all the parts directly made from the integral piece. No part
is welded or precision cast. Exceptional resistance and flawless performance are ensured for generations of
constant use. The absence of pins and screws on the surface of the receiver has given the Master Engraver
an uninterrupted blank canvas on which to express his full creativity. The polishing of the surfaces is done
entirely by hand.
Page 16
– 64 –
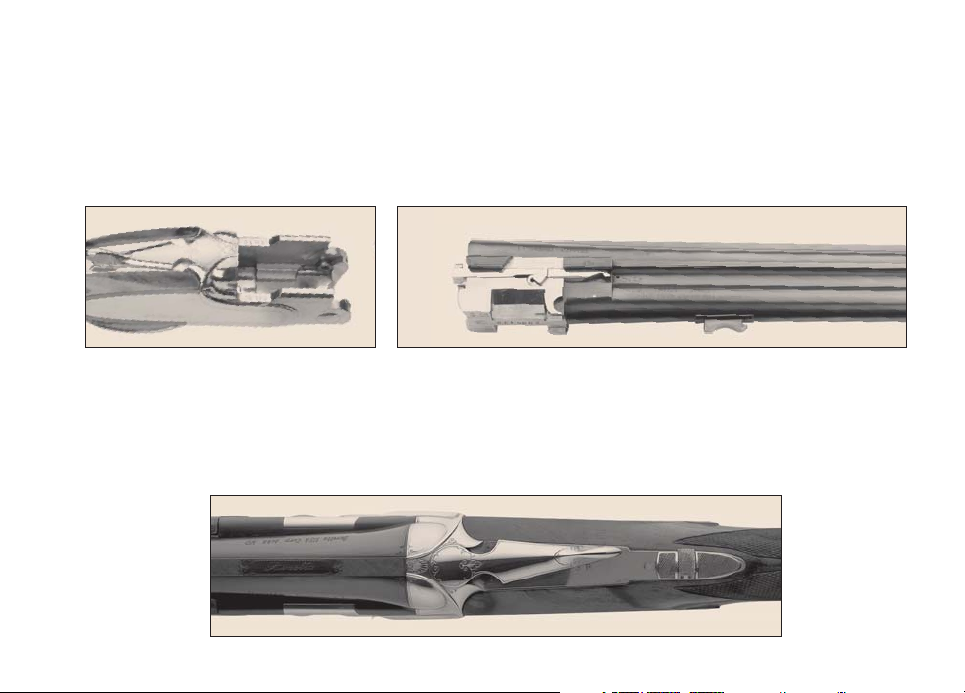
INNOVATIVE LOCKING SYSTEM.
The locking system of the Beretta SO10 over-and-under features a rear longitudinal bolt operating in a
central position (between the two tubes), making the opening of the barrels smooth and noiseless, and
minimizing stress when firing. Two additional lugs, located in the lower part of the receiver, further increase
the strength and the efficiency of the locking system. As on the other Beretta SO models, the classic
trapezoidal locking shoulders of the barrels work in contrast with the shoulders of the receiver.
NEWLY DESIGNED TOP LEVER.
The top lever, made from a solid block of steel, has been elongated and positioned closer to the breech face
in order to render the opening of the barrels smoother. The absence of a retaining screw on the top lever
has given the Master Engraver a wider uninterrupted surface that can be engraved. The safety on the open
top lever blocks the firing mechanism if the receiver is not completely closed. An automatic safety, that
engages when opening the top lever, is available on request.
Page 17

– 65 –
REPLACEABLE HINGE PINS.
The hinge pins can be replaced after intensive use.
EXTRA-RELIABLE LOCK.
The side locks are designed for years of constant use and flawless performance. Safe and reliable, they boast
a crisp trigger pull and fast lock times.
REMOVABLE SIDE LOCKS.
The classic Beretta sideplates can be disassembled by hand by way of two robust hidden keys, facilitating
inspection and maintenance of the firing mechanism. The visible internal parts, all newly designed, are
superbly finished and engraved by hand.
Page 18

– 66 –
TITANIUM TRIGGER.
The trigger of the Beretta SO10 over-and-under is made from precious titanium to ensure superior strength
and light weight.
EXTENDED TRIGGER GUARD.
The extended trigger guard is manufactured from a solid block of steel. Encased within the grip, it adds a
further touch of elegance to the shotgun. No part is welded or precision cast.
THE ENGRAVER’S SIGNATURE.
The exquisite engravings that decorate the Beretta SO10 over-and-under are completely hand executed by
highly qualified Master Engravers. When this work of art, created with the hammer and chisel, bulino, or
gold wire inlay, is completed, the engraver’s signature guarantees the status of the shotgun as a unique
expression of the gun-maker’s art.
Page 19

– 67 –
DEMIBLOC BARRELS.
The new Beretta SO10 over-and-under boasts demibloc barrels, manufactured for the first time using an
exclusive process of cold hammer forging. The perfect concentricity of the tubes obtained with this system
ensures lightweight barrels and exceptional strength. Years of flawless performance are guaranteed. Two
bands on the sides of the barrels help fitting between the fore-end and the tubes, and enhance the contact
of the fore-end with the surface of the barrels. The two bands, together with the side and top ribs, are softsoldered using a low-fusion alloy that causes less deformation of the steel during welding and preserves the
outstanding properties of flexibility, and high tensile and impact strength. The top rib is finely hand
checkered to reduce glare. The barrels are formed of extremely resistant steel made of a special nickelchromium-molybdenum alloy. The cartridge chambers and the bores are hard-chromed for extra corrosion
resistance, extended barrel life and more consistent shot patterns. The deep and gloss blueing of the barrels
is the result of repeated black oxidations and painstaking hand work. All the metal surfaces are polished
carefully by skilled Beretta artisans.
Page 20

– 68 –
NEW STAINLESS STEEL BERETTA OPTIMACHOKE®TUBES.
The new screw-in Beretta Optimachoke
®
tubes, with elongated cone, boast an internal profile specifically
designed to enhance the concentration and distribution of shot patterns and to minimize shot deformation.
The thin walls of the choke tubes optimise barrel balance and reduce the overall weight. Made of stainless
steel, the tubes are engineered to resist steel shot stress and corrosion.
NEW EJECTORS WITH GUIDE.
The Beretta SO10 over-and-under features newly designed ejectors, precisely guided on the demibloc barrels
to ensure flawless extraction and ejection of the cartridges. The contact area between the ejectors and the
shell rim has been increased to improve the efficiency of the cartridge catching.
HIGH QUALITY WALNUT.
The walnut wood used to craft the stock and fore-end is carefully singled out for its grain quality, color and
strength. The skill of the stock-maker and his ability with the age-old tools, such as razor-sharp chisels and
gouges, rasps, emery cloths and files, are wisely used to create custom dimensioned stocks and fore-ends.
The checkering of the wooden parts is also patiently hand executed and provides a functional anti-slip grip
surface. Lastly come polishing by means of repeated coats of oil or wax applied by hand to enhance the
grain, color and brightness of the wood. The slender and elegant fore-end is further embellished by the
newly designed fore-end catch lever with hidden retaining screws.
Page 21

– 69 –
ELEGANT AND STURDY CASE.
Entirely hand executed by master craftsmen, the case of the Beretta SO10 over-and-under is made of solid
wood covered in resistant leather. It features reinforced corners, safety slings and key locks. A full range of
hand-made cleaning and maintenance accessories is provided, each with its own separate compartment.
Page 22

– 70 –
ASSEMBLY
Fig. 7 Fig. 8
!
NOTICE: In order to preserve the wood and metal surfaces from the possibility of corrosion and scratching,
it is recommended to wear cotton cleaning gloves before handling any part of the Beretta SO10. It is also
advisable to handle the shotgun over a soft and smooth surface. The beautiful walnut grain is enhanced by
multiple, hand-applied, layers of oil, wax and Tru-Oil
®
(upon request). The surfaces of the stock and foreend can be subject to scratching or marring if not properly handled and stored. Similarly, the metal parts
(barrels and receiver) are susceptible to the moisture and acidity of the hands.
• Remove the fore-end from the barrels by pulling the fore-end catch lever down (Fig. 7).
WARNING: Do not attempt to assemble the barrels on the receiver with the fore-end attached!
•Wipe excess rust preventative oil from the barrels and the inside surfaces of the receiver. Swab the bores
(the inside of the barrels) with a clean cotton patch held on the supplied cleaning rod .
Page 23

– 71 –
CAUTION: The hinge pin and the locking areas are very important mating surfaces. The receiver, the
barrels and the fore-end iron are subject to very high loads. Improper lubrication of these components can
cause seizing of parts or malfunctioning of the shotgun. (The areas to lubricate are indicated by the arrows
on Fig. 8). Before using the shotgun, make sure that lubricant is present as instructed.
NOTICE: It is recommended to use Beretta-Interflon
®
lubricant with Teflon®(code OL38) or high quality
gun lubricants exclusively. Such products are available at fine gun dealers.
• Push the top lever to the right. When barrels are not assembled on the receiver, the top lever remains
locked in the open position (right) (Fig. 9).
CAUTION: The top lever must be in the open position before the barrels are assembled. Failure to do so
will cause damage to the ejectors.
Fig. 9 Fig. 10
Interflon®is a registered trademark of Interflon. Teflon®is a registered trademark of E.I. Dupont de Nemours.
Page 24

– 72 –
Fig. 12Fig. 11
• Insert the barrels inside the receiver so that the hinge pins of the receiver fit into the corresponding slots
in the barrels (Fig. 10 page 71). Be sure the small lugs of the ejectors (see arrow in Fig. 10) engage their
corresponding slots in the receiver before closing the gun.
• Swing the barrels upwards smoothly and evenly. When the top lever snaps to its centered position, the
barrels are locked into the receiver (Fig.11).
• Fit the fore-end onto the barrels, first inserting the two fore-end iron levers in the slots on the side walls
of the receiver (Fig. 12). Swing the fore-end upwards (Fig. 13). Place the fore-end iron (the curved steel
component at the rear of the fore-end) over the ends of the ejectors against the front part of the receiver
so that the fore-end slides into position under the barrels (Fig. 14).
•Press forcefully to allow the fore-end latch to catch the barrel hook. The operation is done correctly when
the fore-end catch lever is flush with its seat (Fig. 15).
• Run a soft, lightly oiled patch over the surface of the shotgun to remove any finger prints or dirt.
Page 25

– 73 –
Fig. 14
Fig. 15
Fig. 13
NOTICE: Once the shotgun is handled, always
and accurately clean all external surfaces (wood
and metal) with a soft and clean patch in order
to preserve the delicate finishes over time. The
Beretta Cleaning Cloth (FAW08), available at
fine gun dealers, is specially designed to clean
your fine shotgun. Poor handling and cleaning
of the firearm could compromise your Beretta
warranty.
Page 26

– 74 –
At various points in this manual you will be instructed to visually check the cartridge chambers of the
Beretta SO10 shotgun to be certain this is unloaded. This should soon become second nature to you, as
should the following precautions:
• Never assume that a firearm is unloaded.
• Never point or push a firearm toward yourself or another person.
• Always visually check to see that the chambers are unloaded.
• Engage the safety and open the shotgun by pushing the top lever to the right before handing the gun to
another person.
• Never take or pull this shotgun from another person unless the safety is engaged, the barrels are pivoted
downwards and the chambers have been visually checked to confirm that the firearm is completely
unloaded.
To visually check to be certain the cartridge chambers are empty, carefully follow the steps below.
WARNING: Keep your finger OFF THE TRIGGER and the barrels pointed in a SAFE direction.
• Engage the safety by pushing the safety lever all the way rearwards. In this position the marking “S” is
fully visible (Fig. 1, 3, 5 page 61).
WARNING: When the safety lever covers the marking “S” the manual safety is DISENGAGED and the
firearm is in the FIRE position (Fig. 2, 4, 6 page 61).
• Push the top lever to the right and open the shotgun by levering the barrels downwards.
• Check the chambers to be certain they are empty.
CHECK THE GUN IS UNLOADED
!
!
Page 27

– 75 –
If the shotgun is unloaded, proceed to the following step, otherwise refer to the procedure: “UNLOADING
THE SHOTGUN”.
• Swing the barrels upwards to close the shotgun. When the top lever has fully moved to its centered
position, the barrels are correctly closed in the receiver.
WARNING: THE HAMMERS ARE COCKED. Keep the barrels pointed in a safe direction and decock the
hammers by following the instructions of the next paragraph.
NOTICE: Once the shotgun is handled, always and accurately clean all external surfaces (wood and metal)
with a soft and clean patch in order to preserve the delicate finishes over time. The Beretta Cleaning Cloth
(FAW08), available at fine gun dealers, is specially designed to clean your fine shotgun. Poor handling and
cleaning of the firearm could compromise your Beretta warranty.
!
WARNING: Always be certain that the shotgun is unloaded. Please refer to the instructions given in the
previous paragraph.
WARNING: Always keep the shotgun pointed in a safe direction.
Once the top lever is engaged, and the shotgun has been opened to check that it is unloaded, or for
unloading or for inspection of barrel obstructions, the hammers are cocked.
Decock the hammers when the gun is unloaded, using the procedure described below, to allow the springs
to remain in an uncompressed state.
CAUTION: It is important not to decock the hammers on an unloaded gun without the use of snapcaps to
avoid the possibility to damage the firing pins.
DECOCKING THE HAMMERS
!
!
Page 28

– 76 –
DRY FIRING/SNAP CAPS
Dry firing is defined as firing a firearm with no
cartridges in the chambers. The snap caps
supplied with the Beretta SO10 shotgun are inert
chamber inserts that allow the gun to be dry-fired
without damaging the firing pins.
• Open the gun.
• Insert snap caps into the chambers (Fig. 16).
• Pull the trigger to decock the first hammer.
• Push the selector to the second position. (On
some models this is not possible since the
selector is blocked by a screw.)
NOTICE: If the shotgun features a SINGLE
NON-SELECTIVE TRIGGER or a SELECTIVE, BLOCKED TRIGGER (inertia mass type) it is necessary
to push the safety lever all the way rearward (safety engaged) and then push it forward (safety disengaged)
to prepare the firearm for decocking the second hammer.
•Pull the trigger to decock the second hammer.
To take out the snap caps without recocking the hammers:
• Remove the fore-end.
• Lever the barrels downwards only as much as required to take out the snap caps.
NOTICE: An excessive opening of the barrels could cause the separation of the barrels from the receiver.
• Close the gun and replace the fore-end.
Fig. 16
Page 29

– 77 –
Visually check the barrels to be sure there are no obstructions in the chambers and bores (the inside of the
barrels). This is extremely important because if a cartridge is fired into an obstructed barrel, a catostrophic
failure can result.
WARNING: Always be certain that the shotgun is unloaded. Please refer to the instructions given in the
“CHECK THE GUN IS UNLOADED” paragraph.
• Push the top lever to the right and rotate the barrels downwards to open the shotgun.
• Look down each barrel from the muzzle (or front end) so that you can see completely through the barrel
to make sure no obstruction exists.
If an obstruction in the barrel is detected, a qualified gunsmith must remove the obstruction and inspect the
shotgun before it can be fired.
NOTICE: Once the shotgun is handled, always and accurately clean all external surfaces (wood and metal)
with a soft and clean patch in order to preserve the delicate finishes over time. The Beretta Cleaning Cloth
(FAW08), available at fine gun dealers, is specially designed to clean your fine shotgun. Poor handling and
cleaning of the firearm could compromise your Beretta warranty.
CHECKING FOR OBSTRUCTIONS
!
Page 30

– 78 –
AMMUNITION (CARTRIDGE) NOTICE: Beretta assumes no responsibility for physical injury or
property damage resulting from the use of defective, improper, hand-loaded, reloaded or remanufactured
ammunition. Serious damage and injury, and even death, could result fromt he use of incorrect ammunition,
from firing against bore obstructions and from propellant overloads. Use of reloaded ammunition will void
the manufacturer’s warranty.
Use only high-quality, commercially-manufactured ammunition. Be certain that the cartridge is the
appropriate gauge and loading for the shotgun and is clean, dry, and in good condition.
WARNING: Carefully inspect each cartridge before it is inserted in the chamber. Be certain the cartridge
cases are not split, deformed, or the cartridges do not possess any other dents or defects (this applies even
to factory ammunition).
You will find the markings for the gauge, chamber length and type of chokes for your shotgun on the side
of the barrels. This shotgun has been tested with special proof test ammunition.
WARNING: Never use cartridges that do not correspond to the markings on the side of the barrels.
WARNING: Only use cartridges that are the same length or shorter than the length of the chambers
indicated on the side of the barrels.
AMMUNITION
!
!
!
!
Page 31

– 79 –
STEEL SHOT
The fixed-choke barrels of the new Beretta SO10 over-and-under, as well as the new “SP” (Steel Proof)
Beretta stainless steel Optimachoke
®
tubes, are designed for use with factory steel shot cartridges loaded to
standard specifications. When firing steel shot cartridges, with fixed-choke barrels or Beretta stainless steel
Optimachoke
®
tubes, the best results are obtained using open chokes (C0000/CL, 0000/IC, 000/M). When
utilizing steel shot, Full choke constrictions (0/F, 00/M) do not increase pattern density and will distort
normal pattern density associated with lead shot (i.e. “blown pattern”). (See also the paragraph:
“BERETTA STAINLESS STEEL OPTIMACHOKE
®
TUBES”).
WARNING: Read and familiarize yourself with the loading and unloading procedure for this shotgun by
reading this manual prior to using the shotgun. Do not use a loaded firearm until you can perform these
procedures correctly.
Before loading the gun, make sure that the safety is on. A safety is fully engaged only when it can move no
further into the safe position. In that position the marking “S” is fully visible (Fig. 1, 3, 5 page 61). A safety
which is not fully engaged will not prevent weapon discharge. Always point the firearm in a safe direction!
WARNING: Beretta assumes any responsibility for any injury or property damage resulting from improper
or careless handling, intentional or accidental discharge of the firearm.
WARNING: Be sure that you have the correct cartridges for your shotgun.
WARNING: The shooter and bystanders must always wear eye and hearing protection. Particles of shot,
lead, powder, lubricant, etc. may cause injury to persons. Hearing protection reduces the risk of hearing
damage caused by exposure to shooting noise.
LOADING AND FIRING
!
!
!
!
Page 32

– 80 –
WARNING: Point the shotgun in a safe direction. Keep your fingers away from the trigger guard whenever
you do not intend to fire. Never point the firearm at something that is not safe to shoot.
•With the shotgun assembled (see “ASSEMBLY”), push the top lever to the right and open the shotgun by
levering the barrels downwards.
• Hold the barrels up to the light and look down the barrels from the muzzle to make sure they are free of
any obstructions.
• Insert a cartridge of the proper gauge into the chamber of the barrel you want to use, or into both
chambers for two shots.
• Close the shotgun. Be sure that the top lever has moved fully to its center position. Engage the safety if
it is not already engaged.
WARNING: In case the shotgun is provided with an AUTOMATIC SAFETY, the safety is automatically
engaged by the operation of the top lever during the opening of the shotgun. (The marking “S” will be
visible in this case).
NOTICE: If the shotgun features a DOUBLE TRIGGER, the pull on the front trigger allows to fire the
cartridge inserted into the first barrel (the lower-one) and the pull on the rear trigger allows to fire the
cartridge inserted into the second barrel (the upper-one).
If the shotgun features a SINGLE TRIGGER, the pull on the trigger allows the gun to fire first the cartridge
inserted into the first barrel and then the cartridge inserted into the second barrel.
If the gun features a SINGLE SELECTIVE TRIGGER, the pull on the trigger allows the gun to fire first the
barrel you have selected with the barrel selector:
• (Selector to the right) = first barrel (See page 61).
•• (Selector to the left) = second barrel (See page 61).
• When you are ready to fire, disengage the safety and pull the trigger. This will fire the barrel you have
selected to fire first.
!
!
Page 33

– 81 –
WARNING: If the shotgun does not fire a live cartridge when the trigger is pulled, activate the safety, wait
one (1) minute, then open the shotgun and manually remove the unfired cartridge.
NOTICE: The Manufacturer assumes no responsibility for any injury or property damage resulting from
improper or careless handling, intentional or accidental discharge of the firearm.
• Completely release the trigger after the first shot to re-set the shotgun for the next shot. There is no need
to operate the barrel selector (if present) since the gun is automatically ready to fire the second cartridge.
•To fire a second shot from the second barrel, pull the trigger again or pull the second trigger.
WARNING: Always unload the shotgun immediately after shooting is completed. To store the firearm
please refer to the paragraph: “STORAGE”.
!
!
Page 34

– 82 –
UNLOADING THE SHOTGUN
②
③
①
④
Fig. 18Fig. 17
!
WARNING: Do not rely on ejectors to unload Beretta SO10 shotguns! The selective ejectors do not eject
live ammunition. They eject spent shell casings when the chambers are locked open, while the unfired
cartridge/s will be only pulled up. To unload the shotgun, manually remove the live cartridge/s and check
to ensure that both chambers are empty.
• After firing or to otherwise unload the shotgun, engage the safety, push the top lever to the right, open
the shotgun by holding the receiver in place and by levering the barrels downwards.
• The automatic selective ejectors will only eject spent shell cases. Unfired cartridges will only be raised
and need to be extracted by hand.
• Prior to closing the shotgun, inspect the chambers. Be sure both are empty.
• Decock the hammers as indicated in the paragraph: “DECOCKING THE HAMMERS”.
Page 35

– 83 –
WARNING: Always be certain the shotgun is unloaded before attempting disassembly.
WARNING: Always point the shotgun in a safe direction and keep the fingers away from the trigger.
NOTICE: In order to preserve the wood and metal surfaces from the possibility of corrosion and scratching,
it is advisable to wear cotton cleaning gloves before handling any part of the Beretta SO10. It is also
recommended to handle the shotgun over a soft and smooth surface. The beautiful walnut grain is enhanced
by multiple, hand-applied, layers of oil, wax and Tru-Oil
®
(upon request). The surfaces of the stock and
fore-end can be subject to scratching or marring if not properly handled and stored. Similarly, the metal
parts (barrels and receiver) are susceptible to the moisture and acidity of the hands.
• Check to ensure the chambers are empty (See previous paragraph).
• Decock the hammers (See paragraph: “DECOCKING THE HAMMERS”).
• Remove the fore-end from the barrels by pulling the fore-end catch lever down (Fig. 18).
CAUTION: Do not pull the fore-end down too far before pulling it forward to remove it. This will prevent
the fore-end iron from knocking against the receiver.
DISASSEMBLY
CORRECT UNLOADING SEQUENCE
(Fig. 17)
WARNING: Always unload your shotgun before placing it in a vertical position such as against a wall,
fence, tree, etc. as it may fall and be irreparably damaged. The gun may fall from a standing position with
sufficient force to be discharged. If you need to put the Beretta SO10 down temporarily when out hunting,
it is advisable to unload it and leave it with the barrels open on a soft surface completely insulated from the
damp ground.
!
!
!
Page 36

– 84 –
• Push the top lever to the right. Fully open the shotgun by levering the muzzle end of the barrels downwards.
Lift the barrels out of the receiver. Disengage barrel recesses from hinge pins of the receiver. The top
lever remains open.
• Fit the fore-end onto the barrels and press it to catch the barrel hook.
NOTICE: It is advisable to place the top lever in its centered position when the shotgun is being stored or
transported in a gun case.
Proceed as follows: push the top lever completely to the right past the stop position and depress the top
lever plunger (located on the lower section of the breechface of the receiver) (Fig. 19). Once the top lever
plunger is completely depressed, release the top lever to its centered position.
CAUTION: No further disassembly of component parts is recommended unless done by a competent
gunsmith.
NOTICE: Once the shotgun is handled, always
and accurately clean all external surfaces (wood
and metal) with a soft and clean patch in order to
preserve the delicate finishes over time. The
Beretta Cleaning Cloth (FAW08), available at
fine gun dealers, is specially designed to clean
your fine shotgun. Poor handling and cleaning of
the firearm could compromise your Beretta
warranty.
CAUTION: The hinge pin and the locking areas
are very important mating surfaces. The receiver,
the barrels and the fore-end iron are subject to
Fig. 19
Page 37

– 85 –
very high loads. Improper lubrication of these components can cause seizing of parts or malfunctioning of
the shotgun. (The areas to lubricate are indicated by the arrows on Fig. 8 page 70). Before using the shotgun
make sure that lubricant is present as instructed.
NOTICE: It is recommended to use Beretta-Interflon
®
lubricant with Teflon®(product code OL38) or high
quality gun lubricants exclusively. These products are available at fine gun dealers.
Page 38

– 86 –
The side plates/side locks of the Beretta SO10 over-and-under may be manually removed from the receiver
for inspection, cleaning, or merely to access the firing mechanism and admire the precious engraving and
finishing that adorn the visible surfaces.
CAUTION: It is recommended that this operation be limited to the times of need. A frequent and
unnecessary disassembly of the side locks could cause premature wear of the locking keys and/or the damage
of the sideplates and relative engraving.
WARNING: Always check that the firearm is unloaded. Always point the shotgun in a safe direction and
keep the fingers away from the trigger.
NOTICE: Clean the side plates on a soft surface
to avoid damaging the parts.
NOTICE: In order to preserve the wood and
metal surfaces from the possibility of corrosion
and scratching, it is recommended to wear cotton
cleaning gloves before handling any part of the
Beretta SO10. It is also advisable to handle the
shotgun over a soft and smooth surface. The
beautiful walnut grain is enhanced by multiple,
hand-applied, layers of oil, wax and Tru-Oil
®
(optional).
DISASSEMBLY OF THE SIDE LOCKS
Fig. 20
!
Page 39

– 87 –
The surfaces of the stock and fore-end can be subject to scratching or marring if not properly handled and
stored. Similarly, the metal parts (barrels and receiver) are susceptible to the moisture and acidity of the
hands.
• Be sure the hammers are decocked (See paragraph: “DECOCKING THE HAMMERS”).
• Remove the barrels from the receiver and push the top lever into the home position (Fig. 19 page 82) (See
paragraph: “DISASSEMBLY”).
• Using the tool provided, press on the end of the front key on the left side plate of the receiver (Fig. 20)
to allow you to rotate the handle of the key (Fig. 21).
•Turn the key anticlockwise and until it comes right out of the slot (Fig. 22).
• Then do the same with the rear key (Fig. 23 page 88).
Fig. 21 Fig. 22
Page 40

– 88 –
Fig. 23 Fig. 24
Fig. 26Fig. 25
Page 41

– 89 –
• When the rear key has been removed, insert it a couple of turns in the threaded hole in the centre of the
slot for the key handle (Fig. 24) and pull gently to remove the side plate from the receiver (Fig. 25).
NOTICE: The plate on the other side (on the right of the receiver) is no longer held in position by the keys
and could fall out, so hold it in position with one hand as you remove the left side plate.
• If the right side plate does not easily detach from the receiver, insert the rear key in the key hole in the
stock (Fig. 26) and push it gently against the right side plate until it comes out.
NOTICE: When the keys have been removed from the side plates (Fig. 27), you can distinguish between
them because the rear one is slightly shorter and features a recess in the internal surface of the handle of the
key to seat the rim of the side plate extraction hole.
Proceed as follows to reassemble the side plates.
• First mount the right side plate. Insert the front
of it in the recess in the receiver (Fig. 28 page
90) and press the rear part into the slot using
your fingers.
• Then mount the left plate on the other side of
the receiver. Insert the front of it in the recess
in the receiver and press the rear part into the
slot using your fingers.
Fig. 27
Page 42

– 90 –
•Press the left and right side plates to make sure they are in position. Insert the front (longer) key and
rotate it clockwise about 3 turns (Fig. 29). Do not tighten, and leave the handle in the vertical position.
• Holding the side plates flush with the surface of the receiver and stock, tighten the rear key to engage the
other side plate (Fig. 30). Leave the handle in the vertical position.
• Now tighten the front key and lower the handle into the slot (Fig. 31).
• When you are sure that the rear parts of the two side plates are flush with the surface of the stock, lower
the handle of the rear key as well.
Fig. 28
Fig. 29
Page 43

– 91 –
NOTICE: Once the shotgun is handled, always and accurately clean all external surfaces (wood and metal)
with a soft and clean patch in order to preserve the delicate finishes over time. The Beretta Cleaning Cloth
(FAW08) is specially designed to clean your fine shotgun. If the visible firing mechanisms reveal fingerprints
or dirt, carefully clean them lightly with the supplied bristle-brush and lubricate them with Beretta Interflon
®
lubricant with Teflon®(product code OL38), or other high quality gun lubricant. These products
are available at fine gun dealers. Also see the “MAINTENANCE” section of this manual. Poor handling
and cleaning of the firearm could compromise your Beretta warranty.
Fig. 30 Fig. 31
Page 44

– 92 –
The new “SP” (Steel Proof) Beretta stainless steel Optimachoke®tubes are designed for use also with factory
steel shot cartridges loaded to standard specifications. When firing steel shot cartridges, with fixed-choke
barrels or with Beretta stainless steel Optimachoke
®
tubes, the best results are obtained using open chokes
(C0000/CL, 0000/IC, 000/M). When utilizing steel shot, Full choke constrictions (0/F, 00/M) do not increase
pattern density and will distort normal pattern density associated with lead shot (i.e. “blown pattern”). (See
also the paragraph: “ AMMUNITION – Steel shot”).
BERETTA STAINLESS STEEL OPTIMACHOKE®TUBES
FIXED CHOKES AND BERETTA STAINLESS STEEL OPTIMACHOKE®DESIGNATIONS
Beretta American Choke tube compatibility Rim
Markings Designation with steel shot notches
0 (*) F (Full) SP (1) I
00(**) IM (Improved Modified) SP (1) II
000(***) M (Modified) SP III
0000(****) IC (Improved Cylinder) SP IIII
C0000(C****) CL (Cylinder) SP IIIII
(1)Not recommended.
Optimachoke®is a registered trademark of Fabbrica d’Armi Pietro Beretta S.p.A.
Page 45

– 93 –
REMOVAL OF CHOKE TUBES
WARNING: Check the firearm is unloaded. If not, unload the firearm by operating as described in the
paragraph: “UNLOADING THE SHOTGUN”.
WARNING: Never look into the muzzle or change tubes on a loaded shotgun, even with safety engaged.
• Either open the shotgun or lift the barrels out of the receiver.
• Unscrew (anticlockwise) the choke tubes with the Beretta spanner supplied.
• Remove the choke tubes from the muzzle.
CLEANING OF CHOKE TUBES
WARNING: Check the firearm is unloaded. If not, unload the firearm by operating as described in the
paragraph: “UNLOADING THE SHOTGUN”.
WARNING: Never look into the muzzle or change tubes on a loaded shotgun, even with safety engaged.
NOTICE: In order to preserve the wood and metal surfaces from the possibility of corrosion and scratching,
it is recommended to wear cotton cleaning gloves before handling any part of the Beretta SO10. It is also
advisable to handle the shotgun over a soft and smooth surface.
• Either open the shotgun or lift the barrels out of the receiver.
• Thoroughly clean the choke housings. If necessary, use the bristle-brush sprayed with gun cleaning
solvent.
•Make sure the chokes are perfectly clean inside and outside.
• Apply a thin coat of quality Gun Oil to the threads of the barrels and the choke tubes. The use of
Beretta-Interflon
®
lubricating oil, available at fine gun dealers, is recommended.
!
!
!
!
Page 46

– 94 –
NOTICE: Once the shotgun is handled, always and accurately clean all external surfaces (wood and metal)
with a soft and clean patch in order to preserve the delicate finishes over time. The Beretta Cleaning Cloth
(FAW08) is specially designed to clean your fine shotgun. If the visible firing mechanisms reveal fingerprints
or dirt, carefully clean them lightly with the supplied bristle-brush and lubricate them with BerettaInterflon
®
lubricant with Teflon®(product code OL38), or other high quality gun lubricant. These products
are available at fine gun dealers. Also see the “MAINTENANCE” section of this manual. Poor handling
and cleaning of the firearm could compromise your Beretta warranty.
WARNING: Excess oil and grease obstructing the bore, even partially, is very dangerous when firing and
may cause damage to the shotgun and serious injury to the shooter and bystanders.
Never spray or apply oil to the shotshells.
Use lubricants properly: you are responsible for the proper care and maintenance of your firearm.
INSTALLATION OF CHOKE TUBES
WARNING: Check the firearm is unloaded. If not, unload the firearm by operating as described in the
chapter “UNLOADING THE SHOTGUN”.
WARNING: Never look into the muzzle or change tubes on a loaded gun, even with safety engaged.
WARNING: Before installing the chokes, make sure they are not damaged.
• Either open the shotgun or lift the barrels out of the receiver.
• Apply a thin coat of quality Gun Oil to the threads of the barrels and choke tubes.
• Make sure the chokes are perfectly clean inside and out, then insert the desired chokes into the choke
housings.
!
!
!
!
Page 47

– 95 –
• Carefully hand screw the chokes into the barrels clockwise. Using the Beretta spanner tighten the chokes
until they are fully bottomed into their recesses in the barrels.
• Remember to remove the spanner after tightening.
WARNING: Periodically check, with the chambers unloaded and opened, whether the chokes are fully and
tightly set into the barrels. If necessary, firmly tighten the chokes, using the Beretta spanner, until they can
be tightened no more.This tightening is needed to avoid damage to the barrels and to avoid propelling the
chokes out of the muzzle when the shotgun is fired, which may cause damage to the gun or injury to
persons.
WARNING: Choke tubes must be kept correctly tightened in the barrels at all times, even during storage
and cleaning. Cleaning barrels with no choke tubes in place can push dirt into the barrel threads, causing
improper choke installation, rusting, or barrel obstruction.
WARNING: Never shoot choke barrels without using choke tubes. Shooting without choke tubes is very
dangerous as debris could be trapped by the threads and create barrel obstruction. It may also cause erratic
shot pattern and can damage the barrel's internal screw thread irreparably.
Do not alter or modify existing fixed choke Beretta barrels for the use of interchangeable choke tubes. The
resulting wall thickness would be too thin to safely contain the pressure levels generated by shooting.
!
!
!
Page 48

– 96 –
WARNING: Before cleaning, make sure the shotgun is unloaded. If not, unloaded it by operating as
described in the paragraph: “ UNLOADING THE SHOTGUN”.
WARNING: The shotgun should not be disassembled for cleaning beyond what is described below. Only a
qualified gunsmith should conduct further disassembly.
WARNING: Do not attempt to alter the internal parts or the firing mechanism of the shotgun. Alterations
to the internal components can result in a very dangerous situation. Altering the internal parts or the firing
mechanism of the shotgun voids the manufacturer’s warranty.
WARNING: Do not make repairs to any firearm without proper knowledge or training. Do not alter parts
or use substitute parts not made by Beretta. Any alterations or adjustments that may be necessary to the
operating mechanism should be performed by the manufacturer or by its local official distributor.
NOTICE: At the end of a day of shooting, clean and lubricate your shotgun. At the end of the hunting
season, or annually, have your gun completely cleaned, including internal mechanisms, by a competent
gunsmith. Proper periodic maintenance is important for the reliable functioning of any firearm.
NOTICE: In order to preserve the wood and metal surfaces from the possibility of corrosion and scratching,
it is recommended to wear cotton cleaning gloves before handling any part of the Beretta SO10. It is also
advisable to handle the shotgun over a soft and smooth surface. The beautiful walnut grain is enhanced by
multiple, hand-applied, layers of oil, wax and Tru-Oil
®
(upon request). The surfaces of the stock and foreend can be subject to scratching or marring if not properly handled and stored. Similarly, the metal parts
(barrels and receiver) are susceptible to the moisture and acidity of the hands.
MAINTENANCE
!
!
!
!
Page 49

– 97 –
• Disassemble the shotgun.
• Clean the bores (inside of the barrels) with care by passing the supplied cleaning rod and a cotton patch
soaked in a quality Gun solvent or using the bristle-brush. To remove heavier combustion residues fit the
bronze brush on the cleaning rod. Also include the chambers in your cleaning operation, using, if
necessary, the bronze wire brush fitted onto the cleaning rod handle.
• Run a soft clean non-fluffy patch through the bores to remove solvent residue.
• Lightly lubricate the inside of the barrels with a clean cotton patch or the wool brush mounted on the
cleaning rod and soaked in quality Gun Oil. The use of Beretta-Interflon
®
lubricating oil, available at fine
gun dealers, is recommended.
CAUTION: Do not apply excess oil. Accumulation of oil attracts dirt which can interfere with the
functioning and reliability of the shotgun.
•With similar procedure, clean the internal face of the receiver (especially around the firing pin holes) and
lubricate lightly.
• Clean and lightly lubricate the fore-end iron and the barrel hook.
NOTICE: The hinge pin and the locking areas are very important mating surfaces. The receiver, the barrels
and the fore-end iron are subject to very high loads. Improper lubrication of these components can cause
seizing of parts or malfunctioning of the shotgun. (The areas to lubricate are indicated by the arrows on Fig.
8 page 70). Before using the shotgun make sure that lubricant is present as instructed.
• Clean with care the external surfaces of the shotgun to remove any trace of dirt, sweat and fingerprints.
The Beretta Cleaning Cloth (FAW08) is specially designed to do this. Lightly lubricate the metal surfaces
using Beretta-Interflon
®
or other high quality lubricant, available at fine gun dealers.
Page 50

– 98 –
NOTICE: Never oil the wood. The stock and fore-end only need to be cleaned and polished with a soft
clean patch. The Beretta Cleaning Cloth (FAW08) is specially suited for this operation. Remember to
replace the cloth when it is dry or dirty.
WARNING: Excess oil and grease obstructing the bore - even partially - is very dangerous when firing and
may cause damages to the shotgun and serious injury to the shooter and bystanders.
Never spray or apply oil to the shotshells.
Use lubricants properly: you are responsible for the proper care and maintenance of your firearm.
• At the end of the hunting season, or at least once a year, disassemble the sideplates and delicately clean
the visible firing mechanisms with the supplied bristle-brush and a high quality gun cleaning solvent.
•Dry the parts with a clean patch. The Beretta Cleaning Cloth (FAW08) is specially suited for this
operation.
!
Page 51

– 99 –
WARNING: Store your shotgun so that children cannot gain access to it. To reduce the risk of accidents
involving children, unload your firearm, lock it and store the ammunition in a separate locked location.
NOTICE: Store the firearm disassembled (barrels/fore-end in the supplied barrel sleeve and receiver/stock
in the supplied stock sleeve) in the guncase. The Beretta FAW08 protective sleeves are treated with special
non-oily additives that release the active cleaning ingredient and also provide added protection against
corrosion and moisture. Lock the shotgun inside the case using the supplied key. Before storage, always
check the conditions of the shotgun and its case. Make sure that they are perfectly dry. Moisture and water
drops could cause damage to the shotgun.
STORAGE
!
Page 52

Fabbrica d'Armi Pietro Beretta S.p.A.
Via Pietro Beretta, 18 - 25063 GARDONE VAL TROMPIA (Brescia) Italia
Tel.(030) 8341.1 - www.beretta.com
 Loading...